3G - Lynxspring
16
Onyxx ® Cellular Router USER GUIDE Onyxx-CE121 Inbound and Outbound Communication Capabilities 3G
Transcript of 3G - Lynxspring
Onyxx® Cellular Router USER GUIDE
Onyxx-CE121
Inbound and Outbound Communication Capabilities
3G

lynxspring.com
shop.lynxspring.com
1210 NE Windsor Drive Lee’s Summit, MO 64086 [email protected] 1 (877) 649-5969
© 2016 Lynxspring, Inc. All Rights Reserved
Revised 11/14/2016 Page 2 of 16
Table of Contents
INTRODUCTION .............................................................................................................. 3
QUICK HELP DIALOG ...................................................................................................... 3
LOGGING ON .................................................................................................................. 3
Administrator Login Screen ........................................................................................................................ 4
LOGGING OFF ................................................................................................................. 4
DEVICE SETTINGS (IP CONFIGURATION) ........................................................................ 4
NOTE: ........................................................................................................................................................... 4
Changing Device Settings .......................................................................................................................... 5
Cellular Router Information ......................................................................................................................... 5
DEFINE ROUTES ............................................................................................................. 6
Adding a Route ............................................................................................................................................ 6
Editing a Route ............................................................................................................................................ 7
Deleting a Route .......................................................................................................................................... 7
OPTIONAL ACCESSORIES .............................................................................................. 7
CONNECTING BY CELLULAR TO DEVICES .................................................................... 8
Received Signal Strength ........................................................................................................................... 8
Port 80 .......................................................................................................................................................... 8
VIEWING THE AUDIT LOG ............................................................................................... 9
CHANGING THE ADMIN PASSWORD ............................................................................. 9
USING THE CELL ROUTER TO ESTABLISH CONNECTIONS (OUTBOUND) .................. 10
INTERNET EXPLORER USER SETTINGS ....................................................................... 10
OPEN VPN INSTRUCTIONS FOR ESTABLISHING YOUR CONNECTION ....................... 10
BACNET/IP INBOUND CONFIGUATION (OR OTHER UDP COMMUNICATION) .............. 10
BACNET/IP COMMUNICATIONS SET-UP ON EXTERNAL JENESYS DEVICE ................ 10
Connecting a JENE to the Cellular Router (BACnet/IP)......................................................................... 15

lynxspring.com
shop.lynxspring.com
1210 NE Windsor Drive Lee’s Summit, MO 64086 [email protected] 1 (877) 649-5969
© 2016 Lynxspring, Inc. All Rights Reserved
Revised 11/14/2016 Page 3 of 16
Introduction
The Onyxx® CE121 Cellular Router provides routing to devices on your network via a cellular IP connection. It is built on top of the Onyxx Platform with a customized and simplified user interface which is accessible through a standard web browser.
The web application is divided into three main sections: Device Settings Page—Configure the network settings required by the Onyxx-CE121 and retrieve the Cellular
IP address of the device.
Define Routes Page—Setup and configuration of Routes to other devices.
Help Page—Documentation of the features and limitations of the Onyxx-CE121. The basic steps for setting up the Onyxx-CE121 are as follows:
1. Configure the device settings.
2. Define the routes the Onyxx-CE121 will use to connect to other devices.
NOTE: If you are using Internet Explorer 11, please see the section entitled INTERNET EXPLORER USER SETTINGS (page 13) for further details about the settings that will need to be modified.
Quick Help Dialog This section will display helpful information about terms or textboxes. All you need to do is hover over the term or textbox with the pointer to view additional information.
Logging On
Figure 1
In the upper-left hand corner of the interface, you will find the LOGIN link in the WELCOME section.
Navigating to the DEVICE SETTINGS or DEFINE ROUTES screens without being logged on will re-direct to the login screen.
Clicking LOGIN will bring up the administrator Login screen.

lynxspring.com
shop.lynxspring.com
1210 NE Windsor Drive Lee’s Summit, MO 64086 [email protected] 1 (877) 649-5969
© 2016 Lynxspring, Inc. All Rights Reserved
Revised 11/14/2016 Page 4 of 16
Administrator Login Screen
Below is a screen shot of the Login page:
Figure 2
Logging Off
Figure 3
After logging on, the WELCOME section in the upper-left hand corner of the page will now have the LOGOUT link.
Clicking LOGOUT will log the current Admin User out and will allow access to the HOME and HELP pages only.
Device Settings (IP Configuration)
NOTE: Any changes made to the IP settings will need to be saved in order to take effect.
Figure 4
Changing this device’s IP settings will force it to restart its network services.
If you change the IP Address of this device and are using that IP address to access the web interface, you will
need to also change that address in the browser to the new IP Address.
If you change the DHCP setting to “on” , you will need to ask your Network Administrator for
the new IP in order to use it to access the web interface.
To navigate to the Device Settings, click DEVICE SETTINGS in the menu bar.
Figure 5

lynxspring.com
shop.lynxspring.com
1210 NE Windsor Drive Lee’s Summit, MO 64086 [email protected] 1 (877) 649-5969
© 2016 Lynxspring, Inc. All Rights Reserved
Revised 11/14/2016 Page 5 of 16
This will open the DEVICE SETTINGS screen.
Figure 6
Factory Default IP Settings
Hostname: localhost
Hosts File: 127.0.0.1 localhost.localdomain localhost
IP Address: 192.168.1.101
Subnet Mask: 255.255.255.0
NOTE: All other fields are empty by default.
Changing Device Settings
Change the settings according to the IP network(s) the Onyxx-CE121 will attach to. All settings on this page can be modified except for the CELLULAR ROUTER INFORMATION section.
Cellular Router Information
This section displays the Device IP information that will be used to connect remotely.

lynxspring.com
shop.lynxspring.com
1210 NE Windsor Drive Lee’s Summit, MO 64086 [email protected] 1 (877) 649-5969
© 2016 Lynxspring, Inc. All Rights Reserved
Revised 11/14/2016 Page 6 of 16
Define Routes To navigate to the Define Routes click on DEFINE ROUTES in the menu bar.
Figure 13
This will open the DEFINE ROUTES Screen below:
Figure 14
Adding a Route
NOTE: All routes added are configured for both TCP and UDP protocols.
Click the in the upper right hand corner of the page.
The ADD NEW ROUTE dialog box will appear below:
Figure 15

lynxspring.com
shop.lynxspring.com
1210 NE Windsor Drive Lee’s Summit, MO 64086 [email protected] 1 (877) 649-5969
© 2016 Lynxspring, Inc. All Rights Reserved
Revised 11/14/2016 Page 7 of 16
There are three fields:
WAN Port–This required section specifies the port that will be used to connect to the destination device and allow it to be displayed. Accepted port numbers range from 0 and 65535. Using port 80 will limit web user interface access. See PORT 80 section of CONNECTING BY CELLULAR TO DEVICES (page 11) for more details.
IP Address–This required section will specify the IP Address of the destination device. Accepted IP addresses should be in the form of xxx.xxx.xxx.xxx where the xxx represents a number 0 to 255.
LAN Port–The optional section will specify the port actually being used by the destination device. Accepted port numbers range from 0 and 65535. If the LAN port is left blank then the WAN port number is used.
Editing a Route
Click EDIT on the left hand side of the route you want to edit. Text boxes will appear allowing editing of the three fields: WAN Port, IP Address, and LAN Port. See ADDING ROUTE section above for more information on each field.
Deleting a Route
Click DELETE on the left hand side of the route you want to delete. A dialog box will appear for you to confirm the deletion of the Route. NOTE: When communicating to multiple web interfaces, it is recommended that each interface be defined by its own unique port number. For example, when using several JENE devices with FOX; change the FOX port number under NIAGARA FOX SERVICE to a unique value. This should be followed by changing both the WAN and LAN ports in the DEFINED ROUTES tab of the router to match the newly assigned FOX port.
Optional Accessories
A remote mount antenna can be purchased if the device needs to be mounted in a basement or inside of an electrical panel: Part Number: OX-CMA-3WR-12.
Go to shop.lynxspring.com to: Purchase Your Antenna
If this is a private IP on the cellular network, please refer next to the OPEN VPN INSTRUCTIONS FOR
ESTABLISHING YOUR CONNECTION provided on Page 14 of this document.
lynxspring.com
shop.lynxspring.com
1210 NE Windsor Drive Lee’s Summit, MO 64086 [email protected] 1 (877) 649-5969
© 2016 Lynxspring, Inc. All Rights Reserved
Revised 11/14/2016 Page 8 of 16
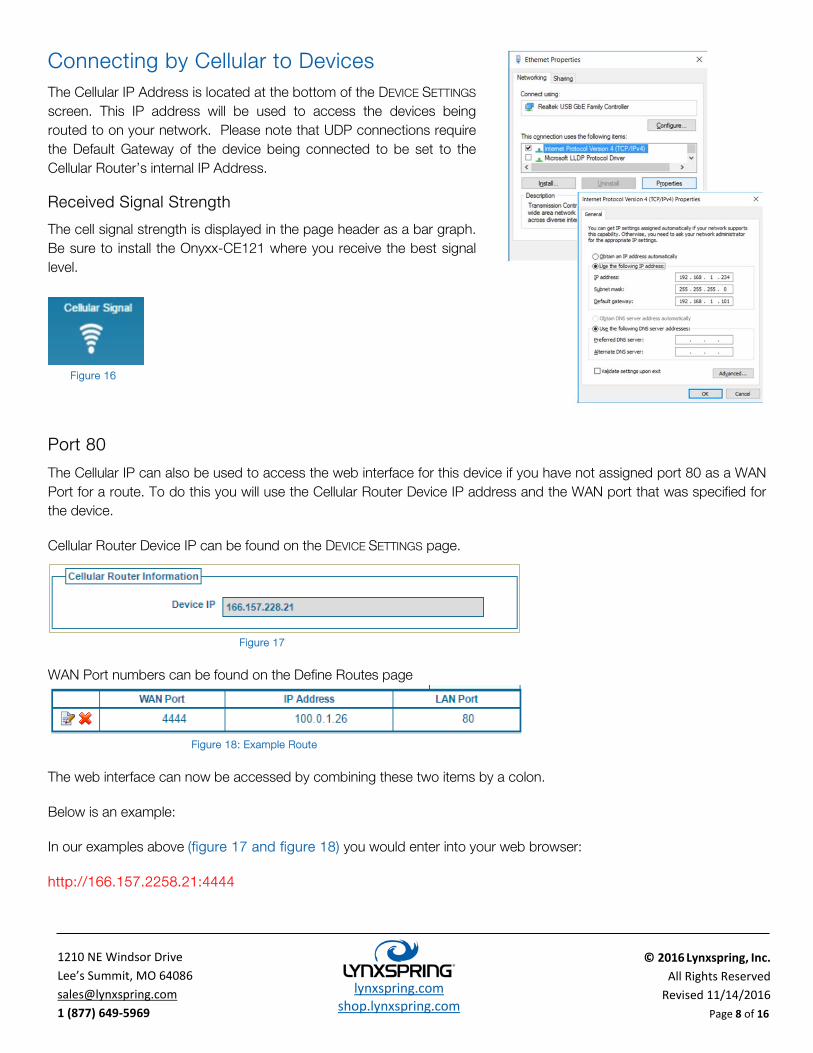
Connecting by Cellular to Devices
The Cellular IP Address is located at the bottom of the DEVICE SETTINGS screen. This IP address will be used to access the devices being routed to on your network. Please note that UDP connections require the Default Gateway of the device being connected to be set to the Cellular Router’s internal IP Address.
Received Signal Strength
The cell signal strength is displayed in the page header as a bar graph. Be sure to install the Onyxx-CE121 where you receive the best signal level.
Figure 16
Port 80
The Cellular IP can also be used to access the web interface for this device if you have not assigned port 80 as a WAN Port for a route. To do this you will use the Cellular Router Device IP address and the WAN port that was specified for the device.
Cellular Router Device IP can be found on the DEVICE SETTINGS page.
Figure 17
WAN Port numbers can be found on the Define Routes page
Figure 18: Example Route
The web interface can now be accessed by combining these two items by a colon.
Below is an example:
In our examples above (figure 17 and figure 18) you would enter into your web browser:
http://166.157.2258.21:4444

lynxspring.com
shop.lynxspring.com
1210 NE Windsor Drive Lee’s Summit, MO 64086 [email protected] 1 (877) 649-5969
© 2016 Lynxspring, Inc. All Rights Reserved
Revised 11/14/2016 Page 9 of 16
Figure 19: Accessing Example route shown in Figure 17 through Cellular IP example shown in Figure 18.
In this example, one would be able to access the web interface for the device at 100.0.1.26 on Port 80.
Viewing the Audit Log To View the devices AUDIT LOG of activity, go to the DEVICE SETTINGS Screen. At the bottom is a button for the AUDIT LOG. After clicking this button you will see the AUDIT LOG WINDOW.
The SELECT ALL Button in the bottom of the Log Window will select all the text in the window for copying.
In addition to the scroll bar that will appear in the log window you can expand its height to see more. In the lower right-hand corner of the Log Window is a handle for dragging the window’s height.
Figure 20: Audit Log Screen
Changing the Admin Password
The default password for the CE-121 is onyxxcell which we highly recommend changing to increase security for your new device. To change the admin password go to the DEVICE SETTINGS screen and click the CHANGE PASSWORD button at the bottom of the screen. The CHANGE ADMIN PASSWORD dialog box below will appear:
Figure 21: Change Admin Password Dialog
There are three fields:
Old Password–Enter the current password for user verification. New Password–Enter new password. Verify New Password–Re-enter the new password for match verification.
NOTE: This new password is needed to login again or to change the Admin password again.

lynxspring.com
shop.lynxspring.com
1210 NE Windsor Drive Lee’s Summit, MO 64086 [email protected] 1 (877) 649-5969
© 2016 Lynxspring, Inc. All Rights Reserved
Revised 11/14/2016 Page 10 of 16
Using the Cell Router to Establish Connections (Outbound Communication)
When the requirements are to connect a device connected to the Cellular Router to an outside resource, simply update the device and ensure that its Gateway is set to that of the Cellular Routers internal IP Address. The following example shows the setup for an outgoing connection on a JENEsys device. It is not necessary to define routes for outgoing connections.
Cellular Router IP Settings
JENEsys IP Settings
Internet Explorer User Settings When using Microsoft Internet Explorer 11 to access the web interface, it may not display all information correctly unless changes are made to the settings. To use Internet Explorer, please follow the instructions below to modify these settings:
1: To change your settings, go to the TOOLS menu and select INTERNET OPTIONS at the bottom of the menu.
Figure 22: Internet Explorer Tools menu
Figure 23: Internet Options in the Tools menu

lynxspring.com
shop.lynxspring.com
1210 NE Windsor Drive Lee’s Summit, MO 64086 [email protected] 1 (877) 649-5969
© 2016 Lynxspring, Inc. All Rights Reserved
Revised 11/14/2016 Page 11 of 16
2: The INTERNET OPTIONS dialog will open up. In the section labeled BROWSING HISTORY, click SETTINGS.
Figure 24: Internet Options Dialog
3: This will open up the WEBSITE DATA SETTINGS dialog box. In the TEMPORARY INTERNET FILES tab, make sure the EVERY TIME I VISIT THE WEBPAGE radio button is selected under the heading CHECK FOR NEWER VERSIONS OF STORED PAGES. Next click OK twice (2) to save these changes.
Figure 25: Website Data Settings Dialog

lynxspring.com
shop.lynxspring.com
1210 NE Windsor Drive Lee’s Summit, MO 64086 [email protected] 1 (877) 649-5969
© 2016 Lynxspring, Inc. All Rights Reserved
Revised 11/14/2016 Page 12 of 16
Open VPN Instructions for Establishing Your Connection
1. Once you have received your login credentials (your username and password)
2. In a standard web browser (Chrome is preferred) go to: https://e2e.lynxspring.com
3. In the drop down menu select LOGIN. Enter your Username and Password at the screen below:
4. Choose the corresponding Platform.
The installer will run from here and create your connection.
All of this will be established through a standard Web browser (preferably Google Chrome).
After the setup has completed, your connection will be established and you will be given access to the
software installation page.

lynxspring.com
shop.lynxspring.com
1210 NE Windsor Drive Lee’s Summit, MO 64086 [email protected] 1 (877) 649-5969
© 2016 Lynxspring, Inc. All Rights Reserved
Revised 11/14/2016 Page 13 of 16
5. Once the software has finished installing on your computer, there will be an icon that will allow you to connect to OpenVPN.
6. You can also connect through https://e2e.lynxspring.com
7. Verification of your established connection:
You will now have access to any cellular devices that you have established.
From here you will be asked to login. From this Icon you can also gain access to
https://e2e.lynxspring.com This green check mark icon (at left) indicates a
successful connection:

lynxspring.com
shop.lynxspring.com
1210 NE Windsor Drive Lee’s Summit, MO 64086 [email protected] 1 (877) 649-5969
© 2016 Lynxspring, Inc. All Rights Reserved
Revised 11/14/2016 Page 14 of 16
BACnet/IP Inbound Configuration (Or Other UDP Communication) Example assumes to following Cell Router Device Settings:
Figure 7
Add the required route as you would any other route… Set the WAN port to the UDP Port in use by the BACnet network (typically port 47808)
Set the IP Address to match that of the BACnet server device being connected to
Set the LAN port only of it differs from the WAN port (not typical)
Figure 8
lynxspring.com
shop.lynxspring.com
1210 NE Windsor Drive Lee’s Summit, MO 64086 [email protected] 1 (877) 649-5969
© 2016 Lynxspring, Inc. All Rights Reserved
Revised 11/14/2016 Page 15 of 16
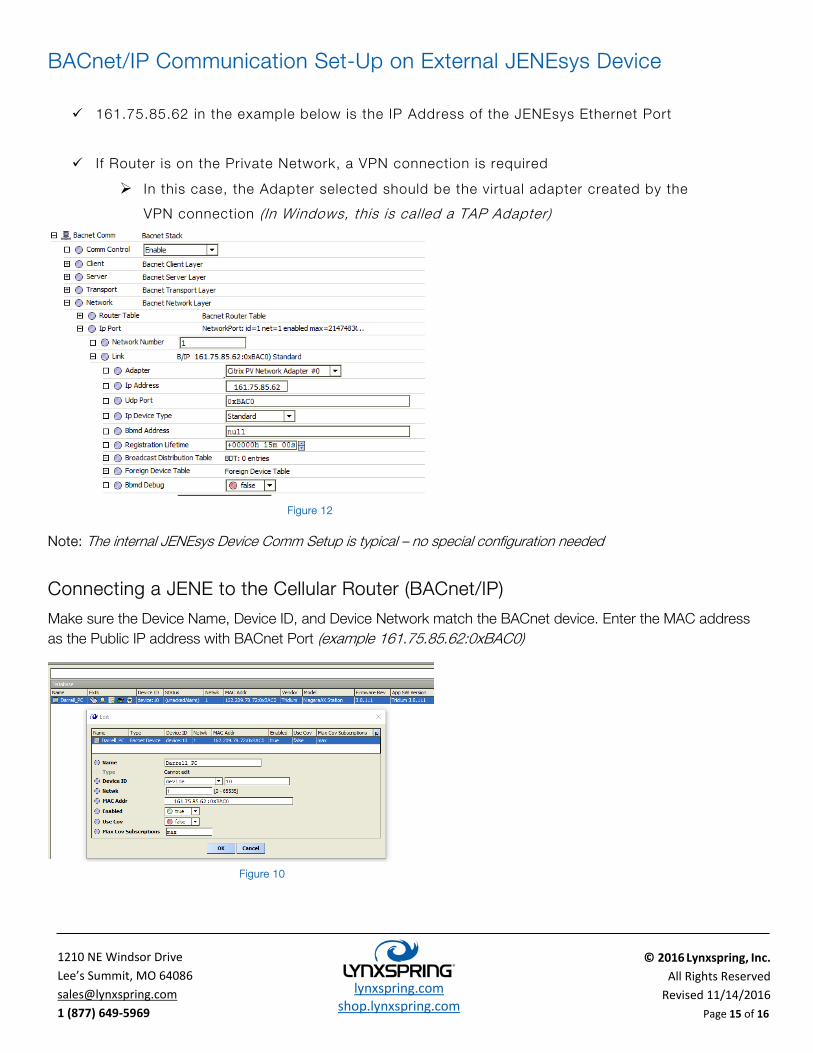
BACnet/IP Communication Set-Up on External JENEsys Device 161.75.85.62 in the example below is the IP Address of the JENEsys Ethernet Port
I f Router is on the Private Network, a VPN connection is required
In this case, the Adapter selected should be the virtual adapter created by the
VPN connection (In Windows, this is called a TAP Adapter)
Figure 12
Note: The internal JENEsys Device Comm Setup is typical – no special configuration needed
Connecting a JENE to the Cellular Router (BACnet/IP)
Make sure the Device Name, Device ID, and Device Network match the BACnet device. Enter the MAC address as the Public IP address with BACnet Port (example 161.75.85.62:0xBAC0)
Figure 10
lynxspring.com
shop.lynxspring.com
1210 NE Windsor Drive Lee’s Summit, MO 64086 [email protected] 1 (877) 649-5969
© 2016 Lynxspring, Inc. All Rights Reserved
Revised 11/14/2016 Page 16 of 16
Trademarks
Lynxspring®, JENEsys® and Onyxx® are registered trademarks of Lynxspring, Inc.
JENEsys Edge™ and Helixx™ are trademarks of Lynxspring, Inc. Other brands and product names mentioned in this manual may be trademarks or registered trademarks of their respective companies and are hereby acknowledged.
Copyright Notice
Copyright © 2016, Lynxspring, Inc.
All rights reserved.
This document contains proprietary information which is protected by copyright. No part of this document may be copied, photocopied, reproduced, translated, or converted to any electronic or machine-readable form in whole or in part without prior written approval of Lynxspring, Inc.
Disclaimer
NO WARRANTY. This technical documentation is being delivered to you AS-IS, and Lynxspring makes no warranty as to its accuracy or use. Any use of the technical documentation or the information contained therein is at the risk of the user. Documentation may include technical or other inaccuracies or typographical errors. Lynxspring reserves the right to make changes in this document without prior notice, and the reader should in all cases consult Lynxspring to determine whether any such changes have been made. The information in this publication does not represent a commitment on the part of Lynxspring.
Lynxspring shall not be liable for incidental or consequential damages resulting from the furnishing, performance, or use of this material.
This guide contains links and references to third-party websites that are not under the control of Lynxspring, and Lynxspring is not responsible for the content of any reference material or linked websites. If you access a third party website mentioned in this guide, then you do so at your own risk. Lynxspring provides these links only as a convenience, and the inclusion of the link does not imply that Lynxspring endorses or accepts any responsibility for the content on those third-party sites.