
20/30 cover1 (Page 1) - Fluke...
38
Noncontact Thermometer • Infrarot-Handthermometer • Thermomètre sans Contact • Termómetro sin Contacto • Termômetro sem Contato Worldwide Headquarters Raytek Corporation 1201 Shaffer Road P.O. Box 1820 Santa Cruz, CA 95061-1820 Phone 831 458 1110 Portable Products Division Phone 800 866 5478 Fax 831 425 4561 European Headquarters Raytek GmbH Blankenburger Str. 135 D-13127 Berlin, Germany Phone 49 30 4 78 00 80 Fax 49 30 4 71 02 51 South American Headquarters Raytek do Brasil Sorocaba, SP Brasil Phone 55 15 233 6338 Fax 55 15 233 6826 World Wide Web www.raytek.com China Raytek China Company Beijing, China Phone 86 10 6437 0284 Fax 86 10 6437 0285 France Raytek France Palaiseau, France Phone 33 1 64 53 15 40 Fax 33 1 64 53 15 44 Japan Raytek Japan, Inc. Tokyo, Japan Phone 81 3 5976 1531 Fax 81 3 5976 1530 United Kingdom Raytek UK Milton Keynes, UK Phone 44 1 908 630800 Fax 44 1 908 630900 ST20 Pro ™ XB Raytek ® ST ™ 56101 Rev. G 9/03 Table of Contents Unit diagram . . . . . . . . . . . . .1 English . . . . . . . . . . . . . . . . .2 Deutsch . . . . . . . . . . . . . . . . .9 Français . . . . . . . . . . . . . . .16 Español . . . . . . . . . . . . . . . .23 Portugues . . . . . . . . . . . . . .30
Transcript of 20/30 cover1 (Page 1) - Fluke...
Noncontact Thermometer • Infrarot-Handthermometer • Thermomètre sans Contact • Termómetro sin Contacto
• Termômetro sem Contato Worldwide HeadquartersRaytek Corporation1201 Shaffer RoadP.O. Box 1820Santa Cruz, CA 95061-1820Phone 831 458 1110
Portable Products DivisionPhone 800 866 5478Fax 831 425 4561
European HeadquartersRaytek GmbHBlankenburger Str. 135D-13127 Berlin, GermanyPhone 49 30 4 78 00 80Fax 49 30 4 71 02 51
South American HeadquartersRaytek do BrasilSorocaba, SP BrasilPhone 55 15 233 6338Fax 55 15 233 6826
World Wide Webwww.raytek.com
ChinaRaytek China CompanyBeijing, ChinaPhone 86 10 6437 0284Fax 86 10 6437 0285
FranceRaytek FrancePalaiseau, FrancePhone 33 1 64 53 15 40Fax 33 1 64 53 15 44
JapanRaytek Japan, Inc.Tokyo, JapanPhone 81 3 5976 1531Fax 81 3 5976 1530
United KingdomRaytek UKMilton Keynes, UKPhone 44 1 908 630800Fax 44 1 908 630900
ST20 Pro™ XB
Raytek® ST™
56101 Rev. G 9/03
Table of ContentsUnit diagram . . . . . . . . . . . . .1English . . . . . . . . . . . . . . . . .2Deutsch . . . . . . . . . . . . . . . . .9Français . . . . . . . . . . . . . . .16Español . . . . . . . . . . . . . . . .23Portugues . . . . . . . . . . . . . .30
SpecificationsTemperature range
ST20 Pro™ -32 to 400°C (-25 to 750°F)
D : S 12 : 1 (ST30 has 90% encircled energy at the focal point)
Display Resolution 0.2°C (0.5°F)
Accuracy For targets:(assumes ambient Above 23°C (73°F): ±1% of reading or ±1°C (± 2°F),operating temperature whichever is greaterof 23-25°C[73-77°F]) -18 to 23°C (0 to 73°F): ± 2°C (± 3°F)@ calibration geometry* -26 to -18°C (-15 to 0°F): ± 2.5°C (± 4°F)
-32 to -26°C (-25 to -15°F): ± 3°C (± 5°F)
Repeatability ± 1°C (± 2°F), or ± 0.5% of reading, whichever is greater
Response time 500 mSec
Spectral response 8–14 µm
Emissivity pre-set 0.95
Ambient operating range 0 to 50°C (32 to 120°F)
Laser Max Laser turns off above 40°C (104°F) ambient temperature
Relative humidity 10–95% RH noncondensing, at 30 to 50°C (86 to 122°F)
Storage temperature -20 to 60°C (-13 to 158°F) without battery
Weight / Dimensions 320g (11oz); 200 x 160 x 55 mm (8 X 6 X 2 in)
Power 9V Alkaline or NiCd battery
Typical Battery life 10 hours with laser and backlight on(Alkaline) 40 hours with laser and backlight off
Tripod Mount 1/4” 20 UNC threading
*Unit calibrator is 279.4mm (11 in.) from the 140mm (5.5 in.) 0.95 emissivity backbody.
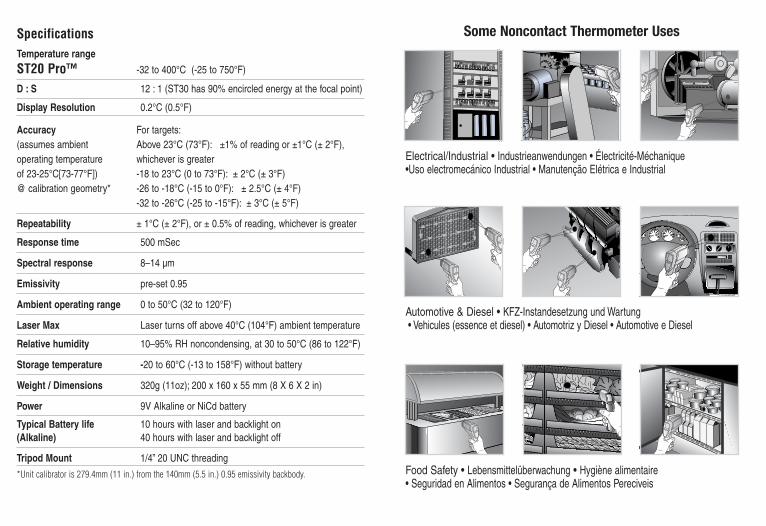
Some Noncontact Thermometer Uses
CREAM
MILK MILK
CREAM
MILK MILK
Electrical/Industrial • Industrieanwendungen • Électricité-Méchanique •Uso electromecánico Industrial • Manutenção Elétrica e Industrial
Automotive & Diesel • KFZ-Instandesetzung und Wartung • Vehicules (essence et diesel) • Automotriz y Diesel • Automotive e Diesel
Food Safety • Lebensmittelüberwachung • Hygiène alimentaire • Seguridad en Alimentos • Segurança de Alimentos Pereciveis
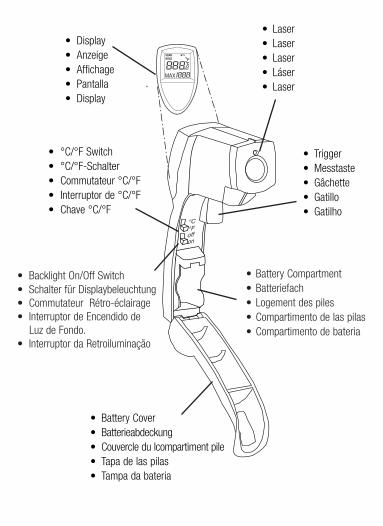
• Battery Compartment• Batteriefach• Logement des piles• Compartimento de las pilas• Compartimento de bateria
• Display• Anzeige• Affichage• Pantalla• Display
• Laser • Laser• Laser • Láser • Laser
• Trigger• Messtaste• Gâchette• Gatillo • Gatilho
• Battery Cover• Batterieabdeckung• Couvercle du lcompartiment pile• Tapa de las pilas• Tampa da bateria
• °C/°F Switch• °C/°F-Schalter• Commutateur °C/°F• Interruptor de °C/°F• Chave °C/°F
• Backlight On/Off Switch• Schalter für Displaybeleuchtung• Commutateur Rétro-éclairage• Interruptor de Encendido de
Luz de Fondo.• Interruptor da Retroiluminação
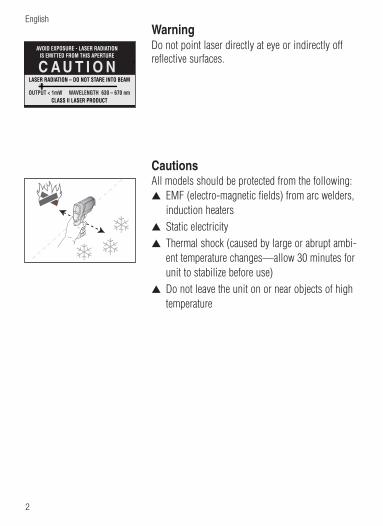
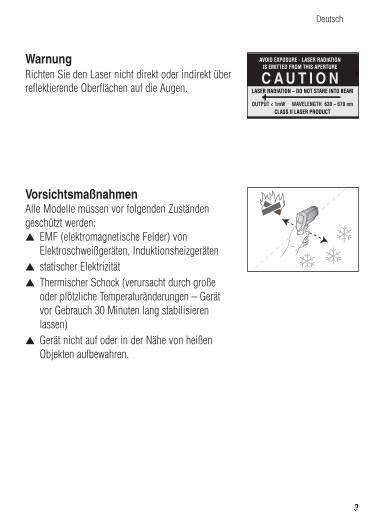
LASER RADIATION – DO NOT STARE INTO BEAM
OUTPUT < 1mW WAVELENGTH 630 – 670 nm CLASS II LASER PRODUCT
C A U T I O NAVOID EXPOSURE - LASER RADIATION
IS EMITTED FROM THIS APERTURE
Warning Do not point laser directly at eye or indirectly offreflective surfaces.
CautionsAll models should be protected from the following:s EMF (electro-magnetic fields) from arc welders,
induction heaterss Static electricitys Thermal shock (caused by large or abrupt ambi-
ent temperature changes—allow 30 minutes forunit to stabilize before use)
s Do not leave the unit on or near objects of hightemperature
English
2
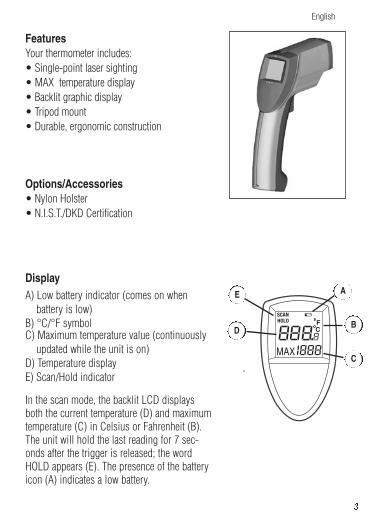
FeaturesYour thermometer includes:• Single-point laser sighting • MAX temperature display• Backlit graphic display• Tripod mount• Durable, ergonomic construction
Options/Accessories• Nylon Holster• N.I.S.T./DKD Certification
In the scan mode, the backlit LCD displaysboth the current temperature (D) and maximumtemperature (C) in Celsius or Fahrenheit (B).The unit will hold the last reading for 7 sec-onds after the trigger is released; the wordHOLD appears (E). The presence of the batteryicon (A) indicates a low battery.
DisplayA) Low battery indicator (comes on when
battery is low)B) °C/°F symbol C) Maximum temperature value (continuously
updated while the unit is on)D) Temperature displayE) Scan/Hold indicator
E A
B
C
D
English
3
4
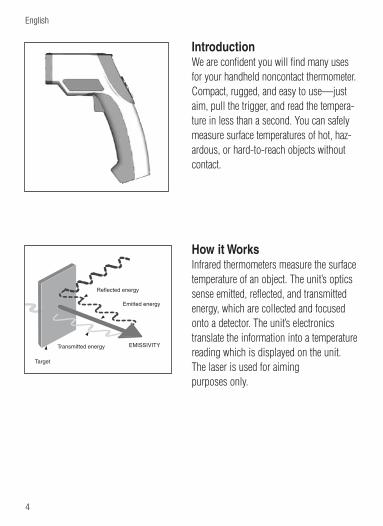
IntroductionWe are confident you will find many usesfor your handheld noncontact thermometer.Compact, rugged, and easy to use—justaim, pull the trigger, and read the tempera-ture in less than a second. You can safelymeasure surface temperatures of hot, haz-ardous, or hard-to-reach objects withoutcontact.
How it WorksInfrared thermometers measure the surfacetemperature of an object. The unit’s opticssense emitted, reflected, and transmittedenergy, which are collected and focusedonto a detector. The unit’s electronicstranslate the information into a temperaturereading which is displayed on the unit.The laser is used for aiming purposes only.
Reflected energy
Emitted energy
Transmitted energy EMISSIVITY
Target
English
5
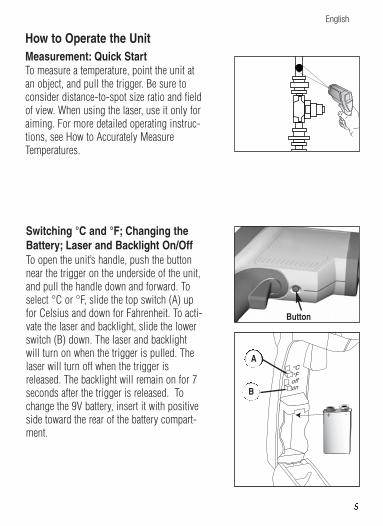
How to Operate the Unit
Switching °C and °F; Changing theBattery; Laser and Backlight On/Off
Measurement: Quick StartTo measure a temperature, point the unit atan object, and pull the trigger. Be sure toconsider distance-to-spot size ratio and fieldof view. When using the laser, use it only foraiming. For more detailed operating instruc-tions, see How to Accurately MeasureTemperatures.
+ -
To open the unit’s handle, push the buttonnear the trigger on the underside of the unit,and pull the handle down and forward. Toselect °C or °F, slide the top switch (A) upfor Celsius and down for Fahrenheit. To acti-vate the laser and backlight, slide the lowerswitch (B) down. The laser and backlightwill turn on when the trigger is pulled. Thelaser will turn off when the trigger isreleased. The backlight will remain on for 7seconds after the trigger is released. Tochange the 9V battery, insert it with positiveside toward the rear of the battery compart-ment.
A
B
Button
English
6
English
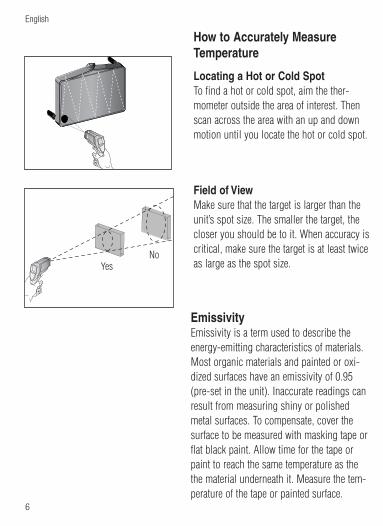
How to Accurately MeasureTemperature
Locating a Hot or Cold Spot To find a hot or cold spot, aim the ther-mometer outside the area of interest. Thenscan across the area with an up and downmotion until you locate the hot or cold spot.
Field of View Make sure that the target is larger than theunit’s spot size. The smaller the target, thecloser you should be to it. When accuracy iscritical, make sure the target is at least twiceas large as the spot size.
YesNo
Emissivity Emissivity is a term used to describe theenergy-emitting characteristics of materials.Most organic materials and painted or oxi-dized surfaces have an emissivity of 0.95(pre-set in the unit). Inaccurate readings canresult from measuring shiny or polishedmetal surfaces. To compensate, cover thesurface to be measured with masking tape orflat black paint. Allow time for the tape orpaint to reach the same temperature as thethe material underneath it. Measure the tem-perature of the tape or painted surface.
1.5" @ 12"
3" @ 36"
5.3" @ 60"
D
S
D S
12 1
=
38mm @ 300mm
75mm @ 900mm
132mm @ 1500mm
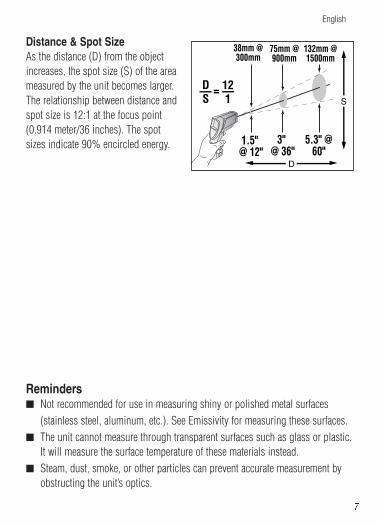
Distance & Spot Size As the distance (D) from the objectincreases, the spot size (S) of the areameasured by the unit becomes larger.The relationship between distance andspot size is 12:1 at the focus point(0.914 meter/36 inches). The spotsizes indicate 90% encircled energy.
Remindersn Not recommended for use in measuring shiny or polished metal surfaces
(stainless steel, aluminum, etc.). See Emissivity for measuring these surfaces.n The unit cannot measure through transparent surfaces such as glass or plastic.
It will measure the surface temperature of these materials instead.n Steam, dust, smoke, or other particles can prevent accurate measurement by
obstructing the unit’s optics.
English
7
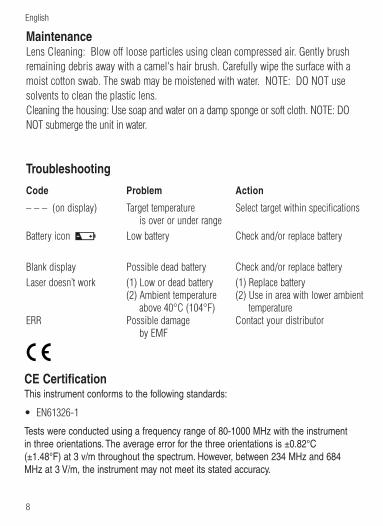
Troubleshooting
Code Problem Action
– – – (on display) Target temperature Select target within specificationsis over or under range
Battery icon Low battery Check and/or replace battery
Blank display Possible dead battery Check and/or replace batteryLaser doesn’t work (1) Low or dead battery (1) Replace battery
(2) Ambient temperature (2) Use in area with lower ambientabove 40°C (104°F) temperature
ERR Possible damage Contact your distributorby EMF
MaintenanceLens Cleaning: Blow off loose particles using clean compressed air. Gently brushremaining debris away with a camel's hair brush. Carefully wipe the surface with amoist cotton swab. The swab may be moistened with water. NOTE: DO NOT usesolvents to clean the plastic lens.Cleaning the housing: Use soap and water on a damp sponge or soft cloth. NOTE: DONOT submerge the unit in water.
CE Certification This instrument conforms to the following standards:
• EN61326-1
Tests were conducted using a frequency range of 80-1000 MHz with the instrumentin three orientations. The average error for the three orientations is ±0.82°C(±1.48°F) at 3 v/m throughout the spectrum. However, between 234 MHz and 684MHz at 3 V/m, the instrument may not meet its stated accuracy.
English
8
LASER RADIATION – DO NOT STARE INTO BEAM
OUTPUT < 1mW WAVELENGTH 630 – 670 nm CLASS II LASER PRODUCT
COMPLIES WITH CFR 1040.10
C A U T I O NAVOID EXPOSURE - LASER RADIATION
IS EMITTED FROM THIS APERTUREWarnung Richten Sie den Laser nicht direkt oder indirekt überreflektierende Oberflächen auf die Augen.
VorsichtsmaßnahmenAlle Modelle müssen vor folgenden Zuständengeschützt werden: s EMF (elektromagnetische Felder) von
Elektroschweißgeräten, Induktionsheizgeräten s statischer Elektrizität s Thermischer Schock (verursacht durch große
oder plötzliche Temperaturänderungen – Gerätvor Gebrauch 30 Minuten lang stabilisierenlassen)
s Gerät nicht auf oder in der Nähe von heißenObjekten aufbewahren.
Deutsch
9
AusstattungIhr Thermometer besitzt:• Einzellaser - Visier • Maximal - Temperaturanzeige• beleuchtete grafische Anzeige• Stativanschlussgewinde• solide, ergonomische Konstruktion
Zubehör und Optionen• Tasche mit Gürtelclip• N.I.S.T./DKD Zertifizierung
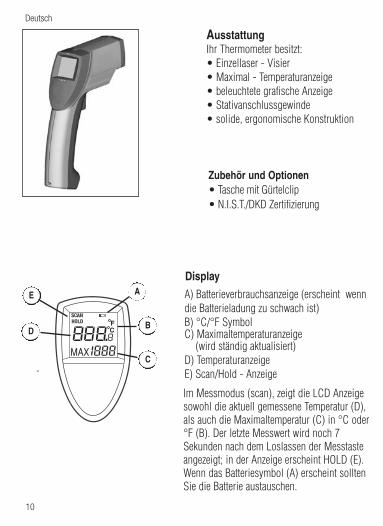
Im Messmodus (scan), zeigt die LCD Anzeigesowohl die aktuell gemessene Temperatur (D),als auch die Maximaltemperatur (C) in °C oder°F (B). Der letzte Messwert wird noch 7Sekunden nach dem Loslassen der Messtasteangezeigt; in der Anzeige erscheint HOLD (E).Wenn das Batteriesymbol (A) erscheint solltenSie die Batterie austauschen.
Display
A) Batterieverbrauchsanzeige (erscheint wenndie Batterieladung zu schwach ist)B) °C/°F Symbol C) Maximaltemperaturanzeige
(wird ständig aktualisiert)D) TemperaturanzeigeE) Scan/Hold - Anzeige
E A
B
C
D
Deutsch
10
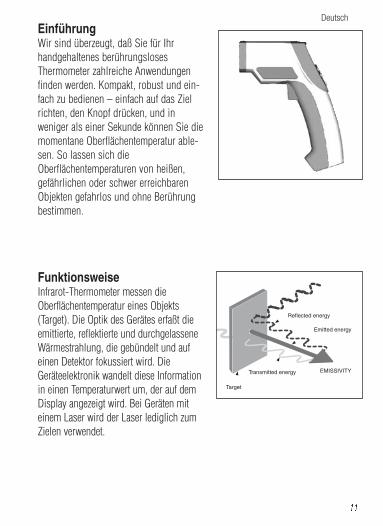
EinführungWir sind überzeugt, daß Sie für Ihrhandgehaltenes berührungslosesThermometer zahlreiche Anwendungenfinden werden. Kompakt, robust und ein-fach zu bedienen – einfach auf das Zielrichten, den Knopf drücken, und inweniger als einer Sekunde können Sie diemomentane Oberflächentemperatur able-sen. So lassen sich dieOberflächentemperaturen von heißen,gefährlichen oder schwer erreichbarenObjekten gefahrlos und ohne Berührungbestimmen.
FunktionsweiseInfrarot-Thermometer messen dieOberflächentemperatur eines Objekts(Target). Die Optik des Gerätes erfaßt dieemittierte, reflektierte und durchgelasseneWärmestrahlung, die gebündelt und aufeinen Detektor fokussiert wird. DieGeräteelektronik wandelt diese Informationin einen Temperaturwert um, der auf demDisplay angezeigt wird. Bei Geräten miteinem Laser wird der Laser lediglich zumZielen verwendet.
Reflected energy
Emitted energy
Transmitted energy EMISSIVITY
Target
Deutsch
11
Bedienung des Gerätes
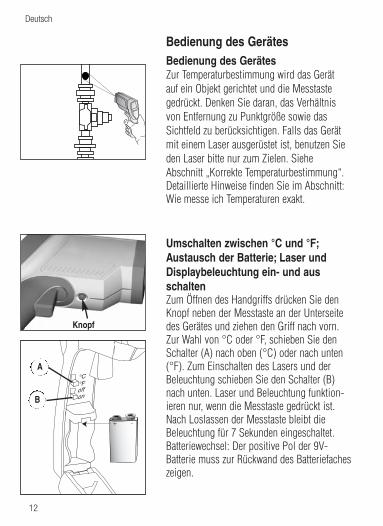
Umschalten zwischen °C und °F;Austausch der Batterie; Laser undDisplaybeleuchtung ein- und aus schaltenZum Öffnen des Handgriffs drücken Sie denKnopf neben der Messtaste an der Unterseitedes Gerätes und ziehen den Griff nach vorn.Zur Wahl von °C oder °F, schieben Sie denSchalter (A) nach oben (°C) oder nach unten(°F). Zum Einschalten des Lasers und derBeleuchtung schieben Sie den Schalter (B)nach unten. Laser und Beleuchtung funktion-ieren nur, wenn die Messtaste gedrückt ist.Nach Loslassen der Messtaste bleibt dieBeleuchtung für 7 Sekunden eingeschaltet.Batteriewechsel: Der positive Pol der 9V-Batterie muss zur Rückwand des Batteriefacheszeigen.
Bedienung des GerätesZur Temperaturbestimmung wird das Gerätauf ein Objekt gerichtet und die Messtastegedrückt. Denken Sie daran, das Verhältnisvon Entfernung zu Punktgröße sowie dasSichtfeld zu berücksichtigen. Falls das Gerätmit einem Laser ausgerüstet ist, benutzen Sieden Laser bitte nur zum Zielen. SieheAbschnitt „Korrekte Temperaturbestimmung“.Detaillierte Hinweise finden Sie im Abschnitt:Wie messe ich Temperaturen exakt.
+ -
A
B
Knopf
Deutsch
12
So können Sie präzise dieTemperatur messen
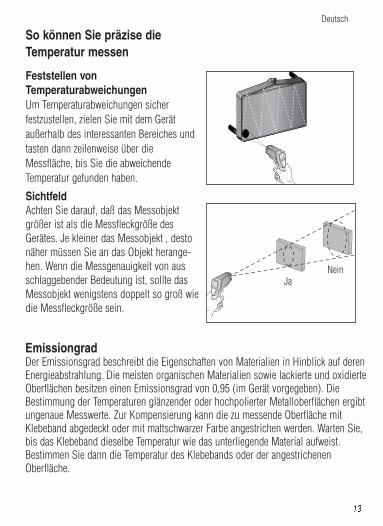
Feststellen vonTemperaturabweichungenUm Temperaturabweichungen sicherfestzustellen, zielen Sie mit dem Gerätaußerhalb des interessanten Bereiches undtasten dann zeilenweise über dieMessfläche, bis Sie die abweichendeTemperatur gefunden haben.
SichtfeldAchten Sie darauf, daß das Messobjektgrößer ist als die Messfleckgröße desGerätes. Je kleiner das Messobjekt , destonäher müssen Sie an das Objekt herange-hen. Wenn die Messgenauigkeit von ausschlaggebender Bedeutung ist, sollte dasMessobjekt wenigstens doppelt so groß wiedie Messfleckgröße sein.
JaNein
EmissiongradDer Emissionsgrad beschreibt die Eigenschaften von Materialien in Hinblick auf derenEnergieabstrahlung. Die meisten organischen Materialien sowie lackierte und oxidierteOberflächen besitzen einen Emissionsgrad von 0,95 (im Gerät vorgegeben). DieBestimmung der Temperaturen glänzender oder hochpolierter Metalloberflächen ergibtungenaue Messwerte. Zur Kompensierung kann die zu messende Oberfläche mitKlebeband abgedeckt oder mit mattschwarzer Farbe angestrichen werden. Warten Sie,bis das Klebeband dieselbe Temperatur wie das unterliegende Material aufweist.Bestimmen Sie dann die Temperatur des Klebebands oder der angestrichenenOberfläche.
Deutsch
13
Hinweisen Zur Messung von Temperaturen glänzender oder hochpolierter
Metalloberflächen (z.B. Edelstahl, Aluminium usw.) wird das Gerät nicht emp-fohlen. Siehe Abschnitt „Emissionsgrad“.
n Es ist nicht möglich durch transparente Materialien, wie Glas oder Kunststoffhindurchzumessen. Gemessen wird grundsätzlich die Oberflächentemperatur.
n Dampf, Staub, Rauch usw. können die korrekte Temperaturbestimmung behin-dern.
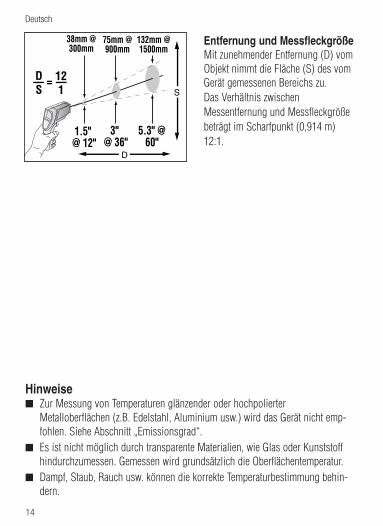
Entfernung und MessfleckgrößeMit zunehmender Entfernung (D) vomObjekt nimmt die Fläche (S) des vomGerät gemessenen Bereichs zu.Das Verhältnis zwischenMessentfernung und Messfleckgrößebeträgt im Scharfpunkt (0,914 m)12:1.
Deutsch
14
1.5" @ 12"
3" @ 36"
5.3" @ 60"
D
S
D S
12 1
=
38mm @ 300mm
75mm @ 900mm
132mm @ 1500mm
WartungReinigung der Linse: Blasen Sie lose Teilchen mit reiner Druckluft weg.Zurückbleibende Verunreinigungen werden dann vorsichtig mit einem weichenPinsel entfernt. Wischen Sie die Oberfläche vorsichtig mit einem feuchtenWattebausch ab. Der Wattebausch kann mit Wasser befeuchtet werden. HINWEIS:KEINE Lösungsmittel zur Reinigung der Linse verwenden.Reinigung des Gehäuses: Mit Seifenlösung und Schwamm oder einem weichenTuch reinigen. HINWEIS: Das Gerät darf NICHT in Wasser eingetaucht werden..
Anzeige Problem Abhilfe
– – – Temperatur des Mess- Wählen Sie ein Messobjekt innerhalbobjektes außerhalb der Messwertgrenzen des GerätesMesswertgrenzen des Gerätes
Batteriesymbol schwache Batterie Batterie prüfen und/oder ersetzenkeine Anzeige Wahrscheinlich leere Batterie Batterie prüfen und/oder ersetzenLaser arbeitet nicht (1) Batterie ist zu schwach (1) Batterie ersetzen
(2) Umgebungstemperatur (2) Arbeiten Sie bei geringererist oberhalb 40°C Umgebungstemperatur
ERR Wahrscheinlich wurde Rufen Sie Ihren Händler andas Gerät durch zu hoheelektromagnetische Felderzerstört
CE=ZertifizierungDieses Gerät entspricht den folgenden Normen:
• EN61326-1
Das Gerät wurde Tests in einem Frequenzbereich von 80-1000 MHz in drei Ausrichtungen unter-zogen. Der durchschnittliche Fehlerwert für die drei Ausrichtungen beträgt ± 0,82°C (±1,48°F)bei 3 V/m im Testspektrum. Im Bereich zwischen 234 MHz und 684 MHz bei 3 V/m kann esjedoch sein, daß das Gerät der angegebenen Genauigkeit nicht entspricht.
Fehlersuche und -behebung
Deutsch
15

LASER RADIATION – DO NOT STARE INTO BEAM
OUTPUT < 1mW WAVELENGTH 630 – 670 nm CLASS II LASER PRODUCT
COMPLIES WITH CFR 1040.10
C A U T I O NAVOID EXPOSURE - LASER RADIATION
IS EMITTED FROM THIS APERTUREAvertissementNe pointez pas le rayon laser directement dans les yeuxou indirectement sur des surfaces réfléchissantes.
PrécautionsTous les modèles doivent être protégés contre : • les champs électromagnétiques des postes de
soudure, les appareils de chauffage par induction • l’électricité statique • les chocs thermiques (causés par d’importants
ou de brusques changements de température -laissez le thermomètre se stabiliser pendant 30 minutes avant de l’utiliser)
• Ne laissez pas le thermomètre sur ou à proximitéd’objets à température élevée.
Français
16
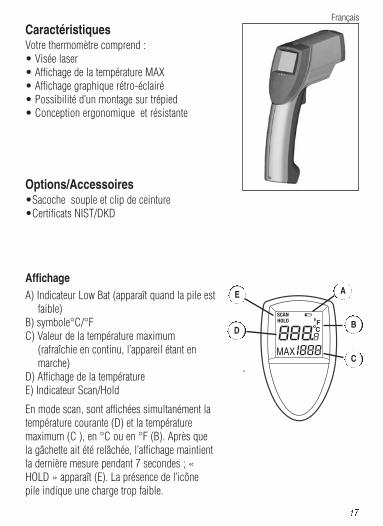
CaractéristiquesVotre thermomètre comprend : • Visée laser • Affichage de la température MAX• Affichage graphique rétro-éclairé• Possibilité d’un montage sur trépied• Conception ergonomique et résistante
Options/Accessoires•Sacoche souple et clip de ceinture •Certificats NIST/DKD
En mode scan, sont affichées simultanément latempérature courante (D) et la températuremaximum (C ), en °C ou en °F (B). Après quela gâchette ait été relâchée, l’affichage maintientla dernière mesure pendant 7 secondes ; «HOLD » apparaît (E). La présence de l’icônepile indique une charge trop faible.
AffichageA) Indicateur Low Bat (apparaît quand la pile est
faible)B) symbole°C/°F C) Valeur de la température maximum
(rafraîchie en continu, l’appareil étant en marche)
D) Affichage de la températureE) Indicateur Scan/Hold
E A
B
C
D
Français
17
18
Reflected energy
Emitted energy
Transmitted energy EMISSIVITY
Target
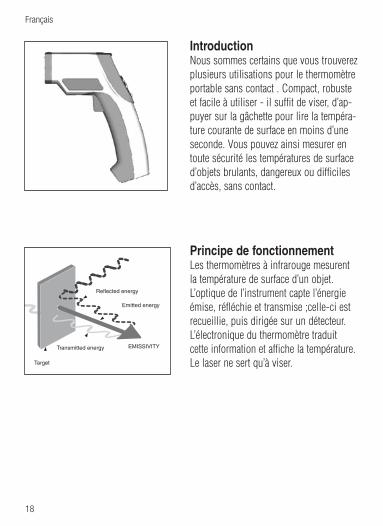
IntroductionNous sommes certains que vous trouverezplusieurs utilisations pour le thermomètreportable sans contact . Compact, robusteet facile à utiliser - il suffit de viser, d’ap-puyer sur la gâchette pour lire la tempéra-ture courante de surface en moins d’uneseconde. Vous pouvez ainsi mesurer entoute sécurité les températures de surfaced’objets brulants, dangereux ou difficilesd’accès, sans contact.
Principe de fonctionnementLes thermomètres à infrarouge mesurentla température de surface d’un objet.L’optique de l’instrument capte l’énergieémise, réfléchie et transmise ;celle-ci estrecueillie, puis dirigée sur un détecteur.L’électronique du thermomètre traduitcette information et affiche la température.Le laser ne sert qu’à viser.
Français
19
Principe de fonctionnement
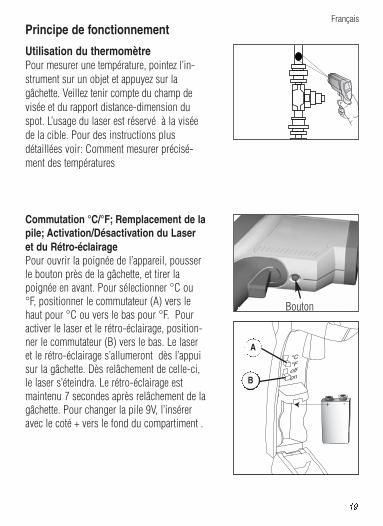
Commutation °C/°F; Remplacement de lapile; Activation/Désactivation du Laseret du Rétro-éclairagePour ouvrir la poignée de l’appareil, pousserle bouton près de la gâchette, et tirer lapoignée en avant. Pour sélectionner °C ou°F, positionner le commutateur (A) vers lehaut pour °C ou vers le bas pour °F. Pouractiver le laser et le rétro-éclairage, position-ner le commutateur (B) vers le bas. Le laseret le rétro-éclairage s’allumeront dès l’appuisur la gâchette. Dès relâchement de celle-ci,le laser s’éteindra. Le rétro-éclairage estmaintenu 7 secondes après relâchement de lagâchette. Pour changer la pile 9V, l’inséreravec le coté + vers le fond du compartiment .
Utilisation du thermomètrePour mesurer une température, pointez l’in-strument sur un objet et appuyez sur lagâchette. Veillez tenir compte du champ devisée et du rapport distance-dimension duspot. L’usage du laser est réservé à la viséede la cible. Pour des instructions plusdétaillées voir: Comment mesurer précisé-ment des températures
+ -
A
B
Bouton
Français
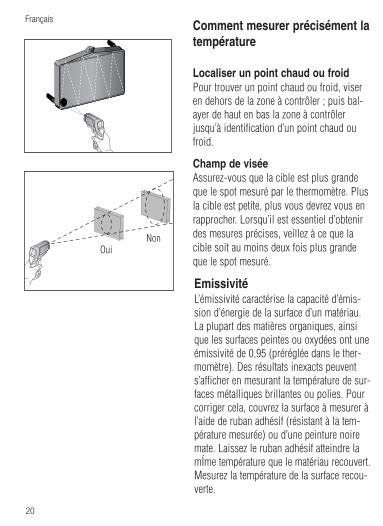
Comment mesurer précisément latempérature
Localiser un point chaud ou froidPour trouver un point chaud ou froid, viseren dehors de la zone à contrôler ; puis bal-ayer de haut en bas la zone à contrôlerjusqu’à identification d’un point chaud oufroid.
Champ de visée Assurez-vous que la cible est plus grandeque le spot mesuré par le thermomètre. Plusla cible est petite, plus vous devrez vous enrapprocher. Lorsqu’il est essentiel d’obtenirdes mesures précises, veillez à ce que lacible soit au moins deux fois plus grandeque le spot mesuré.
OuiNon
EmissivitéL’émissivité caractérise la capacité d’émis-sion d’énergie de la surface d’un matériau.La plupart des matières organiques, ainsique les surfaces peintes ou oxydées ont uneémissivité de 0,95 (préréglée dans le ther-momètre). Des résultats inexacts peuvents’afficher en mesurant la température de sur-faces métalliques brillantes ou polies. Pourcorriger cela, couvrez la surface à mesurer àl’aide de ruban adhésif (résistant à la tem-pérature mesurée) ou d’une peinture noiremate. Laissez le ruban adhésif atteindre lamÍme température que le matériau recouvert.Mesurez la température de la surface recou-verte.
Français
20
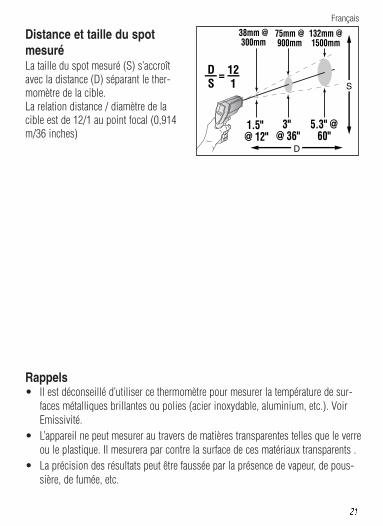
Rappels• Il est déconseillé d’utiliser ce thermomètre pour mesurer la température de sur-
faces métalliques brillantes ou polies (acier inoxydable, aluminium, etc.). VoirEmissivité.
• L’appareil ne peut mesurer au travers de matières transparentes telles que le verreou le plastique. Il mesurera par contre la surface de ces matériaux transparents .
• La précision des résultats peut être faussée par la présence de vapeur, de pous-sière, de fumée, etc.
Distance et taille du spotmesuré La taille du spot mesuré (S) s’accroîtavec la distance (D) séparant le ther-momètre de la cible. La relation distance / diamètre de lacible est de 12/1 au point focal (0,914m/36 inches)
Français
21
1.5" @ 12"
3" @ 36"
5.3" @ 60"
D
S
D S
12 1
=
38mm @ 300mm
75mm @ 900mm
132mm @ 1500mm
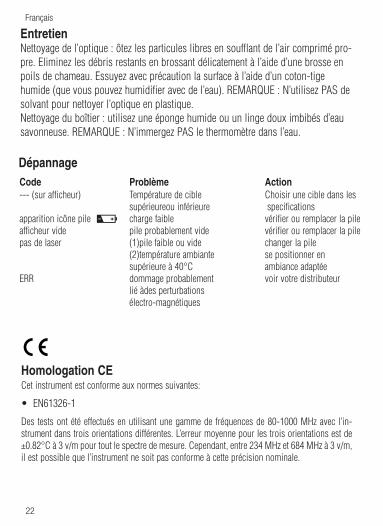
EntretienNettoyage de l’optique : ôtez les particules libres en soufflant de l’air comprimé pro-pre. Eliminez les débris restants en brossant délicatement à l’aide d’une brosse enpoils de chameau. Essuyez avec précaution la surface à l’aide d’un coton-tigehumide (que vous pouvez humidifier avec de l’eau). REMARQUE : N’utilisez PAS desolvant pour nettoyer l’optique en plastique.Nettoyage du boîtier : utilisez une éponge humide ou un linge doux imbibés d’eausavonneuse. REMARQUE : N’immergez PAS le thermomètre dans l’eau.
Code Problème Action--- (sur afficheur) Température de cible Choisir une cible dans les
supérieureou inférieure specificationsapparition icône pile charge faible vérifier ou remplacer la pileafficheur vide pile probablement vide vérifier ou remplacer la pilepas de laser (1)pile faible ou vide changer la pile
(2)température ambiante se positionner en supérieure à 40°C ambiance adaptée
ERR dommage probablement voir votre distributeurlié àdes perturbations électro-magnétiques
Dépannage
Homologation CECet instrument est conforme aux normes suivantes:
• EN61326-1
Des tests ont été effectués en utilisant une gamme de fréquences de 80-1000 MHz avec l’in-strument dans trois orientations différentes. L’erreur moyenne pour les trois orientations est de±0.82°C à 3 v/m pour tout le spectre de mesure. Cependant, entre 234 MHz et 684 MHz à 3 v/m,il est possible que l’instrument ne soit pas conforme à cette précision nominale.
Français
22
LASER RADIATION – DO NOT STARE INTO BEAM
OUTPUT < 1mW WAVELENGTH 630 – 670 nm CLASS II LASER PRODUCT
COMPLIES WITH CFR 1040.10
C A U T I O NAVOID EXPOSURE - LASER RADIATION
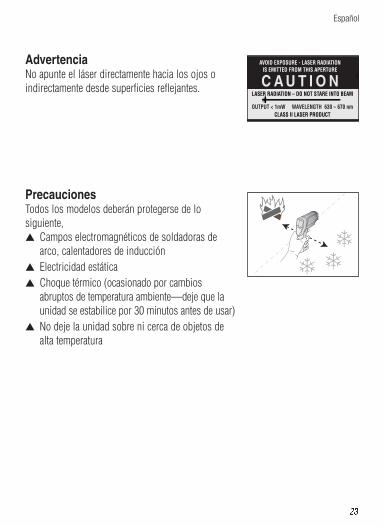
IS EMITTED FROM THIS APERTUREAdvertenciaNo apunte el láser directamente hacia los ojos o indirectamente desde superficies reflejantes.
PrecaucionesTodos los modelos deberán protegerse de lo siguiente,s Campos electromagnéticos de soldadoras de
arco, calentadores de inducción s Electricidad estática s Choque térmico (ocasionado por cambios
abruptos de temperatura ambiente—deje que launidad se estabilice por 30 minutos antes de usar)
s No deje la unidad sobre ni cerca de objetos dealta temperatura
Español
23
CaracterísticasSu termómetro incluye:• Mira láser• Indicación en pantalla de la temperatura MAX• Pantalla gráfica con iluminación de fondo• Montaje en tripode• Diseño ergonómico y resistente.
Opciones/Accesorios• Estuche suave con clip para cinturón• Certificado de Calibración N.I.S.T./DKD
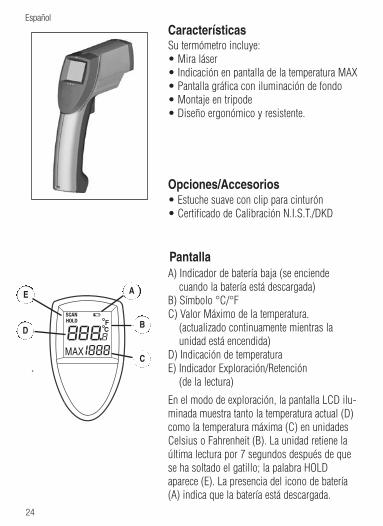
En el modo de exploración, la pantalla LCD ilu-minada muestra tanto la temperatura actual (D)como la temperatura máxima (C) en unidadesCelsius o Fahrenheit (B). La unidad retiene laúltima lectura por 7 segundos después de quese ha soltado el gatillo; la palabra HOLDaparece (E). La presencia del icono de batería(A) indica que la batería está descargada.
PantallaA) Indicador de batería baja (se enciende
cuando la batería está descargada)B) Símbolo °C/°FC) Valor Máximo de la temperatura.
(actualizado continuamente mientras la unidad está encendida)
D) Indicación de temperaturaE) Indicador Exploración/Retención
(de la lectura)
E A
B
C
D
Español
24
Reflected energy
Emitted energy
Transmitted energy EMISSIVITY
Target
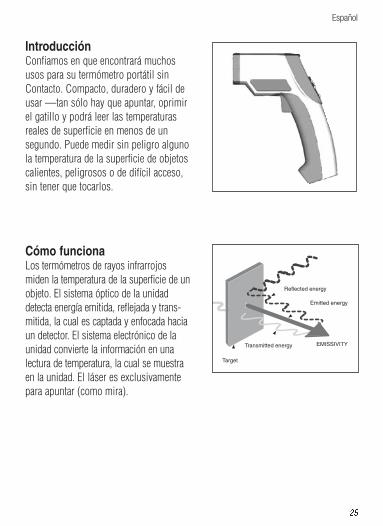
IntroducciónConfiamos en que encontrará muchosusos para su termómetro portátil sinContacto. Compacto, duradero y fácil deusar —tan sólo hay que apuntar, oprimirel gatillo y podrá leer las temperaturasreales de superficie en menos de unsegundo. Puede medir sin peligro algunola temperatura de la superficie de objetoscalientes, peligrosos o de difícil acceso,sin tener que tocarlos.
Cómo funcionaLos termómetros de rayos infrarrojosmiden la temperatura de la superficie de unobjeto. El sistema óptico de la unidaddetecta energía emitida, reflejada y trans-mitida, la cual es captada y enfocada haciaun detector. El sistema electrónico de launidad convierte la información en unalectura de temperatura, la cual se muestraen la unidad. El láser es exclusivamentepara apuntar (como mira).
Español
25
Como operar la Unidad
Cambiando entre °C y °F; Cambiando laBatería; Encendido/Apagado del Lásery Luz de Fondo.
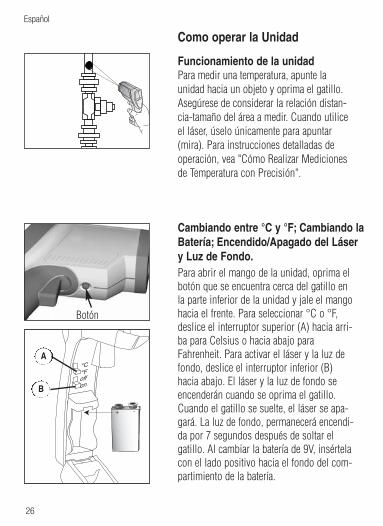
Funcionamiento de la unidadPara medir una temperatura, apunte launidad hacia un objeto y oprima el gatillo.Asegúrese de considerar la relación distan-cia-tamaño del área a medir. Cuando utiliceel láser, úselo únicamente para apuntar(mira). Para instrucciones detalladas deoperación, vea "Cómo Realizar Medicionesde Temperatura con Precisión".
+ -
Para abrir el mango de la unidad, oprima elbotón que se encuentra cerca del gatillo enla parte inferior de la unidad y jale el mangohacia el frente. Para seleccionar °C o °F,deslice el interruptor superior (A) hacia arri-ba para Celsius o hacia abajo paraFahrenheit. Para activar el láser y la luz defondo, deslice el interruptor inferior (B)hacia abajo. El láser y la luz de fondo seencenderán cuando se oprima el gatillo.Cuando el gatillo se suelte, el láser se apa-gará. La luz de fondo, permanecerá encendi-da por 7 segundos después de soltar elgatillo. Al cambiar la batería de 9V, insértelacon el lado positivo hacia el fondo del com-partimiento de la batería.
A
B
Botón
Español
26

Como Medir Temperatura con Precisión
Localizando un Punto Caliente o FríoPara localizar un punto caliente o frío,apunte el termómetro fuera del área deinterés. Entonces, sin soltar el gatillo, real-ice un barrido a través del área conmovimientos de arriba abajo hasta quelocalice el punto caliente o frío.
Campo Visual Cerciórese de que el objeto a medir seamayor que el diámetro del área medida.Mientras más pequeño el objeto, más cercase debe hacer la medición. Cuando seacrítica la precisión, cerciórese de que el objeto sea al menos dos veces másgrande que el diámetro del área a medir.
SiNo
EmisividadLa mayoría de los materiales orgánicos y lassuperficies pintadas u oxidadas tienen unaemisividad de 0,95 (preestablecida en launidad). La medición de superficies metáli-cas brillosas o pulidas resultará enmediciones incorrectas. Para compensar,cubra la superficie que va a medir con cintaaislante o con pintura mate negra. Concedatiempo suficiente para que la cinta alcance lamisma temperatura que el material que estácubriendo. Mida la temperatura de la cinta ode la superficie pintada.
Español
27
Recordatoriosn No se recomienda para uso en la medición de superficies metálicas brillosas o
pulidas (acero inoxidable, aluminio, etc.) Véase Emisividad.n La unidad no puede medir a través de materiales transparentes tales como
vidrio o plástico. La medición corresponderá a la temperatura de la superficie deéstos materiales.
n El vapor, polvo, humo, etc., pueden obstruir la medición, impidiendo una tem-peratura exacta.
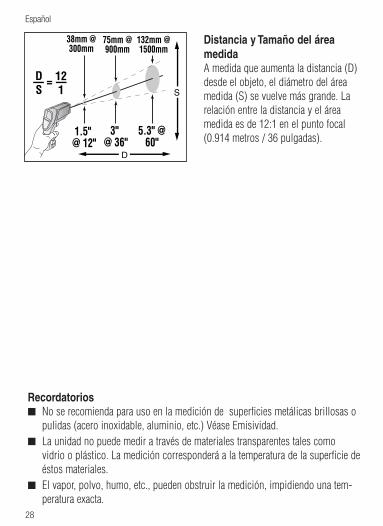
Distancia y Tamaño del áreamedida A medida que aumenta la distancia (D)desde el objeto, el diámetro del áreamedida (S) se vuelve más grande. Larelación entre la distancia y el áreamedida es de 12:1 en el punto focal(0.914 metros / 36 pulgadas).
Español
28
1.5" @ 12"
3" @ 36"
5.3" @ 60"
D
S
D S
12 1
=
38mm @ 300mm
75mm @ 900mm
132mm @ 1500mm
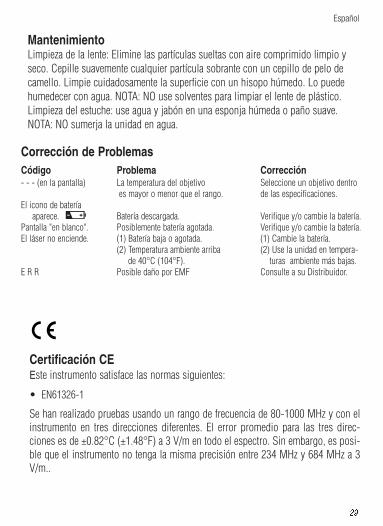
MantenimientoLimpieza de la lente: Elimine las partículas sueltas con aire comprimido limpio yseco. Cepille suavemente cualquier partícula sobrante con un cepillo de pelo decamello. Limpie cuidadosamente la superficie con un hisopo húmedo. Lo puedehumedecer con agua. NOTA: NO use solventes para limpiar el lente de plástico.Limpieza del estuche: use agua y jabón en una esponja húmeda o paño suave.NOTA: NO sumerja la unidad en agua.
Código Problema Corrección- - - (en la pantalla) La temperatura del objetivo Seleccione un objetivo dentro
es mayor o menor que el rango. de las especificaciones.El icono de batería
aparece. Batería descargada. Verifique y/o cambie la batería.Pantalla "en blanco". Posiblemente batería agotada. Verifique y/o cambie la batería.El láser no enciende. (1) Batería baja o agotada. (1) Cambie la batería.
(2) Temperatura ambiente arriba (2) Use la unidad en tempera- de 40°C (104°F). turas ambiente más bajas.
E R R Posible daño por EMF Consulte a su Distribuidor.
Corrección de Problemas
Certificación CEEste instrumento satisface las normas siguientes:
• EN61326-1
Se han realizado pruebas usando un rango de frecuencia de 80-1000 MHz y con elinstrumento en tres direcciones diferentes. El error promedio para las tres direc-ciones es de ±0.82°C (±1.48°F) a 3 V/m en todo el espectro. Sin embargo, es posi-ble que el instrumento no tenga la misma precisión entre 234 MHz y 684 MHz a 3V/m..
Español
29
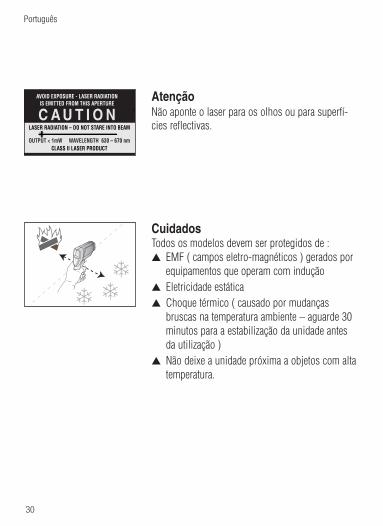
LASER RADIATION – DO NOT STARE INTO BEAM
OUTPUT < 1mW WAVELENGTH 630 – 670 nm CLASS II LASER PRODUCT
COMPLIES WITH CFR 1040.10
C A U T I O NAVOID EXPOSURE - LASER RADIATION
IS EMITTED FROM THIS APERTUREAtenção Não aponte o laser para os olhos ou para superfí-cies reflectivas.
CuidadosTodos os modelos devem ser protegidos de :s EMF ( campos eletro-magnéticos ) gerados por
equipamentos que operam com induçãos Eletricidade estáticas Choque térmico ( causado por mudanças
bruscas na temperatura ambiente – aguarde 30minutos para a estabilização da unidade antes da utilização )
s Não deixe a unidade próxima a objetos com altatemperatura.
Português
30
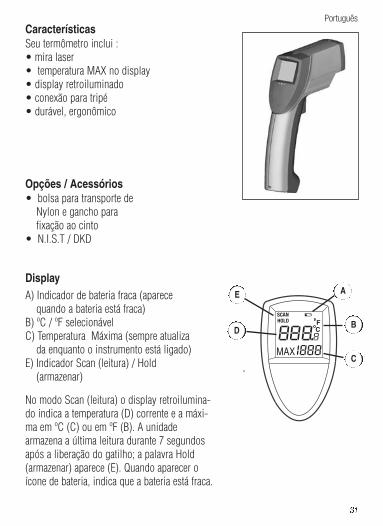
CaracterísticasSeu termômetro inclui :• mira laser• temperatura MAX no display• display retroiluminado• conexão para tripé• durável, ergonômico
Opções / Acessórios• bolsa para transporte de
Nylon e gancho para fixação ao cinto
• N.I.S.T / DKD
No modo Scan (leitura) o display retroilumina-do indica a temperatura (D) corrente e a máxi-ma em ºC (C) ou em ºF (B). A unidadearmazena a última leitura durante 7 segundosapós a liberação do gatilho; a palavra Hold(armazenar) aparece (E). Quando aparecer oícone de bateria, indica que a bateria está fraca.
DisplayA) Indicador de bateria fraca (aparece
quando a bateria está fraca)B) ºC / ºF selecionávelC) Temperatura Máxima (sempre atualiza
da enquanto o instrumento está ligado)E) Indicador Scan (leitura) / Hold
(armazenar)
E A
B
C
D
Português
31
32
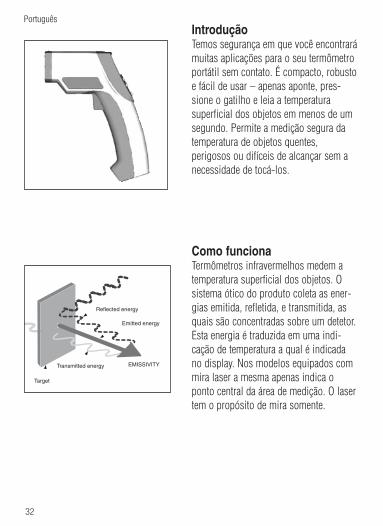
IntroduçãoTemos segurança em que você encontrarámuitas aplicações para o seu termômetroportátil sem contato. É compacto, robustoe fácil de usar – apenas aponte, pres-sione o gatilho e leia a temperaturasuperficial dos objetos em menos de umsegundo. Permite a medição segura datemperatura de objetos quentes,perigosos ou difíceis de alcançar sem anecessidade de tocá-los.
Como funcionaTermômetros infravermelhos medem atemperatura superficial dos objetos. Osistema ótico do produto coleta as ener-gias emitida, refletida, e transmitida, asquais são concentradas sobre um detetor.Esta energia é traduzida em uma indi-cação de temperatura a qual é indicadano display. Nos modelos equipados commira laser a mesma apenas indica oponto central da área de medição. O lasertem o propósito de mira somente.
Reflected energy
Emitted energy
Transmitted energy EMISSIVITY
Target
Português
33
Como operar a unidade
Configurando ºC ou ºF,Trocando bate-ria, Mira laser On/Off
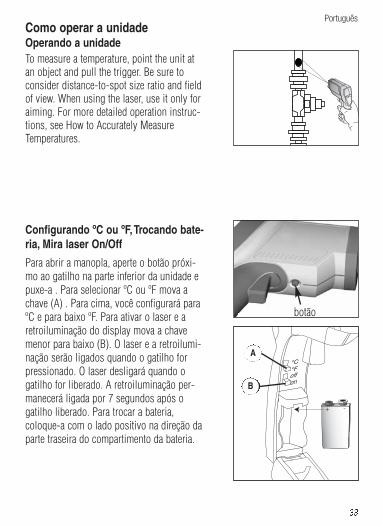
Operando a unidadeTo measure a temperature, point the unit atan object and pull the trigger. Be sure toconsider distance-to-spot size ratio and fieldof view. When using the laser, use it only foraiming. For more detailed operation instruc-tions, see How to Accurately MeasureTemperatures.
+ -
Para abrir a manopla, aperte o botão próxi-mo ao gatilho na parte inferior da unidade epuxe-a . Para selecionar ºC ou ºF mova achave (A) . Para cima, você configurará paraºC e para baixo ºF. Para ativar o laser e aretroiluminação do display mova a chavemenor para baixo (B). O laser e a retroilumi-nação serão ligados quando o gatilho forpressionado. O laser desligará quando ogatilho for liberado. A retroiluminação per-manecerá ligada por 7 segundos após ogatilho liberado. Para trocar a bateria,coloque-a com o lado positivo na direção daparte traseira do compartimento da bateria.
A
B
botão
Português
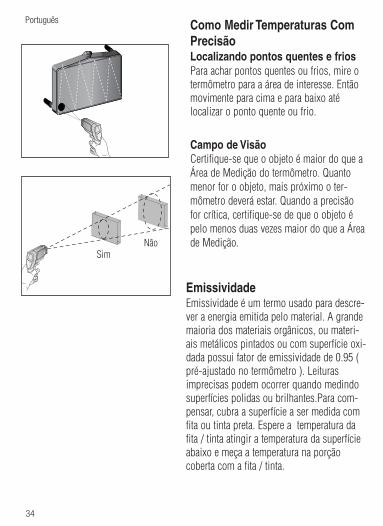
Como Medir Temperaturas ComPrecisãoLocalizando pontos quentes e friosPara achar pontos quentes ou frios, mire otermômetro para a área de interesse. Entãomovimente para cima e para baixo atélocalizar o ponto quente ou frio.
Campo de VisãoCertifique-se que o objeto é maior do que aÁrea de Medição do termômetro. Quantomenor for o objeto, mais próximo o ter-mômetro deverá estar. Quando a precisãofor crítica, certifique-se de que o objeto épelo menos duas vezes maior do que a Áreade Medição.
SimNâo
EmissividadeEmissividade é um termo usado para descre-ver a energia emitida pelo material. A grandemaioria dos materiais orgânicos, ou materi-ais metálicos pintados ou com superfície oxi-dada possui fator de emissividade de 0.95 (pré-ajustado no termômetro ). Leiturasimprecisas podem ocorrer quando medindosuperfícies polidas ou brilhantes.Para com-pensar, cubra a superfície a ser medida comfita ou tinta preta. Espere a temperatura dafita / tinta atingir a temperatura da superfícieabaixo e meça a temperatura na porçãocoberta com a fita / tinta.
Português
34
Lembretesn Não recomendado para medir superfíces metálicas brilhantes ou polidas ( aço
inoxidável, alumínio etc. ). Veja Emissividade.n O termômetro não mede através de superfíces transparentes tais como
vidro.Medirá a temperatura superficial do vidro.n Vapor, pó, fumaça etc. podem prejudicar a precisão das medições, obstruindo o
campo de visão do instrumento.
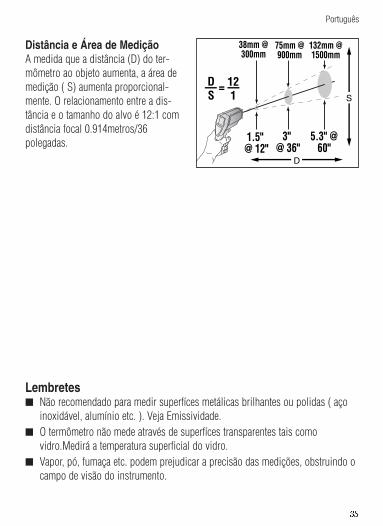
Distância e Área de MediçãoA medida que a distância (D) do ter-mômetro ao objeto aumenta, a área demedição ( S) aumenta proporcional-mente. O relacionamento entre a dis-tância e o tamanho do alvo é 12:1 comdistância focal 0.914metros/36 polegadas.
Português
35
1.5" @ 12"
3" @ 36"
5.3" @ 60"
D
S
D S
12 1
=
38mm @ 300mm
75mm @ 900mm
132mm @ 1500mm
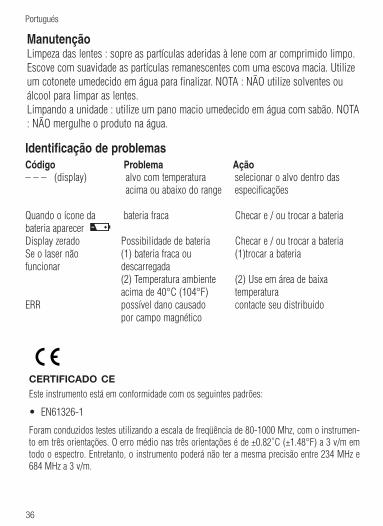
Identificação de problemasCódigo Problema Ação– – – (display) alvo com temperatura selecionar o alvo dentro das
acima ou abaixo do range especificações
Quando o ícone da bateria fraca Checar e / ou trocar a bateriabateria aparecerDisplay zerado Possibilidade de bateria Checar e / ou trocar a bateriaSe o laser não (1) bateria fraca ou (1)trocar a bateriafuncionar descarregada
(2) Temperatura ambiente (2) Use em área de baixa acima de 40°C (104°F) temperatura
ERR possível dano causado contacte seu distribuidopor campo magnético
ManutençãoLimpeza das lentes : sopre as partículas aderidas à lene com ar comprimido limpo.Escove com suavidade as partículas remanescentes com uma escova macia. Utilizeum cotonete umedecido em água para finalizar. NOTA : NÃO utilize solventes ouálcool para limpar as lentes.Limpando a unidade : utilize um pano macio umedecido em água com sabão. NOTA: NÃO mergulhe o produto na água.
CERTIFICADO CE
Este instrumento está em conformidade com os seguintes padrões:
• EN61326-1
Foram conduzidos testes utilizando a escala de freqüência de 80-1000 Mhz, com o instrumen-to em três orientações. O erro médio nas três orientações é de ±0.82˚C (±1.48°F) a 3 v/m emtodo o espectro. Entretanto, o instrumento poderá não ter a mesma precisão entre 234 MHz e684 MHz a 3 v/m.
Portugués
36
![BeautyLink - Volume 7 Issue 1 [cover1]](https://static.fdocuments.in/doc/165x107/58e7696e1a28abac7d8b475d/beautylink-volume-7-issue-1-cover1.jpg)


![Beverage World - July 15, 2011 [Cover1]](https://static.fdocuments.in/doc/165x107/58a2f6211a28ab5d1c8b5a4b/beverage-world-july-15-2011-cover1.jpg)


![E-C152 Cover1 [Converted]](https://static.fdocuments.in/doc/165x107/61aec1a7db8d8f1bcc573ec1/e-c152-cover1-converted.jpg)