![The System of Rice Intensification (SRI)sri.ciifad.cornell.edu/countries/indonesia/indoNTUppt061308.pdf · DIRECT SEEDING is becoming an option] 2. Avoid trauma to the roots--transplant](https://static.fdocuments.in/doc/165x107/612f4ef71ecc515869435c2a/the-system-of-rice-intensification-srisri-direct-seeding-is-becoming-an-option.jpg)
1.4 Transplanting and Direct Seeding Organic Farming/1.4_Transplanting.pdf · transplant crops for...
20
1.4 Transplanting and Direct Seeding Introduction 3 Demonstration 1: Garden-Scale Transplanting and Direct Seeding 5 Instructor’s Demonstration Outline 6 Students’ Step-by-Step Instructions 9 Demonstration 2: Tractor-Mounted Seeding and Transplanting Equipment 13 Instructor’s Demonstration Outline 14 Assessment Questions and Key 15 Appendices 1. Estimating Soil Moisture By Feel 17 2. Transplanting and Irrigation Equipment 18 3. Seedlings at Transplant Maturity; Planting Depths 19 4. Garden-Scale Seed Bed Irrigation 20
Transcript of 1.4 Transplanting and Direct Seeding Organic Farming/1.4_Transplanting.pdf · transplant crops for...

1.4 Transplanting and Direct SeedingIntroduction 3
Demonstration 1: Garden-Scale Transplanting and Direct Seeding 5
Instructor’s Demonstration Outline 6
Students’ Step-by-Step Instructions 9
Demonstration 2: Tractor-Mounted Seeding and Transplanting Equipment 13
Instructor’s Demonstration Outline 14
Assessment Questions and Key 15
Appendices
1. Estimating Soil Moisture By Feel 17
2. Transplanting and Irrigation Equipment 18
3. Seedlings at Transplant Maturity; Planting Depths 19
4. Garden-Scale Seed Bed Irrigation 20

Transplanting and Direct Seeding2 | Unit 1.4

Transplanting and Direct Seeding Unit 1.4 | 3
Introduction: Transplanting and Direct Seeding
Unit Overview
In this unit, two field demonstrations introduce students to the basic skills and concepts associated with direct seeding and transplanting techniques used in traditional French-intensive gardening, and small- to medium-scale field production. Note that there is no lecture outline associated with this unit; it uses garden and field demonstrations and a set of step-by-step instructions to convey the material. Refer to Unit 1.3, Propagating Crops from Seed and Greenhouse Management, for additional information relevant to the material presented here.
MOdes Of instrUctiOn
> GArDEn-ScAlE TrAnSPlAnTInG DEMOnSTrATIOn (1–1.5 hOUrS)
The garden-scale demonstration outline details the basic skills and concepts for direct seeding annual crops and transplanting both annual and perennial container-grown plants. Following the outline is a set of step-by-step instruc-tions for students on seedling and soil preparation, direct seeding, and transplanting techniques.
> TrAcTOr-MOUnTED SEEDInG AnD TrAnSPlAnTInG EQUIPMEnT DEMOnSTrATIOn (1 hOUr)
The demonstration outline for field-scale transplanting and direct seeding details how to use tractor-mounted equip-ment for planting on a larger scale.
> ASSESSMEnT QUESTIOnS (0.5 hOUr)
Assessment questions reinforce key unit concepts and skills.
Learning Objectives
cOncEPTS
• Theoptimalphysicalenvironmentconditionsfavorableforsuccessful transplanting
• Theoptimalsoilmoistureconditionsfavorableforsuccessful transplanting
• Theoptimalseedlingdevelopmentandpre-treatmentsnecessary for successful transplanting
SKIllS
• Howtosowsmall-andlarge-seededcropsusinghandmethods and push seeders
• Howtotransplantfromacelltrayandflatformat
• Howtowater-in/irrigaterecentlytransplantedseedlings
• Howtoirrigateseedbedsforoptimalgermination
Introduction

Transplanting and Direct Seeding4 | Unit 1.4

Transplanting and Direct Seeding Unit 1.4 | 5
Demonstration 1: Garden-Scale Transplanting and Direct Sowing
for the instructor
Overview
The following field demonstration outline covers the basic skills and concepts used to direct seed and transplant crops for garden-scale production. Following the outline below, discuss and demonstrate the tools and techniques used in garden-scale transplanting and direct seeding.
PreParatiOns and MateriaLs
• Recentlypreparedgardenbedat50%–75%offieldcapacity, including a 4-foot section prepared as a seed bed and a 4-foot section prepared using coarse secondary tillage
• Flatofplantsatseedlingmaturity(alliumandbroad-leafcrops)
• Celltrayatseedlingmaturityandimmaturity
• Handtrowelandhandfork
• Wateringwand
• Dibble
• Measuringtape
• Rossandhose
• Mistsystem/micro-sprinklers
• Stringandstakes
• Largeandsmallseed(e.g.,squashandcarrots)
• Pushseeder
• Bedendmarkersandindeliblemarker
• Appendix10,PropagationandCropPerformanceRecordSheet,fromUnit1.3,PropagatingCropsfromSeedandGreenhouseManagement
PreParatiOn tiMe
1.5hours
deMOnstratiOn tiMe
1.5hours
Demonstration 1

Transplanting and Direct Seeding6 | Unit 1.4
deMOnstratiOn OUtLine
A. Discuss Transplanting versus Direct Sowing Askstudentstoexplainwhycertaincropsaretransplantedandothersdirectlysown
1.Transplantedcrops a) Greenhouseadvantages i. Greater climate control ii.Greaterseasonextension iii.Intensiveratherthanextensivemanagementofseedlings iv.Rapidcropsuccessions(e.g.,fromcovercropstocroppingandfromonecroptoanother) b) Rootnatureoftransplantedcrops:Fibrous c) Mayallowforgreatercontroloverspecificdensityofcrops
2.Direct-sowncrops a) Rootnatureofdirect-sowncrops:Oftentaprooted b) Intendeddensityofcrop:Direct-seededcropsrequiresowingathighdensityand
eventualthinning c) Scaleofproduction:Manycropsaredirectseededonalargescaletoavoid
additional production costs d) Exceptions:Mostcrops,includingtap-rootedcrops,maybetransplantedifsown
and transplanted in clusters
B. Review Assessments of Plant, Soil, and Environmental Conditions Priorto Transplanting Askstudentstoassessthecompatibilityofthefollowingenvironmentalconditionsand
seedlingmaturitywiththeplannedtasks,thendiscussanddemonstratethefollowing:
1.Seedlingdevelopmentnecessaryforsuccessfultransplanting a) Shootdevelopment b) Rootdevelopment
2.Seedlingpre-treatmentsnecessaryforsuccessfultransplanting a) Soil/mediamoisture i.Cell-grownseedlingswithmediaatfieldcapacity ii.Flat-grownseedlingswithmediaat50%–75%offieldcapacity b) Hardening-offperiod:Aminimumofthreedaysoffullexposuretofieldconditions
3.Soilconditionsfavorableforsuccessfultransplantingordirectsowing
Ask students to determine soil moisture a) Soilmoisture(seeappendix1,EstimatingSoilMoistureByFeel):50%–75%offield
capacity b) Degreeofsecondarycultivation:Smallerseedsrequiregreatersecondarycultivation
4.Optimalphysicalenvironmentconditionsfavorableforsuccessfultransplantingofflat-grown seedlings
a) Lowlightlevels b) Lowtemperature c) Lowwindspeed d) Highhumidity e) Stepstotakeifenvironmentalconditionsarenotoptimal
Instructor’s Demonstration 1 Outline

Transplanting and Direct Seeding Unit 1.4 | 7
C. Discuss and Demonstrate Transplanting 1.Plantspacingconsiderations:Askstudentstoconsiderhowthefollowingfactors
influencecropspacing a) Irrigationandcultivationconsiderations b) Soilfertility/soildevelopmentconsiderations:Lowfertilitymayrequirereduced
density or supplemental fertility c) Rootandshootsizeatmaturity d) Diseaseprevention/aircirculation e) Stemlengthorstemnumberforcutflowers f) References:Crop-spacingchartinKnott’s Handbook for Vegetable Growers, and
in How to Grow More Vegetables,byJohnJeavons;seedcatalogues(seeResourcessectionofUnit1.3,PropagatingCropsfromSeedandGreenhouseManagement)
2.Toolsusedtoassureuniformplantspacing:Discussanddemonstratetoolsusedtoguideplanting a) Parallellinesofstringbetweenstakes b) Transplant marker, e.g., dibble c) Triangulation d) One’shand
3.Howtoplant:Discussanddemonstratethefollowing a) The importance of a knowledge of crop being planted b) Plantselectioncriteria(developmentandvigorofseedling) c) Planthandlingtechnique d) Depthofplanting
4.Wateringin:Discussanddemonstratewhy,how,andirrigationoptions a) Why?Toassureevensoilmoisturebetweentransplantandsurroundingsoilinorder
to assure uninterruped regrowth b) Optionsonhowtoirrigateaftertransplanting(waterin) i.Basalapplicationwithwateringwand ii.Overheadsprinklerandconsiderationsofscale iii.Overheadsprinkler,transitiontodripirrigation
5.Documenting a) Discussdocumentingaslearningtool b) Wheretodocument? i. Field or bed marker ii.Gardenlogbookwithcropseedingdatesandseedcompany(seeappendix10in
Unit1.3)
6.Post-transplantfollowup a) Irrigation i.Methodofirrigation ii.Monitoringrootzonefor50%offieldcapacity(seeappendix1inthisunit,and
Unit1.5,Irrigation,fordiscussionoffieldcapacity) b) Observationsofsubsequentgrowth i.Predation:Watchseedlingsforinsectorpestdamage.Replaceasneeded. ii.Nutrientneeds:Inspring,heat-lovingcropsgrowinginpoorlydevelopedsoils
may require supplemental fertility iii.Rootdevelopment:Carefullydiggingupseedlingstoobserveroot
developmentprovidesinfomationfordepthofirrigationrequirements
Instructor’s Demonstration 1 Outline

Transplanting and Direct Seeding8 | Unit 1.4
c) Excess/replacementseedlings i.Managementofexcessseedlingsinpropagationarea ii.Treatment:Supplementalfertilitymayberequiredtosustainreplacement
seedlings
D. Discuss and Demonstrate Direct-Sowing Techniques 1.Brieflyreviewoptimalenvironmentalconsiderationsforseedgermination.Askstudentstoconsiderthe
optimalenvironmentalconditionsforseedgerminationintermsof: a) Soilmoisture b) Degreeofsecondarycultivation c) Soiltemperature d) Depthofplanting
2.Demonstrateanddiscussthepros/consofthevariousdirect-sowingtechniques a) Drills/sowingintofurrowsbyhand b) Pushseeder c) Broadcastsowing
3.Irrigation a) Objective b) Techniques and frequency used i.Mistsystems ii.Overhead iii.Drip
4. Thinning established stand a) Stageofdevelopment b) Density:seecrop-spacingchartsinResourcessectioninUnit1.3
5.Questionsandanswers
Instructor’s Demonstration 1

Transplanting and Direct Seeding Unit 1.4 | 9
Demonstration 1: Garden-Scale Transplanting and Direct Sowing
step-by-step instructions for students
a. assess Plant, soil, and environmental conditions Prior to sowing or transplanting 1. Seedling development
a) Shoot development
i. Second set of true leaves (cell format)
ii. Filling out allotted space and second set of true leaves established (flat format)
b) root development
i. root knit (cell format)
ii. Filling out allotted space (flat format)
2. Seedling pre-treatments
a) Soil/mix moisture
i. Field capacity (cell format)
ii. 50%–75% of field capacity (flat format)
b) hardened-off
i. 3–21 day range (minimum of 3 days with 24 hours at field conditions)
ii. hardening-off period should increase in duration with increased differential between field and greenhouse conditions
3. Field or garden soil conditions
a) Soil moisture
i. 50%–75% of field capacity
b) Degree of secondary cultivation
i. Extensive secondary cultivation for small-seeded, direct-sown crops and transplants with small, weak, or inefficient root systems (e.g., carrots)
ii. course secondary tillage for large, vigorous, and resilient transplants (e.g., tomatoes)
4. Optimal environmental conditions favorable to successful transplanting from flat format
a) low light levels
b) low temperature
c) calm winds
d) high relative humidity
e) late afternoon and early evening
b. transplanting 1. Gather necessary tools and materials
a) Seedlings at transplant maturity
b) hand trowel and hand fork
c) Watering wand
d) Dibble
e) Measuring tape
f ) ross and hose
Students’ Step-by-Step Instructions

Transplanting and Direct Seeding10 | Unit 1.4
g) Mist system/micro-sprinklers
h) String and stakes
i) Seed
j) Push seeder
2. Plant spacing considerations: consider how the following factors influence crop spacing
a) Irrigation and cultivation considerations
i. rows should be straight and between-row crop spacing should be large enough to accommodate drip irrigation ribbon and cultivation tools
b) Soil fertility/soil development considerations
i. In infertile or degraded soil, plant densities should be low and increased as soil fertility develops over time
c) root and shoot size
i. how large is the root system and vegetative portion of the plant at maturity?
d) Disease prevention considerations
i. Is the crop susceptible to certain plant pathogens?
ii. Increasing the plant spacing may help to assure adequate air circulation and prevent the development and spread of fungal plant pathogens in certain climates
e) Stem length and stem number in cut flowers
i. By increasing crop density in certain cut flowers, the bloom shaft length may be increased. Decreasing plant densities often results in greater numbers of shorter bloom shafts.
f ) references: crop-spacing chart in Knott’s Handbook for Vegetable Growers, and How to Grow More Vegetables, by John Jeavons; seed packages and catalogues
3. how to plant
a) Know the crop being planted
i. review the crop culture information on the back of the seed package, in seed catalogues, or books on crop culture
b) Plant selection criteria (seedling vigor): Select for vigor and color
c) Plant handling
i. crops grown in a flat format should be handled carefully by the rootball, attempting to disturb the root system as little as possible during the transplanting process. crops grown in a flat format should only be transplanted during the early evening.
ii. crops grown in a cell tray format may be planted throughout the day and with less concern for disturbance of the root system during planting
d) Depth of planting
i. Most crops should be planted to the depth of the cotyledons
ii. crops in the Solanaceae family (tomatoes, peppers, eggplants, etc.) and Brassicaceae family (broccoli, cabbage, cauliflower, etc.) are adventitious rooters and may be buried to the bottom of the first set of true leaves (see appendix 2, Seedlings at Transplant Maturity, Planting Depths)
4. Watering in
a) Seedlings should be immediately irrigated following transplanting
b) Bring the root zone of the crop to field capacity using drip irrigation, overhead sprinkler, or basal soaking
5. Documenting
a) Transcribe the information on the horticultural label (including the transplanting date) to a bed-end stake and the garden record log book (see appendix 10, Unit 1.3)
Students’ Step-by-Step Instructions

Transplanting and Direct Seeding Unit 1.4 | 11
6. Follow-up
a) Determine the type of irrigation to be used and set up any necessary irrigation equipment at this time
b) return remaining seedlings to the propagation area. refill flats with propagation mix and water thoroughly.
c) Over the following approximately 2–5 days, monitor soil moisture in the root zone of the recently transplanted crop. Irrigate once the soil in the root zone has reached 50% of field capacity.
d) Periodic, light overhead irrigation will raise the relative humidity around the seedlings, reduce the rate of evapotransporation, and help minimize transplant shock
e) Observe the growth and development of the roots and shoots of the seedlings, noting the following: rates of growth, changes in color, and damage due to predation
f ) replace seedlings lost to predation
c. direct sowing 1. consider the optimal environmental conditions for seed germination in terms of:
a) Soil moisture
i. 50%–75% of field capacity
b) Degree of secondary cultivation
i. Extensive secondary cultivation is necessary for small-seeded direct-sown crops and transplants with small, weak, or inefficient root systems
c) Soil temperature
i. compare the existing soil temperatures with the optimal germination temperatures found on the back of the seed package, in Knott’s Handbook for Vegetable Growers, or in appendix 2, Unit 1.3, Propagating crops from Seed and Greenhouse Management
2. Direct-sowing techniques
a) Sowing into furrows with hands
i. Open furrow with fingers or hand tool to a depth of approximately 2 times the diameter of the seed to be sown
ii. Sow seed at 2–3 times the density desired at maturity (seedlings are later thinned to desired spacing when the first set of true leaves have developed)
iii. cover seed by pinching furrow together
iv. Gently tamp soil with head of rake to assure soil-to-seed contact
b) Sowing into furrows with push seeder
i. consult the seed plate chart for use of push seeder
ii. Test seeder output on hard, flat surface to confirm desired seed rate/spacing
iii. Periodically check to assure seed output and seed supply in hopper
c) Broadcast sowing
i. Determine application rate using references such as crop-spacing chart in Knott’s Handbook for Vegetable Growers, and in How to Grow More Vegetables, by John Jeavons; seed packages and catalogues
ii. Broadcast evenly over surface of soil
iii. cover lightly with a mixture of 50% garden soil and 50% mature compost
3. Irrigating seed beds
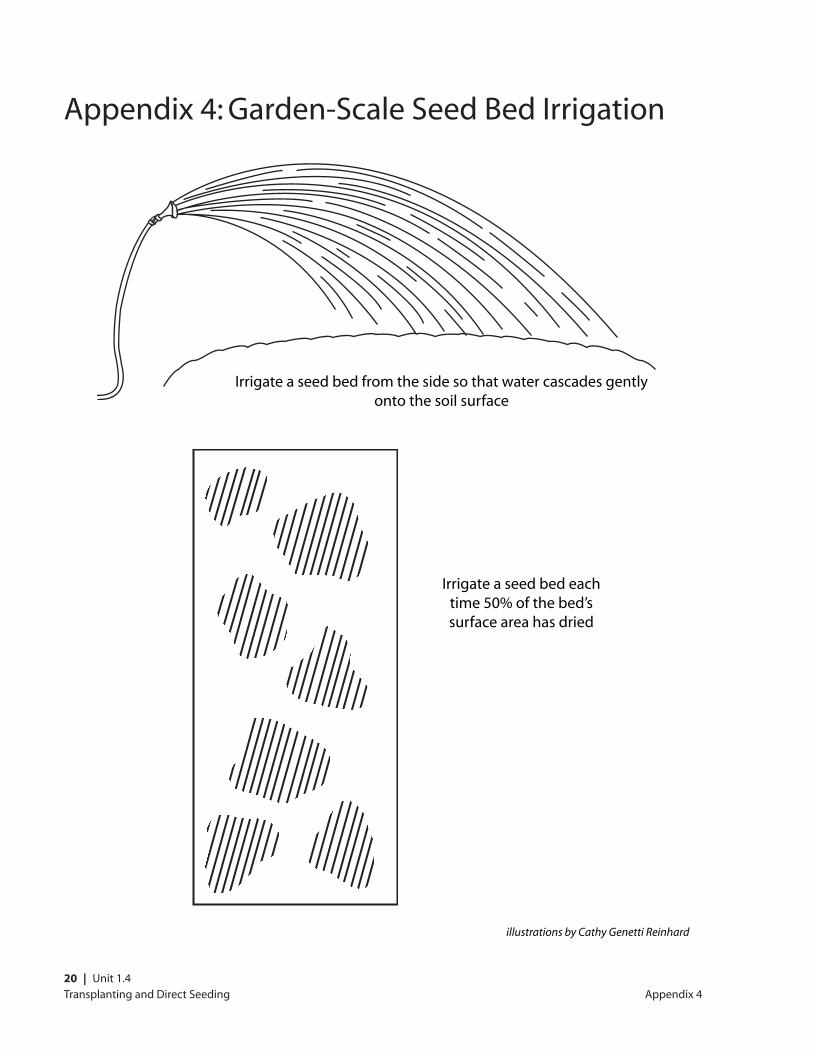
a) Using ross, oscillator, or mist/micro-sprinklers, maintain surface soil moisture with light, frequent applications of water each time 50% of the surface of the soil has dried and discolored (see appendix 4, Garden-Scale Seed Bed Irrigation)
Students’ Step-by-Step Instructions

Transplanting and Direct Seeding12 | Unit 1.4
4. Thinning direct-sown crops
a) Thin directly seeded crops to desired spacing, if necessary, once the first set of true leaves has developed (see crop-spacing chart in Knott’s Handbook for Vegetable Growers, and How to Grow More Vegetables, by John Jeavons; seed packages and catalogues)
Students’ Step-by-Step Instructions
Transplanting and Direct Seeding Unit 1.4 | 13
Demonstration 2: Tractor-Mounted Seeding and Transplanting Equipment
for the instructor
instrUctOr Overview
This field demonstration outline introduces the tractor-mounted equipment and skills used to transplant and direct seed crops. It first covers the sequence of techniques and equipment used to prepare the soil for both transplanting and direct seeding. The outline then introduces the range of equipment and techniques used to transplant and direct seed crops, followed by irrigation techniques.
PreParatiOn and MateriaLs
• Bedshaper/marker
• Tractor-mountedseeder
• Pushseeder
• Plateplanter
• Tractor-mountedtransplantingequipment
• Handtrowels
• Irrigationequipment:dripandsprinkler
• Recordbookforrecordingcropsplanted,sown(seeappendix10inUnit1.3)
• Labelsformarkingbed
• Shovelsforsinglerowplantings
grOUnd PreParatiOn
This demonstration requires access to an area of ground thathasreceivedprimaryandsecondarytillage,pre-irri-gation,andweedcultivation.ThesetechniquesshouldbeincludedinthedemonstrationifnotcoveredpreviouslyinUnit1.2,GardenandFieldTillageandCultivation.
PreParatiOn tiMe
1hour
deMOnstratiOn tiMe
1hour
Instructor’s Demonstration 2
Transplanting and Direct Seeding14 | Unit 1.4
deMOnstratiOn OUtLine
A. Review and Discuss Tools and Sequence Used to Prepare Ground 1.Reviewfieldsoilconditionspriortotillage a) Soilmoisturerange:50%–75%offieldcapacity(seeappendix1inthisunit,and
Unit1.5,Irrigation,fordiscussionoffieldcapacity)
2.Incorporationofcovercropresiduethroughprimarytillage a) Mowing(flailorrotary) b) Apply compost prior to residue incorporation, if necessary c) Incorporatecovercropresiduewithspaderoroff-setwheeldisc
3.Establishmentofseedbedthorughsecondarytillagetechniques a) Rototillordiscfieldtoimprovesurfaceuniformityfollowingresiduebreakdown
4.Plantingbedformation a) Formbedswithlisterbarandshovelsorrollingcultivator b) Shapebedwithbedshaper c) Pre-irrigatetogerminateweedseed d) Cultivateunplanted bedswithsweeps,knives,orrollingcultivatortominimizeweed
pressureandexhaustseedbank e) Plantbedswithseeder,transplanter,orbyhand
B. Demonstrate Bed Shaper/Seeder for Direct-Sown Crops 1.Reviewattachmentofimplement(s)
2.Demonstrateadjustmentofbedshaperheight
3.Demonstrateadjustmentofseedershovels’heightforseedingvariouscrops
4.Reviewexamplesofcropsthataredirectlysownandwhy
C. Demonstrate Implements Used to Prepare Beds for Single-Line Plantings 1.Reviewattachmentandadjustmentofimplement(s)used
2.Reviewexamplesofsingle-linecrops
D. Demonstrate the Use of Mechanical Transplanter 1.Reviewattachmentofimplement(s)
2.Demonstrateadjustmentoftransplanter
3.Transplantpreparations:Irrigationandhardeningoff(seeUnit1.3,PropagatingCropsfromSeedandGreenhouseManagement)
4.Handlingandplacementoftransplants
5.Reviewexamplesofcropsthataremechanicallytransplantedandwhy
E. Review Hand Transplanting Techniques 1.Transplantpreparations:Irrigationandhardeningoff(seeUnit1.5,Irrigation)
2.Handlingandplacement
3.Reviewoftransplantedcrops a) Singlelinecrops b) Doublelinecrops
F. Review Irrigation Techniques Used Immediately Following Transplanting and Direct Seeding 1.Dripirrigation
2.Sprinklerirrigation
Instructor’s Demonstration 2

Transplanting and Direct Seeding Unit 1.4 | 15
Assessment Questions
1) list three physical environmental conditions favorable for successful transplanting of flat-grown seedlings.
2) What is the optimal range of soil moisture for transplanting or direct seeding of crops?
3) Describe how the size, root nature, and vigor of transplants and the size of seeds influence the degree of secondary cultivation needed.
4) list two characteristics of seedlings at transplanting maturity.
5) list two necessary steps in preparing seedlings for transplanting.
Assessment Questions
Transplanting and Direct Seeding16 | Unit 1.4
Assessment Questions Key 1) list three physical environmental conditions
favorable for successful transplanting of flat-grown seedlings
• Lowlightlevels
• Lowtemperature
• Highrelativehumidity
• Calmwinds
2) What is the optimal range of soil moisture for transplanting or direct seeding of crops?
• Between50%–75%offieldcapacity
3) Describe how the size, root nature, and vigor of transplants and the size of seeds influence the degree of secondary cultivation needed
• Directlysowncrops(especiallysmall-seeded crops) require extensive secondary cultivation in order to reduce the surface soil particle size and produce a quality seed bed. Small, inefficient, weak, or shallow-rootedcrops(e.g.,onions,leeks,lettuce)alsorespond favorably to being transplanted into soils having received extensive secondary cultivation.
• Large,vigoroustransplantsmaybetransplanted into more coarsely tilled soils
4) list two characteristics of seedlings at transplanting maturity.
• Secondsetoftrueleavesinitiated
• Rootknit
5) list two necessary steps in preparing seedlings for transplanting.
• Pre-moistenedto50–75%and100%offieldcapacity(flatsandcelltraytransplantsrespectively)
• Hardened-offfor3–21days
Assessment Questions Key

Transplanting and Direct Seeding Unit 1.4 | 17
Appendix 1: Estimating Soil Moisture by Feel
0–25%Noavailablesoilmoisture.Plantswilt. Irrigation re-quired.(1st range)
Dry,loose,singlegrained,flowsthrough fingers. No stain or smear on fingers.
Dry,loose,clodseasily crushed and willflowthroughfingers. No stain or smear on fingers.
Crumbly,dry,powdery, will barely maintain shape. Clods,breaksdowneasily.Mayleaveslight smear or stain when worked with hands or fingers.
Hard,firmbaked,cracked.Usuallytoostiff or tough to work or ribbon1bysqueez-ing between thumb or forefinger.Mayleaveslight smear or stain.
SOIl MOISTUrE lEvEl cOArSE lIGhT MEDIUM hEAvy (% OF FIElD cAPAcITy) (SAnD) (lOAMy SAnD, (FInE, SAnDy lOAM, (clAy lOAM, clAy) SAnDy lOAM) SIlT lOAM)
1Ribbonisformedbysqueezingandworkingsoilbetweenthumbandforefinger
2 Castorballisformedbysqueezingsoilinhand
25–50%Moistureisavail-able,butlevelislow. Irrigation needed.(2nd range)
Appearsdry;willnot retain shape whensqueezedinhand.
Appearsdry;maytend to make a cast2 when squeezedinhand,but seldom will hold together.
Mayformaweakball2 under pres-sure but will still be crumbly.Colorispalewithnoobvi-ous moisture.
Pliable,formsaball;willribbonbutusually breaks or is crumbly.Mayleaveslight stain or smear.
50–75%Moistureisavail-able.Levelishigh.Irrigation not yet needed. (3rd range)
Colorisdarkenedwithobviousmois-ture.Soilmaysticktogetherinveryweak cast or ball.
Colorisdarkenedwithobviousmois-ture.Soil forms weak ball or cast under pressure. Slightfingerstain,but no ribbon whensqueezedbetween thumb and forefinger.
Colorisdarkenedfromobviousmoisture. Forms aball.Workseas-ily, clods are soft with mellow feel. Willstainfingerandhaveslickfeelwhensqueezed.
Colorisdarkenedwithobviousmois-ture. Forms good ball. Ribbonseasily,hasslickfeel.Leavesstainon fingers.
Appears and feels moist.Colorisdarkened.Mayform weak cast or ball.Willleavewetoutline or slight smear on hand.
75% to field capacity (100%) Soilmoisturelevelfollowing an irriga-tion. (4th range)
Appears and feels moist.Colorisdarkened. Forms castorball.Willnot ribbon, but will show smear or stainandleavewetoutline on hand.
Appears and feels moist.Colorisdarkened.Hasasmooth, mellow feel. Forms ball and will ribbon whensqueezed.Stainsandsmears.Leaveswetoutlineon hand.
Colorisdarkened.Appearsmoist;mayfeelsticky.Ribbonsout easily, smears and stainshand,leaveswet outline. Forms good ball.
Appendix 1
Transplanting and Direct Seeding18 | Unit 1.4
Appendix 2
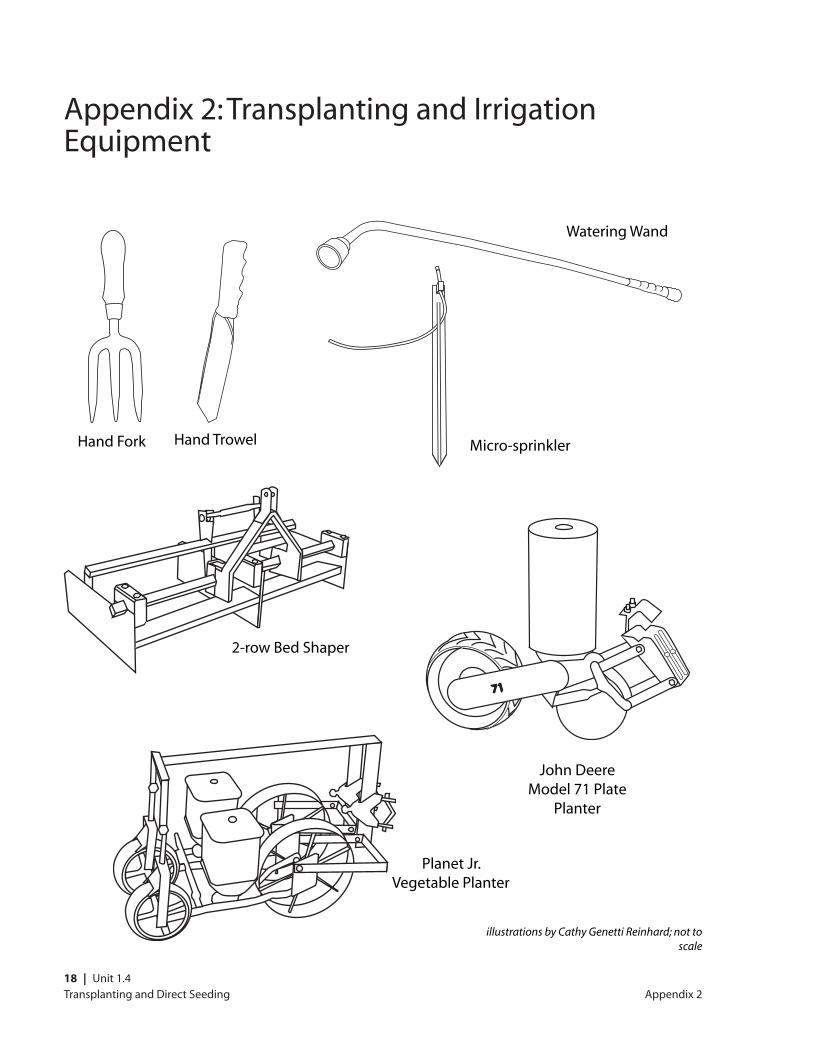
Appendix 2: Transplanting and Irrigation Equipment
7171
Hand forkhand Fork hand Trowel Micro-sprinkler
Watering Wand
2-row Bed Shaper
John Deere Model 71 Plate
Planter
Planet Jr. vegetable Planter
illustrations by Cathy Genetti Reinhard; not to scale

Transplanting and Direct Seeding Unit 1.4 | 19
cell-grown seedling at transplant maturity—note balance of roots
and shoots
Flat-grown seedling at transplant maturity—note balance of roots and shoots
Proper transplanting depth
Appendix 3: Seedlings at Transplant Maturity, Planting Depths
Appendix 3
illustrations by Cathy Genetti Reinhard; not to scale
Improper transplanting depth
Transplanting and Direct Seeding20 | Unit 1.4
Irrigate a seed bed from the side so that water cascades gently onto the soil surface
Irrigate a seed bed each time 50% of the bed’s surface area has dried
Appendix 4: Garden-Scale Seed Bed Irrigation
illustrations by Cathy Genetti Reinhard
Appendix 4