1. What is ProSpeckz IIK? - School of Informatics | The …€¦ · · 2010-09-221. What is...
11
The Hitchhiker’s Guide to ProSpeckzIIK - by Steven Wong - 1- Jun 2005 1. What is ProSpeckz IIK? ProSpeckz IIK (Programmable Speck using Zigbee radio) is the second generation prototyping platform that is designed and developed by Steven Wong at the University of Edinburgh for developing applications for Speckled Computing and intelligent sensor networks. 2. What is on a ProSpeckz IIK? - A Programmable System-on-Chip (PSoC) CY8C29666-24LFXI (www.cypressmicro.com ) - A Zigbee Radio Chip CC2420 (www.chipcon.com ) - A 2.4 GHz Antenna - A RGB LED - A general purpose switch - 2 x 8-bit ports (Port 0, Port 2) free for interfacing with other analog or digital components - A 32.768 KHz external oscillator 3. Setting up and getting ready a. Install the PSoC Designer and the PSoC Programmer using the CDROM provide by the CY3210-MINIPROG1 kit b. Register and get license number for the PSoC C Complier CY3202-C c. Enter the C compiler number in PSoC Designer under Tools->Options->Compiler. Gnd 0 3.3v ISSP BATT+ RESET 1 2 3 5 4 6 7 Gnd Port 2 Port 0 On Off SWITCH XRES SCLK SDATA
Transcript of 1. What is ProSpeckz IIK? - School of Informatics | The …€¦ · · 2010-09-221. What is...

The Hitchhiker’s Guide to ProSpeckzIIK - by Steven Wong
- 1- Jun 2005
1. What is ProSpeckz IIK? ProSpeckz IIK (Programmable Speck using Zigbee radio) is the second generation prototyping platform that is designed and developed by Steven Wong at the University of Edinburgh for developing applications for Speckled Computing and intelligent sensor networks. 2. What is on a ProSpeckz IIK? - A Programmable System-on-Chip (PSoC) CY8C29666-24LFXI (www.cypressmicro.com)- A Zigbee Radio Chip CC2420 (www.chipcon.com)- A 2.4 GHz Antenna - A RGB LED - A general purpose switch - 2 x 8-bit ports (Port 0, Port 2) free for interfacing with other analog or digital components - A 32.768 KHz external oscillator
3. Setting up and getting ready a. Install the PSoC Designer and the PSoC Programmer using the CDROM provide by
the CY3210-MINIPROG1 kit b. Register and get license number for the PSoC C Complier CY3202-C c. Enter the C compiler number in PSoC Designer under Tools->Options->Compiler.
Gnd0
3.3v
ISSP
BATT+
RESET
1
2
3
5
4
6
7
Gnd
Port 2 Port 0
On Off
SWITCH
XRES
SCLK
SDATA

The Hitchhiker’s Guide to ProSpeckzIIK - by Steven Wong
- 2- Jun 2005
4. Your first application Programs for the ProSpeckz would be developed using the PSoC developer and can be written in both assembly (M8C) and C. A template program, “ProSpeckzTemplate.SOC”, is provided with the basic primitive functions for using the ProSpeckz. To simplify development of future ProSpeckz application, always start a new project by cloning the template files provided.
4.1 The simple application to be built The application you are going to build would make use of 2 ProSpeckz (Let’s call them ProSpeckz A and ProSpeckz B). ProSpeckz A would change its LED color periodically every second using interrupts from a 16bit timer. Upon changing colour, it will send the new state of the LED wirelessly to ProSpeckz B. On receiving the information, ProSpeck B would change its LED colour to match that of ProSpeckz A.
Do note that this sample application is made to be as simple as possible thus may not contain the necessary instructions to ensure proper functionality. It’s just a demo. 4.2 Programming ProSpeckzA Step 1: Start PSoc DeveloperRun the PSoC Developer application Step 2: Making a Clone of “ProSpeckzTemplate.SOC”
Click on on the splash screen. On the next screen, select “Clone Project” and enter “ProSpeckzA” as the new project name, then click <Next>.

The Hitchhiker’s Guide to ProSpeckzIIK - by Steven Wong
- 3- Jun 2005
Click <Yes> to create the new directory
Browse to select the “ProSpeckzTemplate.SOC” from whichever directory you store it into. Make sure “Use the same Base Part” is selected and click <Finish>.
A clone project by the name of “ProSpeckzA.SOC” has been created.
Step 3: Selecting the hardware (in this case, the 16bit timer)
You should be in the device editor (look at the title of the window). If not, on the top toolbar,
click on the button. The next step is to select the hardware (digital/analog) modules that you want. In order to do
this, click on the button. After that, click on the <Timers> tab (on the left) and click on
the module <Timer16>.
You can view details of this module, the specifications, the APIs, the sample codes and the needed digital blocks on the rest on the windows.

The Hitchhiker’s Guide to ProSpeckzIIK - by Steven Wong
- 4- Jun 2005
Double-click on the Timer16 module to select it.
You should now see the module “Timer16_1” under the <Selected User Modules> window. Rename the module by left-clicking it and choose <rename>. Change the name of the module to “Timer16”
That’s it. You have just selected a 16-bit timer into the ProSpeckz configuration. The next step is to configure the timer.
The Hitchhiker’s Guide to ProSpeckzIIK - by Steven Wong
- 5- Jun 2005
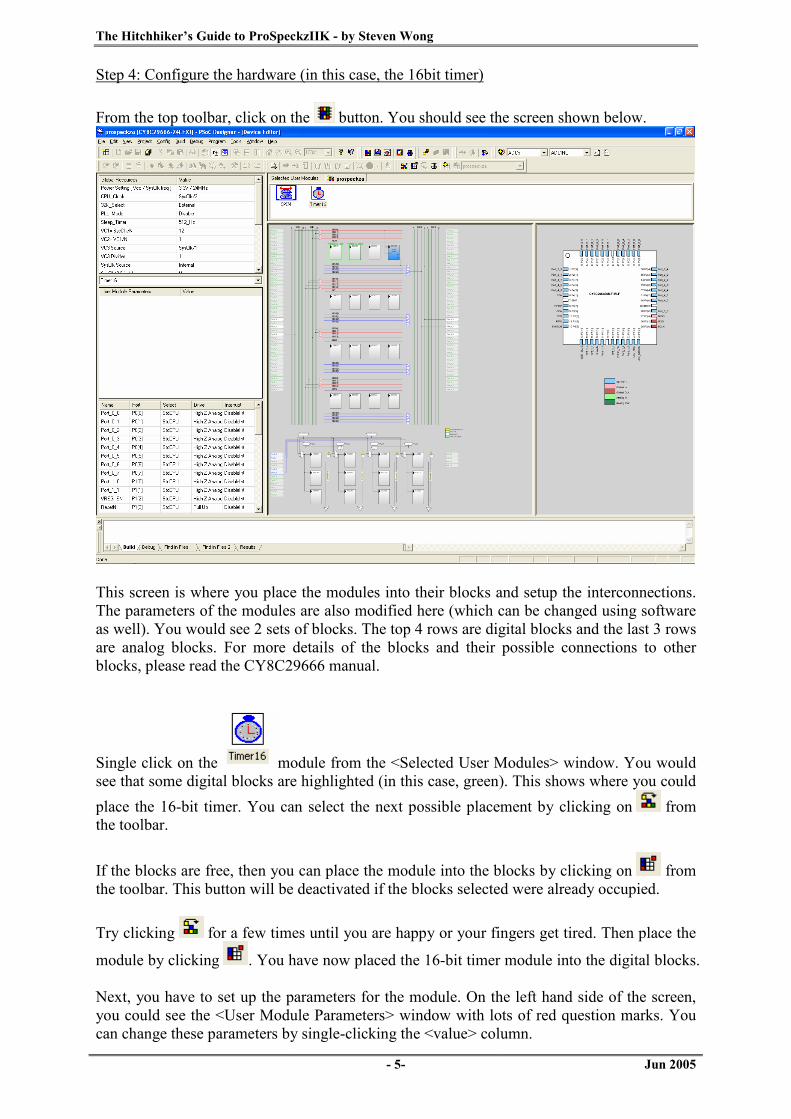
Step 4: Configure the hardware (in this case, the 16bit timer)
From the top toolbar, click on the button. You should see the screen shown below.
This screen is where you place the modules into their blocks and setup the interconnections. The parameters of the modules are also modified here (which can be changed using software as well). You would see 2 sets of blocks. The top 4 rows are digital blocks and the last 3 rows are analog blocks. For more details of the blocks and their possible connections to other blocks, please read the CY8C29666 manual.
Single click on the module from the <Selected User Modules> window. You would see that some digital blocks are highlighted (in this case, green). This shows where you could place the 16-bit timer. You can select the next possible placement by clicking on from the toolbar.
If the blocks are free, then you can place the module into the blocks by clicking on from the toolbar. This button will be deactivated if the blocks selected were already occupied. Try clicking for a few times until you are happy or your fingers get tired. Then place the
module by clicking . You have now placed the 16-bit timer module into the digital blocks. Next, you have to set up the parameters for the module. On the left hand side of the screen, you could see the <User Module Parameters> window with lots of red question marks. You can change these parameters by single-clicking the <value> column.

The Hitchhiker’s Guide to ProSpeckzIIK - by Steven Wong
- 6- Jun 2005
Please enter the following parameter for the module.
That’s it. You have now place the module and configured it. The next step is to generate the codes for it. Step 5: Generating the codes for the configured hardware
Click the button on the tool bar. That’s all for the “hardware”. Let’s move on to the software. Step 6: Getting into the application editor
Go to the application editor by clicking the button on the tool bar. You would see several folders to the left of the screen. “Library Source”, “Library Headers” and “External Headers” are generated for you in Step 5.

The Hitchhiker’s Guide to ProSpeckzIIK - by Steven Wong
- 7- Jun 2005
Step 7: The ProSpeckz filesSelect the “Source Files” folder and you would see 3 files. “boot.asm” � generated by PSoC Designer. Do not edit this. “main.c” � this is where you would write your codes “prospeckz.c” � this contains some primitive functions for the ProSpeckz. To see the
description on the functions, view the “prospeckz.h” file under the “Headers” folder
Step 8: Writing the main codeDouble-click on the “main.c” file. Enter the codes colored in blue into your program. //---------------------------------------------------------------------------- // C main line //---------------------------------------------------------------------------- #include <m8c.h> // part specific constants and macros #include "PSoCAPI.h" // PSoC API definitions for all User Modules #include "PSoCGPIOInt.h" #include "stdlib.h" #include "prospeckz.h"
//This is the main function that would be executed after boot.asm is executed. void main() {
RADIO_Init(0); //Init radio reciever RADIO_SetTxStrength(2); //Set the transmission strength
//enter your codes here Timer16_EnableInt(); //Enable interrupt Timer16 M8C_EnableGInt; //Enable interrupts for PSoC Timer16_Start(); //Start the timer }
//Writing the interrupt service routine #pragma interrupt_handler Timer16_ISR void Timer16_ISR(){ static unsigned char ledColor=0; Packet pkt;
ledColor++; //Change the colour of the LED. LEDs are active low. if (ledColor==8)
ledColor=0; LED_Data_ADDR = ledColor;
pkt.dataLength = 1; //Formating the packet. Set packet length to 1 pkt.data[0]=ledColor; //The first byte of the data packet would contain the led color info
RADIO_Send(&pkt); //Send the packet… simple as that }
To send a data packet wirelessly is extremely simple. Just set the data length, enter the data you want to send into the data[] array and call the function RADIO_Send(); To modify the packet format, the maximum length or to add headers, please modify the “prospeckz.h” file (experts only). Step 9: Compiling the codeBuild the program by pressing the F7 key or clicking the button on the tool bar. Make sure that there are no warnings or errors by looking at the bottom on the screen for the compilation results.
The Hitchhiker’s Guide to ProSpeckzIIK - by Steven Wong
- 8- Jun 2005
Step 10: Downloading the program
That’s all for the programming. Now let’s download the program into a ProSpeckz.
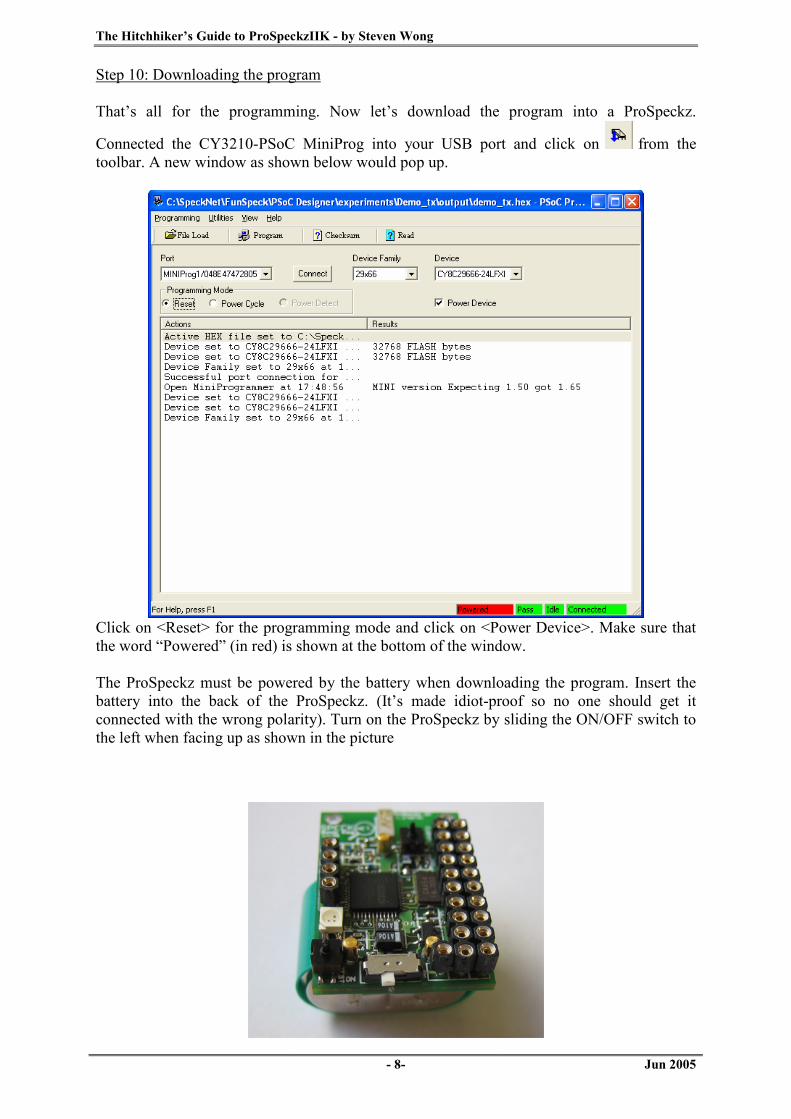
Connected the CY3210-PSoC MiniProg into your USB port and click on from the toolbar. A new window as shown below would pop up.
Click on <Reset> for the programming mode and click on <Power Device>. Make sure that the word “Powered” (in red) is shown at the bottom of the window. The ProSpeckz must be powered by the battery when downloading the program. Insert the battery into the back of the ProSpeckz. (It’s made idiot-proof so no one should get it connected with the wrong polarity). Turn on the ProSpeckz by sliding the ON/OFF switch to the left when facing up as shown in the picture

The Hitchhiker’s Guide to ProSpeckzIIK - by Steven Wong
- 9- Jun 2005
Insert the pin extender into the MiniProg as shown below. The pin position “Vdd” should be left empty.
Next, connect the MiniProg to the ProSpeckz as shown below. Take note of the orientation of the MiniProg.
Back to the computer. Click the button to program the ProSpeckz. Upon completion, close the PSoC Programmer window and disconnect the ProSpeckz from the MiniProg. Reset the ProSpeckz and you should see the LED changing colors.

The Hitchhiker’s Guide to ProSpeckzIIK - by Steven Wong
- 10- Jun 2005
4.3 Programming ProSpeckzB We are not going through all the pictures and text again for this as you should have a pretty good idea how to do it already. There is no hardware configuration needed for ProSpeckz B.
Create a clone of “ProSpeckzTemplate.SOC” by selected File->New Project->Clone from the menu bar then follow Step 2. Name the new project file “ProSpeckz B”. Repeat the same steps from 6-10, with the only difference that the code to be inserted into main.c is as follows (in blue); //---------------------------------------------------------------------------- // C main line //---------------------------------------------------------------------------- #include <m8c.h> // part specific constants and macros #include "PSoCAPI.h" // PSoC API definitions for all User Modules #include "PSoCGPIOInt.h" #include "stdlib.h" #include "prospeckz.h"
//This is the main function that would be executed after boot.asm is executed. void main() {
Packet pkt; RADIO_Init(0); //Init radio reciever
RADIO_SetTxStrength(2); //Set the transmission strength
//enter your codes here RADIO_RecieverOn; //Turn on the Radio Reciever
while (1){ if (RADIO_Recieve(&pkt)== SUCCESS){ //Wait for Packet
if (pkt.dataLength==1){ //Check packet length = 1 LED_Data_ADDR = pkt.data[0]; //Change LED color accordingly
}}
}
}
4.4 Trying the application Hurray!!! You managed to program you very first ProSpeckz application. Turn on both ProSpeckz A and ProSpeckz B. When you placed them closely together, notice how ProSpeckz B follows the color of ProSpeckz A.

The Hitchhiker’s Guide to ProSpeckzIIK - by Steven Wong
- 11- Jun 2005
5. MUST READ!!! Hardware settings that must not be changed. Despite the amount of flexibility on the PSoC, do note the following restrictions when messing about with the hardware configuration of the ProSpeckz IIK-Mini:
a. Operating voltage is always 3.3 volts b. SysClk is internal 24MHz, CPU_CLK is 12MHz and VC1 = SysClk/12 c. Do not remove SPIM. It is the module that would be talking to the radio chip.
However, you could move it between different digital blocks as long as the pin configurations are not changed.
d. Only Port 0 and Port 2 are available on the ProSpeckz II so do not mess with the other ports to be safe.
e. The following is hardwired so don’t change them. i. Port 5[0] = Red LED (LOW to turn LED on) ii. Port 5[1] = Blue LED (LOW to turn LED on) iii. Port 5[2] = Green LED (LOW to turn LED on) iv. Port 5[3] = general purpose switch (HIGH on push) v. Port 3[0] = SCLK (to CC2420) vi. Port 3[1] = FIFO(from CC2420) vii. Port 3[2] = MOSI (to CC2420) viii. Port 3[3] = SFD(from CC2420) ix. Port 3[4] = MISO (from CC2420) x. Port 3[5] = CCA (from CC2420) xi. Port 3[7] = FIFOP (from CC2420) xii. Port 1[3] = ResetN (to CC2420) xiii. Port 4[1] = (from CC2420)
For more experience users, if there is a need, you could shift the following connections from the SPIM module to give yourself more flexibility (for example, if you want a PWM to drive the RGB LED) Port 4[3] = SCLK Port 4[5] = MOSI Port 4[7] = MISO 6. Final notes This quick guide and short tutorial session just briefly runs through on how to use the PSoC designer, the programmer and the ProSpeckz. To fully utilize the flexibility and capability of the ProSpeckz, please read through the datasheets of the PSoC and the CC2420. These are available on the manufacturers’ webpage. You could also use the development kit provided and the tutorials online to assist you in developing applications. A good forum at www.psocdesigner.com contains many interesting readings ranging from implementation issues to novel applications. Do read the application notes available at www.cypressmicro.com for ideas on usages of the PSoC. For the batteries, please make sure that the voltage supplied to a ProSpeckz does not exceed 7.2 volts if driven from a DC adaptor or from other sources, else sparks may fly. For the VARTA batteries provided, a battery charger will be made available to you very soon (or you could build an adapter to connect 2 x 3.6v batteries together in series (so it looks like a PP3 battery) then use a commercially available battery charger). Finally, my apologies for any typos, bad grammar and spelling mistakes (generally, bad English) found in this guide. Thank you for your time and hope you have lots of fun with the ProSpeckz.