· Web viewBy completing the four steps below you will become an expert on the design of bridges...
19
Civil Engineering: Bridge Building The Problem? Four open spans need bridges. You've just been put in charge of deciding which type of bridge is best for each of those four spans. You can examine the location of each bridge site at the following link . Are you up to the task? Let's find out. The Tools? By completing the four steps below you will become an expert on the design of bridges and the impacts they encounter. First, you'll want to take a good look at each site and determine the special requirements your bridges will need using the link below. Then, you will want to research and learn about how different materials, forces, shapes, and loads will impact your bridge using 4 online virtual labs and five station labs set up in the classroom. Next, you'll want to do research and conduct minilabs on the construction of each of the four main types of bridges to learn the advantages and disadvantages of each type. The minilabs are set up in stations around the room. Lastly, you will want to look at what caused the collapse of eight other major bridge systems before you build your own. You can keep track of what you have learned by completing the notes and questions below. Only then will you be ready to try your hand at building a bridge—actually four of them! Follow the steps below: 1. Site Requirements: Research each of the four sites that require a bridge to span them. Record below special requirements that will be needed for each bridge. The requirements for each bridge will be dependent upon the characteristics of the sites where the bridges will be built. Site #1 Requirements: ___________________________________________________________________________ ___________________________________________________________________________ ___________________________________________________________________________ _______________ Site #2 Requirements: ___________________________________________________________________________ ___________________________________________________________________________ ___________________________________________________________________________ _______________
Transcript of · Web viewBy completing the four steps below you will become an expert on the design of bridges...
Civil Engineering: Bridge Building The Problem? Four open spans need bridges. You've just been put in charge of deciding which type of bridge is best for each of those four spans. You can examine the location of each bridge site at the following link. Are you up to the task? Let's find out.
The Tools? By completing the four steps below you will become an expert on the design of bridges and the impacts they encounter. First, you'll want to take a good look at each site and determine the special requirements your bridges will need using the link below. Then, you will want to research and learn about how different materials, forces, shapes, and loads will impact your bridge using 4 online virtual labs and five station labs set up in the classroom. Next, you'll want to do research and conduct minilabs on the construction of each of the four main types of bridges to learn the advantages and disadvantages of each type. The minilabs are set up in stations around the room. Lastly, you will want to look at what caused the collapse of eight other major bridge systems before you build your own. You can keep track of what you have learned by completing the notes and questions below. Only then will you be ready to try your hand at building a bridge—actually four of them! Follow the steps below:
1. Site Requirements: Research each of the four sites that require a bridge to span them. Record below special requirements that will be needed for each bridge. The requirements for each bridge will be dependent upon the characteristics of the sites where the bridges will be built.
Site #1 Requirements: ________________________________________________________________________________________________________________________________________________________________________________________________________________________________________________
Site #2 Requirements: ________________________________________________________________________________________________________________________________________________________________________________________________________________________________________________
Site #3 Requirements: ________________________________________________________________________________________________________________________________________________________________________________________________________________________________________________
Site #4 Requirements: ________________________________________________________________________________________________________________________________________________________________________________________________________________________________________________

2. Impacts on Structures:
A. Force Lab: This lab simplifies the real-life forces and actions that affect structures, in order to illustrate key concepts. Forces act on big structures in many ways. Click on one of the actions on the link above to explore the forces at work and to see real-life examples. Complete questions 1-15 below to organize your findings.
1. Define compression and draw a diagram of a block that is experiencing compression. Include arrows indicating directions of force on your diagram.____________________________________________________________________________________________________________________________________________________
Compression Forces
2. Explain exactly what happens to an object that experiences compression forces. ____________________________________________________________________________________________________________________________________________________
3. Give a real life example of when compression forces are experienced in civil engineering. ____________________________________________________________________________________________________________________________________________________
4. Define tension and draw a diagram of a block that is experiencing compression. Include arrows indicating directions of force on your diagram.____________________________________________________________________________________________________________________________________________________
Tension Forces
5. Explain exactly what happens to an object that experiences tension forces. ____________________________________________________________________________________________________________________________________________________
6. Give a real life example of when tension forces are experienced in civil engineering. ____________________________________________________________________________________________________________________________________________________
7. Define bending and draw a diagram of a block that is experiencing compression. Include arrows indicating directions of force on your diagram.____________________________________________________________________________________________________________________________________________________
Bending Forces
8. Explain exactly what happens to an object that experiences bending forces. ____________________________________________________________________________________________________________________________________________________
9. Give a real life example of when bending forces are experienced in civil engineering. ____________________________________________________________________________________________________________________________________________________
10. Define shear and draw a diagram of a block that is experiencing compression. Include arrows indicating directions of force on your diagram.____________________________________________________________________________________________________________________________________________________
Shearing Forces
11. Explain exactly what happens to an object that experiences shear forces. ____________________________________________________________________________________________________________________________________________________
12. Give a real life example of when shear forces are experienced in civil engineering. ____________________________________________________________________________________________________________________________________________________
13. Define torsion and draw a diagram of a block that is experiencing compression. Include arrows indicating directions of force on your diagram.____________________________________________________________________________________________________________________________________________________
Torsion Forces
14. Explain exactly what happens to an object that experiences torsion forces. ____________________________________________________________________________________________________________________________________________________
15. Give a real life example of when torsion forces are experienced in civil engineering. ____________________________________________________________________________________________________________________________________________________
B. Materials Lab: This lab simplifies the real-life properties of a selection of materials, in order to illustrate key concepts. What you build a structure out of is just as important as how you build it! Different materials have vastly different properties. Click on a material in the link above to find out more about it, and put it to the test. Fill out the table below as you complete the lab to organize your findings.
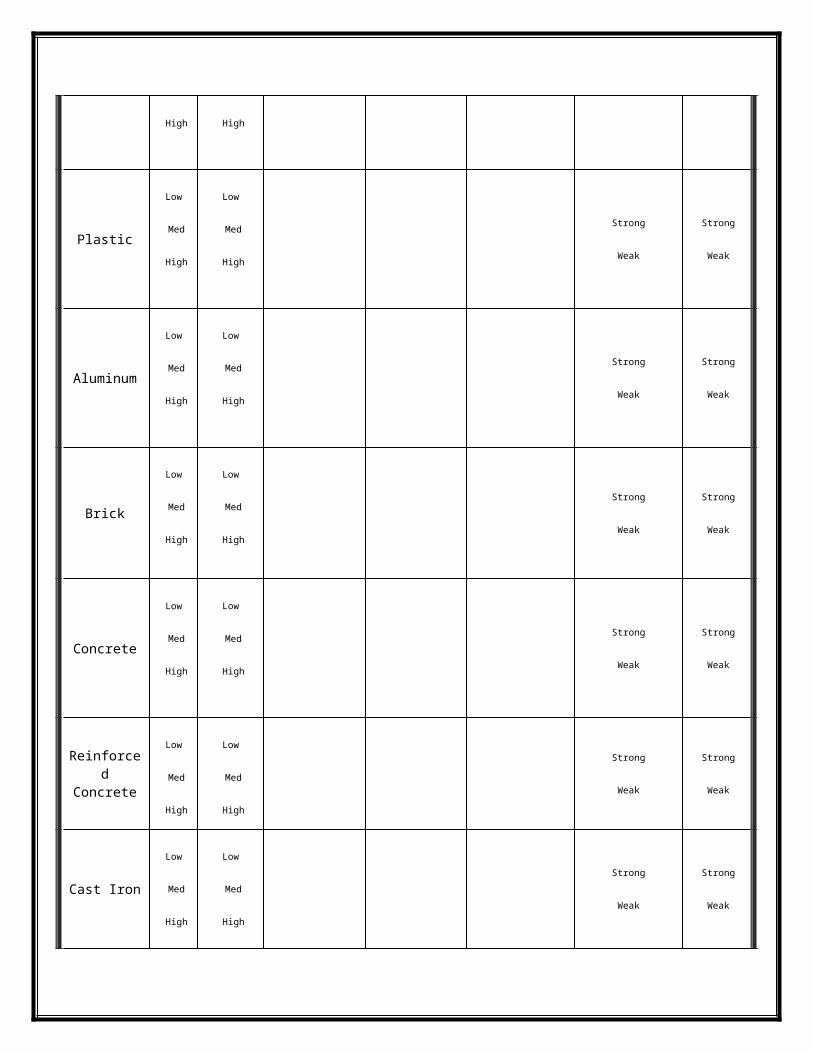
Materials Cost Weight Pros Cons Applications CompressionForces
TensionForces
WoodLow
Med
High
Low
Med
High
Strong
Weak
Strong
Weak
PlasticLow
Med
High
Low
Med
High
Strong
Weak
Strong
Weak
AluminumLow
Med
High
Low
Med
High
Strong
Weak
Strong
Weak
Brick
Low
Med
High
Low
Med
High
Strong
Weak
Strong
Weak
ConcreteLow
Med
High
Low
Med
High
Strong
Weak
Strong
Weak
Reinforced Concrete
Low
Med
High
Low
Med
High
Strong
Weak
Strong
Weak
Cast IronLow Low
Strong
Weak
Strong
Weak
Med
High
Med
High
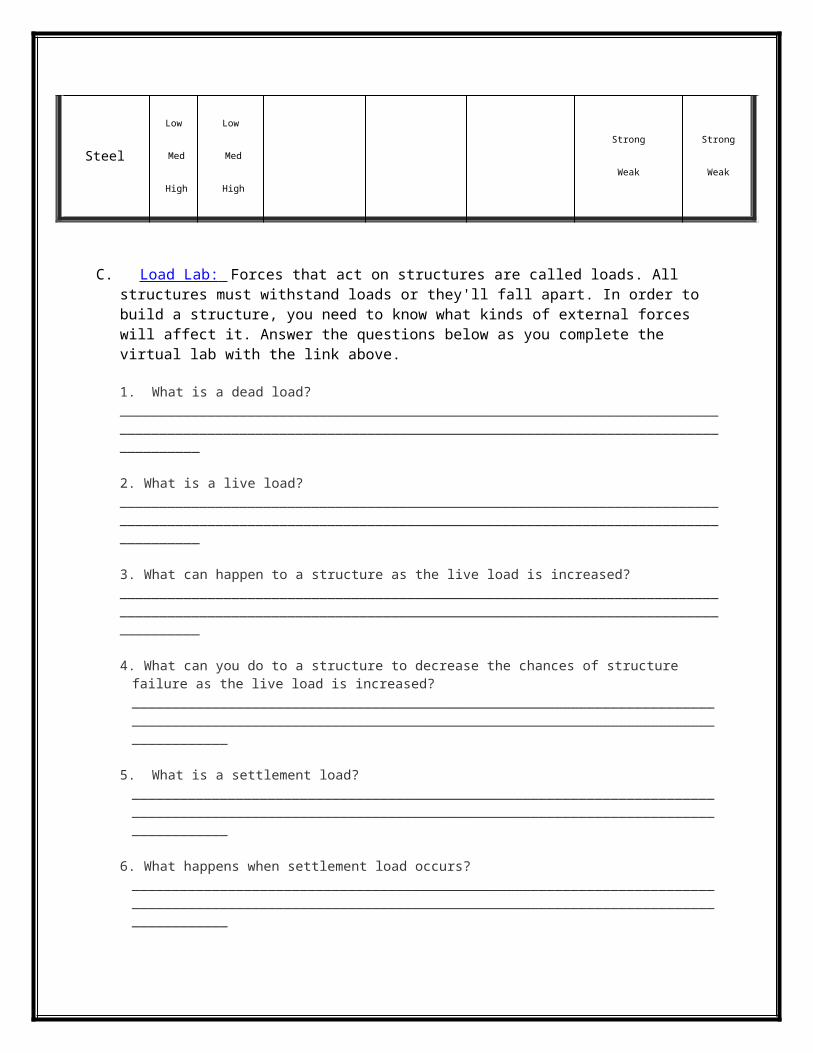
SteelLow
Med
High
Low
Med
High
Strong
Weak
Strong
Weak
C. Load Lab: Forces that act on structures are called loads. All structures must withstand loads or they'll fall apart. In order to build a structure, you need to know what kinds of external forces will affect it. Answer the questions below as you complete the virtual lab with the link above.
1. What is a dead load? ________________________________________________________________________________________________________________________________________________________________
2. What is a live load? ________________________________________________________________________________________________________________________________________________________________
3. What can happen to a structure as the live load is increased? ________________________________________________________________________________________________________________________________________________________________
4. What can you do to a structure to decrease the chances of structure failure as the live load is increased? ______________________________________________________________________________________________________________________________________________________________
5. What is a settlement load? ______________________________________________________________________________________________________________________________________________________________
6. What happens when settlement load occurs? ______________________________________________________________________________________________________________________________________________________________
7. What can be done to support structures that may be impacted by settlement load? ______________________________________________________________________________________________________________________________________________________________
8. Go to station lab #1 in the class and complete the mini lab at the table. What happen to the balloon after the water was heated? ______________________________________________________________________________________________________________________________________________________________Why did this happen? ______________________________________________________________________________________________________________________________________________________________What is all mater made of? ______________________________________________________________________________
What happen to them when you added heat to the water? ______________________________________________________________________________
9. What is thermal load? ______________________________________________________________________________________________________________________________________________________________
10. What happens as a result of a thermal load? ______________________________________________________________________________________________________________________________________________________________
11. Go to station lab #2 in the class and complete the minilab at the table. What happened to the heated glass marbles when you placed them in the iced cold water the first, second, and third times? Draw pictures of your original marble below as well as after each cooling occurrence. __________________________________________________________________________________________________________________________________________________________
12. Go to station #3 in the class and complete the minilab at the table. What happen when you placed the metal sphere through the metal ring before heating the metal sphere? __________________________________________________________________________________________________________________________________________________________
13. Make a prediction about what you think will happen when you place the sphere through the ring after it is heated? __________________________________________________________________________________________________________________________________________________________
14. What actually happen to the sphere when you tried to place it through the ring after you heated it? __________________________________________________________________________________________________________________________________________________________
15. What happen to the sphere when you placed it through the ring after it was cooled in the water? __________________________________________________________________________________________________________________________________________________________
16. Go to station lab #4 in the class and complete the minilab at the table. What happen to the compound bar after you heated it? __________________________________________________________________________________________________________________________________________________________Why do you think this happen? __________________________________________________________________________________________________________________________________________________________
17. Go to station lab #5 in the class and complete the minilab at the table. What happen when you placed your hand on the hand boiler?
Original Marble
Cooling #1 Cooling #2 Cooling #3
_____________________________________________________________________________Why did this happen? __________________________________________________________________________________________________________________________________________________________
18. What can be done to improve a structures ability to handle thermal load? __________________________________________________________________________________________________________________________________________________________
19. Based out what you learned in the minilabs why do you think sidewalks and driveways are generally constructed with seams in them every few feet? _____________________________________________________________________________
20. What is an earthquake load? __________________________________________________________________________________________________________________________________________________________
21. What happens when earthquake load occurs? __________________________________________________________________________________________________________________________________________________________
22. What can be done to support structures that may be impacted by earthquake load? __________________________________________________________________________________________________________________________________________________________
23. What is wind load? __________________________________________________________________________________________________________________________________________________________
24. What happens when wind load occurs? __________________________________________________________________________________________________________________________________________________________
25. What can be done to support structures that may be impacted by wind load? __________________________________________________________________________________________________________________________________________________________
26. What is a dynamic load? __________________________________________________________________________________________________________________________________________________________
27. What can happen when a dynamic load occurs? __________________________________________________________________________________________________________________________________________________________
28. What can be done to support structures that may be impacted by a dynamic load? __________________________________________________________________________________________________________________________________________________________

D. Shape Lab: In the real world, many variables affect the strength and stability of any given shape. The choice of materials, joints, load distribution, and size and thickness of a structure all affect its ability to resist loads. For example, a triangle made of paper would collapse much sooner than an arch made of steel -- an effect that is not demonstrated in this lab. The shape comparisons in this lab depend upon the following conditions: each shape is of equivalent thickness, the joints are hinged, and the live load is applied downward to the structure at a single point at its top and center. However, the shape of a structure does affect how strong it is. Rectangles, arches, and triangles are the most common shapes used to build.
1. Push the rectangle. What happens when you push the side of a rectangle? ____________________________________________________________________________________________________________________________________________________________
2. What can be done to prevent the rectangle from flopping over? ____________________________________________________________________________________________________________________________________________________________
3. Push the arch. What happens when you push on an arch that is not supported on both sides? ____________________________________________________________________________________________________________________________________________________________
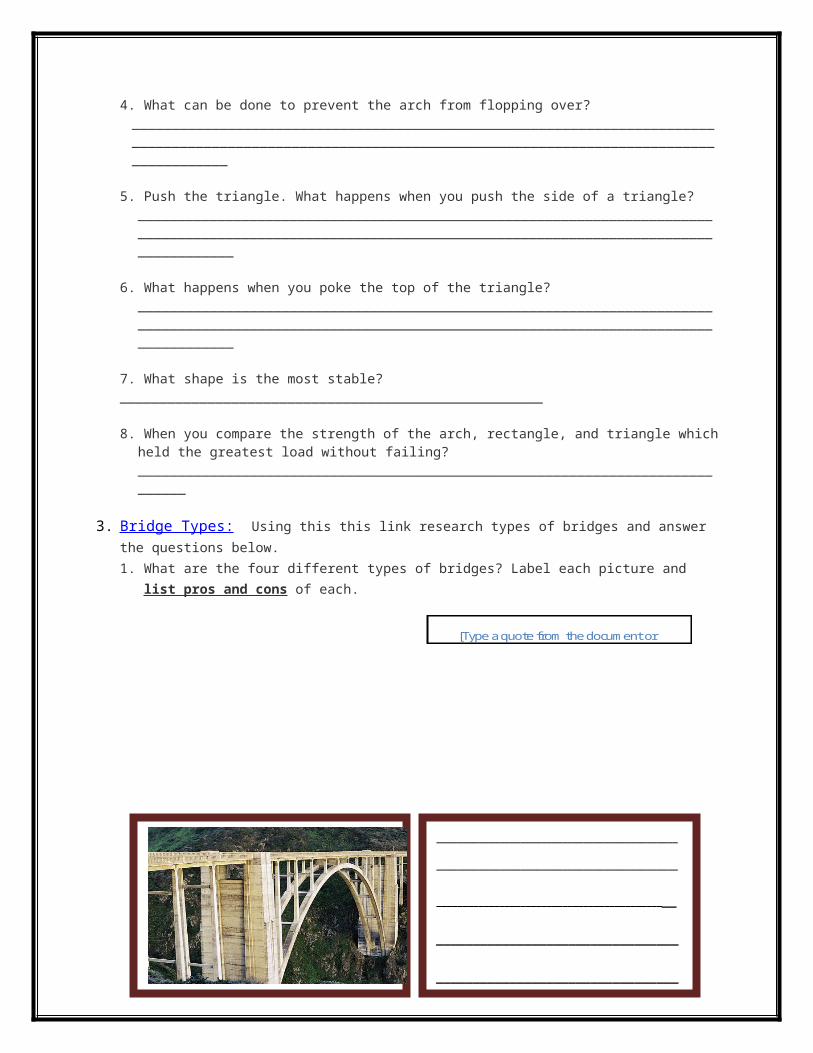
4. What can be done to prevent the arch from flopping over? ______________________________________________________________________________________________________________________________________________________________
5. Push the triangle. What happens when you push the side of a triangle? ____________________________________________________________________________________________________________________________________________________________
6. What happens when you poke the top of the triangle? ____________________________________________________________________________________________________________________________________________________________
7. What shape is the most stable? _____________________________________________________
8. When you compare the strength of the arch, rectangle, and triangle which held the greatest load without failing? ______________________________________________________________________________
3.
Bridge Types: Using this this link research types of bridges and answer the questions below.1. What are the four different types of bridges? Label each picture and list pros and cons of each.
[Type a quote from the document or
[Type a quote from the document or
_________________________________________________
_________________________________________________
_____________________________________________
___________________________________
_____________________________
________________________________________________
_________________________________________________________________________________________________________________________________________________________________________________
________________________________________________
_________________________________________________________________________________________________________________________________________________________________________________
[Type a quote from the document or
2. Using the resources provided by your teacher complete all four “Try It” mini labs (1 for each bridge type) at lab stations 6-9 around the class. Answer these questions for station number 6. What happened when you pressed down on the center arch with no books present?
__________________________________________________________________________________________________________________________________________________________
3. After placing the books at each end what happened when you pressed on the center this time? __________________________________________________________________________________________________________________________________________________________
4. Move to lab station #7. What happens when you press down on the center of the piece of string the first time? __________________________________________________________________________________________________________________________________________________________What happens when you press down on the center of the string after placing the ends of the string under a stack of books? __________________________________________________________________________________________________________________________________________________________
5. Move to lab station number 8. What happens to the top and the bottom of the eraser when you press down on the center on a beam bridge?
________________________________________________
_________________________________________________________________________________________________________________________________________________________________________________
[Type a quote from the document

__________________________________________________________________________________________________________________________________________________________
6. Move to lab station number 9. How to cable-stayeds work? __________________________________________________________________________________________________________________________________________________________
4. View a slide show on 8 major bridge collapses, and see how lessons learned from past collapses have helped improve bridge safety, and how "smart" sensing technology is already aiding the monitoring of bridges both new and old.
1. Summarize what you learned about these bridge collapses in the table below.
Bridge Name Date Collapsed Number Injured Cause of Collapse
2. Watch this video on Smart Bridges. List 5 things you learned about monitoring bridges from watching the video.
a. ______________________________________________________________________________________________________________________________________________
b. ______________________________________________________________________________________________________________________________________________
c. ______________________________________________________________________________________________________________________________________________
d. ______________________________________________________________________________________________________________________________________________
e. ______________________________________________________________________________________________________________________________________________
5. Are you ready to build your bridges? Do you think you know which bridge goes where? Click on this link to start placing your bridges in the proper locations or feel free to review the survey sites again. Fill in the notes below to show you did it correctly.
Bridge Location Type of Bridge
You did such a good job with your assignment that another city has hired you to complete the placement of their bridges as well. Go to this link to help them out.
Bridge Location Type of Bridge
6. Congratulations. You have worked really hard and earned some well needed vacation time. Word has gotten out though about what a great civil engineer you are and other towns and cities are in need of your assistance. If you would like to spend your well-earned vacation time to help out these other cities with their engineering needs click on the links below.
1. Dome Challenge 2. Skyscraper Challenge 3. Dam Challenge 4. Tunnel Challenge
7. You and your team will now have access to Popsicle sticks and white glue. With your team of 3 you will be build a bridge using the knowledge that you have acquired the past few days. You will have 1 day to sketch a blueprint and 2 days to build your bridge. Each group’s bridge must be:
1. Made entirely of popsicle sticks and white glue. No other materials are allowed!
2. Able to span a 1 meter gap.
3. Have a mass less than 250 grams.
4. Have a hole in the middle that is at least 4 cm in diameter so that the testing bar can be inserted.
5. Students will spend the first day drawing a blueprint of their bridge to be handed in at the end of the, drawing a blue print period.
On day 4 students will test their bridges. First each group will have theirteam name and the mass of their bridge recorded. Then each team will record how much mass each bridge held before it broke. You will receive 100 points for building a bridge and 200 points will be based on the weight your bridge can

hold. For example using the scaling system below if you built a bridge that weighed 200 grams in mass then your bridge would need to hold 330 grams of load in order to receive an A+ on the entire project.
Student bridges will be graded with the following scale:
Total Possible Points = 300: (100 for completing a bridge, 200 according to strength)
Letter Grade Percentage: Strength : Weight Ratio
A+ 100% 165:1A 95% 145:1A- 90% 132:1B+ 88% 105:1B 85% 85:1B- 80% 65:1C+ 78% 45:1C 75% 25:1C- 70% 15:1D 65% 1:1F 55% DISQUALIFIEDF 0% NO BRIDGE