virtual Server (shared) User Guide - Telstra · CHAPTER 1 OVERVIEW 2 WELCOME TO THE VIRTUAL SERVER...
61
CLOUD INFRASTRUCTURE VIRTUAL SERVER (SHARED) USER GUIDE
Transcript of virtual Server (shared) User Guide - Telstra · CHAPTER 1 OVERVIEW 2 WELCOME TO THE VIRTUAL SERVER...
CLOUD INFRASTRUCTURE VIRTUAL SERVER (SHARED) USER GUIDE
CHAPTER 1 OVERVIEW 2
WELCOME TO THE VIRTUAL SERVER (SHARED) USER GUIDE
AUSTRALIAN ACCOUNT HOLDERS
For sales, account set-up enquiries and technical support, contact your Telstra representative or visit the Cloud
Services website (www.cloud.telstra.com), where you’ll find all our contact details plus a glossary, FAQs and
Our Customer Terms.
TELSTRA GLOBAL ACCOUNT HOLDERS
For sales, account set-up enquiries and technical support, contact your Telstra Global representative or visit the
Telstra Global website (www.telstraglobal.com/cloud) for the customer service team in your region.
Note: we don’t provide assistance with issues specific to a customer’s local network,
servers, operating systems and software (post-installation). Specialist technical support
may be charged as an additional service.
CONVENTIONS USED IN THIS GUIDE
The following typographical conventions are used in this guide for simplicity and readability:
Web addresses, email addresses and hyperlinks are shown in bold italics, for example www.cloud.telstra.com.
Button names and titles/features on your computer screen are shown in italics.
User input is shown in typewriter font.
Virtual Server (Shared) User Guide, Version 8.0
© Telstra Corporation Limited (ABN 33 051 775 556) 2015. All rights reserved.
This work is copyright. Apart from any use as permitted under the Copyright Act 1968, information contained within this manua l
cannot be used for any other purpose other than the purpose for which it was released. No part of this publication may be
reproduced, stored in a retrieval system, or transmitted in any form or by any means, electronic, mechanical, photocopying,
recording or otherwise, without the written permission of Tels tra Corporation Limited.
Words mentioned in this guide that are known to be trademarks, whether registered or unregistered, have been capitalised or
use initial capitals. Terms identified as trademarks include Microsoft® and Microsoft Windows
®, Microsoft Dynamics
® CRM
Server, Microsoft Exchange® Server, Microsoft Lync
® Server, Microsoft SharePoint
® Server, Microsoft SQL Server
®.
CHAPTER 1 OVERVIEW 3
WHAT’S INSIDE
CHAPTER 1 OVERVIEW 4
CHAPTER 2 HOW IT WORKS 6
CHAPTER 3 CREATE VIRTUAL SERVERS 8
CHAPTER 4 MANAGE VIRTUAL SERVERS 15
CHAPTER 5 NETWORK CONNECTION TO VIRTUAL SERVERS 29
CHAPTER 6 BACKUPS AND SNAPSHOTS 31
CHAPTER 7 REPORTS 58
CHAPTER 1 OVERVIEW 4
CHAPTER 1 OVERVIEW
In this guide, we explain how to create, modify and manage the virtual server (shared) compute service using the
Cloud Services management console.
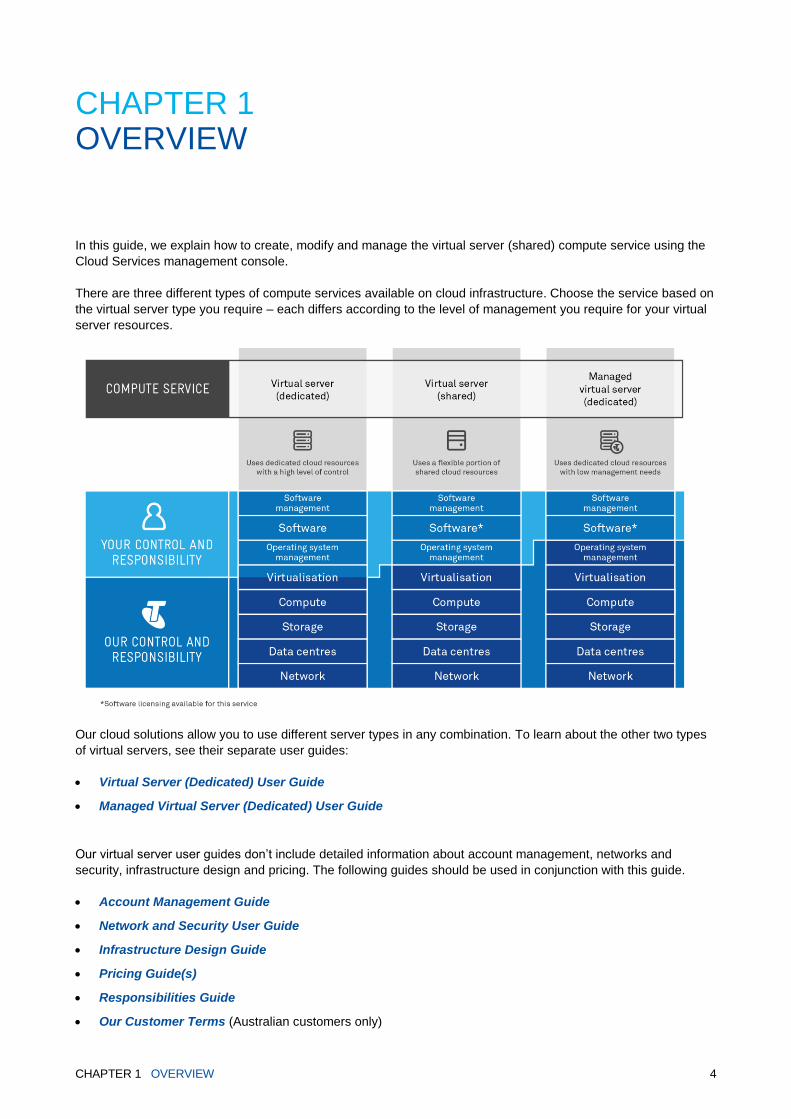
There are three different types of compute services available on cloud infrastructure. Choose the service based on
the virtual server type you require – each differs according to the level of management you require for your virtual
server resources.
Our cloud solutions allow you to use different server types in any combination. To learn about the other two types
of virtual servers, see their separate user guides:
Virtual Server (Dedicated) User Guide
Managed Virtual Server (Dedicated) User Guide
Our virtual server user guides don’t include detailed information about account management, networks and
security, infrastructure design and pricing. The following guides should be used in conjunction with this guide.
Account Management Guide
Network and Security User Guide
Infrastructure Design Guide
Pricing Guide(s)
Responsibilities Guide
Our Customer Terms (Australian customers only)
CHAPTER 1 OVERVIEW 5
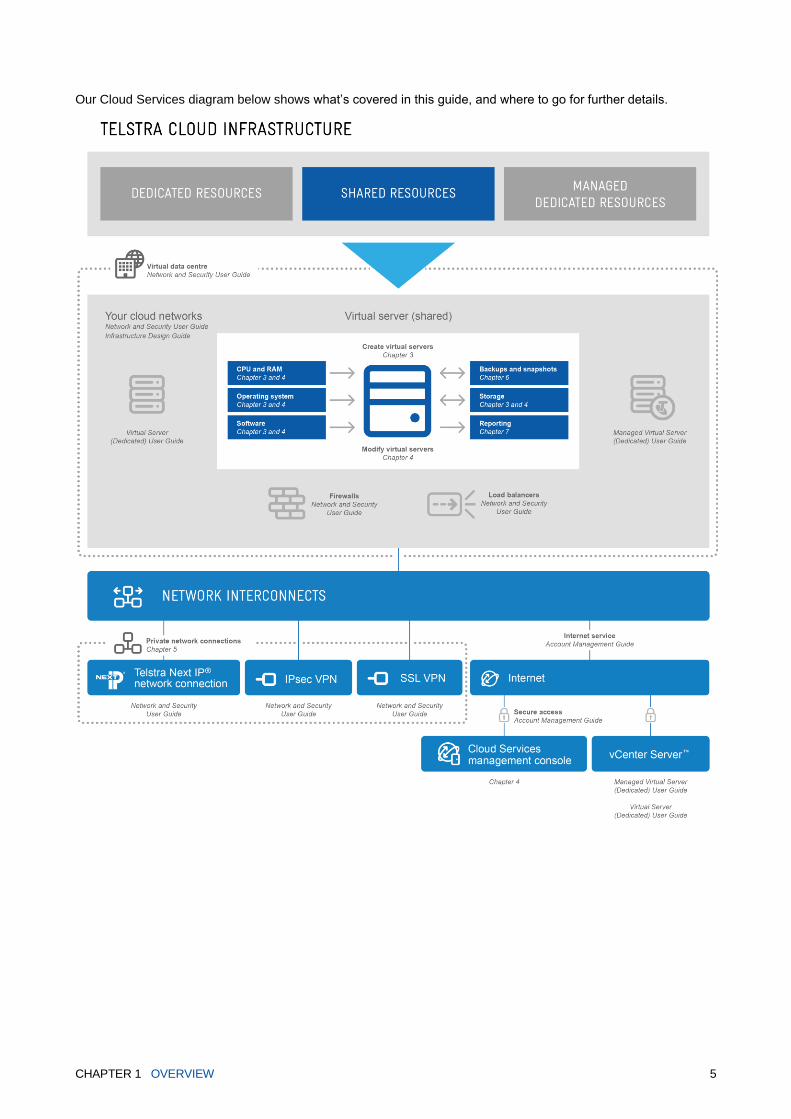
Our Cloud Services diagram below shows what’s covered in this guide, and where to go for further details.
CHAPTER 2 HOW IT WORKS 6
CHAPTER 2 HOW IT WORKS
Virtual server (shared) uses a flexible portion of shared resources based in our cloud. Resources including CPU,
RAM and storage are virtualised for your use, and scaled up or down to meet your needs.
All your virtual server (shared) cloud resources are drawn from our physical infrastructure. Our infrastructure
capacity is shared across multiple customers using securely separated virtual resources.
Your resources are created and managed through the Cloud Services management console. You can choose to
contain specific cloud resources (such as virtual servers, firewalls, load balancers and network connections) in
specific virtual data centre locations.
You can use multiple virtual data centre locations in Australia or globally, and create multiple virtual data centres in
the same location.
OUR INFRASTRUCTURE
Physical infrastructure used to deliver virtual server (shared) is simultaneously used by multiple customers. This
infrastructure includes data centres and network components. Data centres securely house the physical resources
used to provide your virtual servers.
Our network infrastructure includes features to ensure availability and security of your cloud resources and data.
Read more about our infrastructure in the Network and Security User Guide.
RESOURCE SHARING
Virtual server (shared) resources aren’t dedicated to specific physical infrastructure. This allows you to quickly
scale your resources up or down, to meet your business needs.
The shared environment means individual virtual servers won’t receive a predictable volume of resources such as
physical CPU time, memory, networks and storage. At times, multiple customers may be contending for resource
allocation from the same component of physical infrastructure. In these cases, our physical resource is shared
evenly amongst all virtual servers allocated to it.
We manage the load on our physical infrastructure. You may experience variable performance from a virtual
server if the physical infrastructure it’s allocated to is being over or under-utilised for a period of time. To avoid
variable performance, you can choose virtual server (dedicated) resources, where all resources are assigned to
specific physical blades.
THE CLOUD SERVICES MANAGEMENT CONSOLE
You can manage and configure your virtual server (shared) resources at any time, through our secure online
management console at cloud.telstra.com/manage.
Instructions on how to use the Cloud Services management console form most of the content in this guide.
For details about how to access the Cloud Services management console, see our Account Management Guide.
SERVICE PLANS
As part of purchasing a virtual server (shared) plan, you’ll receive a service that allows you to:
Create virtual servers (shared)
Add and configure virtual server resources
CHAPTER 2 HOW IT WORKS 7
Our plans come in a range of sizes, including varying amounts of cloud resources. Compare the different plans
available on our Cloud Services website.
Learn more about managing plans and services in the Account Management Guide.
VIRTUAL SERVER RESOURCES
This section of the guide provides an introduction to the virtual server (shared) resources available on cloud
infrastructure, and the parameters for their use.
You have control of your virtual server resources through the Cloud Services management console. Add, remove,
configure, or scale your resources up or down as you need to.
A virtual server (shared) service allows you to create virtual servers of this type. Each service will allow you to
create virtual servers within one virtual data centre location.
Virtual server (shared) can be deployed alongside our other types of virtual servers – virtual server (dedicated) and
managed virtual server (dedicated) – in the same virtual data centre. There’s no limit to the number of virtual
servers you can create, in either your public or private network.
All virtual server (shared) services have the following resources available:
CPU and RAM
Storage Operating system Applications
Backup
Snapshots
Network resources
As part of your virtual server (shared) environment, we don’t support:
Mounting of remote media to a virtual server
Virtual server cloning
NETWORK RESOURCES
Network and security resources for your virtual server (shared) can be created and managed from within the Cloud
Services management console, but are not detailed in this guide. Your use of network resources is calculated
under your virtual data centre service.
Refer to the Network and Security Guide for information about:
Virtual data centres
Networks and network connections
IPsec VPN
Firewalls
Load balancers
SSL VPN
SMTP mail relay
Security add-ons
VLAN Extension
CHAPTER 3 CREATE VIRTUAL SERVERS 8
CHAPTER 3 CREATE VIRTUAL SERVERS
Once you have purchased a plan, go to the Cloud Services management console to create your virtual servers.
Log in to the Cloud Services management console at cloud.telstra.com/manage. For help with this, refer to the Account Management Guide.
BEFORE YOU CREATE A VIRTUAL SERVER
For security purposes, we suggest configuring a firewall in your public network before creating any virtual servers
in your public network.
Instructions for adding and configuring firewall rules can be found in our Network and Security User Guide.
You may want to prepare a way to access a virtual server, before you create it.
Remote desktop software or Linux secure shell client are two of the possible ways to access your virtual servers.
Bear in mind, if you’re planning to use an SSL VPN, IPsec VPN, Telstra Next IP® network or Global IP VPN
connection, it can take up to three business days to activate the connection to each virtual server.
CREATE VIRTUAL SERVERS
A virtual server (shared) service allows you to create virtual servers of this type at any time, in either your public or
private network.
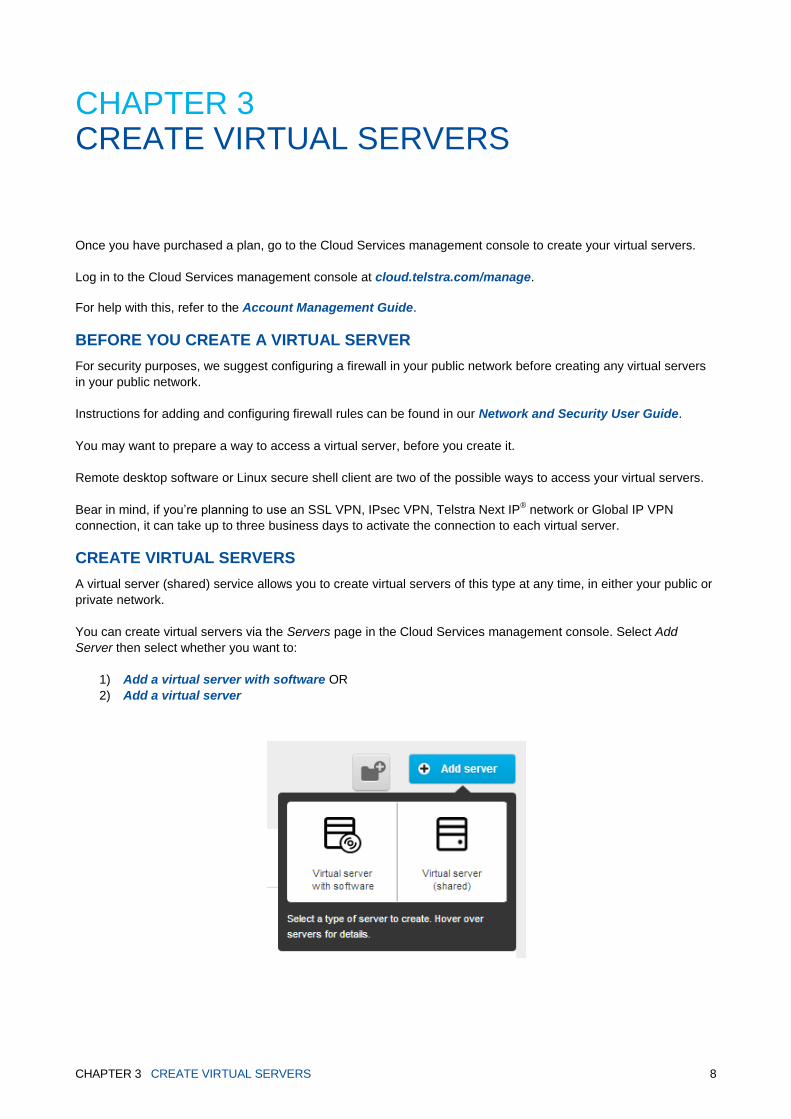
You can create virtual servers via the Servers page in the Cloud Services management console. Select Add
Server then select whether you want to:
1) Add a virtual server with software OR
2) Add a virtual server
CHAPTER 3 CREATE VIRTUAL SERVERS 9
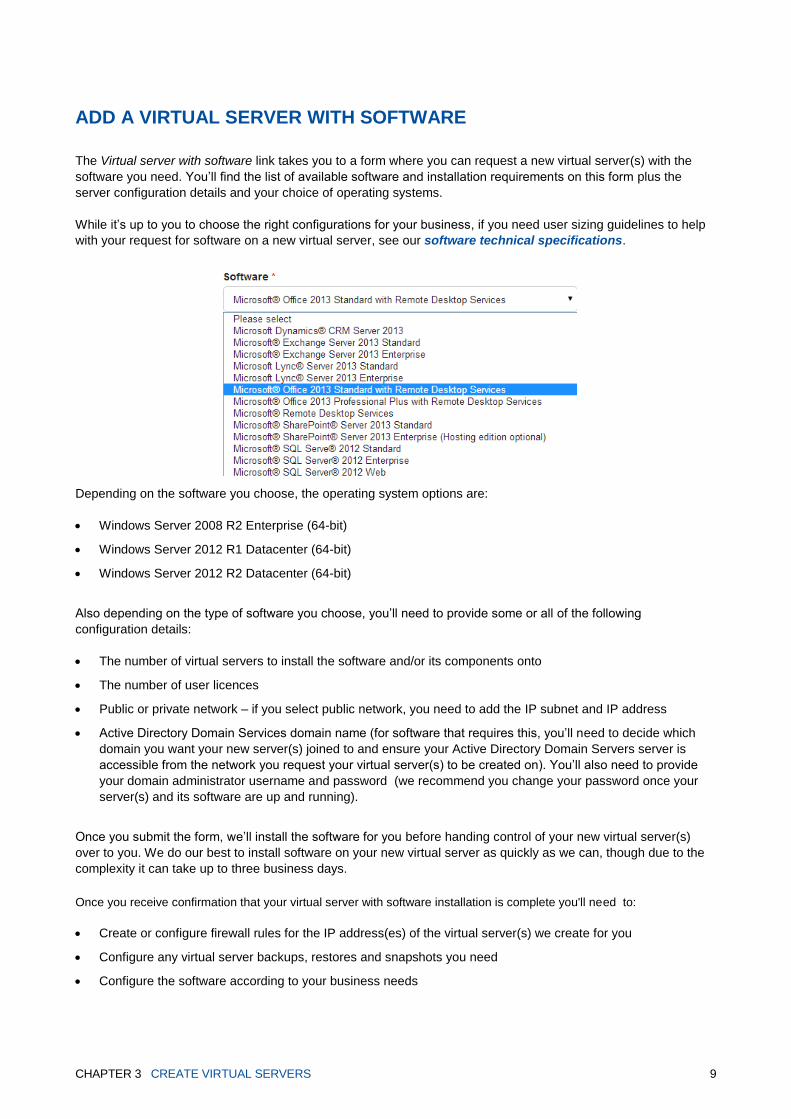
ADD A VIRTUAL SERVER WITH SOFTWARE
The Virtual server with software link takes you to a form where you can request a new virtual server(s) with the
software you need. You’ll find the list of available software and installation requirements on this form plus the
server configuration details and your choice of operating systems.
While it’s up to you to choose the right configurations for your business, if you need user sizing guidelines to help
with your request for software on a new virtual server, see our software technical specifications.
Depending on the software you choose, the operating system options are:
Windows Server 2008 R2 Enterprise (64-bit)
Windows Server 2012 R1 Datacenter (64-bit)
Windows Server 2012 R2 Datacenter (64-bit)
Also depending on the type of software you choose, you’ll need to provide some or all of the following
configuration details:
The number of virtual servers to install the software and/or its components onto
The number of user licences
Public or private network – if you select public network, you need to add the IP subnet and IP address
Active Directory Domain Services domain name (for software that requires this, you’ll need to decide which
domain you want your new server(s) joined to and ensure your Active Directory Domain Servers server is
accessible from the network you request your virtual server(s) to be created on). You’ll also need to provide
your domain administrator username and password (we recommend you change your password once your
server(s) and its software are up and running).
Once you submit the form, we’ll install the software for you before handing control of your new virtual server(s)
over to you. We do our best to install software on your new virtual server as quickly as we can, though due to the
complexity it can take up to three business days.
Once you receive confirmation that your virtual server with software installation is complete you'll need to:
Create or configure firewall rules for the IP address(es) of the virtual server(s) we create for you
Configure any virtual server backups, restores and snapshots you need
Configure the software according to your business needs

CHAPTER 3 CREATE VIRTUAL SERVERS 10
Note: we do not provide any software support. You need to source any help you might need
for set-up, configuration, usage, upgrades and ongoing management of the software.
Need to make any changes?
Email us if you want to change the number of users or CPU associated with your software.
Need to cancel your software?
Uninstall the software and email us when you've done so.
Want to remove a virtual server with software already installed on it?
Back up your data, delete the server and email us.
CHAPTER 3 CREATE VIRTUAL SERVERS 11
ADD A VIRTUAL SERVER
The Virtual server (shared) option takes you to the first of three steps in the virtual server configuration process:
Configure a virtual server
Choose a network
Review
CONFIGURE A VIRTUAL SERVER
To configure a virtual server, you’ll need to:
Specify a virtual server name
Select an operating system
Select a CPU and RAM combination
Add virtual disks
Once a virtual server is active, you’ll be able to change your virtual server’s original configuration by:
Resizing your system disk
Increasing your virtual disk capacity
Later in this guide we describe other functionality you can configure, including:
The power state of a virtual server
Snapshots
Backup settings
Software installation
SPECIFY A VIRTUAL SERVER NAME AND DESCRIPTION
You’ll need to choose a name for the virtual server. Adding a description is optional.
CHAPTER 3 CREATE VIRTUAL SERVERS 12
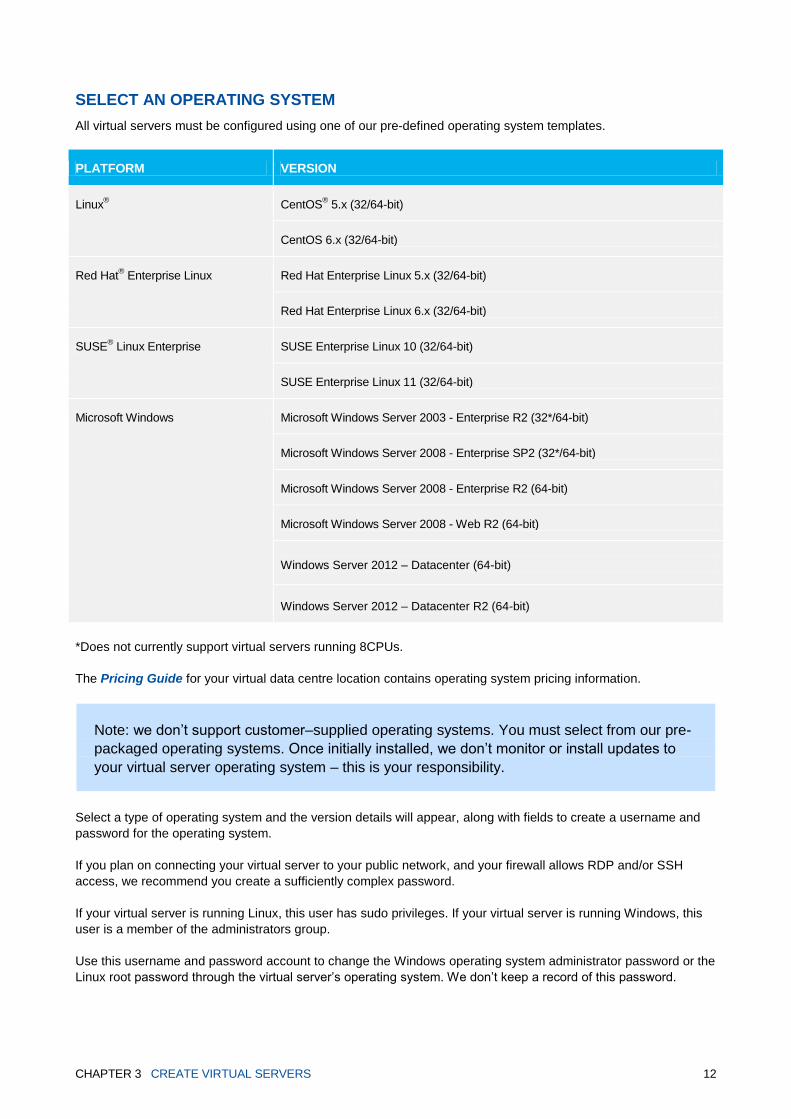
SELECT AN OPERATING SYSTEM
All virtual servers must be configured using one of our pre-defined operating system templates.
PLATFORM VERSION
Linux® CentOS
® 5.x (32/64-bit)
CentOS 6.x (32/64-bit)
Red Hat® Enterprise Linux Red Hat Enterprise Linux 5.x (32/64-bit)
Red Hat Enterprise Linux 6.x (32/64-bit)
SUSE® Linux Enterprise SUSE Enterprise Linux 10 (32/64-bit)
SUSE Enterprise Linux 11 (32/64-bit)
Microsoft Windows Microsoft Windows Server 2003 - Enterprise R2 (32*/64-bit)
Microsoft Windows Server 2008 - Enterprise SP2 (32*/64-bit)
Microsoft Windows Server 2008 - Enterprise R2 (64-bit)
Microsoft Windows Server 2008 - Web R2 (64-bit)
Windows Server 2012 – Datacenter (64-bit)
Windows Server 2012 – Datacenter R2 (64-bit)
*Does not currently support virtual servers running 8CPUs.
The Pricing Guide for your virtual data centre location contains operating system pricing information.
Note: we don’t support customer–supplied operating systems. You must select from our pre-
packaged operating systems. Once initially installed, we don’t monitor or install updates to
your virtual server operating system – this is your responsibility.
Select a type of operating system and the version details will appear, along with fields to create a username and
password for the operating system.
If you plan on connecting your virtual server to your public network, and your firewall allows RDP and/or SSH
access, we recommend you create a sufficiently complex password.
If your virtual server is running Linux, this user has sudo privileges. If your virtual server is running Windows, this
user is a member of the administrators group.
Use this username and password account to change the Windows operating system administrator password or the
Linux root password through the virtual server’s operating system. We don’t keep a record of this password.
CHAPTER 3 CREATE VIRTUAL SERVERS 13
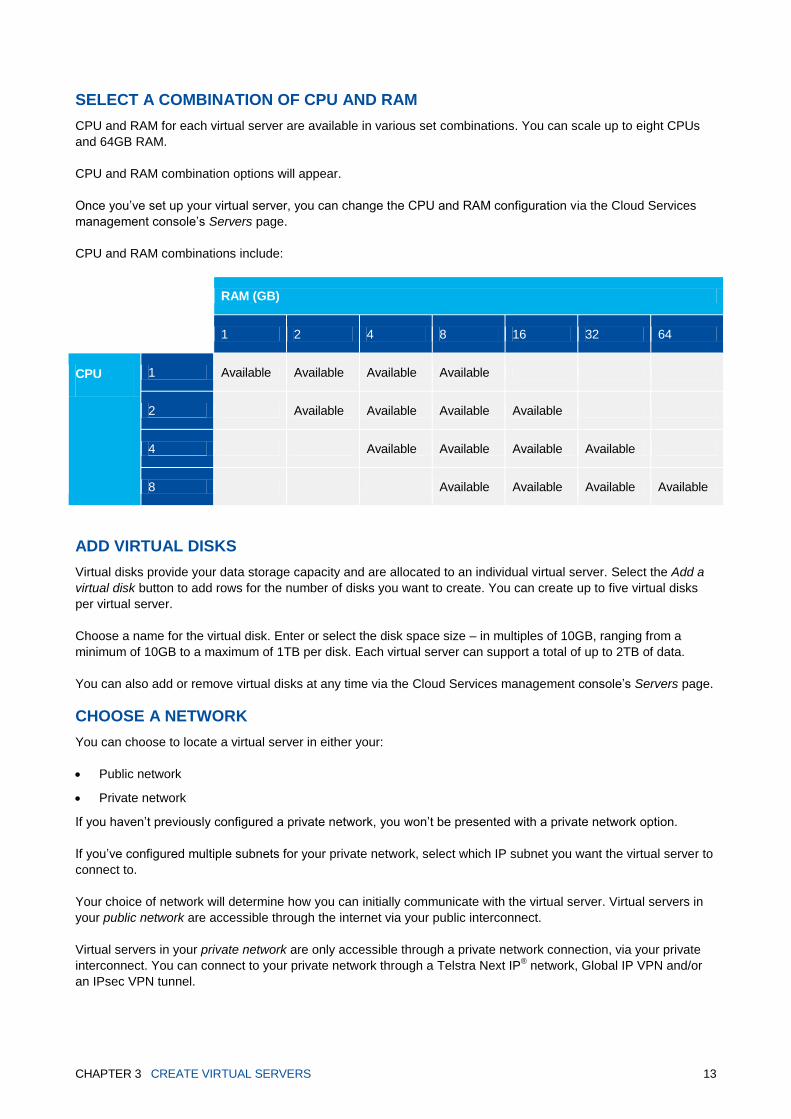
SELECT A COMBINATION OF CPU AND RAM
CPU and RAM for each virtual server are available in various set combinations. You can scale up to eight CPUs
and 64GB RAM.
CPU and RAM combination options will appear.
Once you’ve set up your virtual server, you can change the CPU and RAM configuration via the Cloud Services
management console’s Servers page.
CPU and RAM combinations include:
RAM (GB)
1 2 4 8 16 32 64
CPU 1 Available Available Available Available
2 Available Available Available Available
4 Available Available Available Available
8 Available Available Available Available
ADD VIRTUAL DISKS
Virtual disks provide your data storage capacity and are allocated to an individual virtual server. Select the Add a
virtual disk button to add rows for the number of disks you want to create. You can create up to five virtual disks
per virtual server.
Choose a name for the virtual disk. Enter or select the disk space size – in multiples of 10GB, ranging from a
minimum of 10GB to a maximum of 1TB per disk. Each virtual server can support a total of up to 2TB of data.
You can also add or remove virtual disks at any time via the Cloud Services management console’s Servers page.
CHOOSE A NETWORK
You can choose to locate a virtual server in either your:
Public network
Private network
If you haven’t previously configured a private network, you won’t be presented with a private network option.
If you’ve configured multiple subnets for your private network, select which IP subnet you want the virtual server to
connect to.
Your choice of network will determine how you can initially communicate with the virtual server. Virtual servers in
your public network are accessible through the internet via your public interconnect.
Virtual servers in your private network are only accessible through a private network connection, via your private
interconnect. You can connect to your private network through a Telstra Next IP® network, Global IP VPN and/or
an IPsec VPN tunnel.
CHAPTER 3 CREATE VIRTUAL SERVERS 14
After your virtual server has been created, you can choose to add a second network connection to a virtual server
(dual homing), which would allow you to reach it via both the internet, and a private network connection.
A third connection point, a management IP address available on all virtual servers, enables you to access virtual
servers through SSL VPN and other alternative methods.
See how to create a private network and manage network connections in our Network and Security User Guide.
REVIEW AND SUBMIT
You can review the configuration details before creating the virtual server.
Select Edit to change the server’s configuration details.
It takes us up to three business days to manually install software on your selected server(s). You won’t be able to
access a new virtual server until any software you’ve selected is installed.
CHAPTER 4 MANAGE VIRTUAL SERVERS 15
CHAPTER 4 MANAGE VIRTUAL SERVERS
This section of the guide explains how to view, manage and make changes to your virtual servers.
Most of the ways you can manage your virtual server (shared) are performed through the Cloud Services
management console.
Outside of the Cloud Services management console, you can keep your operating systems up-to-date and install
your own software.
Management functions for virtual server (shared) include:
Group virtual servers
View virtual server details
Change a virtual server’s power state
Change your virtual server’s name and description
Change your virtual server’s CPU and RAM combination
View software installations, manage licensing and user details
Manage system disks and storage
Delete a virtual server
Create and restore from backups
Create and restore from snapshots
Monitor your resource usage
View your activity log
There are additional management functions available through the Cloud Services management console, not
detailed in this guide.
View MAC and IP addresses for network connections – see our Network and Security User Guide
Modify private network connections – see our Network and Security User Guide
USING THE CLOUD SERVICES MANAGEMENT CONSOLE
The management console allows you to manage your virtual servers through the Servers page, which includes a
Details view.
CHAPTER 4 MANAGE VIRTUAL SERVERS 16
THE SERVERS PAGE
The Servers page is located under Infrastructure in the Cloud Services management console.
You can use the Servers page to:
Group your virtual servers
Access your virtual servers
Update virtual server details
Delete virtual servers
Manage storage and snapshots
CHAPTER 4 MANAGE VIRTUAL SERVERS 17
GROUP YOUR VIRTUAL SERVERS
Groups allow you to organise your servers in any way you like (e.g. by function such as development, test or
production).
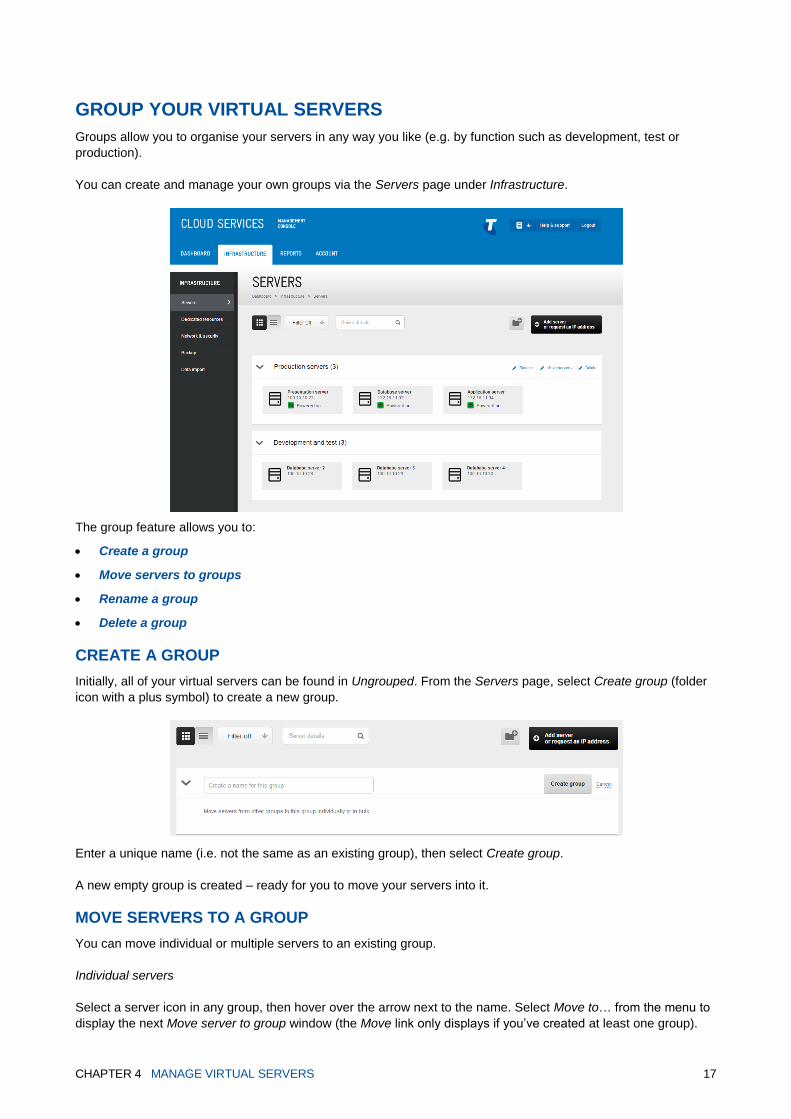
You can create and manage your own groups via the Servers page under Infrastructure.
The group feature allows you to:
Create a group
Move servers to groups
Rename a group
Delete a group
CREATE A GROUP
Initially, all of your virtual servers can be found in Ungrouped. From the Servers page, select Create group (folder
icon with a plus symbol) to create a new group.
Enter a unique name (i.e. not the same as an existing group), then select Create group.
A new empty group is created – ready for you to move your servers into it.
MOVE SERVERS TO A GROUP
You can move individual or multiple servers to an existing group.
Individual servers
Select a server icon in any group, then hover over the arrow next to the name. Select Move to… from the menu to
display the next Move server to group window (the Move link only displays if you’ve created at least one group).
CHAPTER 4 MANAGE VIRTUAL SERVERS 18
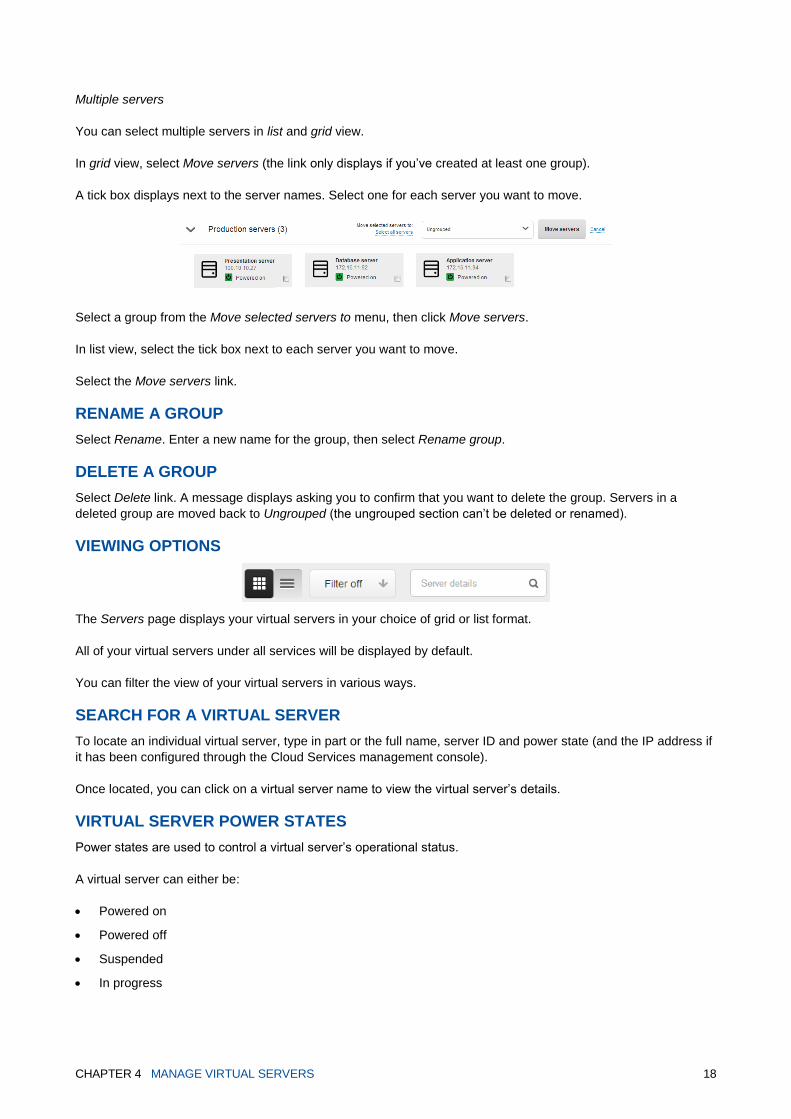
Multiple servers
You can select multiple servers in list and grid view.
In grid view, select Move servers (the link only displays if you’ve created at least one group).
A tick box displays next to the server names. Select one for each server you want to move.
Select a group from the Move selected servers to menu, then click Move servers.
In list view, select the tick box next to each server you want to move.
Select the Move servers link.
RENAME A GROUP
Select Rename. Enter a new name for the group, then select Rename group.
DELETE A GROUP
Select Delete link. A message displays asking you to confirm that you want to delete the group. Servers in a
deleted group are moved back to Ungrouped (the ungrouped section can’t be deleted or renamed).
VIEWING OPTIONS
The Servers page displays your virtual servers in your choice of grid or list format.
All of your virtual servers under all services will be displayed by default.
You can filter the view of your virtual servers in various ways.
SEARCH FOR A VIRTUAL SERVER
To locate an individual virtual server, type in part or the full name, server ID and power state (and the IP address if
it has been configured through the Cloud Services management console).
Once located, you can click on a virtual server name to view the virtual server’s details.
VIRTUAL SERVER POWER STATES
Power states are used to control a virtual server’s operational status.
A virtual server can either be:
Powered on
Powered off
Suspended
In progress
CHAPTER 4 MANAGE VIRTUAL SERVERS 19
You can change an individual virtual server’s power state through the Details tab of a virtual server, or through the
Servers page.
While a virtual server is in Powered off or Suspended mode, you won’t accrue usage of CPU or RAM attributed to
that virtual server.
Through the Servers page
Use the list view to select multiple servers and change all their power states at the same time.
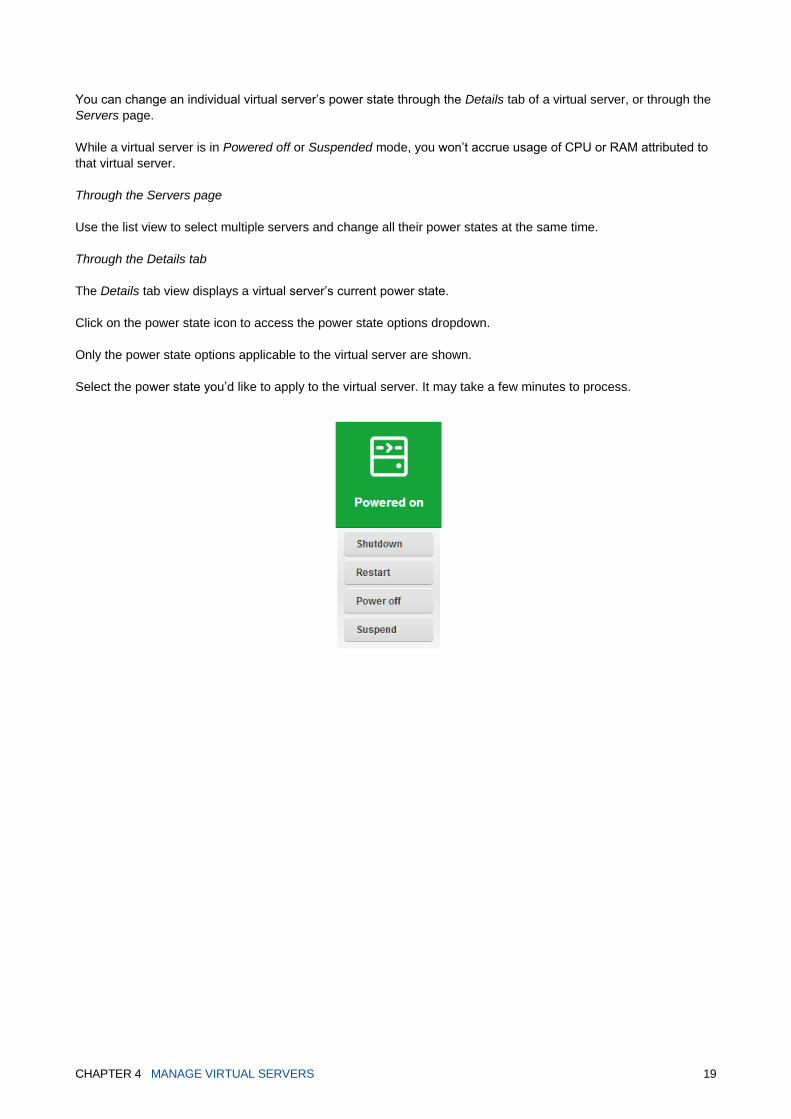
Through the Details tab
The Details tab view displays a virtual server’s current power state.
Click on the power state icon to access the power state options dropdown.
Only the power state options applicable to the virtual server are shown.
Select the power state you’d like to apply to the virtual server. It may take a few minutes to process.
CHAPTER 4 MANAGE VIRTUAL SERVERS 20
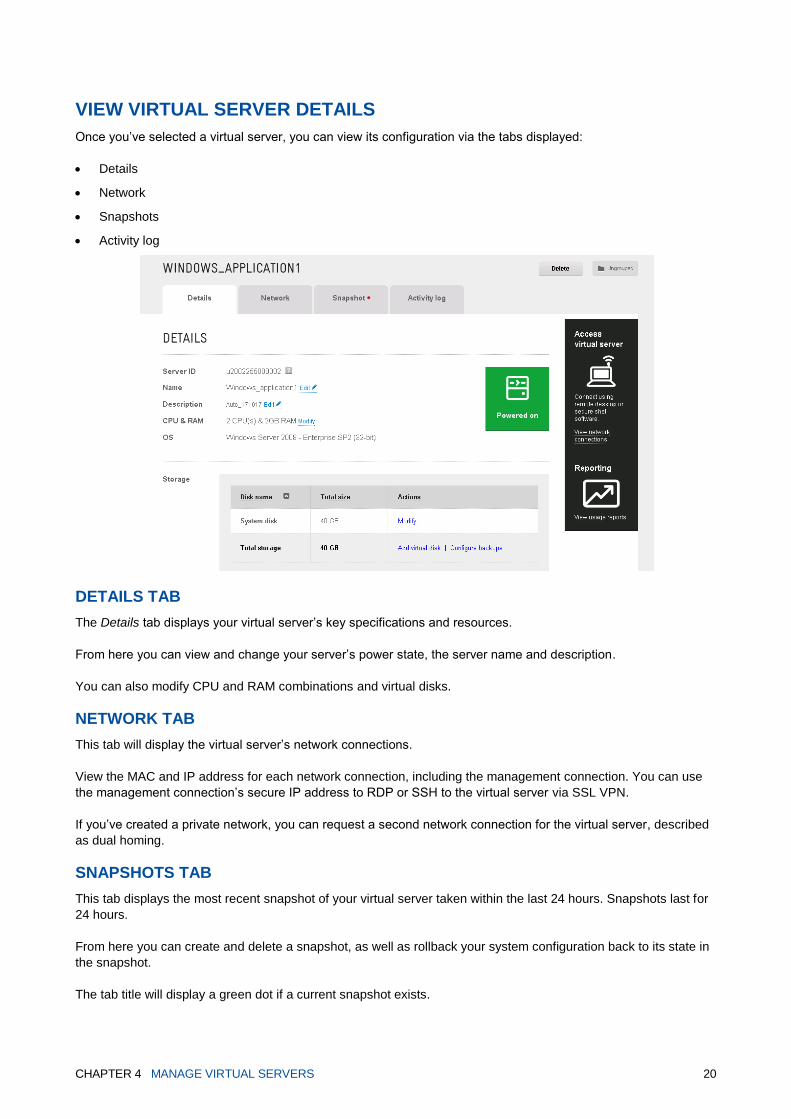
VIEW VIRTUAL SERVER DETAILS
Once you’ve selected a virtual server, you can view its configuration via the tabs displayed:
Details
Network
Snapshots
Activity log
DETAILS TAB
The Details tab displays your virtual server’s key specifications and resources.
From here you can view and change your server’s power state, the server name and description.
You can also modify CPU and RAM combinations and virtual disks.
NETWORK TAB
This tab will display the virtual server’s network connections.
View the MAC and IP address for each network connection, including the management connection. You can use
the management connection’s secure IP address to RDP or SSH to the virtual server via SSL VPN.
If you’ve created a private network, you can request a second network connection for the virtual server, described
as dual homing.
SNAPSHOTS TAB
This tab displays the most recent snapshot of your virtual server taken within the last 24 hours. Snapshots last for
24 hours.
From here you can create and delete a snapshot, as well as rollback your system configuration back to its state in
the snapshot.
The tab title will display a green dot if a current snapshot exists.
CHAPTER 4 MANAGE VIRTUAL SERVERS 21
ACTIVITY LOG TAB
View an activity log of your virtual servers’ tasks over a three-month period.
Use the Reports section to view activity logs of your cloud solution tasks by virtual server and task status.
CHANGE YOUR VIRTUAL SERVER’S NAME AND DESCRIPTION
The Details tab will display a virtual server’s name and description.
Select Edit to change the description.
Select Save once you’re done.
Select Rename to change the virtual server name.
Select Save once you’ve completed the change.
CHANGE YOUR VIRTUAL SERVER’S CPU AND RAM COMBINATION
The Details tab will display the virtual server’s current CPU and RAM combination.
Shut down your virtual server before changing its CPU and RAM. Do this by selecting the power state button and
scroll down to the power off option. It may take a few minutes to process.
Select Modify to change this combination.
The CPU and RAM modification page will display the different CPU and RAM combinations available with your
virtual server’s operating system.
Refer to the CPU and RAM combinations table to see the options available.
Once you have submitted the CPU and RAM modification and it has been completed you can power on your
virtual server.
CHAPTER 4 MANAGE VIRTUAL SERVERS 22
MODIFYING SOFTWARE
Need to make any changes?
Email us if you want to change the number of users or CPU associated with your software.
Need to cancel your software?
Uninstall the software and email us when you've done so.
Want to remove a virtual server with software already installed on it?
Back up your data, delete the server and email us.
UPGRADES AND DOWNGRADES
To install a different software version, you can request a new virtual server with software. That way you can migrate
the data in your current virtual server across to your new one. You might need to check the vendor’s instructions before
doing this.
You’ll also need to uninstall the version of the software you no longer want on your current virtual server(s) and contact
us when you do so. This is so we can adjust our software licence billing and reporting for you.
WHAT HAPPENS NEXT
Any requests to add and remove software – or to modify the number of software users – can take up to three
business days to complete.
CHAPTER 4 MANAGE VIRTUAL SERVERS 23
MANAGE SYSTEM DISKS AND VIRTUAL DISKS
The Details tab will display the system disk and any virtual disks installed on the virtual server. Here you can:
Add virtual disks
Modify the system disk and virtual disks
Remove virtual disks
ADD VIRTUAL DISKS
Select the Add virtual disk button in the virtual server’s Details tab.
The Add a virtual disk button will take you to the disk modification page.
Enter a name for the virtual disk.
Enter or select the disk space size – ranging from a minimum of 10GB to a maximum of 1TB per disk. Each virtual
server can only support up to 2TB of data in total.
The text box will round up to the nearest 10GB.
Select Add virtual disk to create the virtual disk.
You'll need to create the virtual disk partition via your operating system to be able to use the extra space.
RESIZE VIRTUAL DISKS
You can modify your virtual disks through the virtual server’s Details tab.
Select Modify next to the disk’s name.
The Modify link will take you to the disk modification page.
From the virtual disk modification page, you will see the disk’s current storage capacity.
Enter or select the modified disk space size – in multiples of 10GB, ranging from a minimum of 10GB to a
maximum of 1TB. Each virtual server can only support up to 2TB of data in total.
The text box will round up to the nearest 10GB. You can increase the disk’s size, but not decrease.
You’ll need to select Update virtual disk for the update to take effect.
To see the disk updates on your virtual server, you’ll need to increase the size of your partition in the operating
system.
RESIZE A SYSTEM DISK
A virtual server’s original system disk size is based on the operating system you’ve selected:
Linux 10GB
Microsoft Windows Server 2003 20GB
Microsoft Windows Server 2008 40GB
Microsoft Windows Server 2012 60GB
You have the option of increasing the size of the system disk, through the virtual server’s Details tab, once the
virtual server has been created.

CHAPTER 4 MANAGE VIRTUAL SERVERS 24
You'll need to resize the system disk partition to be able to use the extra space.
It’s not possible to reduce the size of a system disk or remove it completely.
REMOVE VIRTUAL DISKS
Select the Remove link next to the virtual disk you would like to delete.
A message will appear asking you to confirm that you want to remove the disk.
Select Remove disk to delete the disk. All data on this disk will be deleted immediately, so we recommend that you
back up any data you wish to keep.
Select Cancel and you’ll be taken back to the virtual server’s Details tab view.
CHAPTER 4 MANAGE VIRTUAL SERVERS 25
DELETE A VIRTUAL SERVER
You can delete a virtual server through the virtual server’s Details panel.
We recommend that you back up your data before starting this process. The deletion process will remove both
your data and the virtual server. Your backup will last for the retention period you have previously selected.
You will need to shut down the virtual server before it can be deleted.
Click on the power state icon to access the power state options dropdown.
Select Shutdown.
It may take a few minutes to process.
To remove the virtual server, select the Delete button from the virtual server’s Details panel.
The Delete button will open a message to confirm that you want to remove the virtual server.
The virtual server will be deleted immediately.
CHAPTER 4 MANAGE VIRTUAL SERVERS 26
MONITORING AND UPDATING YOUR OPERATING SYSTEM
You’re responsible for configuring and monitoring your operating system and ensuring that it's up to date by
installing updates.
We don't provide support for any of these operating systems.
Contact your vendor directly if you have any issues:
Microsoft Windows
Red Hat
SUSE
Linux CentOS
INSTALL YOUR OWN SOFTWARE
You can install your own software on our cloud infrastructure at any time – you just need to confirm the licensing
arrangements with the vendor.
To install an application from an ISO image you'll need to copy it to the virtual server and then mount it locally.
Alternatively, if you chose a Windows operating system, you can request the software you need and have it
installed by us in a state that’s ready for you to configure. Software purchases and installation requests can be
made through the Cloud Services management console.
CLOUD READY
Want to know what software is compatible with your service? Our Cloud Innovation Centre team tests a variety of
software products in our labs to see if they’re compatible with our services. For more information on whether a
software package you wish to use is ‘cloud ready’, contact your Telstra representative.
LICENCE MOBILITY
If you have Microsoft Volume Licensing covered by a Microsoft Software Assurance contract, you may be able to
use your existing eligible software licences on our cloud infrastructure.
Eligible software licences are:
Microsoft Dynamics CRM Server
Microsoft Exchange Server
Microsoft Lync Server
Microsoft SharePoint Server
Microsoft SQL Server
Note: Microsoft Windows Server and desktop apps are ineligible.
How to apply
Step 1 – Determine which of your licences are eligible
View your licence status by logging in to the Microsoft Volume Licensing Service Centre and note which of the
above eligible applications you're licensed for. Typically, your IT or procurement department can access your
licensing agreement details.
CHAPTER 4 MANAGE VIRTUAL SERVERS 27
Step 2 – Verify your licences with Microsoft
Under the Authorised Mobility Partner section of the form, you'll need to write 'Telstra Corporation Limited' as your
mobility partner and include our URL www.telstra.com and licensing email [email protected].
From there, wait for signed notification* from Microsoft before installing your software. This usually takes a few
business days.
Step 3 – Install your application software
*If your licence(s) are eligible, Microsoft will email a counter-signed copy of the form both to you and us. If your
licences can't be verified, Microsoft will return the verification form to you explaining why. You can make any
necessary revisions and resubmit the form as many times as needed.
Remember, it's up to you to have the right licences to install and run software applications on your virtual servers.
See our Responsibility Guide and Our Customer Terms (Australian customers only) or separate agreement
with us.
For more details, see Microsoft Volume Licensing Software Assurance.
CHAPTER 4 MANAGE VIRTUAL SERVERS 28
MANAGE YOUR NETWORKS AND SECURITY
The Cloud Services management console provides various ways to customise your cloud networks and security.
Use the Network & security page to:
Create a private network
Manage the connection to your existing Telstra Next IP® network or Global IP VPN
Create and configure an IPsec VPN tunnel
Create and configure a VLAN Extension tunnel
Create firewalls and configure firewall rules
Create and configure load balancers
Assign SSL VPN users
Set up an SMTP mail relay
For instructions on how to carry out these functions, see the Network and Security User Guide.
To see examples of network configurations constructed on cloud infrastructure, refer to our Infrastructure Design
Guide.
CHAPTER 5 NETWORK CONNECTION TO VIRTUAL SERVERS 29
CHAPTER 5 NETWORK CONNECTION TO VIRTUAL SERVERS
NETWORK CONNECTIONS
You can choose to contain a virtual server within a public or private network, or use dual homing to access a
virtual from both networks.
Your public network is accessible through an internet connection, via your public interconnect. Individual virtual
servers are accessible through their public IP address.
Your private network is only accessible through a private network connection, via your private interconnect.
Individual virtual servers are accessible through their private IP address.
You can connect to a private network via:
Your Telstra Next IP®
network or Global IP VPN
An IPsec VPN tunnel
Both your Telstra Next IP®
network (or Global IP VPN) and an IPsec VPN tunnel
Learn more about virtual server networks in our Network and Security User Guide.
SSL VPN MANAGEMENT CONNECTION TO VIRTUAL SERVERS
In addition to public and private network connections, a third connection point (a management IP address) is
available to all individual virtual servers. Using secure remote access (SSL VPN), you can remotely and securely
manage a virtual server through its management IP address. This connection can’t be used as a secure access
point for end users.
See the Network and Security User Guide for details of how to connect through SSL VPN and manage users.
ACCESS YOUR VIRTUAL SERVERS
To access a virtual server, you’ll need:
Your virtual server’s IP address
Access to either remote desktop software or a Linux secure shell client
CHAPTER 5 NETWORK CONNECTION TO VIRTUAL SERVERS 30
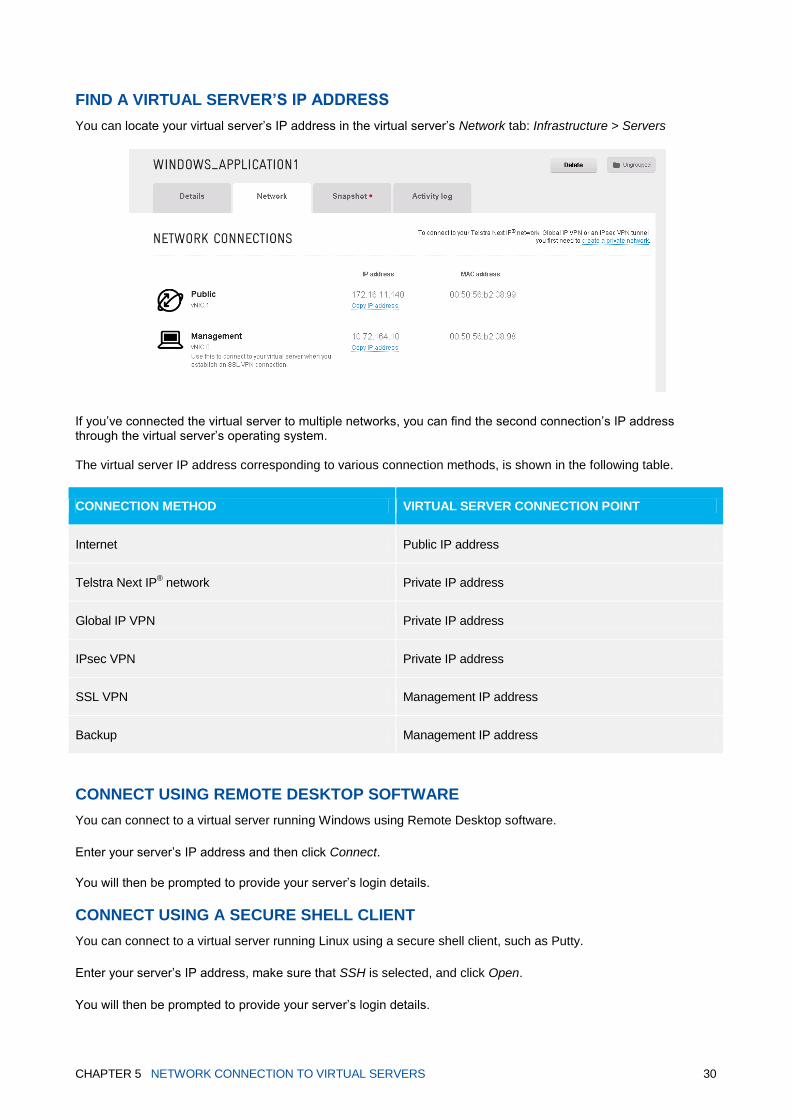
FIND A VIRTUAL SERVER’S IP ADDRESS
You can locate your virtual server’s IP address in the virtual server’s Network tab: Infrastructure > Servers
If you’ve connected the virtual server to multiple networks, you can find the second connection’s IP address through the virtual server’s operating system. The virtual server IP address corresponding to various connection methods, is shown in the following table.
CONNECTION METHOD VIRTUAL SERVER CONNECTION POINT
Internet Public IP address
Telstra Next IP® network Private IP address
Global IP VPN Private IP address
IPsec VPN Private IP address
SSL VPN Management IP address
Backup Management IP address
CONNECT USING REMOTE DESKTOP SOFTWARE
You can connect to a virtual server running Windows using Remote Desktop software.
Enter your server’s IP address and then click Connect.
You will then be prompted to provide your server’s login details.
CONNECT USING A SECURE SHELL CLIENT
You can connect to a virtual server running Linux using a secure shell client, such as Putty.
Enter your server’s IP address, make sure that SSH is selected, and click Open.
You will then be prompted to provide your server’s login details.
CHAPTER 6 BACKUPS AND SNAPSHOTS 31
CHAPTER 6 BACKUPS AND SNAPSHOTS
ABOUT BACKUPS
You can enable nightly file system backups of some or all of your virtual server data.
From the Servers page, select Backups from the left-hand navigation to:
Create a backup
Restore from a backup
Delete a backup
You can back up any of your virtual servers running operating systems we currently support. This includes the
operating system versions listed in this guide, as well as any operating systems you have licensed from us in
the past, and are currently using.
CHAPTER 6 BACKUPS AND SNAPSHOTS 32
HOW TO CREATE BACKUPS
ACCESS THE BACKUPS PAGE
Access the backups modification page in one of two ways:
Select Backups from the left-hand navigation from the Servers page
Or
Use the virtual server’s Details tab to select the Configure backups button
CREATE A BACKUP
Select the name of the virtual server(s) you would like to back up.
If you choose to back up multiple virtual servers here, they’ll all have the same backup configuration.
You’ll need to submit separate requests if you want to set up different backup configurations for each virtual
server.
If you’re running a Linux operating system, the next step is to select the file systems you want to back up.
If you’re running a Windows operating system, you’ll be required to select the drives you want to back up.
We’ve provided just a few examples of file systems and drives you may want to back up.
You can select Other and specify other file systems or drives using the text box.
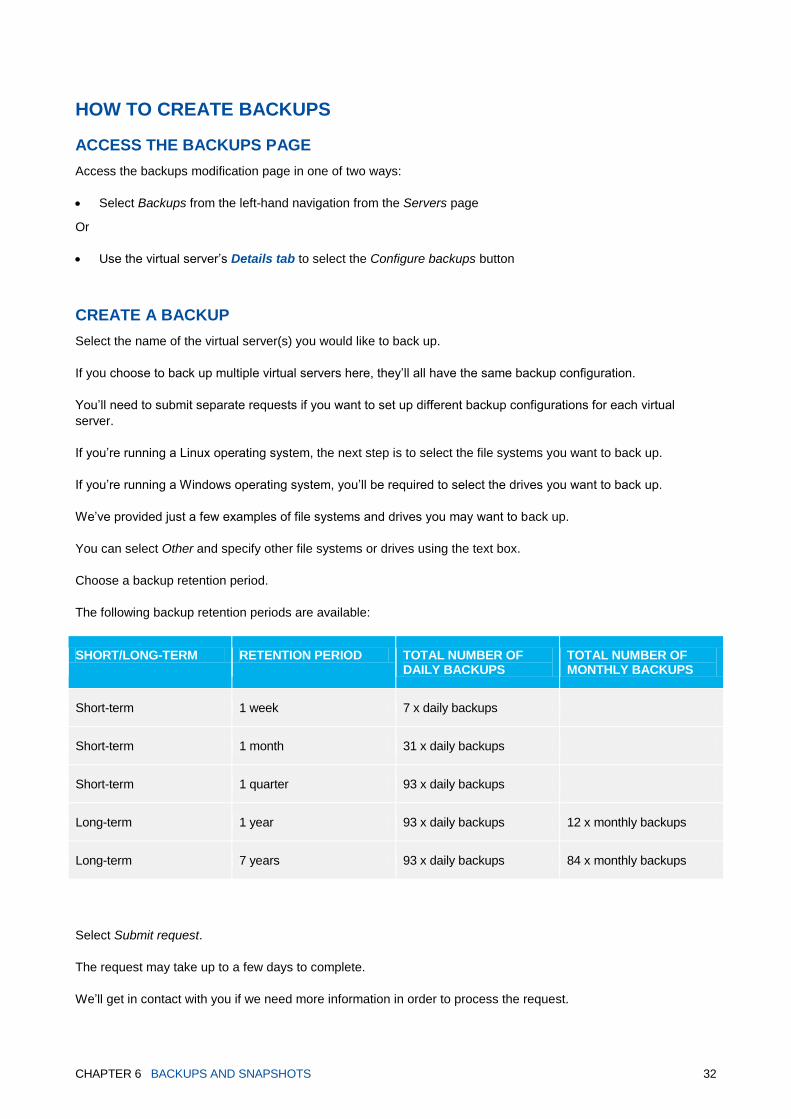
Choose a backup retention period.
The following backup retention periods are available:
SHORT/LONG-TERM RETENTION PERIOD TOTAL NUMBER OF DAILY BACKUPS
TOTAL NUMBER OF MONTHLY BACKUPS
Short-term 1 week 7 x daily backups
Short-term 1 month 31 x daily backups
Short-term 1 quarter 93 x daily backups
Long-term 1 year 93 x daily backups 12 x monthly backups
Long-term 7 years 93 x daily backups 84 x monthly backups
Select Submit request.
The request may take up to a few days to complete.
We’ll get in contact with you if we need more information in order to process the request.
CHAPTER 6 BACKUPS AND SNAPSHOTS 33
BACKUP USERS
You’ll be provided with one username and password per company, per location. These credentials will allow you to
perform backups and restores through the Cloud Services management console.
Note: your password will be provided to you via email and can’t be changed by you. We
suggest capturing your password immediately, as we do not keep a record of your password
after it is issued to you.
BACKUP REPORTING
You’ll receive a daily, weekly and monthly backup report.
BACKUP MANAGEMENT TOOLS
There are two recommended tools (based on EMC Avamar® technology) available to help you manage your
backups:
Client software
Administrator software
If you are only using a Linux operating system on your virtual servers, you won’t have access to the administrator.
Use the command line to initiate a non-scheduled backups and restores.
CLIENT SOFTWARE
The client software is pre-installed on any virtual server running a compatible operating system.
To load the software in Windows, log in to your virtual server and click on the Avamar icon in the taskbar.
From here, selecting Restore or Backup will take you to the web interface.
ADMINISTRATOR SOFTWARE
The administrator software is pre-installed on any virtual server running a compatible Windows operating system.
This software will require upgrading whenever our backup infrastructure is upgraded. We will inform you on
occasions when this is required.
To load the software, log in to your virtual server and click on the administrator icon from your desktop.
From here you can:
Restore from a backup
Create a non-scheduled backup
View the backup activity log
Produce backup reports
CHAPTER 6 BACKUPS AND SNAPSHOTS 34
YOUR LOGIN DETAILS
To access the administrator, enter your administrator username, password, the virtual server’s domain name and
administrator server. These login details are not the same as your Cloud Services management console login
details.
Your login details are emailed to you after we receive your first backup request. Passwords can be reset via the Cloud Services management console, for a fee. We do not keep a record of your passwords.
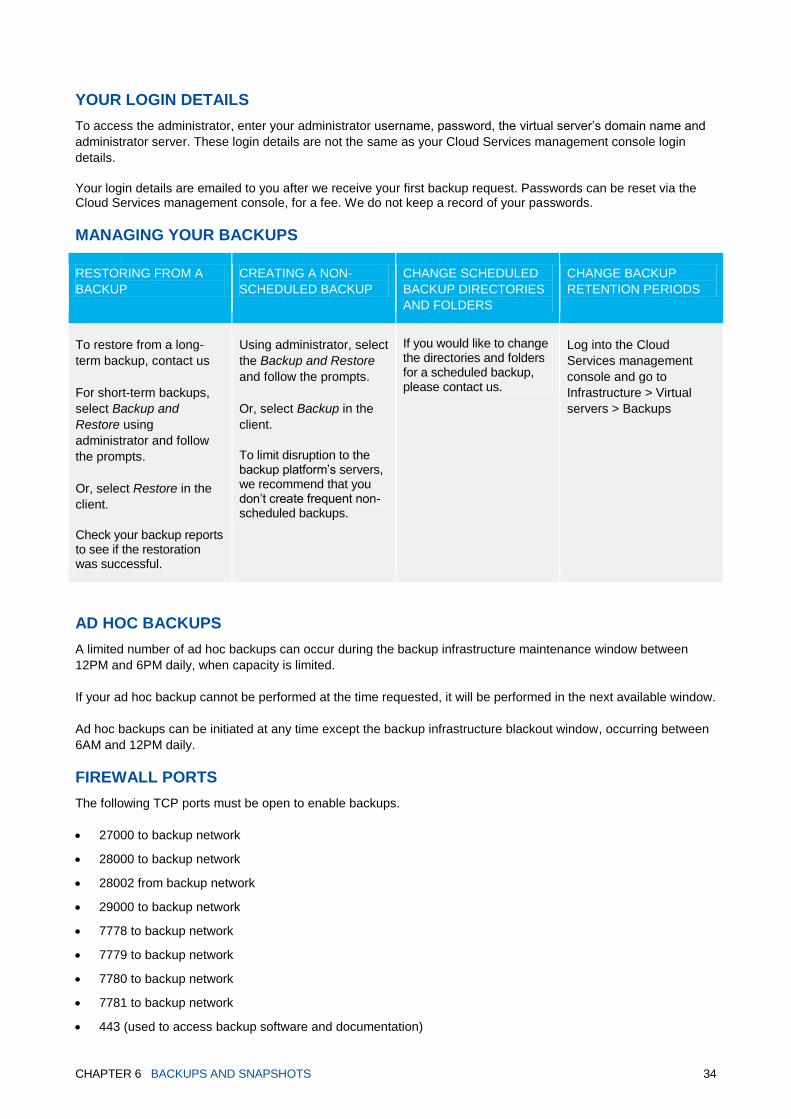
MANAGING YOUR BACKUPS
RESTORING FROM A
BACKUP
CREATING A NON-
SCHEDULED BACKUP
CHANGE SCHEDULED
BACKUP DIRECTORIES
AND FOLDERS
CHANGE BACKUP
RETENTION PERIODS
To restore from a long-
term backup, contact us
For short-term backups,
select Backup and
Restore using
administrator and follow
the prompts.
Or, select Restore in the
client.
Check your backup reports to see if the restoration was successful.
Using administrator, select
the Backup and Restore
and follow the prompts.
Or, select Backup in the
client.
To limit disruption to the backup platform’s servers, we recommend that you don’t create frequent non-scheduled backups.
If you would like to change the directories and folders for a scheduled backup, please contact us.
Log into the Cloud
Services management
console and go to
Infrastructure > Virtual
servers > Backups
AD HOC BACKUPS
A limited number of ad hoc backups can occur during the backup infrastructure maintenance window between
12PM and 6PM daily, when capacity is limited.
If your ad hoc backup cannot be performed at the time requested, it will be performed in the next available window.
Ad hoc backups can be initiated at any time except the backup infrastructure blackout window, occurring between
6AM and 12PM daily.
FIREWALL PORTS
The following TCP ports must be open to enable backups.
27000 to backup network
28000 to backup network
28002 from backup network
29000 to backup network
7778 to backup network
7779 to backup network
7780 to backup network
7781 to backup network
443 (used to access backup software and documentation)

CHAPTER 6 BACKUPS AND SNAPSHOTS 35
111 to backup network
2049 to backup network
2052 to backup network
3008 to backup network
CHAPTER 6 BACKUPS AND SNAPSHOTS 36
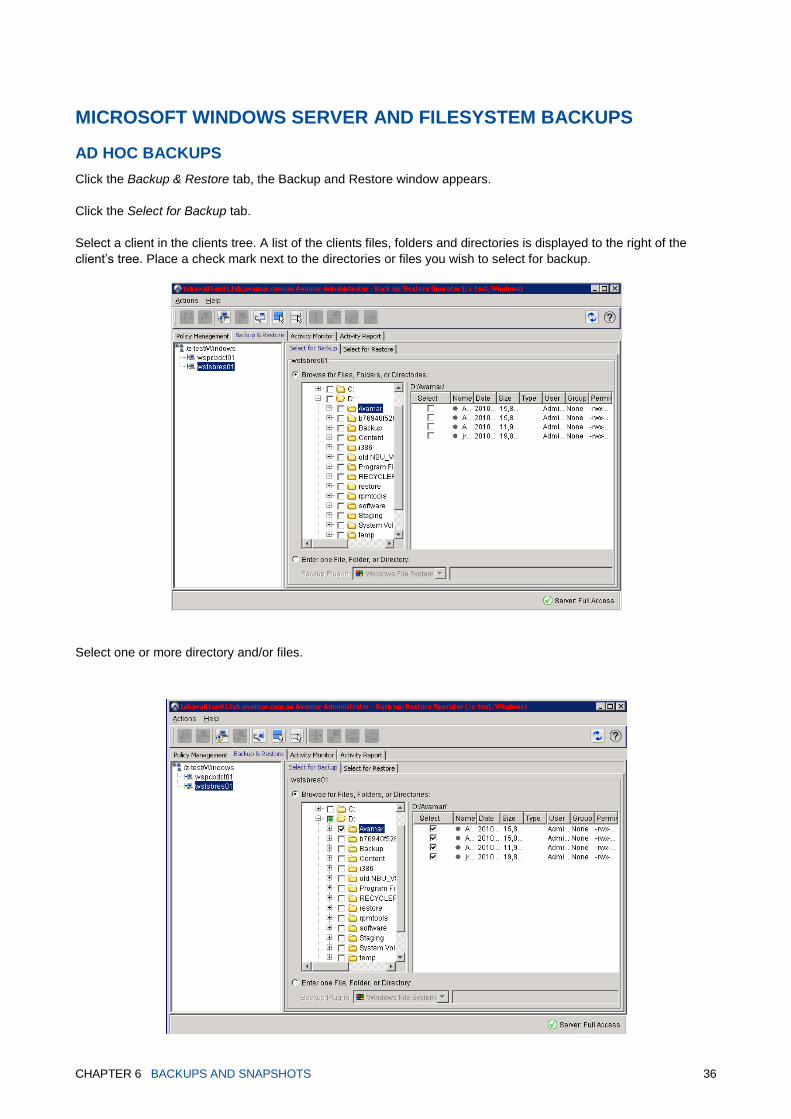
MICROSOFT WINDOWS SERVER AND FILESYSTEM BACKUPS
AD HOC BACKUPS
Click the Backup & Restore tab, the Backup and Restore window appears.
Click the Select for Backup tab.
Select a client in the clients tree. A list of the clients files, folders and directories is displayed to the right of the
client’s tree. Place a check mark next to the directories or files you wish to select for backup.
Select one or more directory and/or files.
CHAPTER 6 BACKUPS AND SNAPSHOTS 37
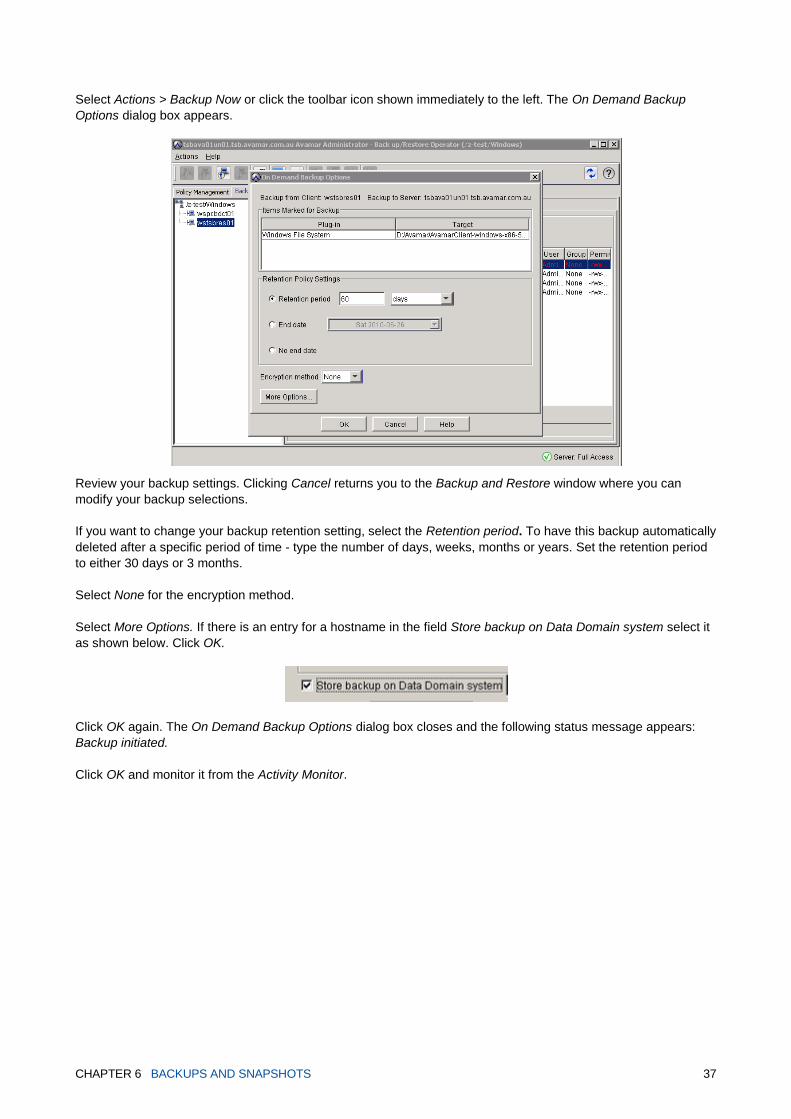
Select Actions > Backup Now or click the toolbar icon shown immediately to the left. The On Demand Backup
Options dialog box appears.
Review your backup settings. Clicking Cancel returns you to the Backup and Restore window where you can
modify your backup selections.
If you want to change your backup retention setting, select the Retention period. To have this backup automatically
deleted after a specific period of time - type the number of days, weeks, months or years. Set the retention period
to either 30 days or 3 months.
Select None for the encryption method.
Select More Options. If there is an entry for a hostname in the field Store backup on Data Domain system select it
as shown below. Click OK.
Click OK again. The On Demand Backup Options dialog box closes and the following status message appears:
Backup initiated.
Click OK and monitor it from the Activity Monitor.
CHAPTER 6 BACKUPS AND SNAPSHOTS 38
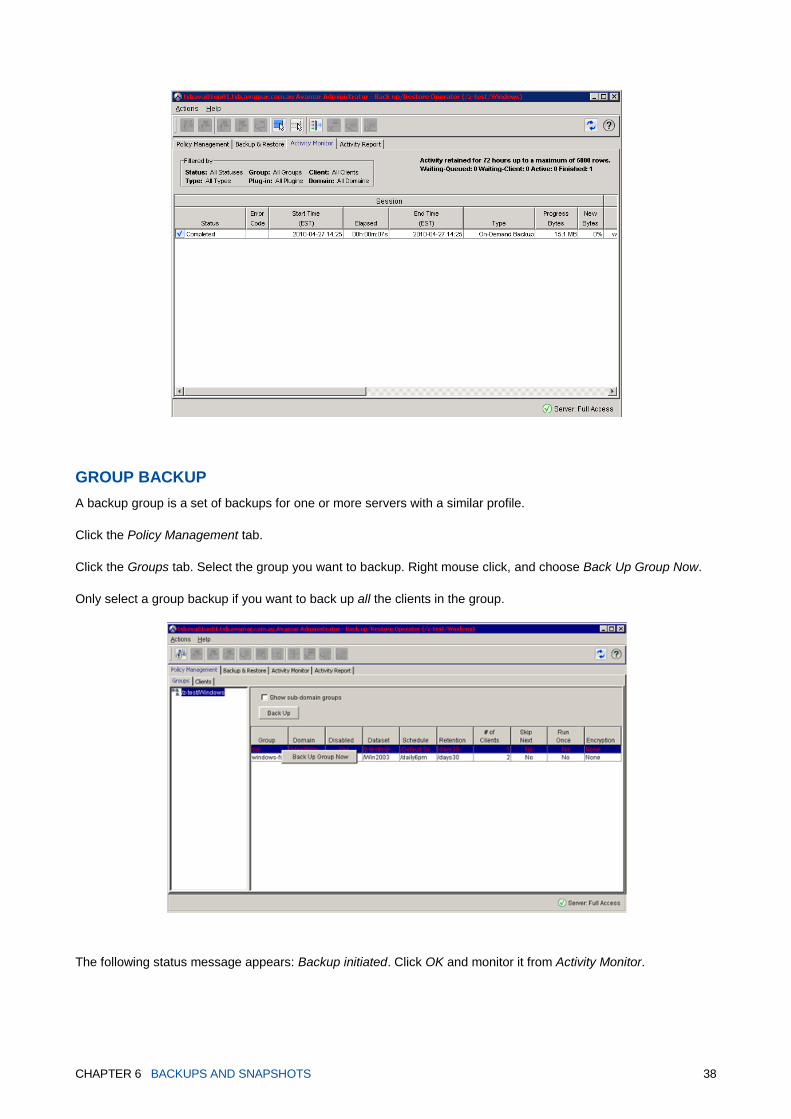
GROUP BACKUP
A backup group is a set of backups for one or more servers with a similar profile.
Click the Policy Management tab.
Click the Groups tab. Select the group you want to backup. Right mouse click, and choose Back Up Group Now.
Only select a group backup if you want to back up all the clients in the group.
The following status message appears: Backup initiated. Click OK and monitor it from Activity Monitor.
CHAPTER 6 BACKUPS AND SNAPSHOTS 39
CHAPTER 6 BACKUPS AND SNAPSHOTS 40
RESTORE FROM A BACKUP
The Backup and Restore window provides two alternative ways to locate and select a backup stored on the server.
You can search for a backup by:
Calendar date
Content
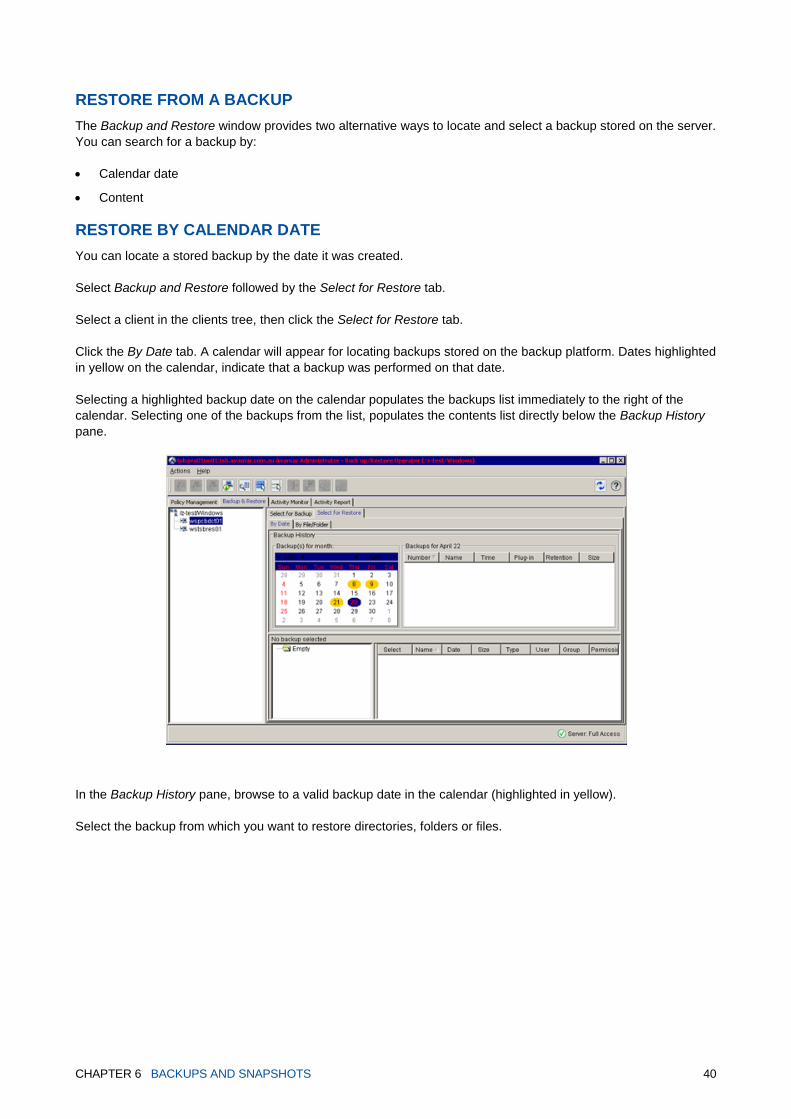
RESTORE BY CALENDAR DATE
You can locate a stored backup by the date it was created.
Select Backup and Restore followed by the Select for Restore tab.
Select a client in the clients tree, then click the Select for Restore tab.
Click the By Date tab. A calendar will appear for locating backups stored on the backup platform. Dates highlighted
in yellow on the calendar, indicate that a backup was performed on that date.
Selecting a highlighted backup date on the calendar populates the backups list immediately to the right of the
calendar. Selecting one of the backups from the list, populates the contents list directly below the Backup History
pane.
In the Backup History pane, browse to a valid backup date in the calendar (highlighted in yellow).
Select the backup from which you want to restore directories, folders or files.
CHAPTER 6 BACKUPS AND SNAPSHOTS 41
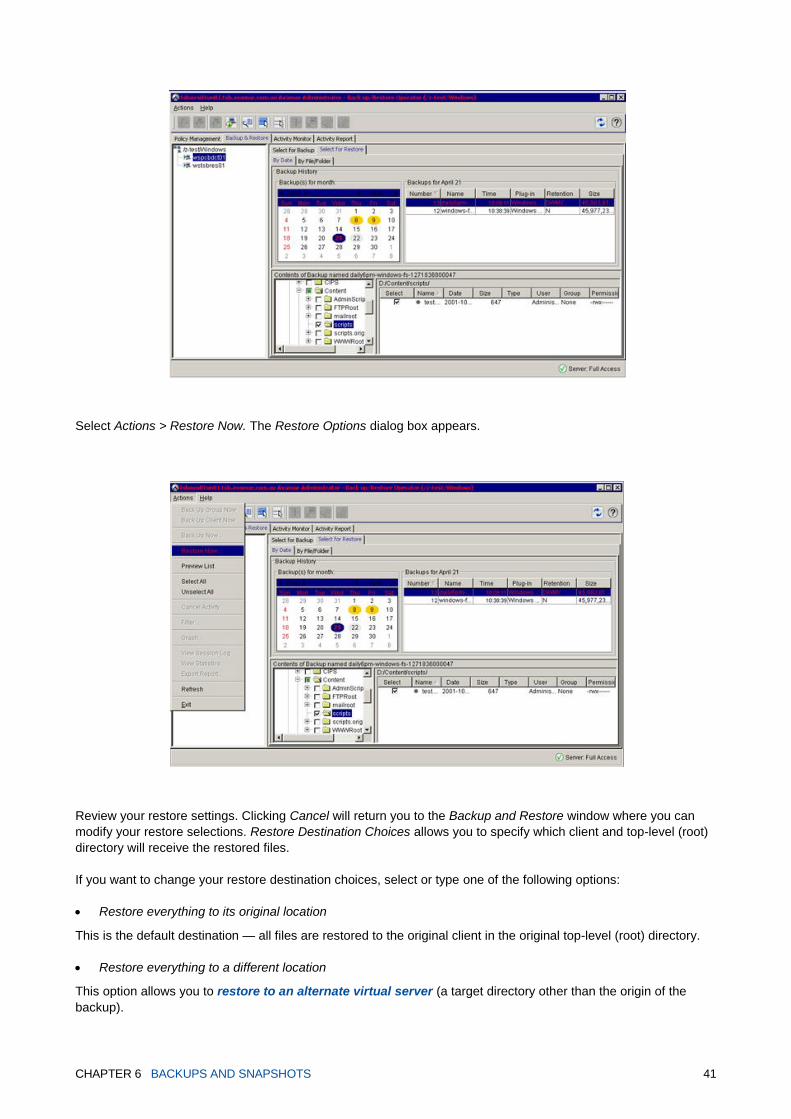
Select Actions > Restore Now. The Restore Options dialog box appears.
Review your restore settings. Clicking Cancel will return you to the Backup and Restore window where you can
modify your restore selections. Restore Destination Choices allows you to specify which client and top-level (root)
directory will receive the restored files.
If you want to change your restore destination choices, select or type one of the following options:
Restore everything to its original location
This is the default destination — all files are restored to the original client in the original top-level (root) directory.
Restore everything to a different location
This option allows you to restore to an alternate virtual server (a target directory other than the origin of the
backup).

CHAPTER 6 BACKUPS AND SNAPSHOTS 42
RESTORING TO AN ALTERNATE VIRTUAL SERVER
Your restore target does not have to be the same virtual server the backup was originally created from.
You can restore a stored backup file to any type of Telstra virtual server that shares the same virtual data centre
location as the virtual server the backup originated from.
You can restore to an alternate virtual server from either:
A long-term backup
A short-term backup
The target virtual server you are restoring to may need to be redirected to the backup platform containing the data
to be restored. A virtual server can only be connected to one backup platform at a time.
Note: performing a single-directory restore to an alternate virtual server will only restore the
contents of the directory. The original parent directory is not restored as part of this
operation. However, if you restore two or more directories to an alternate virtual server, then
the original parent directories will be restored along with the contents of those directories.
RESTORE A LONG-TERM BACKUP TO ALTERNATE VIRTUAL SERVER
To restore from a long-term backup, you’ll need to contact us to specify details including:
The virtual server the backup was created from
The backup files/folders you want to restore
The alternate backup target virtual server
The directory location you’d like the files restored to
We perform all restores from long-term backups. We’ll identify and advise you if a redirected restore is required
when you make your backup request. A redirected restore could cause a temporary backup service interruption.
PREPARING TO RESTORE A SHORT-TERM BACKUP TO ALTERNATE VIRTUAL SERVER
You can check the backup platform that a virtual server is connected to, at any time by following the initial
instructions for changing your backup platform connection.
To allow us to perform a restore to an alternate target, your target virtual server may need to be temporarily
redirected to the backup platform where your chosen backup file(s) are stored.
If so, and you’re restoring to a managed virtual server (dedicated) then we’ll take care of the platform redirection
for you.
We’ll advise you by email if you need to perform a redirection for a virtual server (dedicated) or virtual server
(shared) restore target. In this case, you’ll need to change your backup platform connection.
CHAPTER 6 BACKUPS AND SNAPSHOTS 43
POSSIBLE BACKUP SERVICE INTERRUPTION
If you have scheduled backups configured on your restore target virtual server, your backup service could be
interrupted.
A virtual server can only be connected to one backup platform at a time. Daily scheduled backups will not perform
successfully from your target virtual server while it’s temporarily redirected to a different backup platform.
If your redirected target is a managed virtual server (dedicated), we’ll email you to let you know when the
redirected restore is complete, and your scheduled backups will resume on your target virtual server.
If your redirected target is a virtual server (shared) or virtual server (dedicated), we’ll advise you when the restore
is complete. The scheduled backup service on your target virtual server will only resume when you change your
backup platform connection to its original address.
CHANGING A BACKUP PLATFORM CONNECTION
These actions are not required if your alternative restore target is a managed virtual server (dedicated) – we’ll do
this for you.
If your alternative restore target is a virtual server (shared) or virtual server (dedicated), use this process to either:
Temporarily redirect a restore target virtual server to a different backup platform
Switch a restore target virtual server back to its original backup platform
If you’re required to perform the redirect for the restore, we’ll send you an email with the new platform address you
need to temporarily connect to.
Do not switch your target virtual server back to its original platform, until we advise you by email the restore has
been completed.
The method for connecting a virtual server to a backup platform varies according to your virtual server’s operating
system:
Windows operating system
Linux operating system
CHAPTER 6 BACKUPS AND SNAPSHOTS 44
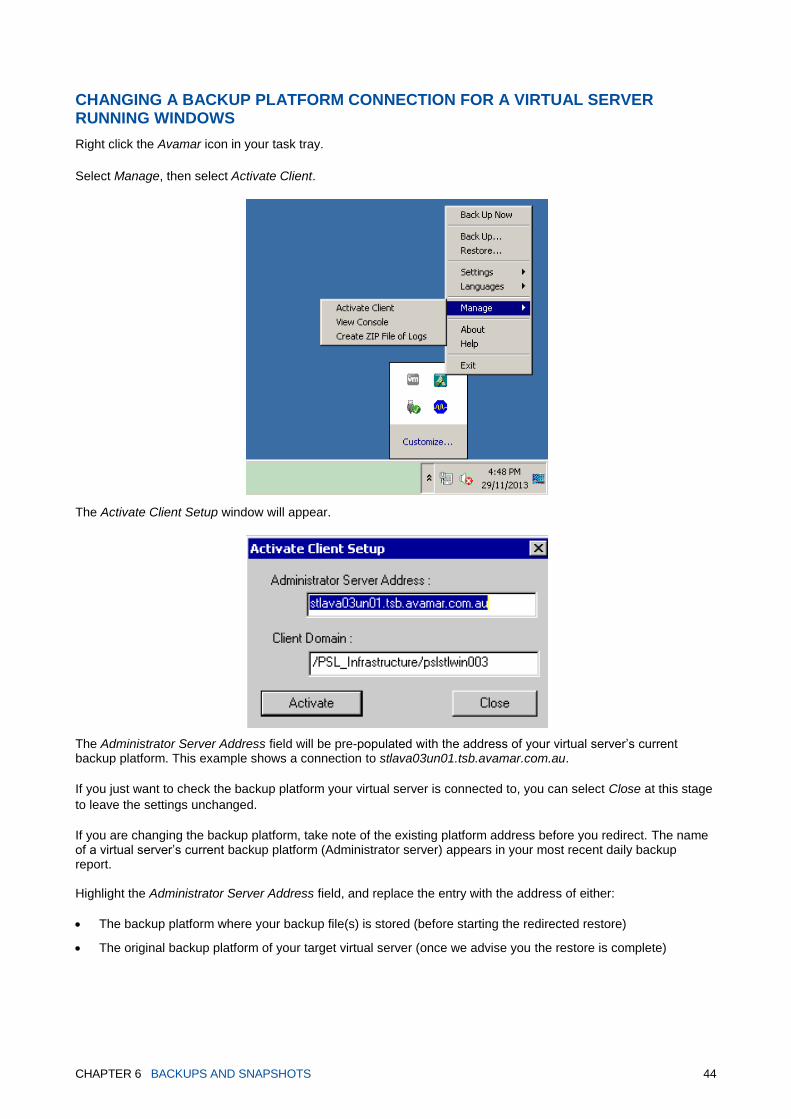
CHANGING A BACKUP PLATFORM CONNECTION FOR A VIRTUAL SERVER RUNNING WINDOWS
Right click the Avamar icon in your task tray.
Select Manage, then select Activate Client.
The Activate Client Setup window will appear.
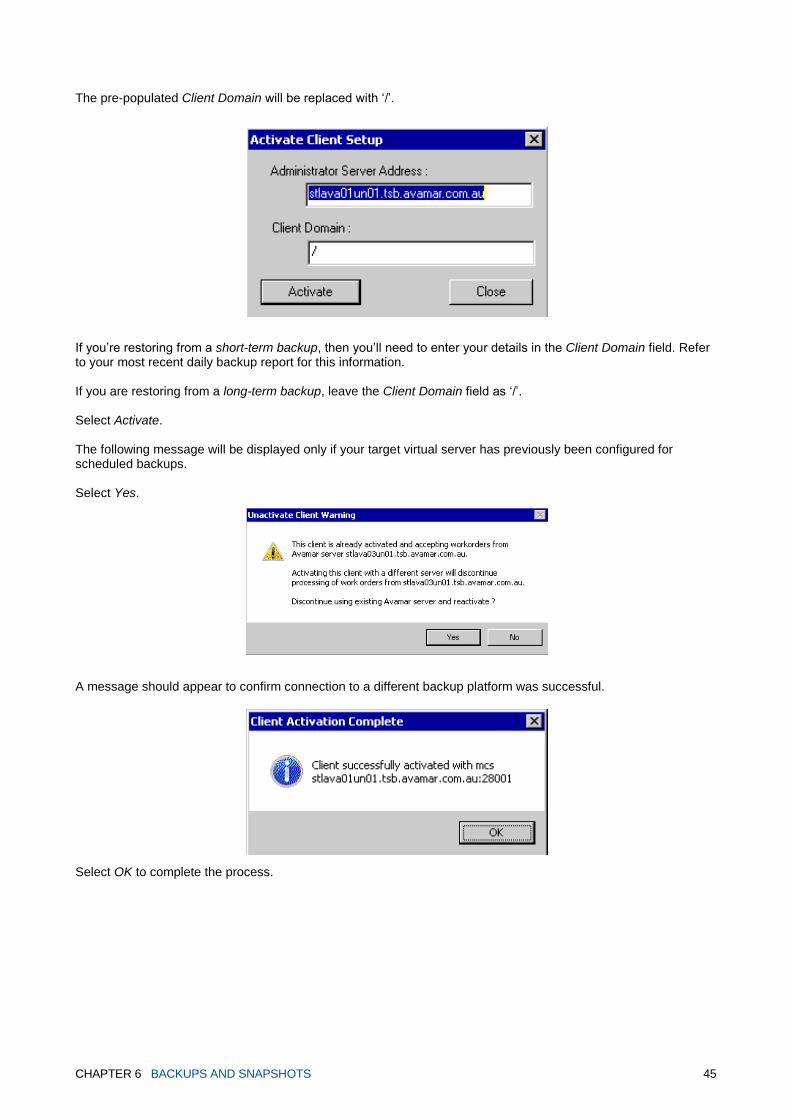
The Administrator Server Address field will be pre-populated with the address of your virtual server’s current backup platform. This example shows a connection to stlava03un01.tsb.avamar.com.au.
If you just want to check the backup platform your virtual server is connected to, you can select Close at this stage
to leave the settings unchanged.
If you are changing the backup platform, take note of the existing platform address before you redirect. The name of a virtual server’s current backup platform (Administrator server) appears in your most recent daily backup report. Highlight the Administrator Server Address field, and replace the entry with the address of either:
The backup platform where your backup file(s) is stored (before starting the redirected restore)
The original backup platform of your target virtual server (once we advise you the restore is complete)
CHAPTER 6 BACKUPS AND SNAPSHOTS 45
The pre-populated Client Domain will be replaced with ‘/’.
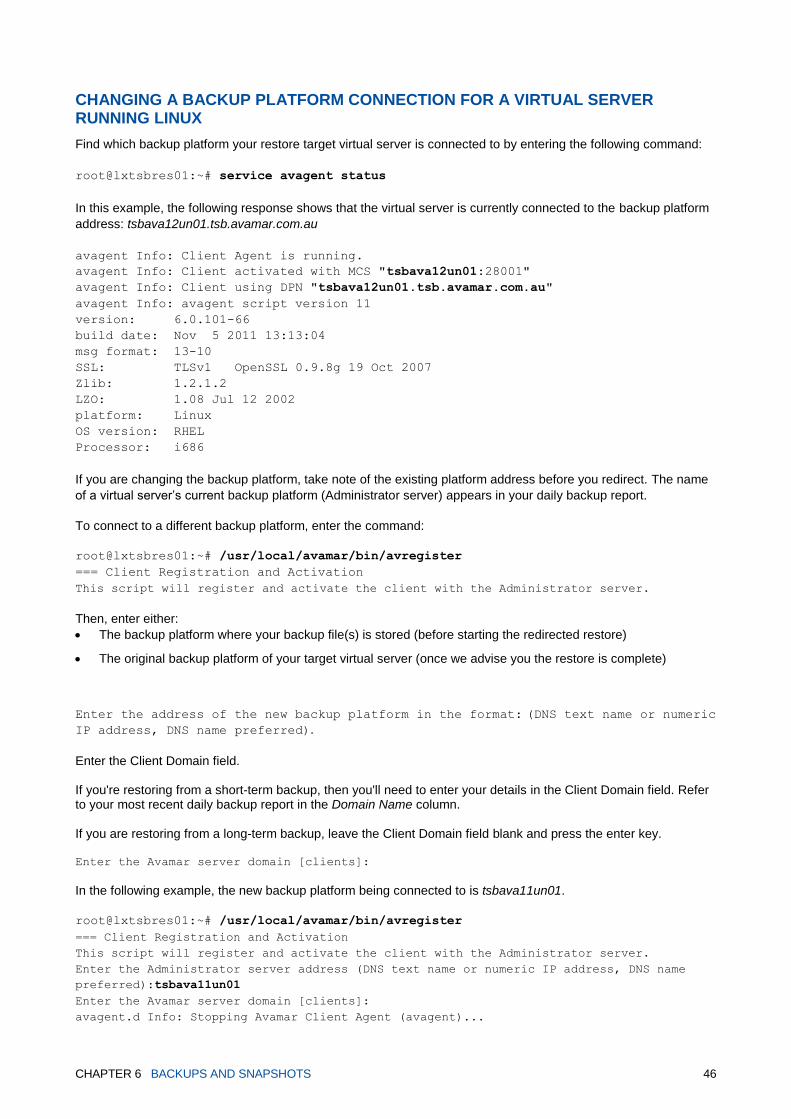
If you’re restoring from a short-term backup, then you’ll need to enter your details in the Client Domain field. Refer to your most recent daily backup report for this information. If you are restoring from a long-term backup, leave the Client Domain field as ‘/’. Select Activate. The following message will be displayed only if your target virtual server has previously been configured for scheduled backups. Select Yes.
A message should appear to confirm connection to a different backup platform was successful.
Select OK to complete the process.
CHAPTER 6 BACKUPS AND SNAPSHOTS 46
CHANGING A BACKUP PLATFORM CONNECTION FOR A VIRTUAL SERVER RUNNING LINUX
Find which backup platform your restore target virtual server is connected to by entering the following command:
root@lxtsbres01:~# service avagent status
In this example, the following response shows that the virtual server is currently connected to the backup platform
address: tsbava12un01.tsb.avamar.com.au
avagent Info: Client Agent is running.
avagent Info: Client activated with MCS "tsbava12un01:28001"
avagent Info: Client using DPN "tsbava12un01.tsb.avamar.com.au"
avagent Info: avagent script version 11
version: 6.0.101-66
build date: Nov 5 2011 13:13:04
msg format: 13-10
SSL: TLSv1 OpenSSL 0.9.8g 19 Oct 2007
Zlib: 1.2.1.2
LZO: 1.08 Jul 12 2002
platform: Linux
OS version: RHEL
Processor: i686
If you are changing the backup platform, take note of the existing platform address before you redirect. The name
of a virtual server’s current backup platform (Administrator server) appears in your daily backup report.
To connect to a different backup platform, enter the command:
root@lxtsbres01:~# /usr/local/avamar/bin/avregister
=== Client Registration and Activation
This script will register and activate the client with the Administrator server.
Then, enter either:
The backup platform where your backup file(s) is stored (before starting the redirected restore)
The original backup platform of your target virtual server (once we advise you the restore is complete)
Enter the address of the new backup platform in the format: (DNS text name or numeric
IP address, DNS name preferred).
Enter the Client Domain field. If you're restoring from a short-term backup, then you'll need to enter your details in the Client Domain field. Refer to your most recent daily backup report in the Domain Name column. If you are restoring from a long-term backup, leave the Client Domain field blank and press the enter key. Enter the Avamar server domain [clients]:
In the following example, the new backup platform being connected to is tsbava11un01.
root@lxtsbres01:~# /usr/local/avamar/bin/avregister
=== Client Registration and Activation
This script will register and activate the client with the Administrator server.
Enter the Administrator server address (DNS text name or numeric IP address, DNS name
preferred):tsbava11un01
Enter the Avamar server domain [clients]:
avagent.d Info: Stopping Avamar Client Agent (avagent)...
CHAPTER 6 BACKUPS AND SNAPSHOTS 47
avagent.d Info: Client Agent stopped.
avagent Info <5241>: Logging to /usr/local/avamar/var/avagent.log
avagent.d Info: Client activated successfully.
avagent Info <5241>: Logging to /usr/local/avamar/var/avagent.log
avagent Info <5417>: daemonized as process id 22187
avagent.d Info: Client Agent started.
Registration Complete.
The command has only been successful if Registration Complete displays.
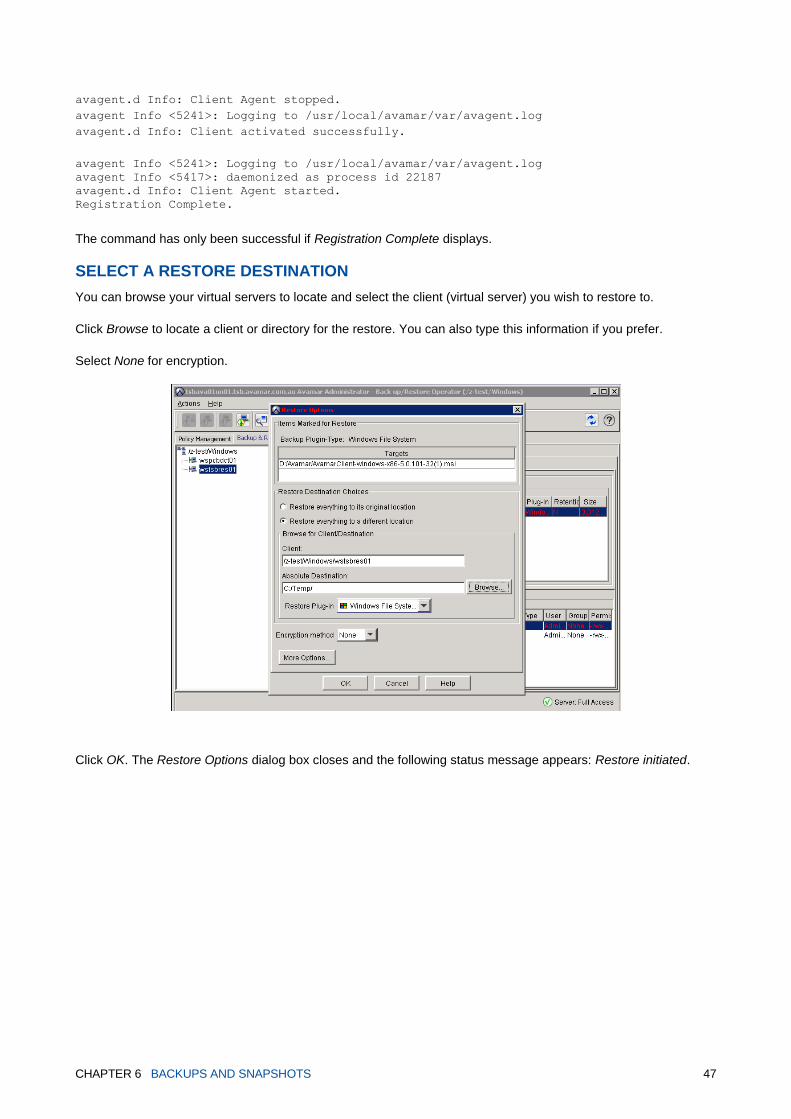
SELECT A RESTORE DESTINATION
You can browse your virtual servers to locate and select the client (virtual server) you wish to restore to.
Click Browse to locate a client or directory for the restore. You can also type this information if you prefer.
Select None for encryption.
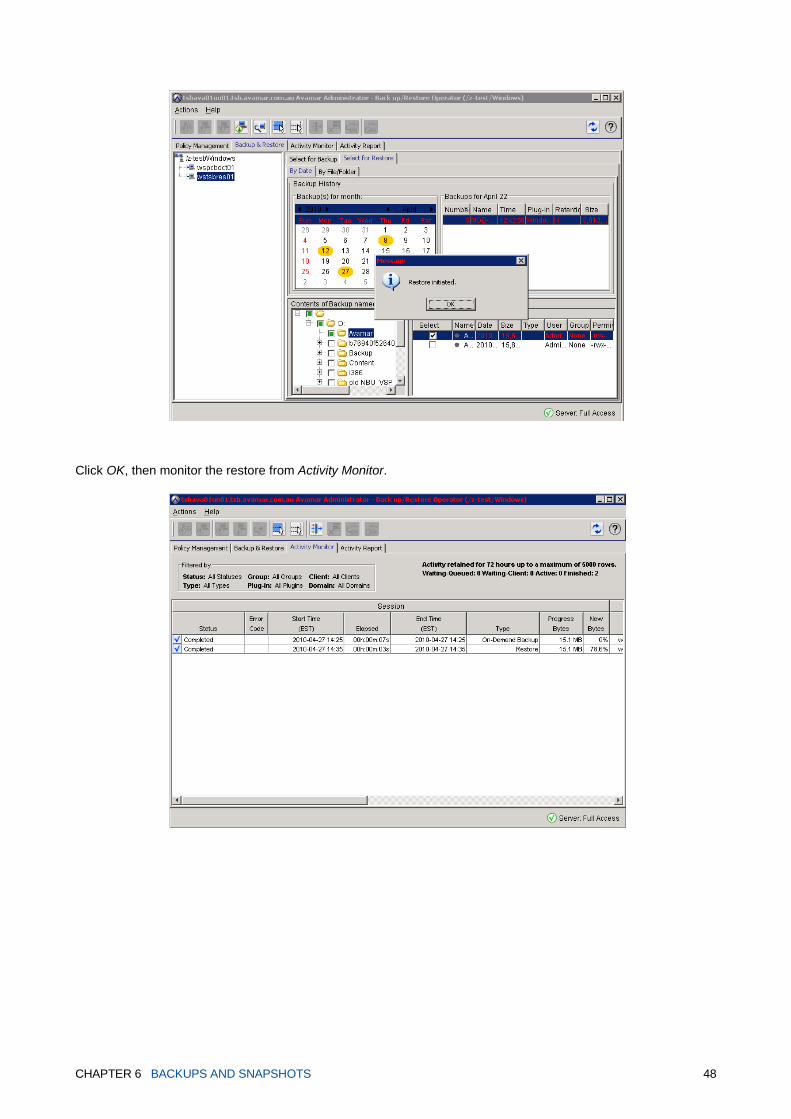
Click OK. The Restore Options dialog box closes and the following status message appears: Restore initiated.
CHAPTER 6 BACKUPS AND SNAPSHOTS 48
Click OK, then monitor the restore from Activity Monitor.
CHAPTER 6 BACKUPS AND SNAPSHOTS 49
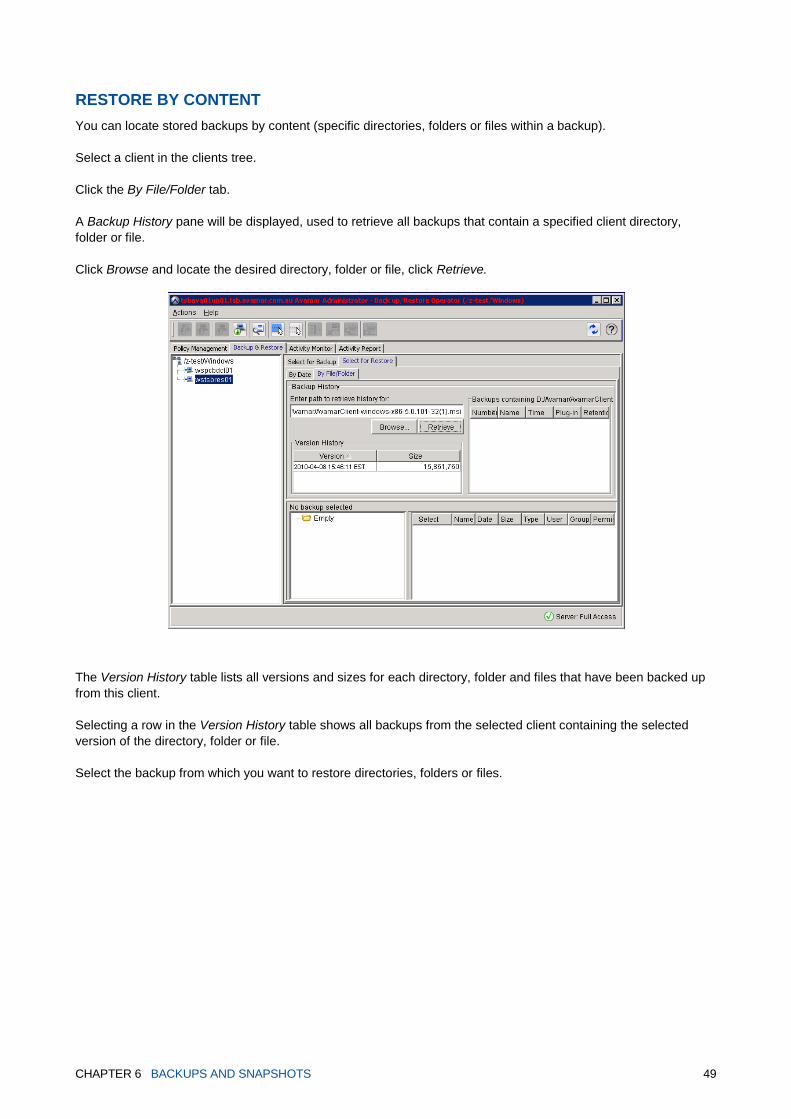
RESTORE BY CONTENT
You can locate stored backups by content (specific directories, folders or files within a backup).
Select a client in the clients tree.
Click the By File/Folder tab.
A Backup History pane will be displayed, used to retrieve all backups that contain a specified client directory,
folder or file.
Click Browse and locate the desired directory, folder or file, click Retrieve.
The Version History table lists all versions and sizes for each directory, folder and files that have been backed up
from this client.
Selecting a row in the Version History table shows all backups from the selected client containing the selected
version of the directory, folder or file.
Select the backup from which you want to restore directories, folders or files.
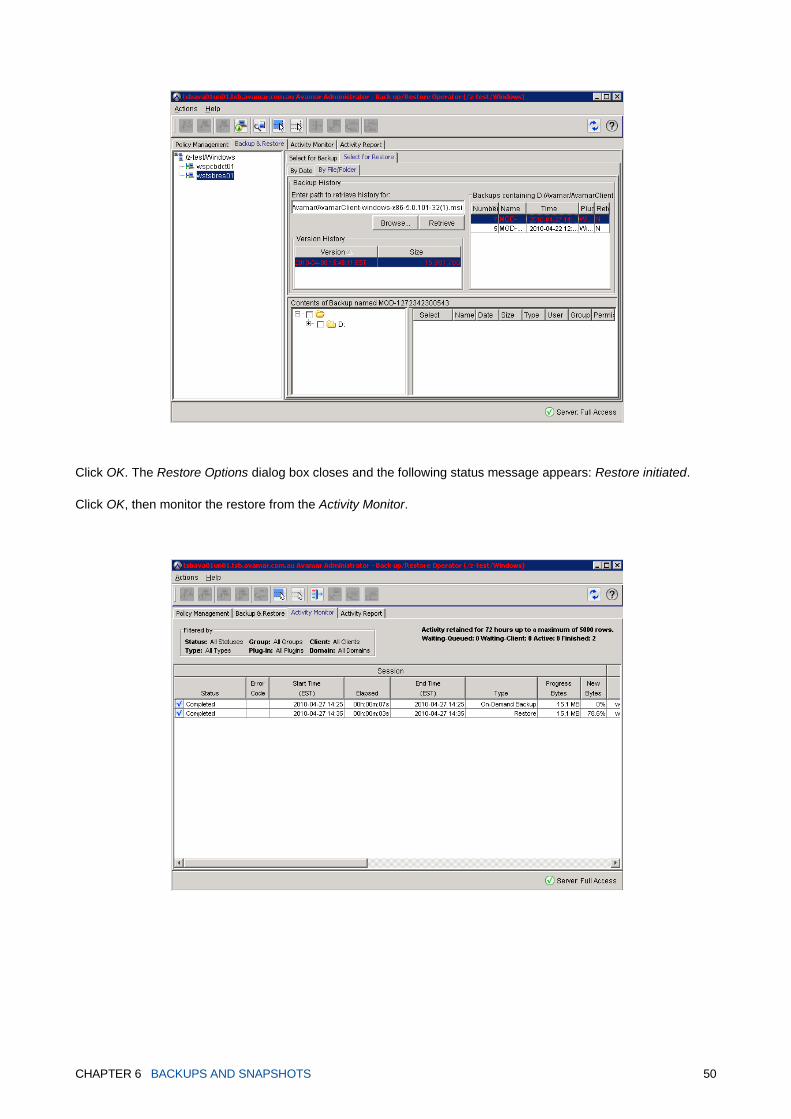
CHAPTER 6 BACKUPS AND SNAPSHOTS 50
Click OK. The Restore Options dialog box closes and the following status message appears: Restore initiated.
Click OK, then monitor the restore from the Activity Monitor.
CHAPTER 6 BACKUPS AND SNAPSHOTS 51
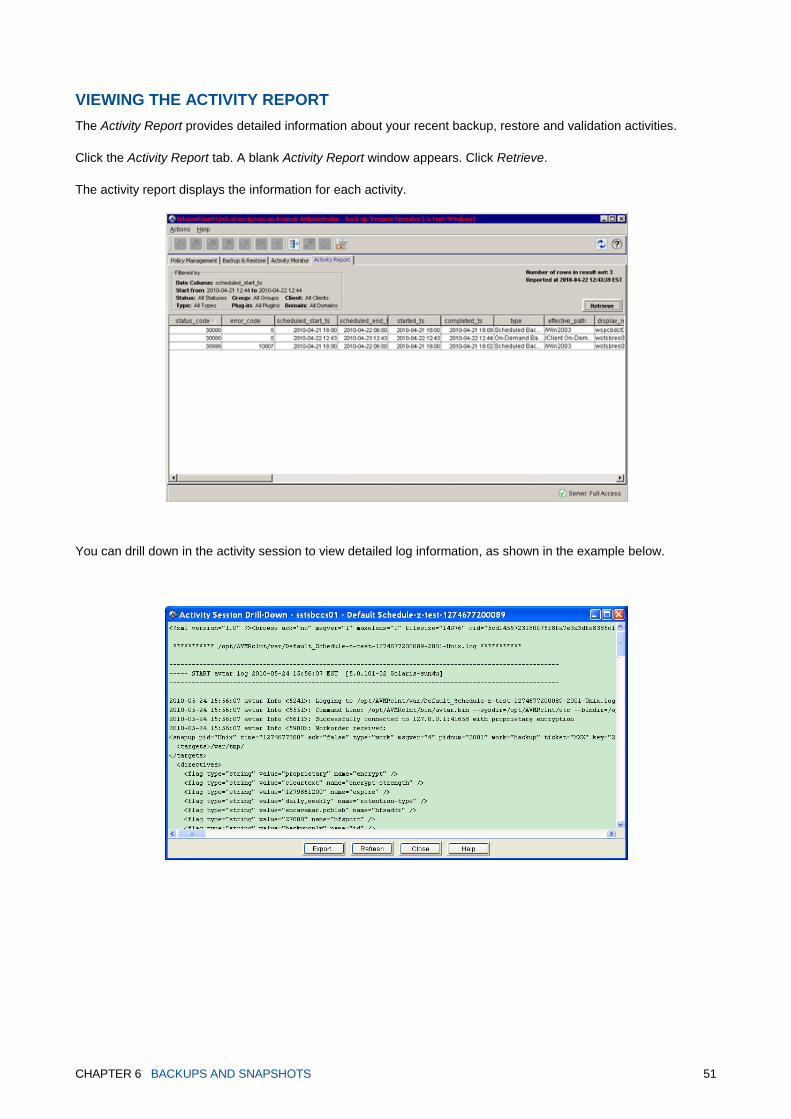
VIEWING THE ACTIVITY REPORT
The Activity Report provides detailed information about your recent backup, restore and validation activities.
Click the Activity Report tab. A blank Activity Report window appears. Click Retrieve.
The activity report displays the information for each activity.
You can drill down in the activity session to view detailed log information, as shown in the example below.
CHAPTER 6 BACKUPS AND SNAPSHOTS 52
BACKUP TROUBLESHOOTING
There are several actions you can take to rectify a non-performing backup or restore operation.
CHECK IF THE AGENT IS RUNNING
On a Windows operating system, open services.msc and check that the backup agent is running.
On a Linux operating system, you can check using command #avagent service status
CHECK COMMUNICATIONS RESTRICTIONS
Ensure there are no restrictions on communications by any firewall on your virtual server.
The following firewall TCP ports must be open to the backup platform:
27000
28000
28002
29000
7778
7779
7780
7781
443
111
2049
2052
3008
ENSURE THE AVAMAR FQDN CAN BE RESOLVED TO AN IP ADDRESS
Perform the following commands:
Windows
ping [Avamar FQDN]
nslookup [Avamar FQDN]
Linux
ping [Avamar FQDN]
nslookup [Avamar FQDN]
Solaris
ping -s [Avamar FQDN]
nslookup [Avamar FQDN]

CHAPTER 6 BACKUPS AND SNAPSHOTS 53
HOST FILE FORMAT
If your virtual server is not using DNS, your host file should be in the format:
(IP address of your allocated administrator server) (fully qualified domain name (FQDN)) and (short name)
Backup details are pre-configured in the host file for each of your virtual servers (shared). Do not delete any
backup host file entries.
If your original host file details have been deleted, you’ll need to re-enter the host file entries corresponding to your
virtual data centre locations:
Melbourne
Hong Kong
London
Singapore
New Jersey
Melbourne backup administrator servers
IP ADDRESS FQDN SHORT NAME
58.162.75.4 dcbava06un01.dcb.avamar.com.au dcbava06un01
58.162.75.5 dcbava07un01.dcb.avamar.com.au dcbava07un01
58.162.75.6 dcbava08un01.dcb.avamar.com.au dcbava08un01
58.162.75.7 dcbava09un01.dcb.avamar.com.au dcbava09un01
58.162.75.8 dcbava10un01.dcb.avamar.com.au dcbava10un01
58.162.75.9 dcbava11un01.dcb.avamar.com.au dcbava11un01
58.162.75.10 dcbava12un01.dcb.avamar.com.au dcbava12un01
58.162.75.11 dcbava13un01.dcb.avamar.com.au dcbava13un01
58.162.75.12 dcbava14un01.dcb.avamar.com.au dcbava14un01
58.162.75.13 dcbava15un01.dcb.avamar.com.au dcbava15un01
58.162.75.14 dcbava16un01.dcb.avamar.com.au dcbava16un01
58.162.75.15 dcbava17un01.dcb.avamar.com.au dcbava17un01
58.162.75.16 dcbava18un01.dcb.avamar.com.au dcbava18un01
58.162.74.4 claava01un01.dcb.avamar.com.au claava01un01

CHAPTER 6 BACKUPS AND SNAPSHOTS 54
IP ADDRESS FQDN SHORT NAME
58.162.74.21 claava02un01.dcb.avamar.com.au claava02un01
58.162.74.38 claava03un01.dcb.avamar.com.au claava03un01
58.162.74.39 claava04un01.dcb.avamar.com.au claava04un01
58.162.74.40 claava05un01.dcb.avamar.com.au claava05un01
58.162.74.41 claava06un01.dcb.avamar.com.au claava06un01
58.162.74.42 claava07un01.dcb.avamar.com.au claava07un01
58.162.74.43 claava08un01.dcb.avamar.com.au claava08un01
58.162.74.44 claava09un01.dcb.avamar.com.au claava09un01
58.162.74.45 claava10un01.dcb.avamar.com.au claava10un01
58.162.74.46 claava11un01.dcb.avamar.com.au claava11un01
58.162.74.47 claava12un01.dcb.avamar.com.au claava12un01
58.162.74.48 claava13un01.dcb.avamar.com.au claava13un01
58.162.74.49 claava14un01.dcb.avamar.com.au claava14un01
58.162.74.254 cladd01.dcb.avamar.com.au cladd01
58.162.75.254 dcbdd01.dcb.avamar.com.au dcbdd01
Hong Kong backup administrator servers
IP ADDRESS FQDN SHORT NAME
101.167.188.4 honava01un01.tsb.avamar.com.au honava01un01
101.167.188.5 honava02un01.tsb.avamar.com.au honava02un01
CHAPTER 6 BACKUPS AND SNAPSHOTS 55
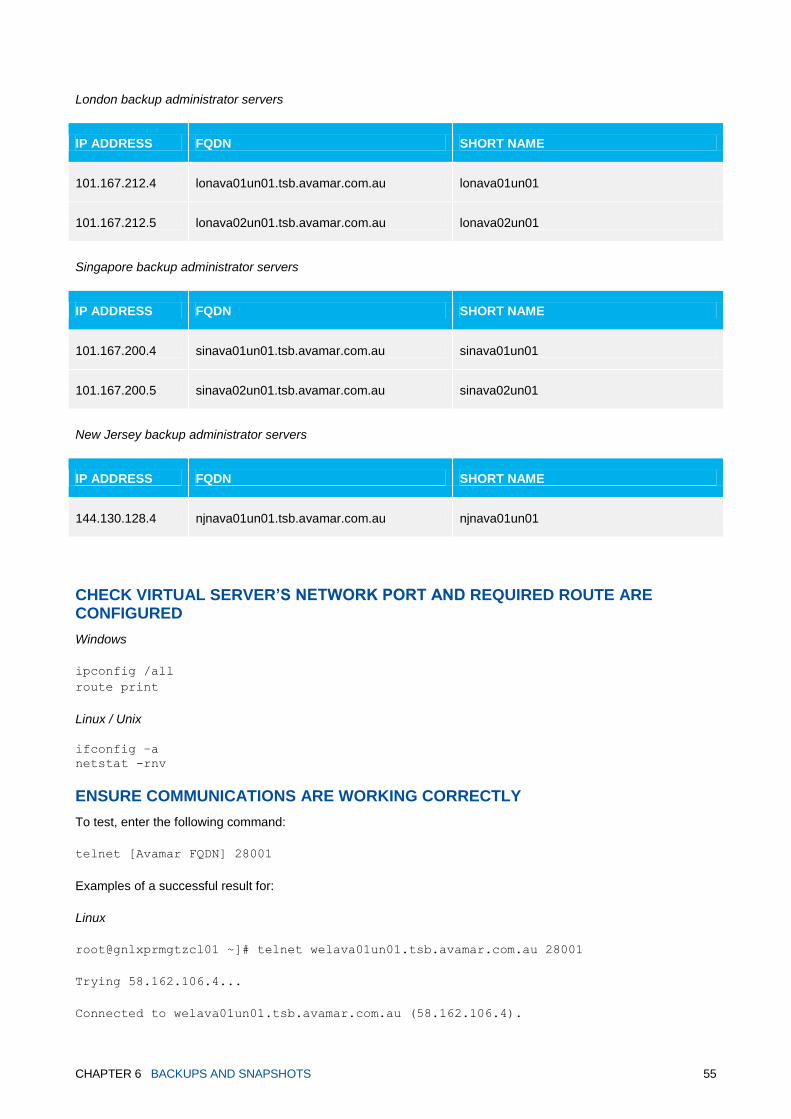
London backup administrator servers
IP ADDRESS FQDN SHORT NAME
101.167.212.4 lonava01un01.tsb.avamar.com.au lonava01un01
101.167.212.5 lonava02un01.tsb.avamar.com.au lonava02un01
Singapore backup administrator servers
IP ADDRESS FQDN SHORT NAME
101.167.200.4 sinava01un01.tsb.avamar.com.au sinava01un01
101.167.200.5 sinava02un01.tsb.avamar.com.au sinava02un01
New Jersey backup administrator servers
IP ADDRESS FQDN SHORT NAME
144.130.128.4 njnava01un01.tsb.avamar.com.au njnava01un01
CHECK VIRTUAL SERVER’S NETWORK PORT AND REQUIRED ROUTE ARE CONFIGURED
Windows
ipconfig /all
route print
Linux / Unix
ifconfig –a
netstat -rnv
ENSURE COMMUNICATIONS ARE WORKING CORRECTLY
To test, enter the following command:
telnet [Avamar FQDN] 28001
Examples of a successful result for:
Linux
root@gnlxprmgtzcl01 ~]# telnet welava01un01.tsb.avamar.com.au 28001
Trying 58.162.106.4...
Connected to welava01un01.tsb.avamar.com.au (58.162.106.4).
CHAPTER 6 BACKUPS AND SNAPSHOTS 56
Escape character is '^]'.
Windows
Telnet welava01un01.tsb.avamar.com.au
The result is a blank screen.
CHECK BACKUP LOGS
Windows logs are located at C:\Program Files\avs\var
Linux logs are located at /usr/local/avamar/var
IF TROUBLESHOOTING FAILS
If these troubleshooting suggestions haven’t worked, email us with:
Screenshots of:
ipconfig /all
route print
host file entries
File copies from your avs installation directory:
avagent.log
avtar.cmd
cid.bin

CHAPTER 6 BACKUPS AND SNAPSHOTS 57
SNAPSHOTS
You can create snapshots (full system image copies) of a compatible server at any time. You can restore a virtual
server - within the lifespan of its snapshot - to its system state when the snapshot was taken.
To confirm the snapshot compatibility of your servers, check your operating system specifications directly from the
operating system vendor and the vendor(s) of any software running on the virtual server.
The Snapshot tab displays the last snapshot taken of your virtual server. Snapshots last for 24 hours, unless
overwritten by another snapshot.
From the Snapshot tab you can:
Create a snapshot
Revert your system configuration back to the snapshot
Delete a snapshot
The tab title will display a green dot if a current snapshot exists.
CREATE A SNAPSHOT
Select the Create new snapshot button under the Snapshots tab.
A message will display asking you to confirm that you want to create a new snapshot.
The new snapshot will replace any existing snapshots.
The new snapshot will be stored for 24 hours and will be charged per GB-hour on top of your plan.
REVERT YOUR SYSTEM CONFIGURATION BACK TO THE SNAPSHOT
Select the Revert to snapshot button in the Snapshots tab.
A message will display asking you to confirm that you want to revert your system back to the snapshot’s point in
time, including the CPU, RAM and storage configurations.
You can’t revert your system configuration back to a snapshot if a task is currently in progress. View the activity
log to see what tasks are running on your virtual server.
You will not be able to use the virtual server during the reversal. Reverting times vary according to server size.
DELETE A SNAPSHOT
Select the Delete active snapshot link in the Snapshots tab.
A message will display asking you to confirm that you want to delete the snapshot.
If you delete a snapshot, you won’t be able to revert your system configuration back to the previous point in time.
CHAPTER 7 REPORTS 58
CHAPTER 7 REPORTS
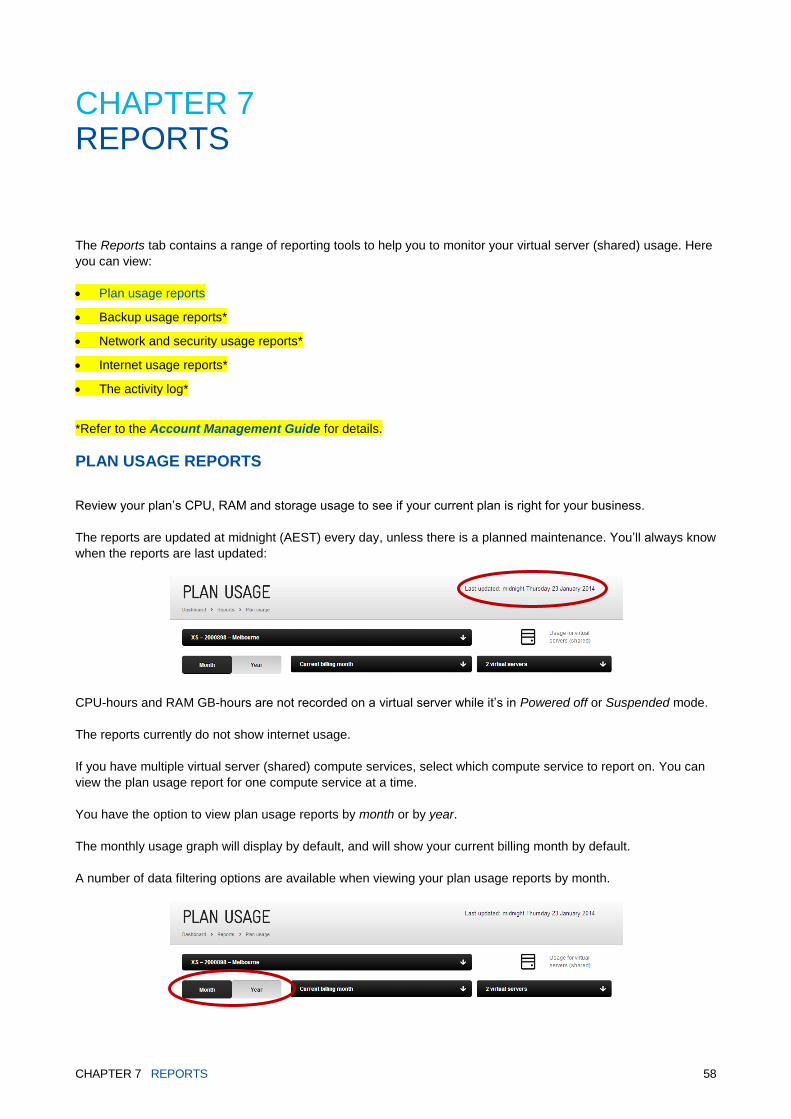
The Reports tab contains a range of reporting tools to help you to monitor your virtual server (shared) usage. Here
you can view:
Plan usage reports
Backup usage reports*
Network and security usage reports*
Internet usage reports*
The activity log*
*Refer to the Account Management Guide for details.
PLAN USAGE REPORTS
Review your plan’s CPU, RAM and storage usage to see if your current plan is right for your business.
The reports are updated at midnight (AEST) every day, unless there is a planned maintenance. You’ll always know
when the reports are last updated:
CPU-hours and RAM GB-hours are not recorded on a virtual server while it’s in Powered off or Suspended mode.
The reports currently do not show internet usage.
If you have multiple virtual server (shared) compute services, select which compute service to report on. You can
view the plan usage report for one compute service at a time.
You have the option to view plan usage reports by month or by year.
The monthly usage graph will display by default, and will show your current billing month by default.
A number of data filtering options are available when viewing your plan usage reports by month.

CHAPTER 7 REPORTS 59
MONTHLY REPORTS
FILTERS
Plan usage reports allow you to filter data either by billing month and virtual server (or both).
You can view monthly usage back to 12 billing months. You can select one, multiple or all virtual servers.
SUBSCRIPTION PLAN USAGE REPORTS
Choose to view your monthly plan usage via either the graph or table.
This graph shows the plan name and how much CPU, RAM and storage have already been used in the billing
month.
The red usage line identifies where you are in the billing month.
You can also access our pricing guides and your Telstra bill from here if you need to check plan and product fees.
The legend in the graph’s top right-hand corner explains what the coloured graph items mean. For example, if you
exceed your plan’s CPU or RAM usage the bar will change colour.
You can also use the filters to view specific virtual servers in the graph.
The colours faded into the background represent the total plan usage.
CHAPTER 7 REPORTS 60
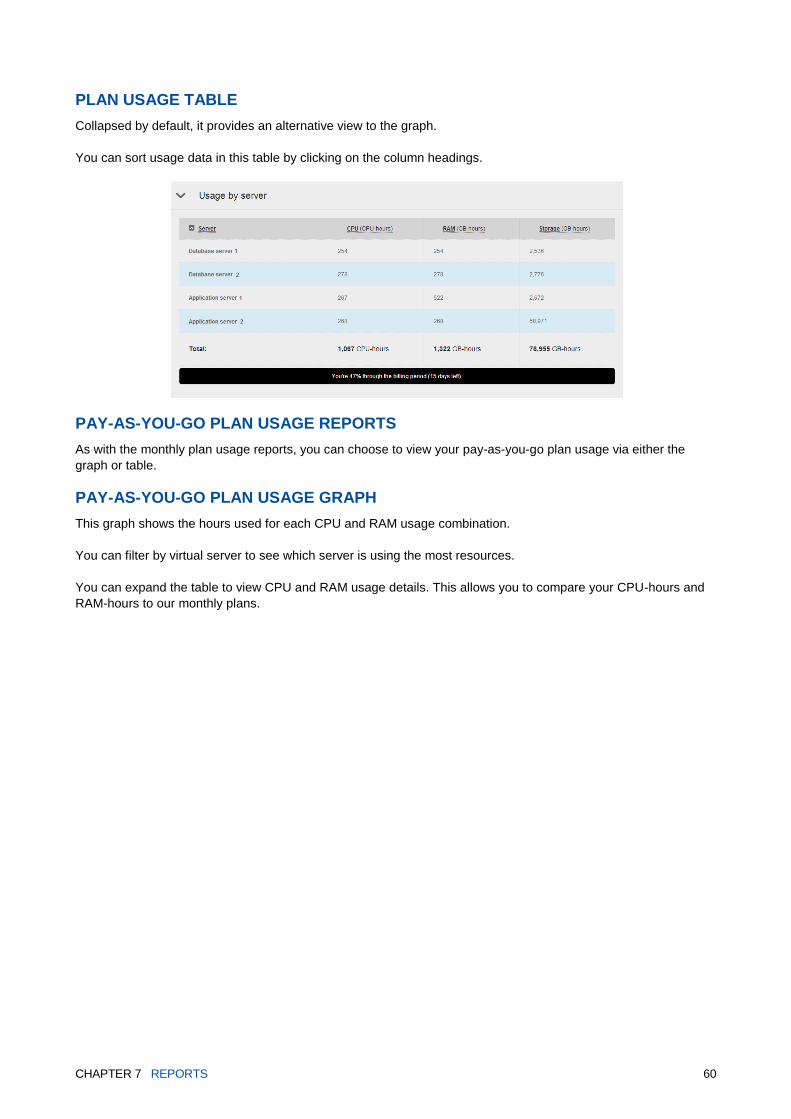
PLAN USAGE TABLE
Collapsed by default, it provides an alternative view to the graph.
You can sort usage data in this table by clicking on the column headings.
PAY-AS-YOU-GO PLAN USAGE REPORTS
As with the monthly plan usage reports, you can choose to view your pay-as-you-go plan usage via either the
graph or table.
PAY-AS-YOU-GO PLAN USAGE GRAPH
This graph shows the hours used for each CPU and RAM usage combination.
You can filter by virtual server to see which server is using the most resources.
You can expand the table to view CPU and RAM usage details. This allows you to compare your CPU-hours and
RAM-hours to our monthly plans.

CHAPTER 7 REPORTS 61
YEARLY REPORTS
The yearly report displays separate CPU, RAM and storage usage graphs for the last 12 billing months (including
the current month).
Here you can view:
The plan’s usage allowance by month (grey)
Actual usage for each month (blue)
Excess usage above plan (red)
You can also view this information in the table below the graph.