


Languages
Pages
Legal

XL CRIBBAGE BOARD
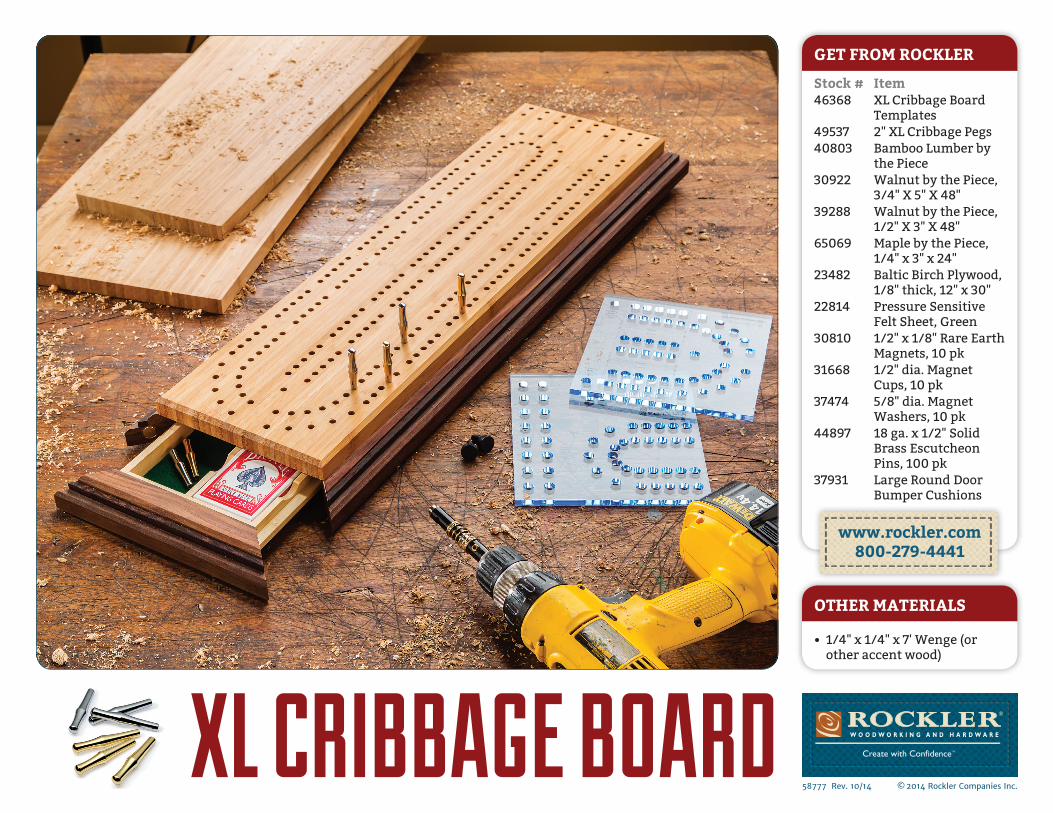
OTHER MATERIALS
• 1/4" x 1/4" x 7' Wenge (or other accent wood)
www.rockler.com800-279-4441
GET FROM ROCKLER
Stock # Item46368 XL Cribbage Board
Templates49537 2" XL Cribbage Pegs40803 Bamboo Lumber by
the Piece30922 Walnut by the Piece,
3/4" X 5" X 48"39288 Walnut by the Piece,
1/2" X 3" X 48"65069 Maple by the Piece,
1/4" x 3" x 24"23482 Baltic Birch Plywood,
1/8" thick, 12" x 30"22814 Pressure Sensitive
Felt Sheet, Green30810 1/2" x 1/8" Rare Earth
Magnets, 10 pk31668 1/2" dia. Magnet
Cups, 10 pk37474 5/8" dia. Magnet
Washers, 10 pk44897 18 ga. x 1/2" Solid
Brass Escutcheon Pins, 100 pk
37931 Large Round Door Bumper Cushions
58777 Rev. 10/14 © 2014 Rockler Companies Inc.
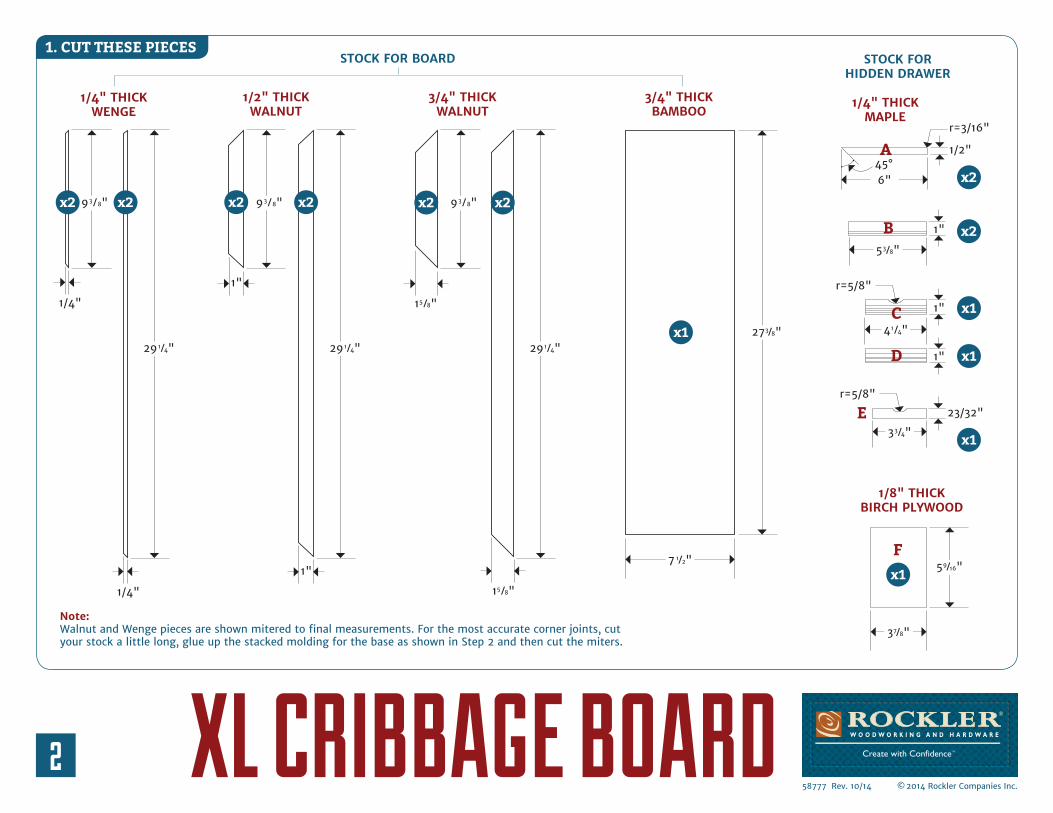
1. CUT THESE PIECES
XL CRIBBAGE BOARD2
1/4" THICK WENGE
1/2" THICK WALNUT
3/4" THICK WALNUT
3/4" THICK BAMBOO
1/4" THICK MAPLE
7 1⁄2"
53⁄8"
41⁄4"
6"45°
1/2"
1"
r=3/16"
r=5/8"
1/4"
1"
15⁄8"
15⁄8"
1"
291⁄4"
93⁄8"x2 x2 x2x2 x2 x2
x2
x2
A
B
C
D
E
F
1/4"
Note: Walnut and Wenge pieces are shown mitered to final measurements. For the most accurate corner joints, cut your stock a little long, glue up the stacked molding for the base as shown in Step 2 and then cut the miters.
273⁄8"x1
x1
x1
x1
1/8" THICK BIRCH PLYWOOD
37⁄8"
59⁄16"x1
1"
1"
23/32"
33⁄4"
r=5/8"
93⁄8" 93⁄8"
291⁄4" 291⁄4"
STOCK FOR HIDDEN DRAWER
STOCK FOR BOARD
58777 Rev. 10/14 © 2014 Rockler Companies Inc.
XL CRIBBAGE BOARD
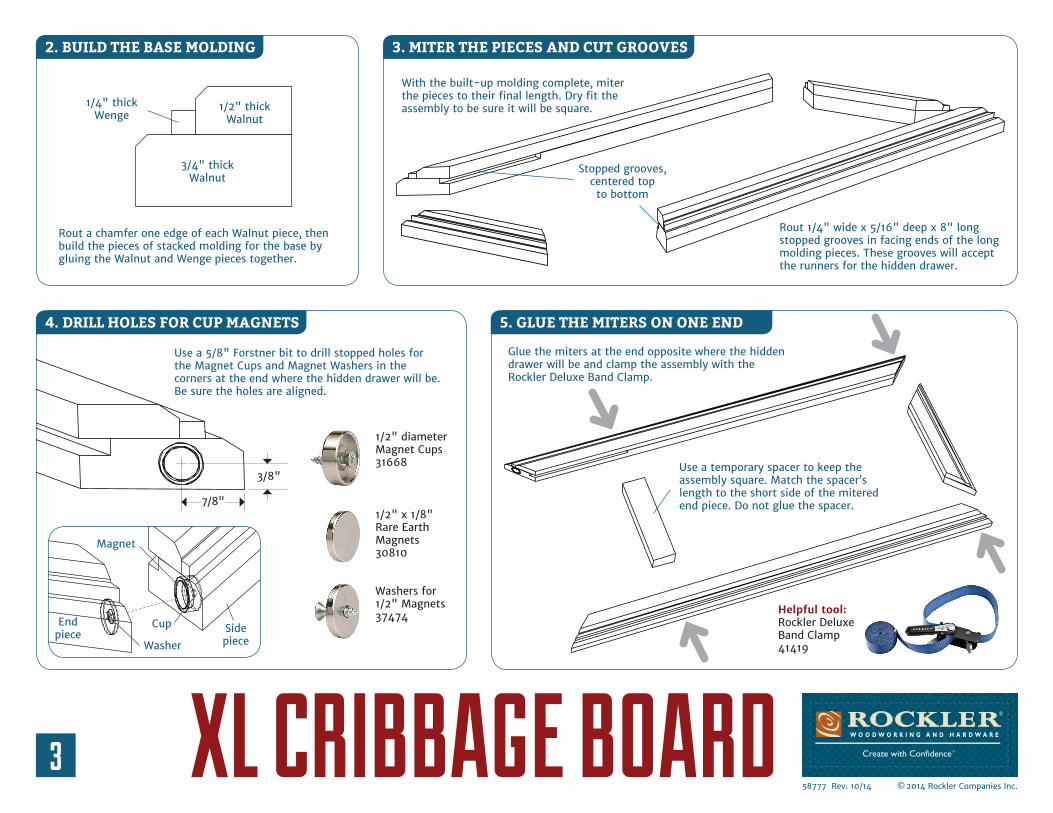
2. BUILD THE BASE MOLDING
4. DRILL HOLES FOR CUP MAGNETS
3. MITER THE PIECES AND CUT GROOVES
5. GLUE THE MITERS ON ONE END
Rout a chamfer one edge of each Walnut piece, then build the pieces of stacked molding for the base by gluing the Walnut and Wenge pieces together.
3
1/2" thick Walnut
1/4" thick Wenge
3/4" thick Walnut
7/8"
With the built-up molding complete, miter the pieces to their final length. Dry fit the assembly to be sure it will be square.
Rout 1/4" wide x 5/16" deep x 8" long stopped grooves in facing ends of the long molding pieces. These grooves will accept the runners for the hidden drawer.
Use a 5/8" Forstner bit to drill stopped holes for the Magnet Cups and Magnet Washers in the corners at the end where the hidden drawer will be. Be sure the holes are aligned.
Stopped grooves, centered top to bottom
Washer
Side piece
End piece
Magnet
Cup
1/2" x 1/8" Rare Earth Magnets30810
Washers for 1/2" Magnets37474
1/2" diameter Magnet Cups31668
3/8"Use a temporary spacer to keep the assembly square. Match the spacer’s length to the short side of the mitered end piece. Do not glue the spacer.
Glue the miters at the end opposite where the hidden drawer will be and clamp the assembly with the Rockler Deluxe Band Clamp.
Helpful tool:Rockler Deluxe Band Clamp41419
58777 Rev. 10/14 © 2014 Rockler Companies Inc.
XL CRIBBAGE BOARD
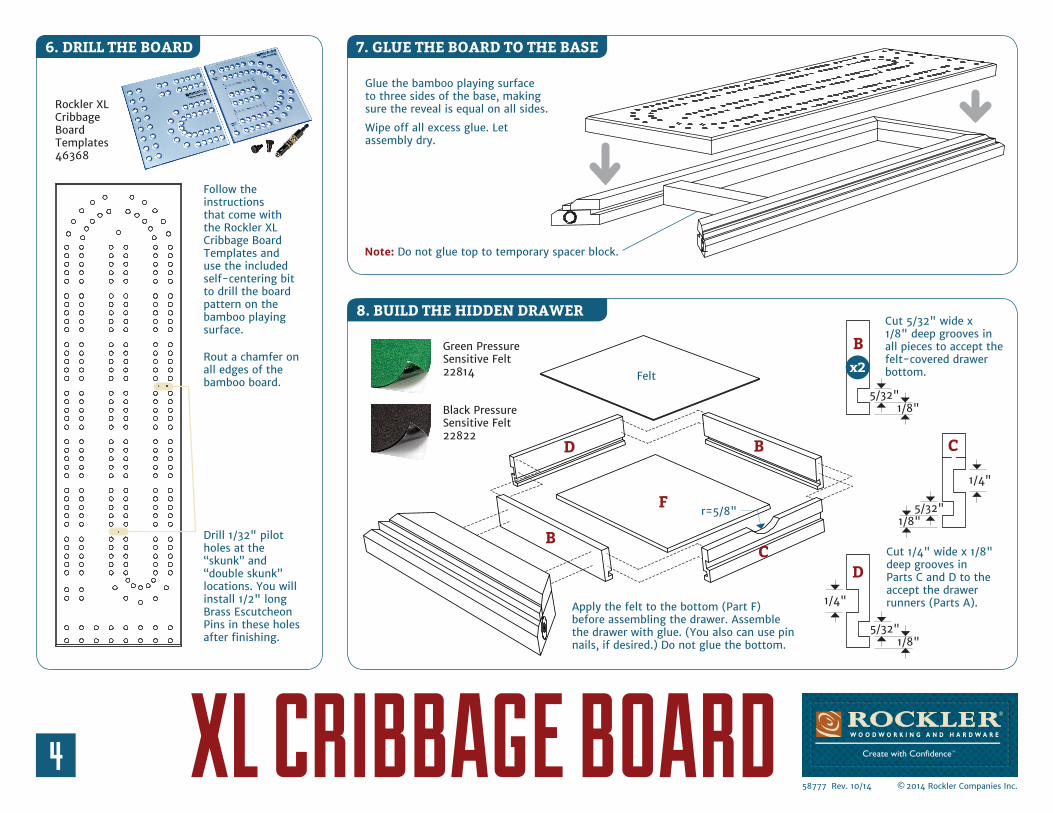
6. DRILL THE BOARD 7. GLUE THE BOARD TO THE BASE
8. BUILD THE HIDDEN DRAWER
Rockler XL Cribbage Board Templates46368
4
Follow the instructions that come with the Rockler XL Cribbage Board Templates and use the included self-centering bit to drill the board pattern on the bamboo playing surface.
Glue the bamboo playing surface to three sides of the base, making sure the reveal is equal on all sides.
Wipe off all excess glue. Let assembly dry.
Cut 5/32" wide x 1/8" deep grooves in all pieces to accept the felt-covered drawer bottom.
Cut 1/4" wide x 1/8" deep grooves in Parts C and D to the accept the drawer runners (Parts A).
Rout a chamfer on all edges of the bamboo board.
Drill 1/32" pilot holes at the “skunk” and “double skunk” locations. You will install 1/2" long Brass Escutcheon Pins in these holes after finishing.
Note: Do not glue top to temporary spacer block.
B
B
B
D
C
C
D
F
Black Pressure Sensitive Felt22822
Green Pressure Sensitive Felt22814 Felt
5/32"
5/32"
5/32"
1/8"
1/8"
1/8"
x2
1/4"
1/4"Apply the felt to the bottom (Part F) before assembling the drawer. Assemble the drawer with glue. (You also can use pin nails, if desired.) Do not glue the bottom.
r=5/8"
58777 Rev. 10/14 © 2014 Rockler Companies Inc.
XL CRIBBAGE BOARD5
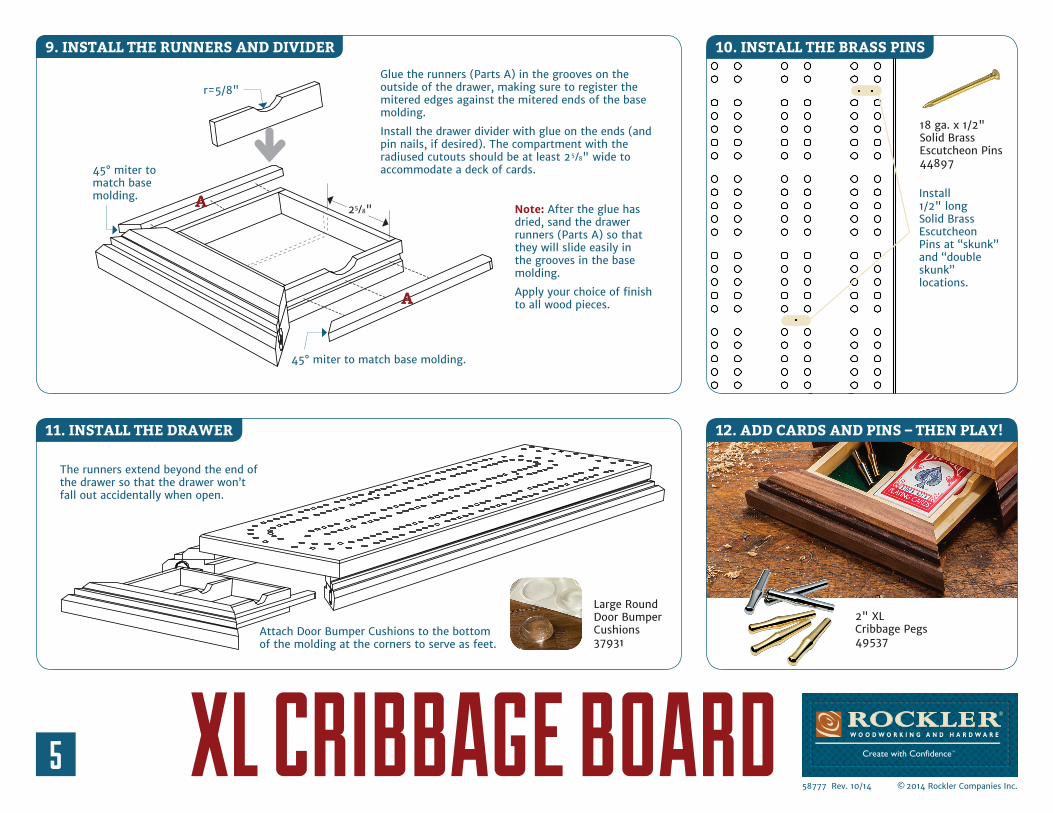
9. INSTALL THE RUNNERS AND DIVIDER
11. INSTALL THE DRAWER
10. INSTALL THE BRASS PINS
12. ADD CARDS AND PINS – THEN PLAY!
r=5/8"
45° miter to match base molding.
45° miter to match base molding. Install
1/2" long Solid Brass Escutcheon Pins at “skunk” and “double skunk” locations.
A
A 25⁄8" Note: After the glue has dried, sand the drawer runners (Parts A) so that they will slide easily in the grooves in the base molding.
Apply your choice of finish to all wood pieces.
18 ga. x 1/2" Solid Brass Escutcheon Pins44897
2" XL Cribbage Pegs49537
The runners extend beyond the end of the drawer so that the drawer won’t fall out accidentally when open.
Attach Door Bumper Cushions to the bottom of the molding at the corners to serve as feet.
Large Round Door Bumper Cushions 37931
Glue the runners (Parts A) in the grooves on the outside of the drawer, making sure to register the mitered edges against the mitered ends of the base molding.
Install the drawer divider with glue on the ends (and pin nails, if desired). The compartment with the radiused cutouts should be at least 25⁄8" wide to accommodate a deck of cards.
58777 Rev. 10/14 © 2014 Rockler Companies Inc.
Top Related