

Languages
Pages
Legal

VMware Integrated OpenStackAdministrator Guide
VMware Integrated OpenStack 1.0.0
This document supports the version of each product listed andsupports all subsequent versions until the document isreplaced by a new edition. To check for more recent editionsof this document, see http://www.vmware.com/support/pubs.
EN-001582-00
VMware Integrated OpenStack Administrator Guide
2 VMware, Inc.
You can find the most up-to-date technical documentation on the VMware Web site at:
http://www.vmware.com/support/
The VMware Web site also provides the latest product updates.
If you have comments about this documentation, submit your feedback to:
Copyright © 2015 VMware, Inc. All rights reserved. Copyright and trademark information.
VMware, Inc.3401 Hillview Ave.Palo Alto, CA 94304www.vmware.com
Contents
1 About This Book 5
2 About VMware Integrated OpenStack 7
VMware Integrated OpenStack System Requirements 7OpenStack Instances in vSphere Web Client 10Monitor OpenStack Instances in the vSphere Web Client 13
3 Adding Capacity and Components in vSphere Web Client 15
Adding the Object Storage Component 15Add a New Compute Cluster 18
4 Update Your VMware Integrated OpenStack Deployment 21
5 Managing OpenStack Projects and Users 23
Create an OpenStack Project 23Modify a Project 24Working with Security Groups 25Create a Cloud User Account in OpenStack 27Modify a User Account 28
6 Working with Instances in OpenStack 29
Create a Snapshot from an Instance 29Control the State of an Instance 29Track Instance Use 30
7 Working with Volume Types in OpenStack 31
Create a Volume Type 31Delete a Volume Type 31
8 Managing Images for the Image Service 33
Upload Images to the Image Service by Using the Dashboard 33Modify Image Settings 34Delete an Existing Image 34
9 Working with Flavors 35
Default Flavor Configurations 35Create a Flavor 35Delete a Flavor 36
Index 37
VMware, Inc. 3

VMware Integrated OpenStack Administrator Guide
4 VMware, Inc.
About This Book 1The VMware Integrated OpenStack Administrator Guide shows you how to performVMware Integrated OpenStack cloud administrative tasks in the VMware Integrated OpenStack, includinghow to create and manage projects, users accounts, flavors, images, and networks.
Intended AudienceThis guide is for cloud administrators who want to create and manage resources with an OpenStackdeployment that is fully integrated with VMware® vSphere®. To do so successfully, you should be familiarwith the OpenStack components and functions.
VMware Technical Publications GlossaryVMware Technical Publications provides a glossary of terms that might be unfamiliar to you. For definitionsof terms as they are used in VMware technical documentation, go to http://www.vmware.com/support/pubs.
VMware, Inc. 5

VMware Integrated OpenStack Administrator Guide
6 VMware, Inc.
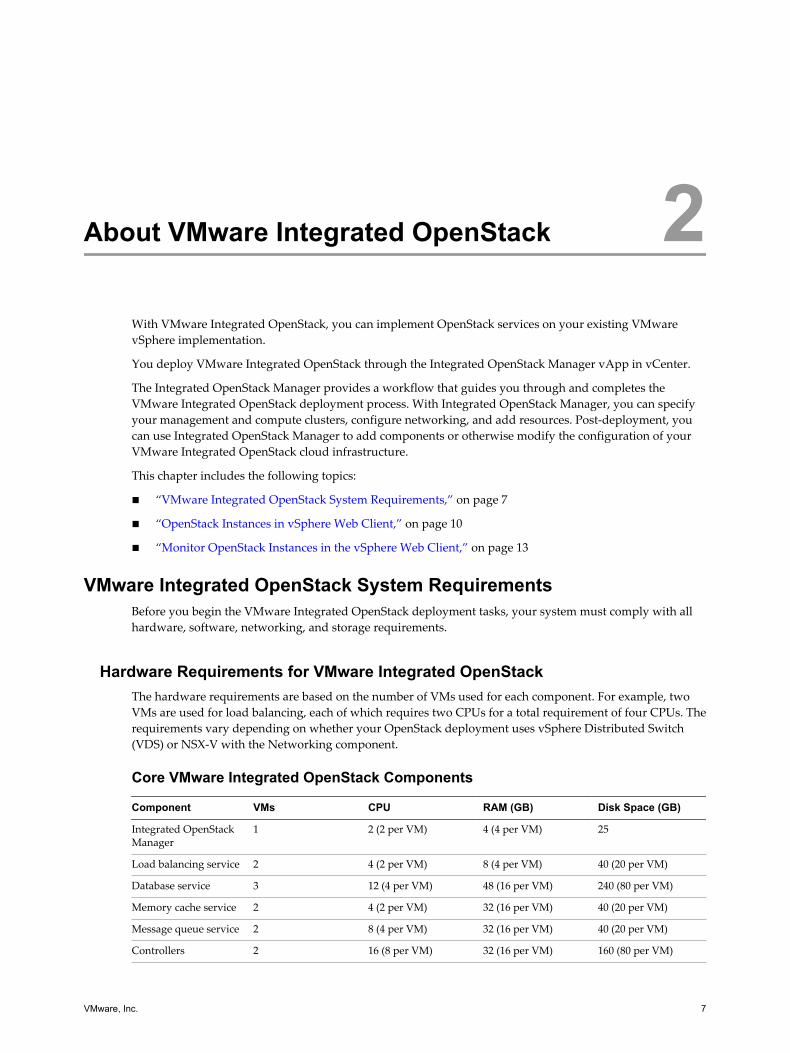
About VMware Integrated OpenStack 2With VMware Integrated OpenStack, you can implement OpenStack services on your existing VMwarevSphere implementation.
You deploy VMware Integrated OpenStack through the Integrated OpenStack Manager vApp in vCenter.
The Integrated OpenStack Manager provides a workflow that guides you through and completes theVMware Integrated OpenStack deployment process. With Integrated OpenStack Manager, you can specifyyour management and compute clusters, configure networking, and add resources. Post-deployment, youcan use Integrated OpenStack Manager to add components or otherwise modify the configuration of yourVMware Integrated OpenStack cloud infrastructure.
This chapter includes the following topics:
n “VMware Integrated OpenStack System Requirements,” on page 7
n “OpenStack Instances in vSphere Web Client,” on page 10
n “Monitor OpenStack Instances in the vSphere Web Client,” on page 13
VMware Integrated OpenStack System RequirementsBefore you begin the VMware Integrated OpenStack deployment tasks, your system must comply with allhardware, software, networking, and storage requirements.
Hardware Requirements for VMware Integrated OpenStackThe hardware requirements are based on the number of VMs used for each component. For example, twoVMs are used for load balancing, each of which requires two CPUs for a total requirement of four CPUs. Therequirements vary depending on whether your OpenStack deployment uses vSphere Distributed Switch(VDS) or NSX-V with the Networking component.
Core VMware Integrated OpenStack Components
Component VMs CPU RAM (GB) Disk Space (GB)
Integrated OpenStackManager
1 2 (2 per VM) 4 (4 per VM) 25
Load balancing service 2 4 (2 per VM) 8 (4 per VM) 40 (20 per VM)
Database service 3 12 (4 per VM) 48 (16 per VM) 240 (80 per VM)
Memory cache service 2 4 (2 per VM) 32 (16 per VM) 40 (20 per VM)
Message queue service 2 8 (4 per VM) 32 (16 per VM) 40 (20 per VM)
Controllers 2 16 (8 per VM) 32 (16 per VM) 160 (80 per VM)
VMware, Inc. 7
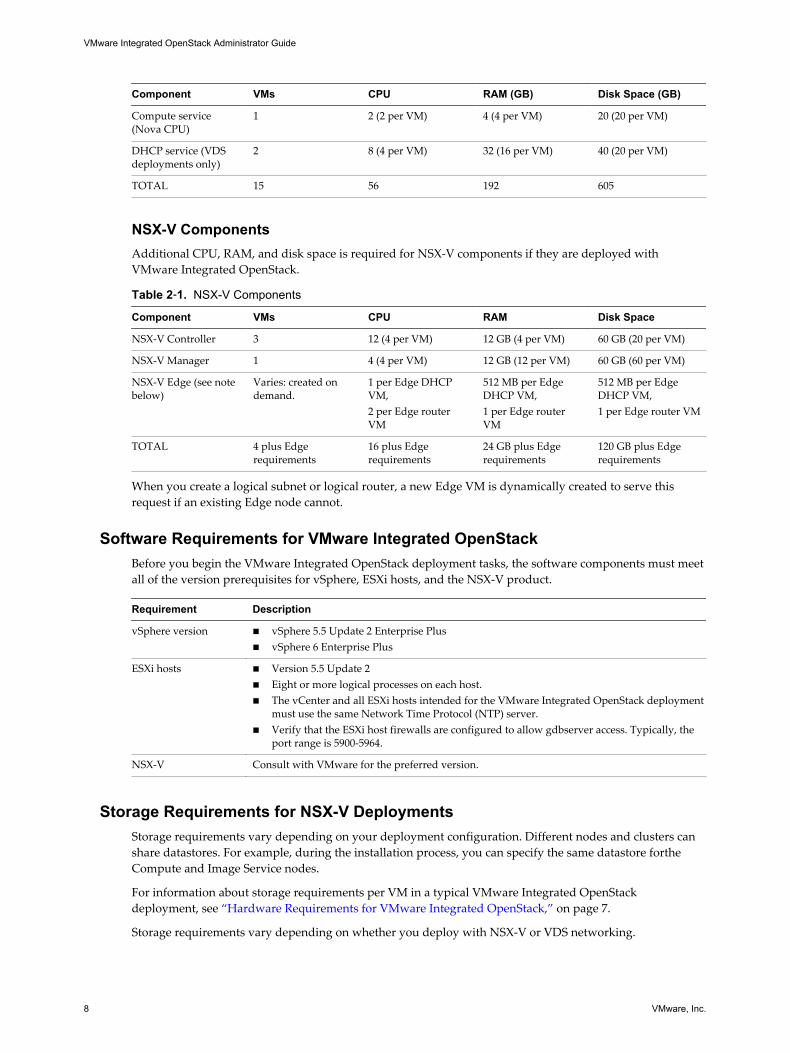
Component VMs CPU RAM (GB) Disk Space (GB)
Compute service(Nova CPU)
1 2 (2 per VM) 4 (4 per VM) 20 (20 per VM)
DHCP service (VDSdeployments only)
2 8 (4 per VM) 32 (16 per VM) 40 (20 per VM)
TOTAL 15 56 192 605
NSX-V ComponentsAdditional CPU, RAM, and disk space is required for NSX-V components if they are deployed withVMware Integrated OpenStack.
Table 2‑1. NSX-V Components
Component VMs CPU RAM Disk Space
NSX-V Controller 3 12 (4 per VM) 12 GB (4 per VM) 60 GB (20 per VM)
NSX-V Manager 1 4 (4 per VM) 12 GB (12 per VM) 60 GB (60 per VM)
NSX-V Edge (see notebelow)
Varies: created ondemand.
1 per Edge DHCPVM,2 per Edge routerVM
512 MB per EdgeDHCP VM,1 per Edge routerVM
512 MB per EdgeDHCP VM,1 per Edge router VM
TOTAL 4 plus Edgerequirements
16 plus Edgerequirements
24 GB plus Edgerequirements
120 GB plus Edgerequirements
When you create a logical subnet or logical router, a new Edge VM is dynamically created to serve thisrequest if an existing Edge node cannot.
Software Requirements for VMware Integrated OpenStackBefore you begin the VMware Integrated OpenStack deployment tasks, the software components must meetall of the version prerequisites for vSphere, ESXi hosts, and the NSX-V product.
Requirement Description
vSphere version n vSphere 5.5 Update 2 Enterprise Plusn vSphere 6 Enterprise Plus
ESXi hosts n Version 5.5 Update 2n Eight or more logical processes on each host.n The vCenter and all ESXi hosts intended for the VMware Integrated OpenStack deployment
must use the same Network Time Protocol (NTP) server.n Verify that the ESXi host firewalls are configured to allow gdbserver access. Typically, the
port range is 5900-5964.
NSX-V Consult with VMware for the preferred version.
Storage Requirements for NSX-V DeploymentsStorage requirements vary depending on your deployment configuration. Different nodes and clusters canshare datastores. For example, during the installation process, you can specify the same datastore fortheCompute and Image Service nodes.
For information about storage requirements per VM in a typical VMware Integrated OpenStackdeployment, see “Hardware Requirements for VMware Integrated OpenStack,” on page 7.
Storage requirements vary depending on whether you deploy with NSX-V or VDS networking.
VMware Integrated OpenStack Administrator Guide
8 VMware, Inc.
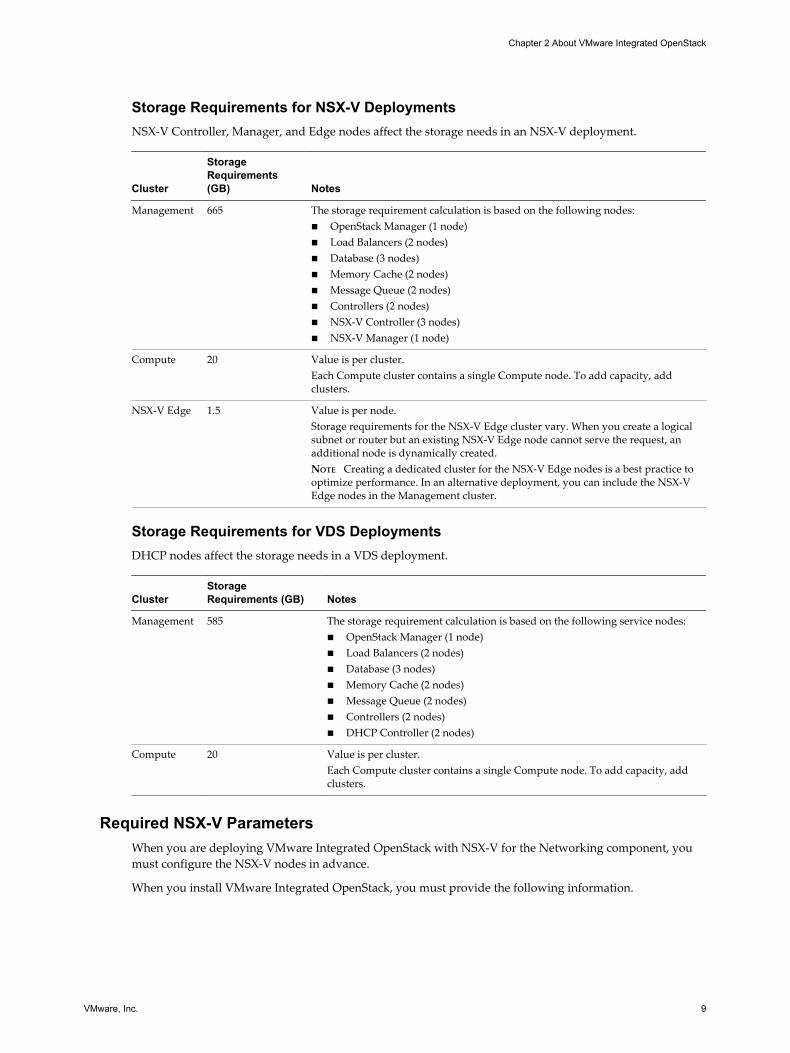
Storage Requirements for NSX-V DeploymentsNSX-V Controller, Manager, and Edge nodes affect the storage needs in an NSX-V deployment.
Cluster
StorageRequirements(GB) Notes
Management 665 The storage requirement calculation is based on the following nodes:n OpenStack Manager (1 node)n Load Balancers (2 nodes)n Database (3 nodes)n Memory Cache (2 nodes)n Message Queue (2 nodes)n Controllers (2 nodes)n NSX-V Controller (3 nodes)n NSX-V Manager (1 node)
Compute 20 Value is per cluster.Each Compute cluster contains a single Compute node. To add capacity, addclusters.
NSX-V Edge 1.5 Value is per node.Storage requirements for the NSX-V Edge cluster vary. When you create a logicalsubnet or router but an existing NSX-V Edge node cannot serve the request, anadditional node is dynamically created.NOTE Creating a dedicated cluster for the NSX-V Edge nodes is a best practice tooptimize performance. In an alternative deployment, you can include the NSX-VEdge nodes in the Management cluster.
Storage Requirements for VDS DeploymentsDHCP nodes affect the storage needs in a VDS deployment.
ClusterStorageRequirements (GB) Notes
Management 585 The storage requirement calculation is based on the following service nodes:n OpenStack Manager (1 node)n Load Balancers (2 nodes)n Database (3 nodes)n Memory Cache (2 nodes)n Message Queue (2 nodes)n Controllers (2 nodes)n DHCP Controller (2 nodes)
Compute 20 Value is per cluster.Each Compute cluster contains a single Compute node. To add capacity, addclusters.
Required NSX-V ParametersWhen you are deploying VMware Integrated OpenStack with NSX-V for the Networking component, youmust configure the NSX-V nodes in advance.
When you install VMware Integrated OpenStack, you must provide the following information.
Chapter 2 About VMware Integrated OpenStack
VMware, Inc. 9
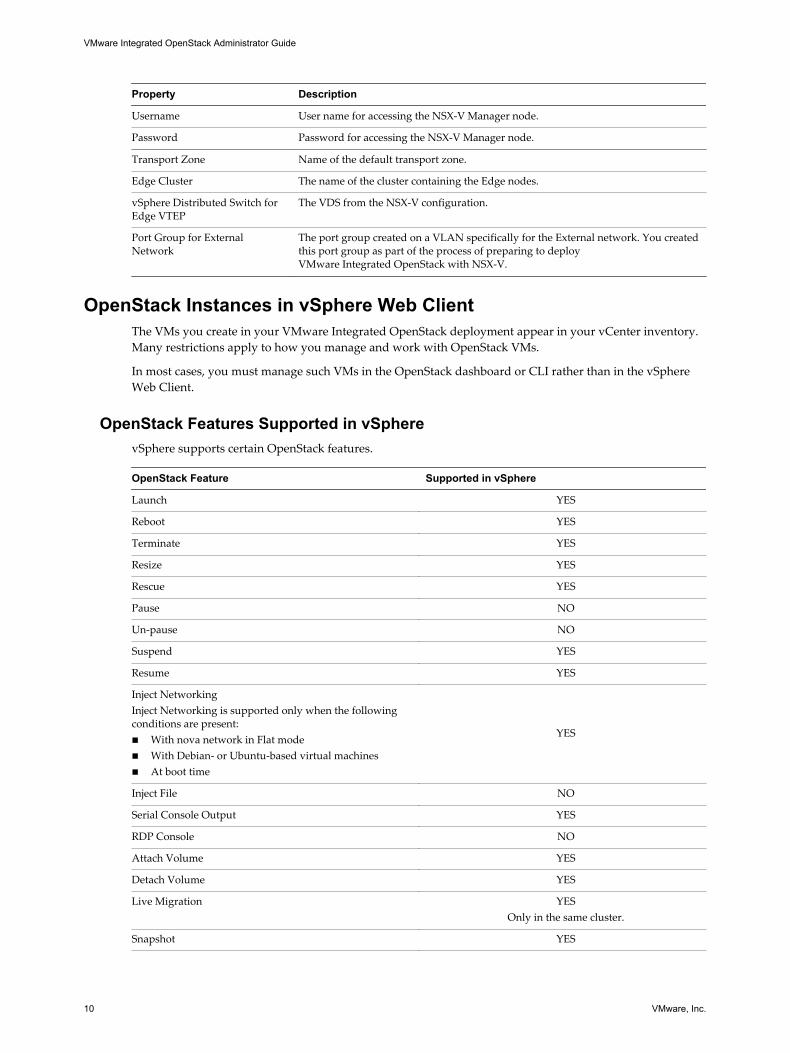
Property Description
Username User name for accessing the NSX-V Manager node.
Password Password for accessing the NSX-V Manager node.
Transport Zone Name of the default transport zone.
Edge Cluster The name of the cluster containing the Edge nodes.
vSphere Distributed Switch forEdge VTEP
The VDS from the NSX-V configuration.
Port Group for ExternalNetwork
The port group created on a VLAN specifically for the External network. You createdthis port group as part of the process of preparing to deployVMware Integrated OpenStack with NSX-V.
OpenStack Instances in vSphere Web ClientThe VMs you create in your VMware Integrated OpenStack deployment appear in your vCenter inventory.Many restrictions apply to how you manage and work with OpenStack VMs.
In most cases, you must manage such VMs in the OpenStack dashboard or CLI rather than in the vSphereWeb Client.
OpenStack Features Supported in vSpherevSphere supports certain OpenStack features.
OpenStack Feature Supported in vSphere
Launch YES
Reboot YES
Terminate YES
Resize YES
Rescue YES
Pause NO
Un-pause NO
Suspend YES
Resume YES
Inject NetworkingInject Networking is supported only when the followingconditions are present:n With nova network in Flat moden With Debian- or Ubuntu-based virtual machinesn At boot time
YES
Inject File NO
Serial Console Output YES
RDP Console NO
Attach Volume YES
Detach Volume YES
Live Migration YESOnly in the same cluster.
Snapshot YES
VMware Integrated OpenStack Administrator Guide
10 VMware, Inc.
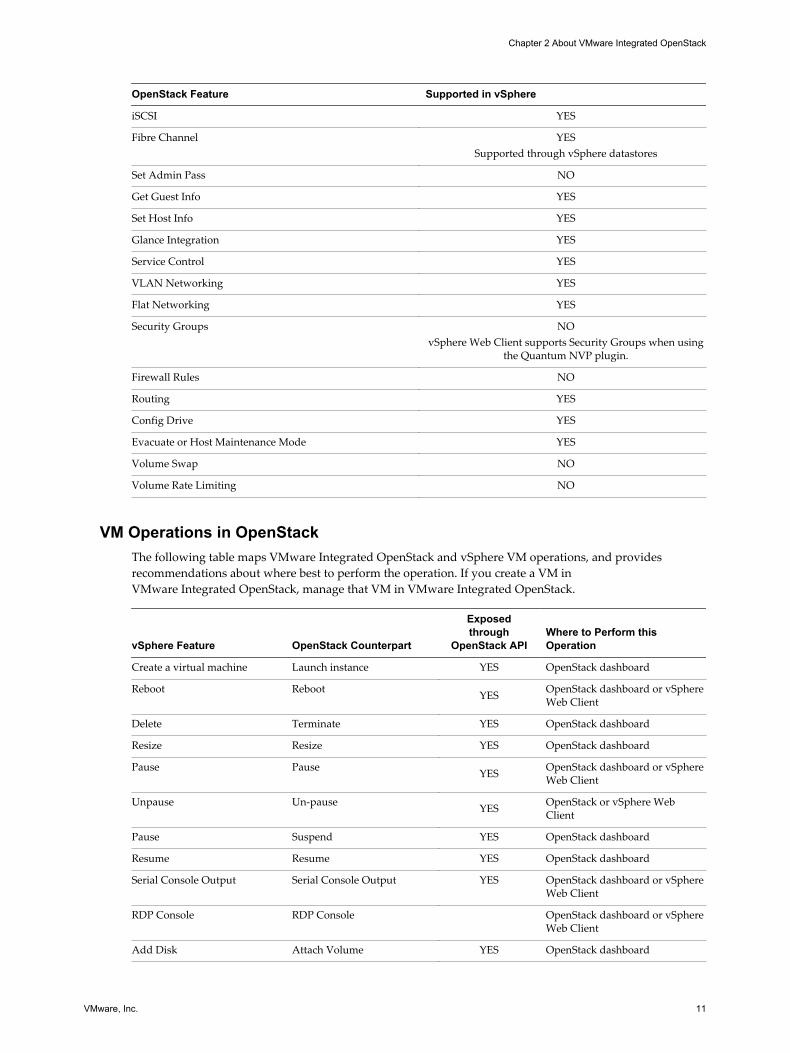
OpenStack Feature Supported in vSphere
iSCSI YES
Fibre Channel YESSupported through vSphere datastores
Set Admin Pass NO
Get Guest Info YES
Set Host Info YES
Glance Integration YES
Service Control YES
VLAN Networking YES
Flat Networking YES
Security Groups NOvSphere Web Client supports Security Groups when using
the Quantum NVP plugin.
Firewall Rules NO
Routing YES
Config Drive YES
Evacuate or Host Maintenance Mode YES
Volume Swap NO
Volume Rate Limiting NO
VM Operations in OpenStackThe following table maps VMware Integrated OpenStack and vSphere VM operations, and providesrecommendations about where best to perform the operation. If you create a VM inVMware Integrated OpenStack, manage that VM in VMware Integrated OpenStack.
vSphere Feature OpenStack Counterpart
Exposedthrough
OpenStack APIWhere to Perform thisOperation
Create a virtual machine Launch instance YES OpenStack dashboard
Reboot Reboot YES OpenStack dashboard or vSphereWeb Client
Delete Terminate YES OpenStack dashboard
Resize Resize YES OpenStack dashboard
Pause Pause YES OpenStack dashboard or vSphereWeb Client
Unpause Un-pause YES OpenStack or vSphere WebClient
Pause Suspend YES OpenStack dashboard
Resume Resume YES OpenStack dashboard
Serial Console Output Serial Console Output YES OpenStack dashboard or vSphereWeb Client
RDP Console RDP Console OpenStack dashboard or vSphereWeb Client
Add Disk Attach Volume YES OpenStack dashboard
Chapter 2 About VMware Integrated OpenStack
VMware, Inc. 11
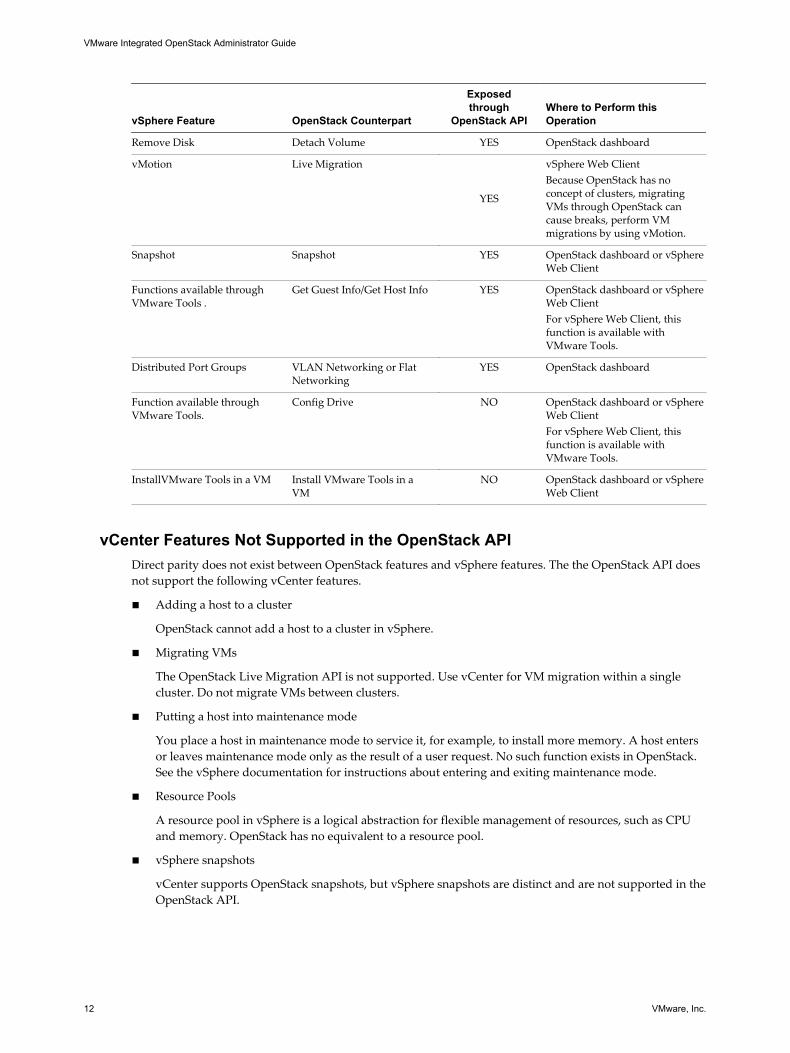
vSphere Feature OpenStack Counterpart
Exposedthrough
OpenStack APIWhere to Perform thisOperation
Remove Disk Detach Volume YES OpenStack dashboard
vMotion Live Migration
YES
vSphere Web ClientBecause OpenStack has noconcept of clusters, migratingVMs through OpenStack cancause breaks, perform VMmigrations by using vMotion.
Snapshot Snapshot YES OpenStack dashboard or vSphereWeb Client
Functions available throughVMware Tools .
Get Guest Info/Get Host Info YES OpenStack dashboard or vSphereWeb ClientFor vSphere Web Client, thisfunction is available withVMware Tools.
Distributed Port Groups VLAN Networking or FlatNetworking
YES OpenStack dashboard
Function available throughVMware Tools.
Config Drive NO OpenStack dashboard or vSphereWeb ClientFor vSphere Web Client, thisfunction is available withVMware Tools.
InstallVMware Tools in a VM Install VMware Tools in aVM
NO OpenStack dashboard or vSphereWeb Client
vCenter Features Not Supported in the OpenStack APIDirect parity does not exist between OpenStack features and vSphere features. The the OpenStack API doesnot support the following vCenter features.
n Adding a host to a cluster
OpenStack cannot add a host to a cluster in vSphere.
n Migrating VMs
The OpenStack Live Migration API is not supported. Use vCenter for VM migration within a singlecluster. Do not migrate VMs between clusters.
n Putting a host into maintenance mode
You place a host in maintenance mode to service it, for example, to install more memory. A host entersor leaves maintenance mode only as the result of a user request. No such function exists in OpenStack.See the vSphere documentation for instructions about entering and exiting maintenance mode.
n Resource Pools
A resource pool in vSphere is a logical abstraction for flexible management of resources, such as CPUand memory. OpenStack has no equivalent to a resource pool.
n vSphere snapshots
vCenter supports OpenStack snapshots, but vSphere snapshots are distinct and are not supported in theOpenStack API.
VMware Integrated OpenStack Administrator Guide
12 VMware, Inc.
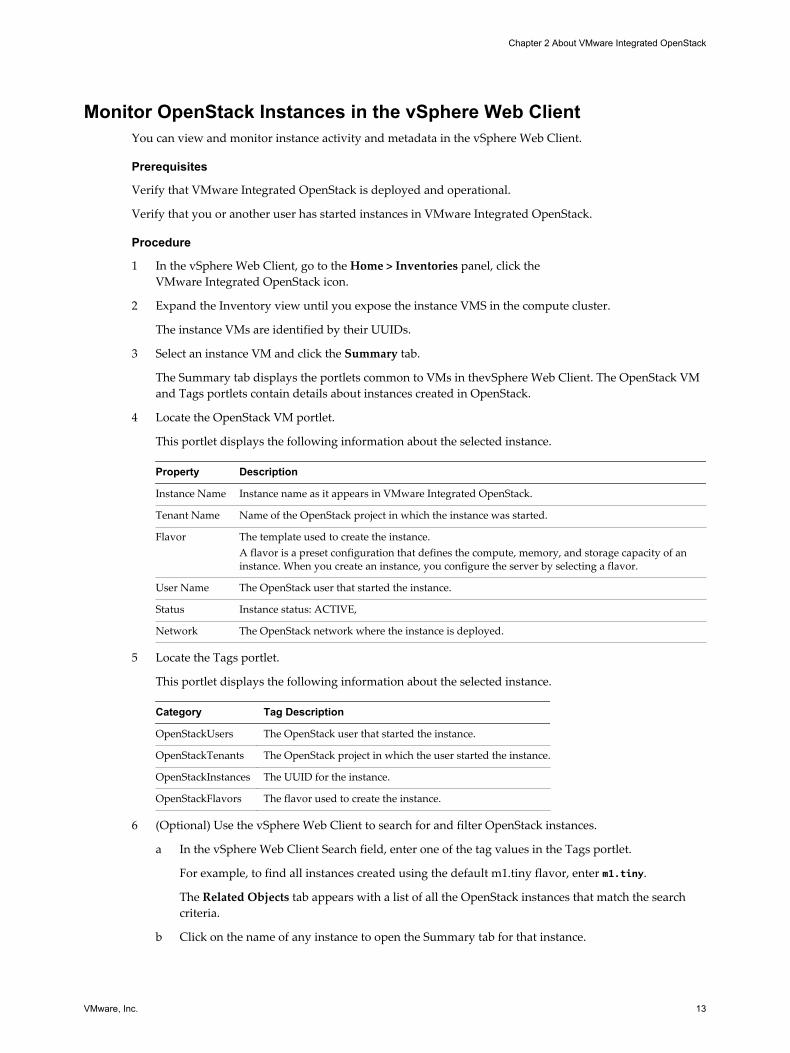
Monitor OpenStack Instances in the vSphere Web ClientYou can view and monitor instance activity and metadata in the vSphere Web Client.
Prerequisites
Verify that VMware Integrated OpenStack is deployed and operational.
Verify that you or another user has started instances in VMware Integrated OpenStack.
Procedure
1 In the vSphere Web Client, go to the Home > Inventories panel, click theVMware Integrated OpenStack icon.
2 Expand the Inventory view until you expose the instance VMS in the compute cluster.
The instance VMs are identified by their UUIDs.
3 Select an instance VM and click the Summary tab.
The Summary tab displays the portlets common to VMs in thevSphere Web Client. The OpenStack VMand Tags portlets contain details about instances created in OpenStack.
4 Locate the OpenStack VM portlet.
This portlet displays the following information about the selected instance.
Property Description
Instance Name Instance name as it appears in VMware Integrated OpenStack.
Tenant Name Name of the OpenStack project in which the instance was started.
Flavor The template used to create the instance.A flavor is a preset configuration that defines the compute, memory, and storage capacity of aninstance. When you create an instance, you configure the server by selecting a flavor.
User Name The OpenStack user that started the instance.
Status Instance status: ACTIVE,
Network The OpenStack network where the instance is deployed.
5 Locate the Tags portlet.
This portlet displays the following information about the selected instance.
Category Tag Description
OpenStackUsers The OpenStack user that started the instance.
OpenStackTenants The OpenStack project in which the user started the instance.
OpenStackInstances The UUID for the instance.
OpenStackFlavors The flavor used to create the instance.
6 (Optional) Use the vSphere Web Client to search for and filter OpenStack instances.
a In the vSphere Web Client Search field, enter one of the tag values in the Tags portlet.
For example, to find all instances created using the default m1.tiny flavor, enter m1.tiny.
The Related Objects tab appears with a list of all the OpenStack instances that match the searchcriteria.
b Click on the name of any instance to open the Summary tab for that instance.
Chapter 2 About VMware Integrated OpenStack
VMware, Inc. 13

VMware Integrated OpenStack Administrator Guide
14 VMware, Inc.
Adding Capacity and Components invSphere Web Client 3
You can add compute clusters and datastores to an existing VMware Integrated OpenStack deployment.You can also manually add the optional Object Storage (Swift) components.
This chapter includes the following topics:
n “Adding the Object Storage Component,” on page 15
n “Add a New Compute Cluster,” on page 18
Adding the Object Storage ComponentAfter you deploy your OpenStack cloud infrastructure by using the Integrated OpenStack Manager, you canadd the optional Object Storage component.
With OpenStack Object Storage, can create redundant, scalable data storage using clusters of standardizedservers to store petabytes of accessible data. Object Storage uses a distributed architecture with no centralpoint of control, providing greater scalability, redundancy, and permanence. Objects can be written tomultiple hardware devices, with the OpenStack software responsible for ensuring data replication andintegrity across the cluster. Storage clusters scale horizontally by adding new nodes. Should a node fail,OpenStack replicates the content from other active nodes.
IMPORTANT Although the Object Storage component can be added as an optional component to yourVMware Integrated OpenStack deployment, VMware does not support it.
Deploy the Object Storage ComponentThe optional Object Storage component is loaded when you deploy the Integrated OpenStack ManagervApp. It requires separate configuration to deploy it.
You configure and deploy the Object Storage component through the VM console.
Prerequisites
Configure and create your VMware Integrated OpenStack cloud.
Procedure
1 Open the console for the Identity Service component.
VMware, Inc. 15
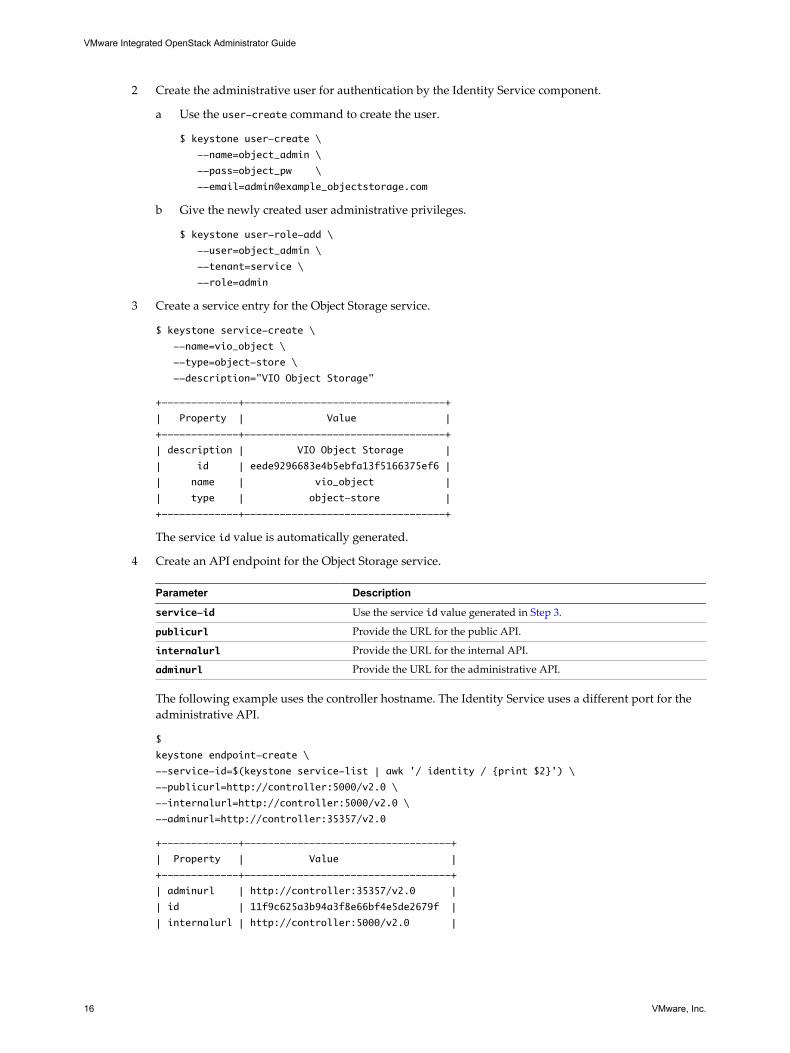
2 Create the administrative user for authentication by the Identity Service component.
a Use the user-create command to create the user.
$ keystone user-create \
--name=object_admin \
--pass=object_pw \
--email=admin@example_objectstorage.com
b Give the newly created user administrative privileges.
$ keystone user-role-add \
--user=object_admin \
--tenant=service \
--role=admin
3 Create a service entry for the Object Storage service.
$ keystone service-create \
--name=vio_object \
--type=object-store \
--description="VIO Object Storage"
+-------------+----------------------------------+
| Property | Value |
+-------------+----------------------------------+
| description | VIO Object Storage |
| id | eede9296683e4b5ebfa13f5166375ef6 |
| name | vio_object |
| type | object-store |
+-------------+----------------------------------+
The service id value is automatically generated.
4 Create an API endpoint for the Object Storage service.
Parameter Description
service-id Use the service id value generated in Step 3.
publicurl Provide the URL for the public API.
internalurl Provide the URL for the internal API.
adminurl Provide the URL for the administrative API. The following example uses the controller hostname. The Identity Service uses a different port for theadministrative API.
$
keystone endpoint-create \
--service-id=$(keystone service-list | awk '/ identity / {print $2}') \
--publicurl=http://controller:5000/v2.0 \
--internalurl=http://controller:5000/v2.0 \
--adminurl=http://controller:35357/v2.0
+-------------+-----------------------------------+
| Property | Value |
+-------------+-----------------------------------+
| adminurl | http://controller:35357/v2.0 |
| id | 11f9c625a3b94a3f8e66bf4e5de2679f |
| internalurl | http://controller:5000/v2.0 |
VMware Integrated OpenStack Administrator Guide
16 VMware, Inc.
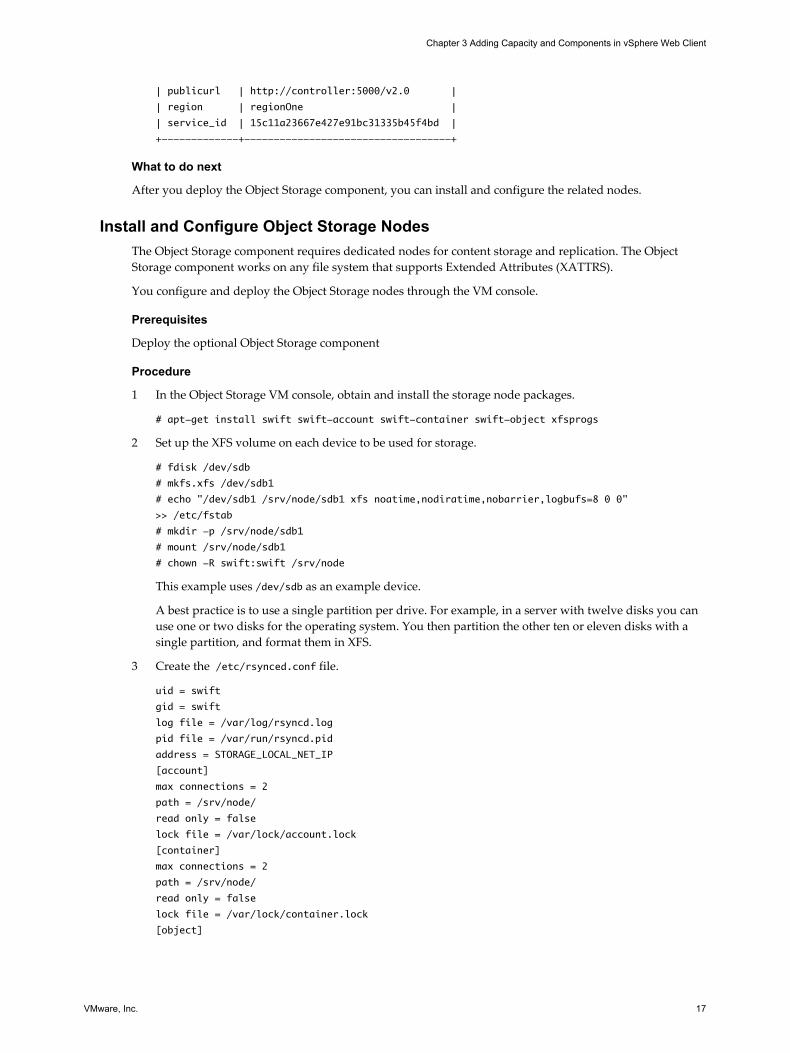
| publicurl | http://controller:5000/v2.0 |
| region | regionOne |
| service_id | 15c11a23667e427e91bc31335b45f4bd |
+-------------+-----------------------------------+
What to do next
After you deploy the Object Storage component, you can install and configure the related nodes.
Install and Configure Object Storage NodesThe Object Storage component requires dedicated nodes for content storage and replication. The ObjectStorage component works on any file system that supports Extended Attributes (XATTRS).
You configure and deploy the Object Storage nodes through the VM console.
Prerequisites
Deploy the optional Object Storage component
Procedure
1 In the Object Storage VM console, obtain and install the storage node packages.
# apt-get install swift swift-account swift-container swift-object xfsprogs
2 Set up the XFS volume on each device to be used for storage.
# fdisk /dev/sdb
# mkfs.xfs /dev/sdb1
# echo "/dev/sdb1 /srv/node/sdb1 xfs noatime,nodiratime,nobarrier,logbufs=8 0 0"
>> /etc/fstab
# mkdir -p /srv/node/sdb1
# mount /srv/node/sdb1
# chown -R swift:swift /srv/node
This example uses /dev/sdb as an example device.
A best practice is to use a single partition per drive. For example, in a server with twelve disks you canuse one or two disks for the operating system. You then partition the other ten or eleven disks with asingle partition, and format them in XFS.
3 Create the /etc/rsynced.conf file.
uid = swift
gid = swift
log file = /var/log/rsyncd.log
pid file = /var/run/rsyncd.pid
address = STORAGE_LOCAL_NET_IP
[account]
max connections = 2
path = /srv/node/
read only = false
lock file = /var/lock/account.lock
[container]
max connections = 2
path = /srv/node/
read only = false
lock file = /var/lock/container.lock
[object]
Chapter 3 Adding Capacity and Components in vSphere Web Client
VMware, Inc. 17
max connections = 2
path = /srv/node/
read only = false
lock file = /var/lock/object.lock
4 (Optional) Modify the address parameter to separate rsync and replication traffic to a replicationnetwork, and modify the value to STORAGE_REPLICATION_NET_IP.
address = STORAGE_REPLICATION_NET_IP
5 Save and close the /etc/rsynced.conf file.
6 Open the /etc/default/rsync file for editing.
7 Change the value for the RSYNC_ENABLE parameter to true.
RSYNC_ENABLE=true
8 Save and close the /etc/default/rsync file.
9 In the Object Storage VM console, start the rsync service.
# service rsync start
IMPORTANT Because the rsync service requires no authentication, run the service on a local, privatenetwork.
10 Create the recon cache directory for the Object Storage component.
# mkdir -p /var/swift/recon
11 Set permissions for the new directory.
# chown -R swift:swift /var/swift/recon
This completes the node installation and configuration.
Add a New Compute ClusterYou can increase the number of compute clusters in your VMware Integrated OpenStack deployment toincrease CPU capacity.
Prerequisites
Reconfigure a cluster with at least one host.
Procedure
1 In vCenter, select Home > VMware Integrated OpenStack > Getting Started.
2 Under Basic Tasks, click Add Clusters to OpenStack.
3 On the Add nova cluster page, select the cluster to add, and click Next.
The cluster you select must contain at least one host.
4 On the Review proposed configuration page, select the existing management VM, and click Next.
5 Select the datastores for the tenants in the new cluster, and click Next.
6 Review the proposed configuration, and click Finish.
VMware Integrated OpenStack Administrator Guide
18 VMware, Inc.
7 Confirm that the new cluster is added to the OpenStack deployment.
a Navigate to the OpenStack datacenter.
b Select Management Cluster > Management VM > Compute node.
The newly added cluster appears in the Compute node.
OpenStack capacity increases based on the resources available in the additional cluster.
Chapter 3 Adding Capacity and Components in vSphere Web Client
VMware, Inc. 19

VMware Integrated OpenStack Administrator Guide
20 VMware, Inc.
Update YourVMware Integrated OpenStackDeployment 4
You update your VMware Integrated OpenStack deployment by applying patches by using theVMware Integrated OpenStack Manager vApp.
VMware provides updates in the form of Debian patches. Depending on the update, you might be requiredto apply the patch by using the VMware Integrated OpenStack Manager CLI.
Procedure
1 Download the Debian patch from VMware.
2 In the vSphere Web Client, select Home > Inventories, and click the VMware Integrated OpenStackicon.
3 Click the Manage tab and click the Updates tab..
The Updates tab lists added patches and indicates if they are installed.
4 Add the patch to the VMware Integrated OpenStack Manager by clicking the green plus sign + andbrowsing to the file location.
5 Select the patch and click Choose.
The patch appears in the list on the Updates tab.
6 Install the patch.
If you can install the patch by using the VMware Integrated OpenStack Manager vApp, the Applyoption appears in the Patch Action column on the Updates tab.
If the Apply option does not appear in the Patch Action column, click More details in the PatchDescription column to access instructions for installing patches by using the CLI.
After you install a patch, the value in the Patch Status column on the Updates tab changes to Installed.
VMware, Inc. 21

VMware Integrated OpenStack Administrator Guide
22 VMware, Inc.
Managing OpenStack Projects andUsers 5
In VMware Integrated OpenStack, cloud administrators manage permissions through user, group, andproject definitions. Projects in OpenStack equate to tenants in vSphere. You can assign users and usergroups to more than one project.
Before you can create a user, you must create at least one project to which you can assign the user.
This chapter includes the following topics:
n “Create an OpenStack Project,” on page 23
n “Modify a Project,” on page 24
n “Working with Security Groups,” on page 25
n “Create a Cloud User Account in OpenStack,” on page 27
n “Modify a User Account,” on page 28
Create an OpenStack ProjectProjects are the equivalent of tenants or accounts. They function as organizational units in the cloud towhich you can assign users.
Prerequisites
Verify that you are logged in to the VMware Integrated OpenStack dashboard as a cloud administrator.
Procedure
1 Select the admin project from the drop-down menu in the title bar.
2 Select Admin > Identity Panel > Projects.
3 Click Create Project.
4 Click the Project Info tab and configure the project settings.
Setting Description
Name Project name.
Description Optional description of the new project.
Enabled New projects are enabled by default. Disabling a project prevents cloud users from accessing theproject, prevents users from managing launching instances for the project, and can prevent usersfrom logging in if they are assigned only to that project.
5 (Optional) Add members to the project by selecting existing cloud users on the Project Members tab.
VMware, Inc. 23
6 (Optional) Add groups of members to the project by selecting existing groups of cloud users on theProject Groups tab.
7 On the Quota tab, accept or modify the quota settings.
Quotas are operational limits that you can configure to manage how much system resources areavailable to a specific project. For example, you can optimize the cloud resources by controlling thenumber of gigabytes allowed for each tenant. Quotas can be enforced at both the project and user level.
8 Click Create Project at the bottom of the panel.
The VMware Integrated OpenStack dashboard assigns an ID to the new project, and the project is listed onthe Projects page.
Modify a ProjectYou can update a project to change its name or description, and enable or temporarily disable it.
IMPORTANT Disabling a project can have negative consequences. For example, if a user is assigned to onlythat project, they cannot log in to the VMware Integrated OpenStack dashboard. Similarly, the project is notaccessible by its members. Project instances continue running, so you must suspend or stop them manually.Project data is retained in case the project is enabled again.
Prerequisites
Verify that you are logged in to the VMware Integrated OpenStack dashboard as a cloud administrator.
Procedure
1 On the VMware Integrated OpenStack dashboard, select the admin project from the drop-down menuin the title bar.
2 Select Admin > Identity Panel > Projects.
3 Select the project to edit.
4 In the Actions column, click More and select Edit Project from the drop-down menu.
In the Edit Project dialog box, you can change the project's name and description, and enable anddisable it.
5 Modify the project settings, and click Save.
6 (Optional) To change user assignments for a project, on the Projects page, click Modify Users for theproject to modify..
Option Action
Assign a user to the current project Click the plus sign (+) for the user.
Remove a user from the currentproject,
Click the minus sign (-) for the user.
7 Click Save.
8 To delete one or more projects, return to the Projects page and select the projects to delete.
NOTE You cannot restore a deleted project.
a Click Delete Projects.
b At the prompt, confirm the deletion.
VMware Integrated OpenStack Administrator Guide
24 VMware, Inc.
Working with Security GroupsA security group is a set of IP filter rules that define networking access and that you can apply to allinstances in a project. Group rules are project-specific. Project members can edit the default rules for theirgroup and add new rule sets.
You can use security groups to apply IP rules by creating a new security group with the desired rules or bymodifying the rules set in the default security group.
About the Default Security GroupEach project in VMware Integrated OpenStack has a default security group that is applied to an instanceunless another security group is defined and specified. Unless it is modified, the default security groupdenies all incoming traffic to your instance and permits only outgoing traffic. A common example is to editthe default security group to permit SSH access and ICMP access, so that users can log in to and pinginstances.
Create a Security GroupSecurity groups are sets of IP filter rules that define networking access and are applied to all instanceswithin a project. You can either modify the rules in the default security group or create a security groupwith custom rules.
To modify an existing rule for a security group, see “Modify the Rules for an Existing Security Group,” onpage 26
Procedure
1 Log in to the VMware Integrated OpenStack dashboard as a cloud administrator.
2 Select the project from the drop-down menu in the title bar.
3 Select Project > Compute > Access & Security.
4 Click the Security Groups tab.
5 Click Create Security Group.
6 Enter a name and description for the new group, and click Create Security Group.
The new group appears in the list on the Security Group tab.
7 Configure the rules for the new group.
a Select the new security group and click Manage Rules.
b Click Add Rule.
c From the Rule drop-down menu, select the rule to add.
The subsequent fields might change depending on the rule you select.
d If applicable, specify Ingress or Egress from the Direction drop-down menu.
e After you complete the rule definition, click Add.
8 Configure additional rules if necessary.
9 Click the Access & Security tab to return to the main page.
Chapter 5 Managing OpenStack Projects and Users
VMware, Inc. 25
Modify the Rules for an Existing Security GroupYou can modify a security group by adding and removing rules assigned to that group. Rules define whichtraffic is allowed to instances that are assigned to the security group.
Procedure
1 Log in to the VMware Integrated OpenStack dashboard as a cloud administrator.
2 Select the project from the drop-down menu in the title bar.
3 Select Project > Compute > Access & Security.
4 Click the Security Groups tab.
5 Select the security group to modify and click Manage Rules.
6 To remove a rule, select the rule and click Delete Rule.
7 To add a rule, click Add Rule and select the custom rule to add from the Rule drop-down menu.
Option Description
Custom TCP Rule Used to exchange data between systems and for end-user communication.
Custom UDP Rule Used to exchange data between systems, for example, at the applicationlevel.
Custom ICMP Rule Used by network devices, such as routers, to send error or monitoringmessages.
Other Protocol You can manually configure a rule if the rule protocol is not included inthe list.
a From the Remote drop-down list, select CIDR or Security Group.
b If applicable, select Ingress or Egress from the Direction drop-down menu.
For TCP and UDP rules, you can open either a single port or a range of ports. Depending on yourselection, different fields appear below the Open Port list.
c Select the kind of access to allow.
Option Description
CIDR (Classless Inter-DomainRouting)
Limits access only to IP addresses within the specified block.
Security Group Allows any instance in the specified security group to access any othergroup instance.You can choose between IPv4 or IPv6 in the Ether Type list.
8 Click Add.
The new rule appears on the Manage Security Group Rules page for the security group.
Enabling SSH and ICMP AccessYou can modify the default security group to enable SSH and ICMP access to instances. The rules in thedefault security group apply to all instances in the currently selected project.
Procedure
1 Log in to the VMware Integrated OpenStack dashboard as a cloud administrator.
2 Select the project from the drop-down menu in the title bar.
VMware Integrated OpenStack Administrator Guide
26 VMware, Inc.
3 Select Project > Compute > Access & Security.
4 Click the Security Groups tab, select the default security group, and click Manage Rules.
5 Click Add Rule and configure the rules to allow SSH access.
Control Value
Rule SSH
Remote CIDR
CIDR 0.0.0.0/0 To accept requests from a particular range of IP addresses, specify the IP address block in the CIDR textbox.
Instances will now have SSH port 22 open for requests from any IP address.
6 Click Add.
7 From the Manage Security Group Rules page, click Add Rule and configure the rules to allow ICMPaccess.
Control Value
Rule All ICMP
Direction Ingress
Remote CIDR
CIDR 0.0.0.0/0
8 Click Add.
Instances will now accept all incoming ICMP packets.
Create a Cloud User Account in OpenStackCloud users have a limited set of rights and privileges relative to cloud administrators. Cloud users arelimited to the tenants to which they are assigned. Tenants are called projects in OpenStack. Cloud users cancreate and manage instances, create and manage volumes, create networks, and create new images, amongother tasks.
Prerequisites
n Verify that you are logged in to the VMware Integrated OpenStack dashboard as a cloud administrator.
n Verify that a configured OpenStack project is available. See “Create an OpenStack Project,” on page 23.
Procedure
1 On the VMware Integrated OpenStack dashboard, select the admin project from the drop-down menuin the title bar.
2 Select Admin > Identity Panel > Users.
3 Click Create User.
4 Configure the user settings.
Option Description
User Name Cloud user name.
Email Valid email address for the new user.
Password/Confirm Password Preliminary password for the new user.
Chapter 5 Managing OpenStack Projects and Users
VMware, Inc. 27
Option Description
Primary Project Project to which the user is assigned. You cannot create a user accountwithout assigning it to at least one project.
Role Role to which the user is assigned. A role is a set of rights and privileges. Auser assigned that role inherits those rights and privileges.
5 Click Create User at the bottom of the panel.
The VMware Integrated OpenStack dashboard assigns an ID to the user, and the user now appears on theUsers page.
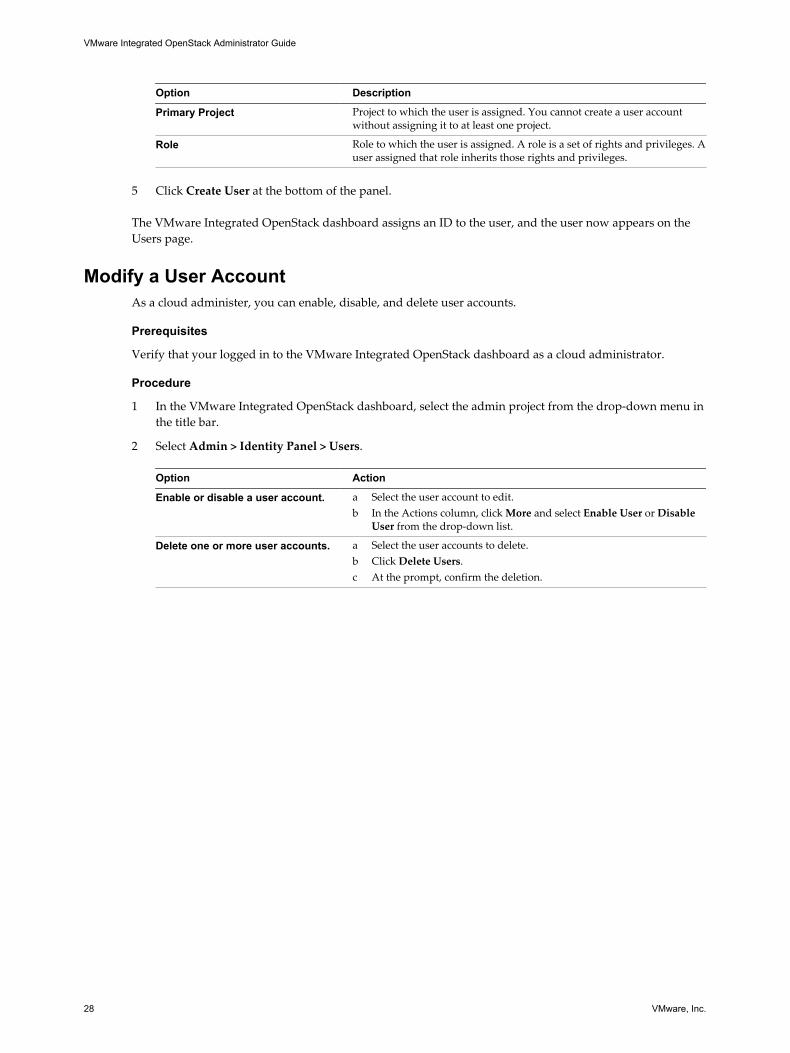
Modify a User AccountAs a cloud administer, you can enable, disable, and delete user accounts.
Prerequisites
Verify that your logged in to the VMware Integrated OpenStack dashboard as a cloud administrator.
Procedure
1 In the VMware Integrated OpenStack dashboard, select the admin project from the drop-down menu inthe title bar.
2 Select Admin > Identity Panel > Users.
Option Action
Enable or disable a user account. a Select the user account to edit.b In the Actions column, click More and select Enable User or Disable
User from the drop-down list.
Delete one or more user accounts. a Select the user accounts to delete.b Click Delete Users.c At the prompt, confirm the deletion.
VMware Integrated OpenStack Administrator Guide
28 VMware, Inc.
Working with Instances in OpenStack 6Instances are virtual machines that run in the cloud.
As a cloud administrative user, you can manage instances for users in various projects. You can view,terminate, edit, perform a soft or hard reboot, create a snapshot from, and migrate instances. You can alsoview the logs for instances or start a VNC console for an instance.
For information about how to use the dashboard to start instances as an end user, see the VMware IntegratedOpenStack User's Guide.
This chapter includes the following topics:
n “Create a Snapshot from an Instance,” on page 29
n “Control the State of an Instance,” on page 29
n “Track Instance Use,” on page 30
Create a Snapshot from an InstanceWith snapshots, you can create new images from running instances.
You can create a snapshot of an instance directly from the Instances page.
Procedure
1 Log in to the VMware Integrated OpenStack dashboard as a cloud administrator.
2 Select the admin project from the drop-down menu in the title bar.
3 Select Admin > System Panel > Instances.
4 In the Actions column, click Create Snapshot.
The snapshot appears on the Images & Snapshots page.
Control the State of an InstanceAs a cloud administrative user, you can pause, unpause, suspend, resume, soft or hard reboot, or terminatean instance.
Procedure
1 Log in to the VMware Integrated OpenStack dashboard as a cloud administrator.
2 Select the admin project from the drop-down menu in the title bar.
3 Select Admin > System Panel > Instances.
4 Select the instance whose state you want to manage.
VMware, Inc. 29
5 In the Actions column, cli choose to ck More and select the state from the drop-down menu.
Items that appear in red text are disabled.
Track Instance UseYou can track the use of instances for each project. You can track costs per month by showing metrics likethe number of VCPUs, disks, RAM, and uptime of all of your instances.
Procedure
1 Log in to the VMware Integrated OpenStack dashboard as a cloud administrator.
2 Select the admin project from the drop-down menu in the title bar.
3 Select Admin > System Panel > Overview.
The Overview page shows the usage summary and project-specific usage information. You can specifya period of time for the usage information. Optionally, you can download a CSV summary.
4 (Optional) Specify a period of time for reporting and click Submit.
5 (Optional) Click Download CSV Summary to download a report of the usage.
VMware Integrated OpenStack Administrator Guide
30 VMware, Inc.
Working with Volume Types inOpenStack 7
Volumes are block storage devices that you attach to instances to enable persistent storage.
As a cloud administrative user, you can manage volumes and volume types for users in various projects.You can create and delete volume types, and you can view and delete volumes.
Cloud users can attach a volume to a running instance or detach a volume and attach it to another instanceat any time. For information about how to use the dashboard to create and manage volumes as an end user,see the VMware Integrated OpenStack User Guide.
This chapter includes the following topics:
n “Create a Volume Type,” on page 31
n “Delete a Volume Type,” on page 31
Create a Volume TypeAs a cloud administrative user, you can manage volumes and volume types for users.
Procedure
1 Log in to the VMware Integrated OpenStack dashboard.
2 Select the project from the drop-down menu in the title bar.
3 Select Admin > System Panel > Volumes.
The Volumes page lists the volumes that are currently configured and available to the current user.
4 Click Create Volume Type.
5 Enter a name for the volume type, and click Create Volume Type.
Delete a Volume TypeAs a cloud administrative user, you can manage volumes and volume types for users in projects.
Procedure
1 Log in to the VMware Integrated OpenStack dashboard.
2 Select the project from the drop-down menu in the title bar.
3 Select Admin > System Panel > Volumes.
The Volumes page lists the volumes that are currently configured and available to the current user.
4 Select the volume types to delete.
VMware, Inc. 31

5 Click Delete Volume Types.
6 At the prompt, confirm the deletion.
VMware Integrated OpenStack Administrator Guide
32 VMware, Inc.
Managing Images for the ImageService 8
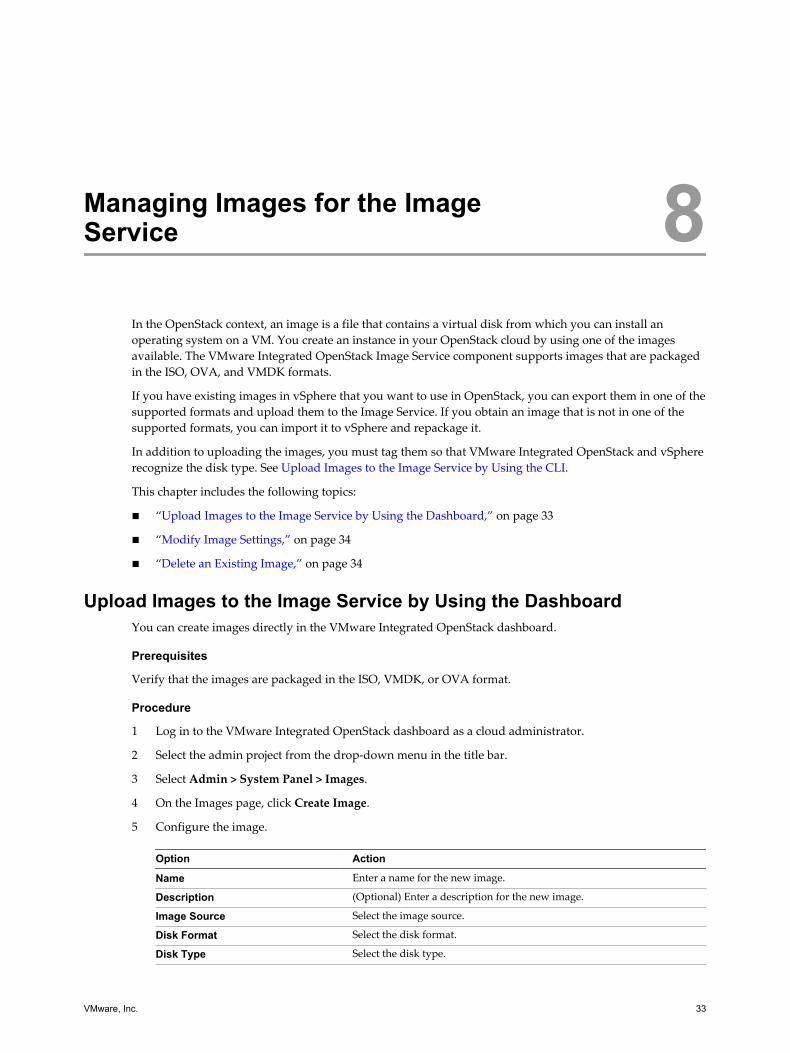
In the OpenStack context, an image is a file that contains a virtual disk from which you can install anoperating system on a VM. You create an instance in your OpenStack cloud by using one of the imagesavailable. The VMware Integrated OpenStack Image Service component supports images that are packagedin the ISO, OVA, and VMDK formats.
If you have existing images in vSphere that you want to use in OpenStack, you can export them in one of thesupported formats and upload them to the Image Service. If you obtain an image that is not in one of thesupported formats, you can import it to vSphere and repackage it.
In addition to uploading the images, you must tag them so that VMware Integrated OpenStack and vSphererecognize the disk type. See Upload Images to the Image Service by Using the CLI.
This chapter includes the following topics:
n “Upload Images to the Image Service by Using the Dashboard,” on page 33
n “Modify Image Settings,” on page 34
n “Delete an Existing Image,” on page 34
Upload Images to the Image Service by Using the DashboardYou can create images directly in the VMware Integrated OpenStack dashboard.
Prerequisites
Verify that the images are packaged in the ISO, VMDK, or OVA format.
Procedure
1 Log in to the VMware Integrated OpenStack dashboard as a cloud administrator.
2 Select the admin project from the drop-down menu in the title bar.
3 Select Admin > System Panel > Images.
4 On the Images page, click Create Image.
5 Configure the image.
Option Action
Name Enter a name for the new image.
Description (Optional) Enter a description for the new image.
Image Source Select the image source.
Disk Format Select the disk format.
Disk Type Select the disk type.
VMware, Inc. 33
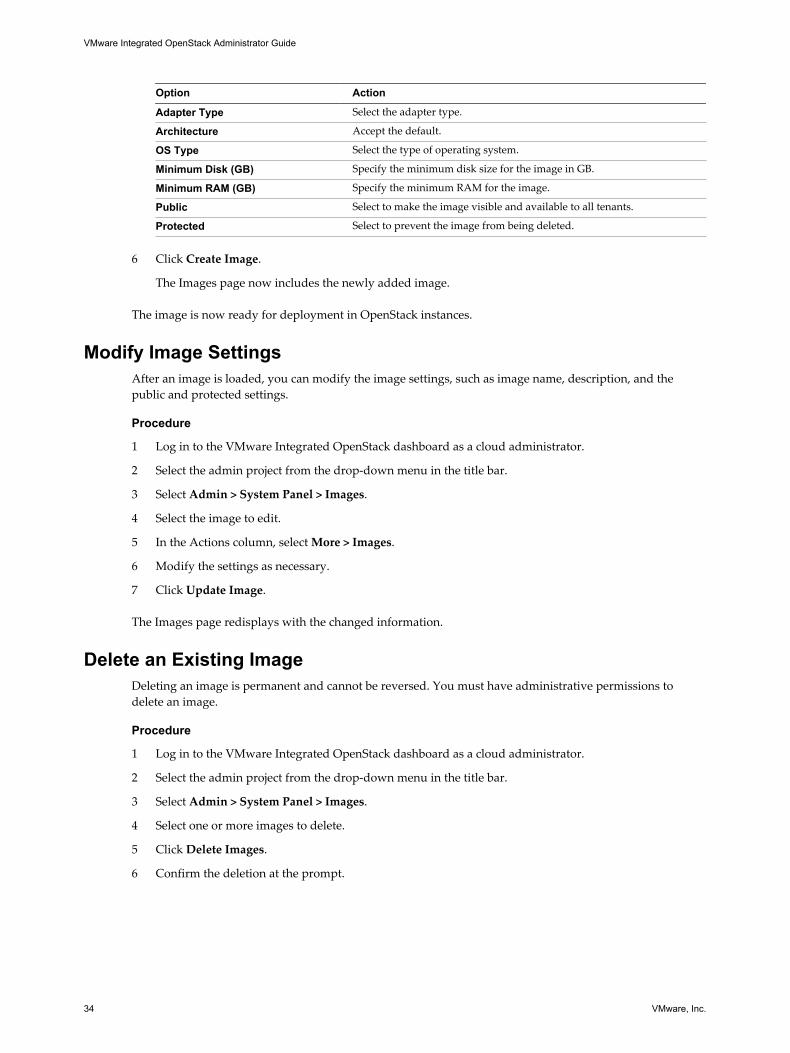
Option Action
Adapter Type Select the adapter type.
Architecture Accept the default.
OS Type Select the type of operating system.
Minimum Disk (GB) Specify the minimum disk size for the image in GB.
Minimum RAM (GB) Specify the minimum RAM for the image.
Public Select to make the image visible and available to all tenants.
Protected Select to prevent the image from being deleted.
6 Click Create Image.
The Images page now includes the newly added image.
The image is now ready for deployment in OpenStack instances.
Modify Image SettingsAfter an image is loaded, you can modify the image settings, such as image name, description, and thepublic and protected settings.
Procedure
1 Log in to the VMware Integrated OpenStack dashboard as a cloud administrator.
2 Select the admin project from the drop-down menu in the title bar.
3 Select Admin > System Panel > Images.
4 Select the image to edit.
5 In the Actions column, select More > Images.
6 Modify the settings as necessary.
7 Click Update Image.
The Images page redisplays with the changed information.
Delete an Existing ImageDeleting an image is permanent and cannot be reversed. You must have administrative permissions todelete an image.
Procedure
1 Log in to the VMware Integrated OpenStack dashboard as a cloud administrator.
2 Select the admin project from the drop-down menu in the title bar.
3 Select Admin > System Panel > Images.
4 Select one or more images to delete.
5 Click Delete Images.
6 Confirm the deletion at the prompt.
VMware Integrated OpenStack Administrator Guide
34 VMware, Inc.
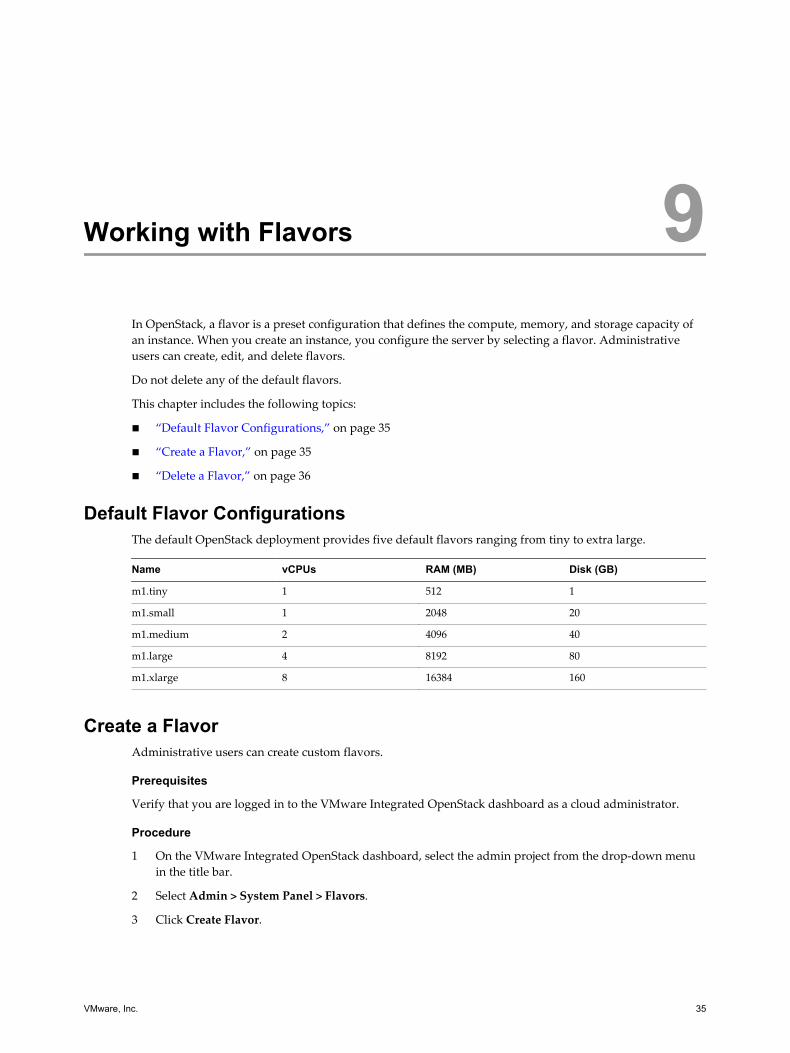
Working with Flavors 9In OpenStack, a flavor is a preset configuration that defines the compute, memory, and storage capacity ofan instance. When you create an instance, you configure the server by selecting a flavor. Administrativeusers can create, edit, and delete flavors.
Do not delete any of the default flavors.
This chapter includes the following topics:
n “Default Flavor Configurations,” on page 35
n “Create a Flavor,” on page 35
n “Delete a Flavor,” on page 36
Default Flavor ConfigurationsThe default OpenStack deployment provides five default flavors ranging from tiny to extra large.
Name vCPUs RAM (MB) Disk (GB)
m1.tiny 1 512 1
m1.small 1 2048 20
m1.medium 2 4096 40
m1.large 4 8192 80
m1.xlarge 8 16384 160
Create a FlavorAdministrative users can create custom flavors.
Prerequisites
Verify that you are logged in to the VMware Integrated OpenStack dashboard as a cloud administrator.
Procedure
1 On the VMware Integrated OpenStack dashboard, select the admin project from the drop-down menuin the title bar.
2 Select Admin > System Panel > Flavors.
3 Click Create Flavor.
VMware, Inc. 35
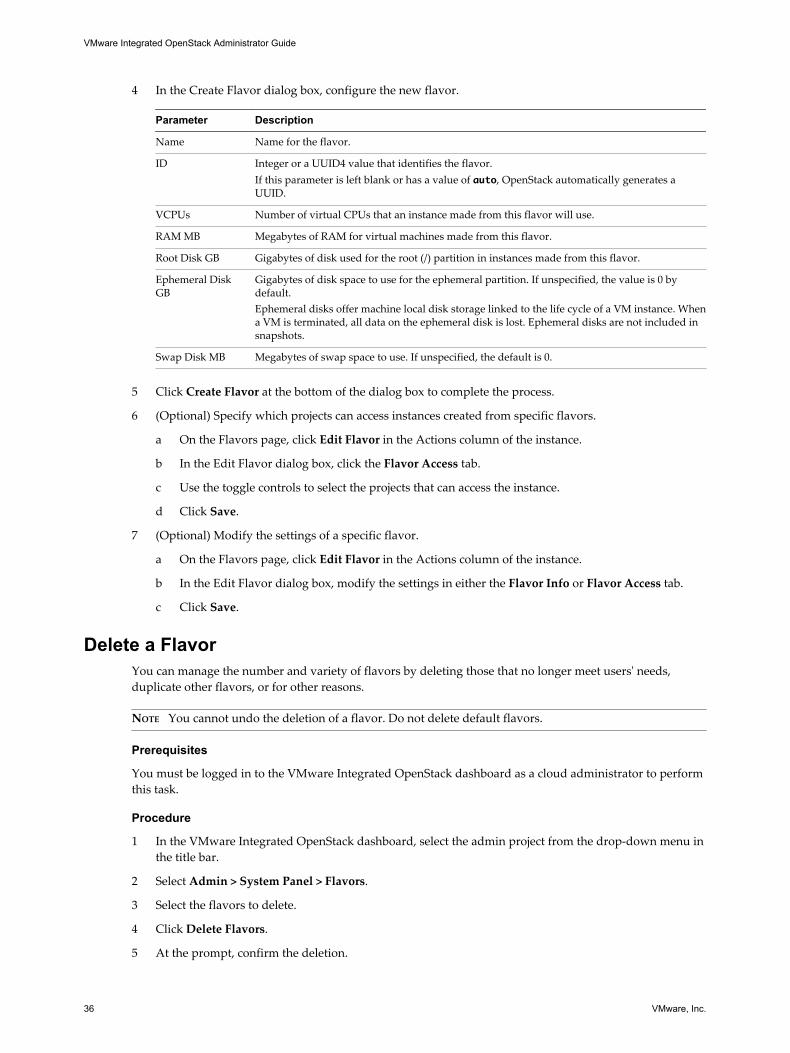
4 In the Create Flavor dialog box, configure the new flavor.
Parameter Description
Name Name for the flavor.
ID Integer or a UUID4 value that identifies the flavor.If this parameter is left blank or has a value of auto, OpenStack automatically generates aUUID.
VCPUs Number of virtual CPUs that an instance made from this flavor will use.
RAM MB Megabytes of RAM for virtual machines made from this flavor.
Root Disk GB Gigabytes of disk used for the root (/) partition in instances made from this flavor.
Ephemeral DiskGB
Gigabytes of disk space to use for the ephemeral partition. If unspecified, the value is 0 bydefault.Ephemeral disks offer machine local disk storage linked to the life cycle of a VM instance. Whena VM is terminated, all data on the ephemeral disk is lost. Ephemeral disks are not included insnapshots.
Swap Disk MB Megabytes of swap space to use. If unspecified, the default is 0.
5 Click Create Flavor at the bottom of the dialog box to complete the process.
6 (Optional) Specify which projects can access instances created from specific flavors.
a On the Flavors page, click Edit Flavor in the Actions column of the instance.
b In the Edit Flavor dialog box, click the Flavor Access tab.
c Use the toggle controls to select the projects that can access the instance.
d Click Save.
7 (Optional) Modify the settings of a specific flavor.
a On the Flavors page, click Edit Flavor in the Actions column of the instance.
b In the Edit Flavor dialog box, modify the settings in either the Flavor Info or Flavor Access tab.
c Click Save.
Delete a FlavorYou can manage the number and variety of flavors by deleting those that no longer meet users' needs,duplicate other flavors, or for other reasons.
NOTE You cannot undo the deletion of a flavor. Do not delete default flavors.
Prerequisites
You must be logged in to the VMware Integrated OpenStack dashboard as a cloud administrator to performthis task.
Procedure
1 In the VMware Integrated OpenStack dashboard, select the admin project from the drop-down menu inthe title bar.
2 Select Admin > System Panel > Flavors.
3 Select the flavors to delete.
4 Click Delete Flavors.
5 At the prompt, confirm the deletion.
VMware Integrated OpenStack Administrator Guide
36 VMware, Inc.
Index
Aaudience 5
Ccapacity, adding 15clusters, adding 15components, adding 15Compute cluster, adding 18
EESXi host requirements 8
Ffeature support 10firewall requirements 8flavors
creating 35default configurations 35deleting 36working with 35
Hhardware requirements
NSX-V components 7OpenStack components 7
Iimages
deleting 34managing 33modifying settings 34uploading with dashboard 33
implementation overview 7instances
controlling state 29monitoring 13pausing 29rebooting 29suspending 29tracking usage 30usage summary 30working with 29
OObject Storage
deploying 15installing nodes 17
Object Storage component, adding post-installation 15
OpenStack componentsCompute cluster 18Object Storage 15
Ppatches, applying 21patching 21product overview 7projects
assigning users 24creating 23deleting 24managing 23modifying 24
Ssecurity groups
about 25CIDR or Security Group 26creating 25ICMP access 26modifying 26SSH access 26
snapshots, create from an instance 29software requirements
ESXi host requirements 8firewall requirements 8vSphere requirements 8
storage, Object Storage component 15system overview 7system requirements
hardware 7hardware requirements 7networking 7NSX-V 9NSX-V components 7OpenStack components 7software 7software requirements 8storage 8
VMware, Inc. 37
Uupdating 21user, creating new account 27users
assigning to projects 24deleting 28enabling or disabling 28
VVMs, in vSphere and OpenStack 10volume type, creating 31volume types 31volumes, deleting 31vSphere requirements 8
VMware Integrated OpenStack Administrator Guide
38 VMware, Inc.
Top Related