


Languages
Pages
Legal


VMware Integrated OpenStackAdministrator Guide
VMware Integrated OpenStack 2.5
This document supports the version of each product listed andsupports all subsequent versions until the document isreplaced by a new edition. To check for more recent editions ofthis document, see http://www.vmware.com/support/pubs.
EN-001582-05

VMware Integrated OpenStack Administrator Guide
2 VMware, Inc.
You can find the most up-to-date technical documentation on the VMware Web site at:
http://www.vmware.com/support/
The VMware Web site also provides the latest product updates.
If you have comments about this documentation, submit your feedback to:
Copyright © 2016 VMware, Inc. All rights reserved. Copyright and trademark information.
VMware, Inc.3401 Hillview Ave.Palo Alto, CA 94304www.vmware.com
Contents
About This Book 5
Updated Information 7
1 About VMware Integrated OpenStack 9
OpenStack Foundation Compliance 9VMware Integrated OpenStack System Requirements 9OpenStack Instances in vSphere Web Client 12Monitor OpenStack Instances in the vSphere Web Client 15The VMware Customer Experience Improvement Program 16
2 Managing Your VMware Integrated OpenStack Deployment 19
Managing Your Deployment Configuration 19Managing Your Network Configuration 24Adding Capacity in vSphere Web Client 28Configure the Backup Service for Block Storage 30Back Up the VMware Integrated OpenStack Deployment 32Restore VMware Integrated OpenStack from a Backup 33Failure Recovery 34Upgrade to VMware Integrated OpenStack 2.5 36Updating Your VMware Integrated OpenStack Deployment 44Customize the Dashboard Logos and Background 46Migrating Volumes Between Datastores 49
3 Managing OpenStack Projects and Users 53
Create an OpenStack Project 53Modify a Project 54Working with Security Groups 55Create a Cloud User Account in OpenStack 57Modify a User Account 58
4 Working with Instances in OpenStack 59
Create a Snapshot from an Instance 59Control the State of an Instance 60Track Instance Use 60Use DRS to Control OpenStack Instance Placement 60Using Affinity and Anti-Affinity to Place OpenStack Instances 64Apply QoS Resource Allocation to Existing Instances 66Configuring Single Root I/O Virtualization for Instances 66Define Default Nova Storage for OpenStack Instances 69
VMware, Inc. 3

5 Working with Volumes and Volume Types in OpenStack 71Create a Volume Type 71Delete a Volume Type 72
6 Managing Images for the Image Service 73
Import Images to the Image Service 73Modify Image Settings 77Modify Image Resource Metadata 78Configuring Images for Windows Guest Customization 78Configure QoS Resource Allocation for Instances Using Image Metadata 80Delete an Existing Image 82Migrating Images 82Add a VM Template as an Image 84Modify the Default Behavior for Nova Snapshots 85Modify the Default Cinder Upload-to-Image Behavior 86
7 Working with Flavors 87
Default Flavor Configurations 87Create a Flavor 87Delete a Flavor 88Modify Flavor Metadata 89Configure QoS Resource Allocation for Instances Using Flavor Metadata 89
8 VMware Integrated OpenStack CLI Command Reference 93
viocli backup Command 93viocli dbverify Command 94viocli deployment Command 94viocli ds-migrate-prep Command 95viocli hyperic Command 96viocli inventory-admin Command 96viocli lbaas-v2 Command 97viocli recover Command 98viocli restore Command 99viocli rollback Command 99viocli services Command 100viocli show Command 100viocli upgrade Command 100viocli volume-migrate Command 101
Index 103
VMware Integrated OpenStack Administrator Guide
4 VMware, Inc.
About This Book
The VMware Integrated OpenStack Administrator Guide shows you how to performVMware Integrated OpenStack cloud administrative tasks in the VMware Integrated OpenStack, includinghow to create and manage projects, users accounts, flavors, images, and networks.
Intended AudienceThis guide is for cloud administrators who want to create and manage resources with an OpenStackdeployment that is fully integrated with VMware® vSphere®. To do so successfully, you should be familiarwith the OpenStack components and functions.
VMware Technical Publications GlossaryVMware Technical Publications provides a glossary of terms that might be unfamiliar to you. For definitionsof terms as they are used in VMware technical documentation, go to http://www.vmware.com/support/pubs.
VMware, Inc. 5

VMware Integrated OpenStack Administrator Guide
6 VMware, Inc.
Updated Information
This VMware Integrated OpenStack Administrator Guide is updated with each release of the product or whennecessary.
This table provides the update history of the VMware Integrated OpenStack Administrator Guide.
Revision Description
001582-05 n Expanded CLI commands to include new and enhanced troubleshooting features, including finding andremoving orphaned instances, and improved logging and status reporting. See Chapter 8, “VMwareIntegrated OpenStack CLI Command Reference,” on page 93.
n Documented new support for LBaaS v2.0. See “Migrate to LBaaS v2.0,” on page 40.n Added procedures for customizing the logo that appears on the dashboard pages. See “Customize the
Dashboard Logos and Background,” on page 46.n Added procedures for migrating images between datastores. See “Migrating Images,” on page 82.n Added procedure for adding storage capacity to the Compute node. See “Add Storage to the Compute
Node,” on page 29.n Added procedure for adding storage capacity to the Image Service node. See “Add Storage to the Image
Service,” on page 29.n Modified the backup service for block storage to accommodate both NFS 3.x and NFS 4.1. See “Configure
the Backup Service for Block Storage,” on page 30.n Added procedure for adding VM templates as images. See “Add a VM Template as an Image,” on
page 84.n Added procedure for modifying the default behavior of Nova snapshots. See “Modify the Default
Behavior for Nova Snapshots,” on page 85.n Added procedure for modifying the default Cinder volume upload behavior. See “Modify the Default
Cinder Upload-to-Image Behavior,” on page 86.n Added procedures for configuring SR-IOV for instances. See “Configuring Single Root I/O Virtualization
for Instances,” on page 66.
001582-04 n Expanded and reorganized procedures for managing your VMware Integrated OpenStack deploymentconfiguration post-installation. See “Managing Your Deployment Configuration,” on page 19.
n Expanded and reorganized topics about managing network settings. See “Managing Your NetworkConfiguration,” on page 24.
n Added documentation on enabling Edge high availability. See “Managing NSX Edge Node HighAvailability,” on page 27.
n Added VMware Integrated OpenStack CLI command documentation. See Chapter 8, “VMwareIntegrated OpenStack CLI Command Reference,” on page 93.
n Expanded procedures for using policy-based storage management. See “Define Default Nova Storage forOpenStack Instances,” on page 69.
n Minor revisions.
VMware, Inc. 7
Revision Description
001582-03 n Expanded image management procedures to include unsupported source image formats. See “ImportImages to the Image Service,” on page 73.
n Updated the version upgrade section to clarify the procedure for adding the required IP address range.See “Add IP Addresses to the Network Configuration,” on page 37.
n Added procedures for leveraging DRS to manage placement of OpenStack instances in vCenter hosts. See “Apply VM Group Settings to Image Metadata,” on page 63.
n Added procedures for specifying QoS resource allocations for instances by modifying the metadata ofthe source image . See “Configure QoS Resource Allocation for Instances Using Image Metadata,” onpage 80.
n Added procedures for specifying QoS resource allocations for instances by modifying the metadata ofthe flavor. See “Configure QoS Resource Allocation for Instances Using Flavor Metadata,” on page 89.
n Added a section on guest customization. See “Configuring Images for Windows Guest Customization,”on page 78.
n Minor revisions.
001582-02 n Updated for VMware Integrated OpenStack version 2.0.n Removed post-installation and additional component topics. These are now included in the VMware
Integrated OpenStack Installation and Configuration Guide.n Added steps for backing up the VMware Integrated OpenStack deployment. See “Back Up the VMware
Integrated OpenStack Deployment,” on page 32 .n Added steps for restoring the VMware Integrated OpenStack deployment from a backup. See “Restore
VMware Integrated OpenStack from a Backup,” on page 33 .n Added steps for recovery individual OpenStack nodes in the event of a failure. See “Failure Recovery,”
on page 34.n Added procedures for configuring a backup service for Cinder volumes.n Minor revisions.
001582-01 n Added steps for associating volume types with an existing storage policy. See “Create a Volume Type,”on page 71.
n Expanded the procedures for configuring the Object Storage node.n Minor revisions.
001582-00 Initial release.
VMware Integrated OpenStack Administrator Guide
8 VMware, Inc.
About VMware Integrated OpenStack 1With VMware Integrated OpenStack, you can implement OpenStack services on your existing VMwarevSphere implementation.
You deploy VMware Integrated OpenStack through the Integrated OpenStack Manager vApp in vCenter.
The Integrated OpenStack Manager provides a workflow that guides you through and completes theVMware Integrated OpenStack deployment process. With Integrated OpenStack Manager, you can specifyyour management and compute clusters, configure networking, and add resources. Post-deployment, youcan use Integrated OpenStack Manager to add components or otherwise modify the configuration of yourVMware Integrated OpenStack cloud infrastructure.
VMware Integrated OpenStack 2.x is based on the Kilo release of OpenStack. (Version 1.0 was based on theIcehouse release.)
This chapter includes the following topics:
n “OpenStack Foundation Compliance,” on page 9
n “VMware Integrated OpenStack System Requirements,” on page 9
n “OpenStack Instances in vSphere Web Client,” on page 12
n “Monitor OpenStack Instances in the vSphere Web Client,” on page 15
n “The VMware Customer Experience Improvement Program,” on page 16
OpenStack Foundation ComplianceVMware Integrated OpenStack complies with the 2015.03, 2015.04, and 2015.05 Guidelines created by theOpenStack Foundation DefCore Committee. In addition, VMware Integrated OpenStack is the first productto achieve verified compliance with the most recent Guideline, version 2015.07.
VMware Integrated OpenStack is designated as an OpenStack Powered Platform™ product and thereforeprovides proven interoperability with all other OpenStack Powered™ products.
For more information, go to http://www.openstack.org/brand/interop/.
VMware Integrated OpenStack System RequirementsBefore you begin the VMware Integrated OpenStack deployment tasks, your system must comply with allhardware, software, networking, and storage requirements.
VMware, Inc. 9
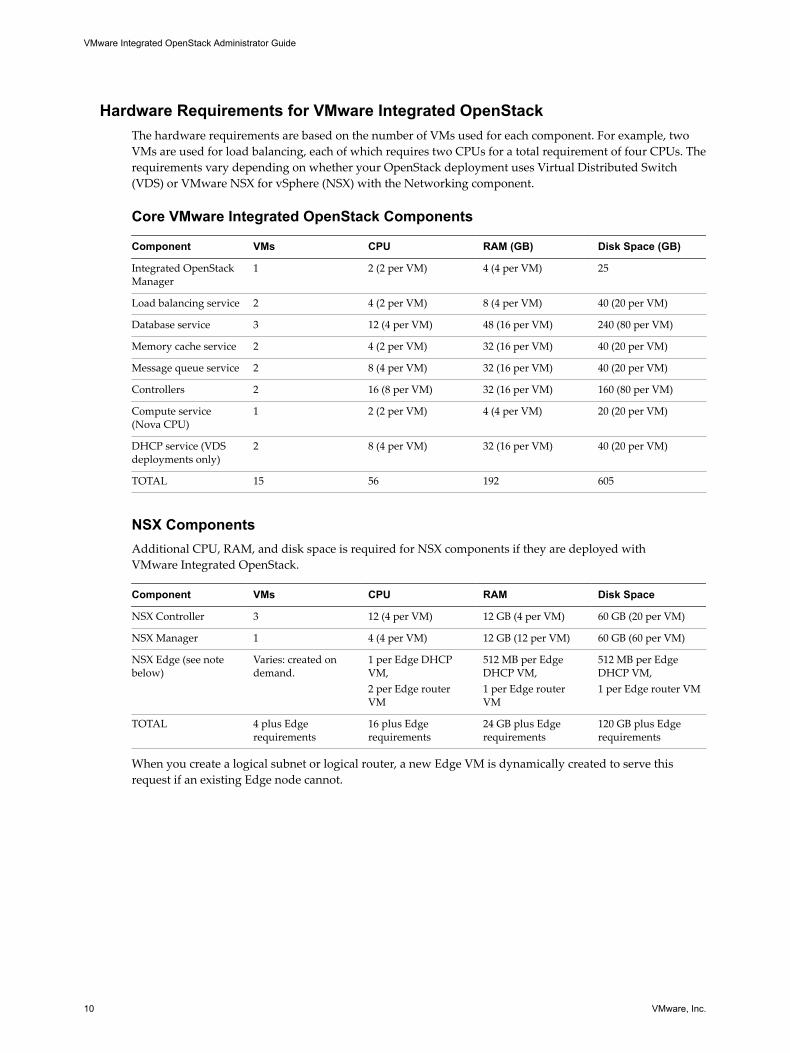
Hardware Requirements for VMware Integrated OpenStackThe hardware requirements are based on the number of VMs used for each component. For example, twoVMs are used for load balancing, each of which requires two CPUs for a total requirement of four CPUs. Therequirements vary depending on whether your OpenStack deployment uses Virtual Distributed Switch(VDS) or VMware NSX for vSphere (NSX) with the Networking component.
Core VMware Integrated OpenStack Components
Component VMs CPU RAM (GB) Disk Space (GB)
Integrated OpenStackManager
1 2 (2 per VM) 4 (4 per VM) 25
Load balancing service 2 4 (2 per VM) 8 (4 per VM) 40 (20 per VM)
Database service 3 12 (4 per VM) 48 (16 per VM) 240 (80 per VM)
Memory cache service 2 4 (2 per VM) 32 (16 per VM) 40 (20 per VM)
Message queue service 2 8 (4 per VM) 32 (16 per VM) 40 (20 per VM)
Controllers 2 16 (8 per VM) 32 (16 per VM) 160 (80 per VM)
Compute service(Nova CPU)
1 2 (2 per VM) 4 (4 per VM) 20 (20 per VM)
DHCP service (VDSdeployments only)
2 8 (4 per VM) 32 (16 per VM) 40 (20 per VM)
TOTAL 15 56 192 605
NSX ComponentsAdditional CPU, RAM, and disk space is required for NSX components if they are deployed withVMware Integrated OpenStack.
Component VMs CPU RAM Disk Space
NSX Controller 3 12 (4 per VM) 12 GB (4 per VM) 60 GB (20 per VM)
NSX Manager 1 4 (4 per VM) 12 GB (12 per VM) 60 GB (60 per VM)
NSX Edge (see notebelow)
Varies: created ondemand.
1 per Edge DHCPVM,2 per Edge routerVM
512 MB per EdgeDHCP VM,1 per Edge routerVM
512 MB per EdgeDHCP VM,1 per Edge router VM
TOTAL 4 plus Edgerequirements
16 plus Edgerequirements
24 GB plus Edgerequirements
120 GB plus Edgerequirements
When you create a logical subnet or logical router, a new Edge VM is dynamically created to serve thisrequest if an existing Edge node cannot.
VMware Integrated OpenStack Administrator Guide
10 VMware, Inc.
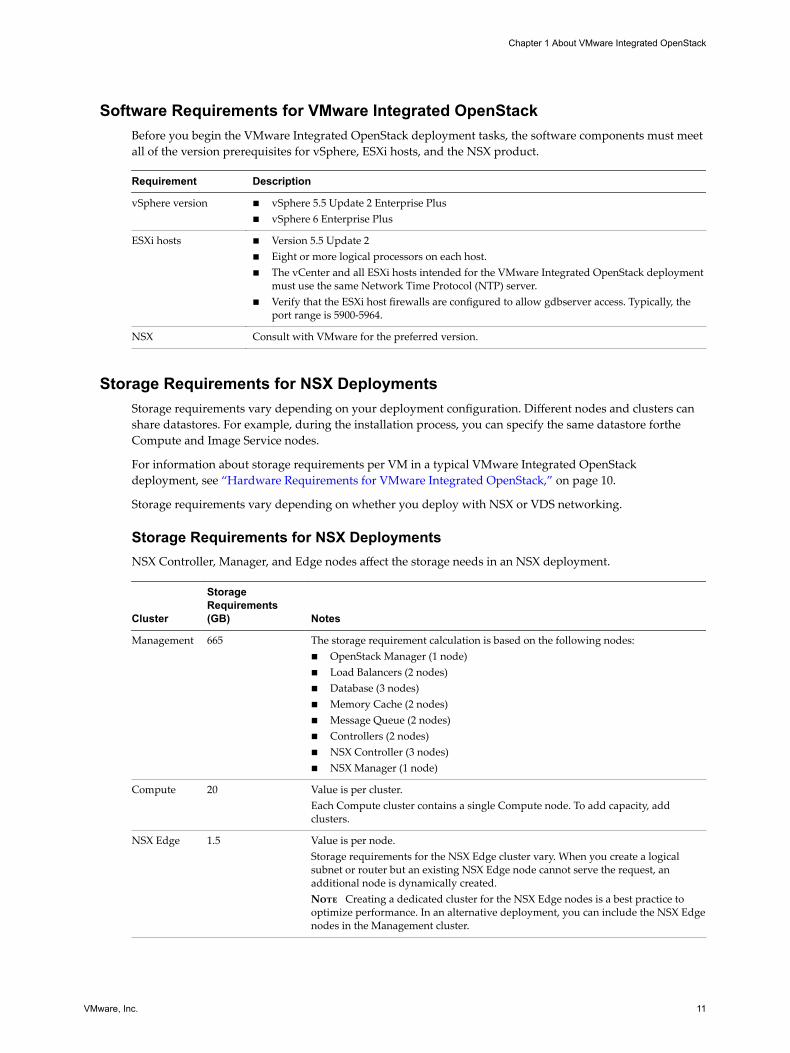
Software Requirements for VMware Integrated OpenStackBefore you begin the VMware Integrated OpenStack deployment tasks, the software components must meetall of the version prerequisites for vSphere, ESXi hosts, and the NSX product.
Requirement Description
vSphere version n vSphere 5.5 Update 2 Enterprise Plusn vSphere 6 Enterprise Plus
ESXi hosts n Version 5.5 Update 2n Eight or more logical processors on each host.n The vCenter and all ESXi hosts intended for the VMware Integrated OpenStack deployment
must use the same Network Time Protocol (NTP) server.n Verify that the ESXi host firewalls are configured to allow gdbserver access. Typically, the
port range is 5900-5964.
NSX Consult with VMware for the preferred version.
Storage Requirements for NSX DeploymentsStorage requirements vary depending on your deployment configuration. Different nodes and clusters canshare datastores. For example, during the installation process, you can specify the same datastore fortheCompute and Image Service nodes.
For information about storage requirements per VM in a typical VMware Integrated OpenStackdeployment, see “Hardware Requirements for VMware Integrated OpenStack,” on page 10.
Storage requirements vary depending on whether you deploy with NSX or VDS networking.
Storage Requirements for NSX DeploymentsNSX Controller, Manager, and Edge nodes affect the storage needs in an NSX deployment.
Cluster
StorageRequirements(GB) Notes
Management 665 The storage requirement calculation is based on the following nodes:n OpenStack Manager (1 node)n Load Balancers (2 nodes)n Database (3 nodes)n Memory Cache (2 nodes)n Message Queue (2 nodes)n Controllers (2 nodes)n NSX Controller (3 nodes)n NSX Manager (1 node)
Compute 20 Value is per cluster.Each Compute cluster contains a single Compute node. To add capacity, addclusters.
NSX Edge 1.5 Value is per node.Storage requirements for the NSX Edge cluster vary. When you create a logicalsubnet or router but an existing NSX Edge node cannot serve the request, anadditional node is dynamically created.Note Creating a dedicated cluster for the NSX Edge nodes is a best practice tooptimize performance. In an alternative deployment, you can include the NSX Edgenodes in the Management cluster.
Chapter 1 About VMware Integrated OpenStack
VMware, Inc. 11

Storage Requirements for VDS DeploymentsDHCP nodes affect the storage needs in a VDS deployment.
ClusterStorageRequirements (GB) Notes
Management 585 The storage requirement calculation is based on the following service nodes:n OpenStack Manager (1 node)n Load Balancers (2 nodes)n Database (3 nodes)n Memory Cache (2 nodes)n Message Queue (2 nodes)n Controllers (2 nodes)n DHCP Controller (2 nodes)
Compute 20 Value is per cluster.Each Compute cluster contains a single Compute node. To add capacity, addclusters.
Required NSX ParametersWhen you are deploying VMware Integrated OpenStack with NSX for the Networking component, youmust configure the NSX nodes in advance.
When you install VMware Integrated OpenStack, you must provide the following information.
Property Description
Username User name for accessing the NSX Manager node.
Password Password for accessing the NSX Manager node.
Transport Zone Name of the default transport zone.
Edge Cluster The name of the cluster containing the Edge nodes.
Virtual Distributed Switch forEdge VTEP
The VDS from the NSX configuration.
Port Group for ExternalNetwork
The port group created on a VLAN specifically for the External network. You createdthis port group as part of the process of preparing to deployVMware Integrated OpenStack with NSX.
OpenStack Instances in vSphere Web ClientThe VMs you create in your VMware Integrated OpenStack deployment appear in your vCenter inventory.Many restrictions apply to how you manage and work with OpenStack VMs.
In most cases, you must manage such VMs in the OpenStack dashboard or CLI rather than in the vSphereWeb Client.
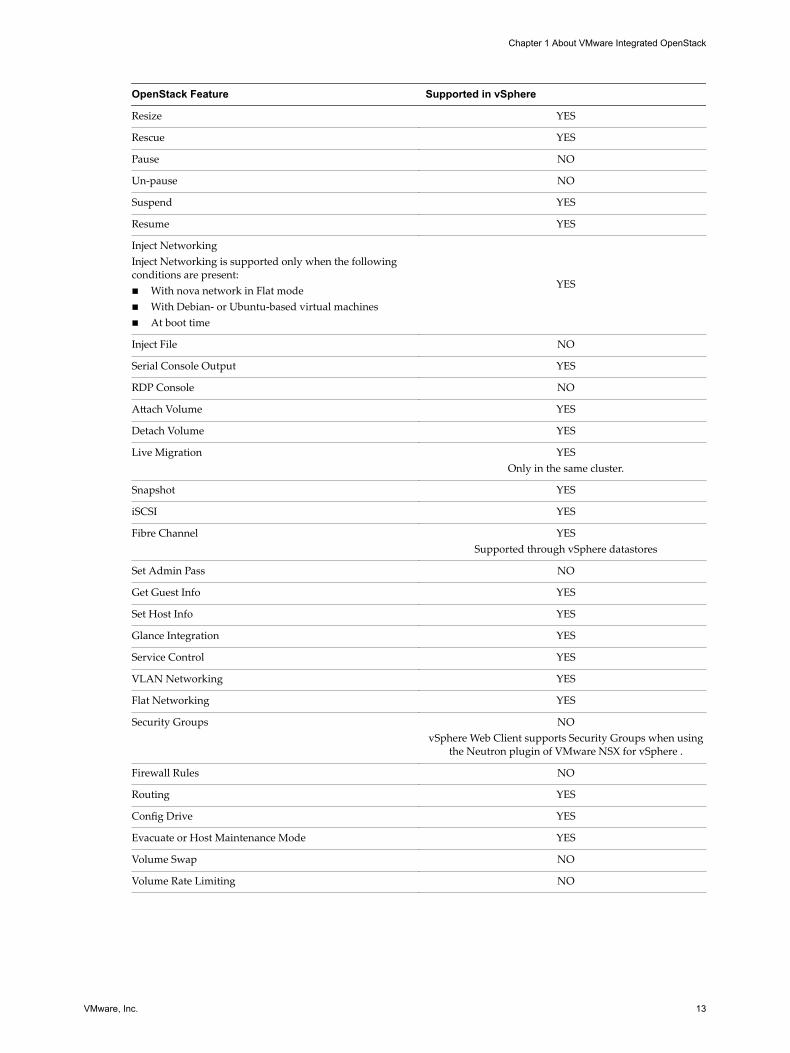
OpenStack Features Supported in vSpherevSphere supports certain OpenStack features.
OpenStack Feature Supported in vSphere
Launch YES
Reboot YES
Terminate YES
VMware Integrated OpenStack Administrator Guide
12 VMware, Inc.
OpenStack Feature Supported in vSphere
Resize YES
Rescue YES
Pause NO
Un-pause NO
Suspend YES
Resume YES
Inject NetworkingInject Networking is supported only when the followingconditions are present:n With nova network in Flat moden With Debian- or Ubuntu-based virtual machinesn At boot time
YES
Inject File NO
Serial Console Output YES
RDP Console NO
Attach Volume YES
Detach Volume YES
Live Migration YESOnly in the same cluster.
Snapshot YES
iSCSI YES
Fibre Channel YESSupported through vSphere datastores
Set Admin Pass NO
Get Guest Info YES
Set Host Info YES
Glance Integration YES
Service Control YES
VLAN Networking YES
Flat Networking YES
Security Groups NOvSphere Web Client supports Security Groups when using
the Neutron plugin of VMware NSX for vSphere .
Firewall Rules NO
Routing YES
Config Drive YES
Evacuate or Host Maintenance Mode YES
Volume Swap NO
Volume Rate Limiting NO
Chapter 1 About VMware Integrated OpenStack
VMware, Inc. 13
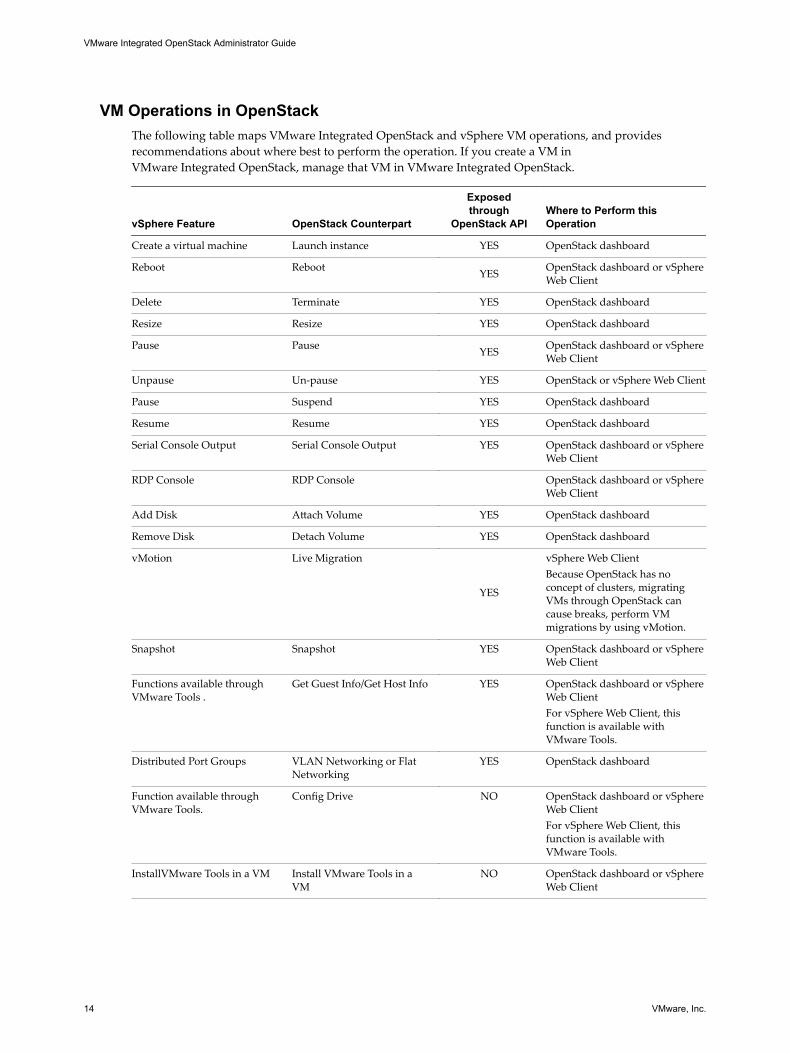
VM Operations in OpenStackThe following table maps VMware Integrated OpenStack and vSphere VM operations, and providesrecommendations about where best to perform the operation. If you create a VM inVMware Integrated OpenStack, manage that VM in VMware Integrated OpenStack.
vSphere Feature OpenStack Counterpart
Exposedthrough
OpenStack APIWhere to Perform thisOperation
Create a virtual machine Launch instance YES OpenStack dashboard
Reboot Reboot YES OpenStack dashboard or vSphereWeb Client
Delete Terminate YES OpenStack dashboard
Resize Resize YES OpenStack dashboard
Pause Pause YES OpenStack dashboard or vSphereWeb Client
Unpause Un-pause YES OpenStack or vSphere Web Client
Pause Suspend YES OpenStack dashboard
Resume Resume YES OpenStack dashboard
Serial Console Output Serial Console Output YES OpenStack dashboard or vSphereWeb Client
RDP Console RDP Console OpenStack dashboard or vSphereWeb Client
Add Disk Attach Volume YES OpenStack dashboard
Remove Disk Detach Volume YES OpenStack dashboard
vMotion Live Migration
YES
vSphere Web ClientBecause OpenStack has noconcept of clusters, migratingVMs through OpenStack cancause breaks, perform VMmigrations by using vMotion.
Snapshot Snapshot YES OpenStack dashboard or vSphereWeb Client
Functions available throughVMware Tools .
Get Guest Info/Get Host Info YES OpenStack dashboard or vSphereWeb ClientFor vSphere Web Client, thisfunction is available withVMware Tools.
Distributed Port Groups VLAN Networking or FlatNetworking
YES OpenStack dashboard
Function available throughVMware Tools.
Config Drive NO OpenStack dashboard or vSphereWeb ClientFor vSphere Web Client, thisfunction is available withVMware Tools.
InstallVMware Tools in a VM Install VMware Tools in aVM
NO OpenStack dashboard or vSphereWeb Client
VMware Integrated OpenStack Administrator Guide
14 VMware, Inc.

vCenter Features Not Supported in the OpenStack APIDirect parity does not exist between OpenStack features and vSphere features. The the OpenStack API doesnot support the following vCenter features.
n Adding a host to a cluster
OpenStack cannot add a host to a cluster in vSphere.
n Migrating VMs
The OpenStack Live Migration API is not supported. Use vCenter for VM migration within a singlecluster. Do not migrate VMs between clusters.
n Putting a host into maintenance mode
You place a host in maintenance mode to service it, for example, to install more memory. A host entersor leaves maintenance mode only as the result of a user request. No such function exists in OpenStack.See the vSphere documentation for instructions about entering and exiting maintenance mode.
n Resource Pools
A resource pool in vSphere is a logical abstraction for flexible management of resources, such as CPUand memory. OpenStack has no equivalent to a resource pool.
n vSphere snapshots
vCenter supports OpenStack snapshots, but vSphere snapshots are distinct and are not supported in theOpenStack API.
Monitor OpenStack Instances in the vSphere Web ClientYou can view and monitor instance activity and metadata in the vSphere Web Client.
Prerequisites
Verify that VMware Integrated OpenStack is deployed and operational.
Verify that you or another user has started instances in VMware Integrated OpenStack.
Procedure
1 In the vSphere Web Client, go to the Home > Inventories panel, click theVMware Integrated OpenStack icon.
2 Expand the Inventory view until you expose the instance VMS in the compute cluster.
The instance VMs are identified by their UUIDs.
3 Select an instance VM and click the Summary tab.
The Summary tab displays the portlets common to VMs in thevSphere Web Client. The OpenStack VMand Tags portlets contain details about instances created in OpenStack.
4 Locate the OpenStack VM portlet.
This portlet displays the following information about the selected instance.
Property Description
Instance Name Instance name as it appears in VMware Integrated OpenStack.
Tenant Name Name of the OpenStack project in which the instance was started.
Chapter 1 About VMware Integrated OpenStack
VMware, Inc. 15

Property Description
Flavor The template used to create the instance.A flavor is a preset configuration that defines the compute, memory, and storage capacity of aninstance. When you create an instance, you configure the server by selecting a flavor.
User Name The OpenStack user that started the instance.
Status Instance status: ACTIVE,
Network The OpenStack network where the instance is deployed.
5 Locate the Tags portlet.
This portlet displays the following information about the selected instance.
Category Tag Description
OpenStackUsers The OpenStack user that started the instance.
OpenStackTenants The OpenStack project in which the user started the instance.
OpenStackInstances The UUID for the instance.
OpenStackFlavors The flavor used to create the instance.
6 (Optional) Use the vSphere Web Client to search for and filter OpenStack instances.
a In the vSphere Web Client Search field, enter one of the tag values in the Tags portlet.
For example, to find all instances created using the default m1.tiny flavor, enter m1.tiny.
The Related Objects tab appears with a list of all the OpenStack instances that match the searchcriteria.
b Click on the name of any instance to open the Summary tab for that instance.
The VMware Customer Experience Improvement ProgramYou can configure this product to collect data that can be used by the VMware Customer ExperienceImprovement Program. The following section contains important information about this program.
VMware’s Customer Experience Improvement Program (CEIP) provides VMware with information thatenables VMware to improve its products and services and to fix problems. When you choose to participatein CEIP, VMware will collect technical information listed below about your use of the VMware products andservices in CEIP reports on a regular basis. This information does not personally identify you.
Configuration Data Data about how you have configured VMware products and services andrelated environment information. Examples of Configuration Data includeversion information for VMware products, product environmentinformation, and product configuration settings. Configuration Data mayinclude obfuscated versions of your device IDs and MAC and InternetProtocol addresses.
Feature Usage Data Data about how you use VMware products and services. Examples ofFeature Usage Data include details about which product features you useand metrics of user interface activity.
Performance Data Data about the performance of VMware products and services. Examples ofPerformance Data include metrics of the performance and scale of VMwareproducts and services, response times for user interfaces, and details aboutyour API calls.
VMware Integrated OpenStack Administrator Guide
16 VMware, Inc.

VMware collects the above CEIP reporting information in connection with a unique CEIP instance identifierthat is stored on your device and which does not personally identify you. This identifier enables VMware todistinguish one report from another.
VMware may update this information from time to time to reflect changes in our products and services, sowe encourage you to periodically review this web page.
Chapter 1 About VMware Integrated OpenStack
VMware, Inc. 17

VMware Integrated OpenStack Administrator Guide
18 VMware, Inc.

Managing YourVMware Integrated OpenStackDeployment 2
Managing your VMware Integrated OpenStack deployment includes modifying configuration settings,backup, recovery, and restoration of your OpenStack configuration and data; using patches for minorupdates, and upgrading to new versions.
This chapter includes the following topics:
n “Managing Your Deployment Configuration,” on page 19
n “Managing Your Network Configuration,” on page 24
n “Adding Capacity in vSphere Web Client,” on page 28
n “Configure the Backup Service for Block Storage,” on page 30
n “Back Up the VMware Integrated OpenStack Deployment,” on page 32
n “Restore VMware Integrated OpenStack from a Backup,” on page 33
n “Failure Recovery,” on page 34
n “Upgrade to VMware Integrated OpenStack 2.5,” on page 36
n “Updating Your VMware Integrated OpenStack Deployment,” on page 44
n “Customize the Dashboard Logos and Background,” on page 46
n “Migrating Volumes Between Datastores,” on page 49
Managing Your Deployment ConfigurationDuring the VMware Integrated OpenStack installation and deployment process, you configure theOpenStack components, specify the syslog server, provide passwords for LDAP, NSX, and vCenter Server,among other deployment tasks. After deployment, you can modify these settings.
Monitor Your VMware Integrated OpenStack DeploymentAfter completing installation, you can monitor your deployment configuration, including datastore sizes,network settings, and metadata service, among other details.
Procedure
1 In vCenter, select Home > VMware Integrated OpenStack.
2 Click the Monitor tab.
VMware, Inc. 19

Modify the Syslog Server AddressThe Syslog server address is configured during installation but you can modify the configuration afterward.
Prerequisites
Verify that the new Syslog server address is valid.
Procedure
1 In vCenter, select Home > VMware Integrated OpenStack > Manage.
2 Click the Settings tab.
3 Click Syslog Server.
The Syslog Server panel displays the current configuration.
4 Click Edit to change the Syslog server address.
5 Click OK to apply the change.
The vSphere Web Client might take a few minutes to update the OpenStack configuration.
Update Deployment PasswordsPart of your VMware Integrated OpenStack deployment configuration includes passwords that allowOpenStack to access and connect with your LDAP server, NSX, and vCenter Server. If the credentialschange, you can modify the password settings directly in the VMware Integrated OpenStack manager toensure continued access.
Only the text boxes with updated passwords on the Change Password page change. To leave a passwordunmodified, leave the text box blank.
Prerequisites
Verify that the passwords you supply in the Change Passwords panel match the passwords configured forthe LDAP server, NSX, or vCenter Server, as appropriate.
Procedure
1 In vCenter, select Home > VMware Integrated OpenStack > Manage.
2 Click the Settings tab.
3 Click Change Passwords.
The Change Passwords panel contains text boxes for updating the current LDAP server, NSX, andvCenter Server password configurations.
4 Enter the new password.
5 Click Submit.
The password settings in the VMware Integrated OpenStack are updated with the new values.
Manage the OpenStack SSL Certificate ConfigurationYou can add OpenStack SSL certificates in the VMware Integrated OpenStack manager. You can importexisting certificates or generate new ones.
Prerequisites
To import a certificate file, verify that you can browse to and select the file.
VMware Integrated OpenStack Administrator Guide
20 VMware, Inc.

Procedure
1 In the vSphere Web Client, select Home > Inventories, and click the VMware Integrated OpenStackicon.
2 Click the Manage tab and click the Settings tab.
3 Click OpenStack SSL Certificate.
The OpenStack SSL Certificate page displays the current status of your participation in the CEIP. Ifenabled, you are opted in. If disabled, you are opted out.
4 Generate a new certificate.
a Provide the Organizational Unit, Organizational Name, Locality Name, State Name, and CountryCode information as appropriate to your organization.
b Click Generate.
The new certificate is generated and applied.
5 Import a certificate file.
a Click Import.
b Browse to and select the certificate file.
c Click OK.
The imported certificate is applied.
Configure the Ceilometer ComponentCeilometer is the telemetric component of OpenStack that collects and persists data regarding the use of thephysical and virtual resources in your OpenStack deployment.
You can enable Ceilometer after completing the VMware Integrated OpenStack deployment.
Procedure
1 In vCenter, select Home > VMware Integrated OpenStack > Manage.
2 Select the Settings tab.
3 Click Ceilometer.
The Ceilometer panel displays the current status and configuration.
4 Click Edit to modify the settings.
5 Select the Configure Ceilometer option.
6 Click OK to configure Ceilometer.
The vSphere Web Client might take a few minutes to update the OpenStack configuration.
Ceilometer is automatically enabled the first time you configure it. Afterwards, the Ceilometer settings showonly Enable and Disable options.
Modify Your Enrollment in the Customer Experience Improvement ProgramDuring the installation process, you can enroll in the VMware Customer Experience Improvement Program(CEIP). After installation, you can modify this configuration in the VMware Integrated OpenStack manager.
The CEIP provides VMware with information that enables VMware to improve its products and servicesand to fix problems. See “The VMware Customer Experience Improvement Program,” on page 16
Chapter 2 Managing Your VMware Integrated OpenStack Deployment
VMware, Inc. 21

Procedure
1 In the vSphere Web Client, select Home > Inventories, and click the VMware Integrated OpenStackicon.
2 Click the Manage tab and click the Settings tab.
3 Click Customer Experience Improvement Program.
The Customer Experience Improvement Program page displays the current status of your participationin the CEIP. If enabled, you are opted in. If disabled, you are opted out.
4 To change the status of your participation, click the enable/disable toggle.
Manage Your Authentication SettingsPart of your VMware Integrated OpenStack deployment configuration includes setting up authentication.Post-installation you can modify this configuration.
Prerequisites
Verify that the new LDAP settings are valid.
Procedure
1 In vCenter, select Home > VMware Integrated OpenStack > Manage.
2 Click the Settings tab.
3 Click Configure the Authentication Source.
The panel displays the current configuration.
VMware Integrated OpenStack Administrator Guide
22 VMware, Inc.

4 Set the VMware Integrated OpenStack authentication source.
You can specify either Database or Active Directory as a LDAP Server.
n If you select the Database option, create and confirm the administrator credentials in the SetupOpenStack admin user panel. These are the credentials the OpenStack administrator will use to loginto the VMware Integrated OpenStack dashboard.
Option Description
OpenStack admin user Define the OpenStack administrative user name. This is the defaultadministrative user name for logging in to theVMware Integrated OpenStack dashboard.
OpenStack admin password Define the OpenStack administrative user password. This is the defaultadministrative user password for logging in to theVMware Integrated OpenStack dashboard.
Confirm password Reenter the password for confirmation. n If you select the Active Directory as a LDAP Server option, complete the LDAP server
configuration, user query, and group query parameters. Each category includes a test button thatenables you to validate your setting.
Category Description
LDAP Server Complete the following parameters to establish the LDAP session.
Encryption Select encryption type from the drop-down menu.
Host name Provide the host name for the LDAP server. Toconnect to multiple directories, you can entermultiple host names separated by commas.
Port Specify the port on the host. The default is 636 forSSL.
Bind user Provide the user name to allow the LDAP clientaccess to the LDAP server.
Bind password Provide the password to allow the LDAP clientaccess to the LDAP server.
User Query Provide the user query settings.
OpenStackadmin user
Define the OpenStack administrative user name.This is the default administrative user name forlogging in to the VMware Integrated OpenStackdashboard.
OpenStackadmin password
Define the OpenStack administrative userpassword. This is the default administrative userpassword for logging in to theVMware Integrated OpenStack dashboard.
User tree DN Search base for users.
User filter LDAP search filter for users.
Userobjectclass
LDAP objectclass for users.
User ID attribute LDAP attribute mapped to the user ID. This valuemust not be a multivalued attribute.
User nameattribute
LDAP attribute mapped to the user name.
Chapter 2 Managing Your VMware Integrated OpenStack Deployment
VMware, Inc. 23
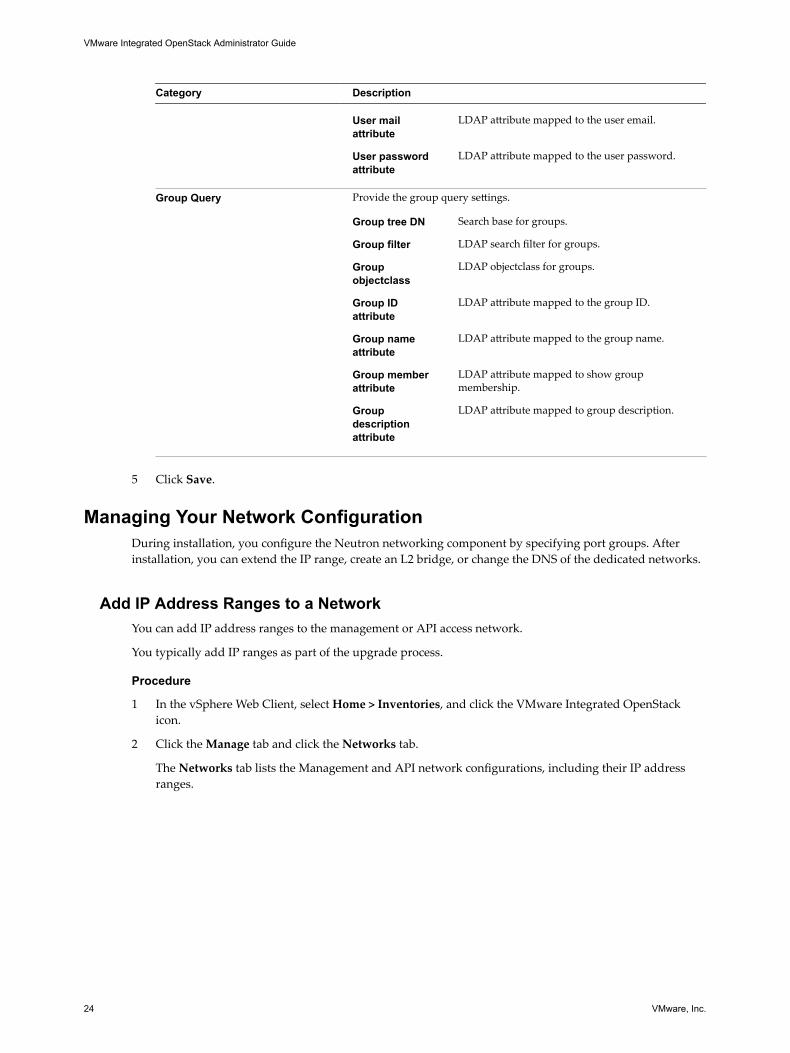
Category Description
User mailattribute
LDAP attribute mapped to the user email.
User passwordattribute
LDAP attribute mapped to the user password.
Group Query Provide the group query settings.
Group tree DN Search base for groups.
Group filter LDAP search filter for groups.
Groupobjectclass
LDAP objectclass for groups.
Group IDattribute
LDAP attribute mapped to the group ID.
Group nameattribute
LDAP attribute mapped to the group name.
Group memberattribute
LDAP attribute mapped to show groupmembership.
Groupdescriptionattribute
LDAP attribute mapped to group description.
5 Click Save.
Managing Your Network ConfigurationDuring installation, you configure the Neutron networking component by specifying port groups. Afterinstallation, you can extend the IP range, create an L2 bridge, or change the DNS of the dedicated networks.
Add IP Address Ranges to a NetworkYou can add IP address ranges to the management or API access network.
You typically add IP ranges as part of the upgrade process.
Procedure
1 In the vSphere Web Client, select Home > Inventories, and click the VMware Integrated OpenStackicon.
2 Click the Manage tab and click the Networks tab.
The Networks tab lists the Management and API network configurations, including their IP addressranges.
VMware Integrated OpenStack Administrator Guide
24 VMware, Inc.

3 Expand the IP addresses available for the Management network.
a Right-click the name of the Management network in the list and select Add IP Range.
b In the Add IP Range dialog box, specify the new IP range.
Note If you are adding addresses as part of the upgrade process, the new IP range must matchthe same number of IP addresses configured for the existing Management network. For example, ina typical VMware Integrated OpenStack deployment, the Management network requires aminimum range of 21 IP addresses.
c Click OK.
4 Expand the IP addresses available for the API network.
a Right-click the name of the API network in the list and select Add IP Range.
b In the Add IP Range dialog box, specify the new IP range.
Note If you are adding addresses as part of the upgrade process, the new IP range must matchthe same number of IP addresses configured for the existing API network. For example, in a typicalVMware Integrated OpenStack deployment, the API network requires a minimum range of 5 IPaddresses.
c Click OK.
Modify the Default Router SettingYou can modify the default router setting that NSX uses in the custom.yml file.
The Neutron configuration file includes a parameter that sets the default router types. For example,tenant_router_types = shared, distributed, exclusive. You can modify the custom.yml file to overridethis configuration with a custom setting.
Procedure
1 Implement the custom.yml file.
sudo mkdir -p /opt/vmware/vio/custom
sudo cp /var/lib/vio/ansible/custom/custom.yml.sample /opt/vmware/vio/custom/custom.yml
2 Open the /opt/vmware/vio/custom/custom.yml file in a text editor.
3 Uncomment the nsxv_tenant_router_types parameter and specify the router types for NSX tenants.
nsxv_tenant_router_types: exclusive, shared, distributed
4 Using SSH, log in to the VMware Integrated OpenStack manager.
5 Switch to root user.
sudo su -
6 Push the new configuration to your VMware Integrated OpenStack deployment.
viocli deployment configure --limit controller
Modify Network DNS SettingAfter installation, you can modify the DNS settings for the networks configured for OpenStack managementand API access.
Important Modifying the network DNS setting results in a brief interruption in the network connection.
Chapter 2 Managing Your VMware Integrated OpenStack Deployment
VMware, Inc. 25

Procedure
1 In the vSphere Web Client, select Home > Inventories, and click the VMware Integrated OpenStackicon.
2 Click the Manage tab and click the Networks tab.
The Networks tab lists the Management and API network configurations, including their DNSaddresses.
3 Right-click the network name whose DNS setting you want to modify and choose Change DNS.
Note You can also select the network in the list, click All Actions and choose Change DNS.
4 Modify the DNS and Secondary DNS IP addresses.
5 Click OK.
Create a VXLAN/VLAN L2 BridgeIn a leaf-spine data center architecture, the OpenStack Compute cluster cannot access VMs on a VLAN. Youcan overcome this technical limitation by creating a VXLAN network and L2 VXLAN and VLAN bridge.
Prerequisites
Verify that a VDS port group is available for the VXLAN network configuration.
Procedure
1 Using SSH, log in as administrator to the VMware Integrated OpenStack manager.
2 Using SSH, log in to the controller01 node.
3 Create the logical L2 gateway on Neutron.
neutron-l2gw l2-gateway-create <gateway-name> \
--device name=<device-name1>,interface_names="<interface-name1>[|<seg-id1>]"
Option Description
<gateway-name> Specifies the name of the new gateway.
<device-name1> Specifies the device name. This is a dummy name. The NSX plug-in createsa dedicated DLR.
<interface-name1> Specifies the distributed port group MOB ID as the interface name.
<seg-id1> Specifies the distributed port group segmentation ID. From the backup edge pool, NSX creates a dedicated DLR called L2 bridging-{gateway-id}.
4 Create the logical L2 gateway connection on Neutron.
neutron-l2gw l2-gateway-connection-create <gateway-name/uuid> <network-name/uuid> \
[--default-segmentation-id=<seg-id>]
Option Description
<gateway-name/uuid> Specifies the name of the existing gateway.
<network-name/uuid> Specifies the network name. This is a dummy name. The NSX plug-increates a dedicated DLR.
<default-segmentation-id=seg-id1>
Specifies the default distributed port group segmentation ID.
This operation connects the OpenStack network with the Provider VLAN network.
VMware Integrated OpenStack Administrator Guide
26 VMware, Inc.

Managing NSX Edge Node High AvailabilityYou can configure VMware Integrated OpenStack to ensure that every NSX Edge node is enable for highavailability.
You can configure the custom.yml file before installing and deploying VMware Integrated OpenStack. If youhave already installed and deployed VMware Integrated OpenStack, you have the additional step ofmanually enabling each running NSX Edge node.
Enable NSX Edge Node High Availability Before DeploymentBefore you install VMware Integrated OpenStack, you can enable high availability for NSX Edge nodes bymodifying the custom.yml file.
Prerequisites
Verify that your Edge cluster has at least two hosts. If not, you might receive an anti-affinity error.
Procedure
1 Implement the custom.yml file.
sudo mkdir -p /opt/vmware/vio/custom
sudo cp /var/lib/vio/ansible/custom/custom.yml.sample /opt/vmware/vio/custom/custom.yml
2 Edit the /opt/vmware/vio/custom/custom.yml file.
a Uncomment the nsxv_edge_ha parameter.
b Set the nsxv_edge_ha parameter to True.
nsxv_edge_ha: True
3 Save the custom.yml file.
When you install and deploy VMware Integrated OpenStack, high availability is enabled by default for allNSX Edge nodes.
Enable NSX Edge Node High Availability After DeploymentIf you have already installed VMware Integrated OpenStack, you can enable high availability for NSX Edgenodes by modifying the custom.yml file and manually modifying each running Edge node.
Prerequisites
Verify that your Edge cluster has at least two hosts. If not, you might receive an anti-affinity error.
Procedure
1 If you have not already done so, implement the custom.yml file.
sudo mkdir -p /opt/vmware/vio/custom
sudo cp /var/lib/vio/ansible/custom/custom.yml.sample /opt/vmware/vio/custom/custom.yml
2 Edit the /opt/vmware/vio/custom/custom.yml file.
a Uncomment the nsxv_edge_ha parameter.
b Set the nsxv_edge_ha parameter to True.
nsxv_edge_ha: True
Chapter 2 Managing Your VMware Integrated OpenStack Deployment
VMware, Inc. 27

3 Save the custom.yml file.
After modifying and saving the custom.yml file, high availability is enabled for all NSX Edge nodessubsequently generated by VMware Integrated OpenStack.
4 Manually enable high availability on all current NSX Edge nodes.
a In the VMware Integrated OpenStack controller, get a list of all current Edge nodes and their edge-id values.
sudo -u neutron nsxadmin -r edges -o list
b Enable high availability on each Edge node by specifying its edge-id value.
sudo -u neutron nsxadmin -r edges -o nsx-update \
--property highAvailability=True \
--property edge-id=<edge-id>
c Repeat the preceding command for each Edge node.
5 Push the new configuration to your VMware Integrated OpenStack deployment.
viocli deployment -v configure
Important This command updates your entire deployment and might briefly interrupt operations.
Adding Capacity in vSphere Web ClientYou can add compute clusters and datastores to an existing VMware Integrated OpenStack deployment.
Add a New Compute ClusterYou can increase the number of compute clusters in your VMware Integrated OpenStack deployment toincrease CPU capacity.
Prerequisites
Prepare a cluster with at least one host.
Procedure
1 In vCenter, select Home > VMware Integrated OpenStack > Manage.
2 Select the Nova Compute tab.
This tab displays the current Nova Compute clusters and their status.
3 Click the green plus-sign icon (+) at the top of the panel.
4 In the Add Nova cluster page of the Add Cluster to OpenStack dialog box, select the cluster youprepared as a prerequisite, and click Next.
The cluster you select must contain at least one host.
5 On the Review proposed configuration page, select the existing management VM, and click Next.
6 Select the datastores for the tenants in the new cluster, and click Next.
7 Review the proposed configuration, and click Finish.
8 Confirm that the new cluster is added to the OpenStack deployment.
The newly added cluster appears in the Nova Compute tab.
OpenStack capacity increases based on the resources available in the additional cluster.
VMware Integrated OpenStack Administrator Guide
28 VMware, Inc.
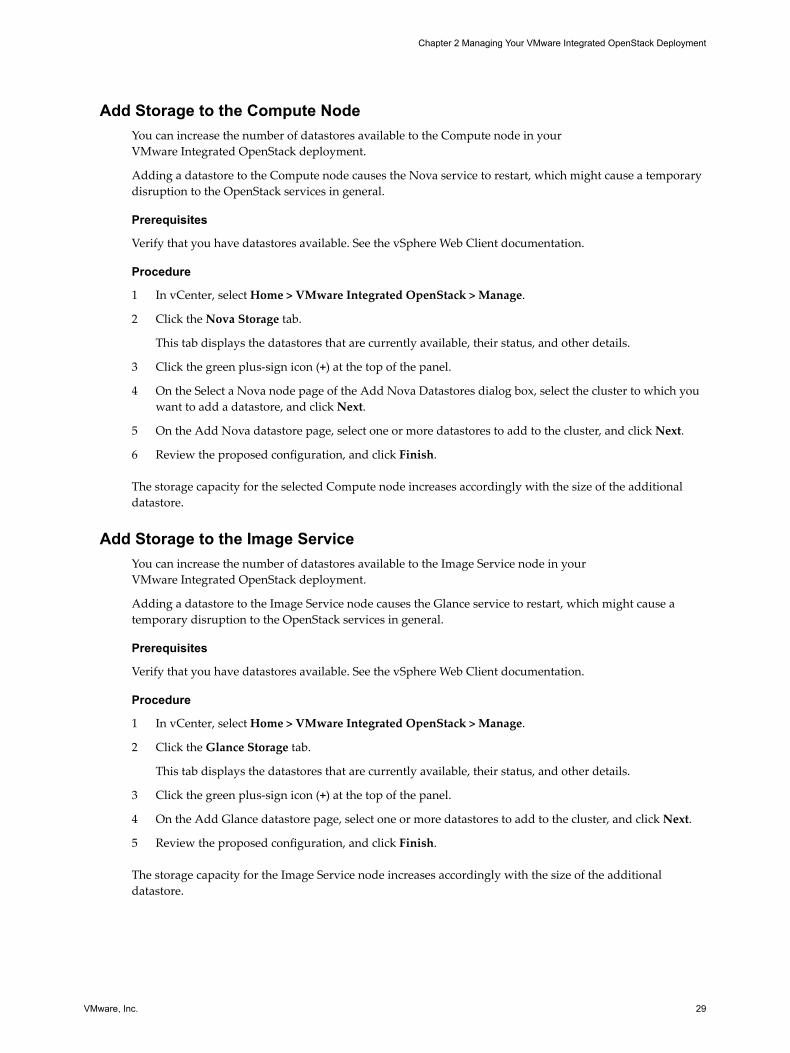
Add Storage to the Compute NodeYou can increase the number of datastores available to the Compute node in yourVMware Integrated OpenStack deployment.
Adding a datastore to the Compute node causes the Nova service to restart, which might cause a temporarydisruption to the OpenStack services in general.
Prerequisites
Verify that you have datastores available. See the vSphere Web Client documentation.
Procedure
1 In vCenter, select Home > VMware Integrated OpenStack > Manage.
2 Click the Nova Storage tab.
This tab displays the datastores that are currently available, their status, and other details.
3 Click the green plus-sign icon (+) at the top of the panel.
4 On the Select a Nova node page of the Add Nova Datastores dialog box, select the cluster to which youwant to add a datastore, and click Next.
5 On the Add Nova datastore page, select one or more datastores to add to the cluster, and click Next.
6 Review the proposed configuration, and click Finish.
The storage capacity for the selected Compute node increases accordingly with the size of the additionaldatastore.
Add Storage to the Image ServiceYou can increase the number of datastores available to the Image Service node in yourVMware Integrated OpenStack deployment.
Adding a datastore to the Image Service node causes the Glance service to restart, which might cause atemporary disruption to the OpenStack services in general.
Prerequisites
Verify that you have datastores available. See the vSphere Web Client documentation.
Procedure
1 In vCenter, select Home > VMware Integrated OpenStack > Manage.
2 Click the Glance Storage tab.
This tab displays the datastores that are currently available, their status, and other details.
3 Click the green plus-sign icon (+) at the top of the panel.
4 On the Add Glance datastore page, select one or more datastores to add to the cluster, and click Next.
5 Review the proposed configuration, and click Finish.
The storage capacity for the Image Service node increases accordingly with the size of the additionaldatastore.
Chapter 2 Managing Your VMware Integrated OpenStack Deployment
VMware, Inc. 29

Configure the Backup Service for Block StorageIt is a best practice to configure a backup service for the Block Storage (Cinder) component of OpenStack toprevent loss of data. You can configure Cinder to back up volumes to either a network file system (NFS) oran Object Storage (Swift) service, which is another OpenStack service.
You configure a backup service by installing OpenStack Debian packages that are included in yourVMware Integrated OpenStack 2.5 deployment.
For the purposes of this procedure, the two controllers are referred to as controller01 and controller02.
Prerequisites
Verify that your VMware Integrated OpenStack 2.5 deployment is installed and running.
For Swift service backup configurations:
n Verify that the Swift component is installed as part of your VMware Integrated OpenStack 2.5deployment. See the VMware Integrated OpenStack Installation and Configuration Guide.
n Verify that the Swift component is registered to the Identity Service component (Keystone), which isanother OpenStack service. This registration is part of the default Keystone configuration. Keystone isinstalled as part of your VMware Integrated OpenStack 2.5 deployment.
For NFS share backup configurations:
n Create a dedicated NFS share folder to store the backed-up data.
n Verify that the owner of the NFS share folder has the same UID as Cinder on the controller nodes. Thedefault Cinder UID is 107. This value might be different in your deployment.
Procedure
1 Using SSH, log in to the VMware Integrated OpenStack manager.
2 Implement the custom.yml file.
sudo mkdir -p /opt/vmware/vio/custom
sudo cp /var/lib/vio/ansible/custom/custom.yml.sample /opt/vmware/vio/custom/custom.yml
3 To use Swift as a backup service, edit the /opt/vmware/vio/custom/custom.yml file.
a Uncomment the cinder_backup_driver parameter.
b Set the cinder_backup_driver parameter to cinder.backup.drivers.swift.
# Driver to use for backups. (string value)
cinder_backup_driver: cinder.backup.drivers.swift
4 To use NFS as a backup service, edit the /opt/vmware/vio/custom/custom.yml file.
a Uncomment the cinder_backup_driver parameter.
b Set the cinder_backup_driver parameter to cinder.backup.drivers.nfs.
# Driver to use for backups. (string value)
cinder_backup_driver: cinder.backup.drivers.nfs
c Uncomment the cinder_backup_share parameter.
VMware Integrated OpenStack Administrator Guide
30 VMware, Inc.
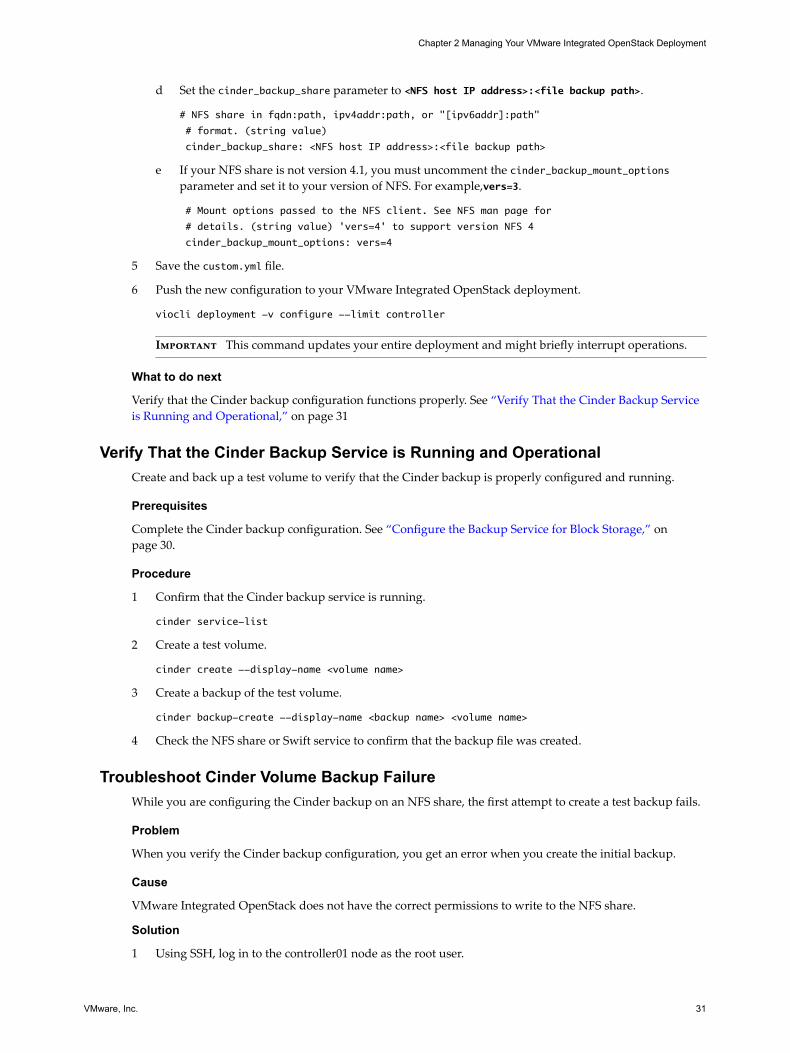
d Set the cinder_backup_share parameter to <NFS host IP address>:<file backup path>.
# NFS share in fqdn:path, ipv4addr:path, or "[ipv6addr]:path"
# format. (string value)
cinder_backup_share: <NFS host IP address>:<file backup path>
e If your NFS share is not version 4.1, you must uncomment the cinder_backup_mount_optionsparameter and set it to your version of NFS. For example,vers=3.
# Mount options passed to the NFS client. See NFS man page for
# details. (string value) 'vers=4' to support version NFS 4
cinder_backup_mount_options: vers=4
5 Save the custom.yml file.
6 Push the new configuration to your VMware Integrated OpenStack deployment.
viocli deployment -v configure --limit controller
Important This command updates your entire deployment and might briefly interrupt operations.
What to do next
Verify that the Cinder backup configuration functions properly. See “Verify That the Cinder Backup Serviceis Running and Operational,” on page 31
Verify That the Cinder Backup Service is Running and OperationalCreate and back up a test volume to verify that the Cinder backup is properly configured and running.
Prerequisites
Complete the Cinder backup configuration. See “Configure the Backup Service for Block Storage,” onpage 30.
Procedure
1 Confirm that the Cinder backup service is running.
cinder service-list
2 Create a test volume.
cinder create --display-name <volume name>
3 Create a backup of the test volume.
cinder backup-create --display-name <backup name> <volume name>
4 Check the NFS share or Swift service to confirm that the backup file was created.
Troubleshoot Cinder Volume Backup FailureWhile you are configuring the Cinder backup on an NFS share, the first attempt to create a test backup fails.
Problem
When you verify the Cinder backup configuration, you get an error when you create the initial backup.
Cause
VMware Integrated OpenStack does not have the correct permissions to write to the NFS share.
Solution
1 Using SSH, log in to the controller01 node as the root user.
Chapter 2 Managing Your VMware Integrated OpenStack Deployment
VMware, Inc. 31

2 Go to the mount directory for the Cinder backup configuration.
cd /var/lib/cinder/backup_mount/
3 Change the folder owner from root to cinder.
chown -R cinder:cinder *
This workaround corrects the configuration and gives the Cinder component permission to access the NFSshare.
Back Up the VMware Integrated OpenStack DeploymentIt is a best practice to periodically back up your OpenStack management server and database.
You perform backup operations in the CLI for the VMware Integrated OpenStack Manager.
Prerequisites
You must log in with administrative or super-user (sudo) privileges to perform backup operations.
Procedure
1 Using SSH, log in to the VMware Integrated OpenStack manager.
2 Switch to root user.
sudo su -
3 (Optional) Switch to verbose mode.
viocli backup <-v | -verbose>
4 (Optional) View the help options.
viocli backup <-h | -help>
5 Use the viocli backup mgmt_server <NFS_VOLUME> command to back up the OpenStack managementserver.
viocli backup mgmt_server [-d DEPLOYMENT] <NFS_VOLUME>
Option Description
-d DEPLOYMENT Specifies the name of the VMware Integrated OpenStack deployment to bebacked up.
NFS_VOLUME Name or IP address of the target NFS volume and directory in the formatremote_host:remote_dir.For example: 192.168.1.77:/backups
The backup file is automatically labeled with the timestamp vio_ms_yyyymmddhhmmss.
6 Back up the OpenStack database.
viocli backup openstack_db [-d DEPLOYMENT] <NFS_VOLUME>
Option Description
-d DEPLOYMENT Specifies the name of the VMware Integrated OpenStack deploymentdatabase to be backed up..
NFS_VOLUME Name or IP address of the target NFS volume and directory in the formatremote_host:remote_dir.For example: 192.168.1.77:/backups
The backup file is automatically labeled with the timestamp vio_os_db_yyyymmddhhmmss.
VMware Integrated OpenStack Administrator Guide
32 VMware, Inc.

If a severe event occurs, you can use the new backup files to restore your VMware Integrated OpenStackdeployment data and configuration.
Restore VMware Integrated OpenStack from a BackupIf a crash occurs, you can restore your VMware Integrated OpenStack management server and OpenStackdatabase from a previous backup.
You perform restore operations in the CLI for the VMware Integrated OpenStack Manager.
Prerequisites
Log in with administrative or super-user (sudo) privileges to perform restore operations.
Verify that you have backups of the management server and database available. See “Back Up the VMwareIntegrated OpenStack Deployment,” on page 32.
Procedure
1 Using SSH, log in to the VMware Integrated OpenStack manager.
2 Switch to root user.
sudo su -
3 (Optional) Switch to verbose mode.
viocli restore <-v | -verbose>
4 (Optional) View the help options.
viocli restore <-h | -help>
5 Restore the OpenStack management server, where PATH specifies the intended location for the backupfile..
viocli restore mgmt_server \
[-d DEPLOYMENT] \
<BACKUP_NAME> \
<NFS_VOLUME>
Option Description
-d DEPLOYMENT Indicates the backup by the deployment name assigned when it wascreated.
BACKUP_NAME Indicates the timestamp label of the backup file to be used to restore themanagement server.
NFS_VOLUME Indicates the NFS host where the backup file is located.
Chapter 2 Managing Your VMware Integrated OpenStack Deployment
VMware, Inc. 33

6 Restore the OpenStack database.
viocli restore openstack_db \
[-d DEPLOYMENT] \
<BACKUP_NAME> \
<NFS_VOLUME>
Option Description
-d DEPLOYMENT Indicates the backup by the deployment name assigned when it wascreated.
BACKUP_NAME Indicates the timestamp label of the backup file to be used to restore thedatabase.
NFS_VOLUME Indicates the NFS host where the backup file is located.
You restore your VMware Integrated OpenStack management server and OpenStack database to the state ofthe backups.
Failure RecoveryIn the event of a disk failure or another critical issue, you can recover the individual nodes in yourVMware Integrated OpenStack deployment using the CLI.
When you recover a VMware Integrated OpenStack node, it returns to the state of a newly deployed node.To recover a database node, you must recover to a backup file. See “Back Up the VMware IntegratedOpenStack Deployment,” on page 32.
Procedure
1 Using SSH, log in to the VMware Integrated OpenStack manager.
2 Switch to root user.
sudo su -
3 Switch to verbose mode.
viocli recover <-v | -verbose>
4 View the help options.
viocli recover <-h | -help>
VMware Integrated OpenStack Administrator Guide
34 VMware, Inc.
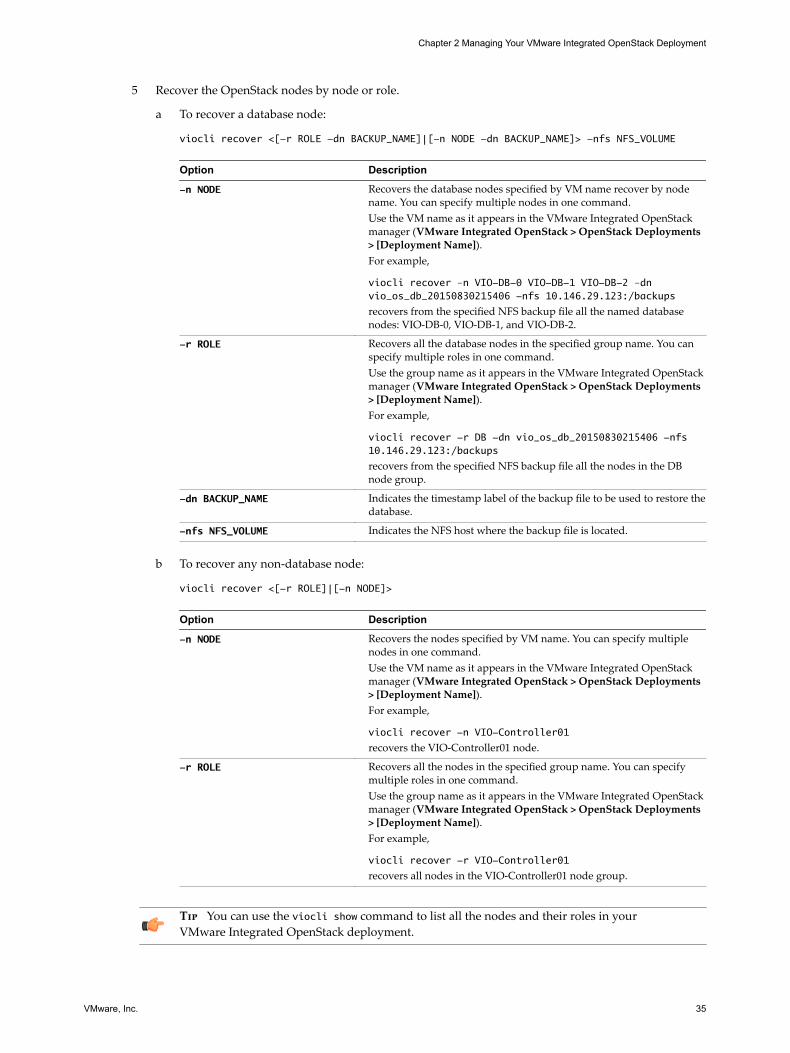
5 Recover the OpenStack nodes by node or role.
a To recover a database node:
viocli recover <[-r ROLE -dn BACKUP_NAME]|[-n NODE -dn BACKUP_NAME]> -nfs NFS_VOLUME
Option Description
-n NODE Recovers the database nodes specified by VM name recover by nodename. You can specify multiple nodes in one command.Use the VM name as it appears in the VMware Integrated OpenStackmanager (VMware Integrated OpenStack > OpenStack Deployments> [Deployment Name]).For example,
viocli recover –n VIO-DB-0 VIO-DB-1 VIO-DB-2 –dn vio_os_db_20150830215406 -nfs 10.146.29.123:/backups
recovers from the specified NFS backup file all the named databasenodes: VIO-DB-0, VIO-DB-1, and VIO-DB-2.
-r ROLE Recovers all the database nodes in the specified group name. You canspecify multiple roles in one command.Use the group name as it appears in the VMware Integrated OpenStackmanager (VMware Integrated OpenStack > OpenStack Deployments> [Deployment Name]).For example,
viocli recover -r DB -dn vio_os_db_20150830215406 -nfs 10.146.29.123:/backups
recovers from the specified NFS backup file all the nodes in the DBnode group.
-dn BACKUP_NAME Indicates the timestamp label of the backup file to be used to restore thedatabase.
-nfs NFS_VOLUME Indicates the NFS host where the backup file is located.
b To recover any non-database node:
viocli recover <[-r ROLE]|[-n NODE]>
Option Description
-n NODE Recovers the nodes specified by VM name. You can specify multiplenodes in one command.Use the VM name as it appears in the VMware Integrated OpenStackmanager (VMware Integrated OpenStack > OpenStack Deployments> [Deployment Name]).For example,
viocli recover -n VIO-Controller01
recovers the VIO-Controller01 node.
-r ROLE Recovers all the nodes in the specified group name. You can specifymultiple roles in one command.Use the group name as it appears in the VMware Integrated OpenStackmanager (VMware Integrated OpenStack > OpenStack Deployments> [Deployment Name]).For example,
viocli recover -r VIO-Controller01
recovers all nodes in the VIO-Controller01 node group.
Tip You can use the viocli show command to list all the nodes and their roles in yourVMware Integrated OpenStack deployment.
Chapter 2 Managing Your VMware Integrated OpenStack Deployment
VMware, Inc. 35
6 Verify the node is running by checking its status in the VMware Integrated OpenStack manager:VMware Integrated OpenStack > OpenStack Deployments > [Deployment Name].
Depending on your deployment, the recovery process might take a few minutes.
Upgrade to VMware Integrated OpenStack 2.5You upgrade VMware Integrated OpenStack to VMware Integrated OpenStack 2.5 by installing a Debianpatch, deploying a separate VMware Integrated OpenStack 2.5 deployment, and migrating to the new,upgraded deployment from your existingVMware Integrated OpenStack deployment. This process requiresvSphere to accommodate the existing deployment and the upgraded deployment. You must make availableadditional resources, datastores, IP addresses, and so on, to complete the upgrade procedure. vSpherecontinues to hold both deployments until you determine that the upgrade process was successful and youdo not need to roll back to your previous VMware Integrated OpenStack deployment.
Prerequisites
n Double the datastore resources dedicated to your current VMware Integrated OpenStack deployment.
n Verify that you have twice the required number of IP addresses available. For details, see “Add IPAddresses to the Network Configuration,” on page 37.
You must have matching resources for every node except the memcache and RabbitMQ nodes. See thehardware requirements in the VMware Integrated OpenStack Installation and Configuration Guide.
n Back up your current deployment. For details, see “Back Up the VMware Integrated OpenStackDeployment,” on page 32.
n To preserve your current VMware Integrated OpenStack configuration, export it as a configuration filefrom the VMware Integrated OpenStack manager.
Procedure
1 Add IP Addresses to the Network Configuration on page 37The upgrade procedure requires a temporary number of IP addresses in addition to your existing IPaddress configuration. vSphere provides a tool that enables you to add this required IP range.
2 Install the VMware Integrated OpenStack 2.5 Upgrade Patch on page 37The VMware Integrated OpenStack 2.5 upgrade is a Debian patch. When you install the upgradepatch, you upgrade the VMware Integrated OpenStack Manager vApp.
3 Migrate to the VMware Integrated OpenStack 2.5 Deployment on page 38After you obtain and install the upgrade patch, you install it as a separate deployment, migrate yourdata, and switch from the VMware Integrated OpenStack 2.0.x deployment.
4 Revert to a Previous VMware Integrated OpenStack Deployment on page 39You can revert to VMware Integrated OpenStack to a previous version by restoring your previousdeployment.
5 Delete the Older VMware Integrated OpenStack Deployment on page 40After you complete the upgrade process to the VMware Integrated OpenStack 2.5 deployment, youcan delete the older VMware Integrated OpenStack deployment. By deleting the old deployment, yourecover the CPU, datastores, and IP addresses resources that it required.
6 Migrate to LBaaS v2.0 on page 40VMware Integrated OpenStack 2.5 supports Load-Balancing-as-a-Service (LBaaS)v2.0.VMware Integrated OpenStack enables LBaaS v1.0 automatically, but as part of the upgradeprocess you have the option of migrating to and enabling LBaaS v2.0.
VMware Integrated OpenStack Administrator Guide
36 VMware, Inc.

Add IP Addresses to the Network ConfigurationThe upgrade procedure requires a temporary number of IP addresses in addition to your existing IP addressconfiguration. vSphere provides a tool that enables you to add this required IP range.
You can use this procedure to add IP addresses for any reason. If you are not adding IP addresses as part ofthe upgrade procedure, the specific number of IP addresses required might not apply.
Procedure
1 In the vSphere Web Client, select Home > Inventories, and click the VMware Integrated OpenStackicon.
2 Click the Manage tab and click the Networks tab.
The Networks tab lists the Management and API network configurations, including their IP addressranges.
3 Expand the IP addresses available for the Management network.
a Right-click the name of the Management network in the list and select Add IP Range.
b In the Add IP Range dialog box, specify the new IP range.
Note If you are adding addresses as part of the upgrade process, the new IP range must matchthe same number of IP addresses configured for the existing Management network. For example, ina typical VMware Integrated OpenStack deployment, the Management network requires aminimum range of 21 IP addresses.
c Click OK.
4 Expand the IP addresses available for the API network.
a Right-click the name of the API network in the list and select Add IP Range.
b In the Add IP Range dialog box, specify the new IP range.
Note If you are adding addresses as part of the upgrade process, the new IP range must matchthe same number of IP addresses configured for the existing API network. For example, in a typicalVMware Integrated OpenStack deployment, the API network requires a minimum range of 5 IPaddresses.
c Click OK.
What to do next
If you added IP addresses as part of the upgrade process, you can now obtain and install the upgrade patch.
Install the VMware Integrated OpenStack 2.5 Upgrade PatchThe VMware Integrated OpenStack 2.5 upgrade is a Debian patch. When you install the upgrade patch, youupgrade the VMware Integrated OpenStack Manager vApp.
Procedure
1 Download the upgrade as a Debian patch from VMware.
If you do not know where to obtain the upgrade patch, go to the VMware Integrated OpenStackproduct page at https://www.vmware.com/products/openstack.
Chapter 2 Managing Your VMware Integrated OpenStack Deployment
VMware, Inc. 37
2 Add the upgrade patch to your VMware Integrated OpenStack installation.
a Log in to the console for theVMware Integrated OpenStack management server.
b Download the debian file for the patch.
c Add the upgrade patch.
viopatch add -l <upgrade patch name>
d Confirm that the upgrade patch is successfully added.
viopatch list
This command returns a list of available patches, their version numbers, their type, and currentstatus. The list should indicate the upgrade patch by its build number.
3 Install the upgrade patch.
a Ensure that VMware Integrated OpenStack service is either running or not yet deployed.
If the VMware Integrated OpenStack service is in any other state, the upgrade will fail.
b Log in to the VMware Integrated OpenStack management server and install the patch.
viopatch install -p <upgrade patch name> -v <upgrade patch version>
The patch installation takes several minutes to finish.
4 Run the viocli dbverify command to check the VMware Integrated OpenStack database for knownproblems, such as duplicated or missing keys, that can cause problems during the upgrade procedure.
viocli dbverify [-d NAME] [-h] [-v]
See “viocli dbverify Command,” on page 94 for more information.
The VMware Integrated OpenStack vApp is now upgraded.
What to do next
You can now install and provision the new VMware Integrated OpenStack deployment.
Migrate to the VMware Integrated OpenStack 2.5 DeploymentAfter you obtain and install the upgrade patch, you install it as a separate deployment, migrate your data,and switch from the VMware Integrated OpenStack 2.0.x deployment.
Procedure
1 If you are logged in to the vSphere Web Client, log out and log back in.
This refreshes the interface so the newly installed patch is accessible through the vSphere Web Client.
2 In the vSphere Web Client, select Home > Inventories, and click the VMware Integrated OpenStackicon.
3 Click the Summary tab to confirm that the VMware Integrated OpenStack manager is upgraded.
The new version appears next to the vApp.
4 Click the Manage tab and click the Upgrades tab.
The Upgrades tab lists the current VMware Integrated OpenStack deployment.
5 Right-click the deployment name and select Upgrade from the pop-up menu.
6 Enter the name for the new deployment.
This name must be different than the name of the existing deployment.
VMware Integrated OpenStack Administrator Guide
38 VMware, Inc.

7 Click Next.
8 Configure the public and private VIP settings for the load balancer service.
These values serve as the temporary VIP configuration. When you migrate from the existingdeployment to the upgraded deployment, the new deployment uses the existing VIP configuration, andthe old deployment uses the temporary deployment.
Option Description
Public Virtual IP This value should be on the same subnet as the OpenStack API Accessnetwork, and should be outside the IP range specified for the OpenStackAPI Access network.
Private Virtual IP Connects the load balancer interface with the Management network.
9 Click Next.
10 Review the upgrade configuration, and click Finish.
The new version is provisioned but not migrated. The existing version remains operative. TheUpgrades tab now lists the current VMware Integrated OpenStack and new deployments. The currentdeployment shows a status of Running and the new, upgraded deployment shows a status ofProvisioned.
11 On the Upgrades tab, right-click the name of the 2.0.x deployment, and select Migrate Data.
Important You are prompted to confirm this action because during data migration, theVMware Integrated OpenStack services stop and downtime incurs until the upgrade process finishes.
When the migration process finishes, the status for the 2.5 deployment on the Upgrades tab changes toMigrated.
12 On the Upgrades tab, right-click the name of your previous deployment, and select Switch to NewDeployment.
When the deployment switching process finishes, the status for the 2.5 deployment on the Upgrades tabchanges to Running. The previous deployment shows a status of Stopped.
What to do next
If the deployment process is unsuccessful, you can revert to your previous VMware Integrated OpenStackdeployment. See “Revert to a Previous VMware Integrated OpenStack Deployment,” on page 39.
If the deployment process is successful, you can delete the previous VMware Integrated OpenStackdeployment.
Revert to a Previous VMware Integrated OpenStack DeploymentYou can revert to VMware Integrated OpenStack to a previous version by restoring your previousdeployment.
Prerequisites
n Double the datastore resources dedicated to your current VMware Integrated OpenStack deployment.
n Verify that you doubled the required number of IP addresses available.
n Verify that you retained the previous VMware Integrated OpenStack deployment in your OpenStackmanager.
n Verify that you are prepared to stop the services running on the previousVMware Integrated OpenStack deployment.
Chapter 2 Managing Your VMware Integrated OpenStack Deployment
VMware, Inc. 39
Procedure
1 In the vSphere Web Client, select Home > Inventories, and click the VMware Integrated OpenStackicon.
2 In the Inventory Lists panel, click OpenStack Deployments.
The current VMware Integrated OpenStack deployment appears in the center pane.
3 Right-click the name of the current deployment on the OpenStack Deployments tab and select StopOpenStack Deployment.
4 Return to the main VMware Integrated OpenStack panel (Home > Inventories > VMware IntegratedOpenStack).
5 Click the Manage tab and click the Upgrades tab.
The Upgrades tab lists the VMware Integrated OpenStack 2.5 and older deployments.
6 Right-click the previous VMware Integrated OpenStack deployment name and select Restore from thepop-up menu.
When the process of reverting your VMware Integrated OpenStack deployment is finished, the OpenStackservices restart.
Delete the Older VMware Integrated OpenStack DeploymentAfter you complete the upgrade process to the VMware Integrated OpenStack 2.5 deployment, you candelete the older VMware Integrated OpenStack deployment. By deleting the old deployment, you recoverthe CPU, datastores, and IP addresses resources that it required.
Prerequisites
Verify that the your upgraded VMware Integrated OpenStack 2.5 deployment is running and functioningsuccessfully. After you delete a deployment, you cannot restore it.
Procedure
1 In the vSphere Web Client, select Home > Inventories, and click the VMware Integrated OpenStackicon.
2 Click the Manage tab and click the Upgrades tab.
The Upgrades tab lists the current and old VMware Integrated OpenStack and old deployments. TheVMware Integrated OpenStack 2.5 deployment shows a status of Running. The previousVMware Integrated OpenStack deployment shows a status of Stopped.
3 Right-click the older VMware Integrated OpenStack deployment and select Delete from the pop-upmenu.
4 At the prompt, confirm the deletion.
The deployment no longer appears on the Upgrades tab or in the OpenStack Deployments list.
Migrate to LBaaS v2.0VMware Integrated OpenStack 2.5 supports Load-Balancing-as-a-Service (LBaaS)v2.0.VMware Integrated OpenStack enables LBaaS v1.0 automatically, but as part of the upgrade processyou have the option of migrating to and enabling LBaaS v2.0.
LBaaS enables Neutron, the networking component of OpenStack, to distribute incoming requests amongdesignated instances. This distribution ensures that the workload is shared predictably among instances andenables more effective use of system resources.
VMware Integrated OpenStack Administrator Guide
40 VMware, Inc.

This procedure is optional. You can continue to use LBaaS v1.0 after upgrading toVMware Integrated OpenStack version 2.5.x and higher.
Important If you have implemented the Ceilomoter OpenStack component and use Heat templates thatrequire LBaaS resources, do not migrate to LBaaS v2.0.
VMware Integrated OpenStack is based on the Kilo release of OpenStack and optionally supports LBaaSv2.0. However, Heat templates are not compatible with LBaaS v2.0 until the Mitaka release of OpenStack.
Important If you enable LBaaS v2.0 in VMware Integrated OpenStack, you cannot revert to LBaaS v1.0.
Configuring LBaaS v2.0VMware Integrated OpenStack 2.5 supports LBaaS v2.0. You enable LBaaS v2.0 after you complete theVMware Integrated OpenStack installation or upgrade process.
This task includes creating a health monitor and associates it with the LBaaS pool that contains the LBaaSserver instances. The health monitor is a Neutron service that checks if the instances are still running on thespecified protocol-port.
Prerequisites
This task applies only to VMware Integrated OpenStack deployed with NSX.
Procedure
1 Using SSH, log in to the VMware Integrated OpenStack manager.
2 Switch to root user.
sudo su -
3 Enable LBaaS v2.0.
viocli lbaasv2-enable
Option Description
-d DEPLOYMENT Indicates the name of the VMware Integrated OpenStack deployment.
4 From the VMware Integrated OpenStack manager, use SSH to log in to the Neutron node.
5 Switch to root user.
sudo su -
6 Create an exclusive router.
neutron router-create --router_type=exclusive <router name>
7 Attach a subnet to the new router.
neutron net-create <network name>
neutron subnet-create <network name> <CIDR value> --name <subnet name>
neutron router-interface-add <router name or id> <subnet name or id>
Chapter 2 Managing Your VMware Integrated OpenStack Deployment
VMware, Inc. 41

8 Create the load balancer.
This step includes creating the load balancer, creating the listener, and creating the load balancer pool.
a Create the load balancer, specifying the load balancing VIP subnet.
neutron lbaas-loadbalancer-create --name LOAD_BALANCER_1_NAME <vip-subnet-id>
Parameter Description
name Provide a name for the new load balancer.
vip-subnet-id Specify the VIP subnet for the new load balancer. Only members on thissubnet can be added to the pool.
b Create a listener for the new load balancer.
neutron lbaas-listener-create \
--loadbalancer LOAD_BALANCER_1_NAME \
--protocol <protocol type> \
--protocol-port <protocol port>
--name LISTENER_1_NAME
Parameter Description
loadbalancer Specify the load balancer you created in the preceding substep.
protocol type Specify the protocol type for the listener.n TCPn HTTPn HTTPS
protocol port Specify the protocol port.
name Provide a name for the new listener.
c Create an LBaaS pool.
neutron lbaas-pool-create \
--lb-algorithm <load balancing method> \
--listener LISTENER_1_NAME \
--protocol <protocol type> \
--name LB_POOL_1
Parameter Description
lb-algorithm Specify a load balancing method:n IP_HASH
Selects a server based on a hash of the source and destination IPaddress of each packet.
n LEAST_CONN
Distributes client requests to multiple servers based on the numberof connections already on the server. New connections are sent tothe server with the fewest connections.
n ROUND_ROBIN
Each server is used in turn according to the weight assigned to it.This process is the smoothest and fairest algorithm when theserver's processing time remains equally distributed.
n URI
VMware Integrated OpenStack Administrator Guide
42 VMware, Inc.

Parameter DescriptionThe left part of the URI, before the question mark, is hashed anddivided by the total weight of the running servers. The resultdesignates which server receives the request, ensuring that arequest is always directed to the same server as long as all serversremain available.
listener Specify the listener you created in the preceding substep.
protocol Specify the protocol for members of the pool to use.n TCPn HTTPn HTTPS
name Provide a name for the new pool.
9 Create the instances for the servers and client.
nova boot --image <image-uuid> --flavor <flavor> <server 1 name>
nova boot --image <image-uuid> --flavor <flavor> <server 2 name>
nova boot --image <image-uuid> --flavor 1 <client name>
10 Add the server instances to the LBaaS pool that you created in Step 9.
neutron lbaas-member-create \
--subnet <subnet-id> --address <server 1 IP> \
--protocol-port 80 <pool name>
neutron lbaas-member-create \
--subnet <subnet-id> --address <server 2 IP> \
--protocol-port 80 <pool name>
11 Set up the health monitor.
neutron lbaas-healthmonitor-create \
--delay DELAY_IN_SECONDS --type [HTTP | TCP] --max-retries NUMBER \
--timeout TIMEOUT_IN_SECONDS --pool LBAAS_POOL
Parameter Description
delay Time in seconds between sending probes to members.
type One of the predefined health monitor types. Specify HTTP or TCP.
max-retries Number of permissible connection failures before changing the memberstatus to INACTIVE.
timeout Maximum number of seconds for a monitor to wait for a connection to beestablished before it times out.Note The timeout value must be less than the delay value.
pool Specify the LBaaS pool to be monitored.
12 (Optional) Send test requests to validate your LBaaS configuration.
a Create a test index.html file.
b From the same directory, run a simple request.
# sudo python -m SimpleHTTPServer 80
c Log in to the client instance.
d Run the wget command to view whether your requests are being correctly load-balanced across thetwo servers in the pool.
# wget -O - http://<vip-ip>
Chapter 2 Managing Your VMware Integrated OpenStack Deployment
VMware, Inc. 43

Updating Your VMware Integrated OpenStack DeploymentYou update your VMware Integrated OpenStack deployment by using the VMware Integrated OpenStackManager vApp or CLI commands to install and apply patches.
After installing a patch, you can revert to a previous version if necessary.
Install Patch Using the vSphere Web ClientVMware provides updates in the form of Debian patches. Patches that do not affect the infrastructure of theVMware Integrated OpenStack deployment can be applied by using the VMware Integrated OpenStackManager vApp.
Prerequisites
vSphere Web Client
Some patches might require you to shut down the VMware Integrated OpenStack service before proceeding.
Procedure
1 Download the Debian patch from VMware.
If you do not know where to obtain the patch, go to the VMware Integrated OpenStack product pagehttps://www.vmware.com/products/openstack or consult with VMware.
2 In the vSphere Web Client, select Home > Inventories, and click the VMware Integrated OpenStackicon.
3 Click the Manage tab and click the Updates tab.
The Updates tab lists added patches and indicates if they are installed.
4 Add the patch to the VMware Integrated OpenStack Manager by clicking the green plus sign + andbrowsing to the file location.
5 Select the patch and click Choose.
The patch appears in the list on the Updates tab.
6 Install the patch.
If you can install the patch by using the VMware Integrated OpenStack Manager vApp, the Applyoption appears in the Patch Action column on the Updates tab.
If the Apply option does not appear in the Patch Action column, click More details in the PatchDescription column to access instructions for installing patches by using the CLI.
After you install a patch, the value in the Patch Status column on the Updates tab changes to Installed.
7 To complete the update, log out of thevSphere Web Client and back in.
You can ignore any error messages you encounter when logging back in.
8 Restart all VMware Integrated OpenStack services.
VMware Integrated OpenStack Administrator Guide
44 VMware, Inc.

Install Patch Using CLI CommandsVMware provides updates in the form of Debian patches. Patches that affect the infrastructure of theVMware Integrated OpenStack deployment must be applied through the command console for theVMware Integrated OpenStack Manager vApp.
Procedure
1 Download the Debian patch from VMware.
If you do not know where to obtain the patch, go to the VMware Integrated OpenStack product pagehttps://www.vmware.com/products/openstack or consult with VMware.
2 Add the patch to your VMware Integrated OpenStack installation.
a Log into the console for theVMware Integrated OpenStack management server.
b Add the patch.
viopatch add -l [path to the debian file]
c Confirm that the patch was successfully added.
viopatch list
This returns a list of available patches, their version numbers, their type, and current status. The listshould indicate the patch by its build number.
3 Install the patch.
a Ensure that VMware Integrated OpenStack service is either running or not yet deployed.
If the VMware Integrated OpenStack service is in any other state, the upgrade will fail.
b Log into the VMware Integrated OpenStack management server and run the following command:
viopatch install -p <upgrade patch name> -v <upgrade patch version>
The patch installation takes 5 to 10 minutes to complete.
4 To complete the update, log out of thevSphere Web Client and back in.
You can ignore any error messages you encounter when logging back in.
5 Restart all VMware Integrated OpenStack services.
If necessary, you can revert to the previous version. For details, see “Reverting a Patch Update Installation,”on page 45.
For troubleshooting the patch installation, see “Troubleshooting Update Patch Installation Problems,” onpage 46
Reverting a Patch Update InstallationYou can revert a patch update installation.
Prerequisites
You can only revert to an earlier version of the same point release. For example, you cannot revert a 2.0implementation to a 1.0.x version.
Procedure
1 Log into the console for theVMware Integrated OpenStack management server.
Chapter 2 Managing Your VMware Integrated OpenStack Deployment
VMware, Inc. 45
2 Run the uninistall command.
viopatch uninstall --patch vio-patch-[version number] --version [build number]
The reversion process takes 5 to 10 minutes to complete.
3 After uninstalling the patch, restart the vSphere Web Client service on the vCenter Server to downgradethe VMware Integrated OpenStack plugin.
Troubleshooting Update Patch Installation ProblemsThis section describe some common errors you might encounter while installing the update patch.
Troubleshoot Update Patch Installation FailureThe patch installation fails.
Problem
After adding and applying the update patch, the installation fails.
Cause
The VMware Integrated OpenStack deployment must be running or not yet deployed.
Solution
1 Ensure that the VMware Integrated OpenStack service is either running or not yet deployed.
2 If the service is running, ensure that all the OpenStack management VMs (database, load balancer, andso on) are also running.
Troubleshoot Update Patch Installation ErrorsYou get an error when using the vSphere Web Client to add patch.
Problem
Patch installation fails with a fatal error message in vSphere Web Client.
Cause
The type of update requires using the CLI to add and install the patch
Solution
u Add and install the patch using the CLI method described in “Install Patch Using CLI Commands,” onpage 45.
Customize the Dashboard Logos and BackgroundBy default, the VMware Integrated OpenStack dashboard log-in page displays the VMware corporate logoand a blank background. All pages in the VMware Integrated OpenStack dashboard display the VMwarecorporate logo in the upper left hand corner. You can customize your deployment configuration to displayyour company's logos or other branding instead of these default graphics.
n The default dimension for the logo graphic is 216 pixels long by 35 pixels wide. You can use a graphicwith different dimensions, but the display might be impacted.
n The background graphic appears in the center of the log-in page.
VMware Integrated OpenStack Administrator Guide
46 VMware, Inc.
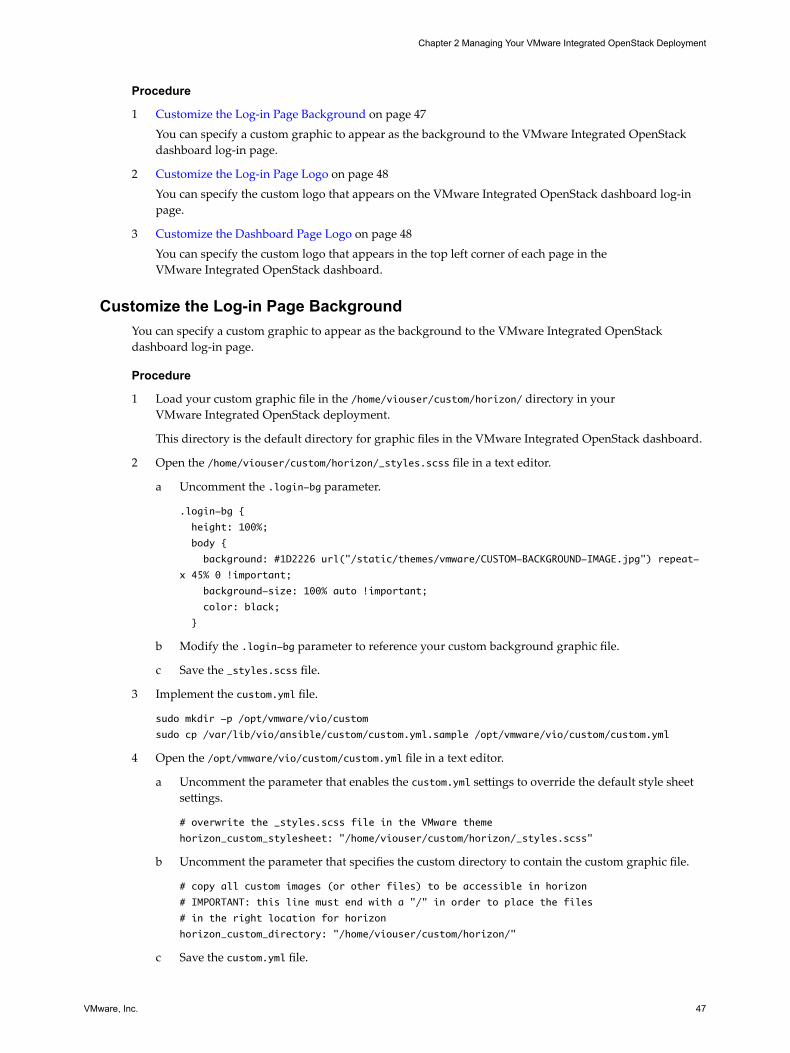
Procedure
1 Customize the Log-in Page Background on page 47You can specify a custom graphic to appear as the background to the VMware Integrated OpenStackdashboard log-in page.
2 Customize the Log-in Page Logo on page 48You can specify the custom logo that appears on the VMware Integrated OpenStack dashboard log-inpage.
3 Customize the Dashboard Page Logo on page 48You can specify the custom logo that appears in the top left corner of each page in theVMware Integrated OpenStack dashboard.
Customize the Log-in Page BackgroundYou can specify a custom graphic to appear as the background to the VMware Integrated OpenStackdashboard log-in page.
Procedure
1 Load your custom graphic file in the /home/viouser/custom/horizon/ directory in yourVMware Integrated OpenStack deployment.
This directory is the default directory for graphic files in the VMware Integrated OpenStack dashboard.
2 Open the /home/viouser/custom/horizon/_styles.scss file in a text editor.
a Uncomment the .login-bg parameter.
.login-bg {
height: 100%;
body {
background: #1D2226 url("/static/themes/vmware/CUSTOM-BACKGROUND-IMAGE.jpg") repeat-
x 45% 0 !important;
background-size: 100% auto !important;
color: black;
}
b Modify the .login-bg parameter to reference your custom background graphic file.
c Save the _styles.scss file.
3 Implement the custom.yml file.
sudo mkdir -p /opt/vmware/vio/custom
sudo cp /var/lib/vio/ansible/custom/custom.yml.sample /opt/vmware/vio/custom/custom.yml
4 Open the /opt/vmware/vio/custom/custom.yml file in a text editor.
a Uncomment the parameter that enables the custom.yml settings to override the default style sheetsettings.
# overwrite the _styles.scss file in the VMware theme
horizon_custom_stylesheet: "/home/viouser/custom/horizon/_styles.scss"
b Uncomment the parameter that specifies the custom directory to contain the custom graphic file.
# copy all custom images (or other files) to be accessible in horizon
# IMPORTANT: this line must end with a "/" in order to place the files
# in the right location for horizon
horizon_custom_directory: "/home/viouser/custom/horizon/"
c Save the custom.yml file.
Chapter 2 Managing Your VMware Integrated OpenStack Deployment
VMware, Inc. 47

Your custom background image appears on the dashboard log-in page the next time you start a session.
Customize the Log-in Page LogoYou can specify the custom logo that appears on the VMware Integrated OpenStack dashboard log-in page.
Procedure
1 Load your custom graphic file to the /home/viouser/custom/horizon/ directory in yourVMware Integrated OpenStack deployment.
This directory is the default directory for graphic files in the VMware Integrated OpenStack dashboard.
2 Modify the /home/viouser/custom/horizon/_styles.scss file in a text editor.
a Uncomment the .login parameter.
.login {
background-image: url(/static/themes/vmware/CUSTOM_LOGIN_PAGE_LOGO.png);
color: white;
background-color: black;
}
b Modify the .login parameter to reference your custom graphic file.
c Save the _styles.scss file.
3 Implement the custom.yml file.
sudo mkdir -p /opt/vmware/vio/custom
sudo cp /var/lib/vio/ansible/custom/custom.yml.sample /opt/vmware/vio/custom/custom.yml
4 Open the /opt/vmware/vio/custom/custom.yml file in a text editor.
a Uncomment the parameter that enables the custom.yml settings to override the default style sheetsettings.
# overwrite the _styles.scss file in the VMware theme
horizon_custom_stylesheet: "/home/viouser/custom/horizon/_styles.scss"
b Uncomment the parameter that specifies the custom directory to contain the custom graphic file.
# copy all custom images (or other files) to be accessible in horizon
# IMPORTANT: this line must end with a "/" in order to place the files
# in the right location for horizon
horizon_custom_directory: "/home/viouser/custom/horizon/"
c Save the custom.yml file.
Your custom logo appears on the dashboard log-in page the next time you start a session.
Customize the Dashboard Page LogoYou can specify the custom logo that appears in the top left corner of each page in theVMware Integrated OpenStack dashboard.
Procedure
1 Load your custom graphic file to the /home/viouser/custom/horizon/ directory in yourVMware Integrated OpenStack deployment.
This directory is the default directory for graphic files in the VMware Integrated OpenStack dashboard.
VMware Integrated OpenStack Administrator Guide
48 VMware, Inc.

2 Modify the /home/viouser/custom/horizon/_styles.scss file in a text editor.
a Uncomment the .topbar parameter.
.topbar {
h1.brand a {
background-image: url(/static/themes/vmware/CUSTOM_PAGE_LOGO.png);
}
}
b Modify the .topbar parameter to reference your custom graphic file.
c Save the _styles.scss file.
3 Implement the custom.yml file.
sudo mkdir -p /opt/vmware/vio/custom
sudo cp /var/lib/vio/ansible/custom/custom.yml.sample /opt/vmware/vio/custom/custom.yml
4 Open the /opt/vmware/vio/custom/custom.yml file in a text editor.
a Uncomment the parameter that enables the custom.yml settings to override the default style sheetsettings.
# overwrite the _styles.scss file in the VMware theme
horizon_custom_stylesheet: "/home/viouser/custom/horizon/_styles.scss"
b Uncomment the parameter that specifies the custom directory to contain the custom graphic file.
# copy all custom images (or other files) to be accessible in horizon
# IMPORTANT: this line must end with a "/" in order to place the files
# in the right location for horizon
horizon_custom_directory: "/home/viouser/custom/horizon/"
c Save the custom.yml file.
Your custom logo appears in the top left corner of each dashboard page the next time you start a session.
Migrating Volumes Between DatastoresYou can safely migrate Cinder volumes between datastores. This enables you to replace datastores, increaseresources and capacity, and preserve volumes without taking them offline. The process for migratingvolumes depends on several factors. For example, the process is very straightforward if the volume is notattached to an instance. If a volume is attached to an instance, you must migrate the instance.
Note You cannot migrate any volume that has snapshots attached. You must first detach the snapshots.
Migrate All Volumes from a Specified DatastoreYou can quickly evacuate all volumes from a specified datastore, automatically migrating them to otherdatastores in the same datastore cluster.
Prerequisites
n Verify that the specified datastore is part of a datastore cluster.
n Verify that Storage DRS is enabled in Not Automation (Manual Mode) for the datastore cluster.
n Verify that the volume does not have any snapshots attached. If so, you must detach them first.
Procedure
1 Using SSH, log in to the VMware Integrated OpenStack manager.
Chapter 2 Managing Your VMware Integrated OpenStack Deployment
VMware, Inc. 49
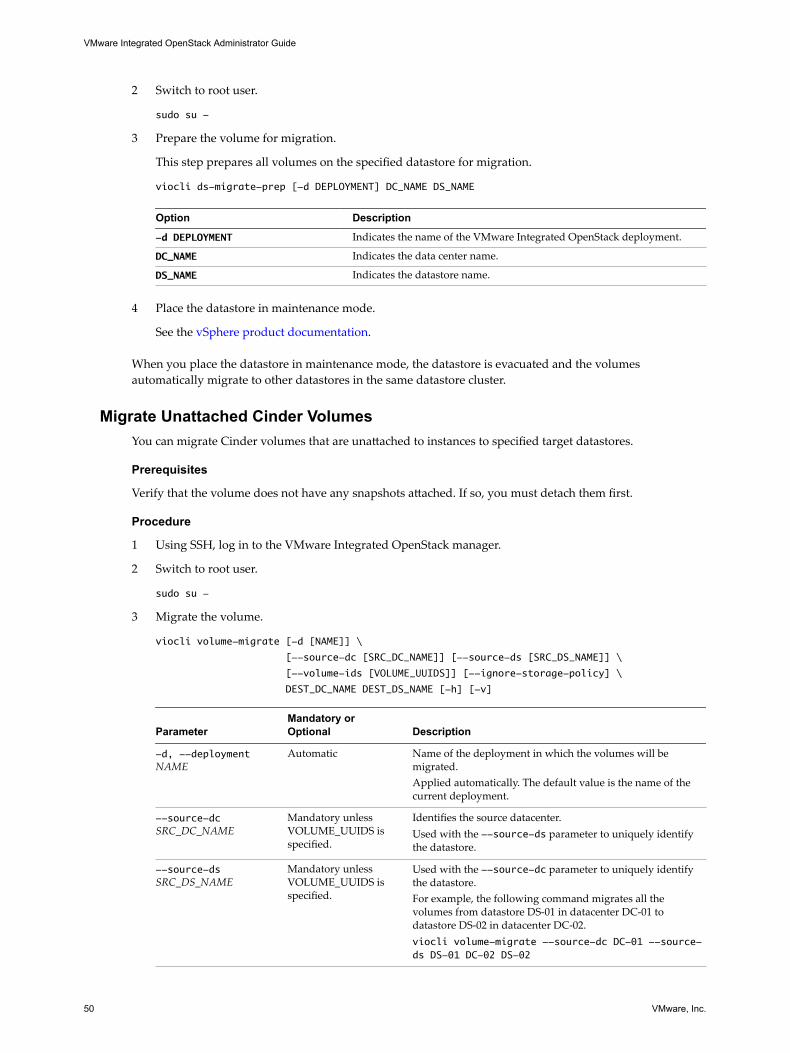
2 Switch to root user.
sudo su -
3 Prepare the volume for migration.
This step prepares all volumes on the specified datastore for migration.
viocli ds-migrate-prep [-d DEPLOYMENT] DC_NAME DS_NAME
Option Description
-d DEPLOYMENT Indicates the name of the VMware Integrated OpenStack deployment.
DC_NAME Indicates the data center name.
DS_NAME Indicates the datastore name.
4 Place the datastore in maintenance mode.
See the vSphere product documentation.
When you place the datastore in maintenance mode, the datastore is evacuated and the volumesautomatically migrate to other datastores in the same datastore cluster.
Migrate Unattached Cinder VolumesYou can migrate Cinder volumes that are unattached to instances to specified target datastores.
Prerequisites
Verify that the volume does not have any snapshots attached. If so, you must detach them first.
Procedure
1 Using SSH, log in to the VMware Integrated OpenStack manager.
2 Switch to root user.
sudo su -
3 Migrate the volume.
viocli volume-migrate [-d [NAME]] \
[--source-dc [SRC_DC_NAME]] [--source-ds [SRC_DS_NAME]] \
[--volume-ids [VOLUME_UUIDS]] [--ignore-storage-policy] \
DEST_DC_NAME DEST_DS_NAME [-h] [-v]
ParameterMandatory orOptional Description
-d, --deploymentNAME
Automatic Name of the deployment in which the volumes will bemigrated.Applied automatically. The default value is the name of thecurrent deployment.
--source-dcSRC_DC_NAME
Mandatory unlessVOLUME_UUIDS isspecified.
Identifies the source datacenter.Used with the --source-ds parameter to uniquely identifythe datastore.
--source-dsSRC_DS_NAME
Mandatory unlessVOLUME_UUIDS isspecified.
Used with the --source-dc parameter to uniquely identifythe datastore.For example, the following command migrates all thevolumes from datastore DS-01 in datacenter DC-01 todatastore DS-02 in datacenter DC-02.viocli volume-migrate --source-dc DC-01 --source-ds DS-01 DC-02 DS-02
VMware Integrated OpenStack Administrator Guide
50 VMware, Inc.
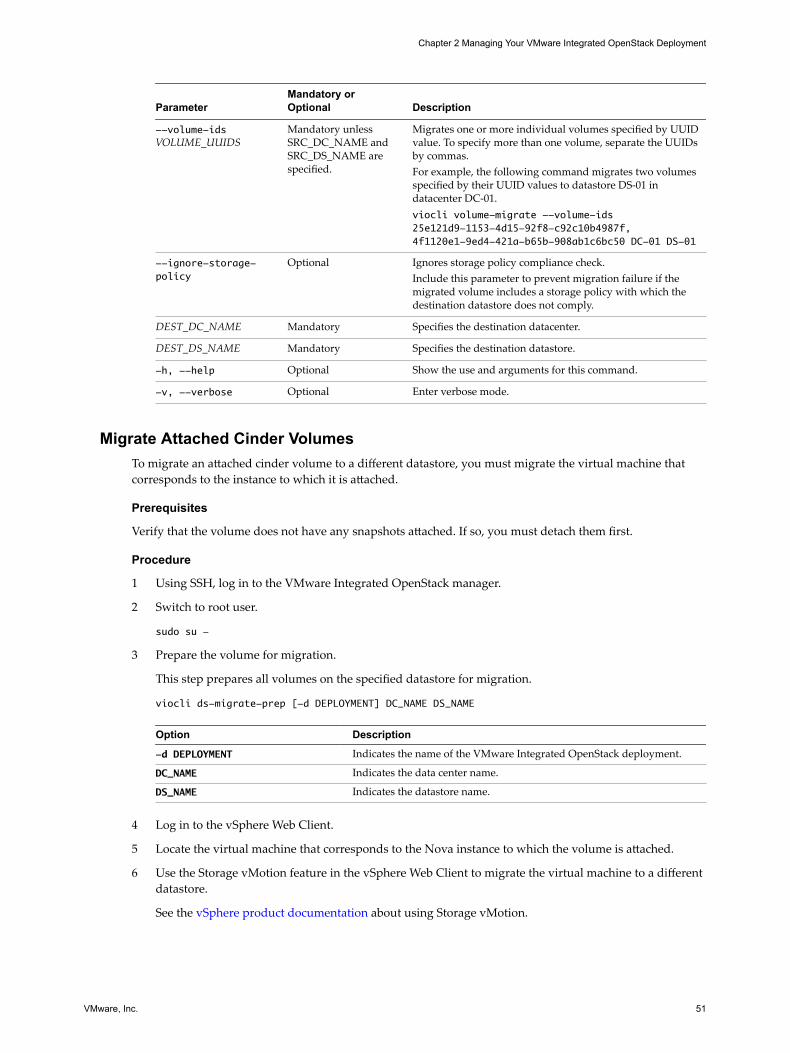
ParameterMandatory orOptional Description
--volume-idsVOLUME_UUIDS
Mandatory unlessSRC_DC_NAME andSRC_DS_NAME arespecified.
Migrates one or more individual volumes specified by UUIDvalue. To specify more than one volume, separate the UUIDsby commas.For example, the following command migrates two volumesspecified by their UUID values to datastore DS-01 indatacenter DC-01.viocli volume-migrate --volume-ids25e121d9-1153-4d15-92f8-c92c10b4987f,4f1120e1-9ed4-421a-b65b-908ab1c6bc50 DC-01 DS-01
--ignore-storage-policy
Optional Ignores storage policy compliance check.Include this parameter to prevent migration failure if themigrated volume includes a storage policy with which thedestination datastore does not comply.
DEST_DC_NAME Mandatory Specifies the destination datacenter.
DEST_DS_NAME Mandatory Specifies the destination datastore.
-h, --help Optional Show the use and arguments for this command.
-v, --verbose Optional Enter verbose mode.
Migrate Attached Cinder VolumesTo migrate an attached cinder volume to a different datastore, you must migrate the virtual machine thatcorresponds to the instance to which it is attached.
Prerequisites
Verify that the volume does not have any snapshots attached. If so, you must detach them first.
Procedure
1 Using SSH, log in to the VMware Integrated OpenStack manager.
2 Switch to root user.
sudo su -
3 Prepare the volume for migration.
This step prepares all volumes on the specified datastore for migration.
viocli ds-migrate-prep [-d DEPLOYMENT] DC_NAME DS_NAME
Option Description
-d DEPLOYMENT Indicates the name of the VMware Integrated OpenStack deployment.
DC_NAME Indicates the data center name.
DS_NAME Indicates the datastore name.
4 Log in to the vSphere Web Client.
5 Locate the virtual machine that corresponds to the Nova instance to which the volume is attached.
6 Use the Storage vMotion feature in the vSphere Web Client to migrate the virtual machine to a differentdatastore.
See the vSphere product documentation about using Storage vMotion.
Chapter 2 Managing Your VMware Integrated OpenStack Deployment
VMware, Inc. 51

VMware Integrated OpenStack Administrator Guide
52 VMware, Inc.

Managing OpenStack Projects andUsers 3
In VMware Integrated OpenStack, cloud administrators manage permissions through user, group, andproject definitions. Projects in OpenStack equate to tenants in vCloud Suite. You can assign users and usergroups to more than one project.
Before you can create a user, you must create at least one project to which you can assign the user.
This chapter includes the following topics:
n “Create an OpenStack Project,” on page 53
n “Modify a Project,” on page 54
n “Working with Security Groups,” on page 55
n “Create a Cloud User Account in OpenStack,” on page 57
n “Modify a User Account,” on page 58
Create an OpenStack ProjectProjects are the equivalent of tenants or accounts. They function as organizational units in the cloud towhich you can assign users.
Prerequisites
Verify that you are logged in to the VMware Integrated OpenStack dashboard as a cloud administrator.
Procedure
1 Select the admin project from the drop-down menu in the title bar.
2 Select Admin > Identity Panel > Projects.
3 Click Create Project.
4 Click the Project Info tab and configure the project settings.
Setting Description
Name Project name.
Description Optional description of the new project.
Enabled New projects are enabled by default. Disabling a project prevents cloud users from accessing theproject, prevents users from managing launching instances for the project, and can prevent usersfrom logging in if they are assigned only to that project.
5 (Optional) Add members to the project by selecting existing cloud users on the Project Members tab.
VMware, Inc. 53
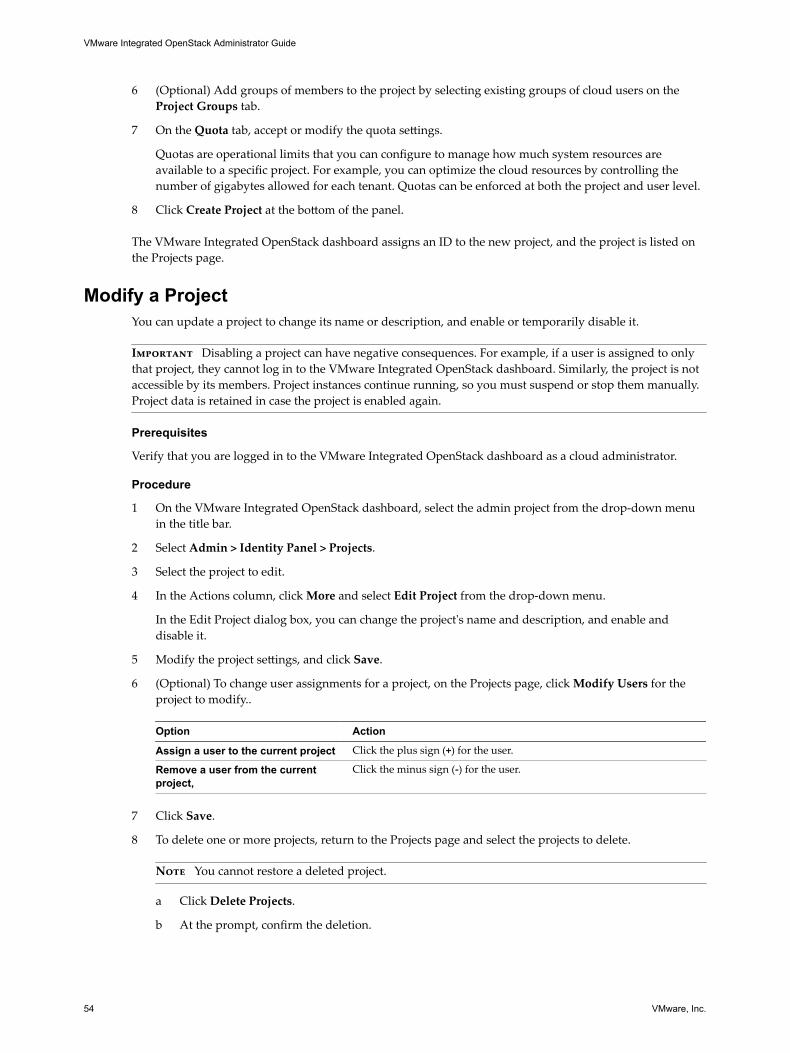
6 (Optional) Add groups of members to the project by selecting existing groups of cloud users on theProject Groups tab.
7 On the Quota tab, accept or modify the quota settings.
Quotas are operational limits that you can configure to manage how much system resources areavailable to a specific project. For example, you can optimize the cloud resources by controlling thenumber of gigabytes allowed for each tenant. Quotas can be enforced at both the project and user level.
8 Click Create Project at the bottom of the panel.
The VMware Integrated OpenStack dashboard assigns an ID to the new project, and the project is listed onthe Projects page.
Modify a ProjectYou can update a project to change its name or description, and enable or temporarily disable it.
Important Disabling a project can have negative consequences. For example, if a user is assigned to onlythat project, they cannot log in to the VMware Integrated OpenStack dashboard. Similarly, the project is notaccessible by its members. Project instances continue running, so you must suspend or stop them manually.Project data is retained in case the project is enabled again.
Prerequisites
Verify that you are logged in to the VMware Integrated OpenStack dashboard as a cloud administrator.
Procedure
1 On the VMware Integrated OpenStack dashboard, select the admin project from the drop-down menuin the title bar.
2 Select Admin > Identity Panel > Projects.
3 Select the project to edit.
4 In the Actions column, click More and select Edit Project from the drop-down menu.
In the Edit Project dialog box, you can change the project's name and description, and enable anddisable it.
5 Modify the project settings, and click Save.
6 (Optional) To change user assignments for a project, on the Projects page, click Modify Users for theproject to modify..
Option Action
Assign a user to the current project Click the plus sign (+) for the user.
Remove a user from the currentproject,
Click the minus sign (-) for the user.
7 Click Save.
8 To delete one or more projects, return to the Projects page and select the projects to delete.
Note You cannot restore a deleted project.
a Click Delete Projects.
b At the prompt, confirm the deletion.
VMware Integrated OpenStack Administrator Guide
54 VMware, Inc.

Working with Security GroupsA security group is a set of IP filter rules that define networking access and that you can apply to allinstances in a project. Group rules are project-specific. Project members can edit the default rules for theirgroup and add new rule sets.
You can use security groups to apply IP rules by creating a new security group with the desired rules or bymodifying the rules set in the default security group.
About the Default Security GroupEach project in VMware Integrated OpenStack has a default security group that is applied to an instanceunless another security group is defined and specified. Unless it is modified, the default security groupdenies all incoming traffic to your instance and permits only outgoing traffic. A common example is to editthe default security group to permit SSH access and ICMP access, so that users can log in to and pinginstances.
Create a Security GroupSecurity groups are sets of IP filter rules that define networking access and are applied to all instanceswithin a project. You can either modify the rules in the default security group or create a security group withcustom rules.
To modify an existing rule for a security group, see “Modify the Rules for an Existing Security Group,” onpage 56
Procedure
1 Log in to the VMware Integrated OpenStack dashboard as a cloud administrator.
2 Select the project from the drop-down menu in the title bar.
3 Select Project > Compute > Access & Security.
4 Click the Security Groups tab.
5 Click Create Security Group.
6 Enter a name and description for the new group, and click Create Security Group.
The new group appears in the list on the Security Group tab.
7 Configure the rules for the new group.
a Select the new security group and click Manage Rules.
b Click Add Rule.
c From the Rule drop-down menu, select the rule to add.
The subsequent fields might change depending on the rule you select.
d If applicable, specify Ingress or Egress from the Direction drop-down menu.
e After you complete the rule definition, click Add.
8 Configure additional rules if necessary.
9 Click the Access & Security tab to return to the main page.
Chapter 3 Managing OpenStack Projects and Users
VMware, Inc. 55
Modify the Rules for an Existing Security GroupYou can modify a security group by adding and removing rules assigned to that group. Rules define whichtraffic is allowed to instances that are assigned to the security group.
Procedure
1 Log in to the VMware Integrated OpenStack dashboard as a cloud administrator.
2 Select the project from the drop-down menu in the title bar.
3 Select Project > Compute > Access & Security.
4 Click the Security Groups tab.
5 Select the security group to modify and click Manage Rules.
6 To remove a rule, select the rule and click Delete Rule.
7 To add a rule, click Add Rule and select the custom rule to add from the Rule drop-down menu.
Option Description
Custom TCP Rule Used to exchange data between systems and for end-user communication.
Custom UDP Rule Used to exchange data between systems, for example, at the applicationlevel.
Custom ICMP Rule Used by network devices, such as routers, to send error or monitoringmessages.
Other Protocol You can manually configure a rule if the rule protocol is not included inthe list.
a From the Remote drop-down list, select CIDR or Security Group.
b If applicable, select Ingress or Egress from the Direction drop-down menu.
For TCP and UDP rules, you can open either a single port or a range of ports. Depending on yourselection, different fields appear below the Open Port list.
c Select the kind of access to allow.
Option Description
CIDR (Classless Inter-DomainRouting)
Limits access only to IP addresses within the specified block.
Security Group Allows any instance in the specified security group to access any othergroup instance.You can choose between IPv4 or IPv6 in the Ether Type list.
8 Click Add.
The new rule appears on the Manage Security Group Rules page for the security group.
Enabling SSH and ICMP AccessYou can modify the default security group to enable SSH and ICMP access to instances. The rules in thedefault security group apply to all instances in the currently selected project.
Procedure
1 Log in to the VMware Integrated OpenStack dashboard as a cloud administrator.
2 Select the project from the drop-down menu in the title bar.
VMware Integrated OpenStack Administrator Guide
56 VMware, Inc.
3 Select Project > Compute > Access & Security.
4 Click the Security Groups tab, select the default security group, and click Manage Rules.
5 Click Add Rule and configure the rules to allow SSH access.
Control Value
Rule SSH
Remote CIDR
CIDR 0.0.0.0/0 To accept requests from a particular range of IP addresses, specify the IP address block in the CIDR textbox.
Instances will now have SSH port 22 open for requests from any IP address.
6 Click Add.
7 From the Manage Security Group Rules page, click Add Rule and configure the rules to allow ICMPaccess.
Control Value
Rule All ICMP
Direction Ingress
Remote CIDR
CIDR 0.0.0.0/0
8 Click Add.
Instances will now accept all incoming ICMP packets.
Create a Cloud User Account in OpenStackCloud users have a limited set of rights and privileges relative to cloud administrators. Cloud users arelimited to the tenants to which they are assigned. Tenants are called projects in OpenStack. Cloud users cancreate and manage instances, create and manage volumes, create networks, and create new images, amongother tasks.
Prerequisites
n Verify that you are logged in to the VMware Integrated OpenStack dashboard as a cloud administrator.
n Verify that a configured OpenStack project is available. See “Create an OpenStack Project,” on page 53.
Procedure
1 On the VMware Integrated OpenStack dashboard, select the admin project from the drop-down menuin the title bar.
2 Select Admin > Identity Panel > Users.
3 Click Create User.
4 Configure the user settings.
Option Description
User Name Cloud user name.
Email Valid email address for the new user.
Password/Confirm Password Preliminary password for the new user.
Chapter 3 Managing OpenStack Projects and Users
VMware, Inc. 57

Option Description
Primary Project Project to which the user is assigned. You cannot create a user accountwithout assigning it to at least one project.
Role Role to which the user is assigned. A role is a set of rights and privileges. Auser assigned that role inherits those rights and privileges.
5 Click Create User at the bottom of the panel.
The VMware Integrated OpenStack dashboard assigns an ID to the user, and the user now appears on theUsers page.
Modify a User AccountAs a cloud administer, you can enable, disable, and delete user accounts.
Prerequisites
Verify that your logged in to the VMware Integrated OpenStack dashboard as a cloud administrator.
Procedure
1 In the VMware Integrated OpenStack dashboard, select the admin project from the drop-down menu inthe title bar.
2 Select Admin > Identity Panel > Users.
Option Action
Enable or disable a user account. a Select the user account to edit.b In the Actions column, click More and select Enable User or Disable
User from the drop-down list.
Delete one or more user accounts. a Select the user accounts to delete.b Click Delete Users.c At the prompt, confirm the deletion.
VMware Integrated OpenStack Administrator Guide
58 VMware, Inc.
Working with Instances in OpenStack 4Instances are virtual machines that run in the cloud.
As a cloud administrative user, you can manage instances for users in various projects. You can view,terminate, edit, perform a soft or hard reboot, create a snapshot from, and migrate instances. You can alsoview the logs for instances or start a VNC console for an instance.
For information about how to use the dashboard to start instances as an end user, see the VMware IntegratedOpenStack User's Guide.
This chapter includes the following topics:
n “Create a Snapshot from an Instance,” on page 59
n “Control the State of an Instance,” on page 60
n “Track Instance Use,” on page 60
n “Use DRS to Control OpenStack Instance Placement,” on page 60
n “Using Affinity and Anti-Affinity to Place OpenStack Instances,” on page 64
n “Apply QoS Resource Allocation to Existing Instances,” on page 66
n “Configuring Single Root I/O Virtualization for Instances,” on page 66
n “Define Default Nova Storage for OpenStack Instances,” on page 69
Create a Snapshot from an InstanceWith snapshots, you can create new images from running instances.
You can create a snapshot of an instance directly from the Instances page.
Procedure
1 Log in to the VMware Integrated OpenStack dashboard as a cloud administrator.
2 Select the admin project from the drop-down menu in the title bar.
3 Select Admin > System Panel > Instances.
4 In the Actions column, click Create Snapshot.
The snapshot appears on the Images & Snapshots page.
VMware, Inc. 59
Control the State of an InstanceAs a cloud administrative user, you can pause, unpause, suspend, resume, soft or hard reboot, or terminatean instance.
Procedure
1 Log in to the VMware Integrated OpenStack dashboard as a cloud administrator.
2 Select the admin project from the drop-down menu in the title bar.
3 Select Admin > System Panel > Instances.
4 Select the instance whose state you want to manage.
5 In the Actions column, click More and select the state from the drop-down menu.
Items that appear in red text are disabled.
Track Instance UseYou can track the use of instances for each project. You can track costs per month by showing metrics likethe number of VCPUs, disks, RAM, and uptime of all of your instances.
Procedure
1 Log in to the VMware Integrated OpenStack dashboard as a cloud administrator.
2 Select the admin project from the drop-down menu in the title bar.
3 Select Admin > System Panel > Overview.
The Overview page shows the usage summary and project-specific usage information. You can specifya period of time for the usage information. Optionally, you can download a CSV summary.
4 (Optional) Specify a period of time for reporting and click Submit.
5 (Optional) Click Download CSV Summary to download a report of the usage.
Use DRS to Control OpenStack Instance PlacementAs a cloud administrator, you can use vSphere DRS settings to control how specific OpenStack instances areplaced on hosts in the Compute cluster . In addition to the DRS configuration, you also modify the metadataof source images in OpenStack to ensure that instances generated from those images are correctly identifiedfor placement.
Prerequisites
n Verify that you are running VMware Integrated OpenStack version 2.0.x or later.
n Verify that VMware Integrated OpenStack is running in vSphere. Go to Home > VMware IntegratedOpenStack > OpenStack Deployments > [Deployment Name].
n At least one dummy VM in the Compute cluster to use as a template to create a DRS VM group.
Procedure
1 Define VM and Host Groups for Placing OpenStack Instances on page 61In the vSphere Web Client, create VM and host groups to contain and manage specific OpenStackinstances.
VMware Integrated OpenStack Administrator Guide
60 VMware, Inc.

2 Create a DRS Rule for OpenStack Instance Placement on page 62In the vSphere Web Client, create a DRS rule to manage the distribution of OpenStack instances in aVM group to a specific host group.
3 Apply VM Group Settings to Image Metadata on page 63You can modify the metadata of a source image to automatically place instances into VM groups. VMgroups are configured in the vSphere Web Client and can be further used to apply DRS rules.
Define VM and Host Groups for Placing OpenStack InstancesIn the vSphere Web Client, create VM and host groups to contain and manage specific OpenStack instances.
Procedure
1 Log in to the vSphere Web Client.
2 Go to the vCenter Hosts and Clusters view.
3 Select the Compute cluster configured for the VMware Integrated OpenStack deployment.
4 Click the Manage tab.
5 Click Settings and click vSphere DRS.
6 Verify the following settings configuration:
n DRS is enabled.
n DRS Automation is set to Fully Automated or Partially Automated .
n Power Management is set to Off.
7 Click VM/Host Groups.
8 Create a VM group.
a Click Add.
b Enter a name for the new VM group.
c From the Type drop-down menu, select VM Group.
d Click Add.
e On the Filter tab, select the dummy VM to create an empty VM group.
You created the dummy VM in an earlier task in this sequence.
f Click OK.
9 Create a Host group.
a Click Add.
b Enter a name for the new host group.
c From the Type drop-down menu, select Host Group.
d Click Add.
e On the Filter tab, add members to the group by selecting one or more hosts.
f Click OK.
Both groups now appear in the VM/Host Groups list on the VM/Host page.
Chapter 4 Working with Instances in OpenStack
VMware, Inc. 61
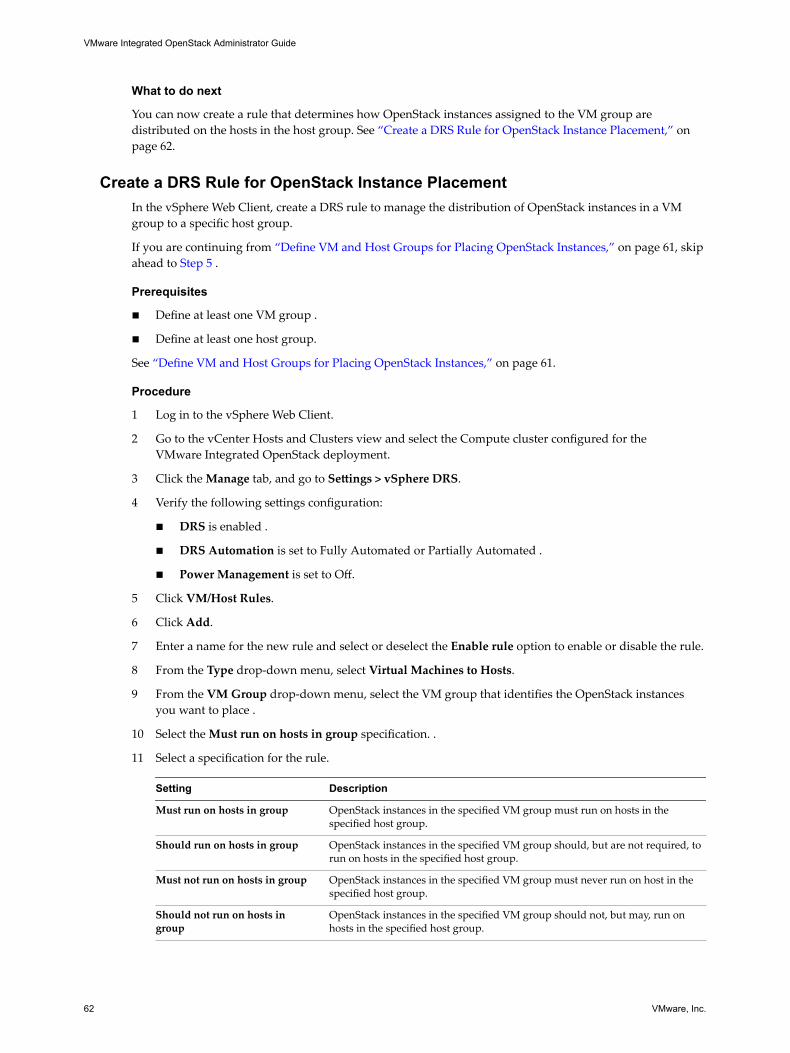
What to do next
You can now create a rule that determines how OpenStack instances assigned to the VM group aredistributed on the hosts in the host group. See “Create a DRS Rule for OpenStack Instance Placement,” onpage 62.
Create a DRS Rule for OpenStack Instance PlacementIn the vSphere Web Client, create a DRS rule to manage the distribution of OpenStack instances in a VMgroup to a specific host group.
If you are continuing from “Define VM and Host Groups for Placing OpenStack Instances,” on page 61, skipahead to Step 5 .
Prerequisites
n Define at least one VM group .
n Define at least one host group.
See “Define VM and Host Groups for Placing OpenStack Instances,” on page 61.
Procedure
1 Log in to the vSphere Web Client.
2 Go to the vCenter Hosts and Clusters view and select the Compute cluster configured for theVMware Integrated OpenStack deployment.
3 Click the Manage tab, and go to Settings > vSphere DRS.
4 Verify the following settings configuration:
n DRS is enabled .
n DRS Automation is set to Fully Automated or Partially Automated .
n Power Management is set to Off.
5 Click VM/Host Rules.
6 Click Add.
7 Enter a name for the new rule and select or deselect the Enable rule option to enable or disable the rule.
8 From the Type drop-down menu, select Virtual Machines to Hosts.
9 From the VM Group drop-down menu, select the VM group that identifies the OpenStack instancesyou want to place .
10 Select the Must run on hosts in group specification. .
11 Select a specification for the rule.
Setting Description
Must run on hosts in group OpenStack instances in the specified VM group must run on hosts in thespecified host group.
Should run on hosts in group OpenStack instances in the specified VM group should, but are not required, torun on hosts in the specified host group.
Must not run on hosts in group OpenStack instances in the specified VM group must never run on host in thespecified host group.
Should not run on hosts ingroup
OpenStack instances in the specified VM group should not, but may, run onhosts in the specified host group.
VMware Integrated OpenStack Administrator Guide
62 VMware, Inc.
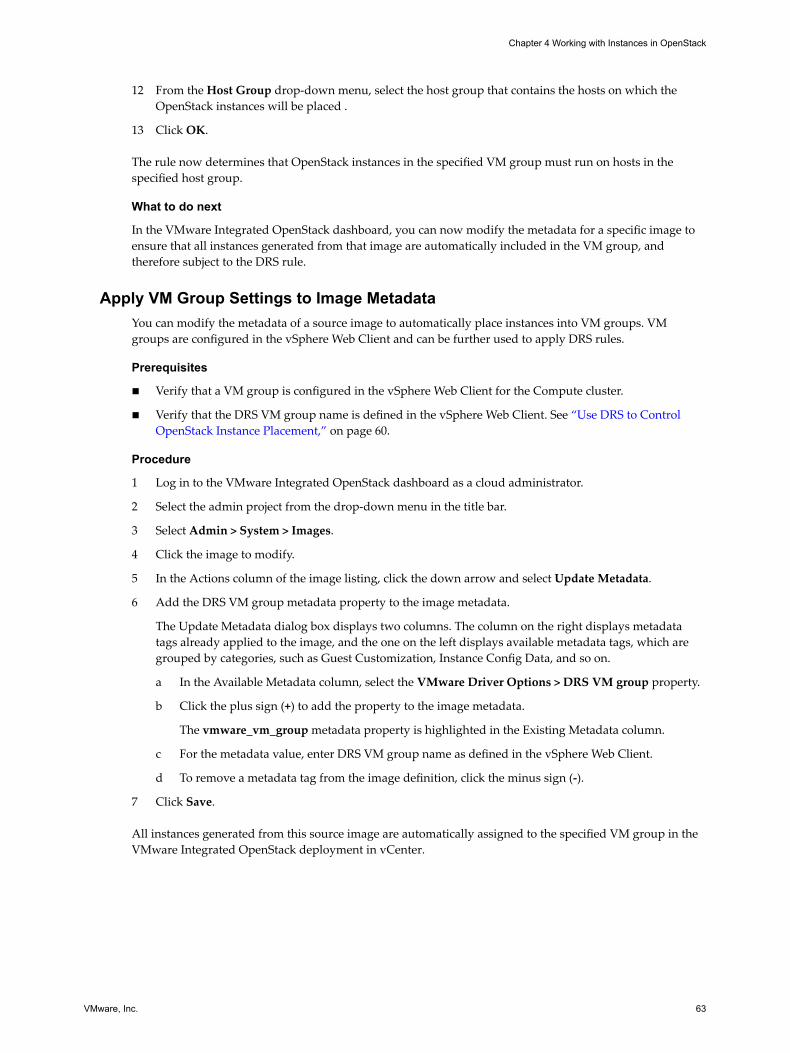
12 From the Host Group drop-down menu, select the host group that contains the hosts on which theOpenStack instances will be placed .
13 Click OK.
The rule now determines that OpenStack instances in the specified VM group must run on hosts in thespecified host group.
What to do next
In the VMware Integrated OpenStack dashboard, you can now modify the metadata for a specific image toensure that all instances generated from that image are automatically included in the VM group, andtherefore subject to the DRS rule.
Apply VM Group Settings to Image MetadataYou can modify the metadata of a source image to automatically place instances into VM groups. VMgroups are configured in the vSphere Web Client and can be further used to apply DRS rules.
Prerequisites
n Verify that a VM group is configured in the vSphere Web Client for the Compute cluster.
n Verify that the DRS VM group name is defined in the vSphere Web Client. See “Use DRS to ControlOpenStack Instance Placement,” on page 60.
Procedure
1 Log in to the VMware Integrated OpenStack dashboard as a cloud administrator.
2 Select the admin project from the drop-down menu in the title bar.
3 Select Admin > System > Images.
4 Click the image to modify.
5 In the Actions column of the image listing, click the down arrow and select Update Metadata.
6 Add the DRS VM group metadata property to the image metadata.
The Update Metadata dialog box displays two columns. The column on the right displays metadatatags already applied to the image, and the one on the left displays available metadata tags, which aregrouped by categories, such as Guest Customization, Instance Config Data, and so on.
a In the Available Metadata column, select the VMware Driver Options > DRS VM group property.
b Click the plus sign (+) to add the property to the image metadata.
The vmware_vm_group metadata property is highlighted in the Existing Metadata column.
c For the metadata value, enter DRS VM group name as defined in the vSphere Web Client.
d To remove a metadata tag from the image definition, click the minus sign (-).
7 Click Save.
All instances generated from this source image are automatically assigned to the specified VM group in theVMware Integrated OpenStack deployment in vCenter.
Chapter 4 Working with Instances in OpenStack
VMware, Inc. 63
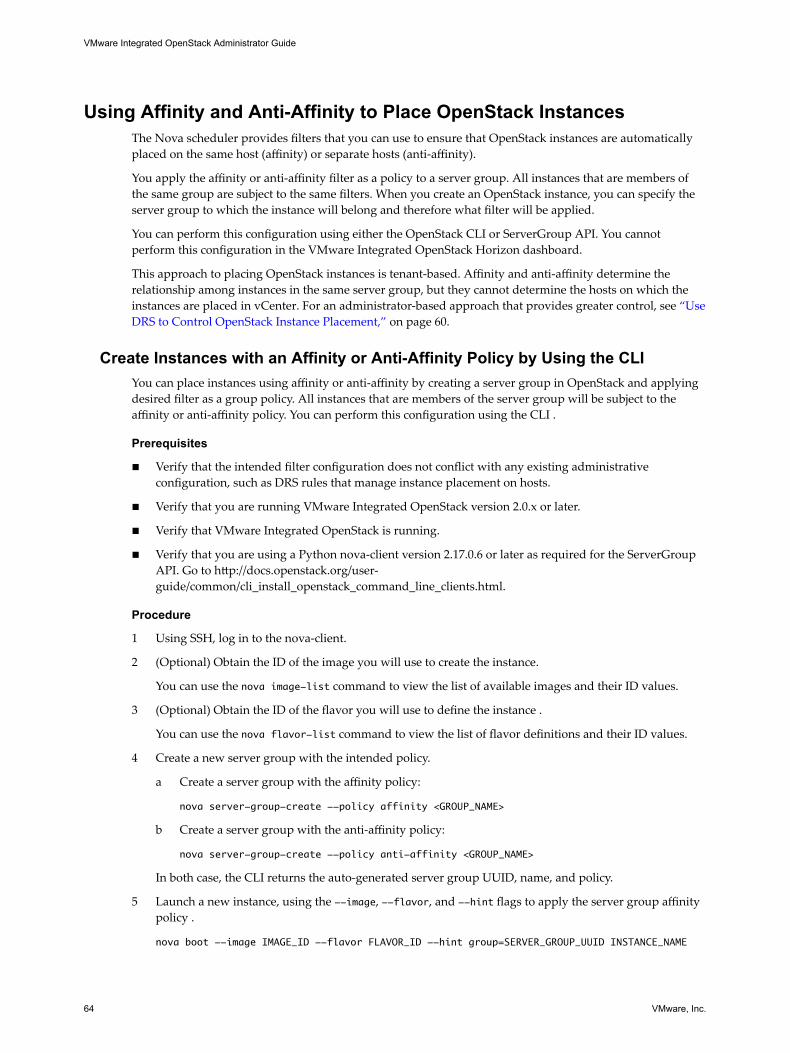
Using Affinity and Anti-Affinity to Place OpenStack InstancesThe Nova scheduler provides filters that you can use to ensure that OpenStack instances are automaticallyplaced on the same host (affinity) or separate hosts (anti-affinity).
You apply the affinity or anti-affinity filter as a policy to a server group. All instances that are members ofthe same group are subject to the same filters. When you create an OpenStack instance, you can specify theserver group to which the instance will belong and therefore what filter will be applied.
You can perform this configuration using either the OpenStack CLI or ServerGroup API. You cannotperform this configuration in the VMware Integrated OpenStack Horizon dashboard.
This approach to placing OpenStack instances is tenant-based. Affinity and anti-affinity determine therelationship among instances in the same server group, but they cannot determine the hosts on which theinstances are placed in vCenter. For an administrator-based approach that provides greater control, see “UseDRS to Control OpenStack Instance Placement,” on page 60.
Create Instances with an Affinity or Anti-Affinity Policy by Using the CLIYou can place instances using affinity or anti-affinity by creating a server group in OpenStack and applyingdesired filter as a group policy. All instances that are members of the server group will be subject to theaffinity or anti-affinity policy. You can perform this configuration using the CLI .
Prerequisites
n Verify that the intended filter configuration does not conflict with any existing administrativeconfiguration, such as DRS rules that manage instance placement on hosts.
n Verify that you are running VMware Integrated OpenStack version 2.0.x or later.
n Verify that VMware Integrated OpenStack is running.
n Verify that you are using a Python nova-client version 2.17.0.6 or later as required for the ServerGroupAPI. Go to http://docs.openstack.org/user-guide/common/cli_install_openstack_command_line_clients.html.
Procedure
1 Using SSH, log in to the nova-client.
2 (Optional) Obtain the ID of the image you will use to create the instance.
You can use the nova image-list command to view the list of available images and their ID values.
3 (Optional) Obtain the ID of the flavor you will use to define the instance .
You can use the nova flavor-list command to view the list of flavor definitions and their ID values.
4 Create a new server group with the intended policy.
a Create a server group with the affinity policy:
nova server-group-create --policy affinity <GROUP_NAME>
b Create a server group with the anti-affinity policy:
nova server-group-create --policy anti-affinity <GROUP_NAME>
In both case, the CLI returns the auto-generated server group UUID, name, and policy.
5 Launch a new instance, using the --image, --flavor, and --hint flags to apply the server group affinitypolicy .
nova boot --image IMAGE_ID --flavor FLAVOR_ID --hint group=SERVER_GROUP_UUID INSTANCE_NAME
VMware Integrated OpenStack Administrator Guide
64 VMware, Inc.
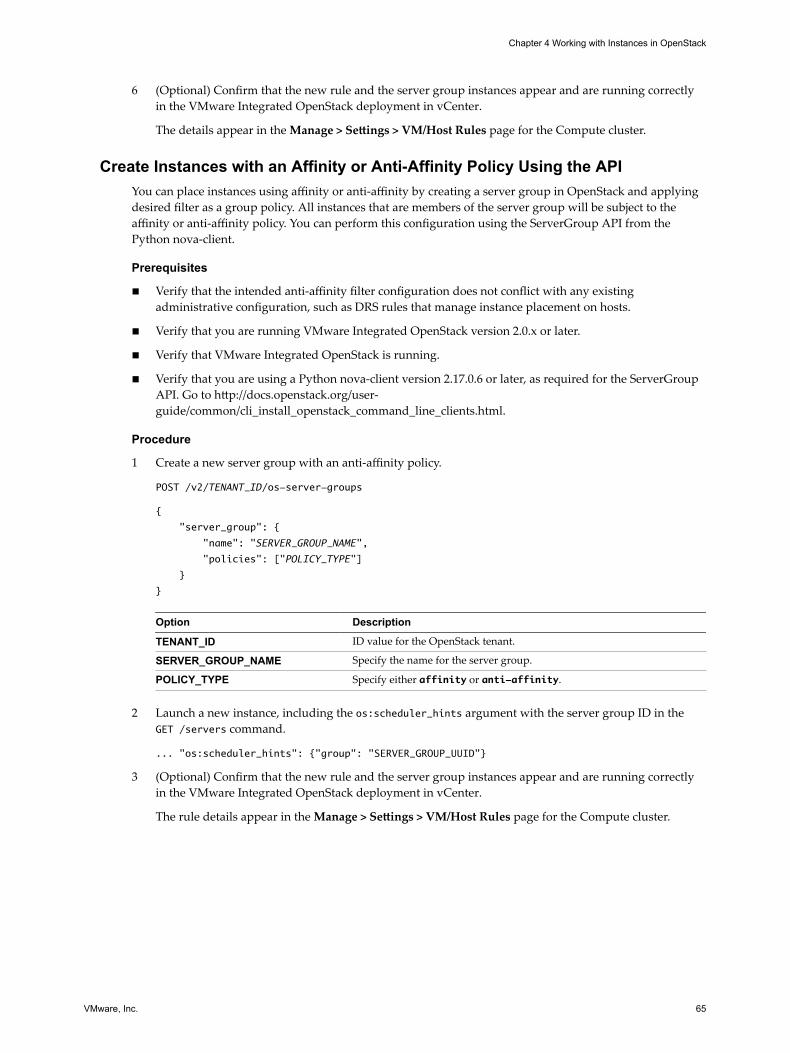
6 (Optional) Confirm that the new rule and the server group instances appear and are running correctlyin the VMware Integrated OpenStack deployment in vCenter.
The details appear in the Manage > Settings > VM/Host Rules page for the Compute cluster.
Create Instances with an Affinity or Anti-Affinity Policy Using the APIYou can place instances using affinity or anti-affinity by creating a server group in OpenStack and applyingdesired filter as a group policy. All instances that are members of the server group will be subject to theaffinity or anti-affinity policy. You can perform this configuration using the ServerGroup API from thePython nova-client.
Prerequisites
n Verify that the intended anti-affinity filter configuration does not conflict with any existingadministrative configuration, such as DRS rules that manage instance placement on hosts.
n Verify that you are running VMware Integrated OpenStack version 2.0.x or later.
n Verify that VMware Integrated OpenStack is running.
n Verify that you are using a Python nova-client version 2.17.0.6 or later, as required for the ServerGroupAPI. Go to http://docs.openstack.org/user-guide/common/cli_install_openstack_command_line_clients.html.
Procedure
1 Create a new server group with an anti-affinity policy.
POST /v2/TENANT_ID/os-server-groups
{
"server_group": {
"name": "SERVER_GROUP_NAME",
"policies": ["POLICY_TYPE"]
}
}
Option Description
TENANT_ID ID value for the OpenStack tenant.
SERVER_GROUP_NAME Specify the name for the server group.
POLICY_TYPE Specify either affinity or anti-affinity.
2 Launch a new instance, including the os:scheduler_hints argument with the server group ID in theGET /servers command.
... "os:scheduler_hints": {"group": "SERVER_GROUP_UUID"}
3 (Optional) Confirm that the new rule and the server group instances appear and are running correctlyin the VMware Integrated OpenStack deployment in vCenter.
The rule details appear in the Manage > Settings > VM/Host Rules page for the Compute cluster.
Chapter 4 Working with Instances in OpenStack
VMware, Inc. 65

Apply QoS Resource Allocation to Existing InstancesYou can apply QoS resource allocation settings to an existing instance by resizing the instance in theVMware Integrated OpenStack dashboard.
Prerequisites
n Requires an OpenStack flavor with the desired QoS resource allocation settings. See “Configure QoSResource Allocation for Instances Using Flavor Metadata,” on page 89.
n Requires VMware Integrated OpenStack version 2.0.x or greater.
n Verify that VMware Integrated OpenStack is running in vSphere.
n Verify that you are logged in to the VMware Integrated OpenStack dashboard as a cloud administrator.
Procedure
1 Log in to the VMware Integrated OpenStack dashboard as a cloud administrator.
2 Select the admin project from the drop-down menu in the title bar.
3 Select Admin > System > Instances.
4 Click the hyperlinked name of the instance to access the Instance Details page.
5 Click the down arrow (next to the Create Snapshot button) and choose Resize Instance.
6 In the Flavor Choice tab, open the New Flavor drop-down list and select the flavor with the desiredQoS resource allocations
7 Click Resize.
The resizing process may take a few minutes.
The instance is now subject to the QoS settings as defined in the flavor metadata.
Configuring Single Root I/O Virtualization for InstancesYou can create instances that use the Single Root I/O Virtualization (SR-IOV) specification by modifying themetadata parameters of the flavor and image used to create the instance. SR-IOV is a specification thatallows a single Peripheral Component Interconnect Express (PCIe) physical device under a single root portto appear as multiple separate physical devices.
For more information about SR-IOV requirements and supported features, see the vSphere Web Client vSphere Web Clientdocumentation.
The following table describes the key components of SR-IOV and their role.
Table 4‑1. SR-IOV Components in the VMware Integrated OpenStack context
Component Role
Nova Compute n Collects the list of SR-IOV devices and updates the listof PCI device specifications.
n Embeds the host object ID in device specifications.
Nova PCI manager n Creates and maintains a device pool with address,vendor ID, product ID, and host ID.
n Allocates and deallocates PCI devices to instancesbased on PCI requests.
VMware Integrated OpenStack Administrator Guide
66 VMware, Inc.
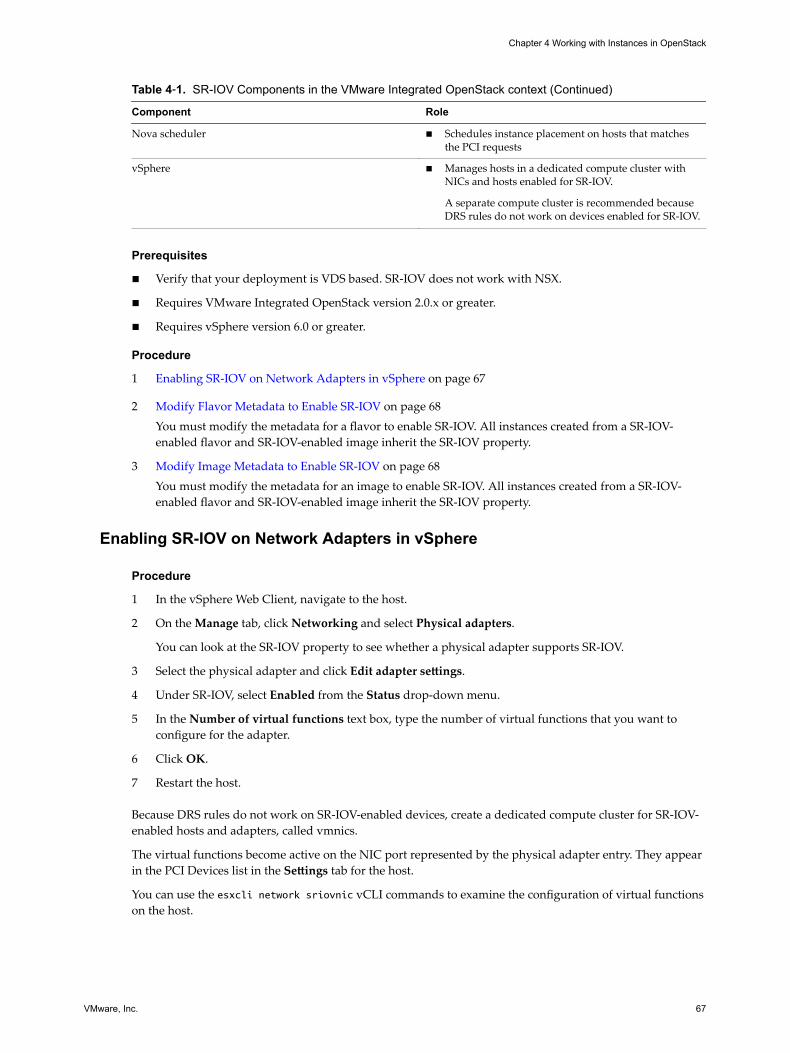
Table 4‑1. SR-IOV Components in the VMware Integrated OpenStack context (Continued)
Component Role
Nova scheduler n Schedules instance placement on hosts that matchesthe PCI requests
vSphere n Manages hosts in a dedicated compute cluster withNICs and hosts enabled for SR-IOV.
A separate compute cluster is recommended becauseDRS rules do not work on devices enabled for SR-IOV.
Prerequisites
n Verify that your deployment is VDS based. SR-IOV does not work with NSX.
n Requires VMware Integrated OpenStack version 2.0.x or greater.
n Requires vSphere version 6.0 or greater.
Procedure
1 Enabling SR-IOV on Network Adapters in vSphere on page 67
2 Modify Flavor Metadata to Enable SR-IOV on page 68You must modify the metadata for a flavor to enable SR-IOV. All instances created from a SR-IOV-enabled flavor and SR-IOV-enabled image inherit the SR-IOV property.
3 Modify Image Metadata to Enable SR-IOV on page 68You must modify the metadata for an image to enable SR-IOV. All instances created from a SR-IOV-enabled flavor and SR-IOV-enabled image inherit the SR-IOV property.
Enabling SR-IOV on Network Adapters in vSphere
Procedure
1 In the vSphere Web Client, navigate to the host.
2 On the Manage tab, click Networking and select Physical adapters.
You can look at the SR-IOV property to see whether a physical adapter supports SR-IOV.
3 Select the physical adapter and click Edit adapter settings.
4 Under SR-IOV, select Enabled from the Status drop-down menu.
5 In the Number of virtual functions text box, type the number of virtual functions that you want toconfigure for the adapter.
6 Click OK.
7 Restart the host.
Because DRS rules do not work on SR-IOV-enabled devices, create a dedicated compute cluster for SR-IOV-enabled hosts and adapters, called vmnics.
The virtual functions become active on the NIC port represented by the physical adapter entry. They appearin the PCI Devices list in the Settings tab for the host.
You can use the esxcli network sriovnic vCLI commands to examine the configuration of virtual functionson the host.
Chapter 4 Working with Instances in OpenStack
VMware, Inc. 67
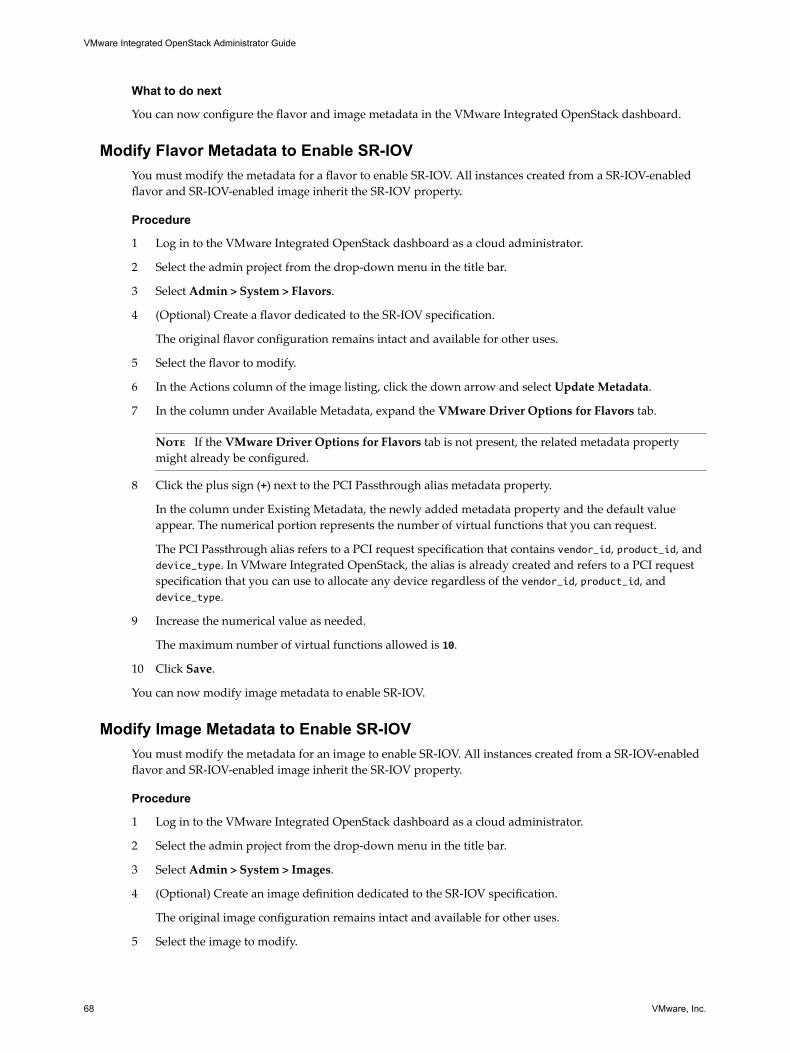
What to do next
You can now configure the flavor and image metadata in the VMware Integrated OpenStack dashboard.
Modify Flavor Metadata to Enable SR-IOVYou must modify the metadata for a flavor to enable SR-IOV. All instances created from a SR-IOV-enabledflavor and SR-IOV-enabled image inherit the SR-IOV property.
Procedure
1 Log in to the VMware Integrated OpenStack dashboard as a cloud administrator.
2 Select the admin project from the drop-down menu in the title bar.
3 Select Admin > System > Flavors.
4 (Optional) Create a flavor dedicated to the SR-IOV specification.
The original flavor configuration remains intact and available for other uses.
5 Select the flavor to modify.
6 In the Actions column of the image listing, click the down arrow and select Update Metadata.
7 In the column under Available Metadata, expand the VMware Driver Options for Flavors tab.
Note If the VMware Driver Options for Flavors tab is not present, the related metadata propertymight already be configured.
8 Click the plus sign (+) next to the PCI Passthrough alias metadata property.
In the column under Existing Metadata, the newly added metadata property and the default valueappear. The numerical portion represents the number of virtual functions that you can request.
The PCI Passthrough alias refers to a PCI request specification that contains vendor_id, product_id, anddevice_type. In VMware Integrated OpenStack, the alias is already created and refers to a PCI requestspecification that you can use to allocate any device regardless of the vendor_id, product_id, anddevice_type.
9 Increase the numerical value as needed.
The maximum number of virtual functions allowed is 10.
10 Click Save.
You can now modify image metadata to enable SR-IOV.
Modify Image Metadata to Enable SR-IOVYou must modify the metadata for an image to enable SR-IOV. All instances created from a SR-IOV-enabledflavor and SR-IOV-enabled image inherit the SR-IOV property.
Procedure
1 Log in to the VMware Integrated OpenStack dashboard as a cloud administrator.
2 Select the admin project from the drop-down menu in the title bar.
3 Select Admin > System > Images.
4 (Optional) Create an image definition dedicated to the SR-IOV specification.
The original image configuration remains intact and available for other uses.
5 Select the image to modify.
VMware Integrated OpenStack Administrator Guide
68 VMware, Inc.

6 In the Actions column of the image listing, click the down arrow and select Update Metadata.
7 In the column under Available Metadata, expand the VMware Driver Options tab.
Note If the VMware Driver Options tab is not present, the related metadata property might alreadybe configured.
8 Click the plus sign (+) next to the Virtual Network Interface metadata property.
In the column under Existing Metadata, the newly added metadata property appears as hw_vif_model.
9 From the drop-down list, select VirtualSriovEthernetCard.
10 Click Save.
Define Default Nova Storage for OpenStack InstancesTo ensure that OpenStack instances booted from a volume use the correct volume type, you can create andapply policy-based management settings, which are called PBM policies.
After you enable the storage policy in the custom.yml file, you apply the policy by modifying the metadataof an OpenStack flavor. All instances created by using that flavor inherit the storage policy configuration.
Procedure
1 Implement the custom.yml file.
sudo mkdir -p /opt/vmware/vio/custom
sudo cp /var/lib/vio/ansible/custom/custom.yml.sample /opt/vmware/vio/custom/custom.yml
2 Edit the /opt/vmware/vio/custom/custom.yml file by uncommenting the PBM options.
##############################
# PBM options
##############################
# (string) The PBM default policy to use when no policy is associated with a flavor
(Mandatory) if nova_pbm_enabled is set to True.
nova_pbm_default_policy: nova
# (boolean) The PBM status. Set this to True to enable storage policies for nova flavors.
nova_pbm_enabled: False
3 Set the nova_pbm_enabled parameter to True.
nova_pbm_enabled: True
4 Save the custom.yml file.
5 Apply the policy to an OpenStack flavor as metadata.
a Log in to the VMware Integrated OpenStack dashboard as a cloud administrator.
b Select the admin project from the drop-down menu in the title bar.
c Select Admin > System > Flavors.
d (Optional) Create a flavor specific to the intended use of this metadata property.
Create a custom flavor to contain the specific configuration. This action leaves the original flavorconfiguration intact and available for other instance creation.
e Select the flavor to modify.
f In the Actions column of the image listing, click the down arrow and select Update Metadata.
Chapter 4 Working with Instances in OpenStack
VMware, Inc. 69

g Enter vmware:storage_policy in the Custom field.
h Click the plus sign (+) next to the Custom field.
In the column under Existing Metadata, the newly added metadata property appears.
i Enter nova as the metadata property value.
6 Click Save.
The default Nova storage policy is applied to all future OpenStack instances that are created from this flavor.
VMware Integrated OpenStack Administrator Guide
70 VMware, Inc.

Working with Volumes and VolumeTypes in OpenStack 5
Volumes are block storage devices that you attach to instances to enable persistent storage.
As a cloud administrative user, you can manage volumes and volume types for users in various projects.You can create and delete volume types, and you can view and delete volumes.
Cloud users can attach a volume to a running instance or detach a volume and attach it to another instanceat any time. For information about how to use the dashboard to create and manage volumes as an end user,see the VMware Integrated OpenStack User Guide.
This chapter includes the following topics:
n “Create a Volume Type,” on page 71
n “Delete a Volume Type,” on page 72
Create a Volume TypeIf you have cloud administrative permissions, you can manage block storage volumes and volume types forusers. After you create a volume type, you use a CLI command to associate it with an existing vCenterstorage-based policy. The storage policy defines one or more datastores for the volume type to use.
Prerequisites
n Verify that the storage policy to be associated with the volume type exists. See the vSphere productdocumentation.
n Verify the name of the storage policy. This value is required when you run the CLI command toassociate the volume type with the storage policy.
Procedure
1 Log in to the VMware Integrated OpenStack dashboard.
2 Select the project from the drop-down menu in the title bar.
3 Select Admin > System Panel > Volumes.
The Volumes page lists the volumes that are configured and available to the current user.
4 Click Create Volume Type.
5 Enter a name for the volume type, and click Create Volume Type again.
VMware, Inc. 71
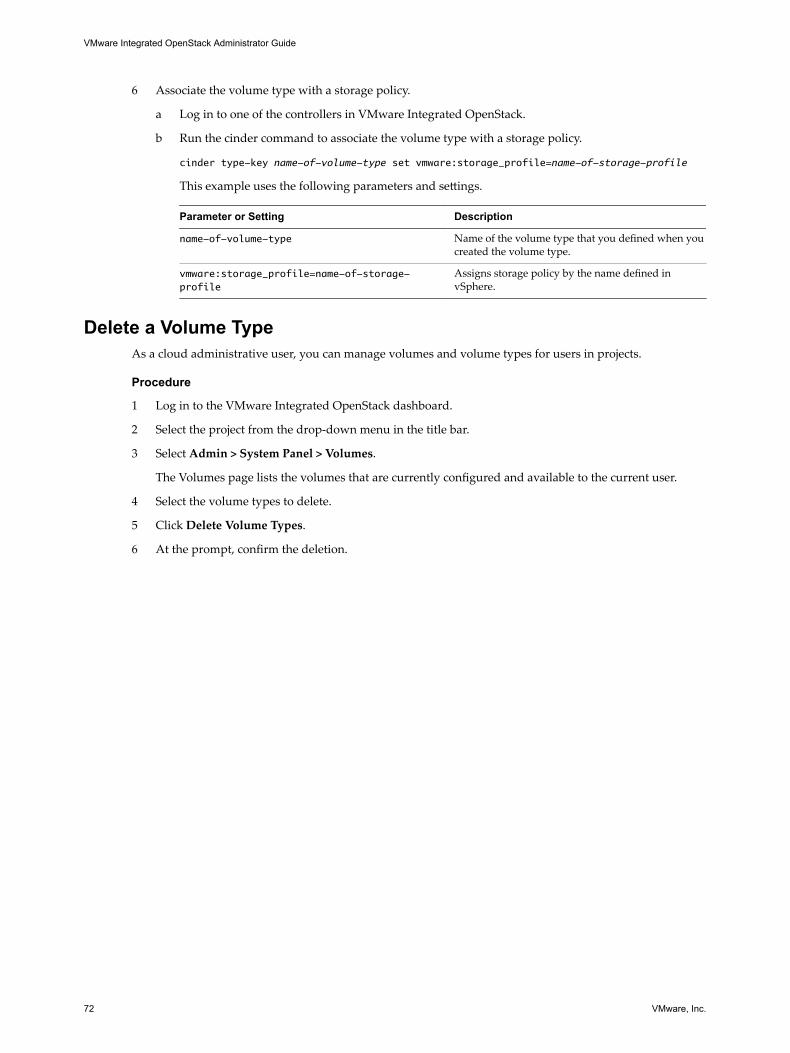
6 Associate the volume type with a storage policy.
a Log in to one of the controllers in VMware Integrated OpenStack.
b Run the cinder command to associate the volume type with a storage policy.
cinder type-key name-of-volume-type set vmware:storage_profile=name-of-storage-profile
This example uses the following parameters and settings.
Parameter or Setting Description
name-of-volume-type Name of the volume type that you defined when youcreated the volume type.
vmware:storage_profile=name-of-storage-profile
Assigns storage policy by the name defined invSphere.
Delete a Volume TypeAs a cloud administrative user, you can manage volumes and volume types for users in projects.
Procedure
1 Log in to the VMware Integrated OpenStack dashboard.
2 Select the project from the drop-down menu in the title bar.
3 Select Admin > System Panel > Volumes.
The Volumes page lists the volumes that are currently configured and available to the current user.
4 Select the volume types to delete.
5 Click Delete Volume Types.
6 At the prompt, confirm the deletion.
VMware Integrated OpenStack Administrator Guide
72 VMware, Inc.

Managing Images for the ImageService 6
In the OpenStack context, an image is a file that contains a virtual disk from which you can install anoperating system on a VM. You create an instance in your OpenStack cloud by using one of the imagesavailable. The VMware Integrated OpenStack Image Service component natively supports images that arepackaged in the ISO, OVA, and VMDK formats.
If you have existing images in vSphere that you want to use in OpenStack, you can export them in one of thesupported formats and upload them to the Image Service. If you obtain an image that is in an unsupportedformat, you can convert it as part of the import process. Unsupported formats are RAW, QCOW2, VDI, andVHD.
This chapter includes the following topics:
n “Import Images to the Image Service,” on page 73
n “Modify Image Settings,” on page 77
n “Modify Image Resource Metadata,” on page 78
n “Configuring Images for Windows Guest Customization,” on page 78
n “Configure QoS Resource Allocation for Instances Using Image Metadata,” on page 80
n “Delete an Existing Image,” on page 82
n “Migrating Images,” on page 82
n “Add a VM Template as an Image,” on page 84
n “Modify the Default Behavior for Nova Snapshots,” on page 85
n “Modify the Default Cinder Upload-to-Image Behavior,” on page 86
Import Images to the Image ServiceYou can use CLI commands or the VMware Integrated OpenStack dashboard to import images.
Prerequisites
To be successfully imported, verify that the image is in one of the natively supported image formats (ISO,OVA, VMDK) or in a format that can be converted during the import process (RAW, QCOW2, VDI, VHD).
Procedure
1 Import Images Using the Horizon Dashboard on page 74You can import images directly in the VMware Integrated OpenStack Horizon dashboard.
VMware, Inc. 73

2 Import Images in Supported Formats Using the CLI on page 75You can make images available for use in instances by importing images to the Image Servicedatastore .
3 Import Images in Unsupported Formats by Using the CLI on page 76You can import images in unsupported image formats such as RAW, QCOW2, VDI, or VHD using theglance-import tool in the CLI. This tool automatically converts the source image to the VMDK format.
Import Images Using the Horizon DashboardYou can import images directly in the VMware Integrated OpenStack Horizon dashboard.
Prerequisites
n Verify that the image is packaged in the ISO, VMDK, OVA, RAW, QCOW2, VDI, or VHD format.
n If the source image format is RAW, QCOW2, VDI, or VHD, verify that the source image is hosted on aserver without credentials to allow plain HTTP requests.
Procedure
1 Log in to the VMware Integrated OpenStack dashboard as a cloud administrator.
2 Select the admin project from the drop-down menu in the title bar.
3 Select Admin > System Panel > Images.
4 On the Images page, click Create Image.
5 Configure the image.
Option Action
Name Enter a name for the new image.
Description (Optional) Enter a description for the new image.
Image Source Select the image source.If the source image format is RAW, QCOW2, VDI, or VHD, you must selectthe Image Location option.
Disk Format Select the disk format.
Disk Type Select the disk type.Images in the RAW, QCOW2, VDI, and VHD formats are automaticallyintrospected to capture their properties and converted to the VMDKformat during the import process.
Adapter Type Select the adapter type.
Architecture Accept the default.
OS Type Select the type of operating system.
Minimum Disk (GB) Specify the minimum disk size for the image in GB.
Minimum RAM (GB) Specify the minimum RAM for the image.
Public Select to make the image visible and available to all tenants.
Protected Select to prevent the image from being deleted.
6 Click Create Image.
The Images page now includes the newly added image.
The image is now ready for deployment in OpenStack instances.
VMware Integrated OpenStack Administrator Guide
74 VMware, Inc.
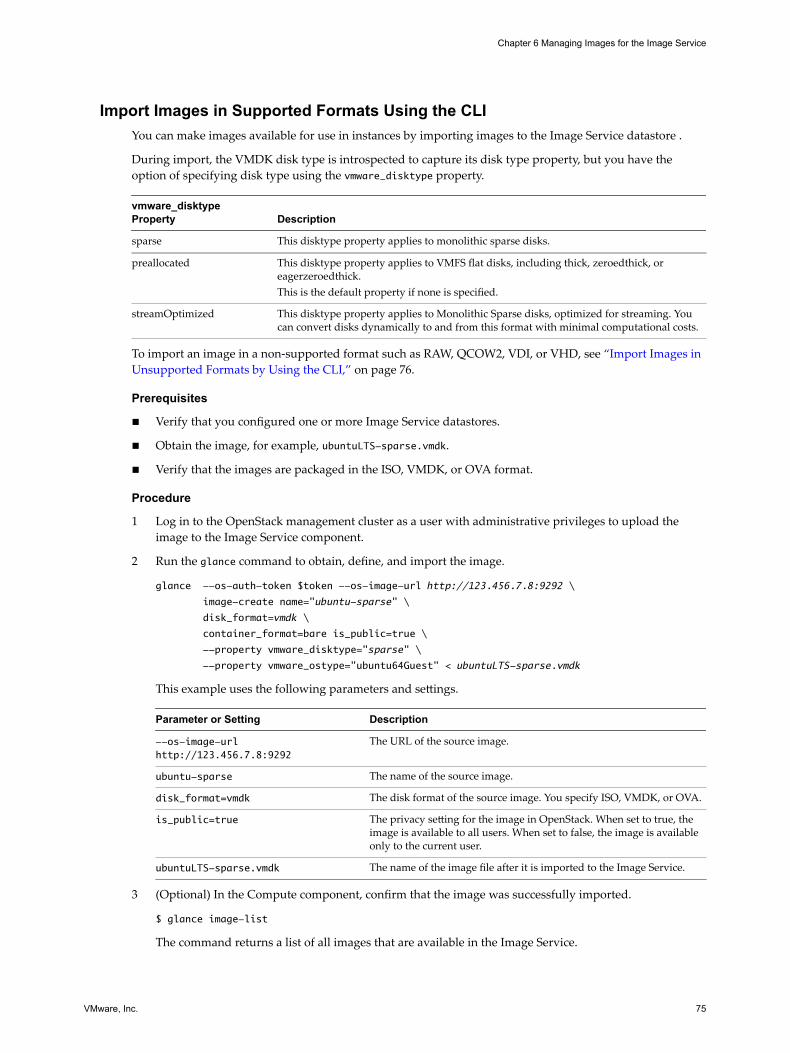
Import Images in Supported Formats Using the CLIYou can make images available for use in instances by importing images to the Image Service datastore .
During import, the VMDK disk type is introspected to capture its disk type property, but you have theoption of specifying disk type using the vmware_disktype property.
vmware_disktypeProperty Description
sparse This disktype property applies to monolithic sparse disks.
preallocated This disktype property applies to VMFS flat disks, including thick, zeroedthick, oreagerzeroedthick.This is the default property if none is specified.
streamOptimized This disktype property applies to Monolithic Sparse disks, optimized for streaming. Youcan convert disks dynamically to and from this format with minimal computational costs.
To import an image in a non-supported format such as RAW, QCOW2, VDI, or VHD, see “Import Images inUnsupported Formats by Using the CLI,” on page 76.
Prerequisites
n Verify that you configured one or more Image Service datastores.
n Obtain the image, for example, ubuntuLTS-sparse.vmdk.
n Verify that the images are packaged in the ISO, VMDK, or OVA format.
Procedure
1 Log in to the OpenStack management cluster as a user with administrative privileges to upload theimage to the Image Service component.
2 Run the glance command to obtain, define, and import the image.
glance --os-auth-token $token --os-image-url http://123.456.7.8:9292 \
image-create name="ubuntu-sparse" \
disk_format=vmdk \
container_format=bare is_public=true \
--property vmware_disktype="sparse" \
--property vmware_ostype="ubuntu64Guest" < ubuntuLTS-sparse.vmdk
This example uses the following parameters and settings.
Parameter or Setting Description
--os-image-urlhttp://123.456.7.8:9292
The URL of the source image.
ubuntu-sparse The name of the source image.
disk_format=vmdk The disk format of the source image. You specify ISO, VMDK, or OVA.
is_public=true The privacy setting for the image in OpenStack. When set to true, theimage is available to all users. When set to false, the image is availableonly to the current user.
ubuntuLTS-sparse.vmdk The name of the image file after it is imported to the Image Service.
3 (Optional) In the Compute component, confirm that the image was successfully imported.
$ glance image-list
The command returns a list of all images that are available in the Image Service.
Chapter 6 Managing Images for the Image Service
VMware, Inc. 75

Import Images in Unsupported Formats by Using the CLIYou can import images in unsupported image formats such as RAW, QCOW2, VDI, or VHD using theglance-import tool in the CLI. This tool automatically converts the source image to the VMDK format.
You can also use the glance-import tool to import images in the supported OVA and VMDK formats.
Prerequisites
n Verify that the image is packaged in the RAW, QCOW2, VDI, or VHD format.
n To allow plain HTTP requests, verify that the image is hosted on a server without credentials.
n Verify that the VMware Integrated OpenStack controller can access the hosted server where the imageis stored.
Procedure
1 Using SSH, log in to the VMware Integrated OpenStack manager.
2 From the VMware Integrated OpenStack manager, use SSH to log in to the controller01 node.
3 Switch to root user.
sudo su -
4 Execute the cloudadmin.rc file.
source cloudadmin.rc
5 Configure the controller01 node to use the internal VIP.
export OS_AUTH_URL=http://INTERNAL_VIP:35357/v2.0
6 To import the image, run the glance-import command.
glance-import image_name image_format image_http_url
Parameter Description
image-name Specify the name for the image as it will appear in the Image Service.
image_format Specify the format of the source image file. Non-VMDK images areconverted automatically to the VMDK format.The following formats are supported:n VMDKn OVAn RAWn QCOW2n VDIn VHD
image_http-url Provide the HTTP location of the source image file. For example:
glance-import cirros-img qcow2
https://launchpad.net/cirros/trunk/0.3.0/+download/cirros-0.3.0-x86_64-disk.img
The CLI displays the task information and status, including the task ID and image ID.
Created import task with id 5cdc4a04-5c68-4b91-ac44-37da07ec82ec
Waiting for Task 5cdc4a04-5c68-4b91-ac44-37da07ec82ec to finish.
Current Status.. SUCCESS
Image cirros-img created with ID: 2120de75-0717-4d61-b5d9-2e3f16e79edc
VMware Integrated OpenStack Administrator Guide
76 VMware, Inc.

7 (Optional) Confirm the import task completed successfully.
If the image is large and requires a lot of time, you can exit the utility safely without affecting theoperation and check the task status later.
Note You must know the task ID to be able to check the status.
glance --os-image-api-version 2 task-show <task_id>
For example:
glance --os-image-api-version 2 task-show 5cdc4a04-5c68-4b91-ac44-37da07ec82ec
+------------+---------------------------------------------------------------------------+
| Property | Value |
+------------+---------------------------------------------------------------------------+
| created_at | 2015-10-15T21:20:59Z |
| expires_at | 2015-10-17T21:21:14Z |
| id | 5cdc4a04-5c68-4b91-ac44-37da07ec82ec |
| input | {"image_properties": {"container_format": "bare", "name": "cirros-img"}, |
| | "import_from_format": "qcow2", "import_from": "https://launchpad.net/ |
| | cirros/trunk/0.3.0/+download/cirros-0.3.0-x86_64-disk.img"} |
| message | |
| owner | def459fd05d7490e9fda07dbe6ee2d76 |
| result | {"image_id": "2120de75-0717-4d61-b5d9-2e3f16e79edc"} |
| status | success |
| type | import |
| updated_at | 2015-10-15T21:21:14Z |
+------------+---------------------------------------------------------------------------+
8 (Optional) Confirm that the import process was successful.
You must know the image ID created by the glance-import command to confirm the import.
glance image-show <image_id>
The command returns details about the specified image.
9 (Optional) Confirm the image is included in the Image Service.
glance image-list
The command returns a list of all images that are available in the Image Service.
Modify Image SettingsAfter an image is loaded, you can modify the image settings, such as image name, description, and thepublic and protected settings.
Procedure
1 Log in to the VMware Integrated OpenStack dashboard as a cloud administrator.
2 Select the admin project from the drop-down menu in the title bar.
3 Select Admin > System Panel > Images.
4 Select the image to edit.
5 In the Actions column, click Edit Images.
6 Modify the settings as necessary.
7 Click Update Image.
Chapter 6 Managing Images for the Image Service
VMware, Inc. 77

The Images page redisplays with the changed information.
Modify Image Resource MetadataAfter an image is loaded, you can modify the image resource metadata settings by adding or removingmetadata tags for the image definition. Image resource metadata can help end users determine the nature ofan image, and is used by associated OpenStack components and drivers that interface with the ImageService.
You can manage metadata definitions on the Metadata Definitions page located atAdmin > System >Metadata Definitions.
Procedure
1 Log in to the VMware Integrated OpenStack dashboard as a cloud administrator.
2 Select the admin project from the drop-down menu in the title bar.
3 Select Admin > System > Images.
4 Click the image to modify.
5 In the Actions column of the image listing, click the down arrow and select Update Metadata.
6 Modify the settings as necessary.
The Update Metadata dialog has two columns. The right shows metadata tags already applied to theimage, and the left column shows available metadata tags, which are grouped by category, such asGuest Customization, Instance Config Data, and so on.
a To add a metadata tag to the image definition, click the plus sign (+).
The item moves to the Existing Metadata column and is highlighted.
b Enter the metadata value in the provided field, if applicable.
c To remove a metadata tag from the image definition, click the minus sign (-).
7 Click Save.
Configuring Images for Windows Guest CustomizationYou can configure images for Windows guest customization directly in the VMware Integrated OpenStackdashboard by applying the guest customization metadata to the Glance image used to create an instance.
The Windows guest customization feature provides an alternative to the cloudbase-init approach toenabling guest customization. If an image currently uses cloudbase-init, do not use theVMware Integrated OpenStack Windows guest customization feature.
Prerequisites
n Verify that you are logged in to the VMware Integrated OpenStack dashboard as a cloud administrator.
n Verify that you have an appropriate Windows OS image available in the Glance Image Service.
n Verify that the correct versions of the Microsoft System Preparation tools (sysprep) for each guestoperating system you want to customize are installed in vSphere. See Installing the Microsoft SysprepTool in the vSphere product documentation.
n Verify that VMware Tools is installed on the source image.
n Verify that the image disk type property correctly reflects the image disk type prior to import.
VMware Integrated OpenStack Administrator Guide
78 VMware, Inc.

This applies only to images imported into Glance in VMware Integrated OpenStack versions earlierthan 2.0. In version 2.0.x and later, image properties (such as disk type) are automatically introspectedduring the Glance import process.
Procedure
1 Log in to the VMware Integrated OpenStack dashboard as a cloud administrator.
2 Select the admin project from the drop-down menu in the title bar.
3 (Optional) Preview the Guest Customization Options metadata definition.
a Select Admin > System > Metadata Definitions.
b Click Guest Customization Options.
c Click the Contents tab.
You can only view the metadata definitions in the VMware Integrated OpenStack dashboard. Youcannot modify the metadata.
4 Select Admin > System > Images.
5 Locate the Windows image to modify.
6 In the Actions column of the image listing, click the down arrow and select Update Metadata.
7 In the column under Available Metadata, expand the Guest Customization Options tab.
Note If the Guest Customization Options tab is not present, the related metadata properties mightalready be configured.
8 Click the plus sign (+) next to the guest customization option you want to add.
Tip You can add all the options simultaneously by the clicking the plus sign (+) on the top GuestCustomization Options tab.
In the column under Existing Metadata, the newly added metadata properties appear.
Note You may need to scroll to the bottom of this column to see the newly added metadata properties.
9 Configure the metadata properties.
Metadata Property Description
Auto logon count Applies the windows_logon_count metadata property.Enter the number of times the machine can automatically logged in to asAdministrator . Typically, this value is set to 1, but you can increase thevalue if your configuration requires multiple reboots. This value might bedetermined by the list of commands executed by the GuiRunOncecommand.
Automatic logon Applies the windows_auto_logon metadata property.If selected, the VM is automatically logged in to as Administrator.
Maximum number of connections Applies the windows_max_connect metadata property.Enter the number of client licenses purchased for the Windows serverbeing installed.Note This property is applied only if the windows_license_modemetadata property, described below, is set to PerServer.
Product Key Applies the windows_product_key metadata property.Enter a valid serial number which is included in the answer file whenmini-setup runs.Note This serial number is ignored if the original guest operating systemwas installed using a volume-licensed CD.
Chapter 6 Managing Images for the Image Service
VMware, Inc. 79

Metadata Property Description
Server licensing mode Applies the windows_license_mode metadata property.Select the licensing mode that matches your source image: PerServer orPerSeat.
Windows workgroup to join Applies the windows_join_workgroup metadata property.Select the workgroup that the VM should join.
10 Click Save.
The image metadata is now configured for Windows guest customization and are applied for all future VMsthat are created from this image.
Configure QoS Resource Allocation for Instances Using ImageMetadata
You can control the QoS resource allocations, such as limits, reservations, and shares, for CPU, RAM, diskIOPS, and virtual network interface (VIF) by modifying the metadata of the source image used to create theinstance. All instances subsequently created from the image inherit the metadata settings.
QoS resource allocation for an instance can also be specified by flavor metadata. In the event of a conflict, theimage metadata configuration overrules the flavor metadata configuration. See “Configure QoS ResourceAllocation for Instances Using Flavor Metadata,” on page 89.
Prerequisites
n Requires VMware Integrated OpenStack version 2.0.x or later.
n Requires vSphere version 6.0 or later.
n Verify that VMware Integrated OpenStack is running in vSphere.
n Verify that you are logged in to the VMware Integrated OpenStack dashboard as a cloud administrator.
Procedure
1 Log in to the VMware Integrated OpenStack dashboard as a cloud administrator.
2 Select the admin project from the drop-down menu in the title bar.
3 Select Admin > System > Images.
4 Click the image to modify.
5 In the Actions column of the image listing, click the down arrow and select Update Metadata.
6 In the column under Available Metadata, expand the VMware Quota tab.
Note If the VMware Quota tab is not present, the related metadata properties might already beconfigured.
7 Click the plus sign (+) next to the VMware Quota metadata property you want to add.
Tip You can add all the options simultaneously by the clicking the plus sign (+) on the VMware Quotatab.
In the column under Existing Metadata, the newly added metadata properties appear .
VMware Integrated OpenStack Administrator Guide
80 VMware, Inc.
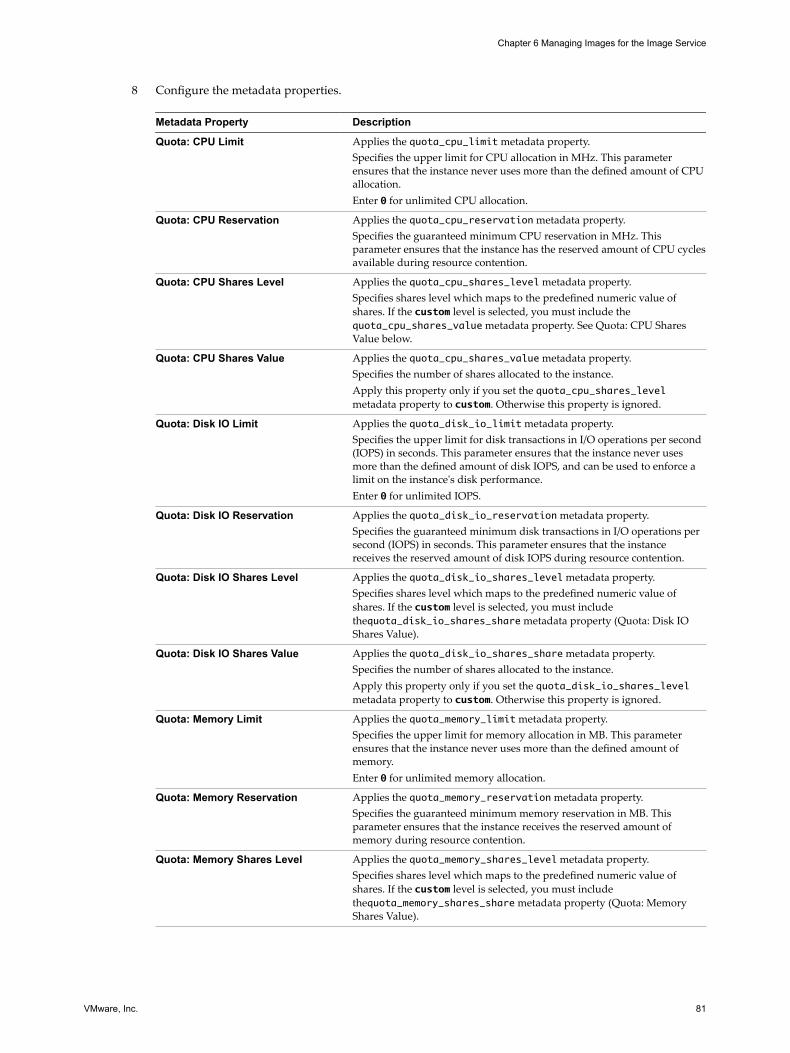
8 Configure the metadata properties.
Metadata Property Description
Quota: CPU Limit Applies the quota_cpu_limit metadata property.Specifies the upper limit for CPU allocation in MHz. This parameterensures that the instance never uses more than the defined amount of CPUallocation.Enter 0 for unlimited CPU allocation.
Quota: CPU Reservation Applies the quota_cpu_reservation metadata property.Specifies the guaranteed minimum CPU reservation in MHz. Thisparameter ensures that the instance has the reserved amount of CPU cyclesavailable during resource contention.
Quota: CPU Shares Level Applies the quota_cpu_shares_level metadata property.Specifies shares level which maps to the predefined numeric value ofshares. If the custom level is selected, you must include thequota_cpu_shares_value metadata property. See Quota: CPU SharesValue below.
Quota: CPU Shares Value Applies the quota_cpu_shares_value metadata property.Specifies the number of shares allocated to the instance.Apply this property only if you set the quota_cpu_shares_levelmetadata property to custom. Otherwise this property is ignored.
Quota: Disk IO Limit Applies the quota_disk_io_limit metadata property.Specifies the upper limit for disk transactions in I/O operations per second(IOPS) in seconds. This parameter ensures that the instance never usesmore than the defined amount of disk IOPS, and can be used to enforce alimit on the instance's disk performance.Enter 0 for unlimited IOPS.
Quota: Disk IO Reservation Applies the quota_disk_io_reservation metadata property.Specifies the guaranteed minimum disk transactions in I/O operations persecond (IOPS) in seconds. This parameter ensures that the instancereceives the reserved amount of disk IOPS during resource contention.
Quota: Disk IO Shares Level Applies the quota_disk_io_shares_level metadata property.Specifies shares level which maps to the predefined numeric value ofshares. If the custom level is selected, you must includethequota_disk_io_shares_share metadata property (Quota: Disk IOShares Value).
Quota: Disk IO Shares Value Applies the quota_disk_io_shares_share metadata property.Specifies the number of shares allocated to the instance.Apply this property only if you set the quota_disk_io_shares_levelmetadata property to custom. Otherwise this property is ignored.
Quota: Memory Limit Applies the quota_memory_limit metadata property.Specifies the upper limit for memory allocation in MB. This parameterensures that the instance never uses more than the defined amount ofmemory.Enter 0 for unlimited memory allocation.
Quota: Memory Reservation Applies the quota_memory_reservation metadata property.Specifies the guaranteed minimum memory reservation in MB. Thisparameter ensures that the instance receives the reserved amount ofmemory during resource contention.
Quota: Memory Shares Level Applies the quota_memory_shares_level metadata property.Specifies shares level which maps to the predefined numeric value ofshares. If the custom level is selected, you must includethequota_memory_shares_share metadata property (Quota: MemoryShares Value).
Chapter 6 Managing Images for the Image Service
VMware, Inc. 81

Metadata Property Description
Quota: Memory Shares Value Applies the quota_memory_shares_share metadata property.Specifies the number of shares allocated to the instance.Apply this property only if you set the quota_memory_shares_levelmetadata property to custom. Otherwise this property is ignored.
Quota: VIF Limit Applies the quota_vif_limit metadata property.Specifies the upper limit for VIF bandwidth in Mbps. This parameterensures that the VIF never uses more than the defined amount ofbandwidth.Enter 0 for unlimited bandwidth allocation.
Quota: VIF Reservation Applies the quota_vif_reservation metadata property.Specifies the guaranteed minimum bandwidth for VIF in Mbps. Thisparameter ensures that the virtual adapter on the instance gets thereserved amount of bandwidth during resource contention. If the instanceuses less than the reserved amount, the remainder is available to othervirtual adapters.
Quota: VIF Shares Level Applies the quota_vif_shares_level metadata property.Specifies shares level which maps to the predefined numeric value ofshares. If the custom level is selected, you must includethequota_vif_shares_share metadata property (Quota: VIF SharesValue).
Quota: VIF Shares Value Applies the quota_vif_shares_share metadata property.in the event that ‘custom’ is used, this is the number of shares.
9 Click Save.
The image metadata is now configured for limits, reservations, and shares for CPU, IOPS, memory, andnetwork bandwidth. This configuration is applied to all future OpenStack instances that are created fromthis image.
Delete an Existing ImageDeleting an image is permanent and cannot be reversed. You must have administrative permissions todelete an image.
Procedure
1 Log in to the VMware Integrated OpenStack dashboard as a cloud administrator.
2 Select the admin project from the drop-down menu in the title bar.
3 Select Admin > System Panel > Images.
4 Select one or more images to delete.
5 Click Delete Images.
6 Confirm the deletion at the prompt.
Migrating ImagesYou can migrate images between datastores in a way that preserves their UUID and metadata.
This process requires you to copy the images folder from the current datastore to an offline datastore andmodify the Image Service image location configuration.
VMware Integrated OpenStack Administrator Guide
82 VMware, Inc.

Procedure
1 Copy the Images Folder to the New Datastore on page 83Copy the images folder, including folder name and relative path, to the new datastore.
2 Update the Migrated Images Location Data on page 83After you copy the images folder to a new datastore, you must update the locations setting on eachimage to reflect the new datastore.
Copy the Images Folder to the New DatastoreCopy the images folder, including folder name and relative path, to the new datastore.
Prerequisites
Verify that both the current and destination datastores are available.
Procedure
1 Using SSH, log in to the ESXi host on which the current Image Service datastore is mounted.
2 Switch to root user.
sudo su -
3 Locate the images folder.
The images folder is typically called images and resides on the top level.
4 Using the cp or scp Linux command, copy the images folder to the new datastore.
Important When copying the folder to the new datastore, retain both the images folder name andrelative path.
What to do next
You must now modify the images data to reflect the new location. For details, see “Update the MigratedImages Location Data,” on page 83.
Update the Migrated Images Location DataAfter you copy the images folder to a new datastore, you must update the locations setting on each image toreflect the new datastore.
Prerequisites
n Verify that the images folder has been copied to the new datastore.
n Verify that the image folder name and relative path on the new datastore are the same as as on theprevious datastore.
n Verify that you know the image ID values of the images you want to update.
Procedure
1 Repeat this procedure for all images that you want to migrate.
2 Using SSH, log in as administrator to the VMware Integrated OpenStack manager.
3 Using SSH, log in to the controller01 node.
4 Switch to root user.
sudo su -
Chapter 6 Managing Images for the Image Service
VMware, Inc. 83
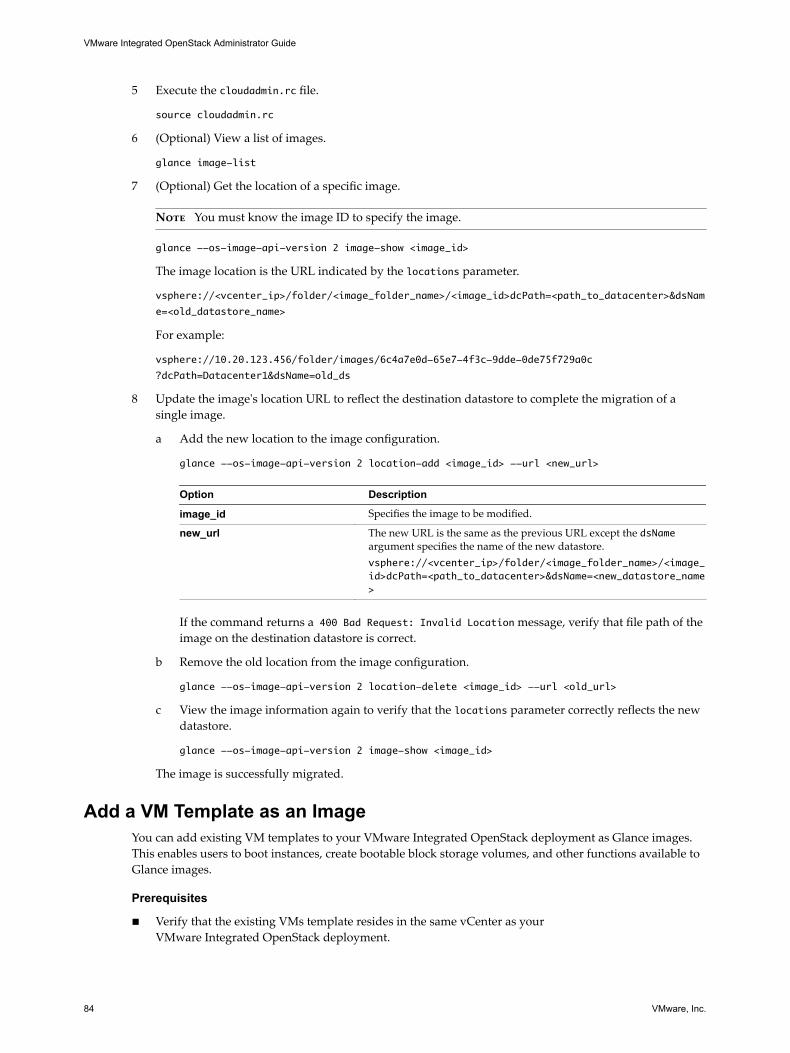
5 Execute the cloudadmin.rc file.
source cloudadmin.rc
6 (Optional) View a list of images.
glance image-list
7 (Optional) Get the location of a specific image.
Note You must know the image ID to specify the image.
glance --os-image-api-version 2 image-show <image_id>
The image location is the URL indicated by the locations parameter.
vsphere://<vcenter_ip>/folder/<image_folder_name>/<image_id>dcPath=<path_to_datacenter>&dsNam
e=<old_datastore_name>
For example:
vsphere://10.20.123.456/folder/images/6c4a7e0d-65e7-4f3c-9dde-0de75f729a0c
?dcPath=Datacenter1&dsName=old_ds
8 Update the image's location URL to reflect the destination datastore to complete the migration of asingle image.
a Add the new location to the image configuration.
glance --os-image-api-version 2 location-add <image_id> --url <new_url>
Option Description
image_id Specifies the image to be modified.
new_url The new URL is the same as the previous URL except the dsNameargument specifies the name of the new datastore.vsphere://<vcenter_ip>/folder/<image_folder_name>/<image_id>dcPath=<path_to_datacenter>&dsName=<new_datastore_name>
If the command returns a 400 Bad Request: Invalid Location message, verify that file path of theimage on the destination datastore is correct.
b Remove the old location from the image configuration.
glance --os-image-api-version 2 location-delete <image_id> --url <old_url>
c View the image information again to verify that the locations parameter correctly reflects the newdatastore.
glance --os-image-api-version 2 image-show <image_id>
The image is successfully migrated.
Add a VM Template as an ImageYou can add existing VM templates to your VMware Integrated OpenStack deployment as Glance images.This enables users to boot instances, create bootable block storage volumes, and other functions available toGlance images.
Prerequisites
n Verify that the existing VMs template resides in the same vCenter as yourVMware Integrated OpenStack deployment.
VMware Integrated OpenStack Administrator Guide
84 VMware, Inc.

n Verify that the following conditions do not apply.
n The VM template has multiple disks.
n The VM template has no disks.
n The source vCenter is not configured for OpenStack.
Procedure
1 Prepare the VM template.
The following metadata settings are not required.
n vmware_adaptertype
n vmware_disktype
The following metadata settings are recommended.
n vmware_ostype
n hw_vif_model
2 Log in to the OpenStack management cluster.
3 Run the glance command to obtain, define, and import the image.
glance image-create --name <NAME> \
--disk-format vmdk --container-format bare
--location "vi://<vcenter-host>/<datacenter-path>/vm/<sub-folders>/<template_name>"
The location parameter points to the inventory path for the VM template and can refer to either VM orhost. For example:
"vi://<datacenter-path>/vm/<template_name>”
or
"vi://<datacenter-path>/host/<host_name>/<template_name>"
The vm and host keywords in the inventory path represent the VM and Templates View and Host andCluster View hierarchy in your vSphere Web Client.
Modify the Default Behavior for Nova SnapshotsBy default, Nova snapshots are Glance images that are stored and organized as VM templates in the vCenterconfigured for VMware Integrated OpenStack. You can modify this behavior so that snapshots are stored asstreamOptimized VMDK disks instead.
Before VMware Integrated OpenStack 2.5, the default behavior was to store Nova snapshots asstreamOptimized VMDK disks. This procedure enables you to restore the pre-2.5 default.
Procedure
1 Implement the custom.yml file.
sudo mkdir -p /opt/vmware/vio/custom
sudo cp /var/lib/vio/ansible/custom/custom.yml.sample /opt/vmware/vio/custom/custom.yml
Chapter 6 Managing Images for the Image Service
VMware, Inc. 85
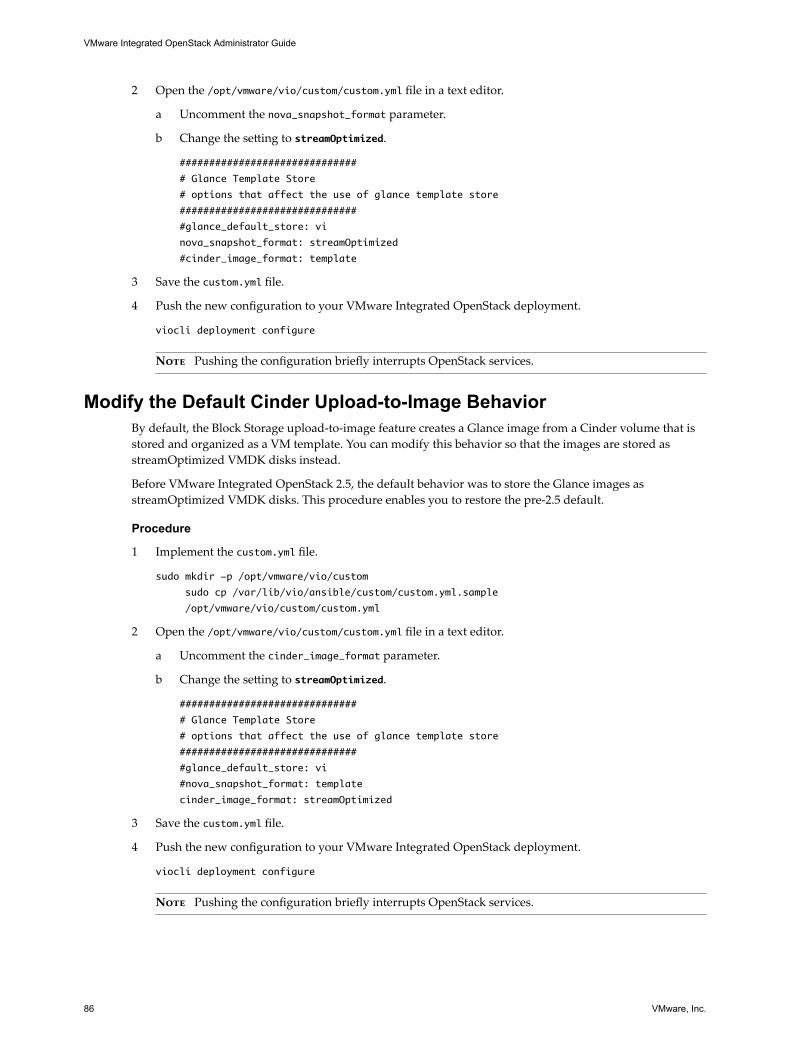
2 Open the /opt/vmware/vio/custom/custom.yml file in a text editor.
a Uncomment the nova_snapshot_format parameter.
b Change the setting to streamOptimized.
##############################
# Glance Template Store
# options that affect the use of glance template store
##############################
#glance_default_store: vi
nova_snapshot_format: streamOptimized
#cinder_image_format: template
3 Save the custom.yml file.
4 Push the new configuration to your VMware Integrated OpenStack deployment.
viocli deployment configure
Note Pushing the configuration briefly interrupts OpenStack services.
Modify the Default Cinder Upload-to-Image BehaviorBy default, the Block Storage upload-to-image feature creates a Glance image from a Cinder volume that isstored and organized as a VM template. You can modify this behavior so that the images are stored asstreamOptimized VMDK disks instead.
Before VMware Integrated OpenStack 2.5, the default behavior was to store the Glance images asstreamOptimized VMDK disks. This procedure enables you to restore the pre-2.5 default.
Procedure
1 Implement the custom.yml file.
sudo mkdir -p /opt/vmware/vio/custom
sudo cp /var/lib/vio/ansible/custom/custom.yml.sample
/opt/vmware/vio/custom/custom.yml
2 Open the /opt/vmware/vio/custom/custom.yml file in a text editor.
a Uncomment the cinder_image_format parameter.
b Change the setting to streamOptimized.
##############################
# Glance Template Store
# options that affect the use of glance template store
##############################
#glance_default_store: vi
#nova_snapshot_format: template
cinder_image_format: streamOptimized
3 Save the custom.yml file.
4 Push the new configuration to your VMware Integrated OpenStack deployment.
viocli deployment configure
Note Pushing the configuration briefly interrupts OpenStack services.
VMware Integrated OpenStack Administrator Guide
86 VMware, Inc.

Working with Flavors 7In OpenStack, a flavor is a preset configuration that defines the compute, memory, and storage capacity ofan instance. When you create an instance, you configure the server by selecting a flavor. Administrativeusers can create, edit, and delete flavors.
Do not delete any of the default flavors.
This chapter includes the following topics:
n “Default Flavor Configurations,” on page 87
n “Create a Flavor,” on page 87
n “Delete a Flavor,” on page 88
n “Modify Flavor Metadata,” on page 89
n “Configure QoS Resource Allocation for Instances Using Flavor Metadata,” on page 89
Default Flavor ConfigurationsThe default OpenStack deployment provides five default flavors ranging from tiny to extra large.
Name vCPUs RAM (MB) Disk (GB)
m1.tiny 1 512 1
m1.small 1 2048 20
m1.medium 2 4096 40
m1.large 4 8192 80
m1.xlarge 8 16384 160
Create a FlavorAdministrative users can create custom flavors.
Prerequisites
Verify that you are logged in to the VMware Integrated OpenStack dashboard as a cloud administrator.
Procedure
1 On the VMware Integrated OpenStack dashboard, select the admin project from the drop-down menuin the title bar.
2 Select Admin > System Panel > Flavors.
VMware, Inc. 87

3 Click Create Flavor.
4 In the Create Flavor dialog box, configure the new flavor.
Parameter Description
Name Name for the flavor.
ID Integer or a UUID4 value that identifies the flavor.If this parameter is left blank or has a value of auto, OpenStack automatically generates aUUID.
VCPUs Number of virtual CPUs that an instance made from this flavor will use.
RAM MB Megabytes of RAM for virtual machines made from this flavor.
Root Disk GB Gigabytes of disk used for the root (/) partition in instances made from this flavor.
Ephemeral DiskGB
Gigabytes of disk space to use for the ephemeral partition. If unspecified, the value is 0 bydefault.Ephemeral disks offer machine local disk storage linked to the life cycle of a VM instance. Whena VM is terminated, all data on the ephemeral disk is lost. Ephemeral disks are not included insnapshots.
Swap Disk MB Megabytes of swap space to use. If unspecified, the default is 0.
5 Click Create Flavor at the bottom of the dialog box to complete the process.
6 (Optional) Specify which projects can access instances created from specific flavors.
a On the Flavors page, click Edit Flavor in the Actions column of the instance.
b In the Edit Flavor dialog box, click the Flavor Access tab.
c Use the toggle controls to select the projects that can access the instance.
d Click Save.
7 (Optional) Modify the settings of a specific flavor.
a On the Flavors page, click Edit Flavor in the Actions column of the instance.
b In the Edit Flavor dialog box, modify the settings in either the Flavor Info or Flavor Access tab.
c Click Save.
Delete a FlavorYou can manage the number and variety of flavors by deleting those that no longer meet users' needs,duplicate other flavors, or for other reasons.
Note You cannot undo the deletion of a flavor. Do not delete default flavors.
Prerequisites
You must be logged in to the VMware Integrated OpenStack dashboard as a cloud administrator to performthis task.
Procedure
1 In the VMware Integrated OpenStack dashboard, select the admin project from the drop-down menu inthe title bar.
2 Select Admin > System Panel > Flavors.
3 Select the flavors to delete.
4 Click Delete Flavors.
VMware Integrated OpenStack Administrator Guide
88 VMware, Inc.

5 At the prompt, confirm the deletion.
Modify Flavor MetadataYou can modify the metadata of a flavor to dynamically add properties to all the instances that aresubsequently created that use that flavor.
You can also use image metadata to specify many flavor metadata settings. If a conflict occurs, the imagemetadata configuration overrules the flavor metadata configuration.
Prerequisites
n Requires VMware Integrated OpenStack version 2.0.x or greater.
n Requires vSphere version 6.0 or greater.
n Verify that VMware Integrated OpenStack is running in vSphere.
n Verify that you are logged in to the VMware Integrated OpenStack dashboard as a cloud administrator.
Procedure
1 Log in to the VMware Integrated OpenStack dashboard as a cloud administrator.
2 Select the admin project from the drop-down menu in the title bar.
3 Select Admin > System > Flavors.
4 (Optional) Create a flavor specific to the intended use of the metadata application.
Create a custom flavor to contain the specific configuration. The custom flavor leaves the original flavorconfiguration intact and available for other instance creation.
5 Select the flavor to modify.
6 In the Actions column of the image listing, click the down arrow and select Update Metadata.
7 Click the plus sign (+) next to the metadata properties to add.
In the column under Existing Metadata, the newly added metadata properties appear.
8 Configure the metadata properties.
For example, you might have to select an option from a drop-down list or enter a string value.
9 Click Save.
The newly added flavor metadata properties are now configured. This configuration is applied to all futureOpenStack instances that are created from this flavor.
Configure QoS Resource Allocation for Instances Using FlavorMetadata
You can control the QoS resource allocations, such as limits, reservations, and shares, for CPU, RAM, diskIOPS, and virtual network interface (VIF) by modifying the metadata of the flavor used to create theinstance. All instances subsequently created using the flavor inherit the metadata settings.
QoS resource allocation can also be specified by image metadata. In the event of a conflict, the imagemetadata configuration overrules the flavor metadata configuration. See “Configure QoS ResourceAllocation for Instances Using Image Metadata,” on page 80.
Prerequisites
n Requires VMware Integrated OpenStack version 2.0.x or greater.
Chapter 7 Working with Flavors
VMware, Inc. 89

n Requires vSphere version 6.0 or greater.
n Verify that VMware Integrated OpenStack is running in vSphere.
n Verify that you are logged in to the VMware Integrated OpenStack dashboard as a cloud administrator.
Procedure
1 Log in to the VMware Integrated OpenStack dashboard as a cloud administrator.
2 Select the admin project from the drop-down menu in the title bar.
3 Select Admin > System > Flavors.
4 (Optional) Create a flavor specific to the set of QoS resource allocations.
You must create a custom flavor to contain the specific configuration. This leaves the original flavorconfiguration intact and available for other uses.
5 Select the flavor to modify.
6 In the Actions column of the image listing, click the down arrow and select Update Metadata.
7 In the column under Available Metadata, expand the VMware Quota tab.
Note If the VMware Quota tab is not present, the related metadata properties might already beconfigured.
8 Click the plus sign (+) next to the VMware Quota metadata property you want to add.
Tip You can add all the options simultaneously by the clicking the plus sign (+) on the VMware Quotatab.
In the column under Existing Metadata, the newly added metadata properties appear.
9 Configure the metadata properties.
Metadata Property Description
Quota: CPU Limit Applies the quota:cpu_limit metadata property.Specifies the upper limit for CPU allocation in MHz. This parameterensures that the instance never uses more than the defined amount of CPUallocation.Enter 0 for unlimited CPU allocation.
Quota: CPU Reservation Applies the quota:cpu_reservation metadata property.Specifies the guaranteed minimum CPU reservation in MHz. Thisparameter ensures that the instance has the reserved amount of CPU cyclesavailable during resource contention.
Quota: CPU Shares Level Applies the quota:cpu_shares_level metadata property.Specifies shares level which maps to the predefined numeric value ofshares. If the custom level is selected, you must includethequota:cpu_shares_value metadata property. See Quota: CPU SharesValue below.
Quota: CPU Shares Value Applies the quota:cpu_shares_value metadata property.Specifies the number of shares allocated to the instance.Apply this property only if you set the quota:cpu_shares_levelmetadata property to custom. Otherwise this property is ignored.
Quota: Disk IO Limit Applies the quota:disk_io_limit metadata property.Specifies the upper limit for disk transactions in I/O operations per second(IOPS) in seconds. This parameter ensures that the instance never usesmore than the defined amount of disk IOPS, and can be used to enforce alimit on the instance's disk performance.Enter 0 for unlimited IOPS.
VMware Integrated OpenStack Administrator Guide
90 VMware, Inc.
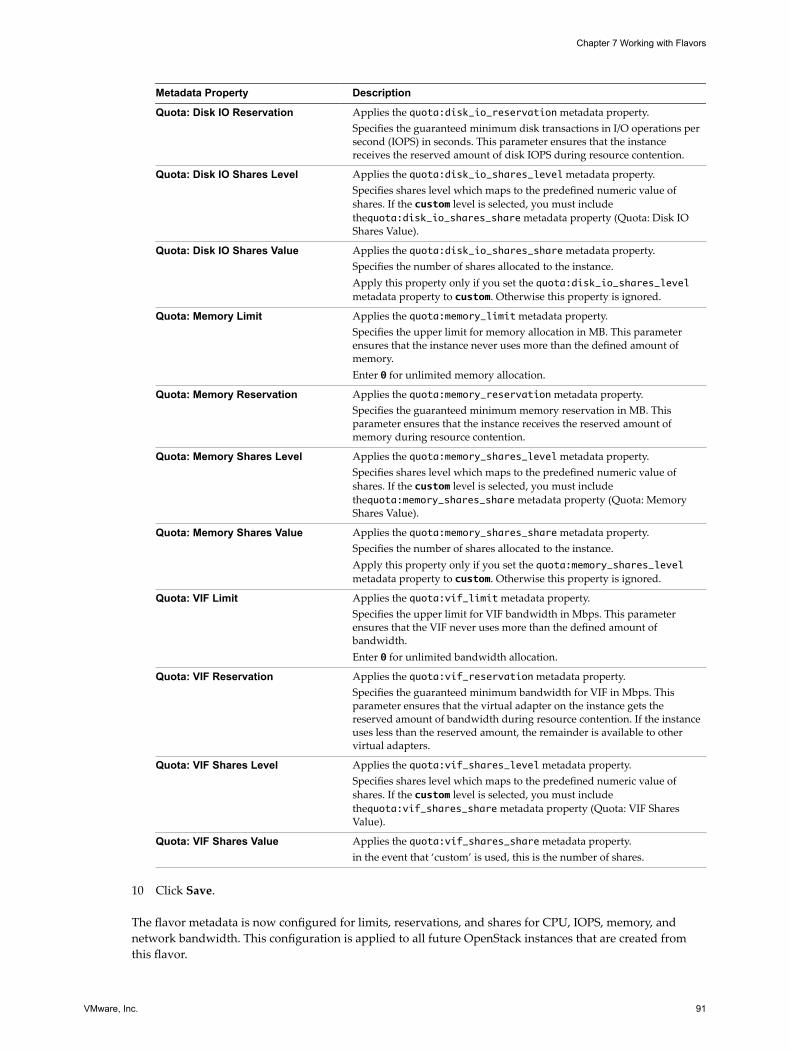
Metadata Property Description
Quota: Disk IO Reservation Applies the quota:disk_io_reservation metadata property.Specifies the guaranteed minimum disk transactions in I/O operations persecond (IOPS) in seconds. This parameter ensures that the instancereceives the reserved amount of disk IOPS during resource contention.
Quota: Disk IO Shares Level Applies the quota:disk_io_shares_level metadata property.Specifies shares level which maps to the predefined numeric value ofshares. If the custom level is selected, you must includethequota:disk_io_shares_share metadata property (Quota: Disk IOShares Value).
Quota: Disk IO Shares Value Applies the quota:disk_io_shares_share metadata property.Specifies the number of shares allocated to the instance.Apply this property only if you set the quota:disk_io_shares_levelmetadata property to custom. Otherwise this property is ignored.
Quota: Memory Limit Applies the quota:memory_limit metadata property.Specifies the upper limit for memory allocation in MB. This parameterensures that the instance never uses more than the defined amount ofmemory.Enter 0 for unlimited memory allocation.
Quota: Memory Reservation Applies the quota:memory_reservation metadata property.Specifies the guaranteed minimum memory reservation in MB. Thisparameter ensures that the instance receives the reserved amount ofmemory during resource contention.
Quota: Memory Shares Level Applies the quota:memory_shares_level metadata property.Specifies shares level which maps to the predefined numeric value ofshares. If the custom level is selected, you must includethequota:memory_shares_share metadata property (Quota: MemoryShares Value).
Quota: Memory Shares Value Applies the quota:memory_shares_share metadata property.Specifies the number of shares allocated to the instance.Apply this property only if you set the quota:memory_shares_levelmetadata property to custom. Otherwise this property is ignored.
Quota: VIF Limit Applies the quota:vif_limit metadata property.Specifies the upper limit for VIF bandwidth in Mbps. This parameterensures that the VIF never uses more than the defined amount ofbandwidth.Enter 0 for unlimited bandwidth allocation.
Quota: VIF Reservation Applies the quota:vif_reservation metadata property.Specifies the guaranteed minimum bandwidth for VIF in Mbps. Thisparameter ensures that the virtual adapter on the instance gets thereserved amount of bandwidth during resource contention. If the instanceuses less than the reserved amount, the remainder is available to othervirtual adapters.
Quota: VIF Shares Level Applies the quota:vif_shares_level metadata property.Specifies shares level which maps to the predefined numeric value ofshares. If the custom level is selected, you must includethequota:vif_shares_share metadata property (Quota: VIF SharesValue).
Quota: VIF Shares Value Applies the quota:vif_shares_share metadata property.in the event that ‘custom’ is used, this is the number of shares.
10 Click Save.
The flavor metadata is now configured for limits, reservations, and shares for CPU, IOPS, memory, andnetwork bandwidth. This configuration is applied to all future OpenStack instances that are created fromthis flavor.
Chapter 7 Working with Flavors
VMware, Inc. 91

VMware Integrated OpenStack Administrator Guide
92 VMware, Inc.
VMware Integrated OpenStack CLICommand Reference 8
The VMware Integrated OpenStack CLI command has specific syntax requirements.
This chapter includes the following topics:
n “viocli backup Command,” on page 93
n “viocli dbverify Command,” on page 94
n “viocli deployment Command,” on page 94
n “viocli ds-migrate-prep Command,” on page 95
n “viocli hyperic Command,” on page 96
n “viocli inventory-admin Command,” on page 96
n “viocli lbaas-v2 Command,” on page 97
n “viocli recover Command,” on page 98
n “viocli restore Command,” on page 99
n “viocli rollback Command,” on page 99
n “viocli services Command,” on page 100
n “viocli show Command,” on page 100
n “viocli upgrade Command,” on page 100
n “viocli volume-migrate Command,” on page 101
viocli backup CommandUse the viocli backup command to create a backup of either manager server data or the OpenStackdatabase. This command requires an NFS server to be available for the VMware Integrated OpenStack CL tomount.
The viocli backup command uses the following syntax.
viocli backup mgmt_server [-d NAME] NFS_VOLUME [-h] [-v]
viocli backup openstack_db [-d NAME] NFS_VOLUME [-h] [-v]
VMware, Inc. 93

ParameterMandatory orOptional Description
-d, --deployment NAME Automatic Name of deployment to use.Applied automatically. The default value is the name of the currentdeployment.
NFS_VOLUME Mandatory Name or IP address of the target NFS volume and directory in theformat remote_host:remote_dir.For example: 192.168.1.77:/backups
-h, --help Optional Show the use and arguments for this command.
-v, --verbose Optional Enter verbose mode.
The backup file of the VMware Integrated OpenStack management server is labeled with the time stampvio_ms_yyyymmddhhmmss. The backup file of the VMware Integrated OpenStack database is labeled with thetime stamp vio_os_db_yyyymmddhhmmss.
viocli dbverify CommandUse the viocli dbverify command to check the VMware Integrated OpenStack database for knownproblems, such as duplicated or missing keys, that can cause problems during the upgrade procedure.
The viocli dbverify command uses the following syntax.
viocli dbverify [-d NAME] [-h] [-v]
Parameter Mandatory or Optional Description
-d, --deployment NAME Automatic Name of deployment to use.Applied automatically. The default value is the name of thecurrent deployment.
-h, --help Optional Show the use and arguments for this command.
-v, --verbose Optional Enter verbose mode.
viocli deployment CommandUse the viocli deployment command to manage your VMware Integrated OpenStack deployment.
The viocli deployment command uses the following syntax.
viocli deployment ACTION [-d NAME] [-p] [-h] [-v]
VMware Integrated OpenStack Administrator Guide
94 VMware, Inc.
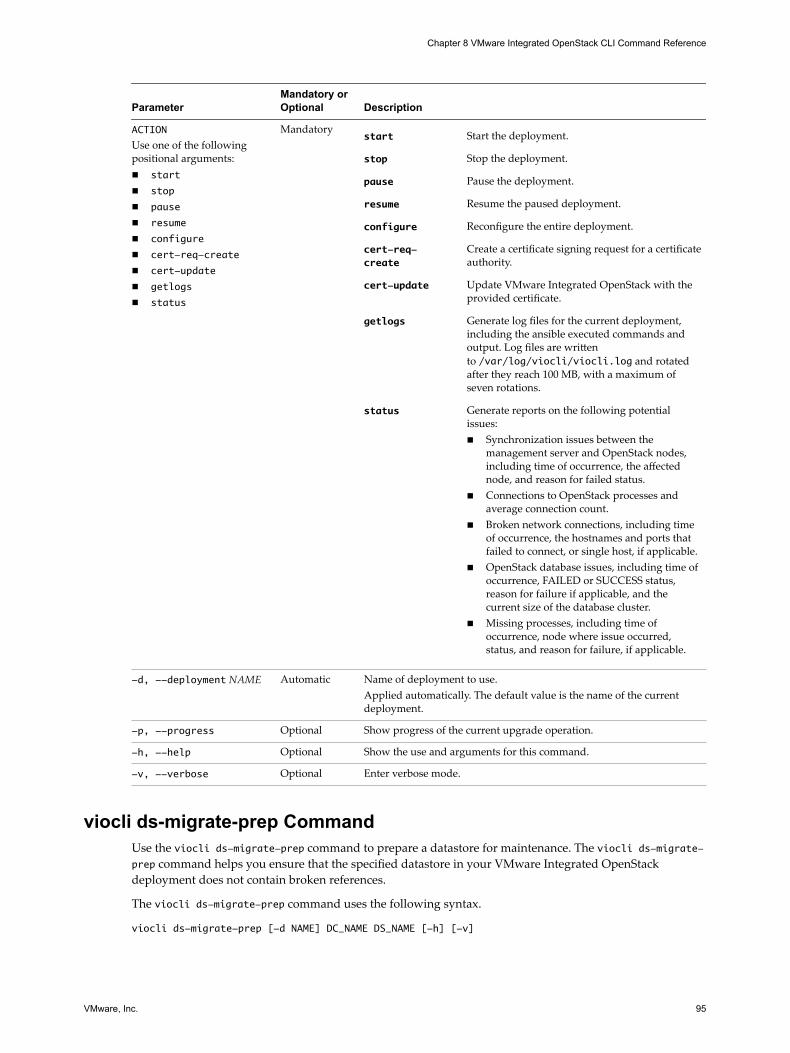
ParameterMandatory orOptional Description
ACTION
Use one of the followingpositional arguments:n start
n stop
n pause
n resume
n configure
n cert-req-create
n cert-update
n getlogs
n status
Mandatorystart Start the deployment.
stop Stop the deployment.
pause Pause the deployment.
resume Resume the paused deployment.
configure Reconfigure the entire deployment.
cert-req-create
Create a certificate signing request for a certificateauthority.
cert-update Update VMware Integrated OpenStack with theprovided certificate.
getlogs Generate log files for the current deployment,including the ansible executed commands andoutput. Log files are writtento /var/log/viocli/viocli.log and rotatedafter they reach 100 MB, with a maximum ofseven rotations.
status Generate reports on the following potentialissues:n Synchronization issues between the
management server and OpenStack nodes,including time of occurrence, the affectednode, and reason for failed status.
n Connections to OpenStack processes andaverage connection count.
n Broken network connections, including timeof occurrence, the hostnames and ports thatfailed to connect, or single host, if applicable.
n OpenStack database issues, including time ofoccurrence, FAILED or SUCCESS status,reason for failure if applicable, and thecurrent size of the database cluster.
n Missing processes, including time ofoccurrence, node where issue occurred,status, and reason for failure, if applicable.
-d, --deployment NAME Automatic Name of deployment to use.Applied automatically. The default value is the name of the currentdeployment.
-p, --progress Optional Show progress of the current upgrade operation.
-h, --help Optional Show the use and arguments for this command.
-v, --verbose Optional Enter verbose mode.
viocli ds-migrate-prep CommandUse the viocli ds-migrate-prep command to prepare a datastore for maintenance. The viocli ds-migrate-prep command helps you ensure that the specified datastore in your VMware Integrated OpenStackdeployment does not contain broken references.
The viocli ds-migrate-prep command uses the following syntax.
viocli ds-migrate-prep [-d NAME] DC_NAME DS_NAME [-h] [-v]
Chapter 8 VMware Integrated OpenStack CLI Command Reference
VMware, Inc. 95
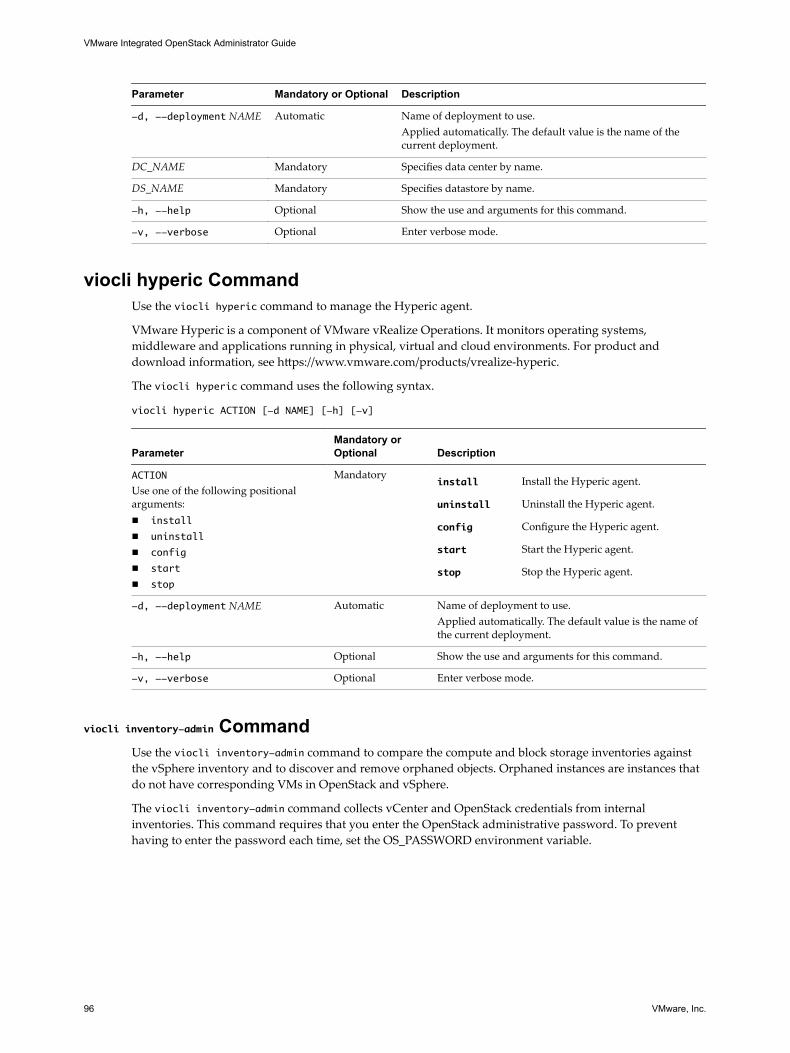
Parameter Mandatory or Optional Description
-d, --deployment NAME Automatic Name of deployment to use.Applied automatically. The default value is the name of thecurrent deployment.
DC_NAME Mandatory Specifies data center by name.
DS_NAME Mandatory Specifies datastore by name.
-h, --help Optional Show the use and arguments for this command.
-v, --verbose Optional Enter verbose mode.
viocli hyperic CommandUse the viocli hyperic command to manage the Hyperic agent.
VMware Hyperic is a component of VMware vRealize Operations. It monitors operating systems,middleware and applications running in physical, virtual and cloud environments. For product anddownload information, see https://www.vmware.com/products/vrealize-hyperic.
The viocli hyperic command uses the following syntax.
viocli hyperic ACTION [-d NAME] [-h] [-v]
ParameterMandatory orOptional Description
ACTION
Use one of the following positionalarguments:n install
n uninstall
n config
n start
n stop
Mandatoryinstall Install the Hyperic agent.
uninstall Uninstall the Hyperic agent.
config Configure the Hyperic agent.
start Start the Hyperic agent.
stop Stop the Hyperic agent.
-d, --deployment NAME Automatic Name of deployment to use.Applied automatically. The default value is the name ofthe current deployment.
-h, --help Optional Show the use and arguments for this command.
-v, --verbose Optional Enter verbose mode.
viocli inventory-admin CommandUse the viocli inventory-admin command to compare the compute and block storage inventories againstthe vSphere inventory and to discover and remove orphaned objects. Orphaned instances are instances thatdo not have corresponding VMs in OpenStack and vSphere.
The viocli inventory-admin command collects vCenter and OpenStack credentials from internalinventories. This command requires that you enter the OpenStack administrative password. To preventhaving to enter the password each time, set the OS_PASSWORD environment variable.
VMware Integrated OpenStack Administrator Guide
96 VMware, Inc.

The viocli inventory-admin command uses the following syntax.
viocli inventory-admin SHOW_ACTION [-d NAME] [--json] \
[--pretty] [--all] [--no-grace-period] \
[--force] [-h] [-v]
viocli inventory-admin CLEAN_ACTION [-d NAME] [--json] \
[--pretty] [--all] [--no-grace-period] \
[--force] [-h] [-v]
ParameterMandatory orOptional Description
SHOW_ACTION
Use one of the followingpositional arguments:n show-instances
n show-instance-vms
n show-shadow-vms
Mandatoryshow-instances
Display orphaned OpenStack instances.
show-instance-vms
Display orphaned vSphere instances.
show-shadow-vms
Display orphaned volume shadow VMs.These are volume VMs that do not havecorresponding block storage volumes in theOpenStack database.
CLEAN_ACTION
Use one of the followingpositional arguments:n clean-instances
n clean-instance-vms
n clean-shadow-vms
Mandatoryclean-instances
Remove orphaned OpenStack instances.
clean-instance-vms
Remove orphaned vSphere instances.
clean-shadow-vms
Remove orphaned volume shadow VMs.These are volume VMs that do not havecorresponding block storage volumes in theOpenStack database.
-d, --deployment NAME Automatic Name of deployment to use.Applied automatically. The default value is the name of thecurrent deployment.
--json Optional Return output in JSON format. This is the default format whenthis command is used noninteractively.
--pretty Optional Return output in human-readable format. This is the defaultformat when this command is used interactively.
--all Optional Show all objects. The default is to show only orphaned objects.
--no-grace-period Optional Disable the default grace period setting.If no grace period is set, the command ignores all objects createdor modified in the last 30 minutes.
-f, --force Optional Perform operation without requiring confirmation.
-h, --help Optional Show the use and arguments for this command.
-v, --verbose Optional Enter verbose mode.
viocli lbaas-v2 CommandUse the viocli lbaasv2-enable command to enable LBaaS v2 for your VMware Integrated OpenStackdeployment. You perform this command post-installation.
The viocli backup command uses the following syntax.
viocli lbaasv2-enable
Chapter 8 VMware Integrated OpenStack CLI Command Reference
VMware, Inc. 97
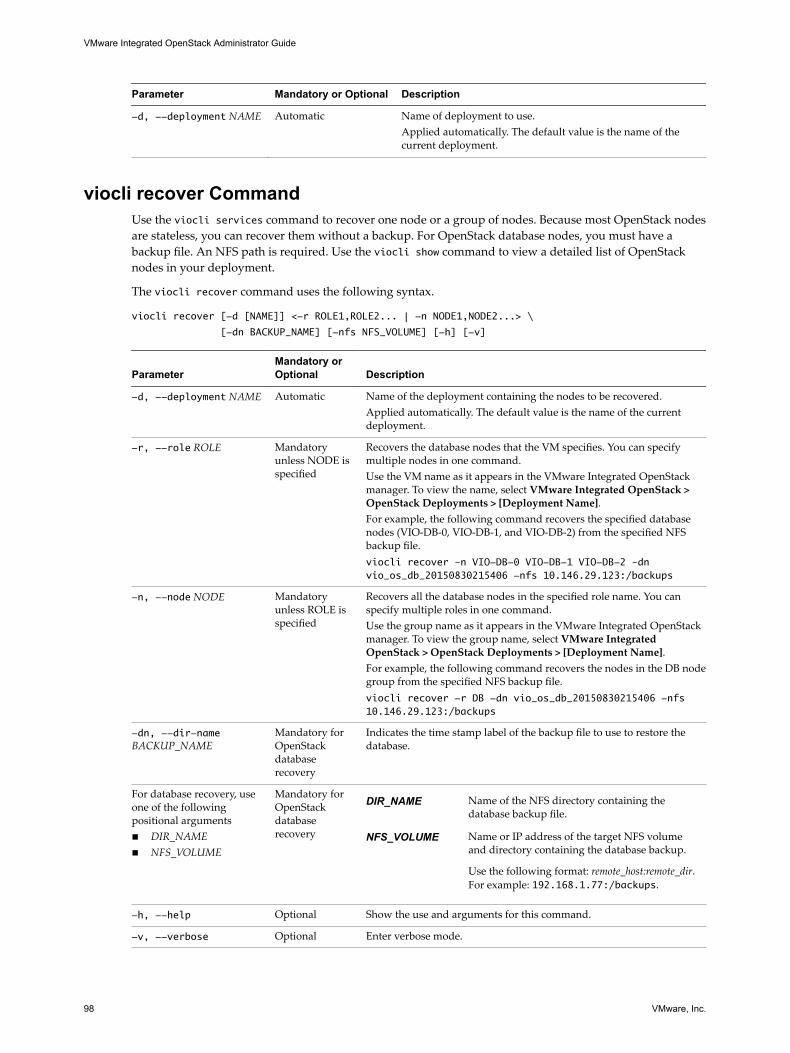
Parameter Mandatory or Optional Description
-d, --deployment NAME Automatic Name of deployment to use.Applied automatically. The default value is the name of thecurrent deployment.
viocli recover CommandUse the viocli services command to recover one node or a group of nodes. Because most OpenStack nodesare stateless, you can recover them without a backup. For OpenStack database nodes, you must have abackup file. An NFS path is required. Use the viocli show command to view a detailed list of OpenStacknodes in your deployment.
The viocli recover command uses the following syntax.
viocli recover [-d [NAME]] <-r ROLE1,ROLE2... | -n NODE1,NODE2...> \
[-dn BACKUP_NAME] [-nfs NFS_VOLUME] [-h] [-v]
ParameterMandatory orOptional Description
-d, --deployment NAME Automatic Name of the deployment containing the nodes to be recovered.Applied automatically. The default value is the name of the currentdeployment.
-r, --role ROLE Mandatoryunless NODE isspecified
Recovers the database nodes that the VM specifies. You can specifymultiple nodes in one command.Use the VM name as it appears in the VMware Integrated OpenStackmanager. To view the name, select VMware Integrated OpenStack >OpenStack Deployments > [Deployment Name].For example, the following command recovers the specified databasenodes (VIO-DB-0, VIO-DB-1, and VIO-DB-2) from the specified NFSbackup file.viocli recover –n VIO-DB-0 VIO-DB-1 VIO-DB-2 –dnvio_os_db_20150830215406 -nfs 10.146.29.123:/backups
-n, --node NODE Mandatoryunless ROLE isspecified
Recovers all the database nodes in the specified role name. You canspecify multiple roles in one command.Use the group name as it appears in the VMware Integrated OpenStackmanager. To view the group name, select VMware IntegratedOpenStack > OpenStack Deployments > [Deployment Name].For example, the following command recovers the nodes in the DB nodegroup from the specified NFS backup file.viocli recover -r DB -dn vio_os_db_20150830215406 -nfs10.146.29.123:/backups
-dn, --dir-nameBACKUP_NAME
Mandatory forOpenStackdatabaserecovery
Indicates the time stamp label of the backup file to use to restore thedatabase.
For database recovery, useone of the followingpositional argumentsn DIR_NAMEn NFS_VOLUME
Mandatory forOpenStackdatabaserecovery
DIR_NAME Name of the NFS directory containing thedatabase backup file.
NFS_VOLUME Name or IP address of the target NFS volumeand directory containing the database backup.
Use the following format: remote_host:remote_dir.For example: 192.168.1.77:/backups.
-h, --help Optional Show the use and arguments for this command.
-v, --verbose Optional Enter verbose mode.
VMware Integrated OpenStack Administrator Guide
98 VMware, Inc.

viocli restore CommandUse the viocli restore command to restore a deployment from a backup file previously created by usingthe viocli backup command. You can restore a backup of either management server data or of theOpenStack database.
The viocli restore command uses the following syntax.
viocli restore mgmt_server [-d [NAME]] <DIR_NAME | NFS_VOLUME> [-h] [-v]
viocli restore openstack_db [-d [NAME]] <DIR_NAME | NFS_VOLUME> [-h] [-v]
ParameterMandatory orOptional Description
-d, --deployment NAME Automatic Name of deployment to use.Applied automatically. The default value is the name ofthe current deployment.
Use one of the following positionalargumentsn DIR_NAMEn NFS_VOLUME
Mandatory DIR_NAME Name of the NFS directory containingthe backup file.
NFS_VOLUME
Name or IP address of the target NFSvolume and directory in the formatremote_host:remote_dir. For example:192.168.1.77:/backups.
-h, --help Optional Show the use and arguments for this command.
-v, --verbose Optional Enter verbose mode.
The backup file of the VMware Integrated OpenStack management server is labeled with the time stampvio_ms_yyyymmddhhmmss. The backup file of the VMware Integrated OpenStack database is labeled with thetime stamp vio_os_db_yyyymmddhhmmss.
viocli rollback CommandUse the viocli rollback command to roll back a recent upgrade of VMware Integrated OpenStack. Use theVMware Integrated OpenStack manager in the vSphere Web Client to perform the rollback.
The viocli rollback command uses the following syntax.
viocli rollback [-d NAME] [-p] [-h] [-v] [-f]
Parameter Mandatory or Optional Description
-d, --deployment NAME Automatic Name of deployment to use.Applied automatically. The default value is the name of thecurrent deployment.
-p, --progress Optional Show progress of the current upgrade operation.
-h, --help Optional Show the use and arguments for this command.
-v, --verbose Optional Enter verbose mode.
-f, --force Optional Perform operation without requiring confirmation.
Chapter 8 VMware Integrated OpenStack CLI Command Reference
VMware, Inc. 99
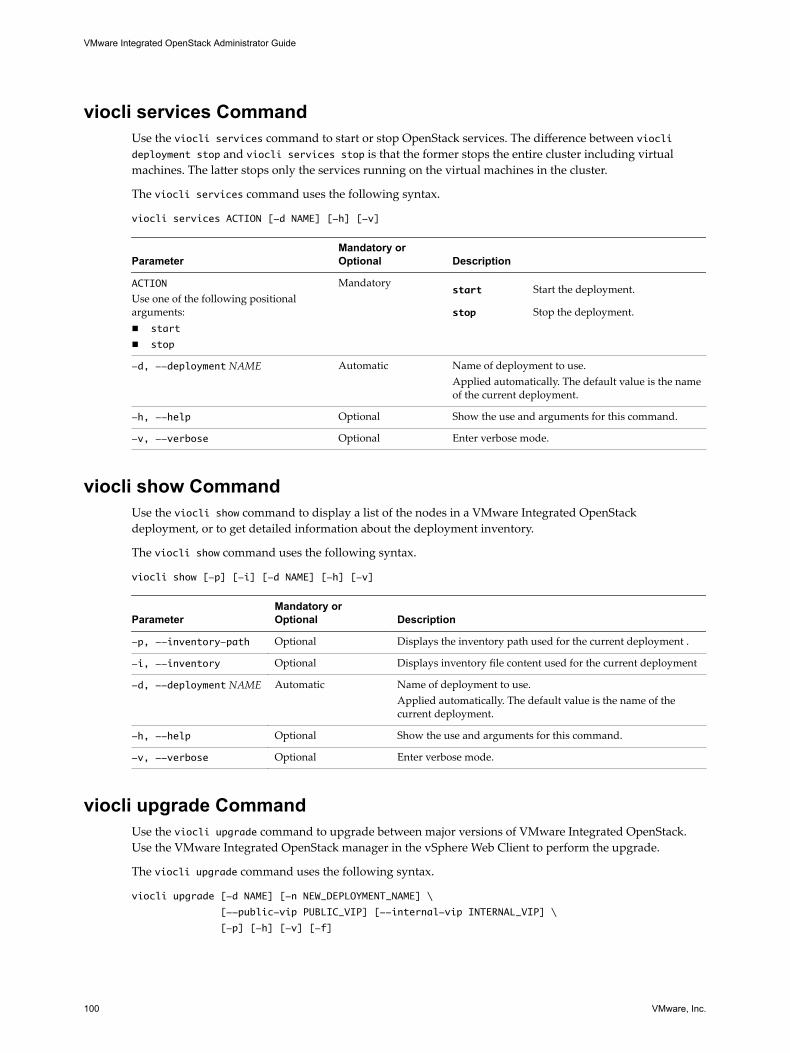
viocli services CommandUse the viocli services command to start or stop OpenStack services. The difference between vioclideployment stop and viocli services stop is that the former stops the entire cluster including virtualmachines. The latter stops only the services running on the virtual machines in the cluster.
The viocli services command uses the following syntax.
viocli services ACTION [-d NAME] [-h] [-v]
ParameterMandatory orOptional Description
ACTION
Use one of the following positionalarguments:n start
n stop
Mandatorystart Start the deployment.
stop Stop the deployment.
-d, --deployment NAME Automatic Name of deployment to use.Applied automatically. The default value is the nameof the current deployment.
-h, --help Optional Show the use and arguments for this command.
-v, --verbose Optional Enter verbose mode.
viocli show CommandUse the viocli show command to display a list of the nodes in a VMware Integrated OpenStackdeployment, or to get detailed information about the deployment inventory.
The viocli show command uses the following syntax.
viocli show [-p] [-i] [-d NAME] [-h] [-v]
ParameterMandatory orOptional Description
-p, --inventory-path Optional Displays the inventory path used for the current deployment .
-i, --inventory Optional Displays inventory file content used for the current deployment
-d, --deployment NAME Automatic Name of deployment to use.Applied automatically. The default value is the name of thecurrent deployment.
-h, --help Optional Show the use and arguments for this command.
-v, --verbose Optional Enter verbose mode.
viocli upgrade CommandUse the viocli upgrade command to upgrade between major versions of VMware Integrated OpenStack.Use the VMware Integrated OpenStack manager in the vSphere Web Client to perform the upgrade.
The viocli upgrade command uses the following syntax.
viocli upgrade [-d NAME] [-n NEW_DEPLOYMENT_NAME] \
[--public-vip PUBLIC_VIP] [--internal-vip INTERNAL_VIP] \
[-p] [-h] [-v] [-f]
VMware Integrated OpenStack Administrator Guide
100 VMware, Inc.

ParameterMandatory orOptional Description
-d, --deployment NAME Automatic Name of deployment to use.Applied automatically. The default value isthe name of the current deployment.
-n, --new-deploymentNEW_DEPLOYMENT_NAME
Mandatory Name of upgrade deployment.
--public-vip PUBLIC_VIP Mandatory Temporary public VIP address assigned tothe new deployment.
--internal-vip INTERNAL_VIP Mandatory Temporary private VIP address assigned tothe new deployment.
-p, --progress Optional Show progress of the current upgradeoperation.
-h, --help Optional Show the use and arguments for thiscommand.
-v, --verbose Optional Enter verbose mode.
-f, --force Optional Perform operation without requiringconfirmation.
viocli volume-migrate CommandUse the viocli volume-migrate command to migrate one or more non-attached volumes from one datastoreto another.
n Volume migration will fail if the volume is attached.
In this case, migrate the corresponding instance. Attached volumes will migrate with the instance.
Note Corresponding volume shadow VMs will not be migrated. To migrate such volume shadowVMs, run the “viocli ds-migrate-prep Command,” on page 95, then migrate the shadow VMs using thevSphere Web Client.
n Volume migration will fail if the volume has a storage policy that cannot be satisfied by the destinationdatastore.
You can force the migration by including the --ignore-storage-policy parameter. The command willoutput a warning if the storage policy is ignored for the migration to a non-compliant datastore.
The viocli volume-migrate command uses the following syntax.
viocli volume-migrate [-d [NAME]] \
[--source-dc [SRC_DC_NAME]] [--source-ds [SRC_DS_NAME]] \
[--volume-ids [VOLUME_UUIDS]] [--ignore-storage-policy] \
DEST_DC_NAME DEST_DS_NAME [-h] [-v]
Parameter Mandatory or Optional Description
-d, --deploymentNAME
Automatic Name of the deployment in which the volumes will be migrated.Applied automatically. The default value is the name of thecurrent deployment.
--source-dcSRC_DC_NAME
Mandatory unlessVOLUME_UUIDS isspecified.
Identifies the source datacenter.Used with the --source-ds parameter to uniquely identify thedatastore.
Chapter 8 VMware Integrated OpenStack CLI Command Reference
VMware, Inc. 101
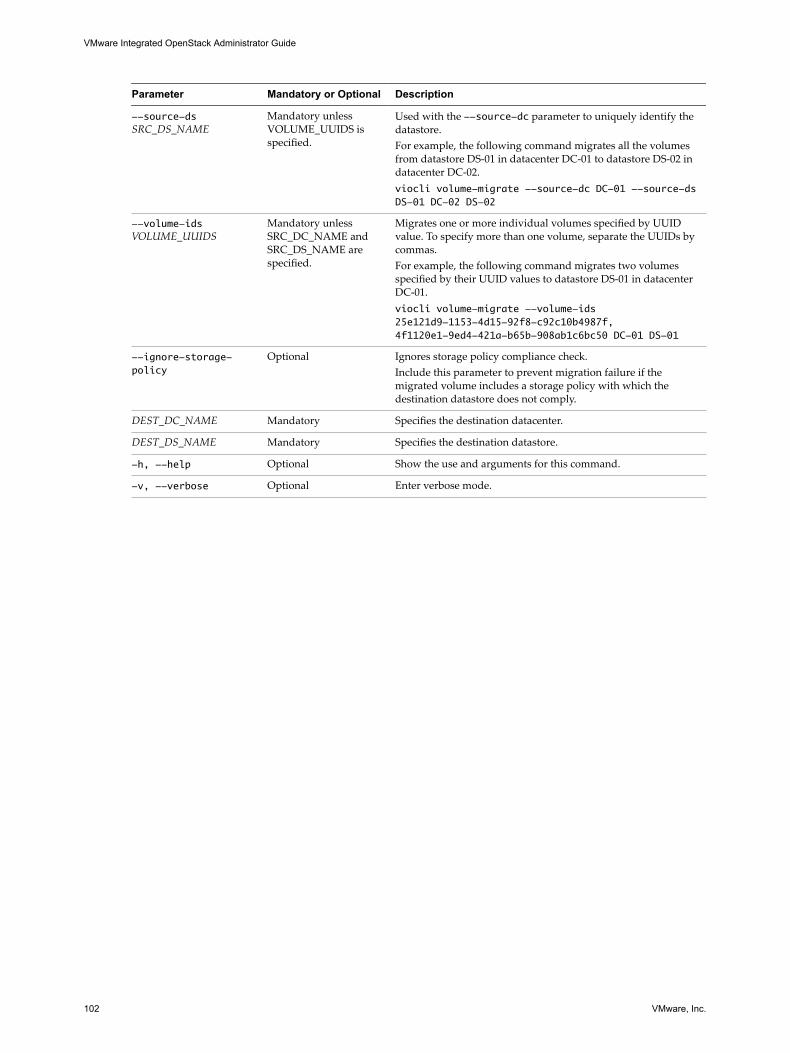
Parameter Mandatory or Optional Description
--source-dsSRC_DS_NAME
Mandatory unlessVOLUME_UUIDS isspecified.
Used with the --source-dc parameter to uniquely identify thedatastore.For example, the following command migrates all the volumesfrom datastore DS-01 in datacenter DC-01 to datastore DS-02 indatacenter DC-02.viocli volume-migrate --source-dc DC-01 --source-dsDS-01 DC-02 DS-02
--volume-idsVOLUME_UUIDS
Mandatory unlessSRC_DC_NAME andSRC_DS_NAME arespecified.
Migrates one or more individual volumes specified by UUIDvalue. To specify more than one volume, separate the UUIDs bycommas.For example, the following command migrates two volumesspecified by their UUID values to datastore DS-01 in datacenterDC-01.viocli volume-migrate --volume-ids25e121d9-1153-4d15-92f8-c92c10b4987f,4f1120e1-9ed4-421a-b65b-908ab1c6bc50 DC-01 DS-01
--ignore-storage-policy
Optional Ignores storage policy compliance check.Include this parameter to prevent migration failure if themigrated volume includes a storage policy with which thedestination datastore does not comply.
DEST_DC_NAME Mandatory Specifies the destination datacenter.
DEST_DS_NAME Mandatory Specifies the destination datastore.
-h, --help Optional Show the use and arguments for this command.
-v, --verbose Optional Enter verbose mode.
VMware Integrated OpenStack Administrator Guide
102 VMware, Inc.

Index
Aadding 37affinity rules, instance placement 64, 65anti-affinity rules, instance placement 64, 65audience 5authentication, modifying configuration 22
Bbacking up
Block Storage 30Cinder 30database 32verifying NFS share 31VMware Integrated OpenStack Manager 32
backup 19block storage
changing default format 86saving as a Glance image 86
Ccapacity, adding 28Ceilometer
configuringdisabling 21enabling 21
modifying 19CEIP
modifying 19opting in or out 21
Cinder backupconfiguring 30troubleshooting 31verifying 31
CLI commandsbackup 93dbverify 94deployment 94ds-migrate-prep 95Hyperic agent 96inventory-admin 96lbaasv2-enable 97recover 98restore 99rollback 99services 100show 100
upgrade 100volume-migrate 101
CLI command reference 93clusters, adding 28components, adding 28Compute cluster, adding 28configuration
modifying 19monitoring 19
Customer Experience Improvement Program,opting in or out 21
customizing appearancedashboard page logo 48log-in page background 47log-in page logo 48using custom graphics for logo and
background 46
Ddatabase
backing up 32restoring from backup 33
datastoresevacuating 49migrating volumes 49
deployment, monitoring 19DRS, instance placement 60DRS rules, placing instances with 62
EESXi host requirements 11
Ffeature support 12firewall requirements 11flavors
creating 87default configurations 87deleting 88working with 87
Hhardware requirements
NSX components 10OpenStack components 10
host groups, for instance placement 61
VMware, Inc. 103

Iimages
converting 76deleting 82importing 73managing 73
metadata, image resource 78metadata settings 78migrating 82, 83modifying settings 77unsupported formats 76uploading with CLI 75uploading with dashboard 74using VM templates 84Windows guest customization 78
implementation overview 9instances
applying QoS 66controlling state 60monitoring 15pausing 60placing with anti-affinity rules 64, 65placing with DRS 60placing with affinity rules 64, 65rebooting 60suspending 60tracking usage 60usage summary 60working with 59
IP addresses 37
LLBaaS, migrating to v2.0 40LBaaS v2
configuring 41enabling 41testing 41
LDAP servermodifying configuration 22update password 20
limits, QoS resource allocation 80, 89Load Balancing as a Service, See LBaaS
Mmemory, QoS resource allocation 80, 89metadata
flavor metadata 89SR-IOV 68VM group property 63
Nnetworks
adding IP ranges 24
changing DNS 25L2 bridging 26modifying 24VXLAN/VLAN 26
NSXmodifying default router 25update password 20
NSX Edge nodesenabling HA post-installation 27enabling HA pre-installation 27managing high availability 27
OOpenStack Foundation, compliance 9OpenStack components
Compute cluster 28Compute storage 29Image Service storage 29
Ppassword, modifying 19patches
applying 44applying with CLI 45applying with Web Client 44
patching, reverting 45patching with Web Client 44PBM, See storage policyproduct overview 9projects
assigning users 54creating 53deleting 54managing 53modifying 54
QQoS resource allocation
through flavor metadata 89through image metadata 80
Rrecovering from failure 34recovery 19reservations, QoS resource allocation 80, 89restoration 19restoring from backup
database 33VMware Integrated OpenStack Manager 33
router, modifying default router 25
Ssecurity groups
about 55
VMware Integrated OpenStack Administrator Guide
104 VMware, Inc.

CIDR or Security Group 56creating 55ICMP access 56modifying 56SSH access 56
snapshotschanging default behavior 85create from an instance 59saving as VM template 85
software requirementsESXi host requirements 11firewall requirements 11vSphere requirements 11
SR-IOVconfigure flavor metadata 68configure image metadata 68configuring 66enabling in virtual NICs 67
SSL certificate, changing 20storage
adding to Glance node 29adding to Nova node 29
storage policy, defining nova storage 69syslog server, modifying 19, 20system overview 9system requirements
hardware 9hardware requirements 10networking 9NSX 12NSX components 10OpenStack components 10software 9software requirements 11storage 11
Ttelemetrics 21troubleshooting, Cinder backup 31troubleshooting installation errors 46troubleshooting installation failure 46troubleshooting the update patch 46
Uupdated information 7updating, reverting 45updating with CLI commands 45upgrade to new version 36upgrading
adding IP ranges 37deleting the previous version 40installing the upgrade patch 37migrating data 38
migrating LBaaS v1.0 to v2.0 40reverting to previous deployment 39
user, creating new account 57users
assigning to projects 54deleting 58enabling or disabling 58
VvCenter, update password 20VIF bandwidth, QoS resource allocation 80, 89viocli commands
backup 93dbverify 94deployment 94ds-migrate-prep 95Hyperic agent 96inventory-admin 96recover 98restore 99rollback 99services 100show 100upgrade 100viocli lbaasv2-enable 97volume-migrate 101
viocli command reference 93VM groups, for instance placement 61VM template, cloning as image 84VMs, in vSphere and OpenStack 12VMware Integrated OpenStack Manager
backing up 32restoring from backup 33
volume type, creating 71volume types 71volumes
deleting 72migrating 49migrating attached 51migrating unattached 50
vSphere requirements 11
WWindows guest customization 78
Index
VMware, Inc. 105

VMware Integrated OpenStack Administrator Guide
106 VMware, Inc.
Top Related