


Languages
Pages
Legal


Visual Basic 2012
Made Easy
Dr.Liew

Disclaimer
Visual Basic 2012 Made Easy is an independent publication and is not affiliated
with, nor has it been authorized, sponsored, or otherwise approved by Microsoft
Corporation.
Trademarks
Microsoft, Visual Basic, Excel and Windows are either registered trademarks or
trademarks of Microsoft Corporation in the United States and/or other countries.
All other trademarks belong to their respective owners.
Liability
The purpose of this book is to provide basic guides for people interested in Visual
Basic 2012 programming. Although every effort and care has been taken to make
The information as accurate as possible, the author shall not be liable for any error,
Harm or damage arising from using the instructions given in this book.
Copyright ® 2012 Liew Voon Kiong
All rights reserved. No Part of this e-book may be reproduced, in any form or by any means, without
permission in writing from the author.
Acknowledgement I would like to express my sincere gratitude to many people who have made their
contributions in one way or another to the successful publication of this book.
My special thanks go to my children Xiang, Yi and Xun who have contributed their
ideas and edited this book. I would also like to appreciate the support provided by
my beloved wife Kim Huang and my youngest daughter Yuan. I would also like to
thank the millions of readers who have visited my Visual Basic Tutorial website at
for their support and encouragement.
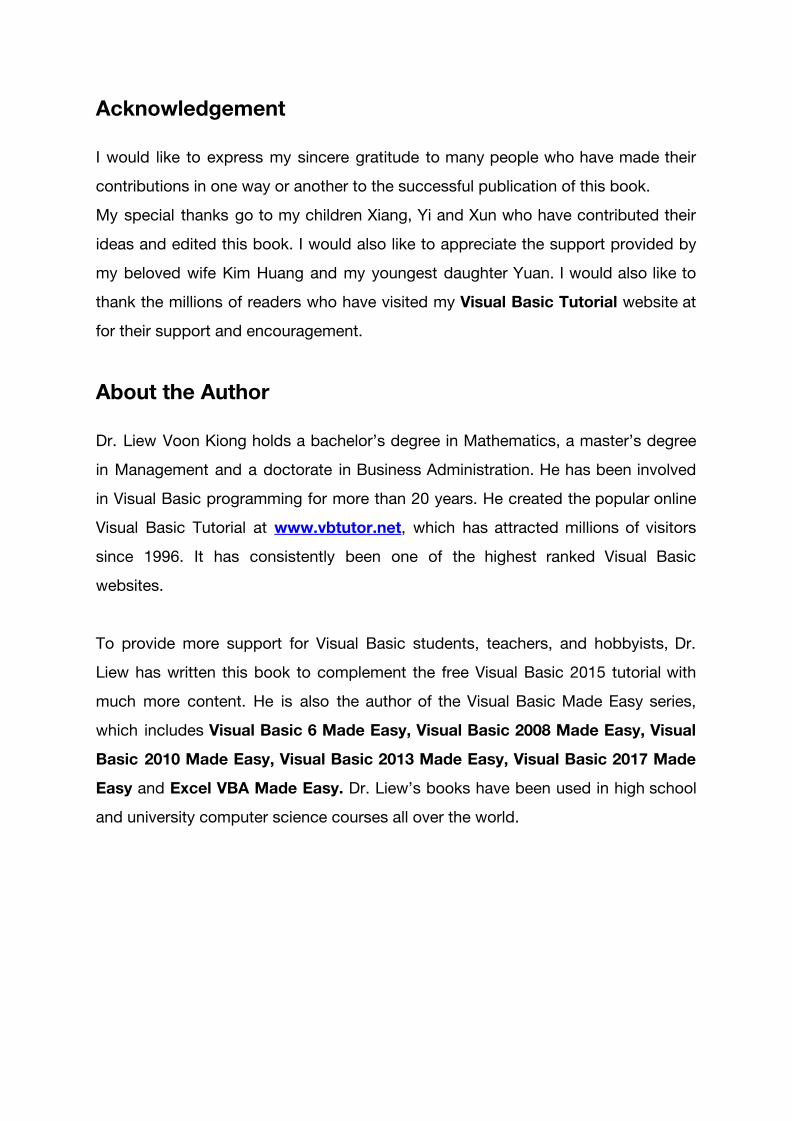
About the Author Dr. Liew Voon Kiong holds a bachelor’s degree in Mathematics, a master’s degree
in Management and a doctorate in Business Administration. He has been involved
in Visual Basic programming for more than 20 years. He created the popular online
Visual Basic Tutorial at www.vbtutor.net, which has attracted millions of visitors
since 1996. It has consistently been one of the highest ranked Visual Basic
websites.
To provide more support for Visual Basic students, teachers, and hobbyists, Dr.
Liew has written this book to complement the free Visual Basic 2015 tutorial with
much more content. He is also the author of the Visual Basic Made Easy series,
which includes Visual Basic 6 Made Easy, Visual Basic 2008 Made Easy, Visual
Basic 2010 Made Easy, Visual Basic 2013 Made Easy, Visual Basic 2017 Made
Easy and Excel VBA Made Easy. Dr. Liew’s books have been used in high school
and university computer science courses all over the world.

Table of Contents
1.1 A Brief Description of Visual Basic 2012 11
1.2 Visual Studio 2012 Integrated Development Environment 12
1.3 Creating a New Project in Visual Studio 2012 13
2.1 Customizing the Form 18
2.2 Adding Controls to the Form 20
3.1 The Concept of Event-Driven Programming 24
3.2 Writing the Code 26
4.1 Text Box 29
Example 4.1 29
4.2 Label 31
Example 4.2 31
4.3 List Box 33
4.3.1 Adding Items to a Listbox 33
4.3.2 Removing Items from a List Box 36
4.4 Combo Box 36
4.4.1 Adding Items to a Combobox 37
4.4.2 Removing Items from a Combobox 39
5.1 Loading an Image in a Picture Box 41
5.1.1 Loading an Image at Design Time 41
5.1.2 Loading an Image at Runtime 44
5.2 Loading an Image in a Picture Box using Open File Dialog Control 45
6.1 Visual Basic 2012 Data Types 48
6.1.1 Numeric Data Types 48
Table 6.1: Numeric Data Types 49
6.1.2 Non-numeric Data Types 49
Table 6.2: Non-numeric Data Types 50
6.1.3 Suffixes for Literals 50
Table 6.3: Non-numeric Data Types 50
6.2 Variables and Constants 51
6.2.1 Variable Names 51
Table 6.4 Valid and Invalid Names 51
6.2.2 Declaring Variables 52
Example 6.1 52
Example 6.2 53
Example 6.3 54
6.2.3 Assigning Values to Variables 54
Example 6.4 55
6.2.4 Scope of Declaration 55
6.2.5 Declaring Constants 56
Example 6.5 56
7.1 Introduction to Arrays 58
7.2 Dimension of an Array 58
7.3 Declaring Arrays 59
Example 7.1 60
Example 7.2 61
Example 7.3 61
Example 7.4 62
8.1 Mathematical Operators 64
Table 8.1 Mathematical Operators 64
8.2 Writing Code that Performs Mathematical Operations 65
Example 8.2 66
Example 8.3: BMI Calculator 66
9.1 String Manipulation Using + and & signs 68
Example 9.1 68
Example 9.2 69
9.2 String Manipulation Using Built-in Functions 71
9.2 (a) Len Function 71
Example 9.3 71
9.2(b) Right Function 72
Example 9.4 72
9.2(c) Left Function 72
9.2 (d) Mid Function 73
Example 9.5 73
9.2(e) Trim Function 74
Example 9.4 74
9.2(f) Ltrim Function 74
9.2(g)The Rtrim Function 75
9.2(h) The InStr function 75
9.2(i) Ucase and the Lcase Functions 75
9.2(j) Chr and the Asc functions 76
10.1 Conditional Operators 77
Table 10.1: Conditional Operators 78
10.2 Logical Operators 78
Table 10.2: Logical Operators 78
10.3 Using the If Control Structure with the Comparison Operators 79
10.3(a) If….Then Statement 79
Example 10.1 79
10.3(b) If….Then…Else Statement 80
Example 10.2 80
Example 10.3 81
10.3(c) If….Then…ElseIf Statement 83
11.1 The Select Case…End Select Structure 85
11.2 The usage of Select Case 86
Example 11.1: Examination Grades 86
Example 11.2 86
Example 11.3 87
Example 11.4 87
12.1 For….Next Loop 89
Example 12.1 a 90
Example 12.1b 90
Example 12.1c 90
Example 12.1d 91
12.2 Do Loop 91
Example 12.2(a) 92
Example 12.2(b) 92
12.3 While….End While Loop 93
Example 12.3 94
13.1 What is a Sub Procedure 95
13.2 Examples of Sub Procedure 95
Example 13.1 95
Example 13.2: Password Cracker 96
14.1 Creating User-Defined Functions 99
Example 14.1: BMI Calculator 99
Example 14.2: Future Value Calculator 101
14.2 Passing Arguments by Value and by Reference 103
Example 14.2(a) 104
15.1 The Abs Function 106
Example 15.1 106
15.2 The Exp function 107
Example 15.2 107
15.3 The Fix Function 108
Example 15.3 108
15.4 The Int Function 109
15.5 The Log Function 109
Example 15.4 109
15.6 The Rnd( ) Function 110
Example 15.5 110
15.7 The Round Function 111
Example 15.6 112
16.1 Format Function for Numbers 113
16.1(a) Built-in Format function for Numbers 113
Example 16.1 114
16.1(b) User-Defined Format Function 115
Table 16.2 User-Defined Format Function 115
Example 16.2 115
16.2 Formatting Date and Time 116
16.2(a) Formatting Date and time using predefined formats 116
Table 16.3 Predefined Date and Time Formats 117
Example 16.3 117
16.2(b) Formatting Date and time using user-defined formats 118
Table 16.4 Formatting Date and time using user-defined formats 119
Example 16.4 119
17.1 Checkbox 121
Example 17.1: Shopping Cart 121
Example 17.2 T-Shirt Promotion 123
Example 17.3 125
Figure 17.3 127
Example 17.4 127
Example 17.5 129
17.2 Radio Button 132
Example 17.6 132
Example 17.7 133
18.1 Introduction 136
18.2 Using On Error GoTo Syntax 136
Example 18.1: Division Errors 137
18.3 Errors Handling using Try…..Catch….End Try Structure 138
19.1 Concepts of Object Oriented Programming 141
19.1.1 Encapsulation 141
19.1.2 Inheritance 141
19.1.3 Polymorphism 142
19.2 Creating Class 142
20.1 Introduction 147
20.2 Creating the Graphics Object 148
20.3 Creating the Pen Object 149
20.4 Drawing a Line 150
20.5 Creating a Rectangle 151
20.6 Customizing Line Style of the Pen Object 153
20.7 Drawing an Ellipse 155
Example 20.1 157
20.8 Drawing a Circle 158
Example 20.2 158
Example 20.3 158
20.9 Drawing Text 159
Example 20.4 160
Example 20.5 161
20.10 Drawing Polygons 162
Example 20.6 Drawing a Triangle A triangle is a polygon with three vertices. Here is the code: 163
Example 20.7 Drawing a Quadrilateral 164
20.11 Drawing a Pie 165
Example 20.8 : Drawing a pie that starts with 0 degree and sweep clockwise through 60 degree. 165
20.12 Filling Shapes with Color 166
20.12(a) Drawing and Filling a Rectangle with Color 167
Example 20.9 167
20.12(b) Drawing and Filling an Ellipse with Colour 169

Example 20.10 169
20.12(c) Drawing and Filling a Polygon with Color 170
Example 20.11 170
20.12(d) Drawing and Filling a Pie 171
Example 20.12 172
21.1 Creating a Digital Clock 174
21.2 Creating a Stopwatch 175
21.3 Creating a Digital Dice 177
22.1 Creating Motion 180
22.2 Creating a Graphical Dice 182
22.3 Creating a Slot Machine 184
23.1 Introduction to Database 188
23.2 Creating a Database Application 189
23.3 Creating Connection to a Database using ADO.NET 190
23.4 Populating Data in ADO.NET 198
Example 23.1 200
23.5 Browsing Records 202
23.6 Editing, Saving, Adding and Deleting Records 203
Example 23.2 204
24.1 Introduction 208
24.2 Reading a Text File 208
24.3 Writing to a Text File 213
25.1 Start Publish Wizard 216
25.2 Choosing Location to Publish 217
25.3 Determine How will Users Install the Application 217
25.4 Finish Publishing Process 218
Chapter 1 Introduction to Visual Basic 2012
❖ A brief description of Visual Basic 2012 ❖ Getting to know the Visual Basic 2012 Integrated Development
Environment
1.1 A Brief Description of Visual Basic 2012
Visual Basic is a third-generation event-driven programming language first released
by Microsoft in 1991. Visual Basic is a user-friendly programming language
designed for beginners. Therefore, It enables anyone to develop GUI window
applications easily. Visual Basic has gone through many phases of development
since the days of BASIC that was built for DOS . BASIC stands for Beginners'
All-purpose Symbolic Instruction Code. The program syntax in Visual Basic
resembles the English language. Since the release of Visual Basic Version1 in
1991, the DOS versions of BASIC were slowly phased out and completely replaced
by Visual Basic . The final version was Visual Basic 6.
In 2002, Microsoft released Visual Basic.NET(VB.NET) to replace Visual Basic 6.
Thereafter, Microsoft declared VB6 a legacy programming language in 2008.
However, Microsoft still provides some form of support for VB6. VB.NET is a fully
object-oriented programming language implemented in the .NET Framework. It was
created to cater for the development of the web as well as mobile applications.
Visual Basic 2012 is the VB.NET version launched by Microsoft in the year 2012. It is
almost similar to the earlier VB.NET version, Visual Basic 2010 and but it has added
many new features.
Visual Basic 2012 is a full-fledged Object-Oriented Programming (OOP) Language,
so it has caught up with other OOP languages such as C++, Java, C# and others.
However, you don't have to know OOP to learn Visual Basic 2012. In fact, if you
are familiar with Visual Basic 6, you can learn Visual Basic 2012 effortlessly because
the syntax and interface are almost similar. Visual Basic 2012 Express Edition is
available free for download from the Microsoft site using the following link:
https://www.visualstudio.com/vs/older-downloads/
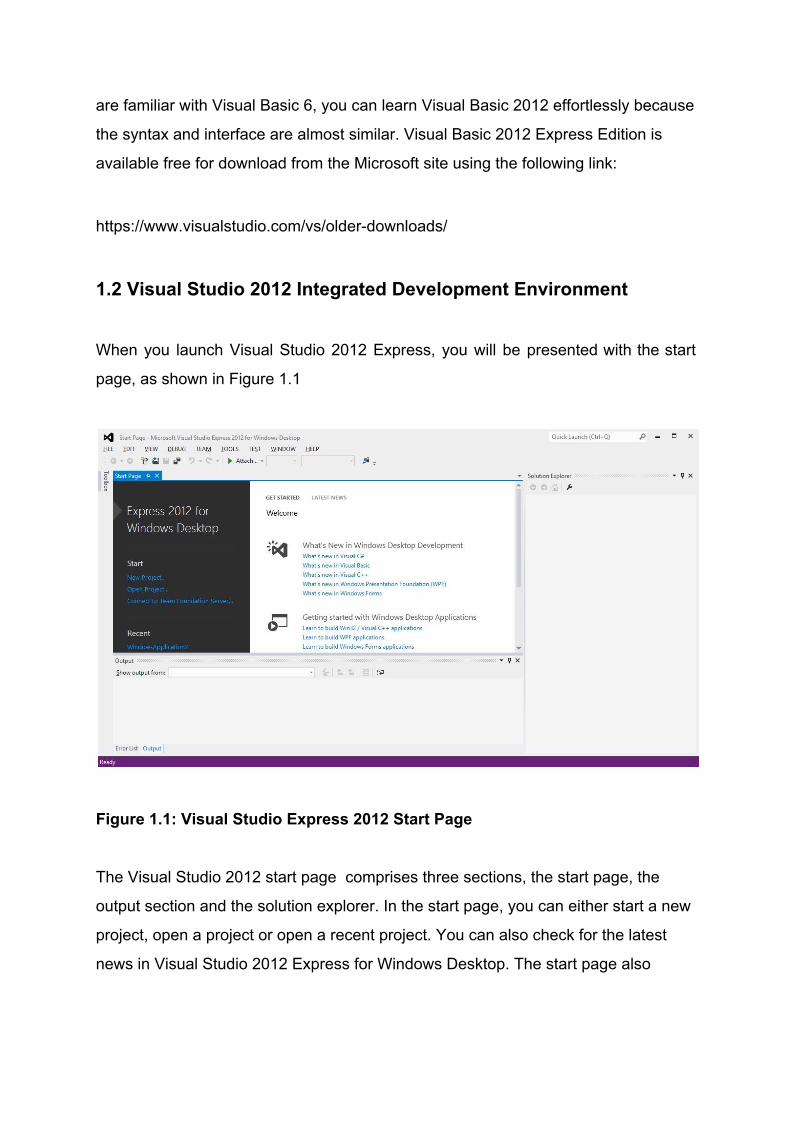
1.2 Visual Studio 2012 Integrated Development Environment
When you launch Visual Studio 2012 Express, you will be presented with the start
page, as shown in Figure 1.1
Figure 1.1: Visual Studio Express 2012 Start Page
The Visual Studio 2012 start page comprises three sections, the start page, the
output section and the solution explorer. In the start page, you can either start a new
project, open a project or open a recent project. You can also check for the latest
news in Visual Studio 2012 Express for Windows Desktop. The start page also
consists of a menu bar and a tool bar where you can perform various tasks by
clicking the menu items.
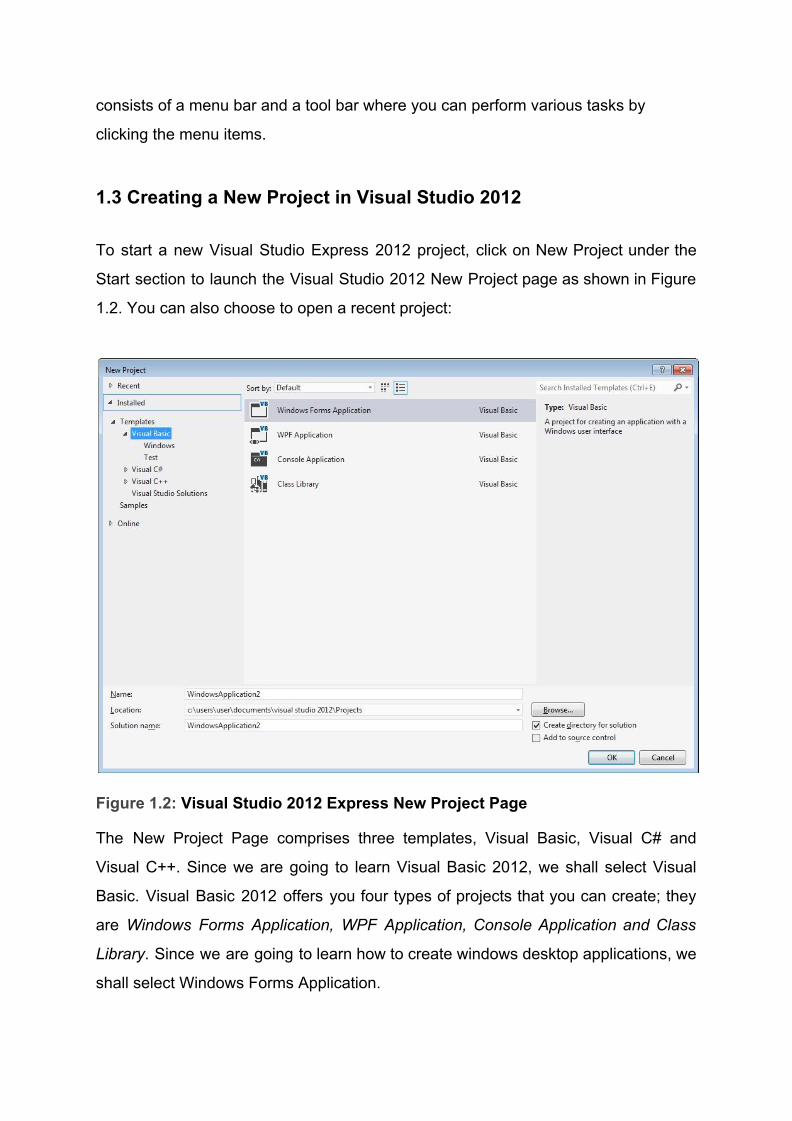
1.3 Creating a New Project in Visual Studio 2012
To start a new Visual Studio Express 2012 project, click on New Project under the
Start section to launch the Visual Studio 2012 New Project page as shown in Figure
1.2. You can also choose to open a recent project:
Figure 1.2: Visual Studio 2012 Express New Project Page
The New Project Page comprises three templates, Visual Basic, Visual C# and
Visual C++. Since we are going to learn Visual Basic 2012, we shall select Visual
Basic. Visual Basic 2012 offers you four types of projects that you can create; they
are Windows Forms Application, WPF Application, Console Application and Class
Library. Since we are going to learn how to create windows desktop applications, we
shall select Windows Forms Application.
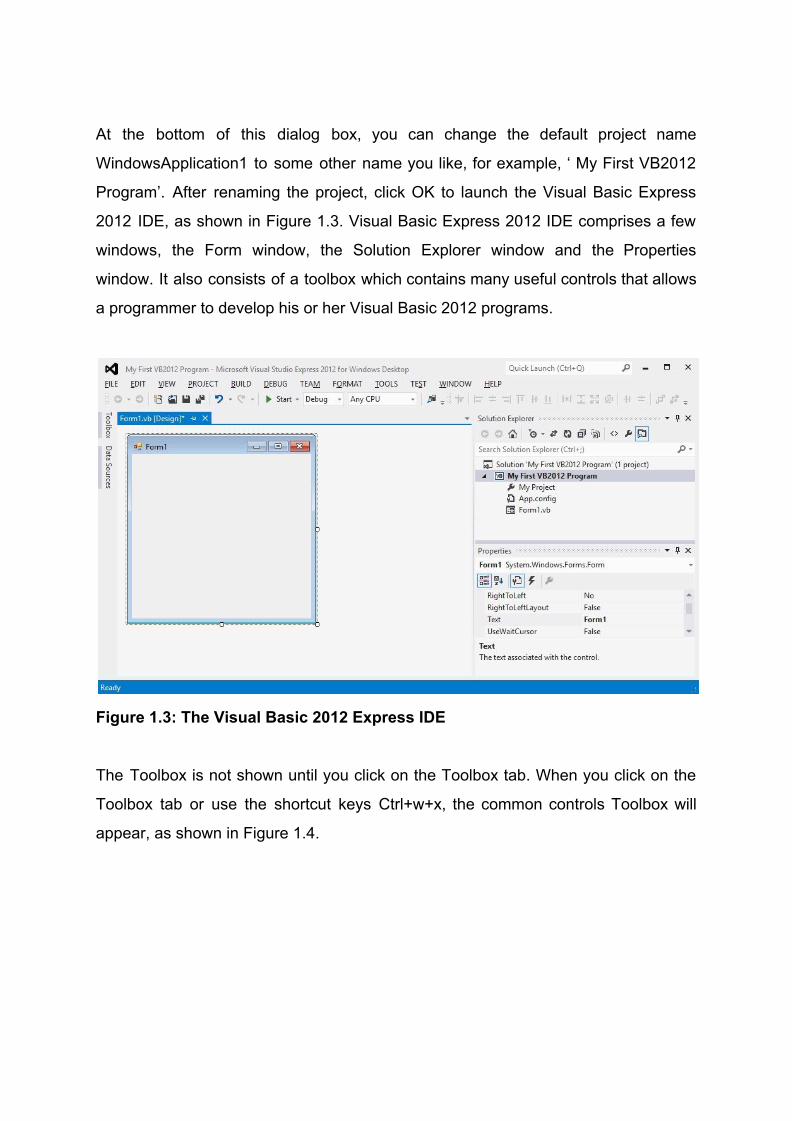
At the bottom of this dialog box, you can change the default project name
WindowsApplication1 to some other name you like, for example, ‘ My First VB2012
Program’. After renaming the project, click OK to launch the Visual Basic Express
2012 IDE, as shown in Figure 1.3. Visual Basic Express 2012 IDE comprises a few
windows, the Form window, the Solution Explorer window and the Properties
window. It also consists of a toolbox which contains many useful controls that allows
a programmer to develop his or her Visual Basic 2012 programs.
Figure 1.3: The Visual Basic 2012 Express IDE
The Toolbox is not shown until you click on the Toolbox tab. When you click on the
Toolbox tab or use the shortcut keys Ctrl+w+x, the common controls Toolbox will
appear, as shown in Figure 1.4.

Figure 1.4: Visual Basic 2012 Express Tool Box

Now, we shall proceed to show you how to create your first program. First, change
the text of the form to My First VB2012 Program in the properties window; it will
appear as the title of the program. Next, insert a button and change its text to OK.
The design interface is shown in Figure 1.5
Figure 1.5: The Design Interface
Now click on the OK button to bring up the code window and enter the following
statement between Private Sub and End Sub procedure, as shown in Figure 1.6:
MsgBox("My First Visual Basic 2012 Program")
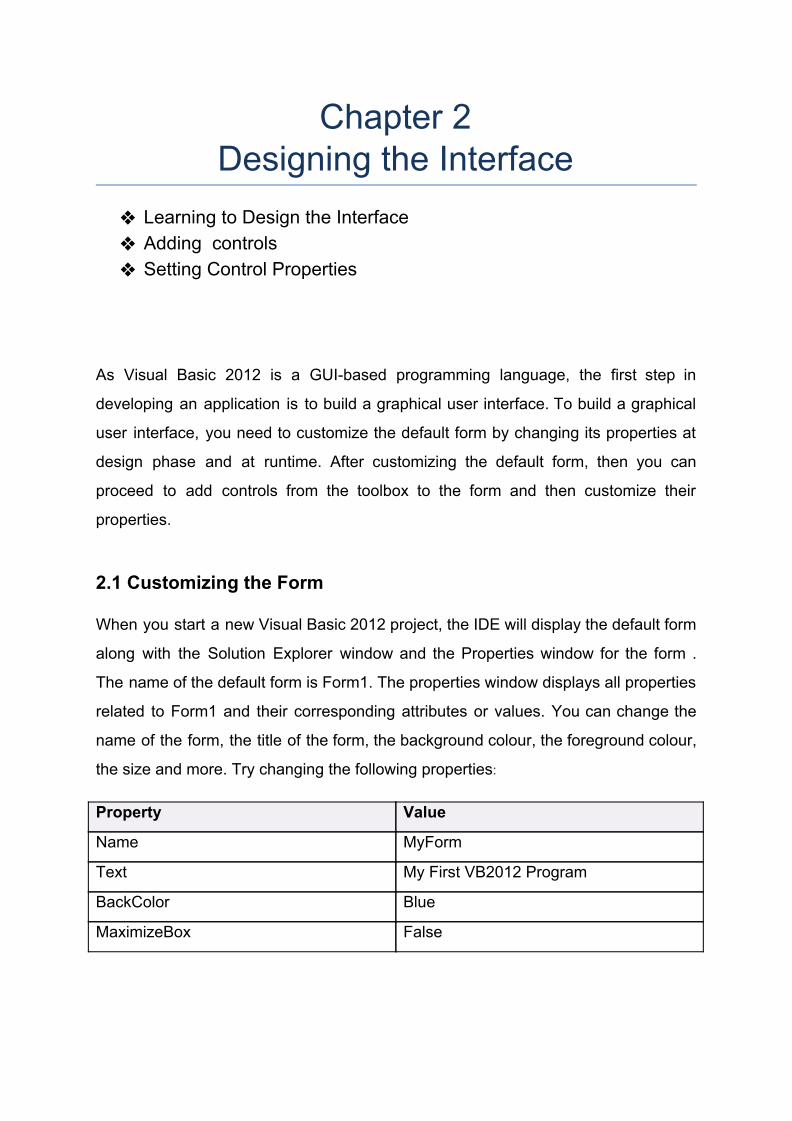
Now click on the Start button on the toolbar or press F5 to run the program then click
on the OK button, a dialog box that displays the “My First Visual Basic 2012
Program″ message will appear, as shown in Figure 1.7. The function MsgBox is a
built-in function of Visual Basic 2012 which can display the text enclosed within the
brackets
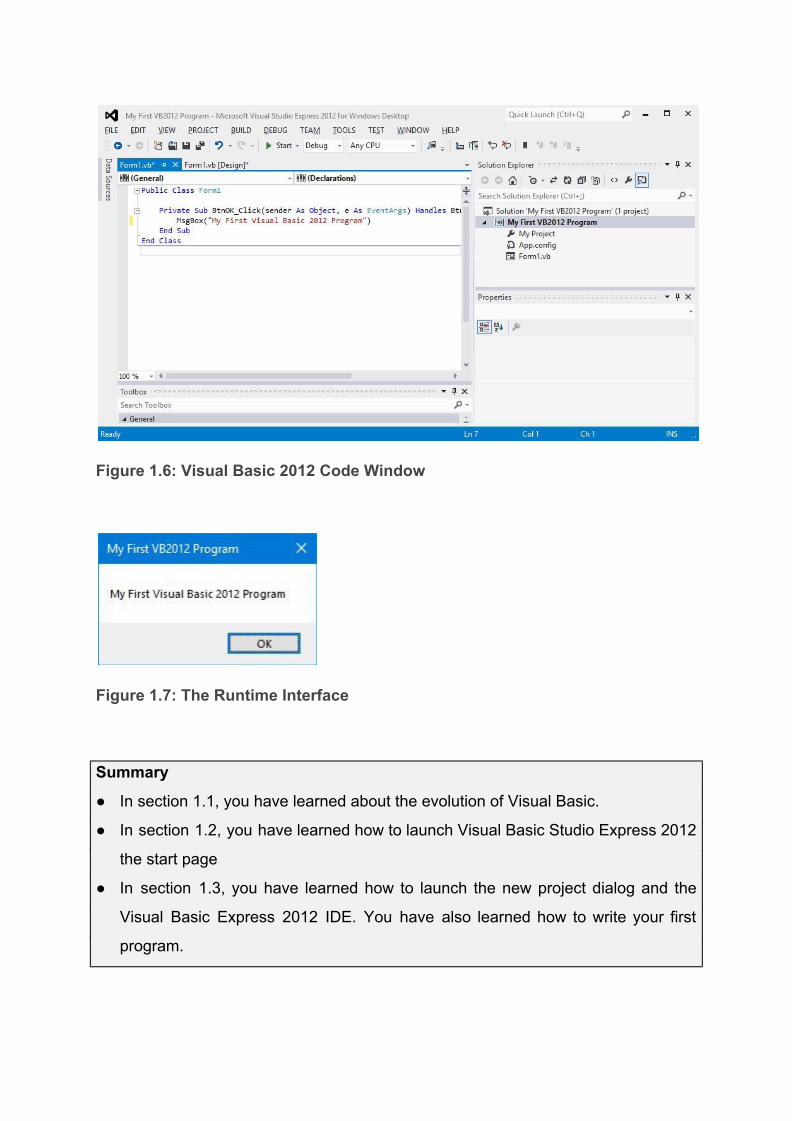
Figure 1.6: Visual Basic 2012 Code Window
Figure 1.7: The Runtime Interface
Summary
● In section 1.1, you have learned about the evolution of Visual Basic.
● In section 1.2, you have learned how to launch Visual Basic Studio Express 2012
the start page
● In section 1.3, you have learned how to launch the new project dialog and the
Visual Basic Express 2012 IDE. You have also learned how to write your first
program.
Chapter 2 Designing the Interface
❖ Learning to Design the Interface ❖ Adding controls ❖ Setting Control Properties
As Visual Basic 2012 is a GUI-based programming language, the first step in
developing an application is to build a graphical user interface. To build a graphical
user interface, you need to customize the default form by changing its properties at
design phase and at runtime. After customizing the default form, then you can
proceed to add controls from the toolbox to the form and then customize their
properties.
2.1 Customizing the Form
When you start a new Visual Basic 2012 project, the IDE will display the default form
along with the Solution Explorer window and the Properties window for the form .
The name of the default form is Form1. The properties window displays all properties
related to Form1 and their corresponding attributes or values. You can change the
name of the form, the title of the form, the background colour, the foreground colour,
the size and more. Try changing the following properties:
Property Value
Name MyForm
Text My First VB2012 Program
BackColor Blue
MaximizeBox False
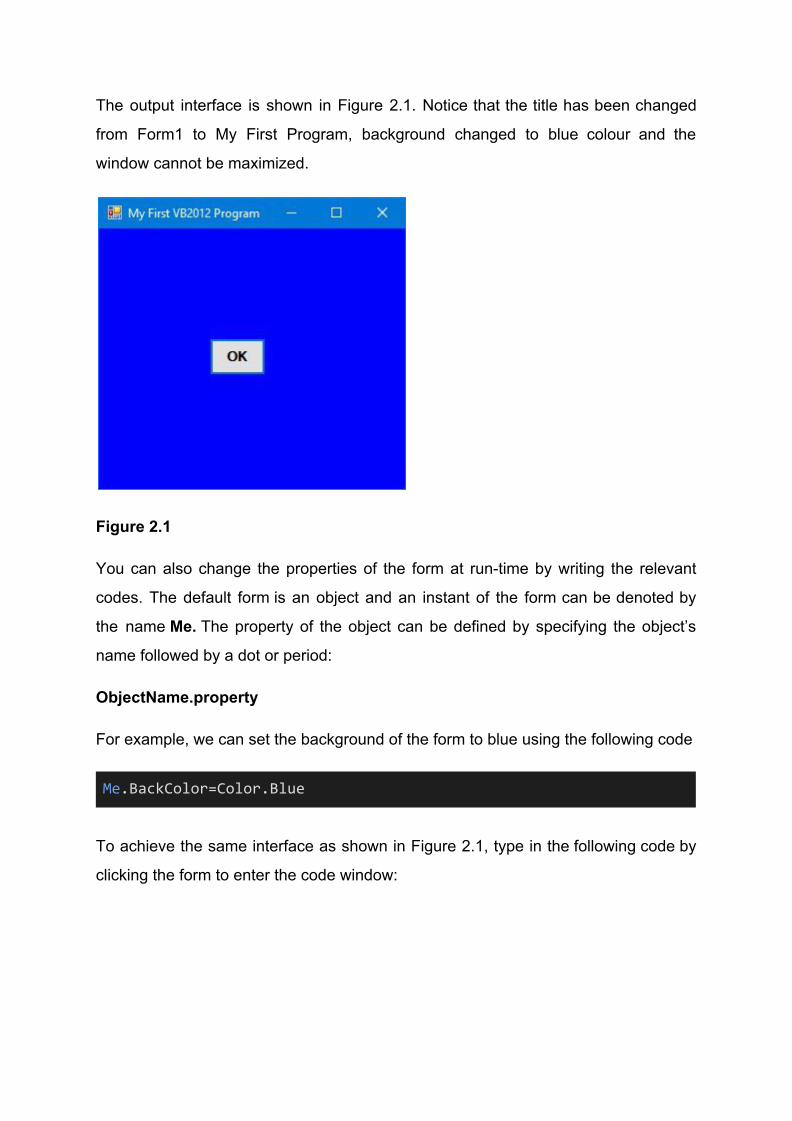
The output interface is shown in Figure 2.1. Notice that the title has been changed
from Form1 to My First Program, background changed to blue colour and the
window cannot be maximized.
Figure 2.1
You can also change the properties of the form at run-time by writing the relevant
codes. The default form is an object and an instant of the form can be denoted by
the name Me. The property of the object can be defined by specifying the object’s
name followed by a dot or period:
ObjectName.property
For example, we can set the background of the form to blue using the following code
Me.BackColor=Color.Blue
To achieve the same interface as shown in Figure 2.1, type in the following code by
clicking the form to enter the code window:
Private Sub Form1_Load(ByVal sender As System.Object, ByVal e As System.EventArgs) Handles MyBase.Load Me.Text = "My First VB2012 Program" Me.BackColor = Color.Blue Me.MaximizeBox=False End Sub
Press F5 to run the program and you will get the exact interface as that shown in
Figure 2.1
2.2 Adding Controls to the Form
In previous section, we have learned how to build an initial interface in Visual Basic
2012 by customizing the default form. Now we shall continue to build the interface by
adding controls to the form. There are numerous controls that we can add to the
form. Among the controls, the most common ones are button, label, textbox, listbox,
combobox, picture box, checkbox, radio button and more. The controls can be made
visible or invisible at runtime. However, some controls will only run in the background
and cannot be seen at runtime, one such control is the timer.
The Toolbox is usually hidden when you start Visual Basic 2012, you need to click
View on the menu bar and then select Toolbox to reveal the tool box, as shown in
Figure 2.2. You can also use shortcut keys Ctrl+w+x to bring out the tool box.
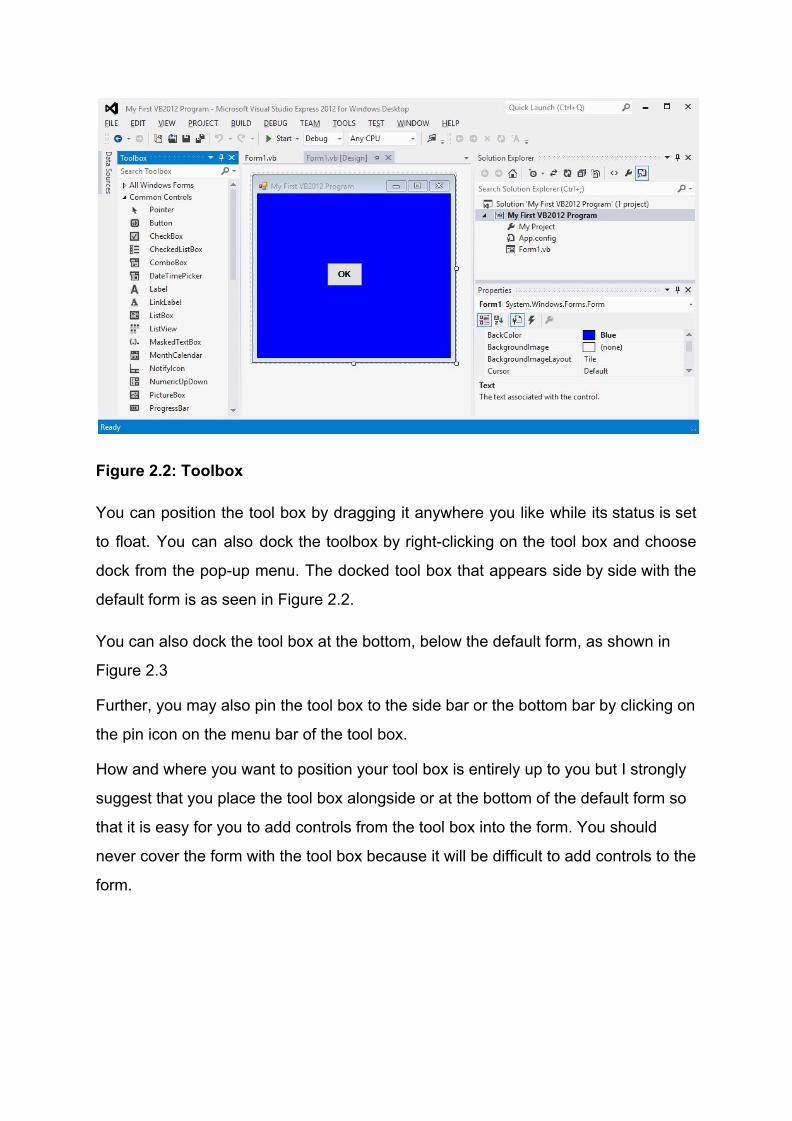
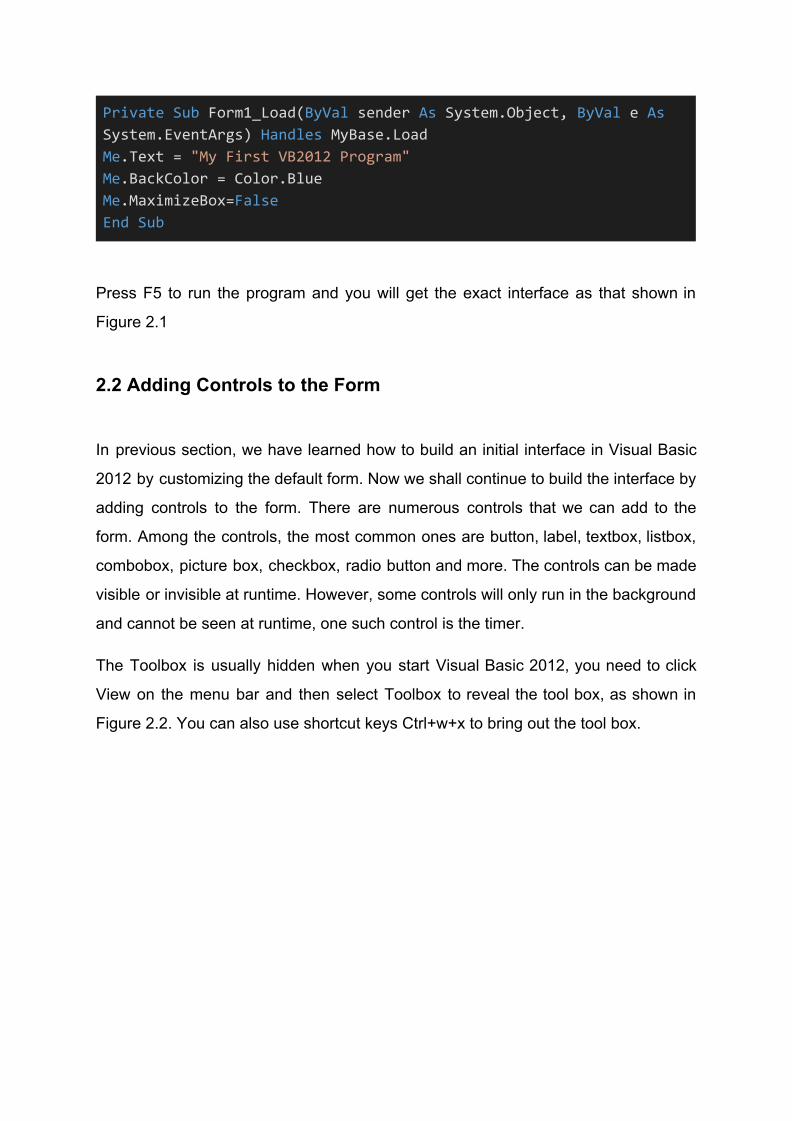
Figure 2.2: Toolbox
You can position the tool box by dragging it anywhere you like while its status is set
to float. You can also dock the toolbox by right-clicking on the tool box and choose
dock from the pop-up menu. The docked tool box that appears side by side with the
default form is as seen in Figure 2.2.
You can also dock the tool box at the bottom, below the default form, as shown in
Figure 2.3
Further, you may also pin the tool box to the side bar or the bottom bar by clicking on
the pin icon on the menu bar of the tool box.
How and where you want to position your tool box is entirely up to you but I strongly
suggest that you place the tool box alongside or at the bottom of the default form so
that it is easy for you to add controls from the tool box into the form. You should
never cover the form with the tool box because it will be difficult to add controls to the
form.
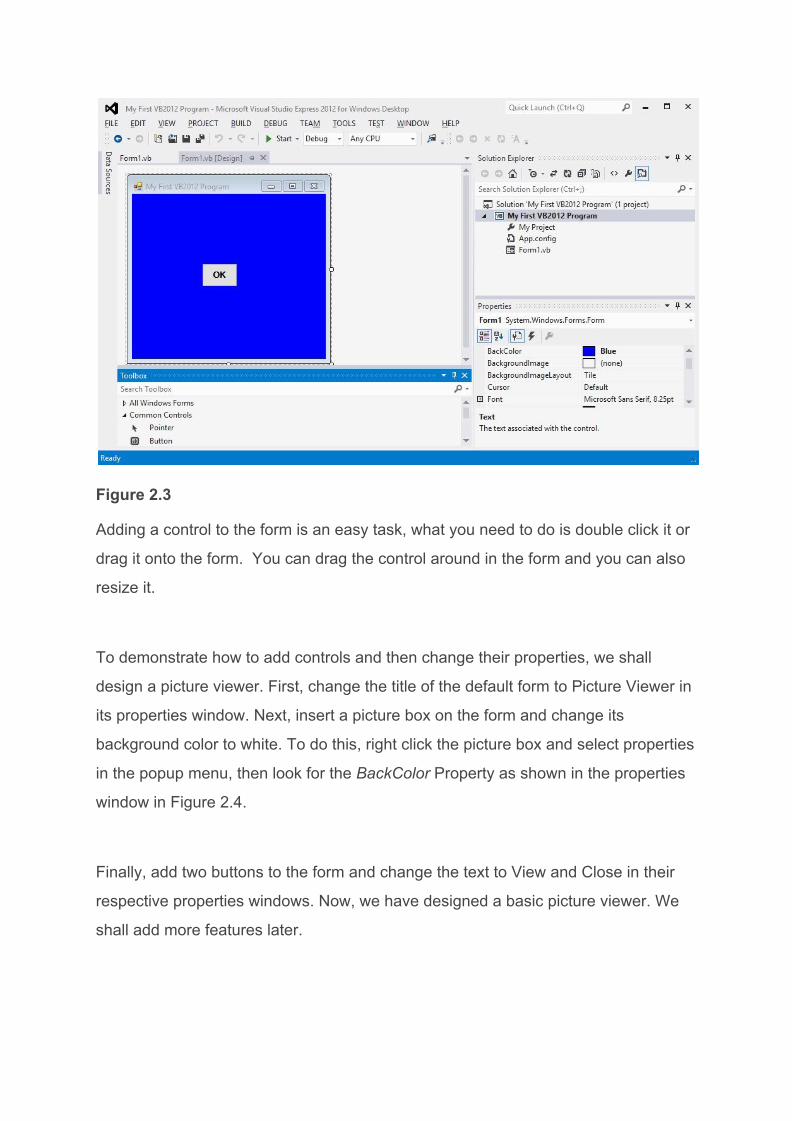
Figure 2.3
Adding a control to the form is an easy task, what you need to do is double click it or
drag it onto the form. You can drag the control around in the form and you can also
resize it.
To demonstrate how to add controls and then change their properties, we shall
design a picture viewer. First, change the title of the default form to Picture Viewer in
its properties window. Next, insert a picture box on the form and change its
background color to white. To do this, right click the picture box and select properties
in the popup menu, then look for the BackColor Property as shown in the properties
window in Figure 2.4.
Finally, add two buttons to the form and change the text to View and Close in their
respective properties windows. Now, we have designed a basic picture viewer. We
shall add more features later.
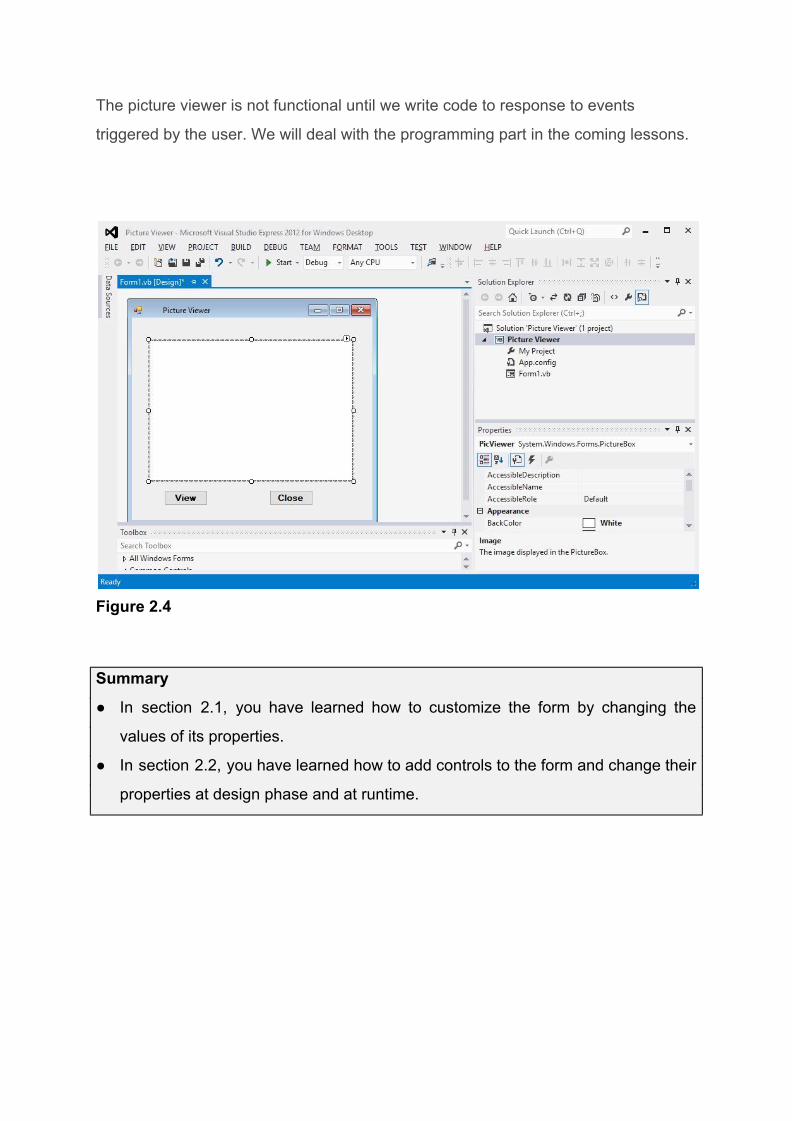
The picture viewer is not functional until we write code to response to events
triggered by the user. We will deal with the programming part in the coming lessons.
Figure 2.4
Summary
● In section 2.1, you have learned how to customize the form by changing the
values of its properties.
● In section 2.2, you have learned how to add controls to the form and change their
properties at design phase and at runtime.
Chapter 3 Writing the Code
❖ Learn the basics of code writing in Visual Basic 2012
In previous chapter, we have learned how to design the user interface by adding
controls to the form and by changing their properties. However, the user interface
alone will not work without adding code to them. In this chapter, we shall learn how
to write code for all the controls so that they can interact with events triggered by the
users. Before learning how to write Visual Basic 2012 code, let us dwell into the
concept of event-driven programming
3.1 The Concept of Event-Driven Programming
Visual Basic 2012 is an event driven programming language because we need to
write code to response to certain events triggered randomly by the user via the
controls on the form. These events do not occur in a certain order. The events
usually comprises but not limited to the user’s inputs. Some of the common events
are load, click, double click, drag and drop, pressing the keys and more.
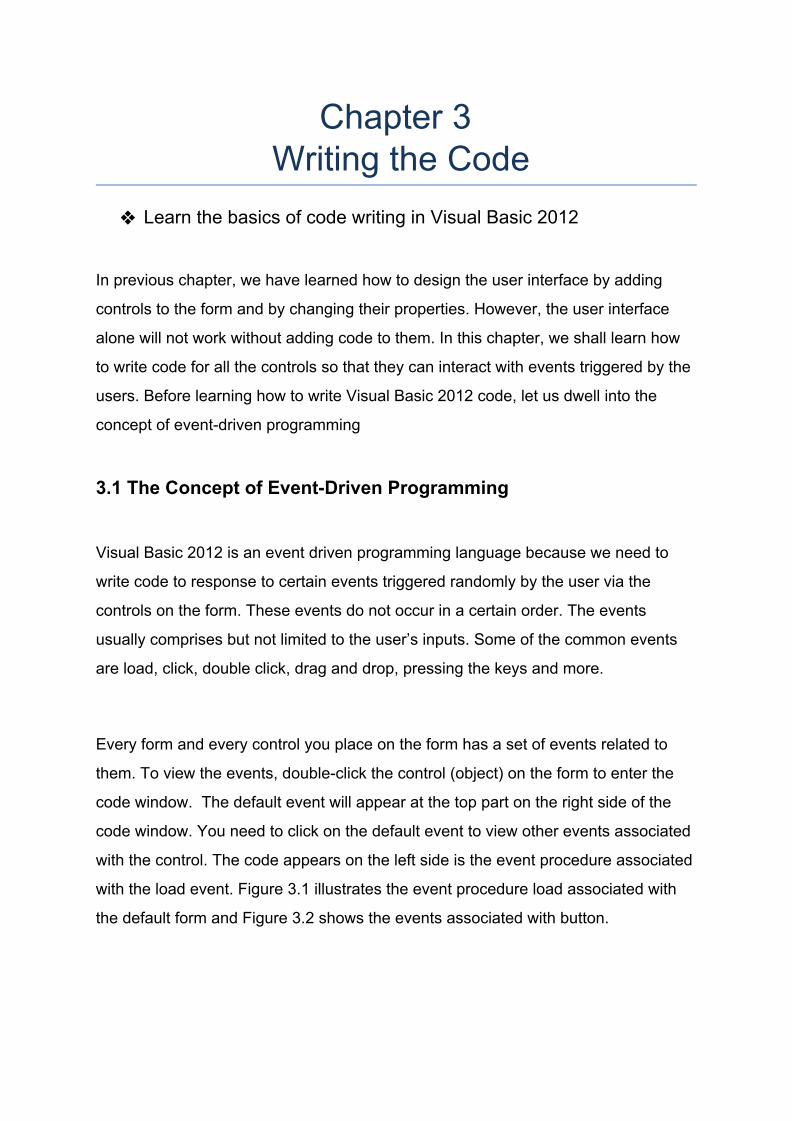
Every form and every control you place on the form has a set of events related to
them. To view the events, double-click the control (object) on the form to enter the
code window. The default event will appear at the top part on the right side of the
code window. You need to click on the default event to view other events associated
with the control. The code appears on the left side is the event procedure associated
with the load event. Figure 3.1 illustrates the event procedure load associated with
the default form and Figure 3.2 shows the events associated with button.
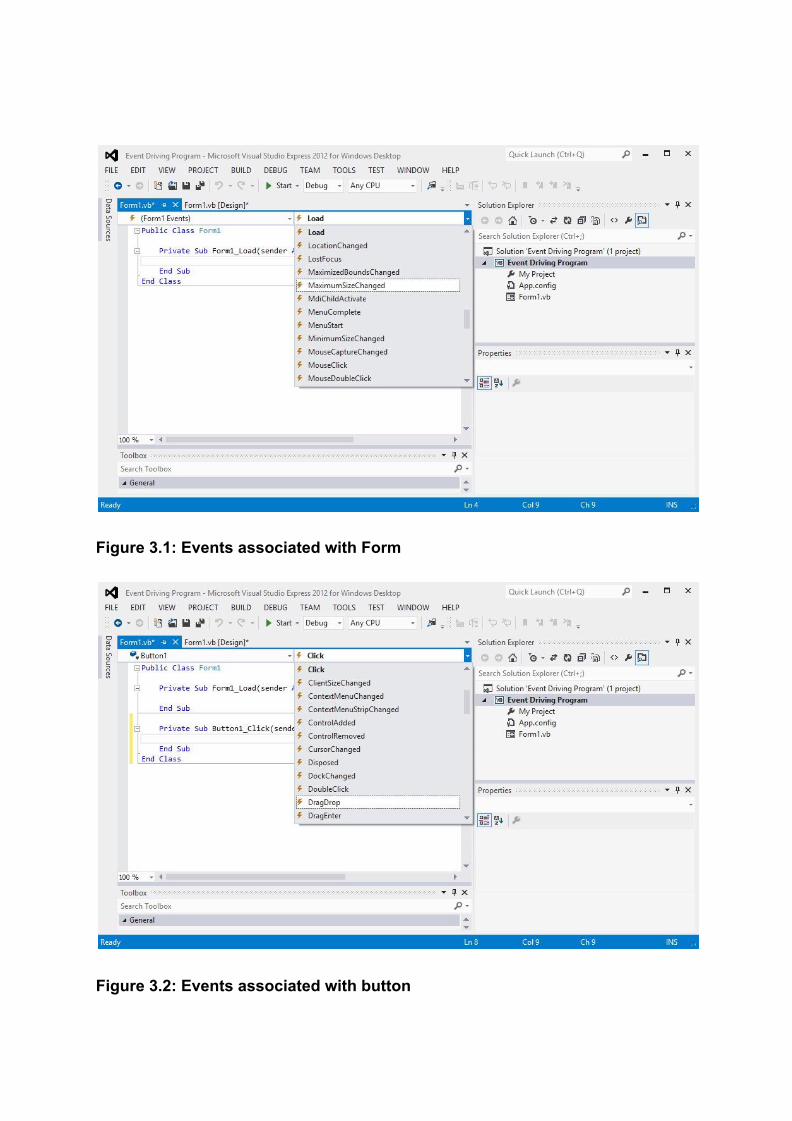
Figure 3.1: Events associated with Form
Figure 3.2: Events associated with button
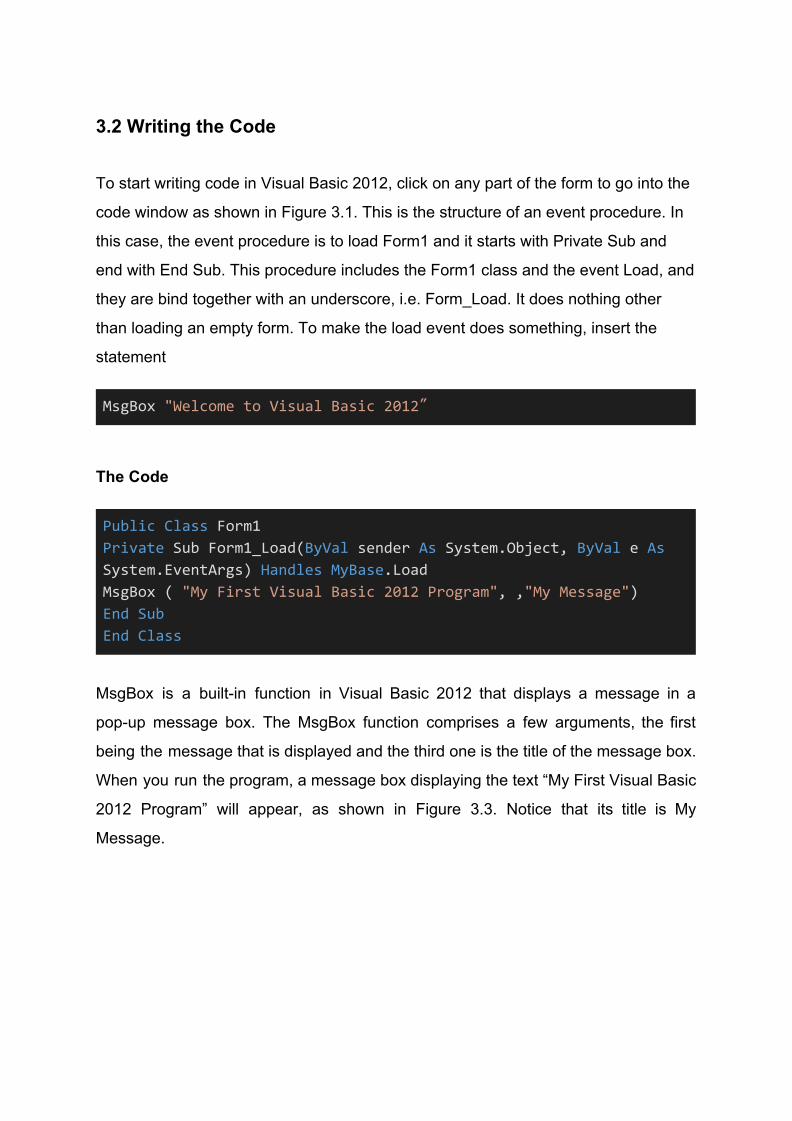
3.2 Writing the Code
To start writing code in Visual Basic 2012, click on any part of the form to go into the
code window as shown in Figure 3.1. This is the structure of an event procedure. In
this case, the event procedure is to load Form1 and it starts with Private Sub and
end with End Sub. This procedure includes the Form1 class and the event Load, and
they are bind together with an underscore, i.e. Form_Load. It does nothing other
than loading an empty form. To make the load event does something, insert the
statement
MsgBox "Welcome to Visual Basic 2012″
The Code
Public Class Form1 Private Sub Form1_Load(ByVal sender As System.Object, ByVal e As System.EventArgs) Handles MyBase.Load MsgBox ( "My First Visual Basic 2012 Program", ,"My Message") End Sub
End Class
MsgBox is a built-in function in Visual Basic 2012 that displays a message in a
pop-up message box. The MsgBox function comprises a few arguments, the first
being the message that is displayed and the third one is the title of the message box.
When you run the program, a message box displaying the text “My First Visual Basic
2012 Program” will appear, as shown in Figure 3.3. Notice that its title is My
Message.
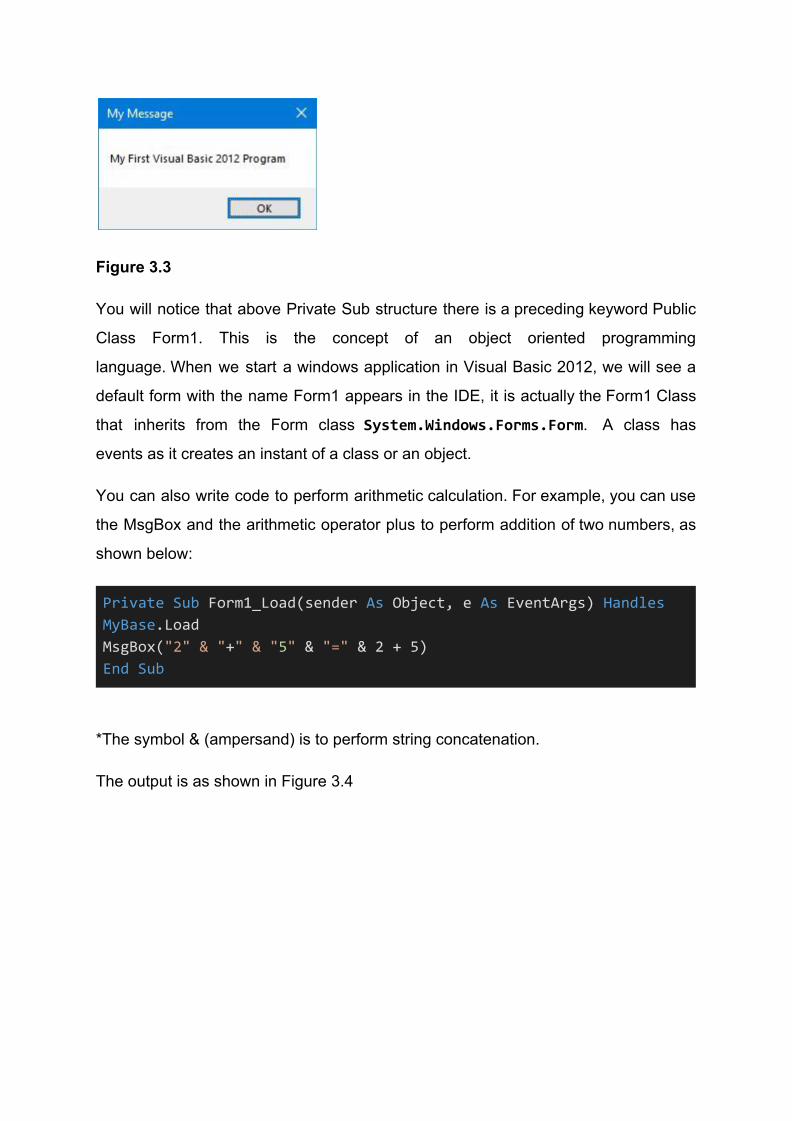
Figure 3.3
You will notice that above Private Sub structure there is a preceding keyword Public
Class Form1. This is the concept of an object oriented programming
language. When we start a windows application in Visual Basic 2012, we will see a
default form with the name Form1 appears in the IDE, it is actually the Form1 Class
that inherits from the Form class System.Windows.Forms.Form. A class has
events as it creates an instant of a class or an object.
You can also write code to perform arithmetic calculation. For example, you can use
the MsgBox and the arithmetic operator plus to perform addition of two numbers, as
shown below:
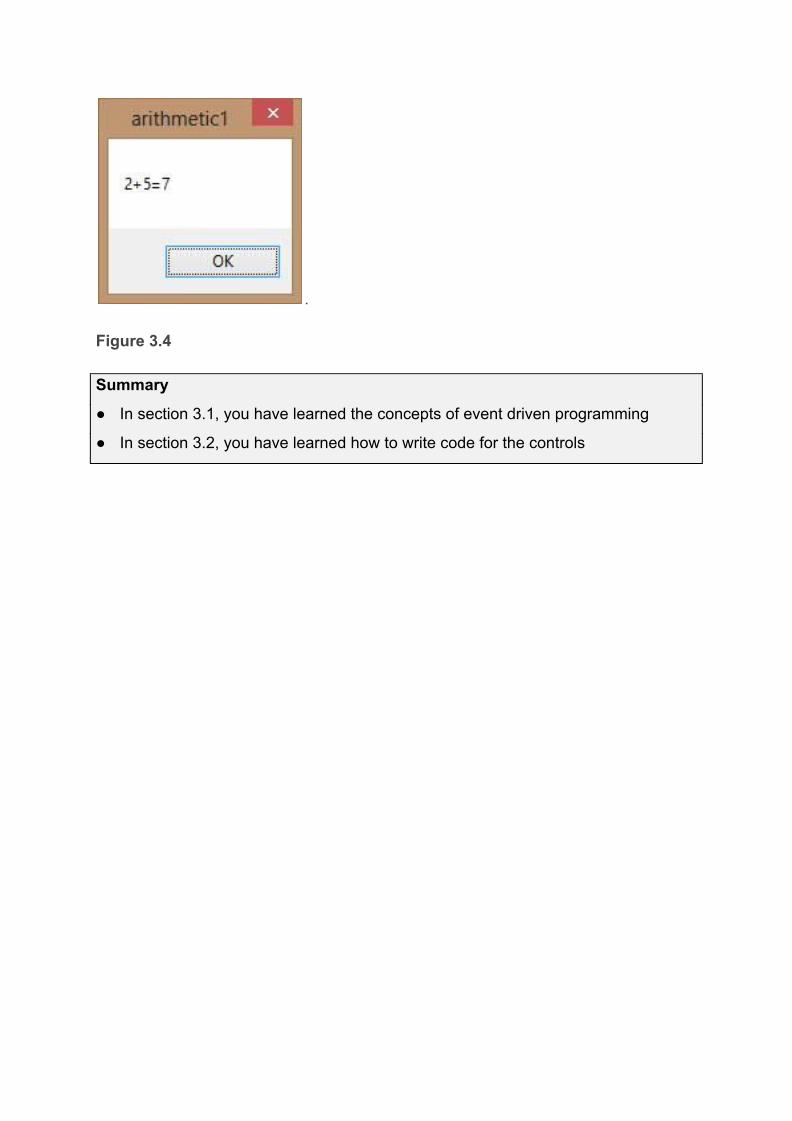
Private Sub Form1_Load(sender As Object, e As EventArgs) Handles MyBase.Load MsgBox("2" & "+" & "5" & "=" & 2 + 5) End Sub
*The symbol & (ampersand) is to perform string concatenation.
The output is as shown in Figure 3.4
.
Figure 3.4
Summary
● In section 3.1, you have learned the concepts of event driven programming
● In section 3.2, you have learned how to write code for the controls
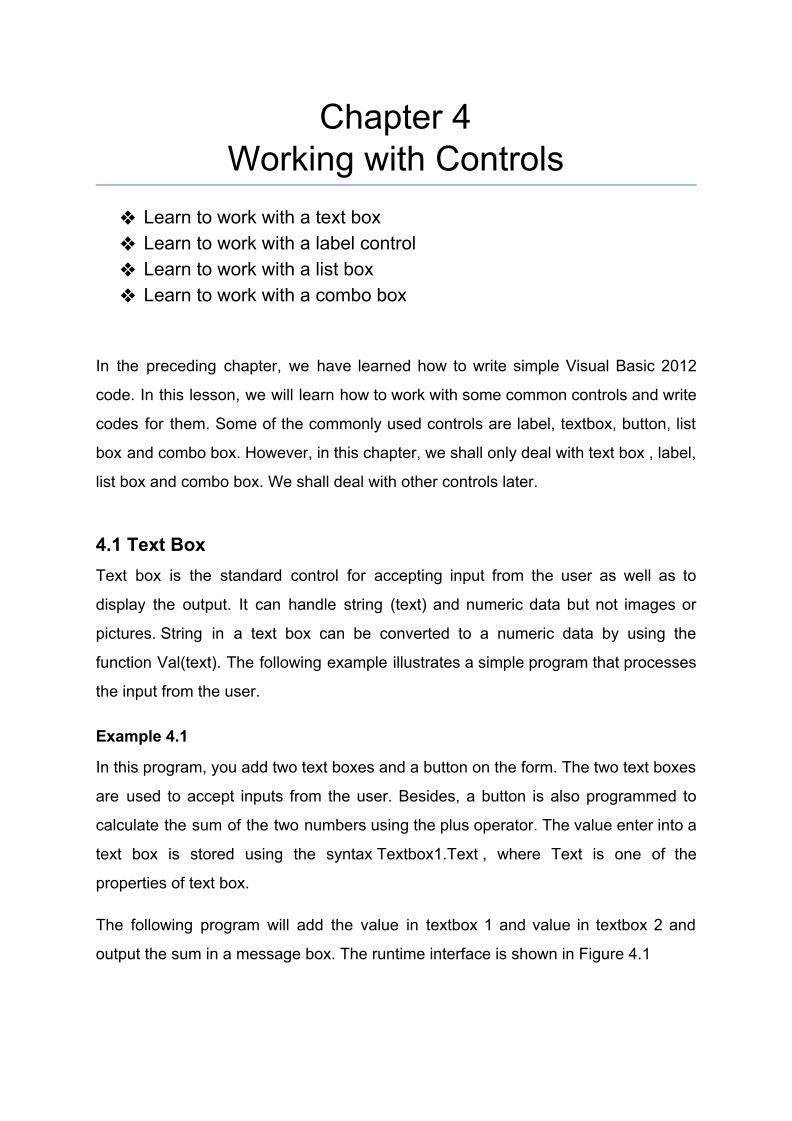
Chapter 4 Working with Controls
❖ Learn to work with a text box ❖ Learn to work with a label control ❖ Learn to work with a list box ❖ Learn to work with a combo box
In the preceding chapter, we have learned how to write simple Visual Basic 2012
code. In this lesson, we will learn how to work with some common controls and write
codes for them. Some of the commonly used controls are label, textbox, button, list
box and combo box. However, in this chapter, we shall only deal with text box , label,
list box and combo box. We shall deal with other controls later.
4.1 Text Box Text box is the standard control for accepting input from the user as well as to
display the output. It can handle string (text) and numeric data but not images or
pictures. String in a text box can be converted to a numeric data by using the
function Val(text). The following example illustrates a simple program that processes
the input from the user.
Example 4.1
In this program, you add two text boxes and a button on the form. The two text boxes
are used to accept inputs from the user. Besides, a button is also programmed to
calculate the sum of the two numbers using the plus operator. The value enter into a
text box is stored using the syntax Textbox1.Text , where Text is one of the
properties of text box.
The following program will add the value in textbox 1 and value in textbox 2 and
output the sum in a message box. The runtime interface is shown in Figure 4.1
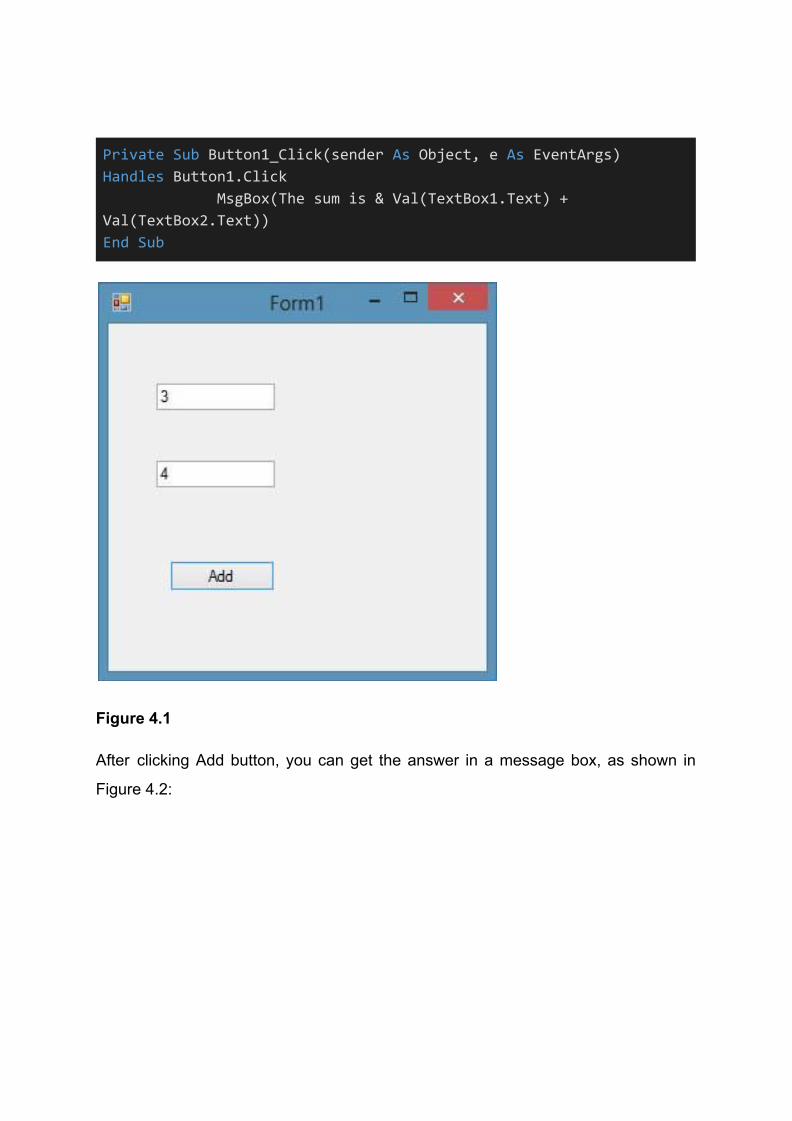
Private Sub Button1_Click(sender As Object, e As EventArgs) Handles Button1.Click MsgBox(The sum is & Val(TextBox1.Text) +
Val(TextBox2.Text))
End Sub
Figure 4.1
After clicking Add button, you can get the answer in a message box, as shown in
Figure 4.2:
Figure 4.2
4.2 Label
Label is a very useful control for Visual Basic, as it is not only used to provide
instructions and guides to the users, it can also be used to display outputs. It is
different from text box because it can only display static text, which means the user
cannot change the text. Using the syntax Label.Text, it can display text and numeric
data . You can change its text in the properties window and also at runtime.
Example 4.2
Based on Example 4.1, you now add two labels, one is to display the text Sum= and
the other label is to display the answer of the Sum. For the first label, change the text
property of the label by typing Sum= over the default text Label1. Further, change its
font to bold and font size to 10. For the second label, delete the default text Label2
and change its font to bold and font size to 10. Besides that, change its background
colour to white.
In this program, instead of showing the sum in a message box, we wish to display
the sum on the label.
The Code
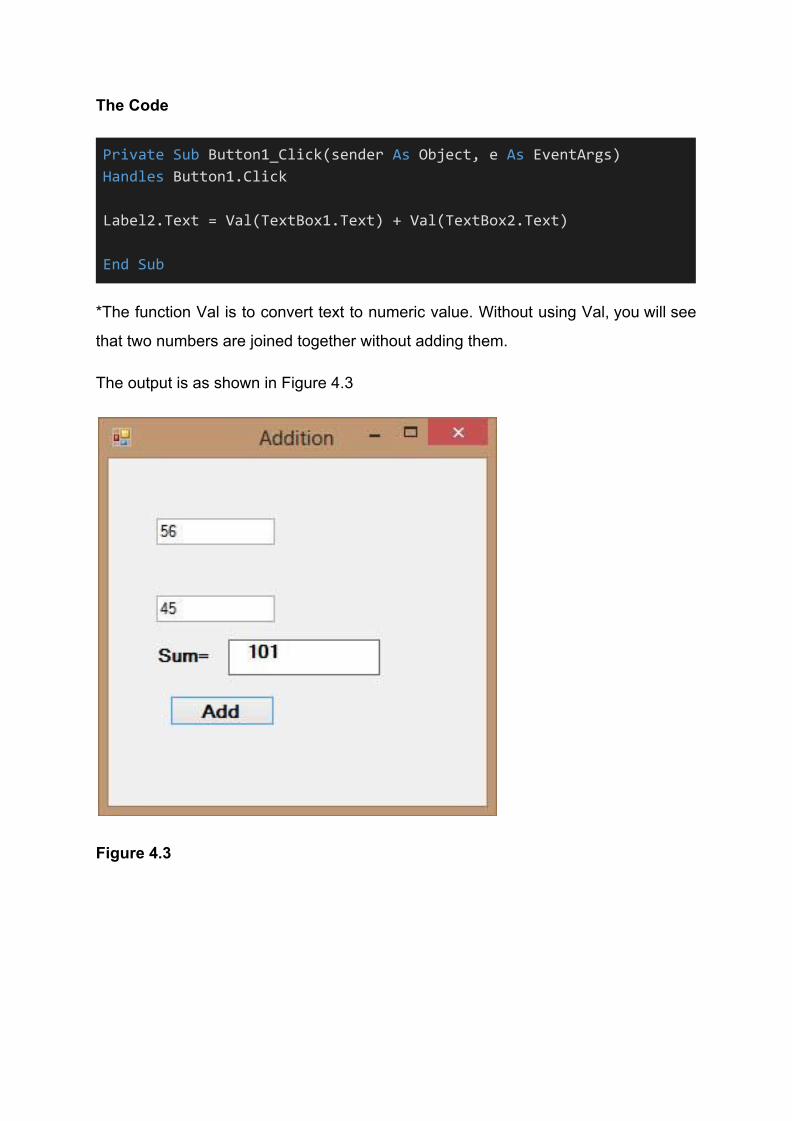
Private Sub Button1_Click(sender As Object, e As EventArgs) Handles Button1.Click
Label2.Text = Val(TextBox1.Text) + Val(TextBox2.Text)
End Sub
*The function Val is to convert text to numeric value. Without using Val, you will see
that two numbers are joined together without adding them.
The output is as shown in Figure 4.3
Figure 4.3
4.3 List Box
The function of the List Box is to present a list of items where the user can click and
select the items from the list. Items can be added at design time and at runtime. The
items can also be removed at design time and also at runtime.
4.3.1 Adding Items to a Listbox
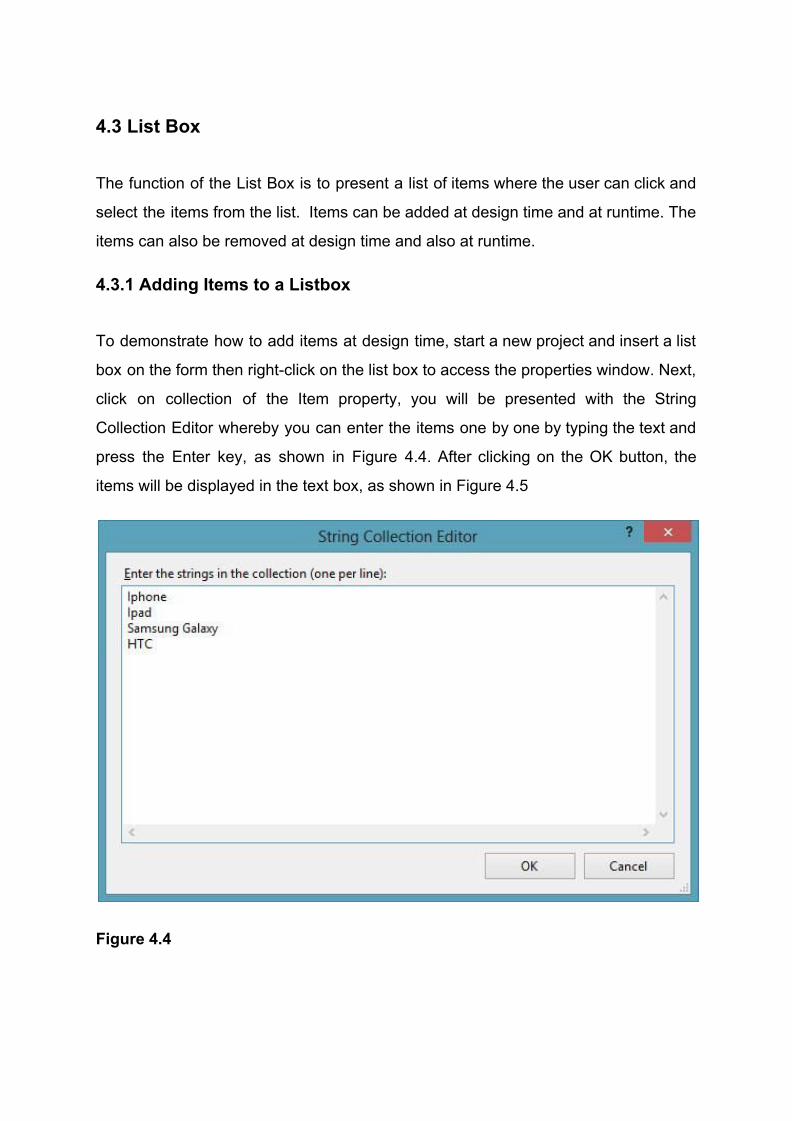
To demonstrate how to add items at design time, start a new project and insert a list
box on the form then right-click on the list box to access the properties window. Next,
click on collection of the Item property, you will be presented with the String
Collection Editor whereby you can enter the items one by one by typing the text and
press the Enter key, as shown in Figure 4.4. After clicking on the OK button, the
items will be displayed in the text box, as shown in Figure 4.5
Figure 4.4

Figure 4.5
Items can also be added at runtime using the Add( ) method. Before we proceed
further, we need to know that Visual Basic 2012 is a full-fledged object oriented
programming language. Therefore, visual basic 2012 comprises objects. All objects
have methods and properties, and they can are differentiated and connected by
hierarchy. For a listbox, Item is an object subordinated to the object ListBox . Item
comprises a method call Add() that is used to add items to the list box. To add an
item to a list box, you can use the following syntax:
ListBox.Item.Add("Text")
For example, you can key-in the following statement
Private Sub Button1_Click(sender As Object, e As EventArgs) Handles Button1.Click
ListBox1.Items.Add("Nokia")
End Sub

The item “Nokia” will be added to the end of the list, as shown in Figure 4.6
Figure 4.6
You can also allow the user to add items using the InputBox function, as follows:
Private Sub Button1_Click(sender As Object, e As EventArgs) Handles Button1.Click Dim myitem myitem = InputBox("Enter your Item") ListBox1.Items.Add(myitem)
End Sub
* The keyword Dim is to declare the variable myitem. You will learn more about
variables in coming lessons
4.3.2 Removing Items from a List Box
To remove items at design time, simply open the String Collection Editor and delete
the items line by line or all at once using the Delete key.
To remove the items at runtime, you can use the Remove method, as illustrated in
the following example. In this example, add a second button and label it “Remove
Items”. Click on this button and enter the following code:
Private Sub Button2_Click(sender As Object, e As EventArgs) Handles Button2.Click ListBox1.Items.Remove("Ipad") End Sub
The item “Ipad” will be removed after running the program. You can also let the user
choose which item to delete.
To clear all the items at once, use the clear method, as illustrated in the following
example. In this example, add a button and label it “Clear Items”
Private Sub Button3_Click(sender As Object, e As EventArgs) Handles Button2.Click ListBox1.Items.Clear()
End Sub
4.4 Combo Box
In Visual Basic 2012, the function of the Combo Box is also to present a list of items
where the user can click and select the items from the list. However, the user needs
to click on the handle (small arrowhead) on the right of the combo box to see the
items which are presented in a drop-down list.
4.4.1 Adding Items to a Combobox
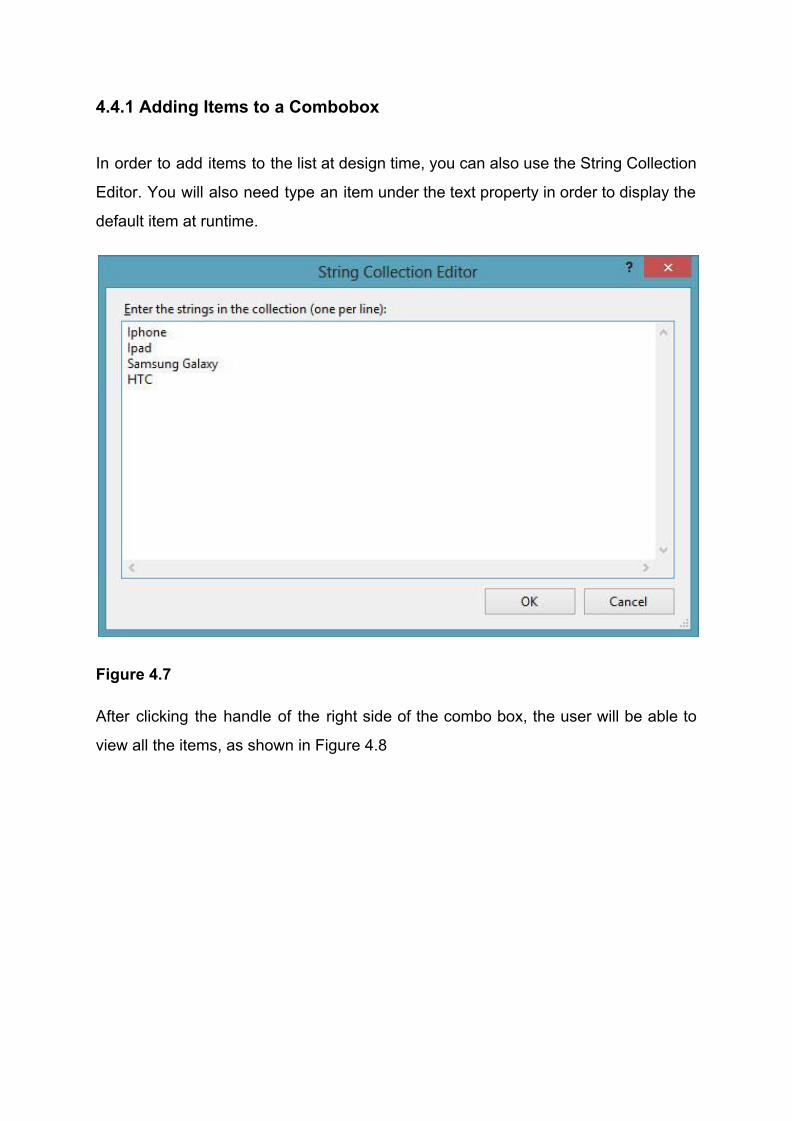
In order to add items to the list at design time, you can also use the String Collection
Editor. You will also need type an item under the text property in order to display the
default item at runtime.
Figure 4.7
After clicking the handle of the right side of the combo box, the user will be able to
view all the items, as shown in Figure 4.8
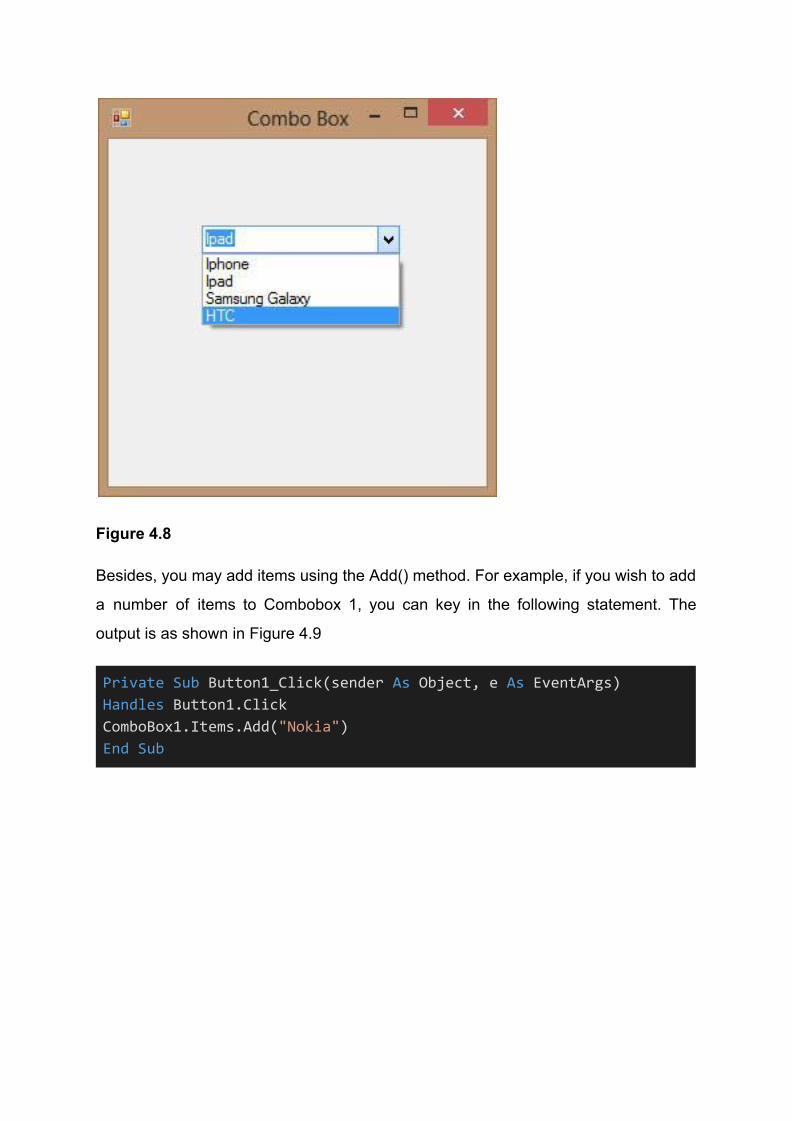
Figure 4.8
Besides, you may add items using the Add() method. For example, if you wish to add
a number of items to Combobox 1, you can key in the following statement. The
output is as shown in Figure 4.9
Private Sub Button1_Click(sender As Object, e As EventArgs) Handles Button1.Click ComboBox1.Items.Add("Nokia") End Sub
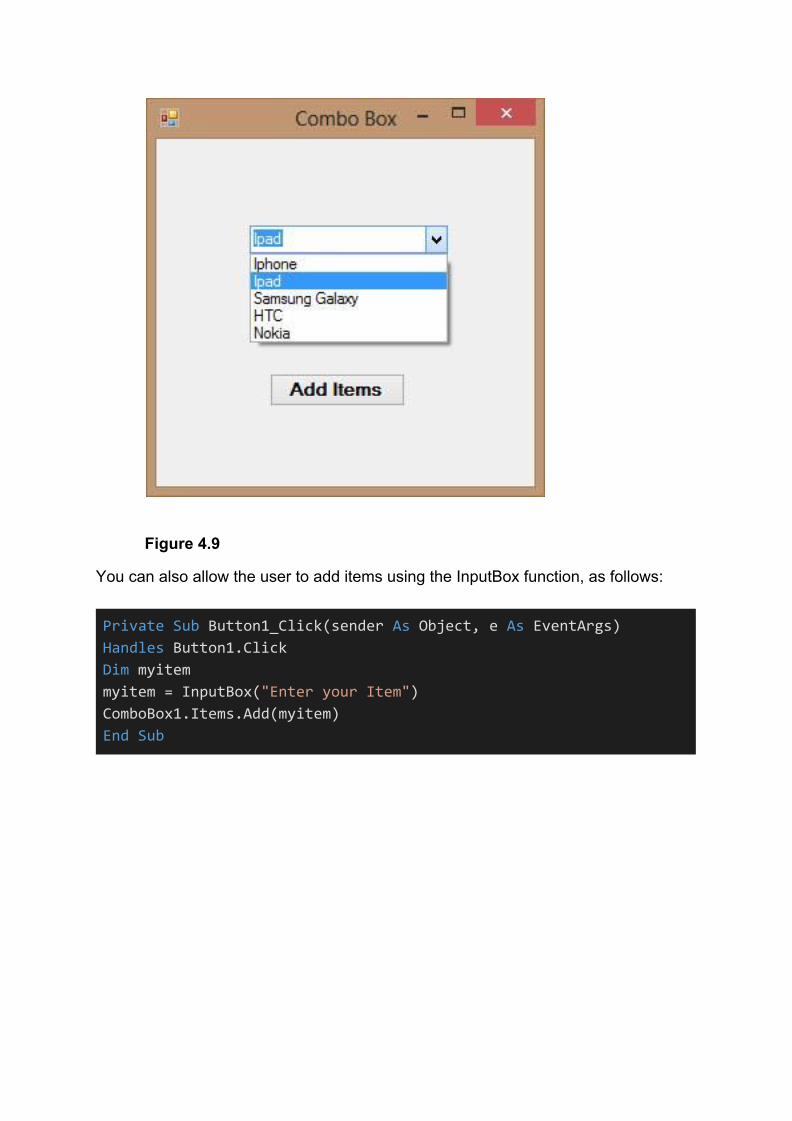
Figure 4.9
You can also allow the user to add items using the InputBox function, as follows:
Private Sub Button1_Click(sender As Object, e As EventArgs) Handles Button1.Click Dim myitem myitem = InputBox("Enter your Item") ComboBox1.Items.Add(myitem)
End Sub
Top Related