


Languages
Pages
Legal


zulily Vendor Portal Instructions—2015 zulily Proprietary and Confidential
The vendor portal is your self-service tool to make selling with zulily easy and convenient. You will use the vendor portal to:
Manage your event setup and details Route shipments Print shipping labels Enter shipment tracking information
Access real-time sales data Submit invoices Access help resources and vendor updates And more!
Vendor Portal Instructions
Instructions Table of Contents
Questions? Contact your Vendor Specialist
Getting StartedAccess the Vendor Portal 2Vendor Portal Navigation 3Account Profile & Contact Information 4Vendor News & Resources 5
Event ManagementEvent Setup 6Product Review 7Final Review 8Event Summary & Sales Reporting 9
Shipping & LogisticsPO Management & Status 10Auto-generated Barcodes 11Routing a PO 12Submit Shipment Tracking 13Create Shipping Labels 14Drop Ship – Submit Tracking Information 15Drop Ship – Process Customer Orders 16
InvoicingGenerate & Upload Invoices 17 1

Use the link included in the Welcome email you received to access the vendor portal.
Can’t find the Welcome email? Check your junk/spam folder or select “forgot password”.
We recommend using Google Chrome internet browser to access the vendor portal; it is the most compatible browser.
1 Sign in and create a password.
Note: if you’ve signed up as a zulily customer, the same password for the website will work for the vendor portal.
Getting Started
Access the Vendor Portal
zulily Vendor Portal Instructions—2015 zulily Proprietary and Confidential
Vendor Portal Instructions
Questions? Contact your Vendor Specialist
2
2
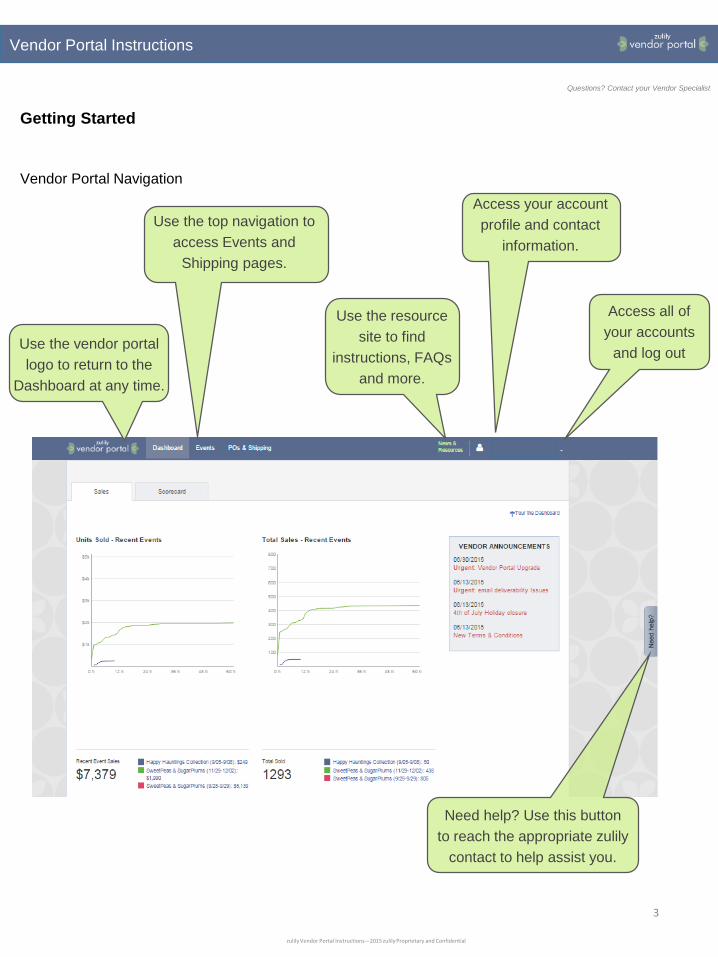
Access all of your accounts
and log out
Need help? Use this button to reach the appropriate zulily
contact to help assist you.
Use the top navigation to access Events and
Shipping pages.
Use the vendor portal logo to return to the
Dashboard at any time.
Access your account profile and contact
information.
Getting Started
Vendor Portal Navigation
zulily Vendor Portal Instructions—2015 zulily Proprietary and Confidential
Vendor Portal Instructions
Questions? Contact your Vendor Specialist
Use the resource site to find
instructions, FAQs and more.
3

Access all of your accounts in the top right drop down menu. View and update contact
information using the icon. Ensure all information is up to date and accurate. Manage who has access to the
vendor portal and email preferences for each of your contacts.
Update payment information, upload tax documentation and view your zulily
agreements.
1
Getting Started
Account Profile & Contact Information
Vendor Portal Instructions
Questions? Contact your Vendor Specialist
zulily Vendor Portal Instructions—2015 zulily Proprietary and Confidential
2
3
Contact name here
Contact name here
Contact name here
Contact name here
4

Access the News & Vendor Resource site from the link in the top navigation bar to get latest zulily updates and news along with help guides, selling tips, tricks and more.
Use the menu on the right to find FAQs, vendor portal instructions and shipping guidelines.
Getting Started
Vendor News & Resources
Vendor Portal Instructions
Questions? Contact your Vendor Specialist
zulily Vendor Portal Instructions—2015 zulily Proprietary and Confidential
1
2
5

Vendor Portal Instructions
Select the Events tab in the top navigation bar to view your Live, Future
and Past Events. Select a Future event and view the tasks to complete. The Set up Review tab has event details including dates,
payment terms, contacts and the zulily Terms & Conditions.
To set up your event images are required. If you do not have images, you must send
product samples for zulily to photograph. Fill in the Event Images & Samples section with
shipment information.
Event Management
Event Set up
Vendor Portal Instructions
Questions? Contact your Vendor Specialist
zulily Vendor Portal Instructions—2015 zulily Proprietary and Confidential
1 2
3 4
You can review the product information you provided to zulily through the
Product Review, and you can view how your products will appear on the website through the preview URL on
the Final Review6

For future events, select the Review Products button to view your product
images & inventory.Edit inventory quantity in the “Vendor
Supplied” column. Use the notes feature to send a note to your zulily buying team. Upload bulk inventory updates using the
“upload file” link. Note, inventory changes cannot be made after 3pm the
day before your event goes live.
Use the search feature to filter your products and easily find the products
you need to update.
View a history of all inventory updates made and download inventory data
using the noted link. And be sure to use the “Save Page” button.
Event Management
Product Review
Vendor Portal Instructions
Questions? Contact your Vendor Specialist
zulily Vendor Portal Instructions—2015 zulily Proprietary and Confidential
1 2
3 4
7

For future events, select the Final Review tab to access event details
and a preview URL link with your final event images and copy.
Review images and copy before they go live. Note, this URL link is not live and is
not shown to customers at time of review prior to event launch
To approve, select the “Approve” button at the bottom right of the section.
Once the final review is approved a time stamp is included at the bottom
of the section and your event is ready to go live.
Event Management
Final Review
Vendor Portal Instructions
Questions? Contact your Vendor Specialist
zulily Vendor Portal Instructions—2015 zulily Proprietary and Confidential
1 2
3 4
8

View an event summary with sales reporting for any live and/or future
event. Simply select an event to view the summary page.
See your sales in real-time as soon as your event goes live. View units sold, sell through
and customers who selected “notify me” when there’s more inventory available. Data
is updated every 10 minutes.
Also view sales by geographic location.
All sales reporting is available for download.
Event Management
Event Summary & Sales Report
Vendor Portal Instructions
Questions? Contact your Vendor Specialist
zulily Vendor Portal Instructions—2015 zulily Proprietary and Confidential
1 2
3 4
9

The POs & Shipping page allows you to view upcoming POs, PO’s not
routed, PO’s in progress and PO’s that are complete.
Download the PO in an excel file in the top right.
Select a PO to view the complete details of the PO including products orders, SKUs
and unit price.
Shipping & Logistics
PO Management & Status
Vendor Portal Instructions
Questions? Contact your Vendor Specialist
zulily Vendor Portal Instructions—2015 zulily Proprietary and Confidential
1 2
3
10

From the POs & Shipping section, select a PO to access auto-generated barcodes.
Print the pdf file with the barcodes on 5160 Avery Labels and affix each barcode to the
outside of each polybag/package item. When printing the barcodes, adjust the print setting to “Actual Size” to
avoid any layout issues.
Select “Barcode” in the top right to download a pdf of the PO’s barcodes.
Shipping & Logistics
Auto-generated Barcodes
Vendor Portal Instructions
Questions? Contact your Vendor Specialist
zulily Vendor Portal Instructions—2015 zulily Proprietary and Confidential
1 2
3 4
11

Next confirm and input your shipment information including warehouse location,
request a pick up for your shipment if necessary and include shipment size details.
Please note: same day pickup deadline is 12pm (noon) per your pickup
warehouse location’s time zone.
If you did not ship the full PO, the PO will move to the In Progress tab with the
remaining units to ship in red under ASN Variance. Ensure you ship each PO in full. Each unit not shipped may incur a
$10/unit chargeback fee.
Select whether your shipment is under or over 125 lbs.
Shipping & Logistics
Routing a PO
Vendor Portal Instructions
Questions? Contact your Vendor Specialist
zulily Vendor Portal Instructions—2015 zulily Proprietary and Confidential
1 2
3 4
Confirm the warehouse information is correct and select
the submit button.
12

If you have tracking information to provide for your PO shipment, select the PO and
select the “report tracking #” button.
When selecting “report tracking #” you will be directed to input the
carrier, tracking # and pickup date.
Please note, if you enter tracking information after your Expected Ship Date, you may be prompted to enter
a delay reason. Please always update tracking the day your items
have shipped.
Shipping & Logistics
Submit Shipment Tracking
Vendor Portal Instructions
Questions? Contact your Vendor Specialist
zulily Vendor Portal Instructions—2015 zulily Proprietary and Confidential
1 2
3
Next confirm/enter the quantities shipped and click the submit button.
13

Shipping & Logistics
Create Shipping Labels
Vendor Portal Instructions
Questions? Contact your Vendor Specialist
zulily Vendor Portal Instructions—2015 zulily Proprietary and Confidential
1 2
3
Confirm and input your shipment information including warehouse location, request a pick up for your shipment if necessary and include
shipment size details.
Please note, same day pickup deadline is 12pm (noon) per your pickup warehouse
location’s time zone.
Next input your shipment dimensions.
The label will download automatically. If it does not, you can manually download by
selected the shipment ID and selecting the “Shipping Label” tab shown above.
Select whether your shipment is under or over 125 lbs.
4
14

If you are set up to ship items directly to zulily customers, your PO’s and details are
shown by “Not Shipped” and “Shipped”. Select a PO to submit tracking in bulk.
Upload tracking for multiple orders. Download the customer orders in the PO. Please note: if you use your own shipping
account you must email your Vendor Specialist the tracking information.
Next, select browse and upload the excel file with columns L (carrier) & M (tracking #)
filled out.
Your excel file will populate below. Next, select Submit Tracking #.
Shipping & Logistics
Drop Ship – Submit Tracking Information
Vendor Portal Instructions
Questions? Contact your Vendor Specialist
zulily Vendor Portal Instructions—2015 zulily Proprietary and Confidential
1 2
3 4
15

If you are set up to ship items directly to zulily customers, your PO’s and details are
shown by “Not Shipped” and “Shipped”. Select a PO to begin shipping.
Confirm quantity, enter the weight for all product and whether orders will be shipped
individually. Select Confirm & Continue when done. Tip: use the bulk edit tool in the top left
to edit multiple orders at once.
Next confirm the shipment box size and split any customer orders if needed. Once a shipment is
confirmed, select “Generate Shipping Labels & Packing Slips” in the top right. Tip: use the bulk confirmation tool
to confirm multiple shipments.
Shipping & Logistics
Drop Ship – Process Customer Orders
Vendor Portal Instructions
Questions? Contact your Vendor Specialist
zulily Vendor Portal Instructions—2015 zulily Proprietary and Confidential
1 2
3 4
Please be patient as the shipping labels & packing slips are generated, this may take a few minutes. Download the files and insert packing slips into each box and adhere the shipping label to the exterior. If a this step
fails, repeat Steps 2 & 3. 16

Vendor Portal Instructions
To generate an invoice, select a PO in the In Progress or Complete tab. In the
top right select “Generate Invoice”.
Select from the 3 options: Option 1: auto-populate an invoice based
on your shipping information.
Option 2: download an invoice template to fill out
Option 3: Upload your own invoice file
Using Option 1 to auto-generate an invoice, simply review the invoice and make any
necessary edits to the quantity and price of your goods in accordance with your shipping records. When complete,
download a copy of the invoice for your records.
Using Option 2 to use a template, select the download button and input
your quantities and price in accordance to your shipping records then select “Upload Template” and
select the file to upload.
Shipping & Logistics
Generate & Upload Invoices
Vendor Portal Instructions
Questions? Contact your Vendor Specialist
zulily Vendor Portal Instructions—2015 zulily Proprietary and Confidential
1 2
3 4
17
Top Related