


Languages
Pages
Legal


USER MANUAL
APP CONTROLLED SUBWOOFERS
C - S E R I E S

CONTENTSENGLISH
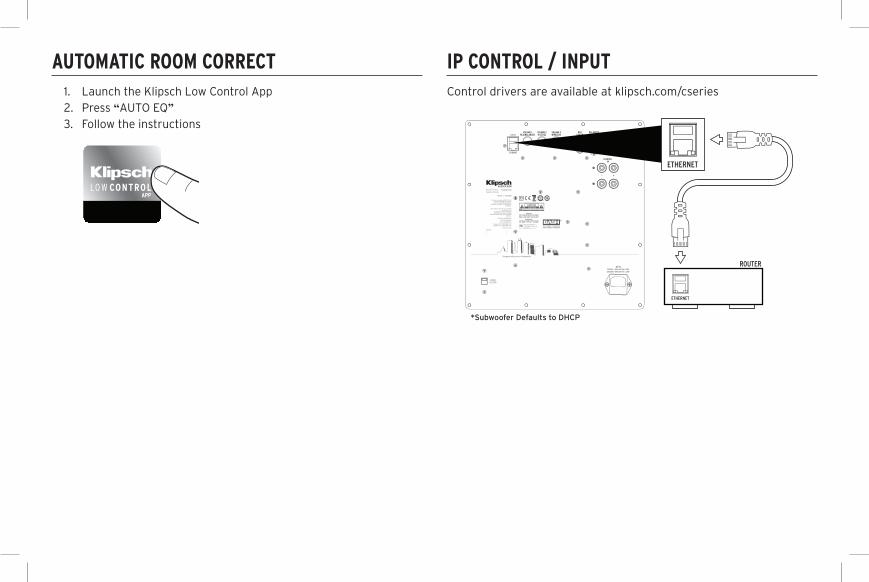
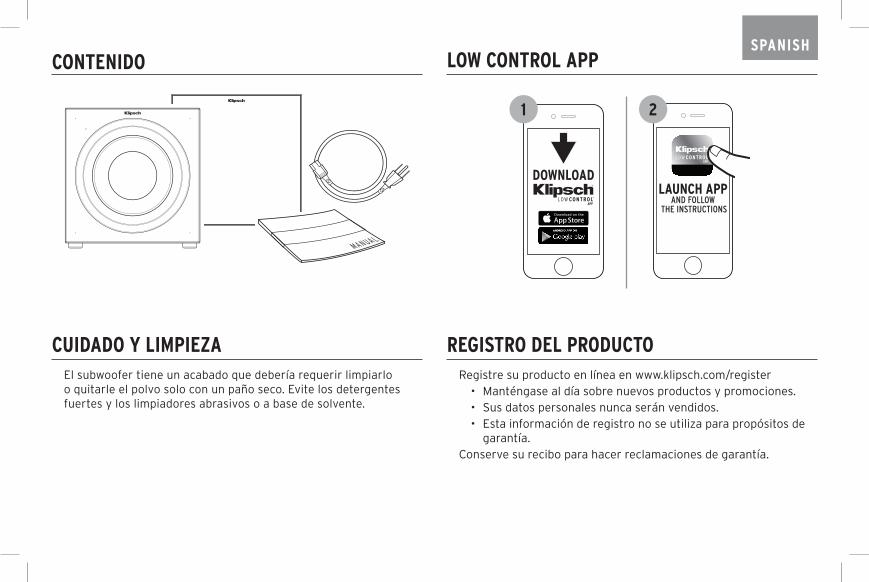
Your subwoofer has a finish that should only require dry dusting or cleaning with a dry cloth. Avoid the use of abrasive or solvent-based cleaners and harsh detergents.
CARE AND CLEANINGRegister your product online at www.klipsch.com/register• Keep up-to-date on new products and promotions.• Your personal information will never be resold.• This registration information is not used for warranty purposes. Please retain your receipt for warranty claims.
PRODUCT REGISTRATION
LOW CONTROL APP
LAUNCH APPAND FOLLOW
THE INSTRUCTIONS
DOWNLOAD
431 2
1 - Ethernet Input for IP Control
2 - Line Level Volume ControlControls Volume RCA and XLR input
3 - Hi-Level Volume ControlControls Volume of High Level Input
4 - Wireless Volume ControlControls Volume of Wireless Input*
5 - PAIR / RESET ButtonFor Pairing to WA-3 Wireless Transmitter*
6 - RCA Unbalanced Line Input 7 - XLR Balanced Line Input 8 - Hi-Level (Speaker Level) Input
WHITE On
BLUE On, App Connected
ORANGE Firmware Updating
OFF Standby
CONNECTIONS
FRONT LED
ETHERNETVOLUME 1
RCA/BALANCEDVOLUME 2HI LEVEL
VOLUME 3WIRELESS PAIR/RESET
RCALINE IN
BALANCEDLINE IN HI LEVEL IN
2
1
3 4 5
6 7
8
*See WA-3 Kit manual for more information

POSITIONING YOUR SUBWOOFERKlipsch® powered subwoofers are designed to reproduce deep bass and deliver the impact that makes your movies and music come alive. Typically, optimum performance will result if you place your subwoofer in a corner of the room on the same wall as your front channel speakers (Refer to Figure 1). Please note that room placement can have a dramatic effect upon the performance of your powered subwoofer. Corner placement, as suggested above, will increase the amount of bass output, while placing the subwoofer along the middle of a wall, or out in the room will decrease the amount of bass output. Experiment with a number of different placement options and control settings to find the one that best suits your particular room and taste. When choosing your subwoofer’s location, keep in mind that you will need to connect the subwoofer’s built-in amplifier to an AC power outlet.
S S
TV
C
L R
XY
Z X=Y=Z
S
S S
L R
S S
FIGURE 1SPEAKER PLACEMENT IN LISTENING AREA
6’ - 15’
Sub
+ Optional Sub
+ Optional Sub
+ Optional Sub

BALANCED OUTPUT
SUB OUT
UNBALANCED INPUT
BALANCED INPUT

HIGH LEVEL INPUT
WIRELESS INPUT *SEE WA-3 KIT MANUAL FOR MORE INFORMATION
SUB OUT
WA-3
SPEAKEROUTPUT
AMPLIFIER
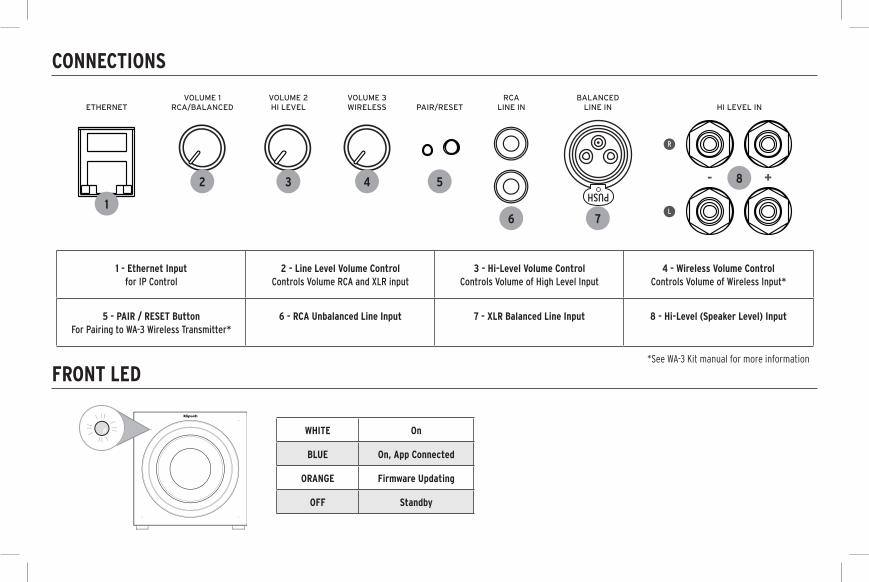
1. Launch the Klipsch Low Control App2. Press “AUTO EQ”3. Follow the instructions
AUTOMATIC ROOM CORRECTControl drivers are available at klipsch.com/cseries
IP CONTROL / INPUT
ROUTER
*Subwoofer Defaults to DHCP
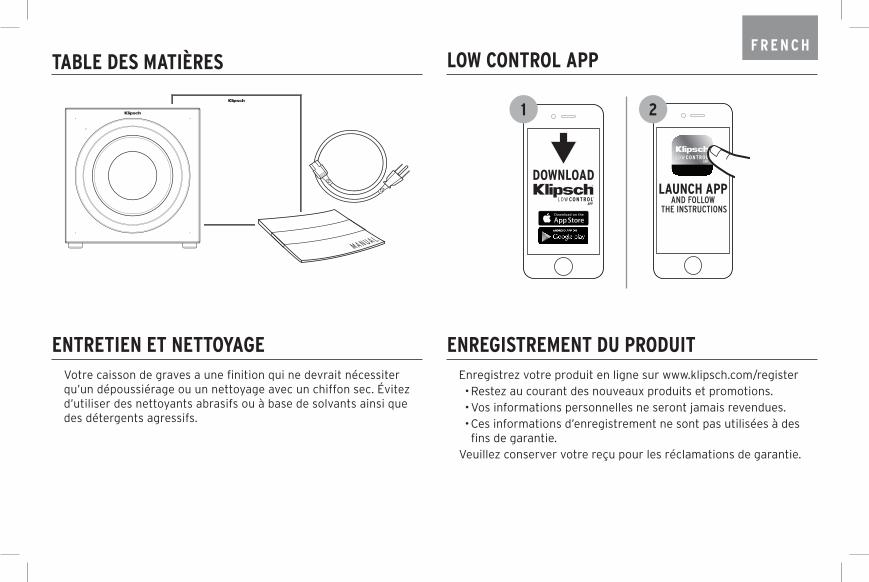
TABLE DES MATIÈRESF R E N C H
Votre caisson de graves a une finition qui ne devrait nécessiter qu’un dépoussiérage ou un nettoyage avec un chiffon sec. Évitez d’utiliser des nettoyants abrasifs ou à base de solvants ainsi que des détergents agressifs.
ENTRETIEN ET NETTOYAGEEnregistrez votre produit en ligne sur www.klipsch.com/register• Restez au courant des nouveaux produits et promotions.• Vos informations personnelles ne seront jamais revendues.• Ces informations d’enregistrement ne sont pas utilisées à des fins de garantie.
Veuillez conserver votre reçu pour les réclamations de garantie.
ENREGISTREMENT DU PRODUIT
LOW CONTROL APP
LAUNCH APPAND FOLLOW
THE INSTRUCTIONS
DOWNLOAD
431 2
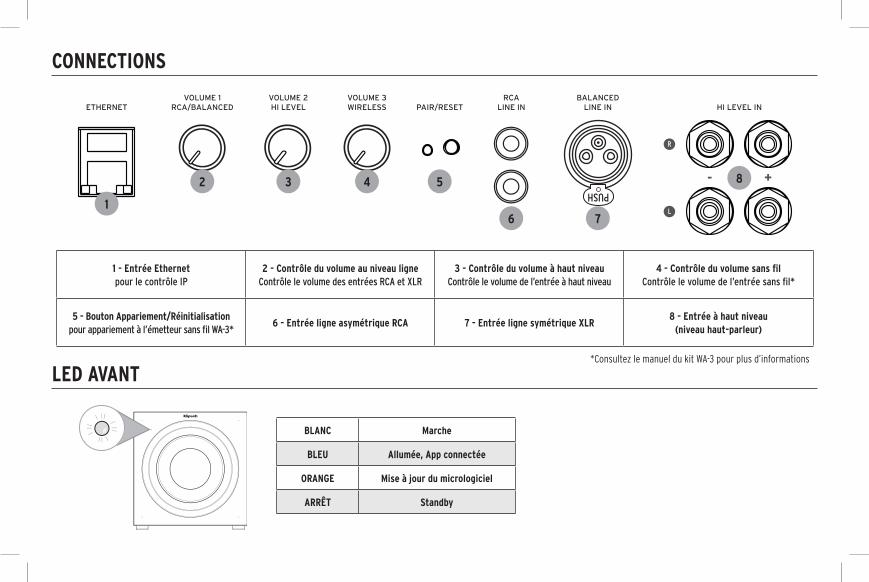
1 - Entrée Ethernet pour le contrôle IP
2 - Contrôle du volume au niveau ligneContrôle le volume des entrées RCA et XLR
3 - Contrôle du volume à haut niveauContrôle le volume de l’entrée à haut niveau
4 - Contrôle du volume sans fil Contrôle le volume de l’entrée sans fil*
5 - Bouton Appariement/Réinitialisationpour appariement à l’émetteur sans fil WA-3*
6 - Entrée ligne asymétrique RCA 7 - Entrée ligne symétrique XLR8 - Entrée à haut niveau
(niveau haut-parleur)
BLANC Marche
BLEU Allumée, App connectée
ORANGE Mise à jour du micrologiciel
ARRÊT Standby
CONNECTIONS
LED AVANT
ETHERNETVOLUME 1
RCA/BALANCEDVOLUME 2HI LEVEL
VOLUME 3WIRELESS PAIR/RESET
RCALINE IN
BALANCEDLINE IN HI LEVEL IN
2
1
3 4 5
6 7
8
*Consultez le manuel du kit WA-3 pour plus d’informations

POSITIONNEMENT DE VOTRE CAISSON DES GRAVESLes caissons de graves actifs Klipsch® sont conçus pour reproduire les fréquences graves profondes et produire l’impact qui donne vie à vos films et à votre musique. Typiquement, les meilleures performances seront obtenues si vous positionnez votre caisson des graves dans un coin de la pièce sur le même mur que vos enceintes avant (voir la Figure 1). Veuillez noter que le positionnement dans la pièce peut avoir un effet spectaculaire sur les performances de votre caisson des graves actif. Le positionnement en angle, comme suggéré ci-dessus, augmentera la quantité de sortie des basses tandis que le positionnement du caisson au milieu d’un mur ou dans la pièce diminuera la quantité des basses en sortie. Expérimentez avec un certain nombre d’options de positionnement et de réglages des contrôles pour trouver ceux qui conviennent le mieux à votre pièce et à vos goûts. Lorsque vous choisissez l’emplacement de votre caisson des graves, n’oubliez pas que vous devrez brancher l’amplificateur intégré du subwoofer à une prise secteur.
S S
TV
C
L R
XY
Z X=Y=Z
S
S S
L R
S S
FIGURE 1POSITIONNEMENT DU HAUT-PARLEUR DANS LA ZONE D’ÉCOUTE
6’ - 15’
Sub
+ Optional Sub
+ Optional Sub
+ Optional Sub

BALANCED OUTPUT
SUB OUT
ENTRÉE ASYMÉTRIQUE
ENTRÉE SYMÉTRIQUE
Sortie caisson des
graves
Sortie symétrique

SORTIE SYMÉTRIQUE
ENTRÉE SANS FIL *CONSULTEZ LE MANUEL DU KIT WA-3 POUR PLUS D’INFORMATIONS
SUB OUT
WA-3
SPEAKEROUTPUT
AMPLIFIER
Sortie du haut-parleur
Sortie caisson des
graves
Amplificateur

ROUTER
1. ancez l’application Klipsch Low Control App2. Appuyez sur « auto eq »3. Suivez les instructions
CORRECTION AUTOMATIQUE DE LA PIÈCELes pilotes de contrôle (drivers) sont disponibles sur klipsch.com/cseries
Routeur
CONTRÔLE IP/ENTRÉE IP
*Le caisson des graves passe par défaut sur DHCP
CONTENIDOSPANISH
El subwoofer tiene un acabado que debería requerir limpiarlo o quitarle el polvo solo con un paño seco. Evite los detergentes fuertes y los limpiadores abrasivos o a base de solvente.
CUIDADO Y LIMPIEZARegistre su producto en línea en www.klipsch.com/register
• Manténgase al día sobre nuevos productos y promociones.• Sus datos personales nunca serán vendidos.• Esta información de registro no se utiliza para propósitos de
garantía.Conserve su recibo para hacer reclamaciones de garantía.
REGISTRO DEL PRODUCTO
LOW CONTROL APP
LAUNCH APPAND FOLLOW
THE INSTRUCTIONS
DOWNLOAD
431 2
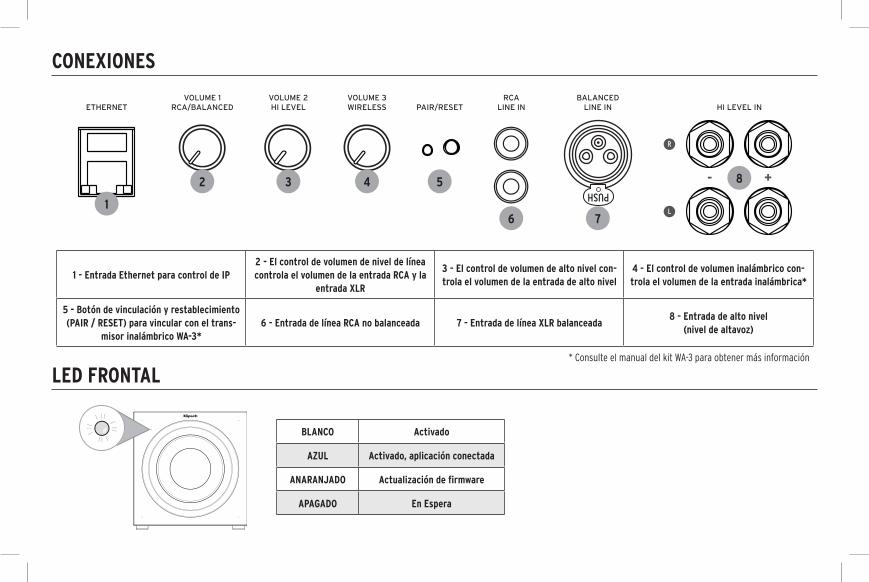
1 - Entrada Ethernet para control de IP2 - El control de volumen de nivel de línea controla el volumen de la entrada RCA y la
entrada XLR
3 - El control de volumen de alto nivel con-trola el volumen de la entrada de alto nivel
4 - El control de volumen inalámbrico con-trola el volumen de la entrada inalámbrica*
5 - Botón de vinculación y restablecimiento (PAIR / RESET) para vincular con el trans-
misor inalámbrico WA-3*6 - Entrada de línea RCA no balanceada 7 - Entrada de línea XLR balanceada
8 - Entrada de alto nivel (nivel de altavoz)
BLANCO Activado
AZUL Activado, aplicación conectada
ANARANJADO Actualización de firmware
APAGADO En Espera
CONEXIONES
LED FRONTAL
ETHERNETVOLUME 1
RCA/BALANCEDVOLUME 2HI LEVEL
VOLUME 3WIRELESS PAIR/RESET
RCALINE IN
BALANCEDLINE IN HI LEVEL IN
2
1
3 4 5
6 7
8
* Consulte el manual del kit WA-3 para obtener más información
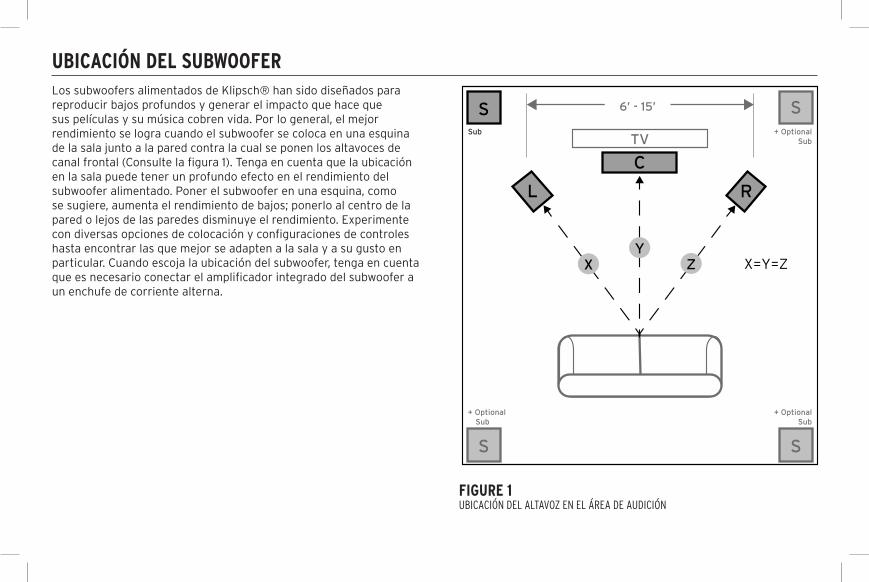
UBICACIÓN DEL SUBWOOFERLos subwoofers alimentados de Klipsch® han sido diseñados para reproducir bajos profundos y generar el impacto que hace que sus películas y su música cobren vida. Por lo general, el mejor rendimiento se logra cuando el subwoofer se coloca en una esquina de la sala junto a la pared contra la cual se ponen los altavoces de canal frontal (Consulte la figura 1). Tenga en cuenta que la ubicación en la sala puede tener un profundo efecto en el rendimiento del subwoofer alimentado. Poner el subwoofer en una esquina, como se sugiere, aumenta el rendimiento de bajos; ponerlo al centro de la pared o lejos de las paredes disminuye el rendimiento. Experimente con diversas opciones de colocación y configuraciones de controles hasta encontrar las que mejor se adapten a la sala y a su gusto en particular. Cuando escoja la ubicación del subwoofer, tenga en cuenta que es necesario conectar el amplificador integrado del subwoofer a un enchufe de corriente alterna.
S S
TV
C
L R
XY
Z X=Y=Z
S
S S
L R
S S
FIGURE 1UBICACIÓN DEL ALTAVOZ EN EL ÁREA DE AUDICIÓN
6’ - 15’
Sub
+ Optional Sub
+ Optional Sub
+ Optional Sub
BALANCED OUTPUT
SUB OUT
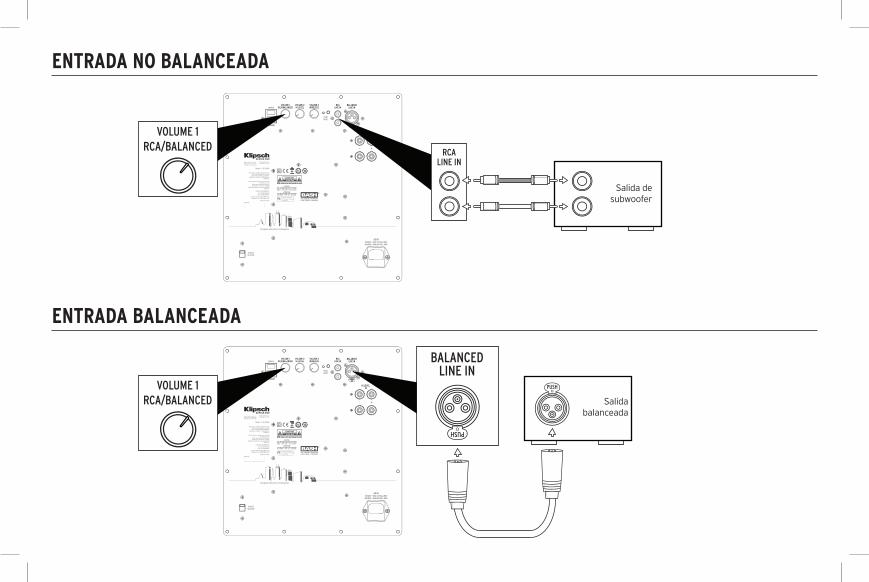
ENTRADA NO BALANCEADA
ENTRADA BALANCEADA
Salida de subwoofer
Salida balanceada
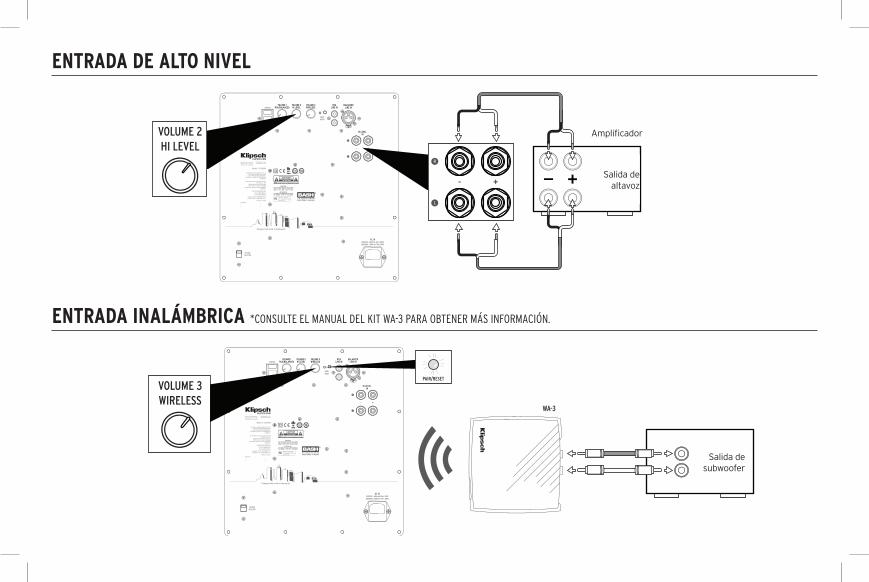
ENTRADA DE ALTO NIVEL
ENTRADA INALÁMBRICA *CONSULTE EL MANUAL DEL KIT WA-3 PARA OBTENER MÁS INFORMACIÓN.
SUB OUT
WA-3
SPEAKEROUTPUT
AMPLIFIER
Salida de altavoz
Amplificador
Salida de subwoofer

1. Inicie la aplicación LowControl App de Klipsch2. Oprima “auto eq” 3. Siga las instrucciones
CORRECCIÓN AUTOMÁTICA DE SALA Hay controladores de control en klipsch.com/cseries.
ENTRADA / CONTROL DE IP
ROUTER
* Valores predeterminados de subwoofer para el DHCP

INHALTGERMAN
Ihr Subwoofer verfügt über eine Oberfläche, die nur mit einem trockenen Tuch abgestaubt oder gereinigt werden muss. Verwenden Sie keine Scheuer- oder Lösungsmittel oder scharfen Reinigungsmittel.
PFLEGE UND REINIGUNGRegistrieren Sie Ihr Produkt online unter www.klipsch.com/register• Dadurch werden Sie über neue Produkte und Sonderangebote
informiert.• Ihre personenbezogenen Daten werden nie verkauft.• Diese Registrierungsdaten werden nicht zu Garantiezwecken
verwendet. Bewahren Sie bitte Ihre Quittung auf, um die Garantie in Anspruch nehmen zu können.
PRODUKTREGISTRIERUNG
LOW CONTROL APP
LAUNCH APPAND FOLLOW
THE INSTRUCTIONS
DOWNLOAD
431 2
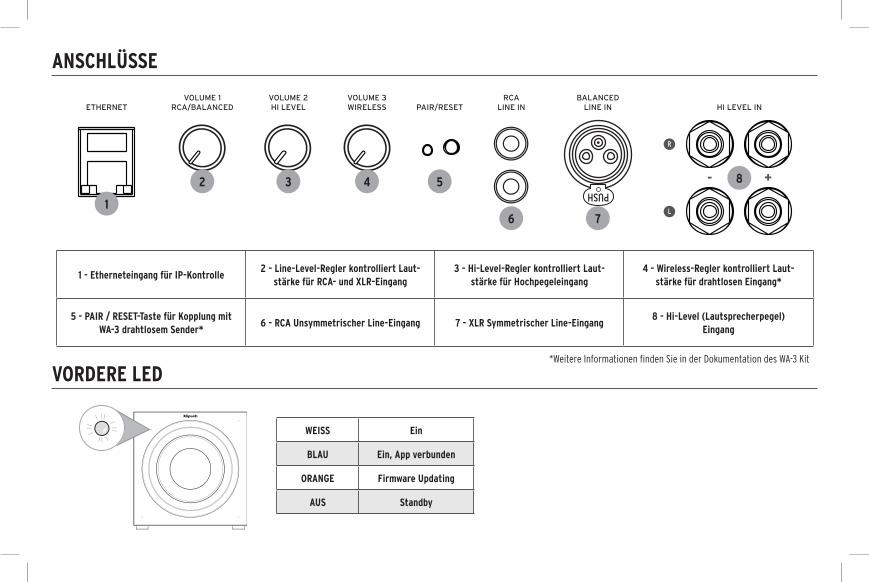
1 - Etherneteingang für IP-Kontrolle2 - Line-Level-Regler kontrolliert Laut-
stärke für RCA- und XLR-Eingang3 - Hi-Level-Regler kontrolliert Laut-
stärke für Hochpegeleingang 4 - Wireless-Regler kontrolliert Laut-
stärke für drahtlosen Eingang*
5 - PAIR / RESET-Taste für Kopplung mit WA-3 drahtlosem Sender*
6 - RCA Unsymmetrischer Line-Eingang 7 - XLR Symmetrischer Line-Eingang 8 - Hi-Level (Lautsprecherpegel)
Eingang
WEISS Ein
BLAU Ein, App verbunden
ORANGE Firmware Updating
AUS Standby
ANSCHLÜSSE
VORDERE LED
ETHERNETVOLUME 1
RCA/BALANCEDVOLUME 2HI LEVEL
VOLUME 3WIRELESS PAIR/RESET
RCALINE IN
BALANCEDLINE IN HI LEVEL IN
2
1
3 4 5
6 7
8
*Weitere Informationen finden Sie in der Dokumentation des WA-3 Kit

PLATZIERUNG DES SUBWOOFERSDie Aktiv-Subwoofer von Klipsch® bieten tiefen Bass und einen Klang, der Ihre Filme und Ihre Musik zum Leben erweckt. Eine Platzierung des Subwoofers in einer Zimmerecke an der gleichen Wand wie die vorderen Lautsprecher (siehe Abbildung 1) bringt meistens die besten Ergebnisse. Denken Sie daran, dass die Platzierung im Raum einen enormen Effekt auf die Leistung Ihres Aktiv-Subwoofers haben kann. Die oben empfohlene Platzierung in einer Ecke steigert die Bassleistung, während eine Platzierung an der Mitte einer Wand oder von den Wänden entfernt die Bassleistung verringert. Experimentieren Sie mit verschiedenen Platzierungen und Geräteeinstellungen, um die ideale Kombination für Ihren Raum und Ihren Geschmack zu finden. Wenn Sie die Position Ihres Subwoofers wählen, sollten Sie daran denken, dass Sie den eingebauten Verstärker des Subwoofers ans Stromnetz anschließen müssen.
S S
TV
C
L R
XY
Z X=Y=Z
S
S S
L R
S S
FIGURE 1PLATZIERUNG DER LAUTSPRECHER IM HÖRBEREICH
6’ - 15’
Sub
+ Optional Sub
+ Optional Sub
+ Optional Sub

BALANCED OUTPUT
SUB OUT
UNSYMMETRISCHER EINGANG
SYMMETRISCHER EINGANG
Sub-Ausgang
Symmetrischer Ausgang

HOCHPEGEL-EINGANG
DRAHTLOSER EINGANG *WEITERE INFORMATIONEN FINDEN SIE IN DER DOKUMENTATION DES WA-3 KIT
SUB OUT
WA-3
SPEAKEROUTPUT
AMPLIFIER
Lautsprecherausgang
Sub-Ausgang
Verstärker

1. Starten Sie die Klipsch Low Control App 2. Klicken Sie auf „Auto Eq“ 3. Folgen Sie den Anleitungen
AUTOMATISCHE RAUMKORREKTURKontrolltreiber sind unter klipsch.com/cseries erhältlich
IP-KONTROLLE / EINGANG
ROUTER
*Subwoofer verwendet standardmäßig DHCP

CONTENUTOI TA L I A N
Il subwoofer presenta una finitura che occorre solo spolverare o pulire con un panno asciutto. Evitare l’uso di detergenti abrasivi, a base di solvente o forti.
CURA E PULIZIAIl prodotto può essere registrato on-line sul sito www.klipsch.com/register.• Si riceveranno così informazioni su nuovi prodotti e promozioni.• I dati personali degli utenti non saranno mai venduti.• Le informazioni di registrazione non vengono utilizzate a scopi
di garanzia.
Conservare la ricevuta per mostrarla in caso di reclami coperti dalla garanzia.
REGISTRAZIONE DEL PRODOTTO
LOW CONTROL APP
LAUNCH APPAND FOLLOW
THE INSTRUCTIONS
DOWNLOAD
431 2

1 - Ingresso Ethernet per controllo IP2 - Regolazione volume a livello di linea per regolare il volume dell’ingresso RCA e XLR
3 - Regolazione volume alto livello per rego-lare il volume dell’ingresso di alto livello
4 - Regolazione volume wireless per rego-lare il volume dell’ingresso wireless*
5 - Pulsante ASSOCIAZIONE / RIPRISTINO Per eseguire l’associazione a un
trasmettitore wireless WA-3* 6 - Ingresso di linea sbilanciato RCA 7 - Ingresso di linea bilanciato XLR
8 - Ingresso di alto livello (livello altoparlante)
BIANCO Acceso
BLU Acceso, app collegata
ARANCIONE Aggiornamento del firmware in corso
SPENTO Standby
CONNESSIONI
LED ANTERIORE
ETHERNETVOLUME 1
RCA/BALANCEDVOLUME 2HI LEVEL
VOLUME 3WIRELESS PAIR/RESET
RCALINE IN
BALANCEDLINE IN HI LEVEL IN
2
1
3 4 5
6 7
8
*Consultare il manuale del kit WA-3 per maggiori informazioni
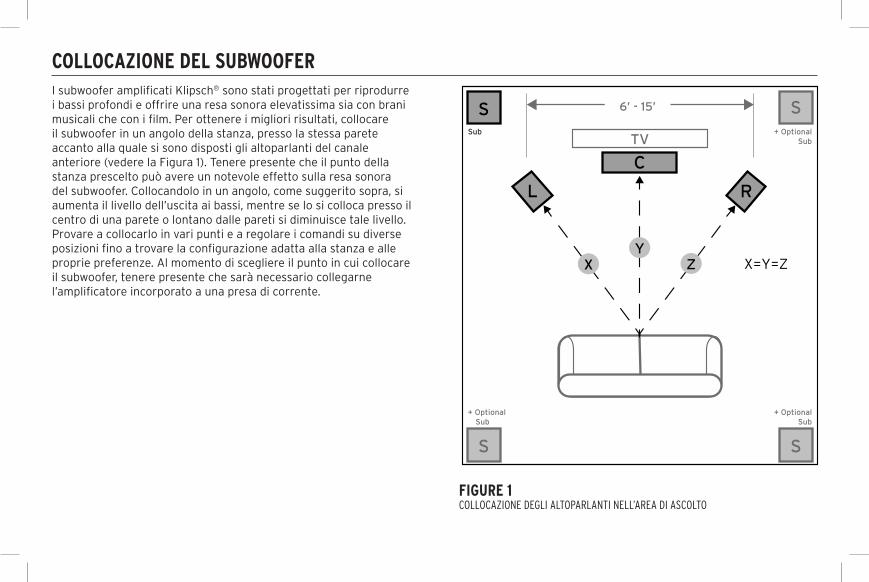
COLLOCAZIONE DEL SUBWOOFERI subwoofer amplificati Klipsch® sono stati progettati per riprodurre i bassi profondi e offrire una resa sonora elevatissima sia con brani musicali che con i film. Per ottenere i migliori risultati, collocare il subwoofer in un angolo della stanza, presso la stessa parete accanto alla quale si sono disposti gli altoparlanti del canale anteriore (vedere la Figura 1). Tenere presente che il punto della stanza prescelto può avere un notevole effetto sulla resa sonora del subwoofer. Collocandolo in un angolo, come suggerito sopra, si aumenta il livello dell’uscita ai bassi, mentre se lo si colloca presso il centro di una parete o lontano dalle pareti si diminuisce tale livello. Provare a collocarlo in vari punti e a regolare i comandi su diverse posizioni fino a trovare la configurazione adatta alla stanza e alle proprie preferenze. Al momento di scegliere il punto in cui collocare il subwoofer, tenere presente che sarà necessario collegarne l’amplificatore incorporato a una presa di corrente.
S S
TV
C
L R
XY
Z X=Y=Z
S
S S
L R
S S
FIGURE 1COLLOCAZIONE DEGLI ALTOPARLANTI NELL’AREA DI ASCOLTO
6’ - 15’
Sub
+ Optional Sub
+ Optional Sub
+ Optional Sub
BALANCED OUTPUT
SUB OUT
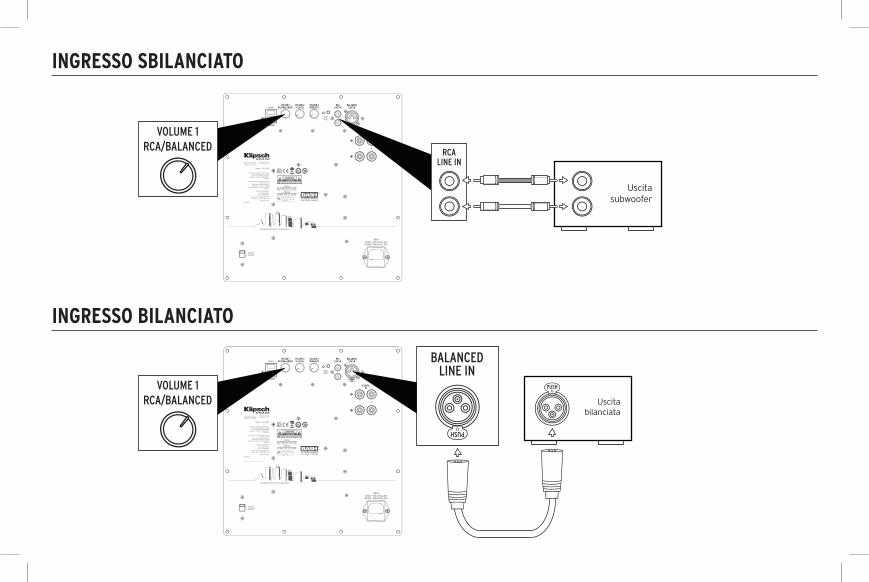
INGRESSO SBILANCIATO
INGRESSO BILANCIATO
Uscita subwoofer
Uscita bilanciata

INGRESSO DI ALTO LIVELLO
INGRESSO WIRELESS *CONSULTARE IL MANUALE DEL KIT WA-3 PER MAGGIORI INFORMAZIONI
SUB OUT
WA-3
SPEAKEROUTPUT
AMPLIFIER
Uscita altoparlante
Amplificatore
Uscita subwoofer
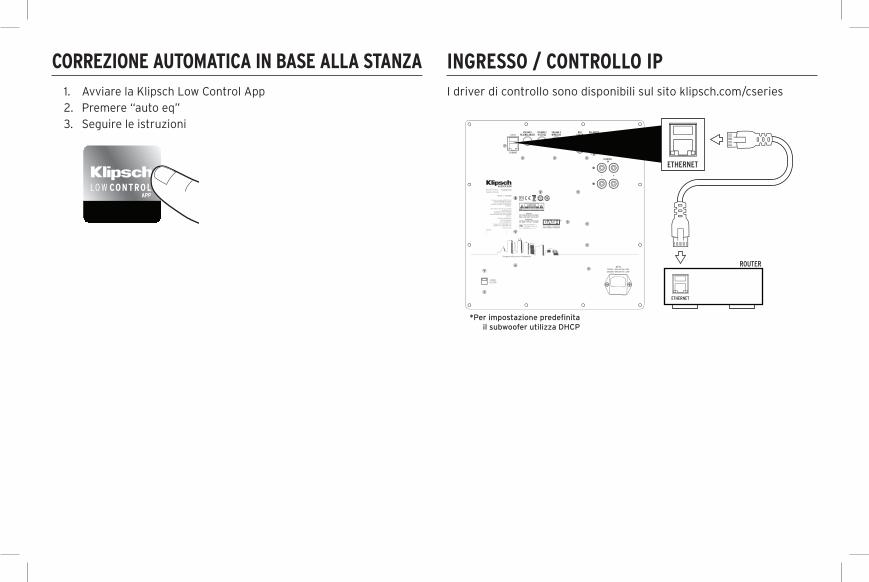
1. Avviare la Klipsch Low Control App2. Premere “auto eq”3. Seguire le istruzioni
CORREZIONE AUTOMATICA IN BASE ALLA STANZAI driver di controllo sono disponibili sul sito klipsch.com/cseries
INGRESSO / CONTROLLO IP
ROUTER
*Per impostazione predefinita il subwoofer utilizza DHCP
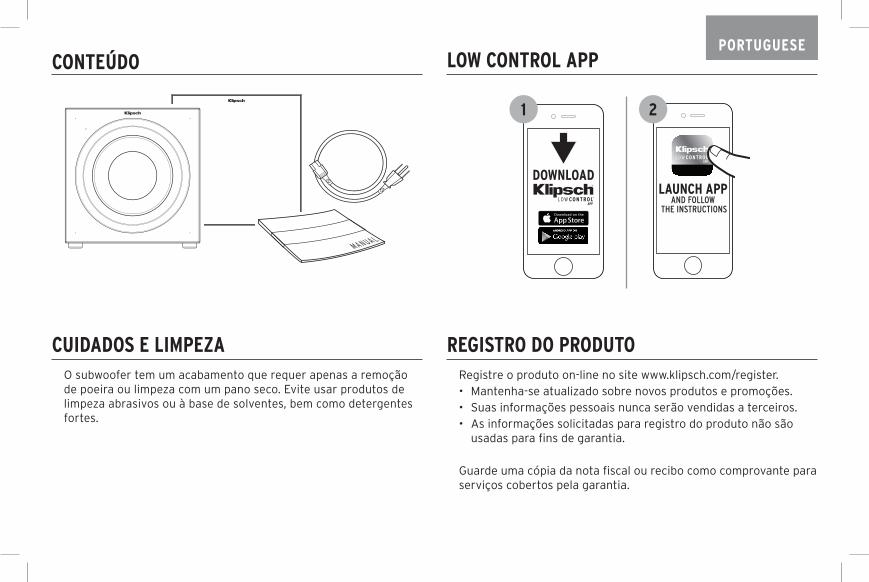
CONTEÚDOPORTUGUESE
O subwoofer tem um acabamento que requer apenas a remoção de poeira ou limpeza com um pano seco. Evite usar produtos de limpeza abrasivos ou à base de solventes, bem como detergentes fortes.
CUIDADOS E LIMPEZARegistre o produto on-line no site www.klipsch.com/register.• Mantenha-se atualizado sobre novos produtos e promoções.• Suas informações pessoais nunca serão vendidas a terceiros.• As informações solicitadas para registro do produto não são
usadas para fins de garantia.
Guarde uma cópia da nota fiscal ou recibo como comprovante para serviços cobertos pela garantia.
REGISTRO DO PRODUTO
LOW CONTROL APP
LAUNCH APPAND FOLLOW
THE INSTRUCTIONS
DOWNLOAD
431 2
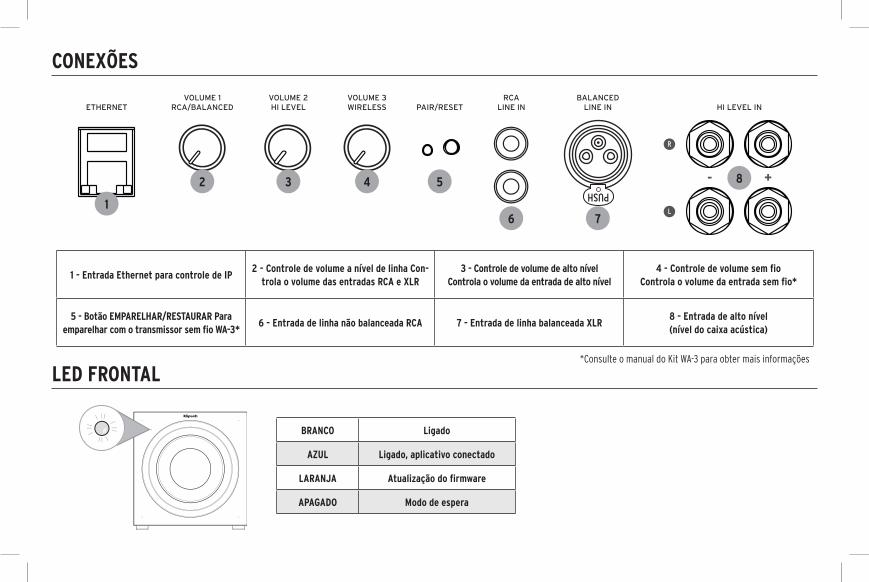
1 - Entrada Ethernet para controle de IP2 - Controle de volume a nível de linha Con-
trola o volume das entradas RCA e XLR3 - Controle de volume de alto nível
Controla o volume da entrada de alto nível4 - Controle de volume sem fio
Controla o volume da entrada sem fio*
5 - Botão EMPARELHAR/RESTAURAR Para emparelhar com o transmissor sem fio WA-3*
6 - Entrada de linha não balanceada RCA 7 - Entrada de linha balanceada XLR8 - Entrada de alto nível (nível do caixa acústica)
BRANCO Ligado
AZUL Ligado, aplicativo conectado
LARANJA Atualização do firmware
APAGADO Modo de espera
CONEXÕES
LED FRONTAL
ETHERNETVOLUME 1
RCA/BALANCEDVOLUME 2HI LEVEL
VOLUME 3WIRELESS PAIR/RESET
RCALINE IN
BALANCEDLINE IN HI LEVEL IN
2
1
3 4 5
6 7
8
*Consulte o manual do Kit WA-3 para obter mais informações
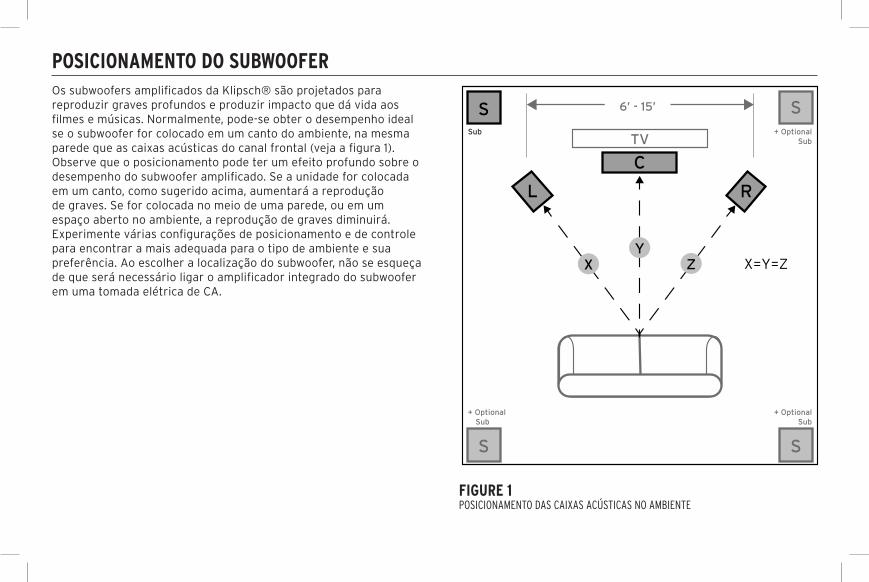
POSICIONAMENTO DO SUBWOOFEROs subwoofers amplificados da Klipsch® são projetados para reproduzir graves profundos e produzir impacto que dá vida aos filmes e músicas. Normalmente, pode-se obter o desempenho ideal se o subwoofer for colocado em um canto do ambiente, na mesma parede que as caixas acústicas do canal frontal (veja a figura 1). Observe que o posicionamento pode ter um efeito profundo sobre o desempenho do subwoofer amplificado. Se a unidade for colocada em um canto, como sugerido acima, aumentará a reprodução de graves. Se for colocada no meio de uma parede, ou em um espaço aberto no ambiente, a reprodução de graves diminuirá. Experimente várias configurações de posicionamento e de controle para encontrar a mais adequada para o tipo de ambiente e sua preferência. Ao escolher a localização do subwoofer, não se esqueça de que será necessário ligar o amplificador integrado do subwoofer em uma tomada elétrica de CA.
S S
TV
C
L R
XY
Z X=Y=Z
S
S S
L R
S S
FIGURE 1POSICIONAMENTO DAS CAIXAS ACÚSTICAS NO AMBIENTE
6’ - 15’
Sub
+ Optional Sub
+ Optional Sub
+ Optional Sub
BALANCED OUTPUT
SUB OUT
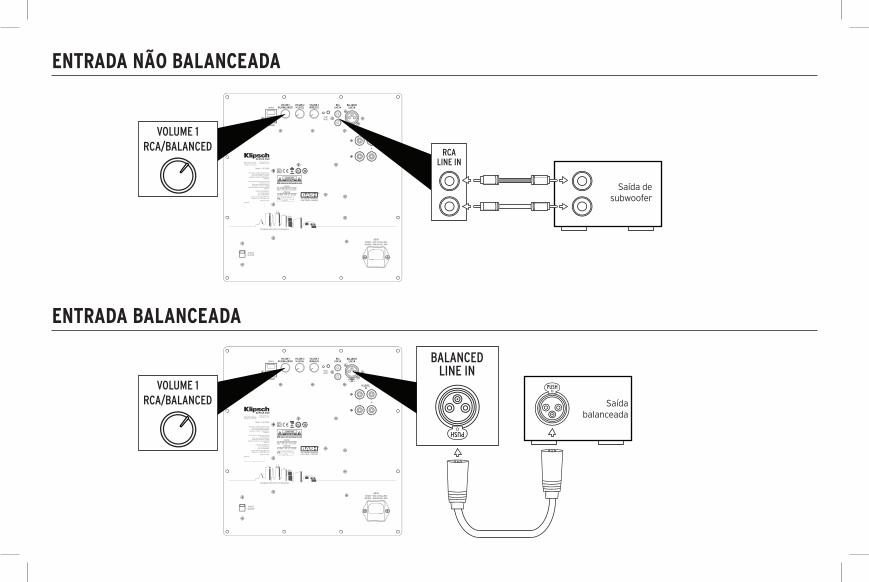
ENTRADA NÃO BALANCEADA
ENTRADA BALANCEADA
Saída de subwoofer
Saída balanceada

ENTRADA DE ALTO NÍVEL
ENTRADA SEM FIO *CONSULTE O MANUAL DO KIT WA-3 PARA OBTER MAIS INFORMAÇÕES
SUB OUT
WA-3
SPEAKEROUTPUT
AMPLIFIER
Saídas para caixas
acústicas
Saída de subwoofer
Amplificador

ROUTER
1. Inicie o Klipsch Low Control App2. Pressione “auto eq”3. Siga as instruções
CORREÇÃO AUTOMÁTICA DE AMBIENTEOs drivers de controle estão disponíveis em klipsch.com/cseries
Roteador
CONTROLE/ENTRADA DE IP
*O parâmetro padrão do subwoofer é DHCP
目录
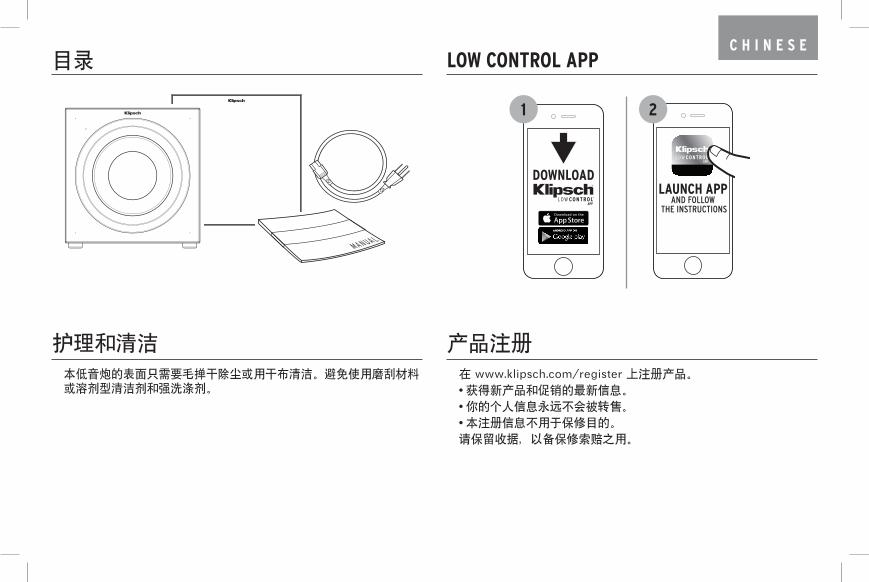
本低音炮的表面只需要毛掸干除尘或用干布清洁。避免使用磨刮材料或溶剂型清洁剂和强洗涤剂。
护理和清洁在 www.klipsch.com/register 上注册产品。• 获得新产品和促销的最新信息。• 你的个人信息永远不会被转售。• 本注册信息不用于保修目的。 请保留收据,以备保修索赔之用。
产品注册
LOW CONTROL APP
LAUNCH APPAND FOLLOW
THE INSTRUCTIONS
DOWNLOAD
431 2
C H I N E S E

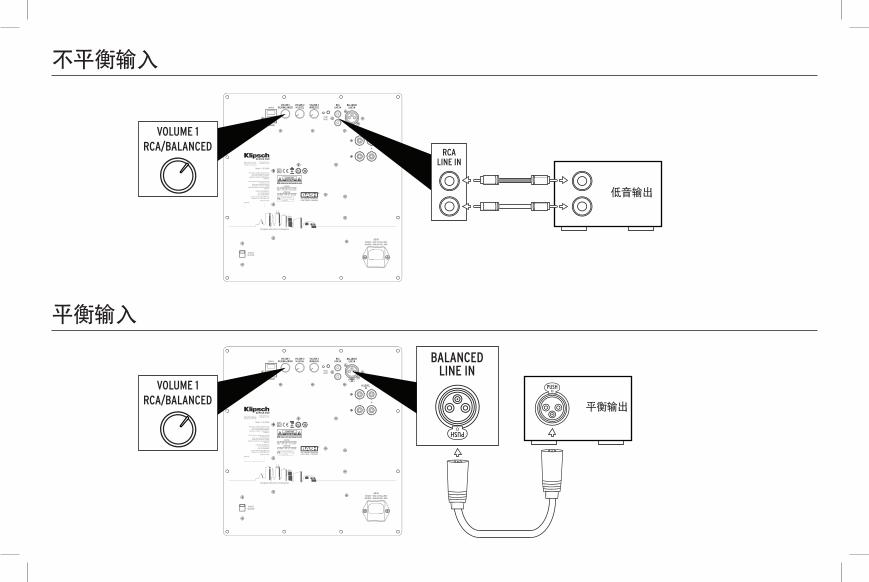
1. 以太网输入,用于 IP 控制2. 线路电平音量控制,用于控制
RCA 音量和 XLR 输入3. 高电平音量控制,用于控制高电
平输入的音量4. 无线音量控制,用于控制无线输
入的音量*
5. 配对/重置按钮,用于与 WA-3 无线发射器进行配对*
6. RCA 不平衡线路输入 7. XLR 平衡线路输入 8. 高电平(音箱电平)输入
白光 通电
蓝光 通电,连接了应用程序
橙色 固件更新中
灭灯 待机
连接
前部 LED 灯*更多信息,请参见 WA-3 工具包说明书。
ETHERNETVOLUME 1
RCA/BALANCEDVOLUME 2HI LEVEL
VOLUME 3WIRELESS PAIR/RESET
RCALINE IN
BALANCEDLINE IN HI LEVEL IN
2
1
3 4 5
6 7
8
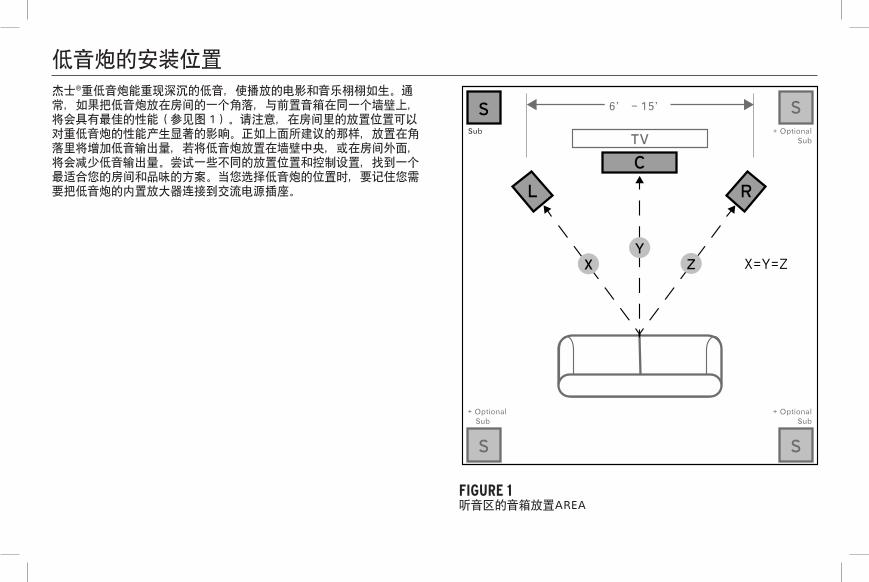
低音炮的安装位置杰士®重低音炮能重现深沉的低音,使播放的电影和音乐栩栩如生。通常,如果把低音炮放在房间的一个角落,与前置音箱在同一个墙壁上,将会具有最佳的性能(参见图 1)。请注意,在房间里的放置位置可以对重低音炮的性能产生显著的影响。正如上面所建议的那样,放置在角落里将增加低音输出量,若将低音炮放置在墙壁中央,或在房间外面,将会减少低音输出量。尝试一些不同的放置位置和控制设置,找到一个最适合您的房间和品味的方案。当您选择低音炮的位置时,要记住您需要把低音炮的内置放大器连接到交流电源插座。
S S
TV
C
L R
XY
Z X=Y=Z
S
S S
L R
S S
FIGURE 1听音区的音箱放置AREA
6’ - 15’
Sub
+ Optional Sub
+ Optional Sub
+ Optional Sub
BALANCED OUTPUT
SUB OUT
不平衡输入
低音输出
平衡输出
平衡输入
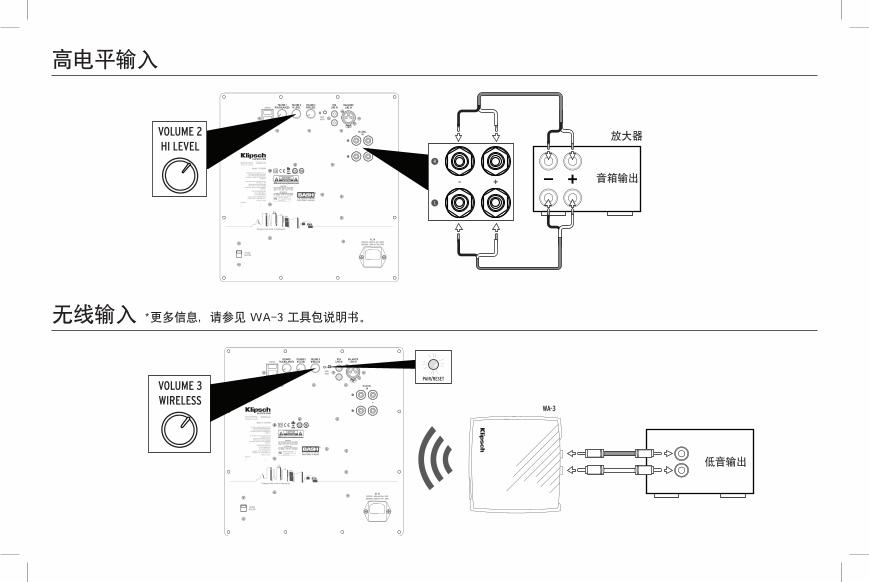
高电平输入
无线输入 *更多信息,请参见 WA-3 工具包说明书。
SUB OUT
WA-3
SPEAKEROUTPUT
AMPLIFIER
音箱输出
放大器
低音输出
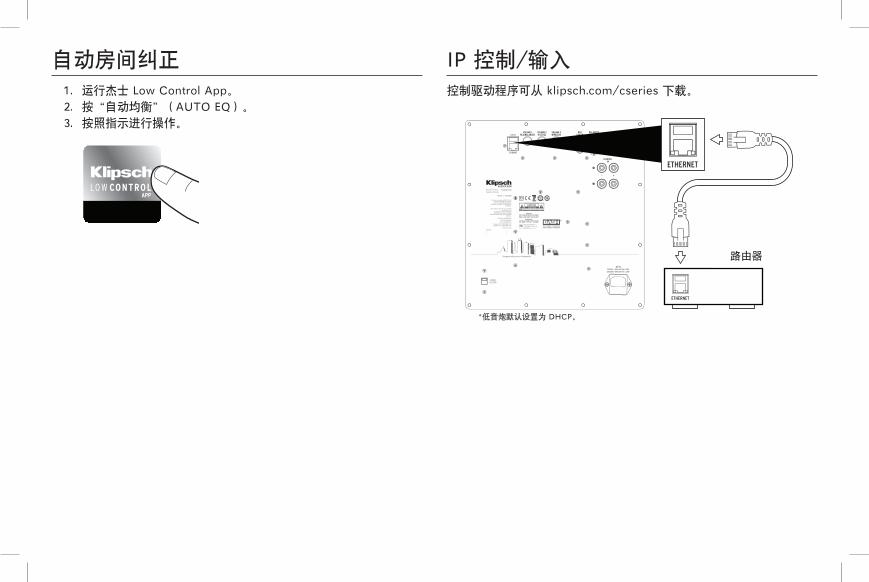
1. 运行杰士 Low Control App。2. 按“自动均衡”(AUTO EQ)。3. 按照指示进行操作。
自动房间纠正控制驱动程序可从 klipsch.com/cseries 下载。
IP 控制/输入
ROUTER
*低音炮默认设置为 DHCP。
路由器

1-800-KLIPSCH ©2014 KLIPSCH GROUP, INC. ALL RIGHTS RESERVED. KLIPSCH AND KEEPERS OF THE SOUND ARE REGISTERED TRADEMARKS OF KLIPSCH GROUP, INC. IN THE USA AND OTHER COUNTRIES.A WHOLLY-OWNED SUBSIDIARY OF VOXX INTERNATIONAL CORPORATION.
3502 WOODVIEW TRACE, INDIANAPOLIS, IN, USA
KLIPSCH.COM
V03-1024
Top Related