


Languages
Pages
Legal


Copyright © 2012
All rights reserved. This book is for the use of the clients and customers of clubsystems group, inc. in conjunction with their
software. This book may not be duplicated in any way without the expressed written consent of clubsystems group, inc.
except in the form of brief excerpts for the purpose of review. The information contained herein may not be duplicated in
other books, databases, or any other kind of medium without the written consent of clubsystems group, inc.
Printed in the USA by:
clubsystems group, inc.
Limits of Liability and Disclaimer of Warranty
clubsystems group, inc. has used its best efforts in preparing this book. These efforts include the development, research, and
testing of the theories and programs to determine their effectiveness. clubsystems group, inc. makes no warranties of any
kind, expressed or implied, with regard to the instructions and suggestions contained in this book beyond those supplied
with the software.
clubsystems group, inc. shall not be held liable in the event of incidental or consequential damages in connection with, or
arising out of, the furnishing, performance or use of the instructions and/or claims of productivity gains beyond the
warranties already stated in the csg License Agreement.
ClubSelect® 2007 All Rights Reserved clubsystems group, inc.

User Guide ClubSelect® Accounts Payable
2
Call csg Education to schedule training! 800-355-7623

ClubSelect® Accounts Payable User Guide
3
Proprietary and Confidential
Table of Contents
ClubSelect® Accounts Payable ................................................................................................. 8
Vendor Maintenance ............................................................................................................... 12
Vendor Inquiry ........................................................................................................................ 22
Invoice Processing .................................................................................................................. 28
Preparation for Invoice Entry............................................................................................ 28
Invoice Batches ................................................................................................................. 29
Regular Invoice Entry ................................................................................................. 33
Batch Update ............................................................................................................... 37
Special Invoice Situations ................................................................................................. 42
Recurring Invoices ...................................................................................................... 42
Prepaid Invoices .......................................................................................................... 46
Invoices with Manual Checks ..................................................................................... 52
Check Printing ........................................................................................................................ 58
Computer Checks .............................................................................................................. 58
Quick Checks .................................................................................................................... 65
Manual Checks.................................................................................................................. 72
Processing Void and Wasted Checks ................................................................................ 76
End of Period Processing ........................................................................................................ 82
Check Reconciliation ........................................................................................................ 85
Reports .................................................................................................................................... 90
Batch Listing ..................................................................................................................... 90
Operating Reports ............................................................................................................. 93
Filtering Tools ............................................................................................................. 93

User Guide ClubSelect® Accounts Payable
4
Call csg Education to schedule training! 800-355-7623
Export an Open Payable Report to Microsoft® Excel ............................................... 100
Employment Development Department Report........................................................ 107
Vendor Reports ............................................................................................................... 110
Filtering Tools ........................................................................................................... 111
End of Year Processing ......................................................................................................... 116
Accounts Payable 1099 Procedures ................................................................................ 116
Club Address Change ............................................................................................... 116
Print 1099 Edit Listings ............................................................................................ 118
1099 Setup Information ............................................................................................ 121
Reclassify 1099’s ...................................................................................................... 125
Change 1099 Amounts .............................................................................................. 127
Magnetic Media ........................................................................................................ 128
Print Custom 1099’s ................................................................................................. 131
Accounts Payable End of Year Procedures .................................................................... 133
Printing End of Year Reports .................................................................................... 133
Control Information .............................................................................................................. 138
General Accounts Payable Information .......................................................................... 138
Check Information .......................................................................................................... 141
Interface Information ...................................................................................................... 144
Vendor Number Information .......................................................................................... 147
Reconciliation Information ............................................................................................. 148
Address Information ....................................................................................................... 149
Positive Pay ..................................................................................................................... 151
Accounts Payable Types ....................................................................................................... 153
Cash Types ............................................................................................................................ 155

ClubSelect® Accounts Payable User Guide
5
Proprietary and Confidential
General ClubSelect® Setup Features ..................................................................................... 157
Security ........................................................................................................................... 157
Messages ......................................................................................................................... 161
ClubConnect® Setup ....................................................................................................... 162
Company Information ..................................................................................................... 163

User Guide ClubSelect® Accounts Payable
6
Call csg Education to schedule training! 800-355-7623

ClubSelect® Accounts Payable User Guide
7
Proprietary and Confidential
Introduction

User Guide ClubSelect® Accounts Payable
8
Call csg Education to schedule training! 800-355-7623
ClubSelect® Accounts Payable
ClubSelect® Accounts Payable has many features and benefits that help make quick, accurate
work of your ongoing finances.
Some ClubSelect® AP features and benefits include:
Unlimited history
Store vendor notes that can be viewed during invoice entry
Calculate invoice schedule and due dates based on invoice date, fixed day of the
month, or default batch date
Add a vendor during invoice entry
Auto-post to GL as each AP batch is posted
Edit and post prepaid AP invoices in GL
Checks for duplicate invoices and checks historically and within each batch
Edit or delete a batch
Select open invoices for payment based on a variety of criteria
Sort checks, check edit listing, and check summary alphabetically
Process quick checks immediately, without an invoice
Drill-down from check to original invoices paid, including invoice expense detail
Inquire, report, and edit all current and past periods (based on GL period designation)
ClubSelect® Accounts Payable User Guide
9
Proprietary and Confidential
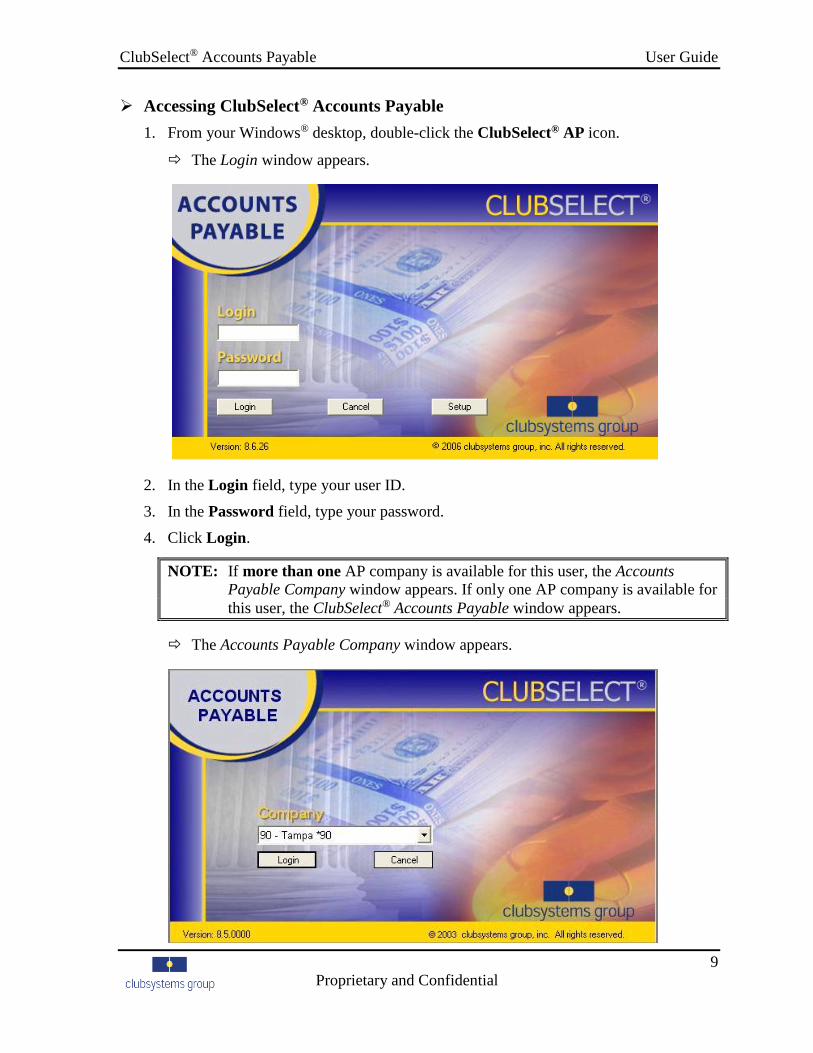
Accessing ClubSelect® Accounts Payable
1. From your Windows® desktop, double-click the ClubSelect® AP icon.
The Login window appears.
2. In the Login field, type your user ID.
3. In the Password field, type your password.
4. Click Login.
NOTE: If more than one AP company is available for this user, the Accounts
Payable Company window appears. If only one AP company is available for
this user, the ClubSelect® Accounts Payable window appears.
The Accounts Payable Company window appears.

User Guide ClubSelect® Accounts Payable
10
Call csg Education to schedule training! 800-355-7623
5. If applicable, from the Company drop-down list, select the desired company.
6. Click Login.
The ClubSelect Accounts Payable window appears.

ClubSelect® Accounts Payable User Guide
11
Proprietary and Confidential
Vendors

User Guide ClubSelect® Accounts Payable
12
Call csg Education to schedule training! 800-355-7623
Vendor Maintenance
ClubSelect® Accounts Payable allows you to store basic information for each vendor for
posting and expensing invoices and pay checks. The information entered in the Vendor
Maintenance window streamlines your day-to-day data entry.
Adding a Vendor
1. From the menu bar, select Vendors and then select Vendor Maintenance.
The Vendor Maintenance window appears.
2. Click the New toolbar button.
3. In the Vendor Number field, type the vendor number.
NOTE: If necessary, the vendor number format can be modified for all vendor
numbers. Please contact csg Support for assistance with this option.

ClubSelect® Accounts Payable User Guide
13
Proprietary and Confidential
4. In the Vendor Name field, type the vendor’s name as it should be printed on checks.
You may use up to a maximum of 30 characters for the name.
The Vendor Name value automatically populates in the Vendor Sort field.
5. In the Vendor Sort field, accept the default or type the name by which to sort this
vendor in reports and listings.
For example: You have a vendor, J.W. Peters Consulting. Instead of sorting the
vendor by the first letter of the vendor name, J, you want this vendor to appear with
your list of vendors sorted by P for Peters. Type Peters Consulting in the Vendor
Sort field.
6. In the Address field, type the vendor’s address. You may use up to a maximum of
255 characters for the address.
NOTE: The U.S. Postal Service recommends mailing addresses appear in all capital
letters with no punctuation except for a comma between the city and state
abbreviation.
7. From the Phone Type drop-down list, select the phone type. For example, cell phone,
fax, pager, etc.
NOTE: You can create a phone type by typing the new name in the Phone Type
field.
8. In the Phone # field, type the corresponding phone number, including area code, with
no formatting. The formatting is completed for you.
9. In the Internet/E-Mail field, type the email address for this vendor.
10. In the Contact Person field, type the main contact name.
11. If applicable, in the Customer Number field, type your customer number assigned
by the vendor. This number can print on checks as reference.

User Guide ClubSelect® Accounts Payable
14
Call csg Education to schedule training! 800-355-7623
You can set up the default department to which this vendor’s invoices most frequently post.
It is not necessary to assign a department, but it is very useful for report sorting and filtering.
12. In the Department field, type the department name.
13. Press Tab.
NOTE: If the department name is new, a dialog box appears so it can be saved for
future use. Click Yes to save the entry.
14. To add or modify departments, right-click the Department field.
The Department Maintenance dialog box appears.
15. To add a new department, click Add New.
16. In the Department field, type the new department name.
NOTE: To modify an existing department, select the department from the list. To
delete an existing department, select the department from the list and click
Delete.
17. Click Save.
18. Click Close.
The Vendor Maintenance window reappears.

ClubSelect® Accounts Payable User Guide
15
Proprietary and Confidential
19. If this vendor applies purchase or use tax to the invoices submitted to your club,
select Purchase & Use Tax.
NOTE: If the Purchase & Use Tax field does not appear and it is needed, it must
first be selected in the Control Information file on the General tab. Please
refer to the Setup section of this User Guide for additional information.
20. If this vendor applies Good and Services tax to invoices submitted to your club, select
GST Tax.
NOTE: If the GST Tax field does not appear and it is needed, it must first be
selected in the Control Information file on the General tab. Please refer to
the Setup section of this User Guide for additional information.
21. If this vendor is inactive, select Inactive Vendor.
NOTE: Inactive vendors can only be viewed and maintained within the Vendor
Maintenance window. You receive a Vendor is inactive message when
processing invoices, checks, and 1099’s to inactive vendors.
The Schedule Pay Date is the date you want to pay the vendor, not necessarily when the
vendor requests the bill be paid.
22. From the Schedule Based On drop-down list, select how the schedule date is to
calculate.
Invoice Date – calculates a schedule date for the invoices of this vendor based on
the invoice date and the Schedule Day(s) field.
Before Due Date – calculates a schedule date for the invoices of this vendor
based on the Schedule Day(s) field subtracted from the due date.
Fixed Day of Month – calculates a schedule date for the invoices of this vendor
based on the next specified fixed day of the month and it is at least the number in
the Days Before Due field.
Batch Default Schedule Date – calculates a schedule date for the invoices of this
vendor based on the scheduled date entered on the batch invoice entry screen.
None – a schedule date must be supplied during invoice entry.
23. In the Schedule Day(s) field, type the appropriate number depending on your
Schedule Based On field selection.
User Guide ClubSelect® Accounts Payable
16
Call csg Education to schedule training! 800-355-7623
24. In the Days Before Due field, type the number of day before invoices are due for this
vendor.
For example, the vendor has net 30 payment terms. Type a 30 in this field and the due
date is automatically calculated using this number.
25. Select Always take discount if the discounted price is always calculated for invoice
payment, regardless of the other terms selected.
26. In the Discount Percent field, type the percentage discount amount for prompt
payment.
27. In the If Paid Within field, type the number of days from the invoice date the invoice
must be paid to receive the discount.
28. In the Finance Charge Percent field, type the finance charge percentage amount
payable to the vendor if an invoice is not paid on time.
29. In the If Paid After field, type the number of days from the invoice date the vendor
allows before a finance charge is applied.
30. Click the Save toolbar button.
NOTE: You can click Recurring to create a recurring invoice for this vendor. Please refer
to the Recurring Invoices topic in this User Guide for additional information.

ClubSelect® Accounts Payable User Guide
17
Proprietary and Confidential
The Distribution tab allows you to create a default general ledger posting for each AP type
for this vendor including any combination of flat amount or percentage distributions to
various accounts. While these defaults can speed up your data entry process, any account,
amount, or percentage information on this tab can be changed during invoice entry.
31. Click the Distribution tab.
The Distribution tab appears.
32. From the AP Type drop-down list, select the Accounts Payable type for the general
ledger distribution, 1099, and discount information.
NOTE: The AP Type affects the GL AP Liability account. For additional
information on AP Types, please refer to the Setup section of this User
Guide.
33. In the Default Invoice Description field, type a general description for this vendor’s
invoices.

User Guide ClubSelect® Accounts Payable
18
Call csg Education to schedule training! 800-355-7623
34. Select Overwrite the GL# Description with the above during Invoice Entry to use
the text entered in the Default Invoice Description field as the preset description in
the GL account description field as history in GL.
NOTE: If you select to transfer GL in detail, this invoice description appears in the
general ledger.
35. In the GL # field, type the general ledger account number commonly used with this
type of purchase/expense or click the lookup icon to select an account number.
NOTE: To search for a GL number, use the * (wildcard). For example, type 10* to
return a list of all the GL accounts that begin with 10.
36. In the Description field, type the description used with this transaction.
NOTE: The current GL account description for the selected GL number appears.
You can type any description in this field and you have the option to save
the description as the preset description. Depending on your settings, this
description may appear on the vendor checks. For assistance setting up this
option, please contact csg Support.
37. In the Amount field, type the appropriate dollar amount for distribution to the
selected GL account number. If there is no set amount, leave this field blank.
38. In the Percent field, type the appropriate percentage for distribution to the selected
GL account number.
For example, you may choose to split the electric bill between several departments
and general ledger account numbers based on percentages.
NOTE: If there is any number in the Amount field, it is applied first, before any
percentage calculations. The percentages in this column must total 100%.
39. From the 1099 drop-down list, select the 1099 this vendor is to receive.
None – this vendor does not receive a 1099 at the end of the year.
Dividend – Dividend Income 1099 gives information about the distribution of
earnings to owners/shareholders.
Miscellaneous – Report of Miscellaneous Income 1099 is used for payments
performed for a trade or business by people not treated as employees
(subcontractors, directors). Included income is rent or royalty payment; prizes and
awards.
Interest – Interest Income 1099 gives information about interest earned. Do not
include income earned in IRA’s or other qualified plans.
Retirement – Distributions from pensions, annuities, retirement, or profit sharing
plans, IRA’s, SEP’s, insurance contracts, and so forth.

ClubSelect® Accounts Payable User Guide
19
Proprietary and Confidential
Sale of Membership – Proceeds from Acquisitions or Abandonment of Secured
Property 1099 give information about the acquisition or abandonment of property
that is security for a debt of which you are the lender.
Pending – use this 1099 type if you are unsure of the proper 1099 status for this
vendor.
40. Select Discountable if the details of this vendor’s invoices are discountable. If
discounts are not used, this field is not reviewed by the system.
The Additional Information tab allows you to establish the 1099 information for a vendor. It
also allows you to track contract information and notes which can be used as reference
during data entry.
41. Click the Add’l Information tab.
The Add’l Information tab appears.

User Guide ClubSelect® Accounts Payable
20
Call csg Education to schedule training! 800-355-7623
42. In the 1099 ID # field, type the vendor’s Internal Revenue Service Federal Employer
Identification Number (EIN) from the vendor’s W-9 form.
43. In the 1099 Name field, type the name that matches the Federal ID # as it appears on
the W-9 form. This is the name under which this income is reported when 1099’s are
printed.
44. From the Default 1099 Type drop-down list, select the type of 1099 this vendor
receives most often.
None – this vendor does not receive a 1099 at the end of the year.
Dividend – Dividend Income 1099 gives information about the distribution of
earnings to owners/shareholders.
Miscellaneous – Report of Miscellaneous Income 1099 is used for payments
performed for a trade or business by people not treated as employees
(subcontractors, directors). Included income is rent or royalty payment; prizes and
awards.
Interest – Interest Income 1099 gives information about interest earned. Do not
include income earned in IRA’s or other qualified plans.
Retirement – Distributions from pensions, annuities, retirement, or profit sharing
plans, IRA’s, SEP’s, insurance contracts, and so forth.
Sale of Membership – Proceeds from Acquisitions or Abandonment of Secured
Property 1099 give information about the acquisition or abandonment of property
that is security for a debt of which you are the lender.
Pending – use this 1099 type if you are unsure of the proper 1099 status for this
vendor.
Sale of Real Estate
45. If Miscellaneous is selected in the Default 1099 Type field, in the Box to use for
Miscellaneous 1099 section select one of the following:
Non-employee compensation
Rent
Health-care
Prizes and Awards
Gross Proceeds paid to an attorney
46. If you have a signed contract for services provided by this vendor, in the Contract
Amount field, type the amount of the contract.
NOTE: If you do not have a signed contract for services, leave the entry as 0.00.
Contract amounts appear during vendor inquiry for informational purposes
only and do not affect invoice processing.

ClubSelect® Accounts Payable User Guide
21
Proprietary and Confidential
47. In the Notes field, type any applicable notes regarding this vendor.
NOTE: The notes appear during vendor inquiry for informational purposes only and
do not affect invoice processing.
The 1099-S tab only applies to vendors who must file a 1099-S form to report the sale of real
estate to the IRS. This is not commonly used. If you need additional assistance with this tab,
please refer to the End of Year Processing section of this User Guide or contact a csg Support
representative.

User Guide ClubSelect® Accounts Payable
22
Call csg Education to schedule training! 800-355-7623
Vendor Inquiry
Vendor inquiry includes the detailed history of all invoices and checks entered into
ClubSelect® Accounts Payable, the current year’s beginning open payable balance, and the
total year-to-date purchases. A drill-down feature connects the invoices and their expense
history to each check.
Reviewing Vendor Information
1. From the menu bar, select Vendors and then select Vendor Inquiry.
The Vendor Inquiry window appears.
2. In the lookup toolbar field, type all or a portion of the vendor’s name or vendor
number and press the Enter key.
The selected vendor information appears.
NOTE: You can also type the vendor number in the search field or click the lookup
icon to view a list of all vendors.

ClubSelect® Accounts Payable User Guide
23
Proprietary and Confidential
The Summary tab shows year-to-date totals based on either a calendar or fiscal year basis.
3. Select Calendar to view calendar (Jan – Dec) year-to-date information or Fiscal to
view the GL company fiscal year-to-date information.
NOTE: If your fiscal year ends in December, both Calendar and Fiscal produce the
same results.
4. Use the following table to determine field usage:
Field Description
Open Balance Displays the total of all open invoices for this
vendor.
Total Purchases Displays the total of all invoices for this vendor.
Contract Amount Displays any contract amount entered on the
Vendor Maintenance window.
Last Invoice No. Displays the last invoice number posted for this
vendor.
Last Invoice Amount Displays the last invoice amount posted for this
vendor.
Last Invoice Date Displays the last invoice date posted for this
vendor.
Total Disbursements Displays the total of all checks for this vendor.
Last Check No. Displays the last check number posted for this
vendor.
Last Check Amount Displays the last check amount posted for this
vendor.
Last Check Date Displays the last check date posted for this
vendor.
5. Click the ellipsis buttons to view the detailed information for the corresponding
field.
6. Click the Last Invoice No. or Last Check No. lookup buttons to view a different
invoice or check.

User Guide ClubSelect® Accounts Payable
24
Call csg Education to schedule training! 800-355-7623
The Detail tab shows detailed information about the totals generated on the Summary tab.
7. Click the Detail tab.
The Detail tab appears.
8. In the View section, select the items to view:
Purchases – select to view only the invoices for this vendor
Disbursements – select to view only the checks for this vendor
Both – select to view both the invoices and checks for this vendor
9. From the Start Period drop-down list, select the starting period.
10. From the End Period drop-down list, select the ending period.
11. From the Cash Account drop-down list, select a cash account. If this field is blank,
all checks, regardless of cash account, appear.
12. From the AP Type drop-down list, select the AP type.
ClubSelect® Accounts Payable User Guide
25
Proprietary and Confidential
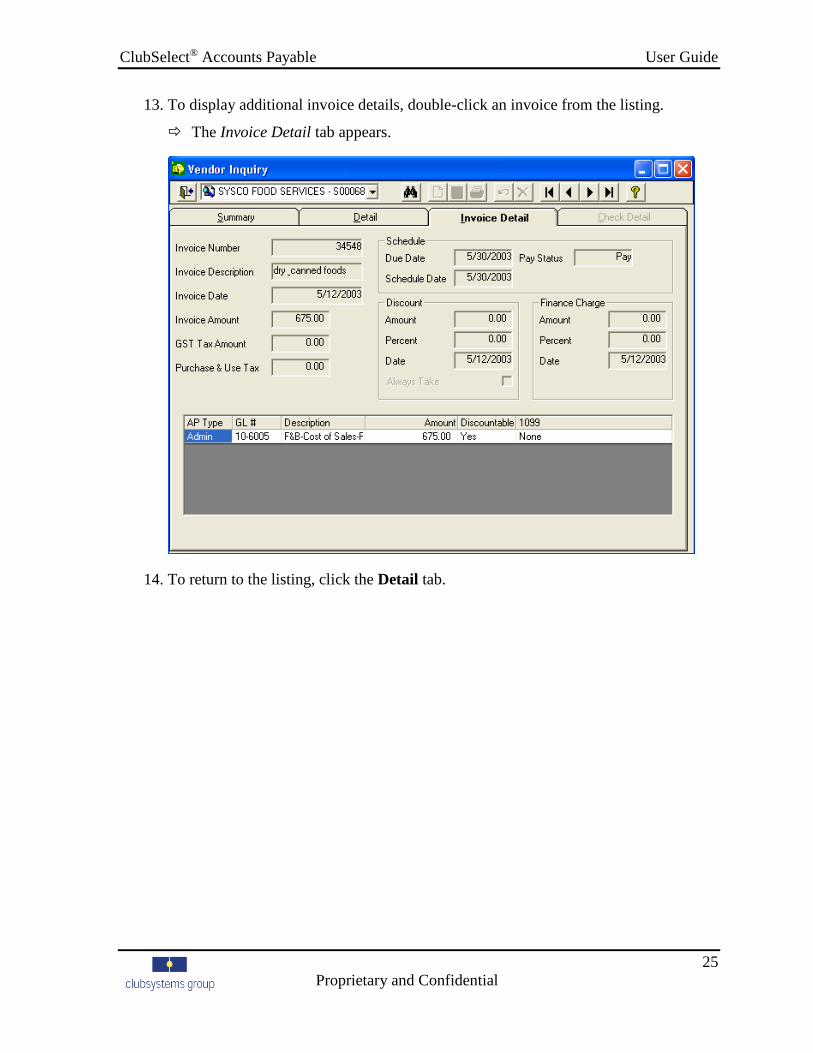
13. To display additional invoice details, double-click an invoice from the listing.
The Invoice Detail tab appears.
14. To return to the listing, click the Detail tab.

User Guide ClubSelect® Accounts Payable
26
Call csg Education to schedule training! 800-355-7623
15. To display additional check details, double-click a check from the listing.
The Check Detail tab appears.
16. To close the window, click the Exit toolbar button.

ClubSelect® Accounts Payable User Guide
27
Proprietary and Confidential
Invoice
Processing

User Guide ClubSelect® Accounts Payable
28
Call csg Education to schedule training! 800-355-7623
Invoice Processing
ClubSelect® Accounts Payable offers a variety of invoice entries to accommodate a variety of
invoice situations. Each invoice entry screen is designed to quickly record detailed
information for every invoice.
Another wonderful feature of ClubSelect® Accounts Payable is that you can set up the
software to automatically check for duplicate vendor invoice numbers. This can help track
duplicate invoice number proactively and save you the time and expense of multiple
payments. For additional information on this feature, please refer to the Setup section of this
User Guide.
Preparation for Invoice Entry
Before proceeding with invoice entry, complete this invoice preparation to ensure maximum
data entry and reconciliation efficiency.
Organize by General Ledger period – sort your invoices by the general ledger
accounting period affected by the purchase. Unless it is an installment purchase, a
batch can only affect one general ledger period.
Code and Edit Batch – although you can always look up the vendor number and GL
account reference during data entry, it is much faster if you write the vendor number
and GL account number affected by the transaction on the invoices before data entry
begins. Another useful technique, highlight the invoice number, invoice date, and
total amount so they stand out during data entry.
Compute Control Totals – calculate the total of all the invoices to include in the
batch.

ClubSelect® Accounts Payable User Guide
29
Proprietary and Confidential
Invoice Batches
Invoices are recorded in ClubSelect® Accounts Payable in batches and these batches are
automatically assigned a sequential number. All invoice batches appear on the Batch Listing
report, grouped by GL period.
Creating a New Batch of Invoices
1. From the menu bar, select Data Entry and then select Invoice Entry.
The Batch Listing window appears.
2. From the G/L Period drop-down list, select the correct month and year. To change
the year, use the left and right arrows.
All the invoice batches for the selected period appear.
NOTE: You cannot post to permanently closed general ledger periods. If it is
necessary to post to a permanently closed period, contact the GL person so
they can make the appropriate change in ClubSelect® General Ledger.

User Guide ClubSelect® Accounts Payable
30
Call csg Education to schedule training! 800-355-7623
3. To start a new batch of invoices, click New.
The Batch window appears.
The Batch Number field is automatically populated and tracked by ClubSelect® Accounts
Payable. There are separate batches for each entry type – regular invoice, recurring invoice,
regular check, quick check, manual check, and voided check.
4. In the Batch Date field, type the date for this batch Use MMDDYY format.
5. In the Default Schedule Date field, type the date invoices are scheduled for payment
for all the vendors set up to use the Batch Schedule Date in the Vendor Maintenance
window.
NOTE: The Default Schedule Date field is ignored for vendors set up with other
schedule and due date calculations.

ClubSelect® Accounts Payable User Guide
31
Proprietary and Confidential
6. From the Default Cash Type drop-down list, select the cash type to assign as the
default for use with manual checks posted within the invoice batch.
7. From the Default A/P Type drop-down list, select the A/P type to assign as the
default for use with this batch.
8. To use multiple A/P types within the batch, select Use multiple A/P types in this
batch.
9. From the Batch Type drop-down list, select one of the following:
Regular Invoice – regular invoice entry. This option is discussed in the Regular
Invoice Entry topic of this User Guide.
Recurring Invoice – recurring vendor invoice entry. This option is discussed in
the Recurring Invoices topic of this User Guide.
Assign Quick Checks – assign a quick check to an invoice. This option is
discussed in the Quick Checks topic of this User Guide.
10. From the GL Period drop-down list, select the appropriate General Ledger period for
this batch.
NOTE: All the Control Total fields are optional. Additional fields available are
Vendor Hash Totals, Invoice Hash Totals, and Check Hash Totals. For
additional setup information, please refer to the Setup section of this User
Guide.
11. In the Invoice Amount field, type the control total for the invoices. This is an
optional field.
12. In the Check Amount field, type the control total for manual checks. Regular
invoices are typically entered without manual checks, therefore the manual check
control total is usually zero for regular invoices. This is an optional field.
13. In the Discount Amount field, type the control total for the discounts. This is an
optional field.
14. In the Finance Charge field, type the control total for the finance charges. This is an
optional field.
NOTE: Discounts and finance charges can be entered during invoice entry, or added
later when checks are run. For vendors set up with automatic discounts, the
system adds the discount to the invoice when the invoice is entered. With
this in mind, you may want to enter anticipated discounts as part of the
control totals.

User Guide ClubSelect® Accounts Payable
32
Call csg Education to schedule training! 800-355-7623
15. Click OK.
When Regular Invoice is select as the batch type, the Invoice Entry window appears.

ClubSelect® Accounts Payable User Guide
33
Proprietary and Confidential
Regular Invoice Entry
When Regular Invoice is selected as the batch type on the Batch window, you are setup for
regular invoice entry. Regular invoices need to be entered into the system as an open
payable. Regular invoices typically increase the GL liability account based on the selected
AP type, and are expensed in the GL period in which they were incurred.
NOTE: When the invoice date is entered, ClubSelect® AP automatically calculates the
due date, schedule date, and any automatic discount. All the calculated fields are
defaults and can be overwritten if necessary.
ClubSelect® AP can automatically expense each invoice to an unlimited number of pre-set
GL accounts defined in a vendor’s file. The automatic distribution can be based on
percentage, actual dollar amounts, or a combination of both. For additional information on
this topic, please refer to the Vendor Maintenance section of this User Guide.
Entering Regular Invoices
1. In the Vendor field, type the beginning of the vendor name or type the vendor
number.
2. Press the Enter key.
A list of matching vendors appears.
3. Select the appropriate vendor from the list.
NOTE: Click the lookup icon to display a list of all your vendors.
Click the ellipsis button to add new vendors during invoice entry.
Click the Address button to view the selected vendor’s address.
4. From the AP Type drop-down list, select the appropriate AP Type for this invoice.
NOTE: AP Types are set up for your club during installation. If you need to set up
additional AP Types, please refer to the Setup section of this User Guide or
contact csg Support for assistance.
5. In the Invoice Number field, type the invoice number.
6. In the Invoice Description field, type a description of the invoice. If the Default
Invoice Description field on the Vendor Maintenance window is populated, the
description appears in this field. The default can be overwritten, if necessary.
NOTE: ClubSelect® AP can automatically copy the invoice description into the GL
account description field in the expense distribution grid. This transfers the
invoice description into the General Ledger as part of the transaction
history. For additional information on this topic, please refer to the Vendor
Maintenance section of this User Guide.

User Guide ClubSelect® Accounts Payable
34
Call csg Education to schedule training! 800-355-7623
7. In the Invoice Date field, type the date from the invoice.
8. In the Invoice Amount field, type the amount of the invoice.
9. If applicable, in the GST Tax Amount field, type the amount of the goods and
services tax that appears on the invoice.
NOTE: If the GST Tax Amount field does not appear and it is needed, it must first
be selected in the Control Information file on the General tab. Please refer
to the Setup section of this User Guide for additional information.
10. If applicable, in the Purchase & Use Tax field, type the amount of purchase and use
tax that appears on the invoice.
NOTE: If the Purchase & Use Tax field does not appear and it is needed, it must
first be selected in the Control Information file on the General tab. Please
refer to the Setup section of this User Guide for additional information.
11. If necessary, modify the calculated date in the Due Date field.
12. If necessary, modify the calculated date in the Schedule Date field.
13. From the Pay Status drop-down list, select the status of this invoice.
14. If necessary, modify the calculated Discount section fields.
15. If necessary, modify the calculated Finance Charge section fields.
If the invoice vendor is set up with pre-defined GL distribution defaults, ClubSelect® AP
calculates the GL distribution. If pre-defined GL distribution is not set up for this vendor, the
GL distribution grid must be completed.
NOTE: Use the GL # description field to describe each invoice expense. This field
information becomes part of the AP history that is available in the General
Ledger.
16. Click the Save toolbar button.
17. To start the next invoice, click the New toolbar button.
18. Continue to add each invoice using the previous steps.
NOTE: For information on the Prepaid and Manual Check buttons, please refer to the
Special Invoice Situations section of this User Guide.

ClubSelect® Accounts Payable User Guide
35
Proprietary and Confidential
19. After all invoices for this batch are entered and saved, click End Batch.
The Invoice Entry Variance window appears.
The control totals values are those numbers previously entered on the Batch window. The
Control Total fields on the Batch window are optional so there may be no value in this
column. If no values are entered on the Batch window, the Variance column displays the
difference between the Control Totals and the Input Totals. This is an expected variance if
you did not enter any Control Totals values on the Batch window.
20. Review the Control Total, Input Totals, and Variance columns to determine any
necessary changes.
User Guide ClubSelect® Accounts Payable
36
Call csg Education to schedule training! 800-355-7623
21. Use the following table to determine button usage:
Button Description
Print Click this button to print a listing of all entries
included in this batch.
Edit
Click this button to return to the Invoice Entry
window. You can then modify or delete existing
invoices in this batch or add new invoices.
Post
Click this button to post this batch of invoices.
The results can be immediately viewed in Vendor
Inquiry, the Open Payable and Aging reports, the
Purchase Register, the Batch Listing, and
ClubSelect® General Ledger.
Exit
Click this button to leave this batch of invoices in
the system, but unposted. Unposted batches
appear in the Invoice Batch window, and can be
edited or posted at any time. For example, if you
are interrupted before finishing invoice entry,
you might want to leave the batch unposted.
NOTE: Unposted batches do not appear in the
Vendor Inquiry, the Open Payable report, and
ClubSelect® General Ledger.
Delete Click this button to delete the ENTIRE batch of
invoices.

ClubSelect® Accounts Payable User Guide
37
Proprietary and Confidential
Batch Update
A batch can hold one invoice or hundreds of invoices. The quantity is determined by your
preference. Each batch must be posted, but all the invoice batches are listed on the Batch
Listing report regardless of their posting status.
If you receive an unexpected variance on the Invoice Entry Variance window or if you need
to add new invoices to an existing batch, you have the ability to edit the batch.
Updating an Invoice Batch
1. From the menu bar, select Data Entry and then select Invoice Entry.
The Batch Listing window appears.
2. From the G/L Period drop-down list, select the correct month and year. To change
the year, use the left and right arrows.
All the invoice batches for the selected period appear.
3. From the batch listing, select the appropriate batch to update.
NOTE: If the batch to edit is posted, click Unpost.

User Guide ClubSelect® Accounts Payable
38
Call csg Education to schedule training! 800-355-7623
4. Click Edit.
The Batch window appears.
5. If necessary, modify the Control Totals section amounts. These are optional fields.

ClubSelect® Accounts Payable User Guide
39
Proprietary and Confidential
6. Click OK.
The Invoice Entry window appears.
7. To modify an existing invoice entry, click the lookup toolbar icon and select All
Records.
8. Select the invoice entry from the list.
9. Modify the record.
10. Click the Save toolbar button to save the changes.
NOTE: To add a new invoice entry, click the New toolbar button and complete
the appropriate information.

User Guide ClubSelect® Accounts Payable
40
Call csg Education to schedule training! 800-355-7623
11. When complete, click End Batch.
The Invoice Entry Variance window appears.
12. Use the following table to determine button usage:
Button Description
Print Click this button to print a listing of all entries
included in this batch.
Edit
Click this button to return to the Invoice Entry
window. You can then modify or delete existing
invoices in this batch or add new invoices.
Post
Click this button to post this batch of invoices.
The results can be immediately viewed in Vendor
Inquiry, the Open Payable and Aging reports, the
Purchase Register, the Batch Listing, and
ClubSelect® General Ledger.

ClubSelect® Accounts Payable User Guide
41
Proprietary and Confidential
Button Description
Exit
Click this button to leave this batch of invoices in
the system, but unposted. Unposted batches
appear in the Invoice Batch window, and can be
edited or posted at any time. For example, if you
are interrupted before finishing invoice entry,
you might want to leave the batch unposted.
NOTE: Unposted batches do not appear in the
Vendor Inquiry, the Open Payable report, and
ClubSelect® General Ledger.
Delete Click this button to delete the ENTIRE batch of
invoices.

User Guide ClubSelect® Accounts Payable
42
Call csg Education to schedule training! 800-355-7623
Special Invoice Situations
ClubSelect® Accounts Payable offers specialized screens and procedures to easily enter and
track invoices that involve unique circumstances.
These special invoices include recurring invoices, prepaid invoices, and invoices paid using a
manual check.
Recurring Invoices
A recurring invoice is a series of identical or similar invoices that are automatically posted
across multiple periods. ClubSelect® Accounts Payable allows you to easily set up recurring
vendor invoices which can save you time for such items as mortgage payments or installment
loans.
Creating a Recurring Invoice
1. From the menu bar, select Setup and then select Recurring Payables.
The Recurring Payables window appears.
NOTE: You can also access the Recurring Payables window by clicking the
Recurring button on the Vendor Maintenance window.
2. Click the New toolbar button.

ClubSelect® Accounts Payable User Guide
43
Proprietary and Confidential
3. In the Vendor field, type the beginning of the vendor name or type the vendor
number.
4. Press the Enter key.
A list of matching vendors appears.
5. Select the appropriate vendor from the list.
NOTE: Click the lookup icon to display a list of all your vendors.
Click the ellipsis button to add new vendors during this setup process.
6. From the AP Type drop-down list, select the AP type for this recurring payable.
NOTE: AP Types are set up for your club during installation. If you need to set up
additional AP Types, please refer to the Setup section of this User Guide or
contact csg Support for assistance.
7. In the Invoice Number field, type the invoice number for this transaction.
8. In the Invoice Description field, type a description for this transaction.
9. In the Invoice field, type the invoice day for this transaction. The Invoice Day and
the Months to Post fields combine for the invoice date.
10. In the Due field, type the due day for this invoice. The Due and Months to Post
fields combine for the due date.
11. In the Schedule field, type the schedule day for this transaction. The Schedule and
Months to Post fields combine for the schedule date.
12. In the Times to Post field, type the number of times this invoice is to post to AP.
0 – the invoice is not posted. The invoice remains as part of the recurring invoice
file until you change or delete the entry.
1-9999 – the invoice posts the number of times indicated. Each time the invoice
posts, the Times to Post field automatically reduces by one. When the field
reaches zero, the invoice is no longer posted but remains as part of the recurring
invoice file until you change or delete the entry.
13. In the Amount field, type the total amount of this invoice to be posted each time the
recurring entry is posted. This amount is used to verify that the entire invoice amount
is distributed to the general ledger accounts listed in the grid.
14. In the GL # field, type the general ledger account number for this transaction.
15. The Description field automatically populates with the selected GL account number
description. This default can be overwritten, if necessary.
16. In the Amount column field, type the amount to apply to this general ledger account
number. All entries in the Amount column must total to equal the Amount field.

User Guide ClubSelect® Accounts Payable
44
Call csg Education to schedule training! 800-355-7623
17. If this invoice can be discounted per the parameters assigned in Vendor Maintenance,
select Discount.
18. From the 1099 drop-down list, select the 1099 type for this transaction.
19. In the Months to Post section, select the appropriate months in which this invoice is
to post.
20. Click the Save toolbar button.
Once the recurring invoice is set up, it must be transferred to an open payable and
incorporated for payment. The frequency of this action is determined by the club’s recurring
invoice needs. Many clubs find it useful to transfer their recurring invoices once a month, at a
fixed time or as the first batch of a new month.
Transferring Recurring Invoices to Open Payables
1. From the menu bar, select Data Entry and then select Invoice Entry.
The Batch Listing window appears.
2. From the G/L Period drop-down list, select the correct month and year. To change
the year, use the left and right arrows.
All the invoice batches for the selected period appear.

ClubSelect® Accounts Payable User Guide
45
Proprietary and Confidential
3. To start a new batch of invoices, click New.
The Batch window appears.
4. In the Batch Date field, type the date for this batch Use MMDDYY format.
5. For recurring invoice entry, from the Batch Type drop-down list, select Recurring
Invoice.
NOTE: The Default Schedule Date field and Control Totals fields are not
completed for recurring invoices.
6. Click OK.
The Invoice Entry window appears.
7. Continue with the normal end batch and post process.

User Guide ClubSelect® Accounts Payable
46
Call csg Education to schedule training! 800-355-7623
Prepaid Invoices
A prepaid invoice is an invoice that needs to be set up for a one-time payment, but involves
repeated expenses over a range of periods. For example, an invoice received in January, due
in February, that covers a year’s worth of liability insurance, is likely expensed 1/12th each
month over the course of the year.
Typically, an initial journal entry debits the prepaid asset account and credits accounts
payable. Then a series of journal entries are required in each appropriate period to expense
the prepaid asset. ClubSelect® Accounts Payable and ClubSelect® General Ledger handle
these tasks for you automatically!
ClubSelect® AP and ClubSelect® GL work together and provide a quick and easy method to
manage your prepaid invoices. Prepaid invoices are entered in AP, but they are stored in GL
where an automatic journal entry to expense a portion of the prepaid is produced for each
appropriate period. The controller also has tracking and editing capabilities through GL.
Use the regular invoice entry procedures to enter a prepaid invoice. Use the Prepaid button
to establish the invoice as prepaid.
Entering Prepaid Invoices
1. From the menu bar, select Data Entry and then select Invoice Entry.
The Batch Listing window appears.

ClubSelect® Accounts Payable User Guide
47
Proprietary and Confidential
2. From the G/L Period drop-down list, select the correct month and year. To change
the year, use the left and right arrows.
All the invoice batches for the selected period appear.
3. To start a new batch of invoices, click New.
The Batch window appears.
4. In the Batch Date field, type the date for this batch Use MMDDYY format.
5. In the Default Schedule Date field, type the date invoices are scheduled for payment
for all the vendors set up to use the Batch Schedule Date in the Vendor Maintenance
window.
NOTE: The Default Schedule Date field is ignored for vendors set up with other
schedule and due date calculations.
6. From the Batch Type drop-down list, select Regular Invoice.
7. In the Invoice Amount field, type the control total for the invoices. This is an
optional field.

User Guide ClubSelect® Accounts Payable
48
Call csg Education to schedule training! 800-355-7623
NOTE: Discounts and finance charges can be entered during invoice entry, or added
later when checks are run. For vendors set up with automatic discounts, the
system adds the discount to the invoice when the invoice is entered. With
this in mind, you may want to enter anticipated discounts as part of the
control totals.
8. Click OK.
The Invoice Entry window appears.
9. In the Vendor field, type the beginning of the vendor name or type the vendor
number.
10. Press the Enter key.
A list of matching vendors appears.
11. Select the appropriate vendor from the list.
NOTE: Click the lookup icon to display a list of all your vendors.
Click the ellipsis button to add new vendors during invoice entry.
Click the Address button to view the selected vendor’s address.

ClubSelect® Accounts Payable User Guide
49
Proprietary and Confidential
12. From the AP Type drop-down list, select the appropriate AP type for this invoice.
NOTE: AP Types are set up for your club during installation. If you need to set up
additional AP Types, please refer to the Setup section of this User Guide or
contact csg Support for assistance.
13. In the Invoice Number field, type the invoice number.
14. In the Invoice Description field, type a description of the invoice.
NOTE: ClubSelect® AP can automatically copy the invoice description into the GL
account description field in the expense distribution grid. This transfers the
invoice description into the General Ledger as part of the transaction
history. For additional information on this topic, please refer to the Vendor
Maintenance section of this User Guide.
15. In the Invoice Date field, type the date from the invoice.
16. In the Invoice Amount field, type the amount of the invoice.
17. If applicable, in the GST Tax Amount field, type the amount of the goods and
services tax that appears on the invoice.
NOTE: If the GST Tax Amount field does not appear and it is needed, it must first
be selected in the Control Information file on the General tab. Please refer
to the Setup section of this User Guide for additional information.
18. If applicable, in the Purchase & Use Tax field, type the amount of purchase and use
tax that appears on the invoice.
NOTE: If the Purchase & Use Tax field does not appear and it is needed, it must
first be selected in the Control Information file on the General tab. Please
refer to the Setup section of this User Guide for additional information.
19. If necessary, modify the calculated date in the Due Date field.
20. If necessary, modify the calculated date in the Schedule Date field.
21. From the Pay Status drop-down list, select the status of this invoice.
22. If necessary, modify the calculated Discount section fields.
23. If necessary, modify the calculated Finance Charge section fields.
24. Complete the GL distribution grid fields. Assign the entire amount of the prepaid
invoice to one prepaid asset account in the G/L chart of accounts.

User Guide ClubSelect® Accounts Payable
50
Call csg Education to schedule training! 800-355-7623
25. Click Prepaid.
A Save Invoice dialog box appears.
26. Click OK.
The Invoice Entry- Prepaid Information window appears.
27. In the Number of Periods for Expense Allocation field, type the number of periods
to apply this prepaid invoice.
28. Press the Tab key.
The amount per period calculates.

ClubSelect® Accounts Payable User Guide
51
Proprietary and Confidential
29. Accept the system calculation in the Amount per Period field.
30. From the Starting Period drop-down list, select the appropriate GL period and year.
31. In the GL Expense Accounts field, type a GL account name or account number.
NOTE: An unlimited number of expense accounts can be used. The total amount
expensed must equal the calculated amount per period.
32. Click OK.
The Invoice Entry window reappears and the prepaid invoice is saved.
33. As necessary, continue entering invoices and click End Batch to complete the
process.

User Guide ClubSelect® Accounts Payable
52
Call csg Education to schedule training! 800-355-7623
Invoices with Manual Checks
Sometimes invoices are paid manually prior to system entry. These invoices are associated
with a manual check. It is very important to record the manual check information with the
invoice to properly account for the cash transaction.
NOTE: Another type of manual check is one in which the check is hand-written after the
invoice has been entered into AP. In this case, enter the manual check without
additional invoice information since you do not want to expense the invoice
again! Please refer to the Manual Checks topic in this User Guide for additional
details on this procedure.
Invoices with manual checks are entered the same way regular invoices are entered, except
that the check information is added before the invoice is saved.
Entering Invoices with Manual Checks
1. From the menu bar, select Data Entry and then select Invoice Entry.
The Batch Listing window appears.
ClubSelect® Accounts Payable User Guide
53
Proprietary and Confidential
2. From the G/L Period drop-down list, select the correct month and year. To change
the year, use the left and right arrows.
All the invoice batches for the selected period appear.
3. To start a new batch of invoices, click New.
The Batch window appears.
4. In the Batch Date field, type the date for this batch in MMDDYY format.
5. From the Batch Type drop-down list, select Regular Invoice.
6. In the Check Amount field, type the control total for the manual check invoices. This
is an optional field.

User Guide ClubSelect® Accounts Payable
54
Call csg Education to schedule training! 800-355-7623
7. Click OK.
The Invoice Entry window appears.
8. In the Vendor field, type the beginning of the vendor name or type the vendor
number.
9. Press the Enter key.
A list of matching vendors appears.
10. Select the appropriate vendor from the list.
NOTE: Click the lookup icon to display a list of all your vendors.
Click the ellipsis button to add new vendors during invoice entry.
Click the Address button to view the selected vendor’s address.
11. From the AP Type drop-down list, select the appropriate AP type for this invoice.
NOTE: AP Types are set up for your club during installation. If you need to set up
additional AP Types, please refer to the Setup section of this User Guide or
contact csg Support for assistance.

ClubSelect® Accounts Payable User Guide
55
Proprietary and Confidential
12. In the Invoice Number field, type the invoice number.
13. In the Invoice Description field, type a description of the invoice.
14. In the Invoice Date field, type the date from the invoice.
15. In the Invoice Amount field, type the total amount of the invoice.
16. If applicable, in the GST Tax Amount field, type the amount of the goods and
services tax that appears on the invoice.
NOTE: If the GST Tax Amount field does not appear and it is needed, it must first
be selected in the Control Information file on the General tab. Please refer
to the Setup section of this User Guide for additional information.
17. If applicable, in the Purchase & Use Tax field, type the amount of purchase and use
tax that appears on the invoice.
NOTE: If the Purchase & Use Tax field does not appear and it is needed, it must
first be selected in the Control Information file on the General tab. Please
refer to the Setup section of this User Guide for additional information.
18. From the Pay Status drop-down list, select the status of this invoice.
19. Complete the GL distribution grid.
20. Click the Save toolbar button.
21. Click Manual Check.
The Invoice Entry- Manual Check window appears.

User Guide ClubSelect® Accounts Payable
56
Call csg Education to schedule training! 800-355-7623
22. Verify the Cash Type field is correct.
23. In the Check No. field, type the check number of the distributed manual check.
24. Verify the Check Date field is correct.
25. Verify the GL Period field is correct.
NOTE: The GL period for the check cannot be different than the GL period for the
invoice!
26. In the Check Amount field, type the amount of the manual check.
27. If applicable, in the Discount Taken field, type the discount amount applied to the
manual check.
28. If applicable, in the F/C Paid field, type the finance charge applied to the manual
check.
29. Click OK.
The Invoice Entry window reappears.
30. If appropriate, continue to enter invoices with or without manual check information.
31. When complete, click End Batch.
This manual check information appears on the check register for the period.

ClubSelect® Accounts Payable User Guide
57
Proprietary and Confidential
Check
Printing

User Guide ClubSelect® Accounts Payable
58
Call csg Education to schedule training! 800-355-7623
Check Printing
ClubSelect® Accounts Payable offers several different check-writing options — regular
computer checks, quick checks, and recording of manual checks written outside the system.
Quick checks are instant checks generated and printed without an invoice. This is very useful
for COD’s and other situations when a check must be cut immediately. After the check
prints, it must be expensed in the system by creating an Assign Quick Check invoice batch.
While the system does not require the expensing to take place immediately (though it is
recommended), AP period end procedures are prevented from running until all quick checks
are assigned.
ClubSelect® AP also allows for manual checks when a hand-written check must be
distributed. They are used to either pay existing invoices or pay new invoices. In both cases,
it is necessary to record that a check was hand-written. When the check pays an existing
invoice, the expense side of AP is already recorded and another invoice is not entered. When
the check pays a new invoice, an invoice must be created with the manual check.
NOTE: Many aspects of the check layout can be modified. If changes are needed after the
initial installation, please refer to the Setup section of this User Guide or contact
csg Support for assistance.
Computer Checks
Computer checks are written based on the criteria set up for each individual check run. These
checks can print to any local or networked printer.
Writing Computer Checks
1. From the menu bar, select Data Entry and then select Computer Checks.
The Print Checks dialog box appears.

ClubSelect® Accounts Payable User Guide
59
Proprietary and Confidential
2. If applicable, from the Cash Type drop-down list, select the appropriate cash type.
NOTE: If you do not have multiple cash types set up in Accounts Payable, the Cash
Type field does not appear.
Cash types are set up for your club during installation. If you need
additional cash types created, please refer to the Setup section of this User
Guide or contact csg Support for assistance.
3. In the Check Date field, type the check date in MMDDYY format. This date is
shown on various reports and displays when referencing the information contained in
the batch.
4. From the GL Period drop-down list, select the appropriate GL period for batch of
checks. This is the period in which the check disbursement is recorded in the General
Ledger.
5. Click Select Invoices.
The Select Open Invoices dialog box appears.

User Guide ClubSelect® Accounts Payable
60
Call csg Education to schedule training! 800-355-7623
6. In the Choose By section, select the method for invoice selection. Each method
(except All) allows criteria to match against open invoices:
All – view all the open invoices
Vendor – select a single vendor for this check run
Due Date – select the cutoff date for comparison against the due date of each
open invoice. Use MMDDYY format. The due date is the date the vendor
requests the bill be paid.
Schedule Date – select the cutoff date for comparison against the schedule date
of each open invoice. Use MMDDYY format. The schedule date is the date you
want to pay the vendor, not necessarily when the vendor requests the bill be paid.
Department – select or deselect each department for this check run
A/P Types – select or deselect each accounts payable type for this check run
7. To select only those open invoices with a specific a dollar limit, select Dollar Limit
and include the desired dollar amount criteria.
8. Select Include all possible discounts to include all open invoices with discounts.
Open invoices with either a discount percentage or a discount dollar amount are
included.
9. Click OK.
The Invoice Selection window appears with a list of all open invoices that match the selection criteria.
NOTE: Double-click any column heading to sort the data in the column for quick and
easy data review and verification. Right-click the Pay column to select or unselect
all the listed invoices.

ClubSelect® Accounts Payable User Guide
61
Proprietary and Confidential
If the resulting list of invoices is not correct, you can:
Click Criteria to return to the Select Open Invoice window.
Unselect the Pay column for any invoice on the list
Click Add to display the Add Invoices to Check Batch window
To make any changes to any column fields for an open payable in the Invoice Selection
window, the Pay column for that payable must be selected. The Status field must also be set
to Pay to select or deselect the Pay column. If the status is Hold or Dispute, no changes can
be made to that open payable record.
Changes can be made to the due date, schedule date, discount amount, and finance charge
amount. ClubSelect® Accounts Payable also gives you the flexibility to change the Check
Amount values in this window. These changes do not affect the actual open payable amount
of the invoice, only the amount paid against the invoice for this check run.
10. Verify the Status field for each open invoice to be paid is Pay.
NOTE: Click Print Register to view or print a Pre-Check Register listing.
11. When the list of open invoices is correct to pay with this check run, click Print
Checks.
The Check Printer Selection window appears.
12. From the Check Printer drop-down list, select the appropriate printer.

User Guide ClubSelect® Accounts Payable
62
Call csg Education to schedule training! 800-355-7623
13. From the Print Checks for drop-down list, select the check signature requirements
for check printing.
All – select to print checks for all selected invoices without regard to check
signature requirements.
Require 1 Signature – select to only print checks for invoices with amounts that
require one signature. This allows you to change the printer paper, if necessary.
Require 2 Signatures – select to only print checks for invoices with amounts that
require two signatures. This allows you to change the printer paper, if necessary.
NOTE: ClubSelect® Accounts Payable gives you the option to automatically require
a second signature. Please review the Setup section of this User Guide or
contact csg Support for assistance.
14. To reprint checks for a specific vendor, in the Starting Vendor field, type the vendor
number of the first check to reprint. This is commonly used for printer or power
failures.
15. Verify the Starting Check # field is correct.
NOTE: ClubSelect® Account Payable tracks the last check number used and
defaults to the next number. If this is incorrect, type the correct check
number.
16. Before loading the pre-printed check forms into the printer, select Test Check and
make sure everything aligns and prints properly. This can save you the expense of
wasted pre-printed forms. Deselect Test Check to print the actual checks.
17. As necessary, in the Horizontal offset field, type the number of inches (usually a
fraction) from the left side of the check the printing should be moved right on the
page. The default is usually 0.00.
To move the check printing to the left on the page, make the number less than 0.00
(or whatever the value currently is) – the value can be a negative number, if
necessary. This usually does not need to be changed.
18. As necessary, in the Vertical offset field, type the number of inches (usually a
fraction such as .05) from the top of the check the printing should be moved down on
the page. The default is usually .05.
To move the check printing up on the page, make the number less than .05 (or
whatever the value currently is) — the value can be a negative number, if necessary.
This usually does not need to be changed.
NOTE: The Preview button is unavailable when Test Check is selected.

ClubSelect® Accounts Payable User Guide
63
Proprietary and Confidential
19. Click Print.
The checks print and the Reprint Checks Confirmation dialog box appears.
After all the checks print, you are prompted to reprint the checks. If you need to reprint
checks, select Yes. The Printer Selection dialog box reappears. At that time you can reprint
all the checks or restart from a particular vendor. Be sure to verify the starting check number
before processing the check reprint.
20. If you do not need to re-print the checks, click No.
The Update Batch Confirmation dialog box appears.
NOTE: To record the computer-generated checks to the General Ledger and remove
the invoices from the open payables list, you MUST click Yes to the Update
Batch Confirmation dialog box!
21. Click Yes.
The batch is updated and a dialog box appears.

User Guide ClubSelect® Accounts Payable
64
Call csg Education to schedule training! 800-355-7623
22. Be sure to remove the check stock from the printer!!
23. Click OK.
The Check Summary window appears.
24. To print a check summary report, click Print.
NOTE: To preview the check summary, click Preview.

ClubSelect® Accounts Payable User Guide
65
Proprietary and Confidential
Quick Checks
Quick checks are instant checks the system generates and prints without an invoice. This is
very useful for COD’s and other situations when a check must be cut immediately. After the
check prints, it must be expensed in the system by creating an Assign Quick Check invoice
batch. While the system does not require the expensing to take place immediately (though it
is recommended), AP period end procedures are prevented from running until all quick
checks are assigned. Unassigned quick checks do not appear on the check register, and the
cash is not credited to a GL cash account.
Creating Quick Checks
1. From the menu bar, select Data Entry and then select Quick Check.
The Quick Check window appears.
2. In the Invoice # field, type the invoice number, if available.
3. In the Invoice Description field, type a description for the invoice.
4. In the Invoice Date field, type a date in MMDDYY format.
5. In the Pay to the Order of field, select a vendor using one of the following methods:
Type a vendor number and press Enter.
Type a portion of a vendor name and press Enter to view a list of matching
vendors. Select the vendor from the list.
Click the lookup icon to view a list of all the vendors.
NOTE: Click the Pay to the order of: ellipsis button to access the Vendor
Maintenance window and add a new vendor.

User Guide ClubSelect® Accounts Payable
66
Call csg Education to schedule training! 800-355-7623
6. If applicable, from the Cash Account drop-down list, select the cash type for this
invoice. If you only have one cash type, this field does not appear.
7. In the Date field, type the check date in MMDDYY format.
8. Verify the Check # field is correct. If necessary, type a new check number.
9. In the Amount field, type the net check amount.
The written amount automatically appears above the Pay to the order of field.
10. Click Print Check.
The Check Printer Selection window appears.
11. From the Check Printer drop-down list, select the correct local or network printer.
12. From the Print Checks for drop-down list, select the check signature requirements
for check printing.
All – select to print checks for all selected invoices without regard to check
signature requirements.
Require 1 Signature – select to only print checks for invoices with amounts that
require one signature. This allows you to change the printer paper, if necessary.
Require 2 Signatures – select to only print checks for invoices with amounts that
require two signatures. This allows you to change the printer paper, if necessary.
13. Verify the Starting Check # field information is correct.
14. Before loading the pre-printed check forms into the printer, select Test Check and
make sure everything aligns and prints properly. This can save you the expense of
wasted pre-printed forms. Deselect Test Check to print the actual checks.

ClubSelect® Accounts Payable User Guide
67
Proprietary and Confidential
15. As necessary, in the Horizontal offset field, type the number of inches (usually a
fraction) from the left side of the check the printing should be moved right on the
page. The default is usually 0.00.
To move the check printing to the left on the page, make the number less than 0.00
(or whatever the value currently is) – the value can be a negative number, if
necessary. This usually does not need to be changed.
16. As necessary, in the Vertical offset field, type the number of inches (usually a
fraction such as .05) from the top of the check the printing should be moved down on
the page. The default is usually .05.
To move the check printing up on the page, make the number less than .05 (or
whatever the value currently is) — the value can be a negative number, if necessary.
This usually does not need to be changed.
NOTE: The Preview button is unavailable when Test Check is selected.
17. To view the check on the screen, click Preview.
18. To print the check, click Print.
NOTE: After a quick check prints, it must be assigned before the next end of month
procedure runs.

User Guide ClubSelect® Accounts Payable
68
Call csg Education to schedule training! 800-355-7623
Quick checks need to be associated with invoices before they can be included on the check
reconciliation, check register, and before the End of Period procedure runs. To post a quick
check, go to Invoice Entry and select the batch type Assign Quick Checks. This invoice
batch is the quick check posting and the invoice.
Associating an Invoice with a Quick Check
1. From the menu bar, select Data Entry and then select Invoice Entry.
The Batch Listing window appears.
2. From the G/L Period drop-down list, select the period and year. To change the year,
use the left and right arrows.
All the invoice batches for the selected period appear.

ClubSelect® Accounts Payable User Guide
69
Proprietary and Confidential
3. Click New.
The Batch window appears.
4. In the Batch Date field, type the date for this batch. Use MMDDYY format.
5. From the Batch Type drop-down list, select Assign Quick Checks.

User Guide ClubSelect® Accounts Payable
70
Call csg Education to schedule training! 800-355-7623
6. Click OK.
The Quick Check Selection window appears with all the unassigned quick checks.
7. Select the appropriate quick check from the list.
8. Click OK.
The Invoice Entry window appears with the quick check information.

ClubSelect® Accounts Payable User Guide
71
Proprietary and Confidential
9. If necessary, select the appropriate GL number for this transaction.
10. Click the Save toolbar button.
11. Click End Batch.
The Invoice Entry Variance window appears.
12. Use the following table to determine button usage:
Button Description
Print Click this button to print a listing of the entries
included in this batch.
Edit Click this button to correct the entries in this
batch.
Post Click this button to post the entries.
Delete Click this button to delete this batch.

User Guide ClubSelect® Accounts Payable
72
Call csg Education to schedule training! 800-355-7623
Manual Checks
ClubSelect® AP also allows for manual checks when a hand-written check must be
distributed. They are used to either pay existing invoices or pay new invoices. In both cases,
it is necessary to record that a check was hand-written. When the check pays an existing
invoice, the expense side of AP is already recorded and another invoice is not entered. When
the check pays a new invoice, an invoice must be created with the manual check. Manual
checks are included on all check registers and appear with computer checks in a vendor
inquiry.
Please refer to the Special Invoice Situations – Invoices with Manual Checks section of this
User Guide for the procedure to enter new invoices with manual checks.
Processing Manual Checks that Pay Existing Invoices
1. From the menu bar, select Data Entry and then select Manual Checks.
The Manual Check Batch window appears.
2. In the Default Check Date field, type the check date to appear as the default during
manual check entry.
NOTE: The Default Check Date is also the batch date and appears on various
reports. The default check date can be overwritten for individual checks, as
necessary.
3. If applicable, from the Cash Type drop-down list, select the appropriate cash type for
this manual check. If you only have one cash type, this field does not appear.

ClubSelect® Accounts Payable User Guide
73
Proprietary and Confidential
4. From the GL Period drop-down list, select the appropriate GL period for the check.
The current period automatically appears.
5. In the Check Amount Total field, type the total amount of the check. This is an
optional field.
6. In the Discounts Taken field, type any discount amount applied. This is an optional
field.
7. In the Finance Charge field, type any finance charge amount applied. This is an
optional field.
8. Click OK.
The Manual Check Entry window appears.

User Guide ClubSelect® Accounts Payable
74
Call csg Education to schedule training! 800-355-7623
9. In the Vendor field, select the vendor for the manual check using one of the
following methods:
Type a vendor number and press Enter.
Type a portion of a vendor name and press Enter to view a list of matching
vendors. Select the vendor from the list.
Click the lookup icon to view a list of all the vendors.
All open invoices for the selected vendor appear.
10. In the Check Date field, type the date of the manual check.
11. In the Check Number field, type the check number used for the manual check.
12. In the Check Amount field, type the total manual check amount.
13. In the Pay column, select the invoice(s) the manual check paid.
The Amount Paid, Discount, and F/C columns automatically populate with the appropriate amounts totaling the Balance column amount and cannot be changed.
14. Click the Save toolbar button.

ClubSelect® Accounts Payable User Guide
75
Proprietary and Confidential
15. Click End Batch.
The Manual Check Variance window appears.
16. Use the following table to determine button usage:
Button Description
Print Click this button to print a listing of the entries
included in this batch.
Edit Click this button to correct the entries in this
batch.
Post Click this button to post the entries.
Delete Click this button to delete this batch.
User Guide ClubSelect® Accounts Payable
76
Call csg Education to schedule training! 800-355-7623
Processing Void and Wasted Checks
Occasionally, checks are written incorrectly, or check forms are damaged and cannot be
used. In these instances, you need to void or waste checks. If the check has been recorded as
a disbursement in ClubSelect® Accounts Payable, void the check. Voiding a check creates the
proper general ledger entry that negates the disbursement entry created when the check was
originally written. Wasting a check does not create a general ledger entry, since no
originating entry was made in the general ledger. It does record the check number as being
unused so a proper record of all check numbers are accounted for. Record a waste check if
you discover check forms damaged and unusable, for example a coffee spill.
NOTE: If the check number does not appear on any check summary or disbursement
listing, it is a wasted check. If the check number appears on a check summary or
disbursement listing, the check must be voided.
Voiding a Check
1. From the menu bar, select Data Entry and then select Void Checks.
The Void Check Batch window appears.
2. In the Void Date field, type the date for the void check entry. The void date is also
the batch date.
3. From the Cash Account drop-down list, select the cash type for the original check.
4. From the GL Period drop-down list, select the general ledger period affected by the
void check batch.
5. In the Check Amount Total field, type the total amount of all checks to void in this
batch. This is an optional field.
ClubSelect® Accounts Payable User Guide
77
Proprietary and Confidential
6. Click OK.
The Void Check window appears.

User Guide ClubSelect® Accounts Payable
78
Call csg Education to schedule training! 800-355-7623
7. In the Check Number field, type the check number to void.
The check information appears.
NOTE: To view all the checks that can be voided, click the Check Number lookup
icon.
8. To add the void to the batch, click the Save toolbar button.
A dialog box appears.
9. To void the original invoice(s) associated with this check, click Yes. If you do not
want to void the invoice(s), click No.
NOTE: Click No to create an open payable so it can be paid with a different check.
This is done if a check is lost. If a check is sent to the wrong vendor, select
Yes to void the original invoice.

ClubSelect® Accounts Payable User Guide
79
Proprietary and Confidential
10. When all the voids are saved to the batch, click End Batch.
The Void Check Variance window appears.
11. Use the following table to determine button usage:
Button Description
Print Click this button to print a listing of the entries
included in this batch.
Edit Click this button to correct the entries in this
batch.
Post Click this button to post the entries.
Delete Click this button to delete this batch.

User Guide ClubSelect® Accounts Payable
80
Call csg Education to schedule training! 800-355-7623
Wasting Checks
1. From the menu bar, select Data Entry and then select Waste Checks.
The Waste Checks window appears.
2. In the Batch Date field, type the date for the wasted check entry.
3. From the Period drop-down list, select the general ledger period affected by the
wasted checks. The general ledger period is for when the check numbers are
accounted.
4. In the Waste From field, type the first check number in the series to waste.
5. In the Waste To field, type the last check number in the series to waste.
NOTE: If you are only wasting one check, type the same check number in both the
Waste From and Waste To fields.
6. In the Reason For Waste field, type any notes pertaining to the wasted checks.
7. To print a listing of entries included in this batch, click Print.
8. To post the entries in this batch, click Post.
NOTE: To delete this batch and not waste any checks, click Cancel. You cannot
temporarily suspend a batch of wasted checks.

ClubSelect® Accounts Payable User Guide
81
Proprietary and Confidential
End of Period
Processing

User Guide ClubSelect® Accounts Payable
82
Call csg Education to schedule training! 800-355-7623
End of Period Processing
ClubSelect® Accounts Payable allows you to run the end of period process multiple times on
any open or closed AP period so the correct information is transferred to the General Ledger.
You can set Accounts Payable to create a period end entry for ClubSelect® General Ledger
by batch or by month. You can also determine the level of purchase and check detail that
passes from AP to GL. Please refer to the Setup section of this User Guide or contact csg
Support for assistance to change these options.
Be sure to complete the end of period process for Accounts Payable before running the end
of period process for General Ledger. If the selected period is already permanently closed in
ClubSelect® General Ledger, you will not be able to close the same period in Account
Payable without making a change in GL. Please contact your club’s GL person for assistance.
NOTE: ClubSelect® Accounts Payable will not allow you to close a period with an
unassigned quick check. Please refer to the Check Printing – Quick Checks
section of this guide for additional details.
In preparation for the period end processing, we recommend you run the following reports
and perform a database backup prior to completing the Period End Procedure:
Batch File Listing
Open Payables Listing
Check Register
Purchase Register
NOTE: For the procedures needed to generate reports, please refer to the Inquiry and
Reports section of this User Guide.

ClubSelect® Accounts Payable User Guide
83
Proprietary and Confidential
Running the End of Period Process
1. From the menu bar, select Processing and then select Period End Procedure.
The Period End Procedure window appears.
2. To generate a GL Distribution report, click GL Report.
The GL Distribution Report window appears.
3. To narrow the results, in the Batch Number field, type the batch number on which to
report. This is not a required field.
4. From the G/L Period drop-down list, select the GL period on which to report.
5. Click Print Preview to view the report on the computer screen or click Print to send
the report to the printer.
User Guide ClubSelect® Accounts Payable
84
Call csg Education to schedule training! 800-355-7623
6. When complete, click Cancel.
The Period End Procedure window reappears.
7. From the list, select the year and period to close.
8. Click OK.
The period is closed to data entry in Accounts Payable and journal entries are created for General Ledger and a dialog box appears.
NOTE: The AP period is not marked closed until the period is closed in ClubSelect®
General Ledger.
9. Click OK.

ClubSelect® Accounts Payable User Guide
85
Proprietary and Confidential
Check Reconciliation
Check reconciliation is an optional feature available in ClubSelect® Accounts Payable, used
to settle the checks issued to each cash type. The reconciliation process includes compiling a
list of outstanding checks. You utilize the check reconciliation process to account for and
remove from the outstanding list, checks presented to your bank, paid and reported to you as
cashed.
NOTE: ClubSelect® Accounts Payable does not include unassigned quick checks on the
check reconciliation.
If the check reconciliation option is not available and you would like to use it, please refer to
the Setup section of this User Guide or contact csg Support for assistance.
Reconciling Checks
1. From the menu bar, select Data Entry and then select Check Reconciliation.
The Check Reconciliation window appears.
2. In the Cleared Amount field, type the total amount for the checks included in this
batch.
3. In the Statement Date field, type the date of the statement on which the checks
appeared.

User Guide ClubSelect® Accounts Payable
86
Call csg Education to schedule training! 800-355-7623
4. Click OK.
The unreconciled checks appear.
5. To find a specific check number, click Search.
6. Click the Clr column for each check that has cleared and appears on the bank
statement you are reconciling.
NOTE: To clear a range of checks, click Range and type the starting and ending
check numbers.
7. Verify the Vendor, Check Date, and Check Amount fields for each check matches
the physical check.
8. If the cleared amount is different than the amount suggested in the Cleared Amount
column, update the amount so it equals the amount paid by the bank.
NOTE: If the bank previously cleared a check for an amount other than the amount
for which it was issued, ClubSelect® Accounts Payable displays the check
on the check reconciliation grid until the variance is resolved. Any previous
cleared amount for a check appears in the Previously Cleared column. Any
difference between the amount for which the check was originally issued
and the amount which cleared the bank appears in the Variance column.
Checks are not cleared from the reconciliation grid until the variance equals
zero.

ClubSelect® Accounts Payable User Guide
87
Proprietary and Confidential
9. Click End Batch.
The Check Reconciliation Variance window appears.
10. Use the following table to determine button usage:
Button Description
Print Click this button to print a listing of the entries
included in this batch.
Edit Click this button to correct the entries in this
batch.
Post Click this button to post the entries.
Exit Click this button to temporarily suspend this
batch. The batch remains unposted.
Delete Click this button to delete this batch.

User Guide ClubSelect® Accounts Payable
88
Call csg Education to schedule training! 800-355-7623

ClubSelect® Accounts Payable User Guide
89
Proprietary and Confidential
Reports

User Guide ClubSelect® Accounts Payable
90
Call csg Education to schedule training! 800-355-7623
Reports
ClubSelect® Accounts Payable gives you several reporting options to help you manage your
vendor and accounting information.
Batch Listing
The Batch Listing displays a one-line summary for each batch entered in AP. Batch types
include regular invoices, regular checks, manual checks, quick checks, voided checks, wasted
checks, and recurring invoices.
Accessing Batch Information
1. From the menu bar, select Data Entry and then select Batch Listing.
The Batch Listing window appears.
2. From the G/L Period drop-down list, select a year and period to view.

ClubSelect® Accounts Payable User Guide
91
Proprietary and Confidential
3. Click Print.
The Batch File Listing window appears.
4. From the Starting Period Value column drop-down list, select the starting period for
the batch listing.
5. From the Ending Period Value column drop-down list, select the ending period for
the batch listing.

User Guide ClubSelect® Accounts Payable
92
Call csg Education to schedule training! 800-355-7623
6. To view the report on the screen, click Print Preview.
The Batch File Listing report appears for the select period range.
7. To print the report to the selected printer, click the Print toolbar button.
8. To close the report preview window, click the Close button.
9. To close the Batch File Listing window, click Exit.
10. To close the Batch Listing window, click the Close button.

ClubSelect® Accounts Payable User Guide
93
Proprietary and Confidential
Operating Reports
Operating Reports allow you to preview and print current and prior month activity. The
following operating reports are available at any time:
Open Payables List
Open Payables Aging
Check Register
Purchase Register
Cash Requirements
Purchase & Use Tax
Prepaid Invoice Report
Filtering Tools
Use the following tables as a guide during report filtering.
Applied Filter Operators
Operators instruct the filter how the value is to be read.
Operator Description
= Equals
< Less than
> Greater than
<= Less than or equal to
>= Greater than or equal to
<> Not equal to
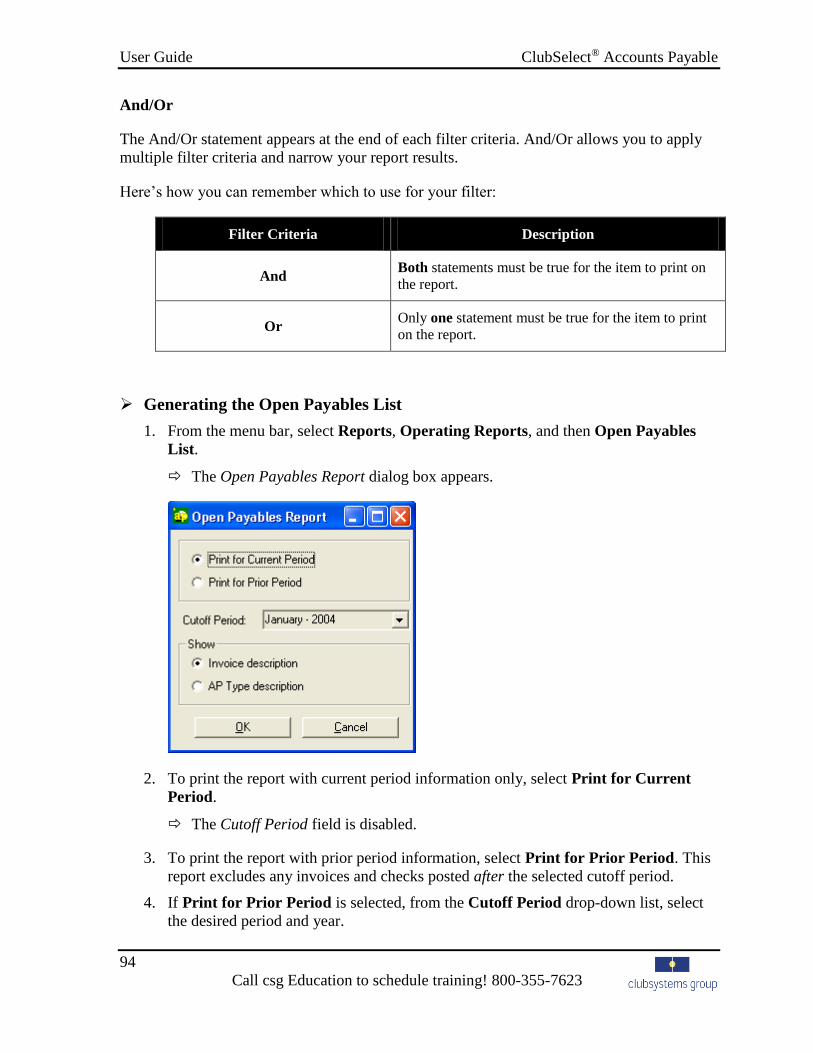
User Guide ClubSelect® Accounts Payable
94
Call csg Education to schedule training! 800-355-7623
And/Or
The And/Or statement appears at the end of each filter criteria. And/Or allows you to apply
multiple filter criteria and narrow your report results.
Here’s how you can remember which to use for your filter:
Filter Criteria Description
And Both statements must be true for the item to print on
the report.
Or Only one statement must be true for the item to print
on the report.
Generating the Open Payables List
1. From the menu bar, select Reports, Operating Reports, and then Open Payables
List.
The Open Payables Report dialog box appears.
2. To print the report with current period information only, select Print for Current
Period.
The Cutoff Period field is disabled.
3. To print the report with prior period information, select Print for Prior Period. This
report excludes any invoices and checks posted after the selected cutoff period.
4. If Print for Prior Period is selected, from the Cutoff Period drop-down list, select
the desired period and year.

ClubSelect® Accounts Payable User Guide
95
Proprietary and Confidential
5. To show the invoice description on the report, select Invoice description.
6. To show the AP type description on the report, select AP Type description.
7. Click OK.
The Open Payables List window appears.

User Guide ClubSelect® Accounts Payable
96
Call csg Education to schedule training! 800-355-7623
8. To add a filter to the report, in the Filtering Options section, below the Filters
folder, double-click the appropriate filter.
The filter appears.
9. In the Value column, type the appropriate value by which to filter the report results.
10. Continue to add filters, as necessary.
NOTE: To delete a filter from the grid, click to the left of the filter’s Description
column and press the Delete key.
11. To preview the report on the screen, click Print Preview.
12. To print the report to the selected printer, click Print.
13. Click Exit.
14. Click Cancel.

ClubSelect® Accounts Payable User Guide
97
Proprietary and Confidential
Generating the Open Payables Aging
1. From the menu bar, select Reports, Operating Reports, and then Open Payables
Aging.
The Open Payables Aging Report dialog box appears.
2. To print the report with current period information only, select Print for Current
Period.
The Cutoff Period field is disabled.
3. To print the report with prior period information, select Print for Prior Period. This
report excludes any invoices and checks posted after the selected cutoff period.
4. If Print for Prior Period is selected, from the Cutoff Period drop-down list, select
the desired period and year.
5. From the Aging Date drop-down list, select the date from which to calculate the
aging.

User Guide ClubSelect® Accounts Payable
98
Call csg Education to schedule training! 800-355-7623
6. Click OK.
The Open Payables Aging window appears.

ClubSelect® Accounts Payable User Guide
99
Proprietary and Confidential
7. To add a filter to the report, in the Filtering Options section, below the Filters
folder, double-click the appropriate filter.
The filter appears.
8. In the Value column, type the appropriate value by which to filter the report results.
9. Continue to add filters, as necessary.
NOTE: To delete a filter from the grid, click to the left of the filter’s Description
column and press the Delete key.
10. To preview the report on the screen, click Print Preview.
11. To print the report to the selected printer, click Print.
12. Click Exit.
13. Click Cancel.

User Guide ClubSelect® Accounts Payable
100
Call csg Education to schedule training! 800-355-7623
Export an Open Payable Report to Microsoft® Excel
ClubSelect® Accounts Payable gives you the option to export the Open Payables List or the
Open Payables Aging report to Microsoft® Excel.
Exporting an Open Payable Report to Excel
1. Generate the desired Open Payable report and select Print Preview to preview the
report on the screen.
The selected Open Payable report appears.
2. Click the Export toolbar button.
The Export dialog box appears.

ClubSelect® Accounts Payable User Guide
101
Proprietary and Confidential
3. From the Format drop-down list, select the Excel option to match your current Excel
version.
4. From the Destination drop-down list, accept the default of Disk file.
5. Click OK.
The Choose Export File dialog box appears.
6. Navigate to the location in which to save this file.
7. In the File name field, type a descriptive name for this export file.
8. Click Save.
The report file is exported to the selected location.

User Guide ClubSelect® Accounts Payable
102
Call csg Education to schedule training! 800-355-7623
Generating the Check Register
1. From the menu bar, select Reports, Operating Reports, and then Check Register.
The Check Register dialog box appears.
2. From the Starting Period drop-down list, select the starting period and year for this
report.
3. From the Ending Date drop-down list, select the ending period and year for this
report.
4. From the Cash Types drop-down list, select the cash type for this report. If you only
have one cash type, this field does not appear.
5. To include any inactive vendors in this report data, select Include Inactive Vendors.
6. To preview the report on the computer screen, click Print Preview.
7. To print the report, click Print.
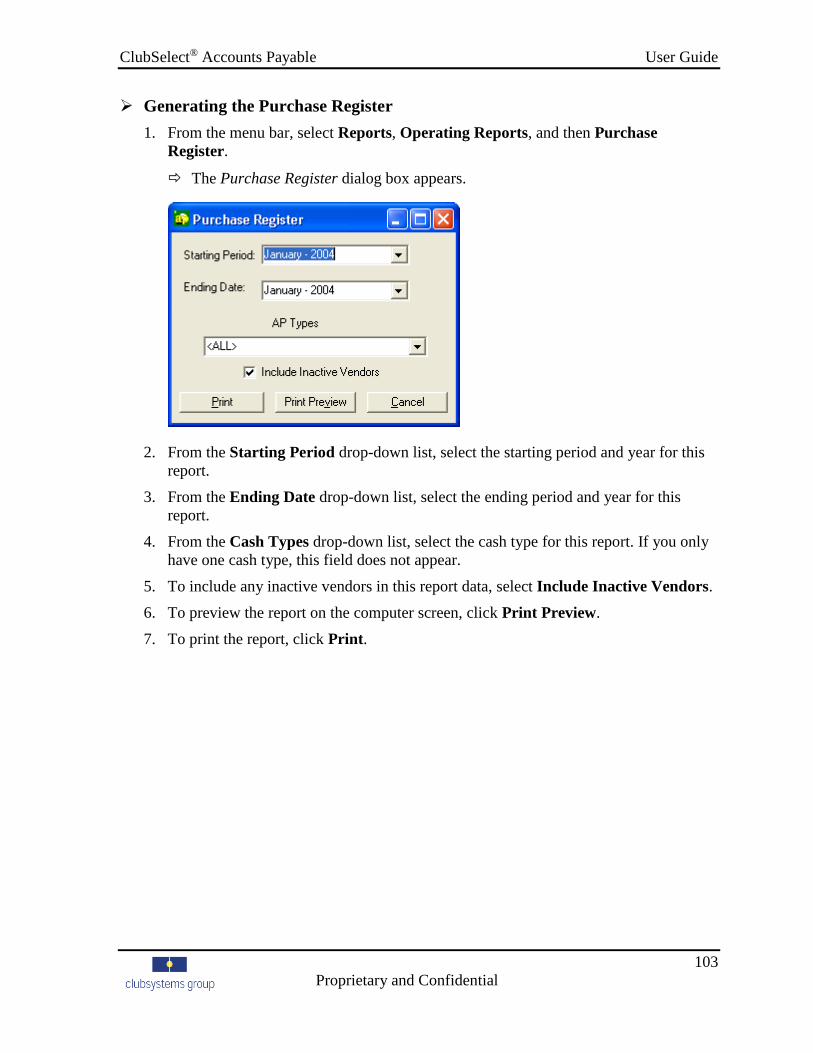
ClubSelect® Accounts Payable User Guide
103
Proprietary and Confidential
Generating the Purchase Register
1. From the menu bar, select Reports, Operating Reports, and then Purchase
Register.
The Purchase Register dialog box appears.
2. From the Starting Period drop-down list, select the starting period and year for this
report.
3. From the Ending Date drop-down list, select the ending period and year for this
report.
4. From the Cash Types drop-down list, select the cash type for this report. If you only
have one cash type, this field does not appear.
5. To include any inactive vendors in this report data, select Include Inactive Vendors.
6. To preview the report on the computer screen, click Print Preview.
7. To print the report, click Print.

User Guide ClubSelect® Accounts Payable
104
Call csg Education to schedule training! 800-355-7623
Generating Cash Requirements
1. From the menu bar, select Reports, Operating Reports, and then select a Cash
Requirements report.
The Cash Requirements dialog box appears.
2. From the Schedule Date drop-down list, select the date for the report data.
3. Click OK.
The Cash Requirements dialog box appears.
4. From the Printer Location drop-down list, select the appropriate printer.
5. To preview the report, click Preview.
6. To print the report, click Print.

ClubSelect® Accounts Payable User Guide
105
Proprietary and Confidential
Generating the Prepaid Invoice Report
1. From the menu bar, select Reports, Operating Reports, and then select Prepaid
Invoice Report.
The Prepaid Invoice Report window appears.

User Guide ClubSelect® Accounts Payable
106
Call csg Education to schedule training! 800-355-7623
2. To add a filter to the report, in the Filtering Options section, below the Filters
folder, double-click the appropriate filter.
The filter appears.
3. In the Value column, type the appropriate value by which to filter the report results.
4. Continue to add filters, as necessary.
NOTE: To delete a filter from the grid, click to the left of the filter’s Description
column and press the Delete key.
5. To preview the report on the screen, click Print Preview.
6. To print the report to the selected printer, click Print.
7. Click Exit.
8. Click Cancel.

ClubSelect® Accounts Payable User Guide
107
Proprietary and Confidential
Employment Development Department Report
The Employment Development Department Report creates a file (INDCONTR) to send to
the California State government and generates an edit listing of the file contents.
This option reports on those independent contractors paid $600 or more per year associated
with a Miscellaneous 1099.
This report can be run multiple times during a month, usually after printing checks.
California law states this report must be submitted within 20 day of making cumulative
payments of $600 or more. The report file is compared against the California list of “Dead-
Beat Dads”.
Generating the Employment Development Department File
1. From the menu bar, select Reports, Operating Reports, and then Create
Employment Development Department file.
The Employment Development Department window appears.
2. In the EDD Employer Account Number field, type the club’s account number. This
number must be exactly eight-characters in length.
3. In the Amount field, accept the default of 600.00.
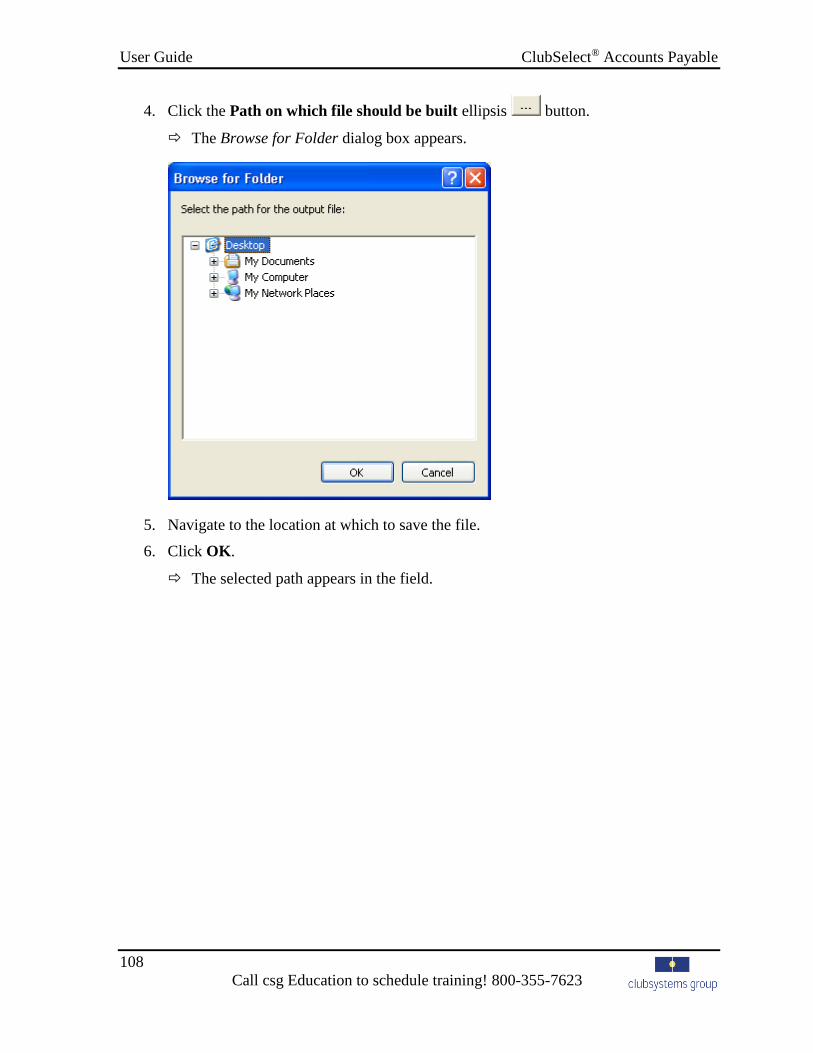
User Guide ClubSelect® Accounts Payable
108
Call csg Education to schedule training! 800-355-7623
4. Click the Path on which file should be built ellipsis button.
The Browse for Folder dialog box appears.
5. Navigate to the location at which to save the file.
6. Click OK.
The selected path appears in the field.

ClubSelect® Accounts Payable User Guide
109
Proprietary and Confidential
7. Click OK.
The EDD file is created on the selected path according to the layout defined by the State of California and a report appears.
NOTE: If a file with the same name exists in the specified path, it is overwritten
without warning.
8. To print the report, click the Print toolbar button.
9. To close the report window, click the Close toolbar button.
A dialog box appears.
10. Click Yes.
The Date of last run field is updated with the current system date and the Employment Development Department window closes.

User Guide ClubSelect® Accounts Payable
110
Call csg Education to schedule training! 800-355-7623
Vendor Reports
ClubSelect® Accounts Payable gives you various vendor reports to track, research, and
generate information. The reports can also be filtered to narrow the list of report results.
Vendor Detail – displays a listing of all the AP vendors with their address, schedule
information, and 1099 information. This list can be filtered by vendor name or
number to narrow the list of vendors.
Vendor Summary – displays a listing of all AP vendor names and numbers. This list
can be sorted by vendor name or number.
Vendor Phone – displays a listing of the AP vendor contact names and phone
numbers. This list can be filtered by vendor name or number to narrow the list of
vendors.
Labels with Addresses – displays labels with AP vendor addresses. This list can be
filtered by vendor name, number, default 1099 type, or zip code.
Labels without Addresses – displays labels without AP vendor addresses. This list
can be filtered by vendor name, number, default 1099 type, or zip code.
Vendor History – displays the purchase and disbursement (invoice and check)
transactions. This information can be filtered using starting and ending periods
allowing you to generate a specific period report or a yearly report. This list can also
be filtered by vendor name, number, or AP Type.
Department – displays a list of all the departments created in Vendor Maintenance
within ClubSelect® Accounts Payable.
Preset Description – displays the descriptions saved in the Invoice Entry window.

ClubSelect® Accounts Payable User Guide
111
Proprietary and Confidential
Filtering Tools
Use the following tables as a guide during report filtering.
Applied Filter Operators
Operators instruct the filter how the value is to be read.
Operator Description
= Equals
< Less than
> Greater than
<= Less than or equal to
>= Greater than or equal to
<> Not equal to
And/Or
The And/Or statement appears at the end of each filter criteria. And/Or allows you to apply
multiple filter criteria and narrow your report results.
Here’s how you can remember which to use for your filter:
Filter Criteria Description
And Both statements must be true for the item to print on
the report.
Or Only one statement must be true for the item to print
on the report.

User Guide ClubSelect® Accounts Payable
112
Call csg Education to schedule training! 800-355-7623
Accessing and Filtering Reports
1. From the menu bar, select Reports, Vendor Reports, and then select a report.
For each report, the appropriate Listing window appears.

ClubSelect® Accounts Payable User Guide
113
Proprietary and Confidential
2. To add a filter to the report, in the Filtering Options section, below the Filters
folder, double-click the appropriate filter.
The filter appears.
3. In the Value column, type the appropriate value by which to filter the report results.
4. Continue to add filters, as necessary.
NOTE: To delete a filter from the grid, click to the left of the filter’s Description
column and press the Delete key.
5. To preview the report on the screen, click Print Preview.
6. To print the report to the selected printer, click Print.
7. Click Exit.

User Guide ClubSelect® Accounts Payable
114
Call csg Education to schedule training! 800-355-7623

ClubSelect® Accounts Payable User Guide
115
Proprietary and Confidential
End of Year
Processing

User Guide ClubSelect® Accounts Payable
116
Call csg Education to schedule training! 800-355-7623
End of Year Processing
Use the following end of year procedures to generate 1099’s, set up the magnetic media,
print end of year reports, and backup the Accounts Payables data for storage.
Accounts Payable 1099 Procedures
Use these procedures to generate the vendor 1099 information for your club.
Club Address Change
Use this procedure if an address or telephone number change is needed.
Making Changes to the Club’s Address
1. From the menu bar, select Setup and then select Control Information.
The Control Information window appears.

ClubSelect® Accounts Payable User Guide
117
Proprietary and Confidential
2. Click the Address tab.
The Address tab appears.
3. Update the fields with the address information to appear on the 1099s.
4. Click Save.
A dialog box appears.
5. Click Yes.

User Guide ClubSelect® Accounts Payable
118
Call csg Education to schedule training! 800-355-7623
Print 1099 Edit Listings
Use the following procedures to print an edit listing for each 1099 type or for one vendor
only.
Printing a 1099 Edit Listing for Each 1099 Type
1. From the menu bar, select Vendors, Vendor 1099’s, and then select Print 1099’s.
The Vendor 1099’s dialog box appears.
2. Verify 1099 Edit Listing is selected.
3. Select Include all applicable vendors.
4. From the Type of 1099 drop-down list, select Misc - Miscellaneous.
5. Verify the correct year is in the 1099 Year field.
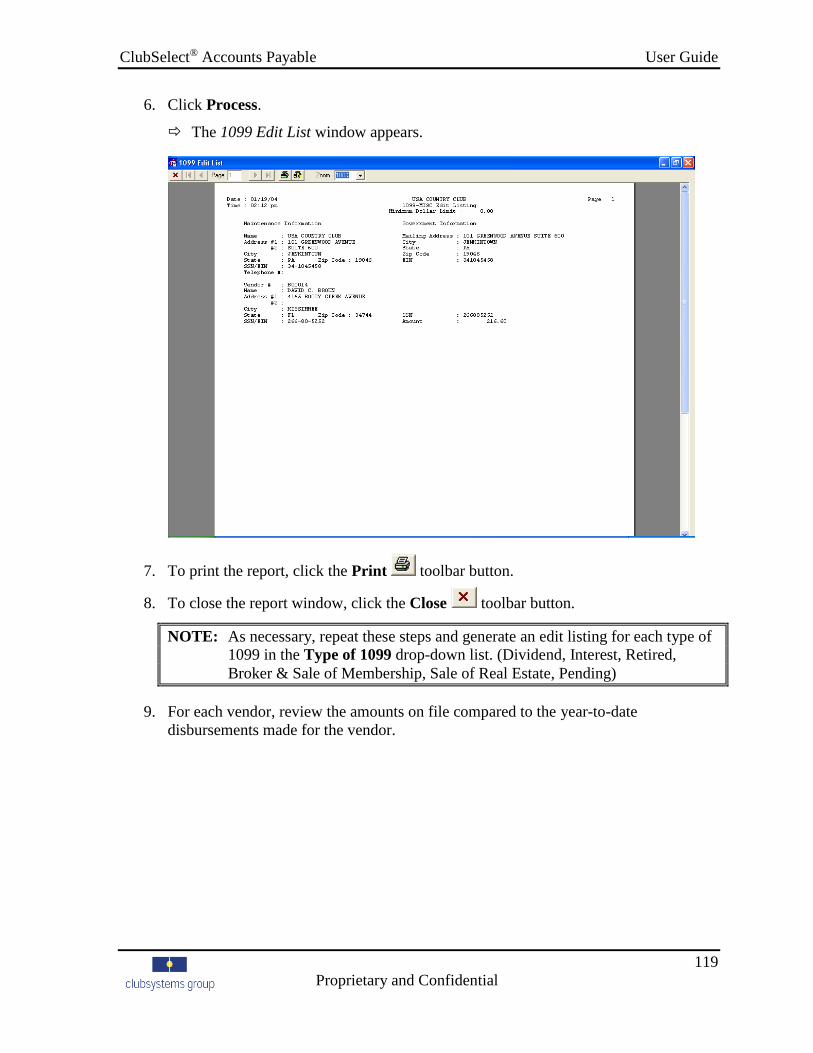
ClubSelect® Accounts Payable User Guide
119
Proprietary and Confidential
6. Click Process.
The 1099 Edit List window appears.
7. To print the report, click the Print toolbar button.
8. To close the report window, click the Close toolbar button.
NOTE: As necessary, repeat these steps and generate an edit listing for each type of
1099 in the Type of 1099 drop-down list. (Dividend, Interest, Retired,
Broker & Sale of Membership, Sale of Real Estate, Pending)
9. For each vendor, review the amounts on file compared to the year-to-date
disbursements made for the vendor.

User Guide ClubSelect® Accounts Payable
120
Call csg Education to schedule training! 800-355-7623
Printing a 1099 Edit Listing for Only One Vendor
1. From the menu bar, select Vendors, Vendor 1099’s, and then select Print 1099’s.
The Vendor 1099’s window appears.
2. Verify 1099 Edit Listing is selected.
3. Select Include only one vendor.
The Vendor lookup field becomes active.
4. Click the Vendor lookup icon and select All Records.
The list of vendor names displays.
5. From the vendor list, select the appropriate vendor.
6. From the Type of 1099 drop-down list, select Misc - Miscellaneous.
7. Verify the correct year is in the 1099 Year field.
8. Click Process.
The 1099 Edit List window appears.
9. To print the report, click the Print toolbar button.
10. To close the report window, click the Close toolbar button.

ClubSelect® Accounts Payable User Guide
121
Proprietary and Confidential
NOTE: As necessary, repeat these steps and generate an edit listing for each type of
1099 in the Type of 1099 drop-down list. (Dividend, Interest, Retired,
Broker & Sale of Membership, Sale of Real Estate, Pending)
11. For the vendor, review the amounts on file compared to the year-to-date
disbursements made for the vendor.
1099 Setup Information
Vendor Maintenance is used to change the 1099 vendor name or federal ID number and setup
a 1099-S which is used to report the sale of real estate to the IRS for a vendor. Please refer to
the Vendor Maintenance section of this User Guide for additional vendor setup information.
Making Changes to the 1099 Vendor Name or Federal ID Number
1. From the menu bar, select Vendors and then select Vendor Maintenance.
The Vendor Maintenance window appears.

User Guide ClubSelect® Accounts Payable
122
Call csg Education to schedule training! 800-355-7623
2. Click the toolbar lookup icon and select All Records.
3. From the vendor list, select the appropriate vendor.
4. Click the Add’l Information tab.
The Add’l Information tab appears.
5. Update the fields, as necessary.
6. Click the Save toolbar button.
7. Click the Exit toolbar button.

ClubSelect® Accounts Payable User Guide
123
Proprietary and Confidential
Use the following procedure to set up a 1099-S form used to report the sale of real estate to
the IRS for a vendor.
Creating a 1099-S for a Vendor
1. From the menu bar, select Vendors and then select Vendor Maintenance.
The Vendor Maintenance window appears.
2. Click the toolbar lookup icon and select All Records.
3. From the vendor list, select the appropriate vendor.
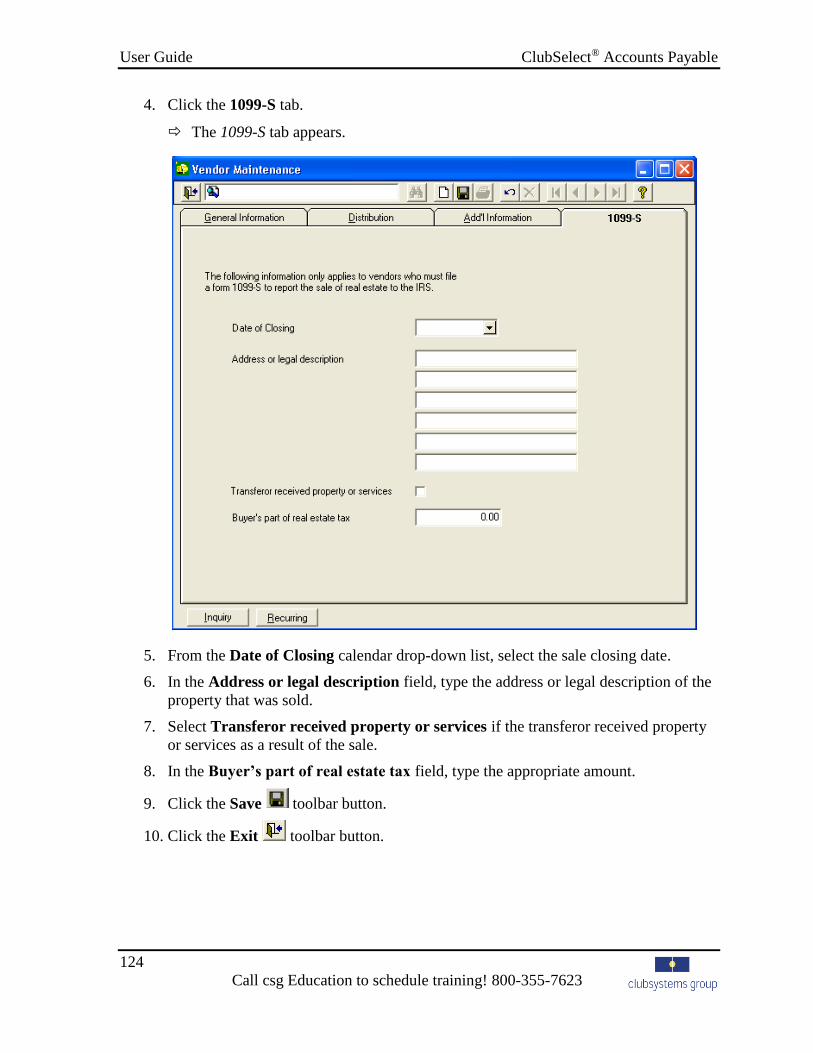
User Guide ClubSelect® Accounts Payable
124
Call csg Education to schedule training! 800-355-7623
4. Click the 1099-S tab.
The 1099-S tab appears.
5. From the Date of Closing calendar drop-down list, select the sale closing date.
6. In the Address or legal description field, type the address or legal description of the
property that was sold.
7. Select Transferor received property or services if the transferor received property
or services as a result of the sale.
8. In the Buyer’s part of real estate tax field, type the appropriate amount.
9. Click the Save toolbar button.
10. Click the Exit toolbar button.

ClubSelect® Accounts Payable User Guide
125
Proprietary and Confidential
Reclassify 1099’s
Use the following steps if you have changed the vendor 1099 type and need to reclassify the
disbursement amounts to the proper 1099 form.
Recalculating 1099s
1. From the menu bar, select Vendors, Vendor 1099’s, and then select Recalculate
1099’s.
The 1099 Recalculation window appears.
2. Verify the correct year is in the 1099 Year field.
3. In the Base calculations on 1099 Type from section, select one of the following:
Vendor — reclassify the 1099 type based on the type at what the vendor is
currently set.
History — reclassify the 1099 type based on the original setting when the invoice
was created.

User Guide ClubSelect® Accounts Payable
126
Call csg Education to schedule training! 800-355-7623
4. To recalculate the 1099 Types for all vendors, select All Vendors.
5. To recalculate the 1099 Types for specific vendors, select Specific Vendors.
The list of available vendors becomes active.
6. If Specific Vendors is selected, select the vendors to recalculate from the list.
7. Click Calculate.
The 1099 Types are recalculated.
8. Click OK.
9. Click Close.

ClubSelect® Accounts Payable User Guide
127
Proprietary and Confidential
Change 1099 Amounts
Use the following procedures to make changes to the 1099 amounts.
Making Changes to the 1099 Amounts
1. From the menu bar, select Vendors, Vendor 1099’s, and then select 1099
Maintenance.
The 1099 Amounts Maintenance window appears.
2. In the 1099 Year field, type the appropriate year.
3. In the Vendor field, click the lookup icon and select All Records.
The list of vendor names displays.
4. From the vendor list, select the appropriate vendor.
5. For each 1099 type, review the calculated amount displayed.
6. If the amount is incorrect, enter the correct amount in the Adjusted Amount column.
7. Click Save.
8. To exit, click the Close button.

User Guide ClubSelect® Accounts Payable
128
Call csg Education to schedule training! 800-355-7623
Magnetic Media
Use the following steps if your club submits 1099’s on magnetic media.
Setting Up Magnetic Media
1. From the menu bar, select Setup and then select Control Information.
The Control Information window appears.
2. Select Use Magnetic Media for 1099’s.
The Transmitter Control Code field activates.
3. In the Transmitter Control Code field, type the five-digit number provided by the
IRS.
4. Click Save.
A dialog box appears.
5. Click Yes.
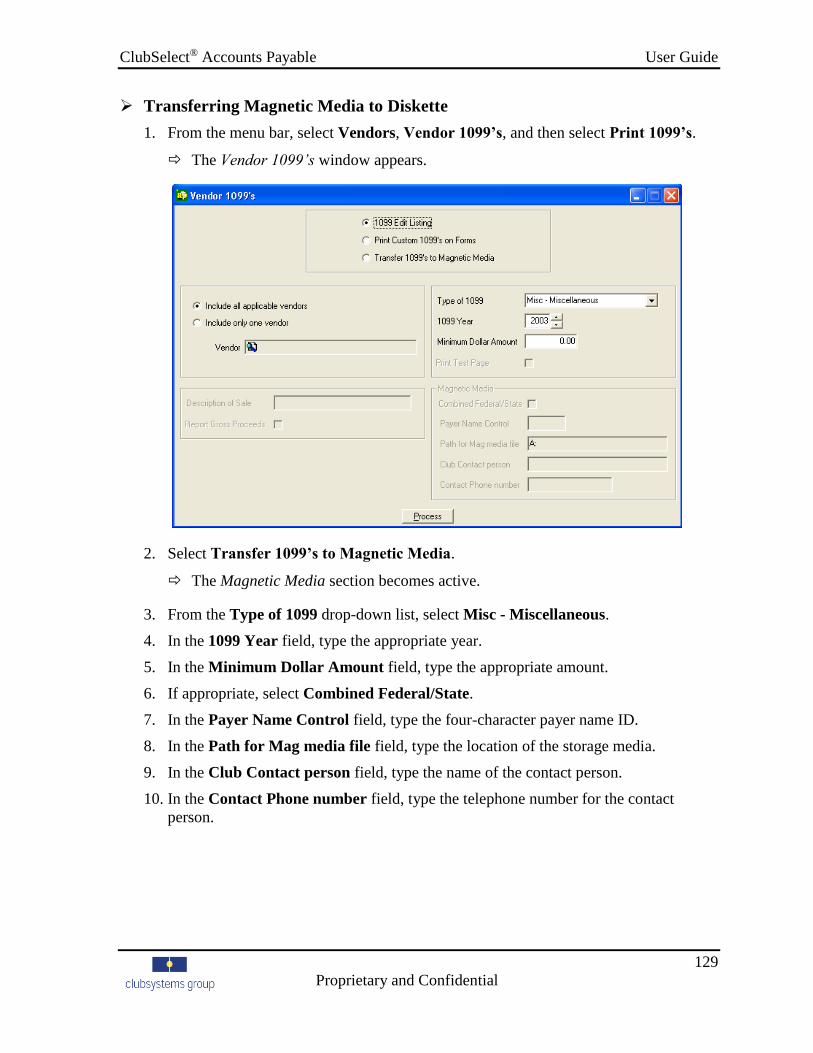
ClubSelect® Accounts Payable User Guide
129
Proprietary and Confidential
Transferring Magnetic Media to Diskette
1. From the menu bar, select Vendors, Vendor 1099’s, and then select Print 1099’s.
The Vendor 1099’s window appears.
2. Select Transfer 1099’s to Magnetic Media.
The Magnetic Media section becomes active.
3. From the Type of 1099 drop-down list, select Misc - Miscellaneous.
4. In the 1099 Year field, type the appropriate year.
5. In the Minimum Dollar Amount field, type the appropriate amount.
6. If appropriate, select Combined Federal/State.
7. In the Payer Name Control field, type the four-character payer name ID.
8. In the Path for Mag media file field, type the location of the storage media.
9. In the Club Contact person field, type the name of the contact person.
10. In the Contact Phone number field, type the telephone number for the contact
person.

User Guide ClubSelect® Accounts Payable
130
Call csg Education to schedule training! 800-355-7623
11. Click Process.
A dialog box appears.
12. Click OK.
The Magnetic Media Transfer Listing prints to your default printer.
NOTE: Repeat these steps and generate diskette for each type of 1099 in the Type of
1099 drop-down list. (Dividend, Interest, Retired, Broker & Sale of Membership,
Sale of Real Estate, Pending)
13. To exit the window, click the Close button.

ClubSelect® Accounts Payable User Guide
131
Proprietary and Confidential
Print Custom 1099’s
When processing multiple types of 1099’s on magnetic media, use a separate diskette for
each 1099 type.
This 1099 information is available for additional processing and reporting, even as accounts
payable information is processed for the new year.
Printing Custom 1099’s on Forms
1. From the menu bar, select Vendors, Vendor 1099’s, and then select Print 1099’s.
The Vendor 1099’s window appears.
2. Select Print Custom 1099’s on Forms.
3. From the Type of 1099 drop-down list, select Misc - Miscellaneous.
NOTE: Be sure to test print the 1099’s on plain white paper to verify the format
and content of the data before printing on the pre-printed forms!
4. Use the pre-printed tax forms supplied by csg.

User Guide ClubSelect® Accounts Payable
132
Call csg Education to schedule training! 800-355-7623
5. Click Process.
The 1099 Forms window appears.
6. To print the report, click the Print toolbar button.
7. To close the report window, click the Close toolbar button.
NOTE: Repeat these steps and print each type of 1099 in the Type of 1099 drop-
down list. (Dividend, Interest, Retired, Broker & Sale of Membership, Sale
of Real Estate, Pending)
8. When complete, click the Close button.

ClubSelect® Accounts Payable User Guide
133
Proprietary and Confidential
Accounts Payable End of Year Procedures
Use these procedures to complete the end of year processing for the accounts payable. These
items must be completed prior to End of Year processing:
Complete the End of Period procedures and close the last period of the fiscal year.
Process the 1099’s. Please refer to the Accounts Payable 1099 Procedures topic of
this User Guide for additional details.
Printing End of Year Reports
The Vendor History, Open Payables List, Check Register, and Purchase Register reports are
recommended, but are not required.
Printing Reports
1. From the menu bar, select Reports, Vendor Reports, and then select Vendor
History.
The Vendor History window appears.

User Guide ClubSelect® Accounts Payable
134
Call csg Education to schedule training! 800-355-7623
2. Select the appropriate starting period and ending period for the fiscal year.
3. Click Print.
4. Click OK.
The report generates.
5. From the menu bar, select Reports, Operating Reports, and then select Open
Payables List.
The Open Payables Report dialog box appears.
6. To print the report with current period information only, select Print for Current
Period.
The Cutoff Period field is disabled.
7. To print the report with prior period information, select Print for Prior Period. This
report excludes any invoices and checks posted after the selected cutoff period.
8. If Print for Prior Period is selected, from the Cutoff Period drop-down list, select
the desired period and year.
9. To show the invoice description on the report, select Invoice description.
10. To show the AP type description on the report, select AP Type description.
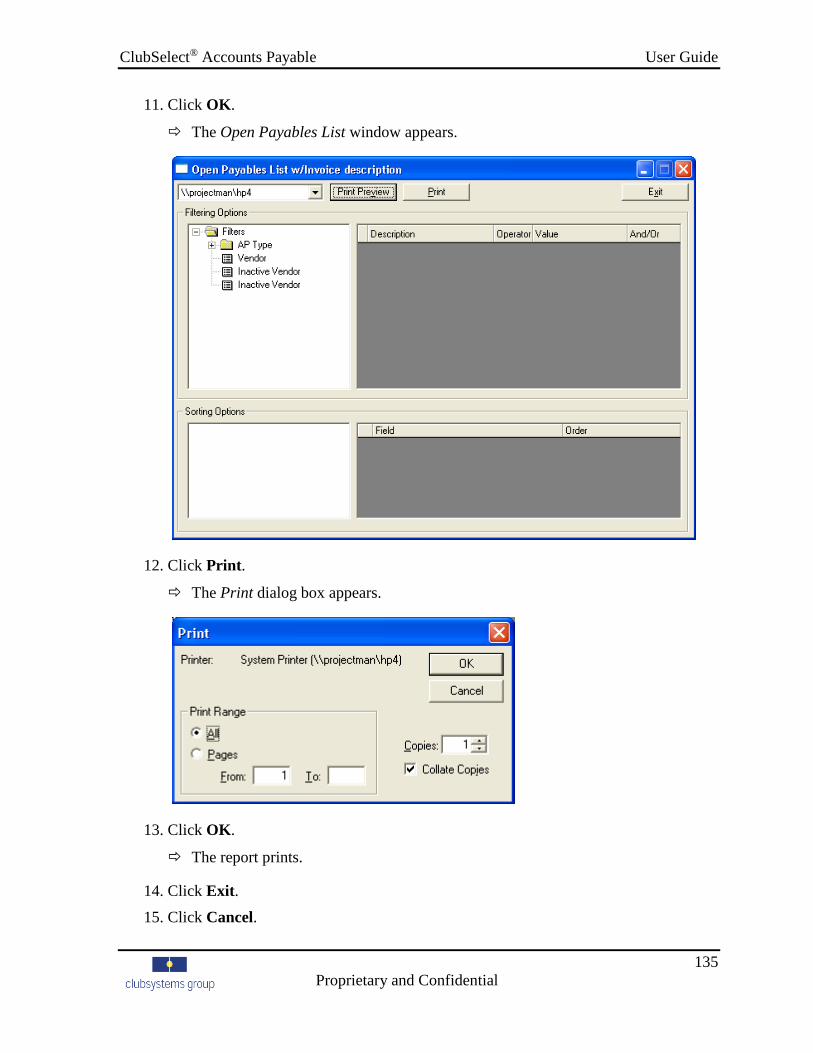
ClubSelect® Accounts Payable User Guide
135
Proprietary and Confidential
11. Click OK.
The Open Payables List window appears.
12. Click Print.
The Print dialog box appears.
13. Click OK.
The report prints.
14. Click Exit.
15. Click Cancel.

User Guide ClubSelect® Accounts Payable
136
Call csg Education to schedule training! 800-355-7623
16. From the menu bar, select Reports, Operating Reports, and then select Check
Register.
The Check Register window appears.
17. Select the appropriate starting period and ending date.
18. Click Print.
The report prints to the assigned default printer.
19. From the menu bar, select Reports, Operating Reports, and then select Purchase
Register.
The Purchase Register window appears.
20. Select the appropriate starting period and ending date.
21. Click Print.
The report prints to the assigned default printer.

ClubSelect® Accounts Payable User Guide
137
Proprietary and Confidential
Setup

User Guide ClubSelect® Accounts Payable
138
Call csg Education to schedule training! 800-355-7623
Control Information
Control Information is the area that defines the club’s accounts payable requirements. The
control information is initially setup during your installation.
General Accounts Payable Information
The General tab defines the basic accounting information for your club.
Setting Up the General Tab
1. From the menu bar, select Setup and then select Control Information.
The Control Information window appears.
2. Use the following table to determine field usage:
Field Description
Federal ID Number
Type the federal identification number for
your company. The federal identification
number is used on 1099 forms.
Print GL Summary On Invoice Edit Select to have the General Ledger Summary
print on the Invoice Edit report.

ClubSelect® Accounts Payable User Guide
139
Proprietary and Confidential
Field Description
Use Magnetic Media for 1099’s Select to have the 1099 information
transmitted via computer diskette.
Transmitter Control Code
This field is available when Use Magnetic
Media for 1099 is selected.
Type the five-digit transmitter code from the
Internal Revenue Service for your magnetic
media submission.
Use Canadian GST Logic
Select to use the Goods and Services Tax.
The Goods and Services Tax is only used by
Canadian clubs.
Purchase & Use Tax
Select to use the Purchase and Use Tax.
Purchase and Use Tax is entered on a per
invoice basis.
Use Employment Development
Department option
Select to create a file (INDCONTR) for
distribution to the California State
government. This file reports those
independent contract vendors (generally
individuals rather than corporations) who
have been paid $600 or more per year for
purchases associated with a Miscellaneous
1099.
A menu option appears under Operating
Reports when this checkbox is selected.
Use Auto Discount Select to allow vendor discount information
setup in Vendor Maintenance.
Use Auto F/C Select to allow vendor finance charge
information setup in Vendor Maintenance.
Duplicate Invoice
Select to have the system automatically
check for duplicate invoices. This feature
helps prevent the duplicate entry of invoices.
# of Months
This field is available when Duplicate
Invoice is selected.
Type the number of months to check for
duplicate invoice numbers.

User Guide ClubSelect® Accounts Payable
140
Call csg Education to schedule training! 800-355-7623
Field Description
Duplicate Check
Select to have the system automatically
check for duplicate manual checks. This
feature helps prevent the duplicate entry of
checks when using the manual check feature.
Computer check numbers cannot be
duplicated and they are unaffected by this
checkbox.
# of Months
This field is available when Duplicate
Check is selected.
Type the number of months to check for
duplicate check numbers.
Use Vendor Hash Totals
Select to have the vendor number hash totals
available to verify your vendor number
entries. The hash totals accumulate a total of
all the vendor numbers entered in the batch.
Use Invoice Hash Totals
Select to have the invoice number hash totals
available to verify your invoice number
entries. The hash totals accumulate a total of
all the invoice numbers entered in the batch.
Use Check Hash Totals
Select to have the check number hash totals
available to verify your check number
entries. The hash totals accumulate a total of
all the check numbers entered in the batch.
Use Batch Controls
Select to use batch controls to verify your
entries. Batch controls accumulate a total of
all the (invoice, check, discount, and finance
charge) amounts as entered in the batch.
3. When complete, click Save.
A dialog box appears.
4. Click Yes.

ClubSelect® Accounts Payable User Guide
141
Proprietary and Confidential
Check Information
The Checks tab defines your club’s basic check format information.
Setting Up the Checks Tab
1. From the menu bar, select Setup and then select Control Information.
The Control Information window appears.
2. Click the Checks tab.
The Checks tab appears.
3. Use the following table to determine field usage:
Field Description
Check Format From the drop-down list, select U.S. or
Canada.
Print Check Number on Check Stub Select to print the check number on the
check stub.
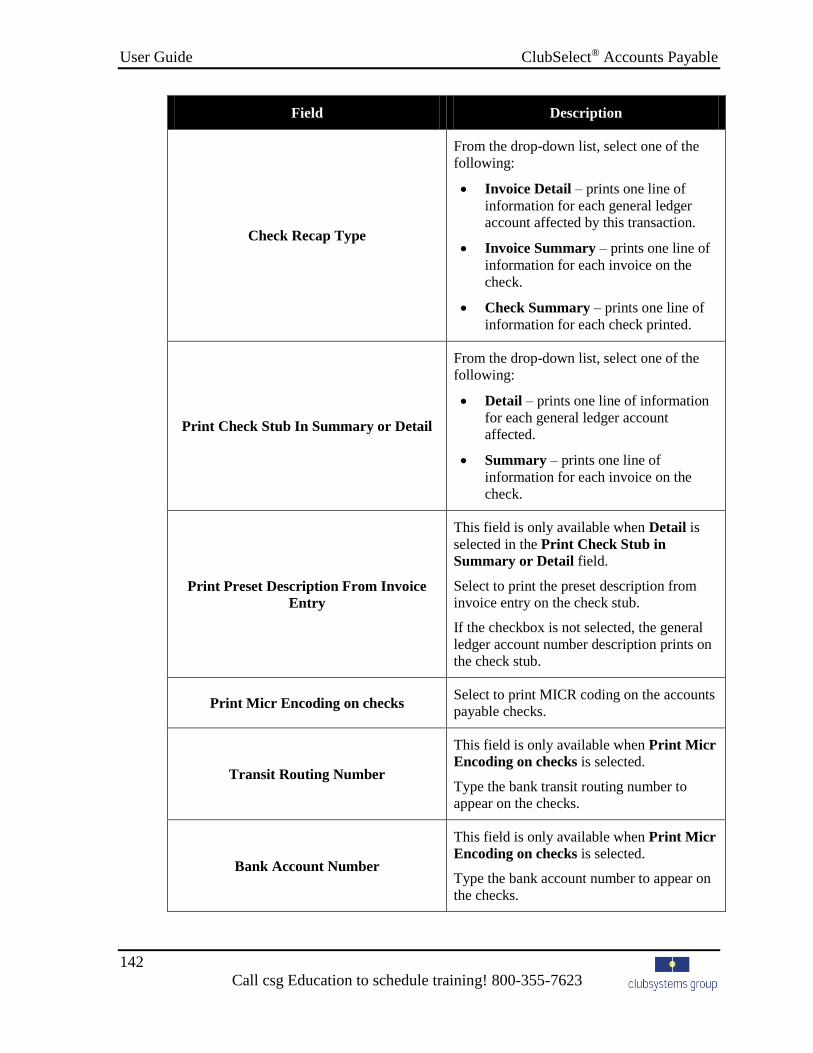
User Guide ClubSelect® Accounts Payable
142
Call csg Education to schedule training! 800-355-7623
Field Description
Check Recap Type
From the drop-down list, select one of the
following:
Invoice Detail – prints one line of
information for each general ledger
account affected by this transaction.
Invoice Summary – prints one line of
information for each invoice on the
check.
Check Summary – prints one line of
information for each check printed.
Print Check Stub In Summary or Detail
From the drop-down list, select one of the
following:
Detail – prints one line of information
for each general ledger account
affected.
Summary – prints one line of
information for each invoice on the
check.
Print Preset Description From Invoice
Entry
This field is only available when Detail is
selected in the Print Check Stub in
Summary or Detail field.
Select to print the preset description from
invoice entry on the check stub.
If the checkbox is not selected, the general
ledger account number description prints on
the check stub.
Print Micr Encoding on checks Select to print MICR coding on the accounts
payable checks.
Transit Routing Number
This field is only available when Print Micr
Encoding on checks is selected.
Type the bank transit routing number to
appear on the checks.
Bank Account Number
This field is only available when Print Micr
Encoding on checks is selected.
Type the bank account number to appear on
the checks.

ClubSelect® Accounts Payable User Guide
143
Proprietary and Confidential
Field Description
Print Vendor #/Name on Check Stub Select to print the vendor number and name
on the check stub.
Print Vendor’s Customer # on Check
Stub
Select to print the vendor’s customer number
on the check stub.
Require Second Signature on Checks
Select to require a second signature on
checks over a specified amount.
When selected, you can print the checks in
two separate batches, based on check
amount.
Amount for Second Signature
This field is only available when Require
Second Signature on Checks is selected.
Type the lowest check amount that requires
a second signature.
4. When complete, click Save.
A dialog box appears.
5. Click Yes.

User Guide ClubSelect® Accounts Payable
144
Call csg Education to schedule training! 800-355-7623
Interface Information
The Interfaces tab defines how accounts payable information is passed to ClubSelect®
General Ledger.
Setting Up the Interfaces Tab
1. From the menu bar, select Setup and then select Control Information.
The Control Information window appears.
2. Click the Interfaces tab.
The Interfaces tab appears.
3. Use the following table to determine field usage:
Field Description
G/L Company
From the drop-down list, select the
ClubSelect® General Ledger company with
which this accounts payable company shares
accounting information. This selected GL
company posts the journal entries from
ClubSelect® AP.
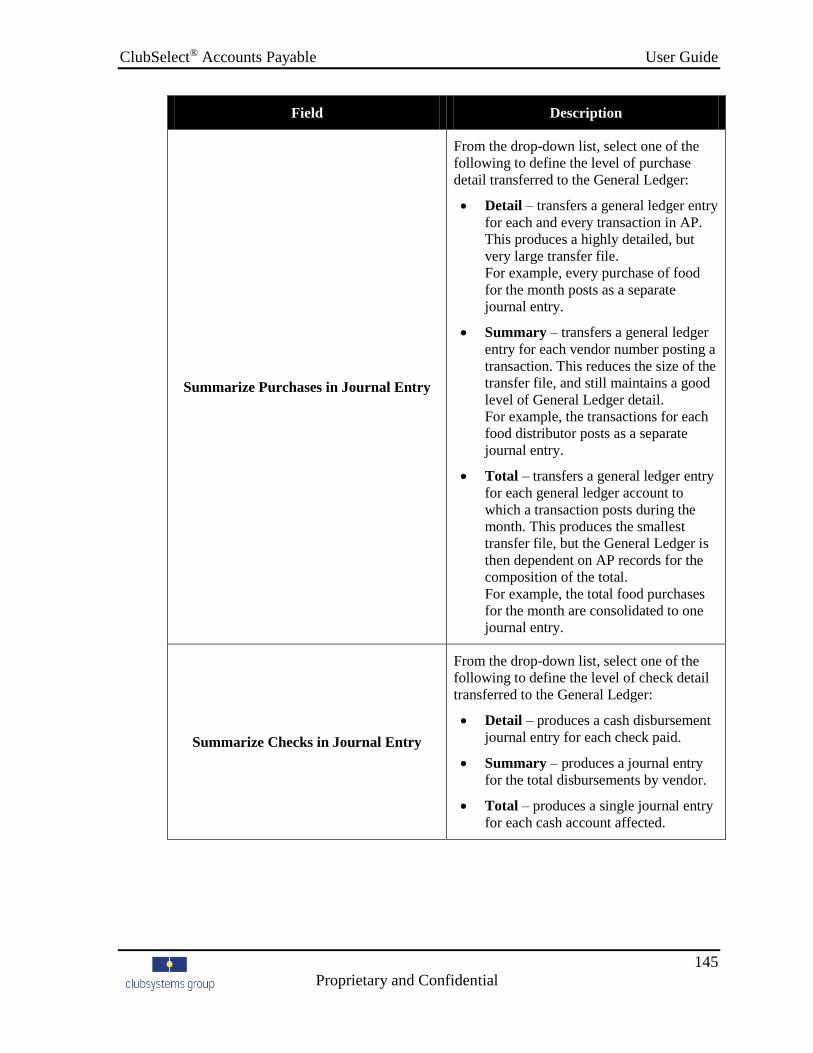
ClubSelect® Accounts Payable User Guide
145
Proprietary and Confidential
Field Description
Summarize Purchases in Journal Entry
From the drop-down list, select one of the
following to define the level of purchase
detail transferred to the General Ledger:
Detail – transfers a general ledger entry
for each and every transaction in AP.
This produces a highly detailed, but
very large transfer file.
For example, every purchase of food
for the month posts as a separate
journal entry.
Summary – transfers a general ledger
entry for each vendor number posting a
transaction. This reduces the size of the
transfer file, and still maintains a good
level of General Ledger detail.
For example, the transactions for each
food distributor posts as a separate
journal entry.
Total – transfers a general ledger entry
for each general ledger account to
which a transaction posts during the
month. This produces the smallest
transfer file, but the General Ledger is
then dependent on AP records for the
composition of the total.
For example, the total food purchases
for the month are consolidated to one
journal entry.
Summarize Checks in Journal Entry
From the drop-down list, select one of the
following to define the level of check detail
transferred to the General Ledger:
Detail – produces a cash disbursement
journal entry for each check paid.
Summary – produces a journal entry
for the total disbursements by vendor.
Total – produces a single journal entry
for each cash account affected.
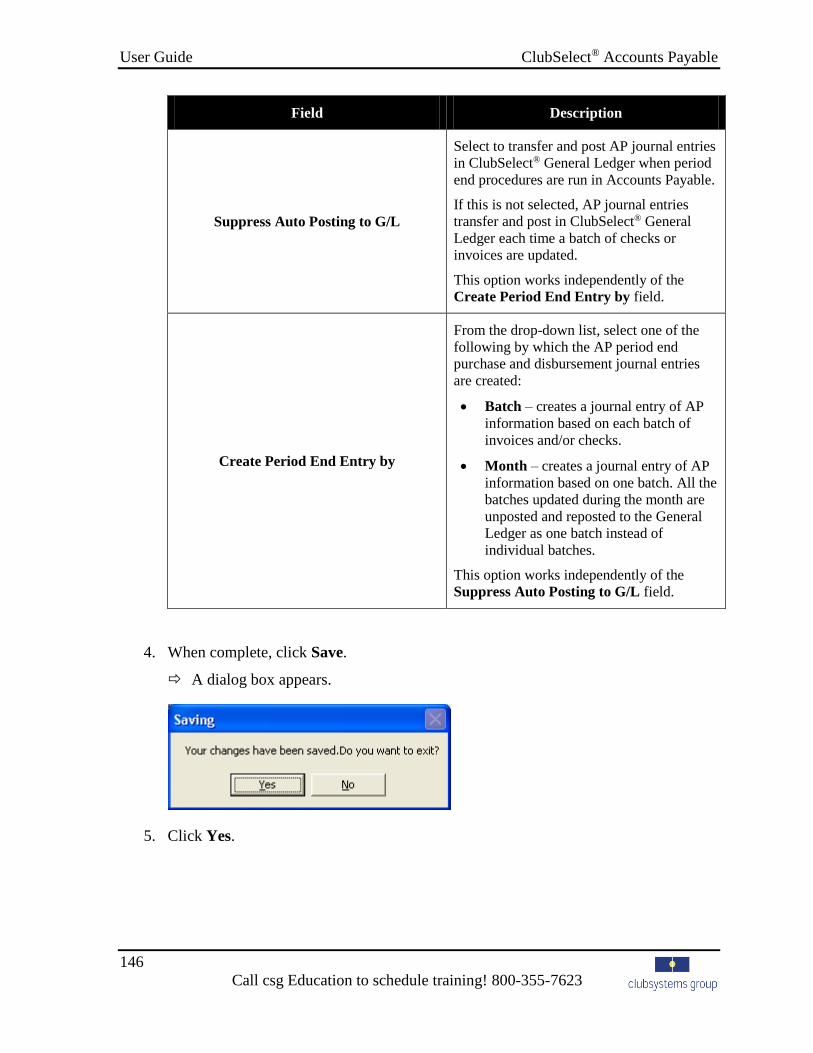
User Guide ClubSelect® Accounts Payable
146
Call csg Education to schedule training! 800-355-7623
Field Description
Suppress Auto Posting to G/L
Select to transfer and post AP journal entries
in ClubSelect® General Ledger when period
end procedures are run in Accounts Payable.
If this is not selected, AP journal entries
transfer and post in ClubSelect® General
Ledger each time a batch of checks or
invoices are updated.
This option works independently of the
Create Period End Entry by field.
Create Period End Entry by
From the drop-down list, select one of the
following by which the AP period end
purchase and disbursement journal entries
are created:
Batch – creates a journal entry of AP
information based on each batch of
invoices and/or checks.
Month – creates a journal entry of AP
information based on one batch. All the
batches updated during the month are
unposted and reposted to the General
Ledger as one batch instead of
individual batches.
This option works independently of the
Suppress Auto Posting to G/L field.
4. When complete, click Save.
A dialog box appears.
5. Click Yes.

ClubSelect® Accounts Payable User Guide
147
Proprietary and Confidential
Vendor Number Information
The Vendor No.’s tab defines how the vendor numbers are formatted and assigned in
ClubSelect® Accounts Payable.
Setting Up the Vendor No.’s Tab
1. From the menu bar, select Setup and then select Control Information.
The Control Information window appears.
2. Click the Vendor No.’s tab.
The Vendor No.’s tab appears.
NOTE: The Vendor No. Format field is set up during the initial installation process
and is unavailable for modification.
3. Select Auto-Assign AlphaNumeric Vendor No.’s to automatically assign vendor
numbers when new vendors are added.
4. In the Vendor No. Increment field, type the number of unassigned vendor numbers
between each auto-assigned vendor number.

User Guide ClubSelect® Accounts Payable
148
Call csg Education to schedule training! 800-355-7623
5. When complete, click Save.
A dialog box appears.
6. Click Yes.
Reconciliation Information
The Reconciliation tab allows you to activate the check reconciliation option within
ClubSelect® Accounts Payable.
Setting Up the Reconciliation Tab
1. From the menu bar, select Setup and then select Control Information.
The Control Information window appears.
2. Click the Reconciliation tab.
The Reconciliation tab appears.
3. To enable the check reconciliation option for the checks written versus the checks
presented to your bank, select Use Check Reconciliation.

ClubSelect® Accounts Payable User Guide
149
Proprietary and Confidential
4. When complete, click Save.
A dialog box appears.
5. Click Yes.
Address Information
The Address tab defines your club address for the ClubSelect® Accounts Payable.
Setting Up the Address Tab
1. From the menu bar, select Setup and then select Control Information.
The Control Information window appears.
2. Click the Address tab.
The Address tab appears.
3. In the Club Name field, type the name of your club.
4. In the Address line 1 field, type the club’s street address.

User Guide ClubSelect® Accounts Payable
150
Call csg Education to schedule training! 800-355-7623
5. If applicable, in the Address line 2 field, type additional street address information.
6. In the City, State, Zip Code fields, type the club’s city, state, and zip code.
7. In the Telephone # field, type the club’s main telephone number.
8. When complete, click Save.
A dialog box appears.
9. Click Yes.

ClubSelect® Accounts Payable User Guide
151
Proprietary and Confidential
Positive Pay
Positive Pay is a fraud prevention service provided by Union Bank, Northern Trust,
Wachovia and other banks that compares the check number and dollar amount submitted for
payment against your ClubSelect® Accounts Payable “checks issued” file. Exception items
are then reported to you by the bank providing this service.
Setting Up the Positive Pay Tab
1. From the menu bar, select Setup and then select Control Information.
The Control Information window appears.
2. Click the Positive Pay tab.
The Positive Pay tab appears.
3. To enable the Positive Pay option, select Use Positive Pay.
4. From the Bank file format drop-down list, select the correct bank type.
5. In the Bank Account Number field, type the account number.
6. In the Branch Number field, type the bank branch number. This is an optional field.
7. To create a new “checks issued” file each time checks are processed, select Always
Append to file. If this is not selected, the “checks issued” file is overwritten each
time checks are processed.
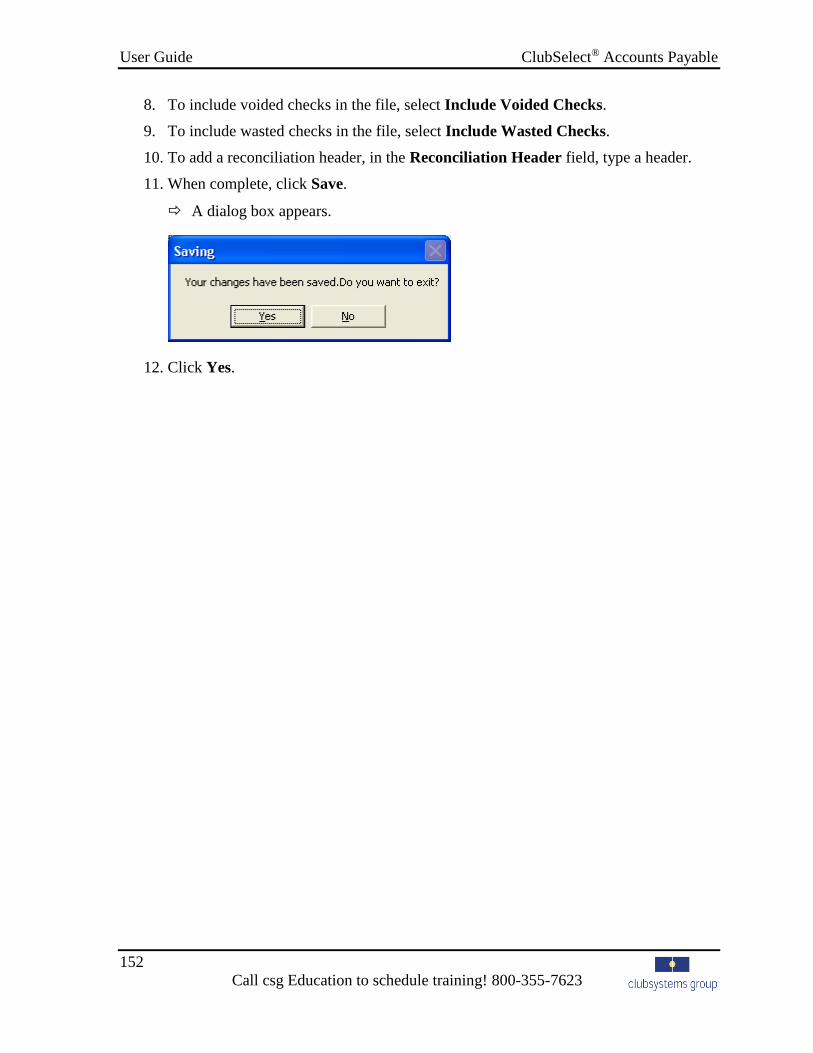
User Guide ClubSelect® Accounts Payable
152
Call csg Education to schedule training! 800-355-7623
8. To include voided checks in the file, select Include Voided Checks.
9. To include wasted checks in the file, select Include Wasted Checks.
10. To add a reconciliation header, in the Reconciliation Header field, type a header.
11. When complete, click Save.
A dialog box appears.
12. Click Yes.

ClubSelect® Accounts Payable User Guide
153
Proprietary and Confidential
Accounts Payable Types
ClubSelect® Accounts Payable allows you to setup a different AP Type for each accounts
payable liability account in your general ledger company.
This is initially set up during the installation process. If you need to create an additional AP
Type and have questions, please contact csg Support.
Creating New AP Types
1. From the menu bar, select Setup and then select AP Types.
The AP Types window appears.
2. Click the New toolbar button.
3. In the Description field, type the name for this AP Type. You may use up to a
maximum of 30 characters.
4. In the G/L Journal No. field, type the associated general ledger journal number.
5. From the Module to Interface drop-down list, select one of the following:
Membership — select if this AP Type represents payments due to another club
under a reciprocal agreement
None — select if this AP Type does not represent a reciprocal agreement
6. If the Module to Interface field is Membership, from the Company to Interface
drop-down list, select the appropriate company. This field is unavailable if None is
selected.
7. If the Module to Interface field is Membership, in the Default Revenue Code field,
type the membership revenue code to which this information is transferred.
This field is unavailable if None is selected.
8. In the G/L Liability No. field, type the general ledger liability account number
affected by accounts payable purchases and disbursements for this AP Type.

User Guide ClubSelect® Accounts Payable
154
Call csg Education to schedule training! 800-355-7623
9. In the G/L Discount No. field, type the general ledger account number to which the
discounts taken on the invoices of this AP Type are credited.
10. In the G/L Fin. Charge No. field, type the general ledger account number to which
the finance charges incurred for this AP Type are expensed.
11. In the AP Type Code field, type a one-character alpha-numeric code to represent this
AP Type. This code must be a unique.
12. To save the changes, click the Save toolbar button.
13. To close the window, click the Exit toolbar button.

ClubSelect® Accounts Payable User Guide
155
Proprietary and Confidential
Cash Types
ClubSelect® Accounts Payable allows you to create different cash accounts for the checks
processed.
Creating a New Cash Type
1. From the menu bar, select Setup and then select Cash Types.
The Cash Types window appears.
2. Click the New toolbar button.
3. In the G/L Asset Account field, type the general ledger asset account number
affected by the Accounts Payable disbursement transactions.
NOTE: Only use those general ledger cash account from which Accounts Payable
can make disbursements. Do not include any cash account from which
Accounts Payable is unable or even unlikely to use (specifically, payroll
clearing accounts, investment options, etc). Each AP Type does not need a
separate cash account.
4. The Cash Type Description field is automatically populated with the general ledger
asset account description. If necessary, type a new description for this cash type.
5. From the Default drop-down list, select one of the following:
Manual — select to use this cash account with manual checks
Computer — select to use this cash account with computer checks
Both Computer and Manual — select to use this cash account with both manual
and computer checks

User Guide ClubSelect® Accounts Payable
156
Call csg Education to schedule training! 800-355-7623
6. In the Last Check No. Issued field, type the last check number issued to this cash
account. This number is used to prompt you when printing checks. This field is
unavailable if the Default field is Manual.
7. To include this cash type in the “checks issued” file for submission to the bank for
verification, select Use in Positive Pay.
8. To save the changes, click the Save toolbar button.
9. To close the window, click the Exit toolbar button.

ClubSelect® Accounts Payable User Guide
157
Proprietary and Confidential
General ClubSelect® Setup Features
The ClubSelect® accounting software gives you the ability to maintain certain system
functions. Only users with the applicable security clearances can access these menu options
from the ClubSelect® Main Menu window.
Use the Setup menu option to:
create or maintain individual software users and user groups and assign security
levels and passwords
maintain a login message to appear each time the software is accessed
with the proper licensing and security, setup additional companies within the software
maintain ClubConnect® application drive and path information
Security
You can create or modify a unique ID for each person using the ClubSelect® accounting
software. Having each user with a unique ID and password allows the system to track all the
additions, changes, and deletions to the accounting records by user ID.
Groups can be set up with default security levels to simplify the process of adding individual
users. If a user is assigned to a group, he or she assumes all the security level clearances
assigned to that particular group. Security levels can be modified and individualized for each
user, if necessary.
Groups are most useful if you have a large number of users.
Creating a New Security Group
1. From the ClubSelect® Main Menu window, from the menu bar, select Setup and then
select Security.
The User & Group Setup window appears.

User Guide ClubSelect® Accounts Payable
158
Call csg Education to schedule training! 800-355-7623
NOTE: To edit an existing group, select the group name from the Groups section
and click Edit. To delete an existing group, select the group name from the
Groups section and click Delete. The Admin and Read-Only User groups
cannot be deleted.
2. In the Groups section, click New.
The Group Setup window appears.
3. In the Group Name field, type a unique name for this group. The name should
represent the users assigned to the group. This is a required field.
4. In the Group Description field, type a detailed description for this group. This
description should represent the security assigned to the group.
5. Click Save.
6. When complete, click the Close button.
Creating a New User
1. From the ClubSelect® Main Menu window, from the menu bar, select Setup and then
select Security.
The User & Group Setup window appears.
NOTE: To edit an existing user, select the user name from the Users section and
click Edit.

ClubSelect® Accounts Payable User Guide
159
Proprietary and Confidential
2. In the Users section, click New.
The User Setup window appears.
3. In the User Name field, type the user name for this user. The name can be a
maximum of 20 characters and must be unique. This is a required field.
4. In the Full Name field, type the user’s full name.
5. In the Description field, type a description of this user. For example, this could be the
user’s job title.
6. In the Password field, type the password for this user. The password can be a
maximum of 20 characters.
7. In the Confirm Password field, type the assigned password for this user again.
8. From the Group drop-down list, select a security group to which this user belongs.
Only existing groups appear in the listing.
9. If this user is inactive and should not access the software, select Inactive.
10. Click Save.
11. When complete, click the Close button.

User Guide ClubSelect® Accounts Payable
160
Call csg Education to schedule training! 800-355-7623
Modifying Security Settings
1. From the ClubSelect® Main Menu window, from the menu bar, select Setup and then
select Security.
The User & Group Setup window appears.
2. From either the User section or the Group section, select the individual user or group
to modify.
The user or group current security information appears in the Security Settings for: section.
3. Click the button to expand the appropriate application.
4. For each security item, select one of the following:
Full Access — grants complete access to the selected screen or process. The user
can process additions, modifications, and deletions.
Read Only — grants view only access to the selected screen or process. The user
is unable to process any additions, modifications, or deletions.
No Access — the user cannot access the selected screen or process. The
information does not appear on the user’s computer screen.
NOTE: To the right of each company line is a Copy Company button. Click to
access the Company Selection dialog box with a list of all available
companies. Select the company(ies) to which the current selected security
applies. Click Copy.
5. When complete, click Save.
A dialog box appears.
6. Click Yes.
7. When complete, click the Close button.

ClubSelect® Accounts Payable User Guide
161
Proprietary and Confidential
Messages
ClubSelect® allows you to post a global message for all users when they login.
Maintaining Messages
1. From the ClubSelect® Main Menu window, from the menu bar, select Setup and then
select Login Messages.
The Login Messages window appears.
2. In the Global Message field, type the message to appear to all users at login. This
field is a total of four lines with 45 characters allowed on each line.
3. Click Save.
A dialog box appears.
4. Click OK.

User Guide ClubSelect® Accounts Payable
162
Call csg Education to schedule training! 800-355-7623
ClubConnect® Setup
ClubSelect® allows you to define a drive and path for other ClubConnect® applications so
they are accessible from the ClubSelect® Main Menu window.
Setting Up ClubConnect® Path Information
1. From the ClubSelect® Main Menu window, from the menu bar, select Setup and then
select ClubConnect Setup.
The ClubConnect Program Setup window appears.
2. For each installed ClubConnect® application, click the browse button.
The Browse dialog box appears.
3. Navigate to the location for the selected application.
4. Click OK.
The selected path appears.
5. When complete, click Save.
A dialog box appears.
6. Click OK.

ClubSelect® Accounts Payable User Guide
163
Proprietary and Confidential
Company Information
You can track and name each separate company you may have and for which you are
licensed. If you only have one company, do not alter this information without assistance from
csg Support.
Creating a New Company
1. From the ClubSelect® Main Menu window, from the menu bar, select Setup and then
select Company Setup.
The Company Setup window appears.
NOTE: Each application appears with the total number of licenses purchased and the
number of licenses remaining.
2. To create a new company, click New.
The Company Details section becomes active.
NOTE: To edit an existing company, select the company from the list and click Edit
and modify the appropriate fields in the Company Details section.
3. In the Company Number field, type a new two digit company number. This is a
required field.
NOTE: Once the company number is saved, it becomes a read-only field and cannot
be changed.
4. In the Company Name field, type a name for this new company. This is a required
field.
5. In the Address field, type the street address for the company.
6. In the Country field, type the country for the company.
7. In the City/Municipality field, type the city for the company.
8. In the State/Province field, type the state abbreviation for the company.
9. In the Zip/Postal Code field, type the zip code.
10. In the Telephone field, type the telephone number for this company.
11. In the Fax field, type the fax number for this company.

User Guide ClubSelect® Accounts Payable
164
Call csg Education to schedule training! 800-355-7623
12. In the Applications section, select the accounting application(s) to which this
company is applicable:
AP — Accounts Payable
AR — Accounts Receivable
GL — General Ledger
NOTE: If one of these applications is not available for selection, this means you do
not have any company licenses remaining for this application. To purchase
additional company licenses, please contact your Account Manager.
13. Click Save.
The new company appears in the Companies section list.
14. When complete, click Close.
Top Related