


Languages
Pages
Legal


PARTS INCLUDED 1 Trailer Hitch Receiver Plate 1 Draw Bar 2 Stabilizer Bars 1 Left Stabilizer Bar Bracket 1 Right Stabilizer Bar Bracket 1 Receiver Plug 1 Hardware Kit Containing: 6 M8-1.25 X 25mm Flange Head Cap Screws 6 M10-1.25 X 25mm Flange Head Cap Screws 8 M6-1.0 X 20mm Flange Head Cap Screws 6 M10-1.25 Flange Nuts 6 M10 External Tooth Lock Washers 8 M6 External Tooth Lock Washers 6 M8 External Tooth Lock Washers 2 Flat Washers—USED IN STEP 11 IF NEEDED 2 1/4” Lock Washers—USED IN STEP 11 IF NEEDED 1 1-7/8” Hitch Ball 1 3/4” Split Lock Washer 1 3/4”-16 Hex Nut 2 Small Clamps with Threads 2 Large Clamps with Threads 1 M6-1.0 X 10mm Hex Head Cap Screw 1 6” Black Nylon Cable Tie 1 Hitch Pin 1 Hair Pin Clip 1 Installation Instructions Please read and understand entire instructions before starting installation.
THANK YOU FOR CHOOSING KϋRYAKYN! IN ORDER TO PROTECT YOU AND OTHERS FROM POSSIBLE INJURY AND/OR PROPERTY DAMAGE OR LOSS, PLEASE PAY CLOSE ATTENTION TO ALL INSTRUCTIONS, WARNINGS, CAUTIONS AND NOTICES REGARDING THE USE AND CARE OF THIS PRODUCT.
TOOLS SUGGESTED Ratchet, Set of Metric Sockets and Hex Wrenches, Set of Metric Combination Wrenches, Large Adjustable Wrench, Torque Wrench (FT/LBS)
INSTALLATION
CUSTOMER SERVICE 877.370.3604 (toll free)
INSTALLATION QUESTIONS
[email protected] or call 715.247.2983
LIMITED WARRANTY
Küryakyn warrants that any Küryakyn products sold hereunder, shall be free of defects in
materials and workmanship for a period of one (1) year from the date of purchase by the
consumer excepting the following provisions:
● Küryakyn shall have no obligation in the event the customer is unable to provide a receipt
showing the date the customer purchased the product(s).
●The product must be properly installed,
maintained and operated under normal conditions.
●Küryakyn makes no warranty, expressed or
implied, with respect to any gold plated products.
●Küryakyn shall not be liable for any
consequential and incidental damages, including labor and paint, resulting from failure of a
Küryakyn product, failure to deliver, delay in delivery, delivery in nonconforming condition, or
for any breech of contract or duty between Küryakyn and a customer.
●Küryakyn products are often intended for use in
specific applications. Küryakyn makes no warranty if a Küryakyn product is used in
applications other than intended.
●Küryakyn electrical products are warranted for one (1) year from the date of purchase by the
consumer. L.E.D.’S contained in components of Küryakyn products will be warranted for defects in materials and workmanship for 3 years from
the date of purchase where as all other components shall be warranted for one(1) year.
This includes, but is not limited to; control modules, wiring, chrome & other components.
●Küryakyn makes no warranty of any kind in
regard to other manufacturer¹s products distributed by Küryakyn. Küryakyn will pass on
all warranties made by the manufacturer and where possible, will expedite the claim on behalf of the customer, but ultimately, responsibility for disposition of the warranty claim lies
with the manufacturer.
ABOUT OUR CATALOG For purchasing Küryakyn® products, you
can receive a complete catalog free of charge. Send the Proof-of-Purchase below with
your address to: Küryakyn, P.O. Box 339, Somerset, WI 54025.
Please indicate either Accessories Catalog for Harley-Davidson® or GL & Metric Cruisers.
Be sure to ask your local dealer about other
Küryakyn® products, the motorcycle parts and accessories designed for riders by riders.
©2005 Küryakyn USA® All Rights reserved.
TRAILER HITCH FOR GL1800 7641
7641-21GL-0113 -cont.-
THIS INDICATION ALERTS YOU TO THE FACT THAT IGNORING THE CONTENTS DESCRIBED HEREIN CAN
RESULT IN POTENTIAL DEATH OR SERIOUS INJURY.
This indication alerts you to the fact that ignoring the contents described herein may negatively affect product performance and functionality.
This indication alerts you to the fact that ignoring the contents described herein can result in potential
injury.
IF INSTALLING THIS PRODUCT FOR ANOTHER PARTY, PLEASE MAKE SURE THEY RECEIVE THIS COPY OF THE INSTALLATION INSTRUCTIONS SO THEY ARE AWARE OF
THE IMPORTANT INFORMATION CONTAINED IN THEM.

STRICTLY OBSERVE THE FOLLOWING GUIDELINES IN ORDER TO USE THE PRODUCT PROPERLY AND AVOID POTENTIALLY DANGEROUS ACCIDENTS. STEP 1 Read and understand all steps in the instructions before starting the installation. Park the motorcycle on a hard, level surface and turn off the ignition. Let cool.
NO MOTORCYCLE MANUFACTURER HAS APPROVED OR ENDORSED KÜRYAKYN TRAILER HITCHES. USE OF A TRAILER
OR TRAILER HITCH ON ANY MOTORCYCLE MAY VOID YOUR WARRANTY AND MAY INCREASE YOUR CHANCES OF INJURY OR ACCIDENT SITUATION.
TOWING A TRAILER BEHIND A MOTORCYCLE INCREASES THE LIKELIHOOD OF INJURY OR DEATH TO BOTH OPERATOR AND
PASSENGER.
IF THE TRAILER FAILS TO HANDLE IN A SAFE AND PREDICTABLE MANNER, STOP THE MOTORCYCLE AND DO
NOT OPERATE WITH THE TRAILER UNTIL YOU HAVE DETERMINED AND CORRECTED THE PROBLEM.
YOU WILL BE WORKING AROUND THE ENGINE AND EXHAUST SYSTEM DURING INSTALLATION. ENSURE THAT THE ENGINE
AND EXHAUST SYSTEM HAVE FULLY COOLED TO PREVENT INJURY.
Inspect all fasteners and components before every use.
Küryakyn is not aware of any current state or federal guidelines for pulling a trailer with a motorcycle. We suggest that you do not exceed the motorcycle manufacturers Gross Vehicle Weight limits
when pulling a loaded trailer. STEP 2 Place the bike on its center stand, if equipped. Using a hex wrench remove the four button socket cap screws that hold the rear fender panel in place. PIC 1 STEP 3 Remove the floorboard, floorboard cover, side cover (PIC 2) and the rear guards (PIC 3) from each side of the bike. STEP 4 Remove the rear turn signal housing from the motorcycle. There are two acorn nuts inside the rear of each saddlebag that secure the housing to the motorcycle. PIC 4 PAGE
2
TRAILER HITCH for GL 1800 INSTALLATION
-cont.-
PIC 1
REMOVE THESE FOUR SCREWS
PIC 3
REMOVE THESE PARTS FROM BOTH SIDES
PIC 2
PIC 5
PIC 4 REMOVE THESE ACORN NUTS IN BOTH SADDLEBAGS TO REMOVE HOUSING
REMOVE THIS CONNECTOR FROM THE MOUNT
REMOVE THIS MOUNT
INSIDE REAR OF RIGHT SADDLEBAG SHOWN
PAGE
3
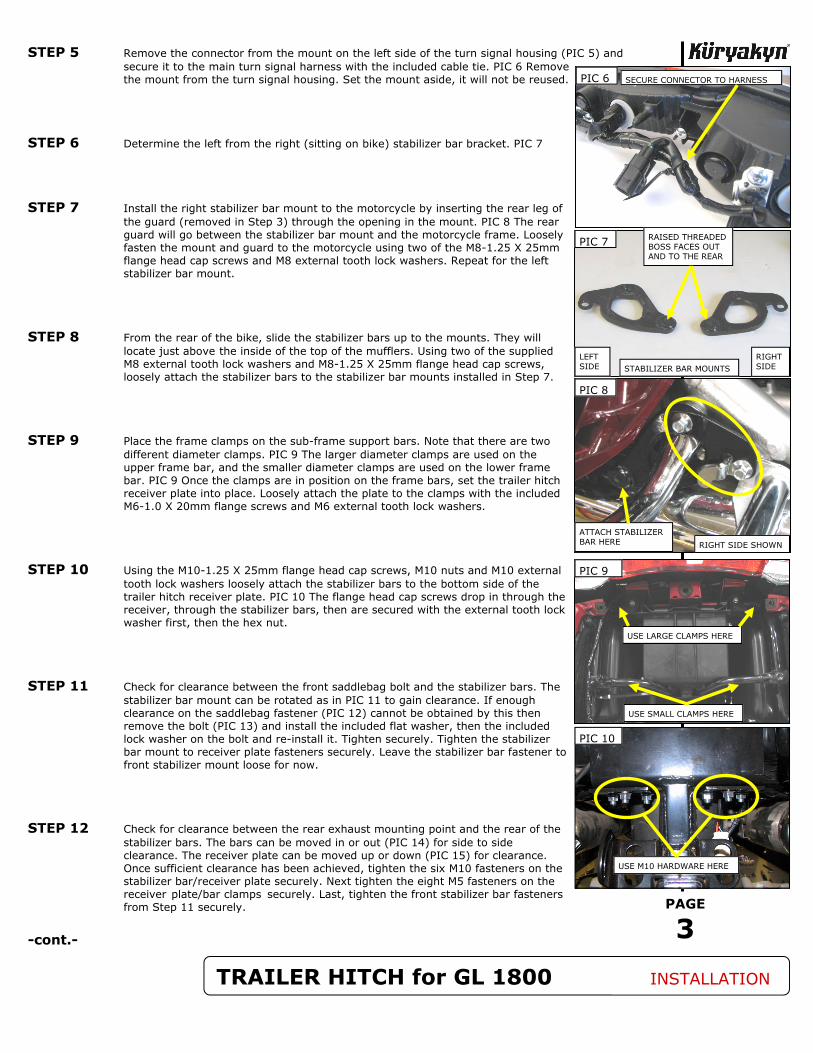
STEP 5 Remove the connector from the mount on the left side of the turn signal housing (PIC 5) and secure it to the main turn signal harness with the included cable tie. PIC 6 Remove the mount from the turn signal housing. Set the mount aside, it will not be reused. STEP 6 Determine the left from the right (sitting on bike) stabilizer bar bracket. PIC 7 STEP 7 Install the right stabilizer bar mount to the motorcycle by inserting the rear leg of the guard (removed in Step 3) through the opening in the mount. PIC 8 The rear guard will go between the stabilizer bar mount and the motorcycle frame. Loosely fasten the mount and guard to the motorcycle using two of the M8-1.25 X 25mm flange head cap screws and M8 external tooth lock washers. Repeat for the left stabilizer bar mount. STEP 8 From the rear of the bike, slide the stabilizer bars up to the mounts. They will locate just above the inside of the top of the mufflers. Using two of the supplied M8 external tooth lock washers and M8-1.25 X 25mm flange head cap screws, loosely attach the stabilizer bars to the stabilizer bar mounts installed in Step 7. STEP 9 Place the frame clamps on the sub-frame support bars. Note that there are two different diameter clamps. PIC 9 The larger diameter clamps are used on the upper frame bar, and the smaller diameter clamps are used on the lower frame bar. PIC 9 Once the clamps are in position on the frame bars, set the trailer hitch receiver plate into place. Loosely attach the plate to the clamps with the included M6-1.0 X 20mm flange screws and M6 external tooth lock washers. STEP 10 Using the M10-1.25 X 25mm flange head cap screws, M10 nuts and M10 external tooth lock washers loosely attach the stabilizer bars to the bottom side of the trailer hitch receiver plate. PIC 10 The flange head cap screws drop in through the receiver, through the stabilizer bars, then are secured with the external tooth lock washer first, then the hex nut. STEP 11 Check for clearance between the front saddlebag bolt and the stabilizer bars. The stabilizer bar mount can be rotated as in PIC 11 to gain clearance. If enough clearance on the saddlebag fastener (PIC 12) cannot be obtained by this then remove the bolt (PIC 13) and install the included flat washer, then the included lock washer on the bolt and re-install it. Tighten securely. Tighten the stabilizer bar mount to receiver plate fasteners securely. Leave the stabilizer bar fastener to front stabilizer mount loose for now. STEP 12 Check for clearance between the rear exhaust mounting point and the rear of the stabilizer bars. The bars can be moved in or out (PIC 14) for side to side clearance. The receiver plate can be moved up or down (PIC 15) for clearance. Once sufficient clearance has been achieved, tighten the six M10 fasteners on the stabilizer bar/receiver plate securely. Next tighten the eight M5 fasteners on the receiver plate/bar clamps securely. Last, tighten the front stabilizer bar fasteners from Step 11 securely.
TRAILER HITCH for GL 1800 INSTALLATION
-cont.-
PIC 6 SECURE CONNECTOR TO HARNESS
PIC 10
USE M10 HARDWARE HERE
PIC 9
USE LARGE CLAMPS HERE
USE SMALL CLAMPS HERE
PIC 7
LEFT SIDE
RIGHT SIDE
RAISED THREADED BOSS FACES OUT AND TO THE REAR
PIC 8
STABILIZER BAR MOUNTS
RIGHT SIDE SHOWN ATTACH STABILIZER BAR HERE

PAGE
4
STEP 13 Install the drawbar into the receiver assembly. Secure with the hitch pin and hair pin clip. Install the included M6-1.0 X 10mm hex head cap screw in the threaded hole in the receiver (PIC 16) and tighten securely. This is to help keep the drawbar from rattling when no weight is attached to the hitch. Install the ball on the receiver. NOTE: To use the included receiver plug: remove the hair pin clip, hitch pin, drawbar and the M6 hex head cap screw from Step 13. Insert the receiver plug into the receiver and secure with the hitch pin and hair pin clip. When the receiver plug is installed, the M6 hex head cap screw (PIC 16) CAN NOT be used, stow this with the drawbar. STEP 14 Reinstall the floorboard covers, floorboard-Tighten to 20 FT/LBS, and side covers to the motorcycle. STEP 15 Re-install the rear turn signal housing and rear panel. STEP 16 Check for clearance between any component on the motorcycle and the stabilizer bars from the front mounting point to the rear mounting point. Readjust per Steps 11-13 until clearance is achieved.
Ensure that the installation of this product does not interfere with the proper operation of the motorcycle before riding.
It is the installer’s responsibility to ensure that all of the fasteners (including pre-assembled) are tightened before operation of the motorcycle. Küryakyn will not provide warranty coverage on products
or components lost due to improper installation or lack of maintenance. Periodic inspection and maintenance are required on all fasteners.
TRAILER HITCH for GL 1800 INSTALLATION
PIC 16
USE M6-1.0 X 10mm HERE STOW WITH DRAWBAR IF RECEIVER PLUG IS USED
PIC 14
LOOSEN THESE FOR SIDE TO SIDE ADJUSTMENT
PIC 11
LOOSEN THESE FOR FRONT OF SADDLEBAG AND EXHAUST CLEARANCE
-cont.-
PIC 15
LOOSEN THESE FOR REAR OF SADDLEBAG AND EXHAUST CLEARANCE
PIC 13
CHECK THIS FASTENER FOR STABILIZER BAR CLEARANCE
PIC 12
RIGHT SIDE SHOWN
Ride On!
PAGE
5
MOTORCYCLE PERFORMANCE IS ALWAYS AFFECTED BY ADDING A TRAILER TO A MOTORCYCLE. ALWAYS RIDE IN A CONSERVATIVE AND
SAFETY CONSCIOUS MANNER WHEN TOWING A TRAILER WITH A MOTORCYCLE. REMEMBER: 1. We recommend only trailers from reputable suppliers, designed for motorcycle towing, and with a proven history of good handling. TOWING A TRAILER WITH POOR HANDLING CAN RESULT IN SEVERE INJURY OR DEATH FROM AN ACCIDENT. 2. Tow only those trailers equipped with a 1-7/8” coupler to match the 1-7/8” ball supplied with the hitch. 3. When connecting to trailer, always make sure ball is tight on hitch, and that coupler is tight on ball. When connecting to trailers equipped with hand wheel couplers, hand-tighten only. Do not tighten with a wrench. Periodically, check these areas for tightness. 4. Always use approved safety chains, and have them securely attached. Cross the safety chains under the tongue of the trailer so that the tongue will not drop to the road if it becomes separated from the hitch. Always leave just enough slack so that you can turn without binding. And, NEVER allow safety chains to drag on the ground. 5. Gross Vehicle Weight, tongue weight, tire pressure and suspension settings MUST COMPLY with the motorcycle and motorcycle trailer manufacturers recommendations. OVERLOADING YOUR MOTORCYCLE AND/OR TRAILER CAN RESULT IN SERIOUS INJURY OR DEATH! 6. Towing a trailer requires a certain amount of experience. Before setting out on an extended ride, get to know your rig. Check the trailer hitch, coupler, safety chains, electrical connector, lights and tires. When pulling a trailer with a motorcycle, extra distance must be allowed for stopping, and a slower speed MUST BE USED when cornering and in inclement weather. The motorcycle and trailer combination is now longer, so allow more passing distance. Reduce speed when traveling downhill (may have to downshift). USE EXTRA CAUTION AND DON’T EXCEED YOUR RIDING CAPABILITIES. During the trip, check occasionally to be sure that the load is secure, and that the lights are still working. 7. The coupler is susceptible to physical damage when trailer is parked. Prop tongue off ground when trailer is not in use. Carefully inspect coupler for damage or missing parts before each hook-up. 8. If trailer sways or bounces while towing, SLOW DOWN BY REDUCING SPEED GRADUALLY and STOP TOWING IMMEDIATELY. Unless cause can be determined, i.e., shifted load, low tire pressure etc., which can be corrected, DO NOT RESUME TOWING. 9. If motorcycle is involved in an accident or spill, with or without trailer attached, the hitch and all attachment points and components on the motorcycle must be inspected for physical damage before towing. 10. Periodically, inspect hitch to insure it is not bent or cracked and check tightness of all hardware relating to trailer hitch assembly and trailer. 11. Never exceed posted speed limits for vehicles pulling trailers which can be different than non-towing vehicles. 12. Many states exclude, by law, vehicles towing trailers from the left hand, or so called fast lanes.
TRAILER HITCH for GL 1800 INSTALLATION
Top Related