


Languages
Pages
Legal


1
Jands Vista V2 Software Release 2.3.14608 Release Notes 26th August, 2015 Jands Pty Ltd, 40 Kent Rd, Mascot, NSW, 2020, Australia Phone: +61 (2) 9582 0909 Fax: +61 (2) 9582 0999 Web: www.jandsvista.com
Specifications subject to change without notice. Manufactured by Jands Pty Ltd ACN 001 187 837 Note: While all due care has been taken in the preparation of this document, Jands Pty Ltd shall not be liable for any inaccuracies or omissions which may occur herein.
Software Patch Release Notes Software version: 2.3.14608 Released on: 26 August 2015 Supersedes version: 2.3.14364 Released on: 1 June 2015
Software Release Notification
Application installation packages for this software release are available for consoles, Windows PC and Mac OSX.
Installation of 2.3 version software for the first time on an L5, T4, T2 or I3 will require using the ISO image file to update. Please note, the ISO creation procedure has changed. The new procedure is outlined in technote TBJLT168 which is attached to these release notes.
If public release versions 2.3.14125 or 2.3.14364 have already been installed on an L5, T4, T2 or I3, consoles can be updated using the console update package.
New Features and Improvements
GUI o Added new icons for some actions that previously had no icons, particularly on the soft
keys. o Reassigned blue icon to "New Snapshot".
Fixture Library o Updated factory library

2
Jands Vista V2 Software Release 2.3.14608 Release Notes 26th August, 2015 Jands Pty Ltd, 40 Kent Rd, Mascot, NSW, 2020, Australia Phone: +61 (2) 9582 0909 Fax: +61 (2) 9582 0999 Web: www.jandsvista.com
Specifications subject to change without notice. Manufactured by Jands Pty Ltd ACN 001 187 837 Note: While all due care has been taken in the preparation of this document, Jands Pty Ltd shall not be liable for any inaccuracies or omissions which may occur herein.
Bugs fixed in this release
Bug Description 6442 Transition when releasing cuelist with effect is now clean
6596 Default values and / or home preset values now behave as expected
6622 Users can no longer accidentally insert global values into the home preset when it is open for editing
6628 Touching another parameter while the first is moving over the live time no longer causes the live time to jump to end.
6648 Users can now create global presets after updating the home preset
N/A Fixed broken jumping
N/A Fixed a bug related to the loading of legacy show files
N/A Fixed crossfading from Stealth mode
N/A Fixed problem with L5 surface disconnecting
N/A Fixed problem with erratic sACN packets
Software Problems
We ask that users of the software report ALL cases of crashes or incorrect operation to [email protected]. Please include as much detail as possible, such as:
The full software version number you were using and platform.
An exported copy of the showfile you were using.
Crash logs or diagnostic reports if available.
o On a Linux console diagnostic reports can be generated by pressing CTRL+ALT+DEL and then exporting files in the same manner as crash logs.
o On PC and OSX these are accessed under the "Help", "Export Logs" option. Follow the onscreen instructions to export the files and send them to us for examination.
Detailed information about the problem you were seeing, what you were trying to do, and how you tried to do it. If possible, try to recreate the problem and tell us the steps to recreate it. The three questions that help us help you are:-
o What did you do?
o What did you expect to happen?
o What actually happened?
A video or screen capture of the problem is an excellent way of showing us the bug.

3
Jands Vista V2 Software Release 2.3.14608 Release Notes 26th August, 2015 Jands Pty Ltd, 40 Kent Rd, Mascot, NSW, 2020, Australia Phone: +61 (2) 9582 0909 Fax: +61 (2) 9582 0999 Web: www.jandsvista.com
Specifications subject to change without notice. Manufactured by Jands Pty Ltd ACN 001 187 837 Note: While all due care has been taken in the preparation of this document, Jands Pty Ltd shall not be liable for any inaccuracies or omissions which may occur herein.
Known Issues
Bug Description 4578 Cannot export a fixture using the export function
Workaround - Console - FTP into the console to obtain file from fixture folder in user directory.PC/MAC – copy file from user library
4752 Can't put a cuelist on an undocked console by drag and drop Workaround - Dock console temporarily
5858 Custom encoders don't indicate which page is selected on LCD No work around available
5886 Fixtures re-appear in chooser after deleting if they had a note attached Workaround - Delete note first, then delete fixtures
5890 Unnecessary dot at cursor in late 2.2 and 2.3 builds No work around available
5903 Issues with resizing dockable windows on consoles No work around available
5927 Booting 2.3 ISO from USB requires user keyboard input to proceed Applies to some T consoles only.
5940 Release timing does not respect custom timings No work around available
5950 Flashing group (htp) fixtures that are midway through playing in a cue cause them to get stuck on Assign the flash button to a Scale (+) instead of an HTP flash. The same can be done for a group fader.
5953 Cloning multi element fixtures causes individual element groups not to clone No work around available
5992 Timecode a few seconds ahead or behind source No work around available
6012 Workspace layout should reset to default for a new show No work around available
6069 2.3 window resizing issues No work around available
6165 Cannot re-use a playback that once had a locked item on it that has since been deleted Workaround - Delete page on playback. Items can then be placed on the playback.
6208 S3/S1 stops the app starting with Windows 8.1 and USB 3. Also effects ability to update firmware Workaround - Plug the console/s into a USB 2.0 port

Technical BulletinProduct Class: Lighting Console Tech Bulletin #TBJLT168
Vista Linux Consoles
Jands Pty Ltd 40 Kent Road Mascot NSW 2020 Australia Phone +61 2 9582 0909 Fax +61 2 9582 0999 www jands com au
Note: While all due care and attention has been taken in the preparation of this document, Jands Pty Ltd shall not be liable for any inaccuracies or omissions which may
occur therein
Date: 6 February 2014 Update: 1 June 2015 Author: Susan Twartz Distribution: General Public Preparing Bootable USB Drives for Updating Console from Vista 2.2 to Vista 2.3 Vista 2.3 includes a new installer which makes applying the console image file (the ISO file) much easier for the end user. However, consoles that already have Vista version 2.2.XXXXX or earlier installed must have the bootable USB formatted following this procedure prior to installing Vista 2.3.XXXXX. Please note: Once the bootable USB has been formatted following this procedure it cannot be used for applications other than Jands Vista. Procedure:
1. Download and install “Win32 Disk Imager” http://sourceforge.net/projects/win32diskimager 2. Run the application; 3. Select the little blue folder icon on the right of the “Image File” field.
4. Navigate to the source image file (.img) on your computer
Once you have selected the image file, press open. The application will revert to the screen in step 3.

Technical BulletinProduct Class: Lighting Console Tech Bulletin #TBJLT168
Vista Linux Consoles
Jands Pty Ltd 40 Kent Road Mascot NSW 2020 Australia Phone +61 2 9582 0909 Fax +61 2 9582 0999 www jands com au
Note: While all due care and attention has been taken in the preparation of this document, Jands Pty Ltd shall not be liable for any inaccuracies or omissions which may
occur therein
5. Select the USB stick in the “Device” field
6. Select “Write. Your computer may display the following message:
Select “Yes” and continue.
7. Wait for the application to complete. Once it has completed you will receive the following message:
L5 Consoles and I3 Consoles Manufactured After January 2013 (see TBJLT 155)
8. Insert the USB device into a console USB port. 9. Power on console. 10. Press the “F2” button repeatedly while the console boots up until the console goes into the
BIOS menu. (The screen will be upside down.) The following dialogue box will appear:

Technical BulletinProduct Class: Lighting Console Tech Bulletin #TBJLT168
Vista Linux Consoles
Jands Pty Ltd 40 Kent Road Mascot NSW 2020 Australia Phone +61 2 9582 0909 Fax +61 2 9582 0999 www jands com au
Note: While all due care and attention has been taken in the preparation of this document, Jands Pty Ltd shall not be liable for any inaccuracies or omissions which may
occur therein
11. Select “No” and press <Enter>. 12. Using the navigation arrows on the keyboard, navigate to the “Boot Menu” and press
<Enter>.
13. The console will display the available Boot parameters 14. Navigate to “Hard Drive BBS Priorities” and press <enter>. The console will display the
current boot device order.
15. Select “Boot Option #1” and press <Enter>. The console will display a list of the bootable devices it has found.
16. From this list highlight the device that is the USB FLASH drive you wish to boot from and
press <Enter>.
17. Press “Esc” to exit Bootable USB

Technical BulletinProduct Class: Lighting Console Tech Bulletin #TBJLT168
Vista Linux Consoles
Jands Pty Ltd 40 Kent Road Mascot NSW 2020 Australia Phone +61 2 9582 0909 Fax +61 2 9582 0999 www jands com au
Note: While all due care and attention has been taken in the preparation of this document, Jands Pty Ltd shall not be liable for any inaccuracies or omissions which may
occur therein
18. Navigate to the “Save and Exit”. 19. The system will now ask you to save all settings. Select “Yes” and press <Enter>.
The system will now exit the BIOS menu and boot from the USB device. There is no requirement to reverse this process when booting the console normally.
T Consoles and I3 Consoles Manufactured Prior to January 2013 20. Insert the USB device into a console USB port. 21. Power on console. 22. Press the <DEL> button repeatedly while the console boots up until the console goes into
the BIOS menu. Select “Advanced BIOS Features”.

Technical BulletinProduct Class: Lighting Console Tech Bulletin #TBJLT168
Vista Linux Consoles
Jands Pty Ltd 40 Kent Road Mascot NSW 2020 Australia Phone +61 2 9582 0909 Fax +61 2 9582 0999 www jands com au
Note: While all due care and attention has been taken in the preparation of this document, Jands Pty Ltd shall not be liable for any inaccuracies or omissions which may
occur therein
23. In the Advanced BIOS features menu navigate down to first boot device and press <Enter> Please note ‐ if your console has the option to select HDD Boot Priorities in this menu, please select that option.
The actual hardware listed under this option may vary depending on the version of CPU tray contained within the console.
24. Navigate to the USB drive and press <+> to ensure the boot priority is changed to the USB drive first. Please note ‐ your console may not allow you to rpess the <+> button. If this is the case, press the "page up" button instead.
25. Press “Esc” to exit 26. Navigate to the “Save and Exit”. 27. The system will now ask you to save all settings. Select “Yes” and press <Enter>.
The system will now exit the BIOS menu and boot from the USB device. There is no requirement to reverse this process when booting the console normally.
All Consoles Once the boot priority of the drives has been set, the console will go through the process of installing the image file.

Technical BulletinProduct Class: Lighting Console Tech Bulletin #TBJLT168
Vista Linux Consoles
Jands Pty Ltd 40 Kent Road Mascot NSW 2020 Australia Phone +61 2 9582 0909 Fax +61 2 9582 0999 www jands com au
Note: While all due care and attention has been taken in the preparation of this document, Jands Pty Ltd shall not be liable for any inaccuracies or omissions which may
occur therein
Note: T consoles will get to this screen below and the user will need to press <Enter> once the boot message appears as illustrated below:
28. To install the dual boot software make sure that both the Vista1 and Vista2 check boxes are selected and click the Next button.
The Confirm Installation window will open.
29. Select a Hard Disk to install to in the Target Disk Device box and select ‘Yes’ in the Proceed with Installation box.

Technical BulletinProduct Class: Lighting Console Tech Bulletin #TBJLT168
Vista Linux Consoles
Jands Pty Ltd 40 Kent Road Mascot NSW 2020 Australia Phone +61 2 9582 0909 Fax +61 2 9582 0999 www jands com au
Note: While all due care and attention has been taken in the preparation of this document, Jands Pty Ltd shall not be liable for any inaccuracies or omissions which may
occur therein
30. Select ‘Initialise’ in the Partitions box, or if Vista V2 has been installed previously select ‘Re‐use’, and click on the ‘Next’ button to start the installation. Note this will completely erase the hard disk – be sure you have already backed up any important data.
31. When the installation is complete, click the ‘Next‘ button
32. Click the finish button to eject the CD (if present) and shutdown the console. Remove the USB drive or CD from the console.
When the console has fully shut down, press the Power button to restart the console

Technical BulletinProduct Class: Lighting Console Tech Bulletin #TBJLT175
Vista Linux Consoles
Jands Pty Ltd 40 Kent Road Mascot NSW 2020 Australia Phone +61 2 9582 0909 Fax +61 2 9582 0999 www jands com au
Note: While all due care and attention has been taken in the preparation of this document, Jands Pty Ltd shall not be liable for any inaccuracies or omissions which may
occur therein
Date: 3 November 2014 Author: Susan Twartz Distribution: General Public Instructions for Installing a Vista v2 Console Update Package Unless otherwise specified console update packages can be installed on Linux consoles in between major software releases. A major release is determined by the change in version numbering – for example changing from 2.2.12345 to 2.3.67890. Procedure:
1. Download the .tgz update file from http://jands.com/support‐vista‐v2/download/ to a USB flash drive or FTP the file into the /Vista V2/UserData/Updates directory on the console.
2. Boot the console. 3. If updating via USB stick, insert the drive into a console USB port. 4. Once the Vista application has opened, select “File”, then “Quit Application”. Wait for the
system settings dialogue to appear. 5. Select “Apply Update”
6. Select “Browse”
Technical BulletinProduct Class: Lighting Console Tech Bulletin #TBJLT175
Vista Linux Consoles
Jands Pty Ltd 40 Kent Road Mascot NSW 2020 Australia Phone +61 2 9582 0909 Fax +61 2 9582 0999 www jands com au
Note: While all due care and attention has been taken in the preparation of this document, Jands Pty Ltd shall not be liable for any inaccuracies or omissions which may
occur therein
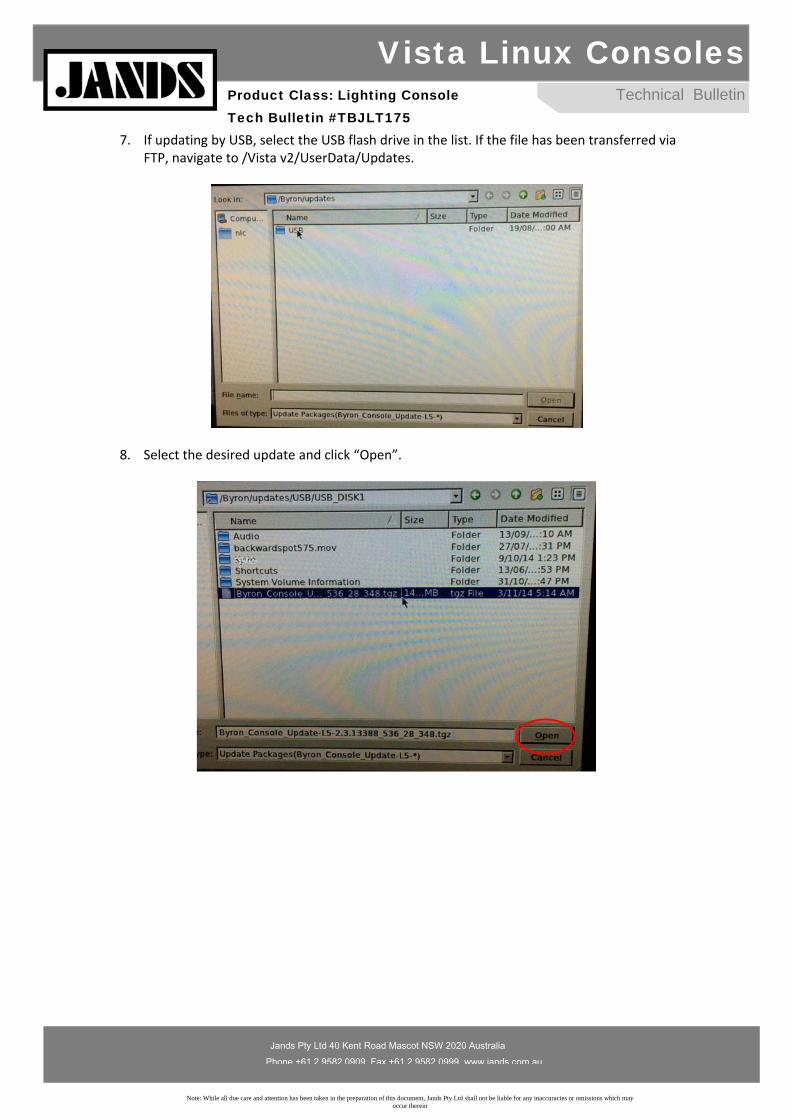
7. If updating by USB, select the USB flash drive in the list. If the file has been transferred via FTP, navigate to /Vista v2/UserData/Updates.
8. Select the desired update and click “Open”.

Technical BulletinProduct Class: Lighting Console Tech Bulletin #TBJLT175
Vista Linux Consoles
Jands Pty Ltd 40 Kent Road Mascot NSW 2020 Australia Phone +61 2 9582 0909 Fax +61 2 9582 0999 www jands com au
Note: While all due care and attention has been taken in the preparation of this document, Jands Pty Ltd shall not be liable for any inaccuracies or omissions which may
occur therein
9. The updater package will appear on the left hand side of the dialogue. Click on the update
package. The package contents are now inspected. Once this is completed, the cursor will revert back from an hour glass to an arrow.
10. Click “Apply Update”. The software will now install the update package.
11. When complete, a new dialogue will appear, warning that the console must be rebooted for the update to take effect. Click “Ok”.

Technical BulletinProduct Class: Lighting Console Tech Bulletin #TBJLT176
Vista Application
Jands Pty Ltd 40 Kent Road Mascot NSW 2020 Australia Phone +61 2 9582 0909 Fax +61 2 9582 0999 www jands com au
Note: While all due care and attention has been taken in the preparation of this document, Jands Pty Ltd shall not be liable for any inaccuracies or omissions which may
occur therein
Date: 3 November 2014 Author: Susan Twartz Distribution: General Public Instructions for Installing the Vista v2 Windows Package These instructions outline the procedure for installing Vista v2 on a PC. Note: Users must have full administrator access to install and run the application. Procedure:
1. Download the Windows installer package from http://jands.com/support‐vista‐v2/download/ to the PC.
2. Close all open applications. 3. Disconnect/switch off all Jands Vista USB devices. 4. If an earlier version of Vista V2 is already installed on the PC, there’s no need to un‐install it ‐
simply install the new version over the top of the old one. 5. Launch the Vista V2 Windows Installer file by double clicking on the Byron Windows Installer
icon.
6. Click ‘Next’.

Technical BulletinProduct Class: Lighting Console Tech Bulletin #TBJLT176
Vista Application
Jands Pty Ltd 40 Kent Road Mascot NSW 2020 Australia Phone +61 2 9582 0909 Fax +61 2 9582 0999 www jands com au
Note: While all due care and attention has been taken in the preparation of this document, Jands Pty Ltd shall not be liable for any inaccuracies or omissions which may
occur therein
7. A location for the installed files is selected automatically. If required you can change the
location by selecting “Browse” and selecting the desired loction. Click ‘Next’.
8. A location for the User Data folder (your show files etc) is selected automatically. If required you can change the location. Click Install.

Technical BulletinProduct Class: Lighting Console Tech Bulletin #TBJLT176
Vista Application
Jands Pty Ltd 40 Kent Road Mascot NSW 2020 Australia Phone +61 2 9582 0909 Fax +61 2 9582 0999 www jands com au
Note: While all due care and attention has been taken in the preparation of this document, Jands Pty Ltd shall not be liable for any inaccuracies or omissions which may
occur therein
The following screen will appear as the application is being installed:
9. When the installation is complete, click Finish.
The application is installed and ready to use.

Technical BulletinProduct Class: Lighting Console Tech Bulletin #TBJLT177
Vista Application
Jands Pty Ltd 40 Kent Road Mascot NSW 2020 Australia Phone +61 2 9582 0909 Fax +61 2 9582 0999 www jands com au
Note: While all due care and attention has been taken in the preparation of this document, Jands Pty Ltd shall not be liable for any inaccuracies or omissions which may
occur therein
Date: 13 August 2015 Author: Susan Twartz Distribution: General Public Instructions for Installing the Vista v2 OSX Package These instructions outline the procedure for installing Vista v2 on a MAC. Note: Users must have full read/write access to install and run the application. The Vista v2 software can be installed on an Apple Mac running OSX Snow Leopard or later. Installation overview Procedure: Installing the Vista software for the first time involves the following steps: • Installing the Vista application • Installing the Sentinel Runtime environment (only required if you have purchased a Vista licence dongle) • Setting a location for your VistaData folder. Your show files, modified fixture files and any other user generated data will be stored in this folder. Note: If you are updating an existing version of Vista with a build number of 11191 or lower please read the ‘Updating from v2.2.11191 or earlier’ section carefully.
1. Download the OSX installer package from http://jands.com/support‐vista‐v2/download/ to the PC.
2. Close all open applications. 3. Disconnect/switch off all Jands Vista USB devices. 4. Double click on the downloaded Byron_OSX_Installer .dmg file to open the installer window
on your desktop. 5. Drag the Vista v2 icon to the Applications folder shortcut.
6. In the Applications folder on your hard disk open the Vista V2 folder and double click the
Byron icon to launch the software. 7. Follow the on‐screen instructions to set up Vista for the first time.
Technical BulletinProduct Class: Lighting Console Tech Bulletin #TBJLT177
Vista Application
Jands Pty Ltd 40 Kent Road Mascot NSW 2020 Australia Phone +61 2 9582 0909 Fax +61 2 9582 0999 www jands com au
Note: While all due care and attention has been taken in the preparation of this document, Jands Pty Ltd shall not be liable for any inaccuracies or omissions which may
occur therein
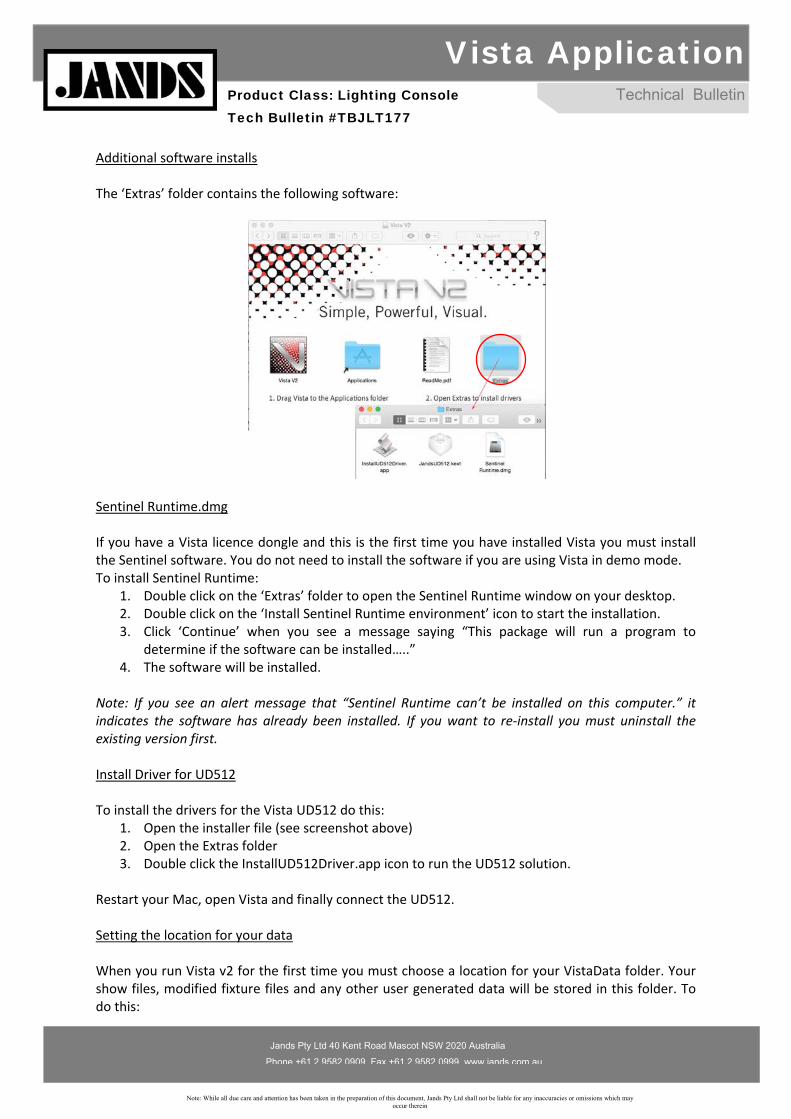
Additional software installs The ‘Extras’ folder contains the following software:
Sentinel Runtime.dmg If you have a Vista licence dongle and this is the first time you have installed Vista you must install the Sentinel software. You do not need to install the software if you are using Vista in demo mode. To install Sentinel Runtime:
1. Double click on the ‘Extras’ folder to open the Sentinel Runtime window on your desktop. 2. Double click on the ‘Install Sentinel Runtime environment’ icon to start the installation. 3. Click ‘Continue’ when you see a message saying “This package will run a program to
determine if the software can be installed…..” 4. The software will be installed.
Note: If you see an alert message that “Sentinel Runtime can’t be installed on this computer.” it indicates the software has already been installed. If you want to re‐install you must uninstall the existing version first. Install Driver for UD512 To install the drivers for the Vista UD512 do this:
1. Open the installer file (see screenshot above) 2. Open the Extras folder 3. Double click the InstallUD512Driver.app icon to run the UD512 solution.
Restart your Mac, open Vista and finally connect the UD512. Setting the location for your data When you run Vista v2 for the first time you must choose a location for your VistaData folder. Your show files, modified fixture files and any other user generated data will be stored in this folder. To do this:

Technical BulletinProduct Class: Lighting Console Tech Bulletin #TBJLT177
Vista Application
Jands Pty Ltd 40 Kent Road Mascot NSW 2020 Australia Phone +61 2 9582 0909 Fax +61 2 9582 0999 www jands com au
Note: While all due care and attention has been taken in the preparation of this document, Jands Pty Ltd shall not be liable for any inaccuracies or omissions which may
occur therein
1. In the Applications folder on your hard disk open the Vista V2 folder and double click the Byron icon to launch the software. Vista will open the ‘Choose a location for your VistaData folder’ window.
2. Navigate to the location you want to use. The recommended location is /Users/yourusername/
3. Click ‘Choose’ to set the location. Vista creates a new folder (VistaData) in the location you selected in step 2
4. Vista will open. Updating from v2.2.11191 or earlier If you are already using Vista v2 (Byron) version 2.2.11191 or earlier be sure to make a backup copy of your ‘UserData’ folder. This folder is normally located inside the Vista2 folder which is inside your Applications folder (/Applications/Vista2/UserData). The latest installer does not overwrite or replace any files in this folder and it will still be usable after the new version is installed. To update from v2.2.1191 or earlier follow these steps:
1. Make a backup copy of your ‘UserData’ folder. 2. Install the new Vista software (see Installing the Vista software above) 3. Locate the new Vista V2 folder, inside the Applications folder. Open it and double click the
Byron’ icon to launch the program. 4. When the new version opens, it will search for your UserData folder and if it is currently
located inside the Vista2 folder the installer will copy all files to the location you choose. The recommended location for the new VistaData folder is inside your user folder (i.e. /Users/yourusername/)
5. Note: If you have a Vista v2 (Byron) icon on your Mac Dock it will still open the old version. You should delete it and add a new shortcut by first locating the new Vista V2 folder, inside the Applications folder, then dragging the Byron application icon to the dock.
Top Related