


Languages
Pages
Legal


Page 1
Developer Walkthroughs
This document is provided “as-is”. Information and views expressed in this document, including URL and
other Internet Web site references, may change without notice. You bear the risk of using it.
Some examples depicted herein are provided for illustration only and are fictitious. No real association or
connection is intended or should be inferred.
This document does not provide you with any legal rights to any intellectual property in any Microsoft
product. You may copy and use this document for your internal, reference purposes.
© 2010 Microsoft. All rights reserved.
Microsoft, SharePoint, Visual Studio, InfoPath, and Visio are trademarks of the Microsoft group of
companies. All other trademarks are property of their respective owners.

SharePoint 2010 Developer Walkthroughs
Page 2
Contents Exercise 1 – Web Part and Linq Walkthrough ....................................................................................................... 4
Task 1 - Create a new SharePoint Project ........................................................................................................ 4 Task 2 - Generate LINQ-to-SharePoint proxy class to access list data ............................................................ 7 Task 3 - Access the SharePoint list data in Visual Web Part ............................................................................ 9 Task 4 – Build and Deploy the Visual Web Part .............................................................................................. 11
Exercise 2 – Build a BCS External Content Type ................................................................................................ 16 Task 1 – Create a Business Data Catalog Model project ................................................................................ 16 Task 2 – Update the Schema of the Entity Class ............................................................................................ 18 Task 3 – Update the Service Code .................................................................................................................. 28 Task 4 – Build and Deploy ............................................................................................................................... 30
Exercise 3 – Create a Silverlight Application for the SharePoint Client Object Model ........................................ 34 Task 1 – Create a Silverlight Application Project ............................................................................................. 34 Task 2 – Write code to access and render SharePoint List Data .................................................................... 36 Task 3 – Deploy and Test using the SharePoint Silverlight web part .............................................................. 40
Exercise 4 – Creating a graph using the SharePoint Object Model and Silverlight Graphing controls ............... 42 Task 1 – Create a Silverlight Application Project ............................................................................................. 42 Task 2 – Write code to access Employee SharePoint List Data and display it in a Silverlight Graph Control 46 Task 3 – Deploy and Test using the SharePoint Silverlight Charting web part ............................................... 49
Exercise 5 – Create a Web Part for a Sandboxed Solution ................................................................................. 53 Task 1 – Create a Sandboxed Solution Project with a web part ..................................................................... 53 Task 2 – Add code to provide querying and rendering functionality ................................................................ 55 Task 3 – Build and Deploy the Sandboxed Solution ....................................................................................... 58
Exercise 6 – Creating an Activity for use in a SharePoint Designer Workflow .................................................... 63 Task 1: Create and Prepare Project ................................................................................................................ 63 Task 2: Create a new Workflow Activity for use by the Reusable Workflow ................................................... 64 Task 3: Add code to create a document library based on parameters passed to our activity. ........................ 66 Task 4: Configure activity for deployment. ....................................................................................................... 69 Task 5: Add the SPDActivityDemo activity to be deployed with SPCHOL305Ex1. ......................................... 73 Task 6: Configure a Feature using Feature Designer ..................................................................................... 74 Task 7: Add and code a Feature Receiver ...................................................................................................... 75 Task 8: Create a re-usable workflow using SharePoint Designer ................................................................... 76 Task 9: Import the reusable workflow into Visual Studio ................................................................................. 84 Task 10: Associate the workflow with a list in SharePoint ............................................................................... 91
Walkthrough Summary ......................................................................................................................................... 93

SharePoint 2010 Developer Walkthroughs
Page 3
The following six walkthroughs are C# walkthroughs of select scenarios that professional developers would do in SharePoint 2010 with Visual Studio 2010. You should find there are sufficient screenshots in these walkthroughs to read the document without having hands on access to the software. These developer walkthroughs are also available as hands on labs as part of this online eLearning course: http://MSSharePointDeveloper.com. There are additional labs in the course, there are also videos, code samples and online virtual lab environments, and the hands on labs are available in both C# and VB.NET. You are welcome to discuss these walkthroughs at http://mssharepointforums.com To provide feedback on this guide, send an e-mail message to [email protected].

SharePoint 2010 Developer Walkthroughs
Page 4
Exercise 1 – Web Part and Linq Walkthrough
Estimated time to complete this exercise: 10 minutes
In this exercise, you will develop and deploy a Visual Web Part that reads data from a list and displays in a DataGrid. In this exercise, you will:
1. Create a Visual Web Part.
2. Generate Linq proxy code.
3. Use a Linq provider to read data from a SharePoint list.
4. Render the data using the SPDataGrid web control.
Task 1 - Create a new SharePoint Project
In this task, a solution and project will be created. It will contain the rest of the development work in Exercise 1 of this lab.
1. Open Visual Studio 2010 by going to Start Menu | All Programs | Microsoft Visual Studio 2010 | Microsoft Visual Studio 2010.
2. From the menu, select File | New | Project.
3. In the New Project dialog window, choose Visual C# | SharePoint | 2010 from the Installed Templates.
4. Select Visual Web Part from the Project Items.
Figure 1 - SharePoint 2010 Visual Web Part Project
5. Enter SPCHOL200-Ex1 in the Name textbox

SharePoint 2010 Developer Walkthroughs
Page 5
6. Enter C:\SPHOLS\SPCHOL200\CS\Ex1 in the Location textbox.
7. Uncheck Create directory for solution.
8. Click OK.
9. In the SharePoint Customization Wizard:
Enter http://intranet.contoso.com/ for the local site.
Set the trust level to Deploy as a farm solution.
Click Finish button.
Figure 2 - SharePoint Customization Wizard
10. Visual Studio will create the new SPCHOL200-Ex1 project and add the necessary files.

SharePoint 2010 Developer Walkthroughs
Page 6
Figure 3 - SPCHOL200-Ex1 Project
11. Notice that Visual Studio also creates a Visual Web Part named VisualWebPart1. Within the Solution Explorer, expand VisualWebPart1 and open VisualWebPart1.webpart.
Figure 4 - Visual Web Part
12. Change the value of the property element with the name attribute value of Title to SPLinqDemoTitle and the value of the property element with the name attribute value of Description to SPLinqDemoPart Description. This will change the Title and Description property of the Visual Web Part once it is deployed. Save the file.
<properties> <property name="Title" type="string">SPLinqDemoTitle</property> <property name="Description" type="string">SPLinqDemoPart Description</property> </properties>

SharePoint 2010 Developer Walkthroughs
Page 7
Task 2 - Generate LINQ-to-SharePoint proxy class to access list data
In this task, you will use the new spmetal.exe code generation utility and generate the Linq-to-SharePoint proxy code.
1. In the Solution Explorer, right-click on SPCHOL200-Ex1 and select Open Folder in Windows Explorer.
2. Hold Shift key and right click anywhere in the Explorer Window and select Open Command Window Here to open the command prompt window in the current project directory:
Figure 5 - Open Command Window Here
3. Type the following command in the command prompt and press Enter to set the path to the SharePoint 2010 folder:
set path=%path%;c:\program files\common files\microsoft shared\web server extensions\14\bin
4. Type the following command in the command prompt and press Enter to generate the Linq-to-SharePoint proxy code.
spmetal.exe /web:http://intranet.contoso.com /namespace:SPCHOL200_Ex1.VisualWebPart1 /code:SPLinq.cs
Note – you may get warnings about content types for list Form Templates. You can safely ignore this warning and continue
5. Close the command window and switch back to Visual Studio.
6. In Visual Studio, right click on SPCHOL200-Ex1 project and select Add | Existing Item.

SharePoint 2010 Developer Walkthroughs
Page 8
Figure 6 - Add Existing Item
7. Select SPLinq.cs from the Add Existing Item dialog window and click Add:
Figure 7 - Add SPLinq.cs File
8. In the Solution Explorer, right click on References and select Add Reference.
9. Switch to Browse tab and enter C:\Program Files\Common Files\Microsoft Shared\Web Server Extensions\14\ISAPI in the File Name text box. Press Enter to change directories. Your Add Reference window should now look like Fig. 11.
10. Select Microsoft.SharePoint.Linq.dll.

SharePoint 2010 Developer Walkthroughs
Page 9
Figure 8 - Add Reference
11. Click OK to add the reference to your project.
Task 3 - Access the SharePoint list data in Visual Web Part
In this task, you will add code to your solution that will allow the Visual Web Part to retrieve SharePoint list data.
1. In Solution Explorer, expand VisualWebPart1 and double-click on VisualWebPart1UserControl.ascx.
2. Visual Studio will open the Visual Web Part User Control.
3. Add the following code to the user control to construct your grid view.

SharePoint 2010 Developer Walkthroughs
Page 10
<%@ Import Namespace="Microsoft.SharePoint.WebControls" %>
<SharePoint:SPGridView id="spGridView" runat="server"
AutoGenerateColumns="false">
<HeaderStyle HorizontalAlign="Left" ForeColor="Navy" Font-Bold="true" />
<Columns>
<SharePoint:SPBoundField DataField="Title"
HeaderText="Title"></SharePoint:SPBoundField>
<SharePoint:SPBoundField DataField="JobTitle"
HeaderText="JobTitle"></SharePoint:SPBoundField>
<SharePoint:SPBoundField DataField="ProjectTitle"
HeaderText="ProjectTitle"></SharePoint:SPBoundField>
<SharePoint:SPBoundField DataField="DueDate"
HeaderText="DueDate"></SharePoint:SPBoundField>
</Columns>
</SharePoint:SPGridView>
Code Snippets: ASP.NET | spchol200_ex1_spgridview
4. The Visual Web Part user control should look like this after adding the code above:
Figure 9 - Visual Web Part User Control
5. In the Solution Explorer, right click on VisualWebPart1UserControl.ascx and select View Code.
6. Add the following using statements to the code behind:
using Microsoft.SharePoint.Linq; using Microsoft.SharePoint; using System.Linq;
Code Snippet: My Code Snippets | spchol200_ex1_namespaces
7. Insert the following code inside the Page_Load method:
var dc = new SPLinqDataContext(SPContext.Current.Web.Url); var Employees = dc.GetList<EmployeesItem>("Employees"); var empQuery = from emp in Employees

SharePoint 2010 Developer Walkthroughs
Page 11
where emp.Project.DueDate < DateTime.Now.AddMonths(6) select new { emp.Title, emp.JobTitle, ProjectTitle = emp.Project.Title, DueDate = emp.Project.DueDate.Value.ToShortDateString() }; spGridView.DataSource = empQuery; spGridView.DataBind();
Code Snippet: My Code Snippets | spchol200_ex1_pageload
Task 4 – Build and Deploy the Visual Web Part
1. In the Solution Explorer, right click on SPCHOL200-Ex1 and select Deploy. This will build and deploy the Visual Web Part to the local SharePoint site: http://intranet.contoso.com
Figure 10 - Deploy VisualWebPart
2. Open Internet Explorer and browse to the following site:
http://intranet.contoso.com
3. If prompted for authentication, enter the following details.
Username: Administrator
Password: pass@word1
4. Click the Edit icon in the top menu to open the SharePoint Ribbon to the Editing Tools.

SharePoint 2010 Developer Walkthroughs
Page 12
Figure 14 – SharePoint Edit Icon
Figure 15 - SharePoint Ribbon - Edit Page
5. Switch to Insert tab in the Ribbon and click on Web Part to insert a Web Part to the page.

SharePoint 2010 Developer Walkthroughs
Page 13
Figure 11 - SharePoint Ribbon - Insert WebPart
6. Under Categories, Select Custom.
7. Under Web Parts, select SPLinqDemoTitle web part.
Figure 12 - Selecting SPlinqDemoTitle Web Part
Put your cursor in the area of the page where you want the Web Part to appear. This must be a zone that accepts Web Parts. In this case, put your cursor in the zone below the Shared

SharePoint 2010 Developer Walkthroughs
Page 14
Documents control.
Figure 13 - Layout Zones
8. Click Add to add the web part to the page. This will add the SPLinqDemoTitle web part to the selected layout zone.

SharePoint 2010 Developer Walkthroughs
Page 15
Figure 14 - SPLinqDemoTitle Web Part added to the layout zone
9. Click on Page, click the down arrow on the “Save and Close” button, and select Stop Editing to save the page and stop editing. Click Yes when prompted to save the changes you made.
Figure 15 - SharePoint Ribbon - Stop Editing
10. Close Internet Explorer.
11. Close Visual Studio 2010.
In the past exercise, you built and deployed a Visual Web Part that uses Linq to SharePoint to retrieve data from a SharePoint list.

SharePoint 2010 Developer Walkthroughs
Page 16
Exercise 2 – Build a BCS External Content Type
This exercise will guide you through creating an external content type using the Visual Studio 2010
BDC Model project template and extend the external content type.
Task 1 – Create a Business Data Catalog Model project
1. Open Visual Studio 2010 by going to Start Menu | All Programs | Microsoft Visual Studio 2010 | Microsoft Visual Studio 2010, and from the menu select File | New | Project.
2. Select the Visual C# | SharePoint | 2010 | Business Data Connectivity Model project template.
3. Enter BDCEx1 in the Name textbox.
Figure 16 - New Project Dialog
4. Enter C:\SPHOLS\SPCHOL304\CS\Ex1 in the Location textbox.
5. Click OK.

SharePoint 2010 Developer Walkthroughs
Page 17
6. Change the URL to http://intranet.contoso.com.
7. Select the Deploy as a farm solution radio button.
Figure 17 - SharePoint Customization Wizard
8. Click Finish.

SharePoint 2010 Developer Walkthroughs
Page 18
Task 2 – Update the Schema of the Entity Class
1. From the top menu, select View | Solution Explorer. In the Solution Explorer, rename Entity1.cs to Customer.cs and Entity1Service.cs to CustomerService.cs. Click Yes when prompted with the below:
Figure 18 - Visual Studio file rename prompt
2. If it’s not already open, double-click on Customer.cs in the Solution Explorer. Replace the code in the body of the Customer class with the following code. This is adding two extra properties and changing the type of a third as a mapping for the type descriptors we added and modified in the BDC definition. Note when you change the Identifier1 to CustomerId, you can use the glyph that appears in the editor to rename all references to the field Identifier1. This doesn’t help you in this case but is a good practice.
public Int32 CustomerId { get; set; }
public string Message { get; set; }
public string FirstName { get; set; }
public string LastName { get; set; }
Code Snippet: My Code Snippets | spchol304_ex1_customer
Figure 19 - Customer class after changes to the body

SharePoint 2010 Developer Walkthroughs
Page 19
Task 3 – Extend the BCS Metadata for the External Content Type 1. In the Solution Explorer, open the BdcModel1.bdcm if the BDC designer isn’t already open.
Figure 20 - Solution Explorer displaying BDCModel1.bdcm in the BDC Designer.
2. In the designer select the Entity1 entity by clicking on the title.
Figure 21 - Entity1 entity
3. Rename the Entity1 to Customer by clicking on the Entity1 name in the designer and pressing F2 (alternatively you can change the name in the Property Grid).
4. Highlight Identifier1 in the Entity designer and press F4 to open the Properties Grid. Use the Properties Grid to rename Identifier1 to CustomerId and set its Type Name to System.Int32.

SharePoint 2010 Developer Walkthroughs
Page 20
Figure 22 - Properties panel after the Type Name change
5. In the BDC Explorer in Visual Studio, expand Model | BDCModel1 | BDCModel1 | Customer | ReadList | returnParameter. Click Entity1List to open its Property Grid.
Figure 23 - BDC Explorer highlighting Entity1List
6. Using the Properties grid, rename Entity1List to CustomerList.

SharePoint 2010 Developer Walkthroughs
Page 21
7. In the BDC Explorer, expand CustomerList.
Figure 24 - BDC Explorer highlighting Entity1
8. Using the Properties grid, rename Entity1 to Customer.
In the BDC Explorer, expand Customer and using the Properties grid rename Identifier1 to CustomerId, set the TypeName to System.Int32.
Figure 25 - Properties grid after changes to Identifier1

SharePoint 2010 Developer Walkthroughs
Page 22
9. In the BDC Explorer right-click Customer and select Add Type Descriptor.
Figure 26 - Customer entity context menu
10. Select TypeDescriptor and, using the Properties grid, change Name to FirstName.
11. In the BDC Explorer right-click Customer and select Add Type Descriptor.
12. Select TypeDescriptor and, using the Properties grid, change Name to LastName.
Figure 27 - Customer entity in BDC Explorer after the addition of FirstName and LastName type descriptors
13. In the BDC Explorer right-click Customer and select Copy.
Figure 28 - Customer entity context menu
14. In the BDC Explorer expand the ReadItem method, right-click returnParameter and select Paste.

SharePoint 2010 Developer Walkthroughs
Page 23
Figure 29 – returnParameter context menu
15. Click Yes.
Figure 30 - Replace Type Descriptor prompt
16. Expand returnParameter | Customer and confirm FirstName and LastName type descriptors have successfully copied.

SharePoint 2010 Developer Walkthroughs
Page 24
Figure 31 - BDC Explorer after Task 1’s, Step 1 to Step 18 changes

SharePoint 2010 Developer Walkthroughs
Page 25
17. In the BDC Explorer expand the ReadItem | id and select Identifier1.
18. Using the Properties grid, rename Identifier1 to CustomerId, set the TypeName to System.Int32.
Figure 32 - Properties grid after changes to Identifier1
19. Using the BDC Method Details pane add an update method
Figure 33 - BDC Method Details adding Update method

SharePoint 2010 Developer Walkthroughs
Page 26
20. Add a parameter and name it id
Figure 34 - Adding the id parameter to the Update method

SharePoint 2010 Developer Walkthroughs
Page 27
21. Open the new Update method in the BDC Explorer window
22. Copy the type descriptor from the CustomerId type description from @id parameter in the ReadItem method to the @id parameter in the Update method
23. Change the Pre-Updater property on the id parameter to be True.
Figure 35 - Updating the Pre-Updater Field to True

SharePoint 2010 Developer Walkthroughs
Page 28
Task 3 – Update the Service Code
1. In the Solution Explorer open the CustomerService.cs.
2. Replace the body of the CustomerService class with the following code. This will return a customer based on a given id, and an array of customers if requested.
public static Dictionary<Int32, Customer> d = null;
public static Customer ReadItem(Int32 id)
{
// take a copy for SharePoint
Customer c = new Customer();
Customer e = d[id];
c.CustomerId = e.CustomerId;
c.FirstName = e.FirstName;
c.LastName = e.LastName;
c.Message = e.Message;
return c;
}
public static IEnumerable<Customer> ReadList()
{
// this is usually the first method called so check for null
if (d == null)
{
d = new Dictionary<Int32, Customer>();
for (int i = 0; i < 10; i++)
{
Customer e = new Customer();
e.CustomerId = i;
e.Message = i + " Item Data";
e.FirstName = i + " First Name";
e.LastName = i + " Last Name";
d.Add(i, e);
}
}
return d.Values;
}
public static void Update(Customer customer, Int32 id)
{
d[id].FirstName = customer.FirstName;
d[id].LastName = customer.LastName;
d[id].Message = customer.Message;
}
Code Snippet: My Code Snippets | spchol304_ex1_customerservice

SharePoint 2010 Developer Walkthroughs
Page 29
Figure 36 - CustomerService class after the changes
3. In the Solution Explorer, expand the Features folder and double click the Feature1.feature node.
This opens the feature designer.
4. Click the Manifest tab at the bottom of the feature designer.
5. Click the + glyph next to Edit Options to open the template editor.
6. Add a new Property for the Site URL
<Property Key="SiteUrl" Value="http://intranet.contoso.com" />

SharePoint 2010 Developer Walkthroughs
Page 30
The feature designer should now look like Figure 37.
Figure 37 – The feature designer with the SiteUrl property added
Task 4 – Build and Deploy
1. From the menu, select Build | Deploy BDCEx1.
2. Open http://intranet.contoso.com in a browser session.
3. Click on Lists in the left hand navigation
Figure 38 - Lists link
4. Click on Create.
Figure 39 - Create link

SharePoint 2010 Developer Walkthroughs
Page 31
In the Create dialog, select External List and select Create.
Figure 31 – Create External List dialog
5. Enter My Contacts In the Name textbox.
6. Click on the second button to the right of the External Content Type text box (the one with the tooltip of “Select External Content Type”).
Figure 32 – Create new external list page

SharePoint 2010 Developer Walkthroughs
Page 32
7. Select BDCEx1.BDCModel1.Customer and click OK.
Figure 33 - Business Data Type Picker -- Webpage Dialog
Figure 40 - New external list page

SharePoint 2010 Developer Walkthroughs
Page 33
8. Click Create.
9. You have just created an external content type and a list to host that content type.
Figure 41 - External Content Type (BDC model) displayed in list

SharePoint 2010 Developer Walkthroughs
Page 34
Exercise 3 – Create a Silverlight Application for the SharePoint Client Object Model
In this exercise, we will create a basic Silverlight application that displays a SharePoint list inside a datagrid. The data for the list is retrieved from the server so it is available in Silverlight using the SharePoint Client Object Model. We will use a Visual Studio 2010 solution and deploy it to the local SharePoint server.
Task 1 – Create a Silverlight Application Project
We will start by creating a standard Silverlight application project. 1. Open Visual Studio 2010 from Start | All Programs | Microsoft Visual Studio 2010 | Microsoft
Visual Studio 2010.
2. From the menu, select File | New | Project.
3. In the New Project dialog box, expand the Installed Templates left hand menu to Other Project Types | Visual Studio Solutions | Blank Solution.
4. Select .NET Framework 3.5
5. Name the solution Begin.
6. Enter C:\SPHOLS\SPCHOL306\CS\Ex1\ in the Location textbox.
Figure 42 - New Project Dialog
7. Press OK to continue.
8. From the menu, select File | Add | New Project.

SharePoint 2010 Developer Walkthroughs
Page 35
9. In the New Project dialog box, expand the Installed Templates left hand menu to Visual C# | Silverlight, and choose the Silverlight Application project type in the project type list in the middle section of the screen.
10. Select .NET Framework 3.5
11. Name the project SPSilverlightExample.
12. Leave the location unchanged.
Figure 43 - Add New Project Dialog
13. Press OK to continue.
Figure 44 - Add Silverlight Application Dialog
14. Press OK to create the project.

SharePoint 2010 Developer Walkthroughs
Page 36
15. Within the SPSilverlightExample project we will now add the reference assemblies to the SharePoint Silverlight Client Object Model. Right-click References in the SPSilverlightExample project and select Add References.
16. Browse to the “C:\Program Files\Common Files\Microsoft Shared\Web Server Extensions\14\TEMPLATE\LAYOUTS\ClientBin” folder.
17. Select Microsoft.SharePoint.ClientSilverlight.dll and Microsoft.SharePoint.Client.Silverlight.Runtime.dll (hold CTRL to select multiple files)
18. Press OK to add the select dll references.
Figure 45 - Add References
Task 2 – Write code to access and render SharePoint List Data
1. In Visual Studio open the Toolbox and expand Silverlight Controls.
2. Drag a DataGrid control onto the existing Grid in the Page.xaml Silverlight Designer.

SharePoint 2010 Developer Walkthroughs
Page 37
Figure 46 - Silverlight Controls Toolbox
3. Expand the DataGrid to take up the entire page by going to the properties grid and setting its Width and Height property to Auto, its HoriztonalAlignment and VerticalAlignment properties to Stretch, and its Margin to 0..
Figure 47 - DataGrid Properties

SharePoint 2010 Developer Walkthroughs
Page 38
4. Also make sure to check AutoGenerateColumns (or set its value to true in the XAML).
Figure 48 - AutoGenerate Columns Property
5. Open App.xaml.cs and add the following using statements to the top of the file:
using Microsoft.SharePoint.Client;
using System.Threading;
Code Snippet: My Code Snippets | spchol306_ex1_app_namespaces
6. Add the following code to the beginning of the Application_Startup method.
ApplicationContext.Init(e.InitParams, SynchronizationContext.Current);
Code Snippet: My Code Snippets | spchol306_ex1_ application_startup
7. Open MainPage.xaml.cs and add the following using statement to the top of the file:
using Microsoft.SharePoint.Client;
Code Snippet: My Code Snippets | spchol306_ex1_page_namespaces
8. Add the following class before the MainPage class:
public class Project
{
public string Title { get; set; }
public DateTime DueDate { get; set; }
public string Description { get; set; }
}
Code Snippet: My Code Snippets | spchol306_ex1_ classes
9. Add the following variable to the MainPage class:
private ListItemCollection _projects;
Code Snippet: My Code Snippets | spchol306_ex1_ property
10. Add the following code to the Page constructor below the call to InitializeComponent:

SharePoint 2010 Developer Walkthroughs
Page 39
ClientContext context = new ClientContext(ApplicationContext.Current.Url);
context.Load(context.Web);
List Projects = context.Web.Lists.GetByTitle("Projects");
context.Load(Projects);
CamlQuery query = new Microsoft.SharePoint.Client.CamlQuery();
string camlQueryXml = "<View><Query><Where><Gt>" +
"<FieldRef Name='Due_x0020_Date' />" +
"<Value Type='DateTime'>2008-01-1T00:00:00Z</Value>" +
"</Gt></Where></Query><ViewFields>" +
"<FieldRef Name=\"Title\" /><FieldRef Name=\"Description\" />" +
"<FieldRef Name=\"Due_x0020_Date\" />" +
"</ViewFields></View>";
query.ViewXml = camlQueryXml;
_projects = Projects.GetItems(query);
context.Load(_projects);
context.ExecuteQueryAsync(new
ClientRequestSucceededEventHandler(OnRequestSucceeded), null);
Code Snippet: My Code Snippets | spchol306_ex1_initializecomponent
11. Add the following code after the constructor:
private void OnRequestSucceeded(Object sender, ClientRequestSucceededEventArgs
args)
{
// this is not called on the UI thread
Dispatcher.BeginInvoke(BindData);
}
private void BindData()
{
List<Project> projects = new List<Project>();
foreach (ListItem li in _projects)
{
projects.Add(new Project()
{
Title = li["Title"].ToString(),
DueDate = Convert.ToDateTime(li["Due_x0020_Date"].ToString()),
Description = li["Description"].ToString()
});
}
dataGrid1.ItemsSource = projects; // must be on UI thread
}
Code Snippet: My Code Snippets | spchol306_ex1_methods
This code initializes the SharePoint Silverlight client object model context (ClientContext). It then gets a reference to the Projects list and runs a simple CAML query against the list to pull all projects with a due date greater than 1/1/2008. The results are converted into a list of Projects and bound to the Silverlight DataGrid control.

SharePoint 2010 Developer Walkthroughs
Page 40
Task 3 – Deploy and Test using the SharePoint Silverlight web part
To deploy the solution to SharePoint the resulting .xap file created by the Silverlight project needs to be in the C:\Program Files\Common Files\Microsoft Shared\Web Server Extensions\14\TEMPLATE\LAYOUTS\ClientBin folder.
1. Right-click the SPSilverlightExample project, select properties and select the Build tab.
2. Change the output path to C:\Program Files\Common Files\Microsoft Shared\Web Server Extensions\14\TEMPLATE\LAYOUTS\ClientBin.
Figure 49 - Project Properties
3. Build the solution. The .xap file has been copied to the required SharePoint directory and you are ready to add the Silverlight web part to the SharePoint website.
4. Open Internet Explorer and browse to http://intranet.contoso.com.
5. Select the Edit icon at the top of the page.
6. Select the Insert tab and the click Web Part.
7. From the Category list select Media and Content, choose the Silverlight Web Part from the web part list, and click Add.
8. In the Silverlight Web Part dialog that pops up enter /_layouts/ClientBin/SPSilverlightExample.xap as the URL.

SharePoint 2010 Developer Walkthroughs
Page 41
Figure 50 - Silverlight Web Part Url Dialog
9. Click OK to save the Silverlight Web Part.
10. Exit edit mode.
11. The final web part will look like this on the SharePoint page:
Figure 51 - Finished Silverlight Web Part
In this exercise you have created a basic Silverlight application that displays a SharePoint list inside a datagrid. The data for the list is retrieved from the server so it is available in Silverlight using the SharePoint Client Object Model.

SharePoint 2010 Developer Walkthroughs
Page 42
Exercise 4 – Creating a graph using the SharePoint Object Model and Silverlight Graphing controls
In exercise two we will again be using the SharePoint Object Model to access SharePoint list data but this time we will use LINQ and the Silverlight Charting controls to display the data in a graph.
Task 1 – Create a Silverlight Application Project
1. Open Visual Studio 2010 from Start | All Programs | Microsoft Visual Studio 2010 | Microsoft Visual Studio 2010.
2. From the menu, select File | New | Project.
3. In the New Project dialog box, expand the Installed Templates left hand menu to Other Project Types | Visual Studio Solutions | Blank Solution.
4. Name the solution Begin.
5. Change the location to C:\SPHOLS\SPCHOL306\CS\Ex2\
Figure 52 - New Project Dialog
6. Press OK to continue.
7. From the menu, select File | Add | New Project.
SharePoint 2010 Developer Walkthroughs
Page 43
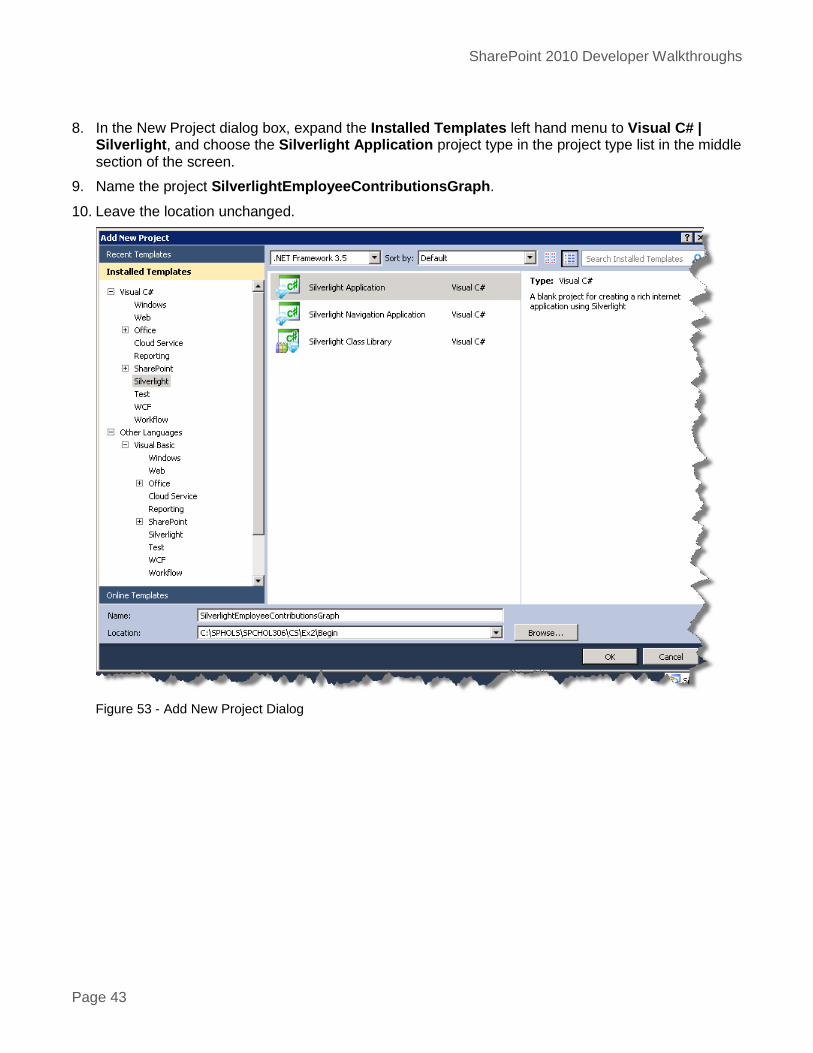
8. In the New Project dialog box, expand the Installed Templates left hand menu to Visual C# | Silverlight, and choose the Silverlight Application project type in the project type list in the middle section of the screen.
9. Name the project SilverlightEmployeeContributionsGraph.
10. Leave the location unchanged.
Figure 53 - Add New Project Dialog

SharePoint 2010 Developer Walkthroughs
Page 44
11. Click OK.
Figure 54 - Add Silverlight Application Dialog
12. Press OK to create the project.
13. Within the SPSilverlightExample project we will now add the reference assemblies to the SharePoint Silverlight Client Object Model. Right-click References in the SilverlightEmployeeContributionsGraph project and select Add References.
14. Browse to the C:\Program Files\Common Files\Microsoft Shared\Web Server Extensions\14\TEMPLATE\LAYOUTS\ClientBin folder.
15. Select Microsoft.SharePoint.ClientSilverlight.dll and Microsoft.SharePoint.Client.Silverlight.Runtime.dll (hold CTRL to select multiple files)
16. Press OK to add the select dll references.

SharePoint 2010 Developer Walkthroughs
Page 45
Figure 55 - Add References
12. Add a reference to the Silverlight Charting Controls assembly. It is available on the .NET tab and is called the System.Windows.Controls.DataVisualization.Toolkit.
Figure 56 - Add DataVisualization Reference
SharePoint 2010 Developer Walkthroughs
Page 46
Task 2 – Write code to access Employee SharePoint List Data and display it in a Silverlight Graph Control
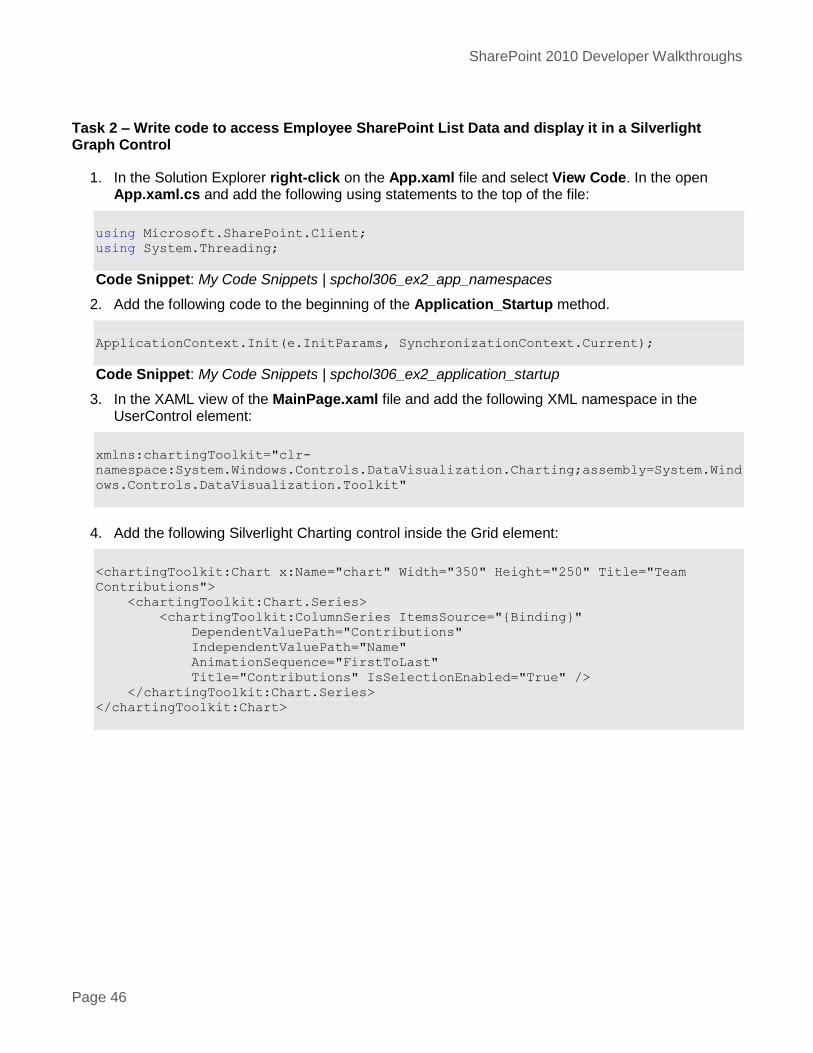
1. In the Solution Explorer right-click on the App.xaml file and select View Code. In the open App.xaml.cs and add the following using statements to the top of the file:
using Microsoft.SharePoint.Client;
using System.Threading;
Code Snippet: My Code Snippets | spchol306_ex2_app_namespaces
2. Add the following code to the beginning of the Application_Startup method.
ApplicationContext.Init(e.InitParams, SynchronizationContext.Current);
Code Snippet: My Code Snippets | spchol306_ex2_application_startup
3. In the XAML view of the MainPage.xaml file and add the following XML namespace in the UserControl element:
xmlns:chartingToolkit="clr-
namespace:System.Windows.Controls.DataVisualization.Charting;assembly=System.Wind
ows.Controls.DataVisualization.Toolkit"
4. Add the following Silverlight Charting control inside the Grid element:
<chartingToolkit:Chart x:Name="chart" Width="350" Height="250" Title="Team
Contributions">
<chartingToolkit:Chart.Series>
<chartingToolkit:ColumnSeries ItemsSource="{Binding}"
DependentValuePath="Contributions"
IndependentValuePath="Name"
AnimationSequence="FirstToLast"
Title="Contributions" IsSelectionEnabled="True" />
</chartingToolkit:Chart.Series>
</chartingToolkit:Chart>

SharePoint 2010 Developer Walkthroughs
Page 47
Figure 57 - Silverlight Chart XAML
5. Open MainPage.xaml.cs and add the following using statement to the top of the file:
using Microsoft.SharePoint.Client;
Code Snippet: My Code Snippets | spchol306_ex2_page_namespaces
6. Add the following classes before the MainPage class:
public class EmployeeContributions
{
public string Name { get; set; }
public string TeamName { get; set; }
public decimal Contributions { get; set; }
}
public class TeamContributions
{
public string Name { get; set; }
public decimal Contributions { get; set; }
}
Code Snippet: My Code Snippets | spchol306_ex2_classes
7. Add the following variable to the MainPage class:
private ListItemCollection _employees;
Code Snippet: My Code Snippets | spchol306_ex2_property
8. Add the following code to the Page constructor below the call to InitializeComponent:

SharePoint 2010 Developer Walkthroughs
Page 48
ClientContext context = new ClientContext(ApplicationContext.Current.Url);
context.Load(context.Web);
List employees = context.Web.Lists.GetByTitle("Employees");
context.Load(employees);
CamlQuery query = new CamlQuery();
string camlQueryXml = null;
query.ViewXml = camlQueryXml;
_employees = employees.GetItems(query);
context.Load(_employees);
context.ExecuteQueryAsync(new
ClientRequestSucceededEventHandler(OnRequestSucceeded), null);
Code Snippet: My Code Snippets | spchol306_ex2_initializecomponent
9. Add the following code after the constructor:
private void OnRequestSucceeded(Object sender, ClientRequestSucceededEventArgs
args)
{
// this is not called on the UI thread
Dispatcher.BeginInvoke(BindData);
}
private void BindData()
{
List<EmployeeContributions> employees = new List<EmployeeContributions>();
// get list item values into a strongly typed class
foreach (ListItem li in _employees)
{
employees.Add(new EmployeeContributions
{
Name = li["Title"].ToString(),
TeamName = li["Team"].ToString(),
Contributions =
Convert.ToDecimal(li["Contribution_x0020__x0028_in_x00"])
});
}
// use linq to group employees on team name and then total team
contributions
List<TeamContributions> teams = employees
.GroupBy(e => e.TeamName)
.Select(t => new TeamContributions
{
Name = t.Key,
Contributions = t.Sum(e => e.Contributions)
}).ToList();
chart.DataContext = teams; // must be on UI thread
}
Code Snippet: My Code Snippets | spchol306_ex2_methods
SharePoint 2010 Developer Walkthroughs
Page 49
10. Like the previous exercise the SharePoint Silverlight client object model is used to retrieve data
from a SharePoint list. Once the employee contribution items have been populated into a list, LINQ is then used to group employees into teams and their contributions summed together. Team contributions are then set as the chart’s data source.
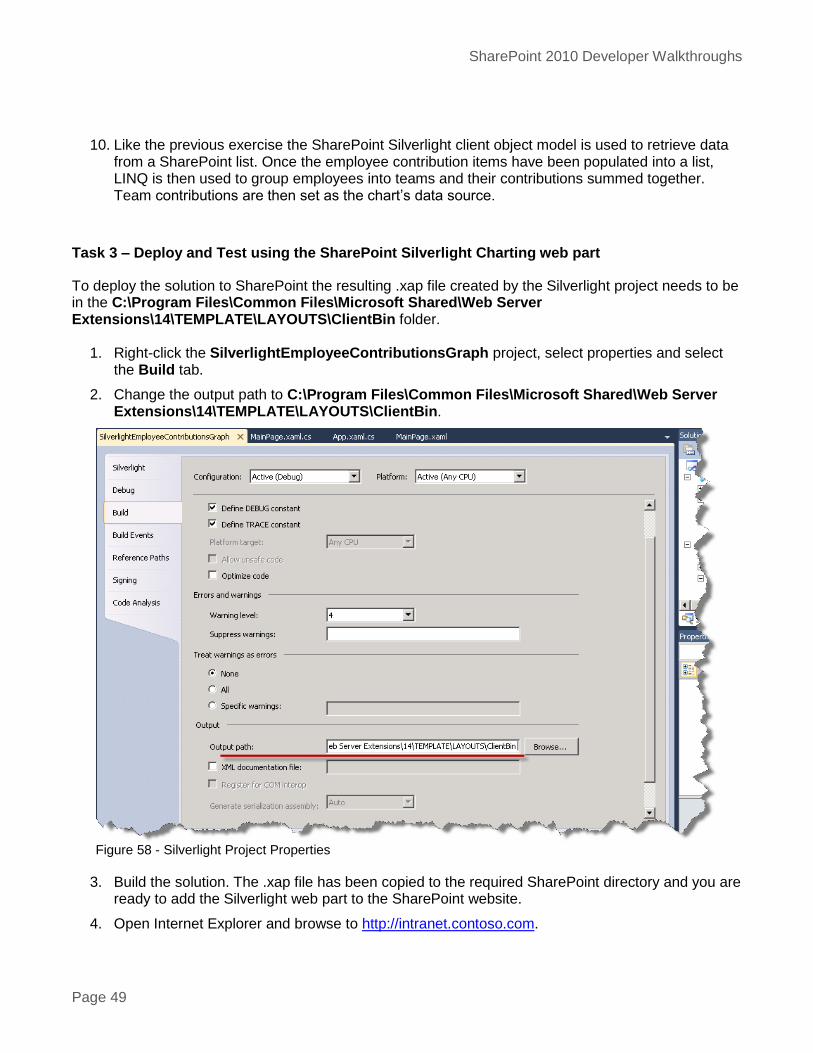
Task 3 – Deploy and Test using the SharePoint Silverlight Charting web part
To deploy the solution to SharePoint the resulting .xap file created by the Silverlight project needs to be in the C:\Program Files\Common Files\Microsoft Shared\Web Server Extensions\14\TEMPLATE\LAYOUTS\ClientBin folder.
1. Right-click the SilverlightEmployeeContributionsGraph project, select properties and select the Build tab.
2. Change the output path to C:\Program Files\Common Files\Microsoft Shared\Web Server Extensions\14\TEMPLATE\LAYOUTS\ClientBin.
Figure 58 - Silverlight Project Properties
3. Build the solution. The .xap file has been copied to the required SharePoint directory and you are ready to add the Silverlight web part to the SharePoint website.
4. Open Internet Explorer and browse to http://intranet.contoso.com.

SharePoint 2010 Developer Walkthroughs
Page 50
5. We will update the Silverlight web part added in the previous exercise to point toward the new Silverlight Charting control we have just made. Click the dropdown icon in the top right hand corner of the Silverlight web part and select Edit Web Part.
Figure 59 - Silverlight Web Part Properties
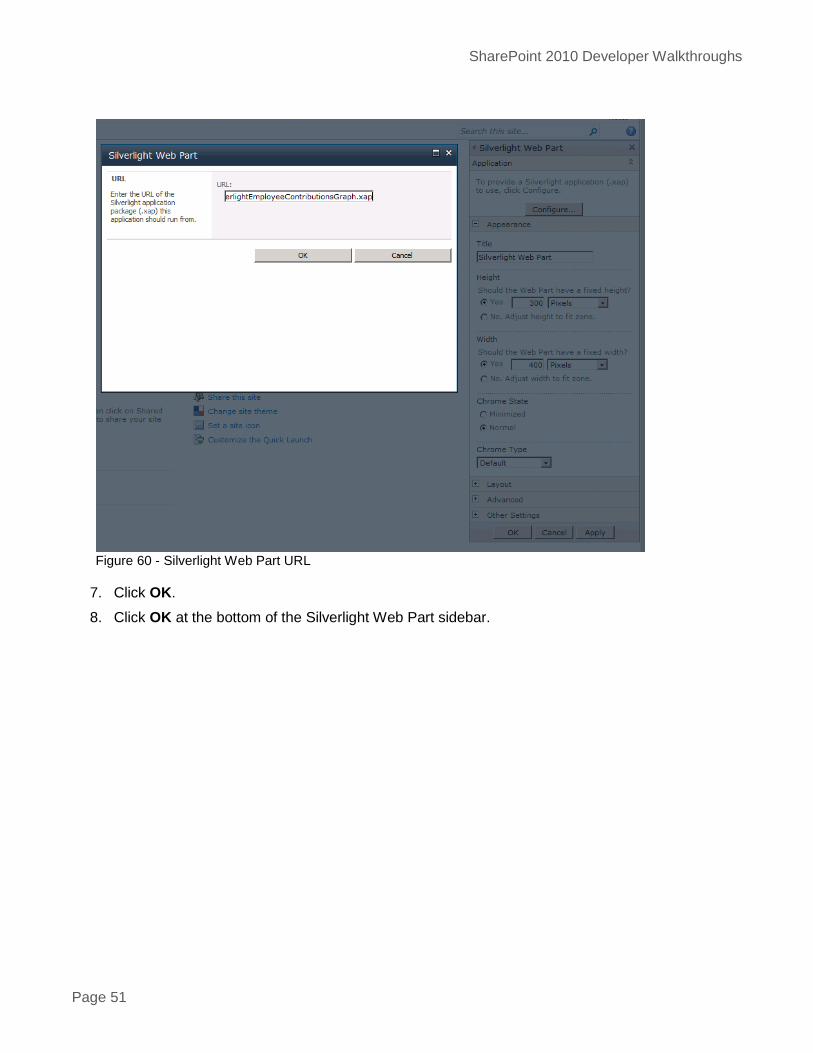
6. Click the Configure button (you may have to scroll the window to the right to see the Configure button) and then enter /_layouts/ClientBin/SilverlightEmployeeContributionsGraph.xap in the Silverlight Web Part dialog.
SharePoint 2010 Developer Walkthroughs
Page 51
Figure 60 - Silverlight Web Part URL
7. Click OK.
8. Click OK at the bottom of the Silverlight Web Part sidebar.

SharePoint 2010 Developer Walkthroughs
Page 52
9. The final web part will look like this:
Figure 61 - Finished Silverlight Chart Web Part

SharePoint 2010 Developer Walkthroughs
Page 53
Exercise 5 – Create a Web Part for a Sandboxed Solution
In this exercise, we will create a web part that renders and updates list data that is deployed as a Sandboxed Solution.
Task 1 – Create a Sandboxed Solution Project with a web part
We will start by creating a standard Silverlight application project. 1. Open Visual Studio 2010 from Start | All Programs | Microsoft Visual Studio 2010 | Microsoft
Visual Studio 2010.
2. From the menu, select File | New | Project.
3. In the New Project dialog box, expand the Installed Templates left-hand menu to Visual C# | SharePoint | 2010 | Empty SharePoint Project.
4. Name the project SBSolutionDemo.
5. Change the location to C:\SPHOLS\SPCHOL307\CS\Ex1\
Figure 62 - New Project Dialog

SharePoint 2010 Developer Walkthroughs
Page 54
6. Press OK to continue.
7. In the SharePoint Customization Dialog, change the local site to use for debugging to http://intranet.contoso.com/.
8. Leave the trust level for the SharePoint solution as Deploy as a sandboxed solution.
Figure 63 - SharePoint Customization Wizard Step1.
9. Press Finish to continue. Visual Studio will create the new project and add the necessary files.
10. Right-click on the SBSolutionDemo project in the Solution Explorer and select Add | New item.
11. Ensure Visual C# | SharePoint | 2010 | is selected in the Installed Templates pane.
12. In the Add New Item dialog, select to add a new Web Part and name it SBWebPart.

SharePoint 2010 Developer Walkthroughs
Page 55
Figure 64 - Add New Item Dialog
13. Press Add to add the web part to the project.
Task 2 – Add code to provide querying and rendering functionality
1. Open SBWebPart.cs and add the following using statement after the other using statements:
using System.Web.UI.HtmlControls;
Code Snippet: My Code Snippets | spchol307_ex1_webpart_namespaces
2. Add the following variables to the SBWebPart class:
DropDownList _ddlProjects = new DropDownList();
TextBox _tbDescription = new TextBox();
TextBox _tbDueDate = new TextBox();
Code Snippet: My Code Snippets | spchol307_ex1_webpart_variables
3. Add the following new methods within the SBWebPart class:

SharePoint 2010 Developer Walkthroughs
Page 56
protected override void OnLoad(EventArgs e)
{
base.OnLoad(e);
if (!Page.IsPostBack)
GetProjectDetails();
}
/* Populate the text boxes with the selected project details */
private void GetProjectDetails()
{
EnsureChildControls();
if (_ddlProjects.SelectedValue != "-- Select a Project --")
{
SPList pList = SPContext.Current.Web.Lists["Projects"];
int nProjectID = Convert.ToInt32(_ddlProjects.SelectedValue);
SPListItem spliProject = pList.GetItemById(nProjectID);
_tbDescription.Text = spliProject["Description"].ToString();
DateTime dueDate = Convert.ToDateTime(spliProject["Due_x0020_Date"]);
_tbDueDate.Text = dueDate.ToShortDateString();
}
else
{
_tbDescription.Text = String.Empty;
_tbDueDate.Text = String.Empty;
}
}
Code Snippet: My Code Snippets | spchol307_ex1_webpart_getprojectdetails

SharePoint 2010 Developer Walkthroughs
Page 57
4. Replace the existing CreateChildControls method with the following code:
protected override void CreateChildControls()
{
base.CreateChildControls();
Panel parent = new Panel();
parent.Style.Add("border", "solid 1px Navy");
parent.Style.Add("background-color", "#EEEEEE");
parent.Style.Add("width", "250px");
_ddlProjects.ID = "ddlProjects";
_ddlProjects.AutoPostBack = true;
_ddlProjects.SelectedIndexChanged += new
EventHandler(ddlProjects_SelectedIndexChanged);
PopulateProjects();
parent.Controls.Add(_ddlProjects);
Panel panel = new Panel();
Label label = new Label();
label.Text = "Description";
panel.Controls.Add(label);
parent.Controls.Add(panel);
panel = new Panel();
panel.Controls.Add(_tbDescription);
parent.Controls.Add(panel);
label = new Label();
label.Text = "Due Date";
panel = new Panel();
panel.Controls.Add(label);
parent.Controls.Add(panel);
panel = new Panel();
panel.Controls.Add(_tbDueDate);
parent.Controls.Add(panel);
panel = new Panel();
Button bUpdateProject = new Button();
bUpdateProject.Text = "Update Project";
bUpdateProject.Click += new EventHandler(bUpdateProject_Click);
panel.Controls.Add(bUpdateProject);
parent.Controls.Add(panel);
Controls.Add(parent);
}
Code Snippet: My Code Snippets | spchol307_ex1_webpart_createchildcontrols
SharePoint 2010 Developer Walkthroughs
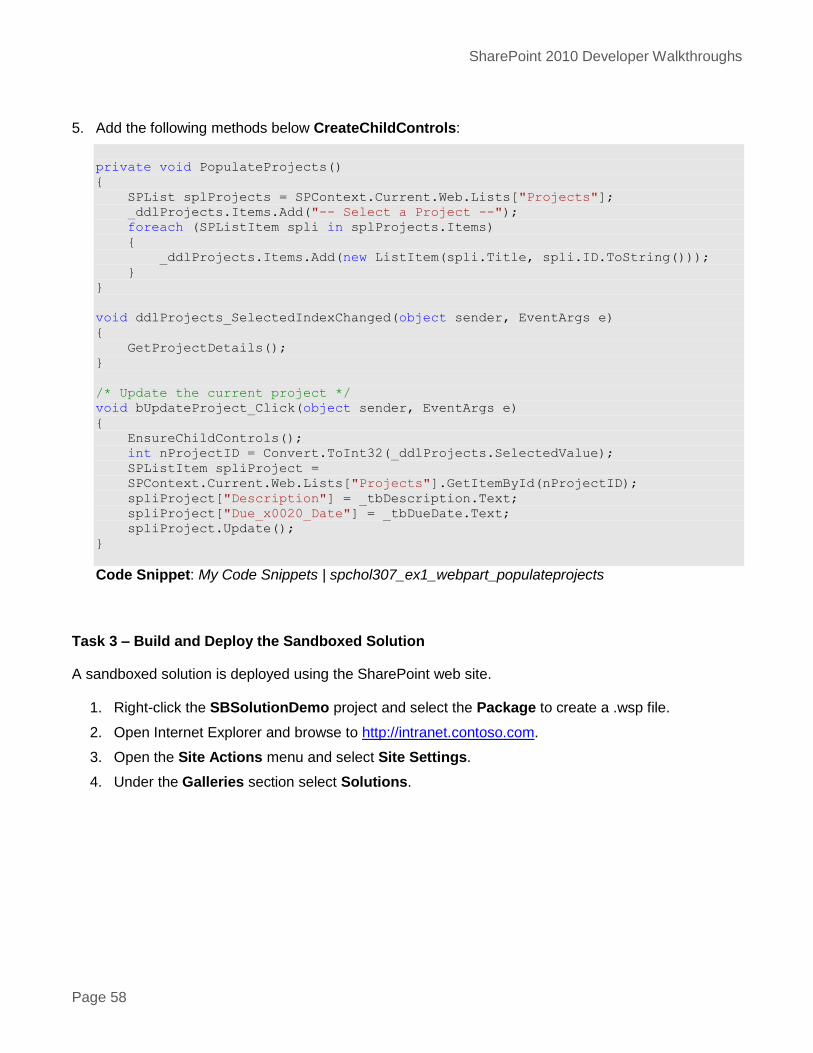
Page 58
5. Add the following methods below CreateChildControls:
private void PopulateProjects()
{
SPList splProjects = SPContext.Current.Web.Lists["Projects"];
_ddlProjects.Items.Add("-- Select a Project --");
foreach (SPListItem spli in splProjects.Items)
{
_ddlProjects.Items.Add(new ListItem(spli.Title, spli.ID.ToString()));
}
}
void ddlProjects_SelectedIndexChanged(object sender, EventArgs e)
{
GetProjectDetails();
}
/* Update the current project */
void bUpdateProject_Click(object sender, EventArgs e)
{
EnsureChildControls();
int nProjectID = Convert.ToInt32(_ddlProjects.SelectedValue);
SPListItem spliProject =
SPContext.Current.Web.Lists["Projects"].GetItemById(nProjectID);
spliProject["Description"] = _tbDescription.Text;
spliProject["Due_x0020_Date"] = _tbDueDate.Text;
spliProject.Update();
}
Code Snippet: My Code Snippets | spchol307_ex1_webpart_populateprojects
Task 3 – Build and Deploy the Sandboxed Solution
A sandboxed solution is deployed using the SharePoint web site.
1. Right-click the SBSolutionDemo project and select the Package to create a .wsp file.
2. Open Internet Explorer and browse to http://intranet.contoso.com.
3. Open the Site Actions menu and select Site Settings.
4. Under the Galleries section select Solutions.

SharePoint 2010 Developer Walkthroughs
Page 59
Figure 65 - Solutions Gallery
5. Select the Solutions tab.
6. On the Solutions tab, select Upload Solution.
7. In the Upload Document dialog that pops up, browse to the .wsp file at C:\SPHOLs\SPCHOL307\CS\Ex1\SBSolutionDemo\SBSolutionDemo\bin\Debug\SBSolutionDemo.wsp.
8. Click OK to upload the SBSolutionDemo.wsp to SharePoint. Leave the Overwrite existing files box checked.
9. Click Activate in the Solution Gallery - Activate Solution dialog. The Sandboxed Solution web part is now ready to be used.
10. Open the Site Actions menu and select More Options.
11. Under the Page section of the Create dialog, select Web Part Page. Click Create.
12. Name the new Web Part Page SBSolutionDemoPage, set the Layout to Full Page, Vertical. And the Save Location to Shared Documents.

SharePoint 2010 Developer Walkthroughs
Page 60
Figure 66 - New Web Part Page
13. Click Create to create the new Web Part Page.
14. Select the middle area of the new Web Part Page and then click the new Insert tab that appears in the top toolbar.
15. Select Web Part and then under Categories Custom and under Web Parts choose SBWebPart.
16. Click Add to add the Sandboxed Solution web part to the page.
17. In the Ribbon, click Page. Next, click Stop Editing in the toolbar
Figure 67 - SBWebPart
SharePoint 2010 Developer Walkthroughs
Page 61
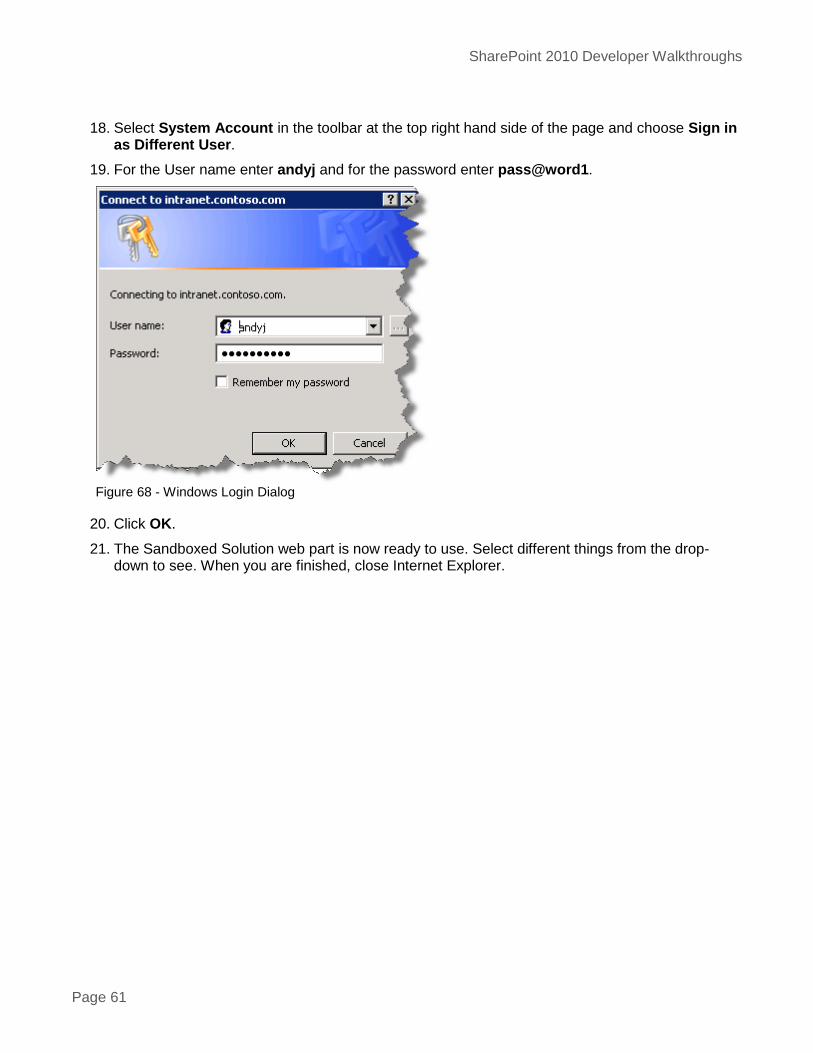
18. Select System Account in the toolbar at the top right hand side of the page and choose Sign in as Different User.
19. For the User name enter andyj and for the password enter pass@word1.
Figure 68 - Windows Login Dialog
20. Click OK.
21. The Sandboxed Solution web part is now ready to use. Select different things from the drop-down to see. When you are finished, close Internet Explorer.

SharePoint 2010 Developer Walkthroughs
Page 62
Figure 69 - The Sandboxed Solution Web Part

SharePoint 2010 Developer Walkthroughs
Page 63
Exercise 6 – Creating an Activity for use in a SharePoint Designer Workflow
This exercise shows how to create a custom workflow activity used by a SharePoint Designer reusable
workflow and deploy them together as a single *.WSP. It also shows how to import that workflow into
Visual Studio 2010.
Task 1: Create and Prepare Project
In this task a project you will create an Empty Project solution and use SharePoint user controls.
1. Open Visual Studio 2010 by going to Start | All Programs | Microsoft Visual Studio 2010 | Microsoft Visual Studio 2010.
2. In Visual Studio 2010, create a new project by going to File | New | Project.
3. Select the Visual C# | SharePoint | 2010 | Empty SharePoint Project project template.
4. Enter SPCHOL305Ex1 in the Name textbox, and enter C:\SPHOLS\SPCHOL305\CS\Ex1 in the Location textbox.
Figure 70 - New Project Dialog
5. Click OK.
6. In the SharePoint Customization Wizard, change the URL to http://intranet.contoso.com and select Deploy as a farm solution. Then click Finish.

SharePoint 2010 Developer Walkthroughs
Page 64
Figure 71 - SharePoint Customization Wizard
7. Visual Studio will create the new SPCHOL305Ex1 project and add the necessary files.
Task 2: Create a new Workflow Activity for use by the Reusable Workflow
1. In Visual Studio 2010, add a new project by going to File | Add | New Project.
2. Change the Framework to .NET Framework 3.5
Figure 72 - Set .NET Framework Version
3. Select the Visual C# | Workflow | Workflow Activity Library project template.
SharePoint 2010 Developer Walkthroughs
Page 65
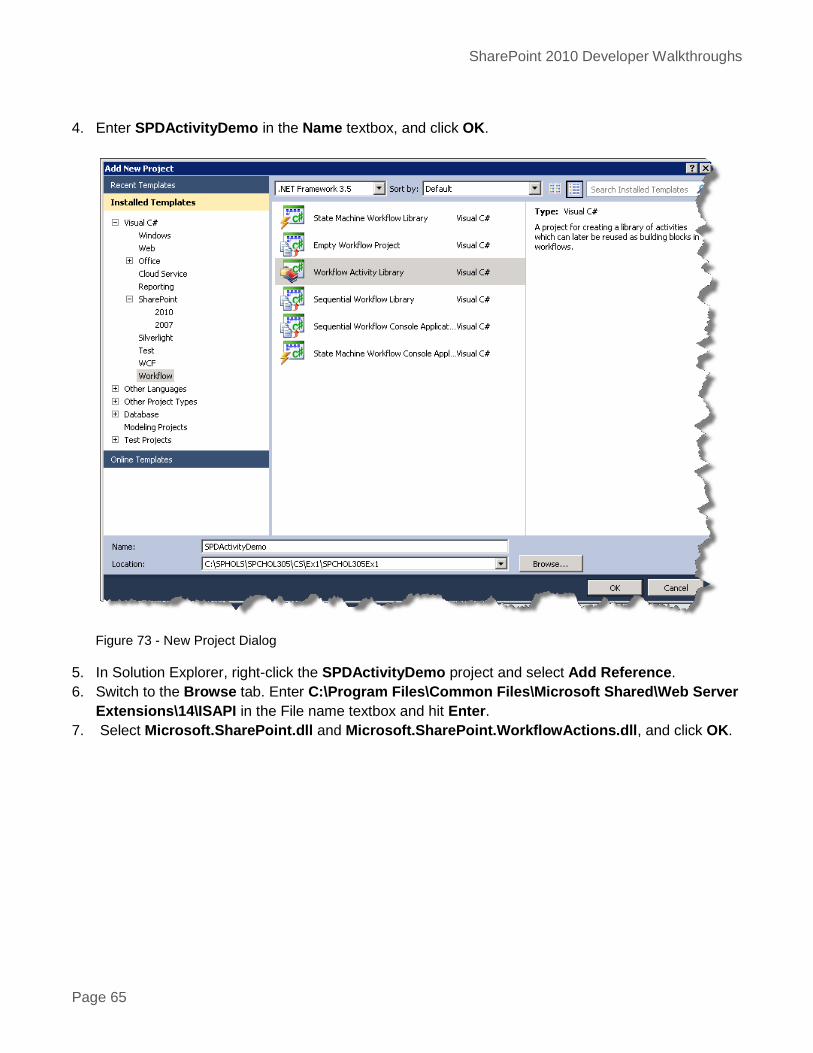
4. Enter SPDActivityDemo in the Name textbox, and click OK.
Figure 73 - New Project Dialog
5. In Solution Explorer, right-click the SPDActivityDemo project and select Add Reference.
6. Switch to the Browse tab. Enter C:\Program Files\Common Files\Microsoft Shared\Web Server
Extensions\14\ISAPI in the File name textbox and hit Enter.
7. Select Microsoft.SharePoint.dll and Microsoft.SharePoint.WorkflowActions.dll, and click OK.

SharePoint 2010 Developer Walkthroughs
Page 66
Figure 74 - Add Reference Dialog
8. Right-click on Activity1.cs in the Solution Explorer and select Rename.
9. Rename Activity1.cs to CreateDocumentLibrary.cs.
Task 3: Add code to create a document library based on parameters passed to our activity.
1. Right-click on the CreateDocumentLibrary.cs file in the Solution Explorer and select View
Code.
2. Change the CreateDocumentLibrary base class from SequenceActivity to Activity, as seen
below.
public partial class CreateDocumentLibrary : Activity
3. Add the following using statements at the top of the file under the existing using statements.:

SharePoint 2010 Developer Walkthroughs
Page 67
using Microsoft.SharePoint; using Microsoft.SharePoint.Workflow; using Microsoft.SharePoint.WorkflowActions;
Code Snippet: My Code Snippets | spchol305_ex1_createdoclib_namespace
4. Add a new DependencyProperty named UrlProperty to the CreateDocumentLibrary class..
This will be the location where the document library will be created.
public static DependencyProperty UrlProperty = DependencyProperty.Register("Url",
typeof(string), typeof(CreateDocumentLibrary), new PropertyMetadata(""));
[DescriptionAttribute("Url of base site")]
[BrowsableAttribute(true)]
[DesignerSerializationVisibilityAttribute(DesignerSerializationVisibility.Visible
)]
[ValidationOption(ValidationOption.Optional)]
public string Url
{
get
{
return ((string)(base.GetValue(CreateDocumentLibrary.UrlProperty)));
}
set
{
base.SetValue(CreateDocumentLibrary.UrlProperty, value);
}
}
Code Snippet: My Code Snippets | spchol305_ex1_createdoclib_urlproperty
5. Add a new DependencyProperty to the CreateDocumentLibrary class named
DocLibNameProperty.
This will be the name of the DocumentLibrary created by the activity.

SharePoint 2010 Developer Walkthroughs
Page 68
public static DependencyProperty DocLibNameProperty =
DependencyProperty.Register("DocLibName", typeof(string),
typeof(CreateDocumentLibrary), new PropertyMetadata(""));
[DescriptionAttribute("Used as doc lib name")]
[BrowsableAttribute(true)]
[DesignerSerializationVisibilityAttribute(DesignerSerializationVisibility.Visible
)]
[ValidationOption(ValidationOption.Optional)]
public string DocLibName
{
get
{
return ((string)(base.GetValue(CreateDocumentLibrary.DocLibNameProperty)));
}
set
{
base.SetValue(CreateDocumentLibrary.DocLibNameProperty, value);
}
}
Code Snippet: My Code Snippets | spchol305_ex1_createdoclib_doclibproperty
6. Add the following code beneath your CreateDocumentLibrary constructor:
protected override ActivityExecutionStatus Execute(ActivityExecutionContext
executionContext)
{
CreateDocLib();
return ActivityExecutionStatus.Closed;
}
private void CreateDocLib()
{
using (SPSite sps = new SPSite(Url))
{
using (SPWeb spw = sps.RootWeb)
{
Guid ID = spw.Lists.Add(DocLibName, DocLibName + " Document Library",
SPListTemplateType.DocumentLibrary);
SPList spdl = spw.Lists[ID];
spdl.OnQuickLaunch = true;
spdl.Update();
}
}
}
Code Snippet: My Code Snippets | spchol305_ex1_createdoclib_execute

SharePoint 2010 Developer Walkthroughs
Page 69
Task 4: Configure activity for deployment.
1. Configure activity for a strong name. Add SPDActivityDemo.snk from Resources folder.
(Location at the start of this manual). To the SPDActivityDemo project.
Figure 75 - Add Existing Item
2. Right-click on the SPDActivityDemo project in the Solution Explorer and select Properties.
3. Click on the Signing tab, check “Sign the Assembly, and then select SPDActivityDemo.snk.
Figure 76 - Signing
4. Build your project (CTRL-SHIFT-B) and fix any errors.

SharePoint 2010 Developer Walkthroughs
Page 70
5. Right-click on the SPCHOL305Ex1 project and click Add, SharePoint Mapped Folder
Figure 77 - SharePoint Mapped Folder
6. Select Template\1033\Workflow in the Add SharePoint Mapped Folder dialog and select OK.

SharePoint 2010 Developer Walkthroughs
Page 71
Figure 78 - Add SharePoint Mapped Folder dialog
7. In the Solution Explorer, expand the newly added Workflow folder.
8. Right-click on the SPCHOL305Ex1 folder (if it exists) and select Delete.
9. Right-click on the Workflow folder and select Add | New Item.
10. Select the XML File template and name the file SPDActivityDemo.ACTIONS then press Add.

SharePoint 2010 Developer Walkthroughs
Page 72
Figure 79 - Add New Item dialog

SharePoint 2010 Developer Walkthroughs
Page 73
7. Replace the contents of SPDActivityDemo.ACTIONS with the following
<?xml version="1.0" encoding="utf-8"?> <WorkflowInfo> <Actions Sequential="then" Parallel="and"> <Action Name="Create Document Library" ClassName="SPDActivityDemo.CreateDocumentLibrary" Assembly="SPDActivityDemo, Version=1.0.0.0, Culture=neutral, PublicKeyToken=a66e91d2ee2fa8f8" AppliesTo="all" Category="Labs"> <RuleDesigner Sentence="Document Library Name %1 to site %2."> <FieldBind Field="DocLibName" Text="Document Library Name" DesignerType="TextArea" Id="1"/> <FieldBind Field="Url" Text="Url of base site" Id="2" DesignerType="TextArea"/> </RuleDesigner> <Parameters> <Parameter Name="DocLibName" Type="System.String, mscorlib" Direction="In" /> <Parameter Name="Url" Type="System.String, mscorlib" Direction="In" /> </Parameters> </Action> </Actions> </WorkflowInfo>
Code Snippet: My XML Snippets | spchol305_ex1_workflowactions_xml
8. Build SPDActivityDemo Project
Task 5: Add the SPDActivityDemo activity to be deployed with SPCHOL305Ex1.
1. In the Solution Explorer expand the Package folder under the SPCHOL305Ex1 project.
2. Double-click on the Package.package file to bring up the Package designer.
3. Click on the Advanced tab on the bottom of the designer
Figure 80 - Advanced Package tab

SharePoint 2010 Developer Walkthroughs
Page 74
4. Click the Add button and select Add Assembly from Project Output.
5. In the Add Existing Assembly from Project Output dialog click the Source Project combo
and select SPDActivityDemo\bin.
Figure 81 - Add Existing Assebly from Project Output dialog
6. Click the button under Safe Controls. Within Safe Controls add the following:
Assembly Name: SPDActivityDemo, Version=1.0.0.0, Culture=neutral, PublicKeyToken= a66e91d2ee2fa8f8 Name Space: SPDActivityDemo Safe: Checked Type Name: *
7. When you have finished filling out the safe control details, press Enter to confirm them. 8. Click OK
Task 6: Configure a Feature using Feature Designer
1. Right-click on the Features folder in the Solution Explorer under the SPCHOL305Ex1 project
and select Add Feature.

SharePoint 2010 Developer Walkthroughs
Page 75
2. Right-click on Feature1 and rename it to SPCHOL305Ex1Feature.
3. In Feature designer change the scope of the SPCHOL305Ex1Feature scope to
WebApplication.
Figure 82 - Feature Designer
Task 7: Add and code a Feature Receiver
1. Right-click on the SPCHOL305Ex1Feature feature in the Solution Explorer and select Add Event Receiver
2. Add a using statement to the top of the code:
using Microsoft.SharePoint.Administration;

SharePoint 2010 Developer Walkthroughs
Page 76
3. Add the following code to your FeatureReceiver class declaration: public override void FeatureActivated(SPFeatureReceiverProperties properties) { SPWebApplication wappCurrent = (SPWebApplication)properties.Feature.Parent; SPWebConfigModification modAuthorizedType = new SPWebConfigModification(); modAuthorizedType.Name = "AuthType"; modAuthorizedType.Owner = "SPDActivityDemo"; modAuthorizedType.Path = "configuration/System.Workflow.ComponentModel.WorkflowCompiler/authorizedTypes"; modAuthorizedType.Type = SPWebConfigModification.SPWebConfigModificationType.EnsureChildNode; modAuthorizedType.Value = "<authorizedType Assembly=\"SPDActivityDemo, " + "Version=1.0.0.0, Culture=neutral, PublicKeyToken=a66e91d2ee2fa8f8\" " + "Namespace=\"SPDActivityDemo\" TypeName=\"*\" Authorized=\"True\" />"; wappCurrent.WebConfigModifications.Add(modAuthorizedType); wappCurrent.WebService.ApplyWebConfigModifications(); }
Code Snippet: My code Snippets | spchol305_ex1_spchol305feature_receiver
4. Build and Deploy the SPCHOL305Ex1Feature project by Right-clicking on the project name
and selecting Deploy.
Figure 83 - Deploy Solution
Task 8: Create a re-usable workflow using SharePoint Designer
1. Open SharePoint Designer 2010 by going to Start | All Programs | SharePoint | Microsoft SharePoint Designer 2010

SharePoint 2010 Developer Walkthroughs
Page 77
2. Click on Sites and then Open Site.
Figure 84 - Sites menu button in SharePoint Designer 2010
If you are asked for credentials use: Username: Administrator Password: pass@word1

SharePoint 2010 Developer Walkthroughs
Page 78
3. Change Site name to http://intranet.contoso.com and select Open
Figure 85 - Open Site dialog

SharePoint 2010 Developer Walkthroughs
Page 79
5. Click the Reusable Workflow button and when prompted name the workflow SPDWorkflow
and then click the OK button to create the reusable workflow.
Figure 86 - Create Reusable Workflow
SharePoint 2010 Developer Walkthroughs
Page 80
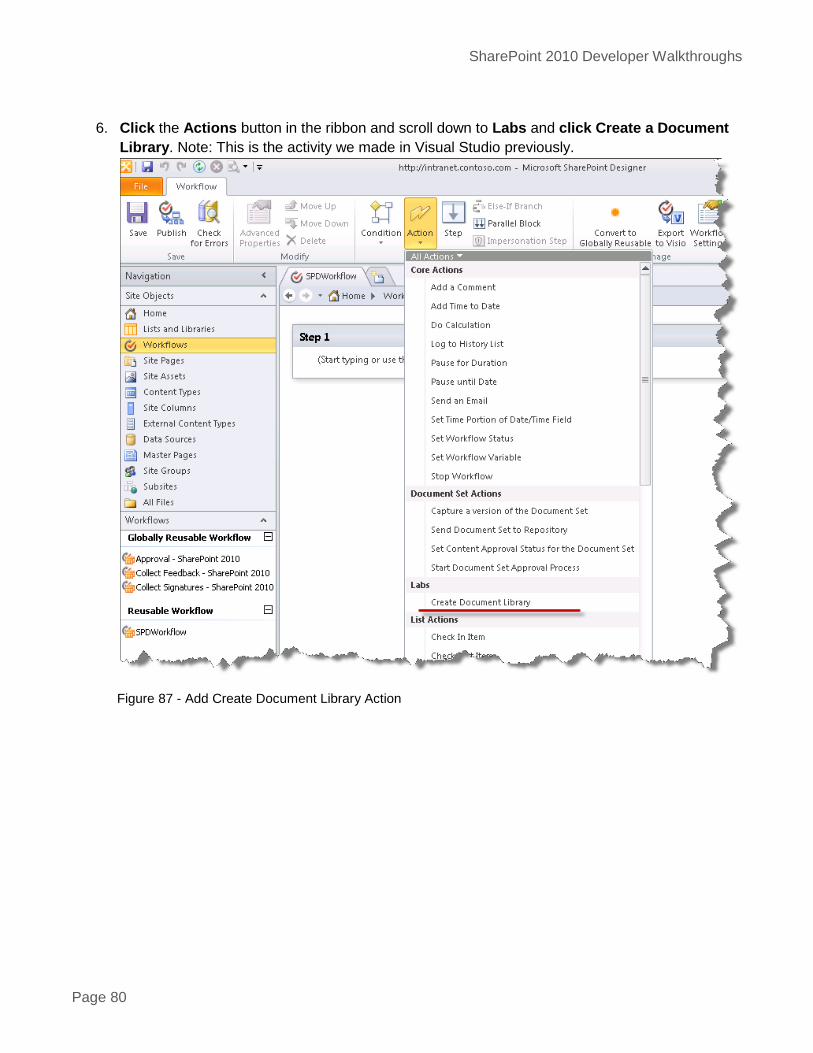
6. Click the Actions button in the ribbon and scroll down to Labs and click Create a Document
Library. Note: This is the activity we made in Visual Studio previously.
Figure 87 - Add Create Document Library Action

SharePoint 2010 Developer Walkthroughs
Page 81
7. Click into Step 1. In the box next to Document Library Name click the Fx button.
8. Select Current Item as the Data Source, and Title as the value of Field from source. Then
Press OK.
Figure 88 - Lookup for String dialog
9. Type in http://intranet.contoso.com as the URL of the base site.
10. Click Save, on the ribbon.
Figure 89 - Configue Workflow Action

SharePoint 2010 Developer Walkthroughs
Page 82
11. Once saved click the Publish button in the ribbon. Wait for the workflow to publish.
Figure 90 - Publish Workflow
12. Once saved click on Workflows in the left navigation.
13. Click the workflow again beneath Reusable Workflow to bring up the workflow properties. Click
Save as Template to save the .WSP file in the Site Assets Library SharePoint list.
Figure 91 - Save As Template
14. Open a web browser at http://intranet.contoso.com

SharePoint 2010 Developer Walkthroughs
Page 83
15. Click Site Actions -> View All Site Content -> Site Assets Library.
Figure 92 - Site Assets Library
16. Click on the SPDWorkflow dropdown menu and click Send To -> Download a Copy.
Figure 93 - Download WSP

SharePoint 2010 Developer Walkthroughs
Page 84
17. Save the WSP to a location that you can access in a subsequent step (like the Desktop)
Figure 94 - Save As Dialog
Task 9: Import the reusable workflow into Visual Studio
1. Back in Visual Studio 2010, right-click on the SPCHOL305Ex1 solution in the Solution
Explorer window Add | New Project.
2. Select the Visual C# | SharePoint | 2010 | Import Reusable Workflow project template.

SharePoint 2010 Developer Walkthroughs
Page 85
3. Change the Name to SPDWorkflowImport.
Figure 95 - New Project Dialog
4. Click Ok.

SharePoint 2010 Developer Walkthroughs
Page 86
5. Make sure the URL is http://intranet.contoso.com. Click Next.
Figure 96 - SharePoint Customization Wizard

SharePoint 2010 Developer Walkthroughs
Page 87
6. When prompted for the .WSP file to import, browse to the SPDWorkflow.wsp file you saved
previously. Click Next.
Figure 97 - SharePoint Customization Wizard
7. Click Finish.

SharePoint 2010 Developer Walkthroughs
Page 88
Figure 98 - SharePoint Customization Wizard

SharePoint 2010 Developer Walkthroughs
Page 89
8. Double-click on Package in the SPCHOL305Ex1 project and add the Converted workflows
feature to the Package.
Figure 99 - SharePoint Package Explorer

SharePoint 2010 Developer Walkthroughs
Page 90
9. Right-click on the SPDWorkflowImport project and select Add Reference
10. Select the project reference SPDActivityDemo and click OK.
Figure 100 - Add Assembly Reference
11. Under the SPDWorkflowImport project, expand the Workflows\SPDWorkflowFT node.
12. Open the Elements.xml
13. Change the workflow Name to SPDWorkflowFT
Figure 101 - Setting the imported workflow name
14. Save the project, build the solution and deploy the SPCHOL305Ex1 project.

SharePoint 2010 Developer Walkthroughs
Page 91
Task 10: Associate the workflow with a list in SharePoint
1. Browse to http://intranet.contoso.com.
2. Click on Site Actions | More Options
3. Select Custom List from the items list.
4. Name the list Customers and press Create.
5. Open List Settings
Figure 102 - List Settings
6. Under Permissions and Management click Workflow Settings.
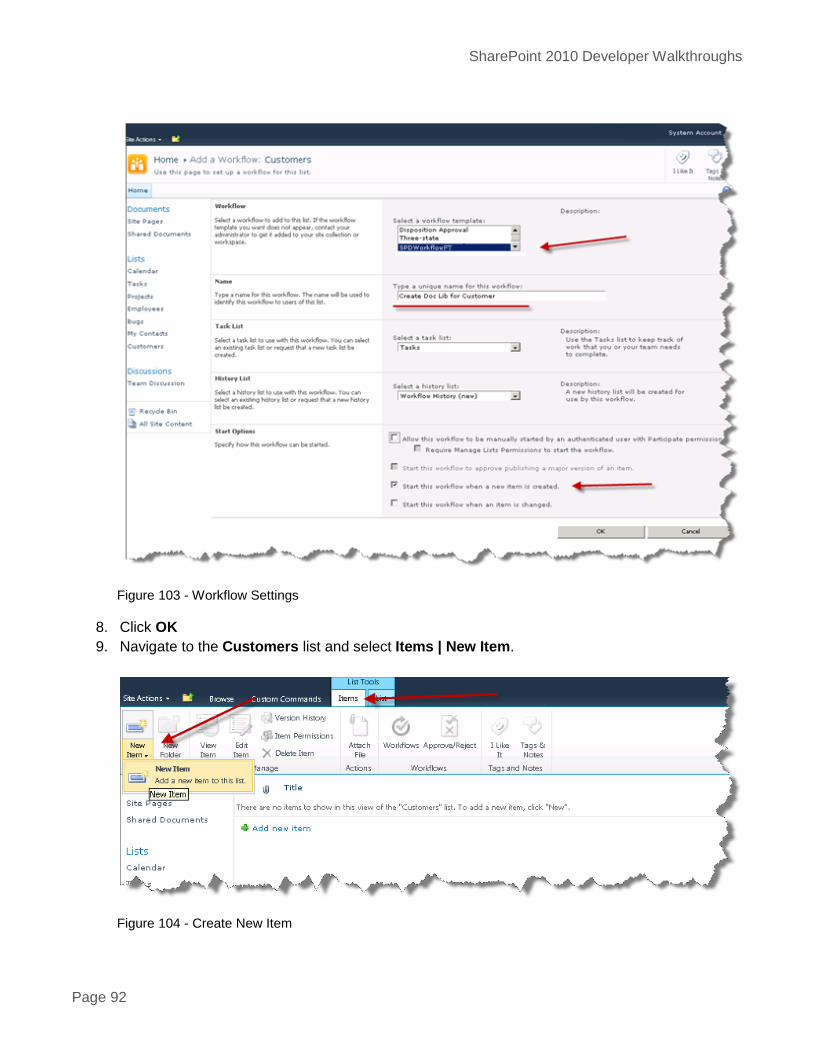
7. Configure the list workflow settings as follows:
Select a workflow template: SPDWorkflowFT
Type a unique name for this workflow: Create Doc Lib for Customer
Select a task list: Tasks
Select a history list: Workflow History
Start options: Start this workflow when a new item is created
SharePoint 2010 Developer Walkthroughs
Page 92
Figure 103 - Workflow Settings
8. Click OK
9. Navigate to the Customers list and select Items | New Item.
Figure 104 - Create New Item

SharePoint 2010 Developer Walkthroughs
Page 93
10. Enter Northwind as name of the new customer and press Save when the Customers – New
Item dialog appears.
Figure 105 - New Item Dialog
11. Wait while a new document library of the same name should be created automatically.
Walkthrough Summary
In this walkthrough document you reviewed walking through six developer scenarios for SharePoint 2010. You can get the hands on labs that these walkthroughs were based on from http://MSSharePointDeveloper.com
Top Related