


Languages
Pages
Legal

Seaplane Performance Pros/Cons 1. Lower service ceiling 2. Slower cruise speed 3. Shorter endurance and range 4. Longer takeoff run and lower climb rate 5. Increase corrosion and maintenance 6. Lower useful load 7. Increase in takeoff weight (common for float plane conversions) 8. More people that want to fly with you!
Seaplane Modifications All the aluminum surfaces inside and out are coated with zinc chromate (green) to prevent corrosion. Some modifications are added to seaplanes to strengthen the airframe, increase aerodynamics, and help with maintenance repairs. These seaplane modifications include lifting rings on top of the fuselage (2 to 4 depending on the aircraft), a ventral fin underneath the tail (some models), and a windshield v-brace. An aircraft converted for water use may have all these modifications added to them commonly referred to as the seaplane kit (STC approval). The Husky is equipped with 2 lifting rings, which are used to raise the aircraft out of the water for maintenance. The Husky is also equipped with a ventral fin located underneath the vertical stabilizer and a windshield v-brace. The ventral fin adds increased yaw stability to make up for the additional vertical surface area (floats) that is forward of the CG.
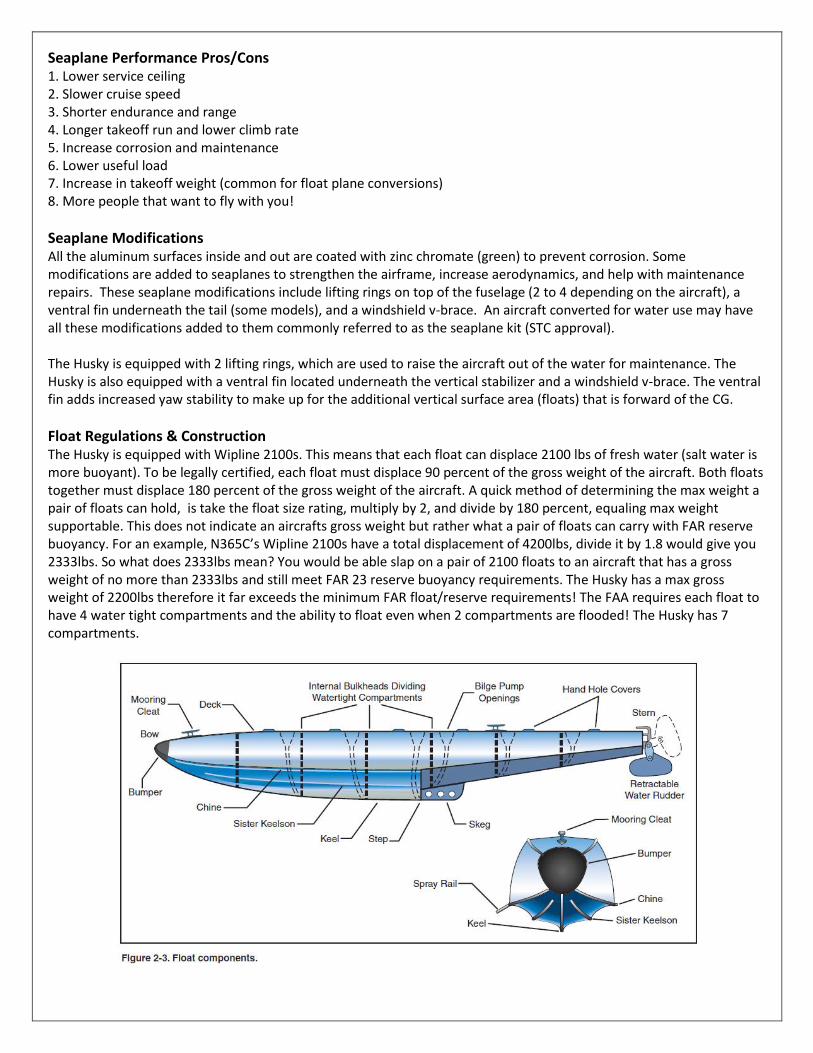
Float Regulations & Construction The Husky is equipped with Wipline 2100s. This means that each float can displace 2100 lbs of fresh water (salt water is more buoyant). To be legally certified, each float must displace 90 percent of the gross weight of the aircraft. Both floats together must displace 180 percent of the gross weight of the aircraft. A quick method of determining the max weight a pair of floats can hold, is take the float size rating, multiply by 2, and divide by 180 percent, equaling max weight supportable. This does not indicate an aircrafts gross weight but rather what a pair of floats can carry with FAR reserve buoyancy. For an example, N365C’s Wipline 2100s have a total displacement of 4200lbs, divide it by 1.8 would give you 2333lbs. So what does 2333lbs mean? You would be able slap on a pair of 2100 floats to an aircraft that has a gross weight of no more than 2333lbs and still meet FAR 23 reserve buoyancy requirements. The Husky has a max gross weight of 2200lbs therefore it far exceeds the minimum FAR float/reserve requirements! The FAA requires each float to have 4 water tight compartments and the ability to float even when 2 compartments are flooded! The Husky has 7 compartments.
Keel Reinforcement strip on the bottom of the float which adds structural strength. The keel extends from the bumper to the step. The keel guides the float in a straight-line through the water and resists sideways motion.
Sister Keelson (Hydrodynamic Lift Boosters) Located on both sides of the keel. Primary job is to channel the water to the step so the float reaches its maximum acceleration/minimum drag point. Functions as additional keels and adds structural strength
Bulkhead Separates the water tight compartments. If a compartment is compromised it will prevent the water from shifting too far aft or too far forward which would adversely affect the aircrafts CG. If a compartment is flooded, it will only flood that compartment which is compromised. They add additional strength to the float.
Step Water is very adhesive, the step is a longitudinal break in the keel which creates turbulence which minimizes water drag. It’s the maximum acceleration/minimum drag point on the float (sweet spot)
Chine Reinforcement strip that connects the side and bottom of the float. The Chine guides water away from the float minimizing spray
Skeg Strong extension of the keel. The keel smoothes out water flow and reduces drag. It provides better directional control while on the step
Spray Rail Located inboard on the chine towards the bow. It’s primary job is to reduce water spray on the propeller.
Seaplane Preflight & Pre-launch Considerations Next, a look at the water and the wind direction/speed will tell you which way the plane will weathervane when free of the beach or dock. Remember you have no brakes and the plane will begin moving immediately when free of its ties. The airplane will immediately weathervane into the wind with no inputs, and begin drifting until the engine starts. Observation alone except for the experienced float pilot, will not determine if there is also a current about to act on the plane before untying, and become the strongest force. This can confuse the new float pilot and the result can be costly damage to the floatplane! There is also the possibility that the engine will not start, thus drifting you into whatever is in the path of the tail. Remember the front of the seaplane is reasonably armored while the back of the plane is really fragile and expensive to fix. Your planning and contingency planning must start here. Now that a successful unmooring and flight seem possible, you can preflight the airplane. The preflight is similar to a land plane in most respects with the addition of the floats and the attachment gear. Your standard pattern around the plane may need to be modified, as parts of the plane may be hard to reach from the dock. Do not let this challenge cheat you of a thorough preflight. The Husky preflight will be easier being on a dry surface! Each float compartment must be pumped out. It is not necessary to get 100% of the water out, but pump until you are getting mostly air. Remember fresh water weighs 8lbs per gallon, if large amounts of water are not pumped this could adversely affect the aircrafts CG! If any particular compartment seems overly full, you may want to consider further investigation before flight. As you are going around the plane, look at all of the external cables and pulleys. Look for chafing, fraying, and sticking. If the water rudder cables bind, the air rudder will bind as well. You will want rudder control on taxi, take off, and landing. Look for cracks and gashes in the float skins. Pay particular attention to the pitot-tube opening and the static ports. Bugs love to nest in these prefab condos.
Continued…… You will also want to take a good look into the engine cowlings, look for bird nests and or mechanic tools—they will quickly catch fire when exposed to the heat of an aircraft engine or damage the engine. You may have to rotate the plane at the dock to get at all of the airframe to do your inspection. It is critical that all gust locks are removed prior to pushing off the dock. Lack of rudder control in a seaplane can be very traumatic as you drift into whatever is out there.
Remember brakes are not an option. Once you depart the dock you will be in motion. When you push off from the dock you will want to get the plane started ASAP. Realizing that you forgot the keys can be really frustrating as you drift towards the rocks backwards. A mental pre-push off checklist is mandatory. If you are taking passengers you must brief them before pushing off (water) or taxi (land). You might also want to point out no-pull, no-push and no-step zones on the plane, in addition to the required safety briefing items such as Emergency Exits, PFD use, and seatbelts.
Preflight Action FAR 91.103 FAR 91.103 explains everything that must be reviewed prior to each flight by the PIC. A good acronym to use is WRAFTN Weather Reports-Forecasts, Runway lengths, Alternatives/ATC Delays, Fuel Requirements, Takeoff and Landing Performance, NOTAMs
Remember, lakes will not have weather reporting, therefore utilize resources to help you better anticipate the weather at your destination! Flying a seaplane will also open up additional alternatives to think about when planning a VFR cross country. If applicable, plan your route to be within gliding distance over bodies of water. This would be highly advantageous in the event of an engine failure or the need to land somewhere in the event of an emergency!
Aircraft Documents (AROW) Airworthiness Certificate, Registration, Operating Manual, W&B Data *Radio License-Required for International Ops
Pilot Documents Pilot Certificate, Medical, Photo ID *Radio License-Required for PIC International Ops
Aircraft Inspection (AV1ATER) A-Annual / ADs (12CM) / (As published-reoccurring or 1-time) V-VOR (30 Days) 1-100 Hour (Max 10 percent) A-Altimeter/Pitot/Mode-C (24CM) T-Transponder (24CM) E-ELT (12CM) R-RNAV-GPS (28 Days) Required Equipment (FAR 91.205-VFR Day and Night)
Day (TOMAATOFFLAMES) Night (FLAPS) Tachometer Fuel Indicators Fuses or Circuit Breakers Oil Pressure *Floatation Device Landing Light
Manifold Pressure Landing Gear Indicator Anti-Collision Lights Airspeed Anti-Collision Position Lights Altimeter Magnetic Compass Source of Electricity Temp Gauge (Liquid) ELT Oil Pressure (Air) Seatbelts *Note: Seaplanes must comply with FAA approved PFDs not USCG life vest. The life vests approved by the FAA are inflatable, whereas USCG vest are non-inflatable. Non-inflatable vest would be impractical in a seaplane for obvious reasons!
Approved / Non-Approved Water Operations When planning a trip you must consider whether the area that you plan to land on, accepts floatplanes. Some areas specifically restrict airplane use. The penalty for landing in a restricted area or watershed can be severe. Some places will not let you take-off, meaning that your wings are coming off and the airplane will have to be trucked to another place. At best you may get a warning or a fine. Some places are restricted because the water is not conducive to seaplane activity due to currents or under water hazards. Luckily these are few. Others are restricted because of intense boat traffic, or require Prior Permission. Still, others are restricted because some other seaplane operator may have angered residents. A great tool for determining if the lake is ok to land on is the SPA (Seaplane Pilots Association) app. It only shows lakes that are registered, if it is not listed check the controlling agency for that lake. It may be the city of Leesburg (contact the city), It may be the local power plant (contact the power plant), if it’s in a National Park (contact the Park), it may be restricted (cant land), it may be private (can’t land); you may need a PPR or PNR (prior permission required or prior notice required). Another resource would be your local FSDO. Use common sense if it’s unknown always check!!!Seaplane bases will be located on your VFR sectional. Know the symbols for your check ride including beacon colors for seaplane bases.
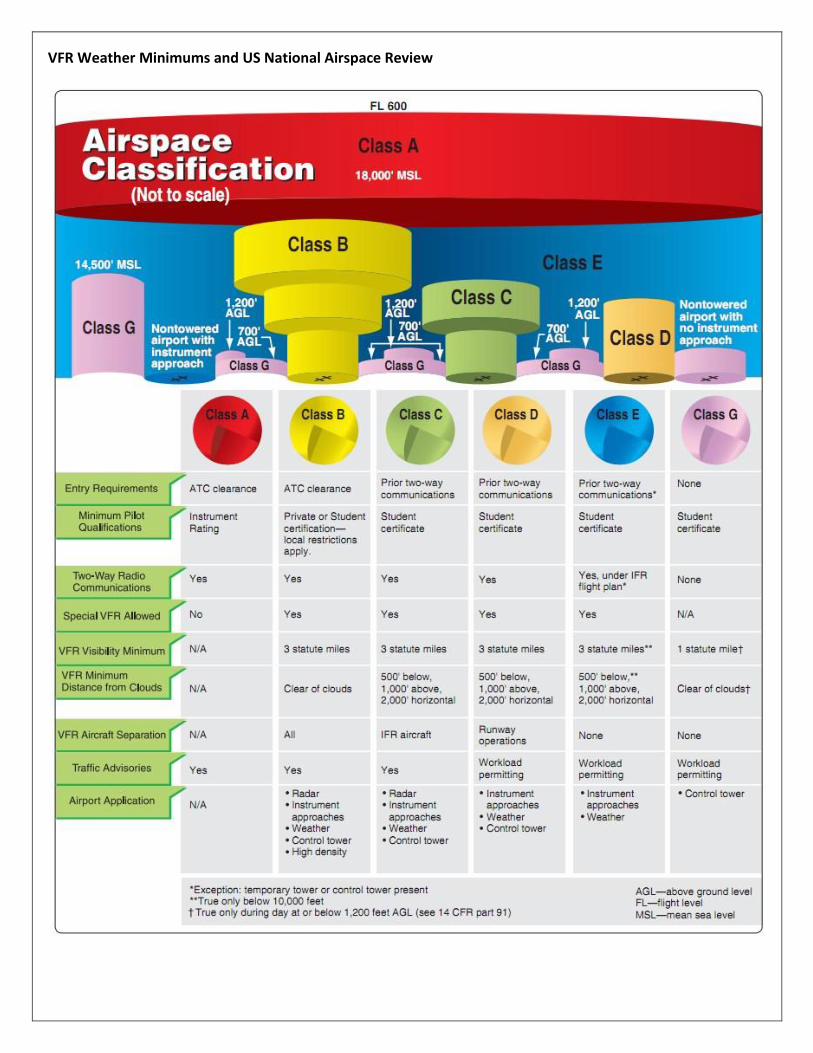
Takeoff and Landing VFR Weather Minimums and SVFR To takeoff and/or land in class B, C, D, and E airspace designated to the surface, you need a minimum of a 1000 foot
ceiling and 3 statute mile visibility (per FAR 91.155). If the weather is below 1000ft and/or 3SM you still may takeoff,
however a special VFR clearance must be obtained. Special VFR requires 1SM visibility for day and night and you must
remain clear of the clouds. Night SVFR requires the pilot to have an instrument rating!
Now most seaplane base and non-seaplane bases are located outside these airspace areas therefore you must be solid
on class G airspace and what minimums are required for takeoff and/or landing! Class G airspace starts at the surface
and goes up to 700AGL or 1200AGL (Class G vertical limits may differ on location). If you’re below 1200AGL (Regardless
of MSL altitude) you need 1SM and must remain clear of clouds during day operations. Night operations require 3SM
visibility, 500 below, 1000 above, and 2000 horizontal! Some examples to look at are Marco Island (MKY), Leesburg
(LEE), Tavares Seaplane Base (FA1), and Dade-Collier (TNT). What weather minimums are required for takeoff and/or
landing under VFR (day)?
Fuel Requirements As far as FAR requirements nothing has changed, 30 minutes day and 45 minutes night at normal cruise speeds. There are few gas stations for seaplanes. Plan accordingly. Some models are approved to use car/ boat gas. Check your aircraft for STC’s allowing MOGAS operation. Always be aware that people at marinas are not aware of the dangers of airplane propellers and they will not know your maneuvering challenges. They will try to grab onto all of your fragile control surfaces and yank to “help” you. In a higher performance seaplane where Avgas is required, it would be wise to call ahead and have the fuel brought to you. Always allow time after refueling for debris and water to settle to the sumps. Marina fuel can be contaminated, so always drain the sumps and check for water and debris. Insist on doing the fueling yourself, as gas dock personnel are not used to dealing with airplanes. If planning to stop at a marina, the SPA has a great app on which marinas provide aviation gas.
Right-of-Way rules (water) FAR 91.115
General – When we are in a seaplane on the water, we are a vessel, we are to keep clear of other vessels and avoid impeding their navigation Crossing – When aircraft or an aircraft and a vessel are on crossing courses, the aircraft or vessel to the others right has the right of way Approaching head on – When aircraft or an aircraft and a vessel are approaching head on, each shall alter its course to the right to keep well clear Overtaking – Each aircraft or vessel that is being overtaken has the right of way, and the one overtaking shall alter course to keep well clear Special Circumstances – Use good common sense as to the environment and situation at the time. Take whatever action is necessary to avoid a collision.
Minimum Safe Altitudes FAR 91.119
A lot of your seaplane flying will be done at much lower altitudes than you’re accustomed to, therefore a review of minimum safe altitudes is crucial Anywhere – An altitude allowing, if a power unit fails, an emergency landing without undue hazards to persons/property Congested – 1000ft above the highest obstacle within 2000 feet Non-Congested – 500ft above the surface Sparsely Populated or over water – the aircraft may not be operated closer than 500 feet to any person, vessel, vehicle, or structure
VFR Cruising Altitudes FAR 91.159
Again, a lot of your seaplane flying will be conducted at lower altitudes therefore you will not have to comply with VFR cruising altitudes. VFR cruising altitudes only need to be complied with when flying above 3000AGL!
Seaplane Night Operations For the Husky, this is a non- issue being amphibian; however for a straight float seaplane this is not ideal! If you find yourself flying after sunset in a straight float seaplane and you don't have enough fuel to make it till dawn, your safest bet would be to find a grass strip with lighting if not applicable, fly to an airport with lighting/PCL. Float damage should be minimal. Occupant damage should be none. Your ego will be damaged more than anything, but it’s a better alternative than being upside down in a lake with no one to help you! If a water landing is your only option, the glassy water technique should be utilized!
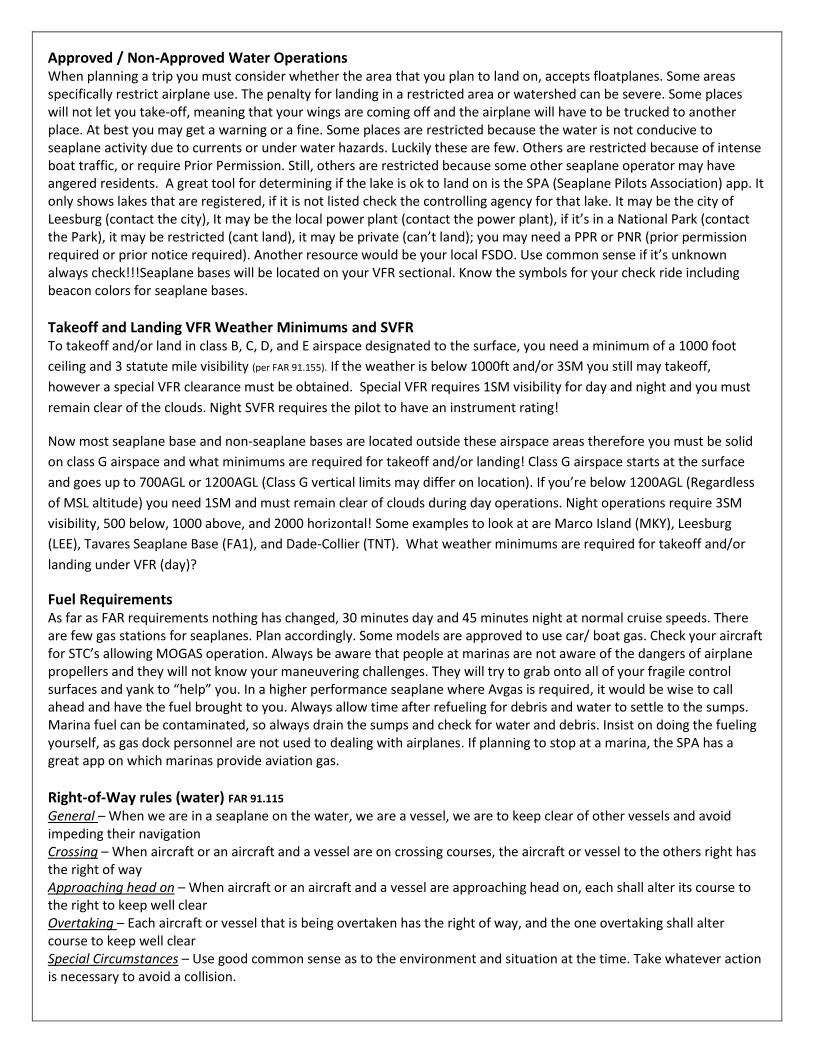
Seaplane Aerodynamics The C of B is the point on the aircraft at which the aircraft pivots while sitting on the water, just like while in the air, the aircraft will pivot (vertical axis) through the aircrafts CG. The C of B is located just behind the aircrafts CG. With some wind, the aircraft will weathervane into the wind because of the larger surface area behind the aircraft’s C of B and with power off, the aircraft will sail downwind. Now we can reverse the weathervane tendency by shifting the C of B aft. This is accomplished by raising the nose after applying power. With the C of B aft, there is more surface area forward of the C of B which will point the tail into the wind. Shifting the C of B aft is really helpful when trying to turn the float plan downwind, which is called a plow turn, more on that shortly.
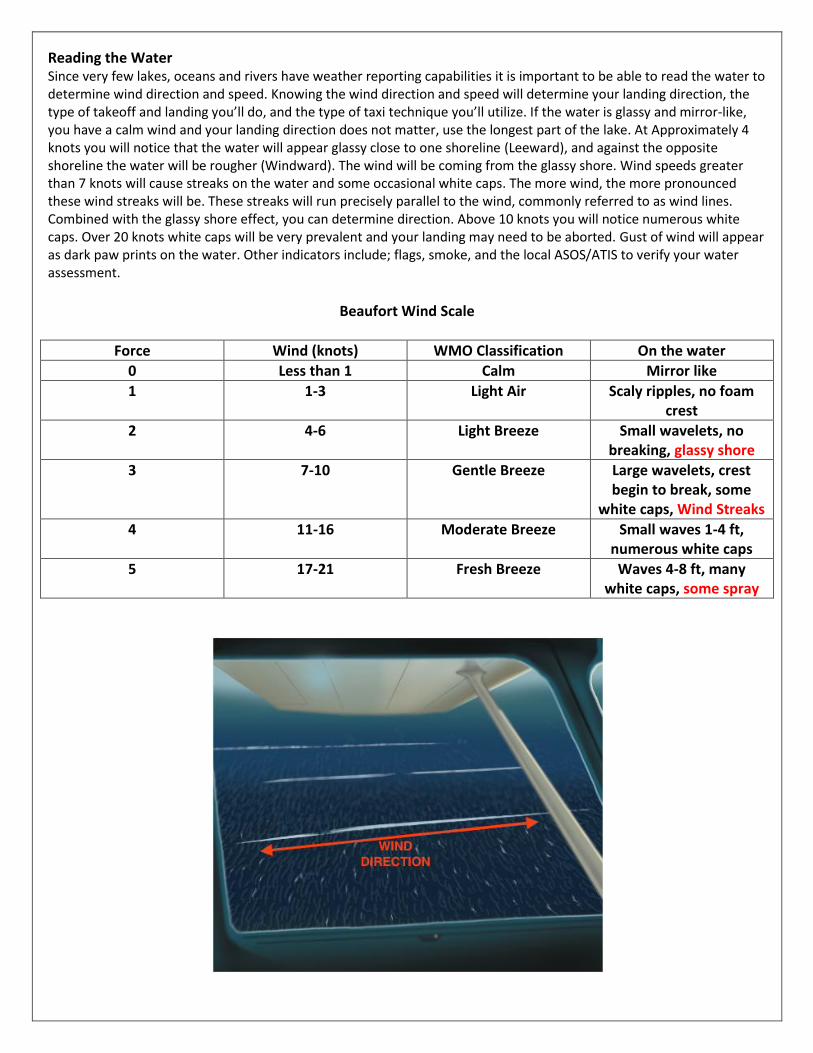
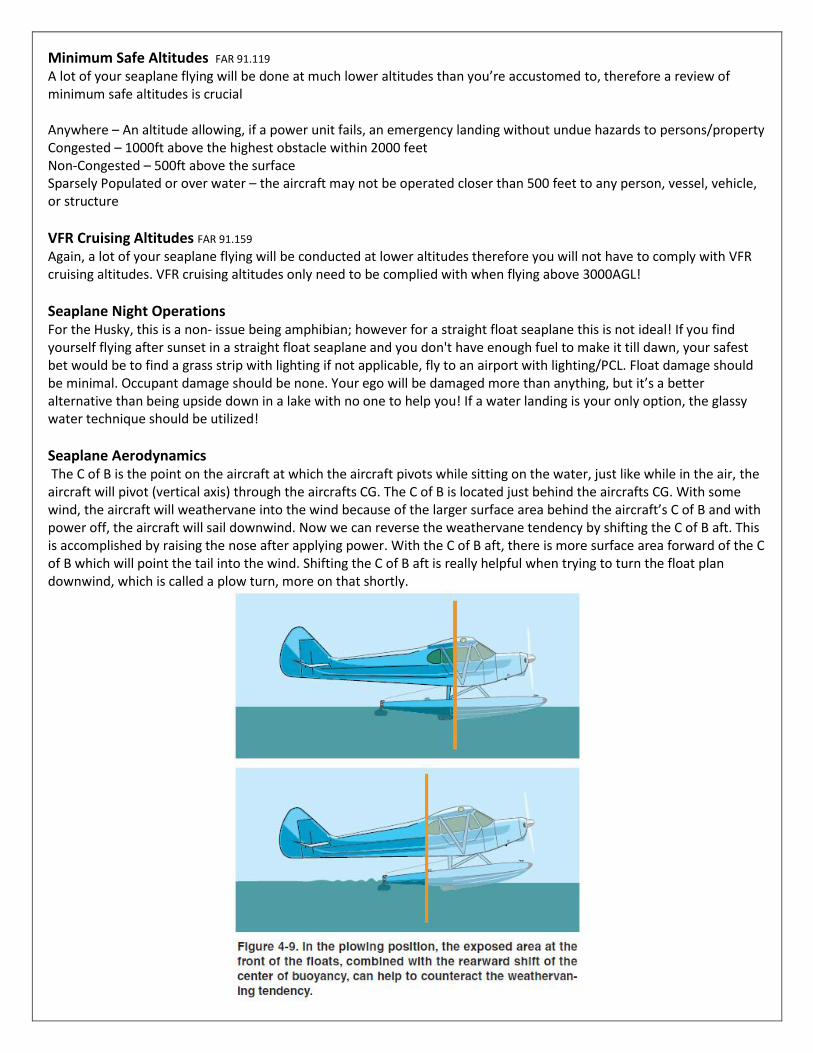
Reading the Water Since very few lakes, oceans and rivers have weather reporting capabilities it is important to be able to read the water to determine wind direction and speed. Knowing the wind direction and speed will determine your landing direction, the type of takeoff and landing you’ll do, and the type of taxi technique you’ll utilize. If the water is glassy and mirror-like, you have a calm wind and your landing direction does not matter, use the longest part of the lake. At Approximately 4 knots you will notice that the water will appear glassy close to one shoreline (Leeward), and against the opposite shoreline the water will be rougher (Windward). The wind will be coming from the glassy shore. Wind speeds greater than 7 knots will cause streaks on the water and some occasional white caps. The more wind, the more pronounced these wind streaks will be. These streaks will run precisely parallel to the wind, commonly referred to as wind lines. Combined with the glassy shore effect, you can determine direction. Above 10 knots you will notice numerous white caps. Over 20 knots white caps will be very prevalent and your landing may need to be aborted. Gust of wind will appear as dark paw prints on the water. Other indicators include; flags, smoke, and the local ASOS/ATIS to verify your water assessment.
Beaufort Wind Scale
Force Wind (knots) WMO Classification On the water
0 Less than 1 Calm Mirror like
1 1-3 Light Air Scaly ripples, no foam crest
2 4-6 Light Breeze Small wavelets, no breaking, glassy shore
3 7-10 Gentle Breeze Large wavelets, crest begin to break, some
white caps, Wind Streaks
4 11-16 Moderate Breeze Small waves 1-4 ft, numerous white caps
5 17-21 Fresh Breeze Waves 4-8 ft, many white caps, some spray
Selecting your landing lane Now that you know the wind direction and speed, you can choose an area to land on. You will want to find a spot that has the following characteristics; 1. Enough length Seaplanes have a fairly short landing roll, and a somewhat longer take off roll. You want to be sure that you can get out of whatever you can get into.
2. Obstacle-free Both your approach and your landing zone should be free of power lines, towers, islands, bridges, etc.
3. Boats and swimmers While you are surveying your spot, keep an eye on all the boat traffic. Boaters cannot generally hear you and they are not accustomed to looking in the sky for incoming aircraft. If they do notice you, they may try to get a closer look by cruising into your path or trying to race the airplane. In any case, they rarely understand the limited maneuverability of airplanes during landing. Fortunately, you are generally faster than boats. Personal watercraft such as Sea-Doo’s and Jet Skis are really fast and extremely maneuverable, and very dangerous! They can and will change direction at random. Give them a wide clearance.
4. Wake-free Large boat wakes are extremely hazardous. Avoiding heavy boat traffic will help in wake avoidance, but occasionally a rogue wave from a far away boat may enter the area. Be vigilant and it may be necessary to extend your flare to fly over a big wave or just go around and wait for the wave to change. Boat traffic is cyclical. A spot may be really busy one minute and completely clear in 10 minutes.
5. Underwater Obstacle-free A low pass over the proposed landing zone will help in determining the safety of your water runway. The seaplane does not need much depth but the float skins are very fragile and stuff just below the surface can ruin a float and your day. Be especially vigilant on rivers since the water may be very murky and the bottom can change rapidly. A submerged tree may have drifted into what was a safe spot yesterday.
6. Compatibility If multiple touch and goes are planned, and houses are present, try to move your practice area so as not to annoy any particular group of lake dwellers. Spread the joy. I also try to make my pattern over the less populated areas. Use right or left pattern to limit exposure to houses.
7. Taxi Strategy Finally, if your intention is to dock or beach somewhere, plan your landing to minimize taxi distance, it will limit overall wear and tear on the plane.
Once all characteristics are in place it is helpful to imagine the runway and the landing spot. This will simplify the pattern, the approach, and the landing.
Seaplane Traffic Pattern The seaplane traffic pattern is like the land based traffic pattern but typically flown at 500 feet AGL, instead of 1000 AGL. The object of the seaplane pattern is to keep the plane within gliding distance of the water and to allow a better view of the landing-zone thus your pattern will be much smaller than your land based pattern. Typically you will use left traffic however use right traffic when safer and or more lake-friendly. Remember this is a pattern of your own making. There will be 2 checklist items you will want to commit to rote memory, one of which you’re already familiar with. The 2 mental checklist items are called GUMP and CARS. The CARS checklist will be verbalized prior to landing and prior to takeoff and the GUMP check should be verbalized prior to landing. The Husky is equipped with a retractable landing gear system therefore pay very close attention to your gear selection. The Husky has a LAGAS (Lake&Air Gear Advisory System) to remind you of your gear selection. The LAGAS reminder will activate below 80 MIAS. Gear indications are (Gear Up) 4 Blue for water landings and (Gear Down) 4 Green for land landings. To silence the LAGAS system press the orange button behind the stick. GUMPS- Gas Undercarriage Mixture Propeller CARS - Carburetor heat, Area Clear, Rudders Up/Down, Stick-Aft
Normal Takeoff (3-9 knots)
You will notice the nose rise with full power. In general to give you an idea of what happens next, there will be a pause of a few seconds, and then the nose will rise further. When the nose rises no further, release back-pressure on yoke, and let aircraft accelerate. If porpoising occurs, ease back slightly on the yoke. As the aircraft attains the proper step position, you will have to adjust the amount of right rudder you are holding. Select a point on the nose and keep your path straight.
1. Flaps 20 2. CARS check 3. Full power (use significant rudder to maintain a straight path) 4. VR approximately 50 MIAS and Climb 70MIAS 5. Flaps up 6. Cruise Climb 80MIAS - Set climb power 25X25
Rough Takeoff (plus 10 knots)
1. Flaps 30 2. CARS Check 3. Full Power (use significant rudder to maintain a straight path) 4. Keep a slightly higher nose up attitude on the step 5. Once airborne level off in ground effect – accelerate to 61MIAS (similar to a soft field takeoff technique)
6. Climb 70MIAS – Flaps up 7. Cruise climb 80MIAS – Set climb power 25X25
Glassy Takeoff (3 knots or less)
Glassy water has very adhesive properties. The wavelets that occur in a normal takeoff, allow air to get under the floats thus reducing drag. In glassy water there is complete float water contact and thus more drag. It may be advantageous to circle first near the take-off point or step taxi back and forth in your takeoff area to create some small waves on the water. Another option is to raise the right float (Left stick) out of the water reducing a large amount of drag. Raising the right float is the easier option due to torque! Additionally, since there is little or no wind you can takeoff in whichever direction that gives you the longest and safest takeoff run.
1. Flaps 20 2. CARS check 3. Full Power 4. Once on the step and accelerating near rotation speed, apply left stick and raise the right float 5. Climb 70MIAS 6. Flaps up 7. Cruise climb 80MIAS – Set climb power 25X25
Crosswind Takeoff Fortunately crosswind takeoffs are more of a rarity for seaplanes since lakes and oceans tend to be wide in many directions, and in narrow bodies of water and rivers there are usually trees or mountains blocking most of the breeze. If a significant breeze exists you may need to leave the water rudders down prior to advancing the throttle to full. The technique is no different than the glass water technique (Lifting the float out of the water).
Confined Area Takeoff This technique is used to takeoff in small bodies of water. In a strong wind it is helpful to leave the water rudders down prior to advancing full power to ensure enough rudder authority.
1. Flaps 20 2. CARS check 3. Position the aircraft 90 degrees from the wind and in a position to utilize as much lake as you can 4. Stick into the wind 5. Full Power, as you're rolling onto the step, step turn and stick into the wind 6. Once you feel the right float lift out of the water (Aircraft rolls left) position the stick neutral and lift off 7. Climb 70MIAS while maintaining a climbing left turn 8. Flaps up 9. Cruise climb 80MIAS – Set climb power 25X25
Normal Landing (3-9knots) 1. Downwind (500AGL) – CARS / GUMPs check (20’’MP/2400RPMS) 2. Abeam landing area – Power 13”, Flaps 10-20, descend 80mph 3. Base Leg – Power As Required, descend 75mph 3. Final Leg – Power As Required, Approach 70mph 4. Upon touchdown power idle, stick full aft
Rough Water Landing (plus 10 knots) 1. Downwind (500AGL) – CARS / GUMPs check (20’’MP/2400RPMS) 2. Abeam landing area – Power 13”, Flaps 10-20, descend 80mph 3. Base Leg – Power As Required, Flaps 30, descend 70mph 3. Final Leg – Power As Required, Approach 65mph 4. Upon touchdown power idle, stick full aft Note: The object of a rough water landing is to keep the nose a little higher than standard to keep the bows from digging into waves. The other
primary goal is to keep the landing speed as low as possible to limit the severity and duration of the waves pounding on the floats. This is most
analogous to a soft field landing in a land plane.
Confined Area Landing 1. Downwind (500AGL) – CARS / GUMPs check (20’’MP/2400RPMS) 2. Abeam landing area – Power 13”, Flaps 10-20, descend 80mph 3. Base Leg – Power As Required, Flaps 30, descend 70mph 3. Final Leg – Power As Required, Approach 65mph 4. Upon touchdown power idle, stick full aft
If obstacles are present at one side of the lake be sure to be aggressive with your pitch and power to get down quickly into the landing area and then readjust your pitch and power to arrest you rate of descent and touch-down smoothly.
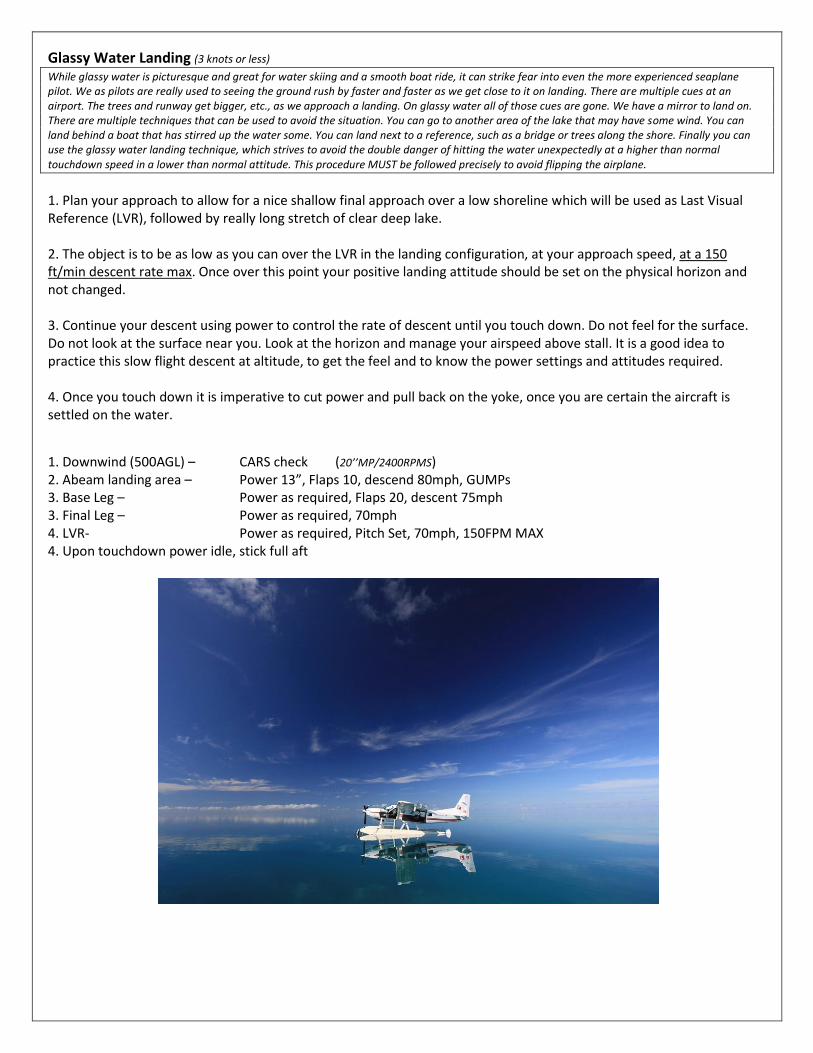
Glassy Water Landing (3 knots or less)
While glassy water is picturesque and great for water skiing and a smooth boat ride, it can strike fear into even the more experienced seaplane pilot. We as pilots are really used to seeing the ground rush by faster and faster as we get close to it on landing. There are multiple cues at an airport. The trees and runway get bigger, etc., as we approach a landing. On glassy water all of those cues are gone. We have a mirror to land on. There are multiple techniques that can be used to avoid the situation. You can go to another area of the lake that may have some wind. You can land behind a boat that has stirred up the water some. You can land next to a reference, such as a bridge or trees along the shore. Finally you can use the glassy water landing technique, which strives to avoid the double danger of hitting the water unexpectedly at a higher than normal touchdown speed in a lower than normal attitude. This procedure MUST be followed precisely to avoid flipping the airplane.
1. Plan your approach to allow for a nice shallow final approach over a low shoreline which will be used as Last Visual Reference (LVR), followed by really long stretch of clear deep lake. 2. The object is to be as low as you can over the LVR in the landing configuration, at your approach speed, at a 150 ft/min descent rate max. Once over this point your positive landing attitude should be set on the physical horizon and not changed. 3. Continue your descent using power to control the rate of descent until you touch down. Do not feel for the surface. Do not look at the surface near you. Look at the horizon and manage your airspeed above stall. It is a good idea to practice this slow flight descent at altitude, to get the feel and to know the power settings and attitudes required. 4. Once you touch down it is imperative to cut power and pull back on the yoke, once you are certain the aircraft is settled on the water.
1. Downwind (500AGL) – CARS check (20’’MP/2400RPMS) 2. Abeam landing area – Power 13”, Flaps 10, descend 80mph, GUMPs 3. Base Leg – Power as required, Flaps 20, descent 75mph 3. Final Leg – Power as required, 70mph 4. LVR- Power as required, Pitch Set, 70mph, 150FPM MAX 4. Upon touchdown power idle, stick full aft
Crosswind Landing There may be occasions where the body of water doesn't allow an upwind landing. Assuming the crosswind is within the maximum demonstrated crosswind component of your airplane, the rare crosswind landing can be accomplished safely. These usually occur on a narrow body of water so a rough water technique should not apply, and by the nature of there being a crosswind the glassy water landing should not be a factor. Your only worry is sideways movement on landing, or landing in a yaw. Float design assumes forward motion and thus are designed to track straight. A side load could tip our top heavy little airplane. The answer is to land in a side-slip into the wind. We will have a normal landing approach adding a side-slip; just enough to compensate for the wind and tracking straight down the runway. We will land on the upwind float and continue to compensate for the breeze with aileron and rudder. Max crosswind is 10mph for the Husky!
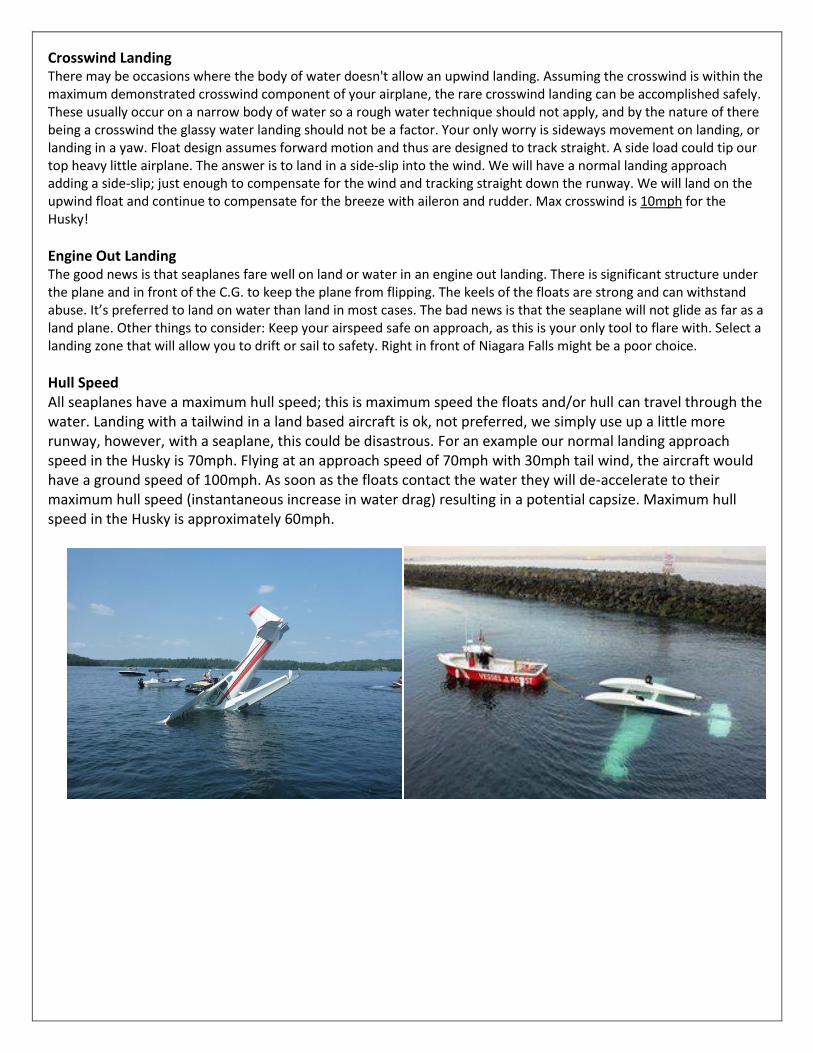
Engine Out Landing The good news is that seaplanes fare well on land or water in an engine out landing. There is significant structure under the plane and in front of the C.G. to keep the plane from flipping. The keels of the floats are strong and can withstand abuse. It’s preferred to land on water than land in most cases. The bad news is that the seaplane will not glide as far as a land plane. Other things to consider: Keep your airspeed safe on approach, as this is your only tool to flare with. Select a landing zone that will allow you to drift or sail to safety. Right in front of Niagara Falls might be a poor choice.
Hull Speed All seaplanes have a maximum hull speed; this is maximum speed the floats and/or hull can travel through the water. Landing with a tailwind in a land based aircraft is ok, not preferred, we simply use up a little more runway, however, with a seaplane, this could be disastrous. For an example our normal landing approach speed in the Husky is 70mph. Flying at an approach speed of 70mph with 30mph tail wind, the aircraft would have a ground speed of 100mph. As soon as the floats contact the water they will de-accelerate to their maximum hull speed (instantaneous increase in water drag) resulting in a potential capsize. Maximum hull speed in the Husky is approximately 60mph.
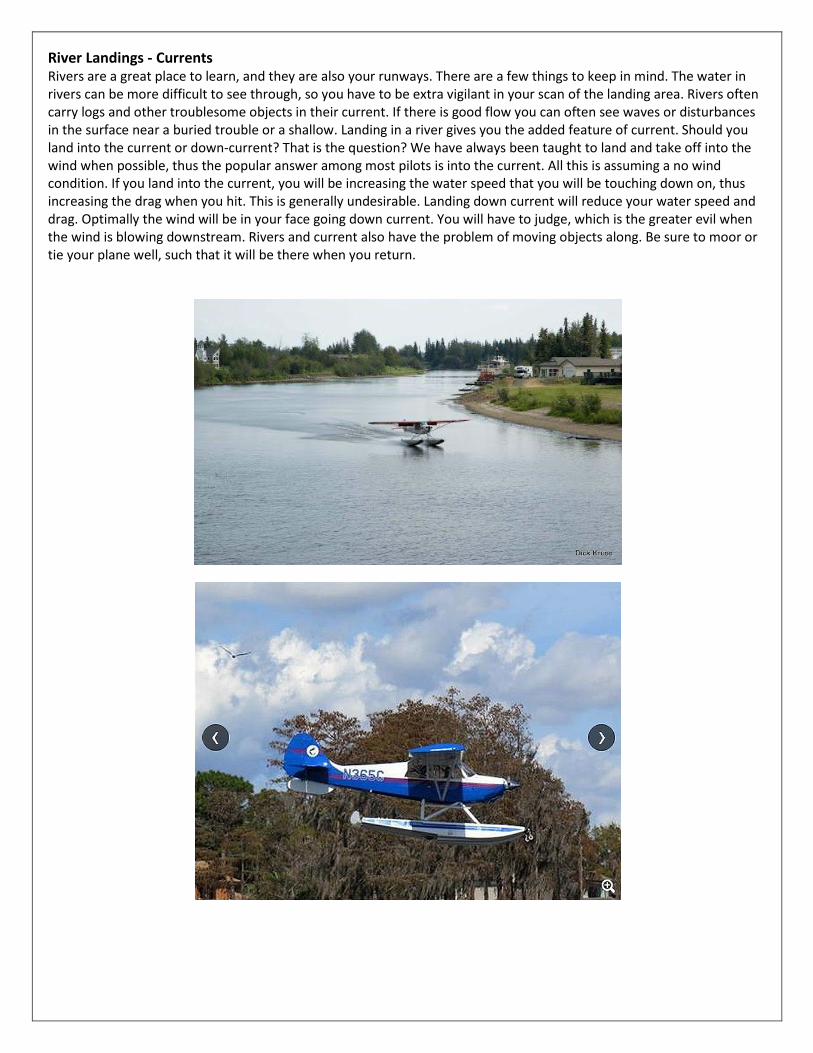
River Landings - Currents Rivers are a great place to learn, and they are also your runways. There are a few things to keep in mind. The water in rivers can be more difficult to see through, so you have to be extra vigilant in your scan of the landing area. Rivers often carry logs and other troublesome objects in their current. If there is good flow you can often see waves or disturbances in the surface near a buried trouble or a shallow. Landing in a river gives you the added feature of current. Should you land into the current or down-current? That is the question? We have always been taught to land and take off into the wind when possible, thus the popular answer among most pilots is into the current. All this is assuming a no wind condition. If you land into the current, you will be increasing the water speed that you will be touching down on, thus increasing the drag when you hit. This is generally undesirable. Landing down current will reduce your water speed and drag. Optimally the wind will be in your face going down current. You will have to judge, which is the greater evil when the wind is blowing downstream. Rivers and current also have the problem of moving objects along. Be sure to moor or tie your plane well, such that it will be there when you return.
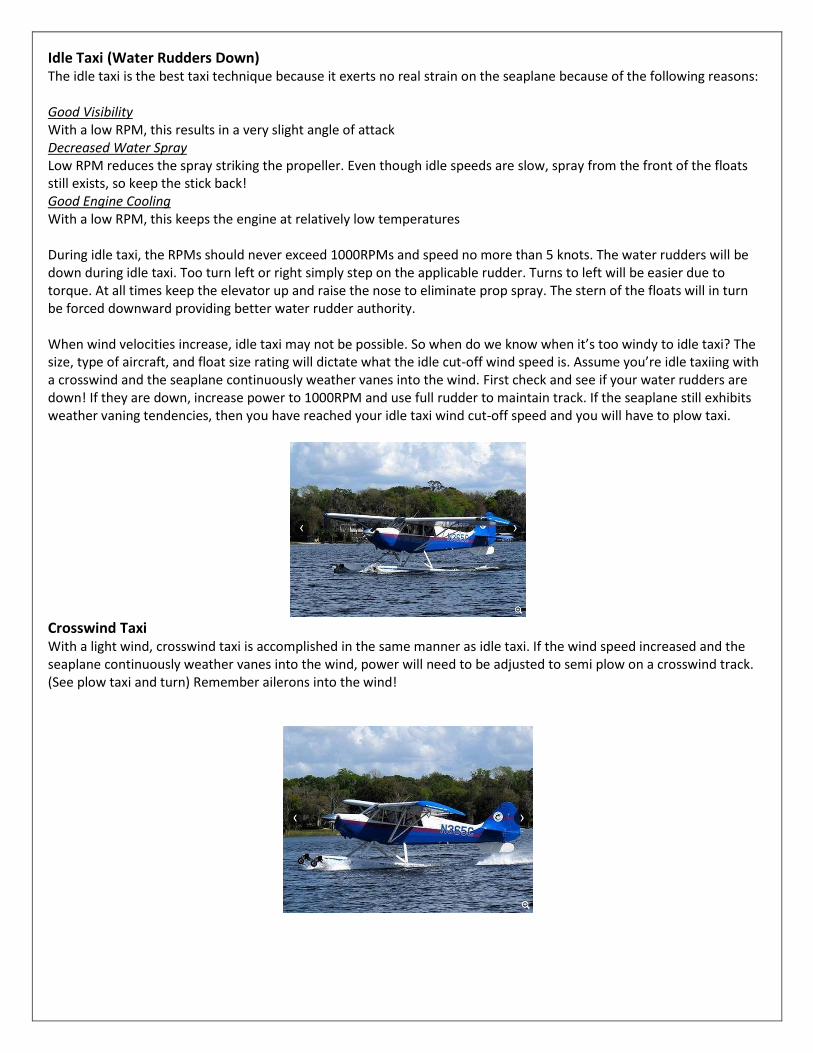
Idle Taxi (Water Rudders Down) The idle taxi is the best taxi technique because it exerts no real strain on the seaplane because of the following reasons: Good Visibility With a low RPM, this results in a very slight angle of attack Decreased Water Spray Low RPM reduces the spray striking the propeller. Even though idle speeds are slow, spray from the front of the floats still exists, so keep the stick back! Good Engine Cooling With a low RPM, this keeps the engine at relatively low temperatures During idle taxi, the RPMs should never exceed 1000RPMs and speed no more than 5 knots. The water rudders will be down during idle taxi. Too turn left or right simply step on the applicable rudder. Turns to left will be easier due to torque. At all times keep the elevator up and raise the nose to eliminate prop spray. The stern of the floats will in turn be forced downward providing better water rudder authority. When wind velocities increase, idle taxi may not be possible. So when do we know when it’s too windy to idle taxi? The size, type of aircraft, and float size rating will dictate what the idle cut-off wind speed is. Assume you’re idle taxiing with a crosswind and the seaplane continuously weather vanes into the wind. First check and see if your water rudders are down! If they are down, increase power to 1000RPM and use full rudder to maintain track. If the seaplane still exhibits weather vaning tendencies, then you have reached your idle taxi wind cut-off speed and you will have to plow taxi.
Crosswind Taxi With a light wind, crosswind taxi is accomplished in the same manner as idle taxi. If the wind speed increased and the seaplane continuously weather vanes into the wind, power will need to be adjusted to semi plow on a crosswind track. (See plow taxi and turn) Remember ailerons into the wind!
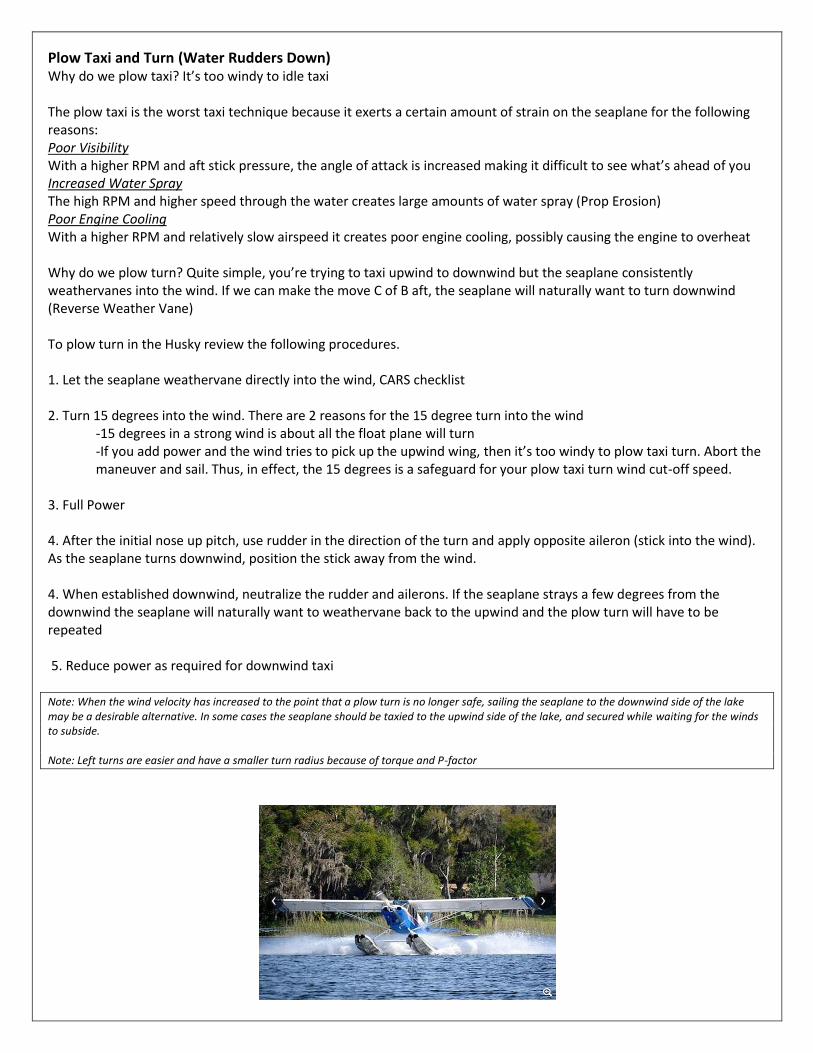
Plow Taxi and Turn (Water Rudders Down) Why do we plow taxi? It’s too windy to idle taxi The plow taxi is the worst taxi technique because it exerts a certain amount of strain on the seaplane for the following reasons: Poor Visibility With a higher RPM and aft stick pressure, the angle of attack is increased making it difficult to see what’s ahead of you Increased Water Spray The high RPM and higher speed through the water creates large amounts of water spray (Prop Erosion) Poor Engine Cooling With a higher RPM and relatively slow airspeed it creates poor engine cooling, possibly causing the engine to overheat Why do we plow turn? Quite simple, you’re trying to taxi upwind to downwind but the seaplane consistently weathervanes into the wind. If we can make the move C of B aft, the seaplane will naturally want to turn downwind (Reverse Weather Vane) To plow turn in the Husky review the following procedures. 1. Let the seaplane weathervane directly into the wind, CARS checklist 2. Turn 15 degrees into the wind. There are 2 reasons for the 15 degree turn into the wind -15 degrees in a strong wind is about all the float plane will turn
-If you add power and the wind tries to pick up the upwind wing, then it’s too windy to plow taxi turn. Abort the maneuver and sail. Thus, in effect, the 15 degrees is a safeguard for your plow taxi turn wind cut-off speed.
3. Full Power 4. After the initial nose up pitch, use rudder in the direction of the turn and apply opposite aileron (stick into the wind). As the seaplane turns downwind, position the stick away from the wind. 4. When established downwind, neutralize the rudder and ailerons. If the seaplane strays a few degrees from the downwind the seaplane will naturally want to weathervane back to the upwind and the plow turn will have to be repeated 5. Reduce power as required for downwind taxi Note: When the wind velocity has increased to the point that a plow turn is no longer safe, sailing the seaplane to the downwind side of the lake may be a desirable alternative. In some cases the seaplane should be taxied to the upwind side of the lake, and secured while waiting for the winds to subside. Note: Left turns are easier and have a smaller turn radius because of torque and P-factor
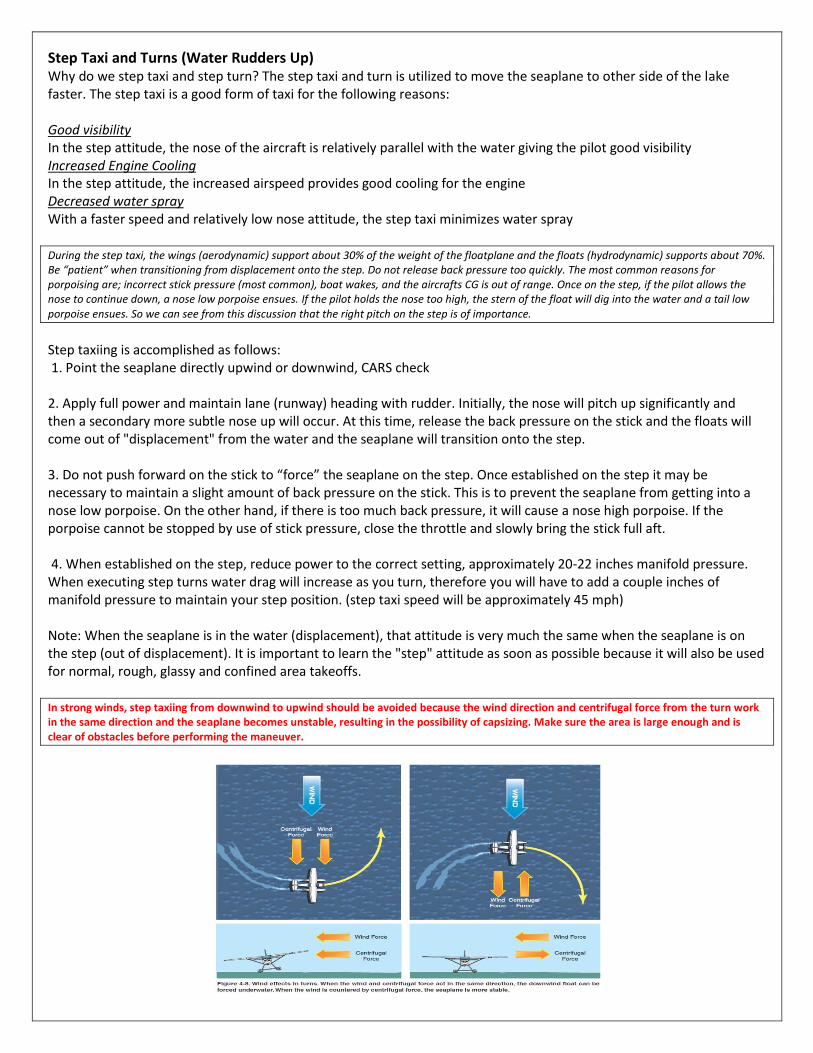
Step Taxi and Turns (Water Rudders Up) Why do we step taxi and step turn? The step taxi and turn is utilized to move the seaplane to other side of the lake faster. The step taxi is a good form of taxi for the following reasons: Good visibility In the step attitude, the nose of the aircraft is relatively parallel with the water giving the pilot good visibility Increased Engine Cooling In the step attitude, the increased airspeed provides good cooling for the engine Decreased water spray With a faster speed and relatively low nose attitude, the step taxi minimizes water spray During the step taxi, the wings (aerodynamic) support about 30% of the weight of the floatplane and the floats (hydrodynamic) supports about 70%. Be “patient” when transitioning from displacement onto the step. Do not release back pressure too quickly. The most common reasons for porpoising are; incorrect stick pressure (most common), boat wakes, and the aircrafts CG is out of range. Once on the step, if the pilot allows the nose to continue down, a nose low porpoise ensues. If the pilot holds the nose too high, the stern of the float will dig into the water and a tail low porpoise ensues. So we can see from this discussion that the right pitch on the step is of importance.
Step taxiing is accomplished as follows: 1. Point the seaplane directly upwind or downwind, CARS check 2. Apply full power and maintain lane (runway) heading with rudder. Initially, the nose will pitch up significantly and then a secondary more subtle nose up will occur. At this time, release the back pressure on the stick and the floats will come out of "displacement" from the water and the seaplane will transition onto the step. 3. Do not push forward on the stick to “force” the seaplane on the step. Once established on the step it may be necessary to maintain a slight amount of back pressure on the stick. This is to prevent the seaplane from getting into a nose low porpoise. On the other hand, if there is too much back pressure, it will cause a nose high porpoise. If the porpoise cannot be stopped by use of stick pressure, close the throttle and slowly bring the stick full aft. 4. When established on the step, reduce power to the correct setting, approximately 20-22 inches manifold pressure. When executing step turns water drag will increase as you turn, therefore you will have to add a couple inches of manifold pressure to maintain your step position. (step taxi speed will be approximately 45 mph) Note: When the seaplane is in the water (displacement), that attitude is very much the same when the seaplane is on the step (out of displacement). It is important to learn the "step" attitude as soon as possible because it will also be used for normal, rough, glassy and confined area takeoffs. In strong winds, step taxiing from downwind to upwind should be avoided because the wind direction and centrifugal force from the turn work in the same direction and the seaplane becomes unstable, resulting in the possibility of capsizing. Make sure the area is large enough and is clear of obstacles before performing the maneuver.
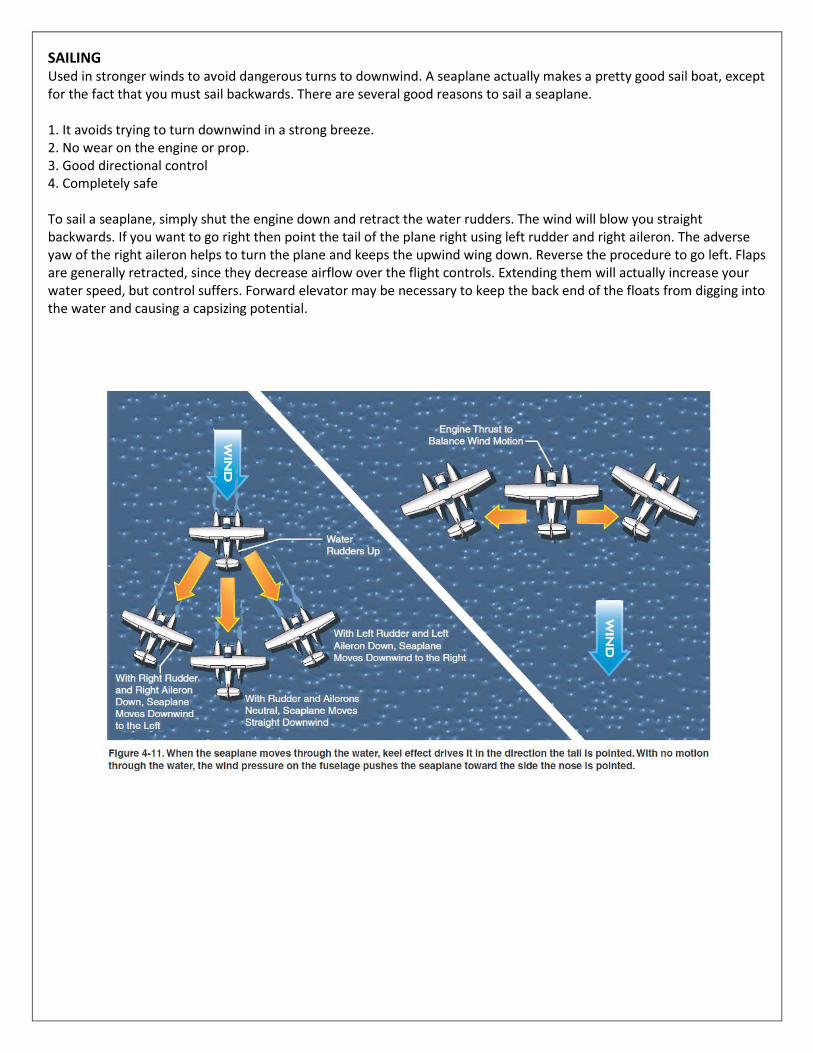
SAILING Used in stronger winds to avoid dangerous turns to downwind. A seaplane actually makes a pretty good sail boat, except for the fact that you must sail backwards. There are several good reasons to sail a seaplane. 1. It avoids trying to turn downwind in a strong breeze. 2. No wear on the engine or prop. 3. Good directional control 4. Completely safe To sail a seaplane, simply shut the engine down and retract the water rudders. The wind will blow you straight backwards. If you want to go right then point the tail of the plane right using left rudder and right aileron. The adverse yaw of the right aileron helps to turn the plane and keeps the upwind wing down. Reverse the procedure to go left. Flaps are generally retracted, since they decrease airflow over the flight controls. Extending them will actually increase your water speed, but control suffers. Forward elevator may be necessary to keep the back end of the floats from digging into the water and causing a capsizing potential.
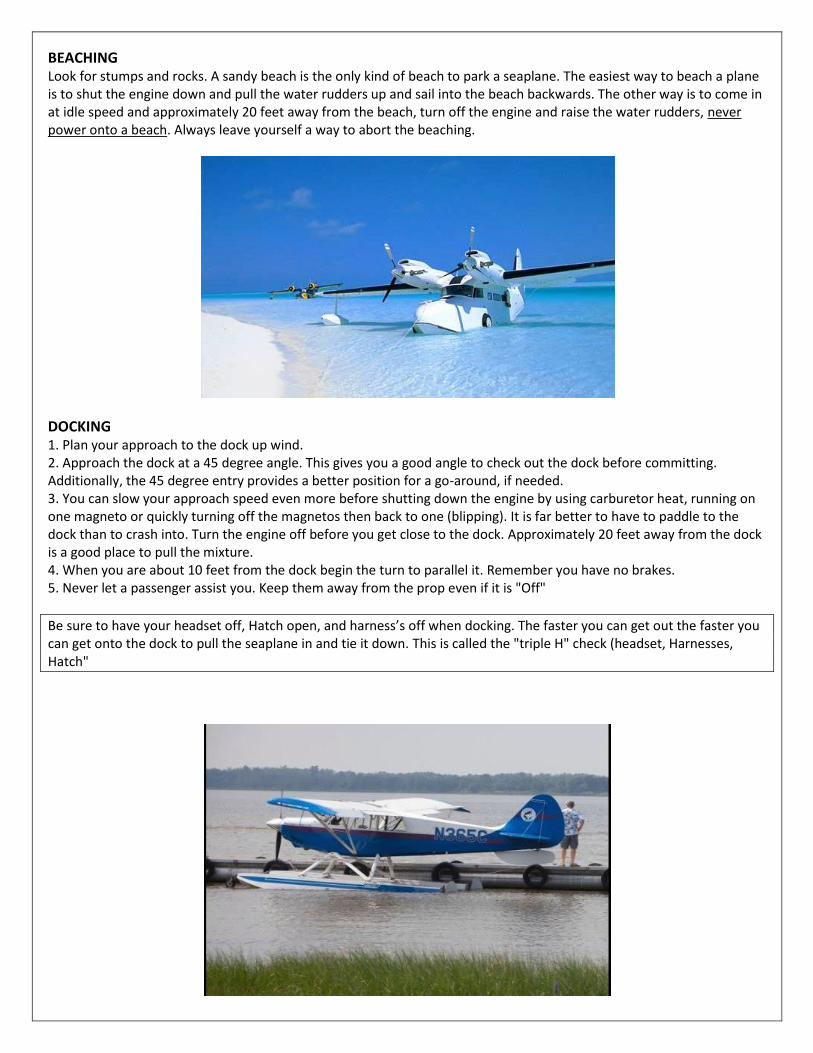
BEACHING Look for stumps and rocks. A sandy beach is the only kind of beach to park a seaplane. The easiest way to beach a plane is to shut the engine down and pull the water rudders up and sail into the beach backwards. The other way is to come in at idle speed and approximately 20 feet away from the beach, turn off the engine and raise the water rudders, never power onto a beach. Always leave yourself a way to abort the beaching.
DOCKING 1. Plan your approach to the dock up wind. 2. Approach the dock at a 45 degree angle. This gives you a good angle to check out the dock before committing. Additionally, the 45 degree entry provides a better position for a go-around, if needed. 3. You can slow your approach speed even more before shutting down the engine by using carburetor heat, running on one magneto or quickly turning off the magnetos then back to one (blipping). It is far better to have to paddle to the dock than to crash into. Turn the engine off before you get close to the dock. Approximately 20 feet away from the dock is a good place to pull the mixture. 4. When you are about 10 feet from the dock begin the turn to parallel it. Remember you have no brakes. 5. Never let a passenger assist you. Keep them away from the prop even if it is "Off"
Be sure to have your headset off, Hatch open, and harness’s off when docking. The faster you can get out the faster you can get onto the dock to pull the seaplane in and tie it down. This is called the "triple H" check (headset, Harnesses, Hatch"
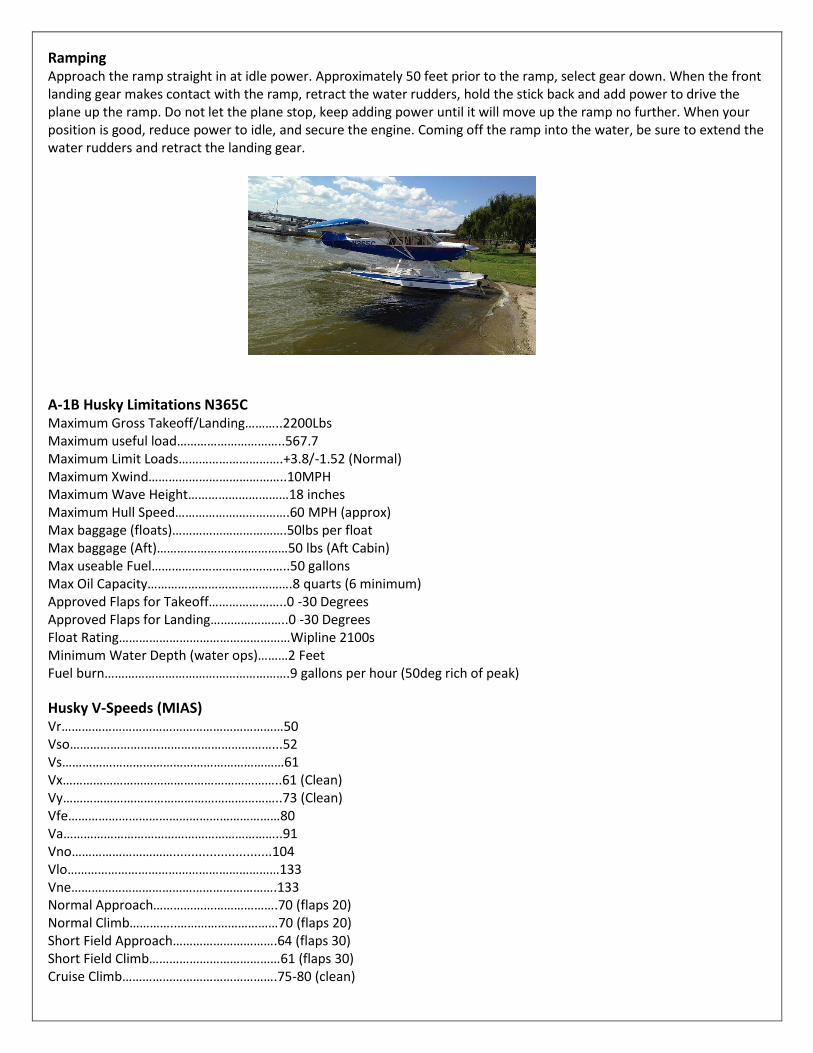
Ramping Approach the ramp straight in at idle power. Approximately 50 feet prior to the ramp, select gear down. When the front landing gear makes contact with the ramp, retract the water rudders, hold the stick back and add power to drive the plane up the ramp. Do not let the plane stop, keep adding power until it will move up the ramp no further. When your position is good, reduce power to idle, and secure the engine. Coming off the ramp into the water, be sure to extend the water rudders and retract the landing gear.
A-1B Husky Limitations N365C Maximum Gross Takeoff/Landing………..2200Lbs Maximum useful load…………………………..567.7 Maximum Limit Loads………………………….+3.8/-1.52 (Normal) Maximum Xwind…………………………………..10MPH Maximum Wave Height…………………………18 inches Maximum Hull Speed…………………………….60 MPH (approx) Max baggage (floats)…………………………….50lbs per float Max baggage (Aft)…………………………………50 lbs (Aft Cabin) Max useable Fuel…………………………………..50 gallons Max Oil Capacity…………………………………….8 quarts (6 minimum) Approved Flaps for Takeoff…………………..0 -30 Degrees Approved Flaps for Landing…………………..0 -30 Degrees Float Rating……………………………………………Wipline 2100s Minimum Water Depth (water ops)………2 Feet Fuel burn……………………………………………….9 gallons per hour (50deg rich of peak)
Husky V-Speeds (MIAS) Vr…………………………………………………………50 Vso……………………………………………………...52 Vs…………………………………………………………61 Vx………………………………………………………..61 (Clean) Vy………………………………………………………..73 (Clean) Vfe………………………………………………………80 Va………………………………………………………..91 Vno…………………………...........................104 Vlo………………………………………………………133 Vne…………………………………………………….133 Normal Approach……………………………….70 (flaps 20) Normal Climb…………..…………………………70 (flaps 20) Short Field Approach………………………….64 (flaps 30) Short Field Climb…………………………………61 (flaps 30) Cruise Climb……………………………………….75-80 (clean)
Flight Controls The husky is equipped with aileron “spades” they increase the aileron effectives, think of it as power steering. All flight controls are a cable – pulley system. No electrically driven flight controls.
Gear System The husky is equipped with an electrically driven reversible pump. The motor is located behind the aft fire wall. The pump is turned on/off by a pressure switch (1500PSI) in the retraction mode and the pump is turned on/off when all for down limit switches are actuated in the extension mode. The gear is held down by down-locks and held up by pressure. Gear light indications are provided by 4 down limit switches (for 4 GREEN-Land Landing) and 4 up limit switches (for 4 BLUE- Water Landing). A RED “pump on” switch illuminates anytime the gear motor is in use. An emergency extension and retraction system is provided. Be sure to select the gear operation on the valve located near the water rudder on the floor. It will need to pumped as much as 120 cycles. During any emergency gear situation be sure to follow the checklist outlined in the POH.
Weight and Balance N365C A-1B Amphibian Husky (POH/STC supplement required)
Weight CG Moment
BEW _______1632.3_____________71.8__________117,199.14____________
Pilot 1 __________________________72.5_______________________________
Pilot2 __________________________99_________________________________
Baggage (Aft) __________________________120________________________________
Compartment (L) _________________________53.5_______________________________
Compartment (R) _________________________53.5_______________________________
Usable Fuel ___________________________84________________________________
Takeoff Weight ______________________________________________________________
Takeoff and Landing Distance (POH / STC supplement required)
Water Takeoff (ISA ____) 50FT_________ Roll___________ Land Takeoff (ISA____) 50FT_________Roll____________ Maximum ROC (ISA _____) _________ Water Landing (ISA_____) 50FT________Roll_____________ Ground Landing (ISA____) 50FT________Roll_____________
VFR Weather Minimums and US National Airspace Review
Sea plane End-of-Course Exam 1. The safest form of taxi is: a) Step b) Plow c) Idle 2. The worst kind of taxi produces is: a) Step b) Plow c) Idle 3. This taxi turn is used to turn the plane downwind, during windy conditions: a) Idle b) Step c) Plow 4. When step taxiing downwind what force(s) tend to bury the outside float and capsize the plane, when we turn into the wind? a) Butterfly Effect and P-factor b) Torque and P factor c) Wind and centrifugal 5. The checklist we use for takeoff, landing, and taxi is: a) PARS b) FARS c) CARS 6. What do we call the effect that makes an idling seaplane (water rudders up) point into the wind? a)Currents b) P-factor c) Weather vane 7. How can we reverse the weather vane tendency? a) Moving the CG aft b) Moving the C of B aft c) Forward stick pressure 8. To taxi a long distance in relatively low winds this form of taxi is used: a) Plow b) Idle c) Step 9. These must be up during step taxi, take-off & landing: a) Flaps b) Cowl flaps c) Water rudders 10. Water rudders are up during sailing operations: True or False 11. Water rudders have to be _____in idle taxi and plow taxi
12. Nick is step taxiing downwind with a 38 mph wind, when he step turns to the left, the most likely result is: a) Wet clothing b) Inverted floats c) All the above 13. When flying the float plane, what is the best indication of wind direction? a) Smoke, trees, etc. b) Wave movement c) Narrow band of slick water next to shore line 14. Why does the float plane turn down wind in the plow turn? a) Centrifugal force b) Center of gravity moves aft c) Center of buoyancy moves aft 15. The rotating beacon at a lighted seaplane base is: a) White / green b) White / blue c) White / yellow 16. What method is used to cancel out severe porposing? a) Control pressure back from neutral b) Control pressure abruptly forward c) Control pressure full aft, throttle to idle 17. During a crosswind takeoff this might have to be lowered to maintain directional control before full power a) Flaps b) Ailerons c) Water rudders 18. Maximum rpm for idle taxi is; and should not exceed what speed: a) 800rpm and 10kts b) 1200rpm and 15kts c) 1000rpm and 5kts 19. The hardest condition under which to land a seaplane is: a) Strong gale force winds b) Beaufort Scale 0 c) Beaufort Scale 12 20. During glassy water operations doing this helps shorten the takeoff run: a) Full aft stick pressure b) Fly over the edge of a water fall c) Lift a float 21. During glassy water landings, the maximum descent rate, crossing you LVR is: a) 1000fpm b) 150fpm c) 500fpm
22. What is the normal position of the stick/yoke during taxi and why? a) Forward - More rudder authority b) Neutral – I don’t know c) Aft –More rudder authority because the stern of the floats are more submerged in the water 23. Our aircraft has what type of floats? a) EDO 2960's b) PK 3000's c) Wipline 2100's 24. What does the 2100 float size rating mean? a) 1200lbs fresh water displacement b) 2100lbs fresh water displacement c) 2100lbs salt water displacement 25. What is the required minimum float buoyancy per float and both floats combined to the aircraft’s max gross takeoff weight? a) 60 percent / 200 percent b) 90 percent / 180 percent c) 45 percent / 90 percent 26. With a float size rating of 2000lbs, what is the maximum weight of the aircraft, that particular float could go on and still meet FAR 23 reserve buoyancy requirements? a) 2,222lbs b) 1800lbs c) 12,500lbs 27. The gross weight of our aircraft is: a) 3350Ibs b) 2200Ibs c) 1950lbs 28. Per FAR 23, a float is designed to have a minimum of __water tight compartments and still be able to float with ___compartments flooded? How many compartments does the Husky have? a) 4-2 and 7 compartments b) 90/180 and 4 compartments c) 6 -12 and 2 compartments 29. Normal traffic pattern altitude for our aircraft is: a) 1000agl b) 500agl f) 800msl 30. List 5 items you would look for, when approach to land on a body of water: ____________________________________________________________________________________________ 31. Name 5 ways to determine wind direction? ___________________, _________________,_________________,_________________, _________________ 32. White caps start to form at approximately ______knots of wind Wind streaks start to form at approximately _____Knots of wind The glass shore effect starts to form at approximately _____knots of wind
33. In a rapid current, which is the most important factor? a) Current speed b) Wind speed c) Proper insurance 34. What’s the purpose of the step? ___________________________________________________ 35. Pick the correct answer: 1. Separate float compartments ______ a. Keel 2. Walking area on top of float ______ b. Skeg 3. Connects side and bottom of float ______ c. Bulkheads 4. Strip on bottom of float ______ d. Spray Rail 5. Deflects water away from prop ______ e. Step 6. Least drag, best acceleration point ______ f. Chine g. Deck 36. How can you find out where you can land and who to contact? _____________________________________ 38. This taxi method is used when taxiing in a strong crosswind: a) Idle b) Plow c) Rough water takeoff 39. List 3 reasons why a seaplane porpoises: _______________, _____________, _______________ 40. Can you turn into the wind on a plow taxi? _______ 41. When docking, how can we slow down our water taxi speed? a) Carburetor heat, one magneto, blipping magnetos b) Carburetor heat, Full power c) Carburetor heat, drag paddle 42. PFD's (Personal Flotation Device) are required by what regulation and must meet certification of the: a) FAA b) USCG c) ESPN
43. What are the required VFR weather minimums (ceiling and visibility) to depart LEE during Class D hours? Are they
different when the tower closes? What about Tavares seaplane base? (All scenarios assuming day operations)
_____________________________________________________________________________________________ 44. When landing on a river, wind is not a factor; would you land and take off with the current or against the current? ____________________ 45. What is the minimum depth of water that you can operate a seaplane? What is the maximum wave height? ______ 46. What would happen if you landed on the water with a 30mph tail wind? ___________________________________ 47. Explain the technique for sailing: ___________________________________________________________________

48. Explain the technique for beaching a seaplane with an off-shore wind: _________________________________________________________________________________________________ __________________________________________________________________________________________________ 49. What are some additional alternatives to think about when planning a VFR cross-country route in a seaplane? __________________________________________________________________________________________________ 50. What is the triple H check that is used for Docking? a) Hatch, Harnesses, Headsets b) Horizontal Stabilizer, Halo, Headsets c) Hamburger, Hans Gruber, Harnesses
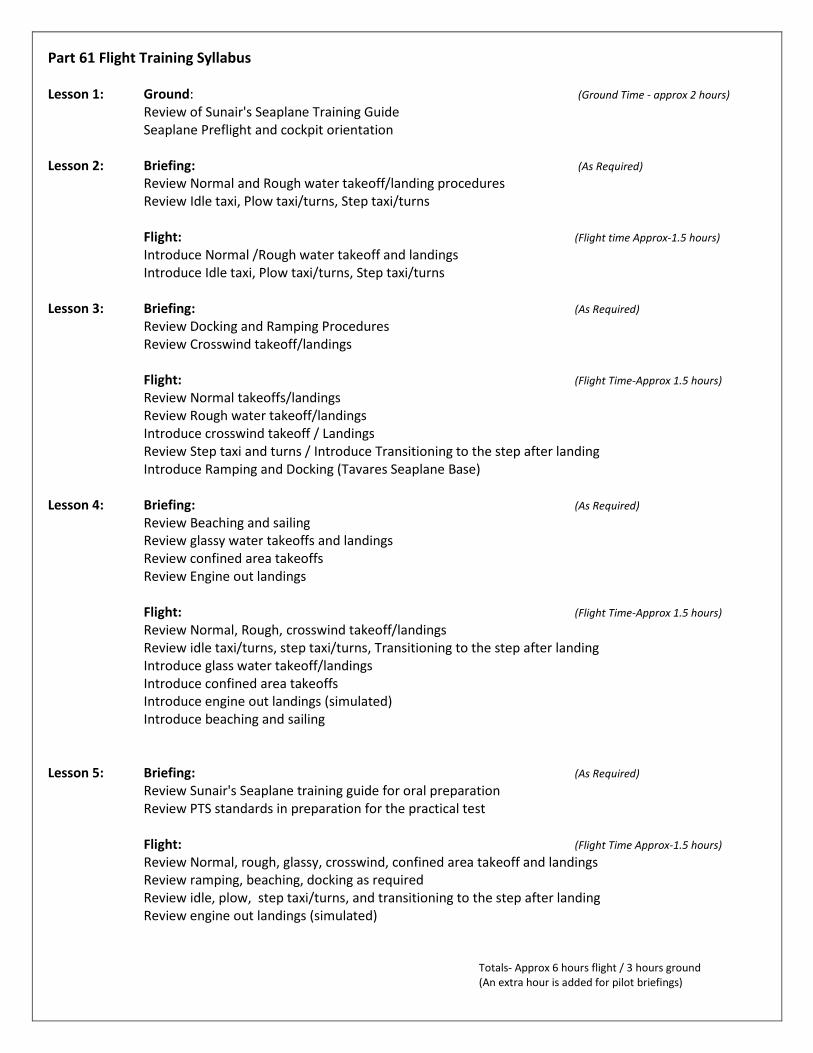
Part 61 Flight Training Syllabus Lesson 1: Ground: (Ground Time - approx 2 hours) Review of Sunair's Seaplane Training Guide Seaplane Preflight and cockpit orientation Lesson 2: Briefing: (As Required) Review Normal and Rough water takeoff/landing procedures Review Idle taxi, Plow taxi/turns, Step taxi/turns Flight: (Flight time Approx-1.5 hours) Introduce Normal /Rough water takeoff and landings Introduce Idle taxi, Plow taxi/turns, Step taxi/turns Lesson 3: Briefing: (As Required) Review Docking and Ramping Procedures Review Crosswind takeoff/landings Flight: (Flight Time-Approx 1.5 hours) Review Normal takeoffs/landings Review Rough water takeoff/landings Introduce crosswind takeoff / Landings Review Step taxi and turns / Introduce Transitioning to the step after landing Introduce Ramping and Docking (Tavares Seaplane Base) Lesson 4: Briefing: (As Required) Review Beaching and sailing Review glassy water takeoffs and landings Review confined area takeoffs Review Engine out landings Flight: (Flight Time-Approx 1.5 hours) Review Normal, Rough, crosswind takeoff/landings Review idle taxi/turns, step taxi/turns, Transitioning to the step after landing Introduce glass water takeoff/landings Introduce confined area takeoffs Introduce engine out landings (simulated) Introduce beaching and sailing Lesson 5: Briefing: (As Required) Review Sunair's Seaplane training guide for oral preparation Review PTS standards in preparation for the practical test Flight: (Flight Time Approx-1.5 hours)
Review Normal, rough, glassy, crosswind, confined area takeoff and landings Review ramping, beaching, docking as required Review idle, plow, step taxi/turns, and transitioning to the step after landing Review engine out landings (simulated) Totals- Approx 6 hours flight / 3 hours ground (An extra hour is added for pilot briefings)
Top Related