


![[GUNSMITHING] The 12g Pistol](https://static.fdocuments.in/doc/165x107/5529676f550346b52e8b474c/gunsmithing-the-12g-pistol.jpg)


Languages
Pages
Legal


4/23/2016 1
Score High Gunsmithing
Adjustable Pillar Bedding
From
Charley Robertson’s
Score High Gunsmithing
Installation Guide For
Winchester Model 70s / Montana 1999
Howa 1500 / Weatherby Vanguard

4/23/2016 2
It’s Easy to View Each
Presentation slide, Simply
Use the spacebar to move forward
Use the backspace key to move backwards

4/23/2016 3
Score High Gunsmithing
9812-A Cochiti Rd. SE
Albuquerque, NM 87123
Ph# 505-292-5532
800-326-5632
http://www.probed2000.com

4/23/2016 4
How to use this CD
To Continue viewing this presentation from
the CD-ROM disk press the spacebar.
To install this presentation directly onto your hard drive so that
it can be run without the CD first exit this application by pressing
the Esc key and go to the bottom left of your screen and select
start. From there choose run. Select the drive which contains
your computers CD drive and double click setup.exe then OK.

4/23/2016 5
Table of Contents Why pillar bed my stock
How to recognize a properly bedded stock
What makes the Score High Adjustable Pillar Bedding System special
Step by step how to properly pillar bed a Winchester 70 using the Score High Adjustable Pillar Bedding System
Pro-Bed 2000 Bedding epoxy
Click on any of the above topics to jump
directly to it. Or, by pressing the spacebar
you can view each topic in order.
Return to the Table of Contents by clicking on the
T.O.C. text at the bottom of each screen

4/23/2016 6
Why Pillar Bedding You need a long lasting rigid foundation to support
the tremendous pressure of the guard screws .
Over time most stocks will crush under the pressure of the
trigger guard screws. When this occurs that portion of the
stock immediately around the screw will compress much
more than the area of the stock in the middle of the action.
T.O.C.

4/23/2016 7
Why Pillar Bedding Once this stock compression occurs the stock along with
its inletting will take on a new shape. When the trigger guard
screws are retightened the action and the stock will each
compromise their shape by bending and flexing as the two
components are drawn together by the trigger guard screws.
The stock tweaks trying to conform to the action and the action
tweaks trying to conform to the stock. This all contributes
to stress in the assembly. A stock with a high compressive
strength post or pillar in between the action and the trigger guard
will eliminate this compression and your stock will give good
service for many many years.
T.O.C.

4/23/2016 8
Why Pillar Bedding All things in nature vibrate. Good rifle accuracy
depends on the management of those vibration
cycles. When the various components of the
rifle are under different types of stress the
vibration cycles become erratic.
The rifles recoil may cause the barreled action to
shift in the stock. This will cause the natural stress
to change, thus the vibration cycles of the next shot
will be different. The barrel may well have a slightly
different point of impact from the previous shot do
to this shifting. The barreled action will NOT shift in
a properly pillar bedded stock. T.O.C.

4/23/2016 9
Why Pillar Bedding
Without the rigid support of Pillars the torque of the
trigger guard screws, measured in inch pounds,
becomes extremely critical because each inch
pound of torque will change the amount of stress
thus changing the relationship between the
barreled action and the stock.
Variance in guard screw torque can easily develop into
a difficult to manage proposition. The proper torque today
may not be tomorrow.
T.O.C.

4/23/2016 10
Why Pillar Bedding
A stress free situation will occur when there
are non yielding, rock solid pillars in between
the action and the trigger guard in such a
position that all of the rifles components are at
rest at the exact point in which they come into
contact with each other.
T.O.C.

4/23/2016 11
Why Pillar Bedding
Summarized Eliminate variable stock compression.
Create a stress free stock to metal fit regardless of the pressure created by the torque of the trigger guard screws.
Achieve shot to shot consistency under any recoil.
T.O.C.
4/23/2016 12
How to Recognize the Properly
Bedded Stock
• A properly bedded stock will be completely
stress free regardless of the torque of the trigger
guard screws.
• A properly bedded stock will not negatively
influence the barreled action during firing.
T.O.C.

4/23/2016 13
How to Recognize the Properly
Bedded Stock
There are several methods of determining if
there is any stress in a rifles bedding.
T.O.C.

4/23/2016 14
The Free Floated Barrel
If a barrel is to be free floated and the general consensus
among accuracy gunsmiths is that it should. It must be
adequately floated. At least a 3 to 4 thickness of note
book paper should be able to pass between the barrel
and forend with out interference.
T.O.C.

4/23/2016 15
The Free Floated Barrel
At the time a rifle is being fired the forend will flex as it
tracks on the front rest. Depending on stock design,
shooting technique and forend stiffness this flex may be
a little or a lot. If the forend comes into contact with the
barrel during the firing process, accuracy will be greatly
compromised.
This can be easily tested by gently
rapping on the bottom of the
forend and listening for the sound
of the forend striking the barrel.
Hopefully it won’t.
T.O.C.

4/23/2016 16
The bore sight Collimator Test With a bore sight collimator inserted in the muzzle of the
barrel loosen and tighten the front and rear trigger guard
screws while looking through the scope.
You should not be able to detect any change whatsoever in the
collimator’s view. Any change in that view illustrates how stresses
are changing under the changing load of the guard screws. If there
are no stresses there are no changes. T.O.C.

4/23/2016 17
The Dial Indicator Test
This is the most definitive test. With a dial indicator
mounted to the barrel loosen and tighten the trigger
guard screws.
Any change in the indicator’s value is an
indication of unwelcome stress. T.O.C
.
4/23/2016 18
Stress Test Using Sight and Feel
This test can be very enlightening and calls for no special
tools. While observing certain areas loosen and tighten
the guard screws.
NOTE: Loosening and tightening trigger guard screws with
out running the risk of having a screw driver slip and mar
the screw slot or even worse the stock, can require ones full
attention, you may want to recruit a friend to help.
T.O.C
.

4/23/2016 19
Stress Test Using Sight and Feel Placing one or more of
your finger tips on both
the stock and metal at
the rear tang and then
the ejection port while
loosening and tightening
the front and rear screws
you can detect any stress
by feeling for a change in
the relationship of stock
and metal. The middle
screw should not be
tightened.
T.O.C
.

4/23/2016 20
Stress Test Using Sight and Feel
While loosening and
tightening the trigger guard
screws, watch for a change in
the gap along the sides of
the free floated barrel also
watch for a change in the gap
directly under the barrel at
the tip of the forend.
T.O.C
.

4/23/2016 21
What Makes the Score High
Adjustable Pillar Bedding System
Special
There are two distinctive features that separate the
Score High Adjustable Bedding Pillars from the others.
1. Pillars can be preadjusted to the correct length
prior to the epoxy process.
2. Pillars remain attached to the action during the
epoxy process guaranteeing proper alignment.
T.O.C.

4/23/2016 22
1. Pillars Can Be Pre-adjusted to
the Correct Length.
By pre-adjusting the
pillars it is easy to
ensure that during the
bedding process the
trigger guard is draw
down against the
bedding pillar NOT THE
STOCK. This eliminates
the possibility
of bedding stress into the
assembled rifle.
T.O.C.

4/23/2016 23
2. Pillars Remain Attached to the
Action During the Bedding Process.
In having the pillars attached to the action, two very important
things happen. First the pillars cannot get out of position during the
epoxy bedding process. Second and most important of all, the pre-
contoured pillars are allowed to seek their own path off the action
to absolutely guarantee 100% contact with action after the epoxy
cures. All this equals “ZERO” stress.
T.O.C.

4/23/2016 24
Future Pillar Bedding Work
The Score High Adjustable Pillar Bedding Kit makes it
economical to do more work in the future. The hardware
that attaches the pillars to the action and the “T” handles
that hold every thing together while the epoxy cures are
all reusable . This means that next time you only need to
purchase the Refill Kit with pillars only.
T.O.C.

4/23/2016 25
This Begins a Step by Step Guide to
Installing the
Score High Adjustable Pillars.
T.O.C.
4/23/2016 26
Introduction
Now that we have reviewed and considered the properties
of a well bedded stock it is time to get started. First, lets
look at the kit contents. We will for this presentation
assume that you have a Deluxe Kit that contains every
thing you need ranging from the installation hardware
the adjustable pillars, bedding epoxy with release agent
And an instruction pamphlet.
T.O.C.

4/23/2016 27
The Pillars
Each pillar has a threaded post with a screw driver slot used for
adjusting the pillars length. There is one short pillar used for the front
guard screw and one long pillar used at the rear. Each threaded post is
cut at 2.5 degrees to match the angle of the trigger guard. You will find
a black mark on one of the screw driver slots. This black mark should
always be toward the muzzle.
T.O.C.

4/23/2016 28
Installation Hardware
There are two double ended screws
that are used to attach the pillars to
the action. One end is ¼ X 32 and
it screws into the action. The other
end is ¼ X 28, has a hex key recess
and screws into the “T” handles.
Each kit also contains two
“T” handles that hold the
assembly together during
the epoxy process
T.O.C.
4/23/2016 29
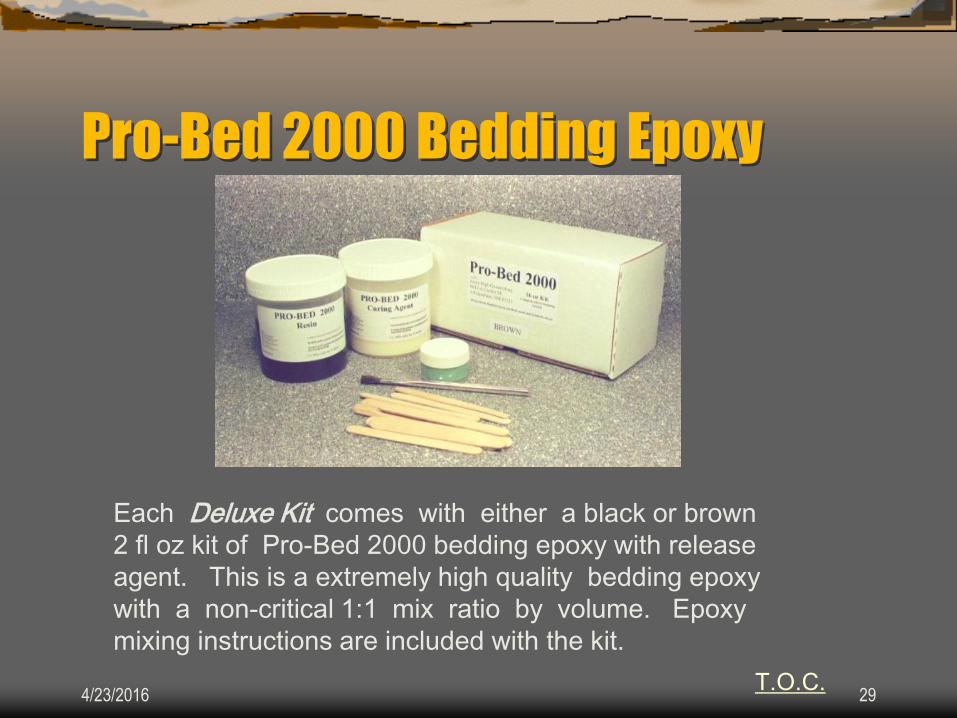
Pro-Bed 2000 Bedding Epoxy
Each Deluxe Kit comes with either a black or brown
2 fl oz kit of Pro-Bed 2000 bedding epoxy with release
agent. This is a extremely high quality bedding epoxy
with a non-critical 1:1 mix ratio by volume. Epoxy
mixing instructions are included with the kit.
T.O.C.
4/23/2016 30
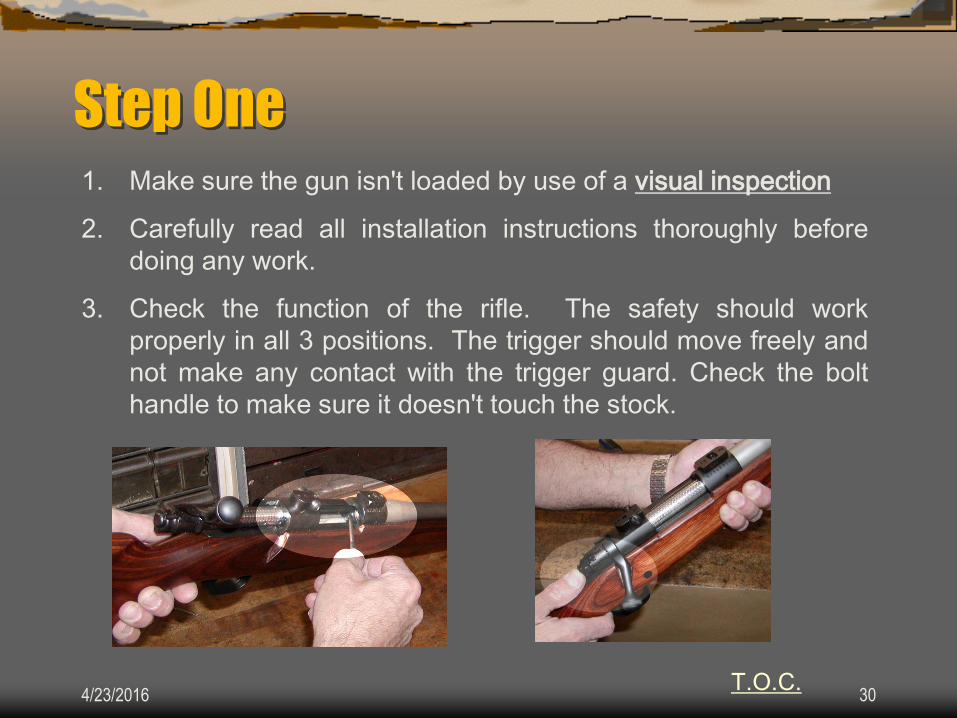
Step One 1. Make sure the gun isn't loaded by use of a visual inspection
2. Carefully read all installation instructions thoroughly before
doing any work.
3. Check the function of the rifle. The safety should work
properly in all 3 positions. The trigger should move freely and
not make any contact with the trigger guard. Check the bolt
handle to make sure it doesn't touch the stock.
T.O.C.
4/23/2016 31
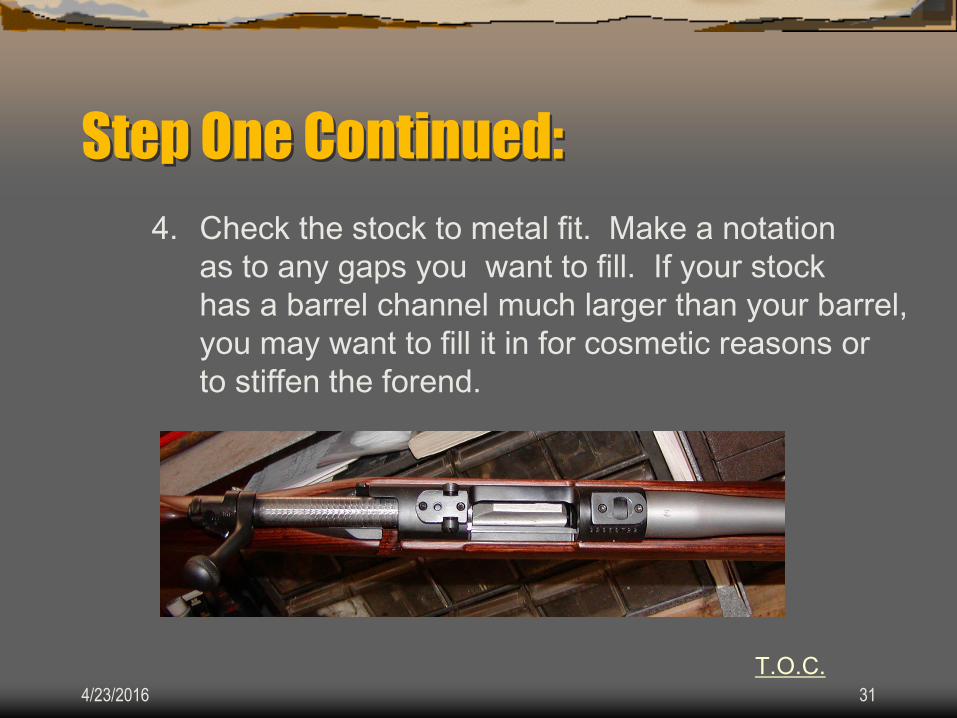
Step One Continued:
4. Check the stock to metal fit. Make a notation
as to any gaps you want to fill. If your stock
has a barrel channel much larger than your barrel,
you may want to fill it in for cosmetic reasons or
to stiffen the forend.
T.O.C.

4/23/2016 32
Step Two
1. Make sure the barrel is free floated. There should be
enough room between the barrel and forend to slide
a thickness of four sheets of note book paper all the
way back to the recoil lug. If it is not free floated, free
float it now.
T.O.C.

4/23/2016 33
Step Two Continued:
Free Floating a the Barrel
There are many tools available to
remove the necessary wood and finish
to get adequate clearance. A metal
scraper is fast and gives the best
control. They can be made by grinding
a radius on the end of an old hack saw
blade. With care 60 grit sand paper can
also be used although it is a slow
process that can easily round corners,.
There are a great number of methods
and tools available use what you are the
most comfortable with.
T.O.C.

4/23/2016 34
Step Two Continued: 1. Remove all of the accessories, sling, scope, bipod etc.
2. Remove the trigger by driving out the trigger pin being
very careful not to loose the bolt stop and spring.
3. Next remove the sear and spring by driving out the sear pin.
The sear pin has a very large head on one side and small on
the other and is easily pushed out.
T.O.C.
4/23/2016 35
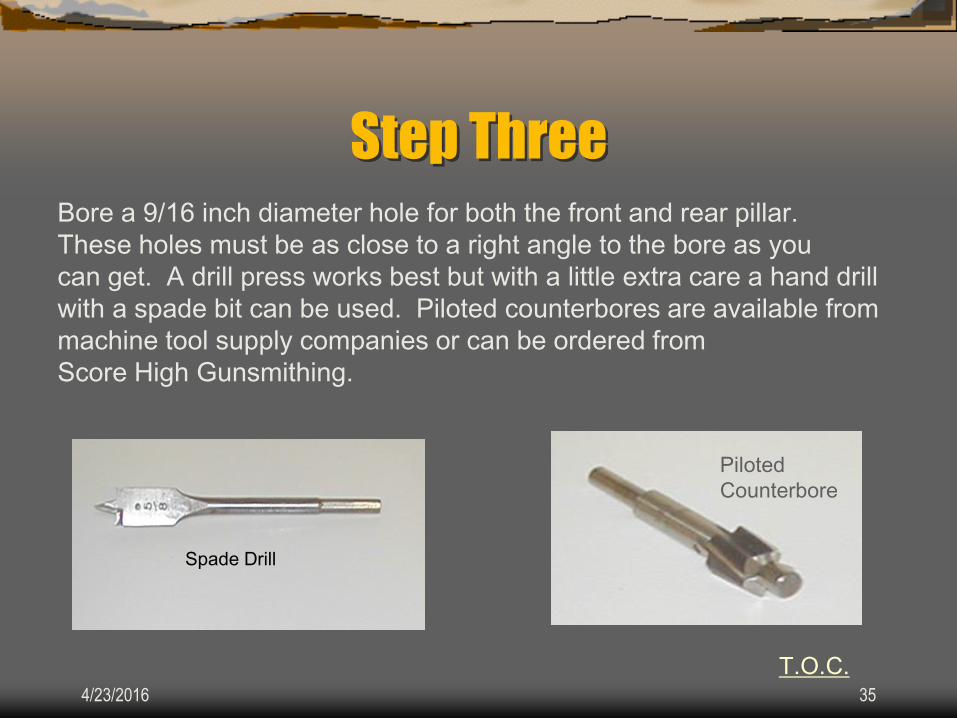
Step Three Bore a 9/16 inch diameter hole for both the front and rear pillar.
These holes must be as close to a right angle to the bore as you
can get. A drill press works best but with a little extra care a hand drill
with a spade bit can be used. Piloted counterbores are available from
machine tool supply companies or can be ordered from
Score High Gunsmithing.
Spade Drill
T.O.C.
Piloted
Counterbore
4/23/2016 36
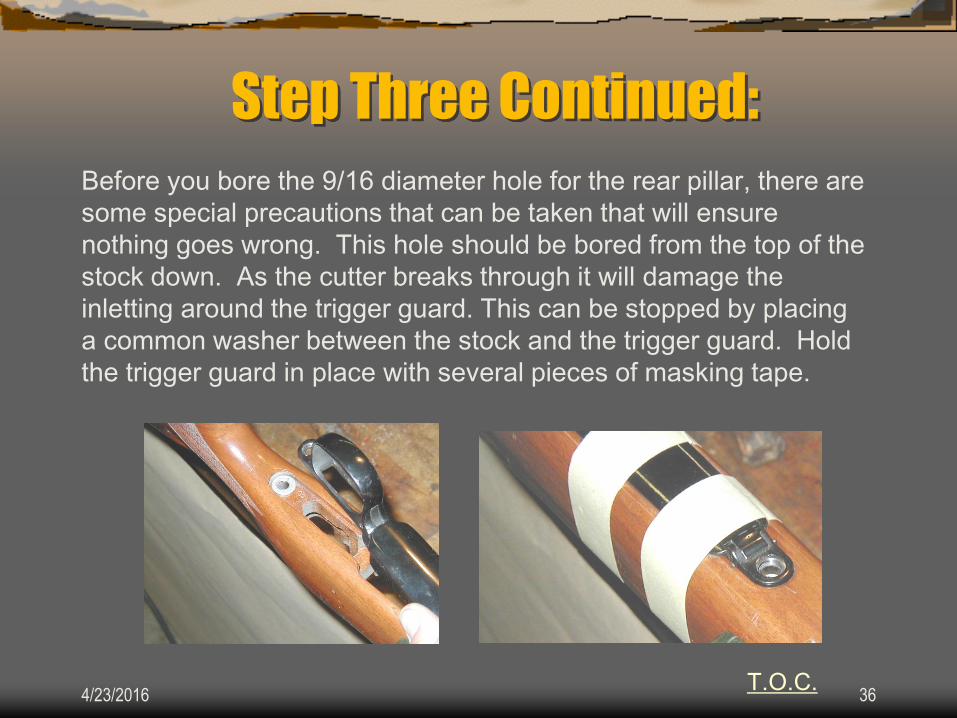
Step Three Continued:
Before you bore the 9/16 diameter hole for the rear pillar, there are
some special precautions that can be taken that will ensure
nothing goes wrong. This hole should be bored from the top of the
stock down. As the cutter breaks through it will damage the
inletting around the trigger guard. This can be stopped by placing
a common washer between the stock and the trigger guard. Hold
the trigger guard in place with several pieces of masking tape.
T.O.C.

4/23/2016 37
Step Three Continued
As the cutter breaks through the stock it will come in contact
with the washer supported by the trigger guard. The cutter will then
ride on the washer. In turn the washer will spin and hold the cutter off
of the trigger guard, preventing any damage to the aluminum trigger
guard. This procedure will not allow the cutter to break through the
inletting and cause damage to the stock.
T.O.C.

4/23/2016 38
Step Three Continued:
Spade Drill Method
To use a spade drill you need to first plug the original holes with
a wooden dowel. Drill a hole .003 to .005 inches smaller than a
5/16 to 3/8 inch diameter wooden dowel so that the dowel has a
compressed fit. Glue can be used in case the hole gets oversize
and won't hold the wooden dowel. Once plugged, you can use
the 9/16 inch diameter spade drill.
T.O.C.

4/23/2016 39
Step Three Continued:
Spade Drill Method
With a bit of care, this method
can be very fast and accurate.
T.O.C.

4/23/2016 40
Step Three Continued
Counter Bore Method
Using a piloted counter bore is the most precise method.
T.O.C.

4/23/2016 41
Step Three Concluded:
The stock is now ready for the final fitting.
T.O.C.
4/23/2016 42
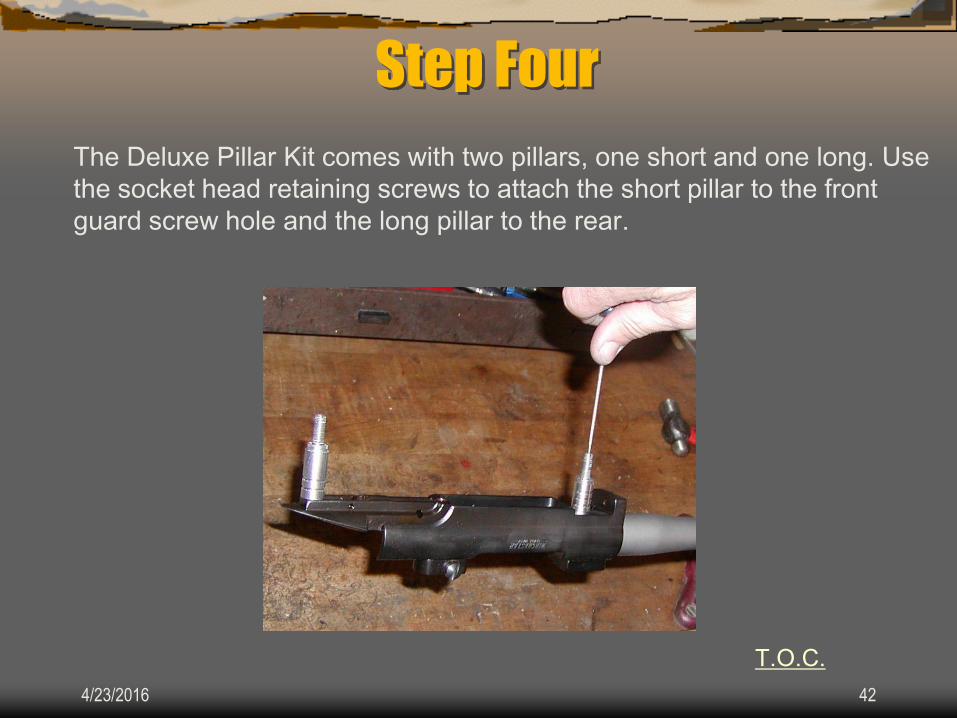
Step Four
The Deluxe Pillar Kit comes with two pillars, one short and one long. Use
the socket head retaining screws to attach the short pillar to the front
guard screw hole and the long pillar to the rear.
T.O.C.
4/23/2016 43
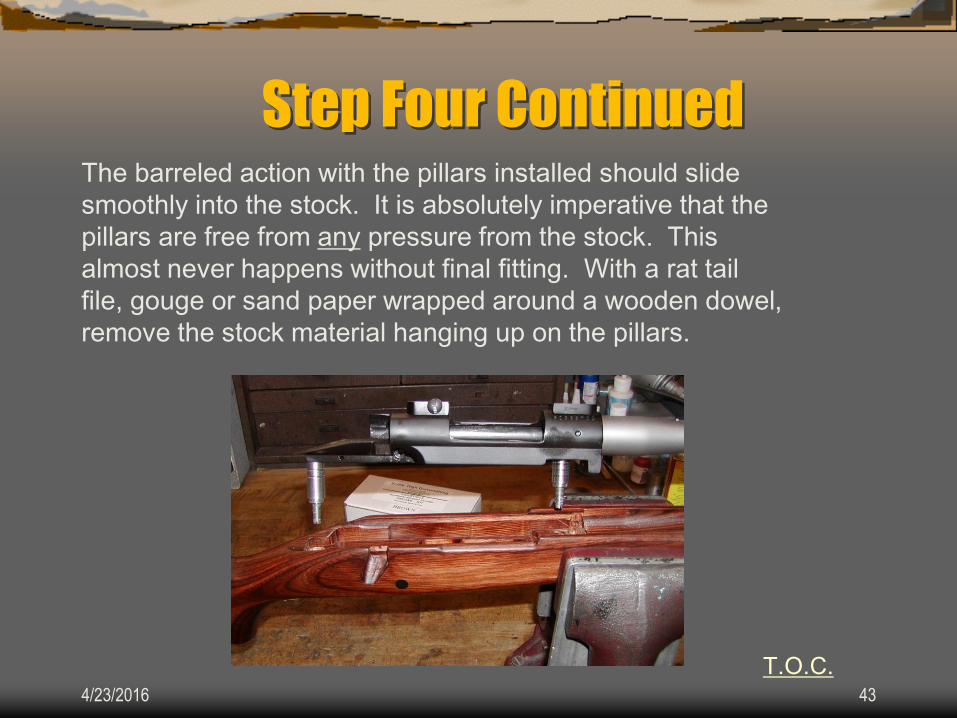
Step Four Continued The barreled action with the pillars installed should slide
smoothly into the stock. It is absolutely imperative that the
pillars are free from any pressure from the stock. This
almost never happens without final fitting. With a rat tail
file, gouge or sand paper wrapped around a wooden dowel,
remove the stock material hanging up on the pillars.
T.O.C.
4/23/2016 44
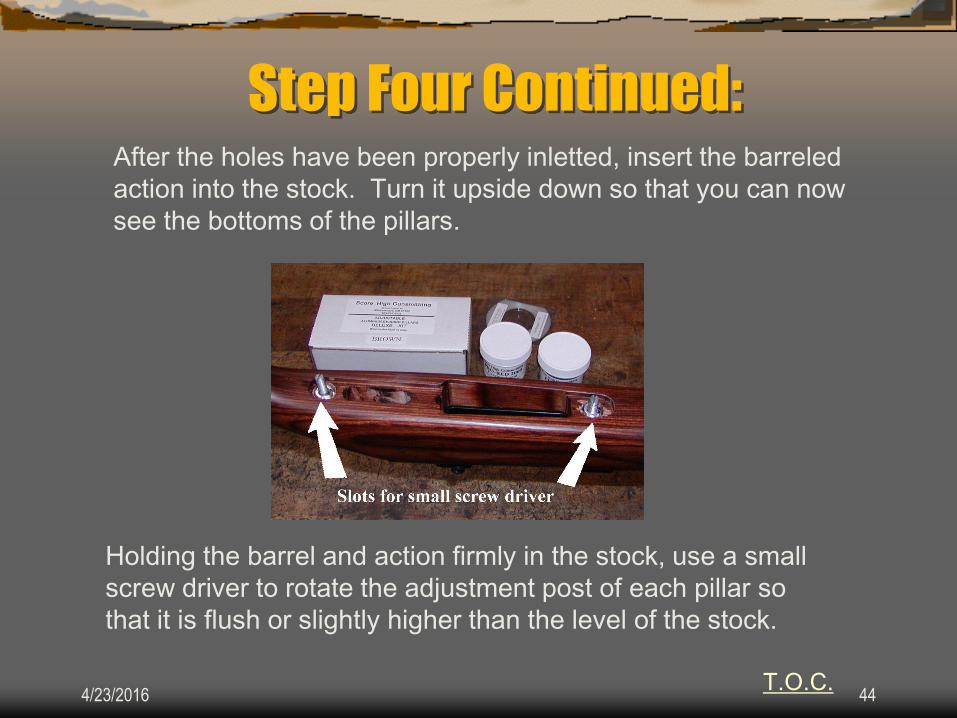
Step Four Continued: After the holes have been properly inletted, insert the barreled
action into the stock. Turn it upside down so that you can now
see the bottoms of the pillars.
Holding the barrel and action firmly in the stock, use a small
screw driver to rotate the adjustment post of each pillar so
that it is flush or slightly higher than the level of the stock.
T.O.C.
4/23/2016 45
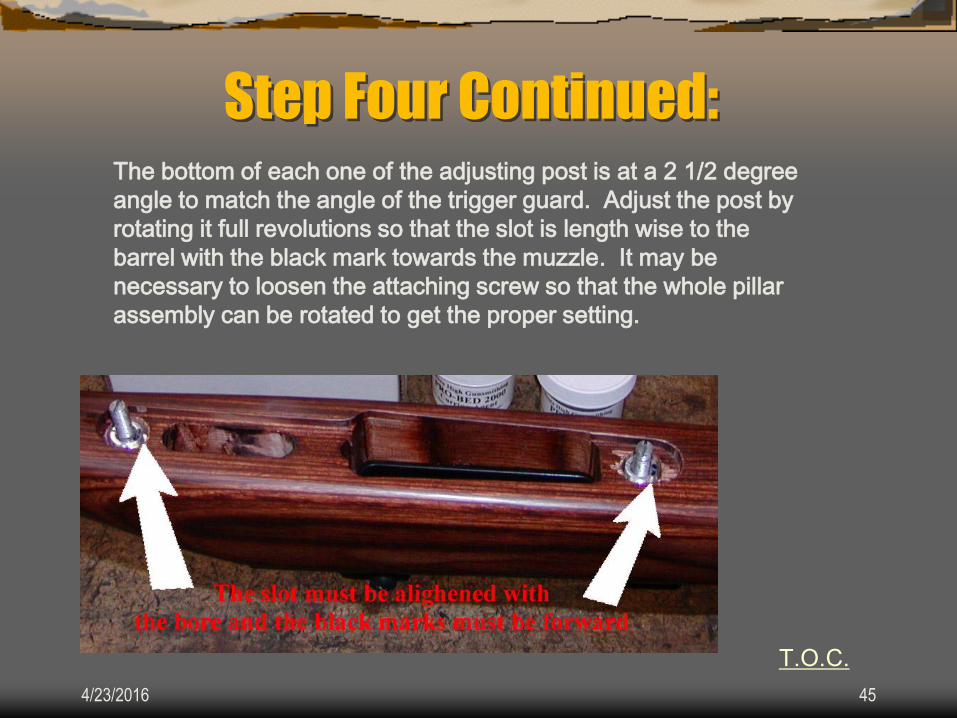
Step Four Continued: The bottom of each one of the adjusting post is at a 2 1/2 degree
angle to match the angle of the trigger guard. Adjust the post by
rotating it full revolutions so that the slot is length wise to the
barrel with the black mark towards the muzzle. It may be
necessary to loosen the attaching screw so that the whole pillar
assembly can be rotated to get the proper setting.
T.O.C.

4/23/2016 46
Step Four Continued:
Check to see that the trigger guard can easily slip over the pillar
retaining screws. If not make adjustments as necessary. It is
important to make sure that your adjustments do not interfere with
how the pillars fit into the stock.
With the magazine box in
place, slide the trigger guard
over the retaining screws and
tighten it down with the "T"
handles. The "T" handles
should tighten firmly, there
should not be any mushy
feeling to them at all.
T.O.C.

4/23/2016 47
Step Four Continued:
Getting the proper adjustment on the pillars can be a bit tricky. Each
end of the bottom of the magazine box has a area that has been cut
away. The trigger guard and floor plate should fit into that area to hold
The magazine box in place. It is very important that the trigger guard
tightens down on the pillars not on the stock or the magazine box. If
the trigger guard tightens down on either the stock or the mag box, the
pillars should be adjusted a bit longer. It is OK if there is a very slight
amount of play between the stock and the barreled action. With the
mag box and trigger guard installed and the “T” handles Snug, loosen
the "T" handles one at a time. There should not be any movement of
the barreled action in the stock. If there is movement then the, pillars
are not properly adjusted.
T.O.C.
4/23/2016 48
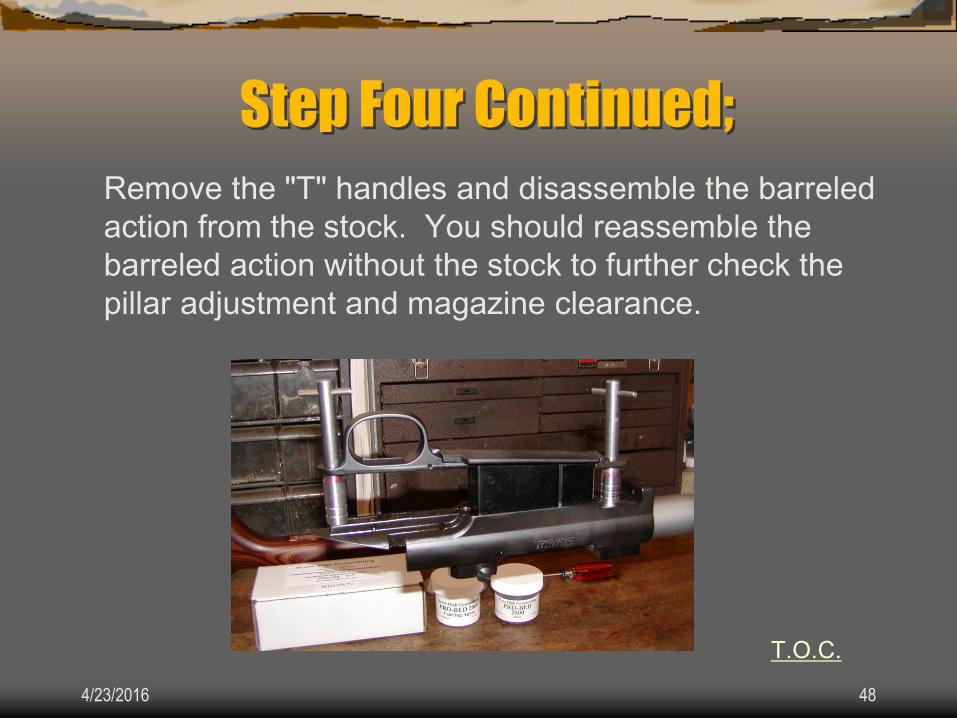
Step Four Continued;
Remove the "T" handles and disassemble the barreled
action from the stock. You should reassemble the
barreled action without the stock to further check the
pillar adjustment and magazine clearance.
T.O.C.

4/23/2016 49
Step Four Continued: The blind magazine box
Some models such as the Winchester model 670
have a blind magazine box. These rifles must be
approached a bit differently.
T.O.C.
4/23/2016 50
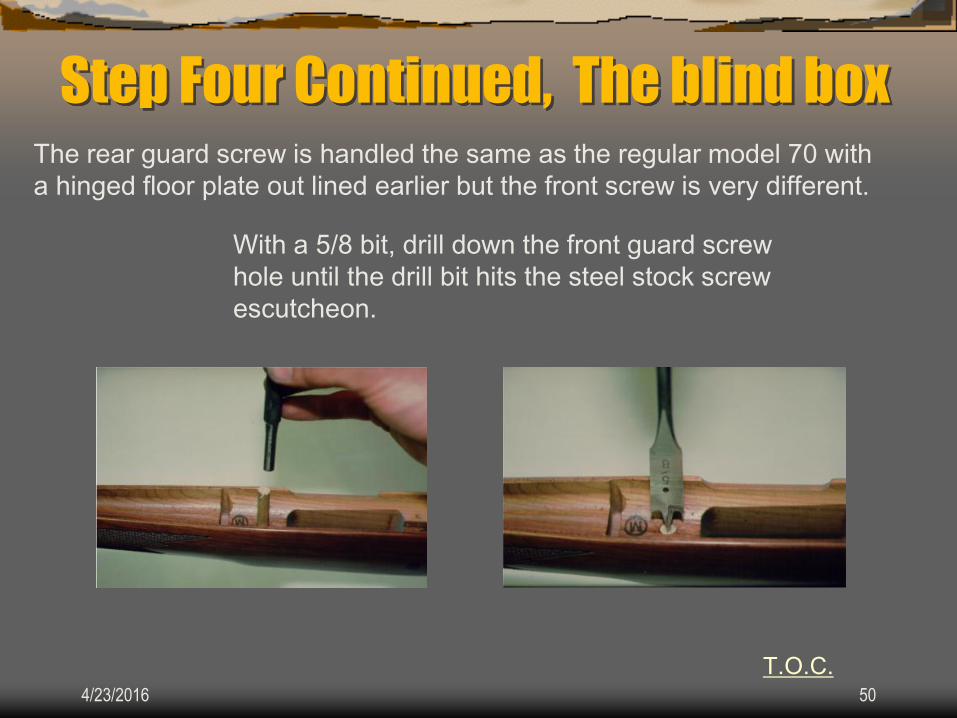
Step Four Continued, The blind box The rear guard screw is handled the same as the regular model 70 with
a hinged floor plate out lined earlier but the front screw is very different.
With a 5/8 bit, drill down the front guard screw
hole until the drill bit hits the steel stock screw
escutcheon.
T.O.C.

4/23/2016 51
Step Four Continued: The blind box Turn the stock upside down in the vise and with a large punch
drive the escutcheon through the hole and out the top of the stock.
By driving it out in this manner you reduce the chance of
breaking the stock. T.O.C.
4/23/2016 52
Step Four Continued: The blind box
After removing the escutcheon open up the hole so that
the escutcheon can easily pass all the way though the
stock with all most no resistance. Use the factory front guard
screw instead of the “T” handle to attach the pillar to the
action.
From this point forward it is similar to the regular
modal 70. The barreled action with the pillars installed
must go in and out of the stock with absolutely
no interference.
T.O.C.
4/23/2016 53
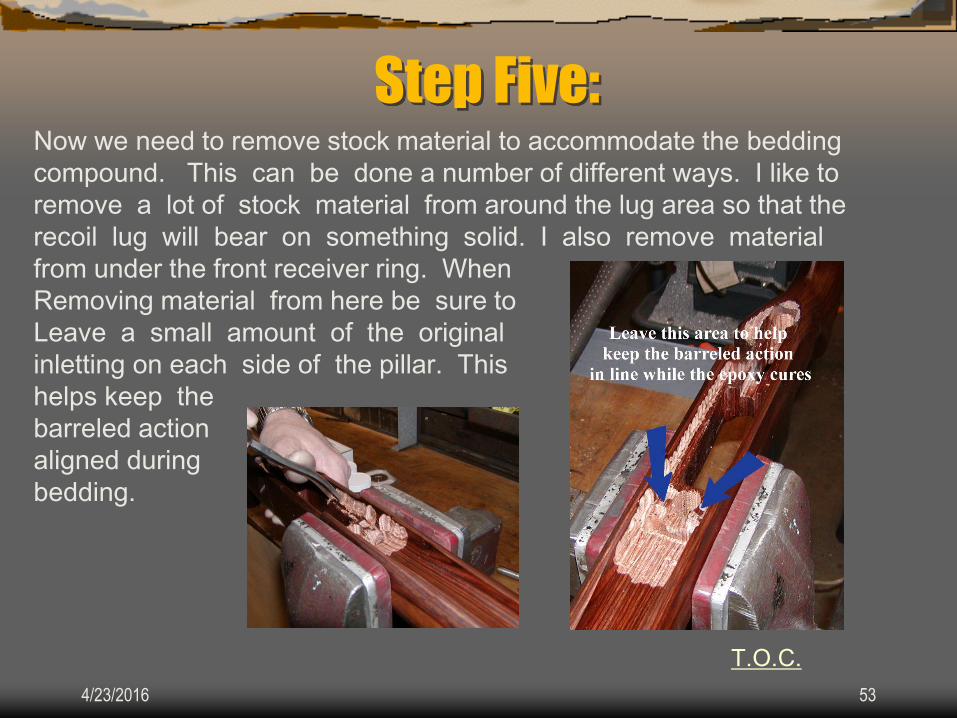
Step Five: Now we need to remove stock material to accommodate the bedding
compound. This can be done a number of different ways. I like to
remove a lot of stock material from around the lug area so that the
recoil lug will bear on something solid. I also remove material
from under the front receiver ring. When
Removing material from here be sure to
Leave a small amount of the original
inletting on each side of the pillar. This
helps keep the
barreled action
aligned during
bedding.
T.O.C.

4/23/2016 54
Step Five Continued: Around the rear pillar you
only need to scrape off the
stock finish so that the stock
bedding compound has
something to bond to. The
epoxy compound will stick
well to the stock finish but the
stock finish does not stick
that well to the stock, for this
reason I like to scrape off all
of the stock finish where ever
I expect to have epoxy
bedding.
T.O.C.

4/23/2016 55
Step Five Continued:
There are many methods used by many different top name
gunsmiths. Some only bed the area around the lug and the
two pillars while some bed the entire action area. Typically I bed
the entire action area. When using that method remove stock
material from along the sides of the inletting as well.
T.O.C.

4/23/2016 56
Step Five Continued
Do not remove stock material from the area
immediately around the bolt stop. It will insure
proper function of the bolt stop if this part of
the stock is not bedded

4/23/2016 57
Step Five Continued:
After relieving the stock, reassemble the barreled action
and stock. It should fit just as it did before. If your stock
has a wide gap between the barrel and forend , and you
want to fill it with epoxy, use two inch wide heavy duty
electrical tape and apply it to your barrel length wise. Use
two or three thicknesses. Check again with note book
paper to see that your barrel is still free floated with the tape
installed and make any necessary alterations.
T.O.C.

4/23/2016 58
Step Six
THE EPOXY
APPLICATION
PROCESS
T.O.C.
4/23/2016 59
Step Six Continued:
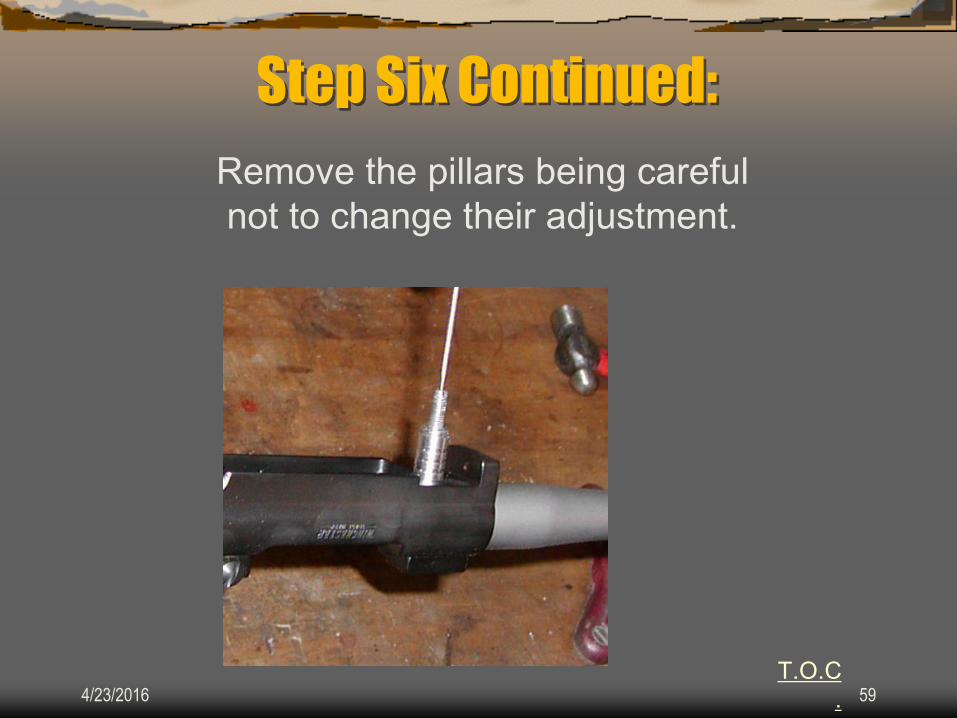
Remove the pillars being careful
not to change their adjustment.
T.O.C
.

4/23/2016 60
Step Six Continued
When handling any chemicals it is a good idea to ware
protective clothing. I like to wear Nitril or latex gloves.
Not only for protection from the epoxy and mold release
but it will also make it easy to clean up the stock after
bedding. Immediately after I’m done with the epoxy
work I can take off the gloves with out fear of leaving
epoxy finger prints on the stock that show up after the
epoxy has cured and cannot be removed without
damaging the stocks finish.
T.O.C.

4/23/2016 61
Step Six Continued:
From this point on we will proceed as if you were
using Pro-Bed 2000 bedding epoxy and the
release agent contained in the Deluxe pillar
bedding kit. If using another Brand of bedding
epoxy be sure to follow the instructions from that
manufacture.
T.O.C.

4/23/2016 62
Step Six Continued:
After carefully removing the pillars, using the brush supplied
in the kit apply mold release over the entire barreled action
and all the parts EXCEPT THE PILLARS.
T.O.C.

4/23/2016 63
Step Six Continued
After the mold release wax is applied, it should be buffed
to a shine everywhere there is a bedded surface. After buffing
you will be able to feel the slick and shiny surface left behind
by the mold release. The mold release provided in the Deluxe Kit
is an industrial grade release agent used by the manufacturing
industry for departing molds on a large scale where fit and finish
cannot be compromised.
T.O.C.

4/23/2016 64
Step Six Continued: After buffing the barreled action to a shine
place modeling clay in the pin holes used to
hold the trigger assembly.
T.O.C.

4/23/2016 65
Step Six Continued: Place 3 or 4 layers of cellophane tape on the bottom of
the recoil lug and trim off the excess with a sharp knife
or razor blade.
T.O.C.
4/23/2016 66
Step Six Continued:
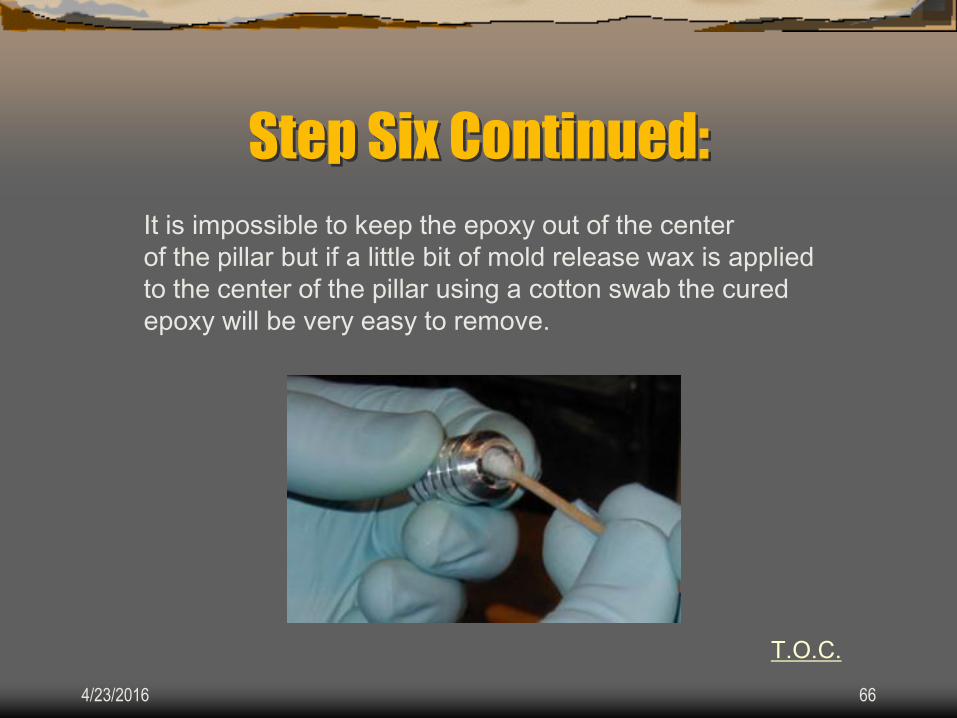
It is impossible to keep the epoxy out of the center
of the pillar but if a little bit of mold release wax is applied
to the center of the pillar using a cotton swab the cured
epoxy will be very easy to remove.
T.O.C.

4/23/2016 67
Step Six Continued: The clean up job will be much easier with release agent
or wax applied to certain parts of the stock's inletting.
Apply to the sides of the magazine well
and to the sides of the trigger inletting.
Be very careful not to get any release
agent or wax on any part of the stock
area that will come into contact with the
receiver.
T.O.C.

4/23/2016 68
Step Six Continued: Some bedding epoxies are very runny.
To prevent them from running out the
bottom of the pillar holes use masking
tape to block the bottoms of the holes.
This will not be necessary with
Pro-Bed 2000
T.O.C.

4/23/2016 69
Step Six Continued: Reattach the pillars to the action and retest the
assembly to ensure that everything will go together
without any hang ups. Then disassemble leaving the
pillars and magazine box in place to get ready for
the actual epoxy bedding process.
T.O.C.

4/23/2016 70
Step Seven: The Epoxy Process
Using Pro-Bed 2000 The contents of Pro-Bed 2000 can separate in the jars after
an extended period of time. Before mixing, it is recommended
that you stir the contents of each jar completely until
homogeneous.
It is very important to remember not to use the same mixing
stick in both the resin and curing agent.
T.O.C.

4/23/2016 71
Step Seven Continued: The mix ratio of Pro-Bed 2000 is 1:1 by volume. One of
the unique qualities of Pro-Bed 2000 is that the mix ratio is
not extremely critical. A slight error one way or the other
will not effect the cure rate or the quality of the cured epoxy.
Here at the shop we have found visual measuring to be more
than adequate.
A piece of cardboard
makes an excellent
mixing surface.
T.O.C.
4/23/2016 72
Step Seven Continued:
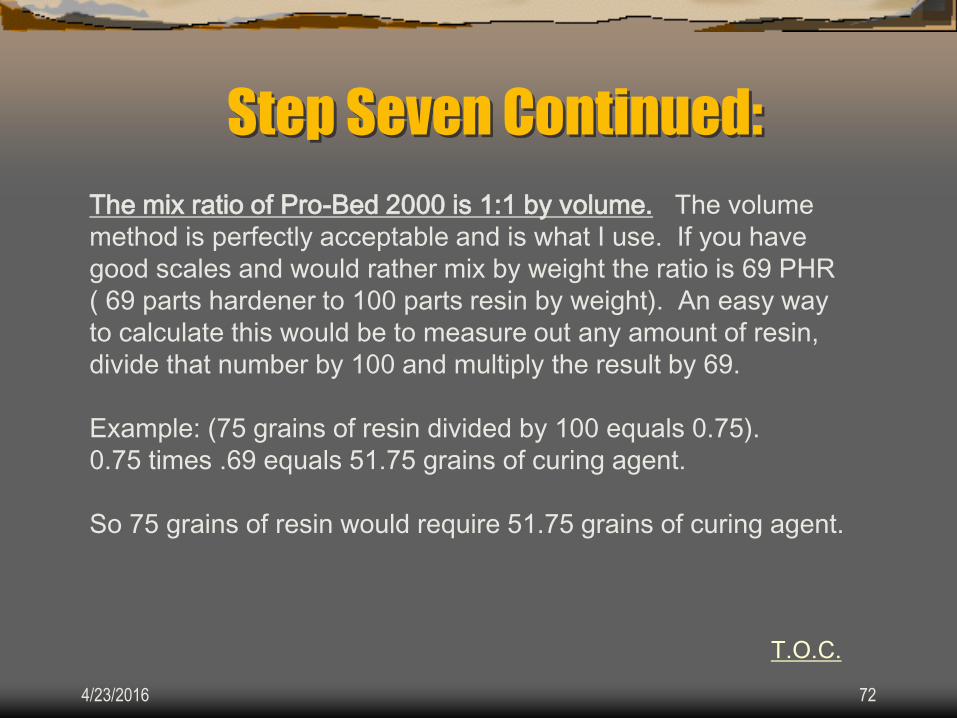
The mix ratio of Pro-Bed 2000 is 1:1 by volume. The volume
method is perfectly acceptable and is what I use. If you have
good scales and would rather mix by weight the ratio is 69 PHR
( 69 parts hardener to 100 parts resin by weight). An easy way
to calculate this would be to measure out any amount of resin,
divide that number by 100 and multiply the result by 69.
Example: (75 grains of resin divided by 100 equals 0.75).
0.75 times .69 equals 51.75 grains of curing agent.
So 75 grains of resin would require 51.75 grains of curing agent.
T.O.C.

4/23/2016 73
Step Seven Continued:
Because both the resin and the curing agent are heavily loaded
with microspheres and fibers it takes a great deal of mixing to
guarantee that the resin and curing agent are adequately mixed
together. There is a very powerful pigment in the resin that will
almost instantly change the epoxy to one solid color long before
the two are adequately mixed together, don’t be fooled by
appearance. Mix, mix and then mix some more.
T.O.C.

4/23/2016 74
Step Seven Continued:
First apply the epoxy compound into the
front pillar hole and then completely fill
the lug area. The majority of the epoxy
should lay flat on the bottom so that
when the barreled action is inserted into
the stock, the very bottom of the action
will come into contact with the epoxy
first and the epoxy will then flow up
around the receiver eliminating any air
bubbles.
T.O.C
.

4/23/2016 75
Step Seven Continued
Next apply a layer of bedding epoxy to the sides of the stock’s
inletting.
T.O.C.

4/23/2016 76
Step Seven Continued:
To ensure that there are
no air bubbles around
the aluminum pillars lay
a layer of bedding epoxy
around both front and
rear pillars.
T.O.C.
4/23/2016 77
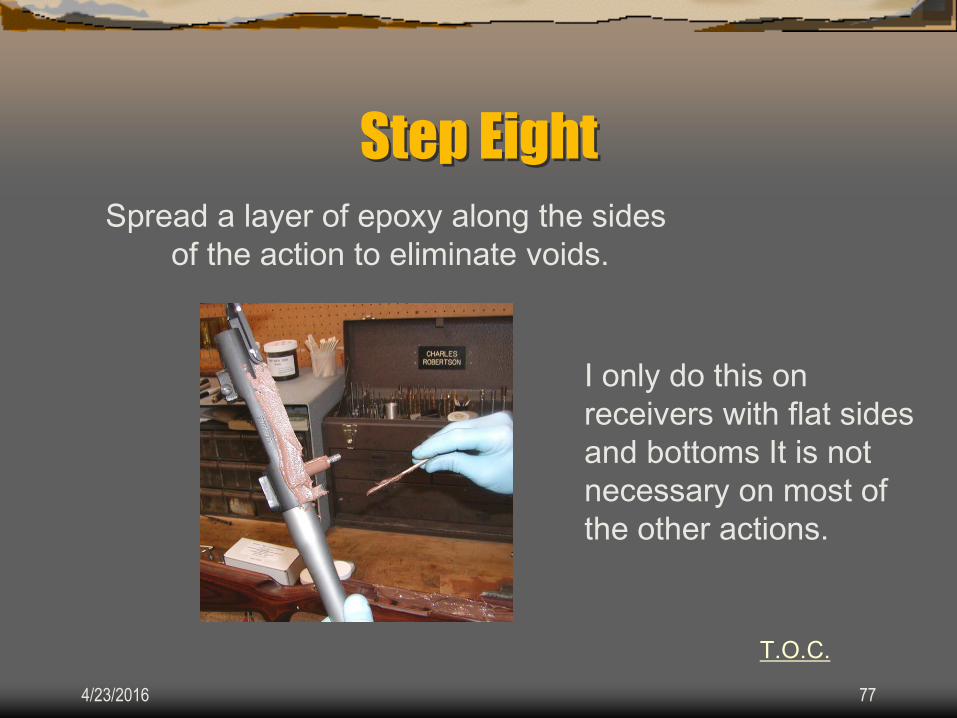
Step Eight
Spread a layer of epoxy along the sides
of the action to eliminate voids.
T.O.C.
I only do this on
receivers with flat sides
and bottoms It is not
necessary on most of
the other actions.

4/23/2016 78
Step Eight With the two pillars properly attached and coated with a layer
of bedding epoxy and the magazine box properly seated into
the magazine cut out in the receiver, it is time to bring the
barreled action and the epoxy filled stock together.
T.O.C.

4/23/2016 79
Step Eight Continued
With the barreled action upside down and with the pillars
pointing straight up, turn the stock over and place it onto the
barreled action. The two pillar retaining screws will pop up from
under the masking tape making the masking tape come loose
from the stock. Remove and discard the tape.
T.O.C.

4/23/2016 80
Step Eight Continued:
Place the trigger guard and floor plate over the pillar retaining
screws and install the “T” handles. It is very important to check
the alignment of the magazine box to make absolutely sure
that it is seated inside the cut out provided in the action.
It is also very important that the “T” handles are not over tightened!
It is very easy to induce stress in the assembly by over tightening.
Once you feel the trigger guard come into contact with the pillars
stop and back off the “T” handles just a tiny bit. T.O.C.
4/23/2016 81
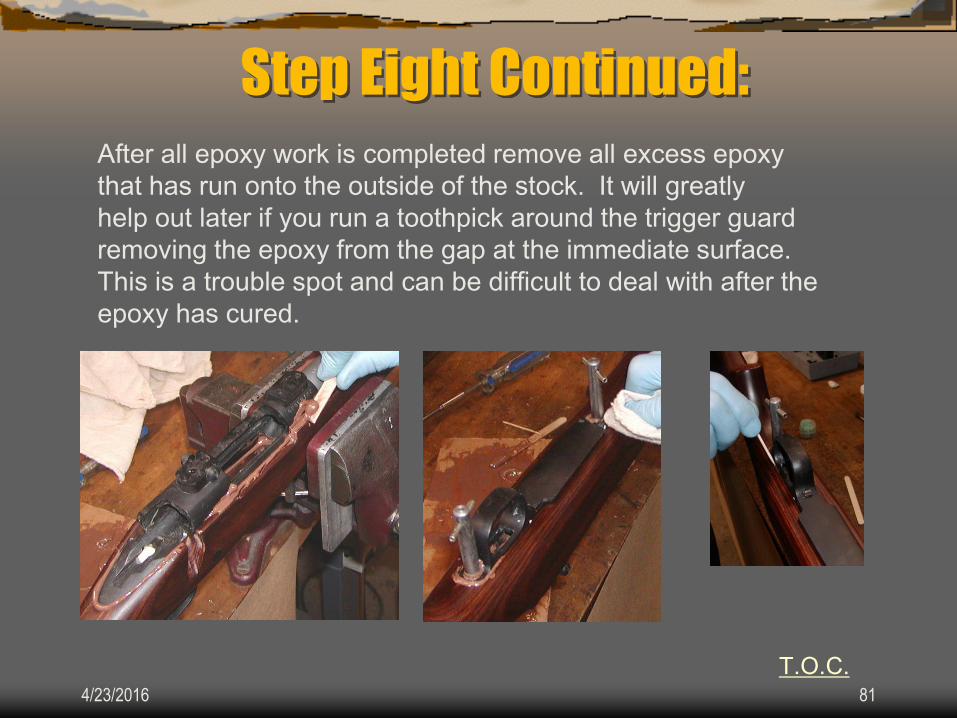
Step Eight Continued:
After all epoxy work is completed remove all excess epoxy
that has run onto the outside of the stock. It will greatly
help out later if you run a toothpick around the trigger guard
removing the epoxy from the gap at the immediate surface.
This is a trouble spot and can be difficult to deal with after the
epoxy has cured.
T.O.C.
4/23/2016 82
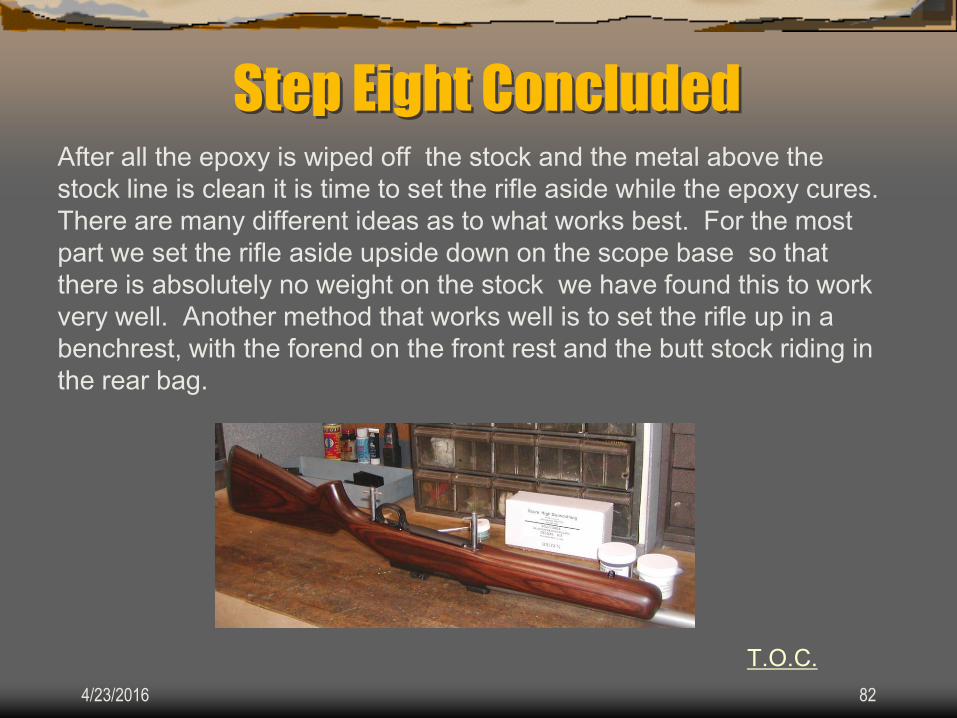
Step Eight Concluded After all the epoxy is wiped off the stock and the metal above the
stock line is clean it is time to set the rifle aside while the epoxy cures.
There are many different ideas as to what works best. For the most
part we set the rifle aside upside down on the scope base so that
there is absolutely no weight on the stock we have found this to work
very well. Another method that works well is to set the rifle up in a
benchrest, with the forend on the front rest and the butt stock riding in
the rear bag.
T.O.C.
4/23/2016 83
Step Eight Concluded
Like most epoxies Pro Bed 2000 will cure
below 70 degrees but it will take longer.
If your work place is very cool, you may
want to remove the bedded rifle to a warmer
place while it cures.
T.O.C.

4/23/2016 84
Step Nine
After 24 hours it is safe to remove the barreled action
from the stock. Prior to removing the metal check all
the little corners for cured epoxy that has run over the
top of the rear tang or the ejection port. The trigger
guard is very prone for this to happen and needs to
be inspected very closely. If there is epoxy present
there it must be removed or it will break off bringing
with it a piece of the stock ruining what would
otherwise be a terrific bedding job.
T.O.C.

4/23/2016 85
Step Nine Continued:
After verifying there is no epoxy excess to cause any
problems, remove the “T” handles. Next remove the
attaching screws. As the attaching screws are removed
they will push the trigger guard out of the inletting. If the
trigger guard is not pushed out try pulling on the trigger
guard bow and it should come free.
T.O.C.
4/23/2016 86
Step Nine Continued:
After completely removing the pillar retaining screws place
the rifle in a vise just in front of the magazine box and partially
insert the bolt into the action to be used as a handle. With
a rocking and lifting motion break the bond of the bedded stock
with the barreled action. If that fails place the rifle upside
down in a padded vice around the mag box area. With
a large wooden dowel or something soft, gently tap on the
bottom of the closed bolt body by using the magazine well for
access from the bottom. The barreled action will easily
fall out.
Be ready. Don’t let it fall to the floor.
T.O.C.
4/23/2016 87
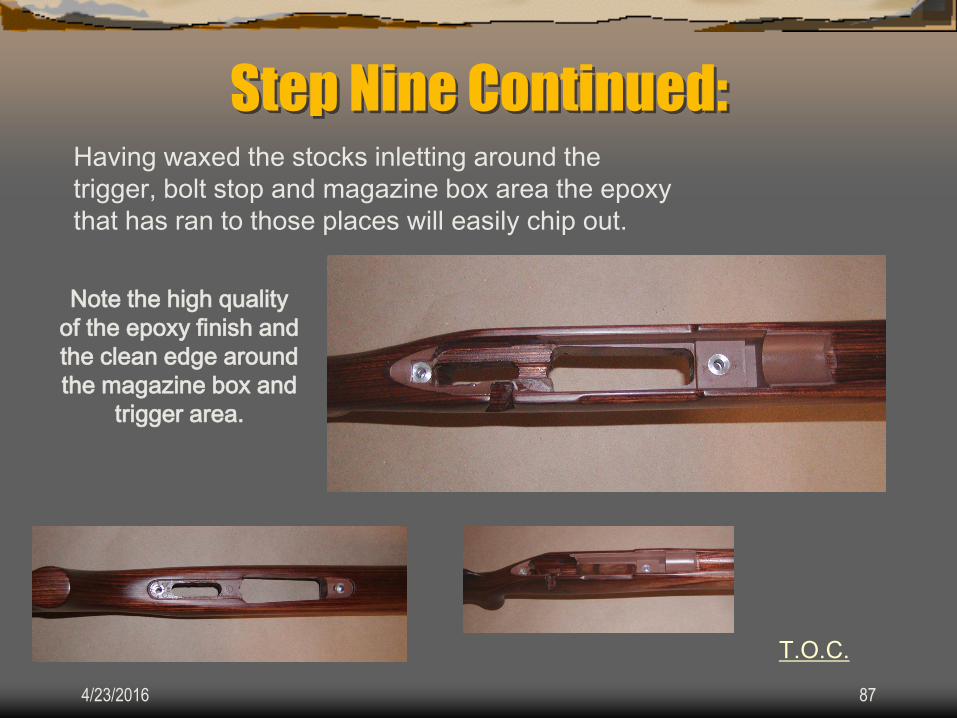
Step Nine Continued: Having waxed the stocks inletting around the
trigger, bolt stop and magazine box area the epoxy
that has ran to those places will easily chip out.
Note the high quality
of the epoxy finish and
the clean edge around
the magazine box and
trigger area.
T.O.C.

4/23/2016 88
Step Nine Continued:
The best cleaner for removing the excess mold release wax is paint
thinner or mineral spirits. Since Acetone is frequently used as an
epoxy thinner it will not work to remove the excess wax.
After all the clean up it is time to reassemble the
rifle by installing the trigger and remounting a
scope if it had one. Do a safety check by operating
the bolt and dry firing. Make sure that the trigger is
not touching the trigger guard either on the sides or
at the tip of the trigger. Check for proper operation
of the safety.
T.O.C.

4/23/2016 89
Step Nine Concluded
After everything is reassembled go back to
“How To Recognize a Properly Bedded Stock”
and see how everything measures up. If all went well you
should be very impressed with your work.
T.O.C.

4/23/2016 90
Pro-Bed 2000 Bedding Epoxy
Ease of mixing: A non-critical mix ratio of 1:1 by volume, ensures that Pro-Bed 2000 always attains full cure.
Overnight cure: Pro-Bed 2000 attains full cure in approximately 16 hours but still gives its user plenty of work time
(approximately 60 to 90 minutes, depending on room temperature.)
Flowability: Pro-Bed 2000 has the perfect consistency. It will flow into all voids of the stock but it still stays where you put
it.
Strength: Pro-Bed 2000 uses the highest quality components such as carbon fiber and high compressive strength
microscopic spheres that give the cured epoxy greater flexural and compressive strength, while completely eliminating the
shrinkage problems. There are no cheap fillers or extenders.
Carvability: Pro-Bed 2000 is not brittle. The cured epoxy can easily be carved, ground or machined without softening or
chipping even in very thin sections.
Appearance: The unique characteristics of Pro-Bed 2000 will make it easy to produce a finished product to be proud of,
free of voids and surface imperfections for both the professional gunsmith and novice alike .
Clean up: All Pro-Bed 2000 kits come with a generous amount of an extremely high quality mold release agent that is
both easy to apply and easy to clean off while giving you the best possible surface finish and debonding characteristics.
Available in Black & Brown
T.O.C.

4/23/2016 91
Pro-Bed 2000 Bedding Epoxy A History
The world of gunstock bedding is unlike any other epoxy
application. We have very special needs. Back in 1998
I started studying epoxy from the standpoint of what a
gunsmith requires. I found that no existing epoxy-resin
has the necessary characteristics needed for stock bedding.
They all shrink as they cure and they lack the compressive
strength needed. Epoxy-resin requires an additive to give
it good structural properties.
T.O.C.

4/23/2016 92
Pro-Bed 2000 I first looked at the metal fillers. The atomized metal particles
used for epoxies have coarse irregular shapes not unlike crushed
stone, except on a much smaller scale. These rough irregular
shapes require large amounts of epoxy-resin to hold them in
suspension or the resin and curing agent cannot be well mixed.
The mixed epoxy must also be fluid enough to flow into the pores
of the stock’s bedding surface. Without this flowability, the epoxy
will not wet the bedding surface and will not stick to the stock.
Even though there may be 72% metal by weight it may only be
27% by volume. This leaves 73% of the bedding compound pure
epoxy-resin that will shrink when it cures and it also lacks
compressive strength.
T.O.C.

4/23/2016 93
Pro-Bed 2000
This is what led me to use high compression strength microspheres.
Because microspheres are perfectly round they will roll over each
other and are quite easy to mix. It takes very little liquid epoxy-resin
to lubricate the microspheres so that they can flow. The microspheres
are also surface treated so they can bond well with the epoxy-resin.
Because of their size distribution, (our microspheres range from 3 to
25 microns) there are very small spheres in between the larger
spheres displacing even more epoxy-resin. It is a fact that the more
epoxy-resin that can be displaced, shrinkage be will reduced and
compressive strength will be enhanced to more resemble the
compressive strength of the microspheres. In this case a crush
strength from 10,000 to 60,000 PSI.
T.O.C.

4/23/2016 94
Pro-Bed 2000
As an example, atomized metal closely resembles crushed stone
on a smaller scale. Imagine a five-gallon bucket filled with
angular crushed stone. Would it be possible to thrust a mixing
stick all the way to the bottom of the bucket? If you were to
tamp the bucket on the floor, would the crushed stone become
more and more packed as each stone found a better resting
place? How much epoxy-resin would it take to lubricate and
hold the stones in suspension so that the bucket of stone could
be mixed or stirred?
T.O.C.

4/23/2016 95
Pro-Bed 2000
Imagine that same five-gallon bucket filled with marbles and
tiny ball bearings of varying diameters. It would certainly be
possible to thrust a mixing stick all the way to the bottom of
the bucket. If you were to tamp the bucket on the floor, would
the marbles and bearings become more and more packed as
each one found a better resting place or would they just slosh
around and occupy the same space? Being able to mix the
bucket of spheres even while dry means that it would only
take enough epoxy-resin to fill the bucket to the top level of
the spheres to have a mixture that would flow. This could be
as little as one gallon.
T.O.C.

4/23/2016 96
Pro-Bed 2000
These high compression strength microspheres along with carbon and
glass fibers held together with the very highest quality resins make Pro-
Bed 2000 the best epoxy available for epoxy bedding stocks. These
microspheres however are not cheap, they cost many times more by
volume than atomized metal or epoxy-resin, but your quality work, like
mine, is worth the extra cost and effort. Pro-Bed 2000 also simplifies
the ease of the mixing issue, using a ratio of 1:1 resin and curing
agent, by volume. I have also included the best mold release agent
ever offered to our profession. It is both easy to apply and clean off,
and it leaves the bedded surface blemish free.
T.O.C.

4/23/2016 97
Thanks for visiting our site !
For more information about
Score High Gunsmithing be
sure to visit our website at
http://www.scorehi.com
Click hear to Order our
products online T.O.C.
Top Related