


Languages
Pages
Legal


RIOT-LabHow to use RIOT in the IoT-Lab
Oliver "Oleg" Hahm
INRIA
October 15, 2015
O. Hahm (INRIA) RIOT-Lab October 15, 2015 1 / 26

Agenda
1 Prepare for a RIOTPrepare your ToolchainObtain the CodeUnderstanding RIOT
2 Using RIOT on native and the TestbedWorking with an ExampleUsing an IPv6 Application
3 Writing an Application for RIOTSetting up the ApplicationSome helpful FeaturesGet your Hands dirty
4 Join the RIOT
Slides are online available at http://riot-os.org/files/2015-riotlab-tutorial.pdf.
O. Hahm (INRIA) RIOT-Lab October 15, 2015 2 / 26

Prepare for a RIOT
Agenda
1 Prepare for a RIOTPrepare your ToolchainObtain the CodeUnderstanding RIOT
2 Using RIOT on native and the TestbedWorking with an ExampleUsing an IPv6 Application
3 Writing an Application for RIOTSetting up the ApplicationSome helpful FeaturesGet your Hands dirty
4 Join the RIOT
O. Hahm (INRIA) RIOT-Lab October 15, 2015 3 / 26

Prepare for a RIOT Prepare your Toolchain
Recommended Build Environment
For the IoT-Lab nodes we recommend to use gcc-arm-embedded toolchain.It can be found on https://launchpad.net/gcc-arm-embedded.
A quick guide to install the proper toolchain can be found in the RIOT wiki:http://wiki.riot-os.org/Setup-a-Build-Environment
See also http://wiki.riot-os.org/Board:-IoT-LAB-M3 for particular information onRIOT on the IoT-Lab nodes.
For the native port you have to install 32bit libraries.See http://wiki.riot-os.org/Family:-native#toolchains
O. Hahm (INRIA) RIOT-Lab October 15, 2015 4 / 26

Prepare for a RIOT Obtain the Code
Github
git clone https://github.com/RIOT-OS/RIOT.git && \
cd RIOT && git checkout 2015.09
or download the zipped version:https://github.com/RIOT-OS/RIOT/archive/2015.09.zip
The braver among you may also try the development version...
As a small �x for CLI-tools and getting rid of some warnings please go to~/iot-lab/parts/cli-tools and typesudo pip install -e .[secure].
O. Hahm (INRIA) RIOT-Lab October 15, 2015 5 / 26
Prepare for a RIOT Understanding RIOT
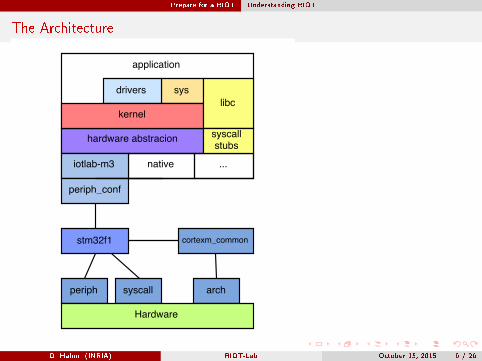
The Architecture
O. Hahm (INRIA) RIOT-Lab October 15, 2015 6 / 26

Prepare for a RIOT Understanding RIOT
The Folder Structure
RIOT
boards
iotlab-m3
core
cpu
cortexm_common
stm32f1
dist
doc
drivers
at86rf231
isl29020
examples
hello-world
pkg
libcoap
sys
net
gnrc
tests
O. Hahm (INRIA) RIOT-Lab October 15, 2015 7 / 26
Prepare for a RIOT Understanding RIOT
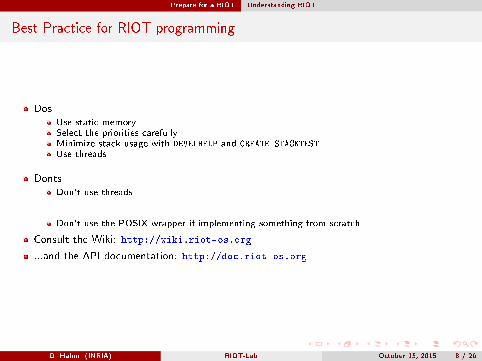
Best Practice for RIOT programming
DosUse static memorySelect the priorities carefullyMinimize stack usage with DEVELHELP and CREATE_STACKTESTUse threads
DontsDon't use threads
Don't use the POSIX wrapper if implementing something from scratch
Consult the Wiki: http://wiki.riot-os.org
...and the API documentation: http://doc.riot-os.org
O. Hahm (INRIA) RIOT-Lab October 15, 2015 8 / 26

Prepare for a RIOT Understanding RIOT
Best Practice for RIOT programming
DosUse static memorySelect the priorities carefullyMinimize stack usage with DEVELHELP and CREATE_STACKTESTUse threadsIncrease �exibility, modularity, and robustness by using IPC.
DontsDon't use threadsTry not to use more than one thread per module.Don't create threads for one-time tasks.Don't use the POSIX wrapper if implementing something from scratch
Consult the Wiki: http://wiki.riot-os.org
...and the API documentation: http://doc.riot-os.org
O. Hahm (INRIA) RIOT-Lab October 15, 2015 8 / 26
Using RIOT on native and the Testbed
Agenda
1 Prepare for a RIOTPrepare your ToolchainObtain the CodeUnderstanding RIOT
2 Using RIOT on native and the TestbedWorking with an ExampleUsing an IPv6 Application
3 Writing an Application for RIOTSetting up the ApplicationSome helpful FeaturesGet your Hands dirty
4 Join the RIOT
O. Hahm (INRIA) RIOT-Lab October 15, 2015 9 / 26

Using RIOT on native and the Testbed Working with an Example
Compile and run on native
Let's prepare a simple, virtual network:
[RIOT]# dist/tools/tapsetup/tapsetup -c 2creating tapbr0creating tap0creating tap1
Now we build and start the �rst virtual node.
[RIOT]# cd examples/default/[default]# make all termBuilding application default for native w/ MCU native."make" -C /home/oleg/git/RIOT/cpu/native...RIOT native board initialized.RIOT native hardware initialization complete.
main(): This is RIOT! (Version: 2015.09 - tbilisi -HEAD)Native RTC initialized.Welcome to RIOT!> helpCommand Description---------------------------------------reboot Reboot the nodeps Prints information about running threads.rtc control RTC peripheral interfaceifconfig Configure network interfacestxtsnd send raw data
O. Hahm (INRIA) RIOT-Lab October 15, 2015 10 / 26

Using RIOT on native and the Testbed Working with an Example
Setup the second Node
Ok, how about a second node?Therefore, we specify the tap interface to use by (re-)using the PORT environment variable. Wecan use any created tap interface from the previous step. (Default is tap0.) Once the node hasstarted, we check its radio address.
[default]# PORT=tap1 make termWelcome to RIOT!> ifconfigIface 4 HWaddr: 8a:c2:b6:72:eb:57
Source address length: 6
O. Hahm (INRIA) RIOT-Lab October 15, 2015 11 / 26

Using RIOT on native and the Testbed Working with an Example
Connecting the two Nodes
It's time to send our �rst packet (assuming that the �rst node is still running.). Go back to the�rst node and type:
> txtsnd 4 8a:c2:b6:72:eb:57 riotlab
On the second node we should see something like:
PKTDUMP: data received:~~ SNIP 0 - size: 7 byte , type: NETTYPE_UNDEF (0)000000 72 69 6f 74 6c 61 62~~ SNIP 1 - size: 20 byte , type: NETTYPE_NETIF (-1)if_pid: 4 rssi: 0 lqi: 0src_l2addr: a6:b7:d0:ea:de:f9dst_l2addr: 8a:c2:b6:72:eb:57~~ PKT - 2 snips , total size: 27 byte
O. Hahm (INRIA) RIOT-Lab October 15, 2015 12 / 26

Using RIOT on native and the Testbed Working with an Example
Using the same example on the testbed
Running the same example on a real node is very similar.We use the environment variable BOARD to specify the target platform � and IOTLAB_ variables fortestbed con�guration.
[default]# BOARD=iotlab -m3 IOTLAB_SITE=lille IOTLAB_DURATION =60 make alliotlab -exp
Building application "default" for "iotlab -m3" with MCU "stm32f1""make" -C /tmp/RIOT/boards/iotlab -m3...Waiting that experiment 29409 gets in state Running"Running"
And now connect to the nodes using the serial_aggregator:
[default]# BOARD=iotlab -m3 IOTLAB_SITE=lille make iotlab -termConnection to lille.iot -lab.info closed.1444752645.849845; Aggregator startedifconfig1444752749.523268;m3 -13; ifconfig1444752749.523673;m3 -9; ifconfig1444752749.525317;m3 -9; Iface 4 HWaddr: 9d:12 Channel: 26 NID: 0x23
TX -Power: 0dBm State: IDLE CSMA Retries: 41444752749.525976;m3 -13; Iface 4 HWaddr: 96:16 Channel: 26 NID: 0x23
TX-Power: 0dBm State: IDLE CSMA Retries: 4...
O. Hahm (INRIA) RIOT-Lab October 15, 2015 13 / 26

Using RIOT on native and the Testbed Using an IPv6 Application
The Shell in a Nutshell
For this step we will use gnrc_networking application from examples directory.
You can con�gure RIOT to provide you with some default system shell commands.
All available shell commands and some online help are shown by calling help:
> helphelpCommand Description---------------------------------------udp send data over UDP and listen on UDP portsreboot Reboot the nodeps Prints information about running threads.ping6 Ping via ICMPv6mersenne_init initializes the PRNGmersenne_get returns 32 bit of pseudo randomnessifconfig Configure network interfacestxtsnd send raw datafibroute Manipulate the FIB (info: 'fibroute [add|del]')ncache manage neighbor cache by handrouters IPv6 default router listrpl rpl configuration tool [help|init|rm|root|show]
The selection of commands depends on the con�guration of your application (and may vary alittle bit for di�erent platforms).
O. Hahm (INRIA) RIOT-Lab October 15, 2015 14 / 26

Using RIOT on native and the Testbed Using an IPv6 Application
Let's communicate
The gnrc_networking application provides you with some helpful shell commands:
1 ping: The famous ICMP diagnosis tool (system command).
2 udp: A very basic command for arbitrary UDP connections (application command).
After we �ashed two nodes, we'll have to �nd out their IPv6 addresses using ifconfig:
m3 -66; ifconfigIface 7 HWaddr: 7f:06 Channel: 26 NID: 0x23 TX-Power: 0dBm State: IDLE
CSMA Retries: 4Long HWaddr: 36:32:48:33:46: d8:7f:06AUTOACK CSMA MTU :1280 6LO IPHCSource address length: 8Link type: wirelessinet6 addr: ff02 ::1/128 scope: local [multicast]inet6 addr: fe80 ::3432:4833:46 d8:7f06 /64 scope: localinet6 addr: ff02 ::1: ffd8:7f06 /128 scope: local [multicast]
Now we can try to ping the other node:
> ping fe80::ff:fe00:f01eINFO # ping fe80::ff:fe00:f01eINFO # Echo reply from fe80::ff:fe00:f01e received , rtt: 0.0340s
O. Hahm (INRIA) RIOT-Lab October 15, 2015 15 / 26
Using RIOT on native and the Testbed Using an IPv6 Application
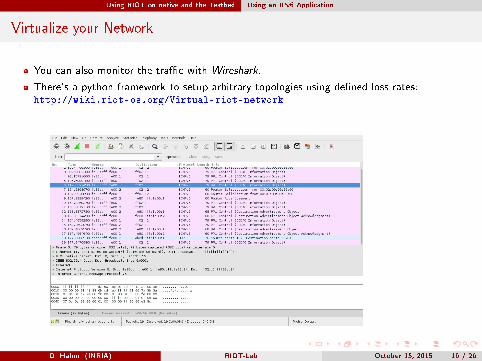
Virtualize your Network
You can also monitor the tra�c with Wireshark.
There's a python framework to setup arbitrary topologies using de�ned loss-rates:http://wiki.riot-os.org/Virtual-riot-network
O. Hahm (INRIA) RIOT-Lab October 15, 2015 16 / 26

Writing an Application for RIOT
Agenda
1 Prepare for a RIOTPrepare your ToolchainObtain the CodeUnderstanding RIOT
2 Using RIOT on native and the TestbedWorking with an ExampleUsing an IPv6 Application
3 Writing an Application for RIOTSetting up the ApplicationSome helpful FeaturesGet your Hands dirty
4 Join the RIOT
O. Hahm (INRIA) RIOT-Lab October 15, 2015 17 / 26

Writing an Application for RIOT Setting up the Application
The Make�le
To create your own RIOT example, you need only two �les:
1 A C (or C++) �le with a main function
2 A Make�le
You can �nd a template for a Make�le in dist/Makefile.
# Giving your application a nameAPPLICATION = riotlab1# Choosing a default platformBOARD ?= native# Specifying the RIOT folderRIOTBASE ?= $(CURDIR)/../../ RIOT# Some helpful compiler flagsCFLAGS += -DSCHEDSTATISTICS -DDEVELHELP# Quieten the building processQUIET ?= 1# Modules to include:USEMODULE += posixUSEMODULE += xtimerUSEMODULE += shell_commands# Let RIOT 's build system take care of the restinclude $(RIOTBASE)/Makefile.include
O. Hahm (INRIA) RIOT-Lab October 15, 2015 18 / 26

Writing an Application for RIOT Setting up the Application
The main() Function
The only mandatory thing in your application is a main function with this prototype:int main(void)
Standard C libraries can be used and parts of POSIX are ble through a wrapper within RIOT.
#include <stdio.h>#include <unistd.h>
#define WAIT_USEC (1000 * 1000)
int main(void){
puts("Hello!");usleep(WAIT_USEC);puts("Good night!");
return 0;}
O. Hahm (INRIA) RIOT-Lab October 15, 2015 19 / 26

Writing an Application for RIOT Setting up the Application
Doing it the RIOT way
Instead of POSIX functions is usually advisable (and more e�cient) to just use the native RIOTfunctions:
#include <stdio.h>#include "xtimer.h"
int main(void){
puts("Let's throw a brick!");xtimer_usleep(SEC_IN_USEC);puts("System terminated");
return 0;}
O. Hahm (INRIA) RIOT-Lab October 15, 2015 20 / 26

Writing an Application for RIOT Some helpful Features
Starting the Shell
#include "shell_commands.h"
static int my_echo(int argc , char **argv);...const shell_command_t shell_commands [] = {
{"echo", "Echo the user's input", my_echo},{NULL , NULL , NULL}
};.../* allocate some memory for the input line */char line_buf[SHELL_DEFAULT_BUFSIZE ];/* starting the shell loop (blocking) */shell_run(shell_commands , line_buf , SHELL_DEFAULT_BUFSIZE);
O. Hahm (INRIA) RIOT-Lab October 15, 2015 21 / 26

Writing an Application for RIOT Some helpful Features
Threads and IPC
/* allocate memory for the thread 's stack */char my_stack[THREAD_STACKSIZE_MAIN ];/* define a function as entry point for your new thread */void *my_thread(void *arg) {...kernel_pid_t pid = thread_create(my__stack , sizeof(my_thread_stack),
THREAD_PRIORITY_MAIN - 1, CREATE_STACKTEST ,my_thread , NULL , "mythread");
msg_t m;m.content.value = 1;msg_send_receive (&m, &m, pid);
O. Hahm (INRIA) RIOT-Lab October 15, 2015 22 / 26

Writing an Application for RIOT Get your Hands dirty
Now it's up to you
Your task is now to extend the sixlowapp example.
Check the source code of the posix_sockets example and API documentation online:http://doc.riot-os.org
Check the documentation for the sensor API, e.g. for the light sensor:http://doc.riot-os.org/group__driver__isl29020.html
Initialize all four sensors in the beginning of the application.
Extend the netcat command to send optionally measured sensor data.
Print the measurements on the receiving side.
O. Hahm (INRIA) RIOT-Lab October 15, 2015 23 / 26

Join the RIOT
Agenda
1 Prepare for a RIOTPrepare your ToolchainObtain the CodeUnderstanding RIOT
2 Using RIOT on native and the TestbedWorking with an ExampleUsing an IPv6 Application
3 Writing an Application for RIOTSetting up the ApplicationSome helpful FeaturesGet your Hands dirty
4 Join the RIOT
O. Hahm (INRIA) RIOT-Lab October 15, 2015 24 / 26

Join the RIOT Getting Support
Where to get help
Mailing [email protected]@riot-os.org
IRC on irc.freenode.org, #riot-os
Regular video conferencing meetings
O. Hahm (INRIA) RIOT-Lab October 15, 2015 25 / 26

The Last Slide� Q&A
Thank you!Any questions?
O. Hahm (INRIA) RIOT-Lab October 15, 2015 26 / 26
Top Related