


Languages
Pages
Legal


rev May, 2015

CREDITS 2
Game DesignBrett Murrell
ArtK. Andersen
Matthew Attard
Armands Auseklis
Kerem Beyit
Deyer Blaylock
Leon Butchers
Jose R. Castello
Lon Chaney
Dean Chaney
Chris Collingwood
Donna D’Amelio
Jacques-Louis David
Gerald C. Double
FrankT
Andrew Hou
Howard David Johnson
Ronald C. Kapaun
Richard Kitner
Zieben Lin
Thomas Long (Fygomatic)
Damir Martin
Mea
Kurt Miller
Gary Oliverio
Laurie Prindle
Lorraine Purviance
Kevin Radthorne
Mike Robinson
Martin Roes
Douglas Shuler
Margit Elland Schmitt
Robert Sicotte
Wolfgang Sigl
Jakov Smojver
Adam Vehige
WritingBrett Murrell
EditingJeff McCamish
Core PlaytestCurtis Barrett, Tigger Barrett, Keith Carter, Marlee Carter, Matt Clark, John Crane, Jeremy Evarts, Marc Gardner, Joe Hartman, Gary Heller, Steve Kennedy, Matthew Jacobsson, Jeff McCamish, Derek Mencer, James Murrell, Jonathan Murrell, Caleb Ortiz, Joshua Ortiz, Colby Patchin, Jared Patchin, Jack Penick, Chris Reed, Luke Roberts, Zane Roberts, Cody Stump
7 Map Platters – Seven large round “buzz saw” map sections. These fit together with the keys like a puzzle.
12 Dome Keys – 6 green (Ancient) and 6 brown (Colonial). Their ages do not matter for the Basic Set.
12 Adventure Keys – Team White and Black Bases, Lith’s Lair, Alliance, 4 Standard Labyrinths and 4 Alternate Labyrinths.
48 Character Cards and Markers – Large cards with the portrait and information on one side, the background story on the other. Each card has a corresponding round marker to represent the character on the map.
6 Reference Cards – Large cards providing key info when you are learning the game.
46 Common Treasure Cards – White treasure deck loaded with weapons.
32 Secret Treasure Cards – Black treasure deck light on weapons but containing powerful secrets.
20 Elite Treasure Cards – Gold treasure deck containing superb treasure.
100 Challenge Cards – Used to resolve attacks, challenges, and other game results. While the one deck is used by both teams, a second deck is in the Master Set to allow each team their own deck.
72 Guardian Cards – 18 for each of the four ages.
54 Gold Encounter Markers – With a question symbol on the back side. Two markers are blank replacements.
7 Creature Markers – Square markers with gold and blue backgrounds.
28 Team Markers – With Team White on one side, Black on the other.
16 Experience Markers – +1 on one side, Active on the other.
6 Lith Tribute Markers – The greatest treasures of mankind to be offered as tribute to Lith, Queen of the Games.
4 Line of Sight Hexagons – With a blue centering star.
18 Blue Encounter Markers and 16 Henchman Markers – Included in the Basic Set but used with the Master Set.
ww
w.d
ue
lofa
ge
s.co
m
– New challenges
– Extended game play
– Additional characters
– Game support
– Rules for Alliance key
duelofages.com is the official resource for DoA. Discover a treasure of additional content, strategies, and mods.
GAME COMPONENTS
Olympus
B
F
?
?
This rulebook is formatted to teach you the game. The website contains the Rules & Missions PDF, which separates the manual into the core rules and scenarios for easier reference.
All game content ©Worldspanner 2011
All rights reserved.
INTRO 3
It is February 30, 2384. Across the Forty Worlds, twenty billion entertainment-seekers engage in the Games. Most hook through v-Space for a few hours of sport. Others spend time with friends at one of the many Reality Realms parks or the Virtuality holo-worlds.
Despite uncountable entertaining options in the Games, there has always been a favorite – Worldspanner. Worldspanner immerses its participants in a thousand different settings, allowing them to take on their favorite persona as a hero or villain of any age, and enjoying delights ranging from masquerade balls to Roman festivals to team contests.
It is your goal to become a professional of the Games – a Challenger...
You are alone in a circular chamber, listening to the chatter of your fellow Psiclone teammates through the commlink in your helmet. You scroll through stats on your helmet display, more out of nervous habit than need. The opponents are old rivals – the Skyhawks, your sixth challenge against them this season.
The 30-second alarm sounds, and you straighten your feedback suit. Now comes the best and worst moment – the discovery of who you are.
The lights dim. Within your helmet the room disappears, replaced by the holovision of a great stage on which you and your teammates are arrayed. Your body is nothing but mist, but it begins to take form like a wraith acquiring flesh. The audience sees the same, and they cheer as they recognize the figures that each of you take.
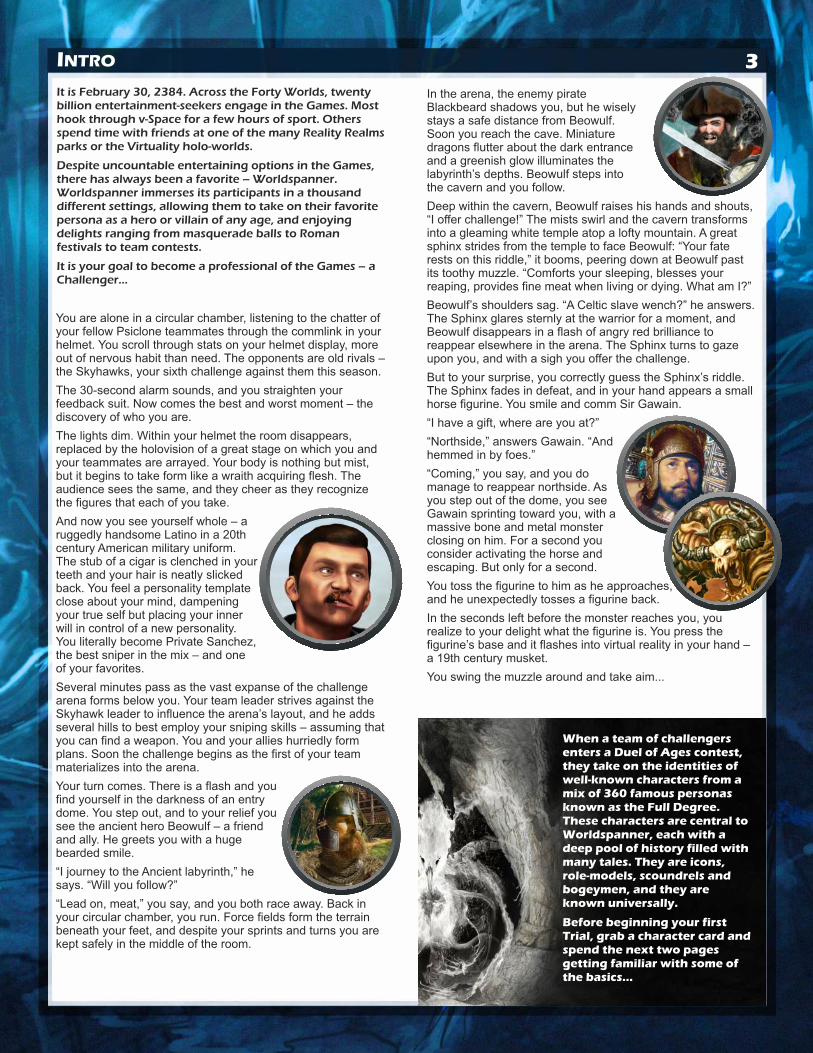
And now you see yourself whole – a ruggedly handsome Latino in a 20th century American military uniform. The stub of a cigar is clenched in your teeth and your hair is neatly slicked back. You feel a personality template close about your mind, dampening your true self but placing your inner will in control of a new personality. You literally become Private Sanchez, the best sniper in the mix – and one of your favorites.
Several minutes pass as the vast expanse of the challenge arena forms below you. Your team leader strives against the Skyhawk leader to influence the arena’s layout, and he adds several hills to best employ your sniping skills – assuming that you can find a weapon. You and your allies hurriedly form plans. Soon the challenge begins as the first of your team materializes into the arena.
Your turn comes. There is a flash and you find yourself in the darkness of an entry dome. You step out, and to your relief you see the ancient hero Beowulf – a friend and ally. He greets you with a huge bearded smile.
“I journey to the Ancient labyrinth,” he says. “Will you follow?”
“Lead on, meat,” you say, and you both race away. Back in your circular chamber, you run. Force fields form the terrain beneath your feet, and despite your sprints and turns you are kept safely in the middle of the room.
In the arena, the enemy pirate Blackbeard shadows you, but he wisely stays a safe distance from Beowulf. Soon you reach the cave. Miniature dragons flutter about the dark entrance and a greenish glow illuminates the labyrinth’s depths. Beowulf steps into the cavern and you follow.
Deep within the cavern, Beowulf raises his hands and shouts, “I offer challenge!” The mists swirl and the cavern transforms into a gleaming white temple atop a lofty mountain. A great sphinx strides from the temple to face Beowulf: “Your fate rests on this riddle,” it booms, peering down at Beowulf past its toothy muzzle. “Comforts your sleeping, blesses your reaping, provides fine meat when living or dying. What am I?”
Beowulf’s shoulders sag. “A Celtic slave wench?” he answers. The Sphinx glares sternly at the warrior for a moment, and Beowulf disappears in a flash of angry red brilliance to reappear elsewhere in the arena. The Sphinx turns to gaze upon you, and with a sigh you offer the challenge.
But to your surprise, you correctly guess the Sphinx’s riddle. The Sphinx fades in defeat, and in your hand appears a small horse figurine. You smile and comm Sir Gawain.
“I have a gift, where are you at?”
“Northside,” answers Gawain. “And hemmed in by foes.”
“Coming,” you say, and you do manage to reappear northside. As you step out of the dome, you see Gawain sprinting toward you, with a massive bone and metal monster closing on him. For a second you consider activating the horse and escaping. But only for a second.
You toss the figurine to him as he approaches, and he unexpectedly tosses a figurine back.
In the seconds left before the monster reaches you, you realize to your delight what the figurine is. You press the figurine’s base and it flashes into virtual reality in your hand – a 19th century musket.
You swing the muzzle around and take aim...
When a team of challengers enters a Duel of Ages contest, they take on the identities of well-known characters from a mix of 360 famous personas known as the Full Degree. These characters are central to Worldspanner, each with a deep pool of history filled with many tales. They are icons, role-models, scoundrels and bogeymen, and they are known universally.
Before beginning your first Trial, grab a character card and spend the next two pages getting familiar with some of the basics...

4Ratings are the core of your character. Each rating is a scale from 0 (hopeless) to 9 (best of the best). Ratings are colored merely as a helpful indicator of quality. High ratings are a healthy blue, while poor ratings are a sickly red.
MELEE
DEFENSE
TRAITS
RANGED
SPEED
HEALTH
RESPECT
HONOR
INTELLECT
STRENGTH
ARMOR
STEALTH
REACT
THROW
POINT
AIM
DAMAGE
POWER
MELEE
WITS
MAIN CHARACTER RATINGS
Wits
Cunning, street smarts, cleverness and battle senses:
Melee
Skill at hand-to-hand combat:
Power and Damage
Damage caused by natural fists, claws or mandibles. Power is the ability of a weapon to penetrate armor, usually 2-3 for a human fist. Damage is the average damage caused on a hit, and is usually 2.
World-class con manPickpocketStreet fighterSorority girlFarm-raised turkey
Special ops kung fu masterArmy PrivateSoccer fanAngry housewifeSpelling bee champion
React
Quickness and agility of body movement. React is your defense against Melee attack:
Stealth
Hide, sneak, and avoid getting shot. Stealth is your Ranged defense:
Armor
Protection of your clothing or skin:
Wind WarriorAcrobatCheerleaderPotbellied plumberZombie with torn ACL
NinjaElfCountry girlAmerican touristInebriated Elvis impersonator
700 lbs. of tinfoilFull plateBreastplateHeavy clothingTrendy swimwear
79
531
79
531
79
531
Aim
Steadiness, cool-headedness, concentration and vision quality. Aim is needed to use carefully aimed weapons like rifles.
Point
Hand-eye coordination and fluid, accurate upper body movements. Point is critical with weapons that are not carefully aimed, such as pistols and automatic weapons.
Throw
Throw strength and accuracy. Important for grenades, spears and arm-strength weapons like bows.
Speed
Land speed. An average human has a Speed of 6.
Health
The amount of punishment you can take before your gallant death. A typical human has Health 4.
Strength
Muscle power and the experience to put it to use:
Intellect
Book learning, logic and memory:
Honor
How you treat others and hold to selfless standards:
Respect
How others regard you:
Steroid test subjectDock workerThose guys in the end zone seatsComputer gamerRipped pixies
EinsteinEinstein’s accountant brotherEinstein during OktoberfestEinstein the BarbarianEinstein’s really smart cat
SaintlySelflessGive-and-takeSelf-servingGrinchy
Rock star!Reality show contestantFamily manLoserFermenting pond scum
79
531
79
531
79
531
79
531
79
531
79
531

CircleFrom Lords to Outcasts, Exemplars to Villains, the Circle is the social class in which the character is most at home.
AN
CI
EN
TC
OL
ON
IA
LM
OD
ER
NF
UT
UR
E
Age and SettingCharacters fall into four ages: Ancient, Colonial, Modern and Future. Within each age are three settings – story universes in which the characters have their being.
LANDS WEST
The colorful setting of Western America during the 1800’s.
CHASMS
An epic fantasy realm where a thousand races share the world with Men.
EPIC HEROES
The ancient histories and mythologies of old Earth, up to the 1400’s A.D.
HORIZONS
Historical old Earth from the 1400’s through World War I.
STARMARCH
A fantasy universe set in the mold of hard science fiction.
AGE OF CRISIS
History and myth during the time of great crisis, between World War II and the 2060’s.
STRANGE TIMES
The daydream realm of conspiracy theorists and their unexplained phenomena.
UNDERGROUND
The hard-bitten realm of lawmen and mobsters during the 20th century.
FORTY WORLDS
History and mythology from the 2060’s to the present.
ALTSPACE
A fantasy universe set in the mold of grand space opera.
A land abundantly populated with the faerie people.
FAER
FOLKTALES
Colonial-era folklore and fairy tale set in the 16th-19th century.
Exemplars
Defenders
Warriors
Commoners
OutcastsVillains
Adventurers
Lords
Icons
The pure at heart
Kings, generalsand other leaders
The famous
Treasure huntersand thrill-seekers
Protectors andlaw-keepers
Skilled fighters
The everymenand everywomen
The dark side Refugees from normalsociety
NatureThere is a magical difference between boys, girls and toothy aliens.
Fiend
Man
Woman
Child
M
W
Fie
C
Holy
Being
Fairy
Machine
H
Fai
Mc
B
The PortraitA character’s portrait does not reflect the character’s equipment. Even though the picture of William Wallace shows him with axe and armor, he actually comes into the challenge with little more than a kilt and an inspiring grimace.
You are ready for the GamesAs a new challenger, you must first prove yourself over three training Trials before being allowed access to the Games. Play each Trial until you are comfortable with the rules, then move to the next. Once skilled, you will begin mastery of the Missions.
As you progress through the Trials and Missions, you are learning the rules step by step. Rules learned in earlier Trials are true later, unless they are specifically described as special.
Enter your first Trial on the next page...
CHARACTER BACKGROUND 5

Game RoundsDuel of Ages is played in rounds. Each round has a Team White turn, followed by a Team Black turn. The phases below occur each turn. Complete them in the order shown. You must finish one phase before going on to the next.
The Free Action PhaseDuring your Free Action, your team (only) can take special actions like trading cards. You will learn about trading soon.
The Move PhaseDuring your Move, your team can move any and all of your characters. The other team cannot move.
The map has a grid of hexagonal spaces. Characters move on the map using those spaces. A character’s Speed rating is used as “move points.” Characters do not need to move full Speed, or even move at all. They cannot save move points for a later turn.
Map terrain and movement
Each space on the map has one and only one terrain type. Each terrain costs a certain number of move points to enter. (You never pay to leave a space.)
Clear – Clear spaces cost 1 point to enter.
Woods and Swamp – Woods costs 2 and Swamp costs 3.
Water and Deep Water – Water costs 2 points to enter. Characters cannot enter Deep Water spaces.
Building – Building spaces cost 3 points to enter.
Rough – Rough is rocky terrain costing 2 points.
Fire, Domes and Obstacles – Characters cannot enter Fire, Dome or Obstacle spaces. Obstacles include the snake statue on Catacombs and the Colossus.
Characters MUST leave a Dome space during their Move phase.
For buildings that take up multiple spaces, it does not matter if you are moving “inside” that Building from one space to another, it always costs 3 points.
6
OlympusCatacombs
NORTH
SOUTH
Stephen DecaturSuva of OrianVenya 8William Wallace
Team White
Ardin GlynnJack HammerSgt. GrittSpartacus
Team Black
4 5
Team Black’s turn
Free Action phaseMove phaseMelee phaseAdventure phase
Team White’s turn
Free Action phaseMove phaseMelee phaseAdventure phase
12
3
4
No! Yes!
5 1
PHILO-SOPHERS
Terrain
TRAINING TRIAL 1 – FACE OFF
MesaCliff & Slope
+1 up Slope
MoveCost
Woods 2
Clear 1
Swamp 3
DeepWater
Building
Water 2
X
3
Obstacle
Rough 2
Fire
Dome
X
X
XCavern& Walls 1/X
X
“Face Off is your first training exercise, teaching hand-to-hand combat. You must learn to handle yourself in battle.”
To Win
Eliminate the enemy team.
Teams and Characters
Divide players into two teams. The team with the best hair is Team White. Teammates sit together.
Give the character cards to the teams, dividing them between the players. Find the marker for each character. Markers have a Team Black and a White side.
Face Off uses only the ratings on the right side of the character card. Ignore all else on the cards, including special abilities.
The Map
Build the map using the circular platters and the triangular keys like a puzzle. Use the Olympus and Catacombs platters, aligning the name text on the platters as shown (both straight horizontal).
Use the six green Dome keys to lock the platters, placing them as shown. It does not matter which Dome key goes where or how they are aligned.
Common Treasure Deck
The white Common deck contains weapons and other shiny loot. Shuffle it. In Face Off, you do not use Ranged cards. If you draw one, discard it face up and draw again.
The Secret and Elite decks are not used in Face Off.
Place characters on the map
Team White places their characters in Dome spaces on the three north keys of the map, no more than one per Dome. Black does the same on the south.
Place Encounters on the map
1. Mix the Gold Encounter markers face down.
2. Starting with Team Black, each team alternates placing Encounters face down on the map without looking at them. Encounters cannot be placed in a Dome space. They must be placed at least 4 spaces away from all other Encounters.
3. Continue until there are no more spaces where an Encounter could be placed.
There is no difference between your characters and teammate characters. Rules never apply just to the characters that YOU are playing.
Any card with one of these three symbols in the upper right is a Ranged card:
For the 4-space limit, ignore terrain, but count around the empty notches in the platters.

7
vs.Melee
React
Damage
vs.Power
Armor
23You:
4Target:
6vs.
7
7vs.
6
01-56-9
BY
AT
TA
CK
ER
IS B
ET
TE
RD
EF
EN
DE
RIS
BE
TT
ER
1-56-9
-2
-1
X
+0+1
-2
12-67-9D
EF
EN
DE
RIS
BE
TT
ER -1
-2X
“If you are stronger, force the enemy where you want him. If the enemy is stronger, lure him where you want him.”
TRAINING TRIAL 1 – FACE OFF
Caverns – Any space containing Cavern Wall is a Cavern. Cavern spaces are always Clear.
Cavern Walls – Caverns are surrounded by black walls. Characters cannot move through cavern walls to the space on the other side unless a passage connects through.
Mesas, Cliffs and Slopes – The snowy white highlands are mesas. Mesas are Clear unless they contain other terrain.
Mesas are surrounded by cliffs. Characters cannot cross a cliffside except at Slopes – the winding brown paths.
It costs 1 extra point to move up onto the mesa using a Slope, but no extra to move down it.
Enemies stop movement
If a character moves into a space containing an enemy, he must stop movement.
Always move one space
A character can always move one space during his Move, even if the cost of that one space is more than his Speed.
This does not allow impossible movement like into Deep Water or across cliffsides.
A movement example
The Melee PhaseMelee is hand-to-hand combat. Melee happens only when enemies are in the same space. In each Melee, characters from both teams can attack. Each character can make one melee attack against any one enemy of their choice in the space. Resolve all attacks in one space before moving on.
Wits determines order
Handle melee attacks in order of Wits -- highest Wits attacks first. The current team breaks any tie. For example, on Team Black’s turn, they attack first in case of a tie.
Natural melee attack
Every character can fight hand-to-hand without needing a Melee card. This is called the natural melee attack.
Making a melee attack
1. Choose your target – an enemy in your space.
2. Compare your Melee rating vs. the target’s React. Determine which is better, and by how much.
These characters each have 6 Speed:
W uses 3 points to enter the Building and 3 to enter the Swamp.
X uses 3 points to enter the Building and decides to stop.
Y uses 4 points on the two Water spaces. He would like to enter the Building space, but that would cost 7 points.
Z decides not to move at all.
This means that a low-Wits character could be killed before being able to attack.
3. Draw a challenge card. If the attacker is better, use the “Attacker is Better” section. If the defender is better, use “Defender is Better.”
4. Look at the column of the card. = Miss, = Hit. Discard the card afterward.
5. If the attack hits, you must now check damage. Compare your Power vs. the target’s Armor. Determine which is better, and by how much.
6. Draw a second challenge card and look at the . column. If this is a number, add or subtract the number from your Damage rating. This might reduce your damage to 0. If the result says “X”, you cause no damage.
7. Subtract the damage from the target’s Health. If Health falls to zero, the character is killed.
Max Health/Current Health
Max Health is the amount shown on the character card. Current Health is the amount that the character has at the moment.
Healing increases a character’s current Health, but cannot increase it above max Health.
On this card, Melee 7 vs. React 6 would hit, while Melee 6 vs. React 7 would miss.
Example: Your Power is 3 and Damage is 2. The target has 4 Armor.
3 Power vs. 4 Armor means the Defender is better by 1.
You draw a challenge card. The Damage column shows “-1”. Subtract 1 from your Damage rating, causing 1 damage.
A wounded character suffers no penalties. He fights bravely until killed.
To track Health loss, dice work best. Glass stones are a close second. Dead flies are a distant third.

8
“An encounter is not about fighting. It is about meeting a kindred spirit who shares your wit, grace, prowess or charm.”
6 1
LUMBERCAMP
Difficulty& Rating
CardsRewarded
Hutep’s Jeweled Blade
On an Amaze Damage result, draw another result to check Luck:– 0-2: Wielder suffers 2 Damage.– 3-6: Target suffers 1 additional damage.– 7-9: User heals 1 Health.
Unearthed 2014 in the lost tomb of a deposed Pharaoh.
3 3modernK
#2
17
52
vs.
Some say that the blade is cursed, some say it is blessed, and others simply die mysteriously after owning it.
+1 Hit
UseLimit
SpecialAbility
Strength andIntellectRequirements
CardNumber
Card Name
PowerandDamage
RatingsUsed
Bonus (not usedin Face Off)
TRAINING TRIAL 1 – FACE OFF
The Adventure Phase
Meeting an Encounter
An Encounter is a person or group waiting to greet your characters. An Encounter is not a fight. Instead, a character must impress the encounter to receive treasure.
Most Encounters show a rating and a difficulty. For example, the Lumber Camp is 6-rated Strength.
If a character is on a space containing an Encounter, he can meet it. Reveal the Encounter to all players.
If the character’s rating equals or exceeds the Encounter’s rating, he impresses the Encounter. He draws as many treasure cards as is shown on the marker. The cards must go to the character that passed the Encounter.
If the character’s rating is less than the Encounter’s rating, he fails to impress. Flip the Encounter back face down. If another allied character is in the space, he can try after you.
For Workshop and Black Market, you must instead pay a card to pass the Encounter.
Encounter Age Bonus
Each Encounter is a certain Age, as indicated by the box color on the marker. For example, Lumberjacks is a Colonial Encounter with a brown box background.
If an Encounter matches the character’s Age, you gain +1 to the rating. For card-paying Encounters of the same age, you can choose not to pay a card at all and still pass it, but you draw one less card for your reward.
The ‘Jacks at the lumber camp respect strength. Weaklings need not apply.
For example, if you meet the Lumberjacks above and have 6 or better Strength, you get to draw 1 card.
Enemies in your space never prevent you from attempting an adventure in the space. Encounters are always voluntary. You are not required to meet them, nor pay a card for Workshop/Black Market.
Afterward, remove the Encounter from the map.
TreasureTreasure cards (“cards”) come in three decks – Common, Secret and Elite. Face Off uses only the Common deck.
4 card carry limit
Each character can carry 4 cards. You must immediately discard excess cards. Place discards face up in a pile.
Strength/Intellect requirement
Look at the Strength and Intellect rating on a card. A character must be as good or better in both Strength and Intellect, or he cannot use that card. He can still carry it.
Use limit
Each card has a P, 1, or K in the lower left.
– The card is permanent, not lost after use. It remains with the character until traded away or lost in some unusual way.
– This card is usable only once, then discarded.
– K can be found on most weapons. Such a weapon is lost after it kills or imprisons a character.
Revealing cards
When you draw a new card, keep it face down on or under the owning character’s card, unrevealed to the enemy. At some point, a card must be revealed. Once revealed, it cannot be hidden again.
Trading cards
Cards can be traded between characters during their Free Action phase. Characters must be in the same space to trade cards. Cards cannot be traded if an enemy is in the space.
You must have at least 3 Strength and 3 Intellect to use Hutep’s Jeweled Blade shown below.
P
1
K

TRAINING TRIAL 1 – FACE OFF
Picking up cards
Characters cannot drop cards voluntarily.
When a character is killed, his cards remain in the space where he was killed.
A character can pick up cards from the ground during Free Action. He cannot pick up cards if an enemy is in the space. He must pick up ALL of the cards. Distribute the cards among any allies in the space, then discard excess or unwanted cards. Unrevealed cards remain unrevealed.
Destroying cards
A character can destroy cards only during his Free Action phase, or whenever he receives new cards.
Card Types
Melee
Melee cards can be used in place of the character’s natural melee attack, usually giving a better Power and Damage rating. Reveal a Melee weapon before attacking with it.
Armor
Armor comes in three types – Body, Helm, and Shield. A character can use only one of each type at a time, though he is allowed to carry others.
For Helms and Shields, the Armor bonus is usually shown on the card in the upper right. Helms give a bonus and often an additional +1 Armor against melee attacks, while Shields often give the added +1 against ranged attacks.
Body Armor provides a specific Armor rating. So, if your natural Armor is higher than this, the card does you no good.
Reveal Armor just before an enemy makes a Damage challenge against the owner.
Transports – Mounts and Vehicles
Transports increase Speed or give a set Speed, as shown on the card in the upper right. Using a Transport is voluntary. Reveal it to use it. A character can use only one Transport during a Move. You must use a chosen Transport through your entire Move phase.
Medical
Medical cards heal a character’s current Health, usually during Free Action. Reveal the card and apply the healing. Only the owner of the card can be healed.
Gadgets, Packs and Stealth
These cards provide advantages as described on the card. Reveal them when you first wish to gain those advantages.
Stop! You are now ready to Face Off...
9
“Adventuring is important, but even a princess must first learn how to defend herself.”
If you are new to Duel of Ages, you can skip this lecture. If not, pay attention!
And now, a few words of discouragement from the Chief Weewak:
“Duel of Ages old-timers: You were a problem before, and you’ll be the problem now. You must learn to unlearn! Many rules have changed since DoA version 1. Do not assume rules. Here are some key changes that will sneak by your animal synapses:”
Cards (Treasure)
1. Card trading happens during Free Action, not Move.
2. Pets are now the living Creatures, as compared to bots which are the machine Creatures. Hunters are the Creatures that you unleash at a specific enemy.
3. Hunters can move through an enemy without stopping.
4. Sentinels are K weapons. They are destroyed once they kill or imprison an enemy.
5. Body armor gives a set armor value, which might not help you if your armor is already strong.
6. Medical cards are usually used in Free Action.
7. Poison is now a “K” card.
8. A Badge drawn for the Vault is fine, and is taken like any other card.
Fighting
1. You can take up to 4 shots in the Fire phase, though there is a penalty for each extra shot.
2. You also lose a “K” weapon if you imprison an enemy.
3. A double-Amaze attack imprisons even if the enemy is not reduced to half Health or less.
4. There is no -1 penalty/+1 bonus to Hit in the team bases.
5. A shot taken into a space containing multiple targets is no longer determined randomly. Instead, you choose a target. But, if you miss, you must take the attack against an ally (if an ally is in the space).
6. Characters on mesas cannot fire down into any cavern space, and vice versa.
And other stuff
1. Attacking the enemy base is entirely different.
2. The light bulb rating is now called Intellect. The lightning bolt is Wits.
3. There are no more tunnels on the map. Instead, caverns can be found on the maps.
4. Setting up the map is different. Pay attention to the map-building rules.
5. Flight costs 1 point per space, even the ending space.
6. If all Domes of your drawn color are full, you can go to any empty Dome of your choice.

TRAINING TRIAL 2 – CROSSFIRE 10
The WastesLithopolis
NORTH
SOUTH
Free Action phase
Move phase
Melee phaseAdventure phase
Fire phase
OpFire phase
vs.
Rating used for Hit
Stealth is Hit defense
Power
Damage
OpFire
Range
Target
1
64
16area
vs.
Ace CannonBoris AndronovDavy CrockettGen. James GavinVictoriaYork
Team WhiteAnnie OakleyGeronimoPat GarrettPhillip Redlegs
Team Black
Attacking in the Fire Phase1. The shooter must have a Ranged weapon. Reveal the
weapon. Each shooter can use only one weapon.
2. No enemies can be in the shooter’s space, including the target himself.
3. The shooter can fire at up to 4 targets. Each of these shots must be at a different target. You must announce how many shots before you conduct the first attack. You do not need to name the specific targets.
4. When shooting at more than one enemy, you suffer -2 Hit on ALL shots for each extra shot.
5. The shooter must see the target. See Line of Sight, below.
6. The target must be in range. To check range, count the number of spaces to the target, including the target’s space but not the shooter’s.
7. Conduct the ranged attack like a melee attack. Aim, Point or Throw is the attack rating. Stealth is the defense.
8. If you kill your target and you are using a “K” weapon, you lose the weapon and all further intended attacks.
Line of SightSome terrain blocks sight completely. Other terrain does not block line of sight, but gives a Stealth bonus to your target.
Often the line of sight is obvious. If not, place sight markers in the shooter’s space and the target’s space, and draw a line with a paper edge or floss between them. If the line touches any of the terrain images, that terrain affects the shot.
Sight is affected only by the image of the terrain, not its shadow or the entire space.
Ignore terrain in the shooter’s space, except Dome and Cavern wall.
Mesa: Only the white counts
The dark cliffs around Mesa are ignored for line of sight. Only the white terrain counts.
A weapon’s OpFire rating is ignored in the Fire phase.
So, if you announce 4 shots, you suffer -6 Hit on ALL FOUR shots.
You cannot check line of sight before announcing the number of shots. If you misjudged lines of sight and cannot take as many shots as you announced, you still suffer the full multi-target penalty above.
For example, Aim is the Hit rating used in this case.
This sight is not blocked. It passes between the Building and Dome. The Building’s shadow and the Dome’s numbers have no effect.
The blue line of sight is not blocked. The red one is.
“In Crossfire, you will gather ranged weapons and employ them.”
To Win
Crossfire lasts 9 rounds. Team White must eliminate Team Black to win. Team Black must simply survive.
Characters
Give the following characters to the teams:
The Map
Use The Wastes and Lithopolis platters, aligning the name text on the platters as shown.
The Common Deck
In Crossfire, do not use Melee weapons. If you draw a Melee card, discard it and draw again.
Setup
Character and Encounter placement is the same as for Trial 1: Face Off.
Game Rounds
Two new phases are added to each turn: Fire and OpFire.
The Fire PhaseDuring Fire, the current team (only) may shoot.
Important! A character that Fires in the Fire phase cannot move in the Move phase.
Ranged CardsUnlike melee, characters do not naturally have a ranged attack. Ranged weapons are required.
Character special abilities are still not used!

TRAINING TRIAL 2 – CROSSFIRE
Clear, Water, Deep Water
These do not affect sight. Open Mesa spaces and Cavern spaces are Clear.
Rough
Rough is too low to affect sight between the target and shooter, but a target in a Rough space gains +2 Stealth.
Building
A shooter can fire into but not past a Building. A target in a Building space gains +3 Stealth.
Dome
No one can see into, out of or past a Dome.
Obstacle
Obstacles block sight.
Mesas
Shooters on Mesas have a height advantage. They can see over lower terrain like Woods, Swamp, Fire, Dome and Building, except for the space directly in front of the lower person. This is also true in reverse for the lower character firing up.
In the top example, only the Woods spaces affect the shot. At the bottom, the Dome does not block sight, but the Building does.
XXX
Obstacle, Caverns and other Mesa spaces
Obstacles and Caverns are as tall as Mesas, and block any sight downward from a Mesa. So do other Mesa spaces.
One Mesa to another
When sighting from one Mesa space to another, all terrain on lower ground is ignored. In the case here, only the Woods affects the shot.
Firing up at Mesa
When firing up at Mesa, the target gains +2 Stealth because he holds the higher ground.
Mesa to Cavern
Shooters on Mesas cannot fire down into Cavern, and persons in Cavern cannot fire up to Mesa.
11
+2
X
XX X
+2 +2+3 +3(total +10 )
+0 +2
+3X
X
+2 +2
X
+2
Woods, Swamp, Fire
These do not block sight, but the target receives a Stealth bonus for each space where the line touches one of these terrain types, including the target space. Woods gives +2 Stealth. Swamp and Fire give +3.
XX
Blocked
Walls along a space’s edge
If the line of sight passes directly along the edge of a space touched by Cavern Wall on either side, sight is blocked.
Not blocked
Caverns and Cavern Walls
Wall blocks sight, but Cavern is Clear. Unlike other terrain, include the shooter’s space when checking sight.
12 TRAINING TRIAL 2 – CROSSFIRE
+2
vs.
2
32
6
+58 2vs.
43 vs.
2 -2 = 0
2
01-5
AT
TA
CK
ER
IS B
ET
TE
R -1+0
1-45-9D
EF
EN
DE
RIS
BE
TT
ER
-2X
“Smart opponents won’t be easy targets. Surprise is important. Don’t act like you have a weapon. Don’t reveal your weapon until you have a good shot.”
Additional Line of Sight Notes
See you, see me
Sight is always the same in reverse. If you see me, I see you.
Markers and Adventure spaces
Characters and all other markers placed on the map never affect line of sight. Neither does the text and images of Adventure spaces, which are always Clear.
Gates
(Gates and bases are introduced in the next Trial.) The Gates of Team Bases affect sight like Cavern Walls.
Resolving Line of Sight arguments
In most cases, line of sight is obvious. But sometimes arguments arise. When you disagree, Team White makes the decision. If their decision benefits Team Black, they get to make the decision again the next time. If it benefits themselves, the decision-making crown passes to Team Black.
Lobbing Grenades
Grenades can be lobbed up over Domes and Buildings to a space on the other side.
For Grenades, treat Dome and Building spaces as Woods when determining line of sight. You cannot throw a grenade into or out of a Dome (but can in and out of a Building.)
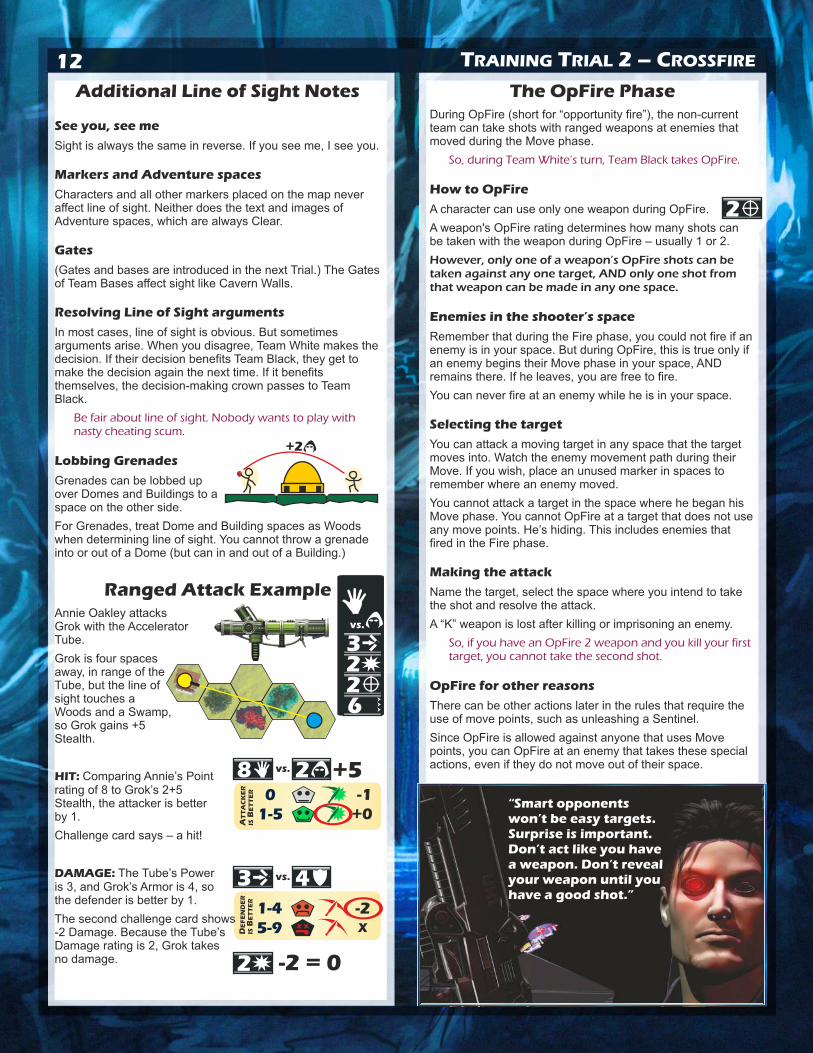
Ranged Attack ExampleAnnie Oakley attacks Grok with the Accelerator Tube.
Grok is four spaces away, in range of the Tube, but the line of sight touches a Woods and a Swamp, so Grok gains +5 Stealth.
HIT: Comparing Annie’s Point rating of 8 to Grok’s 2+5 Stealth, the attacker is better by 1.
Challenge card says – a hit!
DAMAGE: The Tube’s Power is 3, and Grok’s Armor is 4, so the defender is better by 1.
The second challenge card shows -2 Damage. Because the Tube’s Damage rating is 2, Grok takes no damage.
Be fair about line of sight. Nobody wants to play with nasty cheating scum.
The OpFire PhaseDuring OpFire (short for “opportunity fire”), the non-current team can take shots with ranged weapons at enemies that moved during the Move phase.
How to OpFire
A character can use only one weapon during OpFire.
A weapon's OpFire rating determines how many shots can be taken with the weapon during OpFire – usually 1 or 2.
However, only one of a weapon’s OpFire shots can be taken against any one target, AND only one shot from that weapon can be made in any one space.
Enemies in the shooter’s space
Remember that during the Fire phase, you could not fire if an enemy is in your space. But during OpFire, this is true only if an enemy begins their Move phase in your space, AND remains there. If he leaves, you are free to fire.
You can never fire at an enemy while he is in your space.
Selecting the target
You can attack a moving target in any space that the target moves into. Watch the enemy movement path during their Move. If you wish, place an unused marker in spaces to remember where an enemy moved.
You cannot attack a target in the space where he began his Move phase. You cannot OpFire at a target that does not use any move points. He’s hiding. This includes enemies that fired in the Fire phase.
Making the attack
Name the target, select the space where you intend to take the shot and resolve the attack.
A “K” weapon is lost after killing or imprisoning an enemy.
OpFire for other reasons
There can be other actions later in the rules that require the use of move points, such as unleashing a Sentinel.
Since OpFire is allowed against anyone that uses Move points, you can OpFire at an enemy that takes these special actions, even if they do not move out of their space.
So, during Team White’s turn, Team Black takes OpFire.
So, if you have an OpFire 2 weapon and you kill your first target, you cannot take the second shot.

TRAINING TRIAL 2 – CROSSFIRE
X is moving from 2 to 3. He cannot be targeted in his starting space (2), but can be targeted in 3.
X is safe. He cannot be targeted in his starting space (2), and 3 is not in sight.
X is safe. He cannot be targeted in his starting space (2), and Mr. Yellow cannot fire into his own space.
X is NOT safe. He leaves Mr. Yellow’s space, so he cannot prevent the shot in 2.
X and Z are NOT safe. X leaves Mr. Yellow’s space, so he cannot prevent the shot, and Z does not prevent the shot by moving into Mr. Yellow’s space. However, only one shot by Yellow’s weapon can be taken in 2.
X and Z are safe. X remains in Mr. Yellow’s space, preventing OpFire.
X is safe. He refuses to move.
Mr. Yellow has an area weapon. If he fires in 3, he attacks Z only. If he fires in 2, he attacks Y, Z and his ally C.
XZ
1 2 3
XZ
1 2 3
1 2
X
1 2
X
1 2 3
X
1 2 3
X
X
1 2 3
1 2 3 4
ZYCX
OpFire ExamplesTo demonstrate, Mr. Yellow will be the shooter. X and Z have graciously been volunteered to be targets.
single
area
“Arrright maggots! You wanna win, you gotta FIGHT!”
“Easy, Sarge, this is just training.”
“That’s right, Whitebread, this is basic training! MOVE, YOU MAGGOTS!”
“Better do as the Sarge says. But don’t forget to mosey ‘round and greet a few encounters. If you get brawl-happy, you’ll find yourself under-equipped. And adventurin’ becomes mighty important in the real challenges. You can’t win without adventurin’.”
“You can’t win without FIGHTING, Brightwhites!” “Alrighty, Sarge. Just remember, folks.
Balance your fightin’ and your adventurin’ carefully.”
13
XP
XZ
Either X or Z are safe. Mr. Yellow cannot fire two shots into the same space, so he gets only one shot in 2.
XZ
1 2 3
Single and Area WeaponsRanged weapons are either single or area target.
Single target
A single target weapon attacks one target with each shot. The shooter chooses his target and resolves the attack.
It is possible to accidentally shoot your friends, if you shoot at a target that is in a space containing one of your allies. In this case, if you fail to Hit your target, the enemy chooses an ally in that space. You must attempt the same attack against that enemy.
This does not occur if the space has other enemies only. It must contain an ally.
Area target
An area target weapon attacks everything in the target space, enemy and ally. Make a separate Hit and Damage draw for each target. The attacks are considered simultaneous. Resolve all the attacks first, leaving targets in place. Then, decide death/imprisonment and special weapon effects afterward.
Important! Unlike other situations, a “K” area weapon is not lost immediately upon killing a target. Attack all targets, even if you draw the Weapon Broken challenge card.
During OpFire, choose a moving target and a space that he moved into as your primary target. Every target that is in that space or moved into/through that space during their Move is attacked.
Area weapons cannot target same space
You are not allowed to target the same space with an Area weapon more than once in the same phase.
This does not apply if your target is flying (see later).
If Mr. Yellow shoots at X and misses, he must make the same attack against his ally P.
Example: It is the Fire phase and there are two enemies in a nearby space, X and Z. You have an area weapon. You target X and attack them both. You cannot take a second shot by targeting Z.

TRAINING TRIAL 3 – STORMING
Ca
taco
mb
s
Th
e F
org
eLithopolis
B
W
14
“Keep your base in good repair. You don’t, you suffer.”
Davy CrockettDevon RegalMinx and JinxPerindorVictoriaWilliam Wallace
Team WhiteGen. James GavinKit CarsonMartiansPhillip RedlegsSiennyaThe Scarlet Vixen
Team Black
Dismissal and BanishmentCharacters are often dismissed or banished, reappearing in a Dome.
Dismissal
Draw a challenge card and place the character in a Dome of the color shown. The Dome cannot already have a character. If there are no empty Domes of that color, place the character in an empty Dome of any color.
If multiple characters are waiting to be dismissed, you must finish dismissing one character before going on to the next.
Banishment
Banishment is the same as dismissal, but the enemy team draws a card and places the character.
Leaving a Dome
During the Move phase, a character that is in a Dome must leave the Dome. Characters can never remain in a Dome.
Adventures Challenges
Success Levels
Unlike Encounters, all other adventures require a challenge card draw, and are rated on five levels of success. When challenging adventures, draw a challenge card and look at the column. The higher the level of success, the better your reward for the adventure.
FOPP – Failure of Painful Proportions.
FAIL – F-A-I-L.
SQUEAK – You manage to squeak by.
PASS – Congratulations, you succeeded.
AMAZE – Wild, jaw-dropping success!
About Adventure spaces
You always challenge adventures during your own Adventure phase.
You are never required to challenge an adventure in your space. You can challenge adventures even if an enemy is in your space.
A character could adventure more than once in his Adventure phase, if he happens to be moved to a space containing an adventure. For example, if a character sneaks into the Main Gate of the enemy base (see next page), he can immediately attempt to destroy it.
In Storming, you will be destroying sites in the enemy base, and repairing sites in your own. This involves making an Adventure challenge and discovering your level of success...
Example: You challenge an Adventure that is rated 5 Wits. You have 7 Wits. You draw a challenge card and look at the Attacker is Better by 2 line. It shows Pass.
“The Team Bases are key landmarks in all challenges. In Storming you will learn to use, defend and assault these bases.”
To Win
Storming lasts 10 rounds. At game end, count points. The team scoring the most wins:
– Per enemy base site destroyed at game end: 1
– Per enemy imprisoned at game end: 1
However, if at any moment your team has 6 points more than the opponents (as above), you instantly win.
Characters
The Map
Set up the map as shown. The team bases are on the middle sides, with their openings facing inward as shown. Align the platters based on the text alignment below.
Prepare
1. Shuffle the common deck.
2. All characters begin the game off-map, and come into the game as explained later.
3. Each team draws 2 cards face down and places them in their Vault (lay them near the team base). You can look at your own Vault cards.
4. Encounters are not used in this Trial.
01-5
AT
TA
CK
ER
IS B
ET
TE
R -1+0
TRAINING TRIAL 3 – STORMING
Team BasesTeam Bases are caverns. Each has seven sites – the three Gates, Vortex, HQ, Vault and Prison. During the Adventure phase, you can challenge different adventures at these sites.
Gates
You can walk freely through your own Gates. But, you must challenge enemy Gates to gain entry. To challenge a Gate, move to the space in front of it – not to the Gate space itself.
The Main Gate is a 7 Stealth Adventure challenge. On Squeak or better, you successfully pass through the Gate. Move your character onto the Gate space. On Fail or worse, you do not gain entrance and remain on the outside space.
The High Gate is the same as the Main Gate, but is a Respect challenge. To enter the Low Gate, you must bribe the gate-keeper with one card.
Once inside the enemy base, you can exit any of the Gates freely, without challenging them.
Vortex
The Vortex heals the pure of heart. Only wounded allies of the Vortex can use it. The Vortex is a 5 Honor Adventure:
Using your Vault
During Free Action, a character on his Vault space can take up to half (rounded up) of the cards out of his Vault. He can also put cards into the Vault before or after taking half. Enemies in the space do NOT prevent you from using the Vault.
Raiding the enemy Vault
A character on the enemy Vault space can attempt to raid it. This is a 5 Wits Adventure:
Interrogating prisoners
During the Adventure phase, a character on their Prison space can interrogate a prisoner that has cards. Challenge their Strength vs the prisoner’s Strength:
You heal 4 Health, then are dismissed.Heal 2 Health, then dismissed.Heal 1 Health. Dismissed.Dismissed.Banished.
Take 4 random cards, then dismissed.Take 2 random cards, then dismissed.Take1 random card. Dismissed.Dismissed.Banished.
Steal 4 cards from the prisoner, then you are dismissed.Steal 2 cards, then you are dismissed.Steal 1 card, then you are dismissed.You are dismissed.You are banished.
Breaking out prisoners
If you are in the enemy Prison space and an ally is in Prison, you can attempt to break him out. This is a 5 Strength Adventure challenge:
Destroying enemy sites
If you are on any of the seven enemy base site spaces, you can attempt to destroy that site. This is a challenge against the site, or a 1-card payment in the case of the Low Gate.
A destroyed site in your base causes ill effects for your team:
Destroyed Gates – Enemies move freely through destroyed Gates. Destroyed Gates still block sight.
Destroyed Vortex – You cannot use a destroyed Vortex. Your team cannot gain current or max Health in any way.
Destroyed Vault – You cannot use your Vault. Cards added or sent to the Vault for any reason are lost. Cards in the Vault at the time of destruction are NOT lost and can be stolen.
Destroyed Prison – Current prisoners are not released, but new imprisonment results against the enemy are ignored. You cannot interrogate prisoners.
Destroyed HQ – During your Adventure phases, your first dismiss is a banish instead. You also cannot collect tribute (see later). Special ability use of the HQ is unaffected.
Repairing sites
A character on a destroyed site can attempt repair during the Adventure phase. This is the same as a destruction attempt:
No fake adventuring
You cannot challenge base adventures unless it is meaningful to do so. You cannot attempt to heal at the Vortex unless you are wounded. or destroy/repair a site if it is already destroyed or repaired. You cannot attempt to steal from the Vault if it contains no cards.
Special Note: Blocking Gates with terrain
In later missions, it is possible to block off a Gate by placing prohibited terrain like Fire, Deep Water or a Mesa’s cliffside in front of the Gate. This is allowable.
You break out two prisoners of your choice, and all three of you are dismissed.
You break out one prisoner of your choice, and both of you are dismissed.
You break out one prisoner of your choice, and both of you are banished.
Dismissed.Banished.
Site destroyed. Dismissed. Place your team marker on the space.
Dismissed.Banished.
The site is repaired, and you are dismissed. Remove the enemy team marker.
Dismissed.Banished.
So, destroying the HQ is a 5 Intellect challenge.
At theenemy gate,begin here
Move to here onSqueak or better
15

TRAINING TRIAL 3 – STORMING
LuckA special ability or rule may call for a Luck check. Usually, checking Luck is part of a challenge. Look at the Luck number on the challenge card that was drawn for the challenge.
Otherwise, draw a new card and check its Luck.
Mental AbilitiesSome characters and cards have mental abilities. An example is the inspiration of William Wallace. A special is a mental ability only if it is called a “mental ability.”
Reinforce PhaseThe Reinforce phase is added to the end of each game turn.
Characters do not start on the map. Instead, they enter the game during the Reinforce phase. Only the current team takes action during their Reinforce.
During Reinforce, look at the best enemy Respect that is not yet on the map. All of your off-map characters that have a Respect equal to or greater than that must enter the game.
To bring on a character, select the character and dismiss him.
(Note for the future: Some characters in the Master Set have two sets of ratings. For Reinforce, use the Respect listed on the left of the card.)
Storming Special RulesThe following rules apply only for this Trial:
Site destruction
When a site is destroyed (not repaired), the destroyer chooses one of three after-effects:
1. Return a killed ally to the game by dismissal with 1 Health. Draw 1 card for your Vault.
2. All enemies currently in their own team base are banished.
3. Draw 1 card.
Phillip Redlegs has an ability that checks for Luck 4 on any challenge. Use the Luck value on the card that was drawn for the challenge.
So, if the enemy’s best off-map Respect is 5, bring on all of your characters that have a Respect of 5 or greater.
So, characters in Storming arrive as shown:
White Turn 1 – Victoria (9)
Black Turn 1 – Gen. Gavin (6), Kit Carson (6), Siennya (6)
White Turn 2 – Davy Crockett (4), Devon Regal (4), Perindor (4), William Wallace (5)
Black Turn 2 – Martians (4), Phillip Redlegs (4), Vixen (2)
White Turn 3 – Minx and Jinx (2)
Stop! You are ready for Storming...
16
Free ActionFireMoveOpFireMeleeAdventureReinforce
4Imprisoning Enemies
An imprisoned enemy is placed on your team base Prison space. He keeps his cards. A prisoner is helpless. He cannot use cards or special abilities or take any actions. He is not affected by dismissal, banishment, or any event or ability in the game except those that specifically free a prisoner.
Capture
When you kill an enemy character in any way, you can choose instead to imprison him. The enemy goes to prison with 1 Health. You still lose a “K” weapon when you imprison an enemy character.
Subdue (double-Amaze)
If you Amaze on a Hit, then Amaze the Damage, you can choose to imprison the target after applying the damage. If you do so, you lose the weapon if it is a “K” weapon.
Character Special AbilitiesIn Storming, you use the special ability text, but not the symbols beside this text.
Each character has unique abilities explained in text near the bottom of their card. These abilities often let a character “cheat” the rules.
Free Action specials
Each special ability that is activated during Free Action can only be used once per Free Action. For example, a special ability “Draw 1 card” can only draw 1 card per Free Action.
Cliffside and Wall-crossing special abilities
Some specials allow crossing cliffsides and cavern wall for a certain move cost. This cost does not include the space entered. For example, if a character can “cross cliffsides at move cost 4,” this is 4 plus the cost of the space they enter.
Some rules and events in the game allow stealing cards. When stealing, the character being thieved selects the cards being stolen, not the thief.
AurasSome special abilities have an area effect called an aura. Auras extend a certain number of spaces outward. They pass through everything except Cavern Walls, even into and out of Dome spaces.
Important! During OpFire, measure an aura’s range from the space where a character ends movement. However, if the target himself has the aura, measure this aura from the space in which he is being targeted.
Mr. Yellow has a two-space aura. It reaches into every space shown, except Mr. Blue’s space. The 2 range cannot go through cavern wall and must detour through the gate.
Stealing Card special abilities
No!Yes!

Escaping the map
A character that begins their Adventure phase in one of the five spaces of the enemy team’s red start ring can escape. Remove that character permanently from the game.
Prepare
Once the map is complete:
1. Draw 1 Common and 1 Secret card for your Vault.
2. Reveal characters and draw starting cards for the characters (as explained later).
3. Rush does not use the Reinforce phase. Instead, Team Black places their characters a certain distance from the spaces of their starting ring (the red circle shown on the map. The distance depends on the character’s Respect. A character with Respect 0 must be placed in one of those five starting spaces. Respect 1 characters can be placed one space away from one of these starting spaces, and so on. Characters cannot begin in the same space.
4. Once Team Black is done, Team White places their characters.
5. Mix the Encounter markers face down. Beginning with Team White, the teams alternate placing markers on the map until there are no available locations to place them. Encounters must be placed at least 5 spaces from all other Encounters. They cannot be placed in a space containing a character, or in Dome, Obstacle, Deep Water or Fire. They can be placed in caverns, bases, and on other adventure spaces.
The Elite Treasure DeckThe gold elite deck contains valuable treasure. A character that wins cards from an adventure may choose to draw an elite card, but he must use two card draws to do so.
If you win 2 cards from an Encounter, you could draw 1 elite. If you win 3 cards, you could draw 1 elite and 1 common.
MISSION 1: RUSH
“Rush is your first true mission. You now have control over the map, and your team of characters will vary.”
To Win
Rush lasts 12 rounds. At game end, the team with the most Achievements wins. Five achievements can be won:
Encounter Achievement – The team that passes the most Encounters wins this Achievement.
Lith Achievement – The team with Lith’s Favor wins this Achievement.
Base Achievement – The team that has the most enemy base sites destroyed at game end wins this Achievement.
Combat Achievement – Tally the following for each team at game end. The highest tally wins this Achievement.
– Each enemy locked in your Prison: 1
– Each wounded enemy who is not in Prison or escaped: 1
– Count all characters (including escaped ones) that are alive and not in Prison. The larger team receives 2 points per extra character.
Escape Achievement – Tally escape points as follows. The team with the highest tally wins this Achievement.
– The first character of either team that escapes the map: 4
– The second escapee: 3, the third: 2, and the fourth: 1
Characters
Each team plays 8 characters, or 9 if three or more players are on either team. Shuffle the character deck, with the character stories face up. Each team deals themselves 12 characters from the bottom of the deck, keeping the cards secret from the other team. The teams huddle to choose characters, discarding the 3-4 characters that are not chosen.
Determining Team White
Each team reveals their character with the highest Respect. The team with the higher Respect is White. If equal, reveal the next highest character until the tie is broken.
The Map
The map uses four platters and is built as shown.
1 – White chooses a platter, 3 Dome keys, and one random platter and places them as shown, aligning the platters as desired. Place the White Base facing northeast.
2 – Team Black does the same for the rest of the map, facing their base southwest. Then, add the Lith key as shown.
To choose a random platter, put the platter stack below the table. The opposing team calls a number. Put the stack back on the table and count down through the stack.
A wounded character is one that ends the game with less Health than when they started.
A White character escapes, then a Black, then two Whites. White wins 7 points and Black wins 3.
17Team White Start
Team Black Start
W
B
Randomplatter by
Team Black
Random platter by
Team White
Platterchosen by
Team BlackPlatter
chosen byTeam White
Dome keys placed by
Team Black
Dome keys placed by
Team White
Lith
(Note that Team Black puts their platters on the White side, and vice versa)

MISSION 1: RUSH18
If you have this symbol, you move faster with Mounts, and ignore Strength and Intellect restrictions with Mounts.
This symbol provides a +1 Hit bonus when using Blades, and you ignore Strength and Intellect limits with Blades.+1 Hit
+1 Speed
No CardLimit
The character can carry any number of cards, not just four.
Not GiveCards
The character cannot give away cards in trade, and cannot place cards in the Vault.
The character cannot trade cards at all, and cannot use his Vault.
NoTrade
# ## Commoncards
Secretcards
Elitecards
CreaturesSome treasures are Creatures. Creatures appear on the map, and in some ways act like characters.
Creatures share the following rules:
– Creatures are unaffected by all mental abilities and cannot be imprisoned.
– Creatures can move through enemies without stopping, but otherwise obey normal movement rules.
– Creatures cannot carry cards or conduct any Adventures.
– A “K” weapon used to kill a Creature is not lost.
– Until unleashed, a Creature does not exist, and cannot be attacked. It is simply a card.
Hunters
A Hunter is unleashed against one specific enemy.
Unleashing a Hunter
Unleash a Hunter during Free Action (or at start of Melee if you have the Pet or Bot bonus). The target must be in sight.
Name the target and reveal the Hunter. Place the Hunter card separate from your character cards. It is no longer a card carried by the character. Find the Hunter’s marker and place it in the owner’s space.
Any number of Hunters can be unleashed at a time, at different targets if wished. Enemies in your space do not prevent you from unleashing. They could be the target.
Handling a Hunter
A Hunter cannot attack any opponent except its designated target, even if attacked by some other enemy.
As a “K” card, a Hunter is removed as soon its target is killed or imprisoned. Once unleashed, a Hunter cannot be retrieved. It remains even if its owner is killed.
Sentinels
A Sentinel is an immobile machine or beast with both a melee and a ranged weapon.
Unleashing a Sentinel
A character can unleash any number of Sentinels during his Move phase. To do so, he must use all of his move points without moving from his space. As a result, he may be fired at during OpFire.
Reveal the Sentinel card and wait until after OpFire is complete, in case your character is killed before successfully unleashing. Place the Sentinel marker in the owner’s space and put the Sentinel card separate from the character. It is no longer a card carried by the character.
Sentinels cannot be unleashed if an enemy is in the space.
Handling a Sentinel
A Sentinel cannot move. As a “K” card, it is removed if it kills or imprisons an enemy. Once unleashed, a Sentinel cannot be retrieved. It remains even if its owner is killed.
You are free to move the Hunter however you wish. It does not need to be sent straight at the target character.
Otherwise, Elite cards are like Common/Secret cards, worth only one card for all purposes such as paying for challenges.
The Secret Treasure DeckThe black secret deck is the common deck’s sister. When a character draws cards as a result of an adventure, he can draw either common or secret cards. They are equal in value.
Cubes
Cubes are one-use event triggers. When you play the Cube, you can draw another secret card if your Respect is equal to or higher than the value shown next to the Respect symbol.
Secrets and Achievements
A Secret is an event that occurs if you set up the necessary situation. Use as described on the card. Achievement cards award an Achievement if the conditions are satisfied.
Tests
Take the Test to Lith’s Chamber. There, treat it as an adventure, then discard it.
Card Trading SpecialsSome characters have the following restrictions or bonuses to their card handling.
Characters cannot give tribute (see p. 19) if using a Test because they are dismissed after the test.
Character Starting CardsSome characters begin with cards, as shown by the symbols on the character card. Draw these cards once the characters are revealed.
Card BonusesCharacters gain treasure bonuses, as shown by Bonus symbols. If a symbol on a character matches that on a card:
– He ignores the card’s Strength and Intellect requirements.
– He gains the bonus as described in the Bonus box on the card. (Other text on a card is not part of the Bonus.)

MISSION 1: RUSH
Ignoring Non-Hostile EnemiesIf an enemy cannot attack you in melee due to a restriction, ignore them. You do not have to stop when entering their space, can freely trade in their space, and so on. An example is a Hunter that is not targeted at you.
FlightSome characters can fly, if they wish. Announce whether the character intends to fly or not each turn before moving. You cannot mix flying and walking in the same turn.
When flying:
– You cannot move into a Cavern or end your movement in a Cavern space, but you can fly over Cavern spaces.
– You pay only 1 move point per space and can enter any terrain and pass through enemies, but cannot end in a space containing prohibited terrain like Fire or Obstacle.
Shooting at fliers
During OpFire – You cannot fire at a flying target if you are in Cavern or Dome. In any other space, ignore all terrain when targeting the flier, including the space where it ends its move.
During the Fire phase – Fliers are assumed to have landed and therefore no special line of sight rules apply.
Lith’s LairLith is the virtual queen mother of the Challenges, appearing as a female or creature made of flowing marble or obsidian. Characters can interact with Lith in the following ways.
Gaining Lith’s Favor
Gathering a Tribute item from your HQ
Lith is pleased to receive gifts of what man most treasures. If a character stops in or moves through his HQ space, he can collect a Tribute item.
Characters can carry only one Tribute item at a time and cannot trade it. If killed, discard the tribute.
Offering tribute to Lith
During your Adventure phase, if a character is in Lith’s Chamber, he can offer a Tribute item and/or any unrevealed cards as tribute, then be dismissed. Place your team marker on Lith’s Chamber, and a die showing the amount of tribute given so far. A Tribute item is worth 3 points, and a card is worth 1 point.
If the enemy has already given tribute, deduct your tribute amount from their total. If you gave more, replace their team marker with your own.
You also gain 1 tribute point whenever you Amaze at the Reflecting Pool, Obsidian Fangs or Wailing Cave.
Favor
If your team marker is on Lith’s Chamber, you have Lith’s Favor. If the enemy has Favor, your team cannot challenge the Reflecting Pool, Wailing Cave or Obsidian Fangs.
Reflecting Pool
A dark, glassy-calm pool in which enemy secrets are reflected. The Pool is a 5 Intellect Adventure:
Obsidian Fangs
This huge contraption can be guided with the right leverage and elbow grease. It will burst from the ground and ensnare an enemy, or spirit a friend safely away from danger. Obsidian Fangs is a 5 Strength Adventure:
Wailing Cave
A cave of whirling mists; is it wind, or worse? Something moves in the mists, and with the right tact, it may be persuaded to steal treasure from the enemy. The Wailing Cave is a 5 Wits Adventure:
Lith’s Chamber
The home of Lith herself. It is here that you can offer tribute to Lith.
Submitting to a test
If you have a Lith Test card (from the Secret deck) and do not plan to give tribute, you can attempt the Test.
The enemy team must reveal 6 unrevealed cards, then you are dismissed. Gain 1 Lith tribute point.
The enemy must reveal 3 cards, dismissed.The enemy must reveal 1 card, dismissed.Dismissed.Banished.
Banish one enemy if you wish, then dismiss one ally if you wish, then dismiss yourself. Gain 1 Lith tribute point.
You must banish one enemy OR dismiss one ally, then dismiss yourself.
You must dismiss one ally, then dismiss yourself.Dismissed.Banished.
Choose an enemy that has no more than 4 cards. Place all of his cards in his Vault. You are dismissed. Gain 1 Lith tribute point.
Choose an enemy that has no more than 2 cards. That enemy must place all of his cards in his Vault. You are dismissed.
Choose an enemy that has 1 card. That enemy must place the card in his Vault. You are dismissed.
Dismissed.Banished.
Stop! You are ready for Rush...
19

MISSION 2: TRIAD
“Triad replaces the Encounters with the mysteries of the Labyrinths.”
To Win
At game end, determine which team won each of the seven Achievements below. The team with the most wins.
Labyrinth Achievements
Four Achievements can be won, one per Labyrinth. In each Labyrinth, the team with the most team markers wins the Achievement. This could be a tie.
Lith Achievement
The team that has Lith’s Favor wins the Lith Achievement.
Team Base Achievement
The team that has the most sites destroyed in the enemy Team Base at game end wins this Achievement.
Combat Achievement
Tally the following for each team at game end. The team with the highest tally wins this Achievement.
– Each enemy locked in your Prison: 1
– Each wounded enemy not in Prison (a character that ends the game with less Health than when they started): 1
– Count all characters that are alive and not in Prison. The larger team receives 2 points per extra character.
Immediate Victory
A team can win an immediate victory in one of two ways:
Valor Win
If at any moment you have more than twice as many living, unimprisoned characters as the enemy, you win. For example, if you have 6 characters, you gain a valor win if the enemy is reduced to 2 characters.
Glory Win
If at any moment you have more team markers on map than the enemy, equal to the mission team character count, you gain a glory win. (This would be 8-9 markers for Triad.)
Game Time
Choose from one of three lengths and either timed or turned:
The clock begins when the first character enters the game. Games must always end on a Team Black turn.
Characters
Triad uses 8 characters on each team, or 9 per team if either team has three or more players. Characters enter through the normal Reinforce Phase method explained in Storming.
Choose one of the three character selection methods below.
It does not matter if a team has advanced their team markers farther. All that matters is the number of markers.
Short – 2 hours or 12 roundsMedium – 3 hours or 16 roundsEpic – 4 hours or 20 rounds
Standard – of the deck, keeping the cards secret from the other team.
The teams huddle to decide which characters each player will play, discarding the 3-4 characters not chosen.
Draft – Deal 4 secret characters to each team. Then, place 12 characters face up on the table. Choose a first team. The first team takes one character. The second team takes two, and the teams continue selecting two until they have 8-9 characters.
Pure – Deal 8-9 cards, no extras.
Team White
Determine Team White as per Rush.
Map-Building
Triad uses 3 platters. One is chosen by Team White, one by Team Black, and one is random.
Team White begins by adding three pieces (platters and keys) to the map. Team Black then does the same. Continue to alternate three pieces until the map is full. You can now also use the brown Dome keys.
Map-Building Rules
– You must include your chosen platter in the first set of three.
– Each piece must be hooked to the rest when it is placed.
– All seven adventure keys must be part of the map, so you must save room for them and not use too many Dome keys.
– Adventure keys must have their entrance facing a platter.
– You can add the enemy Team Base.
Once the map is complete, draw 1 Common and 1 Secret card for your Vault, and reveal your characters.
Each team deals 12 characters from the bottom
Triad uses seven adventure keys: the two team bases, Lith’s Lair, and the four standard Labyrinths (those with white text and not yellow) -- one of each age. You also use as many Dome keys as necessary to completely fill in all of the map notches.
Prepare
20
White adds three keys and Black adds the final two keys. The map
ended up being a boomerang shape, but it could have been
triangular or straight.
A
M
B
L
Ca
taco
mb
s
W
Oly
mp
us
C
F
Lithopolis
Team Black draws Lithopolis
for the random platter and adds
two keys -- the Modern and
Future Labyrinth.
F
Lithopolis
M
B
L
Ca
taco
mb
s
W
Oly
mp
us
C
4
Team White adds three keys – Black Base, Lith’s Lair and a Dome
key..
L
Ca
taco
mb
s
W
Oly
mp
us
C
B
3
A Map-Build Example
Team Black chooses the Catacombs platter and adds
two keys – White Base and a Dome key.
Team White chooses the
Olympus platter and adds two
keys – the Colonial Labyrinth and a Dome key.
Oly
mp
us
C1
Ca
taco
mb
s
W
Oly
mp
us
C
2
6&5

LabyrinthsThe Labyrinths are caverns containing treasure, protected by Guardians that pull challengers into a momentary alternate reality – such as a Sphinx asking a riddle.
Each Labyrinth contains three paths. You can advance your team along the paths and gain advantages as follows:
Path of War – If your team marker is on the last space, your characters of that Labyrinth’s age gain +1 Hit.
Path of Glory – If your marker is on the last space, your characters of that age gain +1 on Adventure challenges.
Path of Prestige – If your marker is on the last space, your characters of that age gain +1 Speed.
Challenging the Labyrinth
To challenge one of the three paths, you must be on a Path’s starting circle.
Choose the character to make the challenge. Reveal the top card of that age’s deck. You cannot back out after seeing the Guardian. The Guardian will be one of two challenge types:
Rating test
The card shows a number and rating in the upper left. Challenge your own rating against it.
Card-paying test
You must pay the number of cards shown. If you cannot or refuse to pay, you suffer the Failure to Pay result.
The familiarity bonuses
You can receive a bonus of up to +3 against the Guardian. Look at the Setting and Circle symbols in the card’s upper left:
Age – +1 if you are the same Age as the Guardian.
Setting – +1 if you have the same Setting as the Guardian.
Circle – +1 if you have the same Circle as the Guardian.
Resolving a Rating test
Draw a challenge card and determine your success level. Look next to the level of success on the Guardian card:
You are dismissed.
You are banished.
You receive an Experience marker.
Draw cards equal to the amount listed, with Elite cards counting as 2.
You defeat the Guardian. Place a Team marker on the space beyond the Path circle. Once you have resolved the challenge, place the Guardian card at the bottom of the deck. If you fail to defeat the Guardian, it remains on top of the deck and face up, awaiting the next challenger (there is always only one active Guardian per Labyrinth).
MISSION 2: TRIAD
1+
1
48
1
9
21
...to fend off the gargoyle and solve six riddles before the chamber fills with water.
The water does not kill you. The gargoyle does.
That’s four riddles too many.
You solve the riddles, but you are half-drowned.
You solve the riddles before the water can reach that sensitive breath-catching level.
Your new gargoyle friend already knows the answers.
1
32
7
1+
FIVE MINUTES...
6
AMAZE 3
2
7
The gold-on-black numbers are Honor circles. For each circle with a number equal or less than your Honor, draw a challenge card and read the Honor bonus. Apply the effect before moving on to the next. Always do Honor bonuses last, after dismiss/banish.
Resolving a card-paying test
The result of a card-paying test depends on whether you pay the cards or not. Pay, and the reward depends on your familiarity matches. Use the best line that matches.
Example
Begging for mercy
Instead of challenging the Guardian, a character can beg for mercy. Remove the Guardian and banish the character. This is useful to remove a troublesome Guardian.
Once a team marker is placed
Once a team marker has been placed on any path, things change. First, there can be only one team’s marker on any path. On that path, you no longer go to the Path circle to challenge the Guardian, but to the Team marker – whether that marker is yours or your enemy’s.
If you defeat the Guardian and it is your own team marker, move the marker to the last space, the circular dead-end.
Phillip moves onto the Path of Prestige in the Ancient Labyrinth. During his Adventure phase, he announces that he will challenge the Guardian. You flip over the top Ancient Guardian card. It happens to be Five Minutes.
This is a 6 Wits challenge. Phillip has 8 Wits, so he is better by 2.
But, Phillip is Ancient Age, and from the Chasms Setting, and his Circle is Adventurer. Gargoyles and riddles, who better for that than Phillip! So he gains +3, and is now better by 5.
You draw a challenge card, and he gets an Amaze! He earns the results shown to the right.
So, he defeats the Guardian. Place a Team marker in the space beyond the Path of Prestige circle.
He gets two card draws and draws one Elite card.
He is dismissed.
Because Phillip’s Honor is 5, he draws one Honor bonus (for the 3), but not a second (for the 7).
You are imprisoned.
You lose all cards.

MISSION 2: TRIAD
You cannot advance that marker farther and your team cannot challenge the Guardian on that path.
If it is the enemy Team marker, move it back one. If this returns it to the Path circle, remove the Team marker entirely.
Labyrinth progress example
Experience MarkersCharacters can earn Experience markers. These provide a temporary ratings boost.
During Free Action, you can announce use of an Experience marker. The boost lasts until the start of your next Free Action. Flip the marker to the “Active” side. Discard afterward.
Experience gives +1 to all ratings except Health and Damage. A character can use only one Experience marker at a time.
LevelingSome (rare) events call for a character to “Level Up.” To do so, draw a challenge card and look at the Level box in the lower right. Two rating symbols are shown. Choose one. Your character permanently gains +1 to that rating. If Level contains a “?” symbol, you may choose any rating except Speed, Armor, Health and Damage.
A rating cannot be increased above 9.
“Allies” and “Characters”The special words “allies” and “enemies” includes characters, henchmen and creatures. The word “characters” applies to characters and henchmen, but not creatures.
Specials may not apply regardless. The special “Allies gain +1 Hit” would apply even to Creatures. The special “Allies draw 1 card” would not apply to Creatures or Henchmen, because neither can carry cards.
22
You must move here to challenge the Path of War. If you defeat the Guardian and are Team Black, remove the White marker. If you are Team White, move the marker forward to the last space, and your Ancient characters gain +1 Hit.
If you defeat the Guardian, place your team marker here.
End movement here to challenge the Path of Glory.
Currently, all Team Black Ancient characters are gaining +1 Speed.
Only White can challenge Prestige, here, moving the Black marker back one space if they defeat the Guardian.
“Quad expands the arena and introduces alternate Labyrinths.”
You are now ready to play Quad...
Quad is the same as Triad except as explained below.
To Win
Winning Quad is like Triad, with the addition of the alternate Labyrinths. The alternates score Achievements in the same way as the standard Labyrinths.
Game Time
Choose from one of three lengths:
Characters
Quad uses 12 characters on each team. Draw 16 cards for Standard. Draw 6 random and 16 draft characters for Draft.
Map-Building
Quad uses four platters. Two are chosen randomly.
Use the standard Labyrinth, Team Base and Lith keys. In addition, each team must place one (and only one) of the alternate Labyrinths as explained below. Use as many Dome keys as are needed to fill in all map slots.
Alternate LabyrinthsThe four alternate Labyrinths have their name in yellow. They work the same as standard Labyrinths, but the final space of their paths cause different effects:
Path of Power – All allied characters of that age gain +2 Respect and Armor.
Path of Discipline – All allied characters of that age gain +2 Strength and Intellect.
Path of Shadow – All allied characters of that age gain +2 Wits and Stealth.
Alternate Guardians
The alternate Labyrinth has a different Guardian from the standard. Split the Guardian deck of that age into two decks.
Short – 2.5 hours or 12 roundsMedium – 3.5 hours or 16 roundsEpic – 4.5 hours or 20 rounds
You must stop placing Dome keys if there are only enough map slots left for the remaining adventure keys.
MISSION 3: QUAD

23MASTER SET
#
Clear
Woods
Swamp
Building
Obstacle
Rough
HenchmenCharacter cards with a red and black card symbol at the bottom receive henchmen to begin the game. Draw the number of henchmen given by the symbol. These are not normal cards that you carry. Reveal the card and set it near the character, who is the master of that henchman. They enter the game in the same space with their master, but do not need to remain with their master afterward.
Henchmen are treated as characters, except:
– Henchmen cannot carry cards, attempt adventures, or give tribute.
– Henchmen never count for victory.
– A “K” weapon is not lost when killing/imprisoning a henchman.
– If a henchman kills a character (not a henchman or creature), the henchman is summarily executed for his crime and removed from the game. If a henchman imprisons a character, the henchman is himself imprisoned.
Henchmen share the fate of their master
If a master is killed, his henchmen are permanently removed from the game. If a master is imprisoned, his henchmen are imprisoned with him. If the master escapes, his henchmen escape with him. If a master switches sides, so do his henchmen.
A henchman can switch sides, just like a character. In this case, the henchman gains a new master.
If a henchman is in the same space as his master when the master is dismissed or banished, the henchman can move with his master if wished. This also can be done if the master moves due to an adventure, such as passing through an enemy gate.
Using DiceDoA can be played with dice instead of the Challenge decks. Each player needs one 10-sided die.
To conduct a Challenge (Hit, Damage or Adventure):
The attacker/adventurer rolls 1d10 (0=0, not 10) and adds the result to his rating. The opposing team (”defender”) does the same. Compare the results:
– Equal = Squeak – Attacker is greater = Pass – Defender is greater = Fail – Attacker better by 6 or more = Amaze – Defender better by 6 or more = FOPP
Critical Result
If the attacker rolls a 9 and the defender a 0, the result is automatically Amaze. If the attacker is 0 and the defender is 9, the result is automatically FOPP, and, if this was a Hit attempt with a Melee or Ranged card, the weapon is broken and discarded.
Dismiss and Banish
The Domes are numbered 0-9. Roll 1d10 and go to a matching Dome.
Luck
Luck equals the attacker’s die roll.
Rules for the DoA II Master SetThe Duel of Ages II Master Set contains an avalanche of additional content. Rules for this content are included below.
Map Ages and TerrainThe platters and keys come in four ages as shown by the base color. Each age has its own style of terrain:
Obstacle includes the Colossus, the Catacombs serpent, Monument, Painted Desert rock, and Shipwreck.
On the Silver Mines map, the cavern spaces are also Mesa spaces. Characters can be on either the ground or mesa level, but cannot move between the levels.
Weapon Age BonusA character using a Weapon card gains +1 Hit if the weapon card is his Age and he is standing in a space of his Age.
The Labyrinth spaces are Age-specific, but the spaces in the team bases and in Lith have no Age.

BASE ADVENTURES
Blade
Swing
Thrust
Brawler
Powder Pistol
Revolver
Long Pistol
Auto Pistol
Energy Pistol
Bow
Crossbow
Thrown
Grenade
Heavy
Stealth
Armor
Gadget
Medical
SYMBOLS
MELEE
(WEAPON)
Powder Rifle
Long Rifle
Auto Rifle
Energy Rifle
RANGED
(WEAPON)
OTHER
Mount Vehicle
TRANSPORT
Vortex
Using your Vault
Free Action: Take up to half (rounded up). Can also put cards in.
Raiding the enemy Vault
Interrogating prisoners
Breaking out prisoners
Heal 4. Dismissed.Heal 2. Dismissed.Heal 1. Dismissed.Dismissed.Banished.
Take 4 random cards. Dismissed.Take 2. Dismissed.Take 1. Dismissed.Dismissed.Banished.
Steal 4 cards. Dismissed.Steal 2. Dismissed.Steal 1. Dismissed.Dismissed.Banished.
Free 2 prisoners of your choice, all three dismissed.
Free 1 prisoner, both dismissed.Free 1 prisoner, both banished.Dismissed.Banished.
Destroying enemy sites
Repairing sites
Place your team marker on the space. Dismissed.
Dismissed.Banished.
Remove the enemy team marker. Dismissed.
Dismissed.Banished.
Reflecting Pool
Obsidian Fangs
Wailing Cave
Offering Tribute
Tribute Item = 3Unrevealed Card = 1
Enemy team must reveal 6 currently unrevealed cards. Dismissed. Gain 1 Lith tribute point.
Reveal 3. Dismissed.Reveal 1. Dismissed.Dismissed.Banished.
Banish one enemy if you wish, then dismiss one ally if you wish. Dismissed. Gain 1 Lith tribute point.
Must banish enemy OR dismiss ally. Dismissed.
Must dismiss one ally. Dismissed.
Dismissed.Banished.
Choose enemy with no more than 2 cards. Dismissed.
Choose enemy with 1 card. Dismissed.
Dismissed.Banished.
Choose an enemy that has no more than 4 cards. Place all of his cards in his Vault. You are dismissed. Gain 1 Lith tribute point.
LITH ADVENTURES
Adventure 8,14Age 5“Allies” and “Enemies” 22Amaze 14Area target 13Armor cards 9Auras 16Banishment 14Begging for Mercy 21Card Bonus 18Card Specials 18Challenges, Adventure 14Challenges, Damage 7Challenges, Hit 7“Characters” 22Circle 5
Creatures 18Cubes 18Dice 23Dismissal 14Elite treasure deck 17Encounters 8Experience markers 22Fire phase 10Flight 19Fopp 14Free Action phase 6Game Rounds 6Gates 15Health 7Henchmen 23HQ 15
Hunters 18Imprisoning 16Labyrinths 21Labyrinths, Alternate 22Leveling Up 22Line of Sight 10-12Lith 19Luck 16Medical cards 9Melee Attack 7Melee cards 9Mental Abilities 16Move 6-7Nature 5Obsidian Fangs 19OpFire phase 12-13
Prison 15Ranged Attack 10-13Ratings 4Reflecting Pool 19Reinforce phase 16Secret treasure deck 18Secrets 18Sentinels 18Setting 5Sight 10-11Single target 13Special Abilities 16Squeak 14Stealing Cards 14Stealth cards 9Team Bases 15Terrain 6,7,23Transports 9Treasure 8-9Tribute Item 19Tribute, Lith 19Vault 15Vortex 15Wailing Cave 19
Pet Bot
CREATURE
INDEX
Villain
Adventurer
Icon
Outcast
Commoner
Warrior
Lord
Defender
Exemplar
Top Related