


Languages
Pages
Legal


PAUL GILBERT presents
SHRED ALERT!!!
DVD
THE ULTIMATE
DVD GUIDE!
Photograph by PHOTOGRAPHER
PH
OT
OG
RA
PH
ER
TK
TK
TK
2 GU I TA R WOR L D
PAUL GILBERT presents
SHRED ALERT!!!DVD
1. ALTERNATE UNIVERSEUsing alternate picking and note skipping to play interesting arpeggio patterns
2. READY TO RUMBLEQuick, effective pick-hand warm-up exercises
3. READY TO RUMBLE, PART 2More pick-hand warm-up exercises
4. ASSUME THE POSITION Using position shifts to your advantage when soloing
5. ACCENTUATE THE POSITIVEAlternate picking with accent patterns
6. FAST AND CLEANAlternate-picked 16th notes—the business card of shred guitar
7. STICK YER NECK OUT Using neck diagrams to your advantage
8. SHAPE SHIFTINGHow to organize patterns on the fretboard
9. SNAKE-CHARMING LICKSThe fifth mode of harmonic minor
10. UNITED MUTATIONSMastering muting techniques
11. BREAKIN’ OUTThe blessings and benefits of live performance

Instead of just playing a C major triad (C E G) over C5, let’s add the s4 to the mix, as shown in FIGURE 6 with the notes C, E, Fs and G. If we apply the note-skipping concept, we get C-Fs as our first pair (FIGURE 7a). FIGURE 7b illustrates the ensuing sequence played across
» three octaves. It’s also fun to play each pair as a two-note chord (FIGURE 7c).
Try applying this approach to whatever scale or mode you can think of. As shown in FIGURE 8a, it works well with E Dorian, the E blues scale and an A diminished-seven arpeggio. ❒
ALTERNATE UNIVERSE USING ALTERNATE PICKING AND NOTE SKIPPING
TO PLAY INTERESTING ARPEGGIO PATTERNS
CHAPTER 1
3 GU I TA R WOR L D
HI, AND WELCOME to the first chapter of Shred Alert, where I’ll teach you many of the techniques I use. Let’s begin with a very simple picking exercise (FIGURE 1) and look
at some of the neat and musically interesting variations you can spin from it. We have two notes, E and B, picked repeatedly with alternating downstrokes and upstrokes, a technique known as alternate picking. This is a good exercise for what I call “outside picking,” as the pick movement is consistently on the “outside” of the pair of strings, which is considerably easier than “inside picking.”
What I am going to do now is expand on this idea by applying a mathematical pattern to an Em triad arpeggio (E G B). In FIGURE 2a, the notes are played sequentially in an ascending fashion in two octaves across the neck; in FIGURE 2b, the same notes are played in a different position as a sweep-picked arpeggio (sweep picking involves dragging the pick across the strings in a single downward or upward motion).
This is how most rock guitarists play arpeggios—straight up and down. What I like to do in order to create a more interesting melodic contour is apply a note-skipping pattern that goes “up two, back one, up two, back one,” etc,” as demonstrated in FIGURES 3a-d: in FIGURE 3a, instead of playing E to G, I play E to B, just like our initial picking exercise. In FIGURE 3b, I move on to the next pair, G-E, using the same “outside picking” motion. Now that we have a new pattern, let’s get it under our fingers by alternating between each note pair (FIGURE 3c). FIGURE 3d shows the next pair, B and G, and all three pairs are played in sequence in FIGURE 4a. The pattern sounds cool when continued across three octaves, as demonstrated in FIGURES 4b and FIGURE 4c.
This note-skipping concept can be applied to other arpeggios, as well as scales. A very common chord progression in rock and metal is Em D5 C5 (FIGURE 5a). It’s standard practice with this progression to substitute the raised, or sharp, four (s4) for the five of the C5 chord, sounding C and Fs instead of C and G. This alludes to the C Lydian mode, shown in ascending four-note groups in FIGURE 5b.
P.M.
P.M.
FIGURE 1
* = downstroke
*
2
4
2
4
= upstroke
FIGURE 2a Em triad
12
10
14
14
12
16
( )17
151919
FIGURE 2b sweep arpeggio
1210
99
8912
FIGURE 3a
12
1412
14
12
3 3 3 3 3
FIGURE 3b
1014
15
14
15
14
FIGURE 3c
15
14
15
1214
15
14
FIGURE 3d
1417
1417
1417
FIGURE 4a
sim.
12
14
15
14
14
17
FIGURE 4b
1214
15
1414
171416
17
1716
20
FIGURE 4c
17
19
1214
15
1414
171416
17
1716
201719
1719
1620
17
17
1416
1417
15
14
12
14
FIGURE 5aEm
7998
7998
D5
XXXX
XXXX
XXXX
XXXX
577
577 0
C5
XXX
XXX
XXX
XXX
355
34
35 03
435
34
FIGURE 5b C Lydian mode
8
7 9 10
10
9 11 1213
12 14 15
1
!12 12 1013
FIGURE 6
(root)C
8
(maj3)E
7
F#(#4)
9
G(5)
10
FIGURE 7asim.
8
98
9!8
FIGURE 7b 8
912
10 910
10
910
1114
12 1113
12
1213
1417
15 !1920
20
FIGURE 7c
89
1210 9
10 X10
91011
1412 11
13 X12
121314
1715 019
20FIGURE 8a E Dorian
19
1817
19 1817
1920
1/2
1721
E blues scale
1213
151413
1214
14 1212
141512
1215
1512
1215
15 ( )
1/2
1718
18 A diminished-seven arpeggio
1415
17
1615
1416
1714
14
17
1719
20
FIGURE 1 FIGURE 2 FIGURE 2b FIGURE 3a
FIGURE 3b FIGURE 3c FIGURE 3d FIGURE 4a
FIGURE 4b FIGURE 4c
FIGURE 5a
FIGURE 5b FIGURE 6
FIGURE 7a FIGURE 7b
FIGURE 7c FIGURE 8a
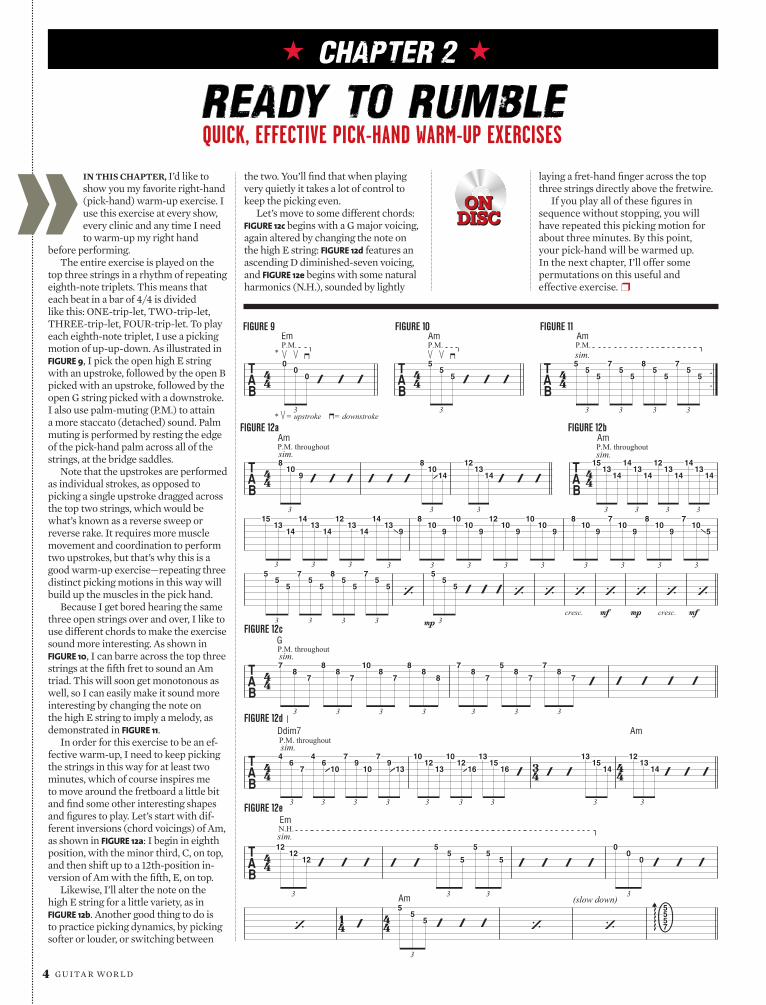
the two. You’ll find that when playing very quietly it takes a lot of control to keep the picking even.
Let’s move to some different chords: FIGURE 12c begins with a G major voicing, again altered by changing the note on the high E string: FIGURE 12d features an ascending D diminished-seven voicing, and FIGURE 12e begins with some natural harmonics (N.H.), sounded by lightly
READY TO RUMBLE QUICK, EFFECTIVE PICK-HAND WARM-UP EXERCISES
CHAPTER 2
» laying a fret-hand finger across the top three strings directly above the fretwire.
If you play all of these figures in sequence without stopping, you will have repeated this picking motion for about three minutes. By this point, your pick-hand will be warmed up. In the next chapter, I’ll offer some permutations on this useful and effective exercise. ❒
P.M.
P.M.
P.M.
FIGURE 1
*
* = upstroke = downstroke
Em
0
0
0
FIGURE 2
Am
5
5
5
FIGURE 3
sim.
Am
55
5
75
5
85
5
75
5
3 3 3 3 3 3
FIGURE 4a
P.M. throughoutsim.
Am
8
109 8
1014
1213
14
FIGURE 4b
sim.P.M. throughoutAm
1513
14
1413
14
1213
14
1413
14
3 3 3 3 3 3 315
1314
1413
14
1213
1414
139
810
9
1010
9
1210
9
1010
9
810
9
710
9
810
97
105
3 3 3 3 3 3 3 3 3 3 3 35
55
75
5
85
5 mp
75
5 5
55
cresc.
mf
mp
cresc.
mf
3 3 3 3 3
FIGURE 4c
P.M. throughoutsim.
G
78
7
88
7
108
7
88
8
78
7
58
7 7
87
3 3 3 3 3 3 3
FIGURE 4d
P.M. throughoutsim.
Ddim7
46
7 46
10
79
10 79
13
1012
13 1012
16 13
1516
1315
14
Am
12
1314
3 3 3 3 3 3 3 3 3
FIGURE 4e
sim.N.H.Em
12
1212
55
5 5
55
00
0 3 3 3 3
Am
5
55
(slow down)
07555
3
IN THIS CHAPTER, I’d like to show you my favorite right-hand (pick-hand) warm-up exercise. I use this exercise at every show, every clinic and any time I need to warm-up my right hand
before performing.The entire exercise is played on the
top three strings in a rhythm of repeating eighth-note triplets. This means that each beat in a bar of 4/4 is divided like this: ONE-trip-let, TWO-trip-let, THREE-trip-let, FOUR-trip-let. To play each eighth-note triplet, I use a picking motion of up-up-down. As illustrated in FIGURE 9, I pick the open high E string with an upstroke, followed by the open B picked with an upstroke, followed by the open G string picked with a downstroke. I also use palm-muting (P.M.) to attain a more staccato (detached) sound. Palm muting is performed by resting the edge of the pick-hand palm across all of the strings, at the bridge saddles.
Note that the upstrokes are performed as individual strokes, as opposed to picking a single upstroke dragged across the top two strings, which would be what’s known as a reverse sweep or reverse rake. It requires more muscle movement and coordination to perform two upstrokes, but that’s why this is a good warm-up exercise—repeating three distinct picking motions in this way will build up the muscles in the pick hand.
Because I get bored hearing the same three open strings over and over, I like to use different chords to make the exercise sound more interesting. As shown in FIGURE 10, I can barre across the top three strings at the fifth fret to sound an Am triad. This will soon get monotonous as well, so I can easily make it sound more interesting by changing the note on the high E string to imply a melody, as demonstrated in FIGURE 11.
In order for this exercise to be an ef-fective warm-up, I need to keep picking the strings in this way for at least two minutes, which of course inspires me to move around the fretboard a little bit and find some other interesting shapes and figures to play. Let’s start with dif-ferent inversions (chord voicings) of Am, as shown in FIGURE 12a: I begin in eighth position, with the minor third, C, on top, and then shift up to a 12th-position in-version of Am with the fifth, E, on top.
Likewise, I’ll alter the note on the high E string for a little variety, as in FIGURE 12b. Another good thing to do is to practice picking dynamics, by picking softer or louder, or switching between
ONDISCONDISC
4 GU I TA R WOR L D
FIGURE 9 FIGURE 10 FIGURE 11
FIGURE 12a FIGURE 12b
FIGURE 12c
FIGURE 12d
FIGURE 12e

Now let’s apply our picking tech-nique to these chord shapes, as dem-onstrated in the second part of FIGURE 14. Following an eighth-note pickup on the fourth string, picked with a downstroke, each eighth-note triplet is picked up-up-down on the second, third and fourth strings, respectively. Notice that I like to use palm muting throughout (rest the edge of the pick-hand palm across the bridge saddles) to attain a more percussive attack and a clearer separation of notes.
Now that you have a handle on the concept, let’s experiment by moving these chord shapes around the board in different patterns: as shown in FIGURE 15, I begin by descending in the same
» manner as FIGURE 14 for the first two bars, but at the end of bar 2 I anticipate each new chord shape by shifting to it on the preceding eighth note, sounded on the fourth string with a down-stroke. This approach is then adhered to for the remainder of the exercise. Anticipating each new chord shape like this serves to make the exercise sound even more interesting.
Once you’ve become comfortable with the picking technique and musi-cal concept, try to invent your own ways of connecting these kinds of tri-adic chord shapes. For the truly adven-turous and ambitious, try applying the pattern to all the other groups of three adjacent strings. ❒
Freely
FIGURE 1
12
1/2E7¨9
121013 1210 9
910 9
10 10 910 910
910 9 7 9 7 6 7 6
86
8 78
1/2
7 7 7 5 7 5 4 1
0 00
22100
3 3 3 3 3 3 3 3
P.M.
FIGURE 2E E7¨9 Am E7 F
141313
121012
109
10
979
E Dm E
756
645
323
211
0
5 A
*
* = downstroke
14
E
13
13
14
E7¨9
= upstroke
12
10
12
Am
10
9
10
E7
sim.
F
9
7
9
E
65
7
54
6
Dm
32
3
E
11
1
3 3 3 3 3 3 3 3
FIGURE 3
14
P.M. throughout
13
13
14
12
10
12
10
9
10
sim.9
7
9
6
57
54
6
32
3 1
16
3 3 3 3 3 3 3 3
5
43
32
7
65
6 5
49
99
7 6
510
109
9 9
714
1313
12 12
1010
109
9 9
77
3 3 3 3 3 3 3 3 3 3 3 3
6
56
54
3 3
22
11
3 3
27
65
10 10
914
1313
14
15 115
3 3 3 3 3 3 3 3
IN THE LAST CHAPTER, I pre-sented an intensive pick-hand exercise that I do before every show or clinic. I know that in any situation it will get me warmed up and ready to play
in no time. To refresh your memory, the exercise is built from sequences of eighth-note triplets that fall on three adjacent strings, one note played per string, moving from the highest string to the lowest. Instead of playing each triplet as a reverse sweep, which in-volves dragging the pick across the three strings in a single upward mo-tion, I prefer to use individual pick strokes, picking the first two notes with upstrokes and the last note with a downstroke. It is the use of these individual strokes that really builds up one’s picking strength and stamina.
With just about everything I use as a warm-up exercise, one of my hopes is that I will eventually use the given technique in a piece of music. I’m not interested in warm-ups that are simply muscle-building routines. To me, it’s more useful and enjoyable if the exer-cise exudes some musical merit as well.
One of the ways to apply a musical approach to this picking exercise is to instill a scalar concept, molding the exercise to the musical structure of a given scale. A scale that works well with this exercise is Phrygian dominant, which is the fifth mode of the harmonic minor scale. Sometimes referred to as the “snake charmer” scale, Phrygian dominant is intervallically spelled 1 f2 3 4 5 f6 f7. In the key of E, the notes are E F Gs A B C D; FIGURE 13 is a descending run based on this exotic-sounding scale.
The first thing I did with the scale was to harmonize it in three-note chords, as shown in the first bar of FIGURE 14. Starting with an E+ (E aug-mented) triad, I move the chord shapes down the neck by shifting each note on each string to the next lower scale tone on that string, i.e., the E note on the fourth string moves down to D, the Gs on the third string moves to F and the C on the second string moves to B. The process continues down the fretboard to first position.
5 GU I TA R WOR L D
READY TO RUMBLE, PART 2MORE PICK-HAND WARM-UP EXERCISES
CHAPTER 3
FIGURE 13
FIGURE 14
FIGURE 15
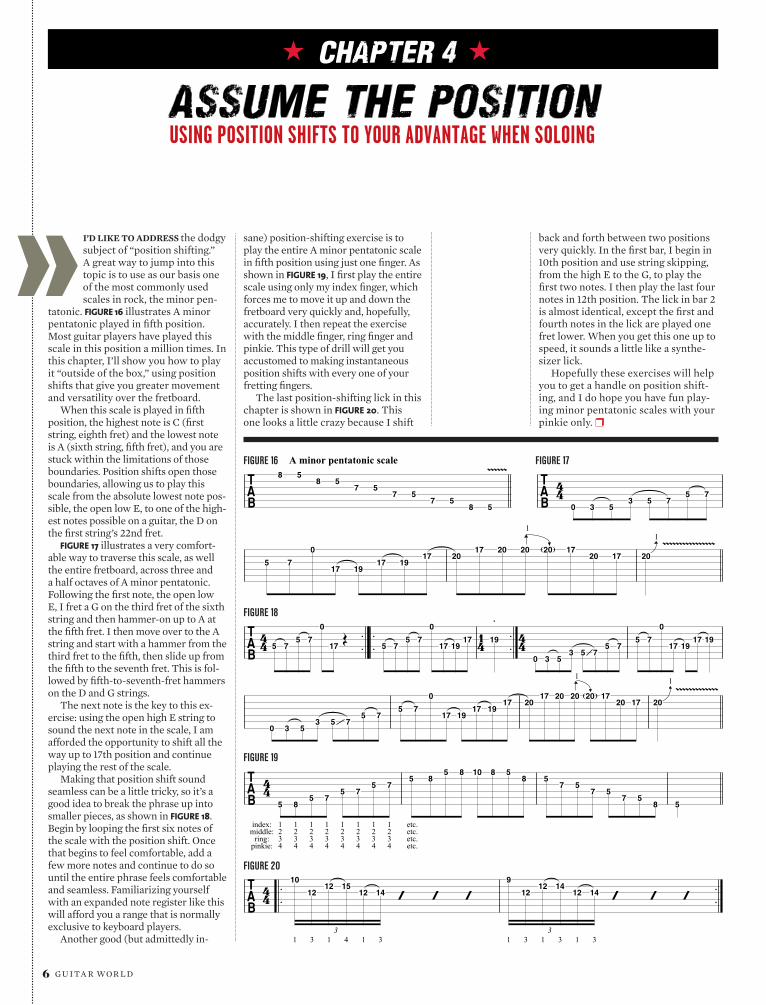
sane) position-shifting exercise is to play the entire A minor pentatonic scale in fifth position using just one finger. As shown in FIGURE 19, I first play the entire scale using only my index finger, which forces me to move it up and down the fretboard very quickly and, hopefully, accurately. I then repeat the exercise with the middle finger, ring finger and pinkie. This type of drill will get you accustomed to making instantaneous position shifts with every one of your fretting fingers.
The last position-shifting lick in this chapter is shown in FIGURE 20. This one looks a little crazy because I shift
» back and forth between two positions very quickly. In the first bar, I begin in 10th position and use string skipping, from the high E to the G, to play the first two notes. I then play the last four notes in 12th position. The lick in bar 2 is almost identical, except the first and fourth notes in the lick are played one fret lower. When you get this one up to speed, it sounds a little like a synthe-sizer lick.
Hopefully these exercises will help you to get a handle on position shift-ing, and I do hope you have fun play-ing minor pentatonic scales with your pinkie only. ❒
FIGURE 1 A minor pentatonic scale8 5
8 57 5
7 57 5
8 5
FIGURE 2
0 3 53 5 7
5 7
5 7
0
17 1917 19
17
1
2017 20 20 20 17
20 17 20
1
FIGURE 3
5 75 7
0
17
5 75 7
0
17 1917 19
0 3 53 5 7
5 75 7
0
17 1917 19
0 3 53 5 7
5 75 7
0
17 1917 19
17
1
2017 20 20 20 17
20 17 20
1
index:middle:ring:pinkie:
1234
FIGURE 4
1234
1234
1234
1234
5 85 7
1234
1234
1234
etc.etc.etc.etc.
5 75 7
5 85 8 10 8 5
8 57 5
7 57 5
8 5
1
FIGURE 5
3 1 4 1 3
10
1212 15
12 14
1 3 1 3 1 3
9
1212 14
12 14 3 3
I’D LIKE TO ADDRESS the dodgy subject of “position shifting.” A great way to jump into this topic is to use as our basis one of the most commonly used scales in rock, the minor pen-
tatonic. FIGURE 16 illustrates A minor pentatonic played in fifth position. Most guitar players have played this scale in this position a million times. In this chapter, I’ll show you how to play it “outside of the box,” using position shifts that give you greater movement and versatility over the fretboard.
When this scale is played in fifth position, the highest note is C (first string, eighth fret) and the lowest note is A (sixth string, fifth fret), and you are stuck within the limitations of those boundaries. Position shifts open those boundaries, allowing us to play this scale from the absolute lowest note pos-sible, the open low E, to one of the high-est notes possible on a guitar, the D on the first string’s 22nd fret.
FIGURE 17 illustrates a very comfort-able way to traverse this scale, as well the entire fretboard, across three and a half octaves of A minor pentatonic. Following the first note, the open low E, I fret a G on the third fret of the sixth string and then hammer-on up to A at the fifth fret. I then move over to the A string and start with a hammer from the third fret to the fifth, then slide up from the fifth to the seventh fret. This is fol-lowed by fifth-to-seventh-fret hammers on the D and G strings.
The next note is the key to this ex-ercise: using the open high E string to sound the next note in the scale, I am afforded the opportunity to shift all the way up to 17th position and continue playing the rest of the scale.
Making that position shift sound seamless can be a little tricky, so it’s a good idea to break the phrase up into smaller pieces, as shown in FIGURE 18. Begin by looping the first six notes of the scale with the position shift. Once that begins to feel comfortable, add a few more notes and continue to do so until the entire phrase feels comfortable and seamless. Familiarizing yourself with an expanded note register like this will afford you a range that is normally exclusive to keyboard players.
Another good (but admittedly in-
6 GU I TA R WOR L D
ASSUME THE POSITION USING POSITION SHIFTS TO YOUR ADVANTAGE WHEN SOLOING
CHAPTER 4
FIGURE 16 FIGURE 17
FIGURE 18
FIGURE 19
FIGURE 20
*by Paul Gilbert
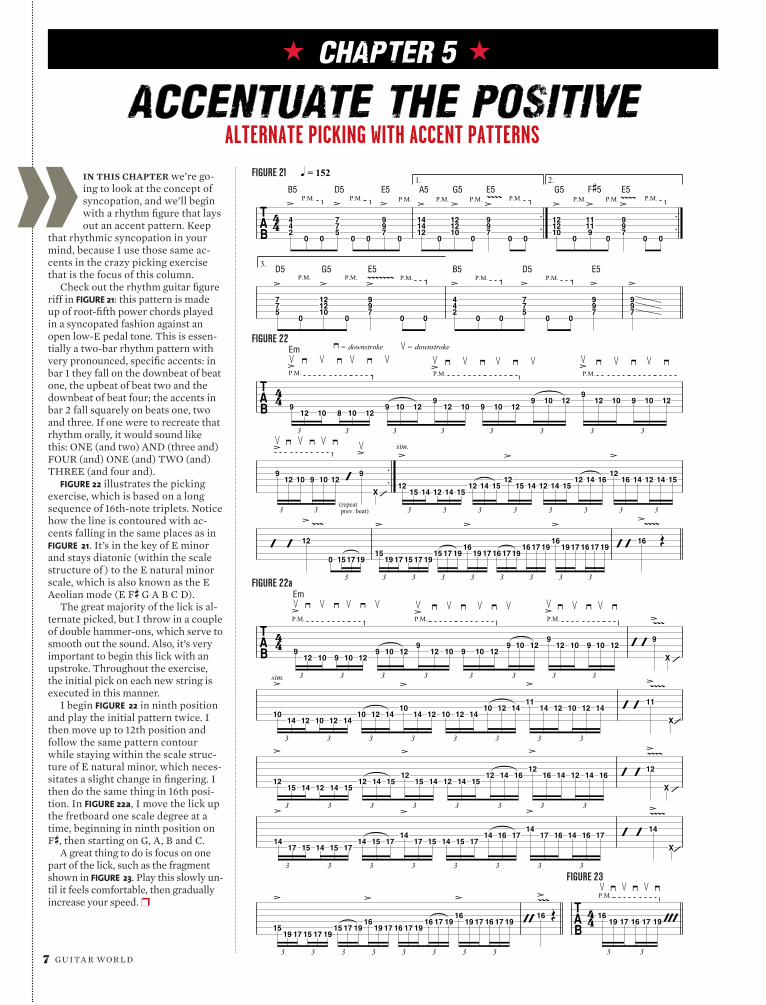
» IN THIS CHAPTER we’re go-ing to look at the concept of syncopation, and we’ll begin with a rhythm figure that lays out an accent pattern. Keep
that rhythmic syncopation in your mind, because I use those same ac-cents in the crazy picking exercise that is the focus of this column.
Check out the rhythm guitar figure riff in FIGURE 21: this pattern is made up of root-fifth power chords played in a syncopated fashion against an open low-E pedal tone. This is essen-tially a two-bar rhythm pattern with very pronounced, specific accents: in bar 1 they fall on the downbeat of beat one, the upbeat of beat two and the downbeat of beat four; the accents in bar 2 fall squarely on beats one, two and three. If one were to recreate that rhythm orally, it would sound like this: ONE (and two) AND (three and) FOUR (and) ONE (and) TWO (and) THREE (and four and).
FIGURE 22 illustrates the picking exercise, which is based on a long sequence of 16th-note triplets. Notice how the line is contoured with ac-cents falling in the same places as in FIGURE 21. It’s in the key of E minor and stays diatonic (within the scale structure of ) to the E natural minor scale, which is also known as the E Aeolian mode (E Fs G A B C D).
The great majority of the lick is al-ternate picked, but I throw in a couple of double hammer-ons, which serve to smooth out the sound. Also, it’s very important to begin this lick with an upstroke. Throughout the exercise, the initial pick on each new string is executed in this manner.
I begin FIGURE 22 in ninth position and play the initial pattern twice. I then move up to 12th position and follow the same pattern contour while staying within the scale struc-ture of E natural minor, which neces-sitates a slight change in fingering. I then do the same thing in 16th posi-tion. In FIGURE 22a, I move the lick up the fretboard one scale degree at a time, beginning in ninth position on Fs, then starting on G, A, B and C.
A great thing to do is focus on one part of the lick, such as the fragment shown in FIGURE 23. Play this slowly un-til it feels comfortable, then gradually increase your speed. ❒
7 GU I TA R WOR L D
ACCENTUATE THE POSITIVEALTERNATE PICKING WITH ACCENT PATTERNS
CHAPTER 5
P.M. P.M. P.M.
1.
P.M.
2.
FIGURE 1 q = 152
B5 D5
244
0 0
577
E5P.M.
A5
0 0799
0
P.M.G5
P.M.E5
121414
0
101212
0
799
G5
0 0
P.M.F#5
P.M.E5
101212
0
91111
0
799
0 0
P.M.
3.
P.M. P.M. D5
P.M.G5
P.M.E5
577
0
101212
0
799
B5
0 0
D5
244
0 0
577
E5
0 0799
799
P.M. P.M. P.M.
FIGURE 2Em = downstroke
9
12
10
8
10
12
= downstroke
9
10 129
12
10
9
10
12
9
10 129
12
10
9
10
12
3 3 3 3 3 3 3 3
9
12
10
9
10
12
(repeat prev. beat)
9
X
sim.
12
15 14 12 14 1512 14 15
12
15 14 12 14 15
12 14 1612
16 14 12 14 15
3 3 3 3 3 3 3 3 3 3
12
0 151719
15
19 17 15 17 19
15 17 1916
19 17 16 17 19
16 17 19 16
19 17 16 17 19 16
3 3 3 3 3 3 3 3 3
P.M. P.M. P.M.
FIGURE 2aEm
9
12
10
9
10
12
9
10 129
12
10
9
10
12
9
10 12 9
12
10
9
10
12
9
X
3 3 3 3 3 3 3 3sim.
10
14 12 10 12 1410 12 14
10
14 12 10 12 14
10 12 14 11
14 12 10 12 14 11
X
3 3 3 3 3 3 3 3
12
15 14 12 14 1512 14 15
12
15 14 12 14 15
12 14 16 12
16 14 12 14 16 12
X
3 3 3 3 3 3 3 3
14
17 15 14 15 1714 15 17
14
17 15 14 15 17
14 16 17 14
17 16 14 16 17 14
X
3 3 3 3 3 3 3 3
P.M.
15
19 17 15 17 1915 17 19
16
19 17 16 17 19
16 17 19 16
19 17 16 17 19 16
FIGURE 3
16
19
17
16
17
19
3 3 3 3 3 3 3 3 3 3
FIGURE 21
FIGURE 22
FIGURE 22a
FIGURE 23
directly against the 19th fret.As these exercises include a few
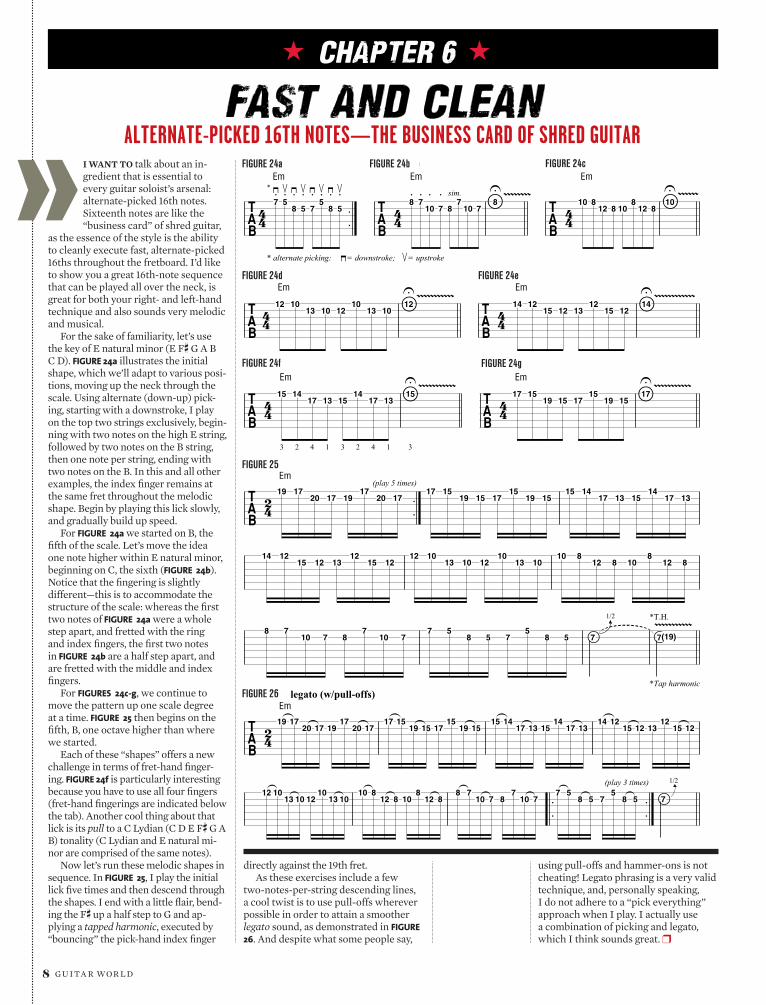
two-notes-per-string descending lines, a cool twist is to use pull-offs wherever possible in order to attain a smoother legato sound, as demonstrated in FIGURE 26. And despite what some people say,
»
FIGURE 1a
*
* alternate picking:
Em
7
5
8
5
= downstroke;
FIGURE 1b
= upstroke
Em
7
5
8
5
sim.8
7
10
7
!8
710 7
8
FIGURE 1c
Em
10 812 8 !10
812 8
10
FIGURE 1dEm
12 1013 10 !12
1013 10
12
FIGURE 1e
Em
14 1215 12 !13
1215 12
14
3
FIGURE 1fEm
2 4 1 3
15 1417 13
2 4 1 3
!1514
17 1315
FIGURE 1g
Em
17 1519 15 !17
1519 15
17
FIGURE 2Em
19 1720 17
(play 5 times)
1917
20 1717 15
19 15 1715
19 1515 14
17 13 1514
17 13
14 1215 12 13
1215 12
12 1013 10 12
1013 10
10 812 8 10
812 8
8 710 7 8
710 7
7 58 5 !7
58 5 7
1/2
!
*T.H.
*Tap harmonic
7
(19)
FIGURE 3 legato (w/pull-offs)Em
19 1720 17 19
1720 17
17 1519 15 17
1519 15
15 1417 13 15
1417 13
14 1215 12 13
1215 12
12 10
13 10 1210
13 1010 8
12 8 108
12 88 7
10 7 87
10 77 5
8 5
(play 3 times)
!75
8 5 7
1/2)
using pull-offs and hammer-ons is not cheating! Legato phrasing is a very valid technique, and, personally speaking, I do not adhere to a “pick everything” approach when I play. I actually use a combination of picking and legato, which I think sounds great. ❒
I WANT TO talk about an in-gredient that is essential to every guitar soloist’s arsenal: alternate-picked 16th notes. Sixteenth notes are like the “business card” of shred guitar,
as the essence of the style is the ability to cleanly execute fast, alternate-picked 16ths throughout the fretboard. I’d like to show you a great 16th-note sequence that can be played all over the neck, is great for both your right- and left-hand technique and also sounds very melodic and musical.
For the sake of familiarity, let’s use the key of E natural minor (E Fs G A B C D). FIGURE 24a illustrates the initial shape, which we’ll adapt to various posi-tions, moving up the neck through the scale. Using alternate (down-up) pick-ing, starting with a downstroke, I play on the top two strings exclusively, begin-ning with two notes on the high E string, followed by two notes on the B string, then one note per string, ending with two notes on the B. In this and all other examples, the index finger remains at the same fret throughout the melodic shape. Begin by playing this lick slowly, and gradually build up speed.
For FIGURE 24a we started on B, the fifth of the scale. Let’s move the idea one note higher within E natural minor, beginning on C, the sixth (FIGURE 24b). Notice that the fingering is slightly different—this is to accommodate the structure of the scale: whereas the first two notes of FIGURE 24a were a whole step apart, and fretted with the ring and index fingers, the first two notes in FIGURE 24b are a half step apart, and are fretted with the middle and index fingers.
For FIGURES 24c-g, we continue to move the pattern up one scale degree at a time. FIGURE 25 then begins on the fifth, B, one octave higher than where we started.
Each of these “shapes” offers a new challenge in terms of fret-hand finger-ing. FIGURE 24f is particularly interesting because you have to use all four fingers (fret-hand fingerings are indicated below the tab). Another cool thing about that lick is its pull to a C Lydian (C D E Fs G A B) tonality (C Lydian and E natural mi-nor are comprised of the same notes).
Now let’s run these melodic shapes in sequence. In FIGURE 25, I play the initial lick five times and then descend through the shapes. I end with a little flair, bend-ing the Fs up a half step to G and ap-plying a tapped harmonic, executed by “bouncing” the pick-hand index finger
8 GU I TA R WOR L D
FAST AND CLEAN ALTERNATE-PICKED 16TH NOTES—THE BUSINESS CARD OF SHRED GUITAR
CHAPTER 6
FIGURE 24a FIGURE 24b FIGURE 24c
FIGURE 24d FIGURE 24e
FIGURE 24f FIGURE 24g
FIGURE 25
FIGURE 26
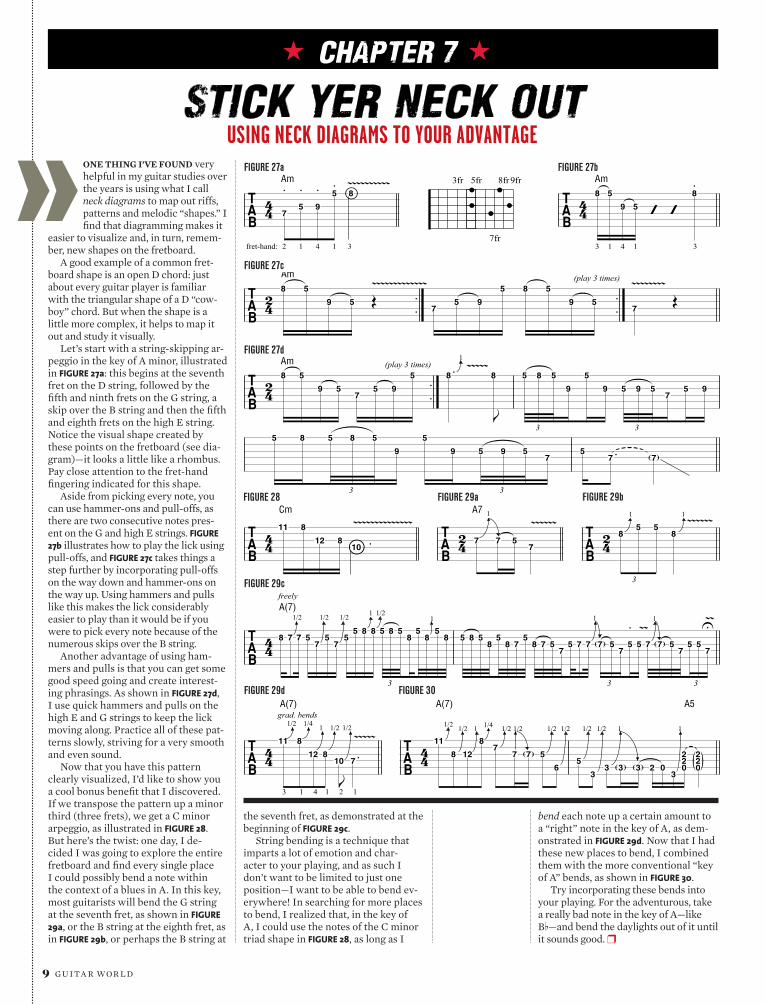
the seventh fret, as demonstrated at the beginning of FIGURE 29c.
String bending is a technique that imparts a lot of emotion and char-acter to your playing, and as such I don’t want to be limited to just one position—I want to be able to bend ev-erywhere! In searching for more places to bend, I realized that, in the key of A, I could use the notes of the C minor triad shape in FIGURE 28, as long as I
» fret-hand: 2
FIGURE 1aAm
1 4 1 3
8fr9fr
7fr
5fr3fr .. ...!
7
5
9
5
8
3
FIGURE 1bAm
1 4 1
8 5
9 5 3
8
FIGURE 1cAm8 5
9 5
75 9
5(play 3 times)
8 5
9 57
FIGURE 1dAm8 5
9 5
(play 3 times)
75 9
5 8 1
8
5 8 5
9
5
9 5 9 57
5 9
3 35 8 5 8 5
9
5
9 5 9 57
57
7
3 3
FIGURE 2Cm
!
11 8
12 810
FIGURE 3a
A7 1
7 7 57
FIGURE 3b
1
85 5
8
1
3
FIGURE 3cfreelyA(7)
1/2
8 7 7
1/2 1/2
57
57
1 1/2
55 8 8
1
5 8 58
58
58 5 8 5
85
8 75
1
8 7 57
5 7 7 7 57
5
5
1 7 7 5
75 5
7
3 3 3
3
FIGURE 3d
grad. bendsA(7)
1/2
1 4
1/4
1
1
2
1/2
11 8
12 8
1/2
1
10
7
FIGURE 4
A(7)
1/2 1/2 1 1/4
11
8 12
8
1/2 1/2
77 7
1/2 1/2 1/2
5
6
1/2
5
3
1
3 3 3
1
A5
2 03
022
022
bend each note up a certain amount to a “right” note in the key of A, as dem-onstrated in FIGURE 29d. Now that I had these new places to bend, I combined them with the more conventional “key of A” bends, as shown in FIGURE 30.
Try incorporating these bends into your playing. For the adventurous, take a really bad note in the key of A—like Bf—and bend the daylights out of it until it sounds good. ❒
ONE THING I’VE FOUND very helpful in my guitar studies over the years is using what I call neck diagrams to map out riffs, patterns and melodic “shapes.” I find that diagramming makes it
easier to visualize and, in turn, remem-ber, new shapes on the fretboard.
A good example of a common fret-board shape is an open D chord: just about every guitar player is familiar with the triangular shape of a D “cow-boy” chord. But when the shape is a little more complex, it helps to map it out and study it visually.
Let’s start with a string-skipping ar-peggio in the key of A minor, illustrated in FIGURE 27a: this begins at the seventh fret on the D string, followed by the fifth and ninth frets on the G string, a skip over the B string and then the fifth and eighth frets on the high E string. Notice the visual shape created by these points on the fretboard (see dia-gram)—it looks a little like a rhombus. Pay close attention to the fret-hand fingering indicated for this shape.
Aside from picking every note, you can use hammer-ons and pull-offs, as there are two consecutive notes pres-ent on the G and high E strings. FIGURE 27b illustrates how to play the lick using pull-offs, and FIGURE 27c takes things a step further by incorporating pull-offs on the way down and hammer-ons on the way up. Using hammers and pulls like this makes the lick considerably easier to play than it would be if you were to pick every note because of the numerous skips over the B string.
Another advantage of using ham-mers and pulls is that you can get some good speed going and create interest-ing phrasings. As shown in FIGURE 27d, I use quick hammers and pulls on the high E and G strings to keep the lick moving along. Practice all of these pat-terns slowly, striving for a very smooth and even sound.
Now that you have this pattern clearly visualized, I’d like to show you a cool bonus benefit that I discovered. If we transpose the pattern up a minor third (three frets), we get a C minor arpeggio, as illustrated in FIGURE 28. But here’s the twist: one day, I de-cided I was going to explore the entire fretboard and find every single place I could possibly bend a note within the context of a blues in A. In this key, most guitarists will bend the G string at the seventh fret, as shown in FIGURE 29a, or the B string at the eighth fret, as in FIGURE 29b, or perhaps the B string at
9 GU I TA R WOR L D
STICK YER NECK OUT USING NECK DIAGRAMS TO YOUR ADVANTAGE
CHAPTER 7
FIGURE 27a FIGURE 27b
FIGURE 27c
FIGURE 27d
FIGURE 28 FIGURE 29a FIGURE 29b
FIGURE 29c
FIGURE 29d FIGURE 30

which is a little more work for the brain because it involves different “shapes.”
Let’s use this approach to create licks. FIGURE 35 incorporates the root/fifth “power chord” concept, with the notes played separately and in sequence. Given a chord progression like A5-G5-F5, as shown in FIGURE 36, you can play that lick in F over the F5 chord. Add a few notes to that shape, and we can get an F Lydian sound, as shown in FIGURES 37a-c.
»
Let’s apply the concept to an E minor lick (FIGURE 38a). We can move this up one and two octaves, as shown in FIGURE 38b, fretting it exactly the same way. For fun, try improvising around those shapes.
FIGURES 39a-c incorporate this con-cept with a Csm7f5 arpeggio; for an additional twist, FIGURE 39c positions a Csm7f5 arpeggio-type lick over an A7 chord, which yields a cool, fusion-y A9 (A Cs E G B) sound. ❒
FIGURE 1
5
7
10
FIGURE 2
a)
0
A5
57
b)
0A5
79
c) 0A5
1012
FIGURE 3
a)
54 7
b)
76 9
c)
109 !12
12 9
109 6
77 4
5
9 67
12 3 3 3 3
FIGURE 4
54 7
76
55
56
77 4
54 7
76
55
9
3
9
FIGURE 5
57
79
10
12
3 3 3 3 3 3
FIGURE 6A5
577
G5
355 0
E5
155
1315
15
!17
1820 20
FIGURE 7a
1312 14 15
FIGURE 7b
1514 16 17
1817 19 20
3 3
FIGURE 7c
13
12 14 15
15
14 16 1718
17 19 20 17
1
17
15!13
FIGURE 8a
7 107 9 10
FIGURE 8b
9 129 1112
1215121415
FIGURE 9a
C#m7¨58fr
T 2 3 1
7 97 10
FIGURE 9b
7 97 10
7 97 10
FIGURE 9cA7
5 7 97 10
7 9 119 12
10 12 1412 15
1/2
14 14 14 12
1/2
!1512
1314
5 5 5 3
I’VE FOUND IT VERY helpful as a guitarist to familiarize myself with the layout of the keyboard on a piano. This in turn has made it easier for me to visual-ize patterns on the guitar fret-
board. A quick look at the black keys on a piano reveal the logic with which they are laid out: starting on the far left and moving right, there are two blacks keys followed by three black keys, and the pattern repeats across the entire key-board. The great thing for piano play-ers is that any scale, chord or musical phrase in one position and octave can be easily moved to another because it will look exactly the same; you only have to memorize its “shape.”
The guitar, however, is not like this; depending on the string or fretboard position, the “shapes” of scales and riffs can change quite a bit, even when playing exactly the same notes. But I’ve developed an approach to the guitar’s fretboard wherein you can use the same shapes, and very easily move them through different octaves.
As shown in FIGURE 31, there is an A note located on the sixth string’s fifth fret, another A one octave higher lo-cated on the seventh fret of the fourth string (two strings over and two frets higher), and another A located at the 10th fret on the second string (two strings over and three frets higher).
It’s very valuable to memorize the positions of these three A notes, because the patterns of many licks based around one of these A notes can easily be moved to either of the other two A notes. This is especially true if the lick falls on the sixth and fifth, fourth and third, or sec-ond and first strings, because these pairs of adjacent strings are tuned in fourths, and the shape of any lick on these pairs of strings will be identical.
A simple example is an A5 power chord: FIGURE 32a combines an A root note on the sixth string with an E note, which is the fifth, on the fifth string; you can move this shape up an octave to the fourth and third strings, two frets high-er (FIGURE 32b), or the second and first strings, three frets higher (FIGURE 32c).
FIGURE 33a illustrates an A major triad (A Cs E) played on the bottom two strings; we can move this same trian-gular shape over to the other A notes (FIGURES 33b and 33c) and yield the same musical result in higher octaves.
In comparison, fingering the notes of this arpeggio across all of the strings in one position would give us something like what is illustrated in FIGURE 34,
10 GU I TA R WOR L D
FIGURE 31
FIGURE 39a
SHAPE SHIFTINGHOW TO ORGANIZE PATTERNS ON THE FRETBOARD
CHAPTER 8
FIGURE 32 FIGURE 33
FIGURE 34 FIGURE 35
FIGURE 36 FIGURE 37a FIGURE 37b
FIGURE 37c FIGURE 38a
FIGURE 38b FIGURE 39b
FIGURE 39c
»
FIGURE 1 B Phrygian dominant modeB7(¨9)
7 8 117 9 10
7 9 710 9 7
11 8 9
FIGURE 2a
B7(¨9)
8 11 12
8 11 12 11 8
12 11 8
freely
FIGURE 2bB7(¨9)
8 11 12
8 11 12 11 8
12 11 8 11 12
8
12 11 8 11 12
8 11 12 111211 8
12
8 11 8
12
8
12 11
8
12 11
5
8 11 12
8
1
11 12 12 12 11 8
12 11 !8
12 11 8 11
FIGURE 3a
B7(¨9)11 12 14
11 12 14
11 12 14
11 12 14
3 3 3 3
FIGURE 3bB7(¨9)
8
8
11
11
12
12
14
14
12
12
11
11
8
8 FIGURE 4
B7(¨9)
14 16 17
14 15 17
11 12 14
11 12 14
8 11 12!8 11 12 12
3 3 3 3 3 3
FIGURE 5B7(¨9)8 11
12
8 12 111211 8
12
8 11 8
12
8
12 11
8
12 11 8 11 12 14
11 12 14
1/2
14 14 12 11 111212 11
14
11
3
14 12
11
14 12 11
17 17 14 14 15 15
17 17
14 14
16 16 17 17
14 14 16
14 16 17
14 15 17 15 17 15 14 14 15 14
17
14
17 16
14
17 16 14 11 12 14
11 12 14
3 3 3 3 3 3 3
12141211
14
111214
14
11
1412
11
1412 11 8 1112
8 11 1112 1112 8
12
811 8
12
8
1211
8
1211 !
1
810
10
5 3 3 3 3 3 3 3 3 3
FIGURE 6
7 4 0 8 5 0 10 10 7 0 8 8 5 0 7 7 4 0 8 8 5 0 10 10 7 0 12 12 8 0
3 3
12 12 8 0 10 1
FIGURE 7
*
*
grad. increase speed8
12 10 811
812 10 8
11
= upstroke
= downstroke
5 5
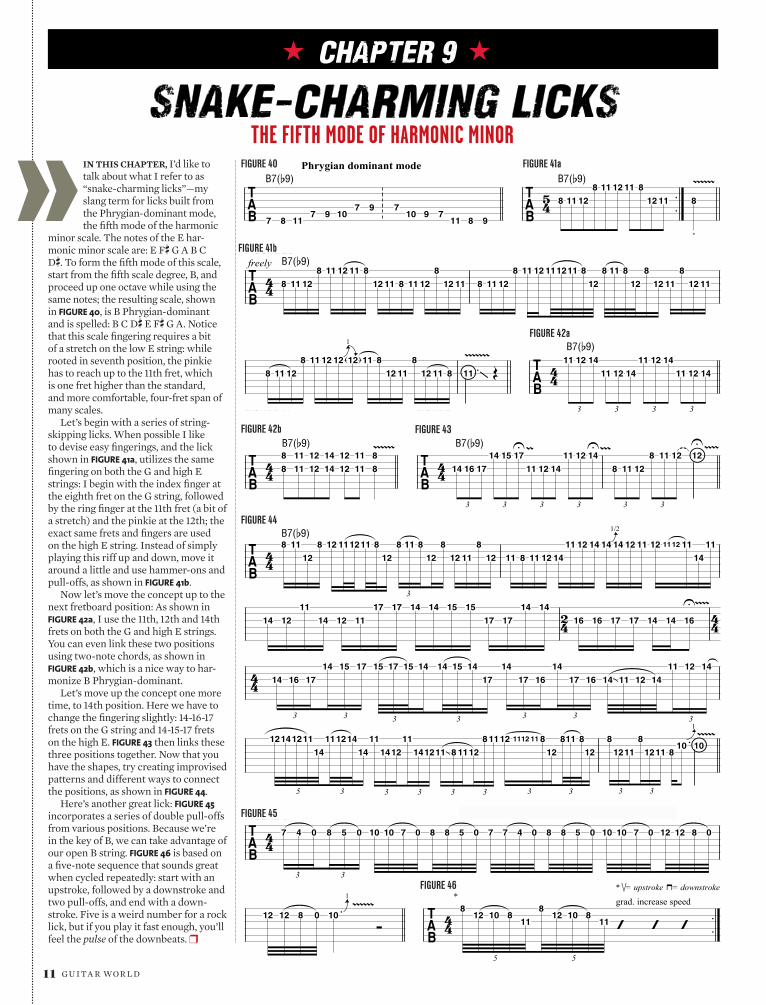
IN THIS CHAPTER, I’d like to talk about what I refer to as “snake-charming licks”—my slang term for licks built from the Phrygian-dominant mode, the fifth mode of the harmonic
minor scale. The notes of the E har-monic minor scale are: E Fs G A B C Ds. To form the fifth mode of this scale, start from the fifth scale degree, B, and proceed up one octave while using the same notes; the resulting scale, shown in FIGURE 40, is B Phrygian-dominant and is spelled: B C Ds E Fs G A. Notice that this scale fingering requires a bit of a stretch on the low E string: while rooted in seventh position, the pinkie has to reach up to the 11th fret, which is one fret higher than the standard, and more comfortable, four-fret span of many scales.
Let’s begin with a series of string-skipping licks. When possible I like to devise easy fingerings, and the lick shown in FIGURE 41a, utilizes the same fingering on both the G and high E strings: I begin with the index finger at the eighth fret on the G string, followed by the ring finger at the 11th fret (a bit of a stretch) and the pinkie at the 12th; the exact same frets and fingers are used on the high E string. Instead of simply playing this riff up and down, move it around a little and use hammer-ons and pull-offs, as shown in FIGURE 41b.
Now let’s move the concept up to the next fretboard position: As shown in FIGURE 42a, I use the 11th, 12th and 14th frets on both the G and high E strings. You can even link these two positions using two-note chords, as shown in FIGURE 42b, which is a nice way to har-monize B Phrygian-dominant.
Let’s move up the concept one more time, to 14th position. Here we have to change the fingering slightly: 14-16-17 frets on the G string and 14-15-17 frets on the high E. FIGURE 43 then links these three positions together. Now that you have the shapes, try creating improvised patterns and different ways to connect the positions, as shown in FIGURE 44.
Here’s another great lick: FIGURE 45 incorporates a series of double pull-offs from various positions. Because we’re in the key of B, we can take advantage of our open B string. FIGURE 46 is based on a five-note sequence that sounds great when cycled repeatedly: start with an upstroke, followed by a downstroke and two pull-offs, and end with a down-stroke. Five is a weird number for a rock lick, but if you play it fast enough, you’ll feel the pulse of the downbeats. ❒
11 GU I TA R WOR L D
SNAKE-CHARMING LICKSTHE FIFTH MODE OF HARMONIC MINOR
CHAPTER 9
FIGURE 40 FIGURE 41a
FIGURE 41b
FIGURE 42a
FIGURE 42b FIGURE 43
FIGURE 44
FIGURE 45
FIGURE 46
12 GU I TA R WOR L D
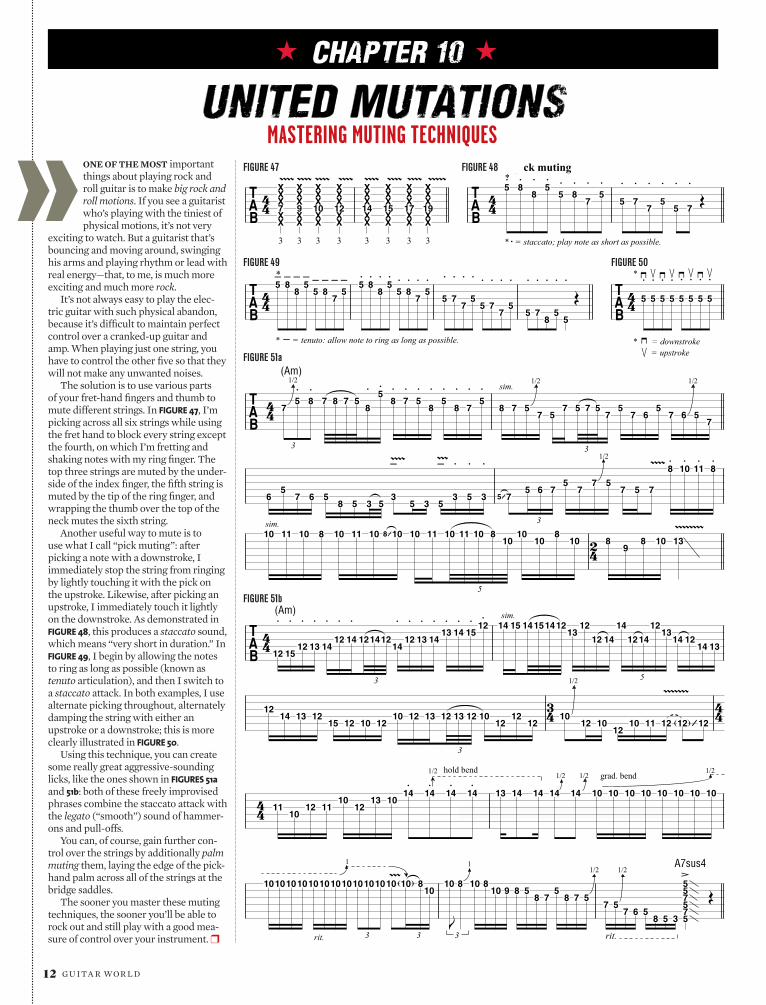
» ONE OF THE MOST important things about playing rock and roll guitar is to make big rock and roll motions. If you see a guitarist who’s playing with the tiniest of physical motions, it’s not very
exciting to watch. But a guitarist that’s bouncing and moving around, swinging his arms and playing rhythm or lead with real energy—that, to me, is much more exciting and much more rock.
It’s not always easy to play the elec-tric guitar with such physical abandon, because it’s difficult to maintain perfect control over a cranked-up guitar and amp. When playing just one string, you have to control the other five so that they will not make any unwanted noises.
The solution is to use various parts of your fret-hand fingers and thumb to mute different strings. In FIGURE 47, I’m picking across all six strings while using the fret hand to block every string except the fourth, on which I’m fretting and shaking notes with my ring finger. The top three strings are muted by the under-side of the index finger, the fifth string is muted by the tip of the ring finger, and wrapping the thumb over the top of the neck mutes the sixth string.
Another useful way to mute is to use what I call “pick muting”: after picking a note with a downstroke, I immediately stop the string from ringing by lightly touching it with the pick on the upstroke. Likewise, after picking an upstroke, I immediately touch it lightly on the downstroke. As demonstrated in FIGURE 48, this produces a staccato sound, which means “very short in duration.” In FIGURE 49, I begin by allowing the notes to ring as long as possible (known as tenuto articulation), and then I switch to a staccato attack. In both examples, I use alternate picking throughout, alternately damping the string with either an upstroke or a downstroke; this is more clearly illustrated in FIGURE 50.
Using this technique, you can create some really great aggressive-sounding licks, like the ones shown in FIGURES 51a and 51b: both of these freely improvised phrases combine the staccato attack with the legato (“smooth”) sound of hammer-ons and pull-offs.
You can, of course, gain further con-trol over the strings by additionally palm muting them, laying the edge of the pick-hand palm across all of the strings at the bridge saddles.
The sooner you master these muting techniques, the sooner you’ll be able to rock out and still play with a good mea-sure of control over your instrument. ❒
3
FIGURE 1
XX
X7
XX
3
XX
X9
XX
3
XX
X10
XX
3
XX
XX
12
X
3
XX
XX
14
X
3
XX
XX
15
X
3
XX
XXX
17
3
XX
XXX
19
FIGURE 2 pick muting
*
* = staccato; play note as short as possible.
5
8
8
5
5
8
7
5
5
7
7
5
5
7
FIGURE 3*
* = tenuto: allow note to ring as long as possible.
5
8
8
5
5
8
7
5
5
8
8
5
5
8
7
5
5
7
7
5
5
7
7
5
5
7
8
5
5
FIGURE 4
*
*
= upstroke= downstroke
5
5
5
5
5
5
5
5
FIGURE 5a(Am)
1/2
75
8
7 8 7 5
8
5
8
7
5
8
sim.
5
8
7
5
1/2
8 7 57 5
7 5 7 57
57 6
5
1/2
7 6 57
3 3
65
7 6 58 5 3 5
3
5 3
5
5
3
5
3
7
5 6 7
1/2
57
7 57 5 7
8
10
11
8
3
sim.10 11 10 8 810 11 10 10 10 11 10 11 10 8
1010
108
10 89
8 10 13
5
FIGURE 5b(Am)
12
15
12
13
14
12
14
121412
14
12
13
14
sim.
13
14
15
12
14 15 1415141213
12
12 14
14
1214
1213
14 1214 13
3 5
1214 13 12
15 12 10 1210 12 13 12 13 12
1/2
1012
1212
1012 10
1210 11 12
12 12
3
1110
12 1110
1213 10
1/2 hold bend
14
14
14
14 1/2
13 14 14
1/2 grad. bend
14 14 10 10 10 10
1/2
10 10 10 10
rit. rit.
10101010
1
10101010101010
10 10 810
10
8
3
1
10 810 9 8 5
8 7
1/2
58 7 5
1/2
7 57 6
A7sus4
58 5 3 5
75755
3 3
3
FIGURE 1
XX
X7
XX
3
XX
X9
XX
3
XX
X10
XX
3
XX
XX
12
X
3
XX
XX
14
X
3
XX
XX
15
X
3
XX
XXX
17
3
XX
XXX
19
FIGURE 2 pick muting
*
* = staccato; play note as short as possible.
5
8
8
5
5
8
7
5
5
7
7
5
5
7
FIGURE 3*
* = tenuto: allow note to ring as long as possible.
5
8
8
5
5
8
7
5
5
8
8
5
5
8
7
5
5
7
7
5
5
7
7
5
5
7
8
5
5
FIGURE 4
*
*
= upstroke= downstroke
5
5
5
5
5
5
5
5
FIGURE 5a(Am)
1/2
75
8
7 8 7 5
8
5
8
7
5
8
sim.
5
8
7
5
1/2
8 7 57 5
7 5 7 57
57 6
5
1/2
7 6 57
3 3
65
7 6 58 5 3 5
3
5 3
5
5
3
5
3
7
5 6 7
1/2
57
7 57 5 7
8
10
11
8
3
sim.10 11 10 8 810 11 10 10 10 11 10 11 10 8
1010
108
10 89
8 10 13
5
FIGURE 5b(Am)
12
15
12
13
14
12
14
121412
14
12
13
14
sim.
13
14
15
12
14 15 1415141213
12
12 14
14
1214
1213
14 1214 13
3 5
1214 13 12
15 12 10 1210 12 13 12 13 12
1/2
1012
1212
1012 10
1210 11 12
12 12
3
1110
12 1110
1213 10
1/2 hold bend
14
14
14
14 1/2
13 14 14
1/2 grad. bend
14 14 10 10 10 10
1/2
10 10 10 10
rit. rit.
10101010
1
10101010101010
10 10 810
10
8
3
1
10 810 9 8 5
8 7
1/2
58 7 5
1/2
7 57 6
A7sus4
58 5 3 5
75755
3 3
UNITED MUTATIONSMASTERING MUTING TECHNIQUES
CHAPTER 10
FIGURE 47 FIGURE 48
FIGURE 49 FIGURE 50
FIGURE 51a
FIGURE 51b
13 GU I TA R WOR L D
» BEING A FULL-TIME guitar player is an amazing experience. I’ve had this “job” for the past 20 or so years, and it’s brought me a great deal of happiness.
I’ve often thought about the most important aspects of my job. One is that, when I perform, it’s not neces-sarily essential that I play all the notes perfectly or in a technically pristine manner. More important is that I have a great time. If I am really having fun onstage, that energy translates to the audience and they have a great time too. Of course, if I hit lots of wrong notes, I definitely won’t be having a good time. But if I hit one bad note and in my mind I’m thinking, “I don’t care—the rest of it is great,” then everything is cool. It’s all about enjoying having the opportunity to perform music.
This brings me to the matter of the difference between being a “bedroom” guitarist and one who is experienced and comfortable playing live in front of people. I’m of the firm belief that when performing onstage you should play the guitar with more than just your fingers—you should play with your entire body.
I performed at a tribute to the Who last year, and had to follow Pete Townshend’s lead when it came to rec-reating his parts. Pete absolutely does not play with just his hands; he uses his whole body, including his back, torso, legs and arms. It’s a stunning experience to play Who songs with the mindset of being a vessel for the music, as Pete does. The Who’s music is very high-energy, and it feels great to stand up and play it with all your might.
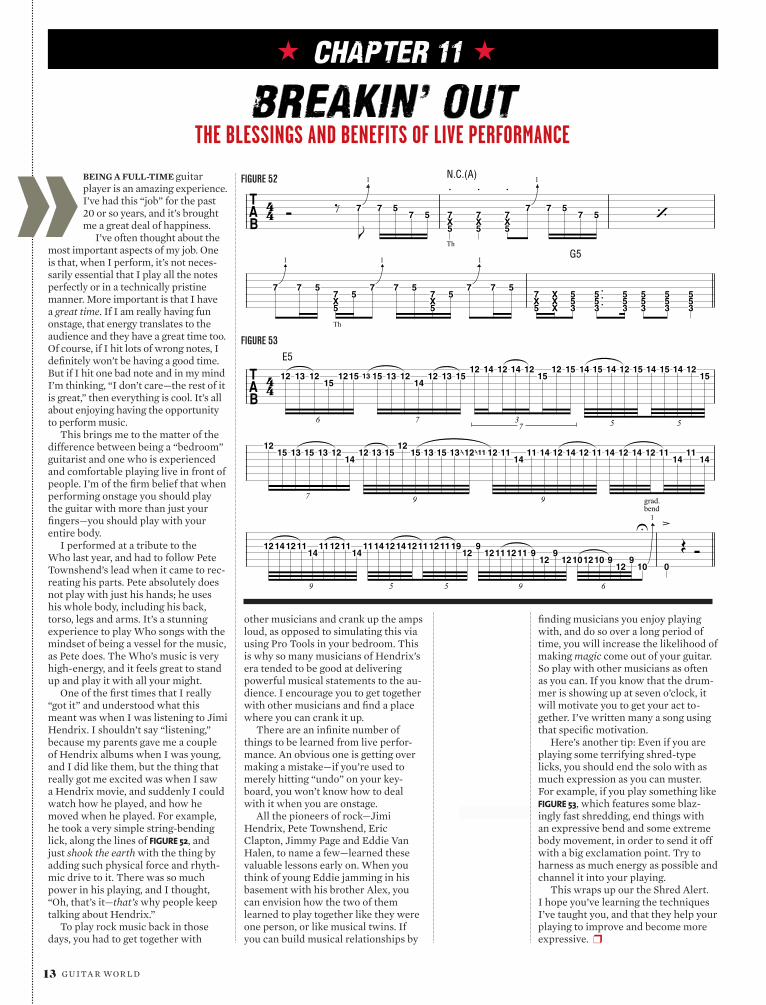
One of the first times that I really “got it” and understood what this meant was when I was listening to Jimi Hendrix. I shouldn’t say “listening,” because my parents gave me a couple of Hendrix albums when I was young, and I did like them, but the thing that really got me excited was when I saw a Hendrix movie, and suddenly I could watch how he played, and how he moved when he played. For example, he took a very simple string-bending lick, along the lines of FIGURE 52, and just shook the earth with the thing by adding such physical force and rhyth-mic drive to it. There was so much power in his playing, and I thought, “Oh, that’s it—that’s why people keep talking about Hendrix.”
To play rock music back in those days, you had to get together with
other musicians and crank up the amps loud, as opposed to simulating this via using Pro Tools in your bedroom. This is why so many musicians of Hendrix’s era tended to be good at delivering powerful musical statements to the au-dience. I encourage you to get together with other musicians and find a place where you can crank it up.
There are an infinite number of things to be learned from live perfor-mance. An obvious one is getting over making a mistake—if you’re used to merely hitting “undo” on your key-board, you won’t know how to deal with it when you are onstage.
All the pioneers of rock—Jimi Hendrix, Pete Townshend, Eric Clapton, Jimmy Page and Eddie Van Halen, to name a few—learned these valuable lessons early on. When you think of young Eddie jamming in his basement with his brother Alex, you can envision how the two of them learned to play together like they were one person, or like musical twins. If you can build musical relationships by
finding musicians you enjoy playing with, and do so over a long period of time, you will increase the likelihood of making magic come out of your guitar. So play with other musicians as often as you can. If you know that the drum-mer is showing up at seven o’clock, it will motivate you to get your act to-gether. I’ve written many a song using that specific motivation.
Here’s another tip: Even if you are playing some terrifying shred-type licks, you should end the solo with as much expression as you can muster. For example, if you play something like FIGURE 53, which features some blaz-ingly fast shredding, end things with an expressive bend and some extreme body movement, in order to send it off with a big exclamation point. Try to harness as much energy as possible and channel it into your playing.
This wraps up our the Shred Alert. I hope you’ve learning the techniques I’ve taught you, and that they help your playing to improve and become more expressive. ❒
FIGURE 1
1
7
Th
N.C.(A)
7 57 5
5X7
5X7
1
5X7
7 7 5
7 5
1
Th
7 7 5
1
5X7 5
7 7 5
5X7 5
1
7 7 5
G5
5X7
XXX
355
355
355
355
355
355
FIGURE 2
E5
1312 13 1215
1215 15 13 1214
12 13 1512 14 12 14 12
1512 15 14 15 14 12 15 14 15 14 12
15
6 7 37 5 5
1215 13 15 13 12
14 1112 13 15
1215 13 15 13 12 12 11
1411 14 12 14 12 11 14 12 14 12 11
1411
14
7 9 9
1214121114
11121114
11141214121112111912
912111211 9
129
12
grad.bend1
101210 912
910
0
9 5 5 9 6
BREAKIN’ OUTTHE BLESSINGS AND BENEFITS OF LIVE PERFORMANCE
CHAPTER 11
FIGURE 52
FIGURE 53
Top Related