


![All Trigonometry Past Paper Questions24429]Credit_Q_s_by_Topic.pdf11 P2 4 2012 P2 3 . 31 | P a g e Factorising 2001 P1 3 2002 P1 1 2 2003 P1 2 2006 P1 1 2 2009 P1 1 2 2 . 32 | P a](https://static.fdocuments.in/doc/165x107/5e66b5752133fa6e6f515a29/all-trigonometry-past-paper-questions-24429creditqsbytopicpdf-11-p2-4-2012.jpg)
Languages
Pages
Legal

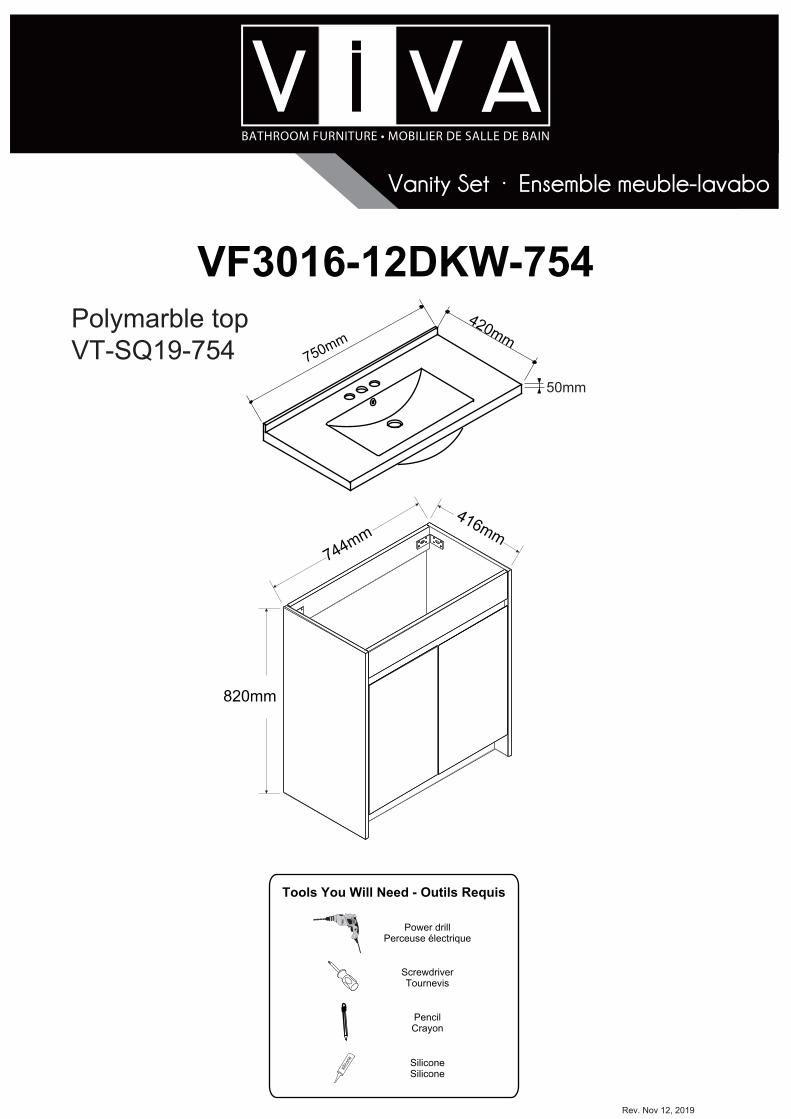
Tools You Will Need - Outils Requis
ScrewdriverTournevis
Power drillPerceuse électrique
PencilCrayon
SiliconeSilicone
silico
ne
VF3016-12DKW-754
Rev. Nov 12, 2019
820mm
744mm416mm
Vanity Set · Ensemble meuble-lavabo
750mm
50mm
420mmPolymarble topVT-SQ19-754

P2 / 8
Size / Dimension:
Replacement parts / Pièces de remplacement
NUM QTÉ / QTY NUM QTÉ / QTY
1
1
1
DIMENSION / SIZE: W x T x D (mm)
1
32-1/4" x 5/8"T x 16-3/8"1820 x 16T x 416
1
1
DIMENSION / SIZE: W x T x D (mm)
1
1
1
1
234567
89
28" x 5/8T" x 4"712 x 16T x 100
28" x 11/16T" x 4-3/4"712 x 18T x 120
28" x 11/16T" x 3-1/8"712 x 18T x 80
28" x 5/8T" x 2-3/4"712 x 16T x 7028" x 5/8T" x 4"712 x 16T x 100
28-1/8" x 5/8" x 15-9/16"714 x 16T x 396
Part List / Liste de pièces:
4 X N
A. Metal cam / Vis pour cam-lock
CB. Cam-lock / Cam-lock
. Cap for cam-lock / Capuchon pour cam-lockD. Wood-dowel / Cheville de boisE. L shaped metal parts / Pièces métalliques en forme de LM. Hinge part on doors / Chamière côté porte
H.Screw / VisN. Hinge part on side panels / Chamière côté panneau
Master Part :
13-7/8" x 11/16T" x 22-7/16"353 x 18T x 570
10 13-7/8" x 11/16T" x 22-7/16"353 x 18T x 570
16 X D
16 X A 16 X B 16 X C
2 X E 4 X M
24 X H
1 X J 4 X K 2 X P
2 X Q
K. Bumper / Pare-chocsP. Plastic plug / Bouchon en plastiqueQ.Screw for back panel / Vis pour panneau arrière
J. Screw / Vis
32-1/4" x 5/8"T x 16-3/8"820 x 16T x 416
2 X R
R. Screw / Vis
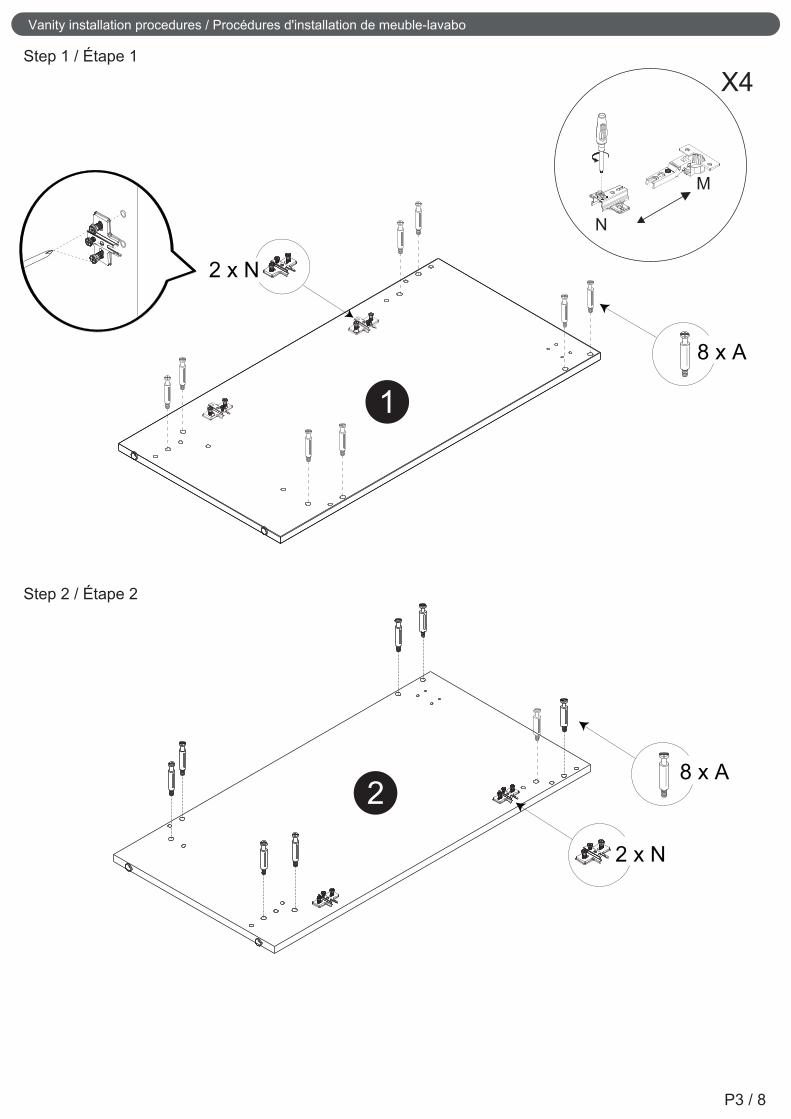
Vanity installation procedures / Procédures d'installation de meuble-lavabo
Step 1 / Étape 1
Step 2 / Étape 2
1
2 x N
2
2 x N
8 x A
P3 / 8
8 x A
M
N
3
Vanity installation procedures / Procédures d'installation de meuble-lavabo
Step 3 / Étape 3
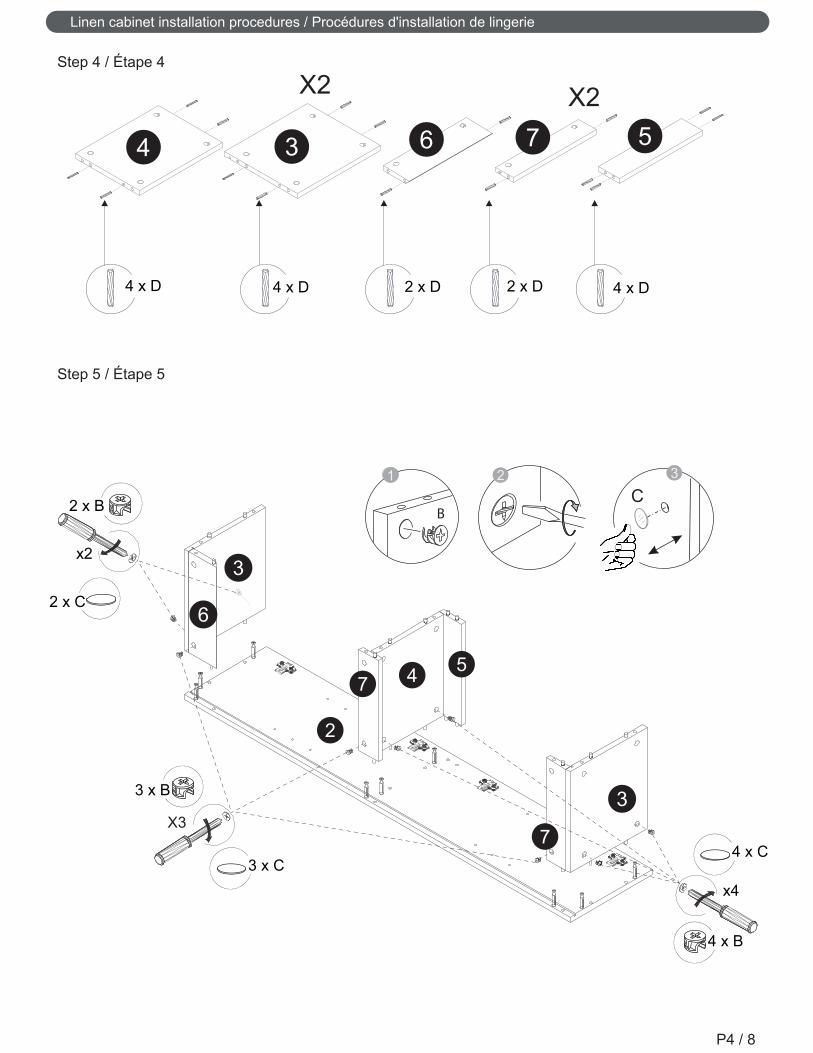
Step 4 / Étape 4
3
2
1
P4 / 8
56 7 8
78
X2
2 x B
2 x C
6 x B
6 x C
X6
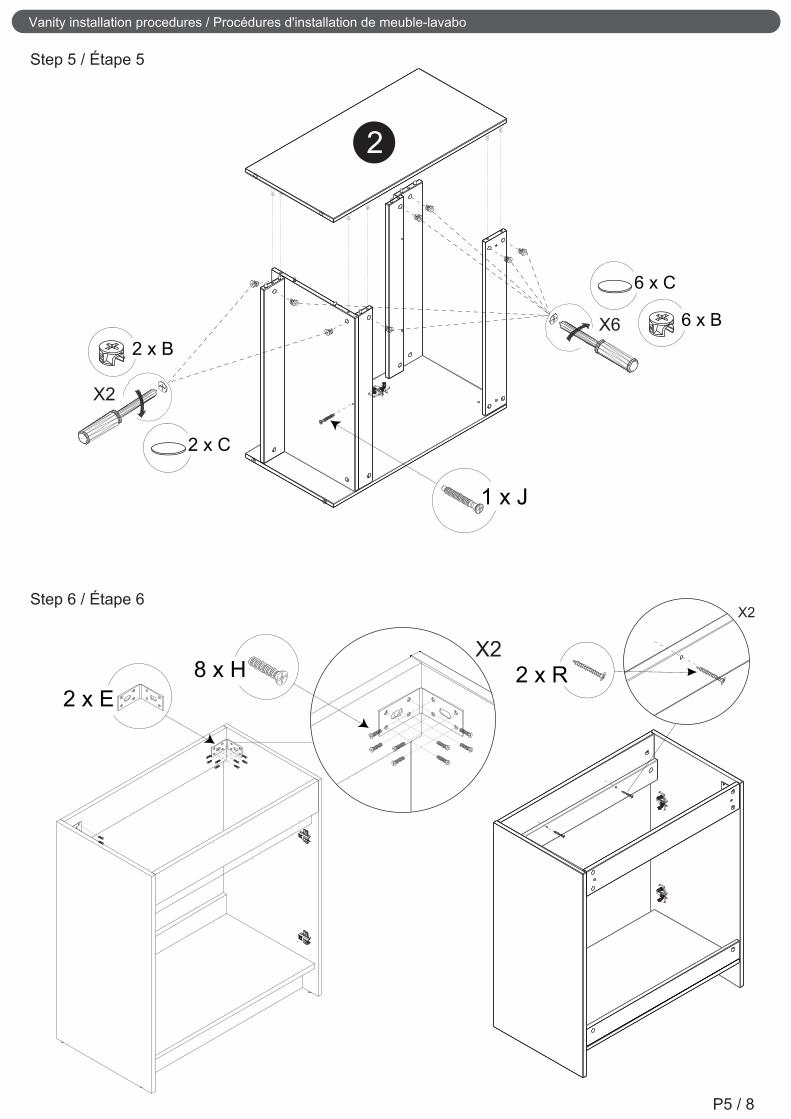
Vanity installation procedures / Procédures d'installation de meuble-lavabo
Step 5 / Étape 5
Step 6 / Étape 6
8 x H 2 x R2 x E
P5 / 8
1 x J
X2
2 x B
2 x C
6 x B
6 x C
X6
2

Vanity installation procedures / Procédures d'installation de meuble-lavabo
x4
Door adjustment*Réglage de la porte
Step 8 / Étape 8
Step 7 / Étape 7
P6 / 8
9
10
4 x K
9 10
2 x M
4 x H4 x H
2 x M
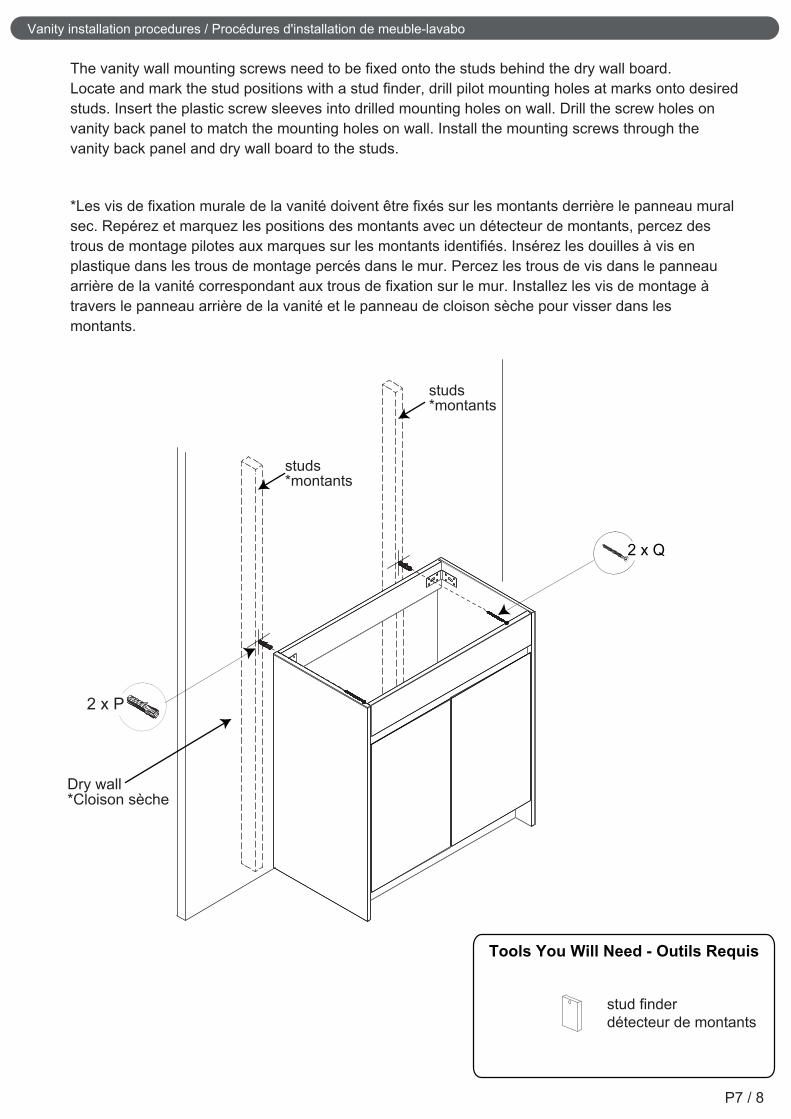
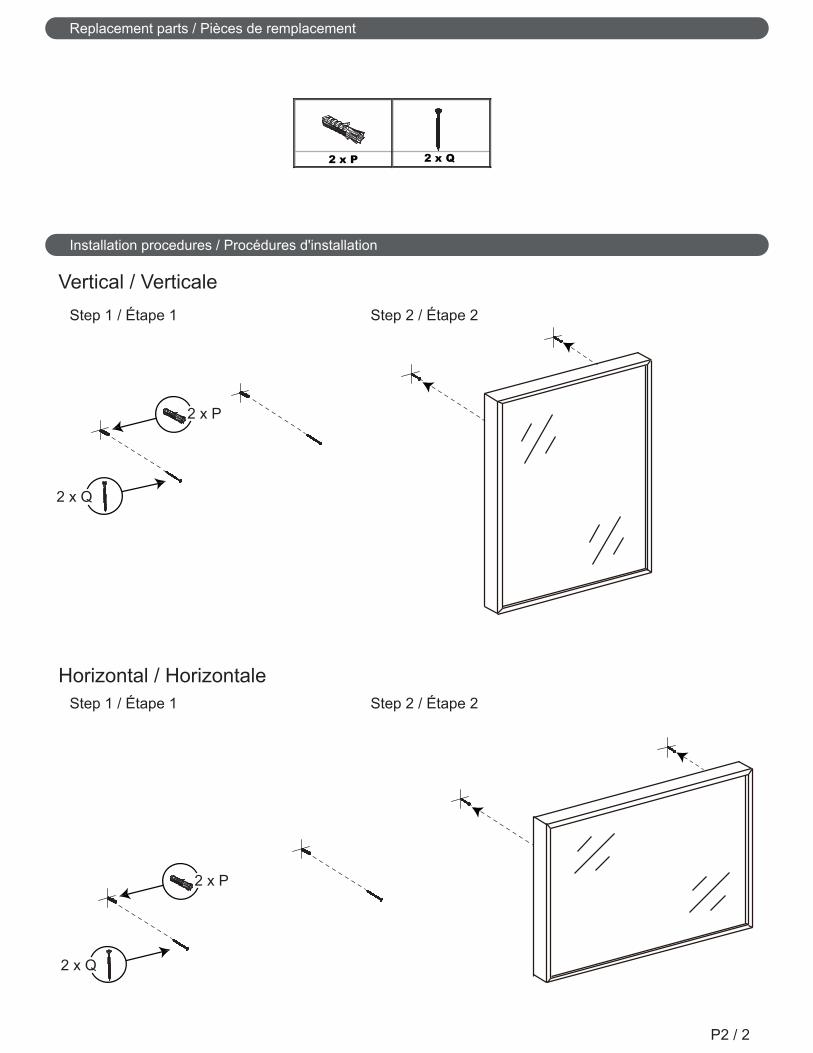
The vanity wall mounting screws need to be fixed onto the studs behind the dry wall board. Locate and mark the stud positions with a stud finder, drill pilot mounting holes at marks onto desiredstuds. Insert the plastic screw sleeves into drilled mounting holes on wall. Drill the screw holes on vanity back panel to match the mounting holes on wall. Install the mounting screws through the vanity back panel and dry wall board to the studs.
*Les vis de fixation murale de la vanité doivent être fixés sur les montants derrière le panneau muralsec. Repérez et marquez les positions des montants avec un détecteur de montants, percez destrous de montage pilotes aux marques sur les montants identifiés. Insérez les douilles à vis enplastique dans les trous de montage percés dans le mur. Percez les trous de vis dans le panneauarrière de la vanité correspondant aux trous de fixation sur le mur. Installez les vis de montage àtravers le panneau arrière de la vanité et le panneau de cloison sèche pour visser dans lesmontants.
Tools You Will Need - Outils Requis
stud finderdétecteur de montants
P7 / 8
Vanity installation procedures / Procédures d'installation de meuble-lavabo
studs*montants
studs*montants
2 x Q
2 x P
Dry wall*Cloison sèche

Step 9 / Étape 9
Step 10 / Étape 10
P8 / 8
Vanity installation procedures / Procédures d'installation de meuble-lavabo
silic
one

Tools You Will Need - Outils Requis
ScrewdriverTournevis
Power drillPerceuse électrique
PencilCrayon
LW5514-12DKW
Linen Cabinet · Lingerie
Melamine board construction
2 doors
2 inner shelves
Profiled handles
Easy to assemble
Doors with soft-close
Reversible cabinet
Construction en bois mélamine
2 portes
2 tablettes intérieures
Poignées profilées
Facile à assembler
Portes avec fermeture lente
Armoire réversible
Rev. Sept 26, 2019
1400
mm
350mm 300mm

P2 / 8
Size / Dimension:
Replacement parts / Pièces de remplacement
NUM QTÉ / QTY NUM QTÉ / QTYDIMENSION / SIZE: W x T x D (mm)
2
1 1
1
1
1
1
1
1
DIMENSION / SIZE: W x T x D (mm)
2
1
1
1
234567
89
101112
318 x 16T x 28112-1/2" x 5/8"T x 11"
318 x 16T x 24412-1/2" x 5/8"T x 9-5/8"
318 x 16T x 8012-1/2" x 5/8"T x 3-1/8"
318 x 16T x 10012-1/2" x 5/8"T x 4"
318 x 16T x 7012-1/2" x 5/8"T x 2-7/8"
11-1/8" x 5/8"T x 55-1/8"282 x 16T x 1400
11-1/8" x 5/8"T x 55-1/8"282 x 16T x 1400
Part List / Liste de pièces:
8 X H
A. Metal cam / Vis pour cam-lock
CB.Cam-lock / Cam-lock
. Cap for cam-lock / Capuchon pour cam-lock
SM. Hanging board / Plaque de suspensionD.Wood-dowel / Cheville de bois
F. Hinge part on side panels / Charnière côté panneauE. Hinge part on doors / Charnière côté porte
F. Handle for doors / Poignée pour portesI . Screw for handle / Vis pour poignéeH. Screw for hinge part on doors / Vis pour charnière côté porte
Master Part :
4 X F
18 X A 18 X B 26 X C
22 X D 1 X SM 4 X E
4 X P
4 X Q 8 X V 16 X W
V. Shelf pin / Broches plateauW. Cap for holes / Bouchon pour trous
P. Plastic plug / Bouchon en plastiqueQ. Screw for back panel / Vis pour panneau arrière
328 x 3T x 65612-7/8" x 1/8"T x 25-13/16"
328 x 3T x 72112-7/8" x 1/8"T x 28-3/8"
317 x 16T x 25912-1/2" x 5/8"T x 10-3/16"
350 x 18T x 68513-3/4" x 11/16"T x 27"
350 x 18T x 68513-3/4" x 11/16"T x 27"

Step 1 / Étape 1
Step 2 / Étape 2
Linen cabinet installation procedures / Procédures d'installation de lingerie
P3 / 8
9 x A
1
2
9 x A
Doors swing RIGHT*Portes battant à DROITE
Doors swing LEFT*Portes battant à GAUCHE
12
4 x N4 x N
Step 4 / Étape 4
Step 5 / Étape 5
Linen cabinet installation procedures / Procédures d'installation de lingerie
321
P4 / 8
4 3 6 7 5
X3
3 x B
3 x C
2 x B
2 x C
x2
4 x B
4 x D 4 x D 2 x D 2 x D 4 x D
4 x C
x4
4 57
2
7
X2 X2
3
6
3

Linen cabinet installation procedures / Procédures d'installation de lingerie
Step 6 / Étape 6
Step 7 / Étape 7
P5 / 8
86
9
1
X3
3 x B
3 x C
2 x B
2 x C
x2
4 x B
4 x C
x4

Linen cabinet installation procedures / Procédures d'installation de lingerie
Step 8 / Étape 8
Step 9 / Étape 9
P6 / 8
11
11
12
12
4 x E
8 x H
Door adjustment*Réglage de la porte
x4
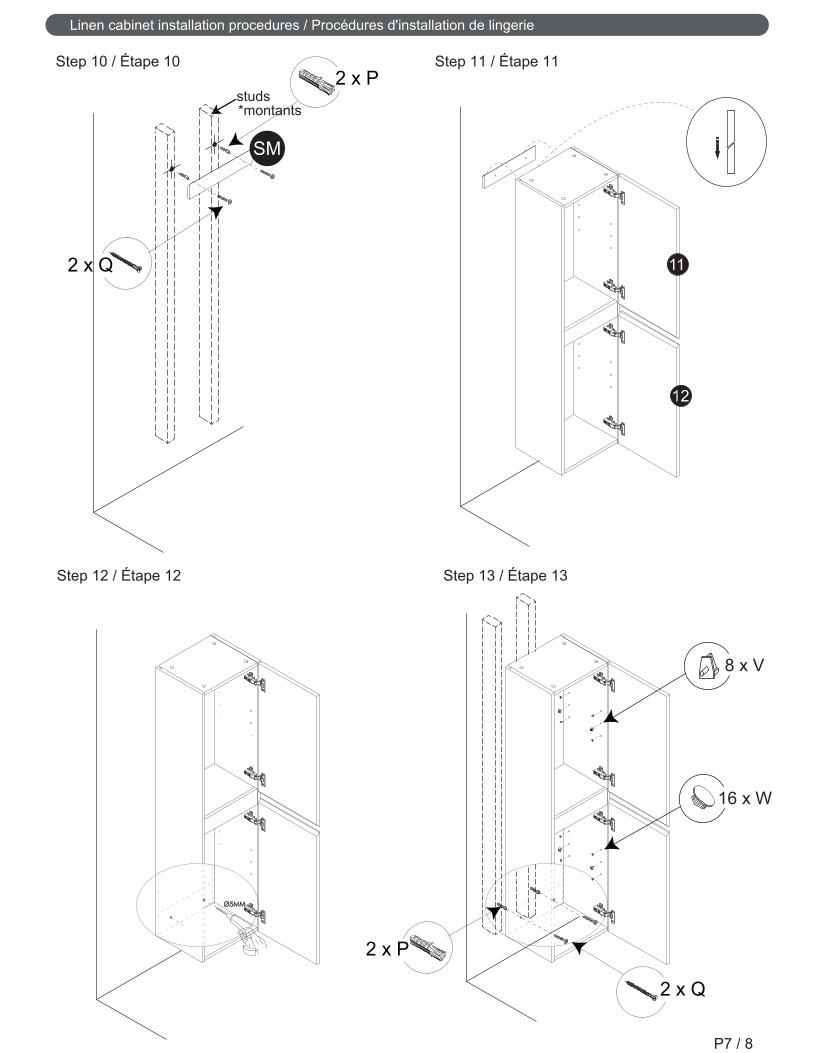
Step 10 / Étape 10 Step 11 / Étape 11
Step 12 / Étape 12 Step 13 / Étape 13
Linen cabinet installation procedures / Procédures d'installation de lingerie
P7 / 8
2 x P
2 x Q
studs*montants
2 x P
2 x Q
16 x W
8 x V
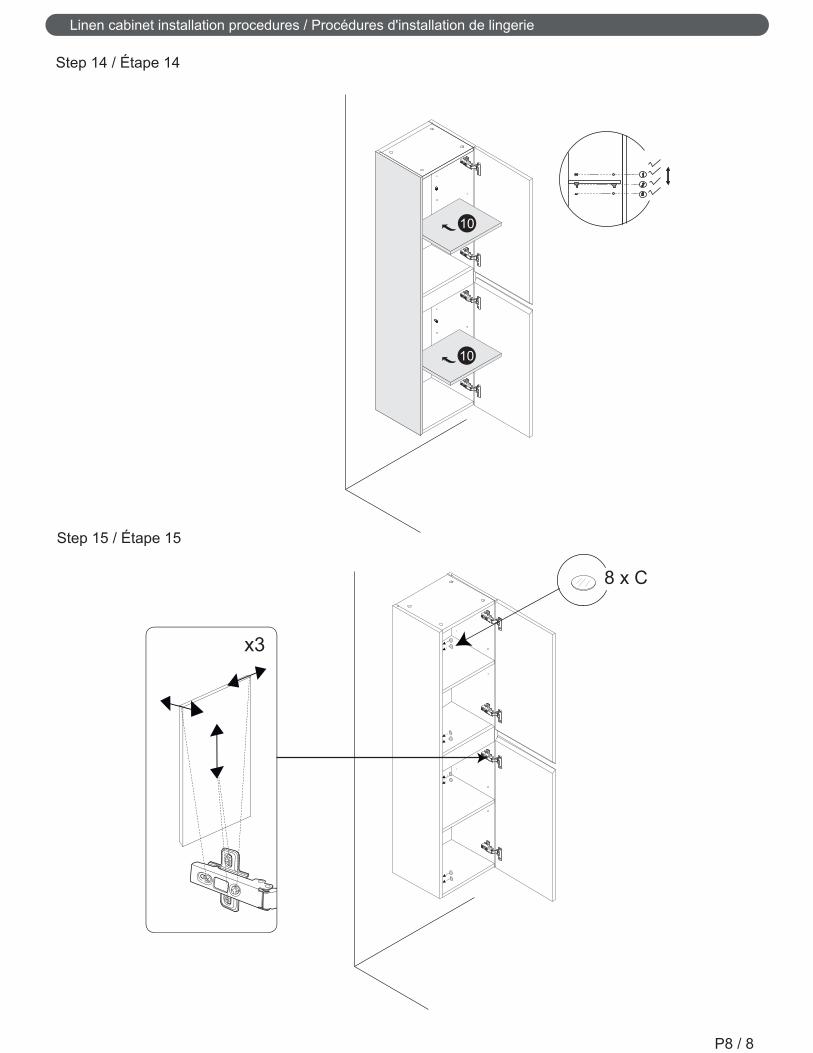
Step 14 / Étape 14
Step 15 / Étape 15
Linen cabinet installation procedures / Procédures d'installation de lingerie
P8 / 8
10
10
8 x C

Tools You Will Need - Outils Requis
ScrewdriverTournevis
Power drillPerceuse électrique
PencilCrayon
32-M6080BK
Mirror · Miroir
Black frame mirrorHang vertically or horizontally
iroir cadre
600mm23 ½"
800mm31 ½"
50mm2"
Rev. , 2019
Installation procedures / Procédures d'installation
Replacement parts / Pièces de remplacement
Step 1 / Étape 1
Step 1 / Étape 1
Step 2 / Étape 2
Step 2 / Étape 2
P2 2
Vertical / Verticale
Horizontal / Horizontale
2 x Q
2 x Q
2 x P 2 x Q
2 x P
2 x P
Top Related