


Languages
Pages
Legal


NEW HOME
MAINTENANCE MANUAL
Provided by:
Address:
Date:

NEW HOME MAINTENANCE MANUAL
The Dominion of Canada General Insurance Company, St. Paul Fire and Marine Insurance Company and Travelers Insurance Company of Canada are the Canadian licensed insurers known as Travelers Canada. The content of this document is only for the informational use of the reader. Information contained herein is not intended as, and does not constitute, legal or professional advice, nor is it an endorsement of any source cited or information provided. In no event will Travelers Canada or any of their subsidiaries or affiliates be liable in contract or in tort to anyone who has access to this document for the accuracy or completeness of the information relied upon in the preparation of this document or for the completeness of any recommendations from cited sources. Readers should consult source articles for more detail. This document does not amend, or otherwise affect, the provisions or coverages of any insurance policy or bond issued by Travelers Canada or any of their subsidiaries or affiliates, nor is it a representation that coverage does or does not exist for any particular claim or loss under any such policy or bond. Coverage depends on the facts and circumstances involved in the claim or loss, all applicable policy or bond provisions and any applicable law.

NEW HOME MAINTENANCE MANUAL
Table of Contents
INTRODUCTION Section 1
SERVICE PROCEDURES Section 2
OWNER’S DUTY TO MITIGATE AND MAINTAIN Section 3
EMERGENCY SITUATIONS Section 4
Plumbing 4.1
Electrical 4.2
Heating 4.3
Roof 4.4
SITE Section 5
Driveways, Sidewalks, and Patios (Concrete) 5.1
Concrete Pavers 5.2
Asphalt 5.3
Gravel 5.4
Site Drainage and Grading 5.5
Sloped Sites 5.6
Window Wells 5.7
Drain Tile 5.8
Sumps 5.9
Landscaping 5.10
HOUSE EXTERIOR Section 6
Exterior Cladding 6.1
Vinyl or Composite Siding 6.2
Wood Siding 6.3
Stucco 6.4
Masonry 6.5
Caulking 6.6
Windows 6.7
Skylights 6.8
Exterior Doors 6.9
Sliding Patio Doors 6.10
Storm Doors 6.11
Overhead Garage Doors 6.12
Weather-stripping 6.13
Finish Hardware and Locks 6.14
Decking 6.15
Handrails 6.16
Roof 6.17
Ice Dams 6.18
Gutters and Downspouts 6.19
Fireplaces and Chimney 6.20

NEW HOME MAINTENANCE MANUAL
Table of Contents
STRUCTURE Section 7
Foundation 7.1
Basement Floor Slab 7.2
Wood Frame 7.3
Beams and Teleposts 7.4
Attics 7.5
Crawl Spaces 7.6
INTERIOR FINISHES Section 8
Hardwood Floors 8.1
Laminate Wood Floors 8.2
Resilient / Vinyl Floors 8.3
Carpet 8.4
Ceramic Tile 8.5
Marble, Granite, and Natural Stone 8.6
Countertops 8.7
Plastic Laminates 8.7.1
Marble, Granite, or Stone 8.7.2
Cabinets 8.8
Walls and Ceilings 8.9
Paint 8.10
Interior Doors 8.11
APPLIANCES Section 9
Appliances 9.1
MECHANICAL SYSTEMS Section 10
Plumbing - General 10.1
Fixtures 10.2
Hot Water Tank 10.3
Exterior Taps 10.4
Toilets 10.5
Faucets 10.6
Bathtub and Shower Enclosures 10.7
Drains 10.8
Floor Drains 10.9
Fire Sprinkler System 10.10
Electrical - General 10.11
G.F.C.I. Circuits 10.12
Smoke and Fire Detectors 10.13
Heating - General 10.14
Heat Pumps 10.15
Ventilation, Condensation and Relative Humidity 10.16
Range Hoods and Exhaust Fans 10.17
Dryer Vents 10.18
Heat Recovery Ventilators 10.19
NEW HOME MAINTENANCE MANUAL
Table of Contents
APPENDICES Section 11
British Columbia Warranty Coverage British Columbia Warranty Exclusions Alberta Warranty Coverage
Appendix “A” Appendix “B” Appendix “C”
Alberta Warranty Exclusions Appendix “D” New Home Maintenance Schedule Appendix “E” Trade and Supplier List Appendix “F”
Maintenance Manual Signoff

NEW HOME MAINTENANCE MANUAL
1. INTRODUCTION The proper care and maintenance of your home is important. Besides protecting your investment, with regular inspections and care, unnecessary problems can be prevented, costly repairs reduced, or wear and tear can be limited. Further, maintenance is an important Owner requirement of the Warranty coverage. All warranty documentation should be carefully reviewed so that you are aware of the Warranty coverage, notice requirements, claims procedures, exclusions, and Warranty expiry dates. Also, regular review of the maintenance manual is encouraged in order to remain familiar with the home care required. If you do not receive the Warranty policy, contact Travelers Canada promptly so a home warranty insurance policy can be issued to you. The Warranty provides coverage on the following:
12 Months Defects in Materials and Labour
24 Months Defects in Delivery and Distribution Systems (Electrical, plumbing, heating, ventilation and air conditioning systems) Note: Plumbing fixtures and light fixtures are covered by the Warranty for 12 months only.
5 Years Defects in the Building Envelope (Actual unintended water penetration (rain or snow) into the building)
10 Years Structural Defects.
The Warranty does not cover contractual issues, incomplete work, financial disputes, or substitutions of products or materials. Prior to move-in, spend the time to properly inspect the inside and the exterior of the house with the Builder. If surface flaws, such as scratched windows, chipped fixtures, or marked flooring should exist, review these concerns with the Builder. For those items agreed to be repaired, record in writing with the Builder and ensure it is dated and signed by both parties. Summarized at the back of this manual for your use are:
New Home Maintenance Schedule
Trade and Supplier List
Maintenance Manual Sign-off. Keeping an accurate record of the maintenance completed is recommended. Retain copies of all maintenance invoices. This information helps to establish a maintenance schedule and may be required for a Warranty claim. If the information contained herein differs from documents or instructions provided by manufacturers, architects, designers, engineers, or contractors, contact the Builder for clarification. In all situations, the terms and conditions noted in Travelers Canada’s home warranty insurance policy shall apply when considering a claim and take precedence over this maintenance manual.

NEW HOME MAINTENANCE MANUAL
2. SERVICE PROCEDURES Upon receipt of the home warranty insurance policy, the document should be reviewed and with specific attention be directed to:
Warranty Expiry Dates
Notice requirements
Claim procedures
Exclusions. If you do not receive the home warranty insurance policy within a reasonable time after possession, contact Travelers Canada promptly so a home warranty insurance policy can be issued to you. It is recommended that the home warranty insurance policy be kept in a safe location. If you feel that a defect exists which is covered by the Warranty, written correspondence to the Builder should to be sent. Upon receipt, your Builder should contact you to arrange an appropriate time to review your concerns and respond to valid claims. Remember to always submit written claim notification to Travelers Canada within the required warranty periods. Refer to the Notice of Claim section in your home warranty insurance policy. Please note that claim items must be reported in writing and your letter should note:
The date
The home warranty insurance policy number
The dwelling unit address
A description of each claim item
The location of each item
Any new contact information, if applicable. Maintain a copy of all claim correspondence for your records. Phone calls, requests to site personnel, or contacting a trade, do not constitute proper notice. Also, vague or overly general references to a problem do not constitute adequate notice. Following move-in, the house may experience some settlement or shrinkage of the building components. Some minor cracking of drywall, tiles, or other cosmetic flaws are not uncommon. Floor squeaks may also occur. This movement and shrinkage is normal. A preferred practice is to address shrinkage and settlement items towards the end of the first year of occupancy. This is often allows for the majority of the settlement or shrinkage to occur in the New Home.
In accordance with the Warranty coverage, an Owner shall allow entry during normal working hours for repairs to be completed. Further, an Owner is responsible to take all reasonable precautions to safeguard, move or protect all fixtures and personal belongings in or about the home to eliminate the possibility of damage before and during repairs. Depending on the situation, an exact colour or texture match of a repair cannot be guaranteed.
As Warranty expiry dates exist, ensure that the proper written notice is sent within the appropriate time periods. For further clarification, refer to the home warranty insurance policy.

NEW HOME MAINTENANCE MANUAL
3. OWNER’S DUTY TO MITIGATE AND MAINTAIN
An Owner is required to maintain the New Home. An Owner is responsible to mitigate or reduce any immediate damage to the New Home. When a situation merits prompt action, an Owner has a duty to lessen the potential damage. This requirement includes damage caused by water penetration. Further, an Owner must take all reasonable actions to restrict or minimize damage to the New Home if a situation exists, that if left unattended will result in immediate damage. For example:
Pipe Leak If a water supply pipe leaks, turn off the water supply valve where possible and place a bucket under the leak in order to reduce resultant damage. Roof Leak If water is dripping from the ceiling, place a bucket under the leak to minimize any resultant damage. Heat Maintain adequate heat in the New Home during the year in order to prevent frozen pipes and any other resultant damage. Moisture/Humidity Maintain adequate moisture/humidity content in the home during the year in order to prevent damage to finishes.
Besides an Owner taking reasonable and timely action to limit damage, written notice should be promptly sent to the Builder and Travelers Canada. Submitting written notice well after the occurrence or after the work is completed may preclude the claim review process or affect the verification of a claim. Some situations may merit that pictures be taken of the problem prior to undertaking emergency repairs. This information can assist in establishing the issue for warranty purposes. An Owner’s duty to mitigate survives even if:
The home is unoccupied
The home is occupied by someone else other than the Owner
The home is for sale
Water penetration does not appear to be causing damage. Unfortunately, if a problem occurs or is made worse due to an Owner’s failure to undertake the proper home maintenance or to mitigate damage, the problem and resultant damage may be excluded from Warranty coverage.

NEW HOME MAINTENANCE MANUAL
4. EMERGENCY SITUATIONS In emergency situations, contact your Builder immediately. If your Builder cannot be reached, contact Travelers Canada for information on the appropriate actions to be taken. Phone calls should always be promptly followed-up with written notice. The following is a synopsis of a few emergency situations and what actions should be taken in addition to contacting your Builder or Travelers Canada.
4.1 Plumbing Under the Warranty, plumbing system defects (Delivery and Distribution System) are covered for two (2) years. Note: Plumbing fixtures are covered by the Warranty for 12 months only. 4.1.1 Burst Water Line A water line can burst due to a number of reasons, such as a loose joint or freezing and should be dealt with immediately. If the burst occurs between a fixture and a shut-off valve, close the shut-off value immediately. If a shut-off value does not exist, locate the main water shut-off valve (usually located where the water line enters the home in the basement or crawl space), and turn it off until the problem can be repaired. It is also advisable to turn off your hot water tank to prevent overheating while the water supply is shut-off. 4.1.2 Frozen Water Line If garden hoses are left attached to hose bibs during the winter, freezing of the water line can occur. This is problematic once the pipes thaw, leaks can occur. If a major leak occurs, follow the steps described above regarding “Burst Water Line”. If accessible, heating the pipe with a hair dryer may thaw ice blockages. Ensure exterior taps are shut-off and drained for the winter. If the frozen pipe is due to a warrantable construction defect, the Builder is responsible for the repair. If the frozen pipe is due to a lack of maintenance or winter care, such as not draining the tap or leaving a hose attached, the problem is an Owner matter. 4.1.3 Leaking Plumbing Line or Hot Water Tank For minor leaks, place a container under the leak and contact your Builder. If major leakage occurs at the hot water tank, immediately shut off the water supply as well as the gas valve or electrical breaker for the water tank. 4.1.4 Plugged Plumbing Fixture or Sewer Line This generally occurs because of inappropriate materials being flushed down a toilet or drain. Do not continue use of toilets or sinks once a major blockage has occurred. Attempt to unclog the line using a plunger. If a larger blockage exists, the services of a plumber may be required. If the blockage is due to a warrantable construction defect, then the Builder is responsible for the repair. In emergency plumbing situations, contact your Builder immediately. The plumber for the home may also provide assistance; refer to the Appendix “F”, Sub-trade and Supplier List.
4.2 Electrical Under the Warranty, electrical system defects (Delivery and Distribution System) are covered for two (2) years. Note: Light fixtures are covered by the Warranty for 12 months.

NEW HOME MAINTENANCE MANUAL
4.2.1 Overloaded Circuit (Breaker Tripping) If this occurs, ensure that the electrical circuit is not overloaded with too many appliances, or that the appliance itself is not faulty. Appliances such as hair dryers, toasters, and kettles that generate heat tend to draw a lot of electrical current. Using more than one of these types of appliances at the same time on the same circuit can cause an overload. Should circuit overload occur, unplug the appliance(s) and reset the breaker. Be sure to turn off the electrical breaker fully before resetting the circuit. If circuit tripping reoccurs, contact your Builder. Ground fault circuit interrupters (G.F.C.I.s) protect your exterior plugs and those in your bathrooms. This device will either be located in the actual plug itself or be a dedicated breaker in your electrical panel. Often one G.F.C.I. will provide protect a number of bathroom or exterior plugs. It is sensitive and designed to trip when grounding occurs due to damp conditions, or when extension cords are excessively long or in poor condition, or if appliances are faulty. Ensure that no unsafe situations exist, and that appliances and extension cords are unplugged, then reset the G.F.C.I. 4.2.2 Sparking Outlets If an electrical outlet sparks excessively, immediately turn off the electrical breaker, have the cause investigated, and immediately contact your Builder. A small spark when an appliance is unplugged is not uncommon. 4.2.3 Power Outage If all the power in your home goes out, check if there is a power blackout in your neighbourhood. If not, check your main breaker (in the electrical panel) and reset it after checking for a current overload. In emergency electrical situations, contact your Builder promptly. The Electrician for the home may also provide assistance; refer to the Appendix “F”, Trade and Supplier List.
4.3 Heating
Under the Warranty, heating system defects (Delivery and Distribution System) are covered for two (2) years. 4.3.1 Faulty Furnace If the furnace does not appear to be operating, ensure that the electrical breaker has not tripped and refer to your furnace manual to check lighting procedures. Check the thermostat setting to ensure it has not been turned down. 4.3.2 Gas If at any time you smell gas, contact the gas utility supplier, 911, or Fire Department immediately. Use an outside phone, not a phone within the house. They will check your system and advise you of any problems. Also, the following steps should be considered:
Open windows for ventilation
Check pilot lights on appliances
Turn the gas off at the main meter
Vacate the house if the situation merits such
Do not operate electrical equipment; this includes turn light switches on or off
Do not smoke or light matches
Do not use the phone or cell phones inside the house. In emergency heating situations, contact your Builder promptly. The Gas Fitter for the home may also provide assistance; refer to Appendix “F”, Trade and Supplier List.

NEW HOME MAINTENANCE MANUAL
4.4 Roof
Under the Warranty, roof leaks are covered for five (5) years. The cause of the water leakage must be from an exterior source (rain or snow). 4.4.1 Leaking Roof If a roof leak occurs, check for the following:
Plugged roof drains
Plugged gutters or downspouts
Debris on the roof
Missing roof shingles
Ice damming at the eaves. Until the leak is repaired, place a container under the leak to protect your New Home. Contact your Builder if a construction defect appears to be the cause. In emergency roof situations, contact your Builder promptly. The roofer for the home may also provide assistance; refer to Appendix “F”, Trade and Supplier List.
NEW HOME MAINTENANCE MANUAL
5. SITE
5.1 Driveways, Sidewalks, and Patios (Concrete) Driveways and sidewalks are generally made of concrete. Concrete is a strong material that wears well and can perform for many years. However, similar to other building materials, care and maintenance is required. Following installation, concrete will shrink as it cures. Shrinkage stress in the concrete can result in cracks. Cracking may be minimized by the installation of control joints in the concrete. These deliberate joints in the concrete are designed to be more susceptible to cracking than the remainder of the slab, thereby controlling where cracks occur. Unfortunately, these control measures are not always effective and cracks can appear despite best efforts. Seasonal variations in temperature may cause soil movement beneath the concrete due to frost penetration. Cracks or raised sections of the concrete can result. Change in height may alter the direction of surface drainage and water may pool against the foundation wall of the New Home. Since pooling water may then seep through the foundation wall and into the home, repairs should be undertaken promptly. Concrete cracks are generally cosmetic and do not require repair unless a tripping hazard exists or the crack exceeds acceptable standards. Both of the instances above are natural occurrences that are beyond the Builder’s control. Another potential cause of damage to concrete surfaces is road salt and other chemical contaminants. Salt or other de-icing products used for ice or snow control can adversely affect the concrete surface. De-icers that contain Ammonium Nitrate, Ammonium Sulphates and Magnesium Chloride are especially damaging to concrete. An alternative to de-icers is sand for increased traction on icy sections of the driveway or sidewalk. Road slush, which can contain salt, should not be allowed to melt on the concrete. Lawn or plant fertilizer, contaminated surface water and run-off from stored materials can permanently stain concrete surfaces. Care should be taken in the handling and storage of potential contaminants on or near any concrete surface. Ensure a quality concrete sealer has been applied following driveway placement and annually as it will help to protect and maintain the concrete. The Builder may or may not have applied a concrete sealer. When regularly applied to a concrete surface, these protective coatings limit absorption. Sealers can be purchased at hardware stores and are available in different finishes. Always follow the manufacturer’s instructions when applying a sealer. With a little care and attention as noted below, concrete can provide years of service: Maintenance Action Items (general)
Remove leaves as some foliage can stain concrete
Keep run-off and excessive hose water away from concrete as the soil below or beside the driveway can become destabilized
Regularly apply a quality concrete sealer
Do not drive or park on new concrete for at least seven (7) days
Do not park or drive heavy or commercial vehicles on residential driveways; this includes large moving trucks
Do not use acids to clean concrete
Do not use excessive pressure from a pressure washer to clean; damage to concrete surfaces can occur; using a stiff broom and concrete cleaner may be preferable.
NEW HOME MAINTENANCE MANUAL
Maintenance Action Items (winter)
Promptly remove snow or ice from concrete
Keep fertilizers away from and off concrete
Brush away/remove road ice and slush, that could contain de-icing chemicals, from driveways especially around the road apron and where vehicles park
Do not use de-icing chemicals or salt on concrete. DAMAGE FROM SALTS, DE-ICERS, OR FERTILIZERS INCLUDING MELT-OFF SLUSH FROM
VEHICLES IS NOT COVERED BY THE WARRANTY. 5.2 Concrete Pavers Manufactured concrete products such as paving stones are also susceptible to surface damage and staining. Concrete pavers are often installed on a layer of course sand or fine gravel. Some localized settlement may occur due to compaction of these materials. Should some areas settle excessively, lift out the pavers in the low area and add sand as required to level the area. Suitable material for this repair can be purchased in bags from most home supply centers. Maintenance Action Item
The precautions for concrete surfaces listed above also apply to these products.
5.3 Asphalt Asphalt surfaces are seldom smooth and often have indentations. Tire impressions or cracking at the edges due to expansion and contraction are other common characteristics. Surface damage may also occur in hot weather as the asphalt softens due to the heat. Sharp or pointed objects such as motorcycle kickstands or trailer hitches can penetrate the surface during warmer conditions. Sealing the asphalt surface every two to five years with an acrylic-based sealant is recommended. These products are readily available at most home supply centers. Maintenance Action Items
Remove gasoline, oil, and solvents spills immediately; petroleum products will dissolve asphalt
Regularly apply a quality asphalt sealer
Keep run-off and excessive hose water away from asphalt as the soil below or beside the driveway can become destabilized
Using a stiff broom and concrete cleaner may be preferable
Do not drive or park on new asphalt for at least seven (7) days
Do not park or drive heavy or commercial vehicles on residential driveways; this includes large moving trucks
Do not use excessive pressure from a pressure washer to clean; damaged asphalt surfaces can occur.
SURFACE DAMAGE CAUSED BY HEAT OR CHEMICALS IS NOT COVERED BY THE WARRANTY.
5.4 Gravel Gravel driveways require raking periodically to fill in depressions and to maintain an even surface. Crowning the driveway to the center or sloping it to one side is a good method of controlling surface water.
NEW HOME MAINTENANCE MANUAL
As this type of driveway consists of loose gravel and wears due to use, adding additional stone regularly is required. This is not considered to be a Warranty matter. Maintenance Action Items
Inspect the driveway at least yearly
Fill any depressions in the driveway as required
Ensure the slope and drainage is functioning; rake as required.
5.5 Site Drainage and Grading The purpose of site drainage patterns is to prevent surface water from pooling near or against the home. The soil adjacent to the house should always slope away from the residence on all sides. Depressions or soil compaction following construction may occur adjacent to the foundation system. These hollows should be filled or graded to direct surface water away from the building for a distance of at least three meters (10’) where possible. Water should not be allowed to pool against the foundation walls. In addition to the grading requirements directly around the home, the overall property drainage and site topography may include swales (designed surface hollows); curtain drains, or catch basins. Ice, snow, leaves, and other debris can block the flow of drainage and must be seasonally maintained by the Owner. Care must be taken not to alter the drainage patterns and flow. Redirecting water towards the house can cause a drainage problem, water leakage, or settlement issues. The Warranty pertains to the New Home; grading in the yard and landscaping is not within the coverage. During periods of excessive rainfall, standing water may occur on the site due to soil saturation. Such conditions are beyond the control of the Builder and not covered by Warranty. Maintenance Action Items
Ensure debris and obstructions are kept away from drainage areas
Check for soil settlement around the foundation and fill depressions as required
Inspect sumps and catch basins at least twice per year for blockages
Do not change the grading of the lot
Do not remove splash pads for drain pipes
Do not place fill or soil against the wall cladding.
5.6 Sloped Sites A key component of a building is the foundation. Despite the scenic views and settings of a hillside, generally a sloped site is affected by slope geometry, soil type, or soil water content. If the soil strength decreases or the soil stresses increase, slope issues can occur. As a soil mass is effected by gravity, the stability of a hillside can be improved by:
Controlling/limiting ground water Decreasing the slope Preventing soil lose or erosion at the foot / toe of the hill.
The moisture content of the soil is an important factor for all sites. When the voids and spaces between soil particles absorb water, the soil weight increases resulting in the greater loading of the hillside. Fine grain soils (such as clays and silts) have lower water permeability and are more susceptible to erosion than course grain soils.
How surface and subsurface water is managed and disposed of is important. Proper drainage limits the overload of the soil and slope. Controlling roof water may be required; allowing water to empty onto the hillside may result in erosion and added weight. A separate and contained drain system may be necessary to channel roof water away from the site. Also, over watering / irrigating can affect slopes. Retaining vegetation may be an important control strategy to prevent soil lose or erosion. The root system for trees, plants, and other vegetation can provide a form of reinforcing as well as consume ground water.

NEW HOME MAINTENANCE MANUAL
If changes or alterations are being considered for the site, a skilled geotechnical engineer that is knowledgeable of the local soil conditions should be consulted with first. A few precautions can minimize potential future problems.
Even with the best construction efforts, problems can occur if the grades or slopes are altered after construction. Maintain positive drainage away from the house and effective surface drainage for the site. Unless approved and certified by a geotechnical engineer: Important
Do not place fill at the top of the slope
Do not increase the slope of the hillside
Do not excavate at the toe of the hillside
Do not alter the grading
Do not change or block drainage
Do not over water or irrigate
Do not remove vegetation from the hillside.
5.7 Window Wells Window wells are a means of providing natural light for basement windows that are below grade. Also, window wells can provide a means of egress for basement bedrooms. Window wells must be kept free of ice, snow, leaves, and other debris which may block the drainage system and flood your New Home. Maintenance Action Items
Inspect and clean window wells at least twice a year
Ensure the drainage in all window wells is working
Do not block window wells
Do not allow snow to accumulate in window wells
Do not grow plants or shrubs in window wells.
5.8 Drain Tile In most jurisdictions, a perimeter drain tile system is required to be located below the level of the basement or crawlspace floor. The drainage system generally comprises of perforated pipes that are covered with gravel. Water seeps into the drain tile and the water is then carried away from the perimeter of the house to prevent it from accumulating at the foundation and enter the house. The requirement for a perimeter drain tile system may be waived by the building authority in arid regions, free draining soils areas, or some rocky sites. Exposed areas of rock in a crawlspace may seep water in wet conditions. Ensure that any surface water is drained away from the New Home. Maintenance Action Items
In silty or sandy soil, regular cleaning/flushing of the drain tile may be required
Do not plant deep-rooted plants, shrubs, or trees near the foundation as roots can clog drain tile
Do not wash debris from the gutters into the drain tile
Do not leave taps or hoses running near the foundation.

NEW HOME MAINTENANCE MANUAL
5.9 Sumps The drain tile often empties into a sump, catch basin, or rock pit. A sump allows sediment in the water to settle to the bottom of the sump. Clearer water is then drained off by another pipe to a storm sewer, ditch, or a rock pit located in the yard. Access pipes or cleanouts are installed to allow the perimeter drain tile to be inspected and cleaned. The location of these cleanouts should be identified for future reference. Sumps and catch basins should be cleaned at least every year. Remove any excessive sediment, leaves, sand, or other debris. As some sumps use electrical pumps, debris or sand can cause damage to the pumps. Review the operation of the electrical pump(s) at least yearly. Ensure that the water intake is clean and the float controls are working properly. Exterior stairwells are often equipped with a drain or sump at the bottom landing to prevent flooding of the basement. These drains must be kept clear of debris. Maintenance Action Items
Know the location of all sumps and catch basins
Inspect sumps and catch basins at least twice a year for debris or blockages
Clean sediment from sumps and catch basins at least yearly
If a sump pump is used, every spring ensure the motor and electrical supply is operational
Do not cover sumps or catch basins with landscaping or other obstructions.
5.10 Landscaping Frequent watering of the grass is essential during the first few weeks after an area has been sodded or seeded. Once the grass is established, weekly watering is adequate. This will promote a deep root system that will result in a healthier, more drought resistant lawn. Frequent light watering results in a shallow root system that causes the lawn to dry out and die in drought conditions. For the same reason, grass should not be cut shorter than two inches in height. Fertilizing twice a year and controlling weeds will promote a healthy lawn. Consult your local home garden centre for suitable products. During the spring thaw, do not allow snow or ice to accumulate in shaded areas as this will damage the grass. Any accumulations of snow should be distributed evenly over a large area so that it melts evenly. Some minor settlement may occur over some areas of new lawns or landscaping. These areas should be filled and re-seeded as required to maintain the original graded surface. When installing flowerbeds, be careful not to interfere with the drainage system. Ensure that flowerbeds are graded away from the foundation wall and that a minimum clearance of eight inches is maintained between the ground level and the bottom of the exterior wall cladding. Trees and shrubs should be kept clear of the house. Deep rooted plants or trees could interfere with the performance of the perimeter drainage system of the house. Newly planted trees or shrubs require a shallow depression around their base. The depression should be worked periodically to loosen the soil to allow air and water to penetrate to the root system. Once the plant is established (approximately two years), the depression can be filled in; however, never raise the soil above the level of the base of the trunk as this will kill the tree. In some arid locations, the installation of lawns, planters, trees or shrubs directly adjacent to your New Home is not recommended. The water required to sustain the health of the lawn or plants causes the soil to expand or collapse depending on the composition of the soil. This could adversely affect the load-bearing ability of the soil and may cause structural damage to the residence. If in-ground sprinklers are provided, make sure the lines and connections are properly drained prior to the onset of freezing temperatures.

NEW HOME MAINTENANCE MANUAL
LANDSCAPING AND YARD SPRINKLER SYSTEMS ARE NOT COVERED BY THE WARRANTY. DO NOT DIRECT SPRINKLERS AGAINST THE BUILDING. NEVER ALLOW SOIL OR GRAVEL TO COME IN CONTACT WITH UNTREATED WOOD MATERIALS OR THE EXTERIOR FINISH.

NEW HOME MAINTENANCE MANUAL
6. HOUSE EXTERIOR
6.1 Exterior Cladding One of the main purposes of the exterior cladding on a house is to protect the building from water leakage. A variety of different cladding systems are used in residential construction. For high weather exposure areas, a rain screen wall system is often required. A rain screen wall is a type of double wall system that is intended to provide a greater level of protection against water leakage. Generally the system consists of an outside cladding layer, then a vented air space between the framed walls. One of the main purposes of this wall system is to separate and keep dry the main wall system. The air space allows for drying and drainage.
6.2 Vinyl or Composite Siding Vinyl and composite siding materials are installed loosely to allow for expansion and contraction due to outside temperature variations. Generally, vinyl, metal, or composite siding materials will not require refinishing. Composite siding will require re-painting in the future. Due to the smooth surface of the siding, these materials can be kept clean by washing with a garden hose, a mild detergent, and some light scrubbing. Never use a pressure washer to clean the exterior cladding. Excessive water pressure can cause damage to the cladding or force water into the wall cavity. Siding installed on sun exposed elevations, especially dark and bright colours, fade more rapidly. Excessive temperatures from intense sunlight exposure or reflected heat from windows may warp or cause sagging of vinyl siding. Screening, lattice, or strategically placed potted shrubs can help to reduce damage from the sun. Damaged or very loose siding should be replaced / refastened to prevent damage to the siding and to prevent the entry of water into the wall cavity. Maintenance Action Items
Inspect siding at least annually for water tightness and surface flaws
Inspect caulking at least annually for failures; repair / replace as required
Repair cracks or holes in the siding or around doors and windows
Direct garden sprinklers away from the building
Keep tree branches, shrubs, and plants away from the siding
Do not place soil or flower beds against the siding
Do not pressure wash the siding
Do not place hot barbeques or outside cookers near siding
Do not pile snow against the house
Do not allow snow to build up at doors and low windows.
6.3 Wood Siding/Shingles Painted wood siding or shingles will generally require re-painting or staining within five (5) years. This type of siding will require re-painting or staining whenever the surface begins to fade, discolour or if peeling occurs. This will vary depending on the type and quality of the product used, initial coverage, and the exposure to the elements. High weather exposure locations can have severe weather conditions that will require much greater care and maintenance of the siding. Moisture in wood siding causes most exterior paint failures. This moisture may be from garden sprinklers, damp shrubbery close to the wall, small cracks in the siding or around door and window details. Spot repair of affected areas can sometimes extend the life of the remaining surfaces. If spot touch-ups of the painted/stained surfaces are undertaken, the new paint/stain colour will likely not match that of the existing surface due to fading and weathering. This cannot be avoided.

NEW HOME MAINTENANCE MANUAL
Siding installed on the south and west elevations, especially dark and bright colours, fade more rapidly. Frequent repainting or staining of the siding to maintain the original appearance and to provide adequate protection may be required. For best results, follow the manufacturer’s recommendations for surface preparation.
Wood siding and shingles can be cleaned with a mild detergent and a garden hose. Do not use a pressure washer on siding as this can damage the surface and force water into the walls. Maintenance Action Items
Inspect siding at least annually for water tightness and surface flaws
Inspect caulking at least annually for failure
Repair / caulk cracks around doors and windows
Direct garden sprinklers away from the building / siding
Keep tree branches, shrubs, and plants away from siding
Keep flower beds well away from the bottom of the siding
Siding or trim that is exposed to severe weather conditions require greater care and maintenance; annually re-finishing may be required
Do not place soil or flower beds against the siding
Do not pressure wash wood siding
Do not place hot barbeques or outside cookers near siding
Do not pile snow against the house. SIDING OR TRIM EXPOSED TO SEVERE WEATHER CONDITIONS REQUIRES GREATER CARE AND MAINTENANCE.
6.4 Stucco Stucco consists of a mixture of sand, lime, water and Portland Cement. Conventional stucco applications, including those with an acrylic top finish coat, are not waterproof. The main protection from water penetration comes from the building paper and flashing installed prior to the application of the stucco. The stucco does help in shedding water, but will become saturated after a prolonged period of rain. Control joints may be installed at each floor level to compensate for the movement of the building frame caused by the wood components which shrink in size as they dry. Hairline cracks may appear in the finish coat after the drying and shrinking process is complete. These cracks should be expected and it is suggested that they be left until near the end of the first year, or until all shrinkage has taken place and then, if desired, they can be repaired. Please note that the repair of the crack is often more unsightly than the original crack. Stucco cracks less than 2 mm (1/16”) in width do not require repair. Larger cracks should be sealed to prevent the entry of water into the wall assembly. Most surface dirt on stucco can be cleaned with a garden hose. Over time, mildew and moss can grow on any shaded surface. A mild solution of bleach and water may remove this growth. A pressure washer should never be used to clean stucco surfaces as considerable damage to the surface and excessive water penetration can occur. Maintenance Action Items
Inspect the stucco at least twice a year for water tightness and surface flaws
Inspect the flashings at least twice a year for water tightness
Inspect caulking at least annually for failures; repair as required
Repair small cracks in the stucco around doors and windows
Direct garden sprinklers away from the stucco / building
Keep flower beds well away from the bottom of the stucco
Keep tree branches, shrubs, and plants away from stucco

NEW HOME MAINTENANCE MANUAL
Do not place soil or flower beds against stucco
Do not pressure wash stucco
Do not place hot barbeques or outside cookers near stucco
Do not pile snow against the stucco.
6.5 Masonry Mortar joints in the brickwork are not entirely waterproof. Periodically, the mortar joints should be inspected for cracks or deterioration. Hairline cracks are not problematic; however, if these cracks are excessive, they should be repointed to reduce the potential for moisture related problems. Repointing involves cleaning out loose mortar to a depth of at least ½” and filling the space with new mortar which is available at your local building supply store. The bottom course of brick contains intentional openings (weep holes) which allow for the drainage of moisture from the cavity located behind the brick. These openings must remain unobstructed and must not be blocked by landscaping. White dust or staining on the masonry surface is referred to as efflorescence. It is the result of salts within the masonry or mortar that migrate to the surface of the brick with time. It can usually be controlled with water and a light scrubbing. More persistent occurrences can be washed off with muriatic acid or baking soda. Should efflorescence continually reoccur in a localized area, it may be due to a specific water source such as a leaking gutter. If so, the problem should be identified and corrected. Maintenance Action Items
Check for masonry at least annually for spalling or deterioration
Ensure all weep holes are clear
Check for cracks in bricks and mortar annually
Check for missing or deteriorated caulking annually
Direct garden sprinklers away from the masonry
Keep flower beds well away from the bottom of the masonry
Keep tree branches, shrubs, and plants away from masonry
Do not place soil or flower beds against brick
Do not pile snow against the house
Do not block weep holes.
6.6 Caulking Flexible sealing compounds are generally referred to as caulking. Numerous varieties of caulking exist and have many specialized uses. Caulking is generally used to seal gaps between dissimilar materials on the exterior of the building and to seal gaps or joints in exterior finishes. In order to conceal the caulking for appearance reasons, some builders may “back caulk” joints and gaps. During construction, caulking is applied as the cladding system is installed. As buildings shift due to settlement or shrinkage, the building framing members or the finishing materials can cause stress to the caulking. While a caulking joint should never be the only means of preventing water from entering a building, it is one of the initial means of keeping water out. When applying caulking, use a high quality material formulated for the specific purpose. Some caulking is for interior use only. Some caulking cannot be painted. Consult with your Builder or local home supply centre for an appropriate product. Maintenance Action Items
Examine caulking annually before the wet and/or cold weather arrives
Any cracked or damaged caulking should be removed and replaced
Always use a quality caulking designed for the specific application.

NEW HOME MAINTENANCE MANUAL
6.7 Windows Building standards require the use of double glazed sealed units mounted in thermally broken window frames. There is a wide assortment of frame types and the material used can vary. Windows may open in different fashions: some may slide horizontally or vertically, open outwards like a door or tilt open in the fashion of an awning. If high relative humidity levels occur inside the New Home during periods of cold weather, condensation and frost on the inside face of the windows may occur. This is a ventilation matter and is not a window fault. Condensation can result in the growth of mildew on the window frame that can be controlled with a mild solution of bleach and water. Windows with wood frames will require greater maintenance. Severe weather or coastal conditions will require much greater care and maintenance of the wood windows. Most window designs incorporate a drainage track at the bottom of the window to collect condensation that runs off of the glazing. These tracks will have weep holes to the outside to drain the moisture. These holes must be kept clean and can be maintained with a short piece of wire or a cotton swab. Condensation between the layers of glass within the window frame indicates that the sealed unit has failed. The glazing unit will require replacement as there is no method of repairing sealed units. If failure of the sealed unit occurs after the expiry of the first year of Warranty coverage, contact your window supplier as the cost of this repair may be partially borne by the manufacturer. Care must always be used when cleaning windows. Sand, dirt, or grit can easily damage glass. Exterior surface scratches on glazed surfaces, unless reported at/or prior to possession, are not considered as a Warranty defect. Maintenance Action Items
Clean and lubricate window hardware annually
Remove any accumulated grime, mildew, or debris from windows
Ensure windows close tightly
Inspect locks and lubricate as required
Keep all weep holes clean
Wipe moisture off windows and frames
Wood windows will require greater maintenance; refinishing of the exterior surfaces may require yearly care
Do not use a dirty cloth to clean glass
Do not use abrasive cleaners or chemicals on the window frames
Do not use a metal scraper or razors on glass. CONTROLLING HUMIDITY LEVELS WITHIN THE HOME IS IMPORTANT IN ORDER TO AVOID CONDENSATION PROBLEMS; OPEN WINDOWS TO VENTILATE AND USE EXHAUST FANS. CONDENSATION AND RESULTANT MILDEW DUE TO LIVING ACTIVITIES OR AN OWNER NOT PROPERLY VENTILATING THE HOME ARE NOT WARRANTABLE DEFECTS.
6.8 Skylights Acrylic skylight glazing does allow the migration of moisture through it; therefore, condensation between the double-glazing can be expected. This form of skylight usually has a vent that can be opened to allow for additional airflow between the acrylic glazing units. Check with the skylight manufacturer for further information in this regard.

NEW HOME MAINTENANCE MANUAL
Maintenance Action Items
Inspect skylights at least annually for water tightness
Inspect skylight flashings at least annually for water tightness
Ensure skylights close tightly
Ensure skylights are securely attached to the frame
Do not use a dirty cloth to clean skylights
Do not use abrasive cleaners or chemicals on skylights
Do not use a metal scraper or razors on glass or acrylic glazing. CONDENSATION AND RESULTANT MILDEW DUE TO LIVING ACTIVITIES OR AN OWNER NOT PROPERLY VENTILATING THE HOME ARE NOT WARRANTABLE DEFECTS.
6.9 Exterior Doors Exterior swing doors are generally made of solid wood, metal, metal over a wood frame with a foam core, or fiberglass. These doors are exposed to detrimental weather conditions and extreme temperature variations from the inside to the outside which can harm the surface of the door. Variations in humidity from the interior to the exterior can also affect a door. Collectively or separately, these conditions can cause doors to warp or change in dimension. Seasonal variations can occur up to ¼” in any direction. It is prudent to refrain from trimming a binding exterior door as the problem may rectify itself with a change in climatic conditions. Some exterior doors have manufacturers’ restrictions as to the colour a door may be painted. The heat absorbed by darker colours can cause failure of the sealing compounds in the glazing and/or cause excessive warping of the door. The wrong paint colour may void the manufacturer’s warranty; therefore, any such restrictions should be reviewed prior to the door being painted. For locations that have severe weather conditions, greater care and maintenance of wood doors will be required. The entry door between the garage and the house will include an automatic door closer or self-closing hinge and a seal (weather-stripping). The door is intended to automatically close to prevent the entry of exhaust gases from the garage into your New Home. Maintenance Action Items
Ensure all exterior doors close tightly to the door frame
Replace all worn or damaged weather stripping as required
Inspect outside door finishes for deterioration at least annually
Check for missing or deteriorated caulking annually
Lubricate hardware as required
Wood doors exposed to severe weather or coastal conditions may require annual maintenance
Do not allow snow to accumulate at or around doors. WOOD DOORS OR TRIM EXPOSED TO SEVERE WEATHER CONDITIONS REQUIRES GREATER CARE AND MAINTENANCE. THE SEASONAL MOVEMENT OF DOORS IS NOT UNCOMMON.
6.10 Sliding Patio Doors Sliding patio doors are usually constructed with metal or vinyl frames and are supplied by a window manufacturer. Adjustment of the door is required at times to ensure a tight fit, smooth operation, and to avoid damage to the door sill. The adjustment rollers at the base of the door can be adjusted by the use of a screw driver.

NEW HOME MAINTENANCE MANUAL
Maintenance Action Items
Ensure all doors close tightly to the door frame
Replace all worn or damaged weather stripping as required
Check for missing or deteriorated caulking annually
Lubricate hardware as required
Keep door tracks clean of dirt and debris
Use care when cleaning the glass
Do not allow snow to accumulate at or around doors
Do not use a dirty cloth to clean glass
Do not use abrasive cleaners or chemicals on the window frames
Do not use a metal scraper on glass. CONDENSATION AND RESULTANT MILDEW DUE TO LIVING ACTIVITIES OR AN OWNER NOT PROPERLY VENTILATING THE NEW HOME ARE NOT WARRANTABLE DEFECTS.
6.11 Storm Doors It is recommended that storm doors be installed where conventional hinged doors are not capable of limiting weather exposures. Unfortunately, this may not be determined until the winter season. Unless supplied by the Builder, the installation of a storm door is not considered to be a Warranty matter.
6.12 Overhead Garage Doors Overhead garage doors are available in a number of widths and finishes. These doors consist of panels and operate on tracks. Some gaps around the door edges and the frame may exist and are not uncommon. Further, some entry of wind, cold, dust, or snow should be expected. Inspect garage doors for operation regularly. Door rollers and travellers need lubricating about every three (3) months. Depending on size of door, some minor sagging may occur. Maintenance Action Items
Ensure door closes smoothly
Replace all worn or damaged weather stripping
Inspect outside door finishes for deterioration annually
Check for missing or deteriorated caulking annually
Lubricate garage doors hardware and rollers annually
Wood doors exposed to severe weather conditions may require annual maintenance
Use extreme care if the door spring is to be adjusted
Do not allow snow to accumulate at or around garage doors. WOOD GARAGE DOORS OR TRIM EXPOSED TO SEVERE WEATHER CONDITIONS REQUIRE GREATER CARE AND MAINTENANCE.
6.13 Weather-Stripping Weather-stripping is installed around doors and windows to reduce air infiltration and provide weather protection. Some weather-stripping materials are flexible, such as: felt, plastic foam, rubber, or vinyl. Other types are rigid strips, edged with foam, felt or plastic. As a building settles, some movement may occur, requiring some basic adjustment and maintenance. Some weather-stripping is adjustable and the door should have firm contact with the weather-stripping. If the threshold is too tight and binding against the bottom of the door, the use of a screwdriver may be needed for adjustment. Wood thresholds require extra maintenance and care, due to exposure to outdoor elements. It is recommended that a protective sealer or paint be used, at least once a year, to help prevent wood deterioration and rotting over time.

NEW HOME MAINTENANCE MANUAL
Maintenance Action Items
Check the weather-stripping at least annually to ensure that the seal is tight
Replace old or worm weather-stripping as required
Re-secure loose weather-stripping
Do not allow snow to accumulate at or around doors
Do not allow paint on weather-stripping.
6.14 Finish Hardware and Locks The factory finish of locks and door handles will wear with use and exposure to environmental conditions. This is especially evident with brass finishes in coastal environments. To restore this finish, remove the factory lacquer finish with a scouring powder, then polish the hardware. Once a uniform appearance is obtained, the surface can be sealed with a coat of clear lacquer. Interior door hardware can be wiped clean with a damp cloth and then polished with a soft dry cloth. Natural body oils and many hand lotions are detrimental to brass finishes and will cause tarnishing. Maintenance Action Item
Lubricate door hardware and locks with powdered graphite or light oil as required. THE FINISH ON LOCKS, DOOR HANDLES, AND HARDWARE WILL WEAR WITH USE AND ENVIRONMENTAL EXPOSURE; THIS IS NOT A WARRANTY DEFECT.
6.15 Decking Sundecks and balconies are exposed to rain, snow, and sun. Care must always be taken not to damage any deck surfaces and membranes especially during snow removal. Wood decking and trim will crack, warp, and split over time. This is normal and cannot be prevented. Painted surfaces will chip or peel and should be touched up annually before the onset of poor weather. Open seams/joints in wood trim should be sealed with a suitable caulking to prevent the entry of water. Decks, handrails and windowsills may require cleaning and “touching up” more frequently than other components of the house due to their horizontal orientation and weathering. Do not use a pressure washer on the decking and trim as this can damage the surface. Maintenance Action Items
Inspect deck membranes regularly for tears, cuts, or other damage and repair promptly
Inspect the joints in the deck membrane for de-laminations
Inspect all railing posts to ensure a proper seal exists at the deck and at all fasteners
Check all drains and scuppers for blockages, especially in the winter
Ensure all drains and scuppers are sealed to the deck membrane
Regularly clean decks with a mild soap and water
Do not allow snow or ice to clog drains and scuppers
Do not allow snow to accumulate at or around deck doors. WOOD DECKS EXPOSED TO SEVERE WEATHER CONDITIONS REQUIRE GREATER CARE AND MAINTENANCE.
6.16 Handrails Handrails are exposed to rain, snow and sun. Cracking, warping, and splitting of wooden handrails and trim is normal and cannot be prevented. Painted surfaces can chip and peel and should be touched up annually before the onset of poor weather. Open seams in wood trim should be sealed with a suitable caulking to prevent the entry of water.

NEW HOME MAINTENANCE MANUAL
Metal handrails may also become chipped over time. Inspect metal railing at least annually and touched up paint chips and other finish flaws as required. Maintenance Action Items
Inspect handrails regularly for surface deterioration and repair promptly
Inspect the joints in railings and trim for separation and seal as required
Inspect all railing posts to ensure a proper seal exists at the deck
Inspect all railing posts for proper support. HANDRAILS EXPOSED TO SEVERE WEATHER CONDITIONS REQUIRE GREATER CARE AND MAINTENANCE.
6.17 Roof If the roof of your New Home is sloped, it will typically be surfaced with asphalt or fiberglass shingles, cedar shingles or shakes (which may or may not be treated with a preservative), slate or concrete tile, metal, or a composite manufactured product. A flat or slightly sloped roof may be surfaced in built-up tar and gravel, membrane, or torched on rolled sheet goods. All roofing is intended to shed water and prevent water entry into the residence. Obstructions that prevent the free flow of water off of the roof or blocked drains can cause leakage or premature failure of the roofing material. The roof and ancillary flashings must be kept free of debris and build-up of ice or snow. Cleaning the roof is recommended annually. Also, the roof surface should also be checked for excess debris after every heavy windstorm. This is especially important if trees surround the home. Coniferous trees can also deposit debris in sufficient quantities to impede the free flow of water. The life expectancy of the roof will depend on the product used and the care and maintenance provided. The typical life expectancy of roof materials, range from 10 - 25 years. Loose, broken or missing shingles following heavy windstorms should be repaired or replaced. It should be noted that most manufacturer’s warranties for shingles do not cover wind damage in conditions exceeding 80 kph (50 mph) unless otherwise specified. Storm related damage is not the Builder’s responsibility; therefore, maintenance repairs should be made as soon as possible after such occurrences to prevent leakage. Leakage can cause serious damage to the interior of your New Home or further damage to the remainder of the roof. Asphalt shingles and some roll roofing have surface granules to protect the product from damage due to ultra-violet radiation from sunlight. If areas of the underlying roof material are exposed, protect with additional granules. In addition, roofs can become soft in hot weather and foot traffic can damage the top surface. Deflection of the roof sheathing or the lifting of shingles due to expansion can cause variations in the roof surface. Wood shingles will crack and split with time. This weathering is generally not a concern unless it causes a roof leak. If such a leak occurs, it should be repaired immediately by installing a piece of sheet metal beneath the cracked shingle. Older wooden roofs are very brittle and traffic on the roof can cause extensive damage to the shingles. Wood roofs become very slippery when wet and extreme caution must be undertaken when working on a wet roof. Some concrete or clay tile roofs can be brittle. Always use caution when walking on a roof so damage is not caused; only walk on tiles that are fully supported. The area beneath the roof surface is often vented to the outdoors. Sloped roofs generally have an attic which is vented at the perimeter (eaves), gables, or at the ridge of the roof. Flat roofs are also vented. Unobstructed ventilation is crucial to the longevity of the roof and roofing material. Maintenance Action Items
Inspect all penetrations through the roof, skylights, plumbing stacks, and vents, annually and re-seal as necessary
Flat roofs should be inspected by a professional every two (2) years and all recommended maintenance should be completed

NEW HOME MAINTENANCE MANUAL
Cedar roofing should be washed annually with a garden hose and any accumulated debris such as needles or moss should be removed from between the shingles or shakes
Check attic spaces for signs of moisture at least yearly
Trim overhanging branches away from the roof
Clean gutters regularly
Do not pressure-wash any roof; high-pressure water can cause damage
Do not walk on cedar roofs in dry weather
Do not block roof venting; check annually. ROOF DAMAGE CAUSED BY EXCESSIVE WIND OR STORM CONDITIONS (EXCEEDING THE MANUFACTURERS’ OR THE BUILDING CODE REQUIREMENTS) IS NOT COVERED BY THE WARRANTY.
CARE MUST ALWAYS BE USED WHEN WALKING ON A ROOF SO DAMAGE IS NOT CAUSED.
6.18 Ice Dams Snow melting on the roof and freezing as it runs off at the un-insulated overhang or eave of the roof can cause ice damming. Ice dams can cause water to back up under the shingles which may result in an interior leak. This is a natural occurrence and generally is not due to a Builder defect. Maintenance Action Items
If ice dams occur, remove the snow and ice off of the roof at the eaves and valleys
Check roof vents and plumbing stacks for water tightness. ROOF DAMAGE FROM NOT REMOVING ICE DAMS IS NOT COVERED BY THE WARRANTY.
6.19 Gutters and Downspouts Gutters are not required by building regulations, however, they are often installed at the perimeter of a roof to control and carry away rainwater. Gutters also serve to limit rainwater from being deposited alongside the foundation where it could eventually seep into the basement or cause water damage to the exterior wall surfaces. Keep gutters, roof drains, and downspouts free of obstructions such as leaves, tree needles, ice, or moss. Blockages can reduce flow efficiency, cause damage, and result in leakage into the building. Excessive ice build-up can detach gutters from the eaves. Maintenance Action Items
Ensure that the runoff water is directed away from the house
If the down pipes empty onto splash pads at grade, do not remove
Check gutters for obstructions at least twice a year and after every heavy windstorm or after prolonged periods of freezing and thawing
When cleaning gutters, roof drains, and downspouts, remove all leaves and debris
Ensure drain baskets exist at the drains
Check joints in gutters for water tightness prior to winter
Keep overhanging branches trimmed away from gutters
Do not wash debris into down pipes and the drain system of the New Home
Do not lean ladders against gutters as this may cause damage
Do not remove splash pads for downspouts. DAMAGED GUTTERS CAUSED BY LADDERS IS NOT A WARRANTABLE DEFECT. GUTTER DAMAGE FROM NOT REMOVING ICE DAMS IS NOT COVERED BY THE WARRANTY.

NEW HOME MAINTENANCE MANUAL
6.20 Fireplaces and Chimney Fireplaces will burn natural gas, propane, or wood. It is important that any debris be removed regularly from fireplace vents. At the beginning of fall, chimneys / flues should be inspected and cleaned. Wood burning fireplaces require extra care and maintenance. Always open the damper prior to lighting a fire. Smoke damage caused by a closed damper is not a construction fault, nor a Warranty defect. In some situations, pre-heating the flue may be required, in order to start a draft. After each use, ash should be swept into the ash pit, often beneath the grating. If an ash pit is not provided, remove the ashes.
Never leave fires unattended. When not using the fireplace, keep the damper closed; so that warm air will not escape in winter, and cold air will not escape in summer. Wood burning produces creosote deposits, which build up over time; if not maintained (removed), may cause a chimney fire. Chimney flues and flue pipes should be inspect and clean at least annually by a professional. Also, ensure no blockages exist. Maintenance Action Items
Ensure chimney flues are cleaned annually
Depending on use, clean ash pits regularly
Keep flammable materials away from fireplaces
Inspect exterior chimney flashings at least yearly: if loose, re-secure
Do not burn wood, paper, or other debris in gas fireplaces
Do not obstruct air supply ducts.

NEW HOME MAINTENANCE MANUAL
7. STRUCTURE
7.1 Foundation The most common material used for foundation construction is cast-in-place concrete. Alternative methods of construction include masonry block, insulated concrete forms (“ICF”), or pressure treated preserved wood. As concrete cures, cracks may occur due to the hydration process and shrinkage stresses. Minor shrinkage cracking cannot be avoided and these cracks have no effect on the structural integrity of a building. Minor cracks in the foundation wall may allow the entry of water and can be repaired from the outside with an asphalt-based sealant. If exterior access is not possible, numerous concrete patching compounds are available and can be installed to the inside surface of the concrete wall. The exterior foundation walls are generally coated with a bituminous damp-proofing material below grade. This material is often exposed for several inches above grade as well. Damp-proofing is installed to prevent moisture from seeping into the concrete. It is not waterproof; therefore, excessive amounts of ground water must be controlled by other means such as site grading or drainage. Efflorescence may appear on the surface of the foundation walls. Efflorescence is a white powder which is caused by salts in the concrete mix that are brought to the surface by water or moisture. It is cosmetic only and can be removed with a brush. Maintenance Action Items
Inspect the foundation for signs of leakage at least annually
Ensure the soil /grade around the foundation is sloped away from the building
Do not plant trees or shrubs next to foundations as roots can cause damage
Do not change the grading around the foundation
Do not over water around foundations. FOR SOME AREAS IN THE PROVINCE, SENSITIVE SOIL CONDITIONS (CLAYS OR SILTS) EXIST. OVER WATERING OF THE SOIL CAN NEGATIVELY AFFECT THE FOUNDATION SYSTEM.
7.2 Basement The floors of basement style homes will be cast-in-place concrete. The surface may not be perfectly smooth or level. As concrete shrinks while curing, stress cracks can occur and are common. Cracks will generally form at corners and across doorways and at the perimeter of the floor where it adjoins the foundation walls. As most floor slabs within a house are not a structural component, there is generally no reason to repair cracks in a concrete floor unless they are larger than 3mm (1/8”) in width; excluding garages and carports. If required, these cracks can usually be filled with concrete grout. Concrete floor slabs can be painted. The product used should be alkali resistant and allow continued curing of the concrete. Painted concrete floors may flake or peel and require regular touch-up. Efflorescence may appear on the surface of the concrete floors. Efflorescence is a white powder which is caused by salts in the concrete mix that are brought to the surface by the water in the concrete mix. It is cosmetic only and can be removed with a brush. Once the concrete has cured, it will likely stop appearing. However, an alternative water source could cause efflorescence to continue indefinitely. If this is the case, the alternate source of water should be identified and remedied. Maintaining the proper heat level in the basement is important in order to reduce moisture build-up. The
minimum indoor temperature of 18C at the outside design temperature should be maintained in this space. Decreasing or deactivating the heat may result in cold floors, condensation, or mildew. Maintenance Action Items

NEW HOME MAINTENANCE MANUAL
Inspect concrete slabs for signs of cracking at least annually
Maintain proper heat in the basement.
AN EXACT COLOUR OR TEXTURE MATCH OF A CONCRETE REPAIR CANNOT BE GUARANTEED.
RESULTANT DAMAGE FROM NOT MAINTANING A PROPER TEMPERATURE IN THE BASEMENT IS NOT A WARRANTY DEFECT. CONTROLLING THE PROPER HUMIDITY LEVELS WITHIN THE HOME IS IMPORTANT AND AN OWNER RESPONSIBILITY. CONDENSATION IS NOT A WARRANTY ISSUE UNLESS A CONSTRUCTION DEFECT EXISTS.
7.3 Wood Frame The most common construction method for the structure of a New Home is wood framing. Floors are constructed using 2"x8", 2"x10", or 2"x12" solid lumber floor joists or manufactured floor joists. Plywood or oriented strand board (“OSB”) sheathing is then screwed or nailed to the top of the joists. To help reduce floor squeaks and to provide additional structural rigidity, glue is often applied to the top of the floor joist prior to the installation of the floor sheathing system. The walls consist of a vertical frame of 2"x4" or 2"x6" studs with horizontal plates of the same width at the top and bottom of the wall. The wall studs are often on a 400mm (16") or 600mm (24") spacing. Plywood, lumber, or OSB sheathing is attached to the exterior frame. For openings, the support of joists, or the support of a roof, beams may be used instead of walls. Beams can consist of several joists nailed together. For larger loads or longer spans, a specialized manufactured beam may be used for added strength. Posts at intermediate locations may support these beams. Most roofs are constructed using prefabricated wood roof trusses spaced 600mm (24”) apart. Detailed roof structures may be framed by hand using roof rafters and ceiling joists. Trusses are capable of spanning large distances while carrying considerable weight. As the design and installation of the roof truss is engineered, this can be confirmed by your Builder or by the supplier of the trusses. The wood used to construct your New Home will shrink as it dries out. Minor changes in the size and the shape of the wood members can occur with drying. These changes do not affect the structural integrity of the wood frame, but may cause flaws in the finishes used throughout the New Home. The most common changes are gypsum board cracks or nail pops in walls and ceilings. The movement that results from the shrinkage of the structure may also affect other finishes such as flooring and wood trim. Minor floor squeaks may appear and doors may begin to bind. Any necessary repairs in this regard should be postponed until towards the end of the first year to allow the majority of the wood shrinkage to occur.
7.4 Beams and Teleposts The floors of the residence may be constructed with beams and provide support for the floor joists or the roof above. In turn, posts at specific intervals may support these beams. Clay or other soils can be subject to shrinking or swelling. Soil movement can be more common and pronounced in specific geographical regions. Where shrinking or swelling soil exists, adjustable metal posts may be necessary and are commonly referred to as teleposts. Beams supported by teleposts should be checked for straightness at least twice a year and the posts should be adjusted as needed. Minor cracking between the wall and the ceiling over a main beam may be an indication that adjustments are required. If the basement is renovated or if further finishing is undertaken, the new walls and finishes should not come in contact with the underside of the beams as this will not allow adjustments to be made to the teleposts.
NEW HOME MAINTENANCE MANUAL
In some situations, wood posts are used. As with all wood, some cracking and twisting is not uncommon. As the dimension of the post increases, so can the size of cracking. Maintenance Action Items
Inspect beams at least yearly for alignment and adjust teleposts as required
Do not encase teleposts (renovations/finishing).
7.5 Attics The space between the ceilings and the roofing is referred to as the attic. Attics are intended as service areas and are not intended as storage spaces. Always use caution when walking in attics as there is no floor support and damage to ceilings can easily occur. The ventilation of an attic space to the exterior is important. Proper roof ventilation reduces moisture build-up and helps to keeps the attic space cooler in the summer. Storing belongings in an attic is not recommended. If stored items limit the air flow, this practice can promote moisture build-up and the growth of mildew. Also, compressing the insulation can reduce the thermal value of the insulation. Inspect all vents and soffits from the exterior each fall and ensure that they are not blocked by plants or debris. All clogged screens should be brushed clean. Repair or replace any broken or missing screens as required. This helps prevent animals and insects from obtaining access into the building. Inspect attics at least annually for water leaks and signs of moisture. Also, piping for exhaust fans should be directed out of the attic space. Ensure the interior humidity in the house is at a proper level. For further information regarding indoor humidity, refer to Subsection 10.16, Ventilation, Condensation, and Relative Humidity. High humidity levels can cause damage if the moist air escapes into the attic space. Maintenance Action Items
Inspect the attic for signs of water leakage and moisture at least annually
Inspect all vents and soffits each fall for blockages
Inspect all exhaust fans, ducts, and vents for leakage
Ensure the attic hatch is securely sealed
Monitor and control the indoor moisture levels in the house
Do not store personal belongings in attic spaces
Do not block vents.
EVEN WHEN ATTIC VENTILATION COMPLIES WITH BUILDING CODE REQUIREMENTS, MOISTURE PROBLEMS MAY RESULT; IN THIS SITUATION, ATTIC DAMAGE CAUSED BY EXTERNAL HUMIDITY CONDITIONS IS NOT COVERED BY THE WARRANTY. TAKE CARE NOT TO CAUSE CEILING DAMAGE WHEN IN THE ATTIC SPACE.

NEW HOME MAINTENANCE MANUAL
7.6 Crawl Spaces The space below the main floor is referred to as a crawl space and is intended as a service area. Storing belongings in a crawl space is not recommended since ventilation and air circulation can be restricted. If belongings are placed in a crawl space, the items should be raised off the floor and kept away from the walls. This practice will allow for the flow of air around the stored items and helps to prevent the growth of mildew. If the crawlspace is heated, maintaining the proper heat level in a crawl space is important in order to
reduce moisture build-up. The minimum indoor temperature of 15C at the outside design temperature should be maintained in this space. Decreasing or deactivating the heat may result in cold floors and mildew. Crawl space floors are required to be sealed with a vapour retarder. This barrier can be polyethylene weighted down with rocks or gravel or a concrete skim coat. Although it is not uncommon for a polyethylene vapour barrier to be installed beneath a concrete slab, either method is acceptable. Despite the system used, some moisture may still transmit through the barrier. If a concrete skim coat is used, it will generally be a lower strength concrete and will be approximately 50mm (2”) thick. It may have a coarse surface appearance, may not be perfectly smooth or level and is not required to be a finished floor. Concrete cracking may be more common due to its weaker strength and the manner in which it was installed. This cracking is normal and if repairs are required, often a suitable caulking can be used. If the crawl space is vented to the exterior, inspect all vents in the spring and fall and ensure that the air flow is not blocked by plants or debris. All clogged screens should be brushed clean. Repair or replace any broken or missing screens as required. This helps prevent animals and insects from obtaining access into the building. Inspect the crawl space at least annually for water leaks and signs of moisture. Maintenance Action Items
Inspect the crawl space for signs of water leakage and moisture at least annually
Inspect all exterior vents, if provided, each spring and fall for blockages
Inspect all pipes, ducts, and vents for leakage
Ensure the crawl space hatch is securely sealed
Maintain proper heat in the crawlspace
Monitor and control the indoor moisture levels in the house
Do not store personal belongs in the crawl space
Do not block vents, if provided.
RESULTANT DAMAGE FROM NOT MAINTAINING A PROPER TEMPERATURE IN THE CRAWL SPACE IS NOT A WARRANTY DEFECT.
CONTROLLING THE PROPER HUMIDITY LEVELS WITHIN THE HOME IS IMPORTANT AND AN OWNER RESPONSIBILITY. CONDENSATION IS NOT A WARRANTY ISSUE UNLESS A CONSTRUCTION DEFECT EXISTS.

NEW HOME MAINTENANCE MANUAL
8. INTERIOR FINISHES
8.1 Hardwood Floors Although kiln dried material is used, hardwood floors are susceptible to movement caused by variations in humidity levels. Low humidity levels can cause the wood to separate at the floor seams. High humidity levels will cause the wood to expand. If excessive, this expansion may lead to cracking, cupping, or swelling of the boards. As movement can vary seasonally, the monitoring and control of the indoor moisture levels is important. For further information regarding indoor humidity, refer to Subsection 10.16, Ventilation, Condensation, and Relative Humidity. The movement of the flooring may also create noises as it expands and contracts. A squeak or creak proof floor cannot be guaranteed. The appearance of hardwood flooring is easy to maintain and mopping with a proper wood cleaner is all that is required for cleaning. The need for wax on hardwood floors is rare and many types of flooring are now factory finished and have specific maintenance requirements. Refer to your Builder or flooring supplier for specific instructions. Wood is a natural material and colour, texture, and grain patterns can vary. Also, wood is available in different grades, appearance variations and fit inconsistencies can exist. Floor finishes should not be compared to furniture finishes. Over time wood floors will show marking, scratches, and imperfections. High heels and pet claws can damage some floors. Wear is not considered a warrantable defect. Maintenance Action Items
Place mats at both the inside and exterior of entrances
Place mats at sinks, dishwashers, and work stations
Avoid using rubber or other dense backed mats as surface discoloration can be caused
Sweep or vacuum (soft surface) floors regularly
Use floor protector pads under furniture
Use protective sliders under appliances
Protect the floor when moving furniture or appliances
Protect against pet damage (such as claws)
Keep the home at a proper temperature and humidity
Do not use water to wash the floor; use a proper wood cleaner
Do not use steam cleaners on the floor
Do not leave wood exposed to direct sunlight as fading may occur
Do not allow spills to remain, clean-up immediately. FLOOR DAMAGE FROM NOT MAINTAINING THE PROPER INDOOR HUMIDITY OR TEMPERATURE IS NOT COVERED BY THE WARRANTY.
8.2 Laminate Wood Floors Laminate flooring typically consists of a decorative finish layer over a tread layer and bottom fiberboard core. Unlike solid hardwood or engineered hardwood, laminate flooring is rarely comprised of wood. Laminate floors are designed to resemble a variety of materials, such as hardwood, stone, or tile. High-quality photographic paper on the top surface of the floor board is used to image wood, stone, or tile. There are a few hybrid products that replace the photographic paper with a very thin slice of real wood veneer. Thicker laminates generally indicate a more durable floor. Laminate flooring generally does not yellow or fade from sunlight. Over time wood floors will show marking, scratches, and imperfections. High heels and pet claws can damage some floors. The repair of surface damage (scratches and chips) may not be possible. Wear is not considered a warrantable defect.

NEW HOME MAINTENANCE MANUAL
Maintenance Action Items
Place mats at both the inside and exterior of entrances
Place mats at sinks, dishwashers, and work stations
Sweep or vacuum (soft surface) floors regularly
Use floor protector pads under furniture
Use protective sliders under appliances
Protect the floor when moving furniture or appliances
Protect against pet damage (such as claws)
Keep the home at a proper temperature and humidity
Do not use water on the floor; use a proper laminate cleaner
Do not use steam cleaners on the floor
Do not allow spills to remain, clean-up immediately. FLOOR DAMAGE FROM NOT MAINTAINING THE PROPER INDOOR HUMIDITY OR TEMPERATURE IS NOT COVERED BY THE WARRANTY.
8.3 Resilient/Vinyl Floors Whether a tile or a sheet product, resilient /vinyl flooring is susceptible to damage from indentations or scratches, particularly those caused by furniture. Flooring should be protected from such damage by using floor pads beneath heavy furniture legs. The ability of a given flooring product to withstand abuse varies greatly from product to product and related damage is not a Warranty defect. Resilient / vinyl flooring should be cleaned with mild cleaner that is approved for use with the specific flooring product. Harsh cleaners can cause fading or affect the composition of the flooring material making it hard and brittle. Consult with the supplier of the specific flooring product for their recommendations. Specialty products are available for floorings to both clean and restore the sheen. Detergents often cause adjoining carpeted areas to mat down as the soaps are carried onto the carpet from the resilient floor areas. Once construction is complete, movement of the floor structure due to shrinkage can also affect floors. While flooring installers apply filler at the seams of the wood underlay materials, it is not always possible to achieve and retain a perfectly level subfloor. This can result in minor ridges becoming visible beneath the flooring under certain light. Generally, these concerns are only cosmetic and do not require any action. Some resilient / vinyl flooring products can become permanently stained by rubber backed floor mats. Also floors will fade over time when exposed to direct sunlight. Maintenance Action Items
Remove dirt regularly (daily or weekly as required)
Clean-up spills immediately
Place mats at both the inside and exterior of entrances
Place mats at exterior entrances at sinks, dishwashers, and work stations
Avoid using rubber or other dense backed mats
Use floor protector pads under furniture
Protect the floor when moving furniture or appliances
Use protective sliders under appliances.
8.4 Carpet Carpet care basically consists of avoiding spills, cleaning high traffic areas regularly to remove surface dirt and vacuuming the entire carpeted area at least weekly to remove dirt. Consult your flooring supplier for the specific cleaning and maintenance requirements of the carpet used in your home.

NEW HOME MAINTENANCE MANUAL
Berber or loop carpeting is susceptible to damage if pulled on. Tension on one loop can cause the carpet to unravel leaving a bare section. If a carpet loop or tuff is pulled or unraveled, trim accordantly. Less expensive carpeting can be more susceptible to matting. This is primarily noticeable in high traffic areas and cannot be prevented other than by the use of carpet runners. Warranties from the carpet manufacturer generally pertain to fiber loss only and do not cover “appearance retention”. Over time, carpets can fade. Direct and continued exposure to sunlight can increase the rate of fading. Maintenance Action Items
Place mats at both the inside and exterior of entrances
Remove stains and spills immediately
Carpets should be vacuumed at least weekly depending on the use and appearance
For heavy traffic areas, vacuum daily
Carpets should be professionally cleaned every year or two depending on use and appearance
Limit exposure to direct or prolonger sunlight where possible.
8.5 Ceramic Tile Ceramic tile is a very durable flooring material. For routine cleaning use a mild detergent; do not use waxes or sealers. As the grout between the tiles is porous and will absorb water which can lead to staining, annual sealing of the grout joints with a clear liquid silicone sealer should be undertaken. Ceramic tiles are available in different grades and colour and texture variations can exist. Also, depending on the tile used, some fit inconsistencies can exist. Floors should not be compared to furniture finishes. The gaps between the tiles are filled with a grout. Some minor cracking of the grout is not uncommon. Maintenance Action Items
Place mats at both the inside and exterior of entrances
Take care not to drop heavy objects on ceramic tile as tile can crack or chip
Inspect tiles at least annually and re-grout as required
Protect the floor when moving furniture or appliances
Do not allow spills to remain, clean-up immediately
Do not use a vacuum cleaner with a beater bar
Do not use steel wool or other abrasives to clean ceramic tiles. SEAL CERAMIC TILE FLOORS AND GROUT AT LEAST YEARLY.
8.6 Marble, Granite, and Natural Stone Although strong and attractive, spills can permanently stain natural marble, granite, and natural stone. All spills should be cleaned up immediately. Cleaning of marble should be done with a clean, soft cloth and warm water. Also, care should be taken to prevent scratching the surface. Annual sealing of the surface should be undertaken with an appropriate sealant. As marble, granite, and other stone products are a natural materials and are available in different grades, appearance variations in the colour, texture, and grain patterns can exist. Since some fit inconsistencies can exist, floors should not be compared to furniture finishes. Maintenance Action Items
Place mats at both the inside and exterior of entrances
Take care not to drop heavy objects on marble as tile can crack or chip
Protect the floor when moving furniture or appliances
Seal surfaces annually

NEW HOME MAINTENANCE MANUAL
Do not allow spills to remain, clean-up immediately
Do not use abrasive cleaners. SINCE MARBLE AND GRANITE ARE NATURAL MATERIALS, SURFACE IMPERFECTIONS ARE NOT UNCOMMON AND ARE NOT CONSIDERED TO BE A WARRANTABLE DEFECT.
SINCE MARBLE AND GRANITE SURFACES ARE SUSCEPTIBLE TO STAINING, CLEAN UP SPILLS IMMEDIATELY.
SINCE MARBLE AND GRANITE SURFACES ARE PERMEABLE, SEAL FLOORS AT LEAST YEARLY.
8. 7 Countertops All countertops require some care and attention; refer to the following.
8.7.1 Plastic Laminate Laminated countertops will burn or de-laminate if hot pots or pans are placed directly on the surface. Protective potholders should be used if hot items are to be placed on the countertop. Electrical appliances may also require protection when in use. The damage caused by hot items is generally not repairable so it is best to error on the side of caution. The ability to withstand scratching does vary with the laminate material used. Abrasive cleaners or steel wool should not be used, as the surface of the laminate will scratch. If allowed to remain on the surface, household bleach or solvents can stain or discolour the laminate. Water must not be allowed to remain on countertop joints as this will result in the counter substrate swelling due to the excess moisture. This damage is irreversible. Clean the surface of plastic laminate with a damp soapy cloth or sponge. For stubborn stains, use a mild household cleaner and rinse thoroughly with clear water. Be aware that some liquid cleaners contain abrasives or solidify at the mouth of the container. These hard solid pieces can scratch the surface if they inadvertently get on the cleaning cloth or sponge used to clean the laminate surface. Maintenance Action Items
Ensure the joint between the countertop and the wall is properly sealed
Do not allow water to remain on countertop joints
Do not use abrasive cleaners or steel wool on a countertop
Do not bleach surfaces
Do not allow spills to remain, clean-up immediately
Do not climb on, sit on, or place heavy loads on a countertop
Do not pound objects on a countertop
Do not use a countertop as a cutting board
Do not place hot objects on a countertop
Do not use a countertop as an ironing board.
8.7.2 Marble, Granite, or Stone Countertops made of marble, granite, stone, or other man-made compounds often have specific cleaning requirements. The manufacturer of the product should be contacted for these instructions. Generally, these types of countertops can be cared for in a manner similar to plastic laminates; abrasive cleaners should not be used. Counter surfaces can also be heat sensitive. As marble, granite, and other stone products are a natural materials and are available in different grades, appearance variations in the colour, texture, and grain patterns can exist.

NEW HOME MAINTENANCE MANUAL
Maintenance Action Items
Ensure the joint between the countertop and the wall is properly sealed
Seal the marble surfaces at least yearly
Do not use abrasive cleaners or steel wool on a countertop
Do not bleach surfaces
Do not allow spills to remain, clean-up immediately
Do not climb on, sit on, or place heavy loads on a countertop
Do not pound objects on a countertop
Do not place hot objects on a countertop
Do not use a countertop as an ironing board. SINCE MARBLE AND GRANITE ARE NATURAL MATERIALS, SURFACE IMPERFECTIONS ARE NOT UNCOMMON AND ARE NOT CONSIDERED TO BE A WARRANTABLE DEFECT. SINCE MARBLE AND GRANITE SURFACES ARE SUSCEPTIBLE TO STAINING, CLEAN UP SPILLS IMMEDIATELY. SINCE MARBLE AND GRANITE SURFACES ARE PERMEABLE, SEAL COUNTERS AT LEAST YEARLY. DO NOT OVERLOAD COUNTER SURFACES AS DAMAGE CAN OCCUR.
8.8 Cabinets Vinyl surfaced cabinets are very susceptible to heat damage. If the kitchen is equipped with a self-cleaning oven, the cabinet drawers and cabinet doors adjoining the range should be kept open when the range is in the self-clean mode to allow excess heat to dissipate. If heat is allowed to build up, the surface may delaminate. This precaution should also be applied when the oven is used for a prolonged period at a high temperature. Most cabinet surfaces can be cleaned using a damp cloth and a mild detergent. Abrasive cleaners should not be used. Grease splattered on the surfaces should be removed immediately as it becomes difficult to remove as it solidifies. Maintenance Action Items
Treat cabinets like furniture; with care
Remove grease or splatters immediately from cabinet surfaces
If hinges or hardware are loose, tighten immediately
Take care not to impact or drag objects against cabinets
Do not use abrasive cleaners on cabinets
Do not place excess strain, weight, or force on the doors or drawers
Do not climb on, sit on, or place heavy loads on cabinets
Do not allow spills to remain, clean up immediately
Do not over-load cabinet shelves or drawers.
8.9 Walls and Ceilings The majority of interior walls and ceilings in your house will likely consist of “drywall”. The wood used to construct your New Home will shrink as it dries out. Minor changes in the size and the shape of the wood members can occur with drying. These changes do not affect the structural integrity of the New Home, but may cause flaws in the finishes used throughout the house. The most common changes are drywall cracks or nail pops in the walls or ceilings. Wall finishes are warranted for one year. If excessive cracks or nail pops occur, it is recommended that these items be repaired at year end. Builders often fill and sand nail pops but may not paint. The Warranty does not require painting of the typical drywall problems.

NEW HOME MAINTENANCE MANUAL
SOME CRACKING OR NAIL POPS ARE NOT UNCOMMON.
SINCE NORMAL SHRINKAGE AND SETTLEMENT OF A HOUSE WILL OCCUR, A PREFERRED PRACTICE IS TO ADDRESS SHRINKAGE AND SETTLEMENT ITEMS TOWARDS THE END OF THE FIRST YEAR OF OCCUPANCY.
8.10 Paint The majority of interior drywall surfaces in your New Home will likely be finished with either a latex (water-based) or alkyd (oil-based) paint. Over time with wear and tear, walls can become scuffed, dented, or dirty. This is normal and is not a warrantable defect. Cleaning can easily be carried out by gently washing the painted surface with a mild soap or detergent solution. Abrasive solutions or over scrubbing should be avoided as this will remove the paint. Walls should not be cleaned for at least three (3) months after possession. Maintenance Action Items
Treat walls with care
Remove grease or splatters immediately from wall surfaces
Take care not to impact or drag objects against walls
Do not clean walls for at least three (3) months
Do not use abrasive cleaners on walls.
8.11 Interior Doors Interior doors are usually a wood veneer over a hollow core. Interior doors are generally sized to allow a gap up to 18mm (¾”) at the bottom of the door and the floor covering. This gap is provided to allow for air circulation beneath the door. Bi-fold doors, at times, require alignment and adjustment. Maintenance Action Items
Inspect door operation regularly
Lubricate hardware as required
Ensure door stops exist if necessary
Do not block or restrict the gap at the base of doors
Do not force a door closed
Do not hang heavy objects from a door. SOME WARPAGE AND SEASONAL MOVEMENT OF DOORS IS NOT UNCOMMON (LESS THAN ¼”).
9. Appliances
9.1 Appliances Appliances included with the purchase of your New Home, which have been installed by the Builder generally come with written instructions. Appliance manuals should detail the operating procedures and care requirements for the specific appliance. These instructions must be followed in order to maintain the manufacturer's warranty. All warranty registration cards provided with the equipment should be promptly completed and returned to the manufacturer to ensure your warranty obligations are met.

NEW HOME MAINTENANCE MANUAL
Prior to using any appliance, consult instruction booklets and manuals thoroughly, and always keep them in a safe place. Do not use harsh or abrasive cleaners on appliances or cook tops. Care and attention should be observed, as excessive impacts can damage surface finishes.
Before calling a maintenance company, ensure that the appliance has been properly plugged into the electrical outlet and that the breaker switch is in the “On” position. Dryers require the exterior vents to be cleaned at least on a monthly basis. If the vents become plugged with lint, the efficiency of the dryer is reduced and a fire hazard may occur. Appliances are heavy and the movement can damage floor surfaces. Moving mats should be used when moving an appliance. Maintenance Action Items
Clear drains in dishwashers as required
Clean exterior dryer vents at least monthly
Clean dryer filters / screens as required
Use care when moving appliances as wall or floor damage can occur
Take care not to impact or drag objects against appliances
Do not use harsh or abrasive cleaners on appliances
Do not place excess strain, weight, or force on appliance doors
Do not climb on, sit on, or place heavy loads on appliances
Do not allow spills to remain, clean up immediately USE CARE WHEN MOVING APPLIANCES. FLOOR DAMAGE FROM AN OWNER MOVING APPLIANCES IS NOT COVERED BY THE WARRANTY. TAKE CARE NOT TO DROP HEAVY OBJECTS ON APPLIANCES. AS PER THE HOME WARRANTY INSURANCE POLICY, APPLICANCES ARE NOT COVERED. CONTACT THE SUPPLIER DIRECTLY IF YOU HAVE ANY ISSUES.
NEW HOME MAINTENANCE MANUAL
10. MECHANICAL SYSTEMS
10.1 Plumbing - General The plumbing in your New Home will likely consist of plastic or copper piping for the supply of water throughout the home. PVC plastic piping is often used for the waste disposal. Other products are available but are less common.
A main water shut-off valve has been provided to turn off the water supply to the New Home. This valve can be used in the event of an emergency and should be located upon occupancy for future reference. Shut-off valves, if provided, for the sinks and toilets, allow for routine maintenance.
Waste line clean-outs may be provided throughout the residence. These clean-outs may be located within cabinets, inside closets, or visible on a wall surface. Clean-outs should remain accessible as they are the means of clearing a blockage in a waste pipe. Drain traps (“p” traps) are present at the outflow of waste piping. These traps provide a barrier of water which prevents the entry of sewer gases into the home. Sinks or drains which are used infrequently may lose this water barrier due to evaporation. If sewer gases are detected, by pouring water down the drain, the trap is re-primed and the odour is stopped. Any waste materials, including grease, fat and petroleum products, should not be disposed of down the plumbing system. These materials will accumulate in the piping, especially in the “p” traps, and can significantly reduce the flow of water through the waste system. These substances are also very detrimental to the municipal sewage treatment systems and private septic systems.
ALWAYS MAINTAIN ADEQUATE HEAT IN THE HOME SO WATER LINES AND PIPES DO NOT FREEZE.
10.2 Fixtures The surfaces of plumbing fixtures are susceptible to damage from abrasive cleaners. Use of abrasive products and steel wool pads should be avoided, as these products will cause the finish of the fixture to become dull and porous. Refer to the manufacturer's recommended maintenance procedures for specific information relating to your products. Maintenance Action Items
Plumbing fixtures are intended for normal household use only
Treat fixtures with care
Take care not to drop heavy objects on fixtures
Do not dispose of caustic products in household fixtures
Do not force faucet handles shut, damage can occur. PLUMBING FIXTURES AND FAUCETS ARE COVERED BY THE WARRANTY FOR A PERIOD OF ONE (1) YEAR.
10.3 Hot Water Tank The water temperature of the hot water tank can be adjusted on the thermostat located on the tank. This
may require the use of a screwdriver. Generally, an average setting for the water temperature is 140 F
(60 C); this setting is generally adequate for a dishwasher. This temperature is hot enough for most uses and should not cause scalding or burns. If hotter water is needed for a special purpose, the thermostat on the tank can be set to a higher temperature; however, the thermostat should be reset to a normal setting when finished. If your house is to remain unoccupied for a substantial period of time, the water temperature should be turned down or switched off at the tank or breaker panel. Some hot water tanks have a “vacation” setting on the thermostat for this purpose. Hot water tanks are equipped with a pressure relief valve at the top of the tank. This is a safety feature that will open and relieve water pressure if the tank / valve exceeds the rated working pressure. If water

NEW HOME MAINTENANCE MANUAL
or water stains are evident at the discharge pipe leading from the relief valve, contact a plumber as this is an indication that the normal operating pressure of the tank has been exceeded. A typical hot water tank has a life expectancy of 5 to 12 years. Periodic draining of the tank will remove sediment from the base of the tank and prolong its life. The sediment has an insulating effect, especially with immersion type elements, which causes the heating elements to operate longer than necessary. Consequently, increases in energy consumption can occur. The hot water tank can be drained by attaching a garden hose to the outflow drain at the base of the tank and routing the hose to a nearby floor drain. Draining can only be accomplished by gravity feed; therefore, the outflow of the drain used must be lower than the base of the tank. Alternatively, the hose can be run outside as long as the outflow is lower than the tank. Prior to draining water from the tank, the electrical power supply or fuel source must be turned off. Do not restore power to the tank until it has been refilled as it may explode due to excessive pressure caused by the heating of air instead of water. Maintenance Action Items
Drain water from the tank annually (refer to the previous instructions)
Ensure the overflow pipe is directed to a drain or within the drain pan; inspect at least yearly
Test the pressure relief valve on the hot water tank at least yearly
Keep the area around a gas hot water tank clean, dust free, and obstructions free in order not to interfere with air supply and combustion.
DO NOT DRAIN THE HOT WATER TANK WITHOUT TURNING OFF THE POWER SUPPLY.
10.4 Exterior Taps Exterior taps often have shut-off valves inside the house that can be closed to allow the hose connections to be drained. This is an important precaution before the winter in order to prevent freezing pipes and water leakage. Once the water supply has been shut-off and the air inlet valve on the tap opened, the exterior valve should be opened to allow any trapped water to drain. This process is reversed in the spring once the threat of freezing is gone. Some exterior taps are "frost free" which means that the valve is connected to a long stem that allows the water to be shut off inside the wall in a warm environment. The outer portion of the piping then drains freely. If renovations are undertaken, ensure the frost free is on the warm side of the insulation. If garden hoses are left attached to exterior taps during the winter, freezing of the water line can occur. This is problematic as once the pipes thaw, leakage may occur.
Maintenance Action Items
Inspect exterior taps at least annually for leaks at the valve / tap
Disconnect garden hoses from all exterior taps prior to freezing weather
Shut off and drain exterior taps prior to freezing weather
If a garage or unheated utility room has taps, shut off and drain the exterior taps prior to freezing weather
Do not allow water to remain in exterior taps and attached hoses during the winter
Do not hang hoses or other items off exterior taps. EXTERIOR TAPS ARE COVERED BY THE WARRANTY FOR A PERIOD OF ONE (1) YEAR.
10.5 Toilets Upon flushing a toilet, water from the tank flows into the bowl. When the tank is empty, the tank flapper valve seal is re-set and supply water to the tanks refills. As the water in the tank rises, a ball float is lifted to a preset water level. Once the ball float reaches the height, the water flow valve is shut off. If set too high, the water level will rise in the tank and run down the overflow pipe into the toilet bowl without shutting off the “running” water. To rectify this, simply adjust the height of the ball float so that the water is shut off before it reaches the height of the overflow outlet.
NEW HOME MAINTENANCE MANUAL
If water continuously runs into the toilet bowl from the tank, there may be a poor flapper valve seal at the base of the tank. This seal can be cleaned with a stiff brush or steel wool. A worn flapper valve requires replacement. High interior humidity levels will result in condensation on the surface of the toilet tank as the tank is refilled with cold water. Water dripping from the base of the toilet tank is likely due to condensation on the tank and not a pipe or gasket leak.
Some toilets and sinks are made of glazed and kiln-fired vitreous china. Other sinks and bathtubs are constructed of enameled steel. Both products are very durable and attractive. To clean these fixtures, use mild powdered or liquid cleaners. The surfaces of plumbing fixtures are susceptible to damage from abrasive cleaners or steel wool pads. Refer to the manufacturer's recommended maintenance procedures for specific information relating to your products. Toilets can be susceptible to blockage. Some new toilets use little water per flush. This results in a lower volume of water carrying away the waste. Repeated flushing may be required in some instances to remove waste. Dense tissue paper and some thick toilet papers are unsuitable for these toilets. Never dispose of hair, grease, lint, diapers, sanitary products, cotton swabs, or plastic in the toilet. Maintenance Action Items
Inspect shut-off valves at least annually for leaks at the tap
Treat fixtures with care
Take care not to drop heavy objects on toilets
Do not use commercial drain cleaners; some are very corrosive
Do not use abrasive cleaners or pads as they will damage the finish.
PLUGGED OR BLOCKED TOILETS ARE NOT A WARRANTABLE DEFECT UNLESS A CONSTRUCTION FAULT EXISTS. PLUMBING FIXTURES ARE COVERED BY THE WARRANTY FOR A PERIOD OF ONE (1) YEAR.
10.6 Faucets Noisy or leaking faucets are frequently due to loose or damaged washers. Turning the fixture off with too much force can damage washers. Faucet handles should be turned no further than the point at which they stop the flow of water. Generally, faucets can be repaired by either replacing the damaged washer or the faucet cartridge. Basic home repair books describe how to replace washers or cartridges; however, due to variations in the methods of manufacture, specific instructions may be required. Prior to beginning the repair, close the water supply lines (shut-off valves) for the faucet. If such valves are not present, the entire water supply system for the house will need to be shut off at the main water valve. Maintenance Action Items
Inspect the shut-off valves at least annually for leaks at each tap
Contact a plumber if you are uncomfortable attempting maintenance
Clean aerators (screens) on faucets regularly. GREEN STAINING ON FIXTURES IS USUALLY DUE TO MINERAL COMPOSITIONS IN THE WATER AND IS NOT A BUILDER DEFECT. PLUMBING FIXTURES AND FAUCETS ARE COVERED BY THE WARRANTY FOR A PERIOD OF ONE (1) YEAR.
10.7 Bathtub and Shower Enclosures A shower curtain or doors will help to prevent water from leaking onto the bathroom floor while the shower is in use. To prevent damage to the flooring or walls, any spills or puddles of water should be cleaned up immediately.

NEW HOME MAINTENANCE MANUAL
Caulking is used to seal seams and prevent water from entering behind the enclosure. If a separation occurs around your bathtub and the wall tiles or between the wall and the enclosure itself, it should be filled immediately with a tub sealer or caulking compound available at any home supply centre. Leaving the gap unsealed may cause serious water damage to adjacent materials. The deterioration of grout between the tiles over time is common and will require maintenance. This is normal. You should apply a clear liquid silicone sealer to the grout joints of tub or shower enclosures that are finished with ceramic tile. This should be done at least every six (6) months. A sealer is used to prevent the porous grout from allowing water to seep through to the substrate material behind the tile. Sealing cannot be done until the grout has cured for approximately six to eight weeks. A liquid sealer product should not be confused with silicon caulking. Always follow the manufacturer’s recommendations for application. Some tub enclosures have specific cleaning requirements. Generally, abrasive cleaners are not recommended and harsh chemical cleaners should be avoided entirely. Follow the manufacturer’s recommendations for maintenance.
Maintenance Action Items
Inspect tub and shower enclosures monthly for signs of leakage
Apply caulking at tub and shower enclosures joints or seams, as required
Apply a clear liquid silicone sealer to the grout joints of tiled tub or shower enclosures at least every six (6) months
Take care not to drop heavy objects on bathtubs or showers
Do not use abrasive cleaners on bathtub and shower enclosures
Do not step into a bathtub or shower compartment with shoes on, as trapped grit and dirt can damage the surface.
DAMAGE CAUSED BY THE LACK OF MAINTENANCE IS NOT COVERED BY THE WARRANTY. DAMAGE OR SCRATCHES TO BATHTUBS OR SHOWERS AFTER POSSESSION IS NOT COVERED BY THE WARRANTY. PLUMBING FIXTURES ARE COVERED BY THE WARRANTY FOR A PERIOD OF ONE (1) YEAR.
10.8 Drains Hair, grease, food particles, or other solid forms of waste can plug drains and pipes. If a blockage occurs, try removing the debris from the trap beneath the fixture. Alternatively, a plunger can be used. Once the drain is partially cleared, flushing with hot water may complete the job. A more severe blockage may require a plumber.
Another common cause of blockages at some sinks is a buildup of debris on the drain plug control arm. Disassembly of the drain apparatus, that is often located under the sink, is required in order to remove blockages. If the blockage is minor, sometimes the debris can be removed with a small auger or a hooked wire.
Maintenance Action Item
Do not use commercial drain cleaners; some products can be very corrosive. PLUGGED OR BLOCKED DRAINS OR PIPES ARE NOT A DEFECT UNLESS A CONSTRUCTION FAULT EXISTS.
10.9 Floor Drains Some municipalities require a floor drain primer which automatically provides water for the “p” trap located below the floor surface. The drain trap is similar to those used under sinks, and when full of water; it forms a seal against sewer gases entering the house.

NEW HOME MAINTENANCE MANUAL
As water evaporates with time, maintain the seal by pouring water down the drain every two to three months if an automatic primer is not present.
Maintenance Action Item
Check water level in the drains every two (2) months.
10.10 Fire Sprinkler System Residential fire sprinkler systems are completely automatic and respond to a fire almost instantly. Sprinkler heads have heat sensors that will respond if required. Only the sprinkler head(s) over the fire will be activated.
Regularly ensure all the control valve(s) are in the open position. The sprinklers placed throughout your home should be inspected to determine if sprinkler heads are:
Obstructed; make sure there is no storage items placed too close to the sprinkler, which would limit the spray in the event of a fire
Painted
Damaged.
If any sprinkler head has been obstructed, painted or damaged, remedy immediately. The system is equipped with an audible alarm that will sound upon sprinkler activation. When you hear the alarm, leave the building immediately (if a fire exists) and call the fire department. Should a sprinkler head discharge (malfunction) without a fire, close the shut-off valve and call a professional service person immediately.
Maintenance Action Items
Know the location of the main shut-off valve for the sprinkler system
Take care when moving large or tall furniture around sprinkler heads
Have the sprinkler system inspected by a professional regularly
Do not paint sprinkler heads
Do not hang items off sprinkler heads
Do not block sprinkler heads with furniture.
USE CARE AROUND SPRINKLER HEADS AS IMPACT CAN CAUSE ACTVATION.
IN A FIRE SITUATION, WATER DAMAGE CAUSED BY THE DISCHARGE OF A SPRINKLER IS NOT COVERED BY THE WARRANTY.
DO NOT DEACTIVATE THE FIRE SPRINKLER SYSTEM.
KNOW THE LOCATION OF THE MAIN SHUT-OFF VALVE FOR THE SPRINKLER SYSTEM.
10.11 Electrical - General The electrical system in your home has been installed in accordance with the requirements of the provincial electrical code. The electrical supply is fed to the home by an underground or overhead cable. With underground service cables, piping, gas lines, etc., care should be taken when digging on your property. For information on these underground services, contact your hydro or gas provider, telephone provider, cable supplier, and the local building department. The glass enclosed meter mounted on your New Home is the gas / utility meter. This meter is the property of the utility provider and it measures the household electrical consumption. The voltage at the point of entry is generally 120/240 volts and 60 cycles per second. Circuit protection for overload is provided by circuit breakers located in the electrical panel(s). The main power shut-off is located inside the electrical panel or immediately adjacent to it. Know the location of the

NEW HOME MAINTENANCE MANUAL
panel and main breaker upon possession. Test the circuit breakers at least yearly by turning off each electrical breaker fully then resetting it to the “on” position. Should a circuit breaker “trip”, it is likely due to overloading of the specific circuit or a short circuit in an appliance cord. The start-up load of electric motors can also temporarily overload a circuit. To correct tripped breakers, isolate the cause of the overload or short and disconnect it. The circuit breaker can then be reset by turning it to the "off" position and then to the "on" position. If the breaker continually trips, contact an electrician. Always use the recommended light bulb for the light fixture. Exceeding the maximum wattage rating can result in bulbs burning out rapidly and circuit breakers tripping. Some pot lights can be especially sensitive to this and many contain high temperature circuit breakers that will turn off the light. If this occurs, check the bulb wattage and reset the light fixture breaker. If the problem continues, have the problem investigated immediately.
Maintenance Action Items
Know the location of the electrical panel
Know how to turn circuit breakers “off” and “on”
Test all circuit breakers at least once a year
Use only the specified wattage for lights; do not exceed specifications.
DAMAGE CAUSED BY POWER SURGES IS NOT COVERED BY THE WARRANTY. BURNED OUT LIGHT BULBS ARE NOT COVERED BY THE WARRANTY. DO NOT EXCEED THE RECOMMENDED LIGHT BULB WATTAGE IN A FIXTURE. THE LOCATION OF LIGHTS IS NOT COVERED BY THE WARRANTY. LIGHT FIXTURES ARE COVERED BY THE WARRANTY FOR A PERIOD OF ONE (1) YEAR.
10.12 G.F.C.I. Circuits A ground fault circuit interrupter (“G.F.C.I.”) is a safety device installed in the electrical system that is designed to prevent electrical shocks. This device is a breaker that shuts down when current leakage lose occurs. Because water and electricity are a poor combination, G.F.C.I. protection is installed for the outlets in bathrooms and the outdoors. G.F.C.I.s can be located in the main electrical panel or within specialty outlet receptacles and is designed to provide protection from ground faults. Multiple bathrooms may have their receptacle wired in series to one G.F.C.I. receptacle. The G.F.C.I. is extremely sensitive and will trip if grounding of the electrical current is detected. Ground faults usually occur in older appliances and electrical equipment or inexpensive extension cords. A poorly insulated extension cord lying on wet ground will often cause a ground fault. If the breaker trips, unplug the source of the ground fault and reset the breaker either at the panel or at the outlet itself.
Maintenance Action Item
Test G.F.C.I. outlets monthly to ensure proper operation.
10.13 Smoke and Fire Detectors Smoke detectors have been installed in accordance with the building code. These devices are connected directly to the electrical system. They will not operate in a power outage unless the unit has a back-up battery.

NEW HOME MAINTENANCE MANUAL
Maintenance Action Items
Test smoke detectors monthly to ensure proper operation
Clean smoke detectors at least twice a year with a vacuum
Replace batteries if required. DO NOT DISCONNECT SMOKE DETECTORS.
10.14 Heating - General Regardless of the type of heating, the system is designed to maintain a minimum indoor temperature of
22C at the outside design temperature for finished living spaces. The indoor temperature is measured in the center of the room. This calculation is defined in the building code and may not necessarily correspond with everyone’s expectation of comfort. The heating system may temporarily not be able to meet the above temperature requirement when the outside temperatures fall below the outdoor winter design temperature. Based on historical weather records, the outside winter design temperature is a statistically determined low temperature for a specific geographical area. During extreme winters, actual cold temperatures may exceed the outside winter design temperature. In these climatic situations, the heating system may not perform as expected. There are numerous types of thermostatic controls for any given heating system. The accuracy of these controls can vary due to internal heat gains caused by a continued demand for heat. At times, it may be necessary to ignore the numerical temperature settings and set the thermostat for a temperature that is comfortable. Adjusting a thermostat to a setting higher than the temperature desired will not speed the rise in temperature. Temperature variations from room to room are not uncommon. As hot air rises it is normal for the floor level to be cooler and the ceiling temperature higher. Also, rooms over unheated spaces may tend to be cooler or take longer to heat. This is normal. In order to balance the heat in various rooms, adjustment of the heat register grills or dampers in the ducts may be necessary. The various heating systems available all have specific requirements for maintenance. The operation of your system is best determined by reviewing the instructions provided by the Builder or the heating system manufacturer. Heating systems can be noisy at times due to the expansion and contraction of the pipes and other metal components. These noises can be particularly noticeable when starting up or cooling down, or at night (when it is quieter) and do not affect the performance of the system. Systems that rely on burning fuel to generate heat require make-up air for combustion. This air supply must not be blocked as dangerous back drafting conditions can occur. Heating systems will not operate unless the thermostat setting is higher than the room temperature. Solar heat gains or other heat sources such as fireplaces can warm a room or area to the extent that the thermostat will not activate. The heating system remains off and the other rooms not positively affected by the heat of the sun can become cooler. Air circulation is required to prevent cold spots from occurring on exterior walls. Keep furniture away from exterior walls and ensure that the outside corners of closets are free of storage items.
Failure to maintain proper indoor temperatures, at least 18C, can result in:
Frozen pipes
Foundation movement
Damages to finishes
A damp interior environment.
Dampness can lead to the formation of mildew and can adversely affect finish materials within the home including hardwood floors.

NEW HOME MAINTENANCE MANUAL
Maintenance Action Items
Keep heat outlets free of furniture or floor coverings which can reduce air flow
Keep cold air returns free of furniture or floor coverings which can reduce air flow
Clean or replace furnace filters at least twice a year to allow the unobstructed flow of air through the furnace
Have the furnace/heating system serviced by a professional at least every two (2) years
Ensure air intakes and exhaust vents are clear; especially during snow conditions
Vacuum heating ducts, registers, and air returns regularly
Maintain a minimum air temperature of 18C even if a room or the house is vacant
Do not block or disconnect the make-up air supply.
THE QUALITY OF THE REPLACEMENT FILTER USED DRAMATICALLY AFFECTS THE AIR QUALITY WITHIN THE HOME. THE ENERGY EFFICIENCY OF A HEATING OR COOLING SYSTEM IS NOT A WARRANTY ISSUE.
RESULTANT DAMAGE FROM NOT MAINTANING A PROPER TEMPERATURE IN THE HOUSE IS NOT A WARRANTY DEFECT.
10.15 Heat Pumps Heat pumps are a mechanical device used to extract heat from air, water, or the ground. As heat pumps may be incapable of providing all of the heating required for comfort, a supplemental heat source (electric heaters or a furnace) is usually required. The care and maintenance of the heat pump equipment should be reviewed with the manufacturer. Heat pumps are also capable of cooling but should not be confused with air conditioning. Many heat pumps are designed to cool 4 - 5 degrees at the design temperature. In the cooling mode, some heat pumps may dehumidify the indoor air and cause low indoor humidity levels. If the indoor humidity is to low, damage to interior trim, wood doors, and wood floors can occur. Any resultant damage from low humidity is not a Warranty defect.
Maintenance Action Items
Check air flow at pump; keep debris away from vent grills
Check service lines at entry points to the house to ensure a proper seal at least annually
Check refrigerant charge for refrigerant leaks annually
Lubricate the motor annually
Ensure all belts are in a good condition and have the correct tension annually
Ensure the thermostat functions perfectly.
RESULTANT DAMAGE FROM LOW HUMIDITY IS NOT A WARRANTY DEFECT. HAVE THE HEAT PUMP SERVICED AS SPECIFIED BY THE MANUFACTURER. THE ENERGY EFFICIENCY OF A HEATING OR COOLING SYSTEM IS NOT A WARRANTY ISSUE.
10.16 Ventilation, Condensation, and Relative Humidity The optimum year round humidity level to be maintained within the residence is approximately 50%. Due to seasonal variations of the outdoor humidity, this humidity level (50%) can be impossible to maintain without the use of specialized mechanical equipment. Mechanical means of maintaining a constant humidity within the home are available. Furnace humidifiers that add moisture to the indoor environment are available, but they must be checked frequently when in use to ensure that the proper water level is maintained within the unit. Due to building code requirements pertaining to energy conservation, current standards for house construction require that the exterior envelope of the building be sealed against incidental air leakage. This sealing of the exterior walls reduces the leakage of warm indoor air to the outdoors.

NEW HOME MAINTENANCE MANUAL
Warm air has the ability to hold more moisture than cold air. Daily activities within your New Home such as showering, boiling water, and even respiration create moisture in the form of water vapour. Surprisingly, this can total 7 - 9 litres (1½ to 2 gallons) of moisture per day from four occupants. The warm air holds this water in suspension and as this moisture-laden air comes in contact with cold surfaces it will condense and water will form. Condensation can fuel the creation of mildew. The failure of an Owner not to maintain proper heating and moisture levels (ventilation) within the house can seriously affect your New Home. Any resultant damage due to an Owner's actions would not be covered under the Warranty.
The key to controlling humidity levels within the home and avoiding condensation is adequate ventilation. Ventilation allows the warm moist air to be exhausted from the home and replaced with dryer cool air from the outdoors. This will marginally increase the heating cost as cold air is brought up to room temperature. However, this added cost is necessary to offset the harm that high humidity levels will cause. As the outdoor temperature drops, the surface temperature of the exterior walls will also decrease. The air inside the house will not be able to sustain as high a level of relative humidity. This will cause condensation to occur on cold surfaces.
The chart below provides a rough guideline for the relative humidity levels that can be sustained within the house as the outdoor temperature drops.
Outside Air Temperature Desirable maximum inside relative humidity
(%) at an indoor temperature of 21C (70F) Celsius Fahrenheit
-29 -20 20%
-24 -10 25%
-18 0 30%
-12 10 35%
- 7 20 40%
0 and above 32 and above 50%
Windows or toilet tanks can be used as a visual guide to determine whether or not the proper relative humidity is being maintained. As soon as condensation occurs on inside window surfaces or on toilet tanks, steps should be taken to reduce the relative humidity by controlling the moisture sources and / or by increasing ventilation. Ventilation is often the only effective means for removing moisture. Dehumidifiers are only practical in limited areas. If vented outdoors, exhaust fans in the kitchen and bathroom will remove moisture created from cooking and bathing before the vapour can circulate through the house. These fans should not exhaust into the attic space as this will move the moisture into the attic potentially causing problems. Fans need to be run often enough to remove the air borne moisture. The length of time required will depend on the number of occupants, the activities undertaken, and outdoor climatic conditions. New Homes are now provided with intermittent timer controls for fans or a continuously running fan for moisture removal. Adjustment and monitoring is required to provide proper ventilation for the specific occupant load and moisture condition within the house.
Windows are an effective means of ventilation and depending on weather conditions, thoroughly airing out the home for at least 15 minutes a day may suffice. In addition, opening a window near the source of moisture while the exhaust fan is in operation will allow for cross ventilation and more effective moisture and odour removal. For homes that do not have a dedicated fresh air inlet, failing to open windows or doors can prevent the proper ventilation of the house. CONTROLLING THE PROPER HUMIDITY LEVELS WITHIN THE HOME IS IMPORTANT AND AN OWNER RESPONSIBILITY. CONDENSATION IS NOT A WARRANTY ISSUE UNLESS A CONSTRUCTION DEFECT EXISTS.

NEW HOME MAINTENANCE MANUAL
10.17 Range Hoods and Exhaust Fans Range hoods and exhaust fans are provided to reduce or eliminate odours and excessive moisture within the house. Not all range hoods vent directly to the outdoors. For efficient operation and to reduce potential fire hazards created by grease accumulation, filters should be washed in mild detergent. Some filters can be run through a dishwasher. Range hoods that do not vent outdoors are usually provided with a charcoal filter that helps to remove grease and odours.
Maintenance Action Items
Replace or clean filters in accordance with the manufacturer’s recommendations
Vacuum bathroom fan grills. CONTROLLING HUMIDITY LEVELS WITHIN THE HOME IS IMPORTANT IN ORDER TO AVOIDING CONDENSATION PROBLEMS; USE EXHAUST FANS TO VENTILATE.
10.18 Dry Vents The dryer should be connected to a duct that discharges warm moist air to the exterior of the building. Through use, dry vents and exterior exhaust duct hoods can become clogged with lint. Periodic cleaning is required to ensure the proper operation of the dryer and to control moisture. Lint will need to be removed from the appliance filter as well.
Maintenance Action Items
Ensure the exterior discharge for a dry vent is not obstructed
Clean / remove lint from dryer vent discharge regularly (depending on use, monthly cleaning may be required).
THE REMOVAL OF LINT FROM A DRYER VENT OR PIPE IS NOT A WARRANTABLE DEFECT. IF THE MOIST AIR FROM THE DRYER IS ALLOWED TO DISCHARGE IN TO THE HOUSE, MOISTURE PROBLEMS CAN OCURR IN THE BUILDING. ALWAYS ENSURE THE DRYER IS VENTED TO THE EXTERIOR.

NEW HOME MAINTENANCE MANUAL
10.19 Heat Recovery Ventilators Some homes will be equipped with a heat recovery ventilator (“HRV”). This mechanical unit continually exhausts stale warm air from within the rooms of a New Home (usually, the kitchen, bathroom and laundry areas), and supplies fresh air to the remaining main living areas. The heat recovery aspect of this unit consists of a heat exchanger inside the unit that warms the fresh outside supply air with the latent heat of the stale warm air that is being exhausted. This is done via a series of baffles which allows the heat transfer without mixing the two air sources. HRVs run continuously and are a superior means of controlling humidity and air quality within the home. They are not required by the building code and at an additional cost are generally installed if requested. Freezing weather can affect the operation of the HRV due to ice build-up within the unit. Precautions should be taken in severe weather to prevent this from occurring. Refer to the manufacturer’s recommendations in this regard.
HAVE THE HRV SERVICED AS SPECIFIED BY THE MANUFACTURER. THE ENERGY EFFICIENCY OF A HRV IS NOT A WARRANTY ISSUE.
MOST MANUFACTURERS REQUIRE ANNUAL SERVICING

NEW HOME MAINTENANCE MANUAL
APPENDIX “A”
BRITISH COLUMBIA WARRANTY COVERAGES A. WARRANTY COVERAGES
1.0 MATERIALS and LABOUR WARRANTY – 2 Years 1.1 This Warranty provides coverage for Materials and Labour for up to two (2) years as set out below:
a) in the first 12 months of the Warranty, for other than the Common Property, common facilities and other assets of a Strata Corporation, coverage for any Defect in Materials and Labour.
b) in the first 15 months of the Warranty, for the Common Property, common facilities and other assets of a Strata Corporation, coverage for any defect in Materials and Labour.
c) in the first 24 months of the Warranty, (i) coverage for any Defect in Materials and Labour supplied for the gas, electrical, plumbing,
heating, ventilation, and air conditioning Delivery and Distribution Systems, (ii) coverage for any Defect in Materials and Labour supplied for the exterior cladding, caulking,
windows, and doors that may lead to detachment or material damage to the New Home or Common Property,
(iii) coverage for any Defect in Materials and Labour which renders the New Home unfit to live in, and;
(iv) subject to Subsection A.1.2, coverage for non-compliance or a violation of the Building Code.
1.2 Non-compliance with, or a violation of the Building Code is considered a Defect covered by Travelers Insurance Company of Canada only if the non-compliance or violation: a) constitutes an unreasonable health or safety risk, or b) has resulted in, or is likely to result in, Material Damage to the New Home.
2.0 BUILDING ENVELOPE WARRANTY - 5 YEARS 2.1 The Warranty provides coverage for the Building Envelope for up to five (5) years for Defects in the
Building Envelope of a New Home, including a Defect which permits unintended water penetration such that it causes, or is likely to cause, Material Damage to the New Home.
3.0 STRUCTURAL DEFECTS WARRANTY - 10 YEARS 3.1 The Warranty provides coverage for Structural Defects for up to ten years for:
a) any Defect in Materials and Labour that results in the failure of a Load Bearing part of the New Home, and
b) any Defect which causes Structural Damage that materially and adversely affects the use of the New Home for residential occupancy.
Notes For the complete Warranty document, refer to your home warranty insurance policy.
If you do not receive the Warranty policy, contact Travelers Canada promptly so a home warranty insurance policy can be issued to you.
NEW HOME MAINTENANCE MANUAL
APPENDIX “B”
BRITISH COLUMBIA WARRANTY EXCLUSIONS D. WARRANTY EXCLUSIONS
1.1 This Warranty does not cover the following:
a) weathering, normal wear and tear, deterioration or deflection consistent with normal industry
standards; b) normal shrinkage of materials caused by drying after construction; c) any loss or damage which arises while the New Home is being used primarily or substantially for non residential purposes; d) materials, labour, or design supplied by an Owner; e) any damage to the extent that it is caused or made worse by an Owner or Third Party, including:
(i) negligent or improper maintenance or improper operation by anyone other than the Builder or its employees, agents, or sub-contractors,
(ii) failure of anyone, other than the Builder or its employees, agents, or sub-contractors, to comply with the Warranty requirements of the manufacturers of appliances, equipment, or fixtures,
(iii) alterations to the New Home, including the conversion of the non-living space into living space or the conversion of the New Home into two (2) or more units, by anyone other than the builder or its employees, agents, or sub-contractors while undertaking their obligations under the sales contract, and,
(iv) changes to the grading of the ground by anyone other than the Builder or its employees, agents, or sub-contractors;
f) failure of an Owner to take timely action to prevent or minimize loss or damage, including the failure to give prompt notice to Travelers Canada of a Defect or discovered loss or a potential Defect or loss;
g) any damage caused by insects or rodents and other animals, unless the damage results from non compliance with the Building Code by the Builder or its employees, agents, or sub-contractors; h) accidental loss or damage from acts of nature including, but not limited to, fire, explosion, smoke,
water escape, glass breakage, windstorm, hail, lightning, falling trees, aircraft, vehicles, flood, earthquake, avalanche, landslide, and changes in the level in the underground water table which are not reasonably foreseeable by the Builder;
i) bodily injury or damage to personal property or real property which is not part of the New Home; j) any Defect in, or caused by, materials or work supplied by anyone other than the Builder or its
employees, agents, or sub-contractors; k) changes, alterations, or additions made to the New Home by anyone after initial occupancy, except
those performed by the Builder or its employees, agents, or sub-contractors under the construction contract or sales agreement, or as required by Travelers Insurance Company of Canada ;
l) contaminated soil; m) subsidence of the land around the New Home or along utility lines, other than subsidence beneath
footings of the New Home or under Driveways or Walkways; n) diminution in the value of the New Home; o) landscaping, both hard and soft, including plants, fencing, detached patios, gazebos and similar
structures; p) non-residential detached structures including sheds, garages, carports or outbuildings, or any structure or construction not attached to or forming an integral part of a multi-unit building or the New Home; q) any commercial use area and any construction associated with a commercial use area; r) roads, curbs, and lanes; s) site grading and surface drainage, except as required by the Building Code; t) the operation of municipal services, including sanitary and storm sewer; u) septic tanks or septic fields; v) the quality or quantity of water, either from a piped municipal water supply or from a well; w) a water well, but excluding equipment installed for the operation of a water well used exclusively for the New Home, which equipment is considered to be part of the plumbing system for the New Home; x) damage caused or made worse by the failure of an Owner to take reasonable steps to mitigate any
damage.

NEW HOME MAINTENANCE MANUAL
APPENDIX “C”
ALBERTA WARRANTY COVERAGES A. WARRANTY COVERAGES
1.0 MATERIALS and LABOUR WARRANTY – 1 YEARS 1.1 This home warranty insurance policy provides coverage for any Defect in Materials and Labour used
in the New Home for a period of 1 year from and including the Commencement Date. 2.0 MATERIALS AND LABOUR WARRANTY (Delivery and Distribution Systems) – 2 YEARS 2.1 This home warranty insurance policy provides coverage for any Defect in Materials and Labour
relating to the Delivery and Distribution Systems of the New Home for a period of 2 years from and including the Commencement Date.
3.0 BUILDING ENVELOPE WARRANTY - 5 YEARS 3.1 This home warranty insurance policy provides coverage for any Defect in the Building Envelope of the New Home that results in the failure of the Building Envelope to perform its intended function for a period of 5 years from and including the Commencement Date. 3.2 This home warranty insurance policy may provide optional coverage for any Defect in the Building Envelope of the New Home that results in the failure of the Building Envelope to perform its intended Function for an additional 2 years to that home warranty insurance coverage provided under Subsection A.3.1. 4.0 STRUCTURAL DEFECTS WARRANTY - 10 YEARS 4.1 This home warranty insurance policy provides coverage for Structural Defects in the New Home for a period of 10 years from and including the Commencement Date.
Notes For the complete Warranty document, refer to your home warranty insurance policy.
If you do not receive the Warranty policy, contact Travelers Canada promptly so a home warranty insurance policy can be issued to you.

NEW HOME MAINTENANCE MANUAL
APPENDIX “D”
ALBERTA WARRANTY EXCLUSIONS D. WARRANTY EXCLUSIONS
1.0 COVERAGE EXCLUSIONS
1.1 The following are excluded from the home warranty insurance coverage: a) any non-residential use area and any construction or reconstruction associated with a non-
residential area; b) site grading and surface drainage except as required by a building code, and not including
subsidence beneath footings of a home or under driveways or walkways; c) utility services; d) septic tanks and septic or absorption fields, unless constructed or otherwise provided by the
residential builder or owner builder; e) home appliances, including but not limited to refrigerators, stoves, ovens, garbage disposal units,
dishwashers, microwaves, clothing washers, clothing dryers and freezers; f) water wells, except equipment installed for the operation of the water well where the equipment is
part of a delivery and distribution system; g) the quality or quantity of water from a municipal water supply, a water well or any other source; h) any component of a Registered Historic Resource or Provincial Historic Resource that is being
converted from commercial to residential use, where that component has been exempted from the application of any provision contained in any building code pursuant to Section 51 of the Historical Resources Act, and
i) designs, materials or labour supplied by anyone other than the residential builder or the employees, agents or subcontractors of a residential builder, but not including any designs, material or labour retained by the residential builder or by an owner builder in a reconstruction.
2.0 LOSS OR DAMAGE EXCLUSIONS 2.1 Any loss or damage resulting from the following is excluded from the home warranty insurance coverage:
a) weathering, normal wear and tear, deterioration or deflection consistent with normal industry
standards; b) normal shrinkage of materials caused by drying after construction; c) substantial use of the residence for non-residential purposes; d) negligent or improper maintenance or improper operation of the new home or anything in the new
home by anyone other than the residential builder or its employees, agents or subcontractors; e) alterations to the home by anyone other than the residential builder or its employees, agents or
subcontractors; f) changes to the grading of the ground by anyone other than the residential builder, or its
employees, agents or subcontractors; g) insects, rodents or other animals, unless the damage results from non-compliance with a building
code by the residential builder or its employees, agents or subcontractors, or the owner builder; h) acts of nature; i) bodily injury, disease, illness or death resulting from any cause; j) damage to personal property or real property that is not part of a new home; k) contaminated soil, except where supplied by or through the residential builder and the residential
builder knew or ought to have known that the soil was contaminated; l) subsidence of the land around a new home or along utility lines, not including subsidence beneath
footings of a new home or under driveways or walkways; m) diminished value of a new home or any component of a new home; n) deficiencies that have been agreed to between a residential builder and the insured prior to or at
the time of possession; o) defects that have been caused or substantially contributed to by a change that is material to the
risk and is within the control and knowledge of the insured; p) fire, explosion, smoke, flooding or sewer back-up; q) loss of income or opportunity; r) loss of enjoyment, use or benefit of the new home; s) inconvenience or distress to the owner; and t) any professional fees, including legal, consulting or medical costs.
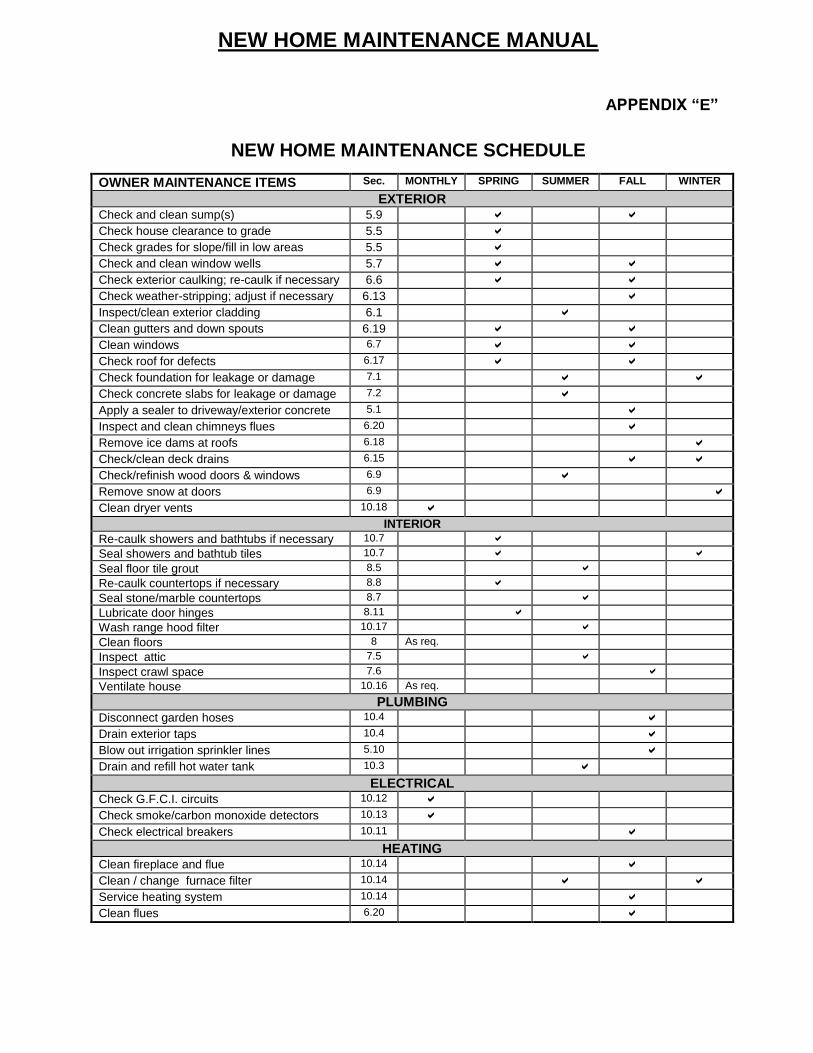
NEW HOME MAINTENANCE MANUAL
APPENDIX “E”
NEW HOME MAINTENANCE SCHEDULE
OWNER MAINTENANCE ITEMS Sec. MONTHLY SPRING SUMMER FALL WINTER
EXTERIOR Check and clean sump(s) 5.9 Check house clearance to grade 5.5 Check grades for slope/fill in low areas 5.5 Check and clean window wells 5.7 Check exterior caulking; re-caulk if necessary 6.6 Check weather-stripping; adjust if necessary 6.13 Inspect/clean exterior cladding 6.1 Clean gutters and down spouts 6.19 Clean windows 6.7 Check roof for defects 6.17 Check foundation for leakage or damage 7.1
Check concrete slabs for leakage or damage 7.2 Apply a sealer to driveway/exterior concrete 5.1 Inspect and clean chimneys flues 6.20 Remove ice dams at roofs 6.18
Check/clean deck drains 6.15
Check/refinish wood doors & windows 6.9 Remove snow at doors 6.9
Clean dryer vents 10.18
INTERIOR
Re-caulk showers and bathtubs if necessary 10.7
Seal showers and bathtub tiles 10.7
Seal floor tile grout 8.5
Re-caulk countertops if necessary 8.8
Seal stone/marble countertops 8.7
Lubricate door hinges 8.11
Wash range hood filter 10.17
Clean floors 8 As req.
Inspect attic 7.5
Inspect crawl space 7.6
Ventilate house 10.16 As req.
PLUMBING Disconnect garden hoses 10.4 Drain exterior taps 10.4 Blow out irrigation sprinkler lines 5.10 Drain and refill hot water tank 10.3
ELECTRICAL Check G.F.C.I. circuits 10.12 Check smoke/carbon monoxide detectors 10.13 Check electrical breakers 10.11
HEATING Clean fireplace and flue 10.14 Clean / change furnace filter 10.14
Service heating system 10.14 Clean flues 6.20

NEW HOME MAINTENANCE MANUAL
APPENDIX “F”
TRADE AND SUPPLIER LIST
New Home Address:
Warranty Certificate Number:
The following trades, contractors, manufacturers, and suppliers were used in the construction of your New Home. These companies or individuals generally provide a one (1) year guarantee. Should you require service, contact your Builder directly as well as you may wish to contact the appropriate trade, contractor, manufacturer, or supplier as well. Please document all contact.
TRADE/SUPPLIER COMPANY NAME CONTACT TELEPHONE
Excavation/Grading
Concrete Supply
Concrete Finishing
Drain Tile
Landscaping
Foundation Forming/Framing
Paving Stones
Siding
Stucco
Masonry
Soffits
Windows
Skylight
Doors
Garage Doors
Deck Finishing
Deck Railings
Roofing
Gutters and Downspouts
Flooring
Hardwood
Resilient Flooring
Carpet
Tile
Marble
Counter Tops
Cabinets
Ceramic Tile
Insulation
Drywall
Painting - Interior
Painting - Exterior
Interior Finishing (Wood Work)
Mirrors
Plumbing
Plumbing Fixtures
Septic System
Electrical
Electrical Fixtures
Heating
Fireplaces
Appliances
Alarm System
Central Vacuum
Regarding Warranty claim information and requirements refer to home warranty insurance policy.
MAINTENANCE MANUAL SIGN-OFF

NEW HOME MAINTENANCE MANUAL
New Home Address:
Warranty Certificate Number:
In addition to the New Home Maintenance Manual, the specific component manuals or information as referenced below (checked off below) have been provided for your New Home.
PRODUCT SPECIFIC MAINTENANCE/OPERATING MANUALS
#
1. 1. Concrete 27. 15. Sinks
2. 2. Siding: Type: ___________________ 28. 16. Garburator
3. 3. Windows 29. 17. Boiler
4. Skylights 30 Furnace
5. 4. Roofing: Type: _________________ 31. Heat Pump
6. Gutters & Downspouts 32. Air-Conditioning
7. 5. Doors 33. Hot Water Tank
8. 6. Siding/Cladding: ________________ 34. Pressure Reducing Valve
9. 7. Door Hardware 35. Sump Pump
10. 8. Garage Door Opener(s) 36. Ventilators
11. Garage Doors 37. GFCI Breaker/Outlet
12. Deck Membranes: Type: _________ 38. Electrical Fixtures
13. 9. Exterior Railings 39. Ceiling Fan
14. 10. Flooring 40. Alarm System
15. Hardwood 41. Smoke Detector
16. Tile 42. Range Hood
17. Resilient Flooring 43. Gas Fireplaces
18. Marble 44. Built-in Vacuum System
19. Carpet 45. Dishwasher
20. 18. Counter Tops 46. Stove
21. 19. Cabinets 47. Wall Oven
22. 20. Mirrors 48. Refrigerator
23. 21. Drapes/Window Coverings 49. Microwave Oven
24. 22. Plumbing Fixtures 50. Washer
25. Faucets 51. Dryer
26. 23. Tub/Shower Enclosure 52. Septic System
I/We, the Owner(s) confirm that the above-noted manuals for my/our New Home (address noted above) have been received from the Builder: I/We also acknowledge it is my/our responsibility to familiarize myself/ourselves with the contents of the New Home Maintenance Manual and these manuals and undertake any maintenance requirements explained therein.
Owner (signature) Builder (signature)
Owner’s Name (print) Builder’s Name (print)
Date Date
1) Builder to the completed the “Warranty Commencement Date Certificate”, Schedule “D” with Owner
2) Builder to complete the Maintenance Manual Sign–off form with the Owner
3) Builder to return the completed Warranty Commencement Date Certificate and Maintenance Manual Sign-off form to Travelers Canada in order for the home warranty insurance policy to be issued.
4) Builder to retain copies of the completed Warranty Commencement Date Certificate and Maintenance Manual Sign-off form.