


Languages
Pages
Legal


MultiRAE Service TrainingFirmware v 3.21B

Training Agenda:
• Firmware Overview• Repairs Allowed• Turning unit on in Diagnostic Mode• Diagnostic Mode• Program Mode• Configuration and Personal settings• The new black MultiRAE• Calibration

Firmware versions
•Adds AutoRAE communicationsV3.21
•Enables Serial communications with “EnableP2P.exe” program
V3.12
•Adds Run silent modeV3.11a
•Adds Wireless•Removes serial communications
V3.11
CapabilityVersion

Wireless Warning!
• Do not use ProRAE Suite v. 3.01A or older to upgrade firmware!
• Wireless capability will be disabled• If wireless capability is disabled, use
WirelessP2P.exe from the website to fix
Training Agenda:
• Firmware Overview• Repairs Allowed• Turning unit on in Diagnostic Mode• Diagnostic Mode• Program Mode• Configuration and Personal settings• The new black MultiRAE• Calibration

Repairs allowed
• Part Replacements: Sensors, Lamps, Batteries, Pump, Housing, Tubing, Filters, Membrane Panel (Keypad)
• PCB replacement through Service Department with serial number of unit
*Always be careful of Electric Static Discharge when working on units. Please use ESD pads on workbench or wear ESD straps on shoes. Make sure that the ESD pad is grounded and that the straps are tested to verify that they are working.

Repairs Not Allowed
• Soldering is not allowed on any of our units! This can compromise Intrinsic Safety of unit and is not allowed under ATEX approval rating in the US, Canada, Mexico and Latin America

Training Agenda:
• Firmware Overview• Repairs Allowed• Turning unit on in Diagnostic Mode• Diagnostic Mode• Program Mode• Configuration and Personal settings• The new black MultiRAE• Calibration

Battery Problems
• If unit will not turn on, use alkaline • If unit works with alkaline, replace
rechargeable battery• If unit still will not turn on, check wiring• If wiring looks OK, replace membrane
panel
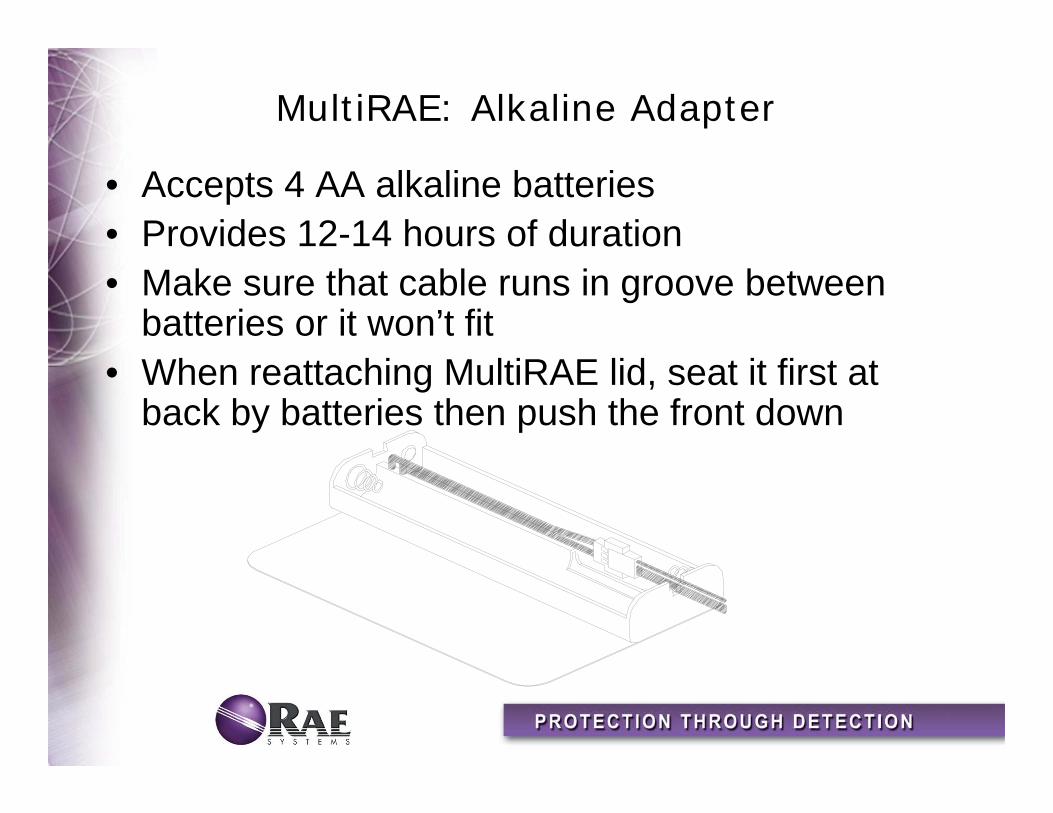
MultiRAE: Alkaline Adapter
• Accepts 4 AA alkaline batteries• Provides 12-14 hours of duration• Make sure that cable runs in groove between
batteries or it won’t fit• When reattaching MultiRAE lid, seat it first at
back by batteries then push the front down

MultiRAE: Navigation
Turning unit on in Diagnostic Mode• With MultiRAE turned off, hold down “Y/+”
key• While still holding “Y/+” key, depress and
hold the “MODE” key.• Hold both keys down for 2 seconds, the
MultiRAE will beep and then release• The fourth warm-up screen will say
“Diagnostic Mode,” if you push the “Y” key now, the warm-up will speed up.

Training Agenda:
• Firmware Overview• Repairs Allowed• Turning unit on in Diagnostic Mode• Diagnostic Mode• Program Mode• Configuration and Personal settings• The new black MultiRAE• Calibration

User Screens
• Field Service– Raw Sensor Values – PID Lamp Fail Threshold – LCD Contrast Adjustment – LEL & OXY Warranty exp– TOX1 & TOX2 Warranty exp – Pump Stall Threshold– Back Light On/Off Threshold– S/N and pump speed– Power run down time – Communicate with PC
• Service Technician– Raw Sensor Values– RF test – PID Lamp Fail Threshold – Battery type / Bias – PID 1X and 10X Range– LCD Contrast Adjustment – LEL Power On/Off Check – Clock/Voltage/Temperature– LEL & OXY Warranty exp– TOX1 & TOX2 Warranty exp – Pump Stall Threshold– Back Light On/Off Threshold– S/N and pump speed– Power run down time – Communicate with PC
Sensor Issues
• High readings in Fresh Air– Calibration
• Failed Fresh Air Calibration– True Fresh Air Calibration with Zero grade air
or– Zeroing Kit
• Failed Span calibration– Check bottle of calibration gas against span
gas value– Try single sensor calibration– Replace sensor

Sensor Issues
• Alarms in Fresh Air– Calibrate sensor: Fresh Air and Span– Check Alarm limits– Check LEL sensor correction factor
• Bias Error– Check TOX 1 sensor: Bias should be turned
on for NO or NH3 sensors only• Sensor does not appear on screen after
unit warms up– Check “Enable/Disable Sensor?” Under
Programming: Change Sensor Configuration

Sensor Issues, cont’d
• Slow response to gas– Sensor is an exotic which required extra time
to respond – check TN-114– Verify that all sensors are installed and no
empty spots in unit, if a sensor is removed and you do not have one to replace it, install a dummy sensor
*When installing a new sensor, a burn-in (equilibration) period is required. Unit needs to be turned on and running or a SensorRAEcan be used before calibration. – Check TN-114 for actual times

Diagnostics: Raw Sensor Outputs
• Main display in Diagnostic Mode. • MultiRAE will return to this screen in 60 seconds
if left in any other diagnostic screen
TOX1 VOC TOX2
310-450 340-450 310-450
LEL 310-1500 RAW 1000-1250
OXY

Diagnostics: Raw Sensor Outputs
• In fresh air the RAW reading should be within the indicated ranges (NH3 will be between 400-550)– Values can be slightly out of range in RAW and SPAN as long as
the Delta is within limits and the sensor calibrates
TOX1 VOC TOX2
310-450 340-450 310-450
LEL 310-1500 RAW 1000-1250
OXY

Instant Answers
• A bad O2 sensor will read very low, if it is in the same range as the rest of the sensors than it is bad
• Any value, such as a single digit (1,3,9)or 4095 continue with the tests below
• Check PCB where sensor plugs to board• Make sure shorting pin is removed• Make sure sensor is completely plugged in• Check for corrosion on sensor and PCB• when the LEL sensor reads 0 or 4095, it could be the sensor
itself

Diagnostic Sensor Testing
• For a quick Diagnostic of Sensors, TN-123 and Span gas is needed to test instrument
• Take the RAW readings in Fresh Air, apply the Span gas and allowthe sensors to stabilize
• Take the Span readings and subtract the two values to get the Delta value
SPAN – RAW = DELTA
• Compare the Delta value to TN-123 to see if the sensor is still good, if it falls within the “Good” range, calibrate the instrument

TN-123: Delta = RAW Zero – RAW Span
≥75 ≥120 450 - 1200 310 - 450 10 ppm Cl2Cl2 ≥50 ≥400 700 - 1800 310 - 450 5 ppm PH3PH3 ≥100 ≥300 700 - 1300 400 - 750 50 ppm NH3NH3 ≥10 ≥100 400 - 500 310 - 450 5 ppm HCNHCN ≥30 ≥100 400 - 1400 310 - 450 5 ppm NO2NO2 ≥30 ≥100 420 - 750 310 - 450 25 ppm NONO ≥50 ≥200 500 - 1700310 - 450 5 ppm SO2SO2 ≥50 ≥300 600 - 950 310 - 450 25 ppm H2SH2S ≥20 ≥100 400 - 650 310 - 450 10 ppm H2SH2S ≥50 ≥100 450 - 900310 - 45050 ppm COCO ≥200* ≥500* 330 - 500 860 - 1250Air/99.9% N2 O2 ≥100 ≥800 1300 -2300310 - 150050% LEL CH4 LEL
≥750≥500
≥1700≥1000
2000 - 8500310 - 450100 ppm IBE#PID (10.6 eV)(9.8 eV)
DeltaUsed
DeltaNew
Raw Span Raw Zero Cal Gas Sensor

LEL Sensor Warning
If LEL sensor goes negative it is poisoned and should be replaced!
Poisoned LEL sensors are not under Warranty! (TN-144 lists substances
which poison LEL)

Inside the MultiRAE
• Always Loosen screws! • Never pull a screw out!• Use a Flat head screwdriver • Lift the top housing off• Unplug the battery at the white connector• Loosen four Philips head screws and lift
silver gas plate free from stand-offs• Turn and lay in battery compartment

Inside the MultiRAE

Replacing Sensors
• Identify location of problem sensor and remove it by gently pulling upwards
• Plug in a new sensor, make sure to remove shorting spring!
• Charcoal filter goes above CO sensor
• Silver MultiRAE

Lamp Troubleshooting Issues
• “Lamp” alarm even if lamp lights (ref. TN-146)– Reset Lamp Failure Threshold
• High lamp readings with rapid movement or moisture (ref. TN-163)– Clean lamp/sensor with GC grade Methanol
• Consistent high or low readings– Check correction factor or gas selection in
Programming under “Change Sensor Configuration?”

Diagnostics: Lamp Failure Threshold
• If MultiRAE gives a “Lamp” alarm check to make sure the Lamp value is above the Fail value if it is close and…
• If the lamp still lights this value may be reset• A lamp that has sat on the shelf for a long period
of time or in colder weather may need a longer warm-up period
TOX1 VOC TOX2 Lamp = 89
LEL Fail = 83 +/- OXY

Diagnostics: Lamp Failure Threshold
• Turn off battery and unplug battery • Remove silver shielding cap from PID
sensor• Gently pull out PID sensor (white Teflon)• Remove lamp from MultiRAE, grasp lamp
by sides and pull out. Try not to touch the flat lamp surface.
• Replace white Teflon PID sensor• Replace silver PID shielding cap• Plug battery back into instrument

Diagnostics: Lamp Failure Threshold
• Turn on MultiRAE in Diagnostic Mode• Press MODE key to return to lamp threshold screen• Adjust the “Fail” value with the “+” and “-” keys until it is at least 6-10
counts above the “Lamp” value. (if your lamp value is very low, set to 70
• Hold the “MODE” and release when the “Save?” message appears• Press “Y/+” to confirm the change (“N/-” or “MODE” will abandon the
change)
TOX1 VOC TOX2 Lamp = 76
LEL Fail = 86 +/- OXY
With Lamp out

Diagnostics: Lamp Failure Threshold
• Turn off MultiRAE, remove battery and replace lamp
• Turn on MultiRAE in Diagnostic Mode• “Lamp” reading should be at least 15-20 counts
above “Fail” threshold. If not, lamp may be defective or very weak. – Replace weak or defective lamp– Reassemble if lamp is good
TOX1 VOC TOX2 Lamp = 94
LEL Fail = 86 +/- OXY
With Lamp in

MultiRAE: When to Clean PID Sensor
• PID works but creeps up to 10+ ppm even in clean air after “Fresh Air Calibration”
• Rapid movements of MultiRAE sends PID into alarm due to dirt movement in sensor
• PID responds to moisture (use the “Breathalyzer” test)
• Prior to cleaning the PID– Check/replace external inlet filter– Make sure inlet tubing is clean

MultiRAE: PID Sensor Clean/Replace
• Remove silver shielding cap from PID sensor
• Gently pull out PID sensor (white Teflon)• Dip entire PID sensor into lamp cleaning
solution (anhydrous methanol) for at least 3 minutes (an ultrasonic cleaner is recommended, but a shot glass is the perfect sized container)
• Dry sensor thoroughly (warm air will speed up this process) overnight is best

MultiRAE: PID Lamp Clean/Replace
• Clean lamp if it is hazy, has sensor grid imprinted on it or is otherwise dirty
• To remove lamp from MultiRAE, grasp lamp by sides and pull out. Try not to touch the flat lamp surface.
• If lamp works, use a cotton swab to clean the flat lamp surface with cleaning solution
• Replace lamp, DO NOT TOUCH FLAT!• Install battery and turn on MultiRAE

MultiRAE: PID Lamp Clean/Replace
– If after warm-up, lamp lights proceed with reassembly
– If lamp does not light, replace lamp• Turn off MultiRAE, remove battery• Replace white Teflon PID sensor• Replace silver PID shielding cap

MultiRAE: Gas Plate Cleaning
• You also need to clean the Gas Plate when you clean the PID
• Follow instructions to remove pump from gas plate
• Immerse gas plate in lamp cleaning solution without pump attached (a ultrasonic cleaner will speed cleaning)
• Dry gas plate with warm air• Follow instructions for pump replacement

Diagnostics: Display Contrast
• In cold weather the display may fade prematurely and in hot weather the display may “bleed”
• Use “Y/+” key to increase contrast and “N/-” key to decrease contrast.
• Press the “MODE” key to accept
TOX1 VOC TOX2
Display ContrastLEL _ _ _ _ _ _ _ _ _ _ OXY

Diagnostic Mode: Warranty Expiration
When calling in a WR we need the following: Serial number of the unit and the sensor, warranty
expiration date, RAW Air and RAW Span
• A sensor with expired Warranty is still good to use if it calibrates and tests correctly
TOX1 VOC TOX2 OXY expire 06/99
LEL LEL expire 06/00 OXY

Pump Issues
• Pump does not stall– Adjust Pump Stall Threshold– Check tubing for leaks– Rebuild/clean pump
• Sensors respond slowly to gas or Unit calibrates OK but doesn’t see gas sample– Check tubing for leaks– Rebuild/clean pump– Tests sensors with gas applied directly to the
sensor

Diagnostics: Adjust Pump Stall
• Block pump inlet for less than 3 seconds*: if pump reading increases, set stall to the average of the pump current and the blocked reading
• Block pump inlet for less than 3 seconds*: if the pump current reading does not increase by more than 10 counts: check tubing, o-rings, clean pump, rebuild and/or replace pump
*If held longer, the pump can be damaged
TOX1 VOC TOX2 Pump = 17 / 16
LEL Stall = 34 +/- OXY

Diagnostics: Adjust Pump Stall
• Set stall to average of Pump Idle and Pump blocked– (Pump Idle + Pump Blocked) / 2 = Stall– Press Mode key to save new Stall Threshold
• If you want to add tubing to take a sample from a distance than you will want to adjust the stall higher
• If you are going to be sampling close to water, loose sand or dirt, than you should adjust the stall lower

Diagnostics: Pump
• If Pump Stall adjustment does not work– Clean pump
• Replace pump housing if cleaning does not work
• If pump housing replacement does not work– replace pump

Pump Maintenance
Extra Tools needed:Needle-nose pliers
Hex or #6 Torx

Pump Maintenance
• Pump rebuild kit costs $40.00 – but they do take practice– (081-0007-000) old pumps use entire kit, new
pumps use the diaphragm only• Most pump problems can be resolved with
a cleaned or rebuilt pump, if this doesn’t work, try replacing everything except the motor– Pump Housing costs $65.00 (021-0020-100)
• New Pump Assembly costs $295.00– Silver (008-3043-002)

MultiRAE: Remove Pump
• Prior to replacing or rebuilding pump– Clean pump
• Remove hose from housing and gas plate• Unplug pump from sensor board power
connector• Lift gas plate assembly from MultiRAE• Loosen and remove screw from gas plate• Separate pump from gas plate

Clean Pump
• Unscrew 4 screws on black valve body
• Clean diaphragm, both pieces of the head, and flapper valve
• Allow to dry before putting back together

Installation of Pump
• Place black valve body on top of metal/black chassis with gas inlets pointing over motor
• Replace 4 screws and tighten snugly• Reconnect tubing from housing to pump
inlet (arrow on pump points inward)• Plug pump into sensor board power
connector

Replace Pump
• Reconnect inlet tubing to gas plate (arrow on pump points outward)
• Make sure that sensors/dummy sensors fill all places to prevent gas leakage
• Replace gas plate and tighten screws • Replace battery

Stall Test
• After warm up period, block pump inlet– If pump does not increase more than 10
counts, inspect pump hose connections and reconnect if necessary
– If pump still does not increase after inspecting hose connections replace Pump
– If pump does increase, reset Pump Stall Threshold
– replace MultiRAE cover and calibrate monitor

Replace Pump
• Remove hose from housing and gas plate• Unplug pump from sensor board power
connector• Lift gas plate assembly from MultiRAE• Loosen and remove screw from gas plate• Separate pump from gas plate• Take new pump and screw it to gas plate

Replace Pump
• Reconnect tubing from housing to pump inlet (arrow on pump points inward)
• Plug pump into sensor board power connector
• Reconnect inlet tubing to gas plate (arrow on pump points outward)

Replace Pump
• Make sure that sensors/dummy sensors fill all places to prevent gas leakage
• Replace gas plate and tighten screws • Replace battery• Turn on MultiRAE in Diagnostic Mode,
pump value should be below 40 with filter on
• The lower the pump value, the better

Stall Test
• After warm up period, block pump inlet– If pump does not increase more than 10
counts, inspect pump hose connections and reconnect if necessary
– If pump does increase, reset Pump Stall Threshold
– replace MultiRAE cover and calibrate monitor

Replace Pump
• If unit passes testing, finish installation and close instrument

Diagnostics: Adjust Backlight
• Automatic backlight trigger threshold
*In this screen the backlight will not turn on
TOX1 VOC TOX2
Light=242LEL Trigger=128 +/- OXY

Diagnostics: S/N & Pump Toggle
• Serial Number of MultiRAE is displayed• Pump can be toggled from High flow
(~250cc/min) to Low flow (~150cc/min) by pressing the “N/-” key
TOX1 VOC TOX2
SN 501692LEL Pump =HI (y/n) OXY

Communicate with PC Display
• If “Y/+” key is pushed then MultiRAE will display “Monitor will Pause. OK?”
• If “Y/+” key is pushed again the MultiRAE will display “ready...” after 5 minutes, unit will no longer communicate with PC
• Tap “MODE” key to return to Main Display
TOX1 VOC TOX2 Communicate
LEL with PC? OXY

Training Agenda:
• Firmware Overview• Repairs Allowed• Turning unit on in Diagnostic Mode• Diagnostic Mode• Program Mode• Configuration and Personal settings• The new black MultiRAE• Calibration

Programming Mode
Getting into Programming from Diagnostic Mode• Hold “MODE” and “N/-” keys for 5 sec. to get in
Programming Mode – The unit will normally ask for a password, default password is 0000
• If MultiRAE asks a question “?”– Answer “Y” or “N”
• To Accept or Escape– Use “MODE” Key
• Hold “MODE” and “Y/+” keys for 5 sec. to get in Regular operations

Appendix A/Table 5
• Appendix A/Table 5 always guides you through Programming Mode
• Diagnostic Mode offers new choices in “Change Monitor Set Up”– “Change Unit ID?”– “Change Host ID?” (not used at this time)– “Enable/Disable Run Silent Mode?”

Program Menu

Program Menu

Program Menu

Program Menu

Program Menu

Program Menu

Training Agenda:
• Firmware Overview• Repairs Allowed• Turning unit on in Diagnostic Mode• Diagnostic Mode• Program Mode• Configuration and Personal settings• The new black MultiRAE• Calibration
Using ProRAE Suite
• Update Firmware• Config All• Editing Configuration Files• Upgrade to Datalogging• Error Messages• Troubleshooting

Updating Firmware
• You can purchase a copy of ProRAE – PN 000-5001-000 $30.00– PN 000-5002-000 $70.00 with cable
• Download it off of the website for free!– When downloading, always remember where
you save the zip file– When you unzip the file, remember where you
save that file – ProRAE Suite will download into your
Program Files under the file RAE Systems

RAE Systems Website

Download ProRAE Suite

ProRAE Suite
• Open ProRAE Suite• Select “Options”• Select “Load Firmware”
– Remember to disconnect from the internet– Plug unit into the wall adapter– Turn off any screensavers
• Choose correct .a07 (firmware) file for the MultiRAE
*If anything interrupts the download, the unit will turn off and not be able to turn back on! You will have to send the instrument back to the factory!

Select “Load Firmware”

Configuration File

Editing Configuration Files
• You can receive a configuration file from the unitor
• Edit the Default configuration file that comes with ProRAE Suite– Configuration files are .cfg files and are found
in the Firmware folder– Default configurations are the only way to
overwrite a lost password

Edit Configuration

Edit ConfigurationChange password
How often you save data determines what your data will look like

Change Alarm Limits
• Instrument will ask for a Fresh Air or Single Sensor Calibration when you
turn on the unit

Custom Gas Selection
New gas appears as an option –factor is only used if gas is chosen

Personalize MultiRAE

Send Configuration/Config All
• If you have made any major changes, save the file – When you have multiple instruments, you can
save the file and send the configuration multiple times
• If you are upgrading firmware to get rid of a bug in the firmware, we suggest using “Config All”

Error Messages
• Most common problems– Unit does not have data– Incorrect COMM Port is selected – Unit is no longer in Communication Mode
• Error messages do not give you the problem in easy/simple-to-understand terms
Troubleshooting
• Try taking instrument out of Communication Mode and putting it back in
• Try receiving Configuration file– Check the data selection: Data Interval,
Sensors selected, Automatic vs Manual, etc.• Try a different COMM Port• Try a new cable
Training Agenda:
• Firmware Overview• Repairs Allowed• Turning unit on in Diagnostic Mode• Diagnostic Mode• Program Mode• Configuration and Personal settings• The new black MultiRAE• Calibration

The New Black MultiRAE

Inside the MultiRAE (old style)

Inside the MultiRAE (New style)
• Top Housing– PN 008-2602-000– List Price $25.00
• Pump– PN 008-3043-003– List Price $295.00
• Bottom Housing– PN 008-2101-000– List Price $25.00
• Membrane panel– PN 008-2104-004– List Price $40.00

Training Agenda:
• Firmware Overview• Repairs Allowed• Turning unit on in Diagnostic Mode• Diagnostic Mode• Program Mode• Configuration and Personal settings• The new black MultiRAE• Calibration

Calibrate Monitor?
• Fresh Air Calibration? • Multiple Sensor Calibration?• Single Sensor Calibration?• Modify Span Gas Value • Change LEL/VOC Span Gas?

MultiRAE: Calibration
• After performing service it is always important to calibrate the MultiRAE

Questions?
Top Related