


Languages
Pages
Legal


National College of Ireland
BSc in Computing
2014/2015
John Cahill
x14378581
Motorcycle Dashcam
Technical Report
Table of Contents
List of Figures: ........................................................................................................... 5
Executive Summary................................................................................................... 8
1 Introduction ......................................................................................................... 9
1.1 Definitions, Acronyms, and Abbreviations .................................................. 9
1.2 Background .................................................................................................. 9
1.3 Aims ............................................................................................................ 11
1.4 Technologies .............................................................................................. 12
1.5 Structure ..................................................................................................... 13
2 System .............................................................................................................. 15
2.1 Requirements ............................................................................................. 15
2.1.1 Functional requirements ..................................................................... 15
2.1.2 Data requirements .............................................................................. 16
Use Case Diagram ........................................................................................... 16
Figure 2 ............................................................................................................. 17
Figure 3 ............................................................................................................. 19
Figure 4 ............................................................................................................. 21
Figure 5 ............................................................................................................. 23
Figure 6 ............................................................................................................. 25
2.1.3 User requirements .............................................................................. 26
2.1.4 Environmental requirements .............................................................. 26
2.1.5 Usability requirements ........................................................................ 27
2.2 Design and Architecture ............................................................................ 28
Figure 7 ............................................................................................................. 28
2.3 Implementation........................................................................................... 29
2.3.1 EC2 and Website ................................................................................ 29
Figure 8 ............................................................................................................. 29
Figure 9 ............................................................................................................. 29
Figure 10........................................................................................................... 30
Figure 11........................................................................................................... 30
Figure 12........................................................................................................... 32

- 3 -
Open CV ........................................................................................................... 32
Figure 13........................................................................................................... 32
Figure 14 .............................................................................................................. 33
Figure 15 .............................................................................................................. 33
Figure 16 .............................................................................................................. 34
Figure 17 .............................................................................................................. 35
Figure 18 .............................................................................................................. 36
Tesseract .......................................................................................................... 36
Figure 19 .............................................................................................................. 36
Figure 20 .............................................................................................................. 36
Figure 21 .............................................................................................................. 36
Figure 22 .............................................................................................................. 37
Pi Camera and SCP ......................................................................................... 37
Figure 23 .............................................................................................................. 38
Database .......................................................................................................... 38
Figure 24 .............................................................................................................. 38
Figure 25 .............................................................................................................. 39
Figure 26 .............................................................................................................. 40
Figure 27 .............................................................................................................. 40
Figure 28 .............................................................................................................. 40
Login system webapp ...................................................................................... 41
Figure 29 .............................................................................................................. 41
Figure 30 .............................................................................................................. 42
Login and start file................................................................................................ 43
Figure 31 .............................................................................................................. 43
Internet with GPRS Shield................................................................................... 43
Figure 32 .............................................................................................................. 43
Delete button ........................................................................................................ 44
Figure 33 .............................................................................................................. 44
2.4 Graphical User Interface (GUI) Layout ..................................................... 45
2.4.1 Before .................................................................................................. 45
Figure 34 .............................................................................................................. 45
Figure 35 .............................................................................................................. 46

- 4 -
Figure 36 .............................................................................................................. 46
2.4.2 After ..................................................................................................... 46
Figure 37 .............................................................................................................. 46
Figure 38 .............................................................................................................. 47
Figure 39 .............................................................................................................. 47
Figure 40 .............................................................................................................. 48
2.5 Testing ........................................................................................................ 48
2.6 Customer testing ........................................................................................ 49
Figure 41 .............................................................................................................. 50
Figure 42 .............................................................................................................. 50
Figure 43 .............................................................................................................. 51
Figure 44 .............................................................................................................. 51
Figure 45 .............................................................................................................. 51
Figure 46 .............................................................................................................. 52
Figure 47 ............................................................................................ 52
Figure 48 .............................................................................................................. 53
Figure 49 .............................................................................................................. 53
Figure 50 .............................................................................................................. 53
Figure 51 .............................................................................................................. 54
Figure 52 .............................................................................................................. 54
2.7 Evaluation ................................................................................................... 55
Figure 53 .............................................................................................................. 55
3 Conclusions ...................................................................................................... 56
4 Further development or research .................................................................... 57
5 References ....................................................................................................... 58
6 Appendix ........................................................................................................... 60
6.1 Project Proposal ......................................................................................... 60
6.2 Project Plan ................................................................................................ 67
6.3 Monthly Journals ........................................................................................ 68
6.4 Other Material Used ................................................................................... 77

- 5 -
List of Figures:
Figure 1 – Motorcycle Dashcam use case
Figure 2 – Switching On use case
Figure 3 – Recording use case
Figure 4 – Upload use case
Figure 5 – Delete use case
Figure 6 – Crash use case
Figure 7 – Class Diagram
Figure 8 – Lamp and Apache code
Figure 9 – PHP error handling
Figure 10 – Phpmyadmin
Figure 11 – Picture Display
Figure 12 – Connection to Mysql database
Figure 13 – Open cv(purging unnecessary files)
Figure 14 – Dependencies installation
Figure 15 – Source code
Figure 16 – Tools needed for open cv
Figure 17 – Building open cv
Figure 18 – Open cv bindings
Figure 19 – Installing necessary components for tesseract
Figure 20 – Separate Image
Figure 21 – Converting Image
Figure 22 – Run tesseract
Figure 23 – Pi Camera and SCP

- 6 -
Figure 24 – Install mysql connector
Figure 25 – Connection code python to mysql
Figure 26 – Image name inserted to database
Figure 27 – PHP connection to sql database on aws
Figure 28 – PHP connection to Database, pulling information from db
Figure 29 – Set up for login system and connection
Figure 30 – Session to have pages only accessed if logged in
Figure 31 – Start file on boot
Figure 32 – Internet with GPRS Shield
Figure 32 – Delete button
Figure 33 – home page (old app)
Figure 34 – cameras (old app)
Figure 35 – folders (old app)
Figure 36 – home page (webapp)
Figure 37 – login (webapp)
Figure 38 – services (webapp)
Figure 39 – recordings (webapp)
Figure 40 – Bike Switched on/raspberry pi
Figure 41 – Blackbox
Figure 42 – Raspberry pi inside blackbox
Figure 43 – Blackbox positioned on motorcycle
Figure 44 – Cable from raspberry pi to battery of bike
Figure 45 – Position of camera
Figure 46 – Customer on home page

- 7 -
Figure 47 – Customer logging in
Figure 48 – Customer accessing services page
Figure 49 – Customer accessing recording page
Figure 50 – Customer switching bike on
Figure 51 – Customer clicking both images
Figure 52 – Customer deleting images
Figure 53 – Finding temperature of raspberry pi

- 8 -
Executive Summary
From my personal use of dashcams, I feel like they are lacking for the user and
their safety. A lot of the cameras have their SD cards attached to their device and
there is no way of tracking if it is lost. They also have no backup or a solution for
the saving of their data if the SD card is destroyed or even lost during an accident.
Some have capabilities to connect to the user’s phone and for the user to upload
the data manually but there is no fall-back program for if the user is in a crash
which is a situation where the recording would be invaluable.
After careful research I came up with the following solution for these problems. To
make the SD card a part of the RP which is hidden inside the bike, already giving
it a better chance of withstanding a crash. It will be encased in a black box which
will be very durable keeping the RP safe. The RP will also be aware if an
accident/crash occurs, which would result in it uploading the video footage either
by connecting to the users phone or if it has its own network it will upload the videos
as soon as it can and automatically overwrite the SD card with a minute of video
before and anything after the crash has occurred.
Overall the project has the potential to compete on the market place, the design
just needs to be more focused on this specific job, allowing it to be built cheaper
and made efficient in its daily tasks. Right now the technology just isn’t there and
can’t adapt well enough with other technologies to make it durable and
trustworthy to the user but as a prototype it does the tasks required of it.

- 9 -
1 Introduction
The project was created with the user in mind, as other products currently out are
very expensive and don’t have a great range of functions when operating the
device. This dashcam is unique as its intended effect is to be upgradable. There
will be available upgrades that will add better quality options for the user. The user
has the option of having it fitted by professionals in a shop or being able to do it
themselves. The only other item needed would be the webapp to connect with the
device and use it to make any necessary changes needed such as delete, or view
which can be accessed from the computer. It’s all to help the user in all cases.
1.1 Definitions, Acronyms, and Abbreviations
MD Motorcycle Dashcam
RP Raspberry Pi
1.2 Background
The motivation behind my project, is I am familiar with the area as I drive a
motorcycle myself and I feel that the technology that could be implemented for a
motorbike user’s own safety could be much more effective than the current models.
As I can drive for hours on end, I require good quality footage for safety and my
own peace of mind, I use an ekken(Eken.com. (2018). Original EKEN H9R Action Camera
| Waterproof action camera, 4k video camera, best budget action camera, Sports cam, helmet
camera | EKEN Official Website. [online] Available at: https://www.eken.com/H9R [Accessed 13
May 2018].) which is a version of a go pro(Gopro.com. (2018). GoPro - Cameras. [online]
Available at: https://gopro.com/ [Accessed 13 May 2018].The big problem that arises first off
is the battery life. To always be recording, I’m required to carry two spare batteries
but as I’ve mentioned, there is also no way to tell when the battery has depleted
itself other than a beeping noise or a red flashing light on the camera itself but as
the engine drowns out all sound, there would be no way to hear the beep and the
camera itself is attached to the helmet so there is no way to see the blinking red
light. The second problem with the go pro style cameras is the placement of the
camera, when an actual crash occurs, the camera is located in a vulnerable

- 10 -
position on the helmet, if your helmet hits anything, the attachment holding the
camera will snap. Now the case that currently protects the go pro whilst being quite
durable if it was a high-speed crash, you run the risk of the camera breaking off
the helmet and disappearing as there is no tracker on it, which could result in a
loss of any important footage that had been recorded.
Go Pro:
Advantage-
High Quality footage. Ability to be placed on bike or helmet. Large storage. Lower quality for longer battery life. Easily removed or detached.
Disadvantage-
Detaches in case of a crash. Short battery life. If attached to side helmet, high speeds can cause wind friction to constantly move helmet to side of camera. Very large and noticeable. Expensive
For cameras mounted such as garmin verb(Athleteshop.ie. (2018). Garmin Virb X Action
Cam with GPS online - Athleteshop.ie. [online] Available at: https://www.athleteshop.ie/garmin-virb-
x-action-cam-with-gps?as=athlete&kwd_id=22985-AGI-49513900314-ASI-382460625073-
ASM68T8MXU&gclid=CjwKCAiA9f7QBRBpEiwApLGUii8LHjSga4bS0sG_kzy7BuTqr6zuFSLFUg
GYnFMeWCgY6vHHE6vBrRoCBGQQAvD_BwE [Accessed 13 May 2018].) to the motorcycle,
these have the capability to be connected to the battery of the bike meaning if the
bike is running, the camera will be recording also. They can be placed on the front
or back of the bike narrowing the view depending where the camera is placed. In
the case of a collision, there wouldn’t be as high a risk of the camera getting
damaged as it would be safely hidden on the bike. In the case of a crash and the
bike being destroyed, the rider would need to be weary as the SD cards are usually
inside the cameras, so they could easily be broken. They are usually much smaller
size making them easier to hide on the bike. The more expensive cameras include

- 11 -
GPS, but they will have a much larger size. They also have cameras with a sensor
to detect the vibrations of a bike, so it will know if a crash has occurred. If a crash
does occur, there is an external battery so if the bike cuts out suddenly from the
crash, the camera will recognize this and keep the camera recording for safety
purposes.
Mounted-cameras:
Advantages-
Connected to battery of bike.
Easily hidden.
Large storage.
Connects to cloud.
GPS capabilities
Disadvantages-
Expensive
More narrowed view
SD card inside camera
No protective case
1.3 Aims
My objective for this project is to build a motorcycle dashcam to record/document
the travels of the user through pictures. My projects main priority is safety as I will
be adding license plate recognition software to capture a license plate in a crash.
It will be saved to an SD card in the raspberry pi. To make it more efficient I will
have attached a vibration sensor so if the user is ever involved in a crash, the data
has a higher chance of being saved.
Added features to help achieve my objective to a better standard would be multiple
cameras to capture all angles to provide the most safety to the user after the crash.
If the user also tours or documents their travels for scenery, better quality cameras
can be used that will still have the same safety features but will provide the user
- 12 -
with high quality footage throughout his journey. It will also have the capability to
be uploaded to their phone or computer as soon as the raspberry pi connects to
the internet via a sim that can be added per the users request so it can be uploaded
easier. One of the cameras will have the capacity to be attached to the helmet
which gives it a better view in terms of safety but will also provide a better-
quality video for users documenting their travels. It will also be connected to the
raspberry pi meaning if the vehicle is turned on, the camera will be recording.
A feature may be included so when the vehicle is idle, the camera will stop
recording and restart as soon as the bike starts moving again.
For certain users who travel frequently, there will be user friendly add-ons such as
a touch screen which can view each camera that will also have
GPS integrated and will show the map on the screen. A pair of earphones may
also be added as to keep the user from taking their eyes off the road, so the
directions will be re-laid to them through the earphones.
For users that are on long distance drive and require the need of their phones, the
touch screen or raspberry pi will be able to sync with the phone giving the
capabilities to have phone calls or even listen to music.
1.4 Technologies
Starting off, I will have one raspberry pi which will have the one camera attached
to it. The camera will be placed at the front end of the bike. The pi will take pictures
every 6 seconds as the camera requires a minimum of 6 seconds to prepare for a
photo. There will also include a raspberry pi GSM/GPSR shield which will allow a
sim to be added to the pi for internet connectivity.
The raspberry pi itself will be placed inside of a black box. This will keep it protected
if there ever is a collision as it will be attached to the back of the motorbike. It will
keep the raspberry pi intact throughout a crash and can easily connect to the
battery of the bike from this position. To keep the raspberry pi from overheating, a
case with a fan attached will be used inside the Blackbox. The box is built in such

- 13 -
a way that it allows air to travel in from beneath but will stop water from getting in
unless the box is turned upside down.
The cameras are not waterproof, so a small acrylic case will be used to protect
them from the weather. As it will only be taking pictures rather than video, it will be
alot less likely for the raspberry pi or camera to overheat unless there is a problem
with the RP. The cameras will be held to the bike with relative ease as they are
quite small and light. This will make it simple to latch them to the handle bar or the
side of the motorbike.
The SD card will also be protected inside the Blackbox so that when a collision
occurs, it will remain intact. The pi will be surrounded by a sponge or foam that will
absorb the brunt of the impact and if the raspberry pi was to come loose, will keep
it from getting damaged.
1.5 Structure
Introduction:
The introduction talks about the project itself and explains how it will work. It is a
basic description of all the functions that will be involved with the process such as
the webapps interaction to the RP and what the user does to initiate certain
procedures. The background explains how the idea formed and the reasons
behind it. It showcases other types of dashcams and go pros to compare their
advantages and disadvantages that come with each one. This will highlight how
this dashcam will differ from those currently on the market. The aims are for the
project and where I want it to go as a developer. It is the objectives I have set for
myself till the due date and what I hope to have built at the end. The technologies
explain what will be used and how each technology will be prepared for any
problems that may lay ahead. They explain how far the application will be taken in
terms of development.
- 14 -
System:
The system explains the requirements used for the project, showing each
functional requirement that the RP is capable of. It then shows a use case for each
displaying it in a diagram to show how the user interacts with the system. The use
cases are also explained in how they function. It explains the interaction with the
environment and the usability requirements explaining what the user can do and
how they can access the RP. The design and architecture explain the project and
all its interactions through a class diagram. It allows one to understand the project
better in terms of having no prototype to view if that is the case. The
implementation is the code explained, all the libraries and algorithms that may be
used in terms of building the prototype. The GUI explains the ui of the webapp and
how the user interacts with the webapp and RP. It shows the main pages that are
used in the webapp.

- 15 -
2 System
2.1 Requirements
There is little technical knowledge needed to know how to run the equipment, if the
equipment is set up properly, the only thing you must do is turn the motorcycle on.
The equipment will know what to do automatically, if you’re using your phone or
the computer for its features, the webapp is self-explanatory and will give all the
help needed to use it in the instructions on the webapp itself. The main job the user
will have to do when first using the RP is getting it setup with a sim card which will
be permanently attached to the RP.
2.1.1 Functional requirements
User activation – High ranked Function. The user switching their motorcycle on
which activates their RP.
Picture recording – High ranked Function. As soon as the RP is activated, it is
programmed to switch all cameras on and start recording.
Deleting – Medium ranked Function. This is completed on either the phone or the
computer files after they are uploaded.
Uploading – Medium ranked Function. This occurs after all the pictures have been
taken, RP connects to known network to upload files.
- 16 -
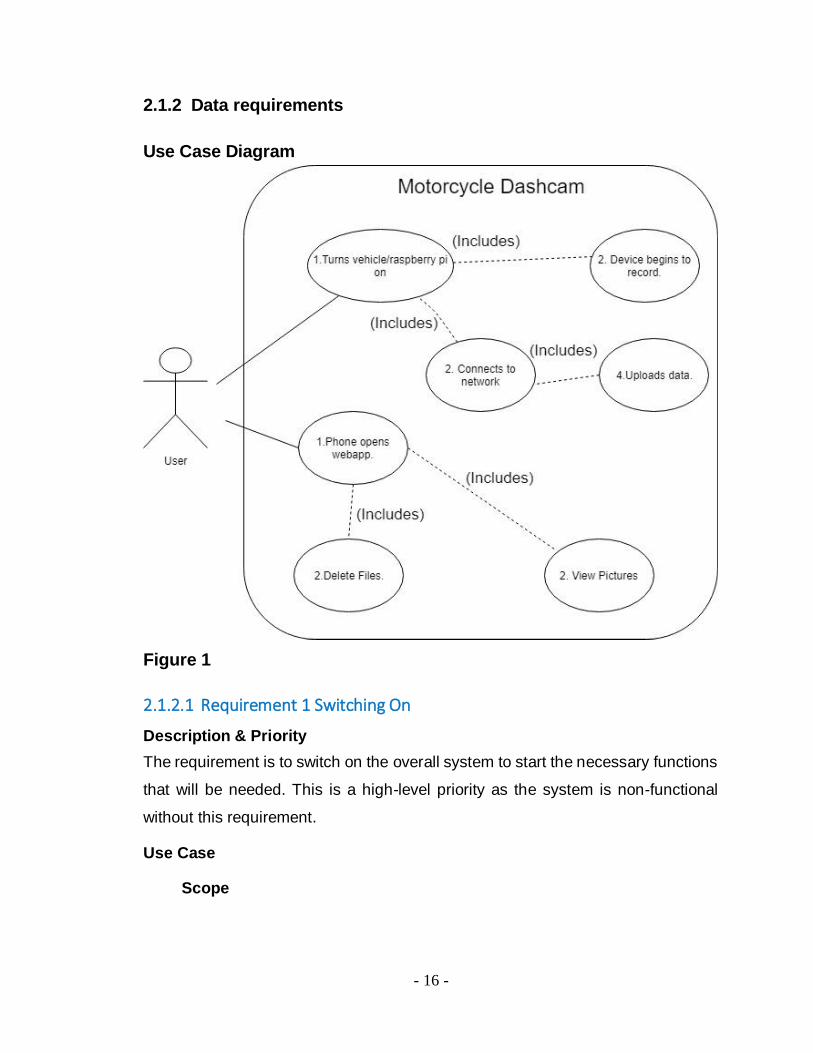
2.1.2 Data requirements
Use Case Diagram
Figure 1
2.1.2.1 Requirement 1 Switching On
Description & Priority
The requirement is to switch on the overall system to start the necessary functions
that will be needed. This is a high-level priority as the system is non-functional
without this requirement.
Use Case
Scope

- 17 -
The scope of this use case is to switch on the device, to allow the system to
begin recording from the camera.
Description
How this is done, is the user switches on their motorcycle which will
immediately turn the RP on. It has been programmed to begin recording on
all cameras.
Use Case Diagram
Figure 2
Flow Description
The user initiates the flow when switching on the motorcycle which starts the
RP, this then starts recording automatically.
Precondition
The motorcycles battery is in a healthy condition to switch the RP on.
Activation
This use case starts when the user switches on the motorcycle which will turn
on/activate the RP.
Main flow
1. The user switches on the motorcycle turning on the RP. 2. The RP automatically turns on. 3. The RP then starts recording.
Alternate flow

- 18 -
A1: Remote Switch in app
4. The user turns on external battery using app which turns on the RP.
Exceptional flow
E1 : Battery’s 5. Motorcycle battery and external battery have run dry.
Termination
The following process is the activation of the camera.
Post condition
The RP is powered and ready for the next step.
2.1.2.2 Requirement 2 Recording
Description & Priority
This is the main function of the RP which is to record the surroundings of the
journey for the user. The priority is high as without this, there is no system needed.
Use Case
Scope
The scope of this use case is to record the full journey that the users takes.
Description
This is done with the SD card holding the data until it hits capacity and is then
looped for the use of the cameras to continue recording.
Use Case Diagram

- 19 -
Figure 3
Flow Description
The user initiates the flow when switching the motorcycle on which activates
the RP. On boot the camera will automatically start recording.
Precondition
The RP needs to be switched on for the recording to be successful.
Activation
This use case starts when the user turns the motorcycle on, as soon as the
RP is fully booted, it will begin recording.
Main flow
1. The system identifies that the RP is switched on. 2. The RP continually records. 3. The RP records until switched off.
Alternate flow
A1: Choosing Cameras 4. The user connects phone. 5. The user navigates to the recording page to switch or turn off cameras.
Exceptional flow
E1: Video Storage Full
6. The RP recognises when SD card is full. 7. The RP will delete the oldest data. 8. The RP will continue recording as a result.
Termination
- 20 -
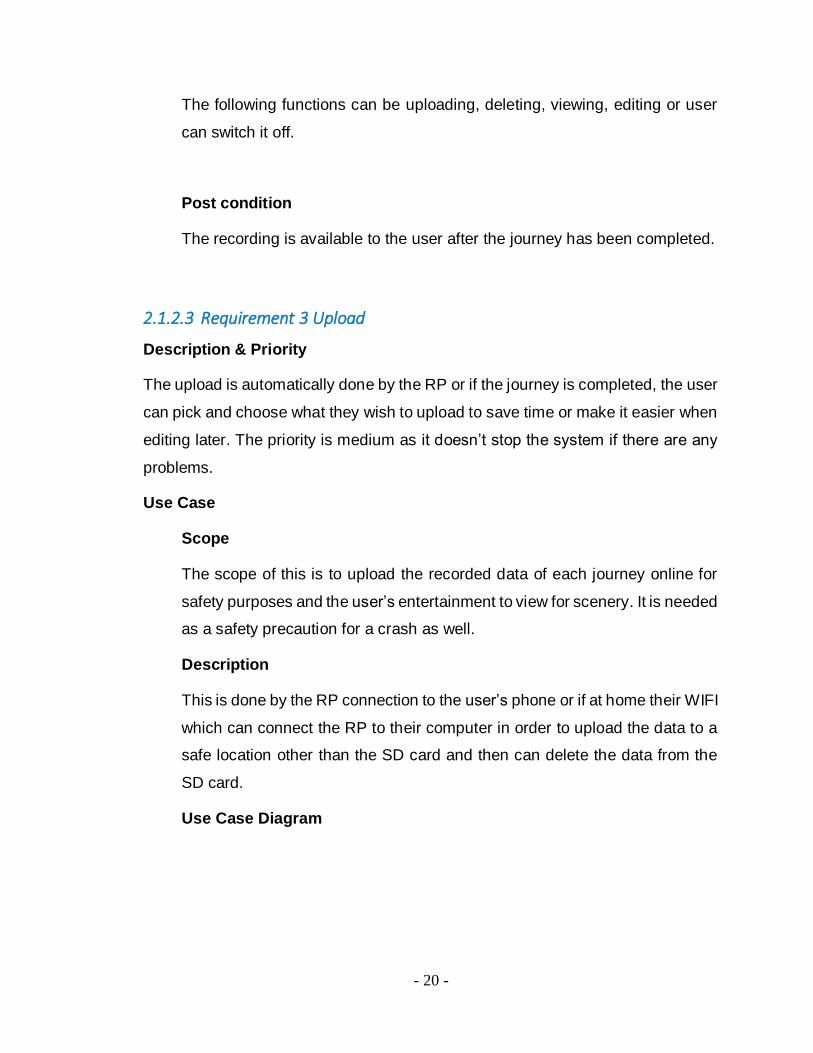
The following functions can be uploading, deleting, viewing, editing or user
can switch it off.
Post condition
The recording is available to the user after the journey has been completed.
2.1.2.3 Requirement 3 Upload
Description & Priority
The upload is automatically done by the RP or if the journey is completed, the user
can pick and choose what they wish to upload to save time or make it easier when
editing later. The priority is medium as it doesn’t stop the system if there are any
problems.
Use Case
Scope
The scope of this is to upload the recorded data of each journey online for
safety purposes and the user’s entertainment to view for scenery. It is needed
as a safety precaution for a crash as well.
Description
This is done by the RP connection to the user’s phone or if at home their WIFI
which can connect the RP to their computer in order to upload the data to a
safe location other than the SD card and then can delete the data from the
SD card.
Use Case Diagram
- 21 -
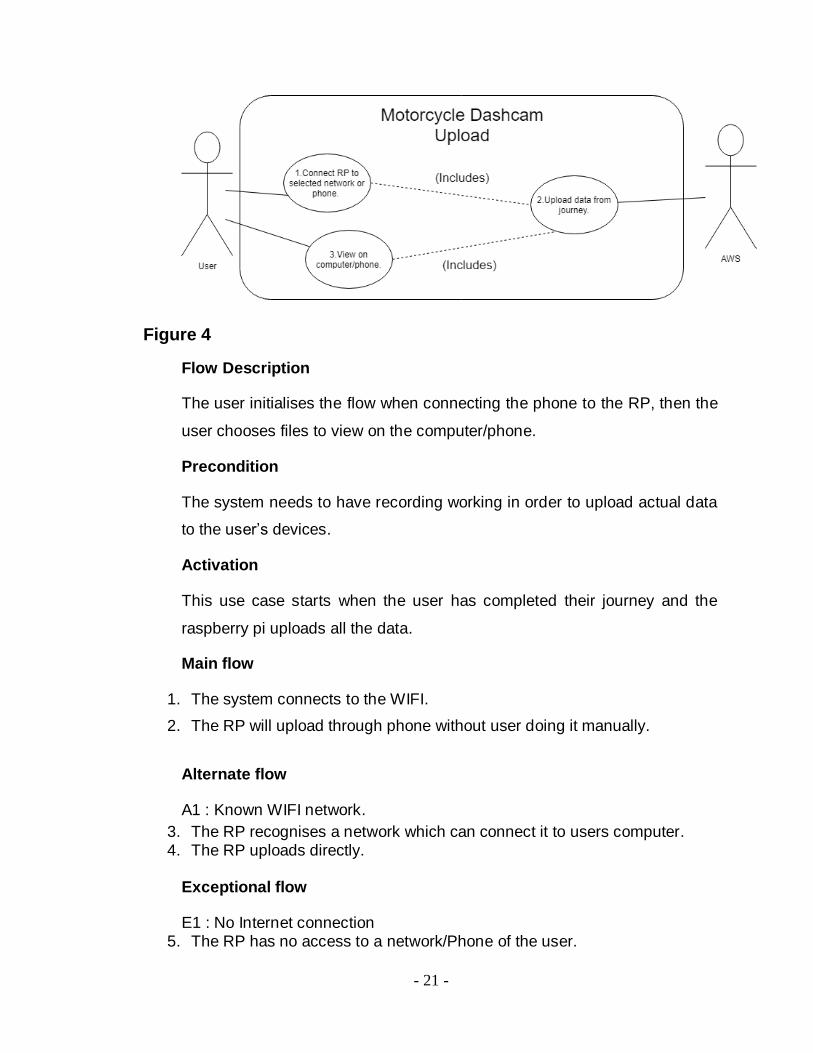
Figure 4
Flow Description
The user initialises the flow when connecting the phone to the RP, then the
user chooses files to view on the computer/phone.
Precondition
The system needs to have recording working in order to upload actual data
to the user’s devices.
Activation
This use case starts when the user has completed their journey and the
raspberry pi uploads all the data.
Main flow
1. The system connects to the WIFI.
2. The RP will upload through phone without user doing it manually.
Alternate flow
A1 : Known WIFI network.
3. The RP recognises a network which can connect it to users computer. 4. The RP uploads directly.
Exceptional flow
E1 : No Internet connection 5. The RP has no access to a network/Phone of the user.

- 22 -
6. The RP will lock the data to SD card if it has right requirements.
Termination
The following functions can be uploading another file or deleting, viewing or
user can switch it off.
Post condition
The upload is complete, and user has access from their phone or computer.
2.1.2.4 Requirement 4 Delete
Description & Priority
The deletion is done on the server and any files being uploaded or that have been
uploaded already. It is also to do with any video files that are locked by the RP for
reasons over a journey. It is a medium priority as it can affect other more prominent
functions of the device.
Use Case
Scope
The scope of this is to enable the user to delete any and all files either on the
RP or their phone/computer freeing up space, so it leaves the RP with all the
space it requires and isn’t taking any room making the RP slower in any way
or form.
Description
This is done by the user, they have access to the files on the server from
there phone or computer. The files uploaded to the computer can be deleted
by the user from any platform capable of internet connection and once they
have their login and password.
Use Case Diagram

- 23 -
Figure 5
Flow Description
The user initiates the flow by navigating to files on app and then deleting a
file.
Precondition
The user has a valid connection to make changes permanent.
Activation
This use case starts when the user deletes files on the server or any files
associated with it.
Main flow
1. The user will delete any files they deem unnecessary. 2. The server will have its files changed as soon as connection is made.
Alternate flow
A1 : Deleted by RP 3. The RP will delete the oldest files when SD card is full
Exceptional flow
E1 : Corrupted File
4. The RP recognises a corruption in a picture file and notifies the user. 5. The user chooses to keep or delete the file.
- 24 -
Termination
The following functions can be deleting another file or uploading, viewing,
editing or user can switch it off.
Post condition
The server will delete files on told to.
2.1.2.5 Requirement 5 Crash
Description & Priority
A vibration sensor is used to recognise a crash occurring, the RP is programmed
to overwrite the SD card and upload the files if possible. It is a high Priority as it is
one of the main reasons for this device.
Use Case
Scope
The scope of this use case is for the RP to know a crash has occurred and
overwrite the SD card.
Description
The RP activates when the vibration sensor goes above its normal
requirements. The SD card is overwritten with the previous minute of footage.
Use Case Diagram

- 25 -
Figure 6
Flow Description
Precondition
The users motorcycle is hit or damaged which activates the vibration sensor.
Activation
When the vibration sensor activates, the RP is programmed to activate its
functions for a crash.
Main flow
1. The vibration sensor activates. 2. The RP overwrites SD card.
Alternate flow
A1 : Uploading 3. The vibration sensor activates. 4. The RP overwrites SD card.

- 26 -
5. The RP connects to phone 6. Uploads files online
Exceptional flow
E1: Vibration sensor broken 7. The vibration sensor doesn’t work properly. 8. The RP cant recognise a crash occurring. 9. The RP functions as normal.
Termination
The following process is the user accessing the app to switch of RPs external
battery.
Post condition
The selected video files from the crash are saved to SD card.
2.1.3 User requirements
The user does not have much interaction with the Raspberry Pi, except when they
turn on the motorbike which will then power the RP and activate its functions. The
user can access the webapp on their phone or laptop depending where they are.
They will have a log in to access their own information and their raspberry pi will
be linked to their log in. When the user is logged in, they can access the contents
page to provide more information about the device and how to use it. They will also
have access to any pictures taken by the raspberry pi and will have the capabilities
to delete the information. Depending on how many cameras are on the device,
they can stream the information to ensure the camera is active. Lastly the
raspberry pi will have a dedicated sim, this will keep the RP connected to the
internet as long as its in range, but the credit will need to be topped up by the user.
2.1.4 Environmental requirements
As the app is now a webapp, any device can be used but android users will be
able to access the webapp as it is produced for android alone. All other users can

- 27 -
access the application over any browser using either a smartphone or laptop/pc.
All system’s platforms can be used from windows to apple and likewise on phone
systems. The only requirement needed from the user is to have access to the
internet.
2.1.5 Usability requirements
The interface of the app is created to be easily navigable, as when your on each
page, if any requirements are necessary of the user they are clearly marked and
visible on the page. There is no previous training required, each page will have a
maximum of two-four buttons all labelled clearly so the user will know what they
can do. It would benefit the user greatly if they have used browsers or an app
before as this would make the use of the app/website a lot simpler for them. The
operability of the webapp is very user friendly with the user having the ability to
keep the app on their phone or having the website saved in their browser of choice.
The only fall back being that the app is unusable if they have no connection to the
internet.

- 28 -
2.2 Design and Architecture
Figure 7
The class diagram (figure 7) above states the architecture for the interaction
between the raspberry pi and the webapp. It states for the webapp that the user’s
information is grabbed when their username and password are used allowing them
access to data from the raspberry pi. The raspberry pi cannot be used until the
motorbike is switched on, the camera will start taking photos immediately on start
up. The data will then be uploaded to the webapp at a specified time to ensure
safety of the recordings. The crash is activated by the raspberry pi when the

- 29 -
motorbike is in an accident and will activate the camera to start recording video
which is then uploaded.
2.3 Implementation
2.3.1 EC2 and Website
Figure 8
The above code in figure 8 is used after a private key is generated using puttyGEN
so a connection can be generated between the computer and the EC2 on AWS.
After logging into the putty as ubuntu, I then install the above which is the lamp
stack so that apache can then be installed to use php in my website. It is restarted
to reset itself.
Figure 9
Stated in figure 9 is code to help when using PHP. The first two lines are used in
the command line to find the php.ini in apache. Then I located the third line in the
code and switched it like the above states. What this does is enable errors to make
PHP easier to work through.
sudo apt-get update
sudo apt-get install lamp-server^
sudo apt-get apache2
sudo /etc/init.d/apache2 restart
locate php.ini
sudo nano /etc/php/7.0/apache2/php.ini
(display_errors = off) changed to (display_errors = on)

- 30 -
Figure 10
The commands in figure 10 are done in the ubuntu server to allow access to
phpMyAdmin. The first command installs it and the second two commands are too
enable extensions that are needed to run it.
Figure 11
This code in figure 11 is from recording.php and is what displays the images
uploaded by the raspberry pi. The files is used to grab the folder that holds all the
images. This way it allows all the images to display rather than a single image. The
i will grab all of the images to display, and the raspberry pi is set to save images.
sudo apt-get install phpmyadmin php-mbstring php-gettext
sudo phpenmod mcrypt
sudo phpenmod mbstring
$files = glob("../webcam/*.*");
for ($i=1; $i<count($files); $i++){
$num = $files[$i];
echo '<li class="image"><img src="'.$num.'" alt="Image"
/></li><span></span>';

- 31 -
<?php
session_start(); // Starting Session
$error=''; // Variable To Store Error Message
if (isset($_POST['submit'])) {
if (empty($_POST['username']) || empty($_POST['password'])) {
$error = "Username orphpinfo(); Password is invalid";}
else{
$username= ($_POST['john']?? 'john');
$password= ($_POST['1234']?? '1234');
$connection = mysqli_connect("localhost", "root", "joker1997");
$username = stripslashes($username);
$password = stripslashes($password);
$username = mysqli_real_escape_string($connection,$username);
$password = mysqli_real_escape_string($connection,$password);
$db = mysqli_select_db( $connection,"company");
$query = mysqli_query($connection, "select * from company where
password='$password' AND username='$username'");
$rows = mysqli_num_rows($query);
if ($rows == 1) {
$_SESSION['login_user']=$username; // Initializing Session
header("location: profile.php"); // Redirecting To Other Page
} else {
$error = "Username or Password is invalid";}
mysqli_close($connection); }}
?>

- 32 -
Figure 12
Displaying in figure 12 is the connection code in login.php that communicates from
the webapp to the SQL database that is held on phpmyadmin. It has the set
password and username already capable but has the capasity to be able to have
multiple users accessing the webapp. For the else statement that is holding the
connection, if it is true it will bring the user to their profile page. This will then allow
them access to any information they uploaded from the raspberry pi or are currently
uploading.
Open CV
Figure 13
In figure 13 above, its getting rid of any unnecassary files and it is expanding the
system as the open cv can take up a lot of storage when compiling and also when
it is being downloaded. It purges the files from the system completely removing
them.
sudo raspi-config (Then advanced options and expand filesystems)
sudo reboot
sudo apt-get purge wolfram-engine
sudo apt-get purge libreoffice*
sudo apt-get clean
sudo apt-get autoremove

- 33 -
Figure 14
In figure 14, dependencies are being installed that are necessary for open cv to
run. This includes Cmake which can help when configuring the build process of
open cv. Image i/o packages are needed to load different images such as png and
jpg. GTK is installed as when open cv is running, it uses a sub module called
highgui which creates a frontend or a basic gui for the data.
Figure 15
Next, figure 15 is downloading the source code for open cv and unzipping it.
sudo apt-get update && sudo apt-get upgrade
sudo apt-get install build-essential cmake pkg-config
sudo apt-get install libjpeg-dev libtiff5-dev libjasper-dev libpng12-dev
sudo apt-get install libavcodec-dev libavformat-dev libswscale-dev libv4l-dev
sudo apt-get install libxvidcore-dev libx264-dev
sudo apt-get install libgtk2.0-dev libgtk-3-dev sudo apt-get install libatlas-base-dev gfortran
sudo apt-get install python2.7-dev python3-dev
cd ~
wget -O opencv.zip https://github.com/Itseez/opencv/archive/3.3.0.zip
unzip opencv.zip
wget-Oopencv_contrib.zip
https://github.com/Itseez/opencv_contrib/archive/3.3.0.zip
unzip opencv_contrib.zip

- 34 -
Figure 16
Next in figure 16, pip is installed as it is needed later for installs in open cv. Next is
the virtual wrapper which is a handy tool for collecting separate dependencies and
creating Python enviroments for each of them. source ~/.profile should be used
everytime you reboot the raspberry pi to guarantee that the variables have set up
correctly. Then you create the virtual environment itself which is called cv. Then
you can enter it using workon cv. Then numpy is installed for numerical processing
when using open cv.
wget https://bootstrap.pypa.io/get-pip.py
sudo python get-pip.py
sudo pip install virtualenv virtualenvwrapper
sudo rm -rf ~/.cache/pip
sudo nano ~/.profile
export WORKON_HOME=$HOME/.virtualenvs (added to bottom line) source /usr/local/bin/virtualenvwrapper.sh (added to bottom line) source ~/.profile
mkvirtualenv cv -p python2
source ~/.profile
workon cv
pip install numpy

- 35 -
Figure 17
In figure 17, while still in the virtual environment. You can then build the above as
stated which is beginning the build for open cv. It will also bring up the python 2
section paths, so you can ensure everything you need has been installed. For
Raspbian Stretch, to get open cv to work and compile properly you need to swap
the config size to compile with multiple cores or else it may not run. You then stop
and restart the file to ensure its switched. Then finally you can compile open cv
using make -j4 which can take up to 4 hours. Then just install after.
cd ~/opencv-3.3.0/
mkdir build cd build cmake -D CMAKE_BUILD_TYPE=RELEASE \ -D CMAKE_INSTALL_PREFIX=/usr/local \ -D INSTALL_PYTHON_EXAMPLES=ON \ -D OPENCV_EXTRA_MODULES_PATH=~/opencv_contrib-3.3.0/modules \ -D BUILD_EXAMPLES=ON .. Sudo nano /etc/dphys-swapfile
# CONF_SWAPSIZE=100 (comment) CONF_SWAPSIZE=1024(write) sudo /etc/init.d/dphys-swapfile stop sudo /etc/init.d/dphys-swapfile start make -j4 sudo make install sudo ldconfig
cd ~/.virtualenvs/cv/lib/python2.7/site-packages/
ln -s /usr/local/lib/python2.7/site-packages/cv2.so cv2.so
sudo nano /etc/dphys-swapfile
CONF_SWAPSIZE=100 # CONF_SWAPSIZE=1024 sudo /etc/init.d/dphys-swapfile stop $ sudo /etc/init.d/dphys-swapfile start
- 36 -
Figure 18
The Final step in figure 18 is to install open cv is then sym-link the open cv bindings
to the virtual environment cv. Then edit the swapfile again as the memory card can
damage if it isn’t done. Then finally stop and start the file again.
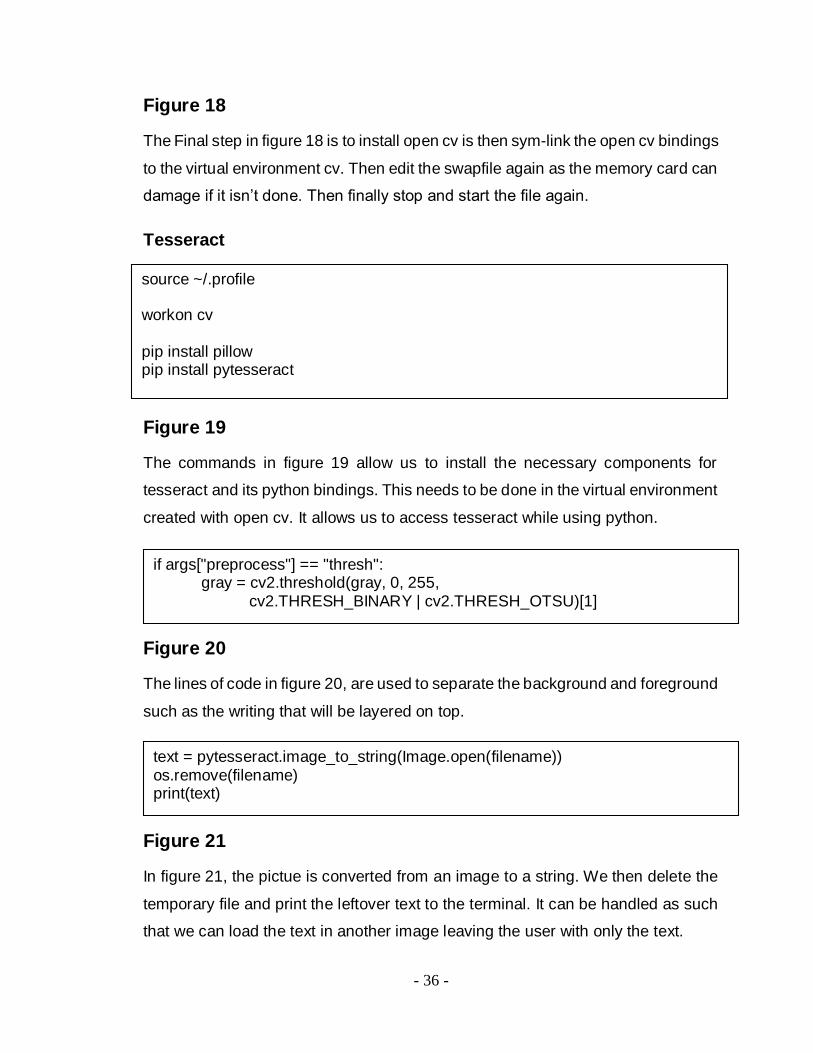
Tesseract
Figure 19
The commands in figure 19 allow us to install the necessary components for
tesseract and its python bindings. This needs to be done in the virtual environment
created with open cv. It allows us to access tesseract while using python.
Figure 20
The lines of code in figure 20, are used to separate the background and foreground
such as the writing that will be layered on top.
Figure 21
In figure 21, the pictue is converted from an image to a string. We then delete the
temporary file and print the leftover text to the terminal. It can be handled as such
that we can load the text in another image leaving the user with only the text.
source ~/.profile
workon cv pip install pillow pip install pytesseract
if args["preprocess"] == "thresh": gray = cv2.threshold(gray, 0, 255, cv2.THRESH_BINARY | cv2.THRESH_OTSU)[1]
text = pytesseract.image_to_string(Image.open(filename)) os.remove(filename) print(text)

- 37 -
Figure 22
The first line in figure 22 will send the image to ocr to be compiled. The second is
the command line which locates the image you want and runs the file while putting
the image grabbed through ocr to compile. Ocr will remove any background noise
from the image, leaving the text intact.
Pi Camera and SCP
ap.add_argument("-i", "--image", required=True,
python ocr.py --image images/example_01.png
sudo apt-get install python-picamera FRAMES = 2
TIMEBETWEEN = 6
frameCount = 0
while frameCount < FRAMES:
imageNumber = str(frameCount).zfill(7)
os.system("raspistill -o /home/pi/Pictures/image%s.jpg"%(imageNumber))
frameCount += 1
time.sleep(TIMEBETWEEN - 6)
else:
os.system(“scp -I /home/pi/Downloads/newubuntu.pem -r /home/pi/Pictures/*
[email protected]:/var/www/html/webcam/”)
os.close

- 38 -
Figure 23
In figure 23, the command is to install the pi camera on the raspberry pi. The
following code is in the picupload.py file. So it states the frames to be 2 so that
means it will take two pictures. The time between being how long it takes between
each photo. For the picamera it takes a minimum of 6 seconds to prepare for a
picture. The count is 0 and in the while loop, as long as the count is less than the
frame it will continue to take photos. Raspistill is what will activate the camera and
place the image in the directory specified. Now as multiple images are being taken,
the framcount is used to number each photo.
The else is run after the last frame is taken by the camera, it will then use scp
which is secure contain protect. It allows files to be transferred or copied to and
between different hosts. The -i is used to identify a specific file. It is grabbing the
newubuntu.pem which is the key that allows a connection to aws. The -r is
recursively allowing the command to grab the entire folder to upload.
Database
Figure 24
The command in figure 24 is what allows the raspberry pi to connect to the
database.
pip install mysql-connector

- 39 -
Figure 25
The code in figure 25 from picupload.py shows the connection being made to the
mysql database which is held on AWS. This connection is being made from the
raspberry pi to the database on aws. There is also error handling to ensure the
user why the and if there is any problems when connecting or using the database.
try: conn = mysql.connector.connect(host="pdb.cxfg2y94di8m.eu-west-1.rds.amazonaws.com", user="johnakasean", passwd="joker1997", db="mc4pdb") except mysql.connector.Error as err: if err.errno == errorcode.ER_ACCESS_DENIED_ERROR: print("Something is wrong with your user name or password") elif err.errno == errorcode.ER_BAD_DB_ERROR: print("Database does not exists") else: print(err)
imgname = (imageNumber,)
cur = conn.cursor()
cur.execute("""INSERT INTO image (imgname)VALUES (%s)""",(imgname))
conn.commit()
cur.execute("SELECT * FROM image")
rows = cur.fetchall()
for eachRow in rows:
print eachRow
conn.close()

- 40 -
Figure 26
The code in figure 26 from picupload.py, shows the statement linking to ‘conn’
which is the connection. It then executes the sql statements which has its value as
the imgname which is linked to imageNumber which is used on a photo is taken
so its grabbing the created name and linking it with the id and timestamp created
in the database. It then commits the execute and then shows the results in the
terminal. Lastly the connection is then closed.
Figure 27
The code in Figure 27 found at recording.php shows the connection established
through php from the webapp to mysql on aws. It has error handling to notify user
if there is any problems.
Figure 28
The code in figure 28 found at recording.php is grabbing the information from the
database using the connection at ‘dbc’. Then is prints the results out by rows to
display all the necessary data together with the image it is assigned to. This is all
done through php.
$dbc=mysqli_connect('pdb.cxfg2y94di8m.eu-west-1.rds.amazonaws.com','johnakasean','joker1997','mc4pdb') or die('Error connecting to MySQL server');
$query = "select * from image ORDER BY id";
$result = mysqli_query($dbc,$query)
or die('Error querying database');
$count=mysqli_num_rows($result);
<td bgcolor="#FFFFFF"><?php echo $row['id']; ?></td>
<td bgcolor="#FFFFFF"><?php echo $row['imgname']; ?></td>
<td bgcolor="#FFFFFF"><?php echo $row['created']; ?></td>

- 41 -
Login system webapp
Figure 29
The code in figure 29 is the connection to the phpMyAdmin found at login.php
which holds the users name and password. I have the user and password being
defined so that they can login. There is then the connection established using the
server, user and password to connect. The user and password are then passed to
see if they are in the database, and the name of the database is given to point it in
the correct path. Then the final query to make give the user access is when it send
the username and password and if returned true they enter and if false told they’re
username and password are incorrect.
$username= ($_POST['john']?? 'john');
$password= ($_POST['1234']?? '1234');
// Establishing Connection with Server by passing server_name, user_id and
password as a parameter
$connection = mysqli_connect("localhost", "root", "joker1997");
// To protect MySQL injection for Security purpose
$username = stripslashes($username);
$password = stripslashes($password);
$username = mysqli_real_escape_string($connection,$username);
$password = mysqli_real_escape_string($connection,$password);
// Selecting Database
$db = mysqli_select_db( $connection,"company");
// SQL query to fetch information of registerd users and finds user match.
$query = mysqli_query($connection, "select * from company where
password='$password' AND username='$username'");
- 42 -
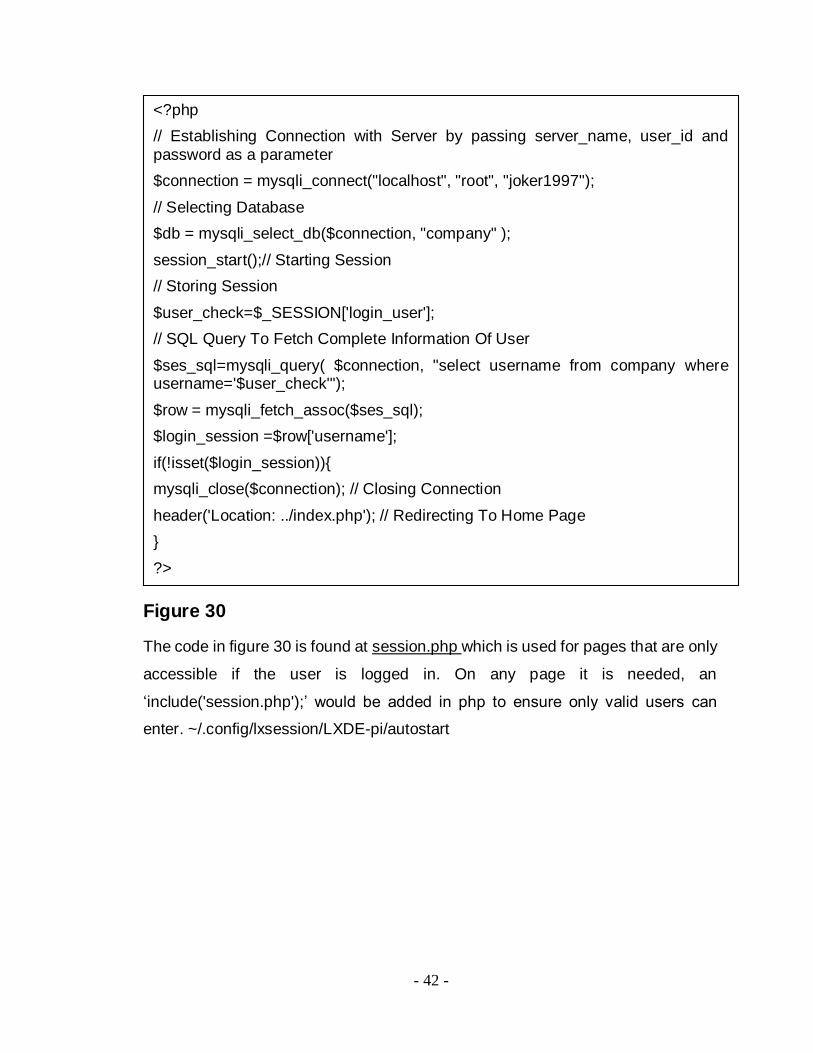
Figure 30
The code in figure 30 is found at session.php which is used for pages that are only
accessible if the user is logged in. On any page it is needed, an
‘include('session.php');’ would be added in php to ensure only valid users can
enter. ~/.config/lxsession/LXDE-pi/autostart
<?php
// Establishing Connection with Server by passing server_name, user_id and password as a parameter
$connection = mysqli_connect("localhost", "root", "joker1997");
// Selecting Database
$db = mysqli_select_db($connection, "company" );
session_start();// Starting Session
// Storing Session
$user_check=$_SESSION['login_user'];
// SQL Query To Fetch Complete Information Of User
$ses_sql=mysqli_query( $connection, "select username from company where username='$user_check'");
$row = mysqli_fetch_assoc($ses_sql);
$login_session =$row['username'];
if(!isset($login_session)){
mysqli_close($connection); // Closing Connection
header('Location: ../index.php'); // Redirecting To Home Page
}
?>

- 43 -
Login and start file
Figure 31
In figure 31, first enter the file by the first command and edit it and enter the second
line at the bottom and this will allow the pi to start the script as soon as its switched
on.
Internet with GPRS Shield
Figure 32
In figure 32 the first commands install the necessary components to use the device.
Then after enabling uart you can install minicom to set it up.
sudo python ~/.config/lxsession/LXDE-pi/autostart
@sudo /usr/bin/python /home/pi/pictureupload/picupload.py
sudo systemctl stop [email protected] sudo systemctl disable [email protected] sudo systemctl stop [email protected] sudo systemctl disable [email protected] sudo nano /boot/cmdline.txt
sudo nano /boot/config.txt
Adding “enable_uart=1”
sudo apt-get install minicom
minicom -s

- 44 -
Delete button
Figure 33
Shown in figure 33 is the deletion code for the row in the database and the image
in the server. When button is pressed it uses the ‘name=”checkbox”’ that is
assigned to the table which holds the id, imgname and also the timestamp included
in the database. So, when the box is ticked on the webapp, the sql query will then
remove it from the database while the unlink will delete the photo from the server.
If it is completed, the page is then refreshed which will show the image has been
deleted.
<td align="center" bgcolor="#FFFFFF"><input name="checkbox[]" type="checkbox" value="<?php echo $row['id']; ?>"></td>
if(isset($_POST['delete']))
{
$checkbox = $_POST['checkbox'];
for($i=0;$i<count($checkbox);$i++){
$del_id = $checkbox[$i];
$sql = "DELETE FROM image WHERE id in ";
$sql.= "('".implode("','",array_values($_POST['checkbox']))."')";
unlink("/var/www/html/webcam/image1.jpg");
$result = mysqli_query($dbc,$sql);
}
// if successful redirect to delete_multiple.php
if($result){
header('Location: recording.php');
}
}
mysqli_close($dbc);
- 45 -
2.4 Graphical User Interface (GUI) Layout
2.4.1 Before
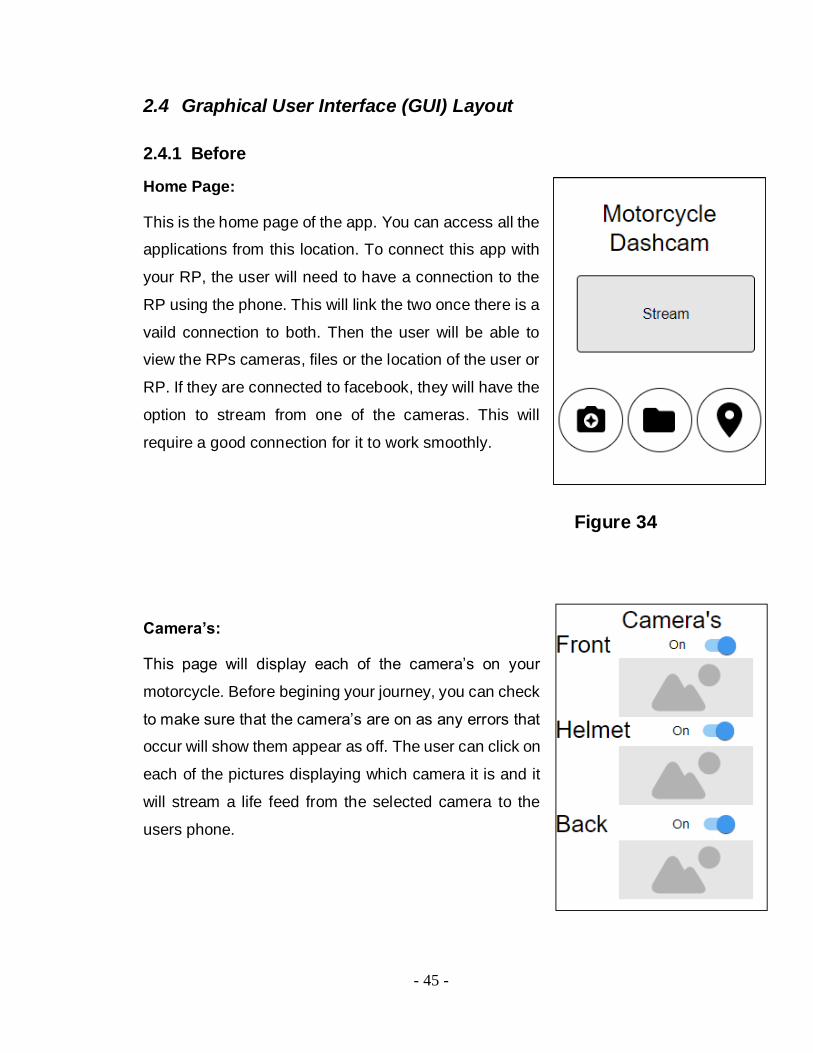
Home Page:
This is the home page of the app. You can access all the
applications from this location. To connect this app with
your RP, the user will need to have a connection to the
RP using the phone. This will link the two once there is a
vaild connection to both. Then the user will be able to
view the RPs cameras, files or the location of the user or
RP. If they are connected to facebook, they will have the
option to stream from one of the cameras. This will
require a good connection for it to work smoothly.
Figure 34
Camera’s:
This page will display each of the camera’s on your
motorcycle. Before begining your journey, you can check
to make sure that the camera’s are on as any errors that
occur will show them appear as off. The user can click on
each of the pictures displaying which camera it is and it
will stream a life feed from the selected camera to the
users phone.
- 46 -
Figure 35
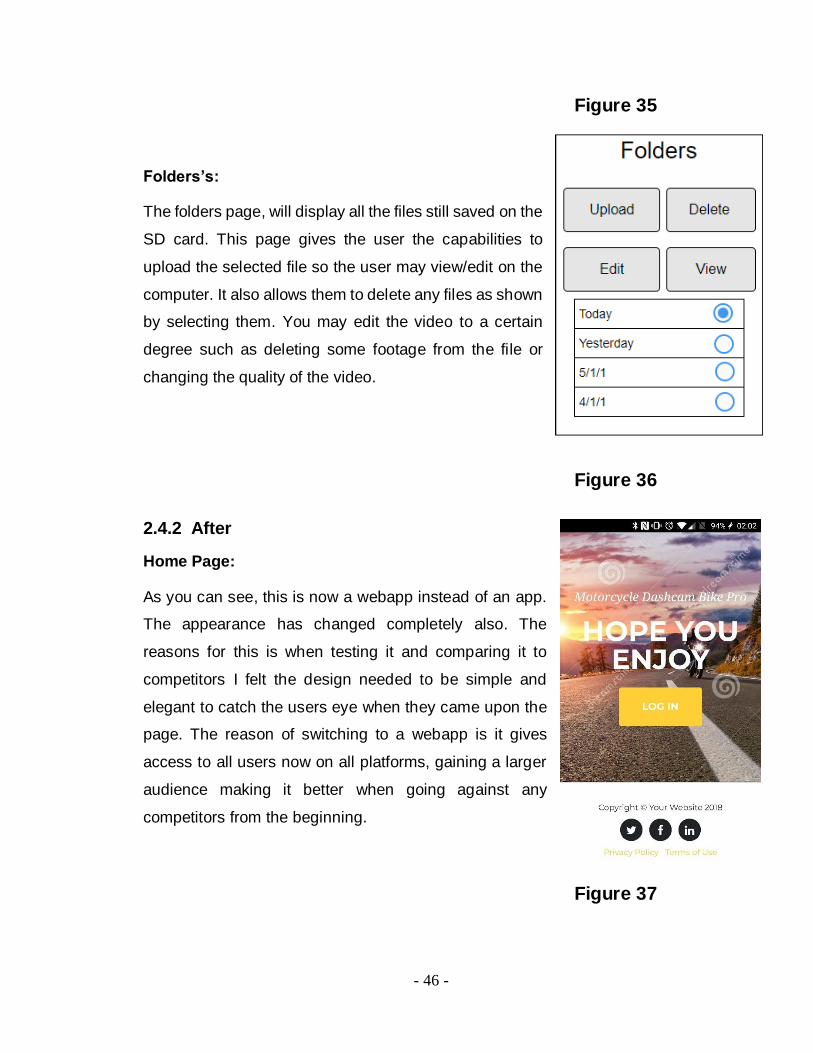
Folders’s:
The folders page, will display all the files still saved on the
SD card. This page gives the user the capabilities to
upload the selected file so the user may view/edit on the
computer. It also allows them to delete any files as shown
by selecting them. You may edit the video to a certain
degree such as deleting some footage from the file or
changing the quality of the video.
Figure 36
2.4.2 After
Home Page:
As you can see, this is now a webapp instead of an app.
The appearance has changed completely also. The
reasons for this is when testing it and comparing it to
competitors I felt the design needed to be simple and
elegant to catch the users eye when they came upon the
page. The reason of switching to a webapp is it gives
access to all users now on all platforms, gaining a larger
audience making it better when going against any
competitors from the beginning.
Figure 37
- 47 -
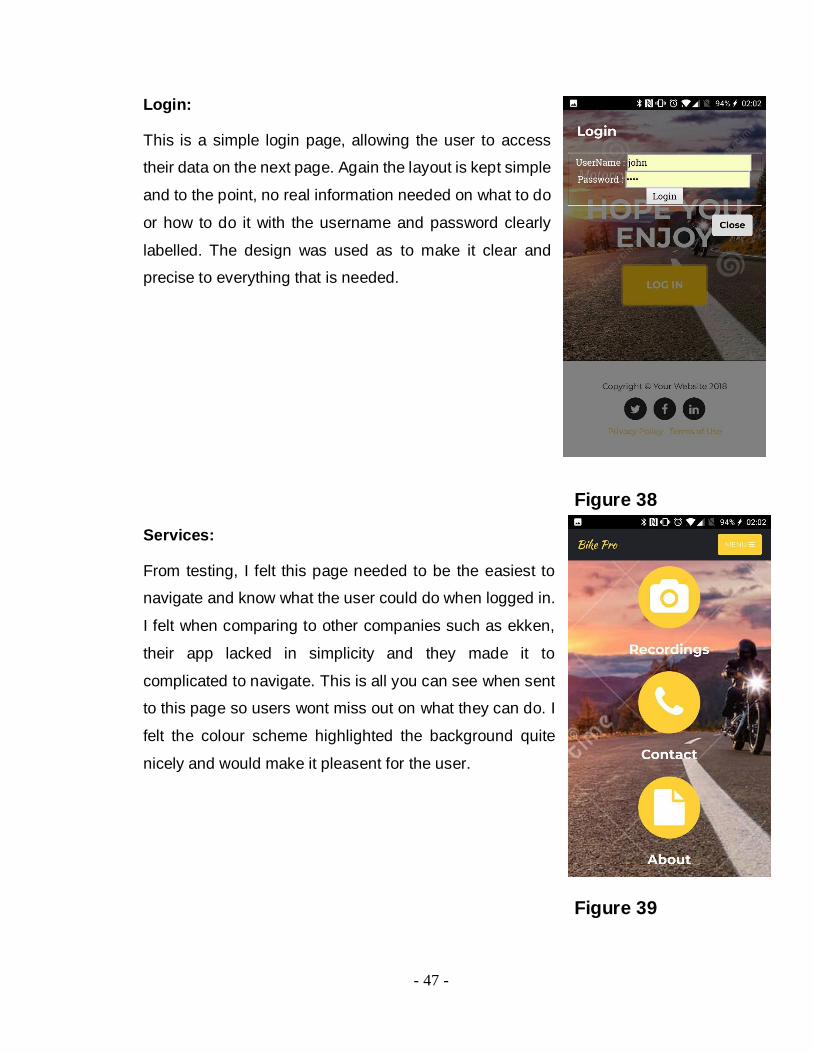
Login:
This is a simple login page, allowing the user to access
their data on the next page. Again the layout is kept simple
and to the point, no real information needed on what to do
or how to do it with the username and password clearly
labelled. The design was used as to make it clear and
precise to everything that is needed.
Figure 38
Services:
From testing, I felt this page needed to be the easiest to
navigate and know what the user could do when logged in.
I felt when comparing to other companies such as ekken,
their app lacked in simplicity and they made it to
complicated to navigate. This is all you can see when sent
to this page so users wont miss out on what they can do. I
felt the colour scheme highlighted the background quite
nicely and would make it pleasent for the user.
Figure 39

- 48 -
Recordings;
This is the page that has the most information which is
owned by the user. They will be able to easily view their
pictures or if they wish, they can simply click them and
then delete them. The idea being with this design that no
real training would be needed once you had used a
phone a handful of times. It would make this page simple
to use.
Figure 40
2.5 Testing
The testing of this project was done in parts, as a majority of the project works on
independently. It needed to be able to do the work immediately once turned on.
This means I kept the raspberry pi and webapp separate for testing to give better
information on errors and to help understand what wasn’t working on an individual
level.
The first testing was done on the raspberry pi. I tested to make sure the pi could
run the code automatically when switched on and if any errors occurred that it
wouldn’t just stop the script.
The second test was to ensure the raspberry pi wouldn’t overheat if left active
inside the blackbox while taking pictures or videos.

- 49 -
I tested the raspberry pi to ensure that when it was taking pictures the necessary
information was being sent to the database and the server. Also, to ensure it
displayed on the webapp.
When testing the recognition software, you must be in a virtual environment to
have access to the necessary imports. This would interfere with the script starting
on boot as there is no work around for entering the virtual environment without
entering the necessary code into the terminal.
Testing done on the webapp, was making sure the login was grabbing the correct
information and that user’s contents. To also ensure that the proper pages were
occurring.
Finally on the webapp, was to ensure that when the user deleted any pictures, that
the information for that picture was also deleted from the database and the image
from the server itself.
2.6 Customer testing
The testing was done using one customer to completely test the device while using
my own motorcycle to get accustomed to how the device worked. She had used
previous dashcams before having an idea for how go pros and dashcams differ
and what he thought of Bike Pro.
The results of the testing went quite smoothly, the most time being taken for getting
the website link typed in and loaded up. She was able to enter her login details in
less than a minute having previous experience using ekken application. While the
bike was switched on and taking pictures, she was able to login and get to the
recordings page with the results already appearing on the webapp. The only issue
she had was that there weren’t more options available but other than that it worked
quickly and smoothly to her liking.
Testing:
-Accessing site: 30-80 seconds(depending on internet)
- 50 -
-Logging in: 30-70 seconds
-accessing different parts of site: 10-40 seconds
-deleting picture: 20 seconds
After logging in all she needed to do, was switch the motorcycle on and when it
came to the webapp, she stated it was very simple to use and easy to navigate
and that the design was very pleasing to look at. The following images taken, are
the project being tested with the customer.
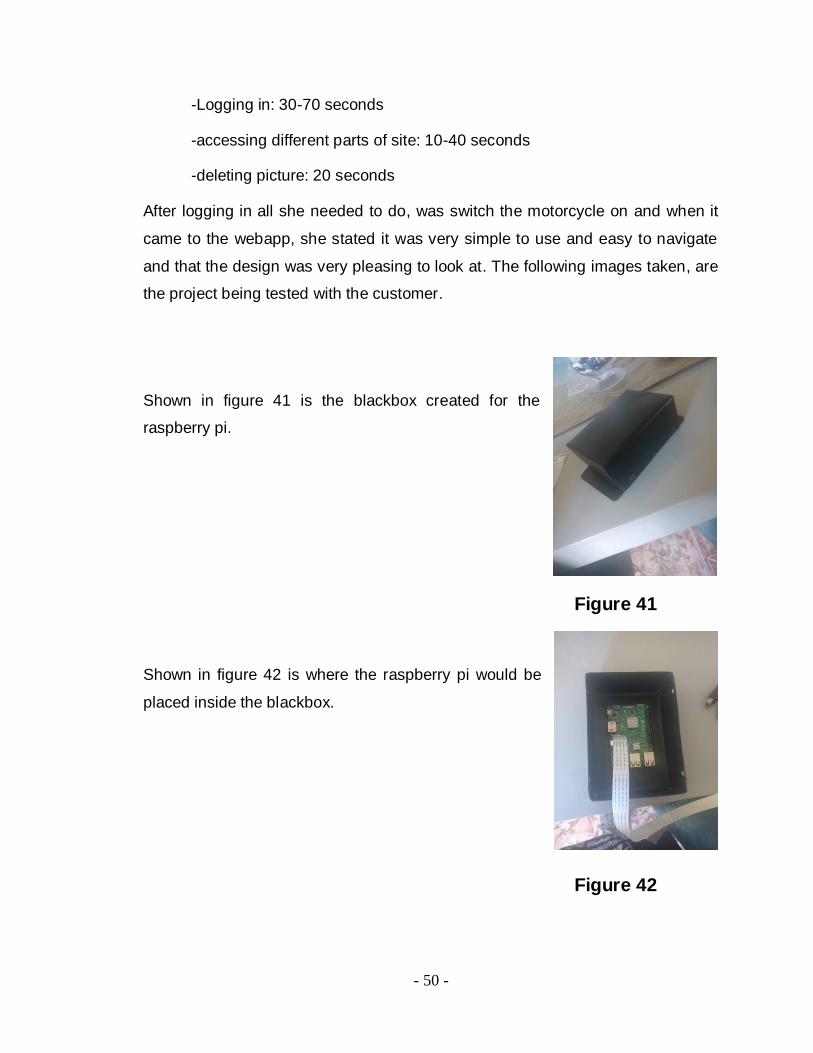
Shown in figure 41 is the blackbox created for the
raspberry pi.
Figure 41
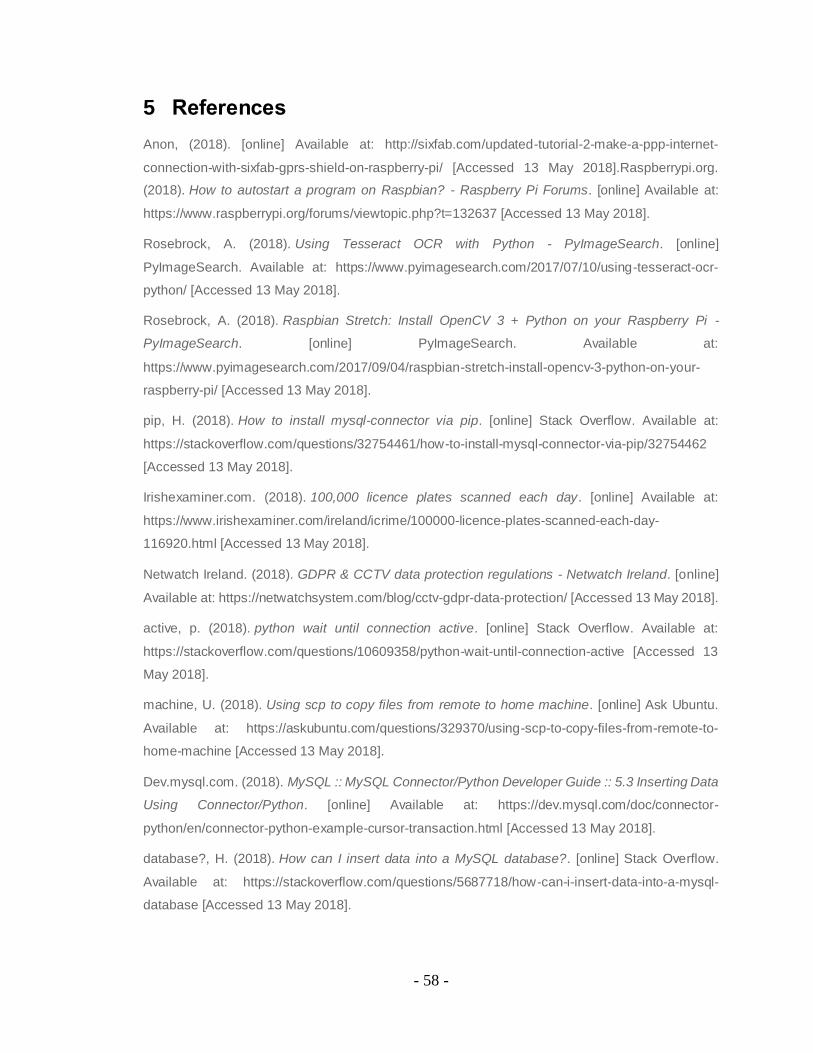
Shown in figure 42 is where the raspberry pi would be
placed inside the blackbox.
Figure 42

- 51 -
Shown in figure 43 is the position of where the
blackbox is held on the bike, which can be easily
secured to the bars.
Figure 43
In figure 44, is the cable connecting the raspberry pi
to the battery of the bike which will automatically
switch on once the ignition is started.
Figure 44
In figure 45, is the position of the camera if permanently
attached to the bike.
Figure 45

- 52 -
In figure 46, you can see the customer accessing the app.
Figure 46
In figure 47, she is entering the username and password to
access the site.
Figure 47
In figure 48, it shows the user then accessing their service
page.

- 53 -
Figure 48
In figure 49, they have then accessed the recordings page
were all images are displayed when uploaded by the
raspberry pi.
Figure 49
In figure 50, the motorcycle is then switched on by the
customer.
Figure 50

- 54 -
In figure 51 she taps both buttons and presses the delete button.
Figure 51
In figure 52, you can then see the images where removed and
the testing is completed.
Figure 52

- 55 -
2.7 Evaluation
The results of the testing were useful as they highlighted some problems that would
have ceased the project from performing to its best standard. One such problem
led to the creation the loop for the internet so the script will continue taking pictures
and upload them as long as there is a viable connection to do so.
After letting the raspberry pi run for over an hour, a solution was needed as when
I ran the following code in figure 53, it was returning 50.1'C when on average it
would run at 40.1'C. To solve the problem I made an adjustment to the blackbox
which would allow more air in. A decision was also made to use a fan that is
attached to the case of the raspberry pi.
Figure 53
When testing the raspberry pi and app in sync, the issues revealed helped to
implement more error handling to show the user what mistakes are being made or
what problems have occurred.
The result of the recognition software, it turned out to be a major flaw that maybe
the Raspbian update will eventually correct but until then there is no way to activate
in the virtual environment rendering the software useless. The only result being, a
camera which has the capabilities for license plate recognition software installed
already.
For the login and delete, same as before it was just ensuring proper error handling
to provide the best and most efficient system to the user.
import os
import time
def measure_temp():
temp = os.popen("vcgencmd measure_temp").readline()
return (temp.replace("temp=",""))
while True:
print(measure_temp())
time.sleep(1)

- 56 -
3 Conclusions
The conclusions I have come to while building this project is that most of my
problems occurred with the technology available and its limitations. One such
example; as the camera’s I used, if one had been accessed with a higher quality
resolution and license plate recognition, I wouldn’t need to rely on the current
software not being able to provide ways to conduct these scripts. The better-quality
camera being able to take pictures every second rather than every six seconds for
the pi camera. The reason that is important it when driving, a lot can occur in six
seconds especially if driving at a fast speed.
The advantage of this device to users is its safety aspects when a crash occurs.
Not only is the SD card hidden away and protected in an almost unbreakable case.
It also uploads its data without user interaction, giving the user peace of mind that
their footage of the resulting crash will be recorded and saved.
There are disadvantages to this project such as how easily damaged items can
get. Such as the raspberry pi if running too many things at once, and overheating
could be an issue. Another issue was the camera only having capabilities to take
pictures every six seconds and having no type of stabilisation to them resulting in
some blurry images on the bike. Only resulting in clear when the bike is at a
standstill.
I also found that, the technology can be quite finicky, as when installing open cv, it
needed to be done multiple times before finding the correct one and as such, the
image on the SD card has become damaged. If damaged the SD card has a
tendency to overheat and then freeze if running too many things at once. I have
had to reinstall the data once when the SD card was corrupted and even when
reinstallation was done correctly, the amount of information needed to do all the
work takes up the majority of the 32gb SD card and it still encounters issues when
running certain jobs. Errors mainly occured when dealing with the recognition
software making me lean even more towards using a camera with the software
already installed.

- 57 -
4 Further development or research
With more time put into this project, there are aspects which could be improved, or
devices added to improve the performance. As I had to use a GSM/GPRS Shield
which used a majority of the GPIO pins, I was unable to add a multi-adapter which
would allow for multiple cameras to be used on the device. An added battery would
be beneficial to the raspberry pi allowing it to continue to record if the bike has
suddenly cut out or switched off from a crash. It would also be convenient if the
user has switched the bike off before the uploading has been completed.
On the webapp it could be improved with as the capabilities to stream from each
camera for social activities or just to ensure the cameras are working correctly.
The ability to edit videos on the webapp and that when deleting the picture or video,
it would also delete from the raspberry pi.
The areas this could be improved in is on the commercial side by being able to add
categories such as Tour, Race, or just your average rider. This would improve the
quality of the product and make it a more unique experience depending on what
style of rider you are. To further improve this the user could have a more individual
style to suit themselves if they do more than one style they can narrate the device
around their motorcycle and themselves. The cameras could also be further
developed allowing for better quality video footage giving the user better memories
depending on their journeys.
When it comes to the legality of the recognition software, there are things that could
be issues such as with the Gardai, they hold their data in databases, but they are
legally only allowed to have them for a year before deleting. Now as dashcams
aren’t considered personal data, its how the information is held that is the risk as
to it being online and accessible to people if it is hacked.
- 58 -
5 References
Anon, (2018). [online] Available at: http://sixfab.com/updated-tutorial-2-make-a-ppp-internet-
connection-with-sixfab-gprs-shield-on-raspberry-pi/ [Accessed 13 May 2018].Raspberrypi.org.
(2018). How to autostart a program on Raspbian? - Raspberry Pi Forums. [online] Available at:
https://www.raspberrypi.org/forums/viewtopic.php?t=132637 [Accessed 13 May 2018].
Rosebrock, A. (2018). Using Tesseract OCR with Python - PyImageSearch. [online]
PyImageSearch. Available at: https://www.pyimagesearch.com/2017/07/10/using-tesseract-ocr-
python/ [Accessed 13 May 2018].
Rosebrock, A. (2018). Raspbian Stretch: Install OpenCV 3 + Python on your Raspberry Pi -
PyImageSearch. [online] PyImageSearch. Available at:
https://www.pyimagesearch.com/2017/09/04/raspbian-stretch-install-opencv-3-python-on-your-
raspberry-pi/ [Accessed 13 May 2018].
pip, H. (2018). How to install mysql-connector via pip. [online] Stack Overflow. Available at:
https://stackoverflow.com/questions/32754461/how-to-install-mysql-connector-via-pip/32754462
[Accessed 13 May 2018].
Irishexaminer.com. (2018). 100,000 licence plates scanned each day. [online] Available at:
https://www.irishexaminer.com/ireland/icrime/100000-licence-plates-scanned-each-day-
116920.html [Accessed 13 May 2018].
Netwatch Ireland. (2018). GDPR & CCTV data protection regulations - Netwatch Ireland. [online]
Available at: https://netwatchsystem.com/blog/cctv-gdpr-data-protection/ [Accessed 13 May 2018].
active, p. (2018). python wait until connection active. [online] Stack Overflow. Available at:
https://stackoverflow.com/questions/10609358/python-wait-until-connection-active [Accessed 13
May 2018].
machine, U. (2018). Using scp to copy files from remote to home machine. [online] Ask Ubuntu.
Available at: https://askubuntu.com/questions/329370/using-scp-to-copy-files-from-remote-to-
home-machine [Accessed 13 May 2018].
Dev.mysql.com. (2018). MySQL :: MySQL Connector/Python Developer Guide :: 5.3 Inserting Data
Using Connector/Python. [online] Available at: https://dev.mysql.com/doc/connector-
python/en/connector-python-example-cursor-transaction.html [Accessed 13 May 2018].
database?, H. (2018). How can I insert data into a MySQL database?. [online] Stack Overflow.
Available at: https://stackoverflow.com/questions/5687718/how-can-i-insert-data-into-a-mysql-
database [Accessed 13 May 2018].

- 59 -
Raspberrypi.org. (2018). How to do time lapses with the Raspberry Pi - Raspberry Pi Forums.
[online] Available at: https://www.raspberrypi.org/forums/viewtopic.php?t=67109 [Accessed 13
May 2018].
Raspberrypi.org. (2018). RPi CPU temp with Python - Raspberry Pi Forums. [online] Available at:
https://www.raspberrypi.org/forums/viewtopic.php?t=185244 [Accessed 13 May 2018].
Tutorialrepublic.com. (2018). Creating a User Login System with PHP and MySQL - Tutorial
Republic. [online] Available at: https://www.tutorialrepublic.com/php-tutorial/php-mysql-login-
system.php [Accessed 13 May 2018].
www.tutorialspoint.com. (2018). PHP MySQL Login. [online] Available at:
https://www.tutorialspoint.com/php/php_mysql_login.htm [Accessed 13 May 2018].
Agarwal, N. (2018). PHP Login Form with Sessions | FormGet. [online] FormGet. Available at:
https://www.formget.com/login-form-in-php/ [Accessed 13 May 2018].
PHP, D. (2018). Delete multiple rows by selecting checkboxes using PHP. [online] Stack Overflow.
Available at: https://stackoverflow.com/questions/14475096/delete-multiple-rows-by-selecting-
checkboxes-using-php [Accessed 13 May 2018].
codeigniter, h. (2018). how to delete image from database and image folder in codeigniter. [online]
Stack Overflow. Available at: https://stackoverflow.com/questions/27917503/how-to-delete-image-
from-database-and-image-folder-in-codeigniter [Accessed 13 May 2018].
The SitePoint Forums. (2018). When delete image from mysql to delete also from folder. [online]
Available at: https://www.sitepoint.com/community/t/when-delete-image-from-mysql-to-delete-
also-from-folder/41106 [Accessed 13 May 2018].
Digitalocean.com. (2018). How To Install and Secure phpMyAdmin on Ubuntu 16.04 |
DigitalOcean. [online] Available at: https://www.digitalocean.com/community/tutorials/how-to-
install-and-secure-phpmyadmin-on-ubuntu-16-04 [Accessed 13 May 2018].
display?, H. (2018). How do I get PHP errors to display?. [online] Stack Overflow. Available at:
https://stackoverflow.com/questions/1053424/how-do-i-get-php-errors-to-display [Accessed 13
May 2018].
Help.ubuntu.com. (2018). ApacheMySQLPHP - Community Help Wiki. [online] Available at:
https://help.ubuntu.com/community/ApacheMySQLPHP [Accessed 13 May 2018].
- 60 -
6 Appendix
6.1 Project Proposal
Project Proposal
Motorcycle Dashcam
John Cahill, x14378581, [email protected]
BSc (Hons) in Computing
Internet Of Things
20/10/2017

- 61 -
Objectives
My objective for this project is to build a motorcycle dashcam to record/document
the travels of the user including pictures and videos. Its main priority is safety as I
will be adding photo to capture a licence plate if in a crash. It will be saved
to an SD card in the raspberry pi. To make it more efficient I will have a vibration
sensor so if the user is ever involved in a crash, the data has a better chance of
being saved.
Added features to help achieve my objective to a better standard would be multiple
cameras to capture all angles to provide the most safety to the user after the
crash.
If the user is also tours or documents their travels for the scenery, better quality
cameras can be used that will still have the same safety but will provide the user
with good quality footage at the end of his drive. It will also have the capability to
be uploaded to their phone or computer as soon as the raspberry pi connects to
the internet through Bluetooth or via a sim that can be added per the users request
so it can be uploaded easier. One of the cameras will have the capabilities to be
attached to the helmet which gives it a better view in safety matters but will also
provide a better-quality video for users documenting. It will also be connected to
the raspberry pi meaning if vehicle is turned on, the camera will also be recording.
A feature may be included so when the vehicle is idle, the camera will stop
recording and restart as soon as the bike starts moving again.
For certain users who travel more, there will be better add-ons such as a touch
screen which can view each camera but will also have GPS integrated and will
show the map on the screen. A pair of earphones may also be added as to keep
the user from taking their eyes off the road, so the directions will be re-laid to them
through the earphones.

- 62 -
For users that are on long distance drive and require the need of their phones, the
touch screen or raspberry pi will be able to sync with the phone giving the
capabilities to have phone calls or even listen to music.
Background
The motivation behind my project, is I am familiar with the area as I drive a
motorcycle myself and I feel that the technology that could be implemented for your
own safety could be much more effective than the current models. As I go for hours
on end, I require a good quality footage for safety and my own frame of mind, I use
an ekken which is like a go pro. The big problem that shows first off is the battery
life. To always be recording, I carry along two spare batteries but as I’ve
mentioned, there is also no way to tell when the battery as depleted itself other
than a beeping noise or a red flashing light on the camera itself but as the engine
drowns out all sound, there would be no way to hear the beep and the camera
itself is attached to the helmet so no way to see the blinking red light. The second
problem with the go pro style cameras is when an actual crash occurs, to protect
the camera, if your helmet hits anything, the attachment holding the camera will
snap in order to try protecting it. Now the case around the go pro would be very
durable but if it was a high-speed crash, you not only have to worry about the
camera damaging on impact but also about losing the actual footage as it would
be easy for it to disappear on a backroad or even a main road.
Go Pro:
Advantage-
High Quality footage. Ability to be placed on bike or helmet. Large storage. Lower quality for longer battery life. Easily removed or detached.
Disadvantage-

- 63 -
Detaches in case of a crash. Short battery life. If attached to side helmet, high speeds can cause wind friction to constantly move helmet to side of camera. Very large and noticeable. Expensive
For cameras mounted to the motorcycle, these have the capability to be connected
to the battery of the bike meaning if the bike is running, the camera will
be recording also. They can be placed on the front or back of the bike making the
view narrowed depending where it is placed. In the case of a collision, there
wouldn’t be as likely a case of the camera getting damaged as it is usually hidden
on the bike. In case of crash of the bike being destroyed, the rider would need to
be weary as the sd cards are usually inside the cameras, so they can easily be
broken. They are usually much smaller size making them easier to hide on the
bike. The more expensive ones include GPS, but they will have a much larger size.
They also have cameras with a sensor to detect the vibrations of a bike, so it will
know if a crash has occurred. If a crash does occur, there is an external battery so
if the bike cuts out suddenly from the crash, the camera will recognise this and
keep the camera recording for safety purposes.
Mounted-cameras:
Advantages-
Connected to battery of bike.
Easily hidden.
Large storage.
Connects to cloud.
GPS capabilities
Disadvantages-
Expensive
More narrowed view
SD card inside camera
No protective case

- 64 -
Technical Approach
Starting off, I have yet to test how reliable the raspberry pi will be when I have it
recording a video for longer than an hour. For this reason, more than one raspberry
pi will be needed. I’m also looking to use a multiadapter to use up to four cameras.
They will be placed on the front and back of the bike and also on the helmet. A
touchscreen will be implemented for the other applications such as GPS and video
capabilities. It will also connect to mobile phone for more applications.
The raspberry pi itself will be placed underneath the seat. This will keep it protected
if theirs ever a collision as it will be in the most cantered position. To keep the
raspberry pi from overheating, a liquid cooling system will be added but as the
amount of space varies depending on how many raspberry pi’s are used, an air
cooling system might be next best option. So, the two-raspberry pi’s will be in some
form of containment under the seat with a pipe to the outside sucking air in to
maintain the temperature of the raspberry pi’s.
The cameras are not waterproof, so I will need to 3d print some form of a case or
create one to suit it. It will also need to be sufficient in size as to keep the cameras
from overheating from overuse. How I fit the cameras to the bike will also be
improvised on the case created to make an attachment I can latch/fit the cameras
into and then attach to the bike. The camera connected to the helmet will have
slightly different attachment to make it easily removable. Depending on the rider,
they can attach the camera to a chest piece also. The wire connecting the camera
will need to be fixed through the jacket so when you sit on the bike, you simply
connect it to the multiadapter and check touchscreen to make sure camera is
working correctly.
The touchscreen will be placed on the tank of the motorcycle, so the rider can
interact with it. It will be able to detach from the bike for safety. This will also need
some form of a cover as it is not water resistant. The touchscreen will have either
a Bluetooth feature or earphones connected to the helmet.

- 65 -
The SD card will have some form of protection that will lock down on
impact/collision to save the SD card from being damaged. This will be connected
to raspberry pi as it will need to have some link with the vibration sensor to know
when to shut.
Special resources required
Raspberry pi x2
Touchscreen for raspberry pi
Multi adapter for cameras
3-4 raspberry pi cameras.
Air intake for raspberry pi.
Technical Details
The language I will be using is python as it works best with the raspberry pi and
will be the easiest to implement. I will also be using python for the photo recognition
software that will detect the license plate. This is the location for a face detection
for the code I hope I can implement or change for the license
plate.(https://pythonprogramming.net/raspberry-pi-camera-opencv-face-
detection-tutorial/)
- 66 -
I will also be using android studios to develop the app and in order to connect both
the raspberry pi to android studios I will be using dweet to make a connection for
all the functions of my app. ( http://dweet.io)
Evaluation
The first few tests I will initiate will be how much the raspberry pi can handle in
terms of different processes. I will attempt to have the three-four cameras recording
at the same time to see how long it will take to overheat. I will then implement my
cooling system to prevent overheating and to see how much processes it can
handle with the added cooling system.
Then, if two are required a test to see how best to split the processes between the
two-raspberry pi’s will be done. With the two being used and the cooling system
most likely added, I don’t think overheating will be an issue. I will then perform
integration tests as the camera’s will be connected to one raspberry pi and the
touchscreen will be to the other. I will use Bluetooth to connect the two in other to
show the video of the cameras on the touchscreen.
The vibration sensor will be used to conduct drop tests to ensure that the correct
results occur when a vibration reaches a certain range. The information that is
developed from the drop testing will be used to initiate the reaction of the
mechanism around the SD card that encloses for protection in the case of a
detected collision. The raspberry pi will also use that information to start the
external battery if the bike suddenly cuts out. This helps ensure that the cameras
will continue recording and will also automatically record the previous two minutes
before the collision. Also, when it happens, the information is authomatically saved
to the SD card as it is considered top priority and will over-write any previous
information.

- 67 -
When testing the touchscreen, I will be testing it with elements such as earphones
in the helmet be it, Bluetooth earphones or cabled ones. It will need to connect to
my phone so that google maps can be accessed or phone calls and even the
capabilities of music being played through them. When first starting the bike, it will
can check each camera to make sure there up and running before you start off on
your journey.
Depending on the driver, there will be more capabilities with the cameras such as
when the bike is in motion, you can have to take pictures at certain intervals
throughout the drive such as when driving past a landmark. For drivers on the road
longer than a few hours, to save the SD cards memory, when the bike has
remained in a spot for longer than a minute, the recording will stop to save 1 the
SD card and to make the drivers life easier if there looking to edit it as they won’t
have to delete out all the stops. For safety reasons, you can have it so only the
camera on the helmet switches off, but the cameras mounted to the bike will
continue as a collision can still occur even when at a standstill.
6.2 Project Plan

- 68 -
6.3 Monthly Journals
Reflective Journal
Student name: John Cahill
Programmed (e.g., BSc in Computing): Internet of Things
Month: September
My Achievements
This month, I was able to create the design and idea of the project and propose it.
My idea was accepted which is a motorcycle dashcam with added features such
as gps integration, using multiple cameras on the bike at once. Also having a mini
screen for the different applications such as google maps or connecting to my
phone in order to listen to music or phone calls.
My contributions to the projects included so far are ordering the different parts I
need such as the camera to start recording. I have also researched the different
applications I’ll be using. I have tried to further the scope by researching a vibration
sensor so if there was a crash on the bike, the video up to 1 minute before it
happened and up till video stops is recorded automatically for safety reasons.
My Reflection
I felt, it worked well to get the scope of my idea and keep it as broad as possible
when doing my research on the different applications. So depending on how well
the project is progressing, I will never be stuck on what to do next.
However, I was not successful in doing very much with the raspberry pi as I couldn’t
configure until the end of the month.
Intended Changes
Next month, I will try to start coding on the raspberry pi and using small jobs with
it in order to get used to using it and try understanding the way I’ll be using it later

- 69 -
with the camera and the touchscreen at a later date. I will also be trying to get an
external battery as this will be the same as when I connect it to the battery of the
bike.
Reflective Journal
Student name: John Cahill
Programmed (e.g., BSc in Computing):
Month: October
My Achievements
This month, I was able to research the equipment I will be using and how I will test
it when it is set up. I have also finished the proposal so the project details, I have
a better concept for my project now.
My contributions to the projects included the project proposal that needed a
technical heading so research for my project was completed to figure out how it
would be implemented. It gave me more insight to what I need to do next and has
given me a timeframe for my project and what I should start on first to get the
project going.
My Reflection
I felt, it worked well to research and review what needs to be done. I also felt that
my work ethic to try and have a set plan has helped me to get a better view on my
next few steps of the project.
However, I was not successful in getting much done in terms of the raspberry pi
itself as I have not begun using anything with it. I have also yet to get the camera
in order to try and test it and see the applications that can be done with it.
Intended Changes

- 70 -
Next month, I will try to get the camera and start the project to see what I can do
and test the capabilities of the raspberry pi itself. I want to see how the camera
runs on full recording and how it effects the raspberry pi and if it will overheat it.
Supervisor Meetings
Date of Meeting:13,20,27/10/2017
Items discussed: Project Proposal
Action Items: How and what to talk about in the proposal and how to tackle the
headings and different ways to talk about my project and how I can implement
different items for it.
Reflective Journal
Student name: John Cahill
Programmed (e.g., BSc in Computing): Internet of Things
Month: November
My Achievements
This month, I have worked on and completed both the requirements document and
the technical document building more on the development of the project and where
it is headed. I have also started coding of the UI for the app for the user to interact
with the Raspberry pi and some functionality with the Raspberry Pi and the camera
such as it immediately recording as soon as the Raspberry Pi is switched on.
My Reflection
- 71 -
I felt, it worked well to get the documents and the direction I want this project to
head in. There is a much better standard to the work quality I feel I will complete
over the next few months while developing the project,
When working with the Raspberry Pi, I find it to be quite unstable at times, such as
working when it wants to. Example is when an error occurs and if I switch
everything off including WIFI and leave it for a certain time. It will start working
again as soon as it is switched back on. In saying that I still feel the progress I
made with the camera is on the right track and know where I want to go next when
programming it.
Intended Changes
Next month, I will try to continue developing the raspberry pi and developing the
app to a better quality. Next, I want to try using dweepy to connect the raspberry
pi and as soon as a video has ended, it being uploaded to the phone or to a
database connected using SQL.
Supervisor Meetings
Date of Meeting:6,15,23/11/2017
Items discussed: Requirements document and Technical Document
Action Items: Discussed what to write for each, and how to revolve it around my
project and where I want the project to go and what direction for it to take, such as
what sections of the device to develop first and what to leave till a later date.
Reflective Journal
Student name: John Cahill
Programmed (e.g., BSc in Computing): Internet of Things

- 72 -
Month: December
My Achievements
This month, I have worked on and completed both the requirements document and
the technical document building more on the development of the project and where
it is headed. I have also started coding of the UI for the app for the user to interact
with the Raspberry pi and some functionality with the Raspberry Pi and the camera
such as it immediately recording as soon as the Raspberry Pi is switched on.
My Reflection
I felt, it worked well to get the documents and the direction I want this project to
head in. There is a much better standard to the work quality I feel I will complete
over the next few months while developing the project,
When working with the Raspberry Pi, I find it to be quite unstable at times, such as
working when it wants to. Example is when an error occurs and if I switch
everything off including WIFI and leave it for a certain time. It will start working
again as soon as it is switched back on. In saying that I still feel the progress I
made with the camera is on the right track and know where I want to go next when
programming it.
Intended Changes
Next month, I will try to continue developing the raspberry pi and developing the
app to a better quality. Next, I want to try using dweepy to connect the raspberry
pi and as soon as a video has ended, it being uploaded to the phone or to a
database connected using SQL.
Supervisor Meetings
Date of Meeting:6,15,23/11/2017
- 73 -
Items discussed: Requirements document and Technical Document
Action Items: Discussed what to write for each, and how to revolve it around my
project and where I want the project to go and what direction for it to take, such as
what sections of the device to develop first and what to leave till a later date.
Reflective Journal
Student name: John Cahill
Programmed (e.g., BSc in Computing): Internet of Things
Month: January
My Achievements
This month, I have worked on trying to install open cv to try make a start on the
recognition software. I have also changed my idea from a app to a webapp in order
to produce a better quality product. I have also changed the information in the
technical document.
My Reflection
I felt, it was a waste as I got no where with the open cv application, trying many
different ways and no success. Also damaging my sd card in the process.
While I changed to a webapp, I feel like I have a better ui design for the webapp
and it is more appealing. The update to the technical report also let me try and
start on a few other sections also.
Intended Changes
Next month, I will try to continue developing the open cv and I also want to make
a start on trying to get the website on EC2 on an ubuntu server.
Supervisor Meetings

- 74 -
Date of Meeting:17,22/01/2017
Items discussed: Open CV
Action Items: Discussed what to try do next month and where I can go next it I
cant figure it out as planned. Also how to make a head start on the technical report.
Reflective Journal
Student name: John Cahill
Programmed (e.g., BSc in Computing): Internet of Things
Month: February
My Achievements
This month, I have worked on open cv and got it working but still havnt gotten a
license plate recognition software file working as of yet. The EC2 is up and running
and am now working on a php login with the webpage. I got a image going onto
the server also.
My Reflection
I still have to try bide my time better as spent a lot wasting it on open cv and when
I got it installed, I still couldn’t get any code to work with it as of yet. I’m also having
difficulty trying to get a id linked to the image taken in a database so I can then
delete one and it will delete the other.
Intended Changes
Next month, I will try to continue developing the open cv and I also want to make
a start on trying to get the website on EC2 on an ubuntu server.
Supervisor Meetings
- 75 -
Date of Meeting:11,25/02/2017
Items discussed: Open CV
Action Items: Discussed what how to try get the delete button in sync with the
database and the image being held on the server.
Reflective Journal
Student name: John Cahill
Programmed (e.g., BSc in Computing): Internet of Things
Month: March
My Achievements
This month I got the database working with phpMyAdmin on the ubuntu server and
also got the raspberry pi uploading the link to the database so the image now has
a connection inside the database.
My Reflection
I felt I got a good head start this month but felt I could of tried to do some more for
the open cv as It would be considered a complex part of the project.
Intended Changes
I can now move on to try get the delete button working and to delete both the image
and database row that is linked. I want to make another go at the recognition
software also as I feel I have the time.
Supervisor Meetings
Date of Meeting:3,15/03/2017

- 76 -
Items discussed: Open CV
Action Items: Helped with sting out the phpMyAdmin and trying to get it so it would
only show the users images if there are two users.
Reflective Journal
Student name: John Cahill
Programmed (e.g., BSc in Computing): Internet of Things
Month: April
My Achievements
This month I got the tesseract working as a recognition software. I also got it so its
taking picture on boot and uploading everything in a single script.
My Reflection
I struggled trying to get the delete button working and to get more work done in the
technical report.
Intended Changes
I can now try to finish the delete button and get the site looking nicer. I also want
to continue trying to get the login so the user can view there own images.
Supervisor Meetings
Date of Meeting:4,15/02/2017
Items discussed: Open CV
Action Items: Discussed how to get the login working and also went over the
technical document and what else I need to have done for it.

- 77 -
Reflective Journal
Student name: John Cahill
Programmed (e.g., BSc in Computing): Internet of Things
Month: May
My Achievements
I got the delete button working to a point and also most of the technical document
finished.
My Reflection
I felt I got enough done just in time for my project to be uploaded.
Intended Changes
Supervisor Meetings
Date of Meeting:5,11/05/2017
Items discussed: Open CV
Action Items: Helped me with the delete button and also reviewed my technical
document.
6.4 Other Material Used
A survey was completed showing most users being older than 30. Most stated they
would be purchasing this device for a specific reason making them more agreeable
to figure out how to use the device properly. Most said they would prefer to just
have it working but if having the app gives them the access to view and control

- 78 -
items they’d be willing to learn. They also said the idea of having a device that can
do more than one function and also has the capabilities of having devices added
or replaced easy is very appealing. As most complained about battery’s and how
they’re would be no issue with the RP.
Top Related