


Languages
Pages
Legal

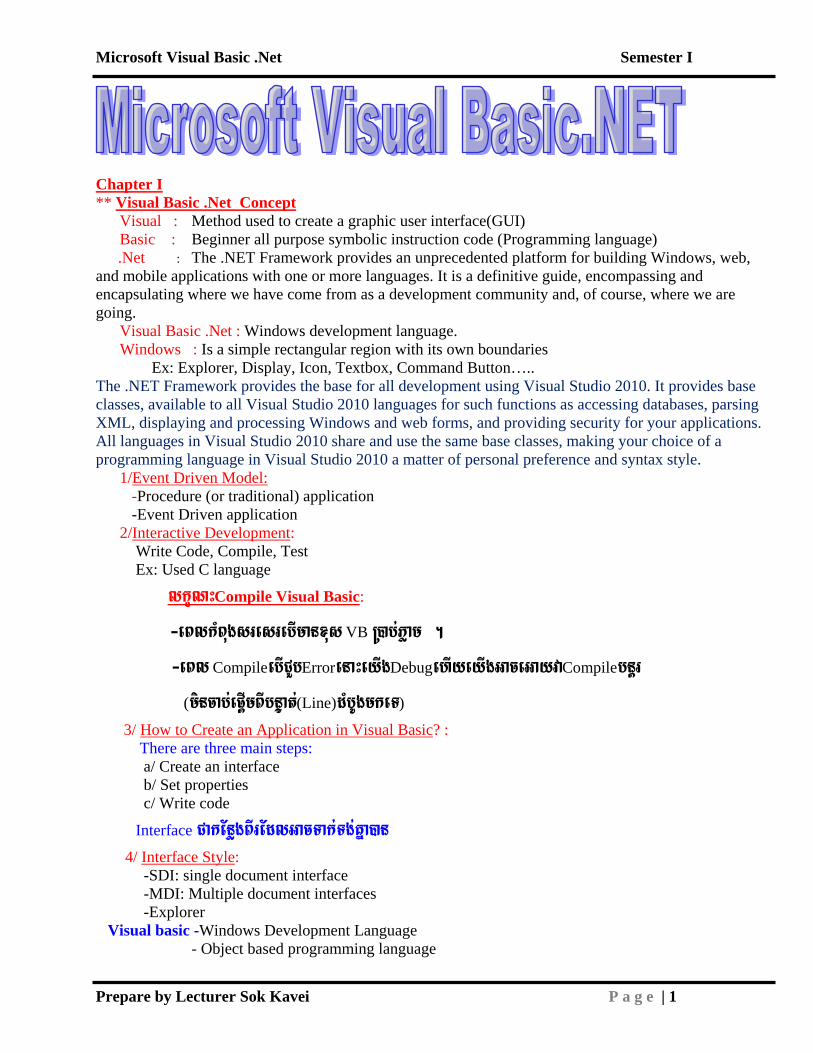
Microsoft Visual Basic .Net Semester I
Prepare by Lecturer Sok Kavei P a g e | 1
** Chapter I
Visual : Method used to create a graphic user interface(GUI) Visual Basic .Net Concept
Basic : Beginner all purpose symbolic instruction code (Programming language) .Net : The .NET Framework provides an unprecedented platform for building Windows, web, and mobile applications with one or more languages. It is a definitive guide, encompassing and encapsulating where we have come from as a development community and, of course, where we are going. Visual Basic .Net : Windows development language. Windows : Is a simple rectangular region with its own boundaries Ex: Explorer, Display, Icon, Textbox, Command Button….. The .NET Framework provides the base for all development using Visual Studio 2010. It provides base classes, available to all Visual Studio 2010 languages for such functions as accessing databases, parsing XML, displaying and processing Windows and web forms, and providing security for your applications. All languages in Visual Studio 2010 share and use the same base classes, making your choice of a programming language in Visual Studio 2010 a matter of personal preference and syntax style. 1/ -Procedure (or traditional) application
Event Driven Model:
-Event Driven application 2/Interactive Development Write Code, Compile, Test
:
Ex: Used C language
lkçNHCompile Visual Basic
-eBlkMBugsresrebImanxus VB R)ab;Pøam .
:
-eBl CompileebICYbErrorenaHeyIgDebugehIyeyIgGaceGayvaCompilebnþr
(mincab;epþImBIbnÞat;(Line)dMbUgmkeT)
3/ How to Create an Application in Visual Basic There are three main steps:
? :
a/ Create an interface b/ Set properties c/ Write code
Interface CakEnøgBIrEdlGacTak;Tg;Kña)an
4/ Interface Style -SDI: single document interface
:
-MDI: Multiple document interfaces -Explorer Visual basic -Windows Development Language - Object based programming language
Microsoft Visual Basic .Net Semester I
Prepare by Lecturer Sok Kavei P a g e | 2
Object: - Tangible object{Form, Control, …}
- Intangible object{KMnit, …}
Object -Property(lkçNHsMKal;rbs; Object Ex: Name, Size…)æ
-Methods(smtßPaBEdl Object GaceFVI)an Ex: List Box manMethods dUcCa
AddItem, RemoveItem, Clear…)
-Events ( CaGMeBI(rWehtukar)EdlGacekIteLIgcMeBaHobject Ex: Text Box Event
dUcCa Click, Change, Gotfocus, Lostfocus …)
5/Variable ( Syntax1: Dim Variable_Name As Data_Type
Public, Private, Dim, Static)
Syntax2: Dim Variable_Name1, Variable_Name2,………… As Data_Type Syntax3: Dim Variable_Name1 As Data_Type, Variable_Name2 As Data_Type, Variable_Name3 As Data_Type
A VB .Net program is made up of variables and programming statements enclosed in a module. This is a big step for someone to understand. The simplest way to understand this is just to realize that variables and programming statements need to be grouped together by something. This something is called a module. Just like a neighborhood groups together homes and streets. A VB.NET program may contain may module just like a city contains many neighborhoods. We will now learn to use variables and programming statements and place them into a module to form a VB.Net program.
VB .Net Program
Before you can use a variable in a program it has to be declared. To declare a variable you use the Dim keyword and specify a data type list in the preceding data type table.
How to Declaring Variables
Dim x as Integer Code (blue)
Dim identifier As datatype Definition (violet)
In the above example x is declared as a variable of Integer data type. Dim means declare variable,
as means specify a data type.
Dim name As String name = "Ed"
Dim name As String = "Ed"

Microsoft Visual Basic .Net Semester I
Prepare by Lecturer Sok Kavei P a g e | 3
Data Type Size Sample
Value Range of values Default
Value String Early 2
GB "hello there" Alphanumeric characters, digits and 2 Billion
characters Null
Char 'a'C Single characters the C stands for character Null Integer or Int32 or %
4 Bytes -5 Larger numbers ranging from -2147483648 to 2147483647
0
Long or Int64
8 Bytes 18459038 Very Large whole numbers 0
Boolean 2 Bytes True True or False False Byte 1 Bytes 10 small numbers range 0 to 255 0 Short or Int16
2 Byte 1234 medium numbers ranging from -32,768 to 32,767
0
Single 4 Byte 5.678 Single-precision floating point numbers with six digits of accuracy. -3.402823E38 -1.401298E-45 -1.401298E-45 3.402823E38
0
Double or #
8 Byte -2.4585E30
Double-precision floating point numbers with 14 digits of accuracy. -1.7976933486231E308 to -4.94065645841247E-324 4.9465645841247E-324 to 1.7976933486231E308
0
Decimal or @
16 Byte 10.50 Decimal fractions, such as dollars and cents. 79,228,162,514,264,337,593,950,335
0
Date 8 Byte #5/23/2002# month, day, year, various date formats available 1/1/100 to 12/31/9999
Object frm as Form Objects represent a group of many values *Form and control are basic building blocks used to create a user interface *Form and controls are objects Control Addition: Programmatic Creation
To programmatically add a control to your application, you must know the name of its class. Once you have decided about the desired control, declare a variable of its class. Here is an example:
Private Sub Form1_Load(ByVal sender As System.Object, ByVal e As System.EventArgs) Handles MyBase.Load Dim btnSubmit As Button End Sub
After, or when, declaring the variable, you can use the New operator to allocate memory for it:
Private Sub Form1_Load(ByVal sender As System.Object, ByVal e As System.EventArgs) Handles MyBase.Load Dim btnSubmit As Button
Microsoft Visual Basic .Net Semester I
Prepare by Lecturer Sok Kavei P a g e | 4
btnSubmit = New Button End Sub
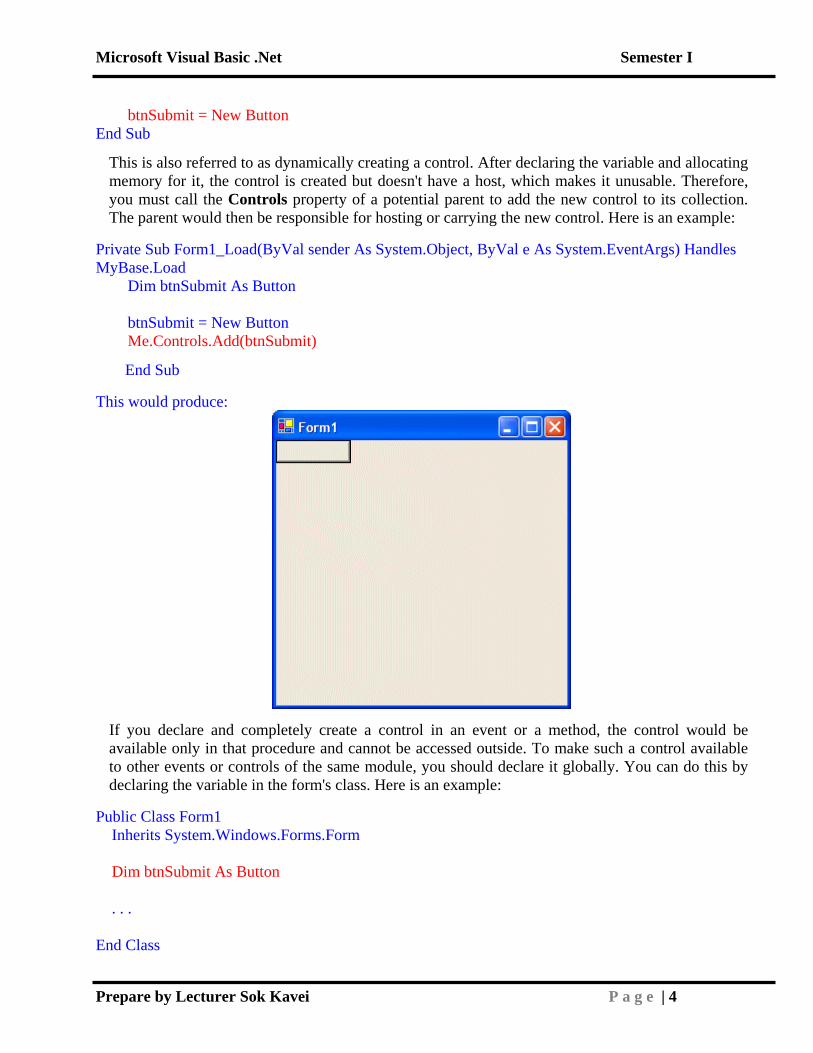
This is also referred to as dynamically creating a control. After declaring the variable and allocating memory for it, the control is created but doesn't have a host, which makes it unusable. Therefore, you must call the Controls property of a potential parent to add the new control to its collection. The parent would then be responsible for hosting or carrying the new control. Here is an example:
Private Sub Form1_Load(ByVal sender As System.Object, ByVal e As System.EventArgs) Handles MyBase.Load Dim btnSubmit As Button btnSubmit = New Button Me.Controls.Add(btnSubmit)
End Sub
This would produce:
If you declare and completely create a control in an event or a method, the control would be available only in that procedure and cannot be accessed outside. To make such a control available to other events or controls of the same module, you should declare it globally. You can do this by declaring the variable in the form's class. Here is an example:
Public Class Form1 Inherits System.Windows.Forms.Form Dim btnSubmit As Button . . . End Class
Microsoft Visual Basic .Net Semester I
Prepare by Lecturer Sok Kavei P a g e | 5
After declaring the control, you can allocate its memory in the form's constructor or prior to using it. Here is an example:
Public Class Form1 Inherits System.Windows.Forms.Form Dim btnSubmit As Button #Region " Windows Form Designer generated code " Public Sub New() MyBase.New() 'This call is required by the Windows Form Designer. InitializeComponent() 'Add any initialization after the InitializeComponent() call btnSubmit = New Button Me.Controls.Add(btnSubmit) End Sub . . . #End Region End Class
* Property Textbox Control
* Methods Setfocus Syntax * Events
: Controlname.Setfocus
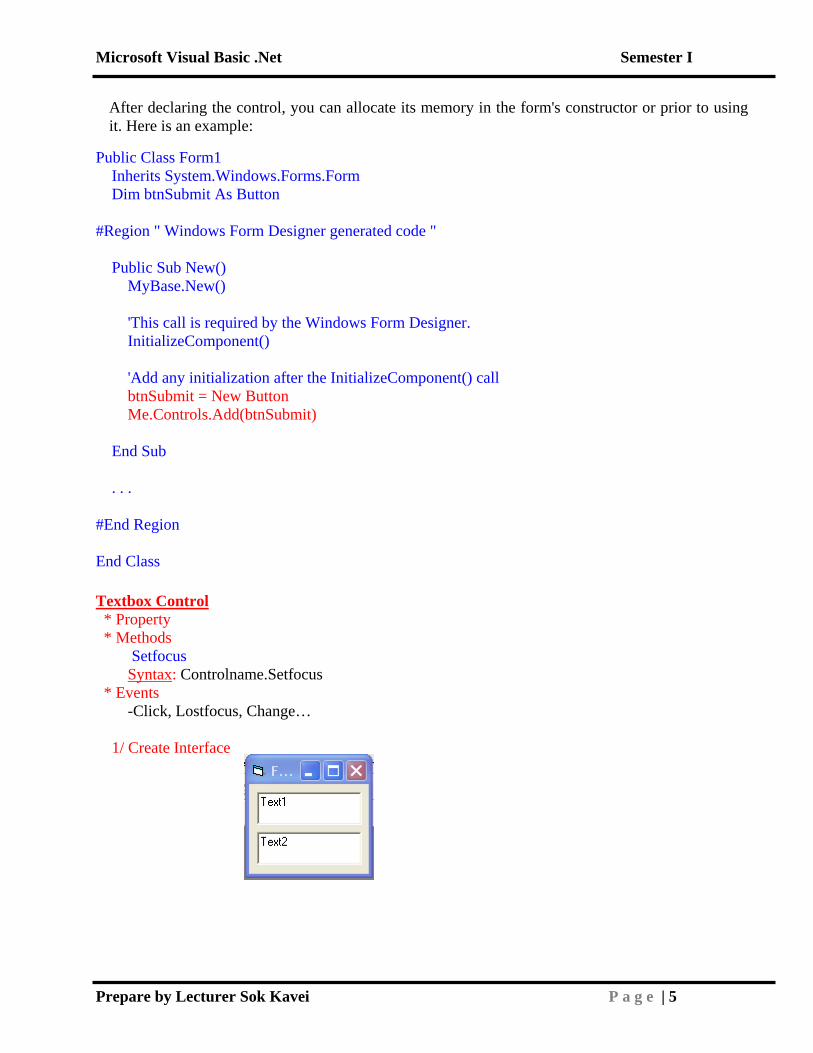
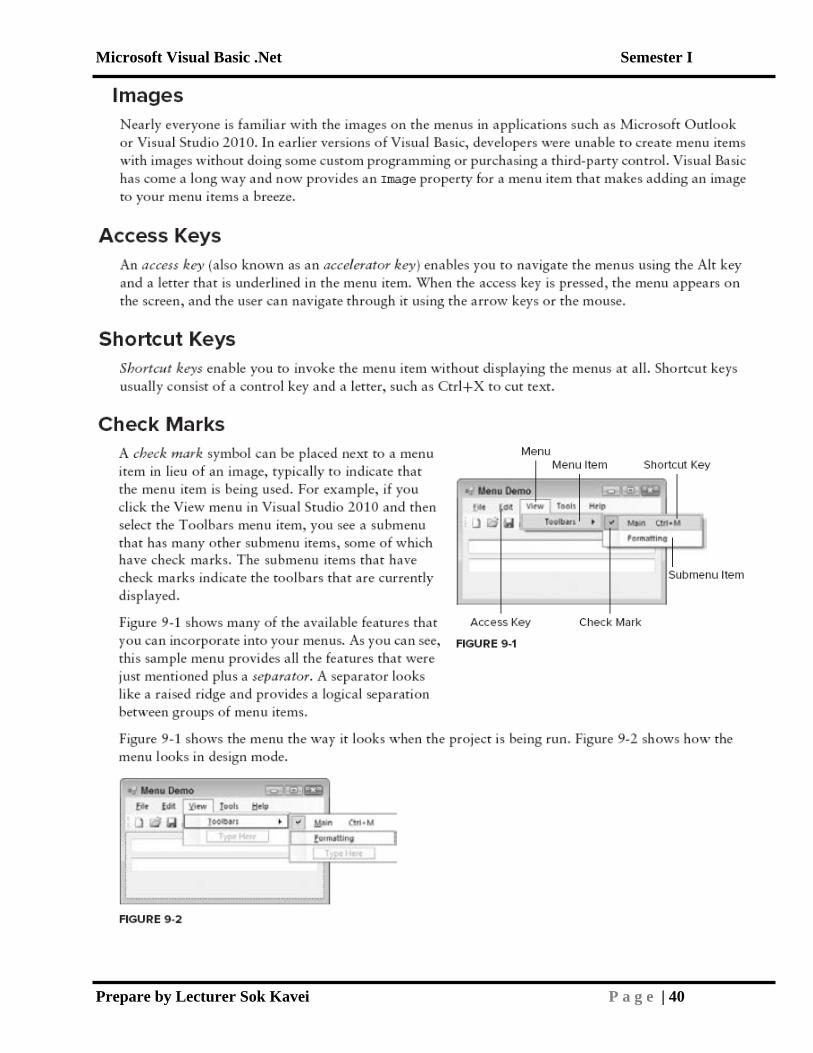
-Click, Lostfocus, Change… 1/ Create Interface
Microsoft Visual Basic .Net Semester I
Prepare by Lecturer Sok Kavei P a g e | 6
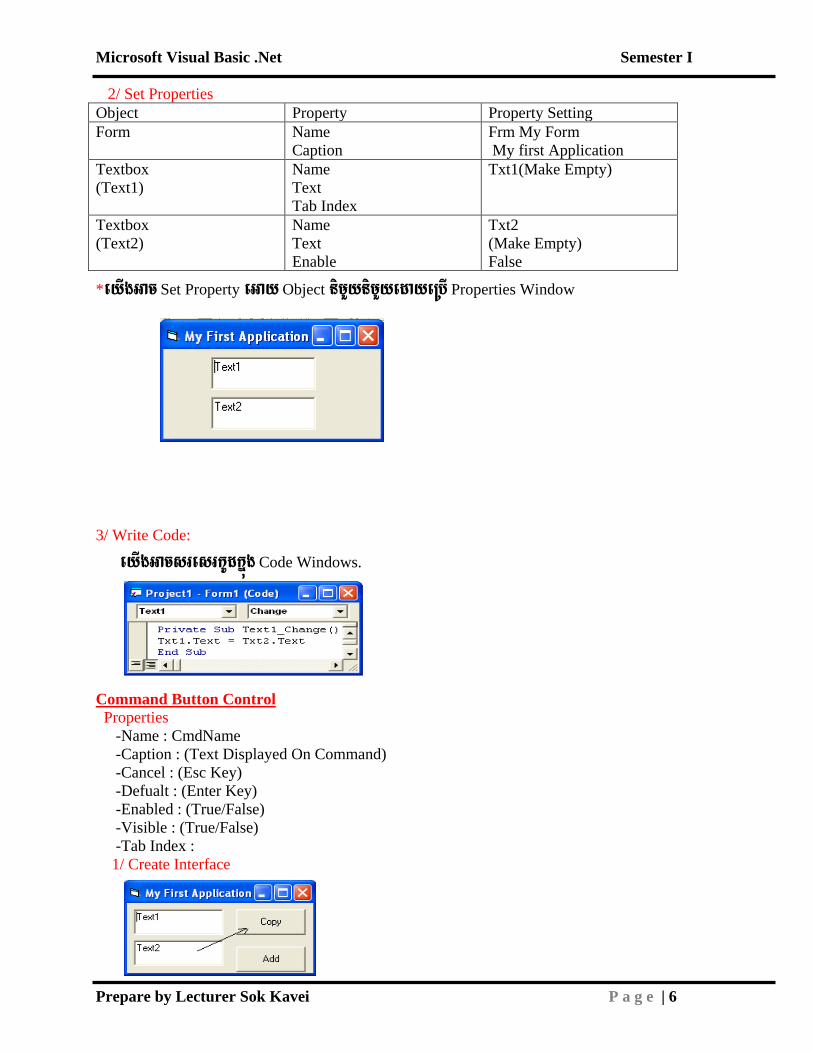
2/ Set Properties Object Property Property Setting Form Name
Caption Frm My Form My first Application
Textbox (Text1)
Name Text Tab Index
Txt1(Make Empty)
Textbox (Text2)
Name Text Enable
Txt2 (Make Empty) False
*eyIgGac Set Property eGay Object nimYynimYyedayeRbI Properties Window
3/ Write Code:
eyIgGacsresrkUdkñúg Code Windows.
Properties Command Button Control
-Name : CmdName -Caption : (Text Displayed On Command) -Cancel : (Esc Key) -Defualt : (Enter Key) -Enabled : (True/False) -Visible : (True/False) -Tab Index : 1/ Create Interface
Microsoft Visual Basic .Net Semester I
Prepare by Lecturer Sok Kavei P a g e | 7
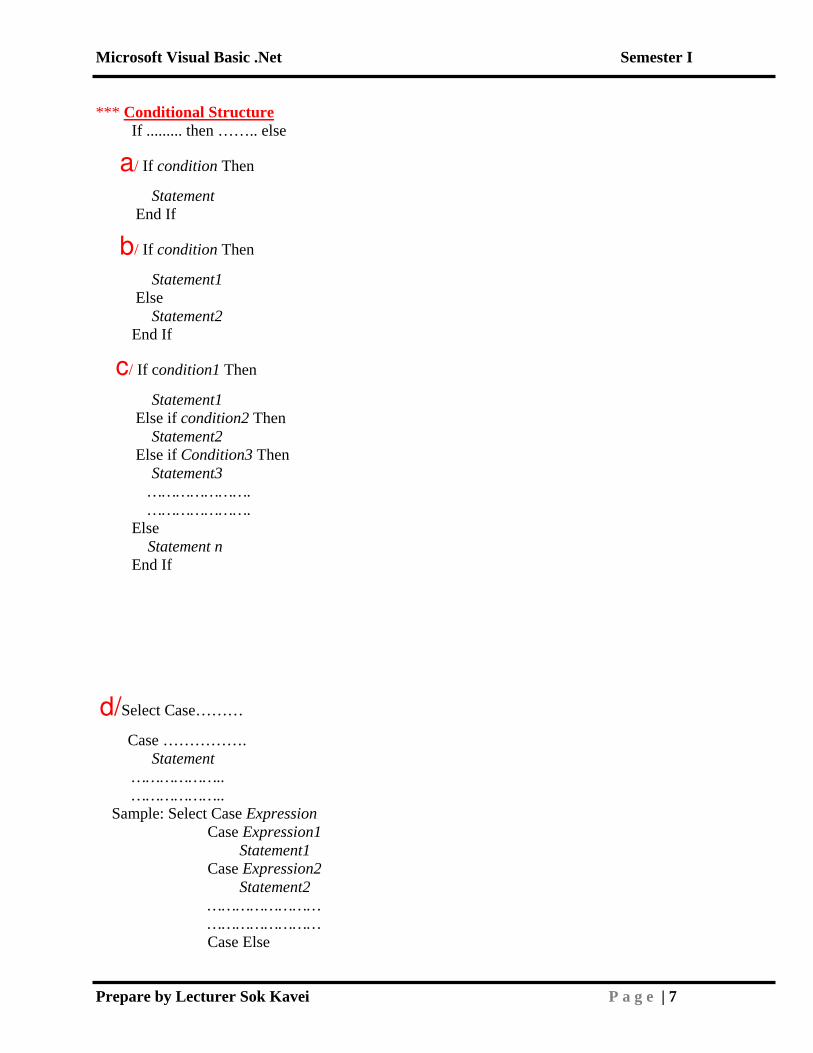
*** If ......... then …….. else
Conditional Structure
a/ If condition Then
Statement End If
b/ If condition Then
Statement1 Else Statement2 End If
c/ If condition1 Then
Statement1 Else if condition2 Then Statement2 Else if Condition3 Then Statement3 …………………. …………………. Else Statement n End If
d/Select Case………
Case ……………. Statement ……………….. ……………….. Sample: Select Case Expression Case Expression1 Statement1 Case Expression2 Statement2 …………………… …………………… Case Else
Microsoft Visual Basic .Net Semester I
Prepare by Lecturer Sok Kavei P a g e | 8
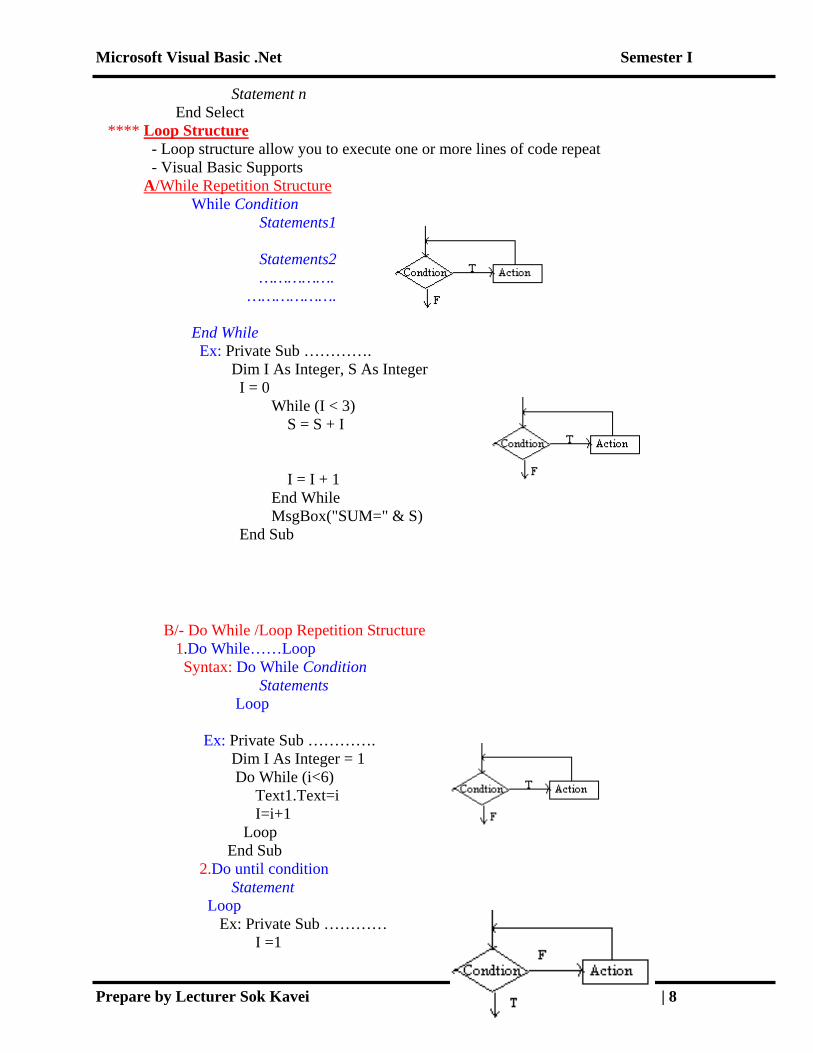
Statement n End Select **** - Loop structure allow you to execute one or more lines of code repeat
Loop Structure
- Visual Basic Supports While Condition
A/While Repetition Structure
Statements1 Statements2 ……………. ………………. End While Ex: Private Sub …………. Dim I As Integer, S As Integer I = 0
While (I < 3) S = S + I
I = I + 1 End While MsgBox("SUM=" & S) End Sub
B/- Do While /Loop Repetition Structure 1.Do While……Loop Syntax: Do While Condition Statements Loop Ex: Private Sub …………. Dim I As Integer = 1 Do While (i<6) Text1.Text=i I=i+1 Loop End Sub 2.Do until condition Statement Loop Ex: Private Sub ………… I =1
Microsoft Visual Basic .Net Semester I
Prepare by Lecturer Sok Kavei P a g e | 9
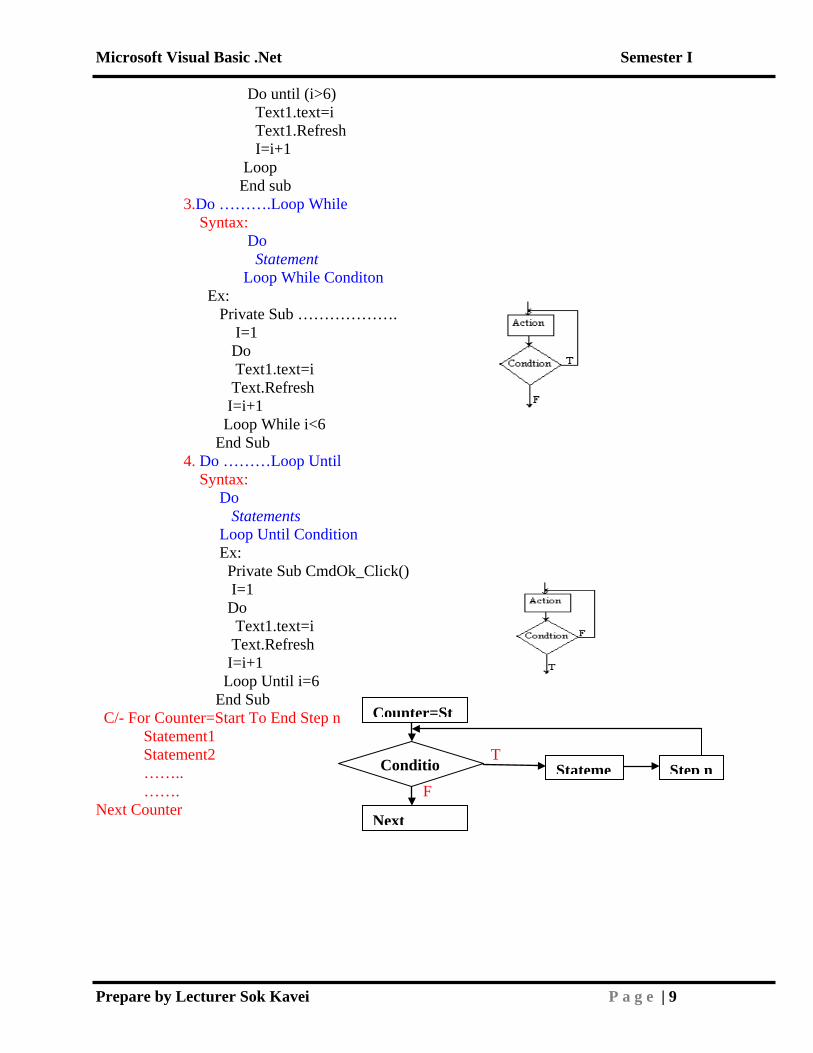
Do until (i>6) Text1.text=i Text1.Refresh I=i+1 Loop End sub 3.Do ……….Loop While Syntax: Do Statement Loop While Conditon Ex: Private Sub ………………. I=1 Do Text1.text=i Text.Refresh I=i+1 Loop While i<6 End Sub 4. Do ………Loop Until Syntax: Do Statements Loop Until Condition Ex: Private Sub CmdOk_Click() I=1 Do Text1.text=i Text.Refresh I=i+1 Loop Until i=6 End Sub C/- For Counter=Start To End Step n Statement1 Statement2 T …….. ……. F Next Counter
Counter=St
Conditio
Stateme
Step n
Next

Microsoft Visual Basic .Net Semester I
Prepare by Lecturer Sok Kavei P a g e | 10
EX
D/ The For Each The For Each . . . Next Loop
In practical, day-to-day work, it’s unlikely that you’ll use For . . . Next loops as illustrated here. Because of way the .NET Framework typically works, you’ll usually use a derivative of the For . . . Next loop called the For Each . . . Next loop.
In the algorithms you design, whenever a loop is necessary, you’ll have a collection of things to work through, and usually this set is expressed as an array. For example, you might want to look through all of the files in a folder, looking for those that are larger than a particular size. When you ask the .NET Framework for a list of files, you are returned an array of strings, with each string in that array describing a single file.
For Each Loop In this Try It Out, you’ll modify your Loops application so that it returns a list of folders
contained at the root of your C drive. 1. Return to the Forms Designer, add another Button control to your form, and set its Name
property to btnForEachLoop and its Text property to For Each Loop. 2. Double-click the button and add the following bolded code to the Click event handler:
Private Sub btnForEachLoop_Click(ByVal sender As System.Object, ByVal e As System.EventArgs) Handles btnForEachLoop.Click
‘List each folder at the root of your C drive For Each strFolder As String In _ My.Computer.FileSystem.GetDirectories("C:\") ‘Add the item to the list lstData.Items.Add(strFolder) Next End Sub Private Sub btnQuittingAForLoop_Click(ByVal sender As System.Object, _ ByVal e As System.EventArgs) Handles btnQuittingAForLoop.Click ‘Clear the list ClearList() ‘List each folder at the root of your C drive For Each strFolder As String In _ My.Computer.FileSystem.GetDirectories("C:\")
Microsoft Visual Basic .Net Semester I
Prepare by Lecturer Sok Kavei P a g e | 11
‘Add the item to the list lstData.Items.Add(strFolder) ‘Do you have the folder C:\Program Files? If String.Compare(strFolder, "c:\program files", True) = 0 Then ‘Tell the user MessageBox.Show("Found it, exiting the loop now.", "Loops") ‘Quit the loop early Exit For End If Next End Sub
Structures Replace UDTs User-defined types, or UDTs, were a way to create a custom data type in VB6. You could create
a new data type that contained other elements within it. For example,you could create a Customer data type using this syntax:
Private Type Customer Name As String Income As Currency End Type
You could then use that UDT in your application, with code like this: Dim buyer As Customer buyer.Name = “Martha” buyer.Income = 20000 MsgBox(buyer.Name & “ “ & buyer.Income)
The Type statement is no longer supported in VB.NET. It has been replaced by the Structure statement. The Structure statement has some major changes, but to recreate the UDT shown earlier, the syntax is this:
Structure Customer Dim Name As String Dim Income As Decimal End Structure
Notice that the only real difference so far is that you have to Dim each variable inside the structure, which is something you did not have to do in the Type statement, even with Option Explicit turned on. Notice also that Dim is the same as Public here, meaning that the variables are visible to any instance of the structure. Structures have many other features, however. One of the biggest differences is that structures can support methods. For example, you could add a Shipping method to the Customer structure to calculate shipping costs based on delivery zone. This code adds a DeliveryZone property and a DeliveryCost function:
Structure Customer Dim Name As String 64 Chapter 3: Major VB.NET Changes Dim Income As Decimal Dim DeliveryZone As Integer Function DeliveryCost() As Decimal If DeliveryZone > 3 Then Return 25 Else Return CDec(12.5)
Microsoft Visual Basic .Net Semester I
Prepare by Lecturer Sok Kavei P a g e | 12
End If End Function End Structure
Here, you have a built-in function called DeliveryCost. To use this structure, your client code would look something like this:
Dim buyer As Customer buyer.Name = “Martha” buyer.Income = 20000 buyer.DeliveryZone = 4 msgbox(buyer.DeliveryCost)
In this case, the message box would report a value of 25. If you think this looks like a class, you are correct. In fact, structures can have properties, methods, and events. They also support implementing interfaces and they can handle events. There are some caveats, however. Some of those stipulations include the following: • You cannot inherit from a structure. • You cannot initialize the fields inside a structure. For example, this code is illegal:
Structure Customer Dim Name As String = “Martha” End Structure
• Properties are public by default, instead of private as they are in classes. Structures are value types rather than reference types. That means if you assign a structure variable to another structure variable, you get a copy of the structure and not a reference to the original structure. The following code shows that a copy is occurring because an update to seller does not update buyer:
Dim buyer As Customer Dim seller ‘ Object data type seller = buyer seller.Name = “Linda” MsgBox(buyer.Name) MsgBox(seller.Name)
Note that the preceding code will not work if you have Option Strict turned on. If you want to test this, you’ll have to enter Option Strict Off. Creating Your Own Namespaces You are free to create your, own namespaces inside your assemblies. You can do this simply by inserting your own Namespace...End Namespace block. Inside the namespace block, you can have structures, classes, enums, interfaces, and other elements. You must name the namespace and it becomes what someone would import. Your code might look like this:
Namespace VolantTraining Public Class Customer ‘code here End Class Public Class Student ‘code here End Class End Namespace
Namespaces can be nested within other namespaces. For example, your namespace
Microsoft Visual Basic .Net Semester I
Prepare by Lecturer Sok Kavei P a g e | 13
might look something like this: Namespace VolantTraining Namespace Customer Class Training ... End Class Class Consulting ... End Class End Namespace Namespace Student ... End Namespace End Namespace
Microsoft Visual Basic .Net Semester I
Prepare by Lecturer Sok Kavei P a g e | 14
Chapter II Working with Data Structures WHAT YOU WILL LEARN IN THIS CHAPTER:
➤ Using Arrays
➤ Working with Enumerations
➤ Using Constants
➤ Working with Structures
In the previous chapters, you worked with simple data types — namely, Integer and String
variables. Although these data types are useful in their own right, more complex programs call
for working with data structures — that is, groups of data elements that are organized in a single
unit. In this chapter, you learn about the various data structures available in Visual Basic
2010. You also will see some ways in which you can work with complex sets of data. Finally,
you learn how you can build powerful collection classes for working with, maintaining, and
manipulating lists of complex data.
UNDERSTANDING ARRAYS
A fairly common requirement in writing software is the need to hold lists of similar or related
data. You can provide this functionality by using an array. Arrays are just lists of data that have
a single data type. For example, you might want to store a list of your friends’ ages in an integer
array or their names in a string array.
This section explains how to define, populate, and use arrays in your applications.
Defining and Using Arrays
When you define an array, you’re actually creating a variable that has more than one dimension.
For example, if you define a variable as a string, you can only hold a single string value in it:
Dim strName As String
However, with an array you create a kind of multiplier effect with a variable, so you can hold more than one value in a single variable. An array is defined by entering the size of the array after the variable name. For example, if you wanted to define a string array with 10 elements, you’d do this:
Dim strName(9) As String
For example, to set the element with index 2 in the array, you’d do this:
strName(2) = "Katie"
To get that same element back again, you’d do this:
MessageBox.Show(strName(2))
What’s important is that other elements in the array are unaffected when you set their siblings, so if
Microsoft Visual Basic .Net Semester I
Prepare by Lecturer Sok Kavei P a g e | 15
you do this:
strName(3) = "Betty"
strName(2)remains set to "Katie".
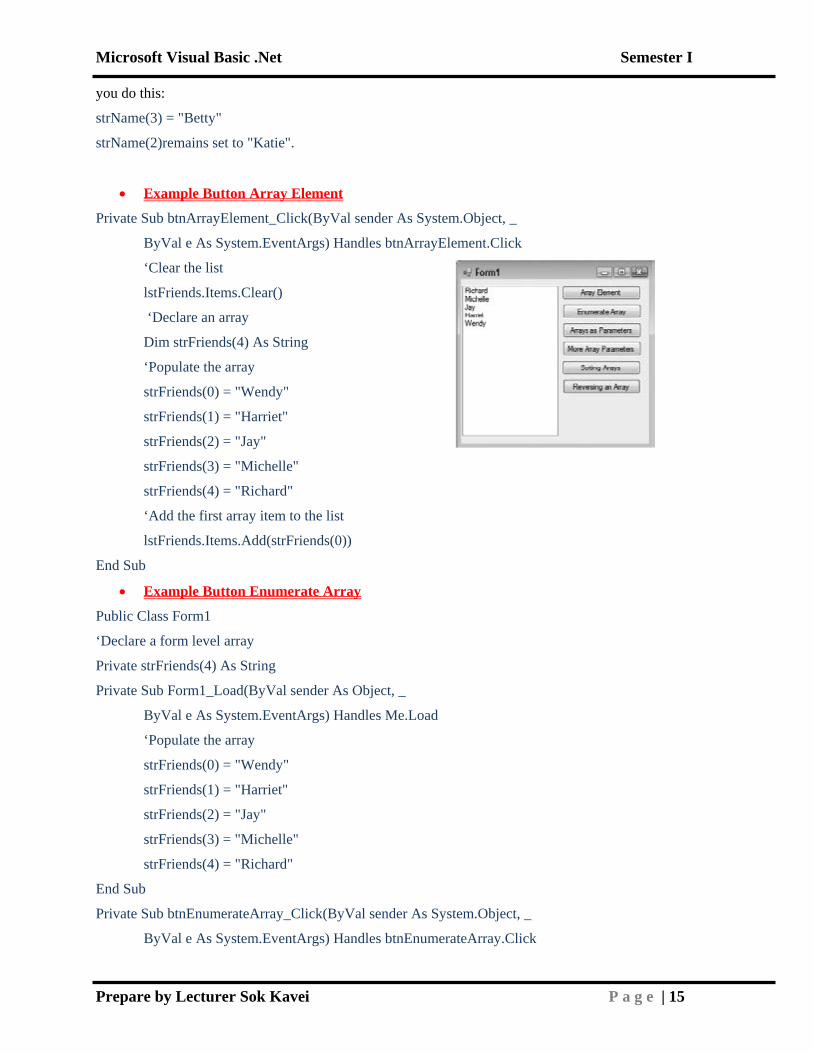
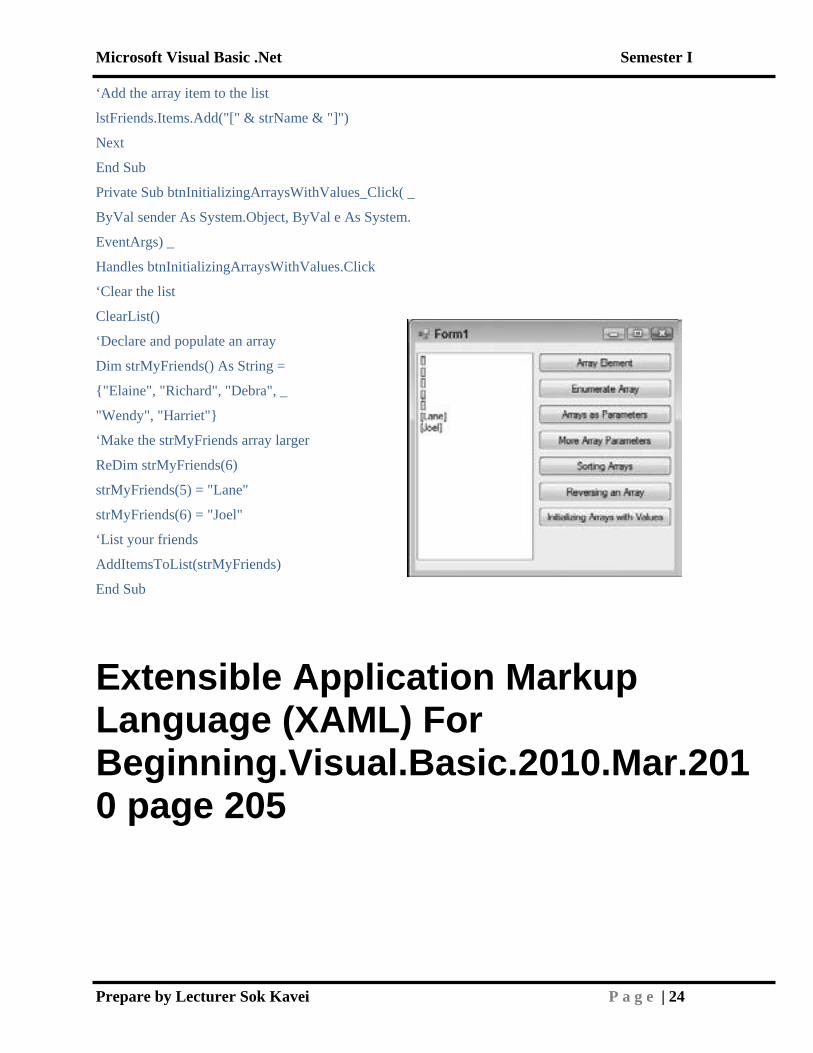
• Example Button Array Element
Private Sub btnArrayElement_Click(ByVal sender As System.Object, _
ByVal e As System.EventArgs) Handles btnArrayElement.Click
‘Clear the list
lstFriends.Items.Clear()
‘Declare an array
Dim strFriends(4) As String
‘Populate the array
strFriends(0) = "Wendy"
strFriends(1) = "Harriet"
strFriends(2) = "Jay"
strFriends(3) = "Michelle"
strFriends(4) = "Richard"
‘Add the first array item to the list
lstFriends.Items.Add(strFriends(0))
End Sub
• Example Button Enumerate Array
Public Class Form1
‘Declare a form level array
Private strFriends(4) As String
Private Sub Form1_Load(ByVal sender As Object, _
ByVal e As System.EventArgs) Handles Me.Load
‘Populate the array
strFriends(0) = "Wendy"
strFriends(1) = "Harriet"
strFriends(2) = "Jay"
strFriends(3) = "Michelle"
strFriends(4) = "Richard"
End Sub
Private Sub btnEnumerateArray_Click(ByVal sender As System.Object, _
ByVal e As System.EventArgs) Handles btnEnumerateArray.Click
Microsoft Visual Basic .Net Semester I
Prepare by Lecturer Sok Kavei P a g e | 16
lstFriends.Items.Clear() ‘Clear the list
‘Enumerate the array
For Each strName As String In strFriends
‘Add the array item to the list
lstFriends.Items.Add(strName)
Next
End Sub
• Example Button Array As Parameter Private Sub btnArraysAsParameters_Click(ByVal sender As System.Object, _
ByVal e As System.EventArgs) Handles btnArraysAsParameters.Click
‘Clear the list
ClearList()
‘List your friends
AddItemsToList(strFriends)
End Sub
Private Sub AddItemsToList(ByVal arrayList() As String)
‘Enumerate the array
For Each strName As String In arrayList
‘Add the array item to the list
lstFriends.Items.Add(strName)
Next
End Sub
• Example More Array Parameters.
Private Sub btnMoreArrayParameters_Click(ByVal sender As System.Object, _
ByVal e As System.EventArgs) Handles btnMoreArrayParameters.Click
‘Clear the list
ClearList()
‘Declare an array
Dim strMoreFriends(1) As String
‘Populate the array
strMoreFriends(0) = "Elaine"
strMoreFriends(1) = "Debra"
‘List your friends
AddItemsToList(strFriends)
AddItemsToList(strMoreFriends)
Microsoft Visual Basic .Net Semester I
Prepare by Lecturer Sok Kavei P a g e | 17
End Sub
• Example Sorting Arrays
Private Sub btnSortingArrays_Click(ByVal sender As System.Object, _
ByVal e As System.EventArgs) Handles btnSortingArrays.Click
ClearList() ‘Clear the list
‘Sort the array
Array.Sort(strFriends)
‘List your friends
AddItemsToList(strFriends)
End Sub
• Reversing an Array
Private Sub btnReversingAnArray_Click(ByVal sender As System.Object, _
ByVal e As System.EventArgs) Handles btnReversingAnArray.Click
‘Clear the list
ClearList()
‘Reverse the order — elements will be in
descending order
Array.Reverse(strFriends)
‘List your friends
AddItemsToList(strFriends)
End Sub
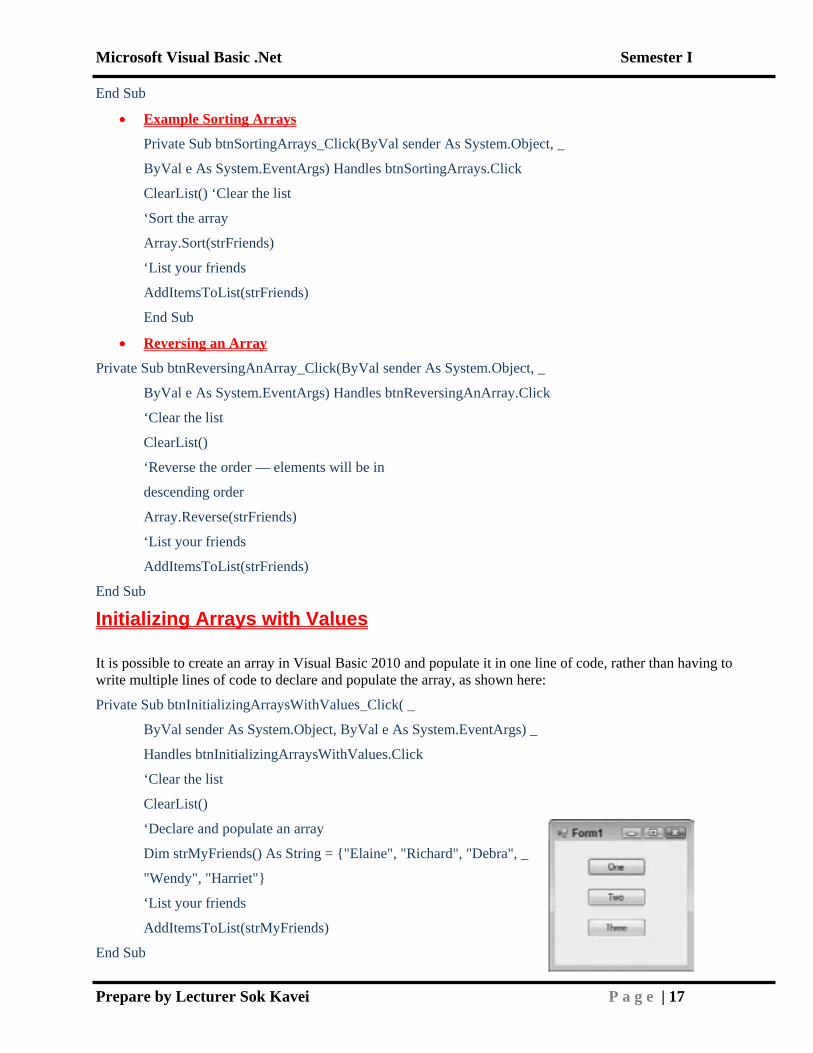
Initializing Arrays with Values
It is possible to create an array in Visual Basic 2010 and populate it in one line of code, rather than having to write multiple lines of code to declare and populate the array, as shown here:
Private Sub btnInitializingArraysWithValues_Click( _
ByVal sender As System.Object, ByVal e As System.EventArgs) _
Handles btnInitializingArraysWithValues.Click
‘Clear the list
ClearList()
‘Declare and populate an array
Dim strMyFriends() As String = {"Elaine", "Richard", "Debra", _
"Wendy", "Harriet"}
‘List your friends
AddItemsToList(strMyFriends)
End Sub

Microsoft Visual Basic .Net Semester I
Prepare by Lecturer Sok Kavei P a g e | 18
Using Constants
Public Class Form1
‘File name constant
Private Const strFileName As String = "C:\Temp\Hello.txt"
Private Sub btnOne_Click(ByVal sender As Object, _
ByVal e As System.EventArgs) Handles btnOne.Click
‘Using a constant
MessageBox.Show("1: " & strFileName, "Constants Demo")
End Sub
STRUCTURES
Applications commonly need to store several pieces of information of different data types that all relate
to one thing and must be kept together in a group, such as a customer’s name and address (strings) and
balance (a number). Usually, an object of a class is used to hold such a group of variables, as you’ll
discover in Chapter 11, but you can also use a structure.
Building Structures
Structures are similar to class objects but are somewhat simpler, so they’re discussed here.
Later, as you design applications, you need to be able to decide whether a structure or a class is appropriate.
As a rule of thumb, we suggest that if you end up putting a lot of methods on a structure, it
should probably be a class. It’s also relatively tricky to convert from a structure to a class later, because
structures and objects are created using different syntax rules, and sometimes the same syntax produces
different results between structures and objects. Therefore, choose once and choose wisely!
TRY IT OUT Building a Structure
Code file Structure Demo.zip is available for download at Wrox.com
Take a look at how you can build a structure.
1. Create a new Windows Forms application in Visual Studio 2010 called Structure Demo.
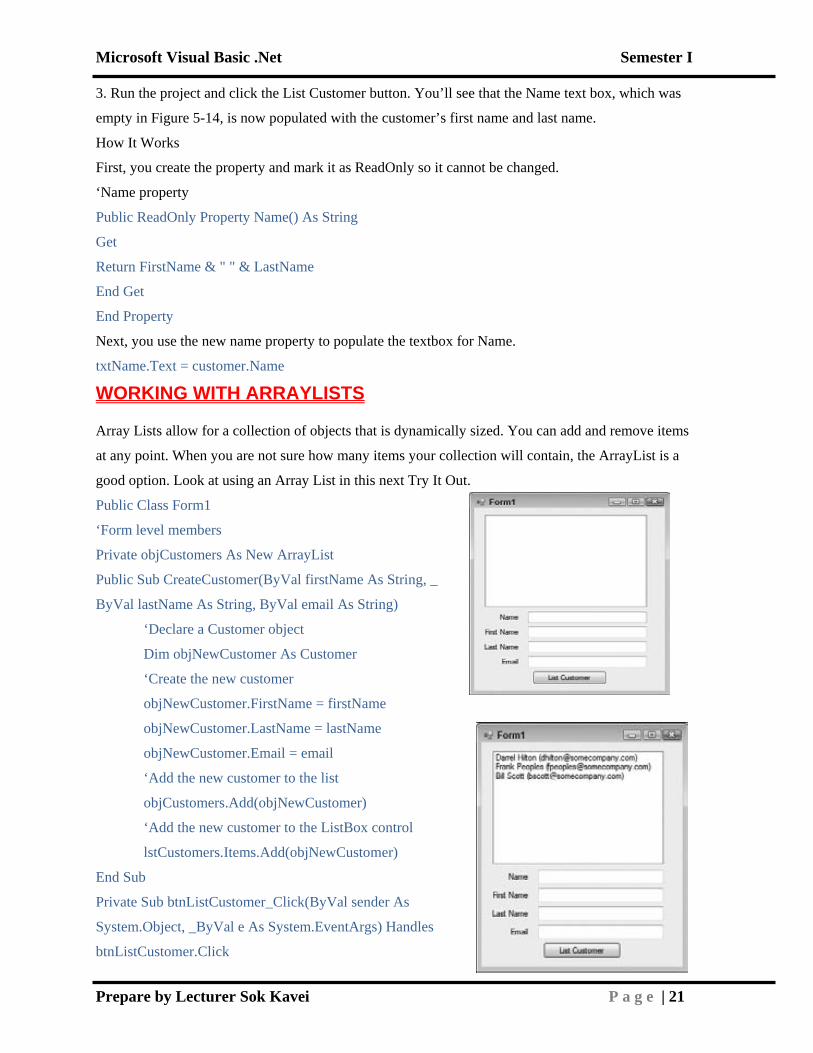
2. When the Forms Designer appears, add four Label controls, four TextBox controls, and a Button
control. Arrange your controls so that they look similar to Figure 5-13.
FIGURE 5-13
figure
3. Set the Name properties as follows:
➤ Set Label1 to lblName.
➤ Set TextBox1 to txtName.
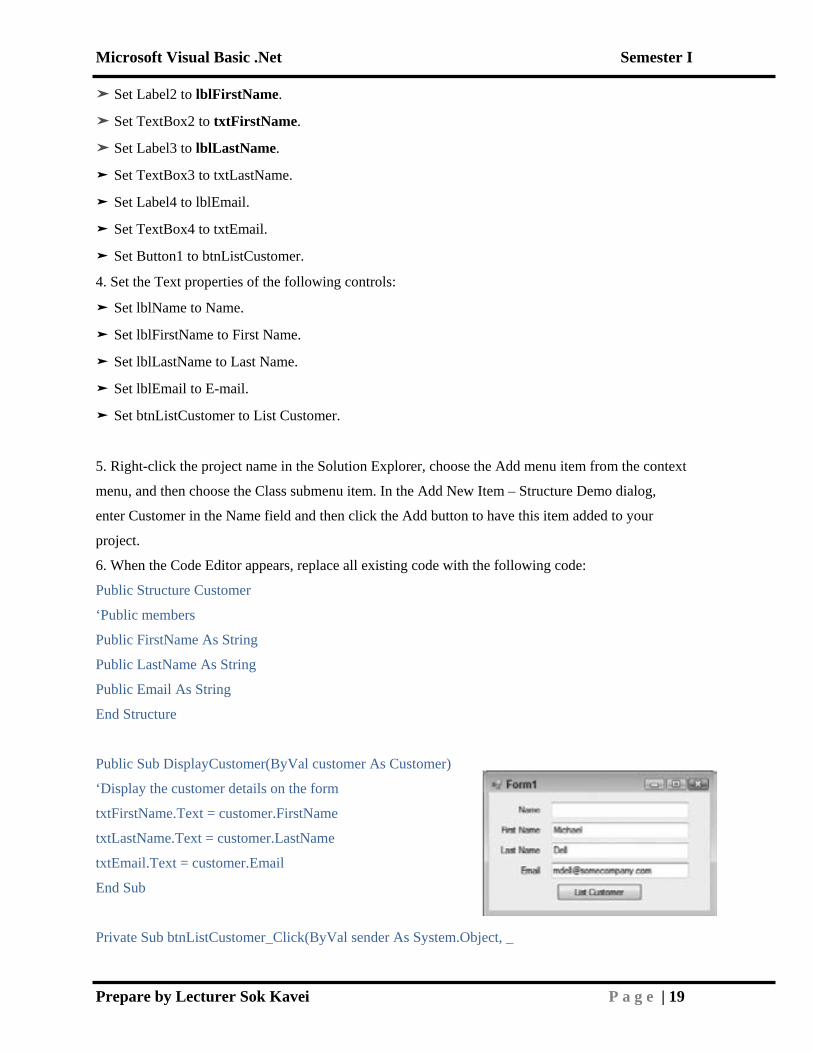
Microsoft Visual Basic .Net Semester I
Prepare by Lecturer Sok Kavei P a g e | 19
➤ Set Label2 to lblFirstName.
➤ Set TextBox2 to txtFirstName.
➤ Set Label3 to lblLastName.
➤ Set TextBox3 to txtLastName.
➤ Set Label4 to lblEmail.
➤ Set TextBox4 to txtEmail.
➤ Set Button1 to btnListCustomer.
4. Set the Text properties of the following controls:
➤ Set lblName to Name.
➤ Set lblFirstName to First Name.
➤ Set lblLastName to Last Name.
➤ Set lblEmail to E-mail.
➤ Set btnListCustomer to List Customer.
5. Right-click the project name in the Solution Explorer, choose the Add menu item from the context
menu, and then choose the Class submenu item. In the Add New Item – Structure Demo dialog,
enter Customer in the Name field and then click the Add button to have this item added to your
project.
6. When the Code Editor appears, replace all existing code with the following code:
Public Structure Customer
‘Public members
Public FirstName As String
Public LastName As String
Public Email As String
End Structure
Public Sub DisplayCustomer(ByVal customer As Customer)
‘Display the customer details on the form
txtFirstName.Text = customer.FirstName
txtLastName.Text = customer.LastName
txtEmail.Text = customer.Email
End Sub
Private Sub btnListCustomer_Click(ByVal sender As System.Object, _
Microsoft Visual Basic .Net Semester I
Prepare by Lecturer Sok Kavei P a g e | 20
ByVal e As System.EventArgs) Handles btnListCustomer.Click
‘Create a new customer
Dim objCustomer As Customer
objCustomer.FirstName = "Michael"
objCustomer.LastName = "Dell"
objCustomer.Email = "[email protected]"
‘Display the customer
DisplayCustomer(objCustomer)
End Sub
Adding Properties to Structures When you need to store basic information, you can add properties to a structure just as you did
to the form in the Enum Demo project earlier in the chapter. You learn how in the next Try It
Out.
TRY IT OUT Adding a Name Property Code file Structure Demo.zip is available for download at Wrox.com
In this Try It Out, you add a ReadOnly name property.
1. Open the Code Editor for Customer and add this bolded code to create a read-only property
Name:
‘Public members
Public FirstName As String
Public LastName As String
Public Email As String
‘Name property
Public ReadOnly Property Name() As String
Get
Return FirstName & " " & LastName
End Get
End Property
2. Open the Code Editor for Form1. Modify the DisplayCustomer method with the bolded code:
Public Sub DisplayCustomer(ByVal customer As Customer)
‘Display the customer details on the form
txtName.Text = customer.Name
txtFirstName.Text = customer.FirstName
txtLastName.Text = customer.LastName
txtEmail.Text = customer.Email
End Sub
Microsoft Visual Basic .Net Semester I
Prepare by Lecturer Sok Kavei P a g e | 21
3. Run the project and click the List Customer button. You’ll see that the Name text box, which was
empty in Figure 5-14, is now populated with the customer’s first name and last name.
How It Works
First, you create the property and mark it as ReadOnly so it cannot be changed.
‘Name property
Public ReadOnly Property Name() As String
Get
Return FirstName & " " & LastName
End Get
End Property
Next, you use the new name property to populate the textbox for Name.
txtName.Text = customer.Name
WORKING WITH ARRAYLISTS
Array Lists allow for a collection of objects that is dynamically sized. You can add and remove items
at any point. When you are not sure how many items your collection will contain, the ArrayList is a
good option. Look at using an Array List in this next Try It Out.
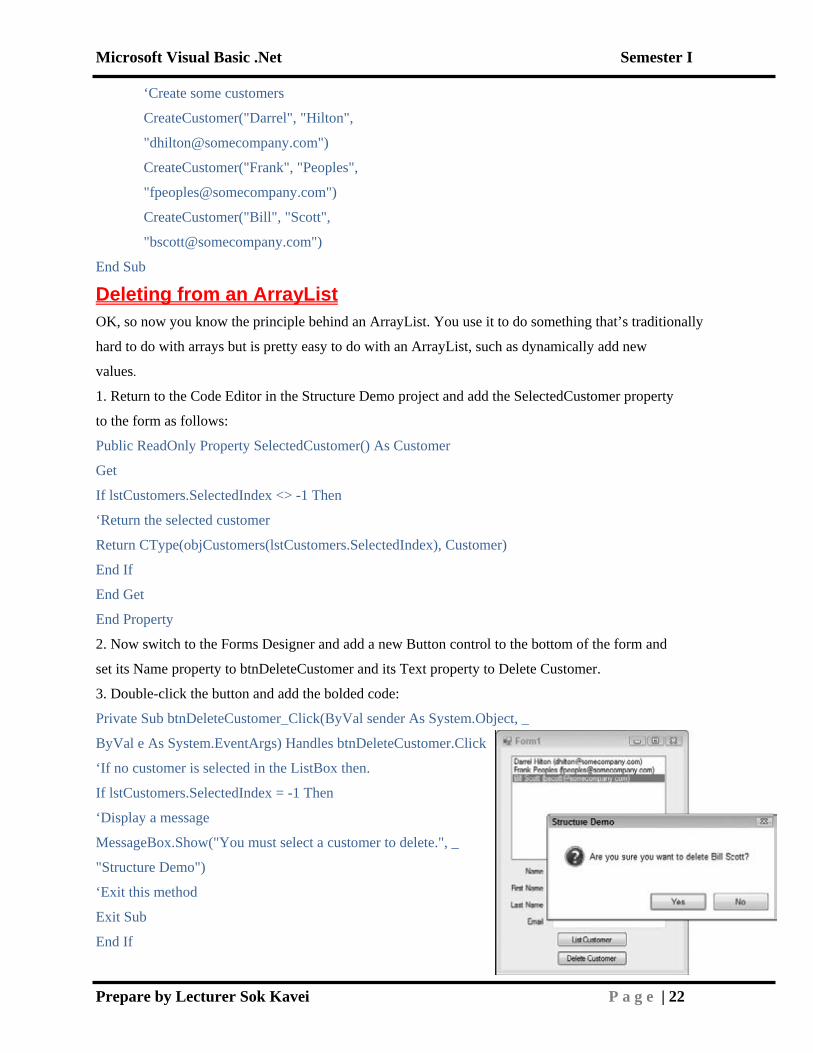
Public Class Form1
‘Form level members
Private objCustomers As New ArrayList
Public Sub CreateCustomer(ByVal firstName As String, _
ByVal lastName As String, ByVal email As String)
‘Declare a Customer object
Dim objNewCustomer As Customer
‘Create the new customer
objNewCustomer.FirstName = firstName
objNewCustomer.LastName = lastName
objNewCustomer.Email = email
‘Add the new customer to the list
objCustomers.Add(objNewCustomer)
‘Add the new customer to the ListBox control
lstCustomers.Items.Add(objNewCustomer)
End Sub
Private Sub btnListCustomer_Click(ByVal sender As
System.Object, _ByVal e As System.EventArgs) Handles
btnListCustomer.Click
Microsoft Visual Basic .Net Semester I
Prepare by Lecturer Sok Kavei P a g e | 22
‘Create some customers
CreateCustomer("Darrel", "Hilton",
CreateCustomer("Frank", "Peoples",
CreateCustomer("Bill", "Scott",
End Sub
Deleting from an ArrayList OK, so now you know the principle behind an ArrayList. You use it to do something that’s traditionally
hard to do with arrays but is pretty easy to do with an ArrayList, such as dynamically add new
values.
1. Return to the Code Editor in the Structure Demo project and add the SelectedCustomer property
to the form as follows:
Public ReadOnly Property SelectedCustomer() As Customer
Get
If lstCustomers.SelectedIndex <> -1 Then
‘Return the selected customer
Return CType(objCustomers(lstCustomers.SelectedIndex), Customer)
End If
End Get
End Property
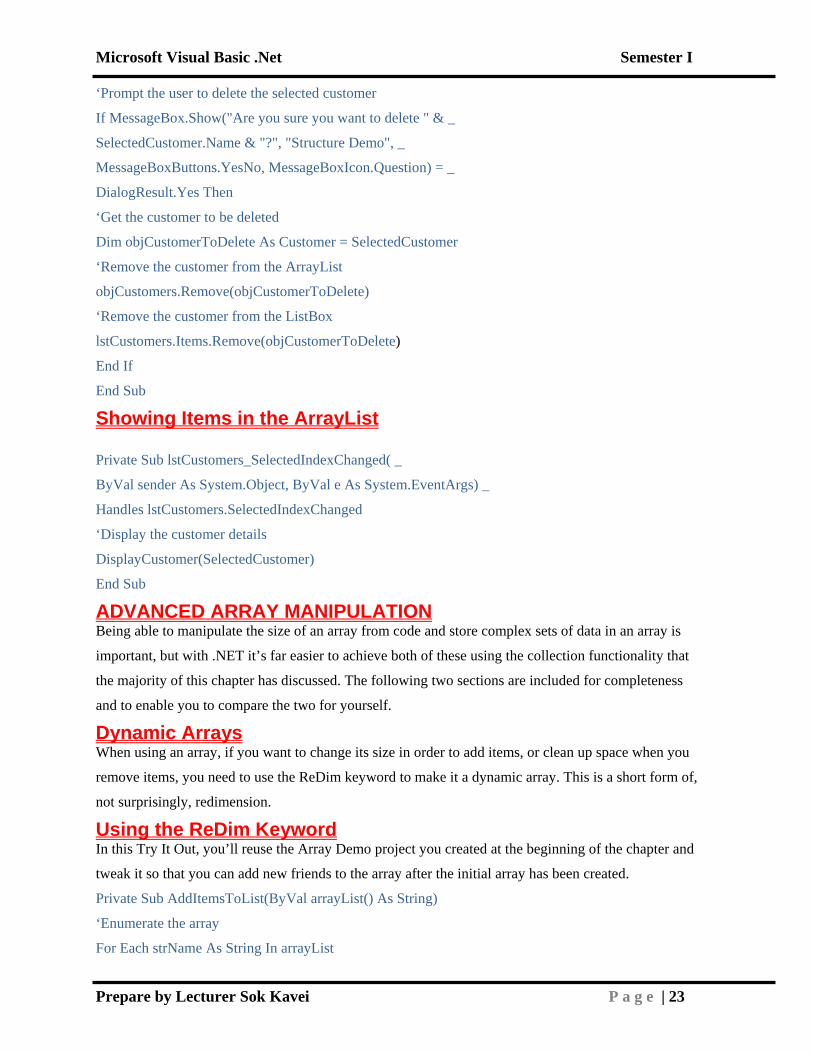
2. Now switch to the Forms Designer and add a new Button control to the bottom of the form and
set its Name property to btnDeleteCustomer and its Text property to Delete Customer.
3. Double-click the button and add the bolded code:
Private Sub btnDeleteCustomer_Click(ByVal sender As System.Object, _
ByVal e As System.EventArgs) Handles btnDeleteCustomer.Click
‘If no customer is selected in the ListBox then.
If lstCustomers.SelectedIndex = -1 Then
‘Display a message
MessageBox.Show("You must select a customer to delete.", _
"Structure Demo")
‘Exit this method
Exit Sub
End If
Microsoft Visual Basic .Net Semester I
Prepare by Lecturer Sok Kavei P a g e | 23
‘Prompt the user to delete the selected customer
If MessageBox.Show("Are you sure you want to delete " & _
SelectedCustomer.Name & "?", "Structure Demo", _
MessageBoxButtons.YesNo, MessageBoxIcon.Question) = _
DialogResult.Yes Then
‘Get the customer to be deleted
Dim objCustomerToDelete As Customer = SelectedCustomer
‘Remove the customer from the ArrayList
objCustomers.Remove(objCustomerToDelete)
‘Remove the customer from the ListBox
lstCustomers.Items.Remove(objCustomerToDelete)
End If
End Sub
Showing Items in the ArrayList Private Sub lstCustomers_SelectedIndexChanged( _
ByVal sender As System.Object, ByVal e As System.EventArgs) _
Handles lstCustomers.SelectedIndexChanged
‘Display the customer details
DisplayCustomer(SelectedCustomer)
End Sub
ADVANCED ARRAY MANIPULATION Being able to manipulate the size of an array from code and store complex sets of data in an array is
important, but with .NET it’s far easier to achieve both of these using the collection functionality that
the majority of this chapter has discussed. The following two sections are included for completeness
and to enable you to compare the two for yourself.
Dynamic Arrays When using an array, if you want to change its size in order to add items, or clean up space when you
remove items, you need to use the ReDim keyword to make it a dynamic array. This is a short form of,
not surprisingly, redimension.
Using the ReDim Keyword In this Try It Out, you’ll reuse the Array Demo project you created at the beginning of the chapter and
tweak it so that you can add new friends to the array after the initial array has been created.
Private Sub AddItemsToList(ByVal arrayList() As String)
‘Enumerate the array
For Each strName As String In arrayList
Microsoft Visual Basic .Net Semester I
Prepare by Lecturer Sok Kavei P a g e | 24
‘Add the array item to the list
lstFriends.Items.Add("[" & strName & "]")
Next
End Sub
Private Sub btnInitializingArraysWithValues_Click( _
ByVal sender As System.Object, ByVal e As System.
EventArgs) _
Handles btnInitializingArraysWithValues.Click
‘Clear the list
ClearList()
‘Declare and populate an array
Dim strMyFriends() As String =
{"Elaine", "Richard", "Debra", _
"Wendy", "Harriet"}
‘Make the strMyFriends array larger
ReDim strMyFriends(6)
strMyFriends(5) = "Lane"
strMyFriends(6) = "Joel"
‘List your friends
AddItemsToList(strMyFriends)
End Sub
Extensible Application Markup Language (XAML) For Beginning.Visual.Basic.2010.Mar.2010 page 205
Microsoft Visual Basic .Net Semester I
Prepare by Lecturer Sok Kavei P a g e | 25
Chapter III Displaying Dialog Boxes WHAT YOU WILL LEARN IN THIS CHAPTER:
➤ Creating a message box using different buttons and icons
➤ Creating an Open dialog box that enables you to open files
➤ Creating a Save dialog box that enables you to save files
➤ Creating a Font dialog box that enables you to apply the selected
font to text
➤ Creating a Color dialog box that enables you to define and select
custom colors
➤ Creating a Print dialog box that prints text from your application
➤ Creating a Browse dialog box that enables you to browse for folders
Microsoft Visual Basic .Net Semester I
Prepare by Lecturer Sok Kavei P a g e | 26
Microsoft Visual Basic .Net Semester I
Prepare by Lecturer Sok Kavei P a g e | 27
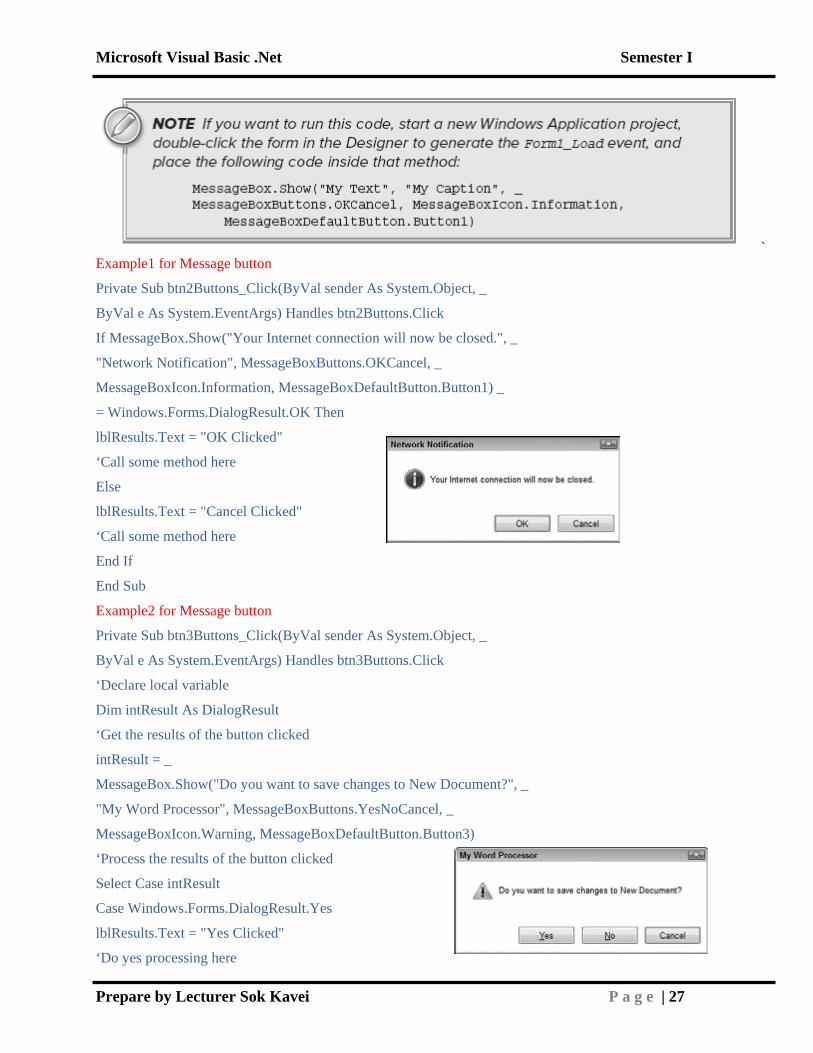
` Example1 for Message button
Private Sub btn2Buttons_Click(ByVal sender As System.Object, _
ByVal e As System.EventArgs) Handles btn2Buttons.Click
If MessageBox.Show("Your Internet connection will now be closed.", _
"Network Notification", MessageBoxButtons.OKCancel, _
MessageBoxIcon.Information, MessageBoxDefaultButton.Button1) _
= Windows.Forms.DialogResult.OK Then
lblResults.Text = "OK Clicked"
‘Call some method here
Else
lblResults.Text = "Cancel Clicked"
‘Call some method here
End If
End Sub
Example2 for Message button
Private Sub btn3Buttons_Click(ByVal sender As System.Object, _
ByVal e As System.EventArgs) Handles btn3Buttons.Click
‘Declare local variable
Dim intResult As DialogResult
‘Get the results of the button clicked
intResult = _
MessageBox.Show("Do you want to save changes to New Document?", _
"My Word Processor", MessageBoxButtons.YesNoCancel, _
MessageBoxIcon.Warning, MessageBoxDefaultButton.Button3)
‘Process the results of the button clicked
Select Case intResult
Case Windows.Forms.DialogResult.Yes
lblResults.Text = "Yes Clicked"
‘Do yes processing here
Microsoft Visual Basic .Net Semester I
Prepare by Lecturer Sok Kavei P a g e | 28
Case Windows.Forms.DialogResult.No
lblResults.Text = "No Clicked"
‘Do no processing here
Case Windows.Forms.DialogResult.Cancel
lblResults.Text = "Cancel Clicked"
‘Do cancel processing here
End Select
End Sub
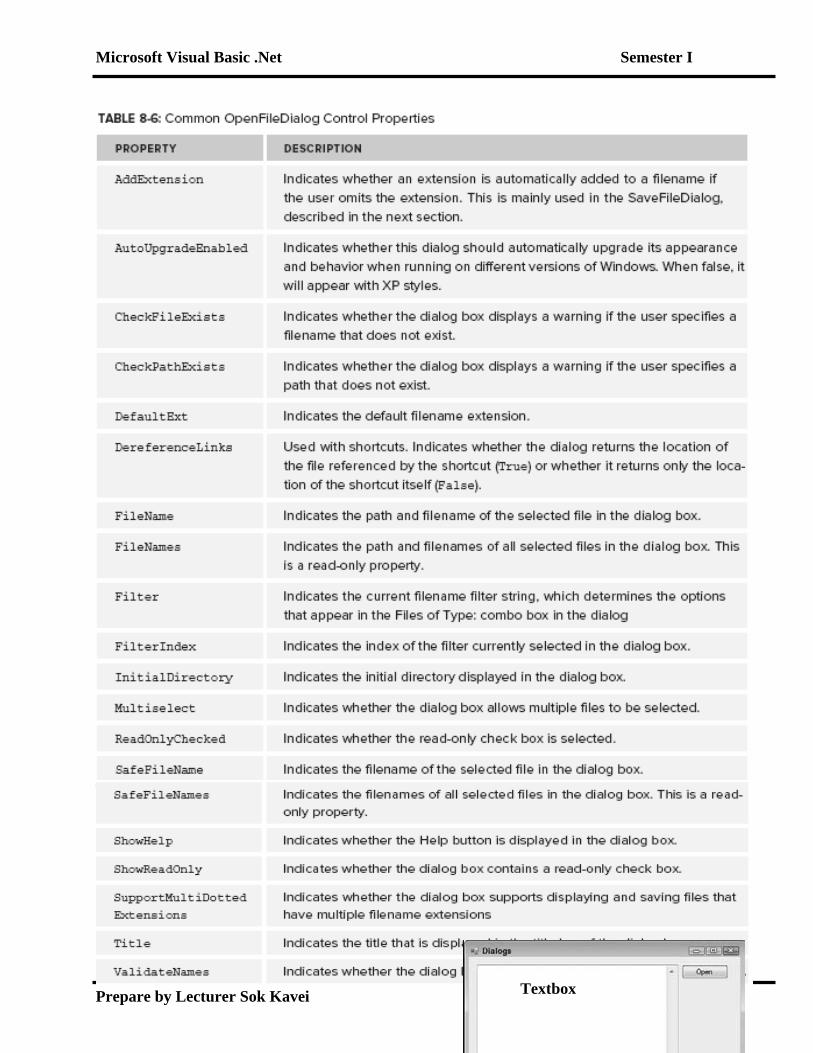
The OpenFileDialog Control
Microsoft Visual Basic .Net Semester I
Prepare by Lecturer Sok Kavei P a g e | 29
Public Class Dialogs
Textbox
Microsoft Visual Basic .Net Semester I
Prepare by Lecturer Sok Kavei P a g e | 30
‘Declare variable
Private strFileName As String
Private Sub btnOpen_Click(ByVal sender As Object, _
ByVal e As System.EventArgs) Handles btnOpen.Click
‘Set the Open dialog properties
With OpenFileDialog1
.Filter = "Text Documents (*.txt)|*.txt|All Files (*.*)|*.*"
.FilterIndex = 1
.Title = "Demo Open File Dialog"
End With
‘Show the Open dialog and if the user clicks the Open button,
‘load the file
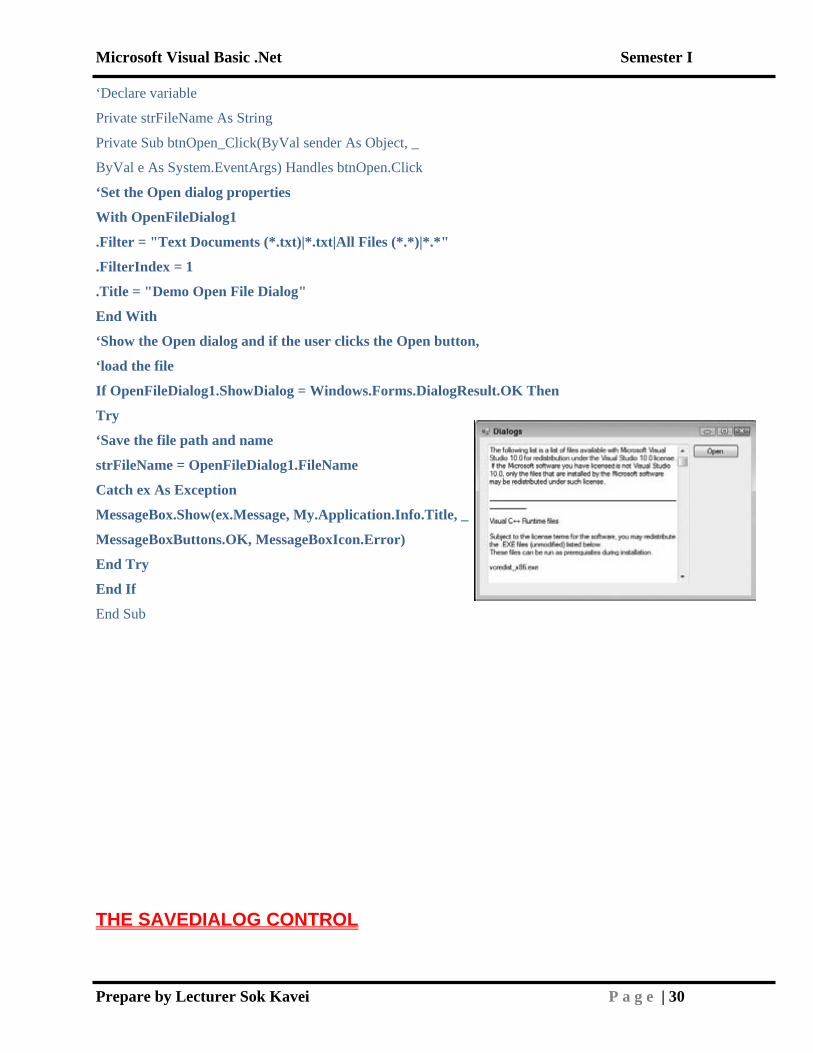
If OpenFileDialog1.ShowDialog = Windows.Forms.DialogResult.OK Then
Try
‘Save the file path and name
strFileName = OpenFileDialog1.FileName
Catch ex As Exception
MessageBox.Show(ex.Message, My.Application.Info.Title, _
MessageBoxButtons.OK, MessageBoxIcon.Error)
End Try
End If
End Sub
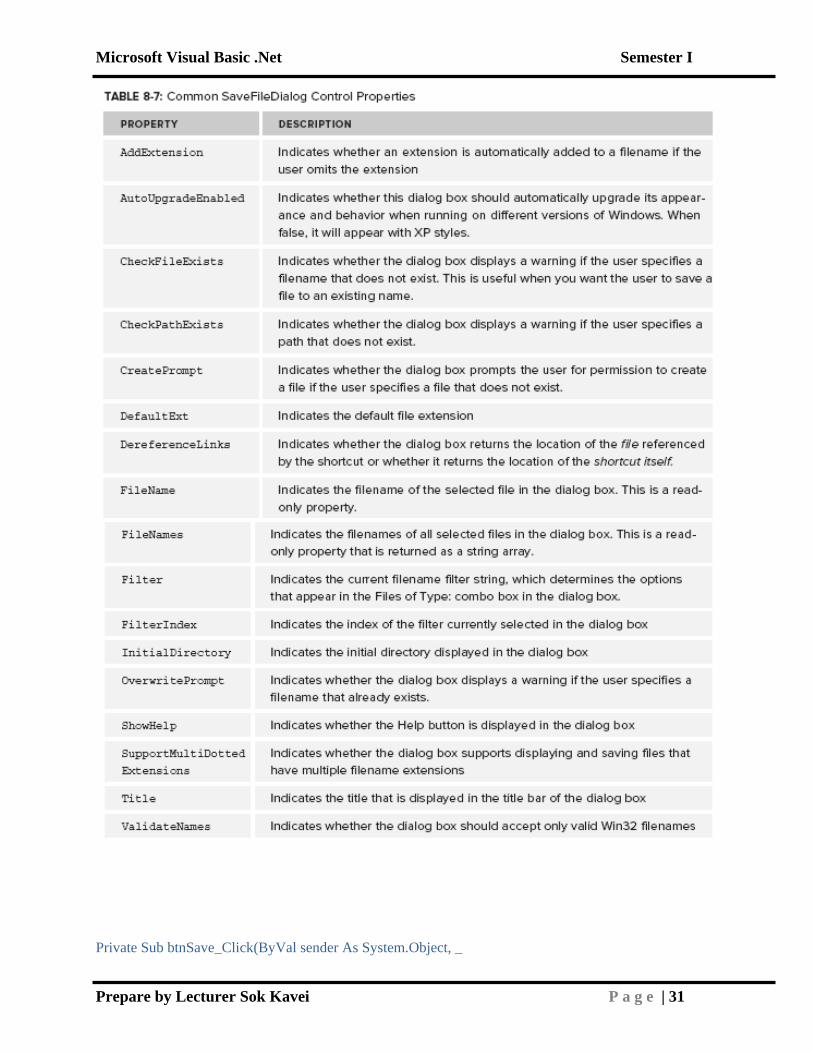
THE SAVEDIALOG CONTROL
Microsoft Visual Basic .Net Semester I
Prepare by Lecturer Sok Kavei P a g e | 31
Private Sub btnSave_Click(ByVal sender As System.Object, _
Microsoft Visual Basic .Net Semester I
Prepare by Lecturer Sok Kavei P a g e | 32
ByVal e As System.EventArgs) Handles btnSave.Click
‘Set the Save dialog properties
With SaveFileDialog1
.DefaultExt = "txt"
.FileName = strFileName
.Filter = "Text Documents (*.txt)|*.txt|All Files (*.*)|*.*"
.FilterIndex = 1
.OverwritePrompt = True
.Title = "Demo Save File Dialog"
End With
‘Show the Save dialog and if the user clicks the Save button,
‘save the file
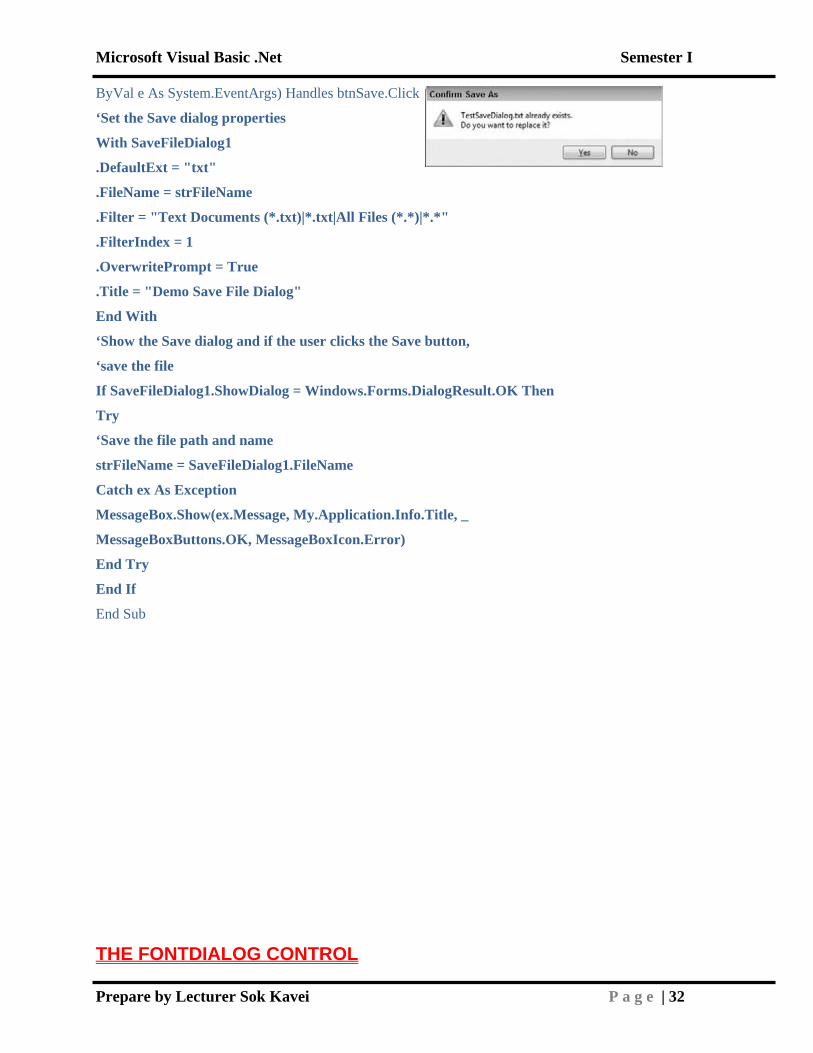
If SaveFileDialog1.ShowDialog = Windows.Forms.DialogResult.OK Then
Try
‘Save the file path and name
strFileName = SaveFileDialog1.FileName
Catch ex As Exception
MessageBox.Show(ex.Message, My.Application.Info.Title, _
MessageBoxButtons.OK, MessageBoxIcon.Error)
End Try
End If
End Sub
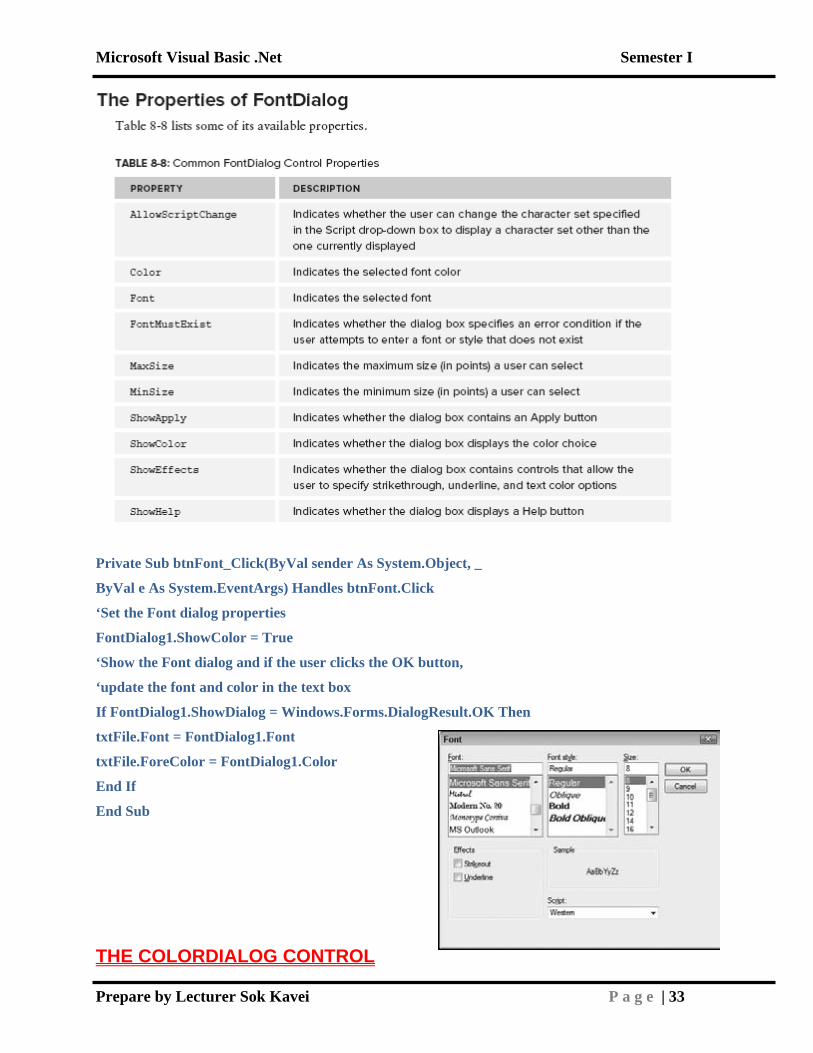
THE FONTDIALOG CONTROL
Microsoft Visual Basic .Net Semester I
Prepare by Lecturer Sok Kavei P a g e | 33
Private Sub btnFont_Click(ByVal sender As System.Object, _
ByVal e As System.EventArgs) Handles btnFont.Click
‘Set the Font dialog properties
FontDialog1.ShowColor = True
‘Show the Font dialog and if the user clicks the OK button,
‘update the font and color in the text box
If FontDialog1.ShowDialog = Windows.Forms.DialogResult.OK Then
txtFile.Font = FontDialog1.Font
txtFile.ForeColor = FontDialog1.Color
End If
End Sub
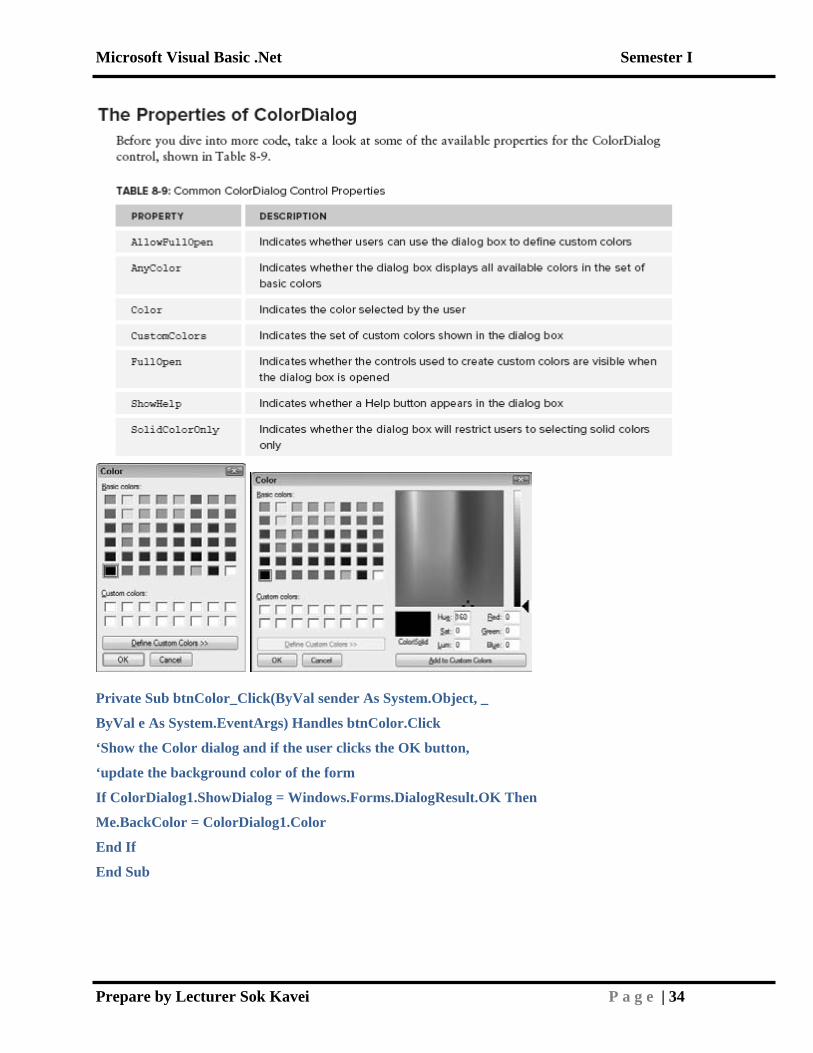
THE COLORDIALOG CONTROL
Microsoft Visual Basic .Net Semester I
Prepare by Lecturer Sok Kavei P a g e | 34
Private Sub btnColor_Click(ByVal sender As System.Object, _
ByVal e As System.EventArgs) Handles btnColor.Click
‘Show the Color dialog and if the user clicks the OK button,
‘update the background color of the form
If ColorDialog1.ShowDialog = Windows.Forms.DialogResult.OK Then
Me.BackColor = ColorDialog1.Color
End If
End Sub

Microsoft Visual Basic .Net Semester I
Prepare by Lecturer Sok Kavei P a g e | 35
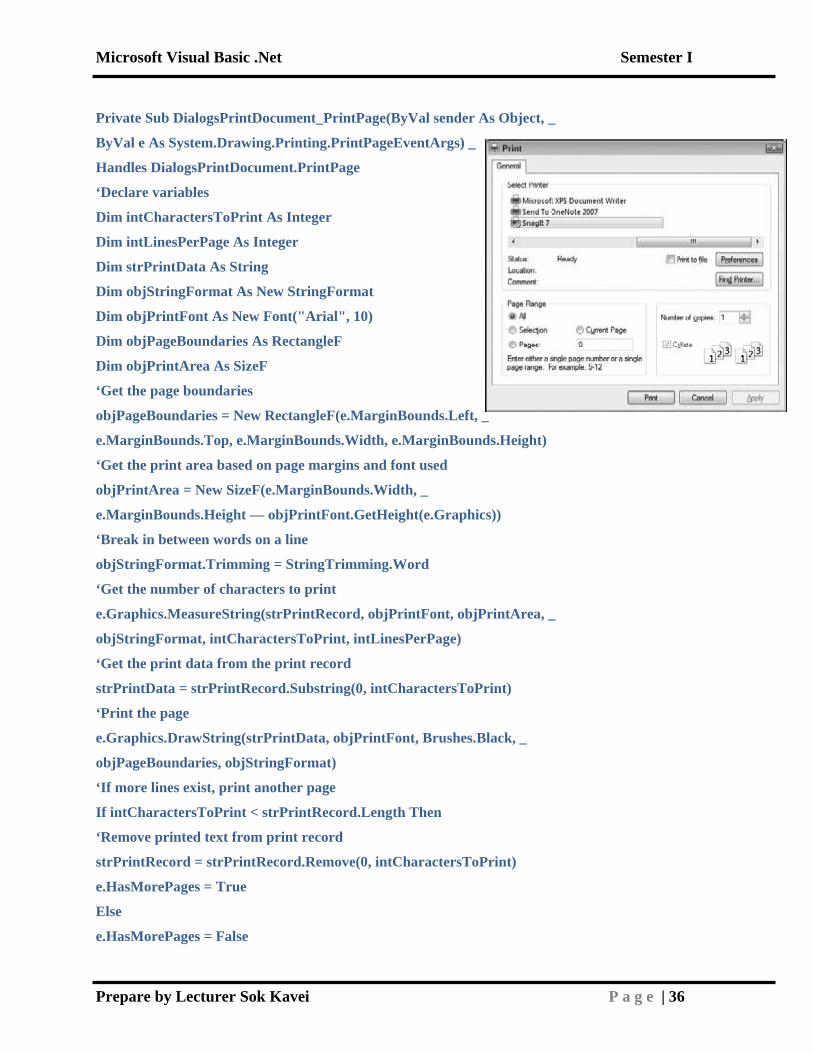
THE PRINTDIALOG CONTROL
Imports System.Drawing.Printing
Public Class Dialogs
‘Declare variables and objects
Private strFileName As String
Private strPrintRecord As String
Private WithEvents DialogsPrintDocument As PrintDocument
Microsoft Visual Basic .Net Semester I
Prepare by Lecturer Sok Kavei P a g e | 36
Private Sub DialogsPrintDocument_PrintPage(ByVal sender As Object, _
ByVal e As System.Drawing.Printing.PrintPageEventArgs) _
Handles DialogsPrintDocument.PrintPage
‘Declare variables
Dim intCharactersToPrint As Integer
Dim intLinesPerPage As Integer
Dim strPrintData As String
Dim objStringFormat As New StringFormat
Dim objPrintFont As New Font("Arial", 10)
Dim objPageBoundaries As RectangleF
Dim objPrintArea As SizeF
‘Get the page boundaries
objPageBoundaries = New RectangleF(e.MarginBounds.Left, _
e.MarginBounds.Top, e.MarginBounds.Width, e.MarginBounds.Height)
‘Get the print area based on page margins and font used
objPrintArea = New SizeF(e.MarginBounds.Width, _
e.MarginBounds.Height — objPrintFont.GetHeight(e.Graphics))
‘Break in between words on a line
objStringFormat.Trimming = StringTrimming.Word
‘Get the number of characters to print
e.Graphics.MeasureString(strPrintRecord, objPrintFont, objPrintArea, _
objStringFormat, intCharactersToPrint, intLinesPerPage)
‘Get the print data from the print record
strPrintData = strPrintRecord.Substring(0, intCharactersToPrint)
‘Print the page
e.Graphics.DrawString(strPrintData, objPrintFont, Brushes.Black, _
objPageBoundaries, objStringFormat)
‘If more lines exist, print another page
If intCharactersToPrint < strPrintRecord.Length Then
‘Remove printed text from print record
strPrintRecord = strPrintRecord.Remove(0, intCharactersToPrint)
e.HasMorePages = True
Else
e.HasMorePages = False
Microsoft Visual Basic .Net Semester I
Prepare by Lecturer Sok Kavei P a g e | 37
End If
End Sub
Private Sub btnPrint_Click(ByVal sender As System.Object, _
ByVal e As System.EventArgs) Handles btnPrint.Click
‘Instantiate a new instance of the PrintDocument
DialogsPrintDocument = New PrintDocument
‘Set the PrintDialog properties
With PrintDialog1
.AllowCurrentPage = False
.AllowPrintToFile = False
.AllowSelection = False
.AllowSomePages = False
.Document = DialogsPrintDocument
.PrinterSettings.DefaultPageSettings.Margins.Top = 25
.PrinterSettings.DefaultPageSettings.Margins.Bottom = 25
.PrinterSettings.DefaultPageSettings.Margins.Left = 25
.PrinterSettings.DefaultPageSettings.Margins.Right = 25
End With
If PrintDialog1.ShowDialog = DialogResult.OK Then
‘Set the selected printer settings in the PrintDocument
DialogsPrintDocument.PrinterSettings = _
PrintDialog1.PrinterSettings
‘Get the print data
strPrintRecord = txtFile.Text
‘Invoke the Print method on the PrintDocument
DialogsPrintDocument.Print()
End If
End Sub
Microsoft Visual Basic .Net Semester I
Prepare by Lecturer Sok Kavei P a g e | 38
THE FOLDERBROWSERDIALOG CONTROL
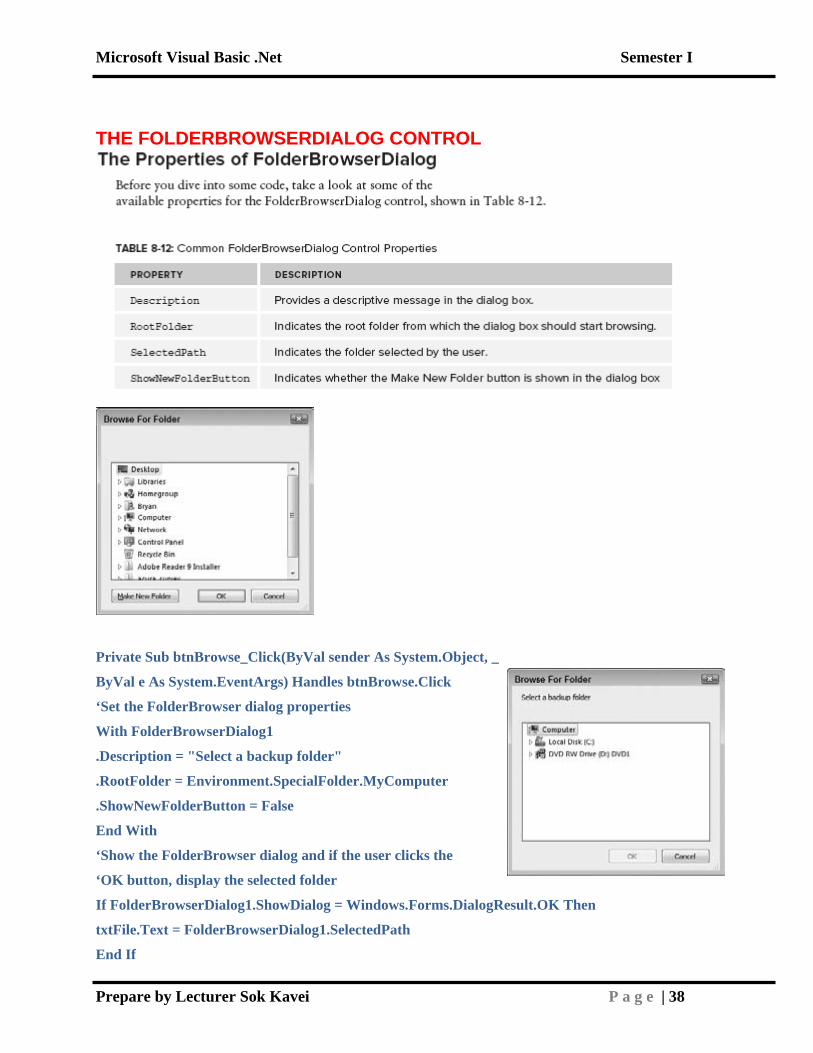
Private Sub btnBrowse_Click(ByVal sender As System.Object, _
ByVal e As System.EventArgs) Handles btnBrowse.Click
‘Set the FolderBrowser dialog properties
With FolderBrowserDialog1
.Description = "Select a backup folder"
.RootFolder = Environment.SpecialFolder.MyComputer
.ShowNewFolderButton = False
End With
‘Show the FolderBrowser dialog and if the user clicks the
‘OK button, display the selected folder
If FolderBrowserDialog1.ShowDialog = Windows.Forms.DialogResult.OK Then
txtFile.Text = FolderBrowserDialog1.SelectedPath
End If
Microsoft Visual Basic .Net Semester I
Prepare by Lecturer Sok Kavei P a g e | 39
End Sub
Chapter IV Creating Menus
Microsoft Visual Basic .Net Semester I
Prepare by Lecturer Sok Kavei P a g e | 40
Microsoft Visual Basic .Net Semester I
Prepare by Lecturer Sok Kavei P a g e | 41
-Add ToolBox Private Sub NewToolStripMenuItem_Click(ByVal sender As Object, _
ByVal e As System.EventArgs) Handles NewToolStripMenuItem.Click
‘Clear the text boxes
TextBox1.Text = String.Empty
TextBox2.Text = String.Empty
‘Set focus to the first text box
TextBox1.Focus()
End Sub
Private Sub NewToolStripButton_Click(ByVal sender As Object, _
ByVal e As System.EventArgs) Handles NewToolStripButton.Click
‘Call the NewToolStripMenuItem_Click procedure
Microsoft Visual Basic .Net Semester I
Prepare by Lecturer Sok Kavei P a g e | 42
NewToolStripMenuItem_Click(sender, e)
End Sub
Private Sub ExitToolStripMenuItem_Click(ByVal sender As Object, _
ByVal e As System.EventArgs) Handles ExitToolStripMenuItem.Click
‘Close the form and end
Me.Close()
End Sub
Coding the View Menu and Toolbars
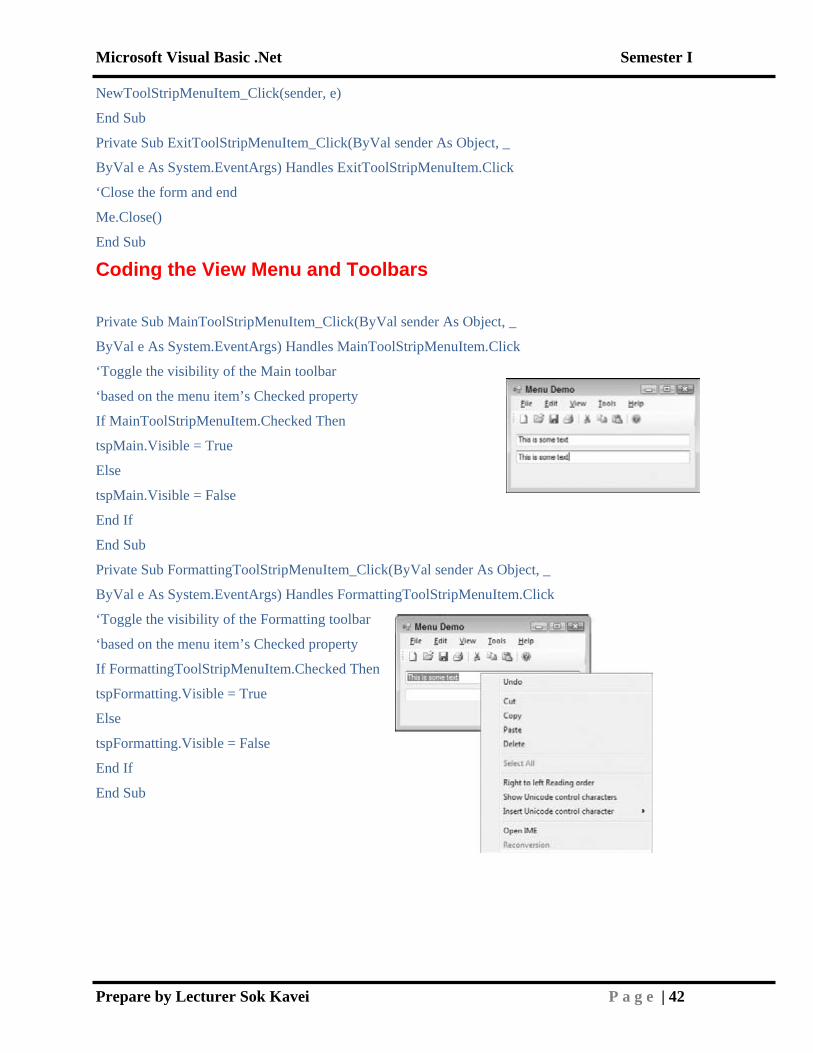
Private Sub MainToolStripMenuItem_Click(ByVal sender As Object, _
ByVal e As System.EventArgs) Handles MainToolStripMenuItem.Click
‘Toggle the visibility of the Main toolbar
‘based on the menu item’s Checked property
If MainToolStripMenuItem.Checked Then
tspMain.Visible = True
Else
tspMain.Visible = False
End If
End Sub
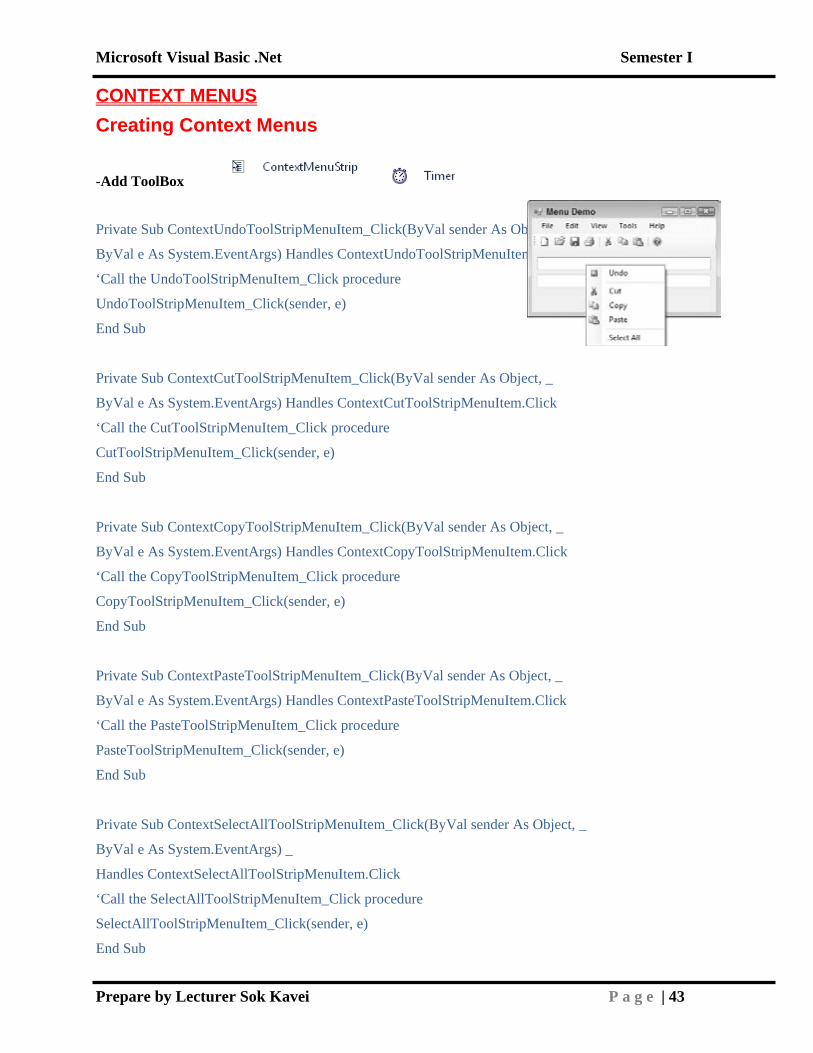
Private Sub FormattingToolStripMenuItem_Click(ByVal sender As Object, _
ByVal e As System.EventArgs) Handles FormattingToolStripMenuItem.Click
‘Toggle the visibility of the Formatting toolbar
‘based on the menu item’s Checked property
If FormattingToolStripMenuItem.Checked Then
tspFormatting.Visible = True
Else
tspFormatting.Visible = False
End If
End Sub
Microsoft Visual Basic .Net Semester I
Prepare by Lecturer Sok Kavei P a g e | 43
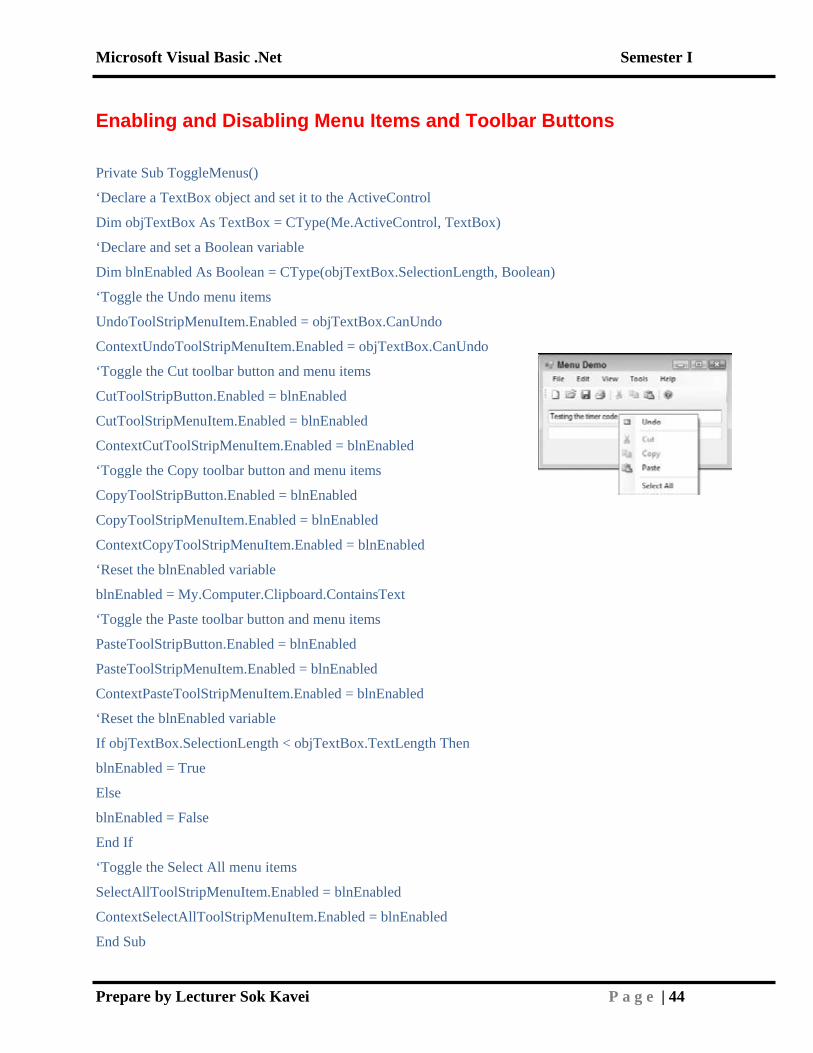
CONTEXT MENUS Creating Context Menus
-Add ToolBox
Private Sub ContextUndoToolStripMenuItem_Click(ByVal sender As Object, _
ByVal e As System.EventArgs) Handles ContextUndoToolStripMenuItem.Click
‘Call the UndoToolStripMenuItem_Click procedure
UndoToolStripMenuItem_Click(sender, e)
End Sub
Private Sub ContextCutToolStripMenuItem_Click(ByVal sender As Object, _
ByVal e As System.EventArgs) Handles ContextCutToolStripMenuItem.Click
‘Call the CutToolStripMenuItem_Click procedure
CutToolStripMenuItem_Click(sender, e)
End Sub
Private Sub ContextCopyToolStripMenuItem_Click(ByVal sender As Object, _
ByVal e As System.EventArgs) Handles ContextCopyToolStripMenuItem.Click
‘Call the CopyToolStripMenuItem_Click procedure
CopyToolStripMenuItem_Click(sender, e)
End Sub
Private Sub ContextPasteToolStripMenuItem_Click(ByVal sender As Object, _
ByVal e As System.EventArgs) Handles ContextPasteToolStripMenuItem.Click
‘Call the PasteToolStripMenuItem_Click procedure
PasteToolStripMenuItem_Click(sender, e)
End Sub
Private Sub ContextSelectAllToolStripMenuItem_Click(ByVal sender As Object, _
ByVal e As System.EventArgs) _
Handles ContextSelectAllToolStripMenuItem.Click
‘Call the SelectAllToolStripMenuItem_Click procedure
SelectAllToolStripMenuItem_Click(sender, e)
End Sub
Microsoft Visual Basic .Net Semester I
Prepare by Lecturer Sok Kavei P a g e | 44
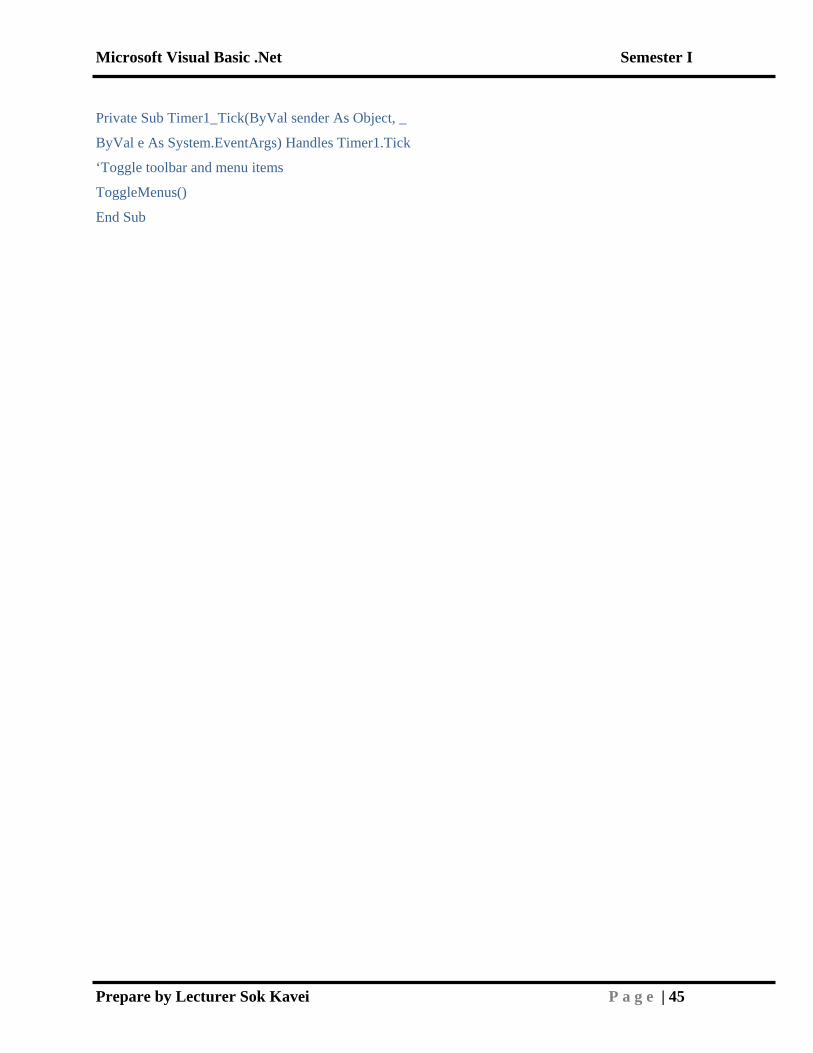
Enabling and Disabling Menu Items and Toolbar Buttons
Private Sub ToggleMenus()
‘Declare a TextBox object and set it to the ActiveControl
Dim objTextBox As TextBox = CType(Me.ActiveControl, TextBox)
‘Declare and set a Boolean variable
Dim blnEnabled As Boolean = CType(objTextBox.SelectionLength, Boolean)
‘Toggle the Undo menu items
UndoToolStripMenuItem.Enabled = objTextBox.CanUndo
ContextUndoToolStripMenuItem.Enabled = objTextBox.CanUndo
‘Toggle the Cut toolbar button and menu items
CutToolStripButton.Enabled = blnEnabled
CutToolStripMenuItem.Enabled = blnEnabled
ContextCutToolStripMenuItem.Enabled = blnEnabled
‘Toggle the Copy toolbar button and menu items
CopyToolStripButton.Enabled = blnEnabled
CopyToolStripMenuItem.Enabled = blnEnabled
ContextCopyToolStripMenuItem.Enabled = blnEnabled
‘Reset the blnEnabled variable
blnEnabled = My.Computer.Clipboard.ContainsText
‘Toggle the Paste toolbar button and menu items
PasteToolStripButton.Enabled = blnEnabled
PasteToolStripMenuItem.Enabled = blnEnabled
ContextPasteToolStripMenuItem.Enabled = blnEnabled
‘Reset the blnEnabled variable
If objTextBox.SelectionLength < objTextBox.TextLength Then
blnEnabled = True
Else
blnEnabled = False
End If
‘Toggle the Select All menu items
SelectAllToolStripMenuItem.Enabled = blnEnabled
ContextSelectAllToolStripMenuItem.Enabled = blnEnabled
End Sub
Microsoft Visual Basic .Net Semester I
Prepare by Lecturer Sok Kavei P a g e | 45
Private Sub Timer1_Tick(ByVal sender As Object, _
ByVal e As System.EventArgs) Handles Timer1.Tick
‘Toggle toolbar and menu items
ToggleMenus()
End Sub
Microsoft Visual Basic .Net Semester I
Prepare by Lecturer Sok Kavei P a g e | 46
Exercise Solution 1. Create a Windows application with a Textbox control and a Button control that will display
whatever is typed in the text box when the user clicks the button.
A. To display the text from a text box on a form when the user clicks the button, you add the
following bolded code to the button’s Click event handler:
Private Sub btnDisplay_Click(ByVal sender As System.Object, _
ByVal e As System.EventArgs) Handles btnDisplay.Click
‘Display the contents of the text box
MessageBox.Show(txtInput.Text, "Exercise 1")
End Sub
2. Create a Windows application with two button controls. In the Click event for the first button,
declare two Integer variables and set their values to any number that you like. Perform
any math operation on these variables and display the results in a message box.
In the Click event for the second button, declare two String variables and set their values
to anything that you like. Perform a string concatenation on these variables and display the
results in a message box.
A. The first part of this exercise requires you to declare two Integer variables and set their
values, and then to perform a math operation of these variables and display the results in a
message box. The variables can be declared and set as:
‘Declare variables and set their values
Dim intX As Integer = 5
Dim intY As Integer = 10
➤ To perform a math operation and display the results can be performed as:
‘Multiply the numbers and display the results
MessageBox.Show("The sum of " & intX.ToString & " * " & _
intY.ToString & " = " & intX * intY, "Exercise 1")
➤ The second part of this exercise requires you to declare two String variables and set
their values, and then to concatenate the variables and display the results in a message
box. The String variables can be declared and set as:
‘Declare variables and set their values
Dim strOne As String = "Visual Basic "
Dim strTwo As String = "2010"
➤ To concatenate the variables and display the results, you could write code such as:
Microsoft Visual Basic .Net Semester I
Prepare by Lecturer Sok Kavei P a g e | 47
‘Concatenate the strings and display the results
MessageBox.Show(strOne & strTwo, "Exercise 1")
3. Create a Windows application with a text box and a button control. In the button’s Click
event, display three message boxes. The first message box should display the length of the
string that was entered into the text box. The second message box should display the first
half of the string, and the third message box should display the last half of the string.
A. This exercise requires you to display the length of the string entered into a text box, and then
display the first half of the string and the last half of the string. To display the length of the
string, you can use the Length property of the Text property of the text box, as shown here:
‘Display the length of the string from the TextBox
MessageBox.Show("The length of the string in the TextBox is " & _
txtInput.Text.Length, "Exercise 2")
➤ To display the first half of the string, you need to use the Substring method with
a starting index of 0, and for the length you use the length of the string divided by
2, as shown here. Don’t forget that with the Option Strict option turned on, you
must convert the results of a division operation to an Integer data type for use in
the SubString method:
‘Display the first half of the string from the TextBox
MessageBox.Show(txtInput.Text.Substring(0, _
CType(txtInput.Text.Length / 2, Integer)), "Exercise 2")
➤ To display the last half of the string you again use the Substring method but this
time you simply give it a starting index of the length of the string divided by 2, as
shown here:
‘Display the last half of the string from the TextBox
MessageBox.Show(txtInput.Text.Substring( _
CType(txtInput.Text.Length / 2, Integer)), "Exercise 2")
4. When using a Select Case statement, how do you allow for multiple items in the Case statement?
A. Separate the items with commas.
5. What is the difference between a Do Until and a Loop Until Do loop?
A. With a Loop Until statement it will always run the code one time.
6. Is ‘‘Bryan’’ and ‘‘BRYAN’’ the same string as Visual Basic sees it?
Microsoft Visual Basic .Net Semester I
Prepare by Lecturer Sok Kavei P a g e | 48
A. No. These strings are different. You can have your code run case-insensitive comparisons so
they look the same when you want your code to see them as equal.
7. When you use the string.compare method, what is the last parameter (a Boolean parameter) used for?
A. It indicates whether or not to use a case-sensitive comparison.
8. In a Select Case statement, how do you put in a catch all case for items that do not have a match?
A. Case Else
9. When writing a For Each Loop, how do you have the loop iterate backwards?
A. Use the Step keyword and give it a negative value.
10. What keyword do you use to exit a loop early?
A. Exit
11. What keyword do you use to keep the values in an array that you ReDim? Where do you
insert it?
A. Preserve. In the statement to redimension (after ReDim) the array.
12. How do you order an array?
A. By using the sort method.
13. Are arrays zero-based or one-based?
A. Arrays are zero-based.
14. Why would you use an enumeration in code?
A. To provide clarity and prevent invalid values from being submitted.
15. When initializing an array with values, what characters do you use to enclose the values?
A. Brackets {}.
16. How does a constant differ from a normal variable?
A. It cannot be changed during runtime.
17. Structures are simpler and similar to what object?
Microsoft Visual Basic .Net Semester I
Prepare by Lecturer Sok Kavei P a g e | 49
A. A class.
18. Hashtables provide a fast mechanism for what?
A. Lookups. Hashtables are very fast at looking up key-value pairs.
19. WPF makes it easy for organizations to separate which parts of software development?
A. WPF makes it easy to separate business logic from presentation logic or user interface design.
20. XAML is based on another type of language. What is it?
A. XAML is based on XML.
21. What property do you set to position a WPF control in a Grid control?
A. To positionWPF controls, you need to set the margin property of the control.
22. In WPF design, you cannot place controls onto a window class, as the window does not
have a design surface. To place controls onto a form, Visual Studio adds what container by
default?
A. The grid container is the default container for designing a form.
23. Name two controls you can use when adding a toolbar to your form.
A. You can use the following controls when adding a toolbar to your form: ToolStrip,
ToolStripButton, ToolStripSeparator, ToolStripProgressBar, ToolStripTextBox,
ToolStripDropDownButton, and ToolStripComboBox.
24. What property do you set to display text to users when they hover over a button on a
toolbar?
A. You set ToolTipText to display text to users when they hover over a button on the toolbar.
25. When you create a WPF and Windows application you design different objects that are
very similar. In a Windows application, you design a form. What do you design in a WPF
application?
A. When creating WPF applications you design a window, not a form.
26. To work with a textbox so a user can add many lines of text, what property must be set to
Microsoft Visual Basic .Net Semester I
Prepare by Lecturer Sok Kavei P a g e | 50
true in a Windows Forms application?
A. Multiline must be set to True.
27. Why would you want to show a form using the ShowDialog method?
A. To show a form modally, you would open it using ShowDialog. This forces the user to act on
the form..
28. To display a dialog box to the user, what method do you use?
A. Use the ShowDialog method to display a dialog box to the user.
29. What method do you call to display a message box?
A. Use the Show method to display a message box to the user.
30. Name the five different ways to display an icon to the user on a message box.
A. The five different ways to show an icon are as follows:
a. No icon
b. Information icon
c. Error icon
d. Exclamation icon
e. Question mark icon
31. How do you determine which button was pressed on a message box?
A. Use the DialogResult enumeration to determine which button was pressed.
32. If you need to write basic code, where should you look for a simple example inside of Visual
Studio?
A. Simple code examples can be found by inserting snippets inside of Visual Studio.
33. How do you add the commonly used menus and toolbars to either a MenuStrip or ToolStrip
control?
A. To add commonly used items, you can choose Insert Standard Items from the control’s context menu.
34. How do you add a custom context menu to a TextBox control?
A. First you create a ContextMenuStrip control and then you set the control’s ContextMenuStrip
property to the new menu you added.
Microsoft Visual Basic .Net Semester I
Prepare by Lecturer Sok Kavei P a g e | 51
35. How do you add a shortcut to a menu item, such as Alt+F?
A. To provide an access key such as Alt+F for the File menu, you add & before the shortcut
character.
36. How do you add a shortcut to a menu item, such as Ctrl+C?
A. To add a shortcut to a menu, use the ShortcutKeys property.
38. What window do you use to track a specific variable while debugging?
A. To track specific variables, use theWatch window.
39. How do you look at all of the variables in scope while debugging?
A. You can see variables in scope by using the Locals windows.
40. How do you best add error handling to your code?
A. The best way to add error handling is by using the Try . . . Catch block. You can also useFinally to always run code whether an error occurs or not.
41. Sometimes you need to cause errors to happen in your code. What keyword do you use to
cause errors?
A. To cause an error, use the Throw keyword.
42. While debugging, how do you move to the very next statement?
A. Step Into enables you to move the next statement.
43. Modify your Car class to implement the IDisposable interface. In the Main procedure in
Module1, add code to dispose of the objCar object after calling the DisplaySportsCarDetails
procedure.
A. The code should now look like this for the Main procedure in Module1.
Sub Main()
‘Create a new sports car object
Dim objCar As New SportsCar
‘Set the horsepower and weight(kg)
objCar.HorsePower = 240
objCar.Weight = 1085
‘Display the details of the car
DisplayCarDetails(objCar)
DisplaySportsCarDetails(objCar)
Microsoft Visual Basic .Net Semester I
Prepare by Lecturer Sok Kavei P a g e | 52
‘Dispose of the object
objCar.Dispose()
objCar = Nothing
‘Wait for input from the user
Console.ReadLine()
End Sub
The Car class should look like this.
Namespace CarPerformance
Public Class Car
Implements IDisposable
Public Color As String
Public HorsePower As Integer
Private intSpeed As Integer
Private intNumberOfDoors As Integer
‘Speed - read-only property to return the speed
Public ReadOnly Property Speed() As Integer
Get
Return intSpeed
End Get
End Property
‘Accelerate - add mph to the speed
Public Sub Accelerate(ByVal accelerateBy As Integer)
‘Adjust the speed
intSpeed += accelerateBy
End Sub
‘NumberOfDoors - get/set the number of doors
Public Property NumberOfDoors() As Integer
‘Called when the property is read
Get
Return intNumberOfDoors
End Get
‘Called when the property is set
Set(ByVal value As Integer)
‘Is the new value between two and five
If value >= 2 And value <= 5 Then
Microsoft Visual Basic .Net Semester I
Prepare by Lecturer Sok Kavei P a g e | 53
intNumberOfDoors = value
End If
End Set
End Property
‘IsMoving - is the car moving?
Public Function IsMoving() As Boolean
‘Is the car’s speed zero?
If Speed = 0 Then
Return False
Else
Return True
End If
End Function
‘Constructor
Public Sub New()
‘Set the default values
Color = "White"
intSpeed = 0
intNumberOfDoors = 5
End Sub
‘CalculateAccelerationRate - assume a constant for a normal car
Public Overridable Function CalculateAccelerationRate() As Double
‘If we assume a normal car goes from 0-60 in 14 seconds,
‘that’s an average rate of 4.2 mph/s
Return 4.2
End Function
Private disposedValue As Boolean = False ‘ To detect redundant calls
‘ IDisposable
Protected Overridable Sub Dispose(ByVal disposing As Boolean)
If Not Me.disposedValue Then
If disposing Then
‘ TODO: free other state (managed objects).
End If
‘ TODO: free your own state (unmanaged objects).
‘ TODO: set large fields to null.
Microsoft Visual Basic .Net Semester I
Prepare by Lecturer Sok Kavei P a g e | 54
End If
Me.disposedValue = True
End Sub
#Region " IDisposable Support "
‘ This code added by Visual Basic to correctly implement the disposable
pattern.
Public Sub Dispose() Implements IDisposable.Dispose
‘ Do not change this code. Put cleanup code in Dispose(ByVal
disposing As Boolean) above.
Dispose(True)
GC.SuppressFinalize(Me)
End Sub
#End Region
End Class
End Namespace
44. Modify the code in the Main procedure inModule1 to encapsulate the declaration and usage
of the SportsCar class in a Using . . . End Using statement. Remember that the Using . . . End
Using statement automatically handles disposal of objects that implement the IDisposable
interface.
A. The code should now look like this for the Main procedure inModule1.
Sub Main()
‘Create a new sports car object
Using objCar As New SportsCar
‘Set the horsepower and weight(kg)
objCar.HorsePower = 240
objCar.Weight = 1085
‘Display the details of the car
DisplayCarDetails(objCar)
DisplaySportsCarDetails(objCar)
End Using
‘Wait for input from the user
Console.ReadLine()
End Sub
45. Modify the Favorites Viewer project to select the first favorite in the ListView control automatically
after it has been loaded so that the LinkLabel control displays the first item when
Microsoft Visual Basic .Net Semester I
Prepare by Lecturer Sok Kavei P a g e | 55
the form is displayed.
You also need to modify the Load event in Form1, and ensure that the ListView control contains
one or more items before proceeding. You do this by querying the Count property of the
Items property of the ListView control. Then you select the first item in the ListView control
using the lstFavorites.Items(0).Selected property and call the Click event for the
ListBox control to update the LinkLabel control.
A. . Private Sub Viewer_Load(ByVal sender As Object, _
ByVal e As System.EventArgs) Handles Me.Load
Try
‘Create and use a new instance of the Favorites class
Using objFavorites As New Favorites
‘Scan the Favorites folder
objFavorites.ScanFavorites()
‘Process each objWebFavorite object in the
‘favorites collection
For Each objWebFavorite As WebFavorite In _
objFavorites.FavoritesCollection
‘Declare a ListViewItem object
Dim objListViewItem As New ListViewItem
‘Set the properties of the ListViewItem object
objListViewItem.Text = objWebFavorite.Name
648 ❘ APPENDIX A EXERCISE SOLUTIONS
objListViewItem.SubItems.Add(objWebFavorite.Url)
‘Add the ListViewItem object to the ListView
lvwFavorites.Items.Add(objListViewItem)
Next
End Using
Catch ExceptionErr As Exception
‘Display the error
MessageBox.Show(ExceptionErr.Message, "Favorites Viewer", _
MessageBoxButtons.OK, MessageBoxIcon.Warning)
End Try
‘If one or more items exist...
If lvwFavorites.Items.Count > 1 Then
‘Select the first item

Microsoft Visual Basic .Net Semester I
Prepare by Lecturer Sok Kavei P a g e | 56
lvwFavorites.Items(0).Selected = True
lvwFavorites_Click(Nothing, Nothing)
End If
End Sub
46. When you compile a Class Library project, what type of file is created?
A. A .dll (Dynamic Link Library) file.
47. Where are signed assemblies stored to be shared on a computer?
A. In the GAC (Global Assembly Cache)
48. How do you install assemblies into the GAC?
A. By dragging the dll into the C:\windows\assembly folder or by running Gacutil.exe.
49. What command would you use to create a key pair file named MyKeyPair.snk?
A. sn -k MyKeyPair.snk
50. When does the task bar redraw?
A. When you mouse over it.
51. If you use a third-party dll and do not have the documentation, how would you investigate
the properties and methods available to you?
A. Use the Object Browser. Press F2 as a shortcut to view the Object Browser.
52. User controls are a good example of which key principle of object-oriented design—
encapsulation or polymorphism?
A. Encapsulation.
53. There are 2 properties that you can set to explain to the user what the Command Link control
will do. What are they?
A. SupplementalExplanation and Text
54. What are the two main ways to reuse controls between applications?
A. The first is to add the control’s source file to every project in which you need the control. The
second way is to build a control library.
55. What method should you override to determine when a user control has been added to a form?
Microsoft Visual Basic .Net Semester I
Prepare by Lecturer Sok Kavei P a g e | 57
A. InitLayout
56. There is a property that will tell you if the control is in runtime or design time. What is its
name and what data type is it?
A. DesignMode, Boolean
57. Add a property to the MyNamespace control called SuppressMsgBox, which contains a
Boolean value. Add code to the Click event handlers for each of the buttons on this control
to show the message box when the SuppressMsgBox property is False, and to suppress the
message box when this property is True.
A. The following shows the code for this exercise:
Public Property SuppressMsgBox() As Boolean
Get
Return blnSuppressMsgBox
End Get
Set(ByVal value As Boolean)
blnSuppressMsgBox = value
End Set
End Property
Private Sub btnApplicationCopyright_Click(ByVal sender As System.Object, _
ByVal e As System.EventArgs) Handles btnApplicationCopyright.Click
RaiseEvent ApplicationCopyrightChanged( _
My.Application.Info.Copyright)
If Not blnSuppressMsgBox Then
MessageBox.Show(My.Application.Info.Copyright, _
strApplicationName)
End If
End Sub
Private Sub btnScreenBounds_Click(ByVal sender As Object, _
ByVal e As System.EventArgs) Handles btnScreenBounds.Click
RaiseEvent ScreenBoundsChanged(My.Computer.Screen.Bounds)
If Not blnSuppressMsgBox Then
MessageBox.Show(My.Computer.Screen.Bounds.ToString, _
strApplicationName)
End If
Microsoft Visual Basic .Net Semester I
Prepare by Lecturer Sok Kavei P a g e | 58
End Sub
Private Sub btnScreenWorkingArea_Click(ByVal sender As Object, _
ByVal e As System.EventArgs) Handles btnScreenWorkingArea.Click
RaiseEvent ScreenWorkingAreaChanged(My.Computer.Screen.WorkingArea)
If Not blnSuppressMsgBox Then
MessageBox.Show(My.Computer.Screen.WorkingArea.ToString, _
strApplicationName)
End If
End Sub
58. How would you write a query to retrieve the Name, Description, and Price fields from a
table called Product?
A. SELECT Name, Description, Price FROM Product;.
59. What would you add to the query to retrieve only items with DVD in their description?
A. WHERE Description LIKE "*DVD*
60. How would you order the results so that the most expensive item comes first?
A. ORDER BY Price DESC
61. What do you put around column names that have spaces in them?
A. Square brackets are used for column names with spaces, such as [First Name].
62. In Visual Studio 2010, what control can you use to navigate through data in a Windows
Forms Application?
A. You can use a BindingNavigator to move through data in a Windows application.
63. What is the terminating character for a SQL command you must use in MS Access?
A. You must terminate your SQL commands with a semicolon in MS Access.
64. What properties do you need to set for a SQL Server connection string when passing a user
name and password?
A. You need to set Server, User ID, Password and Database.
65. Which method do you execute when updating data using a SQLCommand object?
Microsoft Visual Basic .Net Semester I
Prepare by Lecturer Sok Kavei P a g e | 59
A. ExecuteNonQuery is the method to use to run update queries.
66. Why would you use Integrated Security in your connection string?
A. You would use Integrated Security when you want to access the database and have the security
of the current application user.
67. If you do not need to create update/delete/insert commands, how do you have them created
automatically?
A. Use a SqlCommandBuilder to create update/delete/insert commands.
68. What method do you use to populate a dataset with data?
A. Use the Fill method to populate a DataSet.
69. How do you change the way date and time fields are displayed in a Dynamic Data website in
edit mode?
A. Changing the DateTime_Edit.ascx Field Template will change the way date and time fields appear.
70. How do you change the way insert pages are displayed in a Dynamic Data website?
A. Changing the Insert.aspx Page template will change the way insert pages are shown.
71. What type of template do you use to change the way the site looks for just one table?
A. Use an Entity Template to change the design for just one table.
72. If you wanted to build a design and layout that can be inherited by Web Form pages, how
would you do it?
A. To create a design other Web Forms can inherit you should implement master pages.
73. To change the way elements of the page appear, you have two good options when designing
web pages. What are they?
A. When creating Web Forms, you can use themes and skins or cascading style sheets to update
the appearance of elements.
74. What type of data source do you bind the menu control to?
A. You can bind the menu control to a site map (XML file).
75. What property do you set to have static client IDs for server controls?
Microsoft Visual Basic .Net Semester I
Prepare by Lecturer Sok Kavei P a g e | 60
A. Set the ClientIDMode property to Static to force a static client ID.
76. Name one control you can use to help validate form data.
A. You can use a RequiredFieldValidator to force users to enter data when submitting a
form. Other controls are CompareValidator, CustomValidator, RangeValidator, and
RegularExpressionValidator.
77. Name two reasons to use XML to integrate systems or store data.
A. You should use XML because it is human readable, it is a common standard, cross-platform
integration is possible, and it can be validated against a schema.
78. In what two items do you store data in XML?
A. Elements and attributes.
79. Is this valid XML? <Root><one att= ˝red˝ /></root>
A. No, it is not. The closing tag for Root is not cased properly and does not match.
80. Is this valid XML? <Root><one att= ˝red˝ >Me & you</one></Root>
A. No, it is not. The text for element one cannot contain &. To make it valid, replace Me & you
with Me & you
81. Is this valid XML? <Root><one><att>Me</one></att></Root>
A. No, it is not. The tags are not nested properly. <att> must close before <one> because it is
nested inside of <one>. The correct XML would look like this:
<Root><one><att>Me</att></one></Root>.
82. Where are shared assemblies stored?
A. Shared assemblies are stored in the Global Assembly Cache.
83. How are updates handled when using ClickOnce deployment?
A. Updates are handled automatically when using ClickOnce.
84. Name two dialog boxes you can add to a setup project in Visual Studio 2010.
A. Two dialogs that can be added to setup projects are Customer Information and License
Agreement. A few others are ReadMe, Register User, and Splash.
Microsoft Visual Basic .Net Semester I
Prepare by Lecturer Sok Kavei P a g e | 61
85. How do you arrange the order of dialog boxes in the user interface of installations?
A. To change the order of dialogs, right-click the dialog and select move up or move down.
Public Property SuppressMsgBox() As Boolean
Get
Return blnSuppressMsgBox
End Get
Set(ByVal value As Boolean)
blnSuppressMsgBox = value
End Set
End Property
Private Sub btnApplicationCopyright_Click(ByVal sender As System.Object, _
ByVal e As System.EventArgs) Handles btnApplicationCopyright.Click
RaiseEvent ApplicationCopyrightChanged( _
My.Application.Info.Copyright)
If Not blnSuppressMsgBox Then
MessageBox.Show(My.Application.Info.Copyright, _
strApplicationName)
End If
End Sub
Private Sub btnScreenBounds_Click(ByVal sender As Object, _
ByVal e As System.EventArgs) Handles btnScreenBounds.Click
RaiseEvent ScreenBoundsChanged(My.Computer.Screen.Bounds)
If Not blnSuppressMsgBox Then
MessageBox.Show(My.Computer.Screen.Bounds.ToString, _
strApplicationName)
End If
End Sub
Private Sub btnScreenWorkingArea_Click(ByVal sender As Object, _
ByVal e As System.EventArgs) Handles btnScreenWorkingArea.Click
RaiseEvent ScreenWorkingAreaChanged(My.Computer.Screen.WorkingArea)
If Not blnSuppressMsgBox Then
MessageBox.Show(My.Computer.Screen.WorkingArea.ToString, _
strApplicationName)
End If
Microsoft Visual Basic .Net Semester I
Prepare by Lecturer Sok Kavei P a g e | 62
End Sub
Microsoft Resources Probably one of the first sites you’ll intuitively turn to is the Microsoft siteh(ttp://www.microsoft
.com). That makes sense, because it is full of information, including support, tips, hints, downloads,
and newsgroups. To see more newsgroups, navigate to http://www.microsoft.com/communities/.
There are also a number of sites on MSDN that you may find to be very helpful, including the following:
➤ Visual Studio: http://msdn.microsoft.com/en-us/vstudio/
➤ MSDN Library: http://msdn.microsoft.com/library/
➤ Microsoft Developer Network: http://msdn.microsoft.com/
➤ Microsoft Visual Basic: http://msdn.microsoft.com/en-us/vbasic/
➤ .NET Framework download site: http://msdn.microsoft.com/netframework/downloads/
➤ CodePlex: http://www.codeplex.com/ (hosted by Microsoft)
➤ ASP .NET Resources: http://www.asp.net/
➤ Channel 9: http://channel9.msdn.com/
Other Resources As mentioned earlier, hundreds of online sites discuss Visual Basic 2010. These sites give everything
from news on moving from Visual Basic 2008 to Visual Basic 2010, to listings of up and coming conferences
worldwide. Although you can do a search for Visual Basic 2010, the number of sites returned
can be extremely overwhelming. Let’s look at three of these possible sites.
A place to find sample code and examples is at http://www.freevbcode.com/ or http://www
.4guysfromrolla.com/ At these sites, you can find great articles and tips to take your skills to the next
level. Both sites have forums or message boards for your questions and answers.
You can get a journal, The Visual Studio Magazine, from a similar user group. Again, this journal
is backed by meetings and four yearly conferences, along with a website, http://www.devx.com/vb/,
which can give e-mail updates. On the website, you have access to a number of different areas both in
Visual Basic and other related and nonrelated Visual Studio areas.
Of course, these are just three among the many out there, to help you get started. Remember, however,
that the Internet is not the only place to find information, so the next section looks at some resources
not found on the Web.