


Languages
Pages
Legal


MD380L Open Loop Elevato
r Drive Q
uick S
tart Manual
MD380L Open Loop Elevator DriveQuick Start Manual
V0.5Data Code:19010299
Inova Automation Co., LimitedAddress:Unit B01, 17/FMG Tower, 133 Hoi Bun Road, Kwun Tong, Hong Kong Tel: (852) 2751 6080Fax: (852) 2751 6933Email: [email protected]://www.inovance.cn

Contents
1 Product information ................................................................................................................................................ 1
1.1 Nameplate ......................................................................................................................................................... 1
1.2 Designation rule ................................................................................................................................................. 1
1.3 General specifications ....................................................................................................................................... 2
2 Wiring ....................................................................................................................................................................... 3
2.1 Typical wiring 1 (use multi-reference input as frequency reference) .................................................................. 3
2.2 Typical wiring 2 (use analog input as frequency reference) ............................................................................... 4
2.3 Terminal description .......................................................................................................................................... 5
2.4 Extension I/O card MD38IO1 ............................................................................................................................. 7
3 Operation panel ....................................................................................................................................................... 9
3.1 Get familiar with operation panel ....................................................................................................................... 9
4 Quick setup ........................................................................................................................................................... 12
4.1 Complete timing diagram for normal travel (use multi-reference as frequency reference) ............................... 12
4.2 Elevator performance fine tuning ..................................................................................................................... 14
4.3 Setup flowchart ................................................................................................................................................ 16
4.4 IGBT Enable .................................................................................................................................................... 21
5 Function code table .............................................................................................................................................. 23
5.1 Group F0: fundamental .................................................................................................................................... 23
5.2 Group F1: motor 1 parameters ........................................................................................................................ 24
5.3 Group F2: vector control .................................................................................................................................. 25
5.4 Group F3: VF control ....................................................................................................................................... 26
5.5 Group F4: input terminals ................................................................................................................................ 27
5.6 Group F5: output terminals .............................................................................................................................. 29
5.7 Group F6: start and stop control ...................................................................................................................... 30
5.8 Group F7: product and software version checking ........................................................................................... 30
5.9 Group F8: auxiliary functions ........................................................................................................................... 31
5.10 Group F9: fault and protection ......................................................................................................................... 31
5.11 Group FC: multi-reference ............................................................................................................................... 32
5.12 Group FF: drive parameters............................................................................................................................. 32
5.13 Group FP: function code management ............................................................................................................ 33
5.14 Group A5: control optimization ......................................................................................................................... 33
5.15 Group U0: monitoring ...................................................................................................................................... 33
6 Trouble shooting ................................................................................................................................................... 34
6.1 Inverter fault codes .......................................................................................................................................... 34
6.2 Inverter common symptoms and diagnostics ................................................................................................... 37
Revision History ............................................................................................................................................................ 38


1
1 Product information
1.1 Nameplate
Nameplate
AC drive model
Rated input
Rated output
Manufacturer
S/N code
MODEL: MD380LT3.7GB
INPUT:
Suzhou Inovance Technology Co.,Ltd.
S/N:
1.2 Designation rule
MD380L X X.X G B
MD380L Open loop elevator drive
Mark Build-in braking unit B Yes
Mark Voltage class -2T Three-phase 220 V Mark 2.2 3.7 5.5 15 T Three-phase 380 V Applicable motor [kW] 2.2 3.7 5.5 15

2
1.3 General specifications
: At 4 kHz carrier frequency without derating.
: The mounting dimensions are shown below.
Fig 1. Physical appearance and dimensions
Voltage class 220VAC 380/400/415VAC
Drive Model MD380L -2T2.2GB
MD380L -2T3.7GB
MD380L -2T5.5GB
MD380L -2T7.5GB
MD380L T3.7GB
MD380L T5.5GB
MD380L T7.5GB
MD380L T11GB
MD380L T15GB
Dimension Height Width Depth
[H] : 248 mm [W] : 160 mm [D] : 183 mm
[H] : 322 mm [W] : 208 mm [D] : 192 mm
[H] : 248 mm [W] : 160 mm [D] : 183 mm
[H] :322 mm [W] :208 mm [D] : 192 mm
Mounting Hole 5 6 5 6
Rated Input Voltage Three-phase 200Vac to 240Vac, -15% to +10% (170Vac to 264Vac)
Three-phase 380 to 480V, -15% to +10% (323Vac to 528Vac)
Rated Input Current, [A] 10.5 14.6 26 35 10.5 14.6 20.5 26 35
Rated input frequency 50/60 Hz, 5% (47.5 to 63Hz)
Applicable Motor [kW] 2.2 3.7 5.5 7.5 3.7 5.5 7.5 11 15 [HP] 3 5 7.5 10 5 7.5 10.0 15 20
Output Current ,[A]*1 9 13 25 32 9 13 17.0 25 32 Power Capacity, [kVA] 5.9 8.9 17 21 5.9 8.9 11 17 21 Overload Capacity 150% for 60 Sec & 180% for 3 Sec
Max. output voltage Three-phase 200Vac to 240Vac (Proportional to input voltage)
Three-phase 380Vac to 480Vac (Proportional to input voltage)
Max. output frequency 100 Hz
Recommended Power, [W] 500 750 1200 1500 750 1200 1500 2500 3000
Recommended Resistance, [ ] 65 45 22 16 130 90 65 43 32
Enclosure IP 21

3
2 Wiring
2.1 Typical wiring 1 (use multi -reference input as f requency reference )
(Default: F0-03=6, use multi-reference)
NOTE: Extension I/O card MD38IO1 applies to the drive 3.7 kW and above only.
Extension I/O card MD38IO1
DI5
DI4
DI3
DI2
DI1
OP
+10V
AI2
GND
AI1
W
Inverter Output Contactor
V
U PB
1
2
External Braking Resistor (To be supplied by customer)
T
S
R
MD380L
Main Contactor
Analog input 0 to 10V
FM
COM
GND
AO1
T/A
T/B
T/C
IM
Brake Contactor Supply Ground
L1
+24V
Mains Supply 3-Phase
L2 L3
DI10
COM
Travel up
Travel down
Nominal speed
Levelling speed
Inspection speed
OP1
+24VDI6
DI7
DI8
DI9
Recommended Braking Resistor Voltage class 220VAC 380/400/415VAC
Drive Model MD380L -2T2.2GB
MD380L -2T3.7GB
MD380L -2T5.5GB
MD380L -2T7.5GB
MD380L T3.7GB
MD380L T5.5GB
MD380L T7.5GB
MD380L T11GB
MD380L T15GB
Recommended Power, [W] 500 750 1200 1500 750 1200 1500 2500 3000
Recommended Resistance, [ ] 65 45 22 16 130 90 65 43 32
CME
DO1
DO2
CME1
GND
AO2
PC
PB
PA
PGND
AI3
CANL
CANH
Analog input -10V to +10V
Open collector output
Analog output (Voltage/current switchable) 0 to 10VDC/ 0 to 20mA
MODBUS-RTU communication
CANLink Communication
485 -
485+
MC Relay Safety circuit and Power supply
Fault output
110Vdc
COM
Line Reactor
(Optional)
RFI Filter
(Optional)
Phase Monitor Relay
Brake Relay Safety circuit and Power supply
IGBT enable Phase Monitor Relay
MC Relay
ARD speed

4
2.2 Typical wiring 2 (use analog input as frequency reference)
(Set F0-03=2 to use AI1)
NOTE: Extension I/O card MD38IO1 applies to the drive 3.7 kW and above only.
Extension I/O card MD38IO1
DI5
DI4
DI3
DI2
DI1
OP
+10V
AI2
GND
AI1
W
Inverter Output Contactor
V
U PB
1
2
External Braking Resistor (To be supplied by customer)
T
S
R
MD380L
Main Contactor
FM
COM
GND
AO1
T/A
T/B
T/C
IM
Brake Contactor Supply Ground
L1
+24V
Mains Supply 3-Phase
L2 L3
DI10
COM
Travel up
Travel down
OP1
+24VDI6
DI7
DI8
DI9
Recommended Braking Resistor Voltage class 220VAC 380/400/415VAC
Drive Model MD380L -2T2.2GB
MD380L -2T3.7GB
MD380L -2T5.5GB
MD380L -2T7.5GB
MD380L T3.7GB
MD380L T5.5GB
MD380L T7.5GB
MD380L T11GB
MD380L T15GB
Recommended Power, [W] 500 750 1200 1500 750 1200 1500 2500 3000
Recommended Resistance, [ ] 65 45 22 16 130 90 65 43 32
CME
DO1
DO2
CME1
GND
AO2
PC
PB
PA
PGND
AI3
CANL
CANH
Analog input -10V to +10V
Open collector output
Analog output (Voltage/current switchable) 0 to 10VDC/ 0 to 20mA
MODBUS-RTU communication
CANLink Communication
485 -
485+
Fault output
110Vdc
0V
Analog speed reference (0 to 10VDC)
Line Reactor
(Optional)
RFI Filter
(Optional)
Phase Monitor Relay
COM Brake Relay Safety circuit and Power supply
MC Relay Safety circuit and Power supply
IGBT enable Phase Monitor Relay MC Relay
ARD speed

5
2.3 Terminal description
Terminals of main circuit
Terminal Terminal Name Description
R, S, T Three-phase power supply input terminals Connect to the three-phase AC power supply.
(-), (+) Positive and negative terminals of DC bus Common DC bus input point.
PB, (+) Connecting terminals of braking resistor Connect to a braking resistor.
U, V, W Output terminals Connect to a three-phase motor.
Grounding terminal Must be grounded.
Warning: Do not use terminal (--) for braking resistor, otherwise inverter would be damaged!

6
Terminals of main control board
Terminal Terminal Name Description
+10V-GND +10 VDC power supply Provide +10 VDC power supply externally. Usually, it provides power supply to the external potentiometer with resistance range of 1 to Max. output current: 10 mA.
+24V-COM +24 VDC power supply Provide +24 VDC power supply externally. Usually, it provides power supply to DI/DO terminals and external sensors. Max. output current: 200 mA.
OP Input terminal of external power supply Connect to +24 VDC by default. Whether it connects to +24 V or COM is decided by jumper J7. When DI1 to DI5 need to be driven by the external signal, OP needs to be connected to the external power supply and be disconnected from +24 VDC.
AI1-GND Analog input 1 AI1 input voltage range: 0 to 10 VDC. Impedance: 22
AI2-GND Analog input 2
AI2 can be used as voltage input or current input, which is chosen by jumper J8 on main control card. Input range: 0 to 10 VDC or 4 to 20 mA. Impedance: 22 if voltage input, 500 if current input.
DI1-COM Digital input 1 Optical coupling isolation, compatible with dual-polarity input.
Input voltage range: 9 to 30 VDC.
DI2-COM Digital input 2
DI3-COM Digital input 3
DI4-COM Digital input 4
DI5-COM High-speed pulse input Besides features of DI1 to DI4, it can be used for high-speed pulse input. Max. input frequency: 100 kHz.
AO1-GND Analog output 1 Voltage or current output, determined by jumper J5 on main control board. Output voltage range: 0 to 10 VDC. Output current range: 0 to 20 mA.
DO1-CME Digital output 1 Open-collector, dual polarity output, optical coupling isolated. Voltage range: 0 to 24 VDC. Current range: 0 to 50 mA.
FM-COM High-speed pulse output
It is restricted by F5-00 (FM terminal output mode selection). As a high-speed pulse output, the maximum frequency is 100 kHz. As an open-collector output, its specification is the same as that of DO1Voltage range: 0 to 24 VDC. Current range: 0 to 50 mA.
T/A-T/B Normally closed terminal Contact driving capacity: 250 VAC, 3 A; 30 VDC, 1 A. T/A-T/C Normally open terminal

7
2.4 Extension I /O card MD38IO1
NOTE: MD38IO1 applies to the drive 3.7 kW and above only.
Control configuration
Item Listing Description
Inputs 5 digital inputs; 1 analog input
AI range:-10 to 10 VDC, it can be used as AI, PT100 and PT1000 input (thermal sensor, 0 to 200°C).
Outputs 1 relay; 1 digital output; 1 analog output
Communication RS485 interface; CAN interface
RS485 supports MODBUS-RTU protocol; CAN supports CANlink protocol
Terminals
Terminal Terminal Name Description
+24V-COM +24 VDC power supply Provide +24 VDC power supply externally. Usually, it provides power supply to DI/DO terminals and external sensors. Max. output current: 200 mA.
OP1 Input terminal of external power supply Connect to +24 VDC by default. Whether it connects to +24 V or COM is decided by jumper J8. When DI6 to DI10 need to be driven by the external signal, OP1 needs to be connected to the external power supply and be disconnected from +24 VDC.
AI3-PGND Analog input 3
Optical coupling isolation, compatible with differential signal and PT100/PT1000 temperature sensor input (0 to 200°C). Input voltage range: -10 to 10 VDC. Use dial switch S1 to select different input mode: Analog, or PT1000 or PT100, must not select more than one mode at one time.
DI6-COM Digital input 6
Optical coupling isolation, compatible with dual-polarity input.
Input voltage range: 9 to 30 VDC. .
DI7-COM Digital input 7
DI8-COM Digital input 8
DI9-COM Digital input 9
DI10-COM Digital input 10
AO2-GND Analog output 2
Voltage or current output, determined by jumper J3 on extension I/O card. Output voltage range: 0 to 10 VDC. Output current range: 0 to 20 mA. Impedance range: for current output,0 to 500
DO2-CME1 Digital output 2 Multi-function and dual-polarity and open-collector output. Voltage range: 0 to 24 VDC. Current range: 0 to 50 mA.

8
Terminal Terminal Name Description
485+-485- MODBUS communication terminal
MODBUS protocol. Baud rate: 300 to 115200 bps. Max. nodes: 32. Terminal resistance dial switch: S2.
PA-PB Normally closed terminal Contact driving capacity: 250 VAC, 3 A; 30 VDC, 1 A. PA-PC Normally open terminal
CANH-CANL CANlink communication terminal CANlink communication.
NOTE: see below configuration of jumpers
Jumper Description
J3 AO2 output mode selection: voltage or current.
J4 CAN terminal resistance selection
J7 CME1 connection mode selection: connected to COM or not.
J8 OP1 connection mode selection: connected to internal +24V or not.
S1 AI input mode selection: analog input (voltage) or PT100 or PT1000 input (both 0 to 200°C).
S2 RS485 terminal resistance selection (RTU).
NOTE: see below configuration methods for dial switch S1:
S1 configuration AI input mode
Analog input (voltage).
PT1000 thermal sensor (0 to 200°C).
PT100 thermal sensor (0 to 200°C).

9
3 Operation panel
3.1 Get familiar with operation panel
Overview
RUN LOCAL/REMOT FED/REV TUNE/TC
RPM %A VHz
PRG ENTER
RUN STOP
RESMF.K
QUICK
Command source indicatorON: terminal;
OFF: operation panel;BLINK: communication.
Running direction indicatorON: reverse;OFF: forward
Running state indicatorON: running;
OFF:stop.
LED display for parameters
Program key
Menu mode selection key
Run key
Multi-function selection key
Stop/Reset key
Shift key
Increment key
Decrement key
Confirm key
Parameter unit indicator
Other states indicatorON: torque control;BLINK slowly: motor auto-tuning;BLINK quickly: fault state.
Mounting hole
Mounting hole
Parameter unit indicator
Indicator appearance Meaning
RPM %A VHz
Hz for frequency
RPM %A VHz
A for current
RPM %A VHz
V for voltage
RPM %A VHz
% for anything relevant

10
Keys on operation panel
Key Key Name Function
PRG
Programming Enter or exit Level I menu.
ENTER
Confirm Enter the menu interfaces level by level, and confirm the parameter setting.
Increment Increase data or function code.
Decrement Decrease data or function code.
Shift Select the displayed parameters in turn in the stop or running state, and select the digit to be
modified when modifying parameters.
RUN
RUN Start the AC drive in the keypad operation mode.
STOPRES
Stop/Reset Stop the AC drive when it is in the running state and perform the reset operation when it is in the faulty state. The functions of this key are restricted by F7-02.
MF.K
Multifunction Perform function switchover (such as quick switchover of command source or direction) according to the setting of F7-01.
QUICK
Menu mode selection Perform switchover between menu modes according to the setting of FP-03.
Relevant parameters for operation panel setting
Function code
Parameter Name Setting Range Unit Default Commission
F7-01 MF.K key function selection
0: MF.K key disabled 1: Switchover from remote control (terminal or
communication) to keypad control 2: Switchover between forward rotation and
reverse rotation 3: Forward jog 4: Reverse jog 5: Individualized parameter display
N.A. 0 0
F7-02 STOP/RESET key function
0: STOP/RESET key enabled only in keypad control
1: STOP/RESET key enabled in any operation mode
N.A. 1 1
FP-03 Parameter display property
For user defined and user modified parameters 00: non of them will display 01: user defined parameters will display 10: user modified parameters will display 11: both of them will display
N.A. 00

11
Operations of parameters
F0
U0
AC
A1
A0
FP F0 28
2
F1 F0 01 0 F0 02
50.00 F0 F0 F0 00 2
U0 F0 28
AC
F0 00
A1
A0
FP
F1
F0
Parameter arrangement
Function code Group
Description Remark
F0 to FF Standard function code group Standard function parameters
A0 to AC Advanced function code group AI/AO correction
U0 Running state function code group Display of state-monitoring parameters
ENTER
PRG
PRG
ENTER
ENTER
PRG
PRG
ENTER
PRG
PRG

12
4 Quick setup
4.1 Complete timing diagram for normal travel ( use mult i -reference as frequency reference)
DI Enable (If provide)
ON
OFF
DI 1 Travel UP ON
OFF
DI 2 Travel DOWN ON
OFF
DI 3 Nominal Speed ON
OFF
DI 4 Leveling Speed ON
OFF
DI 5 Inspection Speed ON
OFF
50.0Hz
Inverter output frequency
6.0Hz 4.5Hz 3.0Hz
1.5Hz
0.0Hz
Creeping
Optimize Start
Drive Healthy ON
0.1 sec
OFF
FM MC Contactor (Drive Output Contactor)
ON
OFF
100%
DC Injection
30% 15% 0%
ON
OFF
Motor
Current Demand
100% ̀
50%
0%
DO 1 Brake Contactor ON
OFF
t1 t2 t3 t4 t5 t6 t7 t8 t9 t10 t11 t12 t13 t14 t15 t16 t17 t18 ta tb tc
DC Injection 1 active set time F6-06 = 0.0 Sec
DC Injection 2 Level F6-13 = 30%
Brake Release Frequency Threshold F8-56 = 0.00 Hz
DC Injection 2 frequency threshold F6-11 = 0.5 Hz
MC Contactor Delay OFF Set-Time F8-61 = 0.20 Sec
DC Injection 1 Level F6-05 = 0%
Drive Run Permit Delay ON Set-Time F8-60 = 0.20 Sec
Brake Release Current Threshold F8-55 = 5 %
Brake Release Delay ON Time F8-57 = 0.1 Sec
Brake Apply Delay OFF Time F8-59 = 0.2 Sec
F6-04. = 0.3 Sec [ 0.0 : Disable ]
F6-08. [ 80% ]
FC-02. [ x.x % ]
Time, (x.x Sec)
F6-27. [ 30.0% ]
FC-01. [ x.x % ]
0
F6-26. [20.0%]
F6-09. [10%]
F6-26. = 20 %
F0-18. = 2.0 Sec
F6-27. = 30 %
F6-03. = 1.0 Hz
DC Injection 2 active set time F6-14 = 0.5 Sec
Brake Apply Frequency F8-58 = 0.5 Hz
Frequency Demand ( x.x%)
F0-17. [ 3.0Sec]
F0-18. [2.0Sec]

13
Timing diagram description
Event Descriptions Function Drive Status
ta - Drive healthy - MC and brake Contactor are energised
---- RUN
tb - Drive Trip - IGBTs disable - Brake contactor de-energised
---- Trip
tc - MC contactor got de-energised provided drive IGBTs are disabled after 0.1sec ---- Trip
t1 - Drive waits to enable by lift controller ---- Inhibit t2 - Drive MC contactor output energized when direction demand command
enable by the lift controller. - Desired preset speed reference command enable by lift controller
F8-60 Ready
t3 - Drive IGBTs immediately go into active mode after the desire drive run permit delay ON set time has elapse.
F8-60
STOP
t4 - DC injection active - Motor brake contactor energized when motor current demand excess the
brake release current level and brake release frequency
F6-05 F6-06 F8-55 F8-56
RUN
t5 - Motor brake contactor is energized - Optimize profile generator active - Motor start to run
F8-57 F6-03 F6-04
RUN
t6 - DC injection 1 disable after the desired set time has elapsed F6-06 RUN t7 - Start optimizer profile generator disable after the desired set time has elapse. F6-04 RUN t8 - Motor ramp up to the desire preset speed reference. F6-08
F6-09 F0-17 FC-0x
RUN
t9 - Drive output at speed status FC-0x RUN t10 - Change of preset speed reference demand
- Motor ramp down to the desire preset speed reference F6-08 F6-09 F0-17 FC-0x
RUN
t11 - Drive output at speed status FC-0x RUN t12 - Direction demand command disabled
- Motor ramp down to zero speed F6-08 F6-09 F0-18
RUN
t13 - DC injection active when drive output falls below the DC injection 2 frequency threshold
F6-11 F6-13
RUN
t14 - Brake contactor got de-energise when the drive output frequency fall below
the brake apply frequency F8-56 F8-59
RUN
t15 - DC injection still active when brake contactor got de-energise. F6-13 RUN t16 - DC injection disable after the desire set time has elapse F6-14 STOP
t17 - Drive IGBTs got disable - MC contactor delay OFF time active
----- Ready
t18 - MC contactor de-energise after the desire set time has elapse F8-61 Inhibit

14
4.2 Elevator performance fine tuning
Stage Symptom Diagnostics Remedies
Start Rollback Brake device releases too early Increase F8-57,ranging 0 to 0.5s
Start frequency is too low Increase F6-03, ranging 0 to1.5Hz
Torque output is insufficient Make sure F3-00=0, F3-01=0
Starting jerk Brake device releases too late Decrease F8-57, ranging 0 to 0.5s
Start frequency is too high Decrease F6-03, ranging 0 to 1.5Hz
Acceleration Jerk when
acceleration starts
Too fast acceleration at this section Increase F6-08, ranging 0 to 80%;
Or increase F0-17, ranging 0 to 20s
Jerk when
acceleration end
Too fast acceleration at this section Increase F6-09, ranging 0 to (95-(F6-08))%
Or increase F0-17, ranging 0 to 20s
Overshoot when
acceleration ends
Too big speed loop PI gains Decrease F2-03, ranging 0 to 100
Or increase F2-04, ranging 0 to 10
Vibration Too small margin between F2-02 and F2-05 Make sure F2-05 - F2-02 > 3Hz, usually increase
F2-05, ranging from F2-02 to 7Hz
Overcurrent stall prevention occurs Make sure F3-18=170%
Nominal
speed
Vibration Too big speed loop PI gains Decrease F2-00 or F2-03, ranging 0 to 100;
Or increase F2-01 or F2-04, ranging 0.01 to 10.00
Too big current loop PI gains Double check the motor parameters and then
perform motor auto-tuning once more
Frequency Demand
Time
Start Acceleration Nominal speed Deceleration Creeping speed Stop

15
Stage Symptom Diagnostics Remedies
Deceleration Jerk when deceleration starts
Too fast deceleration at this section Increase F6-26, ranging 0 to 80%; Or increase F0-18, ranging 0 to 20s
Vibration Overcurrent stall prevention occurs Make sure F3-18=170% Jerk when deceleration ends
Too fast deceleration at this section Increase F6-27, ranging 0 to 80%; Or increase F0-18, ranging 0 to 20s
Creeping speed
Vibration Torque output is insufficient Make sure F3-00=0, F3-01=0 Elevator gets stuck
Torque output is insufficient Make sure F3-00=0, F3-01=0
Move much slower than expected
Torque output is insufficient Make sure F3-00=0, F3-01=0 Too small creeping speed setting Increase F4-16, ranging 0 to 100%;
Or decrease relevant multi-reference
Stop
Jerk Too fast deceleration at this section 1. Increase F6-27, ranging 0 to 80%; Or increase F0-18, ranging 0 to 20s;
2. Use second deceleration time F8-04: First, set F8-04 bigger than F0-18, ranging F0-18 to 20s; then set F8-26= creeping speed
Braking device applies too early Make sure F8-58=0.5Hz, then increase F8-59,ranging 0 to 0.5s
Too strong DC injection at stop Decrease F6-13, ranging 0 to 100% Slip Too short DC injection active time at stop Increase F6-14,ranging 0 to 1s
Too weak DC injection at stop Increase F6-13, ranging 0 to 100% Braking device applies too late Make sure F8-58=0.5Hz, then decrease
F8-59, ranging 0 to 0.5s Inaccurate levelling position
Too slow deceleration 1. If F8-04 is not applied, then decrease F0-18, ranging 0 to 20s;
2. If F8-04 is applied, then firstly decrease F8-04, ranging F0-18 to 20s; secondly set F8-26 = creeping speed
Slip occurs Levelling varies with different loads
Too weak slip compensation For SVC, increase F2-06 or F 2-00; For VF, increase F3-09
Frequency Demand
Time
Start Acceleration Nominal speed Deceleration Creeping speed Stop

16
4.3 Setup flowchart
START Para Parameter name Default Commissioning
Ahead of setup Default values are elicited from enormous real elevator applications, so users can rely
on them usually, only some adjustments are necessary.
If parameter restoration is prohibited due to some reasons, then the following steps
have to be followed one by one.
Remove DI wirings usually if any DI is set as Forward or Reverse run and if signal is active, then some
operations cannot succeed, such as restoring parameters, changing command source,
wirings at the beginning of commissioning.
Restore parameters FP-01 Parameter operation 0 1
0: No operation
1: Restore default settings except motor parameters
2: Clear records including errors
4
501: Backup parameters NOTE to restore parameters to default at the beginning of commissioning.
Set motor parameters Motor Nameplate
F1-01 Rated motor power model dependent
Unit: kW
F1-02 Rated motor voltage 400
Unit: V
F1-03 Rated motor current model dependent
Unit: A
F1-04 Rated motor frequency 50.00
Unit: Hz
F1-05 Rated motor speed 1440
Unit: rpm.
CONTINUE Para. Parameter name Default Commissioning

17
CONTINUE Para. Parameter name Default Commissioning
Select command source F0-02 Command source selection 1 0
Perform motor auto tuning F1-37 Auto-tuning selection 0 3
0: No auto-tuning
2: Asynchronous motor dynamic auto-tuning
3: Asynchronous motor static auto-tuning(NEW) NOTE
Steps of auto-tuning: 1. Make sure the UVW connection between inverter and motor is not cut off by output contactor; if it is cut off,
then manually handle with the output contactor; 3. Set F1-37=3, press 4. Press the key on panel, then motor starts auto-tuning, it usually takes about 30 seconds to finish
this auto-
5. Restore F0-02 to the default value 1. Select Control mode F0-01 Control mode selection 2 0 or 2
0: SVC control
2: VF control
Select frequency reference source F0-03 Main frequency source X selection 6 2 or 6
0:Digital setting F0-08(pressing or can change F0-08 easily, and the changed
1:Digital setting F0-08(pressing or can change F0-08 easily, but changed
value would be cleared after power off)
2: AI1
3: AI2
4: AI3
5: Pulse setting (DI5)
6: Multi-reference setting
7: Simple PLC
8: PID
9: Communication setting
Set AI if AI is frequency reference F4-13 AI curve 1 minimum input 0.00 0.00
0 V to F4-15;
F4-14 Corresponding setting of AI1minimum input 0.0 0.0
-100.0% to 100.0%
F4-15 AI1 maximum input 5.00
F4-13 to 10.00 V
F4-16 Corresponding setting of AI1maximum input 100.0
-100.0% to 100.0%
CONTINUE Para. Parameter name Default Commissioning

18
CONTINUE Para. Parameter name Default Commissioning
Set multi-reference values FC-01 Reference 1 100.0 100.00 if multi-reference is frequency reference 0.0 to 100.0%.
NOTE: FC-01 is set as nominal speed of elevator. FC-02 Reference 1 11.0 11.0
0.0 to 100.0%. NOTE: FC-02 is set as creep speed of elevator.
FC-04 Reference 4 40.0 40.00
0.0 to 100.0%. NOTE: FC-04 is set as inspection speed of elevator.
FC-08 Reference 8 20.0 20.0
0.0 to 100.0%. NOTE: FC-08 is set as ARD speed of elevator.
Set DI function F4-00 DI1 function selection 1 1 (Forward run)
0: No function
1: Forward RUN (FWD)
2: Reverse RUN (REV)
8: IGBT Enable
9: Fault reset (RESET)
12: Multi-reference terminal 1
13: Multi-reference terminal 2
14: Multi-reference terminal 3 Setting range:0 to 59;
NOTE: this signal comes from elevator controller. F4-01 DI2 function selection 2 2 (Reverse run)
Setting range same as DI1; NOTE: this signal comes from elevator controller.
F4-02 DI3 function selection 12 12
Setting range same as DI1 NOTE: if analog input is used as frequency reference, then DI3 is useless, just leave it alone. If multi-
F4-03 DI4 function selection 13 13
Setting range same as DI1. NOTE: if analog input is used as frequency reference, then DI4 is useless, just leave it alone. If multi-
F4-04 DI5 function selection 14 14
setting range same as DI1; NOTE: if analog input is used as frequency reference, then DI5 is useless, just leave it alone. If multi-
F4-05 DI6 function selection 0
setting range same as DI1;
CONTINUE Para. Parameter name Default Commissioning

19
CONTINUE Para. Parameter name Default Commissioning
Set DO function F5-01 FM function selection 2 2(Fault output)
0 : No output
1 : AC Drive running
2 : Fault output
36: Software current exceeding limit
42 : Brake output
43 : MC (Magnetic contactor) output Setting range:0 to 59;
NOTE: this signal goes to magnetic contactor. F5-02 Relay function selection(TA/TB/TC) 43 43 (MC)
Setting range same as FM; NOTE: this signal goes to magnetic controller.
F5-03 Relay function selection(PA/PB/PC) 42 42(Brake)
Setting range same as FM; NOTE: this signal goes to brake contactor.
Set magnetic contactor F8-60 Drive run delay ON set time 0.20 0.20
0.00 to 10.00 Sec; NOTE: if MC is controlled by elevator controller, then F8-60 is useless.
F8-61 MC contactor delay OFF set time 0.20 0.20
0.00 to 10.00 Sec; NOTE: if MC is controlled by elevator controller, then F8-61 is useless.
Set brake contactor F8-55 Brake release current threshold 5 5
0 to 200%;
F8-56 Brake release frequency threshold 0.00 0.0
0.00 to 25.00 Hz;
F8-57 Brake release delay ON set time 0.0 0.0
0.0 to 5.0 Sec;
F8-58 Brake apply frequency threshold 0.5 0.5
0.00 to 25.00 Hz;
F8-59 Brake apply delay OFF set time 0.2 0.2
0.0 to 5.0 Sec;
Set acceleration and deceleration F0-17 Acceleration time 1 3.0 3.0
0.0 to 6500.0 sec.
F0-18 Deceleration time 1 2.0 2.0
0.0 to 6500.0 sec.
Set startup frequency F6-03 Startup frequency 1.0 1.0
0.0 to 10.0 Hz;
F6-04 Startup frequency active set time 0.3 0.3
0.0 to 100.0 Sec
CONTINUE Para. Parameter name Default Commissioning
20
CONTINUE Para. Parameter name Default Commissioning
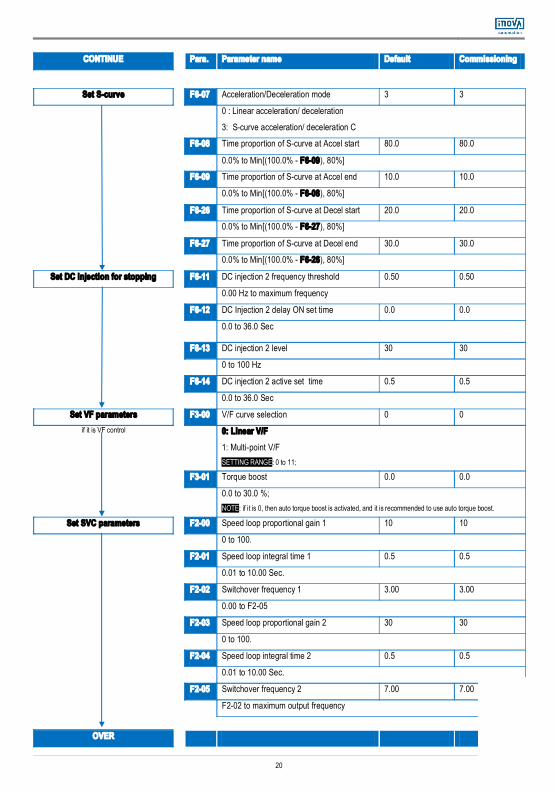
Set S-curve F6-07 Acceleration/Deceleration mode 3 3
0 : Linear acceleration/ deceleration
3: S-curve acceleration/ deceleration C
F6-08 Time proportion of S-curve at Accel start 80.0 80.0
0.0% to Min[(100.0% - F6-09), 80%]
F6-09 Time proportion of S-curve at Accel end 10.0 10.0
0.0% to Min[(100.0% - F6-08), 80%]
F6-26 Time proportion of S-curve at Decel start 20.0 20.0
0.0% to Min[(100.0% - F6-27), 80%]
F6-27 Time proportion of S-curve at Decel end 30.0 30.0
0.0% to Min[(100.0% - F6-26), 80%]
Set DC injection for stopping F6-11 DC injection 2 frequency threshold 0.50 0.50
0.00 Hz to maximum frequency
F6-12 DC Injection 2 delay ON set time 0.0 0.0
0.0 to 36.0 Sec
F6-13 DC injection 2 level 30 30
0 to 100 Hz
F6-14 DC injection 2 active set time 0.5 0.5
0.0 to 36.0 Sec
Set VF parameters F3-00 V/F curve selection 0 0 if it is VF control 0: Linear V/F
1: Multi-point V/F SETTING RANGE: 0 to 11;
F3-01 Torque boost 0.0 0.0
0.0 to 30.0 %; NOTE: if it is 0, then auto torque boost is activated, and it is recommended to use auto torque boost.
Set SVC parameters F2-00 Speed loop proportional gain 1 10 10
0 to 100.
F2-01 Speed loop integral time 1 0.5 0.5
0.01 to 10.00 Sec.
F2-02 Switchover frequency 1 3.00 3.00
0.00 to F2-05
F2-03 Speed loop proportional gain 2 30 30
0 to 100.
F2-04 Speed loop integral time 2 0.5 0.5
0.01 to 10.00 Sec.
F2-05 Switchover frequency 2 7.00 7.00
F2-02 to maximum output frequency
OVER

21
4.4 IGBT Enable
In all elevator applications, an Output Contactor is installed between the inverter output U, V, W and the motor. In an emergency, the Safety Line is opened due to an unsafe condition and the Output Contactor disconnects the power from the inverter to the motor (the motor brake is also applied at the same time). When the Output Contactor opens with current flowing through to the motor (inverter IGBTs are active), there will be arcing in the Output Contactor depending on the motor inductive energy. Arcing of the Output Contactor can reduce the lifetime of the contactor and in some severe cases can damage the contacts poles. Therefore it is recommended to electronically switch off the inverter IGBT firing circuits before opening the Output Contactor (milliseconds later). The inverter IGBT firing can be electronically switched off with the "IGBT Enable" function as shown in the timing charts below. CAUTION: An Output Contactor MUST always be installed as the final safety power cut off to the motor. The "IGBT Enable" function is NOT a substitute for an Output Contactor, it is designed to work together with the Output Contactor.
Frequency Reference
50Hz 25Hz
Time 0
DI1 Forward Run ON
OFF
DI6 IGBT Enable ON
OFF
IGBT s active ON
OFF
Inverter Output Current
100% 50% 0%
T/A-T/B-T/C
Brake Contactor ON
OFF
PA-PB-PC
Output Contactor ON
OFF
* MC reaction time: the reaction time of output relay of MC.
For some applications, the status of output contactor needs to be checked before inverter starts up, hence one relay output of MC will feedback to IGBT Enable (above in the diagram it is DI6).
Drive Run Permit Delay ON Set-Time F8-60 = 0.20 Sec
Brake Release Frequency Threshold F8-56 = 0.00Hz
MC reaction time* (dependant on the contactor)
Brake Release Current Threshold F8-55 = 5%
MC Contactor Delay OFF Set-Time F8-61 = 0.20 Sec
Brake closes immediately after IGBT Enable switches off
Brake release Delay ON Set-Time F8-57 = 0.00 Sec Brake release Delay ON Set-Time
F8-57 = 0.00 Sec
Drive Run Permit Delay ON Set-Time F8-60 = 0.20 Sec
Brake Release Current Threshold F8-55 = 5%

22
This function can work by assigning IGBT Enable function to a digital input, please refer to the table below to set. Take DI6 for example: assign IGBT Enable to DI6, then set F4-05=8 necessary to change active mode of IGBT Enable, then use F4-38 or F4-39 to set (low level or high level active).
Function Code
Parameter Name Setting Range Unit Default Commission
F4-00 DI 1 function selection 0 : No function 1 : Forward RUN (FWD) 2 : Reverse RUN (REV) 8 : IGBT Enable 12: Multi-reference terminal 1 13: Multi-reference terminal 2 14: Multi-reference terminal 3 15: Multi-reference terminal 4
N.A 1 F4-01 DI 2 function selection N.A 2 F4-02 DI 3 function selection N.A 12 F4-03 DI 4 function selection N.A 13 F4-04 DI 5 function selection N.A 14 F4-05 DI 6 function selection N.A 0 8 F4-06 DI 7 function selection N.A 15 F4-07 DI 8 function selection N.A 0 F4-08 DI 9 function selection N.A 0 F4-09 DI 10 function selection N.A 0
F4-38 DI active mode selection (Normal: low level active)
7-segment 0 0 0 0 0 N.A 00000
DI5 active mode: 0: Normal 1: Opposite
DI4 active mode: 0: Normal 1: Opposite
DI3 active mode: 0: Normal 1: Opposite
DI 2 active mode: 0: Normal 1: Opposite
DI 1 active mode: 0: Normal1: Opposite
F4-39 DI active mode selection 2 (Normal: low level active)
7-segment 0 0 0 0 0 N.A 00000
DI10 active mode: 0: Normal 1: Opposite
DI9 active mode: 0: Normal 1: Opposite
DI8 active mode: 0: Normal 1: Opposite
DI7 active mode: 0: Normal 1: Opposite
DI6 active mode: 0: Normal 1: Opposite

23
5 Function code table
NOTE: not all parameters are listed, here below are relevant to open loop elevator applications.
5.1 Group F0: fundamental
Function Code
Parameter name Setting Range Unit Default Commission
F0-01 Motor 1 control mode 0 : Sensor-less flux vector control (SFVC) 2 : V/F control
N.A 2
F0-02 Command source selection 0 : Operation panel control (LED off) 1 : Terminal control (LED on) 2 : Communication control (LED flashing)
N.A 1
F0-03 Main frequency source X selection
2 : AI-1 3 : AI-2 4 : AI-3 6 : Multi-reference
N.A 6
F0-07 Frequency source selection 0 : Main frequency source X N.A 0 F0-09 Rotation direction 0: Same direction
1: Reverse direction N.A 0
F0-10 Maximum frequency 50.00 to 100.00 Hz 50.00 F0-15 Carrier frequency 0.5 to 11.0
(SVC mode: 0.5 to 9) (VF mode: 0.5 to 11)
kHz Model dependant
F0-17 Acceleration time 1 0.00 to 650.00 (F0-19 = 2) 0.0 to 6500.0 (F0-19 = 1) 0 to 65000 (F0-19 = 0)
Sec 3.0
F0-18 Deceleration time 1 0.00 to 650.00 (F0-19 = 2) 0.0 to 6500.0 (F0-19 = 1) 0 to 65000 (F0-19 = 0)
Sec 2.0
F0-19 Acceleration/Deceleration time unit
0 : 1 1 : 0.1 2 : 0.01
Sec 1 1

24
5.2 Group F1: motor 1 parameters
Function Code
Parameter name Setting Range Unit Default Commission
F1-00 Motor type selection 0 : Common asynchronous motor 1 : Variable frequency asynchronous motor
N.A 0
F1-01 Motor rated power 0.1 to 1000.0 kW
Model dependent
F1-02 Motor rated voltage 1 to 2000 V 400 F1-03 Motor rated current 0.01 to 655.35
(For 0.1 to 6553.5 (For AC drive power > 55 kW)
A Model
dependent
F1-04 Motor rated frequency 0.01 Hz to maximum frequency
Hz 50
F1-05 Motor rated rotational speed 1 to 65535 RPM 1440 F1-06 Stator resistance
(asynchronous motor) 0.001 to 65.535 (AC drive power 55 kW) 0.0001 to 6.5535 (AC drive power > 55 kW)
0
F1-07 Rotor resistance (asynchronous motor)
0.001 to 65.535 (AC drive power 55 kW) 0.0001 to 6.5535 (AC drive power > 55kW)
0.000
F1-08 Leakage inductive reactance (asynchronous motor)
0.01 to 655.35mH (AC drive power 55 kW) 0.001 to 65.535 (AC drive power > 55 kW)
mH 0.00
F1-09 Mutual inductive reactance (asynchronous motor)
0.01 to 655.35 (AC drive power 55 kW) 0.001 to 65.535 (AC drive power > 55 kW)
mH 0.00
F1-10 No-load current (asynchronous motor)
0.01 to F1-03 (AC drive power 55 kW) 0.1 to F1-03 (AC drive power > 55 kW)
A 0.00
F1-37 Auto tuning selection 0 : No auto-tuning 2: Asynchronous motor dynamic auto-tuning 3 : Asynchronous motor static auto-tuning(NEW)
N.A 0

25
5.3 Group F2: vector control
Function Code
Parameter name Setting Range Unit Default Commission
F2-00 Speed loop proportional gain 1
0 to 100 N.A 10
F2-01 Speed loop integral time 1 0.01 to 10.00 Sec 0.50 F2-02 Switchover frequency 1 0.00 to F2-05 Hz 3.00 F2-03 Speed loop proportional
gain 2 0 to 100
N.A 30
F2-04 Speed loop integral time 2 0.01 to 10.00 Sec 0.5 F2-05 Switchover frequency 2 F2-02 to maximum output frequency Hz 7.00 F2-06 SVC slip gain 50 to 200 % 100 F2-10 Torque upper limit (for SVC) 0.0 to 200.0 (% inverter rated current) % 150.0 F2-13 Excitation adjustment
proportional gain 0 to 20000
N.A 2000
F2-14 Excitation adjustment integral gain
0 to 20000 N.A 1300
F2-15 Torque adjustment proportional gain
0 to 20000 N.A 2000
F2-16 Torque adjustment integral gain
0 to 20000 N.A 1300

26
5.4 Group F3: VF control
Function code
Parameter Name Setting Range Unit Default Commission
F3-00 V/F curve setting 0: Linear V/F 1: Multi-point V/F 2 to 11: not relevant settings
N.A. 0
F3-01 Torque boost 0.0 to 30.0 (if it is 0, then auto torque boost is activated)
% 0
F3-02 Cut-off frequency of torque boost
0.00 to max output frequency Hz 50.00
F3-03 Multi-point V/F frequency 1 (F1)
0.00 to F3-05 Hz 1.50
F3-04 Multi-point V/F voltage 1 (V1)
0.0 to 100.0 % 6.0
F3-05 Multi-point V/F frequency 2 (F2)
F3-03 to F3-07 Hz 3.00
F3-06 Multi-point V/F voltage 2 (V2)
0.0 to 100.0 % 8.0
F3-07 Multi-point V/F frequency 3 (F3)
F3-05 to rated motor frequency (F1-04) Hz 8.00
F3-08 Multi-point V/F voltage 3 (V3)
0.0 to 100.0 % 20.0
F3-09 V/F slip compensation gain 0 to 200.0 % 0.0
F3-10 V/F over-excitation gain 0 to 200 % 0
F3-11 V/F oscillation suppression gain
0 to100 % 30
F3-13 Voltage source for V/F separation
0 to 8 N.A. 0
F3-14 Voltage digital setting for V/F separation
0 to rated motor voltage V 0
F3-15 Voltage rise time of V/F separation
0.0 to 1000.0 s 0.0
F3-18 Overcurrent stall prevention current limit (for VF mode)
100 to 200 (% inverter rated current) % 170
F3-19 Overcurrent stall prevention enable(for VF mode)
0: Disable; 1: Enable N.A. 1
F3-20 Overcurrent stall prevention gain(for VF mode)
0 to 100 N.A. 20
F3-22 Overvoltage stall prevention voltage limit(for VF/SVC)
650 to 800 V 770
F3-23 Overvoltage stall prevention enable(for VF/SVC)
0: Disable; 1: Enable N.A 0
F3-24 Overvoltage stall prevention frequency gain(for VF/SVC)
0 to 100 N.A 30
F3-25 Overvoltage stall prevention voltage gain(for VF/SVC)
0 to 100 N.A 30

27
5.5 Group F4: input terminals
Function Code
Parameter name Setting Range Unit Default Commission
F4-00 DI 1 function selection (Standard on-board)
0 : No function 1 : Forward RUN (FWD) 2 : Reverse RUN (REV) 3 : Three-line Control 4 : Jog Forward (FJOG) 5 : Jog Reverse (RJOG) 6 : Terminal UP 7 : Terminal DOWN 8 : IGBT Enable 9 : Fault reset (RESET) 10: RUN Pause 11: Normally open (NO) input of external fault 12: Multi-reference terminal 1 13: Multi-reference terminal 2 14: Multi-reference terminal 3 15: Multi-reference terminal 4 16: Terminal 1 for acceleration/deceleration
time selection 17: Terminal 2 for acceleration/deceleration
time selection 18: Frequency source switchover 19: UP and DOWN setting clear (terminal, operation panel) 20: Command source switchover terminal 1 21: Acceleration/Deceleration prohibited 22: PID pause 23: PLC status reset 24: Swing pause 25: Counter input 26: Counter reset 27: Length count input 28: Length reset 29: Torque control prohibited 30: Pulse input (enabled only for DI5) 31: Reserved 32: Immediate DC braking 33: Normally closed (NC) input of external fault 34: Frequency modification forbidden 35: Reverse PID action direction 36: External STOP terminal 1 37: Command source switchover terminal 2 38: PID integral pause 39: Switchover between main frequency source
X and preset frequency 40: Switchover between auxiliary frequency
source Y and preset frequency 41: Motor selection terminal 1 42: Motor selection terminal 2
N.A 1
F4-01 DI 2 function selection (Standard on-board)
N.A 2
F4-02 DI 3 function selection (Standard on-board)
N.A 12
F4-03 DI 4 function selection (Standard on-board)
N.A 13
F4-04 DI 5 function selection (Standard on-board)
N.A 14
F4-05 DI 6 function selection (On-board expansion card)
N.A 0 8
F4-06 DI 7 function selection (On-board expansion card)
N.A 0 15
F4-07 DI 8 function selection (On-board expansion card)
N.A 0
F4-08 DI 9 function selection (On-board expansion card)
N.A 0
F4-09 DI 10 function selection (On-board expansion card)
N.A 0

28
Function Code
Parameter name Setting Range Unit Default Commission
43: PID parameter switchover 44: User defined fault 1 45: User defined fault 2 46: Speed control/Torque control switchover 47: Emergency stop 48: External STOP terminal 2 49: Deceleration DC braking 50: Clear the current running time 51: Switchover between two-line mode and
three line mode 52 to 59 : Reserved
F4-10 DI filter time 0.000 to 1.000 Sec 0.010 F4-11 Terminal command mode 0 : Two-line mode 1
1 : Two-line mode 2 2 : Three-line mode 1 3 : Three-line mode 2
N.A 0
F4-12 Terminal UP/DOWN rate 0.01 to 65.535 Hz/s 1.00 F4-13 AI curve 1 minimum input 0.00 to F4-15 V 0.00 F4-14 Corresponding setting of
AI curve 1 minimum input -100.00 to 100.00 % 0.0
F4-15 AI curve 1 maximum input F4-13 to 10.00V Volt 5.00 F4-16 Corresponding setting of
AI curve 1 maximum input
-100.00 to 100.00 % 100.0
F4-17 AI 1 filter time 0.00 to 10.00 Sec 0.10 F4-38 DI valid mode selection
(for DI1 to DI5) 00000 to 11111 (binary)
N.A 00000
F4-39 DI valid mode selection 2 (for DI6 to DI10)
00000 to 11111 (binary) N.A 00000

29
5.6 Group F5: output terminals
Function Code
Parameter name Setting Range Unit Default Commission
F5-00 FM terminal output mode 0 : High-speed pulse output (FMP) 1 : ON/OFF output (FMR)
N.A 1
F5-01 FMR function (open-collector output terminal) Attention! Set F5-00 = 1 when FM is used as MC or Brake output.
0 : No output 1 : AC Drive running 2 : Fault output (stop) 3 : Frequency-level detection FDT1 output 4 : Frequency reached 5 : Zero-speed running (no output at stop) 6 : Motor overload pre-warning 7 : AC Drive overload pre-warning 8 : Set count value reached 9 : Designated count value reached 10 : Length reached 11 : PLC cycle complete 12 : Accumulated running time reached 13 : Frequency limited 14 : Torque limited 15 : Ready for RUN 16 : AI-1 larger than AI-2 17 : Frequency upper limit reached 18 : Frequency lower limit reached (no output at stop) 19 : Under-voltage state output 20 : Communication setting 21-22 : Reserved 23 : Zero-speed running 2 (having output at stop) 24 : Cumulative power-on time reached 25 : Frequency-level detection FDT2 output 26 : Frequency 1 reached 27 : Frequency 2 reached 28 : Current 1 reached 29 : Current 2 reached 30 : Timing reached 31 : AI-1 input limit exceeded 32 : Load becoming 0 33 : Reverse running 34 : Zero current state 35 : Module temperature reached 36 : Software current limit exceeded 37 : Frequency lower limit reached (having output at stop) 38 : Alarm output 39 : Motor overheat warning 40 : Current running time reached 41 : Fault output (There is no output if it is the coast-to-stop fault and under-voltage occurs) 42 : Brake output 43 : MC (Magnetic contactor) output
N.A 2
F5-02 Relay function (T/A-T/BT/C)
N.A 43
F5-03 Extension card relay function (P/A-P/B-P/C)
N.A 42
F5-04 DO-1 function selection (open-collector output terminal)
N.A 0
F5-05 Extension card DO-2 function
N.A 0
F5-07 AO1 function selection 0 : Running frequency 1 : Set frequency 2 : Output current 3 : Output torque (absolute value)
N.A 3

30
5.7 Group F6: start and stop control
Function Code
Parameter name Setting Range Unit Default Commission
F6-00 Start mode 0 : Direct start 1 : Rotational speed tracking restart 2 : Pre-excited start (asynchronous motor)
N.A 0
F6-03 Startup frequency 0.0 to 10.0 Hz 1.0 F6-04 Startup frequency active set
time 0.0 to 100.0
Sec 0.3
F6-05 DC injection 1 level 0 to 150 % 0 F6-06 DC injection 1 active set time 0.0 to 5.0 Sec 0 F6-07 Acceleration/Deceleration
mode 0 : Linear acceleration/ deceleration 3: S-curve acceleration/ deceleration C N.A 3
F6-08 Time proportion of S-curve at Accel start
0.0% to Min[(100.0% - F6-09), 80%] % 80.0
F6-09 Time proportion of S-curve at Accel end
0.0% to Min[(100.0% - F6-08), 80%] % 10.0
F6-10 Stop mode 0 : Decelerate to stop 1 : Coast to stop
N.A 0
F6-11 DC injection 2 frequency threshold
0.00 Hz to maximum frequency Hz 0.50
F6-12 DC Injection 2 delay ON set time
0.0 to 36.0 Sec 0.0
F6-13 DC injection 2 level 0 to 150 % 30 F6-14 DC injection 2 active set time 0.0 to 5.0 Sec 0.5 F6-26 Time proportion of S-curve at
Decel start 0.0% to Min[(100.0% - F6-27), 80%]
% 20.0
F6-27 Time proportion of S-curve at Decel end
0.0% to Min[(100.0% - F6-26), 80%] % 30.0
5.8 Group F7: product and software version checking
Function Code
Parameter name Setting Range Unit Default Commission
F7-08 Product number N.A. N.A. 380.00 display
F7-10 Performance software version
N.A. N.A. 312.xx display
F7-11 Functional software version N.A. N.A. 312.xx display F7-15 Performance software
temporary version N.A.
N.A. 0.00 display
F7-16 Functional software temporary version
N.A. N.A. 0.00 display

31
5.9 Group F8: auxiliary functions
Function Code
Parameter Name Setting Range Unit Default Commission
F8-04 Deceleration time 2 0.0 to 6500.0 sec 2.0 F8-26 Frequency switchover point
between deceleration time 1 and deceleration time 2
0.00 to maximum frequency Hz 0.00
F8-55 Brake release current threshold
0 to 200 % 5
F8-56 Brake release frequency threshold
0.00 to 25.00 Hz 0
F8-57 Brake release delay ON set time
0.0 to 5.0 sec 0.0
F8-58 Brake apply frequency threshold
0.00 to 25.00 Hz 0.50
F8-59 Brake apply delay OFF set time
0.0 to 5.0 Sec 0.2
F8-60 Drive run delay ON set time 0.20 to 10.00 Sec 0.20 F8-61 MC contactor delay OFF
set time 0.00 to 10.00 Sec 0.20
5.10 Group F9: fault and protection
Function Code
Parameter Name Setting Range Unit Default Commission
F9-00 Motor thermal protection enable selection
0: disable motor thermal protection; 1: enable motor thermal protection N.A 1
F9-01 Motor thermal protection coefficient
0.1 to 10.00 N.A 1.00
F9-02 Motor thermal protection pre-warning coefficient
50 to 99 % 80
F9-07 Ground fault detection Enable 0: Disable; 1: Enable detection upon power on; 2: Enable detection upon power on and upon start;
N.A 2
F9-08 Braking operation voltage level 700 to 800 V 750 F9-09 Fault auto reset times 0 to 20 N.A 0 F9-11 Time interval of fault auto
reset 0.1 to100.0 Sec 1.0
F9-13 Drive output phase loss detection Enable
0: Disable; 1: Enable detection during running; 2: Enable detection upon start and during running
N.A 2
F9-14 1st fault type 0 to 51 N.A. N.A. F9-15 2nd fault type 0 to 51 N.A. N.A. F9-16 3rd (latest) fault type 0 to 51 N.A. N.A. F9-17 Frequency upon 3rd fault N.A. Hz N.A. F9-18 Current upon 3rd fault N.A. A N.A. F9-19 Bus voltage upon 3rd fault N.A. V N.A.

32
Function Code
Parameter Name Setting Range Unit Default Commission
F9-20 Input terminal status upon 3rd fault
N.A. N.A. N.A.
F9-21 Output terminal status upon 3rd fault
N.A. N.A. N.A.
F9-22 AC drive status upon 3rd fault
N.A. N.A. N.A.
F9-23 Power-on time upon 3rd fault N.A. N.A. N.A.
5.11 Group FC: multi-reference
Function Code
Parameter name Setting Range Unit Default Commission
FC-00 Reference 0 0.0 to 100.0 % 10.0% FC-01 Reference 1 0.0 to 100.0 % 100.0% FC-02 Reference 2 0.0 to 100.0 % 11.0% FC-03 Reference 3 0.0 to 100.0 % 12.0% FC-04 Reference 4 0.0 to 100.0 % 40.0% FC-05 Reference 5 0.0 to 100.0 % 13.0% FC-06 Reference 6 0.0 to 100.0 % 14.0% FC-07 Reference 7 0.0 to 100.0 % 15.0% FC-08 Reference 8 0.0 to 100.0 % 20.0% Attention!
F4-02 to F4-04 and F4-06 Multi-Reference
Preset Reference Selector F4-02 F4-03 F4-04 F4-06 FC-00 : Reference 0 0 OFF OFF OFF OFF FC-01 : Reference 1 1 ON OFF OFF OFF FC-02 : Reference 2 2 OFF ON OFF OFF FC-03 : Reference 3 3 ON ON OFF OFF FC-04 : Reference 4 4 OFF OFF ON OFF FC-05 : Reference 5 5 ON OFF ON OFF FC-06 : Reference 6 6 OFF ON ON OFF FC-07 : Reference 7 7 ON ON ON OFF FC-08 : Reference 8 8 OFF OFF OFF ON
5.12 Group FF: drive parameters
Function Code
Parameter name Setting Range Unit Default Commission
FF-00 Factory password 0 to 65535 N.A. 0 FF-01 Drive code 1 to 537
N.A.
Model dependent
FF-02 G/P type selection 1: G type; 2: P type N.A. 1 FF-03 Drive rated power 0 to 6553.5
N.A. Model
dependent display

33
5.13 Group FP: function code management
Function Code
Parameter name Setting Range Unit Default Commission
FP-00 User password 0 to 65535 N.A. 0 FP-01 Parameter initialization 0: No operation
01: Restore factory settings except motor parameters 02: Clear records 04: Restore user backup parameters 501: Back up current user parameters
N.A. 0
FP-03 Parameter display selection 7-segment 0 0 N.A 00
Modified parameters: 0: No display 1: Display
Customized parameters: 0: No display 1: Display
5.14 Group A5: control optimization
Function Code
Parameter name Setting Range Unit Default Commission
A5-06 Under voltage threshold 60.0 to 140.0 % 60.0 100% is 350V A5-09 Overvoltage tripping level 200.0 to 2500.0 V 810
5.15 Group U0: monitoring
Function Code
Parameter name Setting Range Unit Default Commission
U0-00 Running frequency N.A. Hz N.A. U0-01 Set frequency N.A. Hz N.A. U0-02 Bus voltage N.A. V N.A. U0-03 Output voltage N.A. V N.A. U0-04 Output current N.A. A N.A. U0-05 Output power N.A. kW N.A. U0-06 Output torque N.A. % N.A. U0-07 DI state N.A. N.A. N.A. U0-08 DO state N.A. N.A. N.A. U0-09 AI1 voltage N.A. V N.A. U0-10 AI2 voltage N.A. V N.A. U0-11 AI3 voltage N.A. V N.A. U0-41 DI state visual display N.A. N.A. N.A. U0-42 DO state visual display N.A. N.A. N.A. U0-65 Torque upper limit N.A. % N.A.

34
6 Trouble shooting
6.1 Inverter fault codes
Display Fault Name Possible Causes Solutions
Err02 Overcurrent during acceleration
1. The output circuit is short circuited. 2. The acceleration time is too short. 3. Manual torque boost or V/F curve is not
appropriate. 4. The power supply is too low. 5. The startup operation is performed on the
rotating motor. 6. A sudden load is added during acceleration. 7. The AC drive model is of too small power
class.
1: Eliminate short circuit. 2: Increase the acceleration time F0-17. 3: Adjust the manual torque boost or V/F curve. 4: Check that the power supply is normal. 5: Select speed tracking restart or start the motor
after it stops. 6: Remove the added load. 7: Select a drive of higher power class.
Err03 Overcurrent during deceleration
1. The output circuit is short circuited. 2. The deceleration time is too short. 3. The power supply is too low. 4. A sudden load is added during deceleration. 5. The braking resistor is not installed.
1: Eliminate short circuit. 2: Increase the deceleration timeF0-18. 3: Check the power supply, and ensure it is normal. 4: Remove the added load. 5: Install the braking resistor.
Err04 Overcurrent at constant speed
1. The output circuit is short circuited. 2. The power supply is too low. 3. A sudden load is added during operation. 4. The AC drive model is of too small power
class.
1: Eliminate short circuit. 2: Adjust power supply to normal range. 3: Remove the added load. 4: Select a drive of higher power class.
Err05 Overvoltage during acceleration
1. The DC bus voltage is too high . 2. An external force drives the motor during
acceleration. 3. The acceleration time is too short. 4. The braking resistor is not installed.
1: Replace with a proper braking resistor. 2: Cancel the external force or install braking
resistor. 3: Increase the acceleration time. 4: Install a braking resistor.
Err06 Overvoltage during deceleration
1. The DC bus voltage is too high . 2. An external force drives the motor during
deceleration. 3. The deceleration time is too short. 4. The braking resistor is not installed.
1: Replace with a proper braking resistor. 2: Cancel the external force or install braking
resistor. 3: Increase the deceleration time. 4: Install the braking resistor
Err07 Overvoltage at constant speed
1. The DC bus voltage is too high . 2. An external force drives the motor during
deceleration.
1: Replace with a proper braking resistor. 2: Cancel the external force.
: Voltage thresholds
Voltage Class DC Bus Overvoltage threshold DC Bus Undervoltage threshold Braking operation level Three-phase 220 V 400VDC 200VDC 380VDC Three-phase 380 V 810VDC 350VDC 750VDC
Err08 Control power fault The input voltage exceeds the allowed range. Adjust the input voltage to within the allowed range.

35
Display Fault Name Possible Causes Solutions
Err09 Undervoltage 1. Instantaneous power failure occurs. 2. The input voltage exceeds the allowed
range 3. The DC bus voltage is too low . 4. The rectifier bridge and buffer resistor are
faulty. 5. The drive board is faulty. 6. The control board is faulty.
1: Reset the fault. 2: Adjust the input voltage to within the allowed
range. 3 to 6: Seek for maintenance.
Err10 Drive overload 1. The load is too heavy or the rotor is locked. 2. The drive is of too small power class.
1: Reduce the load, or check the motor, or check the machine whether it is locking the rotor.
2: Select a drive of higher power class.
Err11 Motor overload 1. F9-01 is too small. 2. The load is too heavy or the rotor is locked. 3. The drive is of too small power class.
1: Set F9-01 correctly. 2: Reduce load, or check motor, or check the
machine whether it is locking the rotor. 3: Select a drive of larger power class.
Err12 Power input phase loss
1. The three-phase power supply is abnormal. 2. The drive board is faulty. 3. The lightening protection board is faulty. 4. The control board is faulty.
1: Check the power supply. 2 to 4: Seek for maintenance.
Err13 One drive output phase loss
1. The cable between drive and motor is faulty. 2. The drive's three-phase output is
unbalanced when the motor is running. 3. The drive board is faulty 4. The IGBT is faulty.
1: Check the cable. 2: Check the motor windings. 3 to 4: Seek for maintenance.
Err14 IGBT overheat 1. The ambient temperature is too high. 2. The air filter is blocked. 3. The cooling fan is damaged. 4. The thermal sensor of IGBT is damaged. 5. The IGBT is damaged.
1: Reduce the ambient temperature. 2: Clean the air filter. 3 to 5: Seek for maintenance.
Err15 External equipment fault
1. External fault signal is input via DI. 2. External fault signal is input via VDI.
Reset the fault.
Err16 Communication fault
1. The host computer is abnormal. 2. The communication cable is faulty. 3. The extension card type set in F0-28 is
incorrect. 4. The communication parameters in group FD
are set improperly.
1: Check cabling of the host computer. 2: Check the communication cabling. 3: Set F0-28 correctly. 4: Set the communication parameters properly.
Err18 Current detection fault
The drive board is faulty. Replace the drive board.
Err19 Motor tuning fault 1. Motor parameters are wrong. 2. Motor tuning overtime.
1. Check motor parameters F1-00 to F1-05. 2. Check the wiring between drive and motor.
Err21 EEPROM read-write fault
The EEPROM chip is damaged. Replace the main control board.
Err23 Short circuit to ground
The motor is short-circuited to ground. Replace the cables or motor.
Err26 Accumulative running time reached
The accumulative running time reaches the setting of F8-17.
Clear the record by performing parameter initialization (set FP-01 to 2).

36
Display Fault Name Possible Causes Solutions
Err27 User-defined fault 1 1. The user-defined fault 1 signal is input via DI.
2. User-defined fault 1 signal is input via VDI.
Reset the fault.
Err28 User-defined fault 2 1. The user-defined fault 2 signal is input via DI
2. The user-defined fault 2 signal is input via VDI.
Reset the fault.
Err29 Accumulative power-on time reached
The accumulative power-on time reaches the setting of F8-16.
Clear the record by performing parameter initialization (set FP-01 to 2).
Err30 Off load fault Check the connection between motor and load.
Err31 PID feedback lost during running
The PID feedback is lower than FA-26. Check the PID feedback signal or set FA-26 to a proper value.
Err40 Quick current limit 1. The load is too heavy or the rotor is locked. 2. The drive is of too small power class.
1: Reduce the load, or check the motor, or check the machine whether it is locking the rotor.
2: Select a drive of higher power class.
Err41 Motor switchover fault during running
The current motor is switched over via a terminal during running of the AC drive.
Switch over the motor only after the AC drive stops.
Err61 Two or three drive output phases loss
1. The drive output connections get loose; 2. The output contactor gets wrongly operated or malfunctions.
1. Check drive output connections; 2. Check drive output contactor.

37
6.2 Inverter common symptoms and diagnostics
Fault Name Possible Causes Solutions
There is no display at power-on. 1. There is no power supply or the power supply is too
low. 2. The switching power supply on the drive board is
faulty. 3. The rectifier bridge is damaged. 4. The buffer resistor of the drive is damaged. 5. The control board or the keypad is faulty. 6. The cable between the control board and the drive
board or keypad breaks.
1: Check the power supply. 2 to 5: Seek for maintenance. 6: Re-connect the 4-core and 28-core flat cables,
or seek for maintenance.
"HC" is displayed at power-on.
1. The cable between the drive board and the control board is in poor contact.
2. The control board is damaged. 3. The motor winding or the motor cable is short-
circuited to the ground. 4. The power supply is too low.
1: Re-connect the 4-core and 28-core flat cables, or seek for maintenance.
2: Seek for maintenance. 3: Check the motor or replace it, and check the
motor cable. 4. Check the power supply according to
charpter1.3.
The display is normal upon power-on, but "HC" is displayed after start and the motor stops immediately.
1. The cooling fan is damaged or the rotor is locked. 2. A certain terminal is short-circuited.
1: Replace cooling fan, or check the machine whether it is locking the rotor.
2: Eliminate short circuit.
Err14 is reported frequently.
1. The carrier frequency is set too high. 2. The cooling fan is damaged, or the air filter is
blocked. 3. Components (thermal coupler or others) inside the
drive are damaged.
1: Reduce F0-15. 2: Replace the fan and clean the air filter. 3: Seek for maintenance.
The motor does not rotate after the AC drive outputs a non-zero reference.
1. The motor or motor cable is damaged. 2. The motor parameters are set improperly. 3. The cable between the drive board and the control
board is in poor contact. 4. The drive board is faulty. 5. The rotor is locked.
1: Check the motor, or check the cable between the drive and the motor.
2: Check and re-set motor parameters. 3: Re-connect the 4-core and 28-core flat cables,
or seek for maintenance. 4: Seek for maintenance. 5: Check the machine whether it is locking the
rotor.
The DI terminals are disabled.
1. The DI parameters are set incorrectly. 2. The input signal is incorrect. 3. The wire jumper between OP and +24V is in poor
contact. 4. The control board is faulty.
1: Check and reset DI parameters in group F4. 2: Check the input signals, or check the input
cable. 3: Check the jumper between OP and +24 V. 4: Seek for maintenance.
The drive reports overcurrent and overvoltage frequently.
1. The motor parameters are set improperly. 2. The acceleration/deceleration time is too small. 3. The load fluctuates.
1: Reset motor parameters. 2: Set proper acceleration/deceleration time. 3: Check the machine, or seek for maintenance.

38
Revision History
Revision Date Revising Author Description
0.0 25th MAR 4 Xiong Fei Related firmware version: F7-10=312.00 and F7-11=312.02
0.1 17th APR 4 Xiong Fei 1. Related firmware version: F7-10=312.01 and F7-11=312.04. 2. Add mounting hole dimensions into General specifications; 3. Revise Connection diagram; 4. Add motor thermal protection function codes and some others into function
parameters; 5. Correct some items in Elevator quick commissioning; 6. Add motor auto-tuning steps into Elevator quick commissioning.
0.2 18th JUN 2014 Xiong Fei 1. Related firmware version: F7-10=312.01 and F7-11=312.05. 2. Add nameplate and designation rule; 3. Add MD38IO1 into wiring diagram; 4. Add operation panel into quick setup; 5. Improve setup flowchart; 6. Improve trouble shooting; 7. Add extension cards;
0.3 08th JUL 2014 Xiong Fei & Subra & Arut 1. Related firmware version: F7-10=312.01 and F7-11=312.05; 2. Simplify wiring diagram, remove Elevator controller block; 3. Add IGBT Enable function into Chapter 3; 4. MD38IO1 shows as pre-fitted extension I/O card.
0.4 15th JAN Xiong Fei 1. Related firmware version: F7-10=312.03 and F7-11=312.06; 2. Revise the ratings of recommended braking resistors; 3. Add current loop gain parameters (F2-13 to 16); 4. Add overcurrent stall prevention parameters (F3-19 to 20); 5. Add software temporary version parameters (F7-15 to 16); 6. Add factory parameters (FF-00 to 03); 7. Revise protection parameters F9-03, F9-04, F9-07 and F9-13; 8. Add fault code Err61 (Two or three drive output phases loss); 9. Revise the name of Err13(One drive output phase loss); 10. Revise braking operation level from 770VDC to 750VDC; 11. Revise DC injection active time range F6-06 and F6-14; 12. Revise S curve time proportion range F6-08, 09, 26, and 27; 13. Revise default values of F8-55, 56, 57; 14. Revise wiring diagram, move MC and Brake to TA/TB/TC and PA/PB/PC; 15. Revise auto-tuning methods F1-37; 16. Revise F5-01, F5-02, F5-03, F5-04, re-arrange digital outputs; 17. Revise IGBT enable description(DO active mode setting);
0.5 8th JUL Xiong Fei 1. Related firmware version: F7-11=312.07; 2. Revise description of IGBT Enable; 3. Add F3-22 to 25, F9-08, FP-03 4. Change F0-15, F3-23, F6-05, F6-13 5. Revise wiring diagram, add phase monitor relay and MC relay to DI6; 6. Adjust the chapter sequence; 7. Add DI7 as multi-reference in wiring diagram;

MD380L Open Loop Elevato
r Drive Q
uick S
tart Manual
MD380L Open Loop Elevator DriveQuick Start Manual
V0.5Data Code:19010299
Inova Automation Co., LimitedAddress:Unit B01, 17/FMG Tower, 133 Hoi Bun Road, Kwun Tong, Hong Kong Tel: (852) 2751 6080Fax: (852) 2751 6933Email: [email protected]://www.inovance.cn
Top Related