


Languages
Pages
Legal


MapView User Guide – May 2010
Copyright RECONYX, Inc. – www.reconyx.com
MapView Professional Image Management
User Guide
MapView Professional User Guide – May 2010
Copyright RECONYX, Inc. – www.reconyx.com
Inside This Manual
Inside This Manual ..................................................................................................................................... 1 MapView Image Management ................................................................................................................... 2 Overview ................................................................................................................................................. 2 Image Data .............................................................................................................................................. 3 Image Storage and Naming ..................................................................................................................... 4 Viewing and Managing Your Images ..................................................................................................... 5 Manage Image Folders ............................................................................................................................ 8 Manage Sites ......................................................................................................................................... 10 Manage Locations ................................................................................................................................. 15 Erase Memory Card .............................................................................................................................. 20 Check Free Space .................................................................................................................................. 21 View/Load New Images ........................................................................................................................ 22 View Images.......................................................................................................................................... 27 Favorites ................................................................................................................................................ 31 Search Images ....................................................................................................................................... 32 Setup Keywords (for Tagging Images) ................................................................................................. 36 Tag Images and Manage Image Data .................................................................................................... 39 Export Image Data ................................................................................................................................ 43 Create Video.......................................................................................................................................... 44
Warranty and Safety Information........................................................................................................... 45 Limited Warranty .................................................................................................................................. 45
Troubleshooting and Technical Support ................................................................................................ 45 Copyright and Trademark Information ................................................................................................. 47
Disclaimer
While every effort has been made to ensure that the information contained in this “User Guide” is accurate and complete, no liability can be accepted for any errors or omissions.
RECONYX reserves the right to change the specifications of the hardware and software described herein at any time without prior notice.
RECONYX makes no warranties for damages resulting from corrupted or lost data due to a mistake in operation or malfunction of the camera, the software, memory cards, personal computers, or peripheral devices.

MapView Professional User Guide – May 2010
Copyright RECONYX, Inc. – www.reconyx.com Page- 2
MapView Image Management
Overview
MapViewTM Professional software is designed to work with the new RECONYX HyperFireTM Professional and Security Series cameras (PC900, PC800, SC950, SC750), RapidFireTM Professional and Security series cameras (PC90, PC85, and PM75, SM70, and SC95), and the older Silent ImageTM Professional series cameras (PM35, PM35M13, & PM35C31).
MapView provides you with valuable tools to help you get the most from your RECONYX Professional and Security series cameras. MapView will help you:
• Geographically organize and access your images with the click of your mouse when you use an image map of your study site as a backdrop for your camera markers.
• Automatically rename your images upon import so that you can store images from multiple observation periods in a single folder without having to deal with duplicate names on images.
• Analyze and tag images using the image viewer and metadata tagging capabilities (you can define your own metadata key words and values for use when tagging images).
• Export your metadata so that it can be read into other software for further analysis.
MapView Professional User Guide – May 2010
Copyright RECONYX, Inc. – www.reconyx.com Page- 3
Image Data
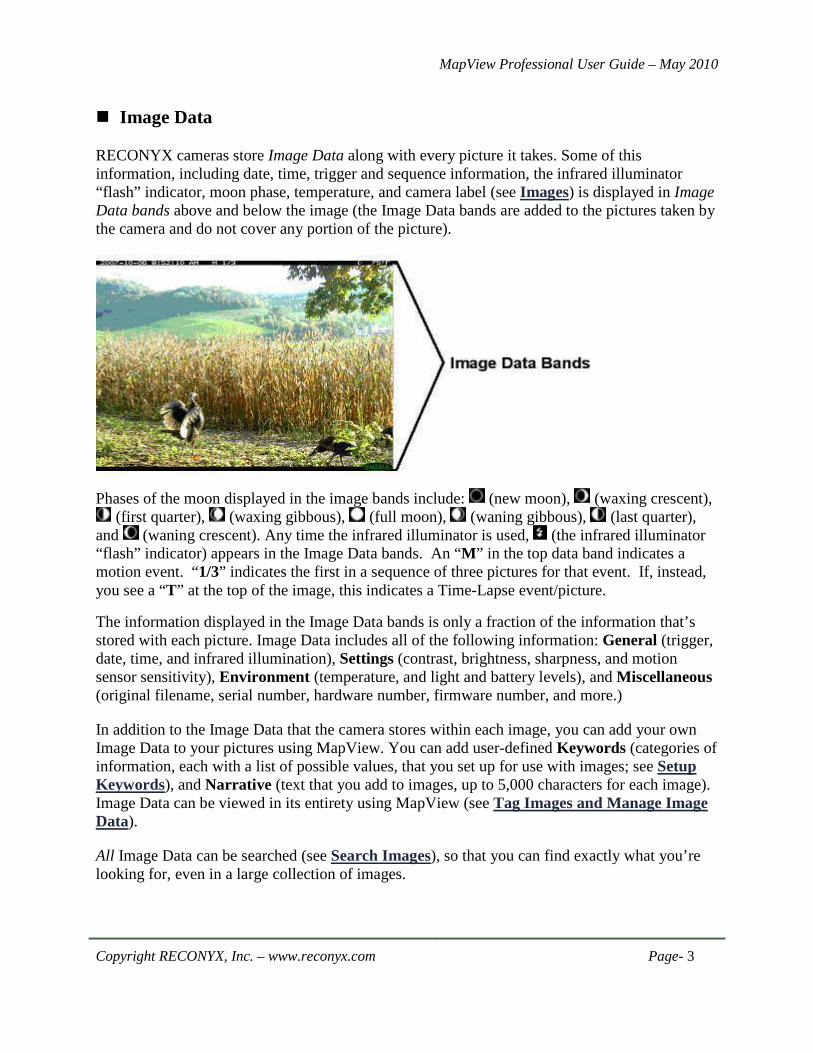
RECONYX cameras store Image Data along with every picture it takes. Some of this information, including date, time, trigger and sequence information, the infrared illuminator “flash” indicator, moon phase, temperature, and camera label (see Images) is displayed in Image Data bands above and below the image (the Image Data bands are added to the pictures taken by the camera and do not cover any portion of the picture).
Phases of the moon displayed in the image bands include: (new moon), (waxing crescent),
(first quarter), (waxing gibbous), (full moon), (waning gibbous), (last quarter), and (waning crescent). Any time the infrared illuminator is used, (the infrared illuminator “flash” indicator) appears in the Image Data bands. An “M” in the top data band indicates a motion event. “1/3” indicates the first in a sequence of three pictures for that event. If, instead, you see a “T” at the top of the image, this indicates a Time-Lapse event/picture.
The information displayed in the Image Data bands is only a fraction of the information that’s stored with each picture. Image Data includes all of the following information: General (trigger, date, time, and infrared illumination), Settings (contrast, brightness, sharpness, and motion sensor sensitivity), Environment (temperature, and light and battery levels), and Miscellaneous (original filename, serial number, hardware number, firmware number, and more.)
In addition to the Image Data that the camera stores within each image, you can add your own Image Data to your pictures using MapView. You can add user-defined Keywords (categories of information, each with a list of possible values, that you set up for use with images; see Setup Keywords), and Narrative (text that you add to images, up to 5,000 characters for each image). Image Data can be viewed in its entirety using MapView (see Tag Images and Manage Image Data).
All Image Data can be searched (see Search Images), so that you can find exactly what you’re looking for, even in a large collection of images.

MapView Professional User Guide – May 2010
Copyright RECONYX, Inc. – www.reconyx.com Page- 4
Image Storage and Naming
Silent Image cameras use date and time settings (see Images), trigger settings and NearVideo sequence numbers (see Triggers), and time lapse settings (see Time Lapse) to name your images. Each time a Silent Image camera is powered on and activated, a new image folder is created on the memory card in the RECONYX folder. These image folders are named based on the date and a sequence number. For example, the first folder created on April 1, 2006 would be named 20060401.000, and the second folder created on that day would be 20060401.001.
Images stored in these folders are named using a trigger code (M=internal motion trigger, E=external motion trigger, T=time lapse), trigger number, and the NearVideo sequence number. For example, M0001103 was taken in response to the 11th motion trigger and was the 3rd NearVideo image taken in response to this trigger.
RapidFire and HyperFire cameras save data with a different naming scheme. Each time the camera is powered on and activated, a new image folder is created on the memory card in the DCIM folder. These image folder names start with 100RECNX, 101RECNX, and so on. And the cameras use a more conventional file naming system with images starting at IMG_0001 and proceeding up to IMG_9999.
MapView Professional User Guide – May 2010
Copyright RECONYX, Inc. – www.reconyx.com Page- 5
Viewing and Managing Your Images
MapView Professional software provides complete image-handling for pictures you take with your RECONYX cameras. You can organize by site and location, view, and search any or all of your images. You can also erase your memory card (see Erase Memory Card) from within MapView.
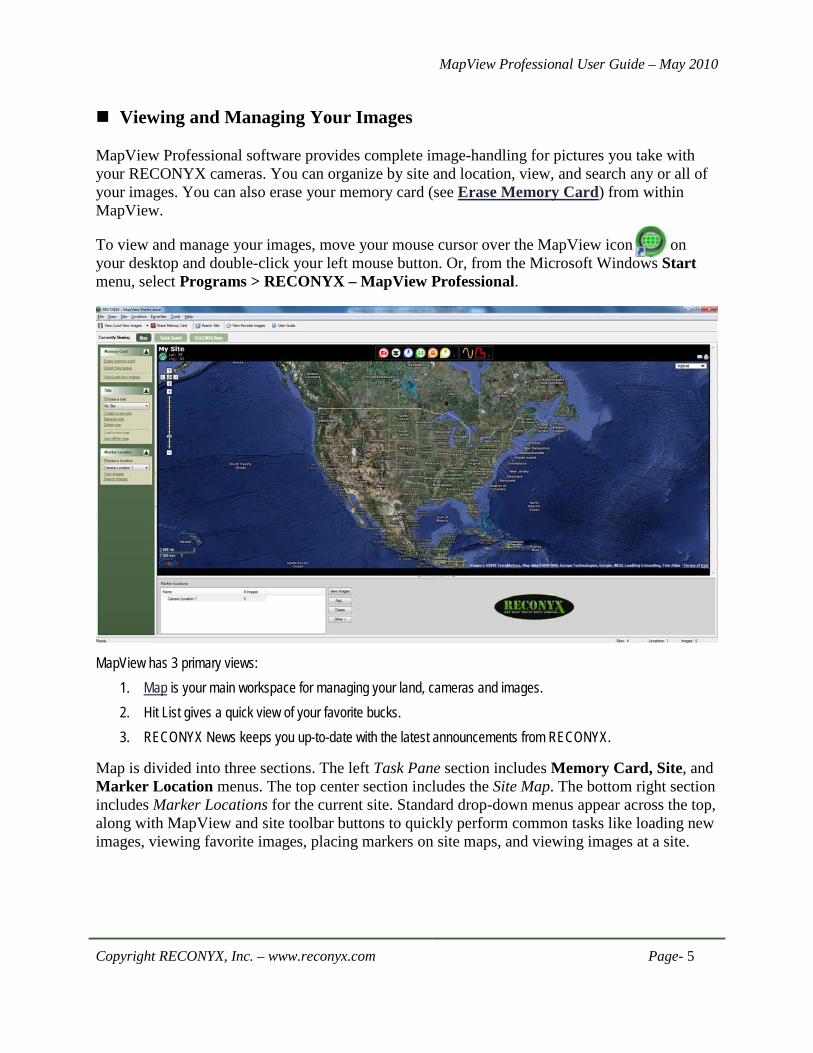
To view and manage your images, move your mouse cursor over the MapView icon on your desktop and double-click your left mouse button. Or, from the Microsoft Windows Start menu, select Programs > RECONYX – MapView Professional.
MapView has 3 primary views:
1. Map is your main workspace for managing your land, cameras and images. 2. Hit List gives a quick view of your favorite bucks. 3. RECONYX News keeps you up-to-date with the latest announcements from RECONYX.
Map is divided into three sections. The left Task Pane section includes Memory Card, Site, and Marker Location menus. The top center section includes the Site Map. The bottom right section includes Marker Locations for the current site. Standard drop-down menus appear across the top, along with MapView and site toolbar buttons to quickly perform common tasks like loading new images, viewing favorite images, placing markers on site maps, and viewing images at a site.

MapView Professional User Guide – May 2010
Copyright RECONYX, Inc. – www.reconyx.com Page- 6
• Task Pane menus can be expanded or contracted. To contract a menu, click the contract button to the right of the menu name. To expand a menu, click the expand button.
• The Task Pane and Marker Locations sections of MapView can be hidden or displayed (hiding sections provides more room to display site maps; see Manage Sites). To hide a section, click the section hide button in the middle of the dividing line between sections. To display a section, click the section display button in the middle of the line along the edge of “MapView.”
. You can also display and hide the right section of the “Load New Images Wizard” (see Load New Images), and the left sections of “Location Viewer” (see View Images) and “Site/Location Search” (see Search Images).
Note: When a section is hidden, the section display button replaces the section hide button, and vice versa. Buttons shown in the preceding examples are for the bottom section. The left section (Task Pane) is hidden and displayed using a similar, vertical button in the middle of the dividing line between sections (the vertical button is bounded by arrows pointing left or right, depending on whether the section can be hidden or displayed, respectively). Tip: The Task Pane can also be hidden by un-checking Task Pane on the View drop-down menu; the Task Pane can be displayed by checking Task Pane on the View drop-down menu.
MapView Professional User Guide – May 2010
Copyright RECONYX, Inc. – www.reconyx.com Page- 7
Common MapView tasks:
Manage Image Folders – Change the location where imported images are stored. This can be done by selecting “Tools” from the top menu and then “Image Folder Settings”.
Manage Sites – Select a site (property or area where you set up your camera(s) in one or more locations) to work with. Rename and delete sites, search images in a site, add a site map and place or remove camera markers, and add new sites.
Manage Locations – Select a location (specific spot within a site where you set up your camera) to work with, rename and delete locations, view images stored in a location, load new images into a location, create new locations, and place or remove markers representing locations on a site map.
Erase Memory Card – Format new memory cards to prepare them for use, and erase used cards to quickly delete old images.
Check Free Space – Check your memory card for free space.
Load New Images – Load (copy) any or all images from your memory card to your computer. You can also load images from one folder on your computer into any of your sites and locations. An image viewer for previewing images before you load them is included in the “Load New Images Wizard.”
View Images – View images that you’ve loaded onto your computer. You can also copy images to your “favorites,” save images to another folder, export image data, move or copy images from one location to another, and delete images using the “Viewer.”
Favorites – Add your “favorite” images to a folder for easy reference across sites and locations. You can use MapView to open this folder and order prints online, copy images to a CD, e-mail photos, and more.
Search Images – Search Image Data of all images in a site (including all locations in the site), or search the Image Data of all images in a location.
Setup Keywords (for Tagging Images) – Create searchable keywords and specify a list of values that can be selected and stored with an image’s Image Data. For example, values for a Species keyword might include Fox, Coyote, Raccoon, Opossum, and Skunk.
Tag Images and Manage Image Data – Add or edit keyword or narrative Image Data, and view all Image Data stored with an image.
Export Image Data – Export Image Data for selected images in comma separated value (CSV) file. Exported data includes all system image data along with user defined Keyword data and any descriptive narrative added to the images.
Create Video – Use any of the images you’ve stored in a location to create a video clip.
MapView Professional User Guide – May 2010
Copyright RECONYX, Inc. – www.reconyx.com Page- 8
Manage Image Folders
By default, MapView stores all imported images into the folder “RECONYX Images” inside of your “My Pictures” folder. Inside that RECONYX folder, each site you’ve created has its own folder with sub-folders for each camera location within that site. The images are stored in these camera location folders.
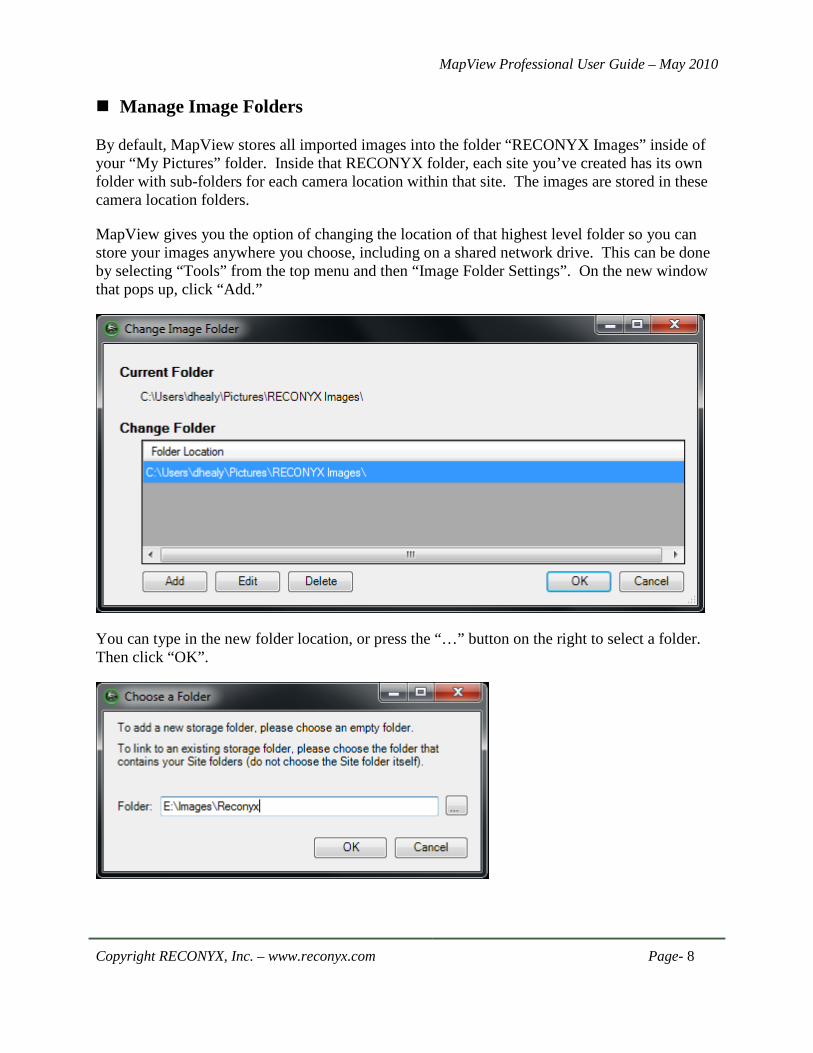
MapView gives you the option of changing the location of that highest level folder so you can store your images anywhere you choose, including on a shared network drive. This can be done by selecting “Tools” from the top menu and then “Image Folder Settings”. On the new window that pops up, click “Add.”
You can type in the new folder location, or press the “…” button on the right to select a folder. Then click “OK”.

MapView Professional User Guide – May 2010
Copyright RECONYX, Inc. – www.reconyx.com Page- 9
The new folder will appear in the list. To change the folder used, select one in the list and click “OK”. The folder list is saved, making it easy to change between folders in the future.
Images are not modified or removed when you change image folders. If you change folders, your sites, maps, camera markers, and images from the previous folder will not be available within MapView – that is, until you switch back to the original folder location. If you change back to the original folder, everything will be there as you saw it before.
MapView Professional User Guide – May 2010
Copyright RECONYX, Inc. – www.reconyx.com Page- 10
Manage Sites
Use the Site drop-down menu at the top of MapView to select the current site, rename a site, delete a site, search images for a site, load a site map, place a camera marker, and create a new site. You can also use the Site Task Pane menu in the left section of MapView to perform many of these tasks (these and other alternate instructions, where available, are also included in this user guide).
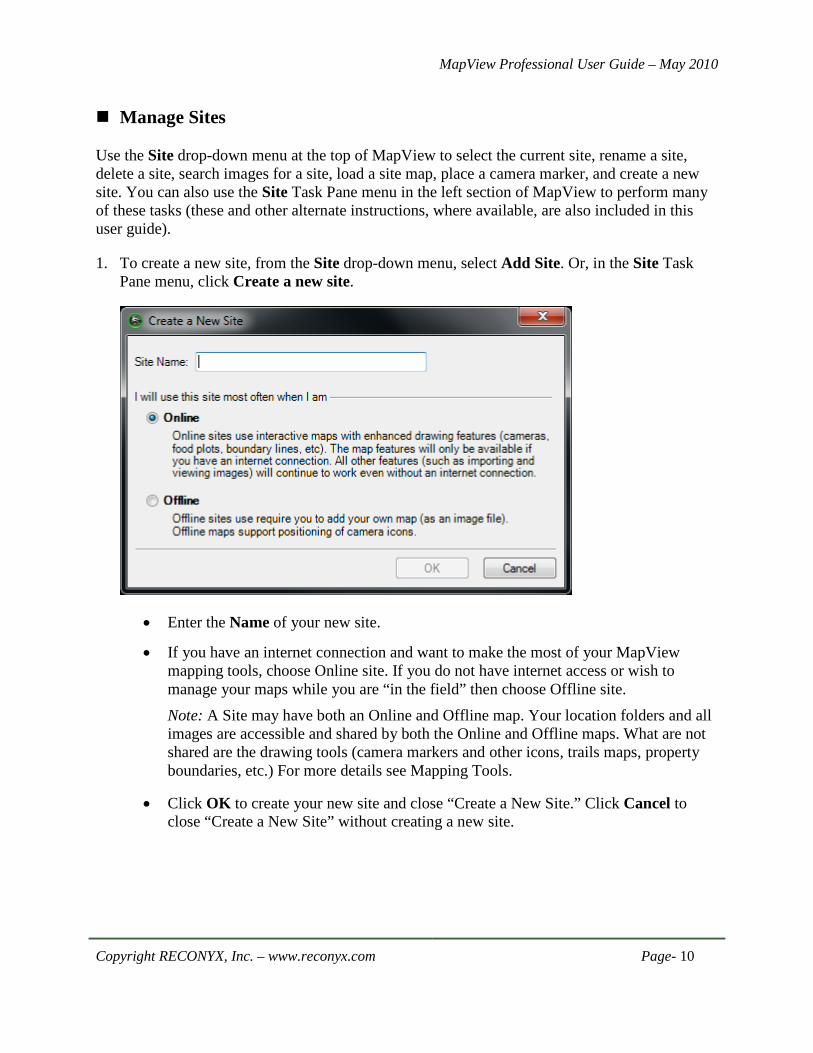
1. To create a new site, from the Site drop-down menu, select Add Site. Or, in the Site Task Pane menu, click Create a new site.
• Enter the Name of your new site.
• If you have an internet connection and want to make the most of your MapView mapping tools, choose Online site. If you do not have internet access or wish to manage your maps while you are “in the field” then choose Offline site. Note: A Site may have both an Online and Offline map. Your location folders and all images are accessible and shared by both the Online and Offline maps. What are not shared are the drawing tools (camera markers and other icons, trails maps, property boundaries, etc.) For more details see Mapping Tools.
• Click OK to create your new site and close “Create a New Site.” Click Cancel to close “Create a New Site” without creating a new site.

MapView Professional User Guide – May 2010
Copyright RECONYX, Inc. – www.reconyx.com Page- 11
2. To select an existing site to work with (the current site), from the Site drop-down menu, select Current Site, and then choose the site you want to work with from the list that appears. Or, in the Site Task Pane menu, Choose a site from the drop-down list.
3. To rename the current site, from the Site drop-down menu, select Rename Current. Or, in the Site Task Pane menu, click Rename site.
Enter the new Name for your site.
Click OK to change the name of your site and close “Rename Site.” Click Cancel to close “Rename Site” without changing the name of your site.
4. To delete the current site, from the Site drop-down menu, select Delete Current. Or, in the Site Task Pane menu, click Delete site.
Important! When you delete a site, all images in all camera locations for that site are deleted. You will be asked to confirm that you want to delete the current site. Click Yes to delete the site. Click No to keep the site and cancel the deletion process. Note: You must have at least one site in MapView (if you have only one site, you cannot delete that site).
5. To search the images in the current site, from the Site drop-down menu, select Search Site. Or, click the Search Site toolbar button.
“Site Search” opens (where Site is the name of your current site). Searches that you perform in this search window will search all images in the current site. See Search Images for detailed instructions on searching your images.

MapView Professional User Guide – May 2010
Copyright RECONYX, Inc. – www.reconyx.com Page- 12
6. To add a site map to the current site;
For Online maps:
Online sites use Google Maps™ mapping service and RECONYX mapping technology to provide you with an interactive camera and image management experience. Online sites start with a default view of North America. Use the navigation tools on the map to zoom in/out and scroll/pan to locate your land. Tip: You can click on the Globe icon in the upper left of the map to open the map search control and Search for a location:
Once you’ve located your site, you can place a variety of markers on the map to represent locations in the site (see Manage Locations). You can also use drawing tools to map your land.
MapView Professional User Guide – May 2010
Copyright RECONYX, Inc. – www.reconyx.com Page- 13
For Offline maps:
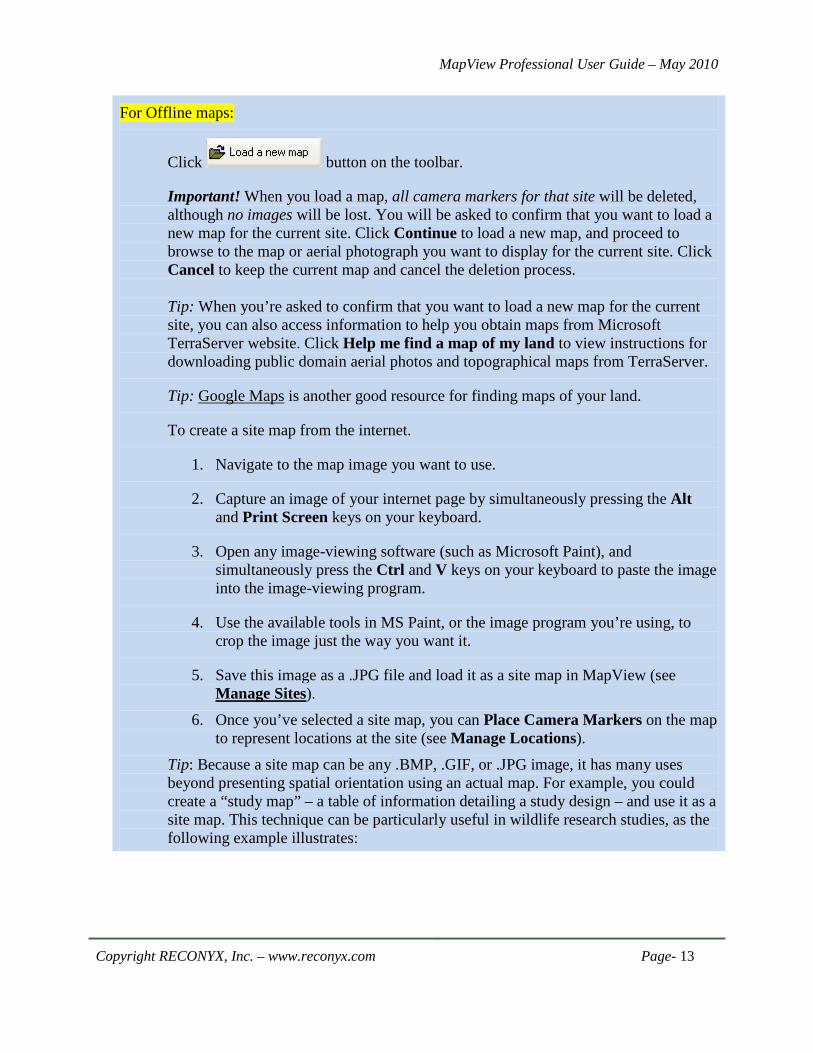
Click button on the toolbar.
Important! When you load a map, all camera markers for that site will be deleted, although no images will be lost. You will be asked to confirm that you want to load a new map for the current site. Click Continue to load a new map, and proceed to browse to the map or aerial photograph you want to display for the current site. Click Cancel to keep the current map and cancel the deletion process. Tip: When you’re asked to confirm that you want to load a new map for the current site, you can also access information to help you obtain maps from Microsoft TerraServer website. Click Help me find a map of my land to view instructions for downloading public domain aerial photos and topographical maps from TerraServer.
Tip: Google Maps is another good resource for finding maps of your land.
To create a site map from the internet.
1. Navigate to the map image you want to use.
2. Capture an image of your internet page by simultaneously pressing the Alt and Print Screen keys on your keyboard.
3. Open any image-viewing software (such as Microsoft Paint), and simultaneously press the Ctrl and V keys on your keyboard to paste the image into the image-viewing program.
4. Use the available tools in MS Paint, or the image program you’re using, to crop the image just the way you want it.
5. Save this image as a .JPG file and load it as a site map in MapView (see Manage Sites).
6. Once you’ve selected a site map, you can Place Camera Markers on the map to represent locations at the site (see Manage Locations).
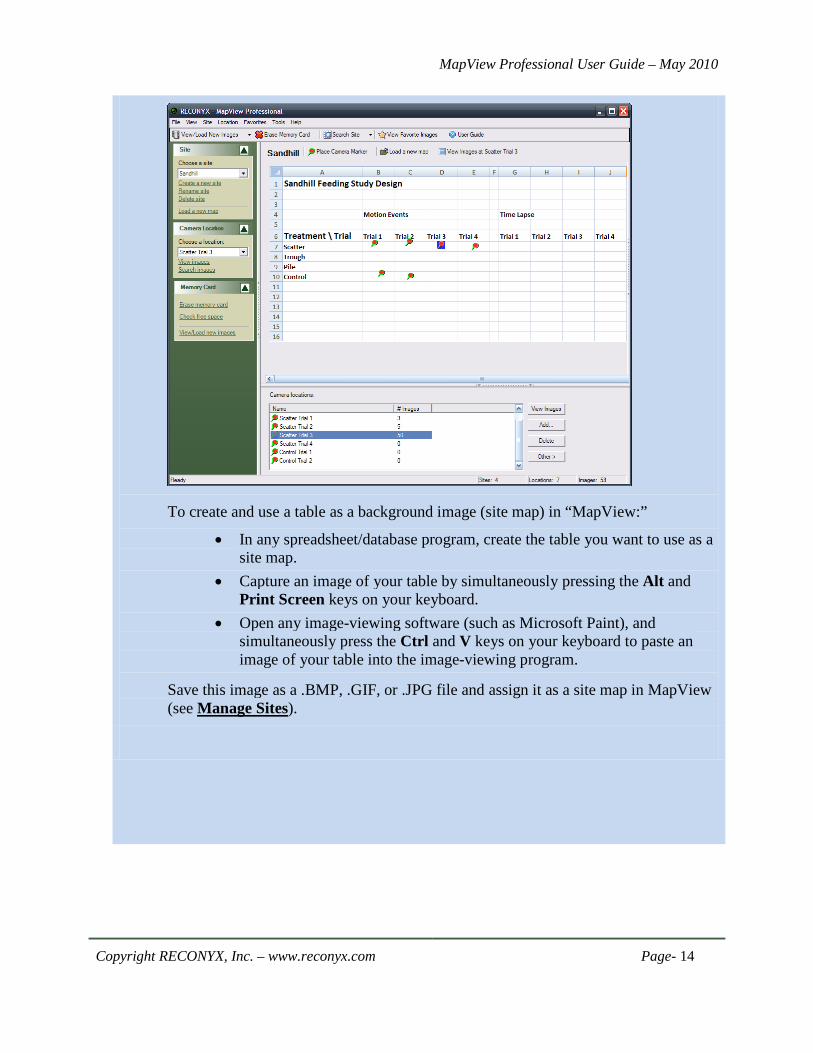
Tip: Because a site map can be any .BMP, .GIF, or .JPG image, it has many uses beyond presenting spatial orientation using an actual map. For example, you could create a “study map” – a table of information detailing a study design – and use it as a site map. This technique can be particularly useful in wildlife research studies, as the following example illustrates:
MapView Professional User Guide – May 2010
Copyright RECONYX, Inc. – www.reconyx.com Page- 14
To create and use a table as a background image (site map) in “MapView:”
• In any spreadsheet/database program, create the table you want to use as a site map.
• Capture an image of your table by simultaneously pressing the Alt and Print Screen keys on your keyboard.
• Open any image-viewing software (such as Microsoft Paint), and simultaneously press the Ctrl and V keys on your keyboard to paste an image of your table into the image-viewing program.
Save this image as a .BMP, .GIF, or .JPG file and assign it as a site map in MapView (see Manage Sites).

MapView Professional User Guide – May 2010
Copyright RECONYX, Inc. – www.reconyx.com Page- 15
Manage Locations
Note: Locations displayed in the Location drop-down menu, the Marker Location Task Pane menu, and Marker locations in the bottom section of MapView are for the current site (see Manage Sites).
Use the Location drop-down menu at the top of MapView to select the current location, rename a location, delete a location, search images for a location, view images for a location, load new images from your memory card or another directory into a location, and add a new location. You can also use the Marker Location Task Pane menu in the left section of MapView to perform many of these tasks (these and other alternate instructions, where available, are also included in this user guide).
If the current site includes a map (see Manage Sites), you can place and remove camera markers to represent your camera locations on the map.
1. To select a different location to work with (the current location), from the Location drop-down menu, select Current Location and then choose the location you want to work with from the list that appears. Or, in the Marker Locations Task Pane menu, Choose a location from the list. Tip: You can also click the location you want to work with from the Marker locations displayed in the bottom section of MapView to make it the current location. Or, if the location you want to work with is associated with a camera marker, you can also click the marker of the location that you want to select.
2. To rename the current location, from the Location drop-down menu, select Rename Current. Tip: You can also click the Other button in the “Camera locations” (bottom) section of MapView and from the menu that appears, select Rename Location.
Change the Name of the location. Click OK to save your changes. Click Cancel to close “Rename Location” without saving your changes

MapView Professional User Guide – May 2010
Copyright RECONYX, Inc. – www.reconyx.com Page- 16
3. To delete the current location, from the Location drop-down menu, select Delete Current. 4. Important! When you delete a location, all images in that location are deleted. You will be
asked to confirm that you want to delete the current location. Click Yes to delete the location. Click No to keep the location and cancel the deletion process.
5. To search the images in the current location, from the Location drop-down menu, select Search Images. Or, in the Marker Location Task Pane menu, click Search images. “Location Search” opens (where Location is the name of your current location); this will search all images in the current location. See Search Images for detailed instructions. Tip: You can also click the Other button in the bottom right corner of MapView, and from the menu that appears, select Search Location. To view images for the current location, from the Location drop-down menu, select View Images. Or, in the Marker Location Task Pane menu, click View Images. See View Images for detailed instructions.
6. To place a marker:
For Online sites: Click on the Marker Type of your choice from the toolbox above the map. Tip: To see more markers, click on the grey down arrows on the right side of the markers toolbox (noted by the green arrow below). Hold your cursor over any marker to see a description of the marker.

MapView Professional User Guide – May 2010
Copyright RECONYX, Inc. – www.reconyx.com Page- 17
For Online sites (continued): Your cursor will change to match the marker you have selected. Move the marker over the map and click to drop it at your selected position.
Select whether you want to Create a new camera location (and enter the Name of the new location), or link the marker to an Existing Location (and select the location from the list of locations that are not yet marked on the site map). Tip: Online sites let you choose many types of markers and link images to them. You may choose to store your images under any marker folder or only use camera markers as image storage folders. Click OK to place the camera marker for this location and close “New Camera.” Click Cancel to close “New Camera” without adding a camera marker.

MapView Professional User Guide – May 2010
Copyright RECONYX, Inc. – www.reconyx.com Page- 18
For Offline sites: From the Site drop-down menu, check Place Camera Marker. Or, click the site’s Place Camera Marker toolbar button. Note: When your mouse cursor looks like a green map pin , “Place Camera Marker” appears any time you click on the site map. Your mouse cursor will automatically switch back to “standard” after you place your marker, or cancel the marker-placing process. Tip: Once you place a marker on a map, it appears as a green map pin with a red center. You can change locations by clicking the marker of the location you want to select. The selected marker has a blue background.
Select whether you want to Create a new camera location (and enter the Name of the new location), or Associate with an existing camera location (and select the location from the list of Camera Locations that are not yet marked on the site map). Click OK to place the camera marker for this location and close “Place Camera Marker.” Click Cancel to close “Place Camera Marker” without adding a camera marker.

MapView Professional User Guide – May 2010
Copyright RECONYX, Inc. – www.reconyx.com Page- 19
7. To load new images into the current location, from the Location drop-down menu, select Load New Images, and then select where you’re loading images from (From Memory Card or From Another Folder). See Load New Images for detailed instructions. Tip: The “Load New Images Wizard” includes an image viewer; you will be able to examine your images before deciding which – if any – you want to load on to your computer.
8. To remove the current site’s camera marker from the map
For Online sites: Click on the marker and from the popup window, choose Delete. Or, click the Other button next to the Marker Locations list, and from the menu that appears, select Remove Camera Marker. Tip: If you want to move the current location’s marker from one position on the map to another, can just click and drag the marker to the new position.
For Offline sites: Move your mouse cursor over the marker, click your right mouse button, and from the menu that appears, select Remove Camera Marker. Or, click the Other button in the in the bottom right corner of BuckView, and from the menu that appears, select Remove Camera Marker. Tip: If you want to move the current location’s camera marker from one position on the map to another, you must first remove the existing camera marker for the current site (use Remove Camera Marker) and then place a new camera marker and associate it with the site (use Place Camera Marker).
9. To create a new location, from the Location drop-down menu, select Add Location. Tip: You can also click the Add button in the bottom right corner of “MapView.”
Enter the Name of the location you’re adding. Click OK to create your new location and close “Add Location.” Click Cancel to close “Add Location” without creating a new location.

MapView Professional User Guide – May 2010
Copyright RECONYX, Inc. – www.reconyx.com Page- 20
Erase Memory Card
Your memory card must be formatted FAT (or FAT32 for a card with greater than 2GB of storage) for use with your RECONYX camera and software. If you are uncertain of the formatting of your card, use MapView to erase the card; erasing the card also properly formats it for use with your camera. Note: You must have permissions set on your computer to allow you to format removable media. If you cannot format memory cards using MapView, check with computer technical support personnel to be sure you have permissions set properly. Troubleshooting and Technical Support also includes instructions for how to set up formatting privileges. Tip: If you are using a laptop computer, consider a PCMCIA adapter card for accessing memory cards as they are more convenient than USB card readers.
Erasing a used card after you’ve loaded the images you want to save onto your computer is a much quicker method of clearing the card than deleting the images is. Options for erasing your memory card are available in the “Load New Images Wizard” (see Load New Images).
To erase your memory card:
1. Insert the card in your computer’s card reader and from the Tools drop-down menu, select Memory Card, and then select Erase (Format). Or, in the Memory Card Task Pane menu, click Erase Memory card. Tip: You can also click the Erase Memory card toolbar button.
Note: Erasing a memory card will delete all images and other information on the card. You will be asked to confirm that you want to erase the card. Click Yes to erase the card. Click No to cancel the process.
2. Erasing is completed automatically.
MapView Professional User Guide – May 2010
Copyright RECONYX, Inc. – www.reconyx.com Page- 21
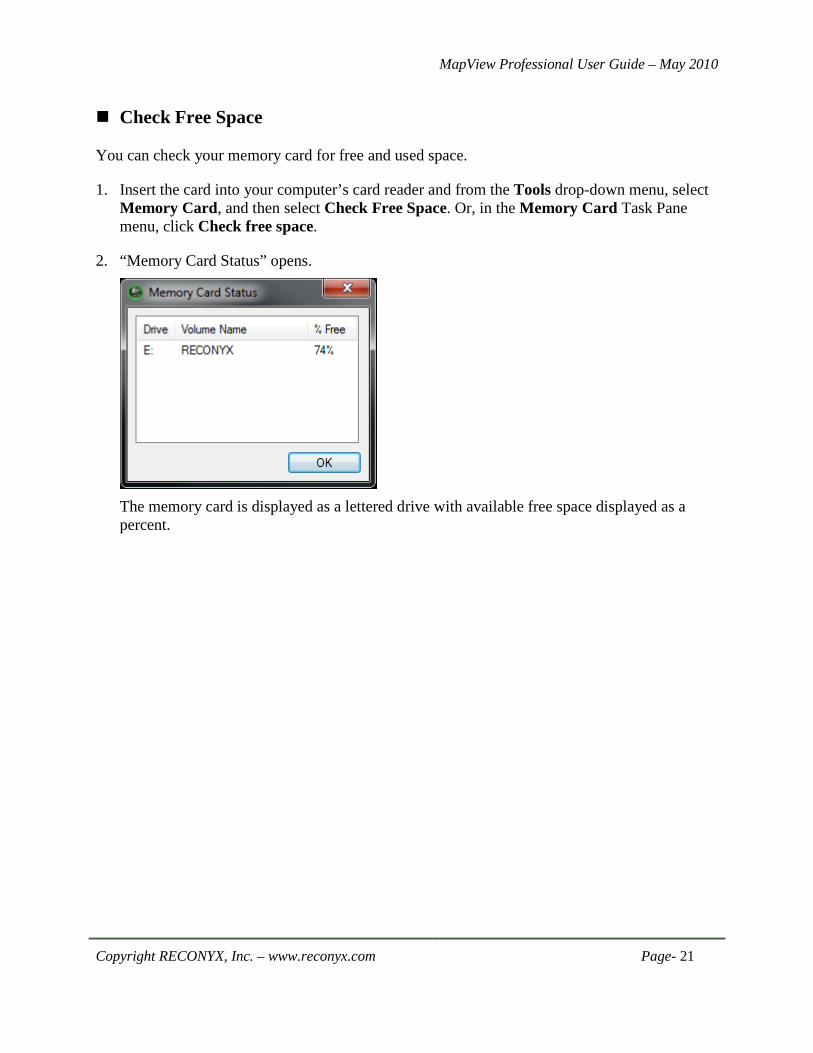
Check Free Space
You can check your memory card for free and used space.
1. Insert the card into your computer’s card reader and from the Tools drop-down menu, select Memory Card, and then select Check Free Space. Or, in the Memory Card Task Pane menu, click Check free space.
2. “Memory Card Status” opens.
The memory card is displayed as a lettered drive with available free space displayed as a percent.

MapView Professional User Guide – May 2010
Copyright RECONYX, Inc. – www.reconyx.com Page- 22
View/Load New Images
The process of loading new images is automated by the “Load New Images Wizard.” The way that you start the “Load New Images Wizard” depends on if you know where you want to load the images, or if you want to choose the site and location where you want to load the images after you select the specific images you want to load. Note: The “Load New Images Wizard” includes an image viewer; you will be able to examine your images before deciding which – if any – you want to load on to your computer.
• If you want to load new images into the current site and location, click the arrow at the right of the View/Load New Images toolbar button (located above the Task Pane menus) and from the menu that appears, select the location you’re loading images from: From Memory Card or From Another Folder.
Tip: If you’re loading images from your memory card and you want to load new images to the current site and location, you can also click the View/Load New Images toolbar button itself (not the arrow). Or, from the Tools drop-down menu, select Memory Card, and then select Load New Images. • If you want to load new images into a different location within the current site, select
the location you want in Camera locations (in the bottom section of MapView) and then click the Other button in the bottom right corner of “MapView.” Then, from the menu that appears, select Load New Images, and then select From Memory Card or From Another Folder.
Note: You can also move your mouse cursor over the location in Camera locations and click your right mouse button. From the menu that appears, select Load New Images, and then select From Memory Card or From Another Folder. Tip: If the location you want to load new images into is marked on the site map, you can move your mouse cursor over the location’s camera marker and click your right mouse button to access the same menu options as when you use the Other button (see preceding note). • If you want to decide the site and location you want to load new images into after you
select the specific images you’re going to load, from the Location drop-down menu, select Load New Images, and then select the location you’re loading images from: From Memory Card or From Another Folder.
Note: If you’re loading images from your memory card and you want to decide the site and location you want to load images into after you select the images you’re going to load, in the Memory Card Task Pane menu, select View/Load new images.
On screens within the wizard:

MapView Professional User Guide – May 2010
Copyright RECONYX, Inc. – www.reconyx.com Page- 23
• Click Erase Memory Card to remove all images from the card (see Erase Memory Card). Note: This button is not available when you’re loading new images from another folder.
• Click Back to return to the previous screen in the wizard. • Click Next to advance to the next screen in the wizard. • Click Finish to close the wizard after image loading is complete. • Click Cancel to close the wizard without loading any images.
1. If you’re loading new images from a memory card, the “Load New Images Wizard” displays the “Choose Source Folder(s)” screen.
Select the folder or folders on your memory card that you want to load images from. As you make your selection(s), a preview of the first image in the selected folder appears at the right. Click Next to continue.
• To select an individual folder for loading, click the checkbox to the left of the folder’s name (so that a checkmark appears in the box). To un-select a folder, click the checkbox to the left of the folder’s name (so that no checkmark appears in the box).
• To quickly check all folders for loading, click Check All. • To quickly un-check all folders (so that no folders are selected for loading), click Un-
Check All. If you’re loading new images from another folder on your computer, the “Load New Images Wizard” displays “Browse for Folder.” Select the folder you’re loading images from and click OK.
MapView Professional User Guide – May 2010
Copyright RECONYX, Inc. – www.reconyx.com Page- 24
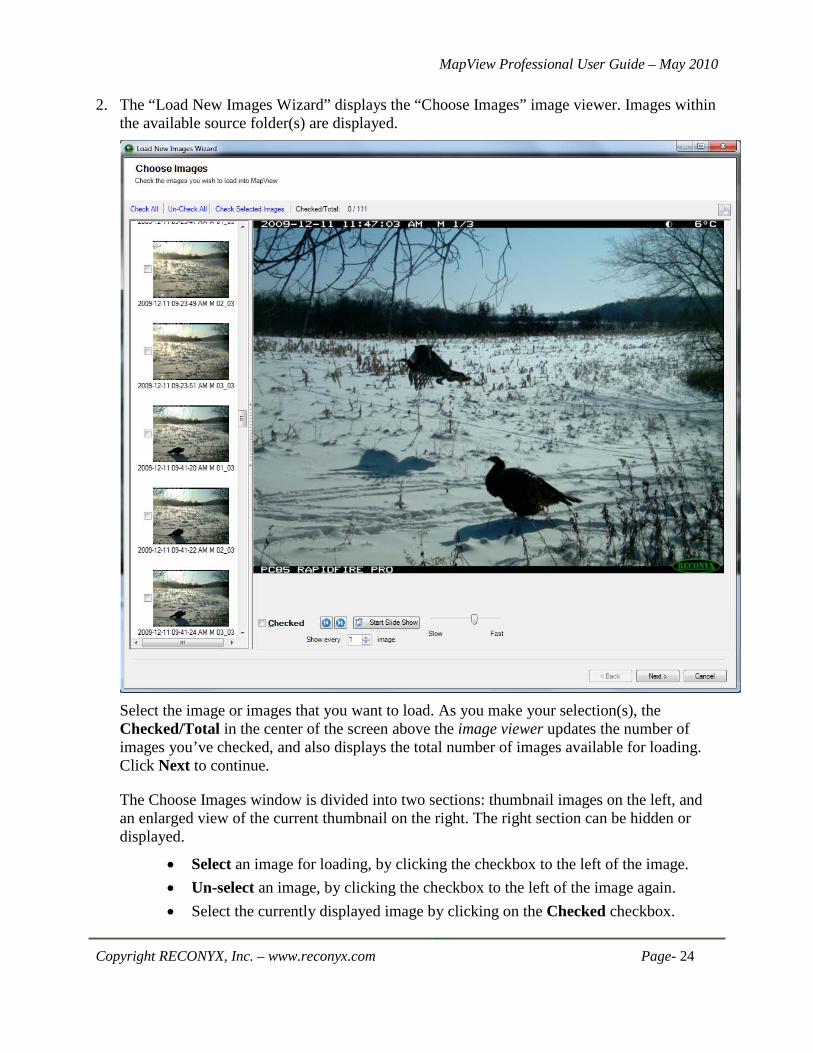
2. The “Load New Images Wizard” displays the “Choose Images” image viewer. Images within the available source folder(s) are displayed.
Select the image or images that you want to load. As you make your selection(s), the Checked/Total in the center of the screen above the image viewer updates the number of images you’ve checked, and also displays the total number of images available for loading. Click Next to continue.
The Choose Images window is divided into two sections: thumbnail images on the left, and an enlarged view of the current thumbnail on the right. The right section can be hidden or displayed.
• Select an image for loading, by clicking the checkbox to the left of the image. • Un-select an image, by clicking the checkbox to the left of the image again. • Select the currently displayed image by clicking on the Checked checkbox.

MapView Professional User Guide – May 2010
Copyright RECONYX, Inc. – www.reconyx.com Page- 25
• To mark all images in a sequence, click the first image you want to load (not the image’s checkbox). Press and hold the Shift key on your keyboard, click the last image in the sequence you want to select, and then release the Shift key. All of the image names from the first image you clicked to the last image you clicked are highlighted. Click the checkbox of any highlighted image to select all of the highlighted images for loading (or click Check Selected Images). You can un-check a sequence of selected images in the same way.
• You can quickly select all images for loading, by clicking Check All. • To quickly un-select all images, click Un-Check All.
Note: You can adjust the size of the right section of the image viewer, and hide or display this section as well (see Viewing and Managing Your Images).
When the image viewer’s enlarged image section is displayed:
• To view the previous image, click the Previous Image button.
• To view the next image, click the Next Image button. • To view the images in a slideshow click the Start Slide Show button.
You can adjust the speed of the slide show by moving the slider control to the left (slower) or to the right (faster) as desired. Click Stop Slide Show at any time after the slideshow begins to stop it.
• To get a quick overview of a lot of images, you can have the slide show skip some of the images. You do this by choosing to show
every “nth” image. “n” can be 1 – 50. Tip: Clicking the displayed image will also stop the slideshow. Note: When the slideshow is playing, the Stop Slide Show button replaces the Start Slide Show button, and vice versa. • To view image data for the current image, click view image data button (above
the upper right corner of the enlarged image).
Note: You can view image data when you’re using the image viewer in the “Load New Images Wizard,” but you cannot edit it. See Tag Images and Manage Image Data to add, edit, or delete image data.
3. If you started the “Load New Images Wizard” using the View/Load New Images toolbar button or the Tools drop-down menu option for loading images, the “Load New Images Wizard” displays the “Choose Camera Location” screen.
If you started the “Load New Images Wizard” using another method, skip to step 4.
Select the Site and Location where you want to load the images you selected.

MapView Professional User Guide – May 2010
Copyright RECONYX, Inc. – www.reconyx.com Page- 26
a. To create a new camera location, select the Site where you want the new location and click Add a new location. Enter the name of the new location and click OK.
Click Next to continue.
4. The “Load New Images Wizard” displays the “Summary” screen. The total number of images you’ve selected to load and the folders from and to which you’re loading those images are displayed for your review. Click Next to continue.
a. By checking the Erase card after saving images checkbox, you will erase your memory card after loading the selected images. This option is not available if you’re loading new images from another folder.
5. The “Load New Images Wizard” displays the “Copying Images” screen. The progress of copying the images you selected is displayed and you will be notified when the process is complete. Click Finish to exit the wizard. Note: Errors, if any, are listed after the process is complete. See Troubleshooting and Technical Support.

MapView Professional User Guide – May 2010
Copyright RECONYX, Inc. – www.reconyx.com Page- 27
View Images
You can view images that you haven’t loaded from your memory card onto your computer using the image viewer that’s included in the “Load New Images Wizard” (see Load New Images). You can also view images that you’ve already loaded onto your computer. The “Viewer” behaves similarly to the image viewer that’s included in the “Load New Images Wizard,” but includes many additional features, such as the ability to print images and create videos from images, search images, and copy images as favorites (see Favorites). Note: When you view images, images are displayed from the current site and location. Before beginning the viewing process, select the site (see Manage Sites) and location (see Manage Locations) you want to view images for.
To open the “Viewer:”
• Click View Images in the Camera location task pane or in the tool bar.
Tip: You can also view images by double-clicking your left mouse button on a Camera location or by selecting the Camera location and clicking the Other button then select View Images.
MapView Professional User Guide – May 2010
Copyright RECONYX, Inc. – www.reconyx.com Page- 28
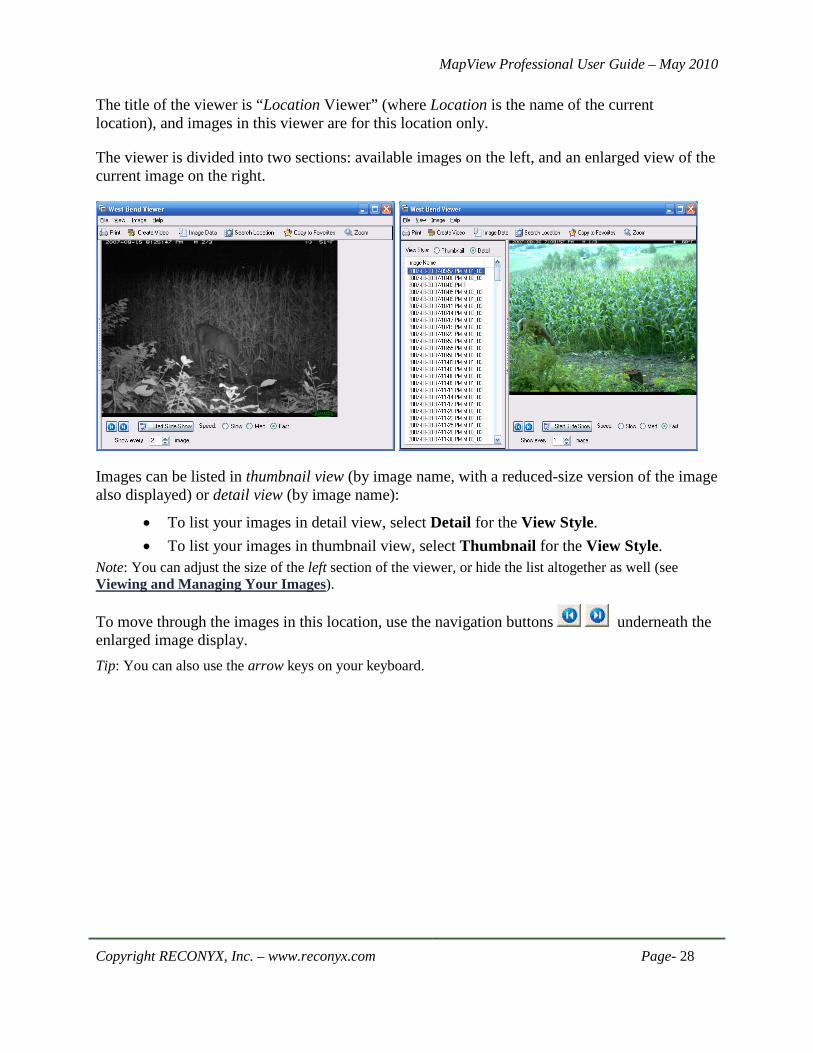
The title of the viewer is “Location Viewer” (where Location is the name of the current location), and images in this viewer are for this location only.
The viewer is divided into two sections: available images on the left, and an enlarged view of the current image on the right.
Images can be listed in thumbnail view (by image name, with a reduced-size version of the image also displayed) or detail view (by image name):
• To list your images in detail view, select Detail for the View Style. • To list your images in thumbnail view, select Thumbnail for the View Style.
Note: You can adjust the size of the left section of the viewer, or hide the list altogether as well (see Viewing and Managing Your Images).
To move through the images in this location, use the navigation buttons underneath the enlarged image display. Tip: You can also use the arrow keys on your keyboard.
MapView Professional User Guide – May 2010
Copyright RECONYX, Inc. – www.reconyx.com Page- 29
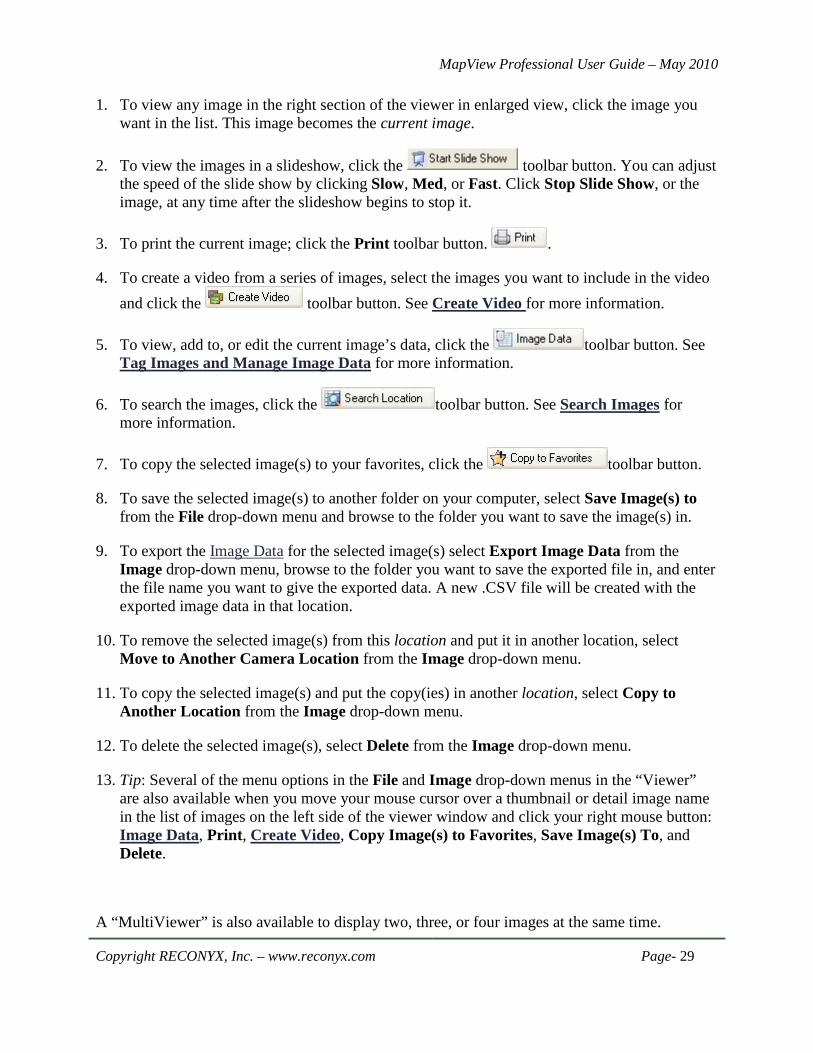
1. To view any image in the right section of the viewer in enlarged view, click the image you want in the list. This image becomes the current image.
2. To view the images in a slideshow, click the toolbar button. You can adjust the speed of the slide show by clicking Slow, Med, or Fast. Click Stop Slide Show, or the image, at any time after the slideshow begins to stop it.
3. To print the current image; click the Print toolbar button. .
4. To create a video from a series of images, select the images you want to include in the video and click the toolbar button. See Create Video for more information.
5. To view, add to, or edit the current image’s data, click the toolbar button. See Tag Images and Manage Image Data for more information.
6. To search the images, click the toolbar button. See Search Images for more information.
7. To copy the selected image(s) to your favorites, click the toolbar button.
8. To save the selected image(s) to another folder on your computer, select Save Image(s) to from the File drop-down menu and browse to the folder you want to save the image(s) in.
9. To export the Image Data for the selected image(s) select Export Image Data from the Image drop-down menu, browse to the folder you want to save the exported file in, and enter the file name you want to give the exported data. A new .CSV file will be created with the exported image data in that location.
10. To remove the selected image(s) from this location and put it in another location, select Move to Another Camera Location from the Image drop-down menu.
11. To copy the selected image(s) and put the copy(ies) in another location, select Copy to Another Location from the Image drop-down menu.
12. To delete the selected image(s), select Delete from the Image drop-down menu.
13. Tip: Several of the menu options in the File and Image drop-down menus in the “Viewer” are also available when you move your mouse cursor over a thumbnail or detail image name in the list of images on the left side of the viewer window and click your right mouse button: Image Data, Print, Create Video, Copy Image(s) to Favorites, Save Image(s) To, and Delete.
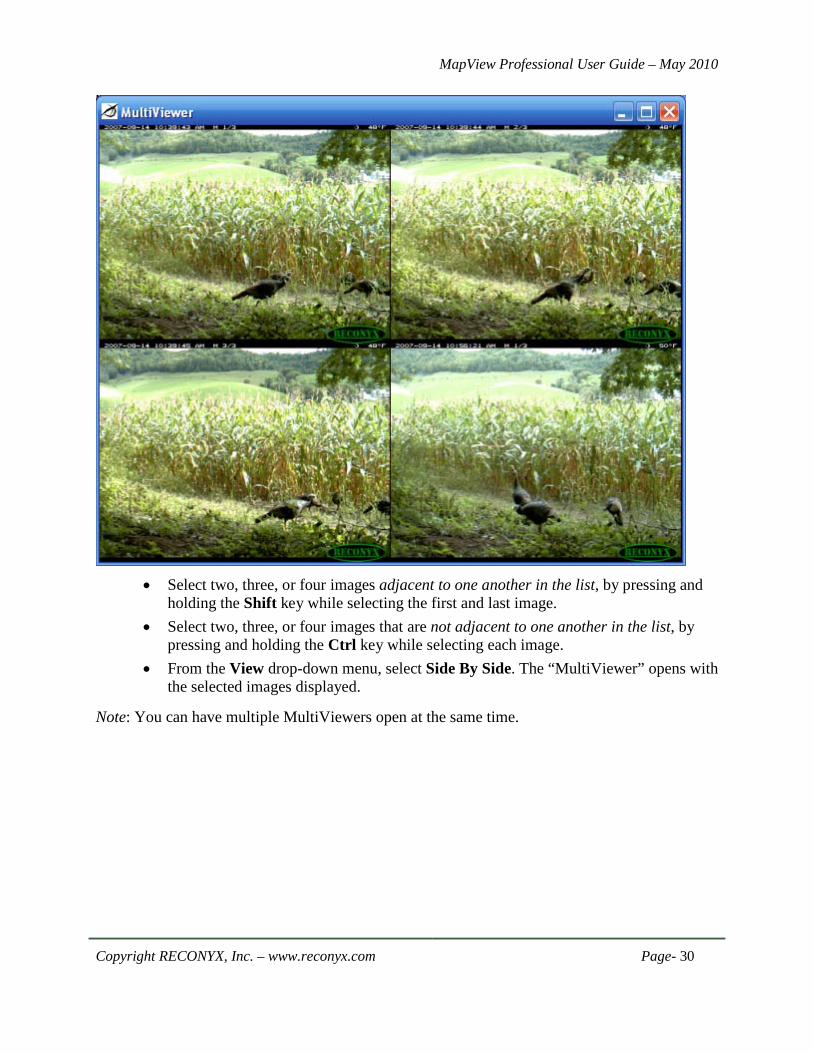
A “MultiViewer” is also available to display two, three, or four images at the same time.
MapView Professional User Guide – May 2010
Copyright RECONYX, Inc. – www.reconyx.com Page- 30
• Select two, three, or four images adjacent to one another in the list, by pressing and
holding the Shift key while selecting the first and last image. • Select two, three, or four images that are not adjacent to one another in the list, by
pressing and holding the Ctrl key while selecting each image. • From the View drop-down menu, select Side By Side. The “MultiViewer” opens with
the selected images displayed.
Note: You can have multiple MultiViewers open at the same time.
MapView Professional User Guide – May 2010
Copyright RECONYX, Inc. – www.reconyx.com Page- 31
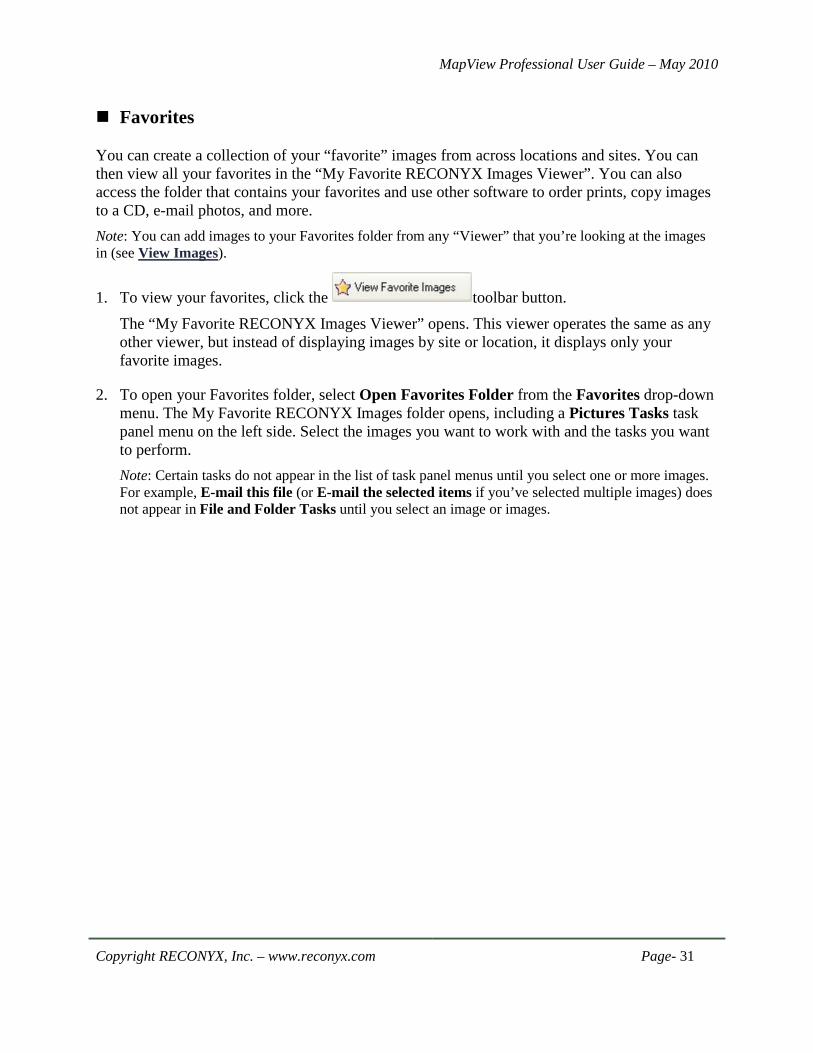
Favorites
You can create a collection of your “favorite” images from across locations and sites. You can then view all your favorites in the “My Favorite RECONYX Images Viewer”. You can also access the folder that contains your favorites and use other software to order prints, copy images to a CD, e-mail photos, and more. Note: You can add images to your Favorites folder from any “Viewer” that you’re looking at the images in (see View Images).
1. To view your favorites, click the toolbar button. The “My Favorite RECONYX Images Viewer” opens. This viewer operates the same as any other viewer, but instead of displaying images by site or location, it displays only your favorite images.
2. To open your Favorites folder, select Open Favorites Folder from the Favorites drop-down menu. The My Favorite RECONYX Images folder opens, including a Pictures Tasks task panel menu on the left side. Select the images you want to work with and the tasks you want to perform. Note: Certain tasks do not appear in the list of task panel menus until you select one or more images. For example, E-mail this file (or E-mail the selected items if you’ve selected multiple images) does not appear in File and Folder Tasks until you select an image or images.

MapView Professional User Guide – May 2010
Copyright RECONYX, Inc. – www.reconyx.com Page- 32
Search Images
You can search Image Data of all images in a site (including all locations in the site), or search the Image Data of all images in a location. The search is the same in both cases. Note: When you search images, images in your search results are displayed from the current site or current location. Before beginning the search process, select the site (see Manage Sites) or location (see Manage Locations) you want to search.
The way that you start the “Search” from within MapView depends on whether you want to search an entire site or a specific location within a site.
• To search all images in the current site, click the Search Site toolbar button.
• To search all images in the current location, click Search images in the Camera
Location Task Pane. Tip: You can also click the Other button in the bottom right corner of MapView, and from the menu that appears, select Search Location.
The title of the search window is “Site Search” or “Location Search” depending if you’re doing a site or location search. Images that you find in searches in this window are from the current site or current location only, as noted in the title of the window.

MapView Professional User Guide – May 2010
Copyright RECONYX, Inc. – www.reconyx.com Page- 33
Note: In site searches, you can choose to limit your search to locations within the site using the Location Filter. In location searches, you can only search the location you selected. Note: You can adjust the size of the left section of the search, and hide or display this section as well. There are 2 ways to search a Site or Location: Basic Search or Advanced Search. Basic Search 1. Choose whether to limit the search to a certain Date Range. If so, check the box by the Start Date and/or End
Date to limit your search to images within that time frame. 2. To search any of the Notes you may have added to your images, enter the text into the Notes Contain field. 3. If you want to limit the search to only images containing bucks on your Hit List, choose Hit List in the Tagging
dropdown box and then check each Hit List buck that you wish to include. Alternatively, you can search only the images where you have entered Count data. Choose Counts from the Tagging dropdown and the check each species you would like to search. The results will only include images where you have marked that 1 or more of these species show in the image.
4. If you’re searching a site and want to limit your search to a location within the site to search, select that location from the list in Location Filter. If you’re searching a location, the Location Filter is not available.
5. Click Search to perform your search. The total number of images found that match your search is displayed above the search results area, and a full-size version of the first image found is displayed to the right of the search section.

MapView Professional User Guide – May 2010
Copyright RECONYX, Inc. – www.reconyx.com Page- 34
Advanced Search 1. Choose the Advanced Search radio button. 2. Click on Define Advanced Search to open the Advanced Search dialog.
3. Choose any Image Data field or Tagging field on the left. 4. Click one of the double-arrow buttons to move the selected search field into one of the 3 search groups:
INCLUDE images meeting ALL of these conditions (the image must satisfy every condition in this list) INCLUDE images meeting ANY of these conditions (the image must satisfy only 1 condition in this list) EXLUDE images meeting ANY of these conditions (the image must not have ANY of the conditions in this list)
5. Click OK to close the Advanced Search window and execute the Search. 6. If you’re searching a site and want to limit your search to a location within the site to search, select that location
from the list in Location Filter and click Search to re-run the last search. If you’re searching a location, the Location Filter is not available.

MapView Professional User Guide – May 2010
Copyright RECONYX, Inc. – www.reconyx.com Page- 35
Search Results
Images can be listed in thumbnail view (by image name, with a reduced-size version of the image also displayed) or detail view (by image name):
• To list your images in detail view, select Detail for the View Style at the top of the list of search results, or from the View drop-down viewer menu, select Detail.
• To list your images in thumbnail view, select Thumbnail for the View Style, or from the View drop-down menu, select Thumbnail.
Note: You can adjust the size of the left section of the search, and hide or display this section as well (see Viewing and Managing Your Images).
Tip: If you’re searching a site with multiple locations, list your images by detail view so that the location of each image found in the search is also displayed (as shown in the preceding example).
Tip: To clear the results of your most recent search, click Clear.
Note: When you’re viewing images in your search results, you can view any image as full size on the right side of the search window, move through images in the list using the navigation buttons underneath the full size image display, display images as a slideshow, zoom in and out on images, copy images to your favorites, save images to another folder on your computer, export image data, move or copy images to another location, and delete images. All of these tasks are the same as those described in View Images. Note: When you’re viewing images in your search results, you can view any image as full size on the right side of the search window, move through images in the list using the navigation buttons underneath the full size image display, copying images to your favorites, saving images to another folder on your computer, exporting image data, moving or copying images to another location, and deleting images. All of these tasks are the same as those described in View Images.
MapView Professional User Guide – May 2010
Copyright RECONYX, Inc. – www.reconyx.com Page- 36
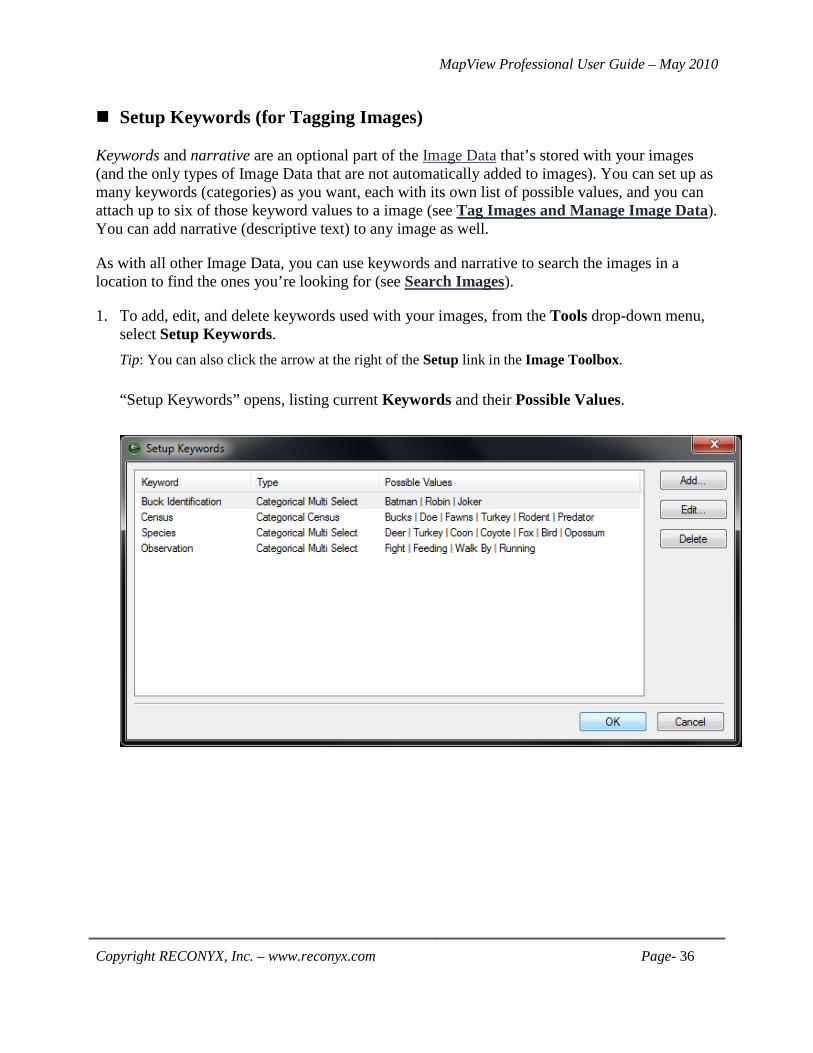
Setup Keywords (for Tagging Images)
Keywords and narrative are an optional part of the Image Data that’s stored with your images (and the only types of Image Data that are not automatically added to images). You can set up as many keywords (categories) as you want, each with its own list of possible values, and you can attach up to six of those keyword values to a image (see Tag Images and Manage Image Data). You can add narrative (descriptive text) to any image as well.
As with all other Image Data, you can use keywords and narrative to search the images in a location to find the ones you’re looking for (see Search Images).
1. To add, edit, and delete keywords used with your images, from the Tools drop-down menu, select Setup Keywords. Tip: You can also click the arrow at the right of the Setup link in the Image Toolbox. “Setup Keywords” opens, listing current Keywords and their Possible Values.
MapView Professional User Guide – May 2010
Copyright RECONYX, Inc. – www.reconyx.com Page- 37
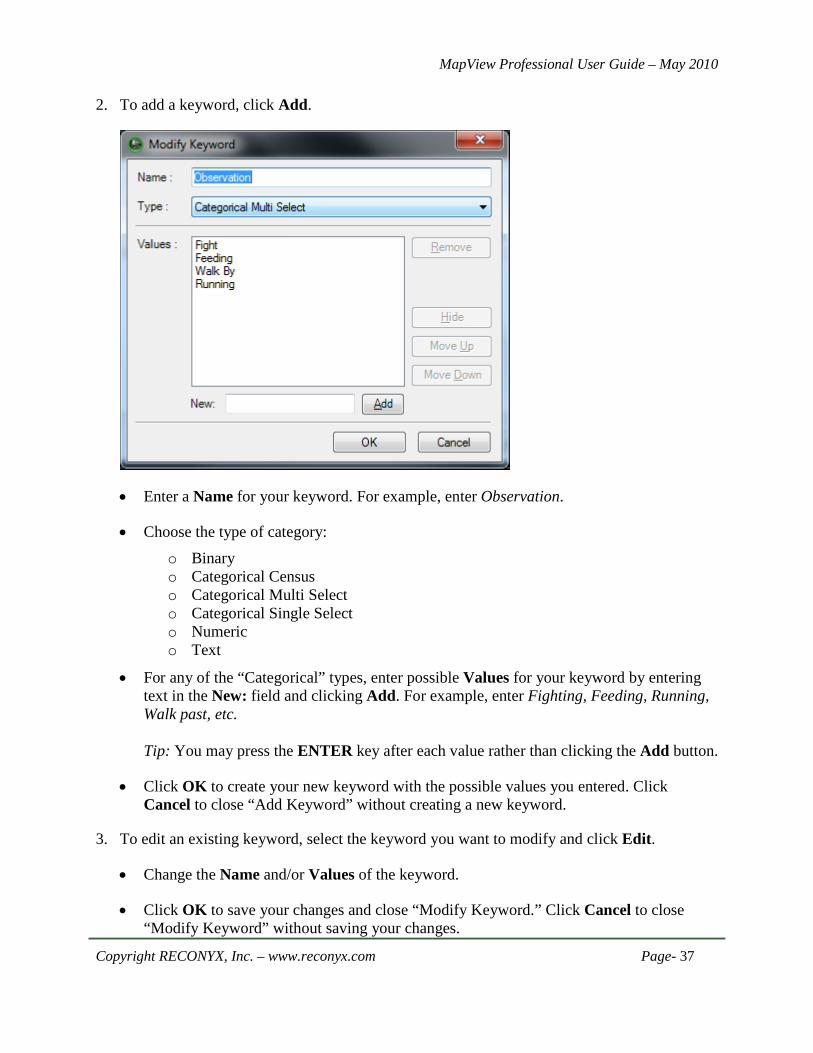
2. To add a keyword, click Add.
• Enter a Name for your keyword. For example, enter Observation.
• Choose the type of category:
o Binary o Categorical Census o Categorical Multi Select o Categorical Single Select o Numeric o Text
• For any of the “Categorical” types, enter possible Values for your keyword by entering text in the New: field and clicking Add. For example, enter Fighting, Feeding, Running, Walk past, etc. Tip: You may press the ENTER key after each value rather than clicking the Add button.
• Click OK to create your new keyword with the possible values you entered. Click Cancel to close “Add Keyword” without creating a new keyword.
3. To edit an existing keyword, select the keyword you want to modify and click Edit.
• Change the Name and/or Values of the keyword.
• Click OK to save your changes and close “Modify Keyword.” Click Cancel to close “Modify Keyword” without saving your changes.

MapView Professional User Guide – May 2010
Copyright RECONYX, Inc. – www.reconyx.com Page- 38
4. To delete an existing keyword, select the keyword you want to delete and click Delete. Note: When you delete a keyword, you will no longer be able to edit that keyword when you are using Image Data (see Tag Images and Manage Image Data), although images that currently include this keyword in their image data will retain it. To remove a tag from an image, find the image and clear the tag (or select multiple images and click the Clear Keyword link in the Image Toolbox).
5. Click OK to save your keyword changes. Click Cancel to close “Setup Keywords” without saving your changes.
MapView Professional User Guide – May 2010
Copyright RECONYX, Inc. – www.reconyx.com Page- 39
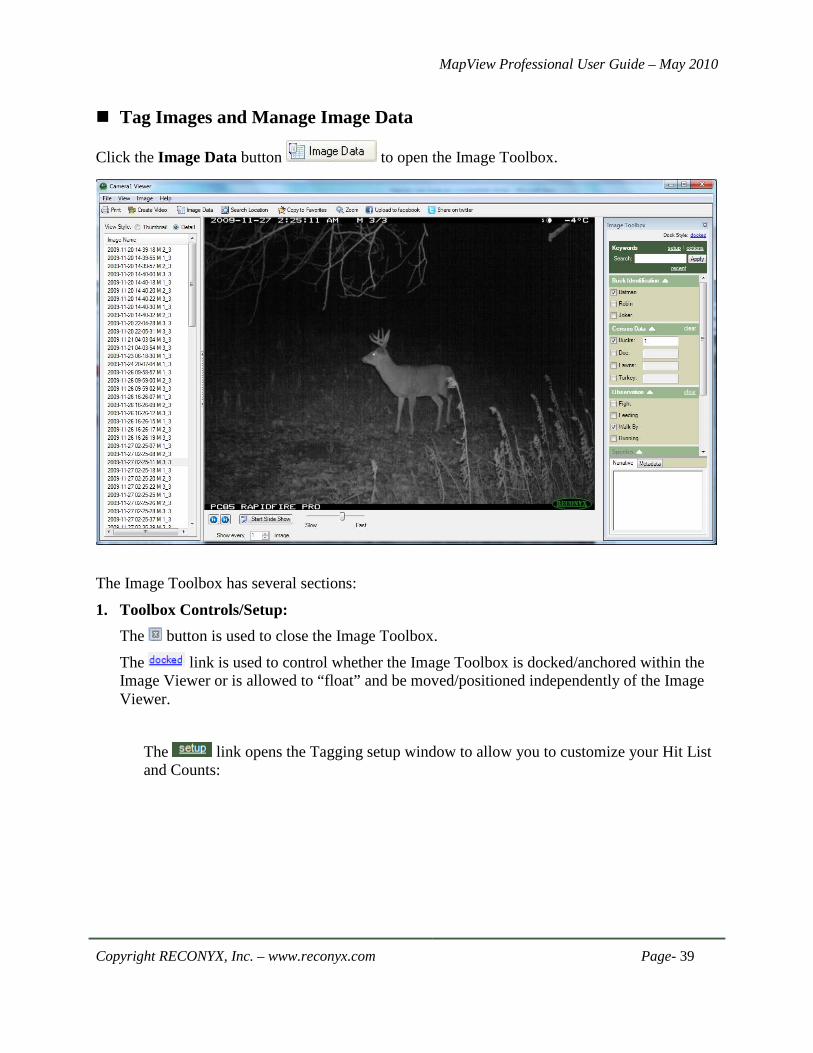
Tag Images and Manage Image Data
Click the Image Data button to open the Image Toolbox.
The Image Toolbox has several sections:
1. Toolbox Controls/Setup: The button is used to close the Image Toolbox.
The link is used to control whether the Image Toolbox is docked/anchored within the Image Viewer or is allowed to “float” and be moved/positioned independently of the Image Viewer.
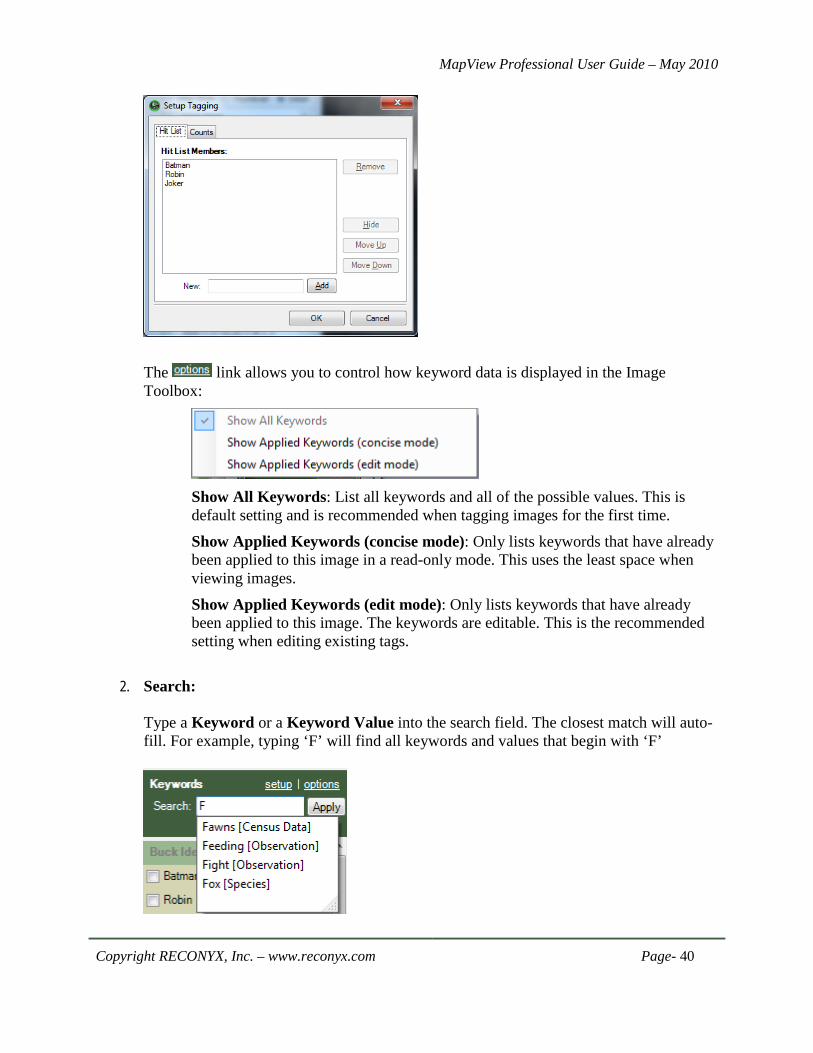
The link opens the Tagging setup window to allow you to customize your Hit List and Counts:
MapView Professional User Guide – May 2010
Copyright RECONYX, Inc. – www.reconyx.com Page- 40
The link allows you to control how keyword data is displayed in the Image Toolbox:
Show All Keywords: List all keywords and all of the possible values. This is default setting and is recommended when tagging images for the first time.
Show Applied Keywords (concise mode): Only lists keywords that have already been applied to this image in a read-only mode. This uses the least space when viewing images.
Show Applied Keywords (edit mode): Only lists keywords that have already been applied to this image. The keywords are editable. This is the recommended setting when editing existing tags.
2. Search: Type a Keyword or a Keyword Value into the search field. The closest match will auto-fill. For example, typing ‘F’ will find all keywords and values that begin with ‘F’

MapView Professional User Guide – May 2010
Copyright RECONYX, Inc. – www.reconyx.com Page- 41
Press ENTER or click the Apply button to apply the selected keyword to the current image(s). If the match is on a single keyword value, the value is applied to the selected image(s). If the match is on a keyword group, a popup will appear to allow you to enter choose which value(s) to apply. For instance, if you have a keyword titled ‘Observation’, you could type ‘Obs’ into the search field and press ENTER. You will be prompted to choose the Observation values that you want to apply:
The link will show the 10 most recent search results.

MapView Professional User Guide – May 2010
Copyright RECONYX, Inc. – www.reconyx.com Page- 42
3. Tagging Controls:
• The buttons are used to collapse or expand each section.
4. Narrative / Metadata Notes are any text you wish to add to your images. Metadata is data about the image that was captured by your RECONYX camera.
The System Metadata tab displays all the image data for the selected image. Note: Information displayed on the System Metadata tab can not be edited.

MapView Professional User Guide – May 2010
Copyright RECONYX, Inc. – www.reconyx.com Page- 43
Export Image Data
Export the Image Data (including your Keyword tags and narrative) for use in any program that supports comma separated value (CSV) format. The export file includes a full pathname to the image itself, so as long as the image files are not moved or deleted, you will have a link back from the exported data to the image.
Exporting data can be done for an individual image or for multiple images. Normally you will be exporting Image Data for a number of selected images – this can be done from the “Viewer” (see View Images).
You can also use the search capability of MapView to select images for export (see Search Images). Using the search capability allows you to selectively choose the images to export data from. You can search on specific keywords or descriptive information you entered into the narrative field. From the search results window, you can select one or more images for exporting data.
Once you have selected the images you want to export Image Data form, select Export Image Data from the Image drop-down menu, then browse to the folder you want to save the exported file in, and enter the file name for the exported data. Tip: You can also select Export from the context menu that appears when you right click a thumbnail or image name.
MapView Professional User Guide – May 2010
Copyright RECONYX, Inc. – www.reconyx.com Page- 44
Create Video
You can create a video clip using any of the images you’ve stored in a location. The video you create is saved as an .AVI (Audio Video Interleave) video and can be viewed using a number of widely available media players, including RealPlayer® and Microsoft Windows Media® Player.
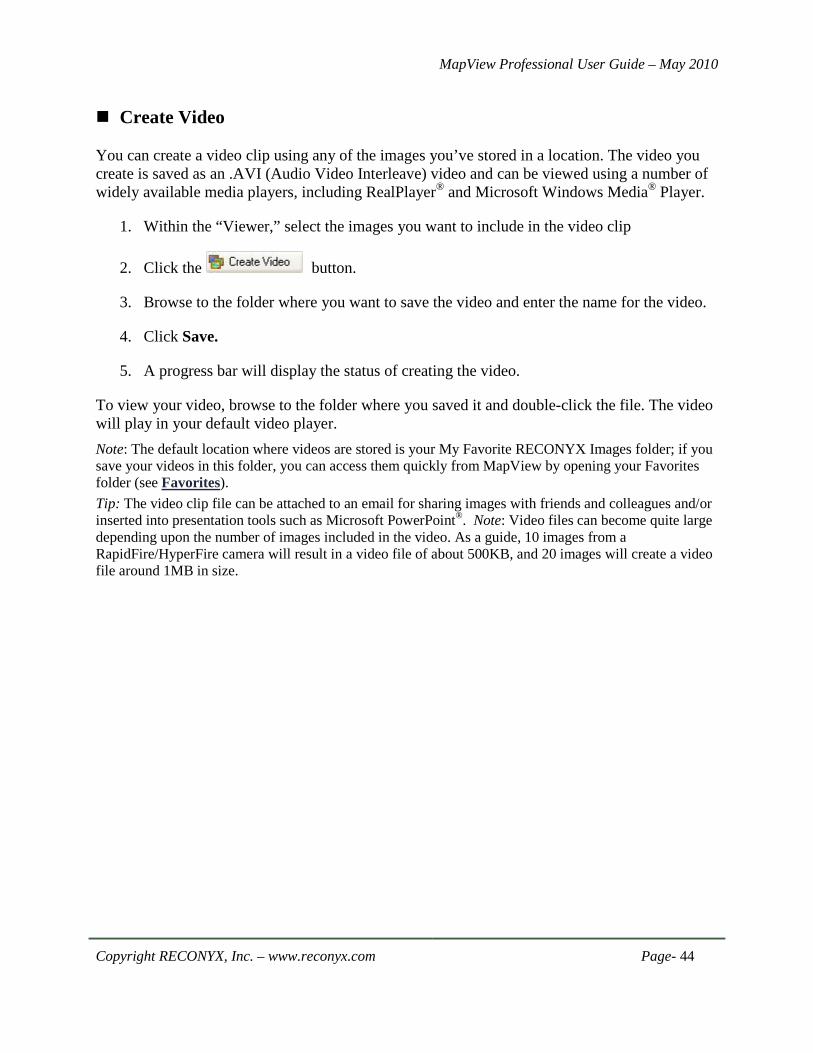
1. Within the “Viewer,” select the images you want to include in the video clip
2. Click the button.
3. Browse to the folder where you want to save the video and enter the name for the video.
4. Click Save.
5. A progress bar will display the status of creating the video.
To view your video, browse to the folder where you saved it and double-click the file. The video will play in your default video player. Note: The default location where videos are stored is your My Favorite RECONYX Images folder; if you save your videos in this folder, you can access them quickly from MapView by opening your Favorites folder (see Favorites). Tip: The video clip file can be attached to an email for sharing images with friends and colleagues and/or inserted into presentation tools such as Microsoft PowerPoint®. Note: Video files can become quite large depending upon the number of images included in the video. As a guide, 10 images from a RapidFire/HyperFire camera will result in a video file of about 500KB, and 20 images will create a video file around 1MB in size.
MapView Professional User Guide – May 2010
Copyright RECONYX, Inc. – www.reconyx.com Page - 45
Warranty and Safety Information
Limited Warranty
Software products are licensed to Buyer under the terms of the applicable RECONYX software license (contained within installation programs). If Buyer wishes to review the software license agreement before purchasing products from RECONYX, a copy of the software license may be obtained by request.
Buyer must obtain a Return Material Authorization (RMA) number from RECONYX before returning any product(s) for repair or replacement. If RECONYX concludes that a returned product is not defective, Buyer will be notified, the product will be returned to Buyer at Buyer’s expense, and Buyer may be charged for RECONYX’s examination and testing of the product.
This limited warranty is the sole warranty for hardware and software products offered by RECONYX and RECONYX shall not be liable for any amounts for said products except in compliance with this warranty.
Troubleshooting and Technical Support
For answers to questions about your RECONYX camera for which you cannot find answers in the User Guides, please check the RECONYX web site (www.reconyx.com) to see if the information you are looking for is covered in the on-line “Frequently Asked Questions” (FAQ) section.
If after searching this User Guide and checking the FAQ’s on the web, you still have questions about your RECONYX camera that you need assistance in answering, please email RECONYX technical support ([email protected]) or call us at 866-493-6064 and ask for Technical Support. We will do everything we can to help you get the most from your RECONYX camera. Troubleshooting your MapView software
If you cannot see your customized Image Data (e.g. in Microsoft Excel®) after exporting tagged images, you must change the alignment of the cells containing keywords in order to make the data visible. The default alignment when opening a .CSV file is Bottom. Select the cells for which you wish to change the alignment and from the Format menu, select Cells. In the window that appears, click the Alignment tab. Change the Vertical setting to a more appropriate value, Top, for example. Click OK and your data should appear in the selected cells.
If you receive error messages while loading new images, this could be the result of either bad images or version incompatibility. If you see an error message that says, “Error Importing Image <filename> Cause: Error reading JPG Comment”, this would indicate a bad image was skipped.
If you receive error messages while loading images from another folder - it may be because there are too many characters in the path to the files (more than 130 characters). To read more
MapView Professional User Guide – May 2010
Copyright RECONYX, Inc. – www.reconyx.com Page - 46
about this known issue or to obtain a fix, go here. A simple solution is to rename or move the folder you are trying to load from. If the full path to the folder can be shortened to fewer than 130 characters, this problem will go away. If this does not solve your problem with loading images from another folder, contact Technical Support.
If you cannot erase your memory card, check with computer technical support personnel to be sure you have permissions set on your computer to allow you to format removable media. The instructions below explain how the appropriate privileges can be assigned.
Determine the version of your operating system. Follow the steps outlined below for your operating system. Windows XP Home Edition From a user account with Administrator privileges:
Click Start, click Run. Enter regedit at the prompt. Browse to: HKEY_LOCAL_MACHINE\Software\Microsoft\WindowsNT\CurrentVersion\Winlogon On the right side, find AllocateDASD. Double Click AllocateDASD, and change the value to 2. Click OK. Close the Registry Editor.
The next time the user logs in, they will be able to erase their memory card. Window XP Professional Edition From a user account with Administrator privileges:
Click Start, click Run. Enter mmc at the prompt. Under File, click on Add/Remove Snap-in… On the Add/Remove Snap-in window, click Add. On the Add Standalone Snap-in window, choose Group Policy from list and click Add. In the wizard window that appears, make sure that Local Computer is typed in the Group Policy Object text box and click Finish. Click Close on the Add Standalone Snap-in window. Click OK on the Add/Remove Snap-in window. Under Local Computer Policy, browse to the following branch: Computer Configuration\Windows Settings\Security Settings\Local Policies\Security Options Right click on Devices: Allowed to format and eject removable media and click Properties. In the Local Security Setting box, click the group you want, and then click OK. Your choices are: Administrators - Only Administrators can format removable media. Administrators and Power Users - Admin and Power users can format removable media. Administrators and Interactive Users - Administrators and Interactive (Limited users) can format removable media. Quit MMC, click Start, and then click Run. Enter gpupdate at the prompt.
The next time the user logs in, they will be able to erase their memory card.

MapView Professional User Guide – May 2010
Copyright RECONYX, Inc. – www.reconyx.com Page - 47
Copyright and Trademark Information
MapViewTM Professional User Guide Copyright© 2010
RECONYX, Inc.
3828 Creekside Lane, Suite 2
Holmen, WI 54636
866-493-6064
www.reconyx.com
MapView Professional, Silent Image, RapidFire and HyperFire are trademarks of RECONYX.
Other trademarks and registered trademarks referred to in this document:
• CodeLoc, InstaOn, and NearVideo are trademarks of RECONYX. • Excel, Microsoft, PowerPoint, Windows, and Windows Media are registered
trademarks of Microsoft® Corporation. • Lexar is a trademark of LexarMedia, Incorporated. • RealPlayer is a registered trademark of RealNetworks, Incorporated. • SanDisk is a registered trademark of SanDisk Corporation. • Google Maps is a registered trademark of Google Inc.
All other trademarks and copyrights referred to are the property of their respective owners.
Top Related