


Languages
Pages
Legal


7/26/2019 Mamiya 645 Pro
http://slidepdf.com/reader/full/mamiya-645-pro 1/44
www.orphancameras.com

7/26/2019 Mamiya 645 Pro
http://slidepdf.com/reader/full/mamiya-645-pro 2/44
Instructions
www.orphancameras.com
www.orphancameras.com

7/26/2019 Mamiya 645 Pro
http://slidepdf.com/reader/full/mamiya-645-pro 3/44
Congratulations on
your
purchase
of the
Mamiya
645
PRO
Mamiya
ioneered
he 6x4.5
ilm ormat
and
ntroduced
he
world's
irst
645
SLR in 1975.The 645 PRO is the latestmasterpiecen this seriesand
incorporates
ll he
latestmechanical,
lectronic nd optical
advances.
ts
external ppearance,
oo,
has
been
modernized
nd
its
ergonomic
esign
further
nhanced.
We
are
sure hat
you
will
enjoy he
many
advantages
his cameraand
its
accessories
ffer
and
want
o
particularly
ention:
The
645
PROhas
a built
in
self imer
(delayed
hutter
elease) hichwill
also
facilitate
imeexposures.
ttaching
pecial
eaf
shutter
enseswill
automati-
callyset he focalplaneshutter o 1/8sec.Heavydutygearsconnect o the
improved
owerDrive
GripWG401
Thisgripalso
utomaticallycocksthe
eaf
shutter
enses
nd
permits
emote
ontrol.
The
AE PrismFinderFE401
specially
reated
or
this camera,automates
exposure ndshows
LED
safety ignals.
5mm
ilmholders ow
come
with
panoramic
dapters. super
ast
300mm
12.8APO enswas
alsodesigned
for
this
camera.
We are convinced hat ydur camerawill serveyou well, becausewe have
designed
t for heavy
professional
se.
However,we
ask
you
o
please
ead
alloperating
nstructions
arefully efore
ou putyour
equipmento
work, n
order o ensure
proper
operation
nd maximum
esults.
Thismanualcoversthe
basic camera.
Sepa-
rate instructions
are
supplied
with
all sys-
tem accessories,
n-
cluding
enses, nders,
fi lm holders, tc.
Foradditional
nforma-
tion
please
eel ree
o
contact
your
author-
ized Mamiyadealeror
the
Mamiyaimporter in
your
country.
www.orphancameras.com

7/26/2019 Mamiya 645 Pro
http://slidepdf.com/reader/full/mamiya-645-pro 4/44
SpecialFeaturesof Mamiya645 pRO....................3
Names
and
Function
of
parts
.................7
Attaching
and
Removing
Lenses
.........................10
Attaching
and
Removing
Rol l
Fi lm
Holders
. . . . . . .11
Attaching
and
Removing
Viewfinders
................
2
Attaching
and
Removing
he
Film
Advance
Grank
. . . . . . .13
lnsertingBatteryand BatteryCheck ....14
Shutter
Release
Selector
.......16
A
Trial
Fami l iar izat ion
est
. . . . . . .
. . . . . . . . . . . .17
F i lm
Loading. . . . . . . . . .
. . . . . . . . . . . . . . . . .1g
Advancing
Film
to
the First
Exposure
................21
Aperture
Ring/Stop-down
Operation
..................
3
Focusing
.. . . . . . . . . . . . . . . .24
Depth-of-field....... ..................25
FifmTransport nd FilmUnloading .....26
Using
he
Self-timer/Delayed
hutter
Releas
....27
Muftiple
xposures
.... . . . . . . . .
. . . . . . . . . . . . . . . . . . .27
Time
Exposures
.... . . . . . . . .
. . . . . . . .2g
Mirror
Lock-up
hotography
........
........2g
Infrared
hotography
.......
............;......30
Using
Flash
.... . . . . . . . . .31
Usinga Tripod
Holding
he
Camera
teady
nd
Secure|y...........33
Attaching
nd
Removing
he Neck
Strap
...........34
Specifications
.........35
Trouble
hooting
.... . . . . . . . . . . . . . . .32
Basic
Accessories
.........
.......gg
System
Chart
..........41
Storing ndCheckingheCamera
.......42
Features
nd
pecifications
ubjectto
hange
ithout
otice.
www.orphancameras.com

7/26/2019 Mamiya 645 Pro
http://slidepdf.com/reader/full/mamiya-645-pro 5/44
3
x More
Negative
rea
Than
he
35mm
Format
Plus
Superior
mage
Quality
rom
Mamiya
World'
Glass
Lenses
The
6x4.5cm
ormatoffers
approx.
3 times
more mage
area han
he
35mm
24x36mm)ormat,
Man's
ision
s
horizontal
nd
rectangular.
Film
Holders
re
ectangular
ndso
are
most
pictures
n
them.
The6x4.5
ormat
salso
arge
nough
o
beviewed
without
magnifier
nd
tsaspect
atio
horizontalvertical)
is ideal,
equiring
minimum
cropping.
Mamiya's
high
pedormancemedium ormat ensesassuresharpness
and
beautiful
olor
idelity.
Sturdy,
Versatile,Safeand
Highly
Reliable
Body
-
Tailored to
Satisfy
Pro
Needs
-
Introduced
n
1975 o
not only
provide
n
alternative
o
the
35mm
ormat,but
to afford
he
user
with advanced
versatil i ty
iven
ts
much
arger
ormat, he
Mamiya 45
Series s constantly eingupgraded. lements uchas
speed
and
handling
lus
a
host of
other
pecialfeatures
have been
enhanced
o
satisfy
he
needs of
most de-
manding
rofessional
.
Two
new
convenient
afety
eatures
havebeen
added
o
the 645
PRO
n
he
ormof
state-of-the-art
ptoelectronics
which
mmediately
dentifies
roblemswith the shutter
(i.e.when t wil l not release)when he AE PrismFinder
FE401
sused.
Whetherthese
alfunctions
evelop
rom
failureo
draw
out he
Dark
Slide,
r
f
here
are
problems
in fi lm take-up,
he
LED will
indicate he
source
of
the
trouble.
With hese
new
advancements,
amiya
elieves
the
mostdemanding
ro
will
be
more han
satisfied
ith
the
new edition
45.
Enhanced nterchangeable ollFilm HolderSystem
-
Enables
Polaroid
and
Even 35mm
Panoramic
Photography
The 645
PRO
featuresan
interchangeable
ilm
holder
system
capable
of
using
a
far wider
range
of
roll
fi lm
holders
han
before.
Depending
n
the application,
he
system
can
be
quickly
attached
o or
detached
rom he
camera,
nsuring
he abil ity
o catch
even
astchanging
scenes. t also features ail-safe evices ncluding,or
example,
ne
hat
warns
when
you
have
ailed o ake
out
the
dark
slide
when he
AE Prism
Finder
FE401
s
being
used.
www.orphancameras.com
7/26/2019 Mamiya 645 Pro
http://slidepdf.com/reader/full/mamiya-645-pro 6/44
f,
lnterchangeable
iewfinders
1. AE Prism FinderFE401
The AE
(automatic
xposure)
rism
Finder
FE401
ea;
tures
hreemodes
of
TTL
metering,
ncluding
utomatic
switching
rom
center-weighted
veraging
o
spot me-
tering. t
also has
a
t3EV
exposure
ompensation
d-
justment.
2.
Prlsm
Finder
PF4O1
The Prism
Finder
PF401
s without
metering lectronics
and
designedor
manual
hotography
ode.
Both
prism
Finders
how
an unreversed,
prightmage
nd
are
deal
for
eyelevel
photography.
3. Waist Level
Finder
N
The Waist
level
Finder
N is
desirable
or
low
angle
photography
nd
particularly
or
horizontal
omposition.
A
self
erecting
hood
with
built- in
magnifier
shields
groundglass
rom
allambient
ight.A
built- in
portsfinder
permits
yelevel
iewing
nd s
ideal
or
action
photog-
raphy.
Bright,
Dynamic
mages
isible
n
he
Focusing
Screen
-
5 Selectable
Types
Available
-
The
645 PRO
can reproduce
right, ynamic
ndsharp
images
n he ocusing
creen,
nabling
ptimum
om-
position
o be
obtained
ccording
o
the
photographic
purpose.
n
addition,
he
645
PRO
greatly
enhances
focusing.
5
types
of
focusing
screens
are
available
o
facilitate
photographing
widevariety
f
subjects.
A
Comprchensive
eries
f
nterchangeable
enses
-
Sharp
mages
ndOutstanding
olorBalance
There
are
an amazing ariety
f
nterchangeable
enses
in
the PRO
6 x 4.5 ormat
series.Mamiya
has
concen-
trated
an
all-outeffort
on
the systematic
production
f
lenses
n
an
effort o
satisfy
a
multitude
f
needs.
All
lenses
are
multi-coated
o eliminate
lare
and
ghosting
evenunder he mostadverseight onditions. hile he
seriesnow
also eatures
hree eaf
shutter
enses,
all
lenses
exhibit
he utmost n
colorbalance, igh
esolu-
www.orphancameras.com

7/26/2019 Mamiya 645 Pro
http://slidepdf.com/reader/full/mamiya-645-pro 7/44
tionand crystal lear
definition.
feature ens s he
new
300mm
12.8APO ens
which
eliminateshromatic
ber-
ration
nd
produces hotos
with
he sharpest
efinition.
Given hewidevariety f lenses n he645PROSeries,
they
greatly
xpand he
world
of
mages hatare
possible.
fil
auto windingwith
he
Power
Drive
Grip
WG401
L|l
This PowerDriveGrip
WG401 has been specially e-
signed
or heavy
duty,
motorized
peration
with
he 645
PRO. talsopermits utomatic hutter ocking f he eaf
shutter
ensesand can be
remote
controlled.
nother
feature, ot
available
reviously
s
he
ollowing:
When
attaching
partially
xposed
ilmholder
in
which
the
ilmhas not beenadvancedo a
new rame),
o the
645
PRO
equipped
ith he Power
Drive
Grip
WG401,
built- in
amera
mechanismwill automaticallydvance
the
film
o
the next
rame,when he
shutter
elease s
activated,
ither on the
camera body or on the
Power
DriveGr ipWG401.
NewAutomaticLeafShutter
Lenses
or
added
versatility.
55mm
Wide
Angle),
0mm
Standard)
50mm
(Telephoto)
enses
These enses reall
n
Seiko
0 shutter, fferthe
dvan-
tages
of syncroflash
hotography
t allshutter
peeds
1/
30,1/60,11125,11250nd1/500 ec.Theoptional ower
DriveGripWG401
will
automatically
ockthe hutters
s
it
transports
he
ilm
and
moves he
mirror.
The
camera's
ocal
plane
hutter
must
be set at
1/8sec.
for leaf
shutter
mode operation.
he leaf
shutter
enses
can do it automatically.
www.orphancameras.com

7/26/2019 Mamiya 645 Pro
http://slidepdf.com/reader/full/mamiya-645-pro 8/44
A Broad
Accessory
System
For
Specialized
pplications
A
useful accessorysystem to serve the specialized
needs
f he
photographer.
t
ncludes
uto
Bellows
nd
Auto
Extension
Rings
or
close-up
and
copying
work;
Infrared
emote
Controlfor
tudio
nd
nature
hotogra-
phy;
External
Battery
Case for
operating
n
cold
sur-
roundings;
Camera
Grips or
convenient
olding
and
more.
ffi
otner
eatures
<Mirror
Lock-up>
Afterfocusing,
heMirrorcan
e ocked
p
before
making
an
exposure.
his
s
convenient
hen
he
camera
s
used
at
slow
shutter
peeds
and is
mounted
on a
tripod or
telephotography,
opywork,
tc.,
ince
ven
averysmall
amount
of vibrations
hould
be
eliminated.
<Self-timer>
Self-timer
or
delayed
hutter elease.
When
activated
t
wil l
ight
red
pilot
amp
n
he ont
f he
camera
or
eight
seconds ndwill
blink or
wo
seconds
efore
riggering
the
shutter.
<Time
Exposure>
Time
exposures
remade
by
util izing
he
Self-timer
nd
the
B
shutter
etting.
new
power
aving
ircuit
esign
switches
he battery
off and
extends
s
life.
www.orphancameras.com
h

7/26/2019 Mamiya 645 Pro
http://slidepdf.com/reader/full/mamiya-645-pro 9/44
Focusing
Screen
N
Aperture
RingCouPing
Pin
This
pin
s
f i t ted
nto he
Ex-
posure
MeterCouPler
f the
lens, o
ransmit
he
aPerture
data
o he
AE
Prism
Finder.
Battery
Check
LamP
Focusing
Screen
Release
Pin
When
you
want to
change
the
screen,
l ide
his
Pin
o
the le f t and remove he
screen.
Shutter
ReleaseSelector
Al ign
he
whi te
ndex
ot
on
the selector
ol lar
with
the
white
quare
ot
n
he
center
for
normaluse.
When the
col lar
s
urned
o
he
ed
dot,
the
release
s
locked.
To
use the Self- t imer,et i t to
c
Shutter
Release
Button
Mirror
.
Never ouch
he
surface
f
the
mirror .
13
Gold
Plated
Contacts
These
contacts
nterface
he
AE Prism
Finder i th
he
SO
dial on the
fi lm holder
and
the shutter peeds.
Hot-shoe
X
contact)
A
cordless
lash an
be used
with
his
shoe.
FlashSync
Terminal
Flashcord
and
optional
er-
minal
Adapter
RA401 an
be
connected
o
this erminal.
Mirror
Lock-up
Lever
Neck Strap
Lu g
Lens
Release
Button
Auxiliary
ReleaseContact
When he cover
s
moved
o
the
eft,
he
contact
ppears.
This
contact
s
used
or
con-
nections f
external
eleases
suchas
a special
and
grip
and
remote ontrol
nit .
Battery
Check
Button
LED disp lays
he
presen t
battery
ondit ion.
7
www.orphancameras.com
www.orphancameras.com
h

7/26/2019 Mamiya 645 Pro
http://slidepdf.com/reader/full/mamiya-645-pro 10/44
Finder
Coupling
Panel Front)
Finder
CouplingPanel
Rear)
Electr ic
Contact for
Fi lm
Holder
This
contact receives
lm
sensit ivi ty
ata rom
he
fi lm
holder .
Fi lm
Holder
Mount
Fi lm Holder Coupl ing
Guide
Pin
Shutter
Curtain
Exposures
re control led
y
opening
nd
closing
he
cur-
tain.
'
Never
ouch
he
surface
f
this
cur tain.
Fi lmTransportGear
F i l m
H o l d e r
M o u n t i n g
Bracket
Shutter
Speed
Dial
Lock
Release
Button
This
button
s
used or
un-
locking he ShutterSpeed
Dial
rom
an
AE
posit ion.
Shutter
Speed Dial
This
dial
selects
he
shutter
speed,
nd
switches
he
op-
erat ion
mode
from
AE
to
manual
hotography.
NeckStrap Lug
Film
Advance
Crank
A
Single
omplete
urn
ocks
the
shutter
nd
advances
he
fi lm
or
each
exposure.
Mult iple
Exposure
Lever
When
this
lever
is
set
at
MULTl ,
i lm snotadvanced
even
when
he
Film
Advance
Crank
s
turned,
hus
allow-
ing
mult iple
xposures
n
he
same
i lm
rame.
www.orphancameras.com
www.orphancameras.com
orphancameras com

7/26/2019 Mamiya 645 Pro
http://slidepdf.com/reader/full/mamiya-645-pro 11/44
Focusing
Ring
This
ring
adjusts
he
ocus.
AM
Lever
When set to
' 'M''
it
permits
you
o
check
depth
of
field.
Normally lways
eave
t
in
A
posit ion.
Tripod
Socket
114 ripodsocket.To con-
vert
o
a 3/8 socket,
emove
the
small crew
n
he
baseof
the
socket.
hen emove he
bushing.
ee
page
32.
Distance
Scale
The camera
o subject
dis-
tance
an
beset
or
conf
rmed
with
his
scale.
Lens
Alignment
Do t
Depth-of-f ield
cale
Provides
quick
reading
of
depth-of-field
or
various P-
ertures
nd
distances.
Exposure
Meter
CouPler
Thiscoupler
s engaged
ith
the ApertureRingCouPling
Pin, ransmitt ing
iaPhragm
information
o
the
AE
Prism
Finder.
Battery Chamber
Cover
Bat tery
Chamber
Cover
Latch
www.orphancameras.com
www.orphancameras.com
www orphancameras com
7/26/2019 Mamiya 645 Pro
http://slidepdf.com/reader/full/mamiya-645-pro 12/44
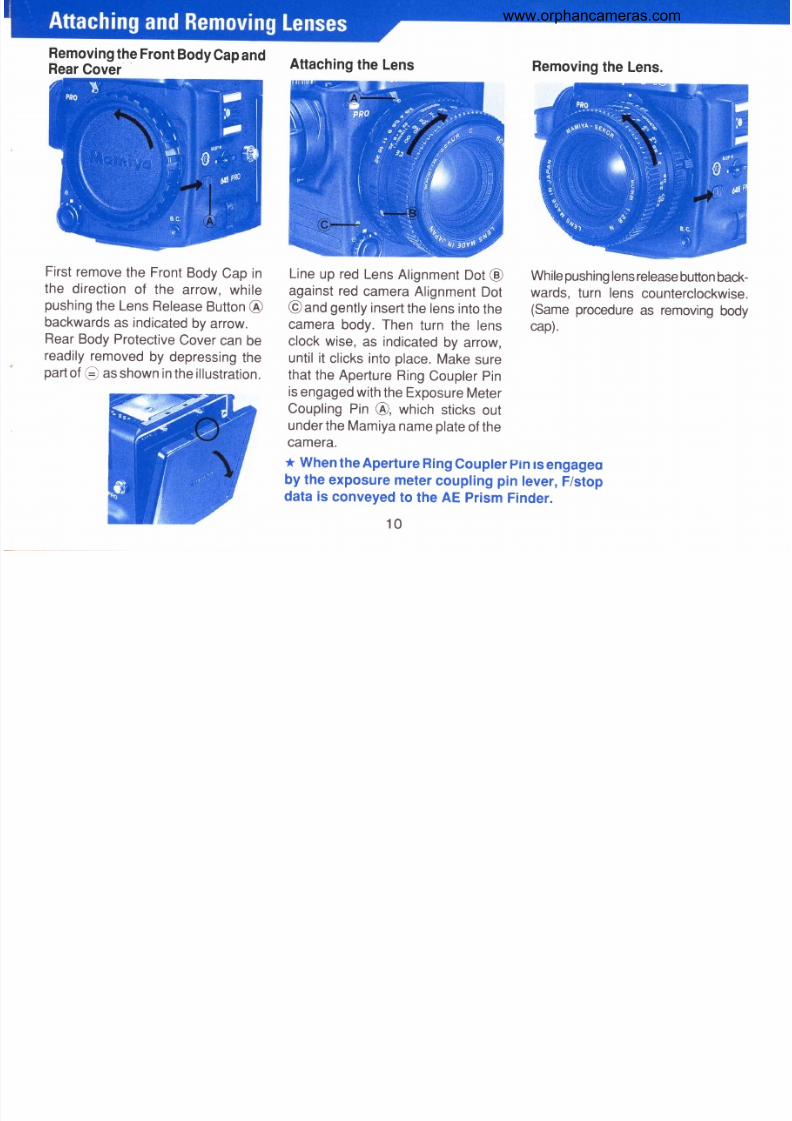
Attaching
he Lens
Removing
he
Front
Body
Cap
and
Rear
Cover
First emove he FrontBodyCap n
the
direct ion
of the
arrow,
whi le
pushing
he Lens
Release
utton
@
backwards
s indicated
y
arrow.
Rear
Body
Protective
Cover
can
be
readily
emoved
by
depressing
he
part
of
C
as
shown
n
he llustration.
Lineup red LensAlignment ot@
against ed
camera
Alignment
Dot
@
and
gently
nsert
he
ens
nto
he
camera
body.
Then
turn
the lens
clock
wise,
?s
indicated
y
arrow,
until t
cl icks
nto
place.
Make
sure
that
he
Aperture
Ring
Coupler
Pin
is
engaged
ith
he Exposure
Meter
Coupl ing
Pin
@, which sticksout
under
he Mamiya
ame
plate
f he
camera.
While ushingens elease utton ack-
wards,
urn
lens
counterclockwise.
(Same
procedure
as
removing
body
cap).
*
When
he Aperture
Ring
Coupler
ptn
ts
engageq
by
the
exposure
meter
coupling
pin
lever,
F/stop
data is
conveyed
o
the AE
Prism
Finder.
Removing
he Lens.
1 0
www.orphancameras.com
www orphancameras com
7/26/2019 Mamiya 645 Pro
http://slidepdf.com/reader/full/mamiya-645-pro 13/44
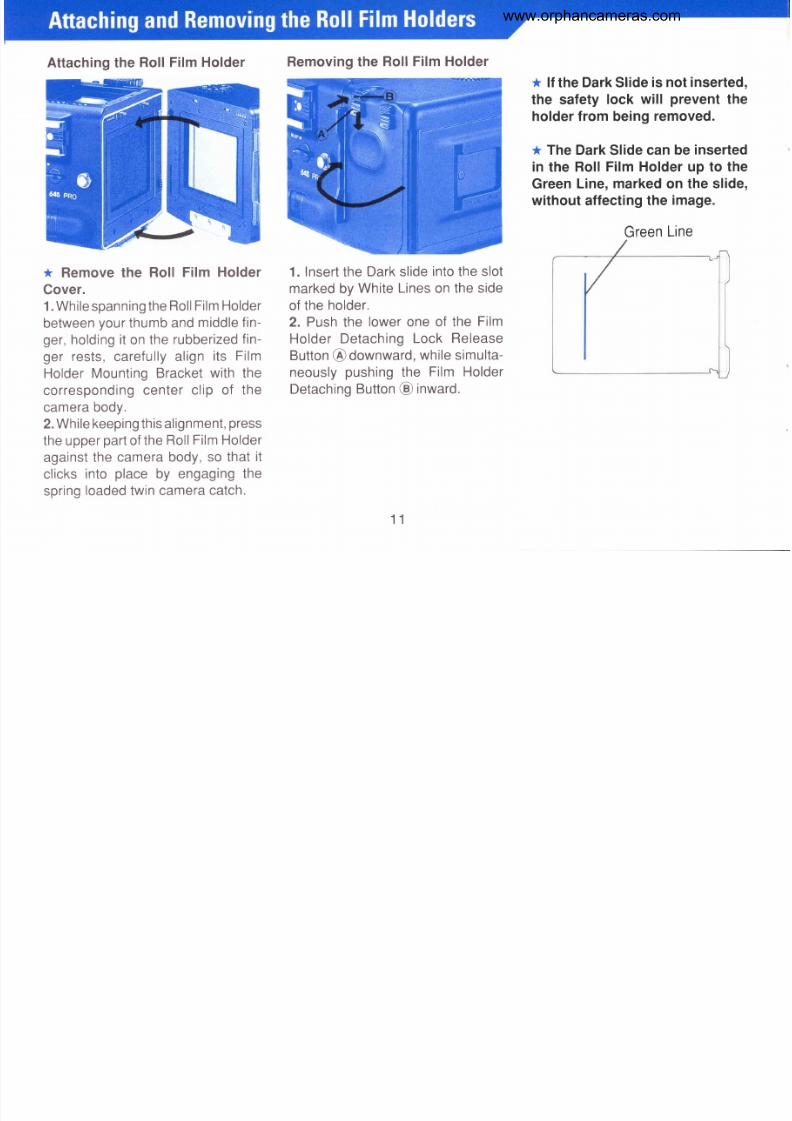
Attaching he
Roll Fi lm
Holder
Removing he
Rol l F i lm Holder
* lf
the
Dark
Slide
s not inserted,
the safety
lock
will
prevent
the
holder rom
being
removed.
* The Dark
Slide
can be
inserted
in
the
Rol l
F i lm Holder
up to
the
Green
Line,
marked
on the sl ide,
without
affecting
he
image.
* Remove he Rol l F i lm Holder
Cover.
1.
Whi le
panning
he
Rol l i lm
Holder
between
our
humb
nd
middle
n-
ger ,
holding
t
on he
rubber ized
in-
ger
rests,
careful ly
l ign
ts Fi lm
Holder
Mounting
Bracket
with
the
cor responding
enter
c l ip of
the
camera
ody.
2.While
eeping
his
l ignment,ress
theupper
ar t
f he
Rol l
F i lmHolder
against
he camera
body,
so that
t
cl icks
nto
place
by
engaging
he
spring
oaded
win
camera
atch.
1. Inser the
Dark
l ide
nto
he
slot
marked y
White
Lines
on the
side
of the
holder.
2. Push
he
lowerone of
the
Fi lm
Holder
Detaching
Lock
Release
Button
@
downward,
hi le
imulta-
neously
pushing
he
Fi lm Holder
Detaching
utton
@
inward.
Green
Line
1 1
www.orphancameras.com
www orphancameras com

7/26/2019 Mamiya 645 Pro
http://slidepdf.com/reader/full/mamiya-645-pro 14/44
The
same
procedure
applies
o
all
finders.
The
il lustrations
shows
the
AE
Prism
Finder
FF4O1.
Attaching
he Finder.
Lift heUpperCover rom hecamera
body.
Insert
heAttaching
atches
@
of
he
f inder
nto
heFinder
oupl ing
anel
@
ln
he ront
wal l
of
he
body.
press
the f inder
down
unti l
he rear
atch
locks
ecurely
n
place.
Removing
he
Finder
Spanninghe f inderwi thyour in-
gers,
ush
he
button
n ts
ight
ide
marked
with
a
downward
pointing
arrow
,
downward,
hi lepushing
the
other
button,
n
he eft
sideS,
inward.
1 2
www.orphancameras.com
www orphancameras com

7/26/2019 Mamiya 645 Pro
http://slidepdf.com/reader/full/mamiya-645-pro 15/44
Removing he
Crank
Attaching
he Crank
Push
he
ockLever
@
on
ts
bottom
in
a
forward
direction
s
far
as
it
will
go
(see
llustration).
With
the
flat
part,
having
a
White
Index ine,
n
op,
ine
heCrankup
against
tsmounting
late
n heside
of the bodyand
push
FilmAdvance
Crank
Lock Leverbackward.
You maychoose ix
different rank
starting
ositions
o suit
your
prefer-
ence.
The
orientation
f the crank
proper
against
ts
base,
before
t is
attached
o the camera,
wil l
be
maintained
hen he entire ssem-
bly
s ocked
nto
place.
1 3
www.orphancameras.com
www.orphancameras.com
7/26/2019 Mamiya 645 Pro
http://slidepdf.com/reader/full/mamiya-645-pro 16/44
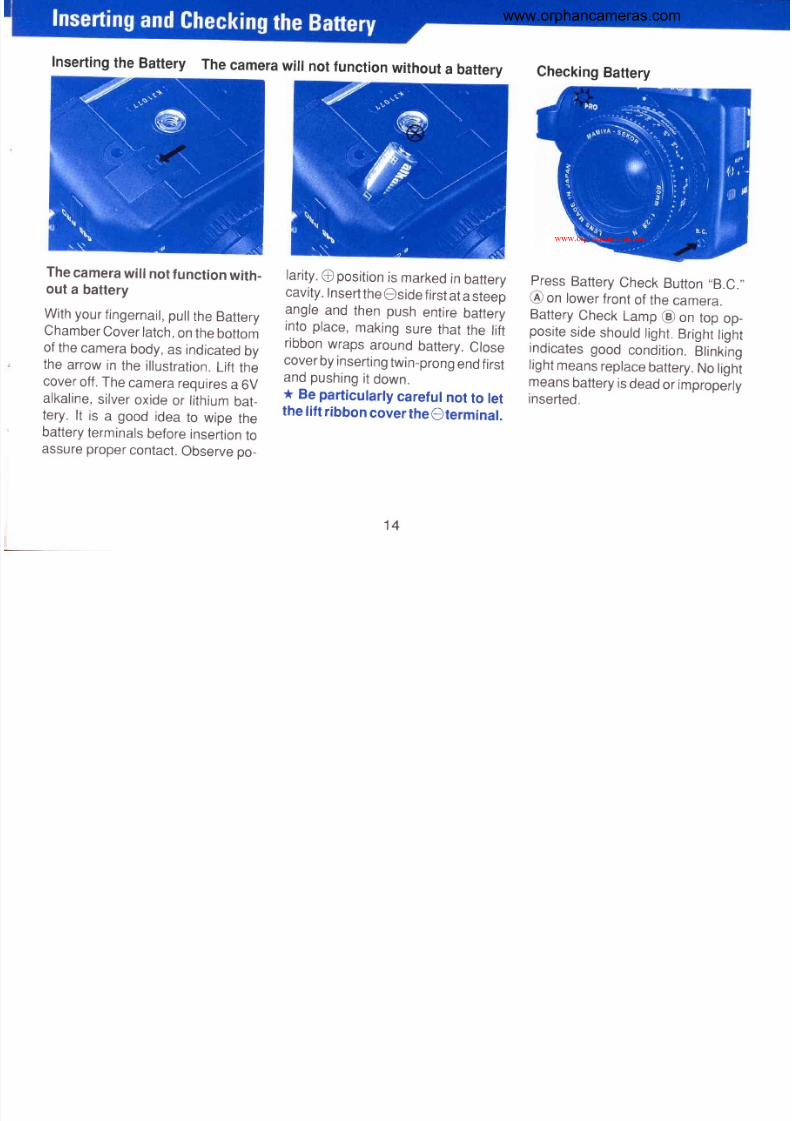
Inserting
he
Battery
The
camera
will
not
function
without
a
battery
The
camerawill not unctionwith-
out
a
battery
With our
ingernai l ,
ul l
he
Battery
Chamber
over
atch,
n
he
bottom
of
the
camera
body,
as indicated
y
the
arrow
n
the
il lustration.
ift
he
cover
off.
The
camera
equires
6V
alkal ine,
i lver
x ide
or l i thium
at-
tery. t is a good idea to wipe the
battery
erminals
efore
nsertion
o
assure roper
ontact.
Observe o_
larity.@positions markedn battery
cavity.
nsert
he
Oside
irst
t
a
steep
angle
and
then push
entire
battery
into place,
making
sure
that
the
li it
r ibbon
wraps
around
battery.
Close
cover
y nserting
win-prong
nd
irst
and
pushing
t
down.
*
Be particularly
careful
not
to let
the
ift r ibboncover heOterminal.
PressBatteryCheckButton ,8.C.
@
on
lower
ront
of
the
camera.
Battery
Check
Lamp
@
on
top
op-
posi te
ide
should
ight.
r ight
ight
indicates
ood
condition.
Blinking
light
means
eplace
attery.
o
ighl
means
attery
s
dead
or mproperly
inserted.
Checking
Battery
1 4
www.orphancameras.com
www.orphancameras.com
www.orphancameras.com

7/26/2019 Mamiya 645 Pro
http://slidepdf.com/reader/full/mamiya-645-pro 17/44
lmportant:
1. The
sealed,
ew
battery
hich
s
suppl ied
ith hiscamera
may
have
been
subject
o storage
onditions
whichhave educed tsservice ife.
Therefore
t rs
desirable
o
replace
t
with
a
fresh
battery
s
soon
as
pos-
s ib le.
2.
Careful ly
ipe the battery
on-
tacts
efore
nserting
nto
hecham-
ber.
Fai lure o
do so
may
result
n
poor
electrical
ontact
and
conse-
quentmalfunctioningf hecamera.
3.
Always
remove battery
when
camera
s not used
or
a
while.
Al-
ways carryspare
batteries.
4.
Battery
i fe
differs,
epending
n
type,age,
storage
ondition,
mbient
temperature,
requency
f
use
etc.
Battery trength
will be
indicated
by
whether
he
ight:
Glows .....Battery trengths suf-
f
cient
Bl inks
.... . attery
capacity
has
dropped
below
he
al-
lowable
evel.
Replace
the
battery.)
Does
ot'f,lit;:i-:
(;:1,:::
the battery.)
1 5
p
www.orphancameras.com

7/26/2019 Mamiya 645 Pro
http://slidepdf.com/reader/full/mamiya-645-pro 18/44
When
set
o
he
yellow
lock
ymbol
1)
tfre
self-tir r
is
operative.
ee
page
27
and
28
tor
urther
nstruc_
t ions.
Operating
the
Shutter
Release
Button
1.
The
Shutter
Release
Button
@
functions
n
wo
steps.
Gentle res-
sure
wil l
ight
he
metering
nforma_
tion
display
f
he
AE
prism
Finder
s
used.Continued ressurewil l re-
lease
he
electromagnetic
hutter.
2.
lf
the
fi lm
is
not
completely
d_
vanced,
f
he
Dark
Slide
s
not
with_
drawn
or if
the
battery
s
dead,
he
shutter i l lnot unction,
ven
when
the
Sh
ut te r
Re lease
Bu t ton
s
pressed.
his
wil l
also
be
he
case
f
the
Shutter
Speed
Dial
s
set
o
,,A
or
AEL
when
he
AE
prism
Finder
is
not
attached.
3.
After
releasing
he
shutter,
he
Fi lm
Advance
Crank
wil l
automati_
cally nlock ndbe eadyoadvance
the
i lm.
Fornormal peration et heWhite
Dot
of
he
Shutter
Release
elector
@
against
he
White
Square
Dot
n.
When
set
to
the
Red
Dot
O, the
Release
Button
s
ocked.
*
Select
his
mode
f
the
camera
wil l
be
idle
for
a
period
and
to
prevent
accidental
shutter
re-
lease.Also when he power Drive
Gr ip
s
used.
1 6
p
www.orphancameras.com

7/26/2019 Mamiya 645 Pro
http://slidepdf.com/reader/full/mamiya-645-pro 19/44
1.
At tach the
Rol l
F i lm
Holdero
hecamera
ody.
2.
Pul l
out
the
DarkSl ide
and
place
t nto
ts
Storage
Slot.
3. Set the
Shutter
Speed
Dial to any
other
position
than
A
or
AEL .
When
he
AE
Pr ism
Finder s
not
mounted n hecamera,
he
shutterwi l lnot
elease
f
he
Shutter
Speed
Dial
s n
he
A
or
AEL
position.
4.
Set the
Mul t iple
Expo-
sure
Leveron the
body o
the
MULTl osit ion.
*
When
only
the body
is
tested,
he
familiarization
checkout can be made either in the MULTI or n
(normal mode).
5. Set
he Shutter
Release
Selector
o
8
(normal
mode), nd
press
he
Shut-
ter ReleaseButton.
6.
Afterthe hutter
as
been
released, dvance
he
Film
AdvanceCrank
one
com-
plete
evolution nd
he
next
frame
will
be
ready.
The empty
i lmspool
ncluded
i th he
i lm
holder
s
supplied itha vinyl ube.Whenplacedn he ake-up
compartment
t
engages
he
film sensor
and
makes
the
holder
unction s
if it is loaded
with
ilm.Please
remove he ube
after
your
est.
1 7
p
www.orphancameras.com
7/26/2019 Mamiya 645 Pro
http://slidepdf.com/reader/full/mamiya-645-pro 20/44
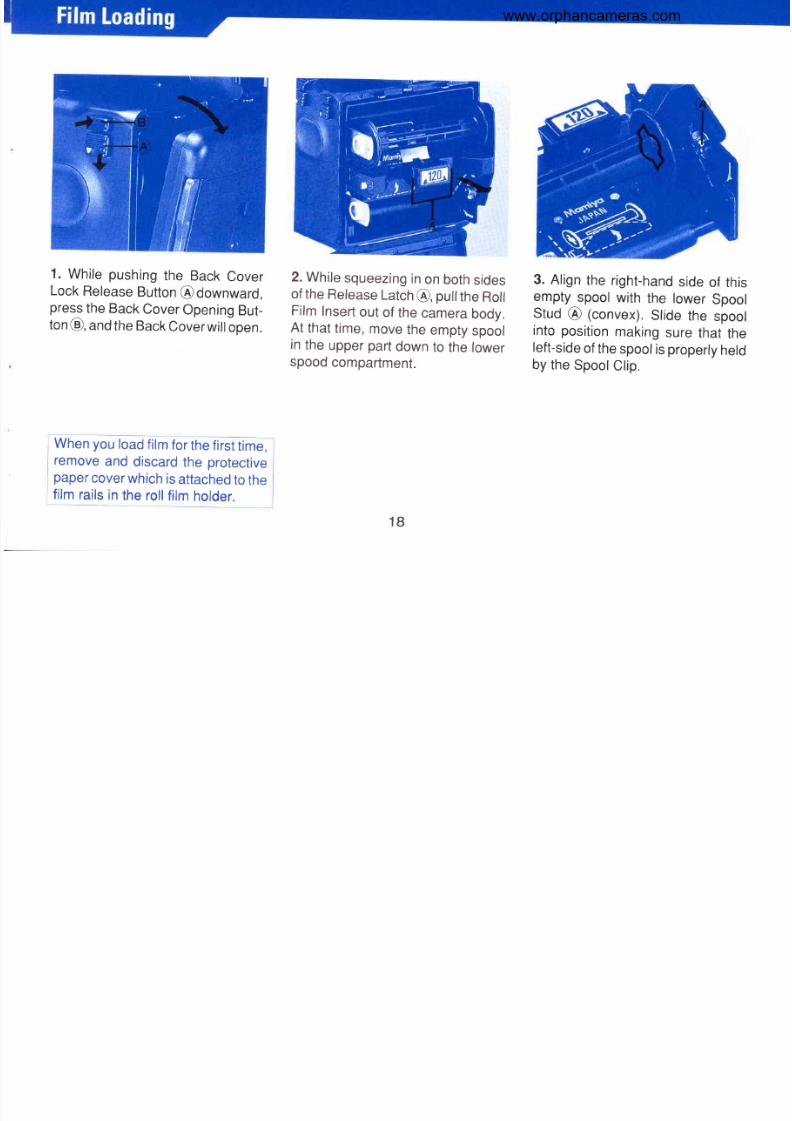
1. Whi lepushing he BackCover
Lock
Release
Button
@downward,
press
he
Back
Cover
Opening
But-
ton
@,
and
heBack
Coverwi l lopen.
2.Whilesqueezingnon bothsides
of
he
Release
atch
@,
pullthe
Roll
Film
nserl
out
of
the
camera
body.
At
that
ime,
move
he
empty
spool
in
the
upper
part
down
o
the ower
spood
compartment.
3. Align he right-hand ideof this
empty
spool
with
the lower
Spool
Stud
@
(convex).
Slide
he
spool
into
position
making
sure
that
the
left-side
f
he
spool
s
properly
eld
by
he
Spool
Cl ip.
Whenyou
oad
ilm
or
he irst
ime.
remove
and
discard
he
protective
paper
over
which
s
attached
o
he
film
rails
n
the
roll
i lm
holder.
1 8
www.orphancameras.com

7/26/2019 Mamiya 645 Pro
http://slidepdf.com/reader/full/mamiya-645-pro 21/44
4. In hesamemanner,nser t rol l
of
i lm n
he upper ompartment. t
that
ime,check hat
he
ilm eader
paper
s
set as shown n
the
photo
above.
The
eader
paper
nside
s
facing
utward n he
pressure late.
Not
hat he
ilm
direction
s wrong
f
the eader
aper
s facing
nward.)
5. Pulloutsomeof he eader aper.
Insert
he ipof he eader
aper
nto
the slotof the
ower
Take-up
Spool.
Gently otate
he take-upspoolas
shown n
the
photo
until he start
mark
on the
eader
aper
s
aligned
with
he startmark
n)
on he
spool
c l ip .
*
Correctly
align the
start
marks
with
eachother,making
sure hat
the
f
lm feeds
properly.
When
m-
properfeeding ccurs, heproper
number
of
exposuresmay not
be
taken.
*
Avoid
exposing
the fi lm
to di-
rect
sunlight when inserting
or
removing
i lm.
1 9
www.orphancameras.com

7/26/2019 Mamiya 645 Pro
http://slidepdf.com/reader/full/mamiya-645-pro 22/44
Film
Speed
(lSO)
Dial
nserting
he Roll
Film
Insert
Insert he loadedRoll Film Insert
into
he
holder ,
he f i lm
ol l
on
top,
whi le
queezing
n
both
ides
f
he
Release
atch
@
as
shown
n llus-
trat ion.
Make
sure
that is
been
properly
seated
and
is
locked
n
place.
Then
close
cover
by firmly
pressing
ts
op
against
he
Rol l
Fi lm
Holder .
*
To
close
he
Back
Cover,
irmly
press
he
op
of
the
back
cover
on
both
sides.
Fi lm
Speed
ndex
of f i lm
holder
ISO
Each ilmholderhas his mportant
feature.
t
electronically
nterfaces
the f i lm
holder
wi th
he AE
pr ism
Finder,
he focalplane
shutter
nd
the
lens
diaphragm,
or
exposure
automation.
This
el iminates
he
need
of having
to manually
eset
he
meter,
every
timeyouchange ilmholdersoaded
with
different
ilms.
Therefore
make
it
a routine
o
always
set
this
dial
with
he
speed
of
the oaded
ilm.
The MemoCl ipon the backof the
Roll
Film
Holder
Cover
accepts
he
box
top
of
the fi lm
carton
and
can
also
be
used or
other
eminders.
25
50
100
2oo
.
400
.
800
.
1600
3200
6400
(32) (40)
64) (80)
12s) (160)
250) (320)
500) (640)
1000) (1250)
2000) (2500)
4000) (5000)
20
Memo
Clip
www.orphancameras.com
7/26/2019 Mamiya 645 Pro
http://slidepdf.com/reader/full/mamiya-645-pro 23/44
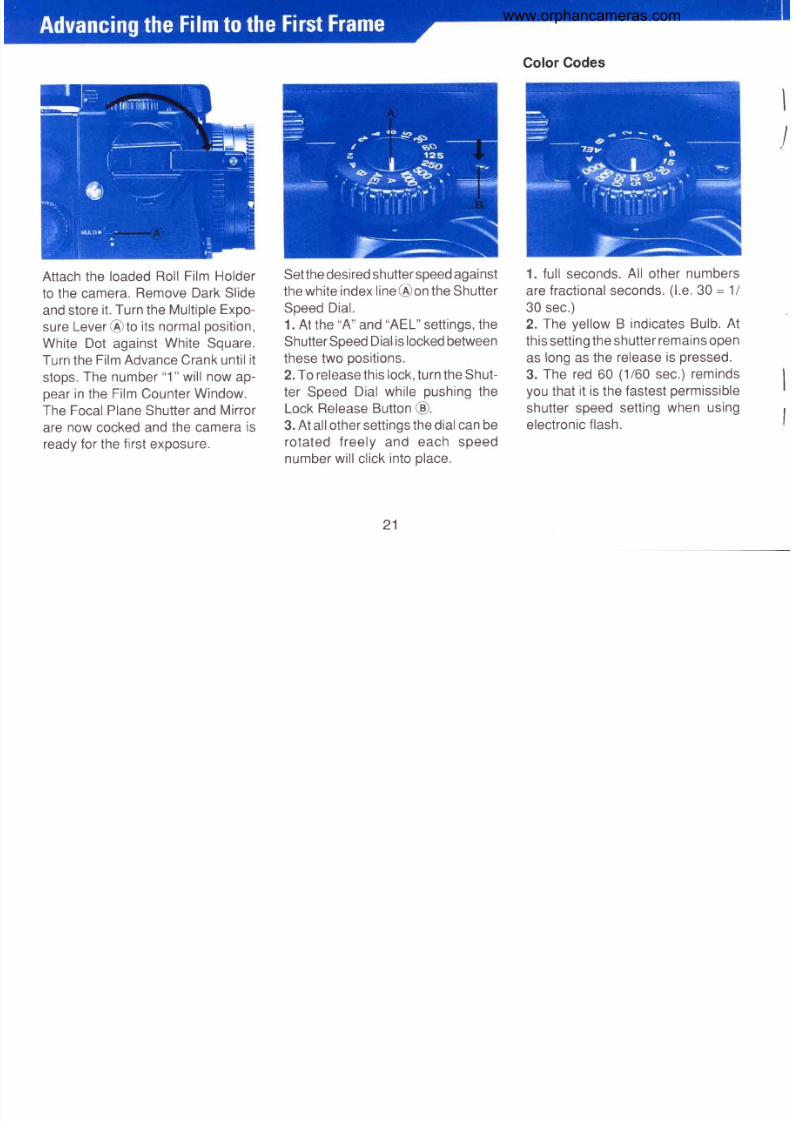
Attach he loadedRollFilm Holder
to the camera.
RemoveDarkSlide
andstore
t.
Turn
he
Multiple
xpo-
sure
Lever
@
to
its normal
osition,
White Dot against
White Square.
Turn
he
FilmAdvance rank nt i l
t
s tops.
he number
1
wil lnow
ap-
pear
n
he
Film
Counter
Window.
TheFocalPlaneShutter nd
Mirror
are
now
cockedand
he camera
s
ready or he
irst
exposure.
Set hedesired
hutter peed
gai
st
the
whi te ndex ine
@on
heShutter
Speed
Dial .
1. At he
A
and
AEL
ettings,he
Shutter peed
Dial
s ocked
etween
these wo
positions.
2.To releasehis
ock,
urn he
Shut-
ter Speed
Dial whi le
pushing
he
Lock
ReleaseButton
@.
3.Atallother ettingshedialcanbe
rotated freely
and
each speed
number
wil l
cl ick
nto
place.
Color Codes
1.
ful l
seconds.
l l
other
numbers
are
ract ionaleconds.
1.e.
0
=
1l
30 sec.)
2.
The
yel low
B
indicates ulb.
At
this et t ing
heshutter
emains pen
as
longas the
release
s
pressed.
3.
The
red
60
(1/60
sec.)
eminds
you
hat
t s
he
astest
ermissible
shutter peed
sett ing
when using
electroniclash.
I
,
I
I
,
2 1
www.orphancameras.com

7/26/2019 Mamiya 645 Pro
http://slidepdf.com/reader/full/mamiya-645-pro 24/44
4.
A
and
AEL
explained
A auto
xposure)and
AEL
auto
exposureock)
etting
must
only
be
usedwhen he AE PrismFinder s
attached
o camera.
1. f
it s not
attached
nd
he
dial s
set o either
of these
positions,
he
shutter elease
willnot
work.
2. lf it
is not
attached
and
the Self-
Timer
s
activated,
he Pilot
Lamp
will ight
or
1
0 seconds
ut
heshut-
ter wil lagainnot release.
lf
the Shutter
Speed
Dial s
set be-
tween lick
tops
ither hehigher
r
lower
exposure
peedmay
result.
I
22
www.orphancameras.com

7/26/2019 Mamiya 645 Pro
http://slidepdf.com/reader/full/mamiya-645-pro 25/44
Set he desired /stopon the Aper-
tureRing
@by
al igninghe /number
with
he
red reference
ot
@
in
the
center f heScaleRing. heAper-
ture
Ring
has
a click top
or
each /
stop.
n-between
licks an
alsobe
sued.
The effect he set f/stopwill have
upon he
picture
area can be con-
f i rmed
n the
Finder
creen.
Move
he
AM Lever
on the
lens
so
that
M
becomes
is ible
the
ens
then can be
stoppeddown to the
preselected
perture.
*
At
position
A ,
the lens is
al-
ways
stopped
down
only when
the
shutter
s
being
released
with
the aperture
being
open.
*
Dur ing normal
photography,
set
the
AM
Lever
so
that
A
is
vis ible.At
M ,
focusing
wi l l
be a
little
difficult.
t
When
us i ng
the AE P r i s m
Finder,
be sure
to set the AM Le-
ver
on
A ;
otherwise,
correct
exposure
cannot
be obtained.
* When aperture has been con-
firmed,
be sure
to
reset
the AM
Lever
o
A .
See
Depth-of-field
n
page
25.
23
www.orphancameras.com

7/26/2019 Mamiya 645 Pro
http://slidepdf.com/reader/full/mamiya-645-pro 26/44
Whileooking
hroughhe
iewfinder,
turn he
ensFocusing ing
nt i l
he
most mportant
ubject
art
appears
sharpandclear.
Focusing
with
the StandardFocusing
Screen
1 Thecamera omes quipped ith
a bright,
Type E, Rangef inder/Mi-
cro-prism
ocusing
creen.
t fea-
tures
a center, pl i t- image
ange-
finder
spot and the subject
s in
sharp
ocuswhen
he spl i t
mages
combine
nto
one.
2. The microprisming
around he
spl i t- imageenter
urtheraci l i tates
focusing. he
microprisms
isap-
pear
only
when
the subject
s in
sharp
ocus.
3.The estof heground lass rea
can alsobe used
or ocusing.
* l n t e r c h a n g e a b l e
F o c u s i n g
Screens
There
are
four
additional
ocus-
ing
screensavailable
or
special-
ized
applications.
They
are easy
to
interchange
nd come
with in-
structions.
q4
24
www.orphancameras.com

7/26/2019 Mamiya 645 Pro
http://slidepdf.com/reader/full/mamiya-645-pro 27/44
Depth
f
ield s
defined s he
zone
of sharpness efore nd behind he
plane
f
focus. t
depends n cam-
erasubject/distance,
ocal ength
f
lens,aperture etting nd distance
the
ens s
ocused
t.
Reading he
Depthof
FieldScale
In
addtion
o
visual
bservation,
he
Depth fField anbedeterminedy
using
he
Depthof
FieldScaleon
each
lens.
/stopnumbersappear
on
both he
rightand
eft
side
of the
red
ndex
mark n the center
of the
scale
ing.Simply
ead
he
f igures
which
appear
bove
he
/stop
um-
bers on
the distance
scale
of the
lens.
Forexample,
with
he
80mm
/2.8N
lens ocused t3m and heaperture
set at
f122,
he
depth
of
field scale
indicates
hat he
zoneof
sharp
o-
cus
wil lextend
omabout
m
o6m.
25
www.orphancameras.com

7/26/2019 Mamiya 645 Pro
http://slidepdf.com/reader/full/mamiya-645-pro 28/44
* Move
he
empty
spoolfrom
the
top
to
the lower
(take-up)
com-
partment,
ready
for
loading
the
next i lm
rol l .
* Never
load,
unload
or handle
f i lm in
di rect
sunl ight.
1. Giv ing he FilmAdvanceCrank
one complete
urn,
wi l l
cock the
shutterand
mirror
and
ready the
camera
or he
next
exposure.
2. When he
f i lm s
completely x-
posed
15
exposuresn
120,30
n
220 tilm),
he
crank stop
will
disen-
gage.
Cont inue
urning nt i l he
pa-
per railerscompletely oundonto
the ake-up pool.
About
ive
urns
after he
astexposure.)
3. Open the Back Cover,and re-
move he
Rol lF i lm nser t . heExpo-
sureCounter
wil l return
o S
(start)
automatically.
4. Pul l the
poolC l ip n he
ol l f i lm
inser t
ut o
remove
he
i lm.
5.
Remove
he
i lm
rom
he
ol l i lm
inser t ; ake ure hat he
i lm
on he
rol ldoes ot oosen, ndseal mme-
diately.
trgp#$
;tnY,U.
26
www.orphancameras.com

7/26/2019 Mamiya 645 Pro
http://slidepdf.com/reader/full/mamiya-645-pro 29/44
Touse heSelf-Timer,et heShut-
ter
Release
electorto
and
press
the Shutter
Release
Button.The
Battery heck
Lampwil l
ight or
8
seconds nd bl ink
or 2
seconds,
whereuponheshutter
i l l
go
off .
*
After
using he self-timer
mode,
be sure to
return
he
Shutter
Re -
l eas e
Se l ec to r t o t he
Wh i te
Square. Normalmode.)
*
To
override he self-timer, fter
having
pressed
he
release,
move
the selector back to the white
square.
* The
Sel f-Timer can also be
overriddenby
inserting
he
Dark
Slide
nto
the
Film Holder
or set-
ting the camera Shutter
Speed
Dial
o
B .
Al igninghewhi te otof heMul t iple
Exposure
Lever
wi th
the
yel low
MULTl
square,disengages
he
m u l t i p l e e x p o s u r e
p r e v e n t i o n
mechanism,
nd
the
f i lm wi l l not
advance
fteran exposure
s made
and the
Fi lm Advance Crank
is
turned.
However,heshutter
i l lbe
recocked,husmakingmul t iple x-
posures
ossible.
n his
mode
he
Exposure ounter
wil l
not
advance.
27
www.orphancameras.com
www.orphancameras.com

7/26/2019 Mamiya 645 Pro
http://slidepdf.com/reader/full/mamiya-645-pro 30/44
*
To
override
he
multiple
expo-
sure
mode
or to
return
o
normal
operation, be sure
to
return
the
lever'sWh te Dot
against he white
squareand hen advance he ilm.
(lf you
forget
you
will
continue
o
make multiple
exposures
on the
same
rame.)
wil l
stay open until he shutter
e-
lease s
pressed
again.
You may
also use a cable
release ogether
with
hecable
elease
dapter.
The
battery c i rcui t
wi l l
automatical ly
switchoff to save
power.)
*
('8
can be erminatedby shift-
ing
the.Shutter
ReleaseSelector
from
t)
or the Shutter Speed
Dial
rom
8 .
For
ime exposures
et he
Shutter
Release
Selector
o
S,
the
self-
t imer
mode,
and set the
Shutter
Speed
Dial to
B .
Press
heshutter
release
nd
both
mirror
nd shutter
28
www.orphancameras.com

7/26/2019 Mamiya 645 Pro
http://slidepdf.com/reader/full/mamiya-645-pro 31/44
This
s
an
important
eature
when
the
ripod
mounted amera
s
used
at
slow
or
longexposure
imes
and
particular ly
lso
with
use
of
long
telephoto
enses.
t el iminates
he
possibi l i ty
f
even
hesl ightest
mir-
ror
bounce
hich
may
affect
mage
sharpness.
*
When us i ng
the
AE P r i s m
Finder, et
he Shutter
Speed
Dial
to
AEL .
Press the
shutter
re-
lease
halfway and
then
lock the
mirror up. l f set to A and the
mirror
is locked up,
LT
(long
time)
wil l
appear
n
the
inderdis-
play
and
correct
exposure
can-
not
be obtained.
*
When
using
a
Leaf Shutter
Lens,
be
sure to
read he
instruc-
t ions
accompanying
t.
Move the
Mirror-up
ever
o
the
yellow
M.
U
P
square,
fter ouhave
composed
and
focused
Your
Pic-
ture.
This
wi l l
raise
he
mirror
nd
the
viewfinder
mage
wil lbeblacked
out.
After
se,
eturn
ever o
normal
(white
quare)
osit ion.
29
www.orphancameras.com

7/26/2019 Mamiya 645 Pro
http://slidepdf.com/reader/full/mamiya-645-pro 32/44
Infraredight ays
beingof
longer
wavelength focus
at a slightly if-
ferent
plane
and
require
he
ollow-
ing
adjustment:
1. Note
he
Red ndex
Mark
against
which
ou
ead
your
distance cale.
The ed nfraredndex
mark s
slightly
to
its right.
2. After ocusingn the usualman-
ner, read
the distance
scale and
move t
o he
ight
o
ine
up
with
he
infrared
ndexmark.
* For
proper
filter
and exposure
information be sure
to consult
the
nstructionsenclosed
with in-
frared
ilm.
* TheA300mmtl2.8APO ens or
645,
being
also
corrected
for
in -
frared
light
rays, does
not need
an
Index
Mark
or infrared.
I
30
www.orphancameras.com

7/26/2019 Mamiya 645 Pro
http://slidepdf.com/reader/full/mamiya-645-pro 33/44
<Caution>
When
using
the
Hot-shoe,
be sure to
put
an appropri-
ate SafetyCover over the X-
sync terminal so that
you
won't
receive
a
high voltage
electric hock
f
he erminal
is
accidentally ouched.
A
SafetyCover
s
put
on the
X-
sync tgerminal
when
the
camera
eaves
he
factory.)
1.
When
usingan
electronic
lash,
plug
he synchronizationord
nto
theSyncTerminalnd ettheShutter
Speed
Dial o
1
/60sec.
orslower.
*
The
Mamiya
645
PROhas
an
X-
sync terminal.
Attach
a shoe-mount
lash
to the
hot-shoe
f
the cameraor the
Left
Hand
GripG1401
opt ional) .
ch
* Do
not use a
flash
unit
specif i -
cal ly dedicated
or anothercam-
era.
t may
damage
our
645
PRO.
*
l f
you
use a
flash
unit
whose
f ash duration is slower than 1l
1000sec.,set the shutter
speed
dial to
1/30sec.
or
slower.
rt
i
I
as
nc
on
za
on a
shutter Speeds
sYnc'
1
1
I
r_
1
1
Terminal
r0-[ol
00
tn
1-zs
60
1 1
30
15
111
B
lq
1
2
1 2 4
Electroniclash
Cannot e used
MF
Class
Cannot e used M
Class
3 1
www.orphancameras.com

7/26/2019 Mamiya 645 Pro
http://slidepdf.com/reader/full/mamiya-645-pro 34/44
2.
For
MF and
M
bulbs,
set
the
Shutter
peed
Dial
o
1/30
sec.
or
s lower
or
the
MF
tYPe,
nd
1115
sec.
or
slower
or
he
M tYPe.
*
When
using
a
flash,
careful ly
read
the
instructions
that
come
with
the
flash
bulbs
or
flash
unit
to check
for
appropriate
shutter
speedsand
o avoid
malfunctions.
TheMamiya
45
PROTripod
ocket
accepts a s tandard
114
r ipod
mounting
crew.
For
use
with
tr i-
pods
having
/8
mounting
crews,
frrst
nscrew
hesmallblack
phi l ips
head etaining
crew
n
hecenter
f
the ripod ocket.
hen emove
he
114
ushing
i th
a thincoin.
o re-
instal l
he
114
ushing,
everse
he
process.
32
www.orphancameras.com

7/26/2019 Mamiya 645 Pro
http://slidepdf.com/reader/full/mamiya-645-pro 35/44
Eye-level
Operation
Hold he
camera
as
shown
n
the
il lustration,
ith
ts
base
resting n
your
efthand, he
righthandsup-
porting
t
from
the
side
and
top.
Press othelbows gainst ourbody
and
activate
he shutter
elease
with
a smooth,
teady
troke.
Waist
Level Operation
For
waist
evel
operation,
t s
desir-
able
to
have the
Neck Strap
at -
tached
and
adjusted
or
your
size.
Duringexposure
keep
it
taut
and
press hecamera rmly gainst our
body.
*
Handhold ing
the
camera
is
even
easier
using
he
Power
Drive
Grip
WG401 or
kept
Hand GriP
GL401
33
www.orphancameras.com

7/26/2019 Mamiya 645 Pro
http://slidepdf.com/reader/full/mamiya-645-pro 36/44
Attaching
he Strap o the Camera
Removing
he Strap
rom
the Camera
1.Whi le ushing own,pul lout he
Neck
Strap
Fastener
@
of the at-
taching l ip.
2. Place he hole of the strap as-
tener
@
over
he
Neck
Strapon he
camera
bodyas
llustrated,
nd
pull
unti l
t
cl icksand
ocks nto
place.
With our ngers, ull heNeckStrap
Fastener
@
of he attaching
lipup-
ward
and
pushpart
@
in
the direc-
tion
of he arrow.
he
strap an
now
be
removed.
*
When
attaching
he Strap o the
Neck
Strap
Lug
on the side of the
camera
with
the
Film Advance
Crank, insert the neck strap fas-
tener
@
into
the
lower
part
of the
double slot.
34
www.orphancameras.com
7/26/2019 Mamiya 645 Pro
http://slidepdf.com/reader/full/mamiya-645-pro 37/44
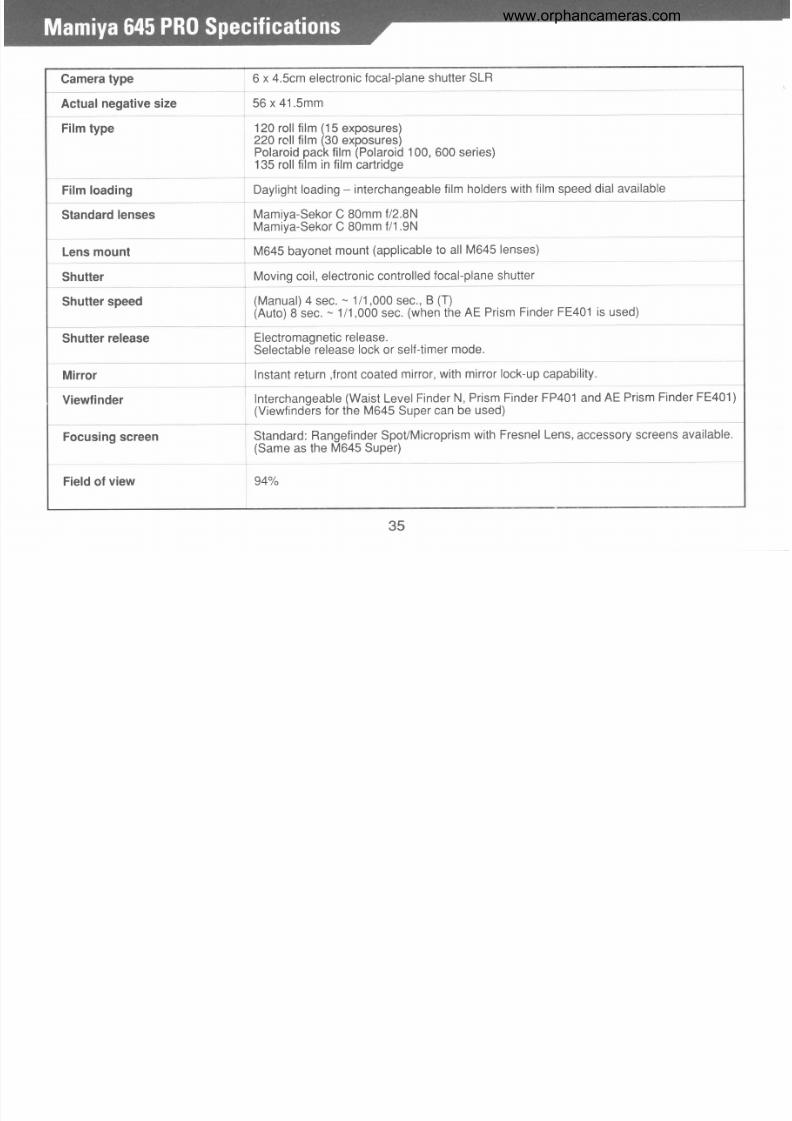
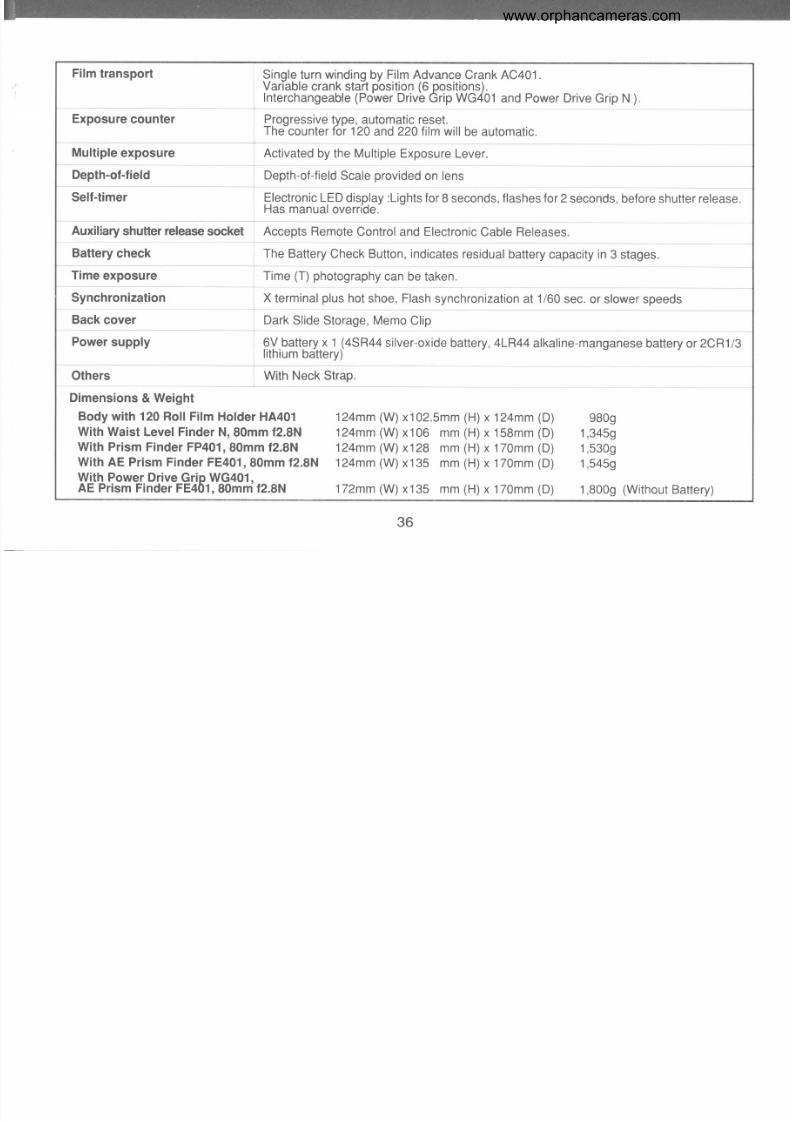
Camera
ype
6
x 4.5cm
electronic
ocal-planehutter
LR
Actual negative size
56
x 41 Smm
Film
ype
120 ol l i lm
15
exposures)
220 roll ilm
(30
exposures)
Polaroid ack i lm Polaroid 00,600series)
135
roll i lm n fi lm
cartridge
Film
oading
Daylight
oading
interchangeable
i lmholders
ith i lm
speed
dialavai lable
Standard
enses
Mamiya-Sekor 80mm
/2.8N
Mamiya-Sekor 80mm
/1 9N
Lens
mount
M645
bayonet
mount
applicable
o all
M645
enses)
Shutter
Moving oi l ,electronic
ontrol led
ocal-plane
hutter
Shutter
speed
(Manual)
sec.
111,000
ec. ,
B
(T)
(nuto)
8 sec.
111,000ec.
when
he
AE
Prism
Finder
E401 s
used)
Shutter
release
Electromagnetic
elease.
Selectable
elease
ock
or self-timer
mode.
Mirror
Instant
eturn
front
oated
mirror,
with mirror
ock-up
apability.
Viewfinder
Interchangeable
Waist
evel
Finder
N, PrismFinder P401 nd
AE
Prism
Finder E401)
(Viewfinders
or he M645
Super
an be
used)
Focusing
screen
Standard:
Rangefinder
poVMicroprism
ith
Fresnel
ens,
accessory
creens
vailable.
(Same
as the
M645Super)
Field
of
view
94%
35
www.orphancameras.com
7/26/2019 Mamiya 645 Pro
http://slidepdf.com/reader/full/mamiya-645-pro 38/44
Film
ransport
Sinole
urn
windino
v
FilmAdvance
CrankAC401
Vaiiabte
crank
stait
pbsition 6 positions).
Interchangeable
Power
Drive
Grip
WG401
and PowerDrive
Grip N
)
Exposure
ounter Prooressive
vpe,
automatic
eset.
Thdcounter
cir120
and
220 ilm
will
be automatic.
Multipleexposure Activated y the MultipleExposure ever.
Depth-of-field
Depth-of-field
cale
provided
n
lens
Self-timer
Electronic
ED
dis,play:Lightsor8
seconds,
lashesor2seconds,
efore hutter
elease.
Has manual
verride.
Auxiliary
shutter
release
socket
Accepts
Remote
Control nd Electronic
able
Releases.
Battery
check The
Battery
Check
Button, ndicates
esidual
attery
apacity
n
3 stages.
Time
exposure
Time
(T) photography
an be
taken.
Synchronization
X
terminal
lus
hot
shoe,
Flash
ynchronization
t
1/60
sec.or slower
peeds
Back
cover
Dark
Slide
Storage,
Memo
Clip
Power
supply
6V battery
1
(4SR44
ilver-oxide
attery,
LR44
alkaline-manganese
attery r
2CR1/3
lithium
dttery)'
Others With Neck
Strap.
Dimensions
&
Weight
Body
with 120 Roll
Film Holder
HA401
With
Waist Level Finder
N,
80mm
f2.8N
With
Prism Finder
FP401,
0mm
f2.8N
With
AE Prism Finder
FE401,
0mm f2.8N
With Power
Drive
Grip
WG401.
AE Prism
Finder
FE401,
0mnf
2.8N
124mm
W)
x102.5mm
H)
x
124mm
D)
124mm
W)
x106
mm
(H)
x
158mm
D)
124mm W)
x128
mm
(H)
x 170mm
D)
124mm
W)
x135
mm
(H)
x 170mm
D)
172mm
W)
x 1
35
mm
(H)
x
1
70mm
D)
9809
3459
5309
5459
8009
(Without
Battery)
36
www.orphancameras.com
7/26/2019 Mamiya 645 Pro
http://slidepdf.com/reader/full/mamiya-645-pro 39/44
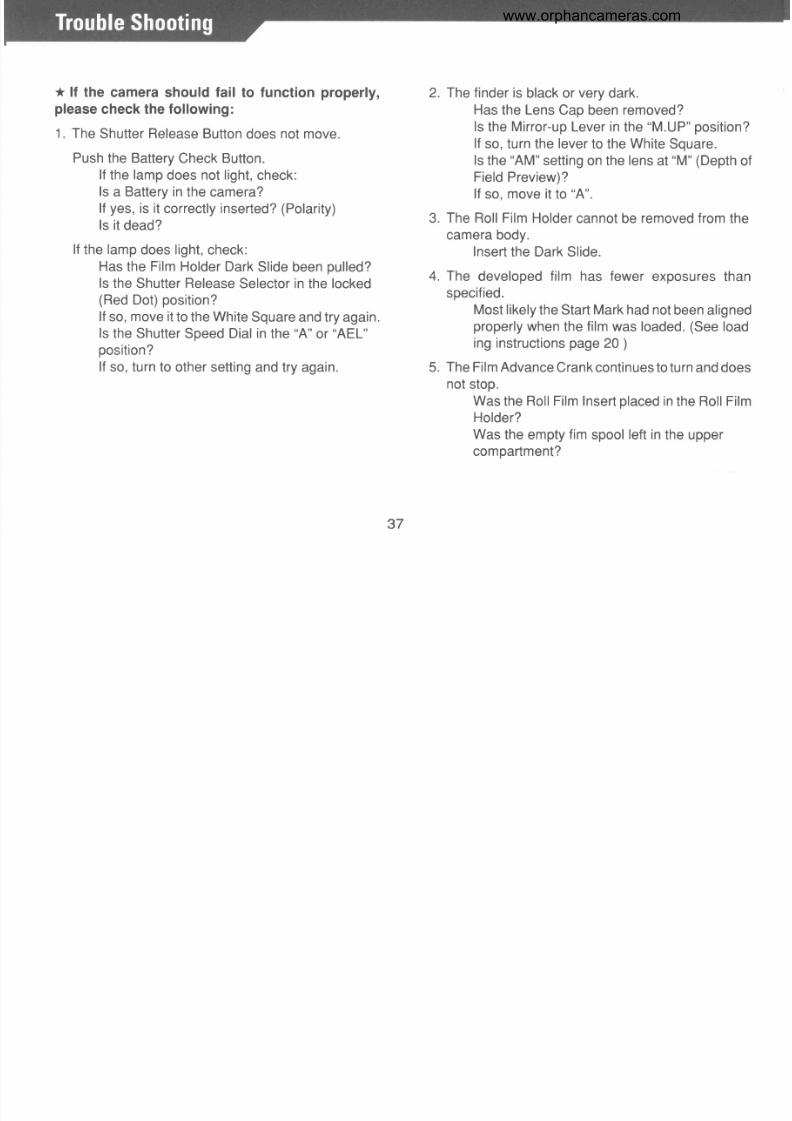
*
lf
the
camera should
fail
to
function
properly,
please
check the
following:
1. The
Shutter
Release
utton
oes
not
move.
Push
he
Battery
Check
Button.
l f
he
amp
does
not ight,
heck:
ls
a
Battery n
he camera?
lf
yes,
s t
correctlynserted?
Polarity)
ls t
dead?
lf
he
amp
does
ight,
heck:
Has
he
Film
HolderDark
Slidebeen
pul led?
ls the ShutterReleaseSelectorn the ocked
(Red
Dot)
posit ion?
lf
so,
move t
o he
White
Square nd ry
again.
ls
the Shutter
peed
Dial n
he
A
or
AEL
position
lf
so, urn
o othersetting
nd ry again.
2. The inder s
blackor
very
dark.
Has
he
Lens
Cap been
emoved?
ls
the
Mirror-up ever n
he
M.UP
osit ion?
lf so, urn he ever o theWhiteSquare.
ls
he
AM
setting
n he
ens
at
r'M
(Depth
f
FieldPreview)?
lf
so,
move t
o
A .
3.
The Rol l
Fi lmHolder
annot e
removedrom
he
camerabody.
Insert
he
Dark
Slide.
4. The
developed
i lm has fewer
exposures han
specifed.
Most
ikely
heStart
Markhadnot
beenaligned
properly
when
he
ilmwas oaded.
See
oad
ing nstructions
age
20
)
5.
TheFilm
Advance
rank
ontinueso urnanddoes
not
stop.
Was
he
RollFi lm nsert
laced
n
he
RollFi lm
Holder?
Was
he empty
im
spool
eft n
he upper
compartment?
37
www.orphancameras.com
7/26/2019 Mamiya 645 Pro
http://slidepdf.com/reader/full/mamiya-645-pro 40/44
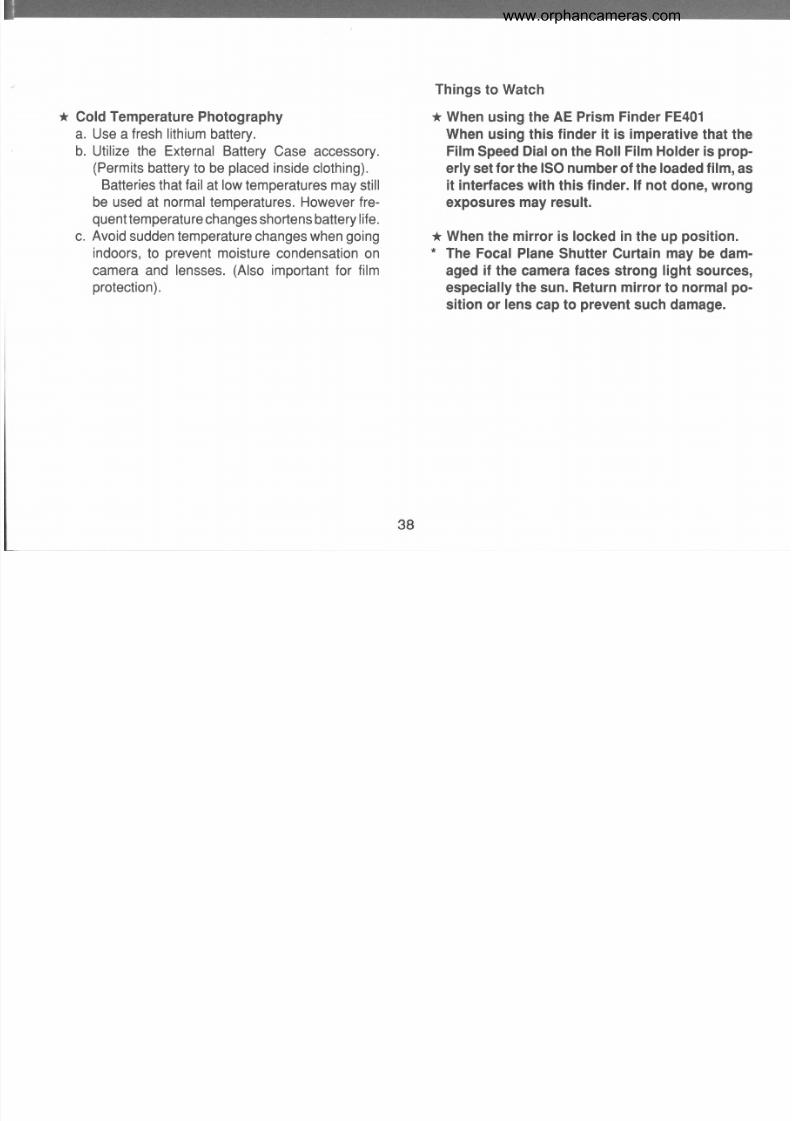
*
Cold
Temperature
Photography
a. Usea
fresh ithium
attery.
b. Utilize he External Battery Case accessory.
(Permits
attery o be
placed
nside
lothing).
Batteries
hat
ail
at
low
emperatures
may
still
be used at
normal
emperatures.
owever
re -
quent
emperature
hanges hortens
attery
ife.
c.
Avoid
udden
emperaturehanges
when
going
indoors,
o
prevent
moisture
ondensation n
camera and
lensses.
Also
mportant or
fi lm
protection).
Things
to
Watch
* When
using the
AE Prism
Finder FE401
When
using this
finder it is
imperative
hat the
FilmSpeedDialon the Roll Film Holder s prop-
erly set
for
the
ISOnumber
of the
loaded ilm,
as
it interfaceswith
this
finder. lf not
done,
wrong
exposures
may result.
* When
the
mirror is locked n
the
up
position.
*
The Focal Plane
Shutter Curtain
may
be dam-
aged
if
the
camera
faces
strong
light
sources,
especially he sun. Return mirror to normal po-
sition or
lens
cap to
prevent
such damage.
www.orphancameras.com

7/26/2019 Mamiya 645 Pro
http://slidepdf.com/reader/full/mamiya-645-pro 41/44
The
AE
Prism
Finder
FE401
The Mamiya
AE
(Automatic xposure)
rism
Finder
FE401
pentaprism
uarantees
true,
upright
mage
and
featuresbuilt- in
lectronic
hutter
ontrol
which.
ensuresaperture-priority,TL automaticexposure
metering
hi le
n
he
A
or
AEL
mode.
<3-Way
Metering ystem>
TheFE401 omes
with
hree
metering
modes: verage
metering
AV),
pot
metering
SP),
nd
AV-SP
metering
capable
f automatically
electing
V
or SP according
to subject
onditions.
The LED
display
n
the
viewfinder
ndicates orrect
exposure.
lf
you
orget
o extract
he
Dark
Slide
when he
inder
s
being
used
with
the
645
PRO,
an
LED
wil l
f lash
a
warnrng.
The
Power Drive Grip
WG401
The
Power
Drive
Grip
WG401
is integral
with
the
winder nd
hand
grip,
enabl ing
uick
and continuous
exposureso be aken: rames anbeadvancedabout
2 trames/sec.).
Usable
with
anyof
hree
ecently eveloped
eaf
shut-
ter
enses,
t
canbe
connected
ith
he
ens
and
winder
with
the
Grip Connecter
PL401, hus automatical ly
inter locking
t
with
he
ens
39
www.orphancameras.com

7/26/2019 Mamiya 645 Pro
http://slidepdf.com/reader/full/mamiya-645-pro 42/44
Roll
F i lm
Holders
Interchangeable
enses
120Roll
Film
Holder
HA401
220
Roll Film
Holder
HB401
135
Roll
Fi lm Holder
HC401
(with
Panoramic
dapter)
Polaroid
Land
Pack
Film
Holder
HP401
Wide-angleLenses
TelephotoLenses
Standard
Lenses
Zoom Lenses
:
SpecialEffect Lenses:
Leaf
Shutter
Lenses :
Tele-Converter :
35mm
/3.5N, 5mm
/2.8N,
55mm
/2.8N
150mm /3.5N, 150mm 12.8,
21Omm
/4N
U
LD300mm/5.6N, 300mm
tl2.&APO,
00mm
/5.6
80mm
l1.9N,
0mm
/2.8N,
11Omm
/2.8N
Zoom
55
ry
110mm /4.5N,
Zoom
ULD105
21
Omm
14.5
Fish-eye LD24mm/4,Shift
50mm
l4,Macro
0mm
/4N
Soft
145mm /4
A55mm /2 .8N/L ,A80mm
f/2.8N/1, 1
50mm
/3.8N/L
2 x Tele-Converter
40
www.orphancameras.com

7/26/2019 Mamiya 645 Pro
http://slidepdf.com/reader/full/mamiya-645-pro 43/44
Polaroide
ack
Fi lmHolder
HP401
AE
prism
Finder
FE401
PrismFinderFP401
Waist
Level
Finder
N
120
Rol lF i lmHolder
HA401
220 Rol l
F i lmHolder
H8401
135Rol lF i lmHolder
HC401
Left
HandGripGL401
Terminal dapter
Power
DriveGrip
645
PRO
Body
The
actual
roducts
may
be
different
rom his
l lustration
www.orphancameras.com

7/26/2019 Mamiya 645 Pro
http://slidepdf.com/reader/full/mamiya-645-pro 44/44
When
he
camera
s not
used
or
a
long
period
f
ime,
remove
he
battery nd any
ilm rom
he camera.
Avoid
toringhe camera
or
prolonged eriods
f ime
in
a d amp or saltyatmosphere.
Color
ilm
shouldbe
storedat the manufacturer'secommendedempera-
tures.)
Since ameras re
precision
nstruments,
void hocks
and
ough
handl ing.
When camera and
lens are st ored
or
a
long
time,
periodically
xercise
he shutter(s) t
various
peeds
and
also
urn he
lens
diaphragms.
Cleaning
Never ouch the surfacecoated mirror.Clean dust
particles
with
a blowerand optical
surfaces
with lens
cleaningissueand
ens
cleaner.
Periodic Check
Periodically
heck hecamera o makesure hat
t
s n
good
working
order,especially eforean
important
assignment. heck he battery,
lash
ynchronization,
mirrorand
hutter
movement,i lm
advance, iaphragm
operation, tc.
Shouldany
malfunction
ccur
or
if
the
camera
has
beendropped,
arred
or become
wet,
do
not
attempt o
fix t
yourself
ut send
t
o the Service
Department
f
your
Mamiya
istributor.
42
Top Related