


Languages
Pages
Legal

INSTRUCTION MANUAL
LAZER ZONE
PZL-1&PZS-1PZL-1


1
ead these brief ion for future refer-
is functioning properly.
risk of severe vibration .
.
of the PZL-1 and the e instruction manual for
ForewordThank you for purchasing the Topcon PZL-1&PZS-1.To quickly and effectively use the PZL-1&PZS-1, please rinstructions carefully, and keep them in a convenient locatence.
Handling PrecautionsBefore starting work or operation, be sure to check that the system
1. Vibration and impact protectionWhen transporting the instrument, provide protection to minimizeor impact. Severe vibration or impacts may affect beam accuracy
2. Checking battery powerBefore operating, check remaining battery life.
3. Storing the instrument for long periodWhen storing the instrument for long period, remove the batteries
This instruction manual explains the basic operation PZS-1. For measuring with these instruments, see ththe controller.

Safety Informationto properties, and tos are placed on the prod-
displays and icons before
rnishings.
ad to death or serious
d to personal injury or
2
In order to encourage the safe use of products, to prevent damage prevent any danger to the operator and to others, important warningucts and inserted in the instruction manuals.We suggest that everyone understand the meaning of the following reading the “Safety Cautions” and text.
Injury refers to hurt, burn, electric shock, etc.Physical damage refers to damage to equipment and structure or fu
Display Meaning
WARNINGIgnoring or disregard of this display may leinjury.
CAUTIONIgnoring or disregard of this display may leaphysical damage to the instrument.
3
Safety Cautions
attempt to disassem-
nly!
used incorrectly.
nd do not use in a coal
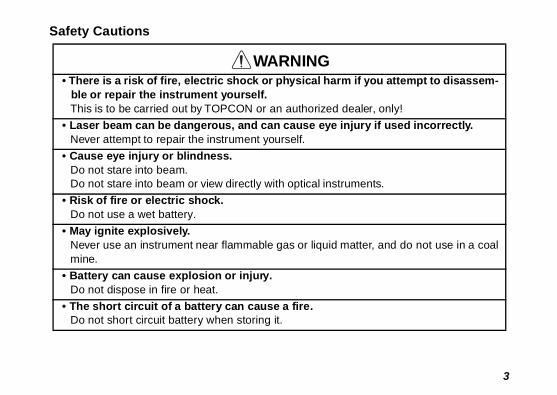
WARNING• There is a risk of fire, electric shock or physical harm if you
ble or repair the instrument yourself.This is to be carried out by TOPCON or an authorized dealer, o
• Laser beam can be dangerous, and can cause eye injury if Never attempt to repair the instrument yourself.
• Cause eye injury or blindness.Do not stare into beam.Do not stare into beam or view directly with optical instruments.
• Risk of fire or electric shock.Do not use a wet battery.
• May ignite explosively.Never use an instrument near flammable gas or liquid matter, amine.
• Battery can cause explosion or injury.Do not dispose in fire or heat.
• The short circuit of a battery can cause a fire.Do not short circuit battery when storing it.
her than those specified
nybody else in the laser er beam at eye level. It
possible to lose visual r dangers - avoid glaring
he batteries, if this does edical advice.
s.
at you fix the instrument
of this when setting up
4
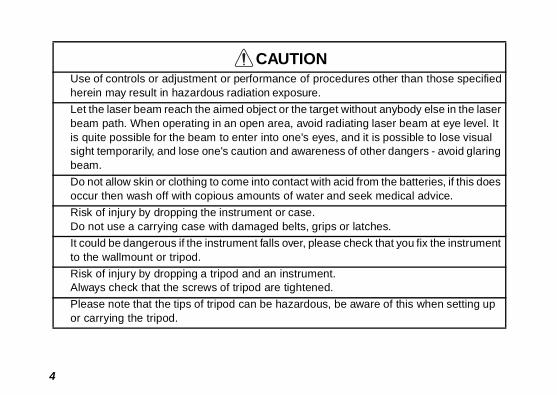
CAUTIONUse of controls or adjustment or performance of procedures otherein may result in hazardous radiation exposure.
Let the laser beam reach the aimed object or the target without abeam path. When operating in an open area, avoid radiating lasis quite possible for the beam to enter into one's eyes, and it is sight temporarily, and lose one's caution and awareness of othebeam.
Do not allow skin or clothing to come into contact with acid from toccur then wash off with copious amounts of water and seek m
Risk of injury by dropping the instrument or case.Do not use a carrying case with damaged belts, grips or latche
It could be dangerous if the instrument falls over, please check thto the wallmount or tripod.
Risk of injury by dropping a tripod and an instrument.Always check that the screws of tripod are tightened.
Please note that the tips of tripod can be hazardous, be aware or carrying the tripod.
5
Userrating.
make periodic checks of the
ults of a faulty or intentional d loss of profits.nsequential damage, and floods, an act of a third party
y damage, or loss of profits sed by using the product or
y damage, or loss of profits
mage caused by wrong
Wear the required protectors (safety shoes, helmet, etc.) when ope
Exceptions from Responsibility1) The user of this product is expected to follow all operating instructions and
product’s performance.2) The manufacturer, or its representatives, assumes no responsibility for res
usage or misuse including any direct, indirect, consequential damage, an3) The manufacturer, or its representatives, assumes no responsibility for co
loss of profits by any disaster, (an earthquake, a fire, an accident, storms,and/or a usage other than under normal conditions.)
4) The manufacturer, or its representatives, assumes no responsibility for andue to a change of data, loss of data, an interruption of business etc., cauan unusable product.
5) The manufacturer, or its representatives, assumes no responsibility for ancaused by usage other than those usages explained in the user manual.
6) The manufacturer, or its representatives, assumes no responsibility for damovement, or action due to connecting with other products.

Laser Safetyoduct is manufactured ting Products” (FDA/BRH lassification, Require-e safety standards for
s 1 (I) Laser Products” ”. In case of any failure, CON dealer.
CLASSII LASER PRODUCT
WAVE LENGTH 630-685nm1mW MAXIMUM OUTPUT
U T I O NLASER RADIATION
NOT STARE INTO BEAM
2�LASER PRODUCT STARE INTO BEAMR RADIATION
Class 1 (I) (Invisible laser)
Class 2 (II) (Visible laser)
6
This product projects a visible laser beam during operation. This prand sold in accordance with “Performance Standards for Light-Emit21 CFR 1040) or “Radiation Safety of Laser Products, Equipment Cments and User’s Guide” (IEC Publication 60825-1) provided on thlaser beam.
As per the said standard, PZL-1 rotating laser is classified as “Clasand PZL-1 plumb beam is classified as “Class 2 (II) Laser Productsdo not disassemble the instrument. Contact TOPCON or your TOPLabels
AVOID EXPOSURELASER LIGHT IS EMITTED
FROM THIS APERTURE
Beam aperture
DIODE LASER
C ADO
CLASSDO NOTLASE
Beam aperture(Visible laser)
(Invisible laser)
Rotating laser
Plumb beam

7
Contents.......................... 1............................... 1............................... 2...............................3............................... 5............................... 5................................ 6............................... 6................................ 7............................... 8.......................... 9........................ 12............................. 12............................. 12............................. 13............................. 13........................ 14..............................14............................. 15............................. 15.............................15........................ 16............................. 16........................ 16........................ 17............................. 17.............................18............................ 18............................ 19............................ 19............................ 19........................ 22........................ 24
Foreword.....................................................................................................Handling Precautions ..............................................................................................Safety Information ...................................................................................................Safety Cautions .......................................................................................................User .........................................................................................................................Exceptions from Responsibility ................................................................................Laser Safety ...........................................................................................................Labels ......................................................................................................................Contents .................................................................................................................Standard System Components ................................................................................
Nomenclature and Functions....................................................................Preparation for Use....................................................................................
Battery Installation ...................................................................................................Instrument Set-up Procedure ..................................................................................Battery Power Remaining Lamp ..............................................................................Turning Auto-leveling Off .........................................................................................
Operation ....................................................................................................Using Plumb Beam .................................................................................................Height Alert Function ...............................................................................................
To Activate the Height Alert Function................................................................About Channels .......................................................................................................
Checking and Adjusting............................................................................Switching to Adjustment Mode ................................................................................
Storage Precautions ..................................................................................Standard / Optional Accessories..............................................................
Laser Zone Beam Receiving Sensor PZS-1 ............................................................Battery .....................................................................................................................
Battery BT-62Q, Battery charger BC-30............................................................Battery Holder DB-63C ......................................................................................Rechargeable Battery Pack BT-63Q..................................................................AC/DC Converter AD-9B/7C ..............................................................................
Error Code ..................................................................................................Specifications.............................................................................................

Standard System Components
hen purchased.)
-1(1)
for PZL-1&PZS-1 model)
0(1), BT-62Q(1)
for PZL-1&PZS-1 model)
ch plug(1)
for PZL-1&PZS-1 model)
t cable JC-8(1)
for PZL-1&PZS-1 model)
8
The numerical value in parentheses shows the quantity.
(Make sure that all of the above items are with the instrument w
PZL-1(1) AD-7C/9B(1) PZS
(Only
Battery BT-63Q(1) Instruction manual(1) BC-3
(Only
Shoulder belt(2) 5/8 in
(Only
Carrying case(1) Join
(Only

9
emitting window
aperture
le
rol panel
ery holder
ment height mark
Nomenclature and FunctionsPZL-1
Rotary head
Serial port
Battery compartment lock
Laser
Beam
Hand
Cont
Batt
Instru

Power switch
Plumb beam key
Power lamp
el selecting key
rd and Bluetooth built-in. ated by the letter "W" fol- number tag as shown
1
##
PZL-1 W
########
model Bluetooth built-in model
10
Control Panel
Manual mode key
Battery power remaining lamp
Bluetooth communication lamp
Manual mode lampChann
Channel selecting lamp
(The lamp functions only for Bluetooth built-in model.)
(The channel-4 is not used now.)
Remote Control Option
There are two PZL-1 models, standaBluetooth built-in models are designlowing the model name on the serialabove.
PZL-
######
Standard

11
ately a minute. It will go
he manual mode.
del.)
when auto-leveling ends.
power.
nel selecting key within 5 l lamp is blinking).
operable time of the keys
annel selecting key is re-
tes. )
Key or Lamp FunctionBattery power remaining lamp
Indicates the amount of battery power remaining.(That lamp will automatically go off after approximback on if any key is pressed.)
Channel selecting lamp
Indicates the selected channel.
Manual mode lamp
Lights up when the manual mode is in use.
Manual mode key When pressed twice, initiates the manual mode.When pressed once in the manual mode, cancels t
Bluetooth communication lamp
Blinks during communication with Bluetooth.(The lamp functions only for Bluetooth built-in mo
Power lamp Blinks during auto-leveling, and lights up steadily
Power switch Turns on the power.When pressed for 2 seconds or more, turns off the
Channel selecting key
The channel can be changed by pressing the chanseconds after the power goes on (while the channeThe channels change in order: 1 → 2 → 3 →1.Each time the channel selecting key is pressed, theis extended by 5 seconds.The selected channel is set 5 seconds after the chleased.
Plumb beam key This button switches the plumb beam on and off.(That beam will automatically go off after five minu

tion, page 18.
12
Preparation for UseBattery InstallationFor battery placement or replacement instructions, see Battery secInstrument Set-up Procedure1 Set the instrument on any smooth surface that is
within ±3° of true level. The PZL-1 auto-level sys-tem will not function if the unit is placed more that ±3° out of level. For best operation, it is recom-mended that it be mounted to a tripod.
Horizontal
Leveling range
13
Battery Power Remaining Lamps when the instrument is
y is pressed.
ual mode key twice in ent can be positioned in
the dry batteries with new king for about five minutes.)
time, blinking still continues. ing display will reset.
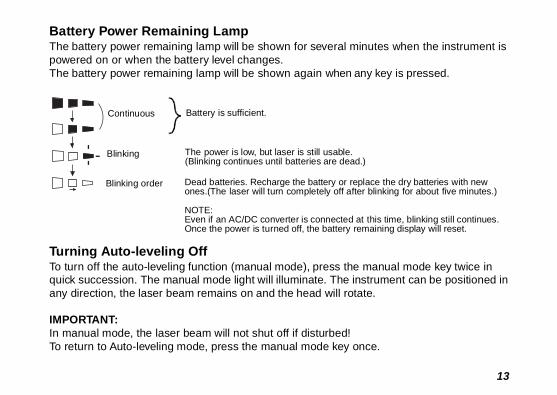
The battery power remaining lamp will be shown for several minutepowered on or when the battery level changes.The battery power remaining lamp will be shown again when any ke
Turning Auto-leveling OffTo turn off the auto-leveling function (manual mode), press the manquick succession. The manual mode light will illuminate. The instrumany direction, the laser beam remains on and the head will rotate.
IMPORTANT:In manual mode, the laser beam will not shut off if disturbed! To return to Auto-leveling mode, press the manual mode key once.
Battery is sufficient.
Dead batteries. Recharge the battery or replace ones.(The laser will turn completely off after blin
NOTE:Even if an AC/DC converter is connected at this Once the power is turned off, the battery remain
Continuous
Blinking
Blinking order
The power is low, but laser is still usable. (Blinking continues until batteries are dead.)
e instrument will perform
ing key. r goes on.) on.
e the instruction manual
.
auto-leveling, the
e beam is emitted.
14
Operation1 Set up the instrument on a flat surface or a tripod. At this time, th
auto-leveling in a range of ±3°.
2 Turn on the power, then select a channel with the channel select(Press the channel selecting key within 5 seconds after the poweAfter auto-leveling ends, the head will rotate and the laser will goFor other operations, and for setting the instrument constant, sefor the controller.
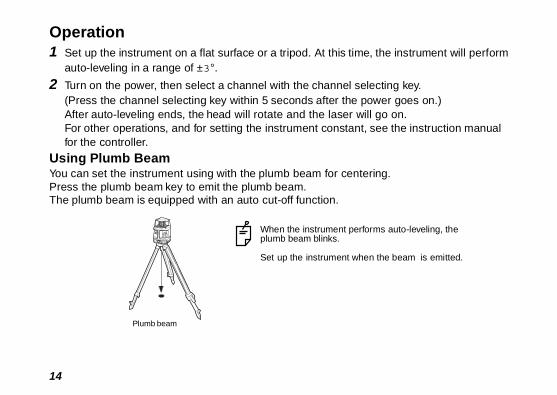
Using Plumb Beam You can set the instrument using with the plumb beam for centeringPress the plumb beam key to emit the plumb beam.The plumb beam is equipped with an auto cut-off function.
Plumb beam
When the instrument performsplumb beam blinks.
Set up the instrument when th
15
Height Alert Function prevents the instrument
instrument changes, the ary. power is turned on.
e.
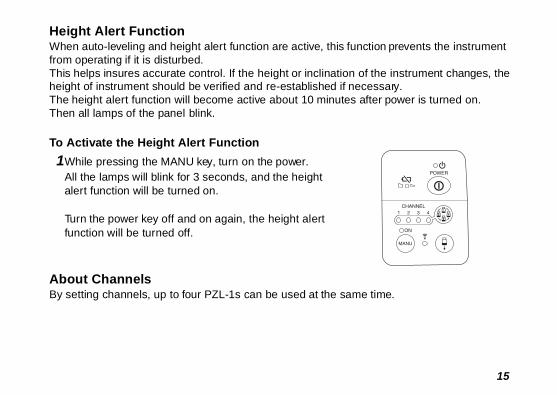
When auto-leveling and height alert function are active, this functionfrom operating if it is disturbed. This helps insures accurate control. If the height or inclination of theheight of instrument should be verified and re-established if necessThe height alert function will become active about 10 minutes afterThen all lamps of the panel blink.
To Activate the Height Alert Function
1While pressing the MANU key, turn on the power.All the lamps will blink for 3 seconds, and the height alert function will be turned on.
Turn the power key off and on again, the height alert function will be turned off.
About ChannelsBy setting channels, up to four PZL-1s can be used at the same tim
er use an abrasive
any moisture with a soft,
ly 30 minutess, a “cal-r Code".
16
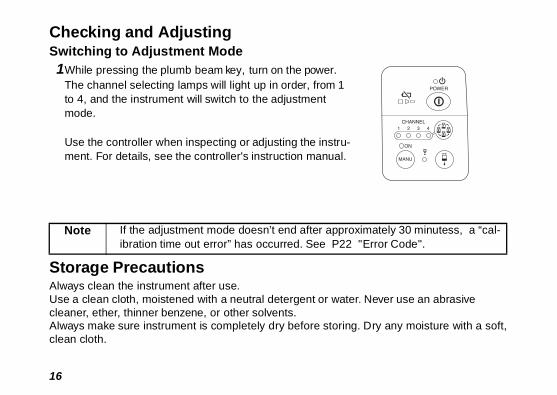
Checking and AdjustingSwitching to Adjustment Mode 1While pressing the plumb beam key, turn on the power.
The channel selecting lamps will light up in order, from 1 to 4, and the instrument will switch to the adjustment mode.
Use the controller when inspecting or adjusting the instru-ment. For details, see the controller's instruction manual.
Storage PrecautionsAlways clean the instrument after use.Use a clean cloth, moistened with a neutral detergent or water. Nevcleaner, ether, thinner benzene, or other solvents.Always make sure instrument is completely dry before storing. Dry clean cloth.
Note If the adjustment mode doesn’t end after approximateibration time out error” has occurred. See P22 "Erro
17
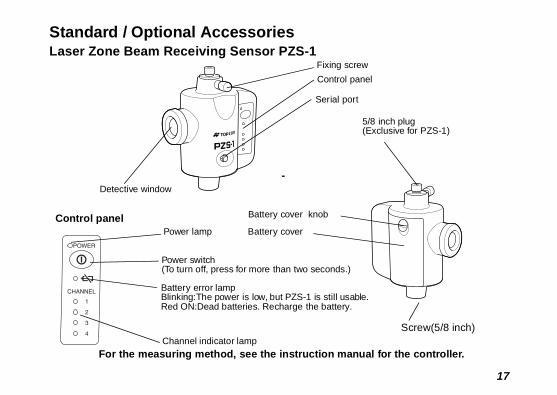
ch plugusive for PZS-1)
Screw(5/8 inch)
r the controller.
Standard / Optional AccessoriesLaser Zone Beam Receiving Sensor PZS-1
Control panel
Power switch(To turn off, press for more than two seconds.)
Power lamp
Channel indicator lamp
Battery error lamp Blinking:The power is low, but PZS-1 is still usable. Red ON:Dead batteries. Recharge the battery.
Control panel Battery cover knob
Battery cover
5/8 in(Excl
Detective window
Serial port
For the measuring method, see the instruction manual fo
Fixing screw
Battery
completed after approxi-
18
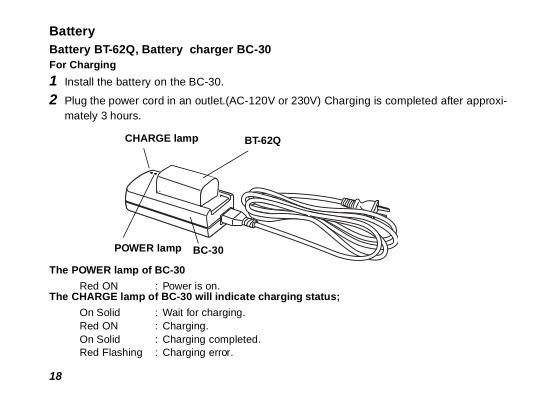
Battery BT-62Q, Battery charger BC-30For Charging
1 Install the battery on the BC-30.
2 Plug the power cord in an outlet.(AC-120V or 230V) Charging ismately 3 hours.
The POWER lamp of BC-30
Red ON : Power is on.The CHARGE lamp of BC-30 will indicate charging status;
On Solid : Wait for charging.Red ON : Charging.On Solid : Charging completed.Red Flashing : Charging error.
BC-30
BT-62Q
POWER lamp
CHARGE lamp
19
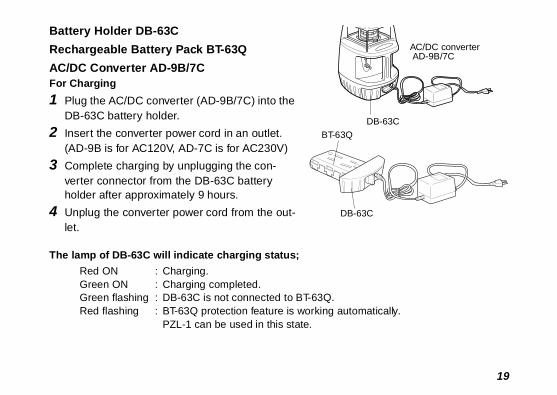
Battery Holder DB-63C
ally.
AC/DC converter AD-9B/7C
63C
Rechargeable Battery Pack BT-63Q
AC/DC Converter AD-9B/7CFor Charging
1 Plug the AC/DC converter (AD-9B/7C) into the DB-63C battery holder.
2 Insert the converter power cord in an outlet. (AD-9B is for AC120V, AD-7C is for AC230V)
3 Complete charging by unplugging the con-verter connector from the DB-63C battery holder after approximately 9 hours.
4 Unplug the converter power cord from the out-let.
The lamp of DB-63C will indicate charging status;
Red ON : Charging.Green ON : Charging completed.Green flashing : DB-63C is not connected to BT-63Q.Red flashing : BT-63Q protection feature is working automatic
PZL-1 can be used in this state.
BT-63Q
DB-63C
DB-

Automatic protection feature; rging range, charging will be
of BT-63Q.
e range of +10°C to +40°C
ttery and should be avoided
d before using with
n a place at +30°C(+86°F) ttery to be completely er charging in the future.f it.may take longer.
20
In case of overcharge or high or low temperature state exceeding chastopped or changed to protect battery.
Note DB-63C can be used with dry batteries instead
Note for charging1)Recharging should take place in a room with an ambient temperatur
(+50°F to +104°F).2)Exceeding the specified charging time may shorten the life of the ba
if possible.3)The battery source will discharge when stored and should be checke
instrument .4)Be sure to charge a stored battery source every 15 days and store i
and below when it will not used for a long period. If you allow the badischarged, it will have an effect on the overall performance for prop
5)The charger may develop heat while charging, there is no problem o6)If charging is done at high temperature, charging time of the battery
21
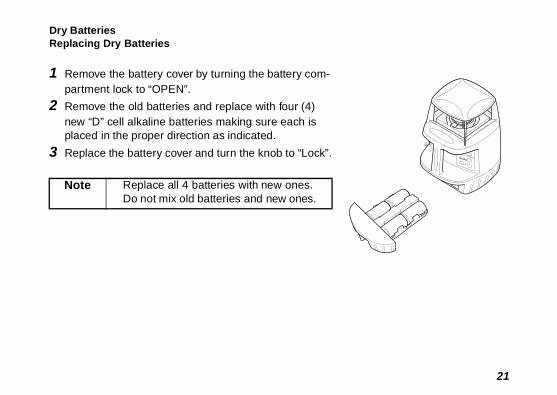
Dry Batteries
Replacing Dry Batteries1 Remove the battery cover by turning the battery com-partment lock to “OPEN”.
2 Remove the old batteries and replace with four (4) new “D” cell alkaline batteries making sure each is placed in the proper direction as indicated.
3 Replace the battery cover and turn the knob to “Lock”.
Note Replace all 4 batteries with new ones. Do not mix old batteries and new ones.
king lamps on the con-
r local Topcon dealer.
tive Action
gain, turn the power off and
gain.
r replace the dry batteries
he instrument.
on.
on.
on.
on.
22
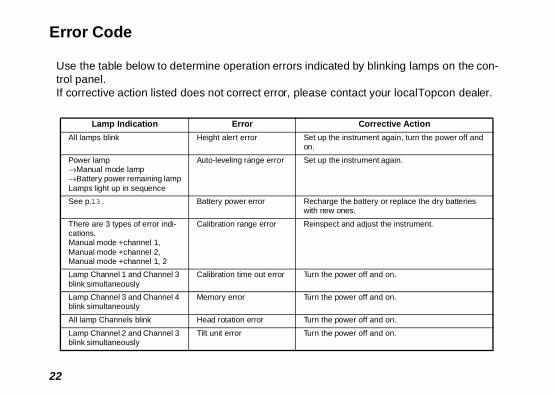
Error Code
Use the table below to determine operation errors indicated by blintrol panel. If corrective action listed does not correct error, please contact you
Lamp Indication Error Correc
All lamps blink Height alert error Set up the instrument aon.
Power lamp →Manual mode lamp→Battery power remaining lampLamps light up in sequence
Auto-leveling range error Set up the instrument a
See p.13. Battery power error Recharge the battery owith new ones.
There are 3 types of error indi-cations.Manual mode +channel 1, Manual mode +channel 2, Manual mode +channel 1, 2
Calibration range error Reinspect and adjust t
Lamp Channel 1 and Channel 3 blink simultaneously
Calibration time out error Turn the power off and
Lamp Channel 3 and Channel 4 blink simultaneously
Memory error Turn the power off and
All lamp Channels blink Head rotation error Turn the power off and
Lamp Channel 2 and Channel 3 blink simultaneously
Tilt unit error Turn the power off and
23
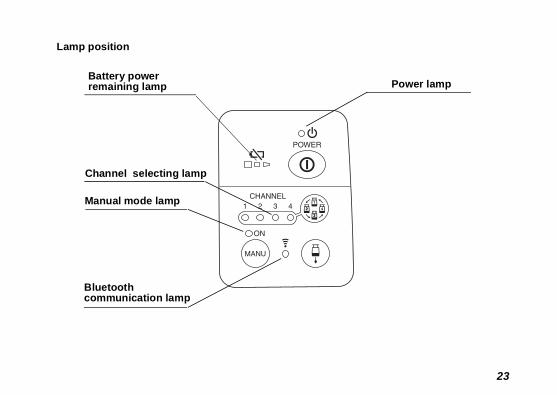
Power lamp
Battery power remaining lamp
Bluetooth communication lamp
Manual mode lamp
Channel selecting lamp
Lamp position
ible laser)
ble laser)
dry batteries ries)eries)529)
m) in]
ery)
e
ss
t by a condition)
24
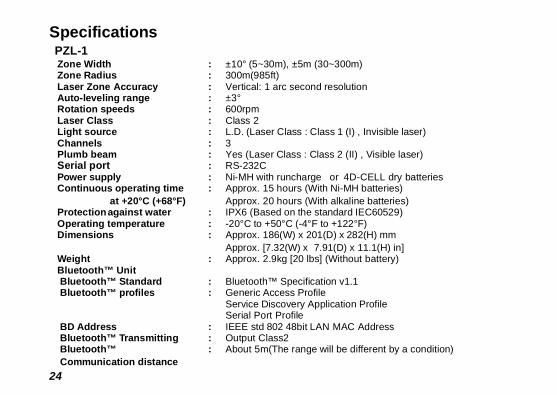
SpecificationsPZL-1Zone Width : ±10° (5~30m), ±5m (30~300m)Zone Radius : 300m(985ft)Laser Zone Accuracy : Vertical: 1 arc second resolutionAuto-leveling range : ±3°Rotation speeds : 600rpmLaser Class : Class 2Light source : L.D. (Laser Class : Class 1 (I) , InvisChannels : 3Plumb beam : Yes (Laser Class : Class 2 (II) , VisiSerial port : RS-232CPower supply : Ni-MH with runcharge or 4D-CELLContinuous operating time at +20°C (+68°F)
: Approx. 15 hours (With Ni-MH batteApprox. 20 hours (With alkaline batt
Protection against water : IPX6 (Based on the standard IEC60Operating temperature : -20°C to +50°C (-4°F to +122°F)Dimensions : Approx. 186(W) x 201(D) x 282(H) m
Approx. [7.32(W) x 7.91(D) x 11.1(HWeight : Approx. 2.9kg [20 lbs] (Without battBluetooth™ Unit Bluetooth™ Standard : Bluetooth™ Specification v1.1 Bluetooth™ profiles : Generic Access Profile
Service Discovery Application ProfilSerial Port Profile
BD Address : IEEE std 802 48bit LAN MAC Addre Bluetooth™ Transmitting : Output Class2 Bluetooth™ Communication distance
: About 5m(The range will be differen

25
PZS-1
529)m) in]
BC-30
Detective angleHorizontal : ±10°Vertical : ±10°
Serial port : RS-232CPower supply : BT-62QContinuous operating time : Approx. 8 hours at +20°C (+68°F)Tripod screw : 5/8 inch x 11ThredOperating temperature : -20°C to +50°C (-4°F to +122°F)Protection against water : IPX6 (Based on the standard IEC60Dimensions : Approx. 170(W) x 86(D) x 144(H) m
Approx. [6.69(W) x 3.38(D) x 5.67(HWeight : Approx. 1 kg [ 2.2 lbs] (With battery)
Input voltage : AC-120V or 230VRecharging time (at+20°C / +68°F)
: Approx. 3 hours
Operating temperature : +10°C to +40°C (+50°F to +104°F)
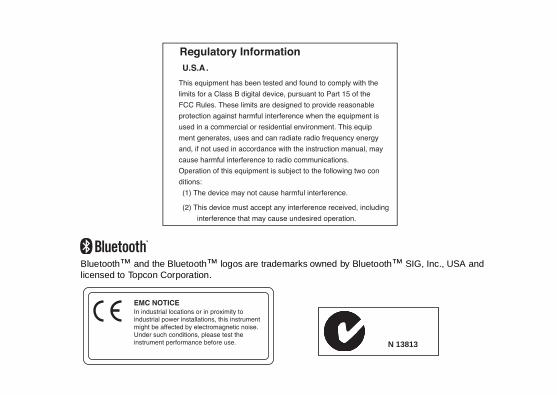
N 13813
th™ SIG, Inc., USA and
Bluetooth™ and the Bluetooth™ logos are trademarks owned by Bluetoolicensed to Topcon Corporation.
. LTD.ch Industrial Complex, Singapore 128381ww.topcon.com.sg
LTD.ington NSW 2127, Australia-2926 www.topcon.com.au
HAILAND) CO., LTD.,ngsarn, Bangkok 10600 Thailand.0-1158
ALAYSIA) SDN. BHD.nd & 1st Floor, Jalan Ampang Putra, umpur, MALAYSIA 4508
ATIONo-Dong, Seocho-gu, Seoul, 137-876, Korea.055-0319 www.topcon.co.kr
IMITED55 Au Pui Wan Street, Fo Tan Road,
www.topcon.com.hk
EIJING OFFICEngzhimen Nandajie, China01-4190
EIRUT OFFICE-LEBANON. Fax: 961-4-521119
UBAI OFFICE304, C-25, Dubai Airport Free Zone,UAE995901
360 90080 W
TOPCON CORPORATION75-1 Hasunuma-cho, Itabashi-ku, Tokyo 174-8580, Japan Phone: 3-3558-2520 Fax: 3-3960-4214 www.topcon.co.jp
TOPCON POSITIONING SYSTEMS, INC.5758 West Las Positas Blvd., Pleasanton, CA 94588, U.S.A.Phone: 925-460-1300 Fax: 925-460-1315 www.topcon.comTOPCON CALIFORNIA3380 Industrial Blvd, Suite 105, West Sacramento, CA 95691, U.S.A.Phone: 916-374-8575 Fax: 916-374-8329
TOPCON EUROPE B.V.Essebaan 11, 2908 LJ Capelle a/d IJssel, The Netherlands.Phone: 010-4585077 Fax: 010-4585045 www.topconeurope.com
TOPCON DEUTSCHLAND G.m.b.H.Giesserallee 31, 47877 Willich, GERMANYPhone: 02154-885-100 Fax: 02154-885-111 [email protected]
TOPCON S.A.R.L. 89, Rue de Paris, 92585 Clichy, Cedex, France.Phone: 33-1-41069490 Fax: 33-1-47390251 [email protected]
TOPCON ESPAÑA S.A.Frederic Mompou 5, ED. Euro 3, 08960, Sant Just Desvern, Barcelona, Spain.Phone: 93-473-4057 Fax: 93-473-3932 www.topconesp.com
TOPCON SCANDINAVIA A. B. Neongatan 2 S-43151 Mölndal, SWEDENPhone: 031-7109200 Fax: 031-7109249
TOPCON (GREATBRITAIN) LTD.Topcon House Kennet Side, Bone Lane, Newbury, Berkshire RG14 5PX U.K.Phone: 44-1635-551120 Fax: [email protected] [email protected]
TOPCON SOUTH ASIA PTEBlk 192 Pandan Loop, #07-01 PantePhone: 62780222 Fax: 62733540 w
TOPCON AUSTRALIA PTY.Unit 18, 4 Avenue of Americas NewPhone: 02-8748-8777 Fax: 02-9647
TOPCON INSTRUMENTS (T77/162 Sinn Sathorn Tower, 37th Fl.Krungdhonburi Rd., Klongtonsai, KloPhone: 02-440-1152~7 Fax: 02-44
TOPCON INSTRUMENTS (MExcella Business Park Block C, GrouTaman Ampang Hilir, 55100 Kuala LPhone: 03-42701068 Fax: 03-4270
TOPCON KOREA CORPOR2F Yooseoung Bldg., 1595-3, SeochPhone: 82-2-2055-0321 Fax: 82-2-2
TOPCON OPTICAL (H.K.) L2/F., Meeco Industrial Bldg., No. 53-Shatin, N.T., Hong KongPhone: 2690-1328 Fax: 2690-2221
TOPCON CORPORATION BRoom 8A Poly Plaza Building, 14 DoDongcheng District, Beijing, 100027,Phone: 10-6501-4191~2 Fax: 10-65
TOPCON CORPORATION BP. O. BOX 70-1002 Antelias, BEIRUTPhone: 961-4-523525/961-4-523526
TOPCON CORPORATION DC/O Atlas Medical FZCO., P. O. Box 54Phone: 971-4-2995900 Fax: 971-4-2
IRELAND OFFICEUnit 69 Western Parkway Business Center
Phone: 01460-0021 Fax: 01460-0129Lower Ballymount Road, Dublin 12, Lreland
PZL-1 & PZS-1 31
Top Related