


Languages
Pages
Legal

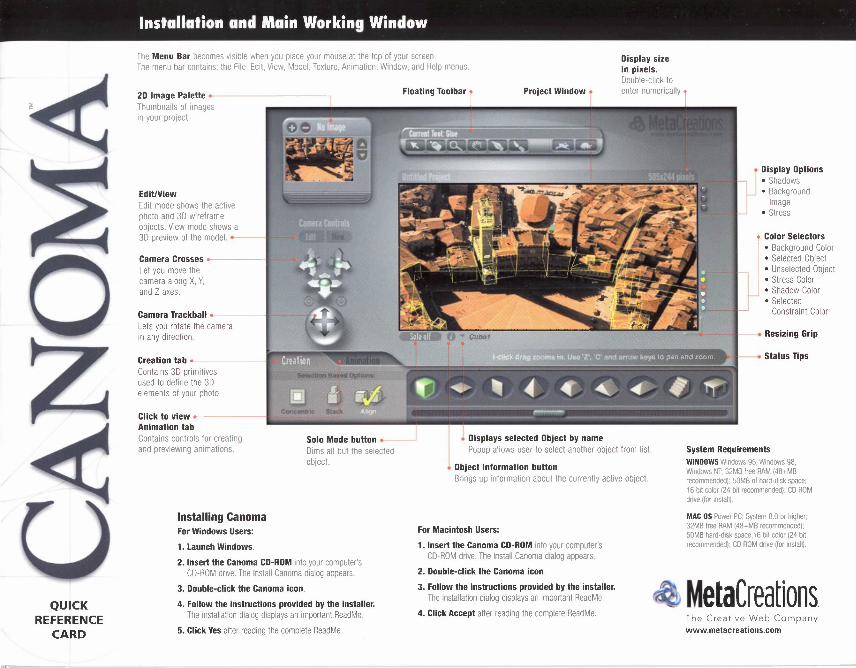
Installation and Main Working Window
The Menu Bar becomes visible when you place your mouse at the top of your screen. The menu bar contains: the File, Edit, View, Model, Texture, Animation, Window, and Help menus.
QUICK REFERENCE
CARD
20 Image Palette .__ Thumbnails of images in your project.
Edit/View Edit mode shows the active photo and 30 wireframe objects. View mode shows a 30 preview of the model. • • ·
Camera Crosses .,_ _ Let you move the camera along X, Y, and Z axes.
Camera Trackball -----~ Lets you rotate the camera in any direction.
Display size in pixels. Double-click to
Creation tab , ~ IMP!fi 4 Contains 30 primitives used to define the 30 elements of your photo. 0 Click to view , I conc: •• tr1< Slac;k """ p Animation tab Contains controls for creating and previewing animations.
Installing Canoma For Windows Users: 1. Launch Windows. 2. Insert the Canoma CD-ROM into your computer's
CO-ROM drive. The Install Canoma dialog appears. 3. Double-click the Canoma icon. 4. Follow the instructions provided by the installer.
The installation dialog displays an important ReadMe. 5. Click Yes after reading the complete Read Me.
Displays selected Object by name Popup allows user to select another object from list.
Object Information button Brings up information about the currently active object.
For Macintosh Users: 1. Insert the Canoma CD-ROM into your computer's
CD-ROM drive. The Install Canoma dialog appears. 2. Double-click the Canoma icon. 3. Follow the instructions provided by the installer.
The installation dialog displays an important ReadMe. 4. Click Accept after reading the complete ReadMe.
Display Options • Shadows • Background
Image • Stress
Color Selectors • Background Color • Selected Object • Unselected Object • Stress Color • Shadow Color • Selected
Constraint Color
Resizing Grip
Status Tips
System Requirements WINDOWS Windows 95, Windows 98, Windows NT; 32MB free RAM (48+MB recommended); 50MB of hard-disk space; 16 bil color (24 bil recommended); CD ROM drive (for inslall).
MAC OS Power PC: System 8.0 or higher; 32MB free RAM (48+MB recommended); 50MB hard-disk space;16 bit color (24 bit recommended); CD ROM drive (for install).
MetaCreations. The Creative Web Company www.metacreations.com

Building Models
Concentric alignment wilt align new object concentrically with selected object.
Stack new object on top of currently selected object.
Alignment Tool aligns the orientation of new object to the selected object.
Primitives available to use atone or in combinations to build 3D objects.
Slider is used to browse through the available primitives.
- Wireframes of objects. Use Pins, Beads, and Glue to affix an object to the image. The image wilt provide texture for the objects.
SetecV Glue Tool Move/Pin or Use glue to Bead Tool align objects
precisely
Zoom In/ Zoom Out
Toot
Pan Tool
Add or Delete Points to or from editable contour
objects.
Current Background Image
Pins are used to affix wireframe corners to picture elements.
Beads are used for aligning edges, usually when corners aren't available.
Click on the "i" .,_ __ _..,_ __ button under the document window to view the Object Information dialog
Object Name - Click and type to name object.
Alignment Attributes Are Selection Based Options in the Creation tab and are set when an object is created.
Object name, Cubel
Primitive type, Cube
Alignment Concentric with: None Staci<ed above: None
Rollltionat align to: None
Rotates object 90' • I : Releases Y constraint • ,C Releases all constraints Releases all orientations

Viewing Proiects
y
~ X, Y, Z Coordinate System
Camera Controls Switch between Edit mode and 3D Preview mode by clicking the toggle buttons. Clicking on any of the Camera Controls automatically puts you into 3D Preview mode.
Camera Control Edit & View toggle buttons ,.__ _
Y-Z Cross controls vertical and Depth motion ,.__ _,,,__.~
X-Y Cross controls horizontal and vertical motion • •.,. ~':- .::._~
X-Z Cross controls horizontal and Depth motion .-------,.--e
Banking Control - rotates camera on the y-axis simulating a tilted horizon or banking effect.
Field of View .------~ acts like a wide-angle lens.
Camera Trackball .------~.,,.. Lets you rotate the camera in any direction, around any axis.
Preview your 3D objects in the document window in View mode. Objects that have had textures applied to them will appear textured in View mode. See next panel to see some textured objects.
l 1n-View Navigation Controls-Click and drag right inside the Project Window while in 3D Preview Mode to move forward, backward, and turn left and right. These controls are useful for moving around in large environments like interiors or city scenes. If you press the Ctrl key while you click-drag, you can slide up, down, left and right. (see Keyboard Shortcuts for complete commands)
Addo------ or delete images
Tray opens to reveal available project photos.
2D Image Palette Displays thumbnails of images in project.
Move through images to select.
Scroll bar Scroll up and down through the available images
Grip and drag downward to open tray.
To Reset the Camera click on the desired image thumbnail in the 2D image tray.
SelecV Move/Pin or Bead Tool
Zoom In/ Zoom Out
Tool
Pan Tool
Texture Pen - Click on an object face ro edit in a 2D program,
such as Painter or Photoshop.

Adding Texture to Scene
Texture Controls let you generate textures for your model based on your photos. You can choose Quick or Quality and high or low resolution textures.
• Resolution options are found in the Texture menu.
~-=R- @•tffij[IJ;ffltt ResoUion Max
.] 1:1 ·- 1: 16 1: 64
Awl}.,Quick Teirtures 1: 256 Appl}.i Quality T el<ti..es 1 : 1024
1: 1n1rny j- Clear ~ custom lexlU1es
1 Removes all textures from all objects.
Preview your 3D objects in the document window in View mode after the textures have been generated.
Uses texture from another side of an object where the back of the object is not visible in the source photos.
Edit texture in Painter or Photoshop , lzi;iiW _
Quality texturing compensates for brightness differences between photos that can show up as seams and also fills in white gaps for which there is no available information. Quality texturing takes longer, uses more memory and looks better than Quick texturing.
Apply edited texture e-----
I
L

Animation
Animation controls-click the Animation tab to display
Returns to previous keyframe
Stop and reset to the first frame
Play or pause animation
Advances to next keyframe
Slider allows you to browse your keyframes, including those not currently visible in tray. Current keyframe
is highlighted Keyframe
animation in seconds. Double click to specify duration.
Check the loop option to set an animation to repeat endlessly.
Delete Keyframe Select keyframe and click on the "minus button" or hit the delete key
I Add Keyframe-click to add the current camera view of your model as a new keyframe in your animation. The new keyframe is added after the current keyframe (You may also click in an empty slot in the Keyframe Strip to add a keyframe.) -------------------~
Creating Animations • Complete the model. • Decide how the camera should move in order to view the model.
• While viewing the model, create keyframes, which indicate how the camera position or orientation has changed.
• Review the animation, using the Animation Preview Controls
• Render the animation as a OuickTime movie, or as a set of frames.
When creating animations such as zoom-ins it is a good idea to map a higher resolution image to the face of the object being approached. Canoma uses this higher resolution image, so that as you get closer to the object the texture still appears crisp and clear.

Export & Render Keyboard Shortcuts
Export options are located in the File menu. These options provide a variety of 3D export environments. - Mew Ctrl+N
.Qpen. .. os-c Qose ~ave Ctrl+S Save~s ...
I as • MetaStream (.MTS) Revert lo Saved Wavefront (.OBJ)
Render Image ... Poser Prop (PPZ)
Rende! Animation. .. Truespace (.SCN) Autodesk (.DXF)
Add Image ... C~l·l VRMl.2(.WRL)
Preferences ...
Open x-0 ... Ctrl+O Save x-S . Ctrl+S New . . x-N Ctrl+N Load Image x-L . . . .. Ctrl+L Quit x-0 Ctrl+O Contextual Menus Ctrl-Cllck Right mouse button
Clicking over constraint or selection will give you the following options:
Delete Pin or Bead (depending on type) Delete Glue (if present) Delete constraints of selection in this image Delete all constraints of selection Delete selection
Ctrl•Q Edit
Render Animation to Disk allows you to set the output size and access the OuickTime movie settings.
Current Window~S'='"--- 640x480 pixels
Output Size _
320 x 240' pixels
Output Modula: ~ OulclcTin'l(f Movlo F.,.F,_ (IJ~UMIJ .._, .... W¥1fW@t1M
Render Image will save the image to your hard disk as a 2D image of the current view in your document window.
Cuirent Window Size 640x480 pixels
Output Size
192<[ x 1440 pixels
: caoc~ )~ )
Output size-specify in pixels the output resolution the image is to be rendered at. Output size may be keyed into the boxes provided
UNIVERSAL
Undo Redo Delete Selection Duplicate Duplicate Aligned Get Info
Select Previous Photo Select Next Photo Select First Photo Select Last Photo Select Image 1-9 Select Image 10 Show Only Selection
MAC
File
. x·Z ...... x-Y
.. Delete . ...... x-D
. Shitt-ee-D x-1
Select ... PgUp
PgDn .. Home ... End .... 1-9
0 .. ... x-space
WIN
... Ctrl+Z Ctrl+Y Delete
. Ctrl+D . Shift +Ctrl+D
. Ctrl+I
PgUp .... PgDn .. Home ... End
...... 1-9 .0
... Ctrl+space
View Toggle edit/view mode TAB TAB Pan Left . . . . . . . . . . . .. Left Arrow Left Arrow Pan Right . . Right Arrow Right Arrow Pan Up . . . . . Up Arrow . . . Up Arrow Pan Down Down Arrow Down Arrow Reset View . Enter . . . . . . . . Enter PanLeft a a Pan Right . . d . . . . d ~n~ .e.. ..e Pan Down .. x ... x Reset View s . s ~~~ .c .... c Zoom Out z . z Pan Left . . Keypad 4 . . Keypad 4 Pan Right .. Keypad 8 Keypad 8 Pan Up .. Keypad 6 Keypad 6
Pan Down Reset View Zoom In Zoom Out
.. Keypad 2
.. Keypad 5
.. Keypad+ . Keypad
........... Keypad 2 ... Keypad 5 ... Keypad+
............ Keypad -
Tool Modifiers Zoom In . . Zoom Tool Zoom Tool Zoom Out . . .. Option-Zoom Tool Alt-Zoom Tool Add/Delete Point . Edit Point Tool Edit Point Tool Edit Texture . . .. Edit Texture Tool .. Edit Texture Tool Erase Edits Option-Edit Text Alt-EditTexture Previous Frame . . Prev Button Prev Button Start (First Frame) . Opt-Prev Button ... Alt-Prev Button Next Frame . . . . . . . . . . . Next Button . . . . . . Next Button End (Last Frame) . Opt-Next Button . Alt-Next Button
Modifiers While Creating Primitives Aligned Stacked Concentric
.. Shift . Option X
In-View Navigation Controls Move Forward Move Backward Turn Left Turn Right Move Up Move Down Slide Left Slide Right Switch to Pan Tool
Click+Drag Up .. Click+Drag Down
Click+Drag Left Click+Drag Right
.. Ctrl+Click+Drag Up Ctrl+Click+Drag Down
Ctrl+Click+Drag Left ......... Ctrl+Click+Drag Right
. . . . . . . . . . . . . . Space
Animation Record Keyframe . . x-R Play/ Pause x-A Stop . ESC
Abort . Mirror Textures
. ESC . x-M
Shift Alt
. Ctrl
.. Ctrl R . Ctrl-A ... ESC
Miscellaneous ........ ESC
.. Ctrl-M
MetaCreations The Creative Web Company www.metacreations.com
©1999 Copyright MetaCrealions Corporation. All Rights Reserved. Canoma is a trademark ot MetaCreations Corporation. All other trademarks or registered trademarks are the propertyoftheirrespectiveowners
Z-CNM·C I O·C·OO I
Top Related