


Languages
Pages
Legal


ZOHOCORP
Installing and configuring AD FS 2.0 to work with ManageEngine SDP On-Demand
Step by Step Guide
ManageEngine On-Demand
3/21/2012
Table of Contents
Installing the AD FS 2.0 2
Running the PowerShell Script 16
Troubleshooting log in issues 19
This document contains the steps for installing and configuring AD FS 2.0 to work with ManageEngine ServiceDesk Plus On-Demand.

Step by Step Guide to installing and configuring AD FS 2.0 with ManageEngine SDP On-Demand
2
Installing the AD FS 2.0
Note: Screenshots contain the following, Verified primary domain name: zillum.com
1. Double-click the downloaded ADFSSetup.exe
2. Click Next

Step by Step Guide to installing and configuring AD FS 2.0 with ManageEngine SDP On-Demand
3
3. Accept the License Agreement and click Next

Step by Step Guide to installing and configuring AD FS 2.0 with ManageEngine SDP On-Demand
4
4. Select 'Federation Server' and click Next

Step by Step Guide to installing and configuring AD FS 2.0 with ManageEngine SDP On-Demand
5
5. Click Next
Step by Step Guide to installing and configuring AD FS 2.0 with ManageEngine SDP On-Demand
6
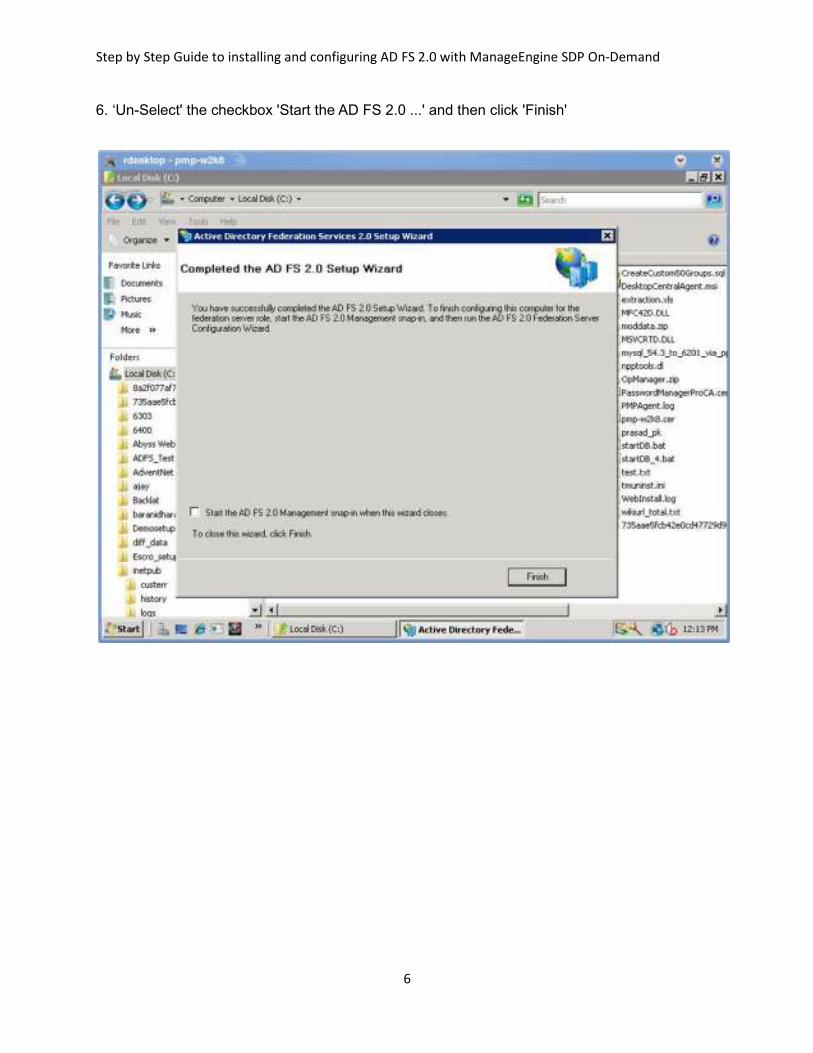
6. ‘Un-Select' the checkbox 'Start the AD FS 2.0 ...' and then click 'Finish'

Step by Step Guide to installing and configuring AD FS 2.0 with ManageEngine SDP On-Demand
7
7. Go to C:\Program Files\Active Directory Federation Services 2.0 directory and edit the file “Microsoft.IdentityServer.ServiceHost.exe.config” using “wordpad”

Step by Step Guide to installing and configuring AD FS 2.0 with ManageEngine SDP On-Demand
8
8. Insert a line <generatePublisherEvidence enabled="false" /> as seen below. Save and Exit
wordpad

Step by Step Guide to installing and configuring AD FS 2.0 with ManageEngine SDP On-Demand
9
9. Double click on FsConfigWizard.exe

Step by Step Guide to installing and configuring AD FS 2.0 with ManageEngine SDP On-Demand
10
10. Select “Create a new Federation Service” and click “Next”

Step by Step Guide to installing and configuring AD FS 2.0 with ManageEngine SDP On-Demand
11
11. Select “Stand-alone Federation server” and click Next

Step by Step Guide to installing and configuring AD FS 2.0 with ManageEngine SDP On-Demand
12
12. Federation Service name will be shown by default based on the SSL Certificate installed on the IIS Server. Click 'Next'

Step by Step Guide to installing and configuring AD FS 2.0 with ManageEngine SDP On-Demand
13
13. If “Delete database” option is shown, then “Select” it and click 'Next

Step by Step Guide to installing and configuring AD FS 2.0 with ManageEngine SDP On-Demand
14
14. Click Next

Step by Step Guide to installing and configuring AD FS 2.0 with ManageEngine SDP On-Demand
15
15. The Wizard will complete the configuration as shown below.

Step by Step Guide to installing and configuring AD FS 2.0 with ManageEngine SDP On-Demand
16
Running the Powershell Script
Powershell script for configuring AD FS 2.0 is available at :
http://sdpondemand.manageengine.com/html/adfsscript.ps1
1. Download the adfsscript.ps1 and save it in C:\ drive in the AD FS installation system 2. Go to Start menu 3. Right click on "Command Prompt" and click "Run as Administrator" 4. Type the following commands :
1. powershell 2. Set-ExecutionPolicy RemoteSigned 3. C:\adfsscript.ps1 <Your Verified Primary Domain Name>
5. Make sure the powershell script ran successfully. Any errors encountered while running the script will be printed in "red" color in the console.
6. If you are unable to set the execution policy to RemoteSigned because of domain policy, you might need to set the same policy in your Domain Controller.
1. Refer here on how to set the execution policy in Domain controller. (http://www.techrepublic.com/blog/datacenter/set-the-powePrshell-execution-policy-via-group-policy/3305)

Step by Step Guide to installing and configuring AD FS 2.0 with ManageEngine SDP On-Demand
17
The steps above are explained in the screenshots that follow:

Step by Step Guide to installing and configuring AD FS 2.0 with ManageEngine SDP On-Demand
18
After running the powershell script, go to SDP On-Demand Admin � SAML Configuration page
and configure the Login URL, Logout URL, Certificate (Saved at C:\certificate.cer) and the
Algorithm (RSA).
The above screenshot shows you the details that you need to fill.

Step by Step Guide to installing and configuring AD FS 2.0 with ManageEngine SDP On-Demand
19
Troubleshooting log in issues Organization Admin (usually the user who first signed-up for SDP On-Demand) can login to the service by visiting sdpondemand.manageengine.com instead of the customized domain. In the login page, instead of AD credentials, the usual SDP On-Demand credentials can be used. After that, the following will help in troubleshooting issues. Make sure that
1. The Active Directory contains the email address of the user. To check this, go to Active Directory Users & Computers. Right click on the user and click Properties. Email address of the user must be present here.
2. The email address in Zoho / SDP On-Demand for that user and in the Active Directory are the same
3. Users have been imported as Requesters in SDP On-Demand 4. The verified primary domain is given correctly while running the adfsscript powershell
script.
• In your SDP On-Demand account, go to Admin ---> Organization Details ---> Domain Details page.
• See the domain that is marked as "Verified Primary Domain".
• This domain name must be given while running the adfsscript powershell script. 5. The "Federation Service Name" present in the AD FS management console and the
Login / Logout URLs configured in SDP On-Demand contain the exact host name.
• If you have used FQDN in Login / Logout URLs, you have to use the same FQDN for the "Federation Service Name".
• If you change the federation service name, a restart of AD FS 2.0 Windows Service needs to be done.
6. The powershell script ran successfully. Any errors encountered while running the script will be printed in "red" color in the console.
Disabling SAML Authentication 1. Organization Admin (usually the user who first signed-up for SDP On-Demand) can login to our service by visiting sdpondemand.manageengine.com instead of the customized domain. In the login page, instead of AD credentials, the usual SDP On-Demand credentials can be used. After logging in, go to Admin ---> SAML Configuration page and delete the configuration. This will disable SAML Authentication. 2. When you import users using the Provisioning App, the application will not import any password from the AD. So the imported users will not have any password associated with them in SDP On-Demand. In case you are planning to disable SAML Authentication and use SDP On-Demand authentication, they will need their password to login. So they have to click "Forgot Password" link in the login page to receive a mail to generate a new password. Authenticating external users Since SAML Authentication works based on browser based re-direction, you will be redirected to a system in your intranet during authentication.

Step by Step Guide to installing and configuring AD FS 2.0 with ManageEngine SDP On-Demand
20
This system is called the identity provider, which takes care of authenticating and redirecting you back to SDP On-Demand. If you are not inside your intranet during the redirection, you will not be able to login to SDP On-Demand. If you need to use SAML authentication anywhere from the internet:
1. AD FS system can be exposed to the internet (by adding a NAT entry or otherwise). You need to put an entry in your external DNS Server for this system. Note that, AD FS need not be installed on a Domain Controller. You can install AD FS on any Winows 2008 system and need to just join the AD FS system to the domain. By this way, your Domain Controller system will not be exposed to internet.
2. (OR) Having a AD FS 2.0 Proxy and adding its external IP address to your external DNS server.
After exposing the system to the internet,
1. Go to SDP On-Demand Admin ----> SAML Configuration page. Change the Login and Logout URLs by giving the fully qualified domain name (fqdn) of the system that you have exposed to internet.
2. In the AD FS system, go to AD FS management, right-click on the service and click "Edit Federation Service Properties". Give the same fqdn for Service name and then restart the AD FS 2.0 Windows Service from the services console. Now try to login again.
Top Related