


Languages
Pages
Legal


Please visit our website (www.gomlab.com) regularly to check out our latest update.
GOM Player Plus User Guide


From High Definition Videos to VR Videos!
GOM Player Plus is a premium video player that offers a more powerful performance than its
previous version, GOM Player. As it is optimized for a 64-bit operating system, it enables
viewers to enjoy not just high-definition videos without buffering, but also various
additional features required for a video playback such as subtitle search, screen capture,
Codec finding, 360︒ VR video’s top-and-bottom or side-by-side mode, etc. Furthermore, it
offers all the functions of the existing GOM player ad-free so that users can enjoy watching
videos in a more pleasant environment.
Key Features of GOM Player Plus
Stronger Performance
Optimized for a 64 bit operating
system, provide uninterrupted
experience of a high-definition
videos.
Ad-free
Watch videos in a pleasant ad-
free environment.
Support for various type of
files
Support various types of video
files and clips.
Strong subtitle feature
Easy to use subtitles by using its
own subtitle data or searching
for subtitle data available
online.
Play 360︒ VR videos
Watch videos adopting 360︒
VR technology. Enjoy VR videos
with keyboard and mouse.
Conveninent play funciton
Easy to pay videos using a basic
control window. Also, it offers a
range of video-related
additional features such as screen reverse,
aspect ratio & color adjustment, screen/sound
capture, etc.

Codec Search
If a specific codec that is not
included in the built-in codecs is
required, it searches for and
inform the needed codec via online
GOM Remote connection
Control both PC power and
GOM player plus using a GOM
remote controller. Now connect
GOM remote controller to other mobile
devices for more convenience.

Manual Writing Rules
Explains the writing rules adopted in this manual.
UI titles within a program
Buttons displayed and UI titles on the screen of a program are written in black bold letters.
Example:
When the GOM player plus installation window pops up, click “Next” button.
Order-type explanation (1)
As for how to use a program, numbers are used for indicating the order.
Example:
1. The 1st step
2. The 2nd step
3. The 3rd step
Order-type explanation (2)
If clicking a button or icon in a program consecutively, > is adopted to indicate the order
Example:
4. Please select License > License Registration items in the basic menu 목을 선택하세요.
List-type explanation
The items over two or more are displayed in a type of list 2.
Example:
List-type explanation 1
• List-type explanation 2
- List-type explanation 3

Program Components
Program components are marked with red circles and numbers. And the name of each item
is described in the gray box below the program image.
Example:
Figure 1. Top Bar Area
① Logo
② Environment Settings
③ Title Area
④ Product Registration Info.
⑤ GOM Remote
⑥ Transparency Setting Area
⑦ Fix the Program Position
⑧ Full Screen
Work Process within an Image
If a user should perform more than two tasks in a single image, the order is indicated with
red squares and numbers
Example:
After selecting the installation type and components, click ”Next” button
Useful Tips
Additional information for users is displayed with Useful Tips letters.
Example:
1 21
3 4 5 6 7 8
1
2

If your PC specs is lower than system requirements, program installation, run and
filming, etc., may not function properly. Also, depending on your PC performance
other than system requirements, the program operation speed may be slowed
down.
Reference Location
The location information for reference in the manual is marked in bold blue letters.
Example:
Please refer to section “Learn about Basic Manu” of the Chapter, “Basic Configuration”


Contents
How to Install GOM Player Plus오류! 책갈피가
정의되어 있지 않습니다.
1. How to Install the Program오류! 책갈피가 정의되어 있지 않습니다.
2. How to Register the Program .... 오류! 책갈피가 정의되어 있지
않습니다.
3. How to Uninstall the Program ... 오류! 책갈피가 정의되어 있지
않습니다.
Basic Configuration 오류! 책갈피가 정의되어
있지 않습니다.
1. Screen Layout ............ 오류! 책갈피가 정의되어 있지 않습니다.
2. Learn about Basic Menu오류! 책갈피가 정의되어 있지 않습니다.
How to Play Videos 오류! 책갈피가 정의되어
있지 않습니다.
1. How to Play General Videos ...... 오류! 책갈피가 정의되어 있지
않습니다.
2. How to Play DVDs ...... 오류! 책갈피가 정의되어 있지 않습니다.
3. How to Play VR Videos ................................................... 38
4. How to Use Favoirtes .. 오류! 책갈피가 정의되어 있지 않습니다.

Contents
How to Configure Playback Settings .. 오류!
책갈피가 정의되어 있지 않습니다.
1. Playback Settings ....... 오류! 책갈피가 정의되어 있지 않습니다.
2. Subtitle Settings ............................................................ 53
3. Video Settings ............................................................... 59
4. Audio Settings ........... 오류! 책갈피가 정의되어 있지 않습니다.
5. Filter Settings ............ 오류! 책갈피가 정의되어 있지 않습니다.
6. Aspect Ratio Settings . 오류! 책갈피가 정의되어 있지 않습니다.
7. How to Change Video Position and Size .......................... 69
8. How to Change Window Position and Size .................... 71
How to Use Additional Features ............ 73
1. How to Capture a Screenshot ....................................... 73
2. How to Capture Audio ................................................... 78
3. How to Use Text-To-Speech (TTS) Feature ....................... 79
4. How to Use GOM Remote .............................................. 80
Preference Settings(Quick Settings) ....... 86
1. Quick Settings ........... 오류! 책갈피가 정의되어 있지 않습니다.
2. Playback Info. Settings ................................................... 92

Contents
Preference Settings(Advanced Settings)오류!
책갈피가 정의되어 있지 않습니다.
1. General Settings......... 오류! 책갈피가 정의되어 있지 않습니다.
2. Playback ...................................................................... 104
3. Subtitles ...................................................................... 108
4. Video ....................... 오류! 책갈피가 정의되어 있지 않습니다.
5. Audio ....................... 오류! 책갈피가 정의되어 있지 않습니다.
6. Filter ....................... 오류! 책갈피가 정의되어 있지 않습니다.
7. Account ..................... 오류! 책갈피가 정의되어 있지 않습니다.
8. Others ....................... 오류! 책갈피가 정의되어 있지 않습니다.
Additional Information ........ 오류! 책갈피가
정의되어 있지 않습니다.
1. System Requirements . 오류! 책갈피가 정의되어 있지 않습니다.
2. Shortcut Key Information .............................................. 131
3. Find Codec .................................................................. 144
4. Frequently Asked Questions ...... 오류! 책갈피가 정의되어 있지
않습니다.
5. Payment .................... 오류! 책갈피가 정의되어 있지 않습니다.
6. Refund Policy ............................................................... 149
7. Menual Information ..................................................... 150


How to Install GOM Player Plus 1
How to Install GOM Player Plus
You can use GOM Player Plus after purchasing and registering an official license to GOM
Player Plus. The official license has no expiration date and any minor updates of the
program will be given with no additional charge.
1. How to Install the Program
To install GOM Player Plus, you should first download the installation program from the
official GOM Player Plus homepage. Please check “오류! 참조 원본을 찾을 수 없습니다.”
items in the “오류! 참조 원본을 찾을 수 없습니다.” chapter before installing the program.
If your PC specs is lower than system requirements, program installation, run
and filming, etc., may not function properly. Also, depending on your PC
performance other than system requirements, the program operation speed
may be slowed down.
To install GOM Player Plus, please follow below steps:
1. Download an installation program in the GOM Player Plus Homepage.
2. Execute GOM Player Plus installation program.
3. Select a language in the installation wizard, then click “OK” button.

How to Install GOM Player Plus 2
4. When GOM Player Plus installation screen is displayed, please click “Next” button.
5. After checking the Software Terms and Conditions, click ‘Agree’ button.
Please make sure that you read and check the Terms and Conditions before
installing the program. If you do not agree with the Terms and Conditions,
you cannot install the program.

How to Install GOM Player Plus 3
6. After selecting installation types and components, click “Next” button.
• Select the installation type: Choose which ways to install.
- Basic installation: Select if you install basic components.
- Re-installation: Select if you re-install the program.
- Customization: Select If you are to designate which components to install.
• Designate components to install: Select the components to install. It can be
performed if the installation type is Customization.
- Create program groups: Create a GOM Player Plus shortcut icon in a program
group.
- Register extensions: Register an extension of video file to play with GOM player.
• Register the extensions of all video files: Register the extensions of all video
files.
• Register the extensions of key files such as AVI, OGM and MKV: Register only
the frequently used video files including AVI, OGM, MKV, etc.
- Create a shortcut icon in the desktop: Generate a GOM Player Plus shortcut icon
in the desktop interface.
1
2

How to Install GOM Player Plus 4
7. Determine a folder to install the program, then click “Install” button.
You may directly enter a folder directory to install or click “Browse”
button to change the directory to install the program.
8. When a program is successfully installed, click “Finish” button.
When you first run the program after installing, a full version registration
window will appear. You can use GOM Player Plus after completing the
registration process.

How to Install GOM Player Plus 5
2. How to Register the Program
This part describes the ways to register a license to use the official version of GOM Player
Plus.
You can purchase the license in the GOM Player Plus Homepage, and each license is only
valid for a single computer.
Please be aware that if you use the same license in two or more computers, the
relevant license can be revoked.
1) How to Register a License
The official GOM Player Plus can be registered and used in one PC only. Thus, if you
want to use the license information purchased in a different PC, you should first
deauthorize the license certificate registered in the existing PC before using in a new
PC
If your GOM Player Plus is not registered as an official product, a full version
registration window will pop up while running GOM Player Plus. You can register the
official GOM Player Plus license certificate in the registration window.
1. Execute GOM Player Plus. The full version registration window will appear.
2. Enter the email you’ve offered in your purchase of the official license and official
license certificate, then click “Register Full Version” button.
1
2

How to Install GOM Player Plus 6
2) How to Deauthorize the License
If you use the license registered in another PC, you have to deauthorize its license
certificate before use.
When a license certificate is deauthorized, you can either register the
license in a different PC or re-register it in the previous PC by means of
license information (email, license key).
The steps to deauthorize a license certificate in the originally registered PC is as
follow:
1. Execute GOM Player Plus.
2. Please click “Product Registration Info.” Icon in the top bar of the program. A
“Product Registration Info.” window will appear.
3. Click “Deauthorize this device” button.

How to Install GOM Player Plus 7
4. When a deauthorization mail sending window is displayed, click “Send Link”
button
.

How to Install GOM Player Plus 8
5. Click “OK” button.
6. Access the email account that you have provided in your purchase of the official
license, open the deauthorization mail sent.
7. Click the authorization URL contained in the email text. It will complete a
deauthorization of a license registered in the PC.
If you have multiple official licenses in use, please visit the
deauthorization site. If you move to the deauthorization site, you can
select a specific license to deauthorize in the site.

How to Install GOM Player Plus 9
3. How to Uninstall the Program
You can uninstall GOM Player Plus by using in the Control Panel in Windows or the
program deleting file in the directory where GOM Player Plus is installed.
The default installation directory and program deleting file of GOM Player Plus
are as follows:
If you run the program deleting file, GOM Player Plus deletion window will pop
up.
Directory: C:\Program Files\GRETECH\GOMPlayerPlus
Program deleting file: Uninstall.exe
The ways to uninstall GOM Player Plus in the Control Panel is as follows:
1. After opening the Control Panel in Windows, click Programs and Features. A
programs and features window will pop up.

How to Install GOM Player Plus 10
2. After clicking the right button of the mouse with GOM Player Plus, select
Uninstall/Change. GOM Player Plus Uninstall window will appear.
3. Click “Uninstall” button

How to Install GOM Player Plus 11
4. After uninstalling the program, click “Close” button.

Basic Configuration 12
Basic Configuration
Describe the main screen layout and basic menu of GOM Player Plus.
1. Screen Layout
The below features the main screen layout of GOM Player Plus.
Figure 2. Main Screen
① Top Bar Area
② Playback Window
③ Video Control Area
④ Play 360︒ VR Video
⑤ Subtitle Helper
⑥ Save Current Image
⑦ Control Panel
⑧ Open
⑨ Playlist Window
① Top Bar Area
Set the program setting or find out the main menu list, license info., etc.
② Playback Window
This is the area where a video being played is shown.
1
2
3 4 5 6 7 8 9

Basic Configuration 13
③ Video Control Area
Control various features on video including playback, pause, modifying the
playback section, audio volume, etc.
④ Play 360︒ VR Video
Play 360 ︒ VR videos
⑤ Subtitle Helper
Used to search a subtitle for the current video or set up a subtitle related setting.
⑥ Save Current Image
Capture and store what’s currently displayed within the screen display area. You
can also set the storage directory by selecting the advanced screen capture menu
in the basic menu.
⑦ Control Panel
Classify frequently used features during video playing in different categories and
confirm and control them.
⑧ Open
Bring a video file from your PC.
⑨ Playlist Window
Add or delete video files in your playlist. And you can select and set a file to play,
repeat or play at a random.

Basic Configuration 14
1) Top Bar Area
Set the program setting or find out the main menu list, license info, etc.
Figure 3. Top Bar Area
① Logo
② Environment Settings
③ Title Area
④ Product Registration Info.
⑤ GOM Remote
⑥ Transparency Setting Area
⑦ Fix a Program location
⑧ Full Screen
① Logo ( )
Check the basic menu list. If you click the logo, a “basic menu list” pops up.
② Environment Settings ( )
Set the platform. If you click, an “Environment Settings Window” pops up.
③ Title Area
See the filename of the video being played.
④ Product Registration Info. ( )
See the license information.
⑤ GOM Remote ( )
Execute GOM Remote program.
⑥ Transparency Setting Area
Adjust the transparency of the program and the video being played. The
transparency level can be adjusted by max. 80%.
⑦ Fix the Program Location
Set the activation/deactivation status of a program.
• : Activate only when a program is selected.
• : Always keep a program activated.
• : Keep a program activated while a video clip is played in the program.
⑧ Full Screen ( )
Turn the program into a Full Screen.
1 21
3 4 5 7 8 6

Basic Configuration 15
2) Playback Window
At present, this is the area where a video being played is shown. The play section of
the video being played can be found and control in the Video Control Area.

Basic Configuration 16
3) Video Control Area
This is the area to control the video currently being played.
Figure 4. Video Control Area
① Play/Pause
② Stop
③ Backward
④ Forward
⑤ Mute
⑥ Volume Control Bar
⑦ Play Time
① Play( )/Pause ( )
Play or pause a video. If you click the Play ( ) icon then the video is played and
turned into the Pause ( ) icon.
② Stop( )
Stop the video on display.
③ Rewind ( )
Move back to the previous time of the currently playing video. If you click it with
the right button on the mouse, it will play the previous video file in the playlist.
④ Forward( )
Move back to the later time of the currently playing video. If you click it with the
right button on the mouse, it will playback the next video file in the playlist.
⑤ Mute( / )
Turn sound off/on the video being played.
⑥ Volume Control Bar
Adjust the volume of the video being played.
⑦ Play Time
See the Play Time of the currently displayed video.
1 21
3 4 5 6 7

Basic Configuration 17
4) Playback 360 VR︒ Video
Move 360︒ VR video left or right directions with a keyboard or mouse. On the touch
screen, you can also use touch gestures.
If you click “Playback 360︒ VR Video”( ) icon, a pop-up menu will appear.
Figure 5. Playback 360 VR Video
① Playback 360︒VR mode
② Import 360︒Video
③ VR Video Setting
① Playback 360︒VR mode
Start VR mode. If you start VR mode, it will turn into 360︒VR Mode stop menu,
and if you select it again, the VR mode will stop.
② Import 360︒ Videos
Able to import 360︒video files.
• Open 360︒video: Open a 360︒video file in your PC.
• Find 360︒video: Search for 360︒VR videos uploaded in YouTube.
③ VR mode Settings
Able to set up a type of videos to be used in a VR mode.
• Mono: Select if a file is a general 2D video.
• Left/right video: Select if a file is a 3D video split horizontally.
• Up/down video: Select if a file is a 3D video split vertically.
1
21
3

Basic Configuration 18
5) Subtitle Helper
Able to search for a subtitle or change the fonts, styles of the currently playing video.
Click the Subtitle Helper( ) icon then a pop-up menu will appear.
Figure 6. Subtitle Helper
① Subtitle Search/Upload
Subtitle
② Subtitle Setting
① Subtitle Search/Upload Subtitles
You can search for subtitles available in the subtitle archive or upload the current
subtitle to the GOM Player subtitle archive.
• Subtitle Search: Search for subtitles in the GOM Player subtitle archive.
• Upload Subtitle: Upload the currently used subtitle to the GOM Player subtitle
archive.
② Subtitle Settings
Able to set up whether or not to display subtitle and subtitle language.
• Select Language: As for a subtitle file that supports multiple languages, the
supported languages are displayed and you can select a desired language among
them.
• Show Subtitles: Turn subtitles on and off.
1
21

Basic Configuration 19
6) Save the Current Frame
Able to capture and store the currently featured screen in the currently playing video.
If you click the Save Current the Current Frame ( )icon, the currently playing video
image is captured and stored.
If you select advance video screen capture menu, you can configure the
storage directory by selecting the advanced screen capture menu in the
basic menu
To see how to capture and store the current screen, you can also refer
to the “How to ” in the “How to Use Additional Features” chapter.
7) Control Panel
Able to manage frequently used features by dividing into different categories. If you
use the control panel, it will facilitate not just playing a video but also frequently used
Setting during a video playback.
If you click the Control Panel( ) icon, the GOM Player Plus Control Panel will appear.
Figure 7. Control Panel
① Control Panel Menu ② Control Panel Items
① Control Panel Menu
Able to select a category in the menu to control.
• Playback: Control the items related to video playback.
• Video: Control the items related to the size and color of videos.
• Subtitles: Select the language of a subtitle or adjust a subtitle synch.
• Audio: Adjust the volume of video sound or set up audio effects.
• Capture: Capture and store the screenshot of a video.
② Control Panel Items
Control the relevant feature of each menu.
1
21

Basic Configuration 20

Basic Configuration 21
Playback
In the Playback Control Panel, you can change the running time or playback speed of
a video and set a section of a video to be played in loop or repeat.
Figure 8. Playback Control Panel
① Time Jump
② Playback Speed
③ A-B Repeat
① Time Jump
Control the running time of a video being played.
② Playback Speed
Control the speed of a video being played. If you click the RESET button, the
speed of the video will reset.
③ A-B Repeat
Turn on or off the section repeat feature. While playing a video, you can click the
Start button in the intended section of the loop and the End button at the end,
the relevant section will be played in repeat.
• RESET: The designated loop section will reset and the full area will be played.
To activate the Start button and the End button, you should turn the A-
B Repeat ON.
1 21
3

Basic Configuration 22
Screen
In the Screen Control Panel, you can view it in a full screen, adjust the size and color
of videos.
Figure 9. Screen Control Panel
① Full Screen mode
② Pan & Scan
③ Color setting
① Full Screen mode
Switch a screen into a Full Screen mode.
② Pan & Scan
You can control the screen using the pre-determined values in the Preset in the
Pan & Scan Menu. Whenever you click, the predetermined preset will rotate in
order. (Ex: Basic value → Preset1 → Preset2 → Preset3 → Basic value)
For details on Pan & Scan menu, refer to “How to Change Video
Position and Size” section in “오류! 참조 원본을 찾을 수 없습니다.”
chapter.
③ Color setting
Adjust the brightness, contrast, and saturation of a video. To change the value,
drag the slide bar or click +, - icon to obtain a desired value.
• RESET: Initialize the set values.
1 21
3

Basic Configuration 23
Subtitles
In the Subtitle Control Panel, you can select the language for subtitle and adjust size
and sync, etc., of subtitles.
Figure 10. Subtitles Control Panel
① Show Sub
② Next Language
③ Subtitle Setting
① Show Sub
Choose if you want to display subtitles on the screen.
② Next Language
Select the language of subtitles of a currently played video.
③ Subtitle Setting
Adjust the subtitle size, subtitle sync, and skip interval.
Skip interval refers to a time unit for skipping subtitle syncs. You can
configure the skip interval in 0.1 second unit from 0.1 to 1.0 seconds.
1 21
3

Basic Configuration 24
Audio
In the Audio Control Panel, you can adjust the sound volume and/or adjust equalizer
or normalizer.
Figure 11. Audio Control Panel
① Audio Volume
② Equalizer
③ normalizer
① Audio Volume
Adjust main volume and wave volume, respectively.
• master: Adjust the main volume.
• wave: Adjust wave volume.
② Equalizer
Determine whether or not an equalizer feature is to be used and adjust detailed
presets. If you turn on the equalizer function, the preset list for setting the
equalizer is activated.
③ Normalizer
Determine whether or not a normalizer feature is to be used.
1
21
3

Basic Configuration 25
Capture
In the Capture Control Panel, the screenshot of a currently played video can be
captured and stored.
Figure 12. 캡처 Control Panel
① Screen Capture
② Capture Setting
③ Open Folder
① Screen Capture
You can make consecutive screenshots of a currently played video. If you click the
number button, the relevant number of screenshot capture will be implemented.
② Capture Setting
During capturing consecutive screenshots, you can configure a capture interval
and the format of saved screenshots.
③ Open Folder
Open the folder where captured screenshots are saved.
1
21 3

Basic Configuration 26
8) Open
Able to import a video or music file in your PC or internet.
If you click the Open ( ) icon, file open window will appear.
The window displayed by clicking the Open( ) icon can be set in Basic
menu’s Open > Basic Open Setting menu.
For more detail on a file open window, refer to “오류! 참조 원본을 찾을
수 없습니다.” section in “오류! 참조 원본을 찾을 수 없습니다.” chapter.
Figure 13. File Open – Window Explorer

Basic Configuration 27
9) Playlist Window
Able to see the List of Playback Files.
Figure 14. Playlist Window
① List of Playback Files
② Repeat Settings
③ Shuffle Playlist
④ Add a File to the Playlist
⑤ Delete a File from the
Playlist
⑥ Select a List
⑦ Arrange a List
⑧ Playlist Open and Save
① List of Playback Files
Check the list of files to be played. The currently playing file is marked in orange
color.
② Repeat Settings
Determine whether or not to put all videos in the List of Playback Files on repeat.
Whenever you click the Repeat icon, it will be changed in the following order: No-
Repeat → Repeat All videos → Repeat one video.
• No-repeat( ): Playback until the last video in the List of Playback Files then stop
playback.
• Repeat all videos( ): Repeat all videos in the List of Playback Files.
• Repeat one video( ): Repeat the currently playing video over and over again.
1
21
3 4 5 6 7 8

Basic Configuration 28
③ Shuffle Playlist
Play back videos in the List of Playback Files in random order.
④ Add a File to the Playlist
Add a new video file to the List of Playback Files.
• File: Add the selected video file to the list.
• Folder: Add all video files in the selected folder to the list.
• URL Add a video file in the entered internet URL to the list.
⑤ Delete a File from the Playlist
Able to delete video files in the List of Playback Files from the List of Playback
Files.
• Selected file: Delete the selected file from the List of Playback Files.
• Not-selected file: Delete all video files except the selected file from the List of
Playback Files.
• All: Delete all video files from the List of Playback Files.
• Non-existing file: Delete all video files that are not actually in the List of Playback
Files other than names.
⑥ Select a List
Able to select video files in the List of Playback Files.
• Select All: Select all video file in the List of Playback Files.
• Select the Rest 선택 반전: Select all files except the chosen file.
• 선택한 file 을 제외한 나머지 file 을 모두 선택합니다.
⑦ Arrange a List
Able to arrange video files in the List of Playback Files.
• Arrange by folder: Arrange video files by different folders.
• Arrange in ascending order: Arrange video files in ascending order by file names.
• Arrange in descending order: Arrange video files in descending order by file
names.
⑧ Playlist Open and Save
Able to find the previously saved List of Playback Files or save the current List of
Playback Files.
• Open Playlist: Find the previously saved List of Playback Files.
• Save Playlist: Save the current List of Playback Files.
• Save the Playlist as different name: Save the current List of Playback Files as
different name.
• Maintain Playlist: Keep the current playlist even after closing the program.

Basic Configuration 29
2. Learn about Basic Menu
Basic menu refers to the menu that appears when you click Logo( ) in
the Top Bar Area or the right button on the mouse in the main screen.
Figure 15. Basic Menu
① How to Import Files
② DVD Control
③ Playback Environment
Settings
④ Preference Settings
⑤ Playback 360︒video
⑥ Exit
① How to Import Files
Able to open a video file in your PC or connect to a file on the internet video. If
you use Favorites function, you can easily register and play frequently played
videos.
② DVD Control
Control DVD video using the exclusive DVD menu. This function is activated when
a DVD video is played.
1
21
3
4
5
6

Basic Configuration 30
③ Playback Environment Settings
Set all detail related to video playback.
④ Preference Settings
Set the basic program environment or check the playback information, program
information and update information.
⑤ Playback 360︒video
Play 360︒VR videos.
⑥ Exit
Terminate a program.

How to Play Videos 31
How to Play Videos
With GOM Player Plus, you can easily find out videos in your PC or internet.
1. How to Play General Videos
If you click the Open menu in the basic, you can import video files in PC or on the
internet in the pop-up menu.
Figure 16. Open menu
• Simple Open: Use the simple open window to import a video file in the PC.

How to Play Videos 32
• Open File: Import video files in your PC using the Window Explorer.
• OPEN URL: Connect to a video or broadcast on the internet.

How to Play Videos 33
• Open Folder: Import all video files in the selected folder.
• Basic Open Setting: If you click the Open ( ) icon on the bottom of the main scree,
you can configure how to open a file.

How to Play Videos 34
1) How to Play Videos in your PC
To playback videos in your PC, take the following steps.
1. Select Open > Open file 열기 menu in the basic menu를 선택하세요.
2. After selecting a file to playback, click the Open button.
How to Play Videos 35
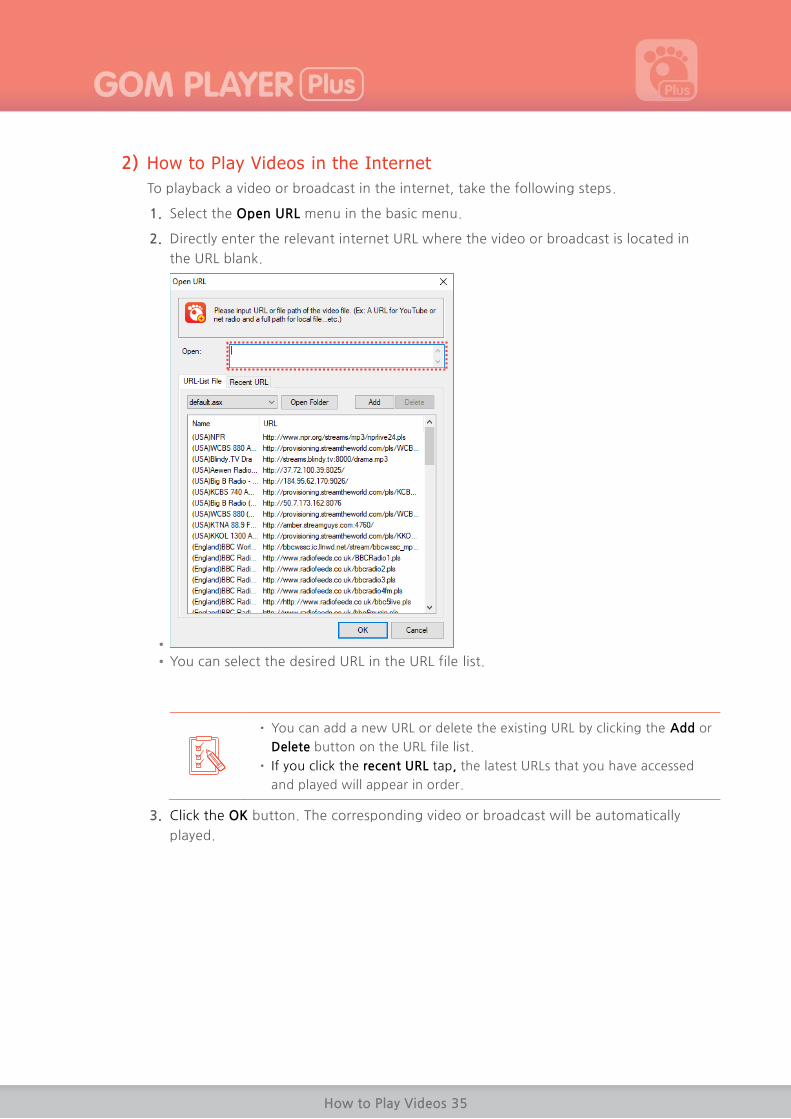
2) How to Play Videos in the Internet
To playback a video or broadcast in the internet, take the following steps.
1. Select the Open URL menu in the basic menu.
2. Directly enter the relevant internet URL where the video or broadcast is located in
the URL blank.
•
• You can select the desired URL in the URL file list.
You can add a new URL or delete the existing URL by clicking the Add or
Delete button on the URL file list.
If you click the recent URL tap, the latest URLs that you have accessed
and played will appear in order.
3. Click the OK button. The corresponding video or broadcast will be automatically
played.

How to Play Videos 36
2. How to Play DVDs
If you select DVD Control Panel Menu in the basic menu, you can playback a DVD video
in a pop-up menu displayed.
DVD Control Panel Menu is activated when a DVD video is played.
Figure 17. DVD Control Panel Menu
① Chapter Shift
② Audio, Subtitles, Angle
Setting
③ Select Exclusive DVD
Menu
① Move to another Chapter
Move to different chapter in a DVD video.
② Audio, Subtitles, Angle Setting
Select audio, subtitle track, and angle of a DVD video.
③ Select Exclusive DVD Menu
Move to the exclusive DVD menu.
1) How to Move a Chapter to Another
Able to skip to each chapter of a DVD video.
• Previous Chapter: Move to the previous chapter.
• Next Chapter: Move to the next chapter.
• Move: Select the desired chapter to move. If you select a menu, a chapter to move
will be displayed.
1
21
3

How to Play Videos 37
2) How to Select Audio, Subtitles, Angle
Able to select audio, subtitles, angles of an DVD video. If you select each menu, the
corresponding item for selecting will be displayed.
• Audio Output: Select the desired audio track (language track).
• Subtitle Option: Select the subtitle track to be displayed on screen.
• Angle Option: Select the screen angle.
Audio Output feature can only be used in a DVD video that has two or
more audio tracks.
Subtitle Option can only be used in the DVD video that includes
subtitles.
3) Move to the Exclusive DVD menu
Able to move to the exclusive DVD menu. If you select each menu, move to the
corresponding menu.
• Root menu: Move to the root menu.
• Title menu: Move to the title menu.
• Chapter menu: Move to the Select Chapter menu.
• Audio Output menu: Move to the Audio Output menu.
• Subtitle Option menu: Move to the Subtitle Option menu.
• Angle Option menu: Move to the Angle Option menu.
Audio Output menu can only be used in a DVD video that has two or
more audio tracks.
Subtitle Option menu can only be used in the DVD video that includes
subtitles.

How to Play Videos 38
3. VR How to Play Videos
Able to play videos produced in a VR (Virtual Reality) format. If you select the Playback
360︒video in the basic menu, you can import and play VR videos in the pop-up menu
displayed.
Figure 18. Playback 360︒VR video menu
① Playback 360︒video
② 360︒VR Mode Setting
③ VR video Setting
④ Help for 360︒VR mode
① Playback 360︒video
Import 360︒ videos in your PC or in the internet.
② 360︒VR Mode Setting
Start or stop VR mode.
③ VR video Setting
Set the types of videos to be used in VR mode.
• Mono: Select if it is a General 2D video.
• Left/Right Mode: Select if a file is a 3D video split horizontally.
• Up/Down Mode: Select if a file is a 3D video split vertically.
④ Help for 360︒VR mode
It will show the help for the Playback 360 VR Video.
1
21
3
4

How to Play Videos 39
1) Playback VR video file
To playback VR videos in your PC or in the Internet, take the following steps.
1. Select Playback 360︒video > Playback 360︒video menu in the basic menu.
2. After searching for 360︒videos, select the video to play from the list.
You can directly enter the title of the desired video in the YouTube
Search box to find out the video.
Open file ... If you click the button, you can import 360︒video saved
in your PC.

How to Play Videos 40
2) HOW TO USE VR FEATURES
Able to control the currently playing VR video with the mouse and keyboard.
How to Make Screen Transition
You can drag the mouse or click keyboard button to do screen transitions in the
direction you want.
Table 1. How to Do Screen Transition in Different Directions
Direction Mouse Keyboard
Rotate to the left After clicking the screen, drag to
the right Keep pressing A key
Rotate to the
right
After clicking the screen, drag to
the left Keep pressing D key
Rotate to upright After clicking the screen, drag to
upright Keep pressing W key
Rotate to
downright
After clicking the screen, drag to
downright Keep pressing S key
If you click the screen transition on the righthand side of the video, you will
see the image for the corresponding direction.
1. Left preview
2. Right preview
3. Front preview
4. Back preview
Screen Zoom-in/Zoom-out
You can zoom-in or zoom-out the screen by pressing + or – key on the keyboard.
1
21
3
4

How to Play Videos 41
4. How to Use Favorites
Register frequently watched videos or a folder containing such videos to Favorites, then
you can easily watch your desired videos whenever you want to enjoy.
If you select the Favorites menu in the basic menu, you can register and playback videos
or folders in the pop—up menu displayed.
Figure 19. Favorites menu
① Add Current File
② Add Current Directory
③ Manage Favorites
④ Favorites List
① Add Current File
Add the currently playing video file to the Favorites list. This feature is activated
while the video is played.
② Add Current Directory
Add the folder in which the currently playing video file is saved to the Favorites
list. This feature is activated while the video is played.
③ Manage Favorites
The Manage Favorites window will appear. You can add to, delete from, or edit
video files or folder in Favorites.
④ Favorite List
Select the list of video files or folders registered in Favorites.
1
21 3
4

How to Play Videos 42
1) How to Add to Favorites
If you select the Favorites > Manage Favorites... menu in the basic menu, you can add
to, delete from the window displayed in the screen.
Figure 20. Manage Favorites Window
• Add: Add a video file or folder where a video file is saved to the Favorites List.
• Edit...: Modify the name and directory of the selected element in the Favorites.
• Delete: Delete the selected element in the Favorites List.
• Clear All: Delete all elements registered in the Favorites.
• Open: Play the elements selected in the Favorites.
• Add to PL: Add the selected elements from the Favorites to the Playlist.

How to Play Videos 43
2) How to Use Favorites
If you select the Favorites menu in the basic menu, the newly added video file or
folder to the Favorites is displayed. If you have added a video file to the Favorites, it
will be instantly played and a folder, the relevant folder will open.
Figure 21. Favorites List
You can play a video or add a video in the Playlist in the Manage Favorites
window.

How to Configure Playback Settings 44
How to Configure Playback Settings
GOM Player Plus has a range of environment setting features useful in playing video files
or clips. Each feature has its own shortcut key, which facilitates users to modify playback
environment while playing a video.

How to Configure Playback Settings 45
1. Playback Settings
If you select the Playback menu in the basic menu, you can make a detailed setting in the
pop-up menu displayed on screen.
Figure 22. Playback Menu
① Bookmarks
② Playback Control
③ Speed
④ Playback Interval
⑤ A-B Repeat/ Intro-Outro
Frame Skip
⑥ Playback File(Chapter)
Change
⑦ Playlist Repeat
⑧ Playlist Shuffle
1
21
3
4
5
6
7
8

How to Configure Playback Settings 46
① Bookmarks
Organize Bookmarks feature in the specific part of the currently playing video. If
you add a specific part to the bookmark, you can designate a specific part for
bookmarks, the video playback will start from the designated part for the
bookmark.
② Playback Control
Control the currently playing video.
• Play/Pause: Play or temporarily stop the currently playing video.
• Stop: Stop the currently playing video and return to the main screen.
• Next frame: Move to the image of the next frame.
• Previous frame: Move to the image of the previous frame.
③ Playback Speed
Control the playback speed of the currently playing video.
④ Playback Interval
Control the playback section of the currently playing video.
⑤ A-B Repeat/Intro-Outro Frame Skip
Play, or skip a specific section of the currently playing video.
⑥ Playback File(Chapter) Change
Select and play videos in the playlist. In case of DVD videos, you can select a
chapter in a video to play
⑦ Playlist Repeat
Repeat the playback of videos in the playlist.
⑧ Playlist Shuffle
Play videos in the playlist in random order.

How to Configure Playback Settings 47
1) How to Change Playback Speed
You can change the playback speed of the currently playing video in the playback
speed area of the playback menu.
• Speed - Normal: Set the playback speed of the currently playing video to normal.
• Speed - Down: The playback speed will slow down by 0.1x than the original speed
of the video.
• Speed - Up: The playback speed will speed up by 0.1x than the original speed of the
video.
• Maintain Play Speed: Determine whether or not to maintain the modified playback
speed. If the Maintain Play Speed is set, the same speed will be applied to the next
video file.
• Use Voice Adjustment: Able to increase the playback speed without shifting the
pitch of the audio track.
2) How to Change Playback Interval
You can change the playback interval the currently playing video in the playback
interval area of the playback menu.
• Move to the Next Frame: Forward by 1 frame.
• Move to the Previous Frame: Backward by 1 frame.
• Backward 10 sec.: Backward by 10 sec.
• Forward 10 sec.: Forward by 10 sec.
• Backward 60 sec: Backward by 60 sec.
• Forward 60 sec.: Forward by 60 sec.
• Forward 300 sec.: Backward by 300 sec.
• Forward 300 sec.: Forward by 300 sec
• Restart from the beginning: Restart the video from the beginning.
• Time Jump: Play the video from the time frame entered by user.
• Move by Keyframe: Set video to move backward or forward based on the keyframe
of the video. It will expediate the search speed of the video at the expense of
accuracy.
• Previous Subtitle Position: Skip to the position where the previous subtitle begins.
• Next Subtitle Position: Skip to the position where the next subtitle begins.
3) How to Set A-B Repeat
You can configure a video to Repeat a certain section in the A-B Repeat of the
Playback menu.

How to Configure Playback Settings 48
Repeat a Single Loop
Select the Playback > A-B Repeat menu in the basic menu then you can manage the
Loop Repeat in a pop-up menu displayed on screen.
Figure 23. A-B Repeat menu
• Set A-B Repeat Start Point: Determine the starting point of the loop section.
• Set A-B Repeat End Point: Determine the finishing point of the loop section.
• Undo A-B Repeat Start Point: Undo the starting point of the loop section.
• Undo A-B Repeat End Point: Undo the finishing point of the loop section.
• Clear A-B Repeat Settings: Cancel the section repeat feature.
• Sequential Playback: Set to repeat the multiple loop section to be played in
sequential order. It can be used when the multiple loop section is set.
• Edit A-B Repeat...: If you select the Edit A-B Repeat menu, the multiple section edit
window will appear.

How to Configure Playback Settings 49
How to Repeat Multiple Loops
Able to repeat more than one sections consecutively. If you select Playback > A-B
Repeat > Edit A-B Repeat... menu in the basic menu, the Edit-A-B repeat window will
appear.
Figure 24. Edit A-B Repeat Window
• Timeframe List: Display the list of currently set time frames.
• Set your starting point: Enter the starting point of the loop.
• Set your ending point: Enter the ending point of the loop.
• Addition: Add the designated section to the timeframe list.
• Start your replay: Play the designated time frame on repeat. If you choose the
Repeat all, it will loop all the timeframes in the timeframe list.

How to Configure Playback Settings 50
4) How to Set Intro/Outro Frame Skip
You can configure a video to skip the certain parts of the beginning and the end of
the video in the pop-up menu that appears when you select the Replay > Intro/Outro
Frame Skip menu in the basic menu.
Figure 25. Intro/Outro Frame Skip Menu
• Frame Skip Settings: Frame skip settings window appears. After selecting the Enable
frame Skip, you can configure which section will skip in the beginning and ending
sections of the video.
• Enable Frame Skip: Determine whether or not to use the frame skip feature.
5) How to Change the Playback File (Chapter)
You can modify the video file to play in the Playback File(chapter) Change area of the
Playback menu.
• Previous file(chapter): Play the previous file (chapter in case of a DVD) of the
currently playing video in the playlist.
• Next file(chapter): Play the next file (chapter in case of a DVD) of the currently
playing video in the playlist.
6) How to Set Repeat the Playlist
You can configure certain videos in the playlist to repeat in the Video list repeat
setting of the Playback menu.

How to Configure Playback Settings 51
• Do not repeat: Replay a video once.
• Repeat all lists: Make all videos in the playlist to repeat.
• Repeat one list: Repeat the currently playing video only.
7) Hot to Set Playlist Shuffle
If you set the Shuffle Playlist in the playlist shuffle area of the Playback menu, you can
repeat videos in the playlist in random order.
8) How to Set Bookmarks
You can configure a bookmark feature in the specific part of the currently playing
video. If you add a specific part to the bookmark, you can designate a specific part for
bookmarks, the video playback will start from the designated part for the bookmark.
Figure 26. Bookmarks menu
• Create Bookmark(N): Add a bookmark to the present point of the currently playing
video.
• Clear all Bookmarks: Remove all bookmarks from the current video.
• Previous Bookmark: Move to the previous bookmark.
• Next Bookmark: Go back to the next bookmark.
• Edit Bookmarks(B): Manage Bookmarks window appears. You can add, remove
bookmarks or set up the bookmark configuration.

How to Configure Playback Settings 52
Figure 27. Manage Bookmarks Window

How to Configure Playback Settings 53
2. Subtitle Setting
If you select the Subtitles menu of the basic menu, you can configure the detail on
subtitles in the pop-up menu displayed on screen.
Figure 28. Subtitles menu
① Select Language
② Show Subtitles
③ Subtitle Explorer
④ Subtitle Position Settings
⑤ Subtitle Spacing Settings
⑥ Subtitle Font Style
Settings
⑦ Subtitle Sync Settings
⑧ 3D Subtitle Mode
① Select Language
Able to set up the language of the currently playing video and the second
subtitles.
② Show Subtitles
Display or hide subtitles on screen.
③ Subtitle Explorer
Confirm the subtitle scripts of a video by different play time, and adjust sync
between video and subtitles.
1
21 3
4
5
6
7
8

How to Configure Playback Settings 54
④ Subtitle Position Settings
Set the location of subtitle on screen in the video.
⑤ Subtitle Spacing Settings
Set the margins around the subtitle texts.
⑥ Subtitle Font Style Settings
Set the size and font style such as boldfaced.
⑦ Subtitle Sync Settings
Set the sync between a video and its subtitles.
⑧ 3D Subtitle Mode
Select the subtitle mode suitable for a 3D video.
1) How to Select Language
If you select the Select Language menu in the Subtitles menu, you can manage the
language of the currently playing video and the second subtitle in the pop-up menu
displayed on screen.
Figure 29. Select Language menu
• Second Subtitle Setting: set the 2nd subtitle to be displayed on screen.
• Maintain the 1st subtitle setting: Maintain the setting of the subtitle selected as the
1st language.

How to Configure Playback Settings 55
2) Subtitle Explorer
You can check the subtitle scripts of a video by different play times and adjust the
sync between the video and its subtitles in the Subtitle Explorer displayed on screen if
you select the Subtitle Explorer menu in the Subtitles menu
If you double click on the subtitle script, it will move to the corresponding
part of the video.
Figure 30. Subtitle Explorer Window
• Open ( ): Import the subtitle file.
• Save ( ): Store what’s modified in the Subtitle Explorer.
• Slow down by 0.5 sec. ( )/Speed up by 0.5 sec.( ): Adjust the subtitle sync in
the unit for a duration of 0.5 sec..
• Adjust all syncs in the selected position ( ): Adjust the default sync according to
the selected subtitle scripts.
• Search the current sync기( ): Find out the sync of the currently playing subtitle on
screen.
• Move to the current sync( ): Move to the sync of the currently playing subtitle on
screen.
• Enlarge Text( )/Reduce Text( ): Adjust the font size of text in the Subtitle
Explorer.

How to Configure Playback Settings 56
Though you change the font size of the Subtitle Explorer, the actual size
of the subtitle displayed in the video stays the same.

How to Configure Playback Settings 57
3) How to Change Subtitle Positions
You can configure the position of subtitles in the Subtitle Position Settings area of the
Subtitles menu
• Default Position: Move the position of subtitle to the default position.
• Up by 2%: Move the position of subtitle texts up by 2% from the current one.
• Down by 2%: Move the position of subtitle texts down by 2% from the current
one.
• Left by 2%: Move the position of subtitle texts to the left by 2% from the current
one.
• Right by 2%: Move the position of subtitle texts to the right by 2% from the
current one.
4) How to Adjust Subtitle Spacing
You can configure the size of margins around subtitle texts in the Subtitle Position
Settings area of the Subtitles menu
• Increase Horizontal Spacing: Enlarge the horizontal margins around the subtitle
texts.
• Decrease Horizontal Spacing: Reduce the horizontal margins around the subtitle
texts.
• Increase Vertical Spacing: Enlarge the vertical margins around the subtitle texts.
• Decrease Vertical Spacing: Reduce the vertical margins around the subtitle texts.
5) How to Change Subtitle Font Style
You can modify sizes and font styles of subtitles in the Subtitle Position Settings area
of the Subtitles menu
• Auto Fond Resizing: Adjust the font size of the subtitle texts automatically in line
with the size of a video. If this function is cancelled, the font size remains the same
even if the screen size varies.
• Font - Bold: Show the subtitle texts in boldfaced style.
• Increase Font Size: Make the subtitle texts larger than the current one.
• Decrease Font Size: Make the subtitle texts smaller than the current one.
6) How to Adjust Subtitle Sync
You can adjust the subtitle sync according to the video in the Subtitle Position
Settings area of the Subtitles menu

How to Configure Playback Settings 58
• 0.5 second(s) faster: Show the current subtitles 0.5 sec. faster than before.
• 0.5 second(s) slower: Show the current subtitles 0.5 sec. slower than before.
• Default Sync: Go back to the default sync of the subtitles.
• Save the Current Sync: Save the modified subtitle sync.
7) How to Set 3D Subtitle Mode
You can select the appropriate subtitle mode for a 3D video by selecting 3D Subtitle
Mode in the Subtitles menu.
• Side-by-Side mode: Show the subtitles to align with a 3D video produced in side by
side mode.
• Top-and-Bottom mode: Show the subtitles to align with a 3D video produced op-
and-Bottom mode.

How to Configure Playback Settings 59
3. Video Settings
If you select the video menu of the basic menu, you can configure detail on video in the
pop-up menu displayed on screen.
Figure 31. Video Menu
① Video Orientation
② Video Zoom In/Out
③ Screen Capture
④ Video Effects
⑤ Video Color
① Video Orientation Settings
Able to rotate a video, turns it upside down or sideways.
② Video Zoom In/Out
Able to enlarge or reduce a video by aspect ratio or scale in pixel scale.
③ Screen Capture
Able make a screenshot of the currently playing video and save it.
• Advanced Screen Capture: Able to make consecutive screenshots or designate the
background for window wallpaper for the desktop. If you select the menu, the
1
21
3
4
5

How to Configure Playback Settings 60
consecutive screen capture window will appear in the Advanced Screen Capture
window.
• Open Screen Capture Folder: Open the folder where screenshots are stored.
• Copy the Current Frame: Copy the current image in the clipboard.
• Save the Current Frame: After capturing the current image, save the image.
• Create Snapshot Preview: After consecutively capture video screens, turn them
into snapshots.
• Set as Wallpaper: Set the current image as the wallpaper of the window desktop.
To learn about how to capture and store a video, refer to “How to ”
section of “How to Use Additional Features” Chapter.
④ Video Effects
Able to create effects in the currently playing video.
⑤ Video Color
Able to calibrate the graphic elements of a video.
1) How to Change Video Orientation
You can rotate a video or turn it upside down or sideways in the of Video Orientation
area of the Video menu
• Rotate: Rotate a video 90︒, 180︒, 270︒. After selecting Rotate menu, determine
the exact angle for rotation.
• Flip - Input: Flip the imported video upside down(up/down).
• Flip -Output: Flip the exported video upside down (up/down).
• Mirror - Input: Flip the imported video vertical (Left/right).
• Mirror - Output: Flip the exported video vertical (Left/right).
If you select the Mirror-Input, it will only flip the video vertical, and not the
overlay items(subtitles) inscribed in the video. For instance, if you select the
Mirror-Input for a video with a separate subtitle file, it is only the video that
is flipped sideways, and the subtitles will be displayed as before. However,
if you select the Mirror-Output, both video and subtitles will be flipped
vertical.

How to Configure Playback Settings 61
2) Video Zoom In/Out
You can enlarge or reduce the video in the Video Zoom IN/Out area of the Video
menu
• Use Default Screen Size: Fit the video to the screen while maintaining the original
ratio of the video.
• Zoom In by Aspect Ratio: Adjust the size of a video according to pre-determined
ratio in the detail settings. The margins that do not fit to the ratio will be displayed
as black background.
• Zoom Out by Aspect Ratio: size of a video according to pre-determined ratio in the
detail settings. The margins that do not fit to the ratio will not be displayed on
screen.
• Zoom In/Out by Pixel: Able to enlarge or reduce the upper and bottom part or the
left and right part of a video in pixel scales. If you shrink a video smaller than basic
size of the video, the reduced part will not be displayed.
• Details: Able to set up details for adjust video in ratio or pixel scale.
- Zoom In/Out by Aspect Ratio: set the basic ratio for resizing videos.
- Zoom In/Out by Pixel: Add or remove pixels on the upper and bottom parts, or left
and right sides of a video.
If you select the Use Default Screen Size, the Details menu will be
deactivated.
3) How to Apply Video Effects
You can apply various video effects in the Video Effects area of the Video menu
• Video Settings: The video Settings window of the Environment Settings will appear.
Able to manage the video related settings.
• Soften: Make the video look softer.
• Sharpen: Mark the video look more vivid.
• Noise: Add noise effect on a video.
• Default: Delete all effects applied to a video.
4) How to Calibrate Color
You can calibrate the color of video in the Video Color area of the Video menu
• Decrease Brightness by 2%: drop a video’s brightness by 2%.
• Increase Brightness by 2%: Raise a video’s brightness by 2%.
• Increase Contrast by 2%: Reduce a video’s contrast by 2%.

How to Configure Playback Settings 62
• Decrease Contrast by 2%: Raise a video’s contrast by 2%.
• Decrease Saturation by 2%: Reduce a video’s saturation by 2%.
• Increase Saturation by 2%증가: Raise a video’s saturation by 2%.
• Decrease Hue by 2%: Reduce a video’s hue by 2%.
• Increase Hue by 2%: Raise a video’s hue by 2%.
How to Configure Playback Settings 63
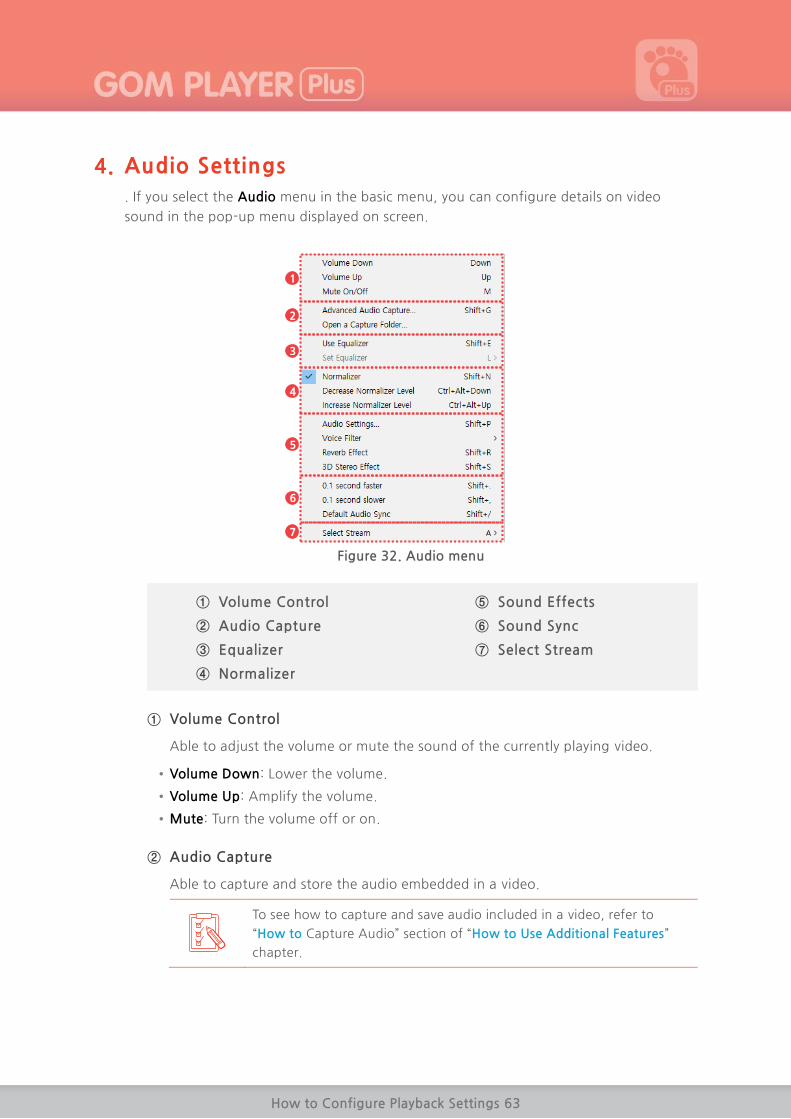
4. Audio Settings
. If you select the Audio menu in the basic menu, you can configure details on video
sound in the pop-up menu displayed on screen.
Figure 32. Audio menu
① Volume Control
② Audio Capture
③ Equalizer
④ Normalizer
⑤ Sound Effects
⑥ Sound Sync
⑦ Select Stream
① Volume Control
Able to adjust the volume or mute the sound of the currently playing video.
• Volume Down: Lower the volume.
• Volume Up: Amplify the volume.
• Mute: Turn the volume off or on.
② Audio Capture
Able to capture and store the audio embedded in a video.
To see how to capture and save audio included in a video, refer to
“How to Capture Audio” section of “How to Use Additional Features”
chapter.
1
21
3
4
5
6
7

How to Configure Playback Settings 64
③ Equalizer
Able to Apply the equalizer1 effect to the audio of the currently playing video.
④ Normalizer
Able to Apply the normalizer2 effect to the audio of the currently playing video.
⑤ Sound Effects
Able to apply sound filters, Reverberation or 3D stereo effect to the currently
playing video.
⑥ Sound Sync
Able to adjust the sync between audio and the currently playing video.
⑦ Select Stream
Able to modify audio tracks and output channels embedded in he currently
playing video.
1) How to Use Equalizer Settings
You can configure the equalizer effect in the Equalizer settings area of the Audio
menu.
• Use Equalizer: Determine whether or not to use the Equalizer effect.
• Set Equalizer: Select the Equalizer Preset.
You can add, modify or remove presets in the Audio Settings > Audio Tab
of the of Environment Settings (Advanced Setting). To see how to add,
modify or remove presets, refer to “오류! 참조 원본을 찾을 수 없습니다.”
section of “오류! 참조 원본을 찾을 수 없습니다.”.
2) How to use Normalizer Settings
You can configure the normalizer effect in the Normalizer settings area of the Audio
menu.
1 Equalizer: A feature to adjust the loudness of treble or bass in frequencies of the original
sound
2 Normalizer: A feature to smooth out peaks and troughs of original sounds by normalizing
their loudness.

How to Configure Playback Settings 65
• Normalizer: Using this option allows you to set the sound level higher or lower in
average.
• Decrease Normalizer Level: Lower the normalized sound in general.
• Increase Normalizer Level: Elevate the normalized sound in general.

How to Configure Playback Settings 66
3) How to Apply Sound Effects
You can apply sound effects in the Sound Effects area of the Audio menu.
• Audio Settings: It shows the Audio Settings windows in the Environment Settings.
Able to manage the audio related settings.
• Voice Filter: Apply a filter to the voice embedded in a video. After selecting the
Voice Filter menu, you can choose whether or not to use voice filter, and types of
voice filers.
- Disable: Do not use a voice filter (Default).
- Remove Voice: Remove the voice from a video.
- Isolate Voice: Emphasize on the voice in a video.
• Reverb Effect: Determine whether or not to use Reverberation effect.
• 3D Stereo Effect: Determine whether or not to use 3D Stereo effect.
You can manage details on voice filter and different effects in the Audio
Settings > Audio Tab of the of Environment Settings (Advanced Setting).
To see how to manage details of audio effects, refer to “오류! 참조 원본을
찾을 수 없습니다.” section of “오류! 참조 원본을 찾을 수 없습니다.”.
4) How to Adjust Audio Sync
You can adjust the sync between video and audio in the Sound Sync area of the
Audio menu.
• 0.1 second faster: Play the sound 0.1 second faster.
• 0.1 second slower: Play the sound 0.1 second slower.
• Default Audio Sync: Reset the audio sync to default values.
5) Select Stream
If you select the Select Stream menu of the Audio menu, you can modify audio tracks
and output channels embedded in the currently playing video.
This feature is available only when there are more than two audio tracks
embedded in a video.

How to Configure Playback Settings 67
5. Filter Settings
If you select the Filter menu in the main menu, you can open the filter setting window or
find the list of current filters and relevant information in the pop-up menu displayed on
screen.
Figure 33. Filter menu
① Advanced Filter settings ② Filter List
① Advanced Filter Settings
You will see the Advanced Filter Settings of the Filter settings in Environment
Settings.
To see Filter Settings in the Advanced Setting Tap, refer to “오류! 참조
원본을 찾을 수 없습니다.s” section of “오류! 참조 원본을 찾을 수
없습니다.” Chapter.
② Filter List
Able to see the list of filters in use. If you select each filter, the relevant
information window will appear.
1
21

How to Configure Playback Settings 68
6. Aspect Ratio Settings
If you select the Aspect Ratio menu in the basic menu, you can configure the aspect ratio
of the currently playing video in the pop-up menu displayed on screen.
Figure 34. Aspect Ratio menu
① Fixed Aspect Ratio Settings
② Aspect Ratio Settings
③ Output Mode Settings
① Fixed Aspect Ratio Settings
You can determine whether or not to have the fixed aspect ratio for a video.
• Enable (Fit to Video): Display a video fits to their original ratio within the window
frame.
• Enable (Fit to Window): Display a video fit to the window frame in the original
aspect ratio of the video. If the aspect ratio of the window frame is different from
the that of the original video, some parts of video will not be displayed.
• Disable: Video will fit to window frame regardless of the original ratio of the
video.
② Aspect Ratio Settings
Able to set up aspect ratio of videos. If you select the desired ratio from the below
options, the aspect ratio of the video will be changed accordingly.
If you select the Disable in the Fixed Aspect Ratio Settings, the
Aspect Ratio setting area will be deactivated.
User Defined ratio can be set in Video > Aspect Ratio tab of the
Environment Settings (Advanced Settings).
① Output Mode Settings
Able to set up the aspect ratio of a video. If you select the desired ratio from the
below options, the aspect ratio of the video will be changed accordingly.
1
21
3

How to Configure Playback Settings 69
7. How to Change Video Position and Size
If you select the Pan & Scan menu in the basic menu, you can adjust the position and size
of the currently playing video in the pop-up menu displayed on screen.
I
Figure 35. Pan & Scan Menu
① Reset to Default
② Preset
③ Move Video
④ Video Size Settings
① Reset to Default
You can change the size and position of modified video into the original ones.
② Preset
Using the pre-determined preset, you can modify the size and position. If you
select the Preset menu, the pre-determined list of presets will appear.
③ Move Video
You can move the video vertically or horizontally within the window frame.
④ Video Size Settings
You can modify the entire size of the video or selectively change its width or
height only.
1
21
3
4

How to Configure Playback Settings 70
How to Set Presets
If you select the Preset > Preset Edit menu in the Pan & Scan menu, you can add, modify
or delete a preset in the Pan & Scan Preset window displayed on screen.
Figure 36. Pan & Scan Preset Window
• List: Show the predetermined preset list. If you select the Preset, the corresponding
value of preset will appear in the Present Edit.
- Add: Add the newly entered values in the Preset edit setting to the list of presets.
- Delete: Delete the selected present in the List.
- Up/Down: Modify the order of selected presents in the List.
• Preset Edit: Allow you to set the name, position and size values of the target video.
• Apply: Apply the newly entered value in the Preset edit to the selected preset.
• Close: Close the Pan & Scan Preset window.

How to Configure Playback Settings 71
8. How to Change Window Position and Size
If you select the Pan & Scan menu in the basic menu, you can adjust the position and
position of window in the pop-up menu displayed on screen.
Figure 37. Pan & Scan Menu
① Move Window
② Window Size Settings
③ Window Position Settings
① Move Window
You can move the window position horizontally or vertically.
② Window Size Settings
You can change the entire size of the window.
③ Window Position Settings
You can configure the position of window displayed on the monitor screen.
1
21
3

How to Configure Playback Settings 72
How to Resize Window
If you select the Screen Size menu in the basic menu, you can adjust the size of
window as designated in the pop-up menu displayed on screen.
Figure 38. Screen Size Menu
① Window Size Settings ② Full Screen Settings
① Window Size Settings
You can magnify or shrink the size of the window in a certain ratio or in line with
predetermined criteria.
• Maximize (No Bank Space): Adjust the size of the window frame fit to the desktop
screen.
• Maximize: Adjust the size of the window frame fit to your monitor screen. If you
select this feature in the maximized state, it will return to the previous screen size.
• Fit to Video Input: Adjust the size of the window to fit to the size of the currently
playing video.
② Full Screen Settings
Adjust the size of window or video to fit to your monitor screen.
• Full Screen: Keep Ratio: Adjust the window frame to fit to your monitor screen.
• Full Screen: Stretched: Adjust the vertical or horizontal sides of the currently
playing video to fit to your monitor screen. This function does not keep the aspect
ratio of the video.
• Full Screen: Full Screen: Adjust the all sides of the currently playing video to fit to
your monitor screen. Depending on the aspect ratio, some parts of the video may
not be displayed
1
21

How to Use Additional Features 73
How to Use Additional Features
GOM Player Plus is not an ordinary video player but has a special feature to capture the
screenshot and audio of a video. Also, for those viewers who have difficulty to read
subtitles, it provides them with alternative means of subtitles, voice reading, through its
Text-To-Speech (TTS) feature.
1. How to Capture a Screenshot
You can make a screenshot from the currently playing video.
1) How to Capture a Single Frame
You can capture and save the image from the currently playing video.
If you want to capture and store the image from the currently playing video, click the
Save the Current Frame ( )Icon or select the Video > Save the Current Frame menu
in the basic menu.
The captured shot will be automatically saved and the directory for
saving can be changed in the advanced screen capture window.
Use the shortcut key(Ctrl + E) for easier screenshot capture.

How to Use Additional Features 74
2) How to Capture Consecutive Frames
You can capture and save the images of the currently playing video in a consecutive
way.
To capture and save the consecutive frames, please take the following steps.
1. Select the Video > Advanced Screen Capture in the basic menu.
2. When Advanced Screen Capture window appears, select which way to capture.
• Image Format: Set the type of image file to save the captured screenshot.
• Output Ratio: Set the ratio and size of the image to be saved.
• Quality: Set the quality of the image. This function will be activated if the image
format is JPEG.
• Burst Interval(sec.): Set the interval(time) of the screenshot captures. If you set the
capture item in the unit of frame, it will make screenshots of the video according
to the designated frame rates.

How to Use Additional Features 75
3. Burst Capture Images: Set the no. of screenshots to be consecutively captured.
4. Click the Bust Capture button.
If you click the Open Directory... button, you can see the saved
screenshots.
Using the GOM Player Plus Control Panel will allow you to consecutively
capture frames in an easier way. To see how to make a screenshot using
the control panel, refer to “오류! 참조 원본을 찾을 수 없습니다.” section
of “오류! 참조 원본을 찾을 수 없습니다.” Chapter.
3) How to Make Snapshots
You can consecutively capture the images of the currently playing video to produce
snapshots.
Figure 39. Snapshot Image
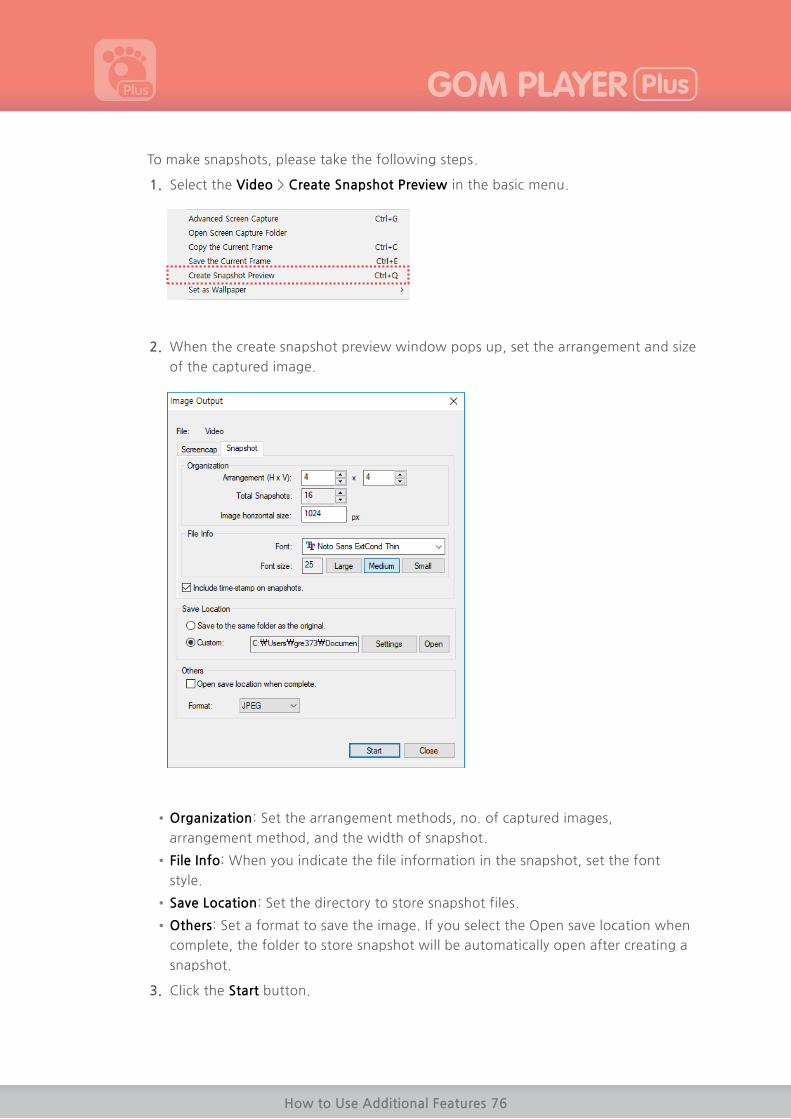
How to Use Additional Features 76
To make snapshots, please take the following steps.
1. Select the Video > Create Snapshot Preview in the basic menu.
2. When the create snapshot preview window pops up, set the arrangement and size
of the captured image.
• Organization: Set the arrangement methods, no. of captured images,
arrangement method, and the width of snapshot.
• File Info: When you indicate the file information in the snapshot, set the font
style.
• Save Location: Set the directory to store snapshot files.
• Others: Set a format to save the image. If you select the Open save location when
complete, the folder to store snapshot will be automatically open after creating a
snapshot.
3. Click the Start button.

How to Use Additional Features 77
4) How to Make a Wallpaper
You can turn the image of the currently playing video into a wallpaper for Windows’
desktop screen.
After selecting the Video > Set as Wallpaper menu in the basic menu, select which
way to arrange it to the desktop screen. After making a screenshot, apply it to the
Windows desktop screen.
Figure 40. Set as Wallpaper
The followings are the ways to arrange the screenshot to the Windows’ desktop
screen:
• Center: Display the screenshot image at the center of the desktop screen.
• Tile: If the screenshot image is smaller than the desktop screen, the multiplied
screenshot images will fill the desktop screen in the form of tiles.
• Stretch: If the screenshot image is smaller than the desktop screen, it will be
stretched to fit the desktop screen.
• Delete: Delete the wallpaper applied to the current desktop screen.
You can create a wallpaper in the Advanced screen capture window.
If the display setting of your PC has “Show Web Contents On My Active
Desktop”, this feature would not apply properly

How to Use Additional Features 78
2. How to Capture Audio
You can capture and save the audio embedded in a video in the Advanced Audio Capture
window displayed if you select the Audio > Advanced Audio Capture menu in the basic
menu.
To capture and save the audio embedded in a video, please take the following steps:
1. Select the Audio > Advanced Audio Capture menu in the basic menu.
2. When the Advanced Audio Capture window pops up, set the file saving directory,
storage format, and quality.
• Format: Set the format of the audio file to be saved *GOM player supports .wav
format and *.ogg format.
• Audio Quality: Set the quality of the audio file. If you select *.ogg format as
saving format, it will be activated.
3. Click the Start button.

How to Use Additional Features 79
3. How to Use Text-To-Speech (TTS) Feature
A Text-To-Speech (TTS) feature enables users to convert the subtitles embedded in a
video into voice. You can select the Accessibility Setting > TTS Activation menu in the
basic menu to turn the Text-To-Speech feature on or off.
If you select the Accessibility Setting menu, the Accessibility Setting of the
Preference pops up. For details on the Accessibility Setting, refer to
“Accessibility Setting (TTS)” section of “오류! 참조 원본을 찾을 수 없습니다.”
chapter.
Figure 41. Accessibility Setting Menu
① TTS ACTIVATION ② Accessibility Setting
① TTS ACTIVATION
Turn the Text-To-Speech function on or off.
② Accessibility Setting
Set the Text-To-Speech setting, if you click the menu, the Other Setting >
Accessibility Setting tap of the Preference (advanced setting) will appear.
1
21
How to Use Additional Features 80
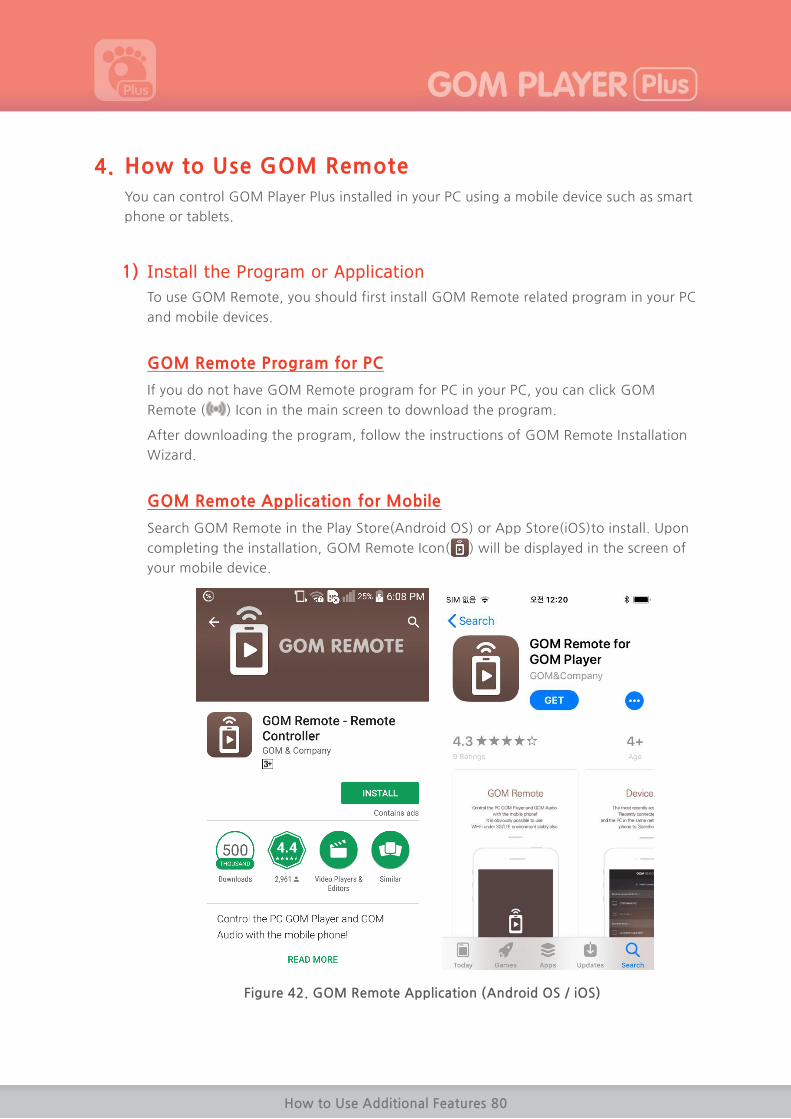
4. How to Use GOM Remote
You can control GOM Player Plus installed in your PC using a mobile device such as smart
phone or tablets.
1) Install the Program or Application
To use GOM Remote, you should first install GOM Remote related program in your PC
and mobile devices.
GOM Remote Program for PC
If you do not have GOM Remote program for PC in your PC, you can click GOM
Remote ( ) Icon in the main screen to download the program.
After downloading the program, follow the instructions of GOM Remote Installation
Wizard.
GOM Remote Application for Mobile
Search GOM Remote in the Play Store(Android OS) or App Store(iOS)to install. Upon
completing the installation, GOM Remote Icon( ) will be displayed in the screen of
your mobile device.
Figure 42. GOM Remote Application (Android OS / iOS)

How to Use Additional Features 81
2) Connect GOM Remote
To use GOM Remote, you should connect the PC with your mobile devices.
1. Run GOM Remote Application on your mobile devices.
2. When the device connection screen is displayed, tap the New connection button.
3. After checking if GOM Remote has been installed in the PC, tap the Yes button.
4. Run GOM Player Plus on your PC.

How to Use Additional Features 82
5. Click GOM Remote ( ) Icon located in the GOM Player Plus top bar area.
6. When a GOM Remote window appears, click the Issuing the security key button in
the Security Key tab.
7. After entering the security key generated in the security key input screen to the
security key boxes, tab the OK button.
1
2

How to Use Additional Features 83
8. When the verification code appears in the security key input screen, enter the
numbers and tab the OK button.
9. Check if the PC and the mobile device are connected without any problem.
1
2

How to Use Additional Features 84
3) Use GOM Remote
With the GOM Remote Application, you can control GOM Player Plus in your PC.
Figure 43. GOM Remote Application
① Program Start/End
② Preference
③ Hide Menu
④ Open File
⑤ Remote Control
⑥ Playlist
⑦ Snapshot
⑧ Mouse
⑨ Play Control Area
① Program Start/End
You can start or finish GOM Player Plus.
② Preference
You can control your PC power, set user environment for GOM Remote
Application environment, or find out how to use GOM Remote.
③ Hide Menu
You can display or hide the menu shown on the top of the screen.
④ Open File
You can play video files located on your PC.
1 21
3
4 5 6 7 8
9

How to Use Additional Features 85
⑤ Remote Control
You can check and use the frequently used features during playback in the form
of Remote Control.
⑥ Playlist
You can see the current playlist.
⑦ Snapshot
You can capture and save the image of the currently playing video.
⑧ Mouse
You can directly control your mouse cursor by using the touch screen of your
mobile device.
⑨ Play Control Area
You can control various features of GOM Player Plus including playback,
Pause/stop, volume, loop playback, etc.

Preference Settings (Quick Settings) 86
Preference Settings (Quick Settings)
This part describes the ways to set the preference and output setting of GOM Player Plus.
if you click Preference ( ) Icon on the top bar area or select the Preference menu in the
basic menu, the Preference window will appear.
Figure 44. Preference > Quick Settings
① Preference Category List
② Reset
③ Backup Preference
④ Advanced Settings/Quick
Settings
⑤ Close
⑥ Category Tab
⑦ Setting Area
① Preference Category List
You can select which environment to set.
• Quick Settings: You can manage the settings regarding playback, video, subtitle,
and audio.
• Player Info.: You can check the information on GOM Player Plus or cancel the
license.
1
21 3
4
5
6
7

Preference Settings (Quick Settings) 87
② Reset
Change all settings to the default mode of the program.
③ Backup Preference
Store the currently set preference information in a register file.
④ Advanced Settings/Quick Settings
Convert to Quick Settings or Advanced Settings.
⑤ Close
Close the Preference window. The changed settings will be kept as it is.
⑥ Category Tab
Select the setting category included in the selected preference.
⑦ Setting Area
Check and modify setting items contained in the selected category.
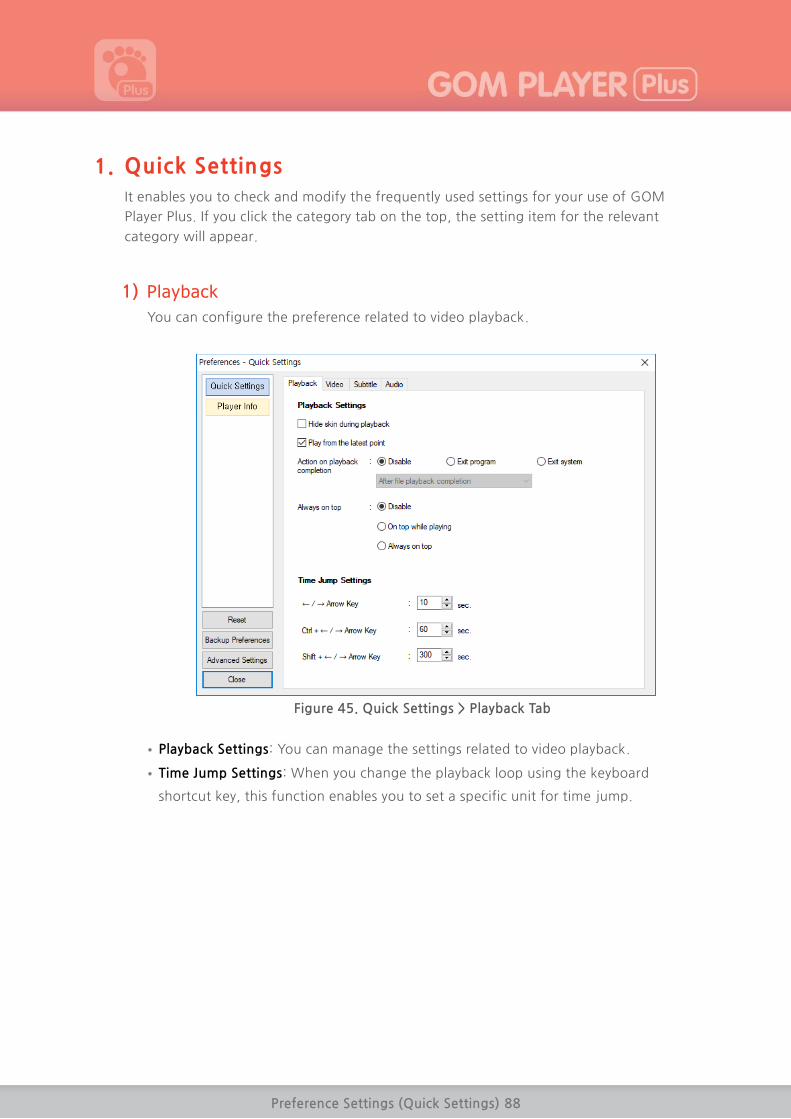
Preference Settings (Quick Settings) 88
1. Quick Settings
It enables you to check and modify the frequently used settings for your use of GOM
Player Plus. If you click the category tab on the top, the setting item for the relevant
category will appear.
1) Playback
You can configure the preference related to video playback.
Figure 45. Quick Settings > Playback Tab
• Playback Settings: You can manage the settings related to video playback.
• Time Jump Settings: When you change the playback loop using the keyboard
shortcut key, this function enables you to set a specific unit for time jump.

Preference Settings (Quick Settings) 89
2) Video
You can manage the detailed setting on playback video (aspect ratio, color,
reverse/rotate, et.)
If you place the mouse cursor over the question mark ( ) Icon, you will
see the detailed explanation on the relevant item displayed on screen.
Figure 46. Quick Settings > Video Tab

Preference Settings (Quick Settings) 90
3) Subtitles
You can manage the detailed setting on subtitles (text encoding, font size and color,
outline, subtitle recommendation feature, etc.)
If you place the mouse cursor over the question mark ( ) Icon, you will
see the detailed explanation on the relevant item displayed on screen.
Figure 47. Quick Settings > Subtitle Tab

Preference Settings (Quick Settings) 91
4) Audio
You can manage the detailed setting on Audio (Output device and channel, equalizer,
normalizer, voice filter, etc.).
If you place the mouse cursor over the question mark ( ) Icon, you will
see the detailed explanation on the relevant item displayed on screen.
Figure 48. Quick Settings > Audio Tab
• Audio Settings: Allow you to select output device and channel regarding audio and
whether or not to use specific features such as equalizer and normalizer.
• Voice Filter: Allow you to determine whether or not to use voice filter, Reverb effect
and 3D stereo effect.

Preference Settings (Quick Settings) 92
2. How to Set the Player Info.
You can find the program information of GOM Player Plus.
Figure 49. Player Info > Player Info Tab
• Check for Update: Check the latest version of GOM Player Plus registered online. If
There is the later version available online than the current one, and a window pop-
up opens and asks if you want to download the latest version for update.
• Deauthorize this device: Able to cancel license registered in your PC.
• Select Language: Able to set basic UI language.

Preferences (Advanced Settings) 93
Preferences (Advanced Settings)
This part explains about how to set the 기본 사용 환경 and 출력 환경 of GOM Player
Plus의. If you click the Preference ( ) Icon found in the top bar area or select the
Preference menu from the basic menu, the Preference window will appear.
Figure 50. Preference > Advanced Settings
① Preference Category List
② Reset
③ Backup Preference
④ Advanced Settings/Quick
Settings
⑤ Close
⑥ Category Tab
⑦ Setting Area
① Preference Category List
You can select which environment to set.
② Reset
Change all settings to the default mode of the program.
1
21 3
4
5
6
7

Preferences (Advanced Settings) 94
③ Backup Preference
Store the currently set preference information in a register file. After exiting from
GOM Player Plus, double-click the saved registry file, execute it, click the Yes
button, and complete the registration in the registry, you can retrieve the saved
environment information.
④ Advanced Settings/Quick Settings
Display Advanced Settings or Quick Settings screen.
⑤ Close
Close the Preference window. The changed settings will be kept as it is.
⑥ Category Tab
Select the setting category included in the selected preference.
⑦ Setting Area
Check and modify setting items contained in the selected category

Preferences (Advanced Settings) 95
2. General Settings
You can configure basic items necessary to use the program.
1) General
You can configure general aspects of the program.
Figure 51. General Settings > General Tab
• Setting the Language: Able to configure the language (UI) to be used in the
program.
• General Settings: Able to configure general aspects of the program. If you tick the
checkbox attached to the end of each item, the relevant item will be configured.

Preferences (Advanced Settings) 96
2) Logo
You can configure the logo to use as the background image of the main screen.
Figure 52. General Settings > Logo Tab
• Logo Image List: Select the logo as the background image of the main screen. To
add or delete a specific image as the logo image, simply click the Add or Delete
button. If you select the file name, the corresponding logo is instantly configured as
the background image.
• Randomize Logo: Whenever you run the program, one of the logos in the logo
image list will be set on the random basis.
• Display: Configure how to display a logo.
• Settings: Configure items related to logo images.

Preferences (Advanced Settings) 97
3) Easy Browser
You can configure the size of easy browser window, UI and folder display method,
etc.
Figure 53. General Settings > Easy Browser Tab

Preferences (Advanced Settings) 98
4) Mouse
You can configure the settings for customized program actions according to mouse
actions.
Figure 54. General Settings > Mouse Tab

Preferences (Advanced Settings) 99
5) Touch
You can configure the settings for customized program actions according to touch
functions when touch feature is in use.
Touch function is only available for a monitor that support touch feature.
Figure 55. General Settings > Touch Tab
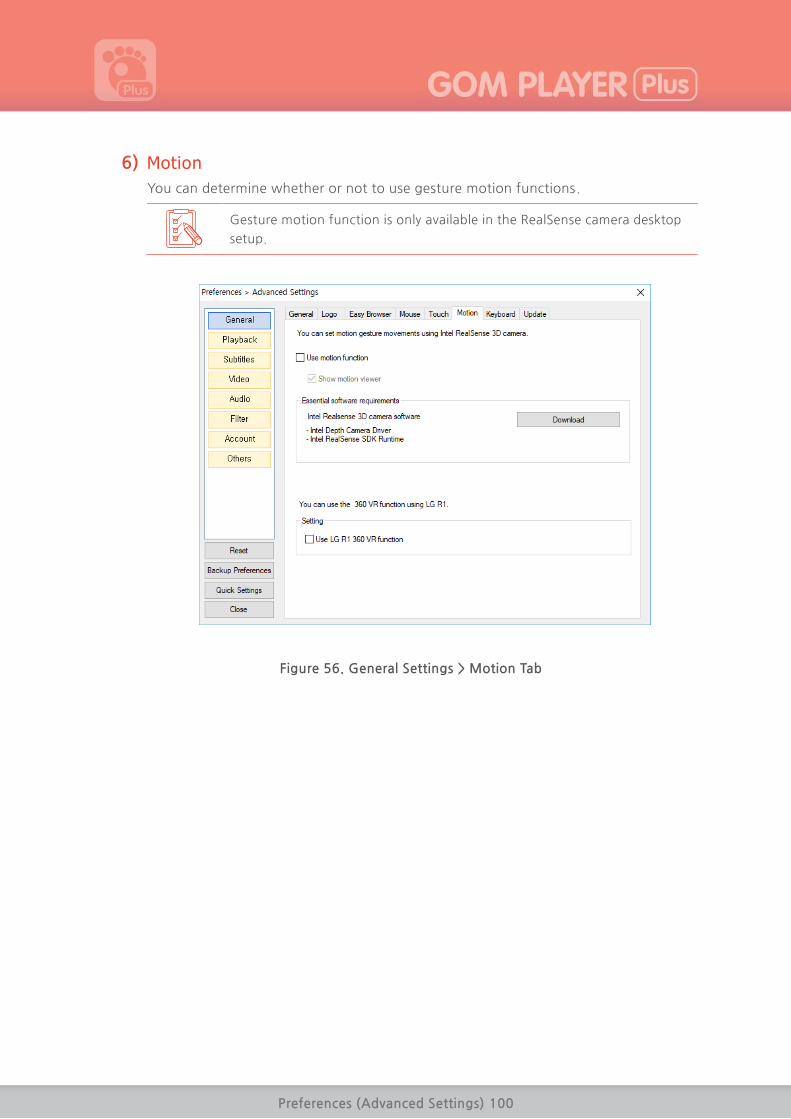
Preferences (Advanced Settings) 100
6) Motion
You can determine whether or not to use gesture motion functions.
Gesture motion function is only available in the RealSense camera desktop
setup.
Figure 56. General Settings > Motion Tab

Preferences (Advanced Settings) 101
The followings are gesture modes by different functions.
Table 2. Gesture modes by different functions
Function Gesture
Required
Motion
(General
video)
Required
motion
(VR Video)
Remarks
Playback/Paus
e V sign V sign
Search Click Click
Able to forward the playback
time up to the location at
which thumb and index finger
touching each other and
dragged afterwards.
Forward Swipe left -
Rewind Swipe right -
Volume up Thumb up Thumb up
Volume down Thumb
down Thumb down
Full Screen
/cancel Tap Tap
Move the
frames in the
video
- Spread fingers
Move vertically and horizontally
based on the location of the
palm center

Preferences (Advanced Settings) 102
7) Keyboard
Allow you to add, modify or delete keyboard shortcut keys.
Figure 57. General Settings > Keybaord Tab
• Use Keyboard Shortcuts: Configure how to use shortcut keys.
- Default: Use all the basic program shortcut keys and user-defined shortcut keys.
- Cat mode: Use user-defined shortcut keys only.
• User-defined: Add new shortcut keys or edit or delete the existing shortcut keys.

Preferences (Advanced Settings) 103
8) Update
Determine whether or not to use a program update notification and/or update to the
latest version.
Figure 58. General Settings > Update Tab

Preferences (Advanced Settings) 104
3. Playback
You can configure detailed settings on video playback.
1) Playback
You can configure detailed items on video playback.
Figure 59. Playback > Playback Tab
• Settings: Determine the task priority during a video playback or configure items
related to playback.
• Playback Window Size: set the window frame size of GOM Player Plus.

Preferences (Advanced Settings) 105
2) DVD
You can configure detailed items on DVD playback.
Figure 60. Playback Settings > DVD Tab
• DVD Starting Point: determine which way to continue on the paused video.
• Language Settings: Configure a language for menus, audio and subtitles embedded
in a DVD.

Preferences (Advanced Settings) 106
3) Music
You can configure detailed items on Music play.
Figure 61. Playback Settings > Music Tab

Preferences (Advanced Settings) 107
4) Time Jump
You can configure the frame rate of time jump when you change the specific
playback section of the currently playing video.
Figure 62. Playback Settings > Time Jump Tab
• Time Jump Setting: Configure the frame rate for changing the playback section
using keyboard shortcut keys.
• Keyframe: configure to move through the playback sections of a video using key
frames.

Preferences (Advanced Settings) 108
4. Subtitles
You can configure items related to the subtitles of a video.
1) Font
Manage subtitle font and style.
Figure 63. Subtitles > Font Tab
• Font: Select a font for subtitles.
- Font: Select among various fonts installed in your PC.
• Settings: Configure font styles (size, effect, etc.)
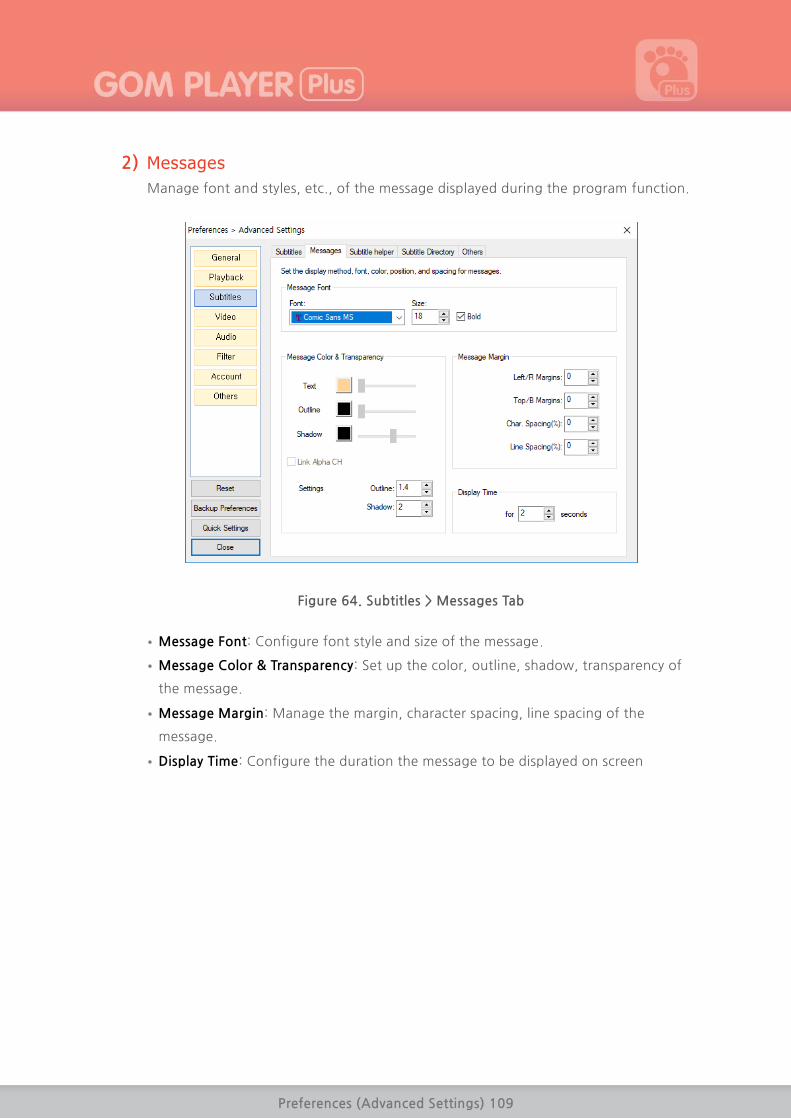
Preferences (Advanced Settings) 109
2) Messages
Manage font and styles, etc., of the message displayed during the program function.
Figure 64. Subtitles > Messages Tab
• Message Font: Configure font style and size of the message.
• Message Color & Transparency: Set up the color, outline, shadow, transparency of
the message.
• Message Margin: Manage the margin, character spacing, line spacing of the
message.
• Display Time: Configure the duration the message to be displayed on screen
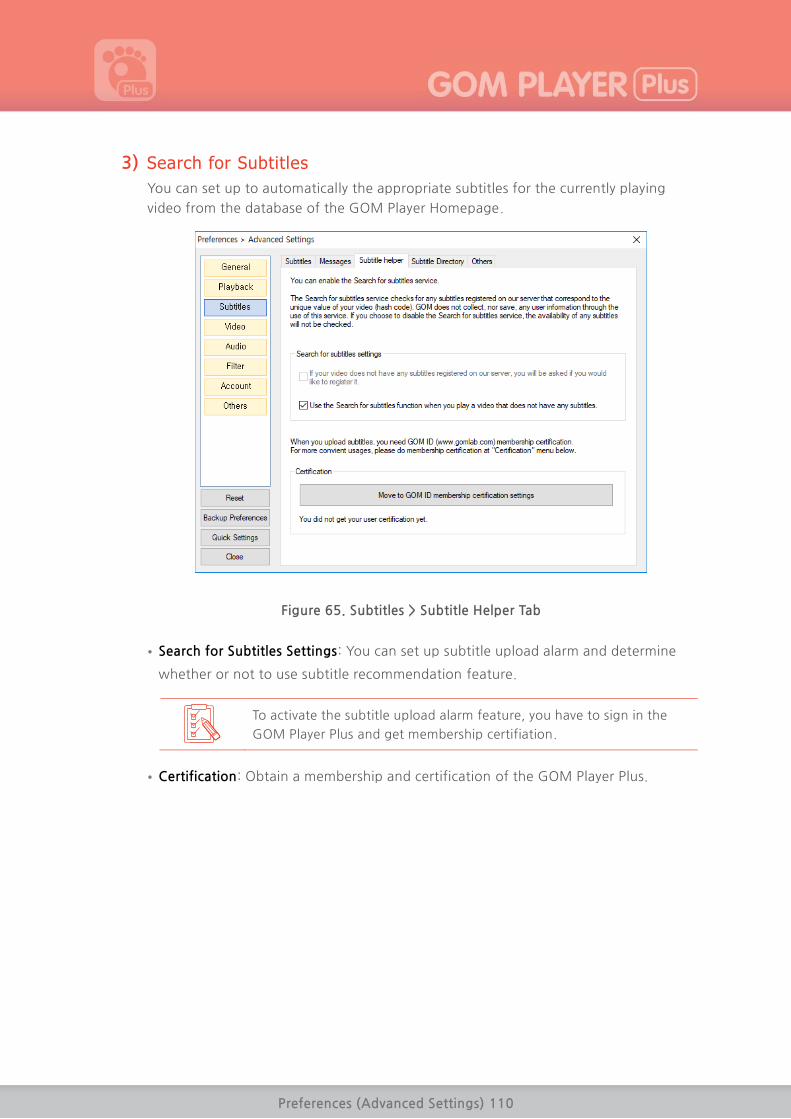
Preferences (Advanced Settings) 110
3) Search for Subtitles
You can set up to automatically the appropriate subtitles for the currently playing
video from the database of the GOM Player Homepage.
Figure 65. Subtitles > Subtitle Helper Tab
• Search for Subtitles Settings: You can set up subtitle upload alarm and determine
whether or not to use subtitle recommendation feature.
To activate the subtitle upload alarm feature, you have to sign in the
GOM Player Plus and get membership certifiation.
• Certification: Obtain a membership and certification of the GOM Player Plus.

Preferences (Advanced Settings) 111
4) Subtitle Directory
If you have stored a video and the matching subtitles in different folders, you can set
up the folder to contain the corresponding subtitles. If you set up the subtitle folder,
the corresponding subtitles for a video will be searched in both video and subtitle
folders when the video is played.
Figure 66. Subtitles > Subtitle Directory Tab

Preferences (Advanced Settings) 112
5) Others
You can manage other features including multiple subtitles, language codes, Time
Sync duration, among others.
Figure 67. Subtitles > Others Tab
• Multi-subtitle: Set the priority of the subtitles and languages when searching for the
matching subtitles for a video.
- Subtitle Priority: Set the priority for the subtitles between one embedded in the
video and external subtitles.
- Preferred Language: Set the priority for the language, if subtitle files consist of
multiple languages.
- Preferred Language for second subtitles: Determine the alternative language to
choose if the preferred language is not available.
• Code Page: Set up the language code to store a subtitle file.
• Subtitle showing period(sec.): Determine the time unit to adjust the sync between a
video and subtitles.

Preferences (Advanced Settings) 113
5. Video
You can set up the items related to a video playback.
1) Video
Manage items related to video output.
Figure 68. Video > Video Tab
• Screen Size +/-: Increase or decrease a video in terms of ratio or pixel scale.
• Ratio: When you resize a video by changing aspect ratio, you can configure the ratio
and location to be applied. This feature will be activated if you choose to enlarge or
reduce a video by changing its ratio in the Screen Size +/-.
• Pixel: Set up the pixel values to be applied when enlarging or shrinking a video in
terms of pixel scale. It will be activated when you choose to resize the video by
changing its pixel in the in the Screen Size +/-.
• Video Control: Adjust the brightness, contrast, situation, and hue of a video or turn
it upside down or rotate.
• Video Output: Determine the resolution and output type of a full-screen video.

Preferences (Advanced Settings) 114
2) Aspect Ratio
You can set up the aspect ratio of the currently playing video.
Figure 69. Video > Aspect Ratio Tab
• Do not keep aspect ratio: Ignore the original video’s aspect ratio and fit the video to
the current screen size.
• Aspect ratio corresponding to the source input(default): Keep the original video’s
aspect ratio and fit the video to the current screen size.
• Stretch screen by aspect ratio: Keep the original aspect ratio and fit the video to the
monito screen. If the screen is not large enough, the horizontal or vertical sides may
not be shown.
If you select the User-defined ratio in the Aspect Ratio settings, you can
adjust the aspect ratio as you want.

Preferences (Advanced Settings) 115
3) Video Effect
You can revise the video quality or add various effects to a video.
Figure 70. Video > Video Effect Tab
• Deblock: Eliminate the blocking effect in a video.
• Video Effect: Adjust the quality of a video to have a softer or sharper look.
- Deinterlace3: Set up the way to use the deinterlace feature.
- Smoothen: Adjust a video to look smoother.
- Sharpen: Adjust a video to look sharper.
- Noise: Set up a video to have a noise effect.
3 Deinterlace: the process of converting the interlace scanning such as analog TV signal into
other scanning mode. Applying the deinterlace helps improve a video quality.

Preferences (Advanced Settings) 116
4) Video Output
You can adjust the detail on color output of a video.
Figure 71. Video > Video Output Tab
• Output Offset: Adjust the hue shift phenomenon by configuring video output
offset.
• Color Space4: Choose a color space to optimize the color of a video.
4 Color Space: A three-dimensional, cylinder shaped coordinates that places hue, one of the
three elements of color in circle from the one axis, represents the changes in brightness with
the distance along a horizontal plane and that of saturation in a horizontal direction and it is
called color space..
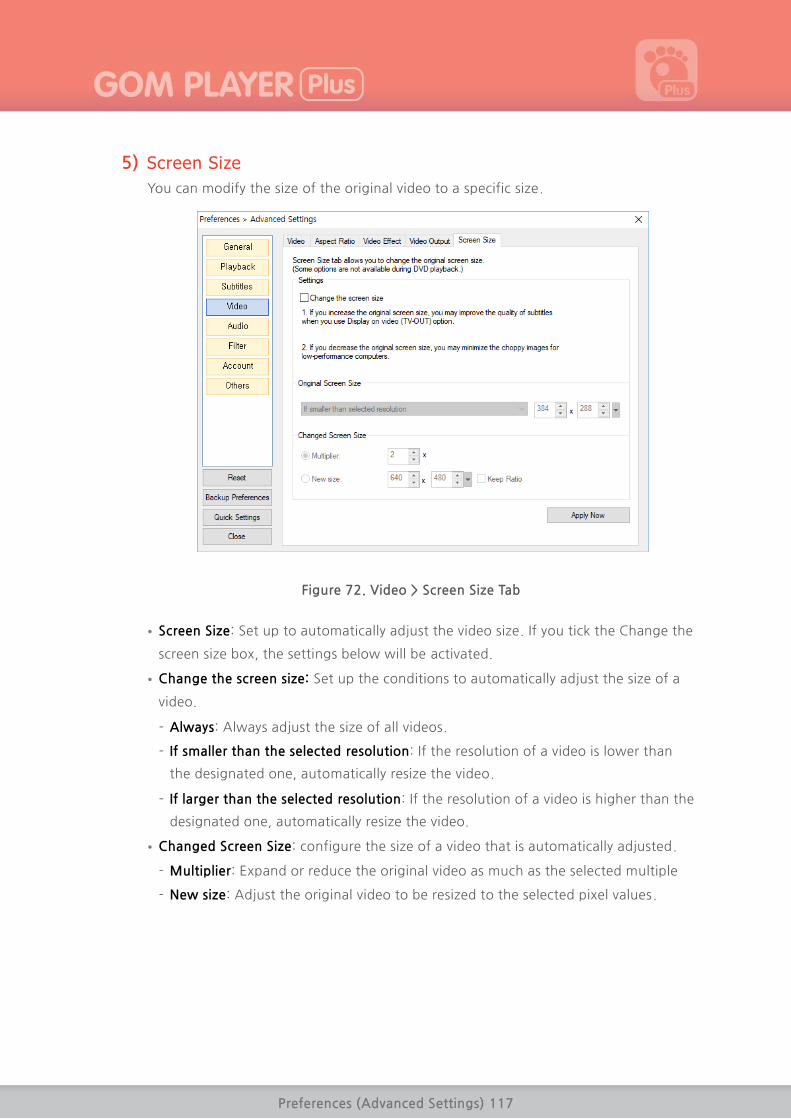
Preferences (Advanced Settings) 117
5) Screen Size
You can modify the size of the original video to a specific size.
Figure 72. Video > Screen Size Tab
• Screen Size: Set up to automatically adjust the video size. If you tick the Change the
screen size box, the settings below will be activated.
• Change the screen size: Set up the conditions to automatically adjust the size of a
video.
- Always: Always adjust the size of all videos.
- If smaller than the selected resolution: If the resolution of a video is lower than
the designated one, automatically resize the video.
- If larger than the selected resolution: If the resolution of a video is higher than the
designated one, automatically resize the video.
• Changed Screen Size: configure the size of a video that is automatically adjusted.
- Multiplier: Expand or reduce the original video as much as the selected multiple
- New size: Adjust the original video to be resized to the selected pixel values.

Preferences (Advanced Settings) 118
6. Audio
You can set up the details on the audio of a video.
1) Audio
Manage the settings for an audio output device, equalizer, normalizer, etc.
Figure 73. Audio > Audio Tab
• Output Device Setting: Configure an audio output device and output channel
connected to your PC.
• Equalizer: Determine whether or not to use equalizer. You can calibrate each
frequency to add them to a user present or use a preset offered by the program.
• Normalizer: Determine whether or not to use Normalizer.
• Limit max volume to 100%: Limit the max. volume of the volume adjustment bar
found in the video control area.

Preferences (Advanced Settings) 119
2) Sound Effect
You can control voice filter, reverberation (Reverb) effect, 3D Stereo(surround) effect,
etc.
Figure 74. Audio > Audio Effects Tab
• Voice Filter: Eliminate or accentuate voice using the voice filter.
• Reverb Effect: Apply Reverb effect to sound and adjust the level of Reverb effect.
• 3D Stereo Effect: Apply 3D stereo effect to sound and adjust the level of 3D stereo
effect.

Preferences (Advanced Settings) 120
7. Filter
You can set up the details on the filter for a video playback.
1) Source Filter
Determine which video file to play using the internal source filter.
If you play a video file that does not adopt the internal source filter, it may
cause some problem in the video playback.
Figure 75. Filter> Source Filter Tab

Preferences (Advanced Settings) 121
2) Codec
Determine which codec to use for a video playback.
Figure 76. Filter> Codec Tab
• Supportable Codecs: Select the codec to use for a video playback.
• Codec Behavior Settings: Set up the method of Codec behavior
- Play to match the audio when audio out of sync(video comes after audio): When a
video is not in sync with the audio, synchronize them based on audio timing.
- Enable Hardware Decoding (if possible) (DXVA 2.0,etc.): Use the hardware
acceleration function. You can automatically change the acceleration method by
clicking the Advanced Settings button or determine whether or not to use the
hardware acceleration feature for specific Codec.

Preferences (Advanced Settings) 122
3) Disable Filters
You can select which filter to exclude for a video playback
Figure 77. Filter> Disable Filters Tab
• Disabled Filters List: Choose filters that will not be applied to a video playback.
• Disable Internal Filters Settings: Choose to block internal video or audio filters. IF
this function is activated, only the external filters will be applicable to a video
playback.

Preferences (Advanced Settings) 123
4) Advanced Settings
You can configure the details on filters.
Figure 78. Filter> Advanced Settings Tab
• Filter Rendering Method: Select the rendering method for a filter.
• Filter Priority: Add which filter to use during a video playback and set the priority
among filters.
The internal Codecs of GOM Player Plus take precedence over newly added
Codecs.

Preferences (Advanced Settings) 124
8. Account
You can set up the details related to GOM Plyer User certifications.
1) Login
You can obtain Your GOM membership and complete the member ID certification in
the GOM Player Homepage(www.gomlab.com).
Figure 79. Account > Login Tab
• GOM ID Certification: you can certify your membership ID after entering your ID and
password.
• Sign up: You can gain GOM player membership in the GOM Player Homepage.
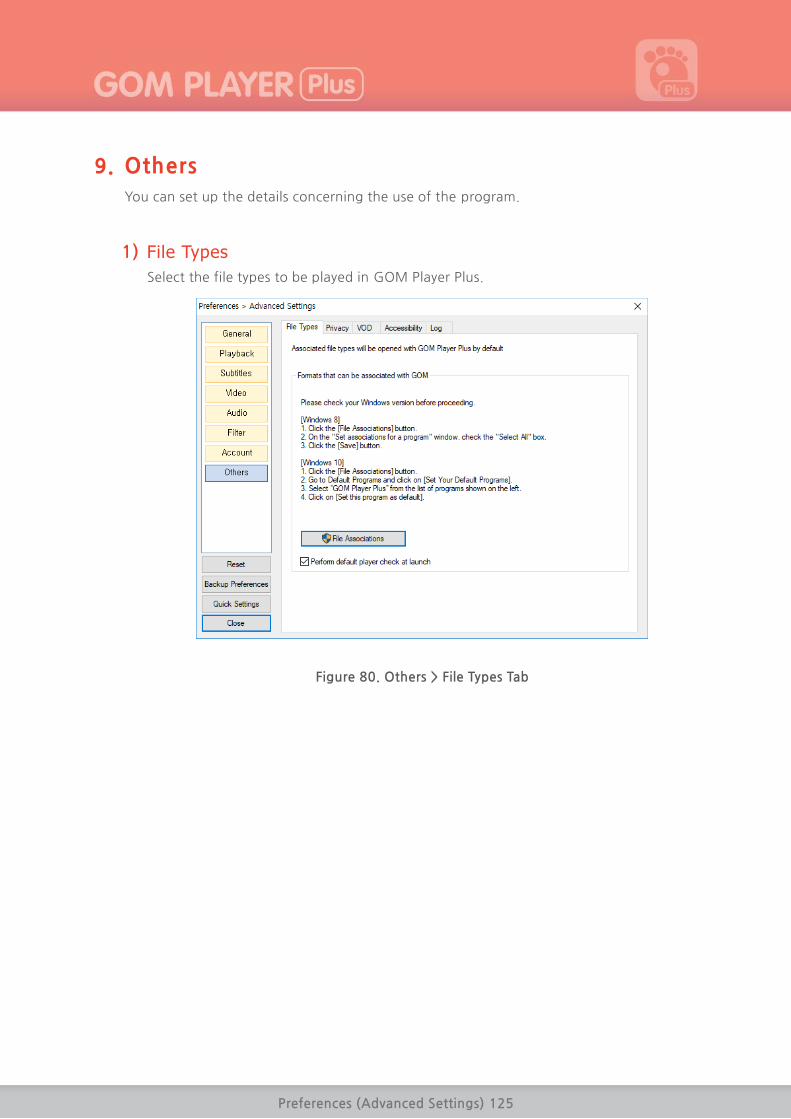
Preferences (Advanced Settings) 125
9. Others
You can set up the details concerning the use of the program.
1) File Types
Select the file types to be played in GOM Player Plus.
Figure 80. Others > File Types Tab

Preferences (Advanced Settings) 126
2) Privacy
You can determine whether or not to save the relevant information of a playback file
after playing a video.
Figure 81. Others > Privacy Tab
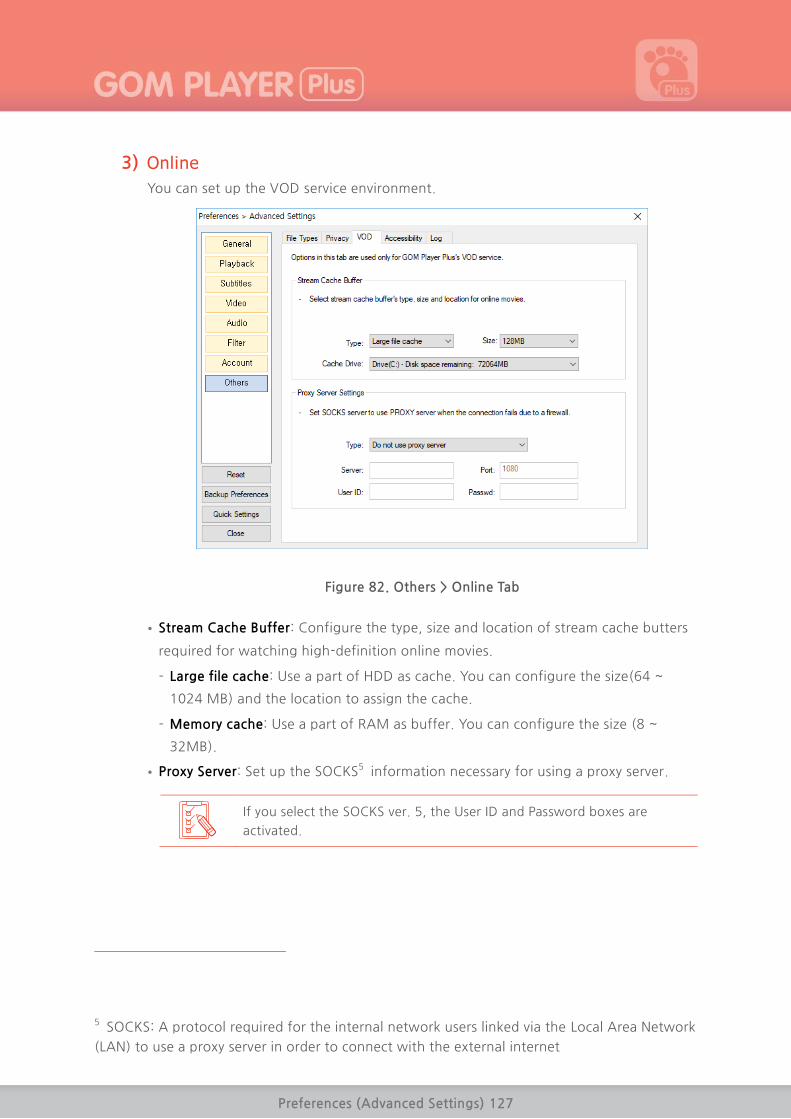
Preferences (Advanced Settings) 127
3) Online
You can set up the VOD service environment.
Figure 82. Others > Online Tab
• Stream Cache Buffer: Configure the type, size and location of stream cache butters
required for watching high-definition online movies.
- Large file cache: Use a part of HDD as cache. You can configure the size(64 ~
1024 MB) and the location to assign the cache.
- Memory cache: Use a part of RAM as buffer. You can configure the size (8 ~
32MB).
• Proxy Server: Set up the SOCKS5 information necessary for using a proxy server.
If you select the SOCKS ver. 5, the User ID and Password boxes are
activated.
5 SOCKS: A protocol required for the internal network users linked via the Local Area Network
(LAN) to use a proxy server in order to connect with the external internet

Preferences (Advanced Settings) 128
4) Accessibility Setting (TTS)
You can set up the Text-To-Speech (TTS) feature. If you use the Text-To-Speech
feature, you can hear the subtitles displayed on screen to be read.
Figure 83. Others > Accessibility Setting(TTS) Tab
• Use the function to read the subtitle: Determine whether or not to use the Text-To-
Speech feature. If you tick the box, the Text-To-Speech (TTS) Setting Area will be
activated.
• Read the subtitle: Set up the TTS engine to convert, reading speed, and voice
volume.
- TTS Engine: You can select Korean (Microsoft Heami Desktop – Korean) and
English (Microsoft Jira Desktop – English).
- Reading Speed: Determine the speed of reading the subtitle.
- Voice Volume: Determine the volume of the converted voice.
- Test: Convert the text in the sentence input box into voice.
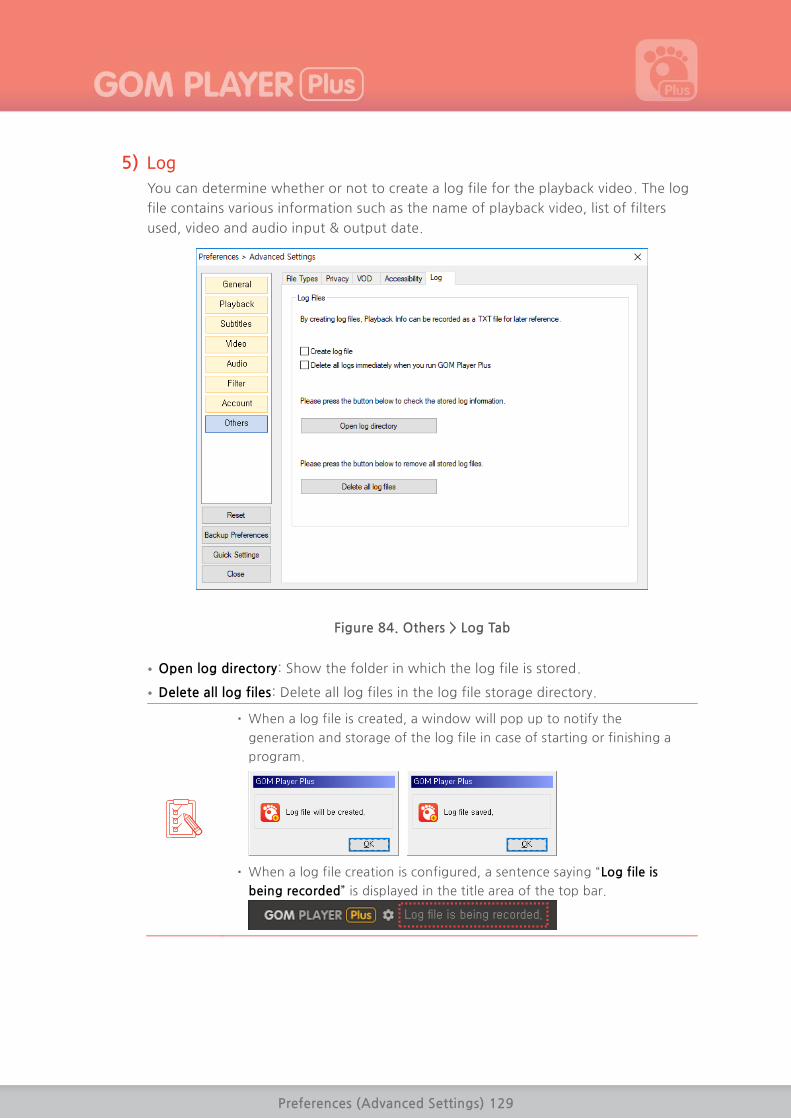
Preferences (Advanced Settings) 129
5) Log
You can determine whether or not to create a log file for the playback video. The log
file contains various information such as the name of playback video, list of filters
used, video and audio input & output date.
Figure 84. Others > Log Tab
• Open log directory: Show the folder in which the log file is stored.
• Delete all log files: Delete all log files in the log file storage directory.
When a log file is created, a window will pop up to notify the
generation and storage of the log file in case of starting or finishing a
program.
When a log file creation is configured, a sentence saying “Log file is
being recorded” is displayed in the title area of the top bar.

Additional Information 130
Additional Information
This part describes the additional information to use GOM Player Plus.
1. System Requirements
System requirements to run GOM Player Plus are as such:
Table 3. System Requirements
Classification Requirements
Operating System Windows 10(64bit) / 8.1(64bit) / 8(64bit) / 7(64bit)
It does not support 32bit OS.
CPU Intel Pentium 4 CPU, AMD Athlon 64 CPU or equivalents
Memory 2G or larger
HDD 200 MB or more
Network
Required for the registration of full version (Once)
After making the certification, you can use the player without
network connections
DirectX DirectX 9.0c or above (recommend to use the latest version of
DirectX 10 or above)
Some videos require DirectX or Windows Media Player.
The recompeting settings vary depending on video file formats.
Table 4. Basic File Types Supported by the Player
Classification Requirements
Video
.avi, .divx, .ogm, .mkv, .mp4, .k3g, .ifo, .ts, .asf, .wmv, .wma, .mov,
.mpg, .m1v, .m2v, .vob, .m4v, .3gp/3gp2, .rmvb, .rm, .ogg, .flv,
.asx(video), .dat
Audio .mp3, .m4a, .aac, .ogg, .flac, .wav, .wma, .rma , .alac
Subtitles smi, srt, rt, sub(& IDX), vtt (text subtitles), dvb, ass, psb, txt, sbv,
vobsub (embedded subtitles)
Playlist .asx, .pls
The audio files excluding the basic file types supported by the player will be
available for playback after installing separate external Codec.

Additional Information 131
2. Shortcut Key Information
To ensure easy and faster access to different functions, GOM Player Plus has multiple
shortcuts to a variety of functions.
You can modify the existing shortcut keys or add new shortcut keys in the
General > Keyboard Tab of the Preference (Advanced Settings).
1) Basic Shortcut key
Function Shortcut key Description
Open program info.
window [F1] Open the program info. Window.
Open file [F2] Open the file open window.
Open subtitle file [F3] Open the open subtitle file window.
Close file during
playback [F4]
Stop the currently playing file and
delete it from the list.
Open preference
window [F5] Open the preference window.
Control panel Open /
Close [F7] Open or close the control panel
Playlist window Open /
Close [F8] Open or close the Playlist window.
Open DVD/CD [F12] Open or close the DVD / CD Rom.
Modify Aspect Ratio
keeping setting Ctrl + [F5]
Set up to keep or not to keep the
aspect ratio of the original video.
Keep Aspect Ratio of
Original Video Ctrl + [F6]
Modify the aspect ratio to that of the
original video
4:3 Aspect Ratio Ctrl + [F7] Convert the aspect ratio of the video to
4:3.
16:9 Aspect Ratio Ctrl + [F8] Convert the aspect ratio of the video to
16:9.
1.85:1 Aspect Ratio Ctrl + [F9] Convert the aspect ratio of the video to
1.85:1.
2.35:1 Aspect Ratio Ctrl + [F10] Convert the aspect ratio of the video to
2.35:1.
User-defined Aspect
Ratio Ctrl + [F11]
Convert the aspect ratio of the video to
the user-defined ratio.

Additional Information 132
Function Shortcut key Description
End program Alt + [F4] Finish the program.

Additional Information 133
2) Shortcut keys for File Open
Function Shortcut key Description
Open the Easy Browser Ctrl + I Open the Easy Browser window.
Open File Ctrl + O or [F2] Open the file (window explorer)
window.
Open URL Ctrl + U Open the URL open window.
Open Folder Ctrl + D Open the Folder Open window.
Open CD drive [F12] Open the CD drive.
Open Subtitle File Alt + O, [F3] Open the subtitle open window.
3) Shortcut keys for Favorites
Function Shortcut key Description
Add current file to
Favorites Alt + G
Add the currently playing file to the
Favorites.
Add current folder to
Favorites Alt + D
Add the currently playing folder to
the Favorites.
Open Favorites Manager Alt + F Open the favorites manager window.
4) Shortcut keys for Playback Controls
Function Shortcut key Description
Play/Pause Space bar,
Ctrl + P Play or pause a video.
Stop Ctrl + Space bar Stop playing a video.
Pause and Hide Player ESC Pause the video playback and
minimize the program
Fast Forward (10 sec) → Jump ahead by 10 seconds
Fast Forward (60 sec) Ctrl + → Jump ahead by 60 seconds.
Fast Forward (300 sec) Shift + → Jump ahead by 300 seconds.
Rewind (10 sec) ← Jump backward by 10 seconds.
Rewind (60 sec) Ctrl + ← Jump backward by 60 seconds.

Additional Information 134
Function Shortcut key Description
Rewind (300 sec) Shift + ← Jump backward by 300 seconds.
Move to Next Keyframe F, Ctrl + > Move to the next frame of the video.
Move to Previous
Keyframe Ctrl + <
Move to the previous frame of the
video.
View Playback Info Tab Display the information of the
currently playing video.
Play Previous File Page Up Play the file prior to the currently
playing fine in the Playlist.
Play Next File Page Down Play the file next to the currently
playing fine in the Playlist.
Play Speed Up C, Ctrl + Shift + F Increase the playback speed.
Play Speed Down X, Ctrl + Shift + B Decrease the playback speed.
Default Speed Z, Ctrl + Shift + N Switch the changed playback speed
to default.
Time Jump G Change the playback interval by
entering a specific time.
Set A-B Repeat Start
Point [
Configure which point to start
repeating a video
Set A-B Repeat End Point ] Configure which point to end
repeating a video
Undo A-B Repeat Start
Point Shift + [ Delete the star point for replay
Undo A-B Repeat End
Point Shift + ] Delete the end point for replay
Clear A-B Repeat
Settings \ Remove the replay section setting.
Interval Skip Settings ' Configure the interval skip
Use Interval Skip Shift + ' Use interval skipping or disable it.

Additional Information 135
5) Shortcut key for Window Size and Position Change
Function Shortcut key Description
Min. size ` Change the playback window to
minimum in size
Hide to Taskbar Shift + X Minimize the size of the program
50% 1 Change the playback window size to
be 0.5 times of the original video.
100% 2 Change the playback window size to
be identical with the original video
150% 3 Change the playback window size to
be 1.5 times of the original video.
200% 4 Change the playback window size to
be two times of the original video.
Fit to Desktop Resolution 5 Change the playback window to
match the resolution of the desktop.
Maximize/Restore 6 Maximize or restore the playback
window size.
Fit to Video Input 7, Del Change the playback window size to
fit to the current video.
Full Screen 8, Enter, Alt + Enter Make the playback window full
screen.
Full Stretch Screen 9, Ctrl + Enter Stretch the video to fill the monitor
screen
Preset of Pan & Scan 0, Ctrl + Numpad 5 Change the Pan & Scan Preset.
Default settings Numpad 5 Reset the changed video settings to
default.
Position window right Numpad 6 Move the video to the right.
Position window left Numpad 4 Move the video to the left.
Position window top Numpad 8 Move the video up
Position window bottom Numpad 2 Move the video down.

Additional Information 136
Function Shortcut key Description
Increase size +, Numpad +,
Ctrl + Numpad 9 Increase the video size.
Decrease size -, Numpad -,
Ctrl + Numpad 1 Decrease the video size.
Increase Window Size
Horizontally Ctrl + Numpad 6 Increase the width of the video.
Decrease Window Size
Horizontally Ctrl + Numpad 4 Decrease the width of the video
Increase Window Size
Vertically
Shift + ↑,
Ctrl + Numpad 8 Increase the height of the video.
Decrease Window Size
Vertically
Shift + ↓,
Ctrl + Numpad 2, Decrease the height of the video.
Place playback window
position left Ctrl + Alt + Numpad 4
Move the playback window to the
left.
Place playback window
position right Ctrl + Alt + Numpad 6
Move the playback window to the
right.
Place playback window
position up Ctrl + Alt + Numpad 8 Move the playback window upwards.
Place playback window
position down Ctrl + Alt + Numpad 2
Move the playback window
downwards.
Increase Window Size Ctrl + Alt + Numpad + Increase the size of the playback
window.
Decrease Window Size Ctrl + Alt + Numpad - Decrease the size of the playback
window.
Position window center Ctrl + Alt + Numpad 5 Locate the playback window at the
center of the monitor
Position window top-left Ctrl + Alt + Numpad 7 Locate the playback window at the
upper left corner.
Position window top-
right Ctrl + Alt + Numpad 9
Locate the playback window at the
upper right corner.
Position window
bottom-left Ctrl + Alt + Numpad 3
Locate the playback window at the
bottom left corner.

Additional Information 137
Function Shortcut key Description
Position window
bottom-right Ctrl + Alt + Numpad 1
Locate the playback window at the
bottom right corner.

Additional Information 138
6) Shortcut keys for Video Control
Function Shortcut key Description
Increase Brightness by
2% R
Increase the brightness of the video
by 2%.
Decrease Brightness by
2% E
Decrease the brightness of the video
by 2%.
Increase Contrast by 2% Y Increase the contrast of the video by
2%
Decrease Contrast by
2% T
Decrease the contrast of the video by
2%
Increase Saturation by
2% I
Increase the saturation of the video
by 2%.
Decrease Saturation by
2% U
Decrease the saturation of the video
by 2%.
Increase Hue by 2% P Increase the hue of the video by 2%.
Decrease Hue by 2% O Decrease the hue of the video by
2%.
Increase Contrast &
Brightness W
Increase contrast and brightness by
2%.
Reset Video Color
Settings Q
Reset the video color settings to
default.
Rotate (Input) Shift + Ctrl + S Rotate the video by 90︒, 180︒ in
clockwise or anti-clockwise direction
Flip Vertically (Input) Ctrl + Y Flip the input video vertically.
Flip Vertically (output) Ctrl + V Flip the output video vertically.
Flip Horizontally (Input) Ctrl + H Flip the input video Horizontally.
Flip Horizontally
(Output) Ctrl + J Flip the output video Horizontally.
Toggle Sharpen Effect Ctrl + M Increase the sharpness of the video.
Noise Ctrl + N Apply the noise effect to the video.

Additional Information 139
Function Shortcut key Description
Toggle Smoothen Effect Ctrl + L Make the video look softer.

Additional Information 140
7) Shortcut keys for Audio Control
Function Shortcut key Description
Audio Control Direction key(↑, ↓),
Mouse Wheel
Increase or decrease the volume of
the video.
Wave Sound Control
Ctrl + Direction key(↑,
↓),
Ctrl + Mouse Wheel
Increase or decrease the volume of
wave sound.
Master Sound Control
Ctrl + Shift +
Direction key(↑, ↓),
Shift + Mouse Wheel
Increase or decrease the volume of
master sound.
Mute M Turn the volume off.
Choose Audio Stream A Select the audio and audio channel.
Advanced Audio Capture Shift + G Open the Advanced Audio Capture
window.
Use Equalizer Shift + E Apply or cancel the equalizer.
Preset L Select an Equalizer Preset.
Use Normalizer Shift + N Apply or cancel the normalizer.
Lower Normalizer Level Ctrl + Alt + Down Decrease the level of the normalizer.
Raise Normalizer Level Ctrl + Alt + Up Increase the level of the normalizer.
Audio Advanced Settings Shift + P Open Audio > Audio Tab in the
Preference(Advanced Settings.
Audio Filter V Select an audio filter.
Reverb Effect Shift + R Apply or cancel the reverb effect.
3D Stereo Effect Shift + S Apply or cancel the 3D stereo effect.
Slow down Audio Sync
by 0.1 sec Shift + > Slow down the audio sync by 0.1 sec.
Speed up Audio Sync by
0.1 sec Shift + < Get the audio sync faster by 0.1 sec.
Reset Audio Sync Shift + / Reset the changed audio sync values
to default.

Additional Information 141
8) Shortcut keys for Screen Capture
Function Shortcut key Description
Advanced Screen Capture Ctrl + G Open the Advanced Screen Capture
window.
Copy Frame to Clipboard Ctrl + C Capture the screenshot and copy to a
clipboard.
Capture Frame to Folder Ctrl + E Capture the screenshot and save as a
file.
Snapshot Preview Window Ctrl + Q Open the Create a Snapshot window.
9) Shortcut keys for Subtitle Control
Function Shortcut key Description
Show/Hide Subtitle Alt + H View or hid the subtitle.
Subtitle Alt + E Open the subtitle explorer.
Control Subtitle Position Alt + Direction
key(↓↑←→) Change the position of the subtitle.
Increase Subtitle’s
Horizontal Margins Alt + Numpad 6
Increase the horizontal margins of the
subtitle.
Decrease Subtitle’s
Horizontal Margins Alt + Numpad 4
Decrease the horizontal margins of the
subtitle.
Increase Subtitle’s
Vertical Margins Alt + Numpad 8
Increase the vertical margins of the
subtitle.
Decrease Subtitle’s
Vertical Margins Alt + Numpad 2
Decrease the vertical margins of the
subtitle.
Default Subtitle Position Alt + HOME Reset the changed subtitle position to
default.
Increase Subtitle Size Alt + Page Up Make the subtitle text larger.
Decrease Subtitle Size Alt + Page Down Make the subtitle text smaller.
Change Subtitle
Language Alt + L Change the language of subtitle.
Speed up Subtitle Sync
by 0.5 sec. >
Increase the subtitle sync speed by 0.5
sec.
Slow down Subtitle Sync
by 0.5 sec. <
Decrease the subtitle sync speed by 0.5
sec.
Default Sync / Reset the changed subtitle sync value

Additional Information 142
Function Shortcut key Description
to default.
Thicken Subtitle Alt + B Make the subtitle text thicker.
Open Subtitle File F3, Alt + O Open the subtitle file open window.
Select Subtitle Language S Select a language for subtitle.
To Previous Subtitle
Position HOME
Return to the previous position of the
subtitle.
To Next Subtitle Position End Move to the next subtitle position.
Save Current Sync Alt + S Save the current subtitle sync setting.
10) Shortcut keys for DVD Control
Function Shortcut key Description
DVD Control Menu D Open the DVD control menu.
Previous Chapter Page Up Move to the previous chapter.
Next Chapter Page Down Move to the next chapter
Root Menu Ctrl + Back Space Go to the DVD root menu.
11) Other Shortcut keys
Function Shortcut key Description
Exit GOM after finishing
the playback Ctrl + X
Configure to end the program after
the current video playback.
Shut Down System after
finishing the playback Ctrl + Z
Configure to shutdown PC after the
current video playback.
Set the current screenshot
as wallpaper
Ctrl + 7,
Ctrl + 8,
Ctrl + 9,
Ctrl + 0
Set up the current screenshot as the
wallpaper of the desktop.
Ctrl + 7: Center
Ctrl + 8: Tile
Ctrl + 9: Stretch
Ctrl + 0: Delete
Playback Info. Ctrl + F1 Open the playback information and file
information windows for the video file.
Always on Top Ctrl + A Always arrange the playback window
on top of other programs
Always on Top while Ctrl + T Arrange the playback window on top

Additional Information 143
Function Shortcut key Description
playing of other programs while playing
Close Alt + F4, Alt + X Close the program.
Close if a file is not open ESC When there is no file left in the list,
close the program
TTS ACTIVATION Alt + T Turn on or off the Text-To-Speech
Function.
Delete the played file Shift + Delete Delete the currently playing file.

Additional Information 144
3. Find Codec
GOM Player Plus’s built-in video Codecs required to play general video files allow users to
play most of video files and clips. However, it may be necessary for some specially
produced videos to install appropriate Codec for the videos in advance. When this
happens, GOM Player Plus help users to easily find and install the necessary Codec.
If you play a video file that requires the external Codec installation, the Find Codec
window will appear. If you click the Find Codec button, it will provide you with the
information of the required Codec or the directory to download the necessary Codec.
Figure 85. Find Codec Window

Additional Information 145
4. Frequently Asked Questions
This part describes the frequently asked questions and answers from GOM Player users.
1) How can I access the official license key information for the full version player that I’ve purchased?
The full version license key that you’ve purchased can be found in the Customer
Service > License > Find your license key. page in the www.gomlab.com Homepage. If
you enter the email address that you used at the time of your purchase in the email
box in the page and click the Send button, the license key information will be sent to
the corresponding email.
If you have entered additional email during your purchase of the full
version license, you can also access to your license information using the
secondary email. When this is the case, you must the Service Center in
advance.
2) Can I use the same official license key on multiple PCs?
The full version license key of GOM Player Plus can only be registered in a single PC.
Therefore, if you would like to use the player in a PC other than the one registered
with the initial license, you have to cancel the license of the existing PC first and re-
register it to the new PC.

Additional Information 146
3) Can I change the email address that I’ve entered at the time of official license purchase?
The email address that you have entered when you purchased a full-version license
will be saved with the full version license key. Therefore, it is not possible to separate
the email address only for modification. In particular, the basic email address is used
to find or cancel your license, it is recommended to use an accessible email address.
If you have entered additional email during your purchase of the full
version license, you can also access to your license information using the
secondary email. When this is the case, you must contact the Service
Center in advance.
4) If I re-install GOM Player Plus after formatting my PC, is it
recognized as an officially licensed player?
The official registration information of GOM Player Plus will be stored in the relevant
PC and used whenever the Player program is executed. Therefore, if you have
formatted your PC and re-install the operation system, it will delete your official
registration information cancelling your official license for GOM Player Plus. In this
case, the free version GOM Player Plus will be executed.
If you have re-installed the operation system after formatting your PC, please follow
the license registration steps to re-register the official license key.
5) What is the difference between GOM Player and GOM Player Plus?
How GOM Player Plus differs from the previous GOM Player is illustrated below:
• As optimized for 64-bit Operating System, it is free from stuttering issue while
playing a high-definition video.
• No advertisement shown in playback window, idle screen, and others
• The improved skin design does not disturb watching experience with an upscale
and sophisticated look.
• You will be the first to get any answer to your inquiry, technical supports or event
related news.
6) Why doesn’t GOM Player Plus offer all Codecs for free?
For two reasons: first, different videos may require different Codecs and; second, if
any Codecs are included and allowed to install, the overlapping Codecs may interfere
with one another, which may lead to various system issues. Therefore, GOM Player
Plus has some built-in Codecs that are reliable and widely used for playing various
video or media files. GOM Player Plus supports medias with typical file extensions
such as AVI, MP4, FLV, WMV, MKV and OGM.

Additional Information 147
7) Which information do you collect and transmit in the Codec Finder System?
It checks if there is appropriate Codec in the system for a video playback in GOM
Player Plus. If there is no required Codec available, It will only sends the information
directly related Codecs for the media to the Codec finder system. However, it will not
collect, send or store other information including the video file info. File types, period,
user’s usage data, etc.

Additional Information 148
5. Payment
Please read the GOM Software License purchase and Refund policy before purchasing a
full version license key.
Cancellation is available at any time within 14 days of your purchase date.(If you
registered your license, you can not cancel your payment. So, Please use the free version
sufficiently before purchasing the license.)
The genuine product in this policy includes an upgrade product.
1) The Agreement regarding the paid license of this Software shall be established by your
consent to this Agreement, your application for the paid license, and acceptance thereof
by GOM & Company. The other matters shall be in accordance with the policies issued by
GOM & Company.
2) While using this Software on a paid basis, you may purchase the license at the GOM
product homepage, or from a service provider who is authorized to sell licenses by GOM
& Company.
3) When you make a normal payment for the charge, the license information will be sent
to you at the email address saved in your profile, if you are a registered member, or to
your email address entered by you for the purchase, if you are a non-registered member.
4) Payment of the amount shall mean that you also consent to the following: GOM &
Company may provide to you various information that are deemed necessary for your use
of the service by such means as email or wireless text messages, provided that you may
refuse to receive such information at your discretion. However, GOM & Company may
notify you of such matters as changes in important policies for the use of the service,
which may include users who have refused to receive such information by such means as
email.
5) After you purchase a Software license, you may cancel the payment if the refund
warranty period defined by GOM & Company (no longer than 14 days) has not expired.
Because you may not cancel or request a refund once license key is registered or after the
refund warranty period has expired, it is recommended that you try using the free version
sufficiently before purchasing a license.
6) If you use the payment information of a third party without their consent thereof, you
shall be liable to civil/criminal liabilities, and may be subject to punishment under any
relevant laws.

Additional Information 149
6. Refund Policy
Please read the GOM Software License purchase and Refund policy before purchasing a
full version license key.
1) Company will make a final refund of the remaining 10% of the amount paid for the
payment processing fee if the user exceeds the refund warranty period (within 14 days)
determined by the company after purchasing the software license.
2) Refund of the software is only available before registering license.
3) In the case of a product bundle where more than two licenses are involved, since it is
considered a single product, a refund for the whole product is not possible if one of the
licenses is registered and partial cancellation or refund for any unused license is also not
allowed.
4) If you have acquired the license free of charge, and not through a normal payment,
but through special services (coupons, gift cards, bonus points given by administrators),
you may not cancel your payment or request a refund, because you have not made any
actual payment.
5) If you breach this Agreement or any relevant laws, by such acts as sharing of your paid
Software license with any third parties, or executing this Software concurrently on a
number of computers with only one paid license, payment cancellations or refund
requests may not be allowed.
6) In any of the following cases, it will not be counted as the number of days of service
use, and GOM & Company will not issue compensation for any damages:
- In the event GOM & Company cannot provide the service due to force majeure, such as
national emergencies, or natural disasters;
- In the event GOM & Company carries out regular checks according to a schedule pre-
defined by it, or expands the servers, or replaces any other equipment based on advance
announcements;
- In the event the service cannot be provided due to causes imputable to you, such as ill
intention or negligence;
- In the event the service cannot be provided due to inevitable causes by virtue of the
telecommunications services;
- In the event the service cannot be provided due to faults of the telecommunications
services provided by communications services other than GOM & Company; and
- In the event the service cannot be provided due to shortcomings or faults of the lines
and equipment owned by individual communications services used by and/or based on
your selection..

Additional Information 150
7. Manual Information
This part specifies the copyright information and revision history of this manual.
Copyright
Copyright 2018 GOM & Company All Rights Reserved.
The copyright and intellectual property of all the contents and designs are owned by
GOM & Company Co., Ltd. If you have any question on this manual or the product,
please contact the person in charge.
Publisher: GOM & Company Co., Ltd.
Address: GOM & Company Building, 216 Gaepo-ro, Gangnam-gu, Seoul, Korea
Tel.: 02) 2193-5700
Homepage: http://www.gomcorp.com/
Revision History
Revision No. Date Detail Remarks
1.0 10/08/2018 First copy

Additional Information 151


Additional Information 1
Top Related