


Languages
Pages
Legal


This book will show you how to develop computer games and simulations with Greenfoot, a
development environment. In this chapter, we shall take a look at Greenfoot itself, see what it
can do and how to use it. We do this by trying out some existing programs.
Once we are comfortable with using Greenfoot, we shall jump right into writing a game
ourselves.
The best way to read this chapter (and indeed the whole book) is by sitting at your computer
with Greenfoot open on your screen and the book open on your desk. We will regularly ask you
to do things in Greenfoot while you read. Some of the tasks you can skip; however, you will have
to do some in order to progress in the chapter. In any case, you will learn most if you follow
along and do them.
At this stage, we assume that you have already installed the Greenfoot software and the book
scenarios (described in Appendix A). If not, read through that appendix first.
1.1 Getting started
Start Greenfoot and open the scenario leaves-and-wombats from the Greenfoot book scenarios
folder.
CHAPTER
1
topics: the Greenfoot interface, interacting with objects, invoking methods, running
a scenario
concepts: object, class, method call, parameter, return value
Note If you are starting Greenfoot for the first time, you will see a dialog asking what you want
to do. Click Choose a scenario. Otherwise, use Scenario–Open1 from the menu.
1 We use this notation to tell you to select functions from the menu. Scenario–Open refers to the Open item
in the Scenario menu.
Getting to know Greenfoot

4 | Chapter 1 ■ Getting to know Greenfoot
Make sure to open the leaves-and-wombats scenario that you find in the book-scenarios folder,
not the somewhat similar wombats scenario from the standard Greenfoot installation.
You will now see the Greenfoot main window, with the scenario open, looking similar to Figure 1.1.
The main window consists of three main areas and a couple of extra buttons. The main areas are:
■ The world. The largest area covering most of the screen (a sand-colored grid in this case) is
called the world. This is where the program will run and we will see things happen.
■ The class diagram. The area on the right with the beige-colored boxes and arrows is the class
diagram. We shall discuss this in more detail shortly.
■ The execution controls. The Act, Run, and Reset buttons and the speed slider at the bottom
are the execution controls. We’ll come back to them in a little while, too.
1.2 Objects and classes
We shall discuss the class diagram first. The class diagram shows us the classes involved in this
scenario. In this case, they are World, WombatWorld, Actor, Leaf, and Wombat.
We shall be using the Java programming language for our projects. Java is an object-oriented
language. The concepts of classes and objects are fundamental in object orientation.
Let us start by looking at the Wombat class. The class Wombat stands for the general concept of
a wombat—it describes all wombats. Once we have a class in Greenfoot, we can create objects
World
Class
diagram
Execution
controls
Figure 1.1
The Greenfoot main
window
1.2 Objects and classes | 5
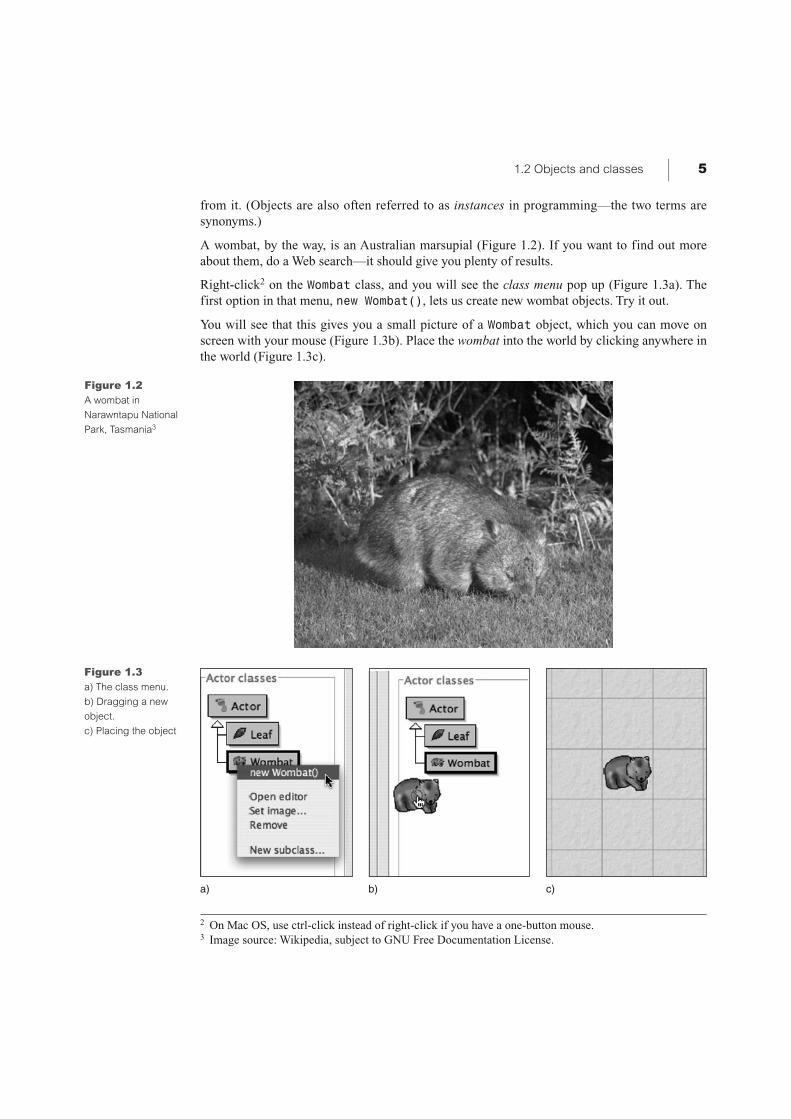
Figure 1.2
A wombat in
Narawntapu National
Park, Tasmania3
a) b) c)
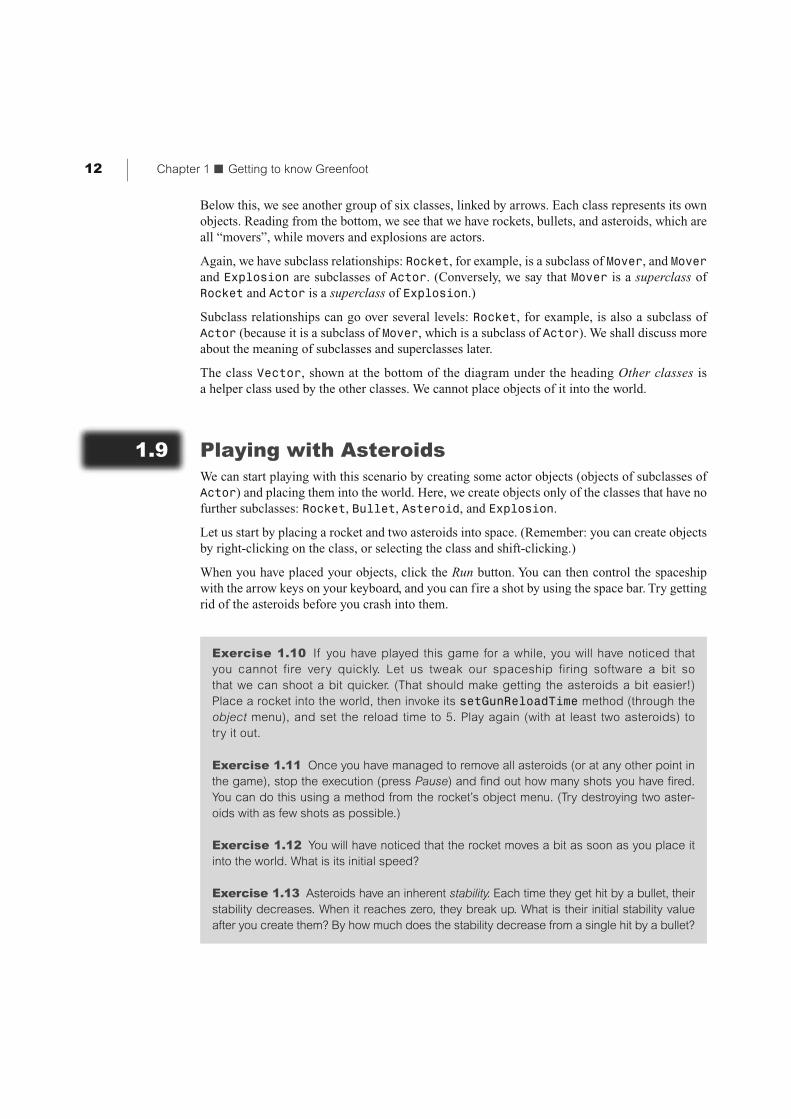
Figure 1.3
a) The class menu.
b) Dragging a new
object.
c) Placing the object
from it. (Objects are also often referred to as instances in programming—the two terms are
synonyms.)
A wombat, by the way, is an Australian marsupial (Figure 1.2). If you want to find out more
about them, do a Web search—it should give you plenty of results.
Right-click2 on the Wombat class, and you will see the class menu pop up (Figure 1.3a). The
first option in that menu, new Wombat(), lets us create new wombat objects. Try it out.
You will see that this gives you a small picture of a Wombat object, which you can move on
screen with your mouse (Figure 1.3b). Place the wombat into the world by clicking anywhere in
the world (Figure 1.3c).
2 On Mac OS, use ctrl-click instead of right-click if you have a one-button mouse.3 Image source: Wikipedia, subject to GNU Free Documentation License.

6 | Chapter 1 ■ Getting to know Greenfoot
Exercise 1.1 Create some more wombats in the world. Create some leaves.
Currently, only the Wombat and Leaf classes are of interest to us. We shall discuss the other
classes later.
1.3 Interacting with objects
Once we have placed some objects into the world, we can interact with these objects by right-
clicking them. This will pop up the object menu (Figure 1.4). The object menu shows us all the
operations this specific object can perform. For example, a wombat’s object menu shows us
what this wombat can do (plus two additional functions, Inspect and Remove, which we shall
discuss later).
In Java, these operations are called methods. It cannot hurt to get used to standard terminology
straightaway, so we shall also call them methods from now on. We can invoke a method by
selecting it from the menu.
Once you have a class in Greenfoot, you can create as many objects from it as you like.
Figure 1.4
The wombat’s object
menu
Concept:
Objects have
methods. Invoking
these performs
an action.
Exercise 1.2 Invoke the move() method on a wombat. What does it do? Try it several
times. Invoke the turnLeft() method. Place two wombats into your world and make them
face each other.
Concept:
Many objects can
be created from
a class.

1.4 Return types | 7
Concept:
The return type of
a method specifies
what a method call
will return.
Figure 1.5
A method result
In short, we can start to make things happen by creating objects from one of the classes provided,
and we can give commands to the objects by invoking their methods.
Let us have a closer look at the object menu. The move and turnLeft methods are listed as:
void move()
void turnLeft()
We can see that the method names are not the only things shown. There is also the word void at
the beginning and a pair of parentheses at the end. These two cryptic bits of information tell us
what data goes into the method call and what data comes back from it.
1.4 Return types
The word at the beginning is called the return type. It tells us what the method returns to us when
we invoke it. The word void means “nothing” in this context: Methods with a void return type
do not return any information. They just carry out their action, and then stop.
Any word other than void tells us that the method returns some information when invoked, and
of what type that information is. In the wombat’s menu (Figure 1.4) we can also see the words
int and boolean. The word int is short for “integer” and refers to whole numbers (numbers
without a decimal point). Examples of integer numbers are 3, 42, -3, and 12000000.
The type boolean has only two possible values: true and false. A method that returns a
boolean will return either the value true or the value false to us.
Methods with void return types are like commands for our wombat. If we invoke the
turnLeft method, the wombat obeys and turns left. Methods with non-void return types are
like questions. Consider the canMove method:
boolean canMove()
When we invoke this method, we see a result similar to that shown in Figure 1.5, displayed in a
dialog box. The important information here is the word true, which was returned by this
Concept:
A method with a
void return type
does not return a
value.

8 | Chapter 1 ■ Getting to know Greenfoot
Exercise 1.3 Invoke the canMove() method on your wombat. Does it always return
true? Or can you find situations in which it returns false?
Try out another method with a return value:
int getLeavesEaten()
Using this method, we can get the information how many leaves this wombat has eaten.
method call. In effect, we have just asked the wombat “Can you move?” and the wombat has
answered “Yes!” (true).
Exercise 1.4 Using a newly created wombat, the getLeavesEaten() method will
always return zero. Can you create a situation in which the result of this method is not zero?
(In other words: can you make your wombat eat some leaves?)
Methods with non-void return types usually just tell us something about the object (Can it
move? How many leaves has it eaten?), but do not change the object. The wombat is just as it
was before we asked it about the leaves. Methods with void return types are usually commands
to the objects that make it do something.
1.5 Parameters
The other bit in the method menu that we have not yet discussed are the parentheses after the
method name.
int getLeavesEaten()
void setDirection(int direction)
The parentheses after the method name hold the parameter list. This tells us whether the method
requires any additional information to run, and if so, what kind of information.
If we see only a pair of parentheses without anything else within it (as we have in all methods so
far), then the method has an empty parameter list. In other words, it expects no parameters—when
we invoke the method it will just run. If there is anything within the parenthesis, then the method
expects one or more parameters—additional information that we need to provide.
Let us try out the setDirectionmethod. We can see that it has the words int directionwritten
in its parameter list. When we invoke it, we see a dialog box similar to the one shown in Figure 1.6.
The words int direction tell us that this method expects one parameter of type int, which
specifies a direction. A parameter is an additional bit of data we must provide for this method to
run. Every parameter is defined by two words: first the parameter type (here: int) and then a
name, which gives us a hint what this parameter is used for. If a method has a parameter, then we
need to provide this additional information when we invoke the method.
Concept:
Methods with
void return
types represent
commands;
methods with
non-void return
types represent
questions.
Concept:
A parameter is
a mechanism to
pass in additional
data to a method.
Concept:
Parameters and
return values have
types. Examples
of types are int for
numbers, and
boolean for
true/false values.

1.6 Greenfoot execution | 9
Figure 1.6
A method call dialog
Exercise 1.5 Invoke the setDirection(int direction) method. Provide a
parameter value and see what happens. Which number corresponds to which direction?
Write them down. What happens when you type in a number greater than 3? What hap-
pens if you provide input that is not a whole number, such as a decimal number (2.5) or a
word (three)?
In this case, the type int tells us that we now should provide a whole number, and the name
suggests that this number somehow specifies the direction to turn to.
At the top of the dialog is a comment that tells us a little more: the direction parameter
should be between 0 and 3.
Concept:
The specification
of a method,
which shows its
return type, name,
and parameters
is called its
signature.
The setDirection method expects only a single parameter. Later, we shall see cases where
methods expect more than one parameter. In that case, the method will list all the parameters it
expects within the parentheses.
The description of each method shown in the object menu, including the return type, method
name, and parameter list, is called the method signature.
We have now reached a point where you can do the main interactions with Greenfoot objects.
You can create objects from classes, interpret the method signatures, and invoke methods (with
and without parameters).
1.6 Greenfoot execution
There is one other way of interacting with Greenfoot objects: the execution controls.
Tip:
You can place
objects into the
world more quickly
by selecting a
class in the class
diagram, and then
shift-clicking in the
world.
Exercise 1.6 Place a wombat and a good number of leaves into the world, and then
invoke a wombat’s act() method several times. What does this method do? How does it
differ from the move method? Make sure to try different situations, for example, the wombat
facing the edge of the world, or sitting on a leaf.
Exercise 1.7 Still with a wombat and some leaves in the world, click the Act button in the
execution controls near the bottom of the Greenfoot window. What does this do?

10 | Chapter 1 ■ Getting to know Greenfoot
The act method is a very fundamental method of Greenfoot objects. We shall encounter it
regularly in all the following chapters. All objects in a Greenfoot world have this act method.
Invoking act is essentially giving the object the instruction “Do whatever you want to do now”.
If you tried it out for our wombat, you will have seen that the wombat’s act does something like
the following:
■ If we’re sitting on a leaf, eat the leaf.
■ Otherwise, if we can move forward, move forward.
■ Otherwise, turn left.
The experiments in the exercises above should also have shown you that the Act button in the
execution controls simply calls the act method of the actors in the world. The only difference to
invoking the method via the object menu is that the Act button invokes the act method of all
objects in the world, whereas using the object menu affects only the one chosen object.
The Run button just calls act over and over again for all objects, until you click Pause.
Let us try out what we have discussed in the context of another scenario.
Concept:
Objects that can
be placed into the
world are known
as actors.
1.7 A second example
Open another scenario, named asteroids1, from the chapter01 folder of the book scenarios. It
should look similar to Figure 1.7 (except that you will not see the rocket or the asteroids on your
screen yet).
1.8 Understanding the class diagram
Let us first have a closer look at the class diagram (Figure 1.8). At the top, you see the two
classes called World and Space, connected by an arrow.
The World class is always there in all Greenfoot scenarios—it is built into Greenfoot. The class
under it, Space in this case, represents the specific world for this particular scenario. Its name
can be different in each scenario, but every scenario will have a specific world here.
The arrow shows an is-a relationship: Space is a World (in the sense of Greenfoot worlds:
Space, here, is a specific Greenfoot world). We also sometimes say that Space is a subclass
of World.
We do not usually need to create objects of world classes—Greenfoot does that for us. When we
open a scenario, Greenfoot automatically creates an object of the world subclass. The object is
then shown on the main part of the screen. (The big black image of space is an object of the
Space class.)
Exercise 1.8 What is the difference between clicking the Act button and invoking the
act() method? (Try with several wombats in the world.)
Exercise 1.9 Click the Run button. What does it do?
Concept:
A subclass
is a class that
represents a
specialization
of another. In
Greenfoot, this
is shown with an
arrow in the class
diagram.

1.8 Understanding the class diagram | 11
Figure 1.8
A class diagram
Figure 1.7
The asteroids1
scenario
12 | Chapter 1 ■ Getting to know Greenfoot
Below this, we see another group of six classes, linked by arrows. Each class represents its own
objects. Reading from the bottom, we see that we have rockets, bullets, and asteroids, which are
all “movers”, while movers and explosions are actors.
Again, we have subclass relationships: Rocket, for example, is a subclass of Mover, and Mover
and Explosion are subclasses of Actor. (Conversely, we say that Mover is a superclass of
Rocket and Actor is a superclass of Explosion.)
Subclass relationships can go over several levels: Rocket, for example, is also a subclass of
Actor (because it is a subclass of Mover, which is a subclass of Actor). We shall discuss more
about the meaning of subclasses and superclasses later.
The class Vector, shown at the bottom of the diagram under the heading Other classes is
a helper class used by the other classes. We cannot place objects of it into the world.
1.9 Playing with Asteroids
We can start playing with this scenario by creating some actor objects (objects of subclasses of
Actor) and placing them into the world. Here, we create objects only of the classes that have no
further subclasses: Rocket, Bullet, Asteroid, and Explosion.
Let us start by placing a rocket and two asteroids into space. (Remember: you can create objects
by right-clicking on the class, or selecting the class and shift-clicking.)
When you have placed your objects, click the Run button. You can then control the spaceship
with the arrow keys on your keyboard, and you can fire a shot by using the space bar. Try getting
rid of the asteroids before you crash into them.
Exercise 1.10 If you have played this game for a while, you will have noticed that
you cannot fire very quickly. Let us tweak our spaceship firing software a bit so
that we can shoot a bit quicker. (That should make getting the asteroids a bit easier!)
Place a rocket into the world, then invoke its setGunReloadTime method (through the
object menu), and set the reload time to 5. Play again (with at least two asteroids) to
try it out.
Exercise 1.11 Once you have managed to remove all asteroids (or at any other point in
the game), stop the execution (press Pause) and find out how many shots you have fired.
You can do this using a method from the rocket’s object menu. (Try destroying two aster-
oids with as few shots as possible.)
Exercise 1.12 You will have noticed that the rocket moves a bit as soon as you place it
into the world. What is its initial speed?
Exercise 1.13 Asteroids have an inherent stability. Each time they get hit by a bullet, their
stability decreases. When it reaches zero, they break up. What is their initial stability value
after you create them? By how much does the stability decrease from a single hit by a bullet?

1.10 Source code | 13
Concept:
Every class is
defined by source
code. This code
defines what
objects of this class
can do. We can
look at the source
code by opening
the class’s editor.
(Hint: Just shoot an asteroid once, and then check the stability again. Another hint: To shoot
the asteroid, you must run the game. To use the object menu, you must pause the game first.)
Exercise 1.14 Make a very big asteroid.
1.10 Source code
The behavior of each object is defined by its class. The way we can specify this behavior is by
writing source code in the Java programming language. The source code of a class is the code
that specifies all the details about the class and its objects. Selecting Open editor from the
class’s menu will show us an editor window (Figure 1.9) that contains the class’s source code.
The source code for this class is fairly complex, and we do not need to understand it all at this
stage. However, if you study the rest of this book and program your own games or simulations,
you will learn over time how to write this code.
At this point, it is only important to understand that we can change the behavior of the objects by
changing the class’s source code. Let us try this out.
Figure 1.9
The editor window of
class Rocket

14 | Chapter 1 ■ Getting to know Greenfoot
Tip:
You can open an
editor for a class
by double-clicking
the class in the
class diagram.
Figure 1.10
Classes after editing
We have seen before that the default firing speed of the rocket was fairly slow. We could change
this for every rocket individually by invoking a method on each new rocket, but we would have
to do this over and over again, every time we start playing. Instead, we can change the code of
the rocket so that its initial firing speed is changed (say, to 5), so that all rockets in the future
start with this improved behavior.
Open the editor for the Rocket class. About 25 lines from the top, you should find a line that reads
gunReloadTime = 20;
This is where the initial gun reloading time gets set. Change this line so that it reads
gunReloadTime = 5;
Be sure to change nothing else. You will notice very soon that programming systems are very
picky. A single incorrect or missing character can lead to errors. If, for example, you remove the
semicolon at the end of the line, you would run into an error fairly soon.
Close the editor window (our change is complete) and look at the class diagram again. It has
now changed: Several classes now appear striped (Figure 1.10). The striped look indicates that a
class has been edited and now must be compiled. Compilation is a translation process: The
class’s source code is translated into a machine code that your computer can execute.
Classes must always be compiled after their source code has been changed, before new objects
of the class can be created. (You will also have noticed that several classes need recompilation
even though we have changed only a single class. This is often the case because classes depend
on each other. When one changes, several need to be translated again.)
We can compile the classes by clicking the Compile All button in the bottom–right corner of
Greenfoot’s main window. Once the classes have been compiled, the stripes disappear, and we
can create objects again.
Exercise 1.15 Make the change to the Rocket class source code as described above.
Close the editor and compile the classes. Try it out: rockets should now be able to fire
quickly right from the start.
Concept:
Computers do not
understand source
code. It needs
to be translated
to machine code
before it can
be executed.
This is called
compilation.

1.11 Summary | 15
1.11 Summary
In this chapter, we have seen what Greenfoot scenarios can look like and how to interact with them.
We have seen how to create objects and how to communicate with these objects by invoking their
methods. Some methods were commands to the object, while other methods returned information
about the object. Parameters are used to provide additional information to methods, while return
values pass information back to the caller.
Objects were created from their classes, and source code controls the definition of the class (and
with this, the behavior and characteristics of all the class’s objects).
We have seen that we can change the source code using an editor. After editing the source,
classes need to be recompiled.
We will spend most of the rest of the book discussing how to write Java source code to create
scenarios that do interesting things.
Concept summary
■ Greenfoot scenarios consist of a set of classes.
■ Many objects can be created from a class.
■ Objects have methods. Invoking these performs an action.
■ The return type of a method specifies what a method call will return.
■ A method with a void return type does not return a value.
■ Methods with void return types represent commands; methods with non-void return types
represent questions.
■ A parameter is a mechanism to pass in additional data to a method.
■ Parameters and return values have types. Examples of types are int for numbers, and boolean
for true/false values.
■ The specification of a method, which shows its return type, name, and parameters, is called
its signature.
■ Objects that can be placed into the world are known as actors.
■ A subclass is a class that represents a specialization of another. In Greenfoot, this is shown
with an arrow in the class diagram.
■ Every class is defined by source code. This code defines what objects of this class can do.
We can look at the source code by opening the class’s editor.
■ Computers do not understand source code. It needs to be translated to machine code before
it can be executed. This is called compilation.
We shall come back to the asteroids game in Chapter 7, where we will discuss how to write
this game.
In the previous chapter, we discussed how to use existing Greenfoot scenarios: We have created
objects, invoked methods, and played a game.
Now, we shall start to make our own game.
2.1 The Little Crab scenario
The scenario we use for this chapter is called little-crab. You will find this scenario in the book
projects for this book.
The scenario you see should look similar to Figure 2.1.
CHAPTER
The first program: Little Crab2
topics: writing code: movement, turning, reacting to the screen edges
concepts: source code, method call, parameter, sequence, if-statement
Exercise 2.1 Start Greenfoot and open the little-crab scenario. Place a crab into the
world and run the program (click the Run button). What do you observe? (Remember: If the
class icons on the right appear striped, you have to compile the project first.)
On the right, you see the classes in this scenario (Figure 2.2). We notice that there is the usual
Greenfoot Actor class, a class called Animal, and the Crab class.
The hierarchy (denoted by the arrows) indicates an is-a relationship (also called
inheritance): A crab is an animal, and an animal is an actor. (It follows then, that a crab also
is an actor.)
Initially, we will work only with the Crab class. We will talk a little more about the Actor and
Animal classes later on.
If you have done the exercise above, then you know the answer to the question “What do you
observe?” It is: “nothing”.

2.1 The Little Crab scenario | 17
Figure 2.1
The Little Crab
scenario
Figure 2.2
The Little Crab actor
classes
The crab does not do anything when Greenfoot runs. This is because there is no source code in
the definition of the Crab class that specifies what the crab should do.
In this chapter, we shall work on changing this. The first thing we shall do is to make the crab
move.
2.2 Making the crab move
Let us have a look at the source code of class Crab. Open the editor to display the Crab source.
(You can do this by selecting the Open editor function from the class’s popup menu, or you can
just double-click the class.)
The source code you see is shown in Code 2.1.
18 | Chapter 2 ■ The first program: Little Crab
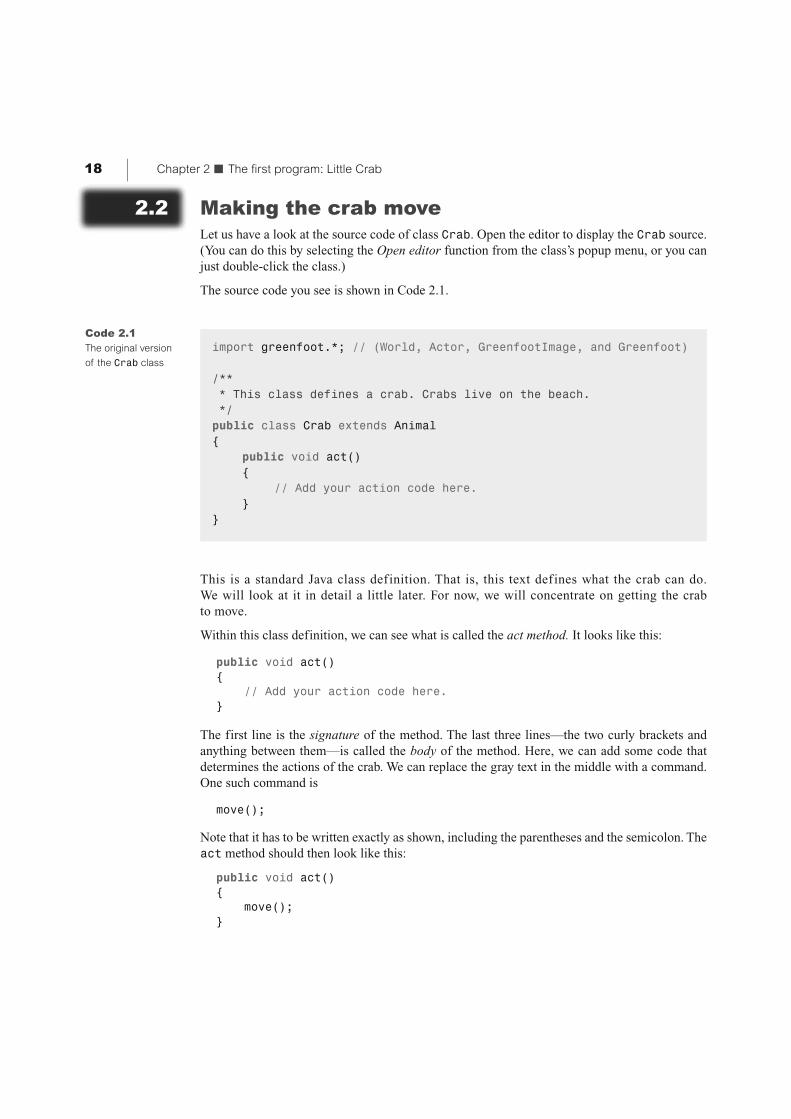
Code 2.1
The original version
of the Crab class
import greenfoot.*; // (World, Actor, GreenfootImage, and Greenfoot)
/**
* This class defines a crab. Crabs live on the beach.
*/
public class Crab extends Animal
{
public void act()
{
// Add your action code here.
}
}
This is a standard Java class definition. That is, this text defines what the crab can do.
We will look at it in detail a little later. For now, we will concentrate on getting the crab
to move.
Within this class definition, we can see what is called the act method. It looks like this:
public void act()
{
// Add your action code here.
}
The first line is the signature of the method. The last three lines—the two curly brackets and
anything between them—is called the body of the method. Here, we can add some code that
determines the actions of the crab. We can replace the gray text in the middle with a command.
One such command is
move();
Note that it has to be written exactly as shown, including the parentheses and the semicolon. The
act method should then look like this:
public void act()
{
move();
}
2.3 Turning | 19
Exercise 2.2 Change the act method in your crab class to include the move() instruc-
tion, as shown above. Compile the scenario (by clicking the Compile All button) and place
a crab into the world. Try clicking the Act and Run buttons.
Exercise 2.3 Place multiple crabs into the world. Run the scenario. What do you
observe?
Concept:
A method call is
an instruction that
tells an object to
perform an action.
The action is
defined by a
method of the
object.
You will see that the crab can now move across the screen. The move() instruction makes the
crab move a little bit to the right. When we click the Act button in the Greenfoot main window,
the act method is executed once. That is, the instruction that we have written inside the act
method (move()) executes.
Clicking the Run button is just like clicking the Act button several times, very quickly. So the
act method is executed over and over again, until we click Pause.
Terminology
The instruction move() is called a method call. A method is an action that an object knows
how to do (here, the object is the crab) and a method call is an instruction telling the crab to
do it. The parentheses are part of the method call. Instructions like this end with a semicolon.
Concept:
Additional informa-
tion can be passed
to some methods
within the paren-
theses. The value
passed is called a
parameter.
2.3 Turning
Let us see what other instructions we can use. The crab also understands a turn instruction.
Here is what it looks like:
turn(5);
The number 5 in the instruction specifies how many degrees the crab should turn. This is called
a parameter. We can also use other numbers, for example:
turn(23);
The degree value is specified out of 360 degrees, so any value between 0 and 359 can be used.
(Turning 360 degrees would turn all the way around, so it is the same as turning 0 degrees, or not
turning at all.)
If we want to turn instead of moving, we can replace the move() instruction with a turn(5)
instruction. The act method then looks like this:
public void act()
{
turn(5);
}

Exercise 2.4 Replace move() with turn(5) in your scenario. Try it out. Also, try values
other than 5 and see what it looks like. Remember: Every time you change your source
code, you must compile again.
Exercise 2.5 How can you make the crab turn left?
Concept:
Multiple instruc-
tions are executed
in sequence,
one after the other,
in the order in
which they are
written.
20 | Chapter 2 ■ The first program: Little Crab
Code 2.2
Making the crab
move and turn
import greenfoot.*; // (World, Actor, GreenfootImage, and Greenfoot)
/**
* This class defines a crab. Crabs live on the beach.
*/
public class Crab extends Animal
{
public void act()
{
move();
turn(5);
}
}
The next thing we can try is to both move and turn. The act method can hold more than one
instruction—we can just write multiple instructions in a row.
Code 2.2 shows the complete Crab class, as it looks when we move and turn. In this case, at
every act step, the crab will move and then turn (but these actions will happen so quickly after
each other that it appears as if they happen at the same time).
Exercise 2.6 Use a move() and turn(N) instruction in your crab’s act method.
Try different values for N.
Terminology
The number within the parentheses in the turn instruction—that is, the 5 in turn(5)—is
called a parameter. A parameter is an additional bit of information that we have to provide
when we call some methods.
Some methods, like move, expect no parameters. They are happy to just execute as soon as
we write the move() instruction. Other methods, such as turn, want more information: How
much should I turn? In this case, we have to provide that information in the form of a parameter
value within the parentheses, for instance, turn(17).

2.4 Dealing with screen edges | 21
Concept:
When a class is
compiled, the com-
piler checks to see
whether there are
any errors. If an
error is found, an
error message is
displayed.
Side note: Errors
When we write source code, we have to be very careful—every single character counts.
Getting one small thing wrong will result in our program not working. Usually, it will not
compile.
This will happen to us regularly: When we write programs, we inevitably make mistakes, and
then we have to correct them. Let us try that out now.
If, for example, we forget to write the semicolon after the move() instruction, we will be told
about it when we try to compile.
Exercise 2.7 Open your editor to show the crab’s source code, and remove the semi-
colon after move(). Then compile. Also experiment with other errors, such as misspelling
move or making other random changes to the code. Make sure to change it all back after
this exercise.
Exercise 2.8 Make various changes to cause different error messages. Find at least five
different error messages. Write down each error message and what change you introduced
to provoke this error.
Tip:
When an error
message appears
at the bottom of
the editor window,
a question mark
button appears to
the right of it.
Clicking this button
displays some
additional informa-
tion about the
error message.
As we can see with this exercise, if we get one small detail wrong, Greenfoot will open the
editor, highlight a line, and display a message at the bottom of the editor window. This
message attempts to explain the error. The messages, however, vary considerably in their
accuracy and usefulness. Sometimes they tell us fairly accurately what the problem is, but
sometimes they are cryptic and hard to understand. The line that is highlighted is often the
line where the problem is, but sometimes it is the line after the problem. When you see, for
example, a “; expected” message, it is possible that the semicolon is in fact missing on
the line above the highlighted line.
We will learn to read these messages a little better over time. For now, if you get a message and
you are unsure what it means, look very carefully at your code and check that you have typed
everything correctly.
2.4 Dealing with screen edges
When we made the crabs move and turn in the previous sections, they got stuck when they
reached the edge of the screen. (Greenfoot is designed so that actors cannot leave the world and
fall off its edge.)
Now, we shall improve this behavior so that the crab notices that it has reached the world edge
and turns around. The question is, How can we do that?

22 | Chapter 2 ■ The first program: Little Crab
Exercise 2.9 Open the editor for the Animal class. Switch to Documentation view. Find
the list of methods for this class (the “Method Summary”). How many methods does this
class have?
Above, we have used the move and turn methods, so there might also be a method that helps
us with our new goal. (In fact, there is.) But how do we find out what methods we have got
available?
The move and turn methods we have used so far come from the Animal class. A crab is an
animal (signified by the arrow that goes from Crab to Animal in the class diagram), therefore
it can do whatever an animal can do. Our Animal class knows how to move and turn—that is
why our crab can also do it. This is called inheritance: The Crab class inherits all the abilities
(methods) from the Animal class.
The question now is, what else can our animals do?
To investigate this, we can open the editor for the Animal class. The editor can display two
different views: It can show the source code (as we have seen for the Crab class) or it can show
the documentation. The view can be switched using a popup selection menu in the top right cor-
ner of the editor window. We now want to look at the Animal class in the Documentation view
(Figure 2.3).
Method
summary View
switch
Figure 2.3
Documentation view
(with method sum-
mary) of the Animal
class
Concept:
A subclass
inherits all the
methods from its
superclass. That
means that it has
and can use all
methods that its
superclass
defines.

2.4 Dealing with screen edges | 23
If we look at the method summary, we can see all the methods that the Animal class
provides. Among them are three methods that are especially interesting to us at the moment.
They are:
boolean atWorldEdge()
Test if we are close to one of the edges of the world.
void move()
Move forward in the current direction.
void turn(int angle)
Turn “angle” degrees toward the right (clockwise).
Here we see the signatures for three methods, as we first encountered them in Chapter 1. Each
method signature starts with a return type and is followed by the method name and the parameter
list. Below it, we see a comment describing what the method does. We can see that the three
method names are atWorldEdge, move, and turn.
The move and turn methods are the ones we used in the previous sections. If we look at their
parameter lists, we can see what we observed before: move has no parameters (the parentheses
are empty), and turn expects one parameter of type int (a whole number) for the angle. (Read
Section 1.5 again if you are unsure about parameter lists.)
We can also see that the move and turn methods have void as their return type. This
means that neither method returns a value. We are commanding or instructing the object
to move or to turn. The animal will just obey the command but not respond with an answer
to us.
The signature for atWorldEdge is a little different. It is
boolean atWorldEdge()
This method has no parameters (there is nothing within the parentheses), but it specifies a return
value: boolean. We have briefly encountered the boolean type in Section 1.4—it is a type that
can hold two possible values: true or false.
Calling methods that have return values (where the return type is not void) is not like issuing a
command, but asking a question. If we use the atWorldEdge() method, the method will
respond with either true (Yes!) or false (No!). Thus, we can use this method to check whether
we are at the edge of the world.
Exercise 2.10 Create a crab. Right-click it, and find the boolean atWorldEdge()
method (it is in the inherited from Animal submenu, since the crab inherited this method
from the Animal class). Call this method. What does it return?
Exercise 2.11 Let the crab run to the edge of the screen (or move it there manually),
and then call the atWorldEdge() method again. What does it return now?
Concept:
Calling a method
with a void return
type issues a
command.
Calling a
method with a
non-void return
type asks a
question.
Concept:
An if-statement
can be used to
write instructions
that are executed
only when a certain
condition is true.
24 | Chapter 2 ■ The first program: Little Crab
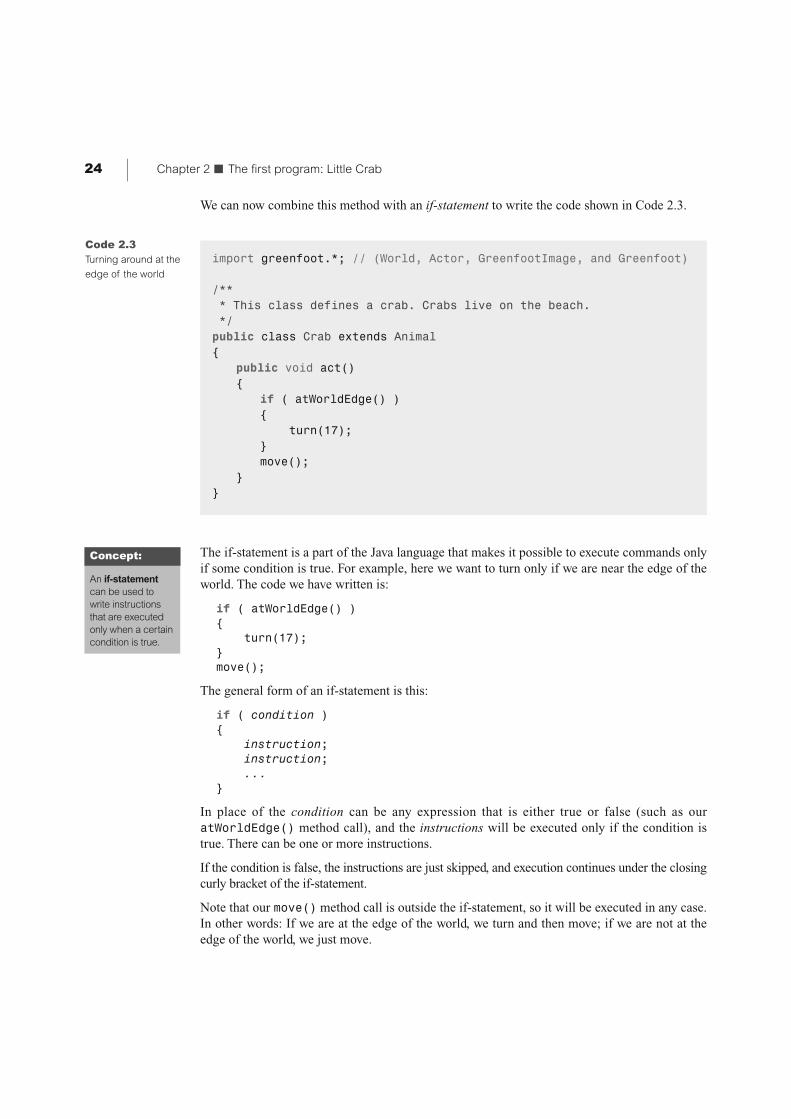
Code 2.3
Turning around at the
edge of the world
import greenfoot.*; // (World, Actor, GreenfootImage, and Greenfoot)
/**
* This class defines a crab. Crabs live on the beach.
*/
public class Crab extends Animal
{
public void act()
{
if ( atWorldEdge() )
{
turn(17);
}
move();
}
}
The if-statement is a part of the Java language that makes it possible to execute commands only
if some condition is true. For example, here we want to turn only if we are near the edge of the
world. The code we have written is:
if ( atWorldEdge() )
{
turn(17);
}
move();
The general form of an if-statement is this:
if ( condition )
{
instruction;
instruction;
...
}
In place of the condition can be any expression that is either true or false (such as our
atWorldEdge() method call), and the instructions will be executed only if the condition is
true. There can be one or more instructions.
If the condition is false, the instructions are just skipped, and execution continues under the closing
curly bracket of the if-statement.
Note that our move() method call is outside the if-statement, so it will be executed in any case.
In other words: If we are at the edge of the world, we turn and then move; if we are not at the
edge of the world, we just move.
We can now combine this method with an if-statement to write the code shown in Code 2.3.

2.5 Summary of programming techniques | 25
Exercise 2.12 Try it out! Type in the code discussed above and see if you can make
your crabs turn at the edge of the screen. Pay close attention to the opening and closing
brackets—it is easy to miss one or have too many.
Exercise 2.13 Experiment with different values for the parameter to the turn method.
Find one that looks good.
Exercise 2.14 Place the move() statement inside the if-statement, rather than after it. Find
out what is the effect and explain the behavior you observe. (Then, fix it again by moving it
back where it was.)
Tip:
In the Greenfoot
editor, when you
place the cursor
behind an opening
or closing bracket,
Greenfoot will
mark the matching
closing or opening
bracket. This can
be used to check
whether your
brackets match up
as they should.
Note: Indentation
In all the code examples you have seen so far (for instance, Code 2.3), you may have noticed
some careful indentation being used. Every time a curly bracket opens, the following lines are
indented one level more than the previous ones. When a curly bracket closes, the indentation
goes back one level, so that the closing curly bracket is directly below the matching opening
bracket. This makes it easy to find the matching bracket.
We use four spaces for one level of indentation. The Tab key will insert spaces in your editor for
one level of indentation as well.
Taking care with indentation in your own code is very important. If you do not indent carefully,
some errors (particularly misplaced or mismatched curly brackets) are very hard to spot.
Proper indentation makes code much easier to read, and thus avoid potential errors.
2.5 Summary of programming techniques
In this book, we are discussing programming from a very example-driven perspective. We intro-
duce general programming techniques as we need them to improve our scenarios. We shall sum-
marize the important programming techniques at the end of each chapter to make it clear what
you really need to take away from the discussion in order to progress well.
In this chapter, we have seen how to call methods (such as move()), with and without parame-
ters. This will form the basis for all further Java programming. We have also learnt to identify
the body of the act method—this is where we start writing our instructions.
You have encountered some error messages. This will continue throughout all your program-
ming endeavors. We all make mistakes, and we all encounter error messages. This is not a sign
of a bad programmer—it is a normal part of programming.
We have encountered a first glimpse of inheritance: Classes inherit the methods from their
superclasses. The Documentation view of a class gives us a summary of the methods available.
And, very importantly, we have seen how to make decisions: We have used an if-statement for
conditional execution. This went hand in hand with the appearance of the type boolean, a value
that can be true or false.

26 | Chapter 2 ■ The first program: Little Crab
Concept summary
■ A method call is an instruction that tells an object to perform an action. The action is defined
by a method of the object.
■ Additional information can be passed to some methods within the parentheses. The value
passed is called a parameter.
■ Multiple instructions are executed in sequence, one after the other, in the order in which they
are written.
■ When a class is compiled, the compiler checks to see whether there are any errors. If an error
is found, an error message is displayed.
■ A subclass inherits all the methods from its superclass. That means that it has, and can use, all
methods that its superclass defines.
■ Calling a method with a void return type issues a command. Calling a method with a non-void
return type asks a question.
■ An if-statement can be used to write instructions that are executed only when a certain
condition is true.

In the previous chapter, we looked at the basics of starting to program our first game. There were
many new things that we had to look at. Now, we will add more interesting behavior. Adding
code will get a little easier from now on, since we have seen many of the fundamental concepts.
The first thing we shall look at is adding some random behavior.
3.1 Adding random behavior
In our current implementation, the crab can walk across the screen, and it can turn at the edge
of our world. But when it walks, it always walks exactly straight. That is what we want to
change now. Crabs don’t always go in an exact straight line, so let us add a little random
behavior: The crab should go roughly straight, but every now and then it should turn a little
off course.
We can achieve this in Greenfoot by using random numbers. The Greenfoot environment itself
has a method to give us a random number. This method, called getRandomNumber, expects a
parameter that specifies the limit of the number. It will then return a random number between
0 (zero) and the limit. For example,
Greenfoot.getRandomNumber(20)
will give us a random number between 0 and 20. The limit—20—is excluded, so the number is
actually in the range 0–19.
The notation used here is called dot notation. When we called methods that were defined in our
own class or inherited, it was enough to write the method name and parameter list. When the
method is defined in another class, we need to specify the class or object that has the method,
followed by a period (dot), followed by the method name and parameter. Since the
getRandomNumber method is not in the Crab or Animal class, but in a class called
Greenfoot, we have to write “Greenfoot.” in front of the method call.
topics: random behavior, keyboard control, sound
concepts: dot notation, random numbers, defining methods, comments
Concept:
When a method
we wish to call is
not in our own
class or inherited,
we need to specify
the class or object
that has the
method before the
method name,
followed by a dot.
This is called dot
notation.
CHAPTER
Improving the Crab—moresophisticated programming3

28 | Chapter 3 ■ Improving the Crab—more sophisticated programming
Let us say we want to program our crab so that there is a 10 percent chance at every step that the
crab turns a little bit off course. We can do the main part of this with an if-statement:
if ( something-is-true )
{
turn(5);
}
Now we have to find an expression to put in place of something-is-true that returns true in
exactly 10 percent of the cases.
We can do this using a random number (using the Greenfoot.getRandomNumber method)
and a less-than operator. The less-than operator compares two numbers and returns true if the
first is less than the second. “Less than” is written using the symbol “<”. For example:
2 < 33
is true, while
162 < 42
is false.
Exercise 3.1 Before reading on, try to write down, on paper, an expression using the
getRandomNumber method and the less-than operator that, when executed, is true exactly
10 percent of the time.
Exercise 3.2 Write down another expression that is true 7 percent of the time.
Concept:
Methods that
belong to classes
(as opposed to
objects) are
marked with the
keyword static in
their signature.
They are also
called class
methods.
Note: Static methods
Methods may belong to objects or classes. When methods belong to a class, we write
class-name.method-name (parameters);
to call the method. When a method belongs to an object, we write
object.method-name (parameters);
to call it.
Both kinds of methods are defined in a class. The method signature tells us whether a given
method belongs to objects of that class, or to the class itself.
Methods that belong to the class itself are marked with the keyword static at the beginning
of the method signature. For example, the signature of Greenfoot’s getRandomNumber
method is
static int getRandomNumber(int limit);
This tells us that we must write the name of the class itself (Greenfoot) before the dot in the
method call.
We will encounter calls to methods that belong to other objects in a later chapter.

3.1 Adding random behavior | 29
Note
Java has a number of operators to compare two values. They are:
< less than >= greater than or equal
> greater than == equal
<= less than or equal != not equal
If we want to express the chance in percent, it is easiest to deal with random numbers out of 100.
An expression that is true 10 percent of the time, for example, could be
Greenfoot.getRandomNumber(100) < 10
Since the call to Greenfoot.getRandomNumber(100) gives us a new random number
between 0 and 99 every time we call it, and since these numbers are evenly distributed, they will
be below 10 in 10 percent of all cases.
We can now use this to make our crab turn a little in 10 percent of its steps (Code 3.1).
Code 3.1
Random course
changes—first try
import greenfoot.*; // (World, Actor, GreenfootImage, and Greenfoot)
/**
* This class defines a crab. Crabs live on the beach.
*/
public class Crab extends Animal
{
public void act()
{
if ( atWorldEdge() )
{
turn(17);
}
if ( Greenfoot.getRandomNumber(100) < 10 )
{
turn(5);
}
move();
}
}
Exercise 3.3 Try out the random course changes shown above in your own version.
Experiment with different probabilities for turning.
This is a pretty good start, but it is not quite nice yet. First of all, if the crab turns, it always turns the
same amount (5 degrees), and secondly, it always turns right, never left. What we would really like

30 | Chapter 3 ■ Improving the Crab—more sophisticated programming
Exercise 3.4 Try out the code shown above. What do you observe? Does the crab turn
different amounts when it turns?
Exercise 3.5 We still have the problem that the crab turns only right. That’s not normal
behavior for a crab, so let’s fix this. Modify your code so that the crab turns either right or left
by up to 45 degrees each time it turns.
Exercise 3.6 Try running your scenario with multiple crabs in the world. Do they all turn
at the same time, or independently? Why?
The project little-crab-2 (included in the book scenarios) shows an implementation of what we
have done so far, including the last exercises.
3.2 Adding worms
Let us make our world a little more interesting by adding another kind of animal.
Crabs like to eat worms. (Well, that is not true for all kinds of crab in the real world, but there are
some that do. Let’s just say our crab is one of those that like to eat worms.) So let us now add a
class for worms.
We can add new actor classes to a Greenfoot scenario by selecting New subclass from one of the
existing actor classes (Figure 3.1). In this case, our new class Worm is a specific kind of animal,
so it should be a subclass of class Animal. (Remember, being a subclass is an is-a relationship:
A worm is an animal.)
When we are creating a new subclass, we are prompted to enter a name for the class and to select
an image (Figure 3.2).
In our case, we name the class “Worm”. By convention, class names in Java should always start
with a capital letter. They should also describe what kind of object they represent, so “Worm” is
the obvious name for our purpose.
Then, we should assign an image to the class. There are some images associated with the scenario,
and a whole library of generic images to choose from. In this case, we have prepared a worm image
and made it available in the scenario images, so we can just select the image named worm.png.
to see is that the crab turns a small, but random amount to either its left or its right. (We will discuss
this now. If you feel confident enough, try to implement this on your own first before reading on.)
The simple trick to the first problem—always turning the same amount, in our case 5 degrees—
is to replace the fixed number 5 in our code with another random number, like this:
if ( Greenfoot.getRandomNumber(100) < 10 )
{
turn( Greenfoot.getRandomNumber(45) );
}
In this example, the crab still turns in 10 percent of its steps. And when it turns, it will turn a random
amount, between 0 and 44 degrees.

3.2 Adding worms | 31
Figure 3.1
Creating new
subclasses
Figure 3.2
Creating a new class
32 | Chapter 3 ■ Improving the Crab—more sophisticated programming
Exercise 3.7 Add some worms to your world. Also add some crabs. Run the
scenario. What do you observe? What do the worms do? What happens when a crab
meets a worm?
We now know how to add new classes to our scenario. The next task is to make these classes
interact: When a crab finds a worm, it should eat it.
3.3 Eating worms
We now want to add new behavior to the crab: When the crab runs into a worm, it eats it. Again,
we first check what methods we have already inherited from the Animal class. When we open
the editor for class Animal again, and switch to the Documentation view, we can see the
following two methods:
boolean canSee (java.lang.Class clss)
Return true if we can see an object of class ‘clss’ right where we are.
void eat (java.lang.Class clss)
Try to eat an object of class ‘clss’.
Using these methods, we can implement this behavior. The first method checks whether
the crab can see a worm. (It can see it only when it runs right into it—our animals are very
short-sighted.) This method returns a boolean—true or false, so we can use it in an
if-statement.
The second method eats a worm. Both methods expect a parameter of type java.lang.Class.
This means that we are expected to specify one of our classes from our scenario. Here is some
sample code:
if ( canSee(Worm.class) )
{
eat(Worm.class);
}
In this case, we specify Worm.class as the parameter to both method calls (the canSee
method and the eat method). This declares which kind of object we are looking for,
and which kind of object we want to eat. Our complete act method at this stage is shown in
Code 3.2.
Try this out. Place a number of worms into the world (remember: shift-clicking into the world is
a shortcut for quickly placing several actors), place a few crabs, run the scenario, and see what
happens.
Once done, we can click Ok. The class is now added to our scenario, and we can compile and
then add worms to our world.

3.4 Creating new methods | 33
Code 3.2
First version of eating
a worm
public void act()
{
if ( atWorldEdge() )
{
turn(17);
}
if ( Greenfoot.getRandomNumber(100) < 10 )
{
turn(Greenfoot.getRandomNumber(90)-45);
}
move();
if ( canSee(Worm.class) )
{
eat(Worm.class);
}
}
Advanced note: Packages
(The notes labeled “Advanced note” are inserted for deeper information for those readers really
interested in the details. They are not crucial to understand at this stage, and could safely be
skipped.)
In the definition of the canSee and eat methods, we have seen a parameter type with the
name java.lang.Class. What is going on here?
Many types are defined by classes. Many of those classes are in the standard Java class
library. You can see the documentation of the Java class library by choosing Java Library
Documentation from Greenfoot’s Help menu.
The Java class library contains thousands of classes. To make these a little easier to work with,
they have been grouped into packages (logically related groups of classes). When a class
name includes dots, such as java.lang.Class, only the last part is the name of the class
itself, and the former parts form the name of the package. So here we are looking at the class
named “Class” from the package “java.lang”.
Try to find that class in the Java library documentation.
3.4 Creating new methods
In the previous few sections, we have added new behavior to the crab—turning at the edge of the
world, occasional random turns, and eating worms. If we continue to do this in the way we have
done so far, the act method will become longer and longer, and eventually really hard to under-
stand. We can improve this by chopping it up into smaller pieces.

We can create our own additional methods in the Crab class for our own purposes. For exam-
ple, instead of just writing some code that looks for a worm and eats it into the act method, we
can add a new method for this purpose. To do this, we first have to decide on a name for this
method. Let us say we call it lookForWorm. We can then create a new method by adding the
following code:
/**
* Check whether we have stumbled upon a worm.
* If we have, eat it. If not, do nothing.
*/
public void lookForWorm()
{
if ( canSee(Worm.class) )
{
eat(Worm.class);
}
}
The first four lines are a comment. A comment is ignored by the computer—it is written for
human readers. We use a comment to explain to other human readers what the purpose of this
method is.
When we define this method, the code does not immediately get executed. In fact, by just defining
this method, it does not get executed at all. We are just defining a new possible action (“looking for
a worm”) that can be carried out later. It will only be carried out when this method is called. We
can add a call to this method inside the act method:
lookForWorm();
Note that the call has the parentheses for the (empty) parameter list. The complete source code
after this restructuring is shown in Code 3.3.
34 | Chapter 3 ■ Improving the Crab—more sophisticated programming
Concept:
Comments are
written into the
source code as
explanations for
human readers.
They are ignored
by the computer.
Code 3.3
Splitting code into
separate methods
public void act()
{
if ( atWorldEdge() )
{
turn(17);
}
if ( Greenfoot.getRandomNumber(100) < 10 )
{
turn(5);
}
move();
lookForWorm();
}
Concept:
A method defini-
tion defines a new
action for objects
of this class. The
action is not imme-
diately executed,
but the method
can be called with
a method call later
to execute it.

3.4 Creating new methods | 35
/**
* Check whether we have stumbled upon a worm.
* If we have, eat it. If not, do nothing.
*/
public void lookForWorm()
{
if ( canSee(Worm.class) )
{
eat(Worm.class);
}
}
Code 3.3
continued
Splitting code into
separate methods
Note that this code change does not change the behavior of our crab at all. It just makes the code
easier to read in the long run. As we add more code to the class, methods tend to become longer
and longer. Longer methods are harder to understand. By separating our code into a number of
shorter methods, we make the code easier to read.
Exercise 3.8 Create another new method named randomTurn (this method has no
parameters and returns nothing). Select the code that does the random turning, and move
it from the act method to the randomTurn method. Then call this new randomTurn
method from your act method. Make sure to write a comment for this method.
Exercise 3.9 Create yet another method named turnAtEdge (it also has no parameters
and returns nothing). Move the code that checks whether we are at the edge of the world (and
does the turn if we are) into the turnAtEdgemethod. Call the turnAtEdgemethod from your
act method. Your act method should now look like the version shown in Code 3.4.
Code 3.4
The new act method
after creating
methods for the
subtasks
public void act()
{
turnAtEdge();
randomTurn();
move();
lookForWorm();
}
By convention, method names in Java always start with a lowercase letter. Method names
cannot contain spaces (or many other punctuation characters). If the method name logically
consists of multiple words, we use capitals in the middle of the method name to mark the start
of each word.

36 | Chapter 3 ■ Improving the Crab—more sophisticated programming
Exercise 3.10 Add a new class to your scenario. The class should be a subclass of
Animal, called Lobster (with a capital ‘L’), and it should use the prepared image lobster.png.
Exercise 3.11 What do you expect lobsters to do when you place them into the world as
they are? Compile your scenario and try it out.
We now want to program our new lobsters to eat crabs. This is quite easy to do, since the behav-
ior is very similar to the behavior of crabs. The only difference is that lobsters look for crabs,
while crabs look for worms.
Exercise 3.12 Copy the complete act method from the Crab class into the Lobster
class. Also copy the complete lookForWorm, turnAtEdge, and randomTurn methods.
Exercise 3.13 Change the Lobster code so that it looks for crabs, rather than worms.
You can do that by changing every occurrence of “Worm” in the source code to “Crab”. For
instance, where Worm.class is mentioned, change it to Crab.class. Also change the
name lookForWorm to lookForCrab. Make sure to update your comments.
Exercise 3.14 Place a crab, three lobsters, and many worms into the world. Run the
scenario. Does the crab manage to eat all worms before it is caught by a lobster?
You should now have a version of your scenario where both crabs and lobsters walk around
randomly, looking for worms and crabs, respectively.
Now, let us turn this program into a game.
3.6 Keyboard control
To get game-like behavior, we need to get a player involved. The player (you!) should be able to
control the crab with the keyboard, while the lobsters continue to run randomly by themselves,
as they already do.
The Greenfoot environment has a method that lets us check whether a key on the keyboard has been
pressed. It is called isKeyDown, and, like the getRandomNumber method that we encountered in
section 3.1, it is a method in the Greenfoot class. The method signature is
static boolean isKeyDown(String key)
We can see that the method is static (it is a class method) and the return type is boolean. This
means that the method returns either true or false, and can be used as a condition in an if-statement.
3.5 Adding a Lobster
We are now at a stage where we have a crab that walks more or less randomly through our world,
and eats worms if it happens to run into them.
To make it a little more interesting, let us add another creature: a lobster.
Lobsters, in our scenario, like to chase crabs.

3.6 Keyboard control | 37
We also see that the method expects a parameter of type String. A String is a piece of text (such
as a word or a sentence), written in double quotes. The following are examples of Strings:
“This is a String”
“name”
“A”
In this case, the String expected is the name of the key that we want to test. Every key on the key-
board has a name. For those keys that produce visible characters, that character is their name, for
example, the A-key is called “A”. Other keys have names too. For instance, the left cursor key is
called “left”. Thus, if we want to test whether the left cursor key has been pressed, we can write
if (Greenfoot.isKeyDown(“left”))
{
...// do something
}
Note that we need to write “Greenfoot.” in front of the call to isKeyDown, since this method
is defined in the Greenfoot class.
If, for example, we want our crab to turn left by 4 degrees whenever the left cursor key is being
pressed, we can write
if (Greenfoot.isKeyDown(“left”))
{
turn(-4);
}
The idea now is to remove the code from the crab that does the random turning and also the code
that turns automatically at the world edge and replace them with the code that lets us control the
crab’s turn with our keyboard.
Exercise 3.15 Remove the random turning code from the crab.
Exercise 3.16 Remove the code from the crab that does the turn at the edge of the world.
Exercise 3.17 Add code into the crab’s actmethod that makes the crab turn left whenever
the left cursor key is pressed. Test.
Exercise 3.18 Add another—similar—bit of code to the crab’s act method that makes
the crab turn right whenever the right cursor key is pressed.
Exercise 3.19 If you have not done so in the first place, make sure that the code that
checks the key-presses and does the turning is not written directly in the act method, but is
instead in a separate method, maybe called checkKeypress. This method should be
called from the act method.
Tip:
Greenfoot automat-
ically saves classes
and scenarios
when their windows
are closed. To keep
a copy of interim
stages of scenar-
ios, use Save A
Copy As from the
Scenario menu.
Try solving the tasks by yourself first. If you get stuck, have a look on the next page. Code 3.5
shows the crab’s complete act and checkKeypress methods after this change. The solution is
also available in the book scenarios, as little-crab-3. This version includes all the changes we
have discussed so far.

38 | Chapter 3 ■ Improving the Crab—more sophisticated programming
Concept:
The API
Documentation
lists all classes
and methods avail-
able in Greenfoot.
We often need to
look up methods
here.
You are now ready to have a first try at playing your game! Place a crab, some worms, and a few
lobsters into the world, and see whether you can get all the worms before the lobsters catch you.
(Obviously, the more lobsters you place, the harder it gets...)
3.7 Ending the game
One simple improvement we can make is to end execution of the game when the crab is caught
by a lobster. Greenfoot has a method to do this—we just need to find out what it is called.
To find out what the available methods in Greenfoot are, we can look at the documentation of
the Greenfoot classes.
In Greenfoot, choose Greenfoot Class Documentation from the Help menu. This will show the
documentation for all the Greenfoot classes in a Web browser (Figure 3.3).
This documentation is also called the Greenfoot API (for application programmers’ interface).
The API shows all available classes and, for each class, all the available methods. You can see
that Greenfoot offers five classes: Actor, Greenfoot, GreenfootImage, MouseInfo, and
World.
Code 3.5
The Crab’s “act”
method: Controlling
the crab with the
keyboard
/**
* Act - do whatever the crab wants to do.
*/
public void act()
{
checkKeypress();
move();
lookForWorm();
}
/**
* Check whether a control key on the keyboard has been pressed.
* If it has, react accordingly.
*/
public void checkKeypress()
{
if (Greenfoot.isKeyDown(“left”))
{
turn(-4);
}
if (Greenfoot.isKeyDown(“right”))
{
turn(4);
}
}

3.7 Ending the game | 39
Figure 3.3
The Greenfoot API in
a browser window
The method we are looking for is in the Greenfoot class.
Exercise 3.20 Open the Greenfoot API in your browser. Select the Greenfoot class.
In its documentation, find the section titled “Method Summary”. In this section, try to
find a method that stops the execution of the running scenario. What is this method
called?
Exercise 3.21 Does this method expect any parameters? What is its return type?
We can see the documentation of the Greenfoot classes by selecting them in the list on the
left. For each class, the main panel in the browser displays a general comment, details
of its constructors, and a list of its methods. (Constructors will be discussed in a later
chapter.)
If we browse through the list of available methods in the class Greenfoot, we can find a
method named stop. This is the method that we can use to stop execution when the crab gets
caught.

40 | Chapter 3 ■ Improving the Crab—more sophisticated programming
We can make use of this method by writing
Greenfoot.stop();
into our source code.
Exercise 3.22 Add code to your own scenario that stops the game when a lobster catches
the crab. You will need to decide where this code needs to be added. Find the place in your
code that gets executed when a lobster eats a crab, and add this line of code there.
We will use this class documentation frequently in the future to look up details of methods we
need to use. We will know some methods by heart after a while, but there are always methods we
need to look up.
3.8 Adding sound
Another improvement to our game is the addition of sounds. Again, a method in the Greenfoot
class helps us with this.
Exercise 3.23 Open the Greenfoot Class Documentation (from the Help menu), and
look at the documentation of class Greenfoot. Find the details of the method that can be
used to play a sound. What is its name? What parameters does it expect?
By looking through the documentation, we can see that the Greenfoot class has a method
called playSound. It expects the name of a sound file (as String) as a parameter, and returns
nothing.
Note
You may like to look at the structure of a Greenfoot scenario in your file system. If you look into
the folder containing the book scenarios, you can find a folder for each Greenfoot scenario. For
the crab example, there are several different versions (little-crab, little-clab-2,
little-crab-3, etc.). Inside each scenario folder are several files for each scenario class, and
several other support files. There are also two media folders: images holds the scenario images
and sounds stores the sound files.
You can see the available sounds by looking into this folder, and you can make more sounds
available by storing them here.
In our crab scenario, two sound files are already included. They are called slurp.wav
and au.wav.
3.8 Adding sound | 41
Exercise 3.24 Add playing of sounds to your scenario: When a crab eats a worm, play
the “slurp.wav” sound. When a lobster eats the crab, play the “au.wav” sound. To do this,
you have to find the place in your code where this should happen.
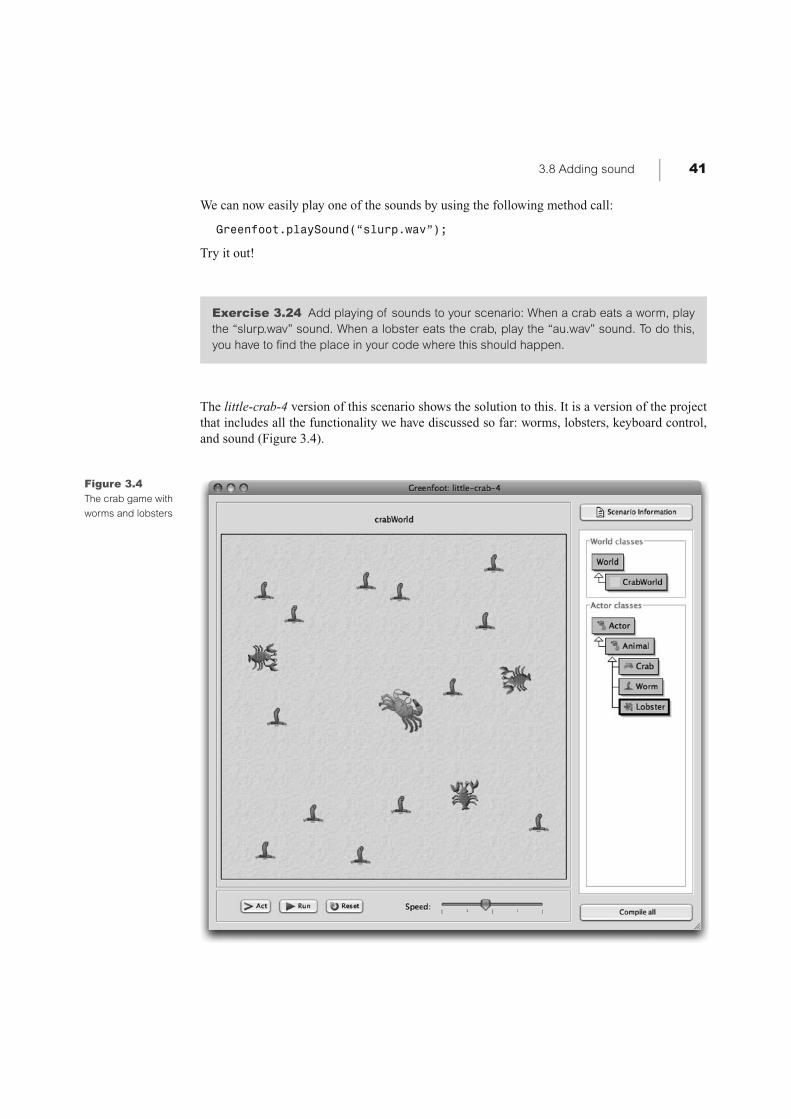
The little-crab-4 version of this scenario shows the solution to this. It is a version of the project
that includes all the functionality we have discussed so far: worms, lobsters, keyboard control,
and sound (Figure 3.4).
Figure 3.4
The crab game with
worms and lobsters
We can now easily play one of the sounds by using the following method call:
Greenfoot.playSound(“slurp.wav”);
Try it out!

42 | Chapter 3 ■ Improving the Crab—more sophisticated programming
Exercise 3.25 If you have a microphone on your computer, make your own sounds to
use when the worms or the crab get eaten. Record the sounds with any sound recording
program, store them in the scenario’s sounds folder, and use them in your code.
3.9 Summary of programming techniques
In this chapter we have seen more examples of using an if-statement—this time for turning at
random times and reacting to key presses. We have also seen how to call methods from another
class, namely the getRandomNumber, isKeyDown, and playSound methods from the
Greenfoot class. We did this by using dot notation, with the class name in front of the dot.
Altogether, we have now seen examples of calling methods from three different places. We can
call methods that are defined in the current class itself (called local methods), method that were
defined in a superclass (inherited methods), and static methods from other classes. The last of
these uses dot notation. (There is one additional version of a method call: calling methods on
other objects—we will encounter that a little later.)
Another important aspect that we explored was how to read the API documentation of an existing
class to find out what methods it has and how to call them.
About sound recording
You can also make your own sounds. Both the sounds included are recorded by simply speaking
into the computer’s microphone. Use one of the many free sound recording programs1, record
your sound, and save (or export) it as a sound file, in either WAV, AIFF, or AU format. Making your
own sounds is further discussed in Chapter 8.
1 Using an Internet search, you should be able to find several free programs that can record and save
sounds. One good program is Audacity (http://audacity.sourceforge.net), but there are many others.
Concept summary
■ When a method we wish to call is not in our own class or inherited, we need to specify the class or
object that has the method before the method name, followed by a dot. This is called dot notation.
■ Methods that belong to classes (as opposed to objects) are marked with the keyword static in
their signature. They are also called class methods.
■ A method definition defines a new action for objects of this class. The action is not immedi-
ately executed, but the method can be called with a method call later to execute it.
■ Comments are written into the source code as explanations for human readers. They are
ignored by the computer.
■ The API Documentation lists all classes and methods available in Greenfoot. We often need to
look up methods here.
Top Related