


Languages
Pages
Legal

FST – 401 (Processing of milk products-I) Page 1 of 8
Experiment # 1
Aim: Preparation of makhan (Desi Butter)
Requirements: Fresh cream, Beater, Utensils, Chilled water
Theory: The cream is agitated and during agitation air is incorporated. The incorporation of air in
cream increases viscosity of cream. This result the fat globules closed to each other. On further
agitation, these fat globules adher to each other to form butter granules and there is change in
emulsion from oil in water (cream) to water in oil (butter).
Procedure:
1. Take weighed amount of cream in a clean utensil.
2. Beat the cream with the help of a beater.
3. Beating/agitation is continued until small butter granules are formed.
4. Add chilled water (break water) to cream to bring down the temperature of the content.
5. Beating is continued until the granules attain pea size.
6. The butter milk is drained off and the butter granules are washed and worked together.
7. The percentage yield of butter is calculated as per formula.
Formula:
Weight of makhan x 100
Makhan (desi butter) (%) =
Weight of cream
FST – 401 (Processing of milk products-I) Page 2 of 8
Experiment # 2
Aim: Preparation of ghee from makhan
Requirements: Fresh cream, utensils, chilled water, beater, heater, ladle, sieve
Procedure:
1. Fresh makhan is prepared from cream by its churning.
2. This makhan is placed over fire. During initial heating of makhan, excessive frothing takes
place which must be controlled carefully to avoid losses.
3. As moisture evaporated and frothing decreasing, the temperature begins to rise above 100°C.
4. When temperature reaches 110°C, a slight caramalization of curd particle is noticed.
5. The heating is discontinued as soon as curd particles attain light brown color.
6. After this clarified fat is decanted off.
7. The ghee obtained is weighed and percentage yield is calculated.
Formula:
Weight of ghee x 100
Ghee (%) =
Weight of makhan
FST – 401 (Processing of milk products-I) Page 3 of 8
Experiment # 3
Aim: Preparation of ghee from cream
Requirements: Heater, beaker, ladle, utensils, sieve, fresh cream
Procedure:
1. The cream is placed over fire and during initial heating of cream, excessive frothing takes place
which must be controlled carefully to avoid losses.
2. As moisture evaporated and frothing decreasing, the temperature begins to rise above 100°C.
3. When temperature reaches 110°C, a slight caramalization of curd particle is noticed.
4. The heating is discontinued as soon as curd particles attain light brown color.
5. After this clarified fat is decanted off.
6. The ghee obtained is weighed and percentage yield is calculated.
Formula:
Weight of ghee x 100
Ghee (%) =
Weight of cream
FST – 401 (Processing of milk products-I) Page 4 of 8
Experiment # 4
Aim: To study ripening of cream
Theory: The term ripening of cream refers to the fermentation of cream which is intended for butter
manufacture. The process is also called souring of cream. The most common bacterias used as starter
culture for ripening of cream are:
· Streptococcus lactis
· Streptococcus cremoris
· Streptococcus diacetylactis
· Leuconostoc citrovorum
The bacteria in butter culture are of two types:
1. One that has the function of fermenting the lactose of milk to produce lactic acid which in
turn coagulates the milk. Streptococcus lactis and Streptococcus cremoris carry out this function
2. The other group of bacteria i.e. Streptococcus diacetylactis and Leuconostoc citrovorum
attack principally the citric acid content of the milk and produce volatile acid and diacetyl which
provides desirable flavor and aroma to butter.
Procedure:
1. Cream is pasteurized at 82°C for 30mins and cooled to 22°C.
2. This cream is inoculated with starter culture at the rate of 0.5-1%.
3. Then this cream is incubated at 22°C for 8-10 hrs during which fermentation of cream take
place and there is development of acidity accompanied by characteristic flavor and aroma. This
cream is used for churning to make butter.
4. The acidity of cream before ripening as well as after ripening can be checked by titration with
N/10 NaOH solution using phenolphthalein as indicator.
Formula:
Titre Value x Normality of NaOH x 90 x 100
Acidity (%) =
(in terms of lactic acid) Weight of sample x 1000

FST – 401 (Processing of milk products-I) Page 5 of 8
Experiment # 5
Aim: Determination of moisture content in a given sample of butter
Requirements: Butter sample, Petri plates, Desiccator, Weighing balance
Theory: Butter is water in oil emulsion in which fat is present in continues phase. BIS specifications
of butter are:
· Fat Not less than 80%
· Moisture Not less than 16%
· Salt Not more than 2.5%
Procedure:
1. Take 5gms of sample in a clean, dry and pre-weighed Petri plate.
2. Put the Petri plate along with sample in a hot air oven at 100°C for a particular time (2hr).
3. After particular time, take out Petri plate from oven and place it in a desiccator for about
15mins to cool.
4. Then take the weight of Petri plate along with dry sample.
5. Calculate percentage moisture content as per formula.
Formula:
Weight of moisture content x 100
Moisture Content (%) = Weight of sample
General Calculation:
Weight of empty Petri plate: W1 (g)
Weight of Petri plate + Sample: W2 (g)
Weight of Petri plate + Dry Sample: W3 (g)
(W3 - W2) x 100
Moisture Content (%) = (W2 – W1)
FST – 401 (Processing of milk products-I) Page 6 of 8
Experiment # 6
Aim: To study neutralization of cream
Requirements: Thermometer, neutralizer, weighing balance, burette, 0.1N NaOH, beaker, cream
Theory: The acidity of cream is expressed as percentage of lactic acid and the excess acidity in
cream is neutralize with help of suitable neutralizer (sodium hydroxide, sodium carbonate, sodium
bicarbonate). The optimum acidity of cream for butter making ranges from 0.20-0.30%.
Procedure:
1. The cream sample is mixed carefully taking care that churning of cream does not takes place. If
cream is thick, then warm it to about 30°C.
2. Take 10gms of sample in beaker.
3. Titrate it with N/10 NaOH solution using phenolphthalein as indicator.
4. Calculate acidity of cream.
5. Excessive acidity in cream is detected and optimum amount of neutralizer is added to cream to
neutralize the excessive acidity of cream.
6. Take the sample and check the acidity again as per step 2 and 3.
Formula:
Titre Value x Normality of NaOH x 90 x 100
Acidity (%) =
(in terms of lactic acid) Weight of sample x 1000
FST – 401 (Processing of milk products-I) Page 7 of 8
EXPERIMENT#7
Aim: To study cream separation methods
Principle: The basic principle of cream separation is based on the fact that milk fat is lighter that the
skim milk portion. At 16°C, the average density of milk fat is 0.93 and skim milk is 1.036. Hence,
when milk fat, which may be considered to be a mixture of fat and skim milk, is subjected to either
gravity or a centrifugal force, the two components i.e. cream & skim milk, by virtue of their differing
densities, separate from one another.
Methods:
1. Gravity Method: When milk is allowed to stand for some time, there is tendency of fat to rise. The velocity or
rate at which the fat globule rise is given by following equation which is known as Stoke’s Law:
V = 2G/9 {(ds-df)r²}/ n
Where,
V = velocity or rate at which a single fat globule rises.
G= Acceleration due to gravity.
ds= density of skim milk.
df= density of fat
r= radius of fat globule
n= viscosity of skim milk
From Stoke’s law it is observed that, Velocity is increased by:
a) Increase in radius of fat globule.
b) Increase in difference in densities of skim milk and fat.
c) Decrease in viscosity of skim milk.
2. Centrigugal Method:
When milk enters the rapidly revolving bowl of the cream separator, it is immediately
subjected to a tremendous centrifugal force, which is 3000-6000 times greater than the gravitational
force. When both the fat and skim milk are subjected to the centrifugal force, the difference in
densities effects the heavier portion i.e. skim milk more intensely than the lighter portion i.e. cream.
Thereby the skim milk is forced to the periphery while the cream milk towards the centre. The skim
milk & cream both form vertical walls within the bowl and are separated by being led through
separate outlets.
Stoke’s law applied to centrifugal separation is as follows:
V = r² {(ds-df)/ n} * N² * R * K
FST – 401 (Processing of milk products-I) Page 8 of 8
Where,
V = velocity or rate of movement of single fat globule.
N= speed of the bowl
ds= density of skim milk.
df= density of fat
r= radius of fat globule
n= viscosity of skim milk
R= Distance of fat globule from the axis of rotation.
K= Constant

FST – 403 (F & V Processing) Page 1 of 12
FST – 403 (Fruits & Vegetable Processing)
List of Practical:
1. To study drying of food products by hot air oven and sun drying
2. Cut out analysis of canned product
3. To carry out re-hydration test (dried peas)
4. To prepare lemon juice
5. Preparation of lemon pickle
6. Preparation of tomato puree
7. Preparation of tomato sauce or ketchup
8. To determine salt content in tomato sauce using Mohr method or direct titration
method
9. To determine acidity of fruit juice
10. Preparation of Apple jam
FST – 403 (F & V Processing) Page 2 of 12
Experiment # 1
Aim: To study drying of food products by hot air oven and sun drying.
Requirements: Oven, trays, knife, beaker, potassium metabisulphite
Sample: Potato, cauliflower, peas
Theory: Drying is the phenomenon of removing adequate moisture from food product. It is
done either by sun or by oven drying method. During sun drying, there is no control
temperature, humidity and air velocity. Thus sun drying occurs naturally whereas in oven
drying, it is done under controlled conditions.
Drying is an important method of food preservation by removing moisture from it. The
moisture is removed to such an extent that there should be no growth of microbes and rate of
deterioration slow down. Drying also reduces weight and bulk of food material which helps in
reduction of packaging and storage requirements. Thereby reduces the transportation cost. Sun
drying is a slow process and is not suitable for high quality products. This is generally used to
lower moisture content to 15% or below. It requires considerable space and a food being
exposed is subjected to contamination and such products will have no storage stability as
compared to the one which is artificially dried. The artificially dried product has final moisture
content in the range of 1-15% and has storage stability at room temperature for a year or longer.
When they reconstituted by adding water, they are very close to the original food material used
during preparation.
Procedure:
Preparation of Sample
Cauliflower:
1. Wash, remove stalks, covering leaves and stems.
2. Break flowers apart into pieces of suitable size.
3. Blanch for 4-5 mins.
4. Immerse in 1% KMS solution for 1hr and drain.
Peas:
1. Wash, remove shell and collect grains.
2. Blanch for 3-4 mins.
3. Immerse in 0.5% KMS solution and drain.
Potato:
1. Wash, peel and cut into 10mm thick slices.
2. Blanch for 3-4 mins.
3. Immerse in 0.5% KMS solution and drain.
Sun Drying
a. Take appropriate sample and weigh it.
b. Spread the sample on clean, dry tray and expose it to sunlight.
c. Allow it to dry for removal of moisture to a desired extent.
d. After the completion of drying, note down the weight of dried product.
e. Calculate percentage moisture content.
Oven Drying

FST – 403 (F & V Processing) Page 3 of 12
a. Take appropriate sample and weigh it.
b. Spread the sample in clean, dry tray and place it in pre heated oven at 100°C for an
appropriate time.
c. After completion of drying, note weight of sample and calculate percentage moisture
content.
Formula:
Weight of moisture content x 100
Moisture Content (%) = Weight of sample
General Calculation:
Weight of Sample: W1 (g)
Weight of Dry Sample: W2 (g)
(W1 - W2) x 100
Moisture Content (%) = W1
FST – 403 (F & V Processing) Page 4 of 12
Experiment # 2
Aim: Cut out analysis of canned product
Requirements: Canned product, physical balance, vacuum gauge, can opener, sieve,
refractometer, measuring cylinder
Procedure:
1. Note the external conditions of can such as body dents or scratches, leakages around
seams, conditions of ends etc. in describing the condition of ends, use the following terms:
a. Flat: A can where both ends are concave, the vacuum is high enough to maintain the
ends of a can in concave condition.
b. Flipper: A can in which the vacuum is so low that mechanical stroke wills produce
distortion of one or both ends.
c. Springer: A can in which one end is distorted and the other end is flat and pressure
on the convex end will cause the flat end to spring out when pressed.
d. Swell: A can in which both ends are convex i.e. in which there is sufficient pressure
to cause permanent distortion of both ends.
2. Weigh the can as such and note the gross weight.
3. Vacuum or pressure: Use a gauge which indicates both vacuum and pressure. Pierce the
hollow pointed end of the gauge through the lid of the can so that the rubber gasket makes a gas
tight seal and prevent the loss of vacuum. Moisten the rubber before applying the gauge and
pierce the can with the gauge towards one edge. Do not press too hard. The vacuum or pressure
is indicated by the needle on the dial of the gauge. Note down the vacuum in mm of Hg and
pressure in pounds.
4. Open the can with a good can opener.
5. Inspection of contents: As soon as the can is opened, note down the appearance on the
surface. Overfilling or under filling can be seen. Cloudiness in the syrup or brine or
unsatisfactory appearance of the fruits or vegetables is more frequently evident at this stage.
6. Gross head space: This is the distance from the top of the double seam to the surface of
contents of the can. Ensure that solid material is below the liquid surface before measuring.
7. Drained weight: Empty the contents of the can in such a manner as to distribute the
products evenly upon a circular sieve, which should be inclined so as to facilitate the drainage
of syrup/brine. Allow the product to drain for 5mins. Calculate the drained weight as the weight
of sieve and the contents minus the weight of dry sieve.
8. Syrup/brine examination: Note the color, clarity, and the flavor of syrup/brine.
Determine the soluble solids by using refractometer.
9. Fruit content: Note the color, taste, flavor, size, shape, any blemishes etc., if present on
the solid food product.
FST – 403 (F & V Processing) Page 5 of 12
Experiment # 3
Aim: To carry out re-hydration test (dried peas)
Requirements: Weighing Balance, water, pan, heating unit
Theory: In reconstitution, water is added to the product which is restored to conditions similar
to that when it was fresh. This enables the product to be cooked like fresh fruits and vegetables.
All vegetables are cooked but many of the dried fruits can be used for eating just by soaking in
water.
Procedure:
1. Weigh the sample (25gms).
2. Put the sample into beaker/pan and add water to it (10 times the weight of dry product).
3. Cover the pan and bring it to boil.
4. Boil gently for 30mins.
5. Drain the sample and collect the water in a beaker and examine for any traces of soil or
sand and other foreign matter.
6. Take the weight of re-hydrated sample and also examine it for palatability, toughness,
flavor, and presence or absence of bad flavors.
7. Calculate re-hydration ratio as per formula
Formula:
Weight of re-hydrated product
Re-hydration ratio =
Weight of dehydrated sample
General Calculation:
Weight of dried sample: A (g)
Weight of re-hydrated sample: B (g)
Re-hydration ratio = B/A
FST – 403 (F & V Processing) Page 6 of 12
Experiment # 4
Aim: To prepare lemon juice
Requirements: Lemon, sugar, KMS, lemon squeezer, knife
Theory: Squash is an important fruit beverage which contains at least 25% of fruit juice or pulp
and 40-50% of TSS. Commercially, it also contains about 1% and 350ppm of SO2 and/or
600ppm sodium benzoate. It is diluted before serving.
Mango, orange, and pine-apple are used for making squash. It can also be prepared from
lemon, lime, bael, guava, litchi, pear, apricot, musk melon and papaya.
Procedure:
1. Take the weight of lemons.
2. Wash the lemons properly under running water and wipe the lemons to dry.
3. The lemons are cut into 2-halves and juice is extracted using squeezer.
4. Take the volume of juice extracted and calculate the required recipe.
5. Mix the sugar syrup by adding calculated amount of water and sugar. Heat the mixture to
dissolve sugar properly.
6. Filter the syrup by muslin cloth.
7. Add lemon juice and strain the prepare lemon squash.
8. Add calculated amount of KMS.
9. Now fill the squash in bottles and store.
General Recipe:
Lemon Juice: 1lt
Water: 1lt
Sugar: 2 Kg
KMS: 2.5gms
(Preservative)
FST – 403 (F & V Processing) Page 7 of 12
Experiment # 5
Aim: Preparation of lemon pickle
Requirements: Lemon, spices
Theory: The preservation of food in common salt or vinegar is called pickling. It is one of the
most ancient method of preserving fruits and vegetables. Pickles are good appetizers and add to
the palatability of a meal. They stimulate the flow of gastric juice and thus help in digestion.
Fruits are generally preserved in sweetened and spiced vinegar, while vegetables are preserved
in salt. Salt improves taste and flavor. It hardens the tissue of vegetables and controls
fermentation.
Procedure:
1. Take the weight of lemons.
2. Wash them properly under running water and then wipe them.
3. Cut the lemons into four pieces.
4. Squeeze out the juice from 1/4th
amount of lemons.
5. Mix all the spices and salt with the juice extracted.
6. Then mix this mixture with lime pieces.
7. Fill the contents into a jar and cover with a lid.
8. Keep the jar in sun for at least 4-6 days and shake it at least twice a day.
9. Store at ambient temperature in a cool and dry place.
Recipe: Lime - 1kg
Salt - 200gm
Red chilli powder - 15gm
Cinnamon - 10gm
Cumin - 10gm
Cardamom (large) - 10gm
Black pepper powder- 10gm
Cloves (headless) - 5
FST – 403 (F & V Processing) Page 8 of 12
Experiment # 6
Aim: Preparation of tomato puree
Requirements: Heating medium, vessel, sieve, pulper, refractometer
Theory: Medium tomato puree is defined as tomato pulp without skin/seed, with or without
added salt and containing not less than 9% of salt free tomato solids. Heavy tomato puree is
further concentrated to obtain solid content not less than 12%.
Tomato paste is defined as tomato pulp without skin/seed, with or without added salt
and containing not less than 25% tomato solids. On further concentration to 33% or more, the
tomato solid product obtained is known as concentrated tomato paste.
Procedure:
1. Take mature and fully ripe tomatoes and wash them properly.
2. Cut them into 4-6 pieces.
3. Heat in a pan for 3-5mins and grind in a pulper to get pulp.
4. Strain the pulp with the help of a sieve.
5. Cook the pulp to desired consistency.
6. Check the end point with refractometer.
7. Fill the puree in bottles or cans at 82-88°C.
8. Sterilize in boiling water followed by cooling and then store in cool and dry place.

FST – 403 (F & V Processing) Page 9 of 12
Experiment # 7
Aim: Preparation of tomato sauce or ketchup
Requirements: Heating medium, vessel, sieve, pulper, refractometer
Theory: Tomato ketchup is made up of strained tomato juice or pulp and spices, salt, sugar,
vinegar and with or without onion or garlic. It contains not less than 12% tomato solids and
25% total solids. About 1/3rd
of sugar is added at the starting of boiling to intensify and fix red
tomato color. If whole quantity is added initially, then cooking time will increase, which will
affect the quality of product adversely. Generally, sugar content varies from 10-26%.
Salt is added towards the end of cooking process, otherwise it bleaches the color of
tomato. Salt content varies from 1.3-3.4%.
Spices are added in powder form by spice bag method. Good quality vinegar is essential
for high quality product. Tomato ketchup contains 1.25-1.5% acetic acid. It is also advisable to
add 0.025% sodium benzoate to product before bottling.
Procedure:
1. Take mature and fully ripe tomatoes and wash them properly.
2. Cut them into 4-6 pieces.
3. Heat in a pan for 3-5mins and grind in a pulper to get pulp.
4. Strain the pulp with the help of a sieve.
5. Take the weight of strained pulp and calculate recipe accordingly.
6. Cook the pulp with 1/3rd
amount of sugar.
7. Also put spice bag in pulp and press it occasionally.
8. Cook till 1/3rd
volume of pulp is obtained. Then remove spice bag after squeezing.
9. Add remaining amount of sugar and salt and continue cooking.
10. Check the end point with refractmeter.
11. Add vinegar and preservative when end point is reached.
12. Fill ketchup at 88°C into bottles.
13. Pasteurize the bottles and cool and store in dry place.
Recipe:
Tomato pulp - 1kg
Sugar - 75gm
Salt - 10gm
Chopped onion - 50gm
Chopped garlic - 5gm
Chopped ginger - 10gm
Red chilli powder - 5gm
Cinnamon - 10gm
Cardamom (large) - 10gm
Aniseed - 10gm
Cumin seed - 10gm
Black pepper - 10gm
Cloves (headless) - 5
Vinegar - 25ml
Sodium benzoate - 0.25gm/kg final product
FST – 403 (F & V Processing) Page 10 of 12
Experiment # 8
Aim: To determine salt content in tomato sauce using Mohr method or direct titration method
Requirements: Volumetric flask (250ml), burette, pipette, titration flask, weighing balance,
funnel
Reagents: 0.1N NaOH, phenolphthalein. 0.1 N silver nitrate, 5% potassium chromate
Procedure:
1. Take 5gm of sample and add approx. 50ml water.
2. Neutralize it with 0.1 N NaOH using phenolphthalein as indicator.
3. Make a volume to 250ml in volumetric flask.
4. Mix it and filter it.
5. Take 10ml of filtrate into titration flask and add about 1ml potassium chromate as
indicator.
6. Titrate with silver nitrate solution till red brown color appears.
7. Carry out a blank titration using 10ml distilled water and 1ml potassium chromate as
indicator.
8. Calculate percentage salt content as per formula
Formula:
(sample titre – blank titre) x N of AgNO3 x volume made up x
100
NaCl (%) =
aliquot of sample taken x wt. of sample x 1000
FST – 403 (F & V Processing) Page 11 of 12
Experiment # 9
Aim: To determine acidity of fruit juice
Requirements: Titration flask, burette, pipette, beaker, volumetric flask (250ml)
Reagents: 0.1 N NaOH, Phenolphthalein
Procedure:
1. Take 100ml of juice and make up volume to 250ml.
2. Take 10 of diluted sample in titration flask and 1-2 drops of phenolphthalein as indicator.
3. Titrate with 0.1 N NaOH till light pink color appears which should persist for at least
15secs.
4. Note the titre value.
5. Calculate percentage acidity as per formula.
Formula:
Titre x N of NaOH x eq. wt. of acid x vol made up x 100
Acidity (%) =
Aliquot of sample x volume of sample x 1000
FST – 403 (F & V Processing) Page 12 of 12
Experiment # 10
Aim: Preparation of Apple jam
Requirements: Heating unit, pulper, pan, peeler, refractometer
Theory: Jam is a product made by boiling fruit pulp with sufficient sugar to a reasonably thick
consistency, firm enough to hold the fruit tissues in position. It can be prepared from one kind
of fruit or from two or more fruits.
Jam contains 0.5–0.6% acid and invert sugar should not be more than 40%. FPO
specifications of jam are:
TSS - 68%
Fruit juice - 45%
Procedure:
1. Take fully ripe and firm apples.
2. Wash the apples properly and remove the outer skin and seeds.
3. Make the pulp. Add water if necessary.
4. Add calculated amount of sugar.
5. Boil the mixture with continue stirring.
6. Add citric acid.
7. Check the end point by refractometer.
8. Fill hot into sterilized bottles.
9. Cool the bottles and store at dry and cool place.
Recipe:
Apple pulp - 1kg
Sugar - 750gm
Citric acid - 2gm
Water - 100ml
FST – 404 (Processing of cereals & legumes) Page 1 of 13
FST – 404 (Processing of cereals & legumes)
List of Practical:
1. Determination of moisture content in a given sample of wheat flour
2. Determination of ash content in a given sample of wheat flour
3. Determination of gluten content in a given sample of wheat flour
4. Determination of acidity or free fatty acids (FFA) in a given sample of wheat
flour
5. Preparation of cake (eggless)
6. Preparation of cake biscuits
7. Study of parboiling of paddy
8. Study of Malting of Barley
9. Study of extraction of oil from rice bran
FST – 404 (Processing of cereals & legumes) Page 2 of 13
Experiment # 1
Aim: Determination of moisture content in a given sample of wheat flour.
Requirements: Weighing Balance, Spatula, Hot Air Oven, Petri plates, Desiccator
Theory: Moisture test is useful to determine the amount of water present in wheat flour. It is
determine by drying in a hot air oven. This method consists of measuring the weight loss by
foods due to evaporation of water.
The wheat flour should be stored at a moisture content of 12-14%. If the moisture
content is more than 14%, then there are chances of microbial growth which immediately
deteriorate flour quality.
Procedure:
1. Take 5gms of sample in a clean, dry and pre-weighed Petri plate.
2. Put the Petri plate along with sample in a hot air oven at 130°C for a particular time
(1hr).
3. After particular time, take out Petri plate from oven and place it in a desiccator for
about 15mins to cool.
4. Then take the weight of Petri plate along with dry sample.
5. Calculate percentage moisture content as per formula.
Formula:
Weight of moisture content x 100
Moisture Content (%) = Weight of sample
General Calculation:
Weight of empty Petri plate: W1 (g)
Weight of Petri plate + Sample: W2 (g)
Weight of Petri plate + Dry Sample: W3 (g)
(W3 - W2) x 100
Moisture Content (%) = (W2 – W1)

FST – 404 (Processing of cereals & legumes) Page 3 of 13
Experiment # 2
Aim: Determination of ash content in a given sample of wheat flour.
Requirements: Weighing Balance, Spatula, Muffle Furnace, Silica Crucible, Desiccator
Theory: Ash is inorganic matter left after igniting all the organic matter. Ash content of flour
gives indication of the milling efficiency. It is also useful in determining the flour grades like
low grade flour which has high amount of bran and will yield higher ash content.
Procedure:
1. Take 2gms of sample in a clean, dry and pre-weighed crucible.
2. Burn all the organic matter by placing the crucible on direct flame until the smoke stops
coming out from sample.
3. Put the crucible along with burned sample in a muffle furnace at 550°C for 6-8 hrs or
until the grayish white residue is obtained.
4. After this, take out crucible from muffle furnace and place it in a desiccator for about
20mins to cool.
5. Then take the weight of crucible along with ash.
6. Calculate percentage ash content as per formula.
Formula:
Weight of ash content x 100
Ash Content (%) = Weight of sample
General Calculation:
Weight of empty Crucible: W1 (g)
Weight of Crucible + Sample: W2 (g)
Weight of Crucible + Ash: W3 (g)
(W3 – W1) x 100
Ash Content (%) = (W2 – W1)

FST – 404 (Processing of cereals & legumes) Page 4 of 13
Experiment # 3
Aim: Determination of gluten content in a given sample of wheat flour.
Requirements: Weighing Balance, Spatula, Stirrer, Beaker, Hot Air Oven
Theory: Gluten is water insoluble portion of wheat flour i.e. obtained after washing away the
starch and bran from the dough under running water and remaining elastic material in dough is
gluten.
Gluten is main portion present in wheat flour and made of gliadin and glutenin. They
absorb water during kneading of dough and result in cohesive and elastic gluten development.
During fermentation of dough in bread manufacturing, the gluten forms 3-D structure which
retains carbon dioxide and causes bread to swell.
For various wheat flour, amount of gluten can be given as:
Ø Whole wheat flour (6%)
Ø White wheat flour (6.6%)
Ø Semolina (12.5%)
Strength of wheat flour depends upon physical qualities of wheat grain. The flour obtained
from strong and hard wheat contains 11-13% gluten and hence preferred for bread
manufacturing. Soft wheat flour contains low gluten content i.e. 7-8% and is suitable for
preparation of biscuits and most of other products where fermentation is not required.
Gluten when dried and milled to powder and added to ordinary flour, it improves dough
ability to rise and increase the bread structure stability. Gluten is a special type protein
commonly found in wheat, barley, rye. Grains which do not have gluten are corn, millet, oat,
sunflower seeds.
Procedure:
1. Sieve the wheat flour and weigh 25gms of it.
2. Add sufficient amount of water slowly in flour and knead it to form stiff and smooth
dough i.e. dough that regains its shape when pressed gently with fingers.
3. Immerse the dough in water in a beaker for 30 minutes.
4. Take out dough from water, squeeze with fingers and gently press under stream of
running water until all the starch is washed out.
Perform the test to check whether the dough is free from starch or not as given in note
below.
5. Remove the loose water from the elastic material i.e. gluten and note down the weigh of
wet gluten.
6. Stretch the gluten in the form of thin layer and place it in a clean and dry pre-weighed
Petri plate.
7. Allow it to dry in a hot air oven at 130°C for 2-3hrs.
8. Take out the Petri plate along with dry gluten from oven and cool it in a desiccator for
15min.
9. Take the weight of dry gluten.
10. Calculate the percentage of wet gluten and dry gluten as per formula.
Formula:
Weight of wet gluten x 100
Wet Gluten (%) = Weight of sample

FST – 404 (Processing of cereals & legumes) Page 5 of 13
Weight of dry gluten x 100
Dry Gluten (%) = Weight of sample
General Calculation:
Weight of wheat flour: W1 (g)
Weight of empty Petri plate: W2 (g)
Weight of Petri plate + wet gluten: W3 (g)
Weight of Petri plate + dry gluten: W4 (g)
(W3 – W2) x 100
Wet Gluten (%) = W1
(W4 – W2) x 100
Dry Gluten (%) = W1
Note: Tests to check whether the dough is free from starch or not
a. Wash water test: Add a drop of water from the dough in a Petri plate containing clean
water. Absence of any milky appearance in water indicates that gluten is starch free.
b. Iodine solution test: Add a drop of water from the dough in Petri plate containing iodine
solution. If the iodine solution does not change the color, it means it is free from starch.

FST – 404 (Processing of cereals & legumes) Page 6 of 13
Experiment # 4
Aim: Determination of acidity or free fatty acids (FFA) in a given sample of wheat flour.
Requirements: Weighing Balance, Spatula, Conical Flask, Glass Stoppered Conical Flask,
Burette, Measuring Cylinder, Filter Paper, Funnel
Chemicals: Benzene, Ethanol, N/56 KOH, Phenolphthalein
Theory: Grains or their milled products undergo physical changes during storage. Acid
phosphates, amino acids, and free fatty acids of flour increases considerably due to enzymatic
hydrolysis of phytin, protein and fat respectively. Milled products deteriorate faster than their
parent grains. The fat acidity (FFA) increases rapidly whereas phosphate and amino acid
acidity increases only during advanced stages of deterioration. The amino acid and acid
phosphates are soluble in strong alcohol. The free fatty acids are soluble in fat solvents or in
strong alcohols. Benzene is used as a fat solvent to exclude acid phosphates and amino acids.
Principle: To the benzene extract, is added 0.04% phenolphthalein-ethanol solution in equal
volume so that the free fatty acids are transferred to alcoholic phase along with indicator to be
available for neutralization with N/56 KOH. The end point is pink or orange pink.
Fat acidity is defined as mg of potassium hydroxide required to neutralize free fatty
acids present in 100gm of sample.
Procedure:
1. Take exactly 20gms of powdered sample in 100ml glass stoppered conical flask.
2. Add 50ml of benzene and shake the flask for few seconds.
3. Loose the stopper to release benzene vapor pressure and replace it immediately.
4. Shake the flask for 45min manually or 30min by mechanical shaker.
5. Filter benzene extract through a coarse filter paper.
6. Take exactly 25ml of filtrate in 250ml conical flask.
7. Add 25ml alcoholic phenolphthalein (0.04%) solution.
8. Titrate against N/56 KOH.
9. Repeat for blank titration by taking 25ml benzene and 25ml alcoholic phenolphthalein
(0.04%) solution.
10. Calculate percentage free fatty acids as per formula.
Formula:
(A-B) x Normality of KOH x Eq. wt. of oleic acid x 100
FFA (%) = Weight of sample x 1000
(in terms of oleic acid)
Where,
A = Sample Titre
B = Blank Titre
Eq. Wt. of oleic acid = 282

FST – 404 (Processing of cereals & legumes) Page 7 of 13
Experiment # 5
Aim: Preparation of cake (eggless)
Requirements: Maida, Sugar, Condensed Milk, Milk, Baking Powder, Cocoa Powder, Oven
Theory: There are two types of cake:
1. Shortened cake: It contains fat as essential ingredient and is leavened chiefly with
baking powder. These cakes include white, yellow and chocolate cakes and pound cakes.
2. Unshortened cake: It does not contain fat as a basic ingredient. These cakes are
leavened by air or steam e.g. angel food cake.
Cake is made from flour, sugar, egg, milk, baking powder, and butter. The leavening
agent i.e. baking powder and eggs have important function in baking of cakes. They contribute
to the structure of cakes. Sugar affects flavor and structure of cakes. Butter is the most
common shortening used. Fat serves the important function of entrapping air during the
creaming process. Thereby leavening the batter and increasing the volume of baked cake.
Many flavors are used in small quantity in cake preparation. These ingredients have no other
effect on cakes other than imparting flavor. Other ingredients added for flavor are chocolate,
vanilla, pine apple etc.
Procedure:
1. Mix the liquid materials i.e. condensed milk, butter, and milk separately to a uniform
consistency.
2. Mix dry material i.e. maida, sugar, baking powder, and cocoa powder separately.
3. Mix all the contents uniformly to a batter using a beater.
4. Add crushed chocolate pieces into a batter.
5. Grease the tray and pour batter into it.
6. Bake it at 190 - 200°C for about 45mins or until it turns into slightly brown in color.
7. After recommended time, put needle in cake and check whether any material is sticking
to it or not.
8. If needle comes out without any material, then it means the cake is ready to eat.
9. It is also considered as end point in cake making.
Recipe: Maida – 250gms, Condensed milk – 200gms, Butter – 50gms, Baking powder – 2tsp,
Sugar– 125gms, Milk – 1cup, Cocoa powder – 2tbs
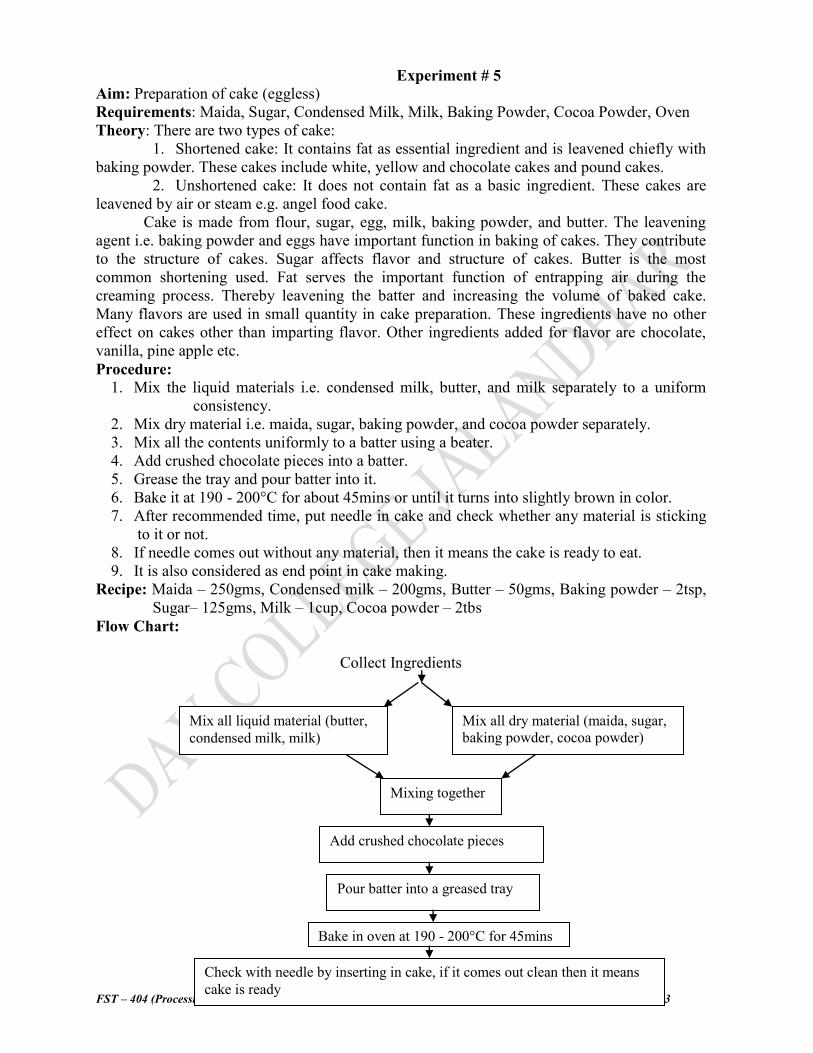
Flow Chart:
Collect Ingredients
Mix all liquid material (butter,
condensed milk, milk)
Mix all dry material (maida, sugar,
baking powder, cocoa powder)
Mixing together
Add crushed chocolate pieces
Pour batter into a greased tray
Bake in oven at 190 - 200°C for 45mins
Check with needle by inserting in cake, if it comes out clean then it means
cake is ready

FST – 404 (Processing of cereals & legumes) Page 8 of 13
Experiment # 6
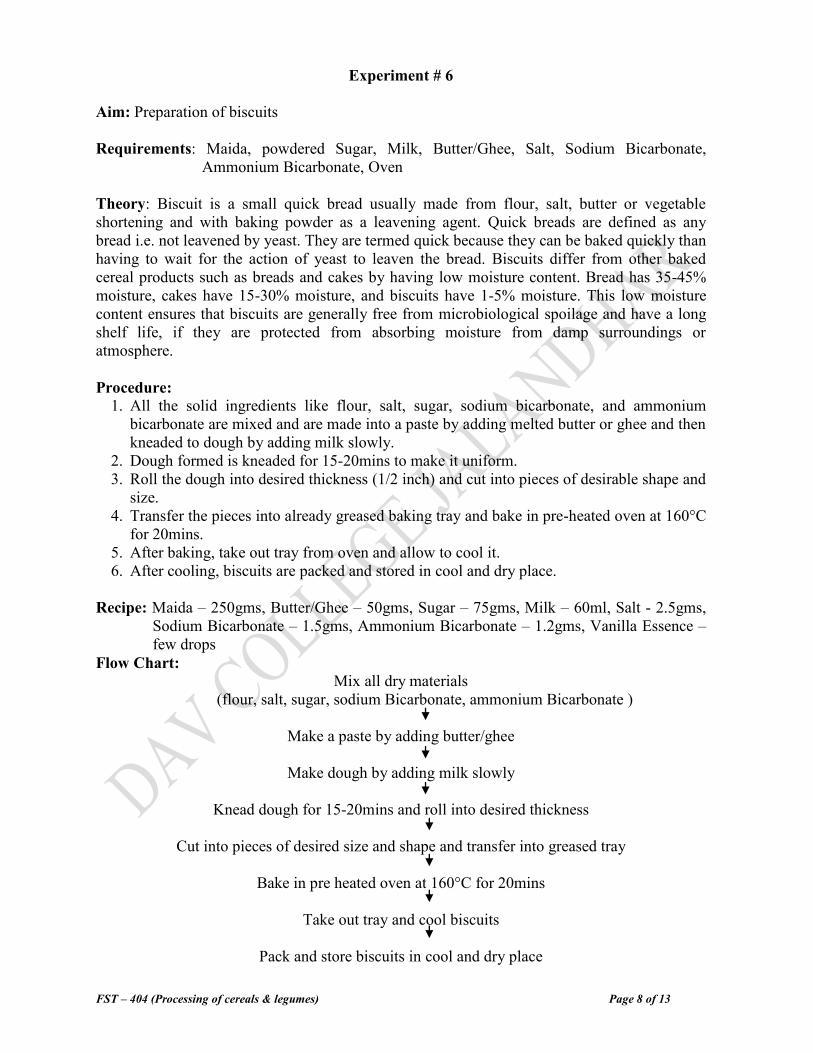
Aim: Preparation of biscuits
Requirements: Maida, powdered Sugar, Milk, Butter/Ghee, Salt, Sodium Bicarbonate,
Ammonium Bicarbonate, Oven
Theory: Biscuit is a small quick bread usually made from flour, salt, butter or vegetable
shortening and with baking powder as a leavening agent. Quick breads are defined as any
bread i.e. not leavened by yeast. They are termed quick because they can be baked quickly than
having to wait for the action of yeast to leaven the bread. Biscuits differ from other baked
cereal products such as breads and cakes by having low moisture content. Bread has 35-45%
moisture, cakes have 15-30% moisture, and biscuits have 1-5% moisture. This low moisture
content ensures that biscuits are generally free from microbiological spoilage and have a long
shelf life, if they are protected from absorbing moisture from damp surroundings or
atmosphere.
Procedure:
1. All the solid ingredients like flour, salt, sugar, sodium bicarbonate, and ammonium
bicarbonate are mixed and are made into a paste by adding melted butter or ghee and then
kneaded to dough by adding milk slowly.
2. Dough formed is kneaded for 15-20mins to make it uniform.
3. Roll the dough into desired thickness (1/2 inch) and cut into pieces of desirable shape and
size.
4. Transfer the pieces into already greased baking tray and bake in pre-heated oven at 160°C
for 20mins.
5. After baking, take out tray from oven and allow to cool it.
6. After cooling, biscuits are packed and stored in cool and dry place.
Recipe: Maida – 250gms, Butter/Ghee – 50gms, Sugar – 75gms, Milk – 60ml, Salt - 2.5gms,
Sodium Bicarbonate – 1.5gms, Ammonium Bicarbonate – 1.2gms, Vanilla Essence –
few drops
Flow Chart:
Mix all dry materials
(flour, salt, sugar, sodium Bicarbonate, ammonium Bicarbonate )
Make a paste by adding butter/ghee
Make dough by adding milk slowly
Knead dough for 15-20mins and roll into desired thickness
Cut into pieces of desired size and shape and transfer into greased tray
Bake in pre heated oven at 160°C for 20mins
Take out tray and cool biscuits
Pack and store biscuits in cool and dry place

FST – 404 (Processing of cereals & legumes) Page 9 of 13
Experiment # 7
Aim: Study of parboiling of paddy
Requirements: Heating medium, Paddy, Oven
Theory: Parboiling is cooking of paddy i.e. hydrothermal treatment given to paddy followed
by drying. The process of parboiling comprises of three steps:
a. Soaking: The process of absorption of water by paddy is called soaking or steeping.
The absorption of water is a difficult process and will continue until equilibrium is obtained.
Soaking of paddy is done to provide starch with quantity of water, sufficient for gelatinization.
Soaking time is reduced by applying vacuum or soaking under pressure in hot water.
b. Steaming: Steaming of soaked paddy is done to gelatinize starch. During it, the granular
texture endosperm becomes pasty and any crack is sealed and endosperm becomes more
compact.
c. Drying: After parboiling, paddy contains high moisture. Soaking and steaming may
result in 35 – 40% moisture in paddy. It is dried quickly to about 14% moisture for safe storage
or for milling. The process of drying is carried out in two steps:
1. Paddy is dried to 18-20% moisture content, then heated and tempered for 4hrs.
2. It is again dried to 13-14% moisture content.
Advantages of Parboiling:
1. All cracks, chalkiness and other defects in rice which causes grain breakage during
milling are treated during parboiling.
2. Vitamins and other micro nutrients get fixed to the central parts of kernel during soaking
and steaming, so there is no removal of them during milling. Hence, milled parboiled rice
is nutritionally superior to milled raw rice.
3. Parboiled rice is harder and smoother than raw rice. However, it is not easily attacked by
insects. So milled product i.e. from parboiled rice is stored better than milled raw rice.
4. Oil in rice grain is pushed outward by heat during parboiling. Hence bran from parboiled
rice contains much more oil than from raw rice and is better raw material for oil
extraction.
Procedure:
1. Taka a vessel and fill it with nearly 3/4th
of boiling water. Add paddy and boil for half an
hour and drain the water.
2. The vessel is covered and left for half an hour.
3. The paddy is now parboiled and can be taken out.
4. It is dried to moisture content of 14%.
FST – 404 (Processing of cereals & legumes) Page 10 of 13
Experiment # 8
Aim: Study of Malting of Barley
Theory: Malt is germinated cereal grains that have been dried in a process known as "malting".
The grains are made to germinate by soaking in water, and are then halted from germinating further
by drying with hot air. Malting grains develops the enzymes required to modify the
grain's starches into sugars, including the monosaccharide glucose, the disaccharide maltose, the
trisaccharide maltotriose, and higher sugars called maltodextrines. It also develops other enzymes,
such as proteases, which break down the proteins in the grain into forms that can be used by yeast.
Malt also contains small amounts of other sugars, such as sucrose and fructose, which are not
products of starch modification but were already in the grain.
Malted grain is used to make beer, whisky, malted shakes, malt vinegar, flavored drinks
such as Horlicks, Ovaltine and Milo, and some baked goods, such as malt loaf, bagels and rich
tea biscuits. Malted grain that has been ground into a coarse meal is known as "sweet
meal". Various cereals are malted, though barley is the most common. A high-protein form of
malted barley is often a label-listed ingredient in blended flours typically used in the manufacture
of yeast breads and other baked goods.
Malting of Barley:
Malt is the product created through controlled germination and drying (or kilning) of
barley, and is primarily used for brewing beer. Malt production is a natural biological process
during which barley kernels are partially sprouted resulting in the modification of barley
endosperm.
This modification involves the breakdown of the cell wall components, the partial
breakdown of proteins, and the generation of the enzymes necessary for converting starch into
sugars during brewing. This process has been carried out for centuries, with malt originally
produced by hand and germinating barley turned using a shovel. Today, malting plants are highly
mechanized and automated, and operate 24 hours a day, 365 days a year.
The malting process consists of three stages: Steeping, Germination, Kilning
Steeping: Steeping is the first stage of the process, where barley is intermittently immersed in
water for about 36-48 hours to initiate germination. Biochemical reactions begin to take place in
the steeping stage, as enzymes are released and simple sugars supply energy to the growing
embryo. Barley moisture content reaches 42-45% after this process is completed and the
germination stage begins.
Germination: During the Germination Stage, the steeped barley continues to grow and
biochemical reaction occurs at a vigorous rate, as enzymes are produced which break down
proteins and other cell wall components. The steeped barley is held in tanks about 5 feet deep for
about 3.5 to 4.5 days, with air circulated through the germinating barley that is turned every 8 to 10
hours to ensure even germination. Moisture is maintained at about 44 to 47% moisture at
temperatures of 57 to 70ºF. The grain at this point is called "green malt". The green malt is
then kiln-dried to the desired color and specification. Malts range in color from very pale through
crystal and amber to chocolate or black malts.
Kilning: The Kilning Stage, the final stage of the malting process, occurs when heated air is
circulated through the product to end germination and the associated biochemical reactions.
Kilning also develops malt flavor and color, and dries the malt to preserve its quality. The malt, at
approximately 4% moisture is very stable and can be stored for several months. The sprouted
barley is kiln-dried by spreading it on a perforated wooden floor. Smoke, coming from
an oasting fireplace (via smoke channels) is then used to heat the wooden floor and the sprouted
grains. The temperature is usually around 55°C (131°F).
The finished malt is then usually shipped to a brewery, where the brewer crushes the malt
and adds water to it. By doing this, biochemical reactions are allowed to continue to take place and
starches and protein in the malt are further broken down. A sugar mixture, Wort, rich in maltose
and amino acids is created from the malt and is easily converted to ethanol by brewer’s yeasts.

FST – 404 (Processing of cereals & legumes) Page 11 of 13
Experiment # 9
Aim: Study of extraction of oil from rice bran
Theory: By weigh, rice bran has 17% oil content. After the refining process, the refined rice
bran oil weighs only 12% of the rice bran raw material. Different steps involved are as follow:
1. Extraction Process: The extracting process starts with raw material preparation. Rice
bran is first screened. It is then heated by steam at temperature higher than 100°C to stop lipase
hydrolysis in rice bran prior to extraction. Advance extracting technology and techniques were
developed with technical assistance from German and Belgian engineers in order to come up
with crude rice bran oil that is high in vitamin E and oryzanol. The crude rice bran oil is
forwarded to the refining process for purifying and packing.
2. Production: Rice bran is the brown layer of brown rice. It is the most nutritious part of
rice. Rice bran is rich in vitamin E and oryzanol, which are naturally present substances that
help to reduce blood cholesterol and fight against free radicals. Rice bran that is used for oil
extraction has to be freshly milled within no more than 24hrs to maintain the vitamins and
nutrition. Besides, since 20% of rice bran is germ, rice bran oil is rich in nutritionally natural
substances. Thus, in Japan, it is known as “heart oil”.
3. Refining Process: The advanced refinery technologies from Germany and Belgium
have been used at the refining process. Every production process is closely monitored resulting
in high oryzanol rice bran oil that is suitable for healthy cooking as well as cosmetics and spa
products. In order to obtain high quality refined rice bran oil, the refining process begins by
reducing excess free fatty acids and then decreasing the color with activated clay. After
decreasing color, the oil is forwarded to crystallization process before filtering the wax through
a filter press machine. The next process is to remove odor by using high pressure steam
deodorizer at 230-240°C. The heating medium used in this process is high pressure steam. No
thermal oil or PCB (Polychlorinated Biphenyl) involved in the production process at all. The
result is high quality and safe rice bran oil.
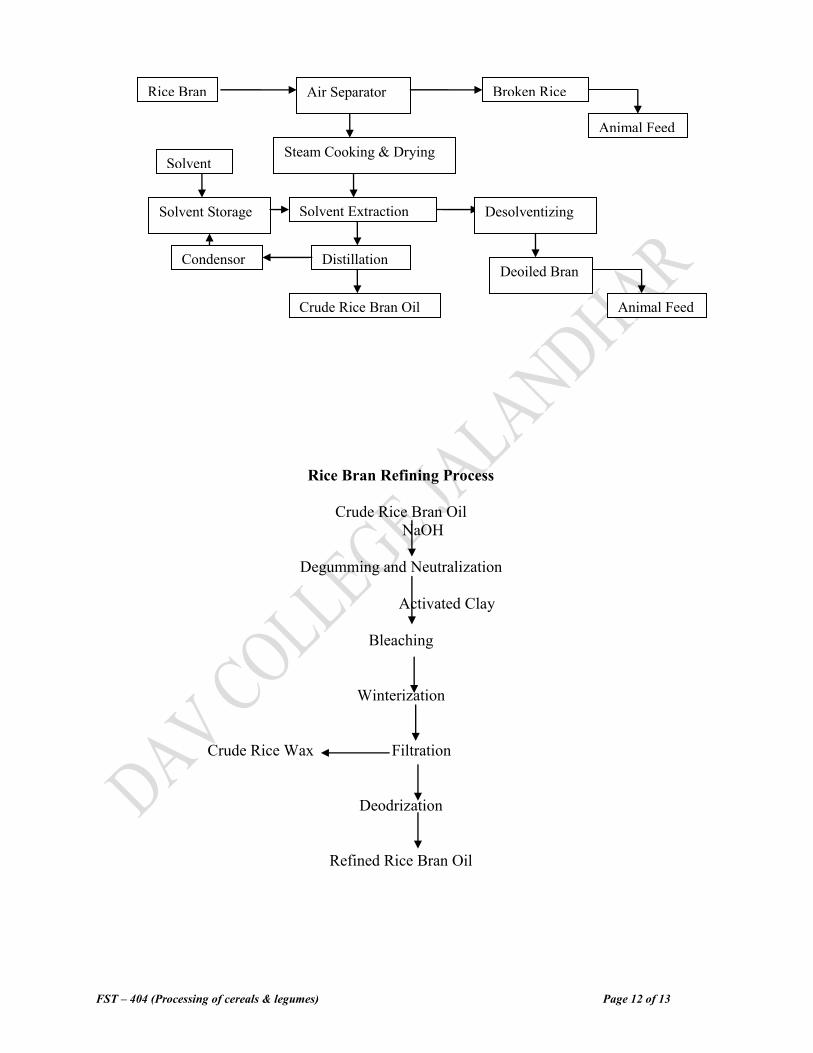
Rice Bran Oil Extracting Process

FST – 404 (Processing of cereals & legumes) Page 12 of 13
Rice Bran Refining Process
Crude Rice Bran Oil
NaOH
Degumming and Neutralization
Activated Clay
Bleaching
Winterization
Crude Rice Wax Filtration
Deodrization
Refined Rice Bran Oil
Rice Bran Air Separator Broken Rice
Steam Cooking & Drying
Solvent Extraction
Distillation
Crude Rice Bran Oil
Animal Feed
Desolventizing
Deoiled Bran
Animal Feed
Condensor
Solvent Storage
Solvent

FST – 404 (Processing of cereals & legumes) Page 13 of 13

FST – 404 (Processing of cereals & legumes) Page 1 of 13
FST – 404 (Processing of cereals & legumes)
List of Practical:
1. Determination of moisture content in a given sample of wheat flour
2. Determination of ash content in a given sample of wheat flour
3. Determination of gluten content in a given sample of wheat flour
4. Determination of acidity or free fatty acids (FFA) in a given sample of wheat
flour
5. Preparation of cake (eggless)
6. Preparation of cake biscuits
7. Study of parboiling of paddy
8. Study of Malting of Barley
9. Study of extraction of oil from rice bran

FST – 404 (Processing of cereals & legumes) Page 2 of 13
Experiment # 1
Aim: Determination of moisture content in a given sample of wheat flour.
Requirements: Weighing Balance, Spatula, Hot Air Oven, Petri plates, Desiccator
Theory: Moisture test is useful to determine the amount of water present in wheat flour. It is
determine by drying in a hot air oven. This method consists of measuring the weight loss by
foods due to evaporation of water.
The wheat flour should be stored at a moisture content of 12-14%. If the moisture
content is more than 14%, then there are chances of microbial growth which immediately
deteriorate flour quality.
Procedure:
1. Take 5gms of sample in a clean, dry and pre-weighed Petri plate.
2. Put the Petri plate along with sample in a hot air oven at 130°C for a particular time
(1hr).
3. After particular time, take out Petri plate from oven and place it in a desiccator for
about 15mins to cool.
4. Then take the weight of Petri plate along with dry sample.
5. Calculate percentage moisture content as per formula.
Formula:
Weight of moisture content x 100
Moisture Content (%) = Weight of sample
General Calculation:
Weight of empty Petri plate: W1 (g)
Weight of Petri plate + Sample: W2 (g)
Weight of Petri plate + Dry Sample: W3 (g)
(W3 - W2) x 100
Moisture Content (%) = (W2 – W1)
FST – 404 (Processing of cereals & legumes) Page 3 of 13
Experiment # 2
Aim: Determination of ash content in a given sample of wheat flour.
Requirements: Weighing Balance, Spatula, Muffle Furnace, Silica Crucible, Desiccator
Theory: Ash is inorganic matter left after igniting all the organic matter. Ash content of flour
gives indication of the milling efficiency. It is also useful in determining the flour grades like
low grade flour which has high amount of bran and will yield higher ash content.
Procedure:
1. Take 2gms of sample in a clean, dry and pre-weighed crucible.
2. Burn all the organic matter by placing the crucible on direct flame until the smoke stops
coming out from sample.
3. Put the crucible along with burned sample in a muffle furnace at 550°C for 6-8 hrs or
until the grayish white residue is obtained.
4. After this, take out crucible from muffle furnace and place it in a desiccator for about
20mins to cool.
5. Then take the weight of crucible along with ash.
6. Calculate percentage ash content as per formula.
Formula:
Weight of ash content x 100
Ash Content (%) = Weight of sample
General Calculation:
Weight of empty Crucible: W1 (g)
Weight of Crucible + Sample: W2 (g)
Weight of Crucible + Ash: W3 (g)
(W3 – W1) x 100
Ash Content (%) = (W2 – W1)
FST – 404 (Processing of cereals & legumes) Page 4 of 13
Experiment # 3
Aim: Determination of gluten content in a given sample of wheat flour.
Requirements: Weighing Balance, Spatula, Stirrer, Beaker, Hot Air Oven
Theory: Gluten is water insoluble portion of wheat flour i.e. obtained after washing away the
starch and bran from the dough under running water and remaining elastic material in dough is
gluten.
Gluten is main portion present in wheat flour and made of gliadin and glutenin. They
absorb water during kneading of dough and result in cohesive and elastic gluten development.
During fermentation of dough in bread manufacturing, the gluten forms 3-D structure which
retains carbon dioxide and causes bread to swell.
For various wheat flour, amount of gluten can be given as:
Ø Whole wheat flour (6%)
Ø White wheat flour (6.6%)
Ø Semolina (12.5%)
Strength of wheat flour depends upon physical qualities of wheat grain. The flour obtained
from strong and hard wheat contains 11-13% gluten and hence preferred for bread
manufacturing. Soft wheat flour contains low gluten content i.e. 7-8% and is suitable for
preparation of biscuits and most of other products where fermentation is not required.
Gluten when dried and milled to powder and added to ordinary flour, it improves dough
ability to rise and increase the bread structure stability. Gluten is a special type protein
commonly found in wheat, barley, rye. Grains which do not have gluten are corn, millet, oat,
sunflower seeds.
Procedure:
1. Sieve the wheat flour and weigh 25gms of it.
2. Add sufficient amount of water slowly in flour and knead it to form stiff and smooth
dough i.e. dough that regains its shape when pressed gently with fingers.
3. Immerse the dough in water in a beaker for 30 minutes.
4. Take out dough from water, squeeze with fingers and gently press under stream of
running water until all the starch is washed out.
Perform the test to check whether the dough is free from starch or not as given in note
below.
5. Remove the loose water from the elastic material i.e. gluten and note down the weigh of
wet gluten.
6. Stretch the gluten in the form of thin layer and place it in a clean and dry pre-weighed
Petri plate.
7. Allow it to dry in a hot air oven at 130°C for 2-3hrs.
8. Take out the Petri plate along with dry gluten from oven and cool it in a desiccator for
15min.
9. Take the weight of dry gluten.
10. Calculate the percentage of wet gluten and dry gluten as per formula.
Formula:
Weight of wet gluten x 100
Wet Gluten (%) = Weight of sample
FST – 404 (Processing of cereals & legumes) Page 5 of 13
Weight of dry gluten x 100
Dry Gluten (%) = Weight of sample
General Calculation:
Weight of wheat flour: W1 (g)
Weight of empty Petri plate: W2 (g)
Weight of Petri plate + wet gluten: W3 (g)
Weight of Petri plate + dry gluten: W4 (g)
(W3 – W2) x 100
Wet Gluten (%) = W1
(W4 – W2) x 100
Dry Gluten (%) = W1
Note: Tests to check whether the dough is free from starch or not
a. Wash water test: Add a drop of water from the dough in a Petri plate containing clean
water. Absence of any milky appearance in water indicates that gluten is starch free.
b. Iodine solution test: Add a drop of water from the dough in Petri plate containing iodine
solution. If the iodine solution does not change the color, it means it is free from starch.
FST – 404 (Processing of cereals & legumes) Page 6 of 13
Experiment # 4
Aim: Determination of acidity or free fatty acids (FFA) in a given sample of wheat flour.
Requirements: Weighing Balance, Spatula, Conical Flask, Glass Stoppered Conical Flask,
Burette, Measuring Cylinder, Filter Paper, Funnel
Chemicals: Benzene, Ethanol, N/56 KOH, Phenolphthalein
Theory: Grains or their milled products undergo physical changes during storage. Acid
phosphates, amino acids, and free fatty acids of flour increases considerably due to enzymatic
hydrolysis of phytin, protein and fat respectively. Milled products deteriorate faster than their
parent grains. The fat acidity (FFA) increases rapidly whereas phosphate and amino acid
acidity increases only during advanced stages of deterioration. The amino acid and acid
phosphates are soluble in strong alcohol. The free fatty acids are soluble in fat solvents or in
strong alcohols. Benzene is used as a fat solvent to exclude acid phosphates and amino acids.
Principle: To the benzene extract, is added 0.04% phenolphthalein-ethanol solution in equal
volume so that the free fatty acids are transferred to alcoholic phase along with indicator to be
available for neutralization with N/56 KOH. The end point is pink or orange pink.
Fat acidity is defined as mg of potassium hydroxide required to neutralize free fatty
acids present in 100gm of sample.
Procedure:
1. Take exactly 20gms of powdered sample in 100ml glass stoppered conical flask.
2. Add 50ml of benzene and shake the flask for few seconds.
3. Loose the stopper to release benzene vapor pressure and replace it immediately.
4. Shake the flask for 45min manually or 30min by mechanical shaker.
5. Filter benzene extract through a coarse filter paper.
6. Take exactly 25ml of filtrate in 250ml conical flask.
7. Add 25ml alcoholic phenolphthalein (0.04%) solution.
8. Titrate against N/56 KOH.
9. Repeat for blank titration by taking 25ml benzene and 25ml alcoholic phenolphthalein
(0.04%) solution.
10. Calculate percentage free fatty acids as per formula.
Formula:
(A-B) x Normality of KOH x Eq. wt. of oleic acid x 100
FFA (%) = Weight of sample x 1000
(in terms of oleic acid)
Where,
A = Sample Titre
B = Blank Titre
Eq. Wt. of oleic acid = 282
FST – 404 (Processing of cereals & legumes) Page 7 of 13
Experiment # 5
Aim: Preparation of cake (eggless)
Requirements: Maida, Sugar, Condensed Milk, Milk, Baking Powder, Cocoa Powder, Oven
Theory: There are two types of cake:
1. Shortened cake: It contains fat as essential ingredient and is leavened chiefly with
baking powder. These cakes include white, yellow and chocolate cakes and pound cakes.
2. Unshortened cake: It does not contain fat as a basic ingredient. These cakes are
leavened by air or steam e.g. angel food cake.
Cake is made from flour, sugar, egg, milk, baking powder, and butter. The leavening
agent i.e. baking powder and eggs have important function in baking of cakes. They contribute
to the structure of cakes. Sugar affects flavor and structure of cakes. Butter is the most
common shortening used. Fat serves the important function of entrapping air during the
creaming process. Thereby leavening the batter and increasing the volume of baked cake.
Many flavors are used in small quantity in cake preparation. These ingredients have no other
effect on cakes other than imparting flavor. Other ingredients added for flavor are chocolate,
vanilla, pine apple etc.
Procedure:
1. Mix the liquid materials i.e. condensed milk, butter, and milk separately to a uniform
consistency.
2. Mix dry material i.e. maida, sugar, baking powder, and cocoa powder separately.
3. Mix all the contents uniformly to a batter using a beater.
4. Add crushed chocolate pieces into a batter.
5. Grease the tray and pour batter into it.
6. Bake it at 190 - 200°C for about 45mins or until it turns into slightly brown in color.
7. After recommended time, put needle in cake and check whether any material is sticking
to it or not.
8. If needle comes out without any material, then it means the cake is ready to eat.
9. It is also considered as end point in cake making.
Recipe: Maida – 250gms, Condensed milk – 200gms, Butter – 50gms, Baking powder – 2tsp,
Sugar– 125gms, Milk – 1cup, Cocoa powder – 2tbs
Flow Chart:
Collect Ingredients
Mix all liquid material (butter,
condensed milk, milk)
Mix all dry material (maida, sugar,
baking powder, cocoa powder)
Mixing together
Add crushed chocolate pieces
Pour batter into a greased tray
Bake in oven at 190 - 200°C for 45mins
Check with needle by inserting in cake, if it comes out clean then it means
cake is ready
FST – 404 (Processing of cereals & legumes) Page 8 of 13
Experiment # 6
Aim: Preparation of biscuits
Requirements: Maida, powdered Sugar, Milk, Butter/Ghee, Salt, Sodium Bicarbonate,
Ammonium Bicarbonate, Oven
Theory: Biscuit is a small quick bread usually made from flour, salt, butter or vegetable
shortening and with baking powder as a leavening agent. Quick breads are defined as any
bread i.e. not leavened by yeast. They are termed quick because they can be baked quickly than
having to wait for the action of yeast to leaven the bread. Biscuits differ from other baked
cereal products such as breads and cakes by having low moisture content. Bread has 35-45%
moisture, cakes have 15-30% moisture, and biscuits have 1-5% moisture. This low moisture
content ensures that biscuits are generally free from microbiological spoilage and have a long
shelf life, if they are protected from absorbing moisture from damp surroundings or
atmosphere.
Procedure:
1. All the solid ingredients like flour, salt, sugar, sodium bicarbonate, and ammonium
bicarbonate are mixed and are made into a paste by adding melted butter or ghee and then
kneaded to dough by adding milk slowly.
2. Dough formed is kneaded for 15-20mins to make it uniform.
3. Roll the dough into desired thickness (1/2 inch) and cut into pieces of desirable shape and
size.
4. Transfer the pieces into already greased baking tray and bake in pre-heated oven at 160°C
for 20mins.
5. After baking, take out tray from oven and allow to cool it.
6. After cooling, biscuits are packed and stored in cool and dry place.
Recipe: Maida – 250gms, Butter/Ghee – 50gms, Sugar – 75gms, Milk – 60ml, Salt - 2.5gms,
Sodium Bicarbonate – 1.5gms, Ammonium Bicarbonate – 1.2gms, Vanilla Essence –
few drops
Flow Chart:
Mix all dry materials
(flour, salt, sugar, sodium Bicarbonate, ammonium Bicarbonate )
Make a paste by adding butter/ghee
Make dough by adding milk slowly
Knead dough for 15-20mins and roll into desired thickness
Cut into pieces of desired size and shape and transfer into greased tray
Bake in pre heated oven at 160°C for 20mins
Take out tray and cool biscuits
Pack and store biscuits in cool and dry place
FST – 404 (Processing of cereals & legumes) Page 9 of 13
Experiment # 7
Aim: Study of parboiling of paddy
Requirements: Heating medium, Paddy, Oven
Theory: Parboiling is cooking of paddy i.e. hydrothermal treatment given to paddy followed
by drying. The process of parboiling comprises of three steps:
a. Soaking: The process of absorption of water by paddy is called soaking or steeping.
The absorption of water is a difficult process and will continue until equilibrium is obtained.
Soaking of paddy is done to provide starch with quantity of water, sufficient for gelatinization.
Soaking time is reduced by applying vacuum or soaking under pressure in hot water.
b. Steaming: Steaming of soaked paddy is done to gelatinize starch. During it, the granular
texture endosperm becomes pasty and any crack is sealed and endosperm becomes more
compact.
c. Drying: After parboiling, paddy contains high moisture. Soaking and steaming may
result in 35 – 40% moisture in paddy. It is dried quickly to about 14% moisture for safe storage
or for milling. The process of drying is carried out in two steps:
1. Paddy is dried to 18-20% moisture content, then heated and tempered for 4hrs.
2. It is again dried to 13-14% moisture content.
Advantages of Parboiling:
1. All cracks, chalkiness and other defects in rice which causes grain breakage during
milling are treated during parboiling.
2. Vitamins and other micro nutrients get fixed to the central parts of kernel during soaking
and steaming, so there is no removal of them during milling. Hence, milled parboiled rice
is nutritionally superior to milled raw rice.
3. Parboiled rice is harder and smoother than raw rice. However, it is not easily attacked by
insects. So milled product i.e. from parboiled rice is stored better than milled raw rice.
4. Oil in rice grain is pushed outward by heat during parboiling. Hence bran from parboiled
rice contains much more oil than from raw rice and is better raw material for oil
extraction.
Procedure:
1. Taka a vessel and fill it with nearly 3/4th
of boiling water. Add paddy and boil for half an
hour and drain the water.
2. The vessel is covered and left for half an hour.
3. The paddy is now parboiled and can be taken out.
4. It is dried to moisture content of 14%.
FST – 404 (Processing of cereals & legumes) Page 10 of 13
Experiment # 8
Aim: Study of Malting of Barley
Theory: Malt is germinated cereal grains that have been dried in a process known as "malting".
The grains are made to germinate by soaking in water, and are then halted from germinating further
by drying with hot air. Malting grains develops the enzymes required to modify the
grain's starches into sugars, including the monosaccharide glucose, the disaccharide maltose, the
trisaccharide maltotriose, and higher sugars called maltodextrines. It also develops other enzymes,
such as proteases, which break down the proteins in the grain into forms that can be used by yeast.
Malt also contains small amounts of other sugars, such as sucrose and fructose, which are not
products of starch modification but were already in the grain.
Malted grain is used to make beer, whisky, malted shakes, malt vinegar, flavored drinks
such as Horlicks, Ovaltine and Milo, and some baked goods, such as malt loaf, bagels and rich
tea biscuits. Malted grain that has been ground into a coarse meal is known as "sweet
meal". Various cereals are malted, though barley is the most common. A high-protein form of
malted barley is often a label-listed ingredient in blended flours typically used in the manufacture
of yeast breads and other baked goods.
Malting of Barley:
Malt is the product created through controlled germination and drying (or kilning) of
barley, and is primarily used for brewing beer. Malt production is a natural biological process
during which barley kernels are partially sprouted resulting in the modification of barley
endosperm.
This modification involves the breakdown of the cell wall components, the partial
breakdown of proteins, and the generation of the enzymes necessary for converting starch into
sugars during brewing. This process has been carried out for centuries, with malt originally
produced by hand and germinating barley turned using a shovel. Today, malting plants are highly
mechanized and automated, and operate 24 hours a day, 365 days a year.
The malting process consists of three stages: Steeping, Germination, Kilning
Steeping: Steeping is the first stage of the process, where barley is intermittently immersed in
water for about 36-48 hours to initiate germination. Biochemical reactions begin to take place in
the steeping stage, as enzymes are released and simple sugars supply energy to the growing
embryo. Barley moisture content reaches 42-45% after this process is completed and the
germination stage begins.
Germination: During the Germination Stage, the steeped barley continues to grow and
biochemical reaction occurs at a vigorous rate, as enzymes are produced which break down
proteins and other cell wall components. The steeped barley is held in tanks about 5 feet deep for
about 3.5 to 4.5 days, with air circulated through the germinating barley that is turned every 8 to 10
hours to ensure even germination. Moisture is maintained at about 44 to 47% moisture at
temperatures of 57 to 70ºF. The grain at this point is called "green malt". The green malt is
then kiln-dried to the desired color and specification. Malts range in color from very pale through
crystal and amber to chocolate or black malts.
Kilning: The Kilning Stage, the final stage of the malting process, occurs when heated air is
circulated through the product to end germination and the associated biochemical reactions.
Kilning also develops malt flavor and color, and dries the malt to preserve its quality. The malt, at
approximately 4% moisture is very stable and can be stored for several months. The sprouted
barley is kiln-dried by spreading it on a perforated wooden floor. Smoke, coming from
an oasting fireplace (via smoke channels) is then used to heat the wooden floor and the sprouted
grains. The temperature is usually around 55°C (131°F).
The finished malt is then usually shipped to a brewery, where the brewer crushes the malt
and adds water to it. By doing this, biochemical reactions are allowed to continue to take place and
starches and protein in the malt are further broken down. A sugar mixture, Wort, rich in maltose
and amino acids is created from the malt and is easily converted to ethanol by brewer’s yeasts.

FST – 404 (Processing of cereals & legumes) Page 11 of 13
Experiment # 9
Aim: Study of extraction of oil from rice bran
Theory: By weigh, rice bran has 17% oil content. After the refining process, the refined rice
bran oil weighs only 12% of the rice bran raw material. Different steps involved are as follow:
1. Extraction Process: The extracting process starts with raw material preparation. Rice
bran is first screened. It is then heated by steam at temperature higher than 100°C to stop lipase
hydrolysis in rice bran prior to extraction. Advance extracting technology and techniques were
developed with technical assistance from German and Belgian engineers in order to come up
with crude rice bran oil that is high in vitamin E and oryzanol. The crude rice bran oil is
forwarded to the refining process for purifying and packing.
2. Production: Rice bran is the brown layer of brown rice. It is the most nutritious part of
rice. Rice bran is rich in vitamin E and oryzanol, which are naturally present substances that
help to reduce blood cholesterol and fight against free radicals. Rice bran that is used for oil
extraction has to be freshly milled within no more than 24hrs to maintain the vitamins and
nutrition. Besides, since 20% of rice bran is germ, rice bran oil is rich in nutritionally natural
substances. Thus, in Japan, it is known as “heart oil”.
3. Refining Process: The advanced refinery technologies from Germany and Belgium
have been used at the refining process. Every production process is closely monitored resulting
in high oryzanol rice bran oil that is suitable for healthy cooking as well as cosmetics and spa
products. In order to obtain high quality refined rice bran oil, the refining process begins by
reducing excess free fatty acids and then decreasing the color with activated clay. After
decreasing color, the oil is forwarded to crystallization process before filtering the wax through
a filter press machine. The next process is to remove odor by using high pressure steam
deodorizer at 230-240°C. The heating medium used in this process is high pressure steam. No
thermal oil or PCB (Polychlorinated Biphenyl) involved in the production process at all. The
result is high quality and safe rice bran oil.
Rice Bran Oil Extracting Process
FST – 404 (Processing of cereals & legumes) Page 12 of 13
Rice Bran Refining Process
Crude Rice Bran Oil
NaOH
Degumming and Neutralization
Activated Clay
Bleaching
Winterization
Crude Rice Wax Filtration
Deodrization
Refined Rice Bran Oil
Rice Bran Air Separator Broken Rice
Steam Cooking & Drying
Solvent Extraction
Distillation
Crude Rice Bran Oil
Animal Feed
Desolventizing
Deoiled Bran
Animal Feed
Condensor
Solvent Storage
Solvent

FST – 404 (Processing of cereals & legumes) Page 13 of 13
1
FST – 405 FOOD PLANT HYGIENE & SANITATION
LIST OF PRACTICALS
Ø To study the sterilization of equipments used in
laboratory by using heat & chemicals.
Ø To check the disinfecting property of alcohol in the
lab using agar plates.
Ø Assessment of surface sanitation.
Ø To determine temporary and permanent hardness of
water
Ø To determine total dissolved salts of water.
Ø To detect the presence of coliform in the given
sample of water.
2
Aim:- To study the sterilization of equipments used in laboratory
by using heat & chemicals.
Theory:- Micro organisms are present in nature and they can contaminate
everything. It must be assumed that all exposed surfaces including wash tubes,
hand glassware and instruments are likely to be contaminated by free floating
microbes which settle down on every exposed material. The principle technique
is to remove or kill micro org. that are present on equipments. Adequate care
must be taken to prevent the entry of any contaminating substances growing in
the environment. Various suitable treatments must be adopted to kill these
micro org. These are:
· Sterilization: It means elimination of all microbes .
· Antiseptic: It means prevention of proliferation of microbes and
prevention of introduction of viable microbes.
· Disinfection: It means reduction in the no. of viable micro org.
Various methods which are used for the purpose of sterilization are:
HEAT STERILIZATION:
Moist heat sterilization
Autoclave: it is the most common method of sterilization. IT works at a time-
temp. combo of 121 degree C at 15 psi for 15 mins, to kill all forms of micro
org using steam under pressure. IT is double jacketed steam container
maintained at particular time temp. combo.
Tyndaliization: It involves 3 successive steam treatments, to achieve
sterilization over the cause of 3 days. This work by killing the vegetative cell
and spores before they get time to form further spores, but if any spore survive
from 1st treatment, it will get killed in 3
rd sterilization cycle.
i. Boiling in water: Boiling at 100 degree C for 30 mins is done in water
bath. Syringes , rubber goods, surgical instruments may be sterilized by
this method.
ii. Steaming: It is done by steam sterilization which works at 100 degree c
under normal atm pressure .
3
Dry Heat Sterilization:
Flaming: is done to loops and straight wires until they glow red which ensures
that any infectious agents i.e. present gets inactivated . However during initial
heating infectious material may be separated from wire before it gets killed and
hence contaminating the nearly surfaces and objects, so dip the wire or loop in
70 percent ethanol, it kills many bacteria before placing it on flame.
Hot air Oven: Glass wares, swab sticks, syringes, powder and oily substance
are sterilized using hot air oven.
CHEMICAL STERILIZATION: a variety of non volatile, non toxic
chemicals are used in laboratory to disinfect glass wares, hands etc. These
includes
a. Halogen and halogen compounds
b. Compounds of heavy metals
c. Phenols and its derivatives
d. Alcohol and detergents
Examples:
a. Mercuric chloride and AgNO3: are used in the ratio of 1:100
resp. , for disinfecting surface of test material.
b. Ethyl Alcohol : used for disinfecting surface of test material &
laboratory desktop.
GASEOUS STERILIZATION:
Ethylene Oxide: it is most commonly used to sterilize objects sensitive to
temp. greater than 60 degree C. It is carried out b/w 30-60 ºC with RH above
30 % and gas conc. B/w 200-800—mg/L.
NO2: It is used rapidly against wide range of micro org. including bacteria.
Viruses and spores. It has a boiling point of 21º C which results in relatively
high saturated vapour pressure coz of this liquid nitrogen may be used as a
constituent source for sterilization.
Ozone: it is also used in some labs to sterilize water as well as disinfecting for
surfaces.
4
Aim : To check the disinfecting property of alcohol in the lab
using agar plates.
Theory: Hygiene is a set of practices performed for preservation of health.
The word hygiene means using sanitary principles to maintain health. Personal
hygiene refers to the cleanliness of person body and cloth. People are the most
common source of food contamination. Hands, breathe, hair, sweat, cough and
sneeze all carry micro org. even if the food handler does not feel sick, he /she
still be carrying that which can cause illness if they get into the food.
Alcohols , usually ethanol, are sometimes used as a disinfectant, but more often
as an antiseptic. Alcohols dehydrate cells, disrupt membranes and cause
coagulation of proteins. A 70% Aqueous solution is more effective at killing
microbes than absolute alcohols. 70% ethyl alcohol is used as antiseptic on skin.
It can also be used to disinfect clinical thermometers. Methyl alcohol kills
fungal spores, hence is useful in disinfecting inoculation hoods. But its
disadvantage is that it evaporates rapidly and it is inflammable.
Procedure:
1. Prepared the nutrient agar and autoclaved it.
2. Petriplates were made and kept undisturbed for solidification.
3. Solidified plates were marked in two equal parts.
4. On one part, normal impression of finger was taken and on other half
impression of alcohol dipped finger is taken.
5. Plates were incubated at 35ºC for 24 hrs.
6. Results were evaluated in the terms of cfu/ml and efficiency of alcohol as a
disinfectant was checked.
5
Aim: Assessment of surface sanitation.
Chemical required: Ringer solution-(dissolve 2.15g NaCl, 0.075g of KCl,
0.12g of anhydrous CaCl2 and 0.5g of sodium thiosulphate in 1000ml of
distilled water and autoclave the bsolution at 15 psi for 20 min), Nutrient agar.
Principle: sanitation is the hygienic means of promoting health through
prevention of human contact with the hazards of wastes as well as the
treatments and proper disposal of sewage or waste matter. Sanitation is the
important because of variety of harmful or deadly bacteria would otherwise
infect people and potentially start disease. The need of sanitation goes beyond
health. The basis for sanitation is the removal of soils from the processing
environment. Bacterial counts on equipments, utensils, working surfaces, walls
and floors are useful means of arresting the standard of hygiene and efficiency
of cleaning procedure in food industries. The swab rinse method was used for
this surface.
Procedure:
1. Prepare the ringer solution and nutrient agar and autoclave it.
2. Cotton swab was made with the help of cotton and glass rods and kept in the
test tube.
3. Cotton swab was rubbed against the test surface and drop it into the test tube
which was further killed by 10 ml of ringer solution.
4. The test tube was shaked and kept undisturbed for 10 mins.
5. Petri plates were prepared using nutrient agar and kept undisturbed till
solidification.
6. 0.1 mL of test soln. was taken and spreading was done on the plates.
7. Plates were incubated at 35º C for 24 hours.
8. The colony count was observed and was results in cfu/mL.
6
Aim- To determine temporary and permanent hardness of water
Reagents Required- 0.1N sulphuric acid, 0.02N sulphuric acid, 0.1N sodium
hydroxide, 0.1N sodium carbonate, methyl orange indicator and
phenolphthalein indicator.
Apparatus Required- burette, beakers, measuring cylinder, conical flask,
funnel, glass rod, heating source.
PRINCIPLE- The hardness of water is due to salt of calcium and magnesium,
sometimes zinc and iron is present in the form of carbonates and sulphates. The
presence of free carbon dioxide or large quantities of sodium chloride, adds to
the hardness. Temporary hardness of water is caused by carbonates or
bicarbonates of calcium and magnesium. Its determined by titration with
sulphuric acid using methyl orange indicator. Permanent hardness is caused due
to calcium sulphates and chlorides of calcium and magnesium may also be
present. Permanent hardness is determined by noting the value of sodium
hydroxide and sodium carbonate required to precipitate sulphates present in
water.
PROCEDURE-
Temporary Hardness- Titrate 100ml of water with 0.02N sulphuric acid using
methyl orange as indicator to a faint red colour.
Permanent Hardness- Take 100ml of sample and boil it. Then add 10ml of
0.1N sodium hydroxide and 0.1N of sodium carbonate. Mix the contents,
evaporate it till the volume reduces to 40ml. Cool the solutions and filter it.
Collect the filtrate in 100ml volumetric flask and make the volume upto 100ml.
Pipette out 50ml of the filtrate and titrate it with 0.1N sulphuric acid using
methyl orange as an indicator. Blank is prepared by dissolving 10ml of 0.1N
sodium hydroxide and 0.1N sodium carbonate in 100ml of volumetric flask and
then titrating 50ml with 0.1N sulphuric acid using methyl orange as an
indicator.
GENERAL CALCULATIONS:
TEMPORARY HARDNESS
Parts of CaCO3 per 106 parts of water = Titre x 0.001 x 10
6
100
(1 ml of 0.02N sulphuric acid = 0.001g of calcium carbonate)
7
PERMANENT HARDNESS
Parts of CaCO3 per 106
=
( Blank titre-Sample titre) x 2 x 0.005 x 10
6
parts of water 100
(1 ml of 0.1N sulphuric acid = 0.005g of calcium carbonate)
TOTAL HARDNESS = TEMPORARY HARDNESS + PERMANENT
HARDNESS
8
Aim- To determine total dissolved salts of water.
Requirements- Evaporating dish, hot waterbath, desicator, whatman filter
paper 4, weighing balance etc.
PRINCIPLE- Water, the universal solvent has large number of salts dissolved
in it which largely governs the physio- chemical properties of water and in turn
have an indirect effect on flora and fauna. Total dissolved solids are determined
as residue left after the evaporation of water.
PROCEDURE-
1) Take the weight of empty evaporating dish
2) Filter the sample using whatman filterpaper number 4
3) Transfer the sample to evaporating dish and evaporate on waterbath
4) Maintain the temperature at 80 C
5) Note the weight of dish along with contents after cooling in desicator.
GENERAL CALCULATIONS:
TDS (mg/l) = Final wt. of dish-Initial wt. of dish / wt or vol. of sample taken
9
Aim-To detect the presence of coliform in the given sample of
water.
Reagents Required- MacConkey Agar
Requirements-Water sample, saline solution, petriplates etc.
Principle-
Coliform bacteria are a commonly used bacterial indicator of sanitary quality of
food and water. Coliform are rod shaped gram negative, non sphere forming
facultative anaerobes. They are found in water contaminated with faecal matter.
They cause serious illness Escherichia Coli (E- Coli) is the best known coliform
and an important indicator of faecal contamination as it is commonly found in
faeces. Its different from other coliforms by their ability to ferment lactose at
44º C
MacConkey Agar (MAC) is a selective differential media used for the detection
and isolation of coliform by their ability to ferment lactose sugar.
Peptone is a source of nitrogen and other nutrients. Lactose is a fermentable
carbohydrate. When lactose is fermented, the Ph drops and changes the colour
and precipitation of bile salts occurs. The crystal voilet and bile salts present the
growth of gram positive bacteria. The colonies on MacConkey Agar appear to
be pinkish red.
PROCEDURE-
1) MacConkey Agar was prepared.
2) Water sample was diluted upto 10-5
dilution by serial dilution method.
3) Pour plating was performed for all the diluted samples.
4) The plates were incubated at 44º C for 24 hours.
5) Observed for the appearance of pinkish red colonies.
Top Related