


Languages
Pages
Legal


ELECTRONIC ATTENDANCE SYSTEM MANUAL For Providers Using the State System Version: March 2019

1 Back to Table of Contents
ELECTRONIC ATTENDANCE SYSTEM MANUAL
Table of Contents Table of Contents ............................................................................................................ 1
Definitions ....................................................................................................................... 6
Chapter 1. General Information .................................................................................. 7
What is the purpose of this manual? ..................................................... 7
What is the State System? .................................................................... 7
How much does the State System cost providers to use? .................... 7
How do providers bill for subsidy when using the system? ................... 8
When must providers start keeping electronic attendance records? ..... 8
Which children must providers use the system for? .............................. 9
How do providers get started with an account to use the state system?
9
What devices are needed to use the system? .................................... 10
How do providers collect parent signatures electronically? ................. 10
How often must providers log into KinderConnect to review and
manage their attendance records? ............................................................................ 11
How do providers use the system when an internet connection is
unreliable? 11
What must providers do when the internet or system is down
completely? 11
Chapter 2. KinderConnect........................................................................................ 12
How to log into KinderConnect ............................................................ 12
How to change the language in KinderConnect to English or Spanish 13
How to register a KinderConnect account for the first time ................. 13
How to reset a forgotten password...................................................... 16
How to unlock a locked KinderConnect account ................................. 18
How to update an expiring KinderConnect password.......................... 19
Message Center .................................................................................. 20
2.7.1 How to read a new message on the KinderConnect Home screen ........... 20
2.7.2 How to get to the Message Center ............................................................ 21
2.7.3 How to delete a message .......................................................................... 21

2 Back to Table of Contents
ELECTRONIC ATTENDANCE SYSTEM MANUAL
2.7.4 How to reset a message ............................................................................ 21
2.7.5 How to create and send a group message ................................................ 21
2.7.6 How Provider Administrators create and send a message to an individual 23
What is the KinderConnect main menu? ............................................. 27
2.8.1 Full screen view ......................................................................................... 27
2.8.2 Condensed screen view ............................................................................ 27
What is the “Operator” tab on the KinderConnect menu? ................... 27
2.9.1 What are the KinderConnect Operator Types? .......................................... 27
2.9.2 How to search for Operators ...................................................................... 27
2.9.3 What information is on the “Operator Detail” screen? ................................ 29
2.9.4 How to add a new Operator ....................................................................... 30
2.9.5 How to edit an Operator’s details ............................................................... 32
2.9.6 How to stop an Operator’s account from being used by making it “inactive”
32
2.9.7 How to delete an Operator account permanently ...................................... 33
2.9.8 How to upload an Operator’s picture (Optional) ......................................... 33
2.9.9 What information is on the “Operator Account” screen? ............................ 33
What is the “Reports” tab on the KinderConnect menu? ..................... 35
2.10.1 How do I create the “Daily Detailed Attendance” report? ....................... 35
2.10.2 What is the KinderSign Tablet Registration Form? ................................. 38
2.10.3 What is the Provider Mobile Sign In Sheet? ........................................... 39
What is the “Attendance” tab on the KinderConnect Menu? ............... 40
2.11.1 How to see the attendance details ......................................................... 40
2.11.2 What are “Time Pairs”? .......................................................................... 42
2.11.3 How to use multiple time pairs ................................................................ 43
2.11.4 How to add/edit “In” or “Out” times ......................................................... 44
2.11.5 How to record a child as “Absent” for an entire calendar day (For licensed
provider use) ........................................................................................................... 44
2.11.6 How to record a closure for professional training days (For licensed
provider use) ........................................................................................................... 46
2.11.7 What if a child is absent for part of the day? (For licensed provider use) 47

3 Back to Table of Contents
ELECTRONIC ATTENDANCE SYSTEM MANUAL
2.11.8 How to view history of changes to attendance details ............................ 48
2.11.9 How to add a note to attendance ............................................................ 48
2.11.10 How to read or edit a saved note ............................................................ 50
2.11.11 What do the different colors for the attendance days and times mean? . 51
2.11.12 How to track overnight attendance ......................................................... 52
2.11.13 When and how to submit attendance ..................................................... 52
2.11.14 When and how to correct/recall attendance ........................................... 55
2.11.15 How to view more attendance details on check in and check out
transactions ............................................................................................................ 57
What is the “Provider” tab on the KinderConnect Menu? .................... 58
2.12.1 How to search for a Provider .................................................................. 58
2.12.2 How to view the account details for a Provider ....................................... 58
2.12.3 How to view families tied to a provider account ...................................... 59
What is the “Child” tab on the KinderConnect menu? ......................... 59
2.13.1 How to search for children ...................................................................... 59
2.13.2 How to add a child .................................................................................. 61
2.13.3 How to record attendance for children on subsidy needing care for private
pay hours 63
2.13.4 How to edit a child’s account details ....................................................... 63
2.13.5 How to delete a child’s account .............................................................. 64
2.13.6 How to merge a child’s account when a full pay child gets authorized for
subsidy 64
2.13.7 How to upload a child’s picture ............................................................... 67
What is the “Sponsor” tab in KinderConnect? ..................................... 67
2.14.1 How to search for a Sponsor account .................................................... 67
2.14.2 How to add a Sponsor ............................................................................ 68
2.14.3 How to edit/update a Sponsor’s details .................................................. 71
2.14.4 How to add children to a Sponsor .......................................................... 72
2.14.5 How to remove children from a Sponsor’s account ................................ 72
2.14.6 How to stop a Sponsor’s account from being used by making it “inactive”
73
2.14.7 How to delete a Sponsor account permanently ...................................... 74

4 Back to Table of Contents
ELECTRONIC ATTENDANCE SYSTEM MANUAL
2.14.8 How to merge a sponsor’s account when a full pay account gets
authorized for subsidy ............................................................................................. 75
2.14.9 How to upload a Sponsor’s picture ......................................................... 77
2.14.10 How to set up a “Sponsor Account” with a PIN ...................................... 77
2.14.11 Is a new Sponsor account needed when the sponsor has or had an
account set up with another provider? .................................................................... 79
2.14.12 How to unlock a Sponsor Account .......................................................... 79
What is on the “Devices” tab in KinderConnect? ................................ 79
Chapter 3. KinderSign .............................................................................................. 80
What tablets are compatible with KinderSign? .................................... 80
How to download the KinderSign application onto an iPad ................. 80
Download the KinderSign Application to Android ................................ 81
How providers register a tablet ........................................................... 81
How to get KinderSign ready for families to use ................................. 83
How do Sponsors sign children in and out of care on a tablet? .......... 84
How do Sponsors create their PIN and secret question? .................... 88
How do Sponsors change their PIN? .................................................. 89
How Sponsors backdate the check in or check out time ..................... 90
How Sponsors read and delete messages from their provider ........... 92
How do Operators create their PIN and secret question? ................... 93
How do Operators change their PIN? ................................................. 94
How do staff/FFNs sign children in or out of care on a tablet for school?
95
How Sponsors and Provider Staff sign children in and out when a tablet
is not connected to the internet (offline) ..................................................................... 96
Chapter 4. KinderSmart ........................................................................................... 98
How to download KinderSmart on an Apple phone ............................. 98
How to register a Sponsor’s smartphone to use KinderSmart ............. 99
How sponsors sign children in or out using KinderSmart on a
Smartphone 101
How Sponsors read messages from their provider in KinderSmart ... 103
Interactive Voice Response (IVR) System .................................................................. 106

5 Back to Table of Contents
ELECTRONIC ATTENDANCE SYSTEM MANUAL
How to set up a Sponsor for the IVR ................................................. 106
How Sponsors sign children in or out through IVR ............................ 106
Chapter 5. Resources ............................................................................................ 107
Chapter 6. Contact Information .............................................................................. 108
Chapter 7. Revision History ................................................................................... 109

6 Back to Table of Contents
ELECTRONIC ATTENDANCE SYSTEM MANUAL
Definitions
Child(ren): Refers to children who receive child care services.
FFN: Family, Friend, and Neighbor providers include grandparents, aunts and uncles,
elders, older siblings, friends, neighbors, and others who help families by providing child
care.
Interactive Voice Response (IVR): a system that allows for sponsors to use a
telephone keypad to sign their children in and out of care.
KinderConnect: a web-based application accessed on the internet. Providers use
KinderConnect to record, correct, and submit attendance for subsidized child care and
to add and edit operators, sponsors, child information, and schedules of care.
KinderSign: replaces paper sign-in sheets. KinderSign is an application that runs on
tablets or iPads that allow providers and sponsors to sign children in and out of care.
KinderSmart: an application that sponsors can run on their smartphone to sign their
children in and out of care.
Operator: providers and/or employees who use KinderConnect. Operators are set up
in KinderConnect to perform administrative functions on behalf of the provider.
Provider: The licensed center, licensed family home, or Family, Friend, Neighbor (FFN)
who provides child care services
QR Code: a type of barcode
Schedule: The start date and end date of care. For children receiving Working
Connections or Seasonal Child Care, this is the start date and end date of their subsidy
authorization.
Sponsor: An adult authorized to check a child in and out of child care facility or home.
Examples include parents, guardians, grandparents, aunts, and uncles.
State System: Refers to the Electronic Attendance System offered by the Department
of Children, Youth, and Families. The state system consists of KinderConnect,
KinderSign, and KinderSmart.
Web Browser: A software application for accessing information on the World Wide
Web. Examples include Microsoft Internet Explorer, Mozilla Firefox, Google Chrome,
and Safari.

7 Back to Table of Contents
ELECTRONIC ATTENDANCE SYSTEM MANUAL
Chapter 1. General Information What is the purpose of this manual?
Welcome to the Electronic Attendance System Manual! Starting July 1, 2018, all providers accepting Working Connections and Seasonal Child Care subsidies are required to track attendance using an electronic attendance system (Washington Administrative Code 170-15-0126).The purpose of this manual is to assist providers with keeping track of attendance electronically using the state system. Note: the pictures/screenshots included in this manual are not real names or information, they are for visual purposes only.
What is the State System? To simplify and improve the attendance tracking process, the Department of Children,
Youth and Families (DCYF) has purchased an electronic attendance system from
Controltec. The system offered by the state works on smartphones, tablets, and
computers in a child care provider’s place of business. The system tracks, stores, and
reports on child attendance to support provider billing.
The system consists of:
KinderConnect is a web-based application accessed on the internet. Providers
use KinderConnect to record, correct, and submit attendance for subsidized child
care and to add and edit operators, sponsors, child information, and schedules of
care.
KinderSign replaces paper sign-in sheets. KinderSign is an application that runs
on tablets or iPads that allow providers and sponsors to sign children in and out
of care.
KinderSmart is an application that sponsors can run on their smartphone to sign
their children in and out of care.
Interactive Voice Response (IVR) allows for sponsors to use a telephone
keypad to sign their children in and out of care.
How much does the State System cost providers to use? For providers who serve children on Working Connections or Seasonal Child Care
subsidy, there is no cost to use KinderConnect, KinderSign, or KinderSmart. Providers
will need to supply their own devices to use these applications. For more information on
devices needed, visit What devices are needed to use the system?.

8 Back to Table of Contents
ELECTRONIC ATTENDANCE SYSTEM MANUAL
How do providers bill for subsidy when using the system? The electronic attendance system does not change the way that billing is done.
Providers will continue to receive invoices from SSPS that they need to claim. Collecting
attendance and claiming payment remain separate processes.
When must providers start keeping electronic attendance
records? While the electronic attendance rules in Washington Administrative Code 170-15-0126
went into effect on July 1, 2018. DCYF updated the implementation timeline to ensure
providers have more time to access the tools and resources they need to gain additional
confidence and skill with using the new system. For providers using the system offered
by DCYF, there are several steps to take to work towards submitting complete
attendance records each month. The milestones are listed below:
Licensed Centers and Family Home Providers with Authorization for Subsidy
Open Prior to August 1, 2018
By Nov. 30, 2018, a provider must have logged at least one check in or check out transaction in the system.
Starting Dec. 1, 2018, licensed providers must log all check in and out activity in the system and electronically "submit" attendance records in KinderConnect.
DCYF will use the normal audit process for care provided on and after Dec. 1, 2018.
DCYF will provide technical assistance and address non-compliance with electronic attendance policies on a case-by-case basis.
Family, Friend, and Neighbor (FFN) Providers with Authorization for Subsidy Open Prior to October 1, 2018
By Nov. 30, 2019, FFN providers must log at least one check in or out transaction in the system.
Starting Dec. 1, 2019, FFN providers must log all check in and out activity in an electronic attendance system and electronically "submit" attendance records in KinderConnect.
DCYF will use the normal audit process for care provided on and after Dec. 1, 2019.
DCYF will provide technical assistance and address non-compliance with electronic attendance policies on a case-by-case basis.
Licensed and FFN Providers New to Serving Families on Working Connections or
Seasonal Child Care

9 Back to Table of Contents
ELECTRONIC ATTENDANCE SYSTEM MANUAL
Licensed centers and family home providers are considered new to serving subsidy families when an initial authorization for subsidy is opened on or after Aug. 1, 2018.
FFN providers are considered new to serving subsidy families when an initial authorization for subsidy is opened on or after Oct. 1, 2018.
Providers new to serving Working Connections or Seasonal child care must take training and log at least one check in or out transaction in KinderConnect within 90 days of initial authorization, or report the use of an approved third party system.
After the first 90 days of initial authorization, providers using the state system must log all check in and out activity in an electronic attendance system and electronically "submit" attendance records in KinderConnect.
DCYF will use the normal audit process for care provided after 90 days of authorization.
DCYF will provide technical assistance and address non-compliance with electronic attendance policies on a case-by-case basis.
Which children must providers use the system for? The use of an electronic attendance system is required for children on Working
Connections and Seasonal Child Care subsidy and optional for all other children.
Ensuring equitable check-in/out processes for families who receive subsidy and families
without subsidy was a core consideration when considering which system to purchase.
The system selected by DCYF allows providers to add and record attendance for
children who are not receiving subsidy. Providers using the state system are
encouraged to use it for all the children in their care to ensure an equitable check in and
out process for all their families.
How do providers get started with an account to use the
state system? Providers using the state system must have an e-mail account. A free account can be
set up through the service of your choosing such as Gmail, Outlook, or Yahoo!.
Providers are eligible to register to use the state system after:
Having open authorization for Working Connections or Seasonal Child Care
Subsidy; and
Having a STARS ID and employment record in MERIT; and
They have completed electronic attendance training, information about training is
available by visiting:
https://www.dcyf.wa.gov/services/early-learning-providers/electronic-attendance-
system/training

10 Back to Table of Contents
ELECTRONIC ATTENDANCE SYSTEM MANUAL
Within ten (10) days of a provider meeting these conditions, DCYF sends an email to
the provider with registration information for KinderConnect.
Note: Only one person with a qualifying employment role in MERIT will be sent an email
with the access code and that any additional staff will need to be added manually.
What devices are needed to use the system? Providers will need to supply their own device(s) to use the state system applications.
Application: Who uses it? What device is needed?
KinderConnect Providers A device with internet or data and a web browser. Recommended devices:
Laptop
Desktop Computer Still accessible on:
Tablets
Smartphones
KinderSign Washington
Providers/Sponsors A tablet on Android 5.0+ or Apple iOS 9.0+, with a rear-facing camera. Note: The Kindle and Kindle Fire usually do not work with the system since they do not have access to the Google Play Store.
KinderSmart Washington
Sponsors The parent/sponsor must have a smartphone with access to the Apple Store or Google Play Store.
Interactive Voice Response (IVR)
Sponsors The parent/sponsor uses a phone to call a toll free number to submit attendance. This can include the use of landlines, basic cellphones, and smartphones without data.
How do providers collect parent signatures electronically? Providers must offer and set up at least one application for sponsors to electronically
sign their children in and out of care:
KinderSign;
KinderSmart; and/or
Interactive Voice Response
KinderConnect does not collect sponsor signatures and therefore cannot be used alone.

11 Back to Table of Contents
ELECTRONIC ATTENDANCE SYSTEM MANUAL
How often must providers log into KinderConnect to
review and manage their attendance records? Electronic attendance records should be kept as close to real-time as possible by
collecting sponsor signatures on a tablet or smartphone at the actual time of a child’s
arrival and departure. Providers are required to review and manage those records
through KinderConnect at least one a week; daily use is recommended. Regular use of
KinderConnect ensures that errors and issues are found and corrected quickly.
Licensed providers must ensure that they log into KinderConnect as often as needed to
comply with any licensing policies for keeping attendance records, see the links below
for more information:
Licensed Centers:
Washington Administrative Code 110-330A-7030 Attendance Records
Washington Administrative Code 110-330A-7032 Electronic attendance records –
Records Retention
Licensed Family Homes:
Washington Administrative Code 110-300B-2125 Child attendance records – Staff to
child ratio records
Washington Administrative Code 110-300B-2126 Electronic attendance records –
Records Retention
How do providers use the system when an internet
connection is unreliable? For providers who are not consistently connected to the internet, you can use the offline
feature on a tablet using KinderSign. If you are using a tablet while offline, you are still
required to take daily attendance and must ensure your attendance is connected to the
internet for upload at least once a week. For more information on collecting offline
attendance activity, see section: How Sponsors sign children in and out when a tablet is
not connected to the internet (offline).
What must providers do when the internet or system
is down completely? When the internet connection or the system is not working or is down, see the Child
Care Subsidy Program Policy Manual, Policy 0126-2:
https://www.dcyf.wa.gov/child-care-subsidy-programs-policy-manual/pol-0126-2-
electronic-attendance-records-providers

12 Back to Table of Contents
ELECTRONIC ATTENDANCE SYSTEM MANUAL
Chapter 2. KinderConnect KinderConnect is a web-based application accessed on the internet. Providers use
KinderConnect to record, correct, and submit attendance for subsidized child care and
to add and edit operators, sponsors, private pay child information, and schedules of
care.
How to log into KinderConnect To access KinderConnect, Provider Administrators must first register on the website.
Once the account is registered, provider administrators can then add accounts for other
operators, if needed. For providers with more than one employee or staff, each
individual needs their own username and password. Individuals cannot share
KinderConnect accounts.
1. Open a web browser.
2. Go to the KinderConnect logon page at:
https://www.electronicattendancewa.com/kc/
3. Enter your Username
4. Enter your Password
5. Click the “Logon” button.

13 Back to Table of Contents
ELECTRONIC ATTENDANCE SYSTEM MANUAL
How to change the language in KinderConnect to English
or Spanish KinderConnect is available in English or Spanish.
To change KinderConnect from one language to another, from the main menu:
1. Press the drop-down arrow next to “Language/Idioma”
2. Select the preferred language
How to register a KinderConnect account for the first time If you are the Provider Administrator, once you have your registration email and this is
your first time accessing KinderConnect:
1. Open a web browser
2. Type the web address for KinderConnect:
https://www.electronicattendancewa.com/kc/
3. Select your preferred Language from the upper-right hand corner the page using
the drop-down menu next to “Language/Idioma”
4. Select “Click Here if you do not have an account”
14 Back to Table of Contents
ELECTRONIC ATTENDANCE SYSTEM MANUAL
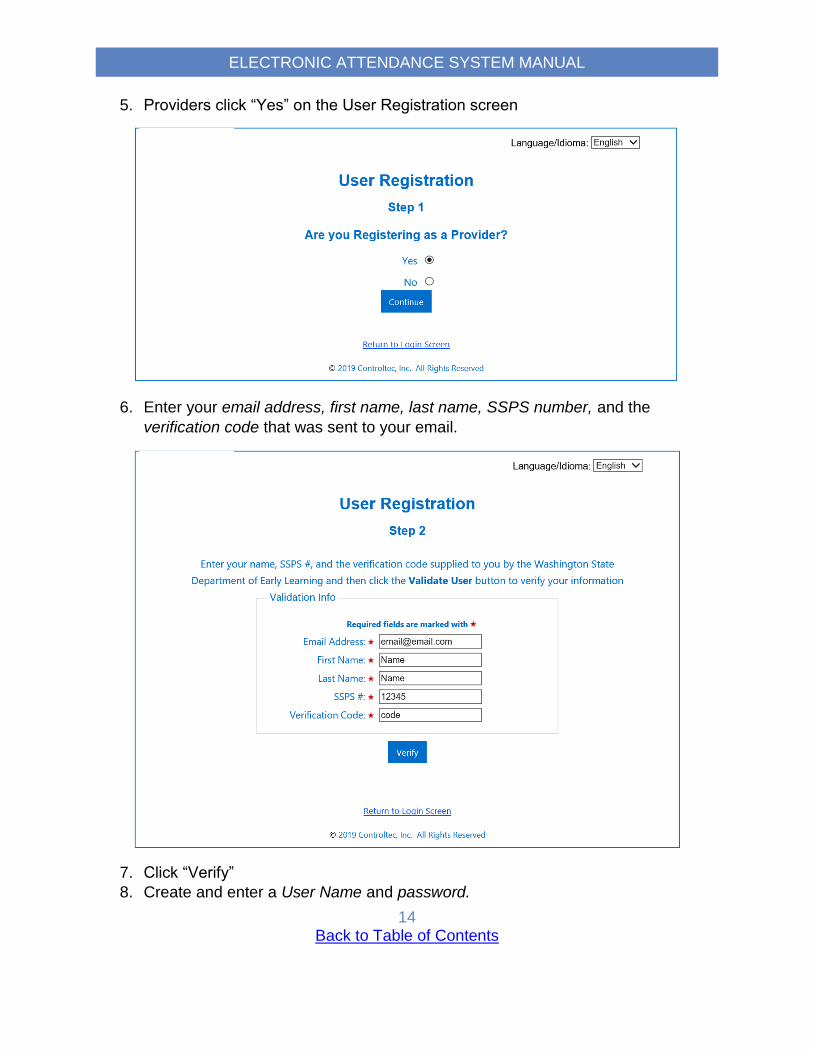
5. Providers click “Yes” on the User Registration screen
6. Enter your email address, first name, last name, SSPS number, and the
verification code that was sent to your email.
7. Click “Verify”
8. Create and enter a User Name and password.
15 Back to Table of Contents
ELECTRONIC ATTENDANCE SYSTEM MANUAL
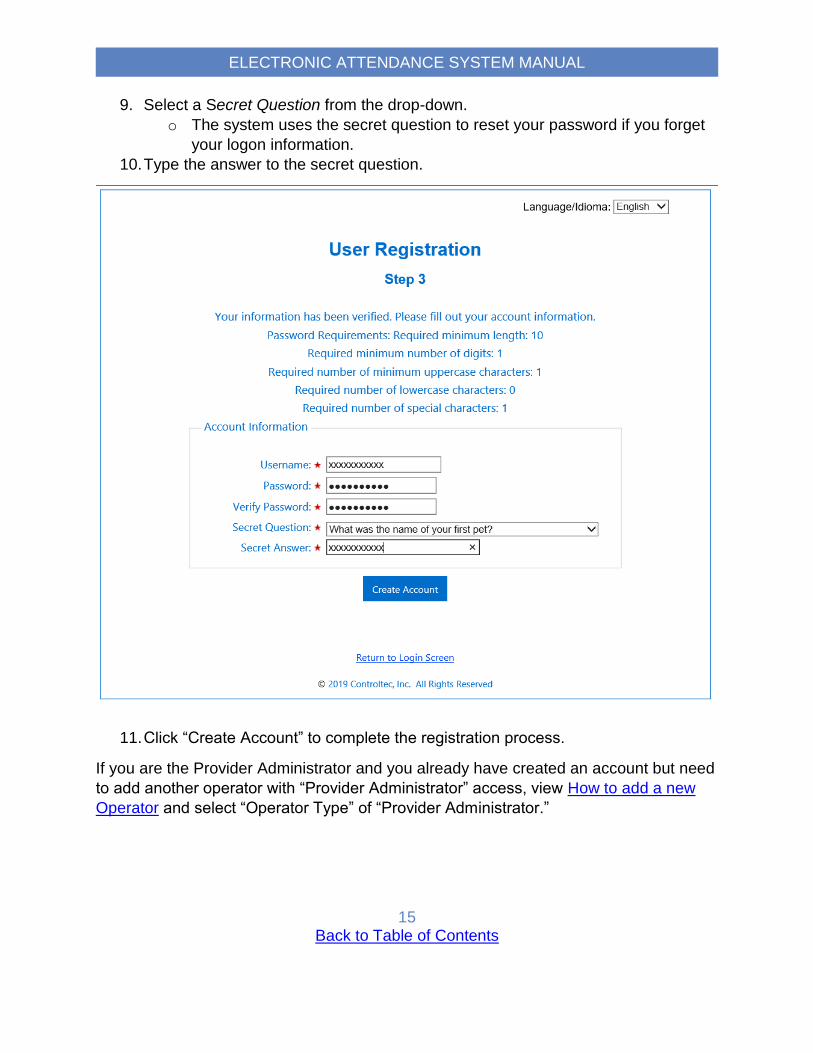
9. Select a Secret Question from the drop-down.
o The system uses the secret question to reset your password if you forget
your logon information.
10. Type the answer to the secret question.
11. Click “Create Account” to complete the registration process.
If you are the Provider Administrator and you already have created an account but need
to add another operator with “Provider Administrator” access, view How to add a new
Operator and select “Operator Type” of “Provider Administrator.”

16 Back to Table of Contents
ELECTRONIC ATTENDANCE SYSTEM MANUAL
How to reset a forgotten password KinderConnect accounts will lock after three (3) wrong password attempts. To avoid
locking your account if you have forgotten your password, from the KinderConnect login
page:
1. Select “Click here if you forgot your password” to open the Reset Password
page.
2. Enter your User Name

17 Back to Table of Contents
ELECTRONIC ATTENDANCE SYSTEM MANUAL
3. Click on “Retrieve Secret Question”. The system will display the Secret Question
you selected when you created the account.
4. In the space provided, enter the answer to your secret question.
5. Press “Validate Secret Question” to open the “Reset Password” page.

18 Back to Table of Contents
ELECTRONIC ATTENDANCE SYSTEM MANUAL
6. Enter the new Password.
7. Enter the new password again in the Verify Password field.
8. Click “Reset Password”
How to unlock a locked KinderConnect account KinderConnect accounts will lock after three (3) wrong password attempts. Once an
account is locked, either contact the Service Desk at 1-844-704-6777 or another
operator can unlock your account. If another operator is unlocking the account:
1. Complete an Operator search and click on “Account” for the locked out operator
2. Uncheck the box for “Locked”
3. Click on the “Save” button

19 Back to Table of Contents
ELECTRONIC ATTENDANCE SYSTEM MANUAL
How to update an expiring KinderConnect password Passwords must be changed at least every ninety (90) days. Ten (10) days prior to the
password expiring, a message will appear as a reminder. Once logged into
KinderConnect:
1. After completing an Operator search, click on “Account”
2. Type in a new password
4. Click on the “Save” button

20 Back to Table of Contents
ELECTRONIC ATTENDANCE SYSTEM MANUAL
Message Center The Message Center allows Provider Administrators to send or read messages and
Operators to read messages through the state system.
2.7.1 How to read a new message on the KinderConnect Home screen
After logging in to KinderConnect, any unread messages will display on the home
screen under “Messages”.
To read a message:
1. Hover over and click on the Subject of the message
2. The message will open in a new window:
3. After reading the message, click on “Close”

21 Back to Table of Contents
ELECTRONIC ATTENDANCE SYSTEM MANUAL
2.7.2 How to get to the Message Center
From the KinderConnect main menu, to review all messages sent or received:
1. Click on the Message Center icon in the upper-right hand corner of the main
menu:
This will open the Message Center:
2.7.3 How to delete a message
From the Message Center:
1. Select “Received” or “Sent” messages
2. Click on the checkbox next to the message to delete, or to select all, select the
checkbox in the upper left-hand blue row.
3. Press the “Delete” button
2.7.4 How to reset a message
Resetting a message will return a read message to unread status. From the Message
Center:
1. Select “Received” or “Sent” messages
2. Click on the checkbox next to the message to reset, or to select all, select the
checkbox in the upper left-hand blue row.
3. Press the “Reset” button
2.7.5 How to create and send a group message
Operators can send messages through the state system to other operators and/or
sponsors. A group message allows for the same message to be sent to numerous
individuals at one time. To create a group message:

22 Back to Table of Contents
ELECTRONIC ATTENDANCE SYSTEM MANUAL
From the Message Center:
1. Click the “New” button
2. Click on “Group Message” to open the “Create Message” window
3. Select the checkbox for the group(s) the message will be sent to (required)
4. From the drop-down menu, select a message priority. If not changed, the
message will default to “Medium” priority. Note: messages with a high priority will
display in red font in the Message Center.

23 Back to Table of Contents
ELECTRONIC ATTENDANCE SYSTEM MANUAL
5. In the “Subject” field, type the subject of the message (required)
6. In the “Message” field, type the text of the message
7. For the “First Appearance Date,” enter the date, or use the calendar button to
select, for when the message will first appear for the recipients to read
8. For the “Final Appearance Date,” enter the date, or use the calendar button to
select, for when the message will last appear for the recipients to read (optional)
9. Click on the checkbox for “Delete after read” if the message should be removed
from the list of Received messages as soon as the recipient reads it (optional)
10. Once the message is complete, click on the “Send” button
2.7.6 How Provider Administrators create and send a message to an individual
Provider administrators can send messages through the state system to other operators
or sponsors. A group message allows for a message to be sent to one or more
individuals when not sending to an entire group. To create an individual message:

24 Back to Table of Contents
ELECTRONIC ATTENDANCE SYSTEM MANUAL
From the Message Center:
1. Click the “New” button
2. Click on “Individual Message” to open the “Create Message” window
3. Click on “Select” to add the names of the individuals the message will go to

25 Back to Table of Contents
ELECTRONIC ATTENDANCE SYSTEM MANUAL
4. Search for the individual
5. Select the checkbox next to the name of the individual(s) to send the message to
6. Click on the “Add” button
7. From the “Create Message” screen, use the drop-down menu to select a
message priority. If not changed, the message will default to “Medium” priority
a. Low and Medium priority messages display to the recipient in black font

26 Back to Table of Contents
ELECTRONIC ATTENDANCE SYSTEM MANUAL
b. High priority messages display to the recipient in red font
8. In the “Subject” field, type the subject of the message (required)
9. In the “Message” field, type the text of the message
10. For the “First Appearance Date,” enter the date, or use the calendar button to
select, for when the message will first appear for the recipients to read
11. For the “Final Appearance Date,” enter the date, or use the calendar button to
select, for when the message will last appear for the recipients to read (optional)
12. Click on the checkbox for “Delete after read” if the message should be removed
from the list of Received messages as soon as the recipient reads it (optional)
13. Once the message is complete, click on the “Send” button

27 Back to Table of Contents
ELECTRONIC ATTENDANCE SYSTEM MANUAL
What is the KinderConnect main menu? The KinderConnect menu is the blue bar at the top of all screens.
2.8.1 Full screen view
Individuals with “Provider Administrator” permissions can see all the menu
choices and can edit records.
Individuals with “Provider User” access can view all the menu choices except for
“Devices”, and they cannot edit records.
2.8.2 Condensed screen view
Clicking on the “☰” symbol will open up the menu vertically and will give you your
full menu options.
What is the “Operator” tab on the KinderConnect menu? The “Operator” page is used to manage and maintain information for all system users,
including setting permissions and roles for each operator. Operators have the ability to
check children in and out of care.
For providers with more than one employee or staff, each individual will need their own
operator account. Operators cannot share accounts.
2.9.1 What are the KinderConnect Operator Types?
There are two operator types:
Provider Administrator: The individual responsible for setting up the system and ongoing administration tasks at the facility or home.
Provider User: Any individual at the provider site that has access to the system and is granted operator login privileges. Provider Users are unable to edit attendance records.
2.9.2 How to search for Operators
A provider may have more than one operator. To search for an operator:
1. Select “Operator” from the main menu
2. Select “Search”

28 Back to Table of Contents
ELECTRONIC ATTENDANCE SYSTEM MANUAL
3. On the Operator Search page, leave all the boxes blank and click the search
button to display a list of all the operators in your program.
4. To refine the search, enter all or part of the operator’s name or other information
about them. The more information you enter, the more specific the search results
are.
5. Click the “Search” button.
6. All operators matching the search criteria will appear.
7. “Search” results display in alphabetical order.
a. You can change the order by clicking the column header to sort the
information by that column.
8. On the “Search Results” page, any underlined items are links that can be clicked
on to access other pages related to that operator.
9. Click on the Operator’s name to view or edit their details.

29 Back to Table of Contents
ELECTRONIC ATTENDANCE SYSTEM MANUAL
2.9.3 What information is on the “Operator Detail” screen?
After completing a search, clicking on an operator’s name will access the “Operator
Details” page.
Use the Operator Detail page to create and maintain the operator’s information.
Descriptions for each section of the details:
Field Description
First Name Middle Name (optional) Last Name
Displays the Operator First Name, Middle Name, and Last Name.
Email Address (optional) Displays the email address for the operator.
Phone Number (optional) Displays the telephone number for the operator.
Operator Type Displays the type of operator
County Displays the county
Foreign Key (ignore) This field can be ignored, it is not used in Washington State
Inactive Check this box to make the operator account inactive/not usable.
Providers: Add Provider Operators might be assigned to different sites. Press “Add Provider” to add as many as necessary

30 Back to Table of Contents
ELECTRONIC ATTENDANCE SYSTEM MANUAL
2.9.4 How to add a new Operator
To add an operator:
1. Select “Operator” from the main menu
2. Select “Detail”
3. Select “New”
4. Enter the operator details:
Field Description
First Name (required) The Operator’s First Name
Middle Name (optional) The Operator’s Middle Name
Last Name (required) The Operator’s Last Name
Email (optional) The Operator’s email address
Phone Number (optional) The Operator’s Phone Number

31 Back to Table of Contents
ELECTRONIC ATTENDANCE SYSTEM MANUAL
Operator Type (required) Options from the drop-down:
Provider administrator: The individual responsible for setting up the system and ongoing administration tasks at the facility or home. Use this provider type for anyone needing to edit attendance data. This role is generally for directors, assistant directors, administrators of licensed facilities, or for FFN providers.
Provider User: Any individual at the provider site that has access to the system and is granted operator login privileges. Use this provider type for anyone needing to view information, but not needing to edit it. Provider Users are unable to edit attendance records. Licensed providers often use this role for teachers or assistants.
County (required) The provider’s county
Foreign Key (ignore) This field can be ignored; it is not used in Washington State
Inactive Checkbox Deactivates the operator’s account when checked
Providers Displays the provider(s) the operator is tied to
5. If not already listed, choose the provider(s) the operator works for by clicking the
“Add Provider” link.
6. Click search to see a list of all providers for your center or enter a name and a list
of providers matching the search criteria will display.

32 Back to Table of Contents
ELECTRONIC ATTENDANCE SYSTEM MANUAL
7. Select the provider and click “OK”.
8. For operators who work at more than one site, repeat the previous step to add
the additional locations.
9. Click the “Save” button on the top of the screen.
2.9.5 How to edit an Operator’s details
To edit the details for an operator:
1. After completing a search, clicking on an operator’s name will access the
“Operator Details” page.
2. Make the necessary changes or updates
3. Click on the “Save” button
2.9.6 How to stop an Operator’s account from being used by making it “inactive”
Providers can deactivate an operator account when that individual should not have
access to the account temporarily, for example, when the operator is on a leave of
absence. Deactivating an account prevents the operator from logging into
KinderConnect and allows the account to be reactivated in the future without having to
create a new operator account for that individual. To inactivate an operator account:
1. After completing a search for the Operator, clicking on an operator’s name will
access the “Operator Details” page.
2. Check the box for “Inactive”

33 Back to Table of Contents
ELECTRONIC ATTENDANCE SYSTEM MANUAL
3. Click on the “Save” button
2.9.7 How to delete an Operator account permanently
Providers can delete an operator account when that individual no longer needs access
to the system permanently, for example, if they are no longer employed by the facility.
Once an operator’s account is deleted, it cannot be brought back. To delete an operator
from the system:
1. After completing a search for the Operator,, clicking on an operator’s name will
access the “Operator Details” page.
2. Click “Delete”
3. To confirm the deletion, click “OK”
2.9.8 How to upload an Operator’s picture (Optional)
To upload a picture of the operator:
1. After completing a search for the Operator,, clicking on an operator’s name will
access the “Operator Details” page.
2. Click “Upload Picture”
3. Locate and select the picture you would like to upload and press “Open”
4. The selected picture will now display on the Operator Detail page
5. The “Delete Picture” button deletes the photo anytime.
6. Follow the steps above to upload a different picture.
2.9.9 What information is on the “Operator Account” screen?
Use the “Operator Account” page to view, create, and edit login related information
about the selected operator. It is helpful to have the operator available when setting up
their login information to have them create their Password, Secret Question, Secret
Answer, and PIN. Operators can also set up their PIN on a tablet, see: How do
operators create their PIN and secret question?
1. After completing a search for the Operator, open the “Account” page from the
main menu
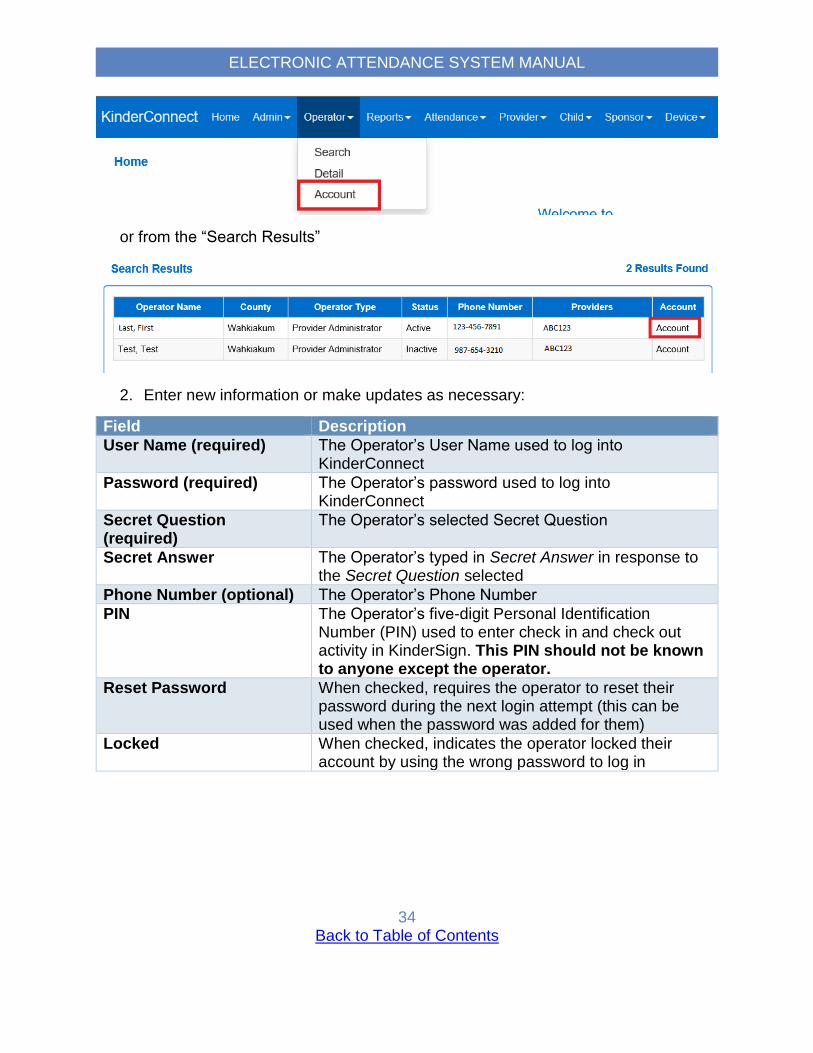
34 Back to Table of Contents
ELECTRONIC ATTENDANCE SYSTEM MANUAL
or from the “Search Results”
2. Enter new information or make updates as necessary:
Field Description
User Name (required) The Operator’s User Name used to log into KinderConnect
Password (required) The Operator’s password used to log into KinderConnect
Secret Question (required)
The Operator’s selected Secret Question
Secret Answer The Operator’s typed in Secret Answer in response to the Secret Question selected
Phone Number (optional) The Operator’s Phone Number
PIN The Operator’s five-digit Personal Identification Number (PIN) used to enter check in and check out activity in KinderSign. This PIN should not be known to anyone except the operator.
Reset Password When checked, requires the operator to reset their password during the next login attempt (this can be used when the password was added for them)
Locked When checked, indicates the operator locked their account by using the wrong password to log in

35 Back to Table of Contents
ELECTRONIC ATTENDANCE SYSTEM MANUAL
3. Click “Save” when all updates are done
What is the “Reports” tab on the KinderConnect
menu? The reports in the system are a tool for providers to use to determine the days and
hours services for children in their care.
2.10.1 How do I create the “Daily Detailed Attendance” report?
You will use the attendance details on this report to bill for subsidies. This report
provides totals for days attended, total hours and total absent days.
1. Select “Reports” from the main menu
2. From the drop-down, select “Daily Detailed Attendance”
3. Select the conditions for the report to display:

36 Back to Table of Contents
ELECTRONIC ATTENDANCE SYSTEM MANUAL
Field Description
Provider (required) When the operator is associated with more than one site, use the drop-down to select which provider’s attendance records to generate the report from
Start Date (required) Type the report start date, or use the calendar to select the date
End Date (required) Type the report end date, or use the calendar to select the date
Only Submitted Attendance Checkbox
If checked, the report will only display information for submitted records. Leaving the checkbox blank will pull all attendance whether submitted or not. Reminder: only children on Working Connections or Seasonal Child Care can have their attendance submitted through the system.
Sort By (Required) From the drop-down, select to sort the report by child name or family name
Page Breaks (Required) From the drop-down, select whether to have the report start a child’s attendance on a new page
Contract Type From the drop-down, select to include “All Children”, “Subsidized Children”, or “Full Cost Children”
Child (Optional) If viewing records for a specific child, search for the child and add them to the report conditions
Signature From the drop-down, select whether to include sponsor signatures
Notes From the drop-down, select an option for including notes:
All transactions, show notes: displays all check in and out activity and includes the text of any notes saved
All transactions, hide notes: displays all check in and out activity and doesn’t display any notes saved
Only transactions with notes: pulls a report that only includes check in and check out activity that has a note and displays the text of any notes saved
Output Type From the drop-down, select what format to view the report

37 Back to Table of Contents
ELECTRONIC ATTENDANCE SYSTEM MANUAL
Click on “View” to create the report

38 Back to Table of Contents
ELECTRONIC ATTENDANCE SYSTEM MANUAL
2.10.2 What is the KinderSign Tablet Registration Form?
Use the QR code on the KinderSign Tablet Registration Form to register your tablet
device. The QR Code is only needed one time at the initial registration of your tablet.
For the instructions on how to register your tablet, view the section How providers
register a tablet.

39 Back to Table of Contents
ELECTRONIC ATTENDANCE SYSTEM MANUAL
2.10.3 What is the Provider Mobile Sign In Sheet?
Sponsors scan the Provider Mobile Sign in Sheet each time they check children in and
out using their smartphone and the KinderSmart application. The Provider Mobile Sign
in Sheet should be printed and placed where Sponsors can scan the QR code with their
phone. Copies of the Provider Mobile Sign In Sheet should remain on site or with the
provider. The smartphone must be registered before a sponsor can sign a child in with
their phone. For the instructions on how to register a sponsor’s smartphone, view the
section: How to register a Sponsor’s smartphone to use KinderSmart.
40 Back to Table of Contents
ELECTRONIC ATTENDANCE SYSTEM MANUAL
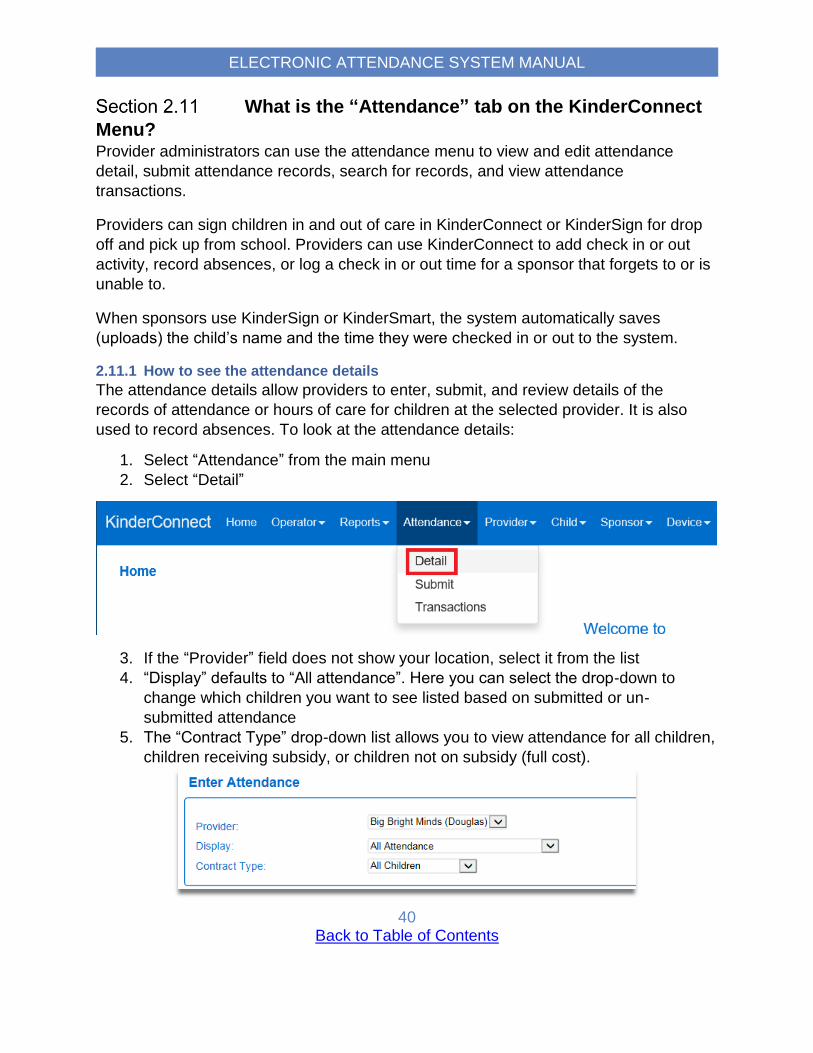
What is the “Attendance” tab on the KinderConnect
Menu? Provider administrators can use the attendance menu to view and edit attendance
detail, submit attendance records, search for records, and view attendance
transactions.
Providers can sign children in and out of care in KinderConnect or KinderSign for drop
off and pick up from school. Providers can use KinderConnect to add check in or out
activity, record absences, or log a check in or out time for a sponsor that forgets to or is
unable to.
When sponsors use KinderSign or KinderSmart, the system automatically saves
(uploads) the child’s name and the time they were checked in or out to the system.
2.11.1 How to see the attendance details
The attendance details allow providers to enter, submit, and review details of the
records of attendance or hours of care for children at the selected provider. It is also
used to record absences. To look at the attendance details:
1. Select “Attendance” from the main menu
2. Select “Detail”
3. If the “Provider” field does not show your location, select it from the list
4. “Display” defaults to “All attendance”. Here you can select the drop-down to
change which children you want to see listed based on submitted or un-
submitted attendance
5. The “Contract Type” drop-down list allows you to view attendance for all children,
children receiving subsidy, or children not on subsidy (full cost).

41 Back to Table of Contents
ELECTRONIC ATTENDANCE SYSTEM MANUAL
Attendance records are organized by the current week. To go to a different date:
1. Type the date; or
,
2. Use the arrows to move forward or back a week; or
3. Click on the calendar icon and select a date.
The first column shows information about the child, total hours attended and total
absences. The rest of the table shows the child’s attendance and schedule by day of
the week.
To find a child:
1. Scroll down to see the children, or
2. Use “Find” and click a letter to go to a list of children whose last name starts with
that letter.

42 Back to Table of Contents
ELECTRONIC ATTENDANCE SYSTEM MANUAL
The table displays the names of the child(ren) who have a schedule (subsidy or private
pay) for that period. There are spaces to enter “In” and “Out” times, as well as record
planned and unplanned absences.
The child’s schedule and the operator’s permissions determine the dates the provider
can edit the attendance for.
2.11.2 What are “Time Pairs”?
Each day of the week has “In” and “Out” time fields to record arrival and departure times
for children.
A child will have an in time for when they arrive and an out time for every time the child
leaves the provider’s care. “In” and “Out” times are called “time pairs”. More than one-
time pair in a day may be needed for children that leave care and come back for
reasons like attending school, going to a doctor’s appointment, or overnight care.
For example, a child dropped off by the sponsor at 6:00am is checked out by the
provider for school at 7:30am. This first pair of in and out times shows the child was in
care for one and a half (1.5) hours.
The child is checked back into care upon return from school at 2:30pm, and the parent
picks up and checks the child out again at 5:00pm.
The time for the second in and out pair is added to the total, shown as daily hours.

43 Back to Table of Contents
ELECTRONIC ATTENDANCE SYSTEM MANUAL
2.11.3 How to use multiple time pairs
The system starts off with displaying two (2) time pairs for each day of care, up to ten
pairs are allowed each day. When a child needs more than the default two (2) time pairs
in a day:
1. Navigate to the Attendance Detail for the current week.
2. For any attendance cells for the current day or a day in the past with no entered
times, there is an ‘Add Time Cells’ link
3. For any attendance cells for days in the future. There is no ‘Add Time Cells’ link
4. On a cell that has no times entered, click the ‘Add Time Cells’ link. A new time
cell appears
5. Click the link again and repeat until the desired number of pairs is reached or the
maximum number of time cells has been reached. After the maximum number
has been reached, the ‘Add Time Cells’ link does not appear.

44 Back to Table of Contents
ELECTRONIC ATTENDANCE SYSTEM MANUAL
6. If you do not enter any times and click ‘Save’, the cells will shrink back to the
original two.
7. Once you have created the new time cells, you can enter the in and out times for
each time pair.
If you do not wish to enter all the empty time cells ahead of time, you can just enter the
first two time-pairs, click the ‘Add Time Cells’ link, enter the third time pair and repeat
until the desired number of time-pairs have been entered.
2.11.4 How to add/edit “In” or “Out” times
From the Attendance Details screen:
1. Click in a box to add a time or update an incorrect time
2. Click “Save”
The system automatically reformats certain times entered, for example, if you type “7a”,
KinderConnect will save it as “07:00 am”.
2.11.5 How to record a child as “Absent” for an entire calendar day (For licensed
provider use)
Licensed providers must record absences in the system. FFNs do not need to record when children are absent.
For the days of the week the provider is open for services, all children in their care should have either a check in and out time, or an absence reason. Attendance for days

45 Back to Table of Contents
ELECTRONIC ATTENDANCE SYSTEM MANUAL
the facility is open are not to be left blank. For example, a facility open Monday-Friday with a child that only attends Monday-Thursday, the child should have a check in and out time for each Monday-Thursday and “Not Scheduled” recorded for each Friday.
From the Attendance Details screen:
1. If a child is absent, use the drop-down menu to select the reason.
2. Once a reason is selected, click “Save”.
Use the following chart to determine which reason to use:
Reason When to use this reason:
Absent When the child is scheduled to be in care, but the child does not show for care. This includes if the child is sick or on vacation.
Holiday The actual day the provider chooses to close in the same month of the eligible holiday.
Not scheduled The child is not scheduled to attend and does not show for care.
Program Closure
The provider closes their facility and the closure is not for a professional day or holiday.
To record a child was absent for a closure day due to professional development
training, see How to mark a closure for professional training days (For licensed provider
use).

46 Back to Table of Contents
ELECTRONIC ATTENDANCE SYSTEM MANUAL
2.11.6 How to record a closure for professional training days (For licensed provider use)
Licensed providers can record child absences due to Professional Training Days in the system. FFNs do not claim professional training days.
A “Professional Development Day” is a day your facility is closed for training purposes.
To mark a day as closed for professional development training:
From the Attendance Details screen:
1. Click the button for “Professional Day”
2. Type the date for the closure, or use the calendar
3. Click “Save”
4. The reason under the “Absent” day drop-down will now display as “Professional
Days” for all children on the date selected

47 Back to Table of Contents
ELECTRONIC ATTENDANCE SYSTEM MANUAL
Note: a professional training day cannot be selected for a date that has recorded any
check-in or check-out activity.
2.11.7 What if a child is absent for part of the day? (For licensed provider use)
KinderConnect only allows an entire calendar day to be marked as absent. It is possible
for a child to attend care and be absent for some of the hours they were scheduled for.
In these situations, it is recommended that providers add a note for the hours the child
is absent without marking the entire day as absent.
Example: A school-aged child attends Monday-Fridays before school from 6am-9am
and afterschool from 3pm-5pm. On Monday, the child attends 6am-9am, but becomes
sick during the school day and does not return for 3pm-5pm. Instead of marking the
child absent for the entire day, keep the check in and out activity for 6am-9am and add
an optional note indicating the child was sick for the 3pm-5pm hours. For steps on
adding a note see: How to add a note to attendance.

48 Back to Table of Contents
ELECTRONIC ATTENDANCE SYSTEM MANUAL
2.11.8 How to view history of changes to attendance details
Saving changes to attendance activates the “History” button.
To view the history, from the Attendance Details screen:
1. Click on “History”
2. The transaction history details will display for the original transaction and the
updates made
2.11.9 How to add a note to attendance
The use of notes is optional. Notes are viewable from reports. The attendance notes are
tied to the day and child the note is added to. Notes can be used to document a variety
of situations including, but not limited to:
Adding a note for why a time in or out was added or changed on behalf of a
sponsor:
o Example: Parent forgot smartphone at home, or
o Tablet was not charged
On days a child attends and is absent for part of the day, add a note for the
hours the child was absent. For an example, see the section: What if a child is
absent for part of the day? (For licensed provider use).

49 Back to Table of Contents
ELECTRONIC ATTENDANCE SYSTEM MANUAL
To add a note to the child’s attendance for that date, from the Attendance Details
screen:
1. Click “Note” for the child and date the note is for
2. Type the note
3. Click “Save”

50 Back to Table of Contents
ELECTRONIC ATTENDANCE SYSTEM MANUAL
2.11.10 How to read or edit a saved note
To view or edit a saved note, from the Attendance Details screen:
1. Click on “Note” for the child and date to view/update
2. If the text is updated, click “Save”
3. If the text is read and no update is needed, click “Cancel”
51 Back to Table of Contents
ELECTRONIC ATTENDANCE SYSTEM MANUAL
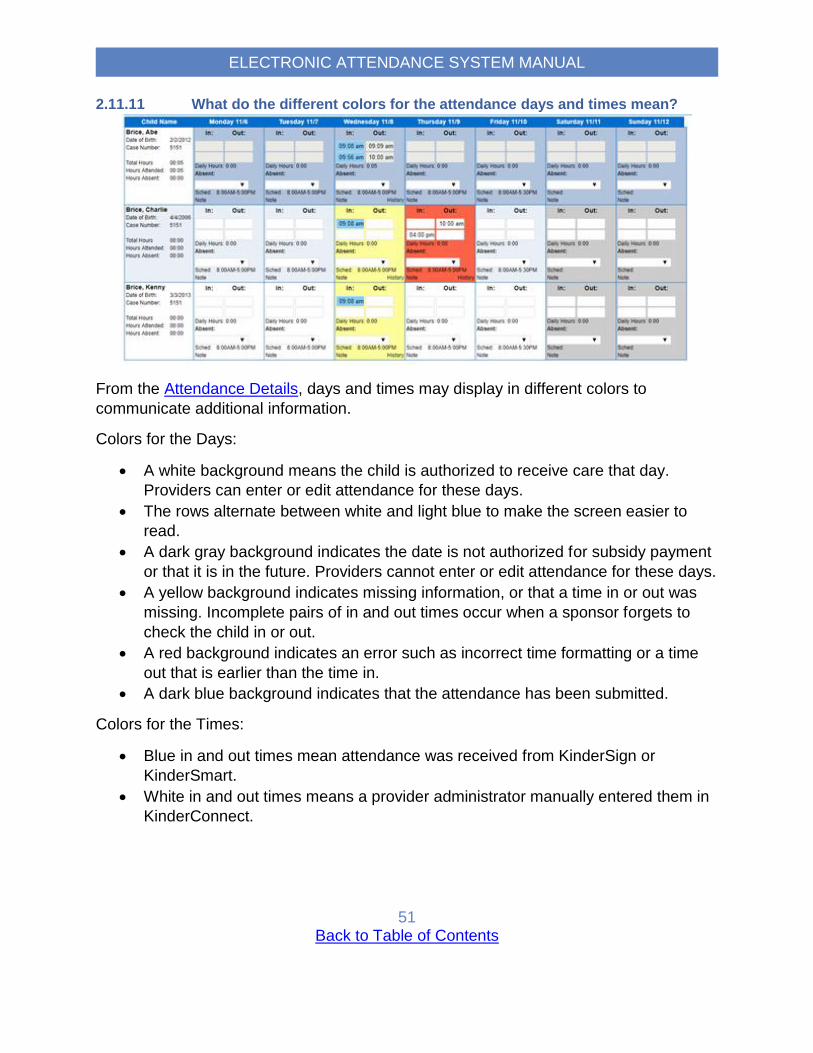
2.11.11 What do the different colors for the attendance days and times mean?
From the Attendance Details, days and times may display in different colors to
communicate additional information.
Colors for the Days:
A white background means the child is authorized to receive care that day.
Providers can enter or edit attendance for these days.
The rows alternate between white and light blue to make the screen easier to
read.
A dark gray background indicates the date is not authorized for subsidy payment
or that it is in the future. Providers cannot enter or edit attendance for these days.
A yellow background indicates missing information, or that a time in or out was
missing. Incomplete pairs of in and out times occur when a sponsor forgets to
check the child in or out.
A red background indicates an error such as incorrect time formatting or a time
out that is earlier than the time in.
A dark blue background indicates that the attendance has been submitted.
Colors for the Times:
Blue in and out times mean attendance was received from KinderSign or
KinderSmart.
White in and out times means a provider administrator manually entered them in
KinderConnect.

52 Back to Table of Contents
ELECTRONIC ATTENDANCE SYSTEM MANUAL
2.11.12 How to track overnight attendance
When children attend care past midnight, the system automatically splits the times of
care to end at 11:59 pm on the first day and begin on the next day as 12:00 am.
2.11.13 When and how to submit attendance
The process of submitting your attendance records in KinderConnect lets DCYF know
that you certify the records are complete and accurate. Attendance records are only
submitted for children on Working Connections or Seasonal Child Care subsidy.
Submitted attendance records become part of your permanent record.
Providers must submit their attendance records for a child prior to claiming payment for
that child. The amount of care submitted must match the amount of days claimed on
the provider’s invoice.
As a reminder, once you submit your attendance records, you must still submit your
invoice to SSPS for payment. The attendance system and the payment system are not
linked together.
To submit your attendance records,
1. Select “Attendance” from the main menu
2. Select “Submit”
3. Verify the Provider name. If the provider is not shown, search for the name and
select it.
4. Verify or select the county.
5. The system displays a list of attendance for all children on subsidy

53 Back to Table of Contents
ELECTRONIC ATTENDANCE SYSTEM MANUAL
6. On the “Submit Attendance” screen, press “Submit” on the row for the billing
cycle you want to submit.
7. Click on the checkbox for the child you would like to submit attendance for.
8. Click “Save”
9. If a provider chooses to submit attendance early, prior to the end of the billing
cycle, the system will display a message for the provider to review and accept
prior to submitting the records.
10. The system displays the Attendance Submittal terms and conditions. Review this
information carefully.
11. Click on the checkbox to agree with the terms and conditions.
12. Press “Submit Attendance” to complete the submission

54 Back to Table of Contents
ELECTRONIC ATTENDANCE SYSTEM MANUAL
If the child’s attendance contains errors for this billing period, the child’s name is labeled
in red, there is no checkbox, and the status shows incomplete or no attendance.
To correct the attendance:
1. Click on “Correct”
2. This will open a list of errors that need to be addressed:
3. Make the necessary changes and press “Save”; or
4. If you need to review the record details, press “Cancel” and click on “Attendance”
to go to the child’s attendance details page.

55 Back to Table of Contents
ELECTRONIC ATTENDANCE SYSTEM MANUAL
5. Once saved, you can now attempt to submit the child’s attendance
2.11.14 When and how to correct/recall attendance
The system has an option to correct errors on submitted attendance referred to as
“recall”. Providers must correct records prior to claiming their payment invoice. To recall
records:
1. From the Submit Attendance page, click “Recall” for the billing period that needs
changes

56 Back to Table of Contents
ELECTRONIC ATTENDANCE SYSTEM MANUAL
2. Select the checkbox for the attendance you would like to edit
3. Click “Save” and the child’s attendance will change status to not submitted
4. To enter a note as to why the correction is needed, click “Note” for the billing
period

57 Back to Table of Contents
ELECTRONIC ATTENDANCE SYSTEM MANUAL
5. Type the note:
6. Click “Save”
7. You can now review, make the necessary changes, and then submit the
attendance again.
2.11.15 How to view more attendance details on check in and check out
transactions
The attendance transactions activity is a log that allows a provider to review the details
of all attendance transactions performed for a selected reporting period. To view the
details:
1. Select “Attendance” from the main menu
2. Select “Transactions”
3. Enter the conditions you would like to search for:
o The start date and end date are required
o Any other search criteria entered will refine the results
4. Click “Search”
The transaction results can be exported to Excel or viewed as a PDF by using the
“Export” and “PDF” buttons.

58 Back to Table of Contents
ELECTRONIC ATTENDANCE SYSTEM MANUAL
What is the “Provider” tab on the KinderConnect
Menu? A provider may have multiple locations or SSPS numbers in KinderConnect. An
operator can view information related to the provider account(s) they are associated
with.
2.12.1 How to search for a Provider
If an operator is tied to more than one location/provider:
1. Select “Provider” from the main menu
2. Select “Search”
3. On the Provider Search page, leave all the boxes blank and click the search
button to display a list of all the providers you are tied to in the system.
4. To refine the search, enter all or part of the provider’s name or other information.
The more information you enter, the more specific the search results are.
5. Click “Search”
6. Click on the Provider Name to see the “Provider Detail” screen.
2.12.2 How to view the account details for a Provider
For the operator to view the provider details:
1. Select “Provider” from the main menu
2. Select “Detail”
The details cannot be edited.

59 Back to Table of Contents
ELECTRONIC ATTENDANCE SYSTEM MANUAL
2.12.3 How to view families tied to a provider account
To display the families and schedules that are active as of the selected date:
3. Select “Provider” from the main menu
4. Select “Cases”
5. A list of all active cases will display, with the dates of the child’s schedule next
to their name:
6. To search for a case previously open, update the “Cases Active as of” date
and click “Search”
What is the “Child” tab on the KinderConnect menu? For children on Working Connections or Seasonal Child Care, KinderConnect will
automatically pull over the child’s information from the authorization for subsidy. After a
subsidy authorization is created or updated, it can take 1-2 business days for the
information to display in KinderConnect. The information for children receiving subsidy
and full cost children is managed on this tab.
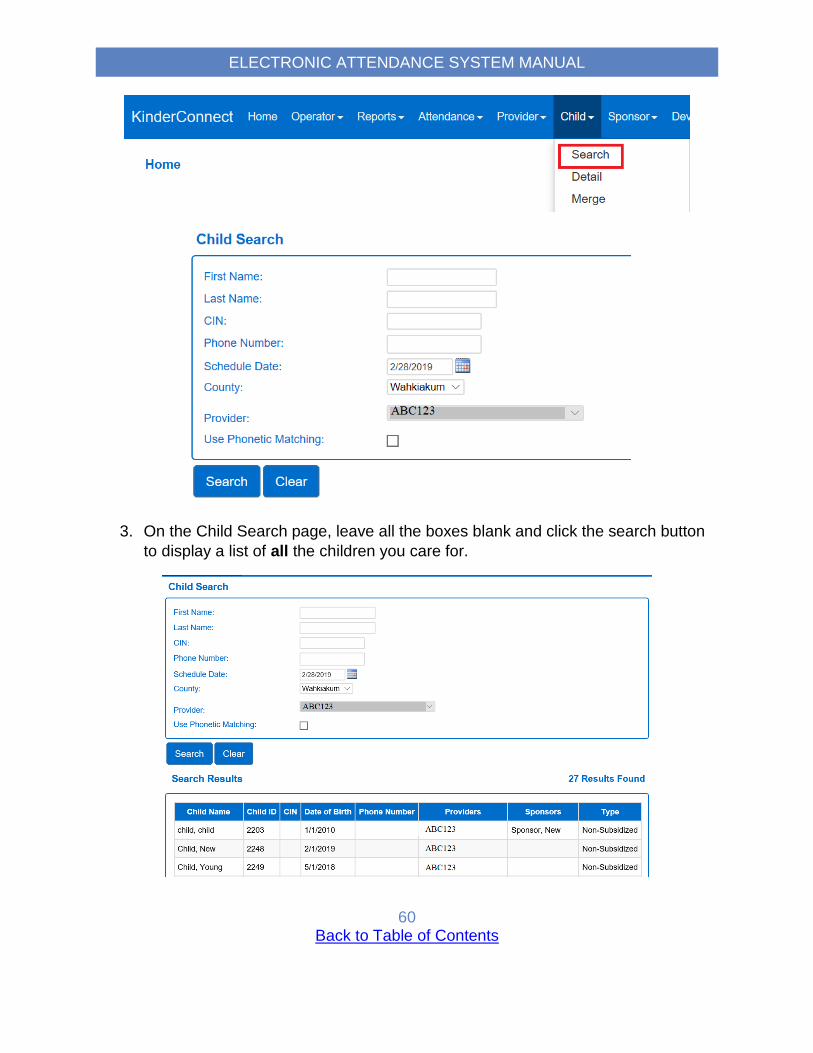
2.13.1 How to search for children
To search for a child:
1. Select “Child” from the main menu
2. Select “Search”
60 Back to Table of Contents
ELECTRONIC ATTENDANCE SYSTEM MANUAL
3. On the Child Search page, leave all the boxes blank and click the search button
to display a list of all the children you care for.

61 Back to Table of Contents
ELECTRONIC ATTENDANCE SYSTEM MANUAL
To refine the search, enter all or part of the child’s name or other information about
them. The more information you enter, the more specific the search results are.
4. “Search” results display in alphabetical order.
a. You can change the order by clicking the column title/header to sort the
information by that column.
5. On the “Search Results” page, any underlined items are links that can be clicked
on to access other pages related to that operator.
6. Click on the child’s name to view or edit their details.
Note: if you are unable to find a child whose schedule end date previously ended,
change the search “Schedule Date” to a date in the past when the child was in care.
2.13.2 How to add a child
Providers may choose to add child accounts for:
children who are not on Working Connections or Seasonal Child Care
children on foster care or child protective services subsidies
To add a child:
1. Select “Child” from the main menu
2. Select “Detail”
3. Select “New”

62 Back to Table of Contents
ELECTRONIC ATTENDANCE SYSTEM MANUAL
4. Enter in the child’s information
Field Description
Child ID or CIN The CIN number does not apply and can be ignored. This is KinderConnect’s Child Identification Number.
First Name (required) The child’s first name
Middle Name (optional) The child’s middle name
Last Name (required) The child’s last name
Date of Birth (required) The child’s date of birth
Phone Number The child’s home phone number can be added
Child Type Child Type displays “Non-Subsidized” after the child is saved.
Subsidized Schedules Not applicable to a child being added as full cost
Non-subsidized Schedules
The schedule for a child not on Working Connections or Seasonal Child Care
5. Click “Add Non-Subsidized schedule”. The provider option should show your
program’s name.
6. Enter a start and end date for the child’s schedule.
a. If you don’t know how long you will be caring for the child, type or select a
future date from the calendar.

63 Back to Table of Contents
ELECTRONIC ATTENDANCE SYSTEM MANUAL
7. Click “OK” to return to the child detail screen.
8. Click the “Save” button at the top to save this child’s record.
2.13.3 How to record attendance for children on subsidy needing care for private pay
hours
For children who have both child care hours covered under subsidy and privately paid
hours, the child must have two separate child accounts. The details about the subsidy
schedule are uploaded automatically from the authorization for subsidy. The provider
program will need to create a new child detail record for private pay hours.
It is important to note the two different accounts. This can be done by adding a number
“2” to the privately paid hours, or another code that you assign.
For example:
Children receiving subsidy from DSHS
Non-subsidized schedule for children who also receive subsidy hours
Bryce Smith Bryce Smith2
Charlie Rice Charlie Rice2
Jasmine Morgan Jasmine Morgan2
The child’s name with the “2” at the end (i.e. Bryce Smith2) will be selected by the
sponsor for private pay hours.
2.13.4 How to edit a child’s account details
To edit information for a child:
1. Select “Child” from the main menu
2. Select “Search”
3. Select the Child’s Name
4. From the “Child Detail” page make any necessary updates or changes
5. Click “Save”

64 Back to Table of Contents
ELECTRONIC ATTENDANCE SYSTEM MANUAL
2.13.5 How to delete a child’s account
Accounts for children receiving subsidy cannot be deleted. The child’s schedule is
based on the begin and end date of the authorization. If a child on subsidy is no longer
in care, contact the DSHS Provider Line to have the authorization end date updated.
To delete a child account for a child not on subsidy:
1. Search for the child’s account
2. From the “Child Detail” screen, click “Delete”
3. Confirm the deletion, click “OK”
2.13.6 How to merge a child’s account when a full pay child gets authorized for subsidy
When a family starts the process to have their subsidy eligibility determined, it may be
necessary to create a child account as full pay to collect attendance while waiting for the
authorization for subsidy. When the child’s authorization is opened, the schedule is
automatically added to the system and it creates a duplicate account for the same child.
To merge the child’s attendance under the full pay and the subsidy accounts:
1. Select “Merge” under the “Provider” or “Child” tab on the main menu

65 Back to Table of Contents
ELECTRONIC ATTENDANCE SYSTEM MANUAL
2. The “Merge Child” screen will now display Step 1: “Select the Authorized Child”
3. Click the Select button next to the child you would like to generate a list of all
potential matches
4. A list of potential matches will now display on the right-hand side of Step 2:
“Select A Matching Child”
5. To see all children added as full pay, click “Show All Children”
6. If no matching children are found by the system, the list displays all potential
children indicating the reason for this result in red bold letters.

66 Back to Table of Contents
ELECTRONIC ATTENDANCE SYSTEM MANUAL
7. Click “Match” next to the child’s name under “Potential Matches” and click “Next”.
8. On the “Confirm Merge” page, click “Merge” to complete the merge
9. The system will confirm the merge
10. Click “OK”

67 Back to Table of Contents
ELECTRONIC ATTENDANCE SYSTEM MANUAL
2.13.7 How to upload a child’s picture
Adding a child’s photo to the system is optional.
To add the picture:
1. Select “Children” from the main menu
2. Select “Search”
3. Select the Child’s Name
4. From the Child Detail screen click the “Upload Picture” button
5. Locate and select the picture you would like to upload and press “Open”
6. The selected picture will now display on the Child Detail page
7. The “Delete Picture” button allows for the picture to be deleted any time.
8. The steps above can be followed to upload a different picture.
What is the “Sponsor” tab in KinderConnect? Sponsors include parents and other adults authorized by the parent to sign the child in
and out of your care. Sponsor accounts allow for the electronic attendance system to
identify the individual picking up or dropping off the child and when using KinderSign or
KinderSmart and collect the sponsor’s signature.
For children on Working Connections or Seasonal Child Care, KinderConnect will
automatically pull over some head of household information from the authorization for
subsidy.
For children with more than one sponsor, individuals will need their own sponsor
account. Sponsor accounts cannot be shared.
When a sponsor does not have an account in the system, the provider will need to
manually enter attendance for the child. Best practice in these cases is for the provider
to add a note with the name of the individual who picked up or dropped off the child. In
some cases, sponsors are not used regularly; if an individual signs a child in or out as
often as once a week, the individual should have their own sponsor account created.
2.14.1 How to search for a Sponsor account
Use the “Sponsors Search” page to locate and access the acount for a sponsor.
To search for a sponsor:
1. Select “Sponsor” from the main menu
2. Select “Search”

68 Back to Table of Contents
ELECTRONIC ATTENDANCE SYSTEM MANUAL
3. On the “Sponsor Search” page, leave all the boxes blank and click the search
button to display a list of all the sponsors tied to your provider account.
4. To refine the search, enter all or part of the sponsors name or other information
about them. The more information you enter, the more specific the search results
are.
5. Click on “Account” on the row with the sponsor’s name to access their account.
2.14.2 How to add a Sponsor
To add a sponsor:
1. Select “Sponsor” from the main menu
2. Select “Detail”

69 Back to Table of Contents
ELECTRONIC ATTENDANCE SYSTEM MANUAL
3. Click “New” to enter a new sponsor.
4. Enter the details for the new sponsor:

70 Back to Table of Contents
ELECTRONIC ATTENDANCE SYSTEM MANUAL
Field Description
Sponsor ID Sponsor ID is a unique number that the system creates after you save the new sponsor
First Name (required) The sponsor’s first name
Middle Name (optional) The sponsor’s middle name
Last Name (required) The sponsor’s last name
Sponsor Type (required) Indicates the type of sponsor from a drop-down list of types
Phone Number (optional) The sponsor’s phone number. Note: For the sponsor to use Interactive Voice Response (IVR), the phone number calling the IVR must match the phone number entered on this screen.
Email Address (optional) The sponsor’s email address
CIN The CIN number does not apply and can be ignored.
Inactive When checked, prevents the sponsor from using the system
County The sponsor’s county
Sponsored Children Indicates which children the Sponsor can check in and out of child care
5. To add sponsored children:
a. Press “Add Children”
b. Search for the child’s name
c. Mark the checkbox next to the name of the child(ren) to link to the sponsor
d. Click “OK”
e. Add the sponsor’s relationship to the child from the drop-down
6. Select “Save”

71 Back to Table of Contents
ELECTRONIC ATTENDANCE SYSTEM MANUAL
2.14.3 How to edit/update a Sponsor’s details
To edit or update information for a sponsor with an account already set up:
1. Select “Sponsor” from the main menu
2. Select “Search”
3. On the “Sponsor Search” page, leave all the boxes blank and click the search
button to display a list of all the sponsors tied to your provider account.
4. To refine the search, enter all or part of the sponsors name or other information
about them. The more information you enter, the more specific the search results
are.
5. Click on the sponsor’s name to access their account details.
6. From the “Sponsor Detail” page make any necessary updates
7. Click “Save”

72 Back to Table of Contents
ELECTRONIC ATTENDANCE SYSTEM MANUAL
2.14.4 How to add children to a Sponsor
To add children for a sponsor to sign in and out:
1. Select “Sponsor” from the main menu
2. Select “Search”
3. Select the Sponsor’s Name
4. From the Sponsor Detail page, press “Add Children”
5. Search for the child’s name
6. Mark the checkbox next to the name of the child(ren) to link to the sponsor
7. Click “OK”
8. Add the sponsor’s relationship to the child from the drop-down
2.14.5 How to remove children from a Sponsor’s account
There may be cases where a Sponsor is no longer authorized to pick up or drop off a
child. To remove a child from a Sponsor’s account:
9. Select “Sponsor” from the main menu
10. Select “Search”
11. Select the Sponsor’s Name
12. From the Sponsor Detail page, under “Sponsored Children”, click “Delete” next to
the child’s name

73 Back to Table of Contents
ELECTRONIC ATTENDANCE SYSTEM MANUAL
2.14.6 How to stop a Sponsor’s account from being used by making it “inactive”
Providers can deactivate a sponsor account when that individual should not have
access to the account temporarily, for example, when the operator is deployed
oversees. Deactivating an account prevents the Sponsor from checking children in and
out of care. To inactivate a Sponsor’s account:
1. Select “Sponsor” from the main menu
2. Select “Search”
3. Select the Sponsor’s Name
4. From the “Sponsor Detail” screen, click on the checkbox for “Inactive”

74 Back to Table of Contents
ELECTRONIC ATTENDANCE SYSTEM MANUAL
5. Click “Save”
2.14.7 How to delete a Sponsor account permanently
Providers can delete a sponsor account when that individual no longer needs access to
the system permanently, for example, if the individual is no longer authorized to pick up
and drop off the child. Deleting a sponsor account will remove their access to
KinderSmart and KinderSign. To delete the sponsor account:
1. Select “Sponsor” from the main menu
2. Select “Search”
3. Select the Sponsor’s Name
4. From the “Sponsor Detail” screen press the “Delete” button

75 Back to Table of Contents
ELECTRONIC ATTENDANCE SYSTEM MANUAL
5. To confirm deletion, click “OK”
2.14.8 How to merge a sponsor’s account when a full pay account gets authorized for
subsidy
When a family starts the process to have their subsidy eligibility determined, it may be
necessary to create a family’s account as full pay to collect attendance while waiting for
the authorization for subsidy. When a child’s authorization is opened, the sponsor’s
information is automatically added to the system and it creates a duplicate account for
the same sponsor. To merge the sponsor’s account under the full pay and the subsidy
accounts:
To merge the sponsor’s account into one:
1. Select “Merge” under the “Sponsor” tab on the main menu
2. The system will now display a list of “Authorized Parents”

76 Back to Table of Contents
ELECTRONIC ATTENDANCE SYSTEM MANUAL
3. Click the button next to the sponsor’s name you would like to merge to generate
a list of all potential matches.
4. A list of potential matches will now display on the right-hand side of the page.
5. To see all parents added as full pay, click “Show all Parents”
6. If no matching sponsors are found, the list displays all potential sponsors
indicating the reason for this result in red bold letters.
7. Click “Match” next to the sponsor’s name under “Potential Matches” and click
“Next”
8. On the “Confirm Merge” page, click “Merge” to complete the merge

77 Back to Table of Contents
ELECTRONIC ATTENDANCE SYSTEM MANUAL
9. The system will confirm the merge, click “OK”
2.14.9 How to upload a Sponsor’s picture
Adding a sponsor’s photo to the system is optional.
To add the picture:
1. Select “Sponsor” from the main menu
2. Select “Search”
3. Select the Sponsor’s Name
4. From the “Sponsor Detail” page press “Upload Picture”
5. Locate and select the picture you would like to upload and press “Open”
6. The selected picture will now display on the Sponsor Detail page
7. The “Delete Picture” button allows for the picture to be deleted any time.
8. The steps above can be followed to upload a different picture.
2.14.10 How to set up a “Sponsor Account” with a PIN
After a new sponsor is added and saved, their account information can be set up. The
Sponsor Account is used to complete the setup of a new sponsor or to help unlock the
sponsor’s account. It is recommended to have the sponsor sit next to you during setup,
so the sponsor can add their password and secret question answer. If a Sponsor is not
available to set up their password and PIN through KinderConnect, they can set up their
PIN when they log into KinderSign or KinderSmart for the first time.
PIN Requirements:
Length: Must be a five-digit number
Cannot contain more than (3) three consecutive digits (example: 12345)
Cannot contain the same digit more than two (2) times (example: 11111)
Sponsors should not share their secret question answer or PIN with anyone,
even during the set-up of a new account.
There are two ways to access a sponsor’s account:
1. Select “Sponsor” from the main menu
2. Select “Search”

78 Back to Table of Contents
ELECTRONIC ATTENDANCE SYSTEM MANUAL
3. Select the “Account” from the same row the sponsor’s name is listed
Or from the Sponsor’s Detail Screen:
1. Select “Sponsor” from the main menu
2. Select “Account”
Enter the required fields:
Note: If only adding a PIN, all the other account information can be left blank.
1. A username is required. Many providers use a combination of the sponsor’s
first name and last name for this. Note: Sponsors are not able to log into
KinderConnect even with this username set up.
2. Ask the sponsor to type in a Password. The sponsor should set up their
password to ensure confidentiality. However, if the administrator sets up the
account for a new sponsor, check the Reset Password box to force the
sponsor to enter a new password the next time they logon.
3. Ask the sponsor to select a Secret Question from the drop-down. The secret
question is used by the sponsor to create a new password if they forget their
old one.
4. Ask the sponsor to type in the Secret Answer.
5. Ask the sponsor to enter a five-digit PIN (or Personal Identification Number)
they will use to sign into KinderSign and KinderSmart. This PIN should not
be known to anyone except the sponsor.

79 Back to Table of Contents
ELECTRONIC ATTENDANCE SYSTEM MANUAL
2.14.11 Is a new Sponsor account needed when the sponsor has or had an account
set up with another provider?
Sponsor accounts are not shared across provider accounts. Sponsors with more than
one provider, or who change providers, using the state system will need to create a
Sponsor Account at each provider. To create a Sponsor Account, visit: How to add a
Sponsor. If the family is receiving Working Connection or Seasonal Child Care, the
Sponsor’s information will automatically be added to the system.
2.14.12 How to unlock a Sponsor Account
If a sponsor enters the wrong PIN three times, they will be locked out of the system and
prevented from using KinderSign or KinderSmart.
To unlock the account:
1. Select “Sponsor” from the main menu
2. Select “Search”
3. Select the “Account” from the same row the sponsor’s name is listed
4. Uncheck the “Locked” checkbox
5. Click “Save”
What is on the “Devices” tab in KinderConnect? The devices menu option allows for providers to search and view information about
devices they have registered.

80 Back to Table of Contents
ELECTRONIC ATTENDANCE SYSTEM MANUAL
Chapter 3. KinderSign KinderSign is the application that replaces paper sign-in sheets by allowing providers
and sponsors to sign children in and out on tablets. Sponsors verify themselves on the
tablet using a PIN and then check children in and out. The check in and out activity is
uploaded from the tablet to the system.
What tablets are compatible with KinderSign? The KinderSign application is supported on Android 5.0+ or Apple iOS 9.0+ devices.
The tablet must have a rear-facing camera for the scanning of QR Codes.
Note: The Kindle and Kindle Fire usually will not work with the system since they do not
have access to the Google Play store by default.
How to download the KinderSign application onto an iPad 1. Tap the App Store icon on the iPad home screen.
2. If the iPad asks if the App Store may access your location, tap “Allow”. If the
iPad asks if you want to set up “Family Sharing”, tap “Not Now”.
3. In the search field (top right), type “KinderSign Washington”, then tap .
4. Once the KinderSign Washington application is found, tap “GET”
5. Tap “Install” to download the application.
6. If your iPad asks you to sign into the iTunes Store, enter your Apple ID,
password and tap “OK”.
7. Agree to the iTunes terms and conditions if asked to do so. If this is a new Apple
Id, tap “Next” to go to a series of screens labelled “Complete Your Apple ID”. Use
these screens to provide additional information, including billing information such
as your address. You are not required to provide credit card details.
8. Once the download is complete, tap “GET”, then “Open”.
9. KinderSign by Controltec will appear on the screen.
10. Note: When the iPad asks “Do you want KinderSign to access your location while
you use the app?” then tap “Allow”. If it asks whether you want to set up family
sharing, tap “Not now”.

81 Back to Table of Contents
ELECTRONIC ATTENDANCE SYSTEM MANUAL
Download the KinderSign Application to Android 1. Tap the Play Store icon on the tablet home screen.
2. In the top search field, type “KinderSign Washington”, then tap .
3. Once the KinderSign Washington application is found, , select the
application
4. Tap
5. Tap “Install” to download.
6. Tap “Accept” to initiate download.
7. Once the download is complete, tap “Open”.
8. KinderSign by Controltec will appear on the screen and your tablet is ready to
scan.
9. Depending on the tablet, upon completion of the download, you may need to tap
“Continue”, and proceed to the “Complete account setup” screen. If asked for
credit card information, tap “Skip”.
10. A message will then flash on the tablet indicating that KinderSign by Controltec
has been added to the home screen.
11. Tap the home button on the lower portion of the tablet to return to the home
screen.
12. Locate the KinderSign icon and tap it to open the app.
How providers register a tablet Each tablet must be registered once to connect the tablet to the provider account. To
register a tablet device:
1. From the main menu, select “Reports”
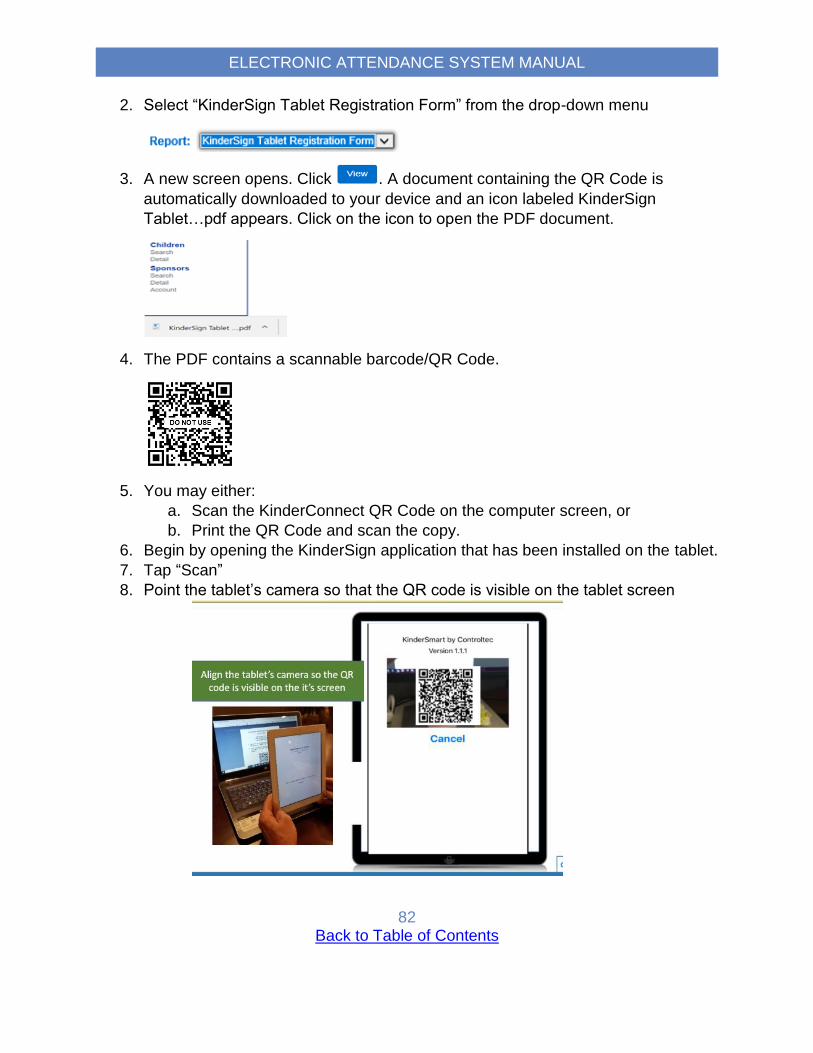
82 Back to Table of Contents
ELECTRONIC ATTENDANCE SYSTEM MANUAL
2. Select “KinderSign Tablet Registration Form” from the drop-down menu
3. A new screen opens. Click . A document containing the QR Code is
automatically downloaded to your device and an icon labeled KinderSign
Tablet…pdf appears. Click on the icon to open the PDF document.
4. The PDF contains a scannable barcode/QR Code.
5. You may either:
a. Scan the KinderConnect QR Code on the computer screen, or
b. Print the QR Code and scan the copy.
6. Begin by opening the KinderSign application that has been installed on the tablet.
7. Tap “Scan”
8. Point the tablet’s camera so that the QR code is visible on the tablet screen

83 Back to Table of Contents
ELECTRONIC ATTENDANCE SYSTEM MANUAL
9. KinderSign will automatically take a picture of the code when it is in proper
position, and the device will be registered. The device displays the following
message:
Device Registered. Your device has been registered and is ready to use.
How to get KinderSign ready for families to use After a tablet is registered, it needs to be set up to allow families to access the sign-in
sheets to check children in and out of care.
1. Open KinderConnect and click on Reports
2. Click the drop-down arrow and select Provider Mobile Sign-In Sheet from the
menu.
3.
4. A new screen opens. Press at the bottom of the screen. A
document containing the QR code is automatically downloaded to your machine
and an icon labeled Provider Mobile Sign-In Sheet.pdf appears. Click on the
icon to open the PDF document.
5. The PDF document contains a scannable barcode/QR code.
6. You may either…
a. Scan the KinderConnect QR code on the computer screen, or
b. Print the QR Code and scan that copy.
i. Printed copies of the QR Code should remain at the facility or home
where care is provided.
7. Using the iPad, open KinderSign. Tap Scan on the iPad screen, which switches
the device to scan mode. Move the QR code into the view of the iPad camera so

84 Back to Table of Contents
ELECTRONIC ATTENDANCE SYSTEM MANUAL
that the QR code can be clearly seen on the iPad screen. As soon as the whole
QR code is visible to the iPad camera, the iPad the QR code automatically.
8. Once the scan is successful, the device is logged in (i.e. can be used to sign
children in and out), and the KinderSign app display the list of children assigned
to this provider.
How do Sponsors sign children in and out of care on a
tablet? After a tablet is registered by the provider and the Provider Mobile Sign In Sheet is
scanned by the provider, for a sponsor to sign a child in or out at the time of drop-off or
pick-up:
1. The first screen on the tablet shows a list of children the provider cares for:
2. The sponsor selects their child or one of their children from the list of children.
3. If the child has more than one sponsor, a list of sponsors appear and the sponsor
much select his/her own name. If the child has only one sponsor, this step is
skipped.
4. The first time a sponsor uses KinderSign, the provider administrator or another
operator needs to enter their five-digit PIN number first. See How do sponsors
create their PIN and secret question?
5. From the “Sponsor Activities” screen, tap “Attendance”

85 Back to Table of Contents
ELECTRONIC ATTENDANCE SYSTEM MANUAL
6. The tablet then displays the time and date and the child or children connected
with this sponsor.
7. For each child, the sponsor taps an option next to the child’s name:
a. To sign in a child at drop-off, the current status next to the child’s name
should show “Checked Out.” Tap “Sign In” next to the child’s name:
b. To sign out a child at pick-up, the current status next to the child’s name
should show “Checked In.” Tap “Sign Out” next to the child’s name:

86 Back to Table of Contents
ELECTRONIC ATTENDANCE SYSTEM MANUAL
c. To record a child as absent, tap “Absent” next to the child’s name, select a
reason from the drop-down:
d. To record no change to the child’s status, leave “None” selected.
8. When a sponsor has more than one child, they should select the attendance
status that is appropriate for each child.

87 Back to Table of Contents
ELECTRONIC ATTENDANCE SYSTEM MANUAL
9. The sponsor can add a note for a child’s attendance by tapping “Note” next to the
child’s name and then typing in the note:
10. After selecting the attendance status for each child, the sponsor signs their name
using their finger in the signature box at the bottom of the screen and taps
“Submit” to automatically transmit attendance records to KinderConnect.
11. A pop-up confirms the attendance saved
12. The tablet returns to the first screen, and is ready for the next child to be checked
in.

88 Back to Table of Contents
ELECTRONIC ATTENDANCE SYSTEM MANUAL
How do Sponsors create their PIN and secret question? The first time a sponsor logs into KinderSign, they need to create a PIN and secret
question. The sponsor’s PIN number will be entered each time they use KinderSign.
The sponsor’s PIN should not be known by anyone but the sponsor. PINs must be five-
digits long and cannot be consecutive numbers or the same digit repeated (examples:
11111 or 12345).
On the tablet:
1. The sponsor selects their child or one of their children from the list of children.
2. If the child has only one sponsor, this step is skipped. If the child has more than
one sponsor, a list of sponsors appear and the sponsor much select his/her own
name.
3. The sponsor will receive a message that the security settings are incomplete, tap
“Next”
4. A provider staff member enters their PIN to validate the sponsor’s identity. After
the provider staff member enters the PIN, tap “Confirm”
5. The sponsor selects a secret question and types in their secret answer:

89 Back to Table of Contents
ELECTRONIC ATTENDANCE SYSTEM MANUAL
6. Tap “Confirm”
7. KinderSign returns to the keypad to create your PIN. Enter your five-digit PIN and
tap “Confirm”
8. Enter the new five-digit PIN again
9. Tap “Confirm”
How do Sponsors change their PIN? After the sponsor has selected their name on the tablet:
1. Tap “Change PIN”

90 Back to Table of Contents
ELECTRONIC ATTENDANCE SYSTEM MANUAL
2. Type in the answer the secret question
3. Tap “Confirm”
4. Enter a new five-digit PIN
5. Tap “Confirm”
6. Enter the new five-digit PIN again
7. Tap “Confirm”
How Sponsors backdate the check in or check out time In situations where a sponsor forgets to, or is unable to, sign a child in and out at the
actual time of check-in or check-out, they may add a check in or check out transaction
for a previous date and time.
Licensed providers must ensure that they maintain records to comply with any licensing
policies and requirements. Providers can add missing check-in and check-out times
through KinderConnect, as necessary.
After a tablet is registered by the provider and the Provider Mobile Sign In Sheet is
scanned by the provider, for the sponsor to change the check-in or check-out time:

91 Back to Table of Contents
ELECTRONIC ATTENDANCE SYSTEM MANUAL
1. The first screen on the tablet shows a list of children the provider cares for:
2. The sponsor selects their child or one of their children from the list of children.
3. If the child has more than one sponsor, a list of sponsors appear and the sponsor
much select his/her own name. If the child has only one sponsor, this step is
skipped.
4. The first time a sponsor uses KinderSign, the provider administrator or another
operator needs to enter their five-digit PIN number first. See How do sponsors
create their PIN and secret question?
5. From the “Sponsor Activities” screen, tap “Attendance”

92 Back to Table of Contents
ELECTRONIC ATTENDANCE SYSTEM MANUAL
6. The tablet then displays the time and date and the child or children connected
with this sponsor.
7. Depending on the tablet, tap “Change” next to “Attendance Time” or tap the date
8. Use the calendar to update the month, day and year and tap “OK”
9. Use the clock to adjust the hour and minutes and tap “OK”
10. You can now select “Sign In”, “Sign Out”, or “Absent” for the date and time that
was selected.
11. Once the attendance has been entered, tap “Submit”
How Sponsors read and delete messages from their
provider After a sponsor signs into the tablet, from the “Sponsor Activities” screen:
1. Select “Messages”
2. Tap the message to view the details:

93 Back to Table of Contents
ELECTRONIC ATTENDANCE SYSTEM MANUAL
3. Expanding a message activates the delete button. To delete the message after
reading, tap “Delete Message”
4. Tap on “Set Reminder” to create a reminder message for yourself
How do Operators create their PIN and secret
question? The first time an operator logs into KinderSign, they need to create a PIN and secret
question. The PIN number will be entered each time they use KinderSign. The
operator’s PIN should not be known by anyone but the operator. PINS must be five-
digits long and cannot be consecutive numbers or the same digit repeated (examples:
11111 or 12345).
On the tablet:
1. Tap ‘Staff’ in the upper-left corner of the tablet
2. The operator taps their name
3. If the operator did not set up their account in KinderConnect, they will receive a
message that the security settings are incomplete, tap “Next”

94 Back to Table of Contents
ELECTRONIC ATTENDANCE SYSTEM MANUAL
4. On the “Staff PIN” screen, another staff member enters their PIN to validate the
operator’s identity. After the provider staff member enters the PIN, tap “Confirm”
5. The operator selects a secret question and types in their secret answer
6. Tap “Confirm”
7. KinderSign returns to the keypad to create your PIN. Enter your five-digit PIN
How do Operators change their PIN? After the sponsor has selected their account on the tablet:
1. Tap “Change PIN”
2. Answer the secret question
3. Enter a new five-digit PIN

95 Back to Table of Contents
ELECTRONIC ATTENDANCE SYSTEM MANUAL
4. Tap “Confirm”
5. Enter the new five-digit PIN again
6. Tap “Confirm”
How do staff/FFNs sign children in or out of care on a
tablet for school? For provider staff or FFNs to check children in/out of care for school:
1. Tap ‘Staff’ in the upper left corner of the tablet
2. Select their name from the list of operators. Note: If a staff member is not listed,
they’ll need to be added as a new operator.
3. On the “Staff Activities” screen, tap “Attendance”

96 Back to Table of Contents
ELECTRONIC ATTENDANCE SYSTEM MANUAL
4. Select which children to display:
a. The list automatically starts with “All Children”. Tap another option to filter
the list:
i. “Children Checked In” displays a list of only children who have
been signed in
ii. “Children Checked Out” displays a list of only children who are not
checked in
b. Use the “Set all children to” option to quickly change the status of multiple
children
i. For example, if numerous children were checked out when dropped
off at school:
1. Set “Children to Display” to “Children Checked Out”
2. Select “Set all children to” to “Sign In”
ii. This will allow for checking multiple children back into child care
when they return to care afterschool
5. The operator signs their name using their finger in the signature box at the
bottom of the screen and taps “Submit” to automatically transmit attendance
records to KinderConnect.
How Sponsors and Provider Staff sign children in and
out when a tablet is not connected to the internet (offline) When a tablet loses its connection to the internet, sponsors and staff can continue to
sign children in and out of care. For licensed providers, this feature can be used when
staff are transporting children to and from the facility. Attendance and other transactions
are stored on the tablet. The amount of transactions that can be stored will be
dependent on the amount of space available on the tablet. For more information, see
How do providers use the system when an internet connection is unreliable?

97 Back to Table of Contents
ELECTRONIC ATTENDANCE SYSTEM MANUAL
The status of the connection to the internet is located at the upper-left hand corner of
the tablet:
When check-in or check-out activity is completed in “offline” mode, the information will
save in a “queue”. In the upper-right had corner of tablet, the number of records waiting
to be uploaded displays. This number is the number of transactions that will be
uploaded to KinderConnect when the connection to internet is restored.
Messages, Case Information, and Transaction Information is unavailable while the
tablet is offline.

98 Back to Table of Contents
ELECTRONIC ATTENDANCE SYSTEM MANUAL
Chapter 4. KinderSmart KinderSmart is a mobile application designed to allow sponsors to check children in and
out of care.
How to download KinderSmart on an Apple phone
1. Tab the App Store icon on the smart phone home screen.
2. If the smart phone asks if the App Store may access your location, tap Allow. If
the smart phone asks if you want to set up Family Sharing, tap Not Now.
3. In the search field, type KinderSmart Washington and tap .
4. Once the KinderSmart Washington app is found, tap GET, then Install to
download it. If your smart phone asks you to sign into the iTunes Store, enter
your Apple ID, password, and tap OK.
5. The very first time you use your Apple ID in the iTunes Store, you must tap
Review, then swipe to agree to the terms and conditions, and then tap Next to
go to a series of screens labelled Complete your Apple ID. Use these screens
to provide additional information, including billing information such as your
address. You are not required to provide credit card details.
6. Once the download is complete, tap GET, then Open.
7. KinderSmart by Controltec will appear on the screen.

99 Back to Table of Contents
ELECTRONIC ATTENDANCE SYSTEM MANUAL
How to register a Sponsor’s smartphone to use
KinderSmart Before a sponsor can sign a child in or out using KinderSmart on their smartphone, the
phone needs to be registered in KinderConnect.
To register a Sponsor/Parent:
1. In KinderConnect, select “Sponsor”
2. click “Search:
1. Enter the specifics for the Sponsor who will be using KinderSmart and, from the
results, click on the Name. Note: Sponsor must exist in KinderConnect prior to
registration. To add a new sponsor, visit How to add a Sponsor.
2. From the Sponsor Detail screen, click “Print Mobile Registration Sheet” to view
the QR code.

100 Back to Table of Contents
ELECTRONIC ATTENDANCE SYSTEM MANUAL
3. Click “Print” on the pop-up menu.
4. A document containing the QR code is automatically downloaded to your device
and an icon labeled Registration.pdf appears. Click on the icon to open the
PDF document.
5. The Sponsor needs to open the KinderSmart app on his/her phone, tap "Scan
and either scan the barcode/ QR Code on the computer screen or scan it from a
print out of the QR Code. Move the top QR code into the view of the phone
camera so that the QR Code can be clearly seen on the phone screen.
6. The bottom QR code will only test how the KinderSmart works after registration.
It allows the sponsor to practice checking a child in or out.
7. After a successful scan, the app will be registered to the Sponsor who will
receive confirmation that the phone was successfully registered.

101 Back to Table of Contents
ELECTRONIC ATTENDANCE SYSTEM MANUAL
How sponsors sign children in or out using KinderSmart
on a Smartphone After the sponsor’s smartphone has been registered, it can now be used to check
children in and out.
1. Providers print the Provider Mobile Sign In Sheet and place it in a location where
sponsors sign in.
2. The sponsor opens the KinderSmart application on their phone
3. The Sponsor taps “Scan”
4. The sponsor scans the QR code from the Provider Mobile Sign In Sheet.
5. On the activities screen, select “Attendance”

102 Back to Table of Contents
ELECTRONIC ATTENDANCE SYSTEM MANUAL
6. The sponsor’s list of children appears.
7. The sponsor selects “Sign In”, “Sign Out” or “Absent” for each child on the main
screen.

103 Back to Table of Contents
ELECTRONIC ATTENDANCE SYSTEM MANUAL
8. The sponsor taps “Done”.
9. The sponsor uses their finger to sign their name in the signature box, then taps
“Submit”.
10. Attendance is automatically transmitted to KinderConnect.
How Sponsors read messages from their provider in
KinderSmart To read messages from the Provider:
1. The sponsor opens the KinderSmart application on their phone
2. The Sponsor taps “Scan”

104 Back to Table of Contents
ELECTRONIC ATTENDANCE SYSTEM MANUAL
3. The sponsor scans the QR code from the “Provider Mobile Sign In Sheet”.
4. On the activities screen, select “Messages”

105 Back to Table of Contents
ELECTRONIC ATTENDANCE SYSTEM MANUAL
5. Tap the message to view the details:
6. To delete the message after reading, tap “Delete Message”

106 Back to Table of Contents
ELECTRONIC ATTENDANCE SYSTEM MANUAL
Interactive Voice Response (IVR) System Interactive Voice Response (IVR) allows for sponsors to use a telephone keypad to sign
their children in and out of care. IVR is for sponsor use only.
How to set up a Sponsor for the IVR Log in to KinderConnect and click on Search under Sponsor in the drop-down
menu.
Enter the name of the Sponsor you are looking for. Click the Search button.
Click on the name of the Sponsor.
On the Sponsor Detail screen, enter the phone number from which the Sponsor
will call the IVR phone number. Click Save.
After this is completed on behalf of the sponsor, the IVR system will recognize
the sponsor’s phone number and allow them to enter attendance data.
How Sponsors sign children in or out through IVR After the provider has How to set up a Sponsor for the IVR:
The Sponsor calls the IVR number for Washington, which is 1 (833) 827-4455.
The Sponsor follows the instructions provided by the IVR system to record
attendance for their child(ren).

107 Back to Table of Contents
ELECTRONIC ATTENDANCE SYSTEM MANUAL
Chapter 5. Resources Electronic Attendance DCYF Website: https://www.dcyf.wa.gov/services/early-learning-providers/electronic-attendance-system
Child Care Subsidy Programs Policy Manual: https://www.dcyf.wa.gov/child-care-subsidy-programs-policy-manual
Subsidy Billing Training For information on subsidy billing training for Licensed Family Homes and FFN providers, contact Whatcom Community College/Annique Quinn at 1-360-383-3218 or email [email protected].

108 Back to Table of Contents
ELECTRONIC ATTENDANCE SYSTEM MANUAL
Chapter 6. Contact Information Electronic Attendance Service Desk Questions can include topics such as error codes, being locked out of the system, and how to add a new sponsor/child/operator. For questions regarding how to use the system or to report issues with using the system contact the Service Desk at 1-844-704-6777 or [email protected]. General Electronic Attendance Policy Questions For questions regarding registration/access codes, training, or exceptions to rule, contact the Electronic Attendance Policy Team at (360) 725-4685 or [email protected] Statewide Provider Line: For questions about the status of a subsidy authorization, contact the Provider Line at 1-800-394-4571 or [email protected]

109 Back to Table of Contents
ELECTRONIC ATTENDANCE SYSTEM MANUAL
Chapter 7. Revision History Revision Date Summary of Changes
03/01/2019 First copy published.
Top Related