


Languages
Pages
Legal


Edline Manual Teacher Guide
Version: September 2011
Copyright Statements:
Edline software is a trademark of Edline. Copyright © 2011.
Microsoft® Windows® names and logos are registered trademarks of the Microsoft Corporation. Copyright © 2011.
All other trademarks and copyrights are the property of their respective holders.
This manual was written for Edline version 2011.
September 22, 2011

Edline Manual © Edline 2011 Page 2
Content
Content ................................................................................................. 2
How Teachers Can Use Edline ..................................................................... 6
How Do I Start? ...................................................................................... 6
Activating Your Account ........................................................................ 7
To Activate Your Account ................................................................. 8
Basic Components of Edline ...................................................................... 11
Edline Terms ....................................................................................... 11
Users ........................................................................................... 11
Groups ......................................................................................... 11
Documents.................................................................................... 12
Folders ........................................................................................ 12
Basic Edline Usage ................................................................................ 12
Edit Mode and Formatting Toolbars...................................................... 15
Combined Calendar ......................................................................... 16
Timing Out ................................................................................... 18
Accessing the Online Help ................................................................. 18
Overview of the Teacher/Class Page ........................................................... 20
Contents and Folders ....................................................................... 22
News ........................................................................................... 22
Calendar ...................................................................................... 22
Links ........................................................................................... 22
Group Info .................................................................................... 22
Setting Up the Teacher/Class Page ............................................................. 23
Creating Documents for Your Website ......................................................... 25
To Add Documents to Your Website ........................................................ 25
To Add Documents to More Than One Location (Class, Sport, Activity) ........... 28

Edline Manual © Edline 2011 Page 3
To Restrict the Visibility of a Document ................................................ 29
To Upload Files (Word, PowerPoint, PDF, and Others) ............................... 30
Creating News Events.............................................................................. 32
To Add News to Your Website ............................................................... 32
Adding Content to a Folder ...................................................................... 34
Creating Folders for Your Website ............................................................. 35
To Add Folders to Your Website ............................................................. 35
Creating Links for Your Website ................................................................ 36
To Add Links to Your Website ............................................................... 36
Adding a Calendar Event .......................................................................... 38
To Add Events to a Calendar ................................................................. 38
To Set an Event as Recurring.............................................................. 39
Reusing a Calendar for Another Time Period ................................................ 40
To Rollover a Calendar Event ............................................................. 40
Changing Content ................................................................................... 42
To Change the Title of Any Item on the Website ........................................ 42
To Change All Other Content ................................................................ 42
Reusing Old Content ............................................................................... 43
To Reuse Old Class Materials ................................................................ 43
Posting Reports to Edline ......................................................................... 44
Viewing Reports..................................................................................... 45
How Students and Parents Can View Reports ............................................. 45
How Teachers and School Administrators Can View Reports ........................... 45
Sending Emails to All Users in Your Class or Activity ....................................... 46
To Send a Mass Email Message ............................................................... 46
To Send a Mass Voice or Text Message .................................................. 48
Displaying a Link to My Email on a Web Page................................................ 49
To Hide Your Email from the Web Page .............................................. 49

Edline Manual © Edline 2011 Page 4
Copying Content to Other Locations ........................................................... 50
To Copy Content ............................................................................... 50
Moving Content to Other Locations ............................................................ 51
To Move Content ............................................................................... 51
Reordering Content on Your Website .......................................................... 53
To Reorder the Content of Sections or Folders ........................................... 53
Deleting Content from Your Website .......................................................... 54
To Delete a Document ........................................................................ 54
Restoring Deleted Content ....................................................................... 56
To Restore Deleted Materials ................................................................ 56
Using My File Locker or My Web Locker ....................................................... 58
Advanced Features ................................................................................. 59
Adding Images to a Document .................................................................. 59
To Add Images to a Document ............................................................ 59
Adding a Clickable Image ..................................................................... 61
To Add a Clickable Image ............................................................... 61
Adding Images to Your Web Page ........................................................... 62
To Add an Image on a Web Page ...................................................... 62
Uploading Multiple Files for Pictures, Audio, and Other Existing Files ................. 63
To Add Multiple Existing Files (Pictures, Audio, Other) .............................. 63
Adding a Table .................................................................................... 64
To Add a Table to a Document ........................................................... 65
Adding a Video .................................................................................... 66
To Add a Video in a Document ............................................................ 66
To Display a Video on the Web Page .................................................... 67
Creating RSS News Feed Links .................................................................. 68
To Add RSS News Feed Links to Your Website ......................................... 68
Creating Discussions .............................................................................. 69

Edline Manual © Edline 2011 Page 5
To Add Discussions to Your Website ..................................................... 69
To Add Details about the Discussion ..................................................... 70
To Configure Anonymity and Approval of Discussion Comments .................... 71
Creating Blogs ..................................................................................... 71
To Add Blogs to Your Website ............................................................. 72
To Add a Blog Entry ......................................................................... 73
To Configure Anonymity and Approval of Blog Comments ........................... 74
Configuring Group Members and Permissions ................................................ 75
To Add a User to a Group ............................................................... 75
To Remove a User from a Group ....................................................... 75
To Change the Permissions for a User in a Group .................................. 75
Index .................................................................................................. 77
Edline Manual © Edline 2011 Page 6
How Teachers Can Use Edline
As a teacher you know that your day doesn't end when the final school bell rings. There are after-
school meetings to attend, papers to grade, expenses to budget, and coursework to plan. Edline is
not just a communication tool for teachers to reach students and parents; it can be used to reduce
printing costs, post grades and other student reports, create interactive discussions and blogs, online
study guides, and rollover course materials from previous semesters to save teachers time. With
Edline, you will be able to quickly and easily:
Keep track of all your school events, including your class schedules, assignments you have
posted in classes, athletic games, club meetings, and teacher meetings from one combined
calendar.
Design the web page for the classes you teach, and control what information will or will not
be viewable by your students and their parents.
Download documents, assignments, or study-guides from your teacher text book editions and
place them online for your students.
Be notified of school closings, and be alerted of any other school news important to you.
Reuse content you posted to Edline so you do not need to create or post it again next
semester or next year.
Update your web pages, post your student grades, attendance records, and other reports from
anywhere you have Internet access.
Have peace of mind knowing all your school data is secure.
How Do I Start?
You can access your school's website from any computer with a web browser, such as Internet Explorer
or Firefox.
Edline Manual © Edline 2011 Page 7
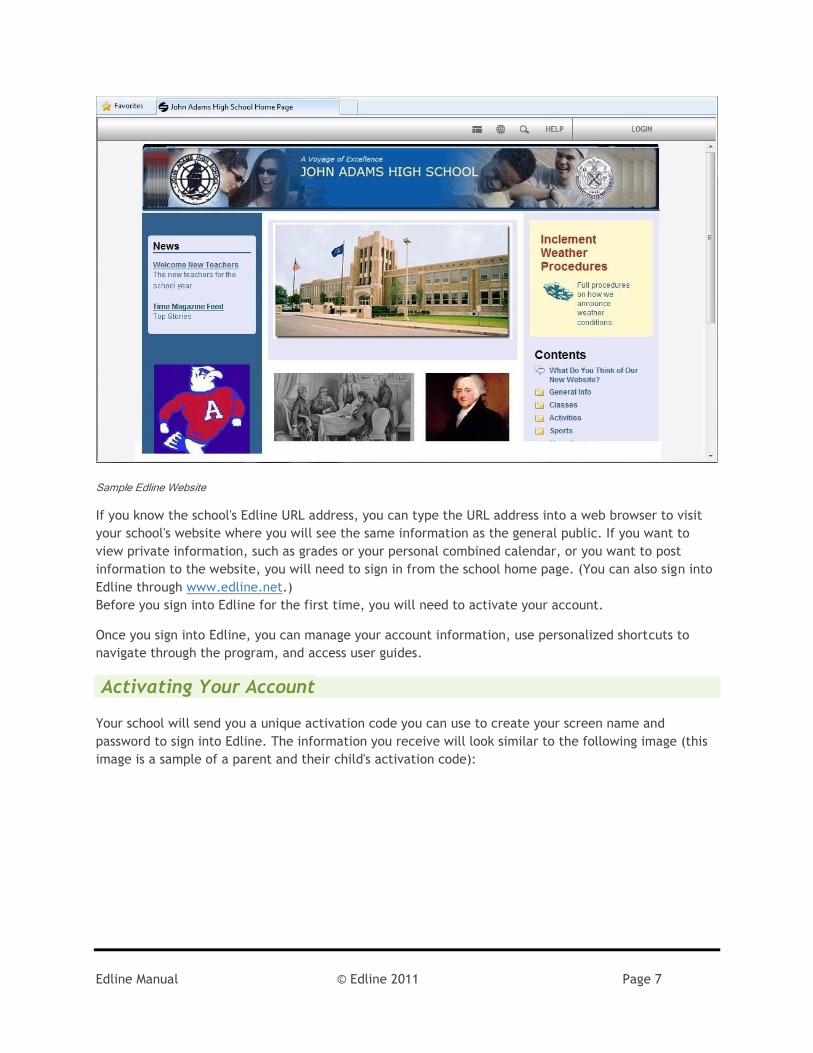
Sample Edline Website
If you know the school's Edline URL address, you can type the URL address into a web browser to visit
your school's website where you will see the same information as the general public. If you want to
view private information, such as grades or your personal combined calendar, or you want to post
information to the website, you will need to sign in from the school home page. (You can also sign into
Edline through www.edline.net.)
Before you sign into Edline for the first time, you will need to activate your account.
Once you sign into Edline, you can manage your account information, use personalized shortcuts to
navigate through the program, and access user guides.
Activating Your Account
Your school will send you a unique activation code you can use to create your screen name and
password to sign into Edline. The information you receive will look similar to the following image (this
image is a sample of a parent and their child's activation code):

Edline Manual © Edline 2011 Page 8
Sample of Activation Code
Important: Students, parents, teachers, and other users returning to the same school as the
previous year with an Edline account will NOT have to reactivate the account. Use your previous screen
name and password.
To Activate Your Account
1. Access your school's website from your web browser and click Sign In. (You can also activate
your account from www.edline.net.).
2. Click the Sign Up link, under New to Edline?
3. Type your Activation Code and click Enter.
Enter Your Activation Code Page
4. Make sure the activation code is yours (your name and school will be listed) and click Activate
this Code.
5. Click I Agree on the Privacy Policy and Terms of Use page.

Edline Manual © Edline 2011 Page 9
Activate Account Page
6. Click New Account to create your user screen name and password if you have never created an
Edline account before.
Parents, guardians, and other users with more than one activation code must still choose New
Account even if they have received several activation codes at once because they can activate
them all at one time as they create their new account. Once they have created their screen
name and password by choosing New Account, they can choose Combined Accounts if they
receive more activation codes later and want to combine them into their current account.
7. Create your Edline sign in information by completing these steps:
Create your Screen Name. The name must be unique and be at least four characters long.
Create your Password and type it again in the Retype Password field. Passwords must be
at least four characters long.
Update your Personal Account information by typing your First Name, Middle Name, and
Last Name.
Click Continue to save your password and access the Manage Account page.
8. Configure your initial account settings by completing the following steps:
Set how you want the school to contact you in the sections for Email Settings, Voice
Dialing Settings (available only to schools with Edline's Notifications module), and Text
Message Settings (available only to schools with Edline's Notifications module). Click the
buttons to enter the email address or phone numbers. The system will send you a
confirmation email.
Create or select a security question to be asked if you forget your password. Type the
correct response as the Answer.

Edline Manual © Edline 2011 Page 10
Click Save and Return to save your account settings.
9. Click Continue to access the list of user guides.
Once you activate your Edline account, anytime you want to sign into Edline, type your screen name
and password to access your information.

Edline Manual © Edline 2011 Page 11
Basic Components of Edline
Note: The Edline Teacher Guide was designed to provide teachers with quick instructions for the
most common class-related functions you will perform with Edline. For full instructions on all the
features available in Edline, see the online Help. A copy of this guide is available in the help in the
Edline User Guides topic.
Before diving into how to use specific features of Edline, in this section we'll discuss basic Edline terms
and usage.
Edline Terms
There are four basic components of the Edline site — people (users), groups, documents, and folders.
These components are organized to display content on various pages that are a part of websites for
districts and schools, as well as classes, sports, and other activities.
Users
Users are people who visit your website. Only users who are members of your school will have an Edline
account.
Groups
Groups in Edline are websites that represent organizations like classes, clubs, and sports that have a
home page within your school or district website. You may also want to create group websites for other
areas such as student counseling, special education, media centers, etc. Many schools create groups for
teacher collaboration sharing lesson plans, curriculum, best practices, etc. Most groups have members
and people who are in charge of that group (such as the teacher for each class). Every group has a
group home page where the main information such as news, calendars, and links associated with the
group can be accessed.
A district is the largest form of a group. Inside a district, you will find links to schools in that district.
Inside a school you will find links to classes, clubs, and many other groups in that school. You can
create groups inside a class if you have students working in teams and you want each team to have its
own page.
The person in charge of a group is called the groupʹ s super user. The group’s super user can add and
remove items from the group home page, add and remove group members, and assign permissions to
group members. A super user may or may not have permissions to change the design of the web page,
depending on your district or school policy.

Edline Manual © Edline 2011 Page 12
Documents
Documents can be anything from assignments, announcements, grade reports, student handbooks,
board meeting minutes, bus schedules, or any other item available on your web page. You can either
type the text (or HTML code) of a document directly on the Document page in Edline, upload to Edline
an existing file that you have created with another program (such as Microsoft® Word® or
PowerPoint®), or add a web document. To keep your content organized, documents are usually stored
in folders.
Folders
Folders on Edline are just like the directory folders available on your computer. They keep things
organized by providing a place to hold items that are related to one another. The Folder page generally
contains a list of items included in the folder.
Folders can hold documents (like assignments or permission slips), groups (like classes or clubs), other
folders, or all three. Every group has its own set of folders listed in Contents on their home page.
Edline provides schools with default folders for Sports and Activities, and provides teachers with
default folders for Assignments and Tests. You can add your own folders to keep your Contents section
organized. If your school does not have a Contents section on its home page, the folders can be seen
by hovering over the Home icon.
When you open a folder, you see a list of what’s inside that folder. To open any item in a folder, click
on the name of the item.
Basic Edline Usage
When you sign into Edline, the first page you see is your school home page. You cannot add items to
this page unless your schoolʹ s Edline super user has granted you special permissions. When you post
items to Edline for display, you will post them on your own home pages.
The Edline menu bar has been designed to allow users to easily access the activities they want to
complete. The following displays the Edline menu bar available throughout the website.
Edline Menu Bar

Edline Manual © Edline 2011 Page 13
The following options are available on the Edline menu bar.
Home — This menu is only available to users signed into Edline. Clicking the button
opens the Home page for your district/school website. Hovering over the button displays the
contents available in the website.
My Edline — This menu is only available to users signed into Edline. This menu displays all the
options under all the following sections: the My Classes and Shortcuts section with the list of
the user's classes and groups (and each child’s information for a Parent user); the My Content
section with the My File Locker, Private Reports, Combined Calendar, Future Classes, Old
Class Materials, and My Submitted Forms options; and the My Account section with the Change
Password, Manage Account, and Privacy and Terms of Use options.
Tools — This menu is only available to users signed into Edline. This section contains the
administrative Manage Settings menu with various management options depending on your
permissions, such as the Manage School/Group, Manage Design, Manage Users, Manage Course
Requests, and Quick Sync options. This menu will also provide access to your gradebook if you
use GradeQuick Web or Easy Grade Pro Web.
Edit This Page — This button is only available to users with permissions to edit the page
when signed into Edline. The Edit This Page button allows users with proper permissions for a
particular page to change both the design and content directly on the page.
View Page As — The View Page As option enables a user to view the web page contents
in several different ways, including the Standard View and the List View. The List View enables
you to view the web content in a list.
Language — The Language option changes the Edline display to the selected language.
Help — Opens the online help file in a separate browser window.
Sign In (Login) / Sign Out (Logout) — Allows the user to sign into and out of your school's
website.
You can get anywhere in the schoolʹ s Edline site from the school home page. This page displays
school‐wide information as well as links to all classes, clubs, sports, and other groups in the schoolʹ s
Edline site. Each class, club, and sport also has its own home page. All home pages are divided into
sections. The following picture displays a standard teacher view of a sample school home page. Your
school’s layout may be different, but the functions of the sections are the same.

Edline Manual © Edline 2011 Page 14

Edline Manual © Edline 2011 Page 15
Edit Mode and Formatting Toolbars
The Edit This Page button from the Edline menu bar enables you to update and format the web page
content. You must have permission to update the particular web page to view the Edit This Page
button. For example, most teachers will have access to the feature on their teacher (class) web pages.
When you click the Edit This Page button, the Edit Mode toolbar appears.
Home Page Edit Mode Toolbar
The options listed on the Edit Mode toolbar depends upon your permission to update content and the
type of page you are updating. For example, some school staff will not have design permissions, so the
Designer, Templates, and Add Box options will not be available. The following list describes each
option available in the home page Edit Mode toolbar (the document page Edit Mode toolbar will have
different options).
Designer — Only available if you have permissions to update the web page design. The
Designer option displays the Site Designer window, which you can use to update the layout of
the web page.
Templates — Only available if you have permissions to update the web page design. The
Templates option displays the Select a Template window, which you can use to select a
template for the web page.
Add Box — Only available if you have permissions to update the web page design. The Add
Box option displays the Type of Box to Add dialog, where you can select the type of content to
add to the web page.
Summary Info — The Summary Info option opens the Summary Information section of the
Modify Group page, where you add the Group Info image to the page. You can also update the
name or description of the web page if you have not edited the description right on the web
page itself. The description will appear below the Group Info picture on the web page.
Visibility — The Visibility option opens the Visibility section of the Modify Group page, where
you can restrict the user types who can view the web page.
URL — The URL option opens the Friendly URL section of the Modify Group page, where you can
update the address of the web page.
Help — The Help option opens the online help.
Done — Allows you to save or cancel the changes and exit the edit mode.

Edline Manual © Edline 2011 Page 16
After you click the Edit This Page button from the Edline menu bar, you can also update the content of
a particular section, such as the description of the class, by typing directly on the web page. The
Formatting toolbar will become available as you type, allowing you to update the fonts, paragraph
formats, and hyperlinks available in your text.
Formatting Toolbar
Once you update the formatting of the web page content, click Save on the Formatting toolbar, and
click Done on the Edit Mode toolbar.
Combined Calendar
When users sign into Edline, they can access their personal combined calendar. This calendar displays
all the items from all the calendars of all the groups a particular user belongs to. For example, a
student's combined calendar would display all of his/her class events, assignment due dates, test
dates, team or club meetings, along with general school activities on a single, personalized calendar. It
can act as a To-Do List. For students, this feature is a great way to track all their academic and extra-
curricular activities. For parents, this feature helps them keep tabs on all of their children's scholastic
and extra-curricular activities. Teachers, counselors, coaches, and other school or district
administrators can monitor meetings, general school events, and their class schedules all from their
own Combined Calendar.
Teachers that categorize their assignments give students/parents the added option to highlight select
categories such as Tests, Assignments, and Projects. Edline then displays the calendar with the
selected category items highlighted.
When teachers post items on their class page calendars, the items also appear on each student's
combined calendar. The calendar items may include study guides, worksheets, and vocabulary lists for
the students and parents use. Students/Parents are able to print out the Combined Calendar as a
reference.
Tip: Parents are able to select whether to view their own combined calendar or which child’s
calendar to view if they have several children. They choose which calendar from the For field below
the calendar.
From the My Edline menu, under My Content, select Combined Calendar.

Edline Manual © Edline 2011 Page 17
Example of Combined Calendar for Parent with Several Children
Edline Manual © Edline 2011 Page 18
Timing Out
Edline keeps track of how long it has been since the last time you clicked a button or link in the site.
For security purposes, if you are idle for nearly 20 minutes, your Edline session will time out. The next
time you click a button or link in Edline, you will be asked to sign in again.
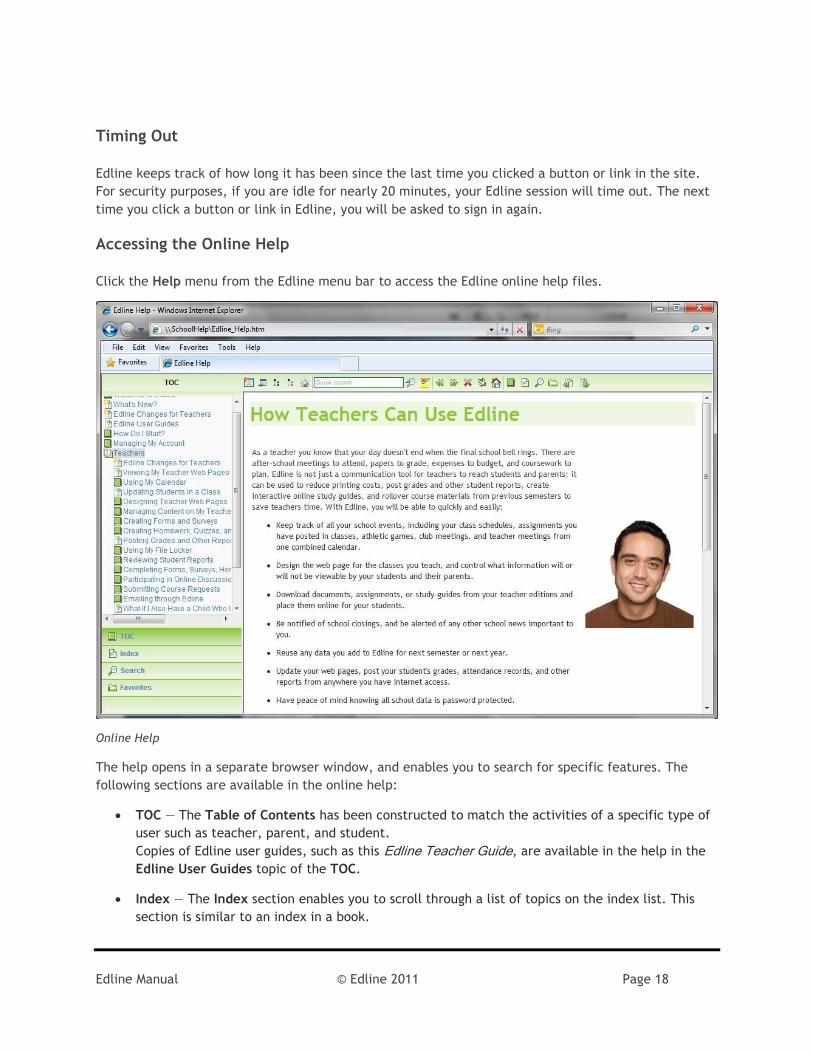
Accessing the Online Help
Click the Help menu from the Edline menu bar to access the Edline online help files.
Online Help
The help opens in a separate browser window, and enables you to search for specific features. The
following sections are available in the online help:
TOC — The Table of Contents has been constructed to match the activities of a specific type of
user such as teacher, parent, and student.
Copies of Edline user guides, such as this Edline Teacher Guide, are available in the help in the
Edline User Guides topic of the TOC.
Index — The Index section enables you to scroll through a list of topics on the index list. This
section is similar to an index in a book.

Edline Manual © Edline 2011 Page 19
Search — The Search section enables you to enter a key word to search for throughout the
online help. The help will list every topic where the word appears.
Favorites — The Favorites section lists any topic or search criteria that you have saved as a
favorite.
Within the documentation you will see Tips, Notes, Important, and Warning messages:
Tips — Contain hints and shortcuts to completing the current activity being described and may
have links to other procedures related to that activity.
Notes — Contain additional details you may want to know concerning the current activity. May
have links to procedures related to that specific activity.
Important — Contains important information you should be aware of concerning the current
activity. Important messages may list size requirements, or possible errors that can occur.
Warning — Contains important information that can alter the data. Read all warnings
carefully!

Edline Manual © Edline 2011 Page 20
Overview of the Teacher/Class Page
The My Edline menu includes the My Classes and Shortcuts option which displays a list of the web
pages for the current classes, sports, groups, and activities where you are a member. For teachers, this
menu shows the classes you teach, the clubs you manage, and the sports you coach, as well as other
groups where you are a member.
From the My Edline menu, select My Classes and Shortcuts, and then click the class or other
activity web page you want to access.
The following picture displays a sample of the teacher view of a teacher's class home page. Your
school’s layout may be different, but the functions of the sections are the same.
Edline Manual © Edline 2011 Page 21
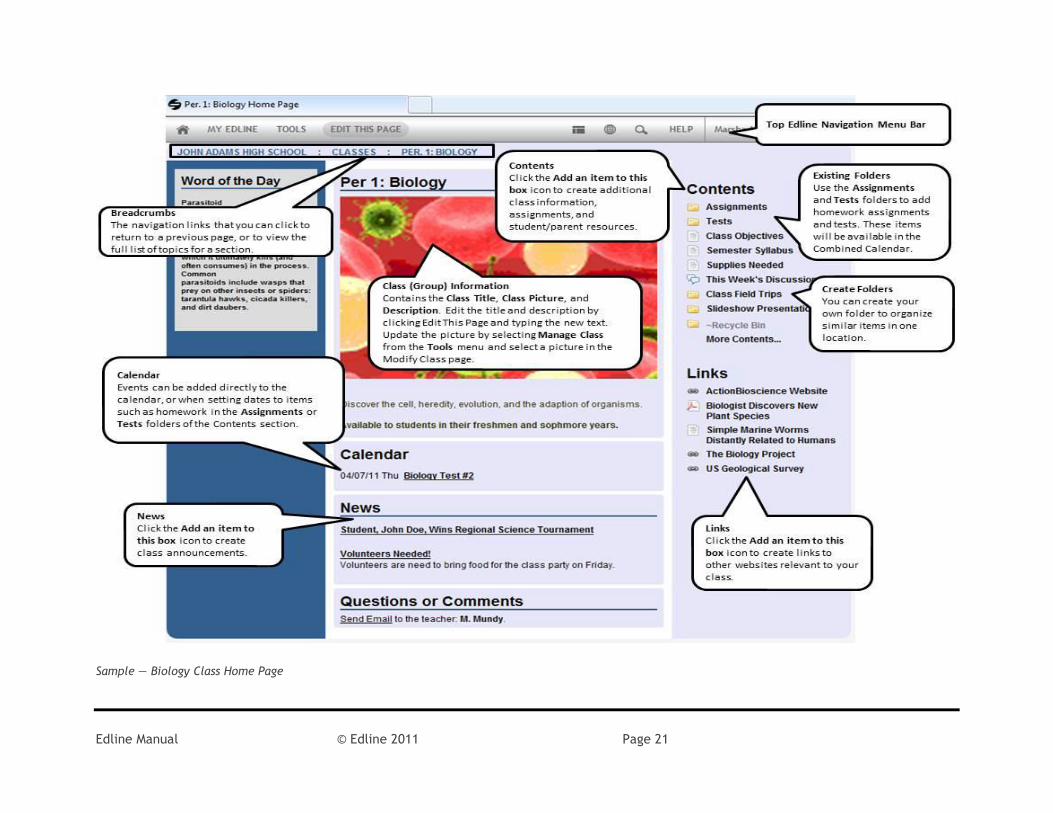
Sample — Biology Class Home Page
Edline Manual © Edline 2011 Page 22
The main sections of a typical teacher's class page includes the Group Info, Contents with the
Assignments and Tests folders, News, Calendar, and Links.
Except for the Group Info section of the page, content for all other sections of the page will be
managed through two icons, which are visible only to users with editing permissions (any super user
including teachers). Add documents to any of the following sections or any folder in the sections by
clicking the Edit This Page button from the Edline menu bar, and then the Add an item to this box
(plus sign) icon. Change items by clicking the Edit in List View (pencil) icon.
Contents and Folders
You can create new documents or upload existing documents such as Classroom Objectives, Semester
Syllabus, School Supplies, and any other items your students and their parents may need. You can
create homework and tests inside the Assignment and Tests folders to keep that information
organized. You can think of Edline folders as a folder in your file cabinet. You can also create
additional folders to group similar data such as a Class Field Trips folder for videos and pictures of
class trips, or Study Guides for notes and practice tests.
News
Add class-related news events to the News section. For example, announce student accomplishments
such as perfect attendance, or university scholarships; or list subject-related magazine articles and
other topics.
Calendar
You can add data to your class calendar in several ways — by adding a date to a document you are
creating such as a homework assignment or test; by adding a date to a particular news event; or by
clicking the Edit This Page button from the Edline menu bar, and then the Add an item to this box
icon in the Calendar section. The item will be available on your class page calendar. In addition,
when a student in your class or their parent accesses their combined calendar, any event you added to
your class will be listed on all class members' combined calendars.
Links
You can create links to other pages in your school's website, or to other external websites you believe
can be helpful for your students. Click the Edit This Page button from the Edline menu bar, and then
the Add an item to this box icon in the Links section to add more links.
Group Info
Similar to the school's home page, you can add or update the name and description of your class and
include the Group Info picture related to the subject you teach. See the Setting Up the Teacher/Class
Page topic for more information.

Edline Manual © Edline 2011 Page 23
Setting Up the Teacher/Class Page
Teachers can begin to personalize their class by displaying a picture for the class in the Group Info
section, and adding a description for the subject.
1. From the Edline menu bar, select Edit This Page to access the class home page in the edit mode. The Edit Mode toolbar appears.
Note: The options listed on the Edit Mode toolbar depend upon your permission to update content
and the type of page you are updating. For example, some school staff will not have design
permissions, so the Designer, Templates, and Add Box options will not be available. A document page
Edit Mode toolbar will have different options.
Sample Class Home Page in Edit Mode

Edline Manual © Edline 2011 Page 24
2. Update the title of the class by typing the new name in the header. Click Save when finished.
Tip: When entering the name of the class, include the period number information first.
Students and parents will then see the classes in the order of the student's class schedules when
they select My Edline and then My Classes and Shortcuts from the Edline menu bar. Teachers
will see their own class list in period order, too.
3. Type a brief welcome or highlight key features for the class under the picture. When you click in
the class description text, the Edit Mode toolbar is replaced with the Formatting toolbar.
Use the Formatting toolbar to enhance your content as desired. Click Save when finished.
4. To update the picture of a teacher class page, hover over the picture in the Group Info section,
and select Choose File from the Replace Image pop-up menu.
Important: Images should be no larger than 200 kb. For best result, set the width of the picture to
the size of the page column.
Search and upload the picture, and click Done when finished.
The image will now be displayed in the Group Info section of your web page.

Edline Manual © Edline 2011 Page 25
Creating Documents for Your Website
New documents can be added to the Edline website. Everyone with editing permissions (any super user
including teachers) will see two icons in each section of their page — the Add an item to this box
(plus) icon to add new content, and the Edit in List View (pencil) icon to change or delete
items already in the section.
Unless you choose to restrict them, all documents are automatically visible to the public as long as the
particular web page is available to the public. Many schools save money posting documents to Edline
that would normally be mailed home. Here are some examples of documents:
District documents can include copies of district budgets, details on district meetings, and
district newsletters (added at the district level by the district super user).
School documents can include messages from the principal, medical forms for new students, and
published articles about the school (added at the school level by the school super user).
Class documents can include homework assignments, study guides, and project descriptions
(added at the class page by the teacher). Teachers can easily upload content available in their
teacher text book editions such as study guides, practice tests, and additional assignments.
Sport page documents can include exercise guides, team statistics, and articles about the team
(added at the sport page by the coach).
To Add Documents to Your Website
Open the web page or folder where you want to add a document.
Important: Teachers, when adding homework assignments, add your document to the Assignments
folder in the Contents section. When adding tests, add your document to the Tests folder in the
Contents section.
1. From the Edline menu bar, click Edit This Page to access the edit mode.
2. Hover over the section where you want to add the document, and click the Add an item to this
box icon to access the Add Item Type pallet.
3. Select Document Page to access the Document Page Title box.
Note: If you want to upload a previously created file, such as a Word document, PDF file,
etc., choose File from the pallet instead of Document Page. See the topic Uploading Files
(Word, PowerPoint, PDF, and Others) for more information.
4. Type the name of the document in the Document Page Title field.
5. Click Create Now for the Document page.

Edline Manual © Edline 2011 Page 26
Document Page
6. Click in the text box to access the Formatting toolbar and type your information on the page.
Type or paste your text (using the Paste from Word icon will eliminate any odd Word
characters), and use the Formatting toolbar to change font styles, paragraph centering, bullet,
etc. You can also spell check the text and insert pictures, videos, and tables into the document.
When you type the text, the first 200 characters will be used as an automatic document summary
viewable to other users. You can overwrite the summary by clicking the Summary Info option in the
menu bar.
Formatting Tool Bar
7. Click Save to save the text. The Edit Mode toolbar will appear.
Document Page Edit Mode Toolbar
The icons available on this toolbar provide options where you can complete the following:
Edline Manual © Edline 2011 Page 27
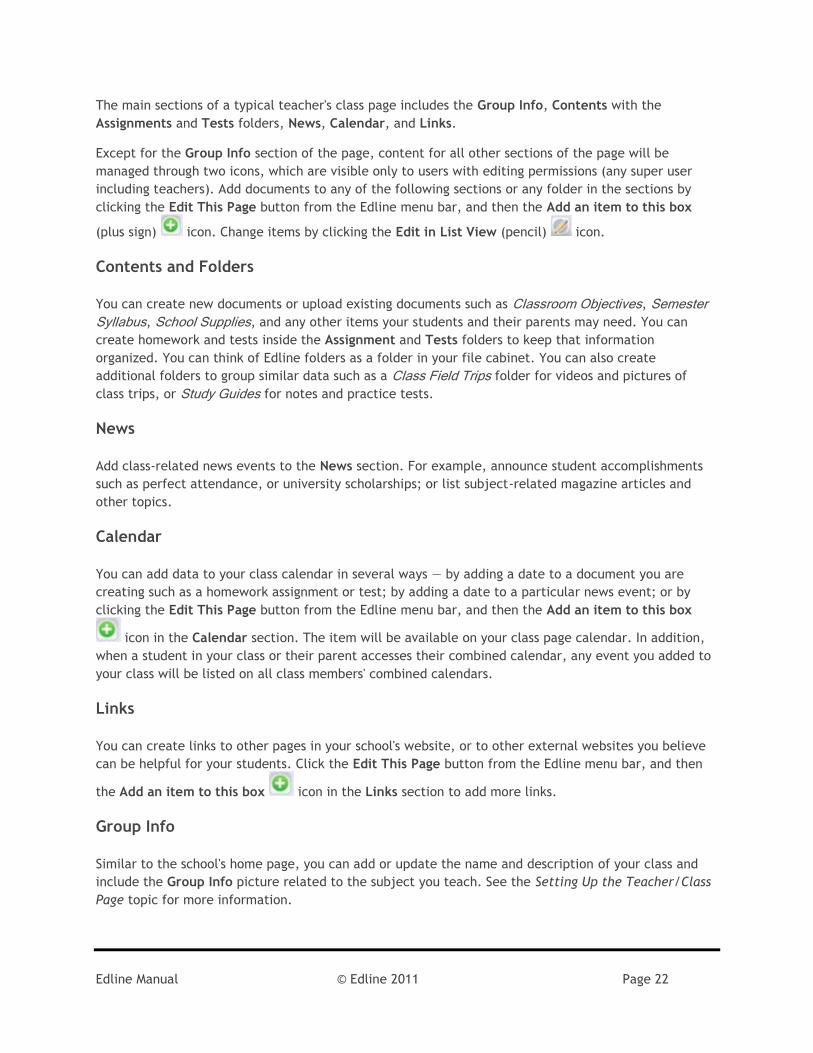
To complete this action … … click this option
To add a summary to a document to appear as a description on the
home page or when a user points to the title …
… click Summary Info.
To limit the type of users that can view the document or to add start
and stop dates for the visibility of the item …
… click Visibility.
To add or update the date attached to the document … … click Dates.
To select multiple classes or groups to post the document (especially
helpful for teachers that instruct multiple classes on the same subject,
or for district users responsible for multiple schools) …
… click Multipost.
To update the web address for the document … … click URL.
8. Click the Summary option from the menu bar to access the Create/Modify Document page.
Modify Document Page
9. Type a brief summary for the document to show on the web page in the Document Summary
field.

Edline Manual © Edline 2011 Page 28
10. Type or select the date for the document in the Calendar Date field if you want the document
to also appear in the calendar (in addition to where you are creating it).
11. Click Save and Return to add the document your page.
12. Click Done to exit the edit mode.
Tip: When available, use the Save and Add Another button to quickly add multiple documents or
files to your website.
To Add Documents to More Than One Location (Class, Sport, Activity)
The Multiple Posting section available in the Create/Modify Document page enables you to determine
which groups to add your document. This feature enables teachers who teach the same course to more
than one class to create the document only once and post it in one step to all the classes they teach,
and it enables the super user of a district to post content to multiple schools. Use this feature to multi-
post any documents, links, news, RSS feeds, discussion groups, and blogs.
1. From the Create/Modify Document page, select the groups to view the document from the
Available Groups field in the Multiple Posting section.
Multiple Posting Section
Important: In order to multi-post to groups, the user must be a member of the group and
have editing permissions, like teachers for their classes. By default, a school super user will see
all classes in their list, but not other groups. Even a super user needs to be a member of the
group in order to multi-post to other groups.
2. Click Add.
Note: To remove a group from viewing the document, click the group name in the Additional
Posted Groups field and click Remove.
3. Click Save and Return to save the changes.

Edline Manual © Edline 2011 Page 29
To Restrict the Visibility of a Document
Except for special types of documents (such as online quizzes), all documents you create are
automatically visible to the public, which means the document is available to anyone who accesses the
website. You can change the visibility of a document to be restricted to a specific user type. Use this
feature to set the visibility of documents, links, news, RSS feeds, discussion groups, and blogs.
1. From the Create/Modify Document page, click Change Visibility in the Document Visibility
section.
Document Visibility Page
2. Select the visibility options in the Basic Visibility Options section and/or the Advanced
Visibility Options section that meet your needs:
Select Public to allow anyone to view the document.

Edline Manual © Edline 2011 Page 30
Select Limited to select the types of users who can view the document. From the drop-
down selection, choose whether those users are limited to your particular group, school,
or district. Select (check) the types of users who can view the document. These users will
be required to sign into Edline before viewing the document from the website.
Select Private to set the document for a specific user only. Type the User ID or Screen
Name assigned to the user. THIS SETTING CANNOT BE REVERSED!
Important: For security reasons, a private document cannot be changed to public without
contacting Edline's technical support.
Select No additional restrictions to disable advanced visibility options.
Select Show from _ until _ to set the document so that it will be visible for a specific
date range, and then be hidden to users after the date range passes. Type or select the
dates in the fields.
Select Show via Site Designer, but hide in lists for super users and design managers. This
setting is used for website design purposes.
Select Hide completely to set the document as personal. The document will only be
available to you, super users, super viewers, and site coordinators.
3. Click Update.
To Upload Files (Word, PowerPoint, PDF, and Others)
You can easily add files, such as Microsoft® Word®, PowerPoint®, and PDF® documents, by uploading
the content to your website. Open the web page or folder where you want to upload a file.
1. From the Edline menu bar, click Edit This Page to access the edit mode.
2. Hover over the section where you want to upload the file, and click the Add an item to this box
icon.
3. From the Add Item Type pallet, select File. The Upload File box appears.
Important: Do not choose File to import a video. Instead, see the Adding a Video topic for
more details.

Edline Manual © Edline 2011 Page 31
Upload Files Dialog
4. Click Pick Files to select the files for your upload. To upload multiple files, press the CTRL key
while selecting the file names.
5. Enter a title and a summary for each file (optional) in the Title and Summary fields.
6. Click Start Upload to upload the files.
7. Click Done when finished.
Tip: You can determine the user types that can view the file, set dates for the file, and you can
multi-post the item to other classes you teach by accessing the additional options from the Edit Mode
toolbar.
8. Click Done to exit the edit mode.

Edline Manual © Edline 2011 Page 32
Creating News Events
News is an important section of the school website that should typically appear on any web page.
District news can include items such as newly elected district personnel or district performance
on state tests (added at the district level by the district super user).
School news can include items such as announcements about new staff or school team victories
(added at the school level by the school super user).
Class news can include items such as congratulations to a class member for winning a
competition, request for volunteers for a class picnic, or other class related topics you want to
share with your students (added at the class page by the teacher).
Sport news can include articles about the team, and any championship victories (added at the
sport page by the coach).
News Section
To Add News to Your Website
Open the web page where you want to create a news item.
1. From the Edline menu bar, click Edit This Page to access the edit mode.
2. Hover over the News section, and click the Add an item to this box icon to access the News
Item Title box.
3. Type the name of the news event in the News Item Title field.
4. Click Create Now to access the Document page.
5. Click in the text box to access the Formatting toolbar and type your information. Type or paste
your text, and use the Formatting toolbar to change font styles, paragraph centering, bullets,
etc.
6. Click the Save button to save the text.
7. To add a summary for the news item to appear on the home page, complete the following steps:
Click the Summary Info menu from the Edit Mode toolbar. The Create/Modify Document
page appears.

Edline Manual © Edline 2011 Page 33
Type a summary of the news item to show on the page in the Document Summary field.
Type or select the date for the news item in the Calendar Date field if you want the news
item to also appear in the calendar (in addition to where you are creating it).
Note: To attach an existing document to a news item (such as a PDF file), expand the Add
Item section, and click Import an Existing File to Browse for and Import the file to the news
item.
Click Save and Return when finished.
Tip: You can determine the type of users that can view the news item, and you can multi-post
the item to other classes you teach by accessing the additional options from the Edit Mode
toolbar.
8. Click Done on the Document page to save all changes.

Edline Manual © Edline 2011 Page 34
Adding Content to a Folder
Edline folders are meant to be used just as you use folders on your computer to organize information.
You can add documents, more folders, links, groups, and other types of content to any folder on
Edline. For example, teachers can add homework to their Assignments folder.
Tip: You can also create your own folder. See the Creating Folders for Your Website topic.
1. Click the name of the folder where you want to add content.
Assignment Folder
2. From the Edline menu bar, click Edit This Page to access the edit mode.
3. Click the Add an item to this box icon to access the Add Item Type pallet.
4. Select the type of item to add to the folder.
Edline Manual © Edline 2011 Page 35
Creating Folders for Your Website
Edline folders are designed to be used just as you use folders on your computer to organize
information. The folder can contain different types of documents, links, or groups. For example, a
science teacher can create a folder called Class Field Trips that contains photos, discussions, and
videos of field trips.
To Add Folders to Your Website
Open the web page or folder where you want to add an additional folder.
1. From the Edline menu bar, click Edit This Page to access the edit mode.
2. Hover over the section where you want to add the folder, and click the Add an item to this box
icon to access the Add Item Type pallet.
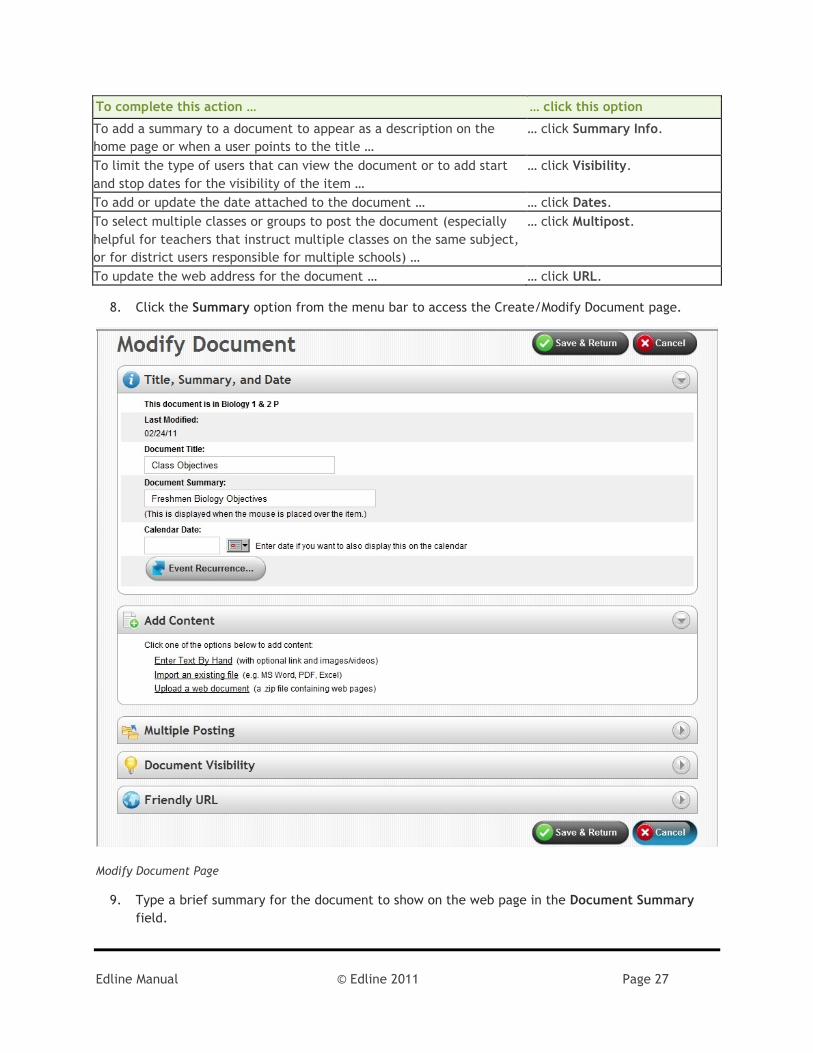
3. Select Folder to access the Create Folder page.
Create Folder Page
4. Type the title of the folder in the Folder Name field. This name will appear on the website.
5. Type a brief summary for the folder in the Folder Description field.
6. Click Save and Return to add the folder.
7. Click Done to exit the edit mode.
Tip: You can determine who can add or view documents in the folder by using the Folder Visibility
and Folder Management sections of the page.

Edline Manual © Edline 2011 Page 36
Creating Links for Your Website
You can include links to other web pages within your website. The permission to add links is available
to super users in charge of web pages. Here are some examples:
District links can include external websites of interest to the community (added at the district
level by the district super user).
School links can include the websites of scholarship information or parent help centers (added at
the school level by the school super user).
Class links can include articles about topics in your subject, or other class related websites you
want to share with your students (added at the class page by the teacher).
Sport page links can include different exercise and health websites (added at the sport page by
the coach).
Links Section
To Add Links to Your Website
This topic steps you through adding links to the Links section of your web page. You can also add links
to your documents and create clickable images that contain a link. See the Adding a Clickable Image
topic for more information.
Open the web page or folder where you want to create a link.
1. From the Edline menu bar, click Edit This Page to access the edit mode.
2. Hover over the Links section, and click the Add an item to this box icon to access the Link
Title box.
3. Type the name of the link in the Link Title field.
4. Click Create Now to access the Create Document page.
5. Type a brief summary for the link in the Document Summary field. This summary will appear
when a visitor hovers over the name of the link.
6. If you want the link to appear on the calendar, type or select the date in the Calendar Date
field.

Edline Manual © Edline 2011 Page 37
7. Type or paste the web address of the web page in the Link to the following URL field, or click Link to to search for an existing Edline resource (document, folder, group, class, etc.) to link to.
8. Select View Link in a New Window When Clicked to have the link open in a new web browser
window. (Recommended for links to external websites.)
9. Click Save and Return to add the link.
10. Click Done to exit the edit mode.
Tip: You can determine who can view the link, and you can copy the link to multiple classes that you
teach through the Document Visibility and Multiple Posting sections on the page.

Edline Manual © Edline 2011 Page 38
Adding a Calendar Event
Events can be added to any calendar on Edline. Here are some examples:
District calendars can include school district meetings and educational conferences (added at
the district level by the district super user).
School calendars can include parent-teacher conferences, open house events, and student after-
school programs (added at the school level by the school super user).
Class calendars can include homework assignments, tests, and upcoming field trips (added at the
class page level by the teacher).
Sport calendars can include games, practices, and award ceremonies (added at the sport page
level by the coach).
To Add Events to a Calendar
Open the web page or folder for the calendar where you want to add an event.
There are several ways to add events to a calendar. It is highly recommended that for most items that
are part of other sections such as news, or tests and assignments, you first open the folder for that
section, create the document, and then add a date to the document. However, if you have events that
are not grouped in a folder, you can add the event directly to the calendar by completing the following
steps.
1. From the Edline menu bar, click Edit This Page to access the edit mode.
2. Click the Add an item to this box icon in the Calendar section.
3. Type the name of the event in the Event Title field. This title will appear on the Calendar.
4. Click the Create Now button access the Create Document page.
5. Select a category for the event from the Category/Folder field. For example, if you are a
teacher and you are setting the date of a test that you did not create in the Tests folder, you
can select the Test category now to place it in the folder as well as on the calendar. Categories
allow users viewing the calendar to highlight specific types of events. Every folder you create in
the Contents section of your web page will be available in this field.
Important: Organizing events using the Category/Folder classification is important because it
enables your students and parents to highlight specific types of events in their own Combined
Calendar. For example, a parent can highlight all homework assignments from all teachers on
their child's Combined Calendar if teachers have placed all the homework in the Assignments
folder on their own class web page.

Edline Manual © Edline 2011 Page 39
6. Type a brief summary for the event in the Document Summary field. The summary appears in
the Calendar section on the web page, and as a pop-up description on the Calendar page if a
user hovers over the event.
7. Type or select the date for the event in the Calendar Date field. If you are creating an event
that is recurring, click the Event Recurrence button.
Tip: You can add a start and stop date to a recurring event using the Document Visibility
section on the page. It is not advisable to add a stop date to an event you plan to use again next
year (see the To Rollover a Calendar Event topic).
8. Click Save and Return to add the event.
9. Click Done to exit the edit mode.
Tip: Use the Save and Add Another button to quickly add multiple events in a single session.
To Set an Event as Recurring
When creating or updating a calendar event, you can set the event as recurring on a specific date,
week, or monthly basis.
1. From the Create/Modify Document page, click the Event Recurrence button.
Event Recurrence Page
2. Type or select the last date of the event occurrence in the End Date field.
3. Select (check) the days of the week when the event occurs. Clear the days when the event will
not occur.
4. Select how often the event occurs by completing the following steps:
Select Every Week for a weekly event.

Edline Manual © Edline 2011 Page 40
Select Every # Week for an event that occurs every specific number of weeks. Select the
number of weeks.
Select Week(s) of Month for a meeting that occurs during a specific week of the month.
Select (check) the specific week.
5. Click Save and Return to update the Create/Modify Document page.
Tip: You can also determine who can view the event, post the event to multiple locations, and re-
categorize an event. See the online help for more information.
Reusing a Calendar for Another Time Period
You can rollover calendar events, individually or globally, to move the events forward or backward a
specific number of years, months, weeks, or days. This feature was designed to make it easy for
teachers to reschedule multiple assignments and other calendar events all at once for the next
semester or year, but it is also useful throughout the year when events need to be rescheduled. This
feature enables schools to rollover events any amount of time because of school closings. You must be
the super user of the web page with the calendar event, or it must be an event you created.
To Rollover a Calendar Event
Open the web page or folder with the whole calendar or specific event you want to rollover.
1. Click Calendar to go to the calendar section.
2. Click List Items to access the list of events.
3. Select (check) the events to rollover. To select all events, click Select All.
Tip: If you are rolling over more than 50 events (such as all the events for a full school year),
set the View field to All for all of the calendar events for the current school year.
Rollover Section in Resource List Page
4. Select the rollover criteria in the Roll Selected Dates fields by completing the following steps:

Edline Manual © Edline 2011 Page 41
Select whether you want the events to be rolled Forward to a future date, or Backward
to an earlier date.
Select the rollover time period of Year, Month, Week, or Day.
Type the specific number of years, months, weeks, or days to use to reset the events.
5. Select Keep on same day of the week if you want to rollover the event to the same weekday.
Clear this field if you are setting the event to a specific date, such as some holidays which
remain on the same date each year.
6. Select Rollover documents in all locations they are displayed to rollover the event in all groups
or class calendars where they are displayed. This feature was designed for teachers to rollover
assignments or events in all their classes at once. A district super user responsible for many
school calendars can also complete this action. Clear this field if you do not want the events
rescheduled in other calendars.
7. Click Rollover Now to update the calendar.

Edline Manual © Edline 2011 Page 42
Changing Content
You can update the content of a document, folder, link, discussion, form, news item, or group on
Edline.
To Change the Title of Any Item on the Website
Open the web page or folder that contains the content you would like to update.
1. From the Edline menu bar, click Edit This Page to access the edit mode.
2. Click the title of any document, folder, link, form, or survey, and change the name.
3. Click Save.
To Change All Other Content
Open the web page, folder, or document you would like to update.
1. From the Edline menu bar, click Edit This Page to access the edit mode.
2. Update the content as required.
3. If the content is listed in several group pages, the Apply changes (update or delete) in all
locations option will be available. This feature was designed for teachers with multiple classes
for the same subject, who need to change all linked copies of an item. Complete one of the
following steps:
Select Apply changes in all locations to update the content in all locations.
Clear Apply changes in all locations to update the content in the currently opened group
only.
4. Click Save and Return to update the content.
5. Click Done to exit the edit mode.
Note: To copy, move, or delete items once they are created, see the topics Copying Content to
Other Locations, Moving Content to Other Locations, or Deleting Content from Your Website.

Edline Manual © Edline 2011 Page 43
Reusing Old Content
Edline enables teachers to reuse old content from past classes using the Old Class Materials feature.
This feature was designed for teachers who want to reuse their old assignments, events, links, images,
or any old class materials from past classes for the next quarter, semester, or year.
To Reuse Old Class Materials
Sign into Edline to access the Old Class Materials feature.
1. From the My Edline menu, under My Content, select Old Class Materials to access the Old Class
Materials page.
Old Class Materials Page
Note: Your old materials become available in this folder when your school super user creates
the new school year, deletes a class, or creates a new semester. Any time a class is deleted or
moved to a past year, the content for that class becomes available in the school archive and the
teacher's Old Class Materials. Using this feature, teachers can effectively copy their entire web
page to a new class.
If you copy a calendar from the Old Class Materials into a new class, use the calendar rollover
feature to set the dates to the new year. See the Reusing a Calendar for Another Time Period
topic for more information.
2. Click the name of the class to access all of the old materials.
3. Select (check) the content to reuse. To select all content, click Select All.
4. Click Copy and access the Copy Selected Items page.
5. Select the classes to copy the information to from the Copy To Groups list.
Tip: To select multiple classes, hold the CTRL key while selecting the classes.
6. Click Copy.

Edline Manual © Edline 2011 Page 44
Posting Reports to Edline
If your district or school uses a School Information System (SIS) or gradebook software program (such as
GradeQuick or Easy Grade Pro) to create reports such as grade reports, absence reports, conduct
reports, and transcripts, the school personnel (teachers and administrators) or the school's Edline super
user may be able to post the reports to the Edline website. Remember — only the intended recipient of
the report, users with the correct permissions, will be able to view the reports that are posted.
Many gradebook software programs will allow you to post to Edline. Please refer to your gradebook
software documentation for further instructions. The reports will be available in the Contents section
of the school or teacher (class) web page, and for students and parents they are always available under
the My Edline menu, My Content/Private Reports.
Contents Box
Tip: When you upload the reports from third-party software, you may be given a choice of names for
the report, depending on your software. If you enter the same report name each time you upload
reports, the new reports will replace the old reports. This overwrite creates a better looking website
and an easier retrieval for parents to find current information. At the end of a quarter you may want to
save a copy of the old reports in Edline; in that case enter a different report name when posting new
reports. This step will create a new folder and leave the existing report folder present with the old
reports from previous quarters.

Edline Manual © Edline 2011 Page 45
Viewing Reports
If your school uses a compatible School Information System (SIS) or gradebook program, teachers and
other school administrators will be able to post the reports to Edline for reliable and secure viewing by
students and parents. Personal information, such as grades or attendance, will not be accessible
without the correct account sign-in information.
Examples of reports include grade reports, absence reports, conduct reports, and transcripts. The
viewing capabilities for these reports are:
Students can view only their own reports.
Parents can view only the reports of their own children.
Teachers can view only the student grades for their own classes. In most cases, teachers will not
have access to absence reports, conduct reports, and transcripts.
Counselors and administrators with super user (or super viewer) permissions can view the reports
of all students from all classes.
Counselors and administrators without super user capabilities can be given permissions to view
specific students instead of all students.
How Students and Parents Can View Reports
1. From the My Edline menu, under My Content, select Private Reports for the list of reports. You
may also find the gradebook report for a particular class from the teacher’s web page.
Note for Parents: From the My Edline menu, under My Classes and Shortcuts, select the
name of your child you want to view, and then open the Private Reports. On the Private Reports
page, you will be able to switch the views to access all of your children's reports.
2. Click View for the report you want to view.
The content and layout of the report will vary depending on the software used at your school.
How Teachers and School Administrators Can View Reports
Teachers' gradebook reports are usually available in the Contents section of their class page.
Open the folder to display a list of reports by the students' names.
Click on the name of any student to view their report.
A school report, such as a transcript, or grade report combining information from multiple
teachers is usually on the school's Home page.
Open the folder containing the reports from the Contents section or from the Home icon, and
click on the name of the student to view their report. These are usually visible only to students,
parents, and authorized administrators.

Edline Manual © Edline 2011 Page 46
Sending Emails to All Users in Your Class or Activity
Teachers, coaches, counselors, district, and school personnel with proper permissions will be able to
create a mass email to all the users listed in their group web page. They may also be able to send voice
and text messages if your school has the Edline Mass Notification module.
To Send a Mass Email Message
Super users of a group (such as teachers of a class) can send a mass message to all or several members
of their class, sport, or activity from the web page.
1. From the menu bar, select Tools and then Send Messages to open the Group Member List page.
2. Select (check) the users who will receive the message. If the group has more than 50 members,
click the Show All option. Click Select All for all users.
Tip: You can also search for a specific user using the Search fields.
3. Select the type of message to send by completing the following steps (options depend on which message system your school has available):
The Email option is automatically selected. Clear this field to not send an email.
Select Voice to have the user contacted via a phone message. (Usually this feature is
available to district and school super users only; however, it can be added to any
super users of a group, such as teachers of a class.)
Select Text to have the user contacted via a text message. (Usually this feature is
available to district and school super users only; however, it can be added to any
super users of a group, such as teachers of a class.)
Select Emergency to have the user contacted via all message forms. (Usually this feature
is available to district and school super users only.)

Edline Manual © Edline 2011 Page 47
4. Click Send Message to access the Choose Email Recipients page.
Choose Email Recipients Page
Note: The Choose Email Recipients page usually displays for teachers only.
5. Select the user types who should receive messages, and then click Continue for the Compose
Message page.
Important: You can send messages only to users with an email address or phone number
entered in Edline. The Email Recipient Summary section lists the number of users who will and
will not be sent the message. Click Who? to view the list of users.
6. Set the Message Delivery Options by completing the following steps:
Select Allow email replies to be sent to me at and type your email address. Clear this
field to not receive email replies.
Select Send me a copy of the email at the email address shown above to receive a copy
of your message. Clear this field to not receive a copy.
Select Send me a copy of the voice message at and type your phone number. Clear this
field to not receive a voice message.
Select Send me a copy of the text-message at and type your cell phone number. Clear
this field to not receive a text message.
7. Type your message in the Compose Message section by completing the following steps:
Type additional user names in the To field. (Optional)
Type your name in the From field. (Optional)
Type a title for the message in the Subject field.
Type the details in the Message field.
8. Click Send the Message to Recipients.
Edline Manual © Edline 2011 Page 48
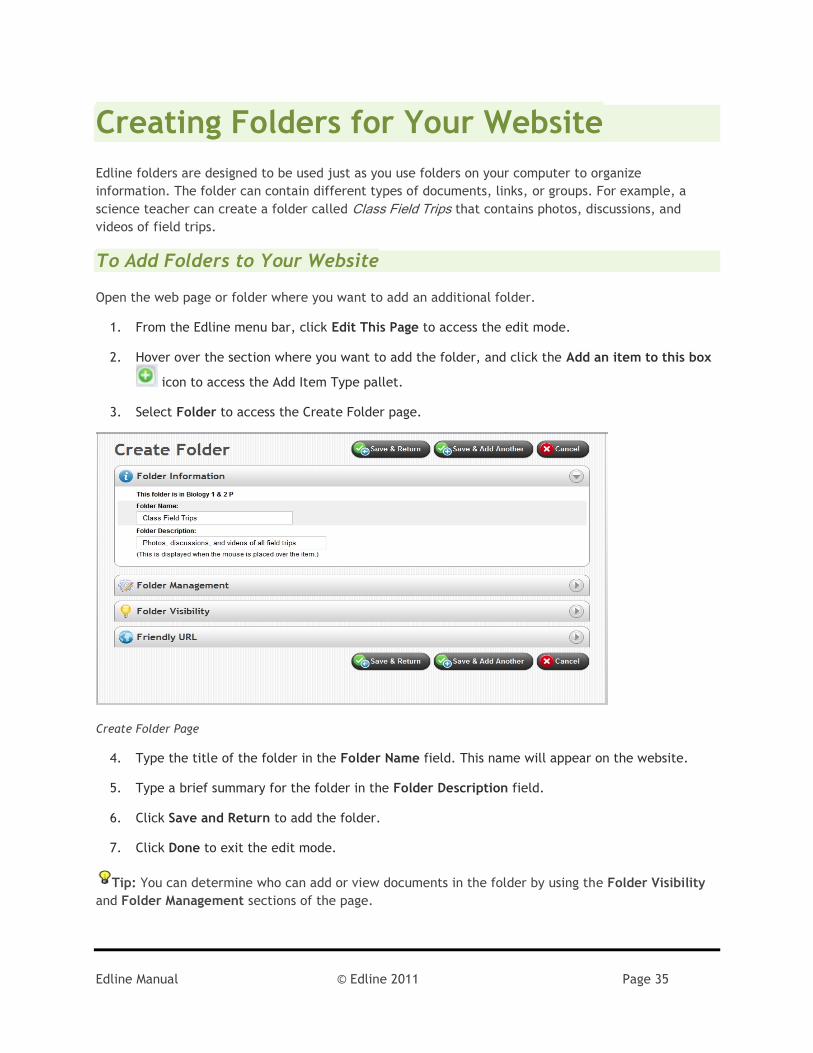
To Send a Mass Voice or Text Message
Your school must have the Edline notification system to send voice or text messages. Usually this
feature is available to district and school super users only; however, it can be added to any super users
of a group (such as teachers of a class).
1. From the menu bar, select Tools and then Send Messages to open the Group Member List page.
2. Select (check) the users who will receive the message. Click Select All for all users.
3. Select the type of message to send by completing the following steps:
The Email option is automatically selected. You can clear this field if you do not want to
send an email.
Select Voice to have the user contacted via a phone message.
Select Text to have the user contacted via a text message.
4. Select Compose Message/Send Messages field to access the Choose Recipients page.
Note: The Choose Email Recipients page usually displays for teachers only.
5. Select the user types who should receive messages, and then click Continue for the Compose
Message page.
6. For voice messages, complete the following steps:
Select Send me a copy of the voice message at and type your phone number.
In the Compose Voice Message section, type the details in the Message field.
Select the language for the message from the Voice Language field. Options include
English and Spanish.
Select how to create the voice message from the Voice Mode field. The Generate a
spoken message using the text entered above option creates a computer voice message
based on the Message text. The Upload audio file of a recorded message (.wav) option
enables you to record your voice in a .wav file and upload the file to Edline. The Voice
Language option does not work for recorded messages.
(Optional) Click Preview the Voice Message on My Computer to receive a link to a .wav
file containing the message.
(Optional) Click Preview the Voice Message by Phone and type your phone number to
hear the message.
7. For text messages, complete the following steps:
Select Send me a copy of the text-message at and type your cell phone number.

Edline Manual © Edline 2011 Page 49
Type the details of your message in the Message field of the Compose Text-Message
section.
8. Click Send the Message to Recipients.
Displaying a Link to My Email on a Web Page
Teachers, school administrators, coaches, and other school personnel who manage a class, sport,
activity, club, or other group website available in the school's Edline website, can determine whether
or not they want a link to their name displayed on a page they manage so school members can email
them. School members who sign in will see your name with a Send email to link. Your email address
itself is not displayed. The general public will not see your name and will not be able to email you
from the web page.
1. From the My Edline menu, select My Account, and then Manage Account to access the Manage
Account page.
2. Make sure Edline has your correct email address configured.
3. Select Yes to Allow members of any group that I manage (like classes) to send me email.
4. If you send emails to users through your web page, select the From email address to list on the
message. If you have more than one email address listed in Edline, select the address from the
Address used for messages from group members (if allowed) field.
5. Click Save and Return.
To Hide Your Email from the Web Page
Select No from the Email Settings section, and then click Save and Return.

Edline Manual © Edline 2011 Page 50
Copying Content to Other Locations
You can copy from one group (school, class, sport, activity) to another. This feature is especially useful
if you did not multi-post a document at the time you created it and want it available (posted) to other
web pages you manage. You must be the super user for the group to be able to copy information.
To Copy Content
Open the web page or folder containing the content you want to copy.
1. From the Edline menu bar, click Edit This Page to access the edit mode.
2. Hover over the section of the web page containing the content you want to copy, and click the
Edit in list view icon. The system displays the list of contents for that section.
3. Select (check) the files to copy. To select all files, click Select All.
4. Click Copy to access the Copy Selected Items page.
Copy Selected Items Page
5. Select the groups (classes, sports, activities) to copy the information to from the list.
Tip: To select multiple groups, hold the CTRL key while selecting the groups.
6. Click Copy.

Edline Manual © Edline 2011 Page 51
Moving Content to Other Locations
You can move content from one location to another, if you created the content, or you are the super
user for the web page containing the content.
To Move Content
Open the web page or folder containing the content you want to move.
1. From the Edline menu bar, click Edit This Page to access the edit mode.
2. Hover over the section that contains the content you want to move, and click the Edit in list
view icon. The system displays the list of contents for that section.
3. Select (check) the content to move. To select all files, click Select All.
4. Click Move To and access the Move Items page.
Move Items Page

Edline Manual © Edline 2011 Page 52
5. If the content is listed in multiple locations, the Move documents in all locations they are
displayed option will be available. This feature was designed for teachers with multiple classes
for a specific subject. The feature enables you to quickly move the multiple copies of the same
item. Complete one of the following steps:
Select Move documents in all locations they are displayed to move the content in all
current locations to the selected location.
Clear Move documents in all locations they are displayed to move only the current
content to the selected location.
6. Select the new location of the content in the Desired Location list. You can select another
resource folder.
7. Click Move Selected Item(s) to update the location of the content.

Edline Manual © Edline 2011 Page 53
Reordering Content on Your Website
If you manage the group (school, class, sport, or folder) you can reorder the content for any section or
folder of the web page, except the Calendar section which lists items by date.
To Reorder the Content of Sections or Folders
Open the web page or folder containing the content you want to reorder.
1. From the Edline menu bar, click Edit This Page to access the edit mode.
2. Hover over the section of the web page containing the content you want to reorder, and click
the Edit in list view icon. The system displays the list of contents in that section.
3. Click Reorder to access the Resource List reorder page.
Resource List Page
4. Type the numerical order of the content in the Order field.
Any remaining items not numbered will be sorted by alphabetical order according to the name of
the content files.
5. Click Save Order.

Edline Manual © Edline 2011 Page 54
Deleting Content from Your Website
The permission to delete items is usually available to super users of a web page. For example, teachers
can delete content from their class pages since they are the super users of those web pages. You can
also delete multiple items at once.
To Delete a Document
Open the web page or folder containing the content you want to delete.
1. From the Edline menu bar, click Edit This Page to access the edit mode.
2. Hover over the section that contains the content to delete, and click the Edit in list view
icon to access a list of items.
3. Select (check) the items that you want to delete. To delete all content, click Select All.
Resource List of Items
4. If the item is listed in multiple locations, the Delete in all locations option will be available.
This feature was designed for teachers with multiple classes for a specific subject. The feature

Edline Manual © Edline 2011 Page 55
enables you to quickly delete the multiple copies of the same item. Complete one of the
following steps:
Select Delete in all locations to delete the content from all locations.
Clear Delete in all locations to delete the content from the current location only.
5. Click Delete. A warning appears.
6. Click OK to complete the deletion.

Edline Manual © Edline 2011 Page 56
Restoring Deleted Content
With Edline, you can restore any content you deleted up to 90 days from the day of the deletion. The
items will be placed in the Recycle Bin of the Contents section or Home menu, and will be visible only
to the super user of the page. The Recycle Bin will appear only after content has been deleted.
Warning for Edline Web-based Gradebook Users: Edline automatically backs up your gradebook by
placing a copy of it in the Recycle Bin at the end of each day you use the gradebook. Edline stores a
maximum of 30 deleted gradebooks in the Recycle Bin. At the end of 90 days, or if more than 30 books
have been backed up, the Recycle Bin will automatically remove the gradebooks starting with the
oldest books first.
To Restore Deleted Materials
Open the web page or folder where the information has been deleted.
1. From the Contents section or Home ( ) menu, click Recycle Bin to access the Recycle Bin
page.

Edline Manual © Edline 2011 Page 57
Recycle Bin Page
2. Select (check) the content you want to un-delete, and click Restore.
3. Click OK after the selected items have been restored.

Edline Manual © Edline 2011 Page 58
Using My File Locker or My Web Locker
My File Locker (called My Web Locker for students) provides temporary online storage space for
documents you want to transfer between home and school to work on them until they are ready to post
on your web pages. This feature eliminates the need for floppy or flash drives and keeps your files safe
until they are ready for use. No one else but you and the school super user can view, add, modify, or
delete documents from your file locker. You can upload documents directly into your locker, and copy
documents out of your locker to other locations.
You can access My File Locker from the My Edline menu. The permission to access My File Locker is
usually available to teachers and staff members.
Important: The My File Locker feature is available for all students in a school when
the district or school has the Interactive Classroom feature.
From the My Edline menu, under My Content, select My File Locker to access the
list of items in My File Locker.
My File Locker
You create documents and upload files to your File Locker just as you would when adding items to a
folder on your web page. For more information, see the online help.

Edline Manual © Edline 2011 Page 59
Advanced Features
Edline contains easy-to-use features to make your web pages more appealing, enticing your visitors to
return to your site again. This Advanced Features section of the guide includes the following topics:
Adding Images to a Document
Adding a Table
Adding a Video
Adding Pictures, Audio, and Other Files
Creating RSS News Feeds
Creating Discussion Groups
Creating Blogs
Configuring Group Members and Permissions
Adding Images to a Document
You can add images directly to a web page only if you have design privileges (see the topic Adding
Images to Your Web Page), but you can add images to documents you create. Images can be static, or
they can be a clickable image that will link users to another web page. For example, you can add a
picture of a yearbook in a document that links your users to the school's online store if they click on
the image. To add a "clickable" image, see the Adding a Clickable Image topic.
To Add Images to a Document
Open the web page or folder where you want to add a document with images.
1. From the Edline menu bar, click Edit This Page to access the edit mode.
2. Hover over the section where you want to upload the pictures, and click the Add an item to this
box icon.
3. Select Document Page from the Add Item Type pallet.
4. Type the name of the document in the Document Page Title field.
5. Click Create Now for the Document page.
6. Click in the text box to access the Formatting toolbar. You can type or paste any text describing
the image or any other information related to the topic, and use the Formatting toolbar to
change font styles, paragraph centering, bullet, etc.

Edline Manual © Edline 2011 Page 60
7. Click the Image icon to add an image by completing the following steps:
Insert/Edit Image
In the General tab, search for the image to add by clicking the Browse icon. The image
location will be listed in the Image URL field.
Note: If you just want to add an image, simply click the Insert button after searching
for the picture. The remaining steps are optional.
In the Image Description field, type any additional information you want to include about
the image. Optional — this information will not be displayed to users.
In the Title field, type the data you want to appear when a user moves their mouse over
the image. If creating a clickable image, type any instructions for the user in this field.
In the Appearance tab, you can determine how the image will look in the document.
Set how the image will be aligned in the document in the Alignment field.
Type new dimensions for the image size in the Dimensions fields.
Check Constrain proportions to keep the height and width sizes proportionate to each
other when resizing the image.
Type the amount of space vertically for the picture before any borders or text
information in the Vertical Space field.
Type the amount of space horizontally for the picture before any borders or text
information in the Horizontal Space field.
Type the width of the border in the Border field.

Edline Manual © Edline 2011 Page 61
Click Insert.
Repeat this step for each picture you want to add to the document.
8. Click Save to add the document with the images.
Tip: You can determine the type of users that can view the file, and you can multi-post the
item to other classes you teach by accessing the additional options from the Edit Mode toolbar.
9. Click Done to exit the edit mode.
Adding a Clickable Image
You can add a clickable image to a document or to your web page that will link users to another web
page. With a clickable image, when the user moves their mouse over the image, text will appear with
instructions. When the user clicks on the image, it will open another web page.
To Add a Clickable Image
To add a "clickable" image, start by following the instructions in the Adding Images to a Document
section. Once the image is in the document, complete the following instructions.
1. From the Document page, click on the image in the text box, then click your right-mouse button
and select the Insert/Edit Link icon. The Insert/Edit Link dialog appears.
Insert/Edit Link Box
Type or paste the link for the image in the Link URL field for an external website link, or
search for an internal link on your Edline website by clicking the Browse ( ) icon. When
a user clicks on the image, the web page listed in this field will open.
Select whether the link will open in a new window or in the same window from the Target
field.
Type the name of the link in the Title field. Optional — this information will not be
displayed to users.

Edline Manual © Edline 2011 Page 62
Tip: To add instructions to appear to the user when they move their mouse over the image,
type the information in the Title field on the Insert/Edit Image dialog. See the Adding Images to
a Document topic for more information.
Click Insert to create the clickable image.
2. Click Save to add the clickable image.
3. Click Done to exit the edit mode.
Adding Images to Your Web Page
There are several ways to add an image to a web page.
Every user with the ability to add documents to their web page can add pictures to those
documents as described in the Adding Images to a Document topic in the online help.
Every super user (including teachers and coaches) can add a Group Info image to their page. The
Group Info image is usually the main picture in the center of the group (district, school, class,
sport, club, or other activity) page and is a part of the description of the group. To add a Group
Info image, see the Adding an Image to a Group Page topic in the online help, or the Setting Up
the Teacher/Class Page topic.
To add additional images to appear on your web page, you will need design privileges. Complete
the following instructions.
To Add an Image on a Web Page
If you are adding the image to your current live design, open the web page where you will add it. From
the Edline menu bar, click Edit This Page to access the Edit Mode toolbar.
If you are adding it to a design that is not yet active, select Manage Design from the Tools menu to
access the Manage Design page. Select the design where you will add the image and click Edit to open
Site Designer tree-view.
1. Click the Add Box button from the Edit Mode toolbar to access the Add Box dialog.
2. From the New Content field, select Document and click OK.
3. Select the location to store the image, and click OK to access the Create/Modify Document
page. This location is not where the picture will be displayed — you will move the image in the
next few steps. You may want to create a folder for your page images.
4. Type the name of the image in the Document Title field.
5. Click the Enter Text By Hand link in the Add Content section, and then click the Image
icon. By adding the image through the toolbar you can easily resize the image from the

Edline Manual © Edline 2011 Page 63
screen, which you cannot do if you import the image. You can also add a web link to the
image, creating a "clickable" image.
6. Click Save and Return. The image will appear at the top of your web page with the Design
Properties dialog, where you can adjust the image properties.
7. Set the design properties for the image.
Change the following two options — In the Other tab, set the Show in Box field to Contents
auto ht, and the Show Header field to No (unless you want the title of the image to appear on
the page).
See the Setting Design Properties topic in the online help.
8. Drag and drop the image to desired location on the website.
9. Click Done to exit the edit mode.
Uploading Multiple Files for Pictures, Audio, and Other Existing Files
Using the Edline multi-file upload feature, you can easily add pictures, audio files, and other types of
files by uploading the content to your website. This feature saves you time when designing new pages
of your website that require multiple files created from other programs. Some uses for the multi-file
upload feature include:
Districts can upload all their existing copies of meeting minutes, budget records, and district
newsletters (added at the district level by the district super user).
Schools can upload all their existing forms, school newsletters, and picture galleries from past
events (added at the school level by the school super user).
Teachers can upload the files available on their teacher edition CDs, electronic copies of
assignments, and any audio files for language arts assignments (added at the class page by the
teacher).
Coaches can upload copies of exercise routines, and sports regulations.
Important: You can upload up to twenty-five (25) files at once. The uploaded files must be less than
30 MB each in size.
To Add Multiple Existing Files (Pictures, Audio, Other)
Open the web page or folder where you want to upload multiple files.
1. From the Edline menu bar, click Edit This Page to access the edit mode.
2. Hover over the section you want to upload the files to, and click the Add an item to this box
icon to access the Add Item Type pallet.

Edline Manual © Edline 2011 Page 64
3. Select File for any file type (Word document, PDF, etc.), Picture for an image file, or Audio for
an audio file. The Upload File box appears.
Upload Files Dialog
4. Click Pick Files to select the files for your upload. To upload multiple files, press the CTRL key
while selecting the file names.
5. Enter a title and a summary for each file (optional) in the Title and Summary fields.
6. Click Start Upload to upload the files.
7. Click Done when finished.
Tip: To add the files to more than one location, copy the content to the other web pages. For
example, if teachers have multiple classes of the same subject they teach and want the content to be
available in all class pages, you can copy the content to all other locations at once.
Adding a Table
You can add a document with a table, allowing for neatly organized information to appear on your web
pages in a table format.

Edline Manual © Edline 2011 Page 65
To Add a Table to a Document
Open the web page or folder where you want to add a table to a document.
1. From the Edline menu bar, click Edit This Page to access the edit mode.
2. Hover over the section where you want to add a document with a table, and click the Add an
item to this box icon.
3. Select Document Page from the Add Item Type pallet.
4. Type the name of the document in the Document Page Title field.
5. Click Create Now for the Document page.
6. Click in the text box to access the Formatting toolbar. You can type or paste any text describing
the table or any other information related to the topic, and use the Formatting toolbar to
change font styles, paragraph centering, bullet, etc.
7. Click the Table icon to add a table by completing the following steps:
Insert/Modify Table
In the General tab, type the number of columns and rows in the Cols and Rows fields.
Type the spacing for the text and table cells in the Cellpadding and Cellspacing fields.
Select how the text is aligned in the table from the Alignment field.
Type the width of the border in the Border field.
Type the size of the table in the Width and Height fields.
Select the type of table from the Class field.
Check Table caption to add a name to the table.

Edline Manual © Edline 2011 Page 66
Note: For the Advanced Properties of a table, see the online help.
Click Insert.
8. Type the text for the table in the text field.
Tip: You can also use your right-mouse button while typing text to update the table's border
styles and colors, insert and delete rows, and insert or delete columns.
9. Click Save to add the document with the table.
10. Click Done to exit the edit mode.
Adding a Video
You can add a video in Edline in a document or as a section on your web page. For example, a teacher
can add a video of a science experiment in a document describing the scientific topic, or on the
science class web page. If you have design privileges, such as a web designer, you can add a video to a
web page as a part of the design.
All streaming videos in Edline are in the Flash® format. Viewers will be required to download and use
the Adobe® Flash Player plug-in. Videos cannot be larger than 30 MB if you are adding the file directly
to the document or web page. There is no limit to the size if you are streaming the video stored on
another website. Currently Edline supports the following video formats only:
AVI (.avi)
QuickTime (.mov)
MPEG-1, MPEG-2, MPEG-4 (.mpeg, .mpg, .mp4, .m4v, etc.)
Windows Media Video/WMV (.wmv)
Flash Video (.flv)
3GPP (.3gp)
To Add a Video in a Document
You would add a video into a document when you want users to launch a video from the document. For
example, teachers might create homework assignments that include videos. Open the web page or
folder where you want to add a video to a document.
1. From the Edline menu bar, click Edit This Page to access the edit mode.
2. Hover over the section where you want to add a video, and click the Add an item to this box
icon to access the Add Item Type pallet.

Edline Manual © Edline 2011 Page 67
3. Select Document Page to access the Document Page Title box.
4. Type the name of the video in the Document Page Title field.
5. Click Create Now for the Document page.
6. Click in the text box to access the Formatting toolbar. You can type or paste any text describing
the video or any other information related to the topic, and use the Formatting toolbar to
change font styles, paragraph centering, bullets, etc.
7. To import the video file, click the Summary Info option on the tool bar to access the Modify
Document page.
In the Add Content section, click the Import an Existing File link.
In the Import Existing File field, click Browse to search for the video to upload the file.
Click Import to import the video.
Click Save and Return when finished.
Tip: You can also add a link to the video instead of including it to the website. By entering a
URL location, the video will not be stored on the Edline site, so there will be no size limitations
for the video. Enter the web location of the video for any video over 30 MB.
To Display a Video on the Web Page
You would add a video to the Edline web page when you want to use the video as a part of your web
page design. You will need design permissions to incorporate a video into a web page. Open the web
page where you want to add the video.
1. From the Edline menu bar, click Edit This Page to access the edit mode.
2. Click the Add Box button from the Edit Mode toolbar to access the Add Box dialog.
3. From the New Content field, select Document and click OK.
4. Select the location to store the video and click OK for the Create/Modify Document page.
5. Type the name of the video in the Document Title field.
6. To import the video file, in the Add Content section, click the Import an Existing File link. In
the Import Existing File field, click Browse to search for the video. Click Import when ready.
7. Click Save and Return when finished. The video will appear at the top of your web page with
the Design Properties dialog, where you can adjust the video properties.

Edline Manual © Edline 2011 Page 68
8. Set the design properties for the video.
See the Setting Design Properties topic in the online help.
9. Drag and drop the video to desired location on the website.
10. Click Done to exit the edit mode.
Creating RSS News Feed Links
An RSS feed is a Really Simple Syndication (RSS) news feed that supplies stories or information from
other websites to your Edline website.
To Add RSS News Feed Links to Your Website
Open the web page or folder where you want to create a news feed.
1. From the Edline menu bar, click Edit This Page to access the edit mode.
2. Hover over the section where you want to add the feed, and click the Add an item to this box
icon to access the Add Item Type pallet.
3. Select RSS Feed to access the Create Document page.
Create Document Page
Edline Manual © Edline 2011 Page 69
4. Type the name of the feed in the Document Title field. This title will appear on the website.
5. Type a brief summary for the feed to appear on the page in the Document Summary field.
6. If you want the feed link to appear on the calendar, type or select the date in the Calendar
Date field.
7. Type or paste the address of the feed page in the RSS Feed URL field.
8. Click Save and Return.
9. Click Done to exit the edit mode.
Creating Discussions
You can add a new discussion to the Edline website. Here are some examples:
District discussions can include topics such as upcoming district votes and political issues (added
at the district level by the district super user).
School discussions can include topics such as new school changes, cafeteria offerings, and other
school-wide topics (added at the school level by the school super user).
Class discussions can include any topics in your subject, or ideas on field trips (added at the
class page by the teacher).
Sport discussions can include opinions on rivalries or schedules (added at the sport page by the
coach).
To Add Discussions to Your Website
Open the web page or folder where you want to add a discussion. You cannot add discussions to the
News, Links, or Calendar sections.
1. From the Edline menu bar, click Edit This Page to access the edit mode.
2. Hover over the section where you want to add the discussion, and click the Add an item to this
box icon to access the Add Item Type pallet.
3. Select Discussion to access the Create Discussion page.
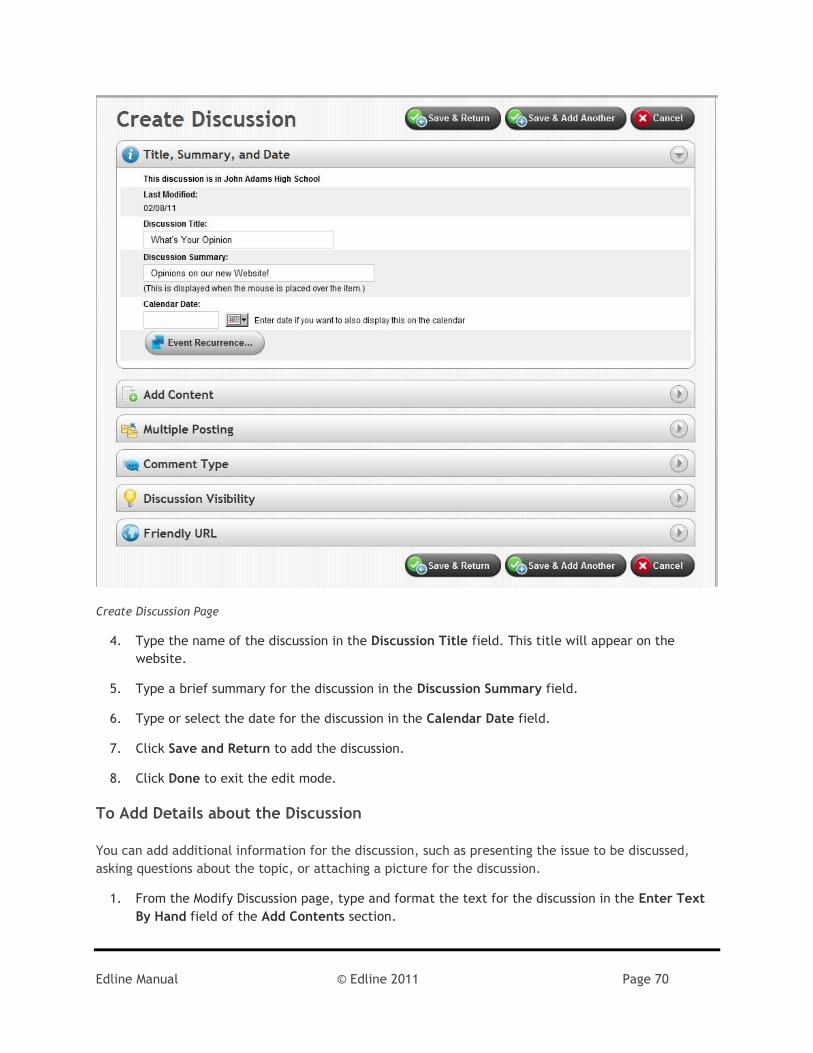
Edline Manual © Edline 2011 Page 70
Create Discussion Page
4. Type the name of the discussion in the Discussion Title field. This title will appear on the
website.
5. Type a brief summary for the discussion in the Discussion Summary field.
6. Type or select the date for the discussion in the Calendar Date field.
7. Click Save and Return to add the discussion.
8. Click Done to exit the edit mode.
To Add Details about the Discussion
You can add additional information for the discussion, such as presenting the issue to be discussed,
asking questions about the topic, or attaching a picture for the discussion.
1. From the Modify Discussion page, type and format the text for the discussion in the Enter Text
By Hand field of the Add Contents section.
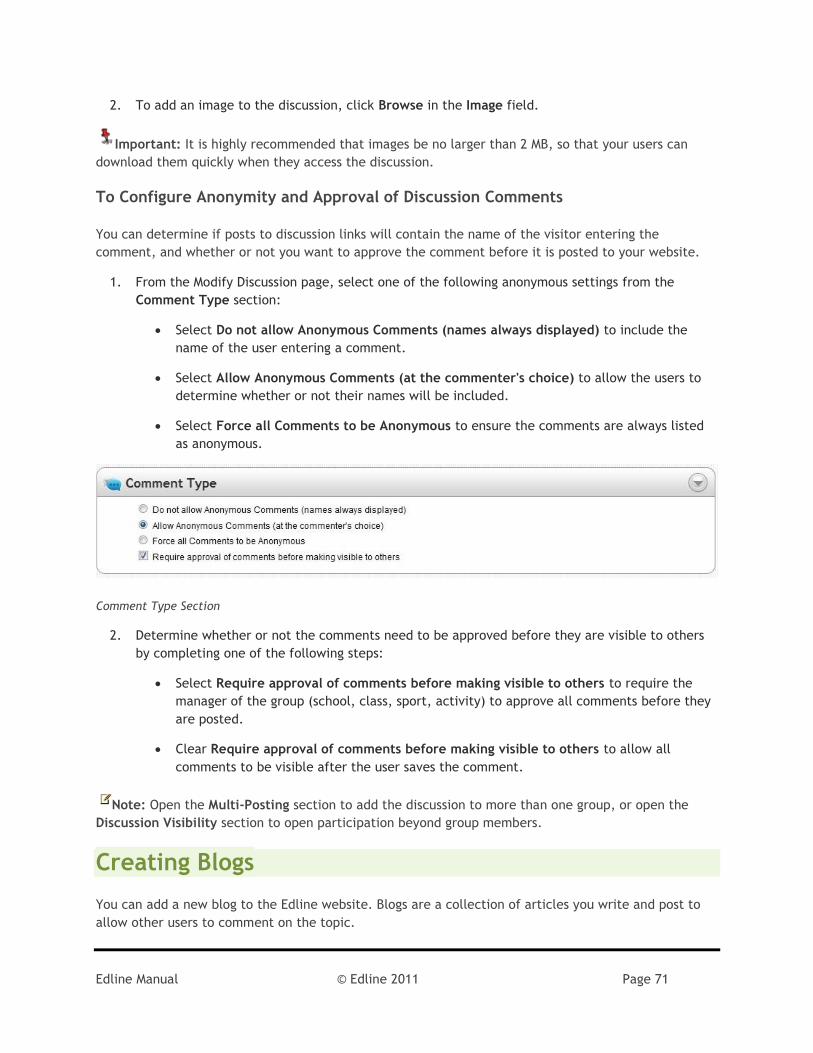
Edline Manual © Edline 2011 Page 71
2. To add an image to the discussion, click Browse in the Image field.
Important: It is highly recommended that images be no larger than 2 MB, so that your users can
download them quickly when they access the discussion.
To Configure Anonymity and Approval of Discussion Comments
You can determine if posts to discussion links will contain the name of the visitor entering the
comment, and whether or not you want to approve the comment before it is posted to your website.
1. From the Modify Discussion page, select one of the following anonymous settings from the
Comment Type section:
Select Do not allow Anonymous Comments (names always displayed) to include the
name of the user entering a comment.
Select Allow Anonymous Comments (at the commenter's choice) to allow the users to
determine whether or not their names will be included.
Select Force all Comments to be Anonymous to ensure the comments are always listed
as anonymous.
Comment Type Section
2. Determine whether or not the comments need to be approved before they are visible to others
by completing one of the following steps:
Select Require approval of comments before making visible to others to require the
manager of the group (school, class, sport, activity) to approve all comments before they
are posted.
Clear Require approval of comments before making visible to others to allow all
comments to be visible after the user saves the comment.
Note: Open the Multi-Posting section to add the discussion to more than one group, or open the
Discussion Visibility section to open participation beyond group members.
Creating Blogs
You can add a new blog to the Edline website. Blogs are a collection of articles you write and post to
allow other users to comment on the topic.

Edline Manual © Edline 2011 Page 72
To Add Blogs to Your Website
Open the web page or folder where you want to add a blog. You cannot add blogs to the News, Links,
or Calendar sections.
1. From the Edline menu bar, click Edit This Page to access the edit mode.
2. Hover over the section where you want to add the blog, and click the Add an item to this box
icon to access the Add Item Type pallet.
3. Select Blog to access the Create Blog page.
Create Blog Page
4. Type the title of the blog in the Blog Name field. This title will appear on the website.
5. Type a brief summary for the blog in the Blog Summary field.
Note: Click the Change Visibility button to restrict which users can view the blog. See the To
Restrict the Visibility of a Document topic for more information.
6. Click Save and Return to add the blog.
7. Click Done to exit the edit mode.

Edline Manual © Edline 2011 Page 73
To Add a Blog Entry
You can add articles to your blog through your blog website. Usually only school staff can add blog
entries.
1. From the blog page, click the Add an item to this box icon to access the Blog Entry Name
dialog.
What would you like to call your new blog entry?
2. Type the name of the article, and click Create Now to access the Create Blog Entry page.
Create Blog Entry Page

Edline Manual © Edline 2011 Page 74
3. Type the name of the entry in the Blog Entry Title field. This title will appear on the website.
4. Type a brief summary for the article in the Blog Entry Summary field.
5. Type or select the date for the article in the Blog Date field. This option sets the article as a
calendar event.
6. Type the entry in the Add Content section.
7. Click Save and Return to add the blog entry.
To Configure Anonymity and Approval of Blog Comments
You can determine if posts to blog entries will contain the name of the visitor entering the comment,
and whether or not you want to approve the comment before it is posted to your website.
1. From the Modify Blog Entry page, select one of the following anonymous settings from the
Comment Type section:
Select Do not allow any Comments to be added to not allow any comments on the
particular entry.
Select Do not allow Anonymous Comments (names always displayed) to include the
name of the user entering a comment.
Select Allow Anonymous Comments (at the commenter's choice) to allow the users to
determine whether or not their names will be included.
Select Force all Comments to be Anonymous to ensure the comments are always listed
as anonymous.
Comment Type Section
2. Determine whether or not the comments need to be approved before they are visible to others
by completing one of the following steps:
Select Require approval of comments before making visible to others to require the
super user of the group (school, class, sport, activity) to approve all comments before
they are posted.
Clear Require approval of comments before making visible to others to allow all
comments to be visible after the user saves the comment.

Edline Manual © Edline 2011 Page 75
Configuring Group Members and Permissions
Users with appropriate permissions can add members to a group (district, school, class, sport, club, or
activity), remove members from a group, and change the permissions for members in a group in the
Edline website. To update the members of a particular group, you must have super user or site
coordinator permissions enabled for the district, school, class, or other group.
1. From the menu bar, select Tools, and then select Manage Group (District, School, Class, Sport,
Activity) to access the Modify Group page.
2. From the Group Management section, click Members and Permissions to view the Group
Member List page.
Note: When you are on the Modify School or Modify District page, you will see the Manage Users
button instead of Members and Permissions.
To Add a User to a Group
If you know the user identification code of the person to add, type the code in the Admin
System User ID field and click Add.
To search for the user's information, click Search for Users to Add to access the User List page.
Tip: You can also search for a specific user using the Search fields.
Select (check) the user(s) to add to the group, and click Add Selected Users to Group.
Click Done on the Group Member List page.
To Remove a User from a Group
Select (check) the user(s) to remove, and click Remove Selected.
Click Done on the Group Member List page.
To Change the Permissions for a User in a Group
Select (check) the user(s) to change, and click Change Permissions to access the Group Member
Permissions page.

Edline Manual © Edline 2011 Page 76
Group Member Permissions Page
Select Yes or No to each type of permission for the particular user in the group. For more
information about each permission, see the Setting Permissions and Policies topic.
Click Update to add the permissions.
Important: Folder and Group Member Permissions are different from School Members Permissions in
that they only allow special permissions in the folder or group where they have been enabled for a
user.

Edline Manual © Edline 2011 Page 77
Index
A
Absence Reports, 45
Accounts, 7
Activating, 7
Email Settings, 10
Password, 10
Screen Name, 10
Security Question, 10
Text Message Settings, 10
Voice Settings, 10
Activation Codes, 7
Sample, 8
Activity Pages
Displaying My Email Address, 49
Attachments, 33
Audio
Adding Audio Files, 63
B
Blogs, 71
Configuring Comments for, 74
Visibility for, 29
C
Calendars, 38
Adding an Event, 38
Recurring Events, 39
Reusing for the Next Time Period, 40
Classes
Setting Up the Class Page, 23
Coaches
Displaying My Email Address, 49
Conduct Reports, 45
Contents on Website
Changing, 42
Copying, 50
Deleting, 54
Moving, 51
Resorting, 53
Restoring Deleted Files, 56
Reusing, 43
Counselors
Displaying My Email Address, 49
D
Discussions
Comments, 71
Creating, 69
Visibility for, 29
Documents
Adding to Your Website, 25
Visibility for, 29

Edline Manual © Edline 2011 Page 78
E
Edline
Getting Started, 6
Emails
Account Settings, 10
Displaying My Email Address Online, 49
Sending Group-Wide Emails (Classes, Sports,
Activities, etc.), 46
F
Files
Adding Files to Website, 63
Folders
Adding Content to, 34
Creating, 35
G
Grades
Reports, 45
I
Images
Adding to Documents, 59
Adding to Your Site, 62
Clickable, 61
Uploading Multiple Images, 63
L
Links
Creating, 36
to Other Websites, 36
Visibility for, 29
M
Multiple Posting
Documents, 28
My File Locker
Using, 58
My Web Locker
Using, 58
N
News
Adding Events, 32
Attachments, 33
Feeds, 68
Visibility for, 29
O
Online Discussions
Comments, 71
Creating, 69
Other Websites
Adding a Link to, 36
P
Passwords, 10
Permissions
Group Members, 75
Users, 75

Edline Manual © Edline 2011 Page 79
Pictures
Adding to Documents, 59
Adding to Your Site, 62
Uploading Multiple Pictures, 63
Private Reports
Viewing, 45
R
Real Simple Syndication, 68
Reports
Absence Reports, 45
Conduct, 45
Grades, 45
Posting, 44
Transcripts, 45
Viewing, 45
RSS News Feed
Creating, 68
Visibility for, 29
S
Screen Names, 10
Security
Group Members, 75
Question, 10
Sports Pages
Displaying My Email Address, 49
T
Tables, 64
Teacher Pages
Displaying My Email Address, 49
Setting Up, 23
Teachers
Displaying My Email Address, 49
Overview, 6
Text Messages
Account Settings, 10
Sending Mass Message, 48
Third-Party Software
Adding Files from Other Applications, 63
V
Videos
Adding in a Document, 66
Adding to a Web Page, 66
Visibility Options
Blogs, 29
Discussions, 29
Documents, 29
Links, 29
News, 29
RSS News Feeds, 29
Voice Mail
Account Settings, 10
Sending Mass Message, 48

Edline Manual © Edline 2011 Page 80
W
Website
Adding Calendar Event, 38
Top Related