

![interoperability.blob.core.windows.netMS-DOC] … · Web view[MS-DOC]: Word (.doc) Binary File Format. Intellectual Property Rights Notice for Open Specifications Documentation.](https://static.fdocuments.in/doc/165x107/5e9968a82ad52c376f28b869/ms-doc-web-view-ms-doc-word-doc-binary-file-format-intellectual-property.jpg)


![MagneticMines_01.doc [.pdf]€¦ · Web view(also …MagneticMines_01.pdf) => doc. pdf URL-doc URL-pdf . more on this topic is on the /Military.htm page at doc. pdf URL . note:](https://static.fdocuments.in/doc/165x107/5eb452a427f00d387f72aed7/magneticmines01doc-pdf-web-view-also-magneticmines01pdf-doc-pdf.jpg)
Languages
Pages
Legal


DB2 Warehouse
Version 9.5
Installation Launchpad
GC19-1272-00
���


DB2 Warehouse
Version 9.5
Installation Launchpad
GC19-1272-00
���

Note:
Before using this information and the product it supports, read the information in “Notices” on page 79.
This edition applies to version 9, release 5, of IBM DB2 Warehouse (product number 5724-E34) and to all
subsequent releases and modifications until otherwise indicated in new editions.
© Copyright International Business Machines Corporation 1996, 2007. All rights reserved.
US Government Users Restricted Rights – Use, duplication or disclosure restricted by GSA ADP Schedule Contract
with IBM Corp.
Contents
Chapter 1. DB2 Warehouse Server
installation . . . . . . . . . . . . . 1
DB2 Warehouse server installation for AIX . . . . 1
System requirements . . . . . . . . . . . 2
DB2 Warehouse architecture . . . . . . . . 2
Install the data server . . . . . . . . . . 4
Install single computer data server . . . . . 4
Required tasks before the installation . . . 5
Install the product . . . . . . . . . 5
Required tasks after installation . . . . . 6
Install the data server on multiple computers . 7
Required tasks before the installation . . . 8
Install the administration node . . . . . 12
Install the data node . . . . . . . . 13
Required tasks after installation . . . . 14
Install the application server . . . . . . . . 19
Required tasks before the installation . . . . 20
Install the application server components . . 21
Required tasks after installation . . . . . 21
DB2 Warehouse server installation for Linux . . . 22
System requirements . . . . . . . . . . 22
DB2 Warehouse architecture . . . . . . . . 23
Install the data server . . . . . . . . . . 25
Install single computer data server . . . . 25
Required tasks before the installation . . . 26
Install the product . . . . . . . . . 26
Required tasks after installation . . . . 27
Install the data server on multiple computers 28
Required tasks before the installation . . . 28
Install the administration node . . . . . 31
Install the data node . . . . . . . . 32
Required tasks after installation . . . . 33
Install the application server . . . . . . . . 39
Required tasks before the installation . . . . 39
Install the application server components . . 40
Required tasks after installation . . . . . 40
DB2 Warehouse server installation for Solaris . . . 41
System requirements . . . . . . . . . . 42
DB2 Warehouse architecture . . . . . . . . 42
Install the data server . . . . . . . . . . 44
Install single computer data server . . . . 44
Required tasks before the installation . . . 45
Install the product . . . . . . . . . 45
Required tasks after installation . . . . 46
Install the data server on multiple computers 47
Required tasks before the installation . . . 48
Install the administration node . . . . . 49
Install the data node . . . . . . . . 51
Required tasks after installation . . . . 52
Install the application server . . . . . . . . 57
Required tasks before the installation . . . . 57
Install the application server components . . 58
Required tasks after installation . . . . . 58
DB2 Warehouse server installation for Windows . . 59
System requirements . . . . . . . . . . 60
DB2 Warehouse architecture . . . . . . . . 61
Install the data server . . . . . . . . . . 63
Install single computer data server . . . . 63
Required tasks before the installation . . . 64
Install the product . . . . . . . . . 64
Required tasks after installation . . . . 64
Install the data server on multiple computers 65
Required tasks before the installation . . . 66
Install the administration node . . . . . 67
Install the data node . . . . . . . . 68
Required tasks after installation . . . . 69
Install the application server . . . . . . . . 71
Required tasks before the installation . . . . 71
Install the application server components . . 71
Required tasks after installation . . . . . 72
Chapter 2. DB2 Warehouse Client
installation . . . . . . . . . . . . . 73
Client installation for Linux . . . . . . . . . 73
System requirements . . . . . . . . . . 73
Install DB2 Warehouse Client components . . . 74
Prepare your environment . . . . . . . . 74
Install the DB2 Warehouse Client components . . 75
Client installation for Windows . . . . . . . . 75
System requirements . . . . . . . . . . 75
Install DB2 Warehouse Client components . . . 76
Prepare your environment . . . . . . . . 76
Install the DB2 Warehouse Client components . . 77
Notices . . . . . . . . . . . . . . 79
Trademarks . . . . . . . . . . . . . . 80
© Copyright IBM Corp. 1996, 2007 iii

iv DB2 Warehouse Version 9.5: Installation Launchpad

Chapter 1. DB2 Warehouse Server installation
You can install DB2® Warehouse on either AIX®, Linux®, Solaris, or Windows®
operating systems.
Related information
“DB2 Warehouse server installation for AIX”
“DB2 Warehouse server installation for Linux” on page 22
“DB2 Warehouse server installation for Solaris” on page 41
“DB2 Warehouse server installation for Windows” on page 59
DB2 Warehouse server installation for AIX
Use this launchpad to install the server components of DB2 Warehouse 9.5, which
is the new name for DB2 Data Warehouse Edition. DB2 Warehouse is a suite of
products that combines the strength of DB2 Enterprise Server Edition with a
powerful business intelligence infrastructure from IBM®. DB2 Warehouse provides
a comprehensive business intelligence platform with tools for building and
deploying analytic solutions.
You can install DB2 Warehouse on a single database partition or, with the DB2
Database Partitioning Feature, across multiple database partitions. This launchpad
guides you through the major tasks you must perform to create a warehousing
environment that matches your needs.
v Before you can install any part of this product, you must copy the Activation CD
for your edition onto the participating computers. The Activation CD for your
product or feature can be downloaded from Passport Advantage® if it is not part
of the physical media pack you received from IBM. The Activation CD contains
the license certificate file (or license key) for your DB2 Warehouse Edition.
v Ensure that your system satisfies the minimum hardware and software
requirements listed on the System Requirements tab. Note that for a production
system, significant planning is required to determine the appropriate hardware
configuration based on factors such as expected size of the warehouse. If you are
migrating from an earlier version of this product, read the DB2 Warehouse
Installation Guide for migration tasks.
v Select DB2 Warehouse architecture to learn the basic concepts you need to plan
your installation of DB2 Warehouse components in your environment.
v Select Install the data server to install the data server components. You can
install the data server in two ways:
– On a single computer, using only the DB2 Warehouse installation program
(single-partition DB2).
– Across multiple computers, using the DB2 Enterprise installation program
with the Database Partitioning Feature (multi-partition DB2). Ensure that your
edition permits the use of the Data Partitioning Feature.v Select Install the application server to install the application server components
using the DB2 Warehouse installation program.
You must use a different installation program to install the client components of
DB2 Warehouse. See the DB2 Warehouse Installation Guide for details.
Related information
© Copyright IBM Corp. 1996, 2007 1
“System requirements”
“DB2 Warehouse architecture”
“Install the data server” on page 4
“Install the application server” on page 19
System requirements
The minimum system requirements for DB2 Warehouse are summarized below.
Make sure you read and apply the full requirements listed in the DB2 Warehouse
Installation Guide. Note that significant planning is required to determine the
appropriate hardware configuration based on factors such as expected size of the
warehouse.
For up to date system requirements, refer to the online documentation.
Operating system:
DB2 Warehouse Server for AIX is supported on AIX 5.3 64-bits kernel on
POWER™ with minimum C++ runtime level: xlC.rte 8.0.0.8 and
xlC.aix50.rte 8.0.0.8
Temporary space for running the installation program:
Approximately 550 MB of disk space is recommended on the user’s temp
directory (/tmp)
Permanent space for the installed components:
Approximately 2 GB of disk space is recommended for the installed
product.
Memory for installing the product:
Approximately 1 GB of memory is needed to install all the data warehouse
server components.
Memory for running the product:
Approximately 1 GB of memory is the minimum amount of memory
required to run the data warehouse server components alone. If you run
the application server components on the same computer, 2 GB of memory
is recommended.
Note that memory and hard drive requirements are related to planning and
depends on your configuration.
DB2 Warehouse architecture
DB2 Warehouse components are arranged into three logical groups:
v data server
v application server
v client
The data server can be installed:
v on a single computer, single-partition DB2
v across multiple computers, multi-partition DB2
You can use this launchpad to install the data server and application server. The
client must be installed using another installation program. The groups of
components for a multi-partition DB2 setup are shown in the following figure. In a
single-partition setup the data server consists of a single computer. It is also
2 DB2 Warehouse Version 9.5: Installation Launchpad
acceptable for small-scale setups to install the data server and application server
components on a single computer (Install the data server -> Install single
computer data server).
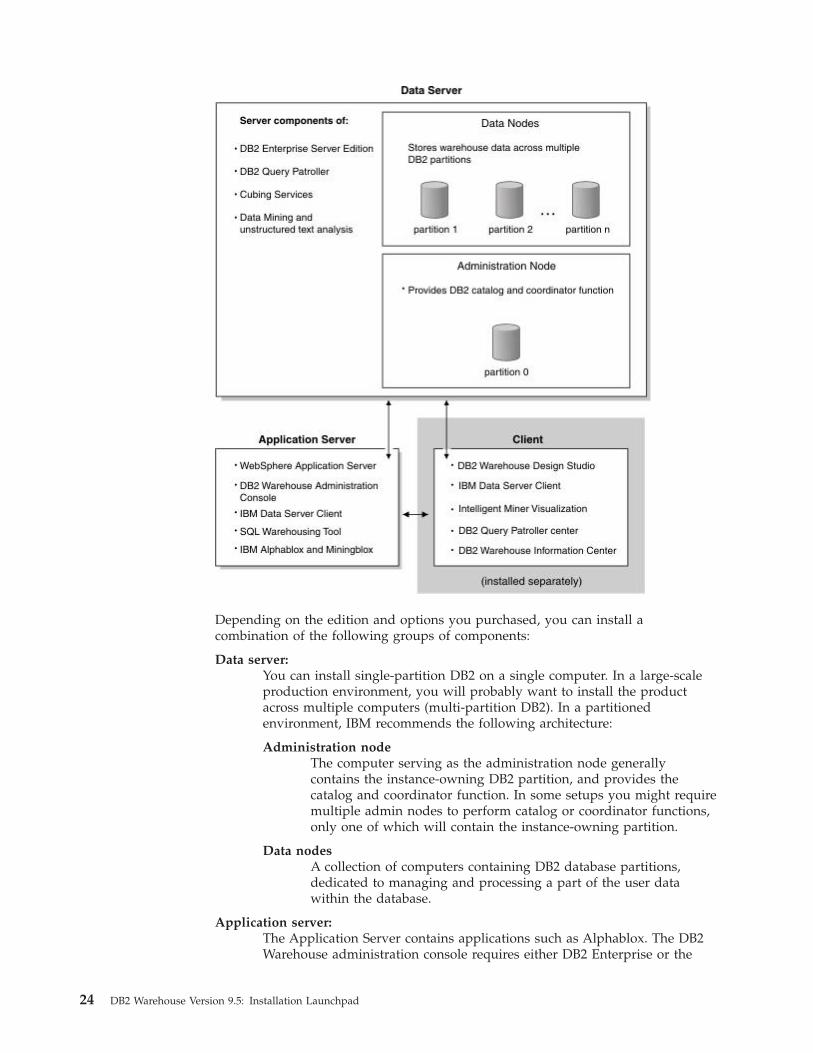
Depending on the edition and options you purchased, you can install a
combination of the following groups of components:
Data server:
You can install single-partition DB2 on a single computer. In a large-scale
production environment, you will probably want to install the product
across multiple computers (multi-partition DB2). In a partitioned
environment, IBM recommends the following architecture:
Administration node
The computer serving as the administration node generally
contains the instance-owning DB2 partition, and provides the
catalog and coordinator function. In some setups you might require
multiple admin nodes to perform catalog or coordinator functions,
only one of which will contain the instance-owning partition.
Data nodes
A collection of computers containing DB2 database partitions,
dedicated to managing and processing a part of the user data
within the database.
Chapter 1. DB2 Warehouse Server installation 3
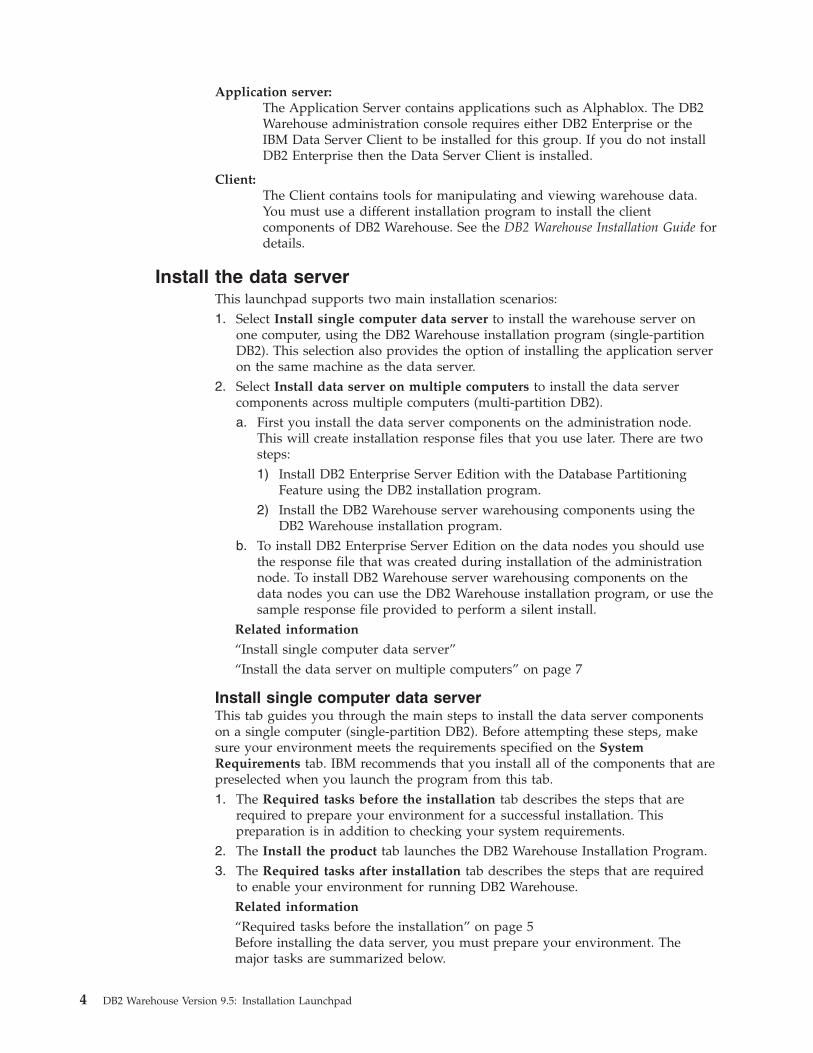
Application server:
The Application Server contains applications such as Alphablox. The DB2
Warehouse administration console requires either DB2 Enterprise or the
IBM Data Server Client to be installed for this group. If you do not install
DB2 Enterprise then the Data Server Client is installed.
Client:
The Client contains tools for manipulating and viewing warehouse data.
You must use a different installation program to install the client
components of DB2 Warehouse. See the DB2 Warehouse Installation Guide for
details.
Install the data server
This launchpad supports two main installation scenarios:
1. Select Install single computer data server to install the warehouse server on
one computer, using the DB2 Warehouse installation program (single-partition
DB2). This selection also provides the option of installing the application server
on the same machine as the data server.
2. Select Install data server on multiple computers to install the data server
components across multiple computers (multi-partition DB2).
a. First you install the data server components on the administration node.
This will create installation response files that you use later. There are two
steps:
1) Install DB2 Enterprise Server Edition with the Database Partitioning
Feature using the DB2 installation program.
2) Install the DB2 Warehouse server warehousing components using the
DB2 Warehouse installation program.b. To install DB2 Enterprise Server Edition on the data nodes you should use
the response file that was created during installation of the administration
node. To install DB2 Warehouse server warehousing components on the
data nodes you can use the DB2 Warehouse installation program, or use the
sample response file provided to perform a silent install.
Related information
“Install single computer data server”
“Install the data server on multiple computers” on page 7
Install single computer data server
This tab guides you through the main steps to install the data server components
on a single computer (single-partition DB2). Before attempting these steps, make
sure your environment meets the requirements specified on the System
Requirements tab. IBM recommends that you install all of the components that are
preselected when you launch the program from this tab.
1. The Required tasks before the installation tab describes the steps that are
required to prepare your environment for a successful installation. This
preparation is in addition to checking your system requirements.
2. The Install the product tab launches the DB2 Warehouse Installation Program.
3. The Required tasks after installation tab describes the steps that are required
to enable your environment for running DB2 Warehouse.
Related information
“Required tasks before the installation” on page 5Before installing the data server, you must prepare your environment. The
major tasks are summarized below.
4 DB2 Warehouse Version 9.5: Installation Launchpad

“Install the product”
“Required tasks after installation” on page 6
Required tasks before the installation:
Before installing the data server, you must prepare your environment. The major
tasks are summarized below.
Before starting, make sure your system satisfies the hardware and software
requirements listed on the System Requirements tab.
Ensure you have root authority
You must have root authority to perform the following tasks. These tasks
should typically be performed by a System Administrator.
Ensure root has write permission to certain files and directories
v /var
v /etc/hosts
v /etc/services. Additionally, the DB2 instance user must have read
permissions to this file.
v /usr/local/bin
v /tmp (your temporary directory)
v your home directory
v instance user home directory
v fenced user home directory
v DB2 Administration user home directory
Collect the necessary installation information
The installation program prompts you for user information about the
components you are installing. You can save time by collecting this
information before you start the installation. This information is listed in
the DB2 Warehouse Installation Guide.
Create required users and groups
The DB2 installation program creates a number of users and groups for
you. You can create additional users and groups to make it easier to
maintain your environment.
Copy the DB2 Warehouse Activation CD on disk
Prior to launching the DB2 Warehouse installation program, you will need
to copy the Activation CD onto your local disk. The Activation CD for
your product or feature can be downloaded from Passport Advantage if it
is not part of the physical media pack you received from IBM.
The launchpad will prompt you for the location where you copied the
Activation CD when you start the DB2 Warehouse installation program. If
you are running the DB2 Warehouse installation directly, you must provide
the location of the Activation CD files on the command line, using the
-profile parameter.
Install the product: To install a data server on a single computer, run the DB2
Warehouse installation program.
IBM recommends that you install all of the components that are preselected when
you launch the program from this tab.
Chapter 1. DB2 Warehouse Server installation 5

Make sure your environment satisfies the requirements specified on the System
Requirements tab.
(This is the launch point for the installation program for DB2 Warehouse.)
Note: While a separate machine is recommended for the Application Server
components, for a small-scale single-partition setup you may choose to install
Application Server components on the same machine as the Data server by
selecting these additional components in the Installer. If you choose to do this
remember to complete Application Server post-installation steps under the Install
the Application Server tab.
Required tasks after installation: After you install the data server, there are
additional tasks you must perform. The tasks are summarized below. Post-Install
tasks are DB2-specific tasks which should be performed by a DBA. (typically the
DB2 instance owner user)
First, verify that the installation was successful. Check the log files listed in ″Log
file locations″ in the DB2 Warehouse Installation Guide. In the main installation log
file dweinstall.log, check the lines that contain keywords such as err, Exception,
wrn for errors and warnings.
If you have installed Query Patroller or Intelligent Miner™ you will need to
perform the following tasks. These tasks should be performed only after you have
created your Warehouse database.
Based on the product edition you purchased, Query Patroller and Intelligent Miner
may not be not available during installation.
Note that the following examples assume the warehouse database, and tablespaces
for certain DB2 Warehouse components (ie. Query Patroller result and control
tablespaces) have been created.
Go to the Install the application server tab.
Related tasks
“Setup Query Patroller”
“Setup Data Mining (Intelligent Miner)” on page 7
Setup Query Patroller:
Enable the database for Query Patroller. Query Patroller will monitor all queries
directed to the administration node.
1. As the DB2 instance owner, issue the following command from the directory:
~/sqllib/bin. In the examples used in this launchpad, the instance owner is
called db2inst1.
2. Enable the database for Query Patroller. Query Patroller will monitor all
queries directed to the administration node.
qpsetup db <dbname> CONTROL_TABLESPACE qpcontrol RESULT_TABLESPACE qpresult
3. Set the configuration parameter DYN_QUERY_MGMT to ENABLE for the database
for which you want Query Patroller to manage queries:
db2 update db cfg for <dbname> using DYN_QUERY_MGMT enable
In a multi-computer environment, this command must be run on all data nodes
as well.
4. Verify that you can start (and stop) Query Patroller on the database:
6 DB2 Warehouse Version 9.5: Installation Launchpad

qpstart <dbname>
qpstop <dbname>
Setup Data Mining (Intelligent Miner):
Enable the instance and database for Data Mining (Intelligent Miner)
As the DB2 instance owner, issue the following commands to enable the instance
for Intelligent Miner:
cd <DB2INSTALL>/bin
./idmenabledb <dbname> fenced dbcfg
where <DB2INSTALL> is the installation directory of DB2 (/opt/IBM/dwe/db2/V9.5) and <dbname> is the name of the database you wish to enable.
Install the data server on multiple computers
This tab guides you through the main steps to install the data server components
across multiple computers (multi-partition DB2). Ensure that your edition permits
the use of the Data Partitioning Feature, required for multi-partition DB2.
You must plan your installation before you proceed. For example, you must decide
which computer will be the administration node for your environment, and which
computers will contain your warehouse data.
1. The Required tasks before the installation tab describes the steps that are
required to prepare your environment for a successful installation. This
preparation is in addition to checking your system requirements.
2. The Install the administration node tab describes how to install the data server
components on the administration node. You must run two installation
programs to complete this step:
a. Install DB2 Enterprise Server Edition on the administration node using the
DB2 installation program. This produces a response file that you use later to
install DB2 Enterprise Server Edition on additional computers.
b. Install the DB2 Warehouse server warehousing components on the
administration node using the DB2 Warehouse installation program. This
produces a response file that you use later to install the DB2 Warehouse
data warehouse server components on additional computers.3. The Install the data node tab describes how to install the data server
components on the participating computers. The data nodes comprise all the
partitions that hold your warehouse data. You must run two installation
programs to complete this step:
a. Run the DB2 Enterprise Server Edition installation program from the
command line to install DB2 Enterprise Server Edition on the data node
computers. You should use the response file that was created when you
installed on the administration node in the previous step.
b. Run the DB2 Warehouse installation program to install the DB2 Warehouse
server warehousing components on the data nodes. Alternatively, you can
use a sample response file provided to perform a silent install.4. The Required tasks after installation tab describes the steps that are required
to enable your environment for running DB2 Warehouse.
Related information
“Required tasks before the installation” on page 8
“Install the administration node” on page 12
Chapter 1. DB2 Warehouse Server installation 7

“Install the data node” on page 13
“Required tasks after installation” on page 14
Required tasks before the installation: Pre-Install tasks are OS tasks which
require ROOT authority to be carried out. These tasks should typically be
performed by a System Administrator.
Prior to launching the DB2 Warehouse installation program, you will need to copy
the Activation CD onto your local disk. The Activation CD for your product or
feature can be downloaded from Passport Advantage if it is not part of the
physical media pack you received from IBM.
The launchpad will prompt you for the location where you copied the Activation
CD when you start the DB2 Warehouse installation program. If you are running
the DB2 Warehouse installation directly, you must provide the location of the
Activation CD files on the command line, using the -profile parameter.
Related tasks
“(Data nodes) Setting up NFS Client” on page 9 Related information
“(All nodes) Create required DB2 users and groups”
“(Admin node) Setting up NFS Server”
“Configure AIX for DB2 Warehouse” on page 9
(All nodes) Create required DB2 users and groups: You need to manually create three
DB2 user IDs on each data node.
On the Admin node (instance-owning partition machine) the 3 users below are
created by the DB2 Installer (see Install section).
Ensure that uids for these users match across all machines, admin and data nodes.
Table 1.
User created username
Group created for user
ID Home directory
DB2 instance owner db2inst1 db2iadm1 /home
DB2 fenced user db2fenc1 db2fadm1 /home
DB2 administration
server user
dasusr1 dasadm1 /dashome (local
directory)
Note:
1. The instance owner’s home directory is where the DB2 instance will be created.
2. The fenced user is used to run user-defined functions (UDFs) and stored
procedures outside the address space used by the database.
3. The user ID for the DB2 administration server is used to run the administration
server on your system. Its home directory must be on a local file system
partition, unlike the home directory of the fenced and instance users.
(Admin node) Setting up NFS Server: The Admin node (instance-owning partition)
will act as an NFS server for the home directories of the DB2 instance user, the
fenced user, and the administration server user. The data nodes and any additional
admin nodes will be NFS clients for these home directories.
1. Create the /home directory.
8 DB2 Warehouse Version 9.5: Installation Launchpad
2. Append the following entries to the /etc/exports file (format provided):
/db2home -sec=sys:none,rw,access=<hostname of BCU 1>:<hostname of BCU N>,\
root=<hostname of BCU 1>:<hostname of BCU n>
/home -sec=sys:none,rw,access=<hostname of BCU 1>:<hostname of BCU N>,\
root=<hostname of BCU 1>:<hostname of BCU n>
3. To export the NFS directories, execute the following command:
/usr/sbin/exportfs –a
4. Verify that the /home directory was exported by running the following
command:
/usr/sbin/exportfs
(Data nodes) Setting up NFS Client:
On all data nodes and all additional administration nodes, complete the following
steps:
1. Create the directory /net/home.
2. Create the soft links /home that point to the /net/home directory:
ln -s /net/home /home
3. Add the following entry to the /etc/filesystems file:
/db2home:
dev = "/db2home"
vfs = nfs
nodename = adminbcu001
mount = true
type = bcu
options = rw,timeo=300,retrans=5,hard,intr,bg,suid,rsize=8192,wsize=8192
account = false
/home:
dev = "/home"
vfs = nfs
nodename = adminbcu001
mount = true
type = bcu
options = rw,timeo=300,retrans=5,hard,intr,bg,suid,rsize=8192,wsize=8192
account = false
4. Mount the remote directory:
mount -all
5. If the mount command fails, use the showmount command to check the status
of the NFS server:
showmount -e <admin node hostname>
Configure AIX for DB2 Warehouse:
Change the maximum number of processes allowed per user
Change the maximum number of processes allowed per user from the
default to 4096. This allows the DB2 UDB instance to create more agent
processes to service queries. Increasing this number has no affect on
resource usage unless processes are actually created.
Procedure:
To change the number of processes on all servers, run the
following command as root on every server:
chdev –l sys0 –a maxuproc=4096
This change will apply to all users that log in after the command is
executed.
Chapter 1. DB2 Warehouse Server installation 9
Enable AIX asynchronous I/O
DB2 uses the underlying AIX operating system asynchronous I/O (AIO) to
improve the performance of buffer pool page cleaning. A small number of
AIO servers might restrict the benefit of AIO by limiting the number of
AIO requests. Therefore, you should increase the number of AIO servers
from the default value of 10.
Procedure:
1. To configure the number of AIO servers on all DB2 servers,
enter the following command as root on every server:
chdev -P –l aio0 –a maxservers=16
The -P flag indicates that the change will be applied to the
device when the system is restarted. The maxservers option
limits the number of concurrent asynchronous I/O requests per
processor. The value should be about the same as the expected
number of concurrent AIO requests.
2. You will need to reboot the server to make this change take
effect. However, you can complete the remaining AIX tuning
tasks first and then reboot.
Increase user limits (ulimit)
After creating the DB2 instance owner ID, you must increase the user
limits (ulimit) for this user. To display the ulimit values, enter the
command:
ulimit -a
To change the user resource limits permanently, you can use the smitty
interface or the chuser command, or you can edit the /etc/security/limits file. The following topic describes how to change the user limits by
modifying the /etc/security/limits file. The default values that the
system is likely to have when AIX is first installed and the recommended
values are given below:
Parameter Default values Recommended values for DB2
time (seconds) unlimited unlimited
file (blocks) 2097151 unlimited
data (KB) 131072 unlimited
stack (KB) 32768 unlimited
memory (KB) 32768 unlimited
coredump (blocks) 2097151 unlimited
nofiles (descriptors) 2000 2000
Note: A block refers to a 512–byte AIX block.
Procedure:
To change the ulimit values for the DB2 instance owner ID, modify
the /etc/security/limits file as root. The default and
recommended entries for the /etc/security/limits file are shown
below:
Parameter Default values Recommended values for DB2
cpu -1 -1
fsize 2097151 -1
10 DB2 Warehouse Version 9.5: Installation Launchpad

Parameter Default values Recommended values for DB2
data 262144 -1
stack 65536 -1
rss 65536 -1
core 2097151 -1
nofiles 2000 2000
Note: The values for fsize, data, stack, rss, and core that are not -1 are
given in the number of 512-byte AIX blocks.
(Recommended) Change Virtual Memory Manager (VMM) settings
Parameter Default values Recommended values for DB2
lru_file_repage 1 0
minperm 20 3
maxperm 80 90
maxclient 80 90
minfree 960 8000
maxfree 1088 8512
Procedure:
1. Use the following command to change the default VMM
tunable parameters:
vmo –p -o lru_file_repage=0 –o minperm%=3 –o maxperm%=90 –o maxclient%=90 –o minfree=8000 –o maxfree=8512
2. You will need to reboot the server to make this change take
effect. However, you can complete the remaining AIX tuning
tasks first and then reboot. You should leave all other VMM
parameters at the default values.
Tuning AIX kernel parameters for I/O
Parameter Default values Recommended values for DB2
j2_minPageReadAhead 2 32
j2_maxPageReadAhead 128 512
j2_nBufferPerPagerDevice 512 2048
lvm_bufcnt 9 16
minpgahead 2 128
maxpgahead 8 512
pv_min_pbuf 512 1024
Procedure:
1. Use the following command to change the default I/O tunable
parameters:
ioo –p –o j2_minPageReadAhead=32 –o j2_maxPageReadAhead=512 –o j2_nBufferPerPagerDevice=2048 –o lvm_bufcnt=16 –o minpgahead=128 –o maxpgahead=512 –o pv_min_pbuf=1024
2. You will need to reboot the server to make this change take
effect. However, you can complete the remaining AIX tuning
tasks first and then reboot. You should leave all other I/O
parameters at the default values.
Chapter 1. DB2 Warehouse Server installation 11

Modifying the AIX network parameters
Procedure:
1. Use the following command to modify the network options to
the values prescribed for the BCU for AIX:
no –p –o sb_max=1310720 –o rfc1323=1 –o ipqmaxlen=250 –o udp_sendspace=65536 –o udp_recvspace=655360 –o tcp_sendspace=221184 –o tcp_recvspace=221184 –o tcp_mssdflt=1440 –o tcp
2. You will need to reboot the server to make this change take
effect. However, you can complete the remaining AIX tuning
tasks first and then reboot.
Install the administration node: The administration node typically contains the
instance-owning database partition that owns the DB2 instance for your data
server. There are two parts to this step:
“Install the DB2 Enterprise Server Edition”
“Install the remaining DB2 Warehouse components” on page 13
After you installed the administration node, you must install the data warehouse
components on the data node. The data node comprises all the partitions that hold
your warehouse data. You can install the data node from the command line using
the response files you created when you installed the administration node. Take
the response files to each computer in your environment and follow the directions
on the Install the data node tab.
Related concepts
“Install the DB2 Enterprise Server Edition”
“Install the remaining DB2 Warehouse components” on page 13
Install the DB2 Enterprise Server Edition: Install the DB2 Enterprise Server Edition
using the DB2 Setup Wizard, or using a response file generated by the Setup
Wizard or based on a template.
Option A: Install using DB2 Setup Wizard::
v After launching the DB2 installation program, in the Select installation, response
files creation, or both window, select the Install DB2 and save my installation
settings in response files option.
v The installation program creates two response files that you can use to silently
install additional partitions. The PROD_ESE.rsp response file is for silently
installing instance-owning database servers. The PROD_ESE_addpart.rsp response
file is for silently installing the participating database servers.
(This is the launch point for the installation program for DB2 Warehouse.)
Option B: Install using response file install::
Procedure:
1. Generate a response file using the DB2 Setup wizard, specifying the options
discussed above, or modify the sample response file located here:
dwe\Ese\db2\aix\samples\db2ese.rsp
2. In a command line window (shell), change to the directory where the DB2
Enterprise Server Edition installation files are located:
cd path_to_image\dwe\Ese
3. Execute the following command:
./db2setup -r responsefile_directory/response_file_name
12 DB2 Warehouse Version 9.5: Installation Launchpad

Install the remaining DB2 Warehouse components: When you finish installing DB2
Enterprise Server Edition, run the DB2 Warehouse installation program to install
the rest of the data warehouse server components for the instance-owning
partition.
IBM recommends that you install all of the components that are preselected when
you launch the program from this tab. You should install DB2 Warehouse using the
existing DB2 server that was installed in the previous step.
You can install the product using one of the following method:
Option A: Using the DB2 Warehouse installation wizard:
IBM recommends you install DB2 Warehouse using this method.
(This is the launch point for the installation program for DB2 Warehouse.)
Option B: Using the response file template provided with the launchpad.:
1. Copy the template response file below onto your hard drive
launchpad\content\linux\dweadmnode.rsp
2. Edit the response file to specify the actual DB2 Enterprise Server Edition install
location and accept the license agreement.
3. In a command line window, execute the following command:
./setup -is:silent -profile /root/db2w_activation_CD/profile -silent -options dweadmnode.rsp -log \!/tmp/dweadmnode.log
The -profile parameter is required. It must be set to the directory where you
copied the activation CD files.
Install the data node: The data node comprises all the partitions that hold your
warehouse data. There are two parts to this step:
Related concepts
“Install the remaining DB2 Warehouse components” Related information
“Install the DB2 Enterprise Server Edition using a response file”
Install the DB2 Enterprise Server Edition using a response file: DB2 Enterprise Server
Edition (ESE) must be installed on all data node partitions using one of the two
response files:
v (Recommended): Use the response file that was created when you installed DB2
on the instance-owning DB2 partition.
v Alternatively, you can modify the sample response file here:
(This is the launch point for the installation program for DB2 Warehouse.)
Procedure:
1. In a command line window (shell), change to the directory where the DB2
Enterprise Server Edition installation files are located:
cd C:\Working\LAUNCH~1\LAUNCH~1\server\dwe\Ese
2. Execute the following command:
./db2setup -r responsefile_directory/response_file_name
Install the remaining DB2 Warehouse components: Intelligent Miner is the only
component other than DB2 Enterprise Server Edition that you install on the data
nodes. Use either method to complete your installation of DB2 Warehouse on a
data node.
Chapter 1. DB2 Warehouse Server installation 13
Intelligent Miner is not available in all product editions. Based on the product
edition that you purchased, you may not be entitled to use Intelligent Miner. In
such situation, you can skip the steps below.
Option A: Run the DB2 Warehouse installation wizard.:
(This is the launch point for the installation program for DB2 Warehouse.)
Option B: Perform a silent installation:
1. Copy the template response file below onto your hard drive
launchpad\content\aix\dwedatanode.rsp
2. Edit the response file to specify the actual DB2 Enterprise Server Edition install
location and accept the license agreement.
3. In a command line window, change to the directory where the DB2 Warehouse
installation files are located and run the following command:
./setup -is:silent -profile /root/db2w_activation_CD/profile -silent -options dwedatanode.rsp -log \!/tmp/dwedatanode.log
The -profile parameter is required. It must be set to the directory where you
copied the activation CD files.
Required tasks after installation: Post-Install tasks are DB2-specific tasks which
should be performed by a DBA. (typically the DB2 instance owner user)
Related information
“(Admin node) Configure DB2 to use OpenSSH”
“(All nodes) Set up communications”
“(Admin node) Register database partitions in db2nodes.cfg file” on page 15
“(Admin node) Create database” on page 16
“Create Partition groups, tablespaces, and bufferpools (INSTRUCTIONS)” on
page 16
“Create Partition groups, tablespaces, and bufferpools (EXAMPLE)” on page 17
“Set up DB2 Warehouse components” on page 19
(Admin node) Configure DB2 to use OpenSSH: Prior to DB2 Version 8.2.2 (Version 8,
FixPack 9), DB2 with the Data Partitioning Feature (DPF) enabled implicitly relied
on rsh as the remote shell mechanism when executing commands on remote DB2
nodes. SSH is a more secure alternative to rsh.
Follow the this link to learn how to configure OpenSSH:http://www.ibm.com/developerworks/db2/library/techarticle/
Steps for different variants of ssh may vary slightly.
(All nodes) Set up communications:
Set DB2COMM parameter
Configure TCP/IP communications for all servers in your environment using the
db2set command if it is not already enabled. For example:
db2set DB2COMM=tcpip
14 DB2 Warehouse Version 9.5: Installation Launchpad
Edit /etc/services file
When you create a DB2 instance using the DB2 Setup wizard or the response file
install, a number of entries are automatically added to the /etc/services file on the
server on which the instance is created (Admin node).
By default, the first port (50000) is reserved for connection requests, and the first
available four ports above 60000 are reserved for fast communications manager
(FCM) communication. FCM handles communication between database partitions.
The number of ports to reserve for FCM equals the maximum number of database
partitions hosted, or potentially hosted, by any machine in the instance.
1. Ensure that the right number of entries was specified for FCM on the admin
node (this is determined by an option in the DB2 Setup Wizard or response
file). If existing entries are insufficient, reserve additional ports to match the
maximum number of database partitions you wish to create on any one
machine.
2. Log on as a root user to each machine participating in the instance (Data
nodes) and add identical entries to the /etc/services file.
An example of /etc/services additions is shown here: launchpad/content/services.txt
(Admin node) Register database partitions in db2nodes.cfg file: The db2nodes.cfg file
maps the participating database partitions to the instance-owning server. The file is
in the home directory of the instance, such as /home/db2inst1/sqllib/db2nodes.cfg. Each partition is assigned a unique number.
The instance-owning partition is numbered as partition 0 and has the following
characteristics:
v Catalog function (only one database partition has the database catalog)
v Coordinator function
v Single-partition data function Query Patroller server and control tables (if
implemented)
v Located on the administration node
The other participating partitions are numbered in ascending order starting with 1
and have the following characteristics:
v Database partitions with partitioned data
v Located on the data nodes
The db2nodes.cfg file that contains the mapping of database partition servers to
computers has the following structure:
<nodenum> <hostname> <logical port> <netname> <resourcesetname>
nodenum
A unique number, between 0 and 999, that identifies a database partition
server in a partitioned database system. The nodenum value that you
select for additional database partition servers must be in ascending order,
however, gaps can exist in this sequence.
hostname
The TCP/IP host name of the database partition server for use by database
partitions that do not use Fast Communication Manager (FCM)
communication. This network will also be used for FCM communication if
no netname is specified in column four. This entry is required.
Chapter 1. DB2 Warehouse Server installation 15
logical port
Specifies the logical port number for the database partition. This field is
used to specify each database partition within a single computer. The
logical port value must start at 0 and continue in ascending order with no
gaps (for example, 0, 1, 2, 3, 4, 5, 6, 7). This field is optional only if you are
using only one partition on a machine and are not using a high speed
interconnect (implying that the netname must be provided).
netname
Specifies the host name or the IP address of the high speed interconnect for
FCM communication. If an entry is specified for this field, all FCM
communication between database partitions will be done on this network.
this parameter is required only if you are using a high speed interconnect
for database partition communications.
resourcesetname
The resourcesetname is for process affinity support when more than one
database partition is on a single computer. This causes all processes for one
database partition to be tied to one CPU, which produces a processor
affinity for each database partition. It is recommended that this feature not
be used because there are potentially significant drawbacks when using
resource sets, offset only by a small potential performance benefit.
Sample db2nodes.cfg file:launchpad/content/db2nodes.cfg
(Admin node) Create database: DB2 creates the database catalog on the database
partition where the CREATE DATABASE command is executed. For this reason
you should ensure that the CREATE DATABASE command is executed on the
database partition that will serve as the catalog. This partition will be located on
the first administration node and will have the database partition number 0 in the
db2nodes.cfg file.
There are two methods to ensure that the catalog is created on database partition 0:
1. You can log on to the server with database partition 0 as the DB2 UDB instance
and then export the DB2NODE environment variable:
export DB2NODE=0
db2 "create database dbname on /db2fs collate using identity pagesize 8192"
Where dbname is the name of your database and /db2fs is the name of the
filesystem on which you intend the partitioned data to reside. Note that a page
size of 8K is used for the database.
2. You can use DB2 syntax to cause a command to be run on only one database
partition:
db2_all "<<+0< db2 \"create database ...\"
You can also put these commands in scripts and execute the scripts.
Create Partition groups, tablespaces, and bufferpools (INSTRUCTIONS):
Bufferpool creation
Bufferpool creation is a complex task related to your warehouse planning. For
guidance on designing bufferpools consult the relevant DB2 Information Center
topic:
http://publib.boulder.ibm.com/infocenter/db2luw/v9r5/index.jsp?topic=/com.ibm.db2.luw.admin.dbobj.doc/doc/c0052485.html
Partition Group creation
16 DB2 Warehouse Version 9.5: Installation Launchpad

When a database is created, the following database partition groups are created
automatically by DB2:
IBMCATGROUP.
This database partition group contains the catalog tables. IBMCATGROUP
consists of one database partition. IBMCATGROUP contains database
partition 0.
IBMTEMPGROUP.
This database partition group comprises all the database partitions.
It is the database partition group in which the default TEMPSPACE1 system
managed temporary table space is created.
Temporary tables are created during various database operations, for
example when a sort spills beyond its sort heap memory or when a
temporary result set is instantiated during query execution.
IBMDEFAULTGROUP.
Immediately after the database is created, this database partition group
becomes the default partition group for table spaces that do not have
explicit partition group assignments.
This partition group contains every partition in the instance by default.
This group also initially contains a table space called USERSPACE1.
USERSPACE1 is the default table space for all user tables that do not have
table space assignments.
You should drop the USERSPACE1 table space. You should then recreate it
(with either the same or a different name) on the partition group that
includes only the data node database partitions.
If you use the suggested database partition group names, this partition
group is named PDPG.
You might want to customize your partition groups based on your warehouse
design. One approach is to create one partition group for partitioned data
contained in data nodes, and another for non-partitioned data stored on the
administration node. See the example for this approach in the ″Creating partition
groups, tablespaces, bufferpools (Examples)″ tab.
Tablespace creation
You should create tablespaces in the appropriate partition groups for
warehouse data and data used by SQL warehousing, Intelligent Miner, and
Query Patroller tools. While your specific design may vary, one approach
is to create at least one tablespace across data nodes for warehouse data,
and a tablespace on only the admin node used exclusively for DB2
Warehouse tools metadata. Note that while this example assumes all
metadata tables within the same database as the warehouse data, it is
possible to place some of these tables in a different database.
Important: Whichever tablespace you specify for DB2 Warehouse tools metadata,
you must grant access on this tablespace to the dweadmin user. During the
installation of the application server, you will need to indicate this tablespace in
the DB2 Warehouse Configuration tool (The tablespace on which dweadmin has
access is automatically selected).
Create Partition groups, tablespaces, and bufferpools (EXAMPLE): Below is a sample
configuration of partition groups, tablespaces and bufferpools. Note that this
Chapter 1. DB2 Warehouse Server installation 17
example is specific to a particular hardware setup. You should determine your
configuration through planning based on your warehouse metrics.
Create partition groups example
1. Create a partition group for partitioned warehouse data:
PDPG.
The database partition group that will hold the partitioned data
for the warehouse. It has the following characteristics:
v Database partitions in this database partition group contain
tables that are partitioned across all the data nodes. This
database partition group contains only the data partitions on
the data nodes. This database partition group does not
include the administration node.
v The tables in this database partition group are normally
medium-sized to quite large. These tables can usually be
collocated with several other tables. This database partition
group is also used to hold the small static tables that are
replicated onto each database partition to enhance join
performance.command: CREATE DATABASE PARTITION GROUP PDPG ON DBPARTITIONNUMS \ (1, 2, 3, 4, 5, 6, 7, 8);
2. Create a partition group for non-partitioned data on administration
node:
SDPG.
The database partition group that will hold the data for the
administration node. It has the following characteristics:
v This database partition group contains one database
partition: database partition 0.
v The tables in this database partition group are usually small.
The tables in this database partition group are usually small.
These tables are typically dimension tables or lookup tables,
and can be static or dynamic. These tables usually cannot be
collocated with any other tables (or perhaps only with one
table).
For tables that are more static, you should use replicated tables
to put a copy of these tables on all the database partitions of
the PDPG database partition group. Replicating the small tables
collocates them with the partitioned tables, which often
increases the performance of joins between partitioned and
single-partition tables.
You should, however, only replicate the tables that are actively
used in the workload. You should, however, only replicate the
tables that are actively used in the workload.
command: CREATE DATABASE PARTITION GROUP SDPG ON DBPARTITIONNUMS (0);
DWECONTROLGROUP.
The database partition group that will hold data used
by certain DB2 Warehouse applications (SQL
Warehousing, Query Patroller)3. Create a partition group on partition 0 called DWECONTROLGROUP
by issuing the following command.
CREATE DATABASE PARTITION GROUP DWECONTROLGROUP ON DBPARTITIONNUM (0);
18 DB2 Warehouse Version 9.5: Installation Launchpad

4. Grant access on DWECONTROLGROUP to the DB2 Warehouse user. If
you use the suggested user names, the DB2 Warehouse user is called
dweadmin.
Create bufferpool example
CREATE BUFFERPOOL BP8K ALL DBPARTITIONNUMS SIZE 130560 PAGESIZE 8K;
Create tablespaces example
1. Drop tablespace USERSPACE1.
2. Create the table spaces for the data nodes. In this example there are
three tablespaces created: a temporary tablespace, a tablespace for
tables, and a tablespace for table indexes.
CREATE TEMPORARY TABLESPACE db2tmp8k IN DATABASE PARTITION GROUP ibmtempgroup PAGESIZE 8K MANAGED BY SYSTEM
USING (/db2fs/bculinux/NODE0000/linuxbcudb/temp/db2tmp8k) on NODE(0)
USING (/db2fs/bculinux/NODE000 $N /linuxbcudb/temp/db2tmp8k) on NODE(1 to 9)
USING (/db2fs/bculinux/NODE00 $N /linuxbcudb/temp/db2tmp8k) on NODE(10 to 99)
USING (/db2fs/bculinux/NODE0 $N /linuxbcudb/temp/db2tmp8k) on NODE(100 to 999)
EXTENTSIZE 64 PREFETCHSIZE 128 BUFFERPOOL bp8K;CREATE REGULAR TABLESPACE ts_pd_data_001
IN DATABASE PARTITION GROUP pdpg PAGESIZE 8K MANAGED BY DATABASE
USING (FILE ’/db2fs/bculinux/NODE00 $N /linuxbcudb/data/ts_pd_data_001’ 100G) ON NODE(10 to 99)
USING (FILE ’/db2fs/bculinux/NODE0 $N /linuxbcudb/data/ts_pd_data_001’ 100G) ON NODE(100 to 999)
AUTORESIZE YES MAXSIZE 150G INCREASESIZE 5G EXTENTSIZE 64 PREFETCHSIZE 128 BUFFERPOOL bp8K NO FILE SYSTEM CACHING;
CREATE REGULAR TABLESPACE ts_pd_idx_001 IN DATABASE PARTITION GROUP pdpg PAGESIZE 8K MANAGED BY DATABASE
USING (FILE ’/db2fs/bculinux/NODE000 $N /linuxbcudb/data/ts_pd_idx_001’ \ 50G) ON NODE(1 to 9)
USING (FILE ’/db2fs/bculinux/NODE00 $N /linuxbcudb/data/ts_pd_idx_001’ \ 50G) ON NODE(10 to 99)
USING (FILE ’/db2fs/bculinux/NODE0 $N /linuxbcudb/data/ts_pd_idx_001’ \ 50G) ON NODE(100 to 999)
AUTORESIZE YES MAXSIZE 100G INCREASESIZE 5G EXTENTSIZE 64 PREFETCHSIZE 128 BUFFERPOOL bp8K NO FILE SYSTEM CACHING;
3. Create the table space for the administration node using the following
statement as an example:
CREATE REGULAR TABLESPACE ts_sd_small_001 IN DATABASE PARTITION GROUP sdpg PAGESIZE 8K MANAGED BY DATABASE
USING (FILE /db2fs/bculinux/NODE0000/linuxbcudb/data/ts_sd_data_001 100G)
AUTORESIZE YES MAXSIZE 200G INCREASESIZE 5G EXTENTSIZE 64 PREFETCHSIZE 128 BUFFERPOOL bp8K NO FILE SYSTEM CACHING;
4. Create the tablespaces for the DB2 Warehouse tools using the following
statement as an example. In this example there are three tablespaces
created: a tablespace for SQL Warehousing and Intelligent Miner tables,
a tablespace for Query Patroller control tables, and a tablespace for
Query Patroller result tables.
CREATE REGULAR TABLESPACE dwedefaultcontrol IN DATABASE PARTITION GROUP dwecontrolgroup PAGESIZE 8k MANAGED BY DATABASE
USING (FILE /db2fs/bculinux/NODE0000/linuxbcudb/dwe/control/c1 1G) ON NODE(0)
AUTORESIZE YES MAXSIZE 5G INCREASESIZE 100M EXTENTSIZE 64 PREFETCHSIZE 32 BUFFERPOOL bp8k NO FILE SYSTEM CACHING;
CREATE REGULAR TABLESPACE qpcontrol IN DATABASE PARTITION GROUP dwecontrolgroup PAGESIZE 8k MANAGED BY DATABASE
USING (FILE /db2fs/bculinux/NODE0000/linuxbcudb/dwe/qpcontrol/c1 1G) ON NODE(0)
AUTORESIZE YES MAXSIZE 5G INCREASESIZE 1G EXTENTSIZE 64 PREFETCHSIZE 32 BUFFERPOOL bp8k NO FILE SYSTEM CACHING;
CREATE REGULAR TABLESPACE qpresult IN DATABASE PARTITION GROUP dwecontrolgroup PAGESIZE 8k MANAGED BY DATABASE
USING (FILE /db2fs/bculinux/NODE0000/linuxbcudb/dwe/qpresult/c1 5G) ON NODE(0)
AUTORESIZE YES MAXSIZE 50G INCREASESIZE 5G EXTENTSIZE 64 PREFETCHSIZE 32 BUFFERPOOL bp8k NO FILE SYSTEM CACHING;
Set up DB2 Warehouse components: Please refer to the section Install single
computer Data Server > Required tasks after installation for a list of tasks to be
performed on the administration node:
“Required tasks after installation” on page 6
Install the application server
This section of the launchpad guides you through the main steps to install the
application server components on one computer. See the DB2 Warehouse
Architecture tab for an overview of how the application server fits into your
environment.
Chapter 1. DB2 Warehouse Server installation 19
Before attempting these steps, make sure your environment meets the requirements
specified on the System Requirements tab.
1. The Required tasks before the installation tab describes the steps that are
required to prepare your environment for a successful installation. This
preparation is in addition to checking your system requirements.
2. The Install the product tab launchs the DB2 Warehouse Installation program
for installing the application server components on your computer.
3. The Required tasks after installation tab describes the steps that are required
to enable your environment for running DB2 Warehouse.
Related information
“Required tasks before the installation”
“Install the application server components” on page 21
“Required tasks after installation” on page 21
Required tasks before the installation
Before you install the application server components, take the following steps.
1. Make sure your environment satisfies the requirements specified on the System
Requirements tab.
2. The application server includes IBM Websphere Application Server 6.1.0.9. If it
is already installed on this computer, you can use that copy with DB2
Warehouse instead of installing a new copy of WebSphere®. Existing WebSphere
applications are not affected by DB2 Warehouse, which is installed in a separate
profile.
3. The installation program prompts you for user information about the
components you are installing. You can save time by collecting this information
before you start the installation. This information is listed in the DB2 Warehouse
Installation Guide.
The application server components require at minimum a DB2 client instance for
accessing metadata tables where data flows and control flows definition are stored.
By default, the IBM Data Server Client will be installed but instead you can choose
to install DB2 Enterprise Server Edition on this node.
In the following section, we assume that you use the default settings (with the
Data Server Client) and that the metadata tables will be created on the target
database on the data server.
Table 2. Create DB2 Warehouse groups
Group created Sample group name
DB2 Warehouse administrators group dweadmgrp
DB2 Warehouse managers group dwemgrgrp
DB2 operators group dweopergrp
Table 3. Create the DB2 Warehouse user admin.
The DB2 Warehouse admin user will be the DB2 client instance owner and will be used to
access the DB2 Warehouse metadata tables.
User created username
Group created for user
ID Home directory
DB2 Warehouse
administrative user
dweadmin dweadmgrp /home
20 DB2 Warehouse Version 9.5: Installation Launchpad

Install the application server components
To install the DB2 Warehouse application server components on this computer, run
the DB2 Warehouse installation program.
IBM recommends that you install all of the components that are preselected when
you launch the program from this tab.
Make sure your environment satisfies the requirements specified on the System
Requirements tab.
(This is the launch point for the installation program for DB2 Warehouse.)
Required tasks after installation
After installing the application server, take the following steps:
1. To verify that the installation was successful, check the log files listed in ″Log
file locations″ in the DB2 Warehouse Installation Guide. In the main installation
log file dweinstall.log and the configuration log file config.log, check for lines
that contain keywords such as err, Exception, wrn for errors and warnings.
2. During installation of the Application Server components, DB2 Warehouse will
either create a new Client instance or will re-use a client or full instance as
specified during installation. Prior to starting the Websphere Application Server
(WAS) it is necessary to ensure that WAS starts up with the correct DB2
environment. This environment is required in order for some Admin Console
and SQL Warehouse features to function properly. For example, if the DB2
instance is called dweadmin, you can run one of following commands: For
bourne, bash and ksh shells:
$ . ~dweadmin/sqllib/db2profile
For csh and tcsh shells:
% source ~dweadmin/sqllib/db2cshrc
3. You must run the DB2 Warehouse configuration tool to complete the
installation. The final panel of the installation program prompts you to launch
the configuration tool. You can use the configuration tool immediately after
installation or any time later to modify your configuration. If you don’t run it
immediately, you can start it by running the config/config.sh file from the
directory where DB2 Warehouse is installed.
4. Unless you installed DB2 Enterprise Server Edition on this machine, you will
have to specify a remote database (on the admin node) for the metadata and
scheduler tables. You can specify your Warehouse database for this purpose, or
you can create a separate database. When prompted by the configuration tool,
enter the database name and a non-partitionned tablespace (e.g.
dwedefaultcontrol) to be used for metadata and scheduler tables. See Install
data server on multiple computer > Required tasks after installation for
details.
5. Start WebSphere Application Server as root. For example:
./startServer.sh server1
See the DB2 Warehouse Installation Guide for more details.
Chapter 1. DB2 Warehouse Server installation 21
DB2 Warehouse server installation for Linux
Use this launchpad to install the server components of DB2 Warehouse 9.5, which
is the new name for DB2 Data Warehouse Edition. DB2 Warehouse is a suite of
products that combines the strength of DB2 Enterprise Server Edition with a
powerful business intelligence infrastructure from IBM. DB2 Warehouse provides a
comprehensive business intelligence platform with tools for building and
deploying analytic solutions.
You can install DB2 Warehouse on a single database partition or, with the DB2
Database Partitioning Feature, across multiple database partitions. This launchpad
guides you through the major tasks you must perform to create a warehousing
environment that matches your needs.
v Before you can install any part of this product, you must copy the Activation CD
for your edition onto the participating computers. The Activation CD for your
product or feature can be downloaded from Passport Advantage if it is not part
of the physical media pack you received from IBM. The Activation CD contains
the license certificate file (or license key) for your DB2 Warehouse Edition.
v Ensure that your system satisfies the minimum hardware and software
requirements listed on the System Requirements tab. Note that for a production
system, significant planning is required to determine the appropriate hardware
configuration based on factors such as expected size of the warehouse. If you are
migrating from an earlier version of this product, read the DB2 Warehouse
Installation Guide for migration tasks.
v Select DB2 Warehouse architecture to learn the basic concepts you need to plan
your installation of DB2 Warehouse components in your environment.
v Select Install the data server to install the data server components. You can
install the data server in two ways:
– On a single computer, using only the DB2 Warehouse installation program
(single-partition DB2).
– Across multiple computers, using the DB2 Enterprise installation program
with the Database Partitioning Feature (multi-partition DB2). Ensure that your
edition permits the use of the Data Partitioning Feature.v Select Install the application server to install the application server components
using the DB2 Warehouse installation program.
You must use a different installation program to install the client components of
DB2 Warehouse. See the DB2 Warehouse Installation Guide for details.
Related information
“System requirements”
“DB2 Warehouse architecture” on page 23
“Install the data server” on page 25
“Install the application server” on page 39
System requirements
The minimum system requirements for DB2 Warehouse are summarized below.
Make sure you read and apply the full requirements listed in the DB2 Warehouse
Installation Guide. Note that significant planning is required to determine the
appropriate hardware configuration based on factors such as expected size of the
warehouse.
For up to date system requirements, refer to the online documentation.
22 DB2 Warehouse Version 9.5: Installation Launchpad

Operating system:
SUSE Linux Enterprise Server 9 (SLES 9) and Enterprise Server 10 (SLES
10), on x86-64 (AMD64, Intel® EM64T)
1. For SLES 9: either SP4, or SP3 plus required maintenance
2. For SLES 10: either SP1 or required maintenance
3. 64-bit RPMs for gcc and libstdc++ are required
Red Hat Enterprise Linux (RHEL) 4 and 5 (with SELinux)
1. RHEL 4 requires Update 4.
2. No update is required for RHEL 5.
3. 64-bit RPMs for gcc and libstdc++ are required
Temporary space for running the installation program:
Approximately 550 MB of disk space is recommended on /tmp
Permanent space for the installed components:
Approximately 1.5 GB of disk space is recommended for the installed
product.
Memory for installing the product:
Approximately 1 GB of memory is needed to install all the data warehouse
server components.
Memory for running the product:
Approximately 1 GB of memory is the minimum amount of memory
required to run the data warehouse server components alone. If you run
the application server components on the same computer, 2 GB of memory
is recommended.
Note that memory and hard drive requirements are related to planning and
depends on your configuration.
DB2 Warehouse architecture
DB2 Warehouse components are arranged into three logical groups:
v data server
v application server
v client
The data server can be installed:
v on a single computer, single-partition DB2
v across multiple computers, multi-partition DB2
You can use this launchpad to install the data server and application server. The
client must be installed using another installation program. The groups of
components for a multi-partition DB2 setup are shown in the following figure. In a
single-partition setup the data server consists of a single computer. It is also
acceptable for small-scale setups to install the data server and application server
components on a single computer (Install the data server -> Install single
computer data server).
Chapter 1. DB2 Warehouse Server installation 23
Depending on the edition and options you purchased, you can install a
combination of the following groups of components:
Data server:
You can install single-partition DB2 on a single computer. In a large-scale
production environment, you will probably want to install the product
across multiple computers (multi-partition DB2). In a partitioned
environment, IBM recommends the following architecture:
Administration node
The computer serving as the administration node generally
contains the instance-owning DB2 partition, and provides the
catalog and coordinator function. In some setups you might require
multiple admin nodes to perform catalog or coordinator functions,
only one of which will contain the instance-owning partition.
Data nodes
A collection of computers containing DB2 database partitions,
dedicated to managing and processing a part of the user data
within the database.
Application server:
The Application Server contains applications such as Alphablox. The DB2
Warehouse administration console requires either DB2 Enterprise or the
24 DB2 Warehouse Version 9.5: Installation Launchpad

IBM Data Server Client to be installed for this group. If you do not install
DB2 Enterprise then the Data Server Client is installed.
Client:
The Client contains tools for manipulating and viewing warehouse data.
You must use a different installation program to install the client
components of DB2 Warehouse. See the DB2 Warehouse Installation Guide for
details.
Install the data server
This launchpad supports two main installation scenarios:
1. Select Install single computer data server to install the warehouse server on
one computer, using the DB2 Warehouse installation program (single-partition
DB2). This selection also provides the option of installing the application server
on the same machine as the data server.
2. Select Install data server on multiple computers to install the data server
components across multiple computers (multi-partition DB2).
a. First you install the data server components on the administration node.
This will create installation response files that you use later. There are two
steps:
1) Install DB2 Enterprise Server Edition with the Database Partitioning
Feature using the DB2 installation program.
2) Install the DB2 Warehouse server warehousing components using the
DB2 Warehouse installation program.b. To install DB2 Enterprise Server Edition on the data nodes you should use
the response file that was created during installation of the administration
node. To install DB2 Warehouse server warehousing components on the
data nodes you can use the DB2 Warehouse installation program, or use the
sample response file provided to perform a silent install.
Related information
“Install single computer data server”
“Install the data server on multiple computers” on page 28
Install single computer data server
This tab guides you through the main steps to install the data server components
on a single computer (single-partition DB2). Before attempting these steps, make
sure your environment meets the requirements specified on the System
Requirements tab. IBM recommends that you install all of the components that are
preselected when you launch the program from this tab.
1. The Required tasks before the installation tab describes the steps that are
required to prepare your environment for a successful installation. This
preparation is in addition to checking your system requirements.
2. The Install the product tab launches the DB2 Warehouse Installation Program.
3. The Required tasks after installation tab describes the steps that are required
to enable your environment for running DB2 Warehouse.
Related information
“Required tasks before the installation” on page 26Before installing the data server, you must prepare your environment. The
major tasks are summarized below.
“Install the product” on page 26
“Required tasks after installation” on page 27
Chapter 1. DB2 Warehouse Server installation 25

Required tasks before the installation:
Before installing the data server, you must prepare your environment. The major
tasks are summarized below.
Before starting, make sure your system satisfies the hardware and software
requirements listed on the System Requirements tab.
Ensure you have root authority
You must have root authority to perform the following tasks. These tasks
should typically be performed by a System Administrator.
Ensure root has write permission to certain files and directories
v /var
v /etc/hosts
v /etc/services. Additionally, the DB2 instance user must have read
permissions to this file.
v /usr/local/bin
v /tmp (your temporary directory)
v your home directory
v instance user home directory
v fenced user home directory
v DB2 Administration user home directory
Collect the necessary installation information
The installation program prompts you for user information about the
components you are installing. You can save time by collecting this
information before you start the installation. This information is listed in
the DB2 Warehouse Installation Guide.
Create required users and groups
The DB2 installation program creates a number of users and groups for
you. You can create additional users and groups to make it easier to
maintain your environment.
Copy the DB2 Warehouse Activation CD on disk
Prior to launching the DB2 Warehouse installation program, you will need
to copy the Activation CD onto your local disk. The Activation CD for
your product or feature can be downloaded from Passport Advantage if it
is not part of the physical media pack you received from IBM.
The launchpad will prompt you for the location where you copied the
Activation CD when you start the DB2 Warehouse installation program. If
you are running the DB2 Warehouse installation directly, you must provide
the location of the Activation CD files on the command line, using the
-profile parameter.
Install the product: To install a data server on a single computer, run the DB2
Warehouse installation program.
IBM recommends that you install all of the components that are preselected when
you launch the program from this tab.
Make sure your environment satisfies the requirements specified on the System
Requirements tab.
(This is the launch point for the installation program for DB2 Warehouse.)
26 DB2 Warehouse Version 9.5: Installation Launchpad

Note: While a separate machine is recommended for the Application Server
components, for a small-scale single-partition setup you may choose to install
Application Server components on the same machine as the Data server by
selecting these additional components in the Installer. If you choose to do this
remember to complete Application Server post-installation steps under the Install
the Application Server tab.
Required tasks after installation: After you install the data server, there are
additional tasks you must perform. The tasks are summarized below. Post-Install
tasks are DB2-specific tasks which should be performed by a DBA. (typically the
DB2 instance owner user)
First, verify that the installation was successful. Check the log files listed in ″Log
file locations″ in the DB2 Warehouse Installation Guide. In the main installation log
file dweinstall.log, check the lines that contain keywords such as err, Exception,
wrn for errors and warnings.
If you have installed Query Patroller or Intelligent Miner you will need to perform
the following tasks. These tasks should be performed only after you have created
your Warehouse database.
Based on the product edition you purchased, Query Patroller and Intelligent Miner
may not be not available during installation.
Note that the following examples assume the warehouse database, and tablespaces
for certain DB2 Warehouse components (ie. Query Patroller result and control
tablespaces) have been created.
Go to the Install the application server tab.
Related tasks
“Setup Query Patroller”
“Setup Data Mining (Intelligent Miner)”
Setup Query Patroller:
Enable the database for Query Patroller. Query Patroller will monitor all queries
directed to the administration node.
1. As the DB2 instance owner, issue the following command from the directory:
~/sqllib/bin. In the examples used in this launchpad, the instance owner is
called db2inst1.
2. Enable the database for Query Patroller. Query Patroller will monitor all
queries directed to the administration node.
qpsetup db <dbname> CONTROL_TABLESPACE qpcontrol RESULT_TABLESPACE qpresult
3. Set the configuration parameter DYN_QUERY_MGMT to ENABLE for the database
for which you want Query Patroller to manage queries:
db2 update db cfg for <dbname> using DYN_QUERY_MGMT enable
In a multi-computer environment, this command must be run on all data nodes
as well.
4. Verify that you can start (and stop) Query Patroller on the database:
qpstart <dbname>
qpstop <dbname>
Setup Data Mining (Intelligent Miner):
Enable the instance and database for Data Mining (Intelligent Miner)
Chapter 1. DB2 Warehouse Server installation 27
As the DB2 instance owner, issue the following commands to enable the instance
for Intelligent Miner:
cd <DB2INSTALL>/bin
./idmenabledb <dbname> fenced dbcfg
where <DB2INSTALL> is the installation directory of DB2 (/opt/IBM/dwe/db2/V9.5) and <dbname> is the name of the database you wish to enable.
Install the data server on multiple computers
This tab guides you through the main steps to install the data server components
across multiple computers (multi-partition DB2). Ensure that your edition permits
the use of the Data Partitioning Feature, required for multi-partition DB2.
You must plan your installation before you proceed. For example, you must decide
which computer will be the administration node for your environment, and which
computers will contain your warehouse data.
1. The Required tasks before the installation tab describes the steps that are
required to prepare your environment for a successful installation. This
preparation is in addition to checking your system requirements.
2. The Install the administration node tab describes how to install the data server
components on the administration node. You must run two installation
programs to complete this step:
a. Install DB2 Enterprise Server Edition on the administration node using the
DB2 installation program. This produces a response file that you use later to
install DB2 Enterprise Server Edition on additional computers.
b. Install the DB2 Warehouse server warehousing components on the
administration node using the DB2 Warehouse installation program. This
produces a response file that you use later to install the DB2 Warehouse
data warehouse server components on additional computers.3. The Install the data node tab describes how to install the data server
components on the participating computers. The data nodes comprise all the
partitions that hold your warehouse data. You must run two installation
programs to complete this step:
a. Run the DB2 Enterprise Server Edition installation program from the
command line to install DB2 Enterprise Server Edition on the data node
computers. You should use the response file that was created when you
installed on the administration node in the previous step.
b. Run the DB2 Warehouse installation program to install the DB2 Warehouse
server warehousing components on the data nodes. Alternatively, you can
use a sample response file provided to perform a silent install.4. The Required tasks after installation tab describes the steps that are required
to enable your environment for running DB2 Warehouse.
Related information
“Required tasks before the installation”
“Install the administration node” on page 31
“Install the data node” on page 32
“Required tasks after installation” on page 33
Required tasks before the installation: Pre-Install tasks are OS tasks which
require ROOT authority to be carried out. These tasks should typically be
performed by a System Administrator.
28 DB2 Warehouse Version 9.5: Installation Launchpad
Prior to launching the DB2 Warehouse installation program, you will need to copy
the Activation CD onto your local disk. The Activation CD for your product or
feature can be downloaded from Passport Advantage if it is not part of the
physical media pack you received from IBM.
The launchpad will prompt you for the location where you copied the Activation
CD when you start the DB2 Warehouse installation program. If you are running
the DB2 Warehouse installation directly, you must provide the location of the
Activation CD files on the command line, using the -profile parameter.
Related tasks
“(Data nodes) Setting up NFS Client” on page 30 Related information
“(All nodes) Create required DB2 users and groups”
“(Admin node) Setting up NFS Server”
(All nodes) Create required DB2 users and groups: You need to manually create three
DB2 user IDs on each data node.
On the Admin node (instance-owning partition machine) the 3 users below are
created by the DB2 Installer (see Install section).
Ensure that uids for these users match across all machines, admin and data nodes.
Table 4.
User created username
Group created for user
ID Home directory
DB2 instance owner db2inst1 db2iadm1 /home
DB2 fenced user db2fenc1 db2fadm1 /home
DB2 administration
server user
dasusr1 dasadm1 /dashome (local
directory)
DB2 Warehouse
administrative user
dweadmin /home (mount point)
Note:
1. The instance owner’s home directory is where the DB2 instance will be created.
2. The fenced user is used to run user-defined functions (UDFs) and stored
procedures outside the address space used by the database.
3. The user ID for the DB2 administration server is used to run the administration
server on your system. Its home directory must be on a local file system
partition, unlike the home directory of the fenced and instance users.
4. The DB2 Warehouse administrative user will be used to create table spaces
required by the DB2 Warehouse components. The same user will also be
created on the application server node.
(Admin node) Setting up NFS Server: The following steps explain how to configure
an NFS server on the administration BCU to share the /home directory. Later in the
implementation process you will create the DB2 instance in the /home/<instance
name> directory. Setting up the NFS server to share the /home directory will allow
all participating computers to access the instance owner’s home directory, which is
a requirement for a partitioned database environment.
Chapter 1. DB2 Warehouse Server installation 29

Procedure
1. Configure the /etc/exports file. To export the current home file system to
another computer, add the following line to the /etc/exports file:
path_to_directory_to_be_exported hostname(options) hostname(options)
For example, to share the /home directory to the first data node, called
datanode001; add the following line to /etc/exports file:
/home datanode001(rw,sync,no_root_squash)
The sync parameter ensures synchronized data access between the nodes, and
the no_root_squash parameter is required for SUID activities, as they are
required by DB2.
Instead of a single machine list, you can specify a netgroup to simplify
maintenance.
Note: Do not leave a space between the host name and the options. Including a
space causes the options to be active for all hosts (listed or otherwise).
2. Verify that the NFS server and nfslock service are active. The NFS server and
the nfslock service should automatically start at boot time. The NFS server is
the software that serves a directory to another computer. The nfslock service
ensures that files are correctly locked so that multiple processes do not interfere
with each other.
a. On SLES, to verify that the NFS server and nfslock service are running, run
the following commands:
chkconfig nfsserver on
chkconfig nfslock on
b. On RHEL, the equivalent commands are:
chkconfig nfs on
chkconfig nfslock on
3. Some additional processes need to be started for NFS to function. You can do
this by rebooting your machine or starting them manually. You can verify
which of these processes are running by running
rpcinfo -p
Note: Red Hat differs from SUSE with respect to the name of the file that starts
the NFS services. On Red Hat, the nfs file starts both the clients and the NFS
server; on SUSE, the nfs file starts the client, and the nfsserver file starts the
NFS server.
(Data nodes) Setting up NFS Client:
The NFS client is required on all nodes that need to access the instance user’s
home directory.
1. Configure the /etc/fstab file on the data nodes . The /etc/fstab file can be
broken down into the local mount points and remote mount points.
a. Local mount points are those of the physical disks that are attached to the
computer, and the virtual file systems that the kernel requires to run.
b. Remote mount points are those that are NFS-mounted to your machine. The
format of the line to be included is as follows:
nfs_server_name:directory exported_local_directory nfs options
For example,
adminnode001:/home /net/adminnode001/home nfs rw,hard,bg,intr,suid,tcp,timeo=600,nolock
30 DB2 Warehouse Version 9.5: Installation Launchpad

Note: The preceding example has been split for formatting purposes. In the
/etc/fstab file, this would be a single entry.2. Create the directory for the mount points. Using the values in step 1, the
directory /net/adminnode001/home should be created:
mkdir -p /net/adminnode001/home
After creating the directory, create symbolic links as follows:
ln -s /net/adminnode001/home /home
Although the local directory could be simply /home, this method allows for
more flexibility if a problem occurs with the NFS server. Using the symbolic
link isolates the mount point to a lower directory so that the root user can still
log in and fix problems if they occur.
3. Mount the directory. As long as the NFS client is set to run at boot time, it is
not necessary to perform this step. You can, however, perform this step to
verify that the mount point was created correctly, and that the permissions are
correctly set. Issue the following commands:
mount /net/adminnode001/home
4. The final step is to verify that the NFS client and the nfslock services are set to
run at boot time.
a. On SLES, both the NFS service that represents the client and the nfslock
service for the client must be enabled:
chkconfig nfs on
chkconfig nfslock on
b. On RHEL, use the GUI tool: redhat-config-services. Ensure that the client
side option is selected.
Note: Red Hat differs from SUSE with respect to the name of the file that starts
the NFS services. On Red Hat, the nfs file starts both the clients and the NFS
server; on SUSE, the nfs file starts the client, and the nfsserver file starts the
NFS server.
Install the administration node: The administration node typically contains the
instance-owning database partition that owns the DB2 instance for your data
server. There are two parts to this step:
“Install the DB2 Enterprise Server Edition”
“Install the remaining DB2 Warehouse components” on page 32
After you installed the administration node, you must install the data warehouse
components on the data node. The data node comprises all the partitions that hold
your warehouse data. You can install the data node from the command line using
the response files you created when you installed the administration node. Take
the response files to each computer in your environment and follow the directions
on the Install the data node tab.
Related concepts
“Install the DB2 Enterprise Server Edition”
“Install the remaining DB2 Warehouse components” on page 32
Install the DB2 Enterprise Server Edition: Install the DB2 Enterprise Server Edition
using the DB2 Setup Wizard, or using a response file generated by the Setup
Wizard or based on a template.
Option A: Install using DB2 Setup Wizard::
Chapter 1. DB2 Warehouse Server installation 31
v After launching the DB2 installation program, in the Select installation, response
files creation, or both window, select the Install DB2 and save my installation
settings in response files option.
v The installation program creates two response files that you can use to silently
install additional partitions. The PROD_ESE.rsp response file is for silently
installing instance-owning database servers. The PROD_ESE_addpart.rsp response
file is for silently installing the participating database servers.
(This is the launch point for the installation program for DB2 Warehouse.)
Option B: Install using response file install::
Procedure:
1. Generate a response file using the DB2 Setup wizard, specifying the options
discussed above, or modify the sample response file located here:
dwe\Ese\db2\linuxamd64\samples\db2ese.rsp
2. In a command line window (shell), change to the directory where the DB2
Enterprise Server Edition installation files are located:
cd path_to_image\dwe\Ese
3. Execute the following command:
./db2setup -r responsefile_directory/response_file_name
Install the remaining DB2 Warehouse components: When you finish installing DB2
Enterprise Server Edition, run the DB2 Warehouse installation program to install
the rest of the data warehouse server components for the instance-owning
partition.
IBM recommends that you install all of the components that are preselected when
you launch the program from this tab. You should install DB2 Warehouse using the
existing DB2 server that was installed in the previous step.
You can install the product using one of the following method:
Option A: Using the DB2 Warehouse installation wizard:
IBM recommends you install DB2 Warehouse using this method.
(This is the launch point for the installation program for DB2 Warehouse.)
Option B: Using the response file template provided with the launchpad.:
1. Copy the template response file below onto your hard drive
launchpad\content\linux\dweadmnode.rsp
2. Edit the response file to specify the actual DB2 Enterprise Server Edition install
location and accept the license agreement.
3. In a command line window, execute the following command:
./setup -is:silent -profile /root/db2w_activation_CD/profile -silent -options dweadmnode.rsp -log \!/tmp/dweadmnode.log
The -profile parameter is required. It must be set to the directory where you
copied the activation CD files.
Install the data node: The data node comprises all the partitions that hold your
warehouse data. There are two parts to this step:
Related concepts
“Install the remaining DB2 Warehouse components” on page 33 Related information
32 DB2 Warehouse Version 9.5: Installation Launchpad

“Install the DB2 Enterprise Server Edition using a response file”
Install the DB2 Enterprise Server Edition using a response file: DB2 Enterprise Server
Edition (ESE) must be installed on all data node partitions using one of the two
response files:
v (Recommended): Use the response file that was created when you installed DB2
on the instance-owning DB2 partition.
v Alternatively, you can modify the sample response file here:
(This is the launch point for the installation program for DB2 Warehouse.)
Procedure:
1. In a command line window (shell), change to the directory where the DB2
Enterprise Server Edition installation files are located:
cd C:\Working\LAUNCH~1\LAUNCH~1\server\dwe\Ese
2. Execute the following command:
./db2setup -r responsefile_directory/response_file_name
Install the remaining DB2 Warehouse components: Intelligent Miner is the only
component other than DB2 Enterprise Server Edition that you install on the data
nodes. Use either method to complete your installation of DB2 Warehouse on a
data node.
Intelligent Miner is not available in all product editions. Based on the product
edition that you purchased, you may not be entitled to use Intelligent Miner. In
such situation, you can skip the steps below.
Option A: Run the DB2 Warehouse installation wizard.:
(This is the launch point for the installation program for DB2 Warehouse.)
Option B: Perform a silent installation:
1. Copy the template response file below onto your hard drive
launchpad\content\linux\dweadmnode.rsp
2. Edit the response file to specify the actual DB2 Enterprise Server Edition install
location and accept the license agreement.
3. In a command line window, change to the directory where the DB2 Warehouse
installation files are located and run the following command:
./setup -is:silent -profile /root/db2w_activation_CD/profile -silent -options dwedatanode.rsp -log \!/tmp/dwedatanode.log
The -profile parameter is required. It must be set to the directory where you
copied the activation CD files.
Required tasks after installation: Post-Install tasks are DB2-specific tasks which
should be performed by a DBA. (typically the DB2 instance owner user)
Related information
“(Admin node) Configure DB2 to use OpenSSH” on page 34
“(All nodes) Set up communications” on page 34
“(Admin node) Register database partitions in db2nodes.cfg file” on page 34
“(Admin node) Create database” on page 35
“Create Partition groups, tablespaces, and bufferpools (INSTRUCTIONS)” on
page 36
“Create Partition groups, tablespaces, and bufferpools (EXAMPLE)” on page 37
Chapter 1. DB2 Warehouse Server installation 33
“Set up DB2 Warehouse components” on page 39
(Admin node) Configure DB2 to use OpenSSH: Prior to DB2 Version 8.2.2 (Version 8,
FixPack 9), DB2 with the Data Partitioning Feature (DPF) enabled implicitly relied
on rsh as the remote shell mechanism when executing commands on remote DB2
nodes. SSH is a more secure alternative to rsh.
Follow the this link to learn how to configure OpenSSH:http://www.ibm.com/developerworks/db2/library/techarticle/
Steps for different variants of ssh may vary slightly.
(All nodes) Set up communications:
Set DB2COMM parameter
Configure TCP/IP communications for all servers in your environment using the
db2set command if it is not already enabled. For example:
db2set DB2COMM=tcpip
Edit /etc/services file
When you create a DB2 instance using the DB2 Setup wizard or the response file
install, a number of entries are automatically added to the /etc/services file on the
server on which the instance is created (Admin node).
By default, the first port (50000) is reserved for connection requests, and the first
available four ports above 60000 are reserved for fast communications manager
(FCM) communication. FCM handles communication between database partitions.
The number of ports to reserve for FCM equals the maximum number of database
partitions hosted, or potentially hosted, by any machine in the instance.
1. Ensure that the right number of entries was specified for FCM on the admin
node (this is determined by an option in the DB2 Setup Wizard or response
file). If existing entries are insufficient, reserve additional ports to match the
maximum number of database partitions you wish to create on any one
machine.
2. Log on as a root user to each machine participating in the instance (Data
nodes) and add identical entries to the /etc/services file.
An example of /etc/services additions is shown here: launchpad/content/services.txt
(Admin node) Register database partitions in db2nodes.cfg file: The db2nodes.cfg file
maps the participating database partitions to the instance-owning server. The file is
in the home directory of the instance, such as /home/db2inst1/sqllib/db2nodes.cfg. Each partition is assigned a unique number.
The instance-owning partition is numbered as partition 0 and has the following
characteristics:
v Catalog function (only one database partition has the database catalog)
v Coordinator function
v Single-partition data function Query Patroller server and control tables (if
implemented)
v Located on the administration node
34 DB2 Warehouse Version 9.5: Installation Launchpad

The other participating partitions are numbered in ascending order starting with 1
and have the following characteristics:
v Database partitions with partitioned data
v Located on the data nodes
The db2nodes.cfg file that contains the mapping of database partition servers to
computers has the following structure:
<nodenum> <hostname> <logical port> <netname> <resourcesetname>
nodenum
A unique number, between 0 and 999, that identifies a database partition
server in a partitioned database system. The nodenum value that you
select for additional database partition servers must be in ascending order,
however, gaps can exist in this sequence.
hostname
The TCP/IP host name of the database partition server for use by database
partitions that do not use Fast Communication Manager (FCM)
communication. This network will also be used for FCM communication if
no netname is specified in column four. This entry is required.
logical port
Specifies the logical port number for the database partition. This field is
used to specify each database partition within a single computer. The
logical port value must start at 0 and continue in ascending order with no
gaps (for example, 0, 1, 2, 3, 4, 5, 6, 7). This field is optional only if you are
using only one partition on a machine and are not using a high speed
interconnect (implying that the netname must be provided).
netname
Specifies the host name or the IP address of the high speed interconnect for
FCM communication. If an entry is specified for this field, all FCM
communication between database partitions will be done on this network.
this parameter is required only if you are using a high speed interconnect
for database partition communications.
resourcesetname
The resourcesetname is for process affinity support when more than one
database partition is on a single computer. This causes all processes for one
database partition to be tied to one CPU, which produces a processor
affinity for each database partition. It is recommended that this feature not
be used because there are potentially significant drawbacks when using
resource sets, offset only by a small potential performance benefit.
Sample db2nodes.cfg file:launchpad/content/db2nodes.cfg
(Admin node) Create database: DB2 creates the database catalog on the database
partition where the CREATE DATABASE command is executed. For this reason
you should ensure that the CREATE DATABASE command is executed on the
database partition that will serve as the catalog. This partition will be located on
the first administration node and will have the database partition number 0 in the
db2nodes.cfg file.
There are two methods to ensure that the catalog is created on database partition 0:
1. You can log on to the server with database partition 0 as the DB2 UDB instance
and then export the DB2NODE environment variable:
export DB2NODE=0
db2 "create database dbname on /db2fs collate using identity pagesize 8192"
Chapter 1. DB2 Warehouse Server installation 35

Where dbname is the name of your database and /db2fs is the name of the
filesystem on which you intend the partitioned data to reside. Note that a page
size of 8K is used for the database.
2. You can use DB2 syntax to cause a command to be run on only one database
partition:
db2_all "<<+0< db2 \"create database ...\"
You can also put these commands in scripts and execute the scripts.
Create Partition groups, tablespaces, and bufferpools (INSTRUCTIONS):
Bufferpool creation
Bufferpool creation is a complex task related to your warehouse planning. For
guidance on designing bufferpools consult the relevant DB2 Information Center
topic:
http://publib.boulder.ibm.com/infocenter/db2luw/v9r5/index.jsp?topic=/com.ibm.db2.luw.admin.dbobj.doc/doc/c0052485.html
Partition Group creation
When a database is created, the following database partition groups are created
automatically by DB2:
IBMCATGROUP.
This database partition group contains the catalog tables. IBMCATGROUP
consists of one database partition. IBMCATGROUP contains database
partition 0.
IBMTEMPGROUP.
This database partition group comprises all the database partitions.
It is the database partition group in which the default TEMPSPACE1 system
managed temporary table space is created.
Temporary tables are created during various database operations, for
example when a sort spills beyond its sort heap memory or when a
temporary result set is instantiated during query execution.
IBMDEFAULTGROUP.
Immediately after the database is created, this database partition group
becomes the default partition group for table spaces that do not have
explicit partition group assignments.
This partition group contains every partition in the instance by default.
This group also initially contains a table space called USERSPACE1.
USERSPACE1 is the default table space for all user tables that do not have
table space assignments.
You should drop the USERSPACE1 table space. You should then recreate it
(with either the same or a different name) on the partition group that
includes only the data node database partitions.
If you use the suggested database partition group names, this partition
group is named PDPG.
You might want to customize your partition groups based on your warehouse
design. One approach is to create one partition group for partitioned data
contained in data nodes, and another for non-partitioned data stored on the
36 DB2 Warehouse Version 9.5: Installation Launchpad
administration node. See the example for this approach in the ″Creating partition
groups, tablespaces, bufferpools (Examples)″ tab.
Tablespace creation
You should create tablespaces in the appropriate partition groups for
warehouse data and data used by SQL warehousing, Intelligent Miner, and
Query Patroller tools. While your specific design may vary, one approach
is to create at least one tablespace across data nodes for warehouse data,
and a tablespace on only the admin node used exclusively for DB2
Warehouse tools metadata. Note that while this example assumes all
metadata tables within the same database as the warehouse data, it is
possible to place some of these tables in a different database.
Important: Whichever tablespace you specify for DB2 Warehouse tools metadata,
you must grant access on this tablespace to the dweadmin user. During the
installation of the application server, you will need to indicate this tablespace in
the DB2 Warehouse Configuration tool (The tablespace on which dweadmin has
access is automatically selected).
Create Partition groups, tablespaces, and bufferpools (EXAMPLE): Below is a sample
configuration of partition groups, tablespaces and bufferpools. Note that this
example is specific to a particular hardware setup. You should determine your
configuration through planning based on your warehouse metrics.
Create partition groups example
1. Create a partition group for partitioned warehouse data:
PDPG.
The database partition group that will hold the partitioned data
for the warehouse. It has the following characteristics:
v Database partitions in this database partition group contain
tables that are partitioned across all the data nodes. This
database partition group contains only the data partitions on
the data nodes. This database partition group does not
include the administration node.
v The tables in this database partition group are normally
medium-sized to quite large. These tables can usually be
collocated with several other tables. This database partition
group is also used to hold the small static tables that are
replicated onto each database partition to enhance join
performance.command: CREATE DATABASE PARTITION GROUP PDPG ON DBPARTITIONNUMS \ (1, 2, 3, 4, 5, 6, 7, 8);
2. Create a partition group for non-partitioned data on administration
node:
SDPG.
The database partition group that will hold the data for the
administration node. It has the following characteristics:
v This database partition group contains one database
partition: database partition 0.
v The tables in this database partition group are usually small.
The tables in this database partition group are usually small.
These tables are typically dimension tables or lookup tables,
and can be static or dynamic. These tables usually cannot be
collocated with any other tables (or perhaps only with one
table).
Chapter 1. DB2 Warehouse Server installation 37
For tables that are more static, you should use replicated tables
to put a copy of these tables on all the database partitions of
the PDPG database partition group. Replicating the small tables
collocates them with the partitioned tables, which often
increases the performance of joins between partitioned and
single-partition tables.
You should, however, only replicate the tables that are actively
used in the workload. You should, however, only replicate the
tables that are actively used in the workload.
command: CREATE DATABASE PARTITION GROUP SDPG ON DBPARTITIONNUMS (0);
DWECONTROLGROUP.
The database partition group that will hold data used
by certain DB2 Warehouse applications (SQL
Warehousing, Query Patroller)3. Create a partition group on partition 0 called DWECONTROLGROUP
by issuing the following command.
CREATE DATABASE PARTITION GROUP DWECONTROLGROUP ON DBPARTITIONNUM (0);
4. Grant access on DWECONTROLGROUP to the DB2 Warehouse user. If
you use the suggested user names, the DB2 Warehouse user is called
dweadmin.
Create bufferpool example
CREATE BUFFERPOOL BP8K ALL DBPARTITIONNUMS SIZE 130560 PAGESIZE 8K;
Create tablespaces example
1. Drop tablespace USERSPACE1.
2. Create the table spaces for the data nodes. In this example there are
three tablespaces created: a temporary tablespace, a tablespace for
tables, and a tablespace for table indexes.
CREATE TEMPORARY TABLESPACE db2tmp8k IN DATABASE PARTITION GROUP ibmtempgroup PAGESIZE 8K MANAGED BY SYSTEM
USING (/db2fs/bculinux/NODE0000/linuxbcudb/temp/db2tmp8k) on NODE(0)
USING (/db2fs/bculinux/NODE000 $N /linuxbcudb/temp/db2tmp8k) on NODE(1 to 9)
USING (/db2fs/bculinux/NODE00 $N /linuxbcudb/temp/db2tmp8k) on NODE(10 to 99)
USING (/db2fs/bculinux/NODE0 $N /linuxbcudb/temp/db2tmp8k) on NODE(100 to 999)
EXTENTSIZE 64 PREFETCHSIZE 128 BUFFERPOOL bp8K;CREATE REGULAR TABLESPACE ts_pd_data_001
IN DATABASE PARTITION GROUP pdpg PAGESIZE 8K MANAGED BY DATABASE
USING (FILE ’/db2fs/bculinux/NODE00 $N /linuxbcudb/data/ts_pd_data_001’ 100G) ON NODE(10 to 99)
USING (FILE ’/db2fs/bculinux/NODE0 $N /linuxbcudb/data/ts_pd_data_001’ 100G) ON NODE(100 to 999)
AUTORESIZE YES MAXSIZE 150G INCREASESIZE 5G EXTENTSIZE 64 PREFETCHSIZE 128 BUFFERPOOL bp8K NO FILE SYSTEM CACHING;
CREATE REGULAR TABLESPACE ts_pd_idx_001 IN DATABASE PARTITION GROUP pdpg PAGESIZE 8K MANAGED BY DATABASE
USING (FILE ’/db2fs/bculinux/NODE000 $N /linuxbcudb/data/ts_pd_idx_001’ \ 50G) ON NODE(1 to 9)
USING (FILE ’/db2fs/bculinux/NODE00 $N /linuxbcudb/data/ts_pd_idx_001’ \ 50G) ON NODE(10 to 99)
USING (FILE ’/db2fs/bculinux/NODE0 $N /linuxbcudb/data/ts_pd_idx_001’ \ 50G) ON NODE(100 to 999)
AUTORESIZE YES MAXSIZE 100G INCREASESIZE 5G EXTENTSIZE 64 PREFETCHSIZE 128 BUFFERPOOL bp8K NO FILE SYSTEM CACHING;
3. Create the table space for the administration node using the following
statement as an example:
CREATE REGULAR TABLESPACE ts_sd_small_001 IN DATABASE PARTITION GROUP sdpg PAGESIZE 8K MANAGED BY DATABASE
USING (FILE /db2fs/bculinux/NODE0000/linuxbcudb/data/ts_sd_data_001 100G)
AUTORESIZE YES MAXSIZE 200G INCREASESIZE 5G EXTENTSIZE 64 PREFETCHSIZE 128 BUFFERPOOL bp8K NO FILE SYSTEM CACHING;
4. Create the tablespaces for the DB2 Warehouse tools using the following
statement as an example. In this example there are three tablespaces
created: a tablespace for SQL Warehousing and Intelligent Miner tables,
a tablespace for Query Patroller control tables, and a tablespace for
Query Patroller result tables.
38 DB2 Warehouse Version 9.5: Installation Launchpad
CREATE REGULAR TABLESPACE dwedefaultcontrol IN DATABASE PARTITION GROUP dwecontrolgroup PAGESIZE 8k MANAGED BY DATABASE
USING (FILE /db2fs/bculinux/NODE0000/linuxbcudb/dwe/control/c1 1G) ON NODE(0)
AUTORESIZE YES MAXSIZE 5G INCREASESIZE 100M EXTENTSIZE 64 PREFETCHSIZE 32 BUFFERPOOL bp8k NO FILE SYSTEM CACHING;
CREATE REGULAR TABLESPACE qpcontrol IN DATABASE PARTITION GROUP dwecontrolgroup PAGESIZE 8k MANAGED BY DATABASE
USING (FILE /db2fs/bculinux/NODE0000/linuxbcudb/dwe/qpcontrol/c1 1G) ON NODE(0)
AUTORESIZE YES MAXSIZE 5G INCREASESIZE 1G EXTENTSIZE 64 PREFETCHSIZE 32 BUFFERPOOL bp8k NO FILE SYSTEM CACHING;
CREATE REGULAR TABLESPACE qpresult IN DATABASE PARTITION GROUP dwecontrolgroup PAGESIZE 8k MANAGED BY DATABASE
USING (FILE /db2fs/bculinux/NODE0000/linuxbcudb/dwe/qpresult/c1 5G) ON NODE(0)
AUTORESIZE YES MAXSIZE 50G INCREASESIZE 5G EXTENTSIZE 64 PREFETCHSIZE 32 BUFFERPOOL bp8k NO FILE SYSTEM CACHING;
Set up DB2 Warehouse components: Please refer to the section Install single
computer Data Server > Required tasks after installation for a list of tasks to be
performed on the administration node:
“Required tasks after installation” on page 27
Install the application server
This section of the launchpad guides you through the main steps to install the
application server components on one computer. See the DB2 Warehouse
Architecture tab for an overview of how the application server fits into your
environment.
Before attempting these steps, make sure your environment meets the requirements
specified on the System Requirements tab.
1. The Required tasks before the installation tab describes the steps that are
required to prepare your environment for a successful installation. This
preparation is in addition to checking your system requirements.
2. The Install the product tab launchs the DB2 Warehouse Installation program
for installing the application server components on your computer.
3. The Required tasks after installation tab describes the steps that are required
to enable your environment for running DB2 Warehouse.
Related information
“Required tasks before the installation”
“Install the application server components” on page 40
“Required tasks after installation” on page 40
Required tasks before the installation
Before you install the application server components, take the following steps.
1. Make sure your environment satisfies the requirements specified on the System
Requirements tab.
2. The application server includes IBM Websphere Application Server 6.1.0.9. If it
is already installed on this computer, you can use that copy with DB2
Warehouse instead of installing a new copy of WebSphere. Existing WebSphere
applications are not affected by DB2 Warehouse, which is installed in a separate
profile.
3. The installation program prompts you for user information about the
components you are installing. You can save time by collecting this information
before you start the installation. This information is listed in the DB2 Warehouse
Installation Guide.
The application server components require at minimum a DB2 client instance for
accessing metadata tables where data flows and control flows definition are stored.
By default, the IBM Data Server Client will be installed but instead you can choose
to install DB2 Enterprise Server Edition on this node.
Chapter 1. DB2 Warehouse Server installation 39

In the following section, we assume that you use the default settings (with the
Data Server Client) and that the metadata tables will be created on the target
database on the data server.
Table 5. Create DB2 Warehouse groups
Group created Sample group name
DB2 Warehouse administrators group dweadmgrp
DB2 Warehouse managers group dwemgrgrp
DB2 operators group dweopergrp
Table 6. Create the DB2 Warehouse user admin.
The DB2 Warehouse admin user will be the DB2 client instance owner and will be used to
access the DB2 Warehouse metadata tables.
User created username
Group created for user
ID Home directory
DB2 Warehouse
administrative user
dweadmin dweadmgrp /home
Install the application server components
To install the DB2 Warehouse application server components on this computer, run
the DB2 Warehouse installation program.
IBM recommends that you install all of the components that are preselected when
you launch the program from this tab.
Make sure your environment satisfies the requirements specified on the System
Requirements tab.
(This is the launch point for the installation program for DB2 Warehouse.)
Required tasks after installation
After installing the application server, take the following steps:
1. To verify that the installation was successful, check the log files listed in ″Log
file locations″ in the DB2 Warehouse Installation Guide. In the main installation
log file dweinstall.log and the configuration log file config.log, check for lines
that contain keywords such as err, Exception, wrn for errors and warnings.
2. During installation of the Application Server components, DB2 Warehouse will
either create a new Client instance or will re-use a client or full instance as
specified during installation. Prior to starting the Websphere Application Server
(WAS) it is necessary to ensure that WAS starts up with the correct DB2
environment. This environment is required in order for some Admin Console
and SQL Warehouse features to function properly. For example, if the DB2
instance is called dweadmin, you can run one of following commands: For
bourne, bash and ksh shells:
$ . ~dweadmin/sqllib/db2profile
For csh and tcsh shells:
% source ~dweadmin/sqllib/db2cshrc
3. You must run the DB2 Warehouse configuration tool to complete the
installation. The final panel of the installation program prompts you to launch
the configuration tool. You can use the configuration tool immediately after
installation or any time later to modify your configuration. If you don’t run it
40 DB2 Warehouse Version 9.5: Installation Launchpad
immediately, you can start it by running the config/config.sh file from the
directory where DB2 Warehouse is installed.
4. Unless you installed DB2 Enterprise Server Edition on this machine, you will
have to specify a remote database (on the admin node) for the metadata and
scheduler tables. You can specify your Warehouse database for this purpose, or
you can create a separate database. When prompted by the configuration tool,
enter the database name and a non-partitionned tablespace (e.g.
dwedefaultcontrol) to be used for metadata and scheduler tables. See Install
data server on multiple computer > Required tasks after installation for
details.
5. Start WebSphere Application Server as root. For example:
./startServer.sh server1
See the DB2 Warehouse Installation Guide for more details.
DB2 Warehouse server installation for Solaris
Use this launchpad to install the server components of DB2 Warehouse 9.5, which
is the new name for DB2 Data Warehouse Edition. DB2 Warehouse is a suite of
products that combines the strength of DB2 Enterprise Server Edition with a
powerful business intelligence infrastructure from IBM. DB2 Warehouse provides a
comprehensive business intelligence platform with tools for building and
deploying analytic solutions.
You can install DB2 Warehouse on a single database partition or, with the DB2
Database Partitioning Feature, across multiple database partitions. This launchpad
guides you through the major tasks you must perform to create a warehousing
environment that matches your needs.
v Before you can install any part of this product, you must copy the Activation CD
for your edition onto the participating computers. The Activation CD for your
product or feature can be downloaded from Passport Advantage if it is not part
of the physical media pack you received from IBM. The Activation CD contains
the license certificate file (or license key) for your DB2 Warehouse Edition.
v Ensure that your system satisfies the minimum hardware and software
requirements listed on the System Requirements tab. Note that for a production
system, significant planning is required to determine the appropriate hardware
configuration based on factors such as expected size of the warehouse. If you are
migrating from an earlier version of this product, read the DB2 Warehouse
Installation Guide for migration tasks.
v Select DB2 Warehouse architecture to learn the basic concepts you need to plan
your installation of DB2 Warehouse components in your environment.
v Select Install the data server to install the data server components. You can
install the data server in two ways:
– On a single computer, using only the DB2 Warehouse installation program
(single-partition DB2).
– Across multiple computers, using the DB2 Enterprise installation program
with the Database Partitioning Feature (multi-partition DB2). Ensure that your
edition permits the use of the Data Partitioning Feature.v Select Install the application server to install the application server components
using the DB2 Warehouse installation program.
You must use a different installation program to install the client components of
DB2 Warehouse. See the DB2 Warehouse Installation Guide for details.
Related information
Chapter 1. DB2 Warehouse Server installation 41
“System requirements”
“DB2 Warehouse architecture”
“Install the data server” on page 44
“Install the application server” on page 57
System requirements
The minimum system requirements for DB2 Warehouse are summarized below.
Make sure you read and apply the full requirements listed in the DB2 Warehouse
Installation Guide. Note that significant planning is required to determine the
appropriate hardware configuration based on factors such as expected size of the
warehouse.
For up to date system requirements, refer to the online documentation.
Operating system:
DB2 Warehouse Server for Solaris is supported on the following platforms:
Solaris 9 64-bits kernel on SPARC
v Patches 111711-12 & 111712-12
v Patch 122300-11, if raw devices are used.
Solaris 10 64-bits kernel on SPARC
v Patches 111711-12 & 111712-12
v Patch 125100-07, if raw devices are used.
Temporary space for running the installation program:
Approximately 550 MB of disk space is recommended on the user’s temp
directory (/tmp)
Permanent space for the installed components:
Approximately 2.5 GB of disk space is recommended for the installed
product.
Memory for installing the product:
Approximately 1 GB of memory is needed to install all the data warehouse
server components.
Memory for running the product:
Approximately 1 GB of memory is the minimum amount of memory
required to run the data warehouse server components alone. If you run
the application server components on the same computer, 2 GB of memory
is recommended.
Note that memory and hard drive requirements are related to planning and
depends on your configuration.
DB2 Warehouse architecture
DB2 Warehouse components are arranged into three logical groups:
v data server
v application server
v client
The data server can be installed:
v on a single computer, single-partition DB2
v across multiple computers, multi-partition DB2
42 DB2 Warehouse Version 9.5: Installation Launchpad
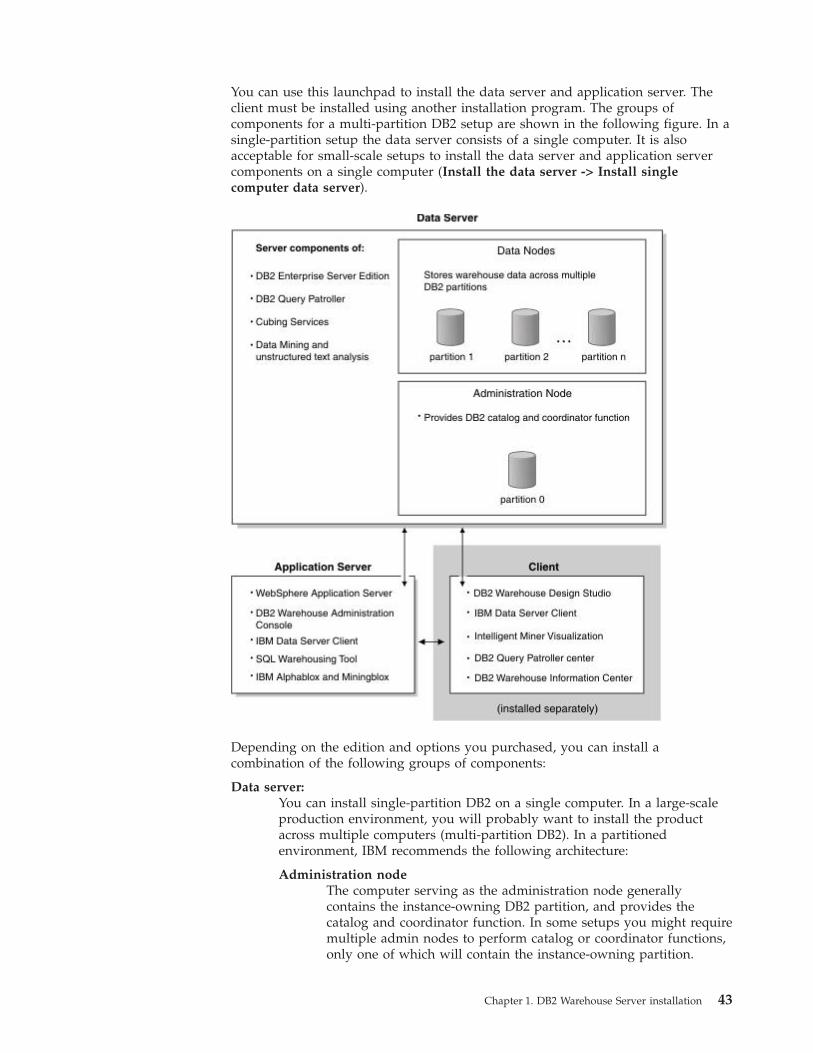
You can use this launchpad to install the data server and application server. The
client must be installed using another installation program. The groups of
components for a multi-partition DB2 setup are shown in the following figure. In a
single-partition setup the data server consists of a single computer. It is also
acceptable for small-scale setups to install the data server and application server
components on a single computer (Install the data server -> Install single
computer data server).
Depending on the edition and options you purchased, you can install a
combination of the following groups of components:
Data server:
You can install single-partition DB2 on a single computer. In a large-scale
production environment, you will probably want to install the product
across multiple computers (multi-partition DB2). In a partitioned
environment, IBM recommends the following architecture:
Administration node
The computer serving as the administration node generally
contains the instance-owning DB2 partition, and provides the
catalog and coordinator function. In some setups you might require
multiple admin nodes to perform catalog or coordinator functions,
only one of which will contain the instance-owning partition.
Chapter 1. DB2 Warehouse Server installation 43
Data nodes
A collection of computers containing DB2 database partitions,
dedicated to managing and processing a part of the user data
within the database.
Application server:
The Application Server contains applications such as Alphablox. The DB2
Warehouse administration console requires either DB2 Enterprise or the
IBM Data Server Client to be installed for this group. If you do not install
DB2 Enterprise then the Data Server Client is installed.
Client:
The Client contains tools for manipulating and viewing warehouse data.
You must use a different installation program to install the client
components of DB2 Warehouse. See the DB2 Warehouse Installation Guide for
details.
Install the data server
This launchpad supports two main installation scenarios:
1. Select Install single computer data server to install the warehouse server on
one computer, using the DB2 Warehouse installation program (single-partition
DB2). This selection also provides the option of installing the application server
on the same machine as the data server.
2. Select Install data server on multiple computers to install the data server
components across multiple computers (multi-partition DB2).
a. First you install the data server components on the administration node.
This will create installation response files that you use later. There are two
steps:
1) Install DB2 Enterprise Server Edition with the Database Partitioning
Feature using the DB2 installation program.
2) Install the DB2 Warehouse server warehousing components using the
DB2 Warehouse installation program.b. To install DB2 Enterprise Server Edition on the data nodes you should use
the response file that was created during installation of the administration
node. To install DB2 Warehouse server warehousing components on the
data nodes you can use the DB2 Warehouse installation program, or use the
sample response file provided to perform a silent install.
Related information
“Install single computer data server”
“Install the data server on multiple computers” on page 47
Install single computer data server
This tab guides you through the main steps to install the data server components
on a single computer (single-partition DB2). Before attempting these steps, make
sure your environment meets the requirements specified on the System
Requirements tab. IBM recommends that you install all of the components that are
preselected when you launch the program from this tab.
1. The Required tasks before the installation tab describes the steps that are
required to prepare your environment for a successful installation. This
preparation is in addition to checking your system requirements.
2. The Install the product tab launches the DB2 Warehouse Installation Program.
3. The Required tasks after installation tab describes the steps that are required
to enable your environment for running DB2 Warehouse.
44 DB2 Warehouse Version 9.5: Installation Launchpad

Related information
“Required tasks before the installation”Before installing the data server, you must prepare your environment. The
major tasks are summarized below.
“Install the product”
“Required tasks after installation” on page 46
Required tasks before the installation:
Before installing the data server, you must prepare your environment. The major
tasks are summarized below.
Before starting, make sure your system satisfies the hardware and software
requirements listed on the System Requirements tab.
Ensure you have root authority
You must have root authority to perform the following tasks. These tasks
should typically be performed by a System Administrator.
Ensure root has write permission to certain files and directories
v /var
v /etc/hosts
v /etc/services. Additionally, the DB2 instance user must have read
permissions to this file.
v /usr/local/bin
v /tmp (your temporary directory)
v your home directory
v instance user home directory
v fenced user home directory
v DB2 Administration user home directory
Collect the necessary installation information
The installation program prompts you for user information about the
components you are installing. You can save time by collecting this
information before you start the installation. This information is listed in
the DB2 Warehouse Installation Guide.
Create required users and groups
The DB2 installation program creates a number of users and groups for
you. You can create additional users and groups to make it easier to
maintain your environment.
Copy the DB2 Warehouse Activation CD on disk
Prior to launching the DB2 Warehouse installation program, you will need
to copy the Activation CD onto your local disk. The Activation CD for
your product or feature can be downloaded from Passport Advantage if it
is not part of the physical media pack you received from IBM.
The launchpad will prompt you for the location where you copied the
Activation CD when you start the DB2 Warehouse installation program. If
you are running the DB2 Warehouse installation directly, you must provide
the location of the Activation CD files on the command line, using the
-profile parameter.
Install the product: To install a data server on a single computer, run the DB2
Warehouse installation program.
Chapter 1. DB2 Warehouse Server installation 45

IBM recommends that you install all of the components that are preselected when
you launch the program from this tab.
Make sure your environment satisfies the requirements specified on the System
Requirements tab.
(This is the launch point for the installation program for DB2 Warehouse.)
Note: While a separate machine is recommended for the Application Server
components, for a small-scale single-partition setup you may choose to install
Application Server components on the same machine as the Data server by
selecting these additional components in the Installer. If you choose to do this
remember to complete Application Server post-installation steps under the Install
the Application Server tab.
Required tasks after installation: After you install the data server, there are
additional tasks you must perform. The tasks are summarized below. Post-Install
tasks are DB2-specific tasks which should be performed by a DBA. (typically the
DB2 instance owner user)
First, verify that the installation was successful. Check the log files listed in ″Log
file locations″ in the DB2 Warehouse Installation Guide. In the main installation log
file dweinstall.log, check the lines that contain keywords such as err, Exception,
wrn for errors and warnings.
If you have installed Query Patroller or Intelligent Miner you will need to perform
the following tasks. These tasks should be performed only after you have created
your Warehouse database.
Based on the product edition you purchased, Query Patroller and Intelligent Miner
may not be not available during installation.
Note that the following examples assume the warehouse database, and tablespaces
for certain DB2 Warehouse components (ie. Query Patroller result and control
tablespaces) have been created.
Go to the Install the application server tab.
Related tasks
“Setup Query Patroller”
“Setup Data Mining (Intelligent Miner)” on page 47
Setup Query Patroller:
Enable the database for Query Patroller. Query Patroller will monitor all queries
directed to the administration node.
1. As the DB2 instance owner, issue the following command from the directory:
~/sqllib/bin. In the examples used in this launchpad, the instance owner is
called db2inst1.
2. Enable the database for Query Patroller. Query Patroller will monitor all
queries directed to the administration node.
qpsetup db <dbname> CONTROL_TABLESPACE qpcontrol RESULT_TABLESPACE qpresult
3. Set the configuration parameter DYN_QUERY_MGMT to ENABLE for the database
for which you want Query Patroller to manage queries:
db2 update db cfg for <dbname> using DYN_QUERY_MGMT enable
46 DB2 Warehouse Version 9.5: Installation Launchpad
In a multi-computer environment, this command must be run on all data nodes
as well.
4. Verify that you can start (and stop) Query Patroller on the database:
qpstart <dbname>
qpstop <dbname>
Setup Data Mining (Intelligent Miner):
Enable the instance and database for Data Mining (Intelligent Miner)
As the DB2 instance owner, issue the following commands to enable the instance
for Intelligent Miner:
cd <DB2INSTALL>/bin
./idmenabledb <dbname> fenced dbcfg
where <DB2INSTALL> is the installation directory of DB2 (/opt/IBM/dwe/db2/V9.5) and <dbname> is the name of the database you wish to enable.
Install the data server on multiple computers
This tab guides you through the main steps to install the data server components
across multiple computers (multi-partition DB2). Ensure that your edition permits
the use of the Data Partitioning Feature, required for multi-partition DB2.
You must plan your installation before you proceed. For example, you must decide
which computer will be the administration node for your environment, and which
computers will contain your warehouse data.
1. The Required tasks before the installation tab describes the steps that are
required to prepare your environment for a successful installation. This
preparation is in addition to checking your system requirements.
2. The Install the administration node tab describes how to install the data server
components on the administration node. You must run two installation
programs to complete this step:
a. Install DB2 Enterprise Server Edition on the administration node using the
DB2 installation program. This produces a response file that you use later to
install DB2 Enterprise Server Edition on additional computers.
b. Install the DB2 Warehouse server warehousing components on the
administration node using the DB2 Warehouse installation program. This
produces a response file that you use later to install the DB2 Warehouse
data warehouse server components on additional computers.3. The Install the data node tab describes how to install the data server
components on the participating computers. The data nodes comprise all the
partitions that hold your warehouse data. You must run two installation
programs to complete this step:
a. Run the DB2 Enterprise Server Edition installation program from the
command line to install DB2 Enterprise Server Edition on the data node
computers. You should use the response file that was created when you
installed on the administration node in the previous step.
b. Run the DB2 Warehouse installation program to install the DB2 Warehouse
server warehousing components on the data nodes. Alternatively, you can
use a sample response file provided to perform a silent install.4. The Required tasks after installation tab describes the steps that are required
to enable your environment for running DB2 Warehouse.
Chapter 1. DB2 Warehouse Server installation 47

Related information
“Required tasks before the installation”
“Install the administration node” on page 49
“Install the data node” on page 51
“Required tasks after installation” on page 52
Required tasks before the installation: Pre-Install tasks are OS tasks which
require ROOT authority to be carried out. These tasks should typically be
performed by a System Administrator.
Prior to launching the DB2 Warehouse installation program, you will need to copy
the Activation CD onto your local disk. The Activation CD for your product or
feature can be downloaded from Passport Advantage if it is not part of the
physical media pack you received from IBM.
The launchpad will prompt you for the location where you copied the Activation
CD when you start the DB2 Warehouse installation program. If you are running
the DB2 Warehouse installation directly, you must provide the location of the
Activation CD files on the command line, using the -profile parameter.
Related tasks
“(Data nodes) Setting up NFS Client” on page 49 Related information
“(All nodes) Create required DB2 users and groups”
“(Admin node) Setting up NFS Server”
(All nodes) Create required DB2 users and groups: You need to manually create three
DB2 user IDs on each data node.
On the Admin node (instance-owning partition machine) the 3 users below are
created by the DB2 Installer (see Install section).
Ensure that uids for these users match across all machines, admin and data nodes.
Table 7.
User created username
Group created for user
ID Home directory
DB2 instance owner db2inst1 db2iadm1 /home
DB2 fenced user db2fenc1 db2fadm1 /home
DB2 administration
server user
dasusr1 dasadm1 /dashome (local
directory)
Note:
1. The instance owner’s home directory is where the DB2 instance will be created.
2. The fenced user is used to run user-defined functions (UDFs) and stored
procedures outside the address space used by the database.
3. The user ID for the DB2 administration server is used to run the administration
server on your system. Its home directory must be on a local file system
partition, unlike the home directory of the fenced and instance users.
(Admin node) Setting up NFS Server: The following steps explain how to configure
an NFS server on the administration node to share the /home directory. Later in
the implementation process you will create the DB2 instance in the
48 DB2 Warehouse Version 9.5: Installation Launchpad

/home/<instance name> directory. Setting up the NFS server to share the /home
directory will allow all participating computers to access the instance owner’s
home directory, which is a requirement for a partitioned database environment.
The following sections about NFS assume that the current home filesystem
partition is large enough to contain the necessary DB2 files as well as other
non-DB2 files. A minimum of 1 GB is recommended.
Procedure
1. To automatically export an NFS file system on Solaris at boot time, add an
entry to the /etc/dfs/dfstab file. Be sure to include all of the host names of
the participating computers as well as all of the names that a given computer
might be known as. Also, ensure that each computer has root authority on the
exported file system by using the root option.
share -F nfs -o rw=datanote001,root=datanote001
\rw=datanote002,root=datanote002\
rw=datanote003,root=datanote003 -d "homes" /home
2. If you created a new filesystem, ensure it is mounted each time the system is
rebooted by adding an entry to the /etc/vfstab. For example:
/dev/dsk/c1t0d2s2 /dev/rdsk/c1t0d2s2 /home ufs 2 yes -
(Data nodes) Setting up NFS Client:
Procedure:
1. On each data node, add an entry to the /etc/vfstab file to NFS mount the file
system automatically at boot time.
adminnode001:/home - /home nfs - yes rw,hard,intr,bg,suid
2. Create and NFS mount the exported file system on each of the data nodes in
the partitioned database environment by entering the following commands:
mkdir /home
mount /home
If the mount command fails, use the showmount command to check the status
of the NFS server. For example:
showmount -e adminnode001
This showmount command should list the file systems which are exported from
the computer named adminnode001. If this command fails, the NFS server may
not have been started. To start the server manually, run the following
commands as root on the NFS server (admin node):
/usr/lib/nfs/mountd
/usr/lib/nfs/nfsd -a 16
These commands are run automatically at boot time if there are any entries in
the /etc/dfs/dfstab file. After starting the NFS server, export the NFS file
system again by running the following command:
sh /etc/dfs/dfstab
Install the administration node: The administration node typically contains the
instance-owning database partition that owns the DB2 instance for your data
server. There are two parts to this step:
“Install the DB2 Enterprise Server Edition” on page 50
“Install the remaining DB2 Warehouse components” on page 50
Chapter 1. DB2 Warehouse Server installation 49

After you installed the administration node, you must install the data warehouse
components on the data node. The data node comprises all the partitions that hold
your warehouse data. You can install the data node from the command line using
the response files you created when you installed the administration node. Take
the response files to each computer in your environment and follow the directions
on the Install the data node tab.
Related concepts
“Install the DB2 Enterprise Server Edition”
“Install the remaining DB2 Warehouse components”
Install the DB2 Enterprise Server Edition: Install the DB2 Enterprise Server Edition
using the DB2 Setup Wizard, or using a response file generated by the Setup
Wizard or based on a template.
Option A: Install using DB2 Setup Wizard::
v After launching the DB2 installation program, in the Select installation, response
files creation, or both window, select the Install DB2 and save my installation
settings in response files option.
v The installation program creates two response files that you can use to silently
install additional partitions. The PROD_ESE.rsp response file is for silently
installing instance-owning database servers. The PROD_ESE_addpart.rsp response
file is for silently installing the participating database servers.
(This is the launch point for the installation program for DB2 Warehouse.)
Option B: Install using response file install::
Procedure:
1. Generate a response file using the DB2 Setup wizard, specifying the options
discussed above, or modify the sample response file located here:
dwe\Ese\db2\solaris\samples\db2ese.rsp
2. In a command line window (shell), change to the directory where the DB2
Enterprise Server Edition installation files are located:
cd path_to_image\dwe\Ese
3. Execute the following command:
./db2setup -r responsefile_directory/response_file_name
Install the remaining DB2 Warehouse components: When you finish installing DB2
Enterprise Server Edition, run the DB2 Warehouse installation program to install
the rest of the data warehouse server components for the instance-owning
partition.
IBM recommends that you install all of the components that are preselected when
you launch the program from this tab. You should install DB2 Warehouse using the
existing DB2 server that was installed in the previous step.
You can install the product using one of the following method:
Option A: Using the DB2 Warehouse installation wizard:
IBM recommends you install DB2 Warehouse using this method.
(This is the launch point for the installation program for DB2 Warehouse.)
Option B: Using the response file template provided with the launchpad.:
1. Copy the template response file below onto your hard drive
50 DB2 Warehouse Version 9.5: Installation Launchpad
launchpad\content\solaris\dweadmnode.rsp
2. Edit the response file to specify the actual DB2 Enterprise Server Edition install
location and accept the license agreement.
3. In a command line window, execute the following command:
./setup -is:silent -profile /root/db2w_activation_CD/profile -silent -options dweadmnode.rsp -log \!/tmp/dweadmnode.log
The -profile parameter is required. It must be set to the directory where you
copied the activation CD files.
Install the data node: The data node comprises all the partitions that hold your
warehouse data. There are two parts to this step:
Related concepts
“Install the remaining DB2 Warehouse components” Related information
“Install the DB2 Enterprise Server Edition using a response file”
Install the DB2 Enterprise Server Edition using a response file: DB2 Enterprise Server
Edition (ESE) must be installed on all data node partitions using one of the two
response files:
v (Recommended): Use the response file that was created when you installed DB2
on the instance-owning DB2 partition.
v Alternatively, you can modify the sample response file here:
dwe/Ese/db2/solaris/samples/db2ese.rsp
Procedure:
1. In a command line window (shell), change to the directory where the DB2
Enterprise Server Edition installation files are located:
cd dwe/Ese
2. Execute the following command:
./db2setup -r responsefile_directory/response_file_name
Install the remaining DB2 Warehouse components: Intelligent Miner is the only
component other than DB2 Enterprise Server Edition that you install on the data
nodes. Use either method to complete your installation of DB2 Warehouse on a
data node.
Intelligent Miner is not available in all product editions. Based on the product
edition that you purchased, you may not be entitled to use Intelligent Miner. In
such situation, you can skip the steps below.
Option A: Run the DB2 Warehouse installation wizard.:
(This is the launch point for the installation program for DB2 Warehouse.)
Option B: Perform a silent installation:
1. Copy the template response file below onto your hard drive
launchpad\content\solaris\dwedatanode.rsp
2. Edit the response file to specify the actual DB2 Enterprise Server Edition install
location and accept the license agreement.
3. In a command line window, change to the directory where the DB2 Warehouse
installation files are located and run the following command:
./setup -is:silent -profile /root/db2w_activation_CD/profile -silent -options dwedatanode.rsp -log \!/tmp/dwedatanode.log
Chapter 1. DB2 Warehouse Server installation 51

The -profile parameter is required. It must be set to the directory where you
copied the activation CD files.
Required tasks after installation: Post-Install tasks are DB2-specific tasks which
should be performed by a DBA. (typically the DB2 instance owner user)
Related information
“(Admin node) Configure DB2 to use OpenSSH”
“(All nodes) Set up communications”
“(Admin node) Register database partitions in db2nodes.cfg file” on page 53
“(Admin node) Create database” on page 54
“Create Partition groups, tablespaces, and bufferpools (INSTRUCTIONS)” on
page 54
“Create Partition groups, tablespaces, and bufferpools (EXAMPLE)” on page 55
“Set up DB2 Warehouse components” on page 57
(Admin node) Configure DB2 to use OpenSSH: Prior to DB2 Version 8.2.2 (Version 8,
FixPack 9), DB2 with the Data Partitioning Feature (DPF) enabled implicitly relied
on rsh as the remote shell mechanism when executing commands on remote DB2
nodes. SSH is a more secure alternative to rsh.
Follow the this link to learn how to configure OpenSSH:http://www.ibm.com/developerworks/db2/library/techarticle/
Steps for different variants of ssh may vary slightly.
(All nodes) Set up communications:
Set DB2COMM parameter
Configure TCP/IP communications for all servers in your environment using the
db2set command if it is not already enabled. For example:
db2set DB2COMM=tcpip
Edit /etc/services file
When you create a DB2 instance using the DB2 Setup wizard or the response file
install, a number of entries are automatically added to the /etc/services file on the
server on which the instance is created (Admin node).
By default, the first port (50000) is reserved for connection requests, and the first
available four ports above 60000 are reserved for fast communications manager
(FCM) communication. FCM handles communication between database partitions.
The number of ports to reserve for FCM equals the maximum number of database
partitions hosted, or potentially hosted, by any machine in the instance.
1. Ensure that the right number of entries was specified for FCM on the admin
node (this is determined by an option in the DB2 Setup Wizard or response
file). If existing entries are insufficient, reserve additional ports to match the
maximum number of database partitions you wish to create on any one
machine.
2. Log on as a root user to each machine participating in the instance (Data
nodes) and add identical entries to the /etc/services file.
An example of /etc/services additions is shown here: launchpad/content/services.txt
52 DB2 Warehouse Version 9.5: Installation Launchpad

(Admin node) Register database partitions in db2nodes.cfg file: The db2nodes.cfg file
maps the participating database partitions to the instance-owning server. The file is
in the home directory of the instance, such as /home/db2inst1/sqllib/db2nodes.cfg. Each partition is assigned a unique number.
The instance-owning partition is numbered as partition 0 and has the following
characteristics:
v Catalog function (only one database partition has the database catalog)
v Coordinator function
v Single-partition data function Query Patroller server and control tables (if
implemented)
v Located on the administration node
The other participating partitions are numbered in ascending order starting with 1
and have the following characteristics:
v Database partitions with partitioned data
v Located on the data nodes
The db2nodes.cfg file that contains the mapping of database partition servers to
computers has the following structure:
<nodenum> <hostname> <logical port> <netname> <resourcesetname>
nodenum
A unique number, between 0 and 999, that identifies a database partition
server in a partitioned database system. The nodenum value that you
select for additional database partition servers must be in ascending order,
however, gaps can exist in this sequence.
hostname
The TCP/IP host name of the database partition server for use by database
partitions that do not use Fast Communication Manager (FCM)
communication. This network will also be used for FCM communication if
no netname is specified in column four. This entry is required.
logical port
Specifies the logical port number for the database partition. This field is
used to specify each database partition within a single computer. The
logical port value must start at 0 and continue in ascending order with no
gaps (for example, 0, 1, 2, 3, 4, 5, 6, 7). This field is optional only if you are
using only one partition on a machine and are not using a high speed
interconnect (implying that the netname must be provided).
netname
Specifies the host name or the IP address of the high speed interconnect for
FCM communication. If an entry is specified for this field, all FCM
communication between database partitions will be done on this network.
this parameter is required only if you are using a high speed interconnect
for database partition communications.
resourcesetname
The resourcesetname is for process affinity support when more than one
database partition is on a single computer. This causes all processes for one
database partition to be tied to one CPU, which produces a processor
affinity for each database partition. It is recommended that this feature not
be used because there are potentially significant drawbacks when using
resource sets, offset only by a small potential performance benefit.
Chapter 1. DB2 Warehouse Server installation 53
Sample db2nodes.cfg file:launchpad/content/db2nodes.cfg
(Admin node) Create database: DB2 creates the database catalog on the database
partition where the CREATE DATABASE command is executed. For this reason
you should ensure that the CREATE DATABASE command is executed on the
database partition that will serve as the catalog. This partition will be located on
the first administration node and will have the database partition number 0 in the
db2nodes.cfg file.
There are two methods to ensure that the catalog is created on database partition 0:
1. You can log on to the server with database partition 0 as the DB2 UDB instance
and then export the DB2NODE environment variable:
export DB2NODE=0
db2 "create database dbname on /db2fs collate using identity pagesize 8192"
Where dbname is the name of your database and /db2fs is the name of the
filesystem on which you intend the partitioned data to reside. Note that a page
size of 8K is used for the database.
2. You can use DB2 syntax to cause a command to be run on only one database
partition:
db2_all "<<+0< db2 \"create database ...\"
You can also put these commands in scripts and execute the scripts.
Create Partition groups, tablespaces, and bufferpools (INSTRUCTIONS):
Bufferpool creation
Bufferpool creation is a complex task related to your warehouse planning. For
guidance on designing bufferpools consult the relevant DB2 Information Center
topic:
http://publib.boulder.ibm.com/infocenter/db2luw/v9r5/index.jsp?topic=/com.ibm.db2.luw.admin.dbobj.doc/doc/c0052485.html
Partition Group creation
When a database is created, the following database partition groups are created
automatically by DB2:
IBMCATGROUP.
This database partition group contains the catalog tables. IBMCATGROUP
consists of one database partition. IBMCATGROUP contains database
partition 0.
IBMTEMPGROUP.
This database partition group comprises all the database partitions.
It is the database partition group in which the default TEMPSPACE1 system
managed temporary table space is created.
Temporary tables are created during various database operations, for
example when a sort spills beyond its sort heap memory or when a
temporary result set is instantiated during query execution.
IBMDEFAULTGROUP.
Immediately after the database is created, this database partition group
becomes the default partition group for table spaces that do not have
explicit partition group assignments.
This partition group contains every partition in the instance by default.
54 DB2 Warehouse Version 9.5: Installation Launchpad
This group also initially contains a table space called USERSPACE1.
USERSPACE1 is the default table space for all user tables that do not have
table space assignments.
You should drop the USERSPACE1 table space. You should then recreate it
(with either the same or a different name) on the partition group that
includes only the data node database partitions.
If you use the suggested database partition group names, this partition
group is named PDPG.
You might want to customize your partition groups based on your warehouse
design. One approach is to create one partition group for partitioned data
contained in data nodes, and another for non-partitioned data stored on the
administration node. See the example for this approach in the ″Creating partition
groups, tablespaces, bufferpools (Examples)″ tab.
Tablespace creation
You should create tablespaces in the appropriate partition groups for
warehouse data and data used by SQL warehousing, Intelligent Miner, and
Query Patroller tools. While your specific design may vary, one approach
is to create at least one tablespace across data nodes for warehouse data,
and a tablespace on only the admin node used exclusively for DB2
Warehouse tools metadata. Note that while this example assumes all
metadata tables within the same database as the warehouse data, it is
possible to place some of these tables in a different database.
Important: Whichever tablespace you specify for DB2 Warehouse tools metadata,
you must grant access on this tablespace to the dweadmin user. During the
installation of the application server, you will need to indicate this tablespace in
the DB2 Warehouse Configuration tool (The tablespace on which dweadmin has
access is automatically selected).
Create Partition groups, tablespaces, and bufferpools (EXAMPLE): Below is a sample
configuration of partition groups, tablespaces and bufferpools. Note that this
example is specific to a particular hardware setup. You should determine your
configuration through planning based on your warehouse metrics.
Create partition groups example
1. Create a partition group for partitioned warehouse data:
PDPG.
The database partition group that will hold the partitioned data
for the warehouse. It has the following characteristics:
v Database partitions in this database partition group contain
tables that are partitioned across all the data nodes. This
database partition group contains only the data partitions on
the data nodes. This database partition group does not
include the administration node.
v The tables in this database partition group are normally
medium-sized to quite large. These tables can usually be
collocated with several other tables. This database partition
group is also used to hold the small static tables that are
replicated onto each database partition to enhance join
performance.command: CREATE DATABASE PARTITION GROUP PDPG ON DBPARTITIONNUMS \ (1, 2, 3, 4, 5, 6, 7, 8);
Chapter 1. DB2 Warehouse Server installation 55
2. Create a partition group for non-partitioned data on administration
node:
SDPG.
The database partition group that will hold the data for the
administration node. It has the following characteristics:
v This database partition group contains one database
partition: database partition 0.
v The tables in this database partition group are usually small.
The tables in this database partition group are usually small.
These tables are typically dimension tables or lookup tables,
and can be static or dynamic. These tables usually cannot be
collocated with any other tables (or perhaps only with one
table).
For tables that are more static, you should use replicated tables
to put a copy of these tables on all the database partitions of
the PDPG database partition group. Replicating the small tables
collocates them with the partitioned tables, which often
increases the performance of joins between partitioned and
single-partition tables.
You should, however, only replicate the tables that are actively
used in the workload. You should, however, only replicate the
tables that are actively used in the workload.
command: CREATE DATABASE PARTITION GROUP SDPG ON DBPARTITIONNUMS (0);
DWECONTROLGROUP.
The database partition group that will hold data used
by certain DB2 Warehouse applications (SQL
Warehousing, Query Patroller)3. Create a partition group on partition 0 called DWECONTROLGROUP
by issuing the following command.
CREATE DATABASE PARTITION GROUP DWECONTROLGROUP ON DBPARTITIONNUM (0);
4. Grant access on DWECONTROLGROUP to the DB2 Warehouse user. If
you use the suggested user names, the DB2 Warehouse user is called
dweadmin.
Create bufferpool example
CREATE BUFFERPOOL BP8K ALL DBPARTITIONNUMS SIZE 130560 PAGESIZE 8K;
Create tablespaces example
1. Drop tablespace USERSPACE1.
2. Create the table spaces for the data nodes. In this example there are
three tablespaces created: a temporary tablespace, a tablespace for
tables, and a tablespace for table indexes.
CREATE TEMPORARY TABLESPACE db2tmp8k IN DATABASE PARTITION GROUP ibmtempgroup PAGESIZE 8K MANAGED BY SYSTEM
USING (/db2fs/bculinux/NODE0000/linuxbcudb/temp/db2tmp8k) on NODE(0)
USING (/db2fs/bculinux/NODE000 $N /linuxbcudb/temp/db2tmp8k) on NODE(1 to 9)
USING (/db2fs/bculinux/NODE00 $N /linuxbcudb/temp/db2tmp8k) on NODE(10 to 99)
USING (/db2fs/bculinux/NODE0 $N /linuxbcudb/temp/db2tmp8k) on NODE(100 to 999)
EXTENTSIZE 64 PREFETCHSIZE 128 BUFFERPOOL bp8K;CREATE REGULAR TABLESPACE ts_pd_data_001
IN DATABASE PARTITION GROUP pdpg PAGESIZE 8K MANAGED BY DATABASE
USING (FILE ’/db2fs/bculinux/NODE00 $N /linuxbcudb/data/ts_pd_data_001’ 100G) ON NODE(10 to 99)
USING (FILE ’/db2fs/bculinux/NODE0 $N /linuxbcudb/data/ts_pd_data_001’ 100G) ON NODE(100 to 999)
AUTORESIZE YES MAXSIZE 150G INCREASESIZE 5G EXTENTSIZE 64 PREFETCHSIZE 128 BUFFERPOOL bp8K NO FILE SYSTEM CACHING;
CREATE REGULAR TABLESPACE ts_pd_idx_001 IN DATABASE PARTITION GROUP pdpg PAGESIZE 8K MANAGED BY DATABASE
USING (FILE ’/db2fs/bculinux/NODE000 $N /linuxbcudb/data/ts_pd_idx_001’ \ 50G) ON NODE(1 to 9)
56 DB2 Warehouse Version 9.5: Installation Launchpad

USING (FILE ’/db2fs/bculinux/NODE00 $N /linuxbcudb/data/ts_pd_idx_001’ \ 50G) ON NODE(10 to 99)
USING (FILE ’/db2fs/bculinux/NODE0 $N /linuxbcudb/data/ts_pd_idx_001’ \ 50G) ON NODE(100 to 999)
AUTORESIZE YES MAXSIZE 100G INCREASESIZE 5G EXTENTSIZE 64 PREFETCHSIZE 128 BUFFERPOOL bp8K NO FILE SYSTEM CACHING;
3. Create the table space for the administration node using the following
statement as an example:
CREATE REGULAR TABLESPACE ts_sd_small_001 IN DATABASE PARTITION GROUP sdpg PAGESIZE 8K MANAGED BY DATABASE
USING (FILE /db2fs/bculinux/NODE0000/linuxbcudb/data/ts_sd_data_001 100G)
AUTORESIZE YES MAXSIZE 200G INCREASESIZE 5G EXTENTSIZE 64 PREFETCHSIZE 128 BUFFERPOOL bp8K NO FILE SYSTEM CACHING;
4. Create the tablespaces for the DB2 Warehouse tools using the following
statement as an example. In this example there are three tablespaces
created: a tablespace for SQL Warehousing and Intelligent Miner tables,
a tablespace for Query Patroller control tables, and a tablespace for
Query Patroller result tables.
CREATE REGULAR TABLESPACE dwedefaultcontrol IN DATABASE PARTITION GROUP dwecontrolgroup PAGESIZE 8k MANAGED BY DATABASE
USING (FILE /db2fs/bculinux/NODE0000/linuxbcudb/dwe/control/c1 1G) ON NODE(0)
AUTORESIZE YES MAXSIZE 5G INCREASESIZE 100M EXTENTSIZE 64 PREFETCHSIZE 32 BUFFERPOOL bp8k NO FILE SYSTEM CACHING;
CREATE REGULAR TABLESPACE qpcontrol IN DATABASE PARTITION GROUP dwecontrolgroup PAGESIZE 8k MANAGED BY DATABASE
USING (FILE /db2fs/bculinux/NODE0000/linuxbcudb/dwe/qpcontrol/c1 1G) ON NODE(0)
AUTORESIZE YES MAXSIZE 5G INCREASESIZE 1G EXTENTSIZE 64 PREFETCHSIZE 32 BUFFERPOOL bp8k NO FILE SYSTEM CACHING;
CREATE REGULAR TABLESPACE qpresult IN DATABASE PARTITION GROUP dwecontrolgroup PAGESIZE 8k MANAGED BY DATABASE
USING (FILE /db2fs/bculinux/NODE0000/linuxbcudb/dwe/qpresult/c1 5G) ON NODE(0)
AUTORESIZE YES MAXSIZE 50G INCREASESIZE 5G EXTENTSIZE 64 PREFETCHSIZE 32 BUFFERPOOL bp8k NO FILE SYSTEM CACHING;
Set up DB2 Warehouse components: Please refer to the section Install single
computer Data Server > Required tasks after installation for a list of tasks to be
performed on the administration node:
“Required tasks after installation” on page 46
Install the application server
This section of the launchpad guides you through the main steps to install the
application server components on one computer. See the DB2 Warehouse
Architecture tab for an overview of how the application server fits into your
environment.
Before attempting these steps, make sure your environment meets the requirements
specified on the System Requirements tab.
1. The Required tasks before the installation tab describes the steps that are
required to prepare your environment for a successful installation. This
preparation is in addition to checking your system requirements.
2. The Install the product tab launchs the DB2 Warehouse Installation program
for installing the application server components on your computer.
3. The Required tasks after installation tab describes the steps that are required
to enable your environment for running DB2 Warehouse.
Related information
“Required tasks before the installation”
“Install the application server components” on page 58
“Required tasks after installation” on page 58
Required tasks before the installation
Before you install the application server components, take the following steps.
1. Make sure your environment satisfies the requirements specified on the System
Requirements tab.
2. The application server includes IBM Websphere Application Server 6.1.0.9. If it
is already installed on this computer, you can use that copy with DB2
Chapter 1. DB2 Warehouse Server installation 57

Warehouse instead of installing a new copy of WebSphere. Existing WebSphere
applications are not affected by DB2 Warehouse, which is installed in a separate
profile.
3. The installation program prompts you for user information about the
components you are installing. You can save time by collecting this information
before you start the installation. This information is listed in the DB2 Warehouse
Installation Guide.
The application server components require at minimum a DB2 client instance for
accessing metadata tables where data flows and control flows definition are stored.
By default, the IBM Data Server Client will be installed but instead you can choose
to install DB2 Enterprise Server Edition on this node.
In the following section, we assume that you use the default settings (with the
Data Server Client) and that the metadata tables will be created on the target
database on the data server.
Table 8. Create DB2 Warehouse groups
Group created Sample group name
DB2 Warehouse administrators group dweadmgrp
DB2 Warehouse managers group dwemgrgrp
DB2 operators group dweopergrp
Table 9. Create the DB2 Warehouse user admin.
The DB2 Warehouse admin user will be the DB2 client instance owner and will be used to
access the DB2 Warehouse metadata tables.
User created username
Group created for user
ID Home directory
DB2 Warehouse
administrative user
dweadmin dweadmgrp /home
Install the application server components
To install the DB2 Warehouse application server components on this computer, run
the DB2 Warehouse installation program.
IBM recommends that you install all of the components that are preselected when
you launch the program from this tab.
Make sure your environment satisfies the requirements specified on the System
Requirements tab.
(This is the launch point for the installation program for DB2 Warehouse.)
Required tasks after installation
After installing the application server, take the following steps:
1. To verify that the installation was successful, check the log files listed in ″Log
file locations″ in the DB2 Warehouse Installation Guide. In the main installation
log file dweinstall.log and the configuration log file config.log, check for lines
that contain keywords such as err, Exception, wrn for errors and warnings.
2. During installation of the Application Server components, DB2 Warehouse will
either create a new Client instance or will re-use a client or full instance as
specified during installation. Prior to starting the Websphere Application Server
58 DB2 Warehouse Version 9.5: Installation Launchpad

(WAS) it is necessary to ensure that WAS starts up with the correct DB2
environment. This environment is required in order for some Admin Console
and SQL Warehouse features to function properly. For example, if the DB2
instance is called dweadmin, you can run one of following commands: For
bourne, bash and ksh shells:
$ . ~dweadmin/sqllib/db2profile
For csh and tcsh shells:
% source ~dweadmin/sqllib/db2cshrc
3. You must run the DB2 Warehouse configuration tool to complete the
installation. The final panel of the installation program prompts you to launch
the configuration tool. You can use the configuration tool immediately after
installation or any time later to modify your configuration. If you don’t run it
immediately, you can start it by running the config/config.sh file from the
directory where DB2 Warehouse is installed.
4. Unless you installed DB2 Enterprise Server Edition on this machine, you will
have to specify a remote database (on the admin node) for the metadata and
scheduler tables. You can specify your Warehouse database for this purpose, or
you can create a separate database. When prompted by the configuration tool,
enter the database name and a non-partitionned tablespace (e.g.
dwedefaultcontrol) to be used for metadata and scheduler tables. See Install
data server on multiple computer > Required tasks after installation for
details.
5. Start WebSphere Application Server as root. For example:
./startServer.sh server1
See the DB2 Warehouse Installation Guide for more details.
DB2 Warehouse server installation for Windows
Use this launchpad to install the server components of DB2 Warehouse 9.5, which
is the new name for DB2 Data Warehouse Edition. DB2 Warehouse is a suite of
products that combines the strength of DB2 Enterprise Server Edition with a
powerful business intelligence infrastructure from IBM. DB2 Warehouse provides a
comprehensive business intelligence platform with tools for building and
deploying analytic solutions.
You can install DB2 Warehouse on a single database partition or, with the DB2
Database Partitioning Feature, across multiple database partitions. This launchpad
guides you through the major tasks you must perform to create a warehousing
environment that matches your needs.
v Before you can install any part of this product, you must copy the Activation CD
for your edition onto the participating computers. The Activation CD for your
product or feature can be downloaded from Passport Advantage if it is not part
of the physical media pack you received from IBM. The Activation CD contains
the license certificate file (or license key) for your DB2 Warehouse Edition.
v Ensure that your system satisfies the minimum hardware and software
requirements listed on the System Requirements tab. Note that for a production
system, significant planning is required to determine the appropriate hardware
configuration based on factors such as expected size of the warehouse. If you are
migrating from an earlier version of this product, read the DB2 Warehouse
Installation Guide for migration tasks.
v Select DB2 Warehouse architecture to learn the basic concepts you need to plan
your installation of DB2 Warehouse components in your environment.
Chapter 1. DB2 Warehouse Server installation 59
v Select Install the data server to install the data server components. You can
install the data server in two ways:
– On a single computer, using only the DB2 Warehouse installation program
(single-partition DB2).
– Across multiple computers, using the DB2 Enterprise installation program
with the Database Partitioning Feature (multi-partition DB2). Ensure that your
edition permits the use of the Data Partitioning Feature.v Select Install the application server to install the application server components
using the DB2 Warehouse installation program.
You must use a different installation program to install the client components of
DB2 Warehouse. See the DB2 Warehouse Installation Guide for details.
Related information
“System requirements”
“DB2 Warehouse architecture” on page 61
“Install the data server” on page 63
“Install the application server” on page 71
System requirements
The minimum system requirements for DB2 Warehouse are summarized below.
Make sure you read and apply the full requirements listed in the DB2 Warehouse
Installation Guide. Note that significant planning is required to determine the
appropriate hardware configuration based on factors such as expected size of the
warehouse.
For up to date system requirements, refer to the online documentation.
Operating system:
DB2 Warehouse Server for Windows is supported on the following
platforms:
v Windows 2003 Standard, Enterprise, Datacenter editions SP1 on x86
(IA32)
v Windows XP Professional Edition SP2 on x86 (IA32)
v Windows Vista Business, Enterprise, and Ultimate editions on x86 (IA32)
v Windows 2003 Standard, Enterprise, Datacenter editions on x64 (AMD64
or Intel EM64T)
You cannot install DB2 Warehouse for Windows x64 on a Windows x86
(IA32) system and vice-versa.
Temporary space for running the installation program:
Approximately 550 MB of disk space is recommended on the user’s temp
directory (%temp%)
Permanent space for the installed components:
Approximately 1.5 GB of disk space is recommended for the installed
product.
Memory for installing the product:
Approximately 1 GB of memory is needed to install all the data warehouse
server components.
Memory for running the product:
Approximately 1 GB of memory is the minimum amount of memory
60 DB2 Warehouse Version 9.5: Installation Launchpad
required to run the data warehouse server components alone. If you run
the application server components on the same computer, 2 GB of memory
is recommended.
Note that memory and hard drive requirements are related to planning and
depends on your configuration.
DB2 Warehouse architecture
DB2 Warehouse components are arranged into three logical groups:
v data server
v application server
v client
The data server can be installed:
v on a single computer, single-partition DB2
v across multiple computers, multi-partition DB2
You can use this launchpad to install the data server and application server. The
client must be installed using another installation program. The groups of
components for a multi-partition DB2 setup are shown in the following figure. In a
single-partition setup the data server consists of a single computer. It is also
acceptable for small-scale setups to install the data server and application server
components on a single computer (Install the data server -> Install single
computer data server).
Chapter 1. DB2 Warehouse Server installation 61

Depending on the edition and options you purchased, you can install a
combination of the following groups of components:
Data server:
You can install single-partition DB2 on a single computer. In a large-scale
production environment, you will probably want to install the product
across multiple computers (multi-partition DB2). In a partitioned
environment, IBM recommends the following architecture:
Administration node
The computer serving as the administration node generally
contains the instance-owning DB2 partition, and provides the
catalog and coordinator function. In some setups you might require
multiple admin nodes to perform catalog or coordinator functions,
only one of which will contain the instance-owning partition.
Data nodes
A collection of computers containing DB2 database partitions,
dedicated to managing and processing a part of the user data
within the database.
Application server:
The Application Server contains applications such as Alphablox. The DB2
Warehouse administration console requires either DB2 Enterprise or the
62 DB2 Warehouse Version 9.5: Installation Launchpad
IBM Data Server Client to be installed for this group. If you do not install
DB2 Enterprise then the Data Server Client is installed.
Client:
The Client contains tools for manipulating and viewing warehouse data.
You must use a different installation program to install the client
components of DB2 Warehouse. See the DB2 Warehouse Installation Guide for
details.
Install the data server
This launchpad supports two main installation scenarios:
1. Select Install single computer data server to install the warehouse server on
one computer, using the DB2 Warehouse installation program (single-partition
DB2). This selection also provides the option of installing the application server
on the same machine as the data server.
2. Select Install data server on multiple computers to install the data server
components across multiple computers (multi-partition DB2).
a. First you install the data server components on the administration node.
This will create installation response files that you use later. There are two
steps:
1) Install DB2 Enterprise Server Edition with the Database Partitioning
Feature using the DB2 installation program.
2) Install the DB2 Warehouse server warehousing components using the
DB2 Warehouse installation program.b. To install DB2 Enterprise Server Edition on the data nodes you should use
the response file that was created during installation of the administration
node. To install DB2 Warehouse server warehousing components on the
data nodes you can use the DB2 Warehouse installation program, or use the
sample response file provided to perform a silent install.
Related information
“Install single computer data server”
“Install the data server on multiple computers” on page 65
Install single computer data server
This tab guides you through the main steps to install the data server components
on a single computer (single-partition DB2). Before attempting these steps, make
sure your environment meets the requirements specified on the System
Requirements tab. IBM recommends that you install all of the components that are
preselected when you launch the program from this tab.
1. The Required tasks before the installation tab describes the steps that are
required to prepare your environment for a successful installation. This
preparation is in addition to checking your system requirements.
2. The Install the product tab launches the DB2 Warehouse Installation Program.
3. The Required tasks after installation tab describes the steps that are required
to enable your environment for running DB2 Warehouse.
Related information
“Required tasks before the installation” on page 64Before installing the data server, you must prepare your environment. The
major tasks are summarized below.
“Install the product” on page 64
“Required tasks after installation” on page 64
Chapter 1. DB2 Warehouse Server installation 63

Required tasks before the installation:
Before installing the data server, you must prepare your environment. The major
tasks are summarized below.
Before starting, make sure your system satisfies the hardware and software
requirements listed on the System Requirements tab.
Ensure you are a member of the local Administrators group.
The user account you use to install DB2 Warehouse Server must be a
member of the local Administrators group. It is not possible to install DB2
Warehouse Server with a restricted user. These tasks should typically be
performed by a System Administrator.
Copy the DB2 Warehouse Activation CD on disk
Prior to launching the DB2 Warehouse installation program, you will need
to copy the Activation CD onto your local disk. The Activation CD for
your product or feature can be downloaded from Passport Advantage if it
is not part of the physical media pack you received from IBM.
The launchpad will prompt you for the location where you copied the
Activation CD when you start the DB2 Warehouse installation program. If
you are running the DB2 Warehouse installation directly, you must provide
the location of the Activation CD files on the command line, using the
-profile parameter.
Install the product: To install a data server on a single computer, run the DB2
Warehouse installation program.
IBM recommends that you install all of the components that are preselected when
you launch the program from this tab.
Make sure your environment satisfies the requirements specified on the System
Requirements tab.
(This is the launch point for the installation program for DB2 Warehouse.)
Note: While a separate machine is recommended for the Application Server
components, for a small-scale single-partition setup you may choose to install
Application Server components on the same machine as the Data server by
selecting these additional components in the Installer. If you choose to do this
remember to complete Application Server post-installation steps under the Install
the Application Server tab.
Required tasks after installation: After you install the data server, there are
additional tasks you must perform. The tasks are summarized below. Post-Install
tasks are DB2-specific tasks which should be performed by a DBA. (typically the
DB2 instance owner user)
First, verify that the installation was successful. Check the log files listed in ″Log
file locations″ in the DB2 Warehouse Installation Guide. In the main installation log
file dweinstall.log, check the lines that contain keywords such as err, Exception,
wrn for errors and warnings.
Then perform the following tasks.
Based on the product edition you purchased, Query Patroller and Intelligent Miner
may not be not available during installation.
64 DB2 Warehouse Version 9.5: Installation Launchpad
Note that the following examples assume the warehouse database, and tablespaces
for certain DB2 Warehouse components (ie. Query Patroller result and control
tablespaces) have been created.
Go to the Install the application server tab.
Related tasks
“Setup Query Patroller”
“Setup Data Mining (Intelligent Miner)”
Setup Query Patroller:
Enable the database for Query Patroller. Query Patroller will monitor all queries
directed to the administration node.
1. Log on with a user with SYSADM privileges (by default, all users of the local
Administrators group have this privilege).
2. In a DB2 comamnd line window, go to directory:
<DB2INSTALL>/sqllib/bin
3. Enable the database for Query Patroller. Query Patroller will monitor all
queries directed to the administration node.
qpsetup db <dbname> CONTROL_TABLESPACE qpcontrol RESULT_TABLESPACE qpresult
4. Set the configuration parameter DYN_QUERY_MGMT to ENABLE for the database
for which you want Query Patroller to manage queries:
db2 update db cfg for <dbname> using DYN_QUERY_MGMT enable
5. Verify that you can start (and stop) Query Patroller on the database:
qpstart <dbname>
qpstop <dbname>
Setup Data Mining (Intelligent Miner):
Enable the instance and database for Data Mining (Intelligent Miner)
1. Log on with a user with SYSADM privileges (by default, all users of the local
Administrators group have this privilege).
2. In a DB2 command line window, issue the following commands to enable the
instance for Intelligent Miner:
cd <DB2INSTALL>/bin
./idmenabledb <dbname> fenced dbcfg
where <DB2INSTALL> is the installation directory of DB2 (C:\Program
Files\IBM\dwe\SQLLIB) and <dbname> is the name of the database you wish to
enable.
Install the data server on multiple computers
This tab guides you through the main steps to install the data server components
across multiple computers (multi-partition DB2). Ensure that your edition permits
the use of the Data Partitioning Feature, required for multi-partition DB2.
You must plan your installation before you proceed. For example, you must decide
which computer will be the administration node for your environment, and which
computers will contain your warehouse data.
1. The Required tasks before the installation tab describes the steps that are
required to prepare your environment for a successful installation. This
preparation is in addition to checking your system requirements.
Chapter 1. DB2 Warehouse Server installation 65
2. The Install the administration node tab describes how to install the data server
components on the administration node. You must run two installation
programs to complete this step:
a. Install DB2 Enterprise Server Edition on the administration node using the
DB2 installation program. This produces a response file that you use later to
install DB2 Enterprise Server Edition on additional computers.
b. Install the DB2 Warehouse server warehousing components on the
administration node using the DB2 Warehouse installation program. This
produces a response file that you use later to install the DB2 Warehouse
data warehouse server components on additional computers.3. The Install the data node tab describes how to install the data server
components on the participating computers. The data nodes comprise all the
partitions that hold your warehouse data. You must run two installation
programs to complete this step:
a. Run the DB2 Enterprise Server Edition installation program from the
command line to install DB2 Enterprise Server Edition on the data node
computers. You should use the response file that was created when you
installed on the administration node in the previous step.
b. Run the DB2 Warehouse installation program to install the DB2 Warehouse
server warehousing components on the data nodes. Alternatively, you can
use a sample response file provided to perform a silent install.4. The Required tasks after installation tab describes the steps that are required
to enable your environment for running DB2 Warehouse.
Related information
“Required tasks before the installation”
“Install the administration node” on page 67
“Install the data node” on page 68
“Required tasks after installation” on page 69
Required tasks before the installation: Before installing the data server, you must
prepare your environment. The major tasks are summarized below.
Before starting, make sure your system satisfies the hardware and software
requirements listed on the System Requirements tab.
Related information
“Prepare your environment”
“Required user accounts” on page 67
Prepare your environment:
v Copy the DB2 Warehouse Activation CD on disk
Prior to launching the DB2 Warehouse installation program, you will need to
copy the activation CD on all participating computer.
You will be prompted for the location where you copied the activation CD when
you start the DB2 Warehouse installation program.
v Ensure that the primary computer and participating computers belong to the
same Windows domain.
v Ensure that each computer object that participates in the partitioned database
environment has the ″Trust computer for delegation″ privilege flagged.
v Ensure that all participating computers can communicate with each other using
TCP/IP:
v On a participating computer, enter the following command:
66 DB2 Warehouse Version 9.5: Installation Launchpad
ping hostname
where hostname is the hostname of another participating computer. You should
repeat this step between all participating computers.
v Ensure that time and date settings on the primary computer and participating
computers are consistent. To be considered consistent, the difference in GMT
time between all computers must be no greater than one hour.
Required user accounts:
Log on with a Domain user prior to installing the product.
v The user account you use to install the product must be a Domain user
account.
v It should be a member of the local Administrators group on all
participating computers.
v This user must have the Act as part of the operating system user right.
Create the instance user account
v During the installation you will be asked to provide a Domain user
account to be associated with the DB2 instance. You must use the same
Domain user account for running the DB2 services on all partitions.
v You can use the same Domain user account as the one used for installing
DB2 on all participating nodes.
Install the administration node: The administration node typically contains the
instance-owning database partition that owns the DB2 instance for your data
server. There are two parts to this step:
“Install the DB2 Enterprise Server Edition”
“Install the remaining DB2 Warehouse components” on page 68
After you installed the administration node, you must install the data warehouse
components on the data node. The data node comprises all the partitions that hold
your warehouse data. You can install the data node from the command line using
the response files you created when you installed the administration node. Take
the response files to each computer in your environment and follow the directions
on the Install the data node tab.
Related concepts
“Install the DB2 Enterprise Server Edition”
“Install the remaining DB2 Warehouse components” on page 68
Install the DB2 Enterprise Server Edition: Install the DB2 Enterprise Server Edition
using the DB2 Setup Wizard, or using a response file generated by the Setup
Wizard or based on a template.
Option A: Install using DB2 Setup Wizard::
v After launching the DB2 installation program, in the Select installation, response
files creation, or both window, select the Install DB2 and save my installation
settings in response files option.
v The installation program creates two response files that you can use to silently
install additional partitions. The PROD_ESE.rsp response file is for silently
installing instance-owning database servers. The PROD_ESE_addpart.rsp response
file is for silently installing the participating database servers.
Chapter 1. DB2 Warehouse Server installation 67
(This is the launch point for the installation program for DB2 Warehouse.)
Option B: Install using response file install::
Procedure:
1. Generate a response file using the DB2 Setup wizard, specifying the options
discussed above, or modify the sample response file located here:
dwe\Ese\db2\windows\samples\db2ese.rsp
2. In a command line window (shell), change to the directory where the DB2
Enterprise Server Edition installation files are located:
cd path_to_image\dwe\Ese
3. Execute the following command:
setup -u responsefile_directory\response_file_name
Install the remaining DB2 Warehouse components: When you finish installing DB2
Enterprise Server Edition, run the DB2 Warehouse installation program to install
the rest of the data warehouse server components for the instance-owning
partition.
IBM recommends that you install all of the components that are preselected when
you launch the program from this tab. You should install DB2 Warehouse using the
existing DB2 server that was installed in the previous step.
You can install the product using one of the following method:
Option A: Using the DB2 Warehouse installation wizard:
IBM recommends you install DB2 Warehouse using this method.
(This is the launch point for the installation program for DB2 Warehouse.)
Option B: Using the response file template provided with the launchpad.:
1. Copy the template response file below onto your hard drive
launchpad\content\windows\dweadmnode.rsp
2. Edit the response file to specify the actual DB2 Enterprise Server Edition install
location and accept the license agreement.
3. In a command line window, execute the following command:
setup -is:silent -profile C:\temp\db2w_activation_CD\profile -silent -options dweadmnode.rsp -log !C:\temp\dweadmnode.log
The -profile parameter is required. It must be set to the directory where you
copied the activation CD files.
Install the data node: The data node comprises all the partitions that hold your
warehouse data. There are two parts to this step:
Related concepts
“Install the remaining DB2 Warehouse components” on page 69 Related information
“Install the DB2 Enterprise Server Edition using a response file”
Install the DB2 Enterprise Server Edition using a response file: DB2 Enterprise Server
Edition (ESE) must be installed on all data node partitions using one of the two
response files:
v (Recommended): Use the response file that was created when you installed DB2
on the instance-owning DB2 partition.
68 DB2 Warehouse Version 9.5: Installation Launchpad
v Alternatively, you can modify the sample response file here:
dwe/Ese/db2/Windows/samples/db2esenn.rsp
Procedure:
1. In a command line window (shell), change to the directory where the DB2
Enterprise Server Edition installation files are located:
cd dwe/Ese
2. Execute the following command:
setup -u responsefile_directory\response_file_name
Install the remaining DB2 Warehouse components: Intelligent Miner is the only
component other than DB2 Enterprise Server Edition that you install on the data
nodes. Use either method to complete your installation of DB2 Warehouse on a
data node.
Intelligent Miner is not available in all product editions. Based on the product
edition that you purchased, you may not be entitled to use Intelligent Miner. In
such situation, you can skip the steps below.
Option A: Run the DB2 Warehouse installation wizard.:
(This is the launch point for the installation program for DB2 Warehouse.)
Option B: Perform a silent installation:
1. Copy the template response file below onto your hard drive
launchpad\content\windows\dweadmnode.rsp
2. Edit the response file to specify the actual DB2 Enterprise Server Edition install
location and accept the license agreement.
3. In a command line window, change to the directory where the DB2 Warehouse
installation files are located and run the following command:
setup -is:silent -profile C:\temp\db2w_activation_CD\profile -silent -options dwedatanode.rsp -log !C:\temp\dwedatanode.log
The -profile parameter is required. It must be set to the directory where you
copied the activation CD files.
Required tasks after installation: After you install the data server, there are
additional tasks you must perform. The tasks are summarized below. Post-Install
tasks are DB2-specific tasks which should be performed by a DBA (typically the
DB2 instance owner user).
Note that the following examples assume the warehouse database, and tablespaces
for certain DB2 Warehouse components (ie. Query Patroller result and control
tablespaces) have been created.
Go to the Install the application server tab after completing the following steps.
Related tasks
“Setup Query Patroller” on page 65
“Setup Data Mining (Intelligent Miner)” on page 65 Related information
“Verify the installation logs” on page 70
“Reserve ports for the Fast Communication Manager (FCM)” on page 70
Chapter 1. DB2 Warehouse Server installation 69

Verify the installation logs: To verify that the installation of DB2 Warehouse was
successful, check the log files listed in ″Log file locations″ in the DB2 Warehouse
Installation Guide. In the main installation log file dweinstall.log, check for lines
that contain keywords such as err, Exception, wrn for errors and warnings.
Reserve ports for the Fast Communication Manager (FCM): When you install DB2 on
the instance-owning partition, a number of ports equal to the number of logical
partitions on the current server will be reserved in
%SystemRoot%\system32\drivers\etc\services
These ports will be used by the Fast Communication Manager (FCM). The reserved
ports will be in the following format:
DB2_InstanceName
DB2_InstanceName_1
DB2_InstanceName_2
DB2_InstanceName_END
On the participating computers (data nodes), update the services to define the
corresponding FCM port for the DB2 instance. The range of the FCM ports
depends on how many logical partitions you want to use on the participating
computer. A minimum of two entries are required, DB2_InstanceName and
DB2_InstanceName_END.
Setup Query Patroller:
Enable the database for Query Patroller. Query Patroller will monitor all queries
directed to the administration node.
1. Log on with a user with SYSADM privileges (by default, all users of the local
Administrators group have this privilege).
2. In a DB2 comamnd line window, go to directory:
<DB2INSTALL>/sqllib/bin
3. Enable the database for Query Patroller. Query Patroller will monitor all
queries directed to the administration node.
qpsetup db <dbname> CONTROL_TABLESPACE qpcontrol RESULT_TABLESPACE qpresult
4. Set the configuration parameter DYN_QUERY_MGMT to ENABLE for the database
for which you want Query Patroller to manage queries:
db2 update db cfg for <dbname> using DYN_QUERY_MGMT enable
5. Verify that you can start (and stop) Query Patroller on the database:
qpstart <dbname>
qpstop <dbname>
Setup Data Mining (Intelligent Miner):
Enable the instance and database for Data Mining (Intelligent Miner)
1. Log on with a user with SYSADM privileges (by default, all users of the local
Administrators group have this privilege).
2. In a DB2 command line window, issue the following commands to enable the
instance for Intelligent Miner:
cd <DB2INSTALL>/bin
./idmenabledb <dbname> fenced dbcfg
where <DB2INSTALL> is the installation directory of DB2 (C:\Program
Files\IBM\dwe\SQLLIB) and <dbname> is the name of the database you wish to
enable.
70 DB2 Warehouse Version 9.5: Installation Launchpad
Install the application server
This section of the launchpad guides you through the main steps to install the
application server components on one computer. See the DB2 Warehouse
Architecture tab for an overview of how the application server fits into your
environment.
Before attempting these steps, make sure your environment meets the requirements
specified on the System Requirements tab.
1. The Required tasks before the installation tab describes the steps that are
required to prepare your environment for a successful installation. This
preparation is in addition to checking your system requirements.
2. The Install the product tab launchs the DB2 Warehouse Installation program
for installing the application server components on your computer.
3. The Required tasks after installation tab describes the steps that are required
to enable your environment for running DB2 Warehouse.
Related information
“Required tasks before the installation”
“Install the application server components”
“Required tasks after installation” on page 72
Required tasks before the installation
Before installing the data warehouse server, you must prepare your environment.
The major tasks are summarized below.
Before starting, make sure your system satisfies the hardware and software
requirements listed on the System Requirements tab.
Ensure you are a member of the local Administrators group.
The user account you use to install DB2 Warehouse Server must be a
member of the local Administrators group. If you are using a Domain user,
this user must also belong to the local Administrators group. It is not
possible to install DB2 Warehouse Server with a restricted user.These tasks
should typically be performed by a System Administrator.
Copy the DB2 Warehouse Activation CD on disk
Prior to launching the DB2 Warehouse installation program, you will need
to copy the Activation CD onto your local disk. The Activation CD for
your product or feature can be downloaded from Passport Advantage if it
is not part of the physical media pack you received from IBM.
The launchpad will prompt you for the location where you copied the
Activation CD when you start the DB2 Warehouse installation program. If
you are running the DB2 Warehouse installation directly, you must provide
the location of the Activation CD files on the command line, using the
-profile parameter.
Install the application server components
To install the DB2 Warehouse application server components on this computer, run
the DB2 Warehouse installation program.
IBM recommends that you install all of the components that are preselected when
you launch the program from this tab.
Make sure your environment satisfies the requirements specified on the System
Requirements tab.
Chapter 1. DB2 Warehouse Server installation 71

(This is the launch point for the installation program for DB2 Warehouse.)
Required tasks after installation
After installing the application server, take the following steps:
1. To verify that the installation was successful, check the log files listed in ″Log
file locations″ in the DB2 Warehouse Installation Guide. In the main installation
log file dweinstall.log and the configuration log file config.log, check for lines
that contain keywords such as err, Exception, wrn for errors and warnings.
2. You must run the DB2 Warehouse configuration tool to complete the
installation. The final panel of the installation program prompts you to launch
the configuration tool. You can use the configuration tool immediately after
installation or any time later to modify your configuration. If you don’t run it
immediately, you can start it by executing the following script:
<DB2W_INSTALL>\config\config.bat
where <DB2W_INSTALL> is the installation directory of DB2 Warehouse Server
(e.g. C:\Program Files\IBM\dwe).
3. Unless you installed DB2 Enterprise Server Edition on this machine, you will
have to specify a remote database (on the admin node) for the metadata and
scheduler tables. You can specify your Warehouse database for this purpose, or
you can create a separate database. When prompted by the configuration tool,
enter the database name and a non-partitionned tablespace to be used for
metadata and scheduler tables.
See the DB2 Warehouse Installation Guide for more details.
72 DB2 Warehouse Version 9.5: Installation Launchpad
Chapter 2. DB2 Warehouse Client installation
You can install DB2 Warehouse on either Linux or Windows operating systems.
Related information
“Client installation for Linux”
“Client installation for Windows” on page 75
Client installation for Linux
Use this launchpad to install the client components of DB2 Warehouse 9.5, which is
the new name for DB2 Data Warehouse Edition. DB2 Warehouse is a suite of
products that combines the strength of DB2 Enterprise Server Edition with a
powerful business intelligence infrastructure from IBM. DB2 Warehouse provides a
comprehensive business intelligence platform with tools for building and
deploying analytic solutions.
Before you can install any part of this product, you must copy the product license
from the Activation disk (or download image) for your edition to this computer. If
you have not yet copied the license, copy it now and then return to this
launchpad.
Ensure that your system satisfies the hardware and software requirements listed on
the System Requirements tab. If you are migrating from an earlier version of this
product, read the DB2 Warehouse Installation Guide for migration tasks.
Select Install the product to prepare your environment and to install the DB2
Warehouse client components on this machine
You must use a different installation program to install the server components of
DB2 Warehouse. See the DB2 Warehouse Installation Guide for details..
Related information
“System requirements”
“Install DB2 Warehouse Client components” on page 74
“Prepare your environment” on page 74
“Install the DB2 Warehouse Client components” on page 75
System requirements
The system requirements for DB2 Warehouse are summarized below. Make sure
you read and apply the full requirements listed in the DB2 Warehouse Installation
Guide.
For up to date system requirements, refer to the online documentation.
Hardware
x86 (Intel® Pentium®, Intel Xeon®, and AMD) 32-bit Intel and AMD
processors
Operating system:
DB2 Warehouse Client is supported on the following platforms:
v Red Hat Enterprise Linux (RHEL) 4 Update 4
v SUSE Linux Enterprise Server (SLES) 9 Service Pack 3
© Copyright IBM Corp. 1996, 2007 73
Temporary space for running the installation program:
Approximately 1GB MB of disk space is recommended on the partition for
temporary files (/tmp)
Permanent space for the installed components:
Approximately 1.5 GB of disk space is recommended for the installed
product.
Memory for installing the product:
Approximately 1 GB of memory is needed to install all the data warehouse
server components.
Memory for running the product:
Approximately 512MB GB of memory is the minimum amount of memory
required to run the Design Studio and other DB2 Warehouse client
components.
Note that memory and hard drive requirements are related to planning and
depends on your configuration.
Install DB2 Warehouse Client components
Before attempting these steps, make sure your environment meets the requirements
specified on the System Requirements tab.
v The tab describes the steps that are required to prepare your environment for a
successful installation. This preparation is in addition to checking your system
requirements.
v The Install the product tab launchs the DB2 Warehouse Installation program.
Prepare your environment
Before installing the data warehouse client, you must prepare your environment.
The major task are summarized below.
Before starting, make sure your system satisfies the hardware and software
requirements listed on the System Requirements tab.
The DB2 Warehouse client components can be installed by a regular user without
root access. Though, pre-install tasks are OS tasks which require root authority to
be carried out. These tasks should typically be performed by a System
Administrator.
Verify file system permissions
The user that will perform the installation must have write permissions to
the following files and directories:
1. /tmp (partition for temporary files)
2. Its home directory
3. The DB2 instance user’s home directory (in a non-root installation, the
DB2 instance files are copied to the home directory of the user
installing the product).
Modify Operating System file limits
By default, Linux limits the number of files that an application can open to
1024 files. IBM recommends that you increase this number before you
install DB2 Warehouse.
Edit the /etc/security/limits.config file, add the following lines:
soft nofile 4096
hard nofile 8192
74 DB2 Warehouse Version 9.5: Installation Launchpad

Log out and then log in again to deploy the changes. To ensure that the
limits.conf file is used by the system, look for the following statement in
the etc/pam.d/login and etc/pam.d/xdm files:
session required pam_limits.so
Install the DB2 Warehouse Client components
To install DB2 Warehouse client on this machine, run the DB2 Warehouse
installation program.
Make sure your environment satisfies the requirements specified on the System
Requirements tab.
(This is the launch point for the installation program for DB2 Warehouse.)
Client installation for Windows
Use this launchpad to install the client components of DB2 Warehouse 9.5, which is
the new name for DB2 Data Warehouse Edition. DB2 Warehouse is a suite of
products that combines the strength of DB2 Enterprise Server Edition with a
powerful business intelligence infrastructure from IBM. DB2 Warehouse provides a
comprehensive business intelligence platform with tools for building and
deploying analytic solutions.
Before you can install any part of this product, you must copy the product license
from the Activation disk (or download image) for your edition to this computer. If
you have not yet copied the license, copy it now and then return to this
launchpad.
Ensure that your system satisfies the hardware and software requirements listed on
the System Requirements tab. If you are migrating from an earlier version of this
product, read the DB2 Warehouse Installation Guide for migration tasks.
Select Install the product to prepare your environment and to install the DB2
Warehouse client components on this machine
You must use a different installation program to install the server components of
DB2 Warehouse. See the DB2 Warehouse Installation Guide for details..
Related information
“System requirements”
“Install DB2 Warehouse Client components” on page 76
“Prepare your environment” on page 76
“Install the DB2 Warehouse Client components” on page 77
System requirements
The system requirements for DB2 Warehouse are summarized below. Make sure
you read and apply the full requirements listed in the DB2 Warehouse Installation
Guide.
For up to date system requirements, refer to the online documentation.
Hardware
x86 (Intel® Pentium®, Intel Xeon®, and AMD) 32-bit Intel and AMD
processors
Chapter 2. DB2 Warehouse Client installation 75

Operating system:
DB2 Warehouse Client is supported on the following platforms:
v Windows Vista Business, Enterprise, Ultimate editions x86 (IA32)
v Windows XP Professional Edition SP2 on x86 (IA32)
Temporary space for running the installation program:
Approximately 550 MB of disk space is recommended on the user’s temp
directory (%temp%)
Permanent space for the installed components:
Approximately 1.5 GB of disk space is recommended for the installed
product.
Memory for installing the product:
Approximately 1 GB of memory is needed to install all the data warehouse
server components.
Memory for running the product:
Approximately 512MB GB of memory is the minimum amount of memory
required to run the Design Studio and other DB2 Warehouse client
components.
Note that memory and hard drive requirements are related to planning and
depends on your configuration.
Install DB2 Warehouse Client components
Before attempting these steps, make sure your environment meets the requirements
specified on the System Requirements tab.
v The tab describes the steps that are required to prepare your environment for a
successful installation. This preparation is in addition to checking your system
requirements.
v The Install the product tab launchs the DB2 Warehouse Installation program.
Prepare your environment
Before installing the data warehouse client, you must prepare your environment.
The major task are summarized below.
Before starting, make sure your system satisfies the hardware and software
requirements listed on the System Requirements tab.
The DB2 Warehouse client components can be installed by a regular user without
root access. Though, pre-install should be carried out by a member of the local
Administrators group. These tasks should typically be performed by a System
Administrator.
Setup Eleveated Privileges (EP)
If installation is to be performed by a non-admin user, an administrative
user must setup Elevated Privileges (EP) for the non-admin user that will
be installing DB2 Warehouse prior installation of DB2 Warehouse.
You do not need to perform this procedure if the user that will be
installing DB2 Warehouse is already a member of the local Administrators
group.
The procedure is described at this address:
http://publib.boulder.ibm.com/infocenter/db2luw/v9//topic/com.ibm.db2.udb.uprun.doc/doc/t0023456.htm
76 DB2 Warehouse Version 9.5: Installation Launchpad

The Installation program does not check whether EP is enabled for the
current user.
Install the DB2 Warehouse Client components
To install DB2 Warehouse client on this machine, run the DB2 Warehouse
installation program.
Make sure your environment satisfies the requirements specified on the System
Requirements tab.
(This is the launch point for the installation program for DB2 Warehouse.)
Chapter 2. DB2 Warehouse Client installation 77

78 DB2 Warehouse Version 9.5: Installation Launchpad

Notices
This information was developed for products and services offered in the U.S.A.
IBM may not offer the products, services, or features discussed in this document in
other countries. Consult your local IBM representative for information on the
products and services currently available in your area. Any reference to an IBM
product, program, or service is not intended to state or imply that only that IBM
product, program, or service may be used. Any functionally equivalent product,
program, or service that does not infringe any IBM intellectual property right may
be used instead. However, it is the user’s responsibility to evaluate and verify the
operation of any non-IBM product, program, or service.
IBM may have patents or pending patent applications covering subject matter
described in this document. The furnishing of this document does not grant you
any license to these patents. You can send license inquiries, in writing, to:
IBM Director of Licensing, IBM Corporation, North Castle Drive, Armonk, NY
10504-1785 U.S.A.
For license inquiries regarding double-byte (DBCS) information, contact the IBM
Intellectual Property Department in your country or send inquiries, in writing, to:
IBM World Trade Asia Corporation, Licensing, 2-31 Roppongi 3-chome, Minato-ku, Tokyo
106-0032, Japan
The following paragraph does not apply to the United Kingdom or any other country
where such provisions are inconsistent with local law: INTERNATIONAL BUSINESS
MACHINES CORPORATION PROVIDES THIS PUBLICATION ″AS IS″ WITHOUT
WARRANTY OF ANY KIND, EITHER EXPRESS OR IMPLIED, INCLUDING, BUT
NOT LIMITED TO, THE IMPLIED WARRANTIES OF NON-INFRINGEMENT,
MERCHANTABILITY OR FITNESS FOR A PARTICULAR PURPOSE. Some states
do not allow disclaimer of express or implied warranties in certain transactions,
therefore, this statement may not apply to you.
This information could include technical inaccuracies or typographical errors.
Changes are periodically made to the information herein; these changes will be
incorporated in new editions of the publication. IBM may make improvements
and/or changes in the product(s) and/or the program(s) described in this
publication at any time without notice.
Any references in this information to non-IBM Web sites are provided for
convenience only and do not in any manner serve as an endorsement of those Web
sites. The materials at those Web sites are not part of the materials for this IBM
product and use of those Web sites is at your own risk.
IBM may use or distribute any of the information you supply in any way it
believes appropriate without incurring any obligation to you.
Licensees of this program who wish to have information about it for the purpose
of enabling: (i) the exchange of information between independently created
programs and other programs (including this one) and (ii) the mutual use of the
information which has been exchanged, should contact:
© Copyright IBM Corp. 1996, 2007 79

IBM Corporation, J46A/G4, 555 Bailey Avenue, San Jose, CA 95141-1003 U.S.A.
Such information may be available, subject to appropriate terms and conditions,
including in some cases, payment of a fee.
The licensed program described in this document and all licensed material
available for it are provided by IBM under terms of the IBM Customer Agreement,
IBM International Program License Agreement or any equivalent agreement
between us.
Any performance data contained herein was determined in a controlled
environment. Therefore, the results obtained in other operating environments may
vary significantly. Some measurements may have been made on development-level
systems and there is no guarantee that these measurements will be the same on
generally available systems. Furthermore, some measurements may have been
estimated through extrapolation. Actual results may vary. Users of this document
should verify the applicable data for their specific environment.
Information concerning non-IBM products was obtained from the suppliers of
those products, their published announcements or other publicly available sources.
IBM has not tested those products and cannot confirm the accuracy of
performance, compatibility or any other claims related to non-IBM products.
Questions on the capabilities of non-IBM products should be addressed to the
suppliers of those products.
All statements regarding IBM’s future direction or intent are subject to change or
withdrawal without notice, and represent goals and objectives only.
This information contains examples of data and reports used in daily business
operations. To illustrate them as completely as possible, the examples include the
names of individuals, companies, brands, and products. All of these names are
fictitious and any similarity to the names and addresses used by an actual business
enterprise is entirely coincidental.
This information contains sample application programs in source language, which
illustrate programming techniques on various operating platforms. You may copy,
modify, and distribute these sample programs in any form without payment to
IBM, for the purposes of developing, using, marketing or distributing application
programs conforming to the application programming interface for the operating
platform for which the sample programs are written. These examples have not
been thoroughly tested under all conditions. IBM, therefore, cannot guarantee or
imply reliability, serviceability, or function of these programs. You may copy,
modify, and distribute these sample programs in any form without payment to
IBM for the purposes of developing, using, marketing, or distributing application
programs conforming to IBM’s application programming interfaces.
Trademarks
The following terms are trademarks or registered trademarks of International
Business Machines Corporation in the United States, other countries, or both:
DB2 IBM
WebSphere
80 DB2 Warehouse Version 9.5: Installation Launchpad

Alphablox and Blox are trademarks or registered trademarks of Alphablox
Corporation in the United States, other countries, or both.
Microsoft® and Windows are trademarks of Microsoft Corporation in the United
States, other countries, or both.
Java™, JavaBeans™, and all Java-based trademarks are trademarks of Sun
Microsystems, Inc. in the United States, other countries, or both.
Linux is a registered trademark of Linus Torvalds in the United States, other
countries, or both.
UNIX® is a registered trademark of The Open Group in the United States and
other countries.
Other company, product or service names may be trademarks or service marks of
others.
Notices 81

82 DB2 Warehouse Version 9.5: Installation Launchpad


����
Program Number:
Printed in USA
GC19-1272-00
Top Related