


Languages
Pages
Legal


CLI Reference GuideFirst Published: 2017-02-20
Americas HeadquartersCisco Systems, Inc.170 West Tasman DriveSan Jose, CA 95134-1706USAhttp://www.cisco.comTel: 408 526-4000 800 553-NETS (6387)Fax: 408 527-0883

© 2017 Cisco Systems, Inc. All rights reserved.

C O N T E N T S
P r e f a c e Preface xxix
Before you Read this Book xxix
Typographic Conventions xxix
Additional Resources xxx
C H A P T E R 1 CLI Quick Reference Guide 1
CLI Commands (No Commit Required) 1
CLI Commands (Commit Required) 7
C H A P T E R 2 Command Line Interface: The Basics 13
Accessing the Command Line Interface (CLI) 13
Factory Default Username and Passphrase 13
Command Line Interface Conventions 14
Command Prompt 14
Command Syntax 15
Select Lists 15
Yes/No Queries 15
Subcommands 16
Escape 16
History 16
Command Completion 17
Configuration Changes 17
General Purpose CLI Commands 17
Committing Configuration Changes 18
Clearing Configuration Changes 18
Quitting the Command Line Interface Session 18
Seeking Help on the Command Line Interface 19
CLI Reference Guide iii

Batch Commands 19
Batch Command Example 19
C H A P T E R 3 The Commands: Reference Examples 23
How to Read the Listing 24
Advanced Malware Protection 24
ampconfig 24
Usage 24
Examples 25
Enabling File Reputation and File Analysis 25
Configure Email Security appliance to Use Public Cloud File Analysis Server 26
(Public Cloud File Analysis Services Only) Configuring Appliance Groups 26
Configure Email Security Appliance to Use an On-Premises File Analysis Server 27
Configure Email Security Appliance to Use an On-Premises File Reputation
Server 28
Clearing Local File Reputation Cache 28
ampstatus 29
Description 29
Usage 29
Example 29
Anti-Spam 29
antispamconfig 30
Description 30
Usage 30
Example 30
antispamstatus 31
Description 31
Usage 31
Example 31
antispamupdate 31
Description 31
Usage 31
Example 32
incomingrelayconfig 32
Description 32
CLI Reference Guideiv
Contents

Usage 32
Example: Enabling Incoming RelaysConfiguring an Incoming Relay 32
slblconfig 34
Description 34
Usage 34
Batch Format - Import 34
Batch Format 34
Batch Format - Export 34
Example - Importing Safelist/Blocklist Entries 35
Graymail Detection and Safe Unsubscribing 35
graymailconfig 35
Description 35
Usage 36
Example 36
graymailstatus 36
Description 36
Usage 36
Example 36
graymailupdate 37
Description 37
Usage 37
Example 37
Anti-Virus 37
antivirusconfig 37
Description 37
Usage 37
Example 38
Viewing Anti-Virus IDE Details 38
antivirusstatus 39
Description 39
Usage 39
Example 39
antivirusupdate 39
Description 39
Usage 39
CLI Reference Guide v
Contents

Example 40
Command Line Management 40
commit 40
Description 40
Usage 40
Example 40
commitdetail 41
Description 41
Usage 41
Example 41
clearchanges or clear 41
Description 41
Usage 41
Example 41
help or h or ? 42
Description 42
Usage 42
Example 42
rollbackconfig 42
Usage 42
Example 42
quit or q or exit 43
Description 43
Usage 43
Example 43
Configuration File Management 43
loadconfig 43
Description 43
Usage 44
Example 44
mailconfig 44
Description 44
Usage 45
Example 45
resetconfig 45
CLI Reference Guidevi
Contents

Description 45
Usage 46
Example 46
saveconfig 46
Description 46
Usage 46
Example 47
showconfig 47
Description 47
Usage 47
Example 47
Cluster Management 48
clusterconfig 48
Description 48
Usage 49
Example 50
Data Loss Prevention 50
dlprollback 50
Description 50
Usage 50
Example 50
dlpstatus 51
Usage 51
Example 51
dlpupdate 51
Description 51
Usage 51
Batch Format 52
Example 52
emconfig 52
Description 52
Usage 52
Batch Format 53
Example of Connecting to RSA Enterprise Manager 53
emdiagnostic 54
CLI Reference Guide vii
Contents

Description 54
Usage 54
S/MIME Security Services 54
smimeconfig 54
Description 54
Usage 54
Examples 54
Creating a Sending Profile for Signing and Encryption 54
Adding a Public Key for Encryption 55
Domain Keys 56
domainkeysconfig 56
Description 56
Usage 56
Batch Format - Signing Profiles 57
Batch Format - Verification Profiles 60
Batch Format - Signing Keys 62
Batch Format - Search for a Key or Profile 64
Batch Format - Global Settings 64
Example: Configuring Domain Keys via the CLI 64
Creating a Sample Domain Keys DNS TXT Record 66
DMARC Verification 68
dmarcconfig 68
Description 68
Usage 68
Batch Format - DMARC Verification Profiles 68
Add a DMARC Verification Profile 68
Edit a DMARC Verification Profile 69
Delete a DMARC Verification Profile 69
Delete all the DMARC Verification Profiles 69
View the Details of a DMARC Verification Profile 69
Export DMARC Verification Profiles 69
Import DMARC Verification Profiles 70
Change Global Settings 70
Example 70
DNS 72
CLI Reference Guideviii
Contents

dig 73
Description 73
Usage 73
Batch Format 73
Example 74
dnsconfig 74
Description 74
Usage 74
Batch Format 74
Example 76
Adding an Alternate DNS Server for Specific Domains 77
Using Your Own DNS Cache Servers 77
dnsflush 78
Description 78
Usage 78
Example 78
dnshostprefs 78
Description 78
Usage 79
Example 79
dnslistconfig 79
Description 79
Usage 79
Example 79
dnslisttest 80
Description 80
Usage 80
Example 80
dnsstatus 80
Description 80
Usage 80
Example 81
General Management/Administration/Troubleshooting 81
addressconfig 82
Description 82
CLI Reference Guide ix
Contents

Usage 83
Example 83
adminaccessconfig 84
Description 84
Usage 84
Batch Format 84
Example - Configuring Network Access List 87
Example - Configuring Login Banner 88
Example - Configuring Web Interface and CLI Session Timeout 88
certconfig 89
Description 89
Usage 89
Example - Pasting in a certificate 89
Example - Creating a Self-signed Certificate 90
Example - Create a Self-signed S/MIME Signing Certificate 92
date 93
Description 93
Usage 93
Example 93
diagnostic 93
Description 93
Using the diagnostic Command 93
Usage 94
Batch Format 94
Example: Displaying and Clearing Caches 95
Example: Verify Connectivity to Another Mail Server 96
Example: Reset Appliance Configuration to the Initial Manufacturer Values 97
diskquotaconfig 97
Usage 97
Batch Format 97
Example 97
ecconfig 98
Usage 98
Batch Format 98
Example 98
CLI Reference Guidex
Contents

ecstatus 99
Usage 99
Example 99
ecupdate 99
Usage 99
Batch Format 99
Example 99
encryptionconfig 100
Usage 100
Example 100
encryptionstatus 102
Description 102
Usage 102
Example 103
encryptionupdate 103
Description 103
Usage 103
Example 103
enginestatus 103
Description 103
Usage 103
Example 104
featurekey 104
Description 104
Usage 104
Example 105
featurekeyconfig 105
Description 105
Usage 105
Example 105
generalconfig 106
Description 106
Usage 106
Example - Configure Internet Explorer Compatibility Mode Override 106
healthcheck 106
CLI Reference Guide xi
Contents

Description 106
Usage 107
Example 107
healthconfig 107
Description 107
Usage 107
Example 107
ntpconfig 108
Description 108
Usage 108
Example 108
portalregistrationconfig 109
Usage 109
Example 109
reboot 110
Description 110
Usage 110
Example 110
repengstatus 110
Description 110
Usage 110
Example 110
resume 111
Description 111
Usage 111
Example 111
resumedel 111
Description 111
Usage 111
Example 111
resumelistener 112
Description 112
Usage 112
Example 112
revert 112
CLI Reference Guidexii
Contents

Description 112
Usage 112
Example 112
settime 113
Description 113
Usage 113
Example 113
settz 113
Description 113
Usage 114
Example 114
shutdown 114
Description 114
Usage 114
Example 115
sshconfig 115
Description 115
Usage 115
Example 115
status 117
Description 117
Usage 117
Example 117
supportrequest 118
Description 118
Usage 118
Example 118
supportrequeststatus 119
Description 119
Usage 119
Example 120
supportrequestupdate 120
Description 120
Usage 120
Example 120
CLI Reference Guide xiii
Contents

suspend 120
Description 120
Usage 120
Example 120
suspenddel 121
Description 121
Usage 121
Example 121
suspendlistener 121
Description 121
Usage 121
Example 121
tcpservices 122
Description 122
Usage 122
Example 122
techsupport 123
Description 123
Usage 123
Example 123
tlsverify 124
Description 124
Usage 124
Batch Format 124
Example 124
trace 124
Description 124
Usage 125
Example 125
trackingconfig 126
Description 126
Usage 126
Example 126
tzupdate 127
Description 127
CLI Reference Guidexiv
Contents

Usage 127
Batch Format 127
Example 127
updateconfig 127
Description 127
Usage 127
Examples 127
Configure the Appliance to Download Updates from Updater Servers 128
Configure the Appliance to Verify the Validity of Updater Server Certificate 129
Configure the Appliance to Trust Proxy Server Communication 130
updatenow 131
Description 131
Usage 131
Batch Format 131
Example 131
version 131
Description 131
Usage 131
Example 132
wipedata 132
Description 132
Usage 132
Example 132
upgrade 133
Description 133
Usage 133
Example 133
Content Scanning 133
contentscannerstatus 133
Usage 133
Example 134
contentscannerudpate 134
Usage 134
Example 134
LDAP 134
CLI Reference Guide xv
Contents

ldapconfig 134
Description 134
Usage 134
Example - Creating a New LDAP Server Profile 135
Example - Configuring Global Settings 138
ldapflush 138
Description 138
Usage 138
Example 138
ldaptest 139
Description 139
Usage 139
Example 139
sievechar 139
Description 139
Usage 140
Example 140
Mail Delivery Configuration/Monitoring 140
addresslistconfig 141
Description 141
Usage 141
Batch Format 141
Example 142
aliasconfig 142
Description 142
Usage 142
Batch Format 143
Example 143
archivemessage 145
Description 145
Usage 145
Example 145
altsrchost 145
Description 145
Usage 145
CLI Reference Guidexvi
Contents

Example 146
bounceconfig 147
Description 147
Usage 147
Example 147
Applying a Bounce Profile to a Listener 148
bouncerecipients 149
Description 149
Usage 149
Example 150
Bounce by Recipient Host 150
Bounce by Envelope From Address 150
Bounce All 150
bvconfig 150
Description 150
Usage 151
Example 151
deleterecipients 152
Description 152
Usage 152
Example 152
Delete by Recipient Domain 152
Delete by Envelope From Address 152
Delete All 152
deliveryconfig 153
Description 153
Usage 153
Example 153
delivernow 153
Description 153
Usage 154
Example 154
destconfig 154
Using the destconfig Command 154
Sample Destination Control Table 155
CLI Reference Guide xvii
Contents

Batch Format 156
Example: Creating a new destconfig Entry 157
Example: Bounce Profile and TLS Settings 158
Example: Inbound “Shock Absorber” 160
Example: Global Settings 161
hostrate 161
Description 161
Usage 161
Example 161
hoststatus 162
Description 162
Usage 162
Example 162
imageanalysisconfig 163
Description 163
Usage 163
Example 163
oldmessage 164
Description 164
Usage 164
Example 164
rate 164
Description 164
Usage 164
Example 165
redirectrecipients 165
Description 165
Usage 165
Batch Format 165
Example 166
resetcounters 166
Description 166
Usage 166
Example 166
removemessage 166
CLI Reference Guidexviii
Contents

Description 166
Usage 167
Example 167
showmessage 167
Description 167
Usage 167
Example 167
showrecipients 168
Description 168
Usage 168
Batch Format 168
Example 168
status 169
Usage 169
Example 169
tophosts 170
Description 170
Usage 170
Example 170
topin 170
Description 170
Usage 171
Example 171
unsubscribe 171
Description 171
Usage 171
Example 172
workqueue 172
Description 172
Usage 172
Example 173
Networking Configuration / Network Tools 173
etherconfig 174
Description 174
Usage 174
CLI Reference Guide xix
Contents

Example 174
interfaceconfig 175
Description 175
Usage 175
Batch Format 175
Example: Configuring an Interface 176
nslookup 177
Description 177
Usage 178
Example 178
netstat 178
Description 178
Usage 179
Example 179
packetcapture 179
Description 179
Usage 179
Example 179
ping 180
Description 180
Usage 181
Example 181
ping6 181
Description 181
Usage 181
Example 182
routeconfig 182
Description 182
Usage 182
Batch Format 183
Example 184
setgateway 184
Description 184
Usage 185
Example 185
CLI Reference Guidexx
Contents
sethostname 185
Description 185
Usage 185
Example 185
smtproutes 186
Description 186
Usage 186
Batch Format 186
Example 187
sslconfig 187
Description 187
Usage 188
Example 188
sslv3config 189
Description 189
Usage 189
Example 189
telnet 190
Description 190
Usage 190
Example 190
traceroute 190
Description 190
Usage 190
Example 191
traceroute6 191
Description 191
Usage 191
Example 191
Outbreak Filters 192
outbreakconfig 192
Description 192
Usage 192
Example 192
outbreakflush 193
CLI Reference Guide xxi
Contents

Description 193
Usage 193
Example 193
outbreakstatus 193
Description 193
Usage 194
Example 194
outbreakupdate 194
Description 194
Usage 194
Example 194
Policy Enforcement 195
dictionaryconfig 195
Description 195
Usage 195
Example 195
Creating a Dictionary 195
Creating a Dictionary 2 196
Importing Dictionaries 197
Exporting Dictionaries 197
exceptionconfig 198
Description 198
Usage 198
Example 198
filters 199
Description 199
Usage 199
Example 199
policyconfig 201
Description 201
Usage 201
Examples 201
Creating an IncomingMail Policy to Drop SpamMessages and Archive Suspected
Spam Messages 201
Creating a Policy for the Sales Team 203
CLI Reference Guidexxii
Contents

Creating a Policy for the Engineering Team 205
Creating the scan_for_confidential Content Filter 207
Creating the no_mp3s and ex_employee Content Filters 209
Enabling Content Filters for Specific Policies 213
DLP Policies for Default Outgoing Policy 217
Create an Incoming Policy to Drop the Messages Identified as Bulk Email or Social
Network Email 218
quarantineconfig 219
Description 219
Usage 219
Example 219
Users and Quarantines 220
scanconfig 221
Description 221
Usage 221
Example 221
stripheaders 222
Description 222
Usage 222
Example 223
textconfig 223
Description 223
Usage 223
Example 223
Importing Text Resources 224
Exporting Text Resources 225
Logging and Alerts 225
alertconfig 226
Description 226
Usage 226
Example: Creating a New Alert 226
displayalerts 227
Description 227
Usage 227
Example 227
CLI Reference Guide xxiii
Contents

findevent 228
Description 228
Usage 228
Example: Search by envelope FROM 228
Example: Search by Message ID 228
Example: Search by Subject 229
Example: Search by envelope TO 229
grep 229
Description 229
Usage 230
Example of grep 230
logconfig 231
Description 231
Usage 231
Example of FTP Push Log Subscription 231
Example of SCP Push Log Subscription 233
Example of Syslog Push Log Subscription 235
rollovernow 236
Description 236
Usage 236
Example 237
snmpconfig 237
Description 237
Usage 237
Example 237
tail 239
Description 239
Usage 239
Example 239
Reporting 240
reportingconfig 240
Using the reportingconfig command 240
Usage 240
Example: Enabling Reporting Filters (M-Series only) 240
Enabling HAT REJECT Information for Domain Reports (M-Series only) 241
CLI Reference Guidexxiv
Contents

Enabling Timeout Alerts (M-Series only) 241
Enabling Centralized Reporting for an Email Security Appliance 241
Configure Storage Limit for Reporting Data (C-Series only) 242
Senderbase 242
sbstatus 243
Description 243
Usage 243
Example 243
senderbaseconfig 243
Description 243
Usage 243
Example 243
SMTP Services Configuration 244
callaheadconfig 244
Description 244
Usage 244
Example 244
listenerconfig 246
Description 246
Usage 246
Batch Format - General listenerconfig 247
Batch Format - HAT 247
Batch Format - RAT 251
Example - Adding a listener 253
Example - Customizing the Host Acess Table (HAT ) for a listener via Export and
Import 254
Example - Enabling Public Key Harvesting and S/MIME Decryption and Verification 259
Example - Advanced HAT Parameters 262
Example - Adding bypass_ca Argument to listenerconfig 264
Example - Configuring SPF and SIDF 264
Example: SPF/SIDF Settings 267
Example: SPF/SIDF in Default Policy Parameters 267
Example - Enable DMARC Verification 268
localeconfig 271
Description 271
CLI Reference Guide xxv
Contents

Usage 271
Example 271
smtpauthconfig 271
Description 271
Usage 272
Example 272
System Setup 273
systemsetup 273
Description 273
Usage 273
Example 273
URL Filtering 275
aggregatorconfig 276
Description 276
Usage 276
Example 276
urllistconfig 276
Description 276
Usage 276
Example 277
webcacheflush 277
Description 277
Usage 277
Example 278
websecurityadvancedconfig 278
Description 278
Usage 278
Batch Format 278
Example 278
websecurityconfig 279
Description 279
Usage 279
Example 279
websecuritydiagnostics 279
Description 279
CLI Reference Guidexxvi
Contents
Usage 279
Example 280
User Management 280
userconfig 280
Description 280
Usage 280
Example - Creating a New User Account 280
Example - Setting Up a RADIUS Server for External Authentication 281
passphrase or passwd 282
Description 282
Usage 282
Example 283
last 283
Description 283
Usage 283
Example 283
who 284
Description 284
Usage 284
Example 284
whoami 284
Description 284
Usage 284
Example 284
Virtual Appliance Management 285
loadlicense 285
Description 285
Usage 285
Example 285
showlicense 285
Description 285
Usage 286
Batch Format 286
Example 286
CLI Reference Guide xxvii
Contents

CLI Reference Guidexxviii
Contents

Preface
The instructions in this book are designed for an experienced system administrator with knowledge ofnetworking and email administration.
This chapter contains the following sections:
• Before you Read this Book, page xxix
• Typographic Conventions, page xxix
• Additional Resources, page xxx
Before you Read this Book
If you have already cabled your appliance to your network, ensure that the default IP address for theappliance does not conflict with other IP addresses on your network. The IP address assigned to theManagement port by the factory is 192.168.42.42 . See the “Setup and Installation” chapter in the userguide for your release for more information about assigning IP addresses to the appliance.
Note
Typographic ConventionsThe following table shows the typographic conventions:
CLI Reference Guide xxix

ExamplesMeaningTypeface or Symbol
Please choose an IP interface for this
Listener.
The sethostname command sets the name ofthe appliance.
The names of commands, files,and directories; on-screencomputer output.
AaBbCc123
mail3.example.com> commitPlease enter some comments describingyourchanges:[]> Changed the system hostname
What you type, when contrastedwith on-screen computer output.
AaBbCc123
Read the QuickStart Guide .
The appliancemust be able to uniquely selectan interface to send an outgoing packet.
Before you begin, please reset yourpassphrase to anew value.Old passphrase: ironportNew passphrase: your_new_passphraseRetype new passphrase:your_new_passphrase
Book titles, new words or terms,words to be emphasized.Command line variable; replacewith a real name or value.
AaBbCc123
Additional ResourcesDocumentation
Documentation for your Email Security appliance is available from:
http://www.cisco.com/c/en/us/support/security/email-security-appliance/tsd-products-support-series-home.html
Knowledge Base
To access the Knowledge Base for information about Cisco Content Security products, visit:
http://www.cisco.com/web/ironport/knowledgebase.html
You need a Cisco.com User ID to access the site. If you do not have a Cisco.com User ID, see Registeringfor a Cisco Account.
Cisco Support Community
Cisco Support Community is an online forum for Cisco customers, partners, and employees. It provides aplace to discuss general content security issues, as well as technical information about specific Cisco products.You can post topics to the forum to ask questions and share information with other users.
Access the Cisco Support Community for Email Security appliances at:
https://supportforums.cisco.com/community/netpro/security/email
CLI Reference Guidexxx
PrefaceAdditional Resources

Customer Support
Use the following methods to obtain support:
U.S.: Call 1 (408) 526-7209 or Toll-free 1 (800) 553-2447
International: http://www.cisco.com/en/US/support/tsd_cisco_worldwide_contacts.html
Support Site: http://www.cisco.com/en/US/products/ps11169/serv_group_home.html
If you purchased support through a reseller or another supplier, please contact that supplier directly with yourproduct support issues.
Registering for a Cisco Account
Access to many resources on Cisco.com requires a Cisco account.
If you do not have a Cisco.com User ID, you can register for one here:https://tools.cisco.com/RPF/register/register.do%20
Cisco Welcomes Your Comments
The Technical Publications team is interested in improving the product documentation. Your comments andsuggestions are always welcome. You can send comments to the following email address:
Please include the title of this book and the publication date from the title page in the subject line of yourmessage.
CLI Reference Guide xxxi
PrefaceAdditional Resources

CLI Reference Guidexxxii
PrefaceAdditional Resources
C H A P T E R 1CLI Quick Reference Guide
This chapter contains the following sections:
Use the tables to locate the appropriate CLI command, a brief description and its availability on the C-, X,and M-series platforms.
• CLI Commands (No Commit Required), page 1
• CLI Commands (Commit Required), page 7
CLI Commands (No Commit Required)Platform AvailabilityDescriptionCLI Command
C- and X- SeriesDisplay the version of various file reputationand analysis components.
ampstatus, on page 29
C- and X- SeriesDisplay Anti-Spam statusantispamstatus, on page31
C- and X- SeriesManually update spam definitionsantispamupdate, onpage 31
C- and X- SeriesDisplay anti-virus statusantivirusstatus, on page39
C- and X- SeriesManually update virus definitionsantivirusupdate, onpage 39
C- and X- SeriesArchives older messages in your queue.archivemessage, onpage 145
C-, X-, and M-SeriesBounce messages from the queuebouncerecipients, onpage 149
CLI Reference Guide 1

Platform AvailabilityDescriptionCLI Command
C-, X-, and M-SeriesClear changesclearchanges or clear,on page 41
C-, X-, and M-SeriesCommit changescommit, on page 40
C- and X- SeriesDisplay detailed information about the lastcommit
commitdetail, on page41
C- and X- SeriesDisplay content scanner version information.contentscannerstatus,on page 133
C- and X- SeriesRequest manual update of content scannerengine.
contentscannerudpate,on page 134
C-, X-, and M- SeriesDisplay the current date and timedate, on page 93
C-, X-, and M-SeriesDelete messages from the queuedeleterecipients, onpage 152
C-, X-, and M-SeriesReschedule messages for immediate deliverydelivernow, on page153
C-, X-, and M-SeriesCheck RAID disks, network caches, andSMTP connections. Clear network caches.
diagnostic, on page 93
C- and X- SeriesLook up a record on a DNS serverdig, on page 73
C-, X-, and M-SeriesDisplay the last n alerts sent by the appliancedisplayalerts, on page227
C- and X- SeriesRollback RSA DLP Enginedlprollback, on page50
C- and X- SeriesVersion information for RSA DLP Enginedlpstatus, on page 51
C- and X- SeriesUpdate RSA DLP Enginedlpupdate, on page 51
C-, X-, and M-SeriesClear all entries from the DNS cachednsflush, on page 78
C- and X- SeriesTest a DNS lookup for a DNS-based listservice
dnslisttest, on page 80
C-, X-, and M-SeriesDisplay DNS statisticsdnsstatus, on page 80
C-SeriesCheck the version of the enrollment client thatis used to obtain certificates
ecstatus , on page 99
C-SeriesUpdate the enrollment client that is used toobtain certificates
ecupdate , on page 99
CLI Reference Guide2
CLI Quick Reference GuideCLI Commands (No Commit Required)

Platform AvailabilityDescriptionCLI Command
C-, X-, and M- SeriesDiagnostic tool for RSA EM on ESA.emdiagnostic, on page54
C- and X-SeriesShows the version of the PXE Engine andDomain Mappings file
encryptionstatus, onpage 102
C- and X-SeriesRequests an update to the PXE Engineencryptionupdate, onpage 103
C- and X-SeriesDisplays the status and CPU usage of allengines enabled on the appliance.
enginestatus, on page103
C-, X-, and M-SeriesAdminister system feature keysfeaturekey, on page 104
C-, X-, and M-SeriesFind events in mail log filesfindevent, on page 228
C- and X-SeriesDisplay the details of existing graymail rulesgraymailstatus, on page36
C- and X-SeriesManually update graymail rulesgraymailupdate, onpage 37
C-, X-, and M-SeriesSearch for text in a log filegrep, on page 229
C- and X-SeriesChecks the health of your Email Securityappliance
healthcheck, on page106
C-, X-, and M-SeriesHelphelp or h or ?, on page42
C-, X-, and M-SeriesMonitor activity for a particular hosthostrate, on page 161
C-, X-, and M-SeriesGet the status of the given hostnamehoststatus, on page 162
C-, X-, and M-SeriesDisplay who has recently logged into thesystem
last, on page 283
C- and X- SeriesFlush any cached LDAP resultsldapflush, on page 138
C- and X- SeriesPerform a single LDAP query testldaptest, on page 139
All virtual appliancesLoad a virtual appliance licenseloadlicense, on page285
C-, X-, and M-SeriesMail the current configuration to an emailaddress
mailconfig, on page 44
C-, X-, and M-SeriesQuery a name servernslookup, on page 177
CLI Reference Guide 3
CLI Quick Reference GuideCLI Commands (No Commit Required)

Platform AvailabilityDescriptionCLI Command
C-, X-, and M-SeriesDisplay network connections, routing tables,and network interface statistics.
netstat, on page 178
C- and X- SeriesClear the cached Outbreak Rulesoutbreakflush, on page193
C- and X- SeriesDisplay current Outbreak Rulesoutbreakstatus, on page193
C- and X- SeriesUpdate Outbreak Filters rulesoutbreakupdate, onpage 194
C- and X- Seriesdisplays a list of old messages in the queue.oldmessage, on page164
C-, X-, and M-SeriesIntercept and display packets beingtransmitted or received over the network
packetcapture, on page179
C-, X-, and M-SeriesChange your passphrasepassphrase or passwd,on page 282
C-, X-, and M-SeriesPing a network hostping, on page 180
C-, X-, and M-SeriesPing a network host using IPV6ping6, on page 181
C-, X-, and M-SeriesQuitquit or q or exit, onpage 43
C-, X-, and M-SeriesMonitor message throughputrate, on page 164
C-, X-, and M-SeriesRestart the systemreboot, on page 110
C- and X- SeriesRedirect all messages to another relay hostredirectrecipients, onpage 165
C- and X- SeriesRemoves old, undelivered messages fromyour queue.
removemessage, onpage 166
C-, X-, and M-SeriesRequest version information of ReputationEngine
repengstatus, on page110
C-, X-, and M-SeriesRestore the factory configuration defaultsresetconfig , on page45
C-, X-, and M-SeriesReset all of the counters in the systemresetcounters, on page166
C-, X-, and M-SeriesResume receiving and deliveriesresume, on page 111
CLI Reference Guide4
CLI Quick Reference GuideCLI Commands (No Commit Required)

Platform AvailabilityDescriptionCLI Command
C-, X-, and M-SeriesResume deliveriesresumedel, on page 111
C-, X-, and M-SeriesResume receivingresumelistener, on page112
C-, X-, and M-SeriesRevert to a previous releaserevert, on page 112
C-, X-, and M-SeriesRoll over a log filerollovernow, on page236
C-, X-, and M-SeriesSaves the configuration to disksaveconfig, on page 46
C- and X- SeriesDisplay status of SenderBase queriessbstatus, on page 243
C-, X-, and M-SeriesManually set the system clocksettime, on page 113
C- and X- SeriesDisplays old undelivered messages in yourqueue.
showmessage, on page167
C-, X-, and M-SeriesDisplay all configuration valuesshowconfig, on page47
All virtual appliancesDisplay virtual appliance license informationshowlicense , on page285
C- and X- SeriesShow messages from the queue by recipienthost, Envelope From address, or all messages
showrecipients, on page168
C-, X-, and M-SeriesShut down the system to power offshutdown, on page 114
C- and X-SeriesConfigure Safelist/Blocklist settingsslblconfig, on page 34
C-, X-, and M-SeriesSystem statusstatus, on page 117
C-, X-, and M-SeriesSend a message to Cisco TACsupportrequest, on page118
C-, X-, and M-SeriesDisplay Support Request Keywords versioninformation
supportrequeststatus, onpage 119
C-, X-, and M-SeriesRequest manual update for Support RequestKeywords
supportrequestupdate,on page 120
C-, X-, and M-SeriesSuspend receiving and deliveriessuspend, on page 120
C-, X-, and M-SeriesSuspend deliveriessuspenddel, on page121
CLI Reference Guide 5
CLI Quick Reference GuideCLI Commands (No Commit Required)

Platform AvailabilityDescriptionCLI Command
C-, X-, and M-SeriesSuspend receivingsuspendlistener, onpage 121
C- and X- SeriesFirst time system setupsystemsetup, on page273
C-, X-, and M-SeriesContinuously display the end of a log filetail, on page 239
C-, X-, and M-SeriesAllow Cisco TAC to access your systemtechsupport, on page123
C-, X-, and M-SeriesConnect to a remote hosttelnet, on page 190
C- and X- SeriesEstablish an outbound TLS connection to aremote host and debug any TLS connectionissues
tlsverify, on page 124
C-, X-, and M-SeriesDisplay the top hosts by queue sizetophosts, on page 170
C-, X-, and M-SeriesDisplay the top hosts by number of incomingconnections
topin, on page 170
C-, X-, and M-SeriesTrace the flow of a message through thesystem
trace, on page 124
C-, X-, and M-SeriesDisplay the network route to a remote hosttraceroute, on page 190
C-, X-, and M- SeriesDisplay the network route to a remote hostusing IPV6.
traceroute6, on page191
C-, X-, and M-SeriesUpdate timezone rulestzupdate, on page 127
C-, X-, and M-SeriesUpdate all componentsupdatenow, on page131
C-, X-, and M-SeriesInstall an upgradeupgrade, on page 133
C-, X-, and M-SeriesView system version informationversion, on page 131
C-, X-, and M-SeriesWipe the core files on the disk and check thestatus of the last coredump operation
wipedata, on page 132
C-, X-, and M- SeriesFlush the cache used by the URL filteringfeature
webcacheflush, on page277
C-, X-, and M- SeriesView diagnostic statistics for URL filteringwebsecuritydiagnostics, on page 279
C-, X-, and M-SeriesList who is logged inwho, on page 284
CLI Reference Guide6
CLI Quick Reference GuideCLI Commands (No Commit Required)

Platform AvailabilityDescriptionCLI Command
C-, X-, and M-SeriesDisplay your current user idwhoami, on page 284
C- and X- SeriesDisplay and/or alter work queue pause statusworkqueue, on page172
CLI Commands (Commit Required)Platform AvailabilityDescriptionCLI Command
C-, X-, and M- SeriesConfigure From: addresses for systemgenerated mail
addressconfig, on page82
C- and X- SeriesConfigure address listsaddresslistconfig, onpage 141
C- and X- SeriesConfigure network access list and banner loginadminaccessconfig, onpage 84
C- and X- SeriesConfigure address of the Cisco AggregatorServer
aggregatorconfig, onpage 276
C-, X-, and M- SeriesConfigure email alertsalertconfig, on page226
C- and X- SeriesConfigure email aliasesaliasconfig, on page142
C- and X- SeriesConfigure Virtual Gateway™ mappingsaltsrchost, on page 145
C-, X-, and M- SeriesConfigure AdvancedMalware Protection (Filereputation and analysis)
ampconfig, on page24
C- and X- SeriesConfigure Anti-Spam policyantispamconfig, onpage 30
C- and X- SeriesConfigure anti-virus policyantivirusconfig, onpage 37
C-, X-, and M- SeriesConfigure the behavior of bouncesbounceconfig, on page147
C- and X- SeriesConfigure key settings for outgoing mail, andconfigure how to handle invalid bounces.
bvconfig, on page 150
C-, X-, and M- SeriesAdd, edit, and remove SMTP Call-Aheadprofiles
callaheadconfig, onpage 244
CLI Reference Guide 7
CLI Quick Reference GuideCLI Commands (Commit Required)

Platform AvailabilityDescriptionCLI Command
C-, X-, and M- SeriesConfigure security certificates and keyscertconfig, on page 89
C- and X- SeriesConfigure cluster related settingsclusterconfig, on page48
C- and X- SeriesConfigure mail deliverydeliveryconfig, onpage 153
C- and X- SeriesConfigure options for the Destination ControlsTable.
destconfig, on page154
C-, X-, and M- SeriesConfigure content dictionariesdictionaryconfig, onpage 195
C-, X-, and M- SeriesConfigure disk spacediskquotaconfig, onpage 97
C- and X- SeriesConfigure DMARC settingsdmarcconfig, on page68
C- and X- SeriesConfigure DNS setupdnsconfig, on page 74
C-, X-, and M- SeriesConfigure IPv4/IPv6 DNS preferencesdnshostprefs, on page78
C- and X- SeriesConfigure DNS List services supportdnslistconfig, on page79
C- and X- SeriesConfigure DomainKeys supportdomainkeysconfig, onpage 56
C-, X-, and M- SeriesConfigure the enrollment client that is used toobtain certificates
ecconfig , on page 98
C- and X- SeriesConfigure the RSA Enterprise Managerinteroperability settings
emconfig, on page 52
C- and X- SeriesConfigure email encryptionencryptionconfig, onpage 100
C-, X-, and M- SeriesConfigure Ethernet settingsetherconfig, on page174
C- and X- SeriesConfigure domain exception tableexceptionconfig, onpage 198
C-, X-, and M-SeriesAutomatically check and update feature keysfeaturekeyconfig, onpage 105
CLI Reference Guide8
CLI Quick Reference GuideCLI Commands (Commit Required)

Platform AvailabilityDescriptionCLI Command
C- and X- SeriesConfigure message processing optionsfilters, on page 199
C-, X-, and M- SeriesConfigure browser settings and other generalsettings
generalconfig, on page106
C- and X- SeriesConfigure graymail detection and safeunsubscribe global settings
graymailconfig, onpage 35
C-, X-, and M- SeriesConfigure the threshold of various healthparameters of your appliance
healthconfig, on page107
C-, X-, and M- SeriesConfigure the IronPort ImageAnalysis settingsimageanalysisconfig,on page 163
C- and X- SeriesConfigure Incoming Relaysincomingrelayconfig,on page 32
C-, X-, and M- SeriesConfigure Ethernet IP addressesinterfaceconfig, onpage 175
C- and X- SeriesConfigure LDAP serversldapconfig, on page134
C- and X- SeriesConfigure mail listenerslistenerconfig, on page246
C-, X-, and M- SeriesLoad a configuration fileloadconfig, on page43
C- and X- SeriesConfigure multi-lingual settingslocaleconfig, on page271
C-, X-, and M- SeriesConfigure access to log fileslogconfig, on page 231
C-, X-, and M- SeriesConfigure NTP time serverntpconfig, on page 108
C- and X- SeriesConfigure Outbreak Filtersoutbreakconfig, onpage 192
C- and X- SeriesConfigure per recipient or sender basedpolicies
policyconfig, on page201
C- and X- SeriesSet Spam Submission Tracking Portalregistration ID for your appliance.
portalregistrationconfig,on page 109
C- and X- SeriesConfigure system quarantinesquarantineconfig, onpage 219
CLI Reference Guide 9
CLI Quick Reference GuideCLI Commands (Commit Required)

Platform AvailabilityDescriptionCLI Command
C-, X-, and M- SeriesConfigure reporting settingsreportingconfig, onpage 240
C-, X-, and M- SeriesRollback to one of the previously committedconfigurations
rollbackconfig, onpage 42
C-, X-, and M- SeriesConfigure IP routing tablerouteconfig, on page182
C- and X- SeriesConfigure attachment scanning policyscanconfig, on page221
C- and X- SeriesConfigure SenderBase connection settingssenderbaseconfig, onpage 243
C-, X-, and M- SeriesSet the default gateway (router)setgateway, on page184
C-, X-, and M- SeriesSet the name of the machinesethostname, on page185
C-, X-, and M- SeriesSet the local time zonesettz, on page 113
C- and X- SeriesConfigure characters for Sieve Email Filtering,as described in RFC 3598
sievechar, on page 139
C-, X-, and M- SeriesConfigure S/MIME functionalitysmimeconfig, on page54
C- and X- SeriesConfigure SMTP Auto profilessmtpauthconfig, onpage 271
C-, X-, and M- SeriesSet up permanent domain redirectionssmtproutes, on page186
C-, X-, and M- SeriesConfigure SNMPsnmpconfig, on page237
C-, X-, and M- SeriesConfigure SSH keyssshconfig, on page 115
C-, X-, and M- SeriesConfigure SSL settingssslconfig, on page 187
C-, X-, and M- SeriesEnable/Disable SSLv3sslv3config, on page189
C- and X- SeriesSet message headers to removestripheaders, on page222
CLI Reference Guide10
CLI Quick Reference GuideCLI Commands (Commit Required)

Platform AvailabilityDescriptionCLI Command
C-, X-, and M- SeriesDisplay information about files opened byprocesses
tcpservices, on page122
C- and X- SeriesConfigure text resourcestextconfig, on page 223
C-, X-, and M- SeriesConfigure the tracking systemtrackingconfig, onpage 126
C-, X-, and M- SeriesUpdate the global unsubscribe listunsubscribe, on page171
C- and X- SeriesConfigure system update parametersupdateconfig, on page127
Configure system upgrade parameters(deprecated command)
LDAP, on page 134
C-, X-, and M- SeriesConfigure whitelists of safe URLs.urllistconfig, on page276
C-, X-, and M- SeriesManage user accounts and connections toexternal authentication sources.
userconfig, on page280
C-, X-, and M- SeriesConfigure advanced settings for URL filteringwebsecurityadvancedconfig,on page 278
C-, X-, and M- SeriesConfigure global settings for URL filteringwebsecurityconfig, onpage 279
CLI Reference Guide 11
CLI Quick Reference GuideCLI Commands (Commit Required)

CLI Reference Guide12
CLI Quick Reference GuideCLI Commands (Commit Required)

C H A P T E R 2Command Line Interface: The Basics
This chapter contains the following sections:
• Accessing the Command Line Interface (CLI), page 13
• Command Line Interface Conventions, page 14
• General Purpose CLI Commands, page 17
• Batch Commands, page 19
Accessing the Command Line Interface (CLI)The Command Line Interface is accessible via SSH or Telnet on IP interfaces that have been configured withthese services enabled, or via terminal emulation software on the serial port. By factory default, SSH andTelnet are configured on the Management port. Use the interfaceconfig command to disable these services.
Access to the CLI varies depending on the management connection method chosen while setting up theappliance. The factory default username and passphrase are listed next. Initially, only the admin user accounthas access to the CLI. You can add other users with differing levels of permission after you have accessedthe command line interface for the first time via the admin account. The system setup wizard asks you tochange the passphrase for the admin account. The passphrase for the admin account can also be reset directlyat any time using the passphrase command.
To connect via Ethernet: Start an SSH or Telnet session with the factory default IP address 192.168.42.42.SSH is configured to use port 22. Telnet is configured to use port 23. Enter the username and passphrasebelow.
To connect via a Serial connection: Start a terminal session with the communication port on your personalcomputer that the serial cable is connected to. See the “Setup and Installation” chapter for more information.Enter the username and passphrase below.
Log in to the appliance by entering the username and passphrase below.
Factory Default Username and Passphrase• Username: admin
CLI Reference Guide 13

• Passphrase: ironport
For example:
login: admin
passphrase: ironport
Command Line Interface ConventionsThis section describes the rules and conventions of the AsyncOS CLI.
Command PromptThe top-level command prompt consists of the fully qualified hostname, followed by the greater than ( > )symbol, followed by a space. For example:
mail3.example.com>
If the appliance has been configured as part of a cluster with the Centralized Management feature, the promptin the CLI changes to indicate the current mode. For example:
(Cluster Americas) >
or
(Machine los_angeles.example.com) >
See “Centralized Management” in the user guide for more information.When running commands, the CLI requires input from you. When the CLI is expecting input from you, thecommand prompt shows the default input enclosed in square brackets ( [] ) followed by the greater than ( >) symbol. When there is no default input, the command prompt brackets are empty.
For example:
Please create a fully-qualified hostname for this Gateway(Ex: "mail3.example.com"):[]>mail3.example.com
CLI Reference Guide14
Command Line Interface: The BasicsCommand Line Interface Conventions

When there is a default setting, the setting is displayed within the command prompt brackets. For example:
Ethernet interface:1. Data 12. Data 23. Management[1]> 1
When a default setting is shown, typing Return is equivalent to typing the default:
Ethernet interface:1. Data 12. Data 23. Management[1]> (type Return)
Command SyntaxWhen operating in the interactive mode, the CLI command syntax consists of single commands with no whitespaces and no arguments or parameters. For example:
mail3.example.com> systemsetup
Select ListsWhen you are presented with multiple choices for input, some commands use numbered lists. Enter the numberof the selection at the prompt.
For example:
Log level:1. Error2. Warning3. Information4. Debug5. Trace[3]> 3
Yes/No QueriesWhen given a yes or no option, the question is posed with a default in brackets. You may answer Y, N, Yes,or No. Case is not significant.
For example:
Do you want to enable FTP on this interface? [Y]> n
CLI Reference Guide 15
Command Line Interface: The BasicsCommand Syntax

SubcommandsSome commands give you the opportunity to use subcommands. Subcommands include directives such asNEW , EDIT , and DELETE . For the EDIT and DELETE functions, these commands provide a list of therecords previously configured in the system.
For example:
mail3.example.com> interfaceconfigCurrently configured interfaces:1. Management (192.168.42.42/24: mail3.example.com)Choose the operation you want to perform:- NEW - Create a new interface.- EDIT - Modify an interface.- GROUPS - Define interface groups.- DELETE - Remove an interface.[]>
Within subcommands, typing Enter or Return at an empty prompt returns you to the main command.
EscapeYou can use the Control-C keyboard shortcut at any time within a subcommand to immediately exit returnto the top level of the CLI.
HistoryThe CLI keeps a history of all commands you type during a session. Use the Up and Down arrow keys onyour keyboard, or the Control-P and Control-N key combinations, to scroll through a running list of therecently-used commands.
mail3.example.com> (type the Up arrow key)
mail3.example.com> interfaceconfig (type the Up arrow key)
mail3.example.com> topin (type the Down arrow key)
CLI Reference Guide16
Command Line Interface: The BasicsSubcommands

Command CompletionThe command-line interface supports command completion. You can type the first few letters of somecommands followed by the Tab key, and the CLI completes the string for unique commands. If the lettersyou entered are not unique among commands, the CLI “narrows” the set. For example:
mail3.example.com> set(type the Tab key)setgateway, sethostname, settime, settzmail3.example.com> seth(typing the Tab again completes the entry withsethostname)
For both the history and file completion features of the CLI, you must type Enter or Return to invoke thecommand.
Configuration ChangesYou can make configuration changes while email operations proceed normally.
Configuration changes will not take effect until you complete the following steps:
Procedure
Step 1 Issue the commit command at the command prompt.Step 2 Give the commit command the input required.Step 3 Receive confirmation of the commit procedure at the CLI.
What to Do Next
Changes to configuration that have not been committed will be recorded but not put into effect until the commitcommand is run.
Not all commands require the commit command to be run. See CLI Quick Reference Guide, on page 1for a summary of commands that require commit to be run before their changes take effect.
Note
Exiting the CLI session, system shutdown, reboot, failure, or issuing the clear command clears changes thathave not yet been committed.
General Purpose CLI CommandsThis section describes the commands used to commit or clear changes, to get help, and to quit the command-lineinterface.
CLI Reference Guide 17
Command Line Interface: The BasicsCommand Completion
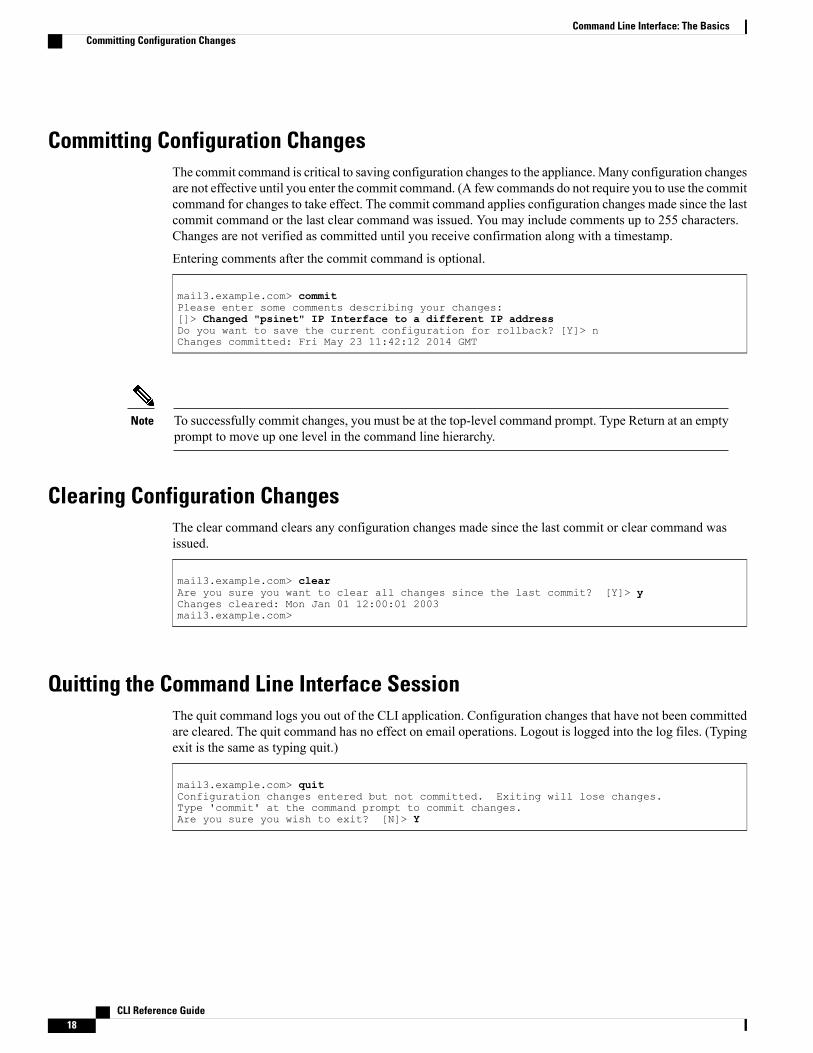
Committing Configuration ChangesThe commit command is critical to saving configuration changes to the appliance.Many configuration changesare not effective until you enter the commit command. (A few commands do not require you to use the commitcommand for changes to take effect. The commit command applies configuration changes made since the lastcommit command or the last clear command was issued. You may include comments up to 255 characters.Changes are not verified as committed until you receive confirmation along with a timestamp.
Entering comments after the commit command is optional.
mail3.example.com> commitPlease enter some comments describing your changes:[]> Changed "psinet" IP Interface to a different IP addressDo you want to save the current configuration for rollback? [Y]> nChanges committed: Fri May 23 11:42:12 2014 GMT
To successfully commit changes, you must be at the top-level command prompt. Type Return at an emptyprompt to move up one level in the command line hierarchy.
Note
Clearing Configuration ChangesThe clear command clears any configuration changes made since the last commit or clear command wasissued.
mail3.example.com> clearAre you sure you want to clear all changes since the last commit? [Y]> yChanges cleared: Mon Jan 01 12:00:01 2003mail3.example.com>
Quitting the Command Line Interface SessionThe quit command logs you out of the CLI application. Configuration changes that have not been committedare cleared. The quit command has no effect on email operations. Logout is logged into the log files. (Typingexit is the same as typing quit.)
mail3.example.com> quitConfiguration changes entered but not committed. Exiting will lose changes.Type 'commit' at the command prompt to commit changes.Are you sure you wish to exit? [N]> Y
CLI Reference Guide18
Command Line Interface: The BasicsCommitting Configuration Changes

Seeking Help on the Command Line InterfaceThe help command lists all available CLI commands and gives a brief description of each command. The helpcommand can be invoked by typing either help or a single question mark ( ? ) at the command prompt.
mail3.example.com> help
Batch CommandsAsyncOS includes support for batch command formats that allow you to execute certain CLI commands usinga new, single-line CLI format. This format reduces the number of inputs required to complete tasks andprovides a mechanism allowing you to easily automate common configuration tasks. Batch commands alsoallow you to issue commands remotely using an SSH client. This enables you to easily script CLI commandsand execute them on multiple appliances at one time.
Not all commands have a batch equivalent, but all batch commands can be executed as non-batch commands.
Batch command syntax is dependent on the specific command being used. Please see the appropriate CLIexample in The Commands: Reference Examples, on page 23 for more information about syntax specific tothat command.
Batch Command ExampleIn the following example, the sendergroup REDLIST is created. It is then associated with the policyTHROTTLED, and then the sender ‘possible_spammer.com’ is added to the sender group.
CLI Reference Guide 19
Command Line Interface: The BasicsSeeking Help on the Command Line Interface

To execute this action using the CLI:
example.com> listenerconfig
Currently configured listeners:
1. IncomingMail (on Management, 192.168.42.42/24) SMTP TCP Port 25 Public
2. OutgoingMail (on Data 2, 192.168.40.42/24) SMTP TCP Port 25 Private
Choose the operation you want to perform:
- NEW - Create a new listener.
- EDIT - Modify a listener.
- DELETE - Remove a listener.
- SETUP - Change global settings.
[]> edit
Enter the name or number of the listener you wish to edit.
[]> IncomingMail
Choose the operation you want to perform:
- NAME - Change the name of the listener.
- INTERFACE - Change the interface.
- LIMITS - Change the injection limits.
- SETUP - Configure general options.
- HOSTACCESS - Modify the Host Access Table.
- RCPTACCESS - Modify the Recipient Access Table.
- BOUNCECONFIG - Choose the bounce profile to use for messages injected on this listener.
- MASQUERADE - Configure the Domain Masquerading Table.
- DOMAINMAP - Configure domain mappings.
[]> HOSTACCESS
There are currently 4 policies defined.
CLI Reference Guide20
Command Line Interface: The BasicsBatch Command Example
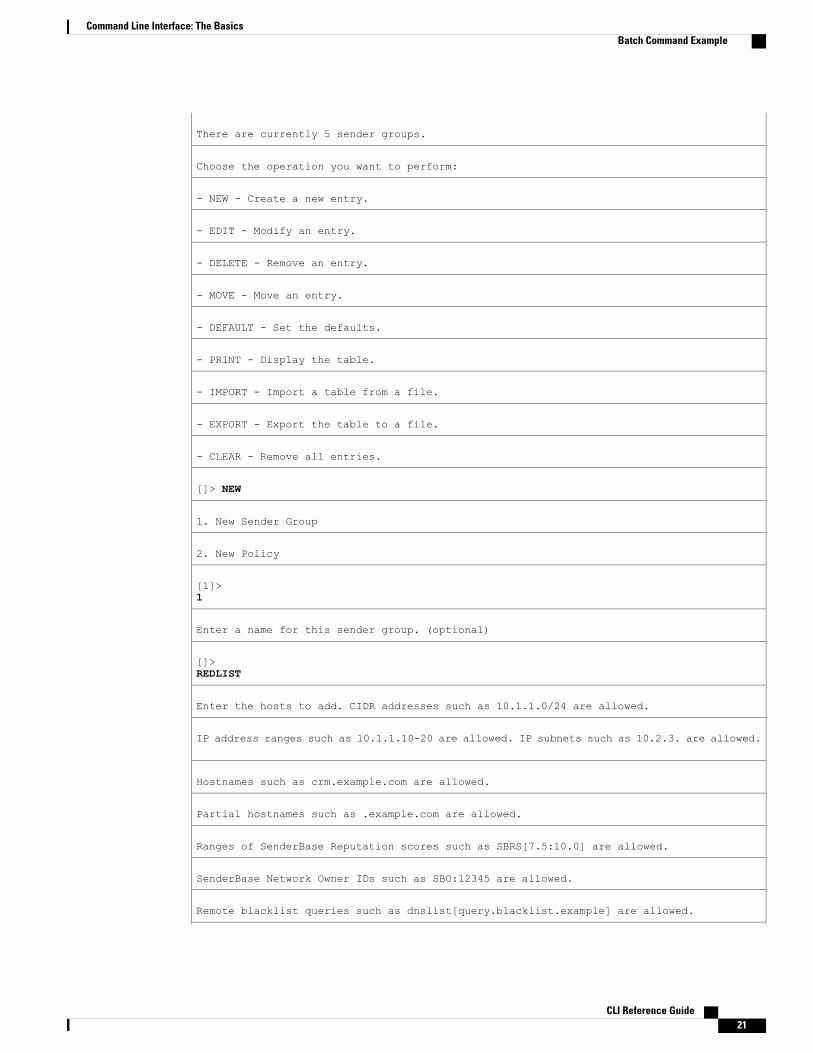
There are currently 5 sender groups.
Choose the operation you want to perform:
- NEW - Create a new entry.
- EDIT - Modify an entry.
- DELETE - Remove an entry.
- MOVE - Move an entry.
- DEFAULT - Set the defaults.
- PRINT - Display the table.
- IMPORT - Import a table from a file.
- EXPORT - Export the table to a file.
- CLEAR - Remove all entries.
[]> NEW
1. New Sender Group
2. New Policy
[1]>1
Enter a name for this sender group. (optional)
[]>REDLIST
Enter the hosts to add. CIDR addresses such as 10.1.1.0/24 are allowed.
IP address ranges such as 10.1.1.10-20 are allowed. IP subnets such as 10.2.3. are allowed.
Hostnames such as crm.example.com are allowed.
Partial hostnames such as .example.com are allowed.
Ranges of SenderBase Reputation scores such as SBRS[7.5:10.0] are allowed.
SenderBase Network Owner IDs such as SBO:12345 are allowed.
Remote blacklist queries such as dnslist[query.blacklist.example] are allowed.
CLI Reference Guide 21
Command Line Interface: The BasicsBatch Command Example

Separate multiple hosts with commas
[]> possible_spammer.com
Select a behavior for this entry.
1. Accept
2. Relay
3. Reject
4. TCP Refuse
5. Continue
6. Policy: ACCEPTED
7. Policy: BLOCKED
8. Policy: THROTTLED
9. Policy: TRUSTED
[1]> 8
Enter a comment for this sender group.
[]>
There are currently 4 policies defined.
There are currently 6 sender groups.
To perform the same action using a CLI batch command:
example.com> listenerconfig edit IncomingMail hostaccess new sendergroup REDLISTpossible_spammer.com Policy: “THROTTLED”
CLI Reference Guide22
Command Line Interface: The BasicsBatch Command Example

C H A P T E R 3The Commands: Reference Examples
This chapter contains the following sections:
• How to Read the Listing, page 24
• Advanced Malware Protection, page 24
• Anti-Spam, page 29
• Graymail Detection and Safe Unsubscribing, page 35
• Anti-Virus, page 37
• Command Line Management, page 40
• Configuration File Management, page 43
• Cluster Management, page 48
• Data Loss Prevention, page 50
• S/MIME Security Services, page 54
• Domain Keys, page 56
• DMARC Verification, page 68
• DNS, page 72
• General Management/Administration/Troubleshooting, page 81
• Content Scanning, page 133
• LDAP, page 134
• Mail Delivery Configuration/Monitoring, page 140
• Networking Configuration / Network Tools, page 173
• Outbreak Filters, page 192
• Policy Enforcement, page 195
• Logging and Alerts, page 225
• Reporting, page 240
CLI Reference Guide 23

• Senderbase, page 242
• SMTP Services Configuration, page 244
• System Setup, page 273
• URL Filtering , page 275
• User Management, page 280
• Virtual Appliance Management , page 285
How to Read the ListingFor each command, there is a description and at least one example of the command being used. The Usagesection specifies the following command attributes:
Procedure
Step 1 Does the command require a commit command to be implemented on the appliance?Step 2 Is the command restricted to a particular mode (cluster, group, or machine).?Step 3 Does the command permit a batch format?
For more information about Centralized Management, see User Guide for AsyncOS for Cisco Email SecurityAppliances .
For more information about batch formats, please see Command Line Interface: The Basics, on page 13.
Advanced Malware Protection• ampconfig, on page 24
• ampstatus, on page 29
ampconfigConfigure file reputation filtering and file analysis. Do not modify advanced options without guidance fromCisco TAC.
UsageCommit: This command requires a ‘commit’.Cluster Management: This command can be used in all three machine modes (cluster, group, machine).
Batch Command: This command supports a batch format. For details, see the inline help by typing thecommand: help ampconfig .
CLI Reference Guide24
The Commands: Reference ExamplesHow to Read the Listing

Examples• Enabling File Reputation and File Analysis, on page 25
• Configure Email Security appliance to Use Public Cloud File Analysis Server, on page 26
• (Public Cloud File Analysis Services Only) Configuring Appliance Groups, on page 26
• Configure Email Security Appliance to Use an On-Premises File Analysis Server, on page 27
• Configure Email Security Appliance to Use an On-Premises File Reputation Server, on page 28
• Clearing Local File Reputation Cache, on page 28
Enabling File Reputation and File Analysis
mail.example.com> ampconfig
File Reputation: Disabled
Choose the operation you want to perform:
- SETUP - Configure Advanced-Malware protection service.
[]> setup
File Reputation: Disabled
Would you like to use File Reputation? [Y]>
Would you like to use File Analysis? [Y]>
File types supported for File Analysis:
1. Microsoft Executables
Do you want to modify the file types selected for File Analysis? [N]>
Specify AMP processing timeout (in seconds)
[120]>
Advanced-Malware protection is now enabled on the system.
Please note: you must issue the 'policyconfig' command (CLI) or Mail
Policies (GUI) to configure advanced malware scanning behavior for
default and custom Incoming Mail Policies.
This is recommended for your DEFAULT policy.
File Reputation: Enabled
File Analysis: Enabled
File types selected for File Analysis:
1. Microsoft Executables
Choose the operation you want to perform:
- SETUP - Configure Advanced-Malware protection service.
- ADVANCED - Set values for AMP parameters (Advanced configuration).
CLI Reference Guide 25
The Commands: Reference Examplesampconfig

- CLEARCACHE - Clears the local File Reputation cache.
[]>
Configure Email Security appliance to Use Public Cloud File Analysis Server
mail.example.com> ampconfigFile Reputation: EnabledFile Analysis: EnabledFile types selected for File Analysis:
Microsoft Windows / DOS ExecutableAppliance Group ID/Name: Not part of any group yetChoose the operation you want to perform:- SETUP - Configure Advanced-Malware protection service.- ADVANCED - Set values for AMP parameters (Advanced configuration).- SETGROUP - Add this appliance to the group of appliances that can share File Analysisreporting details.- CLEARCACHE - Clears the local File Reputation cache.[]> advancedEnter cloud query timeout?[15]>Choose a file reputation server:1. AMERICAS (cloud-sa.amp.sourcefire.com)2. Private reputation cloud[1]>Enter cloud domain?[cloud-domain.com]>Do you want use the recommended reputation threshold from cloud service? [Y]>Enter heartbeat interval?[15]>Do you want to enable SSL communication (port 443) for file reputation? [N]>Choose a file analysis server:1. AMERICAS (https://americas-fa.com)2. Private Cloud[1]>...
(Public Cloud File Analysis Services Only) Configuring Appliance GroupsIn order to allow all content security appliances in your organization to view file analysis result details in thecloud for files sent for analysis from any appliance in your organization, you need to join all appliances tothe same appliance group.
For more information, see the “File Reputation Filtering and File Analysis” chapter in the user guide.
mail.example.com> ampconfigFile Reputation: EnabledFile Analysis: EnabledFile types selected for File Analysis:
Microsoft Windows / DOS ExecutableAppliance Group ID/Name: Not part of any group yetChoose the operation you want to perform:- SETUP - Configure Advanced-Malware protection service.- ADVANCED - Set values for AMP parameters (Advanced configuration).- SETGROUP - Add this appliance to the group of appliances that can share File Analysisreporting details.- CLEARCACHE - Clears the local File Reputation cache.[]> setgroupDoes your organization have multiple Cisco Email, Web, and/or Content Security Managementappliances? [N]> YDo you want this appliance to display detailed analysis reports for files uploaded to thecloud from other appliances in your organization,and vice-versa?[Y]> Enter an Analysis Group name. This name is case-sensitive and must be configuredidentically on each appliance in the Analysis Group.[]> FA_Reporting
CLI Reference Guide26
The Commands: Reference Examplesampconfig

Registration is successful with the group name. This does not require commitFile Reputation: EnabledFile Analysis: EnabledFile types selected for File Analysis:
Microsoft Windows / DOS ExecutableAppliance Group ID/Name: FA_ReportingChoose the operation you want to perform:- SETUP - Configure Advanced-Malware protection service.- ADVANCED - Set values for AMP parameters (Advanced configuration).- VIEWGROUP - view the group members details.- CLEARCACHE - Clears the local File Reputation cache.[]>
After you configure an appliance group, you cannot use the setgroup subcommand. If you want to needto modify the group for any reason, you must open a case with Cisco TAC.You can view the details ofthe appliance group using the viewgroup subcommand.
Note
Configure Email Security Appliance to Use an On-Premises File Analysis Server
mail.example.com> ampconfigFile Reputation: EnabledFile Analysis: EnabledFile types selected for File Analysis:
Microsoft Windows / DOS ExecutableChoose the operation you want to perform:- SETUP - Configure Advanced-Malware protection service.- ADVANCED - Set values for AMP parameters (Advanced configuration).- SETGROUP - Add this appliance to the group of appliances that can share File Analysisreporting details.- CLEARCACHE - Clears the local File Reputation cache.[]> advancedEnter cloud query timeout?[15]>Choose a file reputation server:1. AMERICAS (cloud-sa.amp.sourcefire.com)2. Private reputation cloud[1]>Enter cloud domain?[a.immunet.com]>Do you want use the recommended reputation threshold from cloud service? [Y]>Enter heartbeat interval?[15]>Do you want to enable SSL communication (port 443) for file reputation? [N]>Choose a file analysis server:1. AMERICAS (https://panacea.threatgrid.com)2. Private Cloud[1]> 2Enter file analysis server url?[]> https://mycloud.example.comCertificate Authority:1. Use Cisco Trusted Root Certificate List2. Paste certificate to CLI[1]>File Reputation: EnabledFile Analysis: EnabledFile types selected for File Analysis:
Microsoft Windows / DOS ExecutableChoose the operation you want to perform:- SETUP - Configure Advanced-Malware protection service.- ADVANCED - Set values for AMP parameters (Advanced configuration).- SETGROUP - Add this appliance to the group of appliances that can share File Analysisreporting details.- CLEARCACHE - Clears the local File Reputation cache.[]>
CLI Reference Guide 27
The Commands: Reference Examplesampconfig

Configure Email Security Appliance to Use an On-Premises File Reputation Server
mail.example.com> ampconfigFile Reputation: EnabledFile Analysis: EnabledFile types selected for File Analysis:
Microsoft Windows / DOS ExecutableAppliance Group ID/Name: Not part of any group yetChoose the operation you want to perform:- SETUP - Configure Advanced-Malware protection service.- ADVANCED - Set values for AMP parameters (Advanced configuration).- SETGROUP - Add this appliance to the group of appliances that can share FileAnalysis reporting details.- CLEARCACHE - Clears the local File Reputation cache.[]> advancedEnter cloud query timeout?[15]>Choose a file reputation server:1. AMERICAS (cloud-sa.amp.domain.com)2. Private reputation cloud[1]> 2Enter AMP reputation server hostname or IP address?[]> myamp.domain.comPaste the public key followed by a . on a new line-----BEGIN PUBLIC KEY-----MIGfMA0GCSqGSIb3DQEBAQUAA4GNADCBiQKBgQCqGKukO1De7zhZj6+H0qtjTkVxwTCpvKe4eCZ0FPqri0cb2JZfXJ/DgYSF6vUpwmJG8wVQZKjeGcjDOL5UlsuusFncCzWBQ7RKNUSesmQRMSGkVb1/3j+skZ6UtW+5u09lHNsj6tQ51s1SPrCBkedbNf0Tp0GbMJDyR4e9T04ZZwIDAQAB-----END PUBLIC KEY-----.Enter cloud domain?[immunet.com]>Do you want use the recommended reputation threshold from cloud service? [Y]>Enter heartbeat interval?[15]>Do you want to enable SSL communication (port 443) for file reputation? [N]>Choose a file analysis server:1. AMERICAS (https://threatgrid.com)2. Private analysis cloud[1]>File Reputation: EnabledFile Analysis: EnabledFile types selected for File Analysis:
Microsoft Windows / DOS ExecutableAppliance Group ID/Name: Not part of any group yetChoose the operation you want to perform:- SETUP - Configure Advanced-Malware protection service.- ADVANCED - Set values for AMP parameters (Advanced configuration).- SETGROUP - Add this appliance to the group of appliances that can share FileAnalysis reporting details.- CLEARCACHE - Clears the local File Reputation cache.[]>
Clearing Local File Reputation Cache
mail.example.com> ampconfigFile Reputation: EnabledFile Analysis: EnabledFile types selected for File Analysis:
Microsoft Windows / DOS ExecutableChoose the operation you want to perform:- SETUP - Configure Advanced-Malware protection service.- ADVANCED - Set values for AMP parameters (Advanced configuration).- SETGROUP - Add this appliance to the group of appliances that can share File Analysisreporting details.- CLEARCACHE - Clears the local File Reputation cache.[]> clearcache
CLI Reference Guide28
The Commands: Reference Examplesampconfig

Do you want to clear File Reputation Cache? [N]> yCache cleared successfully.File Reputation: EnabledFile Analysis: EnabledFile types selected for File Analysis:
Microsoft Windows / DOS ExecutableChoose the operation you want to perform:- SETUP - Configure Advanced-Malware protection service.- ADVANCED - Set values for AMP parameters (Advanced configuration).- SETGROUP - Add this appliance to the group of appliances that can share File Analysisreporting details.- CLEARCACHE - Clears the local File Reputation cache.[]>
ampstatus
DescriptionDisplay the version of various Advanced Malware Protection (file reputation and analysis) components.
UsageCommit: This command does not require a ‘commit’.Cluster Management: This command is restricted to machine mode.
Batch Command: This command does not support a batch format.
Example
mail.example.com> ampstatusComponent Version Last UpdatedAMP Client Settings 1.0 Never updatedAMP Client Engine 1.0 Never updated
Anti-SpamThis section contains the following commands:
• antispamconfig, on page 30
• antispamstatus, on page 31
• antispamupdate, on page 31
• incomingrelayconfig, on page 32
CLI Reference Guide 29
The Commands: Reference Examplesampstatus

antispamconfig
DescriptionConfigure anti-spam policy.
UsageCommit: This command requires a ‘commit’.Cluster Management: This command can be used in all three machine modes (cluster, group, machine).
Batch Command: This command does not support a batch format.
ExampleThe following examples demonstrates the configuration for Anti-Spam functionality.
mail3.example.com> antispamconfigChoose the operation you want to perform:- IRONPORT - Configure IronPort Anti-Spam.- CLOUDMARK - Configure Cloudmark Service Provider Edition.- MULTISCAN - Configure IronPort Intelligent Multi-Scan.[]> ironportIronPort Anti-Spam scanning: DisabledChoose the operation you want to perform:- SETUP - Edit IronPort Anti-Spam settings.[]> setupIronPort Anti-Spam scanning: DisabledWould you like to use IronPort Anti-Spam scanning? [Y]> yThe IronPort Anti-Spam License Agreement is displayed (if you have not already acceptedit).Do you accept the above IronPort Anti-Spam license agreement? []> YIncreasing the following size settings may result in decreased performance. Please consultdocumentation for sizerecommendations based on your environment.Never scan message larger than: (Add a trailing K for kilobytes, M for megabytes, or noletters for bytes.)[1M]>Always scan message smaller than: (Add a trailing K for kilobytes, M for megabytes, or noletters for bytes.)[512K]>Please specify the IronPort Anti-Spam scanning timeout (in seconds)[60]>Would you like to enable regional scanning? [N]>IronPort Anti-Spam scanning is now enabled on the system. Please note: you must issue the'policyconfig' command (CLI)or Mail Policies (GUI) to configureCisco IronPort scanning behavior for default and custom Incoming and Outgoing Mail Policies.This is recommended for your DEFAULT policy.IronPort Anti-Spam scanning: EnabledChoose the operation you want to perform:- SETUP - Edit IronPort Anti-Spam settings.[]>
CLI Reference Guide30
The Commands: Reference Examplesantispamconfig

antispamstatus
DescriptionDisplay anti-spam status.
UsageCommit: This command does not require a ‘commit’.Cluster Management: This command can be used in all three machine modes (cluster, group, machine).
Batch Command: This command does not support a batch format.
Example
mail3.example.com> antispamstatusChoose the operation you want to perform:- IRONPORT - Display IronPort Anti-Spam version and rule information.- CLOUDMARK - Display Cloudmark Service Provider Edition version and rule information.- MULTISCAN - Display Intelligent Multi-Scan version and rule information.[]> ironportComponent Last Update VersionCASE Core Files Never updated 3.4.0-013CASE Utilities Never updated 3.4.0-013Structural Rules Never updated 3.3.1-009-20141210_214201Web Reputation DB Never updated 20141211_111021Web Reputation Rules Never updated 20141211_111021-20141211_170330Content Rules Never updated unavailableContent Rules Update Never updated unavailableLast download attempt made on: Never
antispamupdate
DescriptionManually request an immediate update of Anti-Spam rules and related CASE components. This also includesthe Anti-Spam rules and CASE components used by Intelligent Multi-Scan (IMS), but not for the third-partyanti-spam engines used by IMS.
UsageCommit: This command does not require a ‘commit’.Cluster Management: This command is restricted to machine mode. It is further restricted to the login host(i.e., the specific machine you are logged onto).
Batch Command: This command does not support a batch format.
CLI Reference Guide 31
The Commands: Reference Examplesantispamstatus

Example
mail3.example.com> antispamupdateChoose the operation you want to perform:- MULTISCAN - Request updates for Intelligent Multi-Scan- IRONPORT - Request updates for IronPort Anti-Spam- CLOUDMARK - Request updates for Cloudmark Anti-Spam[]> ironportRequesting check for new CASE definitions
incomingrelayconfig
DescriptionUse the incomingrelayconfig command to enable and configure the Incoming Relays feature. In the followingexamples, the Incoming Relays feature is first enabled, and then two relays are added, one is modified, andone is deleted.
UsageCommit: This command requires a ‘commit’.Cluster Management: This command can be used in all three machine modes (cluster, group, machine).
Batch Command: This command does not support a batch format.
Example: Enabling Incoming RelaysConfiguring an Incoming Relay
mail3.example.com> incomingrelayconfigIncoming relays: DisabledChoose the operation you want to perform:- SETUP - Edit update configuration.- RELAYLIST - Configure incoming relays.[]> setupThis command helps your Cisco IronPort appliance determine the sender'soriginating IP address.You should ONLY enable this command if your Cisco IronPort appliance is NOTdirectly connected to the Internet as the "first hop" in your emailinfrastructure.You should configure this feature if other MTAs or servers are configured atyour network's perimeter to relay mail to your Cisco IronPort appliance.Do you want to enable and define incoming relays? [N]> yIncoming relays: EnabledChoose the operation you want to perform:- SETUP - Edit update configuration.- RELAYLIST - Configure incoming relays.[]> relaylistThere are no relays defined.Choose the operation you want to perform:- NEW - Create a new entry[]> newEnter a name for this incoming relay (Ex: "first-hop")[]> first-hopEnter the IP address of the incoming relay. IPv4 and IPv6 addresses are supported.For IPv4, CIDR format subnets such as 10.1.1.0/24, IP address ranges such as 10.1.1.10-20,and subnets such as 10.2.3. are allowed.For IPv6, CIDR format subnets such as 2001:db8::/32 and IP address ranges such as2001:db8::1-2001:db8::11 are allowed.
CLI Reference Guide32
The Commands: Reference Examplesincomingrelayconfig

Hostnames such as crm.example.com and partial hostnames such as .example.com are allowed.[]> 192.168.1.1Do you want to use the "Received:" header or a custom header to determine the originatingIP address?1. Use "Received:" header2. Use a custom header[1]> 1Within the "Received:" header, enter the special character or string after which to beginparsing for the originating IP address:[from]> [Within the headers, enter the position of the "Received:" header that contains the originatingIP address:[1]> 1There is 1 relay defined.Choose the operation you want to perform:- NEW - Create a new entry- EDIT - Modify an entry- DELETE - Remove an entry- PRINT - Display the table[]> printIncoming Header Matchrelay name: IP address: to parse: after: Hops:----------- ----------- --------- ------ -----first-hop 192.168.1.1 Received [ 1There is 1 relay defined.Choose the operation you want to perform:- NEW - Create a new entry- EDIT - Modify an entry- DELETE - Remove an entry- PRINT - Display the table[]> newEnter a name for this incoming relay (Ex: "first-hop")[]> second-hopEnter the IP address of the incoming relay. IPv4 and IPv6 addresses are supported.For IPv4, CIDR format subnets such as 10.1.1.0/24, IP address ranges such as 10.1.1.10-20,and subnets such as 10.2.3. are allowed.For IPv6, CIDR format subnets such as 2001:db8::/32 and IP address ranges such as2001:db8::1-2001:db8::11 are allowed.Hostnames such as crm.example.com and partial hostnames such as .example.com are allowed.[]> 192.168.1.2Do you want to use the "Received:" header or a custom header to determine the originatingIP address?1. Use "Received:" header2. Use a custom header[1]> 2Enter the custom header name that contains the originating IP address:[]> x-Connecting-IPThere are 2 relays defined.Choose the operation you want to perform:- NEW - Create a new entry- EDIT - Modify an entry- DELETE - Remove an entry- PRINT - Display the table[]> printIncoming Header Matchrelay name: IP address: to parse: after: Hops:----------- ----------- --------- ------ -----first-hop 192.168.1.1 Received [ 1second-hop 192.168.1.2 x-Connecting-IP n/a n/aThere are 2 relays defined.Choose the operation you want to perform:- NEW - Create a new entry- EDIT - Modify an entry- DELETE - Remove an entry- PRINT - Display the table[]> delete1. first-hop: 192.168.1.12. second-hop: 192.168.1.2Enter the number of the entry you wish to delete:[1]> 1Incoming relay "first-hop" deleted.There is 1 relay defined.Choose the operation you want to perform:
CLI Reference Guide 33
The Commands: Reference Examplesincomingrelayconfig

- NEW - Create a new entry- EDIT - Modify an entry- DELETE - Remove an entry- PRINT - Display the table[]>
slblconfig
DescriptionConfigure End-User Safelist/Blocklist.
Safelists/Blocklists must be enabled on the appliance via the GUI in order to run this command.Note
UsageCommit: This command does not require a ‘commit’.Batch Command: This command supports a batch format.
Batch Format - Import
Batch FormatReplaces all entries in the End-User Safelist/Blocklist with entries present in the specified file.
slblconfig import <filename> <ignore invalid entries>
• filename - Name of the file that has to be imported. The file must be in the /configuration directory onthe appliance.
• ignore invalid entries - Whether to ignore invalid entries or not. Either 'Yes' or 'No.'
Batch Format - ExportExports all entries in the End-User Safelist/Blocklist to a file the appliance.
slblconfig export
The appliance saves a .CSV file to the /configuration directory using the following naming convention:
slbl<timestamp><serial number>.csv.
CLI Reference Guide34
The Commands: Reference Examplesslblconfig

Example - Importing Safelist/Blocklist Entries
mail.example.com>slblconfigEnd-User Safelist/Blocklist: EnabledChoose the operation you want to perform:- IMPORT - Replace all entries in the End-User Safelist/Blocklist.- EXPORT - Export all entries from the End-User Safelist/Blocklist.[]>importCurrently available End-User Safelist/Blocklist files:1. slbl.csvChoose the file to import from.[1]>1Do you want to ignore invalid entries? [Y]>YEnd-User Safelist/Blocklist import has been initiated...Please wait while this operation executes.End-User Safelist/Blocklist successfully imported.Choose the operation you want to perform:- IMPORT - Replace all entries in the End-User Safelist/Blocklist.- EXPORT - Export all entries from the End-User Safelist/Blocklist.[]>
Graymail Detection and Safe UnsubscribingCommandTask
graymailconfig, on page 35Configure graymail detection and safe unsubscribingglobal settings
policyconfig, on page 201Configuring the incoming mail policy for graymaildetection and safe unsubscribing
graymailstatus, on page 36Display the details of the existing graymail rules
graymailupdate, on page 37Manually request update of the graymail rules
graymailconfig
DescriptionConfigure graymail detection and safe unsubscribing global settings.
To enable graymail detection and safe unsubscribing, anti-spam scanning must be enabled globally.Thiscan be either the IronPort Anti-Spam or the Intelligent Multi-Scan feature.
Note
CLI Reference Guide 35
The Commands: Reference ExamplesGraymail Detection and Safe Unsubscribing

To configure policy settings for graymail detection and safe unsubscribing, use the policyconfig command.For more information, see Create an Incoming Policy to Drop theMessages Identified as Bulk Email or SocialNetwork Email, on page 218.
UsageCommit: This command requires a ‘commit’.Cluster Management: This command can be used in all three machine modes (cluster, group, machine).
Batch Command: This command supports a batch format. For details, see the inline help by typing thecommand: help graymailconfig .
Example
Graymail Detection: DisabledChoose the operation you want to perform:- SETUP - Configure Graymail.[]> setupWould you like to use Graymail Detection? [Y]>Increasing the following size settings may result in decreased performance.Please consult documentation for size recommendations based on yourenvironment.Maximum Message Size to Scan (Add a trailing K for kilobytes, M for megabytes,or no letters for bytes.):[1M]>Timeout for Scanning Single Message(in seconds):[60]>Graymail Safe Unsubscribe: DisabledWould you like to use Graymail Safe Unsubscribe? [Y]>Graymail Detection and Safe Unsubscribe is now enabled. Please note: The globalsettings are recommended only for your DEFAULT mail policy. To configure policysettings, use the incoming or outgoing policy page on web interface or the'policyconfig' command in CLI.
graymailstatus
DescriptionDisplay the details of the existing graymail rules.
UsageCommit: This command does not require a ‘commit’.Cluster Management: This command can be used in all three machine modes (cluster, group, machine).
Batch Command: This command does not support a batch format
Example
mail.example.com> graymailstatusComponent Version Last UpdatedGraymail Engine 01.378.53 Never Updated
CLI Reference Guide36
The Commands: Reference Examplesgraymailstatus

Graymail Rules 01.378.53#15 Never updatedGraymail Tools 1.0.03 Never updated
graymailupdate
DescriptionManually request update of the graymail rules.
UsageCommit: This command does not require a ‘commit’.Cluster Management: This command can be used in all three machine modes (cluster, group, machine).
Batch Command: This command does not support a batch format
Examplemail.example.com> graymailupdateRequesting check for new Graymail updates.
Anti-VirusThis section contains the following CLI commands:
• antivirusconfig, on page 37
• antivirusstatus, on page 39
• antivirusupdate, on page 39
antivirusconfig
DescriptionConfigure anti-virus policy.
UsageCommit: This command requires a ‘commit’.Cluster Management: This command can be used in all three machine modes (cluster, group, machine).
Batch Command: This command does not support a batch format.
CLI Reference Guide 37
The Commands: Reference Examplesgraymailupdate

ExampleIn the following example, the antivirusconfig command is used to enable Sophos virus scanning on the systemand set the time-out value to 60 seconds. To configure the update server, update interval, and optional proxyserver, see updateconfig, on page 127.
The first time you invoke the antivirusconfig command, you may be presented with a license agreement,if you did not accept the license during the systemsetup command. If you do not accept the licenseagreement, the Sophos virus scanning engine will not be enabled on the appliance.
Note
mail3.example.com> antivirusconfigChoose the operation you want to perform:- SOPHOS - Configure Sophos Anti-Virus.- MCAFEE - Configure McAfee Anti-Virus.[]> sophosSophos Anti-Virus: DisabledChoose the operation you want to perform:- SETUP - Configure Sophos Anti-Virus.[]> setupSophos Anti-Virus scanning: DisabledWould you like to use Sophos Anti-Virus scanning? [Y]> y(First time users see the license agreement displayed here.)Please specify the Anti-Virus scanning timeout (in seconds)[60]> 60Sophos Anti-Virus scanning is now enabled on the system.Please note: you must issue the 'policyconfig' command (CLI) or MailPolicies (GUI) to configure Sophos Anti-Virus scanning behavior for default and customIncoming and Outgoing Mail Policies.This is recommended for your DEFAULT policy.Sophos Anti-Virus: EnabledChoose the operation you want to perform:- SETUP - Configure Sophos Anti-Virus.[]>
Viewing Anti-Virus IDE DetailsAsyncOS provides detailed status on the specific anti-virus signature files (IDE files) that have been downloadedby the appliance. You can access these details using the antivirusconfig -> detail subcommand. For example:
mail3.example.com> antivirusconfigChoose the operation you want to perform:- SOPHOS - Configure Sophos Anti-Virus.- MCAFEE - Configure McAfee Anti-Virus.[]> sophosSophos Anti-Virus: EnabledChoose the operation you want to perform:- SETUP - Configure Sophos Anti-Virus.- STATUS - View Sophos Anti-Virus status.- DETAIL - View Sophos Anti-Virus detail.[]> detailSophos Anti-Virus:Product - 3.87Engine - 2.25.0Product Date - 01 Nov 2004Sophos IDEs currently on the system:
'Mkar-E.Ide' Virus Sig. - 23 Dec 2004 01:24:02'Rbot-Sd.Ide' Virus Sig. - 22 Dec 2004 19:10:06'Santy-A.Ide' Virus Sig. - 22 Dec 2004 06:16:32'Bacbanan.Ide' Virus Sig. - 21 Dec 2004 18:33:58'Rbot-Sb.Ide' Virus Sig. - 21 Dec 2004 14:50:46'Rbotry.Ide' Virus Sig. - 21 Dec 2004 06:13:40'Sdbot-Si.Ide' Virus Sig. - 20 Dec 2004 20:52:04
CLI Reference Guide38
The Commands: Reference Examplesantivirusconfig
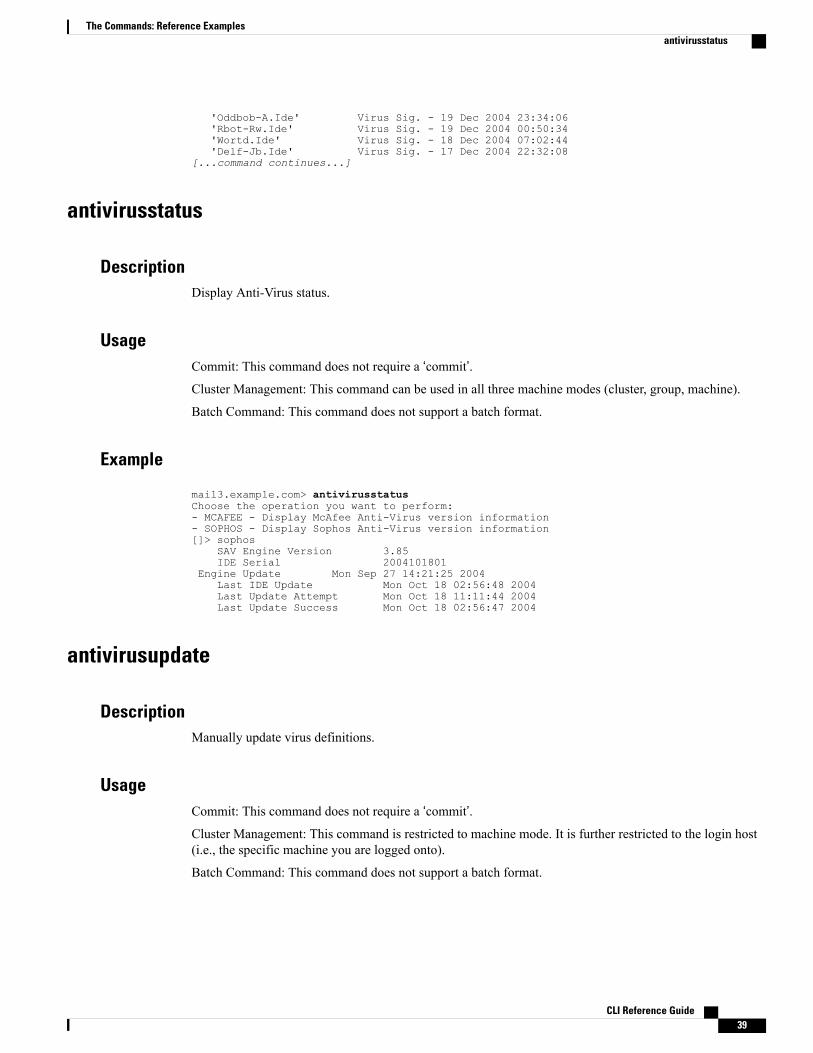
'Oddbob-A.Ide' Virus Sig. - 19 Dec 2004 23:34:06'Rbot-Rw.Ide' Virus Sig. - 19 Dec 2004 00:50:34'Wortd.Ide' Virus Sig. - 18 Dec 2004 07:02:44'Delf-Jb.Ide' Virus Sig. - 17 Dec 2004 22:32:08
[...command continues...]
antivirusstatus
DescriptionDisplay Anti-Virus status.
UsageCommit: This command does not require a ‘commit’.Cluster Management: This command can be used in all three machine modes (cluster, group, machine).
Batch Command: This command does not support a batch format.
Example
mail3.example.com> antivirusstatusChoose the operation you want to perform:- MCAFEE - Display McAfee Anti-Virus version information- SOPHOS - Display Sophos Anti-Virus version information[]> sophos
SAV Engine Version 3.85IDE Serial 2004101801
Engine Update Mon Sep 27 14:21:25 2004Last IDE Update Mon Oct 18 02:56:48 2004Last Update Attempt Mon Oct 18 11:11:44 2004Last Update Success Mon Oct 18 02:56:47 2004
antivirusupdate
DescriptionManually update virus definitions.
UsageCommit: This command does not require a ‘commit’.Cluster Management: This command is restricted to machine mode. It is further restricted to the login host(i.e., the specific machine you are logged onto).
Batch Command: This command does not support a batch format.
CLI Reference Guide 39
The Commands: Reference Examplesantivirusstatus

Example
mail3.example.com> antivirusupdateChoose the operation you want to perform:- MCAFEE - Request updates for McAfee Anti-Virus- SOPHOS - Request updates for Sophos Anti-Virus[]> sophosRequesting update of virus definitionsmail3.example.com>
Command Line ManagementThis section contains the following CLI commands:
• commit, on page 40
• commitdetail, on page 41
• clearchanges or clear, on page 41
• help or h or ?, on page 42
• rollbackconfig, on page 42
• quit or q or exit, on page 43
commit
DescriptionCommit changes. Entering comments after the commit command is optional.
UsageCommit: N/A
Cluster Management: This command can be used in all three machine modes (cluster, group, machine).
Batch Command: This command does not support a batch format.
Example
mail3.example.com> commitPlease enter some comments describing your changes:[]> Changed "psinet" IP Interface to a different IP ad dressDo you want to save the current configuration for rollback? [Y]> nChanges committed: Fri May 23 11:42:12 2014 GMT
CLI Reference Guide40
The Commands: Reference ExamplesCommand Line Management

commitdetail
DescriptionDisplay detailed information about the last commit.
UsageCommit: This command does not require a ‘commit’.Cluster Management: This command can be used in all three machine modes (cluster, group, machine).
Batch Command: This command does not support a batch format.
Example
mail3.example.com> commitdetailCommit at Mon Apr 18 13:46:28 2005 PDT with comments: "Enabled loopback".mail3.example.com>
clearchanges or clear
DescriptionThe clear command clears any configuration changes made since the last commit or clear command wasissued.
UsageCommit: This command does not require a ‘commit’.Cluster Management: This command can be used in all three machine modes (cluster, group, machine).
Batch Command: This command does not support a batch format
Example
mail3.example.com> clearAre you sure you want to clear all changes since the last commit? [Y]> yChanges cleared: Mon Jan 01 12:00:01 2003mail3.example.com>
CLI Reference Guide 41
The Commands: Reference Examplescommitdetail

help or h or ?
DescriptionThe help command lists all available CLI commands and gives a brief description of each command. The helpcommand can be invoked by typing either help or a single question mark ( ? ) at the command prompt.
UsageCommit: This command does not require a ‘commit’.Cluster Management: This command can be used in all three machine modes (cluster, group, machine).
Batch Command: This command does not support a batch format
Example
mail3.example.com> helpDisplays the list of all available commands.
rollbackconfigThe rollbackconfig command allows you to rollback to one of the previously committed 10 configurations.
UsageCommit: This command requires a ‘commit’.Cluster Management: This command is restricted to machine mode.
Batch Command: This command does not support a batch format.
Example
mail.example.com> rollbackconfigPrevious Commits:
Committed On User Description---------------------------------------------------------------------------------1. Fri May 23 06:53:43 2014 admin new user2. Fri May 23 06:50:57 2014 admin rollback3. Fri May 23 05:47:26 2014 admin4. Fri May 23 05:45:51 2014 admin edit userEnter the number of the config to revert to.[]> 2Are you sure you want to roll back the configuration? [N]> yReverted to Fri May 23 06:50:57 2014 admin rollbackDo you want to commit this configuration now? [N]> yCommitted the changes successfully
CLI Reference Guide42
The Commands: Reference Exampleshelp or h or ?

quit or q or exit
DescriptionThe quit command logs you out of the CLI application. Configuration changes that have not been committedare cleared. The quit command has no effect on email operations. Logout is logged into the log files. (Typingexit is the same as typing quit.)
UsageCommit: This command does not require a ‘commit’.Cluster Management: This command can be used in all three machine modes (cluster, group, machine).
Batch Command: This command does not support a batch format
Example
mail3.example.com> quitConfiguration changes entered but not committed. Exiting will lose changes.Type 'commit' at the command prompt to commit changes.Are you sure you wish to exit? [N]> Y
Configuration File ManagementThis section contains the following CLI commands:
• loadconfig, on page 43
• mailconfig, on page 44
• resetconfig , on page 45
• saveconfig, on page 46
• showconfig, on page 47
loadconfig
DescriptionLoad a configuration file.
Loading configuration on clustered machines is supported only using GUI. For instructions, see UserGuide for AsyncOS for Cisco Email Security Appliances .
Note
CLI Reference Guide 43
The Commands: Reference Examplesquit or q or exit

UsageCommit: This command requires a ‘commit’.Cluster Management: This command can be used in all three machine modes (cluster, group, machine).
Batch Command: This command does not support a batch format
ExampleIn this example, a new configuration file is imported from a local location.
mail3.example.com> loadconfig1. Paste via CLI2. Load from file[1]> 2Enter the name of the file to import:[]> changed.config.xmlValues have been loaded.Be sure to run "commit" to make these settings active.mail3.example.com> commitPlease enter some comments describing your changes:[]> loaded new configuration fileDo you want to save the current configuration for rollback? [Y]> nChanges committed: Fri May 23 11:42:12 2014 GMT
In this example, a new configuration file is pasted directly at the command line. (Remember to type Control-Don a blank line to end the paste command.) Then, the system setup wizard is used to change the defaulthostname, IP address, and default gateway information. Finally, the changes are committed.
mail3.example.com> loadconfig1. Paste via CLI2. Load from file[1]> 1Paste the configuration file now.Press CTRL-D on a blank line when done.[The configuration file is pasted until the end tag</config>. Control-D is entered on a separate line.]Values have been loaded.Be sure to run "commit" to make these settings active.mail3.example.com> systemsetup[The system setup wizard is run.]mail3.example.com> commitPlease enter some comments describing your changes:[]> pasted new configuration file and changed default settings viasystemsetupDo you want to save the current configuration for rollback? [Y]> nChanges committed: Fri May 23 11:42:12 2014 GMT
mailconfig
DescriptionTo test the configuration, you can use the mailconfig command immediately to send a test email containingthe system configuration data you just created with the systemsetup command.
CLI Reference Guide44
The Commands: Reference Examplesmailconfig

UsageCommit: This command does not require a ‘commit’.Cluster Management: This command can be used in all three machine modes (cluster, group, machine).
Batch Command: This command does not support a batch format
Example
mail.example.com> mailconfigPlease enter the email address to which you want to send the configuration file.Separate multiple addresses with commas.[]> [email protected] the passphrase option:1. Mask passphrases (Files with masked passphrases cannot be loaded using loadconfig command)2. Encrypt passphrases3. Plain passphrases[1]> 2The configuration file has been sent to [email protected] the configuration to a mailbox to which you have access to confirm that the system is able to send emailon your network.
For enhanced security, if encryption of sensitive data in the appliance is enabled in fipsconfig command,you cannot use Plain passwords option.
Note
resetconfig
DescriptionWhen physically transferring the appliance, you may want to start with factory defaults. The r esetconfigcommand resets all configuration values to factory defaults. This command is extremely destructive, and itshould only be used when you are transferring the unit or as a last resort to solving configuration issues. It isrecommended you run the systemsetup command after reconnecting to the CLI after you have run the resetconfigcommand.
The resetconfig command only works when the appliance is in the offline state. When the resetconfigcommand completes, the appliance is automatically returned to the online state, even before you run thesystemsetup command again. If mail delivery was suspended before you issued the resetconfig command,the mail will attempt to be delivered again when the resetconfig command completes.
Note
CLI Reference Guide 45
The Commands: Reference Examplesresetconfig

The resetconfig command will return all network settings to factory defaults, potentially disconnectingyou from the CLI, disabling services that you used to connect to the appliance (FTP, Telnet, SSH, HTTP,HTTPS), and even removing additional user accounts you created with the userconfig command. Do notuse this command if you are not able to reconnect to the CLI using the Serial interface or the defaultsettings on the Management port through the default Admin user account.
Danger
UsageCommit: This command does not require a ‘commit’.Cluster Management: This command is restricted to machine mode. It is further restricted to the login host(i.e., the specific machine you are logged onto). This command requires access to the local file system.
Batch Command: This command does not support a batch format.
Example
mail3.example.com> suspendDelay (seconds, minimum 30):[30]> 45Waiting for listeners to exit...Receiving suspended.Waiting for outgoing deliveries to finish...Mail delivery suspended.mail3.example.com>resetconfigAre you sure you want to reset all configuration values? [N]> YAll settings have been restored to the factory default.
saveconfig
DescriptionThe saveconfig command saves the configuration file with a unique filename to the configuration directory.
If you are on a clustered environment, this command saves the complete cluster configuration. To run thiscommand on a clustered machine, change your configuration mode to cluster.
Note
UsageCommit: This command does not require a ‘commit’.Cluster Management: This command can be used in all three machine modes (cluster, group, machine).
Batch Command: This command does not support a batch format
CLI Reference Guide46
The Commands: Reference Examplessaveconfig

ExampleIn the following example, the passphrases in the configuration file is encrypted and saved in the configurationdirectory.
mail.example.com> saveconfigChoose the passphrase option:1. Mask passphrases (Files with masked passphrases cannot be loaded using loadconfig command)2. Encrypt passphrases3. Plain passphrases[1]> 2File written on machine "mail.example.com" to the location"/configuration/C100V-4232116C4E14C70C4C7F-7898DA3BD955-20140319T050635.xml".Configuration saved.
For enhanced security, if encryption of sensitive data in the appliance is enabled in fipsconfig command,you cannot use Plain passwords option.
Note
showconfig
DescriptionThe showconfig command prints the current configuration to the screen.
UsageCommit: This command does not require a ‘commit’.Cluster Management: This command can be used in all three machine modes (cluster, group, machine).
Batch Command: This command does not support a batch format
ExampleIn the following example, the configuration is displayed on CLI and the passphrases in the configuration areencrypted.
mail.example.com> showconfigChoose the passphrase display option:1. Mask passphrases (Files with masked passphrases cannot be loaded using loadconfig command)2. Encrypt passphrases3. Plain passphrases[1]> 2<?xml version="1.0" encoding="ISO-8859-1"?><!DOCTYPE config SYSTEM "config.dtd"><!--Product: Cisco C100V Email Security Virtual ApplianceModel Number: C100VVersion: 9.0.0-038Serial Number: 4232116C4E14C70C4C7F-7898DA3BD955Number of CPUs: 2Memory (MB): 6144Current Time: Wed Mar 19 05:30:05 2014
-->
CLI Reference Guide 47
The Commands: Reference Examplesshowconfig
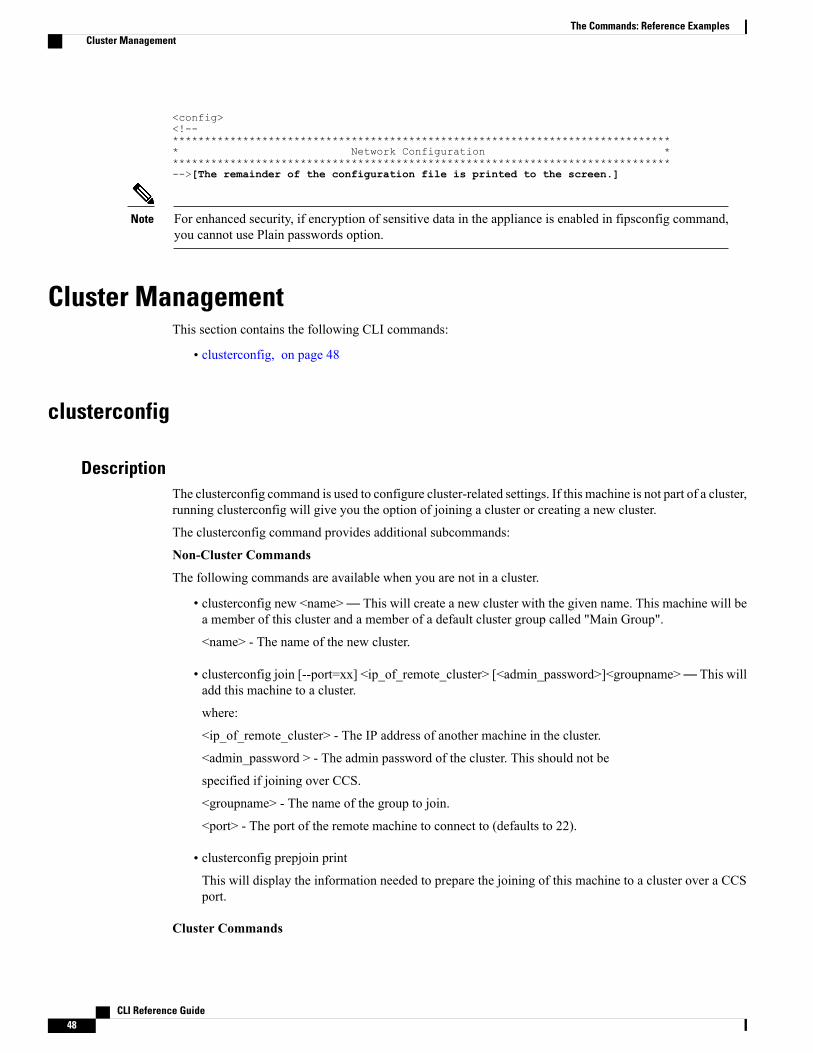
<config><!--******************************************************************************* Network Configuration *******************************************************************************-->[The remainder of the configuration file is printed to the screen.]
For enhanced security, if encryption of sensitive data in the appliance is enabled in fipsconfig command,you cannot use Plain passwords option.
Note
Cluster ManagementThis section contains the following CLI commands:
• clusterconfig, on page 48
clusterconfig
DescriptionThe clusterconfig command is used to configure cluster-related settings. If this machine is not part of a cluster,running clusterconfig will give you the option of joining a cluster or creating a new cluster.
The clusterconfig command provides additional subcommands:
Non-Cluster Commands
The following commands are available when you are not in a cluster.
• clusterconfig new <name>— This will create a new cluster with the given name. This machine will bea member of this cluster and a member of a default cluster group called "Main Group".
<name> - The name of the new cluster.
• clusterconfig join [--port=xx] <ip_of_remote_cluster> [<admin_password>]<groupname>— This willadd this machine to a cluster.
where:
<ip_of_remote_cluster> - The IP address of another machine in the cluster.
<admin_password > - The admin password of the cluster. This should not be
specified if joining over CCS.
<groupname> - The name of the group to join.
<port> - The port of the remote machine to connect to (defaults to 22).
• clusterconfig prepjoin printThis will display the information needed to prepare the joining of this machine to a cluster over a CCSport.
Cluster Commands
CLI Reference Guide48
The Commands: Reference ExamplesCluster Management

The following commands are available when you are in a cluster.
• clusterconfig addgroup <groupname>— Creates a new cluster group. The group starts off with nomembers.
• clusterconfig renamegroup <old_groupname> <new_groupname>— Change the name of a clustergroup.
• clusterconfig deletegroup <groupname> [new_groupname]— Remove a cluster group.
<groupname> - Name of the cluster group to remove.
<new_groupname> - The cluster group to put machines of the old group into.
• clusterconfig setgroup <machinename> <groupname>— Sets (or changes) which group a machine isa member of.
<machinename > - The name of the machine to set.
<groupname> - The group to set the machine to.
• clusterconfig removemachine <machinename>— Remove a machine from the cluster.
• clusterconfig setname <name>— Changes the name of the cluster to the given name.
• clusterconfig list— Display all the machines currently in the cluster.
• clusterconfig connstatus— Display all the machines currently in the cluster and add routing details fordisconnected machines.
• clusterconfig disconnect <machinename>— This will temporarily detach a machine from the cluster.
<machinename> - The name of the machine to disconnect.
• clusterconfig reconnect <machinename> - This will restore connections withmachines that were detachedwith the “disconnect” command.
• clusterconfig prepjoin new <serial_number> <hostname> <user_key>— This will add a new host thatis to join the cluster over the CCSport.
<serial_number> - The serial number of the machine being added.
<hostname> - The host name of the machine being added.
<user_key> - The SSH user key from the "prepjoin print" command from the joining machine.
• clusterconfig prepjoin delete <serial_number|hostname>— This will remove a host that was previouslyindicated to be added from the "prepjoin new" command. This is only necessary to be used if you laterdecide not to add the host. When a host is successfully added to the cluster, its prepjoin information isautomatically removed.
UsageCommit: This command does not require a ‘commit’.Cluster Management: This command is restricted to cluster mode.
Batch Command: This command does not support a batch format.
CLI Reference Guide 49
The Commands: Reference Examplesclusterconfig

ExampleFor an explanation of the clusterconfig command and its uses, see User Guide for AsyncOS for Cisco EmailSecurity Appliances .
Data Loss PreventionThis section contains the following CLI commands:
• dlprollback, on page 50
• dlpstatus, on page 51
• dlpupdate, on page 51
• emconfig, on page 52
• emdiagnostic, on page 54
dlprollback
DescriptionRollback DLP engine and config to the previous version.
DLP must already be configured via the DLP Global Settings page in the GUI before you can use thedlprollback command.
Note
This command will revert your appliance to older DLP policies. You must re-enable DLP policies inOutbound Mail Policies so that DLP scanning can be resumed.
Danger
UsageCommit: This command does not require a ‘commit’.Cluster Management: This command is can be used at cluster, group or machine mode.
Batch Command: This command does not support a batch format.
Examplemail.example.com> dlprollback
This will revert to older DLP policies.
CLI Reference Guide50
The Commands: Reference ExamplesData Loss Prevention

IMPORTANT: After rollback, you must re-enable DLP policies in Outbound Mail Policies so that DLPscanning can be resumed successfully.
Do you wish to rollback? [N]> Y
Requesting rollback for DLP engine.
Re-enable DLP policies in Outbound Mail Policies when rollback is completed (Please check rollback statusin mail logs)
dlpstatusRequest version information for DLP Engine.
DLP must already be configured via the DLP Global Settings page in the GUI before you can use thedlpstatus command.
Note
UsageCommit: This command does not require a ‘commit’.Cluster Management: This command is can be used at cluster, group or machine mode.
Batch Command: This command does not support a batch format.
Examplemail.example.com> dlpstatus
Component Version Last Updated
RSA DLP Engine 3.0.2.31 Never updated
dlpupdate
DescriptionUpdate RSA DLP Engine.
DLP must already be configured via the DLP Global Settings page in the GUI before you can use thedlpupdate command.
Note
UsageCommit: This command does not require a ‘commit’.Cluster Management: This command is can be used at cluster, group or machine mode.
CLI Reference Guide 51
The Commands: Reference Examplesdlpstatus
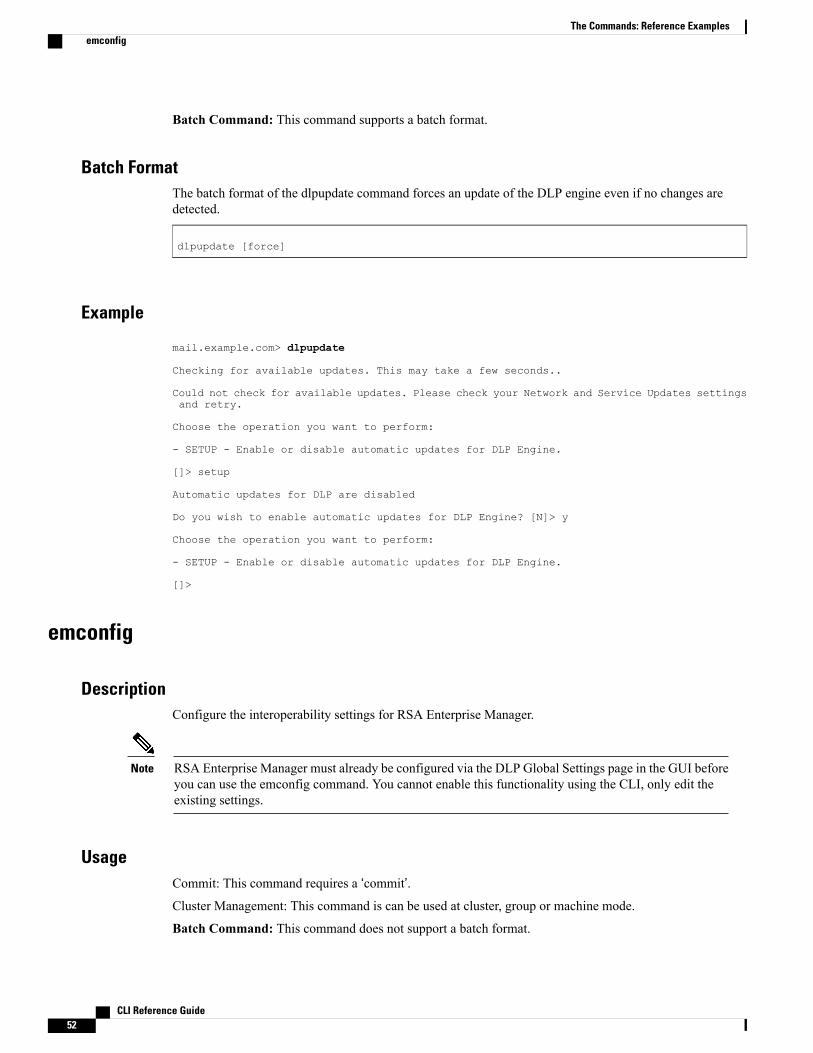
Batch Command: This command supports a batch format.
Batch FormatThe batch format of the dlpupdate command forces an update of the DLP engine even if no changes aredetected.
dlpupdate [force]
Example
mail.example.com> dlpupdate
Checking for available updates. This may take a few seconds..
Could not check for available updates. Please check your Network and Service Updates settingsand retry.
Choose the operation you want to perform:
- SETUP - Enable or disable automatic updates for DLP Engine.
[]> setup
Automatic updates for DLP are disabled
Do you wish to enable automatic updates for DLP Engine? [N]> y
Choose the operation you want to perform:
- SETUP - Enable or disable automatic updates for DLP Engine.
[]>
emconfig
DescriptionConfigure the interoperability settings for RSA Enterprise Manager.
RSA Enterprise Manager must already be configured via the DLP Global Settings page in the GUI beforeyou can use the emconfig command. You cannot enable this functionality using the CLI, only edit theexisting settings.
Note
UsageCommit: This command requires a ‘commit’.Cluster Management: This command is can be used at cluster, group or machine mode.
Batch Command: This command does not support a batch format.
CLI Reference Guide52
The Commands: Reference Examplesemconfig
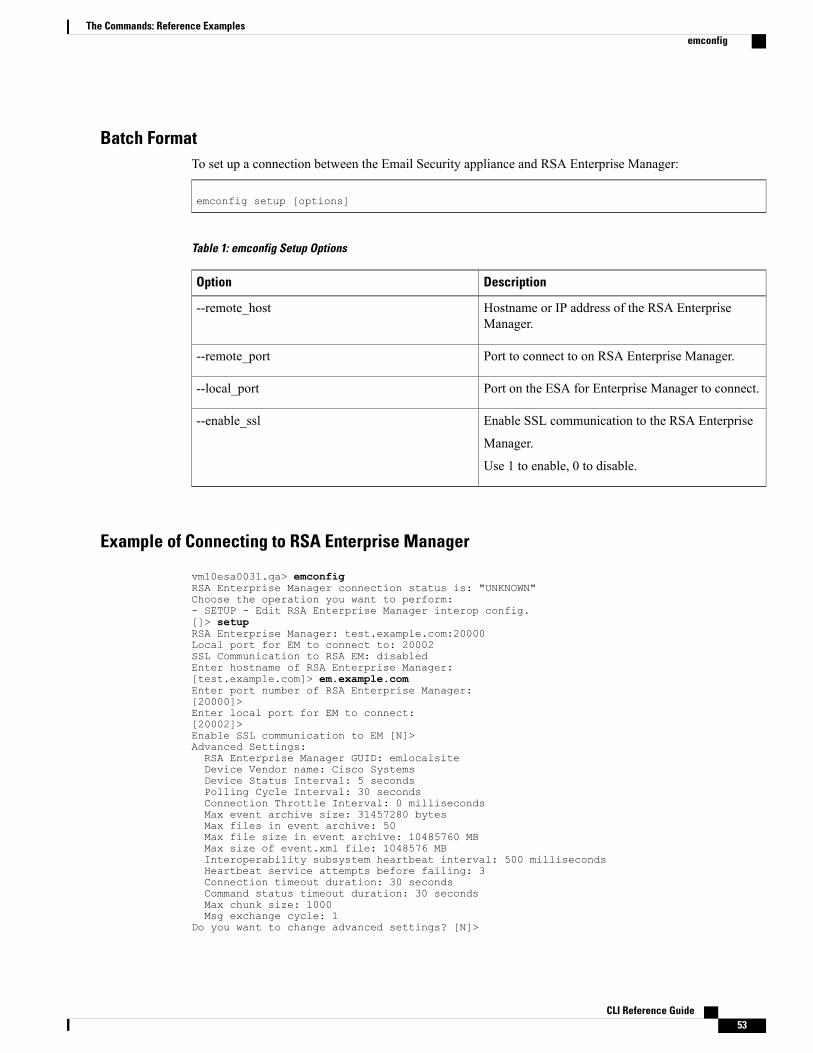
Batch FormatTo set up a connection between the Email Security appliance and RSA Enterprise Manager:
emconfig setup [options]
Table 1: emconfig Setup Options
DescriptionOption
Hostname or IP address of the RSA EnterpriseManager.
--remote_host
Port to connect to on RSA Enterprise Manager.--remote_port
Port on the ESA for Enterprise Manager to connect.--local_port
Enable SSL communication to the RSA Enterprise
Manager.
Use 1 to enable, 0 to disable.
--enable_ssl
Example of Connecting to RSA Enterprise Manager
vm10esa0031.qa> emconfigRSA Enterprise Manager connection status is: "UNKNOWN"Choose the operation you want to perform:- SETUP - Edit RSA Enterprise Manager interop config.[]> setupRSA Enterprise Manager: test.example.com:20000Local port for EM to connect to: 20002SSL Communication to RSA EM: disabledEnter hostname of RSA Enterprise Manager:[test.example.com]> em.example.comEnter port number of RSA Enterprise Manager:[20000]>Enter local port for EM to connect:[20002]>Enable SSL communication to EM [N]>Advanced Settings:RSA Enterprise Manager GUID: emlocalsiteDevice Vendor name: Cisco SystemsDevice Status Interval: 5 secondsPolling Cycle Interval: 30 secondsConnection Throttle Interval: 0 millisecondsMax event archive size: 31457280 bytesMax files in event archive: 50Max file size in event archive: 10485760 MBMax size of event.xml file: 1048576 MBInteroperability subsystem heartbeat interval: 500 millisecondsHeartbeat service attempts before failing: 3Connection timeout duration: 30 secondsCommand status timeout duration: 30 secondsMax chunk size: 1000Msg exchange cycle: 1
Do you want to change advanced settings? [N]>
CLI Reference Guide 53
The Commands: Reference Examplesemconfig

Choose the operation you want to perform:- SETUP - Edit RSA Enterprise Manager interop config.[]>
emdiagnostic
DescriptionDiagnostic tool for RSA EM on ESA.
UsageCommit: This command does not require a ‘commit’.Cluster Management: This command can be used in all three machine modes (cluster, group, machine).
Batch Command: This command does not support a batch format.
S/MIME Security Services
smimeconfig
DescriptionConfigure S/MIME settings such as sending profiles, managing public keys, and so on.
UsageCommit: This command requires a ‘commit’.Cluster Management: This command can be used in all three machine modes (cluster, group, machine).
Batch Command: This command does not support a batch format.
Examples• Creating a Sending Profile for Signing and Encryption, on page 54
• Adding a Public Key for Encryption, on page 55
Creating a Sending Profile for Signing and Encryption
The following example shows how to create a sending profile for signing and encrypting messages usingS/MIME.
mail.example.com> smimeconfig
CLI Reference Guide54
The Commands: Reference Examplesemdiagnostic

Choose the operation you want to perform:- GATEWAY - Manage S/MIME gateway configuration.[]> gatewayChoose the operation you want to perform:- VERIFICATION - Manage S/MIME Public Keys.- SENDING - Manage S/MIME gateway sending profiles.[]> sendingChoose the operation you want to perform:- NEW - Create a new S/MIME sending profile.- EDIT - Edit a S/MIME sending profile.- RENAME - Rename a S/MIME sending profile.- DELETE - Delete a S/MIME sending profile.- IMPORT - Import a S/MIME sending profile from a file- EXPORT - Export a S/MIME sending profile to a file- PRINT - Display S/MIME sending profiles.[]> newEnter a name for this profile:> hr_sign_and_encrypt1. Encrypt2. Sign3. Sign/Encrypt4. TripleEnter S/MIME mode:[2]> 31. smime_signingSelect S/MIME certificate to sign:[1]>1. Detached2. OpaqueEnter S/MIME sign mode:[1]>1. Bounce2. Drop3. SplitEnter S/MIME action:[1]> 3Choose the operation you want to perform:- NEW - Create a new S/MIME sending profile.- EDIT - Edit a S/MIME sending profile.- RENAME - Rename a S/MIME sending profile.- DELETE - Delete a S/MIME sending profile.- IMPORT - Import a S/MIME sending profile from a file- EXPORT - Export a S/MIME sending profile to a file- PRINT - Display S/MIME sending profiles.[]> printS/MIME Sending ProfilesName Certificate S/MIME Mode Sign Mode Action--------- --------------- ------------ --------- --------hr_sign_a smime_signing Sign/Encrypt Detached SplitChoose the operation you want to perform:- NEW - Create a new S/MIME sending profile.- EDIT - Edit a S/MIME sending profile.- RENAME - Rename a S/MIME sending profile.- DELETE - Delete a S/MIME sending profile.- IMPORT - Import a S/MIME sending profile from a file- EXPORT - Export a S/MIME sending profile to a file- PRINT - Display S/MIME sending profiles.[]>
Adding a Public Key for Encryption
The following example shows how to add the public key of the recipient's S/MIME certificate to the appliancefor encrypting messages.
mail.example.com> smimeconfigChoose the operation you want to perform:- GATEWAY - Manage S/MIME gateway configuration.[]> gatewayChoose the operation you want to perform:- VERIFICATION - Manage S/MIME Public Keys.
CLI Reference Guide 55
The Commands: Reference Examplessmimeconfig
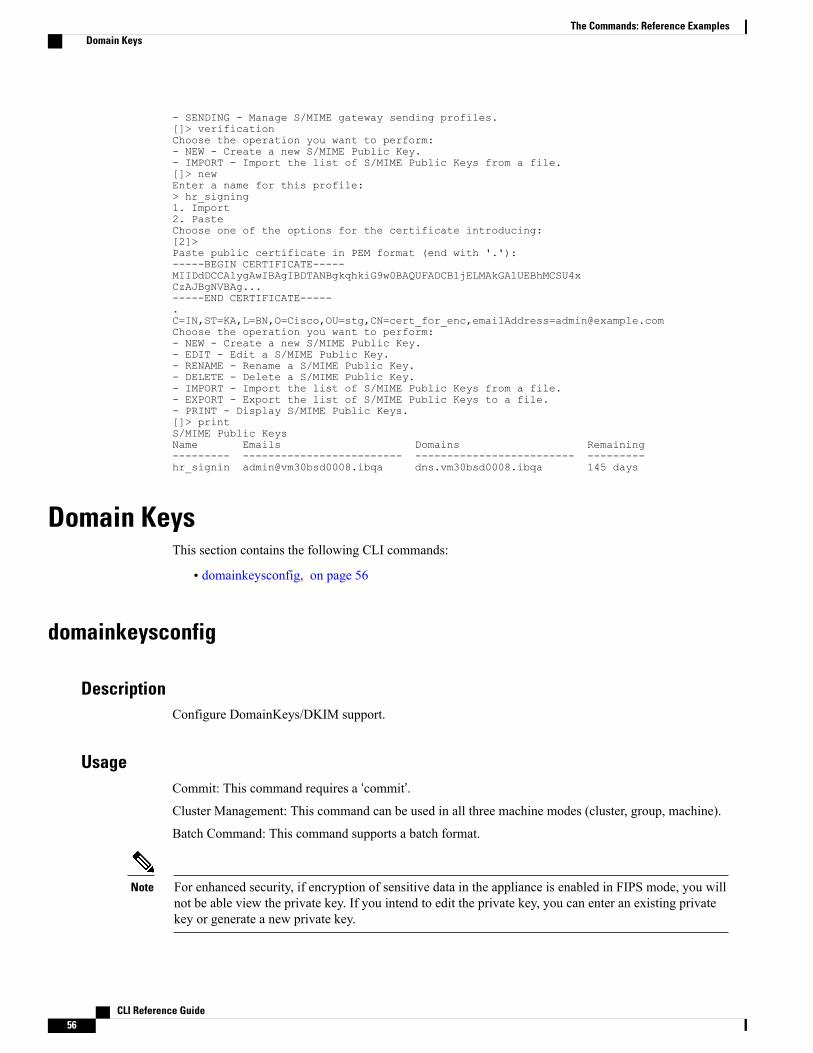
- SENDING - Manage S/MIME gateway sending profiles.[]> verificationChoose the operation you want to perform:- NEW - Create a new S/MIME Public Key.- IMPORT - Import the list of S/MIME Public Keys from a file.[]> newEnter a name for this profile:> hr_signing1. Import2. PasteChoose one of the options for the certificate introducing:[2]>Paste public certificate in PEM format (end with '.'):-----BEGIN CERTIFICATE-----MIIDdDCCAlygAwIBAgIBDTANBgkqhkiG9w0BAQUFADCBljELMAkGA1UEBhMCSU4xCzAJBgNVBAg...-----END CERTIFICATE-----.C=IN,ST=KA,L=BN,O=Cisco,OU=stg,CN=cert_for_enc,[email protected] the operation you want to perform:- NEW - Create a new S/MIME Public Key.- EDIT - Edit a S/MIME Public Key.- RENAME - Rename a S/MIME Public Key.- DELETE - Delete a S/MIME Public Key.- IMPORT - Import the list of S/MIME Public Keys from a file.- EXPORT - Export the list of S/MIME Public Keys to a file.- PRINT - Display S/MIME Public Keys.[]> printS/MIME Public KeysName Emails Domains Remaining--------- ------------------------- ------------------------- ---------hr_signin [email protected] dns.vm30bsd0008.ibqa 145 days
Domain KeysThis section contains the following CLI commands:
• domainkeysconfig, on page 56
domainkeysconfig
DescriptionConfigure DomainKeys/DKIM support.
UsageCommit: This command requires a ‘commit’.Cluster Management: This command can be used in all three machine modes (cluster, group, machine).
Batch Command: This command supports a batch format.
For enhanced security, if encryption of sensitive data in the appliance is enabled in FIPS mode, you willnot be able view the private key. If you intend to edit the private key, you can enter an existing privatekey or generate a new private key.
Note
CLI Reference Guide56
The Commands: Reference ExamplesDomain Keys

Batch Format - Signing ProfilesThe batch format of the domainkeysconfig command can be used to create, edit, or delete signing profiles
• Adding a DomainKeys/DKIM signing profile:
domainkeysconfig profiles signing new <name> <type> <domain> <selector> <user-list>[options]
Table 2: domainkeysconfig New Signing Profile Arguments
DescriptionArgument
Name of domain profile.<name>
Type of domain. Can be dk or dkim .<type>
Domain field of domain profile. This forms the d tagof the Domain-Keys signature.
<domain>
Selector field of domain profile. This forms the s tagof the Domain-Keys signature.
<selector>
Comma separated list of domain profile users. Usersare used tomatch against email addresses to determineif a specific domain profile should be used to sign anemail. Use the special keyword all to match alldomain users.
<user-list>
[options]
The name of the private key that will be used forsigning.
--key_name
The canonicalization algorithm to use when signingby DK. Currently supported algorithms are simpleand nofws . Default is nofws .
--canon
The body canonicalization algorithm of to use whensigning by DKIM. Currently supported algorithmsare simple and relaxed . Default is simple .
--body_canon
The headers canonicalization algorithm of to usewhensigning by DKIM. Currently supported algorithmsare simple and relaxed . Default is simple .
--header_canon
CLI Reference Guide 57
The Commands: Reference Examplesdomainkeysconfig

DescriptionArgument
Number of bytes of canonicalized body that are usedto calculate the signature. Is used only in DKIMprofiles. If used this value becomes l tag of thesignature. By default it is not used.
--body_length
Detrmines how to select headers for signing. Is usedonly in DKIM profiles. Can be one of all , standard ,standard_and_custom . all means to sign allnon-repetitive headers. "standard" means to signpedefined set of well known headers such as Subject,From, To, Sender, MIME heades etc.standard_and_custom means to sign well knownheaders and user-defined set of headers. Default isstandard .
--headers_select
User-defined set of headers to sign. Is used only inDKIM profiles if headers_select isstandard_and_custom . Default is empty set.
--custom_headers
Determines whether to include the i tag into thesignature. Possible values are yes or no . Default isyes .
--i_tag
The identity of the user or agent on behalf of whichthis message is signed. The syntax is a standard emailaddress where the local-part may be omitted. Domainpart of this address should be a sub-domain of orequal to the <domain> . This option is only applicableif --i_tag value is set to yes . Default is an emptylocal-part followed by an @ and by the <domain> .
--agent_identity
Determines whether to include the q tag into thesignature. Possible values are yes or no . Default isyes .
--q_tag
Determines whether to include the t tag into thesignature. Possible values are yes or no . Default isyes .
--t_tag
Determines whether to include the x tag into thesignature. Possible values are yes or no . Default isyes .
--x_tag
Number of seconds before signature is expired. Isused only in DKIM profiles. This value becomes adifference of x and t tags of the signature. This optionis only applicable if --x_tag value is set to yes .Default is 31536000 seconds (one year).
--expiration_time
CLI Reference Guide58
The Commands: Reference Examplesdomainkeysconfig

DescriptionArgument
Determines whether to include the z tag into thesignature. Possible values are yes or no . Default isno .
--z_tag
• Editing a signing profile:
domainkeysconfig profiles signing edit <name> [signing-profile-options]
Signing profile options:
• rename <name>
• domain <domain>
• selector <selector>
• canonicalization <canon>
• canonicalization <header_canon> <body_canon>
• key <key_name>
• bodylength <body_length>
• headerselect <header_select>
• customheaders <custom_headers>
• itag <i_tag> [<agent_identity>]
• qtag <q_tag>
• ttag <t_tag>
• xtag <x_tag> [<expiration_time>]
• ztag <z_tag>
• new <user-list>
• delete <user-list>
• clear
• Delete a signing profile:
domainkeysconfig profiles signing delete <name>
• Show a list of signing profiles:
domainkeysconfig profiles signing list
CLI Reference Guide 59
The Commands: Reference Examplesdomainkeysconfig

• Print the details of a signing profile:
domainkeysconfig profiles signing print <name>
• Test a signing profile:
domainkeysconfig profiles signing test <name>
• Import a local copy of your signing profiles:
domainkeysconfig profiles signing import <filename>
• Export a copy of your signing profile from the appliance:
domainkeysconfig profiles signing export <filename>
• Delete all the signing profiles from the appliance:
domainkeysconfig profiles signing clear
Batch Format - Verification Profiles• Create a new DKIM verification profile:
domainkeysconfig profiles verification new <name> <verification-profile-options>
Table 3: domainkeysconfig Verification Profile Options
DescriptionArgument
The name of DKIM verification profile.--name
The smallest key to be accepted. Possible key-lengthvalues (in bits) are 512, 768, 1024, 1536 and 2048 .Default is 512 .
--min_key_size
CLI Reference Guide60
The Commands: Reference Examplesdomainkeysconfig

DescriptionArgument
The largest key to be accepted. Possible key-lengthvalues (in bits) are 512, 768, 1024, 1536 and 2048 .Default is 2048 .
--max_key_size
A maximum number of signatures in the message toverify. Possible value is any positive number. Defaultis 5 .
--max_signatures_num
A number of seconds before the key query is timedout. Possible value is any positive number. Defaultis 10 .
--key_query_timeout
A number of seconds to tolerate wall clockasynchronization between sender and verifier.Possible value is any positive number. Default is 60.
--max_systemtime_divergence
Whether to use a body length parameter. Possiblevalues are yes or no . Default is yes .
--use_body_length
The SMTP action should be taken in case oftemporary failure. Possible values are accept or reject. Default is accept .
--tempfail_action
The SMTP response code for rejected message incase of temporary failure. Possible value is numberin 4XX format. Default is 451 .
--tempfail_response_code
The SMTP response text for rejectedmessage in caseof temporary failure. Default is #4.7.5 Unable toverify signature - key server unavailable .
--tempfail_response_text
The SMTP action should be taken in case ofpermanent failure. Possible values are accept or reject. Default is accept .
--permfail_action
The SMTP response code for rejected message incase of permanent failure. Possible value is numberin 5XX format. Default is 550 .
--permfail_response_code
The SMTP response text for rejectedmessage in caseof permanent failure. Default is #5.7.5 DKIMunauthenticated mail is prohibited.
--permfail_response_text
• Edit a verification profile:
domainkeysconfig profiles verification edit <name> <verification-profile-options>
CLI Reference Guide 61
The Commands: Reference Examplesdomainkeysconfig

• Delete a verification profile:
domainkeysconfig profiles verification delete <name>
• Print details of an existing verification profile:
domainkeysconfig profiles verification print <name>
• Display a list of existing verification profiles:
domainkeysconfig profiles verification list
• Import a file of verification profiles from a local machine:
domainkeysconfig profiles verification import <filename>
• Export the verification profiles from the appliance:
domainkeysconfig profiles verification export <filename>
• Delete all existing verification profiles from the appliance:
domainkeysconfig profiles verification clear
Batch Format - Signing Keys• Create a new signing key:
domainkeysconfig keys new <key_name> <key-options>
Table 4: domainkeysconfig Signing Keys Options
DescriptionArgument
Generate a private key. Possible key-length values(in bits) are 512 , 768 , 1024 , 1536 , and 2048 .
--generate_key
Use supplied private key.--use_key
CLI Reference Guide62
The Commands: Reference Examplesdomainkeysconfig

DescriptionArgument
Flag to derive and print to the screen a matchingpublic key for the specified private key. If--generate_key is specified first, a new private key isgenerated first, followed by the display of a matchingpublic key.
--public_key
• Edit a signing key:
domainkeysconfig keys edit <key_name> key <key-options>
• Rename an existing signing key:
domainkeysconfig keys edit <key_name> rename <key_name>
• To specify a public key:
domainkeysconfig keys publickey <key_name>
• Delete a key:
domainkeysconfig keys delete <key_name>
• Display a list of all signing keys:
domainkeysconfig keys list
• Display all information about a specify signing key:
domainkeysconfig keys print <key_name>
• Import signing keys from a local machine:
domainkeysconfig keys import <filename>
• Export signing keys from the appliance:
domainkeysconfig keys export <filename>
CLI Reference Guide 63
The Commands: Reference Examplesdomainkeysconfig

• Delete all signing keys on the appliance:
domainkeysconfig keys clear
Batch Format - Search for a Key or Profile• Search for a profile signing key:
domainkeysconfig search <search_text>
Batch Format - Global Settings• Modify global settings for Domain Keys/DKIM on your appliance:
domainkeysconfig setup <setup_options>
The option available is:
• --sign_generated_msgs - Specify whether to sign system-generated messages. Possible values are yesor no .
Example: Configuring Domain Keys via the CLIUse the domainkeysconfig command in the CLI to configure Domain Keys on your appliance.
The domainkeysconfig command has all of the features of theMail Policies -> Domain Keys page. It alsoprovides the ability to generate a sampleDomainKeysDNSTXT record. Formore information about generatingsample Domain Keys DNS TXT records, see Creating a Sample Domain Keys DNS TXT Record, on page66.
In this example, a key is generated, and a domain profile is created:
mail3.example.com> domainkeysconfigNumber of DK/DKIM Signing Profiles: 0Number of Signing Keys: 0Number of DKIM Verification Profiles: 1Sign System-Generated Messages: YesChoose the operation you want to perform:- PROFILES - Manage domain profiles.- KEYS - Manage signing keys.- SETUP - Change global settings.- SEARCH - Search for domain profile or key.[]> keysNo signing keys are defined.Choose the operation you want to perform:- NEW - Create a new signing key.
CLI Reference Guide64
The Commands: Reference Examplesdomainkeysconfig

- IMPORT - Import signing keys from a file.[]> newEnter a name for this signing key:[]> testkey1. Generate a private key2. Enter an existing key[1]>Enter the size (in bits) of this signing key:1. 5122. 7683. 10244. 15365. 2048[3]>New key "testkey" created.There are currently 1 signing keys defined.Choose the operation you want to perform:- NEW - Create a new signing key.- EDIT - Modify a signing key.- PUBLICKEY - Create a publickey from a signing key.- DELETE - Delete a signing key.- PRINT - Display signing keys.- LIST - List signing keys.- IMPORT - Import signing keys from a file.- EXPORT - Export signing keys to a file.- CLEAR - Clear all signing keys.[]>Number of DK/DKIM Signing Profiles: 0Number of Signing Keys: 1Number of DKIM Verification Profiles: 1Sign System-Generated Messages: YesChoose the operation you want to perform:- PROFILES - Manage domain profiles.- KEYS - Manage signing keys.- SETUP - Change global settings.- SEARCH - Search for domain profile or key.[]> profilesChoose the operation you want to perform:- SIGNING - Manage signing profiles.- VERIFICATION - Manage verification profiles.[]> signingNo domain profiles are defined.Choose the operation you want to perform:- NEW - Create a new domain profile.- IMPORT - Import domain profiles from a file.[]> newEnter a name for this domain profile:[]> ExampleEnter type of domain profile:1. dk2. dkim[2]>The domain field forms the basis of the public-key query. The value inthis field MUST match the domain of the sending email address or MUSTbe one of the parent domains of the sending email address. This valuebecomes the "d" tag of the Domain-Keys signature.Enter the domain name of the signing domain:[]> example.comSelectors are arbitrary names below the "_domainkey." namespace. Aselector value and length MUST be legal in the DNS namespace and inemail headers with the additional provision that they cannot contain asemicolon. This value becomes the "s" tag of the DomainKeysSignature.Enter selector:[]> testThe private key which is to be used to sign messages must be entered.A corresponding public key must be published in the DNS following theform described in the DomainKeys documentation. If a key is notimmediately available, a key can be entered at a later time.Select the key-association method:1. Create new key2. Paste in key3. Enter key at later time
CLI Reference Guide 65
The Commands: Reference Examplesdomainkeysconfig

4. Select existing key[1]> 4Enter the name or number of a signing key.1. testkey[1]>The canonicalization algorithm is the method by which the headers andcontent are prepared for presentation to the signing algorithm.Possible choices are "simple" and "relaxed".Select canonicalization algorithm for body:1. simple2. relaxed[1]> 1How would you like to sign headers:1. Sign all existing, non-repeatable headers (except Return-Path header).2. Sign "well-known" headers (Date, Subject, From, To, Cc, Reply-To, Message-ID, Sender,MIME headers).3. Sign "well-known" headers plus a custom list of headers.[2]>Body length is a number of bytes of the message body to sign.This value becomes the "l" tag of the signature.Which body length option would you like to use?1. Whole body implied. No further message modification is possible.2. Whole body auto-determined. Appending content is possible.3. Specify a body length.[1]>Would you like to fine-tune which tags should be used in theDKIM Signature? (yes/no) [N]>Finish by entering profile users. The following types of entries areallowed:- Email address entries such as "[email protected]".- Domain entries such as "example.com".- Partial domain entries such as ".example.com". For example, a partialdomain of ".example.com" will match "sales.example.com". Thissort of entry will not match the root domain ("example.com").
- Leave blank to match all domain users.Enter user for this signing profile:[]> sales.example.comDo you want to add another user? [N]>There are currently 1 domain profiles defined.Choose the operation you want to perform:- NEW - Create a new domain profile.- EDIT - Modify a domain profile.- DELETE - Delete a domain profile.- PRINT - Display domain profiles.- LIST - List domain profiles.- TEST - Test if a domain profile is ready to sign.- DNSTXT - Generate a matching DNS TXT record.- IMPORT - Import domain profiles from a file.- EXPORT - Export domain profiles to a file.- CLEAR - Clear all domain profiles.[]>Choose the operation you want to perform:- SIGNING - Manage signing profiles.- VERIFICATION - Manage verification profiles.[]>Number of DK/DKIM Signing Profiles: 1Number of Signing Keys: 1Number of DKIM Verification Profiles: 1Sign System-Generated Messages: YesChoose the operation you want to perform:- PROFILES - Manage domain profiles.- KEYS - Manage signing keys.- SETUP - Change global settings.- SEARCH - Search for domain profile or key.[]>
Creating a Sample Domain Keys DNS TXT Record
mail3.example.com> domainkeysconfigNumber of DK/DKIM Signing Profiles: 1
CLI Reference Guide66
The Commands: Reference Examplesdomainkeysconfig

Number of Signing Keys: 1Number of DKIM Verification Profiles: 1Sign System-Generated Messages: YesChoose the operation you want to perform:- PROFILES - Manage domain profiles.- KEYS - Manage signing keys.- SETUP - Change global settings.- SEARCH - Search for domain profile or key.[]> profilesChoose the operation you want to perform:- SIGNING - Manage signing profiles.- VERIFICATION - Manage verification profiles.[]> signingThere are currently 1 domain profiles defined.Choose the operation you want to perform:- NEW - Create a new domain profile.- EDIT - Modify a domain profile.- DELETE - Delete a domain profile.- PRINT - Display domain profiles.- LIST - List domain profiles.- TEST - Test if a domain profile is ready to sign.- DNSTXT - Generate a matching DNS TXT record.- IMPORT - Import domain profiles from a file.- EXPORT - Export domain profiles to a file.- CLEAR - Clear all domain profiles.[]> dnstxtEnter the name or number of a domain profile.1. Example[1]>The answers to the following questions will be used to construct DKIM textrecord for DNS. It can be used to publish information about this profile.Do you wish to constrain the local part of the signing identities("i=" tag of "DKIM-Signature" header field) associated with thisdomain profile? [N]>Do you wish to include notes that may be of interest to a human (nointerpretation is made by any program)? [N]>The "testing mode" can be set to specify that this domain is testing DKIM andthat unverified email must not be treated differently from verified email.Do you want to indicate the "testing mode"? [N]>Do you wish to disable signing by subdomains of this domain? [N]>The DKIM DNS TXT record is:test._domainkey.example.com. IN TXT "v=DKIM1;p=MIGfMA0GCSqGSIb3DQEBAQUAA4GNADCBiQKBgQDX5dOG9J8rXreA/uPtYr5lrCTCqR+qlS5Gm1f0OplAzSuB2BvOnxZ5Nr+se0T+k7mYDP0FSUHyWaOvO+kCcum7fFRjS3EOF9gLpbIdH5vzOCKp/w7hdjPy3q6PSgJVtqvQ6v9E8k5Ui7C+DF6KvJUiMJSY5sbu2zmm9rKAH5m7FwIDAQAB;"There are currently 1 domain profiles defined.Choose the operation you want to perform:- NEW - Create a new domain profile.- EDIT - Modify a domain profile.- DELETE - Delete a domain profile.- PRINT - Display domain profiles.- LIST - List domain profiles.- TEST - Test if a domain profile is ready to sign.- DNSTXT - Generate a matching DNS TXT record.- IMPORT - Import domain profiles from a file.- EXPORT - Export domain profiles to a file.- CLEAR - Clear all domain profiles.[]>Choose the operation you want to perform:- SIGNING - Manage signing profiles.- VERIFICATION - Manage verification profiles.[]>Number of DK/DKIM Signing Profiles: 1Number of Signing Keys: 1Number of DKIM Verification Profiles: 1Sign System-Generated Messages: YesChoose the operation you want to perform:- PROFILES - Manage domain profiles.- KEYS - Manage signing keys.- SETUP - Change global settings.- SEARCH - Search for domain profile or key.[]>
CLI Reference Guide 67
The Commands: Reference Examplesdomainkeysconfig

DMARC VerificationThis section contains the following CLI commands:
• dmarcconfig, on page 68
dmarcconfig
DescriptionConfigure DMARC settings.
UsageCommit: This command requires a ‘commit’.Cluster Management: This command can be used in all three machine modes (cluster, group, machine).
Batch Command: This command supports a batch format.
Batch Format - DMARC Verification ProfilesThe batch format of the dmarcconfig can be used to create, edit, or delete verification profiles and modifyglobal settings.
Add a DMARC Verification Profile
dmarcconfig profiles new <name> [options]
DescriptionArgument
Name of the DMARC profile.<name>
[options]
The message action that AsyncOS must take when the policy inDMARC record is reject. Possible values are “reject”, “quarantine”,or “none.”
--rejectpolicy_action
The SMTP response code for rejected messages. The default valueis 550.
--rejectpolicy_response_code
The SMTP response text for rejected messages. The default valueis “#5.7.1 DMARC unauthenticated mail is prohibited.”
--rejectpolicy_response_text
The quarantine for messages that fail DMARC verification.--rejectpolicy_quarantine
CLI Reference Guide68
The Commands: Reference ExamplesDMARC Verification

DescriptionArgument
The message action that AsyncOS must take when the policy inDMARC record is quarantine. Possible values are “quarantine” or“none.”
--quarantinepolicy_action
The quarantine for messages that fail DMARC verification.--quarantinepolicy_quarantine
The message action that AsyncOS must take on the messages thatresult in temporary failure during DMARC verification. Possiblevalues are “accept” or “reject.”
--tempfail_action
The SMTP response code for rejectedmessages in case of temporaryfailure. The default value is 451.
--tempfail_response_code
The SMTP response text for rejected messages in case of temporaryfailure. The default value is “#4.7.1 Unable to perform DMARCverification.”
--tempfail_response_text
The message action that AsyncOS must take on the messages thatresult in permanent failure during DMARC verification. Possiblevalues are “accept” or “reject.”
--permfail_action
The SMTP response code for rejectedmessages in case of permanentfailure. The default value is 550.
--permfail_response_code
The SMTP response text for rejectedmessages in case of permanentfailure. The default value is “#5.7.1 DMARC verification failed.”
--permfail_response_text
Edit a DMARC Verification Profile
dmarcconfig profiles edit <name> [options]
Delete a DMARC Verification Profile
dmarcconfig profiles delete <name>
Delete all the DMARC Verification Profiles
dmarcconfig profiles clear
View the Details of a DMARC Verification Profile
dmarcconfig profiles print <name>
Export DMARC Verification Profiles
dmarcconfig profiles export <filename>
CLI Reference Guide 69
The Commands: Reference Examplesdmarcconfig

Import DMARC Verification Profiles
dmarcconfig profiles import <filename>
Change Global Settings
dmarcconfig setup [options]
DescriptionOptions
The timewhen youwant AsyncOS to generate DMARC aggregate reports.--report_schedule
Send delivery error reports to the domain owners if the DMARC aggregatereport size exceeds 10MB or the size specified in the RUA tag of DMARCrecord.
--error_reports
The entity generating DMARC aggregate reports. This must be a domainname.
--org_name
Additional contact information, for example, details of your organization'scustomer support, if the domain owners who receive DMARC aggregatereports want to contact the entity that generated the report.
--contact_info
Send copy of all the DMARC aggregate reports to specific users, forexample, internal users who perform analysis on the aggregate reports.Enter an email address or multiple addresses separated by commas.
--copy_reports
Skip DMARC verification of messages from specific senders (addresslist).
You can choose only address lists created with full emailaddresses.
Note
--bypass_addresslist
Skip DMARC verification of messages that contain specific header fieldnames. For example, use this option to skip DMARC verification ofmessages from mailing lists and trusted forwarders. Enter a header ormultiple headers separated by commas.
--bypass_headers
ExampleThe following example shows how to setup a DMARC verification profile and edit the global settings ofDMARC verification profiles.
mail.example.com> dmarcconfigNumber of DMARC Verification Profiles: 1Daily report generation time is: 00:00Error reports enabled: NoReports sent on behalf of:Contact details for reports:Send a copy of aggregate reports to: None SpecifiedBypass DMARC verification for senders from addresslist: None SpecifiedBypass DMARC verification for messages with header fields: None SpecifiedChoose the operation you want to perform:
CLI Reference Guide70
The Commands: Reference Examplesdmarcconfig

- PROFILES - Manage DMARC verification profiles.- SETUP - Change global settings.[]> profilesThere are currently 1 DMARC verification profiles defined.Choose the operation you want to perform:- NEW - Create a new DMARC verification profile.- EDIT - Modify a DMARC verification profile.- DELETE - Delete a DMARC verification profile.- PRINT - Display DMARC verification profiles.- IMPORT - Import DMARC verification profiles from a file.- EXPORT - Export DMARC verification profiles to a file.- CLEAR - Clear all DMARC verification profiles.[]> newEnter the name of the new DMARC verification profile:[]> dmarc_ver_profile_1Select the message action when the policy in DMARC record is reject:1. No Action2. Quarantine the message3. Reject the message[3]> 1Select the message action when the policy in DMARC record is quarantine:1. No Action2. Quarantine the message[2]> 2Select the quarantine for messages that fail DMARC verification (when the DMARC policy isquarantine).1. Policy[1]> 1What SMTP action should be taken in case of temporary failure?1. Accept2. Reject[1]> 2Enter the SMTP response code for rejected messages in case of temporary failure.[451]>Enter the SMTP response text for rejected messages in case of temporary failure. Type DEFAULTto use the default response text'#4.7.1 Unable to performDMARC verification.'[#4.7.1 Unable to perform DMARC verification.]>What SMTP action should be taken in case of permanent failure?1. Accept2. Reject[1]> 2Enter the SMTP response code for rejected messages in case of permanent failure.[550]>Enter the SMTP response text for rejected messages in case of permanent failure. Type DEFAULTto use the default response text'#4.7.1 Unable to performDMARC verification.'[#5.7.1 DMARC verification failed.]>There are currently 2 DMARC verification profiles defined.Choose the operation you want to perform:- NEW - Create a new DMARC verification profile.- EDIT - Modify a DMARC verification profile.- DELETE - Delete a DMARC verification profile.- PRINT - Display DMARC verification profiles.- IMPORT - Import DMARC verification profiles from a file.- EXPORT - Export DMARC verification profiles to a file.- CLEAR - Clear all DMARC verification profiles.[]>Number of DMARC Verification Profiles: 2Daily report generation time is: 00:00Error reports enabled: NoReports sent on behalf of:Contact details for reports:Send a copy of aggregate reports to: None SpecifiedBypass DMARC verification for senders from addresslist: None SpecifiedBypass DMARC verification for messages with header fields: None SpecifiedChoose the operation you want to perform:- PROFILES - Manage DMARC verification profiles.- SETUP - Change global settings.[]> setupWould you like to modify DMARC report settings? (Yes/No) [N]> y
CLI Reference Guide 71
The Commands: Reference Examplesdmarcconfig
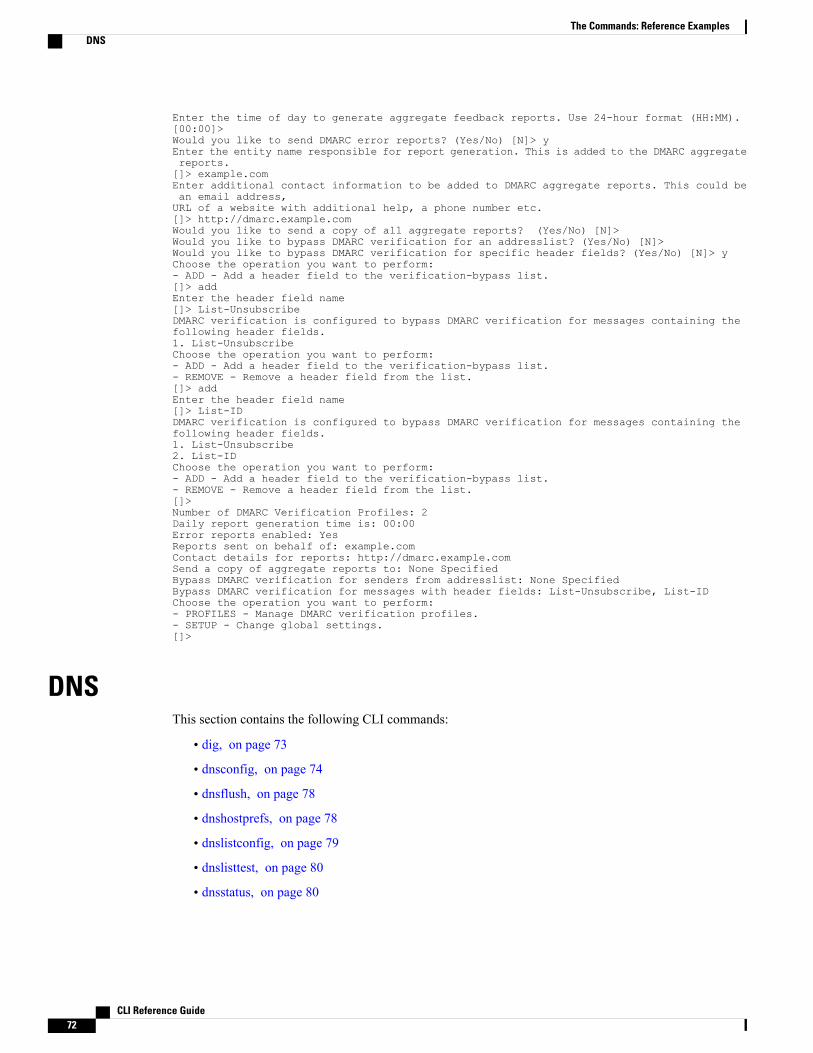
Enter the time of day to generate aggregate feedback reports. Use 24-hour format (HH:MM).[00:00]>Would you like to send DMARC error reports? (Yes/No) [N]> yEnter the entity name responsible for report generation. This is added to the DMARC aggregatereports.[]> example.comEnter additional contact information to be added to DMARC aggregate reports. This could bean email address,URL of a website with additional help, a phone number etc.[]> http://dmarc.example.comWould you like to send a copy of all aggregate reports? (Yes/No) [N]>Would you like to bypass DMARC verification for an addresslist? (Yes/No) [N]>Would you like to bypass DMARC verification for specific header fields? (Yes/No) [N]> yChoose the operation you want to perform:- ADD - Add a header field to the verification-bypass list.[]> addEnter the header field name[]> List-UnsubscribeDMARC verification is configured to bypass DMARC verification for messages containing thefollowing header fields.1. List-UnsubscribeChoose the operation you want to perform:- ADD - Add a header field to the verification-bypass list.- REMOVE - Remove a header field from the list.[]> addEnter the header field name[]> List-IDDMARC verification is configured to bypass DMARC verification for messages containing thefollowing header fields.1. List-Unsubscribe2. List-IDChoose the operation you want to perform:- ADD - Add a header field to the verification-bypass list.- REMOVE - Remove a header field from the list.[]>Number of DMARC Verification Profiles: 2Daily report generation time is: 00:00Error reports enabled: YesReports sent on behalf of: example.comContact details for reports: http://dmarc.example.comSend a copy of aggregate reports to: None SpecifiedBypass DMARC verification for senders from addresslist: None SpecifiedBypass DMARC verification for messages with header fields: List-Unsubscribe, List-IDChoose the operation you want to perform:- PROFILES - Manage DMARC verification profiles.- SETUP - Change global settings.[]>
DNSThis section contains the following CLI commands:
• dig, on page 73
• dnsconfig, on page 74
• dnsflush, on page 78
• dnshostprefs, on page 78
• dnslistconfig, on page 79
• dnslisttest, on page 80
• dnsstatus, on page 80
CLI Reference Guide72
The Commands: Reference ExamplesDNS
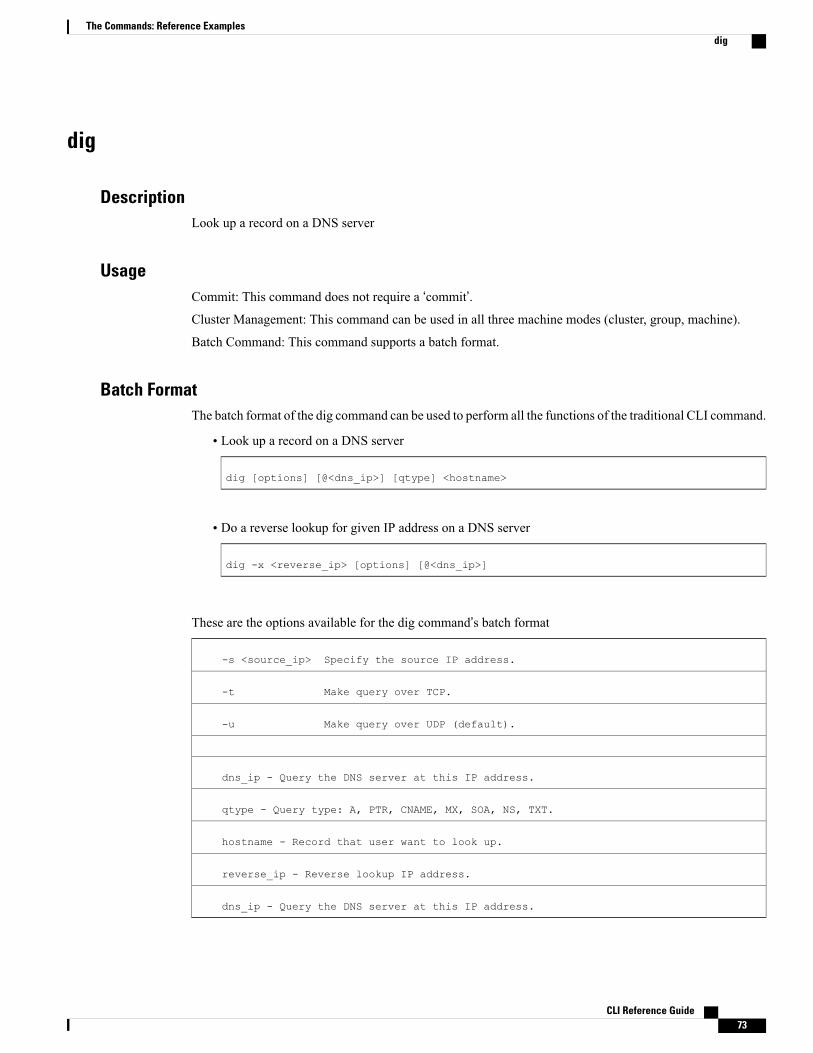
dig
DescriptionLook up a record on a DNS server
UsageCommit: This command does not require a ‘commit’.Cluster Management: This command can be used in all three machine modes (cluster, group, machine).
Batch Command: This command supports a batch format.
Batch FormatThe batch format of the dig command can be used to perform all the functions of the traditional CLI command.
• Look up a record on a DNS server
dig [options] [@<dns_ip>] [qtype] <hostname>
• Do a reverse lookup for given IP address on a DNS server
dig -x <reverse_ip> [options] [@<dns_ip>]
These are the options available for the dig command’s batch format
-s <source_ip> Specify the source IP address.
-t Make query over TCP.
-u Make query over UDP (default).
dns_ip - Query the DNS server at this IP address.
qtype - Query type: A, PTR, CNAME, MX, SOA, NS, TXT.
hostname - Record that user want to look up.
reverse_ip - Reverse lookup IP address.
dns_ip - Query the DNS server at this IP address.
CLI Reference Guide 73
The Commands: Reference Examplesdig

ExampleThe following example explicitly specifies a DNS server for the lookup.
mail.com> dig @111.111.111.111 example.com MX; <<>> DiG 9.4.3-P2 <<>> @111.111.111.111 example.com MX; (1 server found);; global options: printcmd;; Got answer:;; ->>HEADER<<- opcode: QUERY, status: NOERROR, id: 18540;; flags: qr aa rd ra; QUERY: 1, ANSWER: 1, AUTHORITY: 1, ADDITIONAL: 3;; QUESTION SECTION:;example.com. IN MX;; ANSWER SECTION:mexample.com. 10800 IN MX 10 mexample.com.;; AUTHORITY SECTION:example.com. 10800 IN NS test.example.com.;; ADDITIONAL SECTION:example.com. 10800 IN A 111.111.111.111example.com. 10800 IN AAAA 2620:101:2004:4201::bdexample.com. 300 IN A 111.111.111.111;; Query time: 6 msec;; SERVER: 10.92.144.4#53(10.92.144.4);; WHEN: Fri Dec 9 23:37:42 2011;; MSG SIZE rcvd: 143
The dig command filters out the information in the Authority and Additional sections if you do not explicitlyspecify the DNS server when using the command.
Note
dnsconfig
DescriptionConfigure DNS setup
UsageCommit: This command requires a ‘commit’.Cluster Management: This command can be used in all three machine modes (cluster, group, machine).
Batch Command: This command supports a batch format.
Batch FormatThe batch format of the dnsconfig command can be used to perform all the functions of the traditional CLIcommand.
• Configuring DNS to use a local nameserver cache:
dnsconfig parent new <ns_ip> <priority>
CLI Reference Guide74
The Commands: Reference Examplesdnsconfig

Command arguments:
• <ns_ip> - The IP address of the nameserver. Separate multiple IP addresses with commas.
• <priority> - The priority for this entry.
• Deleting the local nameserver cache:
dnsconfig parent delete <ns_ip>
• Configuring alternate DNS caches to use for specific domains:
dnsconfig alt new <domains> <ns_ip>
Cannot be used when using Internet root nameservers.Note
Command arguments:
• <ns_ip> - The IP address of the nameserver. Separate multiple IP addresses with commas.
• <domains> - A comma separated list of domains.
• Deleting the alternate DNS cache for a specific domain:
dnsconfig alt delete <domain>
• Configuring DNS to use the Internet root nameservers:
dnsconfig roots new <ns_domain> <ns_name> <ns_ip>
Nameserver arguments:
• <ns_domain> - The domain to override.
• <ns_name> - The name of the nameserver.
• <ns_ip> - The IP address of the nameserver.
You can override certain domains by specifying an alternate name server for that domain.Note
• Deleting nameservers:
dnsconfig roots delete <ns_domain> [ns_name]
CLI Reference Guide 75
The Commands: Reference Examplesdnsconfig

When deleting, if you do not specify an ns_name , then all nameservers for that domain will be removed.Note
• Clearing all DNS settings and automatically configuring the system to use the Internet root servers:
dnsconfig roots
Displaying the current DNS settings.
dnsconfig print
ExampleEach user-specified DNS server requires the following information:
• Hostname
• IP address
• Domain authoritative for (alternate servers only)
Four subcommands are available within the dnsconfig command:
Table 5: Subcommands for dnsconfig Command
DescriptionSyntax
Add a new alternate DNS server to use for specific domains or local DNSserver.new
Remove an alternate server or local DNS server.delete
Modify an alternate server or local DNS server.edit
Switch between Internet root DNS servers or local DNS servers.setup
mail3.example.com> dnsconfigCurrently using the Internet root DNS servers.Alternate authoritative DNS servers:1. com: dns.example.com (10.1.10.9)Choose the operation you want to perform:- NEW - Add a new server.- EDIT - Edit a server.- DELETE - Remove a server.- SETUP - Configure general settings.[]> setupDo you want the Gateway to use the Internet's root DNS servers or would you likeit to use your own DNS servers?1. Use Internet root DNS servers2. Use own DNS cache servers
CLI Reference Guide76
The Commands: Reference Examplesdnsconfig

[1]> 1Choose the IP interface for DNS traffic.1. Auto2. Management (10.92.149.70/24: mail3.example.com)[1]>Enter the number of seconds to wait before timing out reverse DNS lookups.[20]>Enter the minimum TTL in seconds for DNS cache.[1800]>Currently using the Internet root DNS servers.Alternate authoritative DNS servers:1. com: dns.example.com (10.1.10.9)Choose the operation you want to perform:- NEW - Add a new server.- EDIT - Edit a server.- DELETE - Remove a server.- SETUP - Configure general settings.[]>
Adding an Alternate DNS Server for Specific Domains
You can configure the appliance to use the Internet root servers for all DNS queries except specific localdomains.
mail3.example.com> dnsconfigCurrently using the Internet root DNS servers.No alternate authoritative servers configured.Choose the operation you want to perform:- NEW - Add a new server.- SETUP - Configure general settings.[]> newPlease enter the domain this server is authoritative for. (Ex: "com").[]> example.comPlease enter the fully qualified hostname of the DNS server for the domain "example.com".(Ex: "dns.example.com").[]> dns.example.comPlease enter the IP address of dns.example.com.[]> 10.1.10.9Currently using the Internet root DNS servers.Alternate authoritative DNS servers:1. com: dns.example.com (10.1.10.9)Choose the operation you want to perform:- NEW - Add a new server.- EDIT - Edit a server.- DELETE - Remove a server.- SETUP - Configure general settings.[]>
Using Your Own DNS Cache Servers
You can configure the appliance to use your own DNS cache server.
mail3.example.com> dnsconfigCurrently using the Internet root DNS servers.Alternate authoritative DNS servers:1. com: dns.example.com (10.1.10.9)Choose the operation you want to perform:- NEW - Add a new server.- EDIT - Edit a server.- DELETE - Remove a server.- SETUP - Configure general settings.[]> setupDo you want the Gateway to use the Internet's root DNS servers or would you likeit to use your own DNS servers?1. Use Internet root DNS servers2. Use own DNS cache servers[1]> 2
CLI Reference Guide 77
The Commands: Reference Examplesdnsconfig

Please enter the IP address of your DNS server.Separate multiple IPs with commas.[]> 10.10.200.03Please enter the priority for 10.10.200.3.A value of 0 has the highest priority.The IP will be chosen at random if they have the same priority.[0]> 1Choose the IP interface for DNS traffic.1. Auto2. Management (192.168.42.42/24)3. PrivateNet (192.168.1.1/24: mail3.example.com)4. PublicNet (192.168.2.1/24: mail3.example.com)[1]> 1Enter the number of seconds to wait before timing out reverse DNS lookups.[20]>Enter the minimum TTL in seconds for DNS cache.[1800]>Currently using the local DNS cache servers:1. Priority: 1 10.10.200.3Choose the operation you want to perform:- NEW - Add a new server.- EDIT - Edit a server.- DELETE - Remove a server.- SETUP - Configure general settings.[]>
dnsflush
DescriptionClear all entries from the DNS cache.
UsageCommit: This command does not require a ‘commit’.Cluster Management: This command is restricted to machine mode.
Batch Command: This command does not support a batch format
Example
mail3.example.com> dnsflushAre you sure you want to clear out the DNS cache? [N]> Y
dnshostprefs
DescriptionConfigure IPv4/IPv6 DNS preferences
CLI Reference Guide78
The Commands: Reference Examplesdnsflush

UsageCommit: This command requires a ‘commit’.Cluster Management: This command is restricted to machine mode.
Batch Command: This command does not support a batch format
Example
mail3.example.com> dnshostprefsChoose the operation you want to perform:- NEW - Add new domain override.- SETDEFAULT - Set the default behavior.[]> newEnter the domain you wish to configure.[]> example.comHow should the appliance sort IP addresses for this domain?1. Prefer IPv42. Prefer IPv63. Require IPv44. Require IPv6[2]> 3Choose the operation you want to perform:- NEW - Add new domain override.- SETDEFAULT - Set the default behavior.[]> setdefaultHow should the appliance sort IP addresses?1. Prefer IPv42. Prefer IPv63. Require IPv44. Require IPv6[2]> 1Choose the operation you want to perform:- NEW - Add new domain override.- SETDEFAULT - Set the default behavior.[]>
dnslistconfig
DescriptionConfigure DNS List services support
UsageCommit: This command requires a ‘commit’.Cluster Management: This command is restricted to machine mode.
Batch Command: This command does not support a batch format
Example
mail3.example.com> dnslistconfigCurrent DNS List Settings:
CLI Reference Guide 79
The Commands: Reference Examplesdnslistconfig

Negative Response TTL: 1800 secondsDNS List Query Timeout: 3 secondsChoose the operation you want to perform:- SETUP - Configure general settings.[]> setupEnter the cache TTL for negative responses in seconds:[1800]> 1200Enter the query timeout in seconds:[3]>Settings updated.Current DNS List Settings:Negative Response TTL: 1200 secondsDNS List Query Timeout: 3 secondsChoose the operation you want to perform:- SETUP - Configure general settings.[]>
dnslisttest
DescriptionTest a DNS lookup for a DNS-based list service.
UsageCommit: This command does not require a ‘commit’.Cluster Management: This command is restricted to machine mode.
Batch Command: This command does not support a batch format
Example
mail3.example.com> dnslisttestEnter the query server name:[]> mail4.example.comEnter the test IP address to query for:[127.0.0.2]> 10.10.1.11Querying: 10.10.1.11.mail4.example.comResult: MATCHED
dnsstatus
DescriptionDisplay DNS statistics.
UsageCommit: This command does not require a ‘commit’.Cluster Management: This command is restricted to machine mode.
CLI Reference Guide80
The Commands: Reference Examplesdnslisttest

Batch Command: This command does not support a batch format.
Example
mail3.example.com> dnsstatusStatus as of: Mon Apr 18 10:58:07 2005 PDTCounters: Reset Uptime LifetimeDNS Requests 1,115 1,115 1,115Network Requests 186 186 186Cache Hits 1,300 1,300 1,300Cache Misses 1 1 1Cache Exceptions 0 0 0Cache Expired 185 185 185
General Management/Administration/TroubleshootingThis section contains the following CLI commands:
• addressconfig, on page 82
• adminaccessconfig, on page 84
• certconfig, on page 89
• date, on page 93
• diagnostic, on page 93
• diskquotaconfig, on page 97
• ecconfig , on page 98
• ecstatus , on page 99
• ecupdate , on page 99
• encryptionconfig, on page 100
• encryptionstatus, on page 102
• encryptionupdate, on page 103
• enginestatus, on page 103
• featurekey, on page 104
• featurekeyconfig, on page 105
• generalconfig, on page 106
• healthcheck, on page 106
• healthconfig, on page 107
• ntpconfig, on page 108
• portalregistrationconfig, on page 109
• reboot, on page 110
• repengstatus, on page 110
CLI Reference Guide 81
The Commands: Reference ExamplesGeneral Management/Administration/Troubleshooting

• resume, on page 111
• resumedel, on page 111
• resumelistener, on page 112
• revert, on page 112
• settime, on page 113
• settz, on page 113
• shutdown, on page 114
• sshconfig, on page 115
• status, on page 117
• supportrequest, on page 118
• supportrequeststatus, on page 119
• supportrequestupdate, on page 120
• suspend, on page 120
• suspenddel, on page 121
• suspendlistener, on page 121
• tcpservices, on page 122
• techsupport, on page 123
• tlsverify, on page 124
• trace, on page 124
• trackingconfig, on page 126
• updateconfig, on page 127
• updatenow, on page 131
• upgrade, on page 133
• version, on page 131
• wipedata, on page 132
See also Virtual Appliance Management , on page 285.
addressconfig
DescriptionThe addressconfig command is used to configure the From: Address header. You can specify the display,user, and domain names of the From: address. You can also choose to use the Virtual Gateway domain forthe domain name. Use the addressconfig command for mail generated by AsyncOS for the followingcircumstances:
CLI Reference Guide82
The Commands: Reference Examplesaddressconfig

• Anti-virus notifications
• Bounces
• DMARC feedback reports
• Notifications ( notify() and notify-copy() filter actions)
• Quarantine Messages (and “Send Copy” in quarantine management)
• Reports
• All other messages
In the following example, the From: Address for notifications is changed from: Mail Delivery System[MAILER-DAEMON@domain] (the default) to Notifications [[email protected]]
UsageCommit: This command requires a ‘commit’.Cluster Management: This command can be used in all three machine modes (cluster, group, machine).
Batch Command: This command does not support a batch format.
Example
mail3.example.com> addressconfigCurrent anti-virus from: "Mail Delivery System" <MAILER-DAEMON@domain>Current bounce from: "Mail Delivery System" <MAILER-DAEMON@domain>Current notify from: "Mail Delivery System" <MAILER-DAEMON@domain>Current quarantine from: "Mail Delivery System" <MAILER-DAEMON@domain>Current DMARC reports from: "DMARC Feedback" <MAILER-DAEMON@domain>Current all other messages from: "Mail Delivery System" <MAILER-DAEMON@domain>Choose the operation you want to perform:- AVFROM - Edit the anti-virus from address.- BOUNCEFROM - Edit the bounce from address.- NOTIFYFROM - Edit the notify from address.- QUARANTINEFROM - Edit the quarantine bcc from address.- DMARCFROM - Edit the DMARC reports from address.- OTHERFROM - Edit the all other messages from address.[]> notifyfromPlease enter the display name portion of the "notify from" address["Mail Delivery System"]> NotificationsPlease enter the user name portion of the "notify from" address[MAILER-DAEMON]> NotificationDo you want the virtual gateway domain used for the domain? [Y]> nPlease enter the domain name portion of the "notify from" address[]> example.comCurrent anti-virus from: "Mail Delivery System" <MAILER-DAEMON@domain>Current bounce from: "Mail Delivery System" <MAILER-DAEMON@domain>Current notify from: Notifications <[email protected]>Current quarantine from: "Mail Delivery System" <MAILER-DAEMON@domain>Current DMARC reports from: "DMARC Feedback" <MAILER-DAEMON@domain>Current all other messages from: "Mail Delivery System" <MAILER-DAEMON@domain>Choose the operation you want to perform:- AVFROM - Edit the anti-virus from address.- BOUNCEFROM - Edit the bounce from address.- NOTIFYFROM - Edit the notify from address.- QUARANTINEFROM - Edit the quarantine bcc from address.- DMARCFROM - Edit the DMARC reports from address.- OTHERFROM - Edit the all other messages from address.[]>
CLI Reference Guide 83
The Commands: Reference Examplesaddressconfig

adminaccessconfig
DescriptionUse the adminaccessconfig command to configure:
• Login message (banner) for the administrator.
• IP-based access for appliance administrative interface.
• Web interface Cross-Site Request Forgeries protection.
• Option to use host header in HTTP requests.
• Web interface and CLI session inactivity timeout.
UsageCommit: This command requires a ‘commit’.Cluster Management: This command can be used in all three machine modes (cluster, group, machine).
Batch Command: This command supports a batch format.
Batch FormatThe batch format of the adminaccessconfig command can be used to perform all the functions of the traditionalCLI command.
• Select whether to allow access for all IP addresses or limit access to specific IP address/subnet/range
adminaccessconfig ipaccess <all/restrict/proxyonly/proxy>
• Adding a new IP address/subnet/range
adminaccessconfig ipaccess new <address>
• Editing an existing IP address/subnet/range
adminaccessconfig ipaccess edit <oldaddress> <newaddress>
• Deleting an existing IP address/subnet/range
adminaccessconfig ipaccess delete <address>
CLI Reference Guide84
The Commands: Reference Examplesadminaccessconfig

• Printing a list of the IP addresses/subnets/ranges
adminaccessconfig ipaccess print
• Deleting all existing IP addresses/subnets/ranges
adminaccessconfig ipaccess clear
• Printing the login banner
adminaccessconfig banner print
• Importing a login banner from a file on the appliance
adminaccessconfig banner import <filename>
• Deleting an existing login banner
adminaccessconfig banner clear
• Printing the welcome banner
adminaccessconfig welcome print
• Importing a welcome banner from a file on the appliance
adminaccessconfig welcome import <filename>
• Deleting an existing welcome banner
adminaccessconfig welcome clear
• Exporting a welcome banner
adminaccessconfig welcome export <filename>
CLI Reference Guide 85
The Commands: Reference Examplesadminaccessconfig

• Add an allowed proxy IP address
adminaccessconfig ipaccess proxylist new <address>
• Edit an allowed proxy IP address
adminaccessconfig ipaccess proxylist edit <oldaddress> <newaddress>
• Delete an allowed proxy IP address
adminaccessconfig ipaccess proxylist delete <address>
• Delete all existing allowed proxy IP addresses
adminaccessconfig ipaccess proxylist clear
• Configure the header name that contains origin IP address
adminaccessconfig ipaccess proxy-header <header name>
• Enable or disable web interface Cross-Site Request Forgeries protection
adminaccessconfig csrf <enable|disable>
• Check whether web interface Cross-Site Request Forgeries protection is enabled
adminaccessconfig csrf print
• Configure web interface session timeout
adminaccessconfig timeout gui <value>
• Configure CLI session timeout
adminaccessconfig timeout gui <value>
CLI Reference Guide86
The Commands: Reference Examplesadminaccessconfig

Example - Configuring Network Access ListYou can control from which IP addresses users access the Email Security appliance. Users can access theappliance from any machine with an IP address from the access list you define. When creating the networkaccess list, you can specify IP addresses, subnets, or CIDR addresses.
AsyncOS displays a warning if you do not include the IP address of your current machine in the networkaccess list. If your current machine’s IP address is not in the list, it will not be able to access the applianceafter you commit your changes.
In the following example, network access to the appliance is restricted to two sets of IP addresses:
mail.example.com> adminaccessconfigChoose the operation you want to perform:- BANNER - Configure login message (banner) for appliance administrator login.- WELCOME - Configure welcome message (post login message) for appliance administratorlogin.- IPACCESS - Configure IP-based access for appliance administrative interface.- CSRF - Configure web UI Cross-Site Request Forgeries protection.- HOSTHEADER - Configure option to use host header in HTTP requests.- TIMEOUT - Configure GUI and CLI session inactivity timeout.[]> ipaccessCurrent mode: Allow All.Please select the mode:- ALL - All IP addresses will be allowed to access the administrative interface.- RESTRICT - Specify IP addresses/Subnets/Ranges to be allowed access.- PROXYONLY - Specify IP addresses/Subnets/Ranges to be allowed access through proxy.- PROXY - Specify IP addresses/Subnets/Ranges to be allowed access through proxy or directly.[]> restrictList of allowed IP addresses/Subnets/Ranges:Choose the operation you want to perform:- NEW - Add a new IP address/subnet/range.[]> newPlease enter IP address, subnet or range.[]> 192.168.1.2-100List of allowed IP addresses/Subnets/Ranges:1. 192.168.1.2-100Choose the operation you want to perform:- NEW - Add a new IP address/subnet/range.- EDIT - Modify an existing entry.- DELETE - Remove an existing entry.- CLEAR - Remove all the entries.[]> newPlease enter IP address, subnet or range.[]> 192.168.255.12List of allowed IP addresses/Subnets/Ranges:1. 192.168.1.2-1002. 192.168.255.12Choose the operation you want to perform:- NEW - Add a new IP address/subnet/range.- EDIT - Modify an existing entry.- DELETE - Remove an existing entry.- CLEAR - Remove all the entries.[]>Warning: The host you are currently using [72.163.202.175] is not included in the UserAccess list. Excluding it will prevent yourhost from connecting to the administrative interface. Are you sure you want to continue?[N]> YCurrent mode: Restrict.Please select the mode:- ALL - All IP addresses will be allowed to access the administrative interface.- RESTRICT - Specify IP addresses/Subnets/Ranges to be allowed access.- PROXYONLY - Specify IP addresses/Subnets/Ranges to be allowed access through proxy.- PROXY - Specify IP addresses/Subnets/Ranges to be allowed access through proxy or directly.[]>
CLI Reference Guide 87
The Commands: Reference Examplesadminaccessconfig

Example - Configuring Login BannerYou can configure the Email Security appliance to display a message called a “login banner” when a userattempts to log into the appliance through SSH, Telnet, FTP, or Web UI. The login banner is customizabletext that appears above the login prompt in the CLI and to the right of the login prompt in the GUI. You canuse the login banner to display internal security information or best practice instructions for the appliance.For example, you can create a simple note that saying that unauthorized use of the appliance is prohibited ora detailed warning concerning the organization’s right to review changes made by the user to the appliance.
The maximum length of the login banner is 2000 characters to fit 80x25 consoles. A login banner can beimported from a file in the /data/pub/configuration directory on the appliance. After creating the banner,commit your changes.
In the following example, the login banner “Use of this system in an unauthorized manner is prohibited” isadded to the appliance:
mail.example.com> adminaccessconfigChoose the operation you want to perform:- BANNER - Configure login message (banner) for appliance administrator login.- WELCOME - Configure welcome message (post login message) for appliance administratorlogin.- IPACCESS - Configure IP-based access for appliance administrative interface.- CSRF - Configure web UI Cross-Site Request Forgeries protection.- HOSTHEADER - Configure option to use host header in HTTP requests.- TIMEOUT - Configure GUI and CLI session inactivity timeout.[]> bannerA banner has not been defined.Choose the operation you want to perform:- NEW - Create a banner to display at login.- IMPORT - Import banner text from a file.[]> newEnter or paste the banner text here. Enter CTRL-D on a blank line to end.Use of this system in an unauthorized manner is prohibited.^DChoose the operation you want to perform:- BANNER - Configure login message (banner) for appliance administrator login.- WELCOME - Configure welcome message (post login message) for appliance administratorlogin.- IPACCESS - Configure IP-based access for appliance administrative interface.- CSRF - Configure web UI Cross-Site Request Forgeries protection.- HOSTHEADER - Configure option to use host header in HTTP requests.- TIMEOUT - Configure GUI and CLI session inactivity timeout.[]> bannerBanner: Use of this system in an unauthorized manner is prohibited.Choose the operation you want to perform:- NEW - Create a banner to display at login.- IMPORT - Import banner text from a file.- DELETE - Remove the banner.[]>
Example - Configuring Web Interface and CLI Session TimeoutThe following example sets the web interface and CLI session timeout to 32 minutes.
The CLI session timeout applies only to the connections using Secure Shell (SSH), SCP, and direct serialconnection. Any uncommitted configuration changes at the time of CLI session timeout will be lost. Makesure that you commit the configuration changes as soon as they are made.
Note
mail.example.com> adminaccessconfigChoose the operation you want to perform:
CLI Reference Guide88
The Commands: Reference Examplesadminaccessconfig

- BANNER - Configure login message (banner) for appliance administrator login.- WELCOME - Configure welcome message (post login message) for appliance administratorlogin.- IPACCESS - Configure IP-based access for appliance administrative interface.- CSRF - Configure web UI Cross-Site Request Forgeries protection.- HOSTHEADER - Configure option to use host header in HTTP requests.- TIMEOUT - Configure GUI and CLI session inactivity timeout.[]> timeoutEnter WebUI inactivity timeout(in minutes):[30]> 32Enter CLI inactivity timeout(in minutes):[30]> 32Choose the operation you want to perform:- BANNER - Configure login message (banner) for appliance administrator login.- WELCOME - Configure welcome message (post login message) for appliance administratorlogin.- IPACCESS - Configure IP-based access for appliance administrative interface.- CSRF - Configure web UI Cross-Site Request Forgeries protection.- HOSTHEADER - Configure option to use host header in HTTP requests.- TIMEOUT - Configure GUI and CLI session inactivity timeout.[]>mail.example.com> commitPlease enter some comments describing your changes:[]> Changed WebUI and CLI session timeout valuesDo you want to save the current configuration for rollback? [Y]>Changes committed: Wed Mar 12 08:03:21 2014 GMT
After committing the changes, the new CLI session timeout takes affect only during the subsequent login.Note
certconfig
DescriptionConfigure security certificates and keys.
UsageCommit: This command requires a ‘commit’.Cluster Management: This command can be used in all three machine modes (cluster, group, machine).
Batch Command: This command does not support a batch format.
Example - Pasting in a certificateIn the following example, a certificate is installed by pasting in the certificate and private key.
mail3.example.com> certconfigChoose the operation you want to perform:- CERTIFICATE - Import, Create a request, Edit or Remove Certificate Profiles- CERTAUTHORITY - Manage System and Customized Authorities- CRL - Manage Certificate Revocation Lists[]> certificateList of CertificatesName Common Name Issued By Status Remaining--------- -------------------- -------------------- ------------- ---------Demo Cisco Appliance Demo Cisco Appliance Demo Active 3467 daysChoose the operation you want to perform:
CLI Reference Guide 89
The Commands: Reference Examplescertconfig

- IMPORT - Import a certificate from a local PKCS#12 file- PASTE - Paste a certificate into the CLI- NEW - Create a self-signed certificate and CSR- PRINT - View certificates assigned to services[]> pasteEnter a name for this certificate profile:> partner.comPaste public certificate in PEM format (end with '.'):-----BEGIN CERTIFICATE-----MIICLDCCAdYCAQAwDQYJKoZIhvcNAQEEBQAwgaAxCzAJBgNVBAYTAlBUMRMwEQYDVQQIEwpRdWVlbnNsYW5kMQ8wDQYDVQQHEwZMaXNib2ExFzAVBgNVBAoTDk5ldXJvbmlvLCBMZGEuMRgwFgYDVQQLEw9EZXNlbnZvbHZpbWVudG8xGzAZBgNVBAMTEmJydXR1cy5uZXVyb25pby5wdDEbMBkGCSqGSIb3DQEJARYMc2FtcG9AaWtpLmZpMB4XDTk2MDkwNTAzNDI0M1oXDTk2MTAwNTAzNDI0M1owgaAxCzAJBgNVBAYTAlBUMRMwEQYDVQQIEwpRdWVlbnNsYW5kMQ8wDQYDVQQHEwZMaXNib2ExFzAVBgNVBAoTDk5ldXJvbmlvLCBMZGEuMRgwFgYDVQQLEw9EZXNlbnZvbHZpbWVudG8xGzAZBgNVBAMTEmJydXR1cy5uZXVyb25pby5wdDEbMBkGCSqGSIb3DQEJARYMc2FtcG9AaWtpLmZpMFwwDQYJKoZIhvcNAQEBBQADSwAwSAJBAL7+aty3S1iBA/+yxjxv4q1MUTd1kjNwL4lYKbpzzlmC5beaQXeQ2RmGMTXU+mDvuqItjVHOK3DvPK7lTcSGftUCAwEAATANBgkqhkiG9w0BAQQFAANBAFqPEKFjk6T6CKTHvaQeEAsX0/8YHPHqH/9AnhSjrwuX9EBc0n6bVGhN7XaXd6sJ7dym9sbsWxb+pJdurnkxjx4=-----END CERTIFICATE-----.C=PT,ST=Queensland,L=Lisboa,O=Neuronio,Lda.,OU=Desenvolvimento,CN=brutus.partner.com,[email protected] private key in PEM format (end with '.'):-----BEGIN RSA PRIVATE KEY-----MIIBPAIBAAJBAL7+aty3S1iBA/+yxjxv4q1MUTd1kjNwL4lYKbpzzlmC5beaQXeQ2RmGMTXU+mDvuqItjVHOK3DvPK7lTcSGftUCAwEAAQJBALjkK+jc2+iihI98riEFoudmkNziSRTYjnwjx8mCoAjPWviB3c742eO3FG4/soi1jD9A5alihEOXfUzloenr8IECIQD3B5+0l+68BA/6d76iUNqAAV8djGTzvxnCxycnxPQydQIhAMXt4trUI3nca+U8YL2HPFA3gmhBsSICbq2OptOCnM7hAiEA6Xi3JIQECob8YwkRj29DU3/4WYD7WLPgsQpwo1GuSpECICGsnWH5oaeD9t9jbFoSfhJvv0IZmxdcLpRcpslpeWBBAiEA6/5B8J0GHdJq89FHwEG/H2eVVUYu5y/aD6sgcm+0Avg=-----END RSA PRIVATE KEY-----.Do you want to add an intermediate certificate? [N]> nList of CertificatesName Common Name Issued By Status Remaining-------- ------------------- -------------------- ------------- ---------partner.c brutus.partner.com brutus.partner Active 30 daysDemo Cisco Appliance Demo Cisco Appliance Demo Active 3467 daysChoose the operation you want to perform:- IMPORT - Import a certificate from a local PKCS#12 file- PASTE - Paste a certificate into the CLI- NEW - Create a self-signed certificate and CSR- EDIT - Update certificate or view the signing request- EXPORT - Export a certificate- DELETE - Remove a certificate- PRINT - View certificates assigned to services[]>Choose the operation you want to perform:- CERTIFICATE - Import, Create a request, Edit or Remove Certificate Profiles- CERTAUTHORITY - Manage System and Customized Authorities- CRL - Manage Certificate Revocation Lists[]>mail3.example.com> commitPlease enter some comments describing your changes:[]> Installed certificate and key for receiving, delivery, and httpsDo you want to save the current configuration for rollback? [Y]> nChanges committed: Fri May 23 11:42:12 2014 GMT
Example - Creating a Self-signed CertificateIn the following example, a self-signed certificate is created.
mail3.example.com> certconfigChoose the operation you want to perform:- CERTIFICATE - Import, Create a request, Edit or Remove Certificate Profiles
CLI Reference Guide90
The Commands: Reference Examplescertconfig

- CERTAUTHORITY - Manage System and Customized Authorities- CRL - Manage Certificate Revocation Lists[]> certificateList of CertificatesName Common Name Issued By Status Remaining--------- -------------------- -------------------- ------------- ---------partner.c brutus.neuronio.pt brutus.neuronio.pt Expired -4930daysDemo Cisco Appliance Demo Cisco Appliance Demo Active 3467 daysChoose the operation you want to perform:- IMPORT - Import a certificate from a local PKCS#12 file- PASTE - Paste a certificate into the CLI- NEW - Create a self-signed certificate and CSR- EDIT - Update certificate or view the signing request- EXPORT - Export a certificate- DELETE - Remove a certificate- PRINT - View certificates assigned to services[]> new1. Create a self-signed certificate and CSR2. Create a self-signed SMIME certificate and CSR[1]> 1Enter a name for this certificate profile:> example.comEnter Common Name:> example.comEnter Organization:> ExampleEnter Organizational Unit:> OrgEnter Locality or City:> San FrancisocEnter State or Province:> CAEnter Country (2 letter code):> USDuration before expiration (in days):[3650]>1. 10242. 2048Enter size of private key:[2]>Do you want to view the CSR? [Y]> y-----BEGIN CERTIFICATE REQUEST-----MIICrTCCAZUCAQAwaDELMAkGA1UEBhMCVVMxFDASBgNVBAMTC2V4YW1wbGUuY29tMRYwFAYDVQQHEw1TYW4gRnJhbmNpc29jMRAwDgYDVQQKEwdleGFtcGxlMQswCQYDVQQIEwJDQTEMMAoGA1UECxMDb3JnMIIBIjANBgkqhkiG9w0BAQEFAAOCAQ8AMIIBCgKCAQEA+NwamZyX7VgTZka/x1I5HHrN9V2MPKXoLq7FjzUtiIDwznElrKIuJovwSvonle6GvFlUHfjv8B3WobOzk5Ny6btKjwPrBfaY+qr7rzM4lAQKHM+P6l+lZnPUP05N9RCkLP4XsUuyY6Ca1WLTiPIgaq2fR8Y0JX/kesZcGOqlde66pN+xJIHHYadDoopOgqi6SLNfAzJu/HEu/fnSujG4nhF0ZGlOpVUx4fg33NwZ4wVl0XBk3GrOjbbAih9ozAwfNzxb57amtxEJk+pW+co3uEHLJIOPdih9SHzn/UVU4hiu8rSQR19sDAppkfdWcfaDLF9tnQJPWSYoCh0USgCc8QIDAQABoAAwDQYJKoZIhvcNAQEFBQADggEBAGiVhyMAZuHSv9yA08kJCmrgO89yRlnDUXDDo6IrODVKx4hHTiOanOPu1nsThSvH7xV4xR35T/QV0U3yPrL6bJbbwMySOLIRTjsUcwZNjOE1xMM5EkBM2BOI5rs4l59gFhHVejhG1LyyUDL0U82wsSLMqLFH1IT63tzwVmRiIXmAu/lHYci3+vctb+sopnN1lY1OIuj+EgqWNrRBNnKXLTdXkzhELOd8vZEqSAfBWyjZ2mECzC7SG3evqkw/OGLkAilNXHayiGjeY+UfWzF/HBSekSJtQu6hIv6JpBSY/MnYU4tllExqD+GX3lru4xc4zDas2rS/Pbpn73Lf503nmsw=-----END CERTIFICATE REQUEST-----List of CertificatesName Common Name Issued By Status Remaining--------- ------------------- -------------------- ------------- ---------example.c example.com example.com Valid 3649 dayspartner.c brutus.partner.com brutus.partner.com Valid 30 daysDemo Cisco Appliance Demo Cisco Appliance Demo Active 3467 daysChoose the operation you want to perform:- IMPORT - Import a certificate from a local PKCS#12 file- PASTE - Paste a certificate into the CLI- NEW - Create a self-signed certificate and CSR- EDIT - Update certificate or view the signing request- EXPORT - Export a certificate- DELETE - Remove a certificate
CLI Reference Guide 91
The Commands: Reference Examplescertconfig

- PRINT - View certificates assigned to services[]>
Example - Create a Self-signed S/MIME Signing CertificateThe following example shows how to create a self-signed S/MIME certificate for signing messages.
vm10esa0031.qa> certconfigChoose the operation you want to perform:- CERTIFICATE - Import, Create a request, Edit or Remove Certificate Profiles- CERTAUTHORITY - Manage System and Customized Authorities- CRL - Manage Certificate Revocation Lists[]> certificateList of CertificatesName Common Name Issued By Status Remaining--------- -------------------- -------------------- ------------- ---------Demo Cisco Appliance Demo Cisco Appliance Demo Active 3329 daysChoose the operation you want to perform:- IMPORT - Import a certificate from a local PKCS#12 file- PASTE - Paste a certificate into the CLI- NEW - Create a self-signed certificate and CSR- PRINT - View certificates assigned to services[]> new1. Create a self-signed certificate and CSR2. Create a self-signed SMIME certificate and CSR[1]> 2Enter a name for this certificate profile:> smime_signingEnter Common Name:> CNEnter Organization:> ORGEnter Organizational Unit:> OUEnter Locality or City:> BNEnter State or Province:> KAEnter Country (2 letter code):> INDuration before expiration (in days):[3650]>1. 10242. 2048Enter size of private key:[2]>Enter email address for 'subjectAltName' extension:[]> [email protected] another member? [Y]> nBegin entering domain entries for 'subjectAltName'.Enter the DNS you want to add.[]> domain.comAdd another member? [Y]> nDo you want to view the CSR? [Y]> nList of CertificatesName Common Name Issued By Status Remaining--------- -------------------- -------------------- ------------- ---------smime_sig CN CN Valid 3649 daysDemo Cisco Appliance Demo Cisco Appliance Demo Active 3329 daysChoose the operation you want to perform:- IMPORT - Import a certificate from a local PKCS#12 file- PASTE - Paste a certificate into the CLI- NEW - Create a self-signed certificate and CSR- EDIT - Update certificate or view the signing request- EXPORT - Export a certificate- DELETE - Remove a certificate- PRINT - View certificates assigned to services[]>
CLI Reference Guide92
The Commands: Reference Examplescertconfig

date
DescriptionDisplays the current date and time
UsageCommit: This command does not require a ‘commit’.Cluster Management: This command can be used in all three machine modes (cluster, group, machine).
Batch Command: This command does not support a batch format.
Example
mail.example.com> dateTue Mar 10 11:30:21 2015 GMT
diagnostic
DescriptionUse the diagnostic command to:
• Troubleshoot hardware and network issues using various utilities
• Check the RAID status
• Display ARP cache
• Clear LDAP, DNS, and ARP caches
• Send SMTP test messages
Using the diagnostic CommandThe following commands are available within the diagnostic submenu:
Table 6: diagnostic Subcommands
AvailabilitySub CommandsOption
Available on C30 and C60 only.1. Run disk verifyRAID
2. Monitor tasks in progress
3. Display disk verify verdict
CLI Reference Guide 93
The Commands: Reference Examplesdate

AvailabilitySub CommandsOption
This command has been deprecated. Instead,use the diskquotaconfig command.
No Sub CommandsDISK_USAGE(deprecated)
C-, X-, and M-SeriesFLUSHNETWORK
ARPSHOW
SMTPPING
TCPDUMP
C-, X-, and M-SeriesDELETEDBREPORTING
DISABLE
C-, X-, and M-SeriesDELETEDBTRACKING
DEBUG
C-, X-, and M-SeriesNo Sub CommandsRELOAD
UsageCommit: This command does not require a ‘commit’.Cluster Management: This command is restricted to machine mode. It is further restricted to the login host(i.e., the specific machine you are logged onto). This command requires access to the local file system.
Batch Command: This command supports a batch format.
Batch FormatThe batch format of the diagnostic command can be used to check RAID status, clear caches and show thecontents of the ARP cache. To invoke as a batch command, use the following formats:
Use the batch format to perform the following operations:
• Check the RAID status
diagnostic raid
• Show the contents of the ARP cache
diagnostic network arpshow
CLI Reference Guide94
The Commands: Reference Examplesdiagnostic

• Show the contents of the NDP cache
diagnostic network ndpshow
• Clear the LDAP, DNS, ARP and NDP caches
diagnostic network flush
• Reset and delete the reporting database
diagnostic reporting deletedb
• Enable reporting daemons
diagnostic reporting enable
• Disable reporting daemons
diagnostic reporting disable
• Reset and delete the tracking database
diagnostic tracking deletedb
• Reset configuration to the initial manufacturer values
diagnostic reload
Example: Displaying and Clearing CachesThe following example shows the diagnostic command used to display the contents of the ARP cache and toflush all network related caches.
mail.example.com> diagnosticChoose the operation you want to perform:- RAID - Disk Verify Utility.- DISK_USAGE - Check Disk Usage.- NETWORK - Network Utilities.- REPORTING - Reporting Utilities.- TRACKING - Tracking Utilities.- RELOAD - Reset configuration to the initial manufacturer values.[]> network
CLI Reference Guide 95
The Commands: Reference Examplesdiagnostic

Choose the operation you want to perform:- FLUSH - Flush all network related caches.- ARPSHOW - Show system ARP cache.- NDPSHOW - Show system NDP cache.- SMTPPING - Test a remote SMTP server.- TCPDUMP - Dump ethernet packets.[]> arpshowSystem ARP cache contents:(10.76.69.3) at 00:1e:bd:28:97:00 on em0 expires in 1193 seconds [ethernet](10.76.69.2) at 00:1e:79:af:f4:00 on em0 expires in 1192 seconds [ethernet](10.76.69.1) at 00:00:0c:9f:f0:01 on em0 expires in 687 seconds [ethernet](10.76.69.149) at 00:50:56:b2:0e:2b on em0 permanent [ethernet]Choose the operation you want to perform:- FLUSH - Flush all network related caches.- ARPSHOW - Show system ARP cache.- NDPSHOW - Show system NDP cache.- SMTPPING - Test a remote SMTP server.- TCPDUMP - Dump ethernet packets.[]> flushFlushing LDAP cache.Flushing DNS cache.Flushing system ARP cache.10.76.69.3 (10.76.69.3) deleted10.76.69.2 (10.76.69.2) deleted10.76.69.1 (10.76.69.1) deleted10.76.69.149 (10.76.69.149) deletedFlushing system NDP cache.fe80::250:56ff:feb2:e2d%em2 (fe80::250:56ff:feb2:e2d%em2) deletedfe80::250:56ff:feb2:e2c%em1 (fe80::250:56ff:feb2:e2c%em1) deletedfe80::250:56ff:feb2:e2b%em0 (fe80::250:56ff:feb2:e2b%em0) deletedNetwork reset complete.
Example: Verify Connectivity to Another Mail ServerThe following example shows diagnostics used to check connectivity to another mail server. You can test themail server by sending a message or pinging the server.
mail.example.com> diagnosticChoose the operation you want to perform:- RAID - Disk Verify Utility.- NETWORK - Network Utilities.- REPORTING - Reporting Utilities.- TRACKING - Tracking Utilities.- RELOAD - Reset configuration to the initial manufacturer values.[]> networkChoose the operation you want to perform:- FLUSH - Flush all network related caches.- ARPSHOW - Show system ARP cache.- NDPSHOW - Show system NDP cache.- SMTPPING - Test a remote SMTP server.- TCPDUMP - Dump ethernet packets.[]> smtppingEnter the hostname or IP address of the SMTP server:[mail.example.com]> mail.comThe domain you entered has MX records.Would you like to select an MX host to test instead? [Y]> ySelect an MX host to test.1. mx00.gmx.com2. mx01.gmx.com[1]>Select a network interface to use for the test.1. Management2. auto[2]> 1Do you want to type in a test message to send? If not, the connection will be tested butno email will be sent. [N]>Starting SMTP test of host mx00.gmx.com.Resolved 'mx00.gmx.com' to 74.208.5.4.Unable to connect to 74.208.5.4.
CLI Reference Guide96
The Commands: Reference Examplesdiagnostic

Example: Reset Appliance Configuration to the Initial Manufacturer ValuesThe following example shows how to reset your appliance configuration to the initial manufacturer values.
mail.example.com> diagnosticChoose the operation you want to perform:- RAID - Disk Verify Utility.- NETWORK - Network Utilities.- REPORTING - Reporting Utilities.- TRACKING - Tracking Utilities.- RELOAD - Reset configuration to the initial manufacturer values.[]> reloadThis command will remove all user settings and reset the entire device.If this is a Virtual Appliance, all feature keys will be removed,and the license must be reapplied.Are you sure you want to continue? [N]> YAre you *really* sure you want to continue? [N]> YDo you want to wipe also? [N]> Y
diskquotaconfigView or configure disk space allocation for reporting and tracking, quarantines, log files, packet captures, andconfiguration files.
SeeUser Guide for AsyncOS for Cisco Email Security Appliances for complete information about this feature.
UsageCommit: This command requires a ‘commit’.Cluster Management: This command is restricted to machine mode.
Batch Command: This command supports a batch format.
Batch Formatdiskquotaconfig <feature> <quota> [<feature> <quota> [<feature> <quota>[<feature> <quota>]]]
Valid values for <feature> are euq , pvo , tracking , reporting
Valid values for <quota> are integers.
Example
mail.example.com> diskquotaconfigService Disk Usage(GB) Quota(GB)---------------------------------------------------------------------------Spam Quarantine (EUQ) 1 1Policy, Virus & Outbreak Quarantines 1 3Reporting 5 10Tracking 1 10Miscellaneous Files 5 30
System Files Usage : 5 GBUser Files Usage : 0 GB
Total 13 54 of 143Choose the operation you want to perform:- EDIT - Edit disk quotas[]> edit
CLI Reference Guide 97
The Commands: Reference Examplesdiskquotaconfig

Enter the number of the service for which you would like to edit disk quota:1. Spam Quarantine (EUQ)2. Policy, Virus & Outbreak Quarantines3. Reporting4. Tracking5. Miscellaneous Files[1]> 1Enter the new disk quota -[1]> 1Disk quota for Spam Quarantine (EUQ) changed to 1
Service Disk Usage(GB) Quota(GB)---------------------------------------------------------------------------Spam Quarantine (EUQ) 1 1Policy, Virus & Outbreak Quarantines 1 3Reporting 5 10Tracking 1 10Miscellaneous Files 5 30
System Files Usage : 5 GBUser Files Usage : 0 GB
Total 13 54 of 143Choose the operation you want to perform:- EDIT - Edit disk quotas[]>
ecconfigSet or clear the enrollment client that is used to obtain certificates for use with the URL Filtering feature.
Do not use this command without guidance from Cisco support.
Entries must be in the format <hostname:port> or <IPv4 address:port> . Port is optional.
To specify the default server, enter ecconfig server default .
UsageCommit: This command requires a ‘commit’.Cluster Management: This command can be used at all levels in a cluster.
Batch Command: This command supports a batch format.
Batch Format• To specify a non-default enrollment client server:
> ecconfig server <server_name:port>To use the default enrollment client server:
> ecconfig server default
Example
mail.example.com> ecconfigEnrollment Server: Not Configured (Use Default)Choose the operation you want to perform:- SETUP - Configure the Enrollment Server[]> setupDo you want to use non-default Enrollment server?
CLI Reference Guide98
The Commands: Reference Examplesecconfig

WARNING: Do not configure this option without the assistance of Cisco Support.Incorrect configuration can impact the services using certificates from the Enrollmentserver. [N]> y[]> 192.0.2.1Choose the operation you want to perform:- SETUP - Configure the Enrollment Server[]>
ecstatusDisplay the current version of the enrollment client that is used to automatically obtain certificates for usewith the URL Filtering feature.
UsageCommit: This command does not require a ‘commit’.Cluster Management: This command is restricted to machine mode.
Batch Command: This command does not support a batch format.
Example
mail.example.com> ecstatusComponent Version Last UpdatedEnrollment Client 1.0.2-046 Never updated
ecupdateManually update the enrollment client that is used to automatically obtain certificates for use with the URLFiltering feature. Normally, these updates occur automatically. Do not use this command without guidancefrom Cisco support.
If you use the force parameter (ecupdate [force]) the client is updated even if no changes are detected.
UsageCommit: This command does not require a ‘commit’.Cluster Management: This command is restricted to machine mode.
Batch Command: This command supports a batch format.
Batch Format
> ecupdate [force]
Example
mail.example.com> ecupdateRequesting update of Enrollment Client.
CLI Reference Guide 99
The Commands: Reference Examplesecstatus

encryptionconfigConfigure email encryption.
UsageCommit: This command requires a ‘commit’.Cluster Management: This command is restricted to machine mode.
Batch Command: This command does not support a batch format
ExampleThe following example shows modifications to an encryption profile:
mail.example.com> encryptionconfigIronPort Email Encryption: EnabledChoose the operation you want to perform:- SETUP - Enable/Disable IronPort Email Encryption- PROFILES - Configure email encryption profiles- PROVISION - Provision with the Cisco Registered Envelope Service[]> setupPXE Email Encryption: EnabledWould you like to use PXE Email Encryption? [Y]>WARNING: Increasing the default maximum message size(10MB) may result indecreased performance. Please consult documentation for size recommendationsbased on your environment.Maximum message size for encryption: (Add a trailing K for kilobytes, M formegabytes, or no letters for bytes.)[10M]>Enter the email address of the encryption account administrator[[email protected]]>IronPort Email Encryption: EnabledChoose the operation you want to perform:- SETUP - Enable/Disable IronPort Email Encryption- PROFILES - Configure email encryption profiles- PROVISION - Provision with the Cisco Registered Envelope Service[]> profilesProxy: Not ConfiguredProfile Name Key Service Proxied Provision Status------------ ----------- ------- ----------------HIPAA Hosted Service No Not ProvisionedChoose the operation you want to perform:- NEW - Create a new encryption profile- EDIT - Edit an existing encryption profile- DELETE - Delete an encryption profile- PRINT - Print all configuration profiles- CLEAR - Clear all configuration profiles- PROXY - Configure a key server proxy[]> edit1. HIPAASelect the profile you wish to edit:[1]> 1Profile name: HIPAAExternal URL: https://res.cisco.comEncryption algorithm: ARC4Payload Transport URL: http://res.cisco.comEnvelope Security: High SecurityReturn receipts enabled: YesSecure Forward enabled: NoSecure Reply All enabled: NoSuppress Applet: NoURL associated with logo image: <undefined>
CLI Reference Guide100
The Commands: Reference Examplesencryptionconfig

Encryption queue timeout: 14400Failure notification subject: [ENCRYPTION FAILURE]Failure notification template: System GeneratedFilename for the envelope: securedoc_${date}T${time}.htmlUse Localized Envelope: NoText notification template: System GeneratedHTML notification template: System GeneratedChoose the operation you want to perform:- NAME - Change profile name- EXTERNAL - Change external URL- ALGORITHM - Change encryption algorithm- PAYLOAD - Change the payload transport URL- SECURITY - Change envelope security- RECEIPT - Change return receipt handling- FORWARD - Change "Secure Forward" setting- REPLYALL - Change "Secure Reply All" setting- LOCALIZED_ENVELOPE - Enable or disable display of envelopes in languagesother than English- APPLET - Change applet suppression setting- URL - Change URL associated with logo image- TIMEOUT - Change maximum time message waits in encryption queue- BOUNCE_SUBJECT - Change failure notification subject- FILENAME - Change the file name of the envelope attached to the encryptionnotification.[]> security1. High Security (Recipient must enter a passphrase to open the encryptedmessage, even if credentials are cached ("Remember Me" selected).)2. Medium Security (No passphrase entry required if recipient credentials arecached ("Remember Me" selected).)3. No passphrase Required (The recipient does not need a passphrase to open theencrypted message.)Please enter the envelope security level:[1]> 1Profile name: HIPAAExternal URL: https://res.cisco.comEncryption algorithm: ARC4Payload Transport URL: http://res.cisco.comEnvelope Security: High SecurityReturn receipts enabled: YesSecure Forward enabled: NoSecure Reply All enabled: NoSuppress Applet: NoURL associated with logo image: <undefined>Encryption queue timeout: 14400Failure notification subject: [ENCRYPTION FAILURE]Failure notification template: System GeneratedFilename for the envelope: securedoc_${date}T${time}.htmlUse Localized Envelope: NoText notification template: System GeneratedHTML notification template: System GeneratedChoose the operation you want to perform:- NAME - Change profile name- EXTERNAL - Change external URL- ALGORITHM - Change encryption algorithm- PAYLOAD - Change the payload transport URL- SECURITY - Change envelope security- RECEIPT - Change return receipt handling- FORWARD - Change "Secure Forward" setting- REPLYALL - Change "Secure Reply All" setting- LOCALIZED_ENVELOPE - Enable or disable display of envelopes in languagesother than English- APPLET - Change applet suppression setting- URL - Change URL associated with logo image- TIMEOUT - Change maximum time message waits in encryption queue- BOUNCE_SUBJECT - Change failure notification subject- FILENAME - Change the file name of the envelope attached to the encryptionnotification.[]> forwardWould you like to enable "Secure Forward"? [N]> yProfile name: HIPAAExternal URL: https://res.cisco.comEncryption algorithm: ARC4Payload Transport URL: http://res.cisco.com
CLI Reference Guide 101
The Commands: Reference Examplesencryptionconfig

Envelope Security: High SecurityReturn receipts enabled: YesSecure Forward enabled: YesSecure Reply All enabled: NoSuppress Applet: NoURL associated with logo image: <undefined>Encryption queue timeout: 14400Failure notification subject: [ENCRYPTION FAILURE]Failure notification template: System GeneratedFilename for the envelope: securedoc_${date}T${time}.htmlUse Localized Envelope: NoText notification template: System GeneratedHTML notification template: System GeneratedChoose the operation you want to perform:- NAME - Change profile name- EXTERNAL - Change external URL- ALGORITHM - Change encryption algorithm- PAYLOAD - Change the payload transport URL- SECURITY - Change envelope security- RECEIPT - Change return receipt handling- FORWARD - Change "Secure Forward" setting- REPLYALL - Change "Secure Reply All" setting- LOCALIZED_ENVELOPE - Enable or disable display of envelopes in languagesother than English- APPLET - Change applet suppression setting- URL - Change URL associated with logo image- TIMEOUT - Change maximum time message waits in encryption queue- BOUNCE_SUBJECT - Change failure notification subject- FILENAME - Change the file name of the envelope attached to the encryptionnotification.[]>Proxy: Not ConfiguredProfile Name Key Service Proxied Provision Status------------ ----------- ------- ----------------HIPAA Hosted Service No Not ProvisionedChoose the operation you want to perform:- NEW - Create a new encryption profile- EDIT - Edit an existing encryption profile- DELETE - Delete an encryption profile- PRINT - Print all configuration profiles- CLEAR - Clear all configuration profiles- PROXY - Configure a key server proxy[]>IronPort Email Encryption: EnabledChoose the operation you want to perform:- SETUP - Enable/Disable IronPort Email Encryption- PROFILES - Configure email encryption profiles- PROVISION - Provision with the Cisco Registered Envelope Service[]>
encryptionstatus
DescriptionThe encryptionstatus command shows the version of the PXE Engine and DomainMappings file on the EmailSecurity appliance, as well as the date and time the components were last updated.
UsageCommit: This command does not require a ‘commit’.Cluster Management: This command is restricted to machine mode.
Batch Command: This command does not support a batch format.
CLI Reference Guide102
The Commands: Reference Examplesencryptionstatus

Example
mail3.example.com> encryptionstatusComponent Version Last UpdatedPXE Engine 6.7.1 17 Nov 2009 00:09 (GMT)Domain Mappings File 1.0.0 Never updated
encryptionupdate
DescriptionThe encryptionupdate command requests an update to the PXE Engine on the Email Security appliance.
UsageCommit: This command does not require a ‘commit’.Cluster Management: This command is restricted to machine mode. It is further restricted to the login host(i.e., the specific machine you are logged onto).
Batch Command: This command does not support a batch format.
Example
mail3.example.com> encryptionupdateRequesting update of PXE Engine.
enginestatus
DescriptionThe enginestatus command is used to display the status and CPU usage of various engines enabled on theappliance.
UsageCommit: This command does not requires a ‘commit’.Cluster Management: This command can be used in all three machine modes (cluster, group, machine).
Batch Command: This command supports a batch format. For more details, see the inline help by typing thecommand: help enginestatus.
CLI Reference Guide 103
The Commands: Reference Examplesencryptionupdate

ExampleThe following example shows how to view the status and CPU usage of all engines enabled on the appliance:
vm30esa0086.ibqa> enginestatusChoose the operation you want to perform:- GRAYMAIL - View Graymail engine status- SOPHOS - View Sophos engine status- CASE - View CASE engine status- AMP - View AMP engine status- MCAFEE - View McAfee engine status- ALL - View status of All engines[]> ALLCASE Status: UP CPU: 0.0%Component Version Last UpdatedCASE Core Files 3.5.0-008 Never updatedCASE Utilities 3.5.0-008 Never updatedStructural Rules 3.3.1-009-20141210_214201 Never updatedWeb Reputation DB 20141211_111021 Never updatedWeb Reputation Rules 20141211_111021-20141211_170330 Never updatedContent Rules unavailable Never updatedContent Rules Update unavailable Never updatedSOPHOS Status: UP CPU: 0.0%Component Version Last UpdatedSophos Anti-Virus Engine 3.2.07.365.2_5.30 Never updatedSophos IDE Rules 0 Never updatedGRAYMAIL Status: UP CPU: 0.0%Component Version Last UpdatedGraymail Engine 01-392.68 N10 Nov 2016 07:08 (GMT+00:00) updatedGraymail Rules 01-392.68#121 Never updatedGraymail Tools 1.0.03 Never updatedMCAFEE Status: UP CPU: 0.0%Component Version Last UpdatedMcAfee Engine 5700 Never updatedMcAfee DATs 7437 Never updatedAMP Status: UP CPU: 0.0%Component Version Last UpdatedAMP Client Settings 1.0 Never updatedAMP Client Engine 1.0 Never updated
featurekey
DescriptionThe featurekey command lists all functionality enabled by keys on the system and information related to thekeys. It also allows you to activate features using a key or check for new feature keys.
For virtual appliances, see also loadlicense, on page 285 and showlicense , on page 285.
UsageCommit: This command requires a ‘commit’.Cluster Management: This command is restricted to machine mode.
Batch Command: This command does not support a batch format
CLI Reference Guide104
The Commands: Reference Examplesfeaturekey

ExampleIn this example, the featurekey command is used to check for new feature keys.
mail3.example.com> featurekeyModule Quantity Status Remaining Expiration DateOutbreak Filters 1 Active 28 days Tue Feb 25 06:40:532014IronPort Anti-Spam 1 Dormant 30 days Wed Feb 26 07:56:572014Sophos Anti-Virus 1 Active 26 days Sun Feb 23 02:27:482014Bounce Verification 1 Dormant 30 days Wed Feb 26 07:56:572014Incoming Mail Handling 1 Active 20 days Sun Feb 16 08:55:582014IronPort Email Encryption 1 Dormant 30 days Wed Feb 26 07:56:572014RSA Email Data Loss Prevention 1 Active 25 days Fri Feb 21 10:07:102014McAfee 1 Dormant 30 days Wed Feb 26 07:56:572014Choose the operation you want to perform:- ACTIVATE - Activate a (pending) key.- CHECKNOW - Check now for new feature keys.[]> checknowNo new feature keys are available.
featurekeyconfig
DescriptionThe featurekeyconfig command allows you to configure the machine to automatically download availablekeys and update the keys on the machine.
UsageCommit: This command requires a ‘commit’.Cluster Management: This command can be used in all three machine modes (cluster, group, machine.
Batch Command: This command does not support a batch format.
ExampleIn this example, the featurekeyconfig command is used to enable the autoactivate and autocheck features.
mail3.example.com> featurekeyconfigAutomatic activation of downloaded keys: DisabledAutomatic periodic checking for new feature keys: DisabledChoose the operation you want to perform:- SETUP - Edit feature key configuration.[]> setupAutomatic activation of downloaded keys: DisabledAutomatic periodic checking for new feature keys: DisabledChoose the operation you want to perform:- AUTOACTIVATE - Toggle automatic activation of downloaded keys.- AUTOCHECK - Toggle automatic checking for new feature keys.
CLI Reference Guide 105
The Commands: Reference Examplesfeaturekeyconfig

[]> autoactivateDo you want to automatically apply downloaded feature keys? [N]> yAutomatic activation of downloaded keys: EnabledAutomatic periodic checking for new feature keys: DisabledChoose the operation you want to perform:- AUTOACTIVATE - Toggle automatic activation of downloaded keys.- AUTOCHECK - Toggle automatic checking for new feature keys.[]> autocheckDo you want to periodically query for new feature keys? [N]> yAutomatic activation of downloaded keys: EnabledAutomatic periodic checking for new feature keys: Enabled
generalconfig
DescriptionThe generalconfig command allows you to configure browser settings.
UsageCommit: This command requires ‘commit’.Cluster Management: This command can be used in all three machine modes (cluster, group, machine).
Batch Command: This command supports a batch format. For details, see the inline help by typing thecommand: help generalconfig .
Example - Configure Internet Explorer Compatibility Mode OverrideThe following example shows how to override IE Compatibility Mode.
mail.example.com> generalconfigChoose the operation you want to perform:- IEOVERRIDE - Configure Internet Explorer Compatibility Mode Override[]> ieoverride
For better web interface rendering, we recommend that you enable InternetExplorer Compatibility Mode Override. However, if enabling this featureis against your organizational policy, you may disable this feature.Internet Explorer Compatibility Mode Override is currently disabled.
Would you like to enable Internet Explorer Compatibility Mode Override? [N]yChoose the operation you want to perform:- IEOVERRIDE - Configure Internet Explorer Compatibility Mode Override[]>
healthcheck
DescriptionChecks the health of your Email Security appliance. Health check analyzes historical data (up to three months)in the current Status Logs to determine the health of the appliance.
CLI Reference Guide106
The Commands: Reference Examplesgeneralconfig

UsageCommit: This command does not require a ‘commit’.Cluster Management: This command can be used in all three machine modes (cluster, group, machine).
Batch Command: This command does not support a batch format.
Example
mail.example.com> healthcheckAnalyzing the system to determine current health of the system.The analysis may take a while, depending on the size of the historical data.System analysis is complete.The analysis indicates that the system has experienced the following issue(s)recently:Entered Resource conservation modeDelay in mail processingHigh CPU usageHigh memory usageBased on this analysis,we recommend you to contact Cisco Customer Support before upgrading.
healthconfig
DescriptionConfigure the threshold of various health parameters of your appliance such as CPU usage, maximummessagesin work queue and so on
UsageCommit: This command requires ‘commit’.Cluster Management: This command can be used in all three machine modes (cluster, group, machine).
Batch Command: This command does not support a batch format.
Example
mail.example.com> healthconfigChoose the operation you want to perform:- WORKQUEUE - View and edit workqueue-health configuration.- CPU - View and edit CPU-health configuration.- SWAP - View and edit swap-health configuration.[]> workqueueNumber of messages in the workqueue : 0Current threshold on the workqueue size : 500Alert when exceeds threshold : DisabledDo you want to edit the settings? [N]> yPlease enter the threshold value for number of messages in work queue.[500]> 550Do you want to receive alerts if the number of messages in work queue exceedsthreshold value? [N]> nChoose the operation you want to perform:- WORKQUEUE - View and edit workqueue-health configuration.- CPU - View and edit CPU-health configuration.
CLI Reference Guide 107
The Commands: Reference Exampleshealthconfig

- SWAP - View and edit swap-health configuration.[]> cpuOverall CPU usage : 0 %Current threshold on the overall CPU usage: 85 %Alert when exceeds threshold : DisabledDo you want to edit the settings? [N]> yPlease enter the threshold value for overall CPU usage (in percent)[85]> 90Do you want to receive alerts if the overall CPU usage exceeds threshold value?[N]> nChoose the operation you want to perform:- WORKQUEUE - View and edit workqueue-health configuration.- CPU - View and edit CPU-health configuration.- SWAP - View and edit swap-health configuration.[]> swapNumber of pages swapped from memory in a minute : 0Current threshold on the number of pages swapped from memory per minute : 5000Alert when exceeds threshold : DisabledDo you want to edit the settings? [N]> yPlease enter the threshold value for number of pages swapped from memory in aminute.[5000]> 5500Do you want to receive alerts if number of pages swapped from memory in aminute exceeds the threshold? [N]> nChoose the operation you want to perform:- WORKQUEUE - View and edit workqueue-health configuration.- CPU - View and edit CPU-health configuration.- SWAP - View and edit swap-health configuration.[]>
ntpconfig
DescriptionThe ntpconfig command configures AsyncOS to use Network Time Protocol (NTP) to synchronize the systemclock with other computers. NTP can be turned off using the settime command.
UsageCommit: This command requires ‘commit’.Cluster Management: This command can be used in all three machine modes (cluster, group, machine).
Batch Command: This command does not support a batch format.
Example
mail3.example.com>ntpconfigCurrently configured NTP servers:1. time.ironport.comChoose the operation you want to perform:- NEW - Add a server.- DELETE - Remove a server.- SOURCEINT - Set the interface from whose IP address NTP queries should originate.[]> newPlease enter the fully qualified hostname or IP address of your NTP server.[]> ntp.example.comCurrently configured NTP servers:1. time.ironport.com2. bitsy.mit.ediChoose the operation you want to perform:
CLI Reference Guide108
The Commands: Reference Examplesntpconfig

- NEW - Add a server.- DELETE - Remove a server.- SOURCEINT - Set the interface from whose IP address NTP queries shouldoriginate.[]> sourceint
When initiating a connection to an NTP server, the outbound IP addressused is chosen automatically.If you want to choose a specific outbound IP address,please selectits interface name now.1. Auto2. Management (172.19.0.11/24: elroy.run)3. PrivateNet (172.19.1.11/24: elroy.run)4. PublicNet (172.19.2.11/24: elroy.run)[1]> 1Currently configured NTP servers:1. time.ironport.com2. bitsy.mit.ediChoose the operation you want to perform:- NEW - Add a server.- DELETE - Remove a server.- SOURCEINT - Set the interface from whose IP address NTP queries should originate.[]>mail3.example.com> commitPlease enter some comments describing your changes:[]> Added new NTP serverDo you want to save the current configuration for rollback? [Y]> nChanges committed: Fri May 23 11:42:12 2014 GMT
portalregistrationconfigCisco Spam Submission Tracking Portal is a web-based tool that allows email administrators to track thespam submissions from their organization and to report new misclassified messages to Cisco. This portalrequires all your appliances to have a common registration ID.
Use the portalregistrationconfig command in CLI to set the registration ID. If your appliances are not part ofa cluster, you must set a common registration ID on all your appliances.
For more information about the portal, see Anti-Spam chapter in user guide or online help.
UsageCommit: This command requires ‘commit’.Cluster Management: This command can be used in all three machine modes (cluster, group, machine).
Batch Command: This command does not support a batch format.
Example
mail3.example.com> portalregistrationconfig
Choose the operation you want to perform:
- REGISTRATION_ID - Set up the Registration ID.[]> registration_idEnter the new value of the Registration ID.[]> registrationidexample1234
CLI Reference Guide 109
The Commands: Reference Examplesportalregistrationconfig

reboot
DescriptionRestart the appliance.
UsageCommit: This command does not require a ‘commit’.Cluster Management: This command is restricted to machine mode.
Batch Command: This command does not support a batch format.
Example
mail3.example.com> rebootEnter the number of seconds to wait before abruptly closing connections.[30]>Waiting for listeners to exit...Receiving suspended.Waiting for outgoing deliveries to finish...Mail delivery suspended.
repengstatus
DescriptionRequest version information of Reputation Engine.
UsageCommit: This command does not require a ‘commit’.Cluster Management: This command is restricted to machine mode.
Batch Command: This command does not support a batch format.
Example
mail.example.com> repengstatusComponent Last Update VersionReputation Engine 28 Jan 2014 23:47 (GMT +00:00) 1Reputation Engine Tools 28 Jan 2014 23:47 (GMT +00:00) 1
CLI Reference Guide110
The Commands: Reference Examplesreboot

resume
DescriptionResume receiving and deliveries
UsageCommit: This command does not require a ‘commit’.Cluster Management: This command is restricted to machine mode.
Batch Command: This command does not support a batch format.
Example
mail3.example.com> resumeReceiving resumed for Listener 1.Mail delivery resumed.Mail delivery for individually suspended domains must be resumed individually.
resumedel
DescriptionResume deliveries.
UsageCommit: This command does not require a ‘commit’.Cluster Management: This command is restricted to machine mode.
Batch Command: This command does not support a batch format.
Example
mail.example.com> resumedelCurrently suspended domains:1. domain1.com2. domain2.com3. domain3.comEnter one or more domains [comma-separated] to which you want to resume delivery.[ALL]> domain1.com, domain2.comMail delivery resumed.
CLI Reference Guide 111
The Commands: Reference Examplesresume

resumelistener
DescriptionResume receiving on a listener.
UsageCommit: This command does not require a ‘commit’.Cluster Management: This command is restricted to machine mode.
Batch Command: This command does not support a batch format.
Example
mail3.example.com> resumelistenerChoose the listener(s) you wish to resume.Separate multiple entries with commas.1. All2. InboundMail3. OutboundMail[1]> 1Receiving resumed.mail3.example.com>
revert
DescriptionRevert to a previous release.
UsageCommit: This command does not require a ‘commit’.Cluster Management: This command can be used in all three machine modes (cluster, group, machine).
Batch Command: This command does not support a batch format.
Example
mail.example.com> revertThis command will revert the appliance to a previous version of AsyncOS.WARNING: Reverting the appliance is extremely destructive.The following data will be destroyed in the process:- all configuration settings (including listeners)- all log files- all databases (including messages in Virus Outbreak and Policy quarantines)- all reporting data (including saved scheduled reports)
CLI Reference Guide112
The Commands: Reference Examplesresumelistener

- all message tracking data- all IronPort Spam Quarantine message and end-user safelist/blocklist dataOnly the network settings will be preserved.Before running this command, be sure you have:- saved the configuration file of this appliance (with passphrases unmasked)- exported the IronPort Spam Quarantine safelist/blocklist databaseto another machine (if applicable)
- waited for the mail queue to emptyReverting the device causes an immediate reboot to take place.After rebooting, the appliance reinitializes itself and rebootsagain to the desired version.
Available versions=================
1. 9.1.0-019Please select an AsyncOS version [1]:Do you want to continue? [N]>
settime
DescriptionThe settime command allows you to manually set the time if you are not using an NTP server. The commandasks you if you want to stop NTP and manually set the system clock. Enter the time is using this format:MM/DD/YYYY HH:MM:SS.
UsageCommit: This command does not require a ‘commit’.Cluster Management: This command is restricted to machine mode.
Batch Command: This command does not support a batch format.
Example
mail3.example.com> settimeWARNING: Changes to system time will take place immediatelyand do not require the user to run the commit command.Current time 09/23/2001 21:03:53.This machine is currently running NTP.In order to manually set the time, NTP must be disabled.Do you want to stop NTP and manually set the time? [N]> YPlease enter the time in MM/DD/YYYY HH:MM:SS format.[]> 09/23/2001 21:03:53Time set to 09/23/2001 21:03:53.
settz
DescriptionSet the local time zone.
CLI Reference Guide 113
The Commands: Reference Examplessettime

UsageCommit: This command requires a ‘commit’.Cluster Management: This command can be used in all three machine modes (cluster, group, machine).
Batch Command: This command does not support a batch format.
Example
mail3.example.com> settzCurrent time zone: Etc/GMTCurrent time zone version: 2010.02.0Choose the operation you want to perform:- SETUP - Set the local time zone.[]> setupPlease choose your continent:1. Africa2. America[ ... ]11. GMT Offset[2]> 2Please choose your country:1. Anguilla[ ... ]45. United States46. Uruguay47. Venezuela48. Virgin Islands (British)49. Virgin Islands (U.S.)[45]> 45Please choose your timezone:1. Alaska Time (Anchorage)2. Alaska Time - Alaska panhandle (Juneau)[ ... ]21. Pacific Time (Los_Angeles)[21]> 21Current time zone: America/Los_AngelesChoose the operation you want to perform:- SETUP - Set the local time zone.[]>
shutdown
DescriptionShut down the system to power off
UsageCommit: This command does not require a ‘commit’.Cluster Management: This command is restricted to machine mode.
Batch Command: This command does not support a batch format.
CLI Reference Guide114
The Commands: Reference Examplesshutdown

Example
mail.example.com> shutdownEnter the number of seconds to wait before forcibly closing connections.[30]>System shutting down. Please wait while the queue is being closed...Closing CLI connection.The system will power off automatically.Connection to mail.example.com closed.
sshconfig
DescriptionConfigure SSH server and user key settings.
UsageCommit: This command requires a ‘commit’.Cluster Management: This command is restricted to cluster mode.
Batch Command: This command does not support a batch format.
ExampleIn the following example, a new public key is installed for the administrator account:
mail.example.com> sshconfigChoose the operation you want to perform:- SSHD - Edit SSH server settings.- USERKEY - Edit SSH User Key settings[]> userkeyCurrently installed keys for admin:Choose the operation you want to perform:- NEW - Add a new key.- USER - Switch to a different user to edit.[]> newPlease enter the public SSH key for authorization.Press enter on a blank line to finish.[-paste public key for user authentication here-]Choose the operation you want to perform:- SSHD - Edit SSH server settings.- USERKEY - Edit SSH User Key settings[]>The following example shows how to edit the SSH server configuration.
mail.example.com> sshconfigChoose the operation you want to perform:- SSHD - Edit SSH server settings.- USERKEY - Edit SSH User Key settings[]> sshdssh server config settings:Public Key Authentication Algorithms:
rsa1ssh-dssssh-rsa
Cipher Algorithms:
CLI Reference Guide 115
The Commands: Reference Examplessshconfig

aes128-ctraes192-ctraes256-ctrarcfour256arcfour128aes128-cbc3des-cbcblowfish-cbccast128-cbcaes192-cbcaes256-cbcarcfourrijndael-cbc@lysator.liu.se
MAC Methods:[email protected]@openssh.comhmac-sha1-96hmac-md5-96
Minimum Server Key Size:1024
KEX Algorithms:diffie-hellman-group-exchange-sha256diffie-hellman-group-exchange-sha1diffie-hellman-group14-sha1diffie-hellman-group1-sha1
Choose the operation you want to perform:- SETUP - Setup SSH server configuration settings[]> setupEnter the Public Key Authentication Algorithms do you want to use[rsa1,ssh-dss,ssh-rsa]>Enter the Cipher Algorithms do you want to use[aes128-ctr,aes192-ctr,aes256-ctr,arcfour256,arcfour128,aes128-cbc,3des-cbc,blowfish-cbc,cast128-cbc,aes192-cbc,aes256-cbc,arcfour,[email protected]]>Enter the MAC Methods do you want to use[hmac-md5,hmac-sha1,[email protected],hmac-ripemd160,[email protected],hmac-sha1-96,hmac-md5-96]>Enter the Minimum Server Key Size do you want to use[1024]>Enter the KEX Algorithms do you want to use[diffie-hellman-group-exchange-sha256,diffie-hellman-group-exchange-sha1,diffie-hellman-group14-sha1,diffie-hellman-group1-sha1]>ssh server config settings:Public Key Authentication Algorithms:
rsa1ssh-dssssh-rsa
Cipher Algorithms:aes128-ctraes192-ctraes256-ctrarcfour256arcfour128aes128-cbc3des-cbcblowfish-cbccast128-cbcaes192-cbcaes256-cbcarcfourrijndael-cbc@lysator.liu.se
MAC Methods:[email protected]@openssh.comhmac-sha1-96hmac-md5-96
Minimum Server Key Size:1024
KEX Algorithms:diffie-hellman-group-exchange-sha256
CLI Reference Guide116
The Commands: Reference Examplessshconfig

diffie-hellman-group-exchange-sha1diffie-hellman-group14-sha1diffie-hellman-group1-sha1
Choose the operation you want to perform:- SETUP - Setup SSH server configuration settings[]>Choose the operation you want to perform:- SSHD - Edit SSH server settings.- USERKEY - Edit SSH User Key settings[]>
status
DescriptionShow system status.
UsageCommit: This command does not require a ‘commit’.Cluster Management: This command is restricted to machine mode.
Batch Command: This command does not support a batch format.
Example
mail3.example.com> status
Status as of: Thu Oct 21 14:33:27 2004 PDTUp since: Wed Oct 20 15:47:58 2004 PDT (22h 45m 29s)Last counter reset: NeverSystem status: OnlineOldest Message: 4 weeks 46 mins 53 secsFeature - McAfee: 161 days[....]Feature - Outbreak Filters: 161 daysCounters: Reset Uptime LifetimeReceivingMessages Received 62,049,822 290,920 62,049,822Recipients Received 62,049,823 290,920 62,049,823
RejectionRejected Recipients 3,949,663 11,921 3,949,663Dropped Messages 11,606,037 219 11,606,037
QueueSoft Bounced Events 2,334,552 13,598 2,334,552
CompletionCompleted Recipients 50,441,741 332,625 50,441,741
Current IDsMessage ID (MID) 99524480Injection Conn. ID (ICID) 51180368Delivery Conn. ID (DCID) 17550674
Gauges: CurrentConnectionsCurrent Inbound Conn. 0Current Outbound Conn. 14
QueueActive Recipients 1Messages In Work Queue 0Kilobytes Used 92Kilobytes Free 8,388,516
CLI Reference Guide 117
The Commands: Reference Examplesstatus

QuarantineMessages In QuarantinePolicy, Virus and Outbreak 0
Kilobytes In QuarantinePolicy, Virus and Outbreak 0
supportrequest
DescriptionSend a message to Cisco customer support. This command requires that the appliance is able to send mail tothe Internet. A trouble ticket is automatically created, or you can associate the support request with an existingtrouble ticket.
To access Cisco technical support directly from the appliance, your Cisco.com user ID must be associatedwith your service agreement contract for this appliance. To view a list of service contracts that are currentlyassociated with your Cisco.com profile, visit the Cisco.com Profile Manager athttps://sso.cisco.com/autho/forms/CDClogin.html . If you do not have a Cisco.com user ID, register to getone. See information about registering for an account in the online help or user guide for your release.
UsageCommit: This command does not require a ‘commit’.Cluster Management: This command is restricted to machine mode. It is further restricted to the login host(i.e., the specific machine you are logged onto). This command requires access to the local file system.
Batch Command: This command does not support a batch format.
ExampleThe following example shows a support request that is not related to an existing support ticket.
mail.example.com> supportrequestPlease Note:If you have an urgent issue, please call one of our worldwide Support Centers(www.cisco.com/support). Use this command to open a technical support requestfor issues that are not urgent, such as:- Request for information.- Problem for which you have a work-around, but would like an alternativesolution.Do you want to send the support request to [email protected]?[Y]>Do you want to send the support request to additional recipient(s)?[N]>Is this support request associated with an existing support ticket?[N]>Please select a technology related to this support request:1. Security - Email and Web2. Security - Management[1]> 1Please select a subtechnology related to this support request:1. Cisco Email Security Appliance (C1x0,C3x0, C6x0, X10x0) - MisclassifiedMessages2. Cisco Email Security Appliance (C1x0,C3x0, C6x0, X10x0) - SBRS3. Cisco Email Security Appliance (C1x0,C3x0, C6x0, X10x0) - Other4. Email Security Appliance - Virtual[1]> 3Please select the problem category:
CLI Reference Guide118
The Commands: Reference Examplessupportrequest

1. Upgrade2. Operate3. Configure4. Install[1]> 3Please select a problem sub-category:1. Error Messages, Logs, Debugs2. Software Failure3. Interoperability4. Configuration Assistance5. Install, Uninstall or Upgrade6. Hardware Failure7. Licensing8. Data Corruption9. Software Selection/Download Assistance10. Passphrase Recovery[1]> 5Please enter a subject line for this support request:[]> <Subject line for support request>Please enter a description of your issue, providing as much detail as possibleto aid in diagnosis:[]> <Description of issue>It is important to associate all your service contracts with your Cisco.com profile (CCOID) in order for you to receive completeaccess to support and services from Cisco. Please follow the URLs below to associate yourcontract coverage on your Cisco.com profile.If you do not have a CCO ID, please followthe URL below to create a CCO ID.How to create a CCO ID:https://tools.cisco.com/RPF/register/register.doHow to associate your CCO ID with contract:https://tools.cisco.com/RPFA/profile/profile_management.doFrequently Asked Question:http://www.cisco.com/web/ordering/cs_info/faqs/index.htmlSelect the CCOID1. New CCOID[1]>Please enter the CCOID of the contact person :[]> your nameThe CCO ID may contain alphabets, numbers and '@', '.', '-' and '_' symbols.Please enter the CCOID of the contact person :[]> [email protected] enter the name of the contact person :[]> yournamePlease enter your email address:[]> [email protected] enter the contract ID:[]> 1234Please enter any additional contact information (e.g. phone number):[]>Please wait while configuration information is generated...Do you want to print the support request to the screen?[N]>
supportrequeststatus
DescriptionDisplay Support Request Keywords version information for requesting support from Cisco TAC.
UsageCommit: This command does not require a ‘commit’.Cluster Management: This command can be used in all three machine modes (cluster, group, machine).
CLI Reference Guide 119
The Commands: Reference Examplessupportrequeststatus

Batch Command: This command does not support a batch format.
Example
mail.example.com> supportrequeststatusComponent Version Last UpdatedSupport Request 1.0 Never updated
supportrequestupdate
DescriptionRequest manual update of Support Request Keywords for requesting support from Cisco TAC.
UsageCommit: This command does not require a ‘commit’.Cluster Management: This command can be used in all three machine modes (cluster, group, machine).
Batch Command: This command does not support a batch format.
Example
mail.example.com> supportrequestupdateRequesting update of Support Request Keywords.
suspend
DescriptionSuspend receiving and deliveries
UsageCommit: This command does not require a ‘commit’.Cluster Management: This command is restricted to machine mode.
Batch Command: This command does not support a batch format.
Example
mail3.example.com> suspendEnter the number of seconds to wait before abruptly closing connections.[30]> 45
CLI Reference Guide120
The Commands: Reference Examplessupportrequestupdate

Waiting for listeners to exit...Receiving suspended for Listener 1.Waiting for outgoing deliveries to finish...Mail delivery suspended.mail3.example.com>
suspenddel
DescriptionSuspend deliveries
UsageCommit: This command does not require a ‘commit’.Cluster Management: This command is restricted to machine mode.
Batch Command: This command does not support a batch format.
Example
mail.example.com> suspenddelEnter the number of seconds to wait before abruptly closing connections.[30]>Enter one or more domains [comma-separated] to which you want to suspend delivery.[ALL]> domain1.com, domain2.com, domain3.comWaiting for outgoing deliveries to finish...Mail delivery suspended.
suspendlistener
DescriptionSuspend receiving.
UsageCommit: This command does not require a ‘commit’.Cluster Management: This command is restricted to machine mode.
Batch Command: This command does not support a batch format.
Example
mail3.example.com> suspendlistenerChoose the listener(s) you wish to suspend.Separate multiple entries with commas.1. All
CLI Reference Guide 121
The Commands: Reference Examplessuspenddel

2. InboundMail3. OutboundMail[1]> 1Enter the number of seconds to wait before abruptly closing connections.[30]>Waiting for listeners to exit...Receiving suspended.mail3.example.com>
tcpservices
DescriptionDisplay information about files opened by processes.
UsageCommit: This command does not require a ‘commit’.Cluster Management: This command is restricted to machine mode.
Batch Command: This command does not support a batch format.
Example
mail.cisco.com> tcpservicesSystem Processes (Note: All processes may not always be present)ftpd.main - The FTP daemonginetd - The INET daemoninterface - The interface controller for inter-process communicationipfw - The IP firewallslapd - The Standalone LDAP daemonsntpd - The SNTP daemonsshd - The SSH daemonsyslogd - The system logging daemonwinbindd - The Samba Name Service Switch daemon
Feature Processeseuq_webui - GUI for ISQgui - GUI processhermes - MGA mail serverpostgres - Process for storing and querying quarantine datasplunkd - Processes for storing and querying Email Tracking data
COMMAND USER TYPE NODE NAMEinterface root IPv4 TCP 127.0.0.1:53postgres pgsql IPv4 TCP 127.0.0.1:5432qabackdoo root IPv4 TCP *:8123ftpd.main root IPv4 TCP 10.1.1.0:21euq_webui root IPv4 TCP 10.1.1.0:83euq_webui root IPv6 TCP [2001:db8::]:83gui root IPv4 TCP 172.29.181.70:80gui root IPv4 TCP 10.1.1.0:80gui root IPv6 TCP [2001:db8::]:80gui root IPv4 TCP 172.29.181.70:443gui root IPv4 TCP 10.1.1.0:443gui root IPv6 TCP [2001:db8::]:443ginetd root IPv4 TCP 172.29.181.70:22ginetd root IPv4 TCP 10.1.1.0:22ginetd root IPv6 TCP [2001:db8::]:22ginetd root IPv4 TCP 10.1.1.0:2222ginetd root IPv6 TCP [2001:db8::]:2222hermes root IPv4 TCP 172.29.181.70:25
CLI Reference Guide122
The Commands: Reference Examplestcpservices
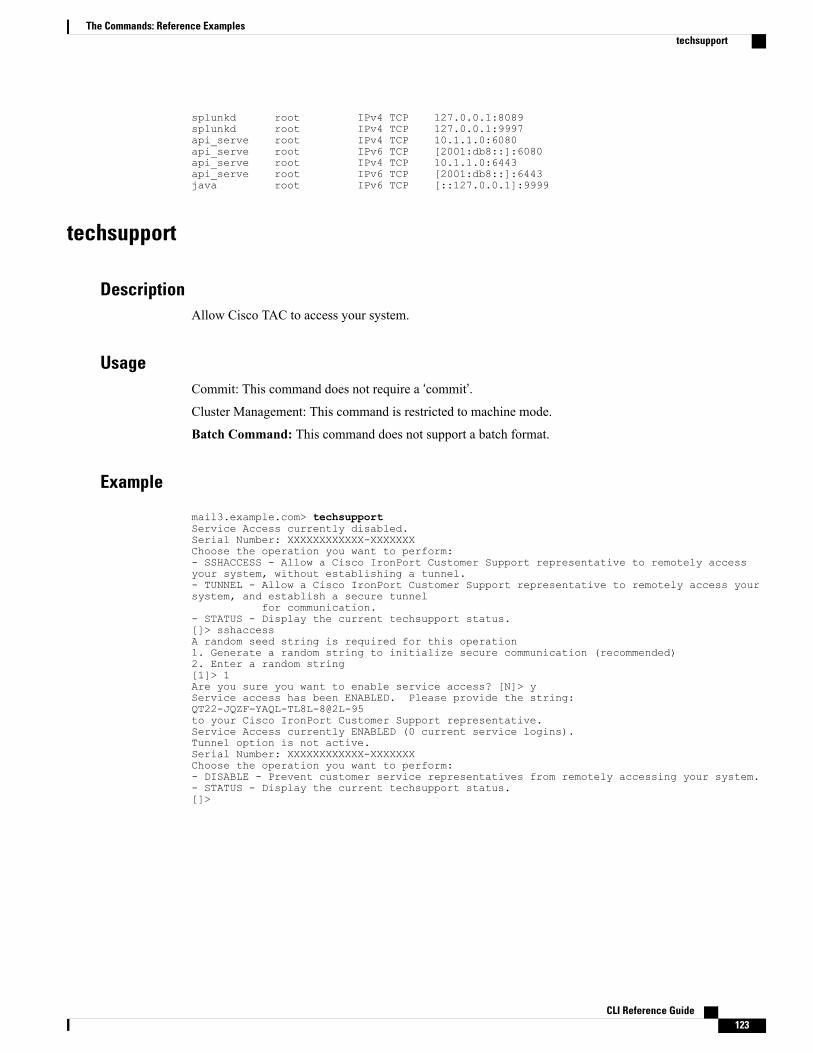
splunkd root IPv4 TCP 127.0.0.1:8089splunkd root IPv4 TCP 127.0.0.1:9997api_serve root IPv4 TCP 10.1.1.0:6080api_serve root IPv6 TCP [2001:db8::]:6080api_serve root IPv4 TCP 10.1.1.0:6443api_serve root IPv6 TCP [2001:db8::]:6443java root IPv6 TCP [::127.0.0.1]:9999
techsupport
DescriptionAllow Cisco TAC to access your system.
UsageCommit: This command does not require a ‘commit’.Cluster Management: This command is restricted to machine mode.
Batch Command: This command does not support a batch format.
Example
mail3.example.com> techsupportService Access currently disabled.Serial Number: XXXXXXXXXXXX-XXXXXXXChoose the operation you want to perform:- SSHACCESS - Allow a Cisco IronPort Customer Support representative to remotely accessyour system, without establishing a tunnel.- TUNNEL - Allow a Cisco IronPort Customer Support representative to remotely access yoursystem, and establish a secure tunnel
for communication.- STATUS - Display the current techsupport status.[]> sshaccessA random seed string is required for this operation1. Generate a random string to initialize secure communication (recommended)2. Enter a random string[1]> 1Are you sure you want to enable service access? [N]> yService access has been ENABLED. Please provide the string:QT22-JQZF-YAQL-TL8L-8@2L-95to your Cisco IronPort Customer Support representative.Service Access currently ENABLED (0 current service logins).Tunnel option is not active.Serial Number: XXXXXXXXXXXX-XXXXXXXChoose the operation you want to perform:- DISABLE - Prevent customer service representatives from remotely accessing your system.- STATUS - Display the current techsupport status.[]>
CLI Reference Guide 123
The Commands: Reference Examplestechsupport
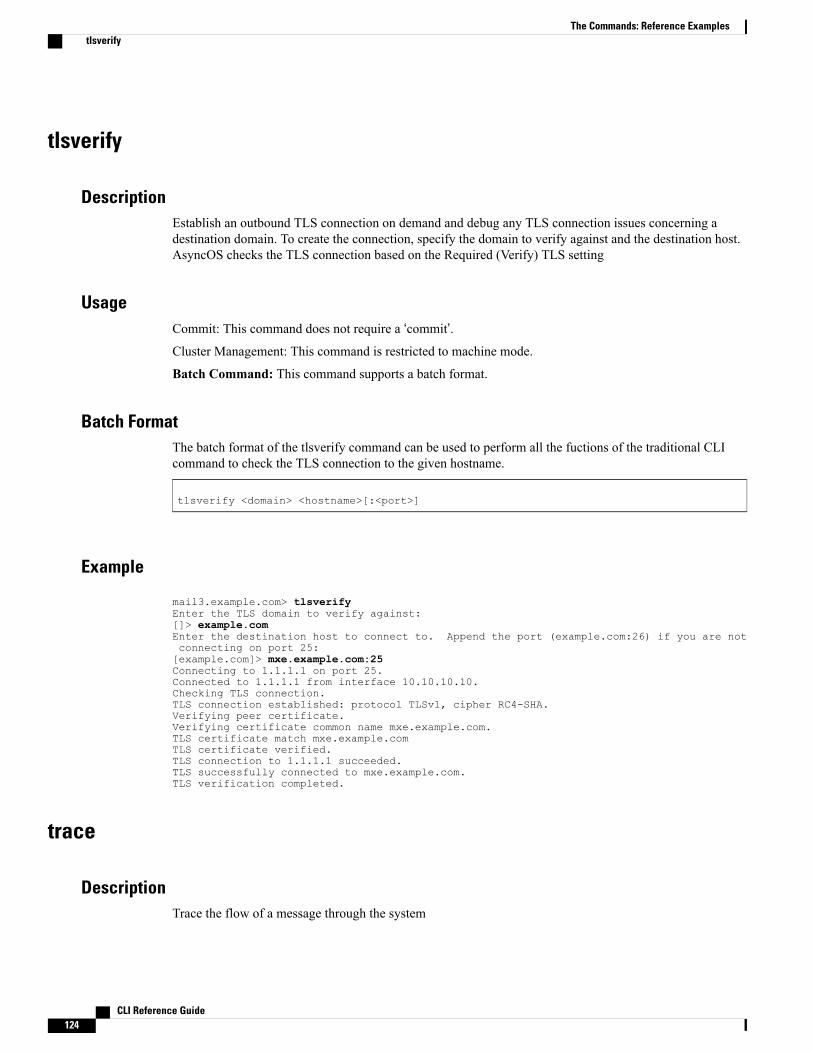
tlsverify
DescriptionEstablish an outbound TLS connection on demand and debug any TLS connection issues concerning adestination domain. To create the connection, specify the domain to verify against and the destination host.AsyncOS checks the TLS connection based on the Required (Verify) TLS setting
UsageCommit: This command does not require a ‘commit’.Cluster Management: This command is restricted to machine mode.
Batch Command: This command supports a batch format.
Batch FormatThe batch format of the tlsverify command can be used to perform all the fuctions of the traditional CLIcommand to check the TLS connection to the given hostname.
tlsverify <domain> <hostname>[:<port>]
Example
mail3.example.com> tlsverifyEnter the TLS domain to verify against:[]> example.comEnter the destination host to connect to. Append the port (example.com:26) if you are notconnecting on port 25:[example.com]> mxe.example.com:25Connecting to 1.1.1.1 on port 25.Connected to 1.1.1.1 from interface 10.10.10.10.Checking TLS connection.TLS connection established: protocol TLSv1, cipher RC4-SHA.Verifying peer certificate.Verifying certificate common name mxe.example.com.TLS certificate match mxe.example.comTLS certificate verified.TLS connection to 1.1.1.1 succeeded.TLS successfully connected to mxe.example.com.TLS verification completed.
trace
DescriptionTrace the flow of a message through the system
CLI Reference Guide124
The Commands: Reference Examplestlsverify

UsageCommit: This command does not require a ‘commit’.Cluster Management: This command is restricted to machine mode.
Batch Command: This command does not support a batch format.
Example
mail3.example.com> traceEnter the source IP[]> 192.168.1.1Enter the fully qualified domain name of the source IP[]> example.comSelect the listener to trace behavior on:1. InboundMail2. OutboundMail[1]> 1Fetching default SenderBase values...Enter the SenderBase Org ID of the source IP. The actual ID is N/A.[N/A]>Enter the SenderBase Reputation Score of the source IP. The actual score is N/A.[N/A]>Enter the Envelope Sender address:[]> [email protected] the Envelope Recipient addresses. Separate multiple addresses by commas.[]> [email protected] message from disk? [Y]> nEnter or paste the message body here. Enter '.' on a blank line to end.Subject: HelloThis is a test message..HAT matched on unnamed sender group, host ALL- Applying $ACCEPTED policy (ACCEPT behavior).- Maximum Message Size: 100M (Default)- Maximum Number Of Connections From A Single IP: 1000 (Default)- Maximum Number Of Messages Per Connection: 1,000 (Default)- Maximum Number Of Recipients Per Message: 1,000 (Default)- Maximum Recipients Per Hour: 100 (Default)- Use SenderBase For Flow Control: Yes (Default)- Spam Detection Enabled: Yes (Default)- Virus Detection Enabled: Yes (Default)- Allow TLS Connections: No (Default)Processing MAIL FROM:- Default Domain Processing: No ChangeProcessing Recipient List:Processing [email protected] Default Domain Processing: No Change- Domain Map: No Change- RAT matched on [email protected], behavior = ACCEPT- Alias expansion: No ChangeMessage Processing:- No Virtual Gateway(tm) Assigned- No Bounce Profile AssignedDomain Masquerading/LDAP Processing:- No Changes.Processing filter 'always_deliver':Evaluating Rule: rcpt-to == "@mail.qa"
Result = FalseEvaluating Rule: rcpt-to == "ironport.com"
Result = TrueEvaluating Rule: OR
Result = TrueExecuting Action: deliver()Footer Stamping:- Not Performed
CLI Reference Guide 125
The Commands: Reference Examplestrace

Inbound Recipient Policy Processing: (matched on Management Upgrade policy)Message going to: [email protected] Evaluation:- Not SpamAntiVirus Evaluation:- Message Clean.- Elapsed Time = '0.000 sec'Outbreak Filter Evaluation:- No threat detectedMessage Enqueued for DeliveryWould you like to see the resulting message? [Y]> yFinal text for messages matched on policy Management UpgradeFinal Envelope Sender: [email protected] Recipients:- [email protected] Message Content:Received: from remotehost.example.com (HELO TEST) (1.2.3.4)by stacy.qa with TEST; 19 Oct 2004 00:54:48 -0700
Message-Id: <3i93q9$@Management>X-IronPort-AV: i="3.86,81,1096873200";
d="scan'208"; a="0:sNHT0"Subject: helloThis is a test message.Run through another debug session? [N]>
When using trace , you must include both the header and the body of the message pasted into the CLI.Note
trackingconfig
DescriptionConfigure the tracking system.
UsageCommit: This command requires a ‘commit’.Cluster Management: This command can be used in all three machine modes (cluster, group, machine).
Batch Command: This command does not support a batch format.
Example
mail.example.com> trackingconfigMessage Tracking service status: Message Tracking is enabled.Choose the operation you want to perform:- SETUP - Enable Message Tracking for this appliance.[]> setupWould you like to use the Message Tracking Service? [Y]>Do you want to use Centralized Message Tracking for this appliance? [N]>Would you like to track rejected connections? [N]>Message Tracking service status: Local Message Tracking is enabled.Rejected connections are currently not being tracked.Choose the operation you want to perform:- SETUP - Enable Message Tracking for this appliance.[]>
CLI Reference Guide126
The Commands: Reference Examplestrackingconfig

tzupdate
DescriptionUpdate timezone rules
UsageCommit: This command does not require a ‘commit’.Cluster Management: This command is restricted to machine mode. It is further restricted to the login host(i.e., the specific machine you are logged onto).
Batch Command: This command supports a batch format.
Batch FormatThe batch format of the tzupdate command forces an update off all time zone rules even if no changes aredetected.
tzupdate [force]
Example
mail.example.com> tzupdateRequesting update of Timezone Rules
updateconfig
DescriptionConfigure system update parameters.
UsageCommit: This command requires a ‘commit’.Cluster Management: This command can be used in all three machine modes (cluster, group, machine).
Batch Command: This command does not support a batch format.
Examples• Configure the Appliance to Download Updates from Updater Servers, on page 128
CLI Reference Guide 127
The Commands: Reference Examplestzupdate

• Configure the Appliance to Verify the Validity of Updater Server Certificate, on page 129
• Configure the Appliance to Trust Proxy Server Communication, on page 130
Configure the Appliance to Download Updates from Updater Servers
In the following example, the updateconfig command is used to configure the appliance to download updateimages from Cisco servers and download the list of available AsyncOS upgrades from a local server.
mail.example.com> updateconfigService (images): Update URL:------------------------------------------------------------------------------------------Feature Key updates http://downloads.ironport.com/asyncosTimezone rules Cisco IronPort ServersEnrollment Client Updates Cisco IronPort ServersSupport Request updates Cisco IronPort ServersCisco IronPort AsyncOS upgrades Cisco IronPort ServersService (list): Update URL:------------------------------------------------------------------------------------------Timezone rules Cisco IronPort ServersEnrollment Client Updates Cisco IronPort ServersSupport Request updates Cisco IronPort ServersService (list): Update URL:------------------------------------------------------------------------------------------Cisco IronPort AsyncOS upgrades Cisco IronPort ServersUpdate interval: 5mProxy server: not enabledHTTPS Proxy server: not enabledChoose the operation you want to perform:- SETUP - Edit update configuration.- VALIDATE_CERTIFICATES - Validate update server certificates- TRUSTED_CERTIFICATES - Manage trusted certificates for updates[]> setupFor the following services, please select where the system will download updates from:Service (images): Update URL:------------------------------------------------------------------------------------------Feature Key updates http://downloads.ironport.com/asyncos1. Use Cisco IronPort update servers (http://downloads.ironport.com)2. Use own server[1]>For the following services, please select where the system will download updates from(images):Service (images): Update URL:------------------------------------------------------------------------------------------Timezone rules Cisco IronPort ServersEnrollment Client Updates Cisco IronPort ServersSupport Request updates Cisco IronPort Servers1. Use Cisco IronPort update servers2. Use own server[1]>For the following services, please select where the system will download updates from(images):Service (images): Update URL:------------------------------------------------------------------------------------------Cisco IronPort AsyncOS upgrades Cisco IronPort Servers1. Use Cisco IronPort update servers2. Use own server[1]>For the following services, please select where the system will download the list of availableupdates from:Service (list): Update URL:------------------------------------------------------------------------------------------Timezone rules Cisco IronPort ServersEnrollment Client Updates Cisco IronPort ServersSupport Request updates Cisco IronPort Servers1. Use Cisco IronPort update servers2. Use own update list[1]>For the following services, please select where the system will download the list of available
CLI Reference Guide128
The Commands: Reference Examplesupdateconfig

updates from:Service (list): Update URL:------------------------------------------------------------------------------------------Cisco IronPort AsyncOS upgrades Cisco IronPort Servers1. Use Cisco IronPort update servers2. Use own update list[1]>Enter the time interval between checks for new:
- Timezone rules- Enrollment Client Updates (used to fetch certificates for URL Filtering)- Support Request updates
Use a trailing 's' for seconds, 'm' for minutes or 'h' for hours. The minimumvalid update time is 30s or enter '0' to disable automatic updates (manualupdates will still be available for individual services).[5m]>When initiating a connection to the update server the originating IP interfaceis chosen automatically. If you want to choose a specific interface, pleasespecify it now.1. Auto2. Management (10.76.69.149/24: vm30esa0086.ibqa)[1]>Do you want to set up a proxy server for HTTP updates for ALL of the followingservices:
- Feature Key updates- Timezone rules- Enrollment Client Updates (used to fetch certificates for URL Filtering)- Support Request updates- Cisco IronPort AsyncOS upgrades
[N]>Do you want to set up an HTTPS proxy server for HTTPS updates for ALL of the followingservices:
- Feature Key updates- Timezone rules- Enrollment Client Updates (used to fetch certificates for URL Filtering)- Support Request updates- Cisco IronPort AsyncOS upgrades- SenderBase Network Participation sharing
[N]>Service (images): Update URL:------------------------------------------------------------------------------------------Feature Key updates http://downloads.ironport.com/asyncosTimezone rules Cisco IronPort ServersEnrollment Client Updates Cisco IronPort ServersSupport Request updates Cisco IronPort ServersCisco IronPort AsyncOS upgrades Cisco IronPort ServersService (list): Update URL:------------------------------------------------------------------------------------------Timezone rules Cisco IronPort ServersEnrollment Client Updates Cisco IronPort ServersSupport Request updates Cisco IronPort ServersService (list): Update URL:------------------------------------------------------------------------------------------Cisco IronPort AsyncOS upgrades Cisco IronPort ServersUpdate interval: 5mProxy server: not enabledHTTPS Proxy server: not enabledChoose the operation you want to perform:- SETUP - Edit update configuration.- VALIDATE_CERTIFICATES - Validate update server certificates- TRUSTED_CERTIFICATES - Manage trusted certificates for updates[]>
Configure the Appliance to Verify the Validity of Updater Server Certificate
If you configure this option, every time the appliance communicates the Cisco updater server, the validity ofthe updater server certificate is verified. If the verification fails, updates are not downloaded and the detailsare logged in Updater Logs. The following example shows how to configure this option:
mail.example.com> updateconfig
CLI Reference Guide 129
The Commands: Reference Examplesupdateconfig
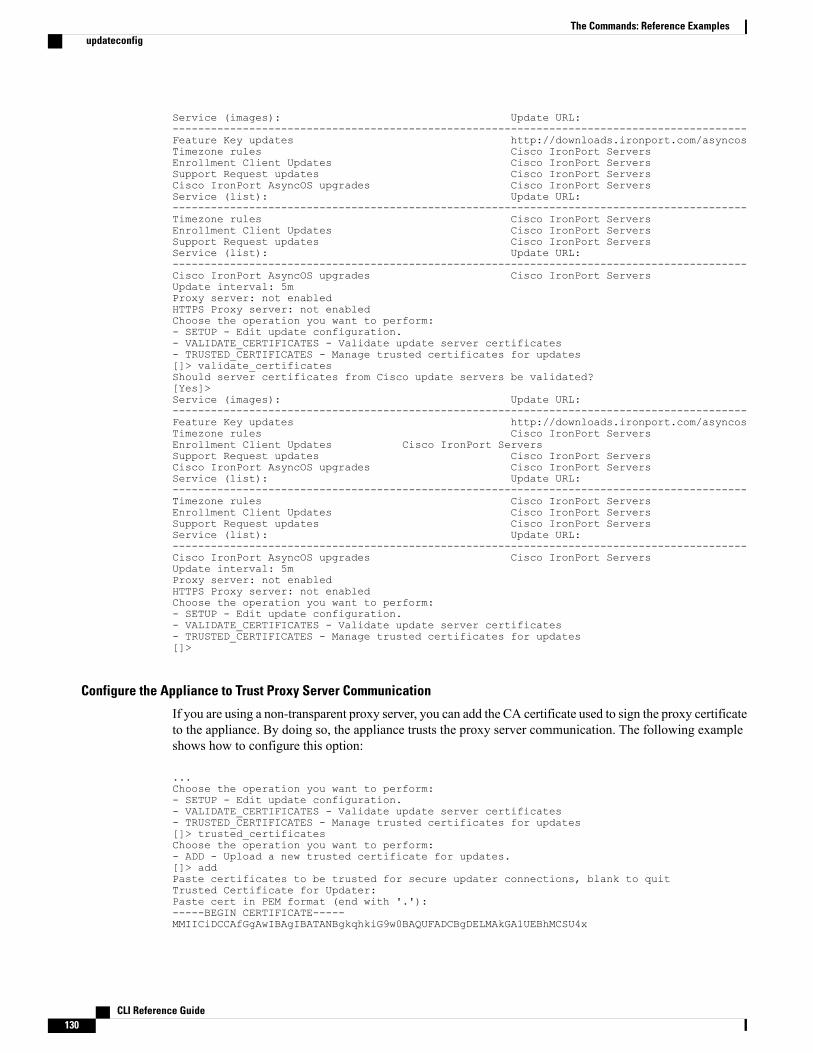
Service (images): Update URL:------------------------------------------------------------------------------------------Feature Key updates http://downloads.ironport.com/asyncosTimezone rules Cisco IronPort ServersEnrollment Client Updates Cisco IronPort ServersSupport Request updates Cisco IronPort ServersCisco IronPort AsyncOS upgrades Cisco IronPort ServersService (list): Update URL:------------------------------------------------------------------------------------------Timezone rules Cisco IronPort ServersEnrollment Client Updates Cisco IronPort ServersSupport Request updates Cisco IronPort ServersService (list): Update URL:------------------------------------------------------------------------------------------Cisco IronPort AsyncOS upgrades Cisco IronPort ServersUpdate interval: 5mProxy server: not enabledHTTPS Proxy server: not enabledChoose the operation you want to perform:- SETUP - Edit update configuration.- VALIDATE_CERTIFICATES - Validate update server certificates- TRUSTED_CERTIFICATES - Manage trusted certificates for updates[]> validate_certificatesShould server certificates from Cisco update servers be validated?[Yes]>Service (images): Update URL:------------------------------------------------------------------------------------------Feature Key updates http://downloads.ironport.com/asyncosTimezone rules Cisco IronPort ServersEnrollment Client Updates Cisco IronPort ServersSupport Request updates Cisco IronPort ServersCisco IronPort AsyncOS upgrades Cisco IronPort ServersService (list): Update URL:------------------------------------------------------------------------------------------Timezone rules Cisco IronPort ServersEnrollment Client Updates Cisco IronPort ServersSupport Request updates Cisco IronPort ServersService (list): Update URL:------------------------------------------------------------------------------------------Cisco IronPort AsyncOS upgrades Cisco IronPort ServersUpdate interval: 5mProxy server: not enabledHTTPS Proxy server: not enabledChoose the operation you want to perform:- SETUP - Edit update configuration.- VALIDATE_CERTIFICATES - Validate update server certificates- TRUSTED_CERTIFICATES - Manage trusted certificates for updates[]>
Configure the Appliance to Trust Proxy Server Communication
If you are using a non-transparent proxy server, you can add the CA certificate used to sign the proxy certificateto the appliance. By doing so, the appliance trusts the proxy server communication. The following exampleshows how to configure this option:
...Choose the operation you want to perform:- SETUP - Edit update configuration.- VALIDATE_CERTIFICATES - Validate update server certificates- TRUSTED_CERTIFICATES - Manage trusted certificates for updates[]> trusted_certificatesChoose the operation you want to perform:- ADD - Upload a new trusted certificate for updates.[]> addPaste certificates to be trusted for secure updater connections, blank to quitTrusted Certificate for Updater:Paste cert in PEM format (end with '.'):-----BEGIN CERTIFICATE-----MMIICiDCCAfGgAwIBAgIBATANBgkqhkiG9w0BAQUFADCBgDELMAkGA1UEBhMCSU4x
CLI Reference Guide130
The Commands: Reference Examplesupdateconfig

DDAKBgNVBAgTA0tBUjENM............................................-----END CERTIFICATE-----.Choose the operation you want to perform:- ADD - Upload a new trusted certificate for updates.- LIST - List trusted certificates for updates.- DELETE - Delete a trusted certificate for updates.[]>
updatenow
DescriptionRequests an update to all system service components.
UsageCommit: This command does not require a ‘commit’.Cluster Management: This command is restricted to machine mode. It is further restricted to the login host(i.e., the specific machine you are logged onto).
Batch Command: This command does support a batch format.
Batch FormatThe batch format of the updatenow command can be used to update all components on the appliance even ifno changes are detected.
updatenow [force]
Example
mail3.example.com> updatenowSuccess - All component updates requested
version
DescriptionView system version information
UsageCommit: This command does not require a ‘commit’.Cluster Management: This command is restricted to machine mode.
CLI Reference Guide 131
The Commands: Reference Examplesupdatenow

Batch Command: This command does not support a batch format.
Example
mail3.example.com> versionCurrent Version===============Product: Cisco C100V Email Security Virtual ApplianceModel: C100VVersion: 9.1.0-019Build Date: 2015-02-17Install Date: 2015-02-19 05:17:56Serial #: 421C73B18CFB05784A83-B03A99E71ED8BIOS: 6.00CPUs: 2 expected, 2 allocatedMemory: 6144 MB expected, 6144 MB allocatedRAID: NARAID Status: UnknownRAID Type: NABMC: NA
wipedata
DescriptionUse the wipedata command to wipe the core files on the disk and check the status of the last coredumpoperation.
Depending on the size of the data, wipe action may take a while and can affect the system performanceuntil the action is complete.
Note
UsageCommit: This command does not require a ‘commit’.Cluster Management: This command is restricted to machine mode.
Batch Command: This command does not support a batch format.
Example
mail.example.com> wipedataWiping data may take a while and can affect system performance till it completes.Choose the operation you want to perform:- STATUS - Display status of last command run- COREDUMP - Wipe core files on disk[]> coredumpwipedata: In progressmail.example.com> wipedataWiping data may take a while and can affect system performance till it completes.Choose the operation you want to perform:- STATUS - Display status of last command run- COREDUMP - Wipe core files on disk
CLI Reference Guide132
The Commands: Reference Exampleswipedata

[]> statusLast wipedata status: Successful
upgrade
DescriptionThe upgrade CLI command displays a list of available upgrades and upgrades the AsyncOS system to theversion specified by the user.
UsageCommit: This command does not require a ‘commit’.Cluster Management: This command is restricted to machine mode.
Batch Command: This command does not support a batch format.
Example
mail3.example.com> upgradeUpgrades available:1. AsyncOS (***DON'T TOUCH!***) 4.0.8 upgrade, 2005-05-09 Build 9002. AsyncOS 4.0.8 upgrade, 2005-08-12 Build 030.......45. SenderBase Network Participation Patch[45]>Performing an upgrade will require a reboot of the system after the upgrade is applied.Do you wish to proceed with the upgrade? [Y]> Y
Content Scanning• contentscannerstatus, on page 133
• contentscannerudpate, on page 134
contentscannerstatusDisplay the content scanning engine version information.
UsageCommit: This command does not require a ‘commit’.Cluster Management: This command is restricted to machine mode.
Batch Command: This command does not support a batch format.
CLI Reference Guide 133
The Commands: Reference Examplesupgrade

Example
mail.example.com> contentscannerstatusComponent Version Last UpdatedContent Scanner Tools 11.2.1884.970097 Never updated
contentscannerudpateRequest manual update of the content scanning engine. If ‘force’ parameter is used, update is performed evenif no changes are detected.
UsageCommit: This command does not require a ‘commit’.Cluster Management: This command is restricted to machine mode. It is further restricted to the login host(i.e., the specific machine you are logged onto).
Batch Command: This command does not support a batch format.
Example
mail.example.com> contentscannerupdate forceRequesting forced update for Content Scanner.
LDAPThis section contains the following CLI commands:
• ldapconfig, on page 134
• ldapflush, on page 138
• ldaptest, on page 139
• sievechar, on page 139
ldapconfig
DescriptionConfigure LDAP servers
UsageCommit: This command requires a ‘commit’.
CLI Reference Guide134
The Commands: Reference Examplescontentscannerudpate

Cluster Management: This command can be used in all three machine modes (cluster, group, machine).
Batch Command: This command does not support a batch format.
Example - Creating a New LDAP Server ProfileIn the following example, the ldapconfig command is used to define an LDAP server for the appliance to bindto, and queries for recipient acceptance ( ldapaccept subcommand), routing ( ldaprouting subcommand),masquerading ( masquerade subcommand), end-user authentication for the Spam Quarantine ( isqauthsubcommand), and alias consolidation for spam notifications ( isqalias subcommand) are configured.
First, the nickname of “PublicLDAP” is given for the mldapserver.example.com LDAP server. Queries aredirected to port 3268 (the default). The search base of example.com is defined ( dc=example,dc=com ), andqueries for recipient acceptance, mail re-routing, and masquerading are defined. The queries in this exampleare similar to an OpenLDAP directory configuration which uses the inetLocalMailRecipient auxiliary objectclass defined in the expired Internet Draft draft-lachman-laser-ldap-mail-routing-xx.txt , also sometimesknown as “the Laser spec.” (A version of this draft is included with the OpenLDAP source distribution.) Notethat in this example, the alternate mailhost to use for queried recipients in the mail re-routing query ismailForwardingAddress . Remember that query names are case-sensitive and must match exactly in order toreturn the proper results.
mail3.example.com> ldapconfigNo LDAP server configurations.Choose the operation you want to perform:- NEW - Create a new server configuration.- SETUP - Configure LDAP options.[]> newPlease create a name for this server configuration (Ex: "PublicLDAP"):[]> PublicLDAPPlease enter the hostname:[]> myldapserver.example.comUse SSL to connect to the LDAP server? [N]> nSelect the authentication method to use for this server configuration:1. Anonymous2. Passphrase based[1]> 2Please enter the bind username:[cn=Anonymous]>Please enter the bind passphrase:[]>Connect to LDAP server to validate setting? [Y]Connecting to the LDAP server, please wait...Select the server type to use for this server configuration:1. Active Directory2. OpenLDAP3. Unknown or Other[3]> 1
Please enter the port number:[3268]> 3268Please enter the base:[dc=example,dc=com]> dc=example,dc=comName: PublicLDAPHostname: myldapserver.example.com Port 3268Server Type: Active DirectoryAuthentication Type: passphraseBase: dc=example,dc=comChoose the operation you want to perform:- SERVER - Change the server for the query.- TEST - Test the server configuration.- LDAPACCEPT - Configure whether a recipient address should be accepted orbounced/dropped.- LDAPROUTING - Configure message routing.- MASQUERADE - Configure domain masquerading.
CLI Reference Guide 135
The Commands: Reference Examplesldapconfig

- LDAPGROUP - Configure whether a sender or recipient is in a specified group.- SMTPAUTH - Configure SMTP authentication.- CERTAUTH - Configure certificate authentication.- EXTERNALAUTH - Configure external authentication queries.- ISQAUTH - Configure Spam Quarantine End-User Authentication Query.- ISQALIAS - Configure Spam Quarantine Alias Consolidation Query.[]> ldapacceptPlease create a name for this query:[PublicLDAP.ldapaccept]> PublicLDAP.ldapacceptEnter the LDAP query string:[(proxyAddresses=smtp:{a})]> (proxyAddresses=smtp:{a})Do you want to test this query? [Y]> nName: PublicLDAPHostname: myldapserver.example.com Port 3268Server Type: Active DirectoryAuthentication Type: passphraseBase: dc=example,dc=comLDAPACCEPT: PublicLDAP.ldapacceptChoose the operation you want to perform:- SERVER - Change the server for the query.- LDAPACCEPT - Configure whether a recipient address should be accepted or bounced/dropped.- LDAPROUTING - Configure message routing.- MASQUERADE - Configure domain masquerading.- LDAPGROUP - Configure whether a sender or recipient is in a specified group.- SMTPAUTH - Configure SMTP authentication.- EXTERNALAUTH - Configure external authentication queries.- ISQAUTH - Configure Spam Quarantine End-User Authentication Query.- ISQALIAS - Configure Spam Quarantine Alias Consolidation Query.[]> ldaproutingPlease create a name for this query:[PublicLDAP.routing]> PublicLDAP.routingEnter the LDAP query string:[(mailLocalAddress={a})]> (mailLocalAddress={a})The query requires one of the attributes below. Please make a selection.[1] Configure MAILROUTINGADDRESS only - Rewrite the Envelope Recipient (and
leave MAILHOST unconfigured)?[2] Configure MAILHOST only - Send the messages to an alternate mail host
(and leave MAILROUTINGADDRESS unconfigured)?[3] Configure both attributes
[]> 1Enter the attribute which contains the full rfc822 email address for therecipients.[mailRoutingAddress]> mailRoutingAddressDo you want to test this query? [Y]> nName: PublicLDAPHostname: myldapserver.example.com Port 3268Server Type: Active DirectoryAuthentication Type: passphraseBase: dc=example,dc=comLDAPACCEPT: PublicLDAP.ldapacceptLDAPROUTING: PublicLDAP.routingChoose the operation you want to perform:- SERVER - Change the server for the query.- LDAPACCEPT - Configure whether a recipient address should be accepted or bounced/dropped.- LDAPROUTING - Configure message routing.- MASQUERADE - Configure domain masquerading.- LDAPGROUP - Configure whether a sender or recipient is in a specified group.- SMTPAUTH - Configure SMTP authentication.- EXTERNALAUTH - Configure external authentication queries.- ISQAUTH - Configure Spam Quarantine End-User Authentication Query.- ISQALIAS - Configure Spam Quarantine Alias Consolidation Query.[]> masqueradePlease create a name for this query:[PublicLDAP.masquerade]> PublicLDAP.masqueradeEnter the LDAP query string:[(mailRoutingAddress={a})]> (mailRoutingAddress={a})Enter the attribute which contains the externally visible full rfc822 email address.[]> mailLocalAddressDo you want the results of the returned attribute to replace the entire friendly portionof the original recipient? [N]> nDo you want to test this query? [Y]> nName: PublicLDAP
CLI Reference Guide136
The Commands: Reference Examplesldapconfig
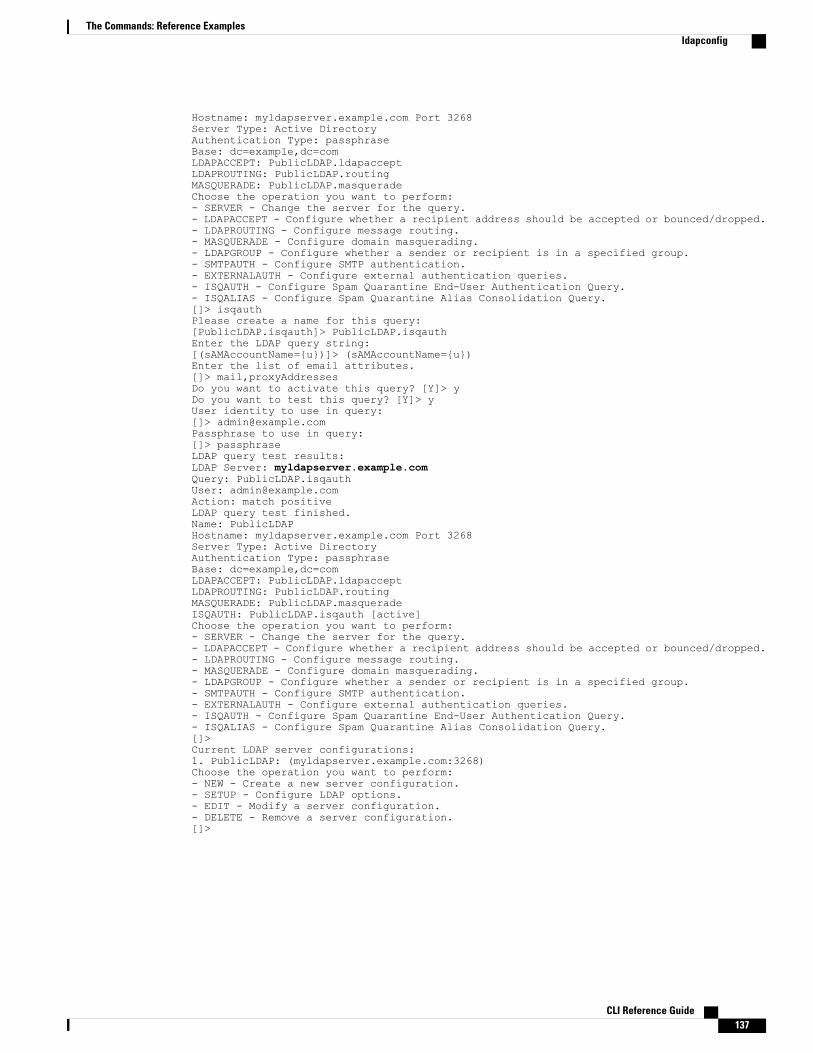
Hostname: myldapserver.example.com Port 3268Server Type: Active DirectoryAuthentication Type: passphraseBase: dc=example,dc=comLDAPACCEPT: PublicLDAP.ldapacceptLDAPROUTING: PublicLDAP.routingMASQUERADE: PublicLDAP.masqueradeChoose the operation you want to perform:- SERVER - Change the server for the query.- LDAPACCEPT - Configure whether a recipient address should be accepted or bounced/dropped.- LDAPROUTING - Configure message routing.- MASQUERADE - Configure domain masquerading.- LDAPGROUP - Configure whether a sender or recipient is in a specified group.- SMTPAUTH - Configure SMTP authentication.- EXTERNALAUTH - Configure external authentication queries.- ISQAUTH - Configure Spam Quarantine End-User Authentication Query.- ISQALIAS - Configure Spam Quarantine Alias Consolidation Query.[]> isqauthPlease create a name for this query:[PublicLDAP.isqauth]> PublicLDAP.isqauthEnter the LDAP query string:[(sAMAccountName={u})]> (sAMAccountName={u})Enter the list of email attributes.[]> mail,proxyAddressesDo you want to activate this query? [Y]> yDo you want to test this query? [Y]> yUser identity to use in query:[]> [email protected] to use in query:[]> passphraseLDAP query test results:LDAP Server: myldapserver.example.comQuery: PublicLDAP.isqauthUser: [email protected]: match positiveLDAP query test finished.Name: PublicLDAPHostname: myldapserver.example.com Port 3268Server Type: Active DirectoryAuthentication Type: passphraseBase: dc=example,dc=comLDAPACCEPT: PublicLDAP.ldapacceptLDAPROUTING: PublicLDAP.routingMASQUERADE: PublicLDAP.masqueradeISQAUTH: PublicLDAP.isqauth [active]Choose the operation you want to perform:- SERVER - Change the server for the query.- LDAPACCEPT - Configure whether a recipient address should be accepted or bounced/dropped.- LDAPROUTING - Configure message routing.- MASQUERADE - Configure domain masquerading.- LDAPGROUP - Configure whether a sender or recipient is in a specified group.- SMTPAUTH - Configure SMTP authentication.- EXTERNALAUTH - Configure external authentication queries.- ISQAUTH - Configure Spam Quarantine End-User Authentication Query.- ISQALIAS - Configure Spam Quarantine Alias Consolidation Query.[]>Current LDAP server configurations:1. PublicLDAP: (myldapserver.example.com:3268)Choose the operation you want to perform:- NEW - Create a new server configuration.- SETUP - Configure LDAP options.- EDIT - Modify a server configuration.- DELETE - Remove a server configuration.[]>
CLI Reference Guide 137
The Commands: Reference Examplesldapconfig

Example - Configuring Global SettingsIn the following example, the LDAP global settings are configured, including the certificate for TLSconnections.
mail3.example.com> ldapconfigNo LDAP server configurations.Choose the operation you want to perform:- NEW - Create a new server configuration.- SETUP - Configure LDAP options.[]> setupChoose the IP interface for LDAP traffic.1. Auto2. Management (10.92.145.175/24: esx16-esa01.qa)[1]> 1LDAP will determine the interface automatically.Should group queries that fail to complete be silently treated as havingnegative results? [Y]>The "Demo" certificate is currently configured. You may use "Demo", but this will not besecure.1. partner.com2. DemoPlease choose the certificate to apply:[1]> 1No LDAP server configurations.Choose the operation you want to perform:- NEW - Create a new server configuration.- SETUP - Configure LDAP options.[]>
ldapflush
DescriptionFlush any cached LDAP results.
UsageCommit: This command does not require a ‘commit’.Cluster Management: This command is restricted to machine mode.
Batch Command: This command does not support a batch format
Example
mail3.example.com> ldapflushAre you sure you want to flush any cached LDAP results? [N]> yFlushing cachemail3.example.com>
CLI Reference Guide138
The Commands: Reference Examplesldapflush

ldaptest
DescriptionPerform a single LDAP query test
UsageCommit: This command does not require a ‘commit’.Cluster Management: This command is restricted to machine mode.
Batch Command: This command does not support a batch format
ExampleIn this example, the ldaptest command is used to test the only recipient acceptance query for the configuredLDAP server configuration. The recipient address “[email protected]” passes the test, while the recipientaddress “[email protected]” fails.
mail3.example.com> ldaptestSelect which LDAP query to test:1. PublicLDAP.ldapaccep[1]> 1Address to use in query:[]> [email protected] query test results:
Query: PublicLDAP.ldapacceptArgument: [email protected]: pass
LDAP query test finished.mail3.example.com> ldaptestSelect which LDAP query to test:1. PublicLDAP.ldapaccep[1]> 1Address to use in query:[]> [email protected] query test results:Query: PublicLDAP.ldapacceptArgument: [email protected]: drop or bounce (depending on listener settings)Reason: no matching LDAP record was foundLDAP query test finished.mail3.example.com>
sievechar
DescriptionSets or disables the character used for Sieve Email Filtering, as described in RFC 3598. Note that the SieveCharacter is ONLY recognized in LDAP Accept and LDAP Reroute queries. Other parts of the system willoperate on the complete email address.
Allowable characters are: -_=+/^#
CLI Reference Guide 139
The Commands: Reference Examplesldaptest

UsageCommit: This command does not require a ‘commit’.Cluster Management: This command can be used in all three machine modes (cluster, group, machine).
Batch Command: This command does not support a batch format
ExampleIn this example, the sievechar command is used to define + as the sieve character recognized in Accept andLDAP Reroute queries.
mail3.example.com> sievecharSieve Email Filtering is currently disabled.Choose the operation you want to perform:- SETUP - Set the separator character.[]> setupEnter the Sieve Filter Character, or a space to disable Sieve Filtering.[]> +Sieve Email Filter is enabled, using the '+' character as separator.This applies only to LDAP Accept and LDAP Reroute Queries.Choose the operation you want to perform:- SETUP - Set the separator character.[]>
Mail Delivery Configuration/MonitoringThis section contains the following CLI commands:
• addresslistconfig, on page 141
• aliasconfig, on page 142
• archivemessage, on page 145
• altsrchost, on page 145
• bounceconfig, on page 147
• bouncerecipients, on page 149
• bvconfig, on page 150
• deleterecipients, on page 152
• deliveryconfig, on page 153
• delivernow, on page 153
• destconfig, on page 154
• hostrate, on page 161
• hoststatus, on page 162
• imageanalysisconfig, on page 163
• oldmessage, on page 164
CLI Reference Guide140
The Commands: Reference ExamplesMail Delivery Configuration/Monitoring

• rate, on page 164
• redirectrecipients, on page 165
• resetcounters, on page 166
• removemessage, on page 166
• showmessage, on page 167
• showrecipients, on page 168
• status, on page 117
• tophosts, on page 170
• topin, on page 170
• unsubscribe, on page 171
• workqueue, on page 172
addresslistconfig
DescriptionConfigure address lists.
UsageCommit: This command requires a ‘commit’.Cluster Management: This command can be used in all three machine modes (cluster, group, machine).
Batch Command: This command supports a batch format.
Batch FormatThe batch format for the addresslistconfig command can be used to create a new address list, edit an existingaddress list, print a list of address lists, delete an address list, or find conflicting addresses within an addresslist.
• Adding a new address list:
addresslistconfig new <name> --descr=<description> --addresses=<address1,address2,...>
• Editing an existing address list:
addresslistconfig edit <name> --name=<new-name> --descr=<description>--addresses=<address1,address2,...>
CLI Reference Guide 141
The Commands: Reference Examplesaddresslistconfig

• Deleting an address list:
addresslistconfig delete <name>
• Printing a list of address lists:
addresslistconfig print <name>
• Finding conflicting addresses within an address list:
addresslistconfig conflicts <name>
Example
mail.example.com> addresslistconfigNo address lists configured.Choose the operation you want to perform:- NEW - Create a new address list.[]> newEnter a name for the address list:> add-list1Enter a description for the address list:> This is a sample address list.Do you want to enter only full Email Addresses? [N]> YEnter a comma separated list of addresses:(e.g.: [email protected])> [email protected], [email protected] list "add-list1" added.Choose the operation you want to perform:- NEW - Create a new address list.- EDIT - Modify an address list.- DELETE - Remove an address list.- PRINT - Display the contents of an address list.- CONFLICTS - Find conflicting entries within an address list.[]>
aliasconfig
DescriptionConfigure email aliases.
UsageCommit: This command requires a ‘commit’.Cluster Management: This command can be used in all three machine modes (cluster, group, machine).
Batch Command: This command supports a batch format.
CLI Reference Guide142
The Commands: Reference Examplesaliasconfig
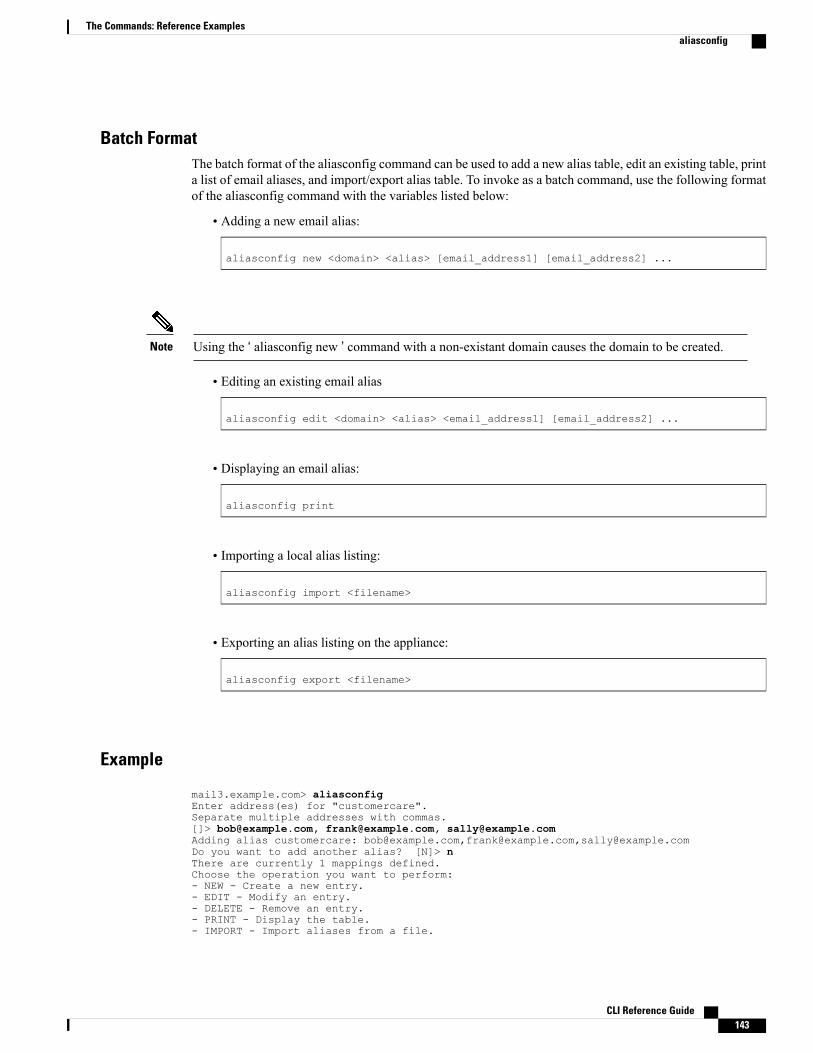
Batch FormatThe batch format of the aliasconfig command can be used to add a new alias table, edit an existing table, printa list of email aliases, and import/export alias table. To invoke as a batch command, use the following formatof the aliasconfig command with the variables listed below:
• Adding a new email alias:
aliasconfig new <domain> <alias> [email_address1] [email_address2] ...
Using the ‘ aliasconfig new ’ command with a non-existant domain causes the domain to be created.Note
• Editing an existing email alias
aliasconfig edit <domain> <alias> <email_address1] [email_address2] ...
• Displaying an email alias:
aliasconfig print
• Importing a local alias listing:
aliasconfig import <filename>
• Exporting an alias listing on the appliance:
aliasconfig export <filename>
Example
mail3.example.com> aliasconfigEnter address(es) for "customercare".Separate multiple addresses with commas.[]> [email protected], [email protected], [email protected] alias customercare: [email protected],[email protected],[email protected] you want to add another alias? [N]> nThere are currently 1 mappings defined.Choose the operation you want to perform:- NEW - Create a new entry.- EDIT - Modify an entry.- DELETE - Remove an entry.- PRINT - Display the table.- IMPORT - Import aliases from a file.
CLI Reference Guide 143
The Commands: Reference Examplesaliasconfig

- EXPORT - Export table to a file.- CLEAR - Clear the table.[]> newHow do you want your aliases to apply?1. Globally2. Add a new domain context3. example.com[1]> 1Enter the alias(es) to match on.Separate multiple aliases with commas.Allowed aliases:
- "user@domain" - This email address.- "user" - This user for any domain- "@domain" - All users in this domain.- "@.partialdomain" - All users in this domain, or any of its sub domains.
[]> adminEnter address(es) for "admin".Separate multiple addresses with commas.[]> [email protected] alias admin: [email protected] you want to add another alias? [N]> nThere are currently 2 mappings defined.Choose the operation you want to perform:- NEW - Create a new entry.- EDIT - Modify an entry.- DELETE - Remove an entry.- PRINT - Display the table.- IMPORT - Import aliases from a file.- EXPORT - Export table to a file.- CLEAR - Clear the table.[]> printadmin: [email protected][ example.com ]customercare: [email protected], [email protected], [email protected] are currently 2 mappings defined.Choose the operation you want to perform:- NEW - Create a new entry.- EDIT - Modify an entry.- DELETE - Remove an entry.- PRINT - Display the table.- IMPORT - Import aliases from a file.- EXPORT - Export table to a file.- CLEAR - Clear the table.[]>
Table 7: Arguments for Configuring Aliases
DescriptionArgument
The domain context in which an alias is applied. ‘Global’ specifies the GlobalDomain Context.
<domain>
The name of the alias to configure
Aliases permitted at the Global Comain Context:
‘ user@domain’ — This email address.
‘ user’— This user for any domain.
‘@domain— All users in this domain.
‘@.partialdomain’— All users in this domain or any of its sub-domains.
Aliases permitted for specific domain contexts:
‘user’— This user in this domain context
‘user@domain’— This email address
<alias>
CLI Reference Guide144
The Commands: Reference Examplesaliasconfig

DescriptionArgument
The email address that an alias mapps to. A single alias can map to multipleemail addresses.
<email_address>
The filename to use with importing/exporting the alias table.<filename>
archivemessage
DescriptionArchive older messages in your queue.
UsageCommit: This command does not require a commit.
Cluster Management: This command is restricted to machine mode..
Batch Command: This command does not support a batch format.
ExampleIn the following example, an older message is archived:
mail3.example.com>archivemessageEnter the MID to archive.[0]> 47
MID 47 has been saved in file oldmessage_47.mbox in the configuration
altsrchost
DescriptionConfigure Virtual Gateway(tm) mappings.
UsageCommit: This command requires a ‘commit’.Cluster Management: This command can be used in all three machine modes (cluster, group, machine).
Batch Command: This command does not support a batch format.
CLI Reference Guide 145
The Commands: Reference Examplesarchivemessage
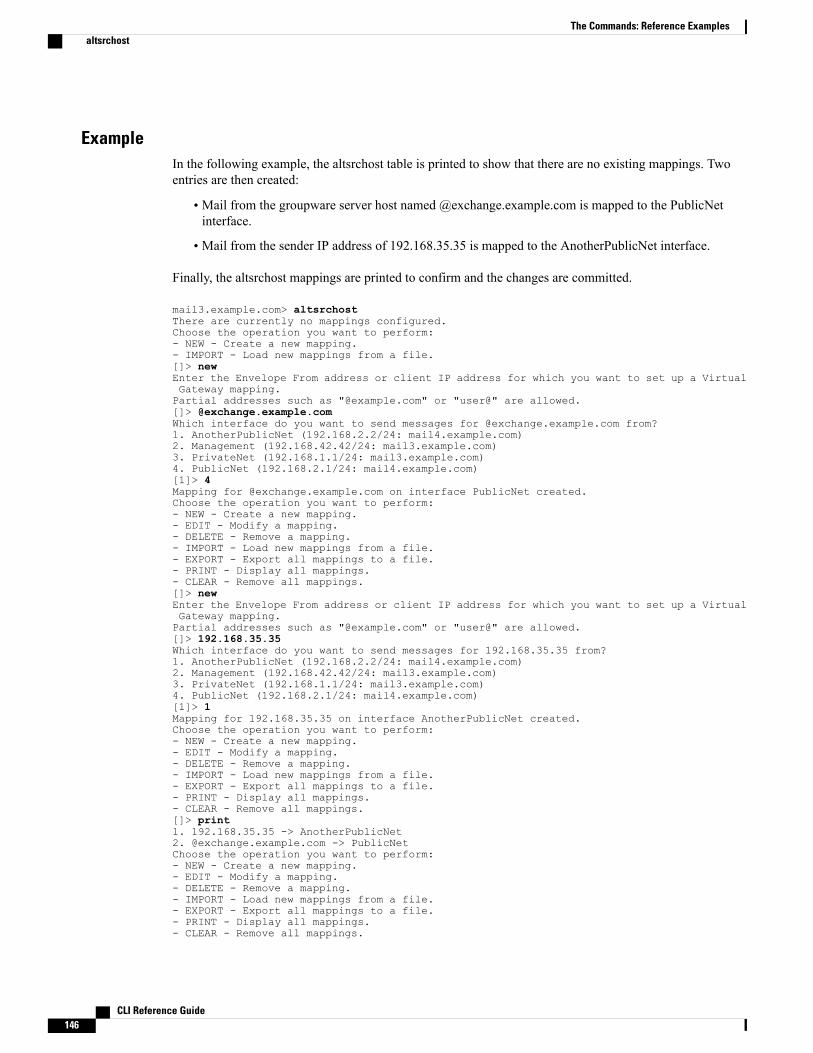
ExampleIn the following example, the altsrchost table is printed to show that there are no existing mappings. Twoentries are then created:
• Mail from the groupware server host named @exchange.example.com is mapped to the PublicNetinterface.
• Mail from the sender IP address of 192.168.35.35 is mapped to the AnotherPublicNet interface.
Finally, the altsrchost mappings are printed to confirm and the changes are committed.
mail3.example.com> altsrchostThere are currently no mappings configured.Choose the operation you want to perform:- NEW - Create a new mapping.- IMPORT - Load new mappings from a file.[]> newEnter the Envelope From address or client IP address for which you want to set up a VirtualGateway mapping.Partial addresses such as "@example.com" or "user@" are allowed.[]> @exchange.example.comWhich interface do you want to send messages for @exchange.example.com from?1. AnotherPublicNet (192.168.2.2/24: mail4.example.com)2. Management (192.168.42.42/24: mail3.example.com)3. PrivateNet (192.168.1.1/24: mail3.example.com)4. PublicNet (192.168.2.1/24: mail4.example.com)[1]> 4Mapping for @exchange.example.com on interface PublicNet created.Choose the operation you want to perform:- NEW - Create a new mapping.- EDIT - Modify a mapping.- DELETE - Remove a mapping.- IMPORT - Load new mappings from a file.- EXPORT - Export all mappings to a file.- PRINT - Display all mappings.- CLEAR - Remove all mappings.[]> newEnter the Envelope From address or client IP address for which you want to set up a VirtualGateway mapping.Partial addresses such as "@example.com" or "user@" are allowed.[]> 192.168.35.35Which interface do you want to send messages for 192.168.35.35 from?1. AnotherPublicNet (192.168.2.2/24: mail4.example.com)2. Management (192.168.42.42/24: mail3.example.com)3. PrivateNet (192.168.1.1/24: mail3.example.com)4. PublicNet (192.168.2.1/24: mail4.example.com)[1]> 1Mapping for 192.168.35.35 on interface AnotherPublicNet created.Choose the operation you want to perform:- NEW - Create a new mapping.- EDIT - Modify a mapping.- DELETE - Remove a mapping.- IMPORT - Load new mappings from a file.- EXPORT - Export all mappings to a file.- PRINT - Display all mappings.- CLEAR - Remove all mappings.[]> print1. 192.168.35.35 -> AnotherPublicNet2. @exchange.example.com -> PublicNetChoose the operation you want to perform:- NEW - Create a new mapping.- EDIT - Modify a mapping.- DELETE - Remove a mapping.- IMPORT - Load new mappings from a file.- EXPORT - Export all mappings to a file.- PRINT - Display all mappings.- CLEAR - Remove all mappings.
CLI Reference Guide146
The Commands: Reference Examplesaltsrchost

[]>mail3.example.com> commitPlease enter some comments describing your changes:[]> Added 2 altsrchost mappingsDo you want to save the current configuration for rollback? [Y]> nChanges committed: Fri May 23 11:42:12 2014 GMT
bounceconfig
DescriptionConfigure the behavior of bounces.
UsageCommit: This command requires a ‘commit’.Cluster Management: This command can be used in all three machine modes (cluster, group, machine).
Batch Command: This command supports a batch format. See the inline CLI help for more details. Use thehelp command to access the inline help for this command.
ExampleIn the following example, a bounce profile named bounceprofile is created using the bounceconfig command.In this profile, all hard bounced messages are sent to the alternate address [email protected] .Delay warnings messages are enabled. One warning message will be sent per recipient, and the default valueof 4 hours (14400 seconds) between warning messages is accepted
mail3.example.com> bounceconfigCurrent bounce profiles:1. DefaultChoose the operation you want to perform:- NEW - Create a new profile.- EDIT - Modify a profile.[]> newPlease create a name for the profile:[]> bounceprofilePlease enter the maximum number of retries.[100]> 100Please enter the maximum number of seconds a message may stay in the queue before beinghard bounced.[259200]> 259200Please enter the initial number of seconds to wait before retrying a message.[60]> 60Please enter the maximum number of seconds to wait before retrying a message.[3600]> 3600Do you want a message sent for each hard bounce? (Yes/No/Default) [Y]> yDo you want bounce messages to use the DSN message format? (Yes/No/Default) [Y]> yEnter the subject to use:[Delivery Status Notification (Failure)]>Select default notification template:1. System Generated2. bounce_english3. bounce_russian[1]>Do you want to configure language specific templates? [N]>Do you want to parse the DSN "Status" field received from bounceresponses to include in the DSN generated by the appliance?
CLI Reference Guide 147
The Commands: Reference Examplesbounceconfig

(Yes/No/Default) [N]>If a message is undeliverable after some interval, do you want to send a delay warningmessage? (Yes/No/Default) [N]> yEnter the subject to use:[Delivery Status Notification (Delay)]>Select default notification template:1. System Generated2. bounce_english3. bounce_russian[1]> 1Do you want to configure language specific templates? [N]>Please enter the minimum interval in seconds between delay warning messages.[14400]> 14400Please enter the maximum number of delay warning messages to send perrecipient.[1]> 1Do you want hard bounce and delay warning messages sent to an alternate address, insteadof the sender? [N]> yPlease enter the email address to send hard bounce and delay warning.[]> [email protected] you want bounce messages to be signed (Yes/No/Default)? [N]>Current bounce profiles:1. Default2. bounceprofileChoose the operation you want to perform:- NEW - Create a new profile.- EDIT - Modify a profile.- DELETE - Remove a profile.[]>mail3.example.com>
Applying a Bounce Profile to a ListenerAfter a bounce profile has been configured, you can apply the profile for each listener using the listenerconfig-> bounceconfig command and then committing the changes.
Bounce profiles can be applied based upon the listener that a message was received on. However, thislistener has nothing to do with how the message is ultimately delivered.
Note
In this example, the OutboundMail private listener is edited and the bounce profile named bouncepr1 isapplied to it.
mail3.example.com> listenerconfigCurrently configured listeners:1. InboundMail (on PublicNet, 192.168.2.1) SMTP Port 25 Public2. OutboundMail (on PrivateNet, 192.168.1.1) SMTP Port 25 PrivateChoose the operation you want to perform:- NEW - Create a new listener.- EDIT - Modify a listener.- DELETE - Remove a listener.- SETUP - Change global settings.[]> editEnter the name or number of the listener you wish to edit.[]> 2Name: OutboundMailType: PrivateInterface: PrivateNet (192.168.1.1/24) TCP Port 25Protocol: SMTPDefault Domain:Max Concurrency: 600 (TCP Queue: 50)Domain Map: DisabledTLS: NoSMTP Authentication: DisabledBounce Profile: DefaultFooter: None
CLI Reference Guide148
The Commands: Reference Examplesbounceconfig

LDAP: OffChoose the operation you want to perform:- NAME - Change the name of the listener.- INTERFACE - Change the interface.- LIMITS - Change the injection limits.- SETUP - Configure general options.- HOSTACCESS - Modify the Host Access Table.- BOUNCECONFIG - Choose the bounce profile to use for messages injected on this listener.- MASQUERADE - Configure the Domain Masquerading Table.- DOMAINMAP - Configure domain mappings.[]> bounceconfigPlease choose a bounce profile to apply:1. Default2. bouncepr13. New Profile[1]> 2Name: OutboundMailType: PrivateInterface: PrivateNet (192.168.1.1/24) TCP Port 25Protocol: SMTPDefault Domain:Max Concurrency: 600 (TCP Queue: 50)Domain Map: DisabledTLS: NoSMTP Authentication: DisabledBounce Profile: bouncepr1Footer: NoneLDAP: OffChoose the operation you want to perform:- NAME - Change the name of the listener.- INTERFACE - Change the interface.- LIMITS - Change the injection limits.- SETUP - Configure general options.- HOSTACCESS - Modify the Host Access Table.- BOUNCECONFIG - Choose the bounce profile to use for messages injected on this listener.- MASQUERADE - Configure the Domain Masquerading Table.- DOMAINMAP - Configure domain mappings.[]>Currently configured listeners:1. InboundMail (on PublicNet, 192.168.2.1) SMTP Port 25 Public2. OutboundMail (on PrivateNet, 192.168.1.1) SMTP Port 25 PrivateChoose the operation you want to perform:- NEW - Create a new listener.- EDIT - Modify a listener.- DELETE - Remove a listener.- SETUP - Change global settings.[]>mail3.example.com> commitPlease enter some comments describing your changes:[]> Enabled the bouncepr1 profile to the Outbound mail listenerDo you want to save the current configuration for rollback? [Y]> nChanges committed: Fri May 23 11:42:12 2014 GMT
bouncerecipients
DescriptionBounce messages from the queue.
UsageCommit: This command does not require a ‘commit’.Cluster Management: This command is restricted to machine mode.
CLI Reference Guide 149
The Commands: Reference Examplesbouncerecipients

Batch Command: This command does not support a batch format
ExampleRecipients to be bounced are identified by either the destination recipient host or the message sender identifiedby the specific address given in the Envelope From line of the message envelope. Alternately, all messagesin the delivery queue can be bounced at once.
Bounce by Recipient Host
mail3.example.com> bouncerecipientsPlease select how you would like to bounce messages:1. By recipient host.2. By Envelope From address.3. All.[1]> 1Please enter the hostname for the messages you wish to bounce.[]> example.comAre you sure you want to bounce all messages being delivered to "example.com"? [N]> YBouncing messages, please wait.100 messages bounced.
Bounce by Envelope From Address
mail3.example.com> bouncerecipientsPlease select how you would like to bounce messages:1. By recipient host.2. By Envelope From address.3. All.[1]> 2Please enter the Envelope From address for the messages you wish to bounce.[]> [email protected] you sure you want to bounce all messages with the Envelope From address of"[email protected]"? [N]> YBouncing messages, please wait.100 messages bounced.
Bounce All
mail3.example.com> bouncerecipientsPlease select how you would like to bounce messages:1. By recipient host.2. By Envelope From address.3. All.[1]>Are you sure you want to bounce all messages in the queue? [N]> YBouncing messages, please wait.1000 messages bounced.
bvconfig
DescriptionConfigure settings for Bounce Verification. Use this command to configure keys and invalid bounced emails.
CLI Reference Guide150
The Commands: Reference Examplesbvconfig
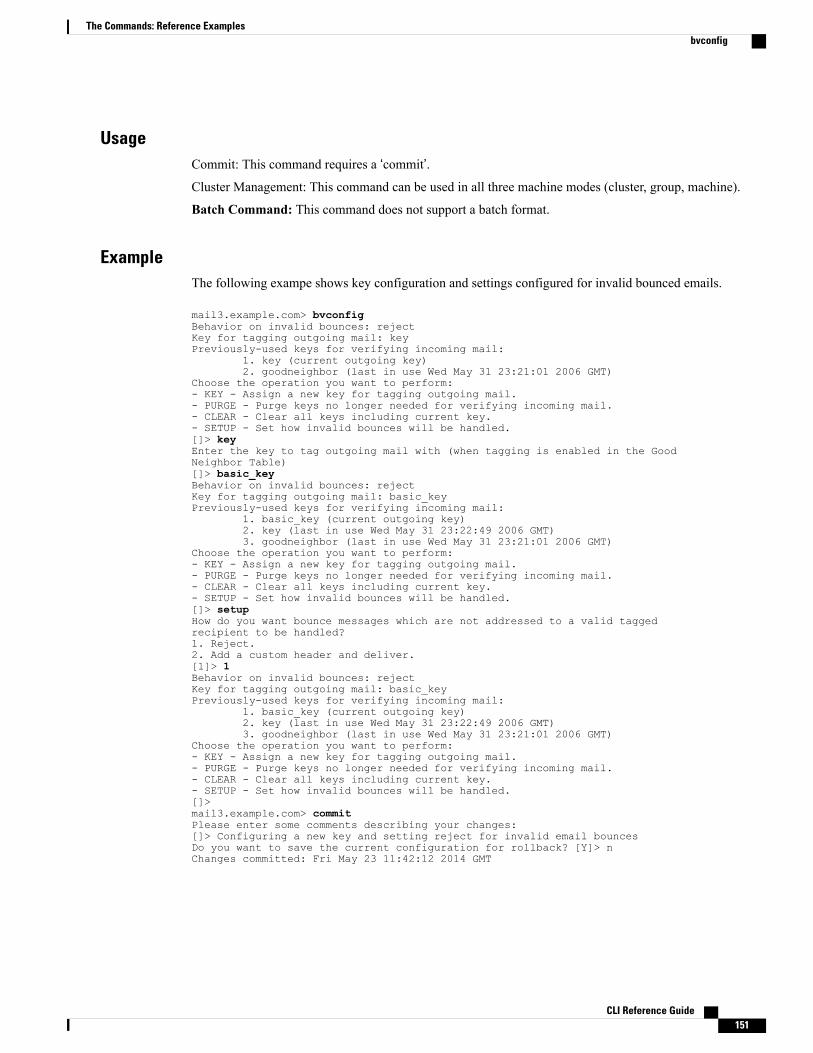
UsageCommit: This command requires a ‘commit’.Cluster Management: This command can be used in all three machine modes (cluster, group, machine).
Batch Command: This command does not support a batch format.
ExampleThe following exampe shows key configuration and settings configured for invalid bounced emails.
mail3.example.com> bvconfigBehavior on invalid bounces: rejectKey for tagging outgoing mail: keyPreviously-used keys for verifying incoming mail:
1. key (current outgoing key)2. goodneighbor (last in use Wed May 31 23:21:01 2006 GMT)
Choose the operation you want to perform:- KEY - Assign a new key for tagging outgoing mail.- PURGE - Purge keys no longer needed for verifying incoming mail.- CLEAR - Clear all keys including current key.- SETUP - Set how invalid bounces will be handled.[]> keyEnter the key to tag outgoing mail with (when tagging is enabled in the GoodNeighbor Table)[]> basic_keyBehavior on invalid bounces: rejectKey for tagging outgoing mail: basic_keyPreviously-used keys for verifying incoming mail:
1. basic_key (current outgoing key)2. key (last in use Wed May 31 23:22:49 2006 GMT)3. goodneighbor (last in use Wed May 31 23:21:01 2006 GMT)
Choose the operation you want to perform:- KEY - Assign a new key for tagging outgoing mail.- PURGE - Purge keys no longer needed for verifying incoming mail.- CLEAR - Clear all keys including current key.- SETUP - Set how invalid bounces will be handled.[]> setupHow do you want bounce messages which are not addressed to a valid taggedrecipient to be handled?1. Reject.2. Add a custom header and deliver.[1]> 1Behavior on invalid bounces: rejectKey for tagging outgoing mail: basic_keyPreviously-used keys for verifying incoming mail:
1. basic_key (current outgoing key)2. key (last in use Wed May 31 23:22:49 2006 GMT)3. goodneighbor (last in use Wed May 31 23:21:01 2006 GMT)
Choose the operation you want to perform:- KEY - Assign a new key for tagging outgoing mail.- PURGE - Purge keys no longer needed for verifying incoming mail.- CLEAR - Clear all keys including current key.- SETUP - Set how invalid bounces will be handled.[]>mail3.example.com> commitPlease enter some comments describing your changes:[]> Configuring a new key and setting reject for invalid email bouncesDo you want to save the current configuration for rollback? [Y]> nChanges committed: Fri May 23 11:42:12 2014 GMT
CLI Reference Guide 151
The Commands: Reference Examplesbvconfig

deleterecipients
DescriptionDelete messages from the queue
UsageCommit: This command does not require a ‘commit’.Cluster Management: This command is restricted to machine mode.
Batch Command: This command does not support a batch format
ExampleThe appliance gives you various options to delete recipients depending upon the need. The following exampleshow deleting recipients by recipient host, deleting by Envelope From Address, and deleting all recipients inthe queue.
Delete by Recipient Domain
mail3.example.com> deleterecipientsPlease select how you would like to delete messages:1. By recipient host.2. By Envelope From address.3. All.[1]> 1Please enter the hostname for the messages you wish to delete.[]> example.comAre you sure you want to delete all messages being delivered to "example.com"? [N]> YDeleting messages, please wait.100 messages deleted.
Delete by Envelope From Address
mail3.example.com> deleterecipientsPlease select how you would like to delete messages:1. By recipient host.2. By Envelope From address.3. All.[1]> 2Please enter the Envelope From address for the messages you wish to delete.[]> [email protected] you sure you want to delete all messages with the Envelope From address of"[email protected]"? [N]> YDeleting messages, please wait.100 messages deleted.
Delete All
mail3.example.com> deleterecipientsPlease select how you would like to delete messages:
CLI Reference Guide152
The Commands: Reference Examplesdeleterecipients

1. By recipient host.2. By Envelope From address.3. All.[1]> 1Are you sure you want to delete all messages in the queue? [N]> YDeleting messages, please wait.1000 messages deleted.
deliveryconfig
DescriptionConfigure mail delivery
UsageCommit: This command requires a ‘commit’.Cluster Management: This command can be used in all three machine modes (cluster, group, machine).
Batch Command: This command does not support a batch format.
ExampleIn the following example, the deliveryconfig command is used to set the default interface to “Auto” with“Possible Delivery” enabled. The system-widemaximum outboundmessage delivery is set to 9000 connections.
mail3.example.com> deliveryconfigChoose the operation you want to perform:- SETUP - Configure mail delivery.[]> setupChoose the default interface to deliver mail.1. Auto2. AnotherPublicNet (192.168.3.1/24: mail4.example.com)3. Management (192.168.42.42/24: mail3.example.com)4. PrivateNet (192.168.1.1/24: mail3.example.com)5. PublicNet (192.168.2.1/24: mail3.example.com)[1]> 1Enable "Possible Delivery" (recommended)? [Y]> yPlease enter the default system wide maximum outbound message deliveryconcurrency[10000]> 9000mail3.example.com>
delivernow
DescriptionReschedule messages for immediate delivery. Users have the option of selecting a single recipient host, or allmessages currently scheduled for delivery.
CLI Reference Guide 153
The Commands: Reference Examplesdeliveryconfig

UsageCommit: This command does not require a ‘commit’.Cluster Management: This command is restricted to machine mode.
Batch Command: This command does not support a batch format
Example
mail3.example.com> delivernowPlease choose an option for scheduling immediate delivery.1. By recipient domain2. All messages[1]> 1Please enter the recipient domain to schedule for delivery.[]>foo.comScheduling all messages to foo.com for delivery.
destconfigFormerly the setgoodtable command. The table is now called the Destination Control Table. Use this table toconfigure delivery limits for a specified domain.
Using the destconfig CommandThe following commands are available within the destconfig submenu:
Table 8: destconfig Subcommands
DescriptionSyntax
Change global settings.SETUP
Add new limits for a domain.NEW
Modify the limits for a domain.EDIT
Remove the limits for a domain.DELETE
Change the default limits for non-specified domains.DEFAULT
Display the list of domains and their limits.LIST
Display the details for one destination or all entries.DETAIL
Remove all entries from the table.CLEAR
Imports a table of destination control entries from a .INI configurationfile.
IMPORT
CLI Reference Guide154
The Commands: Reference Examplesdestconfig

DescriptionSyntax
Exports a table of destination control entries to a .INI configuration file.EXPORT
The destconfig command requires the following information for each row in the Destination Controls table.
• Domain (recipient host)
• Maximum simultaneous connections to the domain
• Messages-per-connection limit
• Recipient limit
• System-wide or Virtual Gateway switch
• Enforce limits per domain
• Time period for recipient limit (in minutes)
• Bounce Verification
• Bounce profile to use for the domain
Sample Destination Control TableThe following table shows entries in a destination control table.
Table 9: Example Destination Control Table Entries
Enforce MX/DOMMin. Prd.Rcpt. LimitConn. LimitDomain
Domain1None500(default)
Unlisted domainsget their own set of500 connectionswith unlimitedrcpts/hr
MXIP1None500(default)
Mail gateways atunlisted domains getup to 500connections, withunlimited rcpts/hr
Domain6050010partner.com
CLI Reference Guide 155
The Commands: Reference Examplesdestconfig

Enforce MX/DOMMin. Prd.Rcpt. LimitConn. LimitDomain
All gateways atpartner.com willshare 10connections, with500 rcpts/minutemaximum
MXIP0None500101.202.101.2
Specifying an IPaddress
Batch FormatThe batch format of the destconfig command can be used to perform all the fuctions of the traditional CLIcommand.
• Creating a new destination control table
destconfig new <profile> [options]
• Editing an existing destination control table
destconfig edit <default|profile> [options]
• Deleting an existing destination control table
destconfig delete <profile>
• Displaying a summary of all destination control entries
destconfig list
• Displaying details for one destination or all entries
destconfig detail <default|profile|all>
• Deleting all existing destination control table entries
destconfig clear
CLI Reference Guide156
The Commands: Reference Examplesdestconfig

• Import table from a file
destconfig import <filename>
• Export table to a file
destconfig export <filename>
For the edit and new batch commands, any or all of the following options may be provided by identifying thevalue with the variable name and an equals sign. Options not specified will not be modified (if using edit ) orwill be set to default values (if using new ).
concurrency_limit=<int> - The maximum concurrency for a specific host.
concurrency_limit_type=<host|MXIP> - Maximum concurrency is per host or per MX IP.
concurrency_limit_apply=<system|VG> - Apply maximum concurrency is system wide or byVirtual Gateway(tm).
max_messages_per_connection=<int> - The maximum number of messages that will be sent perconnection.
recipient_limit_minutes=<int> - The time frame to check for recipient limits in minutes.
recipient_limit=<int> - The number of recipients to limit per unit of time.
use_tls=<off|on|require|on_verify|require_verify> - Whether TLS should be on, off, orrequired for a given host.
bounce_profile=<default|profile> - The bounce profile name to use.
bounce_verification=<off|on> - Bounce Verification option.
Example: Creating a new destconfig EntryIn the following example, the current destconfig entries are printed to the screen. Then, a new entry for thedomain partner.com is created. The concurrency limit of 100 simultaneous connections and recipient limit of50 recipients for a 60-minute time period is set for that domain. So, the system will never open more than 100connections or deliver to more than more than 50 recipients in a given hour to the domain partner.com . Nobounce profile is assigned for this specific domain, and no specific TLS setting is configured. Finally, thechanges are printed to confirm and then committed
mail3.example.com> destconfigThere are currently 2 entries configured.Choose the operation you want to perform:- SETUP - Change global settings.
CLI Reference Guide 157
The Commands: Reference Examplesdestconfig

- NEW - Create a new entry.- EDIT - Modify an entry.- DELETE - Remove an entry.- DEFAULT - Change the default.- LIST - Display a summary list of all entries.- DETAIL - Display details for one destination or all entries.- CLEAR - Remove all entries.- IMPORT - Import tables from a file.- EXPORT - Export tables to a file.[]> listl
Rate Bounce BounceDomain Limiting TLS Verification Profile========= ======== ======= ============ =========(Default) On Off Off (Default)Choose the operation you want to perform:- SETUP - Change global settings.- NEW - Create a new entry.- EDIT - Modify an entry.- DELETE - Remove an entry.- DEFAULT - Change the default.- LIST - Display a summary list of all entries.- DETAIL - Display details for one destination or all entries.- CLEAR - Remove all entries.- IMPORT - Import tables from a file.- EXPORT - Export tables to a file.[]> newEnter the domain you wish to configure.[]> partner.comDo you wish to configure a concurrency limit for partner.com? [Y]> yEnter the max concurrency limit for "partner.com".[500]> 100Do you wish to apply a messages-per-connection limit to this domain? [N]> nDo you wish to apply a recipient limit to this domain? [N]> yEnter the number of minutes used to measure the recipient limit.[60]> 60Enter the max number of recipients per 60 minutes for "partner.com".[]> 50Select how you want to apply the limits for partner.com:1. One limit applies to the entire domain for partner.com2. Separate limit for each mail exchanger IP address[1]> 1Select how the limits will be enforced:1. System Wide2. Per Virtual Gateway(tm)[1]> 1Do you wish to apply a specific TLS setting for this domain? [N]> nDo you wish to apply a specific bounce verification address tagging setting forthis domain? [N]> nDo you wish to apply a specific bounce profile to this domain? [N]> nThere are currently 3 entries configured.mail3.example.com> commitPlease enter some comments describing your changes:[]> Throttled delivery to partner.com in the destconfig tableDo you want to save the current configuration for rollback? [Y]> nChanges committed: Fri May 23 11:42:12 2014 GMT
Example: Bounce Profile and TLS SettingsIn this example, a new destconfig entry is configured for the domain newpartner.com. TLS connections arerequired. The example also shows the bounce profile named bouncepr1 (see Applying a Bounce Profile to aListener, on page 148) configured to be used for all email delivery to the domain newpartner.com .
mail3.example.com> destconfigThere is currently 1 entry configured.Choose the operation you want to perform:- SETUP - Change global settings.- NEW - Create a new entry.
CLI Reference Guide158
The Commands: Reference Examplesdestconfig

- EDIT - Modify an entry.- DELETE - Remove an entry.- DEFAULT - Change the default.- LIST - Display a summary list of all entries.- DETAIL - Display details for one destination or all entries.- CLEAR - Remove all entries.- IMPORT - Import tables from a file.- EXPORT - Export tables to a file.[]> newEnter the domain you wish to configure.[]> newpartner.comDo you wish to configure a concurrency limit for newpartner.com? [Y]> nDo you wish to apply a messages-per-connection limit to this domain? [N]> nDo you wish to apply a recipient limit to this domain? [N]> nDo you wish to apply a specific TLS setting for this domain? [N]> yDo you want to use TLS support?1. No2. Preferred3. Required4. Preferred(Verify)5. Required(Verify)[1]> 3You have chosen to enable TLS. Please use the 'certconfig' command to ensure that there isa valid certificate configured.Do you wish to apply a specific bounce verification address tagging setting for this domain?[N]> yPerform bounce verification address tagging? [N]> yDo you wish to apply a specific bounce profile to this domain? [N]> yPlease choose a bounce profile to apply:1. Default2. New Profile[1]> 1There are currently 2 entries configured.Choose the operation you want to perform:- SETUP - Change global settings.- NEW - Create a new entry.- EDIT - Modify an entry.- DELETE - Remove an entry.- DEFAULT - Change the default.- LIST - Display a summary list of all entries.- DETAIL - Display details for one destination or all entries.- CLEAR - Remove all entries.- IMPORT - Import tables from a file.- EXPORT - Export tables to a file.[]> detail
Rate Bounce BounceDomain Limiting TLS Verification Profile============== ======== ======= ============ =========newpartner.com Default Req On Default(Default) On Off Off (Default)Enter the domain name to view, or enter DEFAULT to view details for thedefault, or enter ALL to view details for all:[]> allnewpartner.comMaximum messages per connection: DefaultRate Limiting: DefaultTLS: RequiredBounce Verification Tagging: OnBounce Profile: DefaultDefaultRate Limiting:500 concurrent connectionsNo recipient limitLimits applied to entire domain, across all virtual gatewaysTLS: OffBounce Verification Tagging: OffThere are currently 2 entries configured.[]>mail3.example.com> commitPlease enter some comments describing your changes:[]> enabled TLS for delivery to newpartner.com using demo certificate
CLI Reference Guide 159
The Commands: Reference Examplesdestconfig

Do you want to save the current configuration for rollback? [Y]> nChanges committed: Fri May 23 11:42:12 2014 GMT
Example: Inbound “Shock Absorber”In this example, another destconfig entry is created to throttle mail to the internal groupware serverexchange.example.com . This “shock absorber” entry for your internal server throttles inbound delivery toyour internal groupware servers during periods of especially high volume traffic. In this example, the appliancewill never open more than ten simultaneous connections or deliver to more than 1000 recipients to the internalgroupware server exchange.example.com in any givenminute . No bounce profile or TLS setting is configured:
mail3.example.com> destconfigThere are currently 2 entries configured.Choose the operation you want to perform:- SETUP - Change global settings.- NEW - Create a new entry.- EDIT - Modify an entry.- DELETE - Remove an entry.- DEFAULT - Change the default.- LIST - Display a summary list of all entries.- DETAIL - Display details for one destination or all entries.- CLEAR - Remove all entries.- IMPORT - Import tables from a file.- CLEAR - Remove all entries.[]> newEnter the domain you wish to configure.[]> exchange.example.comDo you wish to configure a concurrency limit for exchange.example.com? [Y]> yEnter the max concurrency limit for "exchange.example.com".[500]> 10Do you wish to apply a recipient limit to this domain? [N]> yEnter the number of minutes used to measure the recipient limit.[60]> 1Enter the max number of recipients per 1 minutes for "exchange.example.com".[]> 1000Select how you want to apply the limits for exchange.example.com:1. One limit applies to the entire domain for exchange.example.com2. Separate limit for each mail exchanger IP address[1]> 1Select how the limits will be enforced:1. System Wide2. Per Virtual Gateway(tm)[1]> 1Do you wish to apply a specific TLS setting for this domain? [N]> nDo you wish to apply a specific bounce verification address tagging setting for this domain?[N]> nDo you wish to apply a specific bounce profile to this domain? [N]> nThere are currently 3 entries configured.Choose the operation you want to perform:- SETUP - Change global settings.- NEW - Create a new entry.- EDIT - Modify an entry.- DELETE - Remove an entry.- DEFAULT - Change the default.- LIST - Display a summary list of all entries.- DETAIL - Display details for one destination or all entries.- CLEAR - Remove all entries.- IMPORT - Import tables from a file.- CLEAR - Remove all entries.[]>mail3.example.com> commitPlease enter some comments describing your changes:[]> set up shock absorber for inbound mailDo you want to save the current configuration for rollback? [Y]> nChanges committed: Fri May 23 11:42:12 2014 GMT
CLI Reference Guide160
The Commands: Reference Examplesdestconfig

Example: Global SettingsIn this example, the TLS alert and certificate for TLS connections are configured.
mail3.example.com> destconfigChoose the operation you want to perform:- SETUP - Change global settings.- NEW - Create a new entry.- EDIT - Modify an entry.- DELETE - Remove an entry.- DEFAULT - Change the default.- LIST - Display a summary list of all entries.- DETAIL - Display details for one destination or all entries.- CLEAR - Remove all entries.- IMPORT - Import tables from a file.- EXPORT - Export tables to a file.[]> setupThe "Demo" certificate is currently configured. You may use "Demo", but this will not besecure.1. partner.com2. DemoPlease choose the certificate to apply:[1]> 1Do you want to send an alert when a required TLS connection fails? [N]> n
hostrate
DescriptionMonitor activity for a particular host
UsageCommit: This command does not require a ‘commit’.Cluster Management: This command is restricted to machine mode.
Batch Command: This command does not support a batch format
Example
mail3.example.com> hostrateRecipient host:[]> aol.comEnter the number of seconds between displays.[10]> 1
Time Host CrtCncOut ActvRcp ActvRcp DlvRcp HrdBncRcp SftBncEvtStatus Delta Delta Delta Delta
23:38:23 up 1 0 0 4 0 023:38:24 up 1 0 0 4 0 023:38:25 up 1 0 0 12 0 0^C
Use Control-C to stop the hostrate command.
CLI Reference Guide 161
The Commands: Reference Exampleshostrate

hoststatus
DescriptionGet the status of the given hostname.
UsageCommit: This command does not require a ‘commit’.Cluster Management: This command is restricted to machine mode.
Batch Command: This command does not support a batch format
Example
mail3.example.com> hoststatus
Recipient host:[]> aol.comHost mail status for: 'aol.com'Status as of: Fri Aug 8 11:12:00 2003Host up/down: upCounters:QueueSoft Bounced Events 0
CompletionCompleted Recipients 1Hard Bounced Recipients 1DNS Hard Bounces 05XX Hard Bounces 1Filter Hard Bounces 0Expired Hard Bounces 0Other Hard Bounces 0
Delivered Recipients 0Deleted Recipients 0
Gauges:QueueActive Recipients 0Unattempted Recipients 0Attempted Recipients 0
ConnectionsCurrent Outbound Connections 0Pending Outbound Connections 0
Oldest Message No MessagesLast Activity Fri Aug 8 11:04:24 2003Ordered IP addresses: (expiring at Fri Aug 8 11:34:24 2003)
Preference IPs15 64.12.137.121 64.12.138.89 64.12.138.12015 64.12.137.89 64.12.138.152 152.163.224.12215 64.12.137.184 64.12.137.89 64.12.136.5715 64.12.138.57 64.12.136.153 205.188.156.12215 64.12.138.57 64.12.137.152 64.12.136.8915 64.12.138.89 205.188.156.154 64.12.138.15215 64.12.136.121 152.163.224.26 64.12.137.18415 64.12.138.120 64.12.137.152 64.12.137.121
MX Records:Preference TTL Hostname15 52m24s mailin-01.mx.aol.com15 52m24s mailin-02.mx.aol.com15 52m24s mailin-03.mx.aol.com15 52m24s mailin-04.mx.aol.com
CLI Reference Guide162
The Commands: Reference Exampleshoststatus

Last 5XX Error:----------550 REQUESTED ACTION NOT TAKEN: DNS FAILURE(at Fri Aug 8 11:04:25 2003)----------
Virtual gateway information:============================================================example.com (PublicNet_017):
Host up/down: upLast Activity Wed Nov 13 13:47:02 2003Recipients 0
============================================================example.com (PublicNet_023):
Host up/down: upLast Activity Wed Nov 13 13:45:01 2003Recipients
imageanalysisconfig
DescriptionConfigure the IronPort Image Analysis settings
UsageCommit: This command requires a ‘commit’.Cluster Management: This command can be used in all three machine modes (cluster, group, machine).
Batch Command: This command does not support a batch format
Example
mail.example.com>imageanalysisconfigIronPort Image Analysis: EnabledImage Analysis Sensitivity: 65Verdict Ranges: Clean (0-49), Suspect(50-74), Inappropriate (75+)Skip small images with size less than 100 pixels (width or height)
(First time users see the license agreement displayed here.)Choose the operation you want to perform:- SETUP - Configure IronPort Image Analysis.[]> setupIronPort Image Analysis: EnabledWould you like to use IronPort Image Analysis? [Y]>Define the image analysis sensitivity. Enter a value between 0 (least sensitive) and 100(most sensitive). As sensitivity increases, so does the falsepositive rate. The default setting of 65 is recommended.[65]>Define the range for a CLEAN verdict. Enter the upper bound of the CLEAN range by enteringa value between 0 and 98. The default setting of 49 isrecommended.[49]>Define the range for a SUSPECT verdict. Enter the upper bound of the SUSPECT range byentering a value between 50 and 99. The default setting of 74 isrecommended.[74]>Would you like to skip scanning of images smaller than a specific size? [Y]>Please enter minimum image size to scan in pixels, representing either height or width ofa given image.[100]>
CLI Reference Guide 163
The Commands: Reference Examplesimageanalysisconfig

IronPort Image Analysis: EnabledImage Analysis Sensitivity: 65Verdict Ranges: Clean (0-49), Suspect(50-74), Inappropriate (75+)Skip small images with size less than 100 pixels (width or height)Choose the operation you want to perform:- SETUP - Configure IronPort Image Analysis.[]>
oldmessage
DescriptionDisplays the mid and headers of the oldest non-quarantine message on the system.
UsageCommit: This command does not require a commit.
Cluster Management: This command is restricted to machine mode..
Batch Command: This command does not support a batch format.
ExampleIn the following example, an older messages are displayed:
mail3.example.com>oldmessageMID 9: 1 hour 5 mins 35 secs oldReceived: from test02.com ([172.19.0.109])by test02.com with SMTP; 14 Feb 2007 22:11:37 -0800From: [email protected]: [email protected]: TestingMessage-Id: <[email protected]
rate
DescriptionMonitor message throughput
UsageCommit: This command does not require a ‘commit’.Cluster Management: This command is restricted to machine mode.
Batch Command: This command does not support a batch format.
CLI Reference Guide164
The Commands: Reference Examplesoldmessage

Example
mail3.example.com> rate
Enter the number of seconds between displays.[10]> 1Hit Ctrl-C to return to the main prompt.Time Connections Recipients Recipients Queue
In Out Received Delta Completed Delta K-Used23:37:13 10 2 41708833 0 40842686 0 6423:37:14 8 2 41708841 8 40842692 6 10523:37:15 9 2 41708848 7 40842700 8 7623:37:16 7 3 41708852 4 40842705 5 6423:37:17 5 3 41708858 6 40842711 6 6423:37:18 9 3 41708871 13 40842722 11 6723:37:19 7 3 41708881 10 40842734 12 6423:37:21 11 3 41708893 12 40842744 10 79^C
redirectrecipients
DescriptionRedirect all messages to another relay host.
Redirecting messages to a receiving domain that has /dev/null as its destination results in the loss ofmessages. The CLI does not display a warning if you redirect mail to such a domain. Check the SMTProute for the receiving domain before redirecting messages.
Danger
Redirecting recipients to a host or IP address that is not prepared to accept large volumes of SMTP mailfrom this host will cause messages to bounce and possibly result in the loss of mail.
Danger
UsageCommit: This command does not require a ‘commit’.Cluster Management: This command is restricted to machine mode.
Batch Command: This command supports a batch format.
Batch FormatThe batch format of the redirectrecipients command can be used to perform all the fuctions of the traditionalCLI command.
• Redirects all mail to another host name or IP address
redirectrecipients host <hostname>
CLI Reference Guide 165
The Commands: Reference Examplesredirectrecipients

ExampleThe following example redirects all mail to the example2.com host.
mail3.example.com> redirectrecipientsPlease enter the hostname or IP address of the machine you want to send all mail to.[]> example2.comWARNING: redirecting recipients to a host or IP address that is not prepared to accept largevolumes of SMTP mail from this hostwill cause messages to bounce and possibly result in the loss of mail.Are you sure you want to redirect all mail in the queue to "example2.com"? [N]> yRedirecting messages, please wait.246 recipients redirected.
resetcounters
DescriptionReset all of the counters in the system
UsageCommit: This command does not require a ‘commit’.Cluster Management: This command is restricted to machine mode.
Batch Command: This command does not support a batch format.
Example
mail3.example.com> resetcountersCounters reset: Mon Jan 01 12:00:01 2003
removemessage
DescriptionAttempts to safely remove a message for a given message ID.
The removemessage command can only remove messages that are in the work queue, retry queue, or adestination queue. Note that depending on the state of the system, valid and active messages may not be inany of those queues.
CLI Reference Guide166
The Commands: Reference Examplesresetcounters

UsageCommit: This command does not require a ‘commit’.Cluster Management: This command is restricted to machine mode.
Batch Command: This command does not support a batch format.
Example
example.com>removemessageEnter the MID to remove.[]> 1MID 1: 19 secs oldReceived: from example2.com ([172.16.0.102])by test02.com with SMTP; 01 Mar 2007 19:50:41 -0800
From: [email protected]: [email protected]: TestingMessage-Id: <[email protected]>Remove this message? [N]> y
showmessage
DescriptionShows the message and message body for a specified message ID.
UsageCommit: This command does not require a ‘commit’.Cluster Management: This command is restricted to machine mode.
Batch Command: This command does not support a batch format.
Example
example.com> showmessageMID 9: 1 hour 5 mins 35 secs oldReceived: from example2.com([172.19.0.109])by test02.com with SMTP; 14 Feb 2007 22:11:37 -0800
From: [email protected]: [email protected]: TestingMessage-Id: <[email protected]>This is the message body.
CLI Reference Guide 167
The Commands: Reference Examplesshowmessage

showrecipients
DescriptionShow messages from the queue by recipient host, Envelope From address, or all messages.
UsageCommit: This command does not require a ‘commit’.Cluster Management: This command is restricted to machine mode.
Batch Command: This command does support a batch format.
Batch FormatThe batch format of the showrecipients command can be used to perform all the fuctions of the traditionalCLI command.
• Find messages by a recipient host name
showrecipients host <hostname>
• Find messages by an envelope from address
showrecipients [sender_options] <sender_email>
The following sender_option is available:
--match-case Case-sensitive matching for the username portion of an address.
• Find all messages
showrecipients all
ExampleThe following example shows messages in the queue for all recipient hosts.
mail3.example.com> showrecipientsPlease select how you would like to show messages:1. By recipient host.2. By Envelope From address.3. All.[1]> 3Showing messages, please wait.
CLI Reference Guide168
The Commands: Reference Examplesshowrecipients

MID/ Bytes/ Sender/ Subject[RID] [Atmps] Recipient1527 1230 [email protected] Testing[0] [0] [email protected] 1230 [email protected] Testing[0] [0] [email protected] 1230 [email protected] Testing[0] [0] [email protected] 1230 [email protected] Testing[0] [0] [email protected] 1230 [email protected] Testing[0] [0] [email protected] 1230 [email protected] Testing[0] [0] [email protected] 1230 [email protected] Testing[0] [0] [email protected] 1230 [email protected] Testing[0] [0] [email protected] 1230 [email protected] Testing[0] [0] [email protected] 1230 [email protected] Testing[0] [0] [email protected]
status
UsageCommit: This command does not require a ‘commit’.Cluster Management: This command can be used in all three machine modes (cluster, group, machine).
Batch Command: This command does not support a batch format.
Examplemail.example.com> status detail
Status as of: Mon Sep 08 00:01:44 2014 GMTUp since: Tue Aug 26 17:24:16 2014 GMT(12d 6h 37m 28s)Last counter reset: NeverSystem status: OnlineOldest Message: No MessagesFeature - IronPort Anti-Spam: 1459 daysFeature - Incoming Mail Handling: PerpetualFeature - Outbreak Filters: 1459 daysCounters: Reset Uptime LifetimeReceivingMessages Received 2 2 2Recipients Received 2 2 2
RejectionRejected Recipients 0 0 0Dropped Messages 0 0 0
QueueSoft Bounced Events 0 0 0
CompletionCompleted Recipients 0 0 0
Current IDsMessage ID (MID) 2Injection Conn. ID (ICID) 0Delivery Conn. ID (DCID) 13
Gauges: CurrentConnectionsCurrent Inbound Conn. 0
CLI Reference Guide 169
The Commands: Reference Examplesstatus

Current Outbound Conn. 0QueueActive Recipients 2Messages In Work Queue 0Kilobytes Used 184Kilobytes Free 8,388,424
QuarantineMessages In QuarantinePolicy, Virus and Outbreak 0
Kilobytes In QuarantinePolicy, Virus and Outbreak 0
tophosts
DescriptionTo get immediate information about the email queue and determine if a particular recipient host has deliveryproblems— such as a queue buildup— use the tophosts command. The tophosts command returns a list ofthe top 20 recipient hosts in the queue. The list can be sorted by a number of different statistics, includingactive recipients, connections out, delivered recipients, soft bounced events, and hard bounced recipients.
UsageCommit: This command does not require a ‘commit’.Cluster Management: This command is restricted to machine mode.
Batch Command: This command does not support a batch format.
Example
mail3.example.com> tophostsSort results by:1. Active Recipients2. Connections Out3. Delivered Recipients4. Hard Bounced Recipients5. Soft Bounced Events[1]> 1Status as of: Fri Mar 13 06:09:18 2015 GMTHosts marked with '*' were down as of the last delivery attempt.
Active Conn. Deliv. Soft Hard# Recipient Host Recip. Out Recip. Bounced Bounced1* example.com 2 0 0 0 02 the.encryption.queue 0 0 0 0 03 the.euq.queue 0 0 0 0 04 the.euq.release.queue 0 0 0 0 0
topin
DescriptionDisplay the top hosts by number of incoming connections
CLI Reference Guide170
The Commands: Reference Examplestophosts

UsageCommit: This command does not require a ‘commit’.Cluster Management: This command is restricted to machine mode.
Batch Command: This command does not support a batch format.
Example
mail3.example.com> topin
Status as of: Sat Aug 23 21:50:54 2003# Remote hostname Remote IP addr. listener Conn. In1mail.remotedomain01.com 172.16.0.2 Incoming01 102 mail.remotedomain01.com 172.16.0.2 Incoming02 103 mail.remotedomain03.com 172.16.0.4 Incoming01 54 mail.remotedomain04.com 172.16.0.5 Incoming02 45 mail.remotedomain05.com 172.16.0.6 Incoming01 36 mail.remotedomain06.com 172.16.0.7 Incoming02 37 mail.remotedomain07.com 172.16.0.8 Incoming01 38 mail.remotedomain08.com 172.16.0.9 Incoming01 39 mail.remotedomain09.com 172.16.0.10 Incoming01 310 mail.remotedomain10.com 172.16.0.11 Incoming01 211 mail.remotedomain11.com 172.16.0.12 Incoming01 212 mail.remotedomain12.com 172.16.0.13 Incoming02 213 mail.remotedomain13.com 172.16.0.14 Incoming01 214 mail.remotedomain14.com 172.16.0.15 Incoming01 215 mail.remotedomain15.com 172.16.0.16 Incoming01 216 mail.remotedomain16.com 172.16.0.17 Incoming01 217 mail.remotedomain17.com 172.16.0.18 Incoming01 118 mail.remotedomain18.com 172.16.0.19 Incoming02 119 mail.remotedomain19.com 172.16.0.20 Incoming01 120 mail.remotedomain20.com 172.16.0.21 Incoming01 1
unsubscribe
DescriptionUpdate the global unsubscribe list
UsageCommit: This command requires a ‘commit’.Cluster Management: This command can be used in all three machine modes (cluster, group, machine).
Batch Command: This command does not support a batch format.
CLI Reference Guide 171
The Commands: Reference Examplesunsubscribe

ExampleIn this example, the address [email protected] is added to the Global Unsubscribe list, and the feature isconfigured to hard bounce messages. Messages sent to this address will be bounced; the appliance will bouncethe message immediately prior to delivery.
mail3.example.com> unsubscribeGlobal Unsubscribe is enabled. Action: drop.Choose the operation you want to perform:- NEW - Create a new entry.- IMPORT - Import entries from a file.- SETUP - Configure general settings.[]> newEnter the unsubscribe key to add. Partial addresses such as "@example.com"or "user@" are allowed, as are IP addresses. Partial hostnames such as "@.example.com" areallowed.[]> [email protected] Address '[email protected]' added.Global Unsubscribe is enabled. Action: drop.Choose the operation you want to perform:- NEW - Create a new entry.- DELETE - Remove an entry.- PRINT - Display all entries.- IMPORT - Import entries from a file.- EXPORT - Export all entries to a file.- SETUP - Configure general settings.- CLEAR - Remove all entries.[]> setupDo you want to enable the Global Unsubscribe feature? [Y]> yWould you like matching messages to be dropped or bounced?1. Drop2. Bounce[1]> 2Global Unsubscribe is enabled. Action: bounce.Choose the operation you want to perform:- NEW - Create a new entry.- DELETE - Remove an entry.- PRINT - Display all entries.- IMPORT - Import entries from a file.- EXPORT - Export all entries to a file.- SETUP - Configure general settings.- CLEAR - Remove all entries.[]>mail3.example.com> commitPlease enter some comments describing your changes:[]> Added username “[email protected]” to global unsubscribeDo you want to save the current configuration for rollback? [Y]> nChanges committed: Fri May 23 11:42:12 2014 GMT
workqueue
DescriptionDisplay and/or alter work queue pause status
UsageCommit: This command does not require a ‘commit’.Cluster Management: This command is restricted to machine mode.
CLI Reference Guide172
The Commands: Reference Examplesworkqueue

Batch Command: This command does not support a batch format.
Example
mail3.example.com> workqueueStatus: OperationalMessages: 1243Manually pause work queue? This will only affect unprocessed messages. [N]> yReason for pausing work queue:[]> checking LDAP serverStatus: Paused by admin: checking LDAP serverMessages: 1243
Entering a reason is optional. If you do not enter a reason, the system logs the reason as “ operator paused.”
Note
In this example, the work queue is resumed:
mail3.example.com> workqueueStatus: Paused by admin: checking LDAP serverMessages: 1243Resume the work queue? [Y]> yStatus: OperationalMessages: 1243
Networking Configuration / Network ToolsThis section contains the following CLI commands:
• etherconfig, on page 174
• interfaceconfig, on page 175
• nslookup, on page 177
• netstat, on page 178
• packetcapture, on page 179
• ping, on page 180
• ping6, on page 181
• routeconfig, on page 182
• setgateway, on page 184
• sethostname, on page 185
• smtproutes, on page 186
• sslconfig, on page 187
• sslv3config, on page 189
• telnet, on page 190
• traceroute, on page 190
CLI Reference Guide 173
The Commands: Reference ExamplesNetworking Configuration / Network Tools

• traceroute6, on page 191
etherconfig
DescriptionConfigure Ethernet settings, including media settings, NIC pairing, VLAN configuration, and DSRconfiguration.
UsageCommit: This command requires a ‘commit’.Cluster Management: This command is restricted to machine mode.
Batch Command: This command does not support a batch format.
Example
mail3.example.com> etherconfigChoose the operation you want to perform:- MEDIA - View and edit ethernet media settings.- VLAN - View and configure VLANs.- LOOPBACK - View and configure Loopback.- MTU - View and configure MTU.- MULTICAST - Accept or reject ARP replies with a multicast address.[]> vlanVLAN interfaces:Choose the operation you want to perform:- NEW - Create a new VLAN.[]> newVLAN tag ID for the interface (Ex: "34"):[]> 12Enter the name or number of the ethernet interface you wish bind to:1. Data 12. Data 23. Management[1]> 1VLAN interfaces:1. VLAN 12 (Data 1)Choose the operation you want to perform:- NEW - Create a new VLAN.- EDIT - Edit a VLAN.- DELETE - Delete a VLAN.[]>Choose the operation you want to perform:- MEDIA - View and edit ethernet media settings.- VLAN - View and configure VLANs.- LOOPBACK - View and configure Loopback.- MTU - View and configure MTU.- MULTICAST - Accept or reject ARP replies with a multicast address.[]> loopbackCurrently configured loopback interface:Choose the operation you want to perform:- ENABLE - Enable Loopback Interface.[]>Choose the operation you want to perform:- MEDIA - View and edit ethernet media settings.- VLAN - View and configure VLANs.- LOOPBACK - View and configure Loopback.
CLI Reference Guide174
The Commands: Reference Examplesetherconfig

- MTU - View and configure MTU.- MULTICAST - Accept or reject ARP replies with a multicast address.[]> mtuEthernet interfaces:1. Data 1 default mtu 15002. Data 2 default mtu 15003. Management default mtu 15004. VLAN 12 default mtu 1500Choose the operation you want to perform:- EDIT - Edit an ethernet interface.[]> editEnter the name or number of the ethernet interface you wish to edit.[]> pair1That value is not valid.Enter the name or number of the ethernet interface you wish to edit.[]> 12That value is not valid.Enter the name or number of the ethernet interface you wish to edit.[]> 2Please enter a non-default (1500) MTU value for the Data 2 interface.[]> 1200Ethernet interfaces:1. Data 1 default mtu 15002. Data 2 mtu 12003. Management default mtu 15004. VLAN 12 default mtu 1500Choose the operation you want to perform:- EDIT - Edit an ethernet interface.[]>
interfaceconfig
DescriptionConfigure the interface. You can create, edit, or delete interfaces. You can enable FTP, change an IP address,and configure Ethernet IP addresses.
UsageCommit: This command requires a ‘commit’.Cluster Management: This command is restricted to machine mode.
Batch Command: This command supports a batch format.
Batch FormatThe batch format of the interfaceconfig command can be used to perform all the fuctions of the traditionalCLI command.
CLI Reference Guide 175
The Commands: Reference Examplesinterfaceconfig

• Creating a new interface
interfaceconfig new <name>
<ethernet interface>
<hostname>
--ip=IPv4 Address/Netmask
--ip6=IPv6 Address/Prefix Lenght
[--ftp[=<port>]]
[--telnet[=<port>]]
[--ssh[=<port>]]
[--http][=<port>]
[--https[=<port>]]
[--euq_http[=<port>]]
[--euq_https][=<port>]
[--ccs[=<port>]].
FTP is available only on IPv4.
• Deleting an interface
interfaceconfig delete <name>
Example: Configuring an Interface
mail.example.com> interfaceconfigCurrently configured interfaces:1. Management (10.76.69.149/24 on Management: mail.example.com)Choose the operation you want to perform:- NEW - Create a new interface.- EDIT - Modify an interface.- GROUPS - Define interface groups.- DELETE - Remove an interface.[]> editEnter the number of the interface you wish to edit.[]> 1IP interface name (Ex: "InternalNet"):[Management]>
CLI Reference Guide176
The Commands: Reference Examplesinterfaceconfig

Would you like to configure an IPv4 address for this interface (y/n)? [Y]>IPv4 Address (Ex: 192.168.1.2 ):[1.1.1.1]>Netmask (Ex: "24", "255.255.255.0" or "0xffffff00"):[0xffffffff]>Would you like to configure an IPv6 address for this interface (y/n)? [N]> nEthernet interface:1. Data 12. Data 23. Management[3]>Hostname:[mail.example.com]>Do you want to enable SSH on this interface? [Y]>Which port do you want to use for SSH?[22]>Do you want to enable FTP on this interface? [N]>Do you want to enable Cluster Communication Service on this interface? [N]>Do you want to enable HTTP on this interface? [Y]>Which port do you want to use for HTTP?[80]>Do you want to enable HTTPS on this interface? [Y]>Which port do you want to use for HTTPS?[443]>Do you want to enable Spam Quarantine HTTP on this interface? [N]>Do you want to enable Spam Quarantine HTTPS on this interface? [N]>Do you want to enable AsyncOS API (Monitoring) HTTP on this interface? [N]> yWhich port do you want to use for AsyncOS API (Monitoring) HTTP?[6080]>Do you want to enable AsyncOS API (Monitoring) HTTPS on this interface? [N]> yWhich port do you want to use for AsyncOS API (Monitoring) HTTPS?[6443]>The "Demo" certificate is currently configured. You may use "Demo", but this will not besecure. To assure privacy, run "certconfig" first.Both HTTP and HTTPS are enabled for this interface, should HTTP requests redirect to thesecure service? [Y]>You have edited the interface you are currently logged into. Are you sure you want tochange it? [Y]>Currently configured interfaces:1. Management (10.76.69.149/24 on Management: mail.example.com)Choose the operation you want to perform:- NEW - Create a new interface.- EDIT - Modify an interface.- GROUPS - Define interface groups.- DELETE - Remove an interface.[]>
nslookup
DescriptionUse the nslookup command to check the DNS functionality.
The nslookup command can confirm that the appliance is able to reach and resolve hostnames and IP addressesfrom a working DNS (domain name service) server.
Table 10: nslookup Command Query Types
DescriptionQuery Type
the host's Internet address
the canonical name for an aliasCNAME
CLI Reference Guide 177
The Commands: Reference Examplesnslookup
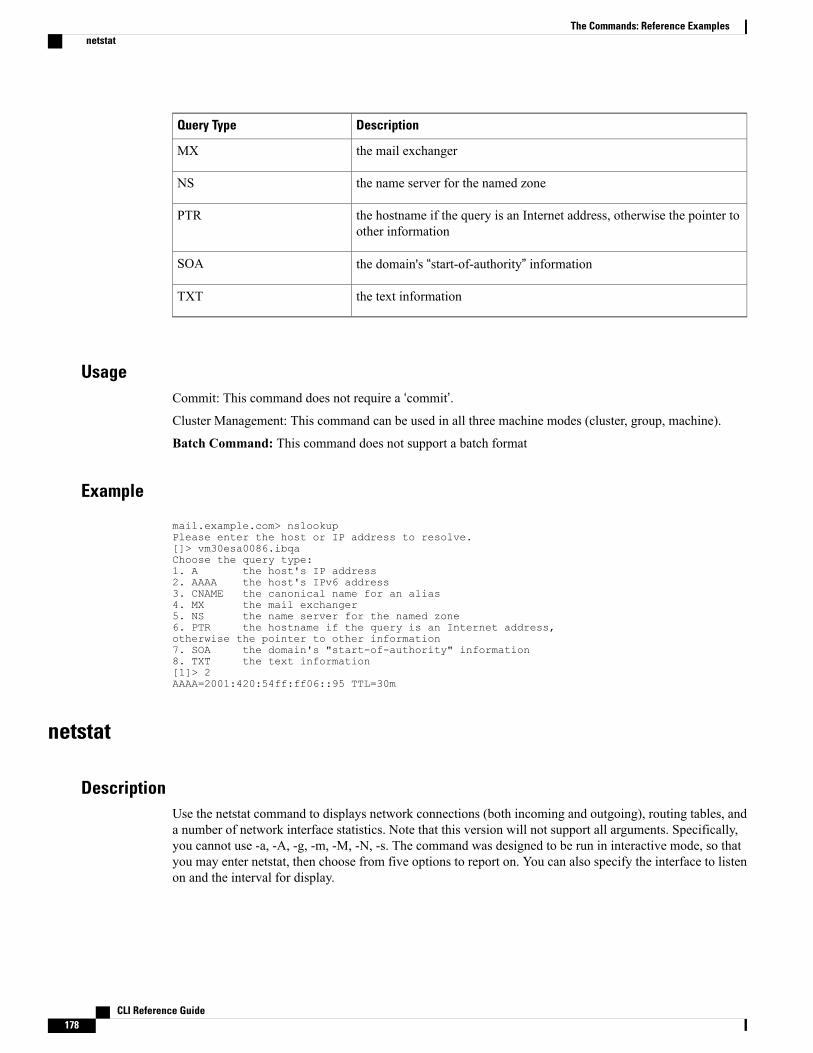
DescriptionQuery Type
the mail exchangerMX
the name server for the named zoneNS
the hostname if the query is an Internet address, otherwise the pointer toother information
PTR
the domain's “start-of-authority” informationSOA
the text informationTXT
UsageCommit: This command does not require a ‘commit’.Cluster Management: This command can be used in all three machine modes (cluster, group, machine).
Batch Command: This command does not support a batch format
Example
mail.example.com> nslookupPlease enter the host or IP address to resolve.[]> vm30esa0086.ibqaChoose the query type:1. A the host's IP address2. AAAA the host's IPv6 address3. CNAME the canonical name for an alias4. MX the mail exchanger5. NS the name server for the named zone6. PTR the hostname if the query is an Internet address,otherwise the pointer to other information7. SOA the domain's "start-of-authority" information8. TXT the text information[1]> 2AAAA=2001:420:54ff:ff06::95 TTL=30m
netstat
DescriptionUse the netstat command to displays network connections (both incoming and outgoing), routing tables, anda number of network interface statistics. Note that this version will not support all arguments. Specifically,you cannot use -a, -A, -g, -m, -M, -N, -s. The command was designed to be run in interactive mode, so thatyou may enter netstat, then choose from five options to report on. You can also specify the interface to listenon and the interval for display.
CLI Reference Guide178
The Commands: Reference Examplesnetstat

UsageCommit: This command does not require a ‘commit’.Cluster Management: This command is restricted to machine mode.
Batch Command: This command does not support a batch format
Example
example.com> netstatChoose the information you want to display:1. List of active sockets.2. State of network interfaces.3. Contents of routing tables.4. Size of the listen queues.5. Packet traffic information.[1]> 2Select the ethernet interface whose state you wish to display:1. Data 12. Data 23. Management4. ALL[]> 1Show the number of bytes in and out? [N]>Show the number of dropped packets? [N]> yName Mtu Network Address Ipkts Ierrs OpktsOerrs Coll DropData 1 1500 197.19.1/24 example.com 30536 - 5 -- -example.com>
packetcapture
DescriptionUse the netstat command to displays network connections (both incoming and outgoing), routing tables, anda number of network interface statistics. Note that this version will not support all arguments. Specifically,you cannot use -a, -A, -g, -m, -M, -N, -s. The command was designed to be run in interactive mode, so thatyou may enter netstat, then choose from five options to report on. You can also specify the interface to listenon and the interval for display.
UsageCommit: This command does not require a ‘commit’.Cluster Management: This command can be used in all three machine modes (cluster, group, machine).
Batch Command: This command does not support a batch format
Example
mail.example.com> packetcaptureCapture Information:
CLI Reference Guide 179
The Commands: Reference Examplespacketcapture
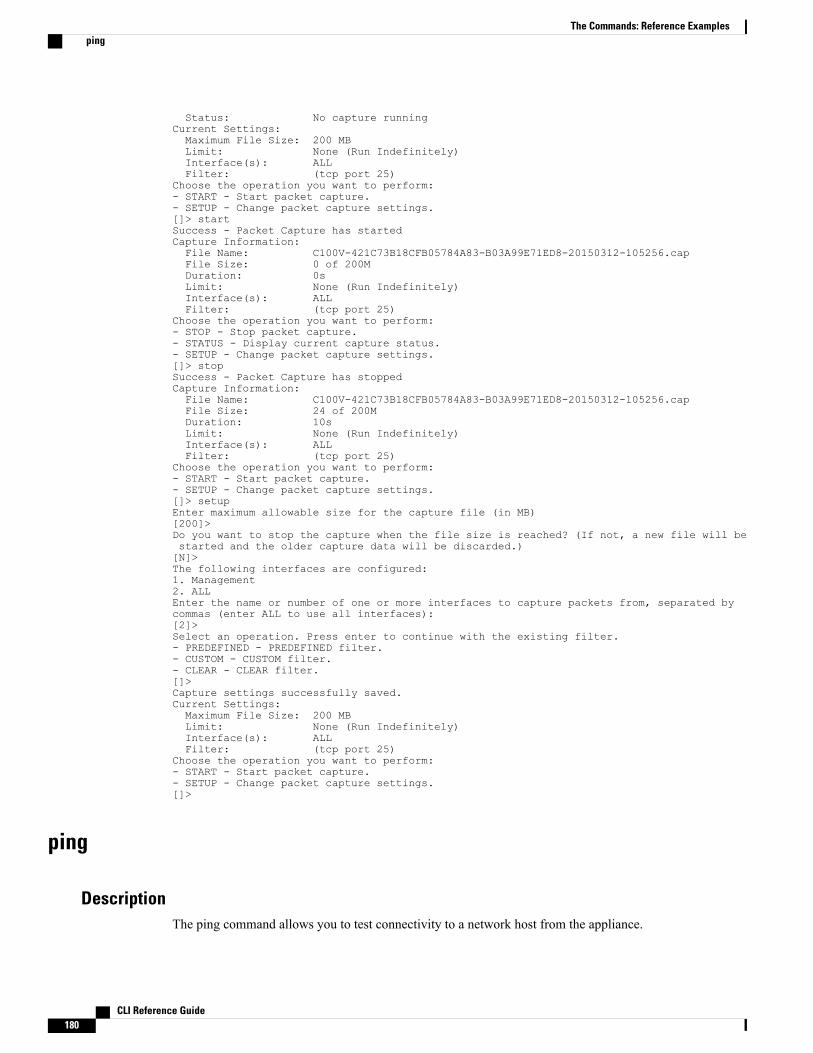
Status: No capture runningCurrent Settings:Maximum File Size: 200 MBLimit: None (Run Indefinitely)Interface(s): ALLFilter: (tcp port 25)
Choose the operation you want to perform:- START - Start packet capture.- SETUP - Change packet capture settings.[]> startSuccess - Packet Capture has startedCapture Information:File Name: C100V-421C73B18CFB05784A83-B03A99E71ED8-20150312-105256.capFile Size: 0 of 200MDuration: 0sLimit: None (Run Indefinitely)Interface(s): ALLFilter: (tcp port 25)
Choose the operation you want to perform:- STOP - Stop packet capture.- STATUS - Display current capture status.- SETUP - Change packet capture settings.[]> stopSuccess - Packet Capture has stoppedCapture Information:File Name: C100V-421C73B18CFB05784A83-B03A99E71ED8-20150312-105256.capFile Size: 24 of 200MDuration: 10sLimit: None (Run Indefinitely)Interface(s): ALLFilter: (tcp port 25)
Choose the operation you want to perform:- START - Start packet capture.- SETUP - Change packet capture settings.[]> setupEnter maximum allowable size for the capture file (in MB)[200]>Do you want to stop the capture when the file size is reached? (If not, a new file will bestarted and the older capture data will be discarded.)[N]>The following interfaces are configured:1. Management2. ALLEnter the name or number of one or more interfaces to capture packets from, separated bycommas (enter ALL to use all interfaces):[2]>Select an operation. Press enter to continue with the existing filter.- PREDEFINED - PREDEFINED filter.- CUSTOM - CUSTOM filter.- CLEAR - CLEAR filter.[]>Capture settings successfully saved.Current Settings:Maximum File Size: 200 MBLimit: None (Run Indefinitely)Interface(s): ALLFilter: (tcp port 25)
Choose the operation you want to perform:- START - Start packet capture.- SETUP - Change packet capture settings.[]>
ping
DescriptionThe ping command allows you to test connectivity to a network host from the appliance.
CLI Reference Guide180
The Commands: Reference Examplesping

UsageCommit: This command does not require a ‘commit’.Cluster Management: This command is restricted to machine mode. It is further restricted to the login host(i.e., the specific machine you are logged onto). This command requires access to the local file system.
Batch Command: This command does not support a batch format.
Example
mail3.example.com> pingWhich interface do you want to send the pings from?1. Auto2. Management (192.168.42.42/24: mail3.example.com)3. PrivateNet (192.168.1.1/24: mail3.example.com)4. PublicNet (192.168.2.1/24: mail3.example.com)[1]> 1Please enter the host you wish to ping.[]> anotherhost.example.comPress Ctrl-C to stop.PING anotherhost.example.com (x.x.x.x): 56 data bytes64 bytes from 10.19.0.31: icmp_seq=0 ttl=64 time=1.421 ms64 bytes from 10.19.0.31: icmp_seq=1 ttl=64 time=0.126 ms64 bytes from 10.19.0.31: icmp_seq=2 ttl=64 time=0.118 ms64 bytes from 10.19.0.31: icmp_seq=3 ttl=64 time=0.115 ms64 bytes from 10.19.0.31: icmp_seq=4 ttl=64 time=0.139 ms64 bytes from 10.19.0.31: icmp_seq=5 ttl=64 time=0.125 ms64 bytes from 10.19.0.31: icmp_seq=6 ttl=64 time=0.124 ms64 bytes from 10.19.0.31: icmp_seq=7 ttl=64 time=0.122 ms64 bytes from 10.19.0.31: icmp_seq=8 ttl=64 time=0.126 ms64 bytes from 10.19.0.31: icmp_seq=9 ttl=64 time=0.133 ms64 bytes from 10.19.0.31: icmp_seq=10 ttl=64 time=0.115 ms^C--- anotherhost.example.com ping statistics ---11 packets transmitted, 11 packets received, 0% packet lossround-trip min/avg/max/stddev = 0.115/0.242/1.421/0.373 ms^C
You must use Control-C to end the ping command.Note
ping6
DescriptionPing a network host using IPv6
UsageCommit: This command does not require a ‘commit’.Cluster Management: This command is restricted to machine mode. It is further restricted to the login host(i.e., the specific machine you are logged onto). This command requires access to the local file system.
CLI Reference Guide 181
The Commands: Reference Examplesping6

Batch Command: This command does not support a batch format.
Example
mail.example.com> ping6Which interface do you want to send the pings from?1. Auto2. Management (192.168.42.42/24: mail3.example.com)[1]> 1Please enter the host you wish to ping.[]> anotherhost.example.comPress Ctrl-C to stop.
You must use Control-C to end the ping6 command.Note
routeconfig
DescriptionThe routeconfig command allows you to create, edit, and delete static routes for TCP/IP traffic. By default,traffic is routed through the default gateway set with the setgateway command. However, AsyncOS allowsspecific routing based on destination.
Routes consist of a nickname (for future reference), a destination, and a gateway. A gateway (the next hop)is an IP address such as 10.1.1.2 . The destination can be one of two things:
• an IP address, such as 192.168.14.32
• a subnet using CIDR notation. For example, 192.168.5.0/24 means the entire class C network from192.168.5.0 to 192.168.5.255 .
For IPv6 addresses, you can use the following formats:
• 2620:101:2004:4202::0-2620:101:2004:4202::ff
• 2620:101:2004:4202::
• 2620:101:2004:4202::23
• 2620:101:2004:4202::/64
The command presents a list of all currently configured TCP/IP routes for you to select from using the editand delete subcommands.
UsageCommit: This command requires a ‘commit’.Cluster Management: This command is restricted to machine mode.
Batch Command: This command supports a batch format.
CLI Reference Guide182
The Commands: Reference Examplesrouteconfig

Batch FormatThe batch format of the smtproutes command can be used to perform all the fuctions of the traditional CLIcommand. You can choose whether to use IPv4 or IPv6 addresses for the route.
• Creating a static route:
routeconfig new 4|6 <name> <destination_address> <gateway_ip>
Table 11: routeconfig Arguments
DescriptionArgument
The IP version (IPv4 or IPv6) to apply thiscommand to. For clear and print this option can beomitted and the command applies to both versions.
4 | 6
The name of the route.name
The IP or CIDR address to match on for outgoingIP traffic.
destination_address
The IP address to send this traffic to.gateway_ip
• Editing a static route:
routeconfig edit 4|6 <name> <new_name> <destination_address> <gateway_ip>
• Deleting a static route:
routeconfig delete 4|6 <name>
• Deleting all static routes:
routeconfig clear [4|6]
• Printing a list of static routes:
routeconfig print [4|6]
CLI Reference Guide 183
The Commands: Reference Examplesrouteconfig

Example
mail3.example.com> routeconfigConfigure routes for:1. IPv42. IPv6[1]>Currently configured routes:Choose the operation you want to perform:- NEW - Create a new route.[]> newPlease create a name for the route:[]> EuropeNetPlease enter the destination IPv4 address to match on.CIDR addresses such as 192.168.42.0/24 are also allowed.[]> 192.168.12.0/24Please enter the gateway IP address for traffic to 192.168.12.0/24:[]> 192.168.14.4Currently configured routes:1. EuropeNet Destination: 192.168.12.0/24 Gateway: 192.168.14.4Choose the operation you want to perform:- NEW - Create a new route.- EDIT - Modify a route.- DELETE - Remove a route.- CLEAR - Clear all entries.[]>mail3.example.com> routeconfigConfigure routes for:1. IPv42. IPv6[1]> 2Currently configured routes:Choose the operation you want to perform:- NEW - Create a new route.[]> newPlease create a name for the route:[]> EuropeIPv6NetPlease enter the destination IPv6 address to match on.CIDR addresses such as 2001:db8::/32 are also allowed.[]> 2620:101:2004:4202::/6Please enter the gateway IP address for traffic to 2620:101:2004:4202::/6:[]> 2620:101:2004:4202::23Currently configured routes:1. EuropeIPv6Net Destination: 2620:101:2004:4202::/6 Gateway:2620:101:2004:4202::23Choose the operation you want to perform:- NEW - Create a new route.- EDIT - Modify a route.- DELETE - Remove a route.- CLEAR - Clear all entries.[]>
setgateway
DescriptionThe setgateway command configures the default next-hop intermediary through which packets should berouted. Alternate (non-default) gateways are configured using the routeconfig command.
CLI Reference Guide184
The Commands: Reference Examplessetgateway

UsageCommit: This command requires a ‘commit’.Cluster Management: This command can be used in all three machine modes (cluster, group, machine).
Batch Command: This command does not support a batch format.
Example
mail3.example.com> setgatewayWarning: setting an incorrect default gateway may cause the current connection to beinterrupted when the changes are committed.Enter new default gateway:[10.1.1.1]> 192.168.20.1mail3.example.com> commitPlease enter some comments describing your changes:[]> changed default gateway to 192.168.20.1Do you want to save the current configuration for rollback? [Y]> nChanges committed: Fri May 23 11:42:12 2014 GMT
sethostname
DescriptionThe hostname is used to identify the system at the CLI prompt. You must enter a fully-qualified hostname.The sethostname command sets the name of the Email Security appliance. The new hostname does not takeeffect until you issue the commit command.
UsageCommit: This command requires a ‘commit’.Cluster Management: This command can be used in all three machine modes (cluster, group, machine).
Batch Command: This command does not support a batch format.
Example
oldname.example.com> sethostname[oldname.example.com]> mail3.example.comoldname.example.com>
For the hostname change to take effect, you must enter the commit command. After you have successfullycommitted the hostname change, the new name appears in the CLI prompt:
oldname.example.com> commitPlease enter some comments describing your changes:[]> Changed System HostnameDo you want to save the current configuration for rollback? [Y]> nChanges committed: Fri May 23 11:42:12 2014 GMT
CLI Reference Guide 185
The Commands: Reference Examplessethostname

The new hostname appears in the prompt as follows:
mail3.example.com>
smtproutes
DescriptionSet up permanent domain redirections.
UsageCommit: This command requires a ‘commit’.Cluster Management: This command can be used in all three machine modes (cluster, group, machine).
Batch Command: This command supports a batch format.
Batch FormatThe batch format of the smtproutes command can be used to perform all the fuctions of the traditional CLIcommand.
• Creating a new SMTP route
smtproutes new <source> <destination> [destination] [destination] [...]
• Deleting an existing SMTP route
smtproutes delete <source>
• Clear a listing of SMTP routes
smtproutes clear
• Print a listing of SMTP routes
smtproutes print
• Import a listing of SMTP routes
smtproutes import <filenames>
CLI Reference Guide186
The Commands: Reference Examplessmtproutes

• Export a listing of SMTP routes
smtproutes export <filenames>
ExampleIn the following example, the smptroutes command is used to construct a route (mapping) for the domainexample.com to relay1.example.com , relay2.example.com , and backup-relay.example.com . Use /pri=# tospecify a destination priority. THE # should be from 0-65535, with larger numbers indicating decreasingpriority. If unspecified, the priority defaults to 0.
(Note that youmay have constructed the samemapping during the systemsetup commandwhen you configuredthe InboundMail public listener.)
mail3.example.com> smtproutesThere are no routes configured.Choose the operation you want to perform:- NEW - Create a new route.- IMPORT - Import new routes from a file.[]> newEnter the domain for which you want to set up a permanent route.Partial hostnames such as ".example.com" are allowed.Use "ALL" for the default route.[]> example.comEnter the destination hosts, separated by commas, which you want mailfor example.com to be delivered.Enter USEDNS by itself to use normal DNS resolution for this route.Enter /dev/null by itself if you wish to discard the mail.Enclose in square brackets to force resolution via address (A)records, ignoring any MX records.[]> relay1.example.com/pri=10, relay2.example.com, backup-relay.example.comMapping for example.com to relay1.example.com, relay2.example.com,backup-relay.example.com/pri=10 created.There are currently 1 routes configured.Choose the operation you want to perform:- NEW - Create a new route.- EDIT - Edit destinations of an existing route.- DELETE - Remove a route.- PRINT - Display all routes.- IMPORT - Import new routes from a file.- EXPORT - Export all routes to a file.- CLEAR - Remove all routes.[]>
sslconfig
DescriptionConfigure SSL settings for the appliance.
You cannot change server and client methods in the FIPS 140-2 compliance mode.Note
CLI Reference Guide 187
The Commands: Reference Examplessslconfig

UsageCommit: This command requires a ‘commit’.Cluster Management:This command can be used in all three machine modes (cluster, group, machine).
Batch Command: This command does not support a batch format.
Example
mail.example.com> sslconfigsslconfig settings:GUI HTTPS method: sslv3tlsv1GUI HTTPS ciphers:
RC4-SHARC4-MD5ALL
Inbound SMTP method: sslv3tlsv1Inbound SMTP ciphers:
RC4-SHARC4-MD5ALL
Outbound SMTP method: sslv3tlsv1Outbound SMTP ciphers:
RC4-SHARC4-MD5ALL
Choose the operation you want to perform:- GUI - Edit GUI HTTPS ssl settings.- INBOUND - Edit Inbound SMTP ssl settings.- OUTBOUND - Edit Outbound SMTP ssl settings.- VERIFY - Verify and show ssl cipher list.[]> guiEnter the GUI HTTPS ssl method you want to use.1. SSL v2.2. SSL v33. TLS v14. SSL v2 and v35. SSL v3 and TLS v16. SSL v2, v3 and TLS v1[5]> 6Enter the GUI HTTPS ssl cipher you want to use.[RC4-SHA:RC4-MD5:ALL]>sslconfig settings:GUI HTTPS method: sslv2sslv3tlsv1GUI HTTPS ciphers:
RC4-SHARC4-MD5ALL
Inbound SMTP method: sslv3tlsv1Inbound SMTP ciphers:
RC4-SHARC4-MD5ALL
Outbound SMTP method: sslv3tlsv1Outbound SMTP ciphers:
RC4-SHARC4-MD5ALL
Choose the operation you want to perform:- GUI - Edit GUI HTTPS ssl settings.- INBOUND - Edit Inbound SMTP ssl settings.- OUTBOUND - Edit Outbound SMTP ssl settings.- VERIFY - Verify and show ssl cipher list.[]> inboundEnter the inbound SMTP ssl method you want to use.1. SSL v2.
CLI Reference Guide188
The Commands: Reference Examplessslconfig

2. SSL v33. TLS v14. SSL v2 and v35. SSL v3 and TLS v16. SSL v2, v3 and TLS v1[5]> 6Enter the inbound SMTP ssl cipher you want to use.[RC4-SHA:RC4-MD5:ALL]>sslconfig settings:GUI HTTPS method: sslv2sslv3tlsv1GUI HTTPS ciphers:
RC4-SHARC4-MD5ALL
Inbound SMTP method: sslv2sslv3tlsv1Inbound SMTP ciphers:
RC4-SHARC4-MD5ALL
Outbound SMTP method: sslv3tlsv1Outbound SMTP ciphers:
RC4-SHARC4-MD5ALL
Choose the operation you want to perform:- GUI - Edit GUI HTTPS ssl settings.- INBOUND - Edit Inbound SMTP ssl settings.- OUTBOUND - Edit Outbound SMTP ssl settings.- VERIFY - Verify and show ssl cipher list.[]>
sslv3config
DescriptionEnable or disable SSLv3 settings for the appliance.
UsageCommit: This command requires a ‘commit’.Cluster Management:This command can be used in all three machine modes (cluster, group, machine).
Batch Command: This command does not support a batch format.
ExampleThe following example shows how to disable SSLv3 for End User Quarantine.
mail.example.com> sslv3configCurrent SSLv3 Settings:--------------------------------------------------
UPDATER : EnabledWEBSECURITY : Enabled
EUQ : EnabledLDAP : Enabled
--------------------------------------------------Choose the operation you want to perform:- SETUP - Toggle SSLv3 settings.[]> setupChoose the service to toggle SSLv3 settings:
CLI Reference Guide 189
The Commands: Reference Examplessslv3config

1. EUQ Service2. LDAP Service3. Updater Service4. Web Security Service[1]>Do you want to enable SSLv3 for EUQ Service ? [Y]>nChoose the operation you want to perform:- SETUP - Toggle SSLv3 settings.[]>
telnet
DescriptionConnect to a remote host
UsageCommit: This command does not require a ‘commit’.Cluster Management: This command is restricted to machine mode. It is further restricted to the login host(i.e., the specific machine you are logged onto). This command requires access to the local file system.
Batch Command: This command does not support a batch format.
Example
mail3.example.com> telnetPlease select which interface you want to telnet from.1. Auto2. Management (192.168.42.42/24: mail3.example.com)3. PrivateNet (192.168.1.1/24: mail3.example.com)4. PublicNet (192.168.2.1/24: mail3.example.com)[1]> 3Enter the remote hostname or IP.[]> 193.168.1.1Enter the remote port.[25]> 25Trying 193.168.1.1...Connected to 193.168.1.1.Escape character is '^]'.
traceroute
DescriptionUse the traceroute command to test connectivity to a network host using IPV4 from the appliance and debugrouting issues with network hops.
UsageCommit: This command does not require a ‘commit’.
CLI Reference Guide190
The Commands: Reference Examplestelnet

Cluster Management: This command is restricted to machine mode. It is further restricted to the login host(i.e., the specific machine you are logged onto). This command requires access to the local file system.
Batch Command: This command does not support a batch format.
Example
mail3.example.com> tracerouteWhich interface do you want to trace from?1. Auto2. Management (192.168.42.42/24: mail3.example.com)3. PrivateNet (192.168.1.1/24: mail3.example.com)4. PublicNet (192.168.2.1/24: mail3.example.com)[1]> 1Please enter the host to which you want to trace the route.[]> 10.1.1.1Press Ctrl-C to stop.traceroute to 10.1.1.1 (10.1.1.1), 64 hops max, 44 byte packets1 gateway(192.168.0.1) 0.202 ms 0.173 ms 0.161 ms2 hostname(10.1.1.1) 0.298 ms 0.302 ms 0.291 msmail3.example.com>
traceroute6
DescriptionUse the traceroute6 command to test connectivity to a network host using IPV6 from the appliance and debugrouting issues with network hops.
UsageCommit: This command does not require a ‘commit’.Cluster Management: This command is restricted to machine mode. It is further restricted to the login host(i.e., the specific machine you are logged onto). This command requires access to the local file system.
Batch Command: This command does not support a batch format.
Example
mail.example.com> traceroute6Which interface do you want to trace from?1. Auto2. D1 (2001:db8::/32: example.com)[1]> 1Please enter the host to which you want to trace the route.[]> example.comPress Ctrl-C to stop.connect: No route to hostvm10esa0031.qa> traceroute6Which interface do you want to trace from?1. Auto2. D1 (2001:db8::/32: example.com)[1]> 2Please enter the host to which you want to trace the route.
CLI Reference Guide 191
The Commands: Reference Examplestraceroute6

[]> example.comPress Ctrl-C to stop.traceroute6 to example.com (2606:2800:220:1:248:1893:25c8:1946) from 2001:db8::, 64 hopsmax, 12 byte packetssendto: No route to host1 traceroute6: wrote example.com 12 chars, ret=-1*sendto: No route to hosttraceroute6: wrote example.com 12 chars, ret=-1*sendto: No route to hosttraceroute6: wrote example.com 12 chars, ret=-1
Outbreak FiltersThis section contains the following CLI commands:
• outbreakconfig, on page 192
• outbreakflush, on page 193
• outbreakstatus, on page 193
• outbreakupdate, on page 194
outbreakconfig
DescriptionUse the outbreakconfig command to configure the Outbreak Filter feature. You perform the following actionsusing this command:
• Enable Outbreak Filters globally
• Enable Adaptive Rules scanning
• Set a maximum size for files to scan (note that you are entering the size in bytes )
• Enable alerts for the Outbreak Filter
• Enable Logging of URLs
UsageCommit: This command requires a ‘commit’.Cluster Management: This command can be used in all three machine modes (cluster, group, machine).
Batch Command: This command does not support a batch format.
Example
mail.example.com> outbreakconfigOutbreak Filters: EnabledChoose the operation you want to perform:- SETUP - Change Outbreak Filters settings.[]> setup
CLI Reference Guide192
The Commands: Reference ExamplesOutbreak Filters

Outbreak Filters: EnabledWould you like to use Outbreak Filters? [Y]>Outbreak Filters enabled.Outbreak Filter alerts are sent when outbreak rules cross the threshold (go above or backdown below), meaning that new messages ofcertain types could be quarantined or will no longer be quarantined, respectively.Would you like to receive Outbreak Filter alerts? [N]>What is the largest size message Outbreak Filters should scan?[524288]>Do you want to use adaptive rules to compute the threat level of messages? [Y]>Logging of URLs is currently disabled.Do you wish to enable logging of URL's? [N]> YLogging of URLs has been enabled.The Outbreak Filters feature is now globally enabled on the system. You must use the'policyconfig' command in the CLI or the EmailSecurity Manager in the GUI to enable Outbreak Filters for the desired Incoming and OutgoingMail Policies.Choose the operation you want to perform:- SETUP - Change Outbreak Filters settings.[]>
outbreakflush
DescriptionClear the cached Outbreak Rules.
UsageCommit: This command does not require a ‘commit’.Cluster Management: This command is restricted to machine mode.
Batch Command: This command does not support a batch format.
Example
mail3.example.com> outbreakflushWarning - This command removes the current set of Outbreak Filter Rules, leaving your networkexposed until the next rule download.Run "outbreakupdate force" command to immediately download Outbreak Filter Rules.Are you sure that you want to clear the current rules? [N]> yCleared the current rules.mail3.example.com>
outbreakstatus
DescriptionThe outbreakstatus command shows the current Outbreak Filters feature settings, including whether theOutbreak Filters feature is enabled, any Outbreak Rules, and the current threshold.
CLI Reference Guide 193
The Commands: Reference Examplesoutbreakflush

UsageCommit: This command does not require a ‘commit’.Cluster Management: This command is restricted to machine mode.
Batch Command: This command does not support a batch format.
Example
mail3.example.com> outbreakstatusOutbreak Filters: Enabled
Component Last Update VersionCASE Core Files 26 Jan 2014 06:45 (GMT +00:00) 3.3.1-005CASE Utilities 26 Jan 2014 06:45 (GMT +00:00) 3.3.1-005Outbreak Rules 26 Jan 2014 07:00 (GMT +00:00) 20140126_063240
Threat Outbreak OutbreakLevel Rule Name Rule Description---------------------------------------------------------------------5 OUTBREAK_0002187_03 A reported a MyDoom.BB outbreak.5 OUTBREAK_0005678_00 This configuration file was generated by...3 OUTBREAK_0000578_00 This virus is distributed in pictures of...
Outbreak Filter Rules with higher threat levels pose greater risks.(5 = highest threat, 1 = lowest threat)
Last update: Mon Jan 27 04:36:27 2014
mail3.example.com>
outbreakupdate
DescriptionRequests an immediate update of CASE rules and engine core.
UsageCommit: This command does not require a ‘commit’.Cluster Management: This command is restricted to machine mode. It is further restricted to the login host(i.e., the specific machine you are logged onto).
Batch Command: This command does not support a batch format.
Example
elroy.run> outbreakupdateRequesting updates for Outbreak Filter Rules.
CLI Reference Guide194
The Commands: Reference Examplesoutbreakupdate
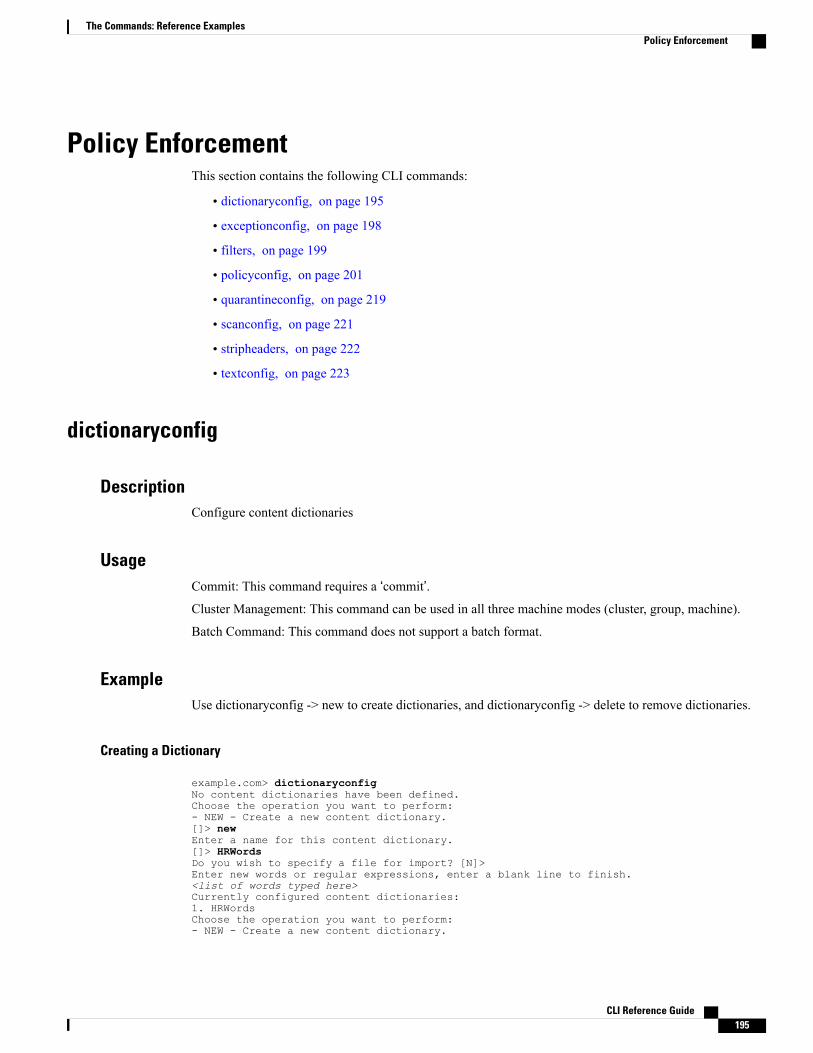
Policy EnforcementThis section contains the following CLI commands:
• dictionaryconfig, on page 195
• exceptionconfig, on page 198
• filters, on page 199
• policyconfig, on page 201
• quarantineconfig, on page 219
• scanconfig, on page 221
• stripheaders, on page 222
• textconfig, on page 223
dictionaryconfig
DescriptionConfigure content dictionaries
UsageCommit: This command requires a ‘commit’.Cluster Management: This command can be used in all three machine modes (cluster, group, machine).
Batch Command: This command does not support a batch format.
ExampleUse dictionaryconfig -> new to create dictionaries, and dictionaryconfig -> delete to remove dictionaries.
Creating a Dictionary
example.com> dictionaryconfigNo content dictionaries have been defined.Choose the operation you want to perform:- NEW - Create a new content dictionary.[]> newEnter a name for this content dictionary.[]> HRWordsDo you wish to specify a file for import? [N]>Enter new words or regular expressions, enter a blank line to finish.<list of words typed here>Currently configured content dictionaries:1. HRWordsChoose the operation you want to perform:- NEW - Create a new content dictionary.
CLI Reference Guide 195
The Commands: Reference ExamplesPolicy Enforcement

- EDIT - Modify a content dictionary.- DELETE - Remove a content dictionary.- RENAME - Change the name of a content dictionary.[]> deleteEnter the number of the dictionary you want to delete:1. HRWords[]> 1Content dictionary "HRWords" deleted.No content dictionaries have been defined.Choose the operation you want to perform:- NEW - Create a new content dictionary.[]>
Creating a Dictionary 2
In this example, a new dictionary named “secret_words” is created to contain the term “codename.” Once thedictionary has been entered, the edit -> settings subcommand is used to define the case-sensitivity and wordboundary detection for words in the dictionary.
mail3.example.com> dictionaryconfigNo content dictionaries have been defined.Choose the operation you want to perform:- NEW - Create a new content dictionary.[]> newEnter a name for this content dictionary.[]> secret_wordsDo you wish to specify a file for import? [N]>Enter new words or regular expressions, enter a blank line to finish.codenameCurrently configured content dictionaries:1. secret_wordsChoose the operation you want to perform:- NEW - Create a new content dictionary.- EDIT - Modify a content dictionary.- DELETE - Remove a content dictionary.- RENAME - Change the name of a content dictionary.[]> editEnter the number of the dictionary you want to edit:1. secret_words[]> 1Choose the operation you want to perform on dictionary 'secret_words':- NEW - Create new entries in this dictionary.- IMPORT - Replace all of the words in this dictionary.- EXPORT - Export the words in this dictionary.- DELETE - Remove an entry in this dictionary.- PRINT - List the entries in this dictionary.- SETTINGS - Change settings for this dictionary.[]> settingsDo you want to ignore case when matching using this dictionary? [Y]>Do you want strings in this dictionary to only match complete words? [Y]>Enter the default encoding to be used for exporting this dictionary:1. US-ASCII2. Unicode (UTF-8)3. Unicode (UTF-16)4. Western European/Latin-1 (ISO 8859-1)5. Western European/Latin-1 (Windows CP1252)6. Traditional Chinese (Big 5)7. Simplified Chinese (GB 2312)8. Simplified Chinese (HZ GB 2312)9. Korean (ISO 2022-KR)10. Korean (KS-C-5601/EUC-KR)11. Japanese (Shift-JIS (X0123))12. Japanese (ISO-2022-JP)13. Japanese (EUC)[2]>Choose the operation you want to perform on dictionary 'secret_words':- NEW - Create new entries in this dictionary.- IMPORT - Replace all of the words in this dictionary.- EXPORT - Export the words in this dictionary.
CLI Reference Guide196
The Commands: Reference Examplesdictionaryconfig

- DELETE - Remove an entry in this dictionary.- PRINT - List the entries in this dictionary.- SETTINGS - Change settings for this dictionary.[]>Currently configured content dictionaries:1. secret_wordsChoose the operation you want to perform:- NEW - Create a new content dictionary.- EDIT - Modify a content dictionary.- DELETE - Remove a content dictionary.- RENAME - Change the name of a content dictionary.[]>mail3.example.com> commitPlease enter some comments describing your changes:[]> Added new dictionary: secret_wordsDo you want to save the current configuration for rollback? [Y]> nChanges committed: Fri May 23 11:42:12 2014 GMT
Importing Dictionaries
In the example below, using the dictionaryconfig command, 84 terms in the profanity.txt text file are importedas Unicode (UTF-8) into a dictionary named profanity .
mail3.example.com> dictionaryconfigNo content dictionaries have been defined.Choose the operation you want to perform:- NEW - Create a new content dictionary.[]> newEnter a name for this content dictionary.[]> profanityDo you wish to specify a file for import? [N]> yEnter the name of the file to import:[]> profanity.txtEnter the encoding to use for the imported file:1. US-ASCII2. Unicode (UTF-8)3. Unicode (UTF-16)4. Western European/Latin-1 (ISO 8859-1)5. Western European/Latin-1 (Windows CP1252)6. Traditional Chinese (Big 5)7. Simplified Chinese (GB 2312)8. Simplified Chinese (HZ GB 2312)9. Korean (ISO 2022-KR)10. Korean (KS-C-5601/EUC-KR)11. Japanese (Shift-JIS (X0123))12. Japanese (ISO-2022-JP)13. Japanese (EUC)[2]>84 entries imported successfully.Currently configured content dictionaries:1. profanityChoose the operation you want to perform:- NEW - Create a new content dictionary.- EDIT - Modify a content dictionary.- DELETE - Remove a content dictionary.- RENAME - Change the name of a content dictionary.
Exporting Dictionaries
In the example below, using the dictionaryconfig command, the secret_words dictionary is exported to a textfile named secret_words_export.txt
mail3.example.com> dictionaryconfigCurrently configured content dictionaries:1. secret_wordsChoose the operation you want to perform:
CLI Reference Guide 197
The Commands: Reference Examplesdictionaryconfig

- NEW - Create a new content dictionary.- EDIT - Modify a content dictionary.- DELETE - Remove a content dictionary.- RENAME - Change the name of a content dictionary.[]> editEnter the number of the dictionary you want to edit:1. secret_words[]> 1Choose the operation you want to perform on dictionary 'secret_words':- NEW - Create new entries in this dictionary.- IMPORT - Replace all of the words in this dictionary.- EXPORT - Export the words in this dictionary.- DELETE - Remove an entry in this dictionary.- PRINT - List the entries in this dictionary.- SETTINGS - Change settings for this dictionary.[]> exportEnter a name for the exported file:[]> secret_words_export.txtmail3.example.com> dictionaryconfigCurrently configured content dictionaries:1. secret_wordsChoose the operation you want to perform:- NEW - Create a new content dictionary.- EDIT - Modify a content dictionary.- DELETE - Remove a content dictionary.- RENAME - Change the name of a content dictionary.[]> editEnter the number of the dictionary you want to edit:1. secret_words[]> 1Choose the operation you want to perform on dictionary 'secret_words':- NEW - Create new entries in this dictionary.- IMPORT - Replace all of the words in this dictionary.- EXPORT - Export the words in this dictionary.- DELETE - Remove an entry in this dictionary.- PRINT - List the entries in this dictionary.- SETTINGS - Change settings for this dictionary.[]> exportEnter a name for the exported file:[]> secret_words_export.txt
exceptionconfig
DescriptionUse the exceptionconfig command in the CLI to create the domain exception table. In this example, the emailaddress “[email protected]” is added to the domain exception table with a policy of “Allow.”
UsageCommit: This command requires a ‘commit’.Cluster Management: This command can be used in all three machine modes (cluster, group, machine)..
Batch Command: This command does not support a batch format.
Example
mail3.example.com> exceptionconfigChoose the operation you want to perform:- NEW - Create a new domain exception table entry
CLI Reference Guide198
The Commands: Reference Examplesexceptionconfig

[]> newEnter a domain, sub-domain, user, or email address for which you wish toprovide an exception:[]> mail.partner.comAny of the following passes:- @[IP address]Matches any email address with this IP address.
- @domainMatches any email address with this domain.
- @.partial.domainMatches any email address domain ending in this domain.
- user@Matches any email address beginning with user@.
- user@domainMatches entire email address.
Enter a domain, sub-domain, user, or email address for which you wish toprovide an exception:[]> [email protected] a policy for this domain exception:1. Allow2. Reject[1]> 1Choose the operation you want to perform:- NEW - Create a new domain exception table entry- EDIT - Edit a domain exception table entry- DELETE - Delete a domain exception table entry- PRINT - Print all domain exception table entries- SEARCH - Search domain exception table- CLEAR - Clear all domain exception entries[]>
filters
DescriptionConfigure message processing options.
UsageCommit: This command requires a ‘commit’.Cluster Management: This command is restricted to machine mode.
Batch Command: This command does not support a batch format
ExampleIn this example, the filter command is used to create three new filters:
• The first filter is named big_messages. It uses the body-size rule to drop messages larger than 10megabytes.
• The second filter is named no_mp3s. It uses the attachment-filename rule to drop messages that containattachments with the filename extension of .mp3 .
• The third filter is namedmailfrompm. It uses mail-from rule examines all mail [email protected] and blind-carbon copies [email protected] .
CLI Reference Guide 199
The Commands: Reference Examplesfilters

Using the filter -> list subcommand, the filters are listed to confirm that they are active and valid, and thenthe first and last filters are switched in position using themove subcommand. Finally, the changes are committedso that the filters take effect.
mail3.example.com> filtersChoose the operation you want to perform:- NEW - Create a new filter.- IMPORT - Import a filter script from a file.[]> newEnter filter script. Enter '.' on its own line to end.big_messages:
if (body-size >= 10M) {drop();
}.1 filters added.Choose the operation you want to perform:- NEW - Create a new filter.- DELETE - Remove a filter.- IMPORT - Import a filter script from a file.- EXPORT - Export filters to a file- MOVE - Move a filter to a different position.- SET - Set a filter attribute.- LIST - List the filters.- DETAIL - Get detailed information on the filters.- LOGCONFIG - Configure log subscriptions used by filters.- ROLLOVERNOW - Roll over a filter log file.[]> newEnter filter script. Enter '.' on its own line to end.no_mp3s:
if (attachment-filename == '\\.mp3$') {drop();
}.1 filters added.Choose the operation you want to perform:- NEW - Create a new filter.- DELETE - Remove a filter.- IMPORT - Import a filter script from a file.- EXPORT - Export filters to a file- MOVE - Move a filter to a different position.- SET - Set a filter attribute.- LIST - List the filters.- DETAIL - Get detailed information on the filters.- LOGCONFIG - Configure log subscriptions used by filters.- ROLLOVERNOW - Roll over a filter log file.[]> newEnter filter script. Enter '.' on its own line to end.mailfrompm:
if (mail-from == "^postmaster$"){ bcc ("[email protected]");}
.1 filters added.Choose the operation you want to perform:- NEW - Create a new filter.- DELETE - Remove a filter.- IMPORT - Import a filter script from a file.- EXPORT - Export filters to a file- MOVE - Move a filter to a different position.- SET - Set a filter attribute.- LIST - List the filters.- DETAIL - Get detailed information on the filters.- LOGCONFIG - Configure log subscriptions used by filters.- ROLLOVERNOW - Roll over a filter log file.[]> list
CLI Reference Guide200
The Commands: Reference Examplesfilters

policyconfig
DescriptionConfigure per recipient or sender based policies.
UsageCommit: This command requires a ‘commit’.Cluster Management: This command can be used in all three machine modes (cluster, group, machine).
Batch Command: This command does not support a batch format.
Examples• Create an Incoming Policy to Drop the Messages Identified as Bulk Email or Social Network Email,on page 218
• Creating a Policy for the Sales Team, on page 203
• Creating a Policy for the Engineering Team , on page 205
• Creating the scan_for_confidential Content Filter, on page 207
• Creating the no_mp3s and ex_employee Content Filters, on page 209
• Enabling Content Filters for Specific Policies, on page 213
• DLP Policies for Default Outgoing Policy, on page 217
• Creating an Incoming Mail Policy to Drop Spam Messages and Archive Suspected Spam Messages,on page 201
Creating an Incoming Mail Policy to Drop Spam Messages and Archive Suspected Spam Messages
In this example, the policyconfig -> edit -> antispam subcommand is used to edit the Anti-Spam settings forthe default incoming mail policy. (Note that this same configuration is available in the GUI from the EmailSecurity Manager feature.)
• First, messages positively identified as spam are chosen not to be archived; they will be dropped.
• Messages that are suspected to be spam are chosen to be archived. They will also be sent to the SpamQuarantine installed on the server named quarantine.example.com . The text [quarantined: possiblespam] is prepended to the subject line and a special header of X-quarantined: true is configured to beadded to these suspect messages. In this scenario, Administrators and end-users can check the quarantinefor false positives, and an administrator can adjust, if necessary, the suspected spam threshold.
Finally, the changes are committed.
mail3.example.com> policyconfigWould you like to configure Incoming or Outgoing Mail Policies?1. Incoming
CLI Reference Guide 201
The Commands: Reference Examplespolicyconfig

2. Outgoing[1]> 1Incoming Mail Policy Configuration
OutbreakFilters:-----------
ContentFilter:----------
Graymail:----------
AdvancedMalwareProtection:----------
Anti-Virus:----------
Anti-Spam:----------
Name:-----
EnabledOffOffN/AMcafeeIronportDEFAULT
Choose the operation you want to perform:- NEW - Create a new policy- EDIT - Edit an existing policy- PRINT - Print all policies- FILTERS - Edit content filters[]> edit
OutbreakFilters:-----------
ContentFilter:----------
Graymail:----------
AdvancedMalwareProtection:----------
Anti-Virus:----------
Anti-Spam:----------
Name:-----
EnabledOffN/AN/AMcafeeIronportDEFAULT1.
Enter the name or number of the entry you wish to edit:[]> 1Policy Summaries:Anti-Spam: IronPort - Deliver, Prepend "[SPAM] " to SubjectSuspect-Spam: IronPort - Deliver, Prepend "[SUSPECTED SPAM] " to SubjectAnti-Virus: OffContent Filters: Off (No content filters have been created)Choose the operation you want to perform:- ANTISPAM - Modify Anti-Spam policy- ANTIVIRUS - Modify Anti-Virus policy- OUTBREAK - Modify Outbreak Filters policy[]> antispamChoose the operation you want to perform:- EDIT - Edit Anti-Spam policy- DISABLE - Disable Anti-Spam policy (Disables all policy-related actions)[]> editBegin Anti-Spam configurationSome messages will be positively identified as spam. Some messages will beidentified as suspected spam. You can set the IronPort Anti-Spam Suspected Spam Thresholdbelow.The following configuration options apply to messages POSITIVELY identified as spam:What score would you like to set for the IronPort Anti-Spam spam threshold?[90]> 901. DELIVER2. DROP3. BOUNCE4. IRONPORT QUARANTINEWhat do you want to do with messages identified as spam?[1]> 2Do you want to archive messages identified as spam? [N]>Do you want to enable special treatment of suspected spam? [Y]> yWhat score would you like to set for the IronPort Anti-Spam suspect spam threshold?[50]> 50The following configuration options apply to messages identified as SUSPECTED spam:1. DELIVER2. DROP3. BOUNCE4. IRONPORT QUARANTINEWhat do you want to do with messages identified as SUSPECTED spam?
CLI Reference Guide202
The Commands: Reference Examplespolicyconfig
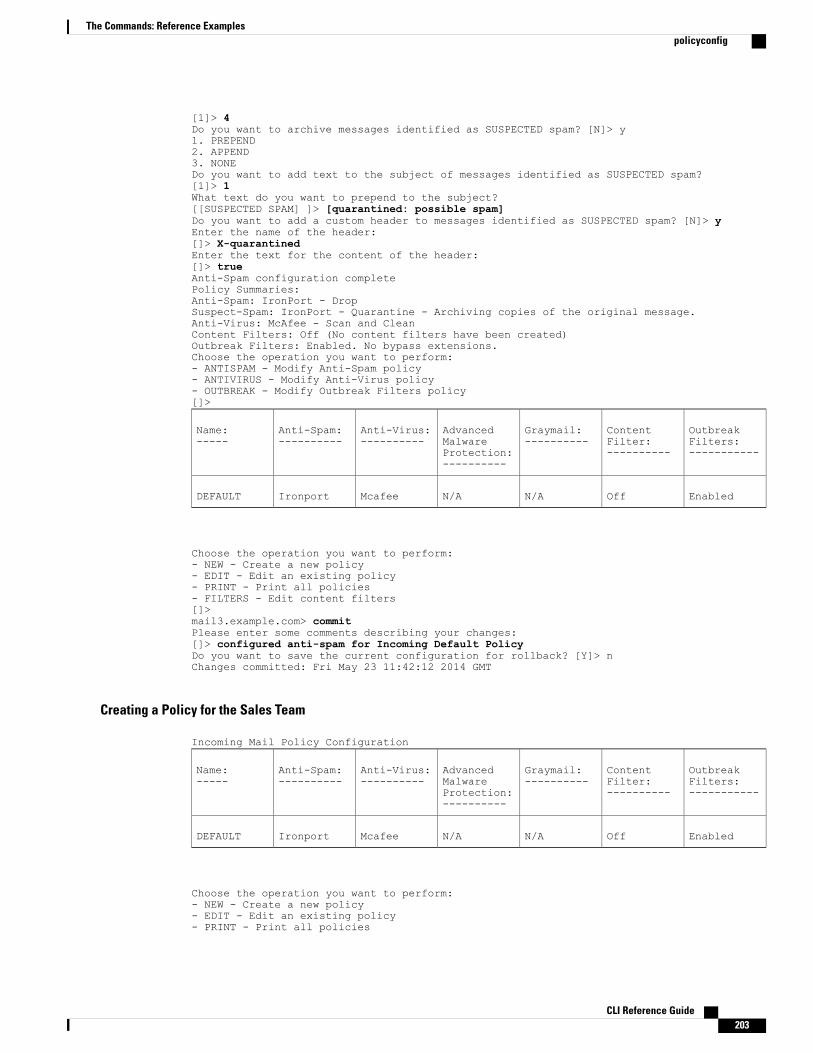
[1]> 4Do you want to archive messages identified as SUSPECTED spam? [N]> y1. PREPEND2. APPEND3. NONEDo you want to add text to the subject of messages identified as SUSPECTED spam?[1]> 1What text do you want to prepend to the subject?[[SUSPECTED SPAM] ]> [quarantined: possible spam]Do you want to add a custom header to messages identified as SUSPECTED spam? [N]> yEnter the name of the header:[]> X-quarantinedEnter the text for the content of the header:[]> trueAnti-Spam configuration completePolicy Summaries:Anti-Spam: IronPort - DropSuspect-Spam: IronPort - Quarantine - Archiving copies of the original message.Anti-Virus: McAfee - Scan and CleanContent Filters: Off (No content filters have been created)Outbreak Filters: Enabled. No bypass extensions.Choose the operation you want to perform:- ANTISPAM - Modify Anti-Spam policy- ANTIVIRUS - Modify Anti-Virus policy- OUTBREAK - Modify Outbreak Filters policy[]>
OutbreakFilters:-----------
ContentFilter:----------
Graymail:----------
AdvancedMalwareProtection:----------
Anti-Virus:----------
Anti-Spam:----------
Name:-----
EnabledOffN/AN/AMcafeeIronportDEFAULT
Choose the operation you want to perform:- NEW - Create a new policy- EDIT - Edit an existing policy- PRINT - Print all policies- FILTERS - Edit content filters[]>mail3.example.com> commitPlease enter some comments describing your changes:[]> configured anti-spam for Incoming Default PolicyDo you want to save the current configuration for rollback? [Y]> nChanges committed: Fri May 23 11:42:12 2014 GMT
Creating a Policy for the Sales Team
Incoming Mail Policy Configuration
OutbreakFilters:-----------
ContentFilter:----------
Graymail:----------
AdvancedMalwareProtection:----------
Anti-Virus:----------
Anti-Spam:----------
Name:-----
EnabledOffN/AN/AMcafeeIronportDEFAULT
Choose the operation you want to perform:- NEW - Create a new policy- EDIT - Edit an existing policy- PRINT - Print all policies
CLI Reference Guide 203
The Commands: Reference Examplespolicyconfig
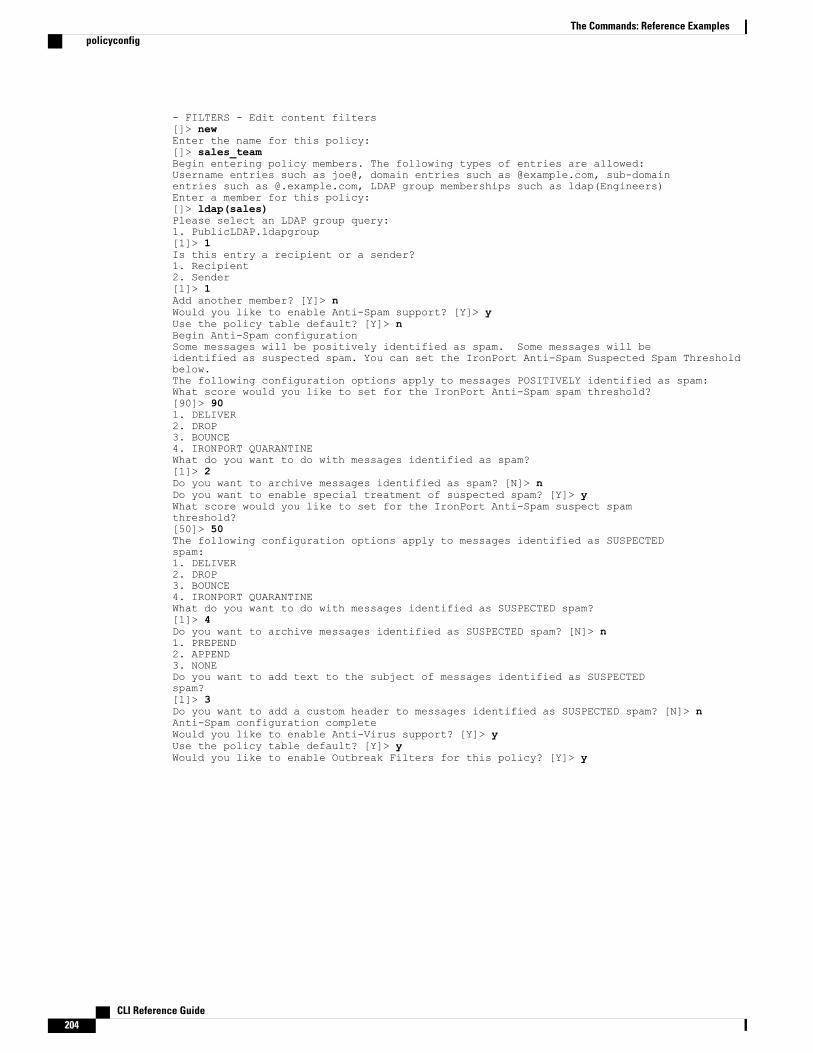
- FILTERS - Edit content filters[]> newEnter the name for this policy:[]> sales_teamBegin entering policy members. The following types of entries are allowed:Username entries such as joe@, domain entries such as @example.com, sub-domainentries such as @.example.com, LDAP group memberships such as ldap(Engineers)Enter a member for this policy:[]> ldap(sales)Please select an LDAP group query:1. PublicLDAP.ldapgroup[1]> 1Is this entry a recipient or a sender?1. Recipient2. Sender[1]> 1Add another member? [Y]> nWould you like to enable Anti-Spam support? [Y]> yUse the policy table default? [Y]> nBegin Anti-Spam configurationSome messages will be positively identified as spam. Some messages will beidentified as suspected spam. You can set the IronPort Anti-Spam Suspected Spam Thresholdbelow.The following configuration options apply to messages POSITIVELY identified as spam:What score would you like to set for the IronPort Anti-Spam spam threshold?[90]> 901. DELIVER2. DROP3. BOUNCE4. IRONPORT QUARANTINEWhat do you want to do with messages identified as spam?[1]> 2Do you want to archive messages identified as spam? [N]> nDo you want to enable special treatment of suspected spam? [Y]> yWhat score would you like to set for the IronPort Anti-Spam suspect spamthreshold?[50]> 50The following configuration options apply to messages identified as SUSPECTEDspam:1. DELIVER2. DROP3. BOUNCE4. IRONPORT QUARANTINEWhat do you want to do with messages identified as SUSPECTED spam?[1]> 4Do you want to archive messages identified as SUSPECTED spam? [N]> n1. PREPEND2. APPEND3. NONEDo you want to add text to the subject of messages identified as SUSPECTEDspam?[1]> 3Do you want to add a custom header to messages identified as SUSPECTED spam? [N]> nAnti-Spam configuration completeWould you like to enable Anti-Virus support? [Y]> yUse the policy table default? [Y]> yWould you like to enable Outbreak Filters for this policy? [Y]> y
CLI Reference Guide204
The Commands: Reference Examplespolicyconfig

Use the policy table default? [Y]> yIncoming Mail Policy Configuration
OutbreakFilters:-----------
ContentFilter:----------
Graymail:----------
AdvancedMalwareProtection:----------
Anti-Virus:----------
Anti-Spam:----------
Name:-----
DefaultDefaultDefaultDefaultDefaultIronPortsales_team
EnabledOffOffN/AMcafeeIronportDEFAULT
Choose the operation you want to perform:- NEW - Create a new policy- EDIT - Edit an existing policy- DELETE - Remove a policy- PRINT - Print all policies- SEARCH - Search for a policy by member- FILTERS - Edit content filters- CLEAR - Clear all policies[]>
Then, create the policy for the engineering team (three individual email recipients), specifying that .dwg filesare exempt from Outbreak Filter scanning.
Creating a Policy for the Engineering Team
Incoming Mail Policy Configuration
OutbreakFilters:-----------
ContentFilter:----------
Graymail:----------
AdvancedMalwareProtection:----------
Anti-Virus:----------
Anti-Spam:----------
Name:-----
DefaultDefaultDefaultDefaultDefaultIronPortsales_team
EnabledOffOffN/AMcafeeIronportDEFAULT
Choose the operation you want to perform:- NEW - Create a new policy- EDIT - Edit an existing policy- DELETE - Remove a policy- PRINT - Print all policies- SEARCH - Search for a policy by member- FILTERS - Edit content filters- CLEAR - Clear all policies[]> newEnter the name for this policy:[]> engineeringBegin entering policy members. The following types of entries are allowed:Username entries such as joe@, domain entries such as @example.com, sub-domain entries suchas @.example.com,LDAP group memberships such as ldap(Engineers)Enter a member for this policy:[]> [email protected] this entry a recipient or a sender?1. Recipient2. Sender[1]> 1
CLI Reference Guide 205
The Commands: Reference Examplespolicyconfig

Add another member? [Y]> yEnter a member for this policy:[]> [email protected] this entry a recipient or a sender?1. Recipient2. Sender[1]> 1Add another member? [Y]> yEnter a member for this policy:[]> [email protected] this entry a recipient or a sender?1. Recipient2. Sender[1]> 1Add another member? [Y]> nWould you like to enable Anti-Spam support? [Y]> yUse the policy table default? [Y]> yWould you like to enable Anti-Virus support? [Y]> yUse the policy table default? [Y]> yWould you like to enable Outbreak Filters for this policy? [Y]> yUse the policy table default? [Y]> nWould you like to modify the list of file extensions that bypassOutbreak Filters? [N]> yChoose the operation you want to perform:- NEW - Add a file extension[]> newEnter a file extension:[]> dwgChoose the operation you want to perform:- NEW - Add a file extension- DELETE - Delete a file extension- PRINT - Display all file extensions- CLEAR - Clear all file extensions[]> printThe following file extensions will bypass Outbreak Filter processing:dwgChoose the operation you want to perform:- NEW - Add a file extension- DELETE - Delete a file extension- PRINT - Display all file extensions- CLEAR - Clear all file extensions[]>Incoming Mail Policy Configuration
OutbreakFilters:-----------
ContentFilter:----------
Graymail:----------
AdvancedMalwareProtection:----------
Anti-Virus:----------
Anti-Spam:----------
Name:-----
DefaultDefaultDefaultDefaultDefaultIronPortsales_team
EnabledDefaultDefaultDefaultDefaultDefaultengineering
EnabledOffOffN/AMcafeeIronportDEFAULT
Choose the operation you want to perform:- NEW - Create a new policy- EDIT - Edit an existing policy- DELETE - Remove a policy- PRINT - Print all policies- SEARCH - Search for a policy by member- MOVE - Move the position of a policy- FILTERS - Edit content filters- CLEAR - Clear all policies[]>
CLI Reference Guide206
The Commands: Reference Examplespolicyconfig

Next, create three new content filters to be used in the Incoming Mail Overview policy table.
In the CLI, the filters subcommand of the policyconfig command is the equivalent of the Incoming ContentFilters GUI page. When you create content filters in the CLI, you must use the save subcommand to save thefilter and return to the policyconfig command.
First, create the scan_for_confidential content filter:
Creating the scan_for_confidential Content Filter
Incoming Mail Policy Configuration
OutbreakFilters:-----------
ContentFilter:----------
Graymail:----------
AdvancedMalwareProtection:----------
Anti-Virus:----------
Anti-Spam:----------
Name:-----
DefaultDefaultDefaultDefaultDefaultIronPortsales_team
EnabledDefaultDefaultDefaultDefaultDefaultengineering
EnabledOffOffN/AMcafeeIronportDEFAULT
Choose the operation you want to perform:- NEW - Create a new policy- EDIT - Edit an existing policy- DELETE - Remove a policy- PRINT - Print all policies- SEARCH - Search for a policy by member- MOVE - Move the position of a policy- FILTERS - Edit content filters- CLEAR - Clear all policies[]> filtersNo filters defined.Choose the operation you want to perform:- NEW - Create a new filter[]> newEnter a name for this filter:[]> scan_for_confidentialEnter a description or comment for this filter (optional):[]> scan all incoming mail for the string 'confidential'Filter Name: scan_for_confidentialConditions:Always RunActions:No actions defined yet.Description:scan all incoming mail for the string 'confidential'Choose the operation you want to perform:- RENAME - Rename this filter- DESC - Edit filter description- ADD - Add condition or action[]> add1. Condition2. Action[1]> 11. Message Body Contains2. Only Body Contains (Attachments are not scanned)3. Message Body Size4. Subject Header5. Other Header6. Attachment Contains7. Attachment File Type
CLI Reference Guide 207
The Commands: Reference Examplespolicyconfig

8. Attachment Name9. Attachment MIME Type10. Attachment Protected11. Attachment Unprotected12. Attachment Corrupt13. Envelope Recipient Address14. Envelope Recipient in LDAP Group15. Envelope Sender Address16. Envelope Sender in LDAP Group17. Reputation Score18. Remote IP19. DKIM authentication result20. SPF verification result[1]> 1Enter regular expression or smart identifier to search message contents for:[]> confidentialThreshold required for match:[1]> 1Filter Name: scan_for_confidentialConditions:body-contains("confidential", 1)Actions:No actions defined yet.Description:scan all incoming mail for the string 'confidential'Choose the operation you want to perform:- RENAME - Rename this filter- DESC - Edit filter description- ADD - Add condition or action- DELETE - Delete condition or action[]> add1. Condition2. Action[1]> 21. Bcc2. Notify3. Redirect To Alternate Email Address4. Redirect To Alternate Host5. Insert A Custom Header6. Insert A Message Tag7. Strip A Header8. Send From Specific IP Interface9. Drop Attachments By Content10. Drop Attachments By Name11. Drop Attachments By MIME Type12. Drop Attachments By File Type13. Drop Attachments By Size14. Send To System Quarantine15. Duplicate And Send To System Quarantine16. Add Log Entry17. Drop (Final Action)18. Bounce (Final Action)19. Skip Remaining Content Filters (Final Action)20. Encrypt (Final Action)21. Encrypt on Delivery22. Skip Outbreak Filters check[1]> 1Enter the email address(es) to send the Bcc message to:[]> [email protected] you want to edit the subject line used on the Bcc message? [N]> yEnter the subject to use:[$Subject]> [message matched confidential filter]Do you want to edit the return path of the Bcc message? [N]> nFilter Name: scan_for_confidentialConditions:body-contains("confidential", 1)Actions:bcc ("[email protected]", "[message matched confidential filter]")Description:scan all incoming mail for the string 'confidential'Choose the operation you want to perform:- RENAME - Rename this filter
CLI Reference Guide208
The Commands: Reference Examplespolicyconfig

- DESC - Edit filter description- ADD - Add condition or action- DELETE - Delete condition or action- SAVE - Save filter[]> add1. Condition2. Action[1]> 21. Bcc2. Notify3. Redirect To Alternate Email Address4. Redirect To Alternate Host5. Insert A Custom Header6. Insert A Message Tag7. Strip A Header8. Send From Specific IP Interface9. Drop Attachments By Content10. Drop Attachments By Name11. Drop Attachments By MIME Type12. Drop Attachments By File Type13. Drop Attachments By Size14. Send To System Quarantine15. Duplicate And Send To System Quarantine16. Add Log Entry17. Drop (Final Action)18. Bounce (Final Action)19. Skip Remaining Content Filters (Final Action)20. Encrypt (Final Action)21. Encrypt on Delivery22. Skip Outbreak Filters check[1]> 141. Policy[1]> 1Filter Name: scan_for_confidentialConditions:body-contains("confidential", 1)Actions:bcc ("[email protected]", "[message matched confidential filter]")quarantine ("Policy")Description:scan all incoming mail for the string 'confidential'Choose the operation you want to perform:- RENAME - Rename this filter- DESC - Edit filter description- ADD - Add condition or action- DELETE - Delete condition or action- MOVE - Reorder the conditions or actions- SAVE - Save filter[]> saveDefined filters:1. scan_for_confidential: scan all incoming mail for the string 'confidential'Choose the operation you want to perform:- NEW - Create a new filter- EDIT - Edit an existing filter- DELETE - Delete a filter- PRINT - Print all filters- RENAME - Rename a filter[]>
Creating the no_mp3s and ex_employee Content Filters
Choose the operation you want to perform:- NEW - Create a new filter- EDIT - Edit an existing filter- DELETE - Delete a filter- PRINT - Print all filters- RENAME - Rename a filter[]> newEnter a name for this filter:[]> no_mp3s
CLI Reference Guide 209
The Commands: Reference Examplespolicyconfig

Enter a description or comment for this filter (optional):[]> strip all MP3 attachmentsFilter Name: no_mp3sConditions:Always RunActions:No actions defined yet.Description:strip all MP3 attachmentsChoose the operation you want to perform:- RENAME - Rename this filter- DESC - Edit filter description- ADD - Add condition or action[]> add1. Condition2. Action[1]> 21. Bcc2. Notify3. Redirect To Alternate Email Address4. Redirect To Alternate Host5. Insert A Custom Header6. Insert A Message Tag7. Strip A Header8. Send From Specific IP Interface9. Drop Attachments By Content10. Drop Attachments By Name11. Drop Attachments By MIME Type12. Drop Attachments By File Type13. Drop Attachments By Size14. Send To System Quarantine15. Duplicate And Send To System Quarantine16. Add Log Entry17. Drop (Final Action)18. Bounce (Final Action)19. Skip Remaining Content Filters (Final Action)20. Encrypt (Final Action)21. Encrypt on Delivery22. Skip Outbreak Filters check[1]> 12Enter the file type to strip:[]> mp3Do you want to enter specific text to use in place of any stripped attachments?[N]> nFilter Name: no_mp3sConditions:Always RunActions:drop-attachments-by-filetype("mp3")Description:strip all MP3 attachmentsChoose the operation you want to perform:- RENAME - Rename this filter- DESC - Edit filter description- ADD - Add condition or action- SAVE - Save filter[]> saveDefined filters:1. scan_for_confidential: scan all incoming mail for the string 'confidential'2. no_mp3s: strip all MP3 attachmentsChoose the operation you want to perform:- NEW - Create a new filter- EDIT - Edit an existing filter- DELETE - Delete a filter- PRINT - Print all filters- MOVE - Reorder a filter- RENAME - Rename a filter[]> newEnter a name for this filter:[]> ex_employeeEnter a description or comment for this filter (optional):[]> bounce messages intended for DougFilter Name: ex_employee
CLI Reference Guide210
The Commands: Reference Examplespolicyconfig

Conditions:Always RunActions:No actions defined yet.Description:bounce messages intended for DougChoose the operation you want to perform:- RENAME - Rename this filter- DESC - Edit filter description- ADD - Add condition or action[]> add1. Condition2. Action[1]> 11. Message Body Contains2. Only Body Contains (Attachments are not scanned)3. Message Body Size4. Subject Header5. Other Header6. Attachment Contains7. Attachment File Type8. Attachment Name9. Attachment MIME Type10. Attachment Protected11. Attachment Unprotected12. Attachment Corrupt13. Envelope Recipient Address14. Envelope Recipient in LDAP Group15. Envelope Sender Address16. Envelope Sender in LDAP Group17. Reputation Score18. Remote IP19. DKIM authentication result20. SPF verification result[1]> 13Enter regular expression to search Recipient address for:[]> dougFilter Name: ex_employeeConditions:rcpt-to == "doug"Actions:No actions defined yet.Description:bounce messages intended for DougChoose the operation you want to perform:- RENAME - Rename this filter- DESC - Edit filter description- ADD - Add condition or action- DELETE - Delete condition or action[]> add1. Condition2. Action[1]> 21. Bcc2. Notify3. Redirect To Alternate Email Address4. Redirect To Alternate Host5. Insert A Custom Header6. Insert A Message Tag7. Strip A Header8. Send From Specific IP Interface9. Drop Attachments By Content10. Drop Attachments By Name11. Drop Attachments By MIME Type12. Drop Attachments By File Type13. Drop Attachments By Size14. Send To System Quarantine15. Duplicate And Send To System Quarantine16. Add Log Entry17. Drop (Final Action)18. Bounce (Final Action)19. Skip Remaining Content Filters (Final Action)20. Encrypt (Final Action)
CLI Reference Guide 211
The Commands: Reference Examplespolicyconfig

21. Encrypt on Delivery22. Skip Outbreak Filters check[1]> 2Enter the email address(es) to send the notification to:[]> [email protected] you want to edit the subject line used on the notification? [N]> yEnter the subject to use:[]> message bounced for ex-employee of example.comDo you want to edit the return path of the notification? [N]> nDo you want to include a copy of the original message as an attachment to thenotification? [N]> yFilter Name: ex_employeeConditions:rcpt-to == "doug"Actions:notify-copy ("[email protected]", "message bounced for ex-employee ofexample.com")Description:bounce messages intended for DougChoose the operation you want to perform:- RENAME - Rename this filter- DESC - Edit filter description- ADD - Add condition or action- DELETE - Delete condition or action- SAVE - Save filter[]> add1. Condition2. Action[1]> 21. Bcc2. Notify3. Redirect To Alternate Email Address4. Redirect To Alternate Host5. Insert A Custom Header6. Insert A Message Tag7. Strip A Header8. Send From Specific IP Interface9. Drop Attachments By Content10. Drop Attachments By Name11. Drop Attachments By MIME Type12. Drop Attachments By File Type13. Drop Attachments By Size14. Send To System Quarantine15. Duplicate And Send To System Quarantine16. Add Log Entry17. Drop (Final Action)18. Bounce (Final Action)19. Skip Remaining Content Filters (Final Action)20. Encrypt (Final Action)21. Encrypt on Delivery22. Skip Outbreak Filters check[1]> 18Filter Name: ex_employeeConditions:rcpt-to == "doug"Actions:notify-copy ("[email protected]", "message bounced for ex-employee ofexample.com")bounce()Description:bounce messages intended for DougChoose the operation you want to perform:- RENAME - Rename this filter- DESC - Edit filter description- ADD - Add condition or action- DELETE - Delete condition or action- SAVE - Save filter[]> saveDefined filters:1. scan_for_confidential: scan all incoming mail for the string 'confidential'2. no_mp3s: strip all MP3 attachments3. ex_employee: bounce messages intended for Doug
CLI Reference Guide212
The Commands: Reference Examplespolicyconfig

Choose the operation you want to perform:- NEW - Create a new filter- EDIT - Edit an existing filter- DELETE - Delete a filter- PRINT - Print all filters- MOVE - Reorder a filter- RENAME - Rename a filter[]>Incoming Mail Policy Configuration
OutbreakFilters:-----------
ContentFilter:----------
Graymail:----------
AdvancedMalwareProtection:----------
Anti-Virus:----------
Anti-Spam:----------
Name:-----
DefaultDefaultDefaultDefaultDefaultIronPortsales_team
EnabledDefaultDefaultDefaultDefaultDefaultengineering
EnabledOffOffN/AMcafeeIronportDEFAULT
Choose the operation you want to perform:- NEW - Create a new policy- EDIT - Edit an existing policy- DELETE - Remove a policy- PRINT - Print all policies- SEARCH - Search for a policy by member- MOVE - Move the position of a policy- FILTERS - Edit content filters- CLEAR - Clear all policies[]>
Enabling Content Filters for Specific Policies
The following illustrates how to enable the policies once again to enable the content filters for some policies,but not for others.
Incoming Mail Policy Configuration
OutbreakFilters:-----------
ContentFilter:----------
Graymail:----------
AdvancedMalwareProtection:----------
Anti-Virus:----------
Anti-Spam:----------
Name:-----
DefaultDefaultDefaultDefaultDefaultIronPortsales_team
EnabledDefaultDefaultDefaultDefaultDefaultengineering
EnabledOffOffN/AMcafeeIronportDEFAULT
Choose the operation you want to perform:- NEW - Create a new policy- EDIT - Edit an existing policy- DELETE - Remove a policy- PRINT - Print all policies- SEARCH - Search for a policy by member- MOVE - Move the position of a policy- FILTERS - Edit content filters
CLI Reference Guide 213
The Commands: Reference Examplespolicyconfig

- CLEAR - Clear all policies[]> edit
OutbreakFilters:-----------
ContentFilter:----------
Graymail:----------
AdvancedMalwareProtection:----------
Anti-Virus:----------
Anti-Spam:----------
Name:-----
DefaultDefaultDefaultDefaultDefaultIronPortsales_team1.
EnabledDefaultDefaultDefaultDefaultDefaultengineering2.
EnabledOffOffN/AMcafeeIronportDEFAULT3.
Enter the name or number of the entry you wish to edit:[]> 3Policy Summaries:Anti-Spam: IronPort - DropSuspect-Spam: IronPort - Quarantine - Archiving copies of the original message.Anti-Virus: McAfee - Scan and CleanGraymail Detection: Unsubscribe - DisabledContent Filters: OffOutbreak Filters: Enabled. No bypass extensions.Choose the operation you want to perform:- ANTISPAM - Modify Anti-Spam policy- ANTIVIRUS - Modify Anti-Virus policy- GRAYMAIL - Modify Graymail policy- OUTBREAK - Modify Outbreak Filters policy- FILTERS - Modify filters[]> filtersChoose the operation you want to perform:- ENABLE - Enable Content Filters policy[]> enable1. scan_for_confidential2. no_mp3s3. ex_employeeEnter the filter to toggle on/off, or press enter to finish:[]> 11. Active scan_for_confidential2. no_mp3s3. ex_employeeEnter the filter to toggle on/off, or press enter to finish:[]> 21. Active scan_for_confidential2. Active no_mp3s3. ex_employeeEnter the filter to toggle on/off, or press enter to finish:[]> 31. Active scan_for_confidential2. Active no_mp3s3. Active ex_employeeEnter the filter to toggle on/off, or press enter to finish:[]>Policy Summaries:Anti-Spam: IronPort - DropSuspect-Spam: IronPort - Quarantine - Archiving copies of the original message.Anti-Virus: McAfee - Scan and CleanGraymail Detection: Unsubscribe - DisabledContent Filters: Enabled. Filters: scan_for_confidential, no_mp3s, ex_employeeOutbreak Filters: Enabled. No bypass extensions.Choose the operation you want to perform:- ANTISPAM - Modify Anti-Spam policy- ANTIVIRUS - Modify Anti-Virus policy- GRAYMAIL - Modify Graymail policy- OUTBREAK - Modify Outbreak Filters policy- FILTERS - Modify filters
CLI Reference Guide214
The Commands: Reference Examplespolicyconfig

[]>Incoming Mail Policy Configuration
OutbreakFilters:-----------
ContentFilter:----------
Graymail:----------
AdvancedMalwareProtection:----------
Anti-Virus:----------
Anti-Spam:----------
Name:-----
DefaultDefaultDefaultDefaultDefaultIronPortsales_team
EnabledDefaultDefaultDefaultDefaultDefaultengineering
EnabledEnabledOffN/AMcafeeIronportDEFAULT
Choose the operation you want to perform:- NEW - Create a new policy- EDIT - Edit an existing policy- DELETE - Remove a policy- PRINT - Print all policies- SEARCH - Search for a policy by member- MOVE - Move the position of a policy- FILTERS - Edit content filters- CLEAR - Clear all policies[]> edit
OutbreakFilters:-----------
ContentFilter:----------
Graymail:----------
AdvancedMalwareProtection:----------
Anti-Virus:----------
Anti-Spam:----------
Name:-----
DefaultDefaultDefaultDefaultDefaultIronPortsales_team1.
EnabledDefaultDefaultDefaultDefaultDefaultengineering2.
EnabledOffOffN/AMcafeeIronportDEFAULT3.
Enter the name or number of the entry you wish to edit:[]> 2Policy Summaries:Anti-Spam: DefaultAnti-Virus: DefaultGraymail Detection: Unsubscribe - DefaultContent Filters: DefaultOutbreak Filters: Enabled. Bypass extensions: dwgChoose the operation you want to perform:- NAME - Change name of policy- NEW - Add a new member- DELETE - Remove a member- PRINT - Print policy members- ANTISPAM - Modify Anti-Spam policy- ANTIVIRUS - Modify Anti-Virus policy- GRAYMAIL - Modify Graymail policy- OUTBREAK - Modify Outbreak Filters policy- FILTERS - Modify filters[]> filtersChoose the operation you want to perform:- DISABLE - Disable Content Filters policy (Disables all policy-relatedactions)- ENABLE - Enable Content Filters policy[]> enable
CLI Reference Guide 215
The Commands: Reference Examplespolicyconfig

1. scan_for_confidential2. no_mp3s3. ex_employeeEnter the filter to toggle on/off, or press enter to finish:[]> 11. Active scan_for_confidential2. no_mp3s3. ex_employeeEnter the filter to toggle on/off, or press enter to finish:[]> 31. Active scan_for_confidential2. no_mp3s3. Active ex_employeeEnter the filter to toggle on/off, or press enter to finish:[]>Policy Summaries:Anti-Spam: DefaultAnti-Virus: DefaultGraymail Detection: Unsubscribe - DefaultContent Filters: Enabled. Filters: scan_for_confidential, ex_employeeOutbreak Filters: Enabled. Bypass extensions: dwgChoose the operation you want to perform:- NAME - Change name of policy- NEW - Add a new member- DELETE - Remove a member- PRINT - Print policy members- ANTISPAM - Modify Anti-Spam policy- ANTIVIRUS - Modify Anti-Virus policy- GRAYMAIL - Modify Graymail policy- OUTBREAK - Modify Outbreak Filters policy- FILTERS - Modify filters[]>Incoming Mail Policy Configuration
OutbreakFilters:-----------
ContentFilter:----------
Graymail:----------
AdvancedMalwareProtection:----------
Anti-Virus:----------
Anti-Spam:----------
Name:-----
DefaultDefaultDefaultDefaultDefaultIronPortsales_team
EnabledEnabledDefaultDefaultDefaultDefaultengineering
EnabledEnabledOffN/AMcafeeIronportDEFAULT
Choose the operation you want to perform:- NEW - Create a new policy- EDIT - Edit an existing policy- DELETE - Remove a policy- PRINT - Print all policies- SEARCH - Search for a policy by member- MOVE - Move the position of a policy- FILTERS - Edit content filters- CLEAR - Clear all policies[]>
The CLI does not contain the notion of adding a new content filter within an individual policy. Rather,the filters subcommand forces you to manage all content filters from within one subsection of thepolicyconfig command. For that reason, adding the drop_large_attachments has been omitted from thisexample.
Note
CLI Reference Guide216
The Commands: Reference Examplespolicyconfig

DLP Policies for Default Outgoing Policy
This illustrates how to enable DLP policies on the default outgoing policy.
mail3.example.com> policyconfigWould you like to configure Incoming or Outgoing Mail Policies?1. Incoming2. Outgoing[1]> 2Outgoing Mail Policy Configuration
DLP:----
OutbreakFilters:-----------
ContentFilter:----------
Graymail:----------
AdvancedMalwareProtection:----------
Anti-Virus:----------
Anti-Spam:----------
Name:-----
OffOffOffOffN/AN/AN/ADEFAULT
Choose the operation you want to perform:- NEW - Create a new policy- EDIT - Edit an existing policy- PRINT - Print all policies- FILTERS - Edit content filters[]> edit
DLP:----
Outbreak
Filters:-----------
ContentFilter:----------
Graymail:----------
AdvancedMalware
Protection:----------
Anti-Virus:----------
Anti-Spam:----------
Name:-----
OffOffOffOffN/AN/AN/ADEFAULT1.
Enter the name or number of the entry you wish to edit:[]> 1Policy Summaries:Anti-Spam: OffAnti-Virus: OffGraymail Detection: Unsubscribe - DisabledContent Filters: Off (No content filters have been created)Outbreak Filters: OffDLP: OffChoose the operation you want to perform:- ANTISPAM - Modify Anti-Spam policy- ANTIVIRUS - Modify Anti-Virus policy- GRAYMAIL - Modify Graymail policy- OUTBREAK - Modify Outbreak Filters policy- DLP - Modify DLP policy[]> dlpChoose the operation you want to perform:- ENABLE - Enable DLP policy[]> enable1. California AB-12982. Suspicious Transmission - Zip Files3. Restricted FilesEnter the policy to toggle on/off, or press enter to finish:[]> 11. Active California AB-12982. Suspicious Transmission - Zip Files3. Restricted FilesEnter the policy to toggle on/off, or press enter to finish:
CLI Reference Guide 217
The Commands: Reference Examplespolicyconfig

[]> 21. Active California AB-12982. Active Suspicious Transmission - Zip Files3. Restricted FilesEnter the policy to toggle on/off, or press enter to finish:[]> 31. Active California AB-12982. Active Suspicious Transmission - Zip Files3. Active Restricted FilesEnter the policy to toggle on/off, or press enter to finish:[]>Policy Summaries:Anti-Spam: OffAnti-Virus: OffGraymail Detection: Unsubscribe - DisabledContent Filters: Off (No content filters have been created)Outbreak Filters: OffDLP: Enabled. Policies: California AB-1298, Suspicious Transmission - ZipFiles, Restricted FilesChoose the operation you want to perform:- ANTISPAM - Modify Anti-Spam policy- ANTIVIRUS - Modify Anti-Virus policy- GRAYMAIL - Modify Graymail policy- OUTBREAK - Modify Outbreak Filters policy- DLP - Modify DLP policy[]>
Create an Incoming Policy to Drop the Messages Identified as Bulk Email or Social Network Email
mail.example.com> policyconfigWould you like to configure Incoming or Outgoing Mail Policies?1. Incoming2. Outgoing[1]> 1Incoming Mail Policy Configuration
OutbreakFilters:-----------
ContentFilter:----------
Graymail:----------
AdvancedMalwareProtection:----------
Anti-Virus:----------
Anti-Spam:----------
Name:-----
N/AOffOffN/AN/AOffDEFAULT
Choose the operation you want to perform:- NEW - Create a new policy- EDIT - Edit an existing policy- PRINT - Print all policies- FILTERS - Edit content filters[]> edit
OutbreakFilters:-----------
ContentFilter:----------
Graymail:----------
AdvancedMalwareProtection:----------
Anti-Virus:----------
Anti-Spam:----------
Name:-----
N/AOffOffN/AN/AOffDEFAULT1.
Enter the name or number of the entry you wish to edit:[]> 1Policy Summaries:Anti-Spam: Off
CLI Reference Guide218
The Commands: Reference Examplespolicyconfig

Graymail Detection: OffContent Filters: Off (No content filters have been created)Choose the operation you want to perform:- ANTISPAM - Modify Anti-Spam policy- GRAYMAIL - Modify Graymail policy- FILTERS - Modify filters[]> graymailChoose the operation you want to perform:- ENABLE - Enable Graymail policy[]> enableBegin Graymail configurationDo you want to enable Safe Unsubscribe? [N]> yDo you want to perform Safe Unsubscribe action only for unsigned messages (recommended)?[Y]>Do you want to enable actions on messages identified as Marketing Email? [N]>Do you want to enable actions on messages identified as Social Networking Email? [N]> y1. DELIVER2. DROP3. BOUNCEWhat do you want to do with messages identified as Social Networking Email?[1]> 2Do you want to archive messages identified as Social Networking Email? [N]>Do you want to enable actions on messages identified as Bulk Email? [N]> y1. DELIVER2. DROP3. BOUNCEWhat do you want to do with messages identified as Bulk Email?[1]> 2Do you want to archive messages identified as Bulk Email? [N]>Graymail configuration complete.Policy Summaries:Anti-Spam: OffGraymail Detection: Unsubscribe - Enabled
Social Networking mails : DropBulk mails : Drop
Content Filters: Off (No content filters have been created)Choose the operation you want to perform:- ANTISPAM - Modify Anti-Spam policy- GRAYMAIL - Modify Graymail policy- FILTERS - Modify filters[]>
quarantineconfig
DescriptionConfigure system quarantines.
UsageCommit: This command requires a ‘commit’.Cluster Management: This command is restricted to machine mode.
Batch Command: This command does not support a batch format.
Example
mail3.example.com> quarantineconfigCurrently configured quarantines:# Quarantine Name Size (MB) % full Messages Retention Policy
CLI Reference Guide 219
The Commands: Reference Examplesquarantineconfig

1 Outbreak 3,072 0.0 1 12h Release2 Policy 1,024 0.1 497 10d Delete3 Virus 2,048 empty 0 30d Delete2,048 MB available for quarantine allocation.Choose the operation you want to perform:- NEW - Create a new quarantine.- EDIT - Modify a quarantine.- DELETE - Remove a quarantine.- OUTBREAKMANAGE - Manage the Outbreak Filters quarantine.[]> newPlease enter the name for this quarantine:[]> HRQuarantineRetention period for this quarantine. (Use 'd' for days or 'h' for hours or 'm' for'minutes'.):[]> 15d1. Delete2. ReleaseEnter default action for quarantine:[1]> 2Do you want to modify the subject of messages that are released because"HRQuarantine" overflows? [N]>Do you want add a custom header to messages that are released because"HRQuarantine" overflows? [N]>Do you want to strip all attachments from messages that are releasedbecause "HRQuarantine" overflows? [N]>Do you want default action to apply automatically when quarantine space fills up? [Y]>Currently configured quarantines:# Quarantine Name Size (MB) % full Messages Retention Policy1 HRQuarantine 1,024 N/A N/A 15d Release2 Outbreak 3,072 0.0 1 12h Release3 Policy 1,024 0.1 497 10d Delete4 Virus 2,048 empty 0 30d Delete(N/A: Quarantine contents is not available at this time.)1,024 MB available for quarantine allocation.Choose the operation you want to perform:- NEW - Create a new quarantine.- EDIT - Modify a quarantine.- DELETE - Remove a quarantine.- OUTBREAKMANAGE - Manage the Outbreak Filters quarantine.
Users and QuarantinesOnce you answer “y” or yes to the question about adding users, you begin user management, where you canmanage the user list. This lets you add or removemultiple users to the quarantine without having to go throughthe other quarantine configuration questions. Press Return (Enter) at an empty prompt ([]>) to exit the usermanagement section and continue with configuring the quarantine.
You will only be prompted to give users access to the quarantine if guest or operator users have alreadybeen created on the system.
Note
A quarantine's user list only contains users belonging to the Operators or Guests groups. Users in theAdministrators group always have full access to the quarantine. When managing the user list, the NEWcommand is suppressed if all the Operator/Guest users are already on the quarantine's user list. Similarly,DELETE is suppressed if there are no users to delete.
CLI Reference Guide220
The Commands: Reference Examplesquarantineconfig

scanconfig
DescriptionConfigure attachment scanning policy
UsageCommit: This command requires a ‘commit’.Cluster Management: This command can be used in all three machine modes (cluster, group, machine).
Batch Command: This command supports a batch format.
ExampleIn this example, the scanconfig command sets these parameters:
• MIME types of video/*, audio/*, image/* are skipped (not scanned for content).
• Nested (recursive) archive attachments up to 10 levels are scanned. (The default is 5 levels.)
• The maximum size for attachments to be scanned is 25 megabytes; anything larger will be skipped. (Thedefault is 5 megabytes.)
• The document metadata is scannned.
• Attachment scanning timeout is set at 180 seconds.
• Attachments that were not scanned are assumed to not match the search pattern. (This is the defaultbehavior.)
• ASCII encoding is configured for use when none is specified for plain body text or anything withMIMEtype plain/text or plain/html.
When setting the assume the attachment matches the search pattern to Y, messages that cannot be scannedwill cause the message filter rule to evaluate to true. This could result in unexpected behavior, such as thequarantining of messages that do not match a dictionary, but were quarantined because their content couldnot be correctly scanned. This setting does not apply to RSA Email DLP scanning.
Note
mail3.example.com> scanconfigThere are currently 5 attachment type mappings configured to be SKIPPED.Choose the operation you want to perform:- NEW - Add a new entry.- DELETE - Remove an entry.- SETUP - Configure scanning behavior.- IMPORT - Load mappings from a file.- EXPORT - Save mappings to a file.- PRINT - Display the list.- CLEAR - Remove all entries.- SMIME - Configure S/MIME unpacking.[]> setup1. Scan only attachments with MIME types or fingerprints in the list.2. Skip attachments with MIME types or fingerprints in the list.
CLI Reference Guide 221
The Commands: Reference Examplesscanconfig
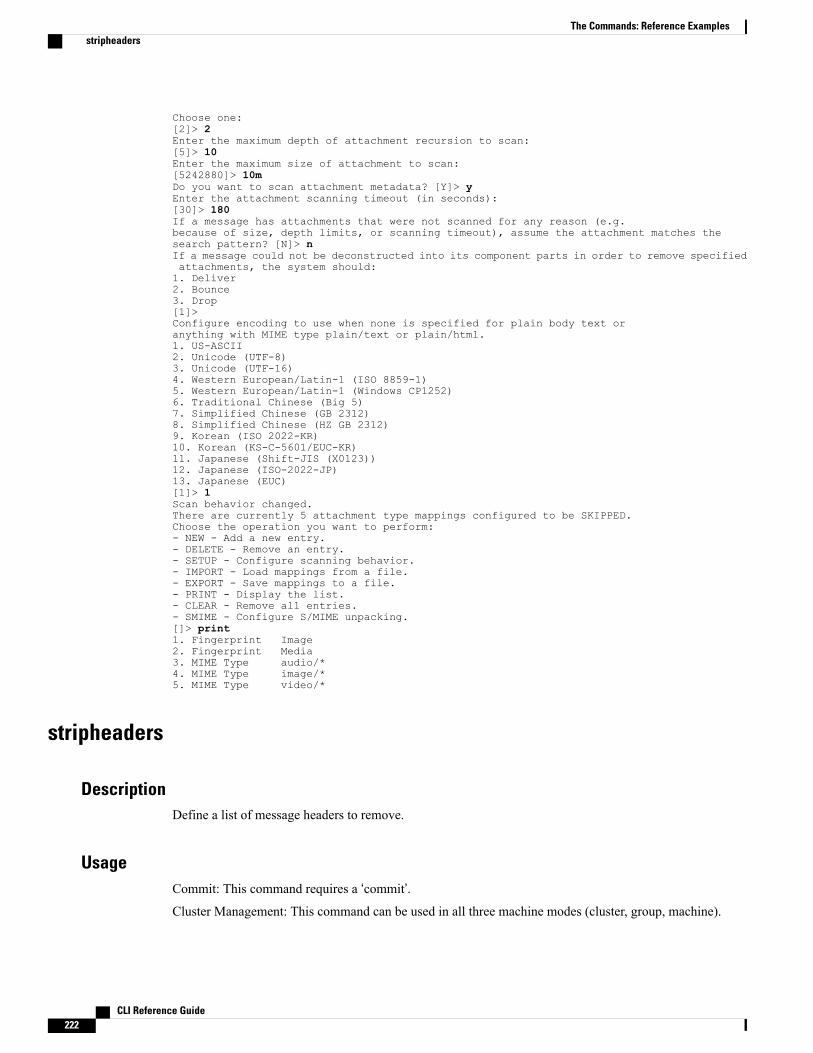
Choose one:[2]> 2Enter the maximum depth of attachment recursion to scan:[5]> 10Enter the maximum size of attachment to scan:[5242880]> 10mDo you want to scan attachment metadata? [Y]> yEnter the attachment scanning timeout (in seconds):[30]> 180If a message has attachments that were not scanned for any reason (e.g.because of size, depth limits, or scanning timeout), assume the attachment matches thesearch pattern? [N]> nIf a message could not be deconstructed into its component parts in order to remove specifiedattachments, the system should:1. Deliver2. Bounce3. Drop[1]>Configure encoding to use when none is specified for plain body text oranything with MIME type plain/text or plain/html.1. US-ASCII2. Unicode (UTF-8)3. Unicode (UTF-16)4. Western European/Latin-1 (ISO 8859-1)5. Western European/Latin-1 (Windows CP1252)6. Traditional Chinese (Big 5)7. Simplified Chinese (GB 2312)8. Simplified Chinese (HZ GB 2312)9. Korean (ISO 2022-KR)10. Korean (KS-C-5601/EUC-KR)11. Japanese (Shift-JIS (X0123))12. Japanese (ISO-2022-JP)13. Japanese (EUC)[1]> 1Scan behavior changed.There are currently 5 attachment type mappings configured to be SKIPPED.Choose the operation you want to perform:- NEW - Add a new entry.- DELETE - Remove an entry.- SETUP - Configure scanning behavior.- IMPORT - Load mappings from a file.- EXPORT - Save mappings to a file.- PRINT - Display the list.- CLEAR - Remove all entries.- SMIME - Configure S/MIME unpacking.[]> print1. Fingerprint Image2. Fingerprint Media3. MIME Type audio/*4. MIME Type image/*5. MIME Type video/*
stripheaders
DescriptionDefine a list of message headers to remove.
UsageCommit: This command requires a ‘commit’.Cluster Management: This command can be used in all three machine modes (cluster, group, machine).
CLI Reference Guide222
The Commands: Reference Examplesstripheaders

Batch Command: This command does not support a batch format.
Example
mail3.example.com> stripheadersNot currently stripping any headers.Choose the operation you want to perform:- SETUP - Set message headers to remove.[]> setupEnter the list of headers you wish to strip from the messages before they are delivered.Separate multiple headers with commas.[]> Delivered-ToCurrently stripping headers: Delivered-ToChoose the operation you want to perform:- SETUP - Set message headers to remove.[]>mail3.example.com>
textconfig
DescriptionConfigure text resources such as anti-virus alert templates, message disclaimers, and notification templates,including DLP, bounce, and encryption notifications.
UsageCommit: This command requires a ‘commit’.Cluster Management: This command can be used in all three machine modes (cluster, group, machine).
Batch Command: This command does not support a batch format.
ExampleUse textconfig -> NEW to create text resources, and textconfig > delete to remove them.
mail3.example.com> textconfigChoose the operation you want to perform:- NEW - Create a new text resource.- IMPORT - Import a text resource from a file.[]> newWhat kind of text resource would you like to create?1. Anti-Virus Container Template2. Anti-Virus Notification Template3. DLP Notification Template4. Bounce and Encryption Failure Notification Template5. Message Disclaimer6. Encryption Notification Template (HTML)7. Encryption Notification Template (text)8. Notification Template[1]> 5Please create a name for the message disclaimer:[]> disclaimer 1Enter the encoding for the message disclaimer:1. US-ASCII2. Unicode (UTF-8)
CLI Reference Guide 223
The Commands: Reference Examplestextconfig

3. Unicode (UTF-16)4. Western European/Latin-1 (ISO 8859-1)5. Western European/Latin-1 (Windows CP1252)6. Traditional Chinese (Big 5)7. Simplified Chinese (GB 2312)8. Simplified Chinese (HZ GB 2312)9. Korean (ISO 2022-KR)10. Korean (KS-C-5601/EUC-KR)11. Japanese (Shift-JIS (X0123))12. Japanese (ISO-2022-JP)13. Japanese (EUC)[1]>Enter or paste the message disclaimer here. Enter '.' on a blank line to end.This message was sent from an IronPort(tm) Email Security appliance..Message disclaimer "disclaimer 1" created.Choose the operation you want to perform:- NEW - Create a new text resource.- IMPORT - Import a text resource from a file.- EXPORT - Export text resource to a file.- PRINT - Display the content of a resource.- EDIT - Modify a resource.- DELETE - Remove a resource from the system.- LIST - List configured resources.[]> deletePlease enter the name or number of the resource to delete:[]> 1Message disclaimer "disclaimer 1" has been deleted.Choose the operation you want to perform:- NEW - Create a new text resource.- IMPORT - Import a text resource from a file.[]>
Use textconfig -> EDIT to modify an existing text resource. You can change the encoding or replace the textof the selected text resource.
Importing Text ResourcesUse textconfig -> IMPORT to import a text file as a text resource. The text file must be present in theconfiguration directory on the appliance.
mail3.example.com> textconfigCurrent Text Resources:1. footer.2.message (Message Footer)Choose the operation you want to perform:- NEW - Create a new text resource.- IMPORT - Import a text resource from a file.- EXPORT - Export text resource to a file.- PRINT - Display the content of a resource.- EDIT - Modify a resource.- DELETE - Remove a resource from the system.- LIST - List configured resources.[]> importWhat kind of text resource would you like to create?1. Anti-Virus Container Template2. Anti-Virus Notification Template3. DLP Notification Template4. Bounce and Encryption Failure Notification Template5. Message Disclaimer6. Encryption Notification Template (HTML)7. Encryption Notification Template (text)8. Notification Template[1]> 8Please create a name for the notification template:[]> strip.mp3filesEnter the name of the file to import:[]> strip.mp3.txtEnter the encoding to use for the imported file:1. US-ASCII
CLI Reference Guide224
The Commands: Reference Examplestextconfig

[ list of encodings ][1]>Notification template "strip.mp3files" created.Current Text Resources:1. disclaimer.2.message (Message Disclaimer)2. strip.mp3files (Notification Template)Choose the operation you want to perform:- NEW - Create a new text resource.- IMPORT - Import a text resource from a file.- EXPORT - Export text resource to a file.- PRINT - Display the content of a resource.- EDIT - Modify a resource.- DELETE - Remove a resource from the system.- LIST - List configured resources.[]>
Exporting Text ResourcesUse textconfig -> EXPORT to export a text resource as a text file. The text file will be created in theconfiguration directory on the appliance.
mail3.example.com> textconfigCurrent Text Resources:1. footer.2.message (Message Footer)2. strip.mp3 (Notification Template)Choose the operation you want to perform:- NEW - Create a new text resource.- IMPORT - Import a text resource from a file.- EXPORT - Export text resource to a file.- PRINT - Display the content of a resource.- EDIT - Modify a resource.- DELETE - Remove a resource from the system.- LIST - List configured resources.[]> exportPlease enter the name or number of the resource to export:[]> 2Enter the name of the file to export:[strip.mp3]> strip.mp3.txtEnter the encoding to use for the exported file:1. US-ASCII[ list of encoding types ][1]>File written on machine "mail3.example.com" using us-ascii encoding.Current Text Resources:1. footer.2.message (Message Footer)2. strip.mp3 (Notification Template)Choose the operation you want to perform:- NEW - Create a new text resource.- IMPORT - Import a text resource from a file.- EXPORT - Export text resource to a file.- PRINT - Display the content of a resource.- EDIT - Modify a resource.- DELETE - Remove a resource from the system.- LIST - List configured resources.[]>
Logging and AlertsThis section contains the following CLI commands:
• alertconfig, on page 226
• displayalerts, on page 227
• findevent, on page 228
CLI Reference Guide 225
The Commands: Reference ExamplesLogging and Alerts
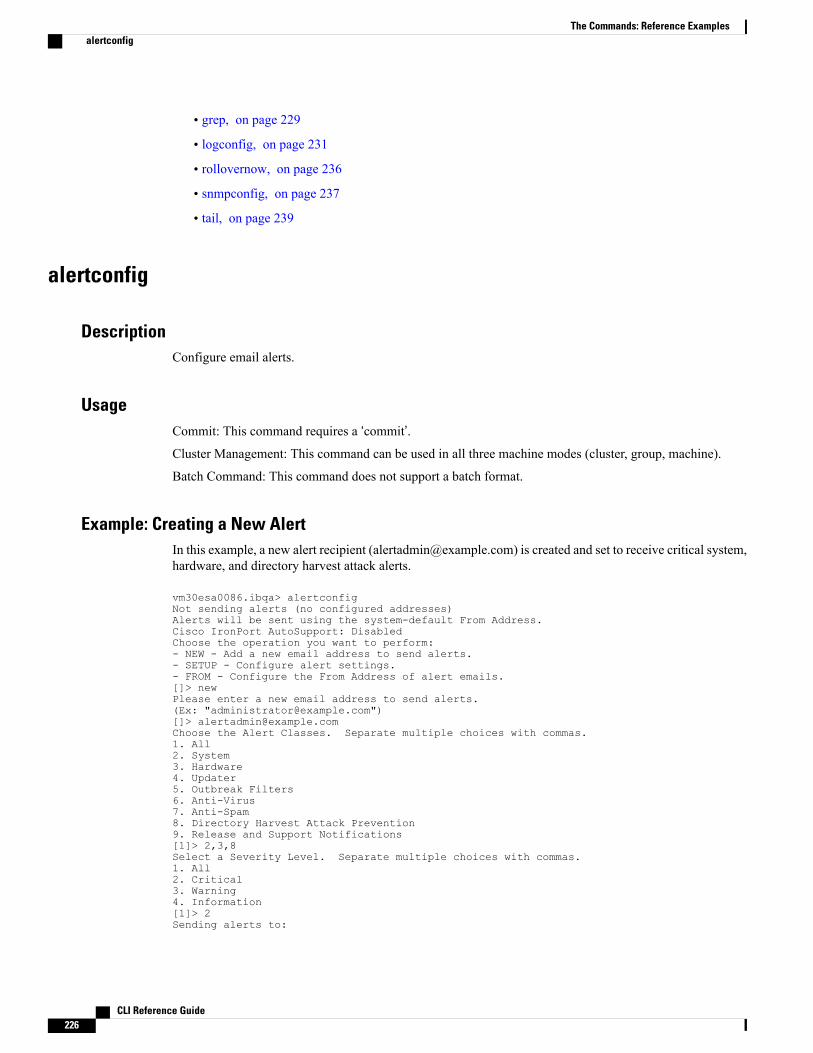
• grep, on page 229
• logconfig, on page 231
• rollovernow, on page 236
• snmpconfig, on page 237
• tail, on page 239
alertconfig
DescriptionConfigure email alerts.
UsageCommit: This command requires a ‘commit’.Cluster Management: This command can be used in all three machine modes (cluster, group, machine).
Batch Command: This command does not support a batch format.
Example: Creating a New AlertIn this example, a new alert recipient ([email protected]) is created and set to receive critical system,hardware, and directory harvest attack alerts.
vm30esa0086.ibqa> alertconfigNot sending alerts (no configured addresses)Alerts will be sent using the system-default From Address.Cisco IronPort AutoSupport: DisabledChoose the operation you want to perform:- NEW - Add a new email address to send alerts.- SETUP - Configure alert settings.- FROM - Configure the From Address of alert emails.[]> newPlease enter a new email address to send alerts.(Ex: "[email protected]")[]> [email protected] the Alert Classes. Separate multiple choices with commas.1. All2. System3. Hardware4. Updater5. Outbreak Filters6. Anti-Virus7. Anti-Spam8. Directory Harvest Attack Prevention9. Release and Support Notifications[1]> 2,3,8Select a Severity Level. Separate multiple choices with commas.1. All2. Critical3. Warning4. Information[1]> 2Sending alerts to:
CLI Reference Guide226
The Commands: Reference Examplesalertconfig

[email protected]: Hardware - Severities: CriticalClass: Directory Harvest Attack Prevention - Severities: CriticalClass: System - Severities: Critical
Initial number of seconds to wait before sending a duplicate alert: 300Maximum number of seconds to wait before sending a duplicate alert: 3600Maximum number of alerts stored in the system are: 50Alerts will be sent using the system-default From Address.Cisco IronPort AutoSupport: DisabledChoose the operation you want to perform:- NEW - Add a new email address to send alerts.- EDIT - Modify alert subscription for an email address.- DELETE - Remove an email address.- CLEAR - Remove all email addresses (disable alerts).- SETUP - Configure alert settings.- FROM - Configure the From Address of alert emails.[]>
displayalerts
DescriptionDisplay the last n alerts sent by the appliance
UsageCommit: This command does not require a ‘commit’.Cluster Management: This command can be used in all three machine modes (cluster, group, machine).
Batch Command: This command does not support a batch format.
Example
> displayalertsDate and Time Stamp Description--------------------------------------------------------------------------------10 Mar 2015 11:33:36 +0000 The updater could not validate the server certificate. Servercertificate not validated - unable to get local issuercertificateLast message occurred 28 times between Tue Mar 10 10:34:57 2015 and Tue Mar 10 11:32:242015.10 Mar 2015 11:23:39 +0000 The updater has been unable to communicate with the updateserver for at least 1h.Last message occurred 8 times between Tue Mar 10 10:29:57 2015 and Tue Mar 10 11:18:24 2015.10 Mar 2015 10:33:36 +0000 The updater could not validate the server certificate. Servercertificate not validated - unable to get local issuercertificateLast message occurred 26 times between Tue Mar 10 09:33:55 2015 and Tue Mar 10 10:29:572015.10 Mar 2015 10:23:39 +0000 The updater has been unable to communicate with the updateserver for at least 1h.Last message occurred 9 times between Tue Mar 10 09:26:54 2015 and Tue Mar 10 10:22:56 2015.
CLI Reference Guide 227
The Commands: Reference Examplesdisplayalerts

findevent
DescriptionFind events in mail log files
UsageCommit: This command does not require a ‘commit’.Cluster Management: This command can be used in all three machine modes (cluster, group, machine).
Batch Command: This command does not support a batch format.
Example: Search by envelope FROM
mail.example.com> findeventPlease choose which type of search you want to perform:1. Search by envelope FROM2. Search by Message ID3. Search by Subject4. Search by envelope TO[1]> 1Enter the regular expression to search for.[]> "Currently configured logs:
Log Name Log Type Retrieval Interval---------------------------------------------------------------------------------1. mail_logs IronPort Text Mail Logs Manual Download NoneEnter the number of the log you wish to use for message tracking.[1]> 1Please choose which set of logs to search:1. All available log files2. Select log files by date list3. Current log file[3]> 3No matching message IDs were found
Example: Search by Message ID
mail.example.com> findeventPlease choose which type of search you want to perform:1. Search by envelope FROM2. Search by Message ID3. Search by Subject4. Search by envelope TO[1]> 2Enter the Message ID (MID) to search for.[]> 1Currently configured logs:
Log Name Log Type Retrieval Interval---------------------------------------------------------------------------------1. mail_logs IronPort Text Mail Logs Manual Download NoneEnter the number of the log you wish to use for message tracking.[1]> 1Please choose which set of logs to search:1. All available log files2. Select log files by date list
CLI Reference Guide228
The Commands: Reference Examplesfindevent

3. Current log file[3]> 1
Example: Search by Subject
mail.example.com> findeventPlease choose which type of search you want to perform:1. Search by envelope FROM2. Search by Message ID3. Search by Subject4. Search by envelope TO[1]> 3Enter the regular expression to search for.[]> "Currently configured logs:
Log Name Log Type Retrieval Interval---------------------------------------------------------------------------------1. mail_logs IronPort Text Mail Logs Manual Download NoneEnter the number of the log you wish to use for message tracking.[1]> 1Please choose which set of logs to search:1. All available log files2. Select log files by date list3. Current log file[3]> 2Available mail log files, listed by log file start time.Specify multiple log files by separating with commas or specify a range with a dash:1. Thu Feb 19 05:18:02 2015[1]>No matching message IDs were found
Example: Search by envelope TO
mail.example.com> findeventPlease choose which type of search you want to perform:1. Search by envelope FROM2. Search by Message ID3. Search by Subject4. Search by envelope TO[1]> 4Enter the regular expression to search for.[]> 'Currently configured logs:
Log Name Log Type Retrieval Interval---------------------------------------------------------------------------------1. mail_logs IronPort Text Mail Logs Manual Download NoneEnter the number of the log you wish to use for message tracking.[1]> 1Please choose which set of logs to search:1. All available log files2. Select log files by date list3. Current log file[3]> 3No matching message IDs were found
grep
DescriptionSearches for text in a log file.
CLI Reference Guide 229
The Commands: Reference Examplesgrep

UsageCommit: This command does not require a ‘commit’.Cluster Management: This command is restricted to machine mode. It is further restricted to the login host(i.e., the specific machine you are logged onto). This command requires access to the local file system.
Batch Command: This command does not support a batch format.
The grep command can be used to search for text strings within logs. Use the following syntax when you runthe grep command:
grep [-C count] [-e regex] [-i] [-p] [-t] [regex] log_name
You must enter either -e regex or regex to return results.Note
Use the following options when you run the grep command:
Table 12: grep Command Options
DescriptionOption
Provides lines of context around the grep pattern found. Enter a valueto specify the number of lines to include.-C
Enter a regular expression.-e
Ignores case sensitivities.-i
Paginates the output.-p
Runs the grep command over the tail of the log file.-t
Enter a regular expression.regex
Example of grepThe following example shows a search for the text string ‘clean’ or ‘viral’ within the antivirus logs. The grepcommand includes a regex expression:
mail3.example.com> grep "CLEAN\\|VIRAL" antivirusFri Jun 9 21:50:25 2006 Info: sophos antivirus - MID 1 - Result 'CLEAN' ()Fri Jun 9 21:53:15 2006 Info: sophos antivirus - MID 2 - Result 'CLEAN' ()Fri Jun 9 22:47:41 2006 Info: sophos antivirus - MID 3 - Result 'CLEAN' ()Fri Jun 9 22:47:41 2006 Info: sophos antivirus - MID 4 - Result 'CLEAN' ()Fri Jun 9 22:47:41 2006 Info: sophos antivirus - MID 5 - Result 'CLEAN' ()Fri Jun 9 22:47:41 2006 Info: sophos antivirus - MID 6 - Result 'CLEAN' ()Fri Jun 9 22:47:42 2006 Info: sophos antivirus - MID 12 - Result 'CLEAN' ()Fri Jun 9 22:53:04 2006 Info: sophos antivirus - MID 18 - Result 'VIRAL' ()Fri Jun 9 22:53:05 2006 Info: sophos antivirus - MID 16 - Result 'VIRAL' ()
CLI Reference Guide230
The Commands: Reference Examplesgrep

Fri Jun 9 22:53:06 2006 Info: sophos antivirus - MID 19 - Result 'VIRAL' ()Fri Jun 9 22:53:07 2006 Info: sophos antivirus - MID 21 - Result 'VIRAL' ()Fri Jun 9 22:53:08 2006 Info: sophos antivirus - MID 20 - Result 'VIRAL' ()Fri Jun 9 22:53:08 2006 Info: sophos antivirus - MID 22 - Result 'VIRAL' ()mail3.example.com>
logconfig
DescriptionConfigure access to log files.
UsageCommit: This command requires a ‘commit’.Cluster Management: This command can be used in all three machine modes (cluster, group, machine).
Batch Command: This command does not support a batch format.
Example of FTP Push Log SubscriptionIn the following example, the logconfig command is used to configure a new delivery log calledmyDeliveryLogs . The log is then configured to be pushed via FTP to a remote host
mail3.example.com> logconfigCurrently configured logs:1. "antispam" Type: "Anti-Spam Logs" Retrieval: FTP Poll2. "antivirus" Type: "Anti-Virus Logs" Retrieval: FTP Poll3. "asarchive" Type: "Anti-Spam Archive" Retrieval: FTP Poll4. "authentication" Type: "Authentication Logs" Retrieval: FTP Poll5. "avarchive" Type: "Anti-Virus Archive" Retrieval: FTP Poll6. "bounces" Type: "Bounce Logs" Retrieval: FTP Poll7. "cli_logs" Type: "CLI Audit Logs" Retrieval: FTP Poll8. "encryption" Type: "Encryption Logs" Retrieval: FTP Poll9. "error_logs" Type: "IronPort Text Mail Logs" Retrieval: FTP Poll10. "euq_logs" Type: "IronPort Spam Quarantine Logs" Retrieval: FTP Poll11. "euqgui_logs" Type: "IronPort Spam Quarantine GUI Logs" Retrieval: FTP Poll12. "ftpd_logs" Type: "FTP Server Logs" Retrieval: FTP Poll13. "gui_logs" Type: "HTTP Logs" Retrieval: FTP Poll14. "mail_logs" Type: "IronPort Text Mail Logs" Retrieval: FTP Poll15. "reportd_logs" Type: "Reporting Logs" Retrieval: FTP Poll16. "reportqueryd_logs" Type: "Reporting Query Logs" Retrieval: FTP Poll17. "scanning" Type: "Scanning Logs" Retrieval: FTP Poll18. "slbld_logs" Type: "Safe/Block Lists Logs" Retrieval: FTP Poll19. "sntpd_logs" Type: "NTP logs" Retrieval: FTP Poll20. "status" Type: "Status Logs" Retrieval: FTP Poll21. "system_logs" Type: "System Logs" Retrieval: FTP Poll22. "trackerd_logs" Type: "Tracking Logs" Retrieval: FTP Poll23. "updater_logs" Type: "Updater Logs" Retrieval: FTP PollChoose the operation you want to perform:- NEW - Create a new log.- EDIT - Modify a log subscription.- DELETE - Remove a log subscription.- SETUP - General settings.- LOGHEADERS - Configure headers to log.- HOSTKEYCONFIG - Configure SSH host keys.[]> newChoose the log file type for this subscription:1. IronPort Text Mail Logs2. qmail Format Mail Logs
CLI Reference Guide 231
The Commands: Reference Exampleslogconfig

3. Delivery Logs4. Bounce Logs5. Status Logs6. Domain Debug Logs7. Injection Debug Logs8. SMTP Conversation Logs9. System Logs10. CLI Audit Logs11. FTP Server Logs12. HTTP Logs13. NTP logs14. LDAP Debug Logs15. Anti-Spam Logs16. Anti-Spam Archive17. Anti-Virus Logs18. Anti-Virus Archive19. Scanning Logs20. IronPort Spam Quarantine Logs21. IronPort Spam Quarantine GUI Logs22. Reporting Logs23. Reporting Query Logs24. Updater Logs25. Tracking Logs26. Safe/Block Lists Logs27. Authentication Logs[1]> 8Please enter the name for the log:[]> myDeliveryLogsChoose the method to retrieve the logs.1. FTP Poll2. FTP Push3. SCP Push4. Syslog Push[1]> 2Hostname to deliver the logs:[]> yourhost.example.comUsername on the remote host:[]> yourusernamePassphrase for your user:[]> thepassphraseDirectory on remote host to place logs:[]> /logsFilename to use for log files:[conversation.text]>Maximum time to wait before transferring:[3600]>Maximum filesize before transferring:[10485760]>Currently configured logs:1. "antispam" Type: "Anti-Spam Logs" Retrieval: FTP Poll2. "antivirus" Type: "Anti-Virus Logs" Retrieval: FTP Poll3. "asarchive" Type: "Anti-Spam Archive" Retrieval: FTP Poll4. "authentication" Type: "Authentication Logs" Retrieval: FTP Poll5. "avarchive" Type: "Anti-Virus Archive" Retrieval: FTP Poll6. "bounces" Type: "Bounce Logs" Retrieval: FTP Poll7. "cli_logs" Type: "CLI Audit Logs" Retrieval: FTP Poll8. "encryption" Type: "Encryption Logs" Retrieval: FTP Poll9. "error_logs" Type: "IronPort Text Mail Logs" Retrieval: FTP Poll10. "euq_logs" Type: "IronPort Spam Quarantine Logs" Retrieval: FTP Poll11. "euqgui_logs" Type: "IronPort Spam Quarantine GUI Logs" Retrieval: FTP Poll12. "ftpd_logs" Type: "FTP Server Logs" Retrieval: FTP Poll13. "gui_logs" Type: "HTTP Logs" Retrieval: FTP Poll14. "mail_logs" Type: "IronPort Text Mail Logs" Retrieval: FTP Poll15. "myDeliveryLogs" Type: "SMTP Conversation Logs" Retrieval: FTP Push - Hostyourhost.example.com16. "reportd_logs" Type: "Reporting Logs" Retrieval: FTP Poll17. "reportqueryd_logs" Type: "Reporting Query Logs" Retrieval: FTP Poll18. "scanning" Type: "Scanning Logs" Retrieval: FTP Poll19. "slbld_logs" Type: "Safe/Block Lists Logs" Retrieval: FTP Poll20. "sntpd_logs" Type: "NTP logs" Retrieval: FTP Poll21. "status" Type: "Status Logs" Retrieval: FTP Poll22. "system_logs" Type: "System Logs" Retrieval: FTP Poll
CLI Reference Guide232
The Commands: Reference Exampleslogconfig

23. "trackerd_logs" Type: "Tracking Logs" Retrieval: FTP Poll24. "updater_logs" Type: "Updater Logs" Retrieval: FTP Poll
Example of SCP Push Log SubscriptionIn the following example, the logconfig command is used to configure a new delivery log called LogPush .The log is configured to be pushed via SCP to a remote host with the IP address of 10.1.1.1, as the user logger, and stored in the directory /tmp . Note that the sshconfig command is automatically called from within thelogconfig command when the log retrieval method is SCP push. (See “Configuring Host Keys” for informationabout Host keys, and “Managing Secure Shell (SSH) Keys” for more information about User keys, in theUserGuide for AsyncOS for Cisco Email Security Appliances .) Also note that an IP address can be used at thehostname prompt.
mail3.example.com> logconfigCurrently configured logs:1. "antispam" Type: "Anti-Spam Logs" Retrieval: FTP Poll2. "antivirus" Type: "Anti-Virus Logs" Retrieval: FTP Poll3. "asarchive" Type: "Anti-Spam Archive" Retrieval: FTP Poll4. "authentication" Type: "Authentication Logs" Retrieval: FTP Poll5. "avarchive" Type: "Anti-Virus Archive" Retrieval: FTP Poll6. "bounces" Type: "Bounce Logs" Retrieval: FTP Poll7. "cli_logs" Type: "CLI Audit Logs" Retrieval: FTP Poll8. "encryption" Type: "Encryption Logs" Retrieval: FTP Poll9. "error_logs" Type: "IronPort Text Mail Logs" Retrieval: FTP Poll10. "euq_logs" Type: "IronPort Spam Quarantine Logs" Retrieval: FTP Poll11. "euqgui_logs" Type: "IronPort Spam Quarantine GUI Logs" Retrieval: FTP Poll12. "ftpd_logs" Type: "FTP Server Logs" Retrieval: FTP Poll13. "gui_logs" Type: "HTTP Logs" Retrieval: FTP Poll14. "mail_logs" Type: "IronPort Text Mail Logs" Retrieval: FTP Poll15. "reportd_logs" Type: "Reporting Logs" Retrieval: FTP Poll16. "reportqueryd_logs" Type: "Reporting Query Logs" Retrieval: FTP Poll17. "scanning" Type: "Scanning Logs" Retrieval: FTP Poll18. "slbld_logs" Type: "Safe/Block Lists Logs" Retrieval: FTP Poll19. "sntpd_logs" Type: "NTP logs" Retrieval: FTP Poll20. "status" Type: "Status Logs" Retrieval: FTP Poll21. "system_logs" Type: "System Logs" Retrieval: FTP Poll22. "trackerd_logs" Type: "Tracking Logs" Retrieval: FTP Poll23. "updater_logs" Type: "Updater Logs" Retrieval: FTP PollChoose the operation you want to perform:- NEW - Create a new log.- EDIT - Modify a log subscription.- DELETE - Remove a log subscription.- SETUP - General settings.- LOGHEADERS - Configure headers to log.- HOSTKEYCONFIG - Configure SSH host keys.[]> newChoose the log file type for this subscription:1. IronPort Text Mail Logs2. qmail Format Mail Logs3. Delivery Logs4. Bounce Logs5. Status Logs6. Domain Debug Logs7. Injection Debug Logs8. SMTP Conversation Logs9. System Logs10. CLI Audit Logs11. FTP Server Logs12. HTTP Logs13. NTP logs14. LDAP Debug Logs15. Anti-Spam Logs16. Anti-Spam Archive17. Anti-Virus Logs18. Anti-Virus Archive19. Scanning Logs20. IronPort Spam Quarantine Logs
CLI Reference Guide 233
The Commands: Reference Exampleslogconfig

21. IronPort Spam Quarantine GUI Logs22. Reporting Logs23. Reporting Query Logs24. Updater Logs25. Tracking Logs26. Safe/Block Lists Logs27. Authentication Logs[1]> 3Please enter the name for the log:[]> LogPushChoose the method to retrieve the logs.1. FTP Poll2. FTP Push3. SCP Push[1]> 3Hostname to deliver the logs:[]> 10.1.1.1Port to connect to on the remote host:[22]>Username on the remote host:[]> loggerDirectory on remote host to place logs:[]> /tmpFilename to use for log files:[delivery.log]>Maximum time to wait before transferring:[3600]>Maximum filesize before transferring:[10485760]>Protocol:1. SSH12. SSH2[2]> 2Do you want to enable host key checking? [N]> yDo you want to automatically scan the host for its SSH key, or enter itmanually?1. Automatically scan.2. Enter manually.[1]> 1SSH2:dsa10.1.1.1 ssh-dssAAAAB3NzaC1kc3MAAACBALwGi4IlWLDVndbIwEsArt9LVE2ts5yE9JBTSdUwLvoq0G3FRqifrce92zgyHtc/ZWyXavUTIM3Xd1bpiEcscMp2XKpSnPPx21y8bqkpJsSCQcM8zZMDjnOPm8ghiwHXYh7oNEUJCCPnPxAy44rlJ5Yz4x9eIoALp0dHU0GR+j1NAAAAFQDQi5GY/X9PlDM3fPMvEx7wc0edlwAAAIB9cgMTEFP1WTAGrlRtbowZP5zWZtVDTxLhdXzjlo4+bB4hBR7DKuc80+naAFnThyH/J8R3WlJVF79M5geKJbXzuJGDK3Zwl3UYefPqBqXp2O1zLRQSJYx1WhwYz/rooopN1BnF4sh12mtq3tde1176bQgtwaQA4wKO15k3zOWsPwAAAIAicRYat3y+Blv/V6wdE6BBk+oULv3eK38gafuip4WMBxkG9GO6EQi8nss82oznwWBy/pITRQfh4MBmlxTF4VEY00sARrlZtuUJC1QGQvCgh7Nd3YNais2CSbEKBEaIOTF6+SX2RNpcUF3Wg5ygw92xtqQPKMcZeLtK2ZJRkhC+Vw==Add the preceding host key(s) for 10.1.1.1? [Y]> yCurrently installed host keys:1. 10.1.1.1 1024 35 12260642076447444117847407996206675325...35205656072. 10.1.1.1 ssh-dss AAAAB3NzaC1kc3MAAACBALwGi4IlWLDVndbIwE...JRkhC+Vw==Choose the operation you want to perform:- NEW - Add a new key.- EDIT - Modify a key.- DELETE - Remove a key.- SCAN - Automatically download a host key.- PRINT - Display a key.- HOST - Display this machine's host keys.[]>Maximum filesize before transferring:[10485760]>Protocol:1. SSH12. SSH2[2]> 2Do you want to enable host key checking? [N]> yCurrently installed host keys:Choose the operation you want to perform:- NEW - Add a new key.- SCAN - Automatically download a host key.- HOST - Display this machine's host keys.[]> scan
CLI Reference Guide234
The Commands: Reference Exampleslogconfig

Choose the ssh protocol type:1. SSH1:rsa2. SSH2:rsa3. SSH2:dsa4. All[4]> 4SSH1:rsa10.1.1.1 1024 35122606420764474441178474079962066753259278682648965870690129496065430424463013457294798980627829828033793152226448694514316218272814453986931612508282328008815740072109975632356478532128816187806830746328234327778100131128176672666244511191783747965898000855947022484692079466697707373948871554575173520565607
Example of Syslog Push Log SubscriptionIn the following example, the logconfig command is used to configure a new delivery log called MailLogSyslogPush . The log is configured to be pushed to a remote syslog server with the IP address of 10.1.1.2,using UPD, with a ‘mail’ facilityand stored in the directory.
mail3.example.com> logconfigCurrently configured logs:1. "antispam" Type: "Anti-Spam Logs" Retrieval: FTP Poll2. "antivirus" Type: "Anti-Virus Logs" Retrieval: FTP Poll3. "asarchive" Type: "Anti-Spam Archive" Retrieval: FTP Poll4. "authentication" Type: "Authentication Logs" Retrieval: FTP Poll5. "avarchive" Type: "Anti-Virus Archive" Retrieval: FTP Poll6. "bounces" Type: "Bounce Logs" Retrieval: FTP Poll7. "cli_logs" Type: "CLI Audit Logs" Retrieval: FTP Poll8. "encryption" Type: "Encryption Logs" Retrieval: FTP Poll9. "error_logs" Type: "IronPort Text Mail Logs" Retrieval: FTP Poll10. "euq_logs" Type: "IronPort Spam Quarantine Logs" Retrieval: FTP Poll11. "euqgui_logs" Type: "IronPort Spam Quarantine GUI Logs" Retrieval: FTP Poll12. "ftpd_logs" Type: "FTP Server Logs" Retrieval: FTP Poll13. "gui_logs" Type: "HTTP Logs" Retrieval: FTP Poll14. "mail_logs" Type: "IronPort Text Mail Logs" Retrieval: FTP Poll15. "reportd_logs" Type: "Reporting Logs" Retrieval: FTP Poll16. "reportqueryd_logs" Type: "Reporting Query Logs" Retrieval: FTP Poll17. "scanning" Type: "Scanning Logs" Retrieval: FTP Poll18. "slbld_logs" Type: "Safe/Block Lists Logs" Retrieval: FTP Poll19. "sntpd_logs" Type: "NTP logs" Retrieval: FTP Poll20. "status" Type: "Status Logs" Retrieval: FTP Poll21. "system_logs" Type: "System Logs" Retrieval: FTP Poll22. "trackerd_logs" Type: "Tracking Logs" Retrieval: FTP Poll23. "updater_logs" Type: "Updater Logs" Retrieval: FTP PollChoose the operation you want to perform:- NEW - Create a new log.- EDIT - Modify a log subscription.- DELETE - Remove a log subscription.- SETUP - General settings.- LOGHEADERS - Configure headers to log.- HOSTKEYCONFIG - Configure SSH host keys.[]> newChoose the log file type for this subscription:1. IronPort Text Mail Logs2. qmail Format Mail Logs3. Delivery Logs4. Bounce Logs5. Status Logs6. Domain Debug Logs7. Injection Debug Logs8. SMTP Conversation Logs9. System Logs10. CLI Audit Logs11. FTP Server Logs12. HTTP Logs13. NTP logs14. LDAP Debug Logs15. Anti-Spam Logs16. Anti-Spam Archive17. Anti-Virus Logs
CLI Reference Guide 235
The Commands: Reference Exampleslogconfig

18. Anti-Virus Archive19. Scanning Logs20. IronPort Spam Quarantine Logs21. IronPort Spam Quarantine GUI Logs22. Reporting Logs23. Reporting Query Logs24. Updater Logs25. Tracking Logs26. Safe/Block Lists Logs27. Authentication Logs[1]> 1Please enter the name for the log:[]> MailLogSyslogPushLog level:1. Critical2. Warning3. Information4. Debug5. Trace[3]> 2Choose the method to retrieve the logs.1. FTP Poll2. FTP Push3. SCP Push4. Syslog Push[1]> 4Hostname to deliver the logs:[]> 10.1.1.2Which protocol do you want to use to transfer the log data?1. UDP2. TCP[1]> 1Which facility do you want the log data to be sent as?1. auth2. authpriv3. console4. daemon5. ftp6. local07. local18. local29. local310. local411. local512. local613. local714. mail15. ntp16. security17. user[14]> 14Currently configured logs:1. "MailLogSyslogPush" Type: "IronPort Text Mail Logs" Retrieval: Syslog Push -Host 10.1.1.2
rollovernow
DescriptionRoll over a log file.
UsageCommit: This command does not require a ‘commit’.
CLI Reference Guide236
The Commands: Reference Examplesrollovernow

Cluster Management: This command is restricted to machine mode.
Batch Command: This command does not support a batch format.
Example
mail3.example.com> rollovernowCurrently configured logs:1. "antispam" Type: "Anti-Spam Logs" Retrieval: FTP Poll2. "antivirus" Type: "Anti-Virus Logs" Retrieval: FTP Poll3. "asarchive" Type: "Anti-Spam Archive" Retrieval: FTP Poll4. "authentication" Type: "Authentication Logs" Retrieval: FTP Poll5. "avarchive" Type: "Anti-Virus Archive" Retrieval: FTP Poll6. "bounces" Type: "Bounce Logs" Retrieval: FTP Poll7. "cli_logs" Type: "CLI Audit Logs" Retrieval: FTP Poll8. "encryption" Type: "Encryption Logs" Retrieval: FTP Poll9. "error_logs" Type: "IronPort Text Mail Logs" Retrieval: FTP Poll10. "euq_logs" Type: "IronPort Spam Quarantine Logs" Retrieval: FTP Poll11. "euqgui_logs" Type: "IronPort Spam Quarantine GUI Logs" Retrieval: FTP Poll12. "ftpd_logs" Type: "FTP Server Logs" Retrieval: FTP Poll13. "gui_logs" Type: "HTTP Logs" Retrieval: FTP Poll14. "mail_logs" Type: "IronPort Text Mail Logs" Retrieval: FTP Poll15. "reportd_logs" Type: "Reporting Logs" Retrieval: FTP Poll16. "reportqueryd_logs" Type: "Reporting Query Logs" Retrieval: FTP Poll17. "scanning" Type: "Scanning Logs" Retrieval: FTP Poll18. "slbld_logs" Type: "Safe/Block Lists Logs" Retrieval: FTP Poll19. "sntpd_logs" Type: "NTP logs" Retrieval: FTP Poll20. "status" Type: "Status Logs" Retrieval: FTP Poll21. "system_logs" Type: "System Logs" Retrieval: FTP Poll22. "trackerd_logs" Type: "Tracking Logs" Retrieval: FTP Poll23. "updater_logs" Type: "Updater Logs" Retrieval: FTP Poll24. All LogsWhich log would you like to roll over?[]> 2Log files successfully rolled over.mail3.example.com>
snmpconfig
DescriptionConfigure SNMP.
UsageCommit: This command requires a ‘commit’.Cluster Management: This command can be used in all three machine modes (cluster, group, machine).
Batch Command: This command does not support a batch format.
ExampleIn the following example, the snmpconfig command is used to enable SNMP on the “PublicNet” interface onport 161. A passphrase for version 3 is entered and then re-entered for confirmation. The system is configuredto service version 1 and 2 requests, and the community string public is entered for GET requests from those
CLI Reference Guide 237
The Commands: Reference Examplessnmpconfig

versions 1 and 2. The trap target of snmp-monitor.example.com is entered. Finally, system location and contactinformation is entered.
mail3.example.com> snmpconfigCurrent SNMP settings:SNMP Disabled.Choose the operation you want to perform:- SETUP - Configure SNMP.[]> setupDo you want to enable SNMP? [N]> yPlease choose an IP interface for SNMP requests.1. Data 1 (192.168.1.1/24: buttercup.run)2. Data 2 (192.168.2.1/24: buttercup.run)3. Management (192.168.44.44/24: buttercup.run)[1]>Enter the SNMPv3 passphrase.>Please enter the SNMPv3 passphrase again to confirm.>Which port shall the SNMP daemon listen on?[161]>Service SNMP V1/V2c requests? [N]> yEnter the SNMP V1/V2c community string.[]> publicFrom which network shall SNMP V1/V2c requests be allowed?[192.168.2.0/24]>Enter the Trap target (IP address). Enter "None" to disable traps.[None]> snmp-monitor.example.comEnterprise Trap Status1. RAIDStatusChange Enabled2. fanFailure Enabled3. highTemperature Enabled4. keyExpiration Enabled5. linkDown Enabled6. linkUp Enabled7. powerSupplyStatusChange Enabled8. resourceConservationMode Enabled9. updateFailure EnabledDo you want to change any of these settings? [N]> yDo you want to disable any of these traps? [Y]>Enter number or numbers of traps to disable. Separate multiple numbers with commas.[]> 1,8Enterprise Trap Status1. RAIDStatusChange Disabled2. fanFailure Enabled3. highTemperature Enabled4. keyExpiration Enabled5. linkDown Enabled6. linkUp Enabled7. powerSupplyStatusChange Enabled8. resourceConservationMode Disabled9. updateFailure EnabledDo you want to change any of these settings? [N]>Enter the System Location string.[Unknown: Not Yet Configured]> Network Operations Center - west; rack #31, position 2Enter the System Contact string.[snmp@localhost]> Joe Administrator, x8888Current SNMP settings:Listening on interface "Data 1" 192.168.2.1/24 port 161.SNMP v3: Enabled.SNMP v1/v2: Enabled, accepting requests from subnet 192.168.2.0/24.SNMP v1/v2 Community String: publicTrap target: snmp-monitor.example.comLocation: Network Operations Center - west; rack #31, position 2System Contact: Joe Administrator, x8888mail3.example.com>
CLI Reference Guide238
The Commands: Reference Examplessnmpconfig

tail
DescriptionContinuously display the end of a log file. The tail command also accepts the name or number of a log toview as a parameter: tail 9 or tail mail_logs.
UsageCommit: This command does not require a ‘commit’.Cluster Management: This command is restricted to machine mode. It is further restricted to the login host(i.e., the specific machine you are logged onto). This command requires access to the local file system.
Batch Command: This command does not support a batch format.
Example
mail3.example.com> tailCurrently configured logs:1. "antispam" Type: "Anti-Spam Logs" Retrieval: FTP Poll2. "antivirus" Type: "Anti-Virus Logs" Retrieval: FTP Poll3. "asarchive" Type: "Anti-Spam Archive" Retrieval: FTP Poll4. "authentication" Type: "Authentication Logs" Retrieval: FTP Poll5. "avarchive" Type: "Anti-Virus Archive" Retrieval: FTP Poll6. "bounces" Type: "Bounce Logs" Retrieval: FTP Poll7. "cli_logs" Type: "CLI Audit Logs" Retrieval: FTP Poll8. "encryption" Type: "Encryption Logs" Retrieval: FTP Poll9. "error_logs" Type: "IronPort Text Mail Logs" Retrieval: FTP Poll10. "euq_logs" Type: "IronPort Spam Quarantine Logs" Retrieval: FTP Poll11. "euqgui_logs" Type: "IronPort Spam Quarantine GUI Logs" Retrieval: FTP Poll12. "ftpd_logs" Type: "FTP Server Logs" Retrieval: FTP Poll13. "gui_logs" Type: "HTTP Logs" Retrieval: FTP Poll14. "mail_logs" Type: "IronPort Text Mail Logs" Retrieval: FTP Poll15. "reportd_logs" Type: "Reporting Logs" Retrieval: FTP Poll16. "reportqueryd_logs" Type: "Reporting Query Logs" Retrieval: FTP Poll17. "scanning" Type: "Scanning Logs" Retrieval: FTP Poll18. "slbld_logs" Type: "Safe/Block Lists Logs" Retrieval: FTP Poll19. "sntpd_logs" Type: "NTP logs" Retrieval: FTP Poll20. "status" Type: "Status Logs" Retrieval: FTP Poll21. "system_logs" Type: "System Logs" Retrieval: FTP Poll22. "trackerd_logs" Type: "Tracking Logs" Retrieval: FTP Poll23. "updater_logs" Type: "Updater Logs" Retrieval: FTP PollEnter the number of the log you wish to tail.[]> 19Press Ctrl-C to stop.Sat May 15 12:25:10 2008 Info: PID 274: User system commit changes: Automated Update forQuarantine Delivery HostSat May 15 23:18:10 2008 Info: PID 19626: User admin commit changes:Sat May 15 23:18:10 2008 Info: PID 274: User system commit changes: Updated filter logsconfigSat May 15 23:46:06 2008 Info: PID 25696: User admin commit changes: Receiving suspended.Sat May 15 23:46:06 2008 Info: PID 25696: User admin commit changes: Suspended receiving.Sat May 15 23:46:35 2008 Info: PID 25696: User admin commit changes: Receiving resumed.Sat May 15 23:46:35 2008 Info: PID 25696: User admin commit changes: Receiving resumed.Sat May 15 23:48:17 2008 Info: PID 25696: User admin commit changes:Sun May 16 00:00:00 2008 Info: Generated report: name b, start time Sun May 16 00:00:002004, size 2154 bytes^Cmail3.example.com>
CLI Reference Guide 239
The Commands: Reference Examplestail

ReportingThis section contains the following CLI commands:
• reportingconfig, on page 240
reportingconfig
Using the reportingconfig commandThe following subcommands are available within the reportingconfig submenu:
Table 13: reportingconfig Subcommands
AvailabilityDescriptionSyntax
M-Series onlyConfigure filters for the SecurityManagementappliance.
filters
M-Series onlyConfigure when you will be alerted due tofailing to get reporting data.
alert_timeout
M-Series onlyConfigure domain report settings.domain
C-, M-SeriesEnable centralized reporting on the SecurityManagement appliance. Enable centralizedor local reporting for the Email Securityappliance.
mode
C-Series onlyConfigure reporting for the Email Securityapplaince.
mailsetup
UsageCommit: This command requires a ‘commit’.
Example: Enabling Reporting Filters (M-Series only)
mail3.example.com> reportingconfigChoose the operation you want to perform:- FILTERS - Configure filtering for the SMA.- ALERT_TIMEOUT - Configure when you will be alerted due to failing to get reporting data- DOMAIN - Configure domain report settings.- MODE - Enable/disable centralized reporting.[]> filtersFilters remove specific sets of centralized reporting data from the "last year" reports.Data from the reporting groups selected below will not be recorded.
CLI Reference Guide240
The Commands: Reference ExamplesReporting
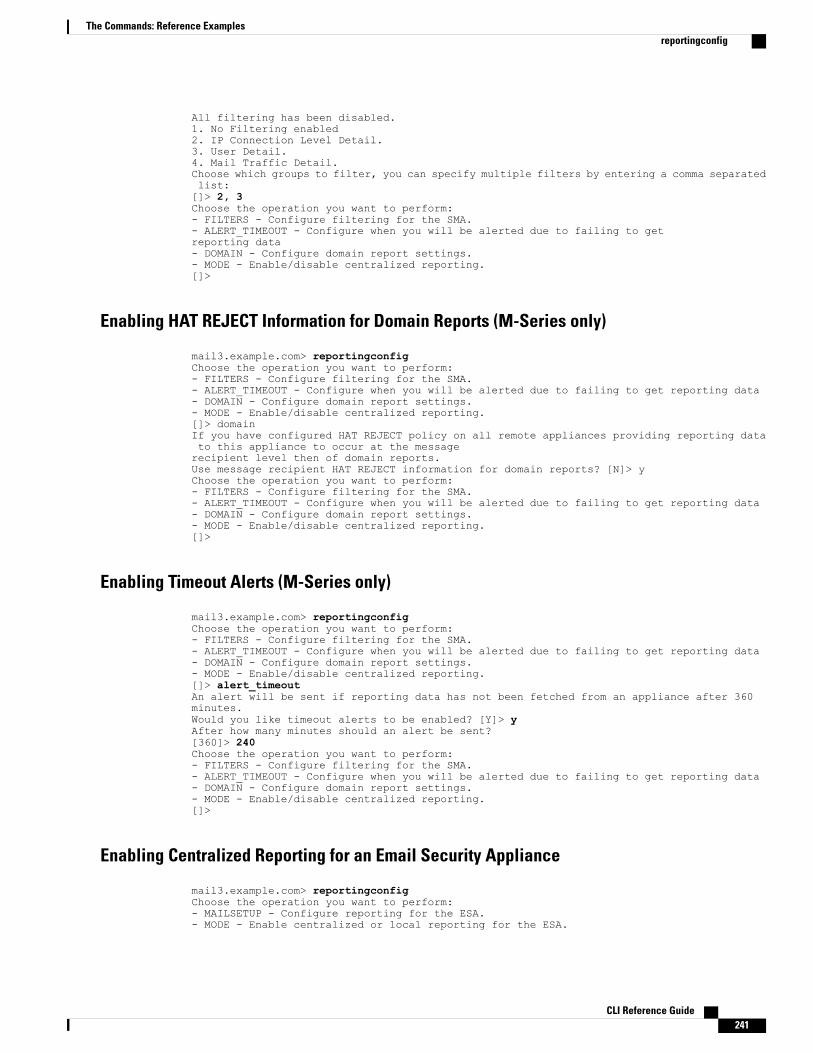
All filtering has been disabled.1. No Filtering enabled2. IP Connection Level Detail.3. User Detail.4. Mail Traffic Detail.Choose which groups to filter, you can specify multiple filters by entering a comma separatedlist:[]> 2, 3Choose the operation you want to perform:- FILTERS - Configure filtering for the SMA.- ALERT_TIMEOUT - Configure when you will be alerted due to failing to getreporting data- DOMAIN - Configure domain report settings.- MODE - Enable/disable centralized reporting.[]>
Enabling HAT REJECT Information for Domain Reports (M-Series only)
mail3.example.com> reportingconfigChoose the operation you want to perform:- FILTERS - Configure filtering for the SMA.- ALERT_TIMEOUT - Configure when you will be alerted due to failing to get reporting data- DOMAIN - Configure domain report settings.- MODE - Enable/disable centralized reporting.[]> domainIf you have configured HAT REJECT policy on all remote appliances providing reporting datato this appliance to occur at the messagerecipient level then of domain reports.Use message recipient HAT REJECT information for domain reports? [N]> yChoose the operation you want to perform:- FILTERS - Configure filtering for the SMA.- ALERT_TIMEOUT - Configure when you will be alerted due to failing to get reporting data- DOMAIN - Configure domain report settings.- MODE - Enable/disable centralized reporting.[]>
Enabling Timeout Alerts (M-Series only)
mail3.example.com> reportingconfigChoose the operation you want to perform:- FILTERS - Configure filtering for the SMA.- ALERT_TIMEOUT - Configure when you will be alerted due to failing to get reporting data- DOMAIN - Configure domain report settings.- MODE - Enable/disable centralized reporting.[]> alert_timeoutAn alert will be sent if reporting data has not been fetched from an appliance after 360minutes.Would you like timeout alerts to be enabled? [Y]> yAfter how many minutes should an alert be sent?[360]> 240Choose the operation you want to perform:- FILTERS - Configure filtering for the SMA.- ALERT_TIMEOUT - Configure when you will be alerted due to failing to get reporting data- DOMAIN - Configure domain report settings.- MODE - Enable/disable centralized reporting.[]>
Enabling Centralized Reporting for an Email Security Appliance
mail3.example.com> reportingconfigChoose the operation you want to perform:- MAILSETUP - Configure reporting for the ESA.- MODE - Enable centralized or local reporting for the ESA.
CLI Reference Guide 241
The Commands: Reference Examplesreportingconfig

[]> modeCentralized reporting: Local reporting only.Do you want to enable centralized reporting? [N]> yChoose the operation you want to perform:- MAILSETUP - Configure reporting for the ESA.- MODE - Enable centralized or local reporting for the ESA.[]>
Configure Storage Limit for Reporting Data (C-Series only)
mail.example.com> reportingconfigChoose the operation you want to perform:- MAILSETUP - Configure reporting for the ESA.- MODE - Enable centralized or local reporting for the ESA.[]> mailsetupSenderBase timeout used by the web interface: 5 secondsSender Reputation Multiplier: 3The current level of reporting data recording is: unlimitedNo custom second level domains are defined.Legacy mailflow report: DisabledChoose the operation you want to perform:- SENDERBASE - Configure SenderBase timeout for the web interface.- MULTIPLIER - Configure Sender Reputation Multiplier.- COUNTERS - Limit counters recorded by the reporting system.- THROTTLING - Limit unique hosts tracked for rejected connection reporting.- TLD - Add customer specific domains for reporting rollup.- STORAGE - How long centralized reporting data will be stored on the C-series before beingoverwritten.- LEGACY - Configure legacy mailflow report.[]> storageWhile in centralized mode the C-series will store reporting data for the M-series to collect.
If the M-series does not collect that data then eventually the C-series will begin tooverwrite the oldest data with new data.A maximum of 24 hours of reporting data will be stored.How many hours of reporting data should be stored before data loss?[24]> 48SenderBase timeout used by the web interface: 5 secondsSender Reputation Multiplier: 3The current level of reporting data recording is: unlimitedNo custom second level domains are defined.Legacy mailflow report: DisabledChoose the operation you want to perform:- SENDERBASE - Configure SenderBase timeout for the web interface.- MULTIPLIER - Configure Sender Reputation Multiplier.- COUNTERS - Limit counters recorded by the reporting system.- THROTTLING - Limit unique hosts tracked for rejected connection reporting.- TLD - Add customer specific domains for reporting rollup.- STORAGE - How long centralized reporting data will be stored on the C-seriesbefore being overwritten.- LEGACY - Configure legacy mailflow report.[]>
SenderbaseThis section contains the following CLI commands:
• sbstatus, on page 243
• senderbaseconfig, on page 243
CLI Reference Guide242
The Commands: Reference ExamplesSenderbase

sbstatus
DescriptionDisplay status of SenderBase queries.
UsageCommit: This command requires a ‘commit’.Cluster Management: This command can be used in all three machine modes (cluster, group, machine).
Batch Command: This command does not support a batch format.
Example
mail3.example.com> sbstatusSenderBase host statusStatus as of: Tue Oct 21 10:55:04 2003Host up/down: up
If the appliance is unable to contact the SenderBase Reputation Service, or the service has never been contacted,the following is displayed:
mail3.example.com> sbstatusSenderBase host statusHost up/down: Unknown (never contacted)
senderbaseconfig
DescriptionConfigure SenderBase connection settings.
UsageCommit: This command requires a ‘commit’.Cluster Management: This command can be used in all three machine modes (cluster, group, machine).
Batch Command: This command does not support a batch format.
Example
mail3.example.com> senderbaseconfigShare statistics with SenderBase Information Service: EnabledChoose the operation you want to perform:- SETUP - Configure SenderBase Network Participation settings[]> setup
CLI Reference Guide 243
The Commands: Reference Examplessbstatus
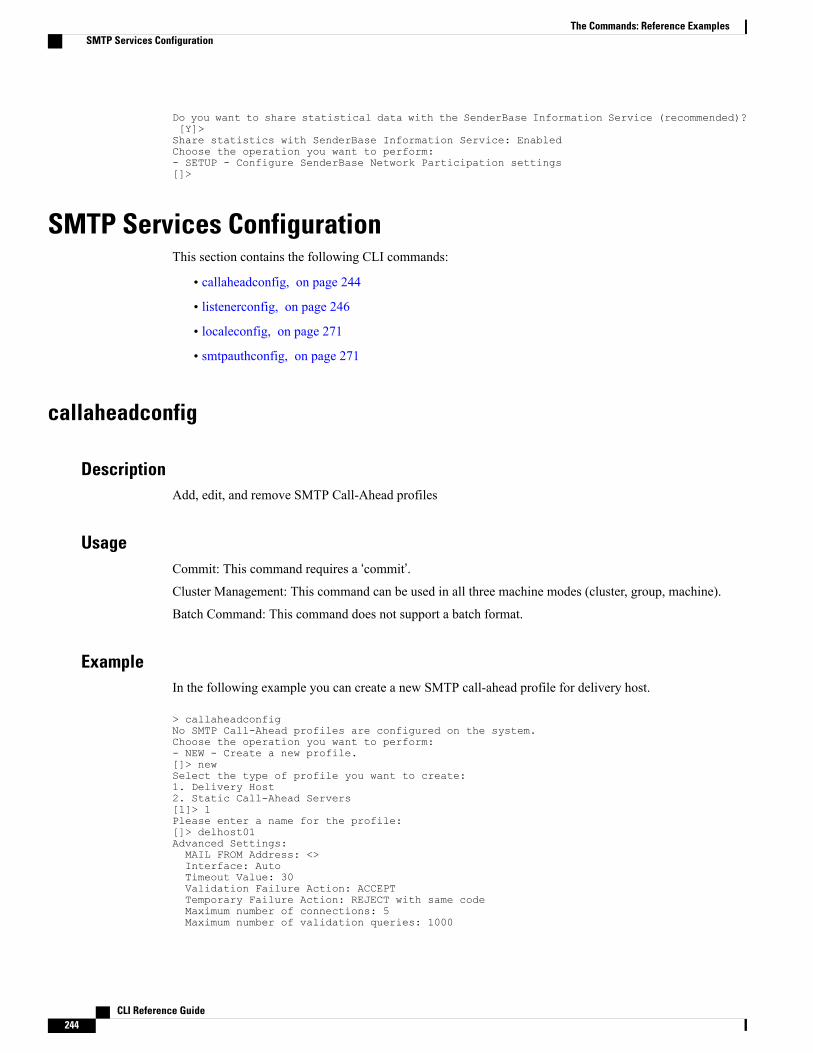
Do you want to share statistical data with the SenderBase Information Service (recommended)?[Y]>Share statistics with SenderBase Information Service: EnabledChoose the operation you want to perform:- SETUP - Configure SenderBase Network Participation settings[]>
SMTP Services ConfigurationThis section contains the following CLI commands:
• callaheadconfig, on page 244
• listenerconfig, on page 246
• localeconfig, on page 271
• smtpauthconfig, on page 271
callaheadconfig
DescriptionAdd, edit, and remove SMTP Call-Ahead profiles
UsageCommit: This command requires a ‘commit’.Cluster Management: This command can be used in all three machine modes (cluster, group, machine).
Batch Command: This command does not support a batch format.
ExampleIn the following example you can create a new SMTP call-ahead profile for delivery host.
> callaheadconfigNo SMTP Call-Ahead profiles are configured on the system.Choose the operation you want to perform:- NEW - Create a new profile.[]> newSelect the type of profile you want to create:1. Delivery Host2. Static Call-Ahead Servers[1]> 1Please enter a name for the profile:[]> delhost01Advanced Settings:MAIL FROM Address: <>Interface: AutoTimeout Value: 30Validation Failure Action: ACCEPTTemporary Failure Action: REJECT with same codeMaximum number of connections: 5Maximum number of validation queries: 1000
CLI Reference Guide244
The Commands: Reference ExamplesSMTP Services Configuration

Cache size: 10000Cache TTL: 900
Do you want to change advanced settings? [N]> nCurrently configured SMTP Call-Ahead profiles:1. delhost01 (Delivery Host)Choose the operation you want to perform:- NEW - Create a new profile.- EDIT - Modify a profile.- DELETE - Delete a profile.- PRINT - Display profile information.- TEST - Test profile.- FLUSHCACHE - Flush SMTP Call-Ahead cache.[]>In the following example you can create a new SMTP call-ahead profile for call ahead server.
> callaheadconfigCurrently configured SMTP Call-Ahead profiles:1. delhost01 (Delivery Host)Choose the operation you want to perform:- NEW - Create a new profile.- EDIT - Modify a profile.- DELETE - Delete a profile.- PRINT - Display profile information.- TEST - Test profile.- FLUSHCACHE - Flush SMTP Call-Ahead cache.[]> newSelect the type of profile you want to create:1. Delivery Host2. Static Call-Ahead Servers[1]> 2Please enter a name for the profile:[]> StaticEnter one or more Call-Ahead servers hostname separated by commas.[]> 192.168.1.2Advanced Settings:MAIL FROM Address: <>Interface: AutoTimeout Value: 30Validation Failure Action: ACCEPTTemporary Failure Action: REJECT with same codeMaximum number of connections: 5Maximum number of validation queries: 1000Cache size: 10000Cache TTL: 900
Do you want to change advanced settings? [N]> nCurrently configured SMTP Call-Ahead profiles:1. Static (Static Call-Ahead Servers)2. delhost01 (Delivery Host)Choose the operation you want to perform:- NEW - Create a new profile.- EDIT - Modify a profile.- DELETE - Delete a profile.- PRINT - Display profile information.- TEST - Test profile.- FLUSHCACHE - Flush SMTP Call-Ahead cache.[]> printSelect the profile you want to print:1. Static (Static Call-Ahead Servers)2. delhost01 (Delivery Host)[1]>
CLI Reference Guide 245
The Commands: Reference Examplescallaheadconfig
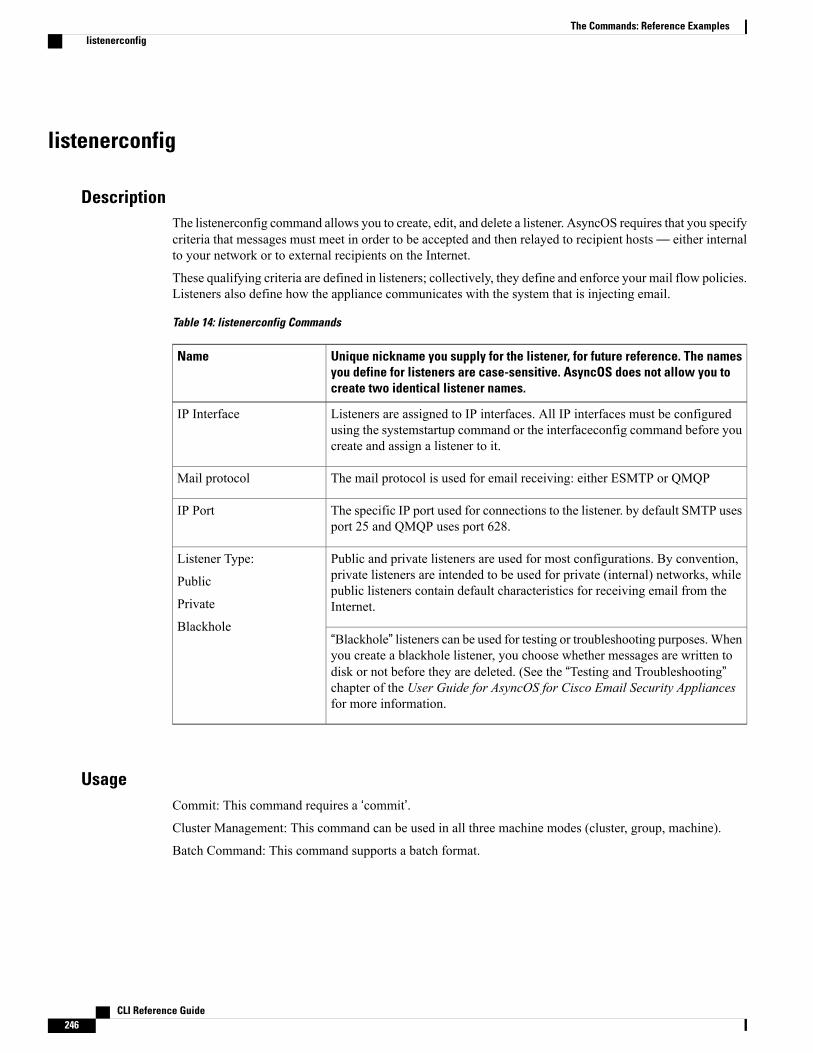
listenerconfig
DescriptionThe listenerconfig command allows you to create, edit, and delete a listener. AsyncOS requires that you specifycriteria that messages must meet in order to be accepted and then relayed to recipient hosts— either internalto your network or to external recipients on the Internet.
These qualifying criteria are defined in listeners; collectively, they define and enforce your mail flow policies.Listeners also define how the appliance communicates with the system that is injecting email.
Table 14: listenerconfig Commands
Unique nickname you supply for the listener, for future reference. The namesyou define for listeners are case-sensitive. AsyncOS does not allow you tocreate two identical listener names.
Name
Listeners are assigned to IP interfaces. All IP interfaces must be configuredusing the systemstartup command or the interfaceconfig command before youcreate and assign a listener to it.
IP Interface
The mail protocol is used for email receiving: either ESMTP or QMQPMail protocol
The specific IP port used for connections to the listener. by default SMTP usesport 25 and QMQP uses port 628.
IP Port
Public and private listeners are used for most configurations. By convention,private listeners are intended to be used for private (internal) networks, whilepublic listeners contain default characteristics for receiving email from theInternet.
Listener Type:
Public
Private
Blackhole“Blackhole” listeners can be used for testing or troubleshooting purposes.Whenyou create a blackhole listener, you choose whether messages are written todisk or not before they are deleted. (See the “Testing and Troubleshooting”chapter of the User Guide for AsyncOS for Cisco Email Security Appliancesfor more information.
UsageCommit: This command requires a ‘commit’.Cluster Management: This command can be used in all three machine modes (cluster, group, machine).
Batch Command: This command supports a batch format.
CLI Reference Guide246
The Commands: Reference Exampleslistenerconfig

Batch Format - General listenerconfigThe batch format of the listenerconfig command can be used to add and delete listeners on a particular interface.The batch format of the listenerconfig command also allows you to configure a listener’s HAT and RAT.
• Adding a new listener:
listenerconfig new <name> <public|private|blackhole|blackholequeueing><interface_name> <smtp|qmqp>
• Deleting a listener:
listenerconfig delete <name>
Batch Format - HATThe following examples demonstrate the use of the batch format of listenerconfig to perform variousHAT-related tasks. For more information about arguments, consult Table - listenerconfig Argument Values-HAT below:
• Adding a new sendergroup to the HAT
listenerconfig edit <name> hostaccess new sendergroup <name> <host_list> <behavior>[options [--comments]
• Add a new policy to the HAT
listenerconfig edit <name> hostaccess new policy <name> <behavior> [options]
• Add a new host list to a sendergroup
listenerconfig edit sendergroup <name> hostaccess edit sendergroup <name> new<host_list>
• Delete a host from a sendergroup
listenerconfig edit sendergroup <name> hostaccess edit sendergroup <name> delete<host>
CLI Reference Guide 247
The Commands: Reference Exampleslistenerconfig

• Move a host in a sendergroup’s list order
listenerconfig edit sendergroup <name> hostaccess edit sendergroup <name> move <host><host-to-insert-before>
• Modify a sendergroup’s policy
listenerconfig edit sendergroup <name> hostaccess edit sendergroup <name> policy<behavior> [options]
• Print a sendergroup listing
listenerconfig edit <name> hostaccess edit sendergroup <name> print
• Rename a sendergroup
listenerconfig edit sendergroup <name> hostaccess edit sendergroup <name> rename<name>
• Editing a HAT’s policy
listenerconfig edit <name> hostaccess edit policy <name> <behavior> [options]
• Deleting a sendergroup from a HAT
listenerconfig edit <name> hostaccess delete sendergroup <name>
• Deleting a policy
listenerconfig edit <name> hostaccess delete policy <name>
• Moving a sendergroup’s position in the HAT
listenerconfig edit <name> hostaccess move <group> <group-to-insert-before>
• Changing a HAT default option
listenerconfig edit <name> hostaccess default [options]
CLI Reference Guide248
The Commands: Reference Exampleslistenerconfig

• Printing the hostaccess table
listenerconfig edit <name> hostaccess print
• Import a local copy of a HAT
listenerconfig edit <name> hostaccess import <filename>
• Exporting a copy of the HAT from the appliance
listenerconfig edit <name> hostaccess export <filename>
• Deleting all user defined sendergroups and policies from the HAT
listenerconfig edit <name> hostaccess clear
Table 15: listenerconfig Argument Values -HAT
DescriptionArgument
“Accept”, “Relay”, “Reject”, “TCP Refuse”, or “Continue”. When selecting abehavior for use with a sendergroup, additional behaviors of the form “Policy:FOO” are available (where “FOO” is the name of policy).
<behavior>
The filename to use with importing and exporting the hostaccess tables.<filename>
A sendergroup <name>.<group>
A single entity of a <host_list><host>
Enter the hosts to add. Hosts can be formatted as follows:
CIDR addresses (10.1.1.0/24)
IP address ranges (10.1.1.10-20)
IP Subnets (10.2.3)
Hostname (crm.example.com)
Partial Hostname (.example.com)
Sender Base Reputation Score range (7.5:10.0)
Senderbase Network Owner IDS (SBO:12345)
Remote blacklist queries (dnslist[query.blacklist.example]
Separate multiple hosts withcommas
Note
<host_list>
CLI Reference Guide 249
The Commands: Reference Exampleslistenerconfig

DescriptionArgument
The name of the sendergroup or policy. HAT labels must start with a letter orunderscore, followed by any number of letters, numbers, underscores or hyphens.
<name>
[options]
Maximum message size. Add a trailing k for kilobytes, M for megabytes, or noletters for bytes.
--max_size
Maximum number of connections allowed from a single host.--max_conn
Maximum number of messages per connection.--max_msgs
Maximum number of recipients per message.--max_rcpt
Override the hostname in the SMTP banner. “No” or SMTP banner string.--override
Specify a custom SMTP acceptance response. “No” or SMTP acceptance responsestring.
--cust_acc
Custom SMTP acceptance response code. Default is 220.--acc_code
Specify a custom SMTP rejection response. “No” or SMTP rejection responsestring.
--cust_rej
Custom SMTP rejection response code. Default is 554.--rej_code
Enable rate limiting per host. “No”, “default” or maximum number of recipientsper hour per host.
--rate_lim
Specify a customSMTP limit exceeded responsemessage. “No” or SMTP rejectionresponse string. Default is “No”.
--cust_lim
Custom SMTP limit exceeded response code. Default is 452.--lim_code
Use SenderBase for flow control by default. “Yes”, “No”, or “default”.--use_sb
Enable anti-spam scanning. “Yes”, “No”, “Default”.--as_scan
Enable anti-virus scanning. “Yes”, “No”, “Default”.--av_scan
Directory Harvest Attack Prevention. “No”, “default”, or maximum number ofinvalid recipients per hour from a remote host.
--dhap
Not supported; use menuing system to configure TLS.--tls
Number of bits of IP address to treat as significant. From 0 to 32, “No” or “default”.--sig_bits
Enable DKIM signing. “Yes”, “No”, “Default.”--dkim_signing
CLI Reference Guide250
The Commands: Reference Exampleslistenerconfig

DescriptionArgument
Enable DKIM verification. “Yes”, “No”, “Default.”--dkim_verification
The name of DKIM verification profile. This option is only applicable if--dkim_verification value is set to “Yes.”
--dkim_verification_profile<name>
Enable SPF verification. “Yes”, “No”, “Default.”--spf
SPF conformance level. Used with “--spf Yes” only. “spf_only”, “sidf_compatible”,“sidf_strict.”
--spf_conf_level
Downgrade SPF PRA verification result. Used with “--spf Yes” and“--spf_conf_level sidf_compatible” only. “Yes”, “No.”
--spf_downgrade_pra
SPF HELO test. Used with “--spf Yes” and “--spf_conf_level sidf_compatible,”or “--spf_conf_level spf_only.” “Yes”, “No”.
--spf_helo_test
Enable DMARC verification. “Yes”, “No”, “Default.”--dmarc_verification
The name of DMARC verification profile. This option is only applicable if--dmarc_verification value is set to “Yes.”
--dmarc_verification_profile<name>
Enable DMARC aggregate reports. “Yes”, “No”, “Default.” This option is onlyapplicable if --dmarc_verification value is set to “Yes.”
--dmarc_agg_reports
Batch Format - RATThe following examples demonstrate the use of the batch format of listenerconfig to perform variousRAT-related tasks. For more information about arguments, consult Table - listenerconfig Argument Values -RAT below:
• Adding a new recipient to the RAT
listenerconfig edit <name> rcptacess new <rat_addr> [options]
• Editing a recipient in the RAT
listenerconfig edit <name> rcptacess edit <rat_addr> [options]
• Deleting a recipient from the RAT
listenerconfig edit <name> rcptacess delete <rat_addr>
CLI Reference Guide 251
The Commands: Reference Exampleslistenerconfig

• Printing a copy of the RAT
listenerconfig edit <name> rcptacess print
• Importing a local RAT to your appliance
listenerconfig edit <name> rcptacess import <filename>
• Exporting a RAT
listenerconfig edit <name> rcptacess export <filename>
• Clearing the default access
listenerconfig edit <name> rcptacess clear <default_access>
Table 16: listenerconfig Argument Values - RAT
DescriptionArgument
Enter the hosts to add. Hosts can be formatted as follows:
CIDR addresses (10.1.1.0/24)
Hostname (crm.example.com)
Partial Hostname (.example.com)
Usernames (postmaster@)
Full email addresses ([email protected], joe@[1.2.3.4]
Separate multiple hosts withcommas
Note
<rat_addr>
<options>
Action to apply to address(es). Either “Accept” or “Reject”. Default is “Accept”.--action
Specify a custom SMTP response. “No” or SMTP acceptance response string.--cust_resp
Custom SMTP response code. Default is 250 for “Accept” actions, 550 for“Reject”.
--resp_code
Bypass receiving control. Default is “No”.--bypass_rc
Bypass LDAP Accept query. Either “Yes” or “No.”--bypass_la
Bypass SMTP Call-Ahead. Default is "No".--bypass_ca
CLI Reference Guide252
The Commands: Reference Exampleslistenerconfig

Example - Adding a listenerIn the following example, the listenerconfig command is used to create a new private listener calledOutboundMail that can be used for the B listener needed in the Enterprise Gateway configuration. (Note: youalso had the option to add this private listener during the GUI’s System Setup Wizard CLI systemsetupcommand.)
A private listener type is chosen and named OutboundMail. It is specified to run on the PrivateNet IP interface,using the SMTP protocol over port 25. The default values for the Host Access Policy for this listener are thenaccepted.
mail3.example.com> listenerconfigCurrently configured listeners:1. InboundMail (on PublicNet, 192.168.2.1) SMTP TCP Port 25 PublicChoose the operation you want to perform:- NEW - Create a new listener.- EDIT - Modify a listener.- DELETE - Remove a listener.- SETUP - Change global settings.[]> newPlease select the type of listener you want to create.1. Private2. Public3. Blackhole[2]> 1Please create a name for this listener (Ex: "OutboundMail"):[]> OutboundMailPlease choose an IP interface for this Listener.1. Management (192.168.42.42/24: mail3.example.com)2. PrivateNet (192.168.1.1/24: mail3.example.com)3. PublicNet (192.168.2.1/24: mail3.example.com)[1]> 2Choose a protocol.1. SMTP2. QMQP[1]> 1Please enter the TCP port for this listener.[25]> 25Please specify the systems allowed to relay email through the IronPort C60.Hostnames such as "example.com" are allowed.Partial hostnames such as ".example.com" are allowed.IP addresses, IP address ranges, and partial IP addresses are allowed.Separate multiple entries with commas.[]> .example.comDo you want to enable rate limiting for this listener? (Rate limiting defines the maximumnumber of recipients per hour you arewilling to receive from a remote domain.) [N]> nDefault Policy Parameters==========================Maximum Message Size: 100MMaximum Number Of Connections From A Single IP: 600Maximum Number Of Messages Per Connection: 10,000Maximum Number Of Recipients Per Message: 100,000Maximum Number Of Recipients Per Hour: DisabledUse SenderBase for Flow Control: NoSpam Detection Enabled: NoVirus Detection Enabled: YesAllow TLS Connections: NoAllow SMTP Authentication: NoRequire TLS To Offer SMTP authentication: NoWould you like to change the default host access policy? [N]> nListener OutboundMail created.Defaults have been set for a Private listener.Use the listenerconfig->EDIT command to customize the listener.Currently configured listeners:
CLI Reference Guide 253
The Commands: Reference Exampleslistenerconfig

1. InboundMail (on PublicNet, 192.168.2.1) SMTP TCP Port 25 Public2. OutboundMail (on PrivateNet, 192.168.1.1) SMTP TCP Port 25 PrivateChoose the operation you want to perform:- NEW - Create a new listener.- EDIT - Modify a listener.- DELETE - Remove a listener.- SETUP - Change global settings.[]>
Example - Customizing the Host Acess Table (HAT ) for a listener via Export and ImportMany of the subcommands within the listenerconfig command allow you to import and export data in orderto make large configuration changes without having to enter data piecemeal in the CLI.
These steps use the CLI to modify the Host Access Table (HAT) of a listener by exporting, modifying, andimporting a file. You can also use the HAT CLI editor or the GUI to customize the HAT for a listener. Formore information, see the “Configuring the Gateway to ReceiveMail” and “UsingMail FlowMonitor” chaptersin the User Guide for AsyncOS for Cisco Email Security Appliances .
To customize a HAT for a listener you have defined via export and import:
Procedure
Step 1 Use the hostaccess -> export subcommands of listenerconfig to export the default HAT to a file.In the following example, the HAT for the public listener InboundMail is printed, and then exported to a filenamed inbound.HAT.txt
Example:
mail3.example.com> listenerconfigCurrently configured listeners:1. InboundMail (on PublicNet, 192.168.2.1) SMTP TCP Port 25 Public2. OutboundMail (on PrivateNet, 192.168.1.1) SMTP TCP Port 25 PrivateChoose the operation you want to perform:- NEW - Create a new listener.- EDIT - Modify a listener.- DELETE - Remove a listener.- SETUP - Change global settings.[]> editEnter the name or number of the listener you wish to edit.[]> 1Name: InboundMailType: PublicInterface: PublicNet (192.168.2.1/24) TCP Port 25Protocol: SMTPDefault Domain:Max Concurrency: 1000 (TCP Queue: 50)Domain map: disabledTLS: NoSMTP Authentication: DisabledBounce Profile: DefaultUse SenderBase For Reputation Filters and IP Profiling: YesFooter: NoneLDAP: offChoose the operation you want to perform:- NAME - Change the name of the listener.- INTERFACE - Change the interface.- LIMITS - Change the injection limits.- SETUP - Configure general options.- HOSTACCESS - Modify the Host Access Table.- RCPTACCESS - Modify the Recipient Access Table.- BOUNCECONFIG - Choose the bounce profile to use for messages injected on this listener.- MASQUERADE - Configure the Domain Masquerading Table.
CLI Reference Guide254
The Commands: Reference Exampleslistenerconfig

- DOMAINMAP - Configure domain mappings.[]> hostaccessDefault Policy Parameters=================Maximum Message Size: 10MMaximum Number Of Concurrent Connections From A Single IP: 10Maximum Number Of Messages Per Connection: 10Maximum Number Of Recipients Per Message: 50Directory Harvest Attack Prevention: EnabledMaximum Number Of Invalid Recipients Per Hour: 25Maximum Number Of Recipients Per Hour: DisabledUse SenderBase for Flow Control: YesSpam Detection Enabled: YesVirus Detection Enabled: YesAllow TLS Connections: NoAllow SMTP Authentication: NoRequire TLS To Offer SMTP authentication: NoDKIM/DomainKeys Signing Enabled: NoDKIM Verification Enabled: NoSPF/SIDF Verification Enabled: NoDMARC Verification Enabled: NoEnvelope Sender DNS Verification Enabled: NoDomain Exception Table Enabled: NoAccept untagged bounces: NoThere are currently 4 policies defined.There are currently 5 sender groups.Choose the operation you want to perform:- NEW - Create a new entry.- EDIT - Modify an entry.- DELETE - Remove an entry.- MOVE - Move an entry.- DEFAULT - Set the defaults.- PRINT - Display the table.- IMPORT - Import a table from a file.- EXPORT - Export the table to a file.- CLEAR - Remove all entries.[]> print$BLOCKED
REJECT {}$TRUSTED
ACCEPT {tls = "off"dhap_limit = 0max_rcpts_per_hour = -1virus_check = "on"max_msgs_per_session = 5000spam_check = "off"use_sb = "off"max_message_size = 104857600max_rcpts_per_msg = 5000max_concurrency = 600
}$ACCEPTED
ACCEPT {}$THROTTLED
ACCEPT {tls = "off"dhap_limit = 0max_rcpts_per_hour = 1virus_check = "on"max_msgs_per_session = 10spam_check = "on"use_sb = "on"max_message_size = 1048576max_rcpts_per_msg = 25max_concurrency = 10
}WHITELIST:
$TRUSTED (My trusted senders have no anti-spam or rate limiting)BLACKLIST:
$BLOCKED (Spammers are rejected)SUSPECTLIST:
CLI Reference Guide 255
The Commands: Reference Exampleslistenerconfig

$THROTTLED (Suspicious senders are throttled)UNKNOWNLIST:
$ACCEPTED (Reviewed but undecided, continue normal acceptance)ALL
$ACCEPTED (Everyone else)Default Policy Parameters=========================Allow TLS Connections: NoAllow SMTP Authentication: NoRequire TLS To Offer SMTP authentication: NoMaximum Concurrency Per IP: 1,000Maximum Message Size: 100MMaximum Messages Per Connection: 1,000Maximum Recipients Per Message: 1,000Maximum Recipients Per Hour: DisabledUse SenderBase For Flow Control: YesSpam Detection Enabled: YesVirus Detection Enabled: YesThere are currently 4 policies defined.There are currently 5 sender groups.Choose the operation you want to perform:- NEW - Create a new entry.- EDIT - Modify an entry.- DELETE - Remove an entry.- MOVE - Move an entry.- DEFAULT - Set the defaults.- PRINT - Display the table.- IMPORT - Import a table from a file.- EXPORT - Export the table to a file.- CLEAR - Remove all entries.[]> exportEnter a name for the exported file:[]> inbound.HAT.txtFile written on machine "mail3.example.com".
Example:
Step 2 Outside of the Command Line Interface (CLI), get the file inbound.HAT.txt .Step 3 With a text editor, create new HAT entries in the file.
In this example, the following entries are added to the HAT above the ALL entry:
spamdomain.com REJECT.spamdomain.com REJECT251.192.1. TCPREFUSE169.254.10.10 RELAY
• The first two entries reject all connections from the remote hosts in the domain spamdomain.com andany subdomain of spamdomain.com .
• The third line refuses connections from any host with an IP address of 251.192.1. x .
• The fourth line allows the remote host with the IP address of 169.254.10.10 to use the Email Securityappliance as an SMTP relay for all of its outbound email to the Internet
CLI Reference Guide256
The Commands: Reference Exampleslistenerconfig

The order that rules appear in the HAT is important. The HAT is read from top to bottom foreach host that attempts to connect to the listener. If a rule matches a connecting host, the actionis taken for that connection immediately. You should place all custom entries in the HAT abovean ALL host definition. You can also use the HAT CLI editor or the GUI to customize the HATfor a listener. For more information, see the “Configuring the Gateway to Receive Mail” and“Using Mail Flow Monitor” chapters in the User Guide for AsyncOS for Cisco Email SecurityAppliances .
Note
Step 4 Save the file and place it in the configuration directory for the interface so that it can be imported. (SeeAppendix B, “Accessing the Appliance,” for more information.)
Step 5 Use the hostaccess -> import subcommand of listenerconfig to import the edited Host Access Table file.In the following example, the edited file named inbound.HAT.txt is imported into the HAT for the InboundMaillistener. The new entries are printed using the print subcommand.
Example:
mail3.example.com> listenerconfigCurrently configured listeners:1. InboundMail (on PublicNet, 192.168.2.1) SMTP TCP Port 25 Public2. OutboundMail (on PrivateNet, 192.168.1.1) SMTP TCP Port 25 PrivateChoose the operation you want to perform:- NEW - Create a new listener.- EDIT - Modify a listener.- DELETE - Remove a listener.- SETUP - Change global settings.[]> editEnter the name or number of the listener you wish to edit.[]> 1Name: InboundMailType: PublicInterface: PublicNet (192.168.2.1/24) TCP Port 25Protocol: SMTPDefault Domain:Max Concurrency: 1000 (TCP Queue: 50)Domain Map: DisabledTLS: NoSMTP Authentication: DisabledBounce Profile: DefaultUse SenderBase For Reputation Filters and IP Profiling: YesFooter: NoneLDAP: OffChoose the operation you want to perform:- NAME - Change the name of the listener.- INTERFACE - Change the interface.- LIMITS - Change the injection limits.- SETUP - Configure general options.- HOSTACCESS - Modify the Host Access Table.- RCPTACCESS - Modify the Recipient Access Table.- BOUNCECONFIG - Choose the bounce profile to use for messages injected on this listener.- MASQUERADE - Configure the Domain Masquerading Table.- DOMAINMAP - Configure domain mappings.[]> hostaccessDefault Policy Parameters=========================Allow TLS Connections: NoAllow SMTP Authentication: NoRequire TLS To Offer SMTP authentication: NoMaximum Concurrency Per IP: 1,000Maximum Message Size: 100MMaximum Messages Per Connection: 1,000Maximum Recipients Per Message: 1,000Maximum Recipients Per Hour: DisabledUse SenderBase For Flow Control: YesSpam Detection Enabled: YesVirus Detection Enabled: Yes
CLI Reference Guide 257
The Commands: Reference Exampleslistenerconfig

There are currently 4 policies defined.There are currently 5 sender groups.Choose the operation you want to perform:- NEW - Create a new entry.- EDIT - Modify an entry.- DELETE - Remove an entry.- MOVE - Move an entry.- DEFAULT - Set the defaults.- PRINT - Display the table.- IMPORT - Import a table from a file.- EXPORT - Export the table to a file.- CLEAR - Remove all entries.[]> importEnter the name of the file to import:[]> inbound.HAT.txt9 entries imported successfully.Default Policy Parameters=========================Allow TLS Connections: NoAllow SMTP Authentication: NoRequire TLS To Offer SMTP authentication: NoMaximum Concurrency Per IP: 1,000Maximum Message Size: 100MMaximum Messages Per Connection: 1,000Maximum Recipients Per Message: 1,000Maximum Recipients Per Hour: DisabledUse SenderBase For Flow Control: YesSpam Detection Enabled: YesVirus Detection Enabled: YesThere are currently 4 policies defined.There are currently 5 sender groups.Choose the operation you want to perform:- NEW - Create a new entry.- EDIT - Modify an entry.- DELETE - Remove an entry.- MOVE - Move an entry.- DEFAULT - Set the defaults.- PRINT - Display the table.- IMPORT - Import a table from a file.- EXPORT - Export the table to a file.- CLEAR - Remove all entries.[]> print$ACCEPTED
ACCEPT$THROTTLED
ACCEPT {spam_check = "on"max_msgs_per_session = 10max_concurrency = 10max_rcpts_per_msg = 25max_rcpts_per_hour = 1dhap_limit = 0virus_check = "on"max_message_size = 1048576use_sb = "on"tls = "off"
}$TRUSTED
ACCEPT {spam_check = "off"max_msgs_per_session = 5000max_concurrency = 600max_rcpts_per_msg = 5000max_rcpts_per_hour = -1dhap_limit = 0virus_check = "on"max_message_size = 104857600use_sb = "off"tls = "off"
}$BLOCKED
REJECT
CLI Reference Guide258
The Commands: Reference Exampleslistenerconfig

WHITELIST:$TRUSTED (My trusted senders have no anti-spam scanning or rate limiting)
BLACKLIST:$BLOCKED (Spammers are rejected)
SUSPECTLIST:$THROTTLED (Suspicious senders are throttled)
UNKNOWNLIST:$ACCEPTED (Reviewed but undecided, continue normal acceptance)
spamdomain.comREJECT (reject the domain "spamdomain.com")
.spamdomain.comREJECT (reject all subdomains of ".spamdomain.com")
251.192.1.TCPREFUSE (TCPREFUSE the IP addresses in "251.192.1")
169.254.10.10RELAY (RELAY the address 169.254.10.10)
ALL$ACCEPTED (Everyone else)
Default Policy Parameters=========================Allow TLS Connections: NoAllow SMTP Authentication: NoRequire TLS To Offer SMTP authentication: NoMaximum Concurrency Per IP: 1,000Maximum Message Size: 100MMaximum Messages Per Connection: 1,000Maximum Recipients Per Message: 1,000Maximum Recipients Per Hour: DisabledUse SenderBase For Flow Control: YesSpam Detection Enabled: YesVirus Detection Enabled: YesThere are currently 4 policies defined.There are currently 5 sender groups.Choose the operation you want to perform:- NEW - Create a new entry.- EDIT - Modify an entry.- DELETE - Remove an entry.- MOVE - Move an entry.- DEFAULT - Set the defaults.- PRINT - Display the table.- IMPORT - Import a table from a file.- EXPORT - Export the table to a file.- CLEAR - Remove all entries.[]>
Remember to issue the commit command after you import so that the configuration change takes effect.
Example - Enabling Public Key Harvesting and S/MIME Decryption and VerificationThe following example shows how to:
• Retrieve (harvest) public key from the incoming S/MIME signed messages
• Enable S/MIME decryption and verification
mail.example.com> listenerconfigCurrently configured listeners:1. MyListener (on Management, 172.29.181.70) SMTP TCP Port 25 PublicChoose the operation you want to perform:- NEW - Create a new listener.- EDIT - Modify a listener.- DELETE - Remove a listener.- SETUP - Change global settings.[]> editEnter the name or number of the listener you wish to edit.
CLI Reference Guide 259
The Commands: Reference Exampleslistenerconfig

[]> 1Name: MyListenerType: PublicInterface: Management (172.29.181.70/24) TCP Port 25Protocol: SMTPDefault Domain: <none configured>Max Concurrent Connections: 50 (TCP Queue: 50)Domain Map: DisabledTLS: NoSMTP Authentication: DisabledBounce Profile: DefaultUse SenderBase For Reputation Filters and IP Profiling: YesFooter: NoneHeading: NoneSMTP Call-Ahead: DisabledLDAP: OffChoose the operation you want to perform:- NAME - Change the name of the listener.- INTERFACE - Change the interface.- CERTIFICATE - Choose the certificate.- LIMITS - Change the injection limits.- SETUP - Configure general options.- HOSTACCESS - Modify the Host Access Table.- RCPTACCESS - Modify the Recipient Access Table.- BOUNCECONFIG - Choose the bounce profile to use for messages injected on this listener.- MASQUERADE - Configure the Domain Masquerading Table.- DOMAINMAP - Configure domain mappings.[]> hostaccess
Default Policy Parameters==========================Maximum Message Size: 10MMaximum Number Of Concurrent Connections From A Single IP: 10Maximum Number Of Messages Per Connection: 10Maximum Number Of Recipients Per Message: 50Directory Harvest Attack Prevention: EnabledMaximum Number Of Invalid Recipients Per Hour: 25Maximum Number Of Recipients Per Hour: DisabledMaximum Number of Recipients per Envelope Sender: DisabledUse SenderBase for Flow Control: YesSpam Detection Enabled: YesVirus Detection Enabled: YesAllow TLS Connections: NoAllow SMTP Authentication: NoRequire TLS To Offer SMTP authentication: NoDKIM/DomainKeys Signing Enabled: NoDKIM Verification Enabled: NoS/MIME Public Key Harvesting Enabled: NoS/MIME Decryption/Verification Enabled: NoSPF/SIDF Verification Enabled: NoDMARC Verification Enabled: NoEnvelope Sender DNS Verification Enabled: NoDomain Exception Table Enabled: NoAccept untagged bounces: NoThere are currently 4 policies defined.There are currently 5 sender groups.Choose the operation you want to perform:- NEW - Create a new entry.- EDIT - Modify an entry.- DELETE - Remove an entry.- MOVE - Move an entry.- DEFAULT - Set the defaults.- PRINT - Display the table.- IMPORT - Import a table from a file.- EXPORT - Export the table to a file.- RESET - Remove senders and set policies to system default.[]> defaultEnter the default maximum message size. Add a trailing k for kilobytes, M for megabytes,or no letter for b[10M]>Enter the maximum number of concurrent connections allowed from a single IP address.[10]>Enter the maximum number of messages per connection.
CLI Reference Guide260
The Commands: Reference Exampleslistenerconfig

[10]>Enter the maximum number of recipients per message.[50]>Do you want to override the hostname in the SMTP banner? [N]>Would you like to specify a custom SMTP acceptance response? [N]>Would you like to specify a custom SMTP rejection response? [N]>Do you want to enable rate limiting per host? [N]>Do you want to enable rate limiting per envelope sender? [N]>Do you want to enable Directory Harvest Attack Prevention per host? [Y]>Enter the maximum number of invalid recipients per hour from a remote host.[25]>Select an action to apply when a recipient is rejected due to DHAP:1. Drop2. Code[1]>Would you like to specify a custom SMTP DHAP response? [Y]>Enter the SMTP code to use in the response. 550 is the standard code.[550]>Enter your custom SMTP response. Press Enter on a blank line to finish.custom_responseWould you like to use SenderBase for flow control by default? [Y]>Would you like to enable anti-spam scanning? [Y]>Would you like to enable anti-virus scanning? [Y]>Do you want to allow encrypted TLS connections?1. No2. Preferred3. Required4. Preferred - Verify5. Required - Verify[1]>Would you like to enable DKIM/DomainKeys signing? [N]>Would you like to enable DKIM verification? [N]>Would you like to enable S/MIME Public Key Harvesting? [N]> y
Would you like to harvest certificate on verification failure? [N]>
Would you like to harvest updated certificate? [Y]>
Would you like to enable S/MIME gateway decryption/verification? [N]> y
Select the appropriate operation for the S/MIME signature processing:1. Preserve2. Remove[1]>Would you like to change SPF/SIDF settings? [N]>Would you like to enable DMARC verification? [N]>Would you like to enable envelope sender verification? [N]>Would you like to enable use of the domain exception table? [N]>Do you wish to accept untagged bounces? [N]>Default Policy Parameters==========================Maximum Message Size: 10MMaximum Number Of Concurrent Connections From A Single IP: 10Maximum Number Of Messages Per Connection: 10Maximum Number Of Recipients Per Message: 50Directory Harvest Attack Prevention: EnabledMaximum Number Of Invalid Recipients Per Hour: 25Maximum Number Of Recipients Per Hour: DisabledMaximum Number of Recipients per Envelope Sender: DisabledUse SenderBase for Flow Control: YesSpam Detection Enabled: YesVirus Detection Enabled: YesAllow TLS Connections: NoAllow SMTP Authentication: NoRequire TLS To Offer SMTP authentication: NoDKIM/DomainKeys Signing Enabled: NoDKIM Verification Enabled: NoS/MIME Public Key Harvesting Enabled: YesS/MIME Decryption/Verification Enabled: YesSPF/SIDF Verification Enabled: NoDMARC Verification Enabled: NoEnvelope Sender DNS Verification Enabled: No
CLI Reference Guide 261
The Commands: Reference Exampleslistenerconfig
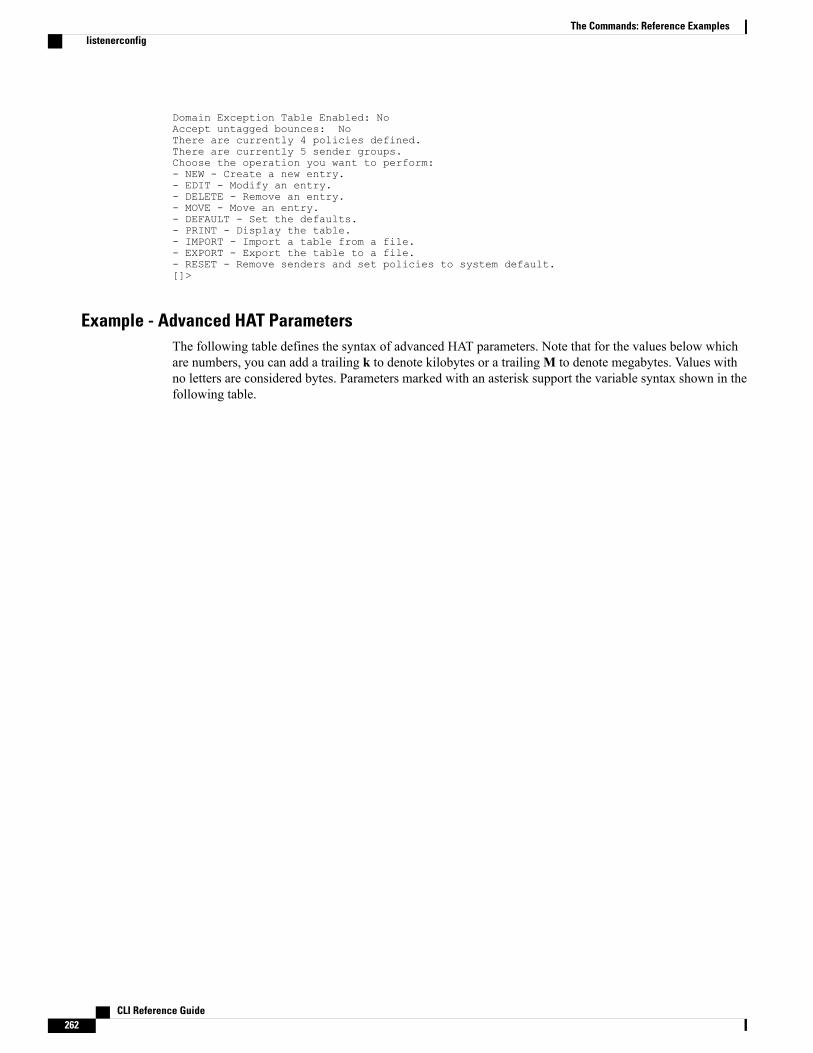
Domain Exception Table Enabled: NoAccept untagged bounces: NoThere are currently 4 policies defined.There are currently 5 sender groups.Choose the operation you want to perform:- NEW - Create a new entry.- EDIT - Modify an entry.- DELETE - Remove an entry.- MOVE - Move an entry.- DEFAULT - Set the defaults.- PRINT - Display the table.- IMPORT - Import a table from a file.- EXPORT - Export the table to a file.- RESET - Remove senders and set policies to system default.[]>
Example - Advanced HAT ParametersThe following table defines the syntax of advanced HAT parameters. Note that for the values below whichare numbers, you can add a trailing k to denote kilobytes or a trailingM to denote megabytes. Values withno letters are considered bytes. Parameters marked with an asterisk support the variable syntax shown in thefollowing table.
CLI Reference Guide262
The Commands: Reference Exampleslistenerconfig
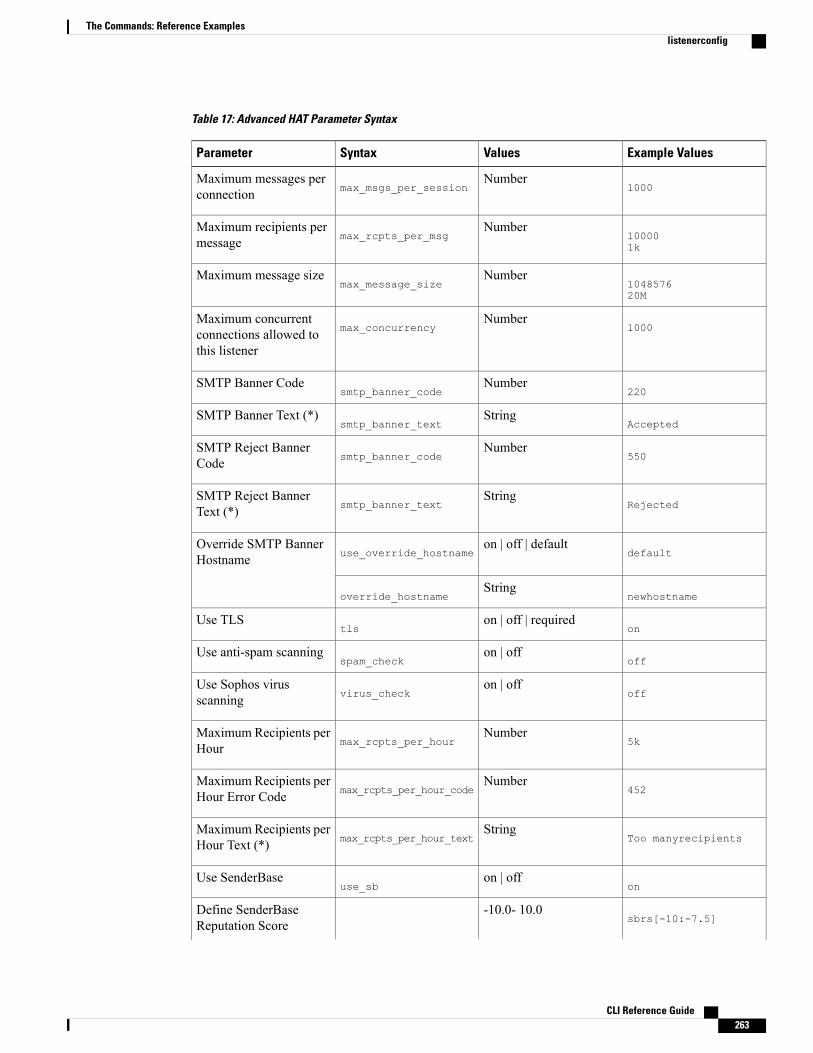
Table 17: Advanced HAT Parameter Syntax
Example ValuesValuesSyntaxParameter
1000Number
max_msgs_per_sessionMaximum messages perconnection
100001k
Numbermax_rcpts_per_msg
Maximum recipients permessage
104857620M
Numbermax_message_size
Maximum message size
1000Number
max_concurrencyMaximum concurrentconnections allowed tothis listener
220Number
smtp_banner_codeSMTP Banner Code
AcceptedString
smtp_banner_textSMTP Banner Text (*)
550Number
smtp_banner_codeSMTP Reject BannerCode
RejectedString
smtp_banner_textSMTP Reject BannerText (*)
defaulton | off | default
use_override_hostnameOverride SMTP BannerHostname
newhostnameString
override_hostname
onon | off | required
tlsUse TLS
offon | off
spam_checkUse anti-spam scanning
offon | off
virus_checkUse Sophos virusscanning
5kNumber
max_rcpts_per_hourMaximum Recipients perHour
452Number
max_rcpts_per_hour_codeMaximum Recipients perHour Error Code
Too manyrecipientsString
max_rcpts_per_hour_textMaximum Recipients perHour Text (*)
onon | off
use_sbUse SenderBase
sbrs[-10:-7.5]-10.0- 10.0Define SenderBase
Reputation Score
CLI Reference Guide 263
The Commands: Reference Exampleslistenerconfig
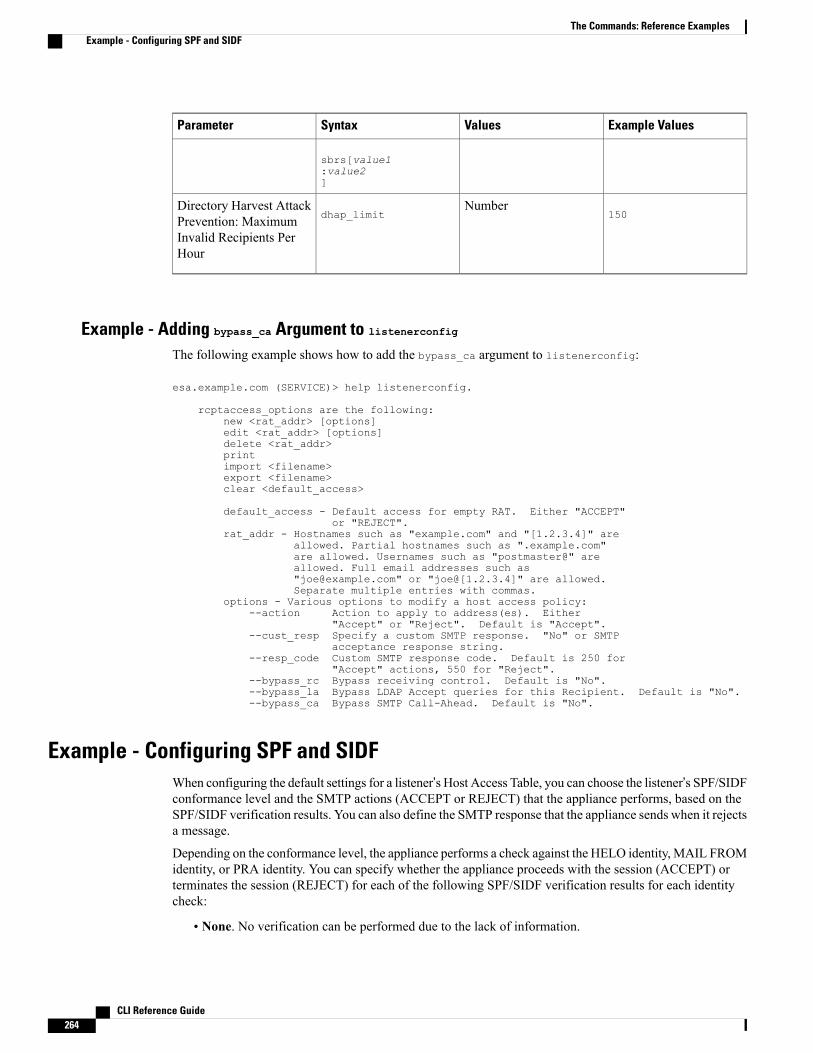
Example ValuesValuesSyntaxParameter
sbrs[value1:value2]
150Number
dhap_limitDirectory Harvest AttackPrevention: MaximumInvalid Recipients PerHour
Example - Adding bypass_ca Argument to listenerconfigThe following example shows how to add the bypass_ca argument to listenerconfig:
esa.example.com (SERVICE)> help listenerconfig.
rcptaccess_options are the following:new <rat_addr> [options]edit <rat_addr> [options]delete <rat_addr>printimport <filename>export <filename>clear <default_access>
default_access - Default access for empty RAT. Either "ACCEPT"or "REJECT".
rat_addr - Hostnames such as "example.com" and "[1.2.3.4]" areallowed. Partial hostnames such as ".example.com"are allowed. Usernames such as "postmaster@" areallowed. Full email addresses such as"[email protected]" or "joe@[1.2.3.4]" are allowed.Separate multiple entries with commas.
options - Various options to modify a host access policy:--action Action to apply to address(es). Either
"Accept" or "Reject". Default is "Accept".--cust_resp Specify a custom SMTP response. "No" or SMTP
acceptance response string.--resp_code Custom SMTP response code. Default is 250 for
"Accept" actions, 550 for "Reject".--bypass_rc Bypass receiving control. Default is "No".--bypass_la Bypass LDAP Accept queries for this Recipient. Default is "No".--bypass_ca Bypass SMTP Call-Ahead. Default is "No".
Example - Configuring SPF and SIDFWhen configuring the default settings for a listener’s Host Access Table, you can choose the listener’s SPF/SIDFconformance level and the SMTP actions (ACCEPT or REJECT) that the appliance performs, based on theSPF/SIDF verification results. You can also define the SMTP response that the appliance sends when it rejectsa message.
Depending on the conformance level, the appliance performs a check against the HELO identity, MAIL FROMidentity, or PRA identity. You can specify whether the appliance proceeds with the session (ACCEPT) orterminates the session (REJECT) for each of the following SPF/SIDF verification results for each identitycheck:
• None. No verification can be performed due to the lack of information.
CLI Reference Guide264
The Commands: Reference ExamplesExample - Configuring SPF and SIDF

• Neutral. The domain owner does not assert whether the client is authorized to use the given identity.
• SoftFail. The domain owner believes the host is not authorized to use the given identity but is not willingto make a definitive statement.
• Fail. The client is not authorized to send mail with the given identity.
• TempError. A transient error occurred during verification.
• PermError. A permanent error occurred during verification.
The appliance accepts the message for a Pass result unless you configure the SIDF Compatible conformancelevel to downgrade a Pass result of the PRA identity to None if there are Resent-Sender: or Resent-From:headers present in the message. The appliance then takes the SMTP action specified for when the PRA checkreturns None.
If you choose not to define the SMTP actions for an identity check, the appliance automatically accepts allverification results, including Fail.
The appliance terminates the session if the identity verification result matches a REJECT action for any ofthe enabled identity checks. For example, an administrator configures a listener to accept messages based onall HELO identity check results, including Fail, but also configures it to reject messages for a Fail result fromthe MAIL FROM identity check. If a message fails the HELO identity check, the session proceeds becausethe appliance accepts that result. If the message then fails the MAIL FROM identity check, the listenerterminates the session and then returns the STMP response for the REJECT action.
The SMTP response is a code number and message that the appliance returns when it rejects a message basedon the SPF/SIDF verification result. The TempError result returns a different SMTP response from the otherverification results. For TempError, the default response code is 451 and the default message text is #4.4.3Temporary error occurred during SPF verification . For all other verification results, the default response codeis 550 and the default message text is #5.7.1 SPF unauthorized mail is prohibited . You can specify your ownresponse code and message text for TempError and the other verification results.
Optionally, you can configure the appliance to return a third-party response from the SPF publisher domainif the REJECT action is taken for Neutral, SoftFail, or Fail verification result. By default, the appliance returnsthe following response:
550-#5.7.1 SPF unauthorized mail is prohibited.
550-The domain example.com explains:
550 <Response text from SPF domain publisher>
To enable these SPF/SIDF settings, use the listenerconfig -> edit subcommand and select a listener. Then usethe hostaccess -> default subcommand to edit the Host Access Table’s default settings. Answer yes to thefollowing prompts to configure the SPF controls:
Would you like to change SPF/SIDF settings? [N]> yes
Would you like to perform SPF/SIDF Verification? [Y]> yes
The following SPF control settings are available for the Host Access Table:
CLI Reference Guide 265
The Commands: Reference ExamplesExample - Configuring SPF and SIDF

Table 18: SPF Control Settings
Available SPF Control SettingsConformance Level
• whether to perform HELO identity check
• SMTP actions taken based on the results of thefollowing identity checks:
• HELO identity (if enabled)
• MAIL FROM Identity
• SMTP response code and text returned for theREJECT action
• verification time out (in seconds)
SPF Only
• whether to perform a HELO identity check
• whether the verification downgrades a Passresult of the PRA identity to None if theResent-Sender: or Resent-From: headers arepresent in the message
• SMTP actions taken based on the results of thefollowing identity checks:
• HELO identity (if enabled)
• MAIL FROM Identity
• PRA Identity
• SMTP response code and text returned for theREJECT action
• verification timeout (in seconds)
SIDF Compatible
• SMTP actions taken based on the results of thefollowing identity checks:
• MAIL FROM Identity
• PRA Identity
• SMTP response code and text returned in caseof SPF REJECT action
• verification timeout (in seconds)
SIDF Strict
The following example shows a user configuring the SPF/SIDF verification using the SPF Only conformancelevel. The appliance performs the HELO identity check and accepts the None and Neutral verification resultsand rejects the others. The CLI prompts for the SMTP actions are the same for all identity types. The user
CLI Reference Guide266
The Commands: Reference ExamplesExample - Configuring SPF and SIDF

does not define the SMTP actions for the MAIL FROM identity. The appliance automatically accepts allverification results for the identity. The appliance uses the default reject code and text for all REJECT results.
Example: SPF/SIDF Settings
Would you like to change SPF/SIDF settings? [N]> yesWould you like to perform SPF/SIDF Verification? [N]> yesWhat Conformance Level would you like to use?1. SPF only2. SIDF compatible3. SIDF strict[2]> 1Would you like to have the HELO check performed? [Y]> yWould you like to change SMTP actions taken as result of the SPF verification? [N]> yWould you like to change SMTP actions taken for the HELO identity? [N]> yWhat SMTP action should be taken if HELO check returns None?1. Accept2. Reject[1]> 1What SMTP action should be taken if HELO check returns Neutral?1. Accept2. Reject[1]> 1What SMTP action should be taken if HELO check returns SoftFail?1. Accept2. Reject[1]> 2What SMTP action should be taken if HELO check returns Fail?1. Accept2. Reject[1]> 2What SMTP action should be taken if HELO check returns TempError?1. Accept2. Reject[1]> 2What SMTP action should be taken if HELO check returns PermError?1. Accept2. Reject[1]> 2Would you like to change SMTP actions taken for the MAIL FROM identity? [N]> nWould you like to change SMTP response settings for the REJECT action? [N]> nVerification timeout (seconds)[40]>
The following shows how the SPF/SIDF settings are displayed for the listener’s Default Policy Parameters.
Example: SPF/SIDF in Default Policy Parameters
SPF/SIDF Verification Enabled: YesConformance Level: SPF onlyDo HELO test: YesSMTP actions:For HELO Identity:None, Neutral: AcceptSoftFail, Fail, TempError, PermError: Reject
For MAIL FROM Identity: AcceptSMTP Response Settings:Reject code: 550Reject text: #5.7.1 SPF unauthorized mail is prohibited.Get reject response text from publisher: YesDefer code: 451Defer text: #4.4.3 Temporary error occurred during SPF verification.
Verification timeout: 40
CLI Reference Guide 267
The Commands: Reference ExamplesExample - Configuring SPF and SIDF

Example - Enable DMARC VerificationThe following example shows how to enable DMARC verification.
mail.example.com> listenerconfigCurrently configured listeners:1. Listener 1 (on Management, 172.29.181.70) SMTP TCP Port 25 PublicChoose the operation you want to perform:- NEW - Create a new listener.- EDIT - Modify a listener.- DELETE - Remove a listener.- SETUP - Change global settings.[]> editEnter the name or number of the listener you wish to edit.[]> 1Name: Listener 1Type: PublicInterface: Management (172.29.181.70/24) TCP Port 25Protocol: SMTPDefault Domain: <none configured>Max Concurrent Connections: 300 (TCP Queue: 50)Domain Map: DisabledTLS: NoSMTP Authentication: DisabledBounce Profile: DefaultUse SenderBase For Reputation Filters and IP Profiling: YesFooter: NoneHeading: NoneSMTP Call-Ahead: DisabledLDAP: OffChoose the operation you want to perform:- NAME - Change the name of the listener.- INTERFACE - Change the interface.- CERTIFICATE - Choose the certificate.- LIMITS - Change the injection limits.- SETUP - Configure general options.- HOSTACCESS - Modify the Host Access Table.- RCPTACCESS - Modify the Recipient Access Table.- BOUNCECONFIG - Choose the bounce profile to use for messages injected on this listener.- MASQUERADE - Configure the Domain Masquerading Table.- DOMAINMAP - Configure domain mappings.[]> hostaccessDefault Policy Parameters==========================Maximum Message Size: 20MMaximum Number Of Concurrent Connections From A Single IP: 10Maximum Number Of Messages Per Connection: 10Maximum Number Of Recipients Per Message: 50Directory Harvest Attack Prevention: EnabledMaximum Number Of Invalid Recipients Per Hour: 25Maximum Number Of Recipients Per Hour: DisabledMaximum Number of Recipients per Envelope Sender: DisabledUse SenderBase for Flow Control: YesSpam Detection Enabled: YesVirus Detection Enabled: YesAllow TLS Connections: NoAllow SMTP Authentication: NoRequire TLS To Offer SMTP authentication: NoDKIM/DomainKeys Signing Enabled: NoDKIM Verification Enabled: NoSPF/SIDF Verification Enabled: NoDMARC Verification Enabled: NoEnvelope Sender DNS Verification Enabled: NoDomain Exception Table Enabled: NoAccept untagged bounces: NoThere are currently 4 policies defined.There are currently 5 sender groups.Choose the operation you want to perform:- NEW - Create a new entry.- EDIT - Modify an entry.
CLI Reference Guide268
The Commands: Reference ExamplesExample - Configuring SPF and SIDF

- DELETE - Remove an entry.- MOVE - Move an entry.- DEFAULT - Set the defaults.- PRINT - Display the table.- IMPORT - Import a table from a file.- EXPORT - Export the table to a file.- RESET - Remove senders and set policies to system default.[]> defaultEnter the default maximum message size. Add a trailing k for kilobytes, M for megabytes,or no letter for bytes.[20M]>Enter the maximum number of concurrent connections allowed from a single IP address.[10]>Enter the maximum number of messages per connection.[10]>Enter the maximum number of recipients per message.[50]>Do you want to override the hostname in the SMTP banner? [N]>Would you like to specify a custom SMTP acceptance response? [N]>Would you like to specify a custom SMTP rejection response? [N]>Do you want to enable rate limiting per host? [N]>Do you want to enable rate limiting per envelope sender? [N]>Do you want to enable Directory Harvest Attack Prevention per host? [Y]>Enter the maximum number of invalid recipients per hour from a remote host.[25]>Select an action to apply when a recipient is rejected due to DHAP:1. Drop2. Code[1]>Would you like to specify a custom SMTP DHAP response? [Y]>Enter the SMTP code to use in the response. 550 is the standard code.[550]>Enter your custom SMTP response. Press Enter on a blank line to finish.Would you like to use SenderBase for flow control by default? [Y]>Would you like to enable anti-spam scanning? [Y]>Would you like to enable anti-virus scanning? [Y]>Do you want to allow encrypted TLS connections?1. No2. Preferred3. Required4. Preferred - Verify5. Required - Verify[1]>Would you like to enable DKIM/DomainKeys signing? [N]>Would you like to enable DKIM verification? [N]>Would you like to change SPF/SIDF settings? [N]>Would you like to enable DMARC verification? [N]> YSelect the DMARC verification profile to use:1. DEFAULT[1]> 1Would you like to send aggregate reports? [N]> YNote: DMARC reports should be DMARC compliant.
Secure delivery is recommended for delivery of DMARC reports.Please enable TLS support using the `destconfig` command.
Would you like to enable envelope sender verification? [N]> YWould you like to specify a custom SMTP response for malformed envelope senders? [Y]>Enter the SMTP code to use in the response. 553 is the standard code.[553]>Enter your custom SMTP response. Press Enter on a blank line to finish.Would you like to specify a custom SMTP response for envelope sender domains which do notresolve? [Y]>Enter the SMTP code to use in the response. 451 is the standard code.[451]>Enter your custom SMTP response. Press Enter on a blank line to finish.Would you like to specify a custom SMTP response for envelope sender domains which do notexist? [Y]>Enter the SMTP code to use in the response. 553 is the standard code.[553]>Enter your custom SMTP response. Press Enter on a blank line to finish.Would you like to enable use of the domain exception table? [N]>Do you wish to accept untagged bounces? [N]>Default Policy Parameters==========================
CLI Reference Guide 269
The Commands: Reference ExamplesExample - Configuring SPF and SIDF

Maximum Message Size: 20MMaximum Number Of Concurrent Connections From A Single IP: 10Maximum Number Of Messages Per Connection: 10Maximum Number Of Recipients Per Message: 50Directory Harvest Attack Prevention: EnabledMaximum Number Of Invalid Recipients Per Hour: 25Maximum Number Of Recipients Per Hour: DisabledMaximum Number of Recipients per Envelope Sender: DisabledUse SenderBase for Flow Control: YesSpam Detection Enabled: YesVirus Detection Enabled: YesAllow TLS Connections: NoAllow SMTP Authentication: NoRequire TLS To Offer SMTP authentication: NoDKIM/DomainKeys Signing Enabled: NoDKIM Verification Enabled: NoSPF/SIDF Verification Enabled: NoDMARC Verification Enabled: YesDMARC Verification Profile: DEFAULTAggregate reports: Yes
Envelope Sender DNS Verification Enabled: YesDomain Exception Table Enabled: NoAccept untagged bounces: NoThere are currently 4 policies defined.There are currently 5 sender groups.Choose the operation you want to perform:- NEW - Create a new entry.- EDIT - Modify an entry.- DELETE - Remove an entry.- MOVE - Move an entry.- DEFAULT - Set the defaults.- PRINT - Display the table.- IMPORT - Import a table from a file.- EXPORT - Export the table to a file.- RESET - Remove senders and set policies to system default.[]>Name: Listener 1Type: PublicInterface: Management (172.29.181.70/24) TCP Port 25Protocol: SMTPDefault Domain: <none configured>Max Concurrent Connections: 300 (TCP Queue: 50)Domain Map: DisabledTLS: NoSMTP Authentication: DisabledBounce Profile: DefaultUse SenderBase For Reputation Filters and IP Profiling: YesFooter: NoneHeading: NoneSMTP Call-Ahead: DisabledLDAP: OffChoose the operation you want to perform:- NAME - Change the name of the listener.- INTERFACE - Change the interface.- CERTIFICATE - Choose the certificate.- LIMITS - Change the injection limits.- SETUP - Configure general options.- HOSTACCESS - Modify the Host Access Table.- RCPTACCESS - Modify the Recipient Access Table.- BOUNCECONFIG - Choose the bounce profile to use for messages injected on this listener.- MASQUERADE - Configure the Domain Masquerading Table.- DOMAINMAP - Configure domain mappings.[]>Currently configured listeners:1. Listener 1 (on Management, 172.29.181.70) SMTP TCP Port 25 PublicChoose the operation you want to perform:- NEW - Create a new listener.- EDIT - Modify a listener.- DELETE - Remove a listener.- SETUP - Change global settings.[]>mail.example.com>
CLI Reference Guide270
The Commands: Reference ExamplesExample - Configuring SPF and SIDF

localeconfig
DescriptionConfigure multi-lingual settings
UsageCommit: This command requires a ‘commit’.Cluster Management: This command can be used in all three machine modes (cluster, group, machine).
Batch Command: This command does not support a batch format.
Example
mail3.example.com> localeconfigBehavior when modifying headers: Use encoding of message bodyBehavior for untagged non-ASCII headers: Impose encoding of message bodyBehavior for mismatched encodings bodies and footers: Use encoding of message footerChoose the operation you want to perform:- SETUP - Configure multi-lingual settings.[]> setupIf a header is modified, encode the new header in the same encoding as the message body?(Some MUAs incorrectly handle headersencoded in a different encoding than the body. However, encoding a modified header in thesame encoding as the message body maycause certain characters in the modified header to be lost.) [Y]>If a non-ASCII header is not properly tagged with a character set, impose the encoding ofthe body on the header duringprocessing and final representation of the message? (Many MUAs create non-RFC-compliantheaders that are then handled inan undefined way. Imposing the encoding of the body on the header may encode the headermore precisely.) [Y]>When there is an encoding mismatch between the message body and a footer, the system initiallyattempts to encode theentire message in the same encoding as the message body. If the system cannot combine themessage body and the footerin the same encoding, do you want the system to failover and attempt to encode the entiremessage using the encoding ofthe message footer? (When this feature is enabled, the system will attempt to display thefooter "in-line" ratherBehavior for untagged non-ASCII headers: Impose encoding of message bodyBehavior for mismatched encodings bodies and footers: Use encoding of message bodyChoose the operation you want to perform:- SETUP - Configure multi-lingual settings.[]>mail3.example.com>
smtpauthconfig
DescriptionConfigure SMTP Auth outgoing and forwarding profiles.
CLI Reference Guide 271
The Commands: Reference Exampleslocaleconfig

UsageCommit: This command requires a ‘commit’.Cluster Management: This command can be used in all three machine modes (cluster, group, machine).
Batch Command: This command does not support a batch format.
ExampleIn the following example, the smtpauthconfig command is used to create a new, forwarding-based profile forthe server “smtp2.example.com:”
mail3.example.com> smtpauthconfigChoose the operation you want to perform:- NEW - Create a new SMTP Auth profile[]> newChoose the type of profile you wish to create:- FORWARD - Create an SMTP Auth forwarding server group profile- OUTGOING - Create an outgoing SMTP Auth profile[]> forwardEnter a name for this profile:[]> forwarding-basedPlease begin entering forwarding servers for this group profile.Enter a hostname or an IP address for the forwarding server:[]> smtp2.example.comEnter a port:[25]>Choose the interface to use for forwarding requests:1. Auto2. Data 1 (192.168.1.1/24: mail3.example.com)3. Data 2 (192.168.2.1/24: mail3.example.com)4. Management (192.168.42.42/24: mail3.example.com)[1]>Require TLS? (issue STARTTLS) [Y]> yEnter the maximum number of simultaneous connections allowed:[10]>Use SASL PLAIN mechanism when contacting forwarding server? [Y]>Use SASL LOGIN mechanism when contacting forwarding server? [Y]>Would you like to enter another forwarding server to this group? [N]>Choose the operation you want to perform:- NEW - Create a new SMTP Auth profile- EDIT - Edit an existing SMTP Auth profile- PRINT - List all profiles- DELETE - Delete a profile- CLEAR - Delete all profiles[]>mail3.example.com> commitPlease enter some comments describing your changes:[]> created SMTP auth profileDo you want to save the current configuration for rollback? [Y]> nChanges committed: Fri May 23 11:42:12 2014 GMT
An authenticated user is granted a RELAY HAT policy.
You may specify more than one forwarding server in a profile. SASL mechanisms CRAM-MD5 andDIGEST-MD5 are not supported between the Email Security appliance and a forwarding server.
Note
CLI Reference Guide272
The Commands: Reference Examplessmtpauthconfig

System Setup
systemsetup
DescriptionFirst time system setup as well as re-installation of the system.
UsageCommit: This command requires a ‘commit’.Cluster Management: This command can be used in all three machine modes (cluster, group, machine).
Batch Command: This command does not support a batch format.
Example
mail3.example.com> systemsetupWARNING: The system setup wizard will completely delete any existing'listeners' and all associated settings including the 'Host Access Table' -mail operations may be interrupted.Are you sure you wish to continue? [Y]> yBefore you begin, please reset the administrator passphrase to a new value.Old passphrase:New passphrase:Retype new passphrase:*****You will now configure the network settings for the IronPort C100.Please create a fully qualified hostname for the IronPort C100 appliance(Ex: "ironport-C100.example.com"):[]> ironport-C100.example.com*****You will now assign an IP address for the "Data 1" interface.Please create a nickname for the "Data 1" interface (Ex: "Data 1"):[]> Data 1Enter the static IP address for "Data 1" on the "Data 1" interface? (Ex:"192.168.1.1"):[]> 192.168.1.1What is the netmask for this IP address? (Ex: "255.255.255.0" or "0xffffff00"):[255.255.255.0]>You have successfully configured IP Interface "Data 1".*****Would you like to assign a second IP address for the "Data 1" interface? [Y]> nWhat is the IP address of the default router (gateway) on your network?:[192.168.1.1]> 192.168.2.1*****Do you want to enable the web interface on the Data 1 interface? [Y]> yDo you want to use secure HTTPS? [Y]> yNote: The system will use a demo certificate for HTTPS.Use the "certconfig" command to upload your own certificate.*****Do you want the IronPort C100 to use the Internet's root DNS servers or wouldyou like it to use your own DNS servers?1. Use Internet root DNS servers2. Use my own DNS servers[1]> 2Please enter the IP address of your DNS server.
CLI Reference Guide 273
The Commands: Reference ExamplesSystem Setup

[]> 192.168.0.3Do you want to enter another DNS server? [N]>You have successfully configured the DNS settings.*****You are now going to configure how the IronPort C100 accepts mail by creating a"Listener".Please create a name for this listener (Ex: "MailInterface"):[]> InboundMailPlease choose an IP interface for this Listener.1. Data 1 (192.168.1.1/24: ironport-C100.example.com)[1]> 1Enter the domain names or specific email addresses you want to accept mail for.Hostnames such as "example.com" are allowed.Partial hostnames such as ".example.com" are allowed.Usernames such as "postmaster@" are allowed.Full email addresses such as "[email protected]" or "joe@[1.2.3.4]" are allowed.Separate multiple addresses with commas.[]> example.com, .example.comWould you like to configure SMTP routes for example.com, .example.com? [Y]> nPlease specify the systems allowed to relay email through the IronPort C100.Hostnames such as "example.com" are allowed.Partial hostnames such as ".example.com" are allowed.IP addresses, IP address ranges, and partial IP addresses are allowed.Separate multiple entries with commas.[]> example.com, .example.comDo you want to enable filtering based on SenderBase Reputation Service (SBRS)Scores for this listener? (Your selection will be used to filter all incomingmail based on its SBRS Score.) [Y]> yDo you want to enable rate limiting for this listener? (Rate limiting definesthe maximum number of recipients per hour you are willing to receive from aremote domain.) [Y]> yEnter the maximum number of recipients per hour to accept from a remote domain.[]> 1000Default Policy Parameters==========================Maximum Message Size: 10MMaximum Number Of Concurrent Connections From A Single IP: 10Maximum Number Of Messages Per Connection: 10Maximum Number Of Recipients Per Message: 50Directory Harvest Attack Prevention: EnabledMaximum Number Of Invalid Recipients Per Hour: 25Maximum Number Of Recipients Per Hour: 1,000Maximum Recipients Per Hour SMTP Response:
452 Too many recipients received this hourUse SenderBase for Flow Control: YesSpam Detection Enabled: YesVirus Detection Enabled: YesAllow TLS Connections: NoAllow SMTP Authentication: NoRequire TLS To Offer SMTP authentication: NoDKIM/DomainKeys Signing Enabled: NoDKIM Verification Enabled: NoSPF/SIDF Verification Enabled: NoDMARC Verification Enabled: NoEnvelope Sender DNS Verification Enabled: NoDomain Exception Table Enabled: NoAccept untagged bounces: NoWould you like to change the default host access policy? [N]> nListener InboundMail created.Defaults have been set for a Public listener.Use the listenerconfig->EDIT command to customize the listener.*****Do you want to use Anti-Spam scanning in the default Incoming Mail policy? [Y]> yWould you like to enable IronPort Spam Quarantine? [Y]> yIronPort Anti-Spam configured globally for the IronPort C100 appliance. Use thepolicyconfig command (CLI) or Mail Policies (GUI) to customize the IronPortsettings for each listener.IronPort selected for DEFAULT policy*****Do you want to use Anti-Virus scanning in the default Incoming and OutgoingMail policies? [Y]> y1. McAfee Anti-Virus
CLI Reference Guide274
The Commands: Reference Examplessystemsetup

2. Sophos Anti-VirusEnter the number of the Anti-Virus engine you would like to use on the defaultIncoming and Outgoing Mail policies.[]> 2Sophos selected for DEFAULT policy*****Do you want to enable Outbreak Filters? [Y]> yOutbreak Filters enabled.Outbreak Filter alerts are sent when outbreak rules cross the threshold (go above or backdown below),meaning that new messages of certain types could be quarantined or will no longer bequarantined, respectively.Allow the sharing of limited data with SenderBase? [Y]> yYou have successfully configured Outbreak Filters and SenderBase.*****You will now configure system alerts.Please enter the email address(es) to send alerts.(Ex: "[email protected]")Separate multiple addresses with commas.[]> [email protected] you like to enable IronPort AutoSupport, which automatically emailssystem alerts and weekly status reports directly to IronPort Customer Support?You will receive a complete copy of each message sent to IronPort.(Recommended) [Y]> y*****You will now configure scheduled reporting.Please enter the email address(es) to deliver scheduled reports to.(Leave blank to only archive reports on-box.)Separate multiple addresses with commas.[]> [email protected]*****You will now configure system time settings.Please choose your continent:1. Africa2. America...11. GMT Offset[11]> 2Please choose your country:1. Anguilla...47. United States48. Uruguay49. Venezuela50. Virgin Islands (British)51. Virgin Islands (U.S.)[]> 47Please choose your timezone:1. Alaska Time (Anchorage)...26. Pacific Time (Los_Angeles)[]> 26Do you wish to use NTP to set system time? [Y]> yPlease enter the fully qualified hostname or IP address of your NTP server, orpress Enter to use time.ironport.com:[time.ironport.com]>*****Would you like to commit these changes at this time? [Y]> yCongratulations! System setup is complete.For advanced configuration, please refer to the User Guide.
URL FilteringThis section contains the following CLI commands:
• aggregatorconfig, on page 276
• urllistconfig, on page 276
CLI Reference Guide 275
The Commands: Reference ExamplesURL Filtering

• webcacheflush, on page 277
• websecurityadvancedconfig, on page 278
• websecurityconfig, on page 279
• websecuritydiagnostics , on page 279
aggregatorconfig
DescriptionConfigure address for Cisco Aggregator Server on the Email Security appliance. This server provides detailsof the end users who clicked on rewritten URLs and the action (allowed, blocked or unknown) associatedwith each user click.
UsageCommit: This command requires a ‘commit’.Cluster Management: This command can be used in all three machine modes (cluster, group, machine).
Batch Command: This command does not support a batch format.
Example
mail.example.com> aggregatorconfigChoose the operation you want to perform:- EDIT - Edit aggregator configuration[]> editEdit aggregator address:[aggregator.organization.com]> org-aggregator.comSuccessfully changed aggregator address to : org-aggregator.com
urllistconfig
DescriptionConfigure or import whitelists of URLs that will not be evaluated by URL filtering features. These lists arenot used by the Outbreak Filters feature.
UsageCommit: This command requires a ‘commit’.Cluster Management: This command can be used in all three machine modes (cluster, group, machine).
Batch Command: This command supports a batch format.
CLI Reference Guide276
The Commands: Reference Examplesaggregatorconfig
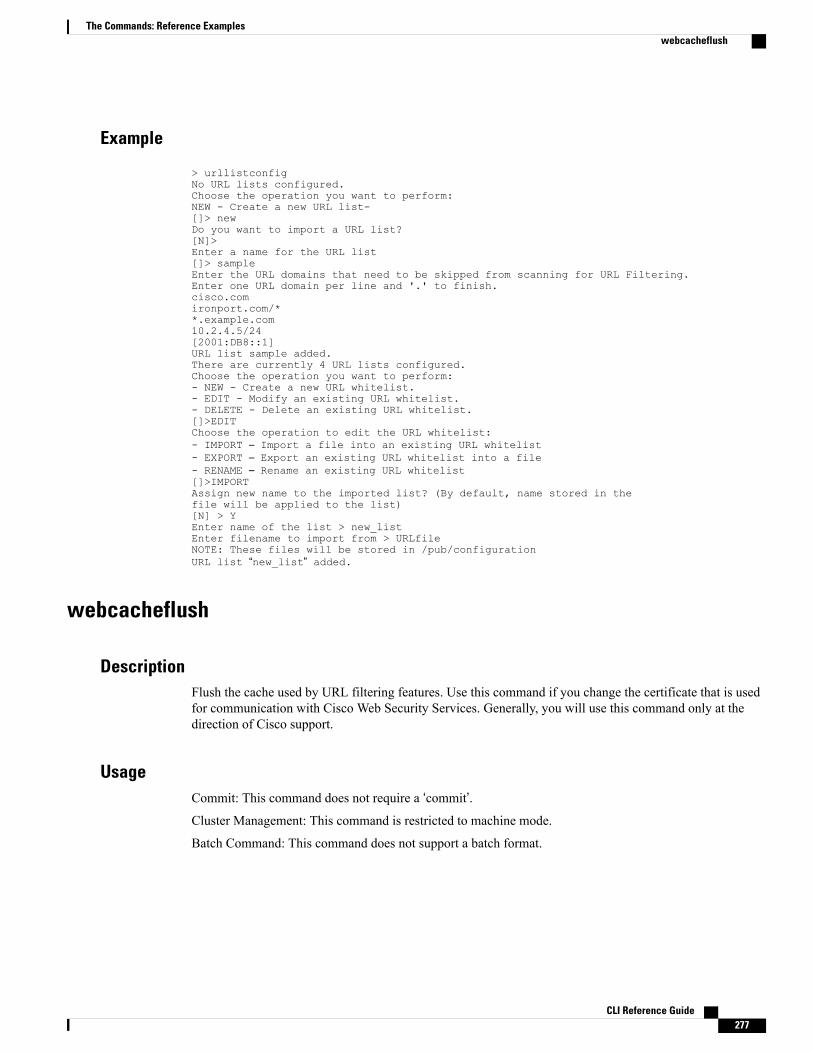
Example
> urllistconfigNo URL lists configured.Choose the operation you want to perform:NEW - Create a new URL list-[]> newDo you want to import a URL list?[N]>Enter a name for the URL list[]> sampleEnter the URL domains that need to be skipped from scanning for URL Filtering.Enter one URL domain per line and '.' to finish.cisco.comironport.com/**.example.com10.2.4.5/24[2001:DB8::1]URL list sample added.There are currently 4 URL lists configured.Choose the operation you want to perform:- NEW - Create a new URL whitelist.- EDIT - Modify an existing URL whitelist.- DELETE - Delete an existing URL whitelist.[]>EDITChoose the operation to edit the URL whitelist:- IMPORT – Import a file into an existing URL whitelist- EXPORT – Export an existing URL whitelist into a file- RENAME – Rename an existing URL whitelist[]>IMPORTAssign new name to the imported list? (By default, name stored in thefile will be applied to the list)[N] > YEnter name of the list > new_listEnter filename to import from > URLfileNOTE: These files will be stored in /pub/configurationURL list “new_list” added.
webcacheflush
DescriptionFlush the cache used by URL filtering features. Use this command if you change the certificate that is usedfor communication with Cisco Web Security Services. Generally, you will use this command only at thedirection of Cisco support.
UsageCommit: This command does not require a ‘commit’.Cluster Management: This command is restricted to machine mode.
Batch Command: This command does not support a batch format.
CLI Reference Guide 277
The Commands: Reference Exampleswebcacheflush

Example
> webcacheflushWeb Security cache has been flushed.
websecurityadvancedconfig
DescriptionConfigure advanced settings for URL filtering.
Except to change timeout values for troubleshooting purposes, use this command only under the directionof Cisco support.
Note
The timeout value is the value, in seconds, for communication with the cloud services that provide reputationand category for URLs.
UsageCommit: This command requires a ‘commit’.Cluster Management: This command is restricted to machine mode.
Batch Command: This command supports a batch format.
Batch FormatFor the batch format, see the CLI inline help.
Example
> websecurityadvancedconfigEnter URL lookup timeout (includes any DNS lookup time) in seconds:[15]>Enter the URL cache size (no. of URLs):[1215000]>Do you want to disable DNS lookups? [N]>Enter the maximum number of URLs that should be scanned:[100]>Enter the Web security service hostname:[example.com]>Enter the threshold value for outstanding requests:[20]>Do you want to verify server certificate? [Y]>Enter the default time-to-live value (seconds):[30]>Do you want to include additional headers? [N]>Enter the default debug log level for RPC server:[Info]>Enter the default debug log level for SDS cache:[Info]>
CLI Reference Guide278
The Commands: Reference Exampleswebsecurityadvancedconfig

Enter the default debug log level for HTTP client:[Info]>
websecurityconfig
DescriptionConfigure basic settings for URL filtering (URL reputation and URL category features.)
Normally, certificate management is automatic. Unless directed to do otherwise by Cisco TAC, you shouldselect No at the prompt to set a certificate.
UsageCommit: This command requires a ‘commit’.Cluster Management: This command can be used in all three machine modes (cluster, group, machine).
Batch Command: This command supports a batch format. See the inline CLI help for more details. Use thehelp command to access the inline help for this command.
Example
mail.example.com> websecurityconfigEnable URL Filtering? [N]> yDo you wish to enable Web Interaction Tracking? [N]> yWeb Interaction Tracking is enabled.Do you want to whitelist URLs using a URL list? [N]> y1. urllist12. urllist23. No URL listEnter the number of URL list[1]> 1URL list 'urllist1' addedmail.example.com> websecurityconfigURL Filtering is enabled.URL list 'urllist1' used.System provided certificate used.Web Interaction Tracking is enabled.
websecuritydiagnostics
DescriptionView diagnostic statistics related to URL filtering.
UsageCommit: This command does not require a ‘commit’.Cluster Management: This command is restricted to machine mode.
CLI Reference Guide 279
The Commands: Reference Exampleswebsecurityconfig

Batch Command: This command does not support a batch format.
Example
mail.example.com> websecuritydiagnosticsCache Size: 254Cache Hits: 551Response Time
Minimum: NoneAverage: 0.0Maximum: None
DNS Lookup TimeMinimum: 9.4198775Average: 10.1786801765Maximum: 10.544356
User ManagementThis section contains the following CLI commands:
• userconfig, on page 280
• passphrase or passwd, on page 282
• last, on page 283
• who, on page 284
• whoami, on page 284
userconfig
DescriptionManage user accounts and connections to external authentication sources.
UsageCommit: This command requires a ‘commit’.Cluster Management: This command is restricted to cluster mode.
Batch Command: This command supports a batch format. See the inline CLI help for more details. Use thehelp command to access the inline help for this command, for example,
mail.example.com> userconfig help
Example - Creating a New User AccountThe following example shows how to create a new user account with a Help Desk User role.
mail.example.com> userconfig
CLI Reference Guide280
The Commands: Reference ExamplesUser Management

Users:1. admin - "Administrator" (admin)External authentication: DisabledChoose the operation you want to perform:- NEW - Create a new account.- EDIT - Modify an account.- DELETE - Remove an account.- POLICY - Change passphrase and account policy settings.- PASSPHRASE - Change the passphrase for a user.- ROLE - Create/modify user roles.- STATUS - Change the account status.- EXTERNAL - Configure external authentication.- DLPTRACKING - Configure DLP tracking privileges.- URLTRACKING - Configure URL tracking privileges.[]> newEnter your Passphrase to make changes:Enter the new username.[]> helpdeskEnter the full name for helpdesk.[]> HELP DESKAssign a role to "helpdesk":1. Administrators - Administrators have full access to all settings of the system.2. Operators - Operators are restricted from creating new user accounts.3. Read-Only Operators - Read-Only operators may only view settings and status information.4. Guests - Guest users may only view status information.5. Technicians - Technician can only manage upgrades and feature keys.6. Help Desk Users - Help Desk users have access only to ISQ and Message Tracking.[1]> 6Would you like to get a system generated passphrase? [N]>Enter the passphrase for helpdesk[]>Please enter the new passphrase again:Users:1. admin - "Administrator" (admin)2. helpdesk - "HELP DESK" (helpdesk)External authentication: DisabledChoose the operation you want to perform:- NEW - Create a new account.- EDIT - Modify an account.- DELETE - Remove an account.- POLICY - Change passphrase and account policy settings.- PASSPHRASE - Change the passphrase for a user.- ROLE - Create/modify user roles.- STATUS - Change the account status.- EXTERNAL - Configure external authentication.- DLPTRACKING - Configure DLP tracking privileges.- URLTRACKING - Configure URL tracking privileges.[]>
Example - Setting Up a RADIUS Server for External AuthenticationThe following example shows how to set up a RADIUS server for external authentication. To set up a RADIUSserver, enter the hostname, port, shared passphrase, and whether to use CHAP or PAP for the authenticationprotocol.
mail.example.com> userconfigUsers:1. admin - "Administrator" (admin)2. hdesk_user - "Helpdesk User" (helpdesk)External authentication: DisabledChoose the operation you want to perform:- NEW - Create a new account.- EDIT - Modify an account.- DELETE - Remove an account.- POLICY - Change passphrase and account policy settings.- PASSPHRASE - Change the passphrase for a user.- ROLE - Create/modify user roles.- STATUS - Change the account status.- EXTERNAL - Configure external authentication.
CLI Reference Guide 281
The Commands: Reference Examplesuserconfig

- DLPTRACKING - Configure DLP tracking privileges.- URLTRACKING - Configure URL tracking privileges.[]> externalChoose the operation you want to perform:- SETUP - Set up global settings.[]> setupDo you want to enable external authentication? [N]> YPlease enter the timeout in seconds for how long the external authentication credentialswill be cached. (Enter '0' to disable expiration ofauthentication credentials altogether when using one time passphrases.)[0]> 30Choose a mechanism to use:LDAP is unavailable because no LDAP queries of type EXTERNALAUTH are configured1. RADIUS[1]> 1Configured RADIUS servers:- No RADIUS servers configuredChoose the operation you want to perform:- NEW - Add a RADIUS server configuration.[]> newPlease enter host name or IP address of the RADIUS server:[]> radius.example.comPlease enter port number of the RADIUS server:[1812]>Please enter the shared passphrase:>Please enter the new passphrase again.>Please enter timeout in seconds for receiving a valid reply from the server:[5]>1. CHAP2. PAPSelect authentication type:[2]>Configured RADIUS servers:Host Port Timeout (s) Auth type------------------------- ----- ---------- ----------radius.example.com 1812 5 papChoose the operation you want to perform:- NEW - Add a RADIUS server configuration.- EDIT - Modify a RADIUS server configuration.- DELETE - Remove a RADIUS server configuration.- CLEAR - Remove all RADIUS server configurations.[]>
passphrase or passwd
DescriptionChange your passphrase.
UsageCommit: This command requires a ‘commit’.Cluster Management: This command is restricted to cluster mode.
CLI Reference Guide282
The Commands: Reference Examplespassphrase or passwd

The passwd command is a special case because it needs to be usable by guest users who can only ever bein machine mode. If a guest user issues the passwd command on a machine in a cluster, it will not printthe warning message but will instead just silently operate on the cluster level data without changing theuser's mode. All other users will get the above written behavior (consistent with the other restrictedconfiguration commands).
Note
Batch Command: This command does not support a batch format.
Example
mail3.example.com> passphraseOld passphrase: your_old_passphraseNew passphrase: your_new_passphraseRetype new passphrase: your_new_passphrasepassphrase changed.
last
DescriptionThe last command displays who has recently logged into the system. By default, it shows all users who havelogged into the system
UsageCommit: This command does not require a ‘commit’.Cluster Management: This command is restricted to machine mode.
Batch Command: This command does not support a batch format.
Example
elroy.run> lastUsername Remote Host Login Time Logout Time Total Time======== ============= ================ ================ ==========admin 10.251.23.186 Thu Sep 01 09:14 still logged in 1h 5madmin 10.251.23.186 Wed Aug 31 14:00 Wed Aug 31 14:01 1madmin 10.251.16.231 Wed Aug 31 13:36 Wed Aug 31 13:37 0madmin 10.251.23.186 Wed Aug 31 13:34 Wed Aug 31 13:35 0madmin 10.251.23.142 Wed Aug 31 11:26 Wed Aug 31 11:38 11madmin 10.251.23.142 Wed Aug 31 11:05 Wed Aug 31 11:09 4madmin 10.251.23.142 Wed Aug 31 10:52 Wed Aug 31 10:53 1madmin 10.251.60.37 Tue Aug 30 01:45 Tue Aug 30 02:17 32madmin 10.251.16.231 Mon Aug 29 10:29 Mon Aug 29 10:41 11mshutdown Thu Aug 25 22:20
CLI Reference Guide 283
The Commands: Reference Exampleslast
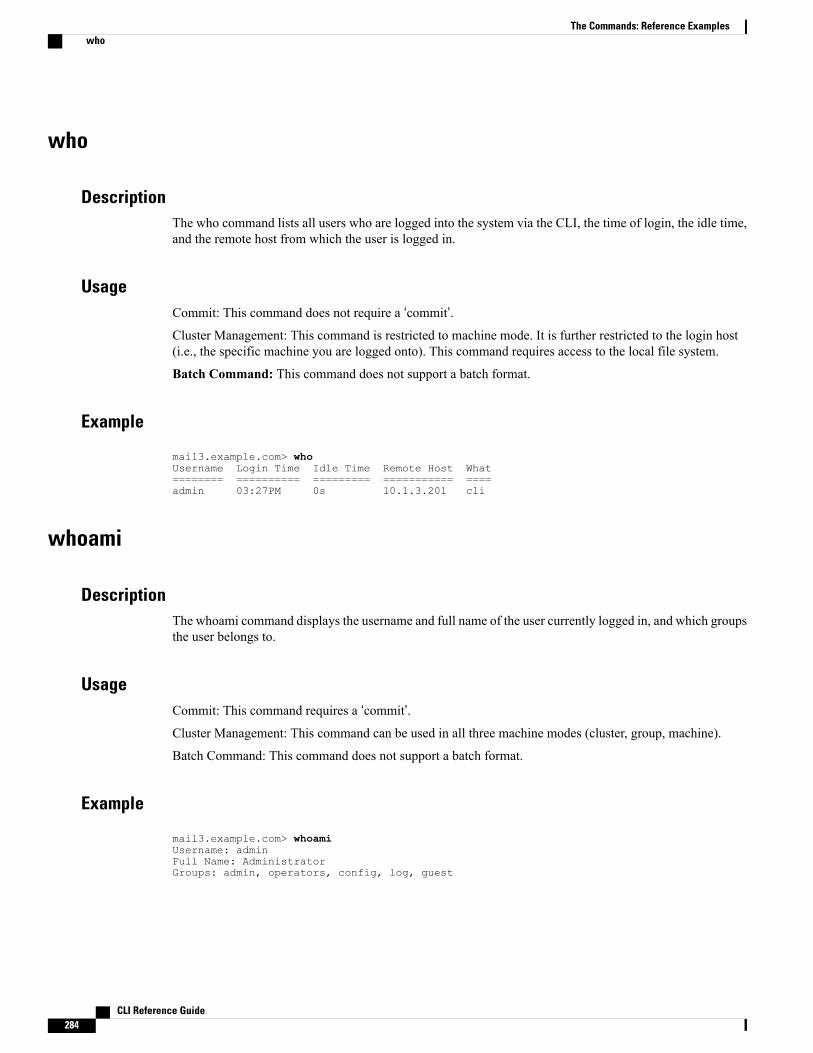
who
DescriptionThe who command lists all users who are logged into the system via the CLI, the time of login, the idle time,and the remote host from which the user is logged in.
UsageCommit: This command does not require a ‘commit’.Cluster Management: This command is restricted to machine mode. It is further restricted to the login host(i.e., the specific machine you are logged onto). This command requires access to the local file system.
Batch Command: This command does not support a batch format.
Example
mail3.example.com> whoUsername Login Time Idle Time Remote Host What======== ========== ========= =========== ====admin 03:27PM 0s 10.1.3.201 cli
whoami
DescriptionThe whoami command displays the username and full name of the user currently logged in, and which groupsthe user belongs to.
UsageCommit: This command requires a ‘commit’.Cluster Management: This command can be used in all three machine modes (cluster, group, machine).
Batch Command: This command does not support a batch format.
Example
mail3.example.com> whoamiUsername: adminFull Name: AdministratorGroups: admin, operators, config, log, guest
CLI Reference Guide284
The Commands: Reference Exampleswho

Virtual Appliance Management• loadlicense, on page 285
• showlicense , on page 285
loadlicense
DescriptionLoads an XML license for a virtual appliance. You can load from a file or copy and paste. For completeinformation, see the Cisco Content Security Virtual Appliance Installation Guide available fromhttp://www.cisco.com/c/en/us/support/security/email-security-appliance/products-installation-guides-list.html.
This command is available to users with Admin or Operator privileges.
UsageCommit: This command does not require a ‘commit’.Cluster Management: This command is restricted to machine mode. It is further restricted to the login host(i.e., the specific machine you are logged onto).
Batch Command: This command does not support a batch format.
Example
mail.example.com> loadlicense1 Paste via CLI2 Load from fileHow would you like to load a license file?[1]> 2Enter the name of the file in /configurations to import:[]> <filename>TERMS AND CONDITIONS OF USE<Terms and conditions>Do you accept the above license agreement?[]> yThe license agreement was accepted.The following feature key have been added:<feature keys>
Errors and hardware misconfigurations may also be shown.
showlicense
DescriptionDisplays information about the current virtual appliance license. Additional details are available using thefeaturekey command.
CLI Reference Guide 285
The Commands: Reference ExamplesVirtual Appliance Management
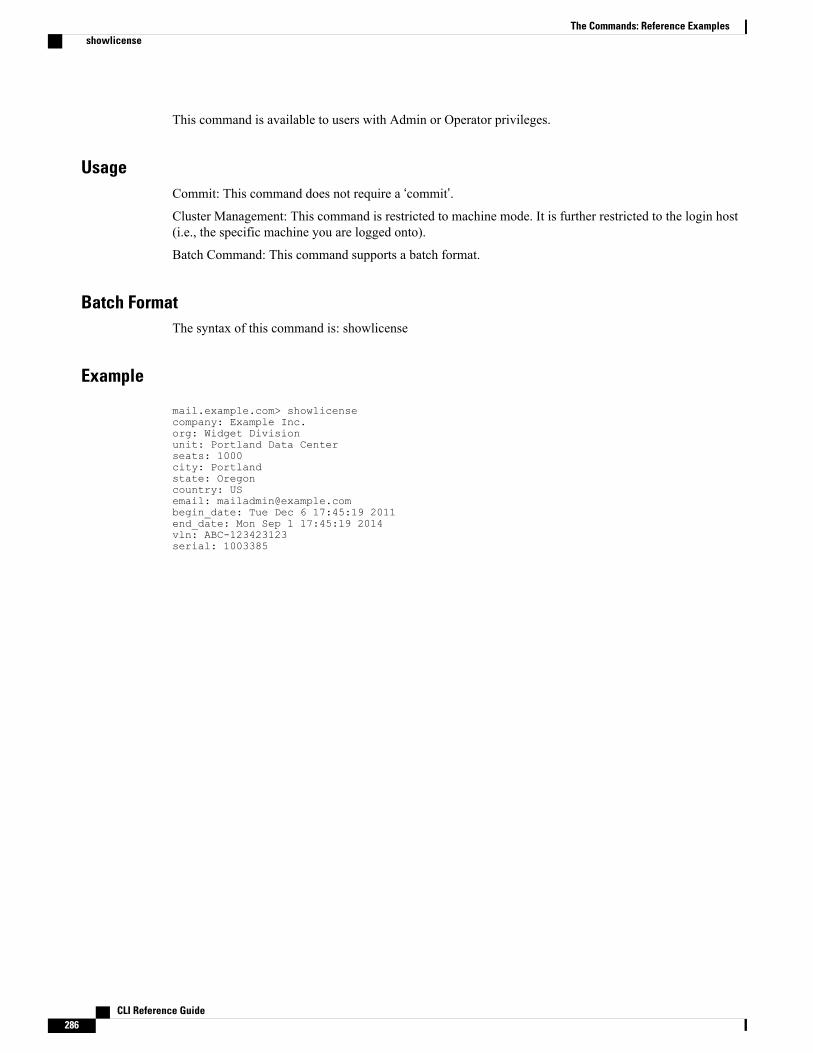
This command is available to users with Admin or Operator privileges.
UsageCommit: This command does not require a ‘commit’.Cluster Management: This command is restricted to machine mode. It is further restricted to the login host(i.e., the specific machine you are logged onto).
Batch Command: This command supports a batch format.
Batch FormatThe syntax of this command is: showlicense
Example
mail.example.com> showlicensecompany: Example Inc.org: Widget Divisionunit: Portland Data Centerseats: 1000city: Portlandstate: Oregoncountry: USemail: [email protected]_date: Tue Dec 6 17:45:19 2011end_date: Mon Sep 1 17:45:19 2014vln: ABC-123423123serial: 1003385
CLI Reference Guide286
The Commands: Reference Examplesshowlicense

I N D E X
A
Anti-Spam 262HAT parameter 262
B
bouncing recipients 150all 150by Envelope From 150by hostname 150
C
case-sensitivity 15in CLI 15
command line interface (CLI) 14, 15, 16conventions 14case-sensitivity in 15default setting 14exit 16history 16subcommands 16white space 15
configuration directory 254content filters 205
creating via CLI 205CRAM-MD5 272
D
delivery queue, monitoring 170Domain Keys 64
DNS TXT record 64
G
global unsubscribe 172adding 172
H
history, in CLI 16Host Access Table (HAT) 254
importing and exporting 254order in 254
L
LDAP 135Laser specification 135
M
maximum 262message size in HAT 262messages per connection in HAT 262recipients per message in HAT 262
maximum recipients per hour 262
N
numbers 262
O
online help 19
CLI Reference Guide IN-1

R
refusing connections 254rejecting connections 254
S
SenderBase 262SMTP 253, 254
protocol 253relay 254
SMTP Auth 272DIGEST-MD5 272
square brackets 14SSH 13
T
Telnet 13text editor 254
CLI Reference GuideIN-2
Index
Top Related