


Languages
Pages
Legal


Cleveland Steel Container
UUNN CClloossiinngg IInnssttrruuccttiioonn MMaannuuaall
© rev 9-8-2015 Cleveland Steel Container Corporation
PROPRIETARY CORPORATE INFORMATION
UN Closing Instruction Manual
Table of Contents Customer Cover Letter
Customer Acknowledgement Form Instruction Sheet Selection Matrix Open Head Pails Instruction Sheet Selection Matrix Tighthead Pails Proper Pail Crimping for Lug Covers UN Closing Instructions

Cleveland Steel Container Corporation
30310 Emerald Valley Parkway #400 Glenwillow, OH 44139
February 15, 2013 To Our Customers and Distributors: Cleveland Steel Container Corporation is required by 49 CFR (Code of Federal Regulations, Title 49--Transportation) to notify all of our customers and distributors using Cleveland Steel Container’s UN Packaging that they must comply with our UN Closing Instructions. The actual terminology in 49 CFR, §178.2(c) Notification, clearly states that the manufacturer or other person certifying compliance with the requirements of Part 178, and each subsequent distributor of that packaging shall: (1) Notify in writing each person to whom that packaging is transferred-- (i) of all requirements in Part 178 not met at the time of transfer, and (ii) of the type and dimensions of any closures, including gaskets, needed to satisfy performance test requirements (2) Retain copies of each written notification for at least one year from date of issuance; and (3) Make copies of all written notifications available for inspection by a representative of the Department In the attached accompanying manual, you will find the newly revised complete set of Cleveland Steel Container Corporation’s UN Closing Instructions. In addition, we have included a matrix that will help you choose which UN Closing Instructions are required based on the type of UN packaging that you purchase. In addition, these closing instructions are to be made available to the actual personnel who will be filling, sealing, and preparing the packaging for shipment. Also included in the manual is an acknowledgement form that must be signed in accordance with 49 CFR, §178.2(c) Notification. We ask that an authorized representative of your company sign and date the form, fax a signed copy of it to Sue Bush at 440-349-8101, e-mail it to [email protected] or mail it to the above address. To fulfill the requirement of compliance with 49 CFR, §178.2(c) Notification, Cleveland Steel Container will retain a copy of the signed acknowledgement form on file at our Corporate Office, such that it can be made available for inspection by a representative of the Department of Transportation. If you have any questions please feel free to contact your Regional Sales Manager. Sincerely yours,
Michael S. Doran UN Program Manager

Cleveland Steel Container Corporation
30310 Emerald Valley Parkway #400 Glenwillow, OH 44139
Receipt of UN Closing Instructions
Acknowledgement Form
I, __________________________, acknowledge that I have received, read, printed and distributed (Please Print Name) to the appropriate Hazmat personnel responsible for UN Compliance, CLEVELAND STEEL CONTAINER CORPORATION’S UN CLOSING INSTRUCTION MANUAL
in accordance with 49 CFR, §178.2(c) Notification.
I understand that the material in this manual is subject to change and/or revision.
_________________________________________ Company Name
_________________________________________ Authorized Representative Signature
_________________________________________ Date
Please fax a signed copy of this form to Sue Bush at 440-349-8101, e-mail it to [email protected] or mail it to the above address.
The UN Closing Instruction Manual includes detailed closing instructions for properly closing UN regulated containers manufactured by Cleveland Steel Container. An acknowledgement form indicating the receipt of these instructions is included. If you are using our closing instructions, please take the time to complete this form and fax a signed copy of it to our corporate office at 440-349-8101, or e-mail it to [email protected]
The Closing Instruction Manual contains two closing instruction matrices that will help you determine which closing instruction is required based on the type of container you are using. Simply click anywhere on the title page to display the Table of Contents, then click on the appropriate closing instruction matrix heading--open head or tighthead. The matrix of choice will be displayed from which you can choose the correct closing instruction. Click on any CSC logo to return to the Table of Contents.
You will need Adobe Reader to view these files. If your PC does not have this reader, click the button on the bottom of the page to install it.
UN Closing Instruction Manual
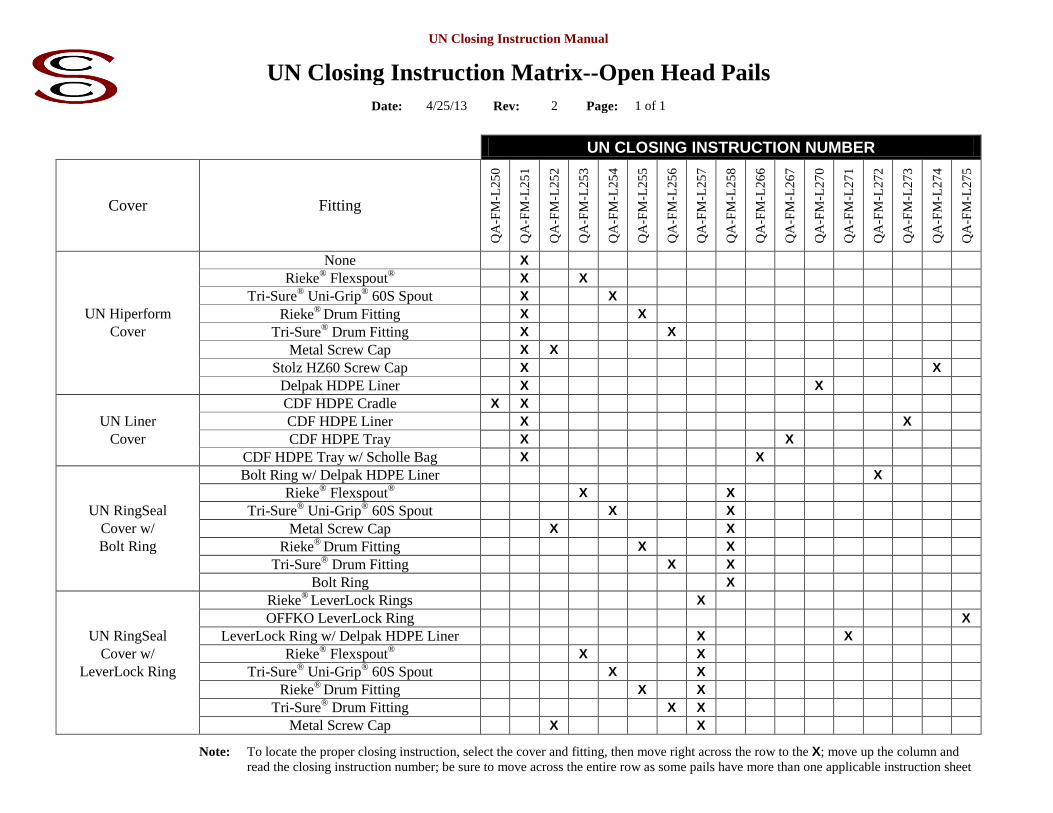
UN Closing Instruction Matrix--Open Head Pails
Date: 4/25/13 Rev: 2 Page: 1 of 1
UN CLOSING INSTRUCTION NUMBER
Cover Fitting
QA
-FM
-L25
0
QA
-FM
-L25
1
QA
-FM
-L25
2
QA
-FM
-L25
3
QA
-FM
-L25
4
QA
-FM
-L25
5
QA
-FM
-L25
6
QA
-FM
-L25
7
QA
-FM
-L25
8
QA
-FM
-L26
6
QA
-FM
-L26
7
QA
-FM
-L27
0
QA
-FM
-L27
1
QA
-FM
-L27
2
QA
-FM
-L27
3
QA
-FM
-L27
4
QA
-FM
-L27
5
None X Rieke® Flexspout® X X Tri-Sure® Uni-Grip® 60S Spout X X
UN Hiperform Rieke® Drum Fitting X X Cover Tri-Sure® Drum Fitting X X
Metal Screw Cap X X Stolz HZ60 Screw Cap X X Delpak HDPE Liner X X CDF HDPE Cradle X X
UN Liner CDF HDPE Liner X X Cover CDF HDPE Tray X X
CDF HDPE Tray w/ Scholle Bag X X Bolt Ring w/ Delpak HDPE Liner X Rieke® Flexspout® X X
UN RingSeal Tri-Sure® Uni-Grip® 60S Spout X X Cover w/ Metal Screw Cap X X Bolt Ring Rieke® Drum Fitting X X
Tri-Sure® Drum Fitting X X Bolt Ring X Rieke® LeverLock Rings X OFFKO LeverLock Ring X
UN RingSeal LeverLock Ring w/ Delpak HDPE Liner X X Cover w/ Rieke® Flexspout® X X
LeverLock Ring Tri-Sure® Uni-Grip® 60S Spout X X Rieke® Drum Fitting X X Tri-Sure® Drum Fitting X X Metal Screw Cap X X
Note: To locate the proper closing instruction, select the cover and fitting, then move right across the row to the X; move up the column and read the closing instruction number; be sure to move across the entire row as some pails have more than one applicable instruction sheet

UN Closing Instruction Manual
UN Closing Instruction Matrix--Tighthead Pails
Date: 9/5/12 Rev: 0 Page: 1 of 1
UN CLOSING INSTRUCTION NUMBER
Cover Fitting
QA
-FM
-L25
0
QA
-FM
-L25
1
QA
-FM
-L25
2
QA
-FM
-L25
3
QA
-FM
-L25
4
QA
-FM
-L25
5
QA
-FM
-L25
6
QA
-FM
-L25
7
QA
-FM
-L25
8
QA
-FM
-L26
6
QA
-FM
-L26
7
QA
-FM
-L27
0
QA
-FM
-L27
1
QA
-FM
-L27
2
QA
-FM
-L27
3
QA
-FM
-L27
4
QA
-FM
-L27
5
Rieke® Flexspout® X Tri-Sure UNi-GRIP® Spout X Rieke® Drum Fitting X Tri-Sure® Drum Fitting X
Tighthead Metal Screw Cap X Top Rieke® Flexspout® &
Metal Screw Cap X X
Tri-Sure UNi-GRIP® Spout & Metal Screw Cap X X
Rieke® Drum Fitting & Metal Screw Cap X X
Tri-Sure® Drum Fitting & Metal Screw Cap X X
Note: To locate the proper closing instruction, select the fitting, then move right across the row to the X; move up the column and read the closing instruction number; be sure to move across the entire row as some pails have more than one applicable instruction sheet

UN Closing Instruction Manual
UNi-Pak Cradle Closing Instructions
Document: QA-FM-L250 Date: 8/29/12 Rev: 6 Page: 1 of 3
CLEVELAND STEEL CONTAINER PROPRIETARY INFORMATION
UNi-Pak Cradle Closing Instructions (UN Lug Cover)
Step 1--Position the cradle into the filled pail. The gasket is already installed in the cradle
Step 2--Place the 1 gallon container, horizontally, into the cradle.
Step 3--Place the UN liner cover on the pail. Ensure that it is evenly seated around the curl of the pail.
The eye of one of the lugs should be centered directly over the seam weld of the pail.
UN Closing Instruction Manual
UNi-Pak Cradle Closing Instructions
Document: QA-FM-L250 Date: 8/29/12 Rev: 6 Page: 2 of 3
CLEVELAND STEEL CONTAINER PROPRIETARY INFORMATION
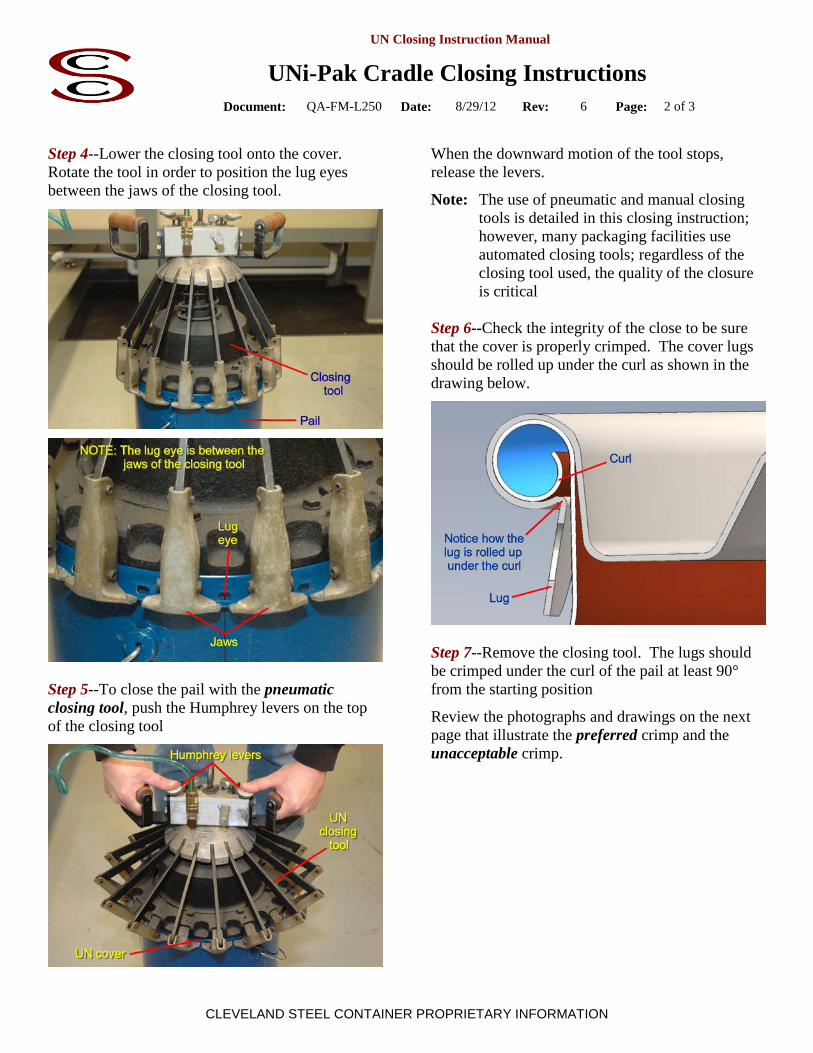
Step 4--Lower the closing tool onto the cover. Rotate the tool in order to position the lug eyes between the jaws of the closing tool.
Step 5--To close the pail with the pneumatic closing tool, push the Humphrey levers on the top of the closing tool
When the downward motion of the tool stops, release the levers.
Note: The use of pneumatic and manual closing tools is detailed in this closing instruction; however, many packaging facilities use automated closing tools; regardless of the closing tool used, the quality of the closure is critical Step 6--Check the integrity of the close to be sure that the cover is properly crimped. The cover lugs should be rolled up under the curl as shown in the drawing below.
Step 7--Remove the closing tool. The lugs should be crimped under the curl of the pail at least 90° from the starting position
Review the photographs and drawings on the next page that illustrate the preferred crimp and the unacceptable crimp.

UN Closing Instruction Manual
UNi-Pak Cradle Closing Instructions
Document: QA-FM-L250 Date: 8/29/12 Rev: 6 Page: 3 of 3
CLEVELAND STEEL CONTAINER PROPRIETARY INFORMATION
UNLiner Cover
One (1) Gallon Container
Cradle
Gasket
Pail(Typical)
Unacceptable Crimp
Preferred Crimp
UN Closing Instruction Manual
Open Head Closing Instructions
Document: QA-FM-L251 Date: 8/23/12 Rev: 6 Page: 1 of 3
CLEVELAND STEEL CONTAINER PROPRIETARY INFORMATION
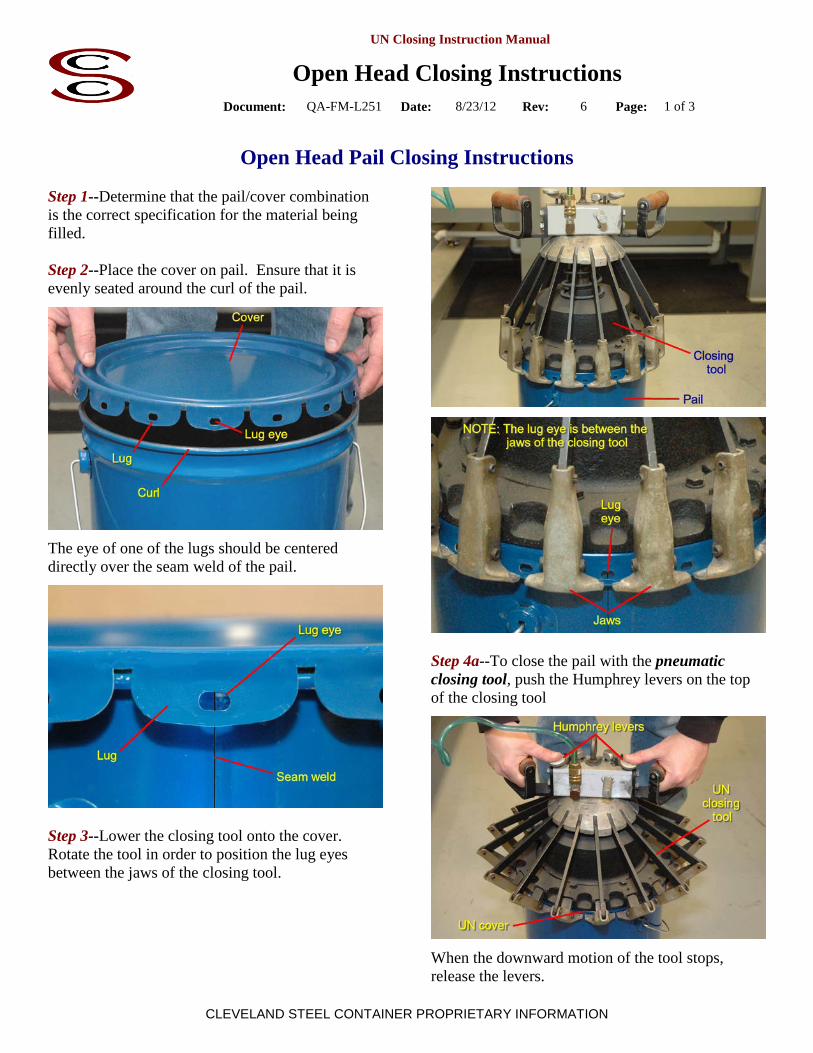
Open Head Pail Closing Instructions
Step 1--Determine that the pail/cover combination is the correct specification for the material being filled. Step 2--Place the cover on pail. Ensure that it is evenly seated around the curl of the pail.
The eye of one of the lugs should be centered directly over the seam weld of the pail.
Step 3--Lower the closing tool onto the cover. Rotate the tool in order to position the lug eyes between the jaws of the closing tool.
Step 4a--To close the pail with the pneumatic closing tool, push the Humphrey levers on the top of the closing tool
When the downward motion of the tool stops, release the levers.

UN Closing Instruction Manual
Open Head Closing Instructions
Document: QA-FM-L251 Date: 8/23/12 Rev: 6 Page: 2 of 3
CLEVELAND STEEL CONTAINER PROPRIETARY INFORMATION
Step 4b--To close the pail with the manual closing tool, push the handles down and out until the downward motion stops
When the downward motion of the tool stops, release the handles.
Note: The use of pneumatic and manual closing tools is detailed in this closing instruction; however, many packaging facilities use automated closing tools; regardless of the closing tool used, the quality of the closure is critical Step 5--Check the integrity of the close to be sure that the cover is properly crimped. Ideally, the cover lugs should be rolled up under the curl as shown in the drawing below.
Step 6--Remove the closing tool. The lugs should be crimped under the curl of the pail at least 90° from the starting position
Review the following photographs and drawings that illustrate the preferred crimp, the acceptable crimp and the unacceptable crimp.
Preferred Crimp

UN Closing Instruction Manual
Open Head Closing Instructions
Document: QA-FM-L251 Date: 8/23/12 Rev: 6 Page: 3 of 3
CLEVELAND STEEL CONTAINER PROPRIETARY INFORMATION
Acceptable Crimp
Unacceptable Crimp
UN Closing Instruction Manual
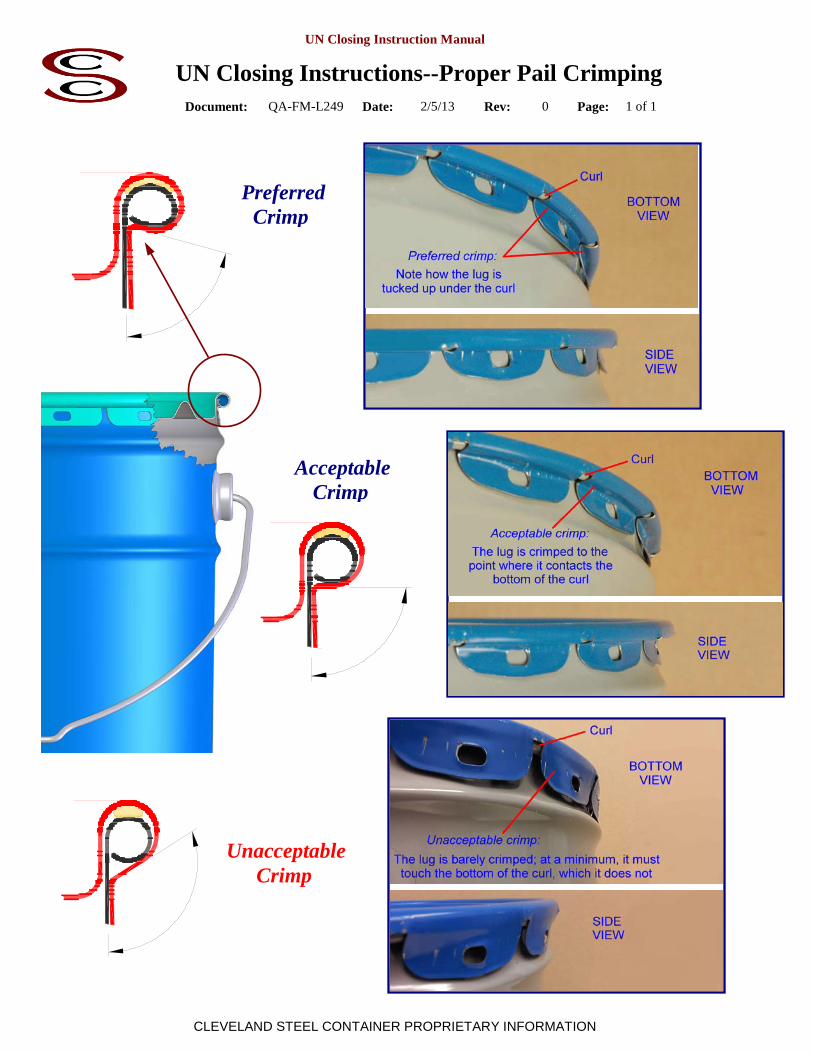
UN Closing Instructions--Proper Pail Crimping
Document: QA-FM-L249 Date: 2/5/13 Rev: 0 Page: 1 of 1
CLEVELAND STEEL CONTAINER PROPRIETARY INFORMATION
Preferred Crimp
Acceptable Crimp
Unacceptable Crimp

UN Closing Instruction Manual
Metal Screw Cap Closing Instructions
Document: QA-FM-L252 Date: 8/29/12 Rev: 5 Page: 1 of 2
CLEVELAND STEEL CONTAINER PROPRIETARY INFORMATION
Metal Screw Cap Closing Instructions
Step 1--Hold the pail securely on a flat surface. Step 2-- Place the innerseal over the opening in the nozzle. Apply pressure to the innerseal to ensure that it locks completely into the nozzle opening.
Note: Use caution in order to prevent distortion to the innerseal while applying pressure
Note: There are 2 styles of innerseals, plain and embossed; both are installed in the same manner; the embossed style is designed to accommodate a metal pour spout and must be used with the nozzle
Step 3--Place the screw cap over the opening in the nozzle. Gently rotate the screw cap clockwise until the threads of the cap smoothly engage the threads in the nozzle.
Step 4--Continue to rotate the screw cap clockwise until it cannot be tightened any further by hand. Using a torque wrench and specialized fitting for the particular cap screw being installed, tighten it to at least 80 inch-pounds.
Refer to the Recommended Torque Specifications chart for the torque specification required for the hydrostatic pressure rating marked on the pail.

UN Closing Instruction Manual
Metal Screw Cap Closing Instructions
Document: QA-FM-L252 Date: 8/29/12 Rev: 5 Page: 2 of 2
CLEVELAND STEEL CONTAINER PROPRIETARY INFORMATION
Automatic Application
Step 1--Set the capping machine torque adjustment to the required specification for the product being packaged in the pail. As a guide, tighten the cap screw to at least 80 inch-pounds.
Refer to the Recommended Torque Specifications chart for the torque specification required for the hydrostatic pressure rating marked on the pail. Step 2--Be sure that the screw cap is not misaligned or mis-threaded. If it is, adjust the alignment of the screw cap and nozzle. Recommended Torque Specifications for
Screw Cap Fittings
Hydrostatic Pressure Rating
Torque
< 80 kPa 80 in-lbs 80 - 100 kPa 100 in-lbs

UN Closing Instruction Manual
Rieke® FlexSpout Closing Instructions
Document: QA-FM-L253 Date: 8/23/12 Rev: 3 Page: 1 of 2
CLEVELAND STEEL CONTAINER PROPRIETARY INFORMATION
Rieke® FlexSpout Closing Instructions
Manual, Hand-Operated Crimping Tool Step 1--Place the pail on a flat surface. Using a screwdriver, pry off the dust cover.
Step 2-- Place the Rieke® FlexSpout in the opening on the top of the pail.
Step 3--The FS-600 Rieke® Hand Crimping Tool is used to crimp the FlexSpout to the opening. Place the crimping tool evenly over the fitting on the pail.
Step 4--In the resting position, the handles of the crimping tool should be approximately 45° to the top of the pail.
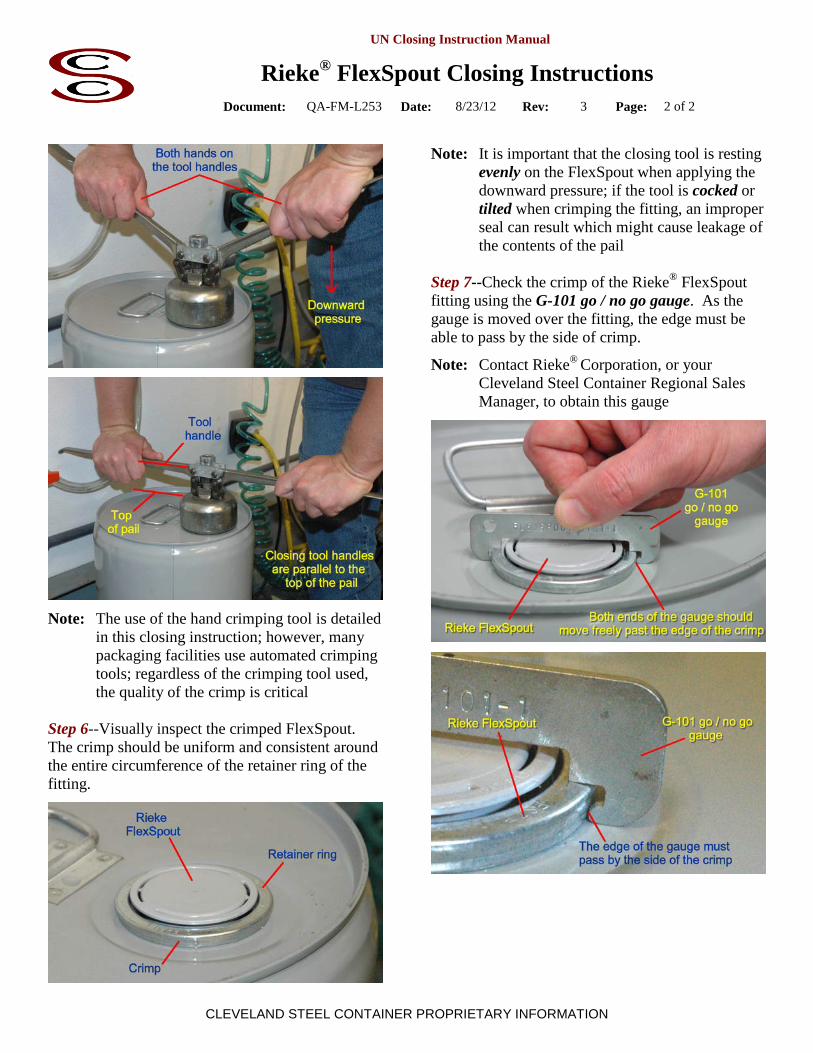
Step 5--Grip the handles of the crimping tool with your hands. Apply even downward pressure until the handles are parallel to the top of the pail in order to properly crimp the fitting.
UN Closing Instruction Manual
Rieke® FlexSpout Closing Instructions
Document: QA-FM-L253 Date: 8/23/12 Rev: 3 Page: 2 of 2
CLEVELAND STEEL CONTAINER PROPRIETARY INFORMATION
Note: The use of the hand crimping tool is detailed in this closing instruction; however, many packaging facilities use automated crimping tools; regardless of the crimping tool used, the quality of the crimp is critical Step 6--Visually inspect the crimped FlexSpout. The crimp should be uniform and consistent around the entire circumference of the retainer ring of the fitting.
Note: It is important that the closing tool is resting evenly on the FlexSpout when applying the downward pressure; if the tool is cocked or tilted when crimping the fitting, an improper seal can result which might cause leakage of the contents of the pail Step 7--Check the crimp of the Rieke® FlexSpout fitting using the G-101 go / no go gauge. As the gauge is moved over the fitting, the edge must be able to pass by the side of crimp.
Note: Contact Rieke® Corporation, or your Cleveland Steel Container Regional Sales Manager, to obtain this gauge

UN Closing Instruction Manual
Tri-Sure® Uni-Grip® 60S Spout Closing Instructions
Document: QA-FM-L254 Date: 4/17/13 Rev: 4 Page: 1 of 2
CLEVELAND STEEL CONTAINER PROPRIETARY INFORMATION
Tri-Sure® Uni-Grip® 60S Spout Closing Instructions
Manual Hand Tool Step 1--Place the pail on a flat surface. Using a screwdriver, pry off the dust cover.
Step 2--Place the Uni-Grip® 60S Spout in the opening on the top of the pail.
Step 3--The Tri-Sure® Uni-Grip® 60S Spout Hand Crimping Tool is used to crimp the Uni-Grip® 60S Spout to the opening.
Place the Tri-Sure® Uni-Grip® 60S Spout Hand Crimping Tool evenly over the fitting at the top of the pail. In the resting position, the handles of the crimping tool should be approximately 45° to the top of the pail.
Step 4--Grip the handles of the crimping tool with your hands. Apply even downward pressure until the handles are parallel to the top of the pail in order to properly crimp the spout (refer to the two photographs in the left hand column on the next page)
Note: It is important that the closing tool is resting evenly on the Uni-Grip® 60S Spout when applying the downward pressure; if the tool is cocked or tilted when crimping the fitting, an improper seal can result which might cause leakage of the contents of the pail

UN Closing Instruction Manual
Tri-Sure® Uni-Grip® 60S Spout Closing Instructions
Document: QA-FM-L254 Date: 4/17/13 Rev: 4 Page: 2 of 2
CLEVELAND STEEL CONTAINER PROPRIETARY INFORMATION
Note: The use of the hand crimping tool is detailed in this closing instruction; however, many packaging facilities use automated crimping tools; regardless of the crimping tool used, the quality of the crimp is critical
UN Closing Instruction Manual
Rieke® Drum Fitting Closing Instructions
Document: QA-FM-L255 Date: 9/04/15 Rev: 7 Page: 1 of 4
CLEVELAND STEEL CONTAINER PROPRIETARY INFORMATION
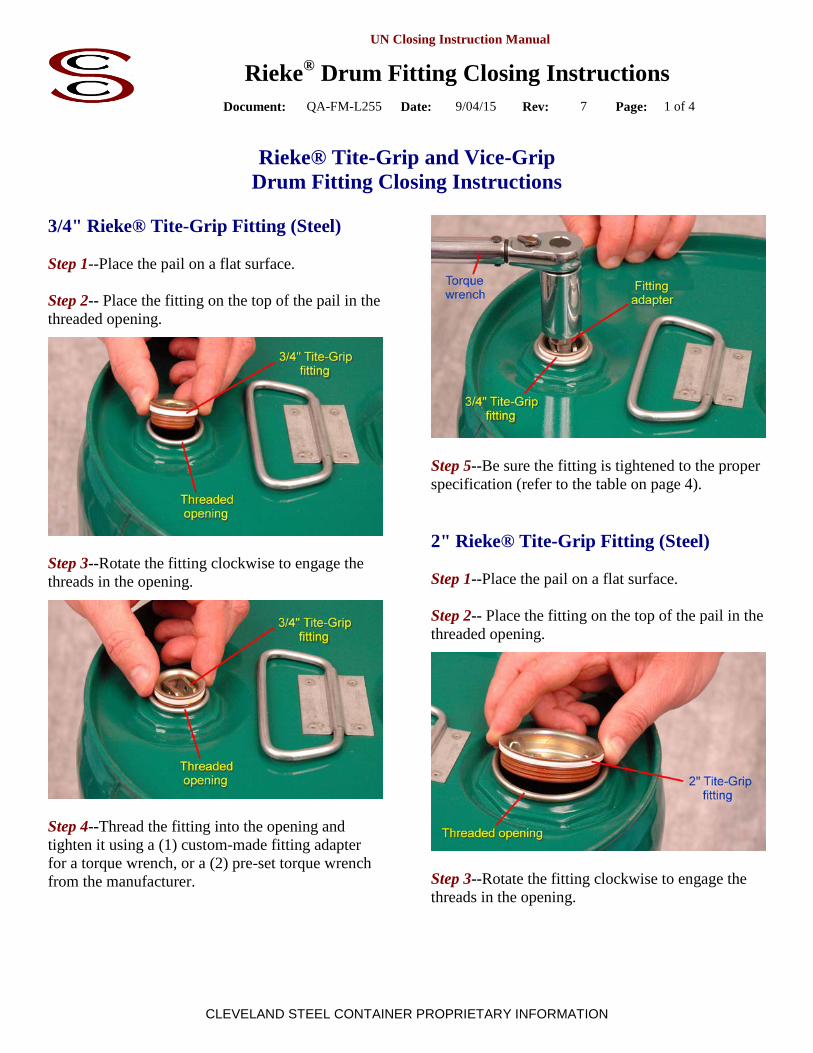
Rieke® Tite-Grip and Vice-Grip Drum Fitting Closing Instructions
3/4" Rieke® Tite-Grip Fitting (Steel) Step 1--Place the pail on a flat surface. Step 2-- Place the fitting on the top of the pail in the threaded opening.
Step 3--Rotate the fitting clockwise to engage the threads in the opening.
Step 4--Thread the fitting into the opening and tighten it using a (1) custom-made fitting adapter for a torque wrench, or a (2) pre-set torque wrench from the manufacturer.
Step 5--Be sure the fitting is tightened to the proper specification (refer to the table on page 4). 2" Rieke® Tite-Grip Fitting (Steel) Step 1--Place the pail on a flat surface. Step 2-- Place the fitting on the top of the pail in the threaded opening.
Step 3--Rotate the fitting clockwise to engage the threads in the opening.
UN Closing Instruction Manual
Rieke® Drum Fitting Closing Instructions
Document: QA-FM-L255 Date: 9/04/15 Rev: 7 Page: 2 of 4
CLEVELAND STEEL CONTAINER PROPRIETARY INFORMATION
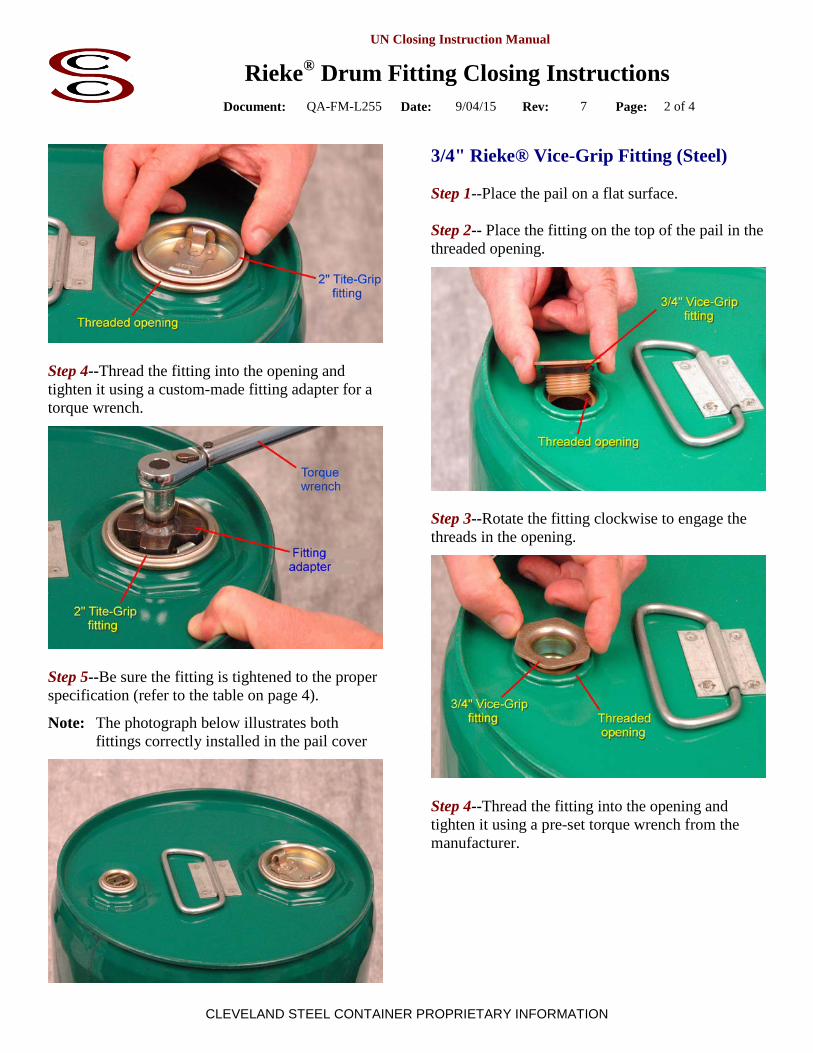
Step 4--Thread the fitting into the opening and tighten it using a custom-made fitting adapter for a torque wrench.
Step 5--Be sure the fitting is tightened to the proper specification (refer to the table on page 4).
Note: The photograph below illustrates both fittings correctly installed in the pail cover
3/4" Rieke® Vice-Grip Fitting (Steel) Step 1--Place the pail on a flat surface. Step 2-- Place the fitting on the top of the pail in the threaded opening.
Step 3--Rotate the fitting clockwise to engage the threads in the opening.
Step 4--Thread the fitting into the opening and tighten it using a pre-set torque wrench from the manufacturer.
UN Closing Instruction Manual
Rieke® Drum Fitting Closing Instructions
Document: QA-FM-L255 Date: 9/04/15 Rev: 7 Page: 3 of 4
CLEVELAND STEEL CONTAINER PROPRIETARY INFORMATION
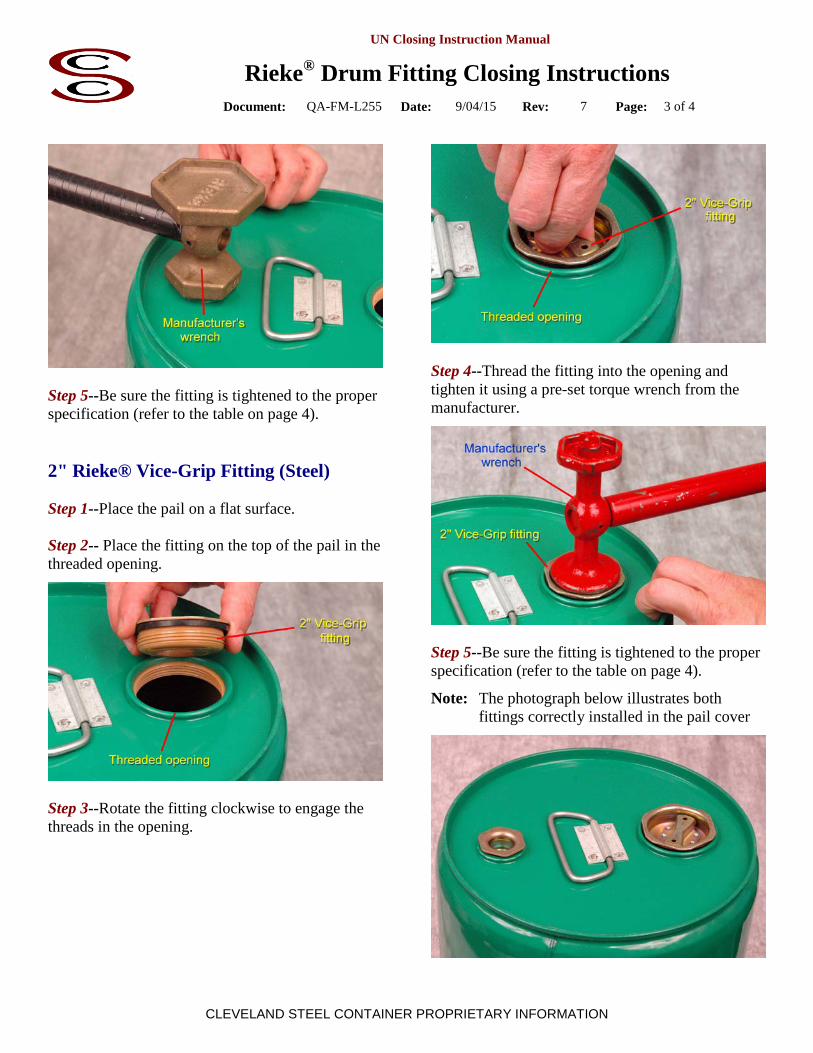
Step 5--Be sure the fitting is tightened to the proper specification (refer to the table on page 4). 2" Rieke® Vice-Grip Fitting (Steel) Step 1--Place the pail on a flat surface. Step 2-- Place the fitting on the top of the pail in the threaded opening.
Step 3--Rotate the fitting clockwise to engage the threads in the opening.
Step 4--Thread the fitting into the opening and tighten it using a pre-set torque wrench from the manufacturer.
Step 5--Be sure the fitting is tightened to the proper specification (refer to the table on page 4).
Note: The photograph below illustrates both fittings correctly installed in the pail cover

UN Closing Instruction Manual
Rieke® Drum Fitting Closing Instructions
Document: QA-FM-L255 Date: 9/04/15 Rev: 7 Page: 4 of 4
CLEVELAND STEEL CONTAINER PROPRIETARY INFORMATION
2" Plugs
Gasket Material Plastic Plug Steel Plug Oven Temp G-43 Buna 20 ft-lbs 30 ft-lbs 450° F G-43w White Buna 20 ft-lbs 30 ft-lbs 450° F G-73-2 LD Polyethylene 9 ft-lbs 40 ft-lbs 120° F G-73-3 Irradiated LD Polyethylene 9 ft-lbs 40 ft-lbs 375° F G-79 LD Polyethylene 20 ft-lbs N/A N/A G-83 Dapon 20 ft-lbs 30 ft-lbs 450° F G-93 EPT / EPDM 20 ft-lbs 30 ft-lbs 450° F G-93w White EPT / EPDM 20 ft-lbs 30 ft-lbs 450° F G-99w White EPT / EPDM 20 ft-lbs N/A N/A
3/4" Plugs
Gasket Material Plastic Plug Steel Plug Oven Temp G-41 Buna 9 ft-lbs 15 ft-lbs 450° F G-41w White Buna 9 ft-lbs 15 ft-lbs 450° F G-71-2 LD Polyethylene 9 ft-lbs 20 ft-lbs 120° F G-71-3 Irradiated LD Polyethylene 9 ft-lbs 20 ft-lbs 375° F G-81w Dapon 9 ft-lbs 15 ft-lbs 450° F G-91 EPT / EPDM 9 ft-lbs 15 ft-lbs 450° F G-91w White EPT / EPDM 9 ft-lbs 15 ft-lbs 450° F
Gasket Material Plug Type Torque Oven Temp G-91w White EPT / EPDM HDPE 4 ft-lbs 120° F

UN Closing Instruction Manual
Tri-Sure® Drum Fitting Closing Instructions
Document: QA-FM-L256 Date: 4/5/13 Rev: 7 Page: 1 of 3
CLEVELAND STEEL CONTAINER PROPRIETARY INFORMATION
Tri-Sure® Drum Fitting Closing Instructions
3/4" Tri-Sure® Fitting (Plastic) Step 1--Place the pail on a flat surface. Step 2-- Place the fitting on the top of the pail in the threaded opening.
Step 3--Rotate the fitting clockwise to engage the threads in the opening.
Step 4--Thread the fitting into the opening and tighten it using a (1) custom-made fitting adapter for a torque wrench, or a (2) pre-set torque wrench from the manufacturer.
Step 5--Be sure the fitting is tightened to the proper specification (refer to the table on page 3). 2" Tri-Sure® Fitting (Plastic) Step 1--Place the pail on a flat surface. Step 2-- Place the fitting on the top of the pail in the threaded opening.
Step 3--Rotate the fitting clockwise to engage the threads in the opening.
UN Closing Instruction Manual
Tri-Sure® Drum Fitting Closing Instructions
Document: QA-FM-L256 Date: 4/5/13 Rev: 7 Page: 2 of 3
CLEVELAND STEEL CONTAINER PROPRIETARY INFORMATION
Step 4--Thread the fitting into the opening and tighten it using a (1) custom-made fitting adapter for a torque wrench, or a (2) pre-set torque wrench from the manufacturer.
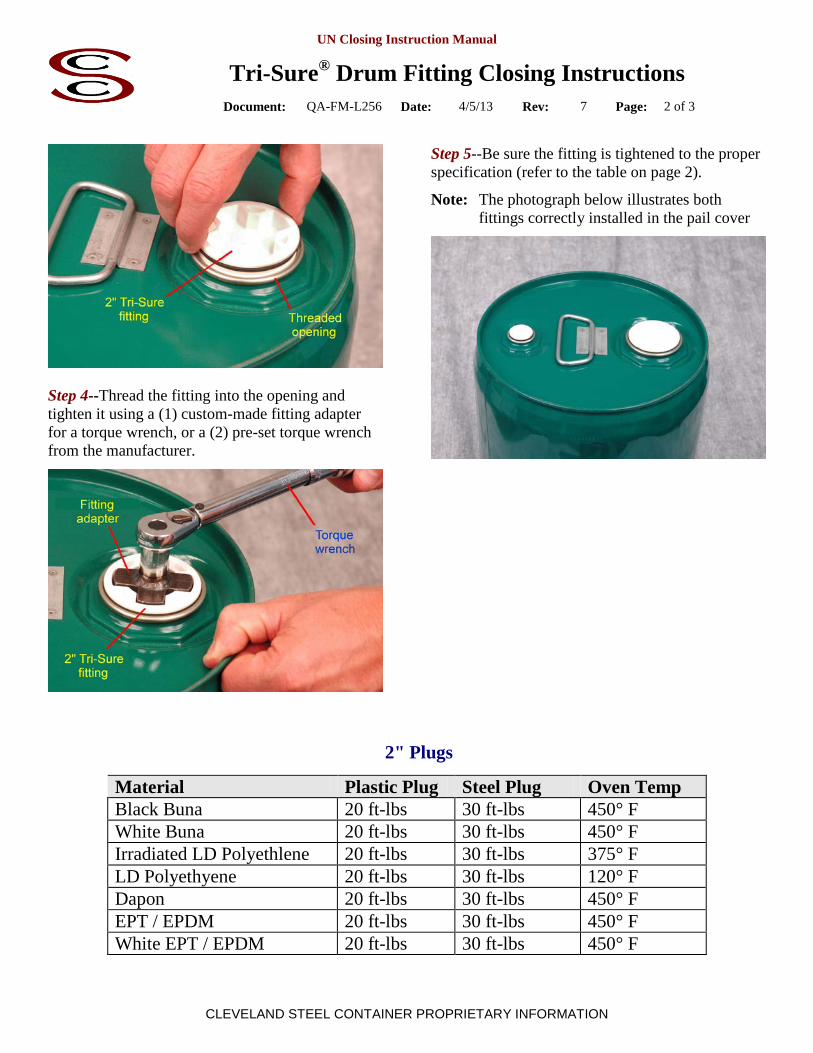
Step 5--Be sure the fitting is tightened to the proper specification (refer to the table on page 2).
Note: The photograph below illustrates both fittings correctly installed in the pail cover
2" Plugs
Material Plastic Plug Steel Plug Oven Temp Black Buna 20 ft-lbs 30 ft-lbs 450° F White Buna 20 ft-lbs 30 ft-lbs 450° F Irradiated LD Polyethlene 20 ft-lbs 30 ft-lbs 375° F LD Polyethyene 20 ft-lbs 30 ft-lbs 120° F Dapon 20 ft-lbs 30 ft-lbs 450° F EPT / EPDM 20 ft-lbs 30 ft-lbs 450° F White EPT / EPDM 20 ft-lbs 30 ft-lbs 450° F
UN Closing Instruction Manual
Tri-Sure® Drum Fitting Closing Instructions
Document: QA-FM-L256 Date: 4/5/13 Rev: 7 Page: 3 of 3
CLEVELAND STEEL CONTAINER PROPRIETARY INFORMATION
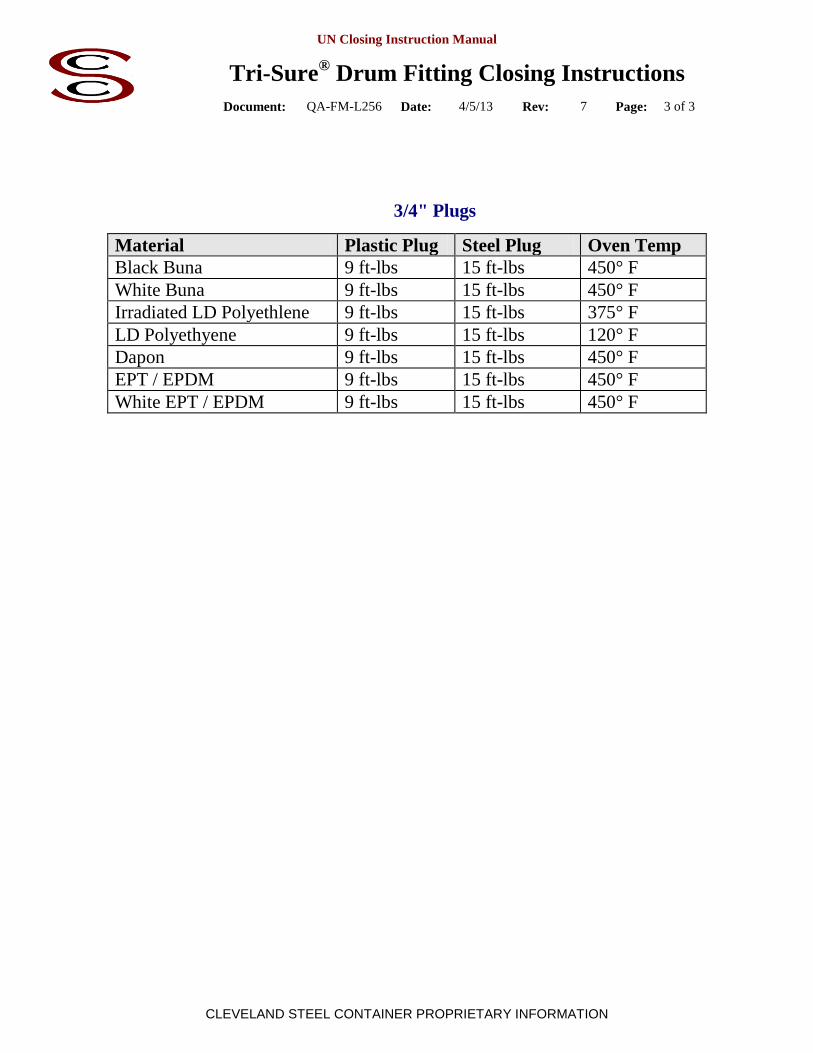
3/4" Plugs
Material Plastic Plug Steel Plug Oven Temp Black Buna 9 ft-lbs 15 ft-lbs 450° F White Buna 9 ft-lbs 15 ft-lbs 450° F Irradiated LD Polyethlene 9 ft-lbs 15 ft-lbs 375° F LD Polyethyene 9 ft-lbs 15 ft-lbs 120° F Dapon 9 ft-lbs 15 ft-lbs 450° F EPT / EPDM 9 ft-lbs 15 ft-lbs 450° F White EPT / EPDM 9 ft-lbs 15 ft-lbs 450° F

UN Closing Instruction Manual
Rieke® (RU/RS) LeverLock Closing Instructions
Document: QA-FM-L257 Date: 4/25/13 Rev: 8 Page: 1 of 3
CLEVELAND STEEL CONTAINER PROPRIETARY INFORMATION
Proper Application of the Rieke® (RU/RS) LeverLock Ring
Step 1--Place the cover on the pail. Press down along the edges and in the center of the cover to ensure that it is seated properly.
Step 2--Select the proper leverlock ring for the material being packaged.
The RU leverlock ring is used when packaging liquids. The RS leverlock ring is used when packaging solids.
The leverlock rings are stamped for the particular application. Also, the RS leverlock ring is wider than the RU leverlock ring.
Step 3--Before placing the leverlock ring on the pail, it must be oriented correctly. There is an Up indicator w/ an arrow stamped into the base of the handle. Orient the ring w/ the arrow pointing up.
UN Closing Instruction Manual
Rieke® (RU/RS) LeverLock Closing Instructions
Document: QA-FM-L257 Date: 4/25/13 Rev: 8 Page: 2 of 3
CLEVELAND STEEL CONTAINER PROPRIETARY INFORMATION
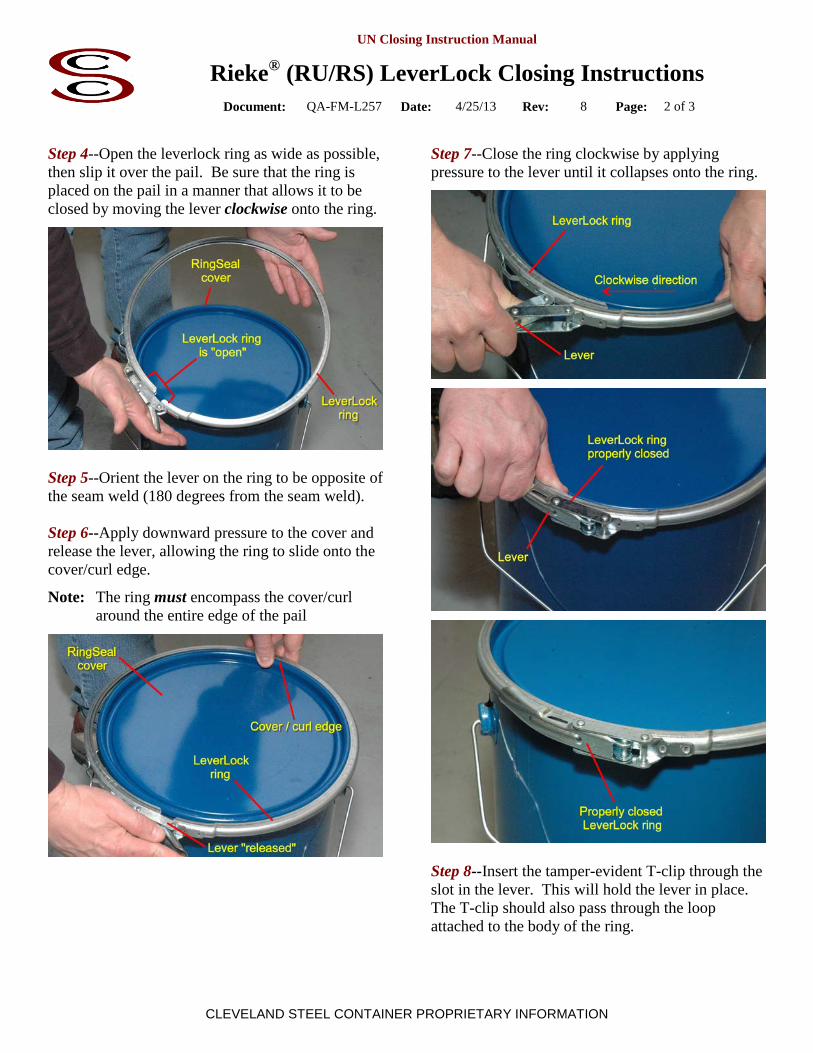
Step 4--Open the leverlock ring as wide as possible, then slip it over the pail. Be sure that the ring is placed on the pail in a manner that allows it to be closed by moving the lever clockwise onto the ring.
Step 5--Orient the lever on the ring to be opposite of the seam weld (180 degrees from the seam weld). Step 6--Apply downward pressure to the cover and release the lever, allowing the ring to slide onto the cover/curl edge.
Note: The ring must encompass the cover/curl around the entire edge of the pail
Step 7--Close the ring clockwise by applying pressure to the lever until it collapses onto the ring.
Step 8--Insert the tamper-evident T-clip through the slot in the lever. This will hold the lever in place. The T-clip should also pass through the loop attached to the body of the ring.

UN Closing Instruction Manual
Rieke® (RU/RS) LeverLock Closing Instructions
Document: QA-FM-L257 Date: 4/25/13 Rev: 8 Page: 3 of 3
CLEVELAND STEEL CONTAINER PROPRIETARY INFORMATION
Note: A locking mechanism can be inserted into the eyelet of the latch to make the lever tamper-evident
Step 9--If the ring is locked properly, it cannot be rotated or moved. If the ring slides, it is oversized.
LeverLock Ring
UN RingSeal Cover
Pail
UN Closing Instruction Manual
Bolt Ring Closing Instructions
Document: QA-FM-L258 Date: 8/24/12 Rev: 4 Page: 1 of 2
CLEVELAND STEEL CONTAINER PROPRIETARY INFORMATION
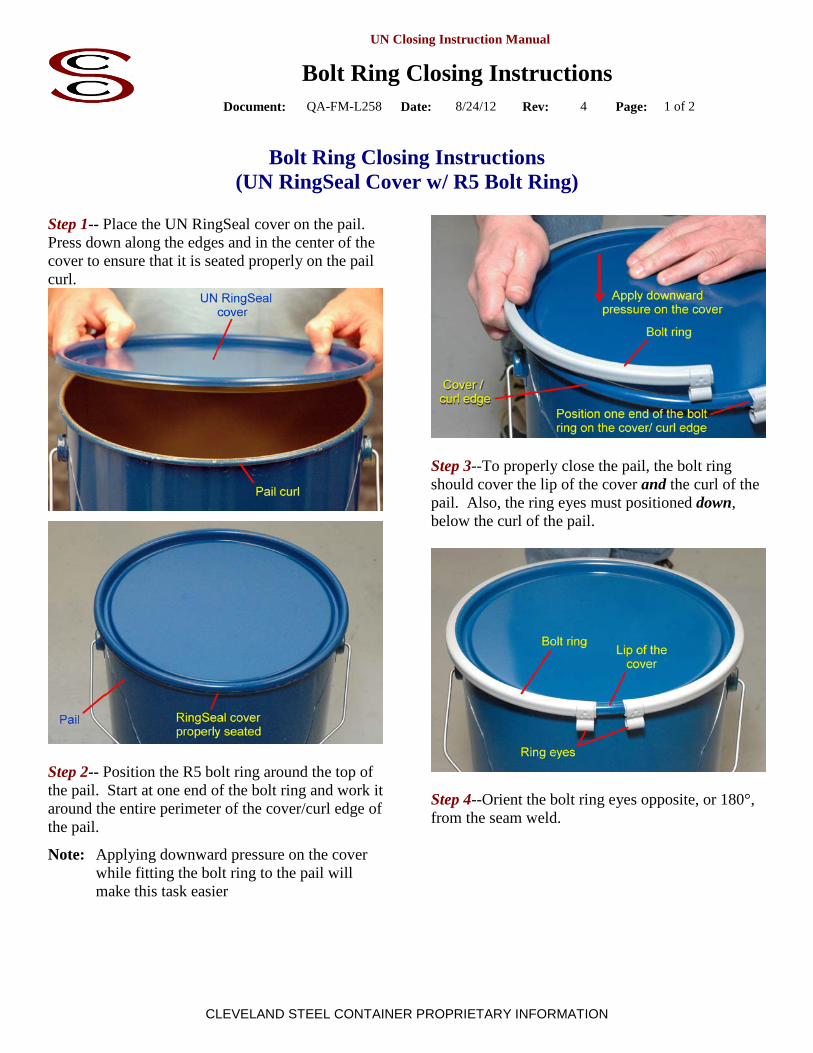
Bolt Ring Closing Instructions (UN RingSeal Cover w/ R5 Bolt Ring)
Step 1-- Place the UN RingSeal cover on the pail. Press down along the edges and in the center of the cover to ensure that it is seated properly on the pail curl.
Step 2-- Position the R5 bolt ring around the top of the pail. Start at one end of the bolt ring and work it around the entire perimeter of the cover/curl edge of the pail.
Note: Applying downward pressure on the cover while fitting the bolt ring to the pail will make this task easier
Step 3--To properly close the pail, the bolt ring should cover the lip of the cover and the curl of the pail. Also, the ring eyes must positioned down, below the curl of the pail.
Step 4--Orient the bolt ring eyes opposite, or 180°, from the seam weld.
UN Closing Instruction Manual
Bolt Ring Closing Instructions
Document: QA-FM-L258 Date: 8/24/12 Rev: 4 Page: 2 of 2
CLEVELAND STEEL CONTAINER PROPRIETARY INFORMATION
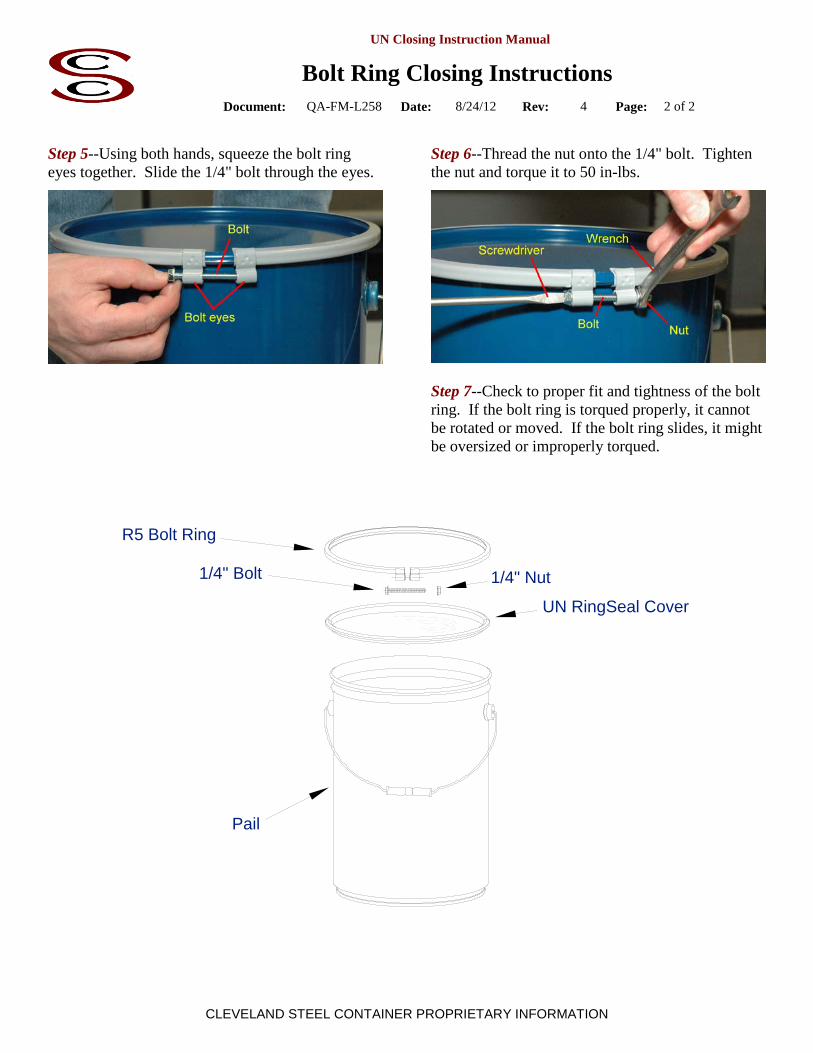
Step 5--Using both hands, squeeze the bolt ring eyes together. Slide the 1/4" bolt through the eyes.
Step 6--Thread the nut onto the 1/4" bolt. Tighten the nut and torque it to 50 in-lbs.
Step 7--Check to proper fit and tightness of the bolt ring. If the bolt ring is torqued properly, it cannot be rotated or moved. If the bolt ring slides, it might be oversized or improperly torqued.
R5 Bolt Ring
1/4" Nut
UN RingSeal Cover
1/4" Bolt
Pail
UN Closing Instruction Manual
UNi-Pak Tray w/ Scholle Bag Closing Instructions
Document: QA-FM-L266 Date: 9/7/12 Rev: 4 Page: 1 of 3
CLEVELAND STEEL CONTAINER PROPRIETARY INFORMATION
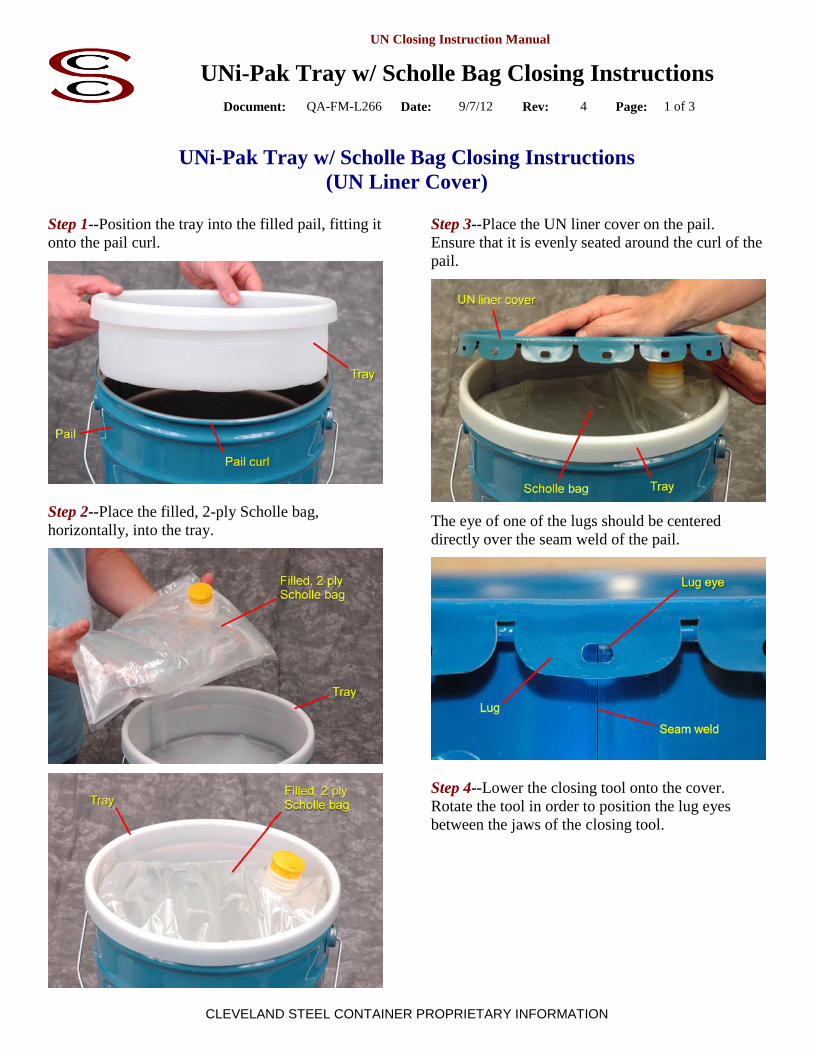
UNi-Pak Tray w/ Scholle Bag Closing Instructions (UN Liner Cover)
Step 1--Position the tray into the filled pail, fitting it onto the pail curl.
Step 2--Place the filled, 2-ply Scholle bag, horizontally, into the tray.
Step 3--Place the UN liner cover on the pail. Ensure that it is evenly seated around the curl of the pail.
The eye of one of the lugs should be centered directly over the seam weld of the pail.
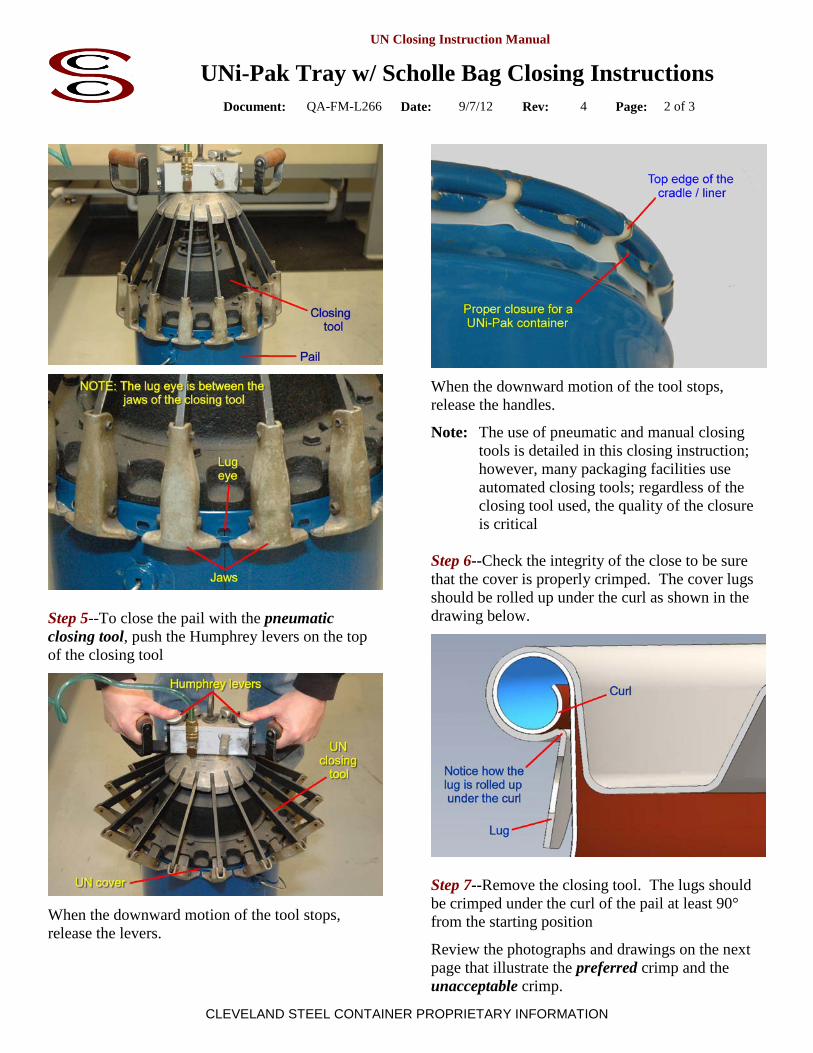
Step 4--Lower the closing tool onto the cover. Rotate the tool in order to position the lug eyes between the jaws of the closing tool.
UN Closing Instruction Manual
UNi-Pak Tray w/ Scholle Bag Closing Instructions
Document: QA-FM-L266 Date: 9/7/12 Rev: 4 Page: 2 of 3
CLEVELAND STEEL CONTAINER PROPRIETARY INFORMATION
Step 5--To close the pail with the pneumatic closing tool, push the Humphrey levers on the top of the closing tool
When the downward motion of the tool stops, release the levers.
When the downward motion of the tool stops, release the handles.
Note: The use of pneumatic and manual closing tools is detailed in this closing instruction; however, many packaging facilities use automated closing tools; regardless of the closing tool used, the quality of the closure is critical Step 6--Check the integrity of the close to be sure that the cover is properly crimped. The cover lugs should be rolled up under the curl as shown in the drawing below.
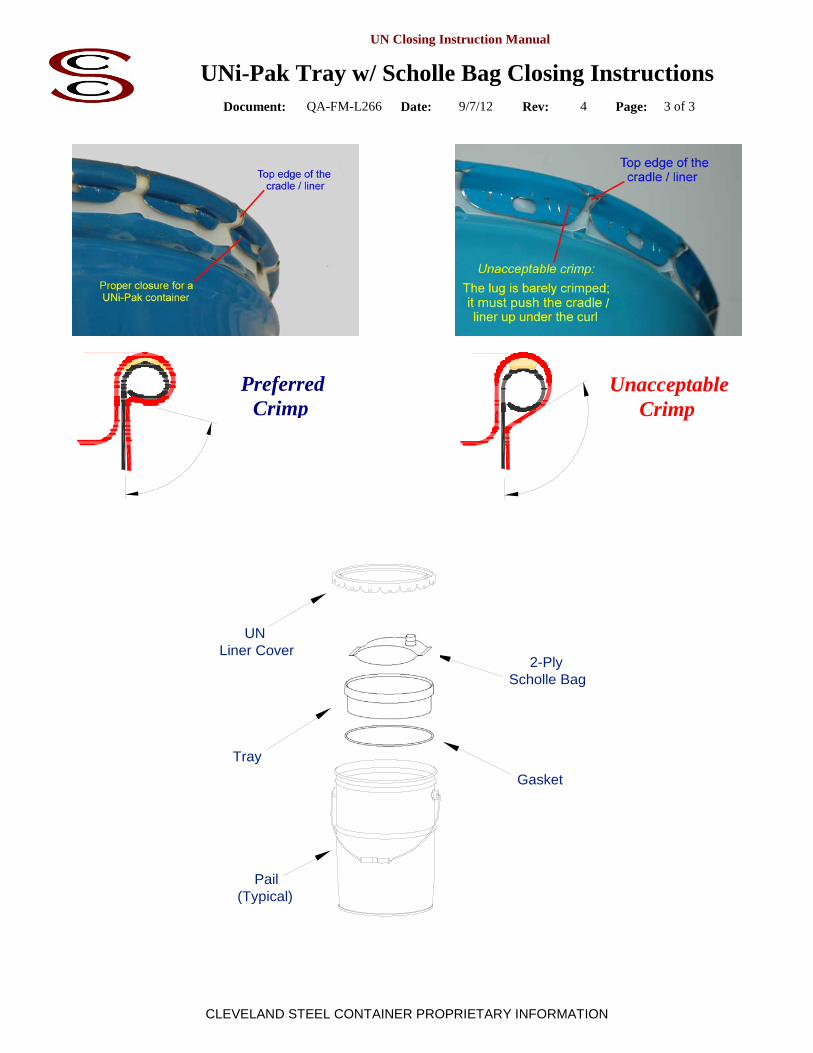
Step 7--Remove the closing tool. The lugs should be crimped under the curl of the pail at least 90° from the starting position
Review the photographs and drawings on the next page that illustrate the preferred crimp and the unacceptable crimp.
UN Closing Instruction Manual
UNi-Pak Tray w/ Scholle Bag Closing Instructions
Document: QA-FM-L266 Date: 9/7/12 Rev: 4 Page: 3 of 3
CLEVELAND STEEL CONTAINER PROPRIETARY INFORMATION
UNLiner Cover
2-Ply Scholle Bag
TrayGasket
Pail(Typical)
Preferred Crimp
Unacceptable Crimp

UN Closing Instruction Manual
UNi-Pak Tray Closing Instructions
Document: QA-FM-L267 Date: 4/2/12 Rev: 3 Page: 1 of 3
CLEVELAND STEEL CONTAINER PROPRIETARY INFORMATION
UNi-Pak Tray Closing Instructions (UN Liner Cover)
Step 1--Position the tray into the filled pail.
Step 2--Fill the tray with the designated material. Step 3--Place the UN liner cover on the pail. Ensure that it is evenly seated around the curl of the pail.
The eye of one of the lugs should be centered directly over the seam weld of the pail.
Step 4--Lower the closing tool onto the cover. Rotate the tool in order to position the lug eyes between the jaws of the closing tool.

UN Closing Instruction Manual
UNi-Pak Tray Closing Instructions
Document: QA-FM-L267 Date: 4/2/12 Rev: 3 Page: 2 of 3
CLEVELAND STEEL CONTAINER PROPRIETARY INFORMATION
Step 5--To close the pail with the pneumatic closing tool, push the Humphrey levers on the top of the closing tool
When the downward motion of the tool stops, release the levers.
Note: The use of pneumatic and manual closing tools is detailed in this closing instruction; however, many packaging facilities use automated closing tools; regardless of the closing tool used, the quality of the closure is critical
Step 6--Check the integrity of the close to be sure that the cover is properly crimped. The cover lugs should be rolled up under the curl as shown in the drawing below.
Step 7--Remove the closing tool. The lugs should be crimped under the curl of the pail at least 90° from the starting position
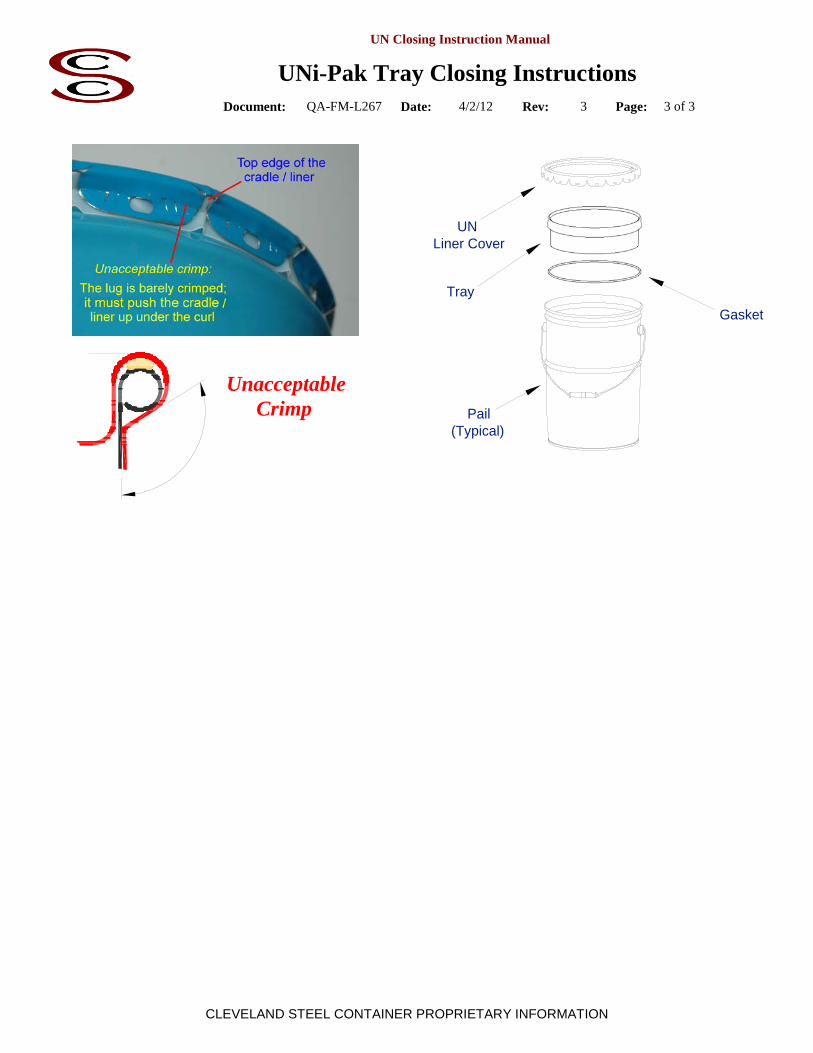
Review the photographs and drawings below and on the next page that illustrate the preferred crimp and the unacceptable crimp.
Preferred Crimp
UN Closing Instruction Manual
UNi-Pak Tray Closing Instructions
Document: QA-FM-L267 Date: 4/2/12 Rev: 3 Page: 3 of 3
CLEVELAND STEEL CONTAINER PROPRIETARY INFORMATION
UNLiner Cover
TrayGasket
Pail(Typical)
Unacceptable Crimp
UN Closing Instruction Manual
Delpak Lug Cover Closing Instructions
Document: QA-FM-L270 Date: 8/23/12 Rev: 3 Page: 1 of 4
CLEVELAND STEEL CONTAINER PROPRIETARY INFORMATION
Delpak Lug Cover Closing Instructions (UN Lug Cover)
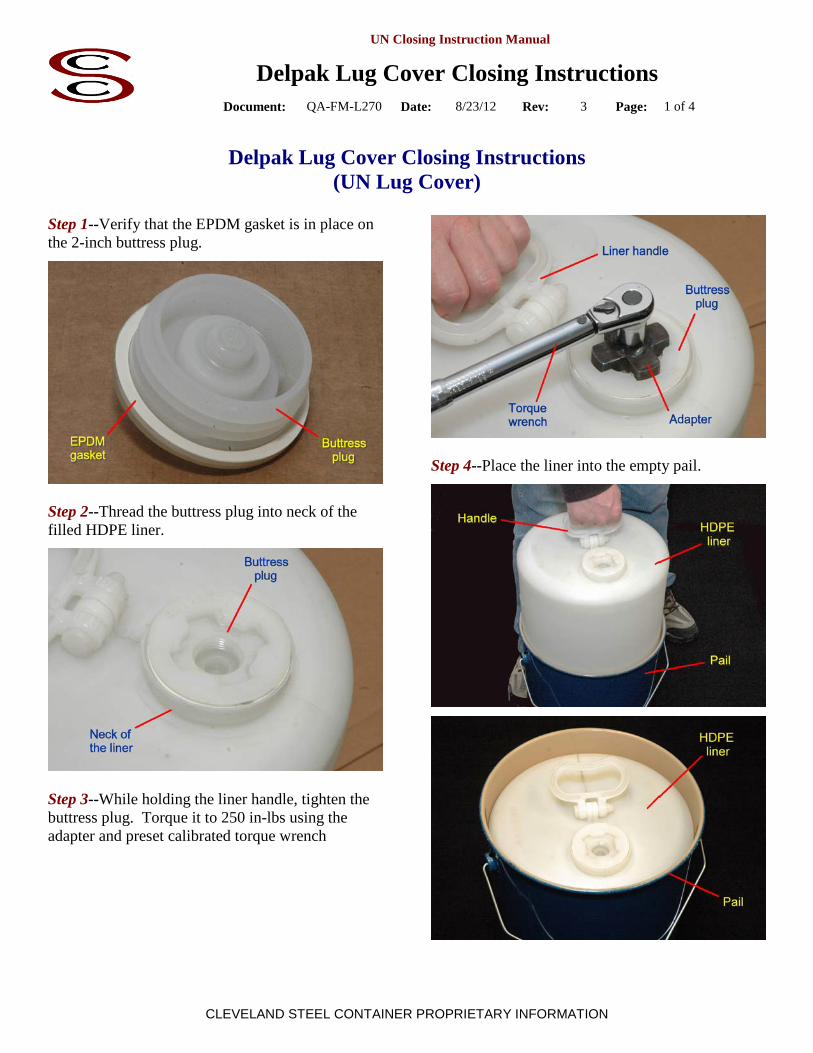
Step 1--Verify that the EPDM gasket is in place on the 2-inch buttress plug.
Step 2--Thread the buttress plug into neck of the filled HDPE liner.
Step 3--While holding the liner handle, tighten the buttress plug. Torque it to 250 in-lbs using the adapter and preset calibrated torque wrench
Step 4--Place the liner into the empty pail.

UN Closing Instruction Manual
Delpak Lug Cover Closing Instructions
Document: QA-FM-L270 Date: 8/23/12 Rev: 3 Page: 2 of 4
CLEVELAND STEEL CONTAINER PROPRIETARY INFORMATION
Step 5--Place the UN cover on pail. Ensure that it is evenly seated around the curl of the pail.
The eye of one of the lugs should be centered directly over the seam weld of the pail.
Step 6--Lower the closing tool onto the cover. Rotate the tool in order to position the lug eyes between the jaws of the closing tool.
Step 6a--To close the pail with the pneumatic closing tool, push the Humphrey levers on the top of the closing tool
When the downward motion of the tool stops, release the levers. Step 6b--To close the pail with the manual closing tool, push the handles down and out until the downward motion stops
UN Closing Instruction Manual
Delpak Lug Cover Closing Instructions
Document: QA-FM-L270 Date: 8/23/12 Rev: 3 Page: 3 of 4
CLEVELAND STEEL CONTAINER PROPRIETARY INFORMATION
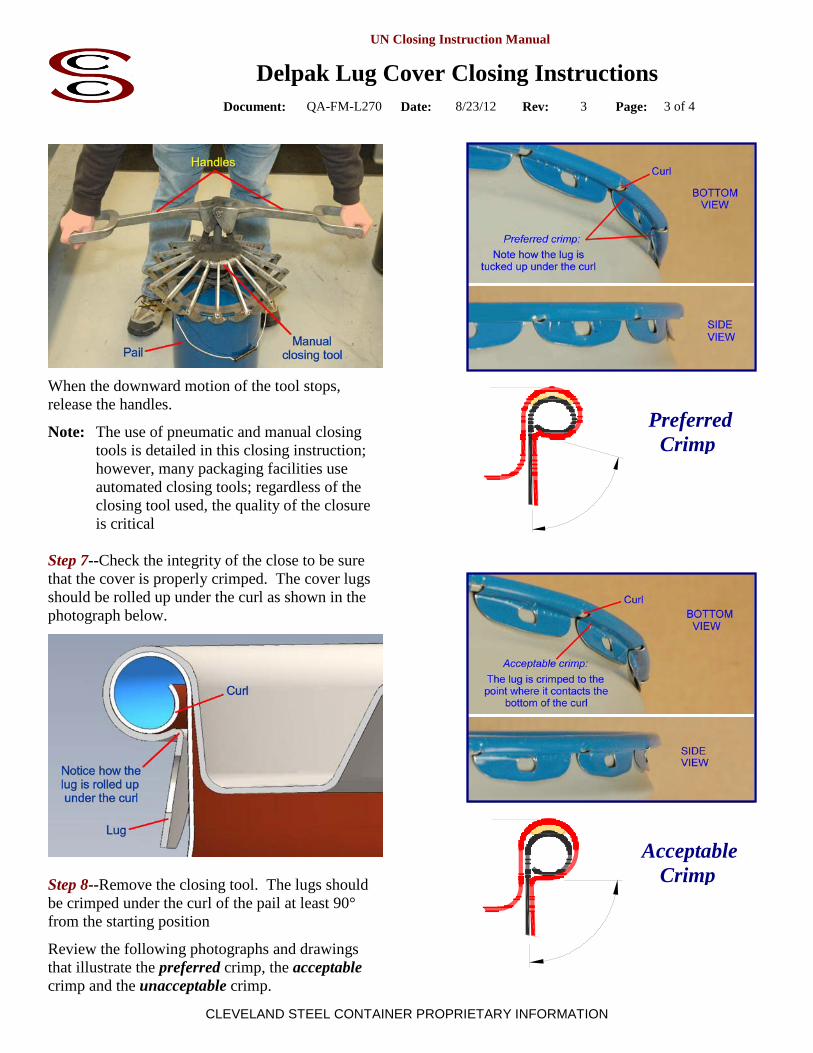
When the downward motion of the tool stops, release the handles.
Note: The use of pneumatic and manual closing tools is detailed in this closing instruction; however, many packaging facilities use automated closing tools; regardless of the closing tool used, the quality of the closure is critical Step 7--Check the integrity of the close to be sure that the cover is properly crimped. The cover lugs should be rolled up under the curl as shown in the photograph below.
Step 8--Remove the closing tool. The lugs should be crimped under the curl of the pail at least 90° from the starting position
Review the following photographs and drawings that illustrate the preferred crimp, the acceptable crimp and the unacceptable crimp.
Preferred Crimp
Acceptable Crimp

UN Closing Instruction Manual
Delpak Lug Cover Closing Instructions
Document: QA-FM-L270 Date: 8/23/12 Rev: 3 Page: 4 of 4
CLEVELAND STEEL CONTAINER PROPRIETARY INFORMATION
UN Lug Cover
HDPE Liner
EPDM Gasket
2" Buttress Plug
Pail
Unacceptable Crimp
UN Closing Instruction Manual
Delpak LeverLock Ring Closing Instructions
Document: QA-FM-L271 Date: 8/24/12 Rev: 3 Page: 1 of 4
CLEVELAND STEEL CONTAINER PROPRIETARY INFORMATION
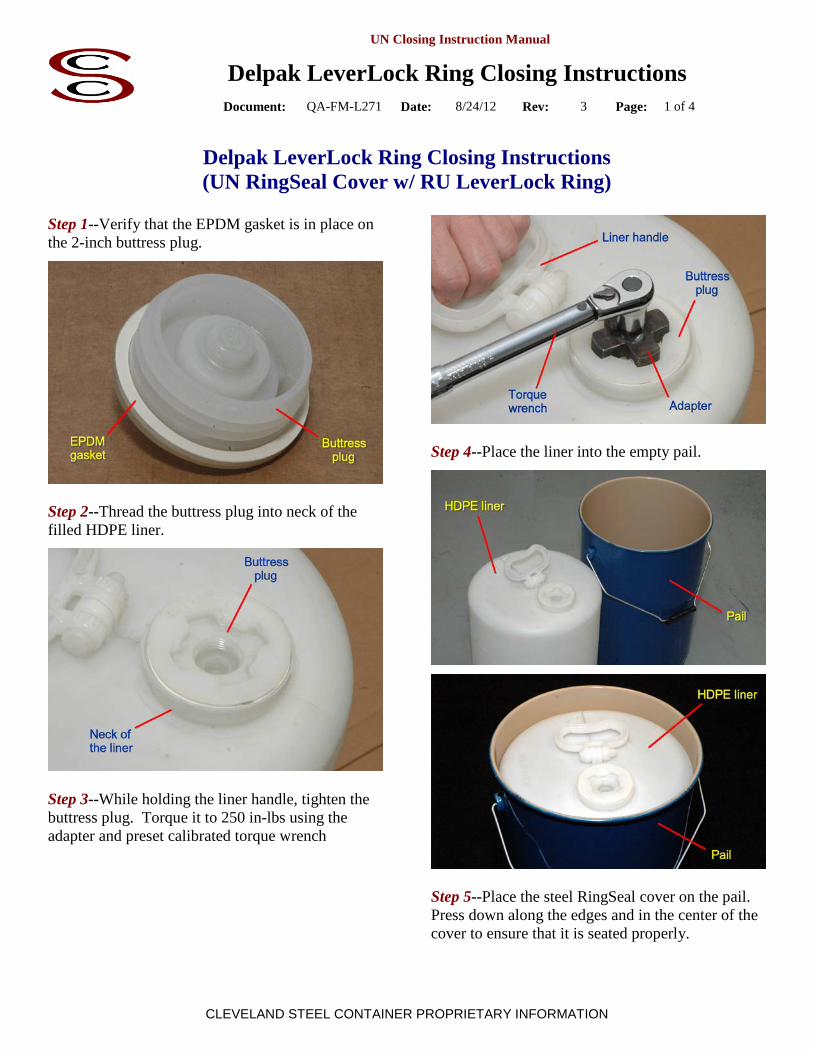
Delpak LeverLock Ring Closing Instructions (UN RingSeal Cover w/ RU LeverLock Ring)
Step 1--Verify that the EPDM gasket is in place on the 2-inch buttress plug.
Step 2--Thread the buttress plug into neck of the filled HDPE liner.
Step 3--While holding the liner handle, tighten the buttress plug. Torque it to 250 in-lbs using the adapter and preset calibrated torque wrench
Step 4--Place the liner into the empty pail.
Step 5--Place the steel RingSeal cover on the pail. Press down along the edges and in the center of the cover to ensure that it is seated properly.

UN Closing Instruction Manual
Delpak LeverLock Ring Closing Instructions
Document: QA-FM-L271 Date: 8/24/12 Rev: 3 Page: 2 of 4
CLEVELAND STEEL CONTAINER PROPRIETARY INFORMATION
Step 6--Before placing the leverlock ring on the pail, it must be oriented correctly. There is an Up indicator w/ an arrow stamped into the base of the handle. Orient the ring w/ the arrow pointing up.
Step 7--Open the leverlock ring as wide as possible, then slip it over the pail. Be sure that the ring is placed on the pail in a manner that allows it to be closed by moving the lever clockwise onto the ring.
Step 8--Orient the lever on the ring to be opposite of the seam weld (180 degrees from the seam weld). Step 9--Apply downward pressure to the cover and release the lever, allowing the ring to slide onto the cover/curl edge.
Note: The ring must encompass the cover/curl around the entire edge of the pail
UN Closing Instruction Manual
Delpak LeverLock Ring Closing Instructions
Document: QA-FM-L271 Date: 8/24/12 Rev: 3 Page: 3 of 4
CLEVELAND STEEL CONTAINER PROPRIETARY INFORMATION
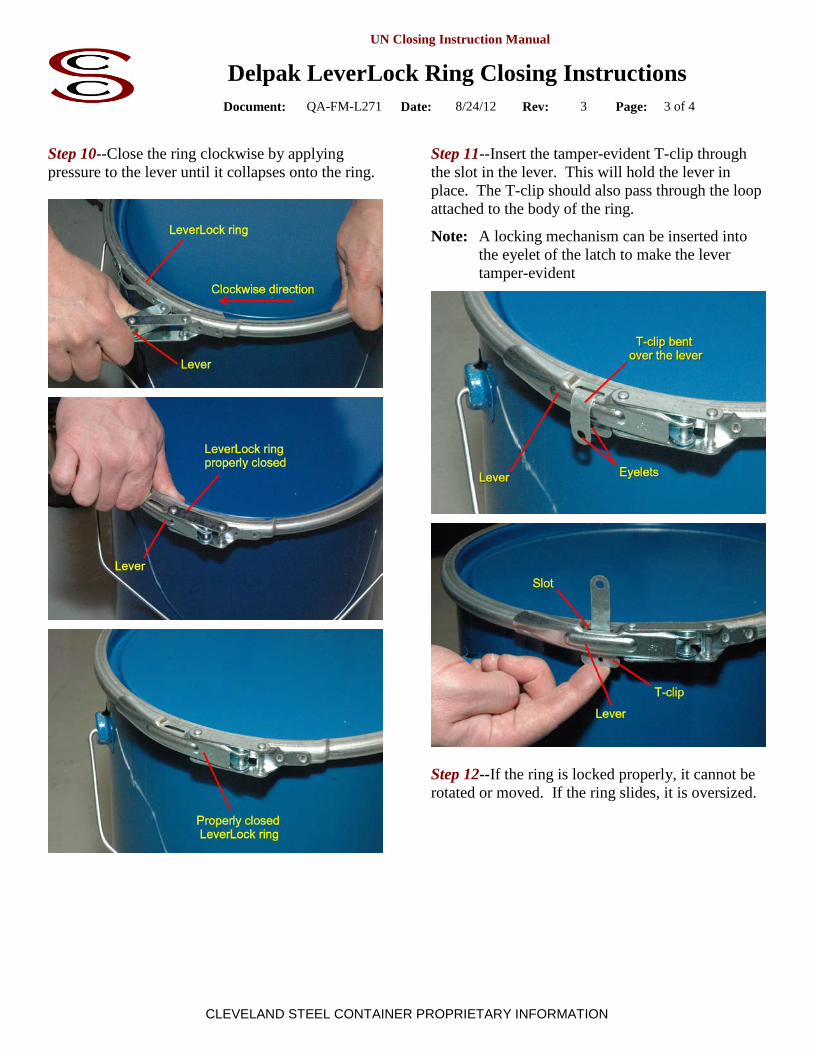
Step 10--Close the ring clockwise by applying pressure to the lever until it collapses onto the ring.
Step 11--Insert the tamper-evident T-clip through the slot in the lever. This will hold the lever in place. The T-clip should also pass through the loop attached to the body of the ring.
Note: A locking mechanism can be inserted into the eyelet of the latch to make the lever tamper-evident
Step 12--If the ring is locked properly, it cannot be rotated or moved. If the ring slides, it is oversized.

UN Closing Instruction Manual
Delpak LeverLock Ring Closing Instructions
Document: QA-FM-L271 Date: 8/24/12 Rev: 3 Page: 4 of 4
CLEVELAND STEEL CONTAINER PROPRIETARY INFORMATION
LeverLock Ring
UN RingSeal Cover
HDPE Liner
EPDM Gasket
2" Buttress Plug
Pail

UN Closing Instruction Manual
Delpak Bolt Ring Closing Instructions
Document: QA-FM-L272 Date: 2/7/12 Rev: 3 Page: 1 of 3
CLEVELAND STEEL CONTAINER PROPRIETARY INFORMATION
Delpak Bolt Ring Closing Instructions (UN RingSeal Cover w/ R5 Bolt Ring)
Step 1--Verify that the EDPM gasket is in place on the 2-inch buttress plug.
Step 2--Thread the buttress plug into the neck of the filled HDPE liner.
Step 3--While holding the liner handle, tighten the buttress plug. Torque it to 250 in-lbs using the adapter and preset calibrated torque wrench.
Step 4--Place the liner into the empty pail.
Step 5--Place the UN RingSeal cover on the pail. Press down along the edges and in the center of the cover to ensure that it is seated properly.

UN Closing Instruction Manual
Delpak Bolt Ring Closing Instructions
Document: QA-FM-L272 Date: 2/7/12 Rev: 3 Page: 2 of 3
CLEVELAND STEEL CONTAINER PROPRIETARY INFORMATION
Step 5--Position the R5 bolt ring around the top of the pail. Start at one end of the bolt ring and work it around the entire perimeter of the cover/curl edge of the pail.
Note: Applying downward pressure on the cover while fitting the bolt ring to the pail will make this task easier
Step 6-To properly close the pail, the bolt ring should cover the lip of the cover and the curl of the pail. Also, the ring eyes must positioned down, below the curl of the pail.
Step 7--Orient the bolt ring eyes opposite, or 180°, from the seam weld. Step 8--Using both hands, squeeze the bolt ring eyes together. Slide the 1/4" bolt through the eyes.
Step 9--Thread the nut onto the 1/4" bolt. Tighten the nut and torque it to 50 in-lbs.
UN Closing Instruction Manual
Delpak Bolt Ring Closing Instructions
Document: QA-FM-L272 Date: 2/7/12 Rev: 3 Page: 3 of 3
CLEVELAND STEEL CONTAINER PROPRIETARY INFORMATION
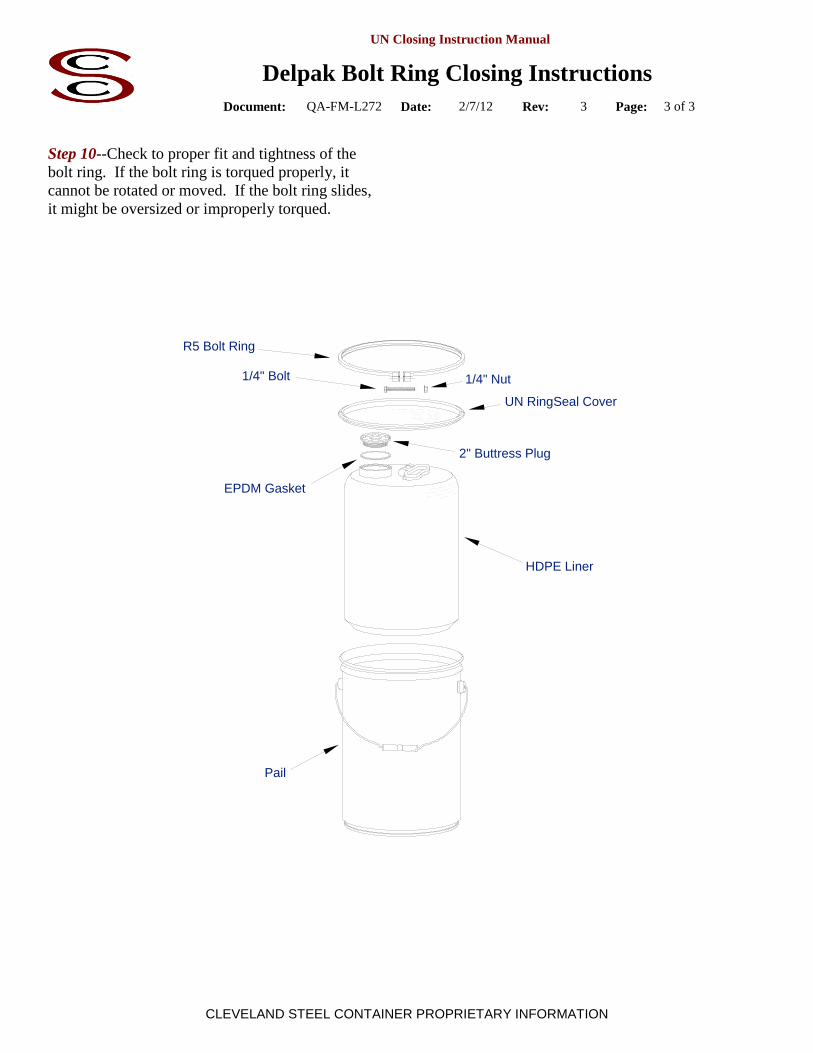
Step 10--Check to proper fit and tightness of the bolt ring. If the bolt ring is torqued properly, it cannot be rotated or moved. If the bolt ring slides, it might be oversized or improperly torqued.
R5 Bolt Ring
1/4" Nut
UN RingSeal Cover
1/4" Bolt
HDPE Liner
EPDM Gasket
2" Buttress Plug
Pail

UN Closing Instruction Manual
Pail Liner Closing Instructions
Document: QA-FM-L273 Date: 8/25/12 Rev: 2 Page: 1 of 4
CLEVELAND STEEL CONTAINER PROPRIETARY INFORMATION
Pail Liner Closing Instructions (UN Lug Cover)
Step 1--Place the pail liner into the empty pail.
Step 2--Using your hands, push the pail liner against the wall of the pail
Step 3--Fill the pail liner/pail with the designated material.
Step 4--Place the polyethylene, or compatible, sheet liner over the opening of the pail, if desired. Be sure to center the sheet liner in order to cover the entire opening.
Note: Using the polyethylene sheet liner will make the package ineligible for air transport due to performance limitations on the hydrostatic pressure test
UN Closing Instruction Manual
Pail Liner Closing Instructions
Document: QA-FM-L273 Date: 8/25/12 Rev: 2 Page: 2 of 4
CLEVELAND STEEL CONTAINER PROPRIETARY INFORMATION
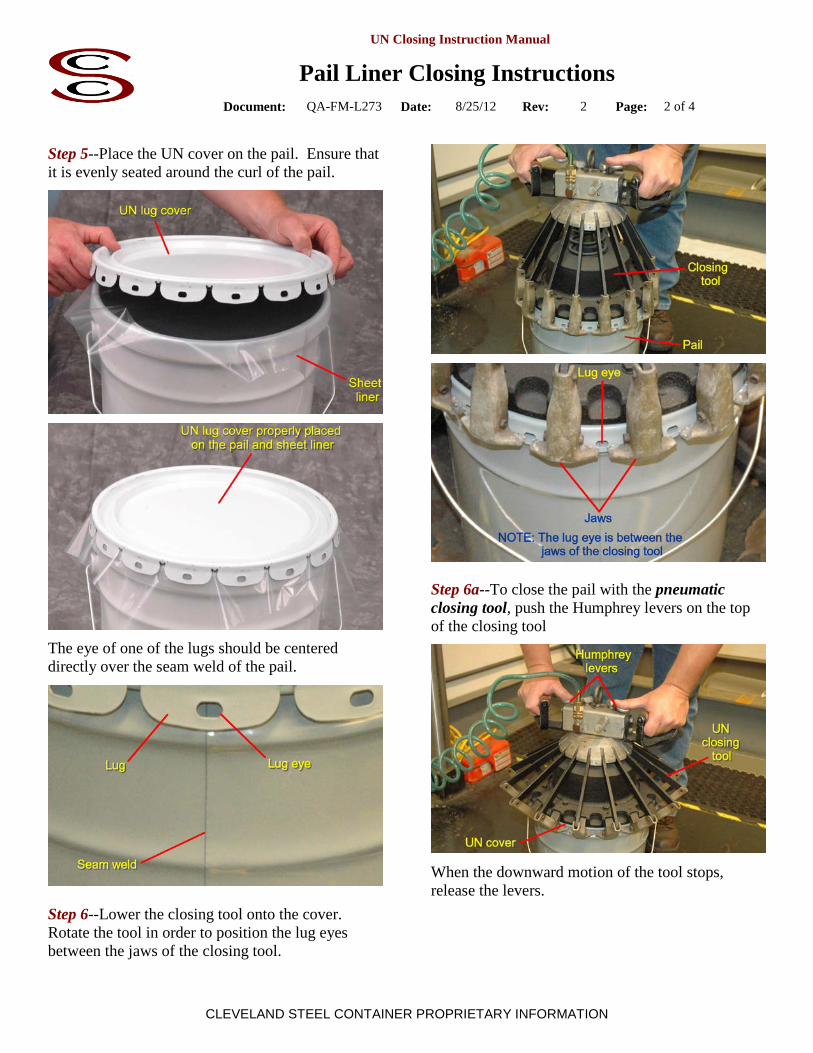
Step 5--Place the UN cover on the pail. Ensure that it is evenly seated around the curl of the pail.
The eye of one of the lugs should be centered directly over the seam weld of the pail.
Step 6--Lower the closing tool onto the cover. Rotate the tool in order to position the lug eyes between the jaws of the closing tool.
Step 6a--To close the pail with the pneumatic closing tool, push the Humphrey levers on the top of the closing tool
When the downward motion of the tool stops, release the levers.
UN Closing Instruction Manual
Pail Liner Closing Instructions
Document: QA-FM-L273 Date: 8/25/12 Rev: 2 Page: 3 of 4
CLEVELAND STEEL CONTAINER PROPRIETARY INFORMATION
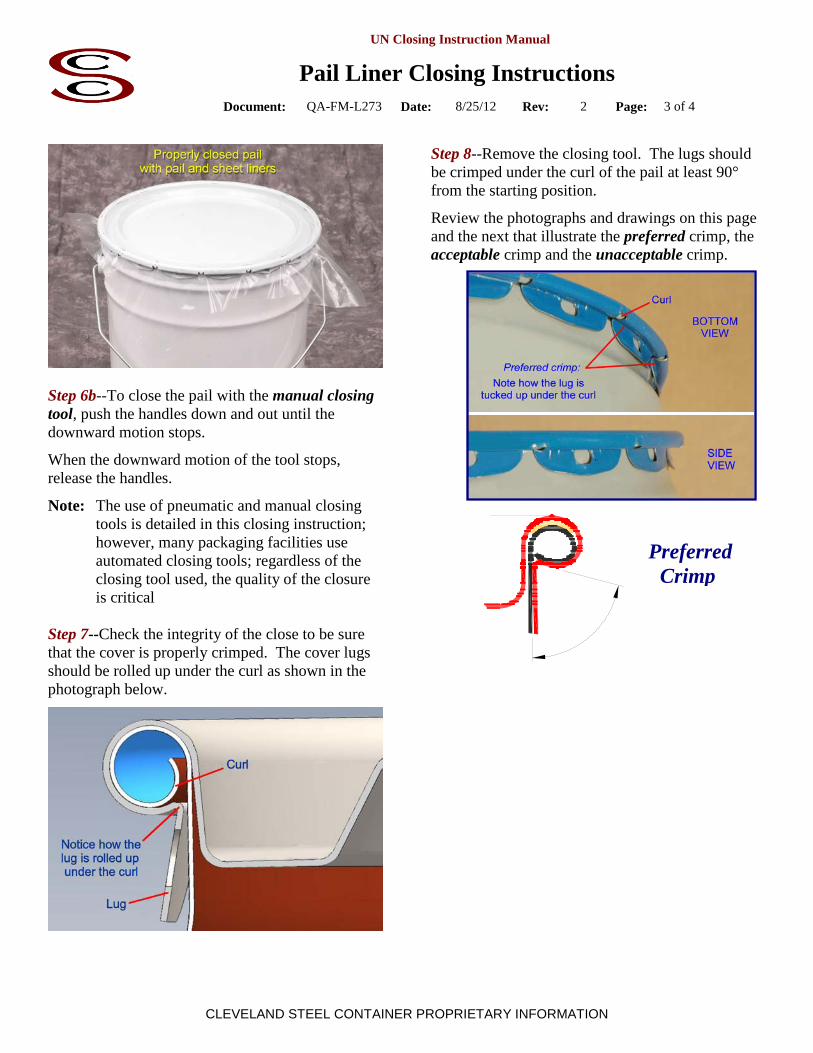
Step 6b--To close the pail with the manual closing tool, push the handles down and out until the downward motion stops.
When the downward motion of the tool stops, release the handles.
Note: The use of pneumatic and manual closing tools is detailed in this closing instruction; however, many packaging facilities use automated closing tools; regardless of the closing tool used, the quality of the closure is critical Step 7--Check the integrity of the close to be sure that the cover is properly crimped. The cover lugs should be rolled up under the curl as shown in the photograph below.
Step 8--Remove the closing tool. The lugs should be crimped under the curl of the pail at least 90° from the starting position.
Review the photographs and drawings on this page and the next that illustrate the preferred crimp, the acceptable crimp and the unacceptable crimp.
Preferred Crimp

UN Closing Instruction Manual
Pail Liner Closing Instructions
Document: QA-FM-L273 Date: 8/25/12 Rev: 2 Page: 4 of 4
CLEVELAND STEEL CONTAINER PROPRIETARY INFORMATION
Pail(Typical)
UNLug Cover
Sheet Liner (optional)
Pail Liner
Acceptable Crimp
Unacceptable Crimp
UN Closing Instruction Manual
Stolz HZ60 Screw Cap Closing Instructions
Document: QA-FM-L274 Date: 11/1/12 Rev: 1 Page: 1 of 1
CLEVELAND STEEL CONTAINER PROPRIETARY INFORMATION
Stolz HZ60 Screw Cap Closing Instructions
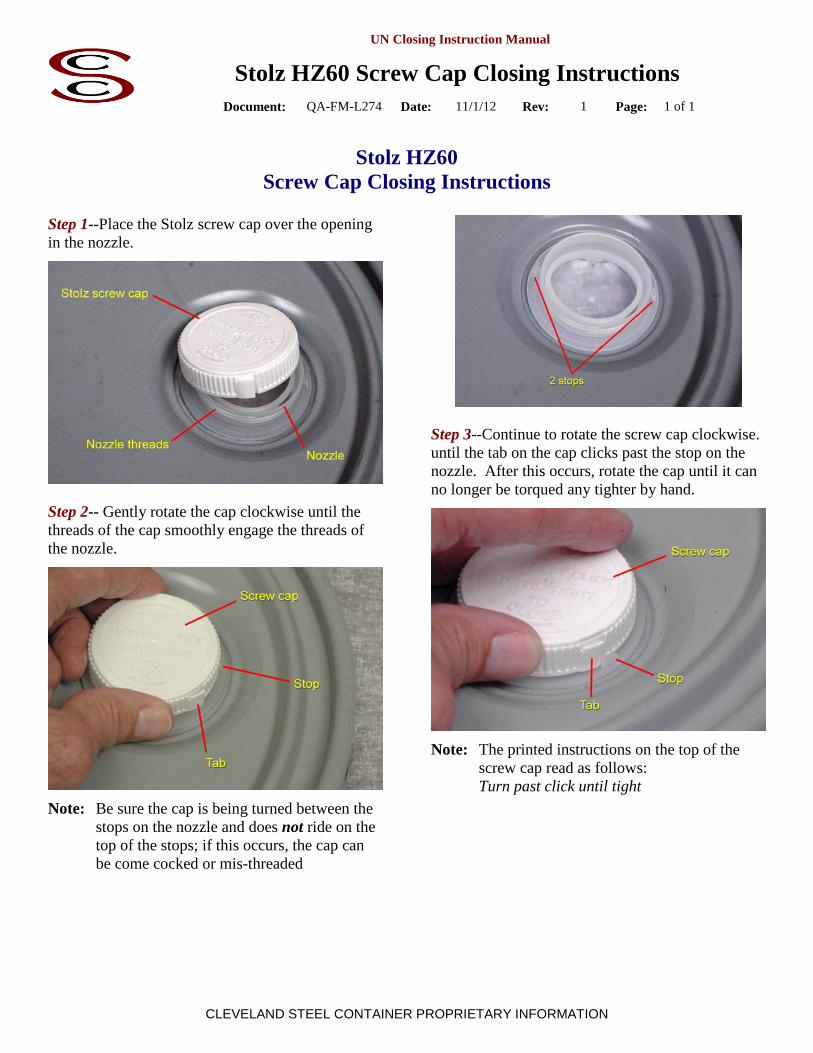
Step 1--Place the Stolz screw cap over the opening in the nozzle.
Step 2-- Gently rotate the cap clockwise until the threads of the cap smoothly engage the threads of the nozzle.
Note: Be sure the cap is being turned between the stops on the nozzle and does not ride on the top of the stops; if this occurs, the cap can be come cocked or mis-threaded
Step 3--Continue to rotate the screw cap clockwise. until the tab on the cap clicks past the stop on the nozzle. After this occurs, rotate the cap until it can no longer be torqued any tighter by hand.
Note: The printed instructions on the top of the screw cap read as follows: Turn past click until tight
UN Closing Instruction Manual
OFFKO (RU-1) LeverLock Ring Closing Instructions
Document: QA-FM-L275 Date: 4/25/13 Rev: 1 Page: 1 of 2
CLEVELAND STEEL CONTAINER PROPRIETARY INFORMATION
Proper Application of the OFFKO (RU-1) LeverLock Ring
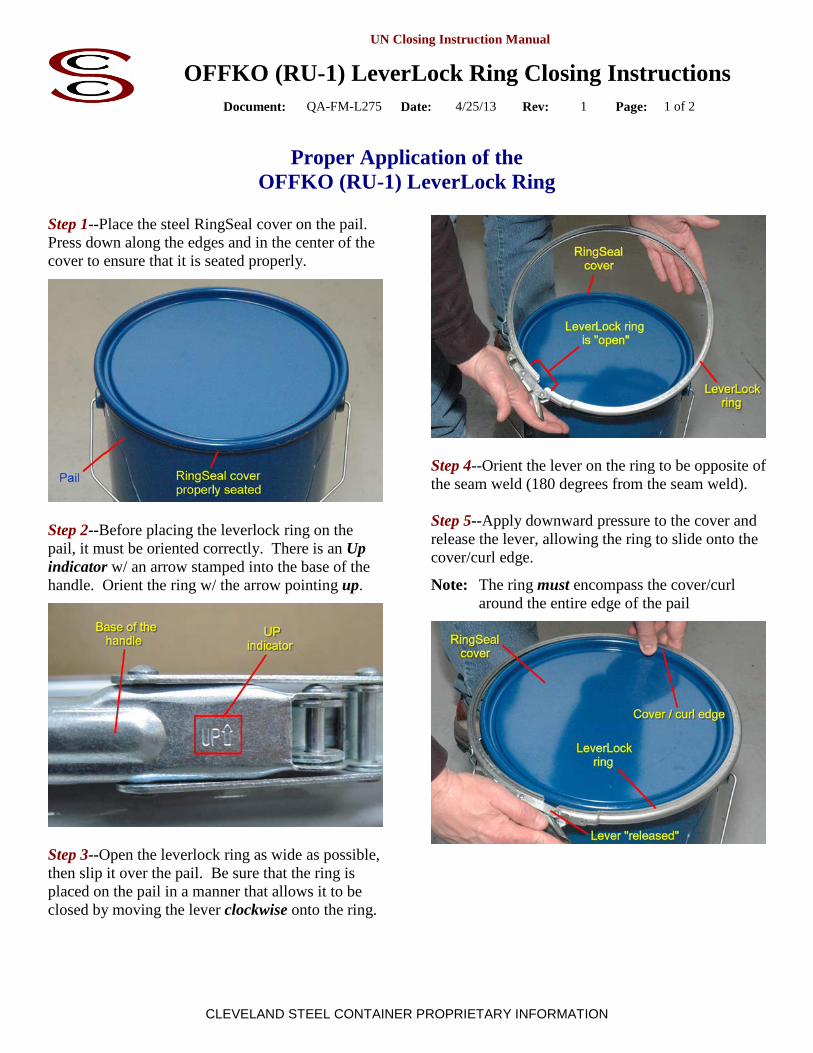
Step 1--Place the steel RingSeal cover on the pail. Press down along the edges and in the center of the cover to ensure that it is seated properly.
Step 2--Before placing the leverlock ring on the pail, it must be oriented correctly. There is an Up indicator w/ an arrow stamped into the base of the handle. Orient the ring w/ the arrow pointing up.
Step 3--Open the leverlock ring as wide as possible, then slip it over the pail. Be sure that the ring is placed on the pail in a manner that allows it to be closed by moving the lever clockwise onto the ring.
Step 4--Orient the lever on the ring to be opposite of the seam weld (180 degrees from the seam weld). Step 5--Apply downward pressure to the cover and release the lever, allowing the ring to slide onto the cover/curl edge.
Note: The ring must encompass the cover/curl around the entire edge of the pail
UN Closing Instruction Manual
OFFKO (RU-1) LeverLock Ring Closing Instructions
Document: QA-FM-L275 Date: 4/25/13 Rev: 1 Page: 2 of 2
CLEVELAND STEEL CONTAINER PROPRIETARY INFORMATION
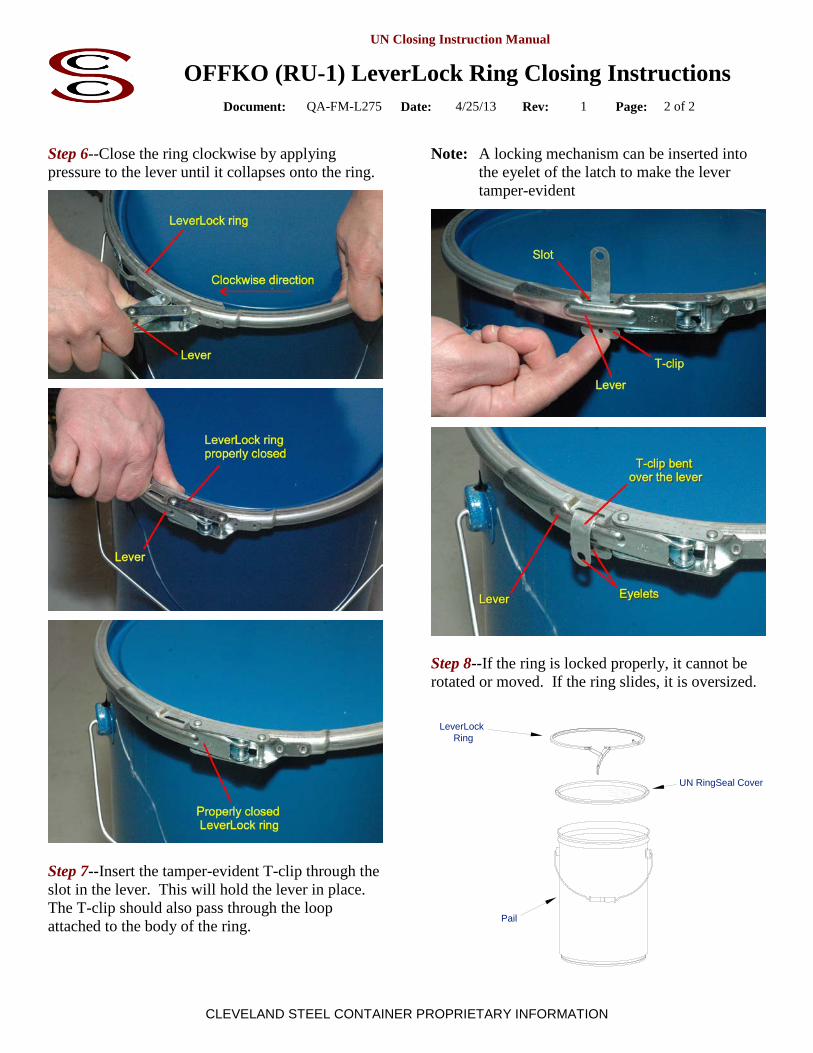
Step 6--Close the ring clockwise by applying pressure to the lever until it collapses onto the ring.
Step 7--Insert the tamper-evident T-clip through the slot in the lever. This will hold the lever in place. The T-clip should also pass through the loop attached to the body of the ring.
Note: A locking mechanism can be inserted into the eyelet of the latch to make the lever tamper-evident
Step 8--If the ring is locked properly, it cannot be rotated or moved. If the ring slides, it is oversized.
LeverLock Ring
UN RingSeal Cover
Pail
Top Related