


Languages
Pages
Legal


721-1001-000 Rev AF August 2015
VIEW Certified Configuration Guide
Cisco Systems Inc. 2100/2500/4400/5500/7500/8500 Series WLC (Wireless LAN Controller),
WiSM (Wireless Services Module), WiSM2, WLC Module, WLC SW for SRE, 3750G
Integrated WLC, and Virtual Controller
with 60x, AP801, AP802, 104x, 113x, 114x, 1121, 122x, 123x, 124x, 125x, 126x,
13xx, 152x, 155x, 160x, 170x, 260x, 270x, 350x, 360x, 370x APs

Spectralink VIEW Certified Configuration Guide: Cisco Controllers and APs
721-1001-AF.docx August 2015 2
Copyright Notice
© 2009-2015 Spectralink Corporation All rights reserved. SpectralinkTM, the Spectralink logo and the
names and marks associated with Spectralink’s products are trademarks and/or service marks of
Spectralink Corporation and are common law marks in the United States and various other countries. All
other trademarks are property of their respective owners. No portion hereof may be reproduced or
transmitted in any form or by any means, for any purpose other than the recipient’s personal use, without
the express written permission of Spectralink.
All rights reserved under the International and pan-American Copyright Conventions. No part of this
manual, or the software described herein, may be reproduced or transmitted in any form or by any
means, or translated into another language or format, in whole or in part, without the express written
permission of Spectralink Corporation.
Do not remove (or allow any third party to remove) any product identification, copyright or other notices.
Notice
Spectralink Corporation has prepared this document for use by Spectralink personnel and customers.
The drawings and specifications contained herein are the property of Spectralink and shall be neither
reproduced in whole or in part without the prior written approval of Spectralink, nor be implied to grant any
license to make, use, or sell equipment manufactured in accordance herewith.
Spectralink reserves the right to make changes in specifications and other information contained in this
document without prior notice, and the reader should in all cases consult Spectralink to determine
whether any such changes have been made.
NO REPRESENTATION OR OTHER AFFIRMATION OF FACT CONTAINED IN THIS DOCUMENT
INCLUDING BUT NOT LIMITED TO STATEMENTS REGARDING CAPACITY, RESPONSE-TIME
PERFORMANCE, SUITABILITY FOR USE, OR PERFORMANCE OF PRODUCTS DESCRIBED
HEREIN SHALL BE DEEMED TO BE A WARRANTY BY SPECTRALINK FOR ANY PURPOSE, OR
GIVE RISE TO ANY LIABILITY OF SPECTRALINK WHATSOEVER.
Contact Information
US Location European Location
800-775-5330 +45 7560 2850
Spectralink Corporation Spectralink Europe ApS
2560 55th Street Langmarksvej 34
Boulder, CO 80301 8700 Horsens, Denmark

Spectralink VIEW Certified Configuration Guide: Cisco Controllers and APs
721-1001-AF.docx August 2015 3
Contents
Introduction ...................................................................... 5
Certified Product Summary .............................................................................................. 5
Known Limitations ............................................................................................................ 6
Spectralink References .................................................................................................... 7
Support Documents ..................................................................................................... 8
White Papers ............................................................................................................... 8
Product Support ............................................................................................................... 9
Chapter 1: Configuration for Wi-Fi Standard QoS or CCXv4
Operation ........................................................................ 10
Overview ...........................................................................................................................10
Network Topology............................................................................................................11
Configuring a New Controller Starting from Factory Defaults ......................................12
Connecting to the Controller Via a Browser ..................................................................12
Installing Software ...........................................................................................................13
Controller Setup ...............................................................................................................14
Connecting APs ...............................................................................................................17
Defining a RADIUS Server ...............................................................................................19
AP Configuration .............................................................................................................22
Configuration for use with 2.4 GHz radio .....................................................................23
Configuring 802.11n for 2.4 GHz .................................................................................31
Configuration for use with 5 GHz radio ........................................................................32
Configuring 802.11n for 5 GHz ....................................................................................39
Setting up the SSID ..........................................................................................................42
Setting up the EDCA parameters profile ........................................................................50
Configuration for handsets running in 802.11a mode mode in 8020/8030 handsets or 5
GHz in 84-Series handsets .........................................................................................50
Configuration for handsets running in 802.11b/g mode, 802.11b and b/g mixed mode,
or 802.11 g only mode in 8020/8030 handsets or 2.4 GHz in 84-Series handsets .......50
Chapter 2: Configuration for SVP Operation ............................ 51
Introduction ......................................................................................................................51
Network Topology............................................................................................................51
Configuring a New Controller Starting from Factory Defaults ......................................52
Connecting to the Controller Via a Browser ..................................................................52
Installing Software ...........................................................................................................53
Controller Setup ...............................................................................................................55
Connecting APs ...............................................................................................................58

Spectralink VIEW Certified Configuration Guide: Cisco Controllers and APs
721-1001-AF.docx August 2015 4
Defining a RADIUS Server ...............................................................................................60
AP Configuration .............................................................................................................62
Configuration for handsets running in 802.11b & b/g mixed and g only mode .............63
Configuring 802.11n for 2.4 GHz .................................................................................67
Configuration for handsets running in 802.11a mode ..................................................69
Configuring 802.11n for 5 GHz: ...................................................................................73
Setting up the SSID ..........................................................................................................76
Setting up the EDCA parameters profile ........................................................................84
Configuration for handsets running in 802.11a mode mode in 8020/8030 handsets ....84
Configuration for handsets running in 802.11b/g mode, 802.11b and b/g mixed mode,
or 802.11 g only mode in 8020/8030 handsets ............................................................84

721-1001-AF.docx August 2015 5
Introduction
Spectralink’s Voice Interoperability for Enterprise Wireless (VIEW) Certification Program is
designed to ensure interoperability and high performance between PIVOT™ by Spectralink®
(87-Series), 84-Series, and 8020/8030 Wireless Telephones and WLAN infrastructure products.
The products listed below have been tested in Spectralink’s lab and have passed VIEW
Certification.
Certified Product Summary Manufacturer: Cisco Systems Inc.: www.cisco.com
Certified products: Controllers: 2100, 2500, 4400, 5500 Series WLC (Wireless LAN Controller) 3750G Integrated WLC, WLC Module, WiSM (Wireless Services Module), WiSM2, Virtual Controller
APs: 60x AP801 AP802 104x 1121 113x 114x
122x 123x 124x 125x 126x 13xx 155x 160x
170x 260x 270x 350x 360x 370x
AP Radio(s): 2.4 GHz (802.11b/g/n), 5 GHz (802.11a/n/ac)
Security: None, WEP, WPA-PSK, WPA2-PSK, WPA2-Enterprise (EAP-FAST and PEAPv0/MSCHAPv2) with CCKM (Cisco Centralized Key Management)** and OKC
QoS: Wi-Fi Standard for Spectralink PIVOT, 8440/8441/8450/8452/8453,8020/8030 SVP for Spectralink 8020/8030
Network topology: Switched Ethernet (recommended)
AP and WLC software versions approved:
7.0.250.0 for 60x, AP801, AP802, 104x, 1121, 113x, 114x, 122x, 123x, 124x, 125x, 126x, 13xx, 155x and 350x Aps with 2100, 2500, 4400, 3750G, 5500, 7500, WLC SW for SRE, WiSM, WiSM2 7.4.121.0 for 60x, 70x, AP801, AP802, 104x, 113x, 114x, 124x, 125x, 126x, 155x, 160x, 260x, 350x, and 360x with 2500, 5500, 7500, 8500, WiSM2, WLC SW for SRE, Virtual Controller 7.6.130.0 for 60x, 70x, AP801, AP802, 104x, 113x, 114x, 124x, 125x, 126x, 155x, 160x, 260x, 270x, 350x, 360x, and 370x with 2500, 5500, 7500, 8500, WiSM2, WLC SW for SRE, Virtual Controller 8.0.115.0 for 170x, 370x with 2500, 5500, 7500, 8500, WiSM2, WLC SW for SRE or UCS-E, Virtual Controller 8.1.102.0 for 260x, 370x with 2500, 5500, 7500, 8500, WiSM2, WLC SW for SRE or UCS-E, Virtual Controller

Spectralink VIEW Certified Configuration Guide: Cisco Controllers and APs
721-1001-AF.docx August 2015 6
Handset* models tested: PIVOT
Handset radio mode: 802.11b 802.11b/g 802.11bgn 802.11a & 802.11an
Meets VIEW minimum call capacity per AP:
8 calls 8 calls 8 calls 10 calls
Handset models tested: Spectralink 8440/8441/8450/8452/8453 Wireless Telephone
Handset radio mode: 802.11b 802.11b/g 802.11bgn 802.11a & 802.11an
Meets VIEW minimum call capacity per AP:
8 calls 8 calls 8 calls 10 calls
Handset models tested: Spectralink 8020/8030 Wireless Telephone
Handset radio mode: 802.11b & b/g mixed. 802.11 g only 802.11a
Meets VIEW minimum call capacity per AP:
6 (Wi-Fi Standard QoS)** 8 calls (SVP)
8 (Wi-Fi Standard QoS) ** 12 calls (SVP)
*Spectralink handset models and their OEM derivatives are verified compatible with the WLAN hardware
and software identified in the table. Throughout the remainder of this document they will be referred to
collectively as “Spectralink Wireless Telephones”, “phones” or “handsets”. The 8440, 8441 (8440 with
personal alarm hardware), 8450 (with 1D bar code reader), 8452 (with 1D and 2D bar code reader), and
8453 (8452 with personal alarm hardware) handsets will be referred to collectively as the 84-Series
handsets. All PIVOT models will be referred to collectively as PIVOT handsets.
** Only Release 3.0 capable Spectralink 8020/8030 handsets support WPA2-Enterprise, Wi-Fi Standard
QoS, and CCXv4 (Cisco Compatible Extensions). Release 3.0 capable handset types connect to PBX’s
that support IP telephony. Release 3.0 capabilities are not available for Spectralink 8020/8030 handsets
connecting to PBXs using the TDM protocol through a Spectralink Telephony Gateway (handset type 30
on the 8020/8030).
Known Limitations
Heavy multicast, broadcast or push-to-talk (PTT) traffic may impair voice quality on 7.0
versions.
Heavy ftp traffic may impair PTT traffic.
Fast Transition Roaming (802.11r) is not supported by the handsets
Multicast by VLAN is not compatible with the PTT feature in the handsets.
When using 7.0 versions, 5 GHz radio, 1142 AP’s, and 80xx handsets, the use of
multiple antennas must be disabled on the AP’s.

Spectralink VIEW Certified Configuration Guide: Cisco Controllers and APs
721-1001-AF.docx August 2015 7
When using 1142 AP’s, A-MPDU aggregation must be disabled for a WLAN containing
any 1142’s if 11n is enabled on the network.
A-MSDU aggregation must be disabled if 11n is enabled on the AP.
In the controller software versions considered in this document, there is an issue related
to band steering that can cause slow roaming on the 2.4 GHz band in the 84-Series and
PIVOT handsets when both radios are active in the handset.
In the WMM/QoS mode, it is important to use the Static CAC Method rather than the
Load Based CAC Method.
DTPC (Dynamic Transmit Power Control) and the Auto setting on the 84-series are
recommended for best range performance. PIVOT uses Auto mode exclusively.
For best operation, the RRM/Tx Power Control (TPC) should be set to Fixed on On
Demand (during a low usage period) and the RRM/DCA Algorithm should be set to
Freeze or OFF. The White Paper: Best Practices Guide to Deploying Spectralink 84-
Series Handsets has more information about cell design. The handsets are not
incompatible with these features, but if used frequently, they will cause long roams and
asymmetric coverage regions that will result in choppy calls during caller movement.
Spectralink References
All Spectralink support documents are available at http://support.spectralink.com.

Spectralink VIEW Certified Configuration Guide: Cisco Controllers and APs
721-1001-AF.docx August 2015 8
To go to a specific product page:
Select the Product Category and Product Type from the dropdown lists and then select the
product from the next page. All resources for that particular product are displayed by default
under the All tab. Documents, downloads and other resources are sorted by the date they were
created so the most recently created resource is at the top of the list. You can further sort the
list by the tabs across the top of the list to find exactly what you are looking for. Click the title to
open the link.
Support Documents
PIVOT by Spectralink Configuration Guide The PIVOT Configuration Guide provides detailed
information about PIVOT menu items that have been developed specifically for the PIVOT
handset.
Spectralink 87-Series Wireless Telephone Deployment Guide The Deployment Guide provides
sequential information for provisioning and deploying the handsets. It covers deployment using
the SLIC tool and CMS as well as manual deployment.
The Spectralink 84-Series Wireless Telephone Administration Guide provides a comprehensive
list of every parameter available on Spectralink 84-Series Wireless Telephones.
The Spectralink 84-Series Deployment Guide is your essential reference for provisioning and
deploying Spectralink 84-Series handsets in any environment.
The Web Configuration Utility User Guide explains how to use a web browser to configure the
Spectralink 84-Series handsets on a per handset basis.
The Spectralink 8020/8030 Wireless Telephone Handset Administration Tool document explains
how to use a software interface to configure the handsets.
Best Practices for Deploying Spectralink 87-Series PIVOT Handsets provides detailed
information on wireless LAN layout, network infrastructure, QoS, security and subnets.
White Papers
Spectralink White Papers are available at http://www.spectralink.com/resources/white-papers.
For the Spectralink 84-Series Wireless Telephones, please refer to Best Practices Guide for
Deploying Spectralink 84-Series Handsets for detailed information on wireless LAN layout,
network infrastructure, QoS, security and subnets.
For additional details on RF deployment please see The challenges of ensuring excellent voice
quality in a Wi-Fi workplace and Deploying Enterprise-Grade Wi-Fi Telephony.
These White Papers identify issues and solutions based on Spectralink’s extensive experience
in enterprise-class Wi-Fi telephony. It provides recommendations for ensuring that a network
environment is adequately optimized for use with Spectralink Wireless Telephones.

Spectralink VIEW Certified Configuration Guide: Cisco Controllers and APs
721-1001-AF.docx August 2015 9
Product Support
Note: Converting autonomous APs to Lightweight mode
This document does not cover the steps involved in converting autonomous APs to
Lightweight mode such that they can be controlled by the Cisco WLCs.
Please contact Cisco's Customer Support at www.cisco.com for instructions on this
procedure. Once the APs are converted, this document can be used to provision APs.
Note: RADIUS server configuration
This document does not cover the steps involved to configure a RADIUS server required for
using WPA2-Enterprise or Cisco FSR security types.
Installation and configuration guides for Cisco Wireless LAN Controllers can be found on
Cisco’s website.
To convert Autonomous APs to Lightweight mode, go to:
http://www.cisco.com/en/US/docs/wireless/access_point/conversion/lwapp/upgrade/guid
e/lwapnote.html
For other assistance, contact either Cisco’s or Spectralink’s customer service at:
www.cisco.com or www.Spectralink.com

721-1001-AF.docx August 2015 10
Chapter 1: Configuration for Wi-Fi
Standard QoS or CCXv4 Operation
Overview
Spectralink 8020/8030 handsets can be configured with Wi-Fi Standard QoS from the WLAN
Settings menu using either the Custom or CCX selection.
If the Custom menu is selected, QoS Wi-Fi Standard is selected from the QoS submenu.
If the CCX menu is selected from the WLAN Settings menu, Wi-Fi Standard QoS is used
automatically without any further menu selections.
Spectralink 84-Series and PIVOT handsets only support Wi-Fi Standard QoS. The handsets
are compatible with both networks configured with CCX (Cisco Compatible Extensions) and
networks that are not configured with CCX, but they have not been CCX certified.

Spectralink VIEW Certified Configuration Guide: Cisco Controllers and APs
721-1001-AF.docx August 2015 11
Network Topology
Note: Example configuration shown
This is a modified diagram and not all components are shown for every system type.

Spectralink VIEW Certified Configuration Guide: Cisco Controllers and APs
721-1001-AF.docx August 2015 12
Configuring a New Controller Starting from Factory
Defaults
Initial provisioning of the controller is done via the command line interface (CLI).
1 Connect a null modem serial cable between the console port of the controller and the
serial port of a PC.
2 Open a terminal program, such as Hyper Terminal, and configure the port settings to
9600 baud, no parity, 8 data bits and 1 stop bit.
3 Power-on the controller. Status of the controller’s boot process will appear as the
controller is powering up. Once the controller is running, it will prompt you to run the
Startup Wizard.
4 The Startup Wizard provides for an easy means to perform initial controller setup and
provisioning. Refer to the Installation and Startup Guide for the Cisco 5500 Series WLC,
or other appropriate controller, found at Cisco’s website. This document contains a
detailed explanation of using the Startup Wizard for the 5500:
http://www.cisco.com/en/US/docs/wireless/controller/5500/install/guide/ctrl5500.htmlOnc
e the controller has been configured via the Startup Wizard, the remaining configuration
can be configured through the switch-web interface using a Web browser (Cisco
recommends using MS IE 6.0+).
5 If necessary, the controller can be reset to factory defaults. To reset the WLC to factory
default, you must reboot, then type Recover-config at the CLI. This only works before the
first time a user logs in via the console.
A few advanced commands must be set from the command line interface after the rest of the
controller has been configured. These are noted in the instructions below.
Connecting to the Controller Via a Browser
1 Connect to the WLC by pointing your internet browser to the URL: https<IP_Addr>
(where <IP_Addr> is the IP address of the management interface of the WLC).
2 Click the Login prompt. The default User Name and Password is admin.
Once logged in properly, a page similar to the one below displays on version 8.1. All
other version go directly to the screen in step 4.
3 Click the Advanced button on the 8.1 screen.

Spectralink VIEW Certified Configuration Guide: Cisco Controllers and APs
721-1001-AF.docx August 2015 13
4 The Summary screen displays.
Installing Software
1 To check the installed version of software, listed in the Product Summary, click Monitor
from the main menu.

Spectralink VIEW Certified Configuration Guide: Cisco Controllers and APs
721-1001-AF.docx August 2015 14
2 In the navigation pane, click Summary. The heading labeled Software Version shows the
current software version.
3 Download the appropriate software for your model of controller from the Cisco website.
4 Set up a Trivial File Transfer Protocol (TFTP) server running on a PC to download the
file to the controller.
5 From the main menu, click Commands.
6 In the navigation pane, click Download File.
7 Fill in the download parameters:
a For File Type, select Code.
b For TFTP Server, type in the IP Address of the TFTP server.
c Add the File Path (this is the path in the TFTP server’s root directory and not the
system path where the TFTP server is located) and File Name of the firmware file to
download.
Note
The example simply uses the /designator for the root TFTP directory.
8 Point the TFTP server to the code.
9 Click Download and allow a few minutes for the download to complete.
10 Reboot the Controller.
Controller Setup
The initial setup of the controller is shown below.
Note: Example only
The setup instructions outlined in this document are for the configuration shown in the
diagram only. Your configuration may differ, and the appropriate adjustments must be
made.

Spectralink VIEW Certified Configuration Guide: Cisco Controllers and APs
721-1001-AF.docx August 2015 15
Note: The WLC will provision the APs
It is not necessary to configure each AP individually. The WLC is capable of provisioning
the APs.
1 From the main menu, click Controller.
2 Set the AP Multicast Mode to Multicast and enter a multicast IP address that is currently
not being used on your network for the Multicast Group Address.
3 Click the Apply button.
Cisco 7.0:

Spectralink VIEW Certified Configuration Guide: Cisco Controllers and APs
721-1001-AF.docx August 2015 16
Cisco 8.1
Other versions:
4 Click Multicast from the options on the left side of the screen
5 Select Enable Global Multicast Mode checkbox
6 Click the Apply button.

Spectralink VIEW Certified Configuration Guide: Cisco Controllers and APs
721-1001-AF.docx August 2015 17
Cisco 7.0:
Other versions:
7 Click Save Configuration.
Connecting APs
As the APs are connected to the network, they should automatically find the controller via the
CAPWAP discovery algorithms. The Dynamic Host Configuration Protocol (DHCP) server will
assign each AP an IP address.
Admin Tip: DHCP server
You can configure a DHCP server to run on a remote PC for a small deployment.
However, for large-scale deployments, an enterprise-grade DHCP server must be
used.
The ap-manager and management interfaces’ configuration should include the DHCP server
you have configured. Alternately, you can configure the DHCP server internally on the controller

Spectralink VIEW Certified Configuration Guide: Cisco Controllers and APs
721-1001-AF.docx August 2015 18
to hand out leases to the connected clients. (Note: The WLC’s DHCP server does not lease
addresses to the AP.) The instructions for doing so are included at the end of this document.
1 From the main menu, click Controller.
2 In the navigation pane, click Interfaces. Verify that the proper IP addresses are
assigned to the interfaces.
3 Under Interface Name click management. Note: the screenshot is from a Cisco 5500.
7.4 and later versions provide redundancy management and redundancy port entries.
7.6 and later versions support a virtual interface entry. If the interface is not present on
the model being configured, no values need to be entered.
4 Under DHCP Information, enter the IP address of the Primary DHCP Server.
5 Repeat this step for the ap-manager interface, if present on the model configured.
6 Click the Apply button and save the changes.

Spectralink VIEW Certified Configuration Guide: Cisco Controllers and APs
721-1001-AF.docx August 2015 19
Cisco 5500 Example:
7 Under service-port, (if present), enter a valid IP Address and Netmask in a different
subnet than the management interface.
8 Click the Apply button and save the changes.
Defining a RADIUS Server
If it is desired to use WPA2-Enterprise security, it is necessary to define a RADIUS server.
1 From the main menu, click SECURITY.
2 Expand RADIUS in the left pane.
3 Click Authentication.
4 Click New… in the right hand corner of the screen.
5 Enter the IP Address of the RADIUS server in the Server IP Address field.

Spectralink VIEW Certified Configuration Guide: Cisco Controllers and APs
721-1001-AF.docx August 2015 20
6 Enter the Shared Secret from the RADIUS server in the Shared Secret and Confirm
Shared Secret fields.
7 Click Apply. The RADIUS server will now be available for selection in the WLANs menu
security screens.
7.0, 7.4 Versions

Spectralink VIEW Certified Configuration Guide: Cisco Controllers and APs
721-1001-AF.docx August 2015 21
7.6 Versions and later:

Spectralink VIEW Certified Configuration Guide: Cisco Controllers and APs
721-1001-AF.docx August 2015 22
AP Configuration
All handsets operating on a given AP radio must have the same QoS setting. All
APs supporting the handsets must be configured to enable the corresponding
features.
1 Power-on and connect the APs to the network. Wait a few minutes for the APs to find the
controller.
2 Verify the APs are associated to the WLC.
3 From the main menu (Advanced mode in 8.1 and later), click Monitor.
8.1 version

Spectralink VIEW Certified Configuration Guide: Cisco Controllers and APs
721-1001-AF.docx August 2015 23
Other versions:
Configuration for use with 2.4 GHz radio
Admin Tip: When to use g-only
When 8020/8030 handsets are set to g-only mode, they support the higher g data
rates. In g-only mode, however, the handset will not detect 802.11b clients and will
not provide protection. G-only mode in these handsets should be used only if there
is no possibility of an 802.11b client or the network will experience data corruption.
1 From the main (Advanced) menu, click Wireless.
2 In the navigation pane, under Access Points click Radios, then select 802.11b/g/n. All
the APs that are connected should be listed, showing their Operational Status as UP.

Spectralink VIEW Certified Configuration Guide: Cisco Controllers and APs
721-1001-AF.docx August 2015 24
3 Select Configure from the drop-down list for the access point you wish to change. Set
the parameters for that AP:
7.4 and earlier versions

Spectralink VIEW Certified Configuration Guide: Cisco Controllers and APs
721-1001-AF.docx August 2015 25
Later versions:
a Set Admin Status to Enable.
b Configure any other settings that might be relevant to your deployment as needed.
c Click the Apply button to save all changes.
Screenshot for access points with internal antennas:

Spectralink VIEW Certified Configuration Guide: Cisco Controllers and APs
721-1001-AF.docx August 2015 26
Screenshot for sample access point with four external antennas and version 7.4 or later:
Network settings
In the navigation pane under 802.11b/g/n, click Network. Set network parameters as follows:
1 Set 802.11b/g Network Status to Disable. The radio will be re-enabled after setting radio
parameters.
Admin Tip: Data Rates
For setting up the Data Rates, please consult your facility’s RF site survey,
designed for voice traffic, to determine if you have sufficient coverage to support all
data rates. Spectralink Wireless Telephones require the following minimum dBm
reading to support the corresponding Mandatory data rate setting in the access
point.
802.11 Radio Standard
Minimum Available Signal Strength (RSSI)
Maximum "Mandatory" Data Rate
802.11b -75 dBm 1 Mb/s
-65 dBm 11 Mb/s
802.11g -67 dBm 6 Mb/s
-47 dBm 54 Mb/s
802.11a -60 dBm 6 Mb/s

Spectralink VIEW Certified Configuration Guide: Cisco Controllers and APs
721-1001-AF.docx August 2015 27
802.11 Radio Standard
Minimum Available Signal Strength (RSSI)
Maximum "Mandatory" Data Rate
-45 dBm 54 Mb/s
Web Info: RF Deployment reference
For additional details on RF deployment please see the Deploying Enterprise-
Grade Wi-Fi Telephony White Paper.
2 Use the default Fragmentation Threshold (2346 bytes).
3 Set the Beacon Period to 100.
4 Set the 1 Mbps and 2 Mbps settings to Disabled.
5 Click the Apply button to save the settings.

Spectralink VIEW Certified Configuration Guide: Cisco Controllers and APs
721-1001-AF.docx August 2015 28
RRM parameters
In the navigation pane under 802.11b/g/n, click RRM. Set RRM parameters as follows:
1 Click TPC. Set the Tx Power Level Assignment Algorithm to Fixed. (The Invoke
Power Update Once/On Demand setting may be deployed occasionally to allow the
Cisco network to self-configure at a time of low usage.) Note that the individual AP
assignments shown above override the Fixed power level set here.
2 Click DCA. Set the Channel Assignment Method to OFF. (The Freeze/Invoke
Channel Update Once setting may be deployed occasionally to allow the Cisco network
to self-configure at a time of low usage.) Leave the default settings of 1, 6, and 11 for
the channel selection.

Spectralink VIEW Certified Configuration Guide: Cisco Controllers and APs
721-1001-AF.docx August 2015 29
Media (Voice/Video)
For 84-Series and 8020/8030 handsets Admission Control (ACM) must be enabled on both the
Voice and Video AC when the handset is configured for Admission Control Mandatory. PIVOT
handsets support Admission Control on PIVOT R1.5 and later.
To enable Admission Control (ACM):
1 In the navigation pane under 802.11 b/g/n, select Media, then select the Voice tab.
2 Select the Admission Control (ACM) checkbox. If CAC Method is available, select
Static from the drop down list. Set the Max RF Bandwidth to 45 for 8020/8030 handsets
or 50 for 84- and PIVOT handsets to limit the bandwidth allocated to handsets to a value
tested to provide good performance. (If both handset types are present, use 50.) If
available, ensure that the Reserved Roaming Bandwidth is set to 6%.
Admin Tip: Use the Static CAC Method.
It is very important to choose the Static CAC method to avoid limiting calls when
there is heavy background traffic.
Admin Tip: Disable WLAN before changing Admission Control settings.
Any WLAN using the network must be disabled before changing Admission Control
settings.

Spectralink VIEW Certified Configuration Guide: Cisco Controllers and APs
721-1001-AF.docx August 2015 30
3 In the navigation pane under 802.11b/g/n, select Media, then select the Video tab.
4 Select the Admission Control (ACM) checkbox. Set the Max RF Bandwidth for Video to
5. If available, ensure that the Reserved Roaming Bandwidth is set to 5%.
Admin Tip: Disable WLAN before changing Admission Control settings.
Any WLAN using the network must be disabled before changing Admission Control
settings.

Spectralink VIEW Certified Configuration Guide: Cisco Controllers and APs
721-1001-AF.docx August 2015 31
5 Click the Apply button to save the settings.
Finalize
1 In the navigation pane under 802.11b/g/n, select Network.
2 Enable 802.11b/g Network Status and 802.11g Support if:
○ 8020/8030 handsets are configured for 802.11b & b/g mixed or g only mode
○ 84-Series handsets are configured for 2.4 GHz
○ 2.4 GHz radio is always enabled on PIVOT handsets.
3 Click the Apply button to save the settings.
Configuring 802.11n for 2.4 GHz
1 In the navigation pane under 802.11 b/g/n, select High Throughput (802.11n). Check
the radio box to enable 11n mode and allow all data rates to be supported.

Spectralink VIEW Certified Configuration Guide: Cisco Controllers and APs
721-1001-AF.docx August 2015 32
2 Disable msdu aggregation:
a Connect to the CLI as described in the section “Configuring a New Controller Starting
from Factory Defaults”.
b Enter the commands:
config 802.11b disable network
config 802.11b 11nsupport a-msdu tx priority all disable
config 802.11b enable network
save config
3 If an 1142 ap is in use, disable mpdu aggregation.
a Connect to the CLI as described in the section “Configuring a New Controller Starting
from Factory Defaults”.
b Enter the commands:
config 802.11b disable network
config 802.11b 11nsupport a-mpdu tx priority all disable
config 802.11b enable network
save config
4 Click the Apply button to save the settings.
5 In the navigation pane under 802.11b/g/n, select Network.
6 For 802.11b/g Network Status, click the Enabled check box.
Configuration for use with 5 GHz radio
1 From the main menu, click Wireless.

Spectralink VIEW Certified Configuration Guide: Cisco Controllers and APs
721-1001-AF.docx August 2015 33
2 In the navigation pane, under Access Points click Radios, then select 802.11a /n. All the
APs that are connected should be listed, showing their Operational Status as UP.
3 Select Configure from the drop-down list for the access point you wish to change. Set
the parameters for that AP:
Settings: Power and channel settings
Global settings for RF Channel Assignment and Tx Power Level Assignment
were not tested. For Custom Tx Power and RF Channel settings please consult
your facility’s RF site survey — optimized for wireless voice traffic — to determine
correct power and channel settings for each AP using non-overlapping channels.
a Configure any other settings that might be relevant to your deployment as needed.
b Click the Apply button to save all changes.

Spectralink VIEW Certified Configuration Guide: Cisco Controllers and APs
721-1001-AF.docx August 2015 34
Screenshot for access points with internal antennas:
Screenshot for access points with external antennas and version 7.4 or later:
Network settings
In the navigation pane under 802.11a/n, click Network. Set the network parameters as follows:
1 Set 802.11a Network Status to Disable; the radio will be re-enabled after setting radio
parameters
2 For setting up the Data Rates, please consult your facility’s RF site survey, designed for
voice traffic, to determine if you have sufficient coverage to support all data rates. The
handset requires the following minimum dBm reading to support the corresponding
Mandatory data rate setting in the access point.

Spectralink VIEW Certified Configuration Guide: Cisco Controllers and APs
721-1001-AF.docx August 2015 35
802.11 Radio Standard
Minimum Available Signal Strength (RSSI)
Maximum "Mandatory" Data Rate
802.11b -70 dBm 1 Mb/s
-60 dBm 11 Mb/s
802.11g -63 dBm 6 Mb/s
-47 dBm 54 Mb/s
802.11a -60 dBm 6 Mb/s
-45 dBm 54 Mb/s
Web Info: RF Deployment Information
For additional details on RF deployment please see the Deploying Enterprise-
Grade Wi-Fi Telephony white paper and the Best Practices Guide to Network
Design Considerations for Spectralink Wireless Telephone.
3 Use the default Fragmentation Threshold (2346 bytes).
4 Set the Beacon Period to 100.
5 Click the Apply button to save the settings.
Spectralink VIEW Certified Configuration Guide: Cisco Controllers and APs
721-1001-AF.docx August 2015 36
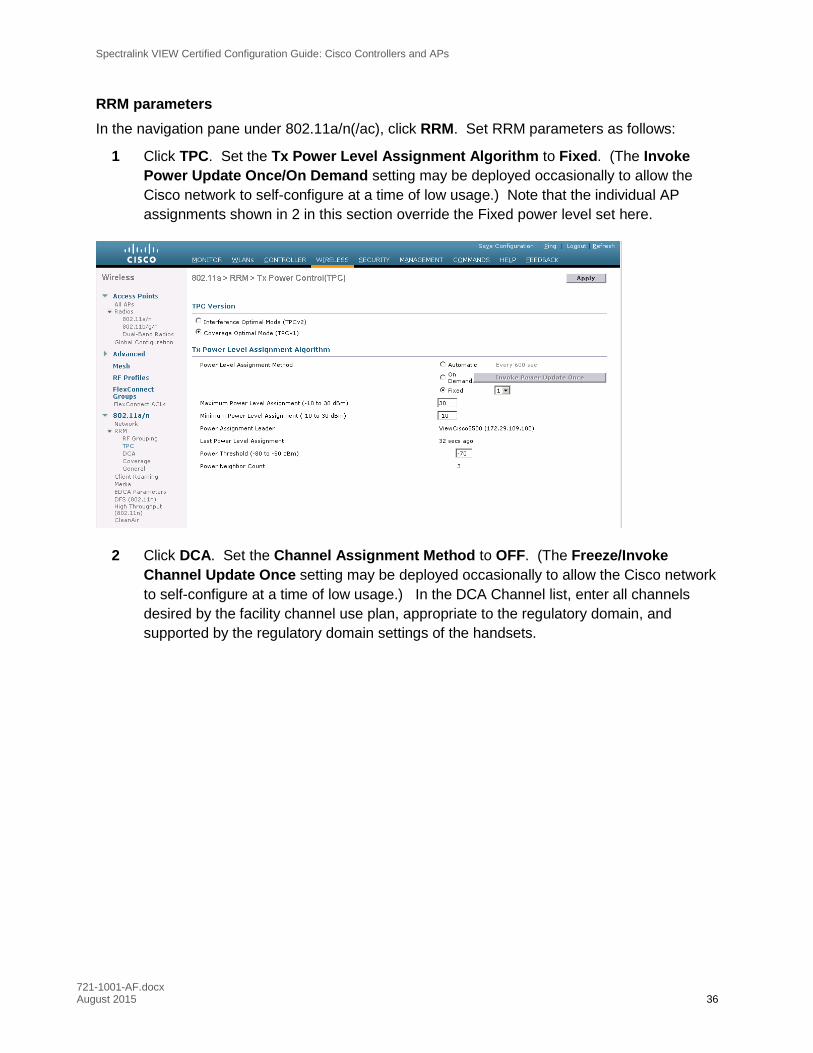
RRM parameters
In the navigation pane under 802.11a/n(/ac), click RRM. Set RRM parameters as follows:
1 Click TPC. Set the Tx Power Level Assignment Algorithm to Fixed. (The Invoke
Power Update Once/On Demand setting may be deployed occasionally to allow the
Cisco network to self-configure at a time of low usage.) Note that the individual AP
assignments shown in 2 in this section override the Fixed power level set here.
2 Click DCA. Set the Channel Assignment Method to OFF. (The Freeze/Invoke
Channel Update Once setting may be deployed occasionally to allow the Cisco network
to self-configure at a time of low usage.) In the DCA Channel list, enter all channels
desired by the facility channel use plan, appropriate to the regulatory domain, and
supported by the regulatory domain settings of the handsets.

Spectralink VIEW Certified Configuration Guide: Cisco Controllers and APs
721-1001-AF.docx August 2015 37
DFS Channels
If DFS channels are used in the deployed network, in the navigation pane under 802.11a/n,
select DFS (802.11h). Check the Channel Announcement radio box to cause the AP to
advertise Spectrum Management. If the AP does not advertise Spectrum Management,
Spectralink handsets will not connect on DFS channels (bandwidth shared with radar facilities).
Media (Voice/Video)
For 84-Series and 8020/8030 handsets Admission Control (ACM) must be enabled on both the
Voice and Video AC when the handset is configured for Admission Control Mandatory. PIVOT
handsets support Admission Control on version 1.5 and later.
To enable Admission Control (ACM):
1 In the navigation pane underneath 802.11 a/n, select Media, then select the Voice tab.
2 Select the Admission Control (ACM) checkbox. If CAC Method is available, select
Static from the drop down list. Set the Max RF Bandwidth to 35 for 8020/8030 handsets
or 55 for 84-Series or PIVOT handsets to limit the bandwidth allocated to handsets to a

Spectralink VIEW Certified Configuration Guide: Cisco Controllers and APs
721-1001-AF.docx August 2015 38
value tested to provide good performance. (If both handset types are present, use 45.)
If available, ensure that the Reserved Roaming Bandwidth is set to 6%.
Admin Tip: Use the Static CAC Method.
It is very important to choose the Static CAC method to avoid limiting calls when
there is heavy background traffic.
3 In the navigation pane under 802.11a/n or 802.11a/n/ac, select Media, then select the
Video tab. Set the Max RF Bandwidth for Video to 5. If available, ensure that the
Reserved Roaming Bandwidth is set to 5%.
4 Select the Admission Control (ACM) checkbox.

Spectralink VIEW Certified Configuration Guide: Cisco Controllers and APs
721-1001-AF.docx August 2015 39
5 Click the Apply button to save the settings.
Configuring 802.11n for 5 GHz
1 In the navigation pane under 802.11 a/n, select High Throughput (802.11n). Check the
radio box to enable 11n mode and allow all data rates to be supported.

Spectralink VIEW Certified Configuration Guide: Cisco Controllers and APs
721-1001-AF.docx August 2015 40
802.11a/n AP’s
802.11a/n/ac AP’s
Admin Tip: 802.11ac
Spectralink has been tested with 802.11ac clients in the network. It is interoperable
with the AP 3700 but not with the AP 3600 in 802.11ac mode.
2 Disable msdu aggregation:
a Connect to the CLI as described in the section “Configuring a New Controller Starting
from Factory Defaults”.

Spectralink VIEW Certified Configuration Guide: Cisco Controllers and APs
721-1001-AF.docx August 2015 41
b Enter the commands:
config 802.11a network disable
config 802.11a 11nsupport a-msdu tx priority all disable
config 802.11a network enable
save config
3 If an 1142 ap is in use, disable mpdu aggregation.
a Connect to the CLI as described in the section “Configuring a New Controller Starting
from Factory Defaults”.
b Enter the commands:
config 802.11a network disable
config 802.11a 11nsupport a-mpdu tx priority all disable
config 802.11a network enable
save config
4 In the navigation pane under 802.11a/n, select Network.
5 For 802.11a Network Status, click the Enabled check box.
6 Click the Apply button to save the settings.

Spectralink VIEW Certified Configuration Guide: Cisco Controllers and APs
721-1001-AF.docx August 2015 42
Setting up the SSID
Voice and data must be on separate SSIDs to prioritize voice traffic. The voice SSID must be
set to Platinum for Quality of Service and the data SSID must be set to Silver for Quality of
Service.
1 From the main menu, click WLANs.
2 In the WLANs screen, select Create New from the drop down list and click Go.
3 Enter the Profile Name and SSID.
4 Click the Apply button twice.
5 Select the Profile Name for the voice SSID.
6 Under the General tab, verify the Radio Policy corresponds to the Spectralink Wireless
Telephone configuration.
○ When Radio Policy is configured for 802.11b/g only, the handsets should be
configured for 802.11b & b/g mixed in 8020/8030 handsets and 2.4 GHz in 84-Series
handsets.
○ When Radio Policy is configured for 802.11a only, the handsets should be
configured for 802.11a in 8020/8030 handsets and 5 GHz in 84-Series handsets.
○ When Radio Policy is configured for 802.11g only, the handsets should be
configured for 802.11g only in 8020/8030 handsets and 2.4 GHz in 84-Series
handsets.
○ When Radio Policy is configured for All, the handsets may be configured to any of
the settings required.

Spectralink VIEW Certified Configuration Guide: Cisco Controllers and APs
721-1001-AF.docx August 2015 43
7 For Status, select the Enabled check box.
(Ensure that the Multicast Vlan Feature remains unchecked for proper PTT
performance.)
8 Under the QoS tab, set Quality of Service to Platinum. This is the required setting for
voice traffic.
9 Set WMM Policy to Required (scroll down to setting as needed).
Versions before 7.4

Spectralink VIEW Certified Configuration Guide: Cisco Controllers and APs
721-1001-AF.docx August 2015 44
Versions after 7.4
10 Under the Security tab, at Layer 2 Security select the desired security policy from the
drop-down list.
○ For WPA2-PSK, under WPA+WPA2 Parameters:
i Select the WPA2-Policy check box.
ii Select the AES check box for WPA2-Encryption.
iii At Auth Key Mgmt select PSK from the drop-down list.
iv If present (7.4. and later versions), ensure that WPA gtk-randomize State is set
to Disable. The Fast Transition and FT PSK radio boxes may be checked or
unchecked as desired.
○ For WPA-PSK, under WPA+WPA2 Parameters:
i Select the WPA-Policy check box.
ii Select the TKIP check box for WPA Encryption.
iii At Auth Key Mgmt select PSK from the drop-down list. The PSK Format may be
selected as ASCII or HEX for both WPA-PSK and WPA2-PSK policies.

Spectralink VIEW Certified Configuration Guide: Cisco Controllers and APs
721-1001-AF.docx August 2015 45
iv If present (7.4 and later versions), ensure that the Fast Transition and FT boxes
remain unchecked.
v If present (7.4. and later versions), ensure that WPA gtk-randomize State is set
to Disable. The Fast Transition and FT PSK radio boxes may be checked or
unchecked as desired.
○ For WPA2-Enterprise (802.1X), select WPA+WPA2 Parameters:
i Select the WPA2 Policy check box.
ii Select the AES check box for WPA2 Encryption.
iii At Auth Key Mgmt, select 802.1X+CCKM from the drop-down list.
iv If present (7.4. and later versions), ensure that WPA gtk-randomize State is set
to Disable.
v If present (7.4 and later versions), the Fast Transition radio box may be
checked to permit other devices to use 802.11r but the FT 802.1x radio box must
not be checked as it limits network access to 802.11r devices only.
Cisco 7.0 Versions:

Spectralink VIEW Certified Configuration Guide: Cisco Controllers and APs
721-1001-AF.docx August 2015 46
Cisco 7.4 and later Versions:
11 Under the Advanced tab
a Set the DTIM to 2 for the radio that corresponds to the Spectralink Wireless handset
configuration.
b Ensure the Enable Session Timeout box is unchecked and that Client Exclusion is
disabled.
c Uncheck the Client Load Balancing and Client Band Select boxes.
d Check off-channel scanning defer for the 0 priority class (prevents contention
between off-channel scanning and PTT).

Spectralink VIEW Certified Configuration Guide: Cisco Controllers and APs
721-1001-AF.docx August 2015 47
Cisco 7.0 versions:
Cisco 7.4 and later versions:

Spectralink VIEW Certified Configuration Guide: Cisco Controllers and APs
721-1001-AF.docx August 2015 48
Cisco 8.1 and later versions:

Spectralink VIEW Certified Configuration Guide: Cisco Controllers and APs
721-1001-AF.docx August 2015 49
12 Click the Apply button to save all changes.

Spectralink VIEW Certified Configuration Guide: Cisco Controllers and APs
721-1001-AF.docx August 2015 50
Setting up the EDCA parameters profile
The EDCA parameters must be set to the WMM setting after the WLAN network QoS has been
set.
Configuration for handsets running in 802.11a mode mode in 8020/8030 handsets
or 5 GHz in 84-Series handsets
1 In the navigation pane under 802.11a/n, select EDCA Parameters.
2 Ensure that WMM is selected from the drop-down list.
3 Click Apply.
Configuration for handsets running in 802.11b/g mode, 802.11b and b/g mixed
mode, or 802.11 g only mode in 8020/8030 handsets or 2.4 GHz in 84-Series
handsets
1 In the navigation pane under 802.11b/g/n, select EDCA Parameters.
2 Ensure that WMM is selected from the drop-down list.
3 Click Apply.
Congratulations! The Cisco controller and its AP’s are now set up for interoperability with Spectralink
handsets in WMM QoS mode.

721-1001-AF.docx August 2015 51
Chapter 2: Configuration for SVP
Operation
Introduction
Spectralink 8020/8030 handsets can be configured for SVP QoS from the WLAN Settings menu
using the Custom selection. Spectralink 84-Series and PIVOT handsets do not support SVP.
Network Topology
Note: Example only
This configuration is not applicable to all customer environments.

Spectralink VIEW Certified Configuration Guide: Cisco Controllers and APs
721-1001-AF.docx August 2015 52
Configuring a New Controller Starting from Factory
Defaults
Initial provisioning of the controller is done via the command line interface (CLI).
1 Connect a null modem serial cable between the console port of the controller and the
serial port of a PC.
2 Open a terminal program, such as Hyper Terminal, and configure the port settings to
9600 baud, no parity, 8 data bits and 1 stop bit.
3 Power-on the controller. Status of the controller’s boot process will appear as the
controller is powering up. Once the controller is running, it will prompt you to run the
Startup Wizard.
4 The Startup Wizard provides for an easy means to perform initial controller setup and
provisioning. Refer to the Installation and Startup Guide for the Cisco 5500 Series WLC,
or other appropriate controller, found at Cisco’s website. This document contains a
detailed explanation of using the Startup Wizard for the 5500:
http://www.cisco.com/en/US/docs/wireless/controller/5500/install/guide/ctrl5500.html.
Once the controller has been configured via the Startup Wizard, the remaining
configuration can be configured through the switch-web interface using a Web browser
(Cisco recommends using MS IE 6.0+).
5 If necessary, the controller can be reset to factory defaults. To reset the WLC to factory
default, you must reboot, then type Recover-config at the CLI. This only works before the
first time a user logs in via the console.
Connecting to the Controller Via a Browser
1 Connect to the WLC by pointing your internet browser to the URL: https<IP_Addr>
(where <IP_Addr> is the IP address of the management interface of the WLC).
2 Click the Login prompt. The default User Name and Password is admin.
Once logged in properly, a page similar to the one below displays on version 8.1. All
other version go directly to the screen in step 4.
3 Click the Advanced button on the 8.1 screen.

Spectralink VIEW Certified Configuration Guide: Cisco Controllers and APs
721-1001-AF.docx August 2015 53
4 The Summary screen displays.
Installing Software
1 To check the installed version of software, listed in the Product Summary, click Monitor
from the main menu.

Spectralink VIEW Certified Configuration Guide: Cisco Controllers and APs
721-1001-AF.docx August 2015 54
2 In the navigation pane, click Summary. The heading labeled Software Version shows the
current software version.
3 Download the appropriate software for your model of controller from the Cisco website.
4 Set up a Trivial File Transfer Protocol (TFTP) server running on a PC to download the
file to the controller.
5 From the main menu, click Commands.
6 In the navigation pane, click Download File.
7 Fill in the download parameters:
a For File Type, select Code.
b For TFTP Server, type in the IP Address of the TFTP server.
c Add the File Path (this is the path in the TFTP server’s root directory and not the
system path where the TFTP server is located) and File Name of the firmware file to
download.
(Note the example simply uses the /designator for the root TFTP directory.) Point the
TFTP server to the code.
8 Click Download and allow a few minutes for the download to complete.
9 Reboot the Controller.

Spectralink VIEW Certified Configuration Guide: Cisco Controllers and APs
721-1001-AF.docx August 2015 55
Controller Setup
The initial setup of the controller is shown below.
Admin Tip: Example configuration
The setup instructions outlined in this document are for the configuration shown in
the diagram only. Your configuration may differ, and the appropriate adjustments
must be made.
1 From the main menu, click Controller.
2 Set the AP Multicast Mode to Multicast and enter a multicast IP address that is currently
not being used on your network for the Multicast Group Address.
3 Click the Apply button.
Cisco 7.0:

Spectralink VIEW Certified Configuration Guide: Cisco Controllers and APs
721-1001-AF.docx August 2015 56
Cisco 8.1
Other versions:
4 Click Multicast from the options on the left side of the screen.
5 Select Enable Global Multicast Mode checkbox.

Spectralink VIEW Certified Configuration Guide: Cisco Controllers and APs
721-1001-AF.docx August 2015 57
6 Click the Apply button.
Cisco 7.0:
Other versions:
7 Click Save Configuration.

Spectralink VIEW Certified Configuration Guide: Cisco Controllers and APs
721-1001-AF.docx August 2015 58
Connecting APs
As the APs are connected to the network, they should automatically find the controller via the
CAPWAP discovery algorithms. The Dynamic Host Configuration Protocol (DHCP) server will
assign each AP an IP address.
Admin Tip: DHCP server
You can configure a DHCP server to run on a remote PC for a small deployment.
However, for large-scale deployments, an enterprise-grade DHCP server must be
used.
The ap-manager and management interfaces’ configuration should include the DHCP server
you have configured. Alternately, you can configure the DHCP server internally on the controller
to hand out leases to the connected clients. (Note: The WLC’s DHCP server does not lease
addresses to the AP.) The instructions for doing so are included at the end of this document.
1 From the main menu, click Controller.
2 In the navigation pane, click Interfaces. Verify that the proper IP addresses are
assigned to the interfaces.
3 Under Interface Name click management. Note: the screenshots are from a Cisco 4400.
The 2100 does not contain a service-port interface. The 5500 does not contain an ap-
manager interface. If the interface is not present on the model being configured, no
values need to be entered.
4 Under DHCP Information, enter the IP address of the Primary DHCP Server.
5 Repeat this step for the ap-manager interface, if present on the model configured.
6 Click the Apply button and save the changes.

Spectralink VIEW Certified Configuration Guide: Cisco Controllers and APs
721-1001-AF.docx August 2015 59
Cisco Controllers other than the 5500:
Cisco 5500:
7 Under service-port, (if present), enter a valid IP Address and Netmask in a different
subnet than the management interface. Click the Apply button and save the changes.

Spectralink VIEW Certified Configuration Guide: Cisco Controllers and APs
721-1001-AF.docx August 2015 60
Defining a RADIUS Server
If it is desired to use WPA2-Enterprise security, it is necessary to define a RADIUS server.
1 From the main menu, click SECURITY.
2 Expand RADIUS in the left pane.
3 Click Authentication.
4 Click New… in the right hand corner of the screen.
5 Enter the IP Address of the RADIUS server in the Server IP Address field.
6 Enter the Shared Secret from the RADIUS server in the Shared Secret and Confirm
Shared Secret fields.
7 Click Apply. The RADIUS server will now be available for selection in the WLANs menu
security screens.

Spectralink VIEW Certified Configuration Guide: Cisco Controllers and APs
721-1001-AF.docx August 2015 61

Spectralink VIEW Certified Configuration Guide: Cisco Controllers and APs
721-1001-AF.docx August 2015 62
AP Configuration
Admin Tip: QoS setting
All handsets operating on a given AP radio must have the same QoS setting. All
APs supporting the handsets must be configured to enable the corresponding
features.
1 Power-on and connect the APs to the network. Wait a few minutes for the APs to find the
controller.
2 Verify the APs are associated to the WLC.
3 From the main menu, click Monitor.
8.1 version

Spectralink VIEW Certified Configuration Guide: Cisco Controllers and APs
721-1001-AF.docx August 2015 63
Other versions:
Configuration for handsets running in 802.11b & b/g mixed and g only mode
Admin Tip: When to use g-only
When 8020/8030 handsets are set to g only mode, they support the higher g data
rates. In g only mode, however, the handset will not detect 802.11b clients and will
not provide protection. G only mode in these handsets should be used only if there
is no possibility of an 802.11b client or the network will experience data corruption.
1 From the main (Advanced) menu, click Wireless.
2 In the navigation pane, under Access Points click Radios, then select 802.11b/g/n. All
the APs that are connected should be listed, showing their Operational Status as UP.
3 Select Configure from the drop-down list for the access point you wish to change. Set
the parameters for that AP:

Spectralink VIEW Certified Configuration Guide: Cisco Controllers and APs
721-1001-AF.docx August 2015 64
7.4 and earlier versions
Later versions:
a Set Admin Status to Enable.
b Configure any other settings that might be relevant to your deployment as needed.
c Click the Apply button to save all changes.

Spectralink VIEW Certified Configuration Guide: Cisco Controllers and APs
721-1001-AF.docx August 2015 65
Screenshot for access points with internal antennas:
Screenshot for access points with external antennas and version 7.4 or later:
4 In the navigation pane under 802.11b/g/n, click Network. Set network parameters as
follows:
Set 802.11b/g Network Status to Disable. The radio will be re- enabled after setting
radio parameters.
Admin Tip: Data Rates
For setting up the Data Rates, please consult your facility’s RF site survey,
designed for voice traffic, to determine if you have sufficient coverage to support all
data rates. Spectralink Wireless Telephones require the following minimum dBm
reading to support the corresponding Mandatory data rate setting in the access
point.

Spectralink VIEW Certified Configuration Guide: Cisco Controllers and APs
721-1001-AF.docx August 2015 66
802.11 Radio Standard
Minimum Available Signal Strength (RSSI)
Maximum "Mandatory" Data Rate
802.11b -75 dBm 1 Mb/s
-65 dBm 11 Mb/s
802.11g -67 dBm 6 Mb/s
-47 dBm 54 Mb/s
802.11a -60 dBm 6 Mb/s
-45 dBm 54 Mb/s
Web Info: RF deployment
For additional details on RF deployment please see the Deploying Enterprise-
Grade Wi-Fi Telephony White Paper.
5 In the navigation pane under 802.11b/g/n, click RRM. Set RRM parameters as follows:
a Click on TPC. Set the Tx Power Level Assignment Algorithm to Fixed. (The
Invoke Power Update Once/On Demand setting may be deployed occasionally to
allow the Cisco network to self-configure at a time of low usage.) Note that the
individual AP assignments shown in 2 in this section override the Fixed power level
set here.

Spectralink VIEW Certified Configuration Guide: Cisco Controllers and APs
721-1001-AF.docx August 2015 67
b Click on DCA. Set the Channel Assignment Method to OFF. (The Freeze/Invoke
Channel Update Once setting may be deployed occasionally to allow the Cisco
network to self-configure at a time of low usage.) Leave the default selection of
channels 1, 6, and 11.
Configuring 802.11n for 2.4 GHz
1 In the navigation pane under 802.11 b/g/n, select High Throughput (802.11n). Check
the radio box to enable 11n mode and allow all data rates to be supported.

Spectralink VIEW Certified Configuration Guide: Cisco Controllers and APs
721-1001-AF.docx August 2015 68
2 Disable msdu aggregation:
a Connect to the CLI as described in the section “Configuring a New Controller Starting
from Factory Defaults”.
b Enter the commands:
config 802.11b network disable
config 802.11b 11nsupport a-msdu tx priority all disable
config 802.11b network enable
save config
3 If an 1142 ap is in use, disable mpdu aggregation.
a Connect to the CLI as described in the section “Configuring a New Controller Starting
from Factory Defaults”.
b Enter the commands:
config 802.11b network disable
config 802.11b 11nsupport a-mpdu tx priority all disable
config 802.11b network enable
save config
4 Click the Apply button to save the settings.
5 In the navigation pane under 802.11b/g/n, select Network.
6 For 802.11b/g Network Status, click the Enabled check box.
a Use the default Fragmentation Threshold (2346 bytes).
b Set the Beacon Period to 100.
c Click the Apply button to save the settings.

Spectralink VIEW Certified Configuration Guide: Cisco Controllers and APs
721-1001-AF.docx August 2015 69
Configuration for handsets running in 802.11a mode
1 From the main menu, click Wireless.
2 In the navigation pane, under Access Points click Radios, then select 802.11a /n. All the
APs that are connected should be listed, showing their Operational Status as UP.
3 Select Configure from the drop-down list for the access point you wish to change. Set
the parameters for that AP:

Spectralink VIEW Certified Configuration Guide: Cisco Controllers and APs
721-1001-AF.docx August 2015 70
Settings: Power and channel settings
Global settings for RF Channel Assignment and Tx Power Level Assignment
were not tested. For Custom Tx Power and RF Channel settings please consult
your facility’s RF site survey — optimized for wireless voice traffic — to determine
correct power and channel settings for each AP using non-overlapping channels.
a Set Admin Status to Enable.
b Configure any other settings that might be relevant to your deployment as needed.
c Click the Apply button to save all changes.
Screenshot for access points with internal antennas:
Screenshot for access points with external antennas and version 7.4 or later:
Network settings
In the navigation pane under 802.11a/n, click Network. Set the network parameters as follows:

Spectralink VIEW Certified Configuration Guide: Cisco Controllers and APs
721-1001-AF.docx August 2015 71
1 Set 802.11a Network Status to Disable; the radio will be re-enabled after setting radio
parameters
2 For setting up the Data Rates, please consult your facility’s RF site survey, designed for
voice traffic, to determine if you have sufficient coverage to support all data rates. The
handset requires the following minimum dBm reading to support the corresponding
Mandatory data rate setting in the access point.
802.11 Radio Standard
Minimum Available Signal Strength (RSSI)
Maximum "Mandatory" Data Rate
802.11b -70 dBm 1 Mb/s
-60 dBm 11 Mb/s
802.11g -63 dBm 6 Mb/s
-47 dBm 54 Mb/s
802.11a -60 dBm 6 Mb/s
-45 dBm 54 Mb/s
Web Info: RF deployment reference
For additional details on RF deployment please see the Deploying Enterprise-
Grade Wi-Fi Telephony White Paper.
3 In the navigation pane under 802.11a/n(/ac), click RRM. Set RRM parameters as
follows:
4 Click TPC. Set the Tx Power Level Assignment Algorithm to Fixed. (The Invoke
Power Update Once/On Demand setting may be deployed occasionally to allow the
Cisco network to self-configure at a time of low usage.) Note that the individual AP
assignments shown in 2 in this section override the Fixed power level set here.

Spectralink VIEW Certified Configuration Guide: Cisco Controllers and APs
721-1001-AF.docx August 2015 72
5 Click on DCA. Set the Channel Assignment Method to OFF. (The Freeze/Invoke
Channel Update Once setting may be deployed occasionally to allow the Cisco network
to self-configure at a time of low usage.) In the DCA Channel list, enter all channels
desired by the facility channel use plan, appropriate to the regulatory domain, and
supported by the regulatory domain settings of the handsets.

Spectralink VIEW Certified Configuration Guide: Cisco Controllers and APs
721-1001-AF.docx August 2015 73
Configuring 802.11n for 5 GHz:
1 In the navigation pane under 802.11 a/n, select High Throughput (802.11n). Check the
radio box to enable 11n mode and allow all data rates to be supported.
802.11a/n AP’s

Spectralink VIEW Certified Configuration Guide: Cisco Controllers and APs
721-1001-AF.docx August 2015 74
802.11a/n/ac AP’s
Admin Tip: 802.11ac
Spectralink has been tested with 802.11ac clients in the network. It is interoperable
with the AP 3700 but not with the AP 3600 in 802.11ac mode.
2 Disable msdu aggregation:
a Connect to the CLI as described in the section “Configuring a New Controller Starting
from Factory Defaults”.
b Enter the commands:
config 802.11a network disable
config 802.11a 11nsupport a-msdu tx priority all disable
config 802.11a network enable
save config
3 If an 1142 ap is in use, disable mpdu aggregation.
a Connect to the CLI as described in the section “Configuring a New Controller Starting
from Factory Defaults”.
b Enter the commands:
config 802.11a network disable
config 802.11a 11nsupport a-mpdu tx priority all disable
config 802.11a network enable
save config

Spectralink VIEW Certified Configuration Guide: Cisco Controllers and APs
721-1001-AF.docx August 2015 75
4 In the navigation pane under 802.11a/n, select Network.
5 For 802.11a Network Status, click the Enabled check box.
6 Click the Apply button to save the settings.

Spectralink VIEW Certified Configuration Guide: Cisco Controllers and APs
721-1001-AF.docx August 2015 76
Setting up the SSID
Voice and data must be on separate SSIDs to prioritize voice traffic. The voice SSID must be
set to Platinum for Quality of Service and the data SSID must be set to Silver for Quality of
Service.
1 From the main menu, click WLANs.
2 In the WLANs screen, select Create New from the drop down list and click Go.
3 Enter the Profile Name and SSID.
4 Click the Apply button twice.
5 Select the Profile Name for the voice SSID.
6 Under the General tab, verify the Radio Policy corresponds to the Spectralink Wireless
Telephone configuration.
○ When Radio Policy is configured for 802.11b/g only, the handsets should be
configured for 802.11b & b/g mixed in 8020/8030
○ When Radio Policy is configured for 802.11a only, the handsets should be
configured for 802.11a in 8020/8030 handsets.
○ When Radio Policy is configured for 802.11g only, the handsets should be
configured for 802.11g only in 8020/8030.
○ When Radio Policy is configured for All, the handsets may be configured to any of
the settings required.
7 For Status, select the Enabled check box.

Spectralink VIEW Certified Configuration Guide: Cisco Controllers and APs
721-1001-AF.docx August 2015 77
(Ensure that the Multicast Vlan Feature remains unchecked for proper PTT
performance.)
8 Under the QoS tab, set Quality of Service to Platinum. This is the required setting for
voice traffic.
9 Set WMM Policy to Disabled (scroll down to setting as needed).

Spectralink VIEW Certified Configuration Guide: Cisco Controllers and APs
721-1001-AF.docx August 2015 78
Screenshot example from Version 7.4 and later
10 Under the Security tab, at Layer 2 Security select the desired security policy from the
drop-down list.
○ For WPA2-PSK, under WPA+WPA2 Parameters:

Spectralink VIEW Certified Configuration Guide: Cisco Controllers and APs
721-1001-AF.docx August 2015 79
i Select the WPA2-Policy check box.
ii Select the AES check box for WPA2-Encryption.
iii At Auth Key Mgmt select PSK from the drop-down list.
iv If present (7.4. and later versions), ensure that WPA gtk-randomize State is set
to Disable. The Fast Transition and FT PSK radio boxes may be checked or
unchecked as desired.
○ For WPA-PSK, under WPA+WPA2 Parameters:
i Select the WPA-Policy check box.
ii Select the TKIP check box for WPA Encryption.
iii At Auth Key Mgmt select PSK from the drop-down list. The PSK Format may be
selected as ASCII or HEX for both WPA-PSK and WPA2-PSK policies.
iv If present (7.4 and later versions), ensure that the Fast Transition and FT boxes
remain unchecked.
v If present (7.4. and later versions), ensure that WPA gtk-randomize State is set
to Disable. The Fast Transition and FT PSK radio boxes may be checked or
unchecked as desired.
○ For WPA2-Enterprise (802.1X), select WPA+WPA2 Parameters:
i Select the WPA2 Policy check box.
ii Select the AES check box for WPA2 Encryption.
iii At Auth Key Mgmt, select 802.1X+CCKM from the drop-down list.
iv If present (7.4. and later versions), ensure that WPA gtk-randomize State is set
to Disable.
v If present (7.4 and later versions), the Fast Transition radio box may be
checked to permit other devices to use 802.11r but the FT 802.1x radio box must
not be checked as it limits network access to 802.11r devices only.

Spectralink VIEW Certified Configuration Guide: Cisco Controllers and APs
721-1001-AF.docx August 2015 80
Cisco 7.0 Versions:
Cisco 7.4 and later Versions:
11 Under the Advanced tab
a Set the DTIM to 2 for the radio that corresponds to the Spectralink Wireless handset
configuration.
b Ensure the Enable Session Timeout box is unchecked and that Client Exclusion is
disabled.
c Uncheck the Client Load Balancing and Client Band Select boxes.

Spectralink VIEW Certified Configuration Guide: Cisco Controllers and APs
721-1001-AF.docx August 2015 81
d Check off-channel scanning defer for the 0 priority class (prevents contention
between off-channel scanning and PTT).
Cisco 7.0 versions:
Cisco 7.4 and later versions:

Spectralink VIEW Certified Configuration Guide: Cisco Controllers and APs
721-1001-AF.docx August 2015 82
Cisco 8.1 and later versions:

Spectralink VIEW Certified Configuration Guide: Cisco Controllers and APs
721-1001-AF.docx August 2015 83
12 Click the Apply button to save all changes.

Spectralink VIEW Certified Configuration Guide: Cisco Controllers and APs
721-1001-AF.docx August 2015 84
Setting up the EDCA parameters profile
The EDCA parameters must be set to the WMM setting after the WLAN network QoS has been
set.
Configuration for handsets running in 802.11a mode mode in 8020/8030 handsets
1 In the navigation pane under 802.11a/n, select EDCA Parameters.
2 Ensure that Spectralink Voice Priority is selected from the drop-down list.
3 Click Apply.
Configuration for handsets running in 802.11b/g mode, 802.11b and b/g mixed
mode, or 802.11 g only mode in 8020/8030 handsets
1 In the navigation pane under 802.11b/g/n, select EDCA Parameters.
2 Select Spectralink Voice Priority from the drop-down list.
3 Click the Apply button to save the settings.

Spectralink VIEW Certified Configuration Guide: Cisco Controllers and APs
721-1001-AF.docx August 2015 85
Congratulations! The Cisco controller and its AP’s are now set up for interoperability with Spectralink
handsets in SVP QoS mode.
END OF DOCUMENT
Top Related