


Languages
Pages
Legal


1
Designed by Cindy Kratzer of Gray Barn Designs
(www.graybarndesigns.com)
Christmas Joy Pillow
Copyright Gray Barn Designs 2017. Unauthorized use and/or duplication of this material without express and written permission from Gray Barn Designs is strictly pro-
hibited. Excerpts and links may be used provided that clear credit is given to Gray Barn Designs with appropriate and specific direction to the original content.
Cutting Instructions For Letters
Materials Needed
2 Fat Quarters Bold Christmas Print (border, pillow back)
1 Fat Quarter White Christmas Print (letters, border)
1 Fat Eighth Red Solid (letters)
1 Fat Eighth Bright Green Solid (border)
1 Package Red Bias Tape, Extra Wide, Double Fold (ties)
18 x 18 inches of muslin fabric (quilt sandwich)
18 x 18 inches of quilt batting (quilt sandwich)
1 Pillow Form (16 x 16 inches)
Finished size = 16 inches x 16 inches
Beginner Skill Level
Letter Number of 1.5"
Red Squares Number of Red
Rectangles
Number of 1.5" White Print
Squares
Number of White Print Rectangles
J 4 (1) 1.5 x 3.5 2 (1) 1.5 x 2.5 (1) 1.5 x 3.5
O 6 (2) 1.5 x 2.5 4 (1) 1.5 x 2.5
Y 4 (1) 1.5 x 3.5 3 (2) 1.5 x 2.5
Total 14 9
Cutting Instructions
White Christmas Print Fabric:
Cut (2) .75” x 4.5” strips (for between letters)
Cut (2) 1.5 “ x 4.5” rectangles (for left & right side of “JOY”)
Cut (2) 1.5” x 12” strips (for top & bottom of “JOY”)
Cut squares and rectangles for letters according to chart
Green Solid Fabric:
Cut (2) 1.25” x 6.25” strips (for left & right side of “JOY”)
Cut (2) 1.25” x 13.5” strips (for top & bottom of “JOY”)
Red Solid Fabric:
Cut squares and rectangles for letters according to chart
Bold Christmas Print Fabric:
Cut (2) 2.5” x 7.5” rectangles (for left & right side of “JOY”)
Cut (2) 5.5” x 17.5” rectangles (for top & bottom of “JOY”)
Cut (1) 17” x 17” square (for pillow back)
Quilting Math
1/4 inch = .25 inch
1/2 inch = .5 inch
3/4 inch = .75 inch
“ is the symbol for inch

2
Make the Half Square Triangles for the Letters
Step 1: Take one 1.5 inch white Christmas print square and place
it right side up on your work surface.
Step 2: Take one 1.5 inch red square and using a thin pencil,
draw a diagonal line from corner to corner on the wrong side of
the fabric. Place it right side down on the white square.
Step 3: Sew along the diagonal line (Diagram 1)
Step 4: Trim the block ¼ inch from the line you just sewed and
press the seam toward the red fabric (Diagram 2). Use the chart at
right to make a total of 8 half square triangles.
Copyright Gray Barn Designs 2017. Unauthorized use and/or duplication of this material without express and written permission from Gray Barn Designs is strictly pro-
hibited. Excerpts and links may be used provided that clear credit is given to Gray Barn Designs with appropriate and specific direction to the original content.
Letter Number of Red/White Half Square Triangles
Needed
J 2
O 4
Y 2
Sewing Instructions
for the Letters
Step 1: Lay out the 1.5 inch squares, half
square triangles and rectangles in rows
according to the diagrams for each letter
as detailed at right.
Step 2: Sew the squares, half square
triangles and rectangles together row by
row according to the diagram for each
letter and press seams open.
Step 3: Sew the rows together and press
seams open.

3
Copyright Gray Barn Designs 2017. Unauthorized use and/or duplication of this material without express and written permission from Gray Barn Designs is strictly pro-
hibited. Excerpts and links may be used provided that clear credit is given to Gray Barn Designs with appropriate and specific direction to the original content.
Sew the JOY Unit Together
Step 1: Lay out the letters and the .75” x 4.5”
white Christmas print rectangles. Sew them
together in the order shown. Press seams open.
Step 2: Sew a 1.5” x 4.5” white Christmas print
rectangle to the left side and to the right side
of the letters. Press seams toward the rectangles.
Step 3: Sew a 1.5” x 12” white Christmas print
strip to the top and to the bottom of the letters.
Press seams toward the strips.
Sew the Outer Borders to the JOY Unit
Step 1: Sew a 1.25” x 6.25” bright green solid rectangle to the left side and to the right side of the JOY unit. Press seams toward the
green rectangle.

4
Step 2: Sew a 1.25” x 13.5” bright green solid strip to the top and to the bottom of the “JOY” unit. Press seams toward the green strips.
Step 3: Sew a 2.5” x 7.5” bold Christmas print rectangle to the left and to the right of the “JOY” unit. Press seams toward the Christmas
print.
Step 4: Sew a 5.5” x 17.5” bold Christmas print rectangle to the top and to the bottom of the “JOY” unit. Press seams toward the
Christmas print.
Copyright Gray Barn Designs 2017. Unauthorized use and/or duplication of this material without express and written permission from Gray Barn Designs is strictly pro-
hibited. Excerpts and links may be used provided that clear credit is given to Gray Barn Designs with appropriate and specific direction to the original content.

5
Quilt the Pillow Top
Step 1: The pillow top should measure 17.5” x 17.5”. Make a quilt sandwich with the 18” x 18” muslin fabric on the bottom, the
18” x 18” batting in the middle and the “JOY” pillow top facing right side up on the top of the batting. Quilt the pillow top using your
favorite quilting method.
Finish the Pillow Step 1: Finish the top edges only of the quilted pillow top and the 17”x 17” pillow backing. Use an overlock stitch or a zig zag stitch,
whichever you prefer.
Copyright Gray Barn Designs 2017. Unauthorized use and/or duplication of this material without express and written permission from Gray Barn Designs is strictly pro-
hibited. Excerpts and links may be used provided that clear credit is given to Gray Barn Designs with appropriate and specific direction to the original content.
Note: Your pillow top will shrink
approximately 1/2 inch during
quilting. After quilting, your pillow
top should measure approximately
17” x 17” . If it is a little bigger or
smaller, don’t worry! Your pillow
will still be perfect!

6
Step 2: WITH RIGHT SIDES TOGETHER, pin the quilted pillow top
to the 17” x 17” pillow backing.
USING A 1/2 INCH SEAM ALLOWANCE, begin sewing 2.5 inches
from the top right corner of the pillow as noted in the diagram
on the right.
Continue sewing around the pillow and stop after you have sewn
2.5 inches from the top left corner of the pillow. This will leave a gap
so you can turn your pillow right side out (after you complete
Step 3).
Step 3: Trim each corner on the diagonal, being careful to not
cut the stitching.
Step 4: Turn your pillow right side out and press the seams. When
you press the top seam of the pillow, be sure the fabric that has
not been sewn together is folded to the inside and the
pressed seam = 1/2 inch.
Step 5: Using your favorite marking technique, mark the pillow
front and the pillow back at 4”, 8” and 12” intervals inside the
opening on the pressed seams.
Copyright Gray Barn Designs 2017. Unauthorized use and/or duplication of this material without express and written permission from Gray Barn Designs is strictly pro-
hibited. Excerpts and links may be used provided that clear credit is given to Gray Barn Designs with appropriate and specific direction to the original content.
7
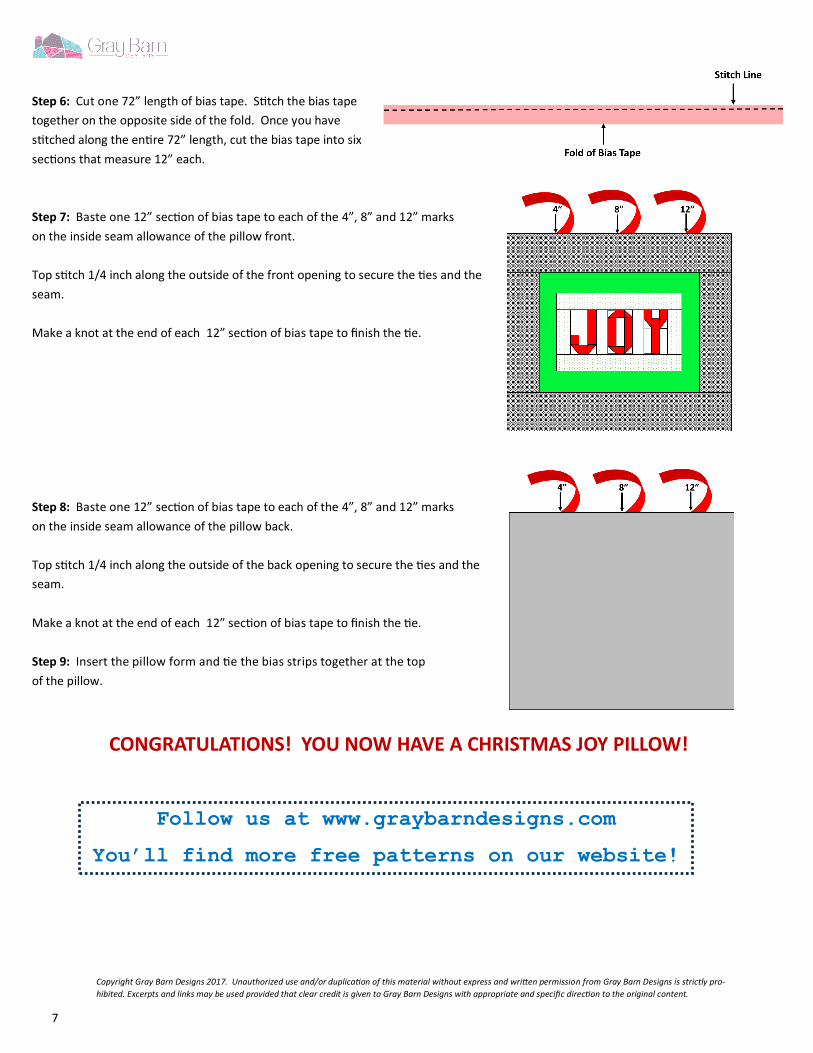
Step 6: Cut one 72” length of bias tape. Stitch the bias tape
together on the opposite side of the fold. Once you have
stitched along the entire 72” length, cut the bias tape into six
sections that measure 12” each.
Step 7: Baste one 12” section of bias tape to each of the 4”, 8” and 12” marks
on the inside seam allowance of the pillow front.
Top stitch 1/4 inch along the outside of the front opening to secure the ties and the
seam.
Make a knot at the end of each 12” section of bias tape to finish the tie.
Step 8: Baste one 12” section of bias tape to each of the 4”, 8” and 12” marks
on the inside seam allowance of the pillow back.
Top stitch 1/4 inch along the outside of the back opening to secure the ties and the
seam.
Make a knot at the end of each 12” section of bias tape to finish the tie.
Step 9: Insert the pillow form and tie the bias strips together at the top
of the pillow.
CONGRATULATIONS! YOU NOW HAVE A CHRISTMAS JOY PILLOW!
Follow us at www.graybarndesigns.com
You’ll find more free patterns on our website!
Copyright Gray Barn Designs 2017. Unauthorized use and/or duplication of this material without express and written permission from Gray Barn Designs is strictly pro-
hibited. Excerpts and links may be used provided that clear credit is given to Gray Barn Designs with appropriate and specific direction to the original content.
Top Related