


Languages
Pages
Legal


Cergo®
Keep it simple and safe.
for Cergo, the pressableceramics within theGoldenGate System
Cergo Kiss
Product Description andInstructions for Use
For further information orfor placing an order:
www.degudent.com
22110/0908/DB
LastRevision:08/2009
Laboratory procedures K2
Naturally beautiful and naturally safe: Cementing.
Cergo Kiss all-ceramic restorations cannot be tem-
porarily cemented and then worn in situ.
Cergo Kiss must be adhesively attached.
Adhesion
Cergo Kiss must be adhesively attached. This is recommended
not only because of the stronger bond obtained, but also
because of the better aesthetic result. Make sure to follow the
adhesive manufacturer’s instructions. The list of suitable adhe-
sives includes: Calibra, Dentsply; Nexus, Kerr Dental; Variolink II,
Ivoclar Vivadent; Compolute, 3M Espe; Duo Cement plus,
Coltene Whaledent.
All cementing surfaces of Cergo Kiss restorations must be
etched with 5% hydrofluoric acid for four minutes. Using 10%
hydrofluoric acid reduces the etching times to two minutes.
Suitable products include: Vita Ceramics Etch (Vita Zahnfabrik),
Porcelain Gel Etch (Ultradent).
All surfaces treated with hydrofluoric acid must be silanized.
All popular silanizing agents are suitable, such as: Calibra Silane
Coupling Agent, Dentsply; Monobond-S, Ivoclar Vivadent; Silane,
Ultradent; Silan Primer, Kerr Dental; RelyX Keramik Primer,
3M Espe
Please note that a silent rising layer shows pronounced aging
after as little as 30 minutes. This is why silanization should wait
until shortly before insertion.
In order not to compromise the quality of the
definitive cementing, temporaries should only be
cemented using non-eugenol cements.
These Instructions for Use are logically continued by the
Instructions for Adhesive Cementing, which is available from
DeguDent free of charge.

2
Nature’s envy:Beguiling beauty and perfect properties
General notes on the Cergo Kiss® pressable ceramics
Indications for usePressable ceramic material for inlays, onlays, veneers, and crowns.Cergo Kiss pressable ceramics can be optionally veneered withDuceragold Kiss veneering ceramics. Cergo Kiss is a componentof the GoldenGate System.For dental use only.
Contraindications• Fabrication of bridgework• Deep subgingival preparations• Bruxism or other types of parafunction
Technical data• Dental ceramic material: Type 2, Class 1 according toDIN EN ISO 6872
• Flexural strength and chemical solubility according toDIN EN ISO 6872
WarningsUndesired side effects of these medical products are extreme rarelyto be expected with proper processing and application. However,reactions of the immune system (such as allergies) or localizedparesthesia (such as an irritating taste or irritation of the oral mucosa)cannot be completely excluded in principle. Should you hear or beinformed of any adverse effects – even when doubtful – we would liketo request notification.
In patient hypersensitivity to Cergo Kiss pressable ceramics or one ofits ingredients, this medical product may not be used or only under theparticular scrutiny of the dentist or physician in charge. Known cross-reactions or interactions of this medical product with other medicalproducts or material already present in the oral environment must betaken into consideration by the dentist or physician in charge whenselecting this medical product.
Notify the dentist or physician in charge of all factors described aboveif you use this medical product for a custom construction.
• Do not inhale dust particles during grinding.
Precautions• Whenworkingwith thesematerials,make sure to complywith the Instructionsfor Use and the correspondingMaterial Safety Data Sheets (MSDS).
• Use only glass beads (2 –4 bar), not alumina, for air-abrading theframeworks.
• Use water cooling when working with the pressable ceramics to avoidlocal overheating.
Adverse reactionsWe are not aware of any risks and/or side effects related to Cergo Kisspressable ceramics.
Safty notesDo not inhale dust particles during grinding.
Transport and storage conditions:• Liquids: Store containers tightly closed at temperaturesabove 10 °C.10 °C1 Lower Temperature limit
• Protect powders and pellet from moisture.2 Keep dry
Symbols on product labels:4 Catalogue number5 Batch code6 Use by7 Pay attention to the instructions for use8 Do not re-use
Combinable liquids
• Dentine/incisal, etc.:Ducera® Liquid SDDucera® Liquid Form
• Stains/glazes:Ducera® Liquid Stain improved
Adhesions:
Follow the manufacturer’s recommendations for composite.Cergo Kiss all-ceramic restorations cannot be temporarily cementedand then worn in situ. Cercon Kiss must be adhesively attached.In order not to compromise the quality of the definitive cementing,temporaries should only be cemented using non-eugenol cements.
Release date: April 2005
Laboratory procedures K1
Preparation recommendations
Crowns, anterior
1.0 mm
Veneers
Onlays
1.5 mm
1,5 mm
2,0 mm
1.0–1.5 mm
0.6 mm
60°80°
When preparing
anterior or posterior teeth,
the anatomical form has to be
reduced as shown.
1.0 mm
Crowns posterior
2.0 mm 2.0 mm2.0 mm
1.5 mm1.5 mm
1.0 mm1.0 mm
1.5 mm
1.0 mm
Inlays
Please note:
• To ensure the stability of the structure, allow ade-
quate space for the Cergo restoration.
• To avoid tension, eliminate sharp line angles.
• Avoid preparation undercuts.
• The dentist should fill deep cavities by placing a
core restoration.
• Pay particular attention to the design of the margin.
• When preparing anterior or posterior teeth, maintain
a framework to veneering material ratio of 50 : 50.
• For inlays, onlays and veneers, maintain a framework
to veneering material ratio of 75 : 25.
0124
Contents 3
IntroductionThe company 4
The GoldenGate System 5
Cergo Kiss 6
Cergo Kiss – the best for patients and the dental team 7
Indications 8
Cergo Kiss shade guide 9
Processing instructionsShade assignment 10
Body Stain assignment table 10
Die preparation 11
Wax modeling 12
Sprueing 13
Investing 14
Pre-heating 15
Pressing 16
Divesting 17
Finishing 18
Staining technique 19
Build-up technique 20
General firing instructions 21
Pressing and firing recommendations 22–25
ServiceTroubleshooting 26–27
Cergo Kiss product range 28
Notes 29–30
4 Introduction
Innovation based on tradition:DeguDent high-tech ceramics.
DeguDent, the leader in innovation and technology,
and DeguDent’s practical high-tech solutions across the
entire range of dental ceramics are something you can
always rely on.
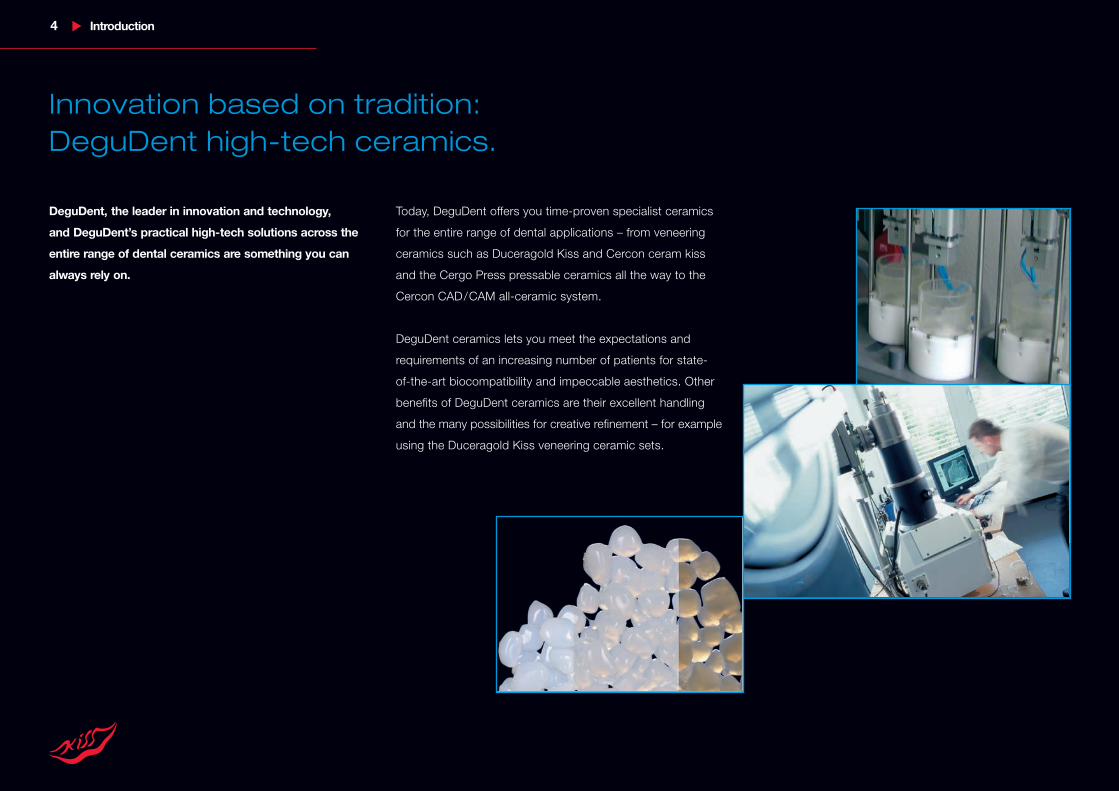
Today, DeguDent offers you time-proven specialist ceramics
for the entire range of dental applications – from veneering
ceramics such as Duceragold Kiss and Cercon ceram kiss
and the Cergo Press pressable ceramics all the way to the
Cercon CAD/CAM all-ceramic system.
DeguDent ceramics lets you meet the expectations and
requirements of an increasing number of patients for state-
of-the-art biocompatibility and impeccable aesthetics. Other
benefits of DeguDent ceramics are their excellent handling
and the many possibilities for creative refinement – for example
using the Duceragold Kiss veneering ceramic sets.

Introduction 5
An advantage for all:All advantages in one system.
The GoldenGate System® stands for materials
tailor-made for each other, a great variety
of indications and maximum biocompatibility.
Cergo Kiss is the GoldenGate System’s pressable
ceramics component, integrating seamlessly with the other
materials within the GoldenGate System.
For example, the results with Cergo Kiss restorations in the
buildup technique using Duceragold Kiss as veneering mate-
rial are no less than excellent. Cergo Kiss is also well suited
for use with the staining technique. You can benefit from the
system’s clinically proven safety – and your great freedom of
combination options.
Take advantage of the state-of-the-art GoldenGate System
high-quality CE-marked materials in your work, a system in
which all DeguDent research elements are optimally attuned
to each other and feature superb biocompatibility.
The GoldenGate System ensures a maximum of safety and biocompatibility in a smart system that is characterized
by openness. Thanks to its innovative components, such as the Cergo Kiss pressable ceramic system, the Degunorm
alloys, and the Duceragold Kiss hydrothermal veneering ceramics, the GoldenGate System provides the best possi-
ble rehabilitation in any environment.
Ceramic restorations: a Duceragold Kiss ceramo-metal crown
and a Cergo Kiss all-ceramic crown
6 Introduction
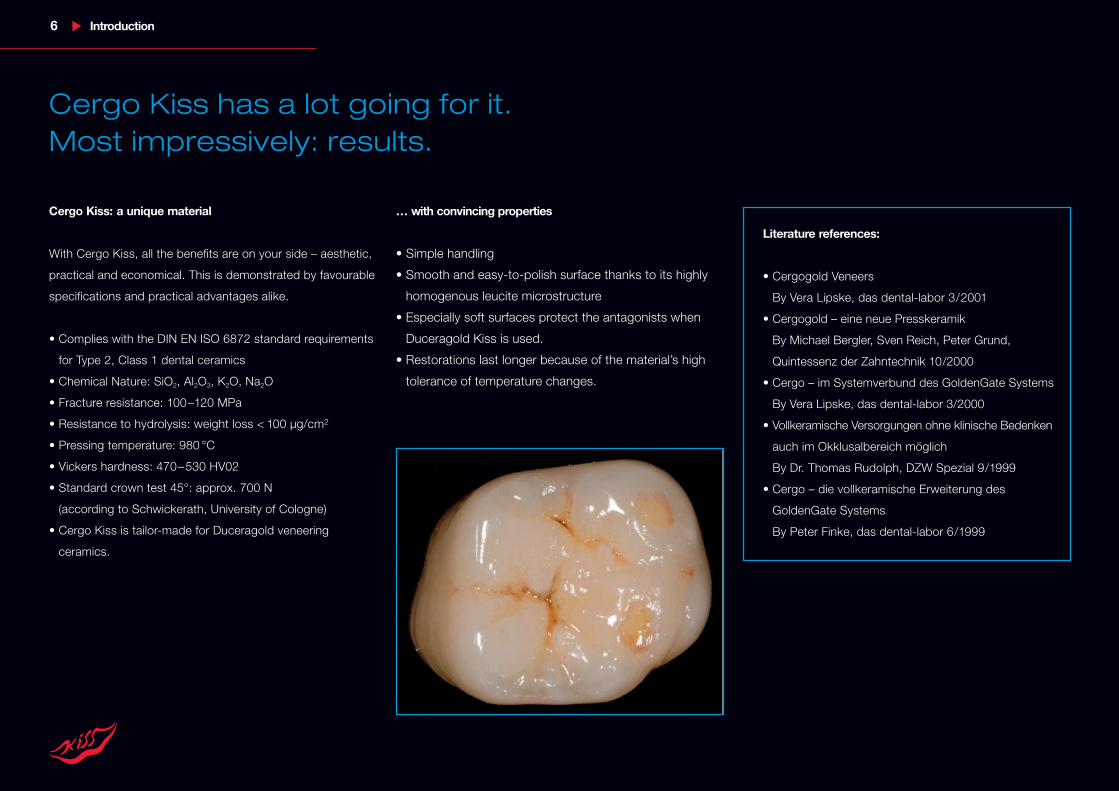
Cergo Kiss has a lot going for it.Most impressively: results.
Cergo Kiss: a unique material
With Cergo Kiss, all the benefits are on your side – aesthetic,
practical and economical. This is demonstrated by favourable
specifications and practical advantages alike.
• Complies with the DIN EN ISO 6872 standard requirements
for Type 2, Class 1 dental ceramics
• Chemical Nature: SiO2, Al2O3, K2O, Na2O
• Fracture resistance: 100–120 MPa
• Resistance to hydrolysis: weight loss < 100 µg/cm2
• Pressing temperature: 980 °C
• Vickers hardness: 470–530 HV02
• Standard crown test 45°: approx. 700 N
(according to Schwickerath, University of Cologne)
• Cergo Kiss is tailor-made for Duceragold veneering
ceramics.
… with convincing properties
• Simple handling
• Smooth and easy-to-polish surface thanks to its highly
homogenous leucite microstructure
• Especially soft surfaces protect the antagonists when
Duceragold Kiss is used.
• Restorations last longer because of the material’s high
tolerance of temperature changes.
Literature references:
• Cergogold Veneers
By Vera Lipske, das dental-labor 3/2001
• Cergogold – eine neue Presskeramik
By Michael Bergler, Sven Reich, Peter Grund,
Quintessenz der Zahntechnik 10/2000
• Cergo – im Systemverbund des GoldenGate Systems
By Vera Lipske, das dental-labor 3/2000
• Vollkeramische Versorgungen ohne klinische Bedenken
auch im Okklusalbereich möglich
By Dr. Thomas Rudolph, DZW Spezial 9/1999
• Cergo – die vollkeramische Erweiterung des
GoldenGate Systems
By Peter Finke, das dental-labor 6/1999
Introduction 7
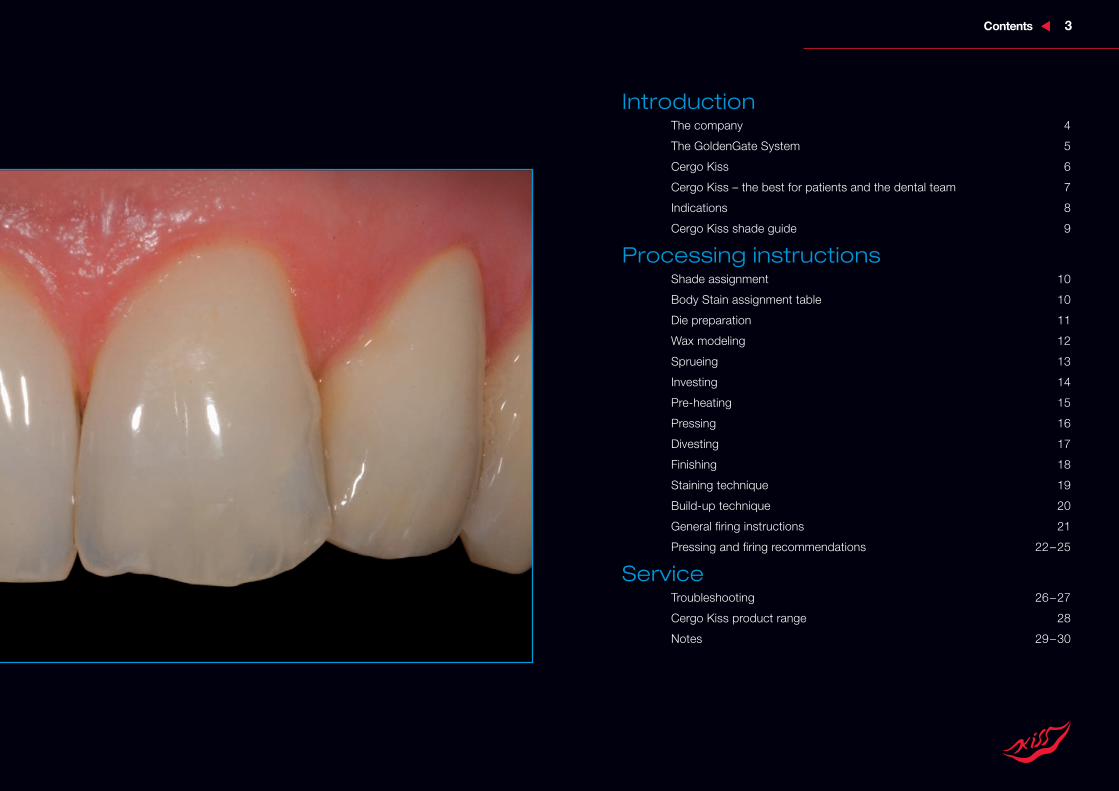
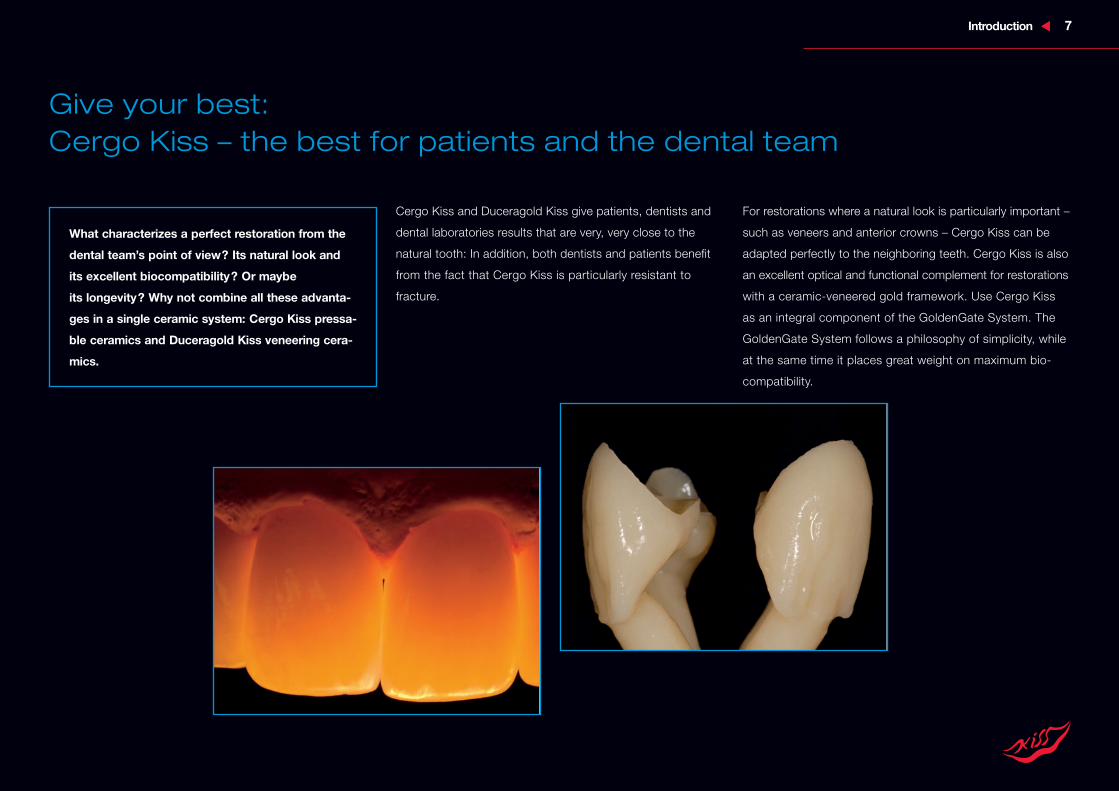
Give your best:Cergo Kiss – the best for patients and the dental team
What characterizes a perfect restoration from the
dental team’s point of view? Its natural look and
its excellent biocompatibility? Or maybe
its longevity? Why not combine all these advanta-
ges in a single ceramic system: Cergo Kiss pressa-
ble ceramics and Duceragold Kiss veneering cera-
mics.
Cergo Kiss and Duceragold Kiss give patients, dentists and
dental laboratories results that are very, very close to the
natural tooth: In addition, both dentists and patients benefit
from the fact that Cergo Kiss is particularly resistant to
fracture.
For restorations where a natural look is particularly important –
such as veneers and anterior crowns – Cergo Kiss can be
adapted perfectly to the neighboring teeth. Cergo Kiss is also
an excellent optical and functional complement for restorations
with a ceramic-veneered gold framework. Use Cergo Kiss
as an integral component of the GoldenGate System. The
GoldenGate System follows a philosophy of simplicity, while
at the same time it places great weight on maximum bio-
compatibility.

8 Introduction
Maximum aesthetics combined with a broad range
of indications and possible applications
Cergo Kiss is the No. 1 pressable ceramic system for highly
aesthetic and biocompatible restorations such as veneers,
inlays, onlays, and crowns within the GoldenGate System.
Together they successfully emulate natural teeth, both in
appearance and material properties: Cergo Kiss unites the
advantages of a hydrothermal ceramic material, such as
smoothness and a surface hardness very close to that of
the natural teeth, with an abrasion behavior similar to that
of dental enamel.
We are not aware of any risks or adverse effects related to
Cergo Kiss pressable ceramics and Duceragold Kiss veneering
ceramics.
Cergo Kiss is used for ceramic restorations using the build-up
and the staining techniques. What exactly does this mean?
Build-up technique
Modeling and pressing frameworks to be veneered with
Duceragold Kiss.
Staining technique
Modeling and pressing fully anatomic frameworks whose
definitive shade is created by staining with LFC (Low Fusing
Ceramic) stains, incisal stains, body stains, and glazing.
Particularly well-suited for the following indications:
• Veneers
• Inlays (one or more surfaces)
• Onlays
• Crowns (anterior and posterior)
Contraindications
The use of Cergo Kiss is contraindicated for
• Bridges
• Very deep subgingival preparations
• Patients with parafunctions (such as bruxism)
• Patients with very pronounced edentulism
Introduction 9
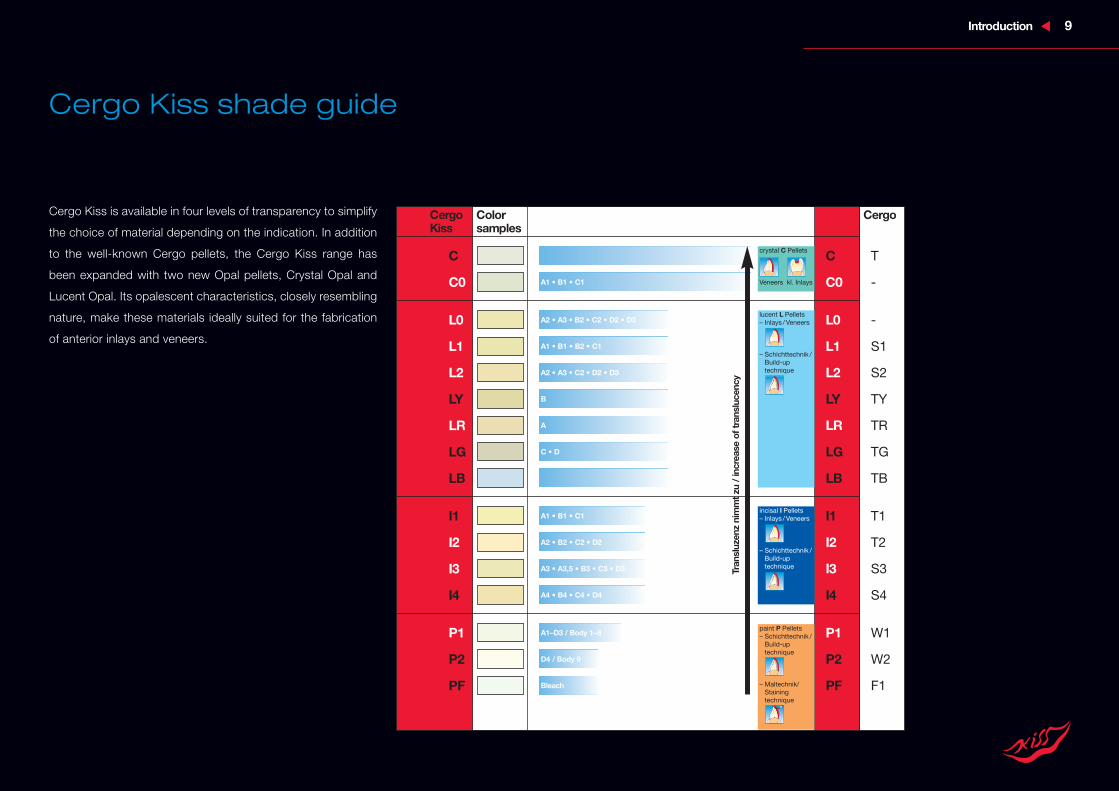
Cergo Kiss shade guide
Cergo Kiss is available in four levels of transparency to simplify
the choice of material depending on the indication. In addition
to the well-known Cergo pellets, the Cergo Kiss range has
been expanded with two new Opal pellets, Crystal Opal and
Lucent Opal. Its opalescent characteristics, closely resembling
nature, make these materials ideally suited for the fabrication
of anterior inlays and veneers.
C
C0
L0
L1
L2
LY
LR
LG
LB
I1
I2
I3
I4
P1
P2
PF
C
C0
L0
L1
L2
LY
LR
LG
LB
I1
I2
I3
I4
P1
P2
PF
T
-
-
S1
S2
TY
TR
TG
TB
T1
T2
S3
S4
W1
W2
F1
crystal C Pellets
Veneers kl. Inlays
lucent L Pellets– Inlays /Veneers
– Schichttechnik /Build-uptechnique
incisal I Pellets– Inlays /Veneers
– Schichttechnik /Build-uptechnique
paint P Pellets– Schichttechnik /Build-uptechnique
– Maltechnik/Stainingtechnique
A1 • B1 • C1
A2 • A3 • B2 • C2 • D2 • D3
A1 • B1 • B2 • C1
A2 • A3 • C2 • D2 • D3
B
A
C • D
A1 • B1 • C1
A2 • B2 • C2 • D2
A3 • A3,5 • B3 • C3 • D3
A4 • B4 • C4 • D4
A1–D3 / Body 1–8
D4 / Body 9
Bleach
Transluzenznimmtzu/increaseoftranslucency
Cergo Color CergoKiss samples
10 Laboratory procedures
Cergo Kissshade assignment
Inlays and veneers, enamel area
Inlays and veneers in the enamel area are pressed with opales-
cent pellets (CO, LO) or any Lucent pellets.
Crown copings
Any dentine pellets can be used for fabricating crown copings.
Smaller veneers and inlays
The C and CO materials are preferred for smaller veneers and
inlays thanks to their high transparency.
Pellets of greater opacity (Incisal 1– 4) are preferred for
larger restorations of deeper cavities or where cusps are
included. The increased opacity helps avoid graying effects in
the incisal region.
Pellets for the staining technique
Use P1 and P2 staining (paint) pellets (see tables). For greatly
discolored groups of teeth, the PF pellet can be used.
Shade assignmenttablesBody stains
The values listed here are intended for orientation only and should
be regarded only as guidelines. Your firing results may differ. All firing
results depend on the performance of the furnace used, which in
turn depends on the make, model and age of the furnace. Therefore,
the guideline values will have to be adapted individually for each
firing. We recommend running a test firing cycle to evaluate the per-
formance of the furnace used. We have compiled and checked all
values and other data with great care. However, we cannot be liable
for your results under any circumstances.
Name Assignment Pellet Number of layers
Body 1 A1 P1 A1 1x
Body 2 A2, A3, A3.5 P1 A2 1x
A3 2x
A3.5 3x
Body 3 A4 P1 A4 2x
Body 4 B1 P1 B1 1x
Body 5 B2, B3, B4 P1 B2 1x
B3 2x
B4 3x
Body 6 C1, C2 P1 C1 1x
C2 2x
Body 7 C3, C4 P1 C3 2x
C4 3x
Body 8 D2, D3 P1 D2 2x
D3 3x
Body 9 D4 P2 D4 2x
Laboratory procedures 11
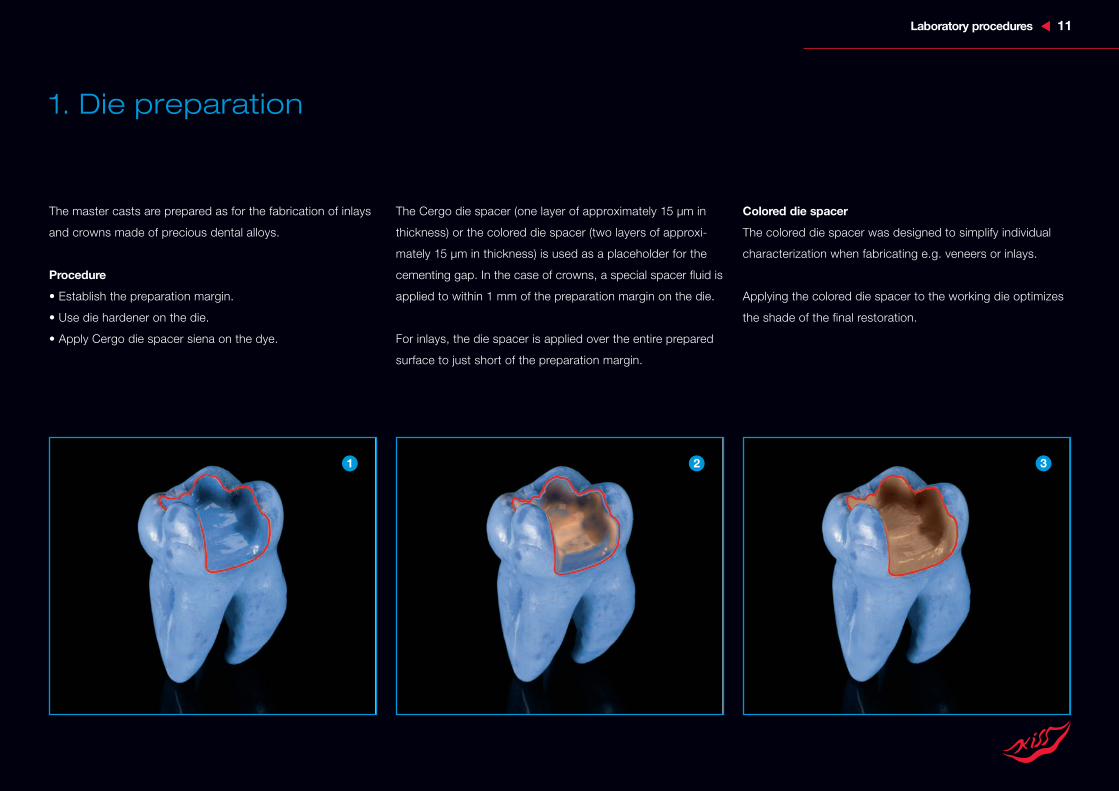
1. Die preparation
The master casts are prepared as for the fabrication of inlays
and crowns made of precious dental alloys.
Procedure
• Establish the preparation margin.
• Use die hardener on the die.
• Apply Cergo die spacer siena on the dye.
The Cergo die spacer (one layer of approximately 15 µm in
thickness) or the colored die spacer (two layers of approxi-
mately 15 µm in thickness) is used as a placeholder for the
cementing gap. In the case of crowns, a special spacer fluid is
applied to within 1 mm of the preparation margin on the die.
For inlays, the die spacer is applied over the entire prepared
surface to just short of the preparation margin.
Colored die spacer
The colored die spacer was designed to simplify individual
characterization when fabricating e.g. veneers or inlays.
Applying the colored die spacer to the working die optimizes
the shade of the final restoration.
1 2 3

12 Laboratory procedures
2. Wax modeling
Use only wax materials that burn out without residue.
Use Isolit isolating liquid.
For anterior teeth, the wall thickness of the wax model must
be at least 0.7 mm.
According to Professor Kappert of Freiburg, Germany, the
thickness of the framework should be more than 50% of the
thickness of the veneer in the case of pressable ceramics.
For posterior teeth, wax up a reduced anatomical form
(including the occlusal profile), a type of dentinal core, in
order to ensure sufficient stability.
The longevity of the design is partially influenced by the
thickness of its framework.
Please note:
• To ensure the stability of the structure, allow adequate space for the Cergo restoration.
• To avoid tension, eliminate sharp line angles.
• Avoid preparation undercuts.
• The dentist should fill deep cavities by placing a core restoration.
• Pay particular attention to the design of the margin.
• Allow for a uniform wall thickness wherever possible.
• When preparing anterior or posterior teeth, maintain a framework to veneering material ratio of 50 : 50.
• For inlays, onlays and veneers, maintain a framework to veneering material ratio of 75 : 25 when using
the build-up technique.
4
Laboratory procedures 13
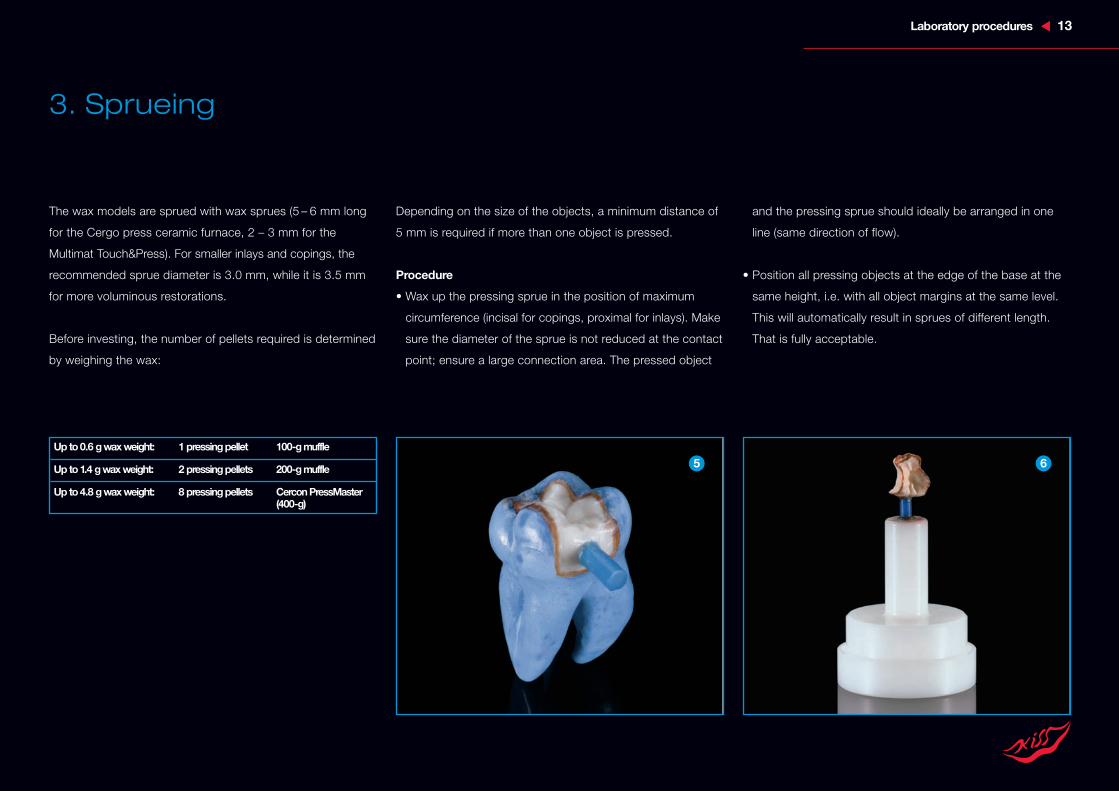
3. Sprueing
The wax models are sprued with wax sprues (5 – 6 mm long
for the Cergo press ceramic furnace, 2 – 3 mm for the
Multimat Touch&Press). For smaller inlays and copings, the
recommended sprue diameter is 3.0 mm, while it is 3.5 mm
for more voluminous restorations.
Before investing, the number of pellets required is determined
by weighing the wax:
Depending on the size of the objects, a minimum distance of
5 mm is required if more than one object is pressed.
Procedure
• Wax up the pressing sprue in the position of maximum
circumference (incisal for copings, proximal for inlays). Make
sure the diameter of the sprue is not reduced at the contact
point; ensure a large connection area. The pressed object
and the pressing sprue should ideally be arranged in one
line (same direction of flow).
• Position all pressing objects at the edge of the base at the
same height, i.e. with all object margins at the same level.
This will automatically result in sprues of different length.
That is fully acceptable.
5 6Up to0.6 gwaxweight: 1 pressingpellet 100-gmuffle
Up to1.4 gwaxweight: 2 pressingpellets 200-gmuffle
Up to4.8 gwaxweight: 8 pressingpellets CerconPressMaster(400-g)
14 Laboratory procedures
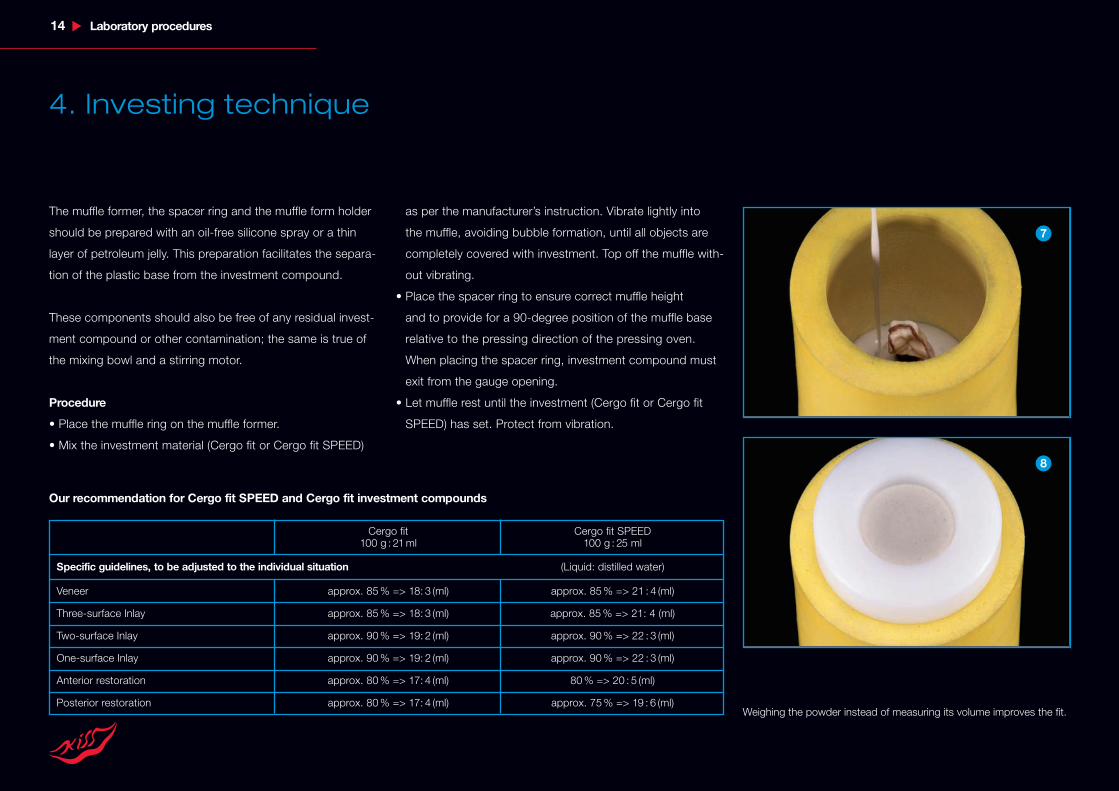
4. Investing technique
The muffle former, the spacer ring and the muffle form holder
should be prepared with an oil-free silicone spray or a thin
layer of petroleum jelly. This preparation facilitates the separa-
tion of the plastic base from the investment compound.
These components should also be free of any residual invest-
ment compound or other contamination; the same is true of
the mixing bowl and a stirring motor.
Procedure
• Place the muffle ring on the muffle former.
• Mix the investment material (Cergo fit or Cergo fit SPEED)
as per the manufacturer’s instruction. Vibrate lightly into
the muffle, avoiding bubble formation, until all objects are
completely covered with investment. Top off the muffle with-
out vibrating.
• Place the spacer ring to ensure correct muffle height
and to provide for a 90-degree position of the muffle base
relative to the pressing direction of the pressing oven.
When placing the spacer ring, investment compound must
exit from the gauge opening.
• Let muffle rest until the investment (Cergo fit or Cergo fit
SPEED) has set. Protect from vibration.
Our recommendation for Cergo fit SPEED and Cergo fit investment compounds
Cergo fit Cergo fit SPEED100 g : 21ml 100 g : 25 ml
Specific guidelines, to be adjusted to the individual situation (Liquid: distilled water)
Veneer approx. 85% => 18: 3 (ml) approx. 85% => 21 : 4 (ml)
Three-surface Inlay approx. 85% => 18: 3 (ml) approx. 85% => 21: 4 (ml)
Two-surface Inlay approx. 90% => 19: 2 (ml) approx. 90% => 22 : 3 (ml)
One-surface Inlay approx. 90% => 19: 2 (ml) approx. 90% => 22 : 3 (ml)
Anterior restoration approx. 80% => 17: 4 (ml) 80% => 20 : 5 (ml)
Posterior restoration approx. 80% => 17: 4 (ml) approx. 75% => 19 : 6 (ml)Weighing the powder instead of measuring its volume improves the fit.
7
8
Laboratory procedures 15
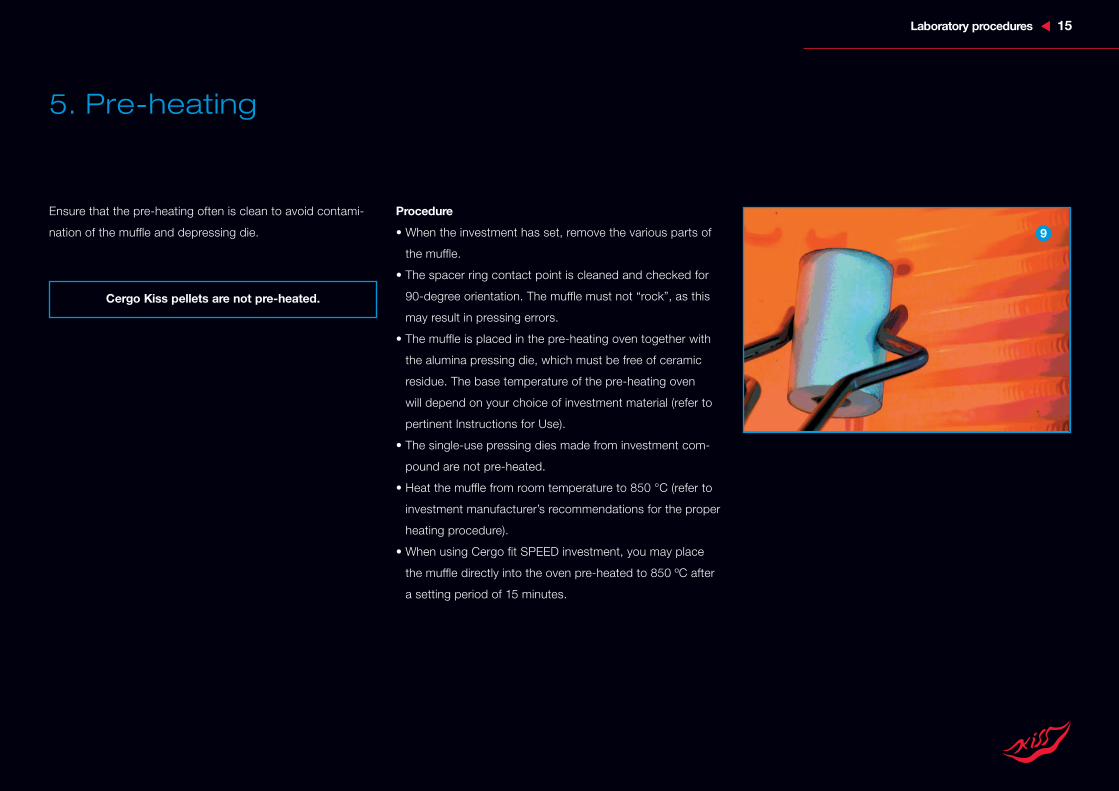
5. Pre-heating
Ensure that the pre-heating often is clean to avoid contami-
nation of the muffle and depressing die.
Procedure
• When the investment has set, remove the various parts of
the muffle.
• The spacer ring contact point is cleaned and checked for
90-degree orientation. The muffle must not “rock”, as this
may result in pressing errors.
• The muffle is placed in the pre-heating oven together with
the alumina pressing die, which must be free of ceramic
residue. The base temperature of the pre-heating oven
will depend on your choice of investment material (refer to
pertinent Instructions for Use).
• The single-use pressing dies made from investment com-
pound are not pre-heated.
• Heat the muffle from room temperature to 850 °C (refer to
investment manufacturer’s recommendations for the proper
heating procedure).
• When using Cergo fit SPEED investment, you may place
the muffle directly into the oven pre-heated to 850 ºC after
a setting period of 15 minutes.
Cergo Kiss pellets are not pre-heated.
9
16 Laboratory procedures
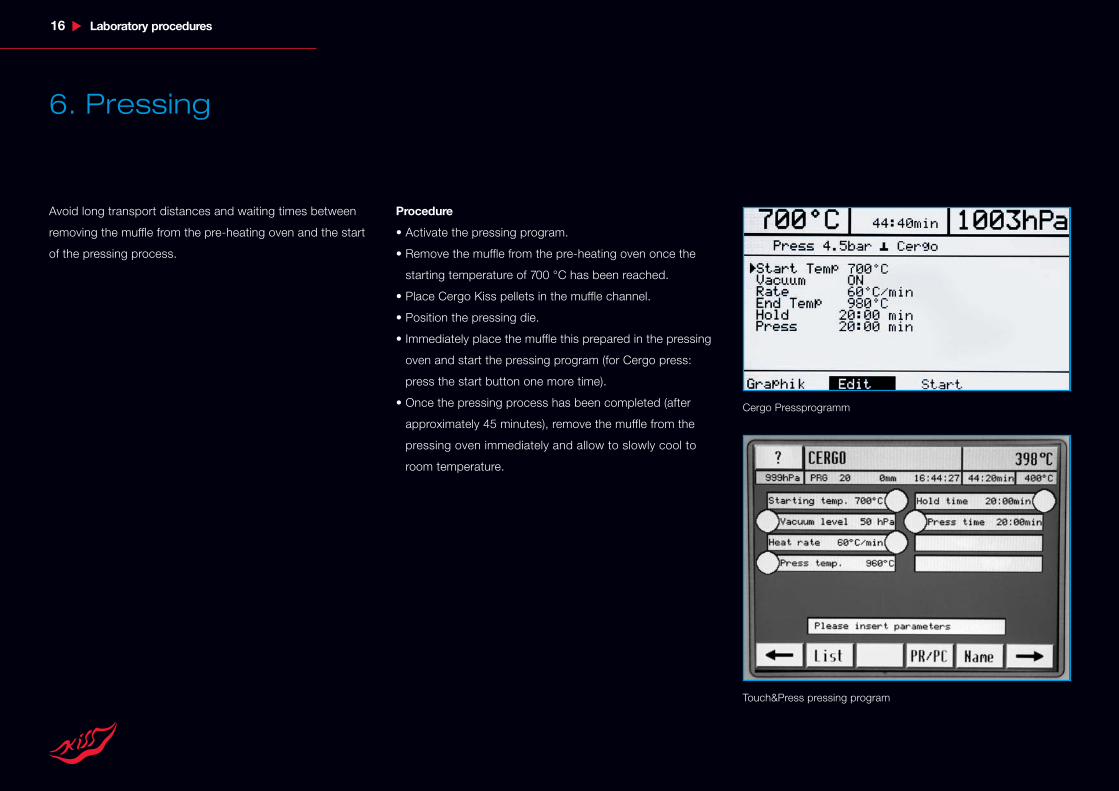
6. Pressing
Avoid long transport distances and waiting times between
removing the muffle from the pre-heating oven and the start
of the pressing process.
Procedure
• Activate the pressing program.
• Remove the muffle from the pre-heating oven once the
starting temperature of 700 °C has been reached.
• Place Cergo Kiss pellets in the muffle channel.
• Position the pressing die.
• Immediately place the muffle this prepared in the pressing
oven and start the pressing program (for Cergo press:
press the start button one more time).
• Once the pressing process has been completed (after
approximately 45 minutes), remove the muffle from the
pressing oven immediately and allow to slowly cool to
room temperature.
Touch&Press pressing program
Cergo Pressprogramm
Laboratory procedures 17
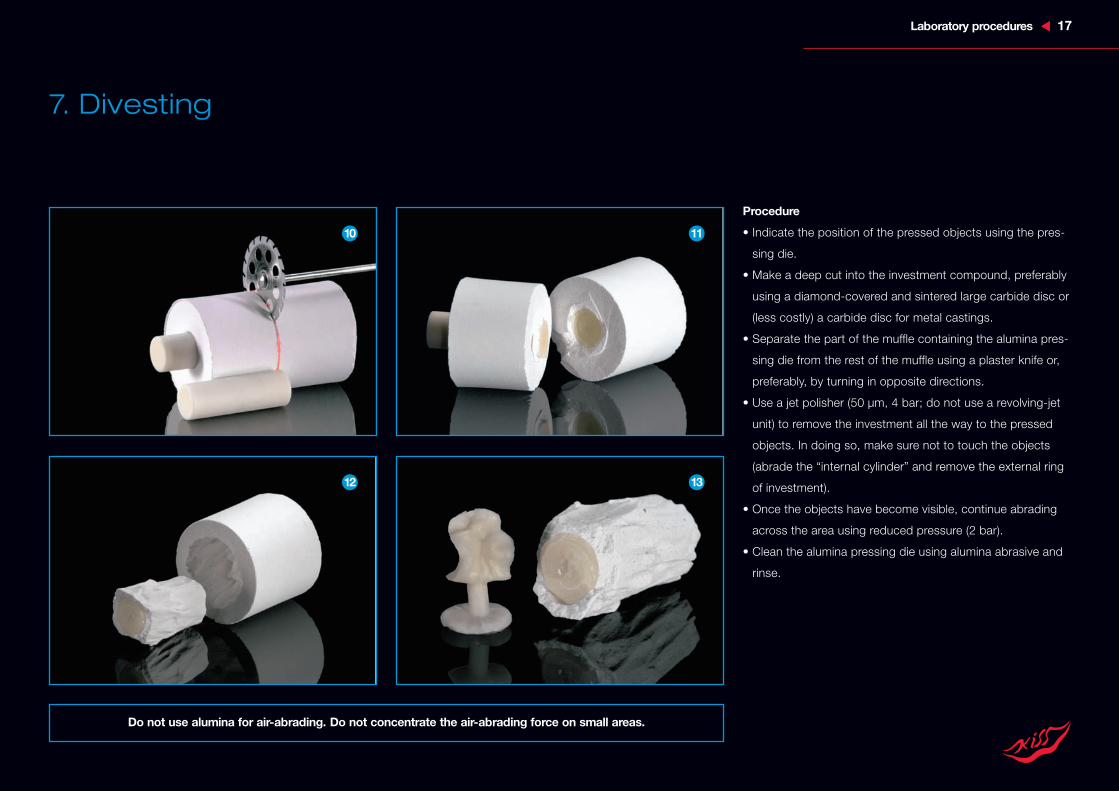
7. Divesting
Procedure
• Indicate the position of the pressed objects using the pres-
sing die.
• Make a deep cut into the investment compound, preferably
using a diamond-covered and sintered large carbide disc or
(less costly) a carbide disc for metal castings.
• Separate the part of the muffle containing the alumina pres-
sing die from the rest of the muffle using a plaster knife or,
preferably, by turning in opposite directions.
• Use a jet polisher (50 µm, 4 bar; do not use a revolving-jet
unit) to remove the investment all the way to the pressed
objects. In doing so, make sure not to touch the objects
(abrade the “internal cylinder” and remove the external ring
of investment).
• Once the objects have become visible, continue abrading
across the area using reduced pressure (2 bar).
• Clean the alumina pressing die using alumina abrasive and
rinse.
Do not use alumina for air-abrading. Do not concentrate the air-abrading force on small areas.
10
12
11
13
18 Laboratory procedures
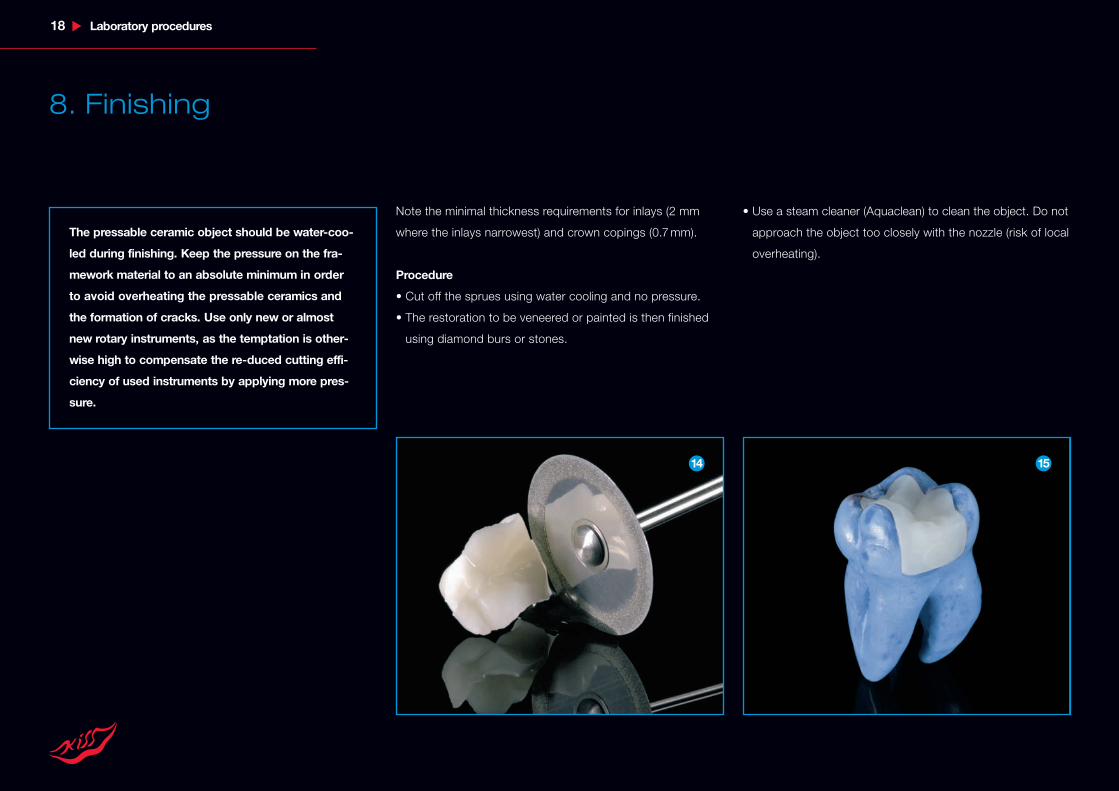
8. Finishing
The pressable ceramic object should be water-coo-
led during finishing. Keep the pressure on the fra-
mework material to an absolute minimum in order
to avoid overheating the pressable ceramics and
the formation of cracks. Use only new or almost
new rotary instruments, as the temptation is other-
wise high to compensate the re-duced cutting effi-
ciency of used instruments by applying more pres-
sure.
Note the minimal thickness requirements for inlays (2 mm
where the inlays narrowest) and crown copings (0.7mm).
Procedure
• Cut off the sprues using water cooling and no pressure.
• The restoration to be veneered or painted is then finished
using diamond burs or stones.
• Use a steam cleaner (Aquaclean) to clean the object. Do not
approach the object too closely with the nozzle (risk of local
overheating).
14 15

Laboratory procedures 19
9. Staining technique
The staining technique uses the LFC stains. These are mixed
to a firm, homogeneous consistency (like a very soft wax)
and worked into the surface with a brush until the surface is
saturated. Irregularities should be avoided.
Fire the stains until the desired characteristic is achieved. To
do so, make the glaze to a very firm consistency and work
into the surface using a taste opaque brush.
You may also use fluorescent body and incisal stains for the
staining technique. These stains allow a broad and regular
characterization of the ceramic surface.
Application of body and incisal stains
• Detailed characterization of the ceramic surface as a paint
firing (build-up technique)
• Complete color characterization after pressing with the P1
and P2 pellets
• Reproduction of all “V” colors
• Gross or detailed characterization of all pressed pellets
(painting and layering technique)
• Use for all CTE-adjusted ceramics.
• In principle, all pellets can be used with body and incisal
paints.
Depending on the consistency of the mixed body stains,
the number of stain firings has to be increased or reduced
by one.
Restoration, prepared for the staining technique The same restoration after glaze firing
16 17
Body and incisal stains are applied depending
on the circumstances of the individual case. The
table on page 10 gives you a first orientation
regarding the use of body stains.

20 Laboratory procedures
10. Build-up technique
For veneers, inlays and crowns, use the layering technique
and Duceragold Kiss. Dispense with the opaque firing and
start building up the ceramics by analogy with ceramo-metal
restorations.
When fabricating inlays, take care that the veneering masses
are separated in the middle, all the way down to the bottom,
in order to ensure control shrinkage.
Pressed coping Second dentine firing Finished restoration
For larger restorations, the final temperature should
be increased from 800 °C to 810 °C.
Firing a ceramic shoulder onto the Cergo Kiss fra-
mework is discouraged for reasons of stability.
18 19 20

Finished restoration 21
General firing instructions
Veneers and inlays are fired on a single-ply piece of firing
cotton, which should be as small as possible and is placed
on top of the firing pins. Crowns are fired on the special firing
pins provided for this purpose.
The glaze firing is performed at 800 °C using LFC glaze and
body stains.
The firing temperature must be increased for all firing
steps in order to balance the low thermal conductivity of
the pressable ceramic framework. As a rule, the firing tem-
perature (final temperature, 80 °C) is approximately 20° C
to 30 °C higher than if Duceragold Kiss is fired to high
gold alloys.
Remove the object from the furnace immediately after the
firing program has run. Use no long-term cooling or tem-
pering phases.
For your orientation: The luster of the veneer after the first firing should be comparable with the veneer of precious-metal frameworks of the
GoldenGate System.
The values listed here are intended for orientation only and should be regarded only as guidelines. Your firing results may differ. All firing results de-
pend on the performance of the furnace used, which in turn depends on the make, model and age of the furnace. Therefore, the guideline values
will have to be adapted individually for each firing. We recommend running a test firing cycle to evaluate the performance of the furnace used. We
have compiled and checked all values and other data with great care. However, we cannot be liable for your results under any circumstances.
General Pre-heating Drying Heating rate Firing Holding Vacuum Long-term cooling
firing program: temp. °C time min °C/min temp. °C time min hPa
Build-up technique
Dentine firing 1 450 6:00 55 800 1:00 50 –
Dentine firing 2 450 5:00 55 800 1:00 50 –
Glaze firing 450 3:00 55 790 1:00 – –
Corrections 450 5:00 55 740 1:00 50 –
Staining technique
Paint 450 3:00 55 800 1:00 – –
Glaze firing 450 3:00 55 800 1:00 – –
22 Firing recommendations
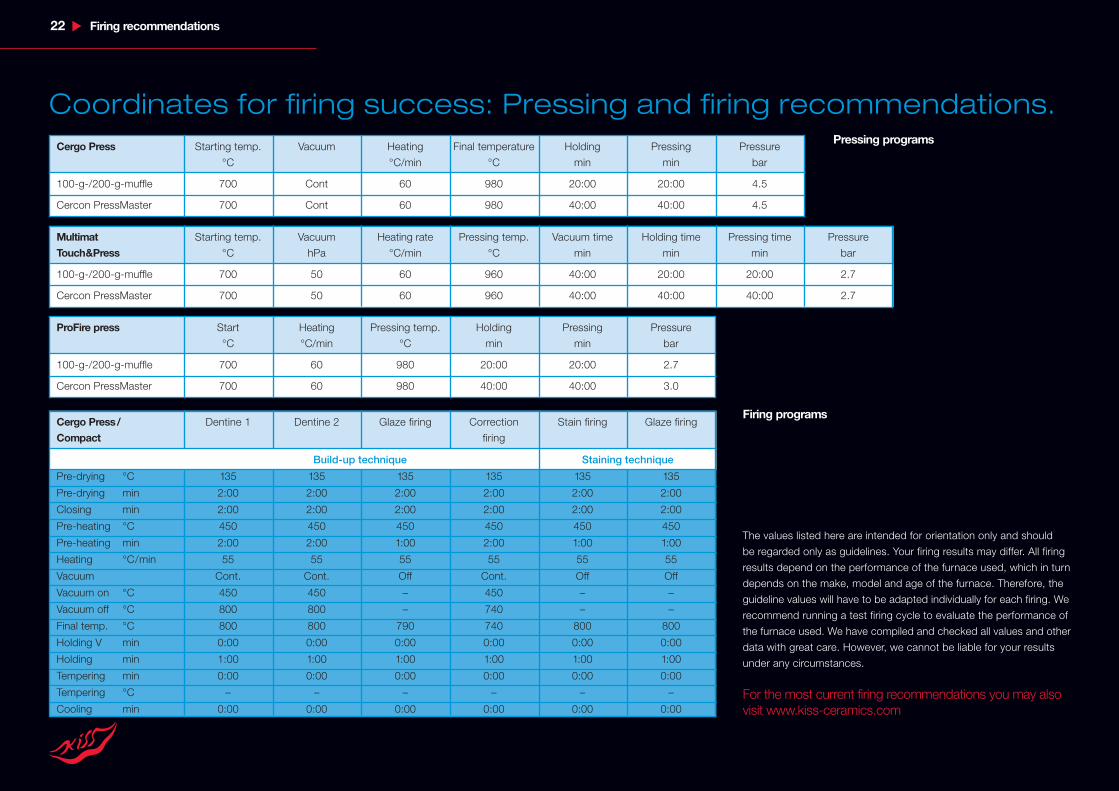
Coordinates for firing success: Pressing and firing recommendations.
The values listed here are intended for orientation only and should
be regarded only as guidelines. Your firing results may differ. All firing
results depend on the performance of the furnace used, which in turn
depends on the make, model and age of the furnace. Therefore, the
guideline values will have to be adapted individually for each firing. We
recommend running a test firing cycle to evaluate the performance of
the furnace used. We have compiled and checked all values and other
data with great care. However, we cannot be liable for your results
under any circumstances.
For the most current firing recommendations you may alsovisit www.kiss-ceramics.com
Cergo Press Starting temp. Vacuum Heating Final temperature Holding Pressing Pressure
°C °C/min °C min min bar
100-g-/200-g-muffle 700 Cont 60 980 20:00 20:00 4.5
Cercon PressMaster 700 Cont 60 980 40:00 40:00 4.5
Multimat Starting temp. Vacuum Heating rate Pressing temp. Vacuum time Holding time Pressing time Pressure
Touch&Press °C hPa °C/min °C min min min bar
100-g-/200-g-muffle 700 50 60 960 40:00 20:00 20:00 2.7
Cercon PressMaster 700 50 60 960 40:00 40:00 40:00 2.7
Cergo Press/ Dentine 1 Dentine 2 Glaze firing Correction Stain firing Glaze firing
Compact firing
Build-up technique Staining technique
Pre-drying °C 135 135 135 135 135 135
Pre-drying min 2:00 2:00 2:00 2:00 2:00 2:00
Closing min 2:00 2:00 2:00 2:00 2:00 2:00
Pre-heating °C 450 450 450 450 450 450
Pre-heating min 2:00 2:00 1:00 2:00 1:00 1:00
Heating °C/min 55 55 55 55 55 55
Vacuum Cont. Cont. Off Cont. Off Off
Vacuum on °C 450 450 – 450 – –
Vacuum off °C 800 800 – 740 – –
Final temp. °C 800 800 790 740 800 800
Holding V min 0:00 0:00 0:00 0:00 0:00 0:00
Holding min 1:00 1:00 1:00 1:00 1:00 1:00
Tempering min 0:00 0:00 0:00 0:00 0:00 0:00
Tempering °C – – – – – –
Cooling min 0:00 0:00 0:00 0:00 0:00 0:00
ProFire press Start Heating Pressing temp. Holding Pressing Pressure
°C °C/min °C min min bar
100-g-/200-g-muffle 700 60 980 20:00 20:00 2.7
Cercon PressMaster 700 60 980 40:00 40:00 3.0
Firing programs
Pressing programs
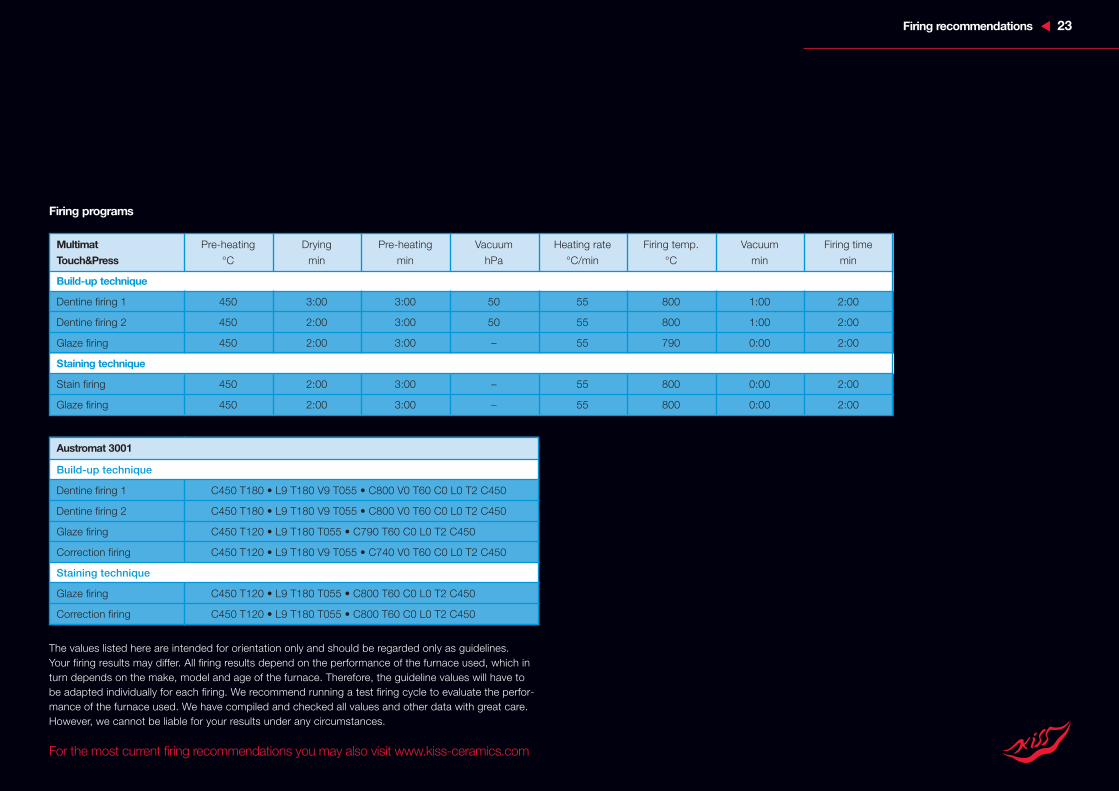
Firing recommendations 23
Multimat Pre-heating Drying Pre-heating Vacuum Heating rate Firing temp. Vacuum Firing time
Touch&Press °C min min hPa °C/min °C min min
Build-up technique
Dentine firing 1 450 3:00 3:00 50 55 800 1:00 2:00
Dentine firing 2 450 2:00 3:00 50 55 800 1:00 2:00
Glaze firing 450 2:00 3:00 – 55 790 0:00 2:00
Staining technique
Stain firing 450 2:00 3:00 – 55 800 0:00 2:00
Glaze firing 450 2:00 3:00 – 55 800 0:00 2:00
Austromat 3001
Build-up technique
Dentine firing 1 C450 T180 • L9 T180 V9 T055 • C800 V0 T60 C0 L0 T2 C450
Dentine firing 2 C450 T180 • L9 T180 V9 T055 • C800 V0 T60 C0 L0 T2 C450
Glaze firing C450 T120 • L9 T180 T055 • C790 T60 C0 L0 T2 C450
Correction firing C450 T120 • L9 T180 V9 T055 • C740 V0 T60 C0 L0 T2 C450
Staining technique
Glaze firing C450 T120 • L9 T180 T055 • C800 T60 C0 L0 T2 C450
Correction firing C450 T120 • L9 T180 T055 • C800 T60 C0 L0 T2 C450
The values listed here are intended for orientation only and should be regarded only as guidelines.Your firing results may differ. All firing results depend on the performance of the furnace used, which inturn depends on the make, model and age of the furnace. Therefore, the guideline values will have tobe adapted individually for each firing. We recommend running a test firing cycle to evaluate the perfor-mance of the furnace used. We have compiled and checked all values and other data with great care.However, we cannot be liable for your results under any circumstances.
For the most current firing recommendations you may also visit www.kiss-ceramics.com
Firing programs
The values listed here are intended for orientation only and should be regarded only as guidelines. Your firing results may differ. All firing results depend on the performance of the furnace
used, which in turn depends on the make, model and age of the furnace. Therefore, the guideline values will have to be adapted individually for each firing. We recommend running a
test firing cycle to evaluate the performance of the furnace used. We have compiled and checked all values and other data with great care. However, we cannot be liable for your results
under any circumstances.
For the most current firing recommendations you may also visit www.kiss-ceramics.com
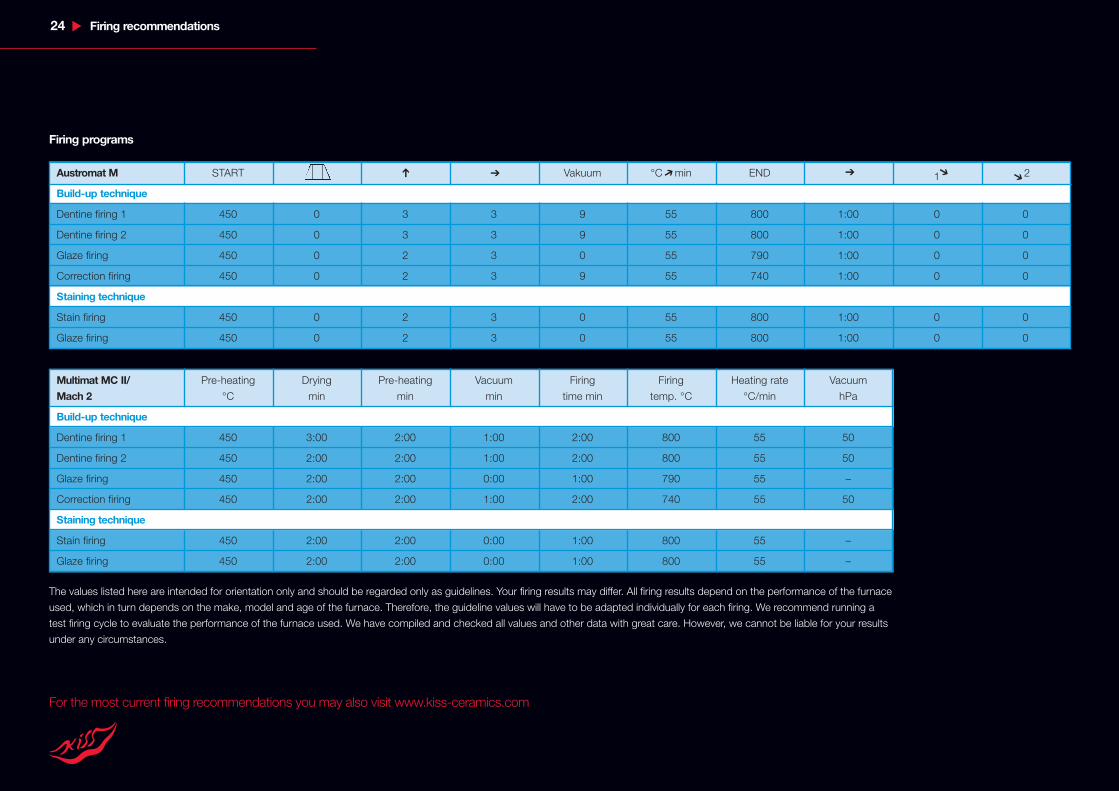
24 Firing recommendations
Multimat MC II/ Pre-heating Drying Pre-heating Vacuum Firing Firing Heating rate Vacuum
Mach 2 °C min min min time min temp. °C °C/min hPa
Build-up technique
Dentine firing 1 450 3:00 2:00 1:00 2:00 800 55 50
Dentine firing 2 450 2:00 2:00 1:00 2:00 800 55 50
Glaze firing 450 2:00 2:00 0:00 1:00 790 55 –
Correction firing 450 2:00 2:00 1:00 2:00 740 55 50
Staining technique
Stain firing 450 2:00 2:00 0:00 1:00 800 55 –
Glaze firing 450 2:00 2:00 0:00 1:00 800 55 –
Austromat M START Vakuum °C min END 1 2
Build-up technique
Dentine firing 1 450 0 3 3 9 55 800 1:00 0 0
Dentine firing 2 450 0 3 3 9 55 800 1:00 0 0
Glaze firing 450 0 2 3 0 55 790 1:00 0 0
Correction firing 450 0 2 3 9 55 740 1:00 0 0
Staining technique
Stain firing 450 0 2 3 0 55 800 1:00 0 0
Glaze firing 450 0 2 3 0 55 800 1:00 0 0
� � �� ��
Firing programs

Firing recommendations 25
Programat Standby Heating rate Firing Closing time Holding time Vacuum Vacuum
P90/P95 temp. °C °C/min temp. °C min min ON °C OFF °C
Build-up technique
Dentine firing 1 300 55 800 6:00 1:00 450 799
Dentine firing 2 300 55 800 6:00 1:00 450 799
Glaze firing 300 55 790 4:00 1:00 – –
Corrections 300 55 740 4:00 1:00 450 739
Staining technique
Stain firing 300 55 800 4:00 1:00 – –
Glaze firing 300 55 800 4:00 1:00 – –
The values listed here are intended for orientation only and should be regarded only as guidelines. Your firing results may differ. All firing
results depend on the performance of the furnace used, which in turn depends on the make, model and age of the furnace. Therefore, the
guideline values will have to be adapted individually for each firing. We recommend running a test firing cycle to evaluate the performance
of the furnace used. We have compiled and checked all values and other data with great care. However, we cannot be liable for your results
under any circumstances.
For the most current firing recommendations you may also visit www.kiss-ceramics.com
Firing programs
Vacumat 200/250 Standby Final temp. Pre-drying Heating Holding time Vacuum time
temp. °C °C min min min min
Build-up technique
Dentine firing 1 450 800 6:00 6:00 1:00 6:00
Dentine firing 2 450 800 6:00 6:00 1:00 6:00
Glaze firing 450 790 4:00 6:00 1:00 –
Corrections 450 740 4:00 6:00 1:00 6:00
Staining technique
Stain firing 450 800 4:00 6:00 1:00 –
Glaze firing 450 800 4:00 6:00 1:00 –

26 Service
Troubleshooting
Problem
• Muffle is damaged after firing
• Flash and voids at the margins and on the inside ofcrowns
• Flash on restorations and sprues
• Restorations are not completely pressed
Cause
• The muffle and the pressing die were not perpendi-cular to the pressing direction, tilting the pressingdie and breaking the muffle
• Pressure too high
• Incorrect sprueing
• Cracks in the investment compound (microcrack)
• Number of pressing pellets is insufficient for thenumber and size of objects too be pressed
• Pressing temperature to low• Actual temperature inside the pressing oven doesnot reach the pre-selected temperature
• Pressing time too short• Pressure too low
Solution
• Always use the spacer ring to ensure the correctperpendicular position of the muffle
• The pressing sprue and the wax model must be inalignment
• Follow the pre-heating recommendations for theinvestment compound
• Observe the second time of the investment compound• Do not place the muffle in a hot pre-heating oven(does not apply to Cergo fit SPEED)
• Determine the weight of the wax model and thesprues to calculate the number of pellets needed
• Set the pressing temperature to 980 °C• Check and, if necessarily, recalibrate thepressing oven
• Set the pressing time to 20 minutes• Set the pressure to 4.5 bar

Service 27
Problem
• Cracks when cutting off the sprues• Cracks when trimming the restauration
• Crown is too narrow (bad fit)• Crown is too wide (bad fit)
• MOD inlay is too wide• MOD inlay is too narrow
• Porosities or white stains on the surface of therestoration or discoloration
• Cracks occur after firing
• Restoration does not fit after firing
Cause
• Local overheating of the pressable ceramic materialdue to the use of improper grinding instruments orexcessive pressure
• Concentration of the mixing fluid is too low• Concentration of the mixing fluid is too high
• Concentration of the mixing fluid is too high• Concentration of the mixing fluid is too low
• Modeling wax that has not burned on completely• Pressing temperature too high
• Incorrect firing parameters• Carrier was left on the firing plate after firing• Incorrect firing pin was used or object was fireddirectly on the carrier
• Restoration has been distorted by excessive firingtemperature
• Ceramic material is present on the inside of the restoration• Restoration does not have the required minimumwall thickness
Solution
• Use sharp and fine diamond burs at low pressure• Cool the restoration with water while grinding
• Use mixing fluid of the proper concentration
• Use mixing fluid of the proper concentration
• Use wax specially designed for all-ceramic restorations• Set the pressing temperature to 980 °C
• Fire without any cooling step• Remove the carrier from the oven immediately after firing• Fire crowns on special firing pins• Fire inlays on a small piece of firing cotton placed onfiring pins
• Decrease the firing temperature• Check the internal surfaces and remove any ceramicmaterial
• Observe the minimum wall thickness requirements

28 Product range
Product range Cergo Kiss
Investment compound
2532 0100 Cergo fit
2540 0114 Special liquid
1,350 ml
2532 0200 Cergo fit SPEED
2540 0117 Cergo fit SPEED liquid, 1,450 ml
Pressing on firing oven
5556 0001 Cergo press
5555 0100 Vacuum pump for Cergo press
Ceramic pellets
6519 0131 Cergo Kiss set case
16 dentin stains (A1–D4)
7 Lucent pellets (LO, L1, L2, LY, LG, LR, LB)
2 Crystal pellets (C, CO)
4 Incisal pellets (I1– I4)
3 Paint pellets (P1, P2, PF)
Pressing muffle
6590 1001 Rubber sleeve
for 100-g muffle
6590 1101 Muffle former for 100-g muffle
6590 1002 Rubber sleeve
for 200-g muffle
6590 1102 Muffle former for 200-g muffle
6590 2001 Pressing die
Veneering ceramic
6039 0131 Duceram Kiss set
Duceragold Kiss individual masses
Firing oven
5555 0001 Cergo compact
5555 0100 Vacuum pump for Cergo compact
Other Cergo system accessories
6590 0001 Die spacer
6590 1201 Object carrier, special
6590 1202 Firing pins (set of 7)
6590 1203 Firing cotton
6590 1210 Set of object carriers

Service 29
Notes

30 Service
Notes
Top Related