


Languages
Pages
Legal


California State Parks Trails Handbook
6-i
Chapter 6. Mountain Bike Trail Design ................................................................ .......
................................................................... ...............................................................................
.......................................................................................................................................
................................................................................................ .....................................................................................
.................................................................... .............................................................................................
.........................................................................................................................
............................................................... ....................
....................................................................................................................................................
................. ........................................................................
......................................... ................................................................................
......................................................................................... ............................................................
..........................................................................
................................................... .......................................
..............................................................................................
....................................................................................................... ............................
........................................................................................... ............................................
.................... ....................................
6-1
6.1. Mountain Bike Uses, Resource Protection, and Sustainability Goals . 6-1 6.1.1. Beginning or Casual Cyclists . 6-1 6.1.2. Intermediate Cyclists . 6-1 6.1.3. Advanced Technical Cyclists . 6-2 6.1.4. Advanced Downhill Cyclists . . 6-2
6.2. User Protocols . 6-2
6.3. Design Requirements . 6-3 6.3.1. Trail Length and Circulation . . 6-3 6.3.2. Tread Width . 6-4 6.3.3. Trail Layout and Tread Construction . 6-4
6.3.3.1. Increasing Trail Sinuosity . 6-4 6.3.3.2. Reducing Long Sight Lines . 6-5 6.3.3.3. Staying Within the Maximum Sustainable Grade Limits . 6-5 6.3.3.4. Reducing Tread Width . 6-5 6.3.3.5. Using “Run Outs” . 6-7 6.3.3.6. Using Natural or Placed Features to Create Pinch Points . 6-7 6.3.3.7. Avoiding Flat Ground . 6-8 6.3.3.8. Texturing and Hardening the Trail Tread 6-11
6.3.4. Low Trail Structures 6-11 6.3.5. Trail Drainage 6-12 6.3.6. Switchbacks and Climbing Turns 6-13 6.3.7. Watercourse Crossings 6-13
Figures Figure 6.1 - Shared and Separate Trails with Loops . 6-3 Figure 6.2 - Natural and Placed Features to Reduce Speed . 6-9 Figure 6.3 - Pinch Point 6-10 Photos Photo 6.1 - Cyclist . 6-1 Photo 6.2 - Using Curvilinear Alignment to Reduce Sight Distance . 6-6 Photo 6.3 - Using Natural Features to Create Sinuosity . 6-6 Photo 6.4 - Narrowing the Trail Tread to Reduce Speed . 6-7 Photo 6.5 - Placing Rocks Offset to Create Pinch Points . 6-8 Photo 6.6 - Using Native Rocks to Texture Surface and Reduce Speed 6-11 Photo 6.7 - Using a Drain Dip to Divert Water Off of the Trail 6-12

California State Parks Trails Handbook
6-1
Chapter 6. Mountain Bike Trail Design Mountain bike trails are designated for non-motorized bicycles equipped for off-road use. Hikers may also use these trails, but they are not the intended primary user group for whom the trail is designed to accommodate. These trails are designed to meet the requirements of mountain bikes and their riders, protect resources, and achieve a durable and maintainable trail. They are not equestrian, multi-use, or accessible trails. The planning, layout, design, and construction techniques discussed in Chapter 5, Principles of Trail Layout and Design, apply to these trails; however, there are also design criteria specific to mountain bikes.
Photo 6.1 - Cyclist 6.1. Mountain Bike Uses, Resource Protection, and Sustainability Goals There are several types of mountain bike users. When designing trails, it is important to match the use with the park unit classification, resource protection policies, and trail sustainability goals for the land management agency. Mountain bike users can be separated into four basic groups.
6.1.1. Beginning or Casual Cyclists
These cyclists seek easy to moderately challenging trails. They prefer single-track trails with a wide smooth surface and a gentle meander as they contour around the landform. Typically, these trails are short to moderate in length. These cyclists enjoy a combination of being outdoors, the beauty of the natural setting, getting exercise, and developing their riding skills. This type of trail is mostly located in frontcountry areas on public lands.
6.1.2. Intermediate Cyclists
These experienced cyclists seek moderate to difficult trails. They prefer narrow single-track trails that have tight turns and rough surfaces. Typically, the trails are

California State Parks Trails Handbook
6-2
moderate to long in length. These cyclists enjoy being outdoors, having a more rustic trail experience, maintaining their physical condition, and testing their biking skills. These trails are in frontcountry and backcountry areas on public lands.
6.1.3. Advanced Technical Cyclists
These technical cyclists seek challenging courses with drop-offs, precipitous ledges, logs and rocks to ride (jump) over, elevated bridges, boardwalks, ramps, jumps, and seesaws. They prefer courses designed to challenge even the most experienced mountain biker and their advanced equipment. These cyclists enjoy being outdoors, testing their riding skills, and the satisfaction of overcoming obstacles. These trails are often located on private land such as ski resorts and mountain biking clubs. Some federal agencies, such as the United Sates Forest Service (USFS) and Bureau of Land Management (BLM), offer these types of trails. The Department’s off-highway vehicle parks and recreation areas may also be suitable locations for these trails.
6.1.4. Advanced Downhill Cyclists
These are downhill and free riding cyclists who seek steep and extremely difficult trails or steep hillslopes without trails. These uses can be highly impactful to the natural and cultural resources of a park. These trail users prefer trails and slopes that provide the maximum test of their skills, and use sophisticated bikes designed for these activities. They enjoy being outdoors, pushing their skills and equipment to the limit, and the thrill that comes from careening down steep routes. These trails and routes exist on private land such as ski resorts and federal land such as those managed by USFS and BLM. The Department’s off-highway vehicle parks and recreation areas may be suitable locations for these trails and routes. However, due to the high-impact nature of these activities, the construction of new trails requires stringent environmental review under CEQA.
Cyclists may participate in more than one of these riding activities. The categories above demonstrate the range of mountain bike riding activities that trail program managers may accommodate. In this manual’s introduction, it was stated that this handbook only addresses trail uses that meet the Department’s definition of sustainable. Of the groups identified above, only trails for beginning, casual, and intermediate cyclists meet this definition. Trails for advanced technical and downhill cyclists currently do not meet this definition and would require experience, funding, and maintenance beyond the scope of existing Department resources. See Chapter 5, Principles of Trail Layout and Design, for additional information on design and management techniques for these trails.
6.2. User Protocols Designated mountain bike trails are designed specifically for cyclists. The standard protocol for yielding requires cyclists to yield the right-of-way to hikers. However, in situations such as the cyclist peddling uphill or when there is limited passing space, it is

California State Parks Trails Handbook
6-3
often easier for the hiker to yield to the cyclist since hikers can easily halt their progress and step off to the side of the trail. Communication between cyclists and hikers is essential so both are aware of each other and what the other plans to do. With narrow single-track trails, it is essential for safety that cyclists and hikers acknowledge each other and indicate how each plans to pass before they meet. 6.3. Design Requirements
6.3.1. Trail Length and Circulation
The majority of cyclists in the U.S. are found in urban areas. They ride their bikes after work and on weekends. To accommodate this user group, trail designers in frontcountry settings strive to provide trails of varying lengths. Trails of 3 to 10 miles provide the distance desired by most cyclists for afternoon or evening rides. Longer trail opportunities are provided for cyclists that have more time and for weekend activities (if the landbase is large enough). Backcountry trails receive the most use on weekends, when cyclists have time to ride longer distances. Like equestrian trails, interconnected loops provide route options to cyclists. (See Figure 6.1.) Loop trails are preferable for all user groups, as retracing one’s path is not nearly as stimulating as traversing new ground. A good way to accommodate all trail users when there is competition for trails is to establish multi-use trails as the main arteries of the system, and have specifically designated trails branch off the main arteries. These trails can connect to other similarly designated loops or loop back to the multi-use artery. (See Figure 6.1.)
Figure 6.1 - Shared and Separate Trails with Loops

California State Parks Trails Handbook
6-4
6.3.2. Tread Width
Class 1 trails have a minimum tread width of 36 inches. Although the primary user is the mountain biker, hikers are frequently encountered. In locations where the hillslope is steep and hikers have difficulty stepping off the trail, passing space should be provided. Passing space should be a minimum of 60 inches wide and 60 inches long. Class 2 trails have a minimum tread width of 18 inches, and passing areas are a minimum of 48 inches wide and 60 inches long. Class 3 trails have a minimum tread width of 12 inches, and passing areas are a minimum of 36 inches wide and 60 inches long.
6.3.3. Trail Layout and Tread Construction
The general layout, design, and construction of mountain bike trails will follow the principles outlined in Chapter 5, Principles of Trail Layout and Design. In addition, an important element in mountain bike trail design is reducing the speed of cyclists. High rates of speed can lead to increased user conflicts (even with other cyclists), safety issues, resource degradation, and trail sustainability issues. There are several design techniques that can be used to help reduce bike speed, including: • Increasing trail sinuosity; • Reducing long sight lines; • Staying within the maximum sustainable grade; • Reducing tread width; • Use “run outs” at the bottom of lengthy downhill trail segments; • Using natural or artificial features to create pinch points; • Avoiding flat ground; and • Texturing the trail tread. Using these design techniques collectively rather than simply relying on a single technique will result in greater speed reduction, user safety, and user satisfaction.
6.3.3.1. Increasing Trail Sinuosity
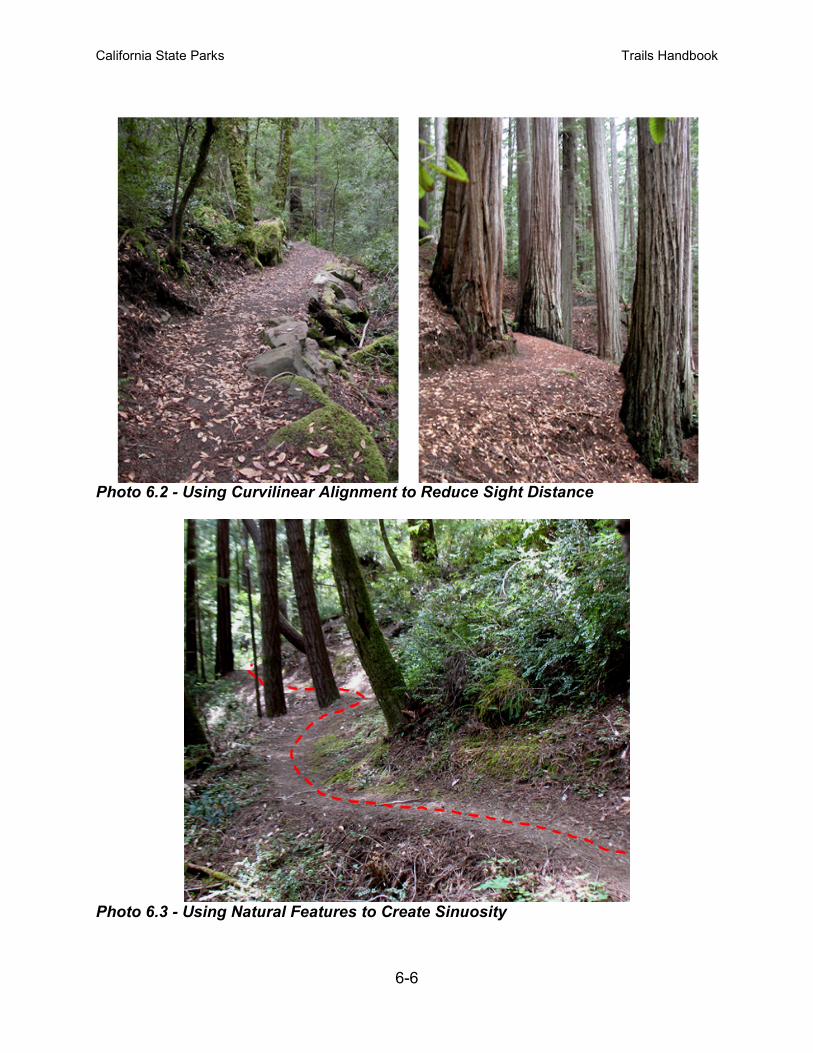
By following a curvilinear alignment (described in Chapter 5, Principles of Trail Layout and Design), the trail will have turns due to contouring around the landform, trees, and rock outcroppings, and dipping in and out of watercourse crossings (including micro-watercourses such as swales and crenulations). A curvilinear trail design has more sinuosity, which makes the mountain biker slowdown and eliminates the need for hard braking. (See Photos 6.2 and 6.3.) Thus, the trail tread receives less wear, the impact on resources is reduced, sustainability is more easily achieved, and user conflicts are avoided. This type of alignment also produces a more challenging ride for the mountain biker, increases user satisfaction, and helps curb illegal trail riding and unauthorized trail construction activities that are prevalent on public lands.
California State Parks Trails Handbook
6-5
6.3.3.2. Reducing Long Sight Lines
Curvilinear layout also eliminates long straight uninterrupted sight lines. If the cyclist can see a clear route ahead (particularly on downhill runs), and there are no turns or natural features to maneuver around, they will accelerate through that segment. When they come to the end of that segment and encounter a curve in the trail, a natural feature to maneuver around, or another trail user, they will apply their brakes hard. This braking action causes the bike to go into a skid. The tires dig into the soil across the trail tread and push the soil toward the outside edge. When this action is repeated over a period of time, an entrenched trail tread develops with a berm on the outside edge. The trail can no longer effectively sheet overland runoff and becomes a ditch that collects and diverts water, making the trail a liability to the resources and unsustainable. This type of use also increases the potential for user conflicts and accidents.
However, reduced sight lines without effectively reducing the cyclist’s speed may create safety concerns by not allowing users to see far enough along the trail to view and avoid other users. The use of additional speed control measures along with site and project specific conditions should be evaluated to determine the advantages and disadvantages of reduced sight lines for speed control.
6.3.3.3. Staying Within the Maximum Sustainable Grade Limits
The trail designer must also be careful not to create trail grades that exceed the maximum sustainable grade or create a sudden grade increase that causes the cyclist to brake hard going downhill or stand on their pedals when going uphill. Keeping linear grades below the maximum sustainable grade and selecting natural objects to weave over or under without rapid elevation change is critical to successful mountain bike trail design. The frequency of natural features encountered on this type of trail can be adjusted to provide higher or lower levels of challenge to the cyclist.
6.3.3.4. Reducing Tread Width
Another design element that is effective in reducing speed is narrowing the tread width, which is often preferred by many mountain bikers. Given that the trail is not designated for one-way traffic, a narrow trail can substantially reduce speeds. Narrowing the tread width limits the cyclist’s maneuverability and ability to avoid on-coming cyclist and hikers. The utilization of other speed control measures is essential with this type of design. (See Photo 6.4.) In addition, where site conditions do not allow for the safe passage of two trail users, trail widening or periodic passing spaces should be provided. Site and project specific conditions should be evaluated to determine the advantages and disadvantages of reducing the trail tread width. Using these design techniques allows the designer to create a sustainable and safe trail alignment tailored to beginning, casual, and intermediate cyclists.
California State Parks Trails Handbook
6-6
Photo 6.2 - Using Curvilinear Alignment to Reduce Sight Distance
Photo 6.3 - Using Natural Features to Create Sinuosity

California State Parks Trails Handbook
6-7
Photo 6.4 - Narrowing the Trail Tread to Reduce Speed
6.3.3.5. Using “Run Outs”
At the end of a long downhill segment that is within the maximum sustainable grade, hard braking may be reduced by leveling the trail or providing an uphill segment to slow the cyclist. The length of a “run out” segment should be sufficient to slow a cyclist ahead of locations where reduced sight lines or other potentially hazardous interactions with other users could be encountered. The effectiveness of run outs can be further improved by texturing the trail tread in these segments. 6.3.3.6. Using Natural or Placed Features to Create Pinch Points
Where conditions permit, appropriate natural features such as rocks and trees can be used as “pinch points” to slow trail users by giving the appearance that the trail narrows between these features. If the landform lacks appropriate natural features then features such as downed trees, rocks, and posts can be placed adjacent to the trail as pinch points. (See Figures 6.2 and 6.3, and Photo 6.5.) These objects can be placed above and below the trail bed where the trail curves or turns. The objects are offset, with one being further up or down the trail from the other, and placed outside of the designed width of the trail tread. When placed in this way, these objects will appear to the cyclist as adjacent with only a narrow opening between them. The cyclist will slow down to negotiate between the two objects. Since the opening between the two objects is as wide as the designed tread width, the location does not present an increased safety risk to the user. In some cases, site specific conditions and project requirements may necessitate that to sufficiently slow users, pinch points should be narrowed to less than the designated trail width. In these cases, caution should be taken to
California State Parks Trails Handbook
6-8
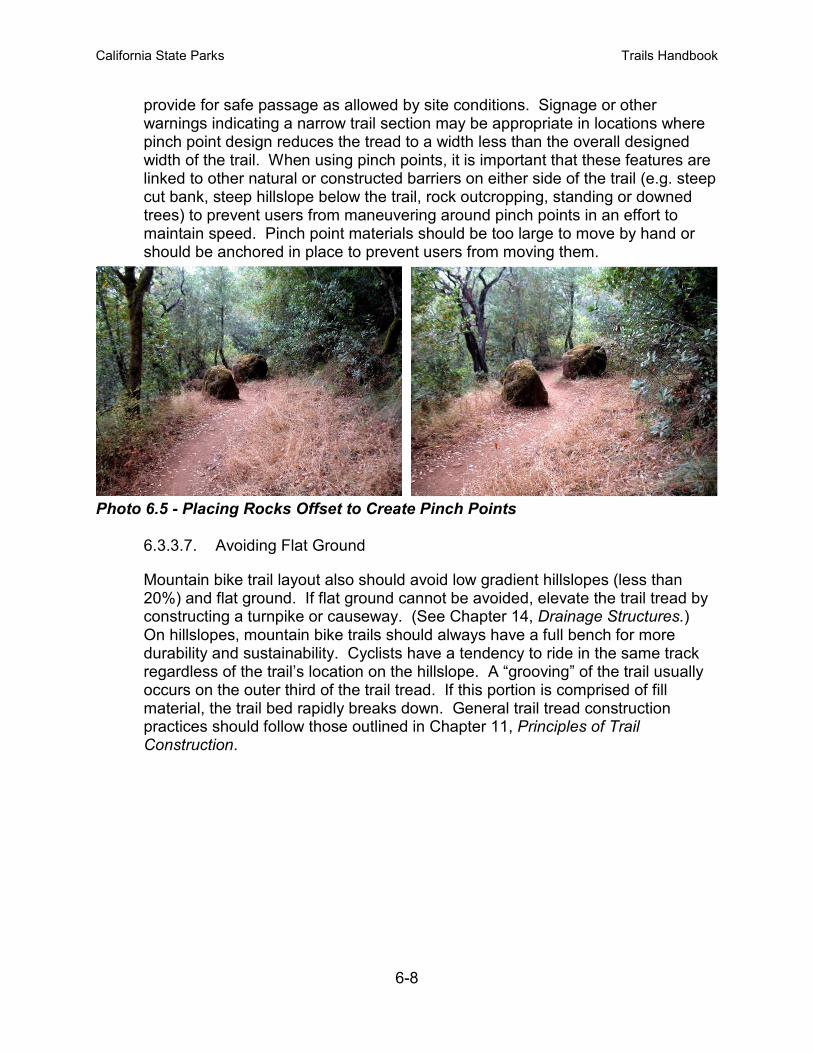
provide for safe passage as allowed by site conditions. Signage or other warnings indicating a narrow trail section may be appropriate in locations where pinch point design reduces the tread to a width less than the overall designed width of the trail. When using pinch points, it is important that these features are linked to other natural or constructed barriers on either side of the trail (e.g. steep cut bank, steep hillslope below the trail, rock outcropping, standing or downed trees) to prevent users from maneuvering around pinch points in an effort to maintain speed. Pinch point materials should be too large to move by hand or should be anchored in place to prevent users from moving them.
Photo 6.5 - Placing Rocks Offset to Create Pinch Points
6.3.3.7. Avoiding Flat Ground
Mountain bike trail layout also should avoid low gradient hillslopes (less than 20%) and flat ground. If flat ground cannot be avoided, elevate the trail tread by constructing a turnpike or causeway. (See Chapter 14, Drainage Structures.) On hillslopes, mountain bike trails should always have a full bench for more durability and sustainability. Cyclists have a tendency to ride in the same track regardless of the trail’s location on the hillslope. A “grooving” of the trail usually occurs on the outer third of the trail tread. If this portion is comprised of fill material, the trail bed rapidly breaks down. General trail tread construction practices should follow those outlined in Chapter 11, Principles of Trail Construction.

California State Parks Trails Handbook
6-9
Figure 6.2 - Natural and Placed Features to Reduce Speed

California State Parks Trails Handbook
6-10
Figure 6.3 - Pinch Point

California State Parks Trails Handbook
6-11
6.3.3.8. Texturing and Hardening the Trail Tread
The trail tread must be uniformly firm and smooth to allow overland sheet flow. However, on mountain bike trails where native rock is encountered during construction, a portion of that rock can be retained within the tread if it does not impede overland sheet flow or present a significant tripping hazard. Leaving rocks that project into the trail tread (sometimes referred to as tread texturing) further reduces the speed of cyclists and provides a more challenging ride. (See Photo 6.6.)
Photo 6.6 - Using Native Rocks to Texture Surface and Reduce Speed
If the parent or native soil is not suitable for long term sustainability, the trail tread can be strengthened by adding crushed rock aggregate. In addition, the application of stone pitching and rip rap will mitigate even the heaviest rates of mechanical wear. These techniques could also be considered “texturing” because the rough, irregular surface helps slow cyclists. (See Chapter 11, Tread Armoring.)
6.3.4. Low Trail Structures
Low trail structures, such as steps and water bars, should be avoided on mountain bike trails. Cyclists have a difficult time negotiating these structures, especially when riding uphill, and often will ride around them, which can cause resource damage. When cyclists encounter a water bar or step, they have to dismount and

California State Parks Trails Handbook
6-12
walk or ride around it on the downhill side, leading to erosion of the hillside, undermining of the structure, resource degradation, and trail maintenance and sustainability problems. When designing and laying out a new mountain bike trail, water bars and steps are never used. If existing mountain bike trails have steps, the trail should be reconstructed or rerouted to eliminate them or they should be reconstructed according to Chapter 17, Trail Steps.
6.3.5. Trail Drainage
Through the use of curvilinear alignment, maximum sustainable grade criteria, full bench construction, proper outsloping, speed reduction design, and trail hardening techniques, the need for additional trail drainage stuctures becomes minimal. If additional drainage is required, drain dips, also known as grade reversals, are an option. Since these structures collect and divert surface runoff from the trail where natural watercourses do not exist, they are not considered a sustainable design. Use of these structures should be judiciously applied and not arbitrarily installed based on a formula that does not take into account the specific site conditions of the trail. To reduce the hydrological impacts of these structures, they must be located where the landform can best withstand the concentrated surface runoff. Furthermore, these drainage structures must be designed and constructed to avoid abrupt grade changes that can lead to increased mechanical wear, tread degredation, and soil erosion. (See Photo 6.7.) For further information on designing and installing drain dips, follow the instructions in Chapter 14, Drainage Structures.
Photo 6.7 - Using a Drain Dip to Divert Water Off of the Trail

California State Parks Trails Handbook
6-13
6.3.6. Switchbacks and Climbing Turns
Switchbacks and climbing turns should be designed and built as discussed in Chapter 12, Topographical Turn, Switchback, and Climbing Turn Construction. When designing these turns, the radius must be wide enough for cyclists to negotiate. A turning radius that is too tight will cause cyclists going downhill to ride on the outside edge of the trail, causing the trail to widen. Cyclists riding uphill will have to dismount if they cannot sustain enough momentum to make it around a tight turn. The minimum radius of a switchback is 8 feet and a climbing turn is 6 feet. At the turn, the grade of the upper and lower legs should be the same. An abrupt grade change at this location should be avoided as it will increase mechanical wear. The grade of the upper and lower legs of the turn should not exceed 12%, unless the material is durable enough to support a steeper grade. If site conditions allow, low linear grades are desirable to reduce strain on the rider and decrease mechanical wear on the trail. Even when the trail tread is extremely durable, linear grades should not exceed 14% due to the difficulty of climbing such a steep turn on a bike. On trails with high use or weak parent soils it may be necessary to armor the surface of the switchback or climbing turn to maintain the tread. (See the Trail Hardening section in Chapter 11, Principles of Trail Construction.)
6.3.7. Watercourse Crossings
The process for selecting watercourse crossing sites is discussed in Chapter 5, Principles of Trail Layout and Design. Wet crossings should not be considered for mountain bike trails unless flows are shallow and have low velocities. All wet crossings, even those across swales, should be armored to protect soil and stream gravel, reduce erosion and sediment delivery, and be sustainable. (See Chapter 14, Drainage Structures, Section 14.5, “Armored Stream Crossings.”)
Dry crossing designs are preferable for mountain bike trails. Culverts, puncheons, and bridges on mountain bike trails should be designed to pedestrian trail standards. All approaches to watercourse crossings should be constructed at trail grade. (See Chapter 16, Trail Bridges.)
Top Related