


Languages
Pages
Legal


BT 0082
Visual Basic
Contents
Unit 1
Visual Basic .NET – An Introduction 1
Unit 2
Basic Concepts and Language Fundamentals 29
Unit 3
Flow Control Statements 50
Unit 4
Form Based Applications 64
Unit 5
Exception Handling in VB.NET 100
Unit 6
Data Access in VB.NET 124
Unit 7
Working with Records in VB.NET 140
Unit 8
Arrays in Visual Basic 152
Unit 9
ImageList and TreeView Controls 178
Unit 10
The ListView Control 198
Edition: Spring 2009
BKID – B1093 9
th Oct. 2009

Unit 11
Classes and Objects 217
Unit 12
Inheritance and Interfaces – I 240
Unit 13
Inheritance and Interfaces – II 266
Unit 14
Multithreading in Visual Basic 290
Acknowledgements, References and
Suggested Readings 307

Director & Dean Directorate of Distance Education Sikkim Manipal University of Health, Medical & Technological Sciences (SMU DDE)
Board of Studies Dr. U. B. Pavanaja (Chairman) Nirmal Kumar Nigam General Manager – Academics HOP – IT Manipal Universal Learning Pvt. Ltd., Bangalore SMU DDE, Manipal Prof. Bhushan Patwardhan Dr. A. Kumaran Chief Academics Research Manager (Multilingual) Manipal Education Microsoft Research Labs India Bangalore. Bangalore. Dr. Harishchandra Hebbar Ravindranath P. S. Director Director (Quality) Manipal Centre for Info. Sciences, Yahoo India Bangalore Bangalore. Dr. N. V. Subba Reddy Dr. Ashok Kallarakkal HOD-CSE Vice President Manipal Institute of Technology, Manipal IBM India, Bangalore Dr. Ashok Hegde H. Hiriyannaiah Vice President Group Manager MindTree Consulting Ltd., Bangalore EDS Mphasis, Bangalore Dr. Ramprasad Varadachar Director, Computer Studies Dayanand Sagar College of Engg. Bangalore.
Content Preparation Team Content Writing Content Editing Mr. Nirmal Kumar Nigam Mr. Balasubramani R Asst. Professor & HoP – IT Asst. Professor – IT SMU DDE, Manipal SMU DDE, Manipal
Instructional Design Language Editing Mr. Kulwinder Pal Ms. Aparna Ramanan Asst. Professor – Education Asst. Professor – English SMU DDE, Manipal SMU DDE, Manipal
Mr. Balasubramani R Mr. Naveen Dias Asst. Professor – IT Sr. Lecturer – English SMU DDE, Manipal Government First Grade College, Mangalore
Edition: Spring 2009
This book is a distance education module comprising a collection of learning material for our students. All rights reserved. No part of this work may be reproduced in any form by any means without permission in writing from Sikkim Manipal University of Health, Medical and Technological Sciences, Gangtok, Sikkim. Printed and published on behalf of Sikkim Manipal University of Health, Medical and Technological Sciences, Gangtok, Sikkim by Mr. Rajkumar Mascreen, GM, Manipal Universal Learning Pvt. Ltd., Manipal – 576 104. Printed at Manipal Press Limited, Manipal.


This book is a comprehensive, hands-on guide to the Visual Basic .NET
programming language addressed to readers with some programming
background. No background in Visual Basic is required, however.
The book covers at the least the fundamentals of every technique that a
professional VB .NET developer will need to master. This is a book about
the techniques you need to master.
Finally, since most people reading this book will have programmed with
some version of Visual Basic before, the book tries to differentiate between
VB .NET and earlier versions of VB as I could. However, this book does not
assume any knowledge of earlier versions of VB, just some programming
experience.
Unit 1: Visual Basic .NET – An Introduction
This unit takes the reader through the basic concepts of Visual Basic.Net
and Visual Studio development environments. It also gives the concepts of
Window Forms, Web forms, and components of .Net framework. It guides
the reader through the process of compiling and running a Visual basic
application It walks through all the basic concepts involved in designing,
running, and executing a Visual Basic.Net application.
Unit 2: Basic Concepts and Language Fundamentals
It gives a walkthrough of all the basic concepts and theory behind the
language needed for a beginner or a developer to start with working on
VB.Net applications. It gives a broad picture of the data types, variables,
and constants in VB.Net.
Unit 3: Flow Control Statements
This unit makes the reader understand the concepts of Flow controls
statements used in VB.Net. It also goes through the looping structures and
arrays along with their syntax in VB.Net
Unit 4: Form Based Applications
This unit gives an extensive walkthrough of the desing and development of
windows form based application. It gives an in-depth coverage of all the
controls used in development of a form based application alogn with code
SUBJECT INTRODUCTION

snippets or complete programs covering each of them. It also discusses the
design of multi-form applications, SDI and MDI Interfaces.
Unit 5: Exception Handling in VB.NET
This unit starts with an introduction of error handling and exception handling
techniques. It describes the usage and application of Exception handling
techniques in VB.Net applications. It then describes the other keywords
associated with exception handling like Exit try, Source and Stacktrace. The
unit gives the user an insight into different ways of handling various
exceptions in various applications.
Unit 6: Data Access in VB.NET
This unit explains the mechanism of data access and the various techniques
of handling data like the usage of data form wizard in Visual Studio.Net. It
demonstrates the concepts of connections strings, opening the connection,
and so on necessary to connect and access the data to any data source. It
then describes the concepts of Structured Query language. The concepts of
filling the data sets, record navigation, and DML operations described.
Unit 7: Working with Records in VB.NET
This unit gives brief introduction to navigating records in VB.NET. Also you
will learn how to add new records, update existing records and deleting
unwanted records.
Unit 8: Arrays in Visual Basic
This unit illustrated the usage of a single variable to store n number of
values of homogenous data type. It also discussed the manipulation
operations on various types of arrays.
Unit 9: The ImageList and TreeView Controls
This unit described the features of all the Windows common controls
included in MsComCtr.ocx. In particular, the implementation and usage of
ImageList and TreeView controls have been described.
Unit 10: The ListView Control
This unit has illustrated the usage and applications of List View Control and
in the real world GUI design. The concepts of loading, retrieving, and
performing various operations on a ListView control have been described.

Unit 11: Classes and Objects
This unit describes the theoretical concepts of classes and objects, and their
applications in VB.Net programming.
Unit 12: Inheritance and Interfaces – Part I
This unit focuses on Inheritance concepts of VB.Net programming. It lets the
reader practice and apply the discussed concepts in real time programming
problems.
Unit 13: Inheritance and Interfaces – Part II
This unit describes the ins and outs of the Object class. This is the class that
all .NET objects ultimately inherit from. It also discusses implementation
inheritance by showing what .NET does to help solve the fragile base class
problem that is at the root of many of the implementation inheritance
problems in other OOP languages such as Java or C++.
Unit 14: Multithreading in Visual Basic
This unit describes the theory behind running various applications
simultaneously in VB.Net. using multithreading. It also discusses in detail
various multithreading related concepts like joining threads, making threads
to sleep, suspending or killing a thread, and the Daemon (Background)
threads.
Objectives of studying this subject
After studying this subject, you should be able to:
describe the architecture of VB.Net
explain the basic concepts of Visual Basic Language
illustrate the usage of various flow control statements
describe and illustrate form based applications
explain and use exception handling
explain the techniques of data accessing using VB.Net
explain and illustrate the working of records
discuss the usage of arrays in programming
explain and apply the ImageList and TreeView controls
explain and apply the ListView control
describe the Object Oriented Concepts in the context of VB.Net
define and explain basic inheritance concepts
describe the Object Class and Interfaces using VB.Net
describe and illustrate multithreading


Visual Basic Unit 1
Sikkim Manipal University Page No.: 1
Unit 1 Visual Basic .NET – An Introduction
Structure:
1.1 Introduction
Objectives
1.2 .Net Framework and Visual Studio.NET
1.3 Windows Forms and Web Forms Applications
1.4 The Components of the .NET Framework
1.5 Compiling and Running a Visual Basic Application
1.6 Visual Basic .NET and Visual Basic 6.0
1.7 Microsoft Development Environment 1.8 Customizing Visual Studio for Use With Visual Basic
1.9 Solutions and Projects in Visual Basic
1.10 Working with the IDE
1.11 The Code Editor Window
1.12 The Solution Explorer
1.13 Working with Windows in the IDE
1.14 Summary
1.15 Terminal Questions
1.16 Answers
1.1 Introduction
Before you can learn how to develop applications with Visual Basic .NET,
you need to become familiar with the .NET Framework, Visual Studio .NET,
and the Microsoft Development Environment. Along the way, you’ll learn
some basic concepts and some basic skills for working with the
Development Environment.
Objectives:
This unit introduces the reader to the basic concepts of Visual Studio.Net
and the .Net framework.
After studying this unit, you should be able to:
describe the importance of .Net Framework and Visual Studio.Net in
developing applications
design Windows Forms and Web Forms
describe the components of .Net Framework
compile and run a Visual basic Application
customize Visual Studio for use with Visual Basic.

Visual Basic Unit 1
Sikkim Manipal University Page No.: 2
1.2 .NET Framework and Visual Studio .NET
The .NET Framework (pronounced “dot net framework”) defines the
environment that you use to execute Visual Basic .NET applications and the
services you can use within those applications. One of the main goals of this
framework is to make it easier to develop applications that run over the
Internet. However, this framework can also be used to develop traditional
business applications that run on the Windows desktop.
To develop a Visual Basic .NET application, you use a product called Visual
Studio .NET (pronounced “Visual Studio dot net”). This is actually a suite of
products that includes the three programming languages described in table
1.1. In this book, of course, you’ll learn how to use Visual Basic .NET, which
is designed for rapid application development.
Visual Studio also includes several other components that make it an
outstanding development product. One of these is the Microsoft
Development Environment, which you’ll be introduced to in a moment.
Another is the Microsoft SQL Server 2000 Desktop Engine (or MSDE).
MSDE is a database engine that runs on your own PC so you can use
Visual Studio for developing database applications that are compatible with
Microsoft SQL Server. SQL Server in turn is a database management
system that can be used to provide the data for large networks of users or
for Internet applications.
The two other languages that come with Visual Studio .NET are C# and
C++. C# .NET (pronounced “C sharp dot net”) is a new language that has
been developed by Microsoft especially for the .NET Framework. Visual
C++ .NET is Microsoft’s version of the C++ language that is used on many
platforms besides Windows PCs.
In this figure, you can see that Visual Studio .NET can be used on any PC
that runs Windows 2000 or later. You can also see that the applications that
are developed with Visual Studio .NET can be run on any PC that runs
Windows 98 or later, depending on which .NET components are used by the
application. From a practical point of view, though, you can assume that the
applications that you develop with Visual Basic .NET will be run on PCs that
are using Windows 2000 or later.

Visual Basic Unit 1
Sikkim Manipal University Page No.: 3
This figure also shows that Visual Basic .NET comes in an inexpensive
Standard Edition that includes only the Visual Basic language, not C# or
C++. All but one of the Visual Basic features presented in this book work
with the Standard Edition as well as the full Visual Studio .NET.
Although the three languages shown in this figure are the only three
programming languages you can use within Visual Studio .NET, other
vendors are free to develop languages for the .NET Framework. For
example, Fujitsu has already developed a version of COBOL for the .NET
Framework.
Figure 1.1: Visual Studio .NET and the .NET Framework
Figure 1.1: .NET Framework
Table 1.1: Programming languages supported by Visual Studio .NET
Language Description
Visual Basic .NET Designed for rapid application development
Visual C# .NET A new language that combines the features of
Java and C++ and is suitable for rapid application
development
Visual C++ .NET Microsoft’s version of C++ that can be used for
developing high-performance applications
Web Services Web Forms
ASP.NET Application Services
ASP.NET Windows Forms
Controls Drawing
Windows Application Services
.NET Framework Base Classes
ADO.NET XML
Net
Threading IO
Security Diagnostics Etc.
Memory Management Common Type System
Life Cycle Monitoring
Common Language Runtime
Visual Basic Unit 1
Sikkim Manipal University Page No.: 4
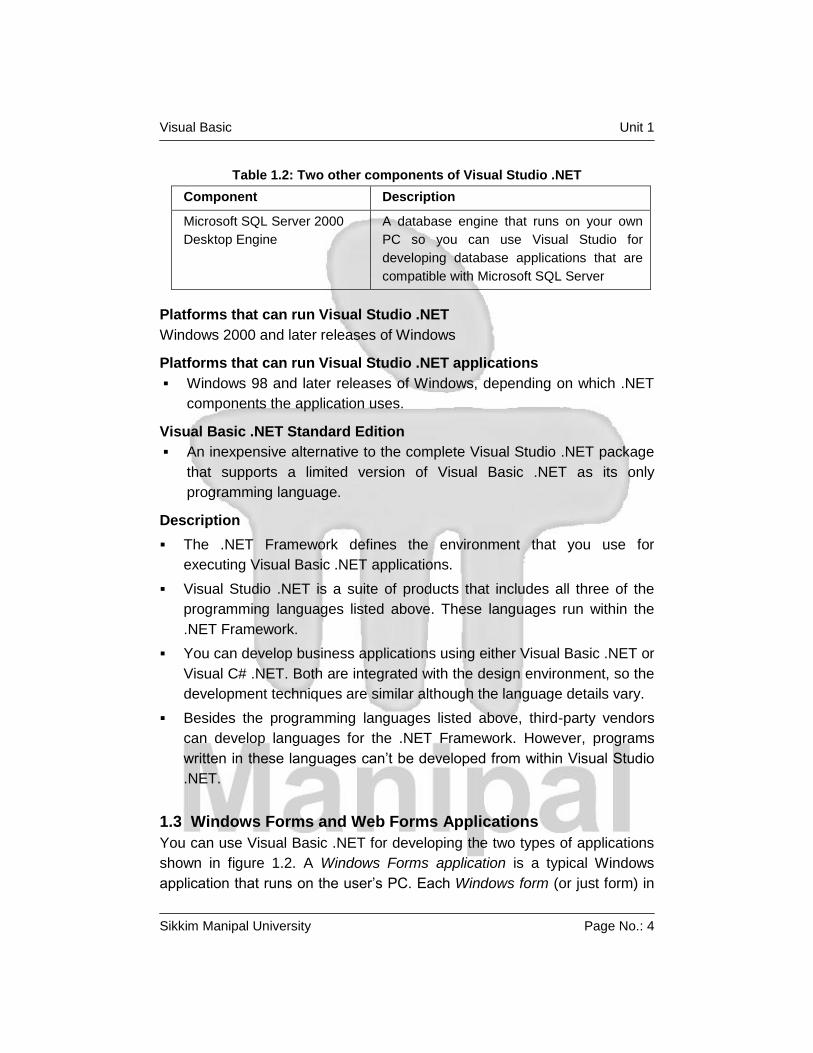
Table 1.2: Two other components of Visual Studio .NET
Component Description
Microsoft SQL Server 2000
Desktop Engine
A database engine that runs on your own
PC so you can use Visual Studio for
developing database applications that are
compatible with Microsoft SQL Server
Platforms that can run Visual Studio .NET
Windows 2000 and later releases of Windows
Platforms that can run Visual Studio .NET applications
Windows 98 and later releases of Windows, depending on which .NET
components the application uses.
Visual Basic .NET Standard Edition
An inexpensive alternative to the complete Visual Studio .NET package
that supports a limited version of Visual Basic .NET as its only
programming language.
Description
The .NET Framework defines the environment that you use for
executing Visual Basic .NET applications.
Visual Studio .NET is a suite of products that includes all three of the
programming languages listed above. These languages run within the
.NET Framework.
You can develop business applications using either Visual Basic .NET or
Visual C# .NET. Both are integrated with the design environment, so the
development techniques are similar although the language details vary.
Besides the programming languages listed above, third-party vendors
can develop languages for the .NET Framework. However, programs
written in these languages can’t be developed from within Visual Studio
.NET.
1.3 Windows Forms and Web Forms Applications
You can use Visual Basic .NET for developing the two types of applications
shown in figure 1.2. A Windows Forms application is a typical Windows
application that runs on the user’s PC. Each Windows form (or just form) in

Visual Basic Unit 1
Sikkim Manipal University Page No.: 5
the application provides a user interface that lets the user interact with the
application. In the example in this figure, the application consists of a single
form that lets the user perform either of two calculations: a future value or a
monthly investment calculation. Many applications, though, require more
than one form.
As part of the user interface, a Windows Forms application uses Windows
Forms controls. For instance, the form in this figure uses radio buttons,
labels, text boxes, and buttons. In the next chapter, you’ll start learning how
to develop Windows Forms applications.
The other type of application that you can develop with Visual Basic .NET is
a Web Forms application. Like a Windows Forms application, a Web Forms
application consists of one or more web forms that can contain controls.
Unlike Windows forms, though, web forms are accessed by and displayed in
a web browser. For instance, the web form in this figure is displayed in the
Microsoft web browser, which is called Internet Explorer.
As part of the user interface, a web form uses Web Forms controls. These
controls are similar to the Windows Forms controls, but they work only with
web forms.
In contrast to a Windows Forms application, which runs on the user’s PC,
the code for a Web Forms application runs on a web server. As this code is
executed, it passes the visual portion of the application to the browser
running on the client in the form of HTML (Hypertext Markup Language).
The browser then interprets the HTML and displays the form. In chapters 19
and 20, you’ll learn how to develop Web Forms applications with Visual
Basic .NET.
A Windows Forms application running on the Windows desktop

Visual Basic Unit 1
Sikkim Manipal University Page No.: 6
A Web Forms application running in a Web browser
Figure 1.2: Windows Forms and Web Forms applications
Description
A Windows Forms application runs on the Windows Desktop and can
consist of one or more Windows forms. These forms provide the
graphical user interface (GUI) for the application.
Each Windows form can contain Windows Forms controls like labels,
text boxes, buttons, and radio buttons. These controls let the user
interact with the application.
A Web Forms application runs on a web server, but its user interface is
displayed in a web browser on the client machine.
A Web Forms application consists of one or more web forms that
provide the user interface for the application. Each form can contain
Web Forms controls like labels, text boxes, buttons, and radio buttons.
Self Assessment Questions
1. The _____ defines the environment that you use to execute Visual Basic
.NET applications and the services you can use within those
applications.

Visual Basic Unit 1
Sikkim Manipal University Page No.: 7
2. To develop a Visual Basic .NET application, you use a product called
_____.
3. A _____ application runs on the Windows Desktop and can consist of
one or more Windows forms.
1.4 The Components of the .NET Framework
To give you a more detailed view of the .NET Framework, figure 1.3
presents the main components of this framework. As you can see, the .NET
Framework provides a common set of services that application programs
written in a .NET language such as Visual Basic .NET can use to run on
various operating systems and hardware platforms. The .NET Framework is
divided into two main components: the .NET Framework Class Library and
the Common Language Runtime.
The .NET Framework Class Library consists of segments of pre-written
code called classes that provide many of the functions that you need for
developing .NET applications. For instance, the Windows Forms classes are
used for developing Windows Forms applications. The ASP.NET classes
are used for developing Web Forms applications. And other classes let you
work with databases, manage security, access files, and perform many
other functions.
Although it’s not apparent in this figure, the classes in the .NET Framework
Class Library are organized in a hierarchical structure. Within this structure,
related classes are organized into groups called namespaces. Each
namespace contains the classes used to support a particular function. For
example, the System.Windows.Forms namespace contains the classes
used to create forms and the System.Data namespace contains the classes
you use to access data.
The Common Language Runtime, or CLR, provides the services that are
needed for executing any application that’s developed with one of the .NET
languages. This is possible because all of the .NET languages compile to a
common intermediate language, which you’ll learn more about in the next
figure. The CLR also provides the Common Type System that defines the
data types that are used by all the .NET languages. That way, you can use
more than one of the .NET languages as you develop a single application
without worrying about incompatible data types.

Visual Basic Unit 1
Sikkim Manipal University Page No.: 8
If you’re new to programming, the diagram in this figure probably doesn’t
mean too much to you right now. For now, then, just try to remember the
general structure of the .NET Framework and the terms that I’ve presented.
As you progress through this book, you will become more familiar with each
of the terms.
Figure 1.3: The components of the .NET Framework
Description
.NET applications do not access the operating system or computer
hardware directly. Instead, they use services of the .NET Framework,
which in turn access the operating system and hardware.
The .NET Framework consists of two main components: the .NET
Framework Class Library and the Common Language Runtime.
The .NET Framework Class Library provides pre-written code in the form
of classes that are available to all of the .NET programming languages.
This class library consists of hundreds of classes, but you can create
simple .NET applications once you learn how to use just a few of them.

Visual Basic Unit 1
Sikkim Manipal University Page No.: 9
The Common Language Runtime, or CLR, is the foundation of the .NET
Framework. It manages the execution of .NET programs by coordinating
essential functions such as memory management, code execution,
security, and other services. Because .NET applications are managed
by the CLR, they are called managed applications.
The Common Type System is a component of the CLR that ensures that
all .NET applications use the same basic data types regardless of what
programming languages were used to develop the applications.
1.5 Compiling and Running a Visual Basic Application
Figure 1.4 shows how an application is compiled and run when using Visual
Basic .NET. To start, you use Visual Studio .NET to create a project, which
is made of one or more source files that contain Visual Basic statements.
Most simple projects consist of just one source file, but more complicated
projects can have more than one source file. A project may also contain
other types of files, such as sound files, image files, or simple text files. As
the figure shows, a solution is a container for projects, which you’ll learn
more about in a moment.
You use the Visual Basic compiler, which is built into Visual Studio, to
compile your Visual Basic source code into Microsoft Intermediate
Language (or MSIL). For short, this can be referred to as Intermediate
Language (or IL).
At this point, the Intermediate Language is stored on disk in a file that’s
called an assembly. In addition to the IL, the assembly includes references
to the classes that the application requires. The assembly can then be run
on any PC that has the Common Language Runtime installed on it. When
the assembly is run, the CLR converts the Intermediate Language to native
code that can be run by the Windows operating system.
CLR is available for Unix System also, i.e. Mono. It is possible that the CLR
will eventually be available for other operating systems as well. In other
words, the Common Language Runtime makes platform independence
possible. Visual Basic applications will be able to run on those operating
systems as well as Windows/Unix operating systems. Whether this will
happen and how well it will work remains to be seen.

Visual Basic Unit 1
Sikkim Manipal University Page No.: 10
1.6 Visual Basic .NET and Visual Basic 6
If you are an experienced Visual Basic 6 programmer, you’ll notice that
Microsoft has made many changes to Visual Basic for .NET. In fact, the
changes are so significant that it’s probably best to think of Visual Basic
.NET as a new language with a familiar syntax.
Although there are a few changes to the Visual Basic language itself, the
most significant change in VB.NET is its reliance on the .NET Framework
classes. These classes affect almost every aspect of VB.NET programming,
including creating and working with forms and controls, using databases and
even working with basic language features such as arrays and strings.
Although Visual Basic .NET provides an upgrade wizard that lets you
convert VB6 applications to VB.NET, it leaves much of the conversion work
up to the programmer. As a result, most companies will probably not
upgrade their existing VB6 applications to VB.NET. Instead, they’ll support
their existing VB6 applications and use VB.NET to develop new
applications.
Figure 1.4: Compiling and Running a Visual Basic application
Visual Basic Unit 1
Sikkim Manipal University Page No.: 11
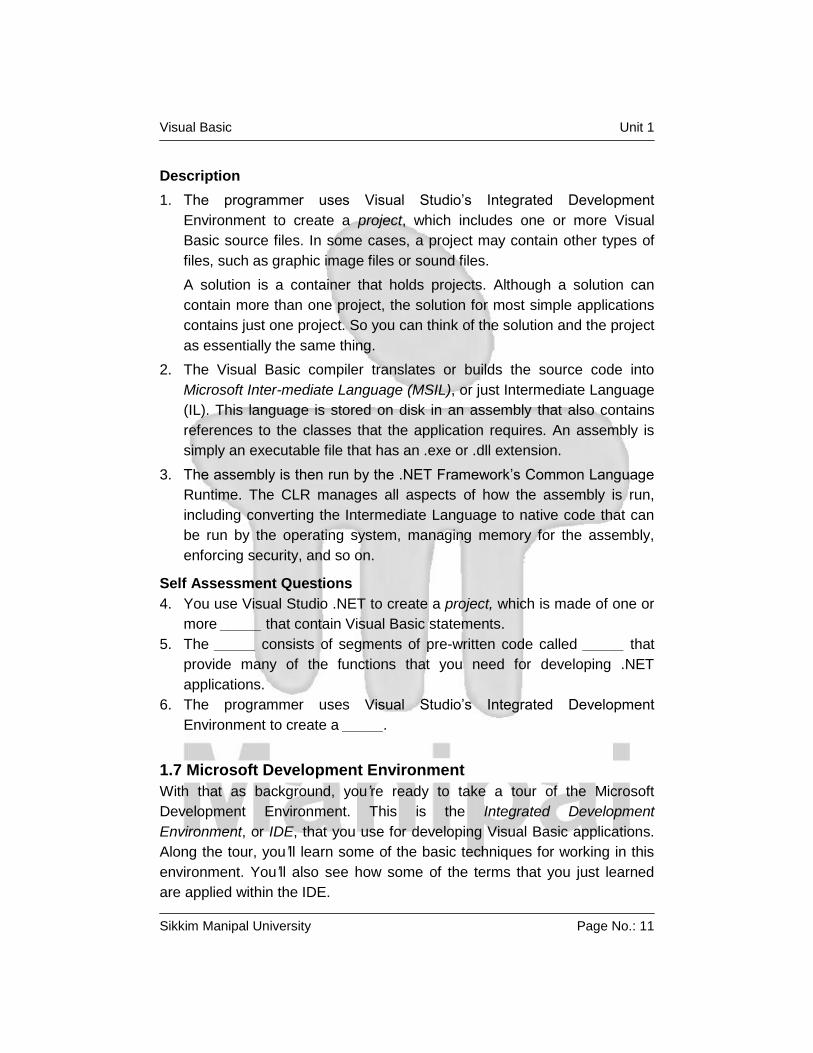
Description
1. The programmer uses Visual Studio’s Integrated Development
Environment to create a project, which includes one or more Visual
Basic source files. In some cases, a project may contain other types of
files, such as graphic image files or sound files.
A solution is a container that holds projects. Although a solution can
contain more than one project, the solution for most simple applications
contains just one project. So you can think of the solution and the project
as essentially the same thing.
2. The Visual Basic compiler translates or builds the source code into
Microsoft Inter-mediate Language (MSIL), or just Intermediate Language
(IL). This language is stored on disk in an assembly that also contains
references to the classes that the application requires. An assembly is
simply an executable file that has an .exe or .dll extension.
3. The assembly is then run by the .NET Framework’s Common Language
Runtime. The CLR manages all aspects of how the assembly is run,
including converting the Intermediate Language to native code that can
be run by the operating system, managing memory for the assembly,
enforcing security, and so on.
Self Assessment Questions
4. You use Visual Studio .NET to create a project, which is made of one or
more _____ that contain Visual Basic statements.
5. The _____ consists of segments of pre-written code called _____ that
provide many of the functions that you need for developing .NET
applications.
6. The programmer uses Visual Studio’s Integrated Development
Environment to create a _____.
1.7 Microsoft Development Environment With that as background, you’re ready to take a tour of the Microsoft
Development Environment. This is the Integrated Development
Environment, or IDE, that you use for developing Visual Basic applications.
Along the tour, you’ll learn some of the basic techniques for working in this
environment. You’ll also see how some of the terms that you just learned
are applied within the IDE.

Visual Basic Unit 1
Sikkim Manipal University Page No.: 12
How to use the Start page The Start page, shown in figure 1.5, is displayed when you start Visual
Studio. From this page, you can open existing projects or create new
projects, change your Visual Studio configuration settings, and access
various online Visual Studio resources.
Note that the first time you start Visual Studio after installing it, the My
Profile link rather than the Get Started link is displayed. You’ll find
information about the My Profile link in the next figure.
The Start page is actually the home page of a web browser that’s built into
Visual Studio. The built-in web browser is displayed whenever you access
the Start page or when you’re accessing Help information. You can return to
the Start page at any time by using the Help, Show Start Page command.
In case you aren’t familiar with the notation I just used, Help, Show Start
Page means to pull down the Help menu from the menu bar and then select
the Show Start Page command. We’ll use this notation throughout this book
because it makes it easier to find the command that you need. Usually, you
only need to pull down one menu and select a command. But sometimes,
you need to go from a menu to one or more submenus and then to the
command. In the second bulleted item in this figure, for example, you go
from the Programs menu to the Visual Studio .NET submenu and then to
the command.
If you’ve worked with a web browser such as Internet Explorer before, you’ll
have no trouble navigating among pages in the Visual Studio browser. A
special Web toolbar includes the buttons you can use to go to the previous
or next page, stop a download, refresh a page, or return to the home page.
This toolbar appears only when you are working in the web browser. When
you’re working with other Visual Studio tools, such as the Forms Designer or
Code Editor, the Web toolbar is replaced by other toolbars.
The nine links located on the left side of the Start page let you access other
Visual Studio resources, including a variety of online resources such as
online communities and download libraries. If you are an experienced Visual
Basic 6 programmer, you may want to explore these links now.

Visual Basic Unit 1
Sikkim Manipal University Page No.: 13
Figure 1.5: Start Page
Description
When you develop applications with Visual Studio, you use its Integrated
Development Environment (IDE). The IDE contains all of the tools you
need to develop .NET programs using Visual Basic, C#, or C++.
To start the Visual Studio IDE, click the Start button in the Windows
task
Visual Studio .NET.
The Start page of the IDE has nine links on the left side that lead to a
variety of resources.
The first time you run Visual Studio after installing it, My Profile is
selected rather than Get Started as shown here. After that, Get Started
is selected when you start Visual Studio unless you configure Visual
Studio to display a different page at startup. The My Profile page is
described in figure 1-6.
As you work with Visual Studio, the Start page will be obscured by other
information. But you can return to the Start page at any time by clicking
the Start Page tab that’s located in the upper left portion of the window,
just below the toolbars, or by choosing the Help, Show Start Page
command.
Visual Basic Unit 1
Sikkim Manipal University Page No.: 14
1.8 Customizing Visual Studio for Use with Visual Basic
The My Profile page, shown in figure 1.6, lets you customize the IDE so it
works the way you want it to. You can return to this page at any time to
change your settings by calling up the Start page and clicking the My Profile
link.
The My Profile page lets you select one of several profiles that configure the
Visual Studio environment. For Visual Basic programming, you’ll want to use
the Visual Basic Developer profile. This profile sets up the keyboard
shortcuts and the Visual Studio windows layout to work best with Visual
Basic.
You can also use the My Profile link to customize the way the IDE’s Help
feature works. I recommend you set the Help Filter option to Visual Basic
and Related so that when you access Help, you won’t have to wade through
pages of information on C# or C++. As for the Show Help option, leave it set
to Internal Help.
Finally, you can customize Visual Studio to display something other than the
Start page as its opening page. The other settings for the At Startup option
open the last project you worked on, display the Open Project dialog box so
you can open an existing project, display the New Project dialog box so you
can create a new project, or just start Visual Studio without opening any
page or dialog box.
Note that there are many ways to customize Visual Studio besides the
lets you customize Visual Studio’s toolbars, menus, and keyboard shortcuts
in the same way you can for Microsoft Off
command has literally hundreds of options you can set to customize Visual
Studio. As you become more proficient with Visual Studio, you may want to
explore some of these customization options. But while you’re just getting
started, I recommend you leave them alone.

Visual Basic Unit 1
Sikkim Manipal University Page No.: 15
Figure 1.6: Customizing Visual Studio for use with Visual Basic
Description
The My Profile page lets you configure Visual Studio to work the way
you want. This page appears the first time you use Visual Studio, but
you can return to it at any time by clicking the My Profile link on the Start
Page.
To customize Visual Studio for use with Visual Basic, select Visual Basic
Developer for the Profile setting. The Keyboard Scheme and Window
Layout settings automatically change to Visual Basic 6, and the Toolbox
is displayed on the left side of the window. You’ll see the effects of these
changes in later figures.
If you want to filter the help information so that only information related
to Visual Basic is displayed, select the Visual Basic or Visual Basic and
Related option for the Help Filter setting. You can also change the filter
as you use the Help feature.

Visual Basic Unit 1
Sikkim Manipal University Page No.: 16
By default, help information is displayed as part of the Visual Studio IDE.
To display it separately from the IDE, select the External Help option for
the Show Help setting.
To display something other than the Start page when you start Visual
Studio, select a different option for the At Startup setting. The other
options let you load and display the last solution you worked on, display
the dialog box for opening an existing project or for starting a new
project, or display an empty environment.
1.9 Solutions and Projects in Visual Basic
Before you work with Visual Basic projects, you need to understand the
distinction between a solution and a project. As figure 1.7 explains, a project
is a container that holds Visual Basic source files and other files needed to
create an assembly that can be run by the .NET CLR. A project can contain
several source files, but all of the source files in a project are compiled
together to create a single assembly.
A solution is a container that holds one or more projects. A solution often
contains just a single project. In that case, there’s not much distinction
between a solution and a project.
However, a solution can contain more than one project. Multi-project
solutions are most useful for large applications developed by teams of
programmers. With a multi-project solution, programmers can work
independently on the projects that make up the solution. In fact, the projects
don’t even have to be written in the same language. For example, a solution
can contain two projects, one written in Visual Basic, the other in C#.
How to open or close an existing project
To open a project, click the Open Project button on the Get Started page or
use the File – Open - Project command. Either way, the Open Project dialog
box shown in figure 1.7 is displayed. From this dialog box, you can locate
and open your Visual Basic projects.
You can also open a project you’ve recently worked on directly from the Get
Started page, which was shown in figure 1.5. And you can open recently
used projects by choosing the project you want to open from the Recent
Projects submenu of the File menu.

Visual Basic Unit 1
Sikkim Manipal University Page No.: 17
At this point, you might be confused about whether you should
open projects or solutions. Both are shown in the Open Project dialog
box. In figure 1.7, Financial Calculations.sln is a solution and
FinancialCalculations.vbproj is a Visual Basic project.
In most cases, it doesn’t matter whether you open the solution or the
project. Each way, both the solution and the project files will be opened. If
you open the project, Visual Studio automatically opens the solution that
contains it. And if you open the solution, Visual Studio automatically opens
all of the solution’s projects.
In contrast, you can’t close a project. Instead, you have to close the solution
that contains it. To do that, you use the Close Solution command in the File
menu.
The Open Project dialog box
Figure 1.7: Opening and closing an existing project
Project and solution concepts
Every project has a project file that keeps track of the files that make up
the project and records various settings for the project. Visual Basic
project files have the extension .vbproj. In this figure, the highlighted file
(FinancialCalculations.vbproj) is a project file.

Visual Basic Unit 1
Sikkim Manipal University Page No.: 18
Likewise, every solution has a solution file that keeps track of the
projects that make up the solution. The solution file’s extension is .sln. In
this figure, you can see a solution file named FinancialCalculations.sln
just above the highlighted project file.
When you open a project, Visual Studio automatically opens the solution
that contains the project. And when you open a solution, Visual Studio
automatically opens the projects contained in the solution. So in most
cases, it doesn’t matter whether you open the project or the solution.
Either way, both are opened.
1.10 Working with the IDE
When you open an existing Visual Basic project, you’ll see a screen like the
one in figure 1.8. Here, one or more tabbed windows are displayed in the
main part of the IDE. In this example, the first tab is for the Start page, and
the second tab is for a form named frmInvestment.vb, which is displayed in
the Form Designer window (or just Form Designer). You use this window to
develop the user interface for a form.
Although it isn’t shown in this example, you can also display the code for a
form in the Code Editor window (or just Code Editor). The Code Editor lets
you develop the Visual Basic code for an application. In the next figure, you
can see what this window looks like.
This figure also illustrates some of the other windows that you use as you
develop Visual Basic applications. To add controls to a form, for example,
you use the Toolbox. And to set the properties of a form or control, you use
the Properties window. You’ll learn more about using these windows in the
next chapter. In addition, you can use the Solution Explorer window (or just
Solution Explorer) to manage the files that make up a solution.
This figure also points out two of the toolbars that are available in the IDE.
Like other Windows programs, you can use these toolbars to perform a
variety of operations, and the toolbars change depending on what you’re
doing. Of course, you can also perform any operation by using the menus at
the top of the IDE. And you can perform some operations using the context-
sensitive shortcut menu that’s displayed when you right-click anywhere in
the IDE.

Visual Basic Unit 1
Sikkim Manipal University Page No.: 19
Figure 1.8: Working with the IDE
Description
The main part of the Visual Studio IDE contains one or more tabbed
windows. To develop a form, you use the Form Designer window. And to
develop code, you use the Code Editor window. The Code Editor isn’t
visible in this figure, but is described in figure 1.9.
To add controls and other items to a form, you use the Toolbox. The
Toolbox contains a variety of items organized into categories such as
Data, Components, Windows Forms, and so on. The items you’ll use
most are the controls in the Windows Forms category.
To change the way a form or control looks or operates, you use the
Properties window. This window displays the properties of the item that’s
selected in the Form Designer window.
You use the Solution Explorer window to manage project files. You’ll
learn more about the Solution Explorer in figure 1.10.
At the top of the Visual Studio window are several toolbars. The
Standard toolbar includes standard Windows toolbar buttons such as
Open, Save, Cut, Copy, and Paste. On the right side of the Standard

Visual Basic Unit 1
Sikkim Manipal University Page No.: 20
toolbar, you’ll find several buttons that summon other windows in the
IDE. As you work with Visual Studio, you’ll find that additional toolbars
are occasionally displayed, depending on the function you’re performing.
1.11 The Code Editor Window
The Code Editor window, shown in figure 1.9, lets you create and edit Visual
Basic source code. After you have designed the user interface for your
project by placing controls on the form, you’ll turn to the Code Editor to
develop the Visual Basic statements that make the controls functional. The
easiest way to call up the Code Editor is to double-click a control. Then, you
can begin typing the Visual Basic statements that will be executed when the
user performs the most common action on that control. If you double-click
on a button, for example, you can enter the statements that will be executed
when the user clicks on that button.
The Code Editor works much like other text editors you’ve worked with.
However, the Code Editor has a number of special features that simplify the
task of editing Visual Basic code. For example, color is used to distinguish
Visual Basic keywords from variables, comments, and other language
elements. And many types of coding errors are automatically highlighted as
you type so you can correct them. You’ll learn more about working with the
Code Editor in the next chapter.
Note that the Code Editor and the Form Designer provide two different ways
to work with the same Visual Basic source file. The Code Editor lets you
work directly with the Visual Basic statements that make up your application.
The Form Designer presents a visual representation of the forms and
controls that are implemented by that code.

Visual Basic Unit 1
Sikkim Manipal University Page No.: 21
A project with a Code Editor window displayed
Figure 1.9: Using the Code Editor
Description
The Code Editor window is where you create and edit the Visual Basic
code that your application requires. The Code Editor works much like
any other text editor you have used, so you shouldn’t have much trouble
learning how to use it.
You can display the Code Editor by double-clicking the form or one of
the controls in the Form Designer window. Or, you can click the View
Code button in the Solution Explorer.
Once you’ve opened the Code Editor, you can return to the Form
Designer by clicking the (Design) tab at the top of the Code Editor or the
View Designer button in the Solution Explorer (to the right of the View
Code button). You can also move among these windows by pressing
Ctrl+Tab or Shift+Ctrl+Tab.
It’s important to realize that the Form Designer and the Code Editor do
not represent two different files. Instead, they provide you with two views
of the same Visual Basic source file. The Form Designer gives you a
visual representation of the form that is implemented by your Visual
Basic code. The Code Editor lets you edit the code for the form.

Visual Basic Unit 1
Sikkim Manipal University Page No.: 22
1.12 The Solution Explorer
Figure 1.10 shows the Solution Explorer, which you use to manage the
projects that make up a solution and the files that make up each project. As
you can see, the files in the Solution Explorer are displayed in a tree view
with the files that make up a project subordinate to the project container and
the project container subordinate to the solution container. If a container has
a plus sign next to it, you can click on the plus sign to display its contents.
Conversely, you can hide the contents of a container by clicking on the
minus sign next to it.
You can also use the buttons at the top of the Solution Explorer to work with
the files in a project. To display the code for a form, for example, you can
highlight the form file and then click on the View Code button. And to display
the user interface for a form, you can highlight the form file and then click on
the View Designer button. For a code file, only the View Code button is
available since a code file doesn’t contain a user interface.
To identify the files that make up a project, you can look at the icon that’s
displayed to the left of the file name. The icon for a form file, for example, is
a form, and the icon for a code file is a document and the letters VB. As you
can see, this project consists of three form files and two code files.
Note, however, that all of the files have the file extension vb regardless of
their contents. Because of that, I recommend that you give your files names
that identify their contents. For example, we add the prefix frm to the names
of our form files. That way, it’s easy to identify the form files when you work
with them outside of the Solution Explorer.
The last four files shown in this figure are custom files that we developed for
this project. In contrast, the first file (AssmblyInfo) was added automatically
when this project was created. This file receives information whenever the
project is compiled into an assembly.
This project also includes a folder named References. This folder contains
references to the assemblies that contain the namespaces that are available
to the project. Remember that the namespaces contain the classes that the
application requires. In this case, all of the assemblies were added to the
project automatically when this project was created.
Visual Basic Unit 1
Sikkim Manipal University Page No.: 23
This should give you some idea of how complicated the file structure for a
single project can be. For this relatively simple application, three form files
and one code file were created by the developer. And five namespaces and
an assembly file were added to the project automatically.
Although you can’t see it here, each Visual Basic program you develop also
has access to the Microsoft.VisualBasic namespace. Among other things,
this namespace includes the classes that provide the Visual Basic functions
you can use in your applications. You’ll learn about many of these functions
throughout this book.
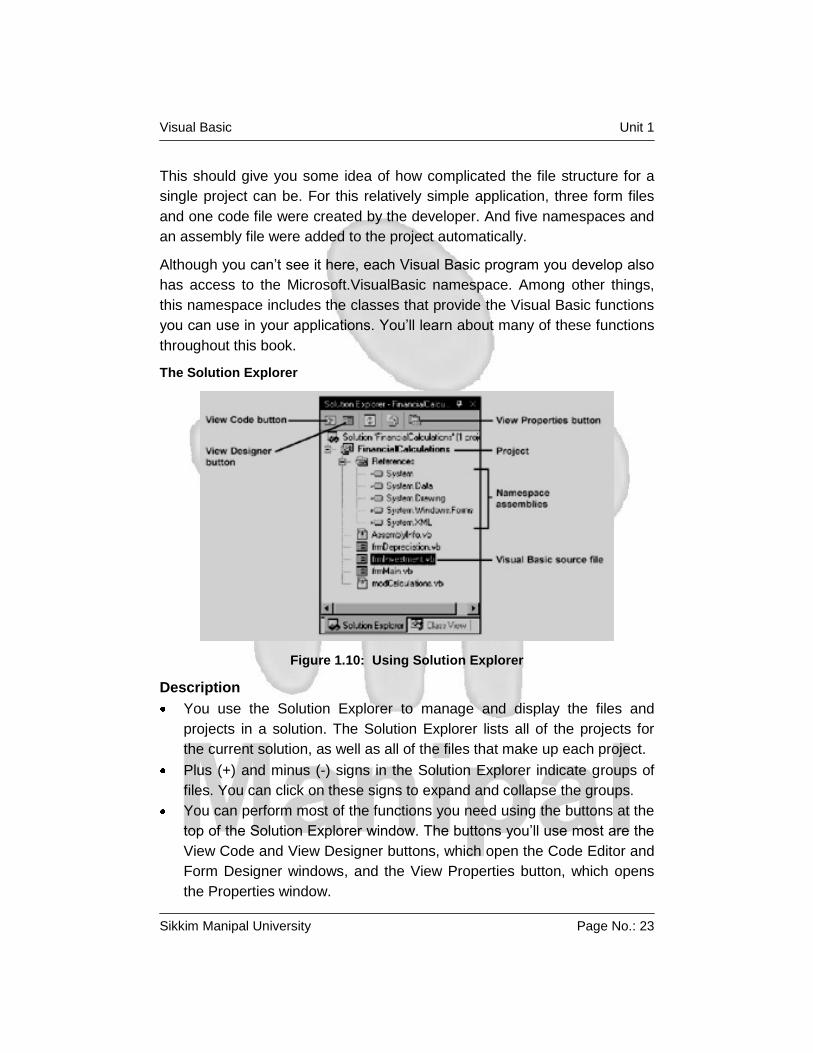
The Solution Explorer
Figure 1.10: Using Solution Explorer
Description
You use the Solution Explorer to manage and display the files and
projects in a solution. The Solution Explorer lists all of the projects for
the current solution, as well as all of the files that make up each project.
Plus (+) and minus (-) signs in the Solution Explorer indicate groups of
files. You can click on these signs to expand and collapse the groups.
You can perform most of the functions you need using the buttons at the
top of the Solution Explorer window. The buttons you’ll use most are the
View Code and View Designer buttons, which open the Code Editor and
Form Designer windows, and the View Properties button, which opens
the Properties window.

Visual Basic Unit 1
Sikkim Manipal University Page No.: 24
Project files
Visual Basic source files are stored with the file extension .vb. Each form
you create for a project will have its own form file. You can also create
code files that contain Visual Basic code but do not define a form. The
Solution Explorer uses different icons to distinguish between form files
and code files.
The AssemblyInfo.vb file is created automatically when the project is
created. It contains information about the assembly that’s created when
you compile the project.
The References folder contains references to the assemblies for the
namespaces that the application can use. These namespaces contain
the classes that the project requires. In most cases, all the assemblies
that you need are included when the project is created.
In addition to the assemblies in the References folder, every Visual
Basic application you develop has access to the Microsoft.VisualBasic
assembly.
1.13 Working with Windows in the IDE In figure 1.11, the Toolbox isn’t visible. Instead, it’s hidden at the left side of
the window. Then, when you need the Toolbox, you can move the mouse
pointer over its button to display it. This is just one of the ways that you can
adjust the windows in the IDE so it’s easier to use. This figure also presents
many of the other techniques that you can use.
By default, the Toolbox is displayed as a docked window at the left side of
the application window. To hide it as shown in this figure, you can click on
its Auto Hide button. The Auto Hide button looks like a pushpin, as
illustrated by the button near the upper right corner of the Properties
window. When a docked window is hidden, it appears as a tab at the edge
of the application window.
You can also undock a docked window so it floats in the middle of the IDE.
To do that, you drag it by its title bar away from the edge of the IDE or
double-click on its title bar. In this figure, for example, you can see that the
Solution Explorer window that was docked at the right side of the IDE is now
floating in the middle of the IDE. In addition, the Class View window, which

Visual Basic Unit 1
Sikkim Manipal University Page No.: 25
was grouped with the Solution Explorer window as a tabbed window, has
been separated from the Solution Explorer window. Although we don’t
recommend this arrangement of windows, it should give you a good idea of
the many ways you can arrange them.
As you review the information in this figure, notice that you can’t hide,
separate, or undock the windows in the main area of the IDE. For the most
part, you’ll just move between these windows by clicking on their tabs or by
using one of the other techniques.
If you experiment with these techniques for a few minutes, you’ll see that
they’re easy to master. Then, as you get more comfortable with Visual
Basic, you can adjust the windows so they work best for you.
The IDE with two floating windows and a hidden window
Figure 1.11: Working with the Windows in the IDE
Rearranging Windows
To close a window, click on its Close button. To redisplay it, click on its
button in the Standard toolbar (if one is available) or select it from the
View menu.
To undock a docked window so it floats on the screen, drag it by its title
bar away from the edge of the application window or double-click on its
title bar. To dock a floating window, drag it by its title bar to the edge of

Visual Basic Unit 1
Sikkim Manipal University Page No.: 26
the application window or double-click on its title bar to return it to its
default location.
To hide a docked window, click on its Auto Hide button. Then, the
window is displayed as a tab at the edge of the screen, and you can
display it by placing the mouse pointer over the tab. To change it back,
display it and then click on the Auto Hide button again.
To size a window, place the mouse pointer over an edge or a corner of
the window, and then drag it.
If two or more windows are grouped into tabbed windows, you can
display any window in the group by clicking on its tab. If you dock,
undock, hide, or unhide a tabbed window, all the windows in the group
are docked, undocked, hidden, or unhidden.
To reset the windows to their default arrangement, you can use the
Environment/General settings of the Tools, Options command.
Self Assessment Questions
7. IDE stands for _____.
8. The _____ page lets you customize the IDE so it works the way you
want it to.
9. Visual Basic project files have the extension _____.
1.14 Summary
To develop a Visual Basic .NET application, you use a product called
Visual Studio .NET (pronounced “Visual Studio dot net”).
A Windows Forms application is a typical Windows application that runs
on the user’s PC.
The .NET Framework Class Library consists of segments of pre-written
code called classes that provide many of the functions that you need for
developing .NET applications.
You use the Visual Basic compiler, which is built into Visual Studio, to
compile your Visual Basic source code into Microsoft Intermediate
Language (or MSIL).
The My Profile page lets you select one of several profiles that configure
the Visual Studio environment.

Visual Basic Unit 1
Sikkim Manipal University Page No.: 27
1.15 Terminal Questions
1. Describe the importance and usage of .net framework in Visual Studio.
2. Describe the process of compiling and running a Visual Basic
application
3. Describe the following:
Code Editor Window
Solution Explorer
1.16 Answers
Self Assessment Questions
1. .NET Framework
2. Visual Studio .NET
3. Windows Forms
4. Source files
5. .NET Framework Class Library, Classes
6. Project
7. Integrated Development Environment
8. My Profile
9. .vbproj
Terminal Questions
1. The .NET Framework (pronounced “dot net framework”) defines the
environment that you use to execute Visual Basic .NET applications and
the services you can use within those applications. One of the main
goals of this framework is to make it easier to develop applications that
run over the Internet. However, this framework can also be used to
develop traditional business applications that run on the Windows
desktop. (Refer section 1.2)
2. You use the Visual Basic compiler, which is built into Visual Studio, to
compile your Visual Basic source code into Microsoft Intermediate
Language (or MSIL). For short, this can be referred to as Intermediate
Language (or IL). (Refer section 1.5)
3. The Code Editor window lets you create and edit Visual Basic source
code. After you have designed the user interface for your project by
placing controls on the form, you’ll turn to the Code Editor to develop the

Visual Basic Unit 1
Sikkim Manipal University Page No.: 28
Visual Basic statements that make the controls functional. The easiest
way to call up the Code Editor is to double-click a control. Then, you can
begin typing the Visual Basic statements that will be executed when the
user performs the most common action on that control. If you double-
click on a button, for example, you can enter the statements that will be
executed when the user clicks on that button. (Refer section 1.11)
The Solution Explorer is used to manage the projects that make up a
solution and the files that make up each project. As you can see, the
files in the Solution Explorer are displayed in a tree view with the files
that make up a project subordinate to the project container and the
project container subordinate to the solution container. If a container has
a plus sign next to it, you can click on the plus sign to display its
contents. Conversely, you can hide the contents of a container by
clicking on the minus sign next to it. (Refer section 1.12)

Visual Basic Unit 2
Sikkim Manipal University Page No.: 29
Unit 2 Basic Concepts and Language
Fundamentals Structure:
2.1 Introduction
Objectives
2.2 First Application
2.3 Namespaces in VB.Net
2.4 A More Interactive Hello World Application
2.5 Basic Data Types and Their Mapping to the CTS
(Common Type System)
2.6 Variables
2.7 VB.Net Option Strict and Option Explicit Settings
2.8 Operators in VB.Net
2.9 Constant or Symbols
2.10 Summary
2.11 Terminal Questions
2.12 Answers
2.1 Introduction
This unit is an introduction to the Language fundamentals of Visual
Basic.Net. It explains a sample application along with various components
involved in it. It describes the concept of namespaces in VB.Net. It also
describes the concept of developing Interactive windows based applications.
It explains the variables, data types, constants and Symbols in Visual
basic.Net environment.
Objectives:
After studying this unit, you will be able to:
Introduce the basic concepts of Visual basic.net and its language
features
Demonstrate simple and interactive applications
Describe namespaces in Visual Basic.Net
Describe variables, data types in Visual Basic. Net

Visual Basic Unit 2
Sikkim Manipal University Page No.: 30
2.2 First Application
Start Microsoft Visual Studio.Net and from the menu select File > New >
Project. A "New Project" dialog will now be displayed. Select "Visual Basic
Project" from "Project Type" and select "Console Application" from
"Templates". Type "MyHelloWorldApplication" (without "") in the "Name" text
box below, then click OK.
This will show you the initial default code for your Hello World application.
Change the name of module from Module 1 to "MyHelloWorldApplication"
and type Console.WriteLine("Hello World") inside the Sub Main() functions'
body like whats shown below:
Visual Basic Unit 2
Sikkim Manipal University Page No.: 31
Module MyHelloWorldApplication
Sub Main()
Console.WriteLine("Hello World")
End Sub
End Module
To compile and execute your application, select "Start" from the "Debug"
menu or to run the application without Debug press Ctrl+F5. A new console
window containing the words “Hello World” will now be displayed. Press any
key to terminate the program and close the console window.
Modify the code as below that includes some more VB.NET features:
Imports System
Namespace MyHelloWorldApplication
Module MyHelloWorldModule
Sub Main()
Console.WriteLine("Hello World")
End Sub
End Module
End Namespace
The first line of the above program (Imports System) usually appears in all
VB.Net programs. It gives us access to the core functionality of
programming. The second line (Namespace MyHelloWorldApplication) will
be discussed.
2.3 Namespaces in VB.Net
A namespace is simply a logical collection of related classes in VB.Net. The
application related classes (like those related with database activity for
example) can be bundled in a named collection and hence it is called as a
namespace (e.g., DataActivity).
VB.Net does not allow two classes with the same name to be used in a
program. The sole purpose of using namespaces is to prevent the name
conflict, which may happen if working with a large number of classes. It is
the same case in the Framework Class Library (FCL). For example, it is
highly possible that the Connection Class in DataActivity conflicts with the
Connection Class of InternetActivity. To avoid this, these classes are made

Visual Basic Unit 2
Sikkim Manipal University Page No.: 32
part of their respective namespace. The fully qualified name of these
classes will be DataActivity.Connection and InternetActivity.Connection,
hence resolving any ambiguity for the compiler.
In the second line of the code, there is a declaration classes (enclosed in
Namespace...End Namespace block) which are part of the
MyHelloWorldApplication namespace.
Namespace MyHelloWorldApplication
...
End Namespace
The VB.Net namespaces have no physical mapping. The namespace may
contain modules, classes, interfaces, events, exceptions, delegates and
even other namespaces which are known as "Internal namespace". These
internal namespaces can be defined like this:
Namespace Parent
Namespace Child
...
End Namespace
End Namespace
The Imports Keyword
The first line of the above program is Imports System. The "Imports"
keyword in the code sample above enables us to use classes in the
"System" namespace. For example, It is possible to access the Console
class from the Main(). One point to remember here is that "Imports" allows
access to classes in the referenced namespace only and not in its
internal/child namespaces. Hence it might be needed to write Imports
System.Collections in order to access the classes defined in Collection
namespace which is a sub/internal namespace of the System namespace.
The Module Keyword
A VB.Net program may contain one or more modules. The Main() sub-
procedure usually resides in one of these modules. Modules in VB.Net are a
combination of general data (fields) and general functions (methods) that
are accessible to any code that can access the namespace of a module. All
the members (fields, methods, properties) defined inside a module are
shared by default.

Visual Basic Unit 2
Sikkim Manipal University Page No.: 33
Modules in VB.Net are defined using the Module statement, followed by the
name of the module. The end of a module is marked with the End Module
statement.
Module MyHelloWorldModule
...
End Module
The Main() Sub-Procedure
In the next line, the Main() sub-procedure of our program is defined:
Sub Main()
...
End Sub
This is the standard layout of a Main sub-procedure within a VB.Net module.
The Main() sub-procedure is the entry point of a program,that is, a VB.Net
program starts its execution from the first line in the Main sub-procedure and
exists with the termination of the Main sub-procedure. We can also define
the Main method inside a class as in the example given below.
Imports System
Namespace MyHelloWorldApplication
Class MyHelloWorldClass
Public Shared Sub Main()
Console.WriteLine("Hello World")
End Sub
End Class
End Namespace
The main sub-procedure is designated as "Shared" as it can be called by
the Common Language Runtime (CLR) without creating any objects from
our MyHelloWorldClass (this is the definition of Shared methods, fields and
properties). The sub-procedure is also declared as "Public" so that classes
outside its namespace and assembly may call this method. Main is the
(standard) name of this method. More evidence of this shall be shown later.
One interesting point is that it is legitimate to have multiple Main() methods

Visual Basic Unit 2
Sikkim Manipal University Page No.: 34
in VB.Net program. However, you have to explicitly identify which Main
method is the entry point for the program.
Printing on the Console
The next line of code prints "Hello World" on the Console screen:
Console.WriteLine("Hello World")
In the code, WriteLine() is called. It is a "Shared" method of the Console
class that is defined in the System namespace. This method takes a string
(enclosed in double quotes) as its parameter and prints it on the Console
window.
VB.Net, like other Object Oriented languages, uses the dot (.) operator to
access the member variables (fields) and methods of a class. Also,
parentheses () are used to identify methods in the code. String literals are
enclosed in double quotation marks ("). Lastly, it must be noted that VB.Net
is a case-insensitive language; hence Console and conSole are the same
words (identifiers) in VB.Net.
Comments
Comments are created by programmers who wish to explain the code.
Comments are ignored by the compiler and are not included in the
executable code. VB.Net uses similar syntax for comments as used in VB
and assembly language. The text following a single quotation mark (' any
comment) is a line comment. The ending is the end of the line.
„This is the main method
Public Shared Sub Main()
Console.WriteLine("Hello World") ' It will print Hello World
End Sub
Important points to remember
VB.Net executable program resides in a class or module.
The entry point to a program is the Shared sub-procedure Main()
VB.Net is not a case sensitive language so SMU and Smu mean the
same thing.
Horizontal whitespaces (tabs and spaces) are ignored by the compiler
between the code. Hence, the following is also a valid declaration of the
Main() method (although not recommended):

Visual Basic Unit 2
Sikkim Manipal University Page No.: 35
Public Shared Sub Main ()
Console.WriteLine (“Hello World”)
End Sub
VB.Net programs need not be saved with the same file name as that of
the class or module containing the Main() method.
There can be multiple Main() methods in a program, but it has to be
specified which one is the entry point.
The boundaries of a namespace, class, module and method are defined
by their respective statements and closed with an End statement.
A namespace is only a logical collection of classes with no physical
mapping on disk.
The "Imports" keyword is used to inform the compiler where to look for
the definition of the classes (namespaces) that is to be used.
Comments are ignored by the VB.Net compiler and are used only to
enhance the readability and understandability of the program for
developers only.
Enclosing your classes or modules in a namespace is optional. It is
possible to write a program where any classes or modules are not
enclosed in a namespace
It is not mandatory that the Main method of a program does not take any
argument. It may take arguments, such as:
Public Sub Main(ByVal CmdArgs() As String)
Console.WriteLine("Hello World")
End Sub
Self Assessment Questions
1. A namespace is simply a logical collection of related _____ in VB.Net.
2. The sole purpose of using _____ is to prevent the name conflict, which
may happen if working with a large number of classes.
3. _____ are ignored by the compiler and are not included in the
executable code.
2.4 A More Interactive Hello World Application
Up to this point we have seen a very static Hello World application that
greets the whole world when it is executed. Let us now make a more

Visual Basic Unit 2
Sikkim Manipal University Page No.: 36
interactive hello world that greets its current user. This program will ask the
user's name and will greet them using their name, like 'Hello Ram', when the
user named „Ram‟ runs it. Consider the following code:
Module MyHelloWorldModule
Sub Main()
Console.Write("Please, write your good name: ") 'line 1
Dim name As String = Console.ReadLine() 'line 2
Console.WriteLine("Hello {0}, Good Luck in VB.Net", name) 'line 3
End Sub
End Module
In the first line of Main, there is another method, Write(), which is a part of
the Console class. This is similar to the WriteLine() method discussed in the
previous program, but the cursor does not move to a new line after printing
the string on the console.
In the second line, there is a declared String variable named "name". Then,
a line of input is taken from the user through the ReadLine() method of the
Console class. The result is stored in the "name" variable. The variables are
placeholders (in memory) for storing data temporarily during the execution
of the program. Variables can hold different types of data depending on their
data-type, for example an integer variable can store an integer (number with
no decimal places), while a string variable can store a string (a series) of
characters. The ReadLine() method of the Console class (contrary to
WriteLine()) reads a line of input typed at the Console Window. It returns
this input as a string, in which the "name" variable is stored.
The third line prints the name given by the user at second line along with a
greeting text. Once again, the WriteLine() method of the Console Class is
used. The substitution parameter {0} is used to specify the position in the
line of text where the data from the variable "name" should be written after
the WriteLine() method is called.
Console.WriteLine("Hello {0}, Good Luck in VB.Net", name);
When the compiler finds a substitution parameter {n} it replaces it with the
(n+1) variables following the string in double quotation marks separated by
comma. Hence, when the compiler finds {0}, it replaces it with (0+1), that is,

Visual Basic Unit 2
Sikkim Manipal University Page No.: 37
1st variable "name" following the double quotes separated by comma. At
run-time, the CLR will read it as:
Console.WriteLine("Hello Ram, Good Luck in VB.Net");
if the value of the variable "name" is "Ram" at run-time.
Alternatively, it can also be written as
Console.WriteLine("Hello " + name + ", Good Luck in VB.Net");
without the substitution parameter altogether. Here we concatenate (add)
the strings together to form a message. (The first approach is similar to C's
printf() function while the second is similar to Java's System.out.println()
method)
When we compile and run this program the output will be as follows:
"Please, write your good name: Ram Hello Ram, Good Luck in VB.Net"
2.5 Basic Data Types and Their Mapping to the CTS (Common
Type System)
There are two kinds of data types in VB.Net
1. Value type (implicit data types, Structure and Enumeration)
2. Reference Type (objects, delegates)
Value types are passed to methods by passing an exact copy while
Reference types are passed to methods by passing only their reference
(handle). Implicit data types are defined in the language core by the
language vendor, while explicit data types are types that are made by using
or composing implicit data types.
As seen in the first unit, implicit data types in .net compliant languages are
mapped to types in Common Type System (CTS) and CLS (Common
Language Specification). Hence, each implicit data type in VB.Net has its
corresponding .Net type. The implicit data types in VB.Net are:

Visual Basic Unit 2
Sikkim Manipal University Page No.: 38
VB.Net type Corresponding
.Net type
Size in
bytes Description
Boolean Boolean 1 Contains either True or False
Char Char 2
Contains any single Unicode
character enclosed in double
quotation marks followed by a
c, for example "x"c
Integral types
Byte Byte 1 May contain integers from
0-255
Short Int16 2 Ranges from -32,768 to 32,767
Integer(defau
lt) Int32 4
Ranges from -2,147,483,648 to
2,147,483,647
Long Int64 8
Ranges from -
9,223,372,036,854,775,808 to
9,223,372,036,854,775,807.
Floating point types
Single Single 4
Ranges from ±1.5 × 10-45 to
±3.4 × 1038 with 7 digits
precision. Requires the suffix 'f'
or 'F'
Double(defau
lt) Double 8
Ranges from ±5.0 × 10-324 to
±1.7 × 10308 with 15-16 digits
precision.
Decimal Decimal 12
Ranges from 1.0 × 10⁻²⁸ to
7.9 × 1028 with 28-29 digits
precision. Requires the suffix
'm' or 'M'
Implicit data types are represented in language using 'keywords'; so each of
above is a keyword in VB.Net (Keyword are the words defined by the
language and can not be used as identifiers). It is worth-noting that string is
also an implicit data type in VB.Net, so String is a keyword in VB.Net. Last
point about implicit data types is that they are value types and thus stored at
the stack, while user defined types or referenced types are stored at heap.
Stack is a data structure that store items in last in first out (LIFO) fashion. It

Visual Basic Unit 2
Sikkim Manipal University Page No.: 39
is an area of memory supported by the processor and its size is determined
at the compile time. Heap is the total memory available at run time.
Reference types are allocated at heap dynamically (during the execution of
program). Garbage collector searches for non-referenced data in heap
during the execution of program and returns that space to Operating
System.
2.6 Variables
During the execution of program, data is temporarily stored in memory. A
variable is the name given to a memory location holding particular type of
data. So, each variable has associated with it a data type and value. In
VB.Net, a variable is declared as:
Dim <variable> as <data type>
Example:
Dim i As Integer
The above line will reserve an area of 4 bytes in memory to store integer
type values, which will be referred in the rest of program by identifier 'i'. You
can initialize the variable as you declare it (on the fly) and can also
declare/initialize multiple variables of same type in a single statement.
Examples:
Dim isReady As Boolean = True
Dim percentage = 87.88, average = 43.9 As Single
Dim digit As Char = "7"c
Self Assessment Questions
4. _____ can hold different types of data depending on their data-type.
5. _____ types are passed to methods by passing an exact copy while
_____ types are passed to methods by passing only their reference.
6. During the execution of program, data is temporarily stored in _____.
2.7 VB.Net Option Strict and Option Explicit Settings
There are two 'bad' features in VB.Net, which are inherent from earlier
versions (VB5 and VB6):
You can declare a variable without specifying its type. VB.Net, in this
case, assumes the type of the variable as System.Object class.

Visual Basic Unit 2
Sikkim Manipal University Page No.: 40
You can convert values (or objects) to incompatible types, for example
String to Integer.
The use of these two features results in quite a number of bugs and makes
the overall design of application bad, complex and difficult to follow. With
incompatible type conversion, the program does compile without any error
but throws a runtime error (exception). But these two features can be turned
off by using the Option Explicit and Option Strict statements.
Option Explicit Statement
Option Explicit, when turned on, does not allow the use of any variable
without proper declaration. There are two methods to apply the Option
Explicit Statement.
To apply the Option Explicit settings to the complete project in Visual
Studio.Net, right click the project name in the solution explorer and
select Properties. It will open the Property Pages window. Now in the
Common Properties tree at left, select Build, it will show the following
window:
From here, you can turn the Option Explicit (as well as Option Strict) on or
off.
To apply the Option Explicit settings to the current file, use the Option
Explicit statement before any statement as, Option Explicit On.

Visual Basic Unit 2
Sikkim Manipal University Page No.: 41
When Option Explicit is on, it will cause the compile time error to write
myName = "Ram" ' compile time error with Option Explicit On
Rather, it has to be written as,
Dim myName As String = "Ram"
Option Strict Statement
When the Option Strict statement is turned on, incompatible type conversion
are not allowed. Option Strict can be turned on or off in the similar fashion
as Option Explicit. You can either use Option Strict Statement as Option
Strict On or you can set it from the project properties. When Option Strict is
On, the following program will cause a compile time error
Sub Main()
Dim strNum As String = "1"
Dim intNum As Integer = strNum
Console.WriteLine(intNum)
End Sub
But if the Option Strict is turned off, the above program will actually compile
and run without error to print 1 on the Console.
It is important to remember that Option Strict also does not allow using un-
declared types and hence there is no use turning the Option Explicit on if
you are already using Option Strict. It is strongly advised to turn on Option
Explicit and Option Strict. Throughout the book, it is assumed that the
Option Strict is turned On.
2.8 Operators in VB.Net
Arithmetic Operators
Several common arithmetic operators are allowed in VB.Net given in the
following table:
Arithmetic Operator Meaning
+ Add
- Subtract
* Multiply
/ Divide
Mod Remainder or modulo

Visual Basic Unit 2
Sikkim Manipal University Page No.: 42
The program below uses these operators
Imports System
Module ArithmeticOperators
' The program shows the use of arithmetic operators
' + - * / Mod
Sub Main()
' result of addition, subtraction, multiplication and modulus operator
Dim sum, difference, product, modulo As Integer
sum = 0
difference = 0
product = 0
modulo = 0
Dim quotient As Double = 0 ' result of division
Dim num1 As Integer = 10 ' operand variables
Dim num2 As Integer = 2
sum = num1 + num2
difference = num1 - num2
product = num1 * num2
quotient = num1 / num2
modulo = 3 Mod num2 ' remainder of 3/2
Console.WriteLine("num1 = {0}, num2 = {1}", num1, num2)
Console.WriteLine()
Console.WriteLine("Sum of {0} and {1} is {2}", num1, num2, sum)
Console.WriteLine("Difference of {0} and {1} is {2}", num1, num2,
difference)
Console.WriteLine("Product of {0} and {1} is {2}", num1, num2,
product)
Console.WriteLine("Quotient of {0} and {1} is {2}", num1, num2,
quotient)
Console.WriteLine()
Console.WriteLine("Remainder when 3 is divided by {0} is {1}",
num2, modulo)
End Sub
End Module

Visual Basic Unit 2
Sikkim Manipal University Page No.: 43
Assignment Operators
Assignment operators are used to assign values to variables. Common
assignment operators in VB.Net are:
Assignment Operator Meaning
= Simple assignment
+= Additive assignment
-= Subtractive assignment
*= Multiplicative assignment
/= Division assignment
The Equal operator is used to assign a value to a variable or a reference.
For example, the instruction,
Dim isPaid As Boolean = false
assigns the value 'False' to the isPaid variable of Boolean type. The Left and
right hand side of the equal or any other assignment operator must be
compatible otherwise the compiler will complain of a syntax error.
Sometimes casting is used for type conversion, e.g., to convert and store
values in a variable of type Double to a variable of type Integer. We need to
apply integer cast using VB.Net's CType() built-in method.
Dim doubleValue As Double = 4.67
Dim intValue As Integer = CType(doubleValue, Integer)' intValue
would be equal to 4
The method CType() is used for compatible type conversions. It takes two
arguments; the first being the source variable to convert to, while the second
argument is the target type of conversion. Hence, the above call to the
method CType() will convert the value in the variable 'doubleValue' of type
Double to a variable of type Integer and will return the converted Integer
type value that will be stored in the Integer variable 'intValue'.
Of course, with narrow casting (from bigger type to smaller type) there is
always a danger of some loss of precision; as in the case above, we only
got 4 of the original 4.67. Sometimes, the casting may result in a runtime
error.

Visual Basic Unit 2
Sikkim Manipal University Page No.: 44
Dim intValue As Integer = 32800
Dim shortValue As Short = CType(intValue, Short)
When the second of these lines is run an error will be given, stating that
"Arithmetic operation resulted in an overflow." Why is it so? Variables of
type Short can only take a maximum value of 32767. The cast above cannot
assign 32800 to a shortValue. This is detected at runtime and an error is
given.
If you try to do an invalid cast of incompatible types like below
Dim strValue As String = "Ram"
Dim intValue As Integer = CType(strValue, Integer)
Then again it will get compiled but will crash the program at runtime.
Relational Operators
Relational operators are used for comparison purposes in conditional
statements. The common relational operators in VB.Net are:
Relational Operator Meaning
= Equality check
<> Un-equality check
> Greater than
< Less than
<= Less than or equal to
>= Greater than or equal to
Relational operators always result in a Boolean statement; either True or
False. For example if we have two variables
Dim num1 = 5, num2 = 6 As Integer
then,
num1 = num2 will result in false
num1 <> num2 will result in true
num1 > num2 will result in false
num1 < num2 will result in true
num1 <= num2 will result in true
num1 >= num2 will result in false

Visual Basic Unit 2
Sikkim Manipal University Page No.: 45
Only compatible data types can be compared. It is invalid to compare a
Boolean with an Integer, if
Dim i = 1 As Integer
Dim b = True As Boolean
then it is a syntax error to compare i and b for equality (i=b)
Logical and Bitwise Operators
These operators are used for logical and bitwise calculations. The common
logical and bitwise operators in VB.NET are:
Logical and Bitwise Operators Meaning
AND bitwise AND
OR bitwise OR
XOR bitwise XOR
NOT bitwise NOT
ANDALSO (Logical or short circuit AND)
OrElse
(Logical or short circuit OR)
The operators And, Or and Xor are rarely used in usual programming
practice. The Not operator is used to negate a Boolean or bitwise
expression like:
Dim b = False As Boolean
Dim bb As Boolean = Not b ' bb would be true
Logical Operators And, Or, AndAlso and OrElse are also used to combine
comparisons like
Dim i=6, j=12 As Integer
Dim firstVar As Boolean = i>3 And j < 10 ' firstVar would be false
Dim secondVar As Boolean = i>3 Or j < 10 ' secondVar would be true.
In the first comparison case: i>3 And j<10 will result in true only if both the
conditions i>3 and j<10 result in true. While in the second comparison: i>3
Or j<10 will result in true if any of the conditions i>3 and j<10 result in true.
You can of course use the combination of And, Or, AndAlso and OrElse in a
single statement like:
bool firstVar = (i>3 And j<10) OrElse (i<7 And j>10) 'firstVar would be
true
Visual Basic Unit 2
Sikkim Manipal University Page No.: 46
In the above statement, conditional expressions are grouped to avoid any
ambiguity.
You can also use And and Or operators in place of AndAlso and OrElse
respectively; but for combining conditional expressions, AndAlso and OrElse
are more efficient as they use "short circuit evaluation", i.e., if in (i>3
AndAlso j<10) expression, i>3 evaluates to false, it would not check the
second expression j<10 and will return false (as in AND, if one of the
participant operand is false, the whole operation will result in false). Hence,
one should be very careful to use assignment expressions with AndAlso and
OrElse operators. The And and Or operators don't do short circuit evaluation
and do execute all the comparisons before returning the result.
Operator Precedence
When several operations occur in an expression, each part is evaluated and
resolved in a predetermined order called operator precedence.
Precedence Rules
o When expressions contain operators from more than one category,
they are evaluated according to the following rules:
o The arithmetic and concatenation operators have the order of
precedence described in the following section, and all have greater
precedence than the comparison, logical, and bitwise operators.
o All comparison operators have equal precedence, and all have
greater precedence than the logical and bitwise operators, but lower
precedence than the arithmetic and concatenation operators.
o The logical and bitwise operators have the order of precedence
described in the following section, and all have lower precedence
than the arithmetic, concatenation, and comparison operators.
o Operators with equal precedence are evaluated left to right in the
order in which they appear in the expression.
Precedence Order
Operators are evaluated in the following order of precedence:
Arithmetic and Concatenation Operators
Exponentiation (^)
Unary identity and negation (+, –)
Multiplication and floating-point division (*, /)

Visual Basic Unit 2
Sikkim Manipal University Page No.: 47
Integer division (\)
Modulus arithmetic (Mod)
Addition and subtraction (+, –), string concatenation (+)
String concatenation (&)
Arithmetic bit shift (<<, >>)
Comparison Operators
All comparison operators (=, <>, <, <=, >, >=, Is, IsNot, Like, TypeOf...Is)
Logical and Bitwise Operators
Negation (Not)
Conjunction (And, AndAlso)
Inclusive disjunction (Or, OrElse)
Exclusive disjunction (Xor)
Comments
The = operator is only the equality comparison operator, not the assignment
operator.
The string concatenation operator (&) is not an arithmetic operator, but in
precedence it is grouped with the arithmetic operators.
The Is and IsNot operators are object reference comparison operators.
They do not compare the values of two objects; they check only to
determine whether two object variables refer to the same object instance.
Associativity
When operators of equal precedence appear together in an expression, for
example multiplication and division, the compiler evaluates each operation
as it encounters it from left to right. The following example illustrates this.
Dim n1 As Integer = 96 / 8 / 4
Dim n2 As Integer = (96 / 8) / 4
Dim n3 As Integer = 96 / (8 / 4)
The first expression evaluates the division 96 / 8 (which results in 12) and
then the division 12 / 4, which results in three. Because the compiler
evaluates the operations for n1 from left to right, the evaluation is the same
when that order is explicitly indicated for n2. Both n1 and n2 have a result of
three. By contrast, n3 has a result of 48, because the parentheses force the
compiler to evaluate 8 / 4 first.
Visual Basic Unit 2
Sikkim Manipal University Page No.: 48
Because of this behavior, operators are said to be left associative in Visual
Basic.
Overriding Precedence and Associativity
You can use parentheses to force some parts of an expression to be
evaluated before others. This can override both the order of precedence and
the left associativity. Visual Basic always performs operations that are
enclosed in parentheses before those outside. However, within
parentheses, it maintains ordinary precedence and associativity, unless you
use parentheses within the parentheses. The following example illustrates
this.
Dim a, b, c, d, e, f, g As Double
a = 8.0
b = 3.0
c = 4.0
d = 2.0
e = 1.0
f = a – b + c / d * e
'The preceding line sets f to 7.0. Because of natural operator precedence
and „associativity, it is exactly equivalent to the following line.
f = (a – b) + ((c / d) * e)
'The following line overrides the natural operator precedence and left
associativity.
g = (a – (b + c)) / (d * e)
' The preceding line sets g to 0.5.
2.9 Constant or Symbols
Constants values once defined cannot be changed in the program.
Constants are declared using Const keyword, like:
Dim Const PI As Double = 3.142
Constants must be initialized as they are declared.
Dim Const MARKS As Integer
It is a notation convention to use capital letters while naming constants.

Visual Basic Unit 2
Sikkim Manipal University Page No.: 49
Self Assessment Questions
7. _____, when turned on, does not allow the use of any variable without
proper declaration.
8. _____ operators are used to assign values to variables.
9. You can use _____ to force some parts of an expression to be
evaluated before others.
2.10 Summary
A namespace is simply a logical collection of related classes in VB.Net.
VB.Net does not allow two classes with the same name to be used in a
program. The sole purpose of using namespaces is to prevent the name
conflict, which may happen if working with a large number of classes.
Value types are passed to methods by passing an exact copy while
Reference types are passed to methods by passing only their reference
(handle).
A variable is the name given to a memory location holding particular type
of data.
You can use parentheses to force some parts of an expression to be
evaluated before others.
Constants values once defined cannot be changed in the program.
2.11 Terminal Questions
1. What do you mean by namespaces? Explain.
2. Explain various basic data types and variables in Visual Basic.
3. Describe various kinds of operators in Visual Basic .NET.
2.12 Answers
1. A namespace is simply a logical collection of related classes in VB.Net.
The application related classes (like those related with database activity
for example) can be bundled in a named collection and hence it is called
as a namespace (e.g., DataActivity). (Refer Section 2.3)
2. There are two kinds of data types in VB.Net.
Value type (implicit data types, Structure and Enumeration)
Reference Type (objects, delegates) (Refer Sections 2.5 & 2.6)
3. Visual Basic .NET contains various kinds of operators such as arithmetic
operators, relational operators, logical operators etc. (Refer Section 2.8)

Visual Basic Unit 3
Sikkim Manipal University Page No.: 50
Unit 3 Flow Control Statements
Structure:
3.1 Introduction
Objectives
3.2 If…Then…Else Statement
3.3 Select…Case Statement
3.4 Loops in VB.Net
3.5 Arrays in VB.Net
3.6 Summary
3.7 Terminal Questions
3.8 Answers
3.1 Introduction
This unit introduces the reader to flow control statements in Visual basic.Net
like If…Then…Else. It demonstrates the concepts of Arrays and Loops in
VB.Net.
Objectives:
After studying this unit, you should be able to:
explain the usage of control statements
describe various flow control statements
describe the applications of Loops and Arrays in Visual Basic.Net.
3.2 If…Then… Else statement
Condition checking has always been the most basic and important construct
in any language. VB.Net provides conditional statements in the form of the
If...Then...Else statement. The structure of this statement is:
If Boolean expression Then
Statement or block of statement
Else
Statement or block of statement
End If

Visual Basic Unit 3
Sikkim Manipal University Page No.: 51
The Else clause above is optional. The typical example is
If i=100 Then
Console.WriteLine("You Reached Hundred")
End If
In the above example, the console message will be printed only if the
expression i=5 evaluates to True. If action is needed in the case when the
condition does not evaluate to true you can use the Else clause.
If i=100 Then
Console.WriteLine("You Reached Hundred")
Else
Console.WriteLine("Still you are not reached Hundred”)
End If
Only the first message will be printed in the case of i being 100. In any other
case (when i is not 100), the second message will be printed. You can also
use a block of statements (more than one statement) under any If and Else.
If i=100 Then
j = i*5
Console.WriteLine("Reached Hundred")
Else
j = i/5
Console.WriteLine("Still not Reached Hundred")
End If
If... Then or If... Then... Else may be written in the same line. For examples,
1. If i=100 Then Console.WriteLine("Reached Hundred")
2. If i=100 Then j = i*5 Else j = i/5
As you might have picked from the above two statements, when an If...
Then and If...Then...Else are used on the same line, we do not need to write
an End If. The reason is quite simple; End is used to mark the end of a block
in VB.Net. With these two statements, we do not create or use any blocks of
statements.
It is always recommended to use If...Then and If...Then...Else statements in
block format with End If. It increases the readability and prevents many bugs
that otherwise can be produced in the code.

Visual Basic Unit 3
Sikkim Manipal University Page No.: 52
You can also have an If after an Else for further conditioning
If i>5 Then ' line 1
If i=6 Then ' line 2
Console.WriteLine("Ok, 6 is also closer to 5")
Else ' line 4
Console.WriteLine("Oops! i is greater than 5 but not 6")
End If
Console.WriteLine("Thanks God, i finally becomes greater than 5")
Else ' line 8
Console.WriteLine("Missed...When will i become 5 or closed to 5?")
End If
ElseIf i=6 is executed only if the first condition i=5 is false. An Else at line 5
will be executed only if the second condition i=6 (line 3) executes and fails
(that is both the first and second condition fails). The point being is that Else
at line 5 is related to the If on line 3.
As If...Then...Else is also an statement, you can use it under other
If...Then...Else statements, like:
If i>5 Then ' line 1
If i=6 Then ' line 2
Console.WriteLine("Ok, 6 is also closer to 5")
Else ' line 4
Console.WriteLine("Oops! i is greater than 5 but not 6")
End If
Console.WriteLine("Thanks God, i finally becomes greater than 5")
Else ' line 8
Console.WriteLine("Missed...When will i become 5 or closed to 5?")
End If
The Else on line 4 is clearly related to the If...Then on line 2 while the Else
on line 8 belongs to the If on line 1. Finally, do note (VB6 and C/C++
programmers especially) that the If statement expects only Boolean
expression and not an Integer value. It is indeed an error to write as
Dim flag As Integer = 0
If flag Then
' do something...
End If

Visual Basic Unit 3
Sikkim Manipal University Page No.: 53
Instead, it can be written as either
Dim flag As Integer = 0
If flag = 1 Then ' note ==
' do something…
End If
or,
Dim flag As Boolean = False
If flag Then ' Boolean expression
' do something...
End If
3.3 Select…Case statement
If you need to perform a series of specific checks, Select...Case is present
in VB.Net and is just the ticket for this. The general structure of
Select...Case statement is as follows:
Select <any implicit data type expression> Case expression statements ' some other case blocks ... Case Else statements End Select
It takes much less time to use the Select...Case than using several
If...Then...ElseIf statements. The following example illustrates the usage of
Select…Case statement.
Imports System
' To execute the program write "SwitchCaseExample 2" or any other
number at
„ command line, if the name of .exe file is "SwitchCaseExample.exe"
Module ArithmeticOperators
' Demonstrates the use of switch...case statement along with
' the use of command line argument
Sub Main(ByVal userInput() As String)
' convert the string input to integer
„Will through run-time exception if there is no input
„at run-time or input is not castable to integer

Visual Basic Unit 3
Sikkim Manipal University Page No.: 54
Dim input As Integer = Integer.Parse(userInput(0))
Select Case input ' what is input?
Case 1 ' if it is 1
Console.WriteLine("You typed 1 (one) as first command line
argument")
Case 2 ' if it is 2
Console.WriteLine("You typed 2 (two) as first command line
argument")
Case 3 To 5 ' if it is 3
Console.WriteLine("You typed number from 3 (three) to
five (five) as first command line argument")
Case Else ' if it is not of the above
Console.WriteLine("You typed other than 1, 2, 3, 4 and 5")
End Select
End Sub
End Module
An integer must be supplied for the command line argument. Firstly, compile
the program (at command line or in Visual Studio.Net). Suppose we made
an exe with name "SelectCaseExample.exe". Now, run it at the command
line as given below:
C:\> SelectCaseExample 2
You typed 2 (two) as command line argument
or,
C:> SelectCaseExample 4
You typed number from 3 (three) to five (five) as first command line
argument
or,
C:> SelectCaseExample 7
You typed other than 1, 2, 3, 4 and 5
If you did not enter any command line argument or give a non-integer
argument, the program will raise an exception.
Unhandled Exception: System.IndexOutOfRangeException: Index was
outside the bounds of the array.

Visual Basic Unit 3
Sikkim Manipal University Page No.: 55
At SelectCaseExample.ArithmeticOperators.Main(String[] userInput) in
C:\Documents and Settings\Ramr.First\My Documents\Visual Studio
Projects\VBDotNe tSchoolLesson3\Module1.vb:line 14
Let us come to the internal workings. We converted the first command line
argument (userInput(0)) into an Integer variable input. For conversion, we
used static Parse() method of the Integer data type. This method takes a
String and returns an equivalent integer or raises an exception if the
conversion can‟t be completed. Next we checked the value of input variable
using switch the statement.
Select Case input
...
End Select
Later on the basis of the input values, we took specific actions under the
respective case statements. Case 1 ' if it is 1 Console.WriteLine("You typed
1 (one) as the first command line argument")
We can also specify a range in the Case Expression to match
Case 3 To 5 ' if it is 3
Console.WriteLine("You typed number from 3 (three)
to five (five) as first command line argument")
If all the specific checks fail (input is neither 1,2,3,4 or 5), the statements
under “Case Else” will execute.
Case Else ' if it is not of the above
Console.WriteLine("You typed other than 1, 2, 3, 4 and 5")
There are some important points to remember when using switch…case
statement in VB.Net
You can use any implicit data type in the Select statement.
You can use multiple statements under a single case statement as
follows
Case "Pakistan"
continent = "Asia"
Console.WriteLine("Pakistan is an Asian Country")
Case Else
continent = "Un-recognized"
Console.WriteLine("Un-recognized country discovered")

Visual Basic Unit 3
Sikkim Manipal University Page No.: 56
Statements under Case Else will only be executed if and only if all Case
checks fail.
You can't have more than one Case Else block in a single Select
statement.
Self Assessment Questions
1. VB.Net provides conditional statements in the form of _____ statement.
2. If you need to perform a series of specific checks, then _____ statement
can be used.
3. Statements under Case Else will only be executed if and only if all Case
checks _____.
3.4 Loops in VB.Net
Loops are used for iteration purposes, that is, performing a task multiple
times (usually until a termination condition is met)
(i) For…Next Loop
The most common type of loop in VB.Net is the For...Next loop. The basic
structure of the For...Next loop is exactly the same as in VB6 and is given
below:
For variable = startingValue To lastValue
statement or block of statements
Next
Let us see a For...Next loop that will write integers from 1 to 10 on the
console.
Dim i As Integer
For i = 1 to 10
Console.WriteLine("In the loop, value of i is " & i)
Next
At the start, an integer variable i is initialized with the value of 1, then the
statements under the For are executed until the value of i does not equal 10.
Each time i is incremented by 1.
The important points about For loop are:
You can use an Exit For statement in a For...Next loop or any other loop
to change the normal execution flow.

Visual Basic Unit 3
Sikkim Manipal University Page No.: 57
An Exit For statement terminates the loop and transfers the execution
point outside the for loop as below:
For i=1 to 10
If i>5 Then
Exit For
End If
Console.WriteLine("In the loop, value of i is {0}.", i)
Next
The loop will terminate once the value of i gets greater than 5. If some
statements are present after Exit For, it should be enclosed under some
conditions. Otherwise the lines following the break point will not execute.
For i = 1 To 10
Exit For
Console.WriteLine()
Next
You can define the increment/decrement (change) in each iteration of a
For...Next Loop using the Step statement. The code below will increment by
2 in the value of i in each cycle of the loop.
For i = 1 To 10 Step 2
Console.WriteLine("Value of i is {0}", i)
Next
The following is the output on the Console,
Value of i is 1
Value of i is 3
Value of i is 5
Value of i is 7
Value of i is 9
Press any key to continue
Note that the increment starts after the first iteration. You can also specify
the negative increment (that is, decrement) in a Step. The following code will
output Integers from 10 to 1.
Value of i is 10
Value of i is 9

Visual Basic Unit 3
Sikkim Manipal University Page No.: 58
Value of i is 8
Value of i is 7
Value of i is 6
Value of i is 5
Value of i is 4
Value of i is 3
Value of i is 2
Value of i is 1
Press any key to continue
(ii) Do While… Loop
The general structure of the Do While...Loop is
Do While Boolean expression
Statement or block of statements
Loop
The statements under Do While will run continuously as long as the Boolean
expression evaluates to true. The similar code for printing integers 1 to 10
on Console using the Do While...Loop is
Dim i As Integer =1
Do While i<=10
Console.WriteLine("In the loop, value of i is " & i)
i = i + 1
Loop
(iii) Do… Loop While
A Do...Loop While is similar to a Do While...Loop, except that it does not
check the condition before entering the first iteration (execution of code
inside the body of loop). The general form of Do...Loop While is:
Do
statement or block of statements
Loop While Boolean expression
The statements under the Do will be executed first and then the Boolean
condition is checked. The loop will continue until the condition remains true.
The code which prints integers 1 to 10 on console using Do...Loop While is

Visual Basic Unit 3
Sikkim Manipal University Page No.: 59
Dim i As Integer = 1
Do
Console.WriteLine("In the loop, value of i is " & i)
i = i + 1
Loop While i<=10
The important point is that the statements in a Do...Loop While execute at
least once.
(iv) Do… Loop Until
A Do...Loop Until is similar to the Do...Loop While, except that it continues to
execute the containing statements until the condition against the Until part
evaluates to True or the condition against the Until remains False. The
general form of the Do...Loop Until is as follows:
Do
statement or block of statements
Loop Until Boolean expression
The statements under the Do will execute first and then the condition is
checked. The loop will continue until the condition remains false. The
following code will print integers from 1 to 10 on console using the Do...Loop
Until.
Dim i As Integer = 1
Do
Console.WriteLine("In the loop, value of i is " & i)
i = i + 1
Loop Until i=10
Again the statements in Do...Loop Until execute at least once.
(v) The For Each Loop
There is another type of loop that is very simple and useful to iterate through
arrays and other collections. This is a For Each loop. The basic structure of
the For Each loop is
For Each <identifier> in <array or collection>
<statements or block of statements>
End For

Visual Basic Unit 3
Sikkim Manipal University Page No.: 60
The following example illustrates the working of For Each loop.
' demonstrates the use of arrays in VB.Net
Public Sub Main()
' declaring and initializing an array of type integer
Dim myIntegers() As Integer = New Integer() {3, 7, 2, 14, 65}
' iterating through the array and printing each element
Dim i As Integer
For Each i in myIntegers
Console.WriteLine(i)
Next
End Sub
We declared the variable 'i' to hold individual values of the array 'myIntegers'
in each iteration. It is necessary to specify the type of variable 'i' same as
the type of elements in the collection (Integer in our case).
Important points to be noted are:
Variables are used to hold individual elements of an array in each iteration
(i in the above example) are read-only. You can't change the elements of an
array through it, you can only read it. This means For Each only allows you
to iterate through the array or collection and not to change the contents of it.
If you wish to perform some work on array elements such as to change the
individual elements, you should use the For...Next loop.
For Each can be used to iterate through arrays or collections. By collection,
we mean any class, struct or interface that implements an IEnumerable
interface. (Just go through this point and come back to it once we complete
the lesson describing classes and interfaces).
The String class is also a collection of characters (implements IEnumerable
interface and returns the Char value in the Current property). The following
code example demonstrates this and prints all the characters of a string.
Public Sub Main()
Dim name As String = "Faraz Rasheed"
Dim ch As Char
For Each ch in name
Console.WriteLine(ch)
End For
End Sub
This will print each character of the name variable on a separate line.

Visual Basic Unit 3
Sikkim Manipal University Page No.: 61
3.5 Arrays in VB.Net
Declaration
An Array is a collection of values of similar data type. Technically, VB.Net
arrays are of reference type. Each array in VB.Net is an object and is
inherited from the System.Array class. Arrays are declared as follows:
Dim <identifier>(<size of array>) As <data type>
Let us define an array of Integer type to hold 10 integers.
Dim myIntegers(9) As Integer
The above will create an array of 10 integers from the index of 0 to 9. The
size of an array is fixed and must be defined before use. You can also use
variables to define the size of array like so:
Dim size As Integer = 10
Dim myIntegers(10-1) As Integer
You can optionally perform declaration and initialization in separate steps
like below:
Dim myIntegers() As Integer
myIntegers = New Integer() {1, 2, 3, 4, 5}
Here we initialized the array myIntegers using the values it holds. Note, we
must enclose the values in curly brackets and separate the individual values
with commas. This will create an array size of 5, whose successive values
will be 1, 2, 3, 4, 5.
It is important to note that when an array declaration and initialization are
performed separately, you must provide values for each element.
Accessing the values stored in array
To access the values in an Array, we use the indexing operator (Integer
index) by passing an Integer to indicate which particular index value we wish
to access. It's important to note that index values in VB.Net starts from 0.
So, if an array contains 5 elements, first element would be at index 0,
second at index 1 and last (fifth) at index 4. The following code
demonstrates how to access the 3rd element of an array.
Dim myIntArray() As Integer
myIntArray = New Integer() {5, 10, 15, 20}
Dim j As Integer = myIntArray(2)

Visual Basic Unit 3
Sikkim Manipal University Page No.: 62
The following example illustrates the usage of an integral array.
' demonstrates the use of arrays in VB.Net
Public Sub Main()
' declaring and initializing an array of type integer
Dim myIntegers() As Integer = New Integer() {3, 7, 2, 14, 65}
' iterating through the array and printing each element
Dim i As Integer
For i = 0 to 4
Console.WriteLine(myIntegers(i))
Next
End Sub
Here we used the For...Next loop to iterate through an array and use the
Console.WriteLine() method to print each individual element of the array.
Note how the indexing operator () is used.
The above program is quite simple and efficient, but we have to hard-code
the size of the array in the For...Next loop. As we mentioned earlier, arrays
in VB.Net are reference type and are a sub-class of the System.Array Class.
This class has a lot of useful properties and methods that can be applied to
any instance of an array. Properties are very much like a combination of
getter and setter methods in common Object Oriented languages.
Properties are context sensitive; meaning the compiler can un-ambiguously
identify whether it should call a getter or a setter in certain contexts. We will
discuss properties in detail in the coming chapters. System.Array has a very
useful read only property “Length” that can be used to find the length or the
size of an array programmatically. Using the Length property, the For...Next
loop from the previous code example can be written as follows:
For i = 0 to myIntegers.Length - 1
Console.WriteLine(myIntegers(i))
Next
This type of loop is very flexible and can be applied to an array of any size
and of any data-type.

Visual Basic Unit 3
Sikkim Manipal University Page No.: 63
We can also understand the common description of the Main() Sub
procedure. Main is also declared as
Public Main(ByVal args As String())
The command line arguments that we pass when executing our program are
available in our programs through an array of String type, which is identified
by args string array.
Self Assessment Questions
4. The most common type of loop in VB.Net is the _____ loop.
5. The statements under Do…While will run continuously as long as the
Boolean expression evaluates to _____.
6. An _____ is a collection of values of similar data type.
3.6 Summary
Condition checking has always been the most basic and important
construct in any language. VB.Net provides conditional statements in the
form of the If...Then...Else statement.
If you need to perform a series of specific checks, Select...Case is
present in VB.Net and is just the ticket for this.
Loops are used for iteration purposes, that is, performing a task multiple
times (usually until a termination condition is met).
3.7 Terminal Questions
1. Write a program to find and display the greatest of three numbers. The
input should be taken through a form based application and the greatest
number should be displayed in a textbox on the form.
2. Write a program to print the day of the week taking the input of numbers
1 to 7 as input using Select… Case statement.
3. Write a program to sort and display an array of integers in ascending
order using the concept of array in VB.Net.
3.8 Answers
1. Use If…Then…Else statement. (Refer Section 3.2)
2. Use Select…Case statement. (Refer Section 3.3)
3. Use arrays. (Refer Section 3.5)

Visual Basic Unit 4
Sikkim Manipal University Page No.: 64
Unit 4 Form Based Applications
Structure:
4.1 Introduction
Objectives
4.2 Creating a New Project
4.3 Forms Design For a Windows Application
4.4 Classes and Objects
4.5 Event Driven Applications
4.6 Working with Label, Text Box, and Button Controls
4.7 Working with Combo Box and List Box Controls
4.8 Working with Check Box and Radio Button Controls
4.9 Working with Group Box and Panel Controls
4.10 Working with Tab Controls
4.11 Developing a Multi-form Application
4.12 Working with Form Objects
4.13 Single-document and Multiple-document Interfaces
4.14 Summary
4.15 Terminal Questions
4.16 Answers
4.1 Introduction
Designing a form is the basis of any graphical user interface based
application. This unit makes the reader understand the concepts of
designing window based form applications using Visual Basic as the
Language. It makes the user to design any application using the available
controls in Visual Basic. It starts with the step of creating a new project to
the stage of creating single and multi-document interfaces.
Objectives:
After studying this unit, you should be able to:
explain the basics of creating window based applications
describe the usage of various controls available in Visual Basic
apply the GUI designing concepts
create single and multi-document based interfaces
test the applications developed

Visual Basic Unit 4
Sikkim Manipal University Page No.: 65
4.2 Creating a New Project
When you create a new Visual Basic project, you use the New Project
dialog box to set the basic options for the project, such as the project’s
name and the location at which the project is saved. In addition, you can use
the Options dialog box to set some options that affect how Visual Studio
handles projects and solutions. You’ll learn about these dialog boxes in the
topics that follow. The project template that you select determines the initial
files, assembly references, code, and property settings that are added to the
project.
(i) Using the New Project dialog box
To create a new project and set the basic options for that project, you use
the New Project dialog box shown in figure 4.1. This dialog box lets you
select the type of project you want to create by choosing one of several
templates.
When you create a new project, Visual Studio also creates a new solution to
hold the project. By default, the solution is given the same name as the
project and is stored in the same folder. If that’s not what you want, you can
click on the More button in the New Project dialog box. This displays
additional options that let you create a solution folder above the project
folder and provide a separate name for the solution.
Figure 4.1: The New Project dialog box
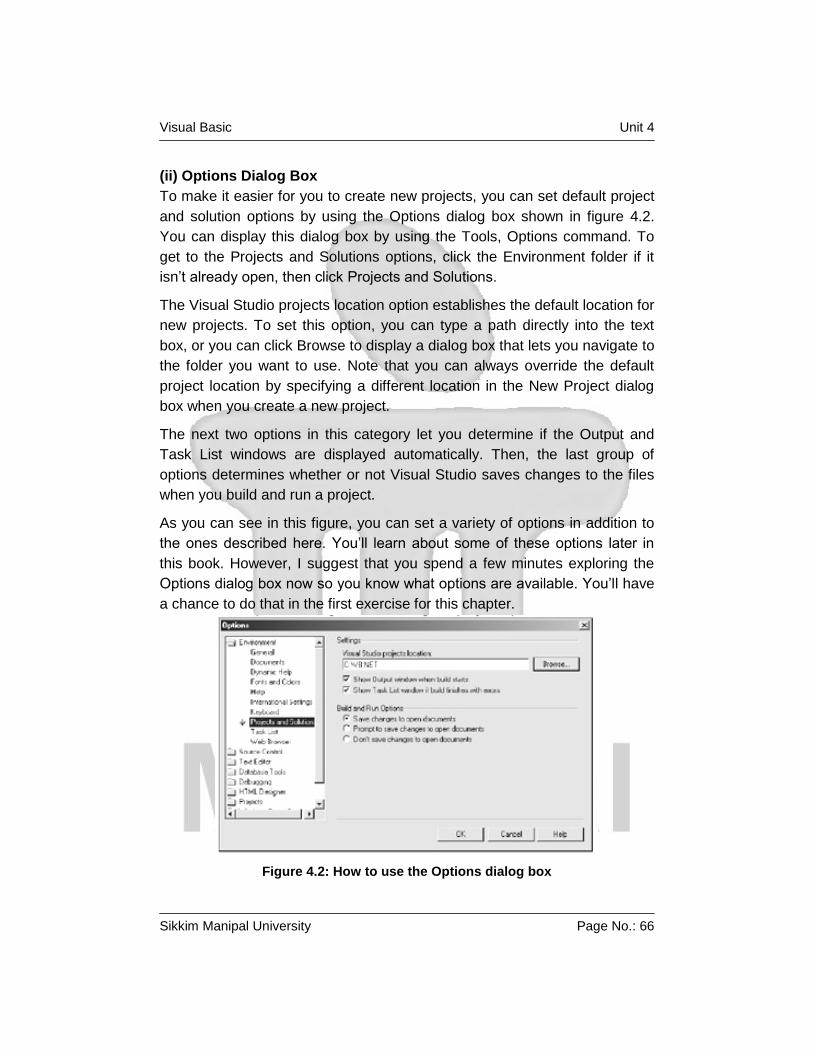
Visual Basic Unit 4
Sikkim Manipal University Page No.: 66
(ii) Options Dialog Box To make it easier for you to create new projects, you can set default project
and solution options by using the Options dialog box shown in figure 4.2.
You can display this dialog box by using the Tools, Options command. To
get to the Projects and Solutions options, click the Environment folder if it
isn’t already open, then click Projects and Solutions.
The Visual Studio projects location option establishes the default location for
new projects. To set this option, you can type a path directly into the text
box, or you can click Browse to display a dialog box that lets you navigate to
the folder you want to use. Note that you can always override the default
project location by specifying a different location in the New Project dialog
box when you create a new project.
The next two options in this category let you determine if the Output and
Task List windows are displayed automatically. Then, the last group of
options determines whether or not Visual Studio saves changes to the files
when you build and run a project.
As you can see in this figure, you can set a variety of options in addition to
the ones described here. You’ll learn about some of these options later in
this book. However, I suggest that you spend a few minutes exploring the
Options dialog box now so you know what options are available. You’ll have
a chance to do that in the first exercise for this chapter.
Figure 4.2: How to use the Options dialog box

Visual Basic Unit 4
Sikkim Manipal University Page No.: 67
4.3 Forms Design For a Windows Application
When you create a new project, the project begins with a single, blank form.
You can then add controls to the form and set the properties of the form and
controls so they look and work the way you want them to. That’s what you’ll
learn to do in the topics that follow.
Example: Design of Invoice Total form
Before I show you how to add controls to a form and set the properties of
the form and controls, I want to describe the Invoice Total form that I’ll use
as an example throughout this chapter. This form is presented in figure 4.3.
As you can see, the form consists of a eight controls: a text box, five labels,
and two buttons.
“The Invoice Total form lets the user enter an order total into the text box,
and then calculates the discount amount and invoice total for that order
when the user clicks on the Calculate button. The discount amount and
invoice total are displayed in label controls. For this simple application, the
discount amount is always calculated as 20% of the order total.
After the discount amount and invoice total are calculated for an order, the
user can enter a different order total and click on the Calculate button again
to display the discount and invoice total for that order amount. This cycle
continues until the user clicks on the Close button in the upper right corner
of the form or clicks on the Exit button. Then, the form is closed and the
application ends.”
Note that this application also provides keystroke options for users who
prefer using the keyboard to the mouse. In particular, the user can activate
the Calculate button by pressing the Enter key and the Exit button by
pressing the Esc key. The user can also activate the Calculate button by
pressing Alt+C and the Exit button by pressing Alt+X. When the user
presses the Alt key, the letters that activate the keys are underlined so the
user can tell which ones to press.

Visual Basic Unit 4
Sikkim Manipal University Page No.: 68
Figure 4.3: Design of Invoice Total form
Description
The Invoice Total form calculates a discount amount and invoice total based
on the order total entered by the user.
The user enters the order total into a text box, and the discount amount and
invoice total are displayed in label controls. Label controls are also used to
identify the amounts that are displayed on the form.
After entering an order total, the user can click on the Calculate button to
calculate the discount amount and the invoice total. Alternatively, the user
can press the Enter key to perform the calculation. For this version of the
Invoice Total application, the discount is always calculated as 20% of the
order total.
To close the form and end the application, the user can click on the Close
button in the upper right corner of the form or on the Exit button.
Alternatively, the user can press the Esc key to exit from the form.
The user can press Alt+C to perform the calculation or Alt+X to exit from the
form. When the user presses the Alt key, the C in the Calculate button will
be underlined and the x in the Exit button will be underlined.
Adding controls to a form
Figure 4.4 shows how you can use the Toolbox to add controls to a form.
The easiest way to do that is to click on the control in the Toolbox, then click
the form at the location where you want to add the control. You can then
resize the control by dragging one of the control’s adjustment handles, and
you can move the control by dragging the control to a new location on the
form.

Visual Basic Unit 4
Sikkim Manipal University Page No.: 69
If you prefer, you can place and size the control in a single operation by
clicking the control in the Toolbox, then clicking and dragging in the form. In
this figure, for example, a button is being added to the form.
A third method for adding controls is to simply double-click the control you
want to add in the Toolbox. This places the control in the upper left corner of
the form. You can then move and resize the control.
A fourth way to add a control is to drag the control from the Toolbox to the
form. The control is placed wherever you drop it. You can then resize the
control.
You can work with several controls at once. For example, let’s say that you
have four text box controls on your form and you want to make them all the
same size with the same alignment. To do that, first select all four controls
by holding down the Shift key as you click on them or by using the mouse
pointer to drag around the controls. Then, use the commands in the Format
menu or the buttons in the Layout toolbar to move, size, and align the first
three controls relative to the fourth control (the primary control). To format
the controls relative to a control other than the last one you selected, click
on that control to make it the primary control. (The primary control will have
different color handles so you can identify it.)
Although these techniques may be hard to visualize as you read about
them, you’ll find that they’re relatively easy to use. All you need is a little
practice, which you’ll get in the first exercise for this chapter.
Figure 4.4: How to add controls to a form

Visual Basic Unit 4
Sikkim Manipal University Page No.: 70
Setting properties
After you have placed controls on a form, you need to set each control’s
properties so the controls will look and work the way you want them to when
the form is displayed. In addition, you need to set some of the properties for
the form itself.
To set the properties of a form or control, you work in the Properties window
as shown in figure 4.5. To display the properties for a specific control, click
on it in the Form Designer window to select the control. To display the
properties of the form, click the form’s title bar or any blank area of the form.
In the Properties window, you can select a property by clicking it. When you
do, a brief description of that property is given at the bottom of the
Properties window. To change a property setting, you change the entry to
the right of the property name by typing a new value or choosing a new
value from a drop-down list.
Figure 4.5: Setting properties
Description
The Properties window displays the properties for the object that’s
currently selected in the Form Designer window. To display the
properties for another object, click on that object or select the object
from the drop-down list at the top of the Properties window.

Visual Basic Unit 4
Sikkim Manipal University Page No.: 71
To change a property, enter a value into the text box or select a value
from its drop-down list if it has one. If a button with an ellipsis (…)
appears at the right side of a property’s text box, you can click on the
ellipsis to display a dialog box that lets you set options for the property.
To change the properties for two or more controls at the same time,
select the controls. Then, the common properties of the controls are
displayed in the Properties window.
When you click on a property in the Properties window, a brief
explanation of the property appears in a pane at the bottom of the
window. For more information, press F1 to display the help information
for the property.
You can use the first two buttons at the top of the Properties window to
sort the properties by category or alphabetically.
You can use the plus and minus signs displayed to the left of some of
the properties and categories in the Properties window to expand and
collapse the list of properties.
Note: If a description isn’t displayed when you click on a property in the
Properties window, right-click on the window and select Description from the
shortcut menu.
The tab order is the order in which the controls on a form receive the focus
when the user presses the Tab key. The tab order should usually be set so
the focus moves left-to-right and top-to-bottom, beginning at the top left of
the form and ending at the bottom right. However, in some cases you’ll want
to deviate from that order. For example, if you have controls arranged in
columns, you may want the tab order to move down each column.
The tab order is initially set based on the order in which you add controls to
the form. So if you add the controls in the right order, you won’t need to alter
the tab order. But if you do need to change the tab order, you can do so by
adjusting the TabIndex property settings. The TabIndex property is simply a
number that represents the control’s position in the tab order, beginning with
zero. So, the first control in the tab order has a TabIndex of 0, the second
control’s TabIndex is 1, and so on.
Access keys are shortcut keys that let the user move directly to a control.
You set a control’s access key by using the Text property. Just precede the
letter in the Text property value that you want to use as an access key with

Visual Basic Unit 4
Sikkim Manipal University Page No.: 72
an ampersand (&). Then, the user can activate the control by pressing Alt
plus the access key.
Note that if you assign an access key to a control that can’t receive the
focus, such as a label control, pressing the access key causes the focus to
move to the next control in the tab order. As a result, you can use an access
key with a label control to create a shortcut for a text box control.
Finally, you should usually set the AcceptButton and CancelButton form
properties. These properties specify the buttons that are activated when the
user presses the Enter and Esc keys. That can make it easier for a user to
work with a form. If, for example, the AcceptButton property of the Invoice
Total form in figure 4.5 is set to the Calculate button, the user can simply
press the Enter key after entering an order total instead of having to use the
mouse to click on the Calculate button.
Property settings for the Invoice Total form Table 4.1 shows the property settings for the Invoice Total form.
Since the form is designed so it’s the right size for the controls it contains,
you can set the FormBorderStyle property to FixedSingle. Then, the user
won’t be able to change the size of the form by dragging the edge of the
form. In addition, you can set the MaximizeBox and MinimizeBox properties
to False so these boxes aren’t displayed on the form and the user can’t
minimize or maximize the form.
Table 4.1: The property settings for the Invoice Total form
The property settings for the form
Default name Property Setting
Form1 FormBorderStyle FixedSingle
MaximizeBox False
MinimizeBox False
StartPosition CenterScreen
Text Calculate invoice total
AcceptButton btnCalculate
CancelButton btnExit

Visual Basic Unit 4
Sikkim Manipal University Page No.: 73
The property settings for the controls
Default name Property Setting
Label1 Text Order total:
TextAlign MiddleRight
TabIndex 0
Label2 Text Discount:
TextAlign MiddleRight
TabIndex 0
Label3 Text Invoice total:
TextAlign MiddleRight
TabIndex 0
TextBox1 Name txtOrderTotal
Text (empty)
TabIndex 1
Label4 Name lblDiscountAmount
Text (empty)
TextAlign MiddleLeft
TabIndex 0
BorderStyle Fixed3D
Label5 Name lblInvoiceTotal
Text (empty)
TextAlign MiddleLeft
TabIndex 0
BorderStyle Fixed3D
Button1 Name btnCalculate
Text &Calculate
TabIndex 2
Button2 Name btnExit
Text E&xit
TabIndex 3
Note: Because label controls can’t receive the focus, the TabIndex
properties for these controls don’t matter. What matters is that the text box
and the two buttons have TabIndex properties with sequence numbers that
move the focus from the text box, to the Calculate button, to the Exit button,
and back to the text box.

Visual Basic Unit 4
Sikkim Manipal University Page No.: 74
Self Assessment Questions
1. When you create a new project, Visual Studio also creates a new _____
to hold the project.
2. Designing a _____ is the basis of any graphical user interface based
application.
3. Just precede the letter in the Text property value that you want to use as
an access key with an _____ symbol.
4.4 Classes and Objects
An object is a self-contained unit that combines code and data. Two
examples of objects you have already worked with are forms and form
controls. A class is the code that defines the characteristics of an object.
You can think of a class as a template for an object. An object is an instance
of a class, and the process of creating an object from a class is called
instantiation. More than one object instance can be created from a single
class. For example, a form can have several button objects, all instantiated
from the same Button class. Each is a separate object, but all share the
characteristics of the Button class. A class can be based on an existing
class. In that case, the existing class is referred to as the base class, and
the new class inherits the characteristics of the base class.
Properties, Methods, and Events
An object’s interface consists of a clearly defined set of properties,
methods, and events. The properties, methods, and events can be
referred to as members of the object.
Properties are the data associated with an object.
Methods are the operations that an object can perform.
Events are signals by which an object can notify other objects that
something noteworthy has occurred.
If you instantiate two or more instances of the same class, all of the
objects have the same properties, methods, and events. However, the
values assigned to the properties can vary from one instance to another.
Objects and Forms
When you use the IDE to design a form, the IDE automatically
generates Visual Basic code that creates a new class based on the
Form class. Then, when you run the project, a form object is instantiated
from the new class.

Visual Basic Unit 4
Sikkim Manipal University Page No.: 75
When you add a control to a form, the IDE automatically generates
Visual Basic code in the Form class that instantiates a control object
from the appropriate class and sets the control’s properties to the values
you have set for the control.
4.5 Event Driven Applications
Visual Basic applications are event-driven, i.e., they work by responding to
the events that occur on objects. To respond to an event, you code an event
procedure (or event handler) as shown in Figure 4.7.
The user may click on an Exit button on the form. Then, the application
responds by executing the event procedure for that object and event. In this
case, the event procedure consists of a single statement that uses the Close
method to close the form. The Private Sub and End Sub statements are
generated by Visual Studio to mark the beginning and the end of the
procedure.
Although the Click and DblClick events are started by user actions, that’s
not always the case. For instance, the GotFocus and LostFocus events can
occur when the user moves the focus to or from a control, but they can also
occur when the Visual Basic code moves the focus to or from a control.
Similarly, the Load event of a form can occur when an application first starts.
And the Closed event occurs after the Close method is executed for a form.
In addition to the events shown here, most objects have many more events
that the application can respond to. For example, events occur when the
user positions the mouse over an object or when the user presses or
releases a key. However, you don’t typically respond to those events.
Event: The user clicks on the Exit button

Visual Basic Unit 4
Sikkim Manipal University Page No.: 76
Figure 4.7: How an application responds to events
Response: The procedure for the Click event of the Exit button is executed
Private Sub btnExit_Click(ByVal sender As System.Object, _
ByVal e As System.EventArgs) _
Handles btnExit.Click
Me.Close()
End Sub
Common control events
Event Occurs when…
Click …the user clicks on the control.
DblClick …the user double-clicks on the control.
GotFocus …the focus is moved to the control.
LostFocus …the focus is moved from the control.
Common Form Events
Event Occurs when…
Load …the form is loaded into memory.
Activated …the form becomes the active form.
Closing …the form is closing.
Closed …the form is closed.

Visual Basic Unit 4
Sikkim Manipal University Page No.: 77
The code for the Invoice Total form
Figure 4.8 presents the code for the Invoice Total form. The first thing to
notice is that the code starts with a Class statement and ends with an End
Class statement. These statements are added automatically when you
create a form, and they’re your first clue that when you create a form you’re
actually creating a new class that defines the form. In this case, the class is
named Form1, which is the default name for the first form that’s added to a
Windows application.
Visual Basic also adds an Inherits statement after the Class statement. In
this case, the Inherits statement says that the new form is based on the
Form class in the System.Windows.Forms namespace of the .NET Class
Library.
The rest of the code for this form consists of two event procedures. The first
one responds to the Click event of the Calculate button; the second one
responds to the Click event of the Exit button. I’ll describe this code briefly
here so you have a general idea of how it works, but if you’re new to
programming you may not understand the code completely until after you
read the next chapter.
The event procedure for the Click event of the Calculate button calculates
the discount amount and the invoice total based on the order total entered
by the user and then displays those values in the appropriate label controls.
To do that, this procedure starts by defining the variables it will use in its
calculations. In this case, three variables are defined, each of which can
hold a decimal value.
In the next group of statements, the value in the Text property of the Order
Total text box, which is the value entered by the user, is assigned to the
variable named dOrderTotal. Because the discount for this version of the
program is always 20%, the discount amount is calculated by multiplying the
order total by .2, and the resulting value is assigned to the variable named
dDiscountAmount. Then, the invoice total is calculated by subtracting the
discount amount from the order total, and the result is assigned to the
variable named dInvoiceTotal.
The next two statements assign the values of the last two variables to the
Text properties of the label controls, which displays the values on the form.
Then, the last statement before the End Sub statement executes the Focus

Visual Basic Unit 4
Sikkim Manipal University Page No.: 78
method of the Order Total text box, which moves the focus to that control.
Otherwise, the focus would remain on the Calculate button that’s used to
start this event procedure.
The other procedure that’s required by this application is for the Click event
of the Exit button. It contains just one statement that performs the Close
event of the form. So when the user clicks on this button, the form is closed,
which ends the application.
Note that all of the shaded code in this figure is generated by Visual Basic
when you start the project and start the event procedures. Beyond that,
Visual Basic generates other code that is hidden in the Code Editor window
under the label “Windows Form Designer generated code”. When the
application is run, this is the code that implements the form and controls that
you designed in the Form Designer. For now, you can just accept the fact
that this generated code should work the way you want it to. By the time you
finish this book, though, you’ll understand what this code does.
Public Class Form1 Inherits System.Windows.Forms.Form
Private Sub btnCalculate_Click (ByVal Sender As System.Object,_
ByVal e as System.EventArgs) Handles btnCalculate.Click
Dim dOrderTotal As Decimal
Dim dDiscountAmount As Decimal
Dim dInvoiceTotal As Decimal
dOrderTotal = txtOrderTotal.Text
dDiscountAmount = dOrderTotal * .2
dInvoiceTotal = dOrderTotal – dDiscountAmount
lblDiscountAmount.Text = dDiscountAmount
lblInvoiceTotal.Text = dInvoiceTotal
txtOrderTotal.Focus()
End Sub
Private Sub btnExit_Click (ByVal Sender As System.Object,_
ByVal e as System.EventArgs) Handles btnExit.Click
Me.Close()
End Sub
End Class
Figure 4.8: The code for the Invoice Total form

Visual Basic Unit 4
Sikkim Manipal University Page No.: 79
Description
The code for the Invoice Total form includes two event procedures. The
first one is executed when the user clicks the Calculate button. This
procedure calculates the discount amount and invoice total based on the
order total entered by the user.
The second event procedure is executed when the user clicks the Exit
button. This procedure closes the form, which ends the application.
When you use the IDE to create a form, you’re actually creating a new
class based on the Form class. That’s why the code for a Windows form
starts with a Class statement and ends with an End Class statement.
That’s also why the Class statement is followed by an Inherits statement
that identifies the Form class. All three of these statements are
generated for you, and you don’t need to change them.
Note: All of the shaded statements in the code are generated for you.
4.6 Working with Label, Text Box, and Button Controls
Since the Invoice Total and Future Value programs that were presented in
previous chapters used label, text box, and button controls, you should
already be familiar with the basic operations of these controls. However, you
may want to know about some of the other properties that affect how they
function. The properties you’re most likely to use are presented in Table 4.2.
As you know, the main purpose of a label control is to display information.
So you almost always set its Text property to the text you want to display
when you design the form. If the text will change as the program executes,
though, you can set this property in the code for the form.
You can include an ampersand (&) in the Text property to indicate the
character that can be used to access the control using the keyboard. Note,
however, that since a label can’t receive the focus, the focus moves to the
next control in the tab order that can receive the focus. In the form shown at
the top of this figure, for example, the access key for the Invoice number
label is the letter I. So if the user holds down the Alt key and presses the
letter I, the focus will move to the text box to the right of the label, which is
what you want.
In some cases, you may want to include an ampersand in the text that’s
displayed in the label. To do that, you have to set the UseMnemonic

Visual Basic Unit 4
Sikkim Manipal University Page No.: 80
property of the label to False. Then, an ampersand you include in the Text
property is treated as a text character.
Several of the text box properties in this figure are used to create multi-line
text boxes like the one shown in the form at the top of this figure. To create
a text box like this, you set the Multiline property to True. Then, you can set
the AcceptsReturn, AcceptsTab, Scrollbars, and WordWrap properties so
the control works the way you want it to. These properties, as well as the
other text box properties shown in this figure, should be self-explanatory, so
I won’t describe them in more detail. If you need more information about any
of these properties, though, you can refer to the online help documentation.
The last property shown in this figure is the Text property of the button
control. Like the label control, you can include one ampersand in this
property to define an access key for it. Unlike the label control, if you want to
include an ampersand in the text, you can type two ampersands in a row. If,
for example, you want to create a Save & Exit button, you can type “Save
&& Exit” as the Text property.
A form with access keys and a multi-line text box
Figure 4.9: How to work with label, text box, and button controls

Visual Basic Unit 4
Sikkim Manipal University Page No.: 81
Table 4.2: Control Properties
Label Control Properties:
Property Example Description
Text &Invoice number:
The text for the label. If an ampersand (&) is included, the next letter is treated as an access key. Then, the user can press Alt plus this letter to move the focus to the control that follows the label in the tab order. (The label itself can’t receive the focus.)
UseMnemonic True Determines whether an ampersand (&) in the Text property of the control identifies an access key (True) or a text character (False).
Text box control properties:
Property Example Description
AcceptsReturn False Determines whether return characters can be entered into a text box whose Multiline property is set to True.
AcceptsTab False Determines whether tab characters can be entered into a text box whose Multiline property is set to True.
CharacterCasing Normal Determines whether characters entered into the text box should be left as entered or converted to upper or lowercase.
HideSelection False Determines if the text in the text box is hidden when the control loses focus.
MaxLength 10 The maximum number of characters that can be entered into the text box. The default is 32767.
Multiline False Determines whether the text in the text box can occupy more than one line.
PasswordChar * The character that’s displayed in place of each character entered into the text box. Used to provide security for entering passwords.
ReadOnly False Determines whether the user can change the text in the text box.
Scrollbars None Determines what scrollbars are displayed in a multi-line text box.
WordWrap True Determines whether the lines in a multi-line text box are wrapped automatically when the end of each line is reached.

Visual Basic Unit 4
Sikkim Manipal University Page No.: 82
Button control property
Property Example Description
Text E&xit The text that will appear on the control. If an ampersand is included, the letter that follows can be used as an access key.
Self Assessment Questions
4. An _____ is a self-contained unit that combines code and data.
5. An object is an _____ of a class, and the process of creating an object
from a class is called _____.
6. Visual Basic applications are _____, i.e., they work by responding to the
events that occur on objects.
4.7 Working with combo box and list box controls
Figure 4.10 shows you how to work with combo boxes and list boxes. In the
form at the top of this figure, a combo box lets the user select a number that
represents the life of an asset and a list box displays the depreciation
amount for each year of the asset’s life. To use this form, the user enters the
initial cost of the asset and the final value of the asset (which is often zero)
in the text boxes. Then, the user selects the life of the asset from the drop-
down list of the combo box or enters the number of years into that box. Last,
the user clicks on the Calculate button to display the year and depreciation
amounts in the list box.
This figure also lists some of the properties and methods you’re likely to use
as you work with combo boxes and list boxes. To get the index value of the
item that the user selects, for example, you can use the SelectedIndex
property. And to get the value of the selected item, you can use the
SelectedItem property. You’ll see coding examples that use these properties
in the next figure (figure 4.11).
One property that applies only to a combo box is the DropDownStyle
property. This property determines how the combo box functions. The
default is DropDown, which means that the user can either click on the drop-
down arrow at the right side of the combo box to display the drop-down list
and select an item, or he can enter a value directly into the text box portion

Visual Basic Unit 4
Sikkim Manipal University Page No.: 83
of the combo box. Note that the value the user enters doesn’t necessarily
have to be a value that appears in the list.
If you want to restrict user entries to just the values in the list, you can set
the DropDownStyle property to DropDownList. Then, the user can only
select a value from the list or enter a value that appears in the list.
The third option for the DropDownStyle property is Simple. Like the
DropDown setting, this setting lets the user enter any value into the text box
portion of the control. However, instead of having to click on an arrow to
display the list, the list is always visible.
When you work with the items in a list box or combo box, you should realize
that you’re actually working with the items in a collection. To refer to this
collection, you use the Items property of the control. Then, you can use the
properties and methods that the .NET Framework provides for working with
collection objects to work with the items in the collection. The most common
properties and methods are summarized in this figure.
The most common event for working with combo boxes and list boxes is the
SelectedIndexChanged event. This event occurs when the value of the
SelectedIndex property changes, which is when the user selects a different
item from the list. For a combo box, you can also use the TextChanged
event to detect when the user enters a value into the text box portion of the
control. Keep in mind, though, that this event will occur each time a single
character is added, changed, or deleted.
Figure 4.10: How to work with combo box and list box controls
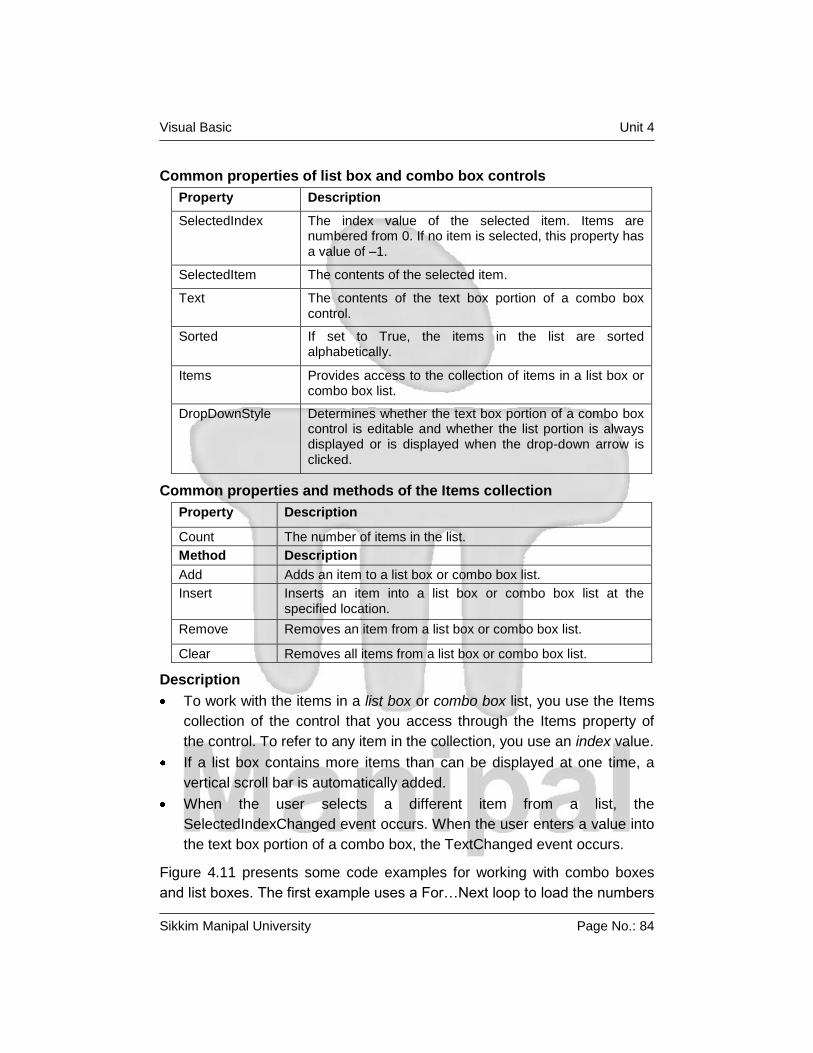
Visual Basic Unit 4
Sikkim Manipal University Page No.: 84
Common properties of list box and combo box controls
Property Description
SelectedIndex The index value of the selected item. Items are numbered from 0. If no item is selected, this property has a value of –1.
SelectedItem The contents of the selected item.
Text The contents of the text box portion of a combo box control.
Sorted If set to True, the items in the list are sorted alphabetically.
Items Provides access to the collection of items in a list box or combo box list.
DropDownStyle Determines whether the text box portion of a combo box control is editable and whether the list portion is always displayed or is displayed when the drop-down arrow is clicked.
Common properties and methods of the Items collection
Property Description
Count The number of items in the list.
Method Description
Add Adds an item to a list box or combo box list.
Insert Inserts an item into a list box or combo box list at the specified location.
Remove Removes an item from a list box or combo box list.
Clear Removes all items from a list box or combo box list.
Description
To work with the items in a list box or combo box list, you use the Items
collection of the control that you access through the Items property of
the control. To refer to any item in the collection, you use an index value.
If a list box contains more items than can be displayed at one time, a
vertical scroll bar is automatically added.
When the user selects a different item from a list, the
SelectedIndexChanged event occurs. When the user enters a value into
the text box portion of a combo box, the TextChanged event occurs.
Figure 4.11 presents some code examples for working with combo boxes
and list boxes. The first example uses a For…Next loop to load the numbers

Visual Basic Unit 4
Sikkim Manipal University Page No.: 85
1 through 40 into a combo box list named cboLife. This is the combo box
from the Calculate Depreciation form you saw in the previous figure that lets
the user specify the life of an asset. Each time through the loop, the Add
method is used to add the number to the Items collection of the combo box.
In this case, the code is in the Load event procedure for the Form, so the
combo box is loaded when the form is loaded. After that, the user can select
a value from the combo box and other procedures can use that value. You
can see, for example, that the Text property of cboLife is used as the third
argument for the SYD function in the second coding example in this figure.
The second example shows how you can load the list box in figure 4.10
when the Click event of the Calculate button occurs. This example begins by
invoking the Clear method to clear all items from the list box. Then, a
For…Next loop uses the SYD function to add the lines to the list box.
The SYD function is one of the financial functions that come with Visual
Basic. It calculates each year’s depreciation using a method know as the
Sum of the Years’ Digits. If you’re not familiar with depreciation, keep in
mind that you don’t have to understand how it works. Just think of it as a
function that requires four arguments and returns a yearly depreciation
value that is added to a list box. The point of this code is to illustrate the use
of the Add method.
Even then, this code may look confusing, but it’s easy to understand if you
break it down. For each year in the asset’s life (iIndex), the Add method is
used to add a string to the Items collection of the list box. This string starts
with the year followed by a colon and some spaces
lstDepreciation.Items.Add ("Year " & iIndex & ": " &
followed by the value derived from the SYD function
SYD(txtInitialCost.Text, txtFinalValue.Text, cboLife.Text, iIndex)
after the FormatCurrency function is used to format the result.
When you use the Add method of the Items collection to add an item to a
list, the item is added at the end of the list. If you want to add the item in
another location, you can use the Insert method as illustrated by the third
example in this figure. When you use this method, you indicate the index
where you want the item inserted along with the value of the item to be
inserted. Keep in mind if you use this method that the index values of a

Visual Basic Unit 4
Sikkim Manipal University Page No.: 86
collection are zero-based. So the index of the first item is 0, the index of the
second item is 1, and so on.
The fourth example in this figure shows how to use the Remove method to
remove an item from a list by specifying its index value. The fifth example
shows how to use the SelectedItem property to get the value of the selected
item. And the last example shows how you can initialize a combo box so
that no value is selected. To do that, you set the SelectedIndex property of
the control to –1, which is not a valid index value.
Code that loads the combo box in figure 4.10
Private Sub Form1_Load(ByVal sender As System.Object, _
ByVal e As System.EventArgs) Handles MyBase.Load
Dim iIndex As Integer
For iIndex = 1 To 40
cboLife.Items.Add(iIndex)
Next iIndex
End Sub
Code that clears and loads the list box in figure 8-3
Private Sub btnCalculate_Click(ByVal sender As System.Object, _
ByVal e As System.EventArgs) Handles btnCalculate.Click
Dim iIndex As Integer
lstDepreciation.Items.Clear()
For iIndex = 1 To cboLife.Text
lstDepreciation.Items.Add("Year " & iIndex & ": " _
& FormatCurrency(SYD(txtInitialCost.Text, _
txtFinalValue.Text, cboLife.Text, iIndex)))
Next iIndex
End Sub
A statement that inserts an item into a combo box list:
cboNames.Items.Insert(iIndex, txtName.Text)
A statement that removes an item from a list
cboNames.Items.Remove(iIndex)
A statement that refers to the selected item in a combo box
sSelectedName = cboNames.SelectedItem
A statement that initializes a combo box so that no item is selected
cboNames.SelectedIndex = -1
Figure 4.11 Code for working with combo box and list box controls

Visual Basic Unit 4
Sikkim Manipal University Page No.: 87
About the depreciation functions:
The SYD function that’s used in the second example is one of the
financial functions that comes with Visual Basic. It calculates the yearly
depreciation for an item by using the Sum of the Years’ Digits method of
depreciation.
The four arguments that the SYD function requires are the initial cost of
the item, the final value of the item, the lifetime of the item in years, and
the year that the item value should be calculated for. This function
returns the depreciation for one year.
Another function that can be used to calculate depreciation is the SLN
function. It calculates straight line depreciation using just the first three
arguments that are used for the SYD function (initial cost, final value,
and lifetime of the item).
To find out more about the depreciation functions or other financial
functions, use the Index tab of the help feature and type in “financial
calculations.”
4.8 Working with Check Box and Radio Button Controls
Figure 4.12 shows you how to work with check boxes and radio buttons.
The main difference between these two types of controls is that radio
buttons in a group are mutually exclusive and check boxes operate
independently. In other words, if the user selects a radio button in a group,
all of the other buttons are automatically turned off. In contrast, when the
user selects a check box, it has no effect on the other check boxes on the
form, even if they appear as a group.
To group radio buttons, you can place them in either a group box control or
a panel control. You’ll learn about these controls in a minute. For now, just
realize that if radio buttons aren’t placed within one of these controls, all of
the radio buttons on the form function as a group.
The property you’re most likely to use when working with radio buttons and
check boxes is the Checked property. This property can have a value of
either True or False to indicate if the control is checked. You can see how
this property is used in the two examples in this figure.

Visual Basic Unit 4
Sikkim Manipal University Page No.: 88
In the first example, the Checked property of the Future Value radio button
is tested in an If statement. If the value of this property is True, a procedure
named CalculateFutureValue is executed. But if the value of this property is
False, it indicates that the Monthly Investment radio button is selected. In
that case, a procedure named CalculateMonthlyInvestment is executed.
The second example is similar. In this case, though, the Checked property
of a check box is tested. If the value of this property is True, the FV function
is executed using the DueDate.EndOfPeriod constant for the fifth argument.
Otherwise, the DueDate.BegOfPeriod constant is used.
The event you’re most likely to work with when you use radio buttons or
check boxes is the CheckedChanged event. This event occurs when you
check or uncheck one of these controls. You’ll see how you can use this
event in one of the applications presented later in this chapter.
4.9 Working with group box and panel controls
Figure 4.12 also illustrates how to use GroupBox and Panel controls. Here,
you can see that the two radio buttons have been placed inside a group box
so it’s clear that they function as a group. The name of the group, which is
displayed in the upper left corner of the group box, is specified by setting the
Text property of the control. In contrast, the panel control doesn’t have a
Text property. Because of that, it’s more common to use this control to form
visual rather than functional groups.
Regardless of which control you use, you should know that if you move one
of these controls in the Form Designer window, all of the controls it contains
are moved with it. In fact, it’s common to use a panel control just to group
controls that can be moved together. Then, if you don’t want the panel to
appear when the form is displayed, you can set its BorderStyle property to
None.

Visual Basic Unit 4
Sikkim Manipal University Page No.: 89
A form with two radio buttons, a group box, a panel, and a check box
Figure 4.12: Working with radio button, check box, group box,
and panel controls
Code that uses the radio buttons
If rdoFutureValue.Checked Then
CalculateFutureValue()
Else
CalculateMonthlyInvestment()
End If
Code that uses the check box
If chkDueAtEnd.Checked Then
txtFutureValue.Text = _
FormatNumber(FV(txtInterestRate.Text / 12 / 100, _
txtYears.Text * 12, -txtMonthlyInvestment.Text, , _
DueDate.EndOfPeriod))
Else
txtFutureValue.Text = _
FormatNumber(FV(txtInterestRate.Text / 12 / 100, _
txtYears.Text * 12, -txtMonthlyInvestment.Text, , _
DueDate.BegOfPeriod))
End If
Description
To determine whether a radio button or check box is checked, you test
its Checked property. This property can be set to either True or False.

Visual Basic Unit 4
Sikkim Manipal University Page No.: 90
When you check or uncheck a radio button or check box, the
CheckedChanged event occurs.
You can use either a group box or a panel control to group controls. The
main difference between the two is that a group box includes a Text
property that contains the caption for the control, but a panel control
does not.
Group boxes are typically used to group controls like radio buttons that
function as a group. Panel controls are typically used to visually group
controls on a form.
If you move a group box or a panel control, all of the controls it contains
move with it.
Self Assessment Questions
7. One property that applies only to a combo box is the _____ property.
8. If you want to restrict user entries to just the values in the list, you can
set the DropDownStyle property to _____.
9. To determine whether a radio button or check box is checked, you test
its _____ property.
4.10 Working with tab controls
This control lets you group other controls on the form into pages. Figure
4.13 presents the basic skills for working with tab controls.
As you can see, the form in this figure contains a tab control with two pages,
also called tabs. The first tab provides controls that let you calculate an
investment, and the second tab provides controls that let you calculate
depreciation. The tab control makes it easy to combine related forms like
this into a single form.
The event you’ll use most often with a tab control is the
SelectedIndexChanged event. This event occurs when the SelectedIndex
property of the control changes, which typically happens as a result of a
user clicking on another tab. The event procedure shown in this figure, for
example, moves the focus to the appropriate control on a tab when that tab
becomes the current tab. Notice that this procedure uses the SelectedIndex
property to determine which tab is current.

Visual Basic Unit 4
Sikkim Manipal University Page No.: 91
A form that uses a tab control with two tabs
Figure 4.13: Working with tab controls
Code that uses the SelectedIndexChanged event of the tab control
Private Sub tabCalculations_SelectedIndexChanged _
(ByVal sender As System.Object, ByVal e As System.EventArgs) _
Handles tabCalculations.SelectedIndexChanged
If tabCalculations.SelectedIndex = 0 Then
If rdoFutureValue.Checked = True Then
txtMonthlyInvestment.Focus()
Else
txtInterestRate.Focus()
End If
Else
txtInitialCost.Focus()
End If
End Sub
Description
After you add a tab control to a form, you can add tabs to it by clicking
on the Add Tab link at the bottom of the Properties window or by
selecting the Add Tab command from the shortcut menu for the control.
By default, the tabs are displayed along the top of the tab control. To
display them along the left, right, or bottom of the control, change the
Alignment property accordingly.

Visual Basic Unit 4
Sikkim Manipal University Page No.: 92
By default, the tabs you add are displayed in a single row. To create
multiple rows of tabs, set the Multiline property to True.
To remove a tab, select it and then click on the Remove Tab link in the
Properties window or select the Remove Tab command from the
shortcut menu for the control.
Each tab in a tab control contains a page where you add the controls for
the tab. You use the Text property of a page to set the text that’s
displayed in its associated tab.
The SelectedIndexChanged event occurs when you move to another
tab. You can use the SelectedIndex property of the tab control to
determine which tab was selected.
4.11 Developing a multi-form application
In the last chapter, you saw forms for calculating an investment and for
calculating depreciation. Each of these forms was stored in a separate
project and operated independently of one another. Another way to
implement related forms like these, though, is to include them both in the
same project. To do that, you need to learn the skills presented in this
chapter.
Basic skills and concepts for developing multi-form applications
Few applications consist of a single form like the ones you’ve seen so far in
this book. Because of that, you need to know how to work with two or more
forms in the same project. You’ll learn the basic skills and concepts for
doing that in the topics that follow.
Adding a form to a project
When you start a new project, it consists of a single blank form. Then, to
add another form to the project, you use the Add New Item dialog box
shown in figure 4.14. From this dialog box, you select the Windows Form
template and then enter the name of the new form. When you click on the
Open button, the new form is created with the name you specify. If you look
at the code that’s generated for this form, you’ll see that the class is also
given this name (without the file extension, of course).
You can also add an existing form to a project using the Add Existing Item
dialog box. This can be useful if you want to use the same form in two
different projects or if you want to create a form that’s similar to an existing

Visual Basic Unit 4
Sikkim Manipal University Page No.: 93
form. Note that when you add an existing form from another project, that
form is copied into the new project. That way, you don’t have to worry about
changing the original form inadvertently. If you did the exercises for the last
chapter, you already saw how this works.
The Add New Item dialog box
Figure 4.14: How to add a form to a project
How to add a new form
Display the Add New Item dialog box by selecting the Project Add
Windows Form command. Or, select the Add Windows Form command
from the shortcut menu that’s displayed when you right-click on the
project in the Solution Explorer.
To add a new form, select the Windows Form template from the Add
New Item dialog box, enter a name for the form, and click on the Open
button.
How to add an existing form
Display the Add Existing Item dialog box by selecting the Project Add
Existing Item command. Or, select the Add Existing Item command from
the shortcut menu for the project.
To add an existing form, select the VB file for the form from the Add
Existing Item dialog box and then click on the Open button.
Note: The Class statement that’s generated for the new form will reflect the
name you specify in the Add New Item dialog box. Because of that, you may

Visual Basic Unit 4
Sikkim Manipal University Page No.: 94
want to change the class statement for the default form to an appropriate
name for consistency.
4.12 Working with form objects
To work with a form using Visual Basic code, you use the techniques shown
in Figure 4.15. To start, you declare an object variable for the form. Then,
you create an instance of the form class and assign a reference to that
instance to the object variable. As with other object variables and classes,
you can do that using a single declaration statement with the New keyword
as shown in the first statement in this figure. Alternatively, you can declare
the variable without the New keyword and then use this keyword in an
assignment statement to create an instance of the class and assign it to the
object variable.
After you create an instance of a form, you can load and display that form
using the Show method as illustrated in the second statement in this figure.
This method is a member of the Form class that’s defined by the .NET
Framework. Any form you create in Visual Basic inherits the members of the
Form class. So you can use any of these members to work with your forms.
Some of the other methods you’re likely to use are listed in this figure.
The syntax for declaring a form variable
{Dim|Private|Public|Static} variablename As [New] formname
A statement that declares a form variable and creates an instance of the
form
Dim frmCalculateInvestment As New frmCalculateInvestment()
A statement that displays a form
frmCalculateInvestment.Show()
Typical methods for working with form objects
Method Description
Show Loads the form if it isn’t already loaded, and then displays the form by setting its Visible property to True.
Hide Hides the form by setting its Visible property to False.
BringToFront Displays the form on top of any other forms that are currently displayed.
SendToBack Displays the form behind any other forms that are currently displayed.
Figure 4.15: Working with form objects

Visual Basic Unit 4
Sikkim Manipal University Page No.: 95
Description
When an application starts by displaying a form, Visual Basic
automatically creates an instance of that form. To display another form
from that form or from a class or module, you have to first declare an
object variable and create an instance of the form.
You declare an object variable that will hold a reference to a form just as
you do any other object variable. If you include the New keyword on the
declaration, an instance of the form class you name is created and
assigned to the form variable. Otherwise, you can code an assignment
statement with the New keyword to do that.
After you declare an object variable and assign a form object to it, you
can use that variable to work with the properties and methods of the
form.
Changing the startup object for a project
By default, the form that’s created when you start a project is the form that
will be displayed when you run the application. If that’s not what you want,
you can change the Startup object property of the project as shown in figure
4.16. To change the startup object to another form, for example, you just
select the form name from the drop-down list. And to change the startup
object to the Main procedure in a module, you select the Sub Main option.
The Property Pages dialog box
Figure 4.16: How to change the startup object for a project
Operation
To display the Property Pages dialog box for a project, select the
Project Properties command, or select the Properties command
from the shortcut menu for the project.

Visual Basic Unit 4
Sikkim Manipal University Page No.: 96
To change the form that’s displayed when the project starts, select the
General group in the Common Properties folder. Then, select the form
that you want from the Startup object combo box.
To run the Main procedure in a module when the project starts, select
the Sub Main option from the Startup object combo box.
4.13 Single-document and multiple-document interfaces
Figure 4.17 shows two versions of the Financial Calculations application that
will be used as examples in this chapter. These applications let the user
calculate an investment or depreciation using forms like the ones you saw in
the last chapter. In addition, each application includes a third form that
provides a way for the user to access the other forms.
The first version of this application uses a single-document interface, or SDI.
In an SDI application, each form runs in its own application window, and this
window is usually shown in the Windows taskbar. Then, you can click on the
buttons in the taskbar to switch between the open forms. When you use this
interface, each form can have its own menus and toolbars. In addition, a
main form called a startup form typically provides access to the other forms
of the application. In this figure, for example, the startup form includes
buttons that the user can click on to display the other forms.
The second version of this application uses a multiple-document interface,
or MDI. In an MDI application, a container form called a parent form
contains one or more child forms. Then, the menus and toolbars on the
parent form contain the commands that let you open and view forms, and
you can use its Window menu to switch between the open forms. When you
close the parent form of an MDI application, all of the child forms are closed
and the application ends.
The main advantage of a multiple-document interface is that the parent form
manages multiple instances of child forms for you. In contrast, if you create
multiple instances of a form in an SDI application, you have to manage them
yourself. As you can imagine, that can get unwieldy.
The parent form in the MDI application in this figure also includes a status
bar. A bar like this can be set up to display a number of information items.
Although you can add a status bar to any form in either an SDI or MDI

Visual Basic Unit 4
Sikkim Manipal University Page No.: 97
application, it makes the most sense to use one on the parent form in an
MDI application.
Incidentally, you can also develop an explorer-style interface with Visual
Basic .NET. In this type of interface, a single window is split into two panes
just as it is in the Windows Explorer. Then, you can use the left pane to
navigate between different parts of the application, and you can use the
right pane to work with the application. This type of interface, however, isn’t
presented in this book.
Single-document interface (SDI)
Multiple-document interface (MDI)
Figure 4.17: Single-document and multiple-document interfaces

Visual Basic Unit 4
Sikkim Manipal University Page No.: 98
Self Assessment Questions
10. The event you’ll use most often with a tab control is the _____ event.
11. Any form you create in Visual Basic inherits the members of the _____
class.
12. In _____ type of interface, a single window is split into two panes just as
it is in the Windows Explorer.
4.14 Summary
When you create a new Visual Basic project, you use the New Project
dialog box to set the basic options for the project, such as the project’s
name and the location at which the project is saved.
When you create a new project, the project begins with a single, blank
form. You can then add controls to the form and set the properties of the
form and controls so they look and work the way you want them to.
An object is a self-contained unit that combines code and data.
A class is the code that defines the characteristics of an object.
An object is an instance of a class, and the process of creating an object
from a class is called instantiation.
Visual Basic applications are event-driven, i.e., they work by responding
to the events that occur on objects.
4.15 Terminal Questions
1. Design a form based applications using labels, text boxes, and buttons
to perform basic arithmetic operations on integers.
2. Develop a form based interface to demonstrate the usage of combo box
and list box controls.
3. With the help of suitable example, describe the development of single-
document and multi-document interface.
4.16 Answers
Self Assessment Questions
1. Solution
2. Form
3. Ampersand (&)
4. Object
5. Instance, Instantiation

Visual Basic Unit 4
Sikkim Manipal University Page No.: 99
6. Event driven
7. DropDownStyle
8. DropDownList
9. Checked
10. SelectedIndexChanged
11. Form
12. Explorer Style Interface
Terminal Questions
1. Refer Section 4.6
2. Refer Section 4.7
3. Refer Section 4.13

Visual Basic Unit 5
Sikkim Manipal University Page No.: 100
Unit 5 Exception Handling in VB.NET
Structure:
5.1 Introduction
Objectives
5.2 A Brief Review of Error Handling in VB6
5.3 Exceptions in .NET
5.4 Structured-Exception-Handling Keywords
5.5 Throwing a New Exception
5.6 The Exit Try Statement
5.7 Using Exception Properties
5.8 Source and StackTrace
5.9 GetBaseException
5.10 HelpLink
5.11 Summary
5.12 Terminal Questions
5.13 Answers
5.1 Introduction
All professional-grade programs need to handle unexpected conditions. In
programming languages before Microsoft .NET, this was often called error
handling. Unexpected conditions generated error codes, which were trapped
by programming logic that took appropriate action.
The common language runtime in .NET does not generate error codes.
When an unexpected condition occurs, the CLR creates a special object
called an exception. This object contains properties and methods that
describe the unexpected condition in detail and communicate various items
of useful information about what went wrong.
Because .NET deals with exceptions instead of errors, the term ―error
handling‖ is seldom used in the .NET world. Instead, the term ―exception
handling‖ is preferred. This term refers to the techniques used in .NET to
detect exceptions and take appropriate action.
This chapter covers how exception handling works in Visual Basic 2005.
There are many improvements over pre-.NET versions of Visual Basic. This
chapter discusses the common language runtime (CLR) exception handler

Visual Basic Unit 5
Sikkim Manipal University Page No.: 101
in detail and the programming methods that are most efficient in catching
errors. Specifically, this chapter covers the following:
A brief review of error handling in Visual Basic 6 (VB6)
The general principles behind exception handling
The Try...Catch...Finally structure, the Exit Try statement, and nested
Try structures
The exception object’s methods and properties
Capabilities in Visual Studio .NET to work with exceptions
Error and trace logging and how you can use these methods to obtain
feedback on how your program is working
This chapter begins with a quick review of error handling in previous
versions of Visual Basic to use as a reference point. Then you will learn new
ways to handle exceptions in .NET.
Objectives:
Error handling is the most important feature of any programming language.
After studying this unit, you should be able to:
describe and discuss the importance of error handling mechanism in
Visual Basic
discuss various exceptions in VB.Net
discuss exception handling keywords
explain the keywords try, catch, throw and finally
explain the properties of exceptions.
5.2 A Brief Review of Error Handling in VB6
For compatibility, Visual Basic 2005 and other .NET versions of Visual Basic
still support the old-style syntax for error handling that was used in Visual
Basic 6 and earlier versions. That means you can still use the syntax
presented in this review. However, it is strongly recommended that you
avoid using this old-style syntax in favor of the exception handling features
that are native to .NET. Using the new Try...Catch syntax (presented after
this review) will give you more flexibility and better code structure.
The old-style syntax in VB6 was handed down from DOS versions of
BASIC. The On Error construct was created in an era when line labels and

Visual Basic Unit 5
Sikkim Manipal University Page No.: 102
GoTo statements were commonly used. Such error handling is difficult to
use and has limited functionality compared to more modern alternatives.
In VB6, a typical routine with error handling code looks like this:
Private Function OpenFile(sFileName As String) As Boolean
On Error GoTo ErrHandler:
Open sFileName For Random As #1
OpenFile = True
Exit Sub
ErrHandler:
Select Case Err.Number
Case 53 ' File not found
MessageBox.Show "File not found"
Case Else
MessageBox.Show "Other error"
End Select
OpenFile = False
End Function
The top of the routine points to a section of code called an error handler,
which is usually placed at the bottom of the routine. The error handler takes
control as soon as an error is detected in the routine, and it checks the error
number to determine what action to take. The error number is available as a
property of the Err object, which is a globally available object that holds error
information in VB6.
There are several other error handling syntax options not included in the
preceding error-handling code. If the error handler can take care of the error
without breaking execution, then it can resume execution with the line of
code that generated the error ( Resume), the one after that ( Resume Next),
or at a particular location ( Resume {LineLabel}).
There’s a much better way to manage errors in VB 2005, called structured
exception handling. The rest of this chapter discusses this new way to work
with code errors, and uses the term structured exception handling
throughout, except for the small sections that discuss compatibility with
older error-handling techniques.

Visual Basic Unit 5
Sikkim Manipal University Page No.: 103
5.3 Exceptions in .NET
.NET implements a systemwide, comprehensive approach to exception
handling. As noted in the chapter introduction, instead of an error number,
there is an exception object. This object contains information relevant to the
error, exposed as properties of the object. Later you’ll see a summary of the
properties and the information they expose in a table.
Such an object is an instance of a class that derives from a class named
System.Exception. As shown later, a variety of subclasses of
System.Exception are used for different circumstances.
Important Properties and Methods of an Exception
The Exception class has properties that contain useful information about the
exception, as shown in the following table:
Property Description
HelpLink A string indicating the link to help for this exception
InnerException Returns the exception object reference to an inner (nested) exception
Message A string that contains a description of the error, suitable for displaying to users
Source A string containing the name of an object that generated the error
StackTrace A read-only property that holds the stack trace as a text string. The stack trace is a list of the pending method calls at the point at which the exception was detected. That is, if MethodA called MethodB, and an exception occurred in MethodB, the stack trace would contain both MethodA and MethodB.
TargetSite A read-only string property that holds the method that threw the exception
The two most important methods of the Exception class are as follows:
Method Description
GetBaseException Returns the first exception in the chain
ToString Returns the error string, which might include as much information as the error message, the inner exceptions, and the stack trace, depending on the error

Visual Basic Unit 5
Sikkim Manipal University Page No.: 104
How Exceptions Differ from the Err Object in VB6
Because an exception contains all of the information needed about an error,
structured exception handling does not use error numbers and the Err
object. The exception object contains all the relevant information about the
error.
However, whereas there is only one global Err object in VB6, there are
many types of exception objects in VB 2005. For example, if a divide by
zero is done in code, then an OverflowException is generated. There are
several dozen types of exception classes in VB 2005, and in addition to
using the ones that are available in the .NET Framework, you can inherit
from a class called ApplicationException and then create your own
exception classes.
In .NET, all exceptions inherit from System.Exception. Special-purpose
exception classes can be found in many namespaces. The following table
lists four representative examples of the classes that extend Exception:
Namespace Class Description
System InvalidOperationException Generated when a call to an object method is inappropriate because of the object’s state
System OutOfMemoryException Results when there is not enough memory to carry out an operation
System.XML XmlException Often caused by an attempt to read invalid XML
System.Data DataException Represents errors in ADO.NET components
It is common for an exception class to reside in a namespace with the
classes that typically generate the exception. For example, the
DataException class is in System.Data, with the ADO.NET components that
often generate a DataException instance.

Visual Basic Unit 5
Sikkim Manipal University Page No.: 105
Having many types of exceptions in VB 2005 enables different types of
conditions to be trapped with different exception handlers. This is a major
advance over VB6.
Self Assessment Questions
1. When an unexpected condition occurs, the CLR creates a special object
called an _____.
2. There’s a much better way to manage errors in VB 2005, called _____.
3. In .NET, all exceptions inherit from _____.
5.4 Structured-Exception-Handling Keywords
Structured exception handling depends on several new keywords in VB
2005:
Try – Begins a section of code in which an exception might be
generated from a code error. This section of code is often called a Try
block. In some respects, this would be the equivalent of an On Error
statement in VB6. However, unlike an On Error statement, a Try
statement does not indicate where a trapped exception should be
routed. Instead, the exception is automatically routed to a Catch
statement (discussed next).
Catch – Begins an exception handler for a type of exception. One or
more Catch code blocks follow a Try block, with each Catch block
catching a different type of exception. When an exception is
encountered in the Try block, the first Catch block that matches that type
of exception receives control. A Catch statement is analogous to the line
label used in a VB6 On Error statement, but the ability to route different
types of exceptions to different Catch statements is a radical
improvement over VB6.
Finally – Contains code that runs when the Try block finishes normally,
or when a Catch block receives control and then finishes. That is, the
code in the Finally block always runs, regardless of whether an
exception was detected. Typically, the Finally block is used to close or
dispose of any resources, such as database connections, that might
have been left unresolved by the code that had a problem. There is no
equivalent of a Finally in VB6.

Visual Basic Unit 5
Sikkim Manipal University Page No.: 106
Throw – Generates an exception. This is similar to Err.Raise in VB6. It’s
usually done in a Catch block when the exception should be kicked back
to a calling routine or in a routine that has itself detected an error such
as a bad argument passed in.
The Try, Catch, and Finally Keywords
Here is an example showing some typical simple structured exception
handling code in VB 2005. In this case, the most likely source of an error is
the items argument. If it has a value of zero, then this would lead to dividing
by zero, which would generate an exception.
First, create a Windows Application in Visual Basic 2005 and place a button
on the default Form1 created in the project. In the button’s click event, place
the following two lines of code:
Dim sngAvg As Single
sngAvg = GetAverage(0, 100)
Then put the following function in the form’s code:
Private Function GetAverage(iItems As Integer, iTotal As Integer) as
Single
' Code that might throw an exception is wrapped in a Try block
Try
Dim sngAverage As Single
' This will cause an exception to be thrown if iItems = 0
sngAverage = CSng(iTotal \ iItems)
' This only executes if the line above generated no error
MessageBox.Show("Calculation successful")
Return sngAverage
Catch excGeneric As Exception
' If the calculation failed, you get here
MessageBox.Show("Calculation unsuccessful - exception caught")
Return 0
End Try
End Function
This code traps all the exceptions with a single generic exception type, and
you don’t have any Finally logic. Run the program and press the button. You

Visual Basic Unit 5
Sikkim Manipal University Page No.: 107
will be able to follow the sequence better if you place a breakpoint at the top
of the GetAverage function and step through the lines.
Here is a more complex example that traps the divide-by-zero exception
explicitly. This second version of the GetAverage function (notice that the
name is GetAverage2) also includes a Finally block:
Private Function GetAverage2(iItems As Integer, iTotal As Integer) as
Single
' Code that might throw an exception is wrapped in a Try block
Try
Dim sngAverage As Single
' This will cause an exception to be thrown.
sngAverage = CSng(iTotal \ iItems)
' This only executes if the line above generated no error.
MessageBox.Show("Calculation successful")
Return sngAverage
Catch excDivideByZero As DivideByZeroException
' You'll get here with an DivideByZeroException in the Try block
MessageBox.Show("Calculation generated DivideByZero
Exception")
Return 0
Catch excGeneric As Exception
' You'll get here when any exception is thrown and not caught in
' a previous Catch block.
MessageBox.Show("Calculation failed - generic exception caught")
Return 0
Finally
' Code in the Finally block will always run.
MessageBox.Show("You always get here, with or without an
error")
End Try
End Function
This code contains two Catch blocks for different types of exceptions. If an
exception is generated, then .NET will go down the Catch blocks looking for
a matching exception type. That means the Catch blocks should be
arranged with specific types first and more generic types after.

Visual Basic Unit 5
Sikkim Manipal University Page No.: 108
Place the code for GetAverage2 in the form, and place another button on
Form1. In the Click event for the second button, place the following code:
Dim sngAvg As Single
sngAvg = GetAverage2(0, 100)
Run the program again and press the second button. As before, it’s easier
to follow if you set a breakpoint early in the code and then step through the
code line by line.
The Throw Keyword
Sometimes a Catch block is unable to handle an error. Some exceptions are
so unexpected that they should be ―sent back up the line‖ to the calling
code, so that the problem can be promoted to code that can decide what to
do with it. A Throw statement is used for that purpose.
A Throw statement, like an Err.Raise, ends execution of the exception
handler – that is, no more code in the Catch block after the Throw statement
is executed. However, Throw does not prevent code in the Finally block
from running. That code still runs before the exception is kicked back to the
calling routine.
You can see the Throw statement in action by changing the earlier code for
GetAverage2 to look like this:
Private Function GetAverage3(iItems As Integer, iTotal as Integer) as
Single
' Code that might throw an exception is wrapped in a Try block
Try
Dim sngAverage As Single
' This will cause an exception to be thrown.
sngAverage = CSng(iTotal \ iItems)
' This only executes if the line above generated no error.
MessageBox.Show("Calculation successful")
Return sngAverage
Catch excDivideByZero As DivideByZeroException
' You'll get here with an DivideByZeroException in the Try block.
MessageBox.Show("Calculation generated DivideByZero
Exception")

Visual Basic Unit 5
Sikkim Manipal University Page No.: 109
Throw excDivideByZero
MessageBox.Show("More logic after the throw − never executed")
Catch excGeneric As Exception
' You'll get here when any exception is thrown and not caught in
' a previous Catch block.
MessageBox.Show("Calculation failed - generic exception caught")
Throw excGeneric
Finally
' Code in the Finally block will always run, even if
' an exception was thrown in a Catch block.
MessageBox.Show("You always get here, with or without an
error")
End Try
End Function
Here is some code to call GetAverage3. You can place this code in
another button’s click event to test it out:
Try
Dim sngAvg As Single
sngAvg = GetAverage3(0, 100)
Catch exc As Exception
MessageBox.Show("Back in the click event after an error")
finally
MessageBox.Show("Finally block in click event")
End Try
5.5 Throwing a New Exception
Throw can also be used with exceptions that are created on-the-fly. For
example, you might want your earlier function to generate an
ArgumentException, since you can consider a value of items of zero to be
an invalid value for that argument.
In such a case, a new exception must be instantiated. The constructor
allows you to place your own custom message into the exception. To show
how this is done, let’s change the aforementioned example to throw your
own exception instead of the one caught in the Catch block:

Visual Basic Unit 5
Sikkim Manipal University Page No.: 110
Private Function GetAverage4(iItems As Integer, iTotal as Integer) as
Single
If iItems = 0 Then
Dim excOurOwnException As New _
ArgumentException("Number of items cannot be zero")
Throw excOurOwnException
End If
' Code that might throw an exception is wrapped in a Try block.
Try
Dim sngAverage As Single
' This will cause an exception to be thrown.
sngAverage = CSng(iTotal \ iItems)
' This only executes if the line above generated no error.
MessageBox.Show("Calculation successful")
Return sngAverage
Catch excDivideByZero As DivideByZeroException
' You'll get here with an DivideByZeroException in the Try block.
MessageBox.Show("Calculation generated DivideByZero
Exception")
Throw excDivideByZero
MessageBox.Show("More logic after the thrown - never executed")
Catch excGeneric As Exception
' You'll get here when any exception is thrown and not caught in
' a previous Catch block.
MessageBox.Show("Calculation failed - generic exception caught")
Throw excGeneric
Finally
' Code in the Finally block will always run, even if
' an exception was thrown in a Catch block.
MessageBox.Show("You always get here, with or without an
error")
End Try
End Function

Visual Basic Unit 5
Sikkim Manipal University Page No.: 111
This code can be called from a button with similar code for calling
GetAverage3. Just change the name of the function called to GetAverage4.
This technique is particularly well suited to dealing with problems detected in
property procedures. Property Set procedures often do checking to ensure
that the property is about to be assigned a valid value. If not, throwing a new
ArgumentException (instead of assigning the property value) is a good way
to inform the calling code about the problem.
5.6 The Exit Try Statement
The Exit Try statement will, under a given circumstance, break out of the Try
or Catch block and continue at the Finally block. In the following example,
you are going to exit a Catch block if the value of iItems is 0, because you
know that your error was caused by that problem:
Private Function GetAverage5(iItems As Integer, iTotal as Integer) As
Single
' Code that might throw an exception is wrapped in a Try block.
Try
Dim sngAverage As Single
' This will cause an exception to be thrown.
sngAverage = CSng(iTotal \ iItems)
' This only executes if the line above generated no error.
MessageBox.Show("Calculation successful")
Return sngAverage
Catch excDivideByZero As DivideByZeroException
' You'll get here with an DivideByZeroException in the Try block.
If iItems = 0 Then
Return 0
Exit Try
Else
MessageBox.Show("Error not caused by iItems")
End If
Throw excDivideByZero
MessageBox.Show("More logic after the thrown - never executed")
Catch excGeneric As Exception

Visual Basic Unit 5
Sikkim Manipal University Page No.: 112
' You'll get here when any exception is thrown and not caught in
' a previous Catch block.
MessageBox.Show("Calculation failed - generic exception caught")
Throw excGeneric
Finally
' Code in the Finally block will always run, even if
' an exception was thrown in a Catch block.
MessageBox.Show("You always get here, with or without an
error")
End Try
End Sub
In your first Catch block, you have inserted an If block so that you can
exit the block given a certain condition (in this case, if the overflow
exception was caused by the value of intY being 0). The Exit Try goes
immediately to the Finally block and completes the processing there:
If iItems = 0 Then
Return 0
Exit Try
Else
MessageBox.Show("Error not caused by iItems")
End If
Now, if the overflow exception is caused by something other than division by
zero, then you’ll get a message box displaying Error not caused by iItems.
Nested Try Structures
In some cases, particular lines in a Try block may need special exception
processing. Moreover, errors can occur within the Catch portion of the Try
structures and cause further exceptions to be thrown. For both of these
scenarios, nested Try structures are available. You can alter the example
under the section ―The Throw Keyword‖ to demonstrate the following code:
Private Function GetAverage6(iItems As Integer, iTotal as Integer) As
Single
' Code that might throw an exception is wrapped in a Try block.
Try
Dim sngAverage As Single

Visual Basic Unit 5
Sikkim Manipal University Page No.: 113
' Do something for performance testing....
Try
LogEvent("GetAverage")
Catch exc As Exception
MessageBox.Show("Logging function unavailable")
End Try
' This will cause an exception to be thrown.
sngAverage = CSng(iTotal \ iItems)
' This only executes if the line above generated no error.
MessageBox.Show("Calculation successful")
Return sngAverage
Catch excDivideByZero As DivideByZeroException
' You'll get here with an DivideByZeroException in the Try block.
MessageBox.Show("Error not divide by 0")
Throw excDivideByZero
MessageBox.Show("More logic after the thrown - never executed")
Catch excGeneric As Exception
' You'll get here when any exception is thrown and not caught in
' a previous Catch block.
MessageBox.Show("Calculation failed - generic exception caught")
Throw excGeneric
Finally
' Code in the Finally block will always run, even if
' an exception was thrown in a Catch block.
MessageBox.Show("You always get here, with or without an
error")
End Try
End Function
In the preceding example, you are assuming that a function exists to log an
event. This function would typically be in a common library, and might log
the event in various ways. You will look at logging exceptions in detail later
in the chapter, but a simple LogEvent function might look like this:
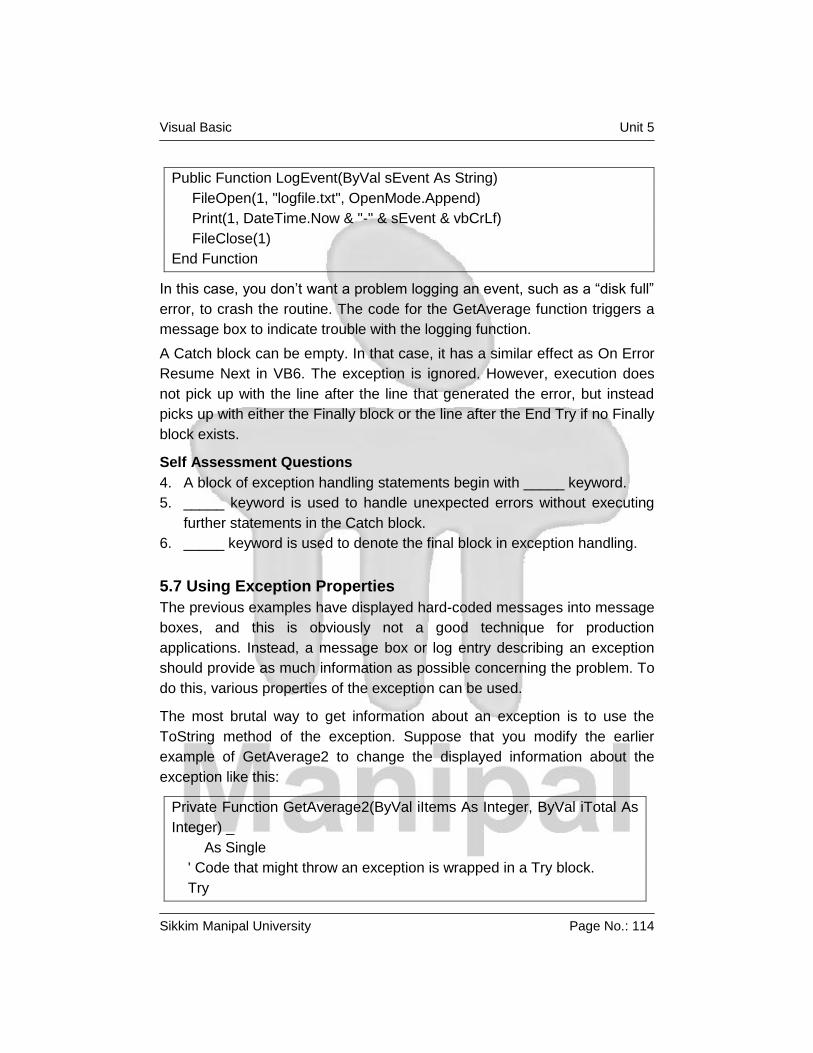
Visual Basic Unit 5
Sikkim Manipal University Page No.: 114
Public Function LogEvent(ByVal sEvent As String)
FileOpen(1, "logfile.txt", OpenMode.Append)
Print(1, DateTime.Now & "-" & sEvent & vbCrLf)
FileClose(1)
End Function
In this case, you don’t want a problem logging an event, such as a ―disk full‖
error, to crash the routine. The code for the GetAverage function triggers a
message box to indicate trouble with the logging function.
A Catch block can be empty. In that case, it has a similar effect as On Error
Resume Next in VB6. The exception is ignored. However, execution does
not pick up with the line after the line that generated the error, but instead
picks up with either the Finally block or the line after the End Try if no Finally
block exists.
Self Assessment Questions
4. A block of exception handling statements begin with _____ keyword.
5. _____ keyword is used to handle unexpected errors without executing
further statements in the Catch block.
6. _____ keyword is used to denote the final block in exception handling.
5.7 Using Exception Properties
The previous examples have displayed hard-coded messages into message
boxes, and this is obviously not a good technique for production
applications. Instead, a message box or log entry describing an exception
should provide as much information as possible concerning the problem. To
do this, various properties of the exception can be used.
The most brutal way to get information about an exception is to use the
ToString method of the exception. Suppose that you modify the earlier
example of GetAverage2 to change the displayed information about the
exception like this:
Private Function GetAverage2(ByVal iItems As Integer, ByVal iTotal As
Integer) _
As Single
' Code that might throw an exception is wrapped in a Try block.
Try

Visual Basic Unit 5
Sikkim Manipal University Page No.: 115
Dim sngAverage As Single
' This will cause an exception to be thrown.
sngAverage = CSng(iTotal \ iItems)
' This only executes if the line above generated no error.
MessageBox.Show("Calculation successful")
Return sngAverage
Catch excDivideByZero As DivideByZeroException
' You'll get here with an DivideByZeroException in the Try block.
MessageBox.Show(excDivideByZero.ToString)
Throw excDivideByZero
MessageBox.Show("More logic after the thrown - never executed")
Catch excGeneric As Exception
' You'll get here when any exception is thrown and not caught in
' a previous Catch block.
MessageBox.Show("Calculation failed - generic exception caught")
Throw excGeneric
Finally
' Code in the Finally block will always run, even if
' an exception was thrown in a Catch block.
MessageBox.Show("You always get here, with or without an
error")
End Try
End Function
When the function is accessed with iItems = 0, a message box similar to the
one in Figure 5.1 will be displayed.
Figure 5.1: Output with iItems = 0
The Message Property
The message in the dialog shown in Figure 5.1 is helpful to a developer
because it contains a lot of information, but it’s not something you would

Visual Basic Unit 5
Sikkim Manipal University Page No.: 116
typically want users to see. Instead, a user normally needs to see a short
description of the problem, and that is supplied by the Message property.
If the previous code is changed so that the Message property is used
instead of ToString, then the message box will provide something like what
is shown in Figure 5.2.
Figure 5.2: Output using ToString method
The InnerException and TargetSite Properties
The InnerException property is used to store an exception trail. This comes
in handy when multiple exceptions occur. It’s quite common for an exception
to occur that sets up circumstances whereby further exceptions are raised.
As exceptions occur in a sequence, you can choose to stack your
exceptions for later reference by use of the InnerException property of your
Exception object. As each exception joins the stack, the previous Exception
object becomes the inner exception in the stack.
For simplicity, you’ll start a new code sample, with just a subroutine that
generates its own exception. You’ll include code to add a reference to an
InnerException object to the exception you are generating with the Throw
method.
This example also includes a message box to show what’s stored in the
exception’s TargetSite property. As shown in the results, TargetSite will
contain the name of the routine generating the exception — in this case,
HandlerExample. Here’s the code:
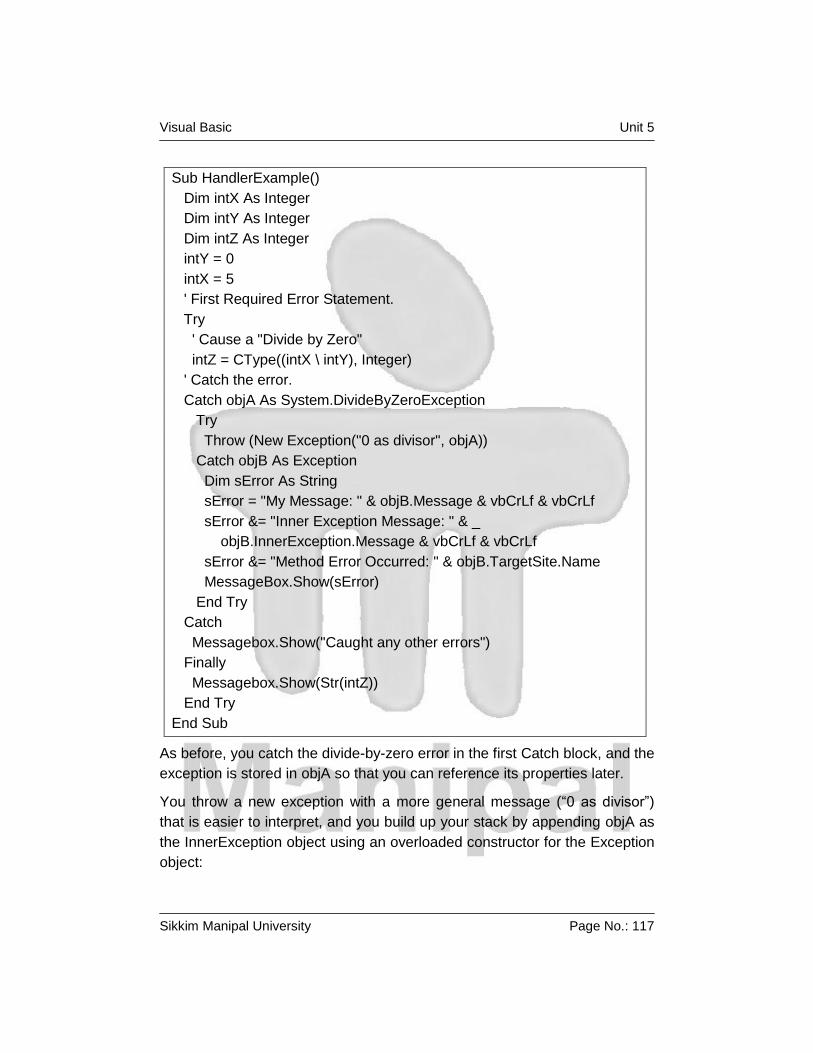
Visual Basic Unit 5
Sikkim Manipal University Page No.: 117
Sub HandlerExample()
Dim intX As Integer
Dim intY As Integer
Dim intZ As Integer
intY = 0
intX = 5
' First Required Error Statement.
Try
' Cause a "Divide by Zero"
intZ = CType((intX \ intY), Integer)
' Catch the error.
Catch objA As System.DivideByZeroException
Try
Throw (New Exception("0 as divisor", objA))
Catch objB As Exception
Dim sError As String
sError = "My Message: " & objB.Message & vbCrLf & vbCrLf
sError &= "Inner Exception Message: " & _
objB.InnerException.Message & vbCrLf & vbCrLf
sError &= "Method Error Occurred: " & objB.TargetSite.Name
MessageBox.Show(sError)
End Try
Catch
Messagebox.Show("Caught any other errors")
Finally
Messagebox.Show(Str(intZ))
End Try
End Sub
As before, you catch the divide-by-zero error in the first Catch block, and the
exception is stored in objA so that you can reference its properties later.
You throw a new exception with a more general message (―0 as divisor‖)
that is easier to interpret, and you build up your stack by appending objA as
the InnerException object using an overloaded constructor for the Exception
object:

Visual Basic Unit 5
Sikkim Manipal University Page No.: 118
Throw (New Exception("0 as divisor", objA))
You catch your newly thrown exception in another Catch statement. Note
how it does not catch a specific type of error:
Catch objB As Exception
Then you construct an error message for the new exception and display it in
a message box:
Dim sError As String
sError = "My Message: " & objB.Message & vbCrLf & vbCrLf
sError &= "Inner Exception Message: " & _
objB.InnerException.Message & vbCrLf & vbCrLf
sError &= "Method Error Occurred: " & objB.TargetSite.Name
MessageBox.Show(sError)
The message box that is produced is shown in Figure 5.3.
Figure 5.3: Message output
First your own message is included, based on the new exception thrown by
your own code. Then the InnerException gets the next exception in the
stack, which is the divide-by-zero exception, and its message is included.
Finally, the TargetSite property gives you the name of the method that threw
the exception. TargetSite is particularly helpful in logs or error reports from
users that are used by developers to track down unexpected problems.
After this message box, the Finally clause displays another message box
that just displays the current value of intZ, which is zero because the divide
failed. This second box also occurs in other examples that follow.
5.8 Source and StackTrace
The Source and StackTrace properties provide the user with information
regarding where the error occurred. This supplemental information can be

Visual Basic Unit 5
Sikkim Manipal University Page No.: 119
invaluable for the user to pass on to the troubleshooter in order to help
resolve errors more quickly. The following example uses these two
properties and shows the feedback when the error occurs:
Sub HandlerExample2()
Dim intX As Integer
Dim intY As Integer
Dim intZ As Integer
intY = 0
intX = 5
' First Required Error Statement.
Try
' Cause a "Divide by Zero"
intZ = CType((intX \ intY), Integer)
' Catch the error.
Catch objA As System.DivideByZeroException
objA.Source = "HandlerExample2"
Messagebox.Show("Error Occurred at :" & _
objA.Source & objA.StackTrace)
Finally
Messagebox.Show(Str(intZ))
End Try
End Sub
The output from the Messagebox statement is very detailed, providing the
entire path and line number where the error occurred, as shown in
Figure 5.4.
Figure 5.4: Output of the above code

Visual Basic Unit 5
Sikkim Manipal University Page No.: 120
Notice that this information is also included in the ToString method
examined earlier (refer to Figure 5.1).
5.9 GetBaseException
The GetBaseException method comes in very handy when you are deep in
a set of thrown exceptions. This method returns the originating exception,
which makes debugging easier and helps keep the troubleshooting process
on track by sorting through information that can be misleading:
Sub HandlerExample3()
Dim intX As Integer
Dim intY As Integer
Dim intZ As Integer
intY = 0
intX = 5
' First Required Error Statement.
Try
' Cause a "Divide by Zero"
intZ = CType((intX \ intY), Integer)
' Catch the error.
Catch objA As System.DivideByZeroException
Try
Throw (New Exception("0 as divisor", objA))
Catch objB As Exception
Try
Throw (New Exception("New error", objB))
Catch objC As Exception
Messagebox.Show(objC.GetBaseException.Message)
End Try
End Try
Finally
Messagebox.Show(Str(intZ))
End Try
End Sub

Visual Basic Unit 5
Sikkim Manipal University Page No.: 121
The InnerException property provides the information that the
GetBaseException method needs, so as your example executes the Throw
statements, it sets up the InnerException property. The purpose of the
GetBaseException method is to provide the properties of the initial
exception in the chain that was produced. Hence,
objC.GetBaseException.Message returns the Message property of the
original OverflowException message even though you’ve thrown multiple
errors since the original error occurred:
Messagebox.Show(objC.GetBaseException.Message)
To put it another way, the code traverses back to the exception caught as
objA and displays the same message as the objA.Message property would,
as shown in Figure 5.5.
Figure 5.5: Message output
5.10 HelpLink
The HelpLink property gets or sets the help link for a specific Exception
object. It can be set to any string value, but is typically set to a URL. If you
create your own exception in code, you might want to set HelpLink to some
URL describing the error in more detail. Then the code that catches the
exception can go to that link. You could create and throw your own custom
application exception with code like the following:
Dim exc As New ApplicationException("A short description of the
problem")
exc.HelpLink = "http://mysite.com/somehtmlfile.htm"
Throw exc
When trapping an exception, the HelpLink can be used to launch a viewer
so the user can see the details about the problem. The following example
shows this in action, using the built-in Explorer in Windows:
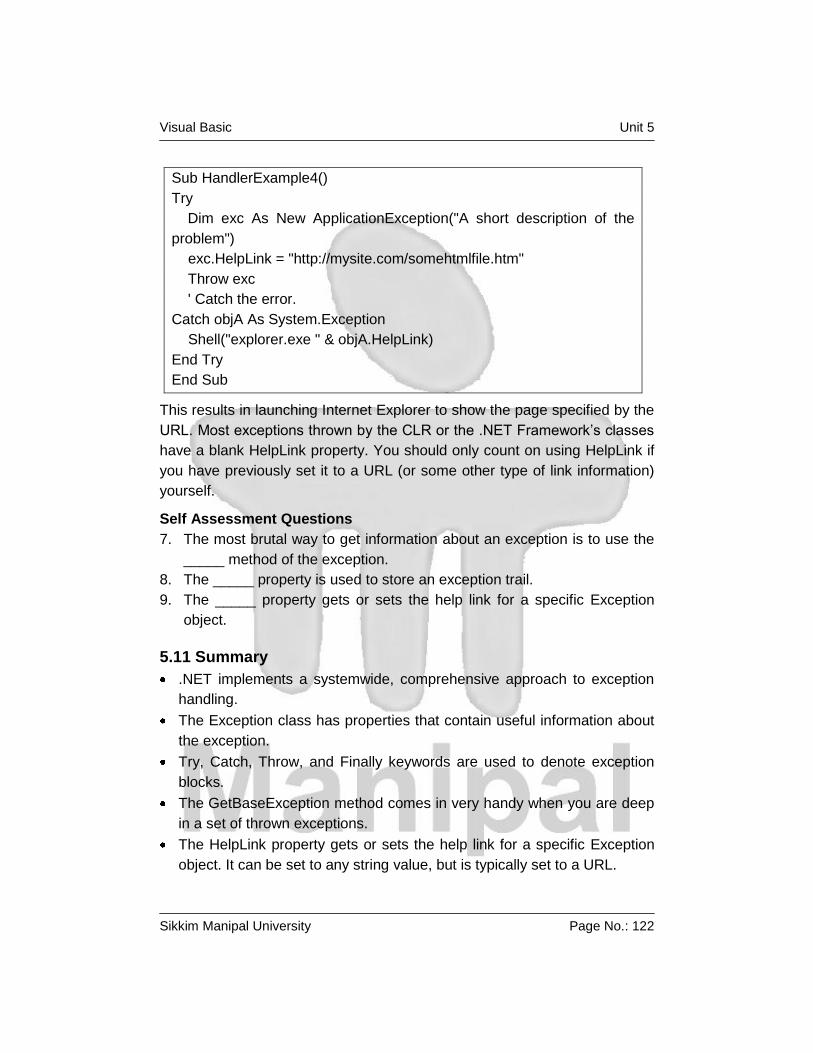
Visual Basic Unit 5
Sikkim Manipal University Page No.: 122
Sub HandlerExample4()
Try
Dim exc As New ApplicationException("A short description of the
problem")
exc.HelpLink = "http://mysite.com/somehtmlfile.htm"
Throw exc
' Catch the error.
Catch objA As System.Exception
Shell("explorer.exe " & objA.HelpLink)
End Try
End Sub
This results in launching Internet Explorer to show the page specified by the
URL. Most exceptions thrown by the CLR or the .NET Framework’s classes
have a blank HelpLink property. You should only count on using HelpLink if
you have previously set it to a URL (or some other type of link information)
yourself.
Self Assessment Questions
7. The most brutal way to get information about an exception is to use the
_____ method of the exception.
8. The _____ property is used to store an exception trail.
9. The _____ property gets or sets the help link for a specific Exception
object.
5.11 Summary
.NET implements a systemwide, comprehensive approach to exception
handling.
The Exception class has properties that contain useful information about
the exception.
Try, Catch, Throw, and Finally keywords are used to denote exception
blocks.
The GetBaseException method comes in very handy when you are deep
in a set of thrown exceptions.
The HelpLink property gets or sets the help link for a specific Exception
object. It can be set to any string value, but is typically set to a URL.

Visual Basic Unit 5
Sikkim Manipal University Page No.: 123
5.12 Terminal Questions
1. Describe the concept of Exceptions in .Net environment
2. Describe the structured Exception handling keywords
3. Describe the concept of Source and Stacktrace
5.13 Answers
Self Assessment Questions
1. Exception
2. Structured Exception Handling
3. System.Exception
4. Try
5. Throw
6. Finally
7. ToString
8. InnerException
9. HelpLink
Terminal Questions
1. .NET implements a systemwide, comprehensive approach to exception
handling. As noted in the chapter introduction, instead of an error
number, there is an exception object. This object contains information
relevant to the error, exposed as properties of the object. (Refer Section
5.3)
2. Try, Catch, Throw and Finally keywords are used to handle exceptions.
(Refer Section 5.4)
3. The Source and StackTrace properties provide the user with information
regarding where the error occurred. This supplemental information can
be invaluable for the user to pass on to the troubleshooter in order to
help resolve errors more quickly. (Refer Section 5.8)

Visual Basic Unit 6
Sikkim Manipal University Page No.: 124
Unit 6 Data Access in VB.NET
Structure:
6.1 Introduction
Objectives
6.2 Visual Studio .NET and the Data Form Wizard
6.3 Setting a Connection String
6.4 Opening the Connection
6.5 The Data Adapter
6.6 Structured Query Language
6.7 Filling the DataSet
6.8 Summary
6.9 Terminal Questions
6.10 Answers
6.1 Introduction
This unit introduces the user to data access techniques used in VB.NET. It
works with Visual Studio 2005 and higher versions. The user is expected to
be familiar with the knowledge of databases and concepts of RDBMS as a
pre-requisite to this unit.
Objectives:
After studying this unit, you should be able to:
explain the usage of Visual Studio.Net in data access
describe the Data Form Wizard of Visual Basic.Net
describe the objects of ADO classes.
6.2 Visual Studio .NET and the Data Form Wizard
VB.Net allows you many ways to connect to a database or a data source.
The technology used to interact with a database or data source is called
ADO.NET. The ADO parts stands for Active Data Objects which, admittedly,
doesn’t explain much. But just like System was a Base Class (leader of a
hierarchy, if you like), so is ADO. Forming the foundation of the ADO Base
Class are five other major objects:
Connection
Command
DataReader

Visual Basic Unit 6
Sikkim Manipal University Page No.: 125
DataSet
DataAdapter
We’ll see just what these objects are, and how to use them, as we go along.
But we can make a start on the ADO.NET trail by creating a simple Address
Book project. All we’ll do is see how to use ADO to open up the database
you downloaded, and scroll through each entry.
What we’re going to be doing is to use a Wizard to create a program that
reads the database and allows us to scroll through it. The wizard will create
a Form for us, and allow us to add buttons to the form so that the data can
be edited, updated, and deleted.
We are going to design the form shown in figure 6.1.
Figure 6.1: Example Form
The Connection Object
The Connection Object is what you need if you want to connect to a
database. There are a number of different connection objects, and the one
you use depends largely on the type of database you're connecting to.
Because we're connecting to an Access database, we'll need something
called the OLE DB connection object.
OLE stands for Object Linking and Embedding, and it’s basically a lot of
objects (COM objects) bundled together that allow you to connect to data

Visual Basic Unit 6
Sikkim Manipal University Page No.: 126
sources in general, and not just databases. You can use it, for example, to
connect to text files, SQL Server, email, and a whole lot more.
There are a number of different OLE DB objects (called data providers), but
the one we'll use is called "Jet". Others are SQL Server and Oracle.
So place a button on your form. Change the Name property to btnLoad.
Double click your button to open up the code window. Add the following line:
Dim con As New OleDb.OleDbConnection
If you have the free Visual Basic 2005 Express Edition, you may see a
wiggly line appear under the line of code. This is because you first need to
add a reference to the Data Objects. Here's how to do this:
Click Project from the menu bar
Then click Add Reference
From the dialogue box, select the .NET tab. Scroll down and select the
System.Data item
Click OK.
At the very top of your code window, before Public Class Form 1, type the
following:
Imports System.Data
This will then allow you to work with the various objects in the Database
section. Your coding window will look as shown in figure 6.2:
Figure 6.2: The Code Window
Whichever version you have, though, the variable con will now hold the
Connection Object. Notice that there is a full stop after the OleDB part.
You'll then get a pop up box from where you can select OleDbConnection.
This is the object that you use to connect to an Access database.

Visual Basic Unit 6
Sikkim Manipal University Page No.: 127
6.3 Setting a Connection String
There are Properties and Methods associated with the Connection Object,
of course. We want to start with the ConnectionString property. This can
take many parameters. Fortunately, we only need a few of these.
We need to pass two things to our new Connection Object: the technology
we want to use to do the connecting to our database; and where the
database is. (If your database was password and user name protected, you
would add these two parameters as well. Ours isn't, so we only need the
two.)
The technology is called the Provider; and you use "Data Source" to
specify where your database is. This should be entered on the same line,
and not two as it is below. So add this to your code:
con.ConnectionString = "PROVIDER=Microsoft.Jet.OLEDB.4.0;Data
Source = C:\AddressBook.mdb"
Notice the two parts, separated by a semi-colon:
1st Part: PROVIDER=Microsoft.Jet.OLEDB.4.0
2nd Part: Data Source = C:\AddressBook.mdb
The first part specifies which provider technology we want to use to do the
connecting (JET). The second part, typed after a semi-colon, points to
where the database is. In the above code, the database is on the C drive, in
the root folder. The name of the Access file we want to connect to is called
AddressBook.mdb. (Note that "Data Source" is two words, and not one.)
But your coding window should now look like this:
Private Sub btnLoad_Click(ByVal Sender as Object,_
ByVal e as System.EventArgs) _
Handles btnLoad.Click
Dim con as new OleDb.OleDbConnection
Con.ConnectionString = “Provider = Microsoft.Jet.OLEDB.4.0;
DataSource = C:\AddressBook.mdb”
This assumes that you have copied the AddressBook database over to the
root folder of your C Drive. If you've copied it to another folder, change the
"Data Source" part to match. For example, if you copied it to a folder called
"databases" you'd put this:

Visual Basic Unit 6
Sikkim Manipal University Page No.: 128
Data Source = C:\databases\AddressBook.mdb
In our code , though, ConnectionString is a property of the con variable.
The con variable holds our Connection Object. We're passing the
Connection String the name of a data provider, and a path to the database.
Self Assessment Questions
1. The technology used to interact with a database or data source is called
_____.
2. ADO stands for _____.
3. The _____ object is required to connect to a database.
6.4 Opening the Connection
Now that we have a ConnectionString, we can go ahead and open the
database. This is quite easy - just use the Open method of the Connection
Object:
con.Open( )
Once open, the connection has to be closed again. This time, just use the
Close method:
con.Close( )
Add the following four lines to your code:
con.Open()
MsgBox("A Connection to the Database is now open")
con.Close()
MsgBox("The Connection to the Database is now Closed")
Test out your new code by running your program. Click your button and the
two message boxes should display. If they don't, make sure your Data
Source path is correct. If it isn't, you might see the error message shown in
figure 6.3.
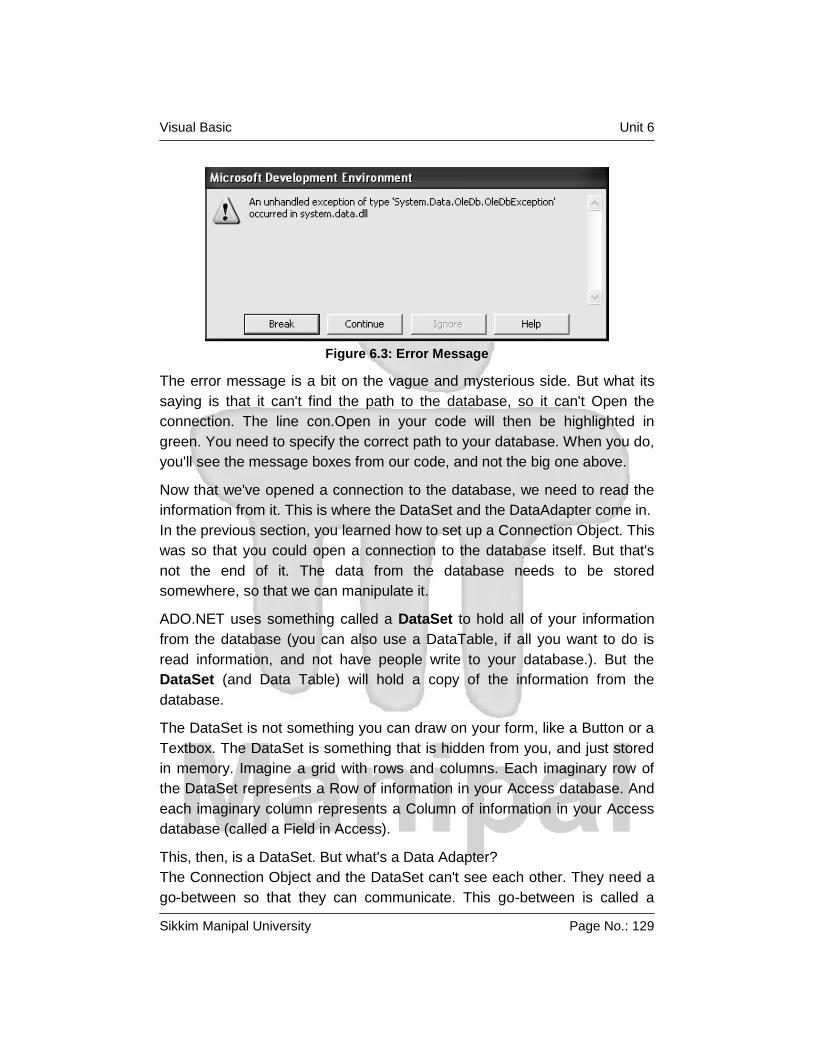
Visual Basic Unit 6
Sikkim Manipal University Page No.: 129
Figure 6.3: Error Message
The error message is a bit on the vague and mysterious side. But what its
saying is that it can't find the path to the database, so it can't Open the
connection. The line con.Open in your code will then be highlighted in
green. You need to specify the correct path to your database. When you do,
you'll see the message boxes from our code, and not the big one above.
Now that we've opened a connection to the database, we need to read the
information from it. This is where the DataSet and the DataAdapter come in.
In the previous section, you learned how to set up a Connection Object. This
was so that you could open a connection to the database itself. But that's
not the end of it. The data from the database needs to be stored
somewhere, so that we can manipulate it.
ADO.NET uses something called a DataSet to hold all of your information
from the database (you can also use a DataTable, if all you want to do is
read information, and not have people write to your database.). But the
DataSet (and Data Table) will hold a copy of the information from the
database.
The DataSet is not something you can draw on your form, like a Button or a
Textbox. The DataSet is something that is hidden from you, and just stored
in memory. Imagine a grid with rows and columns. Each imaginary row of
the DataSet represents a Row of information in your Access database. And
each imaginary column represents a Column of information in your Access
database (called a Field in Access).
This, then, is a DataSet. But what's a Data Adapter?
The Connection Object and the DataSet can't see each other. They need a
go-between so that they can communicate. This go-between is called a
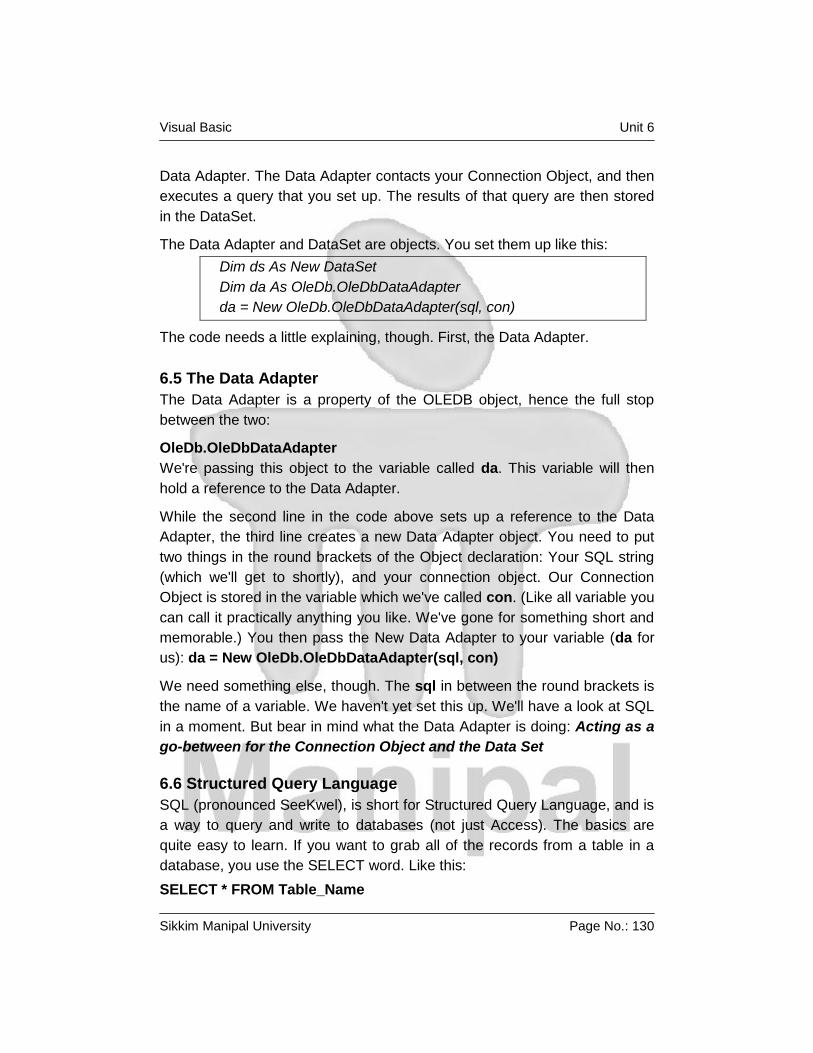
Visual Basic Unit 6
Sikkim Manipal University Page No.: 130
Data Adapter. The Data Adapter contacts your Connection Object, and then
executes a query that you set up. The results of that query are then stored
in the DataSet.
The Data Adapter and DataSet are objects. You set them up like this:
Dim ds As New DataSet
Dim da As OleDb.OleDbDataAdapter
da = New OleDb.OleDbDataAdapter(sql, con)
The code needs a little explaining, though. First, the Data Adapter.
6.5 The Data Adapter
The Data Adapter is a property of the OLEDB object, hence the full stop
between the two:
OleDb.OleDbDataAdapter
We're passing this object to the variable called da. This variable will then
hold a reference to the Data Adapter.
While the second line in the code above sets up a reference to the Data
Adapter, the third line creates a new Data Adapter object. You need to put
two things in the round brackets of the Object declaration: Your SQL string
(which we'll get to shortly), and your connection object. Our Connection
Object is stored in the variable which we've called con. (Like all variable you
can call it practically anything you like. We've gone for something short and
memorable.) You then pass the New Data Adapter to your variable (da for
us): da = New OleDb.OleDbDataAdapter(sql, con)
We need something else, though. The sql in between the round brackets is
the name of a variable. We haven't yet set this up. We'll have a look at SQL
in a moment. But bear in mind what the Data Adapter is doing: Acting as a
go-between for the Connection Object and the Data Set
6.6 Structured Query Language
SQL (pronounced SeeKwel), is short for Structured Query Language, and is
a way to query and write to databases (not just Access). The basics are
quite easy to learn. If you want to grab all of the records from a table in a
database, you use the SELECT word. Like this:
SELECT * FROM Table_Name

Visual Basic Unit 6
Sikkim Manipal University Page No.: 131
SQL is not case sensitive, so the above line could be written:
Select * from Table_Name
But your SQL statements are easier to read if you type the keywords in
uppercase letters. The keywords in the lines above are SELECT and
FROM. The asterisk means "All Records". Table_Name is the name of a
table in your database. So the whole line reads:
"SELECT all the records FROM the table called Table_Name"
You don't need to select all (*) the records from your database. You can just
select the columns that you need. The name of the table in our database is
tblContacts. If we wanted to select just the first name and surname
columns from this table, we can specify that in our SQL String:
SELECT tblContacts.FirstName, tblContacts.Surname FROM
tblContacts
When this SQL statement is executed, only the FirstName and Surname
columns from the database will be returned.
There are a lot more SQL commands, but for our purposes this is enough.
Because we want to SELECT all (*) the records from the table called
tblContacts, we pass this string to the string variable we have called sql:
sql = "SELECT * FROM tblContacts"
So add the following code to your database project:
Dim ds As New DataSet
Dim da As OleDb.OleDbDataAdapter
Dim sql As String
sql = "SELECT * FROM tblContacts"
da = New OleDb.OleDbDataAdapter(sql, con)
(If you're using the free 2005 Express edition, you might see DataSet with a
wiggly line under it. This is because you need to set a reference to
something called System.Xml.dll. To do that, click Project > Add
Reference from the menu bar. The on the NET tab of the dialogue box that
appears, scroll down and click on System.Xml.dll. Then click OK.)
Now that the Data Adapter has selected all of the records from the table in
our database, we need somewhere to put those records - in the DataSet.

Visual Basic Unit 6
Sikkim Manipal University Page No.: 132
6.7 Filling the DataSet
The Data Adapter can Fill a DataSet with records from a Table. You only
need a single line of code to do this:
da.Fill(ds, "AddressBook")
As soon as you type the name of your Data Adapter (da for us), you'll get a
pop up box of properties and methods. Select Fill from the list, then type a
pair of round brackets. In between the round brackets, you need two things:
the Name of your DataSet (ds, in our case), and an identifying name. This
identifying name can be anything you like. But it is just used to identify this
particular Data Adapter Fill. We could have called it "Bacon Sandwich", if we
wanted:
da.Fill(ds, "Bacon Sandwich ")
The code above still works. But it's better to stick to something a little more
descriptive than "Bacon Sandwich"!
Add the new line after the creation of the Data Adapter:
da = New OleDb.OleDbDataAdapter(sql, con)
da.Fill(ds, "AddressBook")
And that's it. The DataSet (ds) will now be filled with the records we
selected from the table called tblContact. There's only one slight problem –
nobody can see the data yet! We'll tackle that in the next part.
In the previous section, we saw what Data Adapters and DataSets were. We
created a Data Adapter so that it could fill a DataSet with records from our
database. What we want to do now is to display the records on a Form, so
that people can see them. So this:
Add two textboxes to your form
Change the Name properties of your textboxes to txtFirstName and
txtSurname
Go back to your code window
Add the following two lines:
txtFirstName.Text = ds.Tables("AddressBook").Rows(0).Item(1)
txtSurname.Text = ds.Tables("AddressBook").Rows(0).Item(2)
You can add them after the line that closes the connection to the database.
Once the DataSet has been filled, a connection to a database can be
closed.

Visual Basic Unit 6
Sikkim Manipal University Page No.: 133
Before the code is explained, run your program and click the button. You
should see "John Smith" displayed in your two textboxes.
So let's examine the code that assigns the data from the DataSet to the
textboxes. The first line was this:
txtFirstName.Text = ds.Tables("AddressBook").Rows(0).Item(1)
It's rather a long line! But after the equals sign, you type the name of your
DataSet (ds for us). After a full stop, select Tables from the popup list. The
Tables property needs something in between round brackets. Quite
bizarrely, this is NOT the name of your database table! It's that identifier you
used with the Data Adapter Fill. We used the identifier "AddressBook". If
we had used "Bacon Sandwich" then we'd put this:
ds.Tables("Bacon Sandwich")
But we didn't, so our code is:
ds.Tables("AddressBook")
Type a full stop and you'll see another list popping up at you. Select Rows
from the list. In between round brackets, you need a number. This is a Row
number from the DataSet. We want the first row, which is row zero in the
DataSet:
ds.Tables("AddressBook").Rows(0)
Type full stop after Rows(0) and the popup list appears again. To identify a
Column from the DataSet, you use Item. In between round brackets, you
type which column you want:
ds.Tables("AddressBook").Rows(0).Item(1)
In our Access database, column zero is used for an ID field. The FirstName
column is the second column in our Access database. Because the Item
collection is zero based, this is item 1 in the DataSet.
You can also refer to the column name itself for the Item property, rather
than a number. So you can do this:
ds.Tables("AddressBook").Rows(0).Item("FirstName")
ds.Tables("AddressBook").Rows(0).Item("Surname")

Visual Basic Unit 6
Sikkim Manipal University Page No.: 134
If you get the name of the column wrong, then VB throws up an error. But an
image might clear things up. The figure 6.4 below shows the items and rows
in the database.
Figure 6.4: Items and Rows in a Database
The image shows which are the Rows and which are the Items in the
Access database Table. So the Items go down and the Rows go across.
However, we want to be able to scroll through the table. We want to be able
to click a button and see the next record. Or click another button and see
the previous record. You can do this by incrementing the Row number. To
see the next record, we'd want this:
txtFirstName.Text = ds.Tables("AddressBook").Rows(1).Item(1)
txtSurname.Text = ds.Tables("AddressBook").Rows(1).Item(2)
The record after that would then be:
txtFirstName.Text = ds.Tables("AddressBook").Rows(2).Item(1)
txtSurname.Text = ds.Tables("AddressBook").Rows(2).Item(2)
So by incrementing and decrementing the Row number, you can navigate
through the records. Let's see how that's done.
You saw in the previous section that you can navigate through the records
of a database by incrementing or decrementing the Row number of the
DataSet. In this section, we're going to see a more practical example of how
to do that. It's better if you start a new project for this. With a new form open,
do the following:
Add two Textboxes. Change the Name properties to txtFirstName and
txtSurname
Add four Buttons. Change the Name and Text properties to these:

Visual Basic Unit 6
Sikkim Manipal University Page No.: 135
Button Name Button Text
btnNext
btnPrevious
btnFirst
btnLast
Next Record
Previous Record
First Record
Last Record
When you're done, your form should look as shown in figure 6.5:
Figure 6.5: Form Window
Press F7 to see your code window, and add the following code to the
Form1 Declarations area:
Declarations area:
Public class Form1
Dim inc as Integer
Dim MaxRows as Integer
Dim con As New OleDb.OleDbConnection
Dim ds as New DataSet
Dim da as OleDb.OleDbDataAdapter
Dim sql as String
(VB 2005 Express Edition users: don't forget to add the references! Click
Project > Add References. Locate System.Data.dll and System.Xml.dll
on the NET tab. Select these items and click OK. Then add Imports
System.Data at the very top of your code window.) Your code will look like
this:
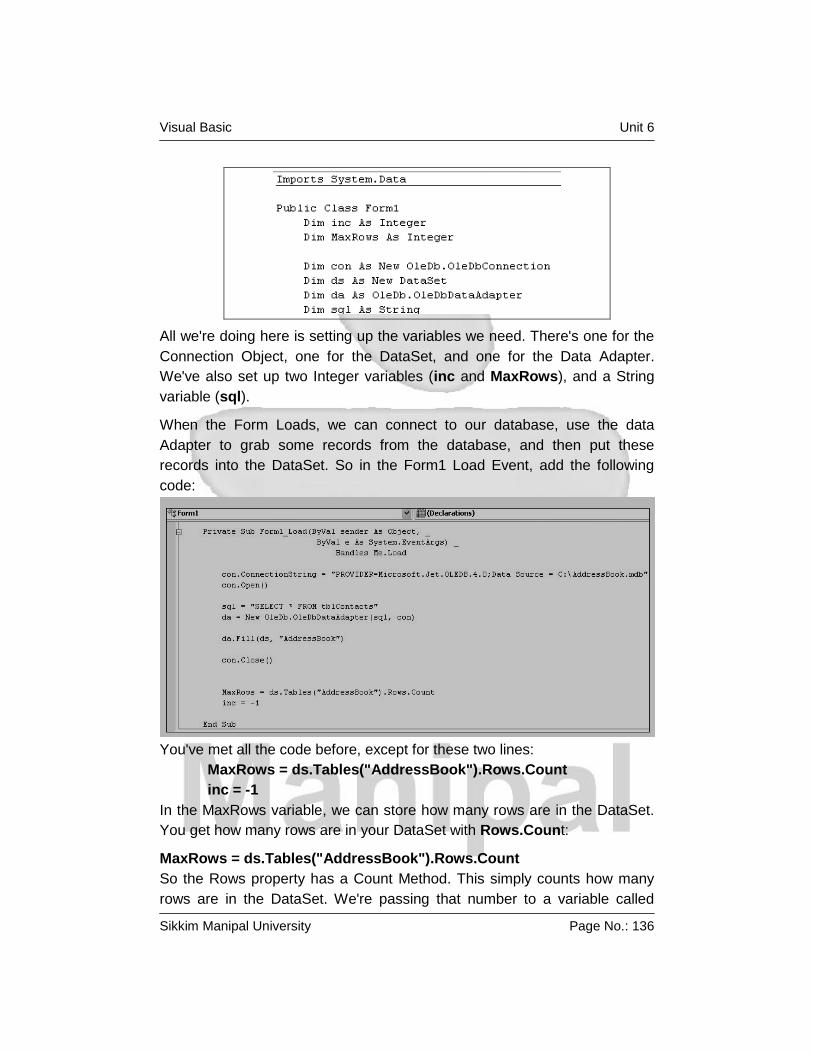
Visual Basic Unit 6
Sikkim Manipal University Page No.: 136
All we're doing here is setting up the variables we need. There's one for the
Connection Object, one for the DataSet, and one for the Data Adapter.
We've also set up two Integer variables (inc and MaxRows), and a String
variable (sql).
When the Form Loads, we can connect to our database, use the data
Adapter to grab some records from the database, and then put these
records into the DataSet. So in the Form1 Load Event, add the following
code:
You've met all the code before, except for these two lines:
MaxRows = ds.Tables("AddressBook").Rows.Count
inc = -1
In the MaxRows variable, we can store how many rows are in the DataSet.
You get how many rows are in your DataSet with Rows.Count:
MaxRows = ds.Tables("AddressBook").Rows.Count
So the Rows property has a Count Method. This simply counts how many
rows are in the DataSet. We're passing that number to a variable called

Visual Basic Unit 6
Sikkim Manipal University Page No.: 137
MaxRows. You can then test what is in the variable, and see if the inc
counter doesn't go past it. You need to do this because VB throws up an
error message if try to go past the last row in the DataSet. (Previous
versions of VB had some called an EOF and BOF properties. These
checked the End of File and Before End of File. These properties have
now gone.)
To navigate through the records, we're going to use that inc variable. We'll
either add 1 to it, or take 1 away. We'll then use the variable for the Rows in
the DataSet. It's better to do this in a Subroutine of your own. So add this
Sub to your code:
Private Sub NavigateRecords()
txtFirstName.Text = ds.Tables("AddressBook").Rows(inc).Item(1)
txtSurname.Text = ds.Tables("AddressBook").Rows(inc).Item(2)
End Sub
The important part is Rows(inc). This moves us through the Rows in the
DataSet. We're then placing the values into the two Textboxes.
The whole of your code so far should look like this (Express Edition user will
have the Imports System.Data line at the very top):
In the next unit, you'll add the code for the buttons.

Visual Basic Unit 6
Sikkim Manipal University Page No.: 138
Self Assessment Questions
4. The _____ will hold a copy of the information from the database.
5. The _____ contacts your Connection Object, and then executes a query
that you set up.
6. In VB.NET, _____ is used to query and write to databases.
6.8 Summary
VB.Net allows you many ways to connect to a database or a data source.
The technology used to interact with a database or data source is called
ADO.NET.
The Connection Object is required to connect to a database.
We need to pass two things to our new Connection Object: the
technology we want to use to do the connecting to our database; and
where the database is.
ADO.NET uses DataSet to hold all of your information from the database.
SQL short for Structured Query Language, is a way to query and write to
databases.
6.9 Terminal Questions
1. Describe the Data form Wizard in Visual Studio.Net.
2. Describe the concept of setting a connection string with an example.
3. What is a Data Adapter? Explain.
6.10 Answers
Self Assessment Questions
1. ADO.NET
2. Active Data Objects
3. Connection
4. DataSet
5. Data Adapter
6. SQL
Terminal Questions
1. VB.Net allows you many ways to connect to a database or a data source.
The technology used to interact with a database or data source is called
ADO.NET. (Refer Section 6.2)
Visual Basic Unit 6
Sikkim Manipal University Page No.: 139
2. There are Properties and Methods associated with the Connection
Object, of course. The ConnectionString property can take many
parameters. (Refer Section 6.3)
3. The Data Adapter is a property of the OLEDB object, hence it is used as
shown below:
OleDb.OleDbDataAdapter
We're passing this object to the variable called da. This variable will then
hold a reference to the Data Adapter. (Refer Section 6.5)

Visual Basic Unit 7
Sikkim Manipal University Page No.: 140
Unit 7 Working with Records in VB.NET
Structure:
7.1 Introduction
Objectives
7.2 Record Navigation
7.3 Add, Update and Delete Records
7.4 Summary
7.5 Terminal Questions
7.6 Answers
7.1 Introduction
This unit introduces the user to access records in VB.NET. Also you will get
familiar with managing records such as adding new records, updating the
existing records and deleting the unwanted records.
Objectives:
After studying this unit, you should be able to:
describe record navigation in VB.NET
add new records
update the existing records
delete unwanted records
7.2 Record Navigation
(i) Move Back One Record at a Time
To move backwards through the DataSet, we need to decrement the inc
counter. This means is deducting 1 from whatever is currently in inc.
But we also need to check that inc doesn't go past zero, which is the first
record in the DataSet. Here's the code to add to your btnPrevious:
If inc > 0 Then
inc = inc - 1
NavigateRecords()
Else
MsgBox("First Record")
End If

Visual Basic Unit 7
Sikkim Manipal University Page No.: 141
So the If statement first checks that inc is greater than zero. If it is, inc gets
1 deducted from. Then the NavigateRecords() subroutine gets called. If inc
is zero or less, then we display a message.
When you've finished adding the code, test your program out. Click the
Previous button first. The message box should display, even though no
records have been loaded into the textboxes. This is because the variable
inc has a value of -1 when the form first loads. It only gets moved on to zero
when the Next button is clicked. You could amend your IF Statement to this:
If inc > 0 Then
inc = inc - 1
NavigateRecords()
ElseIf inc = -1 Then
MsgBox("No Records Yet")
ElseIf inc = 0 Then
MsgBox("First Record")
End If
This new If Statement now checks to see if inc is equal to minus 1, and
displays a message if it does. It also checks if inc is equal to zero, and
displays the "First Record" message box.
(ii) Moving to the Last Record in the DataSet
To jump to the last record in the DataSet, you only need to know how many
records have been loaded into the DataSet - the MaxRows variable in our
code. You can then set the inc counter to that value, but minus 1. Here's the
code to add to your btnLast:
If inc <> MaxRows - 1 Then
inc = MaxRows - 1
NavigateRecords()
End If
The reason we're saying MaxRows - 1 is that the row count might be 5, say,
but the first record in the DataSet starts at zero. So the total number of
records would be zero to 4. Inside of the If Statement, we're setting the inc
counter to MaxRows - 1, then calling the NavigateRecords() subroutine.
That's all we need to do. So run your program. Click the Last button, and
you should see the last record displayed in your textboxes.

Visual Basic Unit 7
Sikkim Manipal University Page No.: 142
(iii) Moving to the First Record in the DataSet
Moving to the first record is fairly straightforward. We only need to set the
inc counter to zero, if it's not already at that value. Then call the Sub:
If inc <> 0 Then
inc = 0
NavigateRecords()
End If
Add the code to your btnFirst. Run your program and test out all of your
buttons. You should be able to move through the names in the database,
and jump to the first and last records.
As yet, though, we don't have a way to add new records, to update records,
or to delete them. Let's do that next.
7.3 Add, Update and Delete Records
In the last section, you learned how to move through the records in your
DataSet, and how to display the records in Textboxes on your form. In this
lesson, we'll see how to add new records, how to delete them and how to
Update a records.
Before we start the coding for these new buttons, it's important to
understand that the DataSet is disconnected from the database. What this
means is that if you're adding a new record, you're not adding it to the
database: you're adding it to the DataSet! Similarly, if you're updating or
Deleting, you are doing it to the DataSet, and NOT to the database. After
you have made all of your changes, you THEN commit these changes to the
database. You do this by issuing a separate command. But we'll see how it
all works.
You'll need to add a few more buttons to your form - five of them. Change
the Name properties of the new Buttons to the following:
btnAddNew
btnCommit
btnUpdate
btnDelete
btnClear
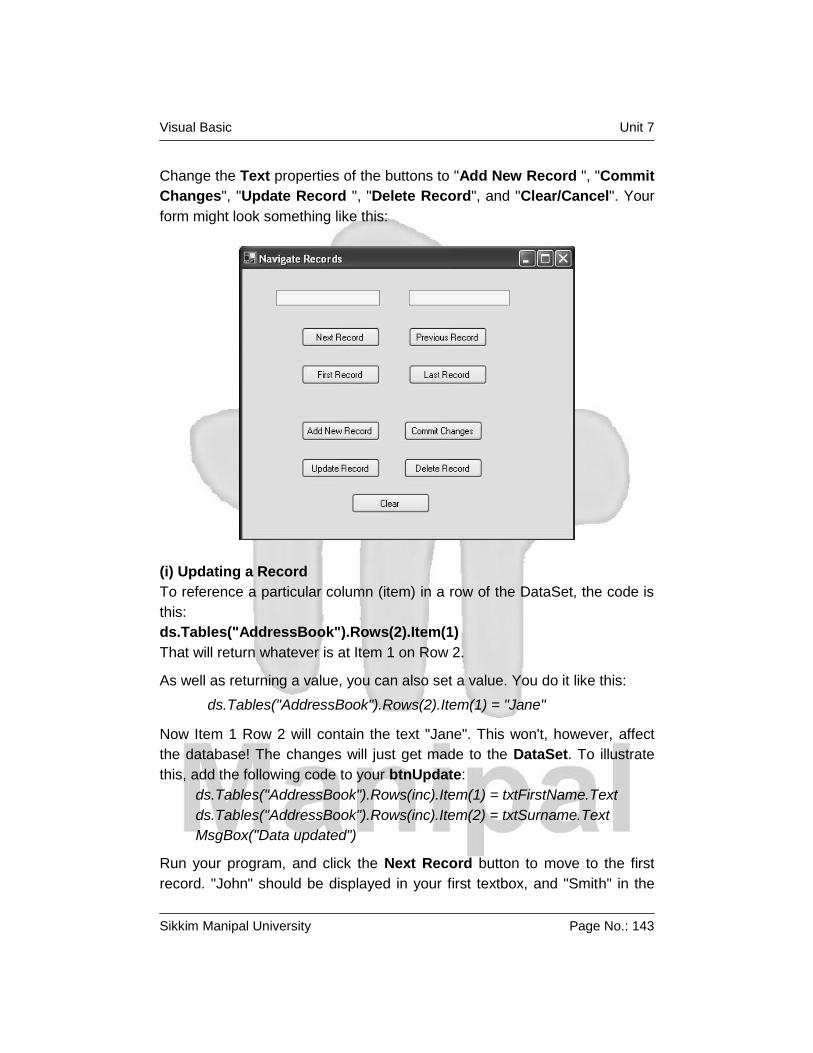
Visual Basic Unit 7
Sikkim Manipal University Page No.: 143
Change the Text properties of the buttons to "Add New Record ", "Commit
Changes", "Update Record ", "Delete Record", and "Clear/Cancel". Your
form might look something like this:
(i) Updating a Record
To reference a particular column (item) in a row of the DataSet, the code is
this:
ds.Tables("AddressBook").Rows(2).Item(1)
That will return whatever is at Item 1 on Row 2.
As well as returning a value, you can also set a value. You do it like this:
ds.Tables("AddressBook").Rows(2).Item(1) = "Jane"
Now Item 1 Row 2 will contain the text "Jane". This won't, however, affect
the database! The changes will just get made to the DataSet. To illustrate
this, add the following code to your btnUpdate:
ds.Tables("AddressBook").Rows(inc).Item(1) = txtFirstName.Text
ds.Tables("AddressBook").Rows(inc).Item(2) = txtSurname.Text
MsgBox("Data updated")
Run your program, and click the Next Record button to move to the first
record. "John" should be displayed in your first textbox, and "Smith" in the
Visual Basic Unit 7
Sikkim Manipal University Page No.: 144
second textbox. Click inside the textboxes and change "John" to "Joan" and
"Smith" to "Smithy". (Without the quotes). Now click your Update Record
button. Move to the next record by clicking your Next Record button, and
then move back to the first record. You should see that the first record is
now "Joan Smithy".
Close down your program, then run it again. Click the Next Record button
to move to the first record. It will still be "John Smith". The data you updated
has been lost! So here, again, is why:
"Changes are made to the DataSet, and NOT to the Database"
To update the database, you need some extra code. Amend your code to
this (the new lines are in bold, red text):
Dim cb As New OleDb.OleDbCommandBuilder(da)
ds.Tables("AddressBook").Rows(inc).Item(1) = txtFirstName.Text
ds.Tables("AddressBook").Rows(inc).Item(2) = txtSurname.Text
da.Update(ds, "AddressBook")
MsgBox("Data updated")
The first new line is this:
Dim cb As New OleDb.OleDbCommandBuilder(da)
To update the database itself, you need something called a Command
Builder. The Command Builder will build a SQL string for you. In between
round brackets, you type the name of your Data Adapter, da in our case.
The command builder is then stored in a variable, which we have called cb.
The second new line is where the action is:
da.Update(ds, "AddressBook")
The da variable is holding our Data Adapter. One of the methods of the
Data Adapter is Update. In between the round brackets, you need the name
of your DataSet (ds, for us). The "AddressBook" part is optional. It's what
we've called our DataSet, and is here to avoid any confusion.
But the Data Adapter will then contact the database. Because we have a
Command Builder, the Data Adapter can then update your database with
the values from the DataSet.
Without the Command Builder, though, the Data Adapter can't do its job. Try
this. Comment out the Command Builder line (put a single quote before the

Visual Basic Unit 7
Sikkim Manipal University Page No.: 145
"D" of Dim). Run your program again, and then try and update a record.
You'll get this error message:
The error is because you haven't got a command builder – a Valid Update
Command. Delete the comment from your Command Builder line and the
error message goes away. You should now be able to make changes to the
database itself (as long as the Access database isn't Read Only).
Try it out. Run your program, and change one of the records. Click the
Update button. Then close the program down, and load it up again. You
should see your new changes displayed in the textboxes.
(ii) Add a New Record
Adding a new record is slightly more complex. First, you have to add a new
Row to the DataSet, then commit the new Row to the Database.
But the Add New Record button on our form is quite simple. The only thing
it does is to switch off other buttons, and clear the textboxes, ready for a
new entry. Here's the code for your Add New Record button:
btnCommit.Enabled = True
btnAddNew.Enabled = False
btnUpdate.Enabled = False
btnDelete.Enabled = False
txtFirstName.Clear()
txtSurname.Clear()
So three buttons are switched off when the Add New Record button is
clicked, and one is switched on. The button that gets switched on is the
Commit Changes button. The Enabled property of btnCommit gets set to
Visual Basic Unit 7
Sikkim Manipal University Page No.: 146
True. But, for this to work, you need to set it to False when the form loads.
So return to your Form. Click btnCommit to select it. Then locate the
Enabled Property in the Properties box. Set it to False. When the Form
starts up, the button will be switched off.
The Clear/Cancel button can be used to switch it back on again. So add this
code to your btnClear:
btnCommit.Enabled = False
btnAddNew.Enabled = True
btnUpdate.Enabled = True
btnDelete.Enabled = True
inc = 0
NavigateRecords()
We're switching the Commit Changes button off, and the other three back
on. The other two lines just make sure that we display the first record again,
after the Cancel button is clicked. Otherwise the textboxes will all be blank.
To add a new record to the database, we'll use the Commit Changes
button. So double click your btnCommit to access its code. Add the
following:
If inc <> -1 Then
Dim cb As New OleDb.OleDbCommandBuilder(da)
Dim dsNewRow As DataRow
dsNewRow = ds.Tables("AddressBook").NewRow()
dsNewRow.Item("FirstName") = txtFirstName.Text
dsNewRow.Item("Surname") = txtSurname.Text
ds.Tables("AddressBook").Rows.Add(dsNewRow)
da.Update(ds, "AddressBook")
MsgBox("New Record added to the Database")
btnCommit.Enabled = False
btnAddNew.Enabled = True
btnUpdate.Enabled = True
btnDelete.Enabled = True
End If
The code is somewhat longer than usual, but we'll go through it.

Visual Basic Unit 7
Sikkim Manipal University Page No.: 147
The first line is an If Statement. We're just checking that there is a valid
record to add. If there's not, the inc variable will be on minus 1. Inside of the
If Statement, we first set up a Command Builder, as before. The next line
is this:
Dim dsNewRow As DataRow
If you want to add a new row to your DataSet, you need a DataRow object.
This line just sets up a variable called dsNewRow. The type of variable is a
DataRow.
To create the new DataRow object, this line comes next:
dsNewRow = ds.Tables("AddressBook").NewRow()
We're just saying, "Create a New Row object in the AddressBook DataSet,
and store this in the variable called dsNewRow." As you can see,
NewRow() is a method of ds.Tables. Use this method to add rows to your
DataSet.
The actual values we want to store in the rows are coming from the
textboxes. So we have these two lines:
dsNewRow.Item("FirstName") = txtFirstName.Text
dsNewRow.Item("Surname") = txtSurname.Text
The dsNewRow object we created has a Property called Item. This is like
the Item property you used earlier. It represents a column in your DataSet.
We could have said this instead:
dsNewRow.Item(1) = txtFirstName.Text
dsNewRow.Item(2) = txtSurname.Text
The Item property is now using the index number of the DataSet columns,
rather than the names. The result is the same, though: to store new values
in these properties. We're storing the text from the textboxes to our new
Row.
We now only need to call the Method that actually adds the Row to the
DataSet:
ds.Tables("AddressBook").Rows.Add(dsNewRow)
To add the Row, you use the Add method of the Rows property of the
DataSet. In between the round brackets, you need the name of your
DataRow (the variable dsNewRow, in our case).

Visual Basic Unit 7
Sikkim Manipal University Page No.: 148
You should know what the rest of the code does. Here's the next line:
da.Update(ds, "AddressBook")
Again, we're just using the Update method of the Data Adapter, just like last
time. The rest of the code just displays a message box, and resets the
button.
But to add a new Row to a DataSet, here's a recap on what to do:
Create a DataRow variable
Create an Object from this variable by using the NewRow() method of
the DataSet Tables property
Assign values to the Items in the new Row
Use the Add method of the DataSet to add the new row
A little more complicated, but it does work! Try your program out. Click your
Add New Record button. The textboxes should go blank, and three of the
buttons will be switched off. Enter a new First Name and Surname, and then
click the Commit Changes button. You should see the message box telling
you that a new record has been added to the database. To see the new
record, close down your program, and run it again. The new record will be
there.
(iii) Delete a Record from a Database
The code to delete a record is a little easier than last time. Double click your
btnDelete and add the following:
Dim cb As New OleDb.OleDbCommandBuilder(da)
ds.Tables("AddressBook").Rows(inc).Delete()
MaxRows = MaxRows - 1
inc = 0
NavigateRecords()
da.Update(ds, "AddressBook")
You've met most of it before. First we set up a Command Builder. Then we
have this line:
ds.Tables("AddressBook").Rows(inc).Delete()
Just as there is an Add method of the DataSet Rows property, so there is a
Delete method. You don't need anything between the round brackets, this
time. We've specified the Row to delete with:
Rows(inc)
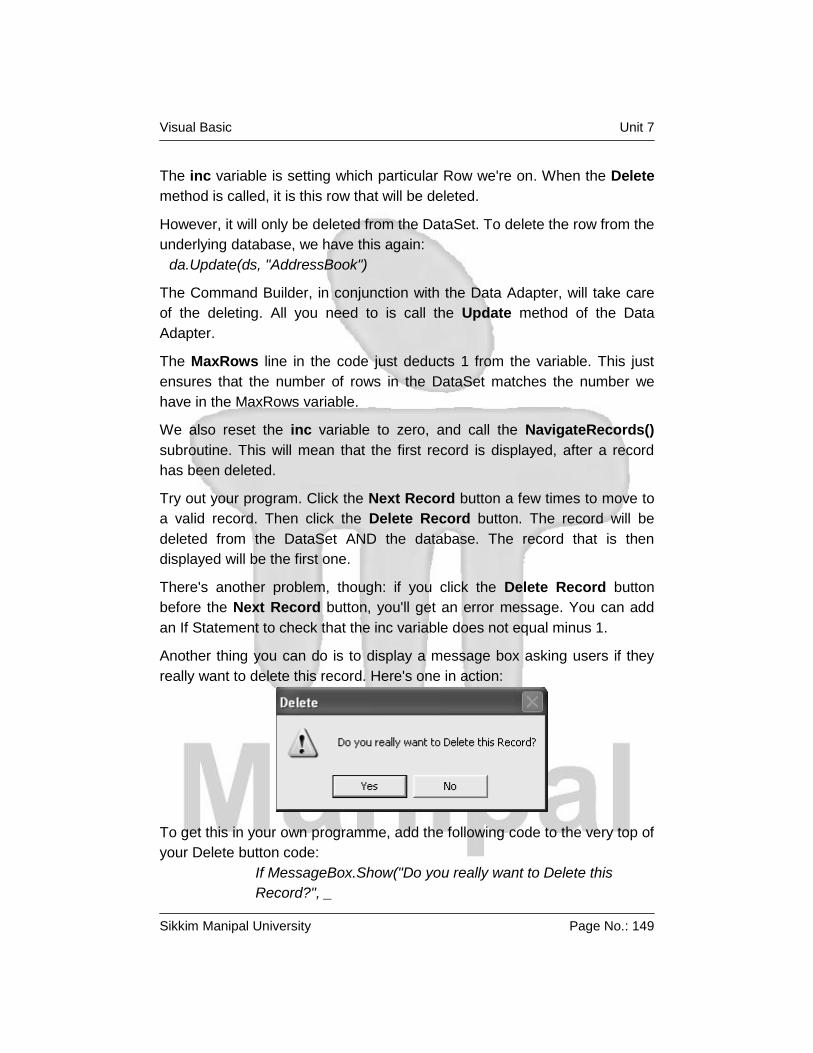
Visual Basic Unit 7
Sikkim Manipal University Page No.: 149
The inc variable is setting which particular Row we're on. When the Delete
method is called, it is this row that will be deleted.
However, it will only be deleted from the DataSet. To delete the row from the
underlying database, we have this again:
da.Update(ds, "AddressBook")
The Command Builder, in conjunction with the Data Adapter, will take care
of the deleting. All you need to is call the Update method of the Data
Adapter.
The MaxRows line in the code just deducts 1 from the variable. This just
ensures that the number of rows in the DataSet matches the number we
have in the MaxRows variable.
We also reset the inc variable to zero, and call the NavigateRecords()
subroutine. This will mean that the first record is displayed, after a record
has been deleted.
Try out your program. Click the Next Record button a few times to move to
a valid record. Then click the Delete Record button. The record will be
deleted from the DataSet AND the database. The record that is then
displayed will be the first one.
There's another problem, though: if you click the Delete Record button
before the Next Record button, you'll get an error message. You can add
an If Statement to check that the inc variable does not equal minus 1.
Another thing you can do is to display a message box asking users if they
really want to delete this record. Here's one in action:
To get this in your own programme, add the following code to the very top of
your Delete button code:
If MessageBox.Show("Do you really want to Delete this
Record?", _

Visual Basic Unit 7
Sikkim Manipal University Page No.: 150
"Delete", MessageBoxButtons.YesNo, _
MessageBoxIcon.Warning) = DialogResult.No Then
MsgBox("Operation Cancelled")
Exit Sub
End If
The first three lines of the code are really one line. The underscore has
been used to spread it out, so as to fit on this page.
But we're using the new message box function:
MessageBox.Show()
In between the round brackets, we specifying the message to display,
followed by a caption for the message box. We then have this:
MessageBoxButtons.YesNo
You won't have to type all that out; you'll be able to select it from a popup
list. But what it does is give you Yes and No buttons on your message box.
After typing a comma, we selected the MessageBoxIcon.Warning icon from
the popup list. But you need to check which button the user clicked. This is
done with this:
= DialogResult.No
Again, you select from a popup list. We want to check if the user clicked the
No button. This will mean a change of mind from the user. A value of No will
then be returned, which is what we're checking for in the If Statement.
The code for the If Statement itself is this:
MsgBox("Operation Cancelled")
Exit Sub
This will display another message for the user. But most importantly, the
subroutine will be exited: we don't want the rest of the Delete code to be
executed, if the user clicked the No button.
And that's it for our introduction to database programming. You not only saw
how to construct a database program using the Wizard, but how to write
code to do this yourself. There is an awful lot more to database
programming, and we've just scratched the surface. But in a beginner's
course, that's all we have time for.

Visual Basic Unit 7
Sikkim Manipal University Page No.: 151
Self Assessment Questions
1. The _____ will build a SQL string for you.
2. If you want to add a new row to your DataSet, you need a _____ object.
7.4 Summary
To move backwards through the DataSet, we need to decrement the inc
counter.
Adding a new record is slightly more complex. First, you have to add a
new Row to the DataSet, then commit the new Row to the Database.
To add a new record to the database, we'll use the Commit Changes
button.
7.5 Terminal Questions
1. Describe the concept of record navigation in VB.NET.
2. Describe the process of adding, updating and deleting records with an
example.
7.6 Answers
Self Assessment Questions
1. Command Builder
2. DataRow
Terminal Questions
1. To move backwards through the DataSet, we need to decrement the inc
counter. This means is deducting 1 from whatever is currently in inc.
(Refer Section 7.2)
2. Refer Section 7.3
Visual Basic Unit 8
Sikkim Manipal University Page No.: 152
Unit 8 Arrays in Visual Basic
Structure:
8.1 Introduction
Objectives
8.2 Declaring Arrays in Visual Basic
Fixed-sized Arrays
Multidimensional Arrays
Static and Dynamic Arrays
Arrays within UDTs
8.3 Arrays and Variants
8.4 Assigning and Returning Arrays
8.5 Inserting and Deleting items using Arrays
8.6 Sorting using Arrays
8.7 Control Arrays
8.8 Jagged Arrays
8.8 Summary
8.9 Terminal Questions
8.10 Answers
8.1 Introduction
In the previous unit, we have seen the usage of built in and user defined
data types. These can be used to store only one data type value in one
variable. In this unit, we are going to see the usage of a single variable to
store n number of values of homogenous data type.
An array is a consecutive group of memory locations that all have the same
name and the same type. To refer to a particular location or element in the
array, we specify the array name and the array element position number.
The Individual elements of an array are identified using an index. Arrays
have upper and lower bounds and the elements have to lie within those
bounds. Each index number in an array is allocated individual memory
space and therefore users must evade declaring arrays of larger size than
required. We can declare an array of any of the basic data types including
variant, user-defined types and object variables. The individual elements of
an array are all of the same data type.

Visual Basic Unit 8
Sikkim Manipal University Page No.: 153
Objectives:
After studying this unit, you should be able to:
declare and use various types of arrays
explain arrays and their variants
describe the process of assigning and returning array variables
illustrate the process of inserting and deleting items from arrays
illustrate the process of sorting using arrays
describe and illustrate control and jagged arrays
8.2 Declaring Arrays in Visual Basic
Arrays occupy space in memory. The programmer specifies the array type
and the number of elements required by the array so that the compiler may
reserve the appropriate amount of memory. Arrays may be declared as
Public (in a code module), module or local. Module arrays are declared in
the general declarations using keyword Dim or Private. Local arrays are
declared in a procedure using Dim or Static. Array must be declared
explicitly with keyword "As".
There are two types of arrays in Visual Basic namely:
Fixed-Size Array: The size of array always remains the same-size doesn't
change during the program execution.
Dynamic Array: The size of the array can be changed at the run time- size
changes during the program execution.
8.2.1 Fixed-Size Arrays
When an upper bound is specified in the declaration, a Fixed-array is
created. The upper limit should always be within the range of long data type.
Declaring a fixed-array
Dim numbers(5) As Integer
In the above illustration, numbers is the name of the array, and the number
6 included in the parentheses is the upper limit of the array. The above
declaration creates an array with 6 elements, with index numbers running
from 0 to 5.
If we want to specify the lower limit, then the parentheses should include
both the lower and upper limit along with the To keyword.

Visual Basic Unit 8
Sikkim Manipal University Page No.: 154
Example
Dim numbers (1 To 6) As Integer
In the above statement, an array of 10 elements is declared but with indexes
running from 1 to 6.
A public array can be declared using the keyword Public instead of Dim as
shown below.
Public numbers(5) As Integer
8.2.2 Multidimensional Arrays
Arrays can have multiple dimensions. A common use of multidimensional
arrays is to represent tables of values consisting of information arranged in
rows and columns. To identify a particular table element, we must specify
two indexes: The first (by convention) identifies the element's row and the
second (by convention) identifies the element's column.
Tables or arrays that require two indexes to identify a particular element are
called two dimensional arrays. Note that multidimensional arrays can have
more than two dimensions. Visual Basic supports at least 60 array
dimensions, but most people will need to use more than two or three
dimensional-arrays.
The following statement declares a two-dimensional array 50 by 50 array
within a procedure.
Dim AvgMarks (50, 50)
It is also possible to define the lower limits for one or both the dimensions as
for fixed size arrays. An example for this is given here.
Dim Marks (101 To 200, 1 To 100)
An example for three dimensional-array with defined lower limits is given
below.
Dim Details(101 To 200, 1 To 100, 1 To 100)
8.2.3 Static and Dynamic arrays
Basically, you can create either static or dynamic arrays. Static arrays must
include a fixed number of items, and this number must be known at compile
time so that the compiler can set aside the necessary amount of memory.
You create a static array using a Dim statement with a constant argument:
Visual Basic Unit 8
Sikkim Manipal University Page No.: 155
' This is a static array.
Dim Names(100) As String
Visual Basic starts indexing the array with 0. Therefore, the preceding array
actually holds 101 items.
Most programs don't use static arrays because programmers rarely know at
compile time how many items you need and also because static arrays can't
be resized during execution. Both these issues are solved by dynamic
arrays. You declare and create dynamic arrays in two distinct steps. In
general, you declare the array to account for its visibility (for example, at the
beginning of a module if you want to make it visible by all the procedures of
the module) using a Dim command with an empty pair of brackets. Then you
create the array when you actually need it, using a ReDim statement:
' An array defined in a BAS module (with Private scope)
Dim Customers() As String
...
Sub Main()
' Here you create the array.
ReDim Customer(1000) As String
End Sub
If you're creating an array that's local to a procedure, you can do everything
with a single ReDim statement:
Sub PrintReport()
' This array is visible only to the procedure.
ReDim Customers(1000) As String
' ...
End Sub
If you don't specify the lower index of an array, Visual Basic assumes it to
be 0, unless an Option Base 1 statement is placed at the beginning of the
module. My suggestion is this: Never use an Option Base statement
because it makes code reuse more difficult. (You can't cut and paste
routines without worrying about the current Option Base.) If you want to
explicitly use a lower index different from 0, use this syntax instead:
ReDim Customers(1 To 1000) As String

Visual Basic Unit 8
Sikkim Manipal University Page No.: 156
Dynamic arrays can be re-created at will, each time with a different number
of items. When you re-create a dynamic array, its contents are reset to 0 (or
to an empty string) and you lose the data it contains. If you want to resize an
array without losing its contents, use the ReDim Preserve command:
ReDim Preserve Customers(2000) As String
When you're resizing an array, you can't change the number of its
dimensions nor the type of the values it contains. Moreover, when you're
using ReDim Preserve on a multidimensional array, you can resize only its
last dimension:
ReDim Cells(1 To 100, 10) As Integer
...
ReDim Preserve Cells(1 To 100, 20) As Integer ' This works.
ReDim Preserve Cells(1 To 200, 20) As Integer ' This doesn't.
Finally, you can destroy an array using the Erase statement. If the array is
dynamic, Visual Basic releases the memory allocated for its elements (and
you can't read or write them any longer); if the array is static, its elements
are set to 0 or to empty strings.
You can use the LBound and UBound functions to retrieve the lower and
upper indices. If the array has two or more dimensions, you need to pass a
second argument to these functions to specify the dimension you need:
Print LBound(Cells, 1) ' Displays 1, lower index of 1st
dimension
Print LBound(Cells) ' Same as above
Print UBound(Cells, 2) ' Displays 20, upper index of 2nd
dimension
' Evaluate total number of elements.
NumEls = (UBound(Cells) _ LBound(Cells) + 1) * _
(UBound(Cells, 2) _ LBound(Cells, 2) + 1)
8.2.4 Arrays within UDTs
UDT structures can include both static and dynamic arrays. Here's a sample
structure that contains both types:
Type MyUDT
StaticArr(100) As Long

Visual Basic Unit 8
Sikkim Manipal University Page No.: 157
DynamicArr() As Long
End Type
...
Dim udt As MyUDT
' You must DIMension the dynamic array before using it.
ReDim udt.DynamicArr(100) As Long
' You don't have to do that with static arrays.
udt.StaticArr(1) = 1234
The memory needed by a static array is allocated within the UDT structure;
for example, the StaticArr array in the preceding code snippet takes exactly
400 bytes. Conversely, a dynamic array in a UDT takes only 4 bytes, which
form a pointer to the memory area where the actual data is stored. Dynamic
arrays are advantageous when each individual UDT variable might host a
different number of array items. As with all dynamic arrays, if you don't
dimension a dynamic array within a UDT before accessing its items, you get
an error 9 – "Subscript out of range."
Self Assessment Questions
1. An ___________ is a consecutive group of memory locations that all
have the same name and same type.
2. _____ arrays are declared in the general declarations using keyword
Dim or Private.
3. Visual Basic supports at least ______ array dimensions.
8.3 Arrays and Variants
Visual Basic lets you store arrays in Variant variables and then access the
array items using the Variant variable as if it were an array:
ReDim Names(100) As String, var As Variant
' Initialize the Names array (omitted).
var = Names() ' Copy the array into the Variant.
Print var(1) ' Access array items through the Variant.

Visual Basic Unit 8
Sikkim Manipal University Page No.: 158
You can even create an array of Variant elements on the fly using the Array
function and store it in a Variant variable:
' Arrays returned by the Array() function are zero-based.
Factorials = Array(1, 1, 2, 6, 24, 120, 720, 5040, 40320, 362880,
3628800)
Likewise, you can pass an array to a procedure that expects a Variant
parameter and then access the elements of the array through that
parameter:
' A polymorphic function that sums the values in any array
Function ArraySum(arr As Variant) As Variant
Dim i As Long, result As Variant
For i = LBound(arr) To UBound(arr)
result = result + arr(i)
Next
ArraySum = result
End Function
The most interesting feature of the preceding routine is that it works
correctly with any type of numeric one-dimensional array. It even works with
String arrays, but in that case you get the concatenation of all items, not
their sum.
This procedure is extremely powerful and reduces the amount of code you
have to write to deal with different kinds of arrays. But you should be aware
that accessing array items through a Variant parameter noticeably slows
down the execution. If you need the best performance, write specific
routines that process specific types of arrays.
You can also pass a multidimensional array to a routine that expects a
Variant parameter. In this case, you can still access the array elements
through the Variants, but if you don't know at compile time how many
dimensions the array has, your routine has to determine that number before
proceeding. You can get this value using a trial-and-error approach:

Visual Basic Unit 8
Sikkim Manipal University Page No.: 159
It's perfectly legal to use the function name inside a function's code as if it
were a local variable, as the previous code snippet does. Often this
technique lets you save a local variable and a final assignment before
exiting the routine, which indirectly makes your code run slightly faster.
Here's a modified ArraySum routine that uses NumberOfDims and works
with both one- and two-dimensional arrays:
Function ArraySum2(arr As Variant) As Variant
Dim i As Long, j As Long, result As Variant
' First check whether we can really work with this array.
Select Case NumberOfDims(arr)
Case 1 ' One-dimensional array
For i = LBound(arr) To UBound(arr)
result = result + arr(i)
Next
Case 2 ' Two-dimensional array
For i = LBound(arr) To UBound(arr)
For j = LBound(arr, 2) To UBound(arr, 2)
result = result + arr(i, j)
Next
Next
Case Else ' Not an array, or too many dimensions
Err.Raise 1001, , "Not an array or more than two dimensions"
End Select
ArraySum2 = result
End Function
' This routine returns the number of dimensions of the array ' passed as an argument, or 0 if it isn't an array. Function NumberOfDims(arr As Variant) As Integer Dim dummy as Long On Error Resume Next Do dummy = UBound(arr, NumberOfDims + 1) If Err Then Exit Do NumberOfDims = NumberOfDims + 1 Loop End Function
Visual Basic Unit 8
Sikkim Manipal University Page No.: 160
Often, if a Variant contains an array, you don't know the basic type of that
array in advance. The VarType function returns the sum of the vbArray
constant (decimal 8192), plus the VarType of the data included in the array.
This lets you test that the array passed to a routine is of a given type:
If VarType(arr) = (vbArray + vbInteger) Then
' Array of integers
ElseIf VarType(arr) = (vbArray + vbLong) Then
' Array of Longs
ElseIf VarType(arr) And vbArray Then
' An array of another type (just tests a bit)
End If
You can also test whether a Variant holds an array using the IsArray
function. When a Variant variable holds an array, the TypeName function
appends a pair of empty parentheses to its result:
Print TypeName(arr) ' Displays "Integer()"
As I've explained, you can either assign an array to a Variant variable or you
can pass an array as a Variant parameter of a procedure. While the two
operations look very similar, they're substantially different. To execute an
assignment, Visual Basic makes a physical copy of the array. As a result,
the Variant variable doesn't point to the original data but to the copy; from
this point on, all the manipulations you do through the Variant variable don't
affect the original array.
Conversely, if you call a procedure and pass an array as a Variant
parameter, no data is physically copied and the Variant simply works as an
alias of the array. You can reorder array items or modify their values, and
your changes are immediately reflected in the original array.
Self Assessment Questions
4. Arrays returned by the Array() function are zero based. (True / False)
5. If you call a procedure and pass an array as a _____ parameter, no data
is physically copied and the Variant simply works as an alias of the
array.

Visual Basic Unit 8
Sikkim Manipal University Page No.: 161
8.4 Assigning and Returning Arrays
Visual Basic adds two important features to arrays. First, you can perform
assignments between arrays. Second, you can write procedures that return
arrays. You can assign arrays only of the same type and only if the target is
a dynamic array. (The latter condition is necessary because Visual Basic
might need to resize the target array.)
ReDim a(10, 10) As Integer
Dim b() As Integer
' Fill the a array with data (omitted).
b() = a() ' This works!
It's no surprise that native assignment commands are always faster than the
corresponding For…Next loops that copy one item at a time. The actual
increment in speed heavily depends on the data type of the arrays and can
vary from 20 percent to 10 times faster. A native assignment between arrays
also works if the source array is held in a Variant. Under Visual Basic 4 and
5, you could store an array in a Variant, but you couldn't do the opposite –
that is, retrieve an array stored in a Variant variable and store it back in an
array of a specific type. This flaw has been fixed in Visual Basic 6:
Dim v As Variant, s(100) As String, t() As String
' Fill the s() array (omitted).
v = s() ' Assign to a Variant.
t() = v ' Assign from a Variant to a dynamic string array.
You often use the capacity to assign arrays to build functions that return
arrays. Notice that pair of brackets at the end of the first line in the following
procedure:
Function InitArray(first As Long, Last As Long) As Long()
ReDim result(first To Last) As Long
Dim i As Long
For i = first To Last
result(i) = i
Next
InitArray = result
End Function

Visual Basic Unit 8
Sikkim Manipal University Page No.: 162
The new capability of returning arrays lets you write highly versatile array
routines. Visual Basic 6 itself includes a few new string functions – namely
Join, Split, and Filter – that rely on it. Here are two examples of what you
can do with this intriguing feature:
Example 1
' Returns a portion of a Long array
' Note: fails if FIRST or LAST are not valid
Function SubArray(arr() As Long, first As Long, last As Long, _
newFirstIndex As Long) As Long()
Dim i As Long
ReDim result(newFirstIndex To last _ first + newFirstIndex) As
Long
For i = first To last
result(newFirstIndex + i - first) = arr(i)
Next
SubArray = result
End Function
Example 2
' Returns an array with all the selected items in a ListBox
Function SelectedListItems(lst As ListBox) As String()
Dim i As Long, j As Long
ReDim result(0 To lst.SelCount) As String
For i = 0 To lst.ListCount - 1
If lst.Selected(i) Then
j = j + 1
result(j) = lst.List(i)
End If
Next
SelectedListItems = result
End Function
Self Assessment Question
6. You can assign arrays only of the same type and only if the target is a
____ array.

Visual Basic Unit 8
Sikkim Manipal University Page No.: 163
8.5 Inserting and Deleting items using Arrays
Some of the most common operations you perform on arrays are inserting
and deleting items, shifting all the remaining elements toward higher indices
to make room or toward lower indices to fill the "hole" a deletion has left.
You usually do this with a For…Next loop, and you can even write generic
array procedures that work with any type of array (with the usual restrictions
about arrays of UDTs and fixed-length strings that can't be passed to a
Variant parameter):
Sub InsertArrayItem(arr As Variant, index As Long, newValue
As Variant)
Dim i As Long
For i = UBound(arr) - 1 To index Step -1
arr(i + 1) = arr(i)
Next
arr(index) = newValue
End Sub
Sub DeleteArrayItem(arr As Variant, index As Long)
Dim i As Long
For i = index To UBound(arr) - 1
arr(i) = arr(i + 1)
Next
' VB will convert this to 0 or to an empty string.
arr(UBound(arr)) = Empty
End Sub
If your application works intensively with arrays, you might find that an
approach based on For…Next loops is too slow. In some cases, you can
considerably speed up these operations by using the RtlMoveMemory API
function, which many Visual Basic programmers know under its popular
alias name, CopyMemory. This function lets you move a block of bytes from
one memory address to another memory address and works correctly even
if the two areas partially overlap.

Visual Basic Unit 8
Sikkim Manipal University Page No.: 164
Here's the code that inserts a new item in an array of Longs:
Private Declare Sub CopyMemory Lib "kernel32" Alias
"RtlMoveMemory" _
(dest As Any, source As Any, ByVal numBytes As Long)
Sub InsertArrayItemLong(arr() As Long, index As Long, newValue
As Long)
' We let VB evaluate the size of each item using LenB().
If index < UBound(arr) Then
CopyMemory arr(index + 1), arr(index), _
(UBound(arr) _ index) * LenB(arr(index))
End If
arr(index) = newValue
End Sub
Sub DeleteArrayItemLong(arr() As Long, index As Long)
If index < UBound(arr) Then
CopyMemory arr(index), arr(index + 1), _
(UBound(arr) _ index) * LenB(arr(index))
End If
arr(index) = Empty
End Sub
Important Note: The prerequisite for using the CopyMemory API function is
that data must be stored in contiguous memory locations, so you absolutely
can't use it to insert or remove elements in String and Object arrays, nor in
arrays of UDTs that contain conventional strings, object references, or
dynamic arrays. (Fixed-length strings and static arrays in UDTs are OK,
though.)
Note that while you can't use the preceding routines for arrays other than
Long arrays, the statements in the procedure body can be recycled for
another data type without any change, thanks to the use of the LenB
function. Therefore, you can derive new array functions that work for other
data types by simply modifying the procedure's name and its parameter list.
Example A function that deletes an item in a Double array by editing just the
first line of code (shown in boldface):
Sub DeleteArrayItemDouble(arr() As Double, index As Long)
' All the other statements here are the same as in

Visual Basic Unit 8
Sikkim Manipal University Page No.: 165
DeleteArrayItemLong
' ...
End Sub
8.6 Sorting using Arrays
Sorting is an operation that you often perform on arrays. As you probably
know, there are dozens of different sort algorithms, each one with its
strengths and weaknesses. We found that the Shell Sort algorithm works
well in most cases, and I've prepared a generic routine that sorts any one-
dimensional array of a data type compatible with the Variant type, either in
ascending or descending order:
Example:
Sub ShellSortAny(arr As Variant, numEls As Long,
descending As Boolean)
Dim index As Long, index2 As Long, firstItem As Long
Dim distance As Long, value As Variant
' Exit if it is not an array.
If VarType(arr) < vbArray Then Exit Sub
firstItem = LBound(arr)
' Find the best value for distance.
Do
distance = distance * 3 + 1
Loop Until distance > numEls
' Sort the array.
Do
distance = distance \ 3
For index = distance + firstItem To numEls + firstItem - 1
value = arr(index)
index2 = index
Do While (arr(index2 - distance) > value) Xor descending
arr(index2) = arr(index2 - distance)
index2 = index2 - distance
If index2 - distance < firstItem Then Exit Do
Loop
arr(index2) = value
Next
Loop Until distance = 1
End Sub

Visual Basic Unit 8
Sikkim Manipal University Page No.: 166
Arrays of Arrays
While you can create two-dimensional arrays in Visual Basic, their structure
isn't really flexible for at least two reasons: All rows in the array must have
the same number of elements, and you can use ReDim Preserve to change
the number of columns but you can't add new rows. The first point is
especially important because it often leads you to declare an array that's far
too large for your needs, thus allocating a lot of memory that in most cases
remains largely unused. You can solve both problems using a structure
known as an array of arrays.
The technique is conceptually simple: Since you can store an array in a
Variant variable, you can build an array of Variants, where each item holds
an array. Each subarray – a row of this pseudo-array – can hold a different
number of elements, and you don't need to use more memory than is strictly
necessary as shown in figure 8.1 below.
Figure 8.1: Array of Arrays
Here's an example, based on an imaginary PIM (Personal Information
Manager) program. In this program, you need to keep track of a list of
appointments for each day of the year. The simplest solution would be to
use an array in which each row corresponds to a day in the year and each
column to a possible appointment. (For the sake of simplicity, let's assume
that each appointment's data can be held in a string.)
ReDim apps(1 To 366, 1 To MAX_APPOINTMENTS) As String
Of course, you now have the problem of setting a reasonable value for the
MAX_APPOINTMENTS symbolic constant. It should be high enough to

Visual Basic Unit 8
Sikkim Manipal University Page No.: 167
account for all possible appointments in a day but not too high because you
might be wasting a lot of memory without any real reason. Let's see how the
array of arrays technique can help us save memory without posing any
artificial limit to your application:
Example:
' A module-level variable
Dim apps(1 To 366) As Variant
' Add an appointment for a given day.
Sub AddNewAppointment(day As Integer, description As
String)
Dim arr As Variant
If IsEmpty(apps(day)) Then
' This is the first appointment for this day.
apps(day) = Array(description)
Else
' Add the appointment to those already scheduled.
arr = apps(day)
ReDim Preserve arr(0 To UBound(arr) + 1) As Variant
arr(UBound(arr)) = description
apps(day) = arr
End If
End Sub
' Extract all the appointments for a given day.
Sub ListAppointments(day As Integer, lst As ListBox)
Dim i As Long
For i = 0 To UBound(apps(1))
lst.AddItem apps(1)(i)
Next
End Sub
In this example, we have kept the code as simple as possible and used an
array of Variant arrays. You could save even more memory if each row of
this array were built using an array of a more specific data type (String, in
this case). Note the special syntax used to address an item in an array of
arrays:
' Change the description for the Nth appointment.
apps(day)(n) = newDescription

Visual Basic Unit 8
Sikkim Manipal University Page No.: 168
Nothing keeps you from extending this concept further, introducing an array
of arrays of arrays, and so on. If you're dealing with arrays in which each
row can vary considerably in length, this approach is going to save you a lot
of memory and, in most cases, improve your overall performance too. A key
feature of an array of arrays is that you can process entire rows of your
pseudo-array as if they were single entities. For example, you can swap
them, replace them, add and delete them, and so on.
' Move the January 1st appointments to January 2nd.
apps(2) = apps(1)
apps(1) = Empty
Finally, an important advantage of this technique is that you can add new
rows without losing the current contents of the array. (Remember that you
can use ReDim Preserve on regular arrays only to modify the number of
columns, not the number of rows.)
' Extend the appointment book for another nonleap year.
ReDim Preserve apps(1 to UBound(apps) + 365) As Variant
Self Assessment Questions
7. The _______ function lets you move a block of bytes from one memory
address to another memory address and works correctly even if the two
areas partially overlap.
8. A key feature of an array of arrays is that you can process entire rows of
your pseudo-array as if they were _____ entities.
8.7 Control Arrays
So far, we've dealt with individual controls, each one with a distinctive name
and a distinct set of properties and events. In addition to these, Visual Basic
embodies the concept of control arrays, in which multiple controls share the
same set of event procedures even though each individual element in the
array can have different values for its properties. A control array can be
created only at design time, and at the very minimum at least one control
must belong to it. You create a control array following one of these three
methods:
You create a control and then assign a numeric, non-negative value to
its Index property; you have thus created a control array with just one
element.

Visual Basic Unit 8
Sikkim Manipal University Page No.: 169
You create two controls of the same class and assign them an identical
Name property. Visual Basic shows a dialog box warning you that
there's already a control with that name and asks whether you want to
create a control array. Click on the Yes button.
You select a control on the form, press Ctrl+C to copy it to the clipboard,
and then press Ctrl+V to paste a new instance of the control, which has
the same Name property as the original one. Visual Basic shows the
warning mentioned in the previous bullet.
Control arrays are one of the most interesting features of the Visual Basic
environment, and they add a lot of flexibility to your programs:
Controls that belong to the same control array share the same set of
event procedures; this often dramatically reduces the amount of code
you have to write to respond to a user's actions.
You can dynamically add new elements to a control array at run time; in
other words, you can effectively create new controls that didn't exist at
design time.
Elements of control arrays consume fewer resources than regular
controls and tend to produce smaller executables. Besides, Visual Basic
forms can host up to 256 different control names, but a control array
counts as one against this number. In other words, control arrays let you
effectively overcome this limit.
The importance of using control arrays as a means of dynamically creating
new controls at run time is somewhat reduced in Visual Basic 6, which has
introduced a new and more powerful capability.
Don't let the term array lead you to think control array is related to VBA
arrays; they're completely different objects. Control arrays can only be one-
dimensional. They don't need to be dimensioned: Each control you add
automatically extends the array. The Index property identifies the position of
each control in the control array it belongs to, but it's possible for a control
array to have holes in the index sequence. The lowest possible value for the
Index property is 0. You reference a control belonging to a control array as
you would reference a standard array item:
Text1(0).Text = ""

Visual Basic Unit 8
Sikkim Manipal University Page No.: 170
Sharing Event Procedures
Event procedures related to items in a control array are easily recognizable
because they have an extra Index parameter, which precedes all other
parameters. This extra parameter receives the index of the element that's
raising the event, as you can see in this example:
Private Sub Text1_KeyPress(Index As Integer, KeyAscii As
Integer)
MsgBox "A key has been pressed on Text1(" & Index & ") control"
End Sub
The fact that multiple controls can share the same set of event procedures
is often in itself a good reason to create a control array. For example, say
that you want to change the background color of each of your TextBox
controls to yellow when it receives the input focus and restore its
background color to white when the user clicks on another field:
Private Sub Text1_GotFocus(Index As Integer)
Text1(Index).BackColor = vbYellow
End Sub
Private Sub Text1_LostFocus(Index As Integer)
Text1(Index).BackColor = vbWhite
End Sub
Control arrays are especially useful with groups of OptionButton controls
because you can remember which element in the group has been activated
by adding one line of code to their shared Click event. This saves code
when the program needs to determine which button is the active one:
' A module-level variable
Dim optFrequencyIndex As Integer
Private Sub optFrequency_Click(Index As Integer)
' Remember the last button selected.
optFrequencyIndex = Index
End Sub

Visual Basic Unit 8
Sikkim Manipal University Page No.: 171
Creating Controls at Run Time
Once you have created a control array at design time, even with just one
item, it's straightforward to create new items at run time using the Load
command:
' Suppose you created Text(0) at design time.
Load Text1(1)
' Move the new control where you need it, and resize it.
Text1(1).Move 1200, 2000, 800, 350
' Set other properties as required.
Text1(1).MaxLength = 10
...
' Finally make it visible.
Text1(1).Visible = True
The Load command creates the new control with exactly the same set of
properties that the first item of the array – Text1(0) in the preceding example
– had at design time, including the position on the form. The only exception
to this rule is that the Visible property for a control created in this way is
always False because Visual Basic correctly expects that you want to move
the new control to a different position before making it visible. Once you
have dynamically added a control, it belongs to the control array and can be
treated exactly like those controls created at design time.
You can remove controls from a control array using the Unload command,
as in the following line of code:
Unload Text(1)
You can unload only controls that were added dynamically at run time; if you
use the Unload command on an item of the array that had been created at
design time, an error occurs. If you unload an item and then reload an item
with the same index, you're actually creating a brand-new instance, which
inherits its properties, size, and position from the first element in the array.
Iterating on the Items of a Control Array
Control arrays often let you save many lines of code because you can
execute the same statement, or group of statements, for every control in the
array without having to duplicate the code for each distinct control. For

Visual Basic Unit 8
Sikkim Manipal University Page No.: 172
example, you can clear the contents of all the items in an array of TextBox
controls as follows:
For i = txtFields.LBound To txtFields.UBound
txtFields(i).Text = ""
Next
Here you're using the LBound and UBound methods exposed by the control
array object, which is an intermediate object used by Visual Basic to gather
all the controls in the array. In general, you shouldn't use this approach to
iterate over all the items in the array because if the array has holes in the
Index sequence an error will be raised. A better way to loop over all the
items of a control array is using the For Each statement:
Dim txt As TextBox
For Each txt In txtFields
txt.Text = ""
Next
A third method exposed by the control array object, Count, returns the
number of elements it contains. It can be useful on several occasions (for
example, when removing all the controls that were added dynamically at run
time):
' This code assumes that txtField(0) is the only control that was
' created at design time (you can't unload it at run time).
Do While txtFields.Count > 1
Unload txtFields(txtFields.UBound)
Loop
8.8 Jagged Arrays
Definition – 1: An array of which each element is itself an array is called an
array of arrays, or a jagged array.
Definition – 2: An array of which each element is itself an array is called an
array of arrays, or a jagged array.
Note: Having arrays as elements is not the same thing as a
multidimensional array, which has more than one index on a single array.
Sometimes the data structure in your application is two-dimensional but not
rectangular. For example, you might have an array of months, each element

Visual Basic Unit 8
Sikkim Manipal University Page No.: 173
of which is an array of days. Since different months have different numbers
of days, the elements do not form a rectangular two-dimensional array. In
such a case, you can use a jagged array instead of a multidimensional
array.
Example:
The following example declares an array variable to hold an array of arrays
with elements of the Double Data Type (Visual Basic). Each element of the
array sales is itself an array that represents a month. Each month array
holds values for each day in that month.
The New clause in the declaration of sales sets the array variable to a
12-element array, each element of which is of type Double(), an array of
Double elements. The For loop then determines how many days are in
each month this year (Year(Now)), and sets the corresponding element of
sales to a Double array of the appropriate size.
In the previous example, the jagged array saves seven elements (six in a
leap year) as compared to a two-dimensional array. In a more extreme case
the memory savings could be significant.
When you initialize a jagged array variable, you can specify the dimension
lengths only for the top-level array. There are several ways you can do this:
Initializing Jagged Array Variables
In the array variable declaration, specify the top-level index upper bound
inside the first pair of parentheses, separated by commas. The following
example declares and creates a variable to hold a jagged array of Byte
elements, specifying only the top-level upper bound.
Dim rainfall(11)() As Byte
Following the execution of this statement, the array in variable rainfall holds
12 elements, each of which is an empty array of Byte elements.
Or
Dim sales()() As Double = New Double(11)() {} Dim month As Integer Dim days As Integer For month = 0 To 11 days = DateTime.DaysInMonth(Year(Now), month + 1) sales(month) = New Double(days - 1) {}
Next month

Visual Basic Unit 8
Sikkim Manipal University Page No.: 174
In the New clause, specify the top-level index upper bound inside the
first pair of parentheses, and supply empty braces ({}). The following
example declares and creates a variable to hold a jagged array of Short
elements, specifying only the top-level upper bound.
Dim snowfall()() As Short = New Short(11)() {}
Following the execution of this statement, the array in variable snowfall
holds 12 elements, each of which is an empty array of Short elements.
Or
In the New clause, specify the top-level index upper bound inside the
parentheses, and supply the element values inside the braces ({}). The
following example declares, creates, and initializes a variable to hold a
jagged array of Char elements, specifying the top-level upper bound and
the values. Note the nested New clauses to initialize the bottom-level
arrays.
Dim decodeValues()() As Char = New Char(1)() {New Char()
{"a"c, "b"c}, New Char() {"p"c, "q"c}}
Following the execution of this statement, the array in variable
decodeValues holds two elements, each of which is a Char array of length 1
with the element at index 0 holding an initialized value. If you supply both
the top-level upper bound and the values, you must include a value for
every top-level element from index 0 through the upper bound.
Or
In the New clause, omit the top-level parentheses and supply the
element values inside the braces ({}). The following example declares,
creates, and initializes a variable to hold a jagged array of Byte
elements, specifying only the element values. Note the two levels of
braces in the New clause.
Dim firstValues()() As Byte = {New Byte() {2, 1}, New Byte() {3, 0}}
Following the execution of this statement, the array in variable irstValues
has length 2, with elements firstValues(0) and firstValues(1). Each of the
elements is initialized to a two-element Byte array, the first with element
values 2 and 1 and the second with element values 3 and 0.
Self Assessment Questions
9. A _____ array can be created only at design time, and at the very
minimum at least one control must belong to it.
Visual Basic Unit 8
Sikkim Manipal University Page No.: 175
10. When you initialize a jagged array variable, you can specify the
dimension lengths only for the ____ array.
8.9 Summary
This unit has covered the following topics:
Declaring Arrays in Visual Basic
An array is a consecutive group of memory locations that all have the same
name and the same type. To refer to a particular location or element in the
array, we specify the array name and the array element position number.
Arrays occupy space in memory. Arrays have upper and lower bounds.
Arrays and Variants
Arrays can be stored in variant variables. It also discusses about passage of
multidimensional arrays to routines expecting variant parameters. You can
create an array of Variant elements on the fly using the Array function and
store it in a Variant variable.
Assigning and Returning Arrays
You can perform assignments between arrays. You can write procedures
that return arrays. You can assign arrays only of the same type and only if
the target is a dynamic array.
Inserting and deleting items using Arrays
The insertion and deletion of items in an array is carried out by shifting all
the remaining elements toward higher indices to make room or toward lower
indices to fill the "hole" a deletion has left. You can do this with a For…Next
loop, and you can even write generic array procedures that work with any
type of array.
Sorting using Arrays
Sorting is an operation that you often perform on arrays. As you probably
know, there are dozens of different sort algorithms, each one with its
strengths and weaknesses. The Shell Sort algorithm on a single
dimensional array has been listed here
Control Arrays
Visual Basic embodies the concept of control arrays, in which multiple
controls share the same set of event procedures even though each
individual element in the array can have different values for its properties. A

Visual Basic Unit 8
Sikkim Manipal University Page No.: 176
control array can be created only at design time, and at the very minimum at
least one control must belong to it.
Jagged Arrays
An array of which each element is itself an array is called an array of arrays,
or a jagged array. Note that having arrays as elements is not the same thing
as a multidimensional array, which has more than one index on a single
array.
8.10 Terminal Questions
1. Describe the theory behind declaring arrays in VB.Net.
2. Explain the usage of variants in VB.Net
3. Explain the application of control arrays with sample code.
4. Describe the usage of Jagged Arrays
8.11 Answers
Self Assessment Questions
1. array
2. Module
3. 60
4. True
5. Variant
6. dynamic
7. Copy Memory
8. single
9. control
10. top-level
Terminal Questions
1. Arrays may be declared as Public (in a code module), module or local.
Module arrays are declared in the general declarations using keyword
Dim or Private. Local arrays are declared in a procedure using Dim or
Static. Array must be declared explicitly with keyword "As". (Refer
Section 8.2)
2. Visual Basic lets you store arrays in Variant variables and then access
the array items using the Variant variable as if it were an array:

Visual Basic Unit 8
Sikkim Manipal University Page No.: 177
ReDim Names(100) As String, var As Variant
' Initialize the Names array (omitted).
var = Names() ' Copy the array into the Variant.
Print var(1) ' Access array items through the Variant.
You can even create an array of Variant elements on the fly using the
Array function and store it in a Variant variable:
' Arrays returned by the Array() function are zero-based.
Factorials = Array(1, 1, 2, 6, 24, 120, 720, 5040, 40320, 362880,
3628800)
(Refer Section 8.3)
3. Visual Basic embodies the concept of control arrays, in which multiple
controls share the same set of event procedures even though each
individual element in the array can have different values for its
properties. A control array can be created only at design time, and at the
very minimum at least one control must belong to it. (Refer Section 8.7)
4. An array of which each element is itself an array is called an array of
arrays, or a jagged array. Note that having arrays as elements is not the
same thing as a multidimensional array, which has more than one index
on a single array. (Refer Section 8.8)

Visual Basic Unit 9
Sikkim Manipal University Page No.: 178
Unit 9 ImageList and TreeView Controls
Structure:
9.1 Introduction
Objectives
9.2 The ImageList Control
Adding Images
Extracting and Drawing Images
Extracting Individual Images
Creating Transparent Images
Using the Draw Method
Creating Composite Images
9.3 The TreeView Control
Setting Design-Time Properties
Run-Time Operations
Adding Node objects
Appearance and Visibility
Showing information about a Node
Editing Node Text
Using Check Boxes
9.4 Summary
9.5 Terminal Questions
9.6 Answers
9.1 Introduction
In the previous units, we have seen the basic programming techniques
using normal variables, programming loops, and record sets. In this unit, we
describe the features of all the Windows common controls included in
MsComCtr.ocx, To test the code presented here, you first make the controls
available to your Visual Basic environment. To do so, execute the
Components command from the Project menu (or just press the Ctrl+T key
combination) to display the Components dialog box similar to the one in
Figure 9.1, and then select the OCXs that interest you, as shown in
Figure 9.2.
When you load into the Visual Basic 6 environment a project built with a
previous version of the language that contains references to older versions

Visual Basic Unit 9
Sikkim Manipal University Page No.: 179
of Windows common controls, a message box appears asking whether you
want to upgrade those controls with their newer versions.
For the maximum compatibility with existing applications, you might decide
to continue to use the older controls, even though upgrading to the newer
versions is the best choice if you want to improve the application's user
interface and functionality. You can turn this warning off by deselecting the
Upgrade ActiveX Controls check box on the General tab of the Project
Properties dialog box.
Figure 9.1: The Components dialog box, with all the Windows common
controls OCXs selected
Figure 9.2: The Common Controls in the Toolbox

Visual Basic Unit 9
Sikkim Manipal University Page No.: 180
Objectives:
After studying this unit, you should be able to:
describe the usage of ImageList control in Windows Programming
describe the process of drawing and extracting images using ImageList
control
describe and illustrate the TreeView control and its importance in
designing the user interfaces
explain the run time operations on TreeView control
9.2 The ImageList Control
The ImageList control is most often used as a container for images and
icons that are employed by other controls, such as TreeView, ListView,
TabStrip, and ImageCombo controls. For this reason, it makes sense to
describe it before any other controls. The ImageList control is invisible at run
time, and to display one of the images it contains you must draw it on a
form, a PictureBox control, or an Image control, or associate it with another
control.
Using the ImageList control as a repository for images that are then used by
other controls offers a number of advantages. Without this control, in fact,
you would have to load images from disk at run time using a LoadPicture
function, which slows down execution and increases the number of files to
be distributed with your program, or an array of Image controls, which slows
down form loading. It's much easier and more efficient to load all the images
in the ImageList control at design time and then refer to them from the other
controls or in source code.
9.2.1 Adding Images
The ImageList control exposes a ListImages collection, which in turn
contains a number of ListImage objects. Each ListImage item holds an
individual image. As with any collection, an individual ListImage object can
be referenced through its numerical index or its string key (if it has one).
Each ListImage object can hold an image in one of the following graphic
formats: bitmap (.bmp), icon (.ico), cursor (.cur), JPEG (.jpg), or GIF (.gif).
The latter two formats weren't supported by the ImageList control distributed
with Visual Basic 5.

Visual Basic Unit 9
Sikkim Manipal University Page No.: 181
Adding Images at Design Time
Adding images at design-time is easy. After you place an ImageList control
on a form, right-click on it, select the Properties command from the pop-up
menu, and switch to the Images tab, as shown in Figure 9.3.
All you have to do now is click on the Insert Picture button and pick up your
images from disk. You should associate a string key with each image so that
you can refer to it correctly later, even if you add or remove other images in
the future (which would affect its numerical index).
Of course, all string keys must be unique in the collection. You can also
specify a string for the Tag property of an image, for example, if you want to
provide a textual description of the image or any other information
associated with this image. Visual Basic never directly uses this property, so
you're free to store any string data in it.
Figure 9.3: The Images tab of the Properties window of an ImageList control
Images added to the ListImages collection can be of any size, with a caveat:
If you're going to use these images inside another common control, all the
images after the first one will be resized and stretched to reflect the size of
the first image added to the control. This isn't an issue if you're going to
display these images on a form, a PictureBox control, or an Image control.
If the ImageList control doesn't contain any images, you can set the size you
want the images to be in the General tab of the Properties dialog box. Trying
to do this when the control already contains one or more ListImage items
raises an error.

Visual Basic Unit 9
Sikkim Manipal University Page No.: 182
Adding Images at Run Time
Adding images at run time requires you to use the Add method of the
ListImages collection, the syntax of which is the following:
Add([Index], [Key], [Picture]) As ListImage
If you omit the Index argument, you add the new image at the end of the
collection. The following code creates a new ListImage item and associates
it with a bitmap loaded from disk:
Dim li As ListImage
Set li = ImageList1.ListImages.Add(, "Cut", _
LoadPicture("d:\bitmaps\cut.bmp"))
You don't need to assign the result value of the Add method to a ListImage
object unless you want to assign a string to the Tag property of the object
just created. Even in that case, you can do without an explicit variable:
With ImageList1.ListImages.Add(, "Cut",
LoadPicture("d:\bitmaps\cut.bmp"))
.Tag = "The Cut icon"
End With
You can remove individual ListImage objects (added either at design time or
at run time) by using the Remove method of the ListImages collection.
' You can use a numerical index or a string key
' to remove the associated image.
ImageList1.ListImages.Remove "Cut"
You can also remove all the images in one operation by using the
collection's Clear method:
' Remove all images.
ImageList1.ListImages.Clear
You can learn the size of the images currently stored in the control by using
the ImageList's ImageWidth and ImageHeight properties. These properties
are in pixels and can be written to only if the ListImages collection is empty;
after you add the first image, they become read-only properties.
9.2.2 Extracting and Drawing Images
If you associate an ImageList control with another common control, you
usually don't have to worry about extracting and showing individual images
because everything is done automatically for you. But if you want to

Visual Basic Unit 9
Sikkim Manipal University Page No.: 183
manually display or print images, you have to learn how to use a few
properties and methods from the ImageList control and its ListImage
dependent objects.
9.2.3 Extracting Individual Images
Each ListImage object exposes a Picture property, which lets you extract the
image and assign it to another control, typically a PictureBox or Image
control:
Set Picture1.Picture = ImageList1.ListImages("Cut").Picture
In general, you can use the Picture property of a ListImage object whenever
you would use the Picture property of a PictureBox or an Image control, as
in the following example:
' Save an image to a disk file.
SavePicture ImageList1.ListImages("Cut").Picture, "C:\cut.bmp"
' Display an image on the current form, zooming it by a factor
' of 4 along the X-axis, and 8 along the Y-axis.
With ImageList1
PaintPicture .ListImages("Cut").Picture, 0, 0, _
ScaleX(.ImageWidth, vbPixels) * 4, ScaleY(.ImageHeight,
vbPixels) * 8
End With
Using the PaintPicture method, you can display any ListImage object on a
form or in a PictureBox control, or you can print it to the Printer object.
ListImage objects also expose an ExtractIcon method, which creates an
icon out of the image and returns it to the caller. You can therefore use this
method whenever an icon is expected, as in this code:
Form1.MouseIcon = ImageList1.ListImages("Pointer").ExtractIcon
Unlike standard collections, keys in the ListImages collection are dealt with
in a case-sensitive way. In other words, "Pointer" and "pointer" are assumed
to be different items.
9.2.4 Creating Transparent Images
The ImageList control has a MaskColor property whose value determines
the color that should be considered transparent when you're performing
graphical operations on individual ListImage objects or when you're

Visual Basic Unit 9
Sikkim Manipal University Page No.: 184
displaying images inside other controls. By default, this is the gray color
(&HC0C0C0), but you can change it both at design time in the Color tab of
the Properties dialog box and at run time via code.
When a graphical operation is performed, none of the pixels in the image
that are the color defined by MaskColor are transferred. To actually display
transparent images, however, you must ensure that the UseMaskColor
property is set to True, which is its default value. You can modify this value
in the General tab of the Properties dialog box or at run time via code:
' Make white the transparent color.
ImageList1.MaskColor = vbWhite
ImageList1.UseMaskColor = True
9.2.5 Using the Draw Method
ListImage objects support the Draw method, which has the following syntax:
Draw hDC, [x], [y], [Style]
where hDC is the handle of a device context (typically the value returned by
the hDC property of a form, a PictureBox control, or the Printer object) and x
and y are the coordinates in pixels where the image should be displayed in
the target object. Style is one of the following values: 0-imlNormal (default,
draw the image without any change), 1-imlTransparent (use the MaskColor
property to account for transparent areas), 2-imlSelected (draw the image
dithered with the system highlight color), or 3-imlFocus (as imlSelected, but
create a hatched effect to indicate that the image has the focus):
' Show an image in the upper left corner of a PictureBox control.
ImageList1.ListImages("Cut").Draw Picture1.hDC, 0, 0
9.2.6 Creating Composite images
The ImageList control also includes the ability to create composite images
by overlaying two individual images held in ListImage objects. This can be
accomplished using the Overlay method. Figure 9.4 shows two individual
images and then what you can get by overlaying the second one on the first
one:
PaintPicture ImageList1.ListImages(1).Picture, 0, 10, 64, 64
PaintPicture ImageList1.ListImages(2).Picture, 100, 10, 64, 64
PaintPicture ImageList1.Overlay(1, 2), 200, 10, 64, 64
Visual Basic Unit 9
Sikkim Manipal University Page No.: 185
Figure 9.4: The effect of the Overlay method
The Overlay method implicitly uses the MaskColor property to determine
which color is to be considered as the transparent color, so you must ensure
that the UseMaskColor property is set to True.
Self Assessment Questions
1. To execute the Components command from the Project menu press the
______ key combination to display the Components dialog box.
2. The ____ control is invisible at run time.
3. As with any collection, an individual ________ object can be referenced
through its numerical index or its string key (if it has one).
9.3 The TreeView Control
The TreeView control is probably the first Windows common control that
users become acquainted with because it's the control Windows Explorer is
based on. Basically, the TreeView control displays a hierarchy of items. A
plus sign beside an item indicates that it has one or more child items. An
item that has child items can be expanded to show them or collapsed to
hide them. This can be done interactively by the user or via code.
The Visual Basic 6 version of the TreeView control has a number of
improvements and now supports check boxes beside each item and full row
selection. Moreover, individual nodes can have different Bold, Foreground,
and Background attributes.
The TreeView control exposes a Nodes collection, which in turn includes all
the Node objects that have been added to the control. Each individual Node
object exposes a number of properties that let you define the look of the
control. Typically, a TreeView control has one single root Node object, but
you can also create multiple Node objects at the root level.

Visual Basic Unit 9
Sikkim Manipal University Page No.: 186
9.3.1 Setting Design-Time Properties
Immediately after creating a TreeView control on a form, you should display
its Properties dialog box (shown in Figure 9.5), which you do by right-
clicking on the control and selecting the Properties menu item. Of course,
you can also set properties that appear in this page at run time, but you
rarely need to change the appearance of a TreeView control once it has
been displayed to the user.
The Style property affects which graphical elements will be used inside the
control. A TreeView control can display four graphical elements: the text
associated with each Node object, the picture associated with each Node
object, a plus or minus sign beside each Node object (to indicate whether
the Node is in collapsed or expanded state), and the lines that go from each
Node object to its child objects.
The Style property can be assigned one of eight values, each one
representing a different combination of these four graphical elements. In
most cases, you use the default value, 7-tvwTreelinesPlusMinusPictureText,
which displays all graphical elements.
Fig. 9.5: The General tab of the Properties dialog box of a TreeView control
The LineStyle property affects how lines are drawn. The value
0-tvwTreeLines doesn't display lines among root Node objects (this is the
default setting), whereas the value 1-tvwRootLines also displays lines
among all root Nodes and makes them appear as if they were children of a

Visual Basic Unit 9
Sikkim Manipal University Page No.: 187
fictitious Node located at an upper level. The Indentation property states the
distance in twips between vertical dotted lines.
The LabelEdit property affects how the end user can modify the text
associated with each Node object. If it's assigned the value 0-tvwAutomatic
(the default), the end user can edit the text by clicking on the Node at run
time; if it's assigned the value 1-tvwManual, the edit operation can be
started only programmatically, by your issuing a StartLabelEdit method.
The ImageList combo box lets you select which ImageList control will be
used to retrieve the images of individual Node objects. The combo box lists
all the ImageList controls located on the current form.
You can associate a TreeView control (or any control) with an ImageList
control located on another form by making the assignment at run time, as
shown in this code:
This technique allows you to use a group of bitmaps and icons in all the
forms of your application without having to duplicate them and thus shrink
the size of the EXE file. This way, you save memory and resources at run
time.
The HideSelection property determines whether the selected Node object
will continue to be highlighted when the TreeView control loses the focus.
The PathSeparator property states which character or string should be used
in the FullPath property of the Node object. The default value for the
PathSeparator property is the backslash character. For example, if you have
a root Node labeled "Root" and a child Node labeled "FirstChild", the
FullPath property of the child Node will be "Root\FirstChild".
The Sorted property states whether Nodes in the control are automatically
sorted in alphabetical order. The documentation omits an important detail:
This property affects only how root Node objects are sorted but has no
effect on the order of child Node objects at lower levels. If you want all the
branches of the tree to be sorted, you should set the Sorted properties of all
individual Node items to True.
Private Sub Form_Load() Set TreeView1.ImageList = AnotherForm.ImageList1 End Sub

Visual Basic Unit 9
Sikkim Manipal University Page No.: 188
The TreeView control that comes with Visual Basic 6 adds a few interesting
properties not available in previous versions of the language. The
FullRowSelect property, if True, causes a Node of the control to be selected
if the user clicks anywhere on its row. (By default, this property is False, in
which case an item can be selected only with a click over it or its plus or
minus symbol.)
If you set the Checkboxes property to True, a check box appears beside
each Node object so that the end user can select multiple Node objects.
By default, you need to double-click on Node items to expand or collapse
them (or click on the plus or minus sign, if present), and you can expand
and collapse any number of tree branches independently of one another.
But if you set the SingleSel property to True, the control's behavior is
different: You expand and collapse items with a single click – that is, as
soon as you select them. Moreover, when you expand a Node, the item that
was previously expanded is automatically collapsed.
The Scroll property determines whether the TreeView control displays a
vertical or horizontal scroll bar if necessary. The default value is True, but
you can set it to False to disable this behavior (even though, honestly, I
can't find a reason why you would want to do that).
Finally the HotTracking property lets you create a Web-like user interface. If
you set this property to True, the cursor changes into a hand when the
mouse passes over the Node object and the TreeView control underlines
the Node's Text property.
9.3.2 Run-Time Operations
To fully exploit the potential of the TreeView control, you must learn to deal
with the Nodes collections and the many properties and methods of Node
objects.
9.3.3 Adding Node objects
One of the shortcomings of the TreeView control is that you can't add items
at design time as you can with ListBox and ComboBox controls. You can
add Node objects only at run time using the Add method of the Nodes
collection.The Add method's syntax is the following:

Visual Basic Unit 9
Sikkim Manipal University Page No.: 189
Relative and Relationship indicate where the new Node should be inserted.
Key is its string key in the Nodes collection, Text is the label that will appear
in the control, and Image is the index or the string key in the companion
ImageList control of the image that will appear beside the Node.
SelectedImage is the index or key of the image that will be used when the
Node is selected. For example, if you're creating a TreeView control that
mimics Windows Explorer and its directory objects, you might write
something like this:
To place the new Node in a given position in the tree, you must provide the
first two arguments. The first argument specifies an existing item in the
Nodes collection by its numerical index or string key; the second argument
states the relationship between the Node being added and its relative. Such
a relationship can be 0-tvwFirst, in which the new Node becomes the first
item at the level of its relative – in other words, it becomes the first sibling of
the relative Node.
Or the relationship can be 1-tvwLast (the new Node becomes the last sibling
of the relative Node); 2-tvwNext (default, the new Node is added
immediately after the relative Node, at the same level in the hierarchy);
3-tvwPrevious (the new Node is inserted immediately before the relative
Node, at the same level in the hierarchy); or 4-tvwChild (the new Node
becomes a child of the relative Node and is inserted after all existing child
nodes).
Here's an example of a routine that fills a TreeView control with the structure
of an MDB file – that is, the tables it contains and the fields for each table.
The routine accepts a reference to the control in its second argument so that
you can easily reuse it in your applications. The third argument passed to
the routine is a Boolean value that states whether system tables should be
displayed:
Add([Relative],[Relationship],[Key],[Text],[Image],[SelectedImage]) As Node
Dim nd As Node Set nd = Add(, , ,"C:\System", "Folder", "OpenFolder")

Visual Basic Unit 9
Sikkim Manipal University Page No.: 190
Note that the routine doesn't include any error handler: if the file doesn't
exist or is an invalid or corrupted MDB archive, the error is simply returned
to the caller. It's usual to show a TreeView control with the root object
already expanded in order to save the end user a mouse click. The routine
does this by setting the root Node object's Expanded property to True.
9.3.4 Appearance and Visibility
You can control the appearance of individual Node objects by setting their
ForeColor, BackColor, and Bold properties, the effects of which are shown
in Figure 9.6. This new feature permits you to visually convey more
information about each Node. Typically, you set these properties when you
add an item to the Nodes collection:
Sub ShowDatabaseStructure(MdbFile As String, TV As TreeView, _ ShowSystemTables As Boolean) Dim db As DAO.Database, td As DAO.TableDef, fld As DAO.Field Dim nd As Node, nd2 As Node ' Clear the current contents of the TreeView control. TV.Nodes.Clear ' Open the database. Set db = DBEngine.OpenDatabase(MdbFile) ' Add the root Node, and then expand it to show the tables. Set nd = TV.Nodes.Add(, , "Root", db.Name, "Database") nd.Expanded = True ' Explore all the tables in the database. For Each td In db.TableDefs ' Discard system tables if user isn't interested in them. If (td.Attributes And dbSystemObject) = 0 Or ShowSystemTables Then ' Add the table under the Root object. Set nd = TV.Nodes.Add("Root", tvwChild, , td.Name, "Table") ' Now add all the fields. For Each fld In td.Fields Set nd2 = TV.Nodes.Add(nd.Index, tvwChild, , _ fld.Name, "Field") Next End If Next db.Close End Sub

Visual Basic Unit 9
Sikkim Manipal University Page No.: 191
Figure 9.6: Effects of the ForeColor, BackColor, and Bold properties of Node
objects, as well as of the Checkboxes property of the TreeView control.
Each Node object has three images associated with it, and the Node's
current state determines which image is displayed. The Image property sets
or returns the index of the default image; the SelectedImage property sets or
returns the index of the image used when the Node is selected; the
ExpandedImage property sets or returns the index of the image used when
the Node is expanded. You can set the first two properties in the Nodes
collection's Add method, but you must explicitly assign the ExpandedImage
property after you've added the item to the collection.
You can learn whether a particular Node is currently visible by querying its
Visible property. A Node item can be invisible because it belongs to a tree
branch that's in a collapsed state or because it has scrolled away from the
visible portion of the control. This property is read-only, but you can force
the visibility state of a Node by executing its EnsureVisible method:
You can learn how many Nodes are visible in the control by executing
TreeView's GetVisibleCount method.
With TV.Nodes.Add(, , , "New Node") .Bold = True .ForeColor = vbRed .BackColor = vbYellow End With
' Scroll the TreeView, and expand any parent Node if necessary.
If aNode.Visible = False Then aNode.EnsureVisible

Visual Basic Unit 9
Sikkim Manipal University Page No.: 192
You have two ways to determine whether a Node is currently the selected
Node object in the control – either by querying its Selected property or by
testing the TreeView's SelectedItem property:
9.3.5 Showing information about a Node
Users expect the program to do something when they click on a Node object
in the TreeView control – for example, to display some information related to
that object. To learn when a Node is clicked, you have to trap the NodeClick
event. You can determine which Node has been clicked by looking at the
Index or Key property of the Node parameter passed to the event
procedure. In a typical situation, you store information about a Node in an
array of String or UDT items:
The NodeClick event differs from the regular Click event in that the latter
fires whenever the user clicks on the TreeView control, whereas the former
is activated only when the user clicks on a Node object.
The previous code snippet has a flaw: In general, the Index property of a
Node object can't be trusted because it can change when other Node
objects are removed from the Nodes collection. For this reason, you should
rely exclusively on the Key property, which is guaranteed not to vary after
the Node has been added to the collection.
' Check whether aNode is the Node currently selected (two ' equivalent ways). ' First way: If aNode.Selected Then MsgBox "Selected" ' Second way: If TreeView1.SelectedItem Is aNode Then MsgBox "Selected" ' Make aNode the currently selected Node (two equivalent ways). ' First way: aNode.Selected = True ' Second way: Set TreeView1.SelectedItem = aNode
Private Sub TreeView1_NodeClick(ByVal Node As MSComctlLib.Node) ' info() is an array of strings that hold nodes' descriptions. lblData.Caption = info(Node.Index) End Sub

Visual Basic Unit 9
Sikkim Manipal University Page No.: 193
For example, you can use the Key property to search for an item in a
standard Collection object, where you store information that's related to the
Node. Here's a better technique: You store the data in the Tag property of
the Node object so that you don't have to worry about removing items from
the control's Node collection.
The BrowMdb.vbp project on the companion CD includes a revised version
of the ShowDatabaseStructure routine to show properties and attributes of
all the Field and TableDef objects displayed in the TreeView control, as you
can see in Figure 9.7.
Fig. 9.7: A simple browser for Microsoft Jet databases
9.3.6 Editing Node Text
By default, the user can click on a Node object to enter Edit mode and
indirectly change the Node object's Text property. If you don't like this
behavior, you can set the LabelEdit property to 1-tvwManual. In this case,
you can enter Edit mode only by programmatically executing a
StartLabelEdit method.
Regardless of the value of the LabelEdit property, you can trap the instant
when the user begins editing the current value of the Text property by
writing code in the BeforeLabelEdit event procedure. When this event fires,
you can discover which Node is currently selected by using the TreeView's

Visual Basic Unit 9
Sikkim Manipal University Page No.: 194
SelectedItem property, and you can cancel the operation by setting the
event's Cancel parameter to True:
Similarly, you can find out when the user has completed the editing and
reject, if you want to, the new value of the Text property by trapping the
AfterLabelEdit event. Typically, you use this event to check whether the new
value follows any syntactical rule enforced by the particular object. For
example, you can reject empty strings by writing the following code:
9.3.7 Using Check Boxes
To display a check box beside each Node in the TreeView control, you
simply need to set the control's Checkboxes property to True, either at
design time or run time. You can then query or modify the state of each
Node using its Checked property:
You can enforce tighter control over what happens when a Node is checked
by writing code in the control's NodeChecked event. This event doesn't fire if
you modify a Node's Checked property using code:
Private Sub TreeView1_BeforeLabelEdit(Cancel As Integer) ' Prevent the root Node's Text property from editing. If TreeView1.SelectedItem.Key = "Root" Then Cancel = True End Sub
Private Sub TreeView1_AfterLabelEdit(Cancel As Integer, _ NewString As String) If Len(NewString) = 0 Then Cancel = True End Sub
' Count how many Node objects are checked, and then reset all check boxes. Dim i As Long, SelCount As Long For i = 1 To TreeView1.Nodes.Count If TreeView1.Nodes(i).Checked Then SelCount = SelCount + 1 TreeView1.Nodes(i).Checked = False End If Next

Visual Basic Unit 9
Sikkim Manipal University Page No.: 195
If you want to prevent the user from modifying the Checked state of a given
Node object, you can't simply reset its Checked property within the
NodeCheck event because all changes to this property are lost when the
event procedure is exited. You can solve this problem by adding a Timer
control on the form and writing this code:
Self Assessment Questions
4. A ___ sign beside an item indicates that it has one or more child items.
5. A TreeView control can display ___ graphical elements.
6. You store the data in the ____ property of the Node object so that you
don't have to worry about removing items from the control's Node
collection.
Dim SelCount As Long ' The number of selected items Private Sub TreeView1_NodeCheck(ByVal Node As MSComctlLib.Node) ' Display the number of selected Nodes. If Node.Checked Then SelCount = SelCount + 1 Else SelCount = SelCount _ 1 End If lblStatus = "Selected Items = " & SelCount End Sub
Dim CheckedNode As Node ' A form-level variable Private Sub TreeView1_NodeCheck(ByVal Node As MSComctlLib.Node) ' Prevent the user from checking the first Node. If Node.Index = 1 Then ' Remember which Node has been clicked on. Set CheckedNode = Node ' Let the Timer routine do the job. Timer1.Enabled = True End If End Sub Private Sub Timer1_Timer() ' Reset the Checked property, and then go to sleep. CheckedNode.Checked = False Timer1.Enabled = False End Sub

Visual Basic Unit 9
Sikkim Manipal University Page No.: 196
9.4 Summary
This unit has covered the following topics:
The ImageList Control
This control is used as a container for images and icons that are employed
by other controls, such as TreeView, ListView, and so on. The advantage of
this control is its inclusion provides the runtime environment to use the
images embedded in this control.
The TreeView Control
The TreeView control is probably the first Windows common control that
users become acquainted with because it's the control Windows Explorer is
based on. Basically, the TreeView control displays a hierarchy of items. A
plus sign beside an item indicates that it has one or more child items. An
item that has child items can be expanded to show them or collapsed to
hide them. This can be done interactively by the user or via code.
9.5 Terminal Questions
1. Describe the process of extracting and drawing images using ImageList
control.
2. Describe the mechanism of creating transparent images using ImageList
control.
3. Describe the methodology of adding node objects to a TreeView control.
4. Explain the usage of check boxes in a TreeView control.
9.6 Answers
Self Assessment Questions
1. Ctrl+T
2. ImageList
3. ListImage
4. plus
5. four
6. Tag

Visual Basic Unit 9
Sikkim Manipal University Page No.: 197
Terminal Questions
1. Each ListImage object exposes a Picture property, which lets you extract
the image and assign it to another control, typically a PictureBox or
Image control. (Refer Section 9.2)
2. The ImageList control has a MaskColor property whose value
determines the color that should be considered transparent when you're
performing graphical operations on individual ListImage objects or when
you're displaying images inside other controls. (Refer Section 9.2)
3. One of the shortcomings of the TreeView control is that you can't add
items at design time as you can with ListBox and ComboBox controls.
You can add Node objects only at run time using the Add method of the
Nodes collection. (Refer Section 9.3)
4. To display a check box beside each Node in the TreeView control, you
simply need to set the control's Checkboxes property to True, either at
design time or run time. You can then query or modify the state of each
Node using its Checked property. (Refer Section 9.3).

Visual Basic Unit 10
Sikkim Manipal University Page No.: 198
Unit 10 The ListView Control
Structure:
10.1 Introduction
Objectives
10.2 Features of ListView Control
10. 3 Setting Design – Time Properties
10.4 General Properties
10.5 Column Headers
10.6 Run-Time Operations
Adding ListItem Objects
Adding ColumnHeaders Objects
Adding ListSubItems
Loading Data from Databases
Sorting and Reordering Columns
Searching Items
10.7 Other Properties, Methods, and Events
10.8 Summary
10.9 Terminal Questions
10.10 Answers
10.1 Introduction
In the previous unit, you have seen the usage of ImageList and TreeView
controls. In this unit, you would see the usage of List View Control and its
applications in the real world GUI design. You would also be going through
the concepts of loading, retrieving, and performing various operations on a
ListView control.
Objectives:
After studying this unit, you should be able to:
define and illustrate the applications of ListView control
describe the general properties of ListView control
explain the setting of run time properties of ListView control
describe the process of adding various items to ListView control
explain data loading from an underlying database
describe the applications of sorting and searching using ListView control

Visual Basic Unit 10
Sikkim Manipal University Page No.: 199
10.2 Features of ListView Control
Together with the TreeView control, the ListView control has been made
popular by Windows Explorer. Now many Windows applications use this
pair of controls side by side, and they're therefore called Windows Explorer-
like applications. In these applications, the end user selects a Node in the
TreeView control on the left and sees some information related to it in the
rightmost ListView control.
The ListView control supports four basic view modes: Icon, SmallIcon, List,
and Report. To see how each mode is rendered, try the corresponding items
in the Windows Explorer View menu. (The Report mode corresponds to the
Details menu command.) To give you an idea of the flexibility of this control,
you should know that the Windows desktop is nothing but a large ListView
control in Icon mode with a transparent background. When used in Report
mode, the ListView control resembles a grid control and lets you display
well-organized information about each item.
The Visual Basic 6 version of the ListView control has many new features. It
can display icons in column headers and grid cells; it supports hot tracking,
full row selection, and reordering of columns; and its items can have
independent Bold and Color attributes. The new ListView control can also
show a background bitmap, grid lines, and check boxes beside each item.
The ListView control exposes two distinct collections: The ListItems
collection comprises individual ListItem objects, each one corresponding to
an item in the control, whereas the ColumnHeaders collection includes
ColumnHeader objects that affect the appearance of the individual headers
visible in Report mode. A third collection, ListSubItems, contains data for all
the cells displayed in Report mode.
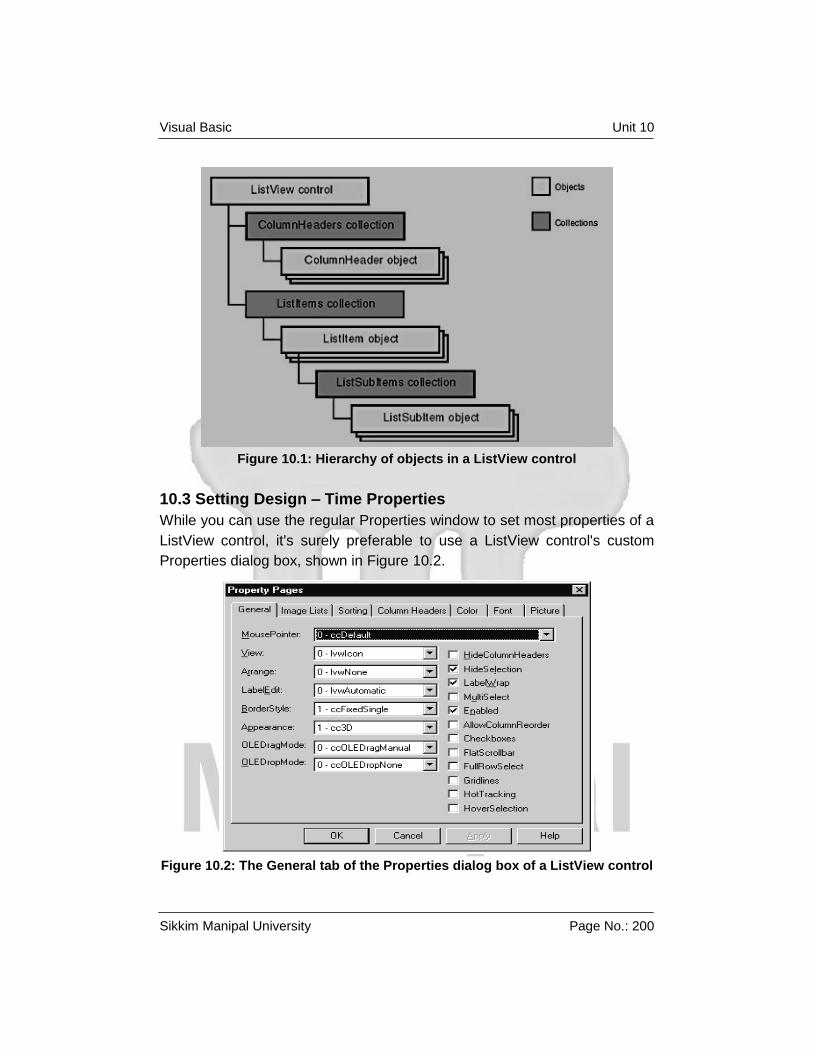
Visual Basic Unit 10
Sikkim Manipal University Page No.: 200
Figure 10.1: Hierarchy of objects in a ListView control
10.3 Setting Design – Time Properties
While you can use the regular Properties window to set most properties of a
ListView control, it's surely preferable to use a ListView control's custom
Properties dialog box, shown in Figure 10.2.
Figure 10.2: The General tab of the Properties dialog box of a ListView control

Visual Basic Unit 10
Sikkim Manipal University Page No.: 201
Self Assessment Questions
1. The ListView control supports ____ basic view modes.
2. The _____ collection comprises individual ListItem objects, each one
corresponding to an item in the control.
10.4 General Properties
We have already referred to the View property, which can be one of the
following values: 0-lvwIcon, 1-lvwSmallIcon, 2-lvwList, or 3-lvwReport. You
can change this property at run time as well as let the user change it
(typically by offering four options in the View menu of your application). The
Arrange property lets you decide whether icons are automatically aligned to
the left of the control (1-lvwAutoLeft) or to the top of the control
(2-lvwAutoTop), or whether they shouldn't be aligned at all (0-lvwNone, the
default behavior). This property takes effect only when the control is in Icon
or SmallIcon display mode.
The LabelEdit property determines whether the user can edit the text
associated with an item in the control. If this property is set to
0-lvwAutomatic, the edit operation can be initiated only by code using a
StartLabelEdit method. The LabelWrap Boolean property specifies whether
longer labels wrap on multiple lines of text when in Icon mode. The
HideColumnHeaders Boolean property determines whether column headers
are visible when in Report mode. (The default value is False, which makes
the columns visible.) If you assign the MultiSelect property the True value,
the ListView control behaves much like a ListBox control whose MultiSelect
property has been set to 2-Extended.
A few properties are new to Visual Basic 6. If you set AllowColumnReorder
to True, users can reorder columns by dragging their headers when the
control is in Report mode. You can change the appearance of the ListView
control by setting the GridLines property to True (thus adding horizontal and
vertical lines). The third new property designed to change the appearance of
the ListView control, the FlatScrollBar property, seems to be buggy: If you
set it to True, the scroll bars don't show. The ListView control shares a few
new properties with the TreeView control. I've already described the
Checkboxes property (which lets you display a check box beside each item)
and the FullRowSelect property (for highlighting entire rows instead of a
row's first item only). The HotTracking Boolean property, if True, changes

Visual Basic Unit 10
Sikkim Manipal University Page No.: 202
the appearance of an item when the user moves the mouse cursor over it.
The HoverSelection Boolean property, if True, lets you select an item by
simply moving the mouse cursor over it. See Figure 10.3 for an example of
what you can get with these new properties.
Figure 10.3: A gallery of new features of ListView controls: Check boxes, grid
lines, and Bold and ForeColor properties for individual items. The alternate
row effect is achieved by means of a tiled background picture
You can associate up to three ImageList subsidiaries with a ListView
control: The first ImageList is used when the control is in Icon mode, the
second is used when the control is in any other display mode, and the third
is used for icons in column headers. You can set these associated
ImageList controls at design time in the Image Lists tab of the Properties
dialog box, or you can set them at run time by assigning an ImageList
control to the ListView's Icons, SmallIcons, and ColumnHeaderIcons
properties, respectively.
The ColumnHeaders property is new to Visual Basic 6 because previous
versions of the ListView control didn't support icons in column headers:
' You can use the same ImageList control for different properties.
Set ListView1.Icons = ImageList1
Set ListView1.SmallIcons = ImageList2
Set ListView1.ColumnHeaderIcons = ImageList2

Visual Basic Unit 10
Sikkim Manipal University Page No.: 203
You can automatically sort the items in the ListView control by setting a few
properties in the Sorting tab of the Properties dialog box. Set the Sorted
property to True if you want to sort items. SortKey is the index of the column
that will be used for sorting (0 for the first column), and SortOrder is the
sorting order (0-lvwAscending or 1-lvwDescending). You can also set these
properties at run time.
10.5 Column Headers
You can create one or more ColumnHeader objects at design time by using
the Column Header tab of the Properties dialog box. You just have to click
on the Insert Column button and then type the values of the Text property
(which will be displayed in the header), the Alignment property (Left, Right,
or Center, although the first column header can only be left-aligned), and the
Width in twips. You can also specify a value for the Key and Tag properties
and set the index of the icon to be used for this header. (It's an index
referred to by the ColumnHeaderIcons property in the ImageList control, or
it's 0 if this column header doesn't have any icons.)
The ListView control that comes with Visual Basic 6 supports a background
bitmap. You can load an image into the control at design time by using the
Picture tab of the Properties dialog box and then selecting the Picture
property in the leftmost list box. You can load an image in any format
supported by the PictureBox control. Two additional properties affect how a
background image is displayed in the control, but you can set them only in
the regular Properties window. The PictureAlignment property lets you align
the image in one of the four corners of the control, center it, or tile it to
spread over the entire control's internal area. The TextBackground property
determines whether the background of ListView's items is transparent
(0lvwTransparent, the default value) or not (1-lvwOpaque); in the latter case,
the background image will be visible only in the area not occupied by
ListItem objects.
The background image offers a great method for displaying rows with
alternate background colors, as shown in Figure 10-12. All you have to do is
create a bitmap as tall as two rows and then set PictureAlignment =
5-lvwTile and TextBackground = 0-lvwTransparent.

Visual Basic Unit 10
Sikkim Manipal University Page No.: 204
10.6 Run-Time Operations
While you can define the appearance of a ListView control at design time,
you can fill it with data only through code. In this section, we would see how
to add and manipulate data for this control.
Self Assessment Questions
3. The _____ property lets you decide whether icons are automatically
aligned to the left of the control (1-lvwAutoLeft) or to the top of the
control (2-lvwAutoTop), or whether they shouldn't be aligned at all.
4. When you have to assign multiple properties, you can use a ___ clause
with the Add method.
Adding ListItem Objects
You add new items to the ListView controls with the ListItems collection's
Add method, which has the following syntax:
Add([Index], [Key], [Text], [Icon], [SmallIcon]) As ListItem
Index is the position at which you place the new item. (If you omit Index, the
item is added to the end of the collection.) Key is the inserted item's optional
key in the ListItems collection, Text is the string displayed in the control,
Icon is an index or a key in the ImageList control pointed to by the Icons
property, and SmallIcon is an index or a key in the ImageList control pointed
to by the SmallIcons property. All these arguments are optional.
The Add method returns a reference to the ListItem object being created,
which you can use to set those properties whose values can't be passed to
the Add method itself, as in the following example:
' Create a new item with a "ghosted" appearance.
Dim li As ListItem
Set li = ListView1.ListItems.Add(, , "First item", 1)
li.Ghosted = True
ListItem objects support a number of new properties. The Bold and
ForeColor properties affect the boldface and color attributes of the objects.
The ToolTipText property allows you to define a different ToolTip for each
item, and the Checked property sets or returns the state of the check box
beside the item (if the ListView's Checkboxes property is True). When you
have to assign multiple properties, you can use a With clause with the Add
method:

Visual Basic Unit 10
Sikkim Manipal University Page No.: 205
With ListView1.ListItems.Add(, , "John Ross", 1)
.Bold = True
.ForeColor = vbRed
.ToolTipText = "Manager of the Sales Dept."
End With
When working with ListView controls whose MultiSelect property is True, the
user can select multiple items by clicking on them while pressing the Ctrl or
the Shift key. You can modify the selection state of a ListItem object via
code by assigning the appropriate value to the Selected property. With such
ListView controls, you must also assign the SelectedItem property to make a
ListItem the current item:
' Make the first ListItem object the current one.
Set ListView1.SelectedItem = ListView1.ListItems(1)
' Select it.
ListView1.ListItems(1).Selected = True
Adding ColumnHeaders Objects
Often you don't know at design time what columns should be displayed in a
ListView control. For example, you might be showing the result of a user-
defined query, in which case you don't know the number and the names of
the fields involved. In such circumstances, you must create ColumnHeader
objects at run time with the Add method of the ColumnHeaders collection,
which has this syntax:
Add([Index], [Key], [Text], [Width], [Alignment], [Icon]) _
As ColumnHeader
Index is the position in the collection, Key is an optional key, Text is the
string displayed in the header, and Width is the column's width in twips.
Alignment is one of the following constants: 0-lvwColumnLeft, 1-
lvwColumnRight, or 2-lvwColumnCenter. Icon is an index or a key in the
ListImage control referenced by the ColumnHeaderIcons property. With the
exception of the Tag property, these are the only properties that can be
assigned when a ColumnHeader object is created, so you can usually
discard the return value of the Add method:

Visual Basic Unit 10
Sikkim Manipal University Page No.: 206
' Clear any existing column header.
ListView1.ColumnHeaders.Clear
' The alignment for the first column header must be lvwColumnLeft.
ListView1.ColumnHeaders.Add , , "Last Name", 2000, lvwColumnLeft
ListView1.ColumnHeaders.Add , , "First Name", 2000, lvwColumnLeft
ListView1.ColumnHeaders.Add , , "Salary", 1500, lvwColumnRight
Adding ListSubItems
Each ListItem object supports a ListSubItems collection, which lets you
create values displayed in the same row as the main ListItem object when
the control is in Report mode. This collection replaces the SubItems array
that was present in previous versions of the control. (The array is still
supported for backward compatibility.) You can create new ListSubItem
objects using the Add method of the ListSubItems collection:
Add([Index], [Key], [Text], [ReportIcon], [ToolTipText]) _
As ListSubItem
Index is the position in the collection of the new item, Key is its optional key,
Text is the string that will be displayed in the grid cell, ReportIcon is the
index or the key of an icon in the ImageList control referenced by the
SmallIcons property, and ToolTipText is the text of a ToolTip that appears
when the user keeps the mouse hovering over this item. You can also
assign individual Bold and ForeColor attributes to each ListSubItem:
' This ListItem goes under ColumnHeader(1).
With ListView1.ListItems.Add(, , "Ross", 1)
.Bold = True
' This ListSubItem goes under ColumnHeader(2).
With .ListSubItems.Add(, , "John")
.Bold = True
End With
' This ListSubItem goes under ColumnHeader(3).
With .ListSubItems.Add(, , "80,000")
.Bold = True
.ForeColor = vbRed
End With
End With

Visual Basic Unit 10
Sikkim Manipal University Page No.: 207
ListSubItem objects are actually displayed only if the ListView control is in
Report mode and only if there are enough ColumnHeader objects. For
example, if the ColumnHeaders collection includes only three elements, the
ListView control will display only up to three items in each row. Because the
leftmost ColumnHeader object is located above ListItem elements, only the
first two elements in the ListSubItems collection will be visible.
ListSubItem objects also support the Tag property, which you can use to
store additional information associated with the items.
Loading Data from Databases
The ListView control can't be automatically bound to a database through
Data, RemoteData, or an ADO Data control. In other words, if you want to
load database data into this control you're on your own. The task of filling a
ListView control with data read from a recordset isn't conceptually difficult,
but you have to account for a few details. First you must retrieve the list of
fields contained in the recordset and create a corresponding number of
ColumnHeader objects of a suitable width. You also have to discard fields
that can't be displayed in ListView controls (for example, BLOB fields), and
you must determine the best alignment for each field (to the right for
numbers and dates, to the left for all others). A routine that does all this,
which you can easily reuse in your applications, is shown below.
Sub LoadListViewFromRecordset(LV As ListView, rs As
ADODB.Recordset, _
Optional MaxRecords As Long)
Dim fld As ADODB.Field, alignment As Integer
Dim recCount As Long, i As Long, fldName As String
Dim li As ListItem
' Clear the contents of the ListView control.
LV.ListItems.Clear
LV.ColumnHeaders.Clear
' Create the ColumnHeader collection.
For Each fld In rs.Fields
' Filter out undesired field types.
Select Case fld.Type
Case adBoolean, adCurrency, adDate, adDecimal, adDouble

Visual Basic Unit 10
Sikkim Manipal University Page No.: 208
alignment = lvwColumnRight
Case adInteger, adNumeric, adSingle, adSmallInt,
adVarNumeric
alignment = lvwColumnRight
Case adBSTR, adChar, adVarChar, adVariant
alignment = lvwColumnLeft
Case Else
alignment = -1 ' This means "Unsupported field type".
End Select
' If field type is OK, create a column with the correct alignment.
If alignment <> -1 Then
' The first column must be left-aligned.
If LV.ColumnHeaders.Count = 0 Then alignment =
lvwColumnLeft
LV.ColumnHeaders.Add , , fld.Name, fld.DefinedSize * 200, _
alignment
End If
Next
' Exit if there are no fields that can be shown.
If LV.ColumnHeaders.Count = 0 Then Exit Sub
' Add all the records in the recordset.
rs.MoveFirst
Do Until rs.EOF
recCount = recCount + 1
' Add the main ListItem object.
fldName = LV.ColumnHeaders(1).Text
Set li = LV.ListItems.Add(, , rs.Fields(fldName) & "")
' Add all subsequent ListSubItem objects.
For i = 2 To LV.ColumnHeaders.Count
fldName = LV.ColumnHeaders(i)
li.ListSubItems.Add , , rs.Fields(fldName) & ""
Next
If recCount = MaxRecords Then Exit Do
rs.MoveNext
Loop
End Sub

Visual Basic Unit 10
Sikkim Manipal University Page No.: 209
The LoadListViewFromRecordset routine expects an ADO Recordset and
an optional MaxRecords argument that lets you limit the number of records
displayed. This is necessary, because – as opposed to what happens with
bound controls, which load only the information that is actually displayed –
this routine reads all the rows in the recordset, which might be a lengthy
process. I suggest that you set MaxRecords to 100 or 200, depending on
the type of connection you have to your database and the speed of your
CPU.
Another problem you face when loading data from a database is that you
might need to manually adjust the width of each column. The
LoadListViewFromRecordset routine initializes the width of all
ColumnHeader objects using the fields' maximum width, but in most cases
values stored in database fields are considerably shorter than this value.
Instead of leaving the burden of the manual resizing on your users, you can
change all columns' width programmatically using the following routine:
Sub ListViewAdjustColumnWidth(LV As ListView, _
Optional AccountForHeaders As Boolean)
Dim row As Long, col As Long
Dim width As Single, maxWidth As Single
Dim saveFont As StdFont, saveScaleMode As Integer, cellText As
String
' Exit if there aren't any items.
If LV.ListItems.Count = 0 Then Exit Sub
' Save the font used by the parent form, and enforce ListView's
' font. (We need this in order to use the form's TextWidth
' method.)
Set saveFont = LV.Parent.Font
Set LV.Parent.Font = LV.Font
' Enforce ScaleMode = vbTwips for the parent.
saveScaleMode = LV.Parent.ScaleMode
LV.Parent.ScaleMode = vbTwips
For col = 1 To LV.ColumnHeaders.Count
maxWidth = 0
If AccountForHeaders Then

Visual Basic Unit 10
Sikkim Manipal University Page No.: 210
maxWidth =
LV.Parent.TextWidth(LV.ColumnHeaders(col).Text)+200
End If
For row = 1 To LV.ListItems.Count
' Retrieve the text string from ListItems or ListSubItems.
If col = 1 Then
cellText = LV.ListItems(row).Text
Else
cellText = LV.ListItems(row).ListSubItems(col - 1).Text
End If
' Calculate its width, and account for margins.
' Note: doesn't account for multiple-line text fields.
width = LV.Parent.TextWidth(cellText) + 200
' Update maxWidth if we've found a larger string.
If width > maxWidth Then maxWidth = width
Next
' Change the column's width.
LV.ColumnHeaders(col).width = maxWidth
Next
' Restore parent form's properties.
Set LV.Parent.Font = saveFont
LV.Parent.ScaleMode = saveScaleMode
End Sub
To determine the optimal width of all the values stored in a given column,
the ListViewAdjustColumnWidth routine evaluates the maximum width of all
the strings stored in that column. The problem is that the ListView control
doesn't support the TextWidth method, so the routine relies on the
TextWidth method exposed by the control's parent form. If a True value is
passed in the second argument, the routine also accounts for the Text
property of all ColumnHeader objects, so no header title is truncated.
The ListView control already allows you to automatically resize columns to
fit their contents, even though this capability hasn't been exposed in the
Visual Basic ActiveX control. In fact, you can interactively resize a column to
fit the longest item it contains by double-clicking on its right border in the
column header (as you would in the Details view mode of Windows
Explorer). In the demonstration program on the companion CD, you'll find

Visual Basic Unit 10
Sikkim Manipal University Page No.: 211
another version of the ListViewAdjustColumnWidth routine that does the
resizing by using API calls instead of plain Visual Basic code. The following
code sample shows how to use the ListViewAdjustColumnWidth routine to
display all the records in the Orders table of the NorthWind.Mdb database,
as shown in Figure 10.3:
Private Sub Form_Load()
Dim cn As New ADODB.Connection, rs As New ADODB.Recordset
' WARNING: you might need to modify the DB path in the next line.
cn.Open "Provider=Microsoft.Jet.OLEDB.3.51;" _
& "Data Source=C:\VisStudio\VB98\NWind.mdb"
rs.Open "Orders", cn, adOpenForwardOnly, adLockReadOnly
LoadListViewFromRecordset ListView1, rs
ListViewAdjustColumnWidth ListView1, True
End Sub
On my 233-MHz machine, this code takes about 15 seconds to complete,
which is more than most customers are willing to wait. Therefore, you
should use this technique judiciously and set an upper limit to the number of
records that are read from a database.
Figure 10.3: This demonstration program loads NorthWind's Orders table into
a ListView control and lets you sort on any field by clicking on the
corresponding column's header

Visual Basic Unit 10
Sikkim Manipal University Page No.: 212
Sorting and Reordering Columns
I already explained how you can define a sort key and a sort order at design
time. You can get the same effect at run time by setting the Sorted, SortKey,
and SortOrder properties. Usually you do this when the end user clicks on a
column header, an action that you can trap in the ColumnClick event:
Private Sub ListView1_ColumnClick(ByVal ColumnHeader As _
MSComctlLib.ColumnHeader)
ListView1.SortKey = ColumnHeader.Index - 1
ListView1.Sorted = True
End Sub
Things are slightly more complicated if you want to offer the ability to sort in
either direction: The first click sorts in ascending order, and the second click
sorts in descending order. In this case, you must check to see whether the
column being clicked is already sorted:
Private Sub ListView1_ColumnClick(ByVal ColumnHeader As _
MSComctlLib.ColumnHeader)
' Sort according to data in this column.
If ListView1.Sorted And _
ColumnHeader.Index - 1 = ListView1.SortKey Then
' Already sorted on this column, just invert the sort order.
ListView1.SortOrder = 1 - ListView1.SortOrder
Else
ListView1.SortOrder = lvwAscending
ListView1.SortKey = ColumnHeader.Index - 1
End If
ListView1.Sorted = True
End Sub
The ListView control is able to sort string data exclusively. If you want to sort
on columns that hold numeric or date information, you must resort to a trick.
Create a new ColumnHeader object, fill it with string data derived from the
numbers or dates you want to sort on, sort on that column, and finally delete
those items. Here's a reusable routine that does all this for you:
Sub ListViewSortOnNonStringField(LV As ListView, ByVal
ColumnIndex As _
Integer, SortOrder As Integer, Optional IsDateValue As Boolean)

Visual Basic Unit 10
Sikkim Manipal University Page No.: 213
Dim li As ListItem, number As Double, newIndex As Integer
' This speeds up things by a factor of 10 or more.
LV.Visible = False
LV.Sorted = False
' Create a new, hidden field.
LV.ColumnHeaders.Add , , "dummy column", 1
newIndex = LV.ColumnHeaders.Count - 1
For Each li In LV.ListItems
' Extract a number from the field.
If IsDateValue Then
number = DateValue(li.ListSubItems(ColumnIndex - 1))
Else
number = CDbl(li.ListSubItems(ColumnIndex - 1))
End If
' Add a string that can be sorted using the Sorted property.
li.ListSubItems.Add , , Format$(number,
"000000000000000.000")
Next
' Sort on this hidden field.
LV.SortKey = newIndex
LV.SortOrder = SortOrder
LV.Sorted = True
' Remove data from the hidden column.
LV.ColumnHeaders.Remove newIndex + 1
For Each li In LV.ListItems
li.ListSubItems.Remove newIndex
Next
LV.Visible = True
End Sub
You can use the ListViewSortOnNonStringField routine from a ColumnClick
event procedure, as I explained previously. The code I just showed you
doesn't work with negative values, but the complete version on the
companion CD solves this problem.

Visual Basic Unit 10
Sikkim Manipal University Page No.: 214
Columns can be moved and reordered at run time. You can let the user drag
a column to a new position by setting the AllowColumnReorder property to
True. However, you shouldn't do this when your ListView control has the
property Checkboxes set to True. If the user moves the first column, the
control's contents will look pretty unusual because the check boxes will
move with the first column.
Reordering columns from your code ensures better control over which
columns are moved and where. In this case, you only have to assign a new
value to the Position property of a ColumnHeader object. For example, you
can exchange the position of the first two columns with this code:
ListView1.ColumnHeaders(1).Position =
ListView1.ColumnHeaders(1).Position _
+ 1
' You need to refresh after reordering one or more columns.
ListView1.Refresh
Searching Items
You can quickly search for a string in a ListView control using the FindItem
method, which has this syntax:
FindItem(Search, [Where], [Start], [Match]) As ListItem
Search is the string being searched. Where specifies in which property the
string will be searched: 0-lvwText for the Text property of ListItem objects,
1-lvwSubItem for the Text property of ListSubItem objects, or 2-lvwTag for
the Tag property of ListItem objects. Start is the index or the key of the
ListItem object from which the search begins. Match can be
0-lvwWholeWord or 1-lvwPartial and defines whether an item that begins
with the searched string makes for a successful search. (Match can be used
only if Where = 0-lvwText.)
Note that you can't search in the Tag property of ListSubItem objects, nor
can you restrict the search to a single column of ListSubItems. All search
operations are case insensitive.
10.7 Other Properties, Methods, and Events
The ListView control supports properties, methods, and events that are
similar to those exposed by the TreeView control, so I won't describe them
in detail here.

Visual Basic Unit 10
Sikkim Manipal University Page No.: 215
You can control when the user edits a value in the control using the
BeforeLabelEdit and AfterLabelEdit events. Regardless of where the user
clicks on the row, the only item that can actually be edited is the one in the
leftmost column. If you want to programmatically start an edit operation, you
have to make a given ListItem object the selected one and then invoke the
StartLabelEdit method:
ListView1.SetFocus
Set ListView1.SelectedItem = ListView1.ListItems(1)
ListView1.StartLabelEdit
If the control's Checkboxes property is set to True, you can read and modify
the checked state of each row through the Checked property of individual
ListItem objects. You can trap the action of ticking a check box by writing
code in the ItemCheck event procedure. Similarly, the ItemClick event fires
when a ListItem object is clicked.
ListItem objects expose an EnsureVisible method that, if necessary, scrolls
the contents of the control to move the item into the visible area of the
control. You can also query the ListView's GetFirstVisible method, which
returns a reference to the first visible ListItem object.
The ListView's HitTest method returns the ListItem object at the specified
coordinates. You typically use this method in drag-and-drop operations
together with the DropHighlight property, as I explained in the section
devoted to the TreeView control. By the way, there's no simple way to
determine which column the mouse is on when the control is in Report
mode.
Self Assessment Questions
5. _____ is the index or the key of an icon in the ImageList control
referenced by the SmallIcons property.
6. The ListView control can be automatically bound to a database through
Data, RemoteData, or an ADO Data control. (True / False)
10.8 Summary
This unit has covered the following topics:
ListView Control: Many Windows applications use this pair of controls side
by side, and they're therefore called Windows Explorer-like applications. In

Visual Basic Unit 10
Sikkim Manipal University Page No.: 216
these applications, the end user selects a Node in the TreeView control on
the left and sees some information related to it in the rightmost ListView
control. The ListView control supports four basic view modes: Icon,
SmallIcon, List, and Report.
10.9 Terminal Questions
1. Explain the design time property settings of a ListView control.
2. Describe the runtime properties of ListView control.
3. Explain the procedure to load data from databases in a ListView control.
10.10 Answers
Self Assessment Questions
1. four
2. ListItems
3. Arrange
4. With
5. ReportIcon
6. False
Terminal Questions
1. While you can use the regular Properties window to set most properties
of a ListView control, it's surely preferable to use a ListView control's
custom Properties dialog box. (Refer Section 10.3)
2. While you can define the appearance of a ListView control at design
time, you can fill it with data only through code. In this section, we would
see how to add and manipulate data for this control.
(Refer Section 10.6)
3. if you want to load database data into this control you're on your own.
The task of filling a ListView control with data read from a recordset isn't
conceptually difficult, but you have to account for a few details. First you
must retrieve the list of fields contained in the recordset and create a
corresponding number of ColumnHeader objects of a suitable width.
You also have to discard fields that can't be displayed in ListView
controls. (Refer Section 10.6)
Visual Basic Unit 11
Sikkim Manipal University Page No.: 217
Unit 11 Classes and Objects
Structure:
11.1 Introduction
Objectives
11.2 OOP in Visual Basic .NET
11.3 How to Objectify Your Programs
11.4 Defining a Class
11.5 Relationships between Classes
11.6 Inheritance in VB.Net
11.7 Building Constructors and Destructors
11.8 Creating and Destroying an Object
11.9 Using System.Object
11.10 Namespaces
11.11 The Imports Keyword
11.12 Summary
11.13 Terminal Questions
11.14 Answers
11.1 Introduction
In the previous units, you have learnt about utilizing various programming
objects like variables, procedures, record sets and so on. All these are
based on objects, which are the fundamental building blocks of VB.Net
programming. In this unit, you will learn about the theoretical concepts of
classes and objects, and their applications in programming.
The original versions of Microsoft® Visual Basic® provided a mechanism for
defining data structures in a user-defined type (UDT). A UDT encapsulates
the data, but not the processing associated with that data. Processing was
defined in global standard modules, often called BAS modules because of
their .bas extension.
The release of Visual Basic 4 dawned a new age for Visual Basic
developers. Visual Basic took its first steps toward becoming an object-
oriented programming (OOP) language by providing object-oriented features
such as class modules. A class module defines data as properties and the
processing associated with that data as methods. By defining a class for

Visual Basic Unit 11
Sikkim Manipal University Page No.: 218
each business entity, encapsulating data in properties and processing in
methods, Visual Basic developers had object-based development.
As Visual Basic evolved from version 4 to version 6, Visual Basic
developers expanded their knowledge of OO to include component-based
development (CBD) techniques. With CBD, Visual Basic developers could
build complete three-tiered applications for Microsoft Windows® and the
Web. This type of development was so common that Microsoft provided a
design pattern known as the Microsoft DNA architecture.
Visual Basic .NET provides another leap in Visual Basic development
capabilities and features and provides for true object-oriented programming,
as detailed in this article.
Objectives:
After studying this unit, you should be able to:
explain and illustrate the use of OOP concepts
describe the design of objects in VB.Net programs
illustrate the methodology of defining classes
explain building relationships between classes
explain the application of Inheritance
explain the usage of Constructors and Destructors
describe the usage of System.object object
describe the concept of Namespaces
11.2 OOP in Visual Basic .NET
For a programming language to be a true OOP language, the language
must meet the following criteria:
Abstraction – Abstraction manages the complexities of a business problem
by allowing you to identify a set of objects involved with that business
problem.
Encapsulation – Encapsulation hides the internal implementation of an
abstraction within the particular object.
Polymorphism – Polymorphism provides for multiple implementations of
the same method. For example, different objects can have a Save method,
each of which perform different processing.

Visual Basic Unit 11
Sikkim Manipal University Page No.: 219
Inheritance – The excitement of Visual Basic .NET lies in inheritance.
Visual Basic 5 introduced the concept of interface inheritance, which allows
you to reuse the interface of a class, but not its implementation. Visual Basic
.NET provides for true implementation inheritance whereby you can reuse
the implementation of a class.
Now let's look at doing object-oriented programming in .NET.
Visual Basic .NET is not Visual Basic 6 with inheritance tacked onto it.
Rather, Visual Basic .NET has been entirely rewritten to be fully object-
oriented. In fact, everything in Visual Basic .NET can be treated as an
object. Yes, even your strings and integers can be accessed as objects in
Visual Basic .NET.
To demonstrate this, start a new Visual Basic .NET console application
project. In the Main subroutine, enter this code:
The first hint that your integer is treated as an object is the list of properties
and methods that appear when you type the dot after the i. Select one of the
properties, such as the MinValue shown in this example. Then run the
application and you will get a message box containing the value of the
selected integer property.
.NET has predefined classes for the intrinsic data types, but what about the
classes that you create? Let's walk through an example to demonstrate how
to create classes in Visual Basic .NET and inherit from them to leverage
some of the new OOP features.
Figure 11.1: Console Application Example
Dim i As Integer MsgBox(i.MinValue)

Visual Basic Unit 11
Sikkim Manipal University Page No.: 220
11.3 How to Objectify Your Programs
In the really old days we practiced what we called structured, procedure-
oriented programming. We identified what needed to be done and then did
one of two things, either:
1. Broke the task to be accomplished into subtasks, and these into smaller
subtasks, until the subtasks were simple enough to be implemented
directly (in other words, the top-down approach).
OR
2. Wrote procedures to solve simple tasks and combine them into more
sophisticated procedures, until we had the functionality we wanted (the
bottom-up approach).
Most experienced programmers did not do what the professors suggested,
of course (which was the top-down approach), and instead used a mixture
of the top-down and bottom-up strategies to solve a programming problem.
There are two important differences between OOP and procedure-oriented
programming:
1. In OOP, you first isolate the classes. Only then do you look for the
methods and properties of the class.
2. You then associate each method or property with the class that is
responsible for carrying out the operation.
Which leads to the obvious question: How do you find the classes? A good
rule of thumb is that classes are the nouns in your analysis of the problem.
In our example, employees are one of the obvious nouns. The methods in
your objects correspond to the verbs that describe actions that affect the
noun, as in RaiseSalary (verb) which affects an Employee (noun). The
properties are the adjectives that describe the noun. Of course, the noun-
verb-adjective correspondence to classes, methods, and properties is only a
first step. Only experience can help you decide which nouns, verbs, and
adjectives are the important ones.
Here is another example: Suppose you want to design a program to
manage your checking account using an object-oriented approach. Some
obvious nouns are:
Account
Check

Visual Basic Unit 11
Sikkim Manipal University Page No.: 221
Check register
Deposit slip
These would lead to classes called Account, Check, CheckRegister,
DepositSlip, and so on. Next, look for verbs. Accounts need to be opened or
closed. Checks need to be added_to the register. The check register needs
to be reconciled. Deposit slips need to be totaled. With each verb, such as
add, reconcile, and total, you have to identify the one object that has the
major responsibility for carrying it out. For example, the deposit slip has the
major responsibility for totaling itself up. Thus, Total should be a method of
the DepositSlip class.
At this point, we want to repeat one golden rule of programming that has not
changed in the march to OOP: keep things simple. Object-oriented
programming is much easier when the classes you build are not complex.
A class with a simple internal structure and limited relationships (coupling is
the buzzword) to other classes is much easier to grasp (and hence to code).
Describing relationships between classes is so important in OOP that a
whole industry has sprung up to explain how to make diagrams that make
class relationships clearer.
The most common tool is called the uniform modeling language (UML).
These diagramming tools are usually part of the Computer-Assisted
Software Engineering (CASE) tools, such as Microsoft's Visual Modeler,
Visio, and Rational Software’s Rational Rose. (A version of Visual Modeler
is included with some versions of VS .NET.)
A UML-based CASE tool can go from the diagram to actually building the
code skeletons for your classes. We recommend the Rational Web site
(www.rational.com/uml) for general overviews of UML.
Self Assessment Questions
1. A ____ encapsulates the data, but not the processing associated with
that data.
2. With ______, Visual Basic developers could build complete three-tiered
applications for Microsoft Windows® and the Web.
3. ______ manages the complexities of a business problem by allowing
you to identify a set of objects involved with that business problem.

Visual Basic Unit 11
Sikkim Manipal University Page No.: 222
4. ____ are the nouns in your analysis of the problem.
5. A _____ CASE tool can go from the diagram to actually building the
code skeletons for your classes.
11.4 Defining a Class
The basic purpose of a class has not changed in Visual Basic .NET. You still
create classes for your business objects and for any supporting objects that
you may need for your application. The primary changes from Visual Basic 6
to Visual Basic .NET involve syntax and some new features.
In Visual Basic 6, you create a class by creating a class module: one class,
one class module. This is no longer the case in Visual Basic .NET. You can
create any number of classes within a single code file. You can even create
classes within classes. But let's start out with a simple example.
Adding a class to a Visual Basic .NET project is very similar to Visual Basic
6. However, instead of getting an empty code file, your class will appear with
the following code:
Note: The current Microsoft convention is to define the class names without
a prefix.
Following that convention, this class name would be Customer instead of
CCustomer. While this convention is more user-friendly when creating
objects using retail products such as Microsoft Word and Excel,
maintenance and support of enterprise systems can benefit from the
additional information that a prefix provides.
If you want to add a second class to the same file, just add another class
statement:
Note: Normally, a class should be defined in its own code file.
Public Class CCustomer End Class
Public Class CCustomer End Class Public Class CContact End Class

Visual Basic Unit 11
Sikkim Manipal University Page No.: 223
Only put classes together if they are tightly coupled. For example, invoice
and invoice line item could be two classes within one code file because you
would normally never use invoice line item without invoice. If you would use
customer contacts (CContact) separate from customers then the CContact
class should be separate from the CCustomer class.
You can then add properties or methods to the class. As with Visual Basic 6,
you normally define a property by declaring a private variable and public
Property procedures. In Visual Basic .NET, you would define a Name
property as follows:
There are only two types of Property procedures in Visual Basic .NET, Get
and Set. The Get procedure retrieves the property value from the class and
the Set procedure assigns the property. Visual Basic 6 provided a property
Let statement that handled intrinsic data types while the Set statement
worked with objects. Now that everything in Visual Basic .NET is basically
an object, there is no need for the Let statement.
Notice that the syntax for a property procedure is also changed. Both the
Get and Set are contained within one property statement. No more
possibility of a mismatch in data types between property Get and Set. This
makes these statements easier to maintain.
Private m_sName As String Property Name() As String Get Return m_sName End Get Set(ByVal Value As String) m_sName = Value End Set End Property
Public Function SayHello() As String If Name <> "" Then Return "Hello " & Name Else Return "Hello World" End If End Function
Visual Basic Unit 11
Sikkim Manipal University Page No.: 224
11.5 Relationships between Classes
Traditional OOP provides three possible relationships between classes:
• Use: dependency
• Containment: “has a” – this is sometimes called aggregation
• Inheritance: “is a”
The use relationship is both the most obvious and the most common,
because it is just a fancy way of saying one class depends on another.
Whenever an object sends a message to another object, the two obviously
depend on each other. For example, an object of the CheckRegister class
(an actual check register) uses objects of the DepositSlip class, because a
check register needs to know what has been deposited. But the DepositSlip
class does not use the Check class, because deposit slips have nothing to
do with checks.
While a class obviously uses another class if it manipulates objects of that
class, more generally, a class A uses a class B if:
• A member of class A sends a message to an object of class B.
or
• A member of class A creates or returns objects of class B.
Note: It is best to minimize the number of classes that use each other. In
other words, do not make your classes needlessly or overly intertwined. (In
OOP-speak, this is called the loose coupling of classes.) The reason to do
this is that if a class A does not use a class B, it does not care about any
changes to B. (And this also means that changes to B will not introduce
bugs into A!)
Containment (aggregation) means that objects of class A contain objects of
class B. For example, a specific CheckRegister object could contain Check
and DepositSlip objects.
Containment is used to carry out delegation: you can delegate to the internal
contained object the tasks that need to be carried out. Aggregation with
method delegation was extremely common in earlier versions of VB,
because that was how you built controls with VB5 and VB6. (Recall that you
made a better textbox by placing a textbox inside a user control form and
then running the control interface wizard to write the delegation code for you
automatically.)

Visual Basic Unit 11
Sikkim Manipal University Page No.: 225
Aggregation is still common in VB .NET, but inheritance takes its place in
many situations. Inheritance is not only one of the three ways classes
depend on each other, it is also one of the four sacred buzzwords of OOP.
Self Assessment Questions
6. In _______ you can create any number of classes within a single code
file.
7. There are only ____ types of Property procedures in Visual Basic.
8. _______ is used to carry out delegation.
11.6 Inheritance in VB.Net
The most talked about new OOP feature in Visual Basic .NET is inheritance.
To fully understand inheritance, let's expand our example.
The Customer class example presented earlier is a small part of a complete
Customer Billing System. This system tracks customers, manages customer
orders, and generates bills in the form of invoices.
The system is complete and delivered to the users. As is typical, after a few
weeks of working with the system the users define additional requirements.
They now need the code to work differently depending on the type of
customer. Normal customers have a standard set of business rules.
Educational customers have more rules, some different data items and
special discounts.
Government customers have even more business rules, other data items,
and a steeper discount. The relationship between the customer, educational
customer, and government customer are depicted using the Unified
Modeling Language (UML) and modeled in Figure 11.2. But how will you
implement this change?

Visual Basic Unit 11
Sikkim Manipal University Page No.: 226
Figure 11.2: Customer Billing System
One solution is to modify the existing Customer class to contain all of the
information for all of the customer types. You can use Select/Case
statements or If statements to manage the logic to handle the different
types. But this can be tedious and complex, especially if there are a lot of
different rules or processing associated with the different types.
A second option is to create a separate class for each customer type,
including the "normal" type. Each class can then contain its own logic for
handling that particular customer type. But if there are similarities in some of
the logic, you may have duplication in the separate classes.
With Visual Basic .NET, there is now a third choice: inheritance. With
inheritance, you can define a common class that is the basis of other
classes. This class is called a base or parent class. In this example, you
would create a common Customer class.
You then create any specialized classes that inherit from the base class.
These classes are called derived or child classes. These classes inherit
functionality from the base class but can override base class functionality to
perform specialized processing.
To try this, let's use the Customer class as the base class. Add another
method to the Customer class to calculate a discount:

Visual Basic Unit 11
Sikkim Manipal University Page No.: 227
This method uses the Overridable keyword. This keyword means that any
derived classes can override this method and define their own
implementation.
Note: If you build a class that may be used as a base class, be sure to use
the Overridable keyword on any function that a derived class may wish to
override.
The derived class is very simple:
The Inherits keyword defines the parent or base class. All of the public
properties and methods of the base class are accessible to this derived
class.
The first method in this derived class is the constructor. This constructor
uses the MyBase keyword to call the constructor in the base class. The
default constructor for the parent class is automatically called when the child
is constructed, but you can manually specify the parent's constructor.
The Overrides keyword on the second function denotes that this is
overriding the function defined within the base class. This allows a derived
class to provide its own implementation of a particular function.
Public Overridable Function CalculateDiscount(ByVal dAmt As Decimal) As Decimal ' Standard discount is no discount ' Return the passed in amount Return dAmt End Function
Public Class CEdCustomer: Inherits CCustomer Public Sub New() MyBase.New() End Sub Public Overrides Function CalculateDiscount(ByVal dAmt As Decimal) As Decimal Dim newAmt As Decimal newAmt = dAmt * CDec(0.9) Return newAmt End Function End Class
Visual Basic Unit 11
Sikkim Manipal University Page No.: 228
Note: If you do not put the Overrides keyword on the function in the derived
class, the function is assumed to shadow the original function. A shadowed
function is a function in the derived class that has the same name as a
function in the base class but is not intended to override the base class
function.
There are several ways to create an instance of the derived class:
Declare an object variable as the derived class and then create the
instance of the derived class:
Declare an object variable as the base class and then create the
instance of the derived class:
The first technique declares the object to be of type CEdCustomer, thereby
defining the object to be of a specific type. The derived object has access to
any public properties and methods of the Customer base class, any
properties and methods overridden in the EdCustomer class, any
properties and methods shadowed in the EdCustomer class, and any
public properties and methods of the EdCustomer class.
The second technique declares the object to be of type CCustomer,
allowing any type of Customer object to be defined and to leverage
polymorphism. This allows reuse of the object variable for any type of
Customer object. However, by declaring the derived object using the parent
class the derived object only has access to any public properties and
methods of the Customer base class and any properties and methods
overridden in the EdCustomer class. It does not have access to any public
properties and methods of the EdCustomer class, nor to any shadowed
properties and methods.
When working with inheritance, there are a few things to remember. First,
you are not limited to just one level of inheritance. The inheritance hierarchy
can be as deep as needed. The properties and methods are inherited down
Private m_oEdCustomer As CEdCustomer m_oEdCustomer = New CEdCustomer()
Private m_oCustomer As CCustomer m_oCustomer = New CEdCustomer()

Visual Basic Unit 11
Sikkim Manipal University Page No.: 229
through the levels. In general, the farther down in the hierarchy a class
appears, the more specialized its behavior. For example, you could define a
HighSchoolEdCustomer class that inherits from the EdCustomer class
that in turn inherits from the Customer class.
Note: To minimize complexity and simplify maintenance, limit your
inheritance hierarchies to no more than about four levels.
Each class, however, can inherit from only one parent class. So an
EdCustomer class cannot inherit from both a Customer class and an
Education class. This is a good thing in that multiple inheritance can get
rather complex and make application maintenance very difficult.
There are two primary uses for inheritance in the applications that you
develop:
You have objects of different types that have similar functionality. For
example: Educational Customer class and Government Customer
class inherit from Customer class.
You have general processing to be done for sets of objects. For
example: every type of business object inherits from a Business Object
(BO) class.
You should not use inheritance when:
You only need one function from the base class. If this is the case, you
should delegate to the class instead of inheriting from it.
If you would need to override all of the functions. If this is the case, you
should use an interface instead of implementation inheritance.
The semantics of the hierarchy are not clear. If there is no clear "is a"
type of relationship, such as an educational customer "is a" customer,
then delegation or an interface may be a better solution. For example, a
vendor has a name like a customer. So the Vendor class could inherit
from the Customer class to get the name.
However, it is not accurate to say that a vendor "is a" customer. So the
semantics are not clear and inheritance should not be used in this case.
11.7 Building Constructors and Destructors
In Visual Basic 6, when you create an instance of a class the Initialize event
is generated. You can put code into the Initialize event to initialize the
object. For example, you may want to define default object data, open
Visual Basic Unit 11
Sikkim Manipal University Page No.: 230
database connections, or create related objects. However, you cannot pass
anything to the Initialize event. This makes it difficult to initialize the object
with specific parameters.
Visual Basic .NET introduces true constructors that are executed whenever
a new instance of the class is created. These constructors are defined with
a subroutine named New:
You can pass data to a constructor for more flexibility and power in
initializing the object. Constructors with parameters are called
parameterized constructors. For example:
In this example, the customer name is passed in to the constructor. That
name is then used to initialize the Name property defined with the Property
procedure.
Both of these constructors can be define for one class. Actually, any number
of constructors can be defined for a class as long as they each have
different parameters. This feature is called overloading. The appropriate
constructor is called based on the data passed to the constructor.
You do not have to define a constructor. If you don't create one, a default
constructor is used.
Instead of a Terminate event, Visual Basic .NET provides a Finalize
destructor. This destructor is called when the .NET garbage collector
determines that the object is not longer needed. There may be a delay
between the time an object is terminated and the time the garbage collector
actually destroys the object.
Public Sub New() ' Perform initialization Debug.WriteLine("I am alive") End Sub
Public Sub New(ByVal sName As String) ' Assign the name Name = sName 'Other initialization Debug.WriteLine(Name & " is alive") End Sub

Visual Basic Unit 11
Sikkim Manipal University Page No.: 231
Note: You should not normally use a Finalize destructor because of this
delay and the additional processing required by the system to manage
objects with a Finalize destructor. Use the Dispose destructor instead.
In order to better manage the resources used by your class, implement the
IDisposable interface and the Dispose destructor:
This destructor is not called automatically, so it must be explicitly called as
shown in the next section.
Note: The Dispose destructor is not required, but it is recommended. By
implementing the Dispose destructor in every class, even if it does not do
anything, developers can routinely can call the Dispose method on any
object.
Self Assessment Questions
9. To build a class that may be used as a base class, be sure to use the
________ keyword on any function that a derived class may wish to
override.
10. The ______ keyword defines the parent or base class.
11.8 Creating and Destroying an Object
In order to use a class, you first need to create an object from the class. In
Visual Basic 6, the recommended syntax for creating an object from a class
is:
This syntax is almost identical in Visual Basic .NET. Since everything is
basically an object in Visual Basic .NET, there is no need for two different
types of assignment, so there is no longer a need for the Set keyword:
Implements IDisposable Public Sub Dispose() Implements System.IDisposable.Dispose ' Perform termination End Sub
Private m_oCustomer as CCustomer Set m_oCustomer = New CCustomer
Private m_oCustomer as CCustomer m_oCustomer = New CCustomer()
Visual Basic Unit 11
Sikkim Manipal University Page No.: 232
Notice the parenthesis when creating the object. If you defined a
parameterized constructor for the class, you can pass the parameter(s) to
the constructor within the parentheses:
With Visual Basic .NET, you can combine the object variable declaration
and the object creation using the New keyword:
The object is created when this declaration is executed. The shorthand form
of this syntax is:
Note: You cannot put a Try... Catch block for error handling around a
module-level declaration. This restriction makes this style of object creation
less useful. In production-quality applications, you may want to stick to the
tried and true approach of first declaring the module-level variable and then
creating an instance with the New keyword in order to support full-featured
error handling.
In the declarations section:
Within a routine:
Continuing with the example, select your favorite style of object creation and
add it to the Sub Main.
m_oCustomer = New CCustomer("Acme Corporation")
Private m_oCustomer As CCustomer = New CCustomer()
Private m_oCustomer As New CCustomer()
If you need to pass parameters, this syntax becomes:
Private m_oCustomer As New CCustomer("Acme Corporation")
Private m_oCustomer as CCustomer
Try
m_oCustomer = New CCustomer()
Catch e As Exception
Debug.WriteLine(e.Message)
End Try

Visual Basic Unit 11
Sikkim Manipal University Page No.: 233
When you have finished using an object, you can call the object's Dispose
method to free the resources used by the object, assuming that a Dispose
method was implemented for the object. You can then set the object
variable to Nothing:
The object is then destroyed when the garbage collector detects that the
object is no longer used.
Note: Unlike Visual Basic 6, an object in .NET is not destroyed the moment
that the object variable is set to Nothing. Rather, it will be destroyed when
the garbage collector detects and destroys it. The garbage collector will
destroy an orphaned object, whether or not you set the object variable to
Nothing.
At this point, you should be able to execute the sample application and see
the debug messages appear in the Output window.
11.9 Using System.Object
Every object in .NET is inherited from a base class called System.Object.
This class is part of the Microsoft .NET Framework and contains the basic
properties and methods required for a .NET object.
Any public properties or methods defined in System.Object are
automatically provided in any object you create. For example,
System.Object contains a default constructor. If your object has no
constructor, it is still constructed because System.Object provides for the
construction.
Many of the public properties and methods of System.Object have a default
implementation. This means that you don't have to write any code to use
them. For example:
The ToString method provides the name of the component and class
associated with m_oCustomer. You can override the default behavior of the
m_oCustomer.Dispose() m_oCustomer = Nothing
m_oCustomer.ToString

Visual Basic Unit 11
Sikkim Manipal University Page No.: 234
ToString method with the Overrides keyword. This allows you to define
your own implementation of some System.Object properties and methods.
The ToString method now returns the name of the customer instead of the
name of the component and class.
11.10 Namespaces
The potential for conflicts between method names exists whenever you use
other people’s code. And even forgetting about these kind of conflicts, you
need some way to group thousands of methods in such a way that you have
some hope of remembering how they fit together.
Thus, there has to have a way of organizing information in as rich a
framework as is supplied with .NET. In .NET this is done with namespaces.
(You can create your own namespaces, and we show you how to do so later
in this chapter.)
The idea is that, just as every town seems to have its own Main Street,
every library of networking code might have its own Open method.
Namespaces give you a way to distinguish between them. For example, the
System.IO namespace is where you find methods to handle files and, as
you might expect, there is a class called File in it for handling files and it has
an Open method. Its full name is:
System.IO.File.Open
because the File class is part of the System.IO namespace and will not
conflict with another File class that might be part of the
Cornell.Morrison.NiftyClasses namespace, which could have its own Open
method.
11.11 The Imports Keyword
Just as we normally do not use a person's full name when referring to
people familiar to us, .NET also has a way of avoiding a lot of superfluous
verbiage. This is done through the use of the Imports statement. With the
right Imports statement, we can replace all those uses of:
System.Text.StringBuilder
Public Overrides Function ToString() As String Return Name End Function

Visual Basic Unit 11
Sikkim Manipal University Page No.: 235
with just a simple:
StringBuilder
Note that the System class is automatically imported into every solution you
build with Visual Studio. This is why you can use:
Console.WriteLine()
rather than
System.Console.WriteLine()
You can get or change the list of the namespaces that are automatically
imported for a solution by looking at the Imports page in the solution’s
property pages, as you can see in Figure 11.3:
Figure11.3: The Imports page in the solution’s property pages
In the Object Browser, the automatically imported Microsoft.VisualBasic
namespace contains the functions (such as the financial functions) that were
part of Visual Basic and were kept in VB .NET as shown in Figure 11.4.
If you import the Microsoft.VisualBasic.Constants, you can reuse most of the
VB constants that you have used before, such as vbCRLF. Note that the
.NET versions of many of these constants do not use a VB prefix (for
example, CrLf) and are stored in the Microsoft.VisualBasic.ControlChars
namespace.
The Imports statement goes before any other declarations, such as the ones
defining the name of a module, but after any Option directives, such as
Option Strict On or Option Compare Text.

Visual Basic Unit 11
Sikkim Manipal University Page No.: 236
Figure 11.4: The Microsoft.VisualBasic namespace in the Object Browser
Using Imports does not bloat your code, because it does not make all the
code in the namespace part of your project – it merely simplifies the typing
of the names of members of the classes in the namespace in your code. It
does not affect the speed of the resulting program either. Also, you can only
import namespaces that are part of a referenced assembly, which are what
you get by working with the Project|Add Reference dialog box.
Note: If two imported namespaces contain classes with identical names,
you have to give the full name of the class, including its namespace, to
distinguish them. (VB .NET will not allow you to create two classes with the
same name in the same namespace.)
Next, you can use a special version of Imports to simplify typing when you
have the potential for name conflicts with classes you have already
imported. For example, if you really wanted to use the VB6 compatibility
layer (not that we recommend it), you have to be aware that it will almost
certainly introduce namespace conflicts. You can add a reference to the VB
compatibility layer and then use a line like this:
Imports VB6Stuff = Microsoft.VisualBasic.Compatibility.VB6
and start writing VB6Stuff followed by a “.” whenever you need a member of
the compatibility layer, without having to worry about name conflicts.
You cannot import an individual class to avoid typing the class name for its
members. A statement such as:
Imports System.IO.DirectoryInfo
to simply get at the members of the DirectoryInfo class is not allowed.

Visual Basic Unit 11
Sikkim Manipal University Page No.: 237
11.12 Summary
This unit has covered the following topics:
OOP in Visual Basic .NET
Visual Basic .NET is not Visual Basic 6 with inheritance tacked onto it.
Rather, Visual Basic .NET has been entirely rewritten to be fully object-
oriented. In fact, everything in Visual Basic .NET can be treated as an
object. Yes, even your strings and integers can be accessed as objects in
Visual Basic .NET.
How to Objectify Your Programs
A good rule of thumb is that classes are the nouns in your analysis of the
problem. The properties are the adjectives that describe the noun. Of
course, the noun-verb-adjective correspondence to classes, methods, and
properties is only a first step. Only experience can help you decide which
nouns, verbs, and adjectives are the important ones.
Defining a Class
You still create classes for your business objects and for any supporting
objects that you may need for your application. You can create any number
of classes within a single code file. You can even create classes within
classes.
Relationships between Classes in Your Programs
Traditional OOP provides three possible relationships between classes:
• Use: dependency
• Containment: “has a” – this is sometimes called aggregation
• Inheritance: “is a”
The use relationship is both the most obvious and the most common,
because it is just a fancy way of saying one class depends on another.
Whenever an object sends a message to another object, the two obviously
depend on each other.
Inheritance in VB.Net
With inheritance, you can define a common class that is the basis of other
classes. This class is called a base or parent class. You then create any
specialized classes that inherit from the base class. These classes are
called derived or child classes. These classes inherit functionality from the

Visual Basic Unit 11
Sikkim Manipal University Page No.: 238
base class but can override base class functionality to perform specialized
processing.
Building Constructors and Destructors
Visual Basic .NET introduces true constructors that are executed whenever
a new instance of the class is created. These constructors are defined with
a subroutine named New. You can pass data to a constructor for more
flexibility and power in initializing the object. Instead of a Terminate event,
Visual Basic .NET provides a Finalize destructor. This destructor is called
when the .NET garbage collector determines that the object is not longer
needed.
Creating and Destroying an Object
In order to use a class, you first need to create an object from the class.
Everything is basically an object in Visual Basic .NET. When you have
finished using an object, you can call the object's Dispose method to free
the resources used by the object, assuming that a Dispose method was
implemented for the object. You can then set the object variable to Nothing
Using System.Object
Every object in .NET is inherited from a base class called System.Object.
This class is part of the Microsoft .NET Framework and contains the basic
properties and methods required for a .NET object. Any public properties or
methods defined in System.Object are automatically provided in any object
you create.
Namespaces
The potential for conflicts between method names exists whenever you use
other people’s code. And even forgetting about these kind of conflicts, you
need some way to group thousands of methods in such a way that you have
some hope of remembering how they fit together. Thus, there has to have a
way of organizing information in as rich a framework as is supplied with
.NET. In .NET this is done with namespaces.
The Imports Keyword
.NET has a way of avoiding a lot of superfluous verbiage. This is done
through the use of the Imports statement.

Visual Basic Unit 11
Sikkim Manipal University Page No.: 239
11.13 Terminal Questions
1. Explain the process of objectifying programs in VB.Net.
2. Describe the usage of relationships between classes.
3. Explain the usage of constructors and destructors in VB.Net programs
11.14 Answers
Self Assessment Questions
1. UDT
2. CBD
3. Abstraction
4. Classes
5. UML-based
6. Visual Basic .NET
7. Two
8. Containment
9. Overridable
10. Inherits
Terminal Questions
1. In the really old days we practiced what we called structured, procedure-
oriented programming. We identified what needed to be done and then
did one of two things, either:
Broke the task to be accomplished into subtasks, and these into smaller
subtasks, until the subtasks were simple enough to be implemented
directly (in other words, the top-down approach). (Refer Section 11.3)
2. Traditional OOP provides three possible relationships between classes:
• Use: dependency
• Containment: “has a” – this is sometimes called aggregation
• Inheritance: “is a”
The use relationship is both the most obvious and the most common,
because it is just a fancy way of saying one class depends on another.
(Refer Section 11.5)
3. Visual Basic .NET introduces true constructors that are executed
whenever a new instance of the class is created. These constructors are
defined with a subroutine named New. (Refer Section 11.7)

Visual Basic Unit 12
Sikkim Manipal University Page No.: 240
Unit 12 Inheritance and Interfaces – I
Structure:
12.1 Introduction
Objectives
12.2 Inheritance Basics
Getting started with Inheritance
Accessing the Parent Class's functionality
12.3 Overriding Properties and Methods
Viewing an Inheritance chain
Conversion and Member access rules
Polymorphism at Work
Shadowing
12.4 Abstract Base Classes
12.5 Summary
12.6 Terminal Questions
12.7 Answers
12.1 Introduction
In the previous unit, we discussed about application of OOP concepts in
VB.Net programming. In this unit, we start by showing you how to do
implementation inheritance in VB .NET.
Unfortunately, learning only the mechanics for doing implementation
inheritance is a very bad idea. We therefore spend a fair amount of time in
this unit showing you how to avoid these dangers through good design of
your inheritance chains.
Objectives:
After studying this unit, you should be able to:
describe the importance of inheritance in programming
apply the concept of overriding properties and methods of parent
classes in the child classes
describe inheritance chaining
explain the conversion and member access rules
illustrate the usage of polymorphism
explain the importance of shadowing in inheritance
describe the importance and applications of Abstract base classes

Visual Basic Unit 12
Sikkim Manipal University Page No.: 241
12.2 Inheritance Basics
Although inheritance is hardly the be-all, end-all of OOP, and interfaces are
often a better choice, you absolutely should not get the idea that you should
avoid using inheritance. Inheritance is a powerful tool that saves you a lot of
work if you use it correctly.
“Correctly” simply means that you should not use inheritance if it is not
absolutely clear that the “is a” relationship holds:
Class A should inherit from a class B only when it is absolutely clear
that, now and forever, you can always use an A object in place of a B
object without getting yourself into trouble.
You may see this fundamental rule in a more abstract form. This kind of
abstraction is necessary when you try to express the rule in a code-oriented
way:
An instance of a child class A that inherits from a parent class B must
be usable in every piece of code that would take an instance of its
parent type as a parameter. In other words if you have a function whose
header is
UseIt(bThing As B)
and aThing is an instance of the child class A, then the following code
must make sense:
UseIt(aThing)
If this seems too abstract, here is a made up (and hopefully humorous)
version of where it fails. Suppose you have a class called Manager and you
want to decide whether a person who manages programmers should inherit
from the Manager class rather than inherit from the Programmer class.
Because managers need big hair, as any Dilbert reader knows, you decide
you will have a property called SetHairStyle in your Manager class. Now
close your eyes and imagine a typical programmer (say his name is Tom)
who is suddenly made a manager of other programmers.
What does he look like hairstyle-wise? Can you imagine a call to:
tom.SetHairStyle(“sharp razor cut’)
always making sense? Sure, some programmers care about hairstyles but
we think it is fair to say that not every programmer does. The moral is a
ManagerOfProgrammers class should inherit from Programmer not
Manager.

Visual Basic Unit 12
Sikkim Manipal University Page No.: 242
Note: Some languages would permit a ManagerOfProgrammers class to
inherit from both a Manager and a Programmer class. Though quite logical
and appealing in principle, languages that support multiple inheritance (as
this ability is called), tend to be incredibly complicated to use in practice. VB
.NET uses its ability to implement multiple interfaces to deal with the
situations when multiple inheritance would otherwise be needed. As you will
soon see, using multiple interfaces it is a much cleaner approach to this kind
of situation than classic multiple inheritance.
Next, you have to be aware that there is no escaping inheritance in your VB
.NET programs. Even if you are completely comfortable with the interface
style of programming used in VB5 and VB6, and think containment and
delegation along with interfaces are the ways to go, you cannot use
interfaces exclusively in VB .NET. This is because it is impossible to use the
.NET Framework without explicitly using inheritance. For example, any .NET
GUI application depends on inheritance to work, as do many of the built-in
collection classes – even using the FolderBrowser object requires
inheritance!
In fact, the way inheritance is used in the .NET Framework is a perfect
example of why inheritance should not be completely replaced by interfaces
in object oriented programming. What happened in the .NET Framework
may well occur in your own projects:
When you build frameworks that other programmers will depend on,
well-designed, thoroughly debugged base classes can be used over and
over again via inheritance as the base on which they build their classes.
12.2.1 Getting Started with Inheritance
Let us start by recalling some terminology. The class you inherit from is
called the base or parent class. The class that inherits from it is called the
child or derived class. The child class automatically has all the public
functionality of the parent class, but you can modify the behavior of the
parent class in the child class. Inheritance is about specializing parent class
behavior and possible adding new behavior as well.
Here is an example of this process at work: suppose you have a company
with an enlightened raise policy. Whenever there is an across-the-board
raise of, say, 5 percent, programmers automatically get 6 percent (a 20
percent bonus). You are responsible for the design of the employee

Visual Basic Unit 12
Sikkim Manipal University Page No.: 243
management system for this company. You decide to make a class called
Programmer that inherits from Employee, and you want to change the
behavior of the RaiseSalary method in the Programmer class to reflect the
automatic (and well-deserved!) 20 percent bonus.
To build the code for this Employee⇒Programmer inheritance chain, let us
first assume that you have already written the code for a Public Employee
class that is either part of your solution or is already referenced via
Project|References. Assuming this is so, then the code for the Programmer
class starts out like this (the key line indicating inheritance is in bold):
Public Class Programmer
Inherits Employee
End Class
The Inherits keyword must be the first nonblank, non-comment line after the
name of the child class. (IntelliSense will automatically show you what
classes you can inherit from, by the way.) Note that a derived class cannot
use the Public access modifier if its parent class is marked Friend or Private.
The reason is that the access modifier you use for the derived class cannot
be less restrictive than the one used for its parent class.
But it can be more restrictive, so a class marked Friend class may inherit
from one marked Public, for example.
The next step in building a child class is to make sure that you give it the
correct kind of constructor. Because the child class must have at least the
same amount of functionality as its parent class, constructors for child
classes usually call the constructor of the parent class to correctly initialize
the instance fields of their parent class. This is done using the special
keyword MyBase, which accesses the parent class (as shown in the
following line in bold), passing in the right values for the constructor:
Public Sub New(ByVal theName As String, ByVal curSalary As
Decimal)
MyBase.New(Name, curSalary)
End Sub
The key line
MyBase.New(theName, curSalary)

Visual Basic Unit 12
Sikkim Manipal University Page No.: 244
calls the constructor of the base Employee class and correctly initializes its
instance fields. If you fail to have a call to MyBase.New when a parent class
requires arguments in its constructor, then VB .NET issues an error
message like this:
C:\vb net book\chapter 5\Example1\Example1\Module1.vb(55):
'Example1.Programmer', the base class of 'Example1.Employee',
does not have an accessible constructor that can be called with
no arguments.
Therefore, the first statement of this constructor must be a call to a
constructor of the base class via 'MyBase.New' or another constructor of
this class via 'MyClass.New' or 'Me.New' which is about as informative an
error message as one could hope to get and clearly reminds you that you
must call MyBase.New at least once if your parent class does not have a
no-argument constructor! After you add the call to MyBase.New, things get
very interesting: how do you access the instance fields of the parent class?
Here is the (we think surprising at first) rule:
A derived class has no privileged access to the instance fields of its
parent class.
This rule means that the derived Programmer class has no privileged
access to the private instance fields of its parent Employee class. For
example, suppose you store the salary in the parent class in a private
instance field called m_Salary and you try to sneak this code into the
Programmer class’s RaiseSalary method:
Public Sub New(ByVal theName As String, ByVal curSalary As
Decimal)
MyBase.New(theName, curSalary)
MyBase.m_salary = 1.2 * curSalary
End Sub
You would get this error message:
'Example1.Employee.m_Salary' is Private, and is not
accessible in this context.
So what do you do? If you want a child class to have access to specific
functionality in the parent class, it is up to the code in the parent class to
allow such access. We will show you how to do this in the next section.

Visual Basic Unit 12
Sikkim Manipal University Page No.: 245
12.2.2 Accessing the Parent Class’s functionality
VB .NET comes with a Protected access modifier that automatically gives
child classes access to the item specified with this modifier. This is true
whether the item is a member function or an instance field. You may be
tempted to use this modifier to make all instance fields of the parent class
Protected, to give derived classes a quick and dirty way to gain access to
the parent class’s instance fields. Do not give in to this temptation. Good
design principles dictate that the Protected access modifier should be used
only for member functions, not for instance fields.
Doing anything else violates encapsulation and prevents you from doing
validation in the place it belongs – the parent class. You need to rely on the
parent class to validate the data. As in real life, “trust but verify” is the
default behavior for good parenting!
For example, our original definition of the Employee class had members
with these signatures:
Public ReadOnly Property TheName() As String
Public ReadOnly Property Salary() As Decimal
so all classes could access these members. To make them accessible only
by derived classes of the parent, change the Public access modifier to
Protected.
You can use these access modifiers (Table 12.1) for the members of a class
in an inheritance chain.
Table 12.1: Access Modifiers for Inheritance
Access Modifier Meaning
Friend Access is limited to code in the current assembly.
Private Only objects of the parent’s type have access to these members.
Protected Access is limited to objects of the parent class type and objects of the type of any of its descendents.
Protected Friend Access is limited to the current assembly or types derived from the parent class.
Public All code that can access an object based on this class can access this member.

Visual Basic Unit 12
Sikkim Manipal University Page No.: 246
As we have said, having Protected and Protected Friend member functions
(but not instance fields) is quite common, because they let you prevent
outside code from accessing protected members.
However, there is a rather interesting gotcha to using Protected.
Fortunately, the compiler is quite good about giving you a clear warning you
when you fall into this hole. Here is a specific example: suppose you have a
class called GeekFest which contains a bunch of programmers with a
method called Boast that wants to access the Salary property in the
Programmer class. (Which means it is accessing the Salary property in the
parent Employee class ultimately). Here is how the code may look:
Now suppose the code in your Employee class had the read-only Salary
property marked Protected instead of Public:
This results in an error message:
C:\vb net book\chapter
5\Example1\Example1\Module1d.vb(19):
'Example1.Module1.Employee.Protected ReadOnly Property
Salary() As Decimal' is Protected, and is not accessible in this
context.
The point is that even though the Programmer class has access to the
protected Salary property in its code, Programmer objects do not have
Public Class GeekFest Private m_Programmers() As Programmer Sub New(ByVal Programmers() As Programmer) m_Programmers = Programmers End Sub Public Function Boast(ByVal aGeek As Programmer) As String Return "Hey my salary is " & aGeek.Salary End Function End Class
Protected ReadOnly Property Salary() As Decimal Get Return MyClass.m_Salary End Get End Property

Visual Basic Unit 12
Sikkim Manipal University Page No.: 247
access to this method when outside the code for the Programmer class. To
sum up:
Code can access protected methods of the parent class only when
inside objects of the derived class and not from objects of the child type
referred to in code outside the derived class.
Self Assessment Questions
1. Inheritance should not be used if it is not absolutely clear that the ____
relationship holds.
2. An instance of a child class A that inherits from a parent class B must be
usable in every piece of code that would take an ____ of its parent type
as a parameter.
3. The _____ keyword must be the first nonblank, non-comment line after
the name of the child class.
12.3 Overriding Properties and Methods
In our example of inheritance in which programmers automatically get a 6
percent raise when everyone else gets 5 percent, you need to change the
behavior of the RaiseSalary method to reflect the automatic 20 percent
bonus. This is called overriding a member function.
Note: You cannot override shared members.
Unlike many OOP languages, the syntax used in VB .NET makes it clear
that you want to override a method in the parent class by a method from the
child class. The clarity comes from the two required keywords:
Overridable: It is used in the parent class to indicate that a method can
be overridden.
Overrides: It is used in the child class to indicate that you are overriding
a method.
To have our basic Employee class override the special method of raising
salaries for an eventual Programmer or Manager class, you use code like
this:
Option Strict On
Public Class Employee
Private m_Name As String
Private m_Salary As Decimal

Visual Basic Unit 12
Sikkim Manipal University Page No.: 248
Private Const LIMIT As Decimal = 0.1D
Public Sub New(ByVal theName As String, ByVal curSalary As
Decimal)
m_Name = theName
m_Salary = curSalary
End Sub
Public ReadOnly Property TheName() As String
Get
Return m_Name
End Get
End Property
Public ReadOnly Property Salary() As Decimal
Get
Return MyClass.m_Salary
End Get
End Property
Public Overridable Overloads Sub RaiseSalary(ByVal Percent
As Decimal)
If Percent > LIMIT Then
'not allowed
Console.WriteLine("NEED PASSWORD TO RAISE SALARY
MORE " & _
"THAN LIMIT!!!!")
Else
m_Salary = (1 + Percent) * m_Salary
End If
End Sub
Public Overridable Overloads Sub RaiseSalary(ByVal Percent
As _
Decimal, ByVal Password As String)
If Password = "special" Then
m_Salary = (1 + Percent) * m_Salary
End If
End Sub
End Class

Visual Basic Unit 12
Sikkim Manipal University Page No.: 249
We use the optional Overloads keyword to make it clear that we have two
versions of RaiseSalary in this class.
Now assume that every programmer’s salary raise should be treated via a
call to the special RaiseSalary method. The child Programmer class looks
like this:
Notice how little code is needed in this child class – most of the functionality
remains unchanged, so we simply inherit it! If you add this code to the Sub
Main, the correct call to the RaiseSalary method (the one with the 20
percent bonus) is made by the compiler for any object that is an instance of
the Programmer class:
Sally will get her 20 percent bonus.
To summarize:
You can override only parent members marked with the Overridable
keyword.
If, at any point in the chain you want to stop the possibility of further
overriding of a method, mark it with the NotOverridable keyword.
VB .NET’s NotInheritable keyword prevents inheritance from a class (these
kinds of classes are sometimes called sealed or final classes). The main
reason to mark an entire class as NotInheritable is if the class has such vital
Public Class Programmer Inherits Employee Public Sub New(ByVal theName As String, ByVal curSalary As Decimal) MyBase.New(theName, curSalary) End Sub Public Overloads Overrides Sub RaiseSalary(ByVal Percent As Decimal) MyBase.RaiseSalary(1.2D * Percent, "special") End Sub End Class
Sub Main() Dim sally As New Programmer("Sally", 150000D) sally.RaiseSalary(0.1D) 'will actually give a 12% raise Console.WriteLine(sally.TheName & " salary is now " & sally.Salary()) Console.ReadLine() End Sub

Visual Basic Unit 12
Sikkim Manipal University Page No.: 250
behavior that you cannot risk changes to it. Many framework classes such
as String are marked as NotInheritable for this reason. However, you do not
have to mark a whole class as NotInheritable if all you want to do is place a
single member of the class off limits to overriding it: you can mark a member
you do not want overridden as NotOverridable.
Note: Members are not overridable by default. Still, we can use the
NotOverridable keyword to make our intentions clear.
You may occasionally want to access the parent class version of a method
that you have overridden. For example, suppose you want to add an
honorific like “Code Guru” to the name of every programmer. MyBase lets
you access the public TheName property of the parent class inside the child
class:
Limitations of MyBase keyword:
You cannot chain it to move to the “grandparent” if your inheritance
chain is that deep; MyBase.MyBase.MemberFunction is illegal.
MyBase is a keyword, and unlike Me, MyBase cannot be used with Is,
assigned to an object variable, or passed to a procedure.
Similarly, the MyClass keyword lets you be sure that even overridden
methods get called as defined in the current class whose code is running,
rather than as defined in some overridden method in a derived class.
Limitations of MyClass:
MyClass is also a keyword, not a real object. Therefore, as with MyBase,
MyClass cannot be used with Is, assigned to an object variable, or
passed to a procedure. (Use Me to refer to the actual instance.)
MyClass cannot be used to access Private members in the class (but
Me can).
Public Overrides ReadOnly Property TheName() As String Get Return "Code Guru " & MyBase.TheName() End Get End Property

Visual Basic Unit 12
Sikkim Manipal University Page No.: 251
12.3.1 Viewing an Inheritance Chain
The Class View and the Object Browser are useful when your inheritance
chain grows in complexity. For example, in Figure 12.1 you can see that the
Class View window shows you how the Programmer class inherits from the
Employee class and only overrides the constructor and the RaiseSalary
method.
Fig. 12.1: Viewing an Inheritance Chain
12.3.2 Conversion and Member Access Rules
You can store a variable of the child class in a variable of the parent class:
If Option Strict is on (as it should be), then once tom is stored in the
employeeOfTheMonth variable, you need to use the CType function to store
employeeOfTheMonth in a Programmer variable:
Dim tom As New Programmer("Tom", 65000) Dim employeeOfTheMonth As Employee employeeOfTheMonth = tom
Dim programmerOnCall As Programmer programmerOnCall = CType(employeeOfTheMonth, Programmer)

Visual Basic Unit 12
Sikkim Manipal University Page No.: 252
Since the compiler has no way of knowing this is acceptable beforehand. Of
course, storing tom in the programmerOnCall variable can be done with a
simple assignment:
Note: When you access the functionality of the tom object variable through
the employeeOfTheMonth Employee variable, you do not have access to
any of the unique members defined in the Programmer class. However, as
you will see in the next section, you would have access to all the members
of the Programmer class that override members of the Employee class.
12.3.3 Polymorphism at Work
One of the main goals of inheritance is to avoid the difficult-to-maintain
Select Case or If-Then-Else If statements by having the compiler and
polymorphism do all the work. For instance, this code works with both the
Employee and Programmer class:
When you run the code, you see Figure 12.2, which shows that the correct
RaiseSalary method is called even though we stored both employees and
programmers in an array of objects of the Employee type.
Figure 12.2: Polymorphism at Work
Sub Main() Dim tom As New Employee("Tom", 50000) Dim sally As New Programmer("Sally", 150000) Dim ourEmployees(1) As Employee ourEmployees(0) = tom ourEmployees(1) = Sally Dim anEmployee As Employee For Each anEmployee In ourEmployees anEmployee.RaiseSalary(0.1D) Console.WriteLine(anEmployee.TheName & " salary now is " & _ anEmployee.Salary()) Next Console.ReadLine() End Sub

Visual Basic Unit 12
Sikkim Manipal University Page No.: 253
Note: This is sometimes described by saying that in VB .NET the default is
that members of classes are virtual. (Virtual technically means that when the
compiler calls a member of an object, it should look at the true type of the
object, not just at what sort of container or reference it is used in.)
In the previous example, what “virtual” means is that even though the
references are to Employee objects (because everything is stored in an
Employee array), the compiler looks at the true type of Sally (she is a
Programmer) in order to call the correct RaiseSalary method (the one that
gives the better raise).
As you can imagine, the use of virtual methods when storing both parent
class objects (employees) and derived class objects (programmers) in a
container marked for by the type of the parent – is quite common. However,
there are some pitfalls in the simple approach we take to using virtual
methods here. To see these pitfalls for yourself, modify the Programmer
class to include a unique member, so that polymorphism will not be
involved. For example, add an instance field and property member as
shown here in the lines in bold:
Public Class Programmer Inherits Employee Private m_gadget As String Public Sub New(ByVal theName As String, ByVal curSalary As Decimal) MyBase.New(theName, curSalary) End Sub Public Overloads Overrides Sub RaiseSalary(ByVal Percent As Decimal) MyBase.RaiseSalary(1.2D * Percent, "special") End Sub Public Property ComputerGadget() As String Get Return m_Gadget End Get Set(ByVal Value As String) m_Gadget = Value End Set End Property End Class

Visual Basic Unit 12
Sikkim Manipal University Page No.: 254
and then change Sub Main by adding the lines in bold:
The modified code results in this error message:
C:\book to comp\chapter
5\VirtualProblems\VirtualProblems\Module1.vb(17):
The name 'Gadget' is not a member of 'VirtualProblems.Employee'.
The problem is that although Sally is a Programmer object and is stored in
the ourEmployees(1) array element, the compiler has no way of knowing
that and thus cannot find the ComputerGadget property. What is more,
unless you turn Option Strict off (which is a dangerous practice, in our
opinion), you must explicitly convert this array entry to the Programmer type
to use these unique members of the Programmer class:
Console.WriteLine(ourEmployees(1).TheName & " gadget is an " &
_
CType(ourEmployees(1), Programmer).ComputerGadget)
The process of converting a reference stored in a parent class object
variable to a child class object is usually called down casting. (Converting
from a child class to the parent class is thus called up casting) Although it is
a common practice, down casting should be avoided whenever possible,
because it often requires you to check the type of an object variable via
code like this:
Sub Main() Dim tom As New Employee("Tom", 50000) Dim sally As New Programmer("Sally", 150000) sally.ComputerGadget = "Ipaq" Dim ourEmployees(1) As Employee ourEmployees(0) = tom ourEmployees(1) = sally Dim anEmployee As Employee For Each anEmployee In ourEmployees anEmployee.RaiseSalary(0.1D) Console.WriteLine(anEmployee.TheName & " salary now is " _ & anEmployee.Salary()) Next Console.WriteLine(ourEmployees(1).TheName & " gadget is an " _ & ourEmployees(1).Gadget) Console.ReadLine() End Sub

Visual Basic Unit 12
Sikkim Manipal University Page No.: 255
If TypeOf ourEmployees(1) Is Programmer Then
'
Else If TypeOf ourEmployees(1) Is Employee Then
'
End If
which, as you can see, requires bringing back the kind of selection
statements that you used polymorphism to banish in the first place! (Up
casting, of course, never causes problems because the fundamental rule of
inheritance is that child objects can be used any place parent objects are
used.)
12.3.4 Shadowing
In earlier versions of VB, as in most programming languages, shadowing
meant that a local variable with the same name as a variable of larger scope
hid the variable with larger scope. (This is one reason the convention arose
to use m_ as a prefix for module-level variables and g_ for global variables.
Using a good naming convention helps prevent shadowing bugs.) You can
think of overriding an inherited method as a special kind of shadowing. For
better or for worse, VB .NET allows another extraordinarily powerful kind of
shadowing:
If you mark a member of a derived class with the Shadows keyword
(which was introduced in beta 2), it hides any members of the parent
class with the same name.
The Shadows keyword can even be used to have a sub in the parent class
and a function with the same name in a child class. For all practical
purposes, shadowing makes a totally new member in the derived class with
that name, and thus makes any inherited members with the name being
shadowed unavailable in the derived class.
This, in turn, means overriding inherited members that have been shadowed
is no longer possible and polymorphism cannot work. Shadowing gets tricky
and can cause subtle bugs when you want to use polymorphism on a
container of, say, Employee objects and you have shadowed a member.
To see this kind of problem at work, modify the Programmer class with the
lines in bold:
Public Class Programmer
Inherits Employee
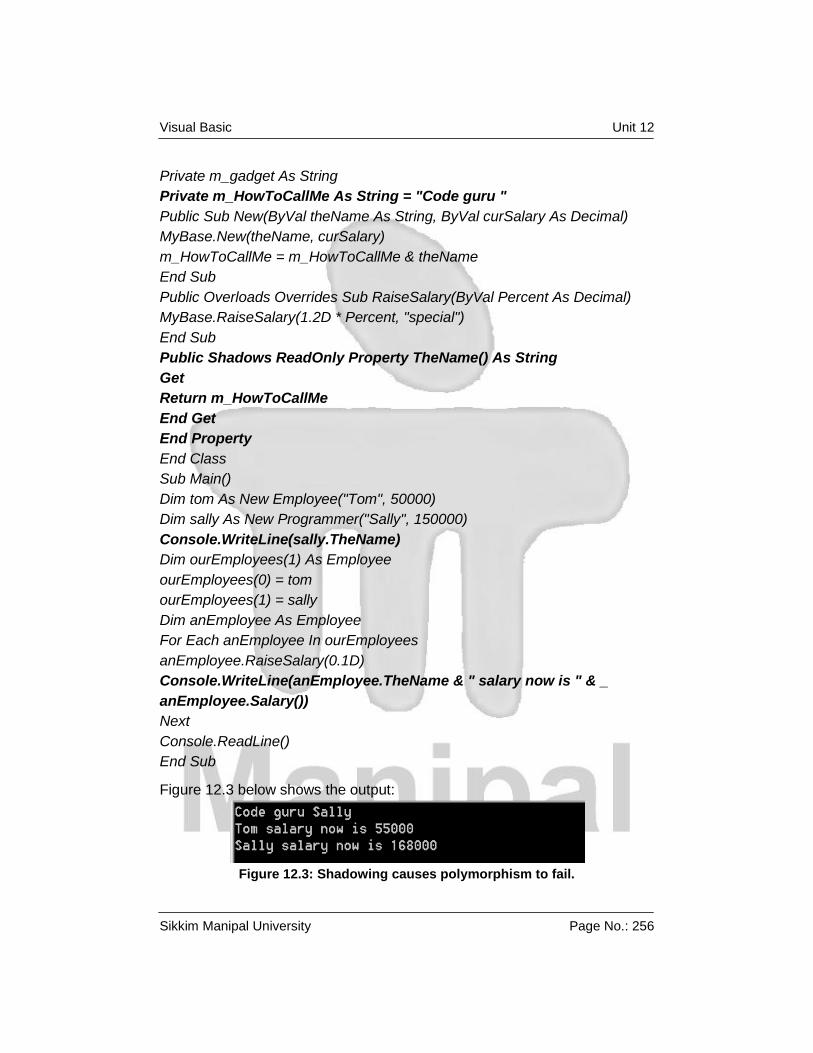
Visual Basic Unit 12
Sikkim Manipal University Page No.: 256
Private m_gadget As String
Private m_HowToCallMe As String = "Code guru "
Public Sub New(ByVal theName As String, ByVal curSalary As Decimal)
MyBase.New(theName, curSalary)
m_HowToCallMe = m_HowToCallMe & theName
End Sub
Public Overloads Overrides Sub RaiseSalary(ByVal Percent As Decimal)
MyBase.RaiseSalary(1.2D * Percent, "special")
End Sub
Public Shadows ReadOnly Property TheName() As String
Get
Return m_HowToCallMe
End Get
End Property
End Class
Sub Main()
Dim tom As New Employee("Tom", 50000)
Dim sally As New Programmer("Sally", 150000)
Console.WriteLine(sally.TheName)
Dim ourEmployees(1) As Employee
ourEmployees(0) = tom
ourEmployees(1) = sally
Dim anEmployee As Employee
For Each anEmployee In ourEmployees
anEmployee.RaiseSalary(0.1D)
Console.WriteLine(anEmployee.TheName & " salary now is " & _
anEmployee.Salary())
Next
Console.ReadLine()
End Sub
Figure 12.3 below shows the output:
Figure 12.3: Shadowing causes polymorphism to fail.

Visual Basic Unit 12
Sikkim Manipal University Page No.: 257
As you can see, polymorphism has stopped working. The first bold line in
the code correctly gives Sally the honorific of “Code Guru” before her name.
Unfortunately, the second bold line no longer works polymorphically, so it no
longer uses the correct TheName method in the Programmer derived class.
The result is that you do not see the honorific. In other words, if you use the
Shadows keyword, members of objects get called by the kind of container
the object is stored in, not by what their ultimate types are. (You could also
say that using the Shadows keyword in a derived class makes a member
nonvirtual.)
Self Assessment Questions
4. Shared members cannot be overridden. (True / False)
5. The ____ keyword lets you be sure that even overridden methods get
called as defined in the current class whose code is running, rather than
as defined in some overridden method in a derived class.
6. The process of converting a reference stored in a parent class object
variable to a child class object is usually called _______.
12.4 Abstract Base Classes
Once you start designing inheritance into your programs, you soon realize
that you often can take advantage of a great deal of common functionality.
For example, contractors are not employees, but they still have information
in common with employees, such as having a name, an address, a tax ID
number, and so on. It might make sense to push common code back as far
as possible into a base class called PayableEntity which has an address
and a tax ID number as properties.
The process of searching for common functionality that you can put into a
common base class, usually called Factoring, is a useful design practice
that lets you take abstraction to its logical conclusion.
However, the factoring process sometimes leads you to a class where some
of the methods are not really implementable, even though they clearly are
common to all the classes in the inheritance chain.
For example, with a class called PayableEntity as the common base class
for both contractors and employees, you might decide that this foundational
class should have a property called TaxID. Now, as should be the case, you

Visual Basic Unit 12
Sikkim Manipal University Page No.: 258
want to check that the format for the tax ID number is correct, by using code
inside a property procedure.
Well, here you are faced with a problem:
Social Security numbers take a different form from the tax ID used by
certain kinds of contractors. This means the verification code for this
property cannot be built into the PayableEntity base class, but must be in
the child classes, because only they can know what form the tax ID must
take.
For these kinds of situations, you build an abstract base class. This is a
class that has at least one member function marked with the MustOverride
keyword, and the class itself is marked with the MustInherit keyword. Here is
an example of what an abstract PayableEntity, MustInherit class looks like:
Notice that the member marked with the MustOverride keyword consists of
just the Property statement with no code inside of it. In general, a member
marked with the MustOverride keyword has only a header and cannot use
an End Property, End Sub, or End Function statement.
Also notice that we were able to use a concrete implementation of the read-
only property TheName, which shows abstract classes can combine
nonabstract members with abstract members. An Employee class that
inherits from the abstract PayableEntity class might look like this, with the
key new lines in bold:
Public Class Employee
Inherits PayableEntity
Private m_Salary As Decimal
Public MustInherit Class PayableEntity Private m_Name As String Public Sub New(ByVal itsName As String) m_Name = itsName End Sub ReadOnly Property TheName() As String Get Return m_Name End Get End Property Public MustOverride Property TaxID() As String End Class

Visual Basic Unit 12
Sikkim Manipal University Page No.: 259
Private m_TaxID As String
Private Const LIMIT As Decimal = 0.1D
Public Sub New(ByVal theName As String, ByVal curSalary As Decimal, _
ByVal TaxID As String)
MyBase.New(theName)
m_Salary = curSalary
m_TaxID = TaxID
End Sub
Public Overrides Property TaxID() As String
Get
Return m_TaxID
End Get
Set(ByVal Value As String)
If Value.Length <> 11 then
'need to do something here - see Chapter 7
Else
m_TaxID = Value
End If
End Set
End Property
ReadOnly Property Salary() As Decimal
Get
Return MyClass.m_Salary
End Get
End Property
Public Overridable Overloads Sub RaiseSalary(ByVal Percent As Decimal)
If Percent > LIMIT Then
'not allowed
Console.WriteLine("NEED PASSWORD TO RAISE SALARY MORE " & _
"THAN LIMIT!!!!")
Else
m_Salary = (1D + Percent) * m_Salary
End If
End Sub
Public Overridable Overloads Sub RaiseSalary(ByVal Percent As _

Visual Basic Unit 12
Sikkim Manipal University Page No.: 260
Decimal, ByVal Password As String)
If Password = "special" Then
m_Salary = (1D + Percent) * m_Salary
End If
End Sub
End Class
The first of the key lines is in the constructor, which now has to call the
constructor of the abstract base class in order to set the name properly. The
second group of key lines adds the most trivial concrete implementation of
the MustOverRide TaxId property. (Note that this code does not do the
needed verification of tax ID numbers here, as you would in a more robust
example.)
Here is a Sub Main you can use to test this program:
Sub Main()
Dim tom As New Employee("Tom", 50000, "111-11-1234")
Dim sally As New Programmer("Sally", 150000, "111-11-2234")
Console.WriteLine(sally.TheName)
Dim ourEmployees(1) As Employee
ourEmployees(0) = tom
ourEmployees(1) = sally
Dim anEmployee As Employee
For Each anEmployee In ourEmployees
anEmployee.RaiseSalary(0.1D)
Console.WriteLine(anEmployee.TheName & " has tax id " & _
anEmployee.TaxID & ", salary now is " & anEmployee.Salary())
Next
Console.ReadLine()
End Sub
Finally, you cannot create a MustInherit class directly. A line like this:
Dim NoGood As New PayableEntity("can't do")
gives this error message:
Class 'PayableEntity' is not creatable because it contains at least one
member marked as 'MustOverride' that hasn't been overridden.

Visual Basic Unit 12
Sikkim Manipal University Page No.: 261
You can, however, assign an object from a derived class to a variable of an
abstract base class type or a container for it (which allows polymorphism to
work its magic):
Example: The CollectionBase Class
The trouble with .NET Framework classes such as ArrayList or HashTable is
that they contain objects, so you always have to use the CType function to
get back to the correct type after you place something in such a collection.
You also run the risk that somebody will put the wrong type of object in the
container and the call to CType will fail. A strongly typed collection is a
container that can only hold objects of a single type or its derived types.
A good example of an abstract base class in the .NET Framework is
CollectionBase, whose derived classes allow you to build strongly typed
collections (Before you embark on creating your own collection class
inheriting from CollectionBase, make sure that the framework does not
already contain the class you need, in the System.Collections.Specialized
Namespace.)
Such type-safe collections rely on an abstract base class called
System.Collections.CollectionBase, and all you have to do is implement
concrete Add and Remove methods and an Item property. This is because
the System.Collections.CollectionBase already has an internal list that holds
the data – you need only delegate the other tasks to this internal list.
Here is an example that builds this kind of specialized collection (which
assumes the Employee class is either referenced or part of this project):
1 Public Class Employees
2 Inherits System.Collections.CollectionBase
3 ' Restricts to adding only Employee items
4 ' delegating to the internal List object's Add method
5 Public Sub Add(ByVal aEmployee As Employee)
6 List.Add(aEmployee)
7 End Sub
8 Public Sub Remove(ByVal index As Integer)
Dim tom As New Employee("Tom", 50000, "123-45-6789") Dim whoToPay(13) As PayableEntity whoToPay(0) = tom

Visual Basic Unit 12
Sikkim Manipal University Page No.: 262
9 If index > Count - 1 Or index < 0 Then
10 ' outside the range, should throw an exception (Chapter 7)
11 MsgBox("Can't add this item") 'MsgBox as a marker for an exception
12 Else
13 List.RemoveAt(index)
14 End If
15 End Sub
16
17 Default Public ReadOnly Property Item(ByVal index As Integer) As
Employee
18 Get
19 Return CType(List.Item(index), Employee)
20 End Get
21 End Property
22 End Class
Lines 5–7 implement the abstract Add method in the base class by
delegating it to the internal List object, so that it will accept only Employee
objects. Lines 8–10 implement the Remove method. Here we are delegated
to the internal List object’s Count and Index properties to make sure we are
not at the end or beginning of the list. Finally, lines 17–21 implement the
Item property. We make this the default property because this is what users
expect for a collection. We make it read-only to prevent someone from
adding an item except via the Add method. It would certainly be acceptable
to make it a read-write property, but that would require some extra code to
verify that the index you add the item to is acceptable. Assuming you have
the basic Employee class, here is some code to test this specialized
collection with an illegal addition (a string) commented out (but in bold):
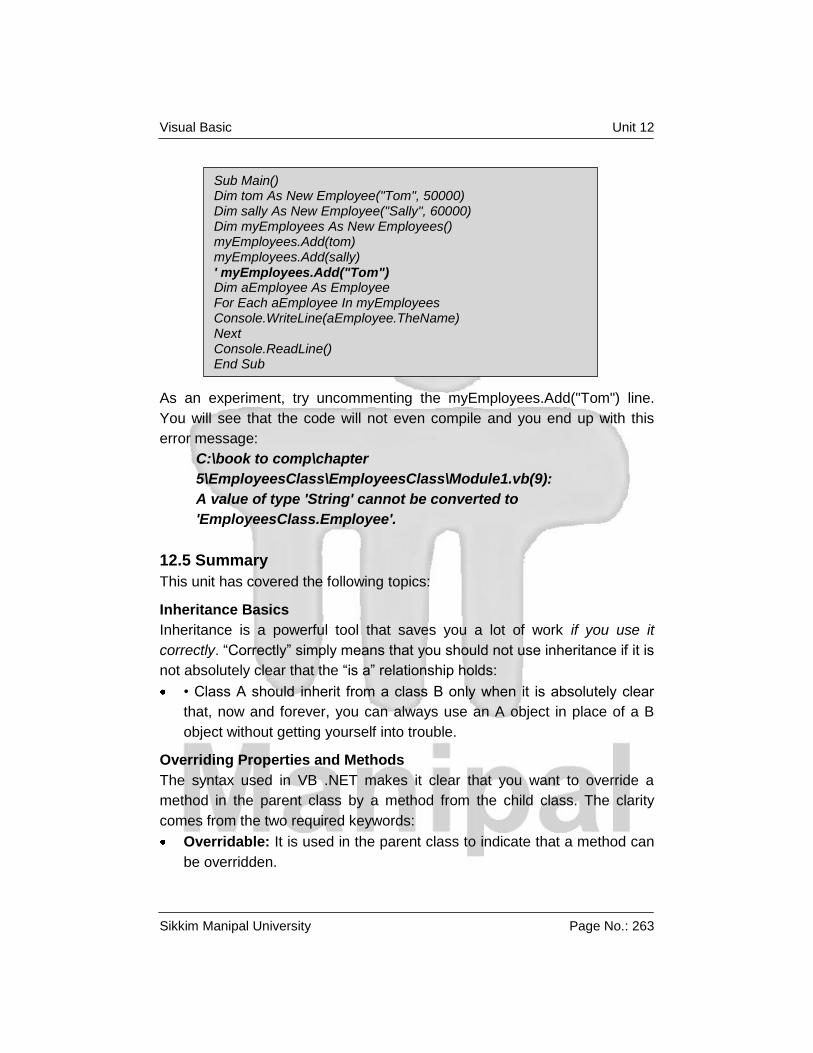
Visual Basic Unit 12
Sikkim Manipal University Page No.: 263
As an experiment, try uncommenting the myEmployees.Add("Tom") line.
You will see that the code will not even compile and you end up with this
error message:
C:\book to comp\chapter
5\EmployeesClass\EmployeesClass\Module1.vb(9):
A value of type 'String' cannot be converted to
'EmployeesClass.Employee'.
12.5 Summary
This unit has covered the following topics:
Inheritance Basics
Inheritance is a powerful tool that saves you a lot of work if you use it
correctly. “Correctly” simply means that you should not use inheritance if it is
not absolutely clear that the “is a” relationship holds:
• Class A should inherit from a class B only when it is absolutely clear
that, now and forever, you can always use an A object in place of a B
object without getting yourself into trouble.
Overriding Properties and Methods
The syntax used in VB .NET makes it clear that you want to override a
method in the parent class by a method from the child class. The clarity
comes from the two required keywords:
Overridable: It is used in the parent class to indicate that a method can
be overridden.
Sub Main() Dim tom As New Employee("Tom", 50000) Dim sally As New Employee("Sally", 60000) Dim myEmployees As New Employees() myEmployees.Add(tom) myEmployees.Add(sally) ' myEmployees.Add("Tom") Dim aEmployee As Employee For Each aEmployee In myEmployees Console.WriteLine(aEmployee.TheName) Next Console.ReadLine() End Sub
Visual Basic Unit 12
Sikkim Manipal University Page No.: 264
Overrides: It is used in the child class to indicate that you are overriding
a method.
Abstract Base Classes
Once you start designing inheritance into your programs, you soon realize
that you often can take advantage of a great deal of common functionality.
The process of searching for common functionality that you can put into a
common base class, usually called Factoring, is a useful design practice
that lets you take abstraction to its logical conclusion. An abstract base
class is a class that has at least one member function marked with the
MustOverride keyword, and the class itself is marked with the MustInherit
keyword.
12.6 Terminal Questions
1. Explain the concept of Inheritance in VB.Net.
2. Describe the theory behind Overriding Properties and Methods.
3. Describe the usage of Abstract Base Classes.
12.7 Answers
Self Assessment Questions
1. “is a”
2. instance
3. Inherits
4. True
5. MyClass
6. down casting
Terminal Questions
1. Although inheritance is hardly the be-all, end-all of OOP, and interfaces
are often a better choice, you absolutely should not get the idea that you
should avoid using inheritance. Inheritance is a powerful tool that saves
you a lot of work if you use it correctly. (Refer Section 12.2)
2. Unlike many OOP languages, the syntax used in VB .NET makes it clear
that you want to override a method in the parent class by a method from
the child class. The clarity comes from the two required keywords:

Visual Basic Unit 12
Sikkim Manipal University Page No.: 265
Overridable: It is used in the parent class to indicate that a method
can be overridden.
Overrides: It is used in the child class to indicate that you are
overriding a method. (Refer Section 12.3)
3. The process of searching for common functionality that you can put into
a common base class, usually called Factoring, is a useful design
practice that lets you take abstraction to its logical conclusion. However,
the factoring process sometimes leads you to a class where some of the
methods are not really implementable, even though they clearly are
common to all the classes in the inheritance chain. (Refer Section 12.4)

Visual Basic Unit 13
Sikkim Manipal University Page No.: 266
Unit 13 Inheritance and Interfaces – II
Structure:
13.1 Introduction
Objectives
13.2 Object: The Ultimate Base Class
The most useful Members of Object
Equals and ReferenceEquals
The ToString method
GetType and Reflection
MemberWiseClone
The Fragile Base Class Problem: Versioning
13.3 Overview of Interfaces
Mechanics of implementing an Interface
When to use Interfaces, when to use Inheritance?
Important Interfaces in the .NET Framework
13.4 Summary
13.5 Terminal Questions
13.6 Answers
13.1 Introduction
In the previous unit, we discussed about the basics of inheritance, overriding
properties and methods.
In this unit we would show you the ins and outs of the Object class. This is
the class that all .NET objects ultimately inherit from. We finish the
discussion of implementation inheritance by showing what .NET does to
help solve the fragile base class problem that is at the root of many of the
implementation inheritance problems in other OOP languages such as Java
or C++. (The fragile base class problem is a fancy way of saying that the
wrong change to a parent class can cause a disaster in the child classes
that inherit from it.)
After discussing inheritance, we will move on to implementing interfaces in
VB .NET. We end this unit by showing you how to use some of the
important interfaces in the .NET Framework, such as IComparable,
ICloneable, and IDisposable.

Visual Basic Unit 13
Sikkim Manipal University Page No.: 267
Objectives
After studying this unit, you should be able to:
describe the Object class which is a parent of all the classes
describe various useful members of Object class
explain and illustrate the Equals and ReferenceEquals method
explain the methods: TOString, GetType, and Reflection
illustrate the usage of MemberWise cloning
describe the Versioning problem
describe the importance and implementation of interfaces
differentiate and apply the usage of inheritance and interfaces
discuss important interfaces in .Net Framework
13.2 Object: The Ultimate Base Class
The .NET Framework (and hence VB .NET) depends on every type
inheriting from the common Object type, this is the ultimate ancestor of all
classes. (OOP speak often calls such a class the cosmic base class.) This
includes both reference types (instances of a class) and value types
(instance of a struct, enum, dates or numeric types). This means, for
example, that any function that takes a parameter of Object type can be
passed a parameter of any type (since the fundamental rules of inheritance
that we mentioned earlier require that child class variables be usable in any
context that parent class variables can be used).
For example, there are a few useful built-in Boolean functions that
determine whether the kind of data you are working with take an object
variable:
• IsArray: Tells you if an object variable is an array
• IsDate: Tells you if an object can be interpreted as a date and time
value
• IsNumeric: Tells you if the object can be interpreted as a number
The Object class itself splits up into two streams of descendants: those that
inherit from System.ValueType (the base class for all value types) and the
reference types that descend directly from Object. You can determine if a
derived type is a value type with code like this:

Visual Basic Unit 13
Sikkim Manipal University Page No.: 268
13.2.1 The Most Useful Members of Object
Because every type in VB .NET inherits from Object, it is likely that you will
often use (or more likely, override) these methods.
Important Note: You will often be tempted to override the Object class’s
protected Finalize method. In theory, you override the Finalize method in
your code to create cleanup code that runs when the garbage collector
reclaims the memory your object uses. Do not do this in practice. Because
you cannot be sure when the Finalize method will run or in what order it will
run, using it for cleanup is chancy at best. Instead, you should implement a
Dispose method as described later on in this chapter in the section on the
IDisposable interface. If you do override the Finalize method, be aware you
must call MyBase.Finalize inside the Finalize method, and you should
always duplicate any Dispose code there as well.
13.2.2 Equals and ReferenceEquals
The Object class supplies two versions of Equals, one shared and one not.
The shared version has this syntax:
Overloads Public Shared Function Equals(Object, Object) As Boolean
and is used in this form:
Equals(a, b)
The nonshared version has the syntax:
Overloads Overridable Public Function Equals(Object) As Boolean
and is used in this form:
a.Equals(b)
The two versions of the Equals method are designed to determine whether
two items have the same value, but you should be prepared to overload
equals if it makes sense in your class. Keep in mind that because shared
members of classes cannot be overridden, you can only override the
Sub Main() Dim a As Integer = 3 Console.WriteLine("a is a value type is " & IsValueType(a)) Console.ReadLine() End Sub Function IsValueType(ByVal thing As Object) As Boolean Return (TypeOf (thing) Is System.ValueType) End Function

Visual Basic Unit 13
Sikkim Manipal University Page No.: 269
nonshared version of Equals. For example if you have two ways of
representing objects in a value type, you should make sure that Equals can
handle this (The designers did this for the String class as well, although
strictly speaking, this is not a value type.)
The Object class also provides a shared (and therefore not overridable)
version of a method called ReferenceEquals. The ReferenceEquals method
determines whether two items refer to the same object; that is, whether the
specified Object instances are the same instance. For example, two strings,
a and b, can have a.Equals(b) true and ReferenceEquals(a, b) false, as this
code shows:
Fig. 13.1: The difference between Equals and ReferenceEquals
13.2.3 The ToString Method
The ToString method returns a string that represents the current object.
How successful this representation is to debugging and to the user of the
class depends on the implementer of the class. The default implementation
of ToString returns the fully qualified type name of the object. For example:
System.Object
OR
Example1.Programmer
You should get into the habit of overriding ToString for your own classes
where you can give a more meaningful string representation of the class.
Sub Main() Dim a As String = "hello" Dim b As String = "Hello" Mid(b, 1, 1) = "h" Console.WriteLine("Is a.Equals(b)true? " & a.Equals(b)) Console.WriteLine("Is ReferenceEquals(a, b) true? " & _ ReferenceEquals(a, b)) Console.ReadLine() End Sub

Visual Basic Unit 13
Sikkim Manipal University Page No.: 270
Example:
The result is:
EmployeeTest1.EmployeeTest1+Employee my name is Tom
13.2.4 GetType and Reflection
Every type in the .NET Framework is represented by a Type object. The
Type class is full of mouth-twisting members such as the GetMembers
method, which lets you get at the members of that class by name. The idea
is that the GetType method in Object returns a Type object that you can use
to query what functionality a type offers you at run time.
This extremely useful feature lets you perform reflection (which sometimes
called runtime type identification). In fact, the Reflection namespace is so
important to the smooth functioning of the .NET Framework that it is
automatically imported into every project in the VS IDE.)
To see reflection at work, add a reference to the System.Windows.Forms
assembly and then run the following program. When you start seeing a
prompt (it will take a moment) press Enter and you will eventually see
something like Figure 13.2. You can keep on pressing Enter and you will
eventually you see all of the members of the Windows.Forms.Form class
(there are many), which is the basis for GUI applications in .NET.
Public Overrides Function ToString() As String Dim temp As String temp = Me.GetType.ToString() & " my name is " & Me.TheName Return temp End Function

Visual Basic Unit 13
Sikkim Manipal University Page No.: 271
Fig. 13.2: The members of the Windows.Forms.Form class via reflection
The key lines 6 and 7 let us retrieve a Type object that represents a
Windows.Forms.Form class. Then, because the GetMembers method of the
Type class returns a collection of MemberInfo objects that describe the
member, we simply iterate through all the members of this class in lines
11–14.
You can replace this code with an instance of another class to see its
members, and you can also get a Type object by passing the fully qualified
name of the class as a string to a version of GetType that is a shared
member of Type class. Reflection allows for late binding in VB .NET via the
InvokeMember method, which takes a string that identifies the member you
want to call (which presumably you discovered by reflection).
1 Option Strict On 2 Imports System.Windows.Forms 3 Module Module1 4 Sub Main() 5 Dim aForm As New Windows.Forms.Form() 6 Dim aType As Type 7 aType = aForm.GetType() 8 Dim member As Object 9 Console.WriteLine("This displays the members of the Form class") 10 Console.WriteLine(" Press enter to see the next one.") 11 For Each member In aType.GetMembers 12 Console.ReadLine() 13 Console.Write(member.ToString) 14 Next 15 Console.WriteLine("Press enter to end") 16 Console.ReadLine() 17 End Sub 18 End Module

Visual Basic Unit 13
Sikkim Manipal University Page No.: 272
13.2.5 MemberWiseClone
First off, in programming, as in modern science:
• A clone is an identical copy of an object.
• The clone’s state can change from the original object’s state but most
important:
• Changes to the clone should not affect the object it was cloned from.
The last point is what makes cloning tricky in any OOP language and it is
why MemberWiseClone is such a potentially dangerous method. The
problem is that objects can have objects inside of them and, if you do not
clone the internal objects at the same time as you clone the object that
contains them, you end up with objects that are joined at the hip and depend
on each other as a result – not what you want in a clone.
The problem is that whenever an object has mutable objects as one of its
instance fields, the MemberWiseClone method always gives you just such
an ill-formed, half-baked kind of clone, known as a shallow copy. The
MemberWiseClone method successfully clones only objects whose
instances fields are value types.
The following example illustrates the meaning of the above stated last point.
Arrays in VB .NET, unlike in VB6 are objects. Consider this class which has
an array as an instance field that we want to try to clone:
1 Public Class EmbeddedObjects 2 Private m_Data() As String 3 Public Sub New(ByVal anArray() As String) 4 m_Data = anArray 5 End Sub 6 Public Sub DisplayData() 7 Dim temp As String 8 For Each temp In m_Data 9 Console.WriteLine(temp) 10 Next 11 End Sub 12 Public Sub ChangeData(ByVal newData As String) 13 m_Data(0) = newData 14 End Sub 15 Public Function Clone() As EmbeddedObjects 16 Return CType(Me.MemberwiseClone, EmbeddedObjects) 17 End Function 18 End Class

Visual Basic Unit 13
Sikkim Manipal University Page No.: 273
Now run this Sub Main:
The result is pretty dramatic, as you can see in Figure 13.3: the change to
the ―clone‖ affected the original object!
Fig. 13.3: Why MemberWiseClone generally will not work?
What is going on in this example? Why does MemberWiseClone fail? Why
do changes to object b affect object a? The reason is that in lines 2 and 4 of
the EmbeddedObject class, we used an array as an instance field that is set
in the constructor.
Arrays are mutable objects, this means the contents of an array can be
changed even when passed ByVal. We changed the state of the internal
array in lines 12–14 of the EmbeddedObjects class. Because the object and
its ―clone‖ are joined by the reference to the m_Data array, these changes
persist when we changed the clone, as you just saw.
Sub Main() Dim anArray() As String = {"HELLO"} Dim a As New EmbeddedObjects(anArray) Console.WriteLine("Am going to display the data in object a now!") a.DisplayData() Dim b As EmbeddedObjects b = a.Clone() Dim newData As String = "GOODBYE" b.ChangeData(newData) Console.WriteLine("Am going to display the data in object b now!") b.DisplayData() Console.WriteLine("Am going to re-display the data in a" & _ " after making a change to object b!!!") a.DisplayData() Console.ReadLine() End Sub

Visual Basic Unit 13
Sikkim Manipal University Page No.: 274
You will see how to fix this example in the section on ICloneable later in this
unit. For now, we merely point out that a true clone (sometimes called a
deep copy) creates clones of all the instance fields of the object, and
continues doing it recursively if necessary. For example, if a class has an
object instance field that in turn has another object instance field, the cloning
process must go two layers down.
Finally, as a way of dealing with its potential problems, the designers of the
.NET Framework made MemberWiseClone a protected member of Object.
This means, as you saw earlier, that only the derived class itself can call
MemberWiseClone. Code from outside the derived class cannot call this
dangerous method in order to clone an object. Also note that
MemberWiseClone returns an Object, which is why we had to use the
CType function in line 16 of the EmbeddedObjects class.
13.2.6 The Fragile Base Class Problem: Versioning
The versioning problem occurred all too often in programming for earlier
versions of Windows, usually in the form of DLL hell – you used a version of
a DLL and a new version came along that broke your code. Why did it break
your code?
The reasons were as obvious as someone inadvertently removing a function
you depended on in the second version, or as subtle as changing the return
type of a function. In any case, all the sources of DLL hell amount to
variations on a theme: someone changes the public interface of code you
depend on, your program is no longer able to use the newer DLL in place of
the older one, and the older one is overwritten.
Whenever you used inheritance in most other OOP languages, you greatly
increased the risk of your code breaking because of versioning issues. You
had to depend on all of the public and protected members of classes higher
up in the food chain not changing in a way that would break your code.
This situation is called the Fragile Base Class Problem: because
inheritance often seems to make our programs resemble a house of cards,
and any disturbance to the bottom layer (the base class) causes the whole
house to fall down. The best way to see this problem in action is to work
with some code. Start by coding the following PayableEntity class into a

Visual Basic Unit 13
Sikkim Manipal University Page No.: 275
separate class library and then compile it into an assembly called
PayableEntityExample by choosing Build.
Close the solution after you have built this DLL.
Now suppose you decide to add a way of getting an address into an
Employee class that depends on the PayableEntity base class,
remembering that we are only going to use the class in its compiled form. To
do this you will need to add a reference to the assembly that contains this
project by going into the \bin subdirectory where you built the
PayableEntityExample DLL. The code for our Employee class might look
like the following; note the line in bold where we inherit from the abstract
class defined in the PayableEntityExample assembly:
Public Class Employee
'since the namespace is PayableEntityExample, the full name of the class
'is PayableEntityExample.PayableEntity!
Inherits PayableEntityExample.Employee
Private m_Name As String
Private m_Salary As Decimal
Private m_Address As String
Private m_TaxID As String
Private Const LIMIT As Decimal = 0.1D
Public MustInherit Class PayableEntity Private m_Name As String Public Sub New(ByVal theName As String) m_Name = theName End Sub Public ReadOnly Property TheName() As String Get Return m_Name End Get End Property Public MustOverride Property TaxID() As String End Class

Visual Basic Unit 13
Sikkim Manipal University Page No.: 276
Public Sub New(ByVal theName As String, ByVal curSalary As
Decimal,_
ByVal TaxID As String)
MyBase.New(theName)
m_Name = theName
m_Salary = curSalary
m_TaxID = TaxID
End Sub
Public Property Address() As String
Get
Return m_Address
End Get
Set(ByVal Value As String)
m_Address = Value
End Set
End Property
Public ReadOnly Property Salary() As Decimal
Get
Return m_Salary
End Get
End Property
Public Overrides Property TaxID() As String
Get
Return m_TaxID
End Get
Set(ByVal Value As String)
If Value.Length <> 11 Then
'need to do something here
Else
m_TaxID = Value
End If
End Set
End Property
End Class

Visual Basic Unit 13
Sikkim Manipal University Page No.: 277
The Sub Main might look like this:
The output is shown in Figure 13.4 below:
Fig. 13.4: A simple program with no versioning yet
You compile this into Versioning1.exe and everyone is happy!
Now, let us imagine the PayableEntity class is actually supplied by a third
party. The brilliant designers of the PayableEntity class are not sitting on
their laurels, so they decide to do what they actually should have done in the
first place: they add an address object to their class, then recompile and
send you the new DLL.
Although they might not send you the source code, we give it to you here.
Notice the change to the constructor (in bold):
Imports Microsoft.VisualBasic.ControlChars
Public Class PayableEntity
Private m_Name As String
Private m_Address As Address
Public Sub New(ByVal theName As String, ByVal theAddress As
Address)
m_Name = theName
m_Address = theAddress
End Sub
Public ReadOnly Property TheName() As String
Get
Return m_Name
End Get
End Property
Public ReadOnly Property TheAddress()
Get
Sub Main() Dim tom As New Employee("Tom", 50000) tom.Address = "901 Grayson" Console.Write(tom.TheName & " lives at " & tom.Address) Console.ReadLine() End Sub

Visual Basic Unit 13
Sikkim Manipal University Page No.: 278
Return m_Address.DisplayAddress
End Get
End Property
End Class
Public Class Address
Private m_Address As String
Private m_City As String
Private m_State As String
Private m_Zip As String
Public Sub New(ByVal theAddress As String, ByVal theCity As String, _
ByVal theState As String, ByVal theZip As String)
m_Address = theAddress
m_City = theCity
m_State = theState
m_Zip = theZip
End Sub
Public Function DisplayAddress() As String
Return m_Address & CrLf & m_City & ", " & m_State _
& crLF & m_Zip
End Function
End Class
This is, of course, an example of truly lousy programming at work. The
developers who coded this managed to lose the original constructor in the
process of ―improving‖ the original version, something that should never be
done. Still, horrors like this did happen and, in the olden days, you probably
would have the old DLL installed on a user’s hard disk, usually in
Windows/System.
Then the new DLL would come along, overwrite the previous version, and
your previously happily running Versioning1 program would break.
Granted, designers of base classes should not do this, but we all know they
did. Try this under .NET, however, and something wonderful happens: your
old program continues to run just fine, because it uses the original
PayableEntity DLL which is automatically stored in the \bin directory of the
Versioning1 solution.
Note: Ultimately, the .NET Framework solves the versioning problem by
making sure your class knows which version of a DLL it depends on and

Visual Basic Unit 13
Sikkim Manipal University Page No.: 279
refuses to run if the correct version is not present. This process is
successful because of the magic of assemblies. However, you can still
circumvent the help .NET’s versioning scheme gives you by copying the
new DLL to the location of the older DLL under the scenario we just
sketched.
.NET’s versioning scheme allows the vendor of a .NET component to add
new members to the next version of their base class (even though the
practice should not be encouraged). Vendors can do this even if the new
member happens to have the same name as a member that you
inadvertently added to a child class that depended on their base class. The
old executable created from the derived class continues to work, because it
will not use the new DLL.
Actually, this is not quite true: it does run fine—until you reopen the source
code for the Versioning1 code in VS .NET, reference the new
PayableEntityExample DLL and try to rebuild the Versioning1 code. At that
point, you will see an like error message like this:
C:\book to comp\chapter 5\Versioning1\Versioning1\Module1.vb(21):
No argument specified or non-optional parameter 'theAddress' of
'Public Sub New(theName As String, theAddress
As PayableEntityExample.Address)'.
The point is once you load up the old source code for the derived class and
reference the new DLL, you will not be able to recompile the code until you
fix the incompatibility that the vendor of the parent class stuck you with.
Before we end this section, we want to make sure that you are not thinking
that eliminating a constructor in favor of a different constructor is a pretty
drastic mistake. Does .NET versioning protect you from more subtle
problems? The answer is yes.
Consider the most common, if subtle, source of versioning problems when
you use inheritance: a Derived class depends on a Parent base class. You
introduce a ParseIt method in the Derived class (as in the following code
where we merely add carriage return/line feed combinations in the parts of
the string we want to display):
Imports Microsoft.VisualBasic.ControlChars
Module Module1
Sub Main()

Visual Basic Unit 13
Sikkim Manipal University Page No.: 280
Dim myDerived As New Derived()
myDerived.DisplayIt()
Console.ReadLine()
End Sub
End Module
Public Class Parent
Public Const MY_STRING As String = "this is a test"
Public Overridable Sub DisplayIt()
Console.WriteLine(MY_STRING)
End Sub
End Class
Public Class Derived
Inherits Parent
Public Overrides Sub DisplayIt()
Console.WriteLine(ParseIt(MyBase.MY_STRING))
End Sub
Public Function ParseIt(ByVal aString As String)
Dim tokens() As String
'actually split defaults to splitting on spaces
tokens = aString.Split(Chr(32))
Dim temp As String
'rejoin them into one string adding a CR/LF betweeen the words
temp = Join(tokens, CrLf)
Return temp
End Function
End Class
End Module
The output is shown in Figure 13.5 below:
Fig. 13.5: A simple parsing program at work
Now imagine you are supplied the Parent class in compiled form instead of
in source form. And, when you are shipped Version 2 of the Parent class, it
comes with its own version of ParseIt that it uses extensively in its code.
Visual Basic Unit 13
Sikkim Manipal University Page No.: 281
Because functions in VB .NET are virtual, polymorphism dictates that calls
to DisplayIt when an object of type Derived is stored in an object variable of
type Parent, will always use the ParseIt method of the Derived class and not
the ParseIt method in the parent class. However, we now have a potential, if
very subtle, versioning problem.
In this scenario, the code in the Parent class that uses its version of ParseIt
function does not know how the Derived class implemented ParseIt. Using
the derived class version of ParseIt, as polymorphism requires, could break
what is needed for the parent class’s functioning.
Self Assessment Questions
1. The ________ boolean function tells you if an object variable is an array.
2. We override the _______ method in your code to create cleanup code
that runs when the garbage collector reclaims the memory your object
uses.
3. The _______ method determines whether two items refer to the same
object; that is, whether the specified Object instances are the same
instance.
4. The default implementation of _______ method returns the fully qualified
type name of the object.
13.3 Overview of Interfaces
We hope we have convinced you that inheritance has its place in VB .NET,
but you need to also master interfaces to take full advantage of VB .NET’s
OOP features. We take this powerful feature up in the next few sections.
First off, think of implementing an interface as making a binding contract
with any class that uses your class. Interface-style programming is the
foundation of what is called object composition or black box reuse in OOP
theory. Interfaces, of course, were also at the heart of COM programming,
and how OOP was done in earlier versions of VB.) With interfaces, you rely
on the class you depend on to expose certain functionality defined by the
signature of the header of the member, now and forever.
Unlike inheritance, there are no dependencies involved with interfaces –
each implementation of an interface can stand on its own.

Visual Basic Unit 13
Sikkim Manipal University Page No.: 282
When you implement an interface, you:
• Assert that your code will have methods with certain signatures
• Have code (possibly even empty code) with those signatures inside the
class
The actual implementation of these members can vary and, as we just said,
they can even do nothing. All you do is make a promise to have certain code
with certain signatures. This simple promise has a lot of nice consequences.
Some of the best ones are:
• It lets a smart compiler replace calls into your code with a fast table
lookup and a jump.
• From the programmer’s point of view, it lets developers call code in your
classes by signature, without fear that the member does not exist.
• The binding contract also lets a compiler use polymorphism just as well
as inheritance chains do.
13.3.1 Mechanics of Implementing an Interface
Many programming shops (Microsoft, for example) subscribe to the notion of
a lead programmer or lead tester on a team. Suppose you want to extend
your employee management program to allow for the idea of a Lead
Programmer or Lead Tester with certain special properties such as having a
morale fund to cheer up people when they have been working too hard.
In building this possibility into an Employee Management system program,
you cannot use inheritance in VB .NET, because the Programmer class and
the Tester class already inherit from the Employee class and only single
inheritance is allowed in .NET. This is a perfect example of where an
interface comes to your rescue.
The first step is to define the interface. Unlike VB6, in which an interface
was merely a class, VB .NET has an Interface keyword. For example, let us
suppose leads have to rate team members and they get to spend the
morale fund. The interface definition would look like this:
Public Interface ILead Sub SpendMoraleFund(ByVal amount As Decimal) Function Rate(ByVal aPerson As Employee) As String Property MyTeam() As Employee() Property MoraleFund() As Decimal End Interface

Visual Basic Unit 13
Sikkim Manipal University Page No.: 283
There are no access modifiers such as Public or Private in an interface
definition; the only valid modifiers for Sub, Function, or Property statements
are Overloads and Default. Defining an interface is thus pretty easy. Any
class implementing our ILead interface makes a contract to have:
• A sub that takes a decimal as a parameter
• A function that takes an Employee object and returns a string
• A read-write property that returns an array of Employee objects
• A read-write property that returns a decimal
And, as you will soon see, the names of members in the implementing
methods do not matter – the key point is that they have the promised
signature.
To implement an interface in a class, the first step is to make sure the
interface is referenced or already part of the solution. Next, you include the
Implements keyword in the line following the class name and any Inherits
statement.
Example:
At this point, you will see that the keyword ILead is underscored by a blue
squiggly line indicating a problem. This is because the compiler is insisting
that you fulfill your contract, even if only by using empty methods.
How do you do this? Unlike earlier versions of VB, which used a specific
form of the signature to indicate a member implemented an interface, VB
.NET indicates this directly, as you can see in the bold second line in this
code:
Public Class LeadProgrammer Inherits Programmer Implements ILead End Class
Public Function Rate(ByVal aPerson As Employee) As String _ Implements ILead.Rate End Function

Visual Basic Unit 13
Sikkim Manipal University Page No.: 284
Although it is certainly common to match up the names of the interface
member and the member that implements it, it is not necessary. For
example, this is perfectly acceptable:
The key point is that the parameter and return types match the signature
used for that part of the interface. You can use any legal attributes on that
kind of method – Overloads, Overrides, Overridable, Public, Private,
Protected, Friend, Protected Friend, MustOverride, Default, and Static
modifiers – and still fulfill the contract. The Shared attribute is the only one
you cannot use, because interface methods must be instance members, not
class members.
If you use a Private member of a class to implement an interface member,
then the only way to get at that member is through a variable of that
interface’s type. Otherwise, unlike earlier versions of VB, you can always
access interface members through an object of the class type. You no
longer have to assign it to a variable of the interfaces type.
Example:
To go the other way, however, you must use CType:
but a line like this is not possible:
aName = tom.TheName 'NOT ALLOWED
Public Property OurMoraleFund() As Decimal Implements ILead.MoraleFund Get Return m_MoraleFund End Get Set(ByVal Value As Decimal) m_MoraleFund = Value End Set End Property
Dim tom As New LeadProgrammer("Tom", 65000) tom.SpendMoraleFund(500)
Dim tom As New LeadProgrammer("Tom", 65000) Dim aLead As ILead, aName As String aLead = tom aName = Ctype(aLead, Programmer).TheName ' OK

Visual Basic Unit 13
Sikkim Manipal University Page No.: 285
In general, here are the rules for converting between an object type and an
interface it implements:
• You can always assign a variable declared to be of the class type to the
variable declared to be of any interface type that the class implements.
In particular, if a method takes as a parameter a variable of an interface
type, you can pass into it a variable of any type that implements the
interface. (This rule is analogous to the fundamental inheritance rule that
derived types can always be used in place of their parent types.) However:
You must use CType to go from a variable of the interface type to a variable
of a type that implements the interface. To determine if an object
implements an interface, use TypeOf with Is.
Example:
Here is the full version of our LeadProgrammer class. Of course, we have
not done much in the implementation of the interface members, but this
code gives you an idea of what you can do:
Public Class LeadProgrammer
Inherits Programmer
Implements ILead
Private m_MoraleFund As Decimal
Private m_MyTeam As Employee()
Public Function Rate(ByVal aPerson As Employee) As String _
Implements ILead.Rate
Return aPerson.TheName & " rating to be done"
End Function
Public Property MyTeam() As Employee() _
Implements ILead.MyTeam
Get
Return m_MyTeam
End Get
Set(ByVal Value As Employee())
m_MyTeam = Value
Dim tom As New LeadProgrammer("tom", 50000) Console.WriteLine((TypeOf (tom) Is ILead)) returns True.

Visual Basic Unit 13
Sikkim Manipal University Page No.: 286
End Set
End Property
Public Sub SpendMoraleFund(ByVal amount As Decimal) _
Implements ILead.SpendMoraleFund
'spend some money
Console.WriteLine("Spent " & amount.ToString())
End Sub
Public Property OurMoraleFund() As Decimal Implements
ILead.MoraleFund
Get
Return m_MoraleFund
End Get
Set(ByVal Value As Decimal)
m_MoraleFund = Value
End Set
End Property
Public Sub New(ByVal theName As String, ByVal curSalary As Decimal)
MyBase.New(theName, curSalary)
End Sub
End Class
13.3.2 When to Use Interfaces, When to Use Inheritance?
Although an interface seems a lot like an abstract class, this analogy can be
more trouble than it is worth to follow. An abstract class can have many
concrete members, but an interface can have none. You should create
abstract base classes only after a thoughtful process of factoring common
behavior out to the most primitive ancestor possible, and for no other
reason.
An interface exists outside an inheritance chain – that is its virtue. You lose
the ability to automatically reuse code, but you gain the flexibility of choosing
your own implementation of the contract. Use an interface when you want to
indicate that certain behavior is required, but you are willing to leave the
actual implementation of the behavior to the implementing class.
In .NET, structures cannot inherit from anything except Object, but they can
implement interfaces. Interfaces are the only choice available to you in .NET

Visual Basic Unit 13
Sikkim Manipal University Page No.: 287
when two classes have some common behavior but there is no ancestor
they are both examples of.
13.3.3 Important Interfaces in the .NET Framework
We obviously cannot cover all the interfaces in the .NET Framework in
these few pages, but we want to mention a few of the most important ones.
Two are in some sense marker interfaces, because you implement them to
advertise that your classes have a certain type of functionality that many
classes may want to exhibit.
These marker interfaces are:
• ICloneable: Indicates a Clone method that provides a deep copy
• IDisposable: Tells the user that your class consumes resources that the
garbage collectors will not be able to reclaim
ICloneable
.NET’s designers decided to let you indicate that you are providing this
feature through a marker interface called ICloneable, which contains one
member Clone:
Implement this interface (and hence the Clone method) if you want to offer
users of your class the opportunity to clone instances of that class. It is then
up to you to decide if using MemberWiseClone is enough when you actually
implement the Clone method in your class. As we said previously,
MemberWiseClone is enough if the instance fields are value types or
immutable types like String.
IDisposable
We have mentioned that you should not rely on the Finalize method to clean
up after resources that the automatic garbage collector cannot know about.
The convention in .NET programming is to implement the IDisposable
interface instead, because it has a single member Dispose, which should
contain the code to reclaim resources.
Public Interface ICloneable Function Clone() As Object End Interface
Public Interface IDisposable Sub Dispose() End Interface
Visual Basic Unit 13
Sikkim Manipal University Page No.: 288
Self Assessment Questions
5. The _____ style programming is the foundation of what is called object
composition or black box reuse in OOP theory.
6. To determine if an object implements an interface, use TypeOf with
_________.
7. The __________ marker interface tells the user that your class
consumes resources that the garbage collectors will not be able to
reclaim.
13.4 Summary
This unit has covered the following topics:
Object: The Ultimate Base Class
The .NET Framework (and hence VB .NET) depend on every type inheriting
from the common Object type, this is the ultimate ancestor of all classes.
This includes both reference types (instances of a class) and value types
(instance of a struct, enum, dates or numeric types). This means, for
example, that any function that takes a parameter of Object type can be
passed a parameter of any type.
Overview of Interfaces
Implementing an interface is making a binding contract with any class that
uses your class. Interface-style programming is the foundation of what is
called object composition or black box reuse in OOP theory. With interfaces,
you rely on the class you depend on to expose certain functionality defined
by the signature of the header of the member, now and forever. Unlike
inheritance, there are no dependencies involved with interfaces – each
implementation of an interface can stand on its own.
13.5 Terminal Questions
1. Describe the following methods of the Object class in VB.Net:
a. Equals and ReferenceEquals
b. MemberWiseClone
2. Explain the Mechanics of Implementing an Interface.
Rule: If your class uses a class that implements IDisposable you must call the
Dispose method.
Visual Basic Unit 13
Sikkim Manipal University Page No.: 289
13.6 Answers
Self Assessment Questions
1. IsArray
2. Finalize
3. ReferenceEquals
4. ToString
5. Interface
6. Is
7. IDisposable
Terminal Questions
1. The Object class supplies two versions of Equals, one shared and one
not. The shared version has this syntax:
Overloads Public Shared Function Equals(Object, Object) As
Boolean
and is used in this form:
Equals(a, b)
The nonshared version has the syntax:
Overloads Overridable Public Function Equals(Object) As
Boolean
and is used in this form:
a.Equals(b) (Refer Section 13.2)
2. Many programming shops (Microsoft, for example) subscribe to the
notion of a lead programmer or lead tester on a team. Suppose you
want to extend your employee management program to allow for the
idea of a Lead Programmer or Lead Tester with certain special
properties such as having a morale fund to cheer up people when they
have been working too hard. (Refer Section 13.3)
Visual Basic Unit 14
Sikkim Manipal University Page No.: 290
Unit 14 Multithreading in Visual Basic
Structure:
14.1 Introduction
Objectives
14.2 Getting Started with Multithreading
14.3 The Mechanics of Thread Creation
14.4 Joining Threads
14.5 Thread Names, CurrentThread, and ThreadState
14.6 The Threads Window
14.7 Sleep Method
14.8 Ending or Interrupting a Thread
14.9 Suspending or Killing a Thread
14.10 Daemon (Background) Threads
14.11 Summary
14.12 Terminal Questions
14.13 Answers
14.1 Introduction
In the previous units, we have studied different applications of VB.Net using
different objects, and controls. In this unit, we would be studying the concept
of running various applications simultaneously in VB.Net. using
multithreading.
Multitasking is a feature of modern operating systems that we all take for
granted. After all, we expect to be able to run a word processor and an
e-mail program at the same time and not have them be in conflict, or have
the word processor stop working if e-mail needs to be downloaded. Of
course, what actually happens is that the operating system rapidly switches
between the programs that are running on the CPU (unless you have
multiple CPUs of course).
This gives the impression that multiple programs are running at the same
time, because even the fastest typist (or for that matter, the fastest Internet
connection) cannot keep up with the speed of even one modern CPU.
Multithreading, in a way, is the next level of multitasking: instead of having
the operating system switch between different programs, multithreading

Visual Basic Unit 14
Sikkim Manipal University Page No.: 291
asks the operating system to switch between different parts of the same
program. Multithreading allows an e-mail program to download new
messages while you are reading or composing another message.
Multithreading, too, is a feature we all seem to take for granted.
VB has never really done multithreading. It is true that, starting with VB5, it
did get a form of multithreading, called apartment threading. As you will
soon see, apartment threading is multithreading on training wheels. And,
like training wheels, apartment threading gives you some of the benefits of
multithreading, but prevents you from accessing its full power in an attempt
to keep you safe. We all need to remove the training wheels sooner or later,
and VB .NET is the first version of VB that does so.
However, multithreading is not an easy feature to fully implement in a
programming language or for programmers to master. Why?
Because multithreading can cause extraordinarily subtle bugs in your
code that seem to occur randomly (the most frustrating kind of bugs!).
Objectives:
After studying this unit, you should be able to:
define and describe the concept of multithreading
explain various mechanisms of Thread creation
illustrate the usage of Join concept in combining one or more threads
describe the thread properties: Thread Names, CurrentThread, and
ThreadState
describe the ThreadWindow
illustrate the process of making a thread sleep by using Sleep method
illustrate the mechanism of ending or interrupting a thread
explain the importance of Daemon(Background) threads
14.2 Getting Started with Multithreading
Multithreading is the most sophisticated form of programming. If you are not
exceedingly careful, you can create bugs that are almost impossible to find
and cost a fortune to fix.
For this reason, some of the programs in this chapter are bad programs - we
purposefully designed them in order to show you how things can go wrong.
We think the safest approach to learning multithreaded programming is to

Visual Basic Unit 14
Sikkim Manipal University Page No.: 292
see what can go wrong even when, on the surface, a program looks like it
should work. You must become more aware of potential problems and ways
of avoiding them if you want to use multithreaded programming techniques.
Still, as dangerous as it can be, multithreading is required if you are to solve
certain programming problems in a professional way. If your programs do
not use multithreading when it is called for, users will be seriously
disappointed and will choose someone else’s program. For example, it was
not until Eudora’s fourth version that the popular e-mail program had the
multithreaded features that modern e-mail programs must have if they are
not to seriously frustrate users. By the time Eudora implemented
multithreading, many people had moved on to other products.
(One of us who was using Eudora as his primary e-mail program stopped
using it because a multithreaded version was not available then.)
Finally, there is no escaping multithreading in .NET: all .NET programs are
multithreaded, since the garbage collector runs as a low priority thread in
the background. And as you will soon learn, serious GUI programming in
.NET depends on using threads correctly in order to keep GUI programs
responsive when parts of your code are running time-consuming processes.
The term thread comes from “thread of execution,” which is used to mean
that every program is running in a certain context. The context describes
how the thread is using memory for storing its code and data. If you store
the context, you essentially store a thread of execution within your program.
Taking a snapshot of the thread’s context takes time. The operating system
has to freeze the thread’s context and store it somewhere when it passes
control to another thread. When the program wants to restart the stopped
thread, it has to restore the thread’s context, which takes more time. You
should use multithreading only when the benefit outweighs the cost. Here
are some typical examples of when this is true:
When there is a natural division of the users handling the program, as in the
example of downloading e-mail while composing new e-mail
When you need to do a complicated calculation in a GUI-intensive
program and do not want your GUI to become unresponsive
When you need to take full advantage of a multiprocessor computer
running an operating system that can use multiple processors (in this

Visual Basic Unit 14
Sikkim Manipal University Page No.: 293
case, as long as you keep the number of active threads to be less than
the number of CPUs, you should incur little or no thread overhead)
Before we delve into the mechanics of writing multithreaded programs, we
want to clear up one common source of confusion amongst people new to
multithreaded programming:
A thread runs a procedure, not an object.
We are not sure what “running an object” means, but one of us often
teaches multithreading programming, and this question seems to be the
uppermost in many people’s minds. Perhaps they are thinking that a thread
should start only by calling the New method of a class, and then that thread
then runs any messages sent to that object. This is completely wrong. A
single object can have multiple threads running different (or even the same)
methods, so different threads are sending and responding to specific
messages sent to the object.
Because a thread is created from a method of an object, you usually must
have previously created the object. After you build the object, you create the
thread by passing it the address of the method inside the object, and then
you tell the thread to start running that method. Of course, a procedure that
a thread was created to run, like all procedures, can create new objects or
manipulate existing objects. It can also call other procedures or functions
that are visible to it. The other vital point to keep in mind is:
• A thread ends when the procedure that you used to create it ends and
will not end normally until this procedure ends.
.NET keeps most of the functionality you call upon to use threads with in the
Threading namespace. Most programs that use threads therefore begin
with:
Imports System.Threading
to simplify typing and to make IntelliSense most useful.
Next, as you might expect, delegates figure prominently into the picture,
since threads run procedures. In particular, the .NET Framework comes with
a ThreadStart delegate in the Threading namespace that you usually use to
start a thread. Here is the syntax for using this delegate:
Public Delegate Sub ThreadStart()

Visual Basic Unit 14
Sikkim Manipal University Page No.: 294
The procedure a ThreadStart delegate calls must be a parameterless
subprocedure. Thus, you cannot build a thread using a function (since this
returns a value) or a procedure that takes parameters. What is more, you
must have alternative methods to get information out of a thread, because
the methods they run do not have return values, nor can they use ByRef
parameters.
For example, if ThreadMethod sits inside a class called WillUseThread, then
you can have the ThreadMethod affect the properties of instances of the
WillUseThread class to pass information out of the ThreadMethod
procedure.
We will introduce the various concepts of multithreading in subsequent
sections.
14.3 The Mechanics of Thread Creation
Let us start with a trivial example: suppose you want to run, in a separate
thread, a procedure that simply decrements a counter forever. Here is the
class that contains the procedure:
Because the test Do Loop is always true, you would think that the
SubtractFromCounter sub would run without interruption. However, through
the magic of threads, this will not quite happen.
Public Class WillUseThreads Public Sub SubtractFromCounter() Dim count As Integer Do While True count -= 1 Console.WriteLine("Am in another thread and counter =" _ & count) Loop End Sub End Class

Visual Basic Unit 14
Sikkim Manipal University Page No.: 295
Here is the Sub Main and the Imports statement we need to get the thread
to run:
Let us go over the key points one by one. First, Sub Main always runs in
what is called the main thread. A .NET program always has at least two
threads running: the main thread and the garbage collection thread. In line 1
we make a new instance of the test class. In line 2 we create a ThreadStart
delegate by passing to it the address of the parameterless sub named
SubtractFromCounter in the instance of the test class we created in line 1.
Because we import the Threading namespace, we do not need to use the
long form ThreadMethod.
We actually create the thread in line 3. Notice that the constructor for the
Thread class requires a ThreadStart delegate. Some people like to combine
the two lines into one (logical) line:
Dim bThread As New Thread(New ThreadStart(AddressOf _
myTest.SubtractFromCounter))
Finally, line 4 “starts” the thread by calling the Start method on the instance
of the Thread class you created with a ThreadStart delegate. This tells the
system to run the Subtract function on its own thread.
Option Strict On Imports System.Threading Module Module1 Sub Main() 1 Dim myTest As New WillUseThreads() 2 Dim bThreadStart As New ThreadStart(AddressOf _ myTest.SubtractFromCounter) 3 Dim bThread As New Thread(bThreadStart) 4 bThread.Start() Dim i As Integer 5 Do While True Console.WriteLine("In main thread and count is " & i) i += 1 Loop End Sub End Module

Visual Basic Unit 14
Sikkim Manipal University Page No.: 296
Figure 14.1 is an example of what might happen after you run this program
for a while and then stop it with Ctrl+Break. In our case, the counter got up
to 341 in the main thread before it decided to actually run the new thread!
Figure 14.1: A simple mutithreaded program stopped while running
If you run the program a little longer, you will see something like Figure 14.2,
which shows that the separate thread was put on hold while the main thread
got to run again. What happens is called preemptive multithreading through
time slicing and we take up what this mouthful means next.
Figure 14.2: Switching between threads in a simple multithreaded program

Visual Basic Unit 14
Sikkim Manipal University Page No.: 297
The operating system uses what is known as preemptive multithreading
through time slicing, to interrupt threads and give other threads time to run.
Certain ways of doing time slicing also solve one of the more common
troubles with multithreading programs – a phenomenon called starvation,
which occurs when you have one thread that takes up all the CPU cycles
and never releases control to the other threads. (Typically, this is the result
of using tight loops like the ones in our example program).
To prevent starvation, make sure your threads give up some time to the
other threads. The next best solution is to have an operating system that
always preempts running threads, no matter how high their priority, so that
every thread gets at least a small slice of time to work in.
By adding this line to the example thread program, right before the call to
start the thread, even low priority threads get a chance at some CPU time:
bThread.Priority=ThreadPriority.Highest
This tells Windows to run the new thread with its highest priority and makes
the main thread a lower priority.
Figure 14.3 shows that the new thread starts running sooner than it did
previously, but Figure 14.4 shows that the main thread still gets some time
(admittedly, only a very small amount of time, and only after the subtracting
thread ran for a long while).
The results you get when you run the program will be similar to those shown
in Figures 14.3 and 14.4, but because of differences between your system
and ours, they will not be identical.

Visual Basic Unit 14
Sikkim Manipal University Page No.: 298
Figure 14.3: Highest priority thread (usually) starts up quicker
Fig. 14.4: Lower priority thread is still not starved
Visual Basic Unit 14
Sikkim Manipal University Page No.: 299
The ThreadPriority enumeration has five levels:
1. ThreadPriority.Highest
2. ThreadPriority.AboveNormal
3. ThreadPriority.Normal
4. ThreadPriority.BelowNormal
5. ThreadPriority.Lowest
Self Assessment Questions
1. Instead of having the operating system switch between different
programs, _____ asks the operating system to switch between different
parts of the same program.
2. A thread runs a ____, not an object.
14.4 Joining Threads
You sometimes need to stop a thread until another thread has finished
doing some work. For example, you may want thread 1 to wait until
computations in thread 2 are finished. You set this up by calling the Join
method on thread 2 while running thread 1. In other words, code like this:
thread2.Join()
puts the current thread to sleep and it waits until thread 2 is over. Thread 1
is now a blocked thread.
If you join thread 1 to thread 2, the operating system will (eventually) start
thread 1 once thread 2 ends. (The jargon says it is now unblocked.)Keep in
mind that this process is nondeterministic: you cannot know exactly how
soon after thread 2 finishes will thread 1 start up again.
There is another version of Join that returns a Boolean value:
thread2.Join(Integer)
This method either waits for the thread 2 to die or waits for a specified time
in milliseconds to expire before thread 2 is unblocked, so that it will be
scheduled to run again by the operating system. This method returns true if
thread 2 dies before the timeout specified, and false if it does not.

Visual Basic Unit 14
Sikkim Manipal University Page No.: 300
14.5 Thread Names, CurrentThread, and ThreadState
Get into the habit of giving each of your threads a name before you start
them. This helps a great deal when debugging programs involving threads.
You do this via the Name property of thread objects with code like this:
bThread.Name = "Subtracting thread"
Also, you can always get a reference to the thread that is running a piece of
code by using Thread.CurrentThread, which returns a reference to the
currently running thread.
Again, saying that threads are scheduled in a nondeterministic manner is a
fancy way of saying you have very little control over what scheduling the
operating system is doing. For this reason, you will occasionally want to
make a call to the ThreadState property, which returns a value that indicates
the current state of a thread.
14.6 The Threads Window
Visual Studio .NET’s Threads window is a great help in dealing with
threaded programs. You make this window active when you are in break
mode by going to the Debug|Windows submenu. Suppose, for example, you
name bThread via a call to:
bThread.Name = "Subtracting thread"
After you use Ctrl+Break (or some other method) to stop the program, your
Threads window will look something like Figure 14.5.
Figure 14.5: The Threads window

Visual Basic Unit 14
Sikkim Manipal University Page No.: 301
The arrow in the first column marks the active thread, the same thread you
get by calling Thread.CurrentThread. The ID column merely lists a number
that identifies each thread. The next column gives the name of the thread (if
you assigned it one).
The next column identifies the code currently running. (For example, the
WriteLine procedure in the Console class, as shown in Figure 10-5). The
remaining columns indicate the priority level and whether the thread is
suspended.
The Threads window lets you – and not the operating system – control
threads in your program via the context menu for each item. For example,
you can freeze the current thread by right-clicking on its line and choosing
Freeze (you can later unfreeze it). Because the operating system cannot run
a frozen thread, this can be a useful in debugging when you need to isolate
a misbehaving thread. You can also make another (nonfrozen) thread active
by right-clicking on its line and choosing Switch to Thread (double-clicking
the thread also works). This is extremely useful when analyzing a program
for possible deadlocks.
14.7 Sleep Method
You may occasionally want to tell a thread to Sleep when it is not needed. A
sleeping thread is another example of a blocked thread. When you put a
thread to sleep, the other threads in the program obviously have more CPU
cycles to play with.
A common syntax for Sleep is:
Thread.Sleep(Number of milliseconds)
which tells the currently active thread to sleep for at least the specified
number of milliseconds. (It may not wake up exactly at that moment,
however.)
Notice the lack of a reference to a specific thread – you can only tell the
currently executing thread to sleep. This version of Sleep makes the current
thread relinquish the rest of its time slice:
Thread.Sleep(0)

Visual Basic Unit 14
Sikkim Manipal University Page No.: 302
This version tells the current thread to go to sleep indefinitely (only a call to
Interrupt can waken it):
Thread.Sleep(Timeout.Infinite)
Because you can interrupt a sleeping thread (even if it is sleeping
indefinitely) with a call to the Interrupt method, which throws a
ThreadInterruptedException, you should use Sleep only in a Try-Catch
block, as in this framework:
Self Assessment Questions
3. The .NET Framework comes with a _____ delegate in the Threading
namespace that you usually use to start a thread.
4. The phenomenon of _____ occurs when you have one thread that takes
up all the CPU cycles and never releases control to the other threads.
5. The ______________ statement tells Windows to run the new thread
with its highest priority and makes the main thread a lower priority.
14.8 Ending or Interrupting a Thread
A thread ends when you get to the end of the method used to create it in the
ThreadStart delegate, but you may need a way to end the method (and thus
the thread) when certain events occur. It is occasionally useful to direct a
thread to check a condition variable to decide if it should end abnormally.
Creating a framework for using a condition variable involves placing code
that tests the condition variable and then exits the Sub if the condition
variable exists. The most common way to do this is to have an enclosing
Do-While loop in your Sub:
Try Thread.Sleep(200) Catch tIe As ThreadInterruptedException 'thread interrupted Catch e As Exception 'other exception End Try

Visual Basic Unit 14
Sikkim Manipal University Page No.: 303
If you need to check the condition variable at a special place, use an If-Then
with the Exit Sub keywords inside an infinite loop.
Unfortunately, code in a sleeping thread (or one that is otherwise blocked) is
not running, so polling the condition variable will not work. In this case, you
need to:
Call the Interrupt method on an object variable that references the
thread.
You can call Interrupt only on a thread in a Wait, Sleep, or Join thread state.
If you do call interrupt on a thread in one of these states, then (eventually)
the thread will start up again, and the runtime will trigger a Thread
Interrupted Exception in the thread. This happens even if the thread has
been put to sleep indefinitely via a call to Thread. Sleep (Timeout .Infinite).
(We say eventually, because of the nondeterministic nature of thread
scheduling.)
In this case, you Catch the ThreadInterruptedException and write cleanup
code in the Catch clause. However, the Catch clause is not required to end
the thread in response to an interruption – that is up to the thread itself!
14.9 Suspending or Killing a Thread
Two other methods in the threading namespace interrupt the normal
functioning of a thread:
Suspend
Abort
We are not sure why these methods were included in .NET, because using
either Suspend or Abort is likely to leave your programs in an unstable state.
Neither method gives a thread a reasonable chance to do any cleanup. If
Sub ThreadedMethod() 'you need to have a way to poll the condition variable 'for example, it can be a property of a class that you have a reference to Do While conditionVariable = False And MoreWorkToDo 'all the code goes here Loop End Sub

Visual Basic Unit 14
Sikkim Manipal University Page No.: 304
you call Suspend or Abort, you have no way of knowing the state the thread
leaves objects in when it suspends itself or when it is aborted.
Calling Abort throws a ThreadAbortException, but, to stress how bad an
idea relying on this rather strange exception is, we quote the documentation
for the .NET SDK:
When a call is made to Abort to destroy a thread, the common language
runtime throws a ThreadAbortException.
ThreadAbortException is a special exception that is not catchable. When
this exception is raised, the runtime executes all the finally blocks before
killing the thread. Since the thread can do an unbounded computation in the
finally blocks, you must call Join to guarantee that the thread has died.
The moral is: do not use Abort or Suspend. (If you do use Suspend, you
must use Resume to wake up the suspended thread.)
Hence:
The only safe method to use to end a thread is to poll a (synchronized)
condition variable or use the Interrupt method we just showed you.
14.10 Daemon (Background) Threads
Some threads that run in the background automatically stop when nothing
else in the program is running. The garbage collector, for instance, runs in
one of these background threads. You usually create a background thread if
you want to have a thread that listens for data, but you want this to happen
only as long as there is some code that can process the data running in
other threads.
The syntax is:
NameOfThread.IsBackground = True
Self Assessment Questions
6. The ____ code puts the current thread (Thread 1) to sleep and waits
until Thread 2 is over.
7. To get a reference to the thread that is running a piece of code we use
_____ method.
8. The _____ version of Sleep makes the current thread relinquish the rest
of its time slice.

Visual Basic Unit 14
Sikkim Manipal University Page No.: 305
14.11 Summary
This unit has covered the following topics:
Getting Started with Multithreading
Multithreading, in a way, is the next level of multitasking: instead of having
the operating system switch between different programs, multithreading
asks the operating system to switch between different parts of the same
program.
Multithreading is required if you are to solve certain programming problems
in a professional way. If your programs do not use multithreading when it is
called for, users will be seriously disappointed and will choose someone
else’s program.
Joining Threads
You sometimes need to stop a thread until another thread has finished
doing some work. For example, you may want thread 1 to wait until
computations in thread 2 are finished. You set this up by calling the Join
method on thread 2 while running thread 1.
Sleep Method
You may occasionally want to tell a thread to Sleep when it is not needed. A
sleeping thread is another example of a blocked thread. When you put a
thread to sleep, the other threads in the program obviously have more CPU
cycles to play with.
Ending or Interrupting a Thread
A thread ends when you get to the end of the method used to create it in the
ThreadStart delegate, but you may need a way to end the method (and thus
the thread) when certain events occur. It is occasionally useful to direct a
thread to check a condition variable to decide if it should end abnormally.
Suspending or Killing a Thread
Using either Suspend or Abort is likely to leave your programs in an
unstable state. Neither method gives a thread a reasonable chance to do
any cleanup. If you call Suspend or Abort, you have no way of knowing the
state the thread leaves objects in when it suspends itself or when it is
aborted.

Visual Basic Unit 14
Sikkim Manipal University Page No.: 306
Daemon (Background) Threads
You usually create a background thread if you want to have a thread that
listens for data, but you want this to happen only as long as there is some
code that can process the data running in other threads.
14.12 Terminal Questions
1. Explain various methods of creating threads in VB.Net.
2. Illustrate the process of making a thread to sleep.
3. Describe how to end or interrupt a thread.
14.13 Answers
Self Assessment Questions
1. multithreading
2. procedure
3. ThreadStart
4. Starvation
5. bThread.Priority=ThreadPriority.Highest
6. thread2.Join()
7. Thread.CurrentThread
8. Thread.Sleep(0)
Terminal Questions
1. Sub Main always runs in what is called the main thread. A .NET program
always has at least two threads running: the main thread and the
garbage collection thread. In line 1 we make a new instance of the test
class. (Refer Section 14.3)
2. You may occasionally want to tell a thread to Sleep when it is not
needed. A sleeping thread is another example of a blocked thread.
When you put a thread to sleep, the other threads in the program
obviously have more CPU cycles to play with. (Refer Section 14.7)
3. A thread ends when you get to the end of the method used to create it in
the ThreadStart delegate, but you may need a way to end the method
(and thus the thread) when certain events occur. It is occasionally useful
to direct a thread to check a condition variable to decide if it should end
abnormally.
(Refer Section 14.8)

Visual Basic Unit 14
Sikkim Manipal University Page No.: 307
Acknowledgements, References and Suggested Readings:
1. .NET Framework Essentials, O’Reilly Series by Thuan L. Thai, Hoang
Lam, 2nd Edition, February 2002.
2. Sceppa, David, 1972-Programming ADO, Microsoft Press
3. Programming VB.NET: A Guide for Experienced Programmers by GARY
CORNELL AND JONATHAN MORRISON, Edition 2002, Apress
Web Sites:
1. http://me.emu.edu.tr/cmpe106/vb/Lectures.htm
2. http://www.learnvisualstudio.net/120.html
3. http://www.vb6.us/
4. http://www.informit.com/
5. http://www.hitmill.com/programming/vb.htm
6. http://www.programmingtutorials.com/vbnet.aspx
7. http://www.worldofdotnet.net/
8. http://www.microsoft.com
Top Related