


Languages
Pages
Legal


IM-P137-02 ST Issue 10 1
BSAT shown
1. Safety information
2. General product information
3. Installation
4. Commissioning
5. Operation
6. Maintenance
7. Spare parts
© Copyright 2015
Printed in GB
IM-P137-02ST Issue 10
1370050/10
BSA and BSATBellows Sealed Stop Valves
Installation and Maintenance Instructions

IM-P137-02 ST Issue 102

IM-P137-02 ST Issue 10 3
1. Safety informationSafe operation of these products can only be guaranteed if they are properly installed, commissioned, used and maintained by qualified personnel (see Section 1.11) in compliance with the operating instructions. General installation and safety instructions for pipeline and plant construction, as well as the proper use of tools and safety equipment must also be complied with.
1.1 Intended useReferring to the Installation and Maintenance Instructions, name-plate and Technical Information Sheet, check that the product is suitable for the intended use/application. The products listed below comply with the requirements of the European Pressure Equipment Directive 97/23/EC and carry the mark when so required. The products fall within the following Pressure Equipment Directive categories:
Product Group 1Gases
Group 2Gases
Group 1Liquids
Group 2Liquids
BSA1BSA1T (PN16)
DN15 - DN25 SEP SEP SEP SEP
DN32 - DN50 1 SEP SEP SEP
DN65 - DN125 2 1 SEP SEP
DN150 - DN200 2 1 2 SEP
BSA2BSA2T
(PN16)
DN15 - DN25 SEP SEP SEP SEP
DN32 - DN50 1 SEP SEP SEP
DN65 - DN125 2 1 SEP SEP
DN150 - DN200 2 1 2 SEP
BSA2BSA2T (PN25)
DN15 - DN25 SEP SEP SEP SEP
DN32 - DN40 1 SEP SEP SEP
DN50 - DN80 2 1 SEP SEP
DN100 - DN125 2 1 2 SEP
DN150 - DN200 3 2 2 SEP
DN250 3 2 2 1

IM-P137-02 ST Issue 104
Product Group 1Gases
Group 2Gases
Group 1Liquids
Group 2Liquids
BSA3BSA3T
(PN40)
DN15 - DN25 SEP SEP SEP SEP
DN32 2 SEP SEP SEP
DN40 - DN50 2 1 SEP SEP
DN65 - DN100 2 1 2 SEP
DN125 - DN150 3 2 2 SEP
(PN25) DN200 3 2 2 SEP
(ASME 150)
DN15 - DN25 SEP SEP SEP SEP
DN40 - DN50 1 SEP SEP SEP
DN80 - DN100 2 1 SEP SEP
(ASME 300)
DN15 - DN25 SEP SEP SEP SEP
DN40 - DN100 2 1 2 SEP
DN150 - DN200 3 2 2 SEP
i) The BSA range has been specifically designed for use on propane or methane gases which are in Group 1 of the above mentioned Pressure Equipment Directive. They can also be used on steam, air or condensate which are in Group 2 of the Pressure Equipment Directive. The products’ use on other fluids may be possible but, if this is contemplated, Spirax Sarco should be contacted to confirm the suitability of the product for the application being considered.
ii) Check material suitability, pressure and temperature and their maximum and minimum values. If the maximum operating limits of the product are lower than those of the system in which it is being fitted, or if malfunction of the product could result in a dangerous overpressure or overtemperature occurrence, ensure a safety device is included in the system to prevent such over-limit situations.
iii) A number of products are supplied for the intention of the end user (or agent thereof) modifying the flange configuration from that supplied. It is the responsibility of the organisation carrying out the modification to do so in accordance with the internationally recognised flange standards and to ensure that the design rating and operation of the product are not compromised. Spirax Sarco will not be held responsible for any unapproved modification or consequential liability resulting in failure to observe these requirements.
iv) Determine the correct installation situation and direction of fluid flow.
v) Spirax Sarco products are not intended to withstand external stresses that may be induced by any system to which they are fitted. It is the responsibility of the installer to consider these stresses and take adequate precautions to minimise them.
vi) Remove protection covers from all connections and protective film from all name-plates, where appropriate, before installation on steam or other high temperature applications.

IM-P137-02 ST Issue 10 5
1.2 AccessEnsure safe access and if necessary a safe working platform (suitably guarded) before attempting to work on the product. Arrange suitable lifting gear if required.
1.3 LightingEnsure adequate lighting, particularly where detailed or intricate work is required.
1.4 Hazardous liquids or gases in the pipelineConsider what is in the pipeline or what may have been in the pipeline at some previous time. Consider: flammable materials, substances hazardous to health, extremes of temperature.
1.5 Hazardous environment around the productConsider: explosion risk areas, lack of oxygen (e.g. tanks, pits), dangerous gases, extremes of temperature, hot surfaces, fire hazard (e.g. during welding), excessive noise, moving machinery.
1.6 The systemConsider the effect on the complete system of the work proposed. Will any proposed action (e.g. closing isolation valves, electrical isolation) put any other part of the system or any personnel at risk? Dangers might include isolation of vents or protective devices or the rendering ineffective of controls or alarms. Ensure isolation valves are turned on and off in a gradual way to avoid system shocks.
1.7 Pressure systems Ensure that any pressure is isolated and safely vented to atmospheric pressure. Consider double isolation (double block and bleed) and the locking or labelling of closed valves. Do not assume that the system has depressurised even when the pressure gauge indicates zero.
1.8 TemperatureAllow time for temperature to normalise after isolation to avoid the danger of burns. If parts made from R-PTFE have been subjected to a temperature approaching 260 °C (500 °F) or higher, they will give off toxic fumes, which if inhaled are likely to cause temporary discomfort. It is essential for a no smoking rule to be enforced in all areas where R-PTFE is stored, handled or processed as persons inhaling the fumes from burning tobacco contaminated with R-PTFE particles can develop 'polymer fume fever'.
1.9 Tools and consumablesBefore starting work ensure that you have suitable tools and/or consumables available. Use only genuine Spirax Sarco replacement parts.

IM-P137-02 ST Issue 106
1.10 Protective clothingConsider whether you and/or others in the vicinity require any protective clothing to protect against the hazards of, for example, chemicals, high/low temperature, radiation, noise, falling objects, and dangers to eyes and face.
1.11 Permits to workAll work must be carried out or be supervised by a suitably competent person.Installation and operating personnel should be trained in the correct use of the product according to the Installation and Maintenance Instructions.Where a formal 'permit to work' system is in force it must be complied with. Where there is no such system, it is recommended that a responsible person should know what work is going on and, where necessary, arrange to have an assistant whose primary responsibility is safety.Post 'warning notices' if necessary.
1.12 HandlingManual handling of large and/or heavy products may present a risk of injury. Lifting, pushing, pulling, carrying or supporting a load by bodily force can cause injury particularly to the back. You are advised to assess the risks taking into account the task, the individual, the load and the working environment and use the appropriate handling method depending on the circumstances of the work being done.
1.13 Residual hazardsIn normal use the external surface of the product may be very hot. If used at the maximum permitted operating conditions the surface temperature of some poducts may reach temperatures in excess of 425 °C (797 °F).Many products are not self-draining. Take due care when dismantling or removing the product from an installation (refer to 'Maintenance instructions').
1.14 FreezingProvision must be made to protect products which are not self-draining against frost damage in environments where they may be exposed to temperatures below freezing point.
1.15 Safety information - Product specificSee the relevant Sections in the attached Installation and Maintenance Instructions for specific details relating to these products.
WarningThe body/bonnet collar gaskets contain a thin stainless steel support ring which may cause physical injury if they are not handled and disposed of carefully.
Care must be taken when opening and closing the handwheel to prevent any possible injury to the hands from the locking screw.

IM-P137-02 ST Issue 10 7
1.16 DisposalUnless otherwise stated in the Installation and Maintenance Instructions, this product is recyclable and no ecological hazard is anticipated with its disposal providing due care is taken, EXCEPT:
R-PTFE:The soft sealing disc insert (soft sealing disc option only) is made of R-PTFE, therefore, any scrap or waste material containing this part must be disposed of as follows:
- Can only be disposed of by approved methods, not incineration.
- Keep R-PTFE waste in a separate container, do not mix it with other rubbish and consign it to a landfill site.
1.17 Returning productsCustomers and stockists are reminded that under EC Health, Safety and Environment Law, when returning products to Spirax Sarco they must provide information on any hazards and the precautions to be taken due to contamination residues or mechanical damage which may present a health, safety or environmental risk. This information must be provided in writing including Health and Safety data sheets relating to any substances identified as hazardous or potentially hazardous.
1.18 Working safely with cast iron products on steamCast iron products are commonly found on steam and condensate systems. If installed correctly using good steam engineering practices, it is perfectly safe. However, because of its mechanical properties, it is less forgiving compared to other materials such as SG iron or carbon steel. The following are the good engineering practices required to prevent waterhammer and ensure safe working conditions on a steam system.
Cast Iron is a brittle material. If the product is dropped during installation and there is any risk of damage the product should not be used unless it is fully inspected and pressure tested by the manufacturer.
Safe Handling

IM-P137-02 ST Issue 108
Prevention of water hammer Steam trapping on steam mains:
Steam Mains - Do's and Don'ts:
Steam Steam
Flow Flow
30 - 50 metre intervalsGradient 1:100Gradient 1:100
Trap setTrap set
Trap set
CondensateCondensate
Condensate
Steam
Steam

IM-P137-02 ST Issue 10 9
Prevention of tensile stressing Pipe misalignment:
Installing products or re-assembling after maintenance:
Thermal expansion:
Do not over tighten.Use correct torque figures.
11
4 2
3
82
6
3
7
Flange bolts should be gradually tightened across diameters to ensure even load and alignment.
Guides
Guides
Limit rods
Limit rods
Fixing pointMedium distance
Small lateral
movement
Small lateral movement
Large lateral movement
Large lateral
movement
Short distance Fixing point
Axial movement
Axial movement
Guides
Guides
5
4
IM-P137-02 ST Issue 1010
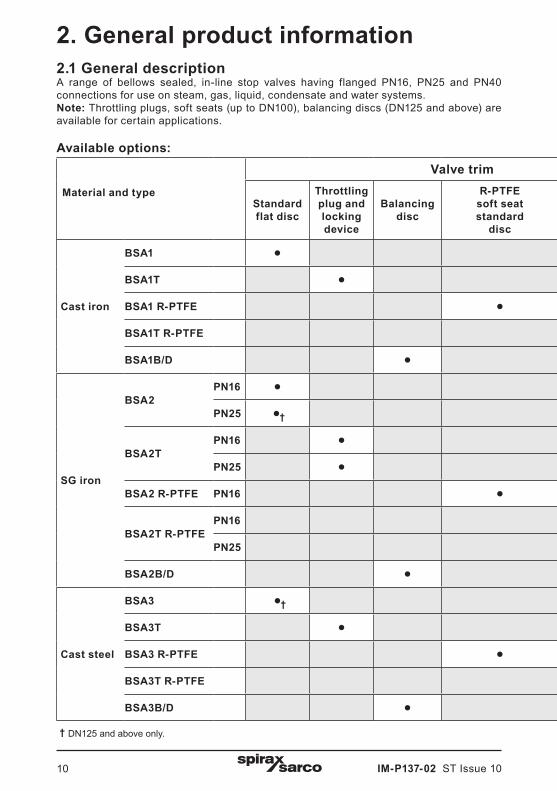
2. General product information2.1 General descriptionA range of bellows sealed, in-line stop valves having flanged PN16, PN25 and PN40 connections for use on steam, gas, liquid, condensate and water systems. Note: Throttling plugs, soft seats (up to DN100), balancing discs (DN125 and above) are available for certain applications.
Available options:
Material and type
Valve trim Bellows
Standard flat disc
Throttling plug and locking device
Balancing disc
R-PTFE soft seat standard
disc
R-PTFE soft seat throttling
plug
Single ply
Twin ply
Cast iron
BSA1 • •BSA1T • •BSA1 R-PTFE • •BSA1T R-PTFE • •BSA1B/D • •
SG iron
BSA2PN16 • •PN25 •† •
BSA2T PN16 • •PN25 • •
BSA2 R-PTFE PN16 • •
BSA2T R-PTFEPN16 • •PN25 • •
BSA2B/D • •
Cast steel
BSA3 •† •BSA3T • •BSA3 R-PTFE • •BSA3T R-PTFE • •BSA3B/D • •
† DN125 and above only.

IM-P137-02 ST Issue 10 11
2.1 General descriptionA range of bellows sealed, in-line stop valves having flanged PN16, PN25 and PN40 connections for use on steam, gas, liquid, condensate and water systems. Note: Throttling plugs, soft seats (up to DN100), balancing discs (DN125 and above) are available for certain applications.
Available options:
Material and type
Valve trim Bellows
Standard flat disc
Throttling plug and locking device
Balancing disc
R-PTFE soft seat standard
disc
R-PTFE soft seat throttling
plug
Single ply
Twin ply
Cast iron
BSA1 • •BSA1T • •BSA1 R-PTFE • •BSA1T R-PTFE • •BSA1B/D • •
SG iron
BSA2PN16 • •PN25 •† •
BSA2T PN16 • •PN25 • •
BSA2 R-PTFE PN16 • •
BSA2T R-PTFEPN16 • •PN25 • •
BSA2B/D • •
Cast steel
BSA3 •† •BSA3T • •BSA3 R-PTFE • •BSA3T R-PTFE • •BSA3B/D • •
† DN125 and above only.
CertificationThe BSA1 and BSA1T are available with a manufacturer's Typical Test Report.The BSA2, BSA2T, BSA3 and BSA3T are available with certification to EN 10204 3.1.Note: All certification/inspection requirements must be stated at the time of order placement.
Note: For further technical data regarding these products see the following Technical Information Sheets: TI-P137-18 and TI-P137-19.
Fig. 1 BSAT shown
StandardsThe product fully complies with the requirements of the European Pressure Equipment
Directive 97/23 / EC and carries the mark when so required.

IM-P137-02 ST Issue 1012
Locking screw
Stroke limiter
BSATHandwheel nut
Used above
25 bar ∆P DN125
17 bar ∆P DN150 6"
10 bar ∆P DN200 8"
6 bar ∆P DN250 (BSA2 only)
Optional gland flange assembly (BSA3 ASME ½" - 4" only)
Optional soft sealing disc
Stroke limiter for throttling versions
The handwheel nut on the BSA1T, BSA2T and BSA3T has a threaded hole for provision of a stroke limiter. Customer to supply standard nuts and bolts as indicated in the table opposite.
Size Hexagon bolt
DN15 - DN80 M8 x 50 mm
DN100 - DN150 M12 x 75 mm
DN200 - DN250 M12 x 100 mm Fig. 2
Fig. 3
Fig. 5
Optional balancing disc assembly
Fig. 4
DN150 shown

IM-P137-02 ST Issue 10 13
2.2 Sizes and pipe connections
2.2.1 BSA1 and BSA1TDN15, DN20, DN25, DN32, DN40, DN50, DN65, DN80, DN100, DN125, DN150 and DN200Flanged EN 1092 / ISO 7005 PN16 and JIS B 2210 / KS B 1511 10KFace-to-face EN 558
2.2.2 BSA2 and BSA2TDN15, DN20, DN25, DN32, DN40, DN50, DN65, DN80, DN100, DN125, DN150, DN200 and DN250* (*PN25 only)Flanged EN 1092 / ISO 7005 PN16 and PN25 Face-to-face EN 558
2.2.3 BSA3 and BSA3T (DIN)DN15, DN20, DN25, DN32, DN40, DN50, DN65, DN80, DN100, DN125, DN150 and DN200 Flanged EN 1092 / ISO 7005 PN40 (DN15 - DN150)Flanged EN 1092 / ISO 7005 PN25 (DN200) Face-to-face EN 558
2.2.4 BSA3 and BSA3T ASME (ANSI)Size ½", ¾", 1", 1½", 2", 3", 4", 6"* and 8"* (*ASME 300 only) Flanged ASME B 16.5 / BS 1560 Class 150 and 300 and JIS B 2210 / KS B 1511 20K Face-to-face ASME B 16.10
2.3 Product limitations
BSA1 and BSA1T see Section 2.4
BSA2 and BSA2T see Section 2.5
BSA3 and BSA3T (DIN) see Section 2.6
BSA3 and BSA3T (ASME) see Section 2.7
Note: The maximum permissible differential pressure in throttling function for BSA_T valves:
DN15 - DN80 2.0 bar (29.00 psi)
DN100 - DN125 1.5 bar (21.75 psi)
DN150 1.0 bar (14.50 psi)
DN200 - DN250 0.8 bar (11.60 psi)
IM-P137-02 ST Issue 1014
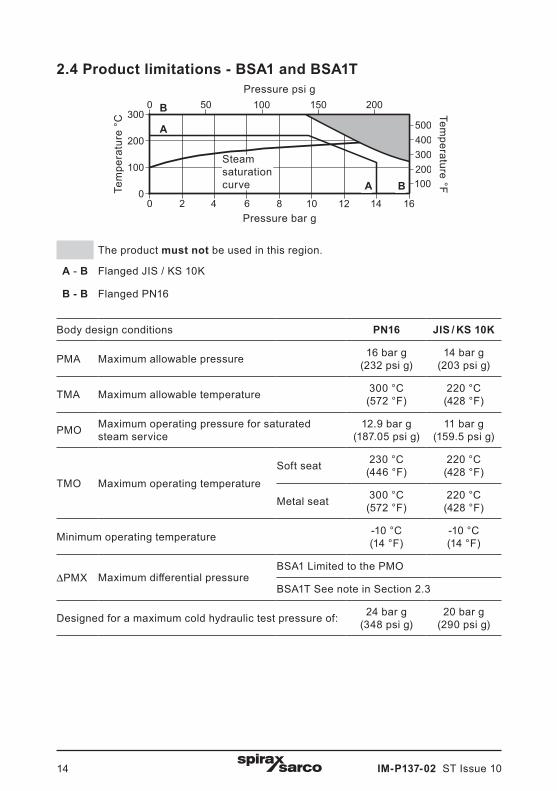
2.4 Product limitations - BSA1 and BSA1T
Steam saturation curve
BTe
mpe
ratu
re °
C
Pressure bar g
A
BA
The product must not be used in this region.
A - B Flanged JIS / KS 10K
B - B Flanged PN16
Body design conditions PN16 JIS / KS 10K
PMA Maximum allowable pressure 16 bar g(232 psi g)
14 bar g(203 psi g)
TMA Maximum allowable temperature 300 °C(572 °F)
220 °C(428 °F)
PMO Maximum operating pressure for saturated steam service
12.9 bar g(187.05 psi g)
11 bar g(159.5 psi g)
TMO Maximum operating temperatureSoft seat 230 °C
(446 °F)220 °C(428 °F)
Metal seat 300 °C(572 °F)
220 °C(428 °F)
Minimum operating temperature -10 °C(14 °F)
-10 °C(14 °F)
PMX Maximum differential pressureBSA1 Limited to the PMO
BSA1T See note in Section 2.3
Designed for a maximum cold hydraulic test pressure of: 24 bar g(348 psi g)
20 bar g(290 psi g)
Pressure psi g
Temperature °F

IM-P137-02 ST Issue 10 15
PN16
PN25
Tem
pera
ture
°C
Steam saturation curve
Pressure bar g
Tem
pera
ture
°C
Pressure bar g
2.5 Product limitations - BSA2 and BSA2T
The product must not be used in this region.
Body design conditions PN16 PN25
PMA Maximum allowable pressure 16 bar g(232 psi g)
25 bar g(362.5 psi g)
TMA Maximum allowable temperature 350 °C(662 °F)
350 °C(662 °F)
PMO Maximum operating pressure for saturated steam service
14.7 bar g(213.15 psi g)
22.3 bar g(323.35 psi g)
TMO Maximum operating temperatureSoft seat 230 °C
(446 °F)230 °C
(446 °F)
Metal seat 350 °C(662 °F)
350 °C(662 °F)
Minimum operating temperature -10 °C(14 °F)
-10 °C(14 °F)
PMX Maximum differential pressureBSA2 Limited to the PMO
BSA2T See note in Section 2.3
Designed for a maximum cold hydraulic test pressure of: 24 bar g(348 psi g)
38 bar g(551 psi g)
Pressure psi g
Temperature °F
Pressure psi g
Temperature °F
Steam saturation curve

IM-P137-02 ST Issue 1016
PN40, DN15 - DN150
PN25, DN200
Tem
pera
ture
°C
Pressure bar g
Tem
pera
ture
°C
Pressure bar g
2.6 Product limitations - BSA3 and BSA3T (DIN)
The product must not be used in this region.
Body design conditions PN25DN200
PN40DN15 - DN150
PMA Maximum allowable pressure 25 bar g(362.5 psi g)
40 bar g(580 psi g)
TMA Maximum allowable temperature 400 °C(752 °F)
400 °C(752 °F)
PMO Maximum operating pressure for saturated steam service
Soft seat 23.2 bar g(336.4 psi g)
27 bar g(391.5 psi g)
Metal seat 23.2 bar g(336.4 psi g)
36.1 bar g(523.45 psi g)
TMO Maximum operating temperatureSoft seat 230 °C
(446 °F)230 °C
(446 °F)
Metal seat 400 °C(752 °F)
400 °C(752 °F)
Minimum operating temperature -10 °C(14 °F)
-10 °C(14 °F)
PMX Maximum differential pressureBSA3 Limited to the PMOBSA3T See note in Section 2.3
Designed for a maximum cold hydraulic test pressure of: 38 bar g(551 psi g)
60 bar g(870 psi g)
Temperature °F
Temperature °F
Pressure psi g
Pressure psi g
Steam saturation curve
Steam saturation curve

IM-P137-02 ST Issue 10 17
Steam saturation curve
C
D ETem
pera
ture
°C
Pressure bar g
F
2.7 Product limitations - BSA3 and BSA3T (ASME / ANSI)
The product must not be used in this region.
C - D Flanged ASME (ANSI) 150
C - E Flanged JIS / KS 20K
C - F Flanged ASME (ANSI) 300
Body design conditions ASME 150 ASME 300 JIS / KS 20K
PMA Maximum allowable pressure 51 bar g(739.5 psi g)
51 bar g(739.5 psi g)
51 bar g(739.5 psi g)
TMA Maximum allowable temperature 425 °C(797 °F)
425 °C(797 °F)
425 °C(797 °F)
PMOMaximum operating pressure for saturated steam service
Soft seat 14 bar g(203 psi g)
27 bar g(391.5 psi g)
27 bar g(391.5 psi g)
Metal seat 14 bar g(203 psi g)
30.7 bar g(445.15 psi g)
41.6 bar g(603.2 psi g)
TMO Maximum operating temperature
Soft seat 230 °C(446 °F)
230 °C(446 °F)
230 °C(446 °F)
Metal seat 425 °C(797 °F)
425 °C(797 °F)
425 °C(797 °F)
Minimum operating temperature -29 °C(-22 °F)
-29 °C(-22 °F)
0 °C(32 °F)
PMX Maximum differential pressure
BSA3 Limited to the PMO
BSA3T See note in Section 2.3
Designed for a maximum cold hydraulic test pressure of:
31 bar g(449.5 psi g)
77 bar g(1 116 psi g)
50 bar g(725 psi g)
Temperature °F
Pressure psi g

IM-P137-02 ST Issue 1018
3. InstallationNote: Before actioning any installation observe the 'Safety information' in Section 1.
Referring to the Installation and Maintenance Instructions, name-plate and Technical Information Sheet, check that the product is suitable for the intended installation:
3.1 Check materials, pressure and temperature and their maximum values. If the maximum operating limit of the product is lower than that of the system in which it is being fitted, ensure that a safety device is included in the system to prevent overpressurisation.
3.2 Remove the protective covers from all connections.
3.3 Install the valve in the direction of flow given by the arrow on the body. The preferred position is with the spindle vertical. The valve can be installed from the vertical to the horizontal plane (see Figure 7).
3.4 Important note: When a balancing disc is installed, the valve body should be mounted with the upstream fluid flowing into the upper valve chamber first, so the fluid pressure acts on top of the balancing disc. This is opposite to normal installation. If a balancing disc is upgrading or replacing a standard disc, the original valve body must be turned around in the pipeline and permanently marked with a new flow arrow indicating the changed direction of flow.
Do not mount the valve upside down.
What is a balancing plug, how does it work and why use it?
- A balancing plug is a two stage on/off mechanism.
- (See Figure 6) The pre-lifting plug (A) acts as a pilot valve and is opened first, allowing the medium to pass through at a controlled rate. The differential pressure then reduces across the valve - allowing the main valve plug (B) to be easily lifted off its seat. To assist closing the valve the flowing medium must enter on the 'Bellows' side, this is the opposite to normal installation.
DN125 shown
A
Fig. 6
B
IM-P137-02 ST Issue 10 19
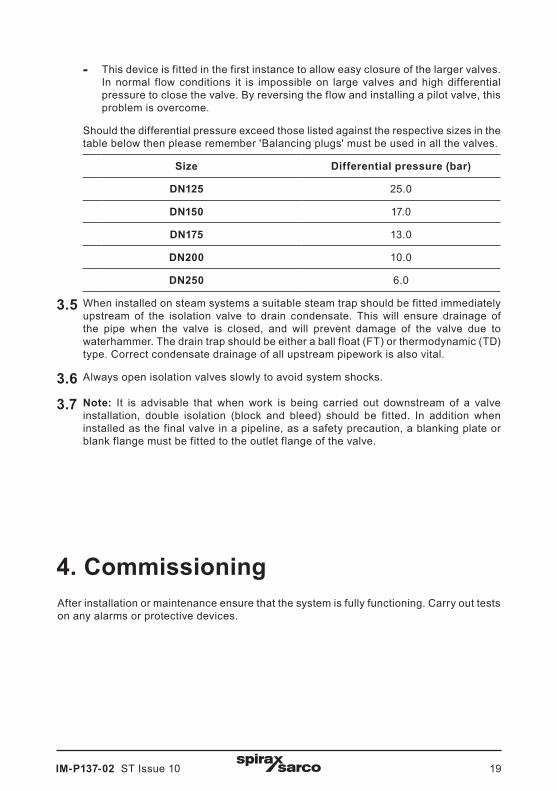
- This device is fitted in the first instance to allow easy closure of the larger valves. In normal flow conditions it is impossible on large valves and high differential pressure to close the valve. By reversing the flow and installing a pilot valve, this problem is overcome.
Should the differential pressure exceed those listed against the respective sizes in the table below then please remember 'Balancing plugs' must be used in all the valves.
Size Differential pressure (bar)
DN125 25.0
DN150 17.0
DN175 13.0
DN200 10.0
DN250 6.0
3.5 When installed on steam systems a suitable steam trap should be fitted immediately upstream of the isolation valve to drain condensate. This will ensure drainage of the pipe when the valve is closed, and will prevent damage of the valve due to waterhammer. The drain trap should be either a ball float (FT) or thermodynamic (TD) type. Correct condensate drainage of all upstream pipework is also vital.
3.6 Always open isolation valves slowly to avoid system shocks.
3.7 Note: It is advisable that when work is being carried out downstream of a valve installation, double isolation (block and bleed) should be fitted. In addition when installed as the final valve in a pipeline, as a safety precaution, a blanking plate or blank flange must be fitted to the outlet flange of the valve.
After installation or maintenance ensure that the system is fully functioning. Carry out tests on any alarms or protective devices.
4. Commissioning

IM-P137-02 ST Issue 1020
Fig. 7
Incorrect installation Correct installation
5. Operation5.1 The bellows sealed isolation valve plays an important role in the conservation of
energy by eliminating fugitive stem seal emissions.
5.2 The valve is operated manually by a handwheel. Special care must be taken to ensure that the movement is made in the correct direction.To open the valve fully, it is recommended to turn the handwheel until the shaft is raised to the maximum position, indicated by the (+) on the bonnet, then turn the handwheel clockwise an 1 to ¼ turn to remove any backlash. This is to prevent the possibility of attempting to force open a valve, which is already fully open, resulting in damage to the stem, bellows unit or other components. Spirax Sarco BSA valves are fitted with a position indicator which can be found on the stem, and should align with the (+) or (-) on the bonnet support pillars. (+ = fully open / - = fully closed).
5.3 If valve 'keys' are used care must be taken not to use excessive force when opening or closing the valve.
5.4 BSAT valves are fitted with a throttling valve plug to allow close control when opening the valve. The number of turns open will affect the flowrate through the valve.Once correct f lowrate is obtained ensure the locking screw and stroke limiter (see Fig. 8) are tightened. This will minimise any vibration. The effect of valve opening for each valve size can be seen in the chart, page 19.

IM-P137-02 ST Issue 10 21
BSAT flow data - The effect of valve opening for each valve sizeSize DN 15 20 25 32 40 50 65 80 100 125 150 200 250Handwheel rotations
Kv values for given handwheel rotations tested to EN 60534-2-3Water at 20 °C
0 0 0 0 0 0 0 0 0 0 0 0 0 00.5 1.2 1.2 1.4 2.2 4.4 4.1 5.6 10.4 12.0 21 28 66 1101 1.7 1.7 2.0 3.7 5.0 5.0 7.0 11.5 14.3 23 30 81 1401.5 2.7 2.9 2.9 5.0 5.5 6.0 9.2 13.6 24.5 26 33 97 1502 3.6 4.0 4.6 7.9 7.6 7.2 11.6 16.3 34.1 42 46 111 1652.5 4.4 5.3 6.4 10.6 11.0 9.7 12.4 18.5 59.6 67 65 149 1903 5.4 6.6 8.5 13.8 14.7 14.1 13.0 21.1 86.2 94 90 199 2254 10.6 17.0 22.6 24.4 25.2 24.5 123.0 140 152 302 3304.5 11.2 18.3 24.4 29.4 32.5 29.0 139.0 181 177 355 4515 11.9 19.6 27.2 37.0 43.6 39.1 164.1 185 216 403 4606 28.9 46.2 60.2 61.0 179.0 220 264 455 6006.5 29.1 47.0 63.0 69.0 186.0 230 288 480 6416.7 29.3 47.2 64.3 73.0 235 293 487 6567 65.9 78.0 241 305 495 6788 71.2 90.0 259 337 507 7388.5 74.6 92.0 348 522 7609.5 99.0 369 79310 101.6 80510.7 827
Stroke limiter for throttling versionsThe handwheel nut on the BSA1T, BSA2T and BSA3T has a threaded hole for the provision of a stroke limiter. Customer to supply standard nuts and bolts as indicated in the table below:
Size Hexagon boltDN15 - DN80 M8 x 50 mm
DN100 - DN150 M12 x 75 mm
DN200 - DN250 M12 x 100 mm
Note: The maximum permissible differential pressure in throttling function:
DN15 - DN80 2.0 bar
DN100 - DN125 1.5 bar
DN150 1.0 bar
DN200 - DN250 0.8 bar
Stroke limiter
Handwheel nut
Fig. 8 Locking screw

IM-P137-02 ST Issue 1022
All the internals of the bellows sealed valve can be replaced (See Section 7, Spare parts).
Note: Before actioning any maintenance programme observe the data in Section 1 - 'Safety information'.
WarningThe body/bonnet collar gaskets (10a and 10b) contain a thin stainless steel support ring which may cause physical injury if they are not handled and disposed of carefully.
6.1 Before undertaking any maintenance on the valve, ensure that any pressure is isolated and safely vented to atmospheric pressure. The valve should then be allowed to cool. When reassembling, ensure that all joint faces are clean.
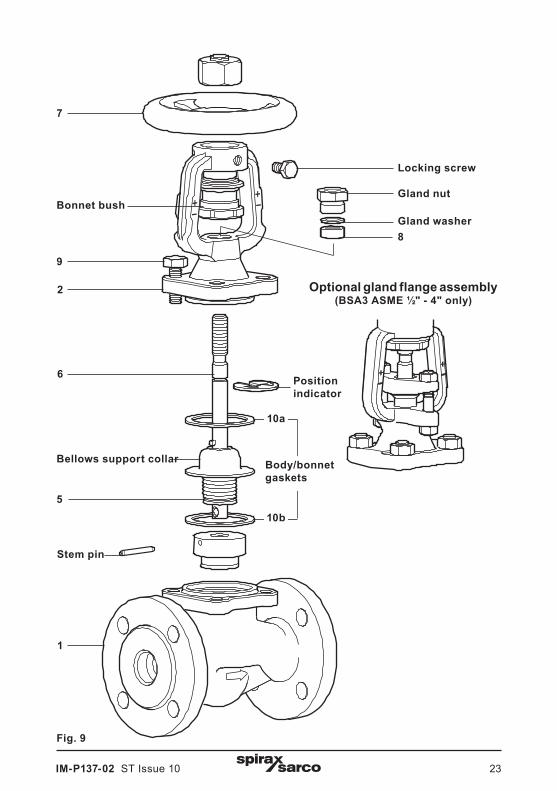
6.2 How to fit the body/bonnet gaskets This can be carried out whilst the valve is connected in the pipeline. Remove the valve bonnet (2) from the body (1) by unscrewing bonnet studs/nuts (9). The body gasket (10b) is now visible and can quickly be replaced. Ensure the gasket face in the body (1) is clean before fitting a replacement.To replace the second gasket (10a) which is situated between the bonnet (2) and the stainless steel bellows support collar, firstly remove the clip-on position indicator, remove the locking screw (BSAT versions only). Rotate the handwheel (7) in a clockwise direction. This pushes the main stem (6) downwards and creates a gap between the bellows support collar and the bonnet (2). If the support collar remains attached to the bonnet (2), gently prise the collar away from the bonnet being careful not to damage the collar. Do not allow the bellows to stretch as this can reduce the bellows life. By continually rotating the handwheel (7) in a clockwise direction, the stem (6) can be unscrewed from the bonnet bush. When the stem (6) is disconnected from the bonnet bush, unscrew the gland nut (unbolt the gland flange if fitted) and remove both this and the gland washer (or gland follower if fitted). Keep these parts safe as they are not supplied as spares. The stem / bellows assembly (6, 5) can now be withdrawn out of the bonnet (2) . The second bellows collar gasket (10a) can now be replaced - ensuring both the bellows support collar surface and bonnet surface are clean and the gasket is accurately located. Before the stem/bellows assembly (6, 5) is reassembled into the bonnet (2), the stem packing ring (8) should be replaced (see Section 6.3).
6. Maintenance
IM-P137-02 ST Issue 10 23
10a
10b
Body/bonnet gaskets
8
6
5
Stem pin
1
2
Fig. 9
Optional gland flange assembly(BSA3 ASME ½" - 4" only)
Position indicator
9
Locking screw
7
Gland nut
Gland washer
Bellows support collar
Bonnet bush

IM-P137-02 ST Issue 1024
6.3 How to fit the stem packingBy following through Section 6.2 it is now possible to replace the stem packing ring (8). Two of these rings are provided in the spares kit but only one is required. Ensure all of the old stem packing material is removed from the bonnet cavity and all locating surfaces are clean. Valve assembly is the opposite to removal - remembering to fit a bellows collar gasket between the collar and the valve bonnet. Ensure the solid stem pin (which is pressed into the stem) is aligned with the slot inside the bonnet. Before screwing the end of the stem into the bonnet bush remember to fit a new stem packing ring (8), the original gland washer (or gland follower) and gland nut (or gland flange) over the stem. Do not allow the stem thread to damage the inner surface of the gland packing ring. Carefully slide the new packing ring down the stem into the cavity and slide the original gland washer (or gland follower if fitted) on top of the packing ring. Remember to tighten the gland packing ring after the valve has been fully assembled.
6.4 How to fit the stem and bellows assemblyBy following through Section 6.2 it is now possible to fit a new stem/bellows assembly (6, 5). Fitting this is opposite to removal - remembering to fit a bellows collar gasket (10a) between the bellows support collar and valve bonnet (2). Ensure the bellows collar gasket (10a) is accurately located. Before fitting the new stem/bellows assembly (6, 5) into the bonnet (2), apply a small amount of lubricating compound such as Gulf Sovereign LC grease to the end of the stem pin (which is pressed into the stem). Ensure the stem pin is aligned with the slot inside the bonnet. Carefully slide the stem up through the bonnet. Before screwing the end of the stem into the bonnet bush remember to fit a new stem packing ring (8) (see Section 6.3), the original gland washer (or gland follower) and gland nut (or gland flange) over the stem (6). Do not allow the stem thread to damage the inner surface of the gland packing ring. Carefully slide the new packing ring down the stem into the cavity and slide the original gland washer (or gland follower if fitted) on top of the packing ring (8). Remember to tighten the gland packing ring after the valve has been fully assembled.

IM-P137-02 ST Issue 10 25
8
6
10a
10b
5
Stem pin
1
2
Fig. 10
Optional gland flange assembly(BSA3 ASME ½" - 4" only)
Position indicator
9
Locking screw
7
Gland nut
Gland washer
Bellows support collar
Bonnet bush
IM-P137-02 ST Issue 1026
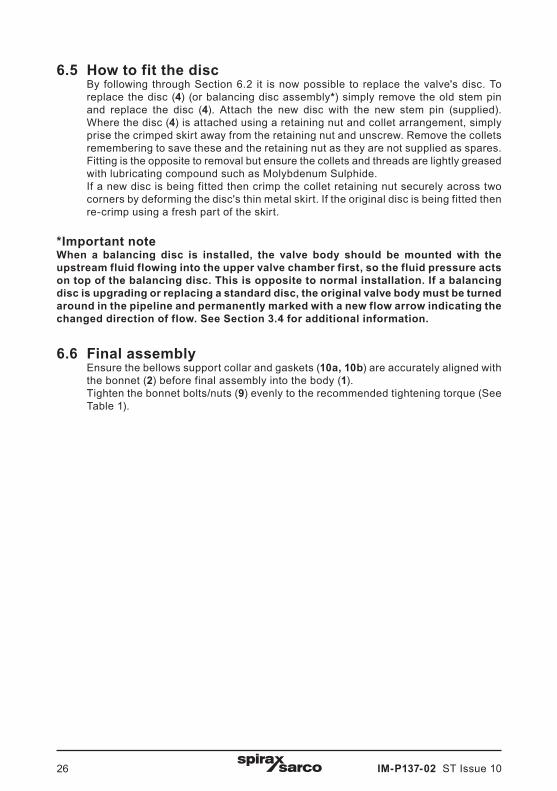
6.5 How to fit the discBy following through Section 6.2 it is now possible to replace the valve's disc. To replace the disc (4) (or balancing disc assembly*) simply remove the old stem pin and replace the disc (4). Attach the new disc with the new stem pin (supplied). Where the disc (4) is attached using a retaining nut and collet arrangement, simply prise the crimped skirt away from the retaining nut and unscrew. Remove the collets remembering to save these and the retaining nut as they are not supplied as spares. Fitting is the opposite to removal but ensure the collets and threads are lightly greased with lubricating compound such as Molybdenum Sulphide.If a new disc is being fitted then crimp the collet retaining nut securely across two corners by deforming the disc's thin metal skirt. If the original disc is being fitted then re-crimp using a fresh part of the skirt.
*Important noteWhen a balancing disc is installed, the valve body should be mounted with the upstream fluid flowing into the upper valve chamber first, so the fluid pressure acts on top of the balancing disc. This is opposite to normal installation. If a balancing disc is upgrading or replacing a standard disc, the original valve body must be turned around in the pipeline and permanently marked with a new flow arrow indicating the changed direction of flow. See Section 3.4 for additional information.
6.6 Final assemblyEnsure the bellows support collar and gaskets (10a, 10b) are accurately aligned with the bonnet (2) before final assembly into the body (1).Tighten the bonnet bolts/nuts (9) evenly to the recommended tightening torque (See Table 1).

IM-P137-02 ST Issue 10 27
Fig. 11
10a
10b
Stem pin
1
2
Handwheel nut
9
Optional balancing disc assembly
Optional soft sealing disc
7
Bonnet bush
Bellows support collar
DN125 shown

IM-P137-02 ST Issue 1028
HandwheelThe handwheel (7) is not supplied as a spare part. However, to remove the handwheel unscrew the main handwheel nut in a clockwise direction. Note: The thread in the handwheel nut is left handed, so it must be unscrewed in a clockwise direction. Place a suitable spanner (a detailed drawing is available from Spirax Sarco) across the flats of the bonnet bush (2) and unscrew the handwheel in the normal way. Note: the handwheel maybe firmly secured on the bonnet bush (2). Refitting the handwheel is the opposite to removal. Apply Loctite 638 to the threads of the handwheel boss and tighten to 50 N m (36 lbf ft). Remember to tighten the handwheel nut to 40 N m (29 lbf ft) in an anticlockwise direction.
Table 1 Recommended bonnet tightening torques N m (lbf ft)
Size mm
BSA1 / BSA1T BSA2 / BSA2T BSA3 / BSA3T
PN16JIS/KS 10K
PN16 / PN25 PN40 ASME 150 / 300JIS/KS 20K
DN15 - DN32 17 A/F 20 - 25(15 - 18)
35 - 40(26 - 29)
35 - 40(26 - 29)
50 - 55(36 - 40)
DN40 - DN65 19 A/F 40 - 45(29 - 33)
55 - 60(40 - 44)
55 - 60(40 - 44)
85 - 90(63 - 66)
DN80 - DN150 24 A/F 70 - 80(51 - 59)
130 - 140(95 - 103)
130 - 140(95 - 103)
190 - 200(140 - 147)
DN200 30 A/F 180 - 200(132 - 147)
260 - 280(191 - 206)
260 - 280(191 - 206)
300 - 320(220 - 235)
DN250 36 A/F 480 - 520(352 - 382)

IM-P137-02 ST Issue 10 29
Fig. 12
10a
10b
Stem pin
1
2
Handwheel nut
9
Optional balancing disc assembly
Optional soft sealing disc
7
Bonnet bush
Bellows support collar
DN125 shown

IM-P137-02 ST Issue 1030
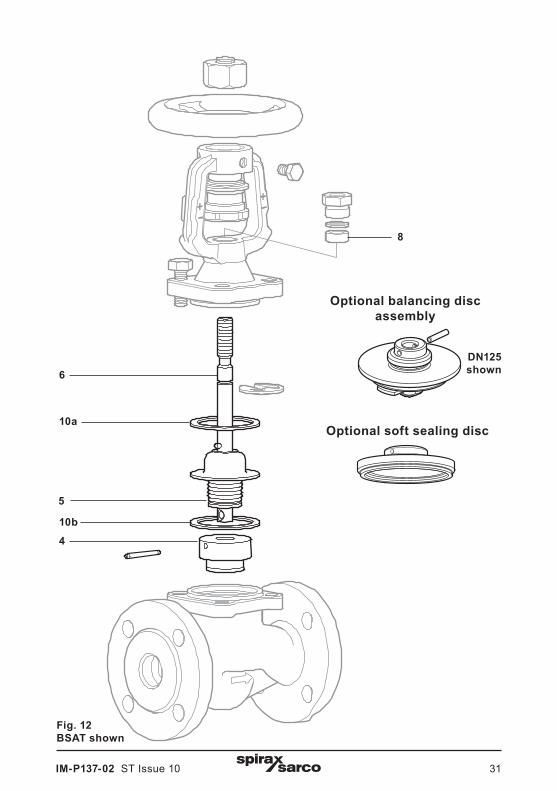
The spare parts available are shown in heavy outline. Parts drawn in a grey line are not supplied as spares.
Available sparesBody/bonnet gasket and stem packing 10a, 10b, 8 (2 off)
Stem and bellows assembly (state if BSA or BSAT) 6, 5
Disc (and optional disc where fitted) - state full description of the valve 4
How to order sparesPlease note: for customer convenience spares are supplied in kits to ensure all the appropriate replacement parts are supplied to carry out a specific maintenance task. e.g. when a stem/bellows assembly is ordered, parts (10a and 10b), (8) and (6, 5) will be included in the kit.Always order spares by using the description given in 'Available spares' and state the size and type of stop valve.Example: 1 - Body / bonnet gasket and stem packing for a DN15 Spirax Sarco BSA2 PN16 bellows sealed stop valve.
Note: The gaskets contain sharp metal reinforcement, please handle with care.
7. Spare parts
IM-P137-02 ST Issue 10 31
4
Fig. 12BSAT shown
8
6
10a
10b
5
Optional soft sealing disc
DN125 shown
Optional balancing disc assembly

IM-P137-02 ST Issue 1032
Top Related