


Languages
Pages
Legal

Andy's Carb Cleaning Guide.doc April 04, 2012
G:\Carbs\Andy's Carb Cleaning Guide.doc Page 1 of 6
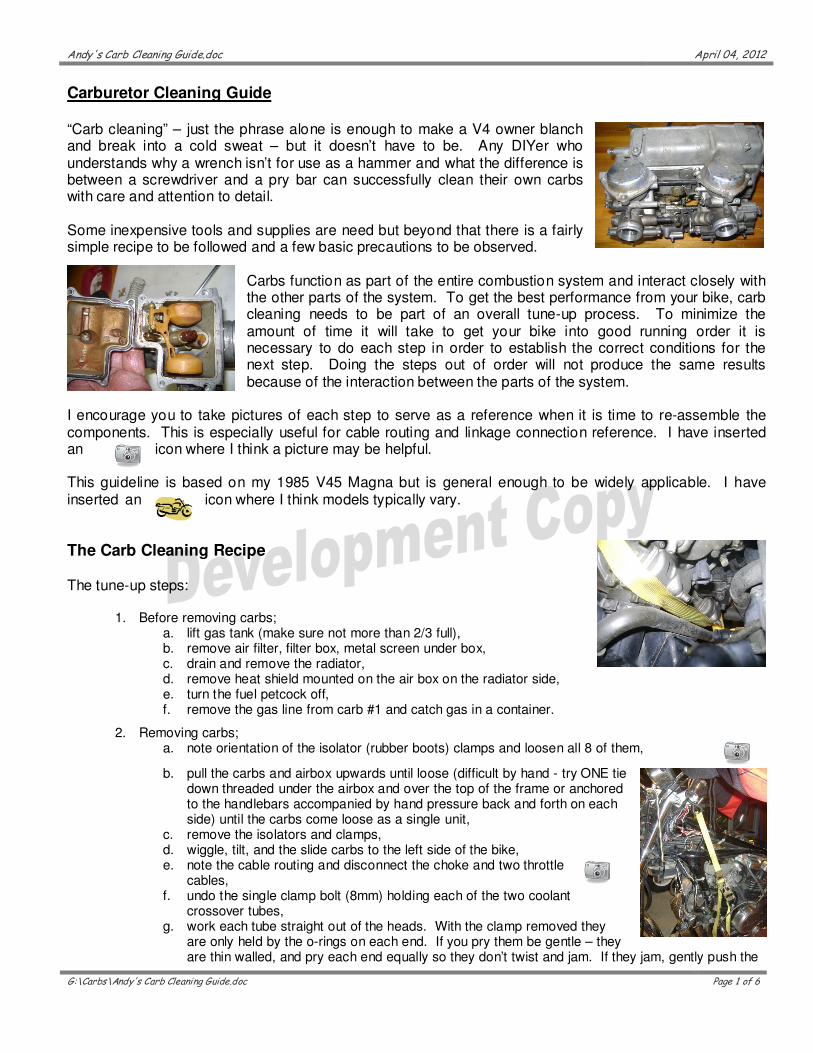
Carburetor Cleaning Guide “Carb cleaning” – just the phrase alone is enough to make a V4 owner blanch and break into a cold sweat – but it doesn’t have to be. Any DIYer who understands why a wrench isn’t for use as a hammer and what the difference is between a screwdriver and a pry bar can successfully clean their own carbs with care and attention to detail. Some inexpensive tools and supplies are need but beyond that there is a fairly simple recipe to be followed and a few basic precautions to be observed.
Carbs function as part of the entire combustion system and interact closely with the other parts of the system. To get the best performance from your bike, carb cleaning needs to be part of an overall tune-up process. To minimize the amount of time it will take to get your bike into good running order it is necessary to do each step in order to establish the correct conditions for the next step. Doing the steps out of order will not produce the same results because of the interaction between the parts of the system.
I encourage you to take pictures of each step to serve as a reference when it is time to re-assemble the components. This is especially useful for cable routing and linkage connection reference. I have inserted an icon where I think a picture may be helpful. This guideline is based on my 1985 V45 Magna but is general enough to be widely applicable. I have inserted an icon where I think models typically vary. The Carb Cleaning Recipe The tune-up steps:
1. Before removing carbs; a. lift gas tank (make sure not more than 2/3 full), b. remove air filter, filter box, metal screen under box, c. drain and remove the radiator, d. remove heat shield mounted on the air box on the radiator side, e. turn the fuel petcock off, f. remove the gas line from carb #1 and catch gas in a container.
2. Removing carbs; a. note orientation of the isolator (rubber boots) clamps and loosen all 8 of them,
b. pull the carbs and airbox upwards until loose (difficult by hand - try ONE tie down threaded under the airbox and over the top of the frame or anchored to the handlebars accompanied by hand pressure back and forth on each side) until the carbs come loose as a single unit,
c. remove the isolators and clamps, d. wiggle, tilt, and the slide carbs to the left side of the bike, e. note the cable routing and disconnect the choke and two throttle
cables, f. undo the single clamp bolt (8mm) holding each of the two coolant
crossover tubes, g. work each tube straight out of the heads. With the clamp removed they
are only held by the o-rings on each end. If you pry them be gentle – they are thin walled, and pry each end equally so they don’t twist and jam. If they jam, gently push the

Andy's Carb Cleaning Guide.doc April 04, 2012
Page 2 of 6
‘out end’ back in level with the other and then continue. Don’t be rough – if you distort the ends you will have trouble getting a leak-free re-installation,
h. remove the carbs out the right side of the bike. Some twisting and tipping may be needed but force isn’t necessary unless you are doing something wrong,
i. with carbs off the bike, drain any remaining gas from them.
3. Before disassembling the carb-airbox unit;
a. Note which carb is which carb number. The carb for cylinder #1 is carb #1. On my bike Cyl #1 is rear left, #2 is front left, #3 is rear right, #4 is front right. You can use a marker or scriber to mark the carb number on the outside of each carb as it is easy to mix them up – especially if this is the first time you have cleaned them.
b. Prepare a container for each carb and the pieces removed from that carb – a plastic tray is excellent but a separate area on the workbench is sufficient. Do not mix the parts between the carbs as there are subtle but critical differences. Label each container with the carb number.
c. Prepare an additional ‘common’ container for linkages and other external parts, d. Note which carb number fits where in the airbox. If you want, use a marker to label the inside of
the airbox.
4. Disassembling the carb-airbox unit; a. Start by removing the 2 screws (Phillips #3) per carb from the inside
of the airbox. If you use an impact driver be careful not to damage the thin-wall cast body of the airbox,
b. Separate the carbs as a group from the air box and lay them on the bench, (Note carbs #3 and #4 are incorrectly identified in the picture)
c. Remove each of the rubber trumpets and place it in the appropriate carb’s container,
d. Carefully note how all the linkages and connecting tubes run. Pictures are a definite plus here. Consider using paint marker dots to identify which end or face is oriented where.
e. Disconnect all the linkages and connecting tubes, placing the springs, washers, nuts, etc. into the common container.
5. Disassembling each carb;
a. Slider - Remove the 3 Phillips screws from the domed chrome top – hold the top in place against a light spring pressure while removing the screws. Before moving the top, look carefully around the edge and note where the little raised channel is located.
b. Lift the top off, remove the coil spring and place both in the container, c. The black rubber diaphragm is delicate and EXPENSIVE treat it with
care while removing it along with the slide and main jet. Put the carb down and hold onto the slide,

Andy's Carb Cleaning Guide.doc April 04, 2012
Page 3 of 6
d. Remove the needle from the slider by pressing down on the plastic piece inside the bottom of the slider and turning it 90 degrees. It should now lift out, releasing the needle. Make a special note of any washers under the head of the needle and remove them with the needle,
e. Place the slide with diaphragm in a protected place – a dedicated margarine container within the carb container would not be going overboard.
f. Float bowl - Turn the carb over and remove the 4 screws holding the bowl. The bowl will likely be stuck in place, very gently pry it apart taking care not to damage the mating surfaces or the float bowl gasket. Inspect the gasket, if it damaged or flattened so that it does not protrude above the mating face of the float bowl, it needs to be replaced,
g. Note the orientation of the float and use needle-nose pliers to pull the float pivot pin completely out, removing it and the float,
h. Remove the float valve, screen, and washer from the carb body under where the brass tang of the float sat,
i. Remove the main jet (slot head), main jet holder (hex body), and the slow jet from the carb body. One piece is pressed in and is not removable,
j. Choke – Remove the nut and washer from the top of the activating shaft for the choke. Pull the black plastic tube up and off the shaft which frees up the lower portion of the shaft so it can be removed from the two fingers holding it. Unscrew the plastic nut around the choke plunger rod and work the shaft forks out of the groove on the end of the plunger. Remove the activating shaft, plastic nut, and plunger. Hopefully yours will not have the woodscrew added by a creative PO to replace the brass nub on the end of the enrichner valve likely broken off during an incorrect disassembly attempt.
k. Butterfly valve –Note the location of any markings on the round butterfly valve – it has a top-bottom and inside-outside orientation that must be maintained when it is reassembled or it will not fit or operate correctly. The valve is secured to the throttle shaft by two small Phillips head screws. It is essential to have a #3 Phillips screwdriver that fits the screw heads tightly or they will be stripped when you try to remove them. The other end of the screws has been slotted and spread apart slightly to ensure they do not vibrate out of the throttle shaft. Remove the screws,
l. Turn the throttle shaft 90 degrees and pull the butterfly valve out, m. The throttle shaft is now free to be removed, n. Around where the throttle shaft enters the carb body there is a
pressed in metal ring covering a felt seal. Use a small screwdriver to remove the ring and washer without damaging either of them. The seal can be damaged by the cleaners and is no longer available as an OEM part – possibly not as an aftermarket part either,

Andy's Carb Cleaning Guide.doc April 04, 2012
Page 4 of 6
o. Pilot needle jet – The pilot jet screws into the outside of the throat of the carb near where the isolator (rubber mounting boot) stops. It may be covered by a thin aluminum plug pressed into the hole over the pilot jet – or that may have been removed during a previous cleaning. If the plug is there, remove it by drilling a small hole through it and inserting a dental pick or wood screw and pulling the cap out,
p. Under the cap is the jet. Use a small slot screwdriver to screw the jet IN until it bottoms gently, counting the turns to the nearest 1/8
th
turn. Record the number of turns for use later – they can be different for each carb so do not mix them up,
q. Unscrew the jet and remove it along with the spring, washer, and o-ring. If the washer and o-ring do not come out it is necessary to hook them and pull them out with a small piece of copper wire or other soft hook that will not damage the seat.
r. If you haven’t done it already, now is a good time to order any replacement parts you need. (The screws for the float bowls and diaphragm housings are size M4x0.70 pitch. length is about 1 inch for float bowls and .75 inch for diaphragm. Do not use longer screws as those for the carb bowl will hit and crack the plastic fuel transfer tubes. Carb mounting screws are M5x1 about 1 inch long.)
s. Record the numbers stamped on the jets and valves along with the carb number they were found in. This information is for future use such as determining if you need to re-jet after changing air filter or muffler type or for diagnostics when having carb problems.
6. Cleaning each carb; Ultrasonic cleaners are excellent for cleaning carbs but are usually to expensive for a DIYer to acquire for occasional use. The next best way for a DIYer to clean carbs is to buy a gallon of carb cleaner and be ready to soak the metal parts in it using a basket or strainer. Spray carb cleaners are useful for cleaning the inside of small passageways in the carb after it has been soaked. If you are fortunate your cleaner will come with a dip basket for lowering parts into the solution – mine was a different style container and I had to use a different container to do the cleaning in. A quick trip to the dollar store and $5 later I was all fixed up with a metal bucket, bowl drilled so it would drain, and tongs. The carb cleaner is a bit expensive – mine was over $40 – but will clean nearly indefinitely so it is a good investment. Carbs must be completely disassembled for optimum cleaning. Never put liquid carb cleaner directly onto rubber, plastic, or felt carb parts as they can be damaged and ruined by it. They can also be damaged by spray carb cleaners. Even if your carbs are identical it is always a good idea to keep all the components for each carb together and reassemble them in the same carb. If you have a 1
st
generation V45 Magna the carbs are each different as are some of the internal parts – it is essential to clean these separately.
a. Soak all the metal parts for one carb together for 1-24 hours then rinse them with water and dry with compressed air. When doing this, take appropriate precautions as the carb cleaner is not good for skin or eyes. Also be aware that compressed air can blow small parts into cosmic black holes if you don’t secure them well when blowing them dry.
b. Once the parts are cleaned then should be checked to confirm that all the passageways are open. Look through each hole in the jets to confirm it is clear. Test passages in the carbs by blowing air or spray cleaner through them and noting where it comes out
Washer and o-ring are still
in here and must be fished
out

Andy's Carb Cleaning Guide.doc April 04, 2012
Page 5 of 6
7. Reassembling carbs; a. First assemble each carb individually generally reversing
the steps listed in #5 above. b. Before replacing the bowl, measure the float height in the
manner specified for your bike and compare the measurement to the specified height for your bike. Float height is critical to getting the surface of the gas in the correct relation to the jets and dramatically affects mixture and performance. Generally the height is measured from the parting surface of the carb to the highest or farthest portion of the float using a caliper or ruler. Tip the carb so that the float only just sits against the tip of the float valve without depressing it. To set the float height without measuring it a template like that shown in the picture can be made from any stiff card. Some floats can not be adjusted and must be replaced it the height is incorrect, others can be adjusted by bending the brass tab that contacts the valve. The very smallest possible deflections of the tab produce large changes in the float height – be gentle to avoid breaking the tab.
c. To hold the gasket in place in the carb bowl use small dabs of gasket sealer in the groove on the bowl. Make sure the dab is small and towards toward the outside of the bowl groove. Do not get much, if any on the inside of the gasket or housing, because fuel may dissolve it and cause problems when it gets into the jets.
d. If you are replacing the stock screws with stainless steel Allen screws check to ensure that the screws that attach the bowls are not long enough to come in contact with the plastic fuel tubes or the tubes will crack.
e. With each carb re-assembled and the float heights set it is time to connect the actuating linkages between the carbs. This is where all those photos will be especially useful. Don’t install the various springs between the carbs just yet – they will only make a break for freedom at every chance.
f. With all the linkages in place it is time to re-attach the carbs to the airbox – put the rubber trumpets in first, (orienting the small holes in them to the lowest position - not critical) then the carb bodies. Leave the screws very loose until you have ensured that nothing will be bent or pinched when the screws are tightened. Snug the screws down and recheck that all is well before tightening the screws.
g. With the carbs secured to the airbox it is time to install the springs that fit between the carbs
8. Before installing carbs a. make sure the fuel filter is clear and the tank(s) do not contain rust or sediment (so you don't have
to clean the carbs again in 2 weeks), b. make sure that the valve clearances are correct (so each cylinder can breathe freely and evenly), c. bench synch the carbs (to get air flow thru carbs roughly equalized). This is an important
step but is a fairly simple concept. On my bike, carb #1 is not adjustable and all others must be adjusted to match it. Carb synching is nothing more than adjusting the carbs so that all the butterfly valves are in exactly the same position. This is done by using a known spacer from the bottom of the carb throat to the bottom of the butterfly valve and setting all the carbs to be the same using the adjusting screws on the linkages.
d. set pilot screws about 2-1/2 turns out on each carb (to get mixture roughly right), e. If your carb boots (isolators) – the rubber mounting boots have been damaged and you
can’t find or perhaps afford new ones, you may want to try using fuel filler neck hose to replace them. The V65 is 36mm (1.42") and the V45 is 32mm (1.25") You can get fuel filler neck hose in both sizes and the ultimate is 1.5" or 1.25" silicon hose.
9. Installing carbs a. There are lots of videos on youtube about this – watch some of them, b. Do not use force to get the carbs into the frame – they are precision parts and also fragile – pry
bars are destructive don’t use them. c. Getting the carb boots and carbs mounted correctly should not require more force than you can
deploy with your bare hands augmented by a cargo strap deployed as shown on youtube.

Andy's Carb Cleaning Guide.doc April 04, 2012
Page 6 of 6
10. After installing carbs a. make sure the air filter is correctly installed and is clean (to allow correct air flow to the carbs), b. on-bike carb synch (to finely balance the air flow across the carbs), (see another article by
MagnAndy on how to build a manometer and synchronize carbs) c. adjust pilot screw on each carb using the idle-drop method to match fuel volume to the air flow
volume, (see another article by MagnAndy on how to set the mixture for your carbs) d. make sure that the hand grips are secure (you will need to HANG ON!).
Happy in Hondaland, MagnAndy Brampton, Ontario, Canada
Top Related