


Languages
Pages
Legal


ACADGILDACADGILD
In this post, we will be discussing cluster setup in Ambari cluster using AWS EC2 instance.
Before moving ahead in this post we recommend readers to go through our previous post
on how Ambari works and steps to install it using a repository.
Setting up Ambari Cluster and It’s Services:
Before starting all the Ambari services, Ambari server needs to be installed on your master
node. You can refer to this post for installing Ambari server.
Ambari Installation Guide - Part I
After installing Ambari Server, log in to the Ambari User Interface using Ambari-server
credentials. You will get a screen similar to the one shown below.
Go to the web browser and enter the server hostname. (http://hostname>:8080)
https://acadgild.com/blog/wp-admin/post.php?post=12191&action=edithttps://acadgild.com/blog/wp-admin/post.php?post=12191&action=edit

ACADGILDACADGILD
Login to admin console using default username (admin) and password (admin) .
After logging in, you will get a screen like this.
https://acadgild.com/blog/wp-admin/post.php?post=12191&action=edithttps://acadgild.com/blog/wp-admin/post.php?post=12191&action=edit

ACADGILDACADGILD
Now, Launch Install wizard to deploy Ambari cluster agents. The wizard will walk you
through the cluster installation process. Begin by naming your Ambari cluster.
https://acadgild.com/blog/wp-admin/post.php?post=12191&action=edithttps://acadgild.com/blog/wp-admin/post.php?post=12191&action=edit

ACADGILDACADGILD
Next, select the service stack you want to install in your Hadoop cluster.
https://acadgild.com/blog/wp-admin/post.php?post=12191&action=edithttps://acadgild.com/blog/wp-admin/post.php?post=12191&action=edit

ACADGILDACADGILD
Enter the list of hosts to be included in the cluster and attach SSH private key for password-
less login to Ambari agents.
Note: When using EC2 instance default user, type ‘ec2-user’ in SSH user account section.
https://acadgild.com/blog/wp-admin/post.php?post=12191&action=edithttps://acadgild.com/blog/wp-admin/post.php?post=12191&action=edit

ACADGILDACADGILD
After clicking on ‘Next’ button, you will get a screen similar to the one shown below. Here, you
can see the list of registered hosts. You can also remove those hosts that are not registered, as
you don't want to include them in the cluster.
https://acadgild.com/blog/wp-admin/post.php?post=12191&action=edithttps://acadgild.com/blog/wp-admin/post.php?post=12191&action=edit

ACADGILDACADGILD
After receiving a successful response from each cluster, then click ‘Next’ to proceed
further. Following the above action, you will get a screen asking you to choose the services you
want to install.
Note: Do not select all services if you are a beginner. You can select the remaining services
later on. Here, I have selected all the services as I’m familiar with all services. So, simply
select only those services familiar to you.
https://acadgild.com/blog/wp-admin/post.php?post=12191&action=edithttps://acadgild.com/blog/wp-admin/post.php?post=12191&action=edit

ACADGILDACADGILD
In the next screen, assign master components to hosts you want them to run on. In this
section, you can assign hosts for services as well.
https://acadgild.com/blog/wp-admin/post.php?post=12191&action=edithttps://acadgild.com/blog/wp-admin/post.php?post=12191&action=edit

ACADGILDACADGILD
Next, assign host and client components to hosts you want them to run on.
https://acadgild.com/blog/wp-admin/post.php?post=12191&action=edithttps://acadgild.com/blog/wp-admin/post.php?post=12191&action=edit

ACADGILDACADGILD
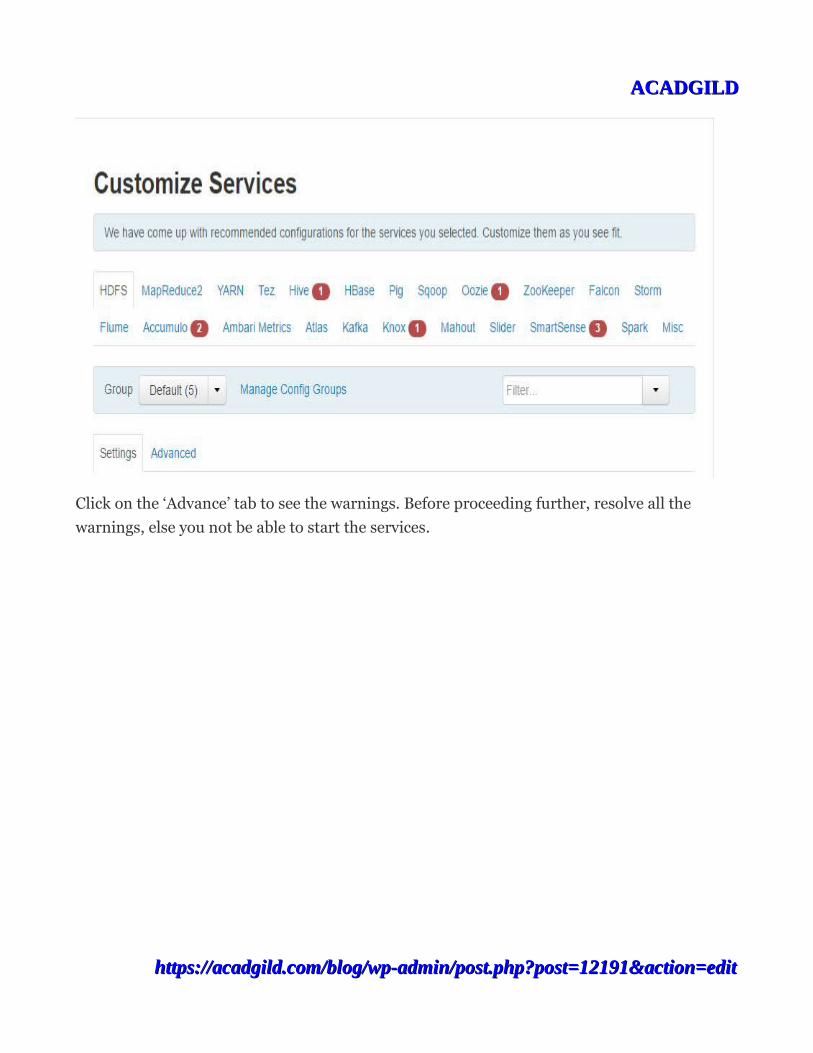
You can also customize the services wherever required.
https://acadgild.com/blog/wp-admin/post.php?post=12191&action=edithttps://acadgild.com/blog/wp-admin/post.php?post=12191&action=edit
ACADGILDACADGILD
Click on the ‘Advance’ tab to see the warnings. Before proceeding further, resolve all the
warnings, else you not be able to start the services.
https://acadgild.com/blog/wp-admin/post.php?post=12191&action=edithttps://acadgild.com/blog/wp-admin/post.php?post=12191&action=edit

ACADGILDACADGILD
Also, don’t forget to download the report by clicking on ‘Print’ as it contains the essential
information like which service is running on which hosts etc. After downloading the report,
you can set up these services and configuration to hosts by clicking on ‘Deploy’ option.
https://acadgild.com/blog/wp-admin/post.php?post=12191&action=edithttps://acadgild.com/blog/wp-admin/post.php?post=12191&action=edit

ACADGILDACADGILD
On clicking on ‘Deploy’, you will get a screen like as shown below, which shows the
installation process. Clicking on ‘Next’, you will be able to deploy the service to hosts.
https://acadgild.com/blog/wp-admin/post.php?post=12191&action=edithttps://acadgild.com/blog/wp-admin/post.php?post=12191&action=edit

ACADGILDACADGILD
After clicking ‘Next’, the entire configuration will finally deploy to hosts.
https://acadgild.com/blog/wp-admin/post.php?post=12191&action=edithttps://acadgild.com/blog/wp-admin/post.php?post=12191&action=edit

ACADGILDACADGILD
On deploying successfully, you will get the Ambari console UI. Login to this UI by providing
the admin credential. Here, you can manage and view all components as well as manage all
the services.
https://acadgild.com/blog/wp-admin/post.php?post=12191&action=edithttps://acadgild.com/blog/wp-admin/post.php?post=12191&action=edit
ACADGILDACADGILD
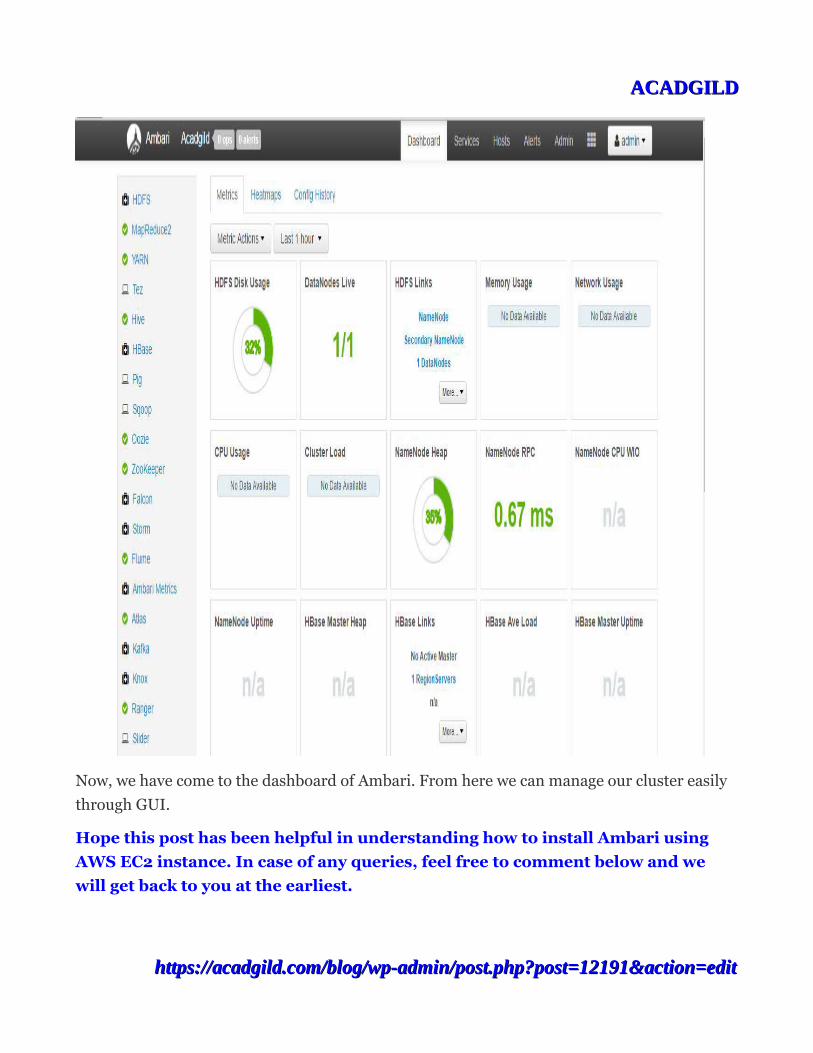
Now, we have come to the dashboard of Ambari. From here we can manage our cluster easily
through GUI.
Hope this post has been helpful in understanding how to install Ambari using
AWS EC2 instance. In case of any queries, feel free to comment below and we
will get back to you at the earliest.
https://acadgild.com/blog/wp-admin/post.php?post=12191&action=edithttps://acadgild.com/blog/wp-admin/post.php?post=12191&action=edit

ACADGILDACADGILD
https://acadgild.com/blog/wp-admin/post.php?post=12191&action=edithttps://acadgild.com/blog/wp-admin/post.php?post=12191&action=edit
Top Related