


Languages
Pages
Legal


ADOBE SIGN SERIES
Faculty and Staff
Adobe Sign
FORM FIELDS Quick Reference Guide
APRIL 2020
© 2020. All Rights Reserved.

ADOBE SIGN
FORM FIELDS Quick Reference Guide
Page 2
REVISION CONTROL
Document Title: Adobe Sign - Form Fields - QRG.docx
Author: Campus Training, Dr. Tammara Sherman
Revision History
Revision Date Revised By Summary of Revisions Section(s) Revised
5/8/2020 T. Sherman Created document All
Review / Approval History
REVIEW DATE REVIEWED BY ACTION (REVIEWED, RECOMMENDED OR APPROVED)

ADOBE SIGN
FORM FIELDS Quick Reference Guide
Page 3
TABLE OF CONTENTS
1.0 INTRODUCTION .............................................................................................................................................. 5
1.1 About This Guide .................................................................................................................................... 5
2.0 MANAGE FORM FIELDS ................................................................................................................................. 6
2.1 Naming Fields ......................................................................................................................................... 6
2.2 Changing the Assigned To ...................................................................................................................... 6
2.3 Changing Field Types ............................................................................................................................. 7
2.4 Changing Form Field Format .................................................................................................................. 7
2.5 Cloning And Copying Fields .................................................................................................................... 8
Copying Fields ........................................................................................................................... 8
Cloning Fields ............................................................................................................................ 9
2.6 Text Input Fields ...................................................................................................................................... 9
Adding Text Input Fields .......................................................................................................... 10
Editing Text Input Fields .......................................................................................................... 10
Edit Text Input Menu ................................................................................................................ 10
Masking Text Input Fields ........................................................................................................ 11
2.7 Date Fields ............................................................................................................................................ 12
Adding Date Fields ................................................................................................................... 12
Editing Date Fields ................................................................................................................... 12
2.8 Signature Fields .................................................................................................................................... 13
Adding Signature Fields ........................................................................................................... 13
Adding Signature Blocks .......................................................................................................... 13
2.9 Selection Fields ..................................................................................................................................... 14
Adding Check Boxes ................................................................................................................ 14
Adding Radio Buttons .............................................................................................................. 15
Adding Drop Downs ................................................................................................................. 15
2.10 Hyperlinks, Images, and File Attachments............................................................................................ 16
Adding Hyperlinks .................................................................................................................... 16
Adding Images ......................................................................................................................... 17
Adding File Attachment fields .................................................................................................. 18
2.11 Aligning And Sizing Fields .................................................................................................................... 18
Alignment and Sizing Options .................................................................................................. 19
3.0 CALCULATED FIELDS................................................................................................................................... 19
3.1 Preparing Fields for Calculations .......................................................................................................... 19

ADOBE SIGN
FORM FIELDS Quick Reference Guide
Page 4
3.2 Adding Calculated fields........................................................................................................................ 19
3.3 Formula Operators ................................................................................................................................ 21
4.0 GETTING HELP .............................................................................................................................................. 22

ADOBE SIGN
FORM FIELDS Quick Reference Guide
Page 5
1.0 INTRODUCTION
Adobe Sign is an electronic form and signature application. It allows you to send electronic documents to
recipients for signature. Additionally, you can take existing documents, make them fillable, and prepare them for
electronic signatures.
1.1 About This Guide
This guide covers the different form fields available in Adobe Sign. It will walk you through the editing form fields
and creating calculated fields. For information on basic Adobe Sign functionality for senders, see the Adobe
Sign Sender Basics Quick Reference Guide.
ADOBE SIGN
FORM FIELDS Quick Reference Guide
Page 6
2.0 MANAGE FORM FIELDS
When you convert a document to a fillable form, you have options for adding fields for text, dates, selections,
images, and hyperlinks. Additionally, you can modify the field appearance by changing the font, changing the
assign to information, and field type. You can edit your form fields for consistency, data validation, and more. This
section covers common edits for form fields and specific edits based on the field type. This section will cover
these options.
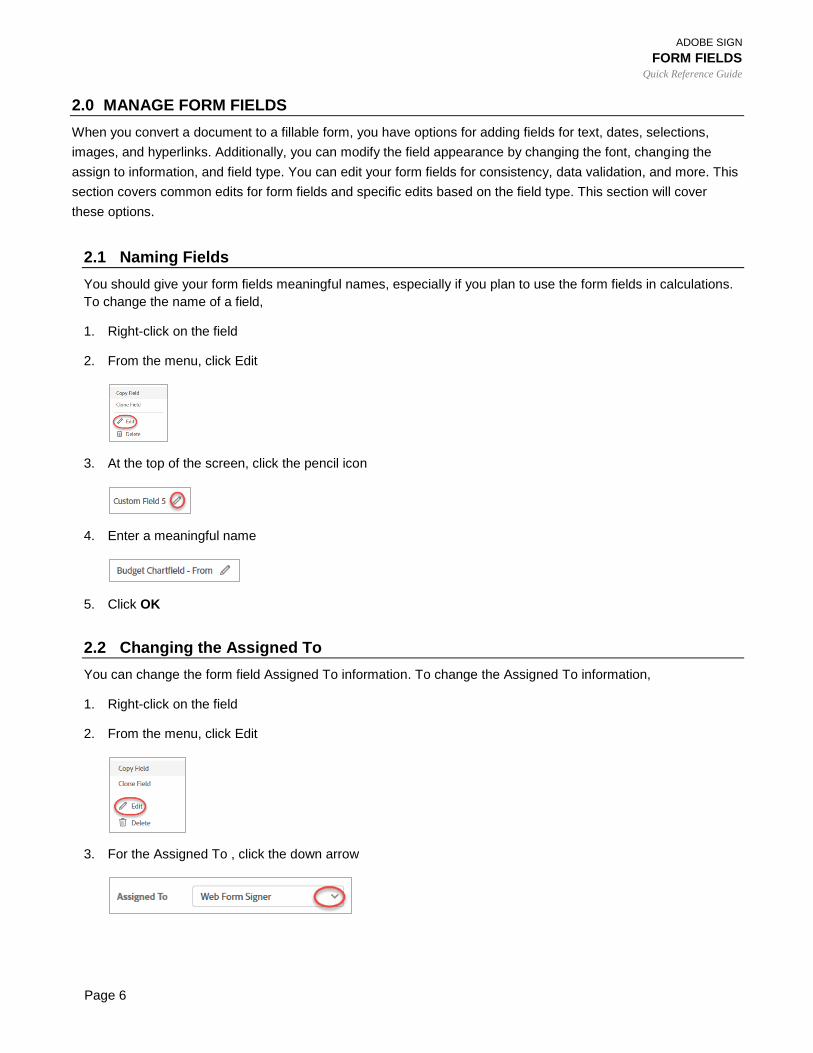
2.1 Naming Fields
You should give your form fields meaningful names, especially if you plan to use the form fields in calculations.
To change the name of a field,
1. Right-click on the field
2. From the menu, click Edit
3. At the top of the screen, click the pencil icon
4. Enter a meaningful name
5. Click OK
2.2 Changing the Assigned To
You can change the form field Assigned To information. To change the Assigned To information,
1. Right-click on the field
2. From the menu, click Edit
3. For the Assigned To , click the down arrow

ADOBE SIGN
FORM FIELDS Quick Reference Guide
Page 7
4. Select the desired recipient
5. Click OK
2.3 Changing Field Types
You can change field types if necessary. To change the Field Type,
1. Right-click on the field
2. From the menu, click Edit
3. For the Field Type , click the down arrow
4. Select the desired Field Type
5. Click OK
2.4 Changing Form Field Format
You can change the format of a form field by changing its appearance. The appearance affects the font, font
size, alignment, and color. To change the appearance,
1. Right-click on the field
2. From the menu, click Edit

ADOBE SIGN
FORM FIELDS Quick Reference Guide
Page 8
3. For the Appearance , click the down arrow
4. To change the font,
Click the down arrow
Select the desired font
5. To change the font size,
Click the down arrow
Select the desired font size
6. To change the alignment, click the desired alignment
7. Click OK
2.5 Cloning And Copying Fields
Cloning and copying fields will both duplicate a field. Cloning creates an exact copy of the source field, which is
helpful if you want the same information to appear other places in your document. On the other hand, copying a
field duplicates the source field but gives the copied field a different name i.e. Copy of Name.
Copying Fields
When copy a field, it produces a new field with all the same attributes except the name. It is best used when
you want to save time from having to edit the field to make same changes, such font, font size, etc. To copy a
field,
Right-click on the desired field

ADOBE SIGN
FORM FIELDS Quick Reference Guide
Page 9
From the menu, select Copy Field
Drag the new field to the desired location
The new field will have a new name.
To change the name, click the pencil icon and enter a meaningful name.
Cloning Fields
Cloning fields allows you to create a duplicate field with the same name. It is best used when you want the
values entered or calculated to appear in other places on your document, such as a Total field. To clone a field,
Right-click on the desired field
From the menu, select Clone Field
Drag the new field to the desired location
The new field will have the same name as the field it was copied from. Both the original field and the copied field will show the same values.
2.6 Text Input Fields
Text Input fields allow you to add areas where the recipients can input information, such as their name,
address, etc.

ADOBE SIGN
FORM FIELDS Quick Reference Guide
Page 10
Adding Text Input Fields
To add a Text Input field,
Select the recipient’s name from the right pane
In the right pane, expand the Data Fields
Drag and drop the Text Input, to the desired areas, i.e. First Name, Last Name, etc.
Editing Text Input Fields
You can edit Text Input fields to change the assigned to, field type, appearance, and more.
Right-click on the desired Text Input field
From the menu, select Edit
Make your changes and selections. For more information, see the Edit Text Input Menu section.
After making your changes, click OK
Edit Text Input Menu
The table below describes each menu item.
Menu Item Description
Pencil icon Allows you to edit the name of the Text Input field. This is handy when creating calculated fields.
Assigned To Changes which recipient will complete the field
Field Type Changes the Text Input field to another field type, such as Date, Signature, or Signature Info

ADOBE SIGN
FORM FIELDS Quick Reference Guide
Page 11
Value Type Changes the field to a calculated or entered value
Required Means the recipient must complete the field
Read only Means the recipient cannot change the field contents
Mask field date Hides the information entered
Multi-line data entry Allows the recipient to enter multiple lines of information
Default Value Sets the initial value of the field
Tooltip Text the recipient will see when hovering over the field
Validation Controls the type of information the recipient can enter, such as numbers or text only
Conditions Allows you to control the information that is visible based on specified criteria
Appearance Control the format of the information entered, such as font, font size, and alignment
Tools Allows you to copy or clone a field
Delete Field Removes the Text Input field
Masking Text Input Fields
You can mask fields when you do not want the recipient’s sensitive information, such as social security number,
etc., visible to others who may view the document. With masked fields, the information displays as asterisks on
the completed PDF.
Please note: The actual information is VISIBLE when exporting reports, such as CSV files.
To add a masked field,
Select the recipient’s name from the right pane
In the right pane, expand the Data Fields
Drag and drop the Text Input, to the desired areas, i.e. First Name, Last Name, etc.
Right-click on the desired Text Input field
From the menu, select Edit

ADOBE SIGN
FORM FIELDS Quick Reference Guide
Page 12
Check the Masked field data checkbox
(Optional) Select the type of validation (i.e date, social security number, phone, etc)
Click OK to save the field properties
Repeat for as many fields as you need to mask
2.7 Date Fields
Date fields allow you to add areas where the recipients can enter dates. The date fields will populate
automatically with the date the recipients sign the document.
Adding Date Fields
To add a date field,
Select the recipient’s name from the right pane
In the right pane, expand the Signer Info Fields
Drag and drop the Date
Editing Date Fields
You can edit date fields to change the date format and more.
Right-click on the Date field
From the menu, select Edit

ADOBE SIGN
FORM FIELDS Quick Reference Guide
Page 13
From the Edit screen, you can change. Click the down arrow for Date Format.
Select a Date Format from the list
Click OK
2.8 Signature Fields
You can add signature fields, initials, and signature blocks for each person who needs to sign the document.
Adding Signature Fields
To add signature fields,
Select the recipient’s name from the right pane
In the right pane, expand the Signature Fields
Drag and drop the Signature to the desired location on your document
Adding Signature Blocks
A signature block contains areas for the form signer to sign and to enter their name and email address. The signature date is populated automatically, when they sign. To add a signature block,

ADOBE SIGN
FORM FIELDS Quick Reference Guide
Page 14
Select the recipient’s name from the right pane
In the right pane, expand the Signature Fields
Drag and drop the Signature Block to the desired location on your document
2.9 Selection Fields
You can add Selection fields allow your recipients to choose among options that you specify. You have a choice
of three selection fields: check box, radio buttons, and drop down. The table below describes their function and
best use.
Selection Field Description Best Use
Check Box Allows the recipient to select one or more
options that apply
When the recipient can select multiple
options
Radio buttons Allows the recipient to select one option
from two or more options
When the recipient can only choose one of
the available options
Drop Down Allows the recipient to select from a list of
options
When the recipient has many options from
which to choose
Adding Check Boxes
Check boxes allow the recipient to select one or more options that apply. To add a Check Box,
Select the recipient’s name from the right pane
In the right pane, expand the Data Fields
Drag and drop the Check Box, , to the desired area

ADOBE SIGN
FORM FIELDS Quick Reference Guide
Page 15
Repeat the above step for each check box option.
Adding Radio Buttons
Radio Buttons allow the recipient to select one option from two or more options. To add Radio Buttons,
Select the recipient’s name from the right pane
In the right pane, expand the Data Fields
Drag and drop the Radio Button, , to the desired area
On the Radio Button Group screen,
Specify the number of options for your radio button group
Click OK
Adobe Sign will place the additional radio buttons on your document.
Drag the radio buttons to the desired areas on the document
Adding Drop Downs
Drop down menus allow the recipient to select from a list of options. To add a Drop Down,
Select the recipient’s name from the right pane

ADOBE SIGN
FORM FIELDS Quick Reference Guide
Page 16
In the right pane, expand the Data Fields
Drag and drop the Drop Down, , to the desired area
To add the options for the Drop Down, double-click the drop down
In the Drop Down Options of the pop-up menu,
Type over the entries with your options
To add more options, enter your options in the blank area
(Optional) Add a default value for your drop down. (A default value allows you to specify a value that stays populated on your document, until the recipient changes it
value by making a different selection from the drop down.)
Click OK
2.10 Hyperlinks, Images, and File Attachments
This section covers adding hyperlinks, images, and file attachments to your documents.
Adding Hyperlinks
Hyperlink fields are a great way to link from your document to a website or other location. You can use it to link
to instructions for completing the document, to policies associated with the document, etc. To add a Hyperlink
field,
Select the recipient’s name from the right pane

ADOBE SIGN
FORM FIELDS Quick Reference Guide
Page 17
In the right pane, expand the More Fields
Drag and drop the Hyperlink field, , to the desired area
Double-click the Hyperlink field
On the Hyperlink menu,
In the Website, enter the URL for the desired website
In the Display Label, enter a label for the website
Click OK
Adding Images
Image fields allows a recipient to attach an image, such as a student id, certificate of completion, etc. You can
export the attached image for later use. To add an Image field,
Select the recipient’s name from the right pane
In the right pane, expand the Data Fields
Drag and drop the Image field, , to the desired area
Resize the image field as necessary
Double-click the Image field
In the Display Label, enter a label for the Image field

ADOBE SIGN
FORM FIELDS Quick Reference Guide
Page 18
Click OK
Adding File Attachment fields
While Image fields allow you to attach an image to a document, File Attachment allows the recipient to attach a
file, such as a certificate of completion, receipts, or other supporting documentation. To add a File Attachment
field,
Select the recipient’s name from the right pane
In the right pane, expand the More Fields
Drag and drop the File Attachment field, , to the desired area on your document
Double-click the File Attachment field
On the menu,
In the Display Label, enter a label for the file attachment field
Click OK
2.11 Aligning And Sizing Fields
The Alignment bar, shown below, allows you to ensure that your form fields are aligned and sized properly. This
bar is activated once you select two or more fields.
To align and size fields,
Click on a form field in your document
While holding down the Shift key on your keyboard, click additional form fields
With the fields selected, click the desired alignment and spacing icon
For descriptions of each alignment and spacing icon, see the next section.

ADOBE SIGN
FORM FIELDS Quick Reference Guide
Page 19
Alignment and Sizing Options
The table below shows the different alignment and spacing icon, their names, and descriptions.
Icon Menu Item Description
Align Top Aligns the top of the fields
Align Middle Aligns the center of the fields
Align Bottom Aligns the bottom of the fields
Align Left Aligns the fields to the left
Align Center Aligns to the fields to the center
Align Right Aligns the fields to the right
Match Width Resizes field to the same width
Match Height Resizes field to the same height
Match Both Width and Height Resizes fields to the same width and height
3.0 CALCULATED FIELDS
With Adobe Sign, you can add form fields that contain formulas. The formulas can contain addition, subtraction,
division, multiplication, and more. Before you add your calculated fields, you should prepare the fields. This
section covers preparing your form fields and adding calculated fields.
3.1 Preparing Fields for Calculations
Before you use your form fields in calculations, it is recommended that you format the fields in a specific
manner for best results.
Give the form fields meaningful names (See the Naming Fields section for instructions). Using meaningful names makes it easier for you to identify the right form fields for your formulas.
Edit the format of the form fields If you will use the form fields for calculations, then format them as numbers. If you are using the form fields for
comparisons, you can format them as text or numbers depending on your needs.
3.2 Adding Calculated fields
Before you add calculated fields, be sure that the fields you will use in your formula are setup properly. See the
section Preparing Fields for Calculations.
1. In the right pane, expand Data Fields
2. Drag Text Input field

ADOBE SIGN
FORM FIELDS Quick Reference Guide
Page 20
3. Right-click on field
4. Click Edit
5. Click pencil to edit name
6. For Value Type, change to Calculated value
7. Click the f(x)
8. Click Fields to expand it
9. Your fields will show in the right pane.
10. To complete your formula,
1. Select a field from the right pane
2. Select an operator from the menu
3. Select another field if appropriate
4. Your formula will appear in the formula section as you make your selections.
5. When satisfied, click Check Syntax
6. Click OK
11. For the Display As, select Number
12. For the Number Format, select a format
13. For the Appearance, select the right justified

ADOBE SIGN
FORM FIELDS Quick Reference Guide
Page 21
14. Click OK
3.3 Formula Operators
The table below shows each formula operator and provides a description of its function. (Source: Adobe Sign
Supported Operators)
+ Add Add two numbers together.
- Minus Subtracts two numbers.
/ Divide Divides two numbers.
* Multiply Multiplies two numbers together.
& Concatenate Concatenate two strings together.
= Compare Equals Compares two values and returns true if the two values are equal and false if they are
not.
!= Compare Not Equal Compares two values and returns true if the two values are not equal and false if they
are.
< Less Than Compares two values and returns Boolean (true or false) if the first value is less than
the second value.
>= Greater than or Equals Compares two values and returns Boolean (true or false) if the first value is greater than
or equal to the second value.
<= Less Than or Equals Compares two values and returns Boolean (true or false) if the first value is less than or
equal to the second value.
> Greater than Compares two values and returns Boolean (true or false) if the first value is greater than
the second value.
% Modulo Returns the remainder of the division between two numbers.
^ Exponent Returns the exponential value of the specified numbers.

ADOBE SIGN
FORM FIELDS Quick Reference Guide
Page 22
4.0 GETTING HELP
If you are unsure or need assistance, please consider the preferred sources and order in which to contact listed
below:
Web Resources
Adobe Sign Resources
Service Center 661-654-4357 [email protected]
Top Related