


Languages
Pages
Legal


ABOVEGROUND INSTALLATION MANUAL


Date Issued: 01/August/2010 FS TCD 001E rev.0 20100801


FIBERSTRONG®
ABOVEGROUND INSTALLATION MANUAL
1
TABLE OF CONTENTS
1 INTRODUCTION 2
1.1 General 2
1.2 Product Range 2
1.3 Applicable International Codes and Standards 2
2 PIPE CONSTRUCTION 3
2.1 General 3
2.2 Resins 3
2.3 Thickness Calculations 3
3 PHYSICAL AND MECHANICAL PROPERTIES 5
3.1 Tolerances on Dimensions 5
3.2 Flow Characteristics 5
3.3 U.V. Resistance 5
4 LAMINATION (BUTT WRAP) JOINTS 5
4.1 Preparation 5
4.2 Cutting Procedure 6
4.3 Lamination 6
5 FLANGED JOINTS 9
5.1 General 9
5.2 Determination of the Bolt Lengths 10
5.3 Flange Drilling Standards 10
5.4 Gaskets Types 11
5.5 Notes 13
5.6 Tightening of Flanges 13
6 FIBERSTRONG® RUBBER SEAL LOCK JOINT 15
6.1 Guidelines for the Installation of FIBERSTRONG® RSLJ Joints 15
6.2 Guidelines for the Dismantling of FIBERSTRONG® RSLJ Joints 18
7 HANDLING OF FIBERSTRONG® MATERIAL: TRANSPORT AND STORAGE 19
7.1 Receiving 19
7.2 Pipe Offloading 19
7.3 Storing FIBERSTRONG® Pipes on Site 20
8 ACCESSORIES 22
8.1 Pipe Supports 22
8.2 Valves 24
8.3 Bellows 25
8.4 Connection to Other Materials 25
8.5 Pipe Connections Through Walls 26
9 FIELD TEST PROCEDURE 28
9.1 Filling, Stabilizing, and Testing 28

FIBERSTRONG®
ABOVEGROUND INSTALLATION MANUAL
2
1.1 General FIBERSTRONG® pipes for aboveground applications are Glass Reinforced Plastics (GRP) consisting of a thermosetting chemical–resistant resin and fiberglass reinforcements.
GRP pipes are flexible, corrosion resistant and can be used for a wide range of applications, such as cooling water, industrial waste water and effluents, fire water lines, seawater lines, acid cleaning and chlorination lines.
1.2 Product RangeFIBERSTRONG® pipes are manufactured using the continuous or the reciprocal filament winding process, according to the International Standards listed below, with nominal internal diameters ranging from 25 mm up to 4,000 mm.
Available standard pressure classes are 4, 7, 10, 12 and 16 bar. Higher pressure classes are available upon request. Additionally, FIBERSTRONG® pipes can be designed for use under full–vacuum conditions as well as for underground applications.
1.3 Applicable International Codes and StandardsStandard Title
ASTM D 2996 Standard Specification for Filament–Wound “Fiberglass” (Glass– Fiber–Reinforced Thermosetting–Resin) Pipe.
ASTM D-3262 Standard Specification for “Fiberglass” (Glass-Fiber-Reinforced Thermosetting-Resin) Sewer Pipe.
ASTM D-3517 Standard Specification for “Fiberglass” (Glass-Fiber-Reinforced Thermosetting-Resin) Pressure Pipe.
ASTM D-3754 Standard Specification for “Fiberglass”(Glass-Fiber-Reinforced Thermosetting-Resin) Sewer and Industrial Pressure Pipe.
AWWA C-950 Fiberglass Pressure Pipe.
AWWA M-45 Fiberglass Pipe Design Manual.
ASME B31.1 Power Piping.
ASME B31.3 Process Piping.
ISO 14692 Petroleum and Natural Gas Industries - Glass-Reinforced Plastics -Piping.
BS EN 1796 Plastics Piping Systems for Water Supply With or Without Pressure - Glass-Reinforced Thermosetting Plastics (GRP) Based on Unsaturated Polyester Resin (UP).
BS EN 14364 Plastics Piping Systems for Drainage and Sewerage With or Without Pressure - Glass-Reinforced Thermosetting Plastics (GRP) Based on Unsaturated Polyester Resin (UP) - Specifications for Pipes, Fittings and Joints.
Table 1: Applicable International Standards
1. INTRODUCTION

FIBERSTRONG®
ABOVEGROUND INSTALLATION MANUAL
3
2.1 GeneralThe pipe is a composite laminate consisting of a corrosion resistant liner, a structural layer and an exterior resin rich layer.
Fig. 1: FIBERSTRONG® Pipe structure
2.2 ResinsThe type of resins used in the manufacturing of FIBERSTRONG® pipes are given in Table 2. Generally, pressure and temperature requirements govern the resin system selection; therefore, maximum service temperatures can change depending on the service requirements. For more information please consult FPI Engineers.
Resin System
Liner Structure
Isophthalic Polyester Isophthalic Polyester
Epoxy based Vinyl Ester Isophthalic Polyester
Epoxy based Vinyl Ester Epoxy based Vinyl Ester
Table 2: Resin Systems
2.3 Thickness CalculationsThe pipe minimum reinforced wall thickness, tE, is the largest of:
A. Pressure RequirementThe pipe structural wall thickness needed to meet the pressure requirement is:
Where:tp = Structural wall thickness (mm)P = Design pressure (MPa)D = Pipe internal diameter (mm)σh = Allowable hoop stress (MPa)
2. PIPE CONSTRUCTION

FIBERSTRONG®
ABOVEGROUND INSTALLATION MANUAL
4
B. Stiffness RequirementThe pipe structural wall thickness needed to meet the stiffness requirement is:
Where:ts = Pipe structural wall thickness (mm)Dm = Pipe mean diameter (mm)S = Pipe specific tangential initial stiffness (Pa)EHF = Structural hoop flexural modulus (MPa)
C. Buckling RequirementThe pipe structural wall thickness needed to meet the buckling requirement depends on the pipe installation.
I. Buried InstallationIf:
Then use:
Otherwise, use:
Where:tb = Pipe structural wall thickness (mm)v2 = Product of both Poisson ratios, due to axial load and hoop loadDm = Pipe mean diameter (mm)PB = Buckling pressure (MPa)EHF = Structural hoop flexural modulus (MPa) L = Distance between stiff ends (support span) (mm)SFb = Buckling safety factorRm = Pipe mean radius (mm)
II. Buried InstallationFor buried installation, use the methodology of AWWA M45, Section 5.7.5.
The final pipe structural wall thickness (tE) is the largest of tp, ts, and tb. The final pipe total wall thickness, T = tE + tu where tu= un-reinforced layers thickness (mm).
Note that the stiffness and aboveground buckling equations are iterative. Start by using the Dm resulting from the pressure calculation then use the calculated thickness to refine the answer.

FIBERSTRONG®
ABOVEGROUND INSTALLATION MANUAL
5
3.1 Tolerances on DimensionsDimension Specification Tolerance
Pipe Inside Diameter (ID) Equal to DN 4 mm or 1.0% whichever is smaller
Length 3, 10 or 11.8 meters ± 25 mm
Roundness Deviation Pipes shall be round +1.0%
End Squareness and End Plainness
Ends shall be both square to axis of the pipe and plane
Not more than 2 mm + 0.005 x DN
Table 3: Tolerances
3.2 Flow CharacteristicsPipe wall friction factors:• Darcy, Fanning, Weisbach f = 0.010 to 0.018• Hazen Williams C1 = 130 to 150• Manning n = 0.0095 to 0.012
3.3 U.V. ResistanceFIBERSTRONG® pipes contain a U.V. inhibitor in their structure. This layer offers sufficient protection against U.V. radiation.
It is recommended that the pipe manufacturer provides assistance for this type of joint.
Figure 2: Typical Butt Wrap Joint Profile
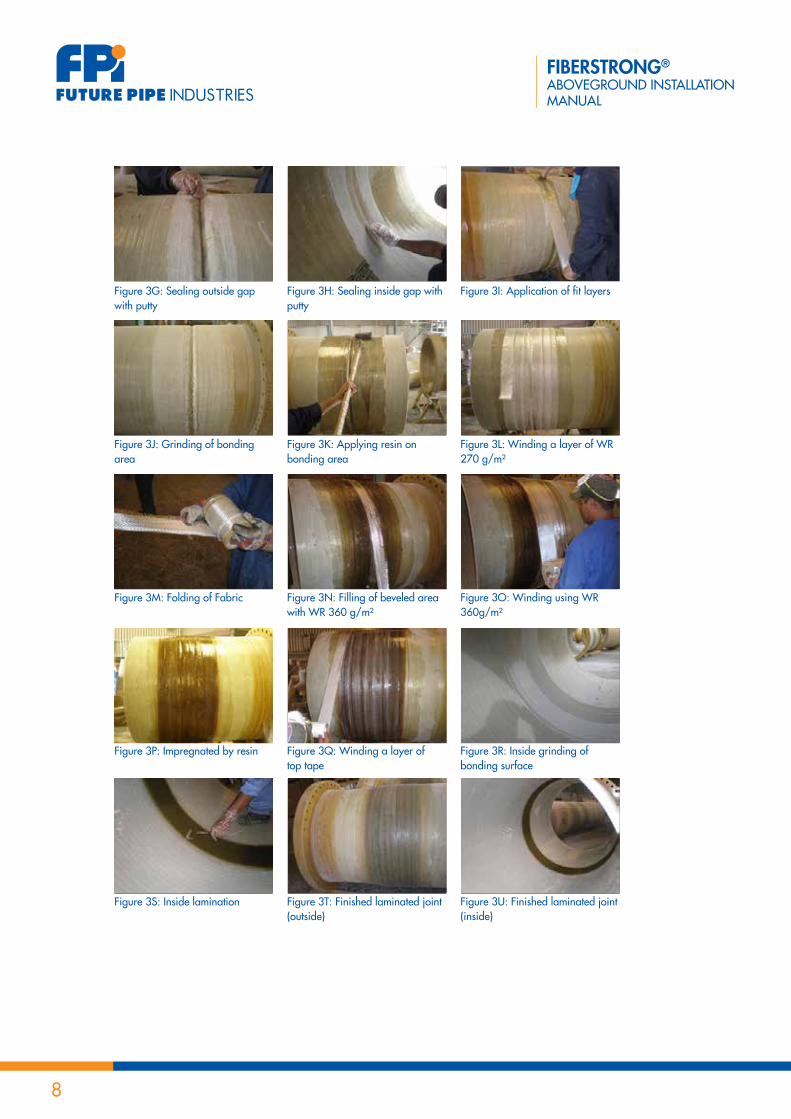
The below procedure describes the steps to be followed for field joint lamination of FIBERSTRONG® pipes (Figures 3A to 3U):
4.1 Preparation1. Check the pipe routing as per the approved drawings.2. Check the alignment and level of the pipes.3. Check if any damage has occurred during unloading and/or laying.4. Ensure that the gap between the two pipes to be laminated is within the allowable limit.
3. PHYSICAL AND MECHANICAL PROPERTIES
4. LAMINATION (BUTT WRAP) JOINTS
Bond area
Joint
Pipe Segment Pipe Segment
Lamination Thickness
ND

FIBERSTRONG®
ABOVEGROUND INSTALLATION MANUAL
6
4.2 Cutting Procedure1. The selected pipe segments are marked using a “wraparound” first. Proceed after that
with cutting of the pipes (if needed) using a diamond wheeled cutter, (Figure 3A).2. When cutting the pipe, make sure that it is being done exactly square to its central axis,
(Figure 3B).3. Pipe beveling is carried out to provide a proper jointing of the pipe sections,
(Figure 3C).4. For pressure applications, grind the edges of the cut curve of the pipe sections at an
angle of maximum 10° to the pipe axis. For non–pressure applications, pipe beveling is not required, (Figure 3D).
4.3 LaminationA. Fit layer1. Measure the fit layer bond length from the end of each pipe.2. Grind the above area to remove the surface layer of the pipes.3. Clean this area and ensure that it is fully dry.4. Fill the gap, if any, between the two pipes with cab–o–seal putty, (Figure 3G and 3H).5. Mix the resin and catalyst as per the quantities specified in the recipe to maintain the
correct ratio.6. Impregnate the roughened area with the above mixture.7. Apply two layers of woven roving glass 270 g/m2 using a 50% overlap between
each two consecutive windings so that wrapping the full surface will end up with two layers of glass, (Figure 3I)
8. Impregnate the above layers with the resin/catalyst mixture.9. Repeat the above two steps until the required number of layers is achieved.10. Allow the lamination to cure under ambient temperature.
B. Main Laminate1. Measure the bond length on each pipe from the middle of the fit layer.2. Grind the above area to remove the surface layer, (Figure 3J)3. Clean this area and ensure that it is fully dry.4. Mix the resin and catalyst as per the quantities specified in the recipe to maintain the
right ratio.5. Impregnate the above area with the resin/catalyst mixture (Figure 3K).6. Apply two layers of woven roving glass 270 g/m2 using 50% overlap between each
two consecutive windings so that wrapping the full surface will end up with two layers of glass, (Figure 3L).
7. Impregnate the above layers with the resin/catalyst mixture.8. Repeat the above two steps till the required number of layers is applied.9. Depending on the pipe diameter and pressure class, the type of glass and the number
of layers are specified in the lamination recipe. If glass 270 g/m2 is to be used only, skip all the below steps – except the last one – and end the lamination with two layers of Top Tape. Otherwise, move to the next step.
10. Apply two layers of woven roving glass 360 g/m2 using 50% overlap between each two consecutive windings so that wrapping the full surface will end up with two layers of glass.

FIBERSTRONG®
ABOVEGROUND INSTALLATION MANUAL
7
11. Impregnate the above layers with the resin/catalyst mixture.12. Repeat the above two steps until the required number of layers is applied. A maximum
of 12 layers should be applied at this stage.13. If more layers are to be applied, move to the following steps. Otherwise, skip all the
below steps – except the last one – and end the lamination with two layers of Top Tape.
14. Apply the specified number of layers of woven roving 580 g/m2 and 360 g/m2 alternatively. Each type of glass should be applied in four consecutive layers before changing to the other type. Every two layers should be impregnated before applying the second two layers of the same type.
15. Apply two layers of woven roving glass 360 g/m2 (Figure 3O).16. Impregnate the above layers with the resin/catalyst mixture.17. Wind two layers of top tape glass around the laminate to extract the excess quantity
of resin and to provide a smooth surface (Figure 3Q).
C. Internal LaminationThe following steps are to be carried out inside the pipes, if access is possible:1. Measure the required bond length from the end of each pipe.2. Grind the above area to remove the internal liner of the pipe (Figure 3R).3. Cut several pieces of woven roving glass 270 g/m2 to the required length.4. Mix the right quantity of resin and catalyst.5. Wet the surface area of internal layer with the mixture.6. Stack several pieces of woven roving on a flat surface and impregnate with the resin
mixture.7. Place the above impregnated woven roving on the joint.8. Evenly press the surface to flush air traps and blisters using a steel roller (Figure 3S).9. Repeat the above three steps until the required thickness is reached.10. Cover the above laminate with two layers of surface mat to provide a smooth resin–
rich laminate surface.
Figure 3A: Marking by wraparound
Figure 3D: Beveling at 10˚ angle
Figure3B: Cutting the pipe
Figure 3E: Adjustment of pipe segments
Figure 3C: Cutting the edges of the pipe
Figure 3F: Alignment of pipe segments
FIBERSTRONG®
ABOVEGROUND INSTALLATION MANUAL
8
Figure 3G: Sealing outside gap with putty
Figure 3J: Grinding of bonding area
Figure 3M: Folding of Fabric
Figure 3P: Impregnated by resin
Figure 3S: Inside lamination
Figure 3H: Sealing inside gap with putty
Figure 3K: Applying resin on bonding area
Figure 3N: Filling of beveled area with WR 360 g/m²
Figure 3Q: Winding a layer of top tape
Figure 3T: Finished laminated joint (outside)
Figure 3I: Application of fit layers
Figure 3L: Winding a layer of WR 270 g/m²
Figure 3O: Winding using WR 360g/m²
Figure 3R: Inside grinding of bonding surface
Figure 3U: Finished laminated joint (inside)

FIBERSTRONG®
ABOVEGROUND INSTALLATION MANUAL
9
5.1 GeneralBefore assembling the Flanged Joints, all safety precautions need to be taken. Ensure that all necessary tools and materials are available.
The necessary tools for the assembly of flanges are:• Ring spanner with the required bolt head size• Torque wrench with the required socket size
Figure 4: Flanged Joint
GRP flanges are flat faced. These flanges must always be accurately aligned and not subject to any stress. On the GRP side of the flanged joint, the bolts and nuts must have washers to avoid exceeding the permitted surface pressure. As an alternative, a steel backing ring can be installed.
Figure 5: Flanges Connected to a Butterfly Valve
When assembling a wafer–type butterfly valve, the bolts should be tightened first by hand. If leakage occurs during pressure tests, the bolts can be tightened up to the maximum values. To prevent damage of the flanges when tightening, spacers may be placed between the GRP flanges.
CRP
underlay ringunderlay ringbutterfly valve space
CRP
5. FLANGED JOINTS

FIBERSTRONG®
ABOVEGROUND INSTALLATION MANUAL
10
5.2 Determination of the Bolt Lengths
Figure 6: Bolt Length Calculation
There are four different types of flanged connections:1. GRP to steel - connected with bolt and nut.2. GRP to GRP - connected with bolt and nut.3. GRP to steel - connected with stud bolt and two nuts.4. GRP to GRP - connected with stud bolt and two nuts.
The lengths can be calculated with the following formulas respectively:Case 1. L = T + t + p + r + m + aCase 2. L = 2T + p + 2r + m + aCase 3. L = T + t + p + 2r + 2m + aCase 4. L = 2T + p + 2r + 2m + 2a
Where:T = Thickness of GRP flange (mm)t = Thickness of the steel flange (mm)p = Thickness of the gasket (mm)r = Thickness of the washer (mm)m = Height of the nut (mm)a = Allowance in addition to the tolerance of the flange thickness:DN 25 to 300: 0, + 3 mmDN 350 to 1,200: 0, + 5 mmDN 1,300 to 2,000: 0, + 8 mmDN 2,100 to 3,000: 0, + 12 mmDN 3,100 to 4,000: 0, + 15 mm
5.3 Flange Drilling StandardsStandard flanges are drilled to ASA 150 pattern. Other drilling standards are also available, see Table 5.
TF
L
mrP

FIBERSTRONG®
ABOVEGROUND INSTALLATION MANUAL
11
Drilling Indication
Related Flange Standard
API Class 75API 605 Class 75ASME B 16.47 Class 75 Series B
API Class 150API 605 Class 150ASME B 16.47 Class 150 Series B
API 300 API 605 Class 300
ASA 150
ANSI/ASME B 16.1 Class 125ANSI/ASME B 16.5 Class 150ASME B 16.47 Class 150 Series AAWWA C207 Class D and E
ASA 300ANSI/ASME B 16.1 Class 250ANSI/ASME B 16.5 Class 300
ASA 600 ANSI/ASME B 16.5 Class 600
PN 6
BS 4504-PN 6DIN 2501 ND 6DIN 2527 ND 6DIN 2531DIN 2631DIN EN 1092-2 PN6ISO 2084 PN 6ISO 7005 PN 6NF E 29-209 PN 6NF 29-221
PN 10
BS 4504-PN 10DIN 2501 ND 10DIN 2527 ND 10DIN 2532DIN 2632DIN EN 1092-2 PN 10ISO 2084 PN 10ISO 7005 PN 10NF E 29-203 PN 10NF E 29-209 PN 10NF 29-222
Drilling Indication
Related Flange Standard
PN 16
BS 4504-PN 16DIN 2501 ND 16DIN 2507 ND 16DIN 2533DIN 2633DIN EN 1092-2 PN 16ISO 2084 PN 16ISO 7005 PN 16NF E 29-203 PN 16NF E 29-209 PN 16NF 29-223
PN 25
BS 4504-PN 25DIN 2501 ND 25DIN 2527 ND 25DIn 2534DIN 2634DIN EN 1092-2PN 10ISO 2084 PN 25ISO 7005 PN 25NF E 29-209 PN 25
PN 40
BS 4504-Pn 40DIN 2501 ND 40DIN 2527 ND 40DIN 2535DIN 2635ISO 2084 PN 40ISO 7005 PN 40
PN 50 ISO 7005 PN 50
PN 63 DIN EN 1092-2 PN 63
JIS 5K JIS B 2210 5K
JIS 10K JIS B 2210 10K
JIS 16K JIS B 2210 16K
MSS 300ASME B 16.47 Class 300 Series AMSS SP-44 Class300
Table 5: Summary of Flange Drilling Standards
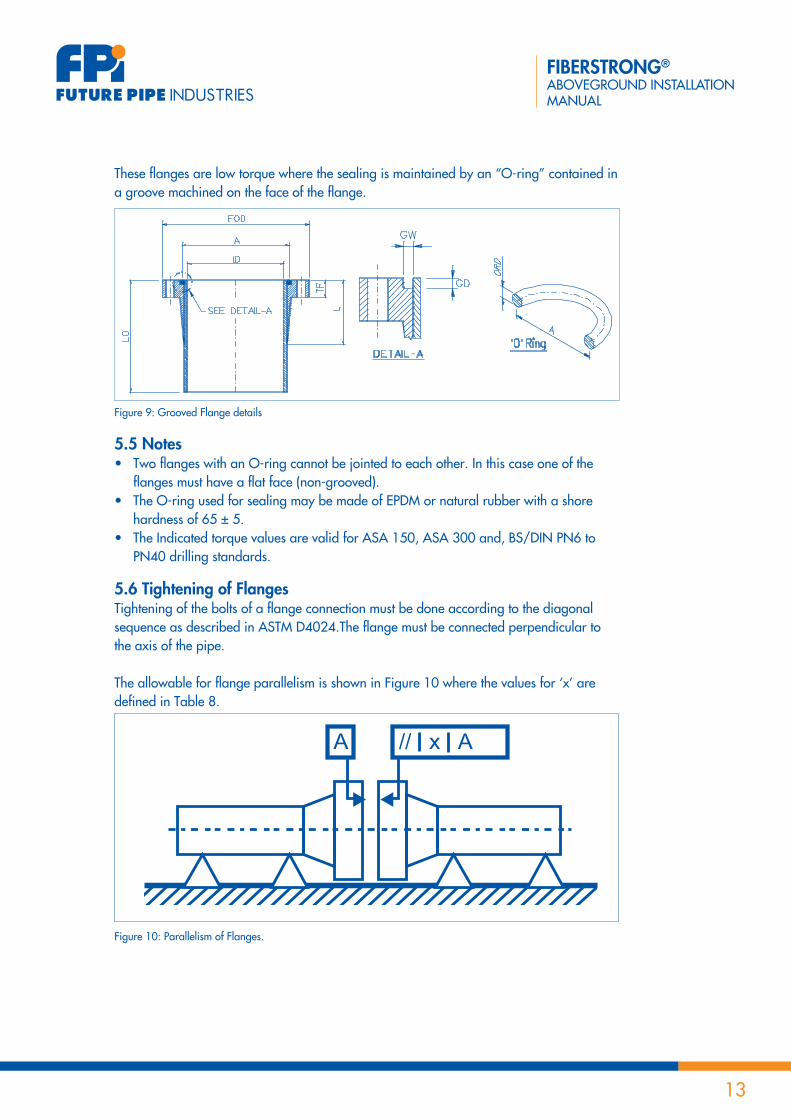
5.4 Gaskets TypesFuture Pipe Industries FIBERSTRONG® flanges have a flat face for diameters up to and including DN 1,400. Larger diameter flanges have a grooved face suitable for an “O-ring” rubber gasket. The recommended gaskets by FPI are:

FIBERSTRONG®
ABOVEGROUND INSTALLATION MANUAL
12
A. DN 25 to DN 1,4001. Kroll & Ziller type G–ST–P/K2. Kroll & Ziller type G–ST–P/S3. Kempchen type WG2
Figure 7: Gasket Cross Section
The recommended bolt torques are given in Table 6.
ID (mm)Torque (Nm)
PN ≤ 12.5 (bar)
PN 16 - 20 (bar)
PN 25 - 32 (bar)
PN 40 - 50 (bar)
25 - - 10 10
40 – 50 - - 15 15
80 – 100 - - 25 25
150 – 200 - 35 50 50
250 – 300 50 50 75 100
350 – 500 75 100 125 150
600 – 700 100 200 300 -
750 – 800 200 300 - -
900 – 1,400 300 400 - -
Table 6: Recommended Bolt Torques for Kroll & Ziller and Kempchen Gaskets
B. DN 1,500 to DN 4,000The flanges have a grooved face suitable for an “O–ring” gasket and the recommended bolt torques are given in Table 7.
Figure 8: Flange O-Ring
ID (mm)Torque (Nm)
All Pressure Classes
1,500 – 4,000 100
Table 7: Recommended Bolt Torques for O-ring Gaskets
Kroll & Zillertype G-ST-P/S & G-ST-P/K
Kempchentype WG2
FIBERSTRONG®
ABOVEGROUND INSTALLATION MANUAL
13
These flanges are low torque where the sealing is maintained by an “O-ring” contained in a groove machined on the face of the flange.
Figure 9: Grooved Flange details
5.5 Notes• Two flanges with an O-ring cannot be jointed to each other. In this case one of the
flanges must have a flat face (non-grooved).• The O-ring used for sealing may be made of EPDM or natural rubber with a shore
hardness of 65 ± 5.• The Indicated torque values are valid for ASA 150, ASA 300 and, BS/DIN PN6 to
PN40 drilling standards.
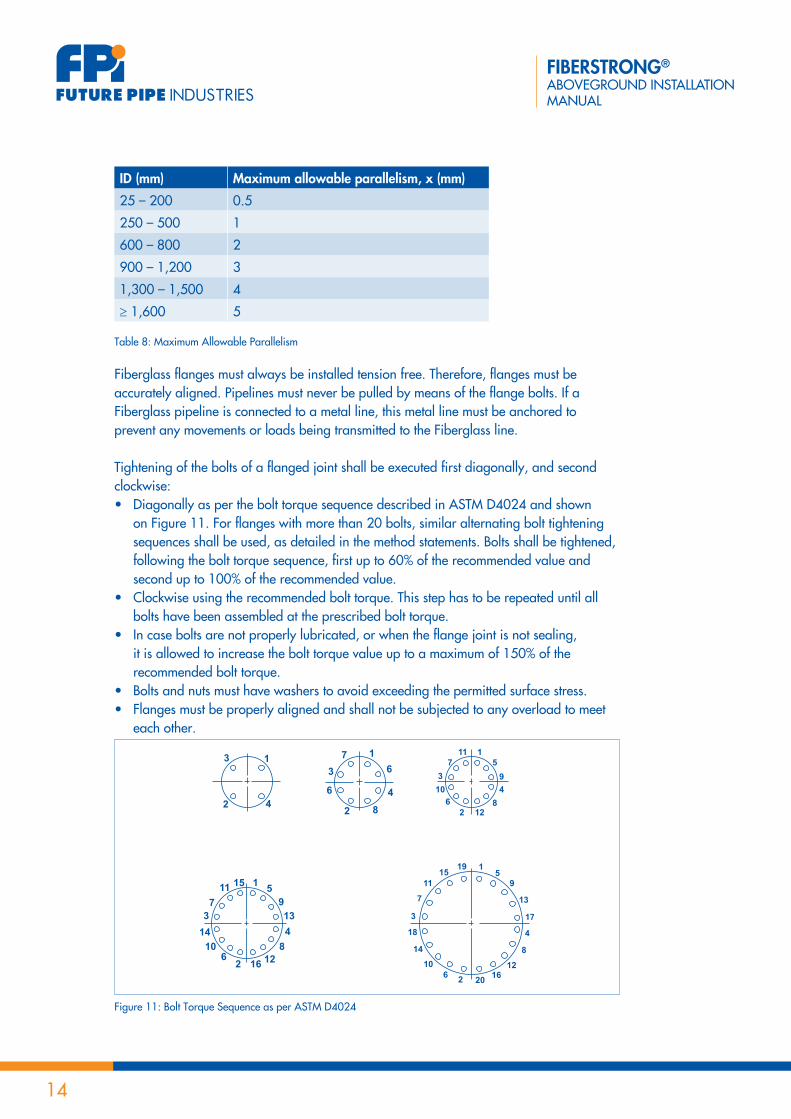
5.6 Tightening of FlangesTightening of the bolts of a flange connection must be done according to the diagonal sequence as described in ASTM D4024.The flange must be connected perpendicular to the axis of the pipe.
The allowable for flange parallelism is shown in Figure 10 where the values for ‘x’ are defined in Table 8.
Figure 10: Parallelism of Flanges.
A A// x
FIBERSTRONG®
ABOVEGROUND INSTALLATION MANUAL
14
ID (mm) Maximum allowable parallelism, x (mm)
25 – 200 0.5
250 – 500 1
600 – 800 2
900 – 1,200 3
1,300 – 1,500 4
≥ 1,600 5
Table 8: Maximum Allowable Parallelism
Fiberglass flanges must always be installed tension free. Therefore, flanges must be accurately aligned. Pipelines must never be pulled by means of the flange bolts. If a Fiberglass pipeline is connected to a metal line, this metal line must be anchored to prevent any movements or loads being transmitted to the Fiberglass line.
Tightening of the bolts of a flanged joint shall be executed first diagonally, and second clockwise:• Diagonally as per the bolt torque sequence described in ASTM D4024 and shown
on Figure 11. For flanges with more than 20 bolts, similar alternating bolt tightening sequences shall be used, as detailed in the method statements. Bolts shall be tightened, following the bolt torque sequence, first up to 60% of the recommended value and second up to 100% of the recommended value.
• Clockwise using the recommended bolt torque. This step has to be repeated until all bolts have been assembled at the prescribed bolt torque.
• In case bolts are not properly lubricated, or when the flange joint is not sealing, it is allowed to increase the bolt torque value up to a maximum of 150% of the recommended bolt torque.
• Bolts and nuts must have washers to avoid exceeding the permitted surface stress.• Flanges must be properly aligned and shall not be subjected to any overload to meet
each other.
Figure 11: Bolt Torque Sequence as per ASTM D4024
15
9
13
17
4
8
12162026
1014
18
3
7
1115 19
15
94
8122
6103
16
482
6
31
4
59134
812162
610
143
711 15 1
2
3 77
11

FIBERSTRONG®
ABOVEGROUND INSTALLATION MANUAL
15
The FIBERSTRONG® Rubber Seal Lock Joint (RSLJ) consists of a fixed spigot and a coupler. The sealing is ensured by rubber Reka rings. The axial thrust load is carried by the nylon locking strips. Due to length limitations of the locking strips, for diameters DN 800 mm and above, two locking strips 180° apart are used for one joint.
The schematic cross section and picture of FIBERSTRONG® RSLJ are shown below.
Figure 12: Cross Section – FIBERSTRONG® RSLJ
Figure 13: FIBERSTRONG® RSLJ
6.1 Guidelines for the Installation of FIBERSTRONG® RSLJ JointsThe locking strip(s) is inserted into the joint to restrain and mechanically lock the two pipe sections. The joint assembly shall be done as per the following instructions:1. Mark the depth of entry on the spigot end.2. The depth of mark on the spigot end is half of coupler length ‘BA’ minus the play
dimension ‘C’, see Figures 14, and 15, as well as Table 10.
6. FIBERSTRONG® RUBBER SEAL LOCK JOINT
Coupler
Locking StripReka Ring Spigot Pipe
IDPipe
Centre Line

FIBERSTRONG®
ABOVEGROUND INSTALLATION MANUAL
16
Figure 14: Position the Reka ring into the coupler
3. Lubricate the exposed Reka ring on the coupler. Avoid applying the lubricant under the Reka ring in order to prevent it from slipping from the groove.
4. The joint should be assembled in such a way that the position of the insertion hole in the coupler allows the locking strip to be inserted easily.
ID (mm)LMark (mm)
7 bar 10 bar 12 bar 16 bar
350 260 260 260 260
400 260 260 260 260
450 260 260 260 260
500 304 304 304 304
600 344 344 344 344
700 380 380 380 380
750 400 400 400 400
800 420 420 420 420
900 440 440 440 440
1,000 500 500 500 500
1,100 500 500 500 -
1,200 520 520 520 -
1,300 520 520 520 -
1,400 540 540 540 -
1,500 540 540 540 -
Table 10: LMark Dimensions for Metric Series
BA
CMark
Mark
Mark

FIBERSTRONG®
ABOVEGROUND INSTALLATION MANUAL
17
5. Ensure that the spigot end is positioned right in front of the coupler and both the spigot and coupler sections are fully aligned.
6. Attach the chain tackles on both sides of the joint and ease the spigot end slowly and gradually into the coupler until the mark on the spigot end is in line with the front of the coupler end.
7. Lightly lubricate the first 150 – 200 mm section of locking strip.8. The beveled end of the locking strip should be resting against the inside surface of the
coupler when inserting. The insertion should be made using a plastic hammer or a piece of wood to tap the key until it resists against the first part of the strip, see Figure 16.
Figure 16: Inserting the Locking Strip
9. For large diameter RSLJ, where the length of the locking strip is relatively long, it is recommended to attach a metal clamp to the locking strip. By positioning this clamp close to the coupler, as shown in Figure 17, this will limit the “buckling” of the locking strip during insertion. A pneumatic hammer can also be used to further ease the insertion.
Figure 17: Insertion of Locking Strips on Large Diameter Joints
locking strip
spigot end
socket end

FIBERSTRONG®
ABOVEGROUND INSTALLATION MANUAL
18
10. For diameters DN 800 mm (DN 33 inch) and above, two locking strips shall be used for one joint. This is due to limitation in length of nylon locking strips. Insertion of two locking strips on one joint is schematically shown in Figure 18.
Figure 18: Insertion of Two Locking Strips
11. The end of the locking strips, sticks out by approximately 100 mm. This allows disassembly of the newly assembled joint.
12. Ensure that the locked joint is stretched after assembly and both the spigot stop and the coupler stop are in contact with the locking strip.
13. The angular deflections are in line with ASTM D4161. The maximum allowable angular deflection of the FIBERSTRONG® RSLJ measured between the pipes, as shown in Figure 19, is 3° for diameters up to 500 mm (20”) and 2° for larger sizes. It is not recommended to reach these values during installation.
Figure 19: Angular Deflection of the Joint
6.2 Guidelines for the Dismantling of FIBERSTRONG® RSLJ JointsIn the unlikely event that the joint needs to be disassembled, all locking strips need to be removed from the joint. For diameters up to DN 800, this can be achieved relatively simply by gripping the protruding ends of the locking strips and pulling them out of the joint. For nominal diameters DN 800 and above, some additional steps are required to disassemble the joint, see Figure 20.1. First pull out the 2nd locking strip, which will have its one end protruding out from the joint.2. Grind carefully the locking strips holes (slots) on the coupler using a grinding machine
as shown below.3. Pull out the first locking strip through grinded locking strip hole and disassemble the joint.
Lockingstrip 1
Lockingstrip 1
VIEW A-A
Insert Locking Strip 1
VIEW A-A
Insert Locking Strip 2
VIEW A-A
Assembled Joint
Lockingstrip 1
Lockingstrip 2
AngularDeflection

FIBERSTRONG®
ABOVEGROUND INSTALLATION MANUAL
19
Figure 20: Removal of the Locking Strips
7.1 ReceivingGenerally pipes will be handed over to the Contractor or his representative at the factory or at the job site, or as agreed upon in the Contractor’s purchase order. In the case of an Ex–works delivery, the pipes and fittings shall be loaded on the Contractor’s trucks, by the factory loading staff. If the loading staff considers the transport unsuitable they will advise the Contractor or his representative accordingly. Thorough inspection is made by the factory loading staff of the goods being loaded; nevertheless, the Contractor or his representative should make their own inspection of the goods during dispatch.
The Contractor should make the following inspection at the time of the reception of the goods:• Each item should be inspected with care upon its arrival.• Total quantity of pipes, fittings, etc. should be carefully checked against our delivery notes.• Any damaged or missing item must be pointed out to the dispatcher or driver and
noted on the delivery note.Materials that have been damaged during transportation should be isolated and stored separately on site, until the material is checked by our site representative and repaired or replaced. Damaged material must not be used before it is repaired.
7.2 Pipe OffloadingOffloading at the jobsite must be carried out carefully under the control and responsibility of the Contractor. Care should be taken to avoid impact with any solid object (i.e. other pipes, ground stones, truck side etc.)
A. Offloading by HandUnloading by hand with two men should be done for small diameter pipes, not exceeding 60 kg.
VIEW A-A
Remove Locking Strip 2
Lockingstrip 1
Lockingstrip 1
Lockingstrip 1
VIEW A-A
Grind slot
VIEW A-A
Remove Locking Strip 1
7. HANDLING OF FIBERSTRONG® MATERIAL: TRANSPORT AND STORAGE

FIBERSTRONG®
ABOVEGROUND INSTALLATION MANUAL
20
B. Mechanical OffloadingMechanical offloading is required for pipes heavier than 60 kg. Flexible slings or straps should be used combined with a mobile crane. When offloading is done with a mobile crane, care must be taken that the pipes do not slide off the slings. Therefore it is recommended to use two slings or nylon lifting straps to hold and lift the pipes. Steel cables must not be used for lifting or handling FIBERSTRONG® pipes. FIBERSTRONG® pipes can also be lifted with one sling or strap balanced in the middle with the aid of a guide rope.
Caution: Hooks must not be used at the pipe ends to lift the pipes, nor should the pipe be lifted by passing a rope or sling through it.
7.3 Storing FIBERSTRONG® Pipes on SiteA. Distribution Along the TrenchAvoid placing the pipes where they can be damaged by traffic or blasting operation. Also avoid laying the pipes on sharp rocks or objects that may damage and affect their function. Store the pipes if possible on soft level ground (e.g. sand), timber bearers or sand bags.
Caution: Pipes must not be stored on rocks.
B. Storing in Stock PilesCare must be taken that the storage surface has the same level, firm as possible and clear of rocks or solid objects that might damage the pipes. Store the pipes in separate stock–piles according to their class and nominal diameter. Pipes are to be placed on wooden timber at a maximum spacing of 6 meters. Any extraneous materials are to be removed from the area. Stock piles should not exceed the heights shown in Table 11. This height is limited for safety purpose and to avoid excessive loads on the pipe during storage.
DN 80 – 400 450 – 600 700 – 800 900 – 1,400 ≥ 1,500
Layers per stock pile
5 4 3 2 1
hmax < 2m < 2.4 m < 2.4 m < 2.8 m -
Table 11: Storing and Stacking Height of FIBERSTRONG® Pipes
Wooden wedges, used in order to prevent the pipe stack from sliding, should be placed on both sides of the stack, on the timber bearer, as shown in Figure 21.
Figure 21: Pipe storage

FIBERSTRONG®
ABOVEGROUND INSTALLATION MANUAL
21
C. Handling of Nested PipesFor some projects, pipes may be delivered “nested” (i.e. one or more small pipes inside a larger pipe). Special handling procedures must be followed when handling and de–nesting such pipe loads.
When handling nested pipes, never use only one sling or strap. Nested pipes must always be lifted using at least two straps or slings. A spreader bar will help to ensure that the load is lifted at one level. Mobile lifting equipment should move slowly when handling nested pipes and all such movements should be kept to a minimum to ensure the safety of site personnel. The Contractor should ensure that the crane operator realizes that the nested pipes in the inside may slip out and fall during movement. All necessary precautions should be taken.
De–nesting a load is easily accomplished by inserting a forklift fork into a padded boom, the forklift lifting capacity should be appropriate to handle the weight and length of pipes being de–nested. Figure 22 shows how this is accomplished. Proper padding is essential; rubber, several wraps of corrugated cardboard sheets, a PVC pipe or PE pipe slipped over the boom are all suitable options to avoid damaging the inside of the pipes.
Figure 22: De nesting of pipes
The Forklift operator should lift the innermost pipe above the pipe around it sufficiently so the pipes do not touch each other when the inner pipe is being pulled out.

FIBERSTRONG®
ABOVEGROUND INSTALLATION MANUAL
22
8.1 Pipe SupportsA. Pipe ProtectionIn order to avoid pipe damage by stones and other sharp objects, it is advisable to support the pipe, for example by means of wooden or concrete sleepers. Using these kinds of support, it is necessary to bond a 180° saddle to the bottom of the pipe at the support locations, in order to protect the pipe against damage caused by possible pipe movements. The length of this saddle with respect to the width of the support must be 50 mm longer than the calculated displacement of the pipe. The support width itself must be at least 100 mm. The jointing systems are the same as those used in underground installations. To avoid sideways displacements, a metal clamp is sufficient.
B. Additional SupportsTo avoid overloading caused by heavy valves, these must be supported separately. When connecting to tanks and pumps, additional forces and movements caused by pumps and tanks fluctuations must be eliminated. It could be necessary to include an expansion loop to absorb these movements. Overhead installation on pipe bridges requires compliance with the rules, which are also applicable in the previous case of installation on wooden or concrete sleepers.
C. Fixed Support PointsFixed points in GRP systems may never be constructed by clamping with pipe clips. This could result in deformations and excessive wall stresses. The pipe must be allowed to expand within its clip. The pipes at fixed points must have additional laminates or bonded collars on both sides of the clip, see Figure 23.
Figure 23: Fixed Support points.
8. ACCESSORIES
FIBERSTRONG®
ABOVEGROUND INSTALLATION MANUAL
23
Choose fixed points so that the loads are balanced. As a result of pumps and tanks fluctuation, branch connections may need rubber seal joints so that these can follow the movements of the main line. Vertical pipe sections with rubber seal joints, in areas where the temperature can drop below zero degrees centigrade, should be positioned so that no water will remain in between the socket and spigot parts.
When using non-locked rubber seal joints or mechanical couplers, pipelines must be anchored at each change in pipe direction, to prevent the pipes coming apart. Sideways movement is prevented by clamping. Where mechanical couplers are fitted, sideways movement can be avoided by securing the coupler itself.
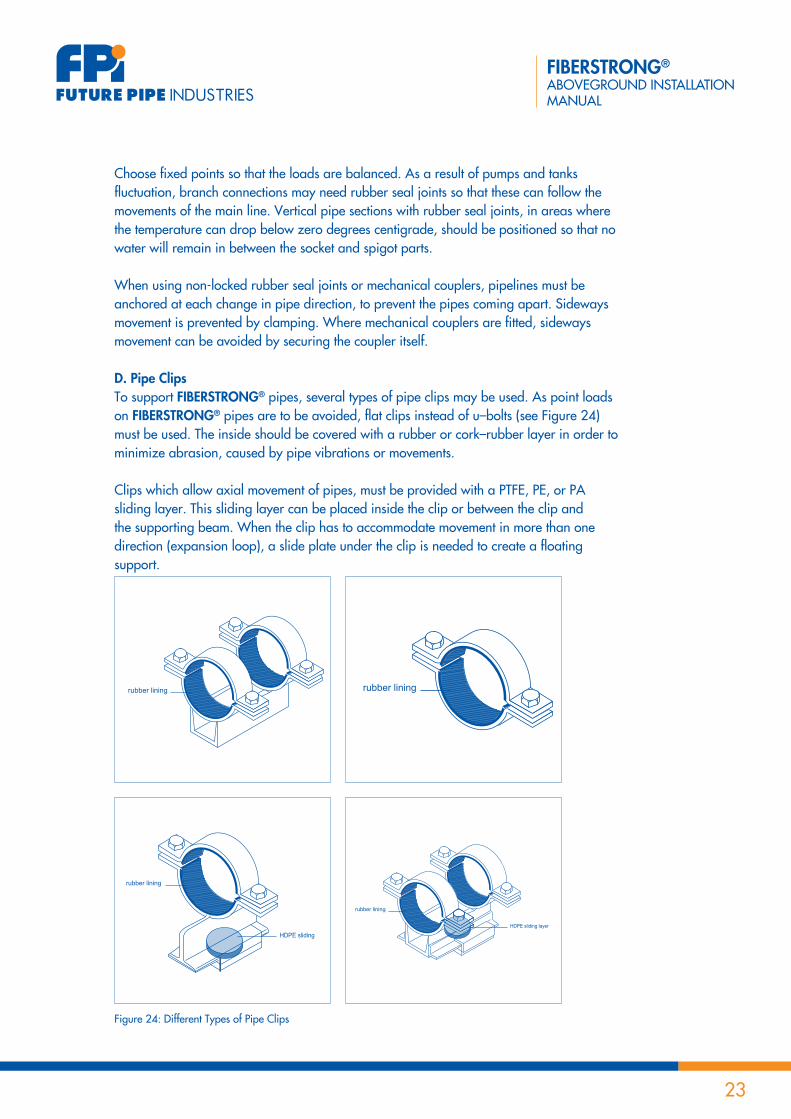
D. Pipe ClipsTo support FIBERSTRONG® pipes, several types of pipe clips may be used. As point loads on FIBERSTRONG® pipes are to be avoided, flat clips instead of u–bolts (see Figure 24) must be used. The inside should be covered with a rubber or cork–rubber layer in order to minimize abrasion, caused by pipe vibrations or movements.
Clips which allow axial movement of pipes, must be provided with a PTFE, PE, or PA sliding layer. This sliding layer can be placed inside the clip or between the clip and the supporting beam. When the clip has to accommodate movement in more than one direction (expansion loop), a slide plate under the clip is needed to create a floating support.
Figure 24: Different Types of Pipe Clips
rubber lining
rubber lining
HDPE sliding
rubber lining
rubber lining
HDPE sliding layer

FIBERSTRONG®
ABOVEGROUND INSTALLATION MANUAL
24
8.2 ValvesTo avoid FIBERSTRONG® pipes being overstressed by bending, valves, butterfly valves or other heavy accessories must be supported separately. This can be done by direct support of the valve or indirectly by means of the flange bolts.
Figure 25: Valve Support
If a FIBERSTRONG® flange is connected to a steel flange, the support should preferably be situated at the side of the steel flange. This is also applicable for underground applications. Pipe sections should not become overloaded by the weight of the accessories, for example by soil settlement. One suggestion would be concrete supports provided with steel connections, able to carry the full load of the valve. Also bending and torque forces caused by opening and closing of valves should be absorbed. Hand operated butterfly valves can be supported or mounted in a manhole as follows:
Figure 26: Support for flange
Figure 27: Support for flange
steelsupport
concretefoundation
butterfly valve
butterfly valve
support
water baffleconcrete wall
butterfly valve
rubber inlay
concrete support

FIBERSTRONG®
ABOVEGROUND INSTALLATION MANUAL
25
8.3 BellowsLow amplitude vibrations will have little effect on FIBERSTRONG® pipes, because these will be absorbed due to the low E–modulus material. To eliminate high amplitude vibrations caused by e.g. pumps, and to eliminate soil settlements or expansion of tanks to which FIBERSTRONG® pipes are connected, bellows can be used. In many cases, it will be possible to connect a bellow directly to the vibrating item by means of flanged joints. Immediately next to this bellow, the pipe section must be supported separately to absorb the pipe loads.
Figure 28: Bellows
Bellows can also be employed to facilitate removal of pipe sections, valves, orifice flanges or gaskets for repair purposes. The flexibility of the bellow allows a play of some 10 to 20 mm so that it is possible to disconnect and connect flanged parts easily.
8.4 Connection to Other Materials
Figure 29: Mechanical Couplers
The most appropriate way to connect objects of different materials is the flanged joint, with the mechanical coupler as an alternative. The flanged connections can be used with standard FIBERSTRONG® products. When a flanged FIBERSTRONG® pipe section is connected to a metal pipe section, this metal part must be anchored so that no contraction or expansion forces will be transmitted to the FIBERSTRONG® pipe section.
8
GRP pipecompensator

FIBERSTRONG®
ABOVEGROUND INSTALLATION MANUAL
26
8.5 Pipe Connections Through WallsSeveral alternatives are available for GRP pipe connections through walls (concrete or otherwise):1. GRP pipe piece provided with a puddle flange, (Figure 30).2. Link–Seal, (Figure 31).3. Casting and sand-coated GRP pipe into the wall, (Figure 32).4. Rolling ring, (Figure 33).5. Special shaped sealing, (Figure 34).6. No connection of the pipe to the wall, (Figure 35).
The puddle flange which is already in the factory connected to the pipe body consists of a ring with a suitable thickness and a height of 80 mm greater than the pipe outer diameter. This puddle flange is connected to the pipe part by means of a lamination and placed into a recess in the wall, after which it is fixed with concrete or mortar.
Link–Seals consist of several linked rubber parts shaped to fit the circular space between the GRP pipe and the inside of an insert in the wall. The rubber parts are interconnected by steel bolts, to form a rubber chain. Under each bolt head and nut, pressure rings are placed.
After assembly of the GRP pipe with the rubber “chain” into the circular wall insert, the rubber is compressed by tightening of the bolts, thus ensuring a complete watertight construction. Link–Seals are available in various materials. The rubber elements are made of EPDM, silicone or Nitrile Rubber. Bolts are of stainless steel, zinc or cadmium plated or phosphated steel. The pressure rings are made of acetal polymer. As an additional advantage, constructions with Link–Seals allow the GRP pipe a certain angular deflection and movement in an eccentric direction.
A sufficiently smooth surface of the hole inside the concrete wall can be obtained in various ways:
1. By fixing a steel pipe piece with water seal before pouring mortar.2. By drilling a hole in the wall with a crown drill with diamond inlays. 3. By fixing a removable plastic casing pipe piece before pouring mortar. After removal
of the casing pipe piece, the quality of the whole surface has to be checked.
Sand-coating of GRP pipe must be carried out as follows: Sand the pipe at the spot where it fits in the wall, over a length at least equal to the wall thickness. Apply a mixture of resin and catalyst equal to that used for bonding or laminating FIBERSTRONG® pipes with the aid of a brush, a roller or a spatula to the sanded surface. Pour sharp sand over the prepared surface and allow the resin mixture to cure. Through this sand–coating an excellent adherence between concrete and GRP is obtained.
Using the rolling ring construction, pipes going into the wall should be provided with a guide–way in order to allow the ring to roll between pipe and wall-casting.

FIBERSTRONG®
ABOVEGROUND INSTALLATION MANUAL
27
The wall penetration consists of a steel pipe provided with flanges. One of these flanges is profiled to fit the shape of the sealing element. By tightening the nuts, the seal will be pressed in the wedge–shaped space between flange and pipe, thus creating an excellent seal.
When a pipe has to pass through a wall, the outside of the pipe must be protected by a flexible material (a rubber layer, with a minimum thickness of 5 mm) protruding some 100 mm outside the wall at each side. In order to allow for setting of the adjoining pipe sections, flexible couplings must be installed on both sides of the wall. Joints must not be located at a distance of more than 1 x ID outside the wall, with a maximum of 0.5m.
Figure 30: Puddle flange
Figure 33: A rolling ring
Figure 31: A Link–Seal
Figure 34: A special shaped sealing
Figure 32: Casting and sand–coated GRP pipe into the concrete wall
Figure 35: No connection of the pipe to the wall

FIBERSTRONG®
ABOVEGROUND INSTALLATION MANUAL
28
Before the installed pipe system can be used, it needs to be tested to ensure that all the joints function correctly. The test equipment must be suited to the diameter and pressure, and be able to reach the required test pressure. If the pipe system ends with a flange, a steel blind flange, which has connections for filling and air release, can easily be connected. The pressure gauge must be connected between the valve and the system in order to indicate the pressure after the valve is closed. Due to the head of water, the pressure gauge should be located at the lowest point. The pressure gauge should have a full scale reading of about twice the test pressure. If the system has not been designed to withstand any negative pressures and this occurs during testing, the system needs to be protected by an air release valve. Trapped air can be released using a vent at the highest point in the system
9.1 Filling, Stabilizing, and TestingFill with water at the lowest point in the line using a small diameter branch connection and vent the trapped air at the highest point(s). Long straight sections may be vented using an inflatable ball or foam pig to expel any air and impurities.
Figure 36: Foam Pig
After filling, the line must be pressurized gradually at 0.8 times the working pressure and must be maintained for twenty-four hours allowing the pipe system to set. After the system is stabilized, the pressure must be raised gradually to 1.5 times the working pressure and maintained for four hours.
After four hours, the pressure may have dropped by 0.5 bar for diameters less than or equal 450 mm and 0.3 bar for diameters larger than or equal 500 mm per 1,000 meter length. The test pressure and its tolerance should be determined in advance. It is preferable to test the line in sections, for example the length of one day installation, which will be shut off by a temporary flanged joint and a ball. The blind flange should be provided with an air release valve. After testing the section, the ball needs to be pushed back about two meters using air via the air release valve. The excess water needs to be released by opening the valve at the start of the line. After the ball has been secured by inflating it, the temporary flange connection can be removed and assembly can continue. The advantage of this method is that the line does not need to be re–filled every time.
9. FIELD TEST PROCEDURE


© Copyright Future Pipe Industries Group 2010, All rights reserved.


ABOVEGROUND INSTALLATION MANUAL
Top Related